

SONIQ E55Z11A-AU Instruction Manual
55” FullHD LED TV
E55Z11A-AU

Table of Contents-------------------------------------------------------------------------------------------------Safety Instruction----------------------------------------------------------------------------------------------Accessories--------------------------------------------------------------------------------------------------------Introduction-------------------------------------------------------------------------------------------------------
Features----------------------------------------------------------------------------------------------------------
Specifications---------------------------------------------------------------------------------------------------
Stand and wall-mounting instructions (optional)---------------------------------------------------
-----------------------------------------------------------------------------------------
Overview of back panel--------------------------------------------------------------------------------------
Overview of front panel--------------------------------------------------------------------------------------
Overview of remote control---------------------------------------------------------------------------- Teletext -----------------------------------------------------------------------------------------------------
Installing Batteries in the Remote Control--------------------------------------------------------------
External Connection--------------------------------------------------------------------------------------- Connecting VCR ----------------------------------------------------------------------------------------------
Connecting a Camcorder------------------------------------------------------------------------------------
Connecting a DVD Player/Set-Top Box ----------------------------------------------------------------
Connecting a DVD Player/Set-Top Box via DVI ------------------------------------------------------
Connecting DVD Player/Set-Top Box via HDMI ------------------------------------------------------
Connecting Digital Audio System-------------------------------------------------------------------------
Connecting PC -----------------------------------------------------------------------------------------------
Supporting signals ----------------------------------------------------------------------------------------------
Basic operation-----------------------------------------------------------------------------------------------
Turning the TV on and off----------------------------------------------------------------------------------
Menu operation ------------------------------------------------------------------------------------------
Menu system instruction--------------------------------------------------------------------------------- Picture-----------------------------------------------------------------------------------------------------------
Sound-------------------------------------------------------------------------------------------------------
Channel-----------------------------------------------------------------------------------------------------
Time------------------------------------------------------------------------------------------------------------- Option------------------------------------------------------------------------------------------------------ Function-------------------------------------------------------------------------------------------------------- PVR---------------------------------------------------------------------------------------------------------Digital Media Player ----------------------------------------------------------------------------------------
-----------------------------------------------------------------------------------------------------
------------------------------------------------------------------------------
---------------------------------------------------------------------------------
--------------------------------------------------------------------------------------------------------------
--------------------------------------------------------------------------------------------------------------
-------------------------------------------------------------------------------------------------------------
----------------------------------------------------------------------------------------------------------------
My Disk------------------------------------------------------------------------------------------------------
Troubleshooting ---------------------------------------------------------------------------------------------
Picture defects and the reason------------------------------------------------------------------------------
General Description
Introduction
Device and File Management
USB Support Character
Photo
Music
Movie
Text
-1 -
1
2-5
6
7-8
7
8
9-10
11-17
11
12
13-14
15-16
17
18-24
18
19
20
21
22
23
24
24
25-28
25
26-28
28-40
28
30-31
32-33
34
35-36
37
38-40
41-50
41
42
42-50
42
44
45
48
49-50
51-52
53
-2 -

-3 -
-4 -
-5 -
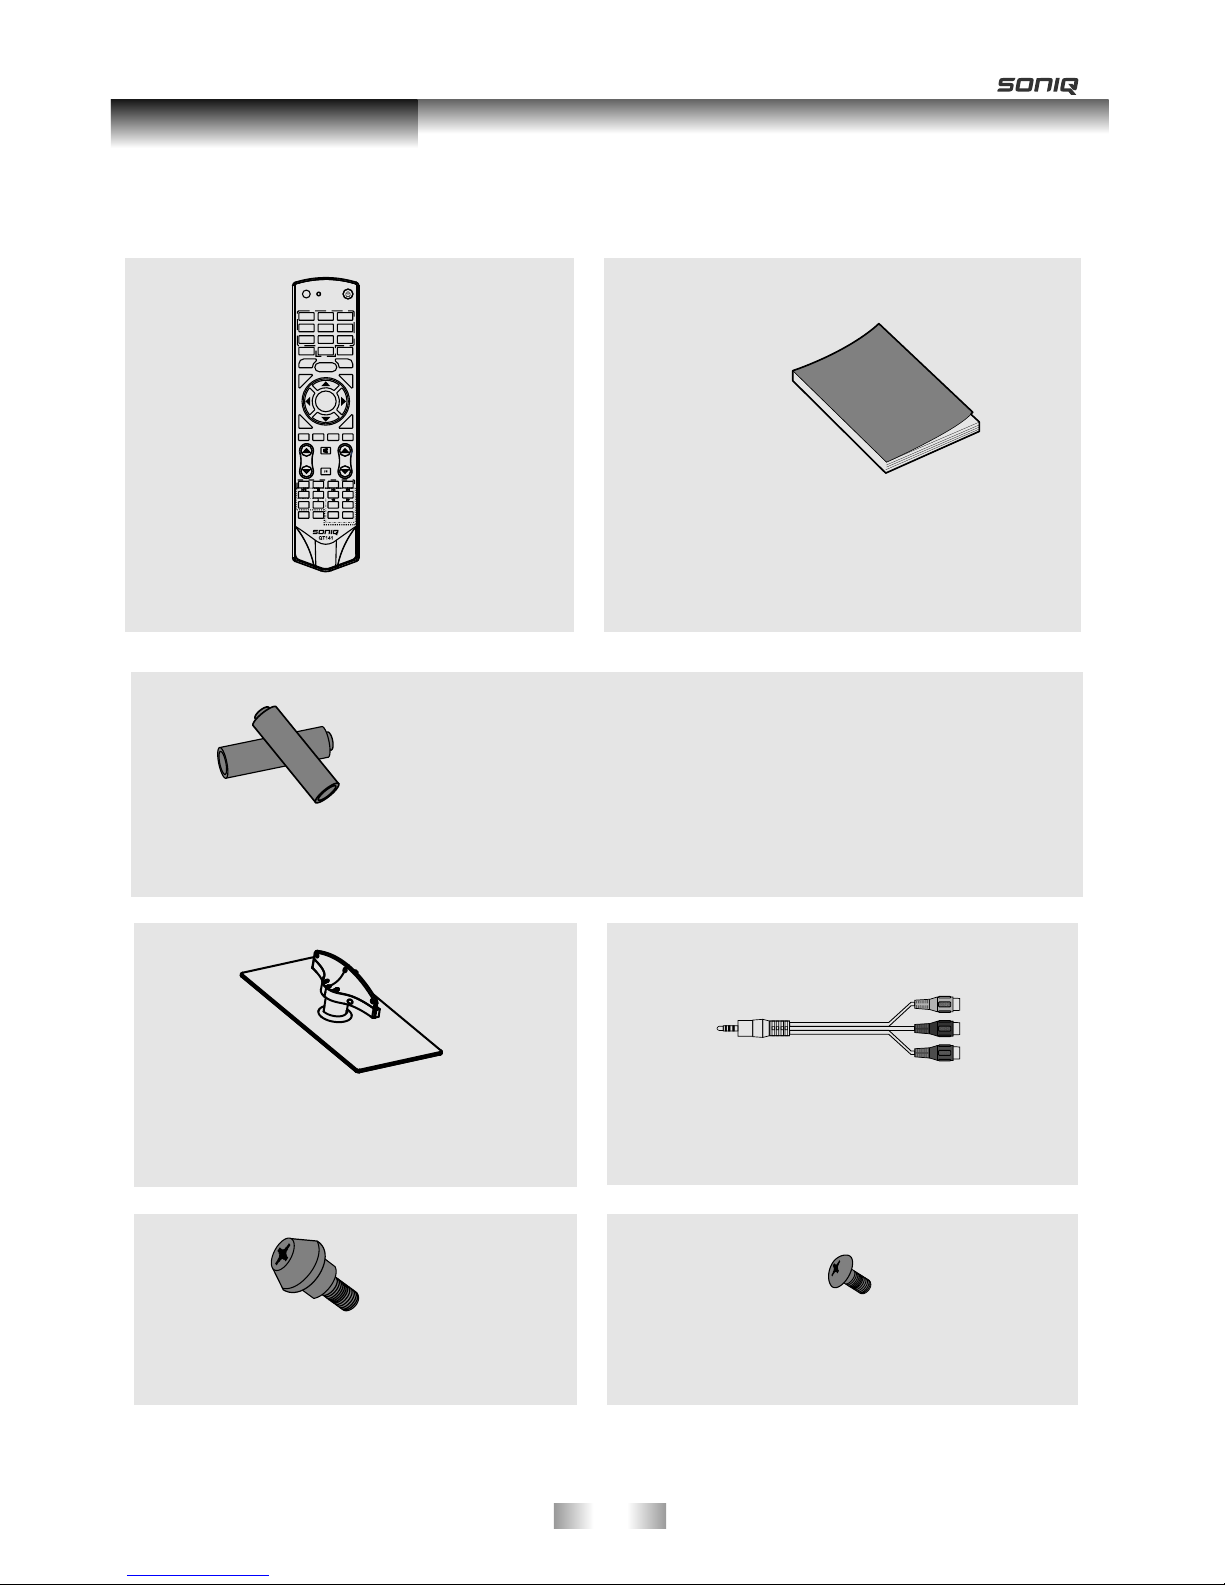
Please make sure the following items are included with your LED TV. If any items are missing, contact your
dealer.
Remote Control
Batteryx2
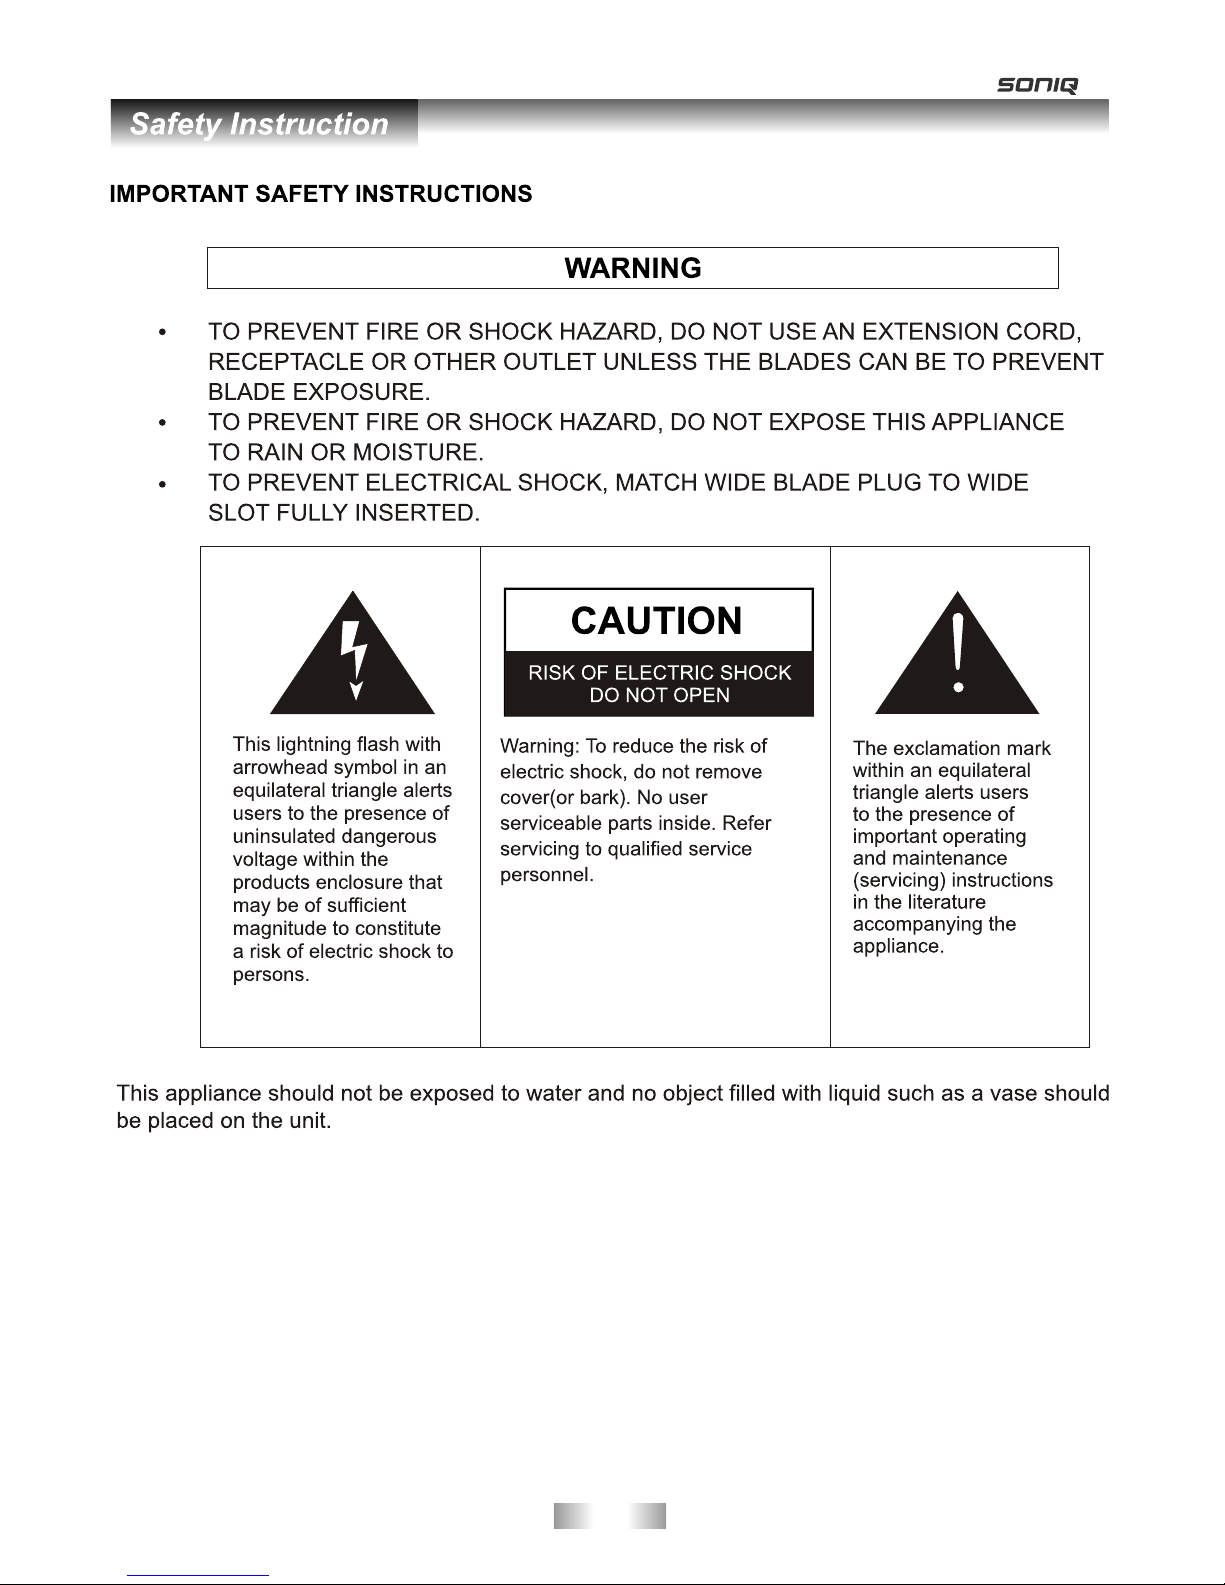
CAUTION:
Do not dispose of batteries in a fire. Do not short circuit,
disassemble or overheat the batteries. Danger of explosion
if battery is incorrectly replaced, please observe polarity.
Replace only with the same or equivalent type.
M8X10,4 Pieces-see rear panel of TV.
Mounting screws
M4X10( 5 Pieces)
Stand screws
Stand(1 Piece)
YPbPr cable(1to3)
and
AV cable(1to3)
-6 -
Accessories
Owner ’s
Instructions
SOUND
AUDIO LANG
VOL PROG
MENU
1 2 3
4 5
6
789
0
INFO
RECALL
FREEZE
SLEEP
EXIT
HOLD
SIZE
REVEAL CANCEL
PICTURE
MUTE
INPUT
POWER
TEXT
SUBTITLE
TIME
SUBCODE
F
AV
C
H
.
L
IS
T
G
UID
E
DTV HDMI
USB
INDEX
PgUp PgDn
RED GREEN
YELLOW
BLUE
OK/
REC LIST
ASPECT
MIX

Features
Input terminals used for external equipment connection
1 x AV output
1 x ANTENNA jack 4 x HDMI inputs
2 x USB inputs
1 x computer PC-RGB input
2 x COMPONENT input
2 x AV inputs 1 x SPDIF output
1 x Headphone output
l TV adopts 55” TFT display screen
l Zero X radiation complies to green environment protection requirement
l Connect to computer directly to realize TV/monitor combo.
l 16:9 wide screen
l Auto tuning and fine tuning
l HDMI input
l Component Compatible (480i; 480P; 576i; 576P; 720P; 1080i; 1080P)
l PC-RGB
l Programmable sleep timer
l Wide range voltage input
l No-signal automatic power off
LED
-7 -
Specifications
Note:
- Design and specifications are subject to change without notice.
- Weight and Dimension shown are approximate.
Display size
LED panel resolution
Power supply
TV receive system
Frequency range
Video in
Antenna Input
Speaker output power
Power consumption
Standby consumption
Work Temperature
Model
Controller power
-8 -
Analog: Antenna:
46.25MHz-855.25MHz
Digital:5-12, 21-69
PAL / NTSC / SECAM
≥5 X2W
155W
o o
0 C-40 C
<1W
~110-240V, 50/60Hz
75 ohms, unbalanced
55” Diagonal (max.)
DC 3V
(Two AAA size batteries)
1920X1080
1304X50X810mm
23Kg
1304X289X858mm
25.5Kg
E55Z11A-AU
Digital: DVB-T
Analog: PAL: BG, I, DK,
SECAM: BG, D/K
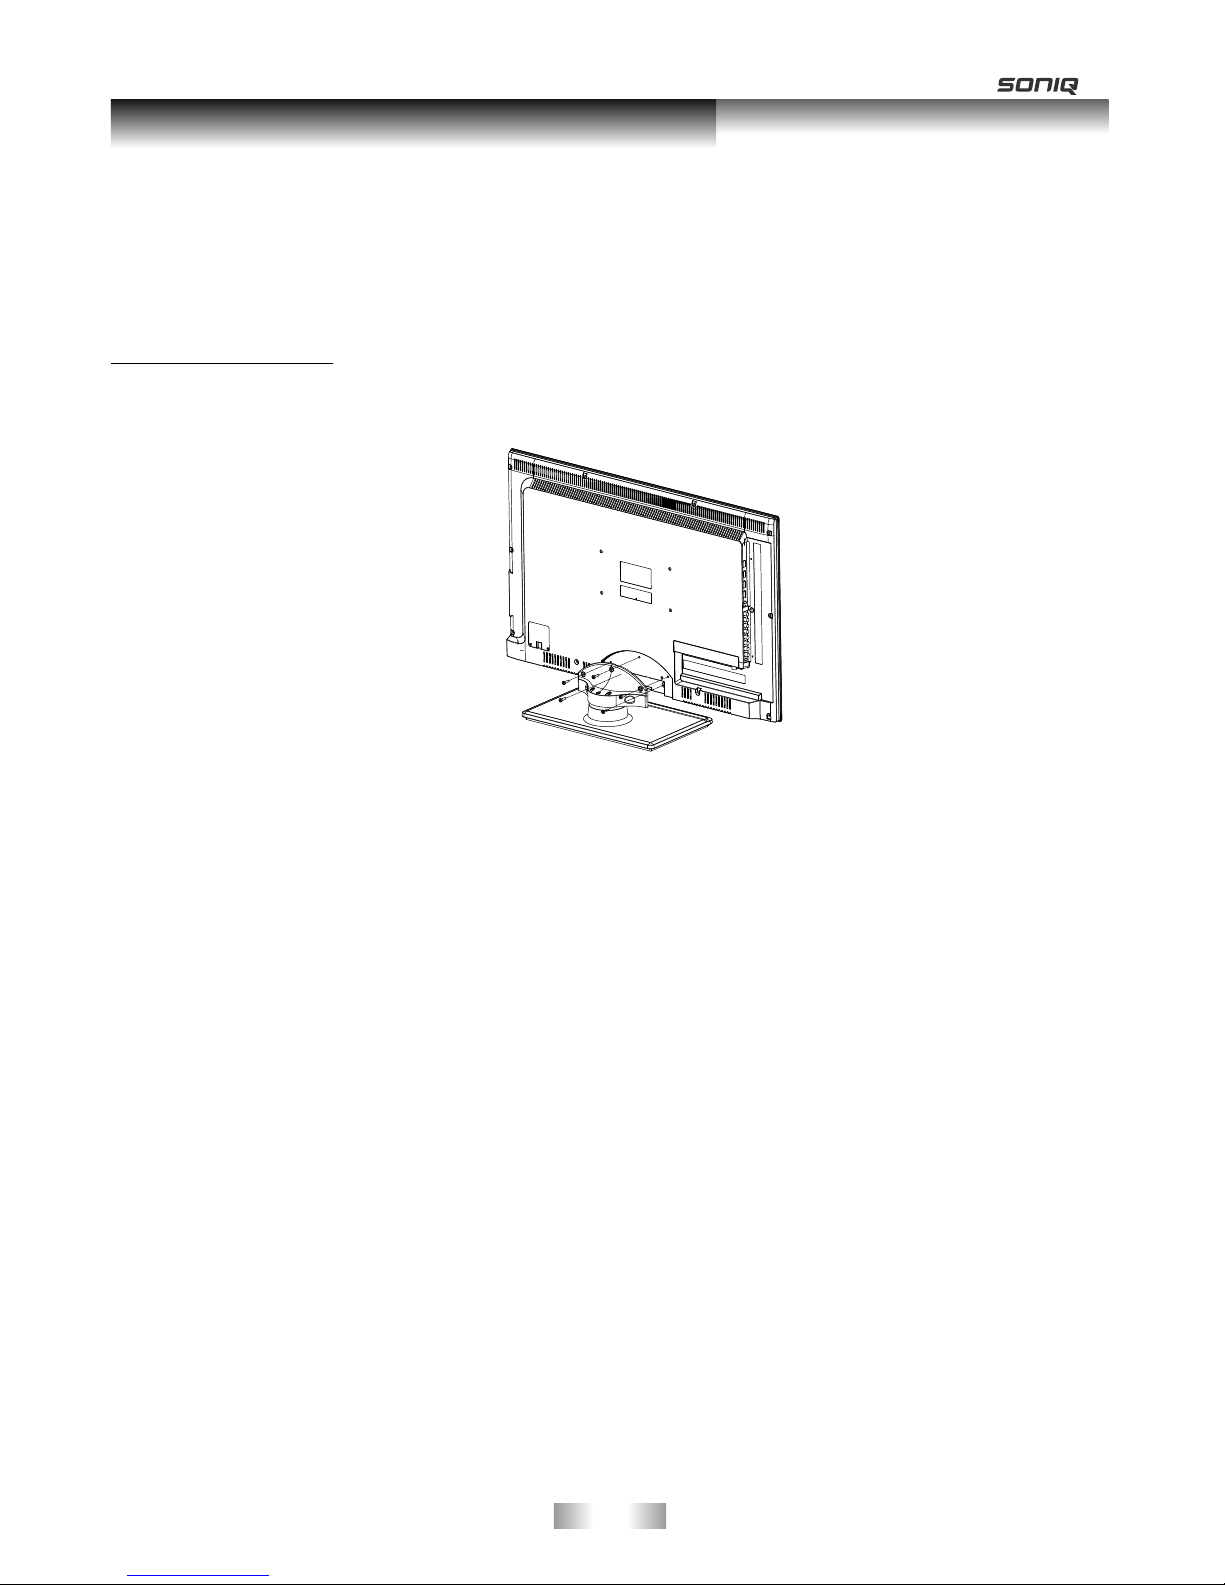
How to assemble the stand
-Before attaching/detaching the stand, make sure to turn off the TV.
-Before performing work, spread cushioning over the base area to lay the LED TV on. This will prevent it f
rom being damaged.
Assembling instruction:
1) Assemble the stand and the unit together with five M4*12 screws. (Figure 1)
- To disconnect the stand from the TV, perform the above steps in reverse order.
Securing the TV Stand
Caution: Pulling, pushing, or climbing on the TV may cause the TV to fall. In particular, ensure your children do
not hang over or destabilize the TV; doing so may cause the TV to tip over, causing serious injuries or death. Follow
all safety precautions For added stability, install the anti-fall device for safety purposes,
as follows.
ALTERNATIVELY
To secure the TV to the wall:
1- Put the screws into the clamps and firmly fasten them onto the wall. Confirm that the screws have been firmly
installed onto the wall.
- You may need additional material such as an anchor depending on the type of wall.
- Since the necessary clamps, screws, and string are not supplied, please purchase them
separately.
2 - Remove the screws from the center back of the TV, put the screws into the clamps, and then fasten the screws
onto the TV again.
If you need to remove or assemble the stand please read the following instructions.
at he start of this manual.
Figure 1
Screws(5-M4X10)
-9 -
Stand and wall-mounting instructions (optional)
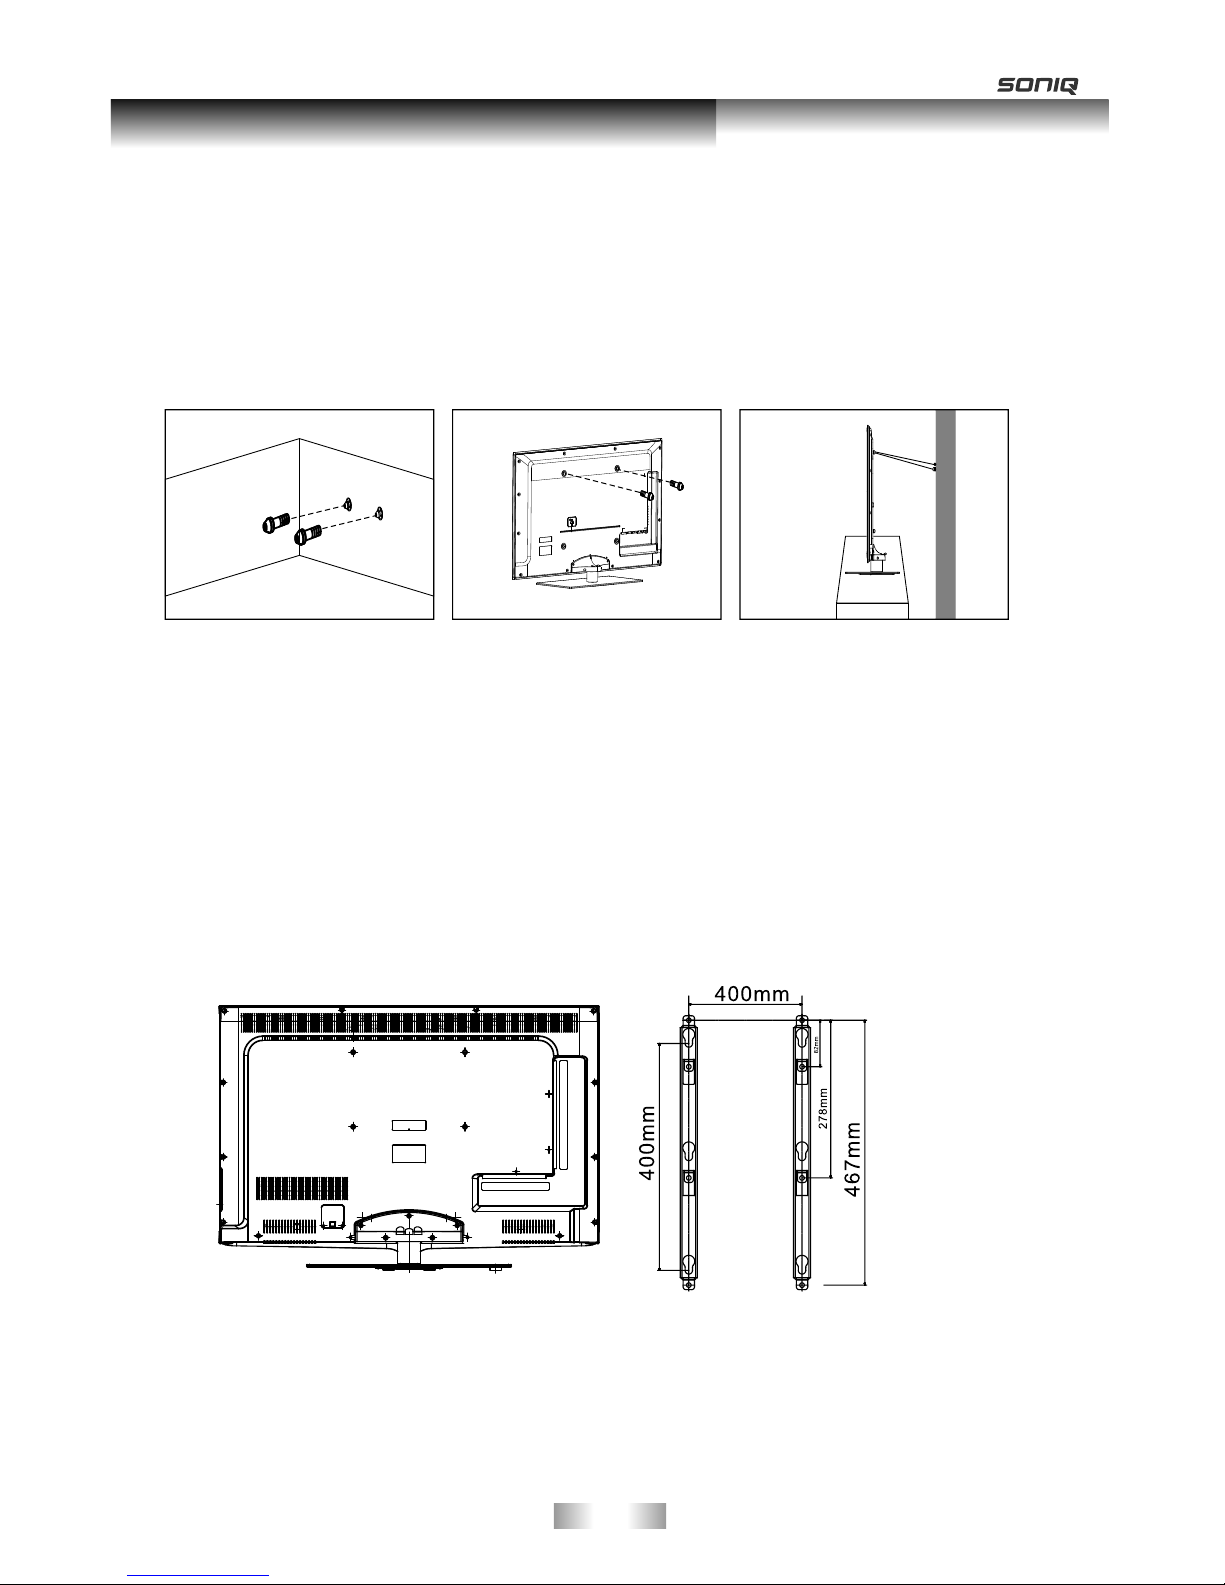
3 - Connect the clamps fixed onto the TV and the clamps fixed onto the wall with a strong cable.
- Install the TV near to the wall so that it does not fall backwards.
- It is safe to connect the string so that the clamps fixed on the wall are equal to or lower than the clamps
fixed on the TV.
- Remove the cable before moving the TV.
4 - Verify all connections are properly secured. Periodically check connections for any sign of fatigue for
failure. If you have any doubt about the security of your connections, contact a professional installer.
(optional)
Your LED TV is able to accommodate wall mounting with the use of a wall mount bracket (not supplied with
LED TV, please contact your local hardware store) and the mounting holes on the back of the unit. We recommend
removing the TV stand prior to wall mounting the TV. Please
How to mount the LED TV on the wall
1.After detaching the stand, fasten 4 mounting screws (Not supplied! Please contact your local hardware store) into
the 4 screw holes on the rear cover, see the figure below.
2.Fasten wall mounting bracket (Not supplied with LED TV, please contact your local hardware store) with screws on
the wall.
3.Carefully check for the strength before releasing the LED TV.
NOTE: For more detailed instructions please refer to your “after market” wall mounting instruction book.
Thread hole size – M6 x 10 depth (TV mounting screw size) on the TV.
Wall mounting instructions
see previous page for instructions on removing the stand.
Wall
-1 0 -
Stand and wall-mounting instructions (optional)
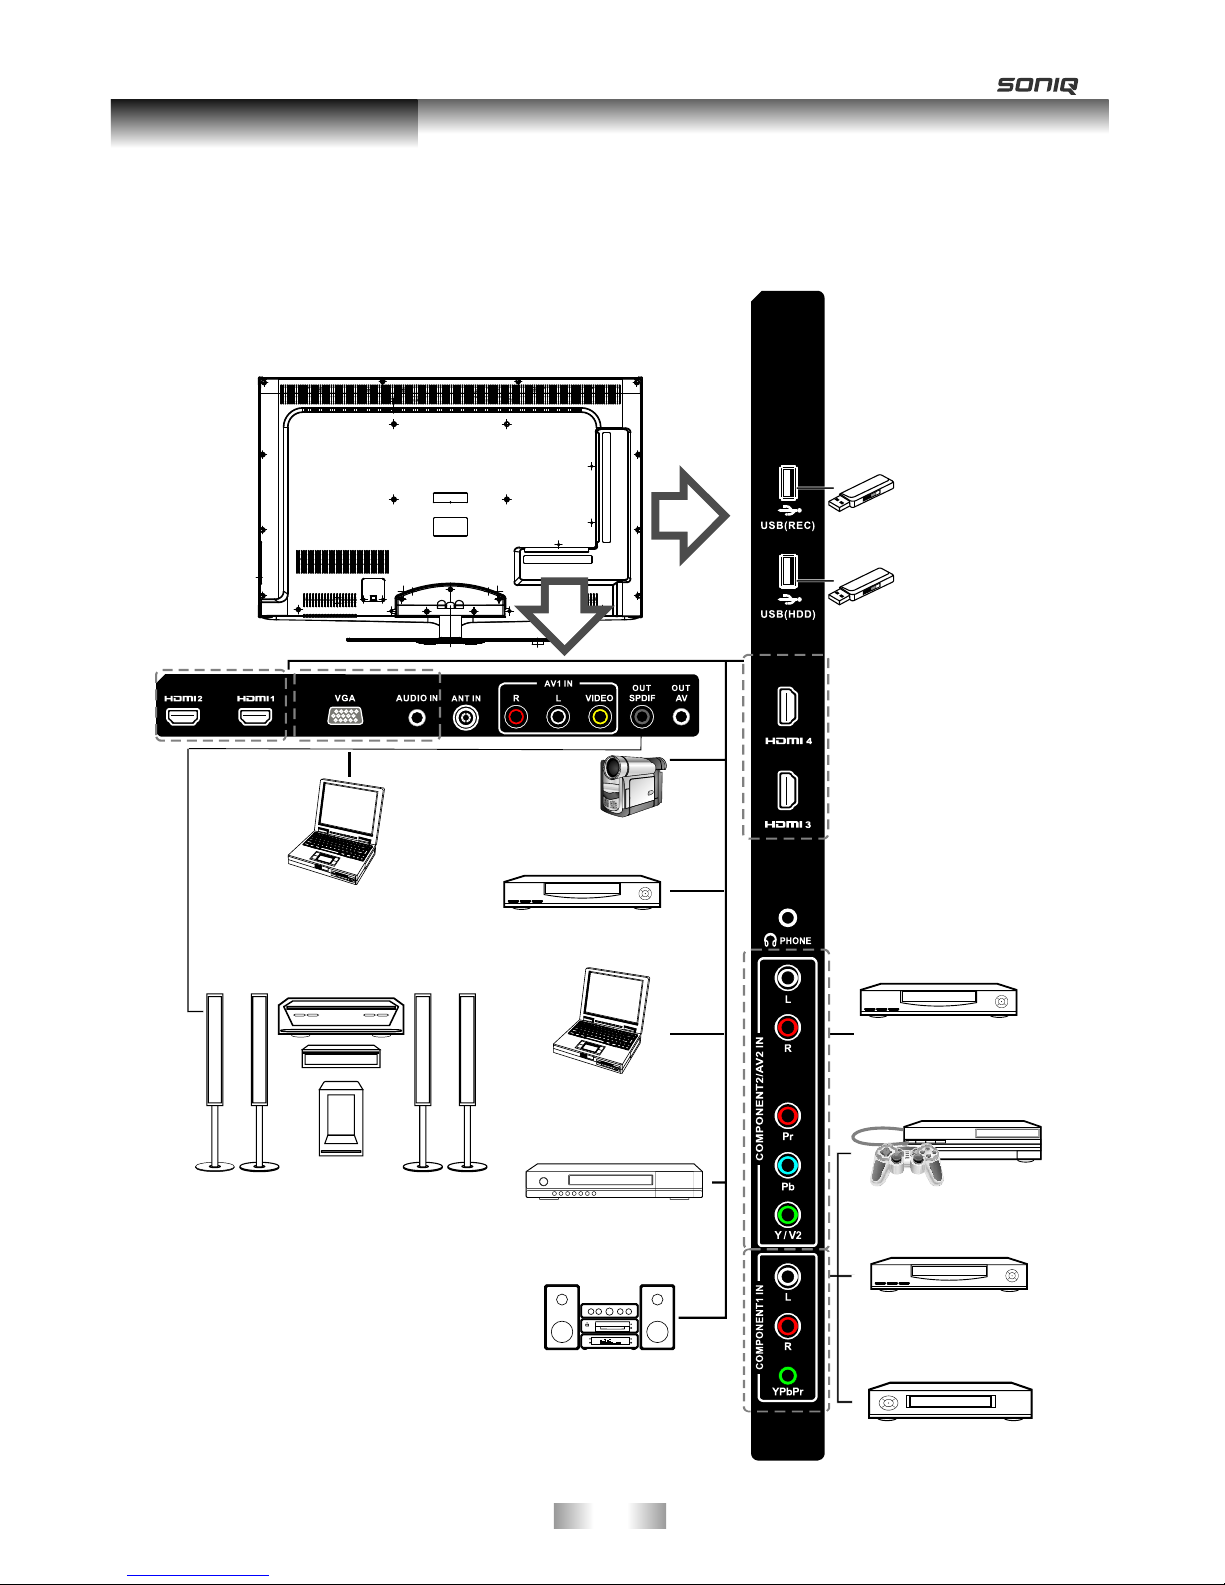
You can connect the TV with video devices such as DVD/VCD player, VCR and video camera to enjoy
the high quality picture.
USB2
USB1
Camcorder
DVD player
PC (HDMI-output)
Blu-ray disc player
Audio system
DVD player
VCR
DVD player with
component output
PC
Home theatre system
with digital input
Overview of back panel
PC (HDMI-output)
PC
Video game equipment
-1 1 -
General Description
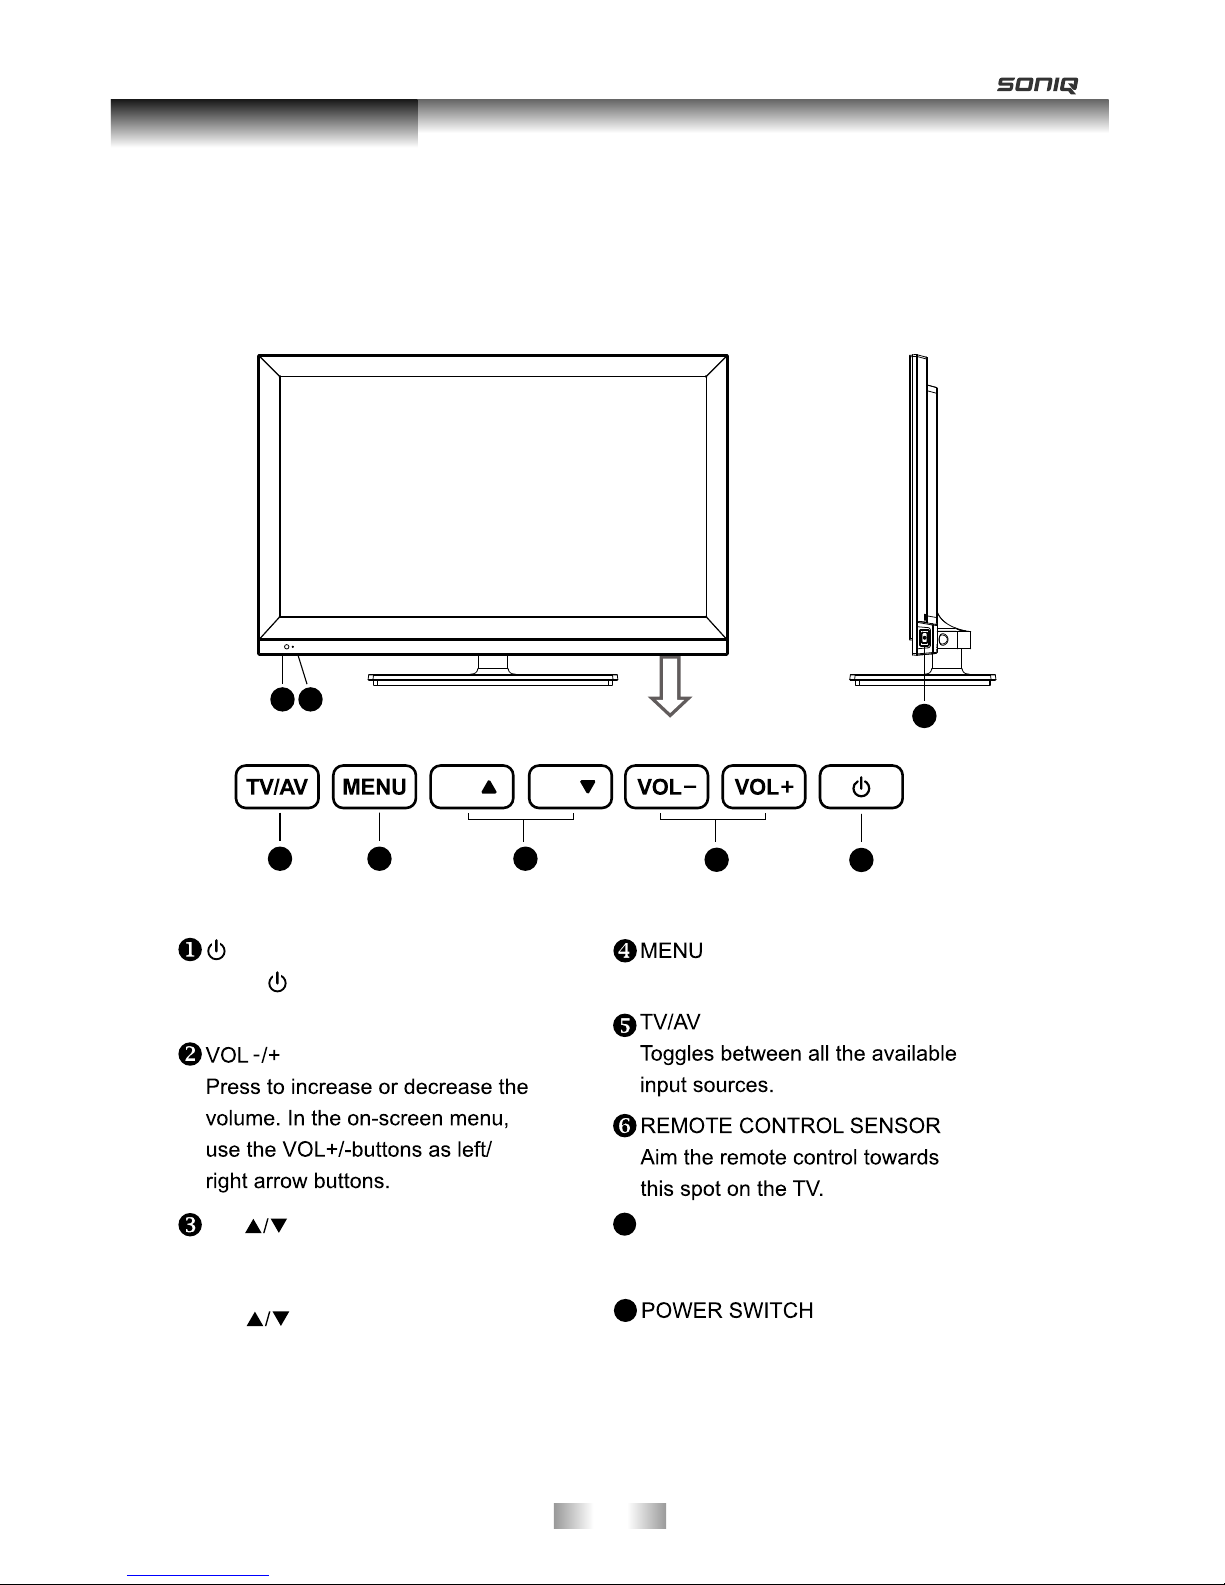
Overview of front panel
The buttons on the lower-right panel control your TV’s basic features, including the on-screen menu. To use the
more advanced features, you must use the remote control.
6
8
7
Standby button
Press button to toggle between
normal and standby mode.
7
POWER INDICATOR
Red:In standby mode.
Green: In power on mode.
8
CH
Press to change programs.
In the on-screen menu, use the
CH buttons as up/down
arrow buttons.
1
45
2
3
-1 2 -
General Description
Press to displ ay on-screen menu
CH CH
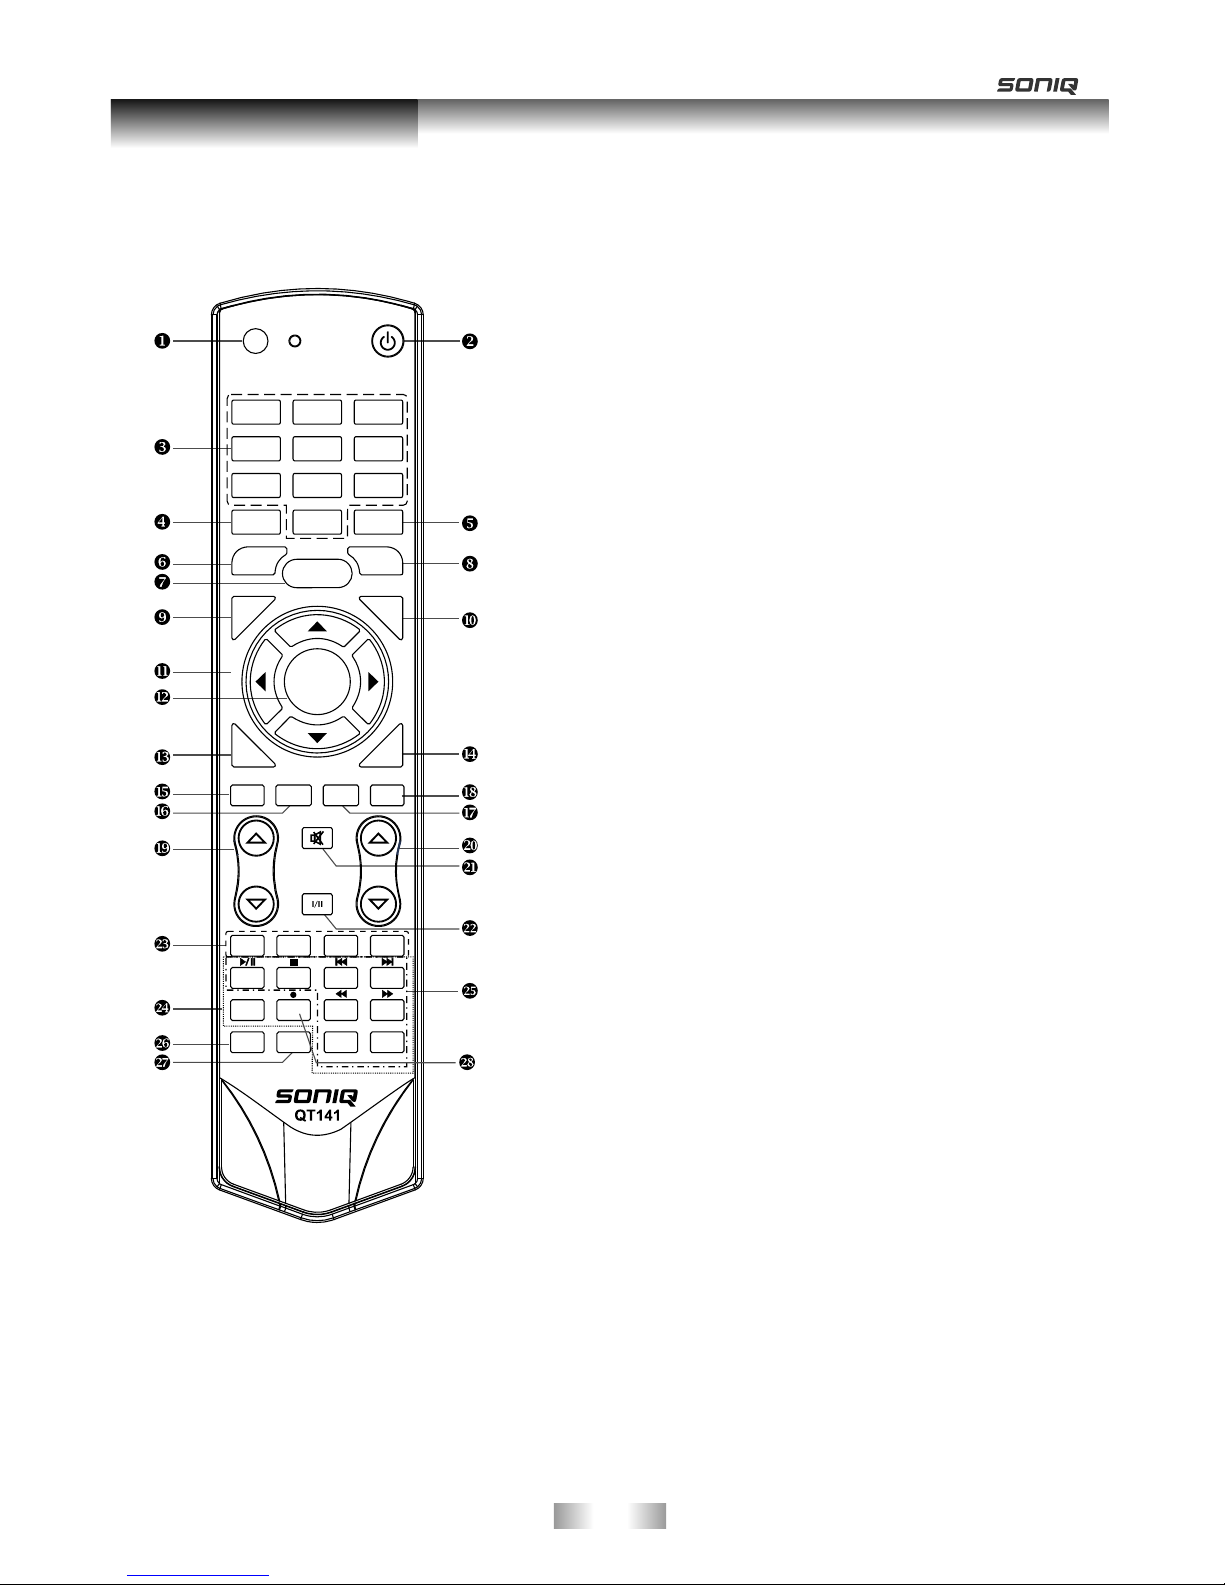
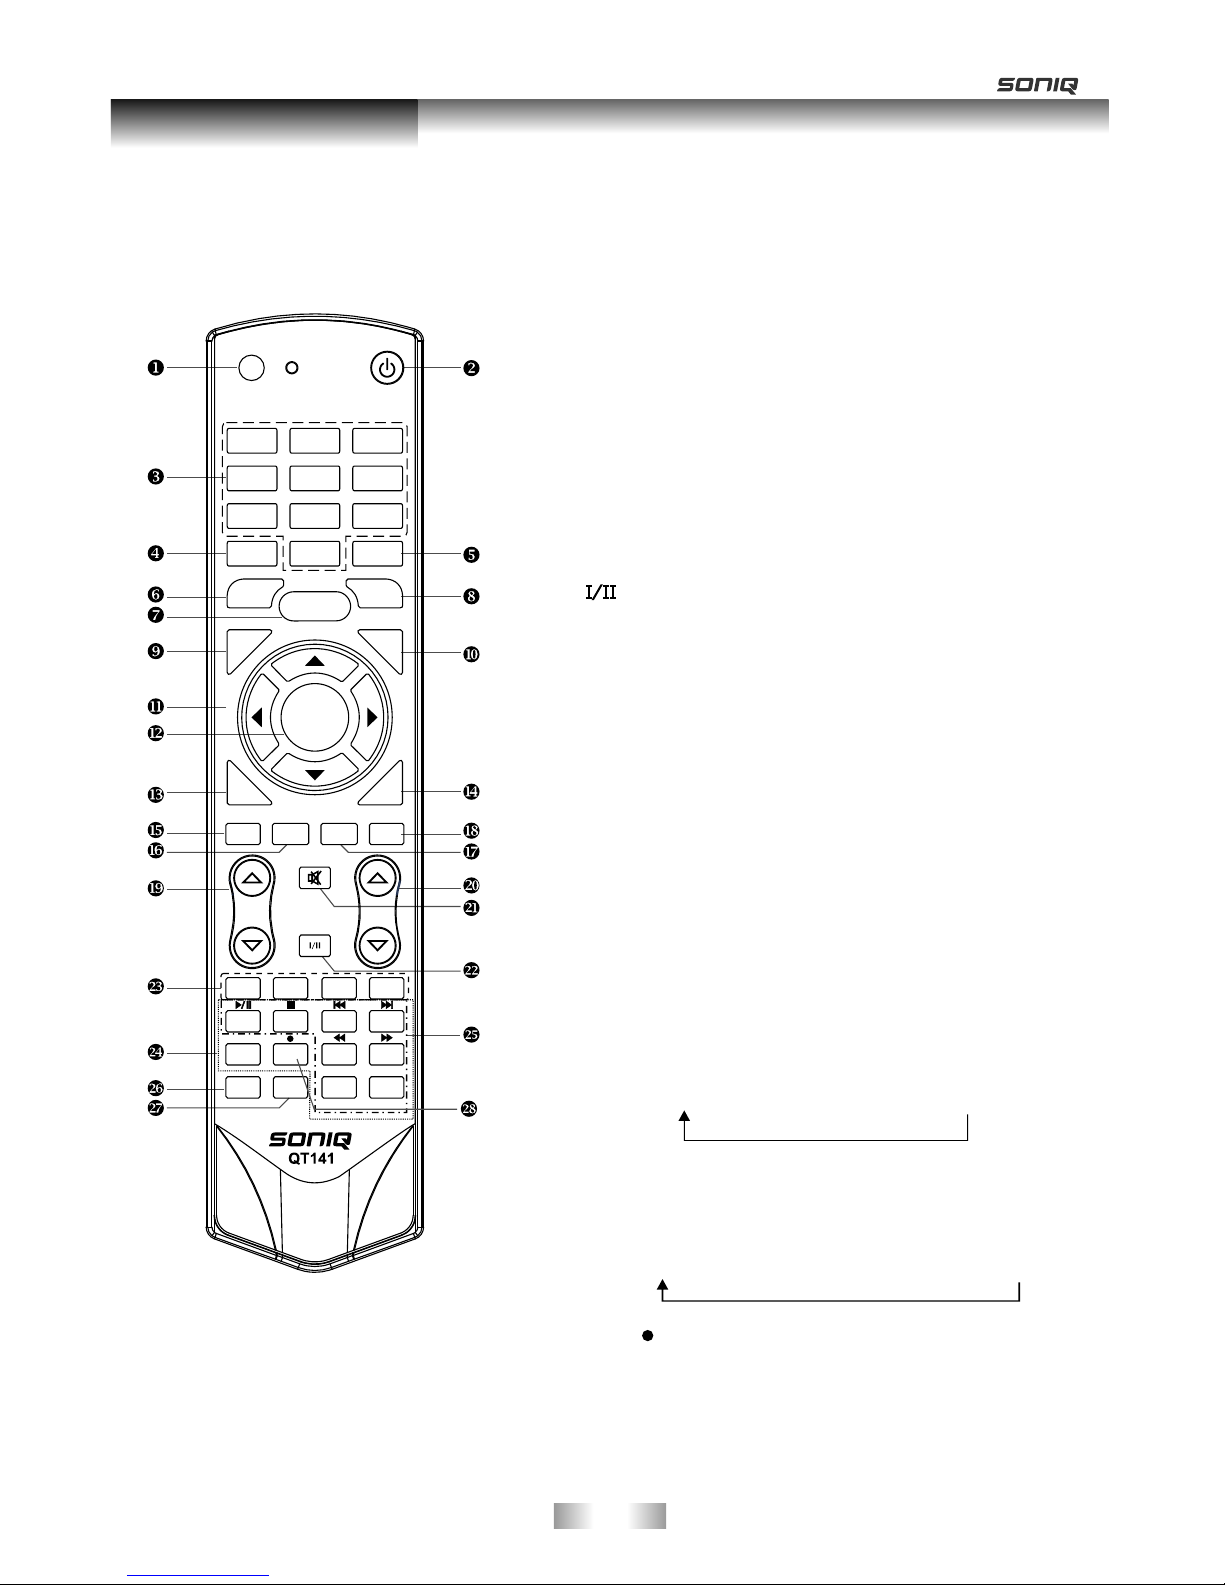
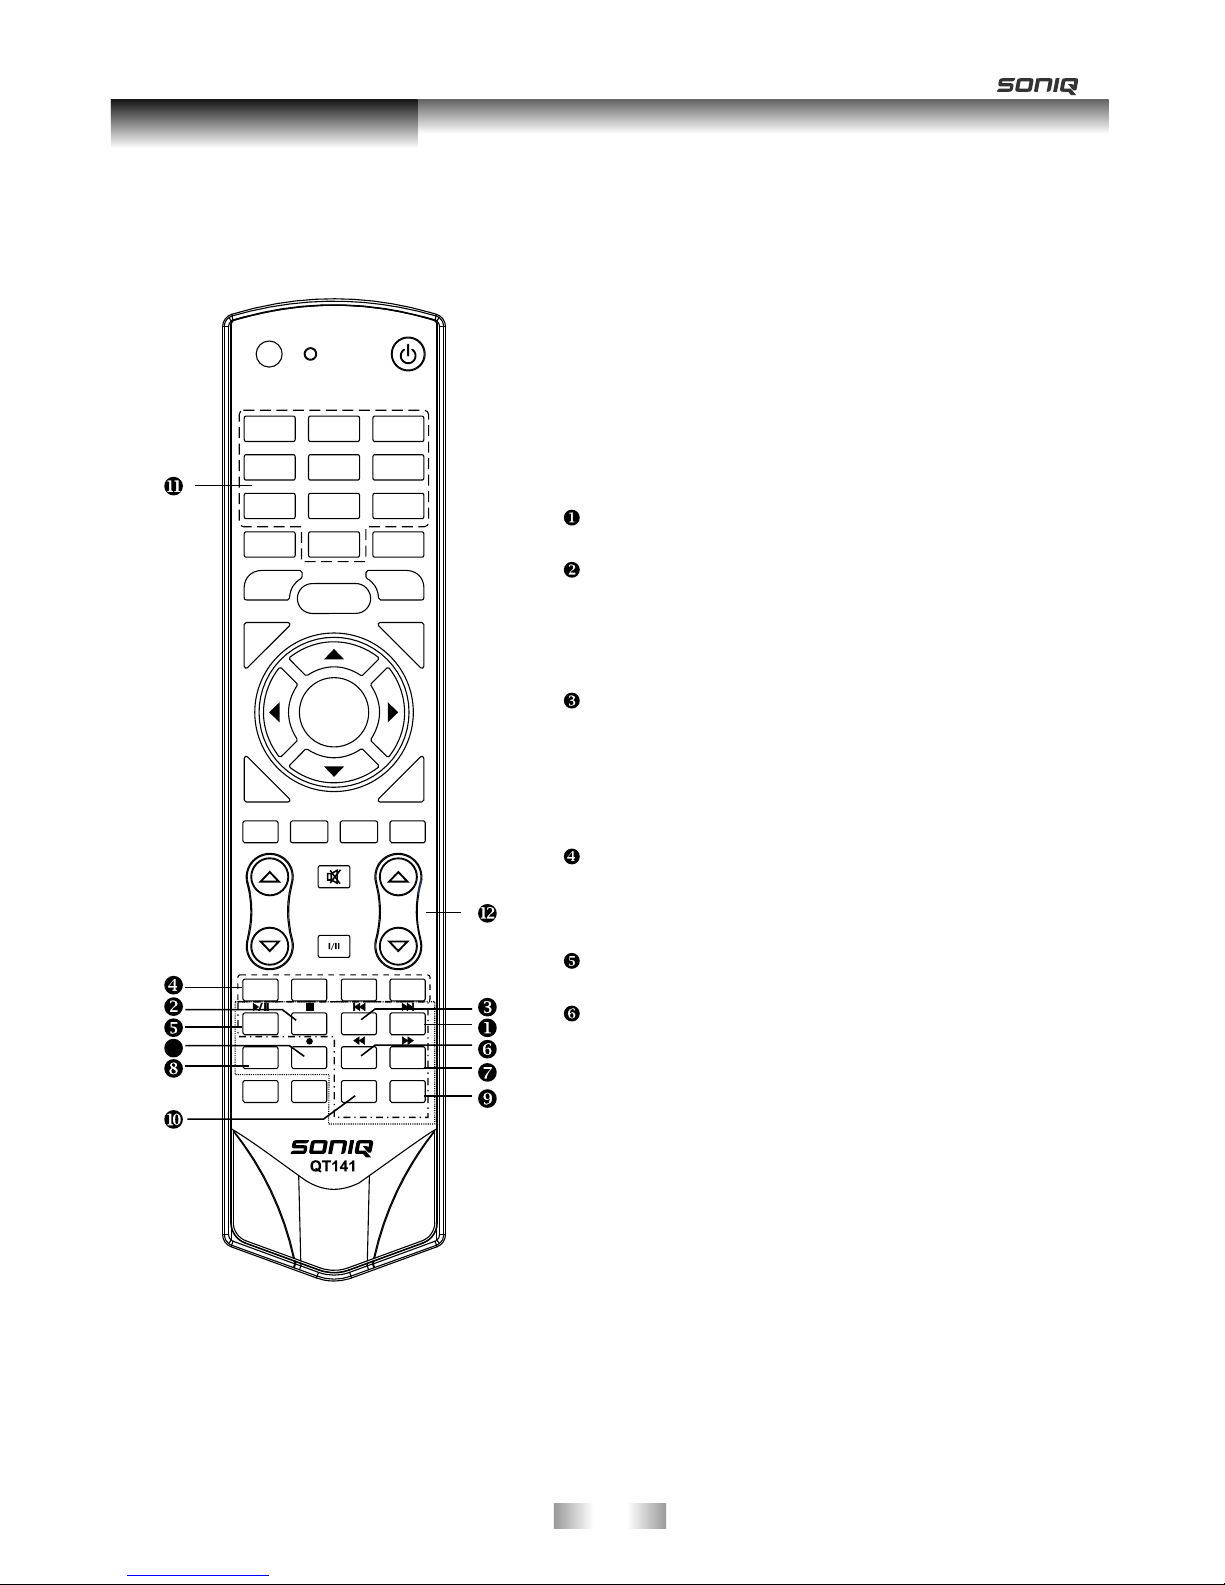
Overview of Remote Control
1. INPUT: This button is used to switch among
different sources: DTV,ATV, AV1, AV2, Component1,
Component2, PC-RGB, HDMI1, HDMI2, HDMI3,
HDMI4, USB.
Select a source and press OK button to confirm.
2. POWER: Press this button to switch to standby
mode, and press it again to turn TV on.
3. Digital buttons(0~9): To select channel with
digital buttons.
4. INFO: This button is used to start the "Current
Service Banner" application that provides
information about the current service.
5. RECALL: Switch to the previous program.
6. FREEZE: Press this button to freeze the image.
7.
8. SLEEP: TV will be switched off automatically at
preset sleep time if you have set sleep timer. Use
your remote control to set the sleep timer.
Press SLEEP button on the remote control, then
press this button again to set sleep time: off, 10,
20,30, 60,90,120,180, 240 min.
After you have set sleep timer, press SLEEP button
again, you will see the Remaining time.
Notes: The sleep timer you have set will be
Cancelled when the TV turns off or if a power
failure occurs.
9. CH.LIST: Press it to show channel list on screen.
10. FAV: Press it to display favorite list.
11.
12.
GUIDE: In DTV source, this button is used to
start the EPG application.
14.
DTV: Switch to DTV mode.
16. HDMI: Switch to HDMI1 mode directly, press
twice to switch to HDMI2, press three times to
switch to HDMI3, press four times to switch to
HDMI4.
MENU: Press this button to display main menu or
exit the menu. When you are in the submenu, you
can press it to return the main menu.
Arrow buttons: Press these buttons to move
cursor up/down/left/right for menu.
OK/REC LIST: Press this button to display a list
of recorded programs. In main menu and submenu
it is a validation button.
13.
EXIT: Exit the menu.
15.
SOUND
AUDIO LANG
VOL
PROG
MENU
1 2 3
4 5
6
7
8
9
0
INFO
RECALL
FREEZE
SLEEP
EXI
T
HOLD
SIZE
REVEAL CANCEL
PICTURE
MUTE
INPUT
POWER
TEXT
SUBTITLE
TIME
SUBCODE
F
A
V
CH
.L
IST
G
U
I
D
E
DTV HDMI
USB
INDEX
PgUp PgDn
RED GREEN
YELLOW
BLUE
OK/
REC LIST
ASPECT
MIX
-1 3 -
General Description
Overview of Remote Control
SOUND
AUDIO LANG
VOL
PROG
MENU
1 2 3
4 5
6
7
8
9
0
INFO
RECALL
FREEZE
SLEEP
E
X
I
T
HOLD
SIZE
REVEAL CANCEL
PICTURE
MUTE
INPUT
POWER
TEXT
SUBTITLE
TIME
SUBCODE
F
A
V
CH.
L
I
S
T
G
UI
D
E
DTV HDMI
USB
INDEX
PgUp PgDn
RED GREEN
YELLOW
BLUE
OK/
REC LIST
ASPECT
MIX
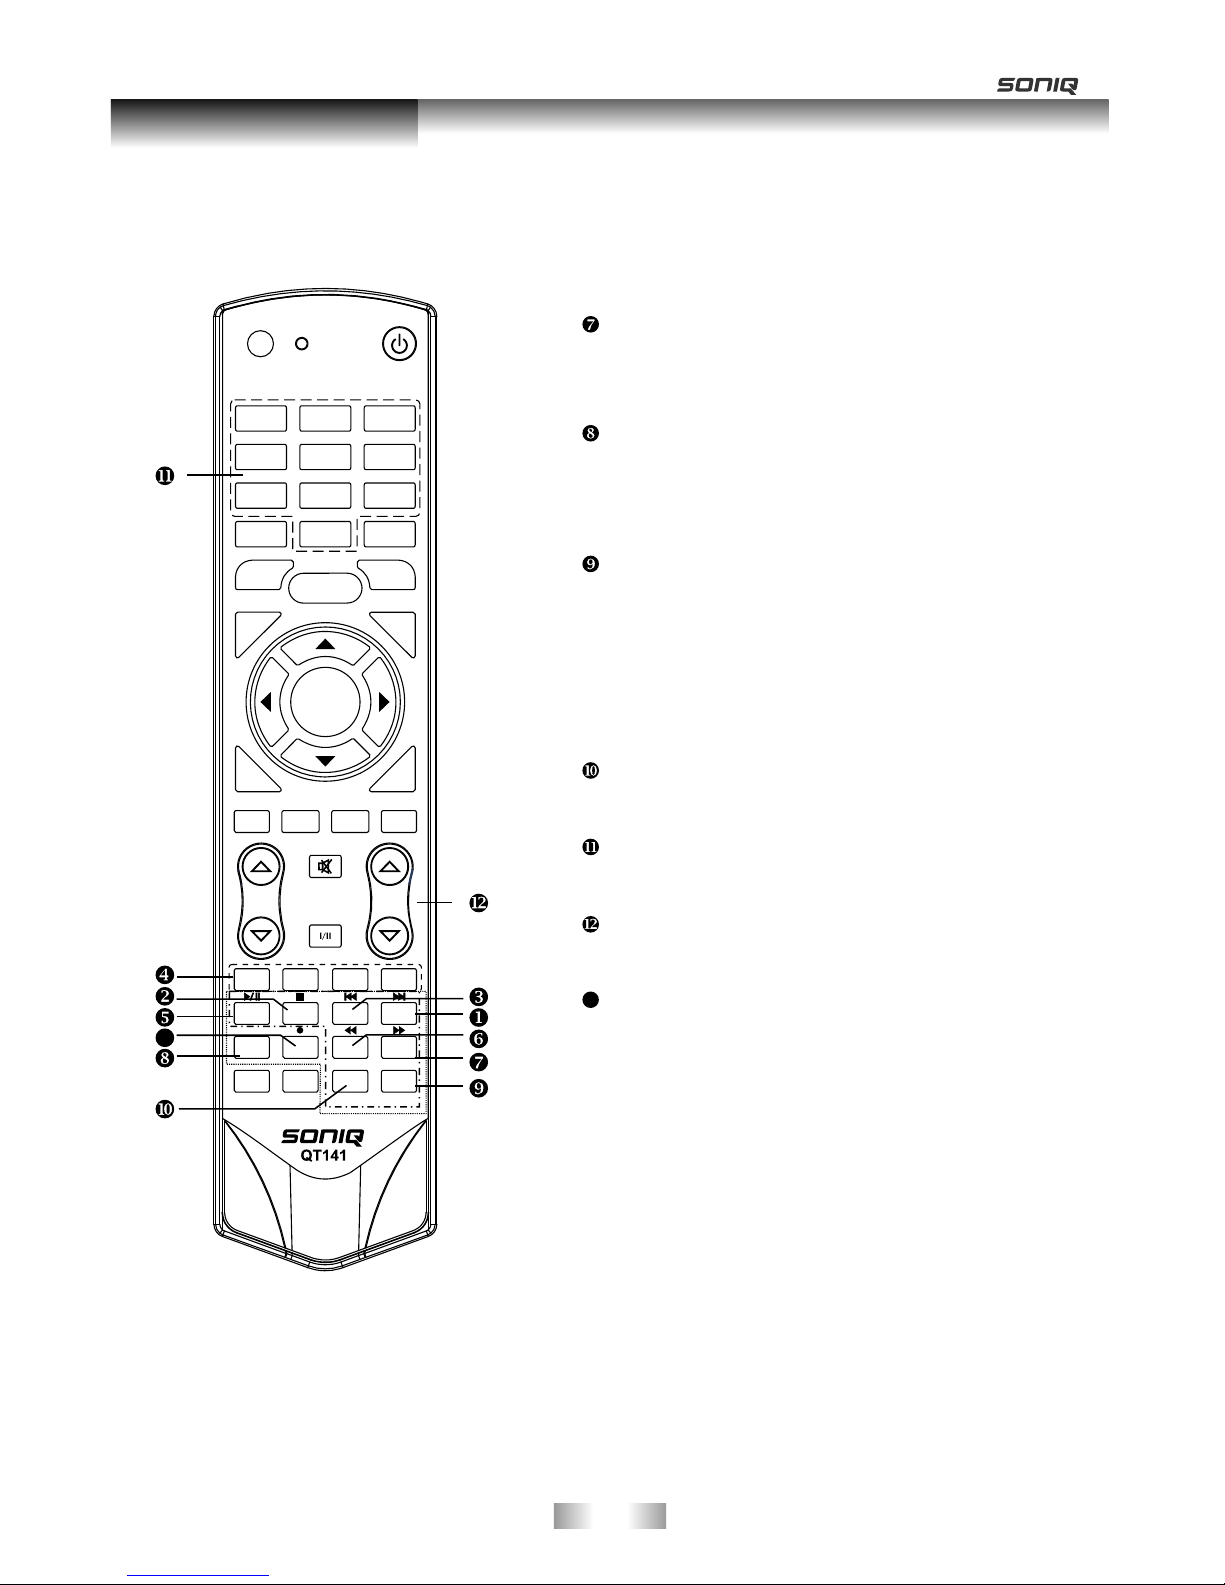
17. USB: Switch to USB mode directly or call the
control menu in USB mode. Please see the
details in “Digital Media Player” on
: Press this button to switch the screen
mode.
19.
22. Button/Audio Lang: source
source
source,the button is used to make language
soundtrack switch(video).
Digital media player control button:
play/pause, stop, previous file, next file, page up,
page down, back, forward, is used to control in
USB mode.
Please refer to instructions in the section
of multimedia player.
26. SOUND: This button is used to select the sound
mode.
27. PICTURE: This button is used to adjust user
picture mode, press this button repeatedly and
select one of four settings.
28. MIX ( ): Teletext buttons for mix function, please
refer to page 15. It is also used for recording function
when TV is on DTV mode, please refer to page 39.
Page41 to Page50.
18. ASPECT
VOL and VOL: Press these buttons to
adjust TV volume.
20. PROGand PROG: Press these buttons to
change channel upward or downward.
In the teletext, these buttons are used to
display the next page and previous page.
21. MUTE: Press this button to shut off sound of the
TV, press again to restore TV sound.
In ATV , the button
is used to set NICAM sound system.
In DTV , the button is used to set the audio
language.
In USB
23. Red/Green/Yellow/Blue Command: These four
buttons are used to request linked buttons with the
current menu/page.
24. TELETEXT buttons: Detail operation please refer to
"Teletext “ in the next page.
25. Including
relevant
Standard" Mild" Bright" User " Sports
-1 4 -
General Description
Music-Movie-Sports-User-Standard
Teletext
OK/
REC LIST
ASPECT
SOUND
AUDIO LANG
VOL
PROG
MENU
1 2 3
4 5
6
7
8
9
0
INFO
RECALL
FREEZE
SLEEP
E
XI
T
HOLD
SIZE
REVEAL CANCEL
PICTURE
MUTE
INPUT
POWER
TEXT
SUBTITLE
TIME
SUBCODE
F
AV
CH.
L
IST
G
U
I
DE
DTV HDMI
USB
INDEX
PgUp PgDn
RED GREEN
YELLOW
BLUE
MIX
13
Teletext is an information system broadcast by certain
channels which be consulted like a newspaper.
It also offers to subtitles for viewers with hearing
problems or who are not familiar with the transmission
language.
You can press these buttons to operate the teletext:
TEXT
Press TEXT button to enter or exit teletext mode.
HOLD
Press HOLD button to toggle Hold function on or
off. When Hold is switched on, the page acquisition
is stopped. When Hold is switched off, the page
acquisition is started.
SIZE
Red/Green/Yellow/Blue Command
INDEX
Press INDEX button, then index page displays.
REVEAL
Press SIZE button one time to display the upper
half of the screen in double height, press the SIZE
button two times to display the lower half of the
screen in double height, press three times to
display the full screen in normal size.
These four buttons are used for quick access to
different pages as numbered at the bottom of the
screen.
Pressing this button will reveal any hidden data
(answers to quizzes for example).Press the REVEAL
button again to return to normal screen.
-1 5 -
General Description
Teletext
CANCEL
SUBTITLE
Turning the Teletext subtitles on or off.
Subtitles is a separate mode with only a few
buttons available. There will be no OSD visible
other than the Teletext Subtitles.
SUBCODE
Subcode mode gives the possibility to select
certain subcode pages of a Teletext page.
Entry of digits within the range 0...9 for current
subcode entry. If the digit completes the entry,
a page request is started.
Press PgUp/PgDn buttons to change the
subcode pages.
TIME
This button is used to show the time of the
Teletext.
Digital buttons(0~9)
You can press them to enter the number of the
Page required.
PgUp/PgDn
You can press them to change page upward or
downward.
MIX
Press MIX botton, the teletext page changes
transparent, TV content and teletext page
content will display at the same time.
Press MIX button again to exit MIX mode.
The CANCEL button will exit from any Teletext on
the display. Press CANCEL button again to exit
Teletext and return to live TV broadcast.
13
OK/
REC LIST
ASPECT
SOUND
AUDIO LANG
VOL
PROG
MENU
1 2 3
4 5
6
7
8
9
0
INFO
RECALL
FREEZE
SLEEP
E
X
IT
HOLD
SIZE
REVEAL CANCEL
PICTURE
MUTE
INPUT
POWER
TEXT
SUBTITLE
TIME
SUBCODE
FAV
C
H
.
L
I
S
T
GUIDE
DTV HDMI
USB
INDEX
PgUp PgDn
RED GREEN
YELLOW
BLUE
MIX
13
-1 6 -
General Description
 Loading...