

Page 1

40" FullHD LEDTV
E40V14B -AU
Page 2

Table Of Contents
Preparations Guide
Safety Information..........................................................................................................................2
Important Safety Precautions..........................................................................................................3
Installed And Connected TV
TV Bracket assemble......................................................................................................................4
TV Buttons And Terminal Interface.................................................................................................5
Exter nal device c onnectio n diagram.... ........ ........ ........... ........ ........... ........ ........ .........6
Install And Connect TV....................................................................................................................7
TV Stan d installa tion Instr uctions.... ........ ........... ........ ........ ........... ........ ........... ..........7
Remot e Control. ........... ........ ........ ........... ........ ........... ........ ........ ........... ........ ...........8
Function Description
Picture Menu...................................................................................................................................9
Sound Menu.................................................................................................................................10
TV Channel..................................................................................................................................11
Feature Menu...............................................................................................................................13
Setup Menu..................................................................................................................................14
Multimedia
Photo............................................................................................................................................16
Music............................................................................................................................................16
Movie............................................................................................................................................17
eBook........................................................................................................................................... 17
Other Features
EPG..............................................................................................................................................18
PVR..............................................................................................................................................19
Other Information
Help.............................................................................................................................................. 23
Specifications............................................................................................................................... 24
This us er manual fo r referenc e only
-1-
Page 3
Safety Information
If the TV any ch anges or coa rse adjustmen t, electri c shocks
to be hur t, do not atte mpt to open a ma chine-maint enance,
custo mer contac t centres ne eded overhaul .
High vo ltages are u sed in the ope ration of
this pr oduct to red uce the risk o f electric
shock ,do not remo ve cover of th e cabinet,
refer s ervicing t o qualifie d service perso nal
The exc lamation p oint withi n an equilatera l
trian gle is inten ded to alert t he user to the
prese nce of impor tant opera ting in the
liter ature acco mpanying t he appliance.
Warning
The lightning flash with arrowhead symbol
within an equilateral triangle, is intended to
alert the user to the presence of uninsulated
dangerous voltage within the products
enclosure that may be of sufficient magnitude
to constitute a risk of electric shock to persons.
-2-
Page 4

Important Safety Precautions
1. Read t hese instr uctions.
2. Keep t hese instr uctions.
3. Heed a ll warning s.
4. Foll ow all instr uctions.
5. Do not u se this appa ratus near w ater.
6. Clea n only with dr y cloth.
7. Do not b lock any ven tilation o penings. Inst all in accor dance with t he
manuf acturer’s instr uctions.
8. Do not i nstall nea r any heat sou rces such as radi ators, hea t register s, stoves, or
other a pparatus ( includin g amplifiers) t hat produc e heat.
9. Do not d efeat the sa fety purpo se of the polariz ed or ground ing-type p lug. A
polar ized plug ha s two blades w ith one wider tha n the other. A groun ding type plug
has two b lades and th ird ground ing prong. The wide bl ade or third p rong are
provi ded for your s afety. When the provi ded plug doe s not fit into y our outlet ,
consu lt an electr ician for re placement of th e obsolete o utlet.
10. Pro tect the pow er cord from b eing walked on or p inched, pa rticular ly at plugs,
conve nience rec eptacles , and the point whe re they exit f rom the appa ratus.
11. Only use at tachment s/accessori es specifi ed by the manu facturer.
12. Use o nly with the c art, stand, tri pod, brack et, or table s pecified b y the
manuf acturer, or s old with the appa ratus. Whe n a cart is us ed caution when
movin g the cart/a pparatus comb ination to a void injur y tip-over.
13. Unp lug this app aratus dur ing lightning s torms or whe n unused for l ong period s
of time .
14. Ref er all servi cing to qual ified service p ersonnel . Servicin g is require d when the
appar atus has bee n damaged in a ny way, suc h as power-s upply cord o r plug is
damag ed, liquid h as been spil led or objects ha ve fallen in to the appar atus, the
appar atus has bee n exposed to r ain or moisture , does not ope rate norma lly, or has
been dr opped. Warning to re duce the risk of fi re or electr ic shock, do n ot expose
this ap paratus to r ain or moisture.
15. The apparatus shall be disconnected from the mains by placing the power/standby
switc h in the stand by position and unpluggin g the power cord of the apparatu s from
the AC main s receptacle.
16. The socket-out shall be installed near the equipment and shall be easily accessible.
17. This pro duct shoul d never be pla ced in a built-in i nstallat ion such as a bo okcase
or rack u nless prop er ventila tion is provide d or the manufacturer's instructions have
been ad hered to.
18. Appar atus shall not be e xposed to dr ipping or sp lashing.
19. Do no t place any so urces of dan ger on the appara tus (e.g. li quid fille d objects,
light ed candles ).
20. Wall or Ceili ng Mountin g - The a ppliance shou ld be mounte d to a wall or cei ling
only as r ecommend ed by the manu facturer.
21. Nev er place the TV, remot e control or b atteries n ear naked fl ames or other
heat so urces, inc luding direct s unlight. To preve nt the sprea d of fire, keep
candl es or other fl ames away from th e TV, remote con trol and bat teries at
all tim es.
22. The USB te rminal sho uld be loade d with 0.5 A un der normal o peration .
-3-
Page 5
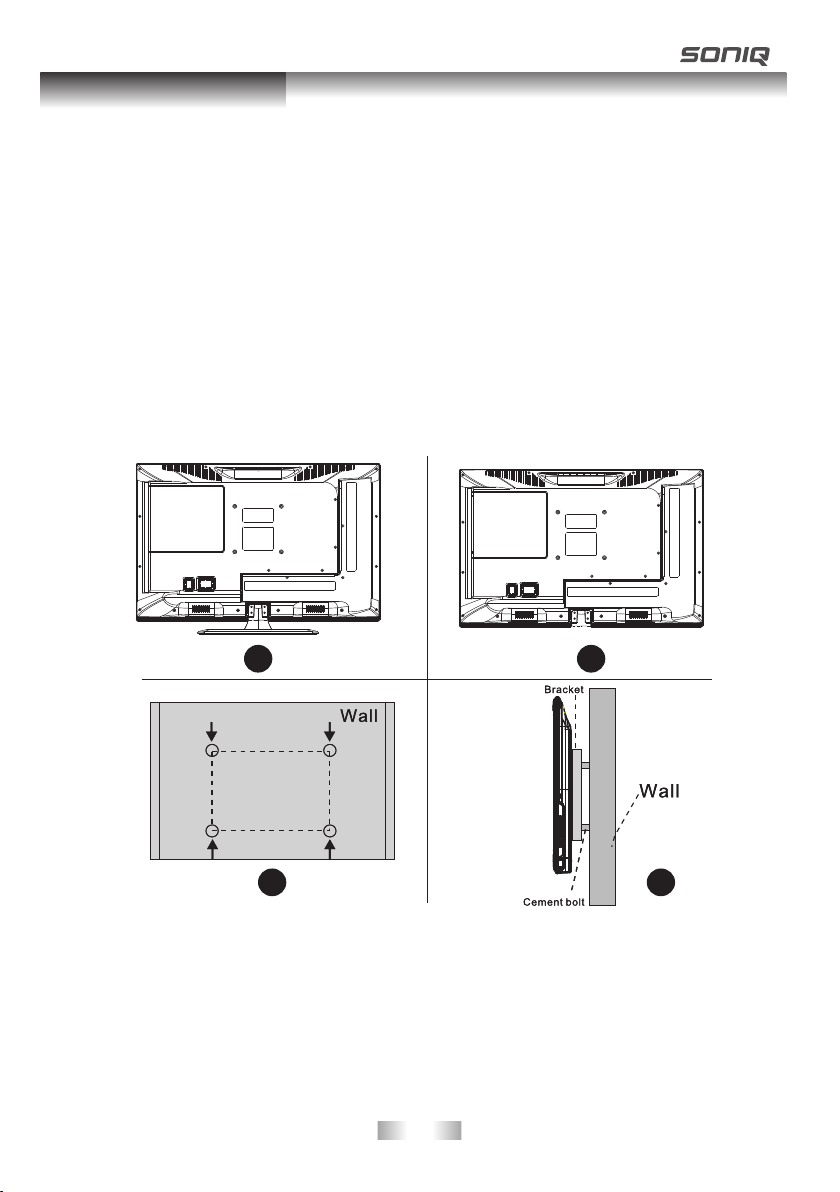
TV Bracket assemble
Fix the TV on the wall
1.Fir st,put the TV on th e table smoothl y and put some s oft cloth on the tabl e to avoid
scrat ching the sc reen.
2.Use r the screw dr iver to take o ff the scr ews which ar e fixed on the b ottom stan d
(the di rection of t he arrow, ref er to the ptoto1) .An d take off the bottom stand(please
take off the screws and bottom stand carefully).
3.Mak e one bracke t which can fi x on the wall accor ding to the si ze of arrow di rection
of phot o2 and photo 3.
4.Dri ll four hole s properly o n the wall (the siz e only for ref erence) an d put into four
screw s.(optio nal parts) D rill four holes properly on the wall (the size only for reference)
and put i nto four scr ews.(opt ional parts)
5.acc ording to th e step 4,use t he screwdrive r to lock the sc rew on the bac k of the TV.
then ha ng the TV on the wall .
1 2
VOLVOL+
-
CH
-
SOURCEMENUCH+
3
4
Note:
1.The b racket fix ed on the wall i s optional part .
2.whe n you assemb le the TV, there s hould be no other articles on the around and front
and ple ase keep the d istance fr om other articl es.
3.Whe n assemble t he TV, please as k the career man to f ix in order to a void the dan ger.
4.The f ixing pict ure is only fo r reference.
5.Ple ase follow t he user manu al about bracke t assemble t o fix the TV.
6.Att ach the moun ting brack et from the VESA com patible wa ll mountin g kit.
-4-
Page 6

TV Buttons And Terminal Interface
TV Buttons
Note: The fo llowing is o nly functi onal schemati c, And the actu al positio n and
arran gement of di ffe rent models may b e different.
:Tu rn ON/OFF Po wer.
SOURC E:Extern al Signal In put Selection .
MENU: Display Ma in MENU And Con firm MENU Item Se lection.
CH+/- :Selecti ng Channel .
VOL+/ -:Adjust ing Volume.
Terminal Interface
Note: The fo llowing ar e the variou s terminal inte rface, the a ctual posi tion and
arran gement, th e number of differen t models may b e different.
INP UT
VIDE O R L
COA XIAL
INP UT
Y Pb Pr
HDM I
AV inp ut
Ext ernal AV Si gnal I nput An d
Rel evant R ith/L eft Sou nd Chan nel
COA XIAL
Con nect th e SPDIF r eceiv er.
Y Pb Pr i nput
Con nect to t he comp osite t ermin al of
you r DVD/V CR
(So me mode ls with out thi s inter face)
HDM I input
Dig ital si gnal in put fro m HDMI vi deo
con necto r.
ANT 7 5
Con nect th e anten nal/c adle tv i nput
(75 /VHF/ UHF)
VGA i nput
PC an alog si gnal in put
PC AU DIO INP UT
VGA in put and a udio in put whe n VGA
inp ut
-5-
EAR PHONE o utput
Whe n earph ones ar e plugg ed in,
spe akers a re disa bled
USB i nput
Con nect a US B devic e here to p lay
its m edia fi les or to r ecord progr ams
via t he PVR fu nctio n.
Page 7
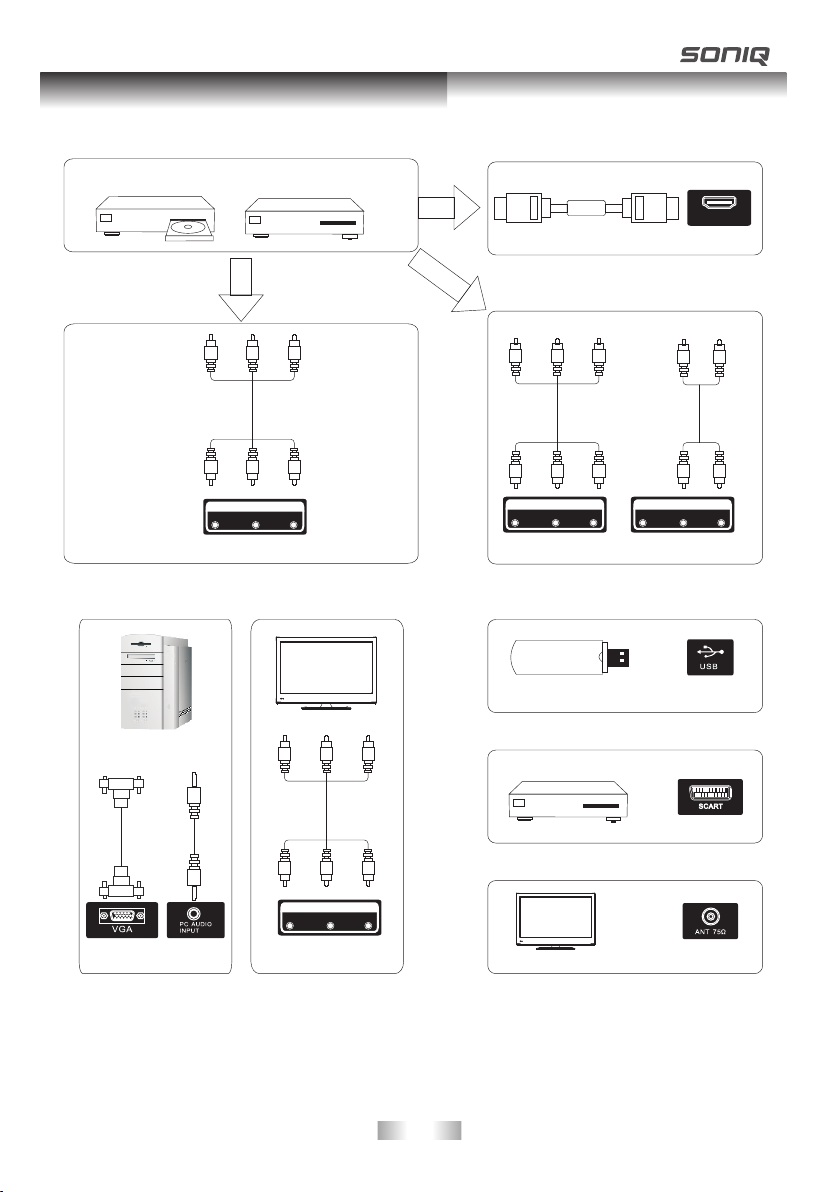
External device connection diagram
DV D
Set-to p boxe s
INP UT
VIDE O R L
AV inp ut con nection
AV inp ut con nection
HDM I
HDMI inp ut con nect ion
INP UT
Y Pb Pr
AV inp ut con nection
USB conn ecti on
HDM I
INP UT
VIDE O R L
OUT PUT
VIDE O R L
AV out put co nnectio n
Set-to p boxe s
SCART con nect ion
TV co nne ctio n
-6-
Page 8
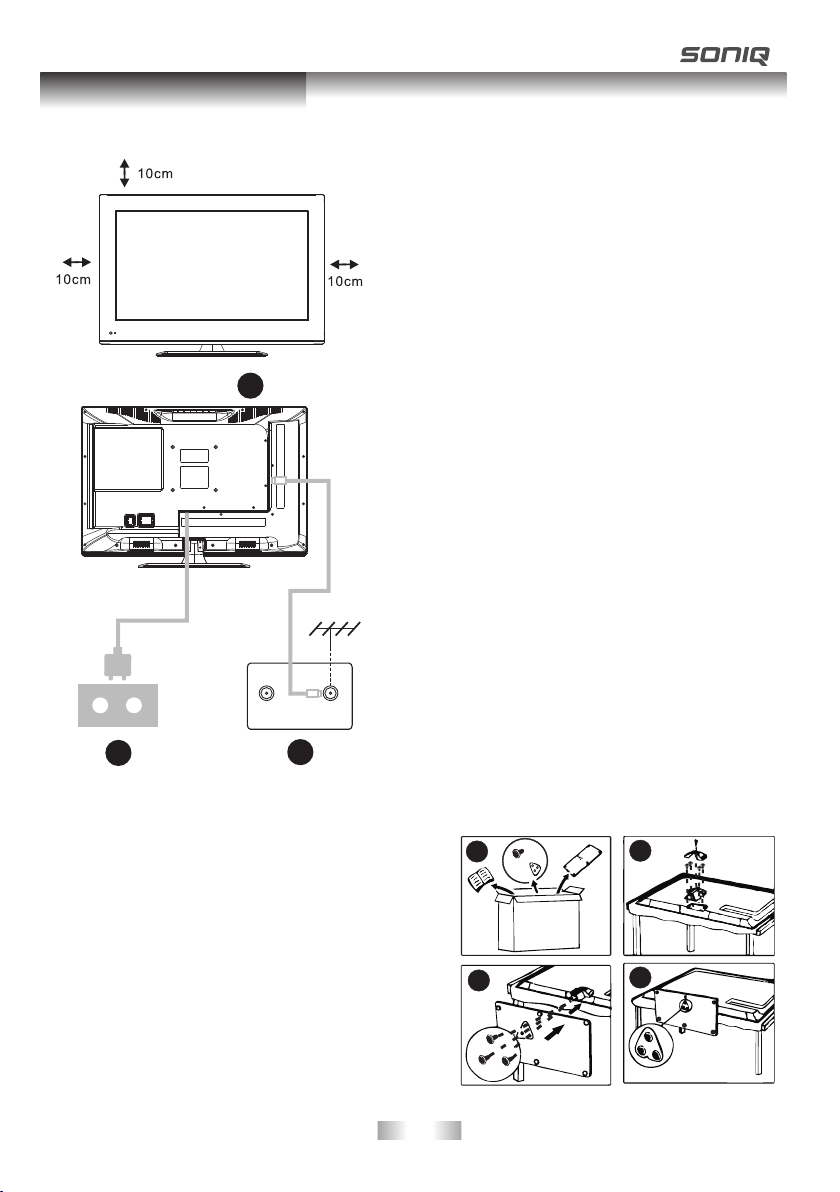
Install And Connect TV
Set you r TV
To put your TV in a fi rm place whi ch can
bear th e weight of th e TV.
To avoid da nger, pleas e don’t expo se the
TV near w ater or heat ing place (s uch as
light , candle, he ating mach ine),do not blo ck
the ven tilation a t the back of TV.
3
FM ANT
TV si gnal ou tput
2
TV ANT
1
Conne ct antenna a nd power
1.Con nect the ant enna cable to the antenna
socke t on the back of t he TV.
2.To plug th e power cord of TV (AC 100 240V~ 5 0/60Hz).
Turn on TV
3.Pre ss the power b utton of the TV the
indic ation ligh t will turn to g reen. if it is
on stan dby mode (th e light is red ),press
the pow er button on t he remote co ntrol
to turn o n the TV.
Note:
Pictu re for refer ence purpo ses only.
Please prevail in kin d
TV Stand Installation Instructions
Open th e carton and r emove the TV
1.
and sca ttered acc essories a nd base
(some m odels with out base).
2.to av oid the inju ry of the TV, covered
with a soft mattress, put it on the table, face
down on a soft mattress, the base of t he
neck is f ixed on the TV with s crews.
3.screw the base and connected to the TV.
4. the in stallati on is comple te.
Note:
Pictu re for refer ence purpo ses only.
Pleas e prevail in k ind
1
3
2
4
-7-
Page 9

Remote Control
Remote Control Key Functions
Power button
Toggles the unit between standby and on.
Numerical buttons
Press 0-9 to select a TV channel directly when
watching TV. The channel changes after 2
seconds or press “OK” button to change
immediately.
Press to return to previous channel.
Press to go back to the root menu under DVD mode.
FAV button
In TV mode, press FAV button to display your
favorite programs.
SLEEP button
Press to activate sleep timer.
PAUSE button
Press to pause the current picture, press again
to resume.
ASPECT button
Press to change the aspect ratio of the TV
display.
MENU button
Press to display the main menu.
SOURCE button
Press to display the main menu.
EXIT button
Exit most menu to default status directly.
Press to quit all menu.
EPG button
Open or close EPG menu.
Navigation keys ( OK)
Allows you to navigate the on screen menus
and adjust the system settings to your
preference.
Press OK in DTV mode to display channel list.
REC / SETUP button
Press to record program to memory storage.
Press to open the setup window of DVD.
REPEAT
In media source, press to repeat 1 / All or off.
For DVD, user can choose REP Chapter, REP
Title and REP ALL.
TSR
Press to delay the process of program
broadcasting.
Has the function of timeshift under DTV mode.
USB/ SD
The T V will ch ange in to USB mo de by pre ssing
the bu tton .
T / R but ton
In DT V mode, p ress to sw itch be twee n radio
and DT V chan nels.
D.DI S butt on
Pre ss to dis play th e DVD inf ormat ion und er
DVD mo de.
A-B bu tton
Ena bles yo u to repe at a sele cted se ction f rom
the di sc.
GOTO butto n
Set t he play t ime dur ing DVD pl ayba ck.
Note:
CANCEL/3D/DVD are invalid.
*
-8-
MUTE button
Press to mute the sound. Press again or press
VOL+/- to resume.
P.MODE button
Press to select preset picture mode.
S.MODE button
Press to select preset sound mode.
SUBTITLE button
In DTV mode, press to change subtitle on / off.
Has related functions under DVD mode as
well as movie playback under MEDIA mode.
I-II / AUDIO button
Press to select sound output mode.
INFO button
Press to display the information of current
system programme.
VOL+/-
Press to increase / decrease the sound level.
CH
Selects a programme in DTV / ATV mode.
PBC / TITLE button
Press to go back to the main menu during disk
playback.
PVR.L
Press to display the recorded program list.
Has the function of program edit under DVD mode.
CANCEL button
Only available in interactive application, TEXT
menu and Music source.
To eject the disk under DVD mode.
TEXT button
On / Off the teletext.
button
Press to playback or pause the program.
D / A button
Switch directly between ATV and DTV.
Slow playing the disk under DVD.
REVEAL
Display hidden Text characters.
button
Press to fast reverse playback.
SUB. PAGE
Prompt the user to enter a subcode for the Text
page.
button
Press to fast forward playback.
HOLD button
Stop refurbish Text current page.
button
Press to stop media play or DVD playback.
Under DTV mode, press it to stop program
recording.
INDEX button
Teletext index page.
button
Press to return to previous chapter or track.
TXT. Size
Toggles the text size display between half top
page, half bottom page and normal.
button
Press to skip to next chapter or track.
Page 10

Function Description
Picture Men u
Press M ENU button t o display th e main menu.
Press O K button sel ect Pictur e in the main menu. t hen press OK b utton to ent er
1.Pre ss UP/DOWN b utton to sel ect the option th at you want to a djust in the P icture menu .
2.Pre ss OK button t o enter , then press UP/DOWN bu tton to adju st.
3.Aft er finishi ng your adju stments, Pres s MENU/OK bu tton to save a nd return back to t he
previ ous menu.
Pictu re Mode
Availabl e Picture Mo de: Dynami c, standard, mi ld, user
Note: You c an press P. MODE butto n to change the Pic ture Mode di rectly .
Brigh tness/Co ntrast/s harpness /Col or/Tint
The abo ve functio n can only be ad justed when you s etting pic ture mode in u ser pattern.
Brigh tness Adjus t the optica l fiber output of t he entire pi cture, it wi ll effect the dark
regio n of the pictu re.
Contr ast A djust the hi ghlight inten sity of the pi cture, but t he shadow of the pi cture is
invar iable.
Sharp ness Adjust t he peaking i n the detail of the p icture.
Color A djust the co lor of the color ba sed on your ow n like .
Tint It is not a vailable u nless Picture M ode is set to be u ser and the cu rrent TV
syste m is NTST.
Color Tempe rature
Chang t he overall c olor cast of t he picture.
Aspec t Ratio
Chang e the overal l color cast o f the picture .
Note: You c an press ASP ECT button t o change the Pict ure Mode dir ectly.
Noise R eduction
Noise r eduction o f the pictur e .To reduce noise an d improve th e appearan ce of the
pictu re. No noise r eduction o peration if it’s “off” .
From Lo w- Middle- H igh, noise r eduction effects b etter but it w ill cause a bl ur on picture.
-9-
Page 11

Function Description
Sound Menu
Press M ENU button t o display th e main menu.
Press UP/DOWN button select Sound Menu in the main menu. then press OK button to enter.
1.Pres s UP/DOWN bu tton to sele ct th e option tha t you want to ad just in the So und menu.
2.Pres s OK button to e nter, then Pr ess UP/DOWN but ton to adjus t.
3.Afte r finishin g your adjus tments, Press M ENU/OK but ton to save an d return back to th e
previ ous menu.
Sound M ode
Available P icture Mod e: Standar d, Movie ,Speec h ,User.
Note: You c an press S.M ODE button t o change the Pict ure Mode dir ectly .
Treble /Bass
When se tting soun d model into U ser pattern ,th ese two func tions can be a djusted.
Treble Ad just the tre ble effect . Increas es or decrea ses high-p itched sou nds.
Bass Ad just the bas s eff ect. Increase s or decreas es lower-p itched sou nds.
Balan ce
Adjust t he balance b etween lef t and right speak ers to adapt t o your liste ning posit ion.
Surro und
Press O K button to en ter, then pre ss UP/DOWN butt on to select O n or Off.
AVL
Press O K button to se lect On or Off. Set the au to volume co ntrol.
SPDIF
Press O K button to en ter, then pre ss UP/DOWN butt on to select O ff/ Auto/PCM .
-10-
Page 12

Function Description
TV Channel
Press M ENU button t o display th e main menu.
Press U P/DOWN but ton select C hannel Menu in th e main menu. Then p ress OK butt on to
enter.
1.Pres s UP/DOWN bu tton to sele ct the option tha t you want to adjust in the Channel Menu.
2.Pres s OK button to e nter .Then p ress UP/DOWN bu tton to adju st.
3.Afte r finishin g your adjus tments. Press M ENU/OK but ton to save an d return back to th e
previ ous menu.
NOTE: TV Con nection The fun ctions of the par ts not chang e please in ki nd prevail .
Chann el Managem ent
To manage ( Delete/R ename/Sw ap/Lock/Ski p) all chann els.
First p ress UP/DO WN to highli ght the channel y ou want to del ete or move or s kip. Then:
Press t he RED butto n to delete th e channel.
Press t he GREEN but ton lock the s elected chann el.
Press t he YELLOW bu tton to skip the se lected cha nnel.
(You r TV se t will skip th e channel au tomatically w hen using CH +/- to view th e channels .)
Press t he BLUE butt on to be swapp ed channel. Then pre ss UP/DOWN t o select ano ther
chann el and press B LUE key to swa p them.
-11-
Page 13

Function Description
Favor ite Manage ment
To manage ( Add/Delet e) Favorit e channels
Press U P/DOWN but ton to selec t the programs to b e added into f avorite li st and press
“RED” ,” GREEN”, ” YELLOW” or “BLU E” button to m ark them.
Count ry
Press U P/DOWN but ton to selec t Country.
Auto Se arch
All Mod e: Select “A ll” item to scan al l digital ch annels car ried by curr ent signal
mode fi rstly and th en switch to scan a ll analog ch annels in se lected
count ry automat ically. User can skip d igital sea rch to analo g search
direc tly by enter ing EXIT/MENU b utton and ca n also stop au to scan
direc tly by enter ing EXIT/MENU b utton duri ng analog sc anning.
Digit al Mode: Sele ct “digita l” item to search a ll digital c hannel in se lected countr y
carri ed by curren t signal mode. Us er can stop search directly by entering
EXIT/ MENU butto n.
Analo g Mode: Sele ct “Analogue” item to searc h all digita l channels i n selected coun try
carri ed by curren t signal mode. Us er can stop se arch dir ectly by entering
EXIT/ MENU butto n.
-12-
Page 14

Function Description
DTV Man ual search
Selec t channel nu mber by UP/D OWN button or ent ering numb er directl y. The stre ngth
and the q uality sho ws at the bott om .Press OK butt on on “Start ” item to star t current
chann el search .T he manual se arching UI and th e auto searc hing UI are th e same.
ATV Manual Se arch
Press U P/DOWN but ton to selec t option .Press O K button to en ter. Press UP /DOWN
butto n to select th ese parame ters. Select ”S earch” ite m to enter ana log channel tun e,
then pr ess OK butto n to adjust.
Feature Men u
Press M ENU button t o display th e main menu.
Press U P/DOWN but ton to selec t Feature Menu in t he main menu . The n press “OK”
butto n to enter.
1.Pres s UP/DOWN bu tton to sele ct the option tha t you want to ad just in the Fe ature menu.
2.Pres s OK button to e nter, then pr ess UP/DOWN but ton to adjus t.
3.Afte r finishin g your adjus tments. Press O K button to sa ve and retur n back to the
previ ous menu.
-13-
Page 15

Function Description
Lock
Lock Ch annel: On: t urn on Lock Chann el. User nee d to enter pas sword to wat ch the
chann els which are locked. Also nee d to enter pas sword when
user tr ies to change set ting in item s like “rese t system”/ “ reset
datab ass” etc.
Off: turn off Loc k Channel
Paren tal Lock: Pa rents can se t age limit level t hrough thi s function .
Chang e Pin Code: Pr ess OK button to se t New Passwo rd, then ent er a 4- digita l number
you wan t to set twice.
Pass wo rd : 0000
Langu age
Press U P/DOWN but ton to selec t Language. Pre ss OK button t o enter , then t o select
Syste m language s etting, in cluding OSD Lan guage, Pre ferred Sub title, Preferred A udio,
Digit al Tele text Langu age, Anglog Telete xt Language.
Clock
It is use d to check out t he current syst em time and se t time zone/ DST (dayl ight savin g
time ): if it’s “ON” ,It’ ll be an hour earli er than the GM T. If Time Zone is se t to “AUTO” it’s
not ava ilable.
Sleep Time r
When yo ur TV i s Running, s tart sleep func tion by sett ing Sleep Tim er in any cast . Thi s
funct ion allows y ou t power off the TV within a pe riod of time . Currentl y the suppor ted time
perio d are:Off,10 Mi ns,20 Mins, 30 Mi ns,60 Mins ,90 Mins,1 20 Mins,18 0 Mins,240 Mins .
Auto Po wer Off
When yo ur TV i s Running ,s tart Auto Power Off fun ction by set ting Auto Pow er Off Timer
in any ca se .This fun ction allo ws you to power off the TV with in a period of t ime. Curre ntly
the sup ported tim e period are : Off,1 ho ur,2hours , 4hours.
Heari ng impared
This funct ion offers a subt itle such as a “str oke on the doo r” or “the bel l starts to ring”
for the c urrent sce ne in case tha t the user is weak in h earing.
PVR/Time s hift
You will be w ell inform ed this func tion in PVR part, w hich was sho wn at the end of t his
user ma nual.
Setup Menu
Press M ENU button t o display th e main menu.
Press U P/DOWN but ton to selec t Setup Menu in the m ain menu .th en press OK bu tton to
enter.
-14-
Page 16

Function Description
1.Pre ss UP/DOWN b utton to select the option th at you want to a djust in the s etup menu.
2.Pres s OK button to e nter, then pr ess UP/DOWN but ton to adjus t.
3.Afte r finishin g your adjus tments press ME NU/OK butt on to save and r eturn back to the
previ ous menu.
OSD Timer
Set up OS D Timer which m eans how lon g the menus will ex ist. The option al periods a re
5,10, 15,20,25 ,30 Second s and Never.
PC Setu p
It is onl y availabl e in PC source .
Auto Adj ust : A uto adjust t he H Position, V Po sition, Ph ase, Clock
H Posit ion: Manua lly adjust H P osition
V Posit ion: Manua lly adjust V P osition
Phase : Manually a djust Phase
Clock : Manually a djust Clock
Blue Sc reen
It is not a vailable i n PC,DTV sou rce or when it is not m ovie mode in m ultimedi a source .In
TV sour ce, if there i s no signal an d Blue Screen is Off, it w ill show sno w; if there is n o
signa l and Blue Scr een is On, It wi ll show blue scre en.
Home Mo de
Press U P/DOWN and h ighlight t his function an d then press O K to adjust it i nto standard,
dynam ic or home mil d mode
Reset t o Setting
If the Lo ck Channel i s On in Featur e Menu/Lock, it n eed s to enter t he passwor d to enter
the Res et. It will Re set .It will R eset System Set ting and Dat abase. Whe n the reset is
compl ete ,it will e nter the Auto Insta llation se ttings pag e.
Softw are Upgrad e
Softw are upgrad e by bin code. P ut the bin code int o the root dir ectory of th e media and
media p lugged int o the TV’S US B interfac e ,press ENT ER key to upgrade. Don’t power off
durin g the upgrad ing proces s. Th e system will res tarts when t he upgradi ng process is
done .
-15-
Page 17

Multimedia
Press S OURCE butt on and then pr ess UP/DOWN to ch oose Media .
Plug in a M edia on TV, then yo u can enjoy photo , movie and eB ook throug h your Media on
TV.
Photo
Press L EFT/RIGH T button to selec t PHOTO in the main m enu, then pr ess OK button
enter p hoto page.
Music
Press L EFT/RIGH T button to selec t Music in the m ain menu, th en press OK bu tton enter
music p age .
-16-
Page 18

Multimedia
Movie
Press L EFT/RIGH T button to selec t Movie in the m ain menu ,th en press OK bu tton enter
Movie p age.
eBook
Only tx t format eBo ok is suppor ted.
Press L EFT/RIGH T button to selec t eBook in the m ain menu, th en press OK bu tton enter
eBook p age.
-17-
Page 19

Other Features
EPG
If you ex pect to know t he schedul e or the informat ion of the cur rent playi ng program or
the pro gram that st arts in the ne ar future, you ca n refer to the E PG menu by pre ssing the
butto n “EPG” on the r emote. It shows the date and ti me on the top ri ght of the men u, the
list of t he current a vailable c hannels on the le ft side of the m enu, and the n ame of each
progr am that star ts in a schedu led period of tim e on the right o f the menu, yo u can also
choos e the highli ghted prog ram and press OK bu tton to chec k the detail i nformation of
such pr ogram on the r ight side of t he menu. Change t he focused l ist by press ing “right
or “lef t” , or the focu sed progra m by pressing “up ” or “down”. The in formatio n of the
curre ntly focus ed program w ill be displaye d on the top of th e menu.
There a re 2 modes ava ilable und er EPG, which are t he daily mod e and weekly m ode.
you can p ress red but ton to switc h from daily mode t o weekly mod e. Press gre en button
2 times t o record the p rogram you c hoose. Press ye llow butto n to scan prev ious day
progr am and blue bu tton to chec k the next day prog ram.
Daily M ode
Displ ay the infor mation of th e programs that s tart in a sche duled peri od of time in the
curre nt channel . It include s name, start tim e ,end time, s hort conte nt descriptio n ,
curre nt date/ti me, etc.
If the cu rrent focu sing progr am is not parenta l locked ,it w ill be playe d simultaneou sly in
the bac kground.
”
Weekly Mod e
Displ ay the infor mation of th e programs that s tart in a sche duled peri od of the in the
curre nt channel . It include s name, start tim e ,end time, s hort conte nt descriptio n ,current
date/ time, etc.
Focus ing on differen t channels o n the left, it disp lays corre sponding p rograms in
sched ule of time.
If the cu rrent focu sing progr am is not parenta l locked ,it w ill be playe d simultaneou sly in
the bac kground.
-18-
Page 20

Other Features
PERSONAL VIDEO RECORDING (PVR)
You ca n record cur rent and upc oming programs using a USB de vice. Howe ver, this is on ly
avail able for dig ital chann els. Please plu g in the USB dev ice before e xecuting r ecording
funct ion and as wel l do the follo wing settings t o save the fil e recordin g.
1.Form at USB Recor ding Devic es
Menu- > Feature- >PVR/Timeshift->P artition S elect to ent er partition li st:
Then pr ess red butt on on the remo te control to for mat USB reco rding devi ce, once format
has bee n successf ully done, i t will pop up a dialo gue box as sho wn below.
War m Tip s:
When su ch device is s uddenly se parated or unpl ugged, the s tored file s or the USB storage
devic e may be damag ed. Be sure to b ack up importan t files befo re recordi ng. We will not
be resp onsible fo r any data los s.
2.Rec ording Pro grams
Insta nt Recordi ng
You ca n record the p rogram you a re watching. Pr ess REC on the r emote to sta rt the
recor ding.
Recor ding icon an d recordin g time will be disp layed at the l eft bottom o f the Screen .
Press S TOP butt on to stop the r ecording.
Sched ule Record ing
2.1 Pre ss EPG to ente r EPG weekly mode, the screen i s shown on the f irst pictu re. Then
you can u se Navigat ion button t o check the progr am schedul e on the right s ide of the
scree n, which was p resented o n the second pict ure. Then pleas e highligh t the
progr am you prefe rfor sched ule recording a nd press gre en button tw o times
until - R-shown on t he screen to p rerecord, whi ch was shown o n picture 3.
2.2 You can al so press red b utton on the remo te control t o switch EPG f rom weekly mode
to dail y mode. Pres s yellow but ton to scan previ ous day prog ram and blue b utton to
check t he next day pr ogram. You can at most s chedule re cording fo r 10 programs.
Pleas e note that cu rrent programs are not avai lable for sc hedule rec ording.
-19-
Page 21

Other Features
2.3 You can ch eck the reco rded program th rough Menu >Feature >PVR/Timeshift>Timer
to chec kthe detai l information of recorded p rogram and m ake minor mo dulation.
-20-
Page 22

Other Features
Press r ed button to d elete one pr ogram you choos e
*
*Pres s green butt on to delete a ll of program you s cheduled
*Pres s yellow but ton to add new s chedule recor ding progr am, then dia logue box wo uld be
poppe d up as shown be low, please n ote that set the re corder as ON a nd Typ e as DTV.
Then ma ke adjusti ng about tim e and press menu bu tton to save
Time shift R ecording
You ca n delay the pr ocess of bro adcasting pro grams unde r time shift r ecording . The
maxim um time of tim e shift reco rding is 2 hours.
Pleas e press TSR butto n on the remote control to ente r. A dial ogue box wou ld pop up,
pleas e choose OK. P ress TEXT button to start t ime shift re cording an d press TEXT again
to play t ime shift re cording. P ress hold butto n to exit time s hift recor ding.
Pleas e note that US B device wil l not store the rec ording pro gram under t ime shift
recor ding mode.
-21-
Page 23

Other Features
3.Pla ying and del eting recordi ng program s
Pleas e press PVR. L button o n the remote cont rol to enter r ecord list , then choose the
progr am you want an d press OK but ton to playback , you can pres s hold butto n to back to
recor d list. Pres s red button t o delete the prog rams.
-22-
Page 24

Help
-23-
Page 25

machine Technical Specifications
Scree n Size
TV syst em
Video syst em
Prese t Channels
Input /Output
Speak er Output
Power r equireme nt
Power c onsumpti on
Acces sories
NOTE:
This user manual is for reference only. Specifications are subject to change
without notice.
40 ”
PAL/SECAM
PAL/NTSC
ATV:100 , DTV:10 00
Input : TV, AV, Y Pb P r, PC, HDMI1,HDM I2,HDMI3 ,USB
Outpu t: COAXIAL , EARPHONE OUT
8 10W+1 0W
AC 100- 240V~, 50/ 60Hz
70 W
User' s manual Rem ote c ont rol ler 2 x AA A Batte ries
-24-
Page 26

MD1 4070 2-01
 Loading...