

Page 1
MD130624-01
Printed in China
AUSTRALIA :1300765 663
HOTLINE
NEW ZEALAND:0800 100 236
www.soniq.com.au
E23Z13A-AU
Page 2
Table of Content s
Safety Instruction
IP Terms an d Condi tions
Table of Co ntent s
Safety Inst ructi on
Intr oduct ion
Intr oduct ion
Pack age Con tents
Main U nit Con trol
Fron t Panel
Rear P anel
………… …………. ..... ..... ..... ..... ..... ..... ..... ..... ... . . . . . . ...... . . . . . . . . . 8
Conn ectio n and Set up
Conn ectin g the Pow er Cord
Conn ectin g the USB D evice
Conn ectin g with an H DMI to HD MI cabl e
Conn ectin g VGA Sign al
.... ..... ..... ..... ..... ..... ..... ..... ..... ..... ............... . . ..... . ... ... ..... ....1
...… ……... ..... ..... ..... ... . ...... . . . . . ...... . . . . . . . . . . . . ..... . . . . . . ... .3-5
………… ……….. ...…. ..... ..... ..... ..... ..... ..... ..... ..... ........ ..... ... .... ... 6
…….. ..... ..….. ...…. ..... ..... ..... ..... ..... ..... ................ ...... ..... ...... 6
…….. ..... ..... ..... ..... ..... ..... ...... . . . ........ .... ..... ..... .............6
………. ...…. ..... ..….. ..... ..... ..... ..... ..... ...... .... ...... .... .... .... 7- 8
………… …………. ..... ..... ..... ..... ..... ..... ..... ..... ... . ... .... .... .... .... ...7
………… …...… ……….. ..... ..... ..... ..... ..... ..... ..... ..... ..9-1 2
………… ..... …….…. ..... ..... ..... ..... ..... ..... ..... ... . . 9
.... ..... .…. ..... . ...... .... .... .... .... .... .... .... .... .... ... . 9
…... ..... ..... ..... ..... ..... ..... ..... ..... . .. 10
………. ..... ..... ..... ..... ..... . . . . . . . . . . . . . . . . .. . . .. . . .. . . ... ..10
Conn ectin g Compo nent Video Signals
Conn ectin g Antenn a
Conn ectin g Compo site Video Signals
Conn ectin g OPTIC AL Sig nal
Remote Cont rol
Remo te Cont rol Key F uncti ons
Usin g the Rem ote Con trol
Batt eries
.... ....… ….... ..... ..... ..... ..... ..... ..... ..... ..... ................................ .... 14
Note s on Usin g Batte ries
Menu O perat ion Gui de
Sour ce Sele ction
Vol + /Vol - (Volume Control)
Menu O perat ion
CHAN NEL ME NU
PICT URE MEN U
SOUN D MENU
TIME MEN U
OPTI ON MENU
LOCK M ENU
PVR FU NCTIO N
Media Play FUNCTION
DVD Op erati on
Troub lesho oting a nd Adv ice
Spec ifica tion
.... ..... ..... ..... ... . ....... . . . ...... . . . . ...... . . . ....... . . . ....... . . . .. 11
.... ..... ..... ..... ..... ..... ..... ..... ..... ..... ... 12
.... ..... ..... ..... ..... ..... ..... ..... ..... ...................... 12
………… ..... ..... ..... ..... ..... ..... ....... . . . ...... . . . ....... . . . ....... ..13-14
………… ….... ..... ..... ..... ..... ..... ..... ..... ..... ....1 3
.... ..... ..... ..... ..... ..... ..... ..... ..... ..... ................ . . ...14
………… ……….. ..... ..... ..... ..... ..... ..... ..... ..... ..... ...14
…... ....… ….... ..... ..... ..... ..... ..... ..... ..... ..... .............15-28
.... ..... ..... ..... ..... ..... ..... ..... ..... ................................ ..... . 15
.... ..... ..... ..... ..... ..... ..... ..... ..... ..... .................... 16
.... ..... ..... ..... ..... ..... ..... ..... ..... ..... ................................ ... 16
………. ...... .... ................................................. ... .....17-18
….…… ….... ..... ..... ..... ..... ..... ..... .... ... . ... . ... .... .... ..... . ... .. 1 9
….…… …………. ..... ..... ..... ..... ..... ..... .... .... .... .... .... ... ... .....1 9
………… ..... ..... ..... ..... ..... ..... ..... .... . ....... . . . ....... . . . ...... . . ..... . 20
………… ……….. ..... ..... ..... ..... ..... ..... ..... ..... ..... ... . . . .........21
………… …………… ….….. ..... ..... ..... ..... ..... ..... ..... ..... ... . ... .... 21
…….. ..... ..... ..... ..... ..... ..... ..... ..... ..... ........... ...... . . . .... .22-2 3
…….. ...... .... .... .... .... .... .... .... .... .... . . ...... . . . ..... 24- 28
.... ..... ..... ..... ..... ..... ..... ..... ..... ..... ................................ ....2 9-36
.... ..... ..... ..... ..... ..... ..... ..... ..... ..... ...............37-38
.... ..... ..... ..... ..... ..... ..... ..... ..... ..... ................................ ..... ..... .39
-1-
.... ..... ..... .... .... ..... ..... ..... ..... ..... ..... 11
IMPORTANT SAFETY INSTRUCTIONS
WARNING
TO PREVENT FIRE OR SHOCK HAZARD, DO NOT USE AN
EXTENSION CORD, RECEPTACLE OR OTHER OUTLET.
TO PREVENT FIRE OR SHOCK HAZARD, DO NOT EXPOSE THIS
APPLIANCE TO RAIN OR MOISTURE.
TO PREVENT ELECTRICAL SHOCK, INSERT THE MAIN PLUG
FULLY INTO THE SOCKET OUTLET.
CAUTION
This lightning flash with
arrowhead symbol in an
equilateral triangle
alerts users to the
presence of
uninsulated dangerous
voltage within the
products enclosure that
may be of sufficient
magnitude to constitute
a risk of electric shock
to persons.
This appliance should not be exposed to water and no object filled with liquid such as a vase
should be placed on the unit.
If a television is not positioned in a sufficiently stable location, it can be potentially hazardous due
to falling.
Many injuries, particularly to children, can be avoided by taking simple precautions such as:
Using cabinets or stands recommended by the manufacturer of the television.
Only using furniture that can safely support the television.
Ensuring the television is not overhanging the edge of the supporting furniture.
Not placing the television on tall furniture (for example, cupboards or bookcases)
without anchoring both the furniture and the television to a suitable support.
Not standing the televisions on cloth or other materials placed between the
television and supporting furniture.
Educating children about the dangers of climbing on furniture to reach the television
or its controls.
Warning: To reduce the risk of
electric shock, do not remove
cover (or back). No user
serviceable parts inside. Refer
servicing to qualified service
personnel.
IMPO RTANT INF OR MATIO N
The exclamation mark
within an equilateral
triangle alerts users
to the presence of
important operating
and maintenance
(servicing) instructions
in the literature
accompanying the
appliance.
-2-
Page 3
Safety Instruction
1. Read instructions-All the safety and operating instructions should be read before the appliance
is operated.
2. Retain instructions-The safety and operating instructions should be retained for future
reference.
3. Heed warnings-All warnings on the appliance and in the operating instructions should be
adhered to.
4. Follow instructions-All operating instructions should be followed.
5. Battery-Batteries shall not be exposed to excessive heat such as sunshine, fire or the like.
6. Earthing Connection-The apparatus shall be connected to a MAINS socket outlet with a
protective earthing connection.
7. Water and Moisture-The appliance should not be used near water.
8. Cart and Stands-The appliance should only be used with a cart or stand that is recommended
by the manufacturer.
9. Wall or Ceiling Mounting-The appliance should be mounted to a wall or ceiling only as
recommended by the manufacturer.
10. Ventilation-The appliance should be well situated so that its location or position does not
interfere with its proper ventilation.
11. Heat-This appliance should be placed away from heat sources such as radiators, heat registers
and stoves.
12. Power Sources-The appliance should only be connected to a power supply as described in the
operating instructions or as marked on the appliance.
13. Grounding or Polarization-Precautions should be taken.
14. Power Cord Protection-Power supply cord should be located so that it is not likely to be walked
on, or pinched by items placed upon it.
15. Cleaning-The appliance should be cleaned only as recommended by the manufacturer.
16. Power Lines-An outdoor antenna should be located away from power lines.
17. Outdoor Antenna Grounding-if an outside anternna is connected to the receiver, the antenna
system must be grounded so as to provide against voltages and built-up static charges.
18. Non-use Periods-The power cord of the appliance should be unplugged from the outlet when
left unused for a long period pf time.
19. Objects and Liquids-Care should be taken so that objects do not fall, and liquids are not spilled
into the enclosure through openings.
20. Conditions Requiring Service-The appliance should be serviced by qualified service personnel
when:
The power-supply cord or the plug has been damaged.
Objects have fallen on or liquid has been spilled into the appliance.
The appliance has been exposed to rain.
The appliance does not appear to operate normally or exhibits a marked change in
performance.
21. This appliance should not be exposed to water and no objects filled with liquids such as a vase
should be placed on the unit.
Safety Instruction
Warning
High voltages are used in the operation of this product.
Do not remove the back cover of the cabinet. Refer servicing
to qualified service personnel.
Warning
To prevent fire or electrical shock hazard, do not expose the
main unit to rain or moisture.
Warning
Do not insert foreign objects into the television’s slots
or openings. Never spill any kind of liquid on the television
receiver.
3cm
Caution
If the television is placed into a confined space, ensure
that the minimum distances are observed as shown.
Heat build up can reduce the service life of your
television, and can also be dangerous.
Caution
Never stand on, lean on, push or apply force to the
product or its stand.
You should pay special attention to children.
-3-
-4-
Page 4
Safety Instruction
Caution
Do not place the main unit on an unstable cart stand,
shelf or table.
Serious injury to an individual, and damage to the
television, may result should it fall.
Caution
When the product is not used for an extended period
of time, it is advisable to disconnect the AC power
cord from the AC outlet.
Instruction
Introduction
Thank you for purchasing the unit. Your unit will bring you years of high-quality viewing enjoyment.
The television is easy to operate and provides exceptionally high quality image. The manual will
explain the operation of the unit, including its functions, features and other important features.
Before installing or operating your unit, please take the time to thoroughly read this manual,
particularly the sections on safety.
Package Contents
Caution
Avoid exposing the main unit to direct sunlight and
other sources of heat. Do not position television
receiver directly on other products which give off heat.
e.g. video cassette players, audio amplifiers. Do not
block the ventilation holes in the back cover.
Ventilation is essential to prevent electrical failure.
Do not squash power supply cord under the main unit.
Caution
The panel used in this product is made of glass.
It can break if the product is dropped or if force is
applied to the panel. Individuals should execute
caution when dealing with broken glass should the
panel break.
Exemptions
SONIQ is not liable for any damage caused by fires, natural disaster (such as thunderstorms,
earthquake, etc.), acts by the third parties, accidents, owner’s misuse or use in other improper
conditions.
SONIQ is not liable for incidental damages (such as profit loss or interruption in business,
modification or erasure of record data, etc.) caused by use or inability to use of product.
SONIQ is not liable for any damage caused by neglect of the instructions described in the
owner’s manual.
SONIQ is not liable for any damage caused by misuse or malfunction through simultaneous
use of this product and the connected equipment.
Main Unit
Remote Control
AAA Batteries (x2)
Quick Reference
Stand
Screws:
4x10mm BM
(x4, Black, one of
them for spare)
AC Adapter Power Cord
Instruction Manual
Warranty Card
Extended
Warranty Cards
-5-
-6-
Page 5
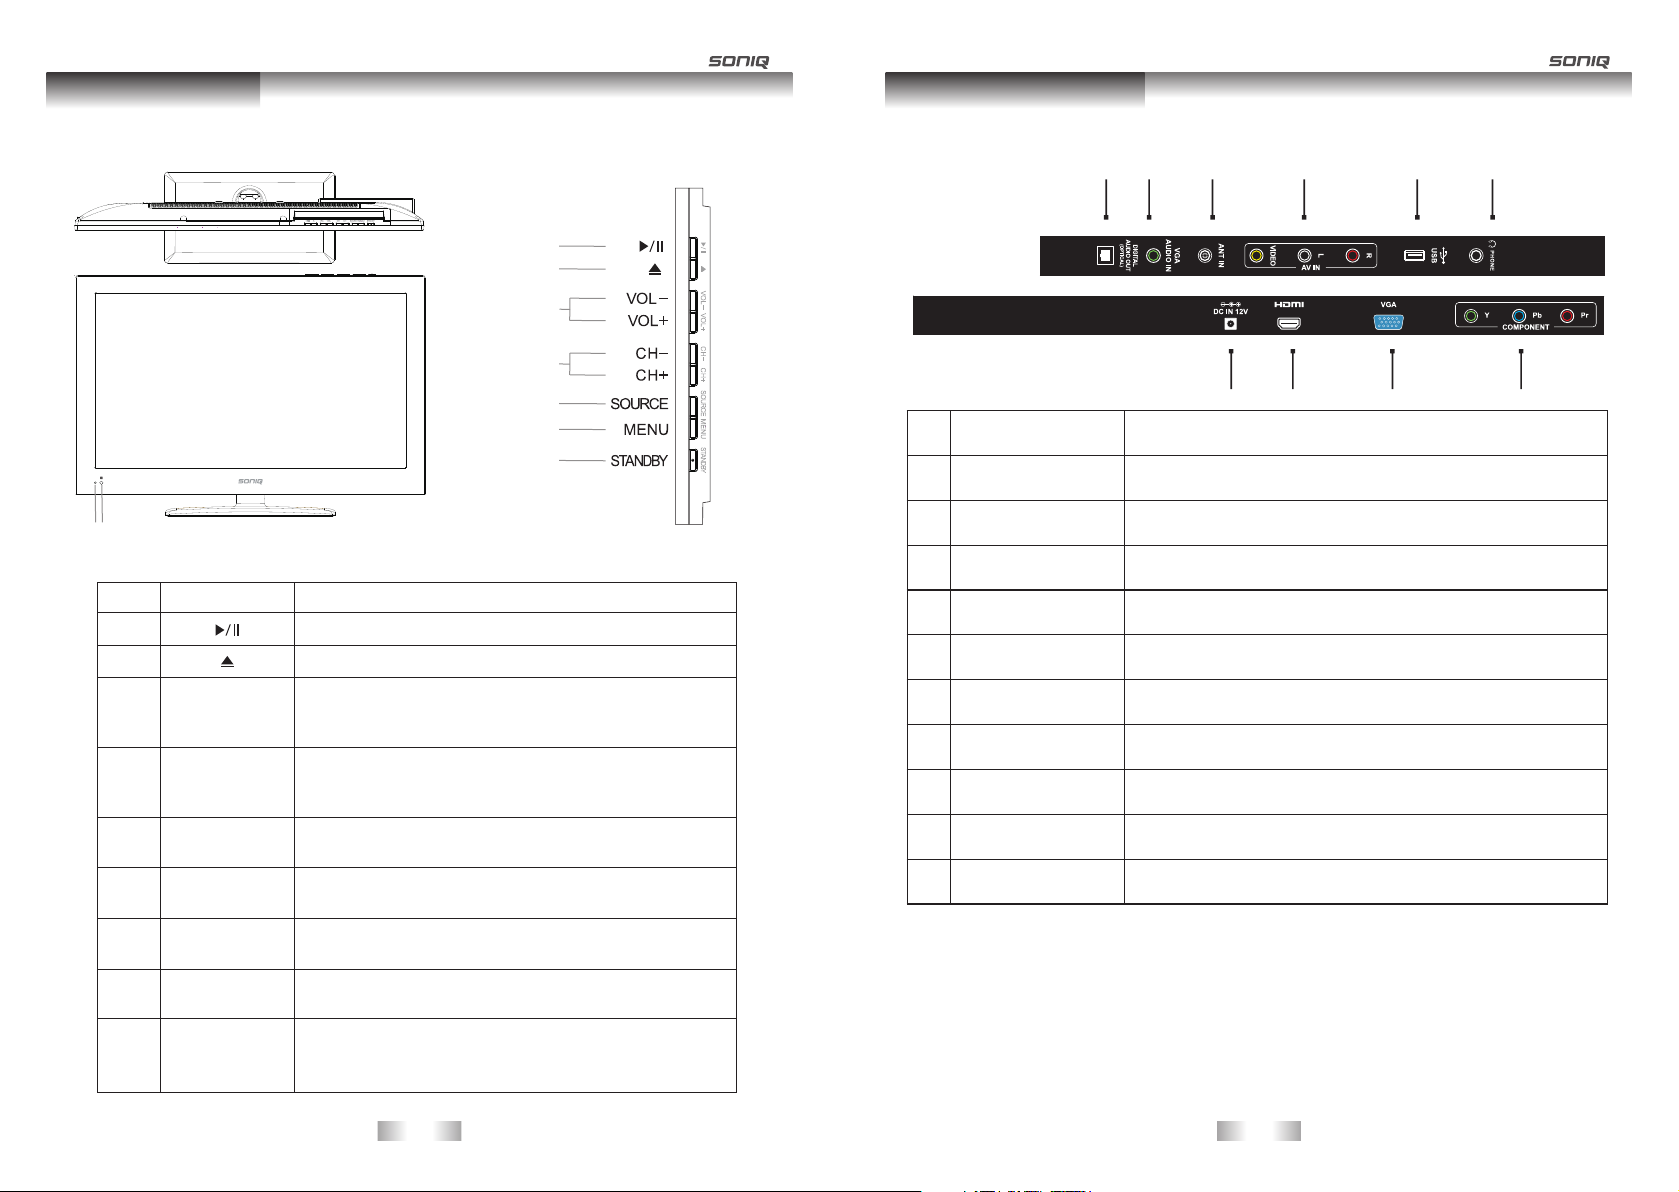
Main Unit Control
Main Unit Control
Front Panel
8 9
No.
1
2
3
4
5
6
7
8
9
Name Description
Playback and Pause function.
Press this button to eject the DVD disc.
Press VOL+ to increase volume, or VOL- to decrease.
VOL+/-
CH+/-
SOURCE
MENU
STANDBY
Power Indicator
Remote Control
Sensor Window
At the OSD menu, press these buttons to move the
selection focus left and right to change settings.
Press these buttons to sequentially select channels.
When the OSD menu is on, press these buttons to move
the selection focus up or down to change settings.
Press to display all possible input signal sources.
Press to cycle through various sources.
Press this button to display the OSD menu.
When the OSD menu is on, press this button to exit the menu.
Press this button to turn the unit on when it is in standby mode.
Press this button once more to put it to standby mode.
Flashes red when the unit is powered on;
Lights up red when the unit is in standby mode.
Receives the signal from the remote control. Do not put
any objects in front of the window in order not to hinder
the reception of signals.
Rear Panel
1 2 3 4 5 6
1
2
3
4
5
6
7
No. Name Description
DIGITAL AUDIO OUT
1
2
3
4
5
6
7
8
9
10
OPTICAL
VGA
AUDIO IN
AV IN
EARPHONE
DC IN
HDMI
VGA
YPbPr
Connect the OPTICAL to the Audio Amplifier using a optical cable.
DVI or PC VGA audio input.
Connect to external antenna.ANT IN
Connect the audio and video output of your AV equipment to the
unit using the AV cable.
Connect for media files playback and program recording.USB
Connect to the earphone.
Connect to the power cord.
Connect the HDMI signal.
Connect the PC VGA signal output of your personal computer.
Connect the component video signal.
7 8 9 10
-7-
-8-
Page 6
Connection and setup
Connection and setup
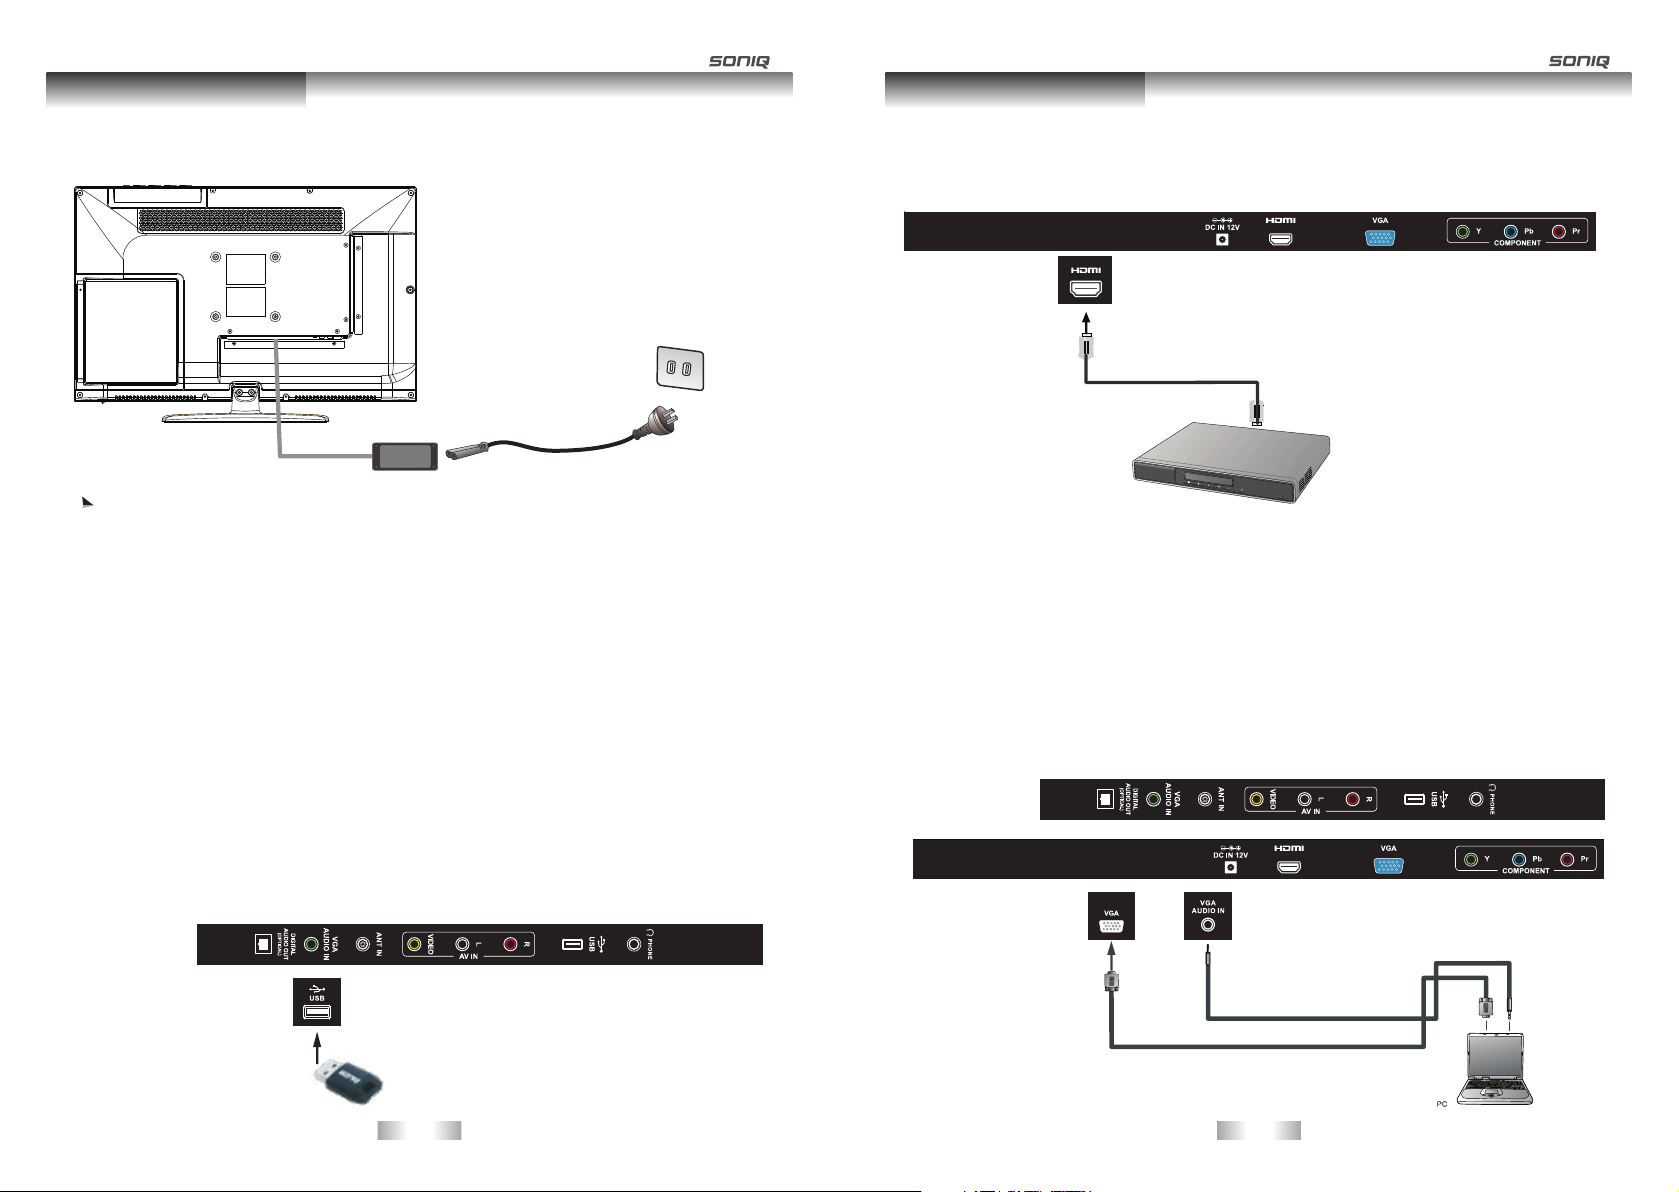
Conn ec ti ng t he Power Cord
Connect one end of the AC adapter to the DC input of unit and then the other end to AC wall outlet.
Wall o utlet
Pow er outl et
AC Ada ptor
Pow er cord
The product must be operated only from the type of power source indicated on the marking
label (100-240 ~ 50/60Hz).
If the unit will not be used for a long period of time, it should be unplugged from the wall outlet.
Connecting the USB Device
Insert USB device directly to the unit.
1. Please do not turn off the TV or unplug the USB device when the connected USB storage device
is working. When such device is suddenly separated or unplugged, the stored files or the USB
storage device may be damaged.
2. Please use only a USB storage device which was formatted as a FAT32 file system, NTFS file
system provided with the Windows operating system. In case of a storage device formatted as a
different utility programmer which is not supported by Windows, it may not be recognized.
3. Please connect power to a USB storage device (over 500mA) which requires an external power
supply. If not, the device may not be recognized.
4. If the USB HDD does not have an external power source, the USB device may not be detected.
So be sure to connect the external power source.
5. The recommended capacity is 1TB or less for a USB external hard disk and 32GB or less
for USB memory.
6. Only English is supported in USB mode. Other languages such as Chinese, Japanese, etc.
will not be displayed or display an error.
Connecting with an HDMI to HDMI cable
Connect the HDMI output terminal of your HDMI device to the HDMI input terminal on the unit
using an HDMI cable.
HDMI cable
Blu-Ray DVD Player
Connecting VGA Signal
Connect PC video output to the VGA IN input terminal using Mini D-SUB 15-Pin cable.
Connect the audio output of your PC to the unit VGA AUDIO IN input terminal using an appropriate
cable.
1. If the input signal resolution is higher than the default display resolution, the screen may be
unable to display image details clearly.
2. Certain PC models cannot be connected to the unit.
3. The computer in the illustration is shown only for reference; your equipment may vary.
4. Additional equipment shown in the illustration is not provided.
5. Do not set the computer’s horizontal and vertical scanning frequencies less then or greater than
the frequency range of the unit. (refer to supported PC Input Signal)
6. If you require more information on how to connect your equipment, please refer to the manual
for the piece of equipment you wish to attach.
USB Device
-9-
D-SUB 15-pin cable
(VGA cable)
Audio cable
-10-
Page 7
Connection and setup
Connection and setup
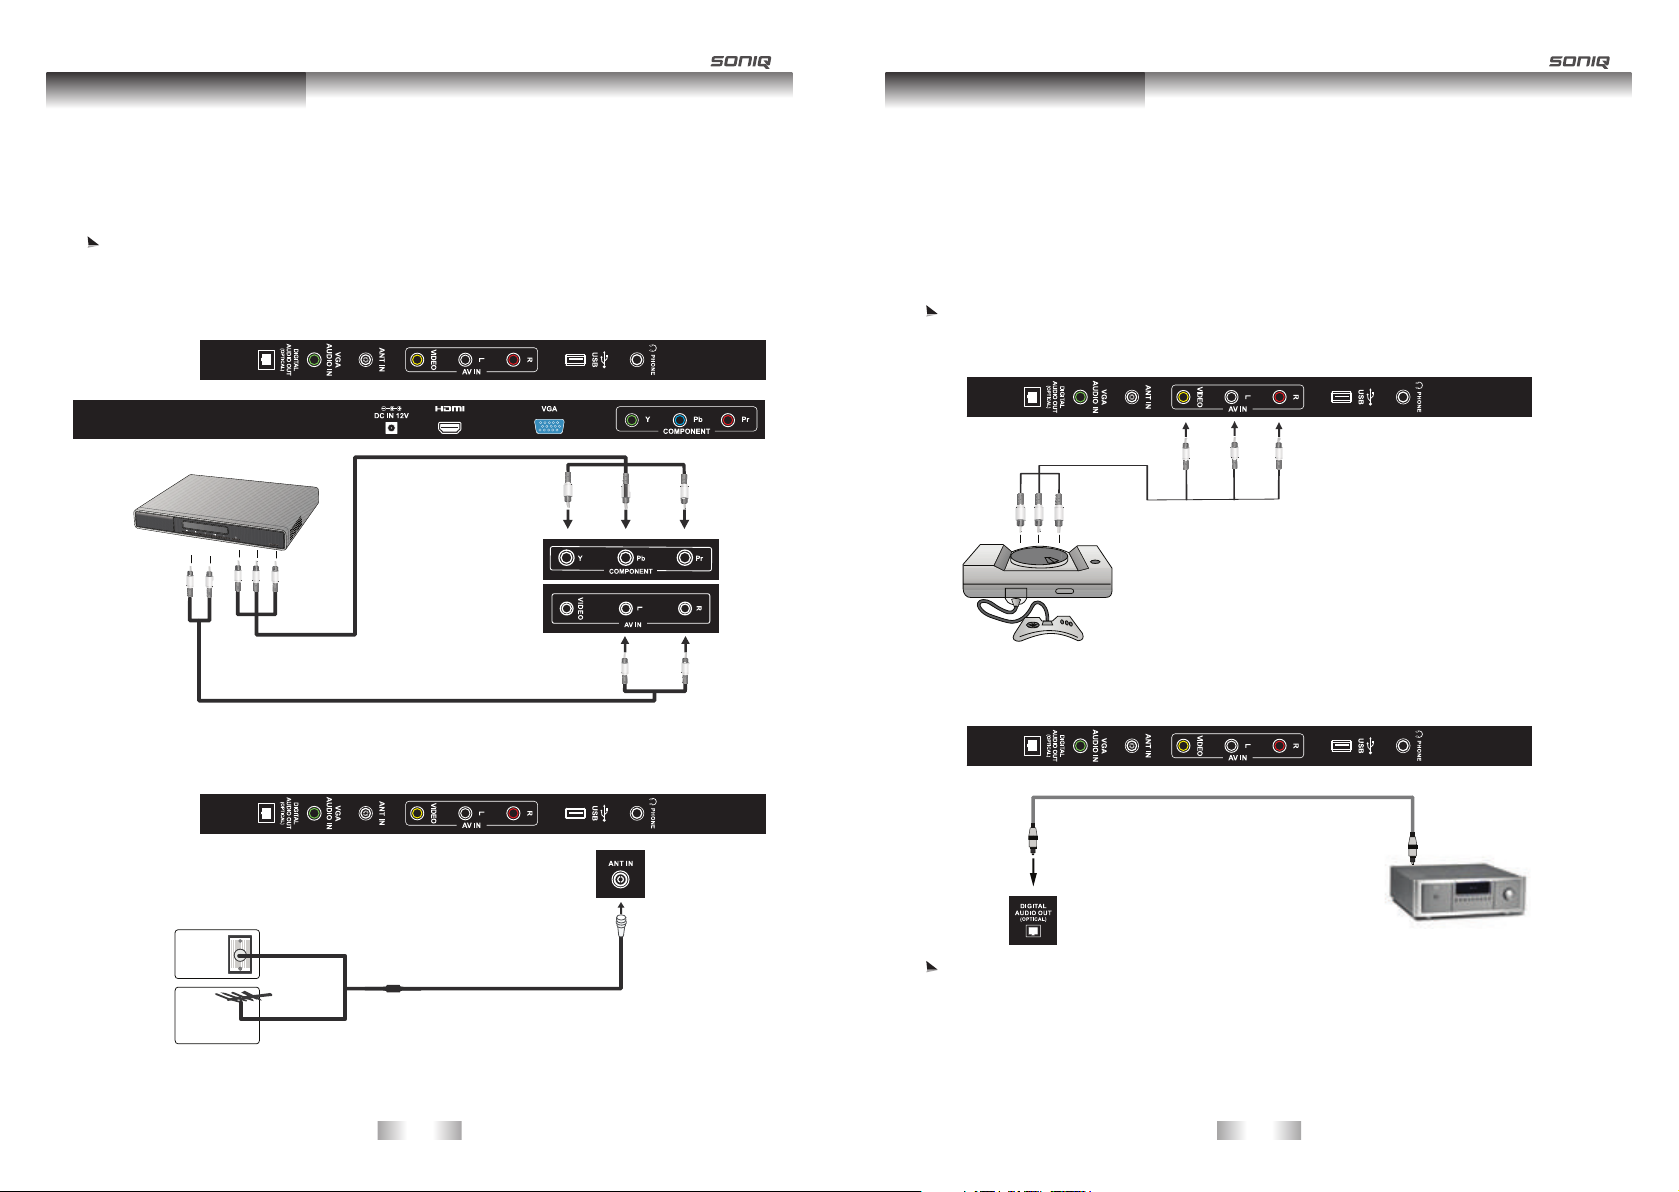
Connecting Component Video Signais
1. Connect the component video output of your AV equipment to the unit COMPONENT YPbPr
terminals using a Component video cable. (green, blue, red cable)
2. Connect the audio output of your AV equipment to the unit AUDIO L/R input terminals using the
AV cable or equivalent.
1. Ensure the connector colors match, failure to connect the colors of the cables to the
corresponding colored terminals will result in an incorrectly color image or badly distorted
image.
2. VIDEO and YPbPr signal share the same audio input. You are required to use it individually at
any time.
Green
Blue
Red
DVD player
Component Video
Audio (AV) cable
cable
White
Red
Connecting Composite Video Signal
Connect the Composite (AV) output of your AV equipment to the Composite VIDEO signal
•
terminal on the unit using a Composite (AV) video cable (RCA connector) as illustrated.
• Before connecting any component, please familiarize yourself with the location and type of
each input.
• If incorrect connections are made, picture or color quality may be adversely affected. Please
ensure that all connectors are firmly seated.
Before connecting, turn off the power to the external devices for safety.
Composite video input is the most commonly used signal input. However, this type of input
also provides a less optimal image quality. Many video sources can only output Composite
video signals, for example, VCRs, camcorders and Video game.
Composite (AV)
video cable
Yellow
White
Red
Video game
Connecting OPTICAL Signal
Connecting Antenna
Wall
Antenna
Socket
Outdoor
Antenna
(VHF, UHF)
Multi-family Dwellings/Apartments
(Connect to wall antenna socket)
RF Coaxial Wire (75 ohm)
Single-family Dwellings / Houses
-11-
SONIQ does not supply these cables.
Optical input
To achieve excellent sound quality, we recommend users to use the high powered speakers
such as the SONIQ CSA32.
-12-
Page 8

Remote Control
Remote Control
Remo te C on tr ol Key Function s
Power button
Toggles the unit between standby and on.
Numerical buttons
Press 0-9 to select a TV channel directly when
watching TV. The channel changes after 2
seconds or press “OK” button to change
immediately.
Press to return to previous channel.
Press to go back to the root menu under DVD mode.
FAV button
In TV mode, press FAV button to display your
favorite programs.
SLEEP button
Press to activate sleep timer.
PAUSE button
Press to pause the current picture, press again
to resume.
ASPECT button
Press to change the aspect ratio of the TV
display.
MENU button
Press to display the main menu.
SOURCE button
Press to display the main menu.
EXIT button
Exit most menu to default status directly.
Press to quit all menu.
EPG button
Open or close EPG menu.
Navigation keys ( OK)
Allows you to navigate the on screen menus
and adjust the system settings to your
preference.
Press OK in DTV mode to display channel list.
REC / SETUP button
Press to record program to memory storage.
Press to open the setup window of DVD.
REPEAT
In media source, press to repeat 1 / All or off.
For DVD, user can choose REP Chapter, REP
Title and REP ALL.
TSR
Press to delay the process of program
broadcasting.
Has the function of timeshift under DTV mode.
T / R button
In DTV mode, press to switch between radio
and DTV channels.
D.DIS button
Press to display the DVD information under
DVD mode.
A-B button
Enables you to repeat a selected section from
the disc.
GOTO button
Set the play time during DVD playback or
movie playing under MEDIA mode.
MUTE button
Press to mute the sound. Press again or press
VOL+/- to resume.
P.MODE button
Press to select preset picture mode.
S.MODE button
Press to select preset sound mode.
SUBTITLE button
In DTV mode, press to change subtitle on / off.
Has related functions under DVD mode as
well as movie playback under MEDIA mode.
I-II / AUDIO button
Press to select sound output mode.
INFO button
Press to display the information of current
system programme.
VOL+/-
Press to increase / decrease the sound level.
CH
Selects a programme in DTV / ATV mode.
PBC / TITLE button
Press to go back to the main menu during disk
playback.
PVR.L
Press to display the recorded program list.
Has the function of program edit under DVD mode.
CANCEL button
Only available in interactive application, TEXT
menu and Music source.
To eject the disk under DVD mode.
TEXT button
On / Off the teletext.
button
Press to playback or pause the program.
D / A button
Switch directly between ATV and DTV.
Slow playing the disk under DVD.
REVEAL
Display hidden Text characters.
button
Press to fast reverse playback.
SUB. PAGE
Prompt the user to enter a subcode for the Text
page.
button
Press to fast forward playback.
HOLD button
Stop refurbish Text current page.
button
Press to stop media play or DVD playback.
Under DTV mode, press it to stop program
recording.
INDEX button
Teletext index page.
button
Press to return to previous chapter or track.
TXT. Size
Toggles the text size display between half top
page, half bottom page and normal.
button
Press to skip to next chapter or track.
Using the Remote Control
When using the remote control, aim it at remote control sensor window with the unit. If there is
an object between the remote control and the signal remote control sensor window on the unit,
the remote may not operate.
When using the remote control, please note:
Do not strike or drop the remote. Do not expose the remote control to liquids and do not
place it in humid environments.
Do not install or place the remote control in direct sunlight, the heat may damage the remote
control.
If the remote control sensor window on the unit is in direct sunlight or strong light, the remote
control may not operate normally. In this situation, change the light source or read just the
angle of your unit, or operate the remote control from a location closer to the remote control
sensor window on the display.
Batteries
Your will need to install the supplied batteries into the remote control to make it operate
following the instructions below.
1. Open t he l id o f th e re mo te c on tr ol b at te ry
comp ar tm en t.
2. Insert two size-AAA batteries.
Ensure that the batteries are inserted with the
positive and negative terminals in the correct
direction corresponding to the (+) and (-) marks
in the battery compartment.
3. Close the lid of the remote control battery co mp ar tm en t.
Notes on Using Batteries
The use of the wrong type of batteries may cause chemical leaks and/or explosion.
Please note the following:
Always ensure that the batteries are inserted with the positive and negative terminals in the
correct direction as shown in the battery compartment.
Different types of batteries have different characteristics. Do not mix different types.
Do not mix old and new batteries. Mixing old and new batteries will shorten battery life and/or
cause chemical leaks from the old batteries.
When batteries fail to function, replace them immediately.
Chemicals which leak from batteries may cause skin irritation. If any chemical matter seeps
out of the batteries, wipe it away immediately using a dry cloth.
Due to varying storage conditions, the battery life for the batteries included with your unit may
be shortened. If the remote control is not used for a long period of time, remove the batteries.
Note :
USB/ SD /3 D/ DVD are inval id .
*
-13-
-14-
Page 9

Menu Operation Guide
Menu Operation Guide
Source Selection
1. Press SOURCE button to display the source list.
2. Press / or SOURCE button to select the input
source you want to.
3. Press OK button to enter the input source.
4. Press EXIT button to quit.
EPG: It is only available in DTV mode.
This function can be used only when the EPG information is broadcasted by digital broadcasting
companies. The EPG displays the programme details for next 8 days.
Press / / / button to move the cursor, press OK button to switch to current channel.
Record: Press red key to display a Recorder window, from which you can set the time you want for
recording. (refer to the below picture)
Schedule: Press yellow key to browse the program information saved in the schedule list, and
press yellow key or EXIT to return.
INFO: Press green key to view the details of the focused channel.
Remind: Press blue key to add a program needs to be reminded, and it will be switched on time.
Index: Press index key on the remote control to view the program list in 7 days.
Vol+ / vol- (Volume control)
Note: Volume adjusting will exit the “MUTE” status.
-15-
Menu o pe ra ti on
You can operate all function by remote control and maybe partial function by the key on panel.
The main menu can be operated by “MENU”, “OK” and “EXIT” button.
“MENU” button can open the menu or exit to the upper level menu. There are six main menu
pages in the system: PICTURE, SOUND, CHANNEL, TIME, LOCK, OPTION.
Press / / / button to select any item or adjust some settings.
Press “OK” button to confirm a selection.
Press “EXIT” button to exit the main menu.
-16-
Page 10

Menu Operation Guide
Menu Operation Guide
CHANNEL MENU
Press MENU button to enter the CHANNEL page as follows:
CHA NNEL
CHA NNEL
Auto Tuning
DTV Manual Tuning
ATV Manual Tuning
Programme Edit
Signal Information
Back Sele ct
CHA NNEL
CHA NNEL
Auto Tuning
DTV Manual Tuning
ATV Manual Tuning
Programme Edit
Signal Information
Back Sele ct
A. Auto Tuning
1. Auto Tuning will be highlighted upon displaying this menu. Press “OK” button to enter.
2. Press to select country, Press “OK” button to enter the next step.
3. Press to select your location, then press “OK” button to enter, and then use to
choose the tuning type.
4. Press “OK” to start auto search.
B. DTV Manual
1. Press to highlight DTV Manual Tuning, Press “OK”
button to enter sub-menu.
2. Users can select channel number by pressing , and set
frequency number by pressing numeric buttons.
3. Press “OK” to start.
Programme Edit
Press button to select Programme Edit, then press “OK” button to enter sub-menu.
Pro gramm e Edit
1. Press Red button to delete the current channel.
2. Press Yellow button to change program order. Selected
channnel can be moved by using , then press “OK” for
confirm.
3. Press Blue button to skip the selected channel.
4. Press FAV button on your remote control to add a channel
to Favorite List.
5. Press Green button to rename the current channel.
(only available in ATV mode)
Signal Information
Press button to select Signal Information, then press OK button to display signal details,
including Channel number, Network name, Modulation model, Signal quality and Signal strength.
C. ATV Man ua l Tunin g
1. Press button to highlight
ATV Manual Tuning, then
Press “OK” button to enter sub-menu.
2. All the items in this displayed menu can be adjusted,
after all the setting being done, press to highlight
“Search”, then Press to start.
-17-
-18-
Page 11

Menu Operation Guide
Menu Operation Guide
PICTURE MENU
1. Press MENU button to bring up the main menu.
2. Then press to enter PICTURE page, it will highlight the first option, press “OK” button to enter.
3. Picture Mode: Press button to adjust the Mode by Standard, Dynamic, Mild, User. Contrast,
Brightness, Color, Sharpness can be adjusted only under user mode, press “Menu”
button to return to the main menu.
4. Color Temperature: Press button to select Cool, Standard, Warm and User. you can adjust
the Red, Green and Blue in User mode.
5. Aspect Ratio will be available under DTV, and you can choose Full, 4:3, Auto.
6. Screen can be available under PC mode.
7. Energy Saving: Yo can choose Middle, High, Low, Standard in this section.
8. Noise Reduction: Can be adjusted among Middle, High, Off, Low.
PIC TURE
PICTU RE
Pict ure mod e Stand ard
Colo r Tempera ture
Aspe ct Rati o
Scre en
Ener gy Savi ng
Back Sel ect
PIC TURE
PICTU RE
Colo r Tempera ture
Aspe ct Rati o
Scre en
Ener gy Savi ng
Nois e Reduc tion Mi ddle
Back Sel ect
SOUND MENU
1. Press MENU button to display the main menu.
2. Sound Mode: Then press to enter SOUND page, it will highlight the first option, then press “OK”
button to enter sub-menu. Press to adjust Sound Mode. You can change the value
of Treble and Bass under user mode.
3. Balance: Press to select Balance, then press “OK” button to enter sub-menu. Press to adjust.
4. Auto Volume: Press to select Auto Volume, then press “OK” button to select On or Off.
5. SPDIF Mode: Press to select SPDIF Mode, then press “OK” button to enter sub-menu, press
to select PCM, Auto and Off.
6. Power On Music: Press to select Power On Music, then press “OK” button to select On or Off.
SOU ND
SOUND
SOU ND
SOUND
TIME MENU
Press MENU to display the main menu.
Use to enter TIME page, it will highlight the first option.
TIM E
TIM E
Off Time Of f
On Time
Colck 0 6/Oct 1 4:56
Time Zon e
Auto Sl eep
Back S elect
1. Off Time
TIM E
TIM E
Off Time Sun day
Hour 0
Minute 0
Back S elect
-Press “OK” to enter sub-menu.
Press button to adjust.
2. On Time
TIM E
TIM E
Mode Sel ect Onc e
Hour12
Minute 1
Source AV
Volume 30
Back S elect
-Press to select On Time, then press “OK” button
to enter the sub-menu. Use button to adjust.
-Clock: Display the current system time. It’s not
3. Time Zone:
available.
Press to select Time Zone, then press “OK” button to enter Sub-menu.
4. Auto Sleep: Press to select Auto Sleep, then press “OK” button to select On or Off.
Sound Mode Standard
Balance
Auto Volume
SPDIF Mode
Power On Music
OK
Back Sel ect
-19-
Sound Mode Standard
Balance
Auto Volume
SPDIF Mode
Power On Music
OK
Back Sel ect
5. Sleep Timer: Press to select Sleep Timer, then press “OK” button to enter sub-menu,
and then press button to adjust.
TIM E
TIM E
SleepTi mer Off
Back S elect
-20-
Page 12

Menu Operation Guide
Menu Operation Guide
OPTION MENU
Press MENU button to display the main menu.
Press to enter OPTION page, it will highlight the first option.
OPT ION
Back
OPT ION
OSD Lan guage E nglis h
PVR Fil e Syste m
OSD Time O ut
OSD Tran spare ncy
Resto re Defa ult
Versio n Info
Back Sele ct
OPT ION
Back
OPT ION
OSD Time O ut
OSD Tran spare ncy
Versio n Info
Resto re Defa ult
Blue Sc reen
Back Sele ct
1. OSD Language: Only English can be Selected in the function.
2. PVR File System: Press “OK” button to enter the PVR File System, User can check
the information of the USB device, or format the USB device.
3. OSD Time Out: Set OSD time out.
4. OSD Transparency: Press OK to enter then press button to adjust the transparency from
off to 100%.
5. Restore Default: Operate this item to resume all the initial setting.
6. Version Info: Highlight this item, and then press “OK” button to check out the version
information of the system.
7. Blue Screen: Press “OK” to select On or Off.
LOCK MENU
Press MENU to bring up the OSD menu. (This function is only available under DTV mode.)
Use button to LOCK page, it will highlight the first option, then press “OK” button to enter the sub-menu.
LOC K
Back
LOCK
Lock System
Set Password
Block Program
Parental Guidance No Block
Back Selec t
LOC K
Back
LOCK
Lock System
Set Password
Block Program
Parental Guidance No Block
Back Selec t
Please enter old password
Please enter password
You are required to input
the
password (default as 0000)
CancelClear
Lock System:
1. Press “OK” button and enter a password dialog page, all the item are bright after
CancelClear
inputting right password. (0000)
2. Set Password: User can change the password, and must remember the new password.
3. Block Program: User can lock some channel by this function, and when locked channel,
need to enter password.
4. Parent Guidance: Parent can set age limit level by this function.
-21-
PVR File System
PVR function is only available for DTV, includes Record, Timeshift and Playback functions. Record
includes in time record and preserve record. In time record can be worded through REC key
immediately, and preserve record needs to preserve beforehand.
Record and Playback can be done at the same time. Timeshift is another function for both recording
and playing. The following will explain in details.
Enter PVR from OPTION menu, as follows:
OPT ION
Back
OPT ION
OSD Lan guage E nglis h
PVR Fil e Syste m
OSD Time O ut
OSD Tran spare ncy
Resto re Defa ult
Versio n Info
Back Sele ct
Select Disk C:
Check PVR File System Start
USB Disk
Format(Hard Disk Recommended)
Time Shift Size
Speed
Free Record Limit 6 Hr.
OK
Select
Menu
Select Disk
Choose the disk to store whatever content recording, normally default as C:
Press button to select Start, then Press OK button to enter the sub-menu.
Select Disk C:
Check PVR File System Checking
USB Disk Pass
Format(Hard Disk Recommended) Pass
Time Shift Size 512MB
Speed 12970 KB/sFull HD Support
Free Record Limit 6 Hr.
OK
Select
Menu
USB Disk
If not inserting USB equipment, it shows No Device connection; If USB equipment is inserted, it
shows PVR initializing.
Time Shift Capacity
The option can not be executed directly.
Time shift space can only be used after you format the memory input source.
Speed
Can’t be chosen. After Check PVR File System, it shows the available speed of USB.
If inspection failed, it shows FAIL, but if it is normal, it shows SUCCESS.
Select Disk C:
Check PVR File System SUCCESS
USB Disk Pass
Format Pass
Time Shift Size All
Speed 12906 KB/s
Free Record Limit 6 Hr.
OK
Select
Menu
File System Size
PVR File System Type Hi Speed FS
PVR File System Size All
SD 13041 Min
HD 3726 Mins
OK
Select
Menu
-22-
Page 13

Menu Operation Guide
Menu Operation Guide
Then Press OK button to start formatting the disk, then a warning with All data will be lost” will be
“
displayed to remind the user to choose Start or EXIT.
Press button to start, button to exit.
Format disk
Warning! All data will be lost.
Start
EXIT
In Time Record Operation
Press REC button on the remote control to start recording the current programme, the recording
window will be disappeared after few seconds and a red transparent icon with REC characters will
be displayed at the right side of the screen. Press HOLD button for stop.
It is available for recording when the unit is in Standby mode.
REC
[00 :0 0:3 6]
Recording
800 S ZTV M01
The S id esh ow w ith Pau l McDer mott (0000320MB)
09:20
PVR. L Operat io n
Press PVR.L button to display the recorded program list, select any of the items for watching.
Recorded List Program
DISNEY ADVENTURES
DISNEY ADVENTURES
DISNEY ADVENTURES
DISNEY ADVENTURES
GOOD CHEF BAO CHFF
GOOD CHEF BAO CHFF
GOOD CHEF BAO CHFF
GOOD CHEF BAO CHFF
GOOD CHEF BAO CHFF
George And Martha
Delete
Select
INFO
OK
Index
Menu
Delete: Press red button to delete focused program.
INFO: Press green button to pop out programme information.
Index: Press to switch recording program orders.
OK: Play focused program.
Up/Down: Press button to select program.
Preserve Record Operation
Press EPG directly to display the PROGRAMME GUIDE window, focus on your favorite channel
that you want to record then press REC button at the remote control to enter into the RECORDER
menu, and then you are required to set the recording time there, Press OK for confirm.
RECORDER
800 SZTVM01
- +
Select
Start Time
42 Minut
14 Hour
May Month
31 Date
End Time
12 Minute
15 Hour
May Month
31 Date
Mode AUTO
Back
-23-
PVR Recorder Schedule
Press yellow button on the remote control to display schedule list.
Schedule List 09:33 25th Dec Delete
Time Date Programme Title Channel Name
10:00 Sun, 25 Dec SP-THE SINGING CHRISTMAS TREE 7 7 Digital
Timeshift
Press TSR button to delay the process of program broadcasting in DTV mode.
20:13
[00:00:03/00:00:00]
A B
Time Shift
Media Menu
Note: Before operating MEDIA menu, plug in USB device, then press SOURCE button to set the Input Source.
Press button to select MEDIA in the Source menu, then press OK button to enter.
YPbPr
PHOTO Menu
Press button to select PHOTO in the main menu, then press OK button to enter.
Press EXIT button to quit the menu.
USB D evice
PHO TO
Press button to select drive disk, then press OK button to enter.
Press button to select Return option to go back to previous menu.
1 / 1
C:\MEDIA
C
Return Up Folder movie music
Photo Text
Sub Menu Select/Unselect All
1/1
-24-
Page 14

OSD Menu Operation
Menu Operation GuideMenu Operation Guide
When highlighting the option you select, picture can be previewed and information of the picture will appear.
Press◄/►button to select the file you want in the file selecting menu, then press button to display
the picture.
1/11MEDIA\Photo\JPEG
Return Up Folder QXQ music
000111.jpg 06.mp3 10024616c.mp3
0521hangmu09.jpg 0521hangmul3.jpg 0521hangmu15.jpg 08_gC1WIvNHu1UZ_0..
Press ◄/► button, OK button to select several files (pressing the blue button underneath will select
0494. jpg
Sub Menu Select/Unselect All
Resolution: 1280x800
Size: 199 KBytes
Date: ---- / -- / --
Time: -- : -- : --
all pictures, press it again if you do not want to select all). Then press button, pictures will
display one by one.
C:\MEDIA\Photo\BMP 1/2
Return Up Folder 1024x768_bmp.bmp 1440x900.bmp
1600x1200b.mp 21312.bmp DTVLOGO_NESX.bmp GRAY1.bmp
GRAY2.bmp untitled.bmp untitled1.bmp untitled123.bmp
Sub Menu Select/Unselect All
Press ▲/▼ button to enlarge or contract the image, ◄/► button rotate the image.
Pau se
Press ◄/► button to select the file you want to delete, then press the red button on remote control
to delete the file.
Copy and Paste can be operated under this interface.
MEDIA Photo BMP 1/2
Return Up Folder 1024x768_bmp.bmp 1440x900.bmp
MUSIC Menu
Press ◄/► button to select MUSIC in the main menu, then press OK button to enter.
Press EXIT button to quit the menu.
USB D evice
MUS IC
X MUTE
Press ◄/► button to select drive disk, then press OK button to enter.
Press ◄/► button to select Return option to go back to the previous menu.
When highlighting the option you selected, music can be previewed and information of the music.
C:\EDIA \ Music \ MP3
Return Up Folder QXQ music
03.mp3 06.mp3 10024616c.mp3
1139153940.mp3 1174270662.mp3 1177515282805.mp3 136erqianyy.mp3
Press button for playing music. Press GOTO button to set the time, and then it will play the music
Sub Menu Select/Unselect All
from that point.
MUSIC
You alw ays on my m ind.m p3
Next: Nemo.mp3
00:13:35 03:20:27
1. You alw ays on my m ind.m p3
2. Nemo .mp3
3. abcd 0 3.mp3
Album:
《ANG5.0》
4. abcd 0 4.mp3
2003
5. abcd 0 5.mp3
Artist:
Zhang Sh aohan
6. abcd 0 6.mp3
Taiwan Chi na
7. abcd 0 7.mp3
Genre:
8. abcd 0 8.mp3
Pop / popul ar
Press CANCEL button, music will play in Energy Saving Mode.
MUSIC
You al way s on m y min d. mp3
Next: Nemo
00:13:35 03:20:27
1/15
Album:
Title:
Blt Rate: 128K
Artist:
Sampling: 44K
Year:
Slze: 3924 KBytes
MUSIC
You alw ays on my m ind.m p3
Next: Nemo.mp3
00:13:35 03:20:27
1. You alw ays on my m ind.m p3
Inpu t Searc h Time
2. Nemo .mp3
0 0 0 0 0 0
3. abcd 0 3.mp3
Album:
《ANG5.0》
4. abcd 0 4.mp3
2003
5. abcd 0 5.mp3
Artist:
Zhang Sha ohan
6. abcd 0 6.mp3
Taiwan Chi na
7. abcd 0 7.mp3
Genre:
8. abcd 0 8.mp3
Pop / popul ar
: :
OK
1600x1200.bmp 21312.bmp DTVLOGO_NESX.bmp GRAY1.bmp
GRAY2.bmp untitled.bmp untitled1.bmp untitled123.bmp
Delete Copy Paste
Press EXIT button to quit the menu.
-25-
Press anyone button to quit the menu.
-26-
Page 15

OSD Menu Operation
Menu Operation Guide
Menu Operation Guide
Menu Operation Guide
MOVIE Menu
Press / button to select MOVIE in the main menu, then press OK button to enter.
Press EXIT button to quit the menu.
USB D evice
MOV IE
X MUTE
Press / button to select the drive disk you want, then press OK button to enter.
Press / button to select Return option to go back to previous menu.
When highlighting the option you selected, movie can be previewed and information will appear.
C:\MEDIA\Movie\mkv
Return
720p_chd-mr&mrs-smi_
BigBuckBunny_108-[Divx7]_AAC5.1_A_
Paranormal_Activity_[- Samsung.Demo.Oceani_ Shutter_Island_[Divx_-[MV].Hotcha-.PartyGi -
Sub Menu Select/Unselect All
1/2
Resolution: 1920 x 1080
Audio Track: 1/2
Subtitle: OFF
Program: -/0
Size: 519585 KBytes
Press button to play the selected movie.
Press button, button button, button
the last or next chapter.
to fast backward or fast forward playback. to play
Press / button to contract or enlarge the image.
TEXT Menu
Press / button to select TEXT in the main menu, then press OK button to enter.
Press EXIT button to quit the menu.
USB D evice
TEX T
X MUTE
Press / button to select the drive disk you want, then press OK button to enter.
Press / button to select Return option to go back to previous menu.
When highlighting the option you selected, text can be previewed and information will appear.
Press button to view the selected text.
MEDIA\Text
This book by the www.wmtxt.com(unkno
Return
wn txt novel download site) for you to or
ganize production
Download free novels more exciting,more
complete version of the nover e-book dow
nload please visit www.wmtxt.com
chinese txt.txt
chapter
English txt.txt
Sub Menu Select/Unselect All
Press / button to turn pages, / button move to last or next Text file.
Setting Background Music When Watching Pictures and Text.
1. Select a music file or more in MUSIC menu by pressing OK button, then exit the MUSIC menu.
2. Enter the PHOTO or TEXT menu and display the photo or text you want, and then press the
yellow button on the remote control to play the music. Press it again when you want to stop the
music.
Size: 35KBytes
1/1
1. Read these instructions.
2. Keep these instructions.
3. Heed all warnings.
4. follow all instructions.
5. Do not use this apparatus near water.
6. Clean only with dry cloth.
1 /2
If you want to watch footage in movie repeatedly, press A-B button at the time it starts and press the
button again at the time it ends.
AB
A-s et
AB
AB- set
Press Exit button to quit the menu.
Sub Menu Select/Unselect All
Sub Menu Select/Unselect All
-31-
- -27
-32-
-28-
Page 16

OSD Menu OperationThe DVD Operation
The DVD Operation
Menu Operation Guide
Basic Operation
1. Press SOURCE button on the remote control and select
DVD mode.
2. Insert a disc into the loading slot located on right side of
the TV. Make sure that you load the disc with the silver
side facing you (label side face away from you). The disc
will be read and after a short time will automatically start
playing.
3. Press button on your unit or on remote control to eject
the DVD disc.
Note: DVD mode must be selected before a disc is loaded.
Skip Ahead or Back
Press or button once during play to skip a chapter (DVD) or a track (Video CD / CD)
backwards or ahead.
Rapid Advance / Reverse
During playback, press / button repeatedly to scan the disc backward or forward at x2, x4,
x8, x20 normal speed. Press or OK button to resume normal play.
Stop Playback
Press button during playback to stop playback; in stop mode, press or OK button, playback
resumes at the point where it stopped previously; press button twice to clear the resume function.
Pause Function
During playback, press button will cause the player to enter pause mode. Press OK button or
button again to continue to play.
For DVD, the picture will become static.
For CD audio, it will become silent.
Slow-motion Play
Press button repeatedly on the remote control during playback, the disc will be played at 1/2,
1/4, 1/8, 1/16 normal speed.
Press or OK button to switch back to normal playback speed.
Repeat A-B
User can specify the repeating interval by marking the starting point and the end point.
1. Press A-B button to mark the starting point (Playback will continue).
2. Press A-B button to mark the end point and then the marked part will be repeated
automatically).
Press A-B button during repetition will disable the repeat function.
Display (Remain Time)
This function is applicable for DVD only. It will display the timing information of the playback on
screen. For DVD playback, subsequently press D.DIS button will show the Chapter Elapsed
Time, Chapter Remain Time, Title Elapsed Time Elapsed Time and Title Remain Time Display
Off one by one.
Changing Subtitle Language (DVD only)
Press SUBTITLE button during playback, the subtitle language shown on the screen will
change in response to each press.
This function only works on the DVDs recorded with multi-language subtitles.
Changing Audio Soundtrack Language (DVD / VCD Disc)
It is possible to change the audio soundtrack language to a different language from the one
selected at the initial settings. (This operation works only on discs with which multiple audio
soundtrack languages are recorded.)
1. Press AUDIO button during DVD disc play, the sound track language changes with the
current sound track number shown on the TV screen.
2. Pressing AUDIO button during VCD disc play will change audio output mode: Left Vocal,
Right Vocal, No Vocal Assist and Voice Cancel.
When no soundtrack languages are recorded, pressing this button will not work.
Displaying Main Menu
While viewing a program, press TITLE / PBC button to return to the main menu. Use navigation
buttons or input the item index through Number (0-9) to do the selection and then press OK
button to start your Program.
Repeat Function
For DVD, user can choose REP Chapter, REP Title and REP ALL.
Subsequently press REPEAT can cycle through these options.
For CD, user can choose Rep Track, and Rep All.
Key press of REPEAT can cycle between these options.
-31-
- -29
-32-
-30-
Page 17

OSD Menu OperationThe DVD Operation
The DVD Operation
Menu Operation Guide
MP3 Operation
This unit can support CD-ROM navigation. Multi-Media files can be played in the player, such as MP3.
Operation
Insert the MP3 disc into the tray. Navigation Menu
will be displayed. The menu will show up the files in
the root directory. Select a file and press OK to start
playing.
Operations such as STOP, skip are similar to that
of CD Audio disc playback.
Cross-folders playback is not supported and
00:00 00:00
001 / 002
/ MP3
MP3
TRACK1
TRACK2
TRACK3
TRACK4
Program Mode is not applicable in MP3 disc
playback.
Play Mode
User can change the Play Mode by pressing REPEAT button. There are several different play
modes when playing mp3 disc.
1. REP1
Only the selected file will be played repeatedly.
2. Single
To play by single.
3. Folder
To play by folder.
4. REP Folder
All the files in the current folder will be played repeatedly in sequence.
Picture CD
The unit can also be used to navigate picture CDs. Insert a picture CD into the tray and the disc
will be loaded automatically. If the disc type can be identified, the player will start showing the
pictures one by one (Slide Show Mode).
Operations
During Slide Show Mode:
1. During photo slide show, Press this button to go back to file folders.
2. Press button will freeze the screen so that the current picture can be held for a long time.
To resume the Slide Show Mode, Press OK button.
3. Press button on the remote control will skip to the next picture.
4. Press REPEAT button on the remote control will repeat the current picture.
5. When all the pictures have been displayed once, the player will enter file folders automatically.
Sub Menu Select/Unselect AllSub Menu Select/Unselect All
DVD Setup Mode (press SETUP button in DVD mode)
Setup Mode provides the menu for the configuration system setup, Language setup, audio
setup and digital setup.
Item selection in the Setup Menu is done by using the Navigation buttons and OK button.
Press Source button sequentially on the remote control to switch to DVD mode.
Press SETUP button to bring up SETUP menu, use button to highlignt an option, and then
press or button to enter the submenu. Press button to return to the previous menu.
Press SETUP button again to exit the Setup Menu.
TV Display
4:3PS
When wide-screen video is played, this mode clips the
right and left sides of the image so that it can be viewed
on a conventional screen. Some wide-screen DVD that
do not permit Pan Scan playback are automatically
-- Ge ne ral S etu p Page --
TV Di splay
OSD L ang
Scr een Sav er
Las t Memor y
Pr ogr am
16: 9
ENG
On
Of f
4:3 /PS
4:3 /LB
16: 9
played in Letter Box mode (black bands at top and
bottom of screen).
Set T V Displ ay Mode
4:3LB
When wide-screen video is played in this mode on a conventional screen, black bands appear at
the top and bottom of the screen.
Wide 16:9
This is the correct mode for playing wide-screen videos on a wide screen.
LANGUAGE SETUP
OSD LANGUAGE
This option allows you to select On-Screen-Display
language as required. The default language in this unit
is fixed at English.
Engl is h
Fren ch
Germ an
-- Ge ne ral S etu p Page --
TV Di splay
OSD L ang
Scr een Sav er
Las t Memor y
Pr ogr am
Set O SD Lang uage
16: 9
ENG
On
Of f
Eng lish
Fre nch
Ger man
Ita lian
Spa nish
Por tugu ese
Ital ia n
Span is h
Port ug ue se
-31-
- -31
-32-
-32-
Page 18

The DVD Operation
The DVD Operation
SCREEN SAVER
When the screen saver is on, when the DVD player
is in stop, no disc state or there is a frame frozen
for more than about 3 minutes, the screen saver
will be displayed. This feature can protect the
screen from damage.
Last memory
When there is no disc menu, turning this function to
“ON” will make the system to play the last point
where you stopped.
Program
Enter this option to edit the program.
Downmix mode
Set front speakers to LT/RT, Stereo.
-- Ge ne ral S etu p Page --
TV Di splay
OSD L ang
Scr een Sav er
Las t Memor y
Pr ogr am
Scr een Sav er
-- Ge ne ral S etu p Page --
TV Di splay
OSD L ang
Scr een Sav er
Las t Memor y
Pr ogr am
Set L ast Mem ory St ate
-- Ge ne ral S etu p Page --
TV Di splay
OSD L ang
Scr een Sav er
Las t Memor y
Pr ogr am
Pr ogr am
-- Sp ea ker Se tup Pag e --
Dow nmi x
Set D ownmi x Mod e
16: 9
ENG
On
Of f
16: 9
ENG
On
Of f
16: 9
ENG
On
Of f
STR LT/ RT
On
Of f
On
Of f
ENT ER
Ste reo
DUAL MONO
If you have Dolby digital output in your amplifier /
decoder, you may select Stereo, Mono L, Mono R
and Mix-Mono accordingly. The audio out
description of these selections is shown in the table
below.
MODE
STEREO
L-MONO
R-MONO
MIX-MONO
LEFT
STEREO-L
L-MONO
R-MONO
L-MONO+R-MONO
DYNAMIC RANGE
Generally when the slider is at “OFF” position, the
audio signal is at the maximum point, while at
“FULL” position, it is at the minimum point.
TV Type
This player supports different TV outputs,
including AUTO, NTSC and PAL system. Select
suitable option according to the color system of
your TV.
Note: Preference Page can only be available
only when you press on the remote
control to exit the current playback.
-- Au dio S etup Pa ge --
Spe aker Se tup
Dua l Mono
Dyn amic
Dua l Mono (1 +1) Set up
RIGHT SPEAKER
STEREO-R
L-MONO
R-MONO
L-MONO+R-MONO
-- Au dio S etup Pa ge --
Spe aker Se tup
Spd if Set up
Dua l Mono
Dyn amic
Set D RC To Full
-- Pr efere nce Pag e --
TV Ty pe
Aud io
Sub title
Dis c Menu
Par ental
Pas swo rd
Def au lt
Set T V Stand ard
AUTO
ENG
ENG
ENG
Ste reo
L-M ono
R-M ono
Mix -Mono
PAL
AUTO
NTS C
FUL L
3/4
1/2
1/4
OFF
-31-
- -33
-32-
-34-
Page 19

The DVD Operation
The DVD Operation
AUDIO
This option allows you to select audio language as
required. If your required language is not available, the
default language recorded will be displayed.
English
French
German
Italian
Spanish
Portuguese
Others
SUBTITLE
This option allows you to select subtitle language as
required. If your required language is not available, the
default language recorded will be displayed.
English
French
German
Italian
Spanish
Portuguese
Others
Off
Disc Menu
This option allows you to select disc menu language as
required. If your required language is not available, the
default language recorded will be displayed.
English
French
German
Italian
Spanish
Portuguese
Others
-- Pr efere nce Pag e --
TV Ty pe
Aud io
Sub title
Dis c Menu
Par ental
Pas swo rd
Def au lt
Pr efe rr ed Au dio L angua ge
-- Pr efere nce Pag e --
TV Ty pe
Aud io
Sub title
Dis c Menu
Par ental
Pas swo rd
Def au lt
Pr efe rr ed Su btitl e Langu age
-- Pr efere nce Pag e --
TV Ty pe
Aud io
Sub title
Dis c Menu
Par ental
Pas swo rd
Def au lt
Pr efe rr ed Me nu Lang uage
AUTO
ENG
ENG
ENG
AUTO
ENG
ENG
ENG
AUTO
ENG
ENG
ENG
Eng lish
Fre nch
Ger man
Ita lian
Spa nish
Por tugu ese
Oth ers
Eng lish
Fre nch
Ger man
Ita lian
Spa nish
Por tugu ese
Oth ers
Of f
Eng lish
Fre nch
Ger man
Ita lian
Spa nish
Por tugu ese
Oth ers
Parental
When playing disc with parental lock function, you may
select an Age Control Grade according to grade of disc
and your own preference. For example, if PG is
selected, DVD video disc rated higher than the PG
grade cannot be played.
PASSWORD
The password option is initialized locked, and you can
set the ratings limit or change the password.
To change the password, you will need to enter the old
password, then enter a 4-digit number for your new
password.
To set the ratings limit, enter your password (the default
password is 0000), and then press ok to confirm.
Default
Choose this option to resume all the setup options to
default settings.
-- Pr efere nce Pag e --
TV Ty pe
Aud io
Sub title
Dis c Menu
Par ental
Pas swo rd
Def au lt
Set P ar ent al Co ntro l
-- Pa ssw ord S etup Pa ge --
Pas swo rd Mo de
Pas swo rd
Cha nge Pas swo rd
-- Pr efere nce Pag e --
TV Ty pe
Aud io
Sub title
Dis c Menu
Par ental
Pas swo rd
Def au lt
Loa d Facto ry S ett ing
AUTO
ENG
ENG
ENG
On
AUTO
ENG
ENG
ENG
2 G
3 PG
4 PG 13
5 PGR
6 R
7 NC1 7
8 ADU LT
Of f
Cha nge
Res et
-31-
- -35
-32-
-36-
Page 20

Trou bleshooting and Advice
Trou bleshooting and Advice
Before calling a service center, Try the following steps to diagnose the problem.
TV unit
Problem
There is no power.
There is no picture
or sound.
There are spots on
the screen.
Degraded colors
or tints.
Improper screen
position or size.
The image appears
distorted.
Ensure the power plug is securely inserted into the unit and wall outlet.
Try a different input source to check whether the source is at fault.
Check for mis-connection of cables or for wrong input source.
Your unit is being affected by interference from automobiles, trains,
high-voltage transmission lines, neon signs or another sources of
interference. Try redirecting or relocating your antenna to reduce the
affects of the interference.
Check whether all the picture adjustments have been properly performed.
Try selecting a different aspect ratio by pressing the ASPECT button on
the remote control.
Ensure the display aspect ratio is correctly set to suit the program source.
Suggested Action
The image appears
too bright, and there
is a loss of definition
in the brightest
areas of the image.
Reduce the contrast setting.
The AV video signal has not been terminated properly somewhere in the
external AV equipment.
The image appears
too washed out, or
the darkest areas of
the image appear
Reduce the brightness level till the black areas of the picture appear as
black.
too bright.
Check for incorrect battery orientation.
Check for dead batteries.
Check your distance and angle from the display.
Check whether remote control is pointing at sensor window.
Remote control
does not function
properly.
There is no picture
or sound, just noise.
Picture is not clear.
No sound.
Check for any obstacle between the remote control and the remote
control sensor window.
Check that the remote control sensor window is not under strong
fluorescent lighting.
Check for any devices (PC or personal digital assistant, PDA) nearby that
transmit infrared signal which may cause interference to signal
transmission between the remote control and the unit. Turn off the
infrared function of these devices.
Make sure the antenna cable is properly connected.
Change channels to confirm if the symptom is still present.
Make sure the antenna cable is properly connected.
Change channels to confirm if the symptom is still present.
If PC (VGA) is selected as the input signal source, use the Auto Sync
Function in the Set Up Menu (In VGA Mode) to let the display adjust
picture automatically.
Check whether you have selected the Mute function.
Make sure the volume is not set to minimum.
Check the AV cables for disconnection.
Antenna
Problem
The picture is not sharp or
the picture moves contains
image movement.
The reception may be weak.
Change channels to confirm if the symptom is still present.
Make sure the outside antenna is not disconnected.
Make sure the antenna is facing the right direction.
Suggested Action
Make sure the antenna is facing the right direction.
The picture is doubled or
tripled.
Picture ghosting is caused by reflections from buildings, large metal
structures and mountains. Carefully realign your antenna to minimize
the ghost images. Ultimately a higher quality antenna professionally
installed may be necessary to reduce the ghosting.
There may be interference from automobiles, trains, high voltage
The picture is spotted.
lines, neon lights, etc.
There may be interference between the antenna cable and
power cable, try positioning them further apart.
Is the television receiving interference from other devices?
Transmission antennas of radio broadcasting stations and
There are stripes on the
screen or colors fade.
transmission antennas of amateur radios and cellular phones
may also cause interference.
Use the television as far away as possible from devices that may
cause possible interference.
The panel uses a panel consisting of sub pixels which require sophisticated technology to
produce. However, there may be few bright or dark pixels on the screen. These pixels will
have no impact on the performance of the TV.
Supported PC Input Signal
Your unit can use as PC monitor, it supports below RGB-PC, HDMI mode INPUT.
RGB-PC, HDMI mode INPUT SPEC
VGA
HDMI 1/HDMI 2 Input
INPUT
FORMAT
Resolution
640x480
640x480
640x480
720x400
800x600
800x600
800x600
832x624
1024x768
1024x768
1152x870
1280x800
1280x960
1360x768
1366x768
Horizontal frequency
( KHz)
31.5
37.86
37.5
31.5
37.9
48.077
46.9
49.7
48.4
60
68.68
47.8
60.0
47.7
47.712
/
Vertical frequency
(HZ)
60
72.809
75
70
60
72.19
75
75
60
75
75
59.8
60
60
59.79
Standard
VGA
VESA
VESA
VGA-T
VESA Guidelines
VESA
VESA
Mac
VESA Guidelines
VESA
Mac
VESA
VESA
VESA
-31-
- -37
-32-
-38-
Page 21

Specification
Specification
Operating Voltage
Power Consumption
Video Format Supporting
Digital TV
Analog TV
Panel Spec
Input & Output
Audio Power
Unit Dimension
DC12V 5A
45W, < 1W (Standby)
COMPONENT
HDMI
Programme
Coverage
Channel Bandwidth
Video Decode
Audio
TV System
Active Area
Pixel Format
Luminance White
Contrast Ratio
Color Depth
Expected Life Time
ANT IN
HDMI input
USB input
input
YPbPr
VGA input
VIDEO input
VGA AUDIO input
DIGITAL AUDIO OUT OPTICAL
DC IN
EARPHONE output
3W+3W
575(L) x 150(W) x 396(H)mm
480i, 480p, 576i, 576p, 720p (50Hz/60Hz),
1080i (50Hz/60Hz), 1080p(50Hz/60Hz).
480p, 576p, 720p (50Hz/60Hz),
1080i (50Hz/60Hz), 1080p (50Hz/60Hz).
Australia
VHF-H: 177 .5 t o 22 6. 5M Hz
UHF: 522.5MHz to 816.5MHz
7MHZ
1080i, 720p, 576p, 576i
MPEG -1; MPE G- 2 AC-3;
PAL B/G; D/K; I
23 inches (58.42cm) diagonal
1366x768 pixel
250cd/m2
4000:1
8bit 16.7Million Colors
about 30,000 hours
A NT IN x 1
HD M I x 1
USB x 1
YPbPr x 1
VGA x 1
VIDEO x 1
VGA AUDIO x 1
DIGITAL AUDIO OUT OPTICAL x 1
DC IN x 1
EARPHONE x 1
Design a nd s pe ci fi cations are subject to ch an ge w it ho ut prior notice.
-31-
- -39
 Loading...