

Page 1
COMPREHENSIVE INTERNET SECURITY
b
SonicWALL Internet Security Appliances
SonicWALL TZ 180
Getting Started Guide
™
Page 2

SonicWALL TZ 180 Getting Started Guide
Thank you for your purchase of the SonicWALL TZ 180, the ultimate security
platform for home and small office deployments.
With integrated support for SonicWALL's Gateway Anti-Virus, the SonicWALL
TZ 180 delivers powerful, yet easy-to-use protection against hackers and
viruses. The SonicWALL TZ 180 also provides support for SonicWALL's
Content Filtering Service to provide enhanced productivity and network
utilization.
This Getting Started Guide contains installation procedures and configuration
guidelines for deploying a SonicWALL TZ 180 on your network. For detailed
configuration information, refer to the SonicOS Standard Administrator’s Guide
on the SonicWALL Resource CD or on the Web at:
<http://www.sonicwall.com/us/support.html>.
SonicWALL TZ 180 Getting Started Guide Page 1
Page 3

Document Contents
This document contains the following sections:
1
Completing Pre-Configuration Tasks - page 3
2
Registering Your SonicWALL - page 9
3
Connecting for Initial Setup - page 11
4
Running the Setup Wizard - page 15
5
Connecting to Your Network - page 21
Appendix
Appendix A: Configuring DHCP IP Addressing - page 25
Appendix B: Safety Instructions and Regulatory Information - page 26
Page 2
Page 4

Completing Pre-Configuration Tasks
1
In this Section
This section provides pre-configuration information. It is necessary to review
this section before setting up your SonicWALL TZ 180.
• System Requirements section, on page 4
• Check Package Contents section, on page 5
• Obtain Configuration Information section, on page 6
• Obtain Internet Service Provider (ISP) Information section, on page 7
SonicWALL TZ 180 Getting Started Guide Page 3
Page 5

System Requirements
Before you begin the setup process, check to ensure that you have a computer
that meets the following requirements. This computer is used to manage your
SonicWALL TZ 180 during the setup process.
• Windows XP, Windows 2000, or Windows NT
• 40MB of disk space available
• One available 10/100 Ethernet (LAN) port
• A Web browser supporting Java and HTTP uploads. Internet Explorer 6.0
or higher, Netscape Navigator 4.7 or higher, Mozilla 1.7 or higher, or Firefox
are recommended
• LAN interface set to obtain an IP address automatically (DHCP addressing
enabled)
Note: In order to connect to the SonicWALL TZ 180, your computer
must be set to obtain an IP address automatically using DHCP.
For more information on configuring DHCP on your computer,
turn to Appendix A: Configuring DHCP IP Addressing section,
on page 25.
Page 4 System Requirements
Page 6
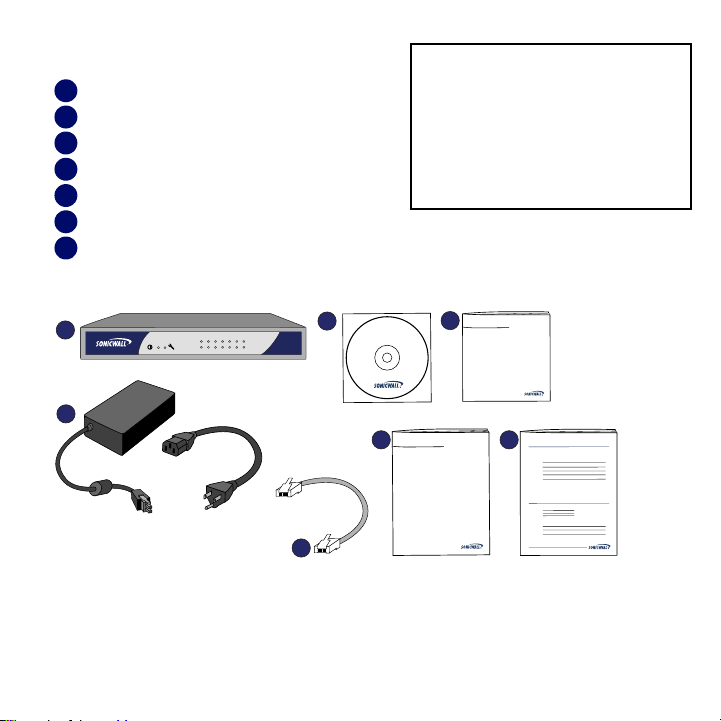
Check Package Contents
1
SonicWALL TZ 180
2
Standard power adapter
3
Ethernet cable
4
SonicWALL Resource CD
5
Getting Started Guide
6
SonicWALL Recommends Guide
7
Release Notes document
Any Items Missing?
If any items are missing from your
package, please contact SonicWALL
support.
A listing of the most current support
options is available online at:
<http://www.sonicwall.com/us/support.html>
*The included power cord is intended for use
in North America only. For European Union
(EU) customers, a power cord is not
included.
4
1
wan opt
12345
link/act
10/100
TZ 180
SonicWALL
Resource CD
5
COMPREHENSIVE INTERNET SECURITY
SonicWALL
Getting Started Guide
2
COMPREHENSIVE INTERNET SECURITY
SonicWALL
Recommends Guide
76
SonicOS Release Notes
Contents
3
SonicWALL TZ 180 Getting Started Guide Page 5
Page 7
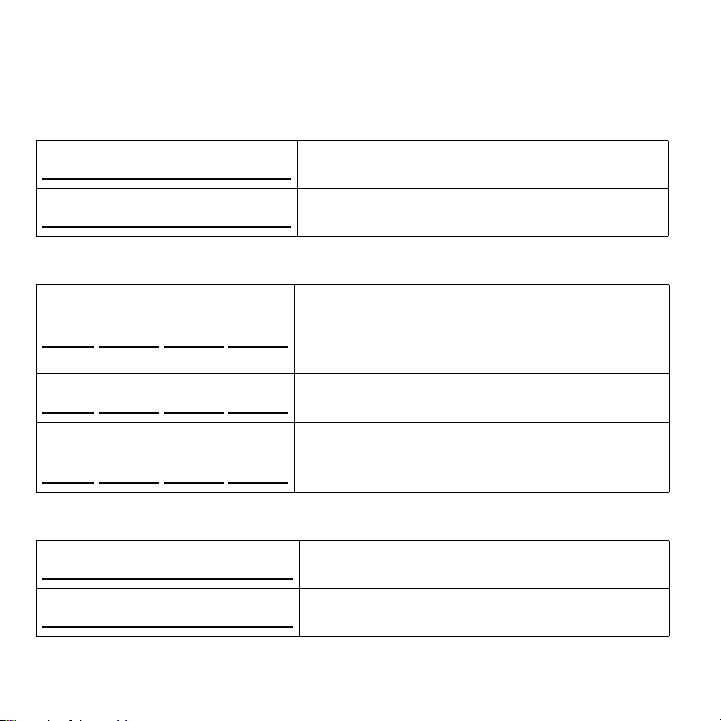
Obtain Configuration Information
Please record the following setup information and keep it for future reference:
Registration Information
Serial Number:
Authentication Code:
Networking Information
LAN IP Address:
. . .
Subnet Mask:
. . .
Ethernet WAN IP Address:
. . .
Administrator Information
Admin Name:
Admin Password:
Record the serial number found on the bottom
panel of your SonicWALL appliance.
Record the authentication code found on the
bottom panel of your SonicWALL appliance.
Select a static IP address for your SonicWALL
appliance that is within the range of your local
subnet. If you are unsure, you can use the default
IP address (192.168.168.168).
Record the subnet mask for the local subnet where
you are installing your SonicWALL appliance.
Select a static IP address for your Ethernet WAN.
This setting only applies if you are already using an
ISP that assigns a static IP address.
Select an administrator account name.
(default is admin)
Select an administrator password.
(default is password)
Page 6 Obtain Configuration Information
Page 8
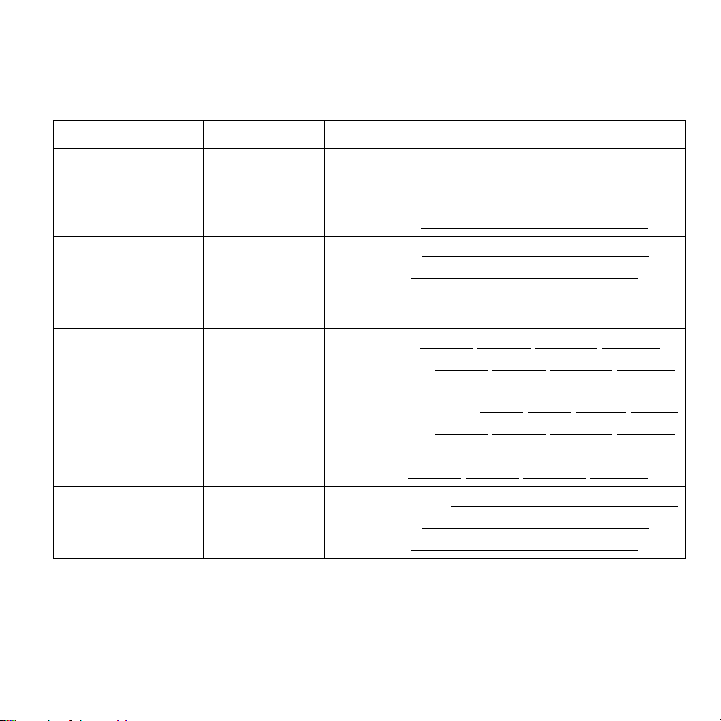
Obtain Internet Service Provider (ISP) Information
Record the following information about your current Internet service:
If you connect via You likely use Please record
Cable modem,
DSL with a router
Home DSL PPPoE User Name:
T1/E1,
Static broadband,
Cable or DSL with
a static IP
Dial-in to a server PPTP Server Address:
DHCP No Internet connection information is usually
required, although some service providers
require a host name.
Host Name:
Password:
Note: Your ISP may require your user name in
the format: name@ISP.com
Static IP IP Address:
Subnet Mask: . . .
Default Gateway
(Rou te r IP Addre ss):
Primary DNS: . . .
Secondary DNS
(optional):
User Name:
Password:
. . .
. . .
. . .
SonicWALL TZ 180 Getting Started Guide Page 7
Page 9

Page 8 Obtain Internet Service Provider (ISP) Information
Page 10
Registering Your SonicWALL
In this Section
This section provides instructions for registering your
SonicWALL TZ 180.
• Registering with MySonicWALL.com section, on page 10
Note: Product registration is an important part of the setup process,
allowing you to enable product support, firmware updates and
other key features.
2
SonicWALL TZ 180 Getting Started Guide Page 9
Page 11
Registering with MySonicWALL.com
1. If you do not yet have a mysonicwall.com account, point your Web browser
to <http://www.mysonicwall.com/> to register before continuing.
2. Locate and record your SonicWALL TZ 180 Serial Number and
Authentication Code. This information is printed on the bottom panel of
your SonicWALL TZ 180.
My Serial Number
My Authentication Code
3. In your Web browser, go to <https://www.mysonicwall.com> and login with
your mysonicwall.com username and password.
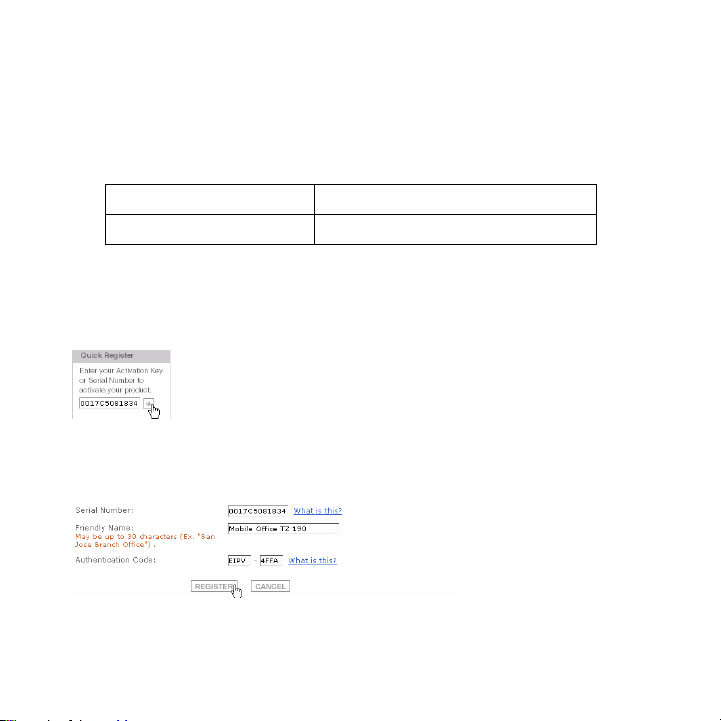
4. Enter your serial number in the Quick Register field and click the small
gray arrow. Follow the on-screen instructions.
5. Confirm your serial number.
6. Enter a friendly name for this appliance.
7. Enter your authentication code.
8. Click the Register button to continue.
9. Follow the online prompts to complete the registration process.
Page 10 Registering with MySonicWALL.com
Page 12

Connecting for Initial Setup
In this Section
This section provides initial configuration instructions for connecting your
SonicWALL TZ 180.
• Apply Power section, on page 12
• Connect WAN Port to the Internet section, on page 13
• Connect your Computer to the LAN (1) Port section, on page 13
• Verify WAN / LAN Connection section, on page 14
3
SonicWALL TZ 180 Getting Started Guide Page 11
Page 13

Apply Power
32 1 Power
1. Connect the AC plug to the power supply.
2. Plug one end of the power supply to the back of the SonicWALL TZ 180.
3. Connect the AC plug to an appropriate power outlet.
To AC power
To SonicWALL TZ 180
The Power LED on the front panel lights up green and the Test LED
lights up and blinks while the appliance performs a series of diagnostic tests.
When the Test LED is no longer lit, the SonicWALL TZ 180 is ready for
configuration. If the Test LED stays lit for more than a few minutes, cycle power
to the SonicWALL.
Page 12 Apply Power
Page 14

Connect WAN Port to the Internet
Using a standard network cable, connect the WAN port of the SonicWALL TZ
180 to your gateway device (usually your cable/DSL modem or T1 router).
Console WAN OPT 5 4 3 2 1 Power
SonicWALL TZ 180
Internet
Router / Modem
Connect your Computer to the LAN (1) Port
Using the supplied network cable and the computer, connect the LAN
(Ethernet) port on the computer to the LAN (1) port on the back of your
SonicWALL TZ 180.
Console WAN OPT 5 4 3 2 1 Power
SonicWALL TZ 180
LAN (Ethernet)
Management Computer
LAN (1)
SonicWALL TZ 180 Getting Started Guide Page 13
Page 15

Verify WAN / LAN Connection
Once the cables are correctly connected, the WA N and LAN (1) lights on the
front panel of your SonicWALL TZ 180 illuminate as illustrated below:
Link/ACT (WAN / LAN 1) - A solid light
Indicates a network connection is present
between the SonicWALL TZ 180 and
another network appliance. A blinking light
indicates connection activity.
10/100 (WAN / LAN 1) - A green light
Indicates a 10 Mbps port connection. An
amber light indicates a 100 Mbps port
connection.
Note: In order to connect to the SonicWALL TZ 180, your computer
must be set to accept dynamic “DHCP” addressing. For more
information on configuring DHCP, turn to Appendix A:
Configuring DHCP IP Addressing section, on page 25.
Page 14 Verify WAN / LAN Connection
Page 16

Running the Setup Wizard
4
In this Section
This section provides instructions to log in and configure your SonicWALL TZ
180 using the SonicWALL Setup Wizard.
• Log into the SonicWALL TZ 180 section, on page 16
• SonicWALL TZ 180 Setup Wizard section, on page 18
• Verify Management Interface Connectivity section, on page 19
• Verify WAN (Internet) Connectivity section, on page 20
Tip: Before completing this section, fill out the information in Obtain
Configuration Information section, on page 6 and Obtain Internet
Service Provider (ISP) Information section, on page 7. You will
need to enter this information during the Setup Wizard.
SonicWALL TZ 180 Getting Started Guide Page 15
Page 17

Log into the SonicWALL TZ 180
Your SonicWALL TZ 180 employs the use of a Web-based management
interface for setup and configuration. Complete the following steps to log into
the management interface.
1. In a Web browser on the computer, navigate to
http://192.168.168.168 (the default IP address of the SonicWALL TZ 180).
The SonicWALL Web management login screen displays:
Note: Depending on your browser settings, one or more security
warnings may display while connecting to the SonicWALL TZ
180 Web management interface. Choose to accept the
certificates in order to log into the appliance.
2. Log into the SonicWALL TZ 180 using “admin” as the user name and
“password” as the password. The Setup Wizard screen displays.
If you are having trouble getting the Login screen or Setup Wizard to appear,
see page 17 for additional troubleshooting information.
Page 16 Log into the SonicWALL TZ 180
Page 18

Unable to See the Setup Wizard?
• If you see the login screen, but not the Setup Wizard:
• Configure your Internet browser to allow popups for the SonicWALL TZ
180.
• Log into the security appliance using “admin” as the user name and
“password” as the password. After you log in, click the Wizards button
on the System > Status page.
• If you do not
• Did you correctly enter the SonicWALL TZ 180 management IP
address, 192.168.168.168, in your Web browser?
• Is your computer set to accept DHCP addressing or set to a static IP
address within the 192.168.168.x subnet range? If not, see Appendix
A: Configuring DHCP IP Addressing section, on page 25 for
instructions on changing your Local Area Connection settings.
• Do you have the Ethernet cable connected between your computer
and the LAN (1) port on your SonicWALL TZ 180?
• Do you need to add the SonicWALL TZ 180 to your list of trusted sites?
Use the default IP address (192.168.168.168) for this purpose.
• Is the Test LED on the front panel of your SonicWALL TZ 180 lit? If
the Test LED stays lit for more than a few minutes after the initial
power on sequence, cycle power to the SonicWALL TZ 180.
see the login screen or the Setup Wizard:
SonicWALL TZ 180 Getting Started Guide Page 17
Page 19

SonicWALL TZ 180 Setup Wizard
1. If the Setup Wizard does not display upon initial login to the SonicWALL
TZ 180 management interface, click the Wizards button in the left-hand
navigation panel of the interface.
2. Select the Setup Wizard radio button and click the Next button to continue.
3. Follow the on-screen prompts to complete the Setup Wizard. Refer to the
information you recorded in Obtain Configuration Information section, on
page 6 and Obtain Internet Service Provider (ISP) Information section, on
page 7 to complete this section.
4. Depending on the changes made during your setup configuration, the
SonicWALL may restart.
Page 18 SonicWALL TZ 180 Setup Wizard
Page 20

Verify Management Interface Connectivity
1. If your SonicWALL did not require a restart, skip to the Verify WAN
(Internet) Connectivity section, on page 20. Otherwise, continue with step 2
2. Wait for the SonicWALL TZ 180 to reboot. When the Test LED is no
longer lit, the SonicWALL TZ 180 is ready for login.
3. If the login page does not display after reboot, open a Web browser on the
computer and manually navigate to the LAN IP address of your SonicWALL
TZ 180.
4. Using your new username and password, log into the appliance.
The System > Security Dashboard page (shown below) displays. You have
correctly configured the SonicWALL TZ 180 to work with the computer on your
LAN. Complete the next section to verify WAN (Internet) connectivity.
SonicWALL TZ 180 Getting Started Guide Page 19
Page 21

Verify WAN (Internet) Connectivity
Complete the following steps to confirm your Internet connectivity.
1. Using a computer connected to the LAN (1) port, launch a new
Web browser.
2. Navigate to an Internet Web site such as <http://www.sonicwall.com>.
If the Web site displays, your SonicWALL TZ 180 is configured correctly as your
gateway device.
SonicWALL TZ 180
wan opt
12345
link/act
10/100
TZ 180
WAN
Internet
LAN (1)
Having Trouble Connecting to the Internet?
• Did you open a new browser window to launch the Web site? Try closing out all
browser windows and launching the browser again.
• Is your computer set to accept DHCP addressing or, if using static IP addressing,
is your IP address set to a range within the SonicWALL’s LAN subnet?
• Is your SonicWALL WAN port connected to your Internet source and showing
(link/act, 10/100) activity?
• Verify that the network settings you recorded on page 6 of this guide are correct.
• Did you enter your network information from page 6 of this guide correctly in the
Setup Wizard? If you are unsure, turn to the SonicWALL TZ 180 Setup Wizard
section, on page 18 to run Setup Wizard again.
Page 20 Verify WAN (Internet) Connectivity
Page 22

Connecting to You r Ne two rk
5
In this Section
This section provides SonicWALL TZ 180 basic network connectivity verification
and examples.
• Connect and Configure Your Network section, on page 22
• SonicWALL TZ 180 Front Panel section, on page 23
• SonicWALL TZ 180 Back Panel section, on page 24
SonicWALL TZ 180 Getting Started Guide Page 21
Page 23

Connect and Configure Your Network
SonicWALL TZ 180
wan opt
12345
TZ 180
Internet
WAN
Local Clients
Your SonicWALL TZ 180 is equipped with a DHCP server. If you enabled this
feature in the Setup Wizard, your DHCP-enabled network clients are
automatically provisioned by the SonicWALL. Setting up your network is as
simple as:
1. Setting your clients to obtain their IP address automatically.
2. Connecting your clients (directly or using a hub/switch) to the
LAN ports (1-5) on your SonicWALL TZ 180.
3. Reading the SonicOS Standard Administrator’s Guide to configure the
features and security services of your SonicWALL TZ 180.
Congratulations! You have successfully completed set up of your SonicWALL
TZ 180. For more detailed information on your SonicWALL TZ 180 feature set,
refer to the latest version of the SonicOS Standard Administrator’s Guide.
Page 22 Connect and Configure Your Network
Page 24

SonicWALL TZ 180 Front Panel
wan opt
12345
Feature Description
Power LED Indicates the SonicWALL TZ 180 is powered on.
Test LED Solid: Indicates that the SonicWALL TZ 180 is in test mode.
Blinking: The unit is booting up, or restarting. This can also indicate that
the unit is in safe mode.
WAN Indicates a device link, activity and connection speed on your WAN port.
OPT Indicates a device link, activity and connection speed on your OPT port.
LAN (1-5) Indicates a device link, activity and connection speed on individual LAN
ports (numbered 1-5).
Link/ACT Solid: Indicates a device is connected to the specified port(s).
Blinking: Indicates activity on the specified port(s).
10/100 Green: Indicates 10M connection on the specified port(s).
Amber: Indicates 100M connection on the specified port(s).
link/act
10/100
TZ 180
SonicWALL TZ 180 Getting Started Guide Page 23
Page 25

SonicWALL TZ 180 Back Panel
Console WAN OPT 5 4 3 2 1 Power
Feature Description
Console Port Provides a console connection to the SonicWALL. This feature is not
WAN Port Provides a connection between your SonicWALL TZ 180 and the
OPT Port Provides a secondary configurable Ethernet port.
LAN Ports
(1-5)
Reset Button Provides the capability to reboot your SonicWALL TZ 180 to a special
Power Provides a power connection using the supplied AC adaptor.
supported on the SonicWALL TZ 180.
Internet, usually connecting through a modem or router.
Provides 5 fully-configurable ports for connection between your
SonicWALL TZ 180 and the devices on your network. These ports
can be connected directly to a computer, or to a network switch or
hub.
diagnostic “safe mode”.
Page 24 SonicWALL TZ 180 Back Panel
Page 26

Appendix A: Configuring DHCP IP Addressing
Complete the following section based on your operating system in order to
configure your management computer to obtain an IP address automatically
(using DHCP addressing):
Windows XP
1. From the Start menu, highlight Connect To and then select Show All Connections.
2. Open the Local Area Connection Properties window.
3. Double-click Internet Protocol (TCP/IP) to open the Internet Protocol (TCP/IP)
Properties window.
4. Select Obtain an IP address automatically.
5. Click OK for the settings to take effect.
Windows 2000
1. From your Windows Start menu, select Settings.
2. Open Network and Dial-up Connections.
3. Click Properties.
4. Highlight Internet Protocol (TCP/IP) and click Properties.
5. Select Obtain an IP address automatically.
6. Click OK for the settings to take effect.
Windows NT
1. From the Start menu, highlight Settings and then select Control Panel.
2. Open Network.
3. Double-click TCP/IP in the TCP/IP Properties window.
4. Select Obtain an IP address automatically.
5. Click OK, and then click OK again.
6. Restart the computer for the changes to take effect.
SonicWALL TZ 180 Getting Started Guide Page 25
Page 27

Appendix B: Safety Instructions and Regulatory Information
Regulatory Model/Type Product Name
APL17-048 TZ 180
Mounting the SonicWALL
• Mount in a location away from direct
sunlight and sources of heat. A maximum
ambient temperature of 104º F (40º C) is
recommended.
• Route cables away from power lines,
fluorescent lighting fixtures, and sources
of noise such as radios, transmitters, and
broadband amplifiers
• The included power cord is intended for
use in North America only. For European
Union (EU) customers, a power cord is not
included.
• Ensure that no water or excessive
moisture can enter the unit.
• Allow unrestricted airflow around the unit
and through the vents on the side of the
unit. A minimum of 1 inch (25.44mm)
clearance is recommended.
• Consideration must be given to the
connection of the equipment to the supply
circuit and the effect of overloading the
circuits has minimal impact on overcurrent
protection and supply wiring. Appropriate
consideration of equipment nameplate
ratings must be used when addressing
this concern.
Page 26 Appendix B: Safety Instructions and Regulatory Information
Lithium Battery Warning
The Lithium Battery used in the SonicWALL
security appliance may not be replaced by the
user. Return the SonicWALL security appliance
to a SonicWALL-authorized service center for
replacement with the same or equivalent type
recommended by the manufacturer. If, for any
reason, the battery or SonicWALL security
appliance must be disposed of, do so following
the battery manufacturer's instructions.
Cable Connections
All Ethernet and RS232 (Console) cables are
designed for intra-building connection to other
equipment. Do not connect these ports directly
to communication wiring or other wiring that
exits the building where the SonicWALL is
located.
Power Supply Information
If the power supply is missing from your
SonicWALL product package, please contact
SonicWALL Technical Support at 408-752-7819
for a replacement. This product should only be
used with a UL listed power supply marked
“Class 2” or “LPS”, with an output rated 12 VDC,
minimum 1.66 A.
Page 28

Weitere Hinweise zur Montage
• Wählen Sie für die Montage einen Ort, der
keinem direkten Sonnenlicht ausgesetzt
ist und sich nicht in der Nähe von
Wärmequellen befindet. Die
Umgebungstemperatur darf nicht mehr
als 40 °C betragen.
• Führen Sie die Kabel nicht entlang von
Stromleitungen, Leuchtstoffröhren und
Störquellen wie Funksendern oder
Breitbandverstärkern.
• Das eingeschlossene Netzkabel ist für
Gebrauch in Nordamerikas nur vorgehabt.
Für Europaïsche Union (EU) Kunden, ist
ein Netzkabel nicht eingeschlossen.
• Stellen Sie sicher, dass das Gerät vor
Wasser und hoher Luftfeuchtigkeit
geschützt ist.
• Stellen Sie sicher, dass die Luft um das
Gerät herum zirkulieren kann und die
Lüftungsschlitze an der Seite des
Gehäuses frei sind. Hier ist ein
Belüftungsabstand von mindestens 26
mm einzuhalten.
• Vergewissern Sie sich, dass das Gerät
sicher im Rack befestigt ist. Insbesondere
muss auf nicht direkte Anschlüsse an
Stromquellen geachtet werden wie z. B.
bei Verwendung von
Mehrfachsteckdosen.
Hinweis zur Lithiumbatterie
Die in der Internet Security Appliance von
SonicWALL verwendete Lithiumbatterie darf
nicht vom Benutzer ausgetauscht werden. Zum
Austauschen der Batterie muss die SonicWALL
in ein von SonicWALL autorisiertes ServiceCenter gebracht werden. Dort wird die Batterie
durch denselben oder entsprechenden, vom
Hersteller empfohlenen Batterietyp ersetzt.
Beachten Sie bei einer Entsorgung der Batterie
oder der SonicWALL Internet Security
Appliance die diesbezüglichen Anweisungen
des Herstellers.
Kabelverbindungen
Alle Ethernet- und RS232-C-Kabel eignen sich
für die Verbindung von Geräten in
Innenräumen. Schließen Sie an die Anschlüsse
der SonicWALL keine Kabel an, die aus dem
Gebäude herausgeführt werden, in dem sich
das Gerät befindet.
Informationen zur
Stromversorgung
Sollte das Netzteil nicht im Lieferumfang der
SonicWALL enthalten sein, wenden Sie sich
diesbezüglich an den technischen Support von
SonicWALL (Tel.: +1-408-752-7819). Dieses
Produkt darf nur in Verbindung mit einem nach
den Normen der Underwriter Laboratories, USA
als „UL-gelistet“ zugelassenen Netzteil der
Kategorie „Class 2“ oder „LPS“ verwendet
werden. Ausgang: 12 VDC Gleichsspannung,
mind. 1,66 A.
SonicWALL TZ 180 Getting Started Guide Page 27
Page 29

FCC Part 15 Class B Notice
NOTE:This equipment was tested and found to comply with the limits for a Class B digital device,
pursuant to Part 15 of the FCC Rules. These limits are designed to provide reasonable protection
against harmful interference in a residential installation. This equipment generates, uses, and can
radiate radio frequency energy. And, if not installed and used in accordance with the instructions, may
cause harmful interference to radio communications. However, there is no guarantee that interference
will not occur in a particular installation. If the equipment does cause harmful interference to radio or
television reception, which can be determined by turning the equipment off and on, the user is
encouraged to try and correct the interference using one or more of the following measures:
• Reorient or relocate the receiving antenna.
• Increase the separation between the equipment and the receiver.
• Connect the equipment into an outlet on a circuit different from the receiver connection.
• Consult SonicWALL for assistance.
Complies with EN55022 Class B and CISPR22 Class B.
*Refer to the label on the bottom of the unit for device information including Class A or Class B FCC
information.
Canadian Radio Frequency Emissions Statement
This Class B digital apparatus complies with Canadian ICES-003.
Cet appareil numérique de la classe B est conforme à toutes la norme NMB-003 du Canada.
Declaration of Conformity
Application of council
Directive
Standards to which
conformity is declared
Page 28 Appendix B: Safety Instructions and Regulatory Information
Directive 89/336/EEC (EMC) and
72/23/EEC (LVD)
EN 55022 (1998) Class B
EN 55024 (1998)
EN 61000-3-2 (2000) +A2
EN 61000-3-3 (2000) +A1
EN 60950-1 (2001) +A11
National Deviations: AT, AU, BE, CH, CN, CZ, DE, DK, FI, FR, GB, GR,
HU, IE, IL, IN, IT, JP, KR, NL, NO, PL, SE, SG, SI
Page 30

VCCI Statement
Regulatory Information for Korea
Ministry of Information and Telecommunication Certification Number
All products with country code “” (blank) and “A” are made in the USA.
All products with country code “B” are made in China.
All products with country code "C" or "D" are made in Taiwan R.O.C.
SonicWALL TZ 180 Getting Started Guide Page 29
Page 31

Copyright Notice
© 2007 SonicWALL, Inc.
All rights reserved.
Under the copyright laws, this manual or the software described within, cannot be copied,
in whole or part, without the written consent of the manufacturer, except in the normal use
of the software to make a backup copy. The same proprietary and copyright notices must
be affixed to any permitted copies as were affixed to the original. This exception does not
allow copies to be made for others, whether or not sold, but all of the material purchased
(with all backup copies) can be sold, given, or loaned to another person. Under the law,
copying includes translating into another language or format.
Specifications and descriptions subject to change without notice.
Trademarks
SonicWALL is a registered trademark of SonicWALL, Inc.
Microsoft Windows 98, Windows NT, Windows 2000, Windows XP, Windows Server 2003,
Internet Explorer, and Active Directory are trademarks or registered trademarks of
Microsoft Corporation.
Netscape is a registered trademark of Netscape Communications Corporation in the U.S.
and other countries. Netscape Navigator and Netscape Communicator are also
trademarks of Netscape Communications Corporation and may be registered outside the
U.S.
Adobe, Acrobat, and Acrobat Reader are either registered trademarks or trademarks of
Adobe Systems Incorporated in the U.S. and/or other countries.
Firefox is a trademark of the Mozilla Foundation.
Other product and company names mentioned herein may be trademarks and/or
registered trademarks of their respective companies and are the sole property of their
respective manufacturers.
Page 30 Copyright Notice
Page 32

Notes
SonicWALL TZ 180 Getting Started Guide Page 31
Page 33

Notes
Page 32 Notes
Page 34

SonicWALL, Inc.
1143 Borregas Avenue
Sunnyval e CA 94089-1306 F +1 408.745.9300
PN: 232-000766-01
Rev A 3/07
©2007SonicWALL,Inc. isaregisteredtrademarkof SonicWALL,Inc.Otherproductnamesmentionedhereinmaybetrademarksand/orregisteredtrademarks of their respective companies.
Specications and descriptionssubjec tto change without notice.
T +1 408.745.9600
www.sonicwall.com
 Loading...