

Page 1

SONICWALL
Internet Security Appliances
Page 2

Contents
Copyright Notice .......................... ............................ ...................... 5
About this Guide ..... ............................ ............................ ............... 7
SonicWALL Technical Support ..................... ............................ ........ 8
1 Introduction
Your SonicWALL Internet Security Appliance ................................... 9
SonicWALL Internet Security Appliance Functi on al Diagram .............10
SonicWALL Internet Security Applian ce Feat u res . ............................11
2 SonicWALL Installation
Inspecting the Package .. ............................ ............................ .......1 5
Overview .....................................................................................15
Connecting the SonicWALL to the Network .....................................1 6
Performing the Initial Configuration ........................................ .......1 8
3 Managing Your SonicWALL
Log into the SonicWALL using a Web Browser ................................28
Status .................... ..................... .............. .............. .....................2 9
CLI Support and Remote Management ............... ............................30
4 General and Network Setting s
Network ................. ....... .............. ....... ....... .............. ....... ....... .......32
Network Settings .............................................. ............................33
Standard Configuration ............................................ .....................35
NAT with DHCP Client Configuration .............................................. 37
NAT with PPPoE Configuration ...... ............................ .....................39
Setting the Time and Date ..................................................... .......4 1
Setting the Administrator Password ...............................................42
Setting the Administrator Inactivity Timeout ...................................43
5 Logging a n d Al erts
View Log .................................................. ............................ .......44
SonicWALL Log Messages ................................. ............................45
Log Settings ....................................... ..........................................46
Log Categories ..................... ............................ ............................48
Alert Categories ...... ......................................................................49
Reports ........... ............................ ............................ .....................49
6 Content Filtering and Blocking
Categories ...................................................................................51
Time of Day .................................................................................53
List Update .......................... ............................ ............................53
Contents Page 1
Page 3

Customize .......... ..................... .............. .............. ..................... ....55
Keywords .................. .............. ....... ....... .............. ....... .............. ....5 7
Consent .................... ................................... ................................ 57
7 Web Management Tools
Restarting the SonicWALL .............................................................6 1
Preferences ........ ....... ....... .............. ....... ....... .............. ....... ....... ....62
Exporting the Settings File ................................... .........................63
Importing the Settings File ............................................................64
Restoring Factory Default Settings .................................................65
Upgrade Features ........................... ............................ ..................68
Diagnostic Tools ........................................... ............................ ....6 9
DNS Name Lookup .......................................................................69
Ping ............................................................................................70
Packet Trace .................... ............................ ............................ ....72
Tech Support Report ......................................................... ...........73
8 Network Access Rules
Services .................... ..................... ............................ ..................7 5
Windows Networking (NetBIO S) Broad c ast Pa ss Th rou g h ................76
Detection Prevention ............... ............................ .........................76
Network Connection Inactivity Timeout ..........................................77
Add Service ........ ............................ ............................ ..................77
Rules ................. ..................... ..................... ............................ .... 78
Understanding the Access Rule Hierarchy ................................... ....84
SonicWALL TELE2 and SOHO2 IP Address Man age ment ..................87
Users ................. ....... .............. ....... .............. ....... ....... .............. ....8 8
Management ................... ............................................................90
Management Method ............... .....................................................9 1
9 Advanced Features
Proxy Relay ............................. ............................ .........................94
Intranet ............. .......................................... ................................ 96
Routes ............... .............. .............. ..................... .............. ........... 9 8
DMZ Addresses (SonicWALL XPRS2, PRO, and PRO-VX Only) ...........9 9
Delete a DMZ Address Range ......................................................101
One-to-One NAT .............. ............................ ............................ ..101
The Ethernet Tab ......................................... ..............................104
10 DHCP Server
Setup ........................................................................................106
Enable DHCP Server ......... ............................ ............................ ..107
Page 2 SonicWALL Int er n et Security A ppl i an c e User ’ s G ui d e
Page 4

Deleting Dynamic Ranges and Static Entries ............................ .....108
DHCP Status ... ............................ ............................ ...................108
SonicWALL TELE2 and SOHO2 IP Address Ma n agemen t ................109
11 SonicWALL VPN
VPN Applications ........................................................................111
The VPN Interface .............................. ............................ ............112
SonicWALL VPN Client for Remote Access and Management ..........113
The Configure Tab ....................... ...............................................114
VPN Advanced Settings ...............................................................115
Advanced Settings for VPN Configurations ............................... .....117
Enabling Group VPN on the SonicWALL ............................ ............118
Group VPN Client Configuration ...................................................120
Manual Key Configuration between the SonicWALL and VPN Client .123
Installing the VPN Client Software ................................................125
VPN between Two SonicWALLs ....................................................130
Example of Manual Key Configuration between Two SonicWALLs ...133
IKE Configuration between Two SonicWALLs ................................136
Example: Linking Two SonicWALLs ..............................................139
Testing a VPN Tunnel Connection Using PING ..............................142
Configuring Windows Networking ................................................143
Adding, Modifying and Deleting De st inat ion Networks ...................146
RADIUS and XAUTH Authentication ...... ............................ ............147
SonicWALL Enhanced VPN Logging .................................. ............149
Disabling Security Associations ....................................................150
Basic VPN Terms and Concepts ........... ............................ ............151
12 SonicWALL Options and Upgrades
SonicWALL VPN Upgrade ............. ...............................................154
SonicWALL VPN Client for Windows .......................... ...................154
SonicWALL Network Anti-Virus ..... ............................ ...................155
Content Filter List Subscriptio n .......................... ..........................155
SonicWALL High Availability Upgrade ... ........................................155
Vulnerability Scanning Service ............. ............................ ............156
SonicWALL Authentication Service ...............................................15 6
SonicWALL ViewPoint Reporting ..................................................156
SonicWALL Per Incident Support ........................ ..........................157
SonicWALL Premium Support .......................................... ............157
SonicWALL Extended Warranty ............ ............................ ............157
SonicWALL Global Management Syste m .................................. .....157
Contents Page 3
Page 5

13 Hardware Description
SonicWALL PRO and PRO-VX Front Panel .....................................158
SonicWALL PRO and PRO-VX Back Panel ......................................159
SonicWALL XPRS2 Front Panel .............................. .......................160
SonicWALL XPRS2 Front Panel Description ...................................160
SonicWALL XPRS2 Back Panel ............................................ .........161
The SonicWALL XPRS2 Back Panel Description ..............................161
SonicWALL SOHO2 and TELE2 Front Panel ............ .......................16 2
SonicWALL SOHO2 and SonicWALL TELE2 Front Panel Description .162
SonicWALL SOHO2 and TELE2 Back Panel ....................................163
The SonicWALL SOHO2 and TELE2 Back Panel Description ... .........163
14 Troubleshooting Guide
The Link LED is off. ....................................................................165
A computer on the LAN cannot access the Intern et . ...... ................165
The SonicWALL does not establish authenticated session s. ............165
The SonicWALL does not save changes that you have made. .........166
Duplicate IP address errors occur when the SonicWALL is installed 166
Machines on the WAN are not reachable. .....................................166
15 Appendices
Appendix A - Technical Specifications ........................... ................167
Appendix B - Introduction to Networking .................................... ..170
Overview ................................................................................... 170
Network Hardware Components ..................................................170
Network Types ...........................................................................170
Firewalls .................................................................................... 170
Gateways ........... ........................................................................17 1
Network Protocols ..... ............................ ............................ .........171
IP Addressing .......................... ............................ .......................17 2
Appendix C - IP Port Numbers .. ............................ .......................17 5
Appendix D - Configuring TCP/IP Settings ...... ............................ ..176
Appendix E - Erasing the Firmware .. ............................................178
Appendix F - Securing the SonicWALL ..........................................180
Mounting the SonicWALL PRO and SonicWALL PRO -VX .................180
Appendix G - Electromagnetic Compatibil ity ..................................181
SonicWALL PRO and SonicWALL PRO-VX .................................... ..181
SonicWALL XPRS2, SonicWALL SOHO2 and SonicWALL TELE 2 .......182
Notes ........................................................................................183
Page 4 SonicWALL Int er n et Security A ppl i an c e User ’ s G ui d e
Page 6

Copyright Notice
©
2001 SonicWALL, Inc. All rights reserved.
Under the copyright laws, this manual or the s oftware described within, can not be c opied,
in whole or part, without the written consent of the manufacturer, except in the normal use
of the software to make a backup copy. The same proprietary and copyright notices must
be affixed to any permitted copies as were affixed to the original. This exception does not
allow copies to be made for others, whether or not sold, but all of the m a terial purchased
(with all backup copies) can be sold, given, or loaned to another person. Under the law,
copying includes translating into another language or format.
SonicWALL is a registered trademark of SonicWALL, Inc.
Other product and company names mentioned herein can be trademarks and/or registered
trademarks of their respective companies.
Specifications and descriptions subject to change without notice.
LIMITED WARRANTY
SonicWALL, Inc. warrants the SonicWALL Internet Security Appliance (the Product) for one
(1) year from the date of purchase against defects in materials and workmanship. If there
is a defect in the hardware, SonicWALL will replace the product at no charge, provided that
it is returned to SonicWALL with transportation charges prepaid. A Return Materials
Authorization (RMA) number must be displayed on the outside of the package for the
product being returned for replacement or the product will be refused. The RMA number
can be obtained by call ing SonicWALL Customer Service bet ween the hours of 8:30 AM and
5:30 PM Pacific Standard Time, Monday through Friday.
Phone:(408) 752-7819
Fax:(408) 745-9300
Web: <http://www.sonicwall.com/support>
This warranty does not apply if the Product has been damaged by accident, abuse, misuse,
or misapplication or has been modified without the written permission of SonicWALL.
In no event shall SonicWALL, Inc. or its suppliers be liable for any damages whatsoever
(including, without limitation, damages for loss of profits, business interruption, loss of
inform ation, or othe r pecuniary l oss) arisin g out of the us e of or inabili ty to use the P roduct.
Some states do not allow the exclusion or limitation of implied warranties or liability for
incidental or consequential damages, so the above limitation or exclusion can not apply to
you. Where liability can not be limited under applicable law, the SonicWALL liability shall
be limited to the amount you paid for the Product. This warranty gives you specific legal
rights, and you can have other rights which vary from state to state.
By using this Product, you agree to these limitations of liability.
Preface Page 5
Page 7

THIS WARRANTY AND THE REMEDIES SET FORTH ABOVE ARE EXCLUSIVE AND
IN LIEU OF ALL OTHER WARRANTIES, ORAL OR WRITTEN, EXPRESS OR
IMPLIED.
No dealer, agent, or employee of SonicWALL is authorized to make any extension or
addition to this warranty.
Page 6 SonicWALL Internet Security Appliance User’s Guide
Page 8

About this Guide
Thank you for purchasing the SonicWALL Internet Security Appliance. The SonicWALL
protect s your Local Area Networ k (LAN ) fr om att acks an d in trusio ns, filte rs ob jecti onal Web
sites, provides private VPN connections to business partners and remote offices, and offers
a centrally-managed defense against software viruses.
This guide covers the installation and configuration of the SonicWALL SOHO2, SonicWALL
TELE2, SonicWALL XPRS2, SonicWALL PRO and SonicWALL PRO-VX. The instructions are
the same for every hardware model except where specifically noted.
Organization of This Guide
Chapter 1, Introduction, describes the features and applications of the SonicWALL.
Chapter 2, SonicWALL QuickStart Installation, demonstrates how to connect the
SonicWALL to your network a nd pe rform the initial configuration.
Chapter 3, Managing Your SonicWAL L, provides a brief overvi ew of the SonicWALL Web
Management Interface.
Chapter 4, Network Settings, describes the configuration of the SonicWALL IP settings,
time and password.
Chapter 5, Logging and Alerting, illustrates the SonicWALL logging, alerting and
reporting features.
Chapter 6, Content Filt erin g and Blo cking , describes So nicWALL Web content filte ring,
including subscription updates and customized Web blocking.
Chapter 7, Web Management Tools, provides directions to restart the SonicWALL,
import and export settings, upload new firmware, and perform diagnostic tests.
Chapter 8, Network Access Rules, explains how to permit and block traffic through the
SonicWALL, set up servers, and en able re mote management.
Chapter 9, Advanced Feat ures, desc ribes ad vanced SonicW ALL setting s, such as One-t o-
One NAT, Automatic Web Proxying and DMZ addresses.
Chapter 10, DHCP Server, describes the configuration and setup of the SonicWALL DHCP
server.
Chapter 11, SonicWALL VPN, explains how to create a VPN tunnel between two
SonicWALLs and from the VPN client to the SonicWALL.
Chapter 12, SonicWALL Options and Upgrades, presents a brief summary of the
SonicWALL's subscription services, firmware upgrades and other options.
Chapter 13, Hardware Description , illustrates and describes the SonicWALL front and
back panel displays. This chapter is divided into three sections for the SonicWALL SOHO2
and SonicWALL TELE2, the Son icWALL XPRS2, and the SonicWALL PRO and SonicWA LL
PRO-VX.
Preface Page 7
Page 9

Chapter 14, Troubleshooting Guide, shows solutions to commonly encountered
problems.
Appendix A, Technical Specifications, lists the SonicWALL specifications.
Appendix B, Introduction to Networking, provides an overview of the Internet, TCP/IP
settings, IP security, and other general netw orki ng topics.
Appendix C, IP Port Numbers, offers information about IP port numbering.
Appendix D, Config uring T CP/IP Settin gs, provides instructi ons for configuring your
Management Station's IP address.
Appendix E, Erasing the Firmware, describes the firmware erase procedure.
Appendix F, Securing the So nicWAL L, details the steps necessary to safely mount the
SonicWALL on a mounti ng rack.
Appendix G, El ectrom agnetic Comp atibil ity, presents important emissions standards
approvals and EMC information.
SonicWALL Technical Support
For fast resolution of technical questions, please visit the SonicWALL Tech Su pport Web
site at <http://www.sonicwall.com/support>. There, you will find resources to resolve
most technical issues and a Web request form to contact one of the SonicWALL Technical
Support engineers.
Page 8 SonicWALL Internet Security Appliance User’s Guide
Page 10

1 Introduction
Your SonicWALL Internet Security Appliance
The SonicWALL Internet security appliance provides a complete security solution that
protects your network from attacks, intrusions, and malicious tampering. In addition, the
SonicWALL filters objectionable Web content and logs security threats. SonicWALL VPN
provides secure, encrypted communications to business partners and branch offices.
SonicWALL VPN is included with the SonicWALL TELE2, the SonicWALL PRO, the
SonicWALL PRO-VX, and the GX series of appliances. It is also available as an upgrade.
The SonicWALL Internet security appliance uses s tateful packet inspection to ensure secure
firewall filtering. Stateful packet inspection is widely considered to be the most effective
method of filtering IP traffic. MD5 authentication is used to encrypt communications
between your Manageme nt Station and the SonicWALL Web Management Interface. MD5
Authentication prevents unauthorized users from detecting and stealing the So nicWALL
password as it is sent over your netwo rk.
The SonicWALL family of Internet security appliances include eight SonicWALL models
customized to the requirements of different networks.
SonicWALL Feature Chart
SonicWALL
Model
TELE2 5 Included
SOHO2/10 10 Optional
SOHO2/50 50 Optional
XPRS2 Unlimited Optional Included
PRO Unlimited Included Included Optional Optional
PRO-VX Unlimited Included Included Included Optional
GX250 Unlimited Included I ncluded Included Optional
GX650 Unlimited Included I ncluded Included Optional
Nodes VPN DMZ Port
High
Availability
Anti-Virus
Introduction Page 9
Page 11

SonicWALL Internet Security Appliance Functional Diagram
The following figure illustrates the SonicWALL's security functions.
By default, the SonicWALL allows outbound access from the LAN to the Internet and blocks
inbound access from the Internet to the LAN. Users on the Internet are restricted from
accessing resources on the LAN unless they are authorized remote users or Network Access
Rules were created to allow inbound access.
If the SonicWALL includes a DMZ port, users on the LAN and on the Internet have full
access to the devices on the DMZ.
Page 10 Soni cW A L L In t ern et Security A pp li an ce Us e r ’s Gu id e
Page 12

SonicWALL Internet Security Appliance Features
Internet Security
• ICSA-Certified Firewall
After undergoing a rigorous suite of tests to expose security vulnerabilities, SonicWALL
Internet security appliances have received Firewall Certification from ICSA, the
internationally-accepted auth ority on network security. The SonicWALL uses stateful
packet inspection, the most effective method of packet filtering, to protect your LAN
from hackers and vandals on the Internet.
• Hacker Attack Prevention
The SonicWALL automatically detects and thwarts Denial of Service (DoS) attacks such
as Ping of Death, SYN Flood, LAND A ttac k, and IP Spoofing.
• Network Address Translation (NAT)
Network Address Translation (NAT) translates the IP addresses used on your private
LAN to a single, public IP address that is used on the Internet. NAT allows multiple
computers to access the Internet, even if only one IP address has been provided by
your ISP.
• Network Access Rules
The default Network Access Rules allow traffic from the LAN to the Internet and block
traffic from the Internet to the LAN. You can create additional Network Access Rules
that allow inbound traffic to network servers, such as Web and mail servers, or that
restrict outbound traffic to certain destinations on the Internet.
• AutoUpdate
The SonicWALL maintains the highest level of security by automatically notifying you
when new firmware is released. When new firmware is available, the SonicWALL Web
Manageme nt Inter face displays a link to download and install the latest fir mware. The
SonicWALL also sends an e-mail with firmware release notes.
• DMZ Port
SonicWALL XPRS2, SonicWALL PRO and SonicWALL PRO-VX include a DMZ port
allowing users to access public servers, such as Web and FTP servers. While Internet
users have unlimited access to the DMZ, the servers located on the DMZ are still
protected against DoS attacks.
• SNMP Support
SNMP (Simp le N e two rk Ma n ag e men t Protoco l) is a network protocol used over
User Datagram Protocol (UDP) that allows network administrators to monitor the status
of the SonicWALL Internet Sec urity appliances and receive n otification of any critical
events as they occur on the network.
Introduction Page 11
Page 13

Content Filtering
• SonicWALL Content Filtering Overview
You can use the SonicWALL Web content filtering to enforce your company's Internet
access policies. The SonicWALL blocks specified categories, such as violence or nudity,
using an optional Content Filter List. Users on your network can bypass the Content
Filter List by authenticating with a unique user name and password.
• Content Filter List Updates (optional)
Since content on the Internet is constantly changing, the SonicWALL automatically
updates the optional Content Filter List every week to ensure that access restrictions
to new and relocated websites and newsgroups are properly enforced.
• Log and Block or Log Only
You can configure the SonicWALL to log and block access to objectional Web sites, or
to log inappropriate usage without blocking Web access.
• Filter Protocols
In addition to filtering acces s to Web sites, the SonicWALL can also block Newsgroups,
ActiveX, Java, Cookies, and Web Proxies.
Logging and Reporting
• Log Categories
You can select the information you wish to display in the SonicWALL event log. You can
view the event log from the SonicWALL Web Management Interface or receive the log
as an e-mail file.
• Syslog Server Support
In addition to the standard screen log, the SonicWALL can write extremely detailed
event log information to an external Syslog server. Syslog is the industry-standard
method to capture information about network activity.
• ViewPoint Reporting
Monitoring critical network events and activity, such as security threats, inappropriate
Web use, and bandwidth levels, is an essential component of network security.
SonicWALL ViewPoint compliments the SonicWALL security features by providing
detailed and comprehensive reports of network activity.
SonicWALL ViewPoint is a software application that creates dynamic, Web-based
network reports. ViewPoint reporting generates both real-time and historical reports to
offer a complete view of all activity through your SonicWALL Internet security
appliance.
• E-mail Alerts
The SonicWALL can be configured to send alerts of high-priority events, such as
attacks, system errors , and blo cked Web s ite s. When these ev en ts occ ur, al erts c an be
immediately sent to an e-mail address or e-mail pager.
Dynamic Host Configuration Protocol (DHCP)
Page 12 Soni cW A L L In t ern et Security A pp li an ce Us e r ’s Gu id e
Page 14

• DHCP Server
The DHCP Server offers centralized management of TCP/IP client configurations,
including IP addresses, gateway addresses, and DNS addresses. Upon startup, each
network client receives its TCP/IP settings automatically from the SonicWALL DHCP
Server.
• DHCP Client
DHCP Client allows the SonicWALL to acquire TCP/IP settings (such a s IP address,
gateway address, DNS address) from your ISP. This is necessary if your ISP assigns you
a dynamic IP address.
Installation and Configuration
• Installation Wizard
The SonicW ALL I n stal lat i on Wiz ar d he lps quickly install and co nfi gu re t he Sonic WALL.
• Online help
SonicWALL help documentation is built into the SonicWALL Web Management Interface
for easy access during installation and management.
IPSec VPN
• SonicWALL VPN
SonicWALL VPN provides a simple, secure tool that enables corporate offices and
business partners to connect securely over the Internet. By encrypting data,
SonicWALL VPN provides private communications between two or mo re sites witho ut
the expense of leased site-to-site lines. SonicWALL VPN comes standard with the
SonicWALL TELE2, the SonicWALL PRO and the SonicWALL PRO-VX, and can also be
purchased as an upgrade.
• VPN Client Software for Windows
Mobile users with dial-up Internet accounts can securely access remote network
resources with the SonicWALL VP N Client. The SonicWALL VPN Client establi shes a
private, encrypted VPN tunnel to the SonicWALL, allowing users to transparently access
network servers from any location. The SonicWALL PRO includes a single VPN client for
secure remote managemen t. The Sonic WALL PRO-VX includes 50 VP N client licenses
for remote management and remote access. Single, 10, 50 and 100 VPN client license
packs can be purchased separately.
Introduction Page 13
Page 15

Contact SonicWALL, Inc. for information about the Content Fi lter List , Netwo rk Anti -
Virus subscriptions, and other upgrades.
Web: http://www.sonicwall.com
E-mail: sales@sonicwall.com
Phone: (408) 745-9600
Fax: (408) 745-9300
Page 14 Soni cW A L L In t ern et Security A pp li an ce Us e r ’s Gu id e
Page 16

2 SonicWALL Installation
This chapter describes the procedure used to install yo ur SonicWALL and pe rform the i nitial
configuration.
Inspecting the Package
The following items should be included in the package:
• One SonicWALL Internet security appliance
• One power supply (not included with International SonicWALL PRO or PRO-VX)
• One Category 5 Ethernet crossover cable (labeled "Crossover")
• One Category 5 Ethernet standard cable
• One SonicWALL Quickstart Guide
• One Companion CD
• One SonicWALL Internet Se curity Appliance User's Guide
If an item is missing from the package, you can contact SonicWALL, Inc. by phone at
(408) 752-7819 or submit a Web Support Form at <http://techsupport.sonicwall.com/
swtech.html>.
Overview
Here are a f ew helpful guidelines for installing the SonicWALL applian ce.
•The WAN Ethernet port should be connected to the Internet router or modem.
•The LAN Ethernet port should be connected to a network hub or switch on the internal,
protected network.
•The DMZ Ethernet port, included with the SonicWALL XPRS2, the SonicWALL PRO and
the SonicWALL P RO-VX, should b e connected to publicly accessible se rvers, such as
Web and Mail servers.
• A crossover cable should be used when co nne cting the SonicWALL dire ctly to another
machine or router.
• A standard Ethernet cable should be used when connecting the SonicWALL to a
network hub, switch, or modem.
SonicWALL Internet Security Appliance User’s Guide Page 15
Page 17

Connecting the SonicWALL to the Network
The following diagram illustrates how the SonicWALL is connected to the network:
The following steps describe integration of the SonicWALL into the network.
1. Connect the WAN Ethernet port on the back of the SonicWALL to the Ethernet port on
your Internet router or modem. Use a crossover c able when connec ting the SonicW ALL
to a router. Use a standard Ethernet cable when connecting to a modem or a hub.
2. Connect the LAN Ethernet port to your Local Area Network (LAN). Use a standard
Ethernet cable when connecting the SonicWALL to a hub or switch. Use a crossover
cable when connecting d irectl y to a computer.
3. Optional: Connect the DMZ Ethernet port to a hub or switch with a standard Ethernet
cable. Or connect the DMZ port directly to a public server with a crossover cable.
4. Plug the SonicWALL power supply into an AC power outlet, then plug the power supply
output cable into the port on the back labeled Power. Use the power adapter supplied
with the SonicWALL, do not use another power supply.
Note: If you are inst alling a SonicWALL PRO o r a SonicWALL PRO-VX, connect the
SonicWALL to an AC power outlet using a power cable. Then press the power switch
to the On position.
5. The SonicWALL runs a series of self-diagnostic tests to check for proper operation.
During the diagnostic tests, which take about 90 seconds, the Test LED remains on.
Wait for the Test LED to turn off.
Verify that all used Link LEDs are illuminated. If not, go to Chapter 14 for
troubleshooting tips. The SonicWALL is now properly attached to your netw ork.
SonicWALL Installation Checklist
SonicWALL Installation Pa ge 16
Page 18

The SonicWALL requires i nforma tion abo ut the IP a ddress confi gurati on of y our netw ork.
Your Internet Ser vice Provider (ISP) shou ld be able to provide this information . If you are
unfamiliar with the terms used in the section, review Appendix B for networking basic terms
and information.
• WAN Gateway (Router) IP Address
The WAN Gateway (Router) IP Address is the addre ss of the router that connects your
LAN to the Internet. If you have cable or DSL Internet access, the router is probably
located at your ISP.
• DNS Addresses
The DNS Addresses are the addre sses o f Domain Na me Servers , ei ther on y our LAN or
the Internet. These addresse s are requir ed for down loading the Conten t F ilter Li st and
for the DNS Name Lookup tool. The DNS ad dresses sho uld be supplied by your ISP.
• Mail Server (Optional)
The Mail Server address is the name or the IP address of the mai l server used to e-mai l
log messages; it can be a server on your LAN or the Internet. For best results , use the
same server used on your LAN for e-mail.
If you are using Network Address Translation (NAT), then you also must have the
following information:
• SonicWALL WAN IP (NAT Public) Address
The SonicWALL WAN IP (NAT Public) Address is the valid IP address that your entire
network uses to access the Internet. This address should be supplied by your ISP.
• WAN/DMZ Subnet Mask
The WAN Subnet Mask defines which IP addresses are connected to the WAN port of
the SonicWALL but not accessed through the WAN router. This subnet mask should be
supplied by your ISP.
• SonicWALL LAN IP Address
The SonicWALL LAN IP address i s the addres s assigned to the SonicWAL L LAN port and
is used to manage the SonicWALL. It should be a unique I P address from your Local
Area Network (LAN) address range.
• LAN Subnet Mask
The LAN Subnet Mask defines the range of IP addresses located on your LAN.
SonicWALL Internet Security Appliance User’s Guide Page 17
Page 19

Performing the Initial Configuration
Setting up your Management Station
All management functions on the SonicWALL are performed from a W eb browser-based
user interface. Management can be performed from any computer co nnected to the LAN
port of the SonicWALL. The computer used for management is referred to as the
Management Station.
The SonicWALL is pre-configured with the IP address “192.168.168.168", which is used to
access it during initial configuration. During the initial configuration, it is necessary to
temporarily change the IP address of your Management Station to one in the same subnet
as the SonicWALL. For example, set the IP address of your Management Statio
“192.168.168.200". Restart the Management Station to activate the address change.
Note: Appendix D describes how to change the IP address of your Management Station.
Launching the Web browser
1. Open a Web Browser. Then type the default SonicWALL IP address,
"192.168.168.168", into the Location or Address field in the Web browser.
Note: Your Web browser must be Java-enabled and support HTTP uploads in order to fully
manage SonicWALL. Netscape Navigator 3.0 and above is recommended.
The first time you contact the SonicWALL, the SonicWALL Installation Wizard
automatically launches and begins the installation process.
n to
The SonicWALL Installation Wizard simplifies the initial installatio n and con figuration o f
the SonicWALL. The Wizard provides a series of menu-driven instructions for setting the
administrator password and configuring the settings necessary to access the Internet.
Note: To bypass the Wizard, click Cancel. Then log into the Son icWALL Management
Interface by entering the User Name "admin" and the Password "password".
SonicWALL Installation Pa ge 18
Page 20

To configure you r SonicWALL appliance, read the in structions on the Wizard Welcome
window and click Next to continue.
Setting the Password
Note: It is very important to choose a pass word which cannot be easily guessed by others.
2. To set the password, enter a new password in the New Password and Confi rm New
Password fields.
This wind ow also di splays the Use SonicWALL Global Management System check box.
SonicWALL Glo bal Management System (SonicWA LL GMS) is a web browser-ba sed securit y
management system. SonicWALL GMS allows enterprises and service providers to
monitor and manage hundreds of remote SonicWALLs from a central location. F or more
information about SonicWALL GMS, contact SonicWALL Sales at (408) 745-9600.
3. Do not select the Use Global Management System check box unless your
SonicWALL is remotely managed by SonicWALL GMS. Click Next to continue.
SonicWALL Internet Security Appliance User’s Guide Page 19
Page 21

Setting the Time and Date
4. Select the appropriate Time Zone from the Time Zone menu. The SonicWALL
internal clock is set automatically by a Network Time Server on the Internet. Click Next
to continue.
Connecting to the Internet
The Connecting to the Internet screen lists the information requi red to complete the
installat ion. You nee d instructi ons for o btaining an IP ad dress automa tically or IP address es
from your ISP .
5. Confirm that you have the proper network information necessary to configure the
SonicWALL to access the Internet. Click the hyperlinks for definitions of the networking
terms. Click Next to proceed to the next step.
SonicWALL Installation Pa ge 20
Page 22

Selecting Your Internet Connection
6. Select Assi gn ed yo u a sing le sta t ic IP ad dre ss , if your ISP has provided you with
a single, valid IP address. Now go to Step 10.
7. Select the second option, Assigned you tw o or m or e IP ad dr esses , if your ISP h as
provided you with two or more IP addresses. Either NAT or Standard mode can be
enabled if your network has two or more valid IP addresses. If you select the second
option, go to Step 11.
8. Select the third option, Provided you with desktop software, a user name, and
password (PPP o E), if your ISP requires user name and password authentication as
well as the installation of log in software. If you select the third option, go to Step 12.
9. Select the fourth option, Automatically assigns you a dynamic IP address
(DHCP), if your ISP automatically assigns you an IP address from their DHCP server.
Your SonicWALL enables NAT with DHCP Cli ent, a typi cal network addres sing mode
for cable and DSL users. If you select the fourth option, go to Step 13.
Note: The SonicWALL Installation Wizard autodetects PPPoE and DHCP connections.
Therefore, it may not be necessary to select from the above options.
Confirming Network Address Translation (NAT) Mode
If you se lect Assi gned you a sing le static I P address in the Connecting to the
Internet window, the Use Network Address Translation (NAT) window is
displayed.
SonicWALL Internet Security Appliance User’s Guide Page 21
Page 23

The Use Network Address Translation (NAT) window verifies that the SonicWALL has
a registered IP address. To confirm this, click Next and go to Step 10.
Selecting Standard or NAT Enabled Mode
If you selected Assigned you a single static IP Address in Step 6, the Optional-
Network Address Translation window is displayed.
10. The Optional-Network Address Translation (NAT) window offers the ab ility to
enab le NAT. S elec t Don’t Use NAT if there are enough static IP addresses for your
SonicWALL, all PCs, and all network devices on your LAN. Selecting Don’t Use NAT
enables the Standard mode. Select Us e NAT if v alid IP addres ses are i n short s upply
or to hide all devices on your LAN behi nd the SonicWALL valid IP address. Click Next
to continue.
SonicWALL Installation Pa ge 22
Page 24
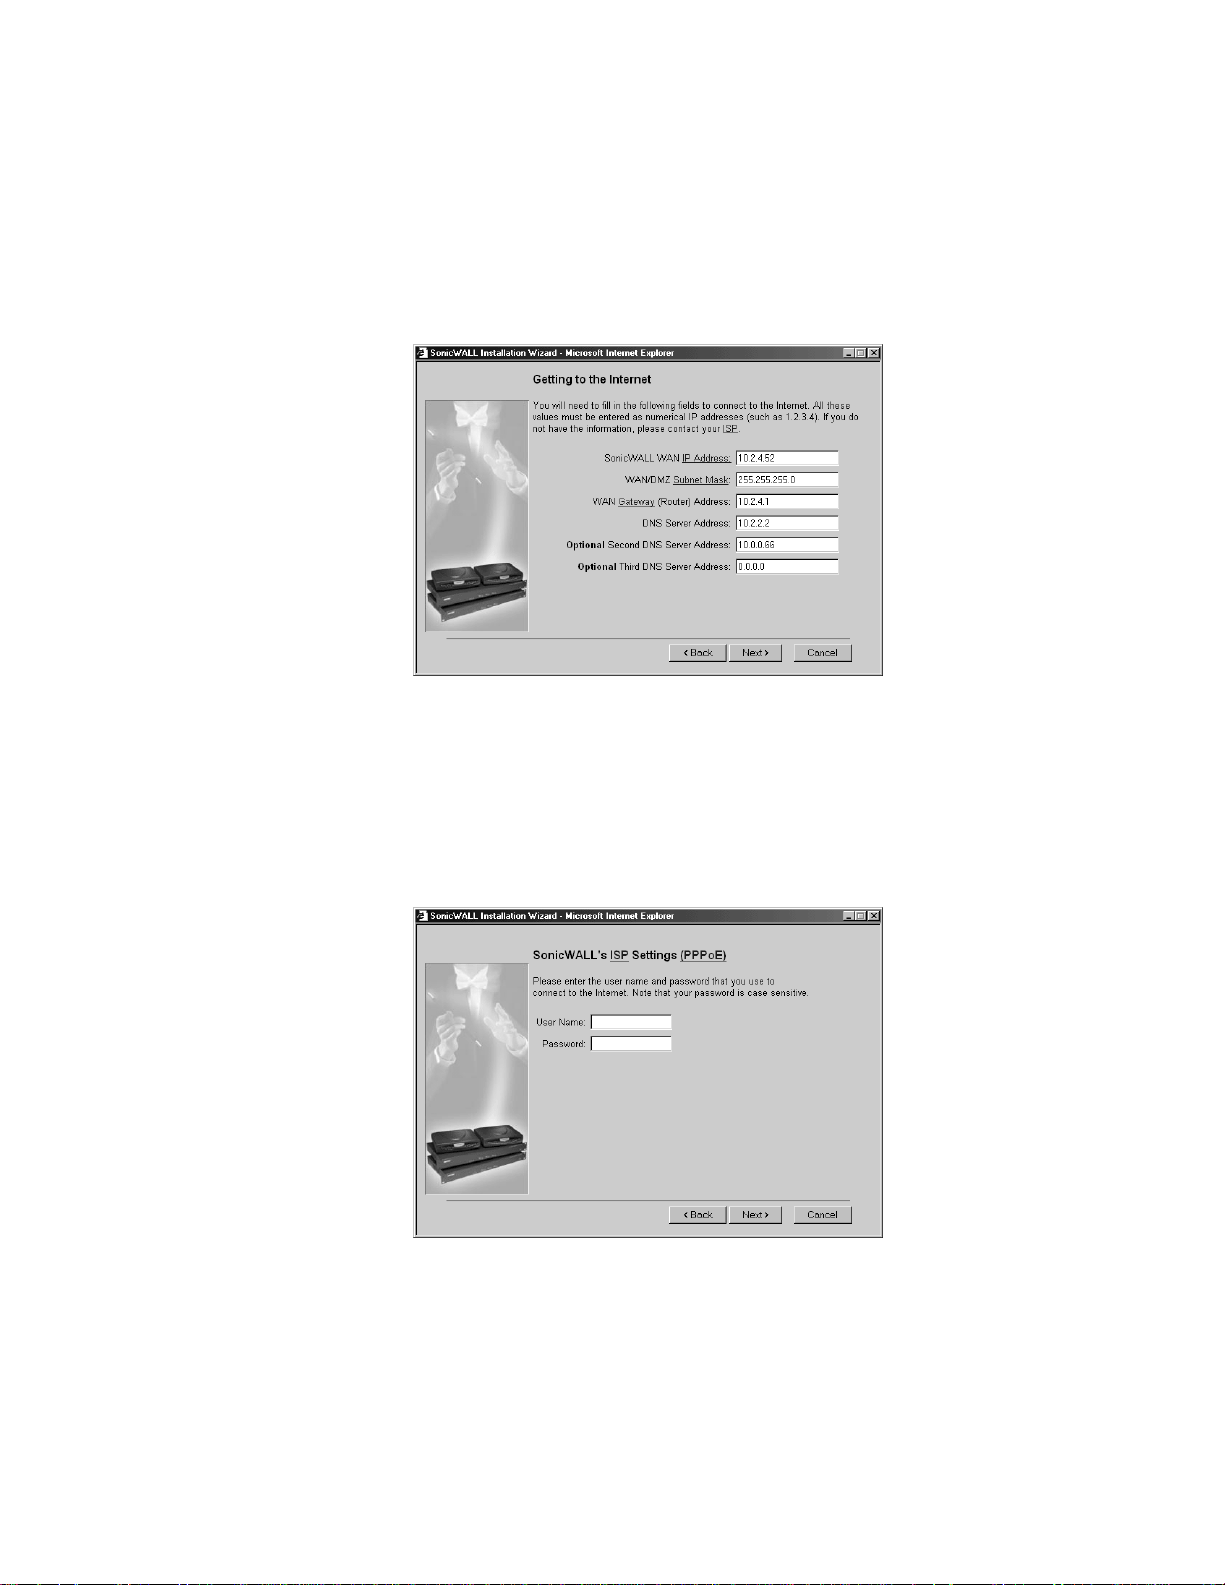
Configuring WAN Network Settings
If you selected either NAT or Standard mode, the Getting to t he Int e rne t window is
displayed.
11. Enter the valid IP address provided by your ISP in the Getting to the Inte rnet
window. Enter the SonicWALL WAN IP Address, WA N/DMZ Su bnet Mask, WAN
Gateway (Router) Address, and DNS Server Addresses. Click Next to continue.
If NAT is disabled, go to Step 13. If Standard mode is s elected, go to Step 14.
Setting the User Name and Password for PPPoE
If you select NAT with PPPoE in the Connecting to the Internet window, the
SonicWALL ISP Settings (PPPoE) wind ow is displayed
.
12. Enter the Use r Na me and Password provided by your ISP. The Password is case-
sensitive. C lick Next and go to Step 13.
SonicWALL Internet Security Appliance User’s Guide Page 23
Page 25
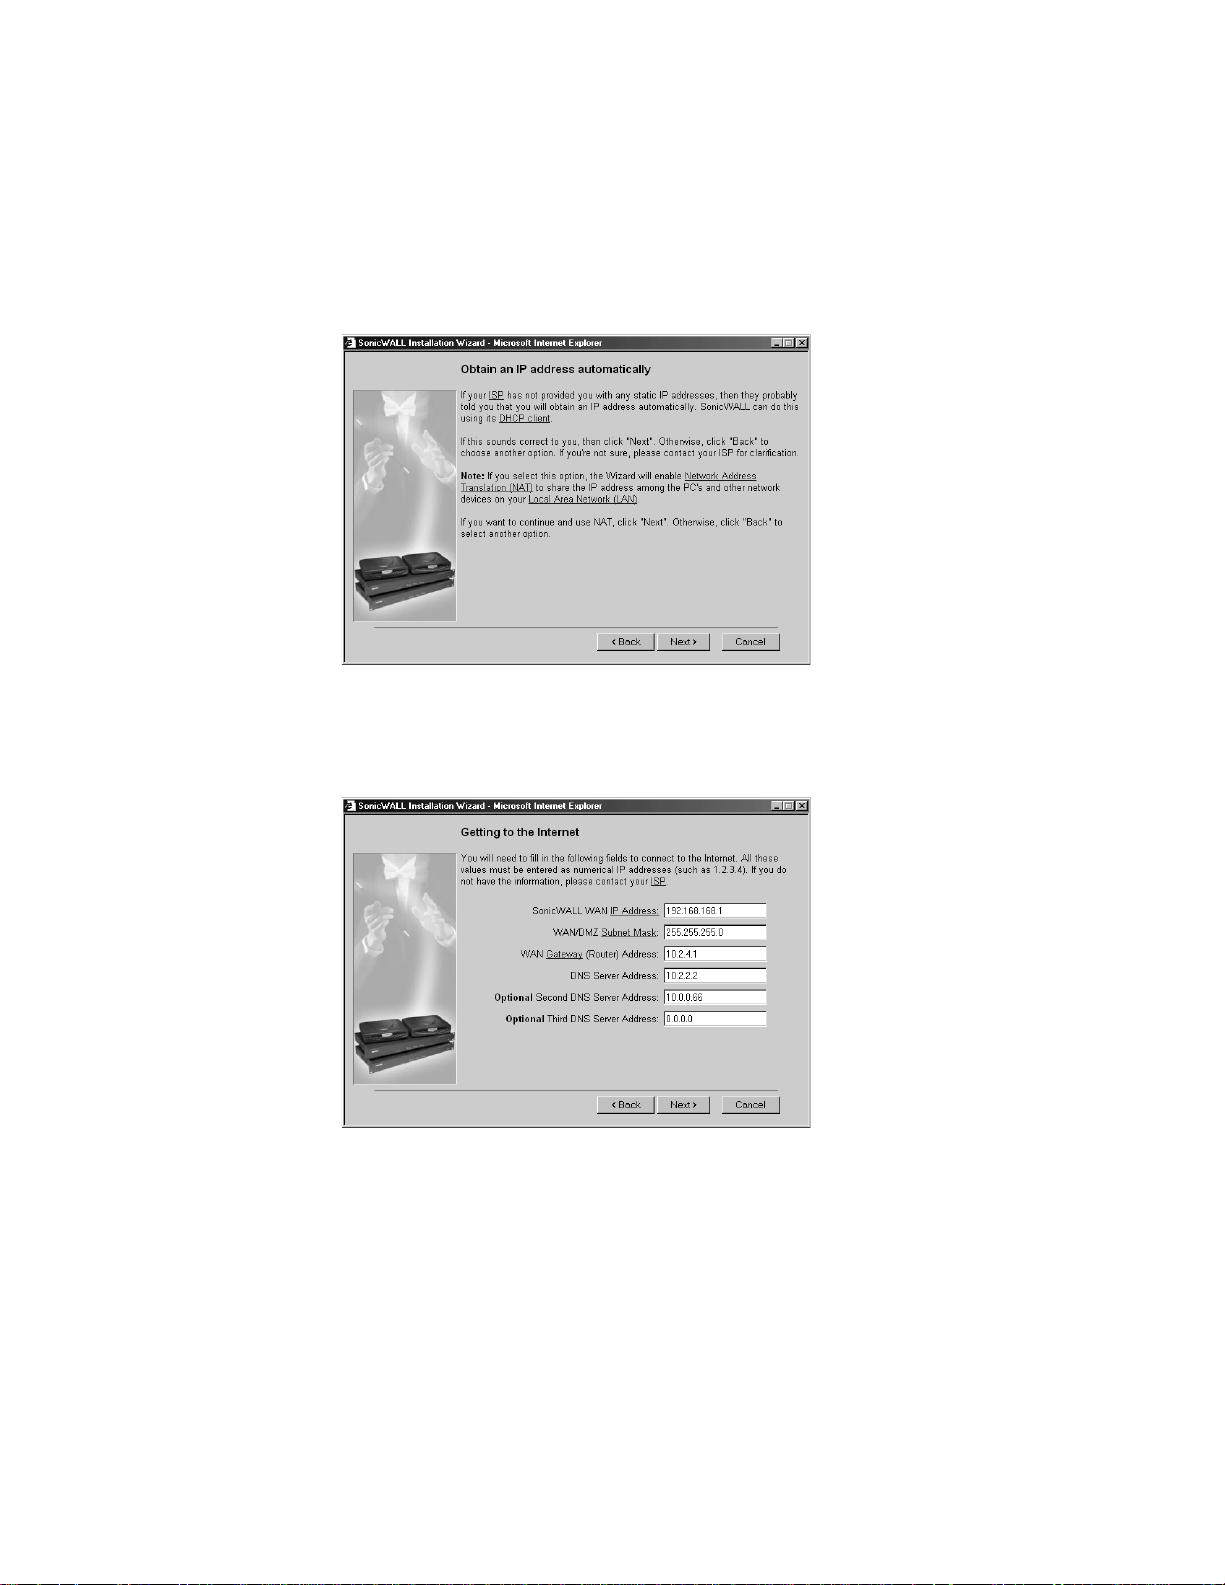
Confirming DHCP Client Mode
If you sel e ct DHCP in Step 6 , the Obtain an IP address automatically window is
displayed.
13. The O btain an I P add ress autom atica lly window states that the ISP dynamically
assigns an IP address to the SonicWALL. To confirm this, click Next and go to Step
15.
Configuring LAN Network Settings
14. The Fill in information about your LAN window allows the configuration of the
SonicWALL LAN IP Address and the LAN Subnet Mask.The SonicWALL LAN IP
Address is the private IP address assigned to the LAN port of the SonicWALL. The LAN
Subnet Mask defines the range of IP addresses on the LAN. The default values
provided by the SonicWALL work for most networks. Enter the SonicWALL LAN settings
and click Next to continue.
SonicWALL Installation Pa ge 24
Page 26
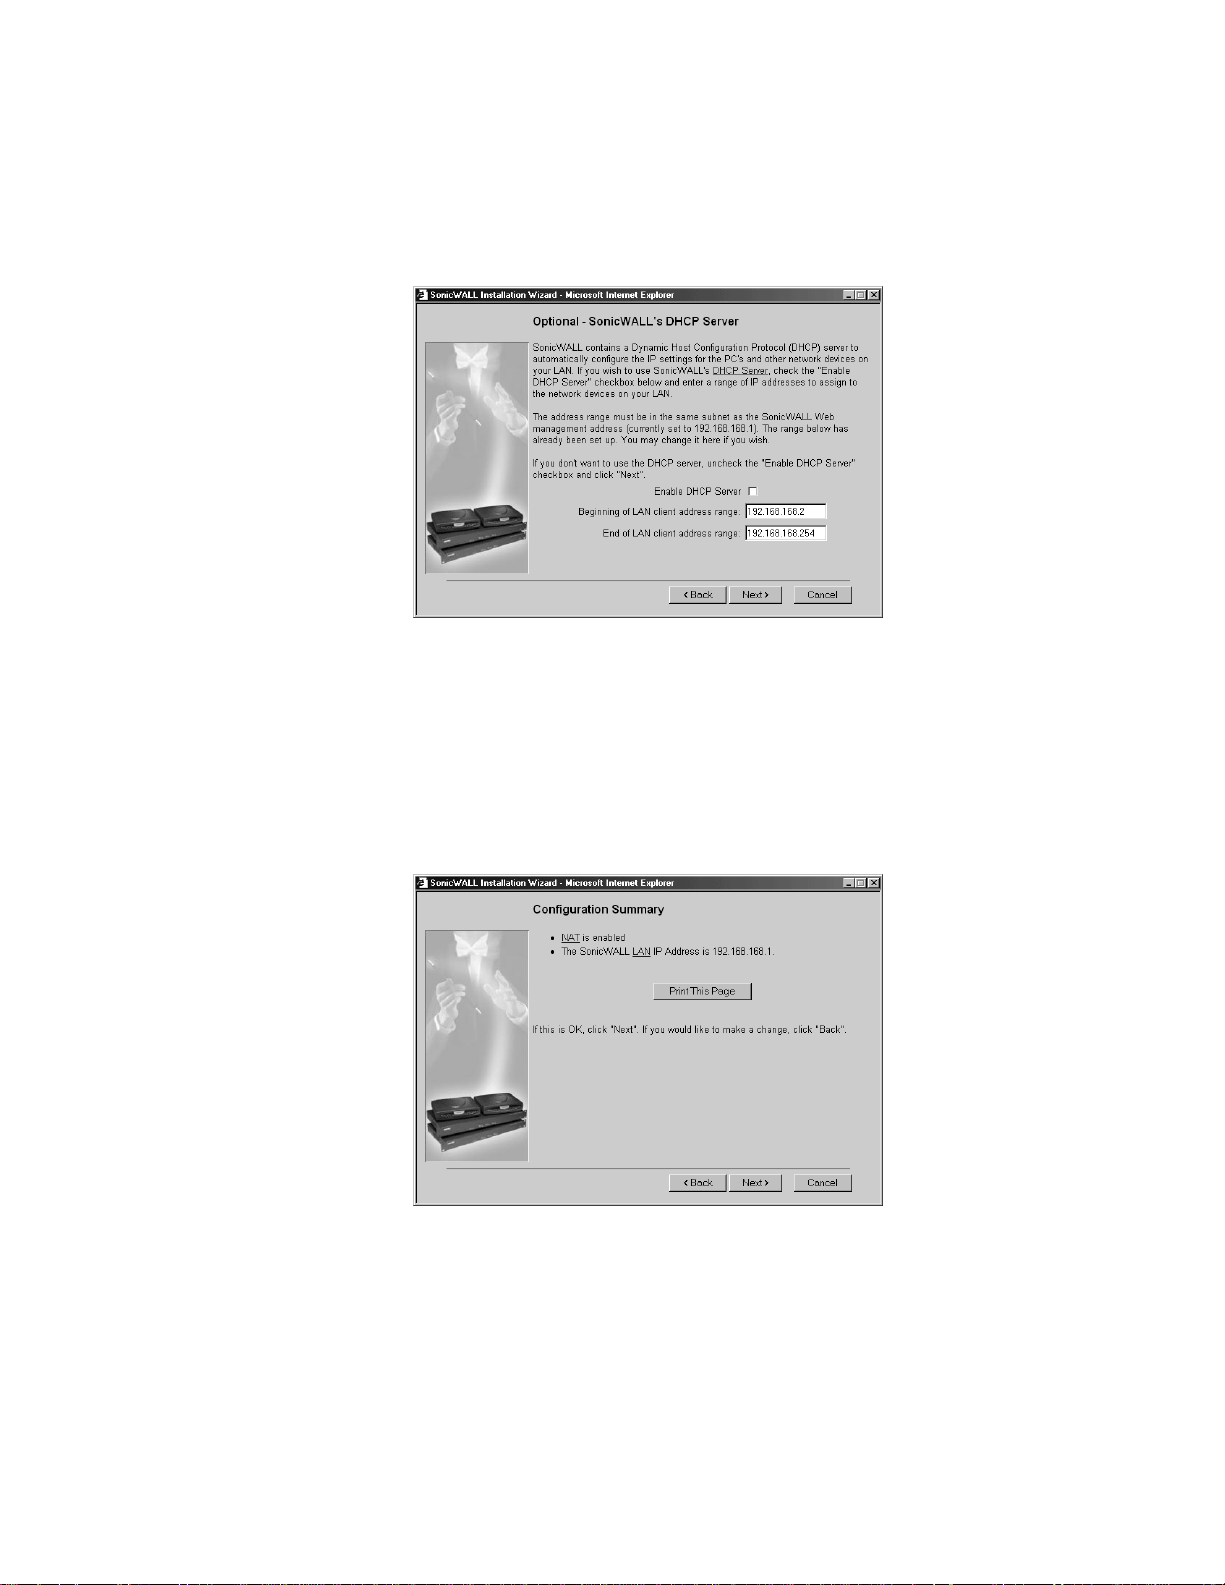
Configuring the SonicWALL DHCP Server
15. The Optional-SonicWALL DHCP Server window configures the S onicWALL DHCP
Server. If enabled, the SonicWALL automatically configures the IP settings of
computers on the LAN. To enable the DHCP server, select the Enable DHCP Server
check box, and specify the range of IP addresses that are assigned to computers on
the LAN.
If the Enable DHCP Server check box is not selected, the DHCP Server is disabled.
Click Next to continue.
Configurat io n Su m m a ry
16. The Configuration Summary window displays the configurati on defined using the
Installation Wizard. To modify any of the settings, click Back to return to the
Connect ing to the Internet w indow. If the configurat ion is correct, click Next to
proceed to the Congratulations window.
SonicWALL Internet Security Appliance User’s Guide Page 25
Page 27
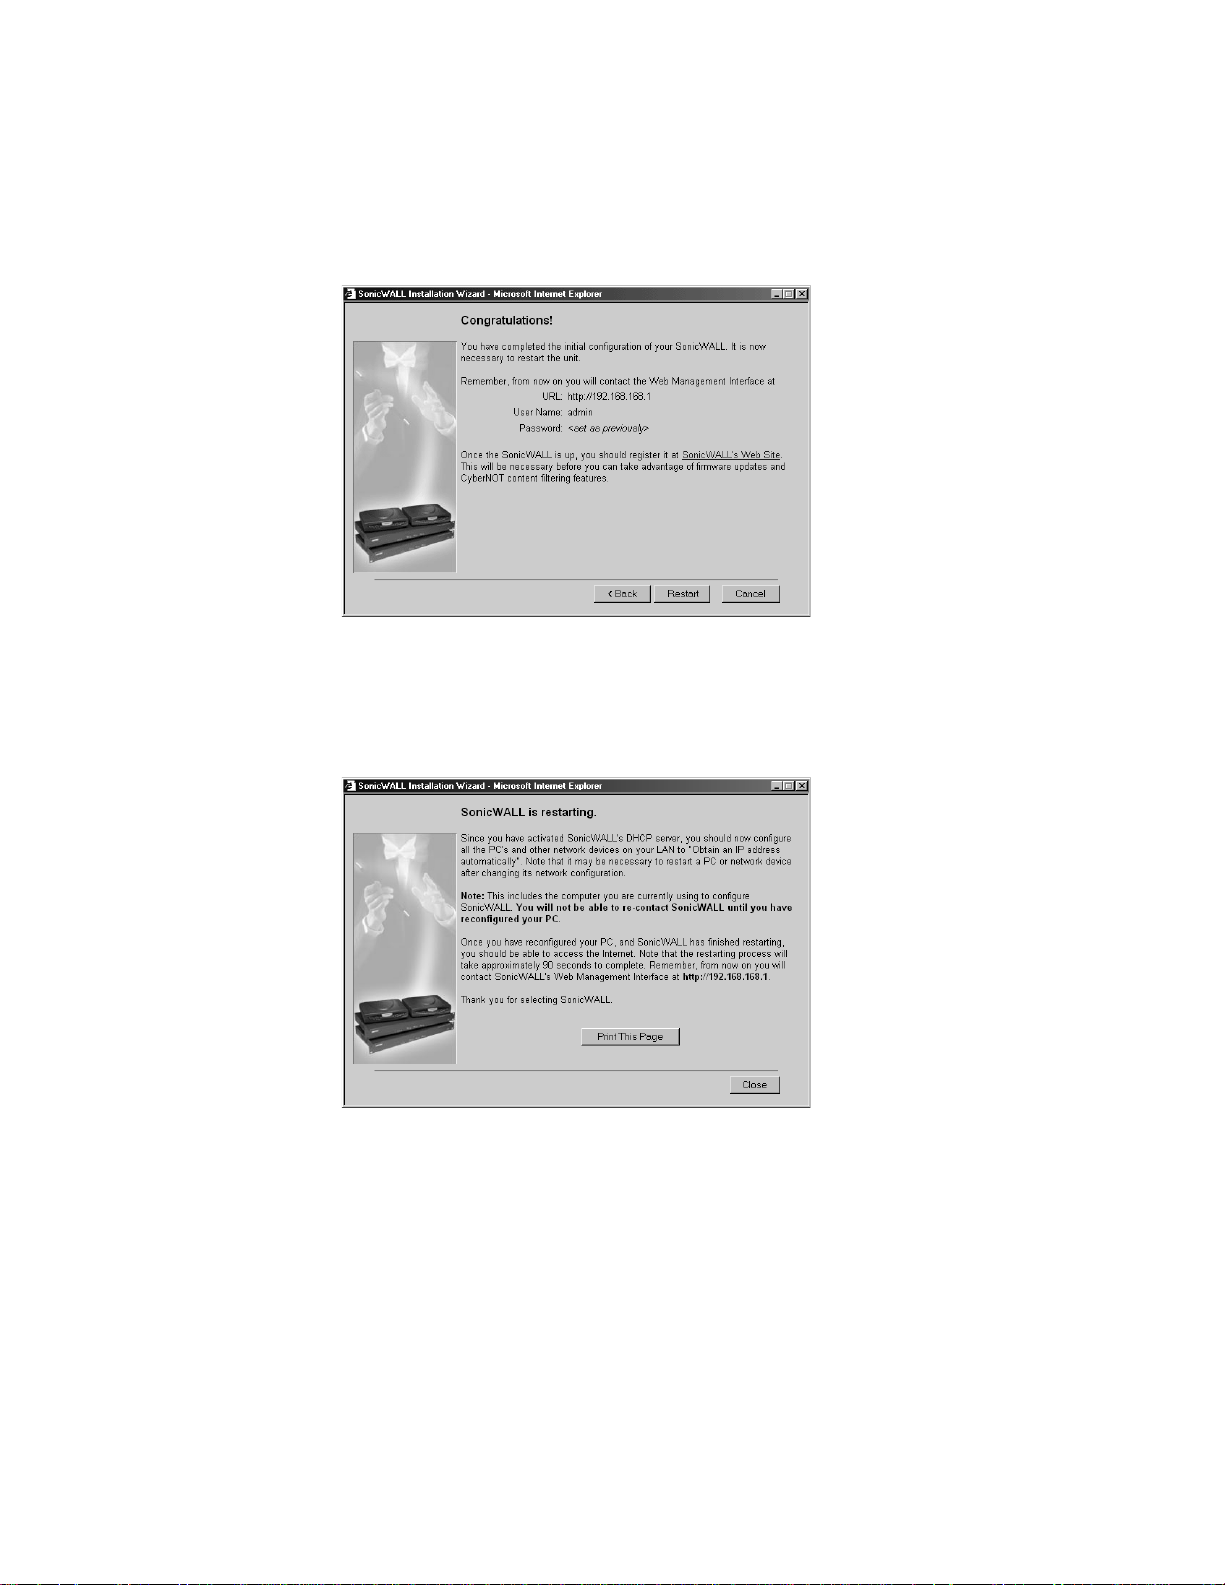
Congratulations
Note:The new SonicWALL LAN IP address, displayed in the URL field of the
Congratulations window, is used to log in and manage the SonicWALL.
17. Click Resta rt to restart the Sonic WAL L.
Restarting
Note:The final window provides important information to help configure the computers on
the LAN. Click Print this Page to print the window information.
The SonicWALL takes 90 sec onds to restart. During this time, the yellow Test LED is lit.
Click Close to exit the SonicWALL Wizard.
SonicWALL Installation Pa ge 26
Page 28

18. Reset the Management Station Information
Reset the IP address of the Management Station according to the information
displayed in the final window of the Installation Wizard.
19. Log into the SonicWALL Management Interface
Once the So nicWALL restarts, conta ct the S onicWALL Web Managem ent Interface at
the new SonicWALL LAN IP address. Ty pe the User Name “admin” and enter the
new administrator password to log into the SonicWALL.
20. R egister the SonicWALL
The Status window in the SonicWALL Web Management Interface di splays a link
to the online registration form. Registering the SonicWALL provides access to
technical support, software updates, and information about new products. Once
registered, you are eligible for a free one-month subscription to the SonicWALL
Content Filter List and a 15-day trial of SonicWALL Network Anti-Virus.
SonicWALL Internet Security Appliance User’s Guide Page 27
Page 29

3 Managing Your SonicWALL
This chapter contains a brief overview of SonicWALL management commands and
functions. The commands and functions are accessed through the SonicWALL Web
Management Interface. The co nfiguration is the same for all Son icWALL Internet
security appliances; any exceptions are noted.
1. Log into the SonicWALL using a Web Browser
You can manage the SonicWALL from any computer connected to the LAN port of
the SonicWALL using a Web browser. The computer used for management is
referred to as the "Management Station".
Note: To manage th e SonicWALL, your Web browser must ha ve Java and Java
applets enabled and support HTTP uploads.
2. Open a Web browser and type the SonicWA LL IP address---initially,
"192.168.168.168"---into the Location or Address field at the top of the
browser. An Authentication window with a Password di alogue bo x is displayed.
3. Type “admin” in the User Name field and the password previously defined in
the Installation Wizard in the Password fiel d. Passwords are c ase-sensitiv e.
Enter the password exactly as defined and click Login.
Note: All SonicWALLs are configured with the U ser Name “admin” an d the default
Password “password”. The User Name is not config ura b le.
If you cannot log in to the SonicWALL, a cached copy of the page is displayed
instead of the correct page. Click Reload or Refresh on the Web browser and try
again. Also, be sure to wait until the Java applet has finished loading before
attempting to log in.
Once the password is entered, an authenticated management session is
established. This session times out after 5 minutes of inactivity. The default timeout can be increased on the Password window in the General section.
Page 28 Managing Your SonicWALL
Page 30

Status
To view the Status tab, log into y our SonicWALL using your web browser. Click General
and then click the Status tab.
Note: The SonicWALL Status window is displayed above. Each SonicWALL Internet
security appliance displays unique characteristics, such as the presence of VPN acceleration
hardware or a different amount of mem ory.
The Status tab displays the following information:
• SonicWALL Serial Number - the serial number of the SonicWALL unit.
• Number of LAN IP addresses all owed with this li cense - number of IP addresses
that can be managed by the SonicWALL
• Registration code - the registration code generated when the SonicWALL is
registered at <http//www.mysonicwall.com>.
• SonicWALL Active time - the length of time in days, hours and minutes that the
SonicWALL is active.
• Firmware version - shows the current version number of the firmware installed on
the SonicWALL.
• ROM version - the version number of the ROM.
• CPU - the type and speed of the SonicWALL processor.
SonicWA LL Internet Se curity App li an c e Us er’ s Gu ide Page 29
Page 31

• VPN Hardware Accelerator Detected - indicates the presence of a VPN Hardware
Accelerator in the firewall. This allows better throughput for VPN c onnections.
• RAM - the amount of Random Access Memory on the board
• Flash - the size of the flash on the board
• Ethernet Speeds - netwo rk speeds of the network card
• Current Connections - number of computers connecte d to the SonicWALL.
Other SonicWALL genera l status information is displayed in this section re lating to other
features in the SonicWALL such as the type of network setti ngs in use, log settings, content
filter use, and if Stealth Mode is enabled on the SonicWALL.
The General, Log, Filter, Tools, Access, Advanced, DHCP, VPN, Anti-Virus, and
High Availa bilit y buttons appear on the le ft side of the window . When one of the buttons
is clicked, related management functions are selected by clicking the tabs at the top of the
window.
Note: High Avai labili ty is avai labl e in the S onicWALL PRO and the SonicWALL P RO-VX. The
High Availability button does not appear in the Web Management Interface of the
SonicWALL TELE2, the SonicWALL SOHO2, and the SonicWALL XPRS2
A Logout button at the bottom of the screen terminates the management session and
redisplays the Authentication window. If Logout is clicked, you must log in again to
manage the Sonic WALL. Online help i s also availabl e. Click Help at the top of any browser
window to view the help files stored in the SonicWALL.
The Status wind ow, sh own on the previous page, displays the status of your SonicWALL.
It contains an overview of the SonicWALL configuration, as well as any important
messages. Check the Status window after making changes to ensure that the SonicWALL
is configured proper ly.
.
CLI Support and Remote Management
Out-of-band management is available on SonicWALL Internet security appliances using the
CLI (Command Line Interfac e) feature. SonicWALL Internet security appliances can be
managed from a console using typed commands and a modem or null-modem cable that is
connected to the serial port located on the back of the Sonic WALL appliance. CLI Support
and Remote Management is available on the PRO and PRO-VX models. The o nly modem
currently supported is the US Robotics v.9 0/v.92 modem. CLI communica tion re q uires the
following modem settings:
• 9600 bps
• 8 bits
• no parity
• no hand-shaking
After the modem is accessed, a terminal emulator window such as a hyper ter minal window
is used to manage the SonicWALL Internet security appliance. Once the SonicWALL is
Page 30 Managing Your SonicWALL
Page 32

accessed, type in the User N ame and password: adm in for User Name and then the
password used for the management interface.
The following CLI commands are available for the SonicWALL:
• ? or Help - d isplays a listing o f the top level commands available.
• Export - exports preferences from the SonicWALL using Z-modem file transfer
protocol.
• Import - imports preferences from the SonicWALL using Z-modem file transfer
protocol.
• Logout - logout of the SonicWALL appliance.
• Ping - pings either an IP address or domain name for a specified host.
• Restart - restart the SonicWALL
• Restore - restores the factory default settings for all saved parameters with the
exception of the password, the LAN IP address, and the subnet mask.
• Status - displays the information typically seen on the web management inte rface
tab labeled General.
• TSR - retrieves a copy of the tech support report using Z-modem file transfer protocol.
SonicWA LL Internet Se curity App li an c e Us er’ s Gu ide Page 31
Page 33

4 General and Network Settings
This chapter describes the tabs in the General section and the configuration o f
the SonicWALL Network Settings. The Network Settings include the
SonicWALL IP settings, the administrator password, and the time and date. There
are three tabs other than the Status tab in the General section:
• Network
• Time
• Password
Network
To confi g ur e the So nicWALL Network Settings, click General on the left side of
the browser window, and then click the Network tab at the top of the window.
Note: The High Availability button only appears i n the Web Management Interface
of the SonicWALL PRO and PRO-VX.
General and Network Settings Page 32
Page 34

Network Settings
Network Addressing Mode
The Network Addressing Mode menu determines the network address scheme of your
SonicWALL. It includes four options: Standard, NAT Enabled, NAT with DHCP Client
and NAT with PPPoE.
• Standard mode requires valid IP addresses for all computers on your network, but
allows remote access to authenticated users.
• NAT Enabled mode translates the private IP addresses on the network to the single,
valid IP address of the SonicWALL. Select NAT Enabled if your ISP assigned you only
one or two valid IP addresses.
• NAT w it h DHCP Cl ie n t mo de configures the SonicWALL to request IP settings from
a DHCP server on the Internet. N AT with DHCP Client is a typical network addres sing
mode for cable and DSL customers.
• NAT with PPPoE mo de uses PPPoE to connect to the Internet. If desktop software
and a user name and password is required by your ISP, select NAT with PPPoE.
LAN Settings
• SonicWALL LAN IP Address
The SonicWALL LAN IP Address i s the I P addres s assigned to the Son icWALL L AN port.
It is used for m anaging the S onicWALL. This I P address should be a un ique address
from the LAN address range.
• LAN Subnet Mask
The LAN Subnet Mask defines which IP addresses are on the LAN. The default Class C
subnet mask of "255.255.255.0" supports up to 254 IP addresses on the LAN. If the
Class C subnet mask is u sed, al l l ocal area net work addresses s hould cont ain the s ame
first three numbers as the SonicWALL LAN IP Address--for example, "192.168.168."
Multiple LAN Subnet Mask Support
Note: This feature does not replace or substitute configuring routes with the Routes tab in
the Advanced section of the SonicWALL. If you have to define a subnet on the other side
of a router, you must define a static route using the Routes tab in the Advanced sectio n.
Multiple LAN Subnet Mask Support facilitates the support of legacy networks
incorporating the Son icWALL, and ma kes it easier to add additional nodes if t he original
subnet is full. Before you can configure multiple local LAN subnets in the SonicWALL, you
must have the fol lowing information:
• Network Gateway Address - This is an IP address assigned to the SonicWALL, in
addition to the existing LAN IP address. If you have config ured your SonicWALL in
Standard mo de, the IP address should be the Default Gateway IP address assigned
to your Internet router on the sam e subnet. All users on the subnet you are c onfiguring
must use this IP address as their default router/gateway address.
Page 33 SonicWALL Internet Security Appliance User’s Guide
Page 35

• Subnet Ma sk - This value defines the size, and based upon the Network Gateway
entry, the scope of the subnet. If you are configuring a subnet mask that currently
exists on the LA N, enter the ex isting subnet mask address into the Subnet Mask field.
If you are configuring a new subnet mask, use a subnet mask that does not overlap
any previously defined subnet masks.
Note: The SonicWALL cannot be managed from any of the additional Network Gateway
addresses. You must use t he IP address set as th e L AN IP addres s of the Son icWALL. Also,
you cannot mix Sta ndard and NAT subnets behind the SonicWALL.
WAN Settings
• WAN Gateway (Router) Address
The WAN Gateway (Router) Address is the IP address of the WAN router or default
gateway that connects your network to the Internet. If you use Cable or DSL, your
WAN r outer is probably located at your IS P.
If you select NAT with DHCP Cli ent or NAT with PPPoE mode, the WAN Gateway
(Router) Address is assigned automatically.
SonicWALL WAN IP Address
The SonicWALL WAN IP Address is a valid IP address assigned to the WAN port of the
SonicWALL. This address should be assigned by your ISP.
If you select NAT Enabled mode, this is the only address seen by users on the
Internet and all activity appears to originate from this address.
If you select NAT with DHCP Client or NAT with PPPoE mode, the So nicWALL WAN
IP address is assigned automatically.
If yo u sele ct Standard m ode, the SonicWALL WAN IP Address is the same as the
SonicWALL LAN IP Address.
• WAN/DMZ Subnet Mask
The WAN/DMZ Subnet Mask determines which IP addresses are located on the
WAN. This subnet mask should be assigned by your ISP.
If you selec t NAT with DHCP Client or NAT with PPPoE mode, the WAN/DMZ
Subnet Mask is assigned automatically.
If you select Standard mode, the WAN/DMZ Subnet Mask is the same as the LAN
Subnet Mask.
DNS Settings
• DNS Servers
DNS Servers, or Domain Name System Servers, are used by the SonicWALL for
diagnostic tests with the DNS Lookup Tool, and for upgrade and registration
functionality. DNS Server addresses should be assigned by your ISP.
General and Network Settings Page 34
Page 36

If you select NAT with DHCP Client or NAT with PP PoE mode, the DN S Server
addresses is assigned automatically.
Note: The SonicWALL does not relay DNS settings to the LAN; you must enable and
configure the SonicWALL's DHCP server or manually configure your computer DNS
settings to obtain DNS name resolution.
Standard Configuration
If your ISP provided you with enough IP addresses for all the computers and network
devic es on your LA N, enable Standard mode.
To configure Standard addressing mode, complete the following instructions:
1. Select Standard from the Network Addressing Mode menu. Because NAT is
disabled, you must assign valid IP addresses to all computers and network devices on
your LAN.
2. Enter a unique, vali d IP a ddress f rom yo ur LAN a ddress range in the SonicWALL LAN
IP Address field. The SonicWALL LAN IP Address is the address assigned to the
SonicWALL LAN port and is used for management of the SonicWALL.
3. Enter your network's subnet mask in the LAN Subnet Mask field. The LAN Subnet
Mask tells your SonicWALL which IP addresses are on your LAN. The default value,
"255.255.255.0", supports up to 254 IP addresses.
4. Enter your WAN router or default gateway address in the WA N Gate way (Ro uter)
Address field. Your router is the device that connects your network to the Internet. If
you use Cable or DSL, your WAN router is located at your ISP.
5. Enter your DNS server IP address(es) in the DNS Servers field. The SonicWALL uses
the DNS servers for diagnostic tests and for upgrade and registration functionality.
6. Click Update. Once the SonicWALL has been updated, a message confirming the
update is displayed at the bottom of the browser windo w. Restart the SonicWALL for
these changes to take effect.
NAT Enabled Configuration
Network Address Translation (NAT) connects your entire network to the Internet using a
single IP address. Network Address Translation offers the following:
• Internet access to addi tional computers on the LAN. Multiple computers can access the
Internet even if your ISP only assigned one or two valid I P addresses to your network.
• Additional security and anonymity because your LAN IP addresses are invisible to the
outsi de world.
If your ISP hasn't provided enough IP addresses for all machines on your LAN, enable NAT
and assign your network a private IP address range. You should use addresses from one
of the following address ranges on your private network:
Page 35 SonicWALL Internet Security Appliance User’s Guide
Page 37

10.0.0.0 - 10.255.255.255
172.16.0.0 - 172.31.255.255
192.168.0.0 - 192.168.255.255
Note: If your network address range uses valid TCP/IP addresses, Internet sites within
that range are not accessible from the LAN. For example, if you assign the address range
199.2.23.1 - 199.2.23.255 to your LAN, a Web server on the Internet with the address of
199.2.23.20 is not accessible.
When NAT is enabled, users on the Internet cannot access mac hines on the LAN unless
they have been designated as Public LAN Servers.
To enable Network Address Translation (NAT), complete the following instructions.
1. Select NAT Enabled from the Network Addressing Mode menu in the Network
window.
2. Enter a unique IP address from your LAN address range in the SonicWALL LAN IP
Address field. The SonicWALL LAN IP Address is the address assigned to the
SonicWALL LAN port and is used for management of the SonicWALL.
3. Enter your network's subnet mask in the LAN Subnet Mask field. The LAN Subnet
Mask tells the SonicWALL which IP addresses are on your LAN. Use the default value,
"255.255.255.0", if there are less than 254 computers on your LAN.
General and Network Settings Page 36
Page 38

4. Enter your WAN router or default gateway address in the WA N Gate way (Ro uter)
Address field. This is the device that connects your network to the Internet. If you use
Cable or DSL, your WAN router is probably located at your ISP.
5. Enter a valid IP address assigned by your ISP in the SonicWALL W AN IP (NAT
Public) Address field. Because NAT is enabled, all network activity appears to
originate fr om this address.
6. Enter you r WAN subn et mask in t he WAN/DMZ S ubnet Mask fiel d. This subnet mask
should be assigned by your ISP.
7. Enter your DNS server IP address(es) in the DNS Servers field. The SonicWALL uses
these DNS servers for diagnostic tests and for upgrade and registration functionality.
8. Click Update. Once the SonicWALL has been updated, a message confirming the
update is displayed at the bottom of the browser windo w. Restart the SonicWALL for
these changes to take effect.
If you enable Network Address Translation, designate the SonicWALL LAN IP Address
as the gateway address for computers on your LAN. Consider the following example:
• The SonicWALL WAN Gateway (Router) Address is "100.1.1.1".
• The SonicWALL WAN IP (NAT Public) Address is "100.1.1.25".
• The private SonicWALL LAN IP Address is "192.168.168.1".
• Computers on the LAN have private IP addresses ranging from "192.168.168.2" to
"192.168.168.255".
In this example , "192.1 68.168.1", the SonicWALL LA N IP Add ress, is us ed as the gateway
or router address for all computers on the LAN.
NAT with DHCP Client Configuration
The SonicWALL can receive an IP address from a DHCP server on the Internet. If your ISP
did not provide you with a valid IP address, and instructed you to set your network settings
to obtain an IP address automatically, enable NAT with DHCP Client. NAT with DHCP
Client mode is typically used with Cable and DSL connections.
To obtain IP settings dynamically, complete the following instructions.
Page 37 SonicWALL Internet Security Appliance User’s Guide
Page 39

1. Select NAT with DHCP Client from the Network Addressing Mode menu.
2. Enter a unique IP address from your LAN address range in the SonicWALL LAN IP
Address field. The SonicWALL LAN IP Address is the address assigned to the
SonicWALL LAN port and is used for management of the SonicWALL.
3. Enter your network subnet mask in the LAN Subnet Mask field. The LAN Subnet Mask
tells your SonicWALL which IP addresses are on your LAN. The default value,
"255.255.255.0", supports up to 254 IP addresses.
4. Click Update. Once the SonicWALL has been updated, a message confirming the
update is displayed at the bottom of the browser windo w. Restart the SonicWALL fo r
these changes to take effect.
Note: When NAT is enabled, designate the SonicWALL LAN IP Address as the gateway
address for computers on the LAN.
When your SonicWALL has successfully received a DHCP lease, the Network window
displays the SonicWALL WAN IP settings.
•The Lease Expires value shows when your DHCP lease expires.
•The WAN Gateway (Router) Address, SonicWALL WAN IP (NAT Public)
Address, WAN/D MZ Subn et Ma sk, and DN S Servers are obtained from a DHCP
server on the Internet.
General and Network Settings Page 38
Page 40

Note: The SonicWALL does not relay DNS settings to the LAN; you must enable and
configure the SonicWALL's DHCP server or manually configure DNS settings on your
computers to obtain DNS name resolution.
In the WAN/DMZ Settings section of Network, you can Renew and Release the
SonicWALL WAN IP (NAT Public) Address lease. When you click on Renew, the SonicWALL
renews the IP address used for the WAN IP address. Click Release, and the lease is
released with the DHCP server.
NAT with PPPoE Configuration
The SonicWALL can use Point-to-Point Protocol over Ethernet to connect to the Internet. If
your ISP requires the installation of desktop software and user name and password
authentication to access the Internet, enable NAT with PPPoE.
To configure NAT with PPPoE, complete the following instructions.
1. Select NAT with PPPoE from the Network Addressing Mode menu.
2. Enter a unique IP address from your LAN address range in the SonicWALL LAN IP
Address field. The SonicWALL LAN IP Address is the address assigned to the
SonicWALL LAN port and is used for management of the SonicWALL.
3. Enter your network subnet mask in the LAN Subnet Mask field. The LAN Subnet
Mask tells your SonicWALL which IP addresses are on your LAN. Use the default value,
"255.255.255.0", if there are less than 254 computers on your LAN.
Page 39 SonicWALL Internet Security Appliance User’s Guide
Page 41

4. Enter the user name provided by your ISP in the User Name field. The user name
identifies the PPPoE client.
5. Enter the password provided by your ISP in the Password field. The password
authenticates the PPPoE session. This field is case sensitive.
6. Sele ct the Disconnect after __ Minutes of Inactivity check box to automatically
disconnect the PPPoE connection after a specified period of inactivity. Define a
maximum number of minutes of inactivity in the Minutes field. T h is v alu e c an ra n ge
from 1 to 99 minutes.
7. In the WAN/DMZ section, select Obtain an IP Addre ss Au tom atica lly if your ISP
does not provide a static IP address. Select U se the follo wing IP Add ress if you r
ISP assigns a specific IP address to you.
8. Click Update. Once the SonicWALL has been updated, a message confirming the
update is displayed at the bottom of the browser windo w. Restart the SonicWALL fo r
these changes to take effect.
Note: When NAT is enabled, the SonicWALL LAN IP Address is used as the gateway
address for computers on the LAN.
When your SonicWALL has successfully established a PPPoE connection, the Network
page displays the SonicWALL WAN IP settings. The WAN Gateway (Router) Address,
SonicWAL L WAN IP (NAT Public) Address , WA N/DMZ Subnet Mask, and DNS
Servers are displayed.
Note: The SonicWALL does not relay DNS settings to the LAN; you must enable and
configure the SonicWALL DHCP server or manually configure the computer DNS settings to
obtain DNS name resolution.
Restart the SonicWALL
Once the network settings have been updated, the Status bar at the bottom of the
browser window displays "Restart SonicWALL for changes to take effect." Restart the
SonicWALL by clicking Restart. Then click Yes to confirm the restart and send the restart
command to the SonicWALL. The restart can take up to 90 seconds, during which time the
SonicWALL is inaccessible and all network traffic through the Sonic WA LL is halted.
Note: If you ch ange the Son icWALL LAN IP Address, you must to change the Management
Station IP address to be in the same subnet as the new LAN IP address.
General and Network Settings Page 40
Page 42

Setting the Time and Date
1. Click the Time tab.
The SonicWALL uses the time and date settings to time stamp log events, to automatically
update the Content Filter List, and for other internal purposes.
2. Select your time zone fro m the Time Zone menu.
3. Click Update to add the information to the SonicWALL.
You can also enable automatic adjustments for daylight sa ving s time, use universal
time (UTC) rather than local time, and display the date in International format,
with the day preceding the month.
To set the time and date manually, clear the check boxes and enter the time (in 24-ho ur
format) and the date.
NTP Settings
Netwo rk Ti me Pr ot oco l (NTP) is a prot ocol use d to sy nch ronize com put er cl ock t imes
in a network of com puters. NTP uses Coordinated Univers al Time (UTC) to synchronize
computer cl ock t ime s to a mi ll is eco nd, an d sometimes to a fractio n o f a mill is eco nd . Selec t
Use NTP to set time automatically if you want to use your local server to set the
SonicWALL clock. You can also set the Update Interval for the NTP server to synchronize
the time in the SonicWALL. The default value is 60 minutes. You can add NTP servers to
the SonicWALL for time synchronization by typing in the IP address of an NTP server in the
Add NTP Server field. If there are no NTP Servers in the list, the internal NTP list is used
Page 41 SonicWALL Internet Security Appliance User’s Guide
Page 43

by default. To remove an NTP server, highlight the IP address and click Delete NTP
Server.
When you have configured the Time window, click Update. Once the SonicWALL has been
updated, a message confirming the update is displayed at the bottom of the browser
window.
Setting the Administrator Password
1. Click the Password tab.
To set the password, enter the old password in the Old Password field, and the new
password in the New Password f ield. Type the new pa ssword again in the Conf irm New
Password field and click Upda te . Once the SonicWALL has been updated, a message
confirming the update is displayed at the bottom of the browser window.
Note: When setting the password for the first time, remember that the SonicWALL's
default password is “password”.
If the password is not entered exactly the same in both New Password fields, the
password is not changed. If you mistype the password, you are not locked out of the
SonicWALL.
Warning: The password ca nnot be rec overed if it is lost or forgotten. If the password is
lost, you must to reset the S onicWALL to its factory default state. Go to Appendix E for
instructions.
General and Network Settings Page 42
Page 44

Setting the Administrator Inactivity Timeout
The Administrator Inactivity Timeout setting allows you to configure the length of
inactivity that can elapse before you are automatically logged ou t of the Web Management
Interface. The SonicWALL is preconfigured to log out the administrator after 5 minutes of
inactivity.
Note: If the Administrator Inactivity Timeout is extended beyond 5 minutes, you
should end every management s ess io n by cli cking Logout to prevent unauthorized access
to the SonicWALL Web Ma nagement Interface.
Enter the desired number of minutes in the Adm inistrator Inactivity Timeout se c tio n
and click Update. The I nactivity T imeout can ra nge from 1 to 99 minutes. Once the
SonicWALL has been updated, a message confirming the update is displayed at the bottom
of the browser window.
Page 43 SonicWALL Internet Security Appliance User’s Guide
Page 45

5 Logging and Alerts
This chapter describes the SonicWALL Internet Security appliance logging, alerting,
and reporting features, which can be viewed in the Log section of the SonicWAL L
Web Management Interface.There are three tabs in the Log section:
• View Log
• Log Settings
• Reports
A fourth tab, ViewPoint
upgrade for the PRO, but it is included with the PRO-VX.
View Log
The SonicWALL m aint ains an Event log which displays potential security threats.
This log can be viewed with a browser using the So nicWALL Web Management
Interface, or i t can be automatically s ent to an e- mail addres s f or conven ience and
archiving. The log is displayed in a table and is sortable by column.
The SonicWALL can alert you of important events, such as an attack to the
SonicWALL. Alerts are immediately e-mailed, either to an e-mail address or to an
e-mail pager.Each log entry contains the date and time of the event and a brief
message describing the event.
Click Log on the left side of the browser window, and then c lick the View Log tab.
™, is available on the PRO and PRO-VX. It is a purc hased
Page 44 SonicWA LL Internet Security Appliance User’s Guide
Page 46

SonicWALL Log Messages
Each log entry contains the date and time of the event and a brief message describing the
event. It is also possible to copy the log entries from the management interface and paste
into a report.
• TCP, UDP, or ICMP packets dropped
When IP packets are blocked by the SonicWALL, dropped TCP, UDP and ICMP
messages is displayed. The messages include the source and destination IP addresses
of the packet. The TCP or UDP port number or the ICMP code follows the IP address.
Log messages usually include the name of the service in quotation marks.
• Web, FTP, Gopher, or Newsgroup blocked
When a machine attempts to connect to the blocked site or newsgroup, a log event is
displayed. The machine's IP address, Ethernet address, the name of the blocked Web
site, and the Content Filter List Code is displayed. Code definitions for the 12
Content Filter List categories are shown below.
a=Violence/Profanity g=Satanic/Cult
b=Partial Nudity h=Drug Culture
c=Full Nudity i=Militant/Extremist
d=Sexual Acts j=Sex Education
e=Gr oss De pictions k=Gamblin g/Illegal
f=Intolerance l=Alcohol/Tobacco
Descriptions of these categories are available on the Web at <http://www.sonicwall.com/
Content-Filter/categories.html>.
• ActiveX, Java, Cookie or Code Archive blocked
When ActiveX, Java or Web cookies are blocked, messages with the source and
destination IP addresses of the connection attempt is displayed.
• Ping of Death, IP Spoof, and SYN Flood Attacks
The IP address of the machine under attack and the source of the attack is displayed.
In most attacks, the source address shown i s fake and does n ot reflect the real source
of the attack.
Note: Some network conditions can produce netw ork traf fic that appears to be an attack,
even when no one is deliberately attacking the LAN. To follow up on a possible attack,
contact your ISP to determine the source o f the attack. Regardless of the nature of the
attack, your LAN is protected and no further steps must be taken.
Loggin g an d A ler ts Page 4 5
Page 47

Log Sett in gs
Click Log on the left side of the browser window, and then click the Log Settings tab.
Configure the following settings:
1. Mail Server - To e-mail log or alert messages, enter the name or IP address of your
mail server in the Mail Server field. If this field is left blank, log and alert messages are
not be e-mailed.
2. Send Log To - Enter your full e-mail address(username@mydomain.com) in the Send
log to field to receive the event log via e-mail. Once sent, the log is cleared from the
SonicWALL memory. If this field is left blank, the log is not e-mailed.
3. Sen d Alert s To - Enter your f ull e-mail address (username@mydomain.com) in the
Send alerts to field to be imme diatel y e-mai led when atta cks or sys tem erro rs occur.
Enter a standard e-mail address or an e-mail paging service. If this field is left blank,
alert messages are not e-mailed.
4. Firewall Name - The Firewall Nam e a p pe ar s i n th e subjec t of e -m a ils se nt by th e
SonicWALL. The Firewall Name is h e lpful if yo u a re m a n agi n g m u lt i ple S on i cW A L Ls
because it specifies the individual SonicWALL sending a log or an alert e-mail. By
default, the Firewall Name is set to the SonicWALL serial number.
5. Syslog Server - In addition to the standard event log, the SonicWALL can send a
detailed log to an external Syslog server. Syslog is an industry-standard protocol used
to capture information about network activity. The SonicWALL Syslog captures all log
Page 46 SonicWA LL Internet Security Appliance User’s Guide
Page 48

activity and includes every connection source and destination IP address, IP service,
and number of bytes transferred. The SonicWALL Syslog support requires an external
server running a Syslog daemon on UDP Port 514.
Syslog Analyzers such as WebTrends Firewall Suite can be used to sort, analyze, and
graph the Syslog data.
Enter the Syslog server name or IP address in the Syslog Server field. Restart the
SonicWALL for the change to take effect.
6. E-mail Log Now - Clicking E-mail Log Now immediately sends the log to the
address in the Send Log To field and then clears the log.
7. Clear Log Now - Clicking Clear Log Now deletes the contents of the log.
8. Send Log / Every / At - The Send Log menu determines the f requenc y o f lo g e-mai l
messages: Daily, Weekly, or When Full. If th e Weekly option is selected, then
enter the day of the week the e-mail is sent in the Every menu. If the Weekly or the
Daily opti on is selected, enter the time of day when the e-mail is sent in the At field.
If the When Full option is selected and the log fills up, it is e-mailed automatically.
9. When log overflows - The log buffer fills up if the SonicWALL cannot e-mail the log
file. The default behavior is to overwrite the log and discard its contents. However, you
can configure the SonicWALL to shut down and prevent traffic from traveling through
the SonicWALL if the log is full.
10. Syslog Individual Event Rate (seconds/event) - The Syslog Indiv idual Event
Rate setting filters repetitive messages from being written to Syslog. If duplicate
events occur during the period specified in the Syslog Individual Event Rate field,
they are not written to Syslog as unique events. Instead, the additional events are
counted, and then at the end of the period, a message is written to the Syslog that
includes the number of times the event occurred.
The Syslog Individual Event Rate default value is 60 seconds and the maximum
value is 86,400 seconds (24 hours). Setting this value to 0 seconds sends all Syslog
messages without filtering.
11. Syslog Format - You can choose the format of the Syslog to be Default or
WebTrends. If you select WebTrends, however, you must have WebTrends
softw are installed on your system.
Loggin g an d A ler ts Page 4 7
Page 49

Log Categories
You can define which log messages appear in the SonicWALL Event Log. All Log
Categories are enabled by default except Network Debug.
• System Maintenance
Logs general system activity, such as administrator log ins, automatic downloads of the
Content Filter Lists, and system activations.
• System Errors
Logs problems with DNS, e-mail, and automatic downloads of the Content Filter List.
• Blocked Web Sites
Logs Web sites or newsgroups blocked by the Content Filter List or by customized
filtering.
• Blocked Java, ActiveX, and Cookies
Logs Java, ActiveX, and Cookies blocked by the SonicWALL.
• User Activity
Logs successful and unsuccessfu l log in attempts.
• Attacks
Logs messages showing Denial of Service attacks, such as SYN Flood, Ping of Death,
and IP spoofing.
• Dropped TCP
Logs blocked incoming TCP connections.
• Dropped UDP
Logs blocked incoming UDP packets.
• Dropped ICMP
Logs blocked incoming ICMP packets.
• Network Debug
Logs NetBIOS broadcasts, ARP resolution problems, and NAT resolution problems.
Also, detailed messages for VPN connections are displayed to assist the network
administrator with troubleshooting problems with active VPN tunnels. Network
Debug information is intended for experienced network administrators.
Page 48 SonicWA LL Internet Security Appliance User’s Guide
Page 50

Alert Categories
Alerts are events, such as attacks, which warrant immediate attention. When events
generate alerts, message s are immediately sent to the e-mai l addres s defi ned in th e Send
alerts to field. Attacks and System Errors are enabled by default , Blo c k ed We b Si te s
is disabled.
• Attacks
Log entries categorized as Attacks generate alert messages.
• System Errors
Log entries categorized as System Errors generate alert messages.
• Blocked Web Sites
Log entries categorized as Blocked Web Sites generate alert messages.
Once you have configured the Log Settings window, click Update. Once the SonicWALL
is updated, a message confirming the update is display ed at the bottom of the browser
window.
Reports
The SonicWALL is able to perform a rolling analysis o f the event log to show the to p 25
most frequently accessed Web sites, the top 25 users of bandwidth by IP address, and the
top 25 services consuming the most bandwidth.
Click Log on the left side of the browser window, and then click the Reports tab.
Loggin g an d A ler ts Page 4 9
Page 51

The Reports window includes the following functions and commands:
• Start Data Collection
Click Start Data C oll ec tion to b e gin lo g a na ly s is . Wh en log a na l ys is i s enable d , t he
button label changes to Stop Data Collection.
• Reset Data
Click Reset to clear the report statistics and begin a new sample period. The sample
period is also reset when data collection is stopped or started, and when the
SonicWALL is restarted.
• View Data
Select the desired report from the Report to view menu. The options are Web Site
Hits, Bandwidth Usage by IP Address, and Bandwidth Usage by Service.
These reports are explained below. Click Refresh Data to update the report. The
length of time analyzed by the report is displayed in the Current Sample Period.
Web Site Hits
Selecting Web Site Hits from the Display Report menu displ ays a tab le showi ng the
URLs for the 25 most frequ ently accessed Web sites and the number of hits to a site during
the current sample period.
The Web Site Hits report ensures that the ma jority of Web acces s is to appropria te We b
sites. If leisure, sports, or other inappropriate sites appear in the Web Site Hits Report, you
can choose to block the sites.
Bandwidth Usage by IP Address
Selecting Bandwidth Usage by IP Address from the Display Report menu displays a
table showing the IP Address of the 25 top us ers of Internet ba ndwidth and the number of
megabytes transmitted during the current sample period.
Bandwidth Usage by Service
Selecting Bandwidth Usage by Service from the Display Report menu displays a table
showing the name of the 25 top Internet services, suc h as HTTP, FTP, RealAudio , etc., and
the number of megabytes received from the service during the current sample period.
The Bandwidth Usage by Service report shows whether the services being used are
appropriate for your organization. If services such as video or push broadcasts are
consuming a large portion of the available bandwidth, you can choose to block these
services.
Page 50 SonicWA LL Internet Security Appliance User’s Guide
Page 52

6 Content Filtering and Blocking
This chapter describes the SonicWALL content filtering features configured in the Filter
section of the SonicWALL Web Management Interface. Content Filtering and Blocking
records Web site blocking by Filter List category, domain name, and keyword.
There are five tabs in the Filter section:
• Categories
• List Update
• Customize
• Keywords
• Consent
Categories
Click Filter on the left side of the brows er window, and then click on the Categories tab.
Note: Content Filtering applies only to the SonicWALL LAN.
Configure the following settings in the Categories window:
Restrict Web Features
• ActiveX
ActiveX is a programming language that embeds scripts in Web pages. Malicious
programmers can use ActiveX to delete files or compromise security. Select the
ActiveX check box to block ActiveX controls.
Content Fi lte r in g an d Bl ocking Page 51
Page 53

• Java
Java is used to embed small programs, called applets, in Web pages. It is safer than
Activ eX si nce it has bu ilt -in secur ity me ch anis ms . Sele ct t he Java check box to block
Java applets from the network.
• Cookies
Cookies are used by Web servers to track Web usage and remember user identity.
Cookies can also compromise users' privacy by tracking Web activities. Select the
Cookies check box to disable Cookies.
• Disable Web Proxy
When a proxy server is located o n the WAN, LAN users can circumvent content f iltering
by pointing to this proxy server. The Disable W eb Prox y check box disables access
to proxy servers located on the WAN. It does not block Web proxies located on the L AN.
• Known Fraud ulent Certifi cates: Digital certificates help verify that Web content
and files originated fr om an authoriz ed party. Enabl ing this featu re protects users
on the LAN from downloading malicious programs warranted by these fraudulent
certificates. If di gital certificates are proven fraudul ent, then the SonicWALL blocks
the Web content and the files that use these fraudulent certificates.
Known fraudulent certificates blocked by SonicWALL include two certificates issued on
January 29 and 30, 2001 by VeriSign to an impostor masquerading as a Microsoft
employee.
Use Filter List (Web/News/FTP/Gopher)
• Log and Block Access
Select the check box and the SonicWALL blocks access to sites on the Content Filter,
custom, and keyword lists and log attempts to access these sites.
• Log Only
If this chec k box is s e lect ed, the SonicWALL lo gs an d then allows access to al l si t es on
the Content Filter, custom, and keyword lists. The Log Only check box allows you to
monitor inappropriate usage without restricting access.
• Block all categories
The SonicWALL uses a Content Filter List generated by CyberPatrol to block access
to objectional Web sites. CyberPatrol cl assifies objectional Web sites based upon input
from a wide range of social, political, and civic organizations. Select the Block all
categories check box to block all of these categories. Alternatively, you can select
categories individually by selecting the appropriate check box.
When you register your SonicWALL at <http://www.mysonicwall.com>, you can download
a one month subscription to Content Filter List updates.
Page 52 SonicWA LL Internet Security Appliance User’s Guide
Page 54

The following is a list of the Content Filter List categories:
Violence/Profanity Satanic/Cult
Partial Nudity Drugs/Drug Culture
Full Nudity Militant/Extremist
Sexual Acts Sex Education
Gross Depictions Questionable/Illegal Gambling
Intole rance Alcohol & Tobacco
Visit <http ://www.sonic wall.com/Con tent-Filt er/categ ories.html > for a detailed de scription
of the criteria used to define Content Filter List categories.
Time of Day
The Time of Day feature allows you to define specific times when Content Filtering is
enforced. For example, you could configure the SonicWALL to filter employees' Internet
access during normal business hours, but allow unrestricted access at night and on
weekends.
Note: Time of Day rest rictions only apply to the Content Filter, Customized blocking and
Keyword blocking. Consent and Restrict Web Features are not affected.
• Always Block
When selecte d , Content Filtering is enforced at all times.
• Block Between
When selecte d, Content F ilterin g is enforced during the time and days specified.
Enter the time period, in 24-hour format, and select the s tarting and ending day of the
week that Content Filtering is enforced.
List Update
Since content on the Internet is constantly changing, the Cont ent Filter L ist requires
updating regularly. The List Updat e window configures the SonicWALL to automatically
download a new list at a specified time every week.
Registering the SonicWALL with SonicWALL, Inc. allows you to receive a one month trial of
the Content Filter List subscription at no charge. Contact SonicWALL Sales at
<sales@sonicwall.com> for information about purchasing a SonicWALL Content Filter List
subscription.
Content Fi lte r in g an d Bl ocking Page 53
Page 55

Click Filter on the left side of the browser window, and then click the List Update tab.
Configure the following settings in the List Update window.
• Download Now
Click Download Now to immediately download and install a new Content Filter
List. This process takes several minutes and requires a current subscription to Content
Filter List updates.
• Automatic Download
Select the Automatic Download check box to enable automatic, weekly downloads
of the Content Fil te r List. T hen s elect the day of the week and the time of day w hen
the new list should be retrieved. A current subscription to the Content Filter List
updates is required.
Once loaded, the creation date of the current active list is displayed at the top of the
window.
• If Filter List Not Loaded
The Content Filter List expires 30 days after it is downloaded. The Content Filter
List can also be e rased if ther e is a failure while downloading a ne w list. If the Content
Filter List expires or fails to download, the Sonic WALL can be configure d to block all
Web sites except for Trusted Domains, or to allow access to all Web sites.
Page 54 SonicWA LL Internet Security Appliance User’s Guide
Page 56

In the If Filter List Not Loaded section, select either Block traffic to all web sites
except for Trusted Domains or Allow traffic to all web sites.
If Al low tra ffic to al l web sites is selected, Forb idden D o mains and Keywords
are still blocked.
Note: The SonicWALL does not ship with the Content Filter List installed. Registering the
SonicWALL provides a one month trial subscription to the Content F ilter List. Follow the
"Download Now" instructions to install the initial Content Filter List
Click Update. Once the SonicWALL is updated, a message confirming the update is
displayed at the bottom of the browser window.
.
Customize
Click Filter on the left side of the browser window, and then click the Customize tab. The
Customize windo w allows you to cust omize the Content Filte r List by manually blocking
or allowing Web site access.
To allow access to a Web site that is blocked by the Content Filter List, enter the host
name, such as “www.ok-site.com”, into the Trusted D om ai ns fields. 256 entries can be
added to the Trusted Domains list.
Content Fi lte r in g an d Bl ocking Page 55
Page 57

To block a Web site that is not blocked by the C o ntent Fi lt er L is t, enter the host name,
such as “www.bad -site.com” into the Forbidden Domains field. 2 56 entries can be added
to the Forbidden Domains list.
Note: Do not include the prefix “http://” in either the Trusted Domains or Forbidden
Domains the fields. All subdomains are affected. For example, entering “yahoo.com”
applies to “mail.yahoo.com” and “my.yahoo.com”.
Click Update. Once the So nicWALL has be en updated, a messa ge confi rming the update
is displayed at the bottom of the browser window.
Note: Customized domains do not have t o be re-entered wh en the Content Filter List is
updated each week and do not require a filter list subscription.
To remove a trusted or forbidden domain, select it from the appropriate list, and click the
Delete Domain button. Once the domain has been deleted, a message is displayed at the
bottom of the Web browser window.
• Enable Content Filter List Customization
To deactivate Content Filter List customization, clear the Enable Content Filter
List Customization check box, and click Update. This option allows you to enable
and disable customization without removing and re-entering custom domains.
• Disable Web traffic except for Trusted Domains
When the Disable Web traffic except for Trusted Domains check box is selected,
the SonicWALL only allows Web access to sites on the Trusted Domains list.
• Don’t block Java/ActiveX/Cookies to Trusted Domains
When thi s box is se l ec te d, S oni cW ALL pe rmits Java, Ac tiveX and Cooki es f r om sites on
the Trusted Domains list to the LAN. This check box allows Java, ActiveX or Cookies
from sites that are known and trusted.
• Message to display when a site is blocked
When a user attempts to access a site that is blocked by the SonicWALL Content
Filter List, a message is displayed on their screen. The default message is “Web Site
Blocked by SonicWALL Filter”. Any message, including embedded HTML, up to 255
characters long, can be define d.
The following example displays a message explaining why the Web site was blocked, with
links to the Acceptable Use Policy and the Network Administrator’s e-mail address:
Access to this site was denied because it violates this company’s <A HREF=http://
www.your-domain.com/acceptable_use _policy.htm>Acceptable Use Policy</A>. Please
contact the <A HREF=”admin@your-domain.com”> Network Administrator</A> if you feel
this was in error.
Page 56 SonicWA LL Internet Security Appliance User’s Guide
Page 58

Keywords
Click Filter on the left side of the browser window, and then click the Keywords tab.
The SonicWALL allows you to block Web URLs containing keywords. For example, if you
add the keyword "XXX", the Web site <http://www.new-site.com/xxx.html> is blocked,
even if it is not in cluded in the Content Filt er List.
To enable this function, select the Ena bl e Key w or d Bl oc ki n g check box.
Enter the keyword to block in the Add Keyword field, and click Update. Once the
keyword has been added, a message confirming the update is displayed at the bottom of
the browser window.
To remove a keyword, select it from the list and click Delete Keyword. Once the keyword
has been removed, a message confirming the update is displayed at the bottom of the
brows er window.
Consent
The Consent tab allows you to enforce content filtering on designated computers and
provide optional filtering on other computers. Consent can be configured to require the
user to agree to the terms outlined in an Acceptable Use Policy window before Web
browsing is allowed.
Content Fi lte r in g an d Bl ocking Page 57
Page 59

Click Filter on the left side of the browser window, and then click the Consent tab.
• Require Consent
Select the Require Consent check box to enable the Consent features.
• Maximum Web usage
In an environment where there are more users than computers, such as a classroom
or library, time limits are often i mposed. The SonicWALL can be used to remind users
when their time has expired by displaying the page defined in the Consent page URL
field. Enter the time limit, in minutes, in the Maximum Web usage field. When the
default value of zero (0) is entered, this feature is disabled.
• Maximum idle time
After a period of inactivity, the SonicWALL requires the user to agree to the terms
outlined in the Consent page before any additional Web browsing is allowed. To
configure the value, follow the link to the Users window and enter the desired value
in the User Idle Timeout section.
Page 58 SonicWA LL Internet Security Appliance User’s Guide
Page 60

• Consent page URL (Optional Filtering)
When a user opens a Web browser on a computer requiring consent, they are shown
a consent page and given the option to access the Internet with or without co ntent
filtering. An example of this page is shown below:
You must create this Web (HTML) page. It can contain the text from, or links to an
Acceptable Use Policy (AUP).
This page must contain links to two pages contained in the SonicWALL, which, when
selected, tell the SonicWALL if the user wishes to have f iltered or u nfiltered acc ess. The
link for unfiltered access must be <192.168.168.168/iAccept.html> and the link for
filtered access must be <192.168.168.168/iAcceptFilter.html>, where the SonicWALL
LAN IP Address is used instead of "192.168.168.168".
• “Consent Accepted” URL (Filtering Off)
When a user accepts the terms outlined in the Consent page and chooses to access
the Internet without the protection of Content Fi lter in g, they are shown a Web page
confi rming the ir sele ction . Ent er the URL o f this pag e in th e “Consent Accepted”
(Filtering Off) field. This page must reside on a Web server and be accessible as a
URL by users on the LAN.
Content Fi lte r in g an d Bl ocking Page 59
Page 61

• “Consent Accepted” URL (Filtering On)
When a user accepts the terms outlined in the Consent page and chooses to access
the Internet with the protection of Content Filtering, they are shown a Web page
confi rming the ir sele ction . Ent er the URL o f this pag e in th e “Consent Accepted”
(Filtering On) field. This page must reside on a Web server and be accessible as a
URL by users on the LAN.
• Consent page URL (Mandatory Filtering)
When a user opens a Web browser on a computer using mandatory content filtering,
a consent page is displayed. You must create the Web page that appears when the
web browser is opened. It can contain the text from an Acceptable Use Policy, and
notification that violations are logged or blocked.
This Web page must reside on a Web server and be accessible as a URL by u sers on
the LAN. This page must also contain a link to a page contained in the SonicWALL that
tells the SonicWALL that the user agrees to have filtering enabled. The link must be
<192.168.168.168/iAcceptFilter.html>, where the SonicWALL LAN IP Address is used
instead of "192.168.168.168".
Enter the URL of this page in the Consent page URL (Mandatory Filtering) field and
click Update. Once the SonicWALL has been updated, a message confirming the
update is displayed at the bottom of the Web browser window.
• Add New Address
The SonicWALL can be configured to enforce content filtering for certain computers on
the LAN. Enter the IP addresses of these computers in the Ad d Ne w Ad dres s field
and click Submit button. Up to 128 IP addresses can be entered.
To remove a computer from the list of computers to be filtered, highlight th e IP address
in the Mandatory Filtered IP Addresses list and click Delete Address.
Page 60 SonicWA LL Internet Security Appliance User’s Guide
Page 62

7 Web Management Tools
This chapter describes the SonicWALL Management Tools, available in the Tools section
of the SonicWALL Web Mana gement Inter face. T he Web Management Tools section
allows you to restart the SonicWALL, import and export configuration settings, update the
SonicWALL firmware, and perform several diagnostic tests.
There are four tabs in the Tools section:
• Restart
• Preferences
• Firmware
• Diagnostic
Restarting the SonicWALL
Click Tools on the left side of the browser window, and then click the Restart tab.
The SonicWALL can be restarted from the Web Management Interface. Click Restart
SonicWALL, and then click Yes to confirm the restart.
The SonicWALL takes up to 90 seconds to restart, and the yellow Test LED is lit. During the
restart time, Internet access for all users on the LAN is momentarily interrupted.
Web Management Tools Page 61
Page 63

Preferences
Click Tools on the left side of the browser window, and then click the Preferences tab.
You can save the S onicWALL settings, and th en retrieve them later fo r backu p purposes.
SonicWALL recommends saving the SonicWALL settings when upgrading the firmware.
The Preferences window also provides options to restore the SonicWALL factory default
settings and launch the SonicWALL Installation Wizard. These functions are described in
detail in the following pages.
Page 62 Soni cW A L L In t ern et Security A pp li an ce Us e r ’s Gu id e
Page 64

Exporting the Se ttings File
It is possible to save the SonicWALL configura t ion information as a file on your computer,
and retrieve it for later use.
1. Click Export in the Preferences tab.
2. Click Export again to download the settings file. Then choose the location to save the
settings file. The file is named “sonicwall.exp” by default, but it can be renamed.
3. Click Save to save the file. This process can take up to a minute.
Web Management Tools Page 63
Page 65

Importing the Sett ing s Fi le
After exporting a settings file, you can import it back to the SonicWALL.
1. Click Import in the Preferences tab.
2. Click Browse to locate a settings file which was saved using Export.
3. Select the file, and click Import.
4. Restart the SonicWALL for the settings to take effect.
Note: The Web browser used to Import Settings must support HTTP uploads. Netscape
Navigator 3.0 and above is recommended. Netscape Navigator can be downloaded at
<http://www.netscape.com>
Page 64 Soni cW A L L In t ern et Security A pp li an ce Us e r ’s Gu id e
.
Page 66

Restoring Factory Default Settings
You can erase the SonicWALL configuration settings and restore the SonicWALL to its
factory def ault state.
1. Click Restore on the Preferences tab to restore factory default settings.
2. Click Yes, and then restart the SonicWALL for the change to take effect.
Note: The SonicWALL LAN IP Address, LAN Subnet Mask, and the Admi nistrator Password
are not reset.
Updating Firmware
The SonicWALL has flash memory and can be easily upgraded with new firmware. Current
firmware can be downloaded from SonicWALL, Inc. Web site directly into the SonicWALL.
Note: Firmware updates are only available to registered users. You can register your
SonicWALL online at <http://www.mysonicwall.com>
1. Click Tools on the left side of the browser window, and then click the Firmware
tab.
.
Web Management Tools Page 65
Page 67

To be automatically notified whe n new firmware is available, select the Notify me when
new firmware is available check box. Then click Update. If you enable firmware
notification, your Son icW ALL sends a status messag e to So nicWALL, Inc. Firmware Server
on a daily basis. The status message includes the following information:
• SonicWALL Serial Number
• Unit Type
• Current Firmware Version
• Language
• Current Available memory
• ROM version
• Options and Upgrades (SonicWALL VPN, Network Anti-Virus)
Note: Please see the SonicWALL Privacy Policy at www.sonicwall.com/corporate_info/
privacy.html for additional information about privacy.
When new firmware is available, a message is e-mailed to the address specified in the Log
Settings window. In addition, the Status window includes noti fication of new f irmware
availability. This notification provides links to firmware release notes and to a Firmware
Update Wizard. Th e Firmw are Up date W izard simplifies and automates the upgrade
process. Fo llow the instr uctions in the Firmware Update Wizard to update the firmwa re.
Page 66 Soni cW A L L In t ern et Security A pp li an ce Us e r ’s Gu id e
Page 68

Updating Firmware Manually
You can also upload fi rmware from the local hard drive. Cl ick Upload Firmware.
Note: The Web browser used to upload new firmware into the SonicWALL must support
HTTP uploads. Netscape Navigator 3.0 and above is recommended.
When firmware is uploaded, the SonicWALL settings can be erased. Before uploading new
firmware, export and save the SonicWALL settings so that the y can be re stor ed late r. Once
the settings have been saved, click Yes.
Web Management Tools Page 67
Page 69

Click Browse and select the firmware file from your local hard drive or from the SonicWALL
Companion CD. Click Upload, and then restart the SonicWALL.
Note: When uploading firmware to the SonicWALL, you must not interrupt the Web
browser by closing the window, clicking a link, or loading a new page. If the browser is
interrupted, it can corrupt the SonicWALL firmware.
Upgrade Features
The SonicWALL can be upgraded to support new or optional features.
Chapter 12, SonicWALL Options and Upgrades, pro vides a s ummary of th e SonicW ALL
firmware upgrades, subscription services, and support offerings. You can contact
SonicWALL or your local reseller for more information about SonicWALL options and
upgrades.
Web:http://www.sonicwall.com
E-mail:sales@sonicwall.com
Phone:(408) 745-9600
Fax:(408) 745-9300
When an upgrade is purchased, an Activation Ke y and instructions fo r registering the
upgrade are included. Once you have registered the upgrade, an Upgrade Key is issued.
Enter this key in the Ente r upg rad e key f ield and click Update. Fo ll ow t he i ns t ruc tio n s
included with the upgr ade for configuration.
Page 68 Soni cW A L L In t ern et Security A pp li an ce Us e r ’s Gu id e
Page 70

Diagnostic Tools
The SonicWALL has several built-in tools which help troublesho ot network problems. Click
Tools on the left side of the browser window and then click the Diagnostic tab.
DNS Name Lookup
The SonicWALL has a DNS lookup tool that returns the numerical IP address of a domain
name or if you type in an IP address, it returns the domain name.
1. Select DNS Name Lookup from the Choose a diagnostic tool menu.
2. Enter the host name to lookup in the Look up the nam e field and click Go. Do not
add the prefix "http://". The SonicWALL then queries the DNS server and displays the
result at the bottom of the screen.
Note: You must define a DNS server IP address in the Network tab of th e General
section to perform a DNS Name Lookup.
Find Network Path
The Find Net wo rk Path tool shows whether an IP host is located on the LAN, the WAN
or the DMZ. This is helpful to determine if the SonicWALL is properly configured. For
example, if the SonicWALL “thinks” that a machine on the Internet is located on the LAN
port, then the SonicWALL Network or Intranet settings can be misconfigured. Find
Network Path shows if the target device is behind a router, and the Ethernet address of
the target device. F ind Netwo rk Path also shows the gateway the device is using and
helps isolate configuration problems.
Web Management Tools Page 69
Page 71

1. Select Find Network Path from the Choose a diagnostic tool menu.
2. Enter the IP address of the device and click Go. The test takes a few seconds to
complete. Once completed, a message showing the results is displayed in the browser
window.
If the network path is incorrect, select the SonicWALL Intranet and Static Routes settings.
Note: Find Network Path requires an IP address. The SonicWALL DNS Name L ookup
tool can be used to find the IP address of a host.
Ping
The Ping test bounces a packet off a machine on the Inte rnet back to the sender. Th is test
shows if the SonicWALL is able to contact the remote host. If users on the LAN are having
problems accessing services on the Internet, try pinging the DNS server, or another
machine at the ISP location. If this test is successful, try pinging devices outside the ISP.
This shows if the problem lies with the ISP connection.
Page 70 Soni cW A L L In t ern et Security A pp li an ce Us e r ’s Gu id e
Page 72

1. Select Ping from the Choose a diagnostic tool menu.
2. Enter the IP address of the target device to ping and click Go. The test takes a few
seconds to complete. Once completed, a message showing the results is displayed in
the browser window.
Note: Ping requires an IP address. The SonicWALL DNS Name Lookup tool ca n be used
to find the IP address of a host.
Web Management Tools Page 71
Page 73

Packet Trace
The Packet Trace tool tracks the status of a communications stream as it moves from
source to destin ation. This is a useful tool to dete rmine if a communi cations stream is be ing
stopped at the SonicWALL, or is lost on the Internet.
To interpret this tool, it is n ecessary to u nderstand the three-way handshake that occurs
for every TCP connection. The following displays a typical three-way handshake initiated
by a host on the SonicWAL L's LAN to a remote host on the WA N.
1. TCP received on LAN [SYN]
From 192.168.168.158 / 1282 (00:a0:4b:05:96:4a)
To 204.71.200.74 / 80 (02:00:cf:58:d3:6a)
The SonicWALL receives SYN from LAN client.
2. TCP sent on WAN [SYN]
From 207.88.211.116 / 1937 (00:40:10:0c:01:4e)
To 204.71.200.74 / 80 (02:00:cf:58:d3:6a)
The SonicWALL fo rwards SYN from LAN client to re mote host.
3. TCP received on WAN [SYN,ACK]
From 204.71.200.74 / 80 (02:00:cf:58:d3:6a)
To 207.88.211.116 / 1937 (00:40:10:0c:01:4e)
The SonicWALL rece ives SYN,ACK from remote host.
4. TCP sent on LAN [SYN,ACK]
From 204.71.200.74 / 80 (02:00:cf:58:d3:6a)
To 192.168.168.158 / 1282 (00:a0:4b:05:96:4a)
The SonicWALL forwards SYN,ACK to LAN client.
5. TCP received on LAN [ACK]
From 192.168.168.158 / 1282 (00:a0:4b:05:96:4a)
To 204.71.200.74 / 80 (02:00:cf:58:d3:6a)
Client sends a final ACK, and waits for start of data transfer.
6. TCP sent on WAN [ACK]
From 207.88.211.116 / 1937 (00:40:10:0c:01:4e
To 204.71.200.74 / 80 (02:00:cf:58:d3:6a)
The SonicWALL forwards the client ACK to the remote host and waits for the data transfer
to begin.
Page 72 Soni cW A L L In t ern et Security A pp li an ce Us e r ’s Gu id e
Page 74

When using packet traces to isol ate network connectivity problems, look f or the location
where the three-way handshake is breaking down. This helps to determine if the problem
resides with the SonicWALL configuration, or if there is a problem on the Internet.
1. Select Packet Trace from the Choose a diagnostic tool menu.
Note: Packet Trace requires an IP address. The SonicWALL DNS Name Lookup tool
can be used to find the IP address o f a host.
2. Enter the IP address of the remote ho st in the Trace on IP address field, and click
Start. You must enter an IP addres s in the Trace on IP address field; do not enter
a host name, such as “www.yahoo.com”.
3. Contact the remote host using an IP a pplication such as Web, FTP, or Telnet.
4. Click Refresh and the packet trace information is displayed.
5. Click Stop to terminate the packet trace, and Reset to clear the results.
Tech Su pport Repo rt
The Tech Support Report generates a detailed report of the SonicWALL configuration
and status, and saves it to the l ocal har d disk. T his fi le can then be e-mai led t o SonicW ALL
Technical Support to help as sist with a problem.
Before e-mailing the Tech Support Report to the SonicWALL Tech nical Support team,
complete a Tech Support Request Form at <http://techsupport.sonicwall.com/
swtech.html>. After the form is submitted, a unique case number is returned. Include this
case number in all correspondence, as it allows SonicWALL tech support to provide you with
better service.
Web Management Tools Page 73
Page 75

In the Tools section, click the Diagnostic tab, and then select Tech Support Report
from the Choose a diagnostic tool menu. Three Report Op tions are availab le in the
Tech Support Report section:
• VPN Keys
• ARP Cache
• DHCP Bindings
1. Select Tech Suppo rt Report from the Choose a diagnostic tool menu.
2. Select the Report Options to be included with your e-mail.
3. Click Save Report to save the file to your system. When you click Save Repor t, a
warning message is displayed.
4. Click OK to save the file. Attach the report to your Tech Support Request e-mail.
Page 74 Soni cW A L L In t ern et Security A pp li an ce Us e r ’s Gu id e
Page 76

8 Network Access Rules
This chapter describes the SonicWALL Network Access Rules, which determine inbound
and outbound access policy, user authentication and remote management. Ne twork
Access Rules are configured in the Access section of the SonicWALL Web Management
Interface. There are five tabs in the Access section:
• Services
• Add Servi ce
• Rules
• Users
• Management
Services
Click Access on the left side of the browser window, and then click the Services tab.
Note: The LAN In column is not displayed if NAT is enabled.
The Services window allows you to customize Network Access Rules by service.
Services displayed in the Services window relate to the rules in the Rules window, s o an y
changes on the Services window appear in the Rules window. The Default rule, at the
bottom of the table, encompasses all Services.
Network Access Rules Page 75
Page 77

LAN Out
If the LAN Out check box is selected, users on your LAN are able to access that service on
the Internet. Ot herwise, they are blocked f rom accessing t hat se rvice. By defau lt, LAN Out
check boxes are selected.
DMZ In (Optional)
If a DM Z In check box is selected, users on the Internet can access that service on the
DMZ. Otherwise, they are bl ocked from accessing that s ervice on the DMZ. By default, DMZ
In check boxes are selected. The DMZ IN column does not appear in the Web
Management Interface for the SonicWA LL SOHO2 and SonicWALL TELE2, which do not
have a separate DMZ port.
Note: If an Alert Icon appears next to a LAN Out, LAN In, or DMZ In check box, a rule
in th e Rules window modifies that service.
Public LAN Server
A Public LAN Server is a LAN server designated to receive inbound traffic for a specific
service, such as Web or e-m ail. You can define a Public LAN Server by entering the
server's IP address in the Public LAN Server field for the appropriate service. If you do
not have a Public LAN Server for a service, enter "0.0.0.0" in the field. See Creating a
Public LAN Server on the following page for more information.
Windows Networking (NetBIOS) Broadcast Pass Through
Comp ut ers r u nn ing Mic r osoft W i n d o ws® communicate with one another through NetBIOS
broadcast packets. By default, the SonicWALL blocks these broadcasts. If you select the
Windows Networking check box, your SonicWALL allows NetBIOS broadcasts from LAN
to DMZ or from LAN to WAN. Then, LAN users are able to view machines on the DMZ and
on the WAN in their Windows Network Neighborhood.
Detection Preventi on
Enable Stealth Mode
By default, the SonicWALL responds to incoming connection requests as either "blocked"
or "open". If you enable Stealth M ode, your SonicWALL does not respond to blocked
inbound connection requests. Stealth Mode makes your SonicWALL essentially invisible
to hackers.
Randomize IP ID
A Randomize IP ID check box is available to prevent hackers using various detection
tools from detecting the presence of a SonicWALL appliance. IP packets are given random
IP IDs which m a kes it more difficult fo r hackers to “fingerprint” the SonicWALL appliance.
Use this check box for additional security from hacke rs.
Page 76 Soni cW A L L In t ern et Security A pp li an ce Us e r ’s Gu id e
Page 78

Network Connection Inactivity Timeout
If a connection to a remote server remains idle for more than five minutes, the S onicWALL
closes the connection. Without this timeout, Internet connections could stay open
indefinitely, cre ating potential security ho les. You can increase the Inactivity Timeout if
applications, such as Telnet and FTP, are frequently disconnected .
Add Service
To add a service not listed in the Services window, click Access on the left side of the
browser window, a nd then click the Add Service tab.
The list on the right side of the window displays the services that are currently defined.
These services also appear in the Services window.
Two numbers appear in brackets next to each service. The first number indicates the
service's IP port number. The second number indicates the IP protocol type (6 for TCP, 17
for UDP, or 1 for ICMP).
Note: There can be multiple entries with the same name. For example, the default
configuration has two entries labeled “Name Service (DNS)”--for UDP port 53 and TCP port
53. Multi ple e ntr ies wit h th e same n ame ar e grouped together, and are treated as a single
service. Up to 128 entries are supported.
Network Access Rules Page 77
Page 79

Add a Known Service
1. Select the name of the service you want to add from the Add a known service list.
2. Click Add. The new service appears in the list box on the right side of the browser
window. Note that some services add more than one entry to the list.
Add a Custom Service
1. Select [Custom Service] from the Add a known service list.
2. Type a unique name , such as “CC:mail” or “Quake” in the Name field.
3. Enter the beginning number of the IP port range and ending number o f the I P port
range in the Port Range fields. If the service only requires one IP port, enter the
single port number in both Port Range fields.
Note: Visit <http://www.ietf.org/rfc/rfc1700.txt> for a list of IP port numbers.
4. Select the IP protocol type, TCP, UDP or ICMP, from the Protocol list.
5. Click Add. The new service appears in the list on the right side of the browser window.
Note: If multiple entries wit h the same name are cre ated, they are grouped together as a
single service and can not function as expected.
Enable Logging
You can enable and disable logging of events in the SonicWALL Ev en t Lo g. For example,
if Lin ux a uthe n ticat ion m es sag es a re f illin g up y our log, you can dis able log gin g o f Li nux
authentication.
1. Highlight the name of the desired service in the list.
2. Clear the Enable Logging check box.
3. Click Modify.
Delete a Service
To delete a service, highlight the name in the list, and click Delete Service. If multiple
entries with the same name exist, delete all entries to remove the service.
Rules
The SonicWALL evaluates the source IP address, the destination IP address, and the
service type when determining whether to allow or deny traffic. Custom rules take
precedence and override the SonicWALL default rules.
By default, the SonicWALL blocks all traffic from the Internet to the LAN and allows all
traffic from the LAN to the Internet. Custom rules can be created to modify the default
rules. For example, rules can be created for the following purposes:
• Allow traffic from the Internet to a mail server on the LAN.
• Restrict users on the LAN from using a specified service, such as QuickTime.
• Allow specified IP addresses on the Internet to access a sensitive server on the LAN.
Page 78 Soni cW A L L In t ern et Security A pp li an ce Us e r ’s Gu id e
Page 80

To create custom Network Access Rules, click Access on the left side of the browser
window, and then click the Rules tab.
Note: Use extreme caution when creating or deleting Network Access Rules, because you
can disable firewall protection or block access to the Internet.
Add A New Rule
1. Click Add New Rule... to open the Add Rule window.
2. Select Allow or Deny in t he Action list depending upon whether the rule is intended
to permit or block IP traffic.
Network Access Rules Page 79
Page 81

3. Select the name of the service af fected by the Rule from the Service list. If the service is not li sted, you must define the se rvice in th e Add Service window. The Default
service encompasses all IP services.
4. Select the source of the traffic affected by the rule, eit her LAN, WAN, DMZ, or *, from
the Source Ethernet menu.
If you want to define the source IP addresses that are affected by the rule, such as
restricting certain users from accessing the Internet, enter the starting IP addresses of
the address range in the Addr Ran ge Be gin field and the ending IP address in the
Addr Range End field. To in clude all IP addresses , enter * in the A ddr Ra nge Begi n
field.
5. Select the destination of the traffic affected by the rule, either LAN, WAN, DMZ, or *,
from the Destination Ethernet menu.
If you want to define the destination IP addresses that are affected by the rule, for
example, to allow inbound Web access to several Web servers on your LAN, enter the
starting IP addresses of the address range in the Addr Range Beg in field and the
ending IP address in the Addr Range End field. To include all IP addresses, enter *
in the Addr Range Begin field.
6. Select always from the Apply this rule menu if the rule is always in effe ct.
Select from the Apply this rule to define the specific time and day of week t o enforce
the rule. Enter the time of day (in 24-hour format) to begin and end enforcement. Then
select the day of week to begin and end enforcement.
Note: If you want to enable the rule at different times depending on the day of the
week, you have to make additional rules for each time period.
7. If you would like for the rule to timeout after a period of inactivity, set the amount of
time, in minutes, in the Inactivity Timeout in Minutes field. The default value is 5
minutes.
8. Do not select the Allow Fr ag mented P ac ke ts check box. Large I P packets are often
divided into fragments before they are routed over the Internet and then reassembled
at a destination host. Because hackers exploit IP fragmentation in Denial of Service
attacks, the SonicWALL blocks fragmented packets by default. You can override the
default configuration to allow fragmented packets o ver PPTP or IPSec.
9. Click Update. Once the SonicWALL has been updated, the new rule appears in the list
of Current Network Access Rules.
Note: Although custom rules can be created that allow inbound IP traffic, the
SonicWALL does not disable protection fr om Denial of Service attacks, suc h as the SYN
Flood and Ping of Death attacks.
Page 80 Soni cW A L L In t ern et Security A pp li an ce Us e r ’s Gu id e
Page 82

For example, to configure the SonicWALL to allow Internet traffic to your web server with
an IP address of 208.5.5.5 (Standard mode), create the following rule:
1. Verify that HTTP has been added as a Service as outlined previously.
2. Click the Rules tab, and click Add New Rule....
3. Select Allow, then Web (HTTP) from the Service menu.
4. Select WAN from the Ethernet Source menu, and leave th e Addr Range Begin and
Addr Range End a s they appear.
5. Select LAN from t he Et he rnet Des ti nat ion menu, and type in the IP address of the
web server, 208.5.5.5 in the Addr Range Begin field. No IP address is added in the
Addr Range End since the destination is not a range of IP addresses.
6. Select always from the Apply this rule menu.
7. Enter a value (in minutes) in th e Activity Timeout in Minutes field.
8. Do not select the Allow Fragmented Packets check box.
9. Click Update to add the rule to the SonicWALL.
Note: The source part (WAN, LAN, DMZ) can be limited to certain parts of the Internet
using a range of IP addresses on the WAN , LAN or D MZ. For example, the following rule
can be used to configure the same web server to be only visible from a single C class subnet
on the Internet: Allow HTTP, Source WAN 216.77.88.1 - 216.77.88.254, Destination LAN
208.5.5.5.
Creating Public Servers using NAT mode
It is possible to run a single Internet server per protocol on the LAN, using NAT, with only
a single IP address from your ISP. You can set up and run an e-mail server, a web server,
and an FTP server on different computers and configure them to be visible from the
Internet. The following example shows how to configure public servers using NAT mode.
Let’s assume that you have a SonicWALL configured in the N AT mode, w ith IP addresses
on the LAN in the range 192.1 68.1.1 to 192.16 8.1.254, and a WAN IP addr ess of 208.1.2. 3.
The web server has an IP address of 192.168.1.10; the e-mail server has an IP address of
Network Access Rules Page 81
Page 83

192.168.1.11; and the FTP server has an IP address of 192.168.1.12. To enable the
servers, click Access on the left side of the Management interface, and then the Services
tab.
1. Type in the IP address of the web server in the Pu blic LAN Server field on the Web
(HTTP) line.
2. Type in the IP address of the FTP server in the Public LAN Server field on the File
Transfer (FTP) line.
3. Type in the IP address of the e- mail server in the Public LAN Server field on the Send
Email (POP3) line.
4. Click Update and Restart the unit.
All three servers are vi sible fro m the outside using the public IP address 208 .1.2.3, an d any
associated domain names that translate to that address. From the LAN, the servers can
only be accessed using the private IP addres ses, 1 92.168.1.x of the s ervers, not the public
IP addresses or domain names.
The public LAN server configuration method described above does not al low a s erver to be
visible at public IP addresses other than the NAT Public IP address of the firewall. Nor does
it allow the s erver to be visible o nly from certain parts of the I nternet. Yo u cannot have two
servers using the same port numbers configured in this manner. For more flexible
configurations of servers in a NAT environment, you must to use a One-to-One NAT
configuration.
This “Public LAN Server” method works because the SonicWALL sees a request for a
particular service as a request for a particular port, and routes the request to the host
associated with the service.
Note: An IP address on the LAN (e.g. 192.168.1.x) cannot be used in both Public LAN
Server configurations and in One-to-One NAT configurations.
Creating a Public LAN Server
A Public LAN Server is a server on your LAN that is accessible to users on the Internet.
Creating a Public LAN Server in the Services window is the easiest way to set up a
mail server, Web server or other public server, on your LAN.
To create a Public LAN Server, complete the following instructions.
1. Determine what type of service your server uses, such as FTP, Web, or Mail. Locate
this service in the Services window. If the service does not appear in the Services
window, you must defi ne it in the Add Service window.
2. Enter the server's IP address in the Public LAN Server field for the appropriate
service.
Note: If NAT is enab led, t his IP address should b e a p rivat e LAN addres s. Us ers on t he
Internet access the Pu blic LAN S erver at the Soni cWALL WAN IP (NAT Public) Address.
Page 82 Soni cW A L L In t ern et Security A pp li an ce Us e r ’s Gu id e
Page 84

3. You do not have to remove the Deny Default * to LAN Rule in the Rules window
to allow inbound access to a Public LAN Server.
4. Click Update. Once the SonicWALL has been updated, a message confirming the
update is displayed at the bottom of the browser window.
Repeat these instructions to configure additional Public LAN Servers.
Additional Notes:
•In Standard Network Addressing Mode, users on the Internet access Public LAN
Servers at their valid, LAN IP addresses.
• If NAT is enabled, users on the Internet access Public LAN Servers at the SonicWALL
WAN IP (NAT Public) Address.
• If users on the Internet cannot access Public LAN Servers, make sure that the Public
LAN Servers have been configured properly and have Internet connectivity. Also,
confirm that the DNS MX record points to the correct IP address--the WAN IP (NAT
Public) Address, if NAT is enabled.
• If you have multiple LAN servers of the same service, such as multiple Web servers,
and your SonicWALL has been configured for St andard Network Addressing
Mode, you must to create additional rules in the Rules window for the remaining
Public LAN Servers.
• If you have multiple LAN servers of the same service, such as multiple Web servers,
and you have enabled NAT, you must configure One-to-One NAT. Go to Chapter 9 for
more information about On e- to-One NAT.
Network Access Rules Page 83
Page 85

Current Network Access Rules List
All Network Access Rules are listed in the Current Network Access Rules table. The
rules are listed from most to least specific. The rules at the top o f Current Network
Access Rules list take precedence over rules at the bottom of the list.
Edit a Ru le
To ed it a r ule, click the Note Pad icon on the right side of the browser window. A new
Web browser window appears, displaying the current confi guration of the rule. Make the
desired changes and click Update to update t he ru le. T he modi fi ed ru le is d is played in the
list of Current Network Access Rules.
Delete a Rule
To delete a rule, click the Trash Can icon at the ri ght side of the browser window. A dial og
box appears with the message “Do you want to remove this rule?”. Click OK. Once the
SonicWALL has been updated, a message confirming the update is displayed at the bottom
of the browser window.
Enable/Disable a Rule
To disable a rule without permanently removing it, clear the Enable check box to the right
of the rule . To ena ble a disa bled rul e, se lec t th e Enable check box. The configur ation is
updated automatically, and a message confirming the update is di splayed at the bottom of
the browser window.
Restore the Default Network Access Rules
If the SonicWALL Network Access Rules have been modified or deleted, you can restore
the Def ault R ul es . The Default Rules prevent malicious intrusions and attacks, block all
inbound IP traffic and allow all outbound IP traffic. Click Restore Rules to Defaults to
reset the Network Access Rules. Once the SonicWALL has been updated, a message
confirming the update is displayed at the bottom of the browser window.
Understanding the Access Rule Hierarchy
The rule hierarchy has two basic concepts:
1. Specific rules override general rules.
• An individual service is more specific than the Default service.
• A single Ethernet link, such as LAN or WAN, is more specific than * (all).
• A single IP address is more specific than an IP address range .
2. Equally specific Deny rules override Allow rules.
Rules are displayed in the Current Network Access Rules list from the most specific to
the least specific, and rules at the top override rules listed below. For example, consider
the section of the Rules window shown below.
Page 84 Soni cW A L L In t ern et Security A pp li an ce Us e r ’s Gu id e
Page 86

The Default Allow Rule (#7) at the bottom of the page allows all traffic from the LAN to
the WAN. However, Rule #1 b locks IRC (Chat) traffic from a computer on the LAN to a
server on the WAN.
The De faul t Deny Rule (#6) bl ocks all traffic from the W AN to the LAN, ho wever, Rule
#2 overrides this rule by allowing Web traffic from the WAN to the LAN.
Examples
The following examples illustrate methods for creating Network Access Rules.
Blocking LAN access for specific services
This example shows how to block LAN access to NNTP servers on the Internet during
business hours.
1. Click Add New Rule in the Rules window to launch the Add Network Access Rule
Web browser window.
2. Select Deny from the Action menu.
3. Select NN TP from the Service menu. If the service is not listed in the list, you must
to add it in the Add Service window.
4. Select LAN from the So u rce Ethern et menu.
5. Since all computers on the LAN are to be affected, enter * in the Sour ce Ad dr Ran ge
Begin field.
6. Select WAN from the Destination Ethernet menu.
7. Enter * in the Destination Addr Range Begin field to block access to all NNTP
servers.
8. Select Apply this rule "from" to configure the time of enforcement.
9. Enter "8:30" and "17:30" in the hour fields.
10. Select Mon to Fri from the menu.
11. Click Update to add your new Rul e .
Network Access Rules Page 85
Page 87

Enabling Ping
By default, your SonicWALL does not respond to ping requests from the Internet. This Rule
allows ping requests from your ISP servers to your SonicWALL.
1. Click Add New Rule in the Rules window to launch the "Add Network Access
Rule" window.
2. Select Allow from the Action menu.
3. Select Ping from the Service menu.
4. Select WAN from the Source Ethernet menu.
5. Enter the starting IP address of the ISP network in the Source Addr Range Begin
field and the ending IP address of the ISP n etwork in the Source Addr Range End
field.
6. Select LA N from the Destination Ethernet menu.
7. Since the intent is to allow a ping only to the SonicWALL, enter the SonicWALL LAN IP
Address in the Destination Addr Range Begin field.
8. Select Always from the Apply this rule menu to ensure continuous enforcement.
9. Click Update to add your new Rule.
Page 86 Soni cW A L L In t ern et Security A pp li an ce Us e r ’s Gu id e
Page 88

SonicWALL TELE2 and SOHO2 IP Address Management
The SonicWALL TELE2 has a five node license which is cannot be upgraded. The SonicWALL
SOHO2 10-user license and 50-user license allow a maximum of 10 and 50 LAN IP
addresses to access the Internet, respectively. The SonicWALL cannot differentiate
between IP addresses designated for Internet access and IP addresses intended for LAN
access only. You can define a Rule to prevent IP addresses from counting toward the
SonicWALL SOHO2 IP license limit.
1. Click Add New Rule in the Rules window to launch the "Add Network Access
Rule" window.
2. Select Deny from the Action menu.
3. Select Default from the Service menu to block all ou tbound connections.
4. Select LAN from the So u rce Ethern et m e nu.
5. Enter the starting IP address of the range to be blocked in the Source Addr Range
Begin field and the ending IP address of the range in the Source Addr Range End
field. For instance, if you are using the 192.168.168 .10 1 th rou gh 19 2.1 68.1 68.150 for
IP addresses on the LAN, enter 192.168.168.101 as the beginning address and
192.168.168.150 as the ending address.
6. Select * from the Destination Ethernet menu.
7. Enter * from the Destination Addr Range Begin field.
8. Select always from the Apply this rule menu to ensure continuous enforcement.
9. Click Update to ad d your new rule.
Network Access Rules Page 87
Page 89

Users
The SonicWALL provides an authentication method giv ing authorized Internet users access
to LAN resources and allows users on the LAN to bypass Web content filtering. The Users
tab allows you to configure the user settings.
User Settings
Click Access on the left side of the browser window, and then click on the Users tab.
• User Idle Timeout
This sets the maximum period of inactivity before a user is required to re-establish an
Authenticated Session. The inactivity timeout applies to both Remote Acce ss and
Bypass Filters. This value can range from 5 to 99 minutes.
• Current User List
The Current User List is a list that displays all currently defined users.
To add a new user, complete the following instruc tions.
1. Highlight the -Add New User- entry in the Current User List box.
2. Enter the user log in name in the User Name field.
3. Enter the user password in the Password and Confirm Passwor d fields. It is important to use a pas sword that could not be guessed by someone else. Avoid using names
of friends, family, pets, etc. The passw ord should consist of random characters, such
as “a*$#7fe2j%42”. The password is case sensitive.
Page 88 Soni cW A L L In t ern et Security A pp li an ce Us e r ’s Gu id e
Page 90

4. Choose the privileges to be enabled for the user by select ing one or both check boxes.
Two op tions are available:
• Remote Access - This option provides unrestricted access to the LAN from a remote
location on the Internet. Only Standard m ode supports Remote Access. If NAT is
enabled, VPN client remote access is recommended.
• Bypass Fil te rs - Thi s opt i on p rov ide s unre s tr ic ted access to the Internet from the
LAN, bypassing Web, News, Java, and ActiveX blocking.
5. Click Update User.
Note: The SonicWALL supports up to 100 users.
Edit Us e r Se tt in g s
To change a user password o r user privileges, highlight the name in the Current User
List, make the changes and click Update User. To delete a user, highlig ht the name and
click Remove User.
Establishing an Authenticated User Session
To establish an Authenticated User Session, a user must enter the SonicWALL LAN IP
Address into the Location or Go to field in their Web browser.
Note: The Web browser used to establish an authenticated session must support Java and
JavaScript.
The user sees the SonicWALL authentication window, asking for their user name and
password. After completing these fields and clicking Login, their password is verified using
MD5 authentication. The password is never sent " in the clear" over the Internet, preventing
password theft.
Note: User names are not case sensitive (“john” is equivalent to “JOH N” or “John”), but
passwords are case sensitive (“password” is not the same as “Password”).
Once authenticated, remote users are able to access all IP resources on the LAN, and users
on the LAN are able to bypass the Content Filter Lists. The connection closes if use r
inactivity on the connection exceeds the configured time-out period. If the connection is
closed, the remote user must re-authenticate.
Note: Authenticated Sessions create a log entry when established. However, user
activity is not logged.
Network Access Rules Page 89
Page 91

Management
SonicWALL SNMP Support
SNMP (Simpl e Net wor k M anag eme nt Prot oco l) is a network protocol used over User
Datagram Protocol (UDP) that allows network administrators to monitor the status of the
SonicWALL Internet Security appliances and receive notification of any critical events as
they occur on the network. SonicWALL Internet security appliances support SNMP v1/v2c
and all relevant Management Information Base II (MIBII) groups except egp and at. The
SonicWALL replies to SNMP Get commands for MIBII via any interface and supports a
custom SonicWALL MIB for generating trap messages. The custom SonicWALL MIB is
available for download from the SonicWALL website and can be loaded into third-party
SNMP management softw a re such as HP Openview, Tivoli, or SNMPC.
To configure SNMP in the SonicWALL Internet Security appliance, log into the SonicWALL
Management interface. Click Access, then Management. The SNMP configuration panel
is displayed.
The SonicWALL SNMP agent generates two traps: Cold Start Trap and Alert Traps. Cold
Start Traps indicates that the SonicWALL appliance is re-initial izing itself s o that the agent
configuration or the appliance can be altered. Alert Traps are based on the existing
SonicWALL alert messages which allows the trap messages to share a common message
string with the alerts. Accordingly, no trap message can exist without a corresponding alert
message.
To configure SNMP, type in the necessary information in the following fields:
1. To enable the SNMP agent, select Enable SNMP.
2. Ty pe in the System Name. T his is th e hostname of the S o nicWALL applianc e.
Page 90 Soni cW A L L In t ern et Security A pp li an ce Us e r ’s Gu id e
Page 92

3. In the System Contact field, type in the name of the network administrator for the
SonicWALL appliance.
4. Type in an e-mail address, telephone number, or pager number in the System
Location field.
5. Create a name for a group or community of administrators who can view SNMP data,
and type it into the Get Community Name field.
6. Create a name for a group or community of administrators who can view SNMP traps,
and type it into the Trap Community Name field.
7. Enter the IP address or hostname of the SNMP management system receiving the
SNMP traps into the Host 1 thr ough 4 fields. Up to 4 addresses or hostnames can be
specified.
Configuration of the Log/Log Settings for SNMP
Trap messages are ge nerated only for the categorie s that alert messages are normally sent,
i.e. attacks, sys tem errors, bloc ked web si tes. I f none of the categories are selected on the
Log Settings page, then none of the trap messages are sent out.
Configuration of the Service and Rules Pages
By default, the SonicWALL appliance responds only to SNMP Get messages received on
its LAN interface. Appropriate rules must be set up in the SonicWALL to allow SNMP traffic
to and from the WAN. SNMP trap messages can be sent via the LAN, WAN, or DMZ
interface.
If your SNMP management system supports discovery, the SNMP agent should
automatically discover the SonicWALL appliance on the network. Otherwise, you must add
the SonicWALL appliance to the list of SNMP manageable devices on the SNMP
management system.
Management Method
All SonicWALLs include a Mana gement Securi ty Assoc iation (SA) for secure remote
management. The Mana geme nt SA does not permit access to remote network resources.
Because the Management SA is a standard feature, SonicWALL SOHO2 and SonicWALL
XPRS2 owners can remotely manage the So nicWALL with th e purchase of the SonicWALL
VPN Client rather than the more expensive VPN Upgrade.
Note: If you have enabled VPN on your SonicWALL, the SonicWALL can be managed
remotely using a Management SA or with a VPN SA. See Chapter 11 for VPN
configuration instructions and basic VPN terms and concepts .
To enable secure remote management, click Access on the left side of the browser
window, and click the Management tab. Then select Managed: "from the LAN
interface and remotely from the WAN interface" to enable secure remote
management.
Network Access Rules Page 91
Page 93

When remote management is enabled, a Management SA is automatically generated.
The Manag ement SA uses Manual Keying to set up a VPN tunnel between the SonicWALL
and the VPN client. The Management SA also defines Inbound and Outbound
Security Parameter Indices (SPIs) which match the last eight digits of the SonicWALL
serial number. The preset SPIs are displayed in the Security Association Information
section. It is not necessary to configure a VPN connection for Remote Management as
the Management SA is automatically configured in this section.
1. Enter a 16-character hexadecimal encryption key in the Encryption Key field. Valid
hexadecimal characters include 0, 1, 2, 3, 4, 5, 6, 7, 8, 9, A, B, C, D, E and F. An
example of a valid encryption key is 1234567890A-BCDEF. Or you can use the
randomly generated key that appears in the Encryption Key field.
2. Enter a 32-character hexadecimal authentication key in the Authentic ation Key field.
An example of a valid authen tication key i s 1234567- 89 0ABCDEF123456 7890ABCDEF.
Or you can use the randomly generated key that appears in the Authe nti cati on Ke y
field.
3. Click Update. R estart the Sonic WAL L fo r the change to take effect.
Note: Whe n a Management SA is created, the remote SonicWALL is managed at the
SonicWALL WAN IP Address. In contrast, when connecting to a VPN SA, the remote
SonicWALL is managed at the SonicWALL LAN IP Address.
4. Click Help in the upper right corner of the SonicWALL Management Interface to access
detaile d instruct ions for co nfigurin g the VPN cli ent. Addi tional ins tructions are availa ble
at <http://www.sonicwall.com/products/documentation/VPN_documentation.html >.
Page 92 Soni cW A L L In t ern et Security A pp li an ce Us e r ’s Gu id e
Page 94

Note: The Management Method list also includes the option for management by
SonicWALL Global Manag ement S ystem (Soni cWALL GMS ). Select this option if the
SonicWALL is managed remotely by SonicWALL GMS. Refer to SonicWALL GMS
documentation for setup instructi ons.
Manage Using Internet Explorer check box
The check box labeled Manage Using Internet Explorer is selected by default. It
enables the Microsoft Internet Explorer web browser to quickly load the SonicWALL Web
Management Authentication web page. With the IE check box enabled, the SonicWALL
Internet security appliance LAN port responds to NetBIOS name request on port 137.
Users can disable the LAN port response to port 137 by clearing the IE check box, but the
log in process into the SonicWALL Management interface slows down.
Network Access Rules Page 93
Page 95

9 Advanced Features
This chapter describes the SonicWALL Advanced Fea tur e s, s u ch as Web Pr oxy
Forwarding, DMZ Address settings, and One-to-One NAT. The Advanced
Features can be accessed in the Advanced section of the SonicWALL Web
Management Interface.The re are six tabs in the Advanced section:
• Proxy Relay
• Intranet
• Routes
• DMZ Addr esse s
• One-to-One NAT
• Ethernet
Proxy Relay
Web Proxy Forwarding
A Web proxy server intercepts HTTP requests and determines if it has stored copies
of the requested Web pages. If it does not, the proxy completes the request to the
server on the Internet, returning the requested information to the user and also
saving it locally for future requests.
Setting up a Web proxy server on a network can be cumbersome, beca use each
computer on the network must be configured to direct Web requ ests to the server.
Page 94 SonicWALL Int ern et Security A pp li an ce User’s Guide
Page 96

If you have a proxy server on your network, instead of configuring each computer to point
to the proxy server, you can move the server to the WAN and enable Web
ProxyForwarding. The SonicWALL automatically forwards all Web proxy requests to the
proxy server without requiring all the computers on the network to be configured.
Configuring Web Proxy Relay
1. Connect your Web proxy server to a hub, and connect the hub to the SonicWALL WAN
port.
Note: The proxy server must be located on the WAN or the DMZ; i t can not be located
on the LAN.
2. Log into the SonicWALL Web Management Interface. Click Advanced at the left side
of the browser window, and then click the Proxy Relay tab at the top of the window.
3. Enter the name or IP address o f the proxy server i n the Proxy Web Server field, and
the proxy IP port in the Proxy Web Server Port field. Click Update.
4. If the Web proxy server is located on the WAN between the SonicWALL and the
Internet router, add the Web proxy server address in the SonicWALL Intranet tab.
Click the Intranet tab at the top of the window.
5. To bypass the Proxy Servers if a failure occurs, select the Bypass Proxy Servers
Upon Proxy Server Failure check box.
Note: The Intranet settings tab is displa yed on page 98.
6. In the Intranet tab, enter the proxy server's IP address in the Add Range field.
7. Select Sp ecified address ranges are atta ched to the WAN link and click Update.
Once the SonicWALL has been updated, a message confirming the update is displayed
at the bottom of the browser window.
Bypass Proxy Servers Upon Proxy Failure
If a web proxy server is specified in the Proxy Relay tab of the Advanced section,
selecting the Bypass Proxy Servers Upon Proxy Server Failure check box allows
clients behind the SonicWALL to bypass the web proxy server in the event it becomes
unavailable. Instead, the client’s browser accesses the Internet directly as if a web proxy
server is not specified.
Advanced Features Page 95
Page 97

Intranet
The SonicWALL can be configured as an Intranet firewall to prevent network users from
accessing sensitive servers. By default, users on your LAN can access the Internet router,
but not devices connected to the WAN port of the SonicWALL. To enable access to the area
between the SonicWALL WAN port and the Internet, you must configure the Intranet
settings on the SonicWALL.
Intranet firewal lin g is ac hieved by conn ecting th e Soni cWALL between an u nprotected an d
a protected segment, as shown below.
Installation
1. Connect the LAN Ethernet port on the back of the SonicWALL to the network segment
to be protected against unauthorized access.
2. Connect the WAN Ethernet port on the back of the SonicWALL to the rest of the
network.
Note: Devices connected to the WAN port do not have firewall protection. It is
recommended that you use another So nicWALL Internet security appliance to protect
computers on the WAN
3. Connect the SonicWALL to a po wer o utlet. For SonicWALL PRO and SonicW ALL PROVX, press the Power Switch to the ON position.
Page 96 SonicWALL Int ern et Security A pp li an ce User’s Guide
.
Page 98

Intranet Configuration
Click Advanced on the left side of the browser window, and then click the Intranet tab.
To enable an In tranet firewal l, yo u must speci fy which mac hines ar e located o n the LAN, or
you must specif y which machines are located on the WAN.
It is best to select the network area with the least number of machines. For example, if only
one or two machines are connected to the WAN, select Specifie d ad dr ess r an ge s are
attached to the WAN link. That way, you only have to enter one or two IP addresses in
the Add Range section. Specify the IP addresses individually or as a range.
Intranet Settings
Select one of the foll owing f our opti ons:
• SonicWALL WAN link is connected directly to the Internet router
Select this option if the SonicWALL is protecting your entire network. This is the default
setting.
• Specified address ranges are attached to the LAN link
Select this option if it is easier to specify the devices on your LAN. Then enter your LAN
IP address range(s). If you do no t include all comp uters on your L AN, the c omputers
not included will be unable to send or receive data through the SonicWAL L.
Advanced Features Page 97
Page 99

• Specified address ranges are attached to the WAN link
Select this option if it is easier to specify the devices on your WAN. Then enter your
WAN IP address range(s). Computers connected to the WAN port that are not included
are inaccessible to users on your LAN.
• Add Range
To add a range of addresses, such as "199.2.23.50" to "199.2.23.54", enter the
starting address in the From Address field and the ending address in the To Address
field. An individual IP address should be entered in the From Address field only.
Note: Up to 64 address ranges can be entered.
Click Update. Once the SonicWALL has been updated, a message confirming the update is
displayed at the bottom of the browser window.
Routes
If you have routers on your Local Area Network, you have to configure the Static Routes
section of the SonicWALL.
Click Advanced on the left side of the browser window, and then click the Routes tab.
The SonicWALL LAN IP Address, LAN Subnet Mask, WAN IP Address and WAN/DMZ Subnet
Mask a re displ ayed in the Current Networ k Settings section. Refer to these settings
when configuring your Static Routes.
Page 98 SonicWALL Int ern et Security A pp li an ce User’s Guide
Page 100

To add Stat ic Route e ntries, complete the follow ing ins tructions:
1. Enter the destination network of the static route i n the Dest. Network field. The destination network is the IP address subnet of the remote network segment.
Note: If the destination network uses IP addresses ranging from "192.168.1.1" to
"192.168. 1.255", en ter "192 .168.1.0" in the Dest. Network fi eld.
2. Enter the subnet mask of the remote network segment in the Subnet mask field.
3. Enter the IP address of y our router in the Gateway field. This IP address should be in
the same subnet as the SonicWALL. If your router is located on the SonicWALL LAN,
the Gateway address shoul d be in the s ame s ubnet a s the Soni cWALL LAN IP Address .
4. Select the port on the SonicWALL that the router is conn ected to either th e LA N, the
WAN, or the DMZ, from the Link list.
5. Click Update . Once the SonicWALL has been updated, a message confirming the up-
date is displayed at the bottom of the Web browser window. Restart the Soni cWALL
for the change to take effect.
Note: The SonicWALL can support up to 64 static route entries.
DMZ Addresses (SonicWALL XPRS2, PRO, and PRO-VX Only)
The SonicWALL provides s ecurity by preve nting Internet users from access ing machines on
the LAN. This security, however, al so prevent s users from reaching public servers, such as
Web or e-mail servers.
The SonicWALL offers a special DMZ ("Demilitarized Zone") port that provides Internet
access to network servers. The DMZ sits between the local network and the Internet.
Servers on the DMZ are publicly accessible, but they are protected from attacks such as
SYN Flood and Ping of Death. Use of the DMZ port is optional .
If you are configuring the SonicWALL SOHO2 or the SonicWALL TELE2, please go to
Chapter 8, Network Access Rules, for information about setting up publicly accessible
servers.
Using the DMZ is a strongly recommended alternative to placing servers on the WAN port
where they are not protected or established Public LAN servers.
Advanced Features Page 99
 Loading...