


SonicOS and SonicOSX 7
SSL VPN
Administration Guide

Contents
About SSL VPN 3
About NetExtender 7
Creating an Address Object for the NetExtender Range 7
Setting Up Access 8
Configuring Proxies 9
Installing the Stand-Alone Client 9
Configuring Users for SSL VPN Access 10
For Local Users 10
For RADIUS, LDAP and TACACS+ Users 11
For Tunnel All Mode Access 12
Biometric Authentication 13
Configuring SSL VPN Server Behavior 14
Server Settings page 14
SSL VPN Status on Zones 14
SSL VPN Server Settings 14
RADIUS User Settings 16
SSL VPN Client Download URL 16
Configuring SSL VPN Client 17
Configuring the Settings Options 18
Configuring the Client Routes 18
Configuring Client Settings 19
Configuring the SSL VPN Web Portal 21
Portal Settings 21
Portal Logo Settings 23
Viewing SSL VPN Sessions 24
Status Page 24
Bookmark Page 24
Configuring Virtual Office 25
Accessing the Virtual Office Portal 25
Using NetExtender 25
Configuring SSL VPN Bookmarks 26
Configuring Device Profile Settings for IPv6 29
SonicWall Support 30
About This Document 31
SonicOS/X 7 SSL VPN Administration Guide
Contents
2

About SSL VPN
NOTE: References to SonicOS/X indicate that the functionality is available in both SonicOS and
SonicOSX.
This section provides information on how to configure the SSL VPN features on the SonicWall network
security appliance. SonicWall’s SSL VPN features provide secure remote access to the network using the
NetExtender client.
NetExtender is an SSL VPN client for Windows, or Linux users that is downloaded transparently. It allows
you to run any application securely on the network and uses Point-to-Point Protocol (PPP). NetExtender
allows remote clients seamless access to resources on your local network. Users can access NetExtender
two ways:
l Logging in to the Virtual Office web portal provided by the SonicWall network security appliance
l Launching the standalone NetExtender client
3
Each SonicWall appliance supports a maximum number of concurrent remote users. Refer to the the
Maximum number of concurrent SSL VPN users for details.
MAXIMUM CONCURRENT USERS
(HARDWARE FIREWALLS)
SonicWall appliance
model
NSa 9650 3000
NSa 9450 3000
NSa 9250 3000
NSa 6650 2000
NSa 5650 1500
NSa 4650 1000
NSa 3650 500
NSa 2650 350
SM 9600 3000
SM 9400 3000
SM 9200 3000
NSA 6600 1500
NSA 5600 1000
Maximum concurrent
SSL VPN connections
SonicOS/X 7 SSL VPN Administration Guide
About SSL VPN
3

SonicWall appliance
model
Maximum concurrent
SSL VPN connections
NSA 4600 500
NSA 3600 350
NSA 2600 250
TZ600/TZ600P 200
TZ500/TZ500 W 150
TZ400/TZ400 W 100
TZ350/TZ350 W 75
TZ300/TZ300 W/TZ300P 50
SOHO 250/SOHO 250W 25
MAXIMUM CONCURRENT USERS (VMWARE)
VMware ESXi appliance
model
Maximum concurrent
SSL VPN connections
10 10
25 25
50 25
100 25
200 50
300 50
400 50
800 50
1600 50
MAXIMUM CONCURRENT USERS (AZURE)
Azure appliance model Maximum concurrent
SSL VPN connections
10 10
25 25
50 25
100 25
200 100
400 100
800 100
1600 100
SonicOS/X 7 SSL VPN Administration Guide
About SSL VPN
4

MAXIMUM CONCURRENT USERS (AWS)
AWS appliance model Maximum concurrent
SSL VPN connections
10 10
25 25
50 25
100 25
200 50
400 50
800 50
1600 50
MAXIMUM CONCURRENT USERS (AWS - PAYG)
AWS - PAYG appliance
model
Maximum concurrent
SSL VPN connections
200 50
400 50
800 50
1600 50
MAXIMUM CONCURRENT USERS (LINUX KVM)
Linux KVM appliance
model
Maximum concurrent
SSL VPN connections
10 10
25 25
50 25
100 25
200 50
300 50
400 50
800 50
1600 50
MAXIMUM CONCURRENT USERS (MICROSOFT
HYPER-V)
Microsoft Hyper-V
appliance model
Maximum concurrent
SSL VPN connections
10 10
25 25
50 25
SonicOS/X 7 SSL VPN Administration Guide
About SSL VPN
5
Microsoft Hyper-V
appliance model
Maximum concurrent
SSL VPN connections
100 25
200 50
300 50
400 50
800 50
1600 50
SonicOS/X supports NetExtender connections for users with IPv6 addresses. The address objects dropdown menu includes all the predefined IPv6 address objects.
NOTE: IPv6 Wins Server is not supported. IPv6 FQDN is supported.
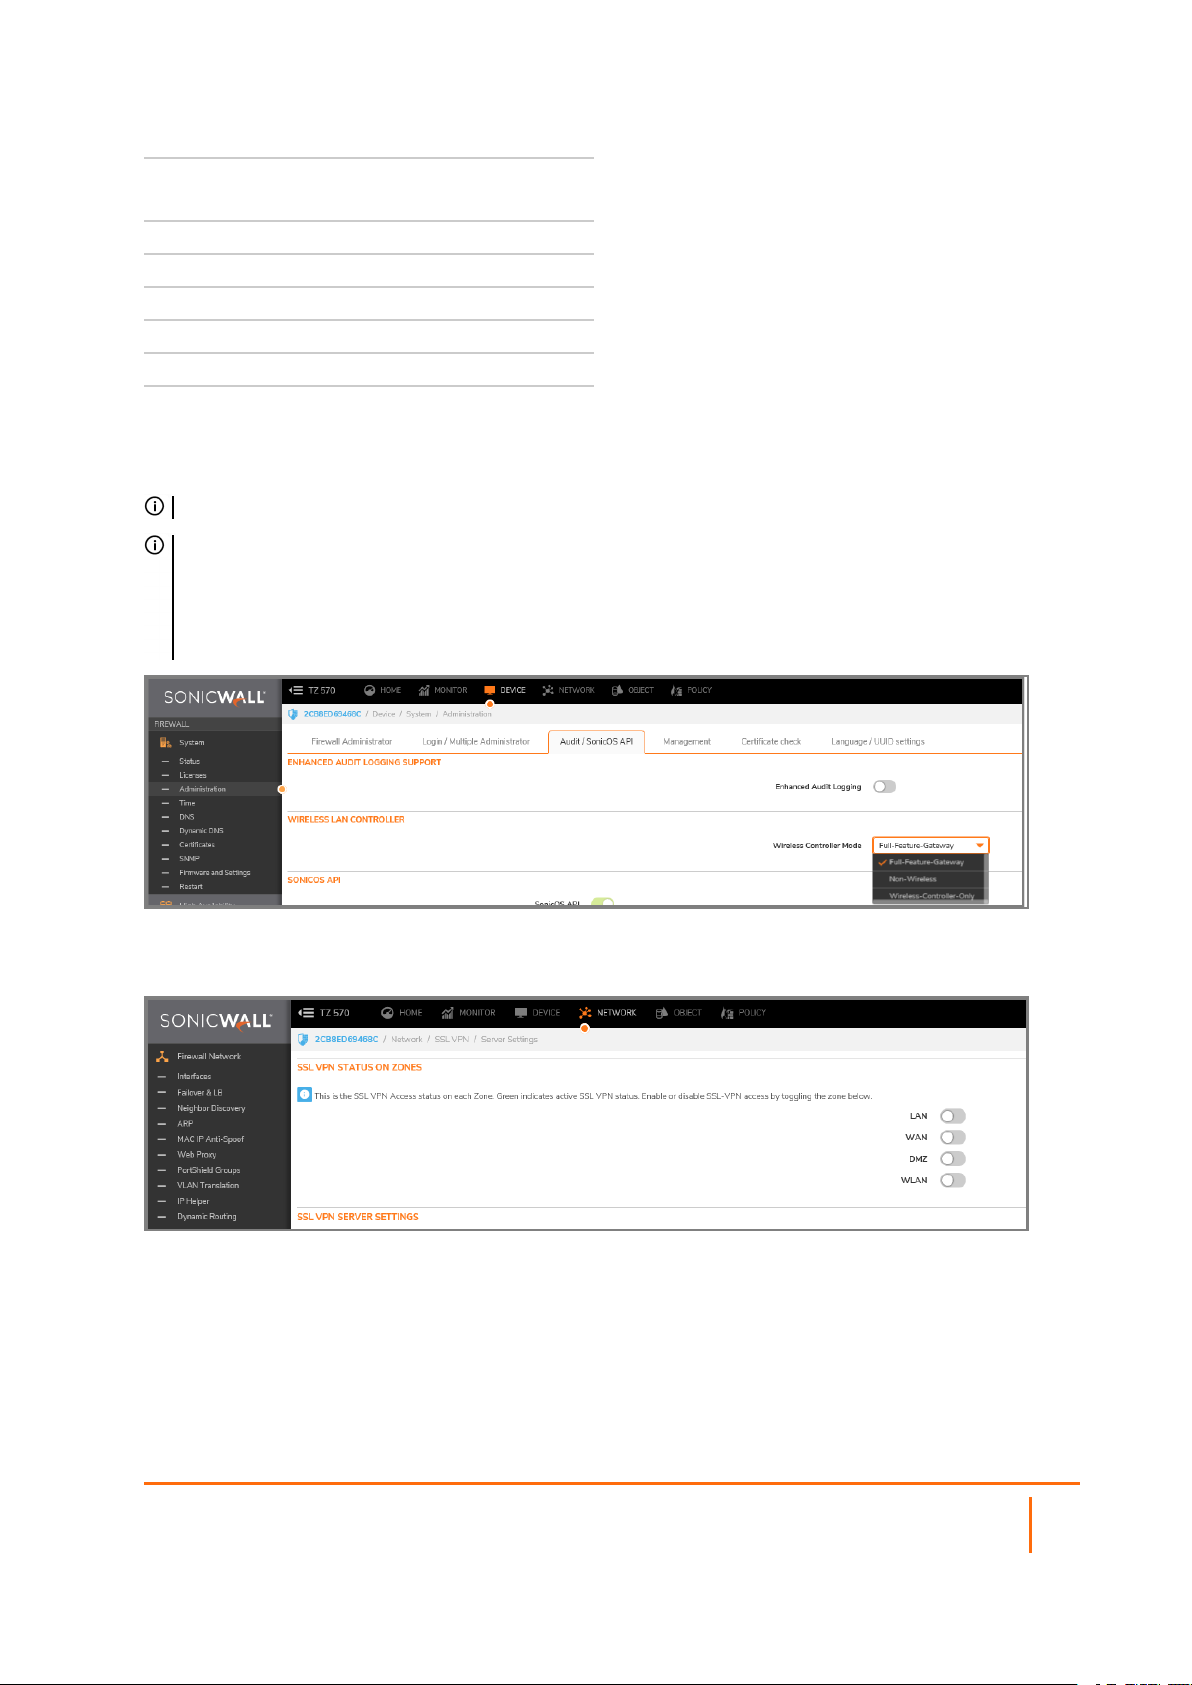
NOTE: SSL VPN connectivity is available when Wireless Controller Mode on the DEVICE | System >
Administraton page in Wireless Controller, and is set to either Full-Feature-Gateway or Non-
Wireless. If Wireless-Controller-Only is enabled for Wireless Controller Mode, SSL VPN interfaces are
not available.
NETWORK|SSL VPN > Server Settings > SSL VPN SSL VPN Status on Zones displays inactive status for
all zones, and SSL VPN zones are not editable.
Topics:
l About NetExtender
l Configuring Users for SSL VPN Access
l Biometric Authentication
SonicOS/X 7 SSL VPN Administration Guide
About SSL VPN
6

About NetExtender
SonicWall’s SSL VPN NetExtender is a transparent software application for Windows, and Linux users that
enables remote users to securely connect to the company network. With NetExtender, remote users can
securely run any application on the company network. Users can upload and download files, mount network
drives, and access resources as if they were on the local network.
NetExtender provides remote users with full access to your protected internal network. The experience is
virtually identical to that of using a traditional IPsec VPN client. Linux systems can also install and use the
NetExtender client. Windows users need to download the client from the portal, and those with mobile
devices need to download Mobile Connect from the application store.
The NetExtender standalone client can be installed the first time the user launches NetExtender from the
portal. Thereafter, it can be accessed directly from the Start menu on Windows systems, or by he path name
or from the shortcut bar on Linux systems.
After installation, NetExtender automatically launches and connects a virtual adapter for secure SSL VPN,
point-to-point access to permitted hosts and subnets on the internal network.
Topics:
l Creating an Address Object for the NetExtender Range
l Setting Up Access
l Configuring Proxies
l Installing the Stand-Alone Client
Creating an Address Object for the NetExtender Range
As a part of the NetExtender configuration, you need to create an address object for the NetExtender IP
address range. This address object is then used when configuring the Device Profiles.
You can create address objects for both an IPv4 address range and an IPv6 address range to be used in the
SSL VPN > Client Settings configuration. The address range configured in the address object defines the
IP address pool from which addresses are assigned to remote users during NetExtender sessions. The range
needs to be large enough to accommodate the maximum number of concurrent NetExtender users you
intend to support. You might want to allow for a few extra addresses for growth, but it is not required.
NOTE: In cases where other hosts are on the same segment as the appliance, the address range must
not overlap or collide with any assigned addresses.
SonicOS/X 7 SSL VPN Administration Guide
About SSL VPN
7
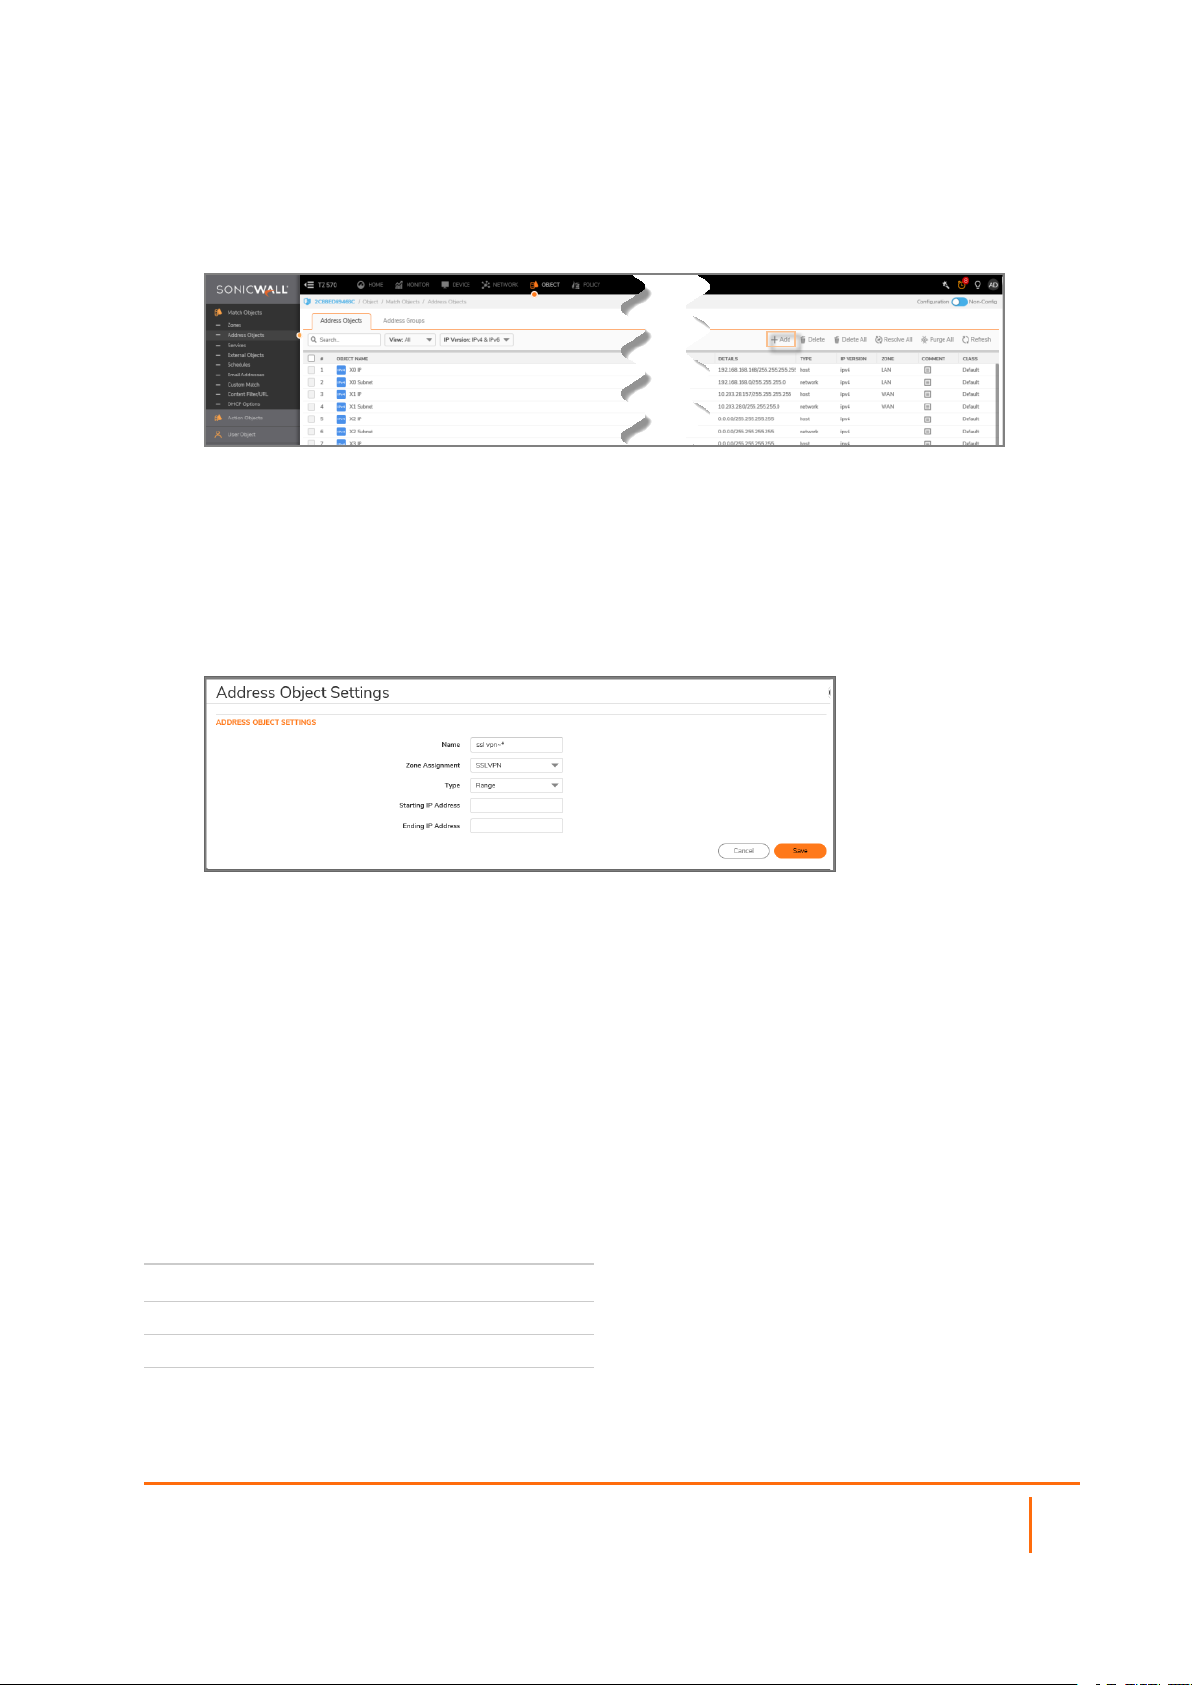
To create an address object for the NetExtender IP address range:
1.
Navigate to OBJECTS > Address Objects.
2.
Click Add.
3.
Type a descriptive name in the Name field.
4.
For Zone Assignment, select SSLVPN.
5.
For Type, select Range.
6.
In the Starting IP Address field, type in the lowest IP address in the range you want to use.
NOTE:The IP address range must be on the same subnet as the interface used for SSL VPN
services. Ensure that IPaddress range does not collide with other assigned ranges.
7.
In the Ending IP Address field, type in the highest IP address in the range you want to use.
8.
Click ADD.
9.
Click CLOSE.
Setting Up Access
NetExtender client routes are used to allow and deny access for SSL VPN users to various network
resources. Address objects are used to easily and dynamically configure access to network resources.
Tunnel All mode routes all traffic to and from the remote user over the SSL VPN NetExtender tunnel—
including traffic destined for the remote user’s local network. This is done by adding the following routes to
the remote client’s route table:
ROUTES TO BE ADDED TO REMOTE
CLIENT’S ROUTE TABLE
IP Address Subnet mask
0.0.0.0 0.0.0.0
0.0.0.0 128.0.0.0
128.0.0.0 128.0.0.0
SonicOS/X 7 SSL VPN Administration Guide
About SSL VPN
8

NetExtender also adds routes for the local networks of all connected Network Connections. These routes are
configured with higher metrics than any existing routes to force traffic destined for the local network over the
SSL VPN tunnel instead. For example, if a remote user is has the IP address 10.0.67.64 on the 10.0.*.*
network, the route 10.0.0.0/255.255.0.0 is added to route traffic through the SSL VPN tunnel.
NOTE: To configure Tunnel All mode, you must also configure an address object for 0.0.0.0, and assign
SSL VPN NetExtender users and groups to have access to this address object.
Administrators also have the ability to run batch file scripts when NetExtender connects and disconnects.
The scripts can be used to map or disconnect network drives and printers, launch applications, or open files
or Web sites. NetExtender Connection Scripts can support any valid batch file commands.
Configuring Proxies
SonicWall SSL VPN supports NetExtender sessions using proxy configurations. Currently, only HTTPS proxy
is supported. The proxy settings can also be manually configured in the NetExtender client preferences.
NetExtender can automatically detect proxy settings for proxy servers that support the Web Proxy Auto
Discovery (WPAD) Protocol.
NetExtender provides three options for configuring proxy settings:
l Automatically detect settings - To use this setting, the proxy server must support Web Proxy Auto
Discovery Protocol), which can push the proxy settings script to the client automatically.
l Use automatic configuration script - If you know the location of the proxy settings script, you can
select this option and provide the URL of the script.
l Use proxy server - You can use this option to specify the IP address and port of the proxy server.
Optionally, you can enter an IP address or domain in the BypassProxy field to allow direct
connections to those addresses and bypass the proxy server. If required, you can enter a user name
and password for the proxy server. If the proxy server requires a username and password, but you do
not specify them, a NetExtender pop-up window prompts you to enter them when you first connect.
When NetExtender connects using proxy settings, it establishes an HTTPS connection to the proxy server
instead of connecting to the firewall server directly. The proxy server then forwards traffic to the SSL VPN
server. All traffic is encrypted by SSL with the certificate negotiated by NetExtender, of which the proxy
server has no knowledge. The connecting process is identical for proxy and non-proxy users.
Installing the Stand-Alone Client
The first time a user launches NetExtender, the installer can be downloaded and run on the user's system.
The installer creates a profile based on the user’s login information. The installer window then closes and
automatically launches NetExtender. If the user has a legacy version of NetExtender installed, the installer
uninstalls or requests the user to uninstall the old NetExtender first and then can install the new version.
After the NetExtender stand-alone client has been installed, Windows users can launch NetExtender from
their PC’s Start > Programs menu or system tray and can configure NetExtender to launch when Windows
boots. Mac users can launch NetExtender from their system Applications folder, or drag the icon to the dock
for quick access. On Linux systems, the installer creates a desktop shortcut in /usr/share/NetExtender. This
can be dragged to the shortcut bar in environments like Gnome and KDE.
SonicOS/X 7 SSL VPN Administration Guide
About SSL VPN
9
NOTE: Complete instructions for installing NetExtender on a SonicWall appliance can be found in How
to setup SSL-VPN feature (NetExtender Access) on SonicOS 5.9 & above (SW10657) in the Knowledge
Base.
VIDEO: The video, How to configure SSL VPN, also explains the procedure for configuring NetExtender.
Configuring Users for SSL VPN Access
For users to be able to access SSL VPN services, they must be assigned to the SSLVPN Services group.
Users attempting to login through the Virtual Office and who do not belong to the SSLVPN Services group
are denied access.
Topics:
l For Local Users
l For RADIUS and LDAP Users
l For Tunnel All Mode Access
For Local Users
The following is a quick reference, listing the User settings needed to enable SSLVPN Services.
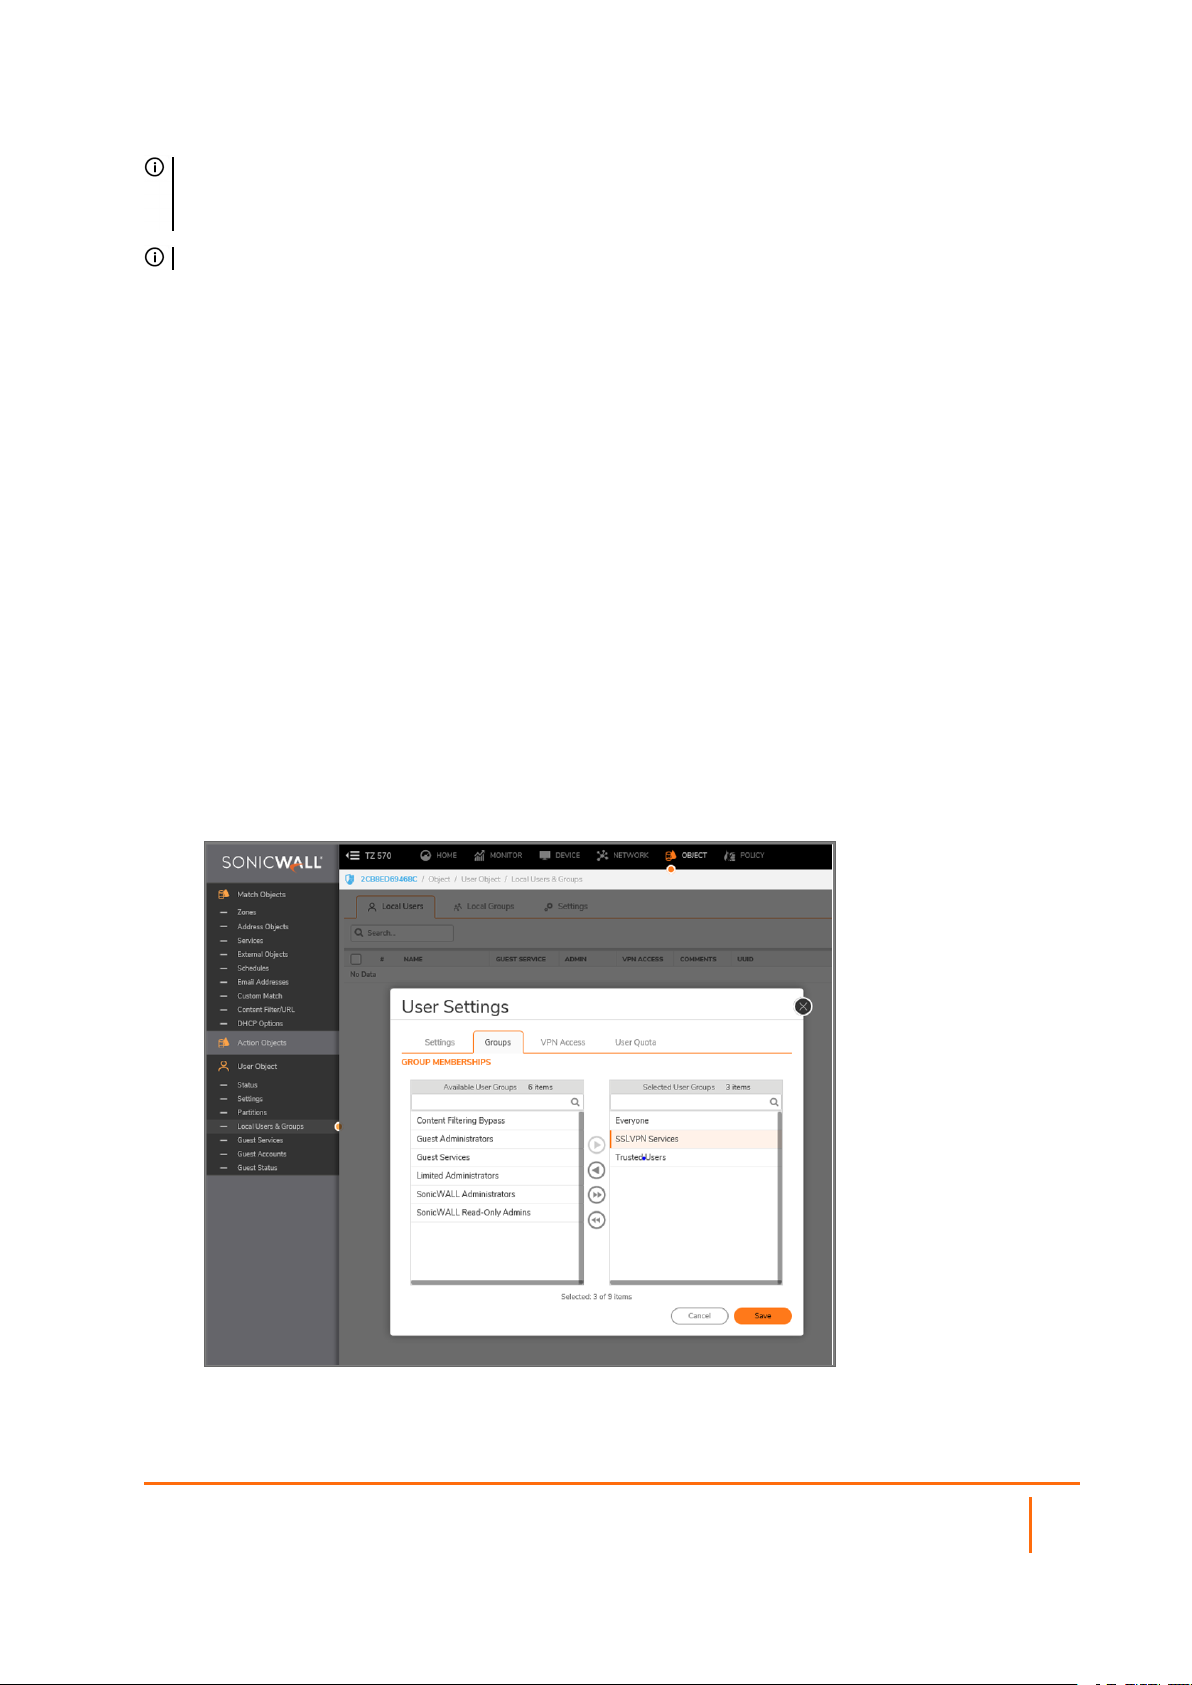
To configure SSL VPN access for local users:
1.
Navigate to MANAGE | System Setup | Users > Local Users & Groups.
2.
Click the Edit icon for the user you want to set up, or click Add User to create a new user.
3.
Select Groups.
SonicOS/X 7 SSL VPN Administration Guide
10
About SSL VPN

4.
In the User Groups column, select SSLVPN Services and click the Right Arrow to move it to the
Member Of column.
5.
Select VPN Access and move the appropriate network resources VPN users (GVC, NetExtender, or
Virtual Office bookmarks) to the Access List.
NOTE: The VPN Access settings affect the ability of remote clients using GVC, NetExtender, or
SSL VPN Virtual Office bookmarks to access network resources. To allow GVC, NetExtender, or
Virtual Office users to access a network resource, the network address objects or groups must be
added to the Access List on VPN Access.
6.
Click OK.
For RADIUS, LDAP and TACACS+ Users
The procedure for configuring RADIUS, LDAP and TACACS+ users is similar. You need to add the users to
the SSL VPN Services user group.
To configure SSL VPN access for RADIUS, LDAP and TACACS+ users:
1.
Select the OBJECT|User Object > Settings view and click on the Authentication tab.
2.
In the User authentication method field: Select RADIUS or RADIUS + Local Users. Select LDAP or
LDAP + Local Users.
3.
Select: CONFIGURE RADIUS CONFIGURE LDAP
4.
Select: RADIUS Users > Users & Groups.
SonicOS/X 7 SSL VPN Administration Guide
About SSL VPN
11

5.
Select SSLVPN Services in the appropriate field: Default user group to which all RADIUS users
belong Default LDAP User Group
6.
Click OK.
For Tunnel All Mode Access
The detailed process for adding and configuring local users and groups is described in SonicOS/X Users.
The following is a quick reference, listing the User settings needed to set up users and groups for Tunnel
All mode.
To configure SSL VPN NetExtender users and groups for Tunnel All Mode:
1.
Navigate to OBJECTS | User Objects | Users > Local Users & Groups.
SonicOS/X 7 SSL VPN Administration Guide
About SSL VPN
12

2.
Click on Add icon and define SSLVPN as a selected group.
3.
Select VPN Access.
4.
Select the WAN RemoteAccess Networks address object and click Right Arrow to move it to the
Access List.
5.
5 Repeat the processes for all local users and groups that use SSL VPN NetExtender.
Biometric Authentication
IMPORTANT: To use biometric authentication, Mobile Connect 4.0 or higher must be installed on the
mobile device and configured to connect with the firewall.
SonicOS/X supports biometric authentication in conjunction with SonicWall Mobile Connect. Mobile
Connect is an application that allows users to securely access private networks from a mobile device. With
Mobile Connect 4.0 you can use finger-touch for authentication as a substitute for username and password.
The configuration settings to allow this method of authentication are on the NETWORKS | SSL VPN >
Client Settings page. These options only show when Mobile Connect is used to connect to the firewall.
After configuring biometric authentication on the SSL VPN > Client Settings page, Touch ID (iOS) or
Fingerprint Authentication (Android) need to be enabled on the user’s smart phone or other mobile device.
SonicOS/X 7 SSL VPN Administration Guide
About SSL VPN
13

Configuring SSL VPN Server Behavior
The SSL VPN > Server Settings page configures firewall to act as an SSL VPN server.
Server Settings page
Topics:
l SSL VPN Status on Zones
l SSL VPN Server Settings
l RADIUS User Settings
l SSL VPN Client Download URL
4
SSL VPN Status on Zones
This section displays the SSL VPN Access status on each zone:
l Green indicates active SSL VPN status.
l Red indicates inactive SSL VPN status.
Enable or disable SSL VPN access by clicking the zone name.
SSL VPN Server Settings
To configure the SSL VPN server settings:
1.
In the SSL VPN Port field, enter the SSL VPN port number. The default is 4433.
2.
From the Certificate Selection drop-down menu, select the certificate that used to authenticate
SSL VPN users. The default method is Use Self-signed Certificate.
3.
In the User Domain field, enter the user’s domain, which must match the domain field in the
NetExtender client. The default is LocalDomain.
l If authentication partitioning is not being used, this field has to match with the domain field in
the NetExtender Client.
SonicOS/X 7 SSL VPN Administration Guide
Configuring SSL VPN Server Behavior
14

l If authentication partitioning is being used, then in NetExtender, the user can enter any of the
domain names configured with the partitions, for this reason, selecting the partition for
authenticating their name/password externally through RADIUS or LDAP. In this case, the
name set here is a default for the user to enter for local authentication, or if they have no local
account, for authentication in the default partition.
l Note that in either case, when used with external authentication, this user domain name is not
passed to the RADIUS/LDAP server, sending just the simple user name without it.
4.
To enable web management over SSL VPN, select Enabled from the Enable Web Management
over SSL VPN drop-down menu. The default is Disabled.
5.
To enable SSH management over SSL VPN, select Enabled from the Enable SSH Management
over SSL VPN drop-down menu. The default is Disabled.
6.
In the Inactivity Timeout (minutes) field, enter the number of minutes of inactivity before logging
out the user. The default is 10 minutes.
SonicOS/X 7 SSL VPN Administration Guide
Configuring SSL VPN Server Behavior
15

RADIUS User Settings
This section is available only when either RADIUS or LDAP is configured to authenticate SSL VPN users on
the OBJECTS | User Objects > Settings page. Enabling MSCHAP mode for RADIUS allows users to
change expired passwords when they log in.
To configure MSCHAP or MSCHAPv2 mode:
1.
Select Use RADIUS in.
2.
Select one of these two modes:
l MSCHAP
l MSCHAPV2
NOTE: In LDAP, passwords can only be changed when using either Active Directory with TLS
and binding to it using an administrative account or when using Novell eDirectory.
If this option is set when LDAP is selected as the authentication method of login on the Users >
Settings page, but LDAP is not configured in a way that allows password updates, then password
updates for SSL VPN users are performed using MSCHAP-mode RADIUS after using LDAP to
authenticate the user.
3.
Click ACCEPT at the bottom of the page.
SSL VPN Client Download URL
In this section of the page, you set up where the client system downloads the SSL VPN client from. You can
download the files from the appliance and put them on your web server to provide your own server to host
this client package. Otherwise, clients can download the SSL VPN files from the firewall.
To configure your own web server for SSL VPN client file downloads:
1.
Select the link in Click here to download the SSL VPN zip file which includes all SSL VPN client
files to download all the client SSL VPN files from the appliance. Open and unzip the file, and then
put the folder on your HTTP server.
2.
Select Use customer’s HTTP server as downloading URL: (http://) to enter your SSL VPN client
download URL in the supplied field.
3.
Click ACCEPT.
SonicOS/X 7 SSL VPN Administration Guide
Configuring SSL VPN Server Behavior
16

Configuring SSL VPN Client
On the SSL VPN > Client Settings page, you can edit the Default Device Profile. The Default Device
Profile enables SSL VPN access on zones, configures client routes, and configures the client DNS and
NetExtender settings.
The SSL VPN > Client Settings page also displays the configured IPv4 and IPv6 network addresses and
zones that have SSL VPN access enabled.
5
Edit the Default Device Profile to select the zones and NetExtender address objects, configure client routes,
and configure the client DNS and NetExtender settings.
SSL VPN access must be enabled on a zone before users can access the Virtual Office web portal. SSL VPN
Access can be configured on the NETWORK | SSL VPN| Server Settings page.
Topics:
l Configuring the Settings Option
l Configuring the Client Routes
l Configuring Client Settings
SonicOS/X 7 SSL VPN Administration Guide
Configuring SSL VPN Client
17

Configuring the Settings Options
To configure Default Device Profile:
1.
Navigate to the Network | SSL VPN > Client Settings page.
2.
Click the Edit icon for the Default Device Profile. Select the Basic tab.
The Name and Description of the Default Device Profile cannot be changed.
3.
In the Zone IP V4 drop-down menu, choose SSLVPN or a custom zone to set the zone binding for
this profile.
4.
From the Network Address IP V4 drop-down menu, select the IPv4 NetExtender address object
that you created for this profile. Refer to Creating an Address Object for the NetExtender Range for
instructions. This setting selects the IP Pool and zone binding for this profile. The NetExtender client
gets the IP address from this address object if it matches this profile.
5.
In the Zone IP V6 drop-down menu, choose SSLVPN or a custom zone to set the zone binding for
this profile.
6.
From the Network Address IP V6 drop-down menu, select the IPv6 NetExtender address object
that you created.
7.
Click OK to save settings and close the window or proceed to Configuring the Client Routes.
Configuring the Client Routes
In Client Routes, you can control the network access allowed for SSL VPN users. The NetExtender client
routes are passed to all NetExtender clients and are used to govern which private networks and resources
remote users can access third-party the SSL VPN connection.
To configure the client routes:
1.
Navigate to the Network | SSL VPN > Client Settings page.
2.
Click the Edit icon for the Default Device Profile.
SonicOS/X 7 SSL VPN Administration Guide
Configuring SSL VPN Client
18

3.
Select Client Routes.
4.
To force all traffic for NetExtender users over the SSL VPN NetExtender tunnel—including traffic
destined for the remote user’s local network, select Enabled from the Tunnel All Mode drop-down
menu.
5.
Under Networks, select the address object to which you want to allow SSL VPN access.
6.
Click the Right Arrow to move the address object to the Client Routes list.
7.
Repeat until you have moved all the address objects you want to use for Client Routes.
Creating client routes also creates access rules automatically. You can also manually configure
access rules for the SSL VPN zone. Refer to SonicOS and SonicOSX 7 Access Rules for details about
access rules.
8.
Click OK to save the settings and close the window or proceed to Configuring Client Settings.
Configuring Client Settings
The Client Settings screen has two sections containing options:
l SSLVPN Client DNS Setting
l NetExtender Client Settings
To configure SSLVPN Client DNS Settings:
1.
Navigate to the NETWORKS | SSL VPN > Client Settings page.
2.
Click the Edit icon for the Default Device Profile.
SonicOS/X 7 SSL VPN Administration Guide
Configuring SSL VPN Client
19

3.
Select Client Settings. The screen displays the SSLVPN Client and DNS Setting sections.
SonicOS/X 7 SSL VPN Administration Guide
Configuring SSL VPN Client
20

6
Configuring the SSL VPN Web Portal
On the SSL VPN > Portal Settings page, you configure the appearance and functionality of the SSL VPN
Virtual Office web portal. The Virtual Office portal is the website where users log in to launch NetExtender or
access internal resources by clicking Bookmarks. It can be customized to match any existing company
website or design style.
Topics:
l Portal Settings
l Portal Logo Settings
Portal Settings
The portal settings customize what the user sees when attempting to log in. Configure the options as
needed to match your company’s requirements. Go to NETWORKS | SSL VPN > Portal Settings.
SonicOS/X 7 SSL VPN Administration Guide
Configuring the SSL VPN Web Portal
21

Option Definitions
l Portal Site Title: Enter the text to display as the top title of the portal page in this field. The default is
SonicWall - Virtual Office.
l Portal Banner Title: Enter the text to display next to the logo at the top of the page in this field. The
default is Virtual Office.
l Home Page Message: Enter the HTML code for the message to display above the NetExtender icon.
Type your own text or click EXAMPLE TEMPLATE to populate the field with a default template that
you can keep or edit. Click PREVIEW to see what the Home Page Message looks like.
l Login Message: Enter the HTML code for the message to display when users are prompted to log
into the Virtual Office. Type your own text or click EXAMPLE TEMPLATE to populate the field with a
default template that you can keep or edit. Click PREVIEW to see what the Login Message looks like.
The following options customize the functionality of the Virtual Office portal:
l Enable HTTP meta tags for cache control recommended) - Select to insert into the browser HTTP
tags that instruct the web browser not to
l Launch NetExtender after login - Select to launch NetExtender automatically after a user logs in. This
option is not selected by default.
l Display Import Certificate Button - Select to display an Import Certificate button on the Virtual Office
page. This initiates the process of importing the firewall’s self-signed certificate onto the web
browser. This option is not selected by default.
NOTE: This option only applies to the Internet Explorer browser on PCs running Windows when Use
Selfsigned Certificate is selected from the Certificate Selection drop-down menu on the SSL VPN >
Server Settings page.
SonicOS/X 7 SSL VPN Administration Guide
Configuring the SSL VPN Web Portal
22

Portal Logo Settings
This section describes the settings for configuring the logo displayed at the top of the Virtual Office portal.
l Default Portal Logo – Displays the default portal logo which is the SonicWall logo.
l Use Default SonicWall Logo – Select this checkbox to use the SonicWall logo supplied with the
appliance. This option is not selected by default.
l Customized Logo (Input URL of the Logo) — Enter the URL for the logo you want to display.
TIP: The logo must be in GIF format of size 155 x 36; a transparent or light background is
recommended.
SonicOS/X 7 SSL VPN Administration Guide
Configuring the SSL VPN Web Portal
23

7
Viewing SSL VPN Sessions
In the NETWORK view, theSSL VPN > Status page displays a summary of active NetExtender sessions on
the Status page, and bookmarks on the Bookmark page.
Status Page
The Status page displays the user name, virtual IP address, WAN IP address, length of time logged in,
inactivity time, and login time. You can also view traffic statistics for each user session.
The SSL VPN Sessions Status Information table describes the status information displayed for each user
session, or the available action.
SSL VPN SESSIONS STATUS INFORMATION
Status Description
User Name Displays the user name.
Client Virtual IP Displays the IP address assigned to the user from the NetExtender client IP
address pool.
Client WAN IP Displays the IP address of the WAN interface to which NetExtender is
connected.
Logged In Displays the length of time that the user has been logged in.
Inactivity Time Displays the length of time that the user has been inactive.
Login Time Displays the date and time that the user initially logged in.
Traffic Click the Statistics icon to view traffic statistics for the user session.
Comments Click the icon to view comments about the user session.
Bookmark Page
The Bookmark page displays the server name, type of bookmark, logged in information, service time, and
last active time.
SonicOS/X 7 SSL VPN Administration Guide
Viewing SSL VPN Sessions
24

Configuring Virtual Office
The SSL VPN > Virtual Office page displays the Virtual Office web portal inside of the SonicOS/X
management interface.
Topics:
l Accessing the Virtual Office Portal
l Using NetExtender
l Configuring SSL VPN Bookmarks
8
Accessing the Virtual Office Portal
You can access the Virtual Office Portal two different ways. System administrators can access it through the
appliance interface and have rights to make changes applicable to the entire site. Users access it differently
through different process and can only make changes that affect their particular profile.
For system administrators to access the SSL VPN Virtual Office portal:
1.
Select the NETWORK view.
2.
Look under SSL VPN > Virtual Office.
For users to view the SSL VPN Virtual Office web portal:
1.
Navigate to the IP address of the firewall.
2.
Click the link at the bottom of the Login page that says Click here for sslvpn login.
Using NetExtender
SonicWall NetExtender is a transparent software application that enables remote users to securely connect
to the remote network. With NetExtender, remote users can securely run any application on the remote
network. Users can upload and download files, mount network drives, and access resources as if they were
on the local network. The NetExtender connection uses a Point-to-Point Protocol (PPP) connection. The
Virtual Office portal displays a link to download the NetExtender client.
SonicOS/X 7 SSL VPN Administration Guide
Configuring Virtual Office
25

Users can access NetExtender in these ways:
l Logging in to the Virtual Office portal provided by the SonicWall security appliance and clicking on the
NetExtender download link, then installing and launching NetExtender.
l Launching the standalone NetExtender client. After downloading NetExtender from the Virtual Office
portal and installing it the first time, it can thereafter be accessed directly from the user’s PC as you
would with any other client application.
NetExtender displays a popup window when launched. The SonicWall server is prepopulated with the server
used for the initial NetExtender launch and client download. The domain is also populated with the
corresponding domain. The user enters username and password and then clicks Connect.
After the connection is established, the NetExtender window provides three screens: Status, Routes, and
DNS. The Status screen displays the server, client IP address, the number of kilobytes sent and received,
and the throughput in bytes per second. The Routes screen displays the destination subnet IP addresses
and corresponding netmasks. The DNS screen displays the DNS servers, DNS suffix, and WINS servers.
The routes and DNS settings are controlled by the SonicOS/X administrator on the SonicWall appliance.
Users can close the NetExtender window after the connection is established. The connection stays open,
while window is minimized and can be reopened from the system tray (on Windows).
See About NetExtender for additional information about NetExtender.
Configuring SSL VPN Bookmarks
User bookmarks can be defined to appear on the Virtual Office home page. Individual users cannot modify
or delete bookmarks created by the administrator.
NOTE: When creating bookmarks, remember that some services can run on non-standard ports, and
some expect a path when connecting. When you configure a portal bookmark, you need to match the
Service type with the right format for the Name or IP Address. Refer to the following table when setting
those options.
NOTE: Service types for ActiveX and Java do not exist in SonicOS/X 7. Preferences from older versions
convert to HTML5 during an upgrade.
BOOKMARK NAME OR IP ADDRESS FORMATS BY SERVICE TYPE
Service Type Format Example for Name or IP Address
Field
RDP - ActiveX
RDP - Java IP
Address
VNC IP Address IP: Port (mapped to session)
IP:Port (non-standard)
FQDN
Host name
FQDN
Host name
10.20.30.4
10.20.30.4:6818
JBJONES-PC.sv.us.sonicwall.com
JBJONES-PC
10.20.30.4:5901 (mapped to session 1)
JBJONES-PC.sv.us.sonicwall.com
JBJONES-PC
NOTE: Do not use session or
display number instead of port.
10.20.30.4
NOTE: Do not use 10.20.30.4:1
TIP: For a bookmark to a Linux
server, see the Tip below this table.
SonicOS/X 7 SSL VPN Administration Guide
Configuring Virtual Office
26

Service Type Format Example for Name or IP Address
Field
Telnet IP Address
IP:Port (non-standard)
FQDN
Host name
SSHv1
SSHv2
IP Address
IP:Port (non-standard)
FQDN
Host name
10.20.30.4:6818
JBJONES-PC.sv.us.sonicwall.com
JBJONES-PC
10.20.30.4
10.20.30.4
10.20.30.4:6818
JBJONES-PC.sv.us.sonicwall.com
JBJONES-PC
IMPORTANT: When creating a Virtual Network Computing (VNC) bookmark to a Linux server, you must
specify the port number and server number in addition to the Linux server IP the Name or IP Address
field in the form of ipaddress:port:server. For example, if the Linux server IP address is 192.168.2.2, the
port number is 5901, and the server number is 1, the value for the Name or IP Address field would be
192.168.2.2:5901:1.
To add a portal bookmark:
1.
Navigate to the NETWORK | SSL VPN > Virtual Office page.
2.
Click ADD.
3.
Type a descriptive name for the bookmark in the Bookmark Name field.
4.
In the Name or IP Address field, enter the fully qualified domain name (FQDN) or the IPv4 address of
a host machine on the LAN. Refer to the Bookmark Name or IP Address Formats by Service Type
table for examples of the Name or IP Address expected for a given Service type.
5.
In the Service drop-down menu, chose the appropriate service type:
l RDP (HTML5-RDP)
l SSHv2 (HTML5-SSHv2)
l TELNET (HTML5-TELNET)
l VNC (HTML5-VNC)
Different options display, depending on what you selected.
SonicOS/X 7 SSL VPN Administration Guide
Configuring Virtual Office
27

6.
Complete the remaining fields for the service you selected. For the options and definitions, refer to
the following table:
If Service is set to RDP (HTML5-RDP), configure the following:
Screen Size From the drop-down menu, choose the default terminal services
screen size to be used when users execute this bookmark.
From the drop-down menu, choose the default terminal services
screen size to be used when users execute this bookmark.
Colors In the drop-down menu, select the default color depth for the
terminal service screen when users select this bookmark.
Application and Path
(optional)
Start in the following
folder
Show windows
advanced options
If you want, enter the local path to where your application resides
on your remote computer.
If you want, enter the local folder from which to execute application
commands.
Click the arrow to expand this and see all the Windows advanced
options. Check the box to enable those that you want:
l Redirect clipboard
l Auto reconnection
l Window drag
l Redirect audio
l Desktop background
l Menu/window animation
Automatically log in Check the box to enable automatic login. If selected, choose which
credentials to use:
l Use SSL-VPN account credentials
l Use custom credentials
If you choose custom credentials, enter the username, password
and domain for the credentials.
NOTE: You can use dynamic variables for the username and
domain. Refer to the Dynamic Variables table below.
Display Bookmark to
Check the box to display the bookmarks to Mobile Connect users.
Mobile Connect Clients
If Service is set to SSHv2 (HTML5-SSHv2), configure the following:
Automatically accept
Check the box to enable.
host key
Display Bookmark to
Check the box to display the bookmarks to Mobile Connect users.
Mobile Connect clients
If Service is set to TELNET (HTML5-TELNET), configure the following:
Display Bookmark to
Check the box to display the bookmarks to Mobile Connect users.
Mobile Connect clients
If Service is set to VNC (HTML5-VNC), configure the following::
View Only Check the box to set the bookmark to view only mode
Share Desktop Enables the shared desktop feature.
SonicOS/X 7 SSL VPN Administration Guide
Configuring Virtual Office
28

Display Bookmark to
Mobile Connect clients
7 Click OK to save the configuration.
Check the box to display the bookmarks to Mobile Connect users.
DYNAMIC VARIABLES
Text Usage Variable Example Usage
Login Name
Domain Name
%USERNAME% US\%USERNAME%
%USERDOMAIN% %USERDOMAIN\%USERNAME%
Configuring Device Profile Settings for IPv6
SonicOS/X supports NetExtender connections for users with IPv6 addresses. On the SSL VPN > Client
Settings page, first configure the traditional IPv6 IP address pool, and then configure an IPv6 IP Pool.
Clients will be assigned two internal addresses: one IPv4 and one IPv6.
NOTE: IPv6 Wins Server is not supported.
On the SSL VPN > Client Routes page, user can select a client routes from the drop-down list of all
address objects including all the pre-defined IPv6 address objects.
NOTE: IPv6 FQDN is supported.
SonicOS/X 7 SSL VPN Administration Guide
Configuring Virtual Office
29

SonicWall Support
Technical support is available to customers who have purchased SonicWall products with a valid
maintenance contract.
The Support Portal provides self-help tools you can use to solve problems quickly and independently, 24
hours a day, 365 days a year. To access the Support Portal, go to https://www.sonicwall.com/support.
The Support Portal enables you to:
l View knowledge base articles and technical documentation
l View and participate in the Community forum discussions at
https://community.sonicwall.com/technology-and-support.
l View video tutorials
l Access https://mysonicwall.com
l Learn about SonicWall professional services
l Review SonicWall Support services and warranty information
l Register for training and certification
l Request technical support or customer service
9
To contact SonicWall Support, visit https://www.sonicwall.com/support/contact-support.
SonicOS/X 7 SSL VPN Administration Guide
30
SonicWall Support

About This Document
NOTE: A NOTE icon indicates supporting information.
IMPORTANT: An IMPORTANT icon indicates supporting information.
TIP: A TIP icon indicates helpful information.
CAUTION: A CAUTION icon indicates potential damage to hardware or loss of data if
instructions are not followed.
WARNING: A WARNING icon indicates a potential for property damage, personal injury, or
death.
SonicOS and SonicOSX SSL VPN Administration Guide
Updated - August 2020
Software Version - 7
232-005348-00 Rev B
Copyright © 2020 SonicWallInc. All rights reserved.
The information in this document isprovided in connection with SonicWall and/or itsaffiliates’pr oducts. No license, express or
implied, by estoppel or otherwise, to any intellectual property right is granted by this document or in connection with the sale of
products. EXCEPT AS SET FORTH IN THE TERMS AND CONDITIONS AS SPECIFIED IN THE LICENSE AGREEMENT FOR
THIS PRODUCT, SONICWALL AND/OR ITS AFFILIATES ASSUME NO LIABILITY WHATSOEVER AND DISCLAIMS ANY
EXPRESS, IMPLIED OR STATUT ORY WARRANT Y RELATING T O ITS PRODUCTS INCLUDING, BUT NOT LIMITED T O,
THE IMPLIED WARRANTY OF MERCHANT ABILITY, FITNESS FOR A PARTICULAR PURPOSE, OR NON-INFRINGEMENT.
IN NO EVENT SHALL SONICWALL AND/OR ITS AFFILIATES BE LIABLE FOR ANY DIRECT, INDIRECT, CONSEQUENTIAL,
PUNITIVE, SPECIAL OR INCIDENT AL DAMAGES ( INCLUDING, WIT HOUT LIMITATION, DAMAGES FOR LOSS OF
PROFITS, BUSINESS INTERRUPTION OR LOSS OF INFORMATION) ARISING OUT OF THE USE OR INABILITY TO USE
THIS DOCUMENT, EVEN IF SONICWALL AND/OR ITS AFFILIATES HAVE BEEN ADVISED OF THE POSSIBILITY OF SUCH
DAMAGES. SonicWall and/or itsaffiliatesmake no representations or warranties with respect to the accuracy or completeness of
the contents of this document and reserves the right to make changes to specifications and product descriptions at any time without
notice. and/or its affiliates do not make any commitment to update the information contained in this document.
For more information, visit https://www.sonicwall.com/legal.
End User Product Agreement
To view the SonicWall End User Product Agreement, go to: https://www.sonicwall.com/en-us/legal/license-agreements.
Open Source Code
SonicWall Inc. is able to provide a machine-readable copy of open source code with r estrictivelicenses such as GPL, LGPL, AGPL
when applicable per license requirements. To obtain a complete machine-readable copy, send your written requests, along with
certified check or money order in the amount of USD 25.00 payable to “SonicWallInc.”, to:
General PublicLicense Source Code Request
Attn: Jennifer Anderson
1033 McCarthy Blvd
Milpitas, CA 95035
SonicOS/X 7 SSL VPN Administration Guide
SonicWall Support
31
 Loading...