

Content Filtering Service 3.0
This document describes the Content FIltering Service (CFS) 3.0 feature and includes the
following sections:
• Overview of New CFS Features — page 1
• Prerequisites for Deployment — page 2
• Application Firewall for CFS — page 2
• CFS 3.0 Policy Management Overview — page 4
• CFS 3.0 Configuration Examples — page 8
Overview of New CFS Features
The latest iteration of the CFS feature allows the administrator to use the power of SonicWALL’s
Application Firewall feature in order to increase create a more powerful and flexible solution.
Note While the new Application Firewall method of CFS management offers more control and
flexibility, the administrator can still choose the previous user/zone management method to
perform content filtering. Information on implementing the CFS feature using the previous
method can be found in the SonicOS Enhanced Administrator’s Guide.
The CFS 3.0 includes the following updates:
• Application Firewall - is now included as part of the CFS rule creation process.to
implement more granular, flexible and powerful content filter policy control, creating CFS
policy allow lists utilizing Application Firewall framework.
• Application Objects - Users/groups, address objects and zones can be assigned for
individual CFS policies.
• Bandwidth Management - CFS specifications can be included in bandwidth management
policies based on CFS website categories. This also allows use of ‘Bandwidth Aggregation’
by adding a per-action bandwidth aggregation method.
• SSL Certificate Common Name - HTTPS Content Filtering is significantly improved by
adding the ability to use an SSL certificate common name, in addition to server IP
addresses.
• New CFS Categories - Three new categories (Multimedia, Social Networking, and
Malware) are now included in the CFS list.
Content Filtering Service 3.0
1
Prerequisites for Deployment
Prerequisites for Deployment
In order to implement CFS 3.0 as described in this document, your network deployment must
meet the following hardware/software requirements:
• SonicWALL UTM Appliance running SonicOS 5.6.4 firmware or higher
• Application Firewall License registered to your SonicWALL UTM appliance
• CFS Premium License for CFS version 3.0 registered to your SonicWALL UTM appliance
Application Firewall for CFS
In order to support the new CFS features, the application firewall feature now includes:
• Two new Application Objects (CFS Category List, CFS Allow List) and
• One new Application Firewall Policy (CFS)
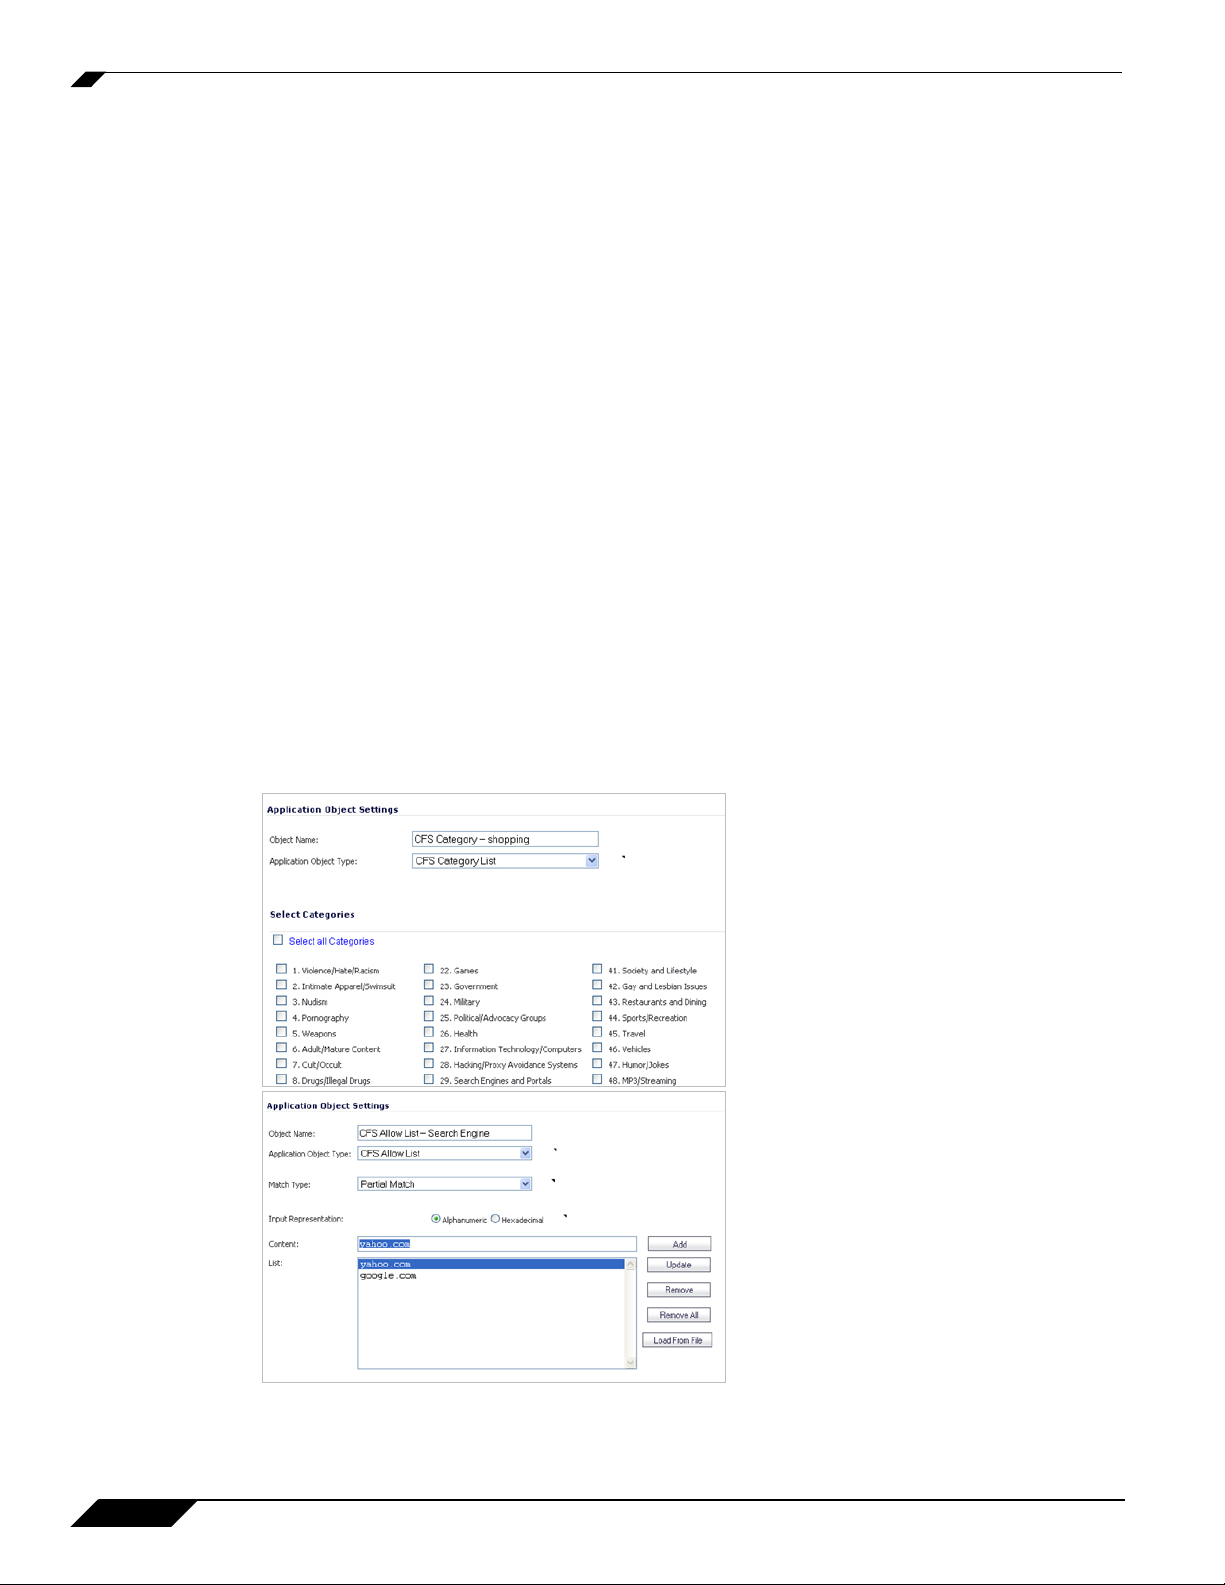
Application Objects
CFS Category List – This application object provides a checklist containing all of the
predefined CFS categories which can be used in the application firewall CFS policy.
CFS Allow List – This application object provides the ability to match text strings – such as
Website URLs – for use as objects in a policy. The match type can be Exact, Partial, Prefix, or
Suffix.
1
1. Application Firewall/CFS 3.0 are not supported on all hardware/software platforms, please refer to your license management page in MySonicWALL to confirm license availability.
2
Content Filtering Service 3.0
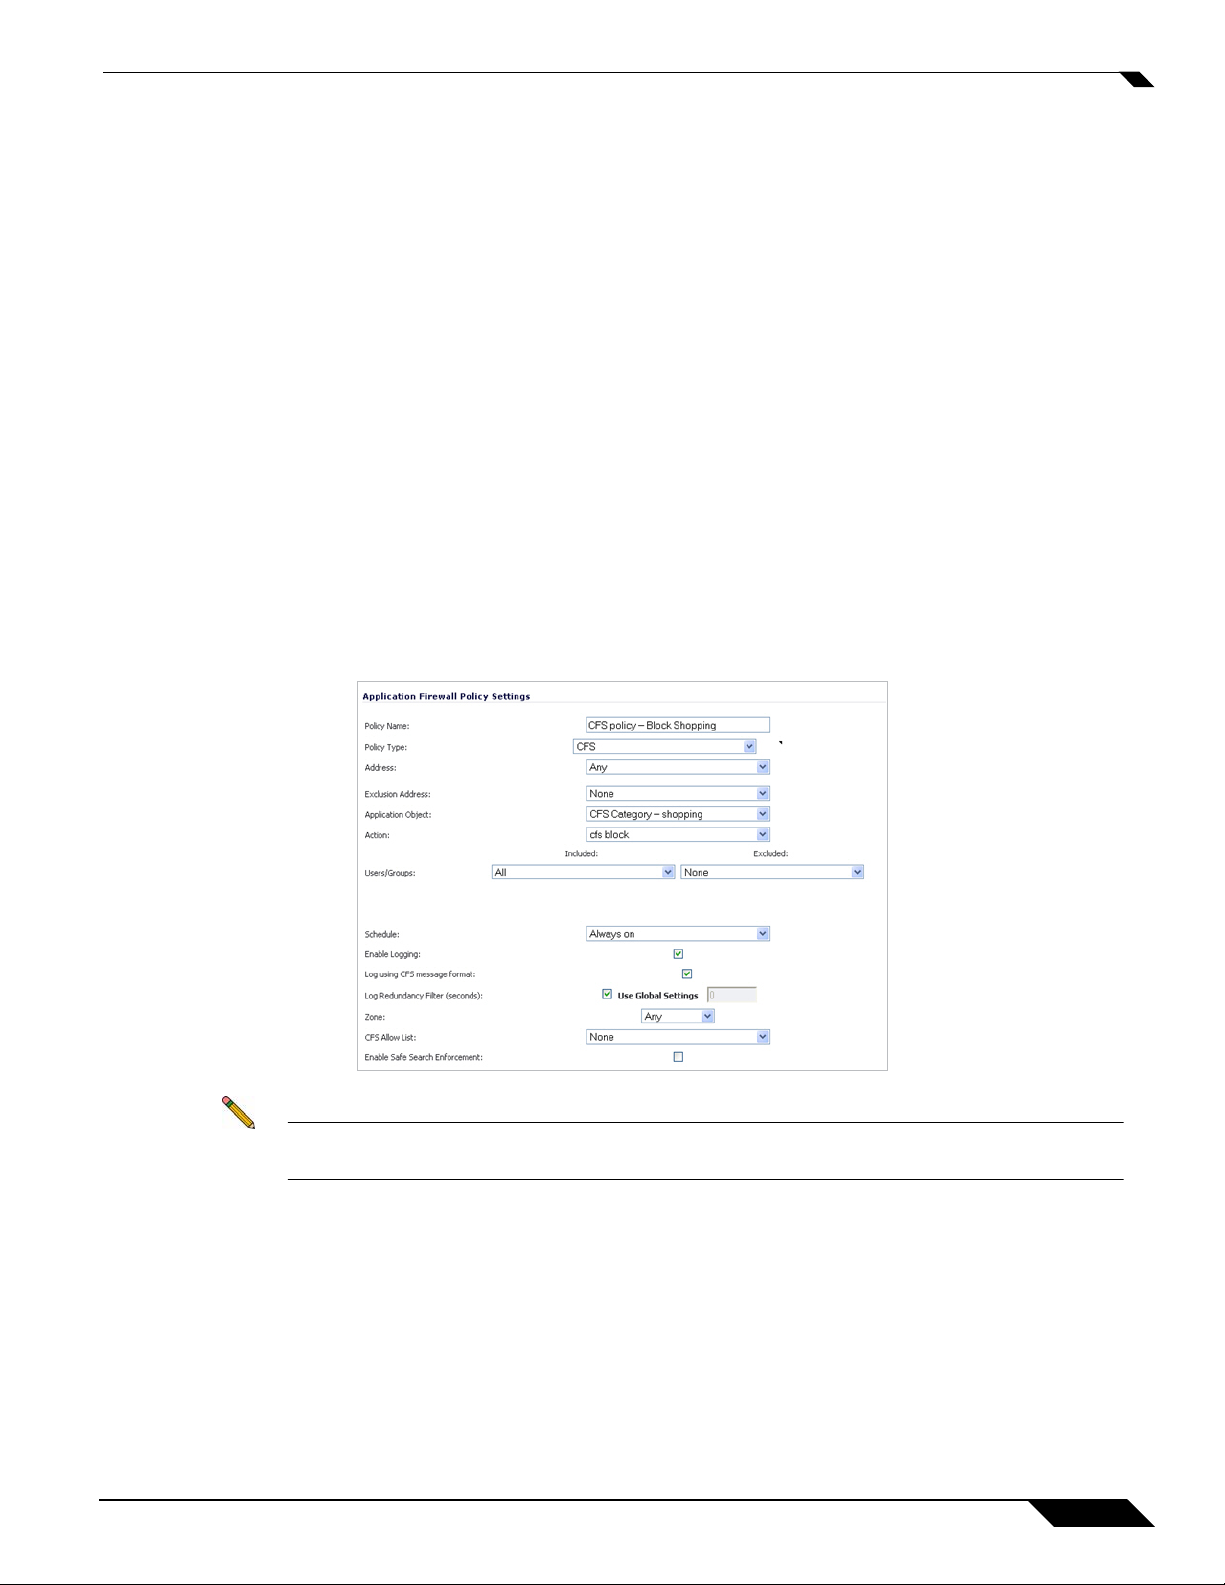
Application Firewall Policy
CFS Policy Type – When defining an Application Firewall policy, the Application Object drop
down list displays all application objects which have been defined in the previous section as
‘CFS Category List’.
Allowed actions on this policy type include:
–
HTTP Block Page
–
Manage Bandwidth
–
No Action
–
CFS Block Page
–
Packet Monitor
Allowed Zones include:
–
LAN
–
DMZ
–
SSLVPN
–
VPN
–
WLAN
Application Firewall for CFS
Note CFS Message Format Checkbox – By default, messages are logged in Application Firewall
format. This checkbox allows you to log using message format standard for CFS.
Content Filtering Service 3.0
3
CFS 3.0 Policy Management Overview
CFS 3.0 Policy Management Overview
When a CFS policy assignment is implemented using the Application Firewall method, it is
controlled by Application Firewall CFS policies in the Application Firewall > Policies page
instead of by Users and Zones.
While the new Application Firewall method of CFS management offers more control and
flexibility, the administrator can still choose the previous user/zone management method to
perform content filtering.
This section includes the following sub-sections:
• Bandwidth Management Methods — page 7
• Choosing CFS Policy Management Type — page 6
• Enabling Application Firewall and CFS — page 6
• Bandwidth Management Methods — page 7
The CFS Application Firewall Policy Settings Screen
There are multiple changes/additions to the CFS policy creation window when used in
conjunction with Application Firewall. The table and image in this section provide information
on Application Firewall interface for CFS.
4
Content Filtering Service 3.0
CFS 3.0 Policy Management Overview
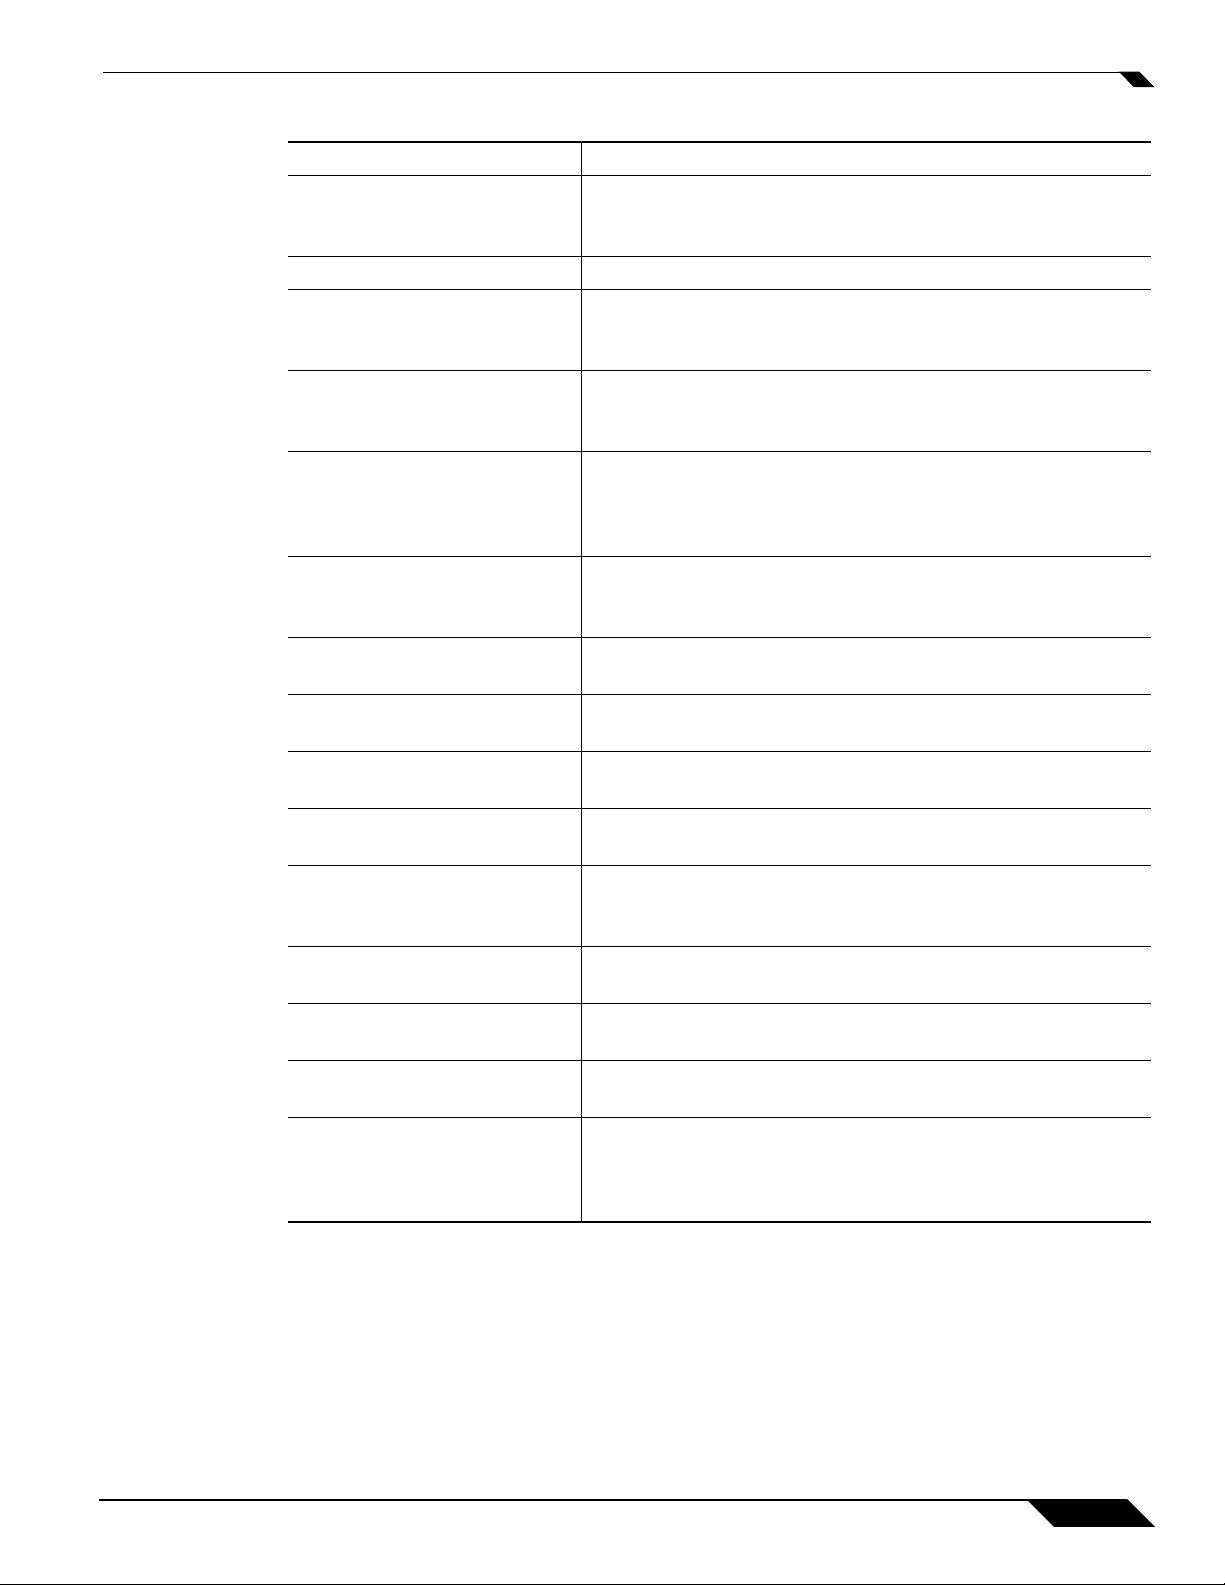
Feature Function
Policy Name A friendly name for the policy. If applying a single policy to
multiple groups, it is often a good idea to include the group
name in this field.
Policy Type Select “CFS” to show the content filtering options.
Address Address or address group to which this policy is applied. The
default value is “Any”, which is also the most common
selection for CFS policies.
Exclusion Address Address or address group to exclude from this policy. The
default value is “None”, which is also the most common
selection for CFS policies.
Application Object Select the relevant application object, this object dictates the
type of content which will trigger the policy to be enforced.
These objects are user-created in the
Firewall > Match Objects screen.
Action Select the action to perform. These can be pre-defined
actions such as “CFS block page”, or custom actions which
you may define in the Firewall > Action Objects screen.
Users/Groups Choose individual users or groups to Include (default: All) or
Exclude (default: None) from this policy.
Schedule Select a specific schedule to dictate when this policy is to be
enforced. The default value is “Always on”.
Enable Logging Select to enable logging of any actions taken on behalf of this
policy. This option is selected by default.
Log Using CFS Message
Format
Log Redundancy Filter
(seconds)
Select to use the legacy CFS logging format. This option is
not selected by default.
Dictates the sensitivity of the log-redundancy filter. Select
“Use Global Settings” (default) or enter your own per-policy
setting in seconds.
Zone Select a specific zone on which this policy is to be enforced.
The default value is “Any”.
CFS Allow List Select a custom allow list to allow selected resources. The
default value is “None”.
CFS Forbidden List Select a custom forbidden list to deny selected resources.
The default value is “None”.
Enable Safe Search
Environment
Select this option to require the strictest filtering on all
searches on search engines like Google and Yahoo that offer
some form of safe-search filtering. This option is not selected
by default.
Content Filtering Service 3.0
5

CFS 3.0 Policy Management Overview
Choosing CFS Policy Management Type
The choice of which policy management method to use – Via User and Zone Screens or Via
Application Firewall – is made in the Security Services > Content Filter page.
Note While the new Application Firewall method of CFS management offers more control and
flexibility, the administrator can still choose the previous user/zone management method to
perform content filtering.
Enabling Application Firewall and CFS
Before the services begin to filter content, you must enable them:
Step 1 Navigate to the Security Services > Content Filter page in the SonicOS management
interface.
Step 2 Select ‘Via Application Firewall’ from the CFS Policy Assignment dropdown list.
Step 3 Click the Accept button to apply the change.
Step 4 Navigate to the Firewall > App Rules page.
Step 5 Check the box to Enable Application Firewall.
6
Content Filtering Service 3.0

Bandwidth Management Methods
Bandwidth Management feature can be implemented in two separate ways:
• Per Policy Method
–
The bandwidth limit specified in a policy is shared across all actions where it is applied
–
Application Firewall actions share the bandwidth specified in a single policy
–
Example: two policies share a BWM limit of 500kb/s, limiting the total bandwidth
between the two policies to 500kb/s
• Per Action Aggregate Method
–
Apply the bandwidth management limit specified in a policy individually to each action
–
Application Firewall actions each use the entire bandwidth specified in a policy
–
Example: two policies each have an independent limit of 500kb/s, the total possible
bandwidth between those two rules is 1000kb/s
CFS 3.0 Policy Management Overview
500kb/s
Action 1
cfs
BWM Limit
Per Policy
500kb/s
BWM Limit
Per Action
Bandwidth Aggregation Method is selected in the Application Firewall Action Settings screen
when the Action type is set as Bandwidth Management.
Action 2
Action 1
Action 2
exe
cfs
exe
Content Filtering Service 3.0
7

CFS 3.0 Configuration Examples
CFS 3.0 Configuration Examples
This section provides configuration examples using Application Firewall feature to create and
manage CFS policies:
• Blocking Forbidden Content — page 8
• Bandwidth Managing Content — page 10
• Applying Policies to Multiple Groups — page 13
• Creating a Custom CFS Category — page 14
Blocking Forbidden Content
To create a CFS Policy for blocking forbidden content:
• Create an Application Object — page 8
• Create an Application Firewall Policy to Block Forbidden Content — page 9
Create an Application Object
Create an application object containing forbidden content:
Step 1 Navigate to the Firewall > Match Objects page in the SonicOS management interface.
Step 2 Click the Add New Match Object button, the Add/Edit Match Object window displays.
Step 3 Enter a descriptive Object Name, such as ‘Forbidden Content’.
Step 4 Select ‘CFS Category List’ from the Match Object Type dropdown list.
Step 5 Use the checkboxes to select the categories you wish to add to the forbidden content list.
Step 6 Click the OK button to add the object to the Application Objects list.
8
Content Filtering Service 3.0

CFS 3.0 Configuration Examples
Create an Application Firewall Policy to Block Forbidden Content
Create an Application Firewall policy to block content defined in the Application Object:
Step 1 Navigate to the Firewall > App Rules page in the SonicOS management interface.
Step 2 Click the Add Policy button, the Add/Edit Application Firewall Policy window displays.
Step 3 Enter a descriptive name for this action in the Policy Name field, such as ‘Block Forbidden
Content’.
Step 4 Select ‘CFS’ from the Policy Type dropdown list.
Step 5 From the Application Object dropdown list, select the object you created in the previous
section. In the case of our example, this object is named ‘Forbidden Content’.
Step 6 From the Action dropdown list, select ‘CFS block page’ to display a pre-formatted ‘blocked
content’ page when users attempt to access forbidden content.
Step 7 Optionally, select the Users/Groups who this policy is to be Included or Excluded on from the
dropdown list. Our example uses the defaults of including ‘all’ and excluding ‘none’.
Step 8 Optionally, select a Schedule of days and times when this rule is to be enforced from the
dropdown list. Our example uses ‘Always On’ to always enforce this policy.
Step 9 Optionally, select the checkbox for Log using CFS message format if you wish for the logs to
use this format instead of the standard Application Firewall format.
Step 10 Optionally, select the appropriate Zone where the policy is to be enforced. Our example uses
‘LAN’ to enforce the policy on all traffic traversing the local network.
Step 11 Optionally, select a CFS Allow List to enforce on this particular policy.
Step 12 Optionally, select the appropriate CFS Forbidden List to enforce on the particular policy.
Step 13 Click the OK button to create this policy.
Content Filtering Service 3.0
9

CFS 3.0 Configuration Examples
Bandwidth Managing Content
To create a CFS Policy for applying BWM to non-productive content:
• Create an Application Object — page 8
• Create a Bandwidth Management Action Object — page 11
• Create an Application Firewall Policy to Block Forbidden Content — page 9
Create an Application Object for Non-Productive Content
Create an application object containing non-productive content:
Step 1 Navigate to the Firewall > Match Objects page in the SonicOS management interface.
Step 2 Click the Add New Match Object button, the Add/Edit Match Object window displays.
Step 3 Enter a descriptive Object Name, such as ‘Non-Productive Content’.
Step 4 Select ‘CFS Category List’ from the Match Object Type dropdown list.
Step 5 Use the checkboxes to select the categories you wish to add to the content list.
Step 6 Click the OK button to add the object to the Application Objects list.
10
Content Filtering Service 3.0

Create a Bandwidth Management Action Object
This section details creating a custom Action Object for bandwidth management.
Note Although application firewall contains pre-configured action objects for bandwidth
management, a custom action object provides more control, including the ability to manage
bandwidth per policy or per action.
To create a new BWM action:
Step 1 Navigate to the Firewall > Action Objects page in the SonicOS management interface.
Step 2 Click the Add New Action Object button, the Add/Edit Action Object window displays.
Step 3 Enter a descriptive Action Name for this action.
Step 4 Select ‘Bandwidth Management’ from the Action dropdown list.
Step 5 Select from the Bandwidth Aggregation Method dropdown list:
a. Per Policy - to share/aggregate this bandwidth limit across all actions where it is applied.
b. Per Action - to individually apply this limit on each action to which it is enforced.
CFS 3.0 Configuration Examples
Step 6 Create the desired settings for Inbound Bandwidth Management and Outbound Bandwidth
Management.
Step 7 Click the OK button to create this object.
Content Filtering Service 3.0
11

CFS 3.0 Configuration Examples
Create an Application Firewall Policy to Manage Non-Productive Content
Create an Application Firewall policy to block content defined in the Application Object:
Step 1 Navigate to the Firewall > App Rules page in the SonicOS management interface.
Step 2 Click the Add Policy button, the Add/Edit Application Firewall Policy window displays.
Step 3 Enter a descriptive name for this action in the Policy Name field.
Step 4 Select ‘CFS’ from the Policy Type dropdown list.
Step 5 From the Application Object dropdown list, select the object you created in the previous
section. In the case of our example, this object is named ‘Nonproductive Content’.
Step 6 From the Action dropdown list, select ‘Bandwidth Management - 100k’ to apply this custom
BWM rule when users attempt to access non-productive content.
Note If you chose not to create a custom BWM object, you may use one of the pre-defined BWM
objects (BWM high, BWM medium, or BWM low).
Step 7 Optionally, select the Users/Groups who this policy is to be Included or Excluded on from the
dropdown list. Our example uses the defaults of including ‘all’ and excluding ‘none’.
Step 8 Optionally, select a Schedule of days and times when this rule is to be enforced from the
dropdown list. Our example uses the pre-defined ‘Work Hours’ selection to enforce this policy
only during weekday work hours.
Step 9 Optionally, select the checkbox for Log using CFS message format if you wish for the logs to
use this format instead of the standard Application Firewall format.
Step 10 Optionally, select the appropriate Zone where the policy is to be enforced. Our example uses
‘LAN’ to enforce the policy on all traffic traversing the local network.
Step 11 Click the OK button to create this policy.
12
Content Filtering Service 3.0

Applying Policies to Multiple Groups
This section details applying a single policy to multiple user groups. CFS allows the
administrator to apply one policy to different groups, allowing for variation (in time restrictions,
exclusions, etc...) in the way it is applied to users.
To apply a policy to multiple groups:
• Enable CFS Custom Categories — page 14
• Add a New CFS Custom Category Entry — page 14
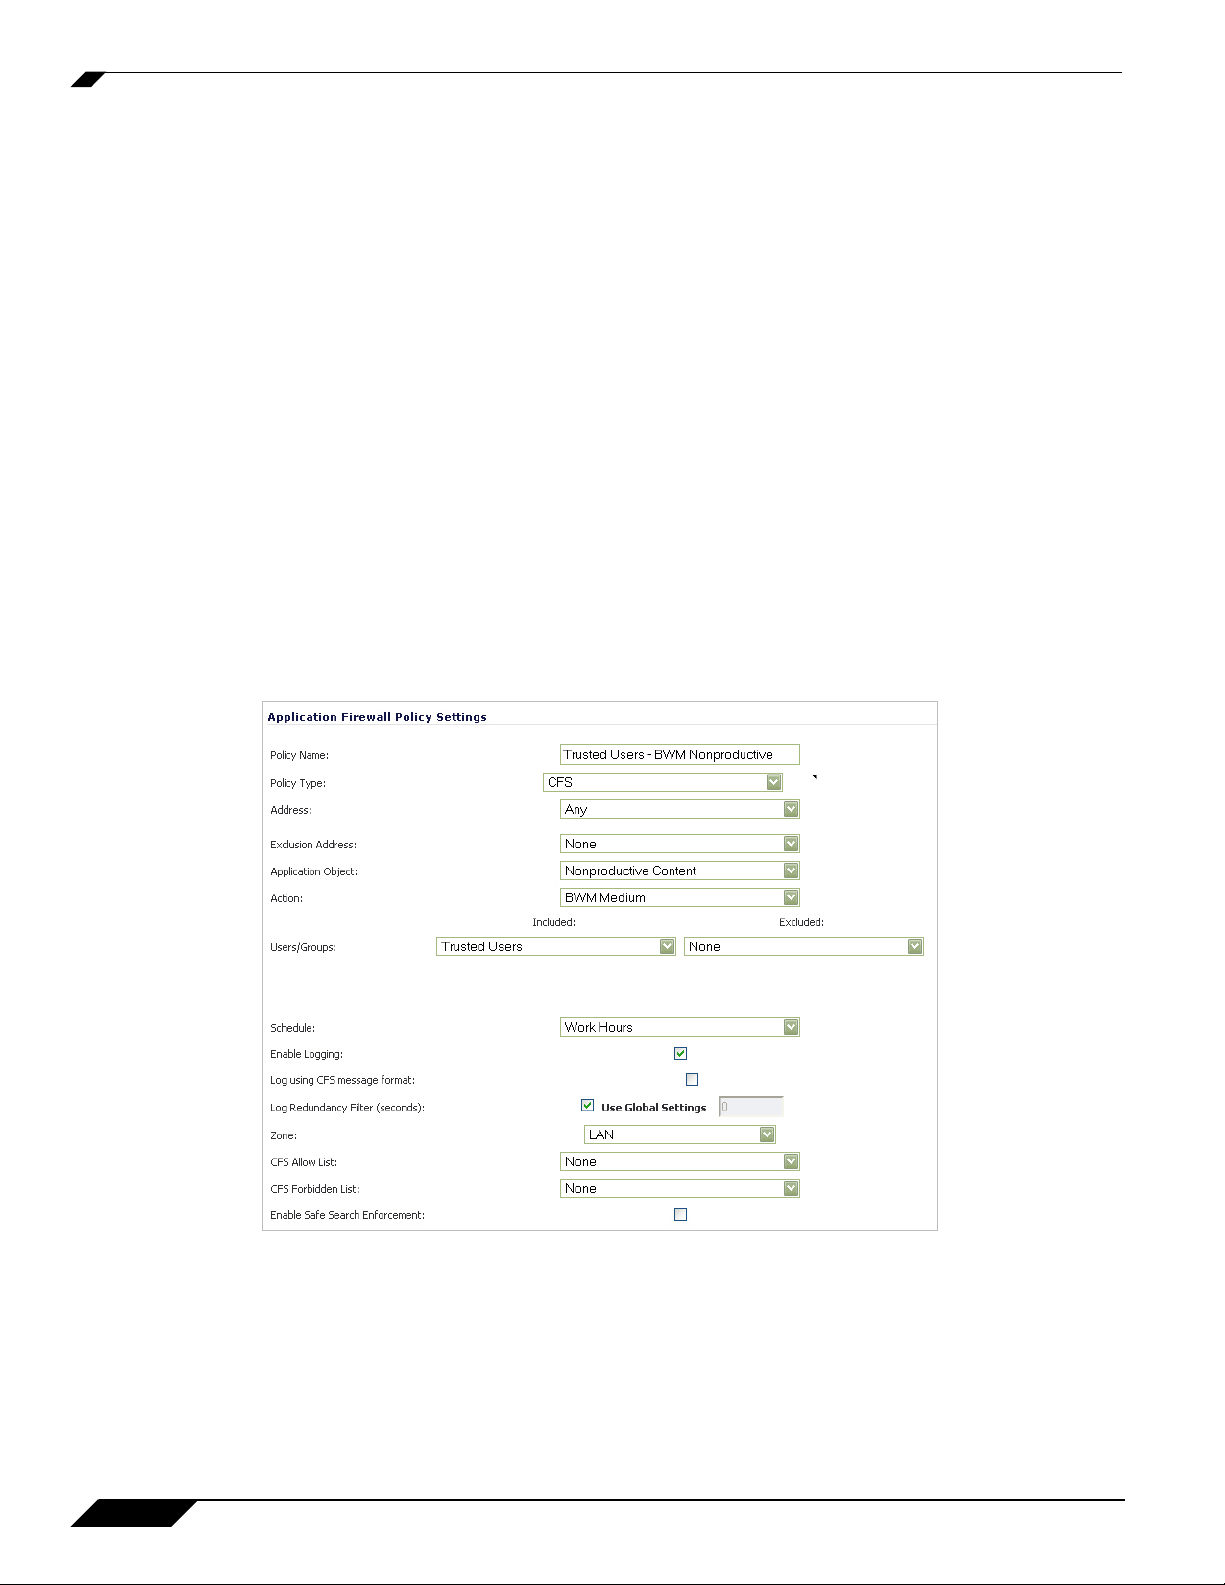
Create a Group-Specific Application Firewall Policy
Create an Application Firewall policy to block content defined in the Application Object:
Step 1 Navigate to the Firewall > App Rules page in the SonicOS management interface.
Step 2 Click the Add Policy button, the Add/Edit Application Firewall Policy window displays.
Step 3 Enter a descriptive name for this action in the Policy Name field. For easy identification, this
name can include the user group to which you are applying the policy.
Step 4 Select ‘CFS’ from the Policy Type dropdown list.
Step 5 Select an Application Object from the dropdown list. Our example uses ‘Nonproductive
Content’.
Step 6 Select an Action form the dropdown list.Our example uses the pre-defined ‘BWM Medium’
action to manage bandwidth of the applicable content.
Step 7 Select the Users/Groups who this policy is to be Included or Excluded on from the dropdown
list. Our example uses the ‘Trusted Users’ group, although you may choose a different, or
custom group depending on your needs.
Step 8 Select a Schedule appropriate for this group. Our example uses the pre-defined ‘Work Hours’
schedule.
CFS 3.0 Configuration Examples
Content Filtering Service 3.0
13

CFS 3.0 Configuration Examples
With this the selections in this example, Nonproductive Content will be Bandwidth Managed
for Trusted Users only during Work Hours.
Step 9 Click the OK button to create this policy. The new policy displays in the Application Firewall
Policies list.
Step 10 Repeat steps 2-9 with variations required by your implementation in order to create a policy for
each required group.
Creating a Custom CFS Category
This section details creating a custom CFS category entry. CFS allows the administrator not
only to create custom Policies, but also allows for custom domain name entries to the existing
CFS rating categories. This allows for insertion of custom CFS-managed content into the
existing and very flexible category structure.
To create a new CFS custom category:
• Enable CFS Custom Categories — page 14
• Add a New CFS Custom Category Entry — page 14
Enable CFS Custom Categories
Step 1 Navigate to the Security Services > Content Filter page in the SonicOS management
interface.
Step 2 Scroll down and click the CFS Custom Category section and select the Enable CFS Custom
Category checkbox.
Step 3 Click the Accept button to save your changes and enable the Custom Category feature.
Add a New CFS Custom Category Entry
Step 1 Again in the Security Services > Content Filter page, scroll down to the CFS Custom
Category section and click the Add... button.
Step 2 Enter a descriptive Name for the custom entry.
Step 3 Choose the pre-defined Category to which this entry will be added.
Step 4 Enter a domain name into the Content field.
14
Content Filtering Service 3.0

CFS 3.0 Configuration Examples
Note All subdomains of the domain entered are affected. For example, entering “yahoo.com”
applies to “mail.yahoo.com” and “my.yahoo.com”, hence it is not necessary to enter all
FQDN entries for subdomains of a parent domain.
Step 5 Click the OK button to add this custom entry.
Content Filtering Service 3.0
15

CFS 3.0 Configuration Examples
16
Document Revision History
7/30/10 First Draft (PL)
8/18/10 Final Draft - feedback incorporated, new content added (PL)
12/21/10 Revised for SonicOS 5.8 (PL)
PN: 232-001986-00 Rev A
Content Filtering Service 3.0
 Loading...