

Page 1

COMPREHENSIVE INTERNET SECURIT Y
S o n i c WALL Internet Security Ap p l i a n c e s
A D M I N I S T RATOR’S GUIDE
™
Page 2

Contents
Copyright Notice ..................................................................................................11
About this Guide ..................................................................................................12
Sonic WA LL Technical Support ...... .......... .......................... ................. ................13
Firmware Version ................................................................................................13
1 Introduc tion ............ .............. .............. .............. .............. ..................14
SonicWALL Internet Security Appliance Features .............................................15
2 Configuring the Network Mode on the SonicWALL ...........................18
Config uring the Son icWALL in Stan d ard Mode ............... ..................... .............19
Configuring the SonicWALL in NAT Enabled Mode ...........................................20
Configuring NAT with PPPoE Client ....................................................................2 6
Configuring NAT with DHCP Client .....................................................................32
Confi gu ring NAT wit h L2T P C lient .............. .................. ......................... ..............37
Config u ring NAT with P P T P Cl ie n t ...... .......................... ..................... .................38
Logging into the SonicWALL Management Interface .......................................44
3 Registeri ng at myS o ni c WALL.com .............. .............. ........................46
Creating a New User Account .............................................................................46
Proble ms C reating a Mys o n icWALL.co m U se r A cco u n t? ................. .............. ...51
User Name an d P ass word Func tions ......... .................... ..................... ...............51
Registering Your SonicWALL Internet Security Appliance ................................51
Click Here Registr ation ........ .................. .................. ......................... ..................51
Quick Registration ...............................................................................................52
Status an d Options .......... .......................... .................. ......................... ..............53
Managing Your Son ic W A LL .............. .................. ......................... .................. ......54
Renaming Your SonicWALL ................................................................................54
Transferring a SonicWALL Prod u ct ............ .................... ..................... ...............5 5
Delete P ro d u ct ...................... .................... ........................... .................... ...........56
Managing Servic es f o r So n icWALL Int er net Security Applianc e s ................ ....57
Activating Services Using mySonicWALL.com ...................................................58
4 Configuring the TELE3 SP Modem Connection ..................................60
Config uring the TEL E3 SP WAN Fail o ve r Feature .............. .............. .................60
Configuring Modem Profiles ...............................................................................61
Dial-Up Configuration ..........................................................................................61
ISP Set t ings ...... .......... .......................... .................. ......................... .................. ..62
Location Settings ................................................................................................62
TELE3 SP Mod e m Configu ration .................... ........................... .................... .....64
Modem Settings ..................................................................................................64
Contents Page 1
Page 3

Primary Interfa ce ...................... .................. .................. ......................... ..............65
Failover Settings ........ .......................... .................. ......................... ....................65
Configuring a Modem Profile for Manual Dial-Up .............................................66
Status ..... .. .... .. .... .. .... .. .... .. .... .. .... .. .... .. .... .. .... .. .... .. .... .. .... .. ..... .. .... .. .... .. .... .. .... .. .... .69
Modem Status ................ .................. .................. ................. .......................... ......69
Chat Scripts ...... .......... .......................... .................. ......................... .................. ..70
Custom Chat Scripts ...........................................................................................71
5 Managing Your SonicWALL Internet Security Applia n ce .............. ....72
Status ..... .. .... .. .... .. .... .. .... .. .... .. .... .. .... .. .... .. .... .. .... .. .... .. .... .. ..... .. .... .. .... .. .... .. .... .. .... .73
CLI Support and Remote Management .............................................................75
6 General and Network Setting s ............ .............. .............. .............. ....76
Netwo rk Se ttings .................... .......................... .................. ......................... ........76
Netwo rk Ad d ressing Mod e .......... .......................... ................. .......................... ..76
LAN Settings ........................................................................................................77
Multiple LAN Subnet Mask Support ..................................................................77
WAN Settings ....................................................................................................... 78
DNS Settings .......................................................................................................78
Standard Configuration ......................................................................................79
NAT Enabled Configuration ................................................................................79
NAT with DHCP Client Configuration ..................................................................81
NAT wit h PPPoE Conf iguration .............. ................................. ............................82
Restar ting the SonicWALL .. ........ .................... ..................... .................... ...........83
NAT with L2TP Clie n t Configur ation ...................... .............................................84
Restar ting the SonicWALL .. ........ .................... ..................... .................... ...........85
NAT with PPTP Client Configuration ...................................................................86
Restar ting the SonicWALL .. ........ .................... ..................... .................... ...........87
Setting the Time an d Date ................................ ......................................... ........88
NTP Settings ........................................................................................................88
Config u ring the Ad ministra to r Settings ........... .............. ..................... ...............89
Administrator Name ............................................................................................89
Change the Administrator Password .................................................................89
Settin g th e Administr ator Inac tivity Tim e o ut ..... .. ............... .................... ...........90
Login Fa ilure Handling .................... .......................... ..................... .....................9 0
Page 2 SonicWALL Internet Security Appliance Administrator’s Guide
Page 4

7 Logging and Alerts ............................................................................91
View Log ...............................................................................................................91
SonicWALL Log Messages ..................................................................................92
Log Set ti ngs ........ .......... .......................... .................. ......................... ..................93
Config u re th e f o llowing s e ttings: .............. .................... ..................... .................93
Log Cate go ries ........................ .................. .......................... ................. ................95
Alerts/SNMP Traps .................... .................. .................. ................. .................. ..96
Reports ................................................................................................................96
Web Site Hits .......................................................................................................97
Bandwid th Us age by IP Ad dr e s s .. ........ .................... ........................... ...............97
Bandwid th Us age by Service .................... .................... ........................... ...........97
Sonic WA LL ViewPoint ...... .......... .......................... ................. .......................... ....98
8 Content Fi lt erin g and Bloc k ing ...................... .............. .............. .......99
Config u ring SonicW ALL Conte n t Filtering .... .................... ..................... ...........100
Restrict Web Features ......................................................................................100
URL List .... .................... .......................... .................... ........................... .............101
Custo m izing the Con tent Filtering List ...... .......... ................................. ............103
Consent .. .. .... .. .... .. .... .. .... .. .... .. .... .. .... .. .... .. .... .. .... .. .... .. .... .. ..... .. .... .. .... .. .... .. .... .. ... 10 5
Mandatory Filtered IP Addresses .....................................................................106
Configuring N2H2 Internet Filtering .................................................................107
Restrict Web Features ......................................................................................107
Config uring the We bsense Enterprise Con tent Filte r .......... .............. .............110
Restrict Web Features ......................................................................................110
Config uring the We bsense Content Filter List . .............. ............... ................... 1 12
Websense Server Status ..................................................................................112
Settin gs ...... ........ ...... ........ ...... ........ ...... ........ ...... ........ ...... ......... ...... ........ ...... .....11 2
URL Cache .........................................................................................................113
9 Web Management Tools ................................................................. 114
Restar ting the SonicWALL .. ........ .................... ..................... .................... .........11 4
Preferences .......................................................................................................115
Exporting the Settings File ................................................................................115
Importing the Settings File ...............................................................................116
Restoring Factory Default Settings ..................................................................116
Updating Firmware ............................................................................................117
Updating Firmware Manuall y .......................... .................. ...............................118
Upgrade Features .............................................................................................119
Diagnostic Tools ................................................................................................120
DNS Name Lookup ...........................................................................................120
Contents Page 3
Page 5

Ping ....................................................................................................................122
Packet Trace ......................................................................................................123
Trace Route .......................................................................................................126
10 Network Access Rules ...................................................................127
Viewin g N e tw o rk Access Ru les ...... .............. ........................... ......................... 1 27
Services .............................................................................................................128
LAN Out ..............................................................................................................128
DMZ In (Optional) ..............................................................................................128
LAN In .................................................................................................................128
Public LAN Server ..............................................................................................129
Windows Networking (NetBIOS) Broadcast Pass Through .............................129
Windows Me ssenger Suppor t ........................ ........................... .......................129
Detection Prevention ........................................................................................129
Netwo rk C o n nection Inactivity Timeout ...... .....................................................129
Add Service .............. .......................... .......................... ........................... ...........130
Add a Known Service ................ .................... ........................... .................... .....130
Add a Custom Service .......................................................................................130
Enable Lo gging .......................... .......................... ........................... ...................131
Delete a Se rvice .... .............. .................... .................... ..................... .................131
Rules ..................................................................................................................131
Maximum Number of Rules by Product ...........................................................132
Netwo rk A c ce ss Rule Logic List ........ .......... ......................... ............................133
Bandwid t h Managem e n t .................... .......................... ........................... .........13 3
Add A New Rule .................................................................................................134
Add New Rule Example s .................................... ................. .......................... ....136
Curren t Network Ac ce ss Rules Tab le ........ ......................... ..............................137
Users . ............. .......... ............ .......... ............ .......... ............ ........... ............ .......... .139
Global User Settings .........................................................................................139
User Login ..........................................................................................................142
RADIUS ..... .. .... .. .... .. .... .. .... .. .... .. .... .. .... .. .... .. .... .. .... .. .... .. .... ..... .. .... .. .... .. .... .. .... .. ... 14 3
Management ....................................................................................................145
Sonic WA LL SNMP Sup po rt ...................... .......................... ...............................1 45
Sonic WA LL Manageme n t Protocol ...................... ......................... .................. ..146
Addit io n al Manageme n t .......... .......................... ................. .......................... ....146
Page 4 SonicWALL Internet Security Appliance Administrator’s Guide
Page 6

11 Advanced Features .......................................................................148
Proxy Relay ............ .......................... ................................ ........................... .......148
Web Prox y Fo rwardin g ........ .......................... ........................... ......................... 1 48
Config u ring Web Pr oxy Rela y ............ ....................................... .........................149
Bypass P ro x y Servers Upon Proxy Failure ....... ..................... .................... .......149
Intranet ..............................................................................................................150
Installation .........................................................................................................150
Intranet Configuration .......................................................................................151
Intranet Settings ...............................................................................................151
VPN Single-Armed Mode (s tan d -alone VPN gatewa y) .................. ...................152
Configuring a SonicWALL for VPN Single Armed Mode ..................................153
Routes .... .. .... .. .... .. .... .. .... .. .... .. .... .. .... .. .... .. .... .. .... .. .... .. .... .. ..... .. .... .. .... .. .... .. .... .. ... 15 4
LAN Route Advertisement ................................................................................155
RIPv2 Authentication ........................................................................................156
DMZ Route Advertisement .......... .................. ......................... .......................... 156
DMZ Addresses .............. .......................... .......................... ......................... ......156
DMZ in Standard Mode ....................................................................................157
DMZ in NAT Mode ............................ .......................... ......................... ..............157
Delete a DMZ A d d re s s Range .............. .................... ..................... ................... 1 58
HomePort Configuration ...................................................................................158
HomePort in Standard Mode ...........................................................................158
HomePo rt in N AT Mode .............................. ........................... .................... .......159
Delete a HomePort Address Range .................................................................159
One-to-One NAT .................................................................................................160
One-to-One NAT Conf igurat io n Example ...... ........ ............... .................... .........161
Ethernet .............................................................................................................162
WAN Link Settings .............................................................................................162
Enable Bandwidth Management .....................................................................162
DMZ/WorkPort Link Settings ...........................................................................163
LAN/HomePort Link Settings ...........................................................................163
Proxy Man agement wo rk station ethe rnet address on WAN ..........................1 63
MTU Set tings .................................. .......................... ......................... ................163
SonicWALL Bandwidth Management ..............................................................164
Contents Page 5
Page 7

12 DHCP Server ..................................................................................166
Setup . ..... .. .... .. .... .. .... .. .... .. .... .. .... .. .... .. .... .. .... .. .... .. .... .. .... .. ..... .. .... .. .... .. .. .... .. .... .. .16 6
Allow DHCP Pass Through in Standard Mode .................................................166
Config uring the Son icWALL DH C P Server .................... ..................... ...............167
Deleting Dynamic Ranges and Static Entries .................................................168
DHCP over VPN .................................................................................................168
DHCP Relay Mode .............................................................................................168
Configuring the Central Gateway for VPN over DHCP .....................................169
Configuring the Remote Gateway for VPN over DHCP ....................................169
DHCP Statu s ...................... .................... .......................... ..................... .............172
DHCP Serve r on the Sonic W ALL TELE3 TZ and TZ X ....... ............... ........ .........173
Setup . ..... .. .... .. .... .. .... .. .... .. .... .. .... .. .... .. .... .. .... .. .... .. .... .. .... .. ..... .. .... .. .... .. .. .... .. .... .. .17 3
Allow DHCP Pass Through in Standard Mode .................................................173
Config uring the Son icWALL DH C P Server .................... ..................... ...............174
Deleting Dynamic Ranges and Static Entries .................................................175
DHCP Statu s ...................... .................... .......................... ..................... .............176
13 SonicWALL VPN ............................................................................177
VPN Management Interface .............................................................................178
Summar y Tab .......... .......................... .................... ........................... .................178
Global V P N Settings ................ .......................... ..................... .......................... .178
VPN Band w id th Management .......... .......................... ........................... ...........179
VPN Policies .......................................................................................................179
Curren tly Active VPN T u n ne ls ...................... ......................... .................. ..........1 79
SonicWALL NAT Traversal Support ..................................................................180
AES (Advanced Encryption Standard) Support ...............................................180
Config u re Tab ...... .............. .......................... .................... ........................... .......181
Add/Modify IPSec Security Associations .........................................................181
Secur ity Policy Se ttings ........................ .......................... ................................. ..182
Desti n ation Networks ........................ .......................... ................................. ....186
Advanced Settings ............................................................................................187
Enable Keep Alive .............................................................................................187
Try to bring u p all possib le SAs ...... ........ .................... ........................... ...........187
Require authentication of local users .............................................................188
Require au thenti cation of re mo te users ......... ........................... .....................188
Enable Wi n d o w s Network in g (NetBIOS) broad c ast ......................... ...............188
Apply NAT and firewall rules .............................................................................188
Forward Packets to Remote VPNs ...................................................................188
Route all interne t traffic thro ugh this SA .......................... ...............................189
Page 6 SonicWALL Internet Security Appliance Administrator’s Guide
Page 8

Enable Perfect F o rward Secre cy .................... ..................... .................... .........189
Phase 2 DH Grou p ........ .................... .................... ........................... .................189
Default LAN Gateway ........................................................................................189
VPN Terminated at the LAN, DMZ, or LAN/DMZ .............................................190
Advanced Settings for VPN Configurations .....................................................191
Configuring SonicWALL VPN .............................................................................192
Group VPN Configuration for the So nicWALL an d V P N Client ........................193
Config u ring Group VPN on the So nicWALL .... ..................... .......................... ...19 3
Group VP N C lient Set u p .... ................................ ........................... .....................195
Manua l Ke y Configuration for th e So n icWALL and VP N Cl ient ................ ......199
Config u ring the SonicWALL .................. .................... ........................... .............199
Configuring the VPN Client ...............................................................................200
IKE and Manual Key Con f iguration for Two Soni cW ALLs .............. .............. ...20 6
Manual Key for Two SonicWALLs .....................................................................206
Config uring the Second Son icW A LL Applia nc e ............. ............... ................... 2 08
Example of Manual Key Configuration for Two SonicWALLs .........................208
IKE Conf iguration f o r Tw o So nicWALL s ....... .............. ......... .............. .............. .211
Exampl e of IKE Configu ration fo r Tw o So nicWALLs ........... .................... .........213
SonicWALL Third Party Digital Certificate Support ..........................................216
Overview of Third Party Digital Certificate Support .........................................217
Creating a Certificate Signing Request .. .............. ..................... .................... ...21 9
SonicWALL Enhanced VPN Logging .................................................................220
Testing a VPN Tunnel Connection Using PING ................................................221
Config u ring Windo ws Network ing .. .................... ........................... ...................222
14 High Availability ... ... ........ ... ........ ... ... ........ ... ...... ..... ... ...... ..... ...... ... 225
Before Configuring High Availability .................................................................225
Network Configuration for High Availability Pair .............................................225
Config uring High Availabi lity on the Primary SonicWALL ....................... .........226
Confi gu ration Chan ges ............................ ................................. ........................2 28
Synchronizing Changes between the Primary and Backup SonicWALLs ......229
High Availability Status ........ .......................... ......................... .......................... 229
High Availability Status Wi n d o w ...... .......... ......................... ..............................230
E-mail Alerts Indicating Status Change ...........................................................231
View Log .............................................................................................................232
Forcing Transitions ............................................................................................232
Configuration Notes ..........................................................................................233
Contents Page 7
Page 9

15 SonicWAL L Op ti ons a nd U pg rad es ....................... .............. ...........234
SonicWALL VPN Client ......................................................................................234
Sonic WA LL Network An ti-Virus ................ .......................... ...............................234
Content Filter Li s t Su b s criptio n .......... .......................... ........................... .........23 5
Vulne rability Sca nning Serv ic e .......................... ......................... .................. ....235
SonicWALL Authentication Service ..................................................................235
SonicWALL ViewPoint Reporting ......................................................................236
SonicWALL Global Management System ........................................................236
Contac t Your Resell e r o r So nicWALL ................................... .......................... ..236
16 Hardware Descriptions .................................................................237
SonicWALL PRO 230 and PR O 330 ........... ........ ........ ......... ........ .............. .......237
SonicWA LL PRO 200 and PRO 300.................... .............. ..................... ...........239
SonicWALL PRO 100..........................................................................................241
SonicWALL TELE3 SP ........................................................................................243
Sonic WA LL TELE3 TZ...... .................................. ................................. ................245
SonicWALL TELE3 TZX.......................................................................................247
Sonic W ALL SOHO3 and TELE3............. .............................................................249
SonicWALL GX 250 and GX 650.......................................................................251
17 Troubleshooting Guide ..................................................................254
The Link LED is o f f ................ .......................... ..................... .................... .........254
A computer on the LAN cannot access the Internet .......................................254
The SonicWALL does not establish authenticated sessions ..........................254
The Son icWALL does not save changes that you hav e m ad e ............ ............255
Duplicate IP address errors ..............................................................................255
Machines on the WAN are not reachable ................ ..................... ................... 2 55
VPN tunn e l problem s .... ........ .......................... ........................... .......................255
18 Appendices ....................................................................................256
Append ix A - Techni cal Specifications ........................ .....................................256
Appendix B - SonicWALL Support Solutions ....................................................257
Appendix C - Introd uc tion to Net w o rking ..... ........ ..................... .................... ...26 3
Appendix D - IP Port Numbers ...... ........ .......................... ..................... .............268
Appendix E - Configu ring TCP/IP Se ttings ................. ............... .......................269
Appendix F - Basic VPN Terms and Concepts .................................................274
Append ix G- Erasin g th e Firmware ........................ ................................. ..........278
Appendix H- Mounting the SonicW A LL PRO 200 and PRO 300 ........ ........ .....279
Appendix I - Configuring RADIUS and ACE Servers .........................................280
Page 8 SonicWALL Internet Security Appliance Administrator’s Guide
Page 10

Copyright Notice
©
2002 SonicWALL, Inc. All rights reserved.
Under the copyright laws, this manual or the software described within, ca n n ot b e c opied, in whole
or part, without the written consent of the manufacturer, except in the normal use of the software
to make a backup copy. The same proprietary and copyr ight notices must be affi xed to any permitte d
copies as were affixed to the original. This exception does not allow copies to be made for others,
whether or not sold, but all of the material purchased (with all backup copi es ) can be sold, given, or
loaned to another person. Under the law, copying includes translating into another language or
format.
SonicWALL is a registered trademark of SonicWALL, Inc.
Other product and company names mentioned herein can be trademarks and/or registered
trademarks of their respectiv e companies.
Specifications and descriptions subject to change without notice.
LIMITED WARRANTY
SonicWALL, Inc. warrants the SonicWALL Internet Security Appliance (the Product) for one (1) year
from the date of purchase against defects in materials and workmanship. If there is a defect in the
hardware, SonicWALL will replace the product at no charge, provided that it is returned to
SonicWALL with transportation charges prepaid. A Return Materials Authorization (RMA) number
must be displayed on the outsid e of the package for the product being returned for replacement or
the pr oduct will b e refused . The RMA n umber can be ob tained by calling Son icWALL Cu stomer
Service between the hours of 8:30 AM and 5:30 PM Pacific Standard Time, Monday through Friday.
Phone:(40 8) 75 2- 781 9
Fax:(408) 745-9300
Web: <http:// www .so n ic wal l.co m /su ppo rt>
This warr anty does not ap ply if the Product has been dam aged by accident , abuse, misuse , or
misapplication or has been modif ied with ou t the written permission of SonicWALL.
In no event shall SonicWALL, Inc. or its suppliers be liable for any damages whatsoever (including,
without limitation, damages for loss of profits, business interruption, loss of information, or other
pecuniary loss) arising out of the use of or inability to use the Product.
Some sta tes do not a ll ow the excl u sion or lim itat ion of imp lie d wa rr ant ies or li ab ili ty fo r in ci de ntal
or consequential damages, so the above limitation or exclusion can not apply to you. Where liability
can not be limited under applicable law, the SonicWALL liability shall be limited to the amount you
paid for the Product. This warranty gives you specific legal rights, and you can have other rights
which vary from state to state.
By using this Product, you agree to these limitations of liability.
THIS WARRANTY AND THE REMEDIES SET FORTH ABOVE ARE EXCLUSIVE AND IN LIEU OF ALL
OTHER WARRANTIES, ORAL OR WRITTEN, EXPRESS OR IMPLIED.
No dealer, agent, or employee of SonicWALL is authorized to make any extension or addition to this
warranty.
Page 11
Page 11

About this Guide
Thank you for purchasing th e SonicWALL Internet Security appliance. The SonicWALL protects your
PC from attac ks a nd int rus ions, f ilte rs obj ectio nal W eb sites, prov ides privat e V PN co nne ction s to
business partners and remote offices, and offers a centrally-managed defense against software
viruses.
This manual covers the conf iguration of the SonicWALL Internet Security appl ia nce installation and
features.
Organization of this Guide
Chapter 1, Introduction - describes the features and applications of the SonicWALL.
Chapter 2, Configuring the Network Mode on the SonicWALL - de scribes the instal lation of the
SonicWALL and configuring netwo rk settings for the SonicWALL.
Chapter 3, Registering at mySonicWALL.com - provides details on registering your SonicWALL
appliance in the product registration database.
Chapter 4, Configuring the TELE3 SP Modem - contains detailed instructions on modem
configuration for the TELE3 SP.
Chapter 5, Managing Your SonicWALL Internet Securit y Appliance - provides a brief overview of the
SonicWALL Web Management Interface.
Chapter 6, General and Network Settings - descri bes the conf igur ation o f the Soni cWALL IP setting s,
time, and password.
Chapter 7, Logg in g and A ler t s - illustrates the SonicWALL logging, alerting, and reporting features.
Chapter 8, Content Filtering and Blocking - describes S onicWALL We b content filte ring, including
subscription updates and customized Web blocking.
Chapter 9, Web Management Too ls - provides dir ections to re start the SonicWAL L, import and ex port
settings, uplo ad new fi rmware, and perform diagnostic tests.
Chapter 10, Network Access Rules - explains how to permit and block traffic through the SonicWALL,
set up servers, and enable re mote manag e m ent.
Chapter 11, Advanced Features - descri be s a dv anc ed S oni c WA LL settings , su ch a s One - to- O ne NAT
and Automatic Web Proxying.
Chapter 12, DHCP Server - describes the con figu rat i on an d se tup o f the Son ic W ALL DHC P se rve r.
Chapter 13, SonicW ALL VPN - explains how to create a VPN tunnel be tween two SonicWALLs and
creating a VPN tunnel from the VPN client to the SonicWALL.
Chapter 14, High Availabi lity - describes the configuration of two SonicWALLs (one primary and one
backup) as a High Availability pair.
Chapter 15, SonicWALL Options and Upgrades - presents a brief summary of the SonicWALL's
subscription services, firmware upgrades and other options.
Page 12 SonicWALL Internet Security Appliance User’s Guide
Page 12

Chapter 16, Hardware Descriptions - provides a description of the front and back of SonicWALL
Intern et se curity app lia nces, incl uding LED li gh ts an d por t s.
Chapter 17, Troubleshooting Guide - shows solutions to commonly encountered problems.
Appendix A, Technical Specifications - lists the SonicWALL specifications.
Appendix B, SonicWALL Support Solutions - describes available support packages from SonicWALL.
Appendix C, Introduction to Networking - provides an overview of the Internet, TCP/IP settings, IP
security, and other general networ king topic s.
Appendix D, IP Po r t Num bers - offers information about IP port numbering.
Appendix E, Configuring TCP/IP Settings - provides instructions for configuring your Management
Station's IP address.
Appendix F, Basic VPN Terms and Concepts - covers VPN terminology and configur ation con cepts.
Appendix G, Erasing the Firmware - descri be s the fir m war e era se proce du r e.
Appendix H, Mounting the SonicWALL PRO 200 an d PRO 300 - describes how to rack mount the
SonicWALL appliance.
Appendix I, Configuring RADIUS and ACE Servers - provides vendor-specific configuration
instructions fo r RADIUS and ACE s ervers. The app endix also i ncludes a RADIUS Attr ibutes Dictio nary.
SonicWALL Technical Support
For fast resolution of technical questions, please visit the SonicWALL Tech Support Web site at
<http://www.sonicwall.com/support>. There, you will find resources to resolve most technical
issues and a Web request form to contact one of the SonicWALL Technical Support engineers.
Firmware Version
This manual is updated and released with firmware version 6.4.0.0. Always check
<http:www.sonciwall.com/products/documentation.html> for the latest version of this manual and
other upgrade manuals as well.
Icons Used in this Manual
Alert - Important information about features that can affect firewall performance, security
features, or cause potential problems with your SonicWA LL.
TIP - Useful information about security features and configurations on your SonicWALL.
Page 13
Page 13
1 Introduction
Your SonicWALL Inte rnet Security Appliance
The SonicWALL Int ern et Security Appliance provide s a complete security soluti on that protects your
network from attacks, intrusions, and malicious tampering. In addition, the SonicWALL filters
objectiona ble We b conte nt and l ogs sec urity th reats. Son icWALL V PN provi des se cure, e ncrypted
communications to business partners and branch offices.
The Sonic WALL Int ernet Secu rity App liance u ses sta teful packet i nspection to ensu re secure firewal l
filtering. Stateful packet inspection is widely consi dered to be th e most effective method of filtering
IP traffic. MD5 authentication is used to encrypt communications between your Management
Statio n and t he Sonic WALL Web Manageme nt Int erface. MD5 Aut hentic ation preven ts una uthori zed
users from detecting and stealing the SonicWALL password as it is sent over your network.
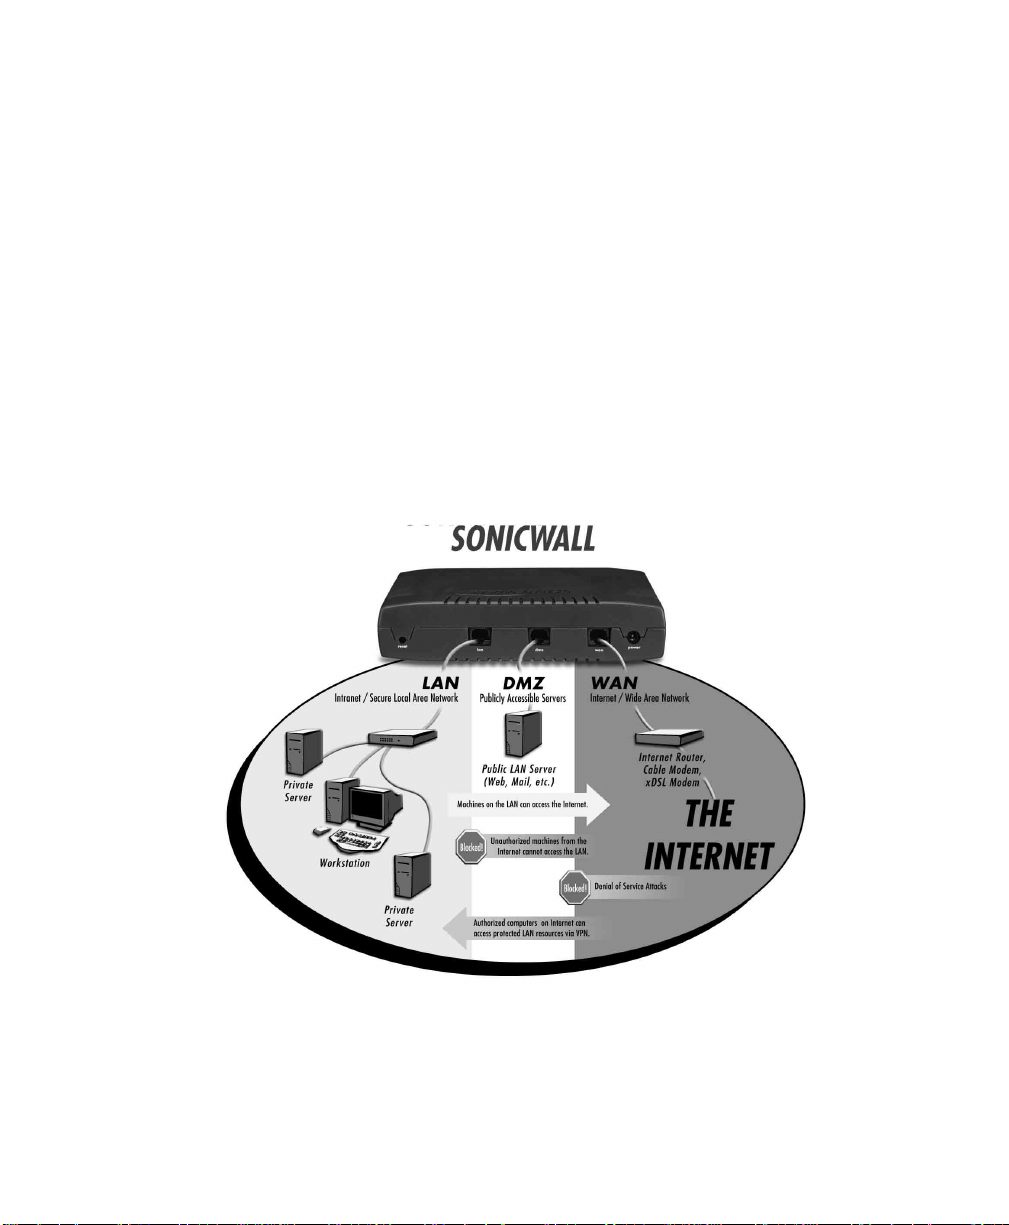
SonicWALL Internet Security Appliance Functional Diagram
The following figure illustrates the SonicWALL Internet security appliance functions.
By default, the SonicWALL Internet security appliance allows outbound access from the LAN to the
Internet and blocks inb ound access from the Intern et to the LAN. Users on t he Internet are restri cted
from acce ssing r eso urces o n the L AN unl ess th ey are auth orized r em ote us ers or Netwo rk Acce ss
Rules were created to allow inbo und acce ss. If the Son icWALL includes a DM Z port, user s on the
LAN and the Internet have access to the devices on the DMZ.
Page 14 SonicWALL Internet Security Appliance Administrator’s Guide
Page 14

SonicWALL Internet Security Appliance Features
Internet Security
• ICSA-Certified Firewall
After undergoing a rigorous suite of tests to expose security vulnerabilities, SonicWALL Internet
security a ppliances have re ceived Firewall C ertificatio n from ICSA, the internationally-accepted
authority on network security. The SonicWALL uses stateful packet inspection, the most
effective method of packet filtering, to protect your LAN from hackers and vandals on the
Internet.
• Hacker Attack Prevention
The SonicWALL automatic ally detects and thwarts Denial of Service (DoS) attacks such as P ing
of Death, SYN Flood, LAND Attack, and IP Spoofing.
• Network Address Translation (NAT)
Network Address Translation (NAT) translates the IP addresses used on your private LAN to a
single, public IP address that is used on the Internet. NAT allows multiple computers to access
the Internet, even if only one IP address has been provided by your ISP.
• Network Access Rules
The default Network Access Rules allow traffic from the LAN to the Internet and block traffic
from the Internet to the LAN. You can create additional Network Access Rules that allow
inbound tra ffic t o ne twork se rvers, such a s Web an d e- mail s erv ers, or that r estr ict o utb ound
traffic to certain destinations on the Internet.
• Autoupdate
The SonicWALL maintai ns the highest level of secur ity by automatically notifyi ng yo u w he n new
firmware is released. When new firmware is available, the SonicWALL Web Management
Interface displays a link to download and install the latest firmware.
• DMZ Port
The SonicW AL L PR O 10 0, PRO 200, PRO 300, PRO 23 0, and t h e S o nicW AL L PRO 330 inc lude
a DMZ port allowing users to access public servers, such as Web and FTP servers. While Internet
users have unli mited acces s to the DM Z, the se rvers on the DMZ are s till p rotec ted against D oS
attacks.
• HomePort
The TELE3 TZ and TELE3 TZX include a HomePort that allows you to separate company
computers from home computers on your home network yet share the same Internet
connection.
• WorkPort
The TELE3 TZ and TELE3 TZX include a WorkPort that allows you to isolate your IPSec VPN and
secures your corporate connections with a stateful pack et inspection firewall.
• SNMP (Simp l e Net work Managem e nt Prot oc ol ) Support
SNMP is a network protocol used over User Datagram Protocol (UDP) that allows network
administrators to monit or the status of the Son icWALL Internet Secur ity Appl iances and recei ve
notification of any critical events as they occur on the network.
Introduction Page 15
Page 15

Content Filtering
• SonicWALL Content Filtering
You can use the SonicWALL Web content filtering to enforce your company's Internet access
policies. The SonicWALL blocks specified categories, such as violence or nudity, using an
optional Content Filter List. Users on your network can bypass the Content Filter List by
authenticating with a unique user name and password.
• Content Filter List Updates (optional)
Since content on the Internet is constantly changing, the SonicWALL automaticall y updates the
optional Content Filter List every week to ensure that access restrictions to new and relocated
Websites and newsgroups are properly enforced.
• Log and Blo ck or Lo g Only
You can configure the SonicWALL to log and block access to objectional Web sites, or to log
inappropriate usage without blocking Web access.
• Filter P r ot ocols
In addition to filtering access to We b sites, the SonicWALL can also block Newsgroups, ActiveX,
Java, Cookies, and Web Proxies.
Logging and Reporting
• Log Cate go r ies
You can select the information you wish to display in the SonicWALL event log. You can view the
event log from the SonicWALL Web Management Interface or receive the log as an e-mail file.
• Syslog Server Support
In addition to the standard screen log, the SonicWALL can write detailed event log information
to an external Syslog server. Syslog is the industry-standard method to capture information
about network activity.
• ViewPoint Re po r tin g (optional)
Monitoring critical network ev ents and ac tivity , such as s ecurity t hreats , inappro priate Web u se,
and bandwidth levels, is an essential component of network security. SonicWALL ViewPoint
complements the SonicWALL security features by providing detailed and comprehensive
reports of network activity.
SonicWALL ViewPoint is a software application that creates dynamic, Web-based network
reports. ViewPoint reporting generates both real-time and histor ical reports to offer a complete
view of all activity through your SonicWALL Internet Security Appli a nc e.
• E-mail Alerts
The Soni cWA LL can be c on fi gured to s end a lert s o f hi gh-p ri ori ty event s, s uch as atta ck s, sys tem
errors, and blocked Web sites. When these events occur, alerts can be immediately sent to an
e-ma il ad dress or e- mail pag er.
Page 16 SonicWALL Internet Security Appliance Administrator’s Guide
Page 16

Dynamic Host Configuration Protocol (DHCP)
• DHCP Server
The DHCP Server offers centralized management of TCP/IP client configurations, including IP
addresses, gateway addresses, and DNS addresses. Upon startup, e ach network client receives
its TCP/IP settings automatic a lly from the SonicWALL DHCP Server.
• DHCP Client
The DHCP Client allows the SonicWALL to acquire TCP/IP settings (such as IP address, gateway
address, DNS add ress) from your I SP. This i s necessar y if you r ISP a ssigns you a dynam ic IP
address.
• DHCP over VPN
DHCP over VPN allows a Host (DHCP Client) behind a SonicWALL obtain an IP address lease
from a DHCP server at the end of a VPN tunnel. In some network deployments, it is desirable to
have all VPN networks residing in one IP subnet address space. This facilitates address
administration for the networks using VPN tunnel s.
Easy Installation and Configuration
• Installation Wizard
The SonicWA LL Installation Wi za rd helps yo u qu ic k ly inst al l and con figu r e the Son icW AL L.
• Online help
SonicWA LL h elp doc ument ation is b uilt i nto the So nicWA LL We b Manag ement I nter face f or ea sy
access during installation and management.
IPSec VPN
• SonicWAL L VPN
SonicWALL VPN provides a simple, secure tool that enables corporate offices and business
partners to connect securely over the Internet. By encrypting data, SonicWALL VPN provides
private communications between two or more sites without the expense of leased site-to-site
lines.
• VPN Client Software for Windows
Mobile users wi th di al-up I nternet accounts c an se curely access re mote netwo rk res ources wit h
the SonicWALL VPN Client. The SonicWALL VPN Client establishes a private, encrypted VPN
tunnel to the SonicWALL, allowing users to transparently access network servers from any
location.
Contact SonicWALL, Inc. for information about the Content Filter List, Network
Anti-Virus subscripti ons, an d othe r upgrades.
Web: http://www.sonicwall.com
E-mail: sales@sonicwall.com
Phone: (408) 745-9600
Fax: (408) 745-93 00
Introduction Page 17
Page 17
2 Configuring the Network Mode on the SonicWALL
The SonicWALL Internet security appliance allows the following common network configurations:
Standard, NA T E na bl ed, NAT with PPPoE Client, NAT with DHCP Client, NAT with L2TP Client, and NAT
with PP TP Cli e nt are included in this chapter.
Standard Mode
Config uring th e SonicW ALL in Sta ndard mo de requ ires a stat ic IP addr ess from your ISP. In this
mode, you must have separate static IP addresses for all computers on your network.
Instructions for configuring a SonicWALL in Standard mode begi n on pa ge 19.
Networ k Add r ess Trans lation (NAT) Enabl ed
Using NAT to set up y our Soni cWALL el iminate s the need for separa te IP addr esses f or all com puters
on your LAN. It is a way to conserve IP addresses available from the pool of IPv4 addresses for the
Internet. If you do not have enough individual IP addresses for all computers on your network, you
can use NAT for your network configurat ion.
Instruct ions for configuring NAT Enabled mod e be gi n on page 2 0.
NAT with PPPoE Client
NAT with PPPoE Client is a networ k protocol that uses Point to Point Protocol over Ethernet (PPPoE)
to connect with a remote site using various Remote Access Service products. This protocol is
typically found when using a DSL modem with an ISP requiring a user name and password to log into
the remote server. The ISP may then allow you to obtain an IP address automatically or give you a
specific IP address.
Instruct ions for configuring NAT with PPPoE Client mode begin on page26.
Page 18 SonicWALL Internet Security Appliance Administrator’s Guide
Page 18

NAT with DHCP Client
NAT with DHCP Client is a networking mode that allows you to obtain an IP address for a specific
length of time from a DHCP server. The length of time is called a lease, which is renewed by the
DHCP server typically after a few days. When the lease is ready to expire, the client contacts the
server to renew the l ease. This is a common network configuration for customers with cable or D SL
modems. You are not assigned a specific IP address by your ISP.
Instruct ions for configuring NAT with DHCP Client mode begin on page 32.
NAT with L2TP Client
NAT with L2TP Client is a networking mode that allows you to connect to a remote L2TP server to
obtain IP address settings. L2TP (Layer 2 Tunneling Protocol) is a network protocol using IPSec to
encrypt transmit ted data, and is only suppor ted by Win dows 2000. If you are runnin g othe r versions
of Windows, you must use PPTP as your tunneling protocol.
Instruct ions for configuring NAT with L2TP Client mode begin on page 37.
NAT with PPTP Client
NAT with PPT P Client is a networking mode supporting PPTP (Point to Point Tunneling Protocol) to
connect to a remote server. It uses Mi crosoft Point to Point Encryption (MPPE) to prov ide encryptio n
of transmitted data. PPTP typically supports older Microsoft clients that require tunneling
connectivity or situations in which a tunnel passes through a firewall performing NAT.
Instruct ions for configuring NAT with PPTP Client begin o n pa ge 38.
Configuring the SonicWALL in Standard Mode
This section describes configur ing the SonicW AL L in Standard mode. You must have a single, static
IP address to begin configuration. Follow the instructions below.
TIP Be sure to have your network information including your WAN IP address, subnet mask, and DNS
settings ready. This information is obtained from your ISP.
1. Open a We b bro wser and enter the def ault So nicWALL IP add ress, 192 .168.16 8.168 , in the
Location or Address field.
2. The Login window appears. Enter admin in the User Name field, and password in the Password
field.
3. Click Cancel on the initial Installation Wizard page to cancel the wizard.
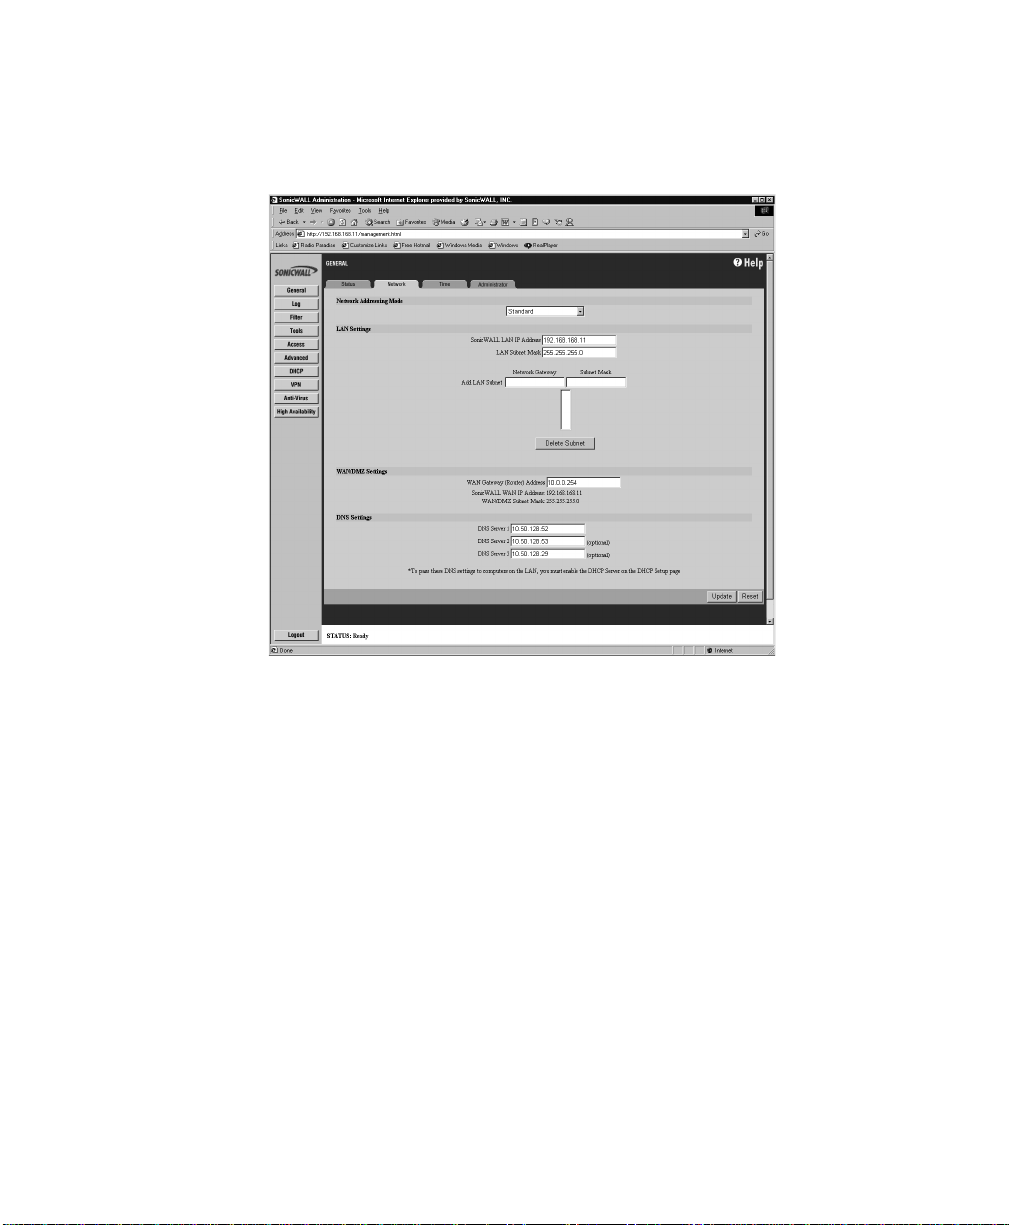
4. Click Network in the General section.
5. Select Standard from the Net w o rk Ad dr e ssi n g Mo d e menu.
6. Enter 192.1 68.168.1 in the SonicWALL LA N IP Address field.
7. Enter 255.2 55.255.0 in the LAN Subnet Ma sk field.
8. Enter your WAN router or default gateway IP address i n the WAN Gateway (Rout er) Address field.
If you have DSL or cable, your WAN router is typically located at your ISP.
9. Enter your DNS IP address(es) in the DNS Server fields.
10. Click Upd ate. Once the SonicWALL is updated, you must restart the SonicWALL for the changes
to take effect.
Configuring the Network Mode on the SonicWALL Page 19
Page 19
Configuring the SonicWALL in NAT Enabled Mode
This section describes configuring the SonicWALL appliance in the NAT mode. Essentially, NAT
translates the IP addresses in one network into those for a different network. As a form of packet
filter ing for fi rewalls, it prote cts a net work from outsid e intrusi on from h ackers b y repla cing the
internal (LAN) IP address on packets passing through a SonicWALL with a “fake” one from a fixed
pool of a ddr esse s. T he act ual IP ad dr esse s of co mputer s o n t he LAN are h id den fro m ou tsid e vi ew.I f
you are assign ed a single IP address by your IS P, fol low t he ins tru cti on s be lo w .
Tip Be sure to have your network information including your WAN IP address, subnet mask, and DNS
settings ready. This information is obtained from your ISP.
The SonicWALL Installation Wizard simplifies the initial installation and configuration of the
Sonic WA LL. T he Wizard provides a series of menu-driven instructions for setting the administrator
password and configuring the setting s necessary to access the Internet.
Accessing the Wizard
Alert Yo ur We b bro wse r m ust be Java-enabl ed an d su ppo rt H TTP u plo ad s i n o rde r to full y m an age
SonicWALL. Internet Explorer 5.0 an d above as well as Netscape Navigator 4.0 and above are
recommended.
1. Open a We b B row se r . The n e nte r t he default So n icWALL IP a d dr e ss, "1 92. 16 8.168.168", i nto
the Location or Address field in the Web browser.
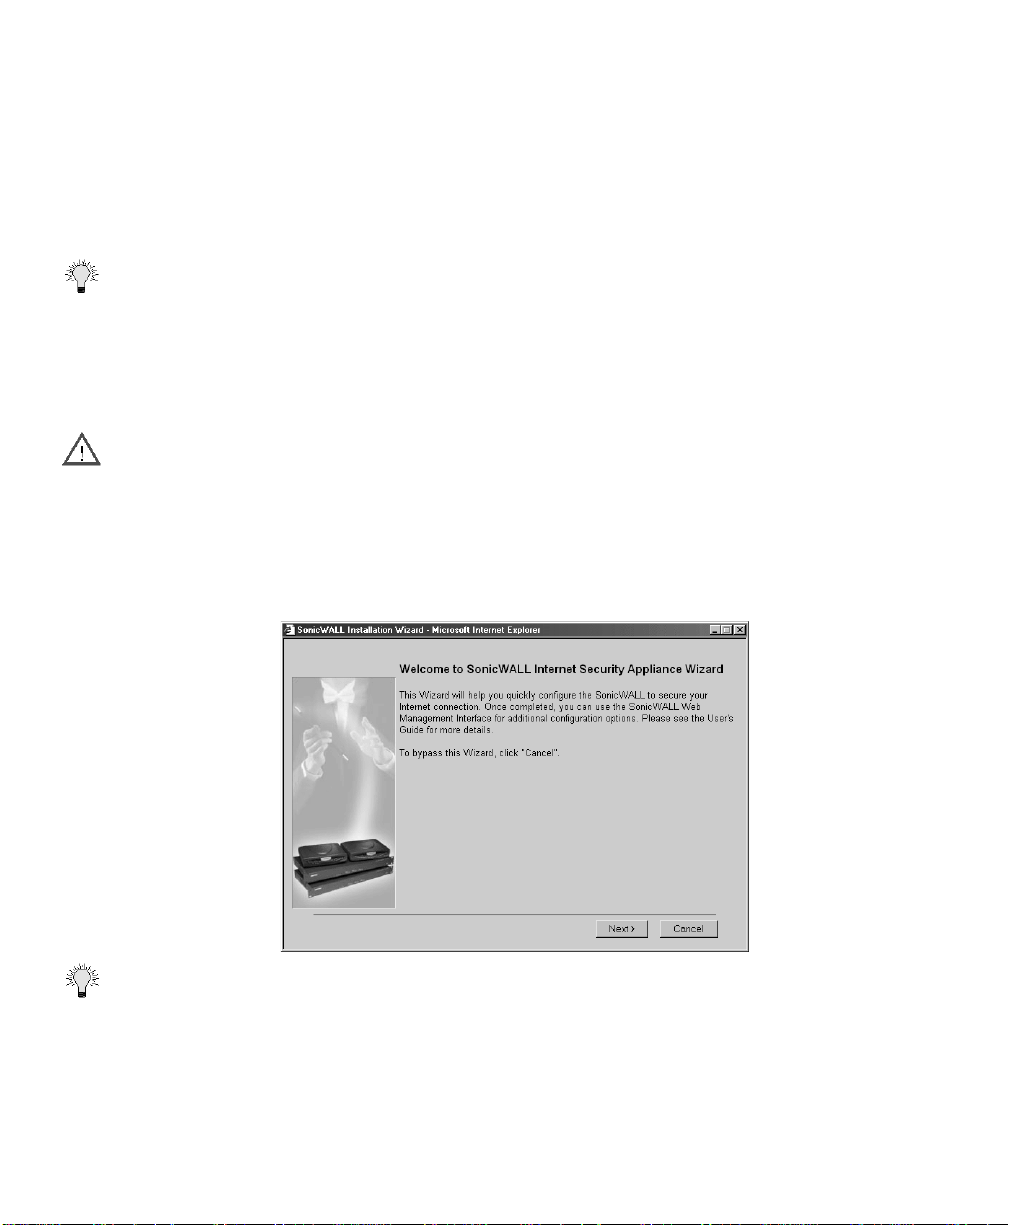
The first time you access the SonicWALL Management i nterfac e, the SonicWALL Installati on Wiz ard
automatically launches and begins the install ation process.Click Next to continue.
Tip To bypass the Wizard, click Cancel. Then log into the SonicWALL Management Interface by
entering the User Nam e "adm in " and the Passwo rd "password".
Page 20 SonicWALL Internet Security Appliance Administrator’s Guide
Page 20
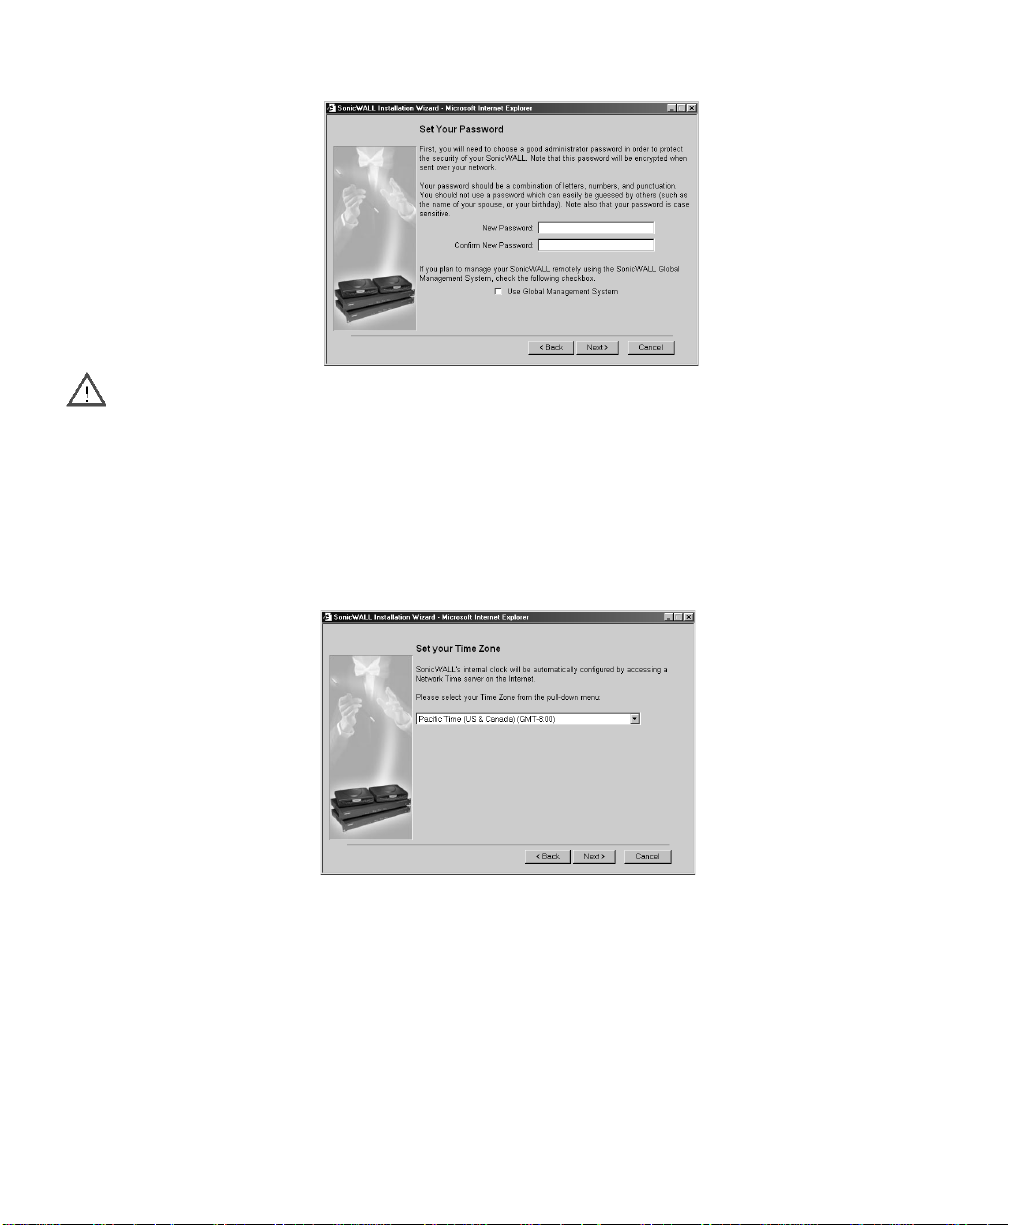
Settin g th e Pa s s word
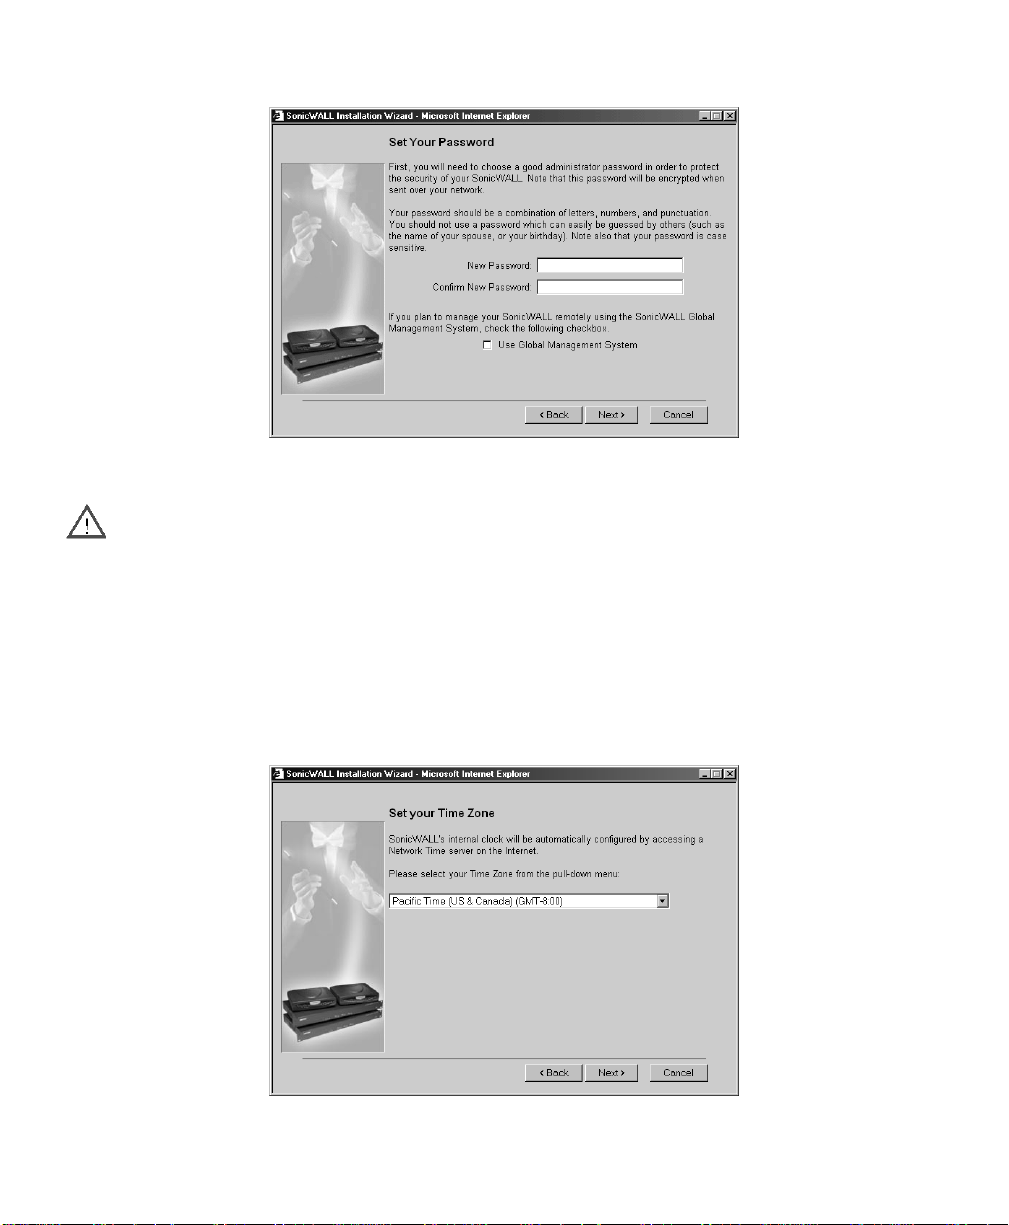
2. To set the password, enter a new password in the New Password and Confirm New Password
fields.
Alert It is very important to choose a password which cannot be easily guessed by others.
This page al so displays the Use SonicWALL Glo bal Manageme nt System check box. SonicWALL
Global Management System (SonicWALL GMS) is a Web browser-based security management
system. SonicWALL GMS al low s en terpri ses and se rvice prov iders to m onitor and manage h undr eds
of rem ote Soni cWAL Ls fr om a ce ntral locat ion . For mo re inf ormat ion about S oni cWALL G MS, co ntact
SonicWALL Sales at (408) 745-9600.
3. Do not select the Use Global Mana gement S ystem c heck bo x unle ss y our Soni cWAL L is remo tely
managed by SonicWALL GMS. Click Next to continue.
Setting th e Time and Date
Configuring the Network Mode on the SonicWALL Page 21
Page 21

4. Select the appropriate Time Zon e fro m t he Ti me Z one menu. The SonicWALL internal clock is
set automatically by a Network Time Server on the Internet. Click Next to continue.
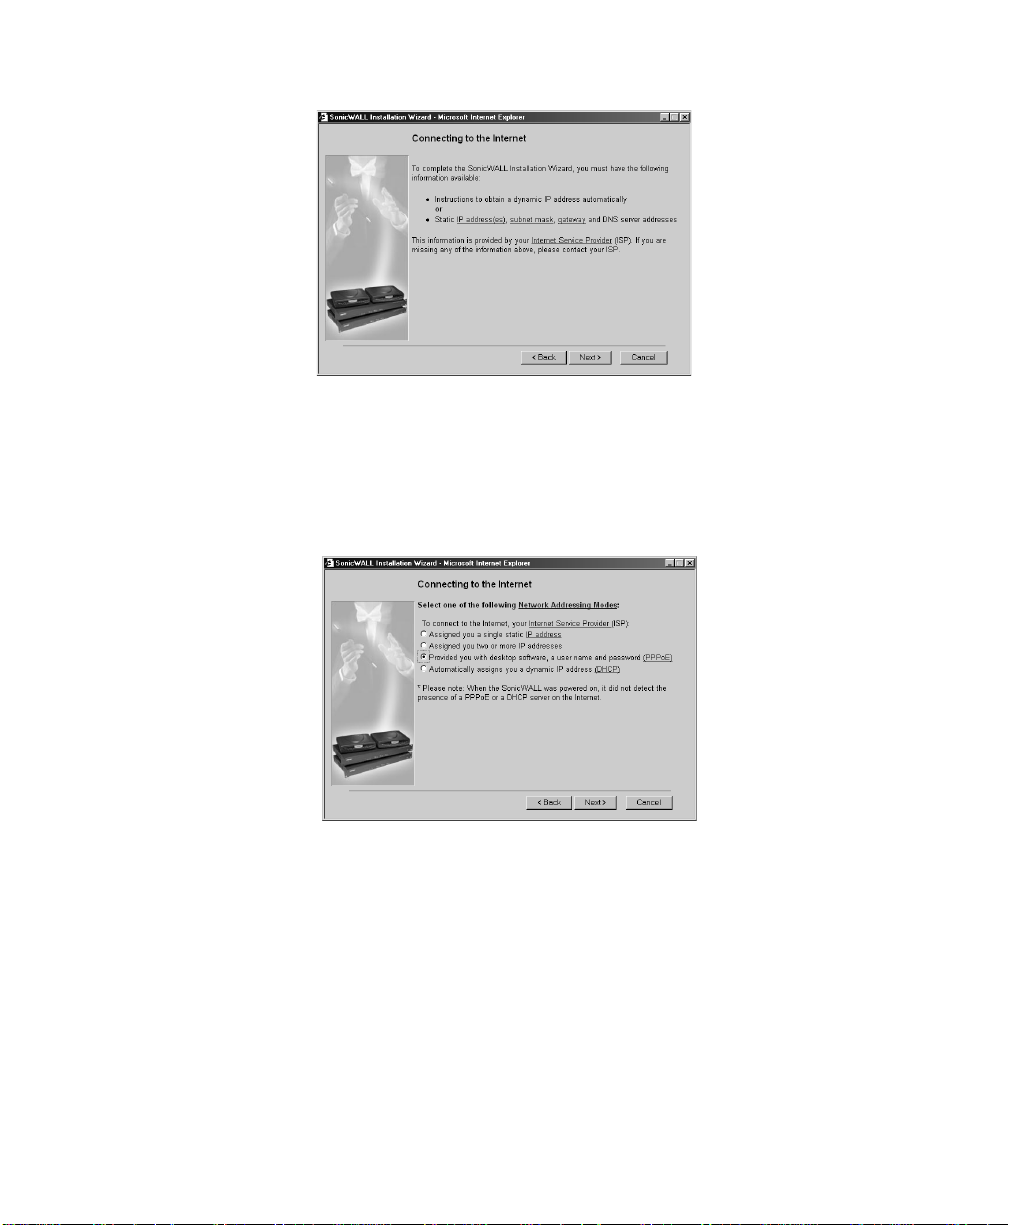
Connecting to the Internet
The Connectin g to the Internet screen lists the informatio n required to c omplete the ins tallation. You
need instructions for obtaining an IP address automatically or IP addresses from your ISP.
5. Confirm that you ha ve the proper net work infor mation nece ssary to config ure the Sonic WALL to
access the Internet. Click the hyperlinks for definitions of the networking terms. Click Next to
proceed to the next step.
Selecting Your Internet Connection
6. Select Assigned you a single static IP address, if your ISP has provided you with a single, valid
IP address. You can configure the SonicWALL to use NAT with a single, static IP address. The
advantages of Network Address Translation (NAT) are IP address conservation, and h id ing your
IP address from a public WAN such as the Internet.
Page 22 SonicWALL Internet Security Appliance Administrator’s Guide
Page 22
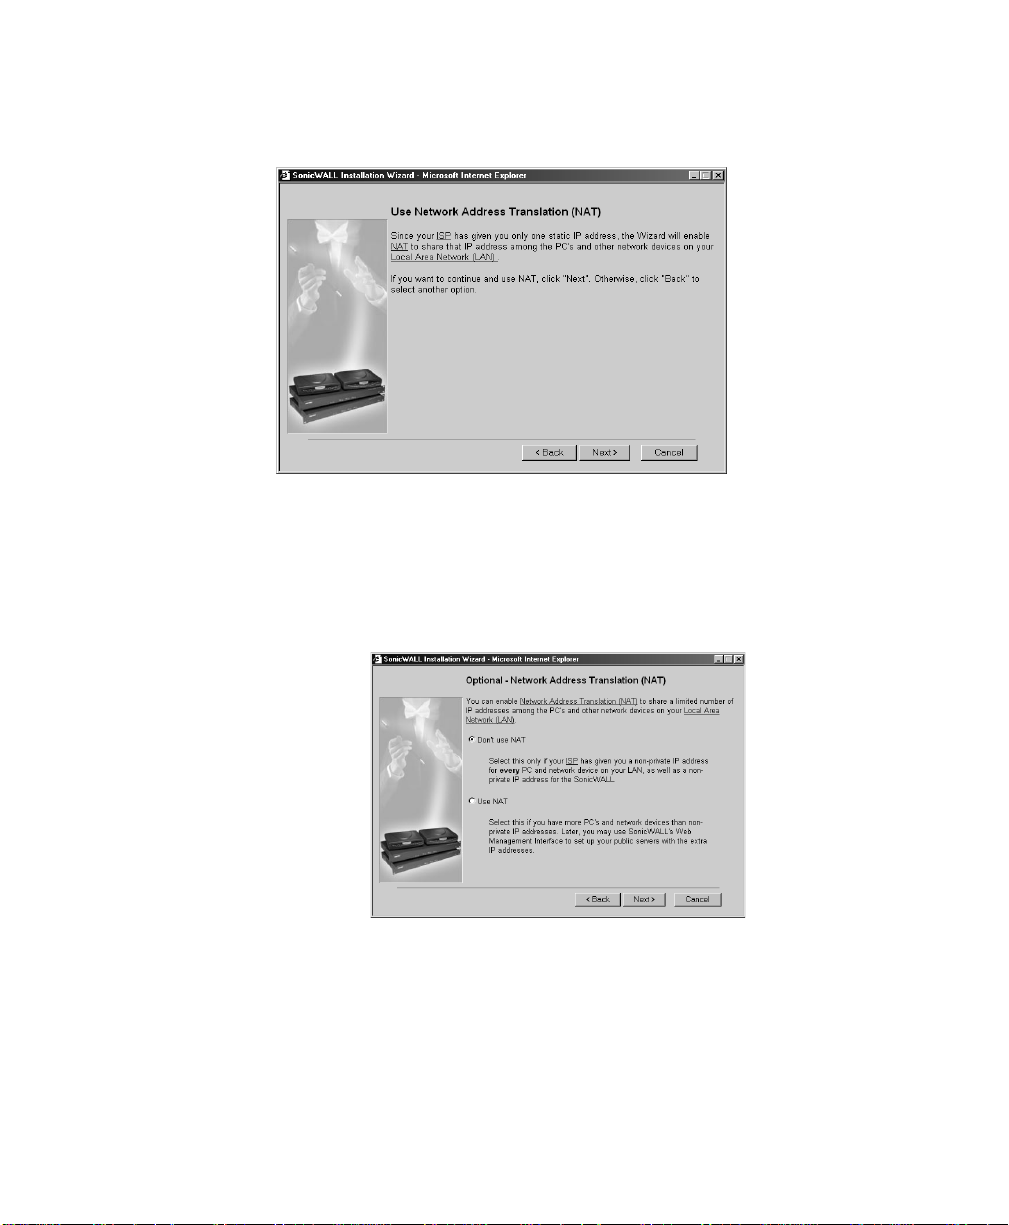
Confirming Network Address Translation (NAT) Mode
If you select Assigned you a single static IP address in the Connecting to the Internet page, the Use
Network Address Translation (NAT) page is di splayed .
The Use Network Address Translation (NAT) page verifies that the SonicWALL has a registered IP
address.
Selecting NAT Enabled Mode
If you selected Assigned you two or more static IP Addresses, the Optional-Network Address
Translation page is displ aye d.
7. The Optional-Network Address Translation (NAT) page offers the ability to enable NAT. Select
Don’t Use NAT, if there are enough static IP addresses for your SonicWALL, all PCs, and all
network devices on your LAN. Selecting Don’t Use NAT enables the Standard mode. Select Use
NAT, if valid IP addresses are in short supply or to hide all devices on your LAN behind the
SonicW ALL vali d IP address. Click Next to continue.
Configuring the Network Mode on the SonicWALL Page 23
Page 23
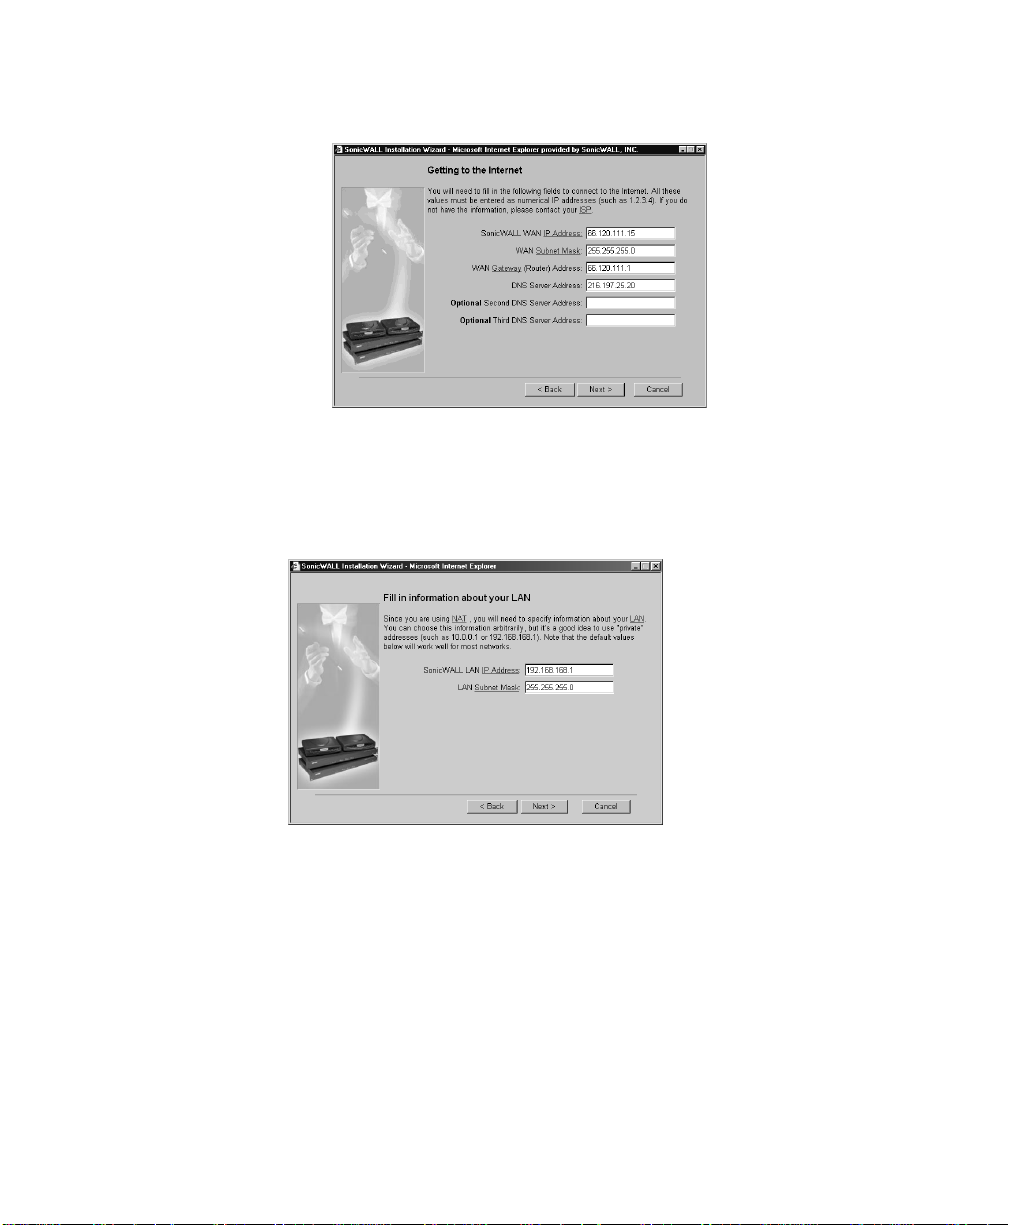
Configuring WAN Network Settings
If you selected either NAT or Standard mode, the Getting to the Internet page is displayed.
8. Enter the IP add ress provi ded by your I SP in the Son ic W AL L WA N I P Ad dr e ss , WAN /DMZ Subn et
Mask, WAN Gateway (Router) Address, and DNS Server Addresses. Click Next to continue.
Configuring LAN Network Settings
9. The Fill in information about your LAN page allows the configuration of the SonicWALL LAN IP
Address and the LAN Subnet Mask. The SonicWALL LAN IP Address is the private IP address
assigned to the LAN port of the SonicWALL. The LAN Subnet Mask defines the range of IP
addresses on the LAN. The default values provided by the SonicWALL work for most networks.
If you do not use the default settings, enter the SonicWALL LAN settings and click Next to
continue.
Page 24 SonicWALL Internet Security Appliance Administrator’s Guide
Page 24
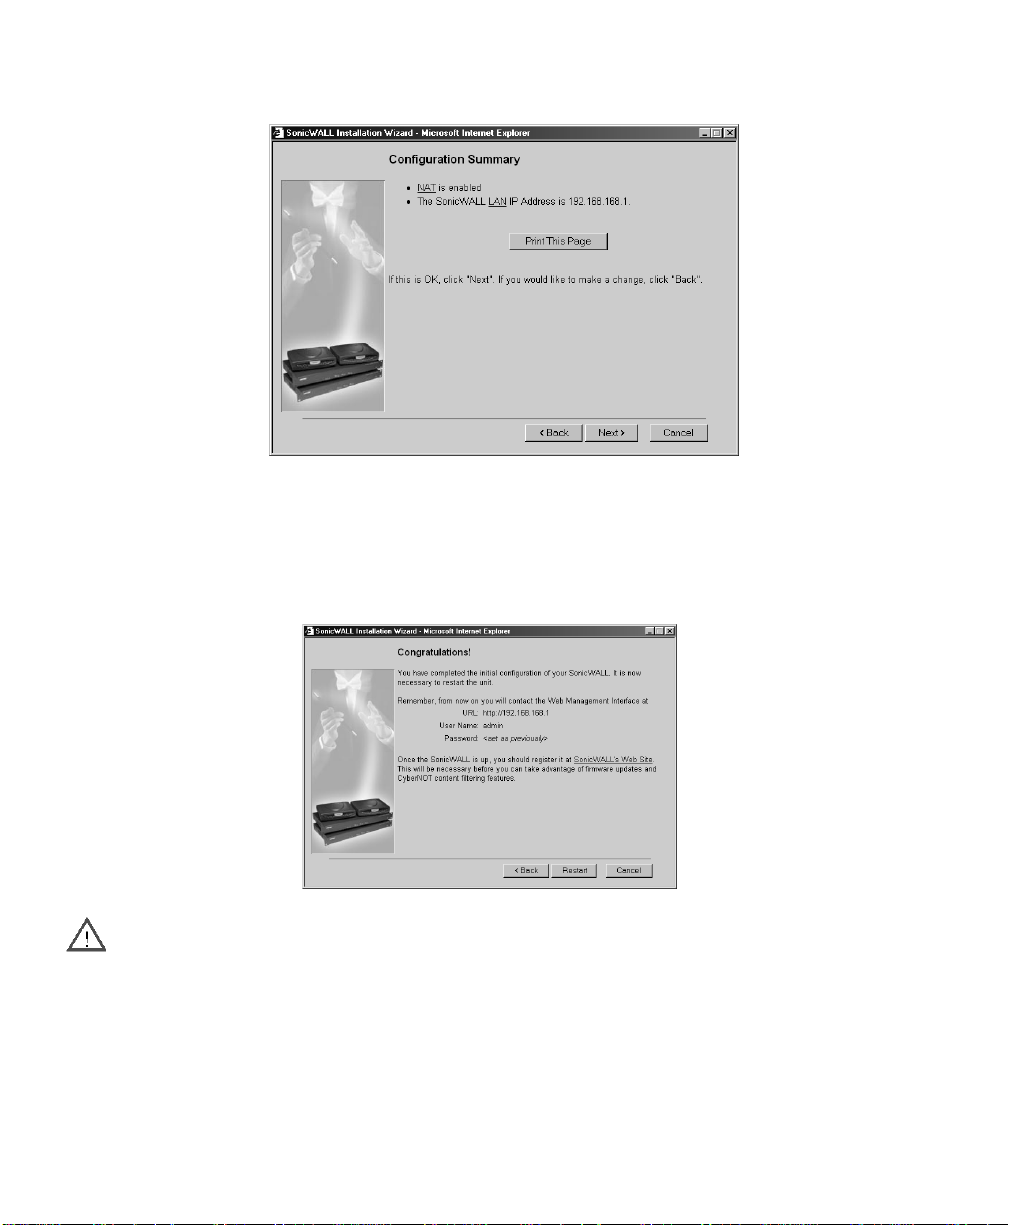
Configuration Summary
10. The Configuration Summary page displays the configuration defined using the Installation
Wizard. To modify any of the setti ngs, click Back to return to th e Connecting to the Internet page.
If the configuration is correct, click Next to proceed to the Congratulations page.
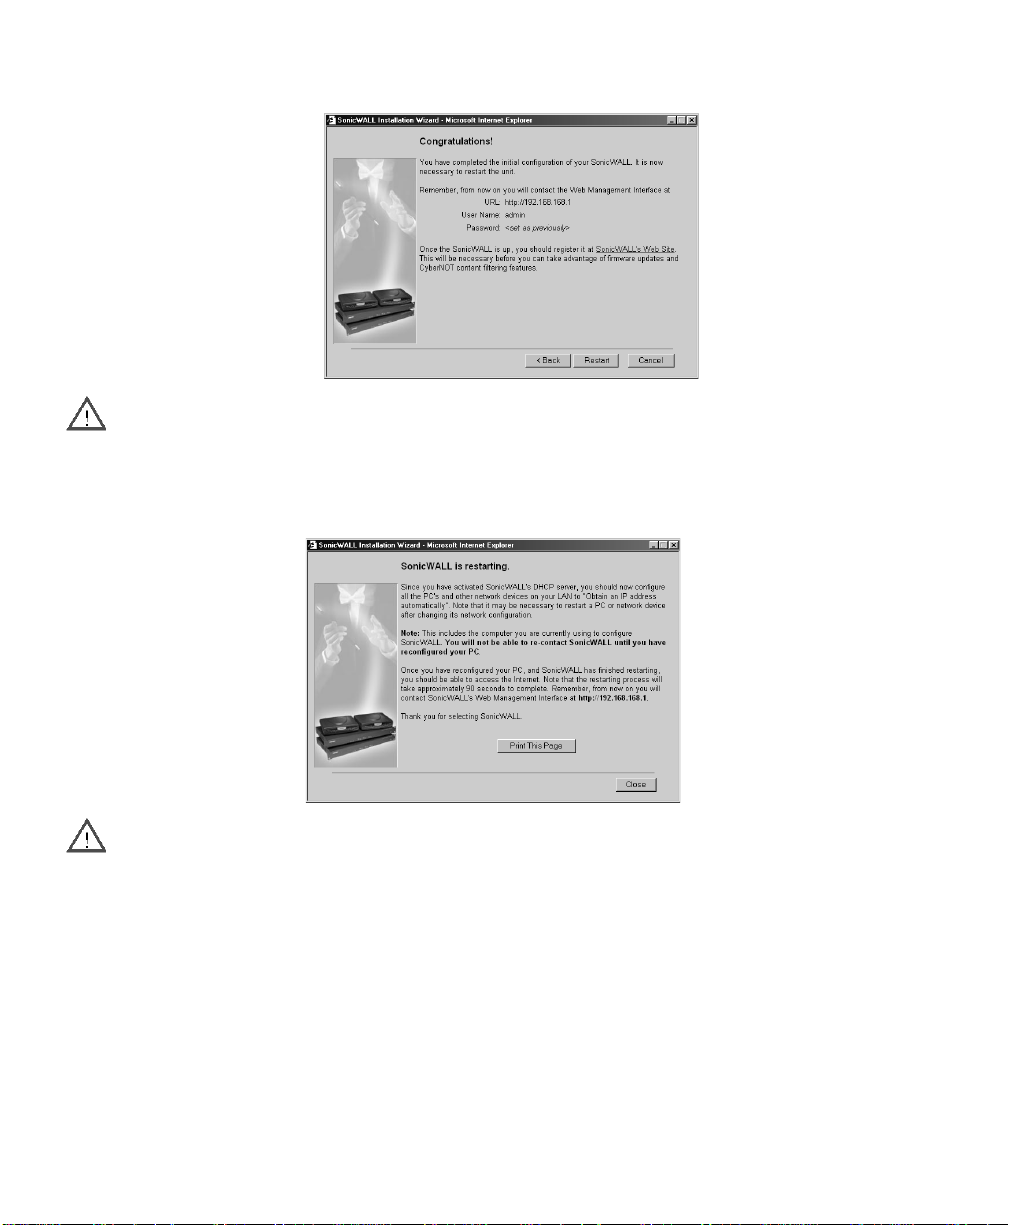
Congratulations
Alert The new SonicWALL LAN IP address, displayed in the URL field of the Congratulations page, is
used to log in and manage the SonicWALL.
11. Click Restart to restart the SonicWALL.
Configuring the Network Mode on the SonicWALL Page 25
Page 25
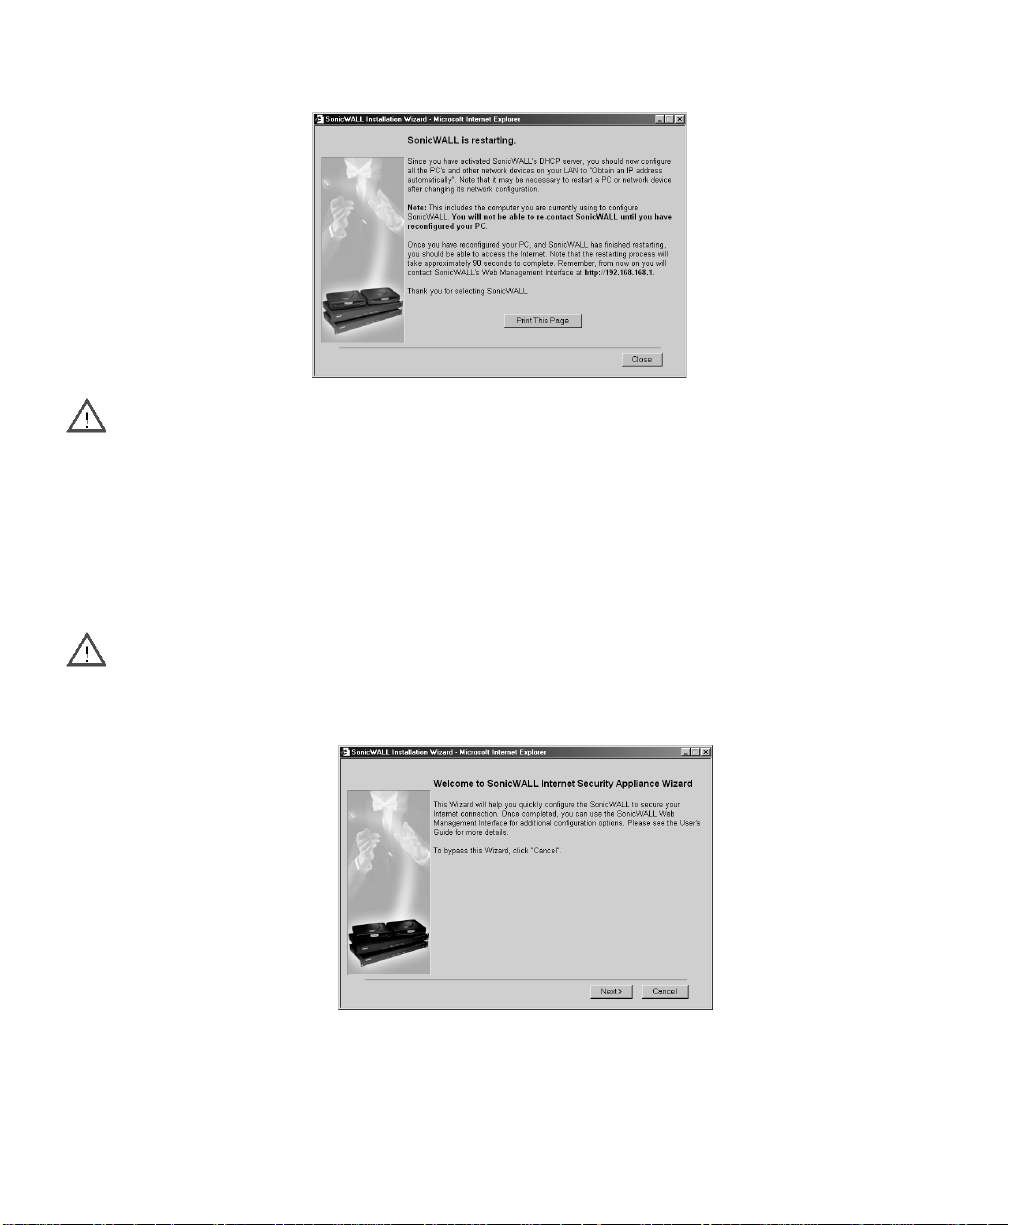
Restarting
Alert The final page provides important information to help configure the computers on the LAN.
Click Print this Page to print the windo w information.
12. The SonicWALL takes 90 seconds to restart. During this time, the yellow Test LED is lit. Click
Close to exit the SonicWALL Wizard.
Configuring NAT with PPPoE Client
The SonicWALL Installation Wizard simplifies the initial installation and configuration of the
SonicWALL. The Wizard provides a series of menu-driven instructions for setting the administrator
password and configuring the setting s necessary to access the Internet.
Alert Be sure to have your network information including your user name and password ready. This
information is obtained from your ISP.
To configure your SonicWALL appliance, read the instructions on the Wizard Welcome page and click
Next to continue.
Page 26 SonicWALL Internet Security Appliance Administrator’s Guide
Page 26
Settin g th e Pa s s word
Alert It is very important to choose a password which cannot be easily guessed by others.
1. To set the password, enter a new password in the New Password and Confirm New Password
fields.
This window also displays the Use So ni cW A LL G l obal Mana g e ment Sys te m che c k bo x.
2. Do not select the Use Global Mana gement S ystem c heck bo x unle ss y our Soni cWAL L is remo tely
managed by SonicWALL GMS. Click Next to continue.
Setting th e Time and Date
3. Select the appropriate Time Zon e fro m t he Ti me Z one menu. The SonicWALL internal clock is
set automatically by a Network Time Server on the Internet. Click Next to continue.
Configuring the Network Mode on the SonicWALL Page 27
Page 27
Connecting to the Internet
The Connecting to the Internet page lists the information required to complete the installation.
Tip Confirm that you have the necessary network information from your ISP before proceeding with
the Connecting to the Internet page s.
4. Click the hyperlinks for definitions of the networking terms. Click Next to continue.
Selecting Your Internet Connection
5. Select Provided you with desktop software, a user name and password (PPPoE), if your ISP has
provided you with desktop software, a user name and password information.
Page 28 SonicWALL Internet Security Appliance Administrator’s Guide
Page 28
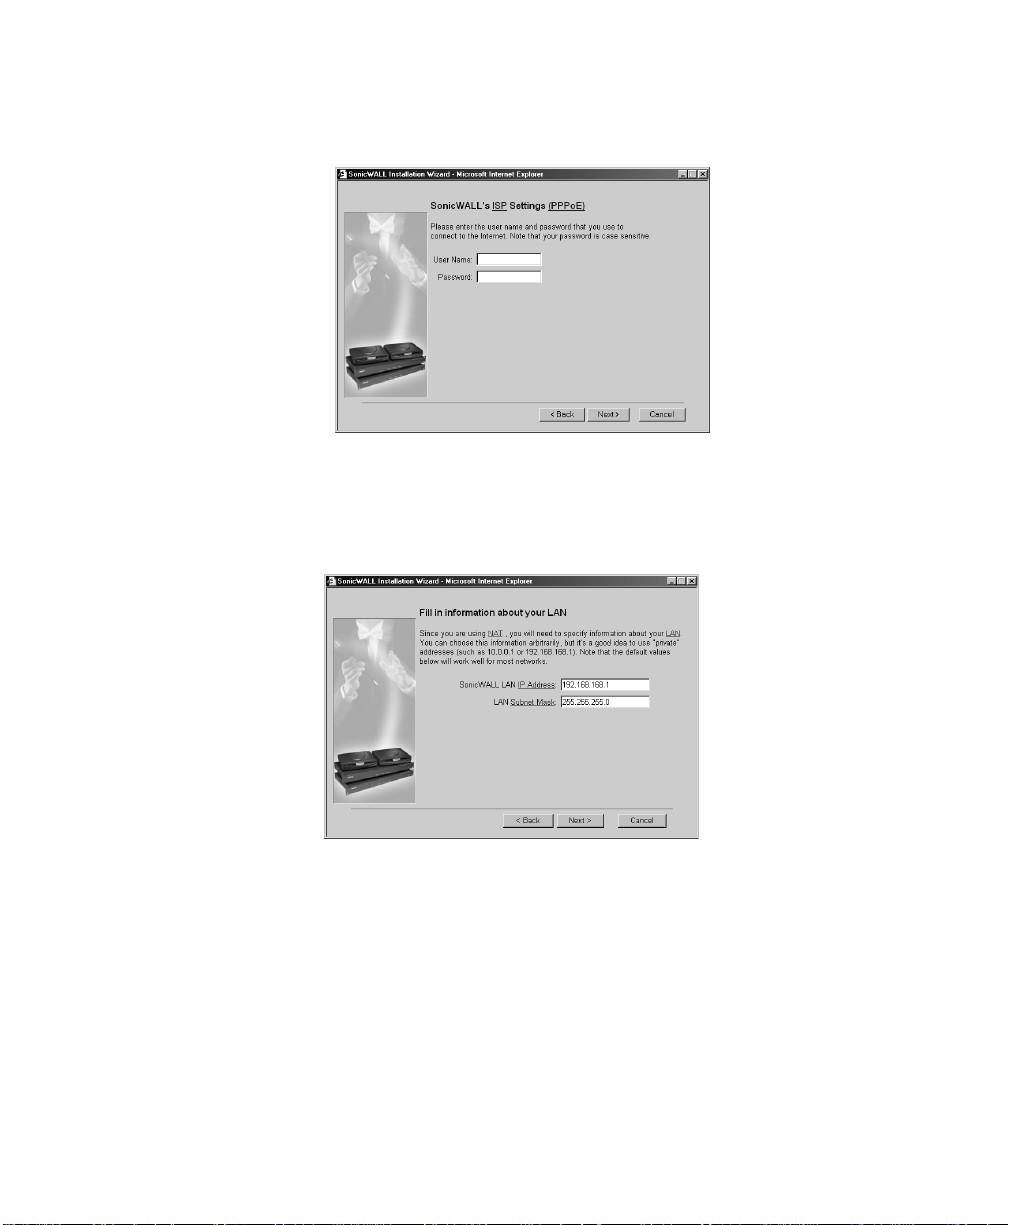
Setting the User Name and Password for PPPoE
6. If you s elected Pr ovided you wit h desktop softwa re, a use r name a nd pass word ( PPPoE), t he
SonicWAL L ISP Set tin gs (PPP oE) pa ge is displ aye d.
7. Enter the User Name and Password provided by your ISP into the User Name and Password
fields.
Configuring LAN Network Settings
8. The Fill in information about your LAN page allows the configuration of the SonicWALL LAN IP
Address and the LAN Subnet Mask.The SonicWALL LAN IP Address is the private IP address
assigned to the LAN port of the SonicWALL. The LAN Subnet Mask defines the range of IP
addresses on the LAN. The default values provided by the SonicWALL work for most networks.
If you do not use the default settings, enter the SonicWALL LAN settings and click Next to
continue.
Configuring the Network Mode on the SonicWALL Page 29
Page 29
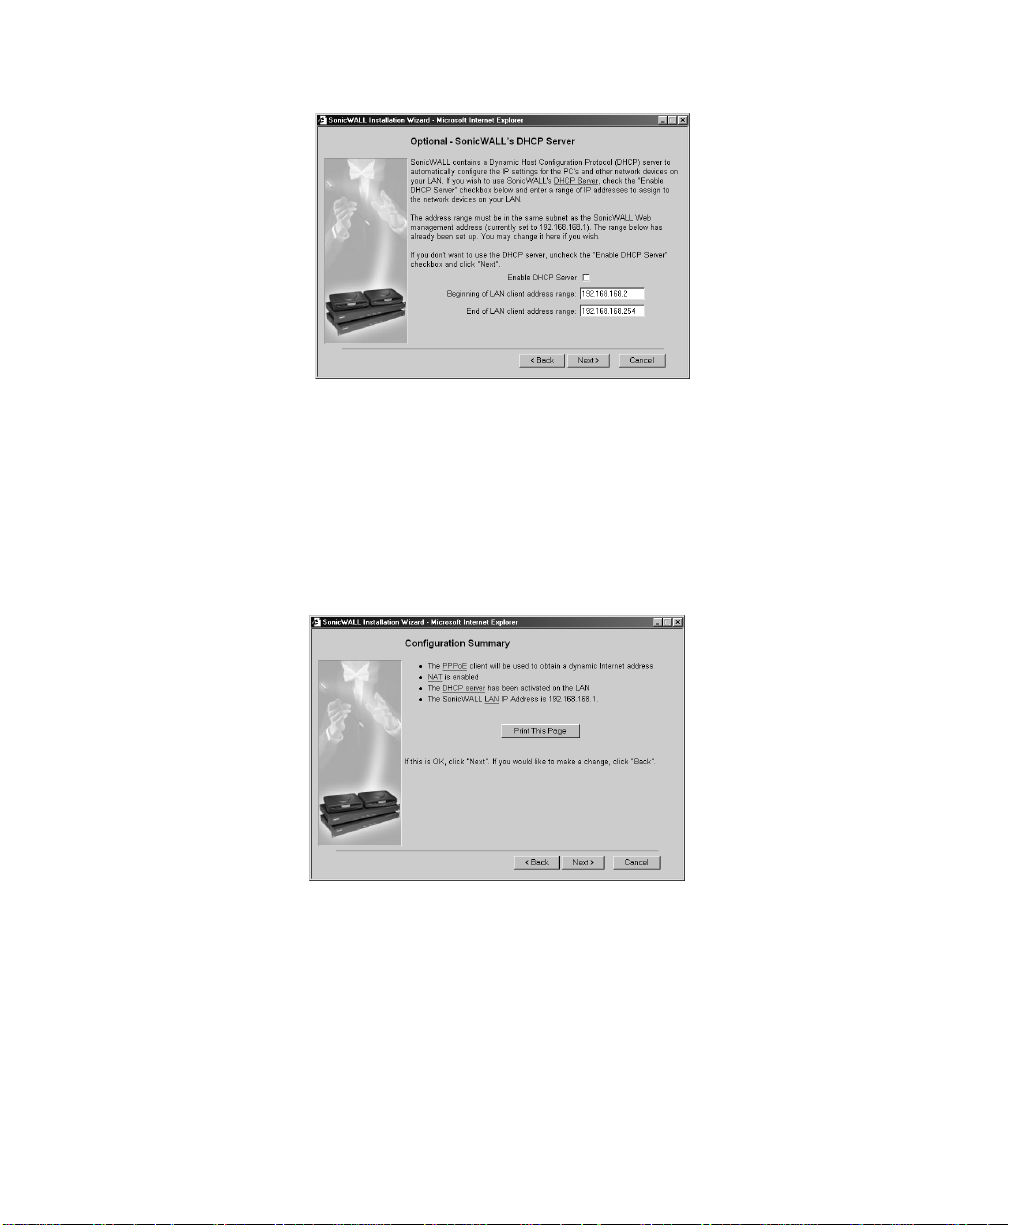
Configuring the SonicWALL DHCP Server
9. The Option al-S oni cWAL L DHCP Se rver pag e c on fi gures th e Soni cWA LL DH CP Serve r. If en abled ,
the SonicWALL automaticall y confi gures the IP set tings of computers on the LAN. To enable the
DHCP server, select the Enable DHC P Server check box, and specify the range of IP addresses
that are assigned to computers on the LAN.
If the Enable DHCP Server check box is not selected, the DHCP Server is disabled. Click Next to
continue.
Configuration Summary
10. The Configuration Summary page displays the configuration defined using the Installation
Wizard. To modify any of the settings, click Back to return to the Connecting to the Internet
window. If the configuration is correct, click Next to proceed to the Congratulations page.
Page 30 SonicWALL Internet Security Appliance Administrator’s Guide
Page 30
Congratulations
Alert The new SonicWALL LAN IP address, displayed in the URL field of the Congratulations page, is
used to log in and manage the SonicWALL.
11. Click Restart to restart the SonicWALL.
Restarting
Alert The final window provides important information to help configure the computers on the LAN.
12. Click Print this Page to print the window information.
The SonicWALL takes 90 seconds to restart. During this time, the yellow Test LED is li t . C l ic k Close
to exit the SonicWALL Wizard.
Configuring the Network Mode on the SonicWALL Page 31
Page 31

Configuring NAT with DHCP Client
Accessing the Installation Wizard
The SonicWALL Installation Wizard simplifies the initial installation and configuration of the
Sonic WA LL. T he Wizard provides a series of menu-driven instructions for setting the administrator
password and configuring the setting s necessary to access the Internet.
Tip To bypass the Wizard, click Cancel. Then log into the SonicWALL Management Interface by
entering the User Nam e "adm in " and the Passwo rd "password".
The first time you access the SonicWALL Management i nterfac e, the SonicWALL Installati on Wiz ard
automatically launches and begins the installation process.
1. To co nfi gur e your Son ic WA LL a ppl ian ce , r ea d the in s truc ti ons o n t he Wizar d Welcome page and
click Next to continue.
Settin g th e Pa s s word
Alert It is very important to choose a password which cannot be easily guessed by others.
2. To set the password, enter a new password in the New Password and Confirm New Password
fields.
This page also di spla ys the Use SonicWALL Global Management System check box.
3. Do not select the Use Global Mana gement S ystem c heck bo x unle ss y our Soni cWAL L is remo tely
managed by SonicWALL GMS. Click Next to continue.
Page 32 SonicWALL Internet Security Appliance Administrator’s Guide
Page 32

Setting th e Time and Date
4. Select the appropriate Time Zon e fro m t he Ti me Z one menu. The SonicWALL internal clock is
set automatically by a Network Time Server on the Internet. Click Next to continue.
Connecting to the Internet
The Connecting to the Internet page lists the information required to complete the installation.
Tip Confirm that you have the necessary network information from your ISP before proceeding with
the Connecting to the Internet page s.
5. Confirm that you ha ve the proper net work infor mation nece ssary to config ure the Sonic WALL to
access the Internet. Click the hyperlinks for definitions of the networking terms. Click Next to
proceed to the next step.
Configuring the Network Mode on the SonicWALL Page 33
Page 33

Selecting Your Internet Connection
6. Select th e option, Automatically assigns you a dynamic IP address (DHCP).
7. The Obtain an IP address automatically page is displayed.
The Obtain an IP address automatically page states that the ISP dynamically assigns an IP address
to the SonicWALL. To conf ir m this, click Next.
Page 34 SonicWALL Internet Security Appliance Administrator’s Guide
Page 34

Configuring LAN Network Settings
8. The Fill in information about your LAN page allows the configuration of the SonicWALL LAN IP
Addres s an d th e LAN Subn et Mas k. Th e SonicWALL LAN IP Address is the private IP address
assigned to the LAN port of the SonicWALL. The LAN Subnet Mask defines the range of IP
addresses on the LAN. The default values provided by the SonicWALL work for most networks.
If you do not use the default settings, enter the SonicWALL LAN settings and click Next to
continue.
Configuring the SonicWALL DHCP Server
9. The Option al-S oni cWAL L DHCP Se rver pag e c on fi gures th e Soni cWA LL DH CP Serve r. If en abled ,
the SonicWALL automaticall y confi gures the IP set tings of computers on the LAN. To enable the
DHCP server, select the Enable DHC P Server check box, and specify the range of IP addresses
that are assigned to computers on the LAN.
If the Enable DHCP Server check box is not selected, the DHCP Server is disabled. Click Next to
continue.
Configuring the Network Mode on the SonicWALL Page 35
Page 35

Configuration Summary
10. The Configuration Summary page displays the configuration defined using the Installation
Wizard. To modify any of the settings, click Back to return to the Connecting to the Internet
window. If the configuration is correct, click Next to proceed to the Congratulations page.
Congratulations
Alert The new SonicWA LL LA N IP a ddres s, d i splay ed in the U RL f iel d of th e Co ngr atula ti ons wi ndo w,
is used to log in and manage the SonicWALL.
11. Click Restart to restart the SonicWALL.
Page 36 SonicWALL Internet Security Appliance Administrator’s Guide
Page 36

Restarting
Tip The final window provides important information to help configure the computers on the LAN.
Click Print this Page to print this information.
The SonicWALL takes 90 seconds to restart. During this time, the yellow Test LED is li t . C l ic k Close
to exit the SonicWALL Wizard.
Configuring NAT with L2TP Client
This section describes configuring the SonicWALL in NAT with L2TP Clie nt mode. You must have a
single, sta tic IP ad dr e ss to be gi n co nf ig ur at ion. Follow the in st r uc tio ns be lo w .
Tip Be sure to have your network information including your WAN IP address, subnet mask, and DNS
settings ready. This information is obtained from your ISP.
1. Open a We b bro wser and enter the def ault So nicWALL IP add ress, 192 .168.16 8.168 , in the
Location or Address fields.
2. The Login window appears. Enter admin in the User Name field, and password in the Password
field.
3. Click Cancel on the initial Installation Wizard page to cancel the wizard.
4. Click Network in the General section.
5. Select NA T with L2 TP Clie nt fr om t he N etw o rk Ad dr e ssi n g Mo de menu.
6. Enter 192.1 68.168.1 in the SonicWALL LA N IP Address field.
7. Enter 255.2 55.255.0 in the LAN Subnet Ma sk field.
8. I f y ou obta i n a n I P ad dr es s dy n am ic al l y f rom t h e L2 TP s er v er, se l ec t Obtain an IP addr ess usin g
DHCP. The other fie ld s i n t h e W AN Set t i ng s a r e g r eyed ou t a nd a re f il led in when a connect ion
is made to the L2TP server.
9. If you have WAN IP address information, select Use the specified IP address.
10. Enter the WAN IP addres s for the gateway in the WAN Gateway (Router) Address field.
11. Enter the WAN IP address for the SonicWALL in the SonicWALL W AN IP ( NAT Public ) Address
field.
12. Enter your DNS IP address in the DNS Server field.
Configuring the Network Mode on the SonicWALL Page 37
Page 37

13. Enter the host name in the L2TP Host Name field.
14. Enter the server IP address in the L2TP Server IP Address field.
15. Enter your user na me and password in t he User Name and User Password fields.
16. Select Di sconnect after ___ min utes of inactivity if you want to end an inactive connection. Enter
the number of minutes of inactivity before the connection is dropped. The default value is 10
minutes.
17. The L2TP settings are filled in once a connection is made to the L2TP settings .
18. Click Upd ate. Once the SonicWALL is updated, you must restart the SonicWALL for the changes
to take effect.
Configuring NAT with PPTP Client
The SonicWALL Installation Wizard simplifies the initial installation and configuration of the
Sonic WA LL. T he Wizard provides a series of menu-driven instructions for setting the administrator
password and configuring the setting s necessary to access the Internet.
Tip Be sure to have your network information including your PPTP Server IP address, user name,
and password ready. This information is obtained from your ISP.
The first time you access the SonicWALL Management i nterfac e, the SonicWALL Installati on Wiz ard
automatically launches and begins the installation process.
1. To co nfi gur e your Son ic WA LL a ppl ian ce , r ea d the in s truc ti ons o n t he Wizar d Welcome page and
click Next to continue.
Setting the Password
Page 38 SonicWALL Internet Security Appliance Administrator’s Guide
Page 38

Alert It is very important to choose a password which cannot be easily guessed by others.
1. To set the password, enter a new password in the New Password and Confirm New Password
fields.
2. Do not select the Use Global Mana gement S ystem c heck bo x unle ss y our Soni cWAL L is remo tely
managed by SonicWALL GMS. Click Next to continue.
Setting th e Time and Date
3. Select the appropriate Time Zon e fro m t he Ti me Z one menu. The SonicWALL internal clock is
set automatically by a Network Time Server on the Internet. Click Next to continue.
Configuring the Network Mode on the SonicWALL Page 39
Page 39

Connecting to the Internet
The Connecting to the Internet page lists the information required to complete the installation.
Tip Confirm that you have the necessary network information from your ISP before proceeding with
the Connecting to the Internet page s.
4. Confirm that you ha ve the proper net work infor mation nece ssary to config ure the Sonic WALL to
access the Internet. Click the hyperlinks for definitions of the networking terms. Click Next to
proceed to the next step.
Selecting Your Internet Connection
5. Select Provided you with server IP address, a user name and password (PPTP), if your ISP has
provided you with a server IP address, a user name, and a password information.
Page 40 SonicWALL Internet Security Appliance Administrator’s Guide
Page 40

Setting the User Name and Password for PPTP.
6. The SonicWALL ISP Setti ngs (PP TP) page is displayed. Enter t he server IP a ddress in the Server
IP field, and your use r name and password in th e User Name and Password fields .
Configuring LAN Network Settings
7. The Fill in information about your LAN page allows the configuration of the SonicWALL LAN IP
Addres s an d th e LAN Subn et Mas k. Th e SonicWALL LAN IP Address is the private IP address
assigned to the LAN port of the SonicWALL. The LAN Subnet Mask defines the range of IP
addresses on the LAN. The default values provided by the SonicWALL work for most networks.
If you do not use the default settings, enter the SonicWALL LAN settings and click Next to
continue.
Configuring the Network Mode on the SonicWALL Page 41
Page 41

Configuring the SonicWALL DHCP Server
8. The Option al-S oni cWAL L DHCP Se rver pag e c on fi gures th e Soni cWA LL DH CP Serve r. If en abled ,
the SonicWALL automaticall y confi gures the IP set tings of computers on the LAN. To enable the
DHCP server, select the Enable DHC P Server check box, and specify the range of IP addresses
that are assigned to computers on the LAN.
If the Enable DHCP Server check box is not selected, the DHCP Server is disabled. Click Next to
continue.
Configuration Summary
9. The Configuration Summary page displays the configuration defined using the Installation
Wizard. To modify any of the settings, cl ick Back to re turn to the Connectin g to the Internet page.
If the configuration is correct, click Next to proceed to the Congratulations page.
Page 42 SonicWALL Internet Security Appliance Administrator’s Guide
Page 42

Congratulations
Alert The new SonicWALL LAN IP address, displayed in the URL field of the Congratulations page, is
used to log in and manage the SonicWALL.
10. Click Restart to restart the SonicWALL.
Restarting
Tip The final window provides important information to help configure the computers on the LAN.
Click Print this Page to print this information.
The SonicWALL takes 90 seconds to restart. During this time, the yellow Test LED is li t . C l ic k Close
to exit the SonicWALL Wizard.
Configuring the Network Mode on the SonicWALL Page 43
Page 43

Logging into the SonicWALL Management Interface
Once the SonicWALL restarts, cont act the SonicWALL Manage ment interf ace at the new SonicWALL
LAN IP address. Enter the User Name “admin” and enter the new administrator password to log into
the Sonic WALL.The Status page is displayed.
The Status tab displays the following information:
• SonicWALL Serial Number - the serial number of the SonicWALL unit.
• Number of LAN IP addresses allowed with this license - number of IP addresses managed by
the SonicWALL
• Registration code - the registration code generated when the SonicWALL is registered at
<http//www.mysonicwall.com>.
• SonicWAL L Active tim e - the length of time in days, hours and minutes that the SonicWALL is
active.
• Firmware version - shows the current version number of the firmware installed on the
SonicWALL.
• ROM version - the version number of the ROM.
• CPU - the type and speed of the SonicWALL processor.
• VPN Hardware Accelerator Detected - indi cates the presence of a VP N H a rdw a re Accelerator in
the firewall. This allows better through put for VPN connections.
• RAM - the amount of Ra ndom Access Memory on t he board
• Flash - the size of the flash on the board
• Ethernet Sp eeds - network speeds of the network card
• Current Connections - number of computers connected to the SonicWALL.
Page 44 SonicWALL Internet Security Appliance Administrator’s Guide
Page 44

Other SonicWALL general status information is displayed in this section relating to other features in
the SonicWALL such as the type of network settings in use, log settings, content filter use, and if
Stealth Mod e is enabled on the SonicWAL L.
Configuring the Network Mode on the SonicWALL Page 45
Page 45

3 Registering at mySonicWALL.com
After you complete the initial installation and configuration of your SonicWALL, you should register
your SonicWALL Internet Security Appliance at <http://www.mysonicwall.com>. MySonicWALL.com
delivers a convenient, centralized way to register all your SonicWALL Internet Security appliances
and Security Services. It eliminates the need to individually register SonicWALL appliances and
upgrades to streamline the management of all your SonicWALL security services.
You can do the fol lo w in g wi t h My So ni cW A L L .co m :
• Centrally register all your SonicWALL appliances and services.
• Access firmware and security service updates.
• Get So n icWALL al er t s on services, firmwar e, an d pr oducts .
• Check status of your SonicWALL services and upgrades linked to each registered SonicWALL
Internet security appliance.
• Manag e (acti va te , ch a ng e, or dele te ) yo ur Soni cW ALL securit y se rvi ce s on line .
Alert You must re gister your SonicWAL L on mySonicWAL L.com to access techn ical support. By
regis terin g yo ur S onic WALL , you pr ovide the init ial in form ati on n eces sary for t echn ica l sup por t if
any problems arise during installation.
Creating a New Us er Account
If you c urr ently hav e a MySo nicW ALL. com use r ac coun t, you can s kip this se ction and pro ceed to
Adding New Appliances or Services.
1. Enter <http://www.mysonicwall.com> into your Web browser.
2. As a new user, locate the st atement, “If you are not a registered user, click here
and an information form appears.
Page 46 SonicWALL Internet Security Appliance Administrator’s Guide
.” Click the link,
Page 46

Account Information
3. All fiel d marked with an * are required fi elds. Be su re to fill ou t the form com pletely before
submitting to the user database. Create a User Name and password for your m ySonicWALL
account. Confirm th e password b y typing i t i n the Confirm Password field. Fo r you r c onveni en ce,
you can reco rd th e in fo r m ati o n be lo w .
User Name:_______ _______________ Password:__________________
Alert You must remember your user name and password until you have activated your account. If
you forget your password before your user account is active, you have to create a new user account.
Tip If your security policy doesn’t allow you to write d own p ass wor ds, write down a hint or a prompt
for your password.
4. Create a Secret Question and Answer to prompt you for your password if you forget it.
Registering at mySonicWALL.com Page 47
Page 47

Personal Information
5. Complete the Personal I nfo rmation section of the Registration form.
Be sure to enter the correct e-mail address as the subscription code for your SonicWALL user
account is e-mailed to you. The subscription code is necessary to activate your account.
6. Select your time zone from the Ti me Zone menu, and then select any or all of the following
options:
•Yes, I would like to be a Be ta Teste r.
•No, I do not wa n t to be con t a ct e d by S on i cW ALL via e-mail.
•I would like to receive security alerts from SonicWALL.
•I would like to receive product information from SonicWALL.
7. Click Submit.
8. Review your information carefully to ensure that it is accurate. Click Back on your Web browser
navigation bar to go back to the form and re-enter any information.
Page 48 SonicWALL Internet Security Appliance Administrator’s Guide
Page 48

9. If all the information is correct, click OK. A confirmation message appears notifying you that your
account must be activated within 72 hours of creating it. You also receive an e-mail with your
subscripti on cod e in it. Wri te yo ur sub scr i ptio n cod e be low :
Subscript ion code:_______________________________
Note: For security reasons, the subscriber name and part of the subscription code are masked.
10. Return to the mySonicWALL.com login screen, or alternatively, click on the link in the e-mail
message to provide your subscription code to activate your account.
Registering at mySonicWALL.com Page 49
Page 49

_
11. Enter the subscription code you received via e-mail into the Subscription Code field, and click
Submit.
12. Your Account Management interface appears and you can now register SonicWALL Internet
Security Appliances or Services. You can also delete or transfer appliances from your user
account.
Page 50 SonicWALL Internet Security Appliance Administrator’s Guide
Page 50

Problems Creating a MysonicWALL.com User Account?
If you’re having trouble creating a user account on th e mySonicWALL.com Web site, be sure to check
the following items in your browser:
•Accept Cookies
•Internet Explorer 5.0 or higher
•Netscape 4.5 or higher
•Allow Java scripts
•Correct Password for MysonicWALL.com
User Name and Password Functions
If you forget your user name, you must send an e-mail message to Tech Support requesting your
user name. Be sure to include the e-mail address used to create the MysonicWALL.com account.
If you for get your pas swor d, us e th e Forget Password? Click here
and Answer to remember your pa ssword. If you d id not set u p a Secret Question and Answer for your
password, a lin k appe a rs all ow ing yo u to rese t your password. Be su re to us e the sa me use r nam e
and e-mail address as your MysonicWALL.com user account.
link to use your Secret Question
Registering Y our SonicWA LL Internet Security Appliance
To register your SonicWALL Internet Security Appliance, click the hyperlink, Click Here, in the
Registered SonicWALL Products section. Or to quickly register your appliance, enter the Activation
Key of a servi ce , or a So ni cWALL Int ern et S ecuri ty Appl ianc e serial n umber in to t he fiel d i n the Quick
Register secti o n.
Click Here Registration
If you use the hyperlink, Click Here, a My Products page appears, and you can register your
applia nce by ent ering t he Serial Number in th e Add New Product field. You can also cr eat e a Fr ien dly
Name, such as San Francisco Office, to identify the SonicWALL. Using Fri endl y N ame s can assist you
with managing multiple SonicWALLs.
Registering at mySonicWALL.com Page 51
Page 51

Quick Registration
To quickly register a SonicWALL Internet Security A ppliance, enter the serial number in the field
under t he Quick Register section, and click Go. The serial number automatically appears in the
Serial Number field. You ca n then create a Friendly Name for the appliance. If you enter the in correct
serial number into the Seria l Number field, a message stating that the appliance is previously
registere d may be retu rned. Write your SonicWALL serial nu mber below.
SonicWALL Serial Number:______________ ______
After you register the SonicWALL, the Friendly Name appears as a hyperlink under Registered
Sonic W A L L Pr oduct s. Click on the Friendly Name to view the services activated on the appliance.
Note: Services may vary from model to model and may not have the same activated fields as the
above appliance. Also, the serial number, registration code, and activation keys are masked for
security rea so n s.
Page 52 SonicWALL Internet Security Appliance Administrator’s Guide
Page 52

Status and Options
Click Stat us and Options underneath the login information to search for the status and options
relating to a particular SonicWALL appliance. Enter the SonicWALL serial number to search for the
related information.
Inform ation displaye d in cl ud es
• Serial Number
• Product
• Registration Code
• Node Support Upgrad e Ke y
There is also a list of applicable services with their activation keys as well as expiration dates for
subscriptions.
Registering at mySonicWALL.com Page 53
Page 53

Managing Your SonicWALL
You can rename your SonicWALL, transfer your SonicWALL, or delete your SonicWALL in this section
of Services Management.
Renaming Your SonicWALL
You can rename your SonicWALL at any time in order to manage your SonicWALLs. To rename your
Sonic WALL, clic k Rename in the Manage Products section. Enter the new name in the Friendly
Name field, and click Submit.
After clicki ng Submit, a new page appears with the message that you have successfully renamed
your SonicWALL.
Page 54 SonicWALL Internet Security Appliance Administrator’s Guide
Page 54

Tran sf erring a SonicWALL Product
You can transfer a SonicWALL to another mySonicWALL.com user at any time. Transferring a
SonicWALL is necessary if you sell the appliance to another user, or if you want to transfer it to
another person in your company. For example, the sales manager for the East Coast has left, and
you were managing the services for his SonicWALL. However, another manager may have an
immediate ne ed fo r t he Soni cWA LL, and requ ests th at y ou t ran sfer th e ap pli anc e to him. T o t ransf er
a SonicWALL to another user, click Transfer in the Manage Product se ctio n .
Enter the User Name of the new owner, and the e-mail address ID in the appropriate fields. Click
Submit. A page is returned w ith the message that you’ve successful ly transferred the SonicWALL to
the new us er.
Registering at mySonicWALL.com Page 55
Page 55

Also, an e-mail message is sent to both the old and new user as a notification that the appliance
was tr ansferred.
Tip You can only transfer a SonicWALL to another registered user of mySonicWALL.com.
Delete Pro d uc t
You can a ls o de le te a S o ni cW AL L from yo ur m yS o ni cW A LL. co m user account. C l ic k on the Friendly
Name for the appliance, and then click Delete. A confir matio n me ssa ge a pp ears i n t he nex t wi ndow ,
and you have successfully deleted a SonicWALL from your user account. You can add the SonicWALL
back to your account at any time.
Page 56 SonicWALL Internet Security Appliance Administrator’s Guide
Page 56

Managin g Services for SonicWALL Internet Security Appliance s
In the Applicable Services section of mySonicWALL.com, a list of installed and inactivated services
for yo ur SonicWALL is displ ayed.
Activated services are indicated by the Installed icon with a green check mark.
Inactive services are in dicated by the Activate icon with a red arrow.
Activated servi ce name s are also hyperlinked to an i nformation page with Activation Stat us and the
Expiration Date of the service. Services can also be renewed by clicking on the name, and entering
the activation key into the Activation Key field.
Registering at mySonicWALL.com Page 57
Page 57

Activating Services Using mySonicWALL.com
To activate a service such as Content Filter, use the following steps:
1. Log into mySonicWALL.com using your username and password. Select the appliance to be
upgraded with the Content Filter List subscription, and click the name.
2. Click Activate next to Con t en t F i l t er. The following screen appears with an Activation Key field,
and a Terms an d Conditi o ns message.
3. Enter the Activation Key into the Activation Key fi eld , and selec t I have read and agreed to all of
the above terms and conditions . Click Submit.
4. The Content Filter List subscription is now active, and you can download the Content Filter List
through your SonicWALL appli ance.
Page 58 SonicWALL Internet Security Appliance Administrator’s Guide
Page 58

Registering at mySonicWALL.com Page 59
Page 59

4 Configuring the TELE3 SP Modem Connection
To improve the operational availability of networks and ensure fast recovery from network failures,
the SonicWALL has the capability of using a modem to dial a secondary network connection for the
WAN. In t he event that the WAN Ethernet connec t ion is lost or failing, the modem dials an ISP using
a preconfigured profile preventing a lengthy interruption in active network connectivity.
Alert Using the WAN failover feature may cause disruption of some features such as One-to-One
NAT. See the SonicWALL TELE3 SP Administrator’s Manual for aff ected features.
After configuring your computer on the LAN, you can configure the TELE3 SP modem connection for
ISP failover or as a primary dial-up access port.
Alert You cannot us e th e WAN fail ove r featu re i f you ha ve co nfi gured the TELE3 SP to use Sta nd ard
mode in the Network section of the Management interface.
Configuring the TELE3 SP WAN Failover Feature
The TELE3 SP modem can be used as a failover option when your “always on” DSL or cable
connection fails. The SonicWALL automatically detects the failure of the WAN connection and uses
the parameters configured for the modem to establish anothe r active connection.
Alert The TELE3 SP modem can only dial out. Dialing into the internal modem is not supported.
However, an external modem can be connected to the CLI port for remotely accessing the
SonicWALL for out-of-band su pp ort.
To acce ss th e mo dem c onf ig ur atio n s ect i on of y our So ni cWALL , lo g ont o the Manageme nt int er fa ce,
and click Modem. There are two tabs used for modem configuration: Profiles and Configure.
Page 60 SonicWALL Internet Security Appliance Administrator’s Guide
Page 60

Configuring Modem Profiles
You can co nfigure modem profiles on the S onicWALL usin g your dial-up ISP informat ion for the
connection. Multiple modem profiles can be used when you have a different profile for individual
ISPs. Click Profiles, and follow the instructions below to configure your Dial-up Configuration.
Tip The SonicWALL supports a maximum of ten (10) configuration profiles.
Dial-Up Configuration
The current profile is displayed in the Current Profile fiel d. You can selec t a profi le f rom th e men u to
edit th e co nf igur at ion or cre at e a ne w pr ofi le. To cr eat e a new pr of ile , sele ct Add New Profile from
the menu, and enter a name for the profile in the Name field. You can use names such as Home,
Office, or Traveling to distinguish different profiles from each other. After you have created a name
for your dial-up configuration, you must configure the ISP settings in the dial-up ISP Settings section
and the Location Settings section.
Configuring the TELE3 SP Modem Connection Page 61
Page 61

ISP Settings
To configure your ISP settings, you must obtain your Internet information from your dial-up Internet
Service Provider. Use the information to configure the following dial-up ISP Settings:
1. Enter the primary number used to dial your ISP in the Primary Phone Number field.
Tip If a specific prefix is used to access an outside line, such as 9, &, or , , enter the number as part
of the primary phone number.
2. Enter the secondary number used to dial your ISP in the Secondary Phone Number field
(optional).
3. Enter yo ur d ia l- u p IS P use r na m e in th e User field.
4. Enter the password provided by your dial-up ISP in the Password field .
5. Confirm your dial-up ISP password in the Confirm field.
6. In the IP address section, select Obtain Automatically if y ou do not have a permanent dial-up IP
address from your ISP. If you have a permanent dial-up IP address from your ISP, select Specify
and enter th e IP address in the IP Address field.
Alert Do not enter your broadband/high speed ISP information here. Enter only your dial-up Internet
access infor m ation.
7. If you obtain an IP address automatically for your DNS server(s), select Obtain A utom atically. If
your ISP has a specific IP address for the DNS server(s), select Specify and ent er the I P ad dress
in the field. Alternatively, you can use your internal DNS server IP address or a specific DNS
server IP address on the Internet.
8. If your ISP has given you a script that runs when you access your ISP connection, cut and paste
the script text in the Chat Script field. See the Information on Chat Scripts section at the end of
this chapter for more information on using chat scripts.
Location Settings
Use this section to configure modem behavior on the TELE3 SP for WAN failover. The TELE3 SP has
an autodetect feature that detects when the WAN Ethernet cable is physically disconnected from
the TELE3 SP and automatically dials the ISP whether or not Enable WAN Failover is selected. You
can override this feature by selecting Manual Dial for the modem behavio r. The re ar e three t yp es of
dial-up behavior:
•Persistent Connection - By sel ecting Persistent Connection, the modem dials automatically
when a WAN connection fails. If the Primary Profile cannot connect, the modem uses the
Secondary Profile to dial an ISP.
•Dial on Data - Using Dial on Data requires that outbound data is detected before the modem
dials the ISP. Outbound data does not need to originate from computers on the LAN, but can
also be packets generated by the SonicWALLTELE3 SP internal applications such as
AutoUpdate and Anti-Virus. Also, if Enable WAN Failover is selected, the pings generated by the
Probe can trigger the modem to dial when no WAN Ethernet connection is detected. If the
Primary Profile cannot connect, the modem uses the Secondary Profile to dial an ISP.
Page 62 SonicWALL Internet Security Appliance Administrator’s Guide
Page 62

•Manual Dial - Selecting Manual Dial for a P r im a r y Pr of il e means that WAN Failover does not
automatically occur. Manual Dial requires you to log into the SonicWALL, click Modem, then
Configure. Click Co nnect and the modem uses the Primary Profile information to dial an ISP.
Alert If you are configuring two dial-up profiles for WAN fai l over, the modem behavior s hould be the
same for each profile. For example, if your Primary Profile uses Persistent Connection, your
Secondar y Profile should also use Persistent Connection.
1. Select Persistent Connection if you want the modem connection to stay active until the WAN
Ethernet connection is reactivated. If you want the modem to dial the ISP only when there is
data to transmit, select Dial on Data. Select Manual Dial to dial up the connection only when
you want to dial the ISP as in the case of traveling with the SP.
Alert If you enable Persistent Connection for the modem, the modem connection remains active
until the WAN Ethernet connection is r ea ctivated or you force disconnection by clicki ng Disconnect
on the Configure page.
2. Enter the number of minutes a dial-up connection is allowed to be inactive in the Inactivity
Timeout (minu t es) field. The default value is five (5) minutes.
3. Select the connection speed from the Max Connection Speed (bps) menu.
Auto is the default settin g as the TELE3 SP automatically detects the connecti on speed when it
connect s to the IS P .
4. Select Maximum Connection Time (minutes) if the connection is terminated after the specified
time. Enter the number of minutes for the connection to be active. The value can range from 0
to 1440 minutes. This feature does not conflict with Inactivity Timeout. If both features are
configured, the connection is termin ated based on the shortest configured time.
5. If you select Maximum Con necti on T ime ( min ute s), enter the number of minutes to delay before
redia l ing th e ISP in the Delay Before Reconnect. The val ue can r a ng e f rom 0 t o 14 40, a nd t he
defau l t v a lu e is 0 which means t here is n o de la y befor e re connec t in g t o the ISP.
6. Select Disable VPN when Dialed if VPN Security Associations (SAs) are disabled when the
modem connects to the ISP. T ermin ating the d ial-up c onnectio n re-enab les the VPN SAs. This is
useful if you want to deploy your own point-to-point RAS network and want packets to be sent
in the clear to your intranets.
7. If you have cal l w aiti ng on you r te lep hone li ne , you s h ould di sabl e it or a not her ca ll ca n in te rr upt
your connection to your ISP. Select Disable Call Wait ing and then select command from the list.
If you do not see your command listed, select Other, and enter the command in the field.
8. If the phone number for your ISP is busy, you can configure the number of times that the
SonicWALL modem attempts to connect in the Dial Retries per Pho ne Number fi el d. T he de fa ul t
value is zero (0).
9. Enter the number of seconds between attempts to redial in the Delay Between Retries
(seconds) field. The default value is five (5) seconds.
10. Click Update to add the dial-up profile to the SonicWALL.
Configuring the TELE3 SP Modem Connection Page 63
Page 63

TELE3 SP Modem Configuration
The Configure tab allows you to enable the modem to provide secondary dial-up ISP connection
support and configure the modem settings. There are two sections available: Modem Settings and
Failover Settings.
Modem Settings
The Modem Settings section lets you select from a list of modem profiles, select the volume of the
modem, and also configure AT commands for modem initialization. To configure the SonicWALL
modem settings, follow these steps:
1. Select the Primar y Pro fi le from the list of profi les that the Soni cWALL us es to acces s the modem
and dial the secondary connecti on. If you have enabled Manual Dial for the Primary Profile, the
Secondary Profile is not used.
2. Select the Secon dar y Pro file from the list of profiles. If the Primary Profile can not esta blish a
connection, the SonicWALL uses the Second a ry P ro fil e to ac cess the modem a nd establish a
connection.
3. Select the volume of the mode m from the Speaker V olume men u. The defau lt value is Medium.
4. Select In itializ e Modem For Use In and select the country from the drop down menu. United
States is selected by default.
5. If the modem uses AT commands to initialize, select Initialize Modem Using AT Commands.
Enter any AT commands used for the modem in the AT Commands (for modem initialization)
field. AT commands are instructions used to control a modem such as ATS7=30 (allow up to 30
seconds to wait for dialtone), ATS8=2 (set the amount of time the modem pauses when it
encounter s a “, ” in the string).
Tip The default settings for the modem are generally sufficient for normal operation. The AT
Commands (for modem initialization) box is provided for nonst andard situations.
Page 64 SonicWALL Internet Security Appliance Administrator’s Guide
Page 64

Primary Interface
The SonicWALL TELE3 SP automatically detects if a WAN Ethernet connection exists when the
SonicWALL is powered on. Because it can automatically detect the Ethernet connection, the Primary
Interface is Ethernet.
Failover Settings
You can enabl e WAN failover for the Sonic WALL by confi guring setti ngs in this section. Sel ect Enable
WAN Failover to use this feature on the SonicWALL. The Secondary Interface Setting defaults to
Modem.
Preempt Mode
Select Preempt Mode if you want the TELE3 SP to re-es t a blish the connection to the WAN Ethernet
interface after a connection failure on the WAN Ethernet port.
Probing on the TELE3 SP
Probing for WAN connectivity occurs over the Ethernet connection, the dial-up connection, or both.
When probing is disabled on the Ethernet link, the SP only performs link detection. If the Ethernet
connection is lost for a duration of 5-9 seconds, the SP considers the Ethernet connection to be
unavailable. If the Ethernet link is lost for 0-4 seconds, the SP does not consider the connection to
be lost. If you are swap ping ca bles quic kly, un nece ssar y WAN fai lover do es no t occur on the SP. If
probing is e nabled and the cable is unplu gged, the 5-9 secon ds link detection does not oc cur.
Instead, the probing rules apply to the connection using the parameters configured for Probe
Interval Time and number of Missed Probes. If probing is enabled on Dial-up, the dial-up connection
is terminated and re-established when probing fails over the modem.
Use the following instructions to configure the Failover Settings:
1. Select Enable WAN Failover.
2. Select Enable Probing.
3. Select an opti on from th e Probe Through menu. Select Ethernet Only to pro be t he Eth ernet WAN
connecti on and fai lov er t o th e mo dem wh en the c onn ect ion i s lost . Se lec t Modem Only to probe
a dial-u p connection and have t he modem redial whe n the dial -up connecti on is lost. Select
Modem and Ethernet to enable both types of probing on the SP.
4. Enter the IP address for the probe target in the Probe Target (IP Address) field. The Probe IP
address is a static IP address on the WAN. If this field is left blank, or 0.0.0.0 is entered as the
address, the Probe Target is the WAN Gateway IP address.
Tip The probe is a ping sent to the IP address and is used, along with the response, as a method of
determining Internet connect ivity.
5. In the Probe Interval (seconds) field, enter the amount of time between probes to the Probe
Target. Five (5) seconds is the default value. To deactivate the Probe Detection feature, enter
zero (0) as t he va lue. In this case, the WAN Failover only occurs when loss of the physical WAN
Ethernet connection occurs on the TELE3 SP.
Configuring the TELE3 SP Modem Connection Page 65
Page 65

6. Enter a value for the number of successful probes required to reactivate the primar y connection
in the Successful Probes to Reactivate Primary field. The defaul t value is fi ve (5) . By requ iri ng a
number of successful probes before the SonicWALL returns to its primary connection, you can
prevent the SonicWALL fro m returning to th e primary connection befor e the primary c onnectio n
becomes stable.
7. Enter the number of misse d probes requ ired for the WAN failov er to occur in th e Failover Trigger
Level (mis sed pr ob e s) fi el d .
8. Enable Preempt Mode if you want the primary WAN Ethernet interface to take over from the
secondary modem WAN interface when it becomes active after a failure. If you do not enable
Preempt Mode, the secondary WAN mo dem interf ace remai ns act ive as the WAN inte rface u ntil
you click Disconnect.
9. Click Upda te for the settings to take effect on the SonicWALL.
Configuring a Modem Profile for Manual Dial-Up
You can also use the modem to dial your ISP for Internet access without a broadband connection.
If you’re traveling with your TELE3 SP, you can create profiles for each ISP configuration necessary
for dial-up Internet access. To configure your modem for manual dial-up access, follow these steps:
1. Log onto your Management station, and click Modem, then Profiles.
2. Create a name for your profile and enter it in the Name field.
ISP Set ti n g s
1. Enter the primary number used to dial up the ISP in the Primary Phone Number field.
Tip If a specific prefix is used to access an outside line, such as 9, enter the number as part of the
phone number .
2. Enter the secondary number used to dial your ISP in the Secondary Phone Number field
(optional).
3. Enter your ISP user name in the User field.
4. Enter your ISP password in the Password field.
5. Confirm your ISP password in the Confirm field.
6. Select Obtain Automaticall y if you do not have a permanent IP address from your ISP. If you have
a permanent IP address from y our ISP, sel ect Specify and enter the I P address in th e IP Address
field.
7. If you obtain an IP address automatically for your DNS Server(s), select Obtain Automatically. If
your dial-up ISP has a specific IP address for the DNS Server(s ), select Specify and enter the IP
address in the field.
8. If your dial-up ISP has given you a script that runs when you access your dial-up ISP connection,
cut and paste the scrip t text i n the Chat Script fie ld . See t he Informat ion on Chat Scri pts section
at the end of this chapter for more information on using chat scripts.
Page 66 SonicWALL Internet Security Appliance Administrator’s Guide
Page 66

Location Settings
1. Select Manual Di al to have the modem dial only when you click Connect on the Configure pa ge.
2. Enter the number of minutes the connection is allowed to be inactive in the Inactivity Timeout
(minutes) field. The default value is five (5) minutes.
3. Select the connection speed from the Max Connection Speed (bps) menu. Auto is the d ef aul t
setting.
4. If you have cal l w aiti ng on you r te lep hone li ne , you s h ould di sabl e it or a not her ca ll ca n in te rr upt
your connection to your ISP. Select Disable Call Waiting and then select the command from the
list. If you do not see your command listed, select Other, and enter the command in the field.
5. Co nfigure the number of times that the SonicWALL modem attempts to connect if the dial-up
connection i s busy in the Dial Retries per Phone Number field. The default value is zero (0).
6. Enter the number of seconds between attempts to redial in the Delay Between Retries
(seconds) field. The default value is five (5) seconds.
7. Click Upda te to add the dial-up profile to the SonicWALL.
Configure Modem Settings
8. Select your manual dial-up profile as the Primary Profile.
9. Select None as the Secondary Profile.
10. Select the modem speaker volume from the Speaker Volume menu.
11. Click Connect to dial your ISP. When the modem has connected to the ISP, the button text
changes t o Disconnect. To end the connection, click Disconnect. To dial-u p m anually , l o g o nt o
the Manag e ment station, and click Modem. Click Configure, and then click C onnect.
If you attempt to dial-up your ISP while the WAN Ethernet connection is active, a warning message
is displayed:
Click OK to begin dia li ng the IS P, or Cance l to return to the curren t status.
Configuring the TELE3 SP Modem Connection Page 67
Page 67

Configuring Your TELE3 SP in Modem Only Mode
Configuring the Network Settings
Follow t hese steps to confi gure your TELE3 SP to use only the modem for Internet access:
1. When the Installation Wizard launches, follow the steps in your Quick Start Guide until the Set
Your Passwor d page appea rs. E nter and confir m your new passw ord.
Tip If you do not set a new password, the Installation Wizard relaunches when the SonicWALL is
rebooted.
2. Co ntinue with the Installation Wizard. A warning message appears alerting you that no WAN
connect ion was detect ed.
3. Select Assigned you a single static IP address and click Next.
4. The Use Network Address Translation window is displayed. Click Next.
5. Leave the default values of 0.0.0.0 in the SonicWALL WAN IP Address field and the WAN
Gateway (Router) Address fiel d. L eave t he defaul t set ting of 255. 255.25 5.0 in th e Subnet Mask
field. If your dial-up ISP has given you DNS Server IP address(es), enter the address(es) in the
DNS Server Address fields. If not, t hen leave the DNS Server Add r ess fields blank.
6. Leave the default values in the SonicWALL LAN IP add ress field and Subnet Mask field.
7. If your TELE3 SP acts as the DHCP server on your network, select Enable DHCP Server and click
Next. If not, clic k Next.
8. Click Print this Page to print out the network settings of the TELE3 SP. Click Next.
9. Click Restart to enable the network settings on the TELE3 SP.
Configuring the Modem Settings
After your TELE3 SP has restarted, log into it using the SonicWALL LAN IP address. Click Modem, and
configure the dial-up connection settings by creating a Modem Profile TELE3 SP. Refer to the
Modem configuration steps in the section “Configuring Modem Profiles” on page 61.
Tested Internet Service Providers
The following Internet Service Providers (ISPs) have successfully tested with the TELE3 SP:
ISP Additional Chat Script Required?
AT&T No
MSN No
Earthlink No
High Stream No
UUnet No
Page 68 SonicWALL Internet Security Appliance Administrator’s Guide
Page 68

Status
The Status tab displays dial-up connection information when the modem is active.
Modem Status
In the Mo dem Stat us section, the current active network information from your ISP is displayed
when the modem is a ctive:
•WAN Gateway (Router) Address
•WAN IP (NAT Publ ic ) Add res s
•WAN Subnet Mask
•DNS Server 1
•DNS Server 2
•DNS Server 3
•Current Active Dial-Up Profile (id)
•Current C onnection Speed
If the modem is inactive, the Status page displays a list of possible reasons that your modem is
inactive. When the modem is active, the network settings from the ISP are used for WAN access. If
you click General, then Network, a message is displayed reminding you that the modem is active
and the current network settings are displayed on the Modem Status page.
Configuring the TELE3 SP Modem Connection Page 69
Page 69

Chat Scripts
Some legacy se r ver s can requ i re company-specifi c ch at sc ript s for logg in g on to the dial -u p serv ers.
A chat script, like other types of scripts, automates the act of typing commands using a key bo ard. It
consists of commands and responses, made up of groups of expect-response pairs as well as
additional control commands, used by the chat script interpreter on the TELE3 SP. The TELE3 SP
uses a default chat script that works with most ISPs, but your ISP may require a chat script with
specific commands to “chat” with their server. If an ISP requires a specific chat script, it is typically
provided to you with your dial-up access information. The default chat script for the TELE3 SP has
the following commands:
ABORT ‘NO DIALTONE’
ABORT ‘BUSY’
ABOR ‘NO CAR RIER’
“ATQ0
“ATE0
“ATM1
“ATL0
“ATV1
OK ATDT\T
CONNECT \D \C
The first three commands direct the chat script interpreter to abort if any of the strings “NO
CARRIER”. “NO DIALTONE”, or “B USY” are received fr om t he modem.
The next five commands are AT commands that tell the chat interpreter to wait for nothing as
“ define s an em pty strin g, and configure th e fo llo wi ng on t he m od e m: r etu rn co m m a nd r es pon se s,
don’t echo characters, report the connecting baud rate when connected, and return verbose
responses.
The next line has OK as th e expe cted s tring , and the in terp reters wait s for OK to be returned in
response to the previous command, ATV1, before continuing the script. If OK is not returned within
the default time perio d of 50 seconds, the chat interpre ter aborts the scri pt and the connection fails.
If OK is r eceived , the p refix an d ph one num ber of the se lected dial-u p accou nt is d ialed. The \T
command is replaced by chat script interpreter with the prefix and phone number of the dial-up
account.
In the last line of the script, Connect is the expected response from the remote modem. If the
modems succe ssfull y conn ect, Connect is returned from the TELE3 SP modem.The \D adds a pause
of one second to allow the server to start the PPP authentication. The \C command ends the chat
script end without sending a car riage return to the modem. The TELE3 SP then attempts to establ ish
a PPP (Point-to-Po int Prot oco l) co nne ct ion over the ser ial link. The PPP co n ne cti on usua lly incl ud e s
authentication of the user by using PAP (Password Authentication Protocol) or CHAP (Challenge
Handshake Authentication Protocol) from the PPP suite. Once a PPP connection is established, it
looks like any other network interface.
Page 70 SonicWALL Internet Security Appliance Administrator’s Guide
Page 70

Custom Chat Scripts
Custom chat scripts can be used when the ISP dial-up server does not use PAP or CHAP as an
authentication protocol to control access. Instead, the ISP requires a user to log onto the dial-up
server by prompting for a user name and password before establishing the PPP connection. For t he
most part, this type of server is part of the legacy systems rooted in the dumb terminal login
architecture. Because these types of servers can prompt for a user name and password in a variety
of ways o r requ ire subsequent commands to init iate the PPP connection, a Chat Script field i s
provided for you to enter a custom script.
If a custom chat script is required by an ISP for establishing a connection, it is commonly found on
their web site or provided with their dial -up acc ess informat ion. Some times the sc ripts c an be found
by using a search engine on the Internet and using the keywords, “chat script ppp Linux <ISP
name>”.
A custom chat script can look li k e t he following script:
ABORT ‘NO CARRIER’
ABORT ‘NO DIALTONE’
ABORT ‘BUSY’
“ ATQ0
“ ATE0
“ ATM1
“ ATW2
“ ATV1
OK ATDT\T
CONNECT “
sername: \L
assword: \P
Tip The first character of username and password are ignored during PPP authentication.
The script looks a lot like the prev ious script with the exception of the commands at the end. There
is an empty string (“) after Con nect which sends a carr iage return command to the server. The chat
interpreter th en waits f or sername: substring. When a response is returned, the current PPP account
user name, substituting the \L command control string, is sent. Then, th e ch at interpreter waits for
the substring assword:, and sends the password, substituting \P with the PPP account pa ssword. If
either the sername or assword substring are not received within the timeout period, the chat
interpreter aborts the dial-up process resulting in a dial-up failu re.
Configuring the TELE3 SP Modem Connection Page 71
Page 71

5 Managing Your SonicWALL Internet Security Appliance
This chapter contains a brief overview of SonicWALL management commands and functions. The
commands and functions are accessed through the SonicWALL Web Management Interface.
You can manage the SonicWALL from any computer connected to the LAN port of the SonicWALL
using a Web browser. The computer used for management is referred to as the “Management
Station".
1. Log into the SonicWALL using a Web Browser.
Alert To m anag e the So nic WA LL, your Web browser m ust h ave Jav a an d Ja va applets enabl ed and
support HTTP uploads.
2. Open a Web browser and type the SonicWALL IP address, initia lly, "192. 168.168.16 8", into the
Location or Address field at the top of the browser. An Authentication window with a Password
dialogue box is displayed.
3. Type “adm in” in th e User Name field and the password previously defined in the Installation
Wizard in the Password field. Passwords are case-sensitive. Enter the password exactly as
defined and click Login.
Tip All SonicWALLs are configured with the default User Name “admin” and the default Password
“password”.
If you cannot log into the SonicWALL, a cached copy of the page is displayed instead of the correct
page. Click Reload or Refresh on the Web browser and try again. Also, be sure to wait until the Java
applet has finished loading befo re attempting to log in.
Once the pa ssw o rd is e nte r ed, a n authe n tica te d m a n age m en t se ssi o n is es tab li sh ed . This ses si on
times out after 5 minutes of inactivity. The default time-out can be increased on the Password
windo w in the General section.
HTTPS Managem ent
The Son icWALL fam ily of Inter net S ecurit y Applianc es suppo rts HTTPS Management using Secure
Socke t Laye r (SSL). HTTPS Ma nagement allows secure access to the SonicWALL without a VPN
client. It is a simple and secure way t o manage your SonicWALL from both the LAN and t he WAN.
You log into the SonicWALL Management interface using https://IP Address where the IP address
is the SonicWALL LAN IP address. For example, if the LAN IP address of your SonicWALL appliance
is 192.16 8.16 8.1, you c an lo g into it by t yping https ://19 2.168 .168. 1. Ac cess i s en crypte d usi ng
SSL technology for a secure connection.
Page 72 SonicWALL Internet Security Appliance User’s Guide
Page 72

The first time you access the SonicWALL Management interface using HTTPS, you may see the
follow ing informatio n message:
Click Yes to continue the login process. SSL is supported by Netscape 4.7 and higher, as well as
Intern et Ex pl or e r 5.5 a nd hig her.
HTTPS management supports the following versions of SSL: SSLv2, SSLv3, and TLSv1. Also, the
following e ncryption ciphers are supported: RC4-MD5, EXP-R C4-MD5, DES-CBC3-SHA, DES-CBCSHA, RC4-SHA, EXP-RC2-CBC-MD5, NULL-SHA, and NULL-MD5. The RSA key used is 1024-bit.
Status
The Status window, displays the status of your S onicWALL. It contains an overv iew of the SonicWALL
configuration, as well as any important messages. Check the Status window after making changes
to ensure that the SonicWALL is configured pr operly.
To view the Status tab, log into your SonicWALL using your Web browser. Click General and then click
the Status tab to display the Status window.
Managing Your SonicWALL Internet Security Appliance Page 73
Page 73

Note: The Status window displays the unique characteristics of the SonicWALL Internet Security
Appliance, such as the presence of VPN acceleration hardware or a different amount of memory.
Your Stat us window will be different from the wind ow displayed above, depending on your settings.
The Status tab displays the following information:
• SonicWALL Serial Number - the serial number of the SonicWALL unit.
• Number of LA N IP addresses a llowed with thi s license - n umber o f IP ad dresse s that c an be
managed by t he SonicWALL
• Registration code - the registration code generated when the SonicWALL is registered at
<http//www.mysonicwall.com>.
• SonicWAL L Active tim e - the length of time in days, hours and minutes that the SonicWALL is
active.
• Firmware version - shows the current version number of the firmware installed on the SonicWALL.
• ROM version - indicates the version number of the ROM.
• CPU - displays th e t ype and speed of the So nicWALL processor.
• VPN Hardware Accelera tor Detected - indicates the presence of a VPN Hardware
Accelerator in the firewall. This allows better throughput for VPN connections.
• RAM - shows the amount of Random Access Memory on the board.
• Flash - indicates the size of the flash on the board.
• Ethernet Sp eeds - displays network speeds of the network card.
• Current Connections - number of computers connected to the SonicWALL.
Other SonicWALL general status information is displayed in this section relating to other features in
the SonicWALL such as the type of network settings in use, log settings, content filter use, and if
Steal th Mode is enab le d on the SonicWA L L .
The General, Log, Filter, Tools, Access, Advanced, DHCP , VPN, Anti-Virus, and High Availability
buttons appear on the left side of the window. When one of the buttons is clicked, related
management functions are selected by clicking the tabs at the top of the window.
A Logout button at the bottom of the screen terminates the management session and redisplays the
Authentication window. If Logout is clicked, you must log in again to manage the SonicWALL. online
help is also available. Click Help at the top of any browser win dow to view th e help files s tored in th e
SonicWALL.
Page 74 SonicWALL Internet Security Appliance User’s Guide
Page 74

CLI Support and Remo te Management
Out-of-ba nd ma na ge me nt is av a ilab l e o n S onicWALL Int er net Security Ap pl ia nce s using th e CLI
(Command Line Inte rfac e) feature. SonicWALL Internet Security Appliances can be managed from a
console using typed commands and a modem or null-modem cable that is connected to the serial
port l ocat ed on t he b ack of the Son ic WALL a ppl ian ce. The on ly mo dem c urr ent ly s upp orted is t he U S
Robotics v.90/v.92 modem. C LI communicatio n requires the foll owing modem settin gs :
• 9600 bps
• 8 bits
• no parit y
• no hand-shaking
After the modem is accessed, a terminal emulator window such as a hyper terminal window is used
to manag e the So nic WA LL In ter net S ec urit y App li anc e. On ce t he Soni cWA LL i s ac cess ed, typ e in t he
User Name and password: admin for User Name and then the password used for the management
interface.
The following CLI commands are available for the SonicWALL:
• ? or Help - displays a listing of the top level commands available.
• Export - expo rt s preferences from the SonicWALL using Z-modem file tra nsfer protocol.
• Import - imports pre ferences from the SonicWALL usin g Z-modem file tran sfer protocol.
• Logout - logout of the SonicWALL appliance.
• Ping - pings either an IP address or domain name for a specified host.
• Restart - restart the SonicW AL L
• Restore - restores the f actory default s ettin gs f or all sa ved paramete rs with t he excep tion o f the
password, the LAN IP address, and the subnet mask.
• Status - displays the information typically seen on the Web management interface tab labeled
General.
• TSR - retrieves a copy of the tech support report using Z-modem file transfer protocol.
Managing Your SonicWALL Internet Security Appliance Page 75
Page 75

6 General and Network Settings
This chapter describes the tabs in the General section and the configuration of the SonicWALL
SonicWALL Internet Security appliance Network Settings. The Network Settings include the
SonicWALL IP settings, the administrator password, and the time and date. There are three tabs
other th a n Status in the General secti on:
• Network
• Time
• Administrator
Network Settings
To configure the SonicWALL Network Settings, click General, and then click the Network tab.
Network Addressing Mode
The Netw ork Addressin g M od e menu determines the network address scheme of your SonicWALL.
It includ es six op tions: Standard, NAT Enabled, NAT with DH CP Client, NAT with PPP oE, NAT with
L2TP Client , and NAT with PPTP Client.
• Standard mode requires valid IP a ddresse s for a ll compu ters on your ne twork, bu t allows remote access to authenticated users.
• NAT Enabled mode translates the private IP addresses on the network to the single, valid IP
address of the SonicW AL L. Select NAT Enabled if your ISP assigned you only one or two valid IP
addresses.
• NAT with DHCP Client mode configures the SonicWALL to request IP settings from a DHCP s erver on the Internet. NA T w i th D H CP C lient is a typi cal network addressing mode for cable and DSL
customers.
• NAT with P PPoE mode uses PPPoE to connect to the Internet. If desktop software and a user
name and password is required by your ISP, select NAT with PPPoE.
Page 76 SonicWALL Internet Security Appliance Administrator’s Guide
Page 76

• NAT with L2TP Client mode uses IPSec to connect a L2TP server and encrypts all data
transmitted from the client to the server. However, it does not encrypt network traffic to other
destinations.
• NAT with PPTP Client mode uses Point to Point Tunneling Protocol (PPTP) to connect to a remote
server. It supports older Microsoft implementations requiring tunneling connectivity.
LAN Settings
• SonicWALL LAN IP Address
The Son ic WAL L L A N I P Ad dr es s is th e IP a ddr es s ass ig ned to t he S oni cWA LL L AN por t. I t i s u sed
for managi ng the So nicWALL . This IP addres s should be a unique address f rom the LAN ad dress
range.
• LAN Subnet Mask
The LAN Subnet Mask defines which IP addresses are on the LAN. The default Class C subnet
mask of " 255.2 55.25 5.0" su ppor ts up to 25 4 IP a ddres ses o n the LAN. I f the Class C sub net
mask is used, all local area network addresses should contain the same first three numbers as
the SonicWALL LAN IP Address--for example, "192.168.168."
Multiple LAN Subnet Mask Support
Alert This feature does not replace or substitute configuring routes with the Routes tab in the
Advanced s ec tio n of the Soni cWAL L. I f you h a ve t o de fi ne a subn et on t he oth er sid e of a rou ter , yo u
must define a static route us ing the Routes tab in the Advanced section.
Multiple LAN Subnet Ma sk Support fa cili tat es th e sup port of leg ac y ne tw ork s i n co rpor a tin g th e
SonicWALL, and makes it easier to add additional nodes if the original subnet is full. Before you can
configure mu lti pl e lo cal LAN su bn et s in th e S onic W ALL , yo u m ust hav e the fo llow i ng infor m at io n :
• Network Gateway Address - This is an IP address assigned to the SonicWALL in addition to the
existing LAN IP address. If you have configured your SonicWALL in Standard mode, the IP
address should be the Default Gateway IP address assigned to your Internet router on the same
subnet . All us ers on th e subne t you ar e configu ring m ust use t his IP a ddres s as thei r defaul t
router/gateway address.
• Subnet Mask - This value defines the size, and based upon the Network Gateway entry, the
scope o f the subnet. If you a re configuring a subnet mask that currently exists on t he LAN, enter
the existing subne t mask address into the Subne t Mask f ield. If you a re con figurin g a new su bnet
mask, use a subnet mask that does not overlap any previously defined subnet masks.
Alert The SonicWALL cannot be managed from any of the additional Network Gateway addresses.
You must use the IP address set as the LAN IP address of the SonicWALL. Also, you cannot mix
Standard and NAT subne ts behind the SonicWALL.
General and Network Settings Page 77
Page 77

WAN Settings
• WAN Gateway (Router) Address
The WAN Gateway (Ro uter) Address is the IP address of the WAN router or default gateway that
connects your network to the Internet. If you use Cable or DSL, your WAN router is typically
located at your ISP. If you use a router located at your site, use the IP address assigned to it.
If you select NAT with DHCP Client or NAT with PPPoE mode, the WA N Gateway (Router) Addres s
is assigned automatically.
• SonicWALL WAN IP Address
The SonicWALL WAN IP Address is a valid IP address assigned to the WAN port of the
SonicWALL. This address should be assigned by your ISP.
If you select NA T En a ble d mode, this is the only address seen by users on the Internet and all
activity appears to originate from this address.
If you selec t NAT wi th DHCP Clien t, NAT w ith PPPoE, NAT with L2TP Cl ient, or NAT with PPT P
Client mode, the SonicWALL WAN IP address is assigned automatically.
If you select Standard mode, the SonicWALL WAN IP Address is the same as the SonicWALL LAN
IP Address.
• WAN/LAN Subnet Mask
The WAN/LAN Subnet Mask determines which IP addresses are located on the WAN. This
subnet mask sho ul d be ass ig ned by yo ur ISP.
If you selec t NAT wi th DHCP Clien t, NAT with PPPo E, NAT w ith L2TP Client, or NAT with PPTP
Client mode, the WAN/LAN Subnet Mask is assigned automatically.
If you select Standard mode, the WAN/LAN Subnet Mask is the same as the LAN Subnet Mask .
DNS Settings
• DNS Servers
DNS Serv ers, or Domain Name System Servers, are used by the SonicWALL for diagnostic tests
with the DNS Lo okup Tool , and for upgrade and registration functio nality. DNS Server addr esses
should be assigned by your ISP .
If you selec t NAT wi th DHCP Clien t, NAT w ith PPPoE, NAT with L2TP Client, or NAT with PPTP
Client mode, the DNS Server addresses is assigned automatically.
Alert Enable and configure the SonicWALL DHCP server or manually configure client DNS settings
to obtain DNS name resolution.
Page 78 SonicWALL Internet Security Appliance Administrator’s Guide
Page 78

Standard Configurat ion
If your ISP provi ded you wi th enough IP addres ses for all t he compu ters and net work devices on your
LAN, enable Standard mode.
To configure Standard addressing mode, complete the following instructions:
1. Select Standard from the Network Addressing Mode menu. Because NAT is disabled, you must
assign valid IP addresses to all computers and network devices on your LAN.
2. Enter a unique, valid IP address from your LAN address range in the SonicWALL LAN IP Address
field. The SonicWALL LAN IP Address is the address assigned to the SonicWALL LAN and is used
for manage ment of the SonicW ALL.
3. Enter your network subnet mask in the LAN Subnet Mask field. The LAN Subnet Mask tells your
SonicWALL which IP addresses are on your LAN. The default value, "255.255.255.0", supports
up to 254 IP add res s es .
4. Enter your WAN router or default gateway address in the WAN Gateway (Router) Address field.
Your router is the device that connects your network to the Internet. If you use Cable or DSL,
your WA N ro u te r is ty pic a ll y l o ca ted at your IS P . If you use a r ou t er lo cat e d a t yo ur sit e , use the
IP address assigned to it.
5. Enter your DNS server IP address(es) in the DNS Servers field. The SonicWALL uses the DNS
servers for diagnostic tests and for upgrade and registration functionality.
6. Click Update. Once the SonicWALL has b een updated, a m essage confirming the update is
displayed at the bottom of the browser window. Restart the SonicWALL for these changes to
take effect.
NAT Enabled Configuration
Network Address Translation (NAT) connects your entire network to the Internet using a single IP
address. Network Address Translation offers the following:
• Internet access to additional compute rs on the LAN. Mult iple computers can access the Intern et
even if your ISP only assigned one or two valid IP addresses to your network.
• Additiona l secu rity and a non ymity beca use y our LA N IP addr esses are i nvisi ble to the outsi de
world.
If your ISP hasn't provide d enough IP addresses for all machi nes on your LAN, enable NAT and assign
your network a private IP address range. You should use addresses from one of the following
address ra nges on your priva te network:
10.0.0.0 - 10.25 5.255.255
172.16.0.0 - 172.31.255.255
192.168 .0. 0 - 192 .168.255.2 55
Tip If your network address range uses valid TCP/IP addresses, Internet si tes within that range are
not accessible from the LAN. For example, if you assign the address range 199.2.23.1 -
199.2.23.2 55 to your LAN, a Web server on the Inte rnet with the add ress of 199.2.2 3.20 is not
accessible.
General and Network Settings Page 79
Page 79

When NAT is enabled, users on the Internet cannot access machines on the LAN unless they have
been designated as Public LAN Servers.
To enable Network Address Translation (NAT), complete the following instructions.
1. Select NA T Enabl ed fr om the Network Addressing Mode menu in the Network window.
2. Enter a unique IP address from your LAN address range in the SonicWALL LAN IP Address field.
The SonicWALL LAN IP Address is the address assigned to the SonicWALL LAN and is used for
management of the SonicWALL.
3. Enter your network subnet mask in the LAN Subnet Mask fi el d. The LAN Subnet Mask tells the
SonicWALL which IP addr esses are on yo ur LAN. Use the de fault value, "255.255.255. 0", if
there are less than 254 computers on your LAN.
4. Enter your WAN router or default gateway address in the WAN Gateway (Router) Address field.
This is the device that connects y our network to the Internet. If you use Cable or DSL, your WAN
router is probably located at your ISP. If you use a router located at your site, use the IP address
assigned to it.
5. E nter a valid IP address assigned by your ISP in the SonicWALL WA N IP (NAT Pub lic) Address
field. Because NAT is enabled, all network activity appears to originate from this address.
6. Enter your W AN su bn e t mask in the WAN/LAN S u bnet Mas k field. This subnet mask should be
assigned by yo ur ISP .
7. Enter your DNS server IP address(es) in the DNS Servers fi eld. The SonicWA LL uses these DNS
servers for diagnostic tests and for upgrade and registration functionality.
8. Click Update. Once the SonicWALL has b een updated, a m essage confirming the update is
displayed at the bottom of the browser window. Restart the SonicWALL for these changes to
take effect.
If you enable Network Address Translation, designate the SonicWALL LAN IP Address as the gateway
address for computers on your LA N. Consider the following example:
•The SonicWALL WAN Gateway (Router) Address is "10.1.1.1".
Page 80 SonicWALL Internet Security Appliance Administrator’s Guide
Page 80

•The SonicWALL WAN IP (NAT Public) Address is "10. 1.1.25".
•The private SonicWALL L AN IP Address is "192.168.168.1".
• Computers on the LAN have private IP addresses ranging from "192.168.168.2" to
"192.168.168.255".
In this example, "192.168.168.1", the SonicWALL LAN IP Addr ess, i s used as the gateway or router
address for all computers on the LAN.
NAT with DHCP Client Configuration
The SonicWALL can receive an IP address from a DHCP server on the Internet. If your ISP did not
provide you with a valid IP address, and instructed you to set your network settings to obtain an IP
address automatically, enable NAT with DHCP Client. This mode is ty pically u sed wi th Cable and DS L
connections.
To obtain IP settings dynamically, complete the following instructions.
1. Select NAT with DHCP Client from the Netw ork Add r es si ng Mode menu.
2. Enter a unique IP address from your LAN address range in the SonicWALL LAN IP Address field.
The SonicWALL LAN IP Address is the address assigned to the SonicWALL LAN and is used for
management of the SonicWALL.
3. Enter your network subnet mask in the LAN Subn e t Mask f iel d. Th e LAN Sub net Mask tel ls your
SonicWALL which IP addresses are on your LAN. The default value, "255.255.255.0", supports
up to 254 IP add res s es .
4. Click Update. Once the SonicWALL has b een updated, a m essage confirming the update is
displayed at the bottom of the browser window. Restart the SonicWALL for these changes to
take effect.
Alert! W hen NA T i s en ab led, de sig n ate the So nic WA LL LAN IP Address as th e g ate way ad dre ss for
computers on the LAN.
General and Network Settings Page 81
Page 81

When your SonicWALL has successfully received a DHCP lease, the Network window displays the
SonicWALL WAN IP settings.
•The Lease Expires value shows when your DHCP lease expires.
•The WAN Gateway (Router) Address, SonicWALL WAN IP (NAT Public) Address, WAN/LAN
Subnet Mas k, and DNS Servers are obta ined from a DHCP server on th e Internet.
Alert Enable and configure the SonicWALL DHCP server or manually configure client DNS settings
to obtain DNS name resolution.
In the WAN/LAN Settings secti on of Network, you can Renew and Release the So ni cW A LL W AN I P
(NAT Public ) Ad dr e ss lea se . Wh e n y ou c lick on Renew, the SonicWA L L re n ews the IP a ddress used
for the WAN IP address. Click Release, and the lease is released with the DHCP server.
NAT with PPPoE Configuration
The SonicWALL can use Point-to-Point Protocol over Ethernet (PPPoE) to connect to the Internet. If
your ISP requires the installation of desktop software and user name and password authentication
to acces s th e In te r ne t , e na ble NAT with PPPoE .
To configure NAT with PPPoE, complete the following instruction s.
1. Select NA T with PPP oE fr om the Netw o rk Addressin g Mo de menu.
2. Enter a unique IP address from your LAN address range in the SonicWALL LAN IP Address field.
The Soni cW AL L LA N IP Addr e ss i s th e ad dr es s ass i gne d to t he Soni cW ALL LA N po rt and is use d
for manage ment of the SonicW ALL.
Page 82 SonicWALL Internet Security Appliance Administrator’s Guide
Page 82

3. Enter your network subne t mask in the LAN Subnet Mask field. The LAN Subnet Mask tells your
SonicWALL which IP addr esses are on yo ur LAN. Use the de fault value, "255.255.255. 0", if
there are less than 254 computers on your LAN.
4. Enter the user name provided by your ISP in the User Name field. The user name identifies the
PPPoE client.
5. Enter the password pro vid ed by yo ur ISP in the Password field. The password authenticates the
PPPoE session . This fi eld is case sen sitiv e.
6. Select the Disconnect after __ Minutes of Inactivity check box to automatically disconnect the
PPPoE connection after a specified period of inactivity. Define a maximum number of minutes
of inactivity in the Minutes field. This value can range from 1 to 99 minutes.
7. In the WAN/LAN section, select Obtain an IP Address Automatically if your ISP does not provide
a static IP address. Select U se the following IP Addre ss if your ISP assigns a specific IP address
to you.
8. Click Update. Once the SonicWALL has b een updated, a m essage confirming the update is
displayed at the bottom of the browser window. Restart the SonicWALL for these changes to
take effect.
Alert When NAT is enabled, the SonicWALL LAN IP Address is used as the gateway address for
computers on the LAN.
When your So ni cWALL ha s s ucces sfu ll y es ta blis hed a P PPo E con nec ti on, the Network page displays
the SonicWALL WAN IP settings. The WAN Gateway (Router) Address, SonicWALL WAN IP (NAT
Public) Address, WAN/LAN Subnet Mas k, and DN S Se rvers are displayed.
Alert Enable and configure the SonicWALL DHCP server or manually configure client DNS settings
to obtain DNS name resolution.
Restarting the SonicWALL
Once the network setting s have been updated, the Status bar at the bottom of the browser window
displays "Restart SonicWALL for changes to take ef fect." Restart the SonicWALL by clicking Restart.
Then click Yes to confirm the restart and send the restart command to the SonicWALL. The restart
can take up to 90 seconds, during which time the SonicWAL L is inaccessible a nd all network traffic
through the SonicWALL is halted.
Alert If you change the SonicWALL LA N IP Address, you mu st to change the Ma nagement Station IP
address to be in the same subnet as the new LAN IP address.
General and Network Settings Page 83
Page 83

NAT with L2TP Client Configuration
The SonicWALL can use L2TP over Ethernet to connect to a L2TP server.
To configure NAT with L2TP Client, complete the following instructions.
1. Select NA T with L2 TP Clie nt fr om t he N etw o rk Ad dr e ssi n g Mo de menu.
2. Enter a unique IP address from your LAN address range in the SonicWALL LAN IP Address field.
The Soni cW AL L LA N IP Addr e ss i s th e ad dr es s ass i gne d to t he Soni cW ALL LA N po rt and is use d
for manage ment of the SonicW ALL.
3. Enter your network subne t mask in the LAN Subnet Mask field. The LAN Subnet Mask tells your
SonicWALL which IP addr esses are on yo ur LAN. Use the de fault value, "255.255.255. 0", if
there are less than 254 computers on your LAN.
4. If you obtain a WAN IP add ress from the L2TP server, select Obtain an IP address using DHCP.
If you have WAN IP address information, select Use the specified IP address, and enter your
WAN information in the WAN Gateway(Router) Address, SonicWALL WAN IP (NAT Public)
Address, and WAN Subnet Mask fields.
5. Enter the DNS server IP address in the DNS Server 1 field.
6. Enter the L2TP server host name in the L2TP Host Name field.
7. Enter the IP address of the L2TP server in the L2TP Server IP Address field.
8. Enter your user name and password in the User Name and User Password fi el d s .
Page 84 SonicWALL Internet Security Appliance Administrator’s Guide
Page 84

9. Select the Disconnect after __ Minutes of Inactivity check box to automatically disconnect the
L2TP connection after a specified period of inactivity. Define a maximu m nu mb er o f minutes of
inactivity in the Minutes field. Thi s value can range from 1 to 99 minutes.
10. Click Update. Once the SonicWALL has been updated, a message confirming the update is
displayed at the bottom of the browser window. Restart the SonicWALL for these changes to
take effect.
Alert When NAT is enabled, the SonicWALL LAN IP Address is used as the gateway address for
computers on the LAN.
When your So ni cWALL has su cce s sfu lly e st abl is he d a L2 TP c on ne cti on , t h e Network page disp lay s
the SonicWALL WAN IP settings. The WAN Gateway (Router) Address, SonicWALL WAN IP (NAT
Public) Address, WAN/LAN Subnet Mas k, and DN S Se rvers are displayed.
Alert Enable and configure the SonicWALL DHCP server or manually configure client DNS settings
to obtain DNS name resolution.
Restarting the SonicWALL
Once the network setting s have been updated, the Status bar at the bottom of the browser window
displays "Restart SonicWALL for changes to take ef fect." Restart the SonicWALL by clicking Restart.
Then click Yes to confirm the restart and send the restart command to the SonicWALL. The restart
can take up to 90 seconds, during which time the SonicWAL L is inaccessible a nd all network traffic
through the SonicWALL is halted.
Alert! If you change the SonicWALL LAN IP Address, you must to change the Management Station
IP address to be in the same subnet as the new LAN IP address.
General and Network Settings Page 85
Page 85

NAT with PPTP Client Configuration
The Soni cWA LL c an use Po int -to -Poi nt T unnel in g P ro tocol ov er E the rne t t o c onn ec t to a P PTP se rver .
This option supports older network implementations requiring tunneling support.
To configure NAT with PPTP Client, complete the fo llowing instructions.
1. Select NAT wi th PPT P Client from the Network Addressi ng Mode menu.
2. Enter a unique IP address from your LAN address range in the SonicWALL LAN IP Address field.
The Soni cW AL L LA N IP Addr e ss i s th e ad dr es s ass i gne d to t he Soni cW ALL LA N po rt and is use d
for manage ment of the SonicW ALL.
3. Enter your network subne t mask in the LAN Subnet Mask field. The LAN Subnet Mask tells your
SonicWALL which IP addr esses are on yo ur LAN. Use the de fault value, "255.255.255. 0", if
there are less than 254 computers on your LAN.
4. If you obt a i n a WA N IP a ddress fr om t he P PT P server, s e le ct Obtain an IP address using DHCP.
If you ha ve WAN IP add ress inf ormati on, select Use the specified IP address, and enter your
WAN information in the WAN Gateway(Router) Address, SonicWALL WAN IP (NAT Public)
Address, and WAN Subnet Mask fields.
5. Enter the DNS server IP address in the DNS Server 1 field.
6. Enter the PPTP server host name in the PPTP Host Name field.
Page 86 SonicWALL Internet Security Appliance Administrator’s Guide
Page 86

7. Enter the IP address of the PPTP server in the PPTP Server IP Address field.
8. Enter your user name and password in the User Name and User Password fi el d s .
9. Select the Disconnect after __ Minutes of Inactivity check box to automatically disconnect the
L2TP connection after a specified period of inactivity. Define a maximu m nu mb er o f minutes of
inactivity in the Minutes field. Thi s value can range from 1 to 99 minutes.
10. Click Update. Once the SonicWALL has been updated, a message confirming the update is
displayed at the bottom of the browser window. Restart the SonicWALL for these changes to
take effect.
Alert When NAT is enabled, the SonicWALL LAN IP Address is used as the gateway address for
computers on the LAN.
When your SonicWALL has successfully established a PPTP connection, the Network page displays
the SonicWALL WAN IP settings. The WAN Gateway (Router) Address, SonicWALL WAN IP (NAT
Public) Address, WAN/LAN Subnet Mas k, and DN S Se rvers are displayed.
Alert Enable and configure the SonicWALL DHCP server or manually configure client DNS settings
to obtain DNS name resolution.
Restarting the SonicWALL
Once the network setting s have been updated, the Status bar at the bottom of the browser window
displays "Restart SonicWALL for changes to take ef fect." Restart the SonicWALL by clicking Restart.
Then click Yes to confirm the restart and send the restart command to the SonicWALL. The restart
can take up to 90 seconds, during which time the SonicWAL L is inaccessible a nd all network traffic
through the SonicWALL is halted.
Alert If you change the SonicWALL LAN IP Addres s, you must to change the Management Stati on IP
address to be in the same subnet as the new LAN IP address.
General and Network Settings Page 87
Page 87

Setti ng the Time and Date
The SonicWALL uses the time and date settings to time stamp log events, to automatically update
the Content Filter List, and for other internal purposes .
1. Click the Time tab.
2. Select your time zone from the Time Zone menu.
3. Click Upda te to add the information to the SonicWALL.
You can also enable automatic adjustments for daylight savings time, use universal time (UTC)
rath er than lo cal time, a nd display the date in International format, with the day preceding the
month.
To set the time and date manually, clear the check boxes and enter the time (in 24-hour format) and
the date.
NTP Settings
Network T ime Pr ot ocol (NTP) is a protoc ol used to sync h ron ize com pu ter clo ck ti mes in a netw ork o f
computers. NTP uses Coordinated Universal Time (UTC) to synchronize computer clock times to a
millisecond, and sometimes to a fraction of a mi llisecond. Select Use NTP to set time automatically
if you want to use your local server to set the SonicWALL clock. You can also set the Update Interval
for the NTP server to synchronize the time in the SonicWALL. The default value is 60 minutes. You
can add NTP servers to the SonicWALL for time synchronization by entering in the IP address of an
NTP server in the Add NTP Server field. If there are no NTP Servers in the list, the internal NTP list is
used by def ault. To remov e an NTP serve r, highlight th e IP address an d click Delete NTP Server.
When you have configured the Time wind ow, click Update. Once t he SonicWALL h a s been updated ,
a message confirming the update is displayed at the bottom of the browser window.
Page 88 SonicWALL Internet Security Appliance Administrator’s Guide
Page 88

Config u ri n g th e Administrator Se ttings
The Password tab is now the Administrator tab. In this section, you can configure a new
administrator name, an administrator pa sswo rd, inactivity timeout, and login failure handling .
Administrator Na me
The Administrator Name can be changed from the default setting of admin to any word using
alphanumeric characters up to 30 characters i n length. To cre ate an n ew administrator name, ent er
the new name in the Administrator Name field. Click Update for the changes to take effect on the
SonicWALL.
Change the Administrator Password
To set the password, enter the old password in the Old Password field, and the n ew pass word in th e
New Passwo rd field. Enter the new password again in the Confirm New Password field and click
Update. Once the SonicWALL has been updated, a message confirming the update is displayed at
the bottom of the browser window.
Tip When setting the password for the first time, remember that the SonicWALL default password
is “password”.
If the password is not entered exactly the same in both New Password fields, the password is not
changed. If you mistype the password, you are not locked out of the SonicWALL.
Alert The password cannot be recovered if it is lost or forgotten. If the password is lost, you must to
reset the SonicWALL to its factory default state.
General and Network Settings Page 89
Page 89

Setti n g the Administrator Inactivity Timeout
The Administrator Inactivity Timeout setting allows you to configure the length of inactivity that can
elapse before you are automatically logged out of the Web Management Interface. The SonicWALL
is preconfigured to log out the administrator after 5 minutes of inactivity.
Tip If the Administrator Inactivity Timeout is extended beyond 5 minutes, you should end every
management session by clicking Logout to prevent unauthorized access to the SonicWALL Web
Management Inter fa ce.
Enter the desired number of minutes in the Administrator Inactivity Timeout section and click
Update. The Inactivity Timeout can range from 1 to 99 minutes. Click Update, and a message
confirming the update is displayed at the bottom of the browser window.
Login Failure Handling
You can configure the SonicWALL to lockout an administrator or a user if the login credentials are
incor re ct. Se lec t Ena ble Us er L oc kou t on l ogin f ailur e to prevent users from attempting to log into
the SonicWALL without proper authentication credentials. Enter the number of failed attempts
before the user is locked out in the Lock o ut u se r after __ failed lo gin attempts in a 1 minute period
field. Enter the length of time that must elapse before the user attempts to log into the SonicWALL
again in the Lockout Period (minutes) field.
Alert If the administrator and a user are logging into the SonicWALL using the same source IP
address, the administrator is also locked out of the SonicWALL. The lockout is based on the source
IP address of the user or administrator.
Page 90 SonicWALL Internet Security Appliance Administrator’s Guide
Page 90

7 Logging and Alerts
This chapter describes the SonicWALL Internet security appliance logging, alerting, and reporting
features, which can be viewed in the Log section of the SonicWALL Web Management
Interface.There are four t abs in the Log section:
• View Log
• Log Settings
• Reports
• ViewPoint (requires a purchased upgrade)
View Log
The SonicWALL maintains an Event log wh ich displays potential secu rity threat s. This log can be
viewed with a browser using th e So nicWALL Web Management Interface, or it can be automatically
sent to an e-mail address for convenience and archiving. The log is displayed in a table and is
sortable by column.
The SonicWALL can alert you of important events, such as an attack to the SonicWALL. Alerts are
immediately e-mailed, either to an e-mail a ddress or t o a n e-mail pager. Each lo g entry conta ins the
date and ti me of the event and a brief message describing the event.
Click Log on the left side of the browser window, and then click View Log.
Logging and Alert s Pa ge 91
Page 91

SonicW A LL Log Messages
Each log entry contains the date and tim e of the even t and a bri ef messag e describing the event. It
is also possible to copy the log entries from the management interface and paste into a report.
• TCP, UDP, or ICMP packets dropped
When IP packets are blocked by the SonicWALL, dropped TCP, UDP and ICMP messages are
displayed. The messages include the source and destination IP addresses of the packet. The
TCP or UDP port number or the ICMP code follows the IP address. Log messages usually include
the name of the service in quotation marks.
• Web, FTP, Gopher, or Newsgroup blocked
When a computer attempts to connect to the blocked site or newsgroup, a log event is
displayed. The computer’s IP address, Ethernet address, the name of the blocked Web site, and
the Content Filter List Code is displayed. Code definitions for the 12 Content Filter List
categories are shown below.
a=Violence/Profanity g=Satanic/Cult
b=Partial Nudity h=Drug Culture
c=Full Nudity i=Militant/Extremist
d=Sexual Acts j=Sex Education
e=Gross Depictions k=Gambling/Il legal
f=Intolerance l=Alcohol/Tobacco
Descriptions of the categories are available at <http://www.sonicwall.com/Content-Filter/
categories.html>.
• ActiveX, Java, Cookie or Code Archive b l oc k ed
When Ac tiv eX, Jav a o r W e b c oo k ies a re b lo ck e d, me ssa g es w ith t he so ur c e and de st i nati on I P
addresses of the connection attempt is displayed.
• Ping of Death, IP Spoof, and SYN Flood Attacks
The IP address of the machine under attack and the source of the attack is displayed. In most
attacks , the source address shown is fake and does not reflect the real source of the attack.
TIP! Some network condi tions can produ ce netw ork traff ic that appe ars to be an att ack, eve n when
no one is deliberately attacking the LAN. To follow up on a possible attack, contact your ISP to
determine the source of the attack. Regardless of the nature of the attack, your LAN is protected
and no further steps are needed.
Page 92 SonicWALL Internet Security Appliance Administrator’s Guide
Page 92

Log Sett in g s
Click Log on the left side of the browser window, and then click the Log Settings tab.
Configure the following settings:
1. Mail Server - To e-mail log or alert messages, enter the name or IP address of your mail server
in the Mail Server field. If this field is left blank, log and alert messages are not
e-mailed.
2. Send Log To - Enter yo ur full e- mail addr ess( user name @myd omai n.co m) in the Send log to fiel d
to receive the event log via e-mail. Once sent, the log is cl eared from the SonicWALL memory. If
this field is left blank, the log is not e-mailed.
3. Send Alerts To - Enter your full e-mail address (username@mydomain.com) in the Send alerts
to field to be immediately e-mailed when attacks or system errors occur. Enter a standard e-mail
address or an e- mai l pa ging ser vic e. If t hi s fi eld i s left b lan k, e- mail ale rt me ssa ges are no t sent .
4. Firewall Name - The Firewall Name appears in the subject of e-mails sent by the SonicWALL. The
Firewall Name is helpful if you are managing multiple SonicWALLs because it specifies the
individual SonicWALL sending a log or an alert e-mail. By default, the Firew all Name is s et to th e
SonicWALL serial number.
Logging and Alert s Pa ge 93
Page 93

5. Syslog Server - In addition to the standard event log, the SonicWALL can send a detailed log to
an external Syslog server. The SonicWALL Syslog captures all log activity and includes every
connection source and destination IP addre ss, IP servi ce, and number of bytes transfe rred. The
SonicWALL Syslog support requires an external server running a Syslog daemon on UDP Port
514.
Syslog Analyzers such as WebTrends Fi rew all Suite can be used to sort, analyze, and graph the
Syslog data.
Enter the Syslog server name or IP address in the Add Syslog Server field. Messages from the
SonicWALL are then sent to the servers. Up to three Sys l og Server IP addresses can be added.
If the SonicWALL is managed by SGMS, however, the Syslog Server fields cannot be configur ed
by the administrator of the SonicWALL.
6. E-mail Log N ow - Clicking E-mail Log Now immediate ly sends the log to the address in the Sen d
Log To field and then clears the log.
7. Clear Log Now - Clicki ng Clear Log Now deletes the contents of the log.
8. Send Log / Every / At - The Send Log menu determines the frequency of log e-mail messages:
Daily, Weekly, or When Full. If the Weekly option is selected, then ente r the day of the week the
e-mail is sent in the Every menu. If the Weekly or the Daily option is selected, enter the time of
day when th e e- mail is se nt i n th e At field . I f t he When Ful l opti on is se lected and the log fill s u p,
it is e-maile d a ut omaticall y .
9. When log overflows - The log buffer fills up if the SonicWALL cannot e-mail the log file. The
default b ehav ior is t o ov erw rit e th e l og and d is car d it s c ont ent s. Ho wev er, you can c onfig ur e th e
SonicWALL to shut down and prevent traffic from traveling through the SonicWALL if the log is
full.
10. Syslog Individual Event Rate (seconds/event) - The Syslog Individual Event Rate setting
prevents repetitive messages from being written to Syslog . I f d uplicate events occur during the
period specified in the Syslog Indiv idual Even t Rate field, they are not written to Syslog as
unique events. Instead, the additional events are counted , a nd then at th e end of the peri od, a
message is written to the Syslog that includes the number of times the event occurred .
The Syslog Indi vidual Event Rate defaul t value is 60 seconds and the maximum val ue is 86,4 00
seconds (24 hours). Setting this value to 0 seconds sends all Syslog messages without filtering.
11. Syslog Format - You can choose the format of the Syslog to be Default or WebTrends. If you
select WebTrends, however, you must have WebTrends software installed on your system.
Page 94 SonicWALL Internet Security Appliance Administrator’s Guide
Page 94

Log Cate g or i es
You can d efine whi ch log message s appear in t he SonicWA LL Event Log. All Log Categories are
enabled by de fau lt exce pt Network Debug.
• System Maintenance
Logs general system activity, such as administrator log ins, automatic downloads of the Content
Filter Lists, and system activations.
• System Errors
Logs problems with DNS, e-mail, and automatic downloads of the Content Filter List.
• Blocked Web Sites
Logs Web sites or newsgroups blocked by the Content Filter List or by customized filtering.
• Blocked Java, etc.
Logs Jav a, ActiveX, and Cookies blocke d by t he SonicWALL.
• User Activity
Logs successful and unsuccessful log in attempts.
• VPN TCP Stats
Logs TCP connections over VPN tunnels.
• Attacks
Logs messages showing Denial of Service attacks, such as SYN Flood, Ping of Death, and IP
spoofing.
• Dropped TCP
Logs blocked incoming TCP connections.
• Dropped UDP
Logs blocked incoming UDP packets.
• Dropped ICMP
Logs blocked incoming ICMP packets.
• Network Debug
Logs NetBIOS broadcasts, ARP resolution problems, and NAT resolution problems. Also,
detailed messages for VPN connections are displayed to assist the network administrator with
troubleshooting problems with active VPN tunnels. Network Debug i nforma t io n is intended fo r
experienced network administrators.
Logging and Alert s Pa ge 95
Page 95

Alerts/SNMP Traps
Alerts are events, such as attacks, which warrant immediate attention. When events generate
alerts, messages are immediately sent to the e-mail address defined in the Send alerts to field.
Attacks and System Errors are enabled by default, Blocked Web Sites is dis a bled.
• Attacks
Log entries categorized as Attacks generate alert messages.
• System Errors
Log entries categorized as System Errors generate alert messages.
• Blocked Web Sites
Log entries categorized as Blocked Web Sites gener at e aler t me ssag e s.
• VPN Tunnel Status
Log entries categorized as VPN Tunnel Status generate alert messages.
Once you have configured the Log Settings window, click Update. Once t he S o ni cW AL L i s u p dat e d,
a message confirming the update is displayed at the bottom of the browser window.
Reports
The SonicWALL can perform a rolling analysis of the event log to show the top 25 most frequently
accessed Web sites, the top 25 users of bandwidth by IP address, and the top 25 services
consuming the most bandwidth. Click Log on the left si de of the browser win do w, and then click the
Reports tab.
Page 96 SonicWALL Internet Security Appliance Administrator’s Guide
Page 96

The Reports window includes the foll owing functions and commands:
• Start Data Collection
Click Start Data Collection to begin log analysis. When log analysis is enabled, the button label
changes to Stop Data Collection.
• Reset Data
Click Reset to clear the report statistics and begin a new sample period. The sample period is
also reset when data collection is sto pped or st arted , and when the SonicWALL is restarted.
• View Data
Select the desired report from the Report to view menu. The options are Web Site Hits,
Bandwidth Usage by IP Address, and Bandwidth Usage by Service. T hese reports are explained
below. Cli ck Refresh Data to update the report. The length of time analyzed by the report is
displayed in the Current Sample Period.
Web Site Hits
Selecting Web Site Hits from the Display Report menu displays a table showing the URLs for the 25
most frequ ently accessed We b sites and the number of hits to a site during the cur rent sample
period.
The Web Site Hits report ensures that the majority of Web access is to appropriate Web sites. If
leisure, sports, or other inappropriate sites appear in the Web Site Hits Report, you can choose to
block the sites.
Bandwidth Usage by IP Address
Selecting Bandwidth Usage by IP Address from the Display Report menu displays a table showing
the IP Address of the 25 top users of Internet bandwidth and the number of megabytes transmitted
during the curr ent sample period.
Bandwidth Usage by Service
Selecting Bandwidth Usage b y S er vice fro m the Display Report menu displays a table show ing the
name of the 25 top Internet services, such as HTTP, FTP, RealAudio, etc., and the number of
megabytes rece ived from the service during th e current sample period.
The Bandwidth Usage by Service report shows whether the services being used are appropriate for
your org ani zati on . I f ser v ices such as vi de o or pu sh broa dcas ts ar e co ns umi ng a larg e por ti on of the
available bandwidth, you can choose to block these services.
Logging and Alert s Pa ge 97
Page 97

SonicWALL ViewPoint
SonicWALL ViewPoint is a software solution that creates dynamic, Web-based reports of network
activity. ViewPoint generates both real-time and historical reports to provide a complete view of all
activity through your SonicWALL Internet Security Appliance. With SonicWALL ViewPoint, you are
able to monitor ne two rk access, enhance network security and anticipate future bandwidth need s.
SonicWALL ViewPoint
• Displays bandwidth use by IP address and service.
• Iden t if ies ina pp r opriat e Web us e.
• Presents detaile d reports of attacks.
• Collects and aggregates system and network errors.
Page 98 SonicWALL Internet Security Appliance Administrator’s Guide
Page 98

8 Content Filtering and Blocking
Internet content filtering allows you to create and enforce Internet access policies tailored to the
needs of your organi zati on. You can b lock h armful Web ap plica tions from e nterin g your netw ork. an d
select Web content categories to block or monitor, such as pornography or racial intolerance, from
a pre-defined Content Filter List.
There are three Content Filter Lists available for use with your SonicWALL:
• SonicWALL - Selecti ng SonicWALL for the Content Filter Li st Ty pe allo ws yo u use t he S oni cWA L L
Content Filter List (optional upgrad e) and completely c ustomize your Content Filter feat ures including allowed and forb id d en dom a in s a s well as co n te nt filte ring us ing keyw ords.
Tip When y ou re gis ter y our Son ic WALL a t < http :// www. myson icwa ll .c om>, yo u c an down loa d a one
month subscription to the SonicWALL Content Filter List updates.
• N2H2 - N2H2 is a third party content filter software package supported by SonicWALL. You can
obtain more information on N2H2 at [http://www.n2h2.com]. If you select N2H2 from the list,
an N2H2 tab is available to configure the location of the N2H2 server and other
settings.
• Websense Enterprise - Websense Enterprise is also a third party content filter list package
supported by SonicWALL. You can obtain more information on Websense Enterprise at
[http://ww w .W e bse n se .co m ]. If y ou se le ct Websense Enterprise from the list, a Websense tab
is availa ble to configur e t he location of the Webs ense server and oth er settings.
There are four tabs in the Filter section if the SonicWALL Content Fi lter is select ed:
• Configure
• URL List
• Customize
• Consent
Content Filteri ng and Blocking Page 99
Page 99

Configuring SonicWALL Content Filtering
The Configure tab is common between the three types of Content Filtering. Click Filter on the left
side of the browser window, and then click on the Configure tab.
Select the type of Content Filter from the Content Filter Type menu. To enforce Content Filtering on
the LAN, select Apply Content Filter.
Content f il teri ng can a l so be enfor ce d on t he LAN, DM Z, or bot h. Se lect LAN, DMZ, or both . Both LAN
and DMZ are selected by default.
Restrict W eb Feat ures
Restrict Web Features enhances your network security by blocking potentially harmful Web
appli cations from entering your network. Select an y of the following applications to block:
Block:
• ActiveX
ActiveX is a programming language that embeds scripts in Web pages. Malicious programmers
can use ActiveX to delete files or compromise security. Select the ActiveX check box to bl ock
ActiveX controls.
• Java
Java is used to download and run small programs, called applets, on Web sites. It is safer than
ActiveX since it has built-in security mechanisms. Select the Java check box to bloc k Java
applets from the network.
• Cookies
Cookies are us ed by Web serve rs to trac k Web usage and remember us er identi ty . Cooki es can
also compr omise users' privacy by track ing Web activities . Selec t the Cookies che ck box to
disable Cookies.
• Known Fra udulent Certificates
Digital certificates help verify that Web content and files originated from an authorized party.
Enabling this feature protects users on the LAN from downloading malicious programs
warranted by these fraudulent certificates. If digital certificates are proven fraudulent, then the
SonicWALL blocks the Web content and the files that use these fraudulent certificates.
Known frau dulen t ce rtific ates bloc ked by So nicWA LL in clud e two cert if ic ates is sued on Jan uary
29 and 30, 2001 by VeriSign to an impostor masquerading as a Microsoft employee.
• Access to HTTP Proxy Servers
When a proxy server is located on the WAN, LAN users can circumvent content filtering by
pointing their c omputer to the proxy se rver. Check th is b ox to pre vent LAN users from accessin g
proxy servers on the WAN.
• Don’t Block Java/ActiveX/Cookies to Trusted Domains
Select this opti on if you have tru sted domains using J ava, ActiveX, and Cookies. To add a truste d
domain, enter the domain name into the Add Truste d Domain field. Click Update to add the
domain to the list of trusted domains. To delete a domain, select it from the list, and then click
Delete.
Page 100 SonicWALL Internet Security Appliance Administrator’s Guide
Page 100

Trus ted Doma i n s
Trusted Domains can be ad ded i n th e Re str ict Web F ea tu re s se ction of th e Configure tab. If you trust
content o n spe ci fic do m a in s, you can se l ec t Don’t block Java/ActiveX/Cookies to Trusted Domains
and then add the Trusted Do mains to the SonicWALL using the Add Trusted Dom ain field. Java
scripts, ActiveX, and cookies are not blocked from Tru st ed D oma i ns if the checkbox is selected.
Message to display when a site is blocked
Enter your customized text to display to the user when access to a blocked site is attempted. The
default message is Web Site blocked by SonicWALL Filter. Any message, inclu ding emb edded HTML ,
up to 255 characters long, can be entered in this field.
URL List
The URL List page allows you to see the sta tus o f t he C ontent Fi lte r L ist as w ell as conf igure
a specific time to download the list. You can also determine how the SonicWALL responds
when a Content Filter List is unavailable. Selecting categories to block is also configured
on this page.
List Stat u s
This section of the URL List tab indicates the status of the URL list. If the Content Filter List is loaded,
a status message is displayed in this section.
List Updates
It is important to note that Host names, and not TCP/IP addresses, are used for all filtering. Many
blocked s ites op erate serv er po ols, wher e m any c omp uters ser vice a si ngle ho st nam e, making it
impractical and difficult to add and maintain the numerical addresses of every server in the pool.
Many sites included in the Content Filter List regularly change the IP address of the server to try to
bypass Content Filter Lists. For this reason, maintaining a current list subscription is critical for
effec ti v e content fi lt e r ing.
Content Filtering and Blocking Page 101
 Loading...