

Page 1

SonicWALL Email Security
Solutions
EMAIL SECURITY SonicWALL Email Security
SonicWALL
Email Security 7.0
8000
Getting Started Guide
Page 2

Getting Started Guide 7.0 | 1
SonicWALL Email Security 8000
Getting Started Guide
This Getting Started Guide contains installation procedures and configuration guidelines for
deploying a SonicWALL Email Security appliance on your network.
SonicWALL Email Security provides effective, high-performance, and easy-to-use inbound and
outbound email threat protection. Ideal for the small to medium size business, this self-running,
self-updating appliance delivers powerful protection against spam, virus and phishing attacks in
addition to preventing leaks of confidential information. Combining anti-spam, anti-phishing,
content filtering, policy management and content complianc e capabilities in a single seamlessly
integrated solution, SonicWALL Email Security provides powerful protection without c omplexity.
Note:
z
SonicWALL TotalSecure Email provides complete protection from spam, virus attacks and
phishing. Without TotalSecure Email, you must have a subscription to SonicWALL Email
Protection and Dynamic Support to use the spam and phishing protection provided by the
SonicWALL Email Security appliance. To purchase a subscription, contact your SonicWALL
vendor.
Please read this entire Getting Started Guide before setting up your
SonicWALL Email Security 8000 appliance.
An updated version of this guide may exist. Refer to SonicWALL’s Documentation Web site for
complete, updated documentation at: <http://www.sonicwall.com/Support.html>
.
Page 3

2 | Email Security Soft ware
Contents
This document contains the following sections:
Before You Begin
1
{
“Check Package Contents” on page 3
{
“What You Need to Begin” on page 4
{
“Record Configuration Information” on page 4
{
“Overview of the SonicWALL Email Security Appliance” on page 6
Registering Your SonicWALL Email Security Appliance
2
{
“Before You Register” on page 7
{
“Creating a mysonicwall.com Account” on page 7
{
“Registering Your SonicWALL Email Security Appliance” on page 8
Initial Setup and Configuration
3
{
“Apply Power to the SonicWALL Email Security” on page 9
{
“Connect Directly to the SonicWALL Email Security Appliance” on page 9
{
“Login to the SonicWALL Email Security Appliance” on page 9
{
“Initial System Configuration” on page 10
{
“Activating the Email Security License Subscriptions” on page 12
Connecting and Configuring Network Settings
4
{
“Connecting the SonicWALL Email Security to Your Network” on page 13
{
“The SonicWALL Email Security Interface” on page 14
{
“Changing the Default Administrator Password” on page 14
{
“Using Quick Configuration to Set Up Email Management” on page 15
Verification and Further Configuration
5
{
“Routing Mail to Your SonicWALL Email Security” on page 17
{
“Verifying Mail from the Internet Through Your SonicWALL Email Security” on page 17
Page 4
Getting Started Guide 7.0 | 3
1
Before You Begin
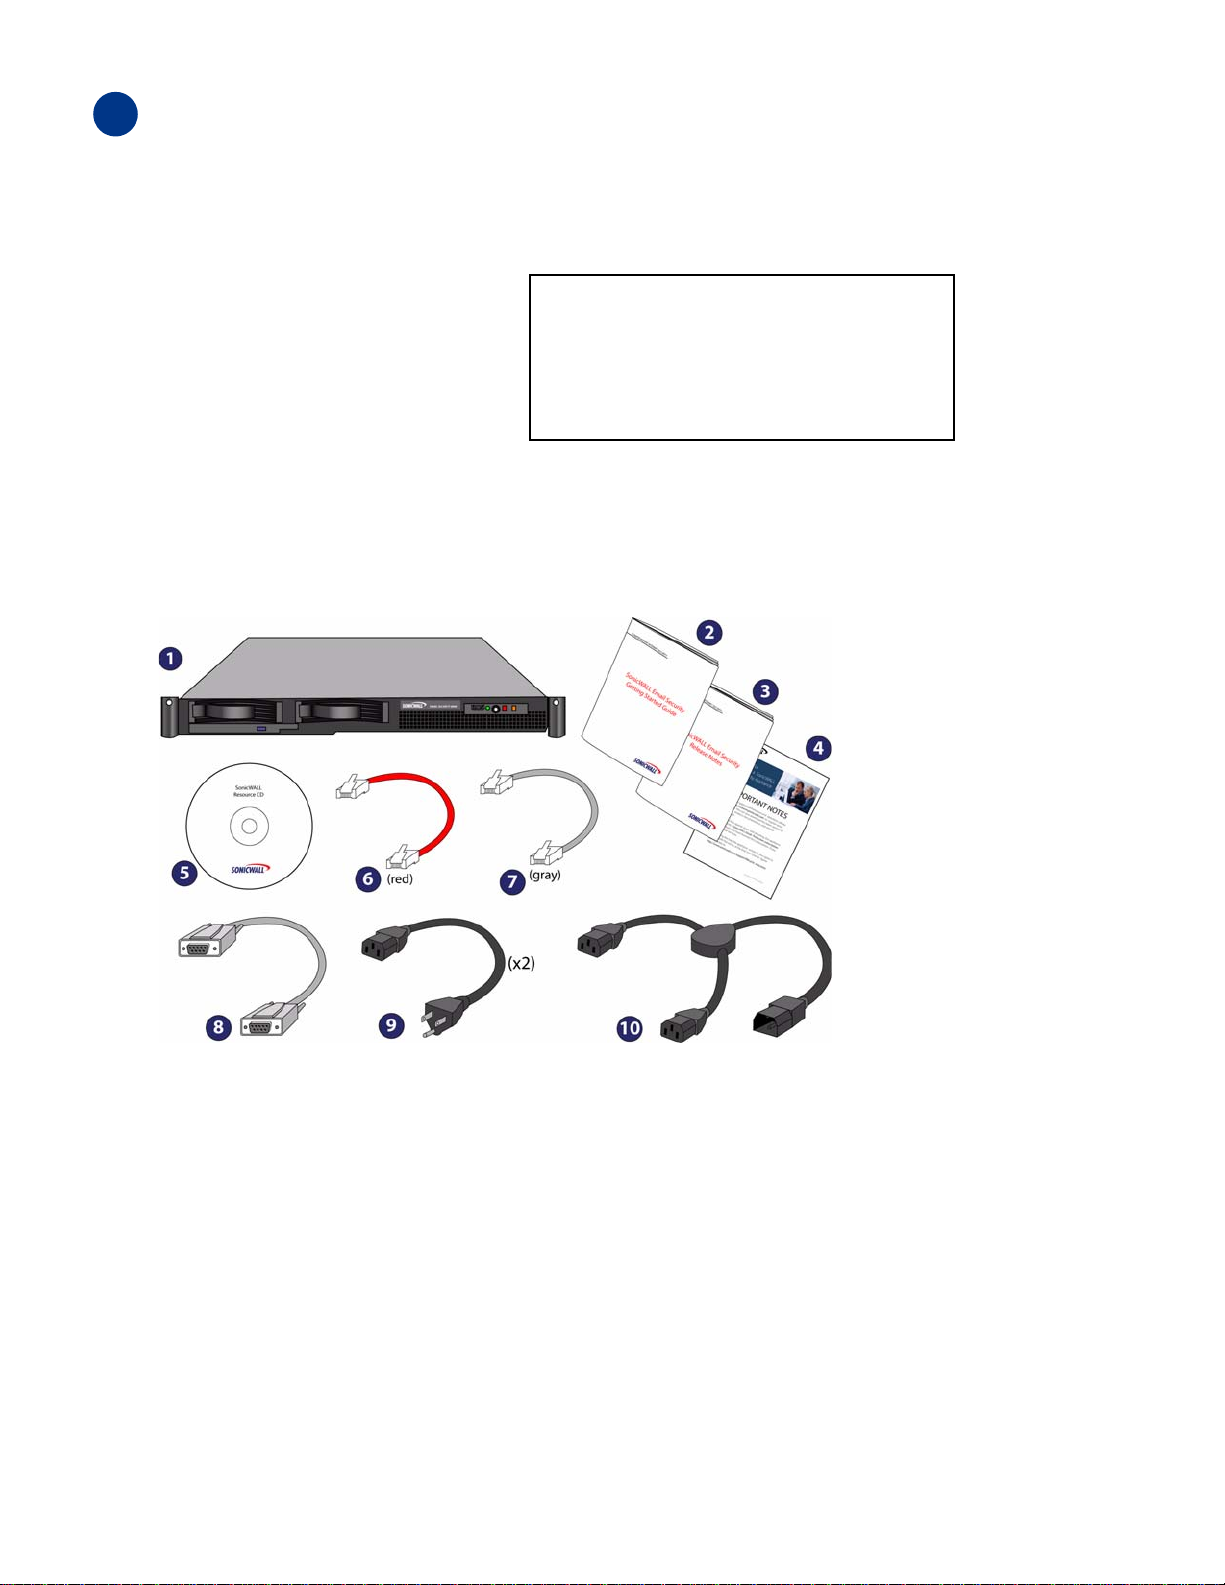
Check Package Contents
One SonicWALL Email Security appliance
One Getting Started Guide document
One Release Note document
One Thank You card
One SonicWALL Resource CD
One crossover cable (red)
One Ethernet cable (gray)
One RS232 CLI cable
Two standard power cords*
One Y-Split power cable*
One Rack mount Kit (not pictured)
*The included power cords are intended for use in North America only. For European Union (EU)
customers, power cords are not included.
*Das eingeschlossene Netzkabel ist für Gebrauch in Nordamerikas nur vorgehabt.
Für Europaïsche Union (EU) Kunden, ist ein Netzkabel nicht eing eschlossen.
Any Items Missing?
If any items are missing from your package,
contact:
SonicWALL Support
<http://www.sonicwall.com/us/Support.html>
Email:
customer_service@sonicwall.com
Page 5

What You Need to Begin
z
A computer to use as a management station for initial configuration of SonicWALL Email
Security software
z
Internet Explorer 5.0 or higher
z
An Internet connection
Record Configuration Information
Before continuing, record the following configuration information for your reference:
Registration Information
Serial Number:
(xxxxxx-xxxxxx)
Au thentication Code:
(xxx-xxx)
Networking Information\
E m a i l S e c u r i t y I P A d d r e s s :
E m a i l S e c u r i t y S u b n e t M a s k :
G a t ew a y I P Ad d r es s :
DNS Server 1 :
D N S S e r v e r 2 ( o p t i o n a l ) :
Host N ame:
Page 4 Getting Started Guide 7.0
Record the serial number found on
the top right access panel of your
SonicWALL Email Security appliance.
Record the authentication code
found on the top right access panel
of your SonicWALL Email Security
appliance.
Select a free static IP address for
your
SonicWALL Email Security appliance that is within the range of your
local subnet.
Enter the subnet mask for the local
subnet where you are installing
your SonicWALL Email Security
appliance.
Record the IP address of your network’s
gateway device (such as your
perimeter
firewall/router).
Record your DNS Server information.
Record the fully qualified domain
name within your network for your
SonicWALL Email Security appliance (maximum 32 characters).
Page 6

Pa ssword:
Ema i l S e rve r IP :
LDA P Se r ver IP:
Getting Started Guide 7.0 | 5
Select a password for your SonicWALL Email Security appliance
(default is password).
Record the IP address or hostname
of your email server.
Record the IP address or hostname
of your directory services server,
such as LDAP or Microsoft Active
Directory.
Page 7
6 | Email Security Soft ware
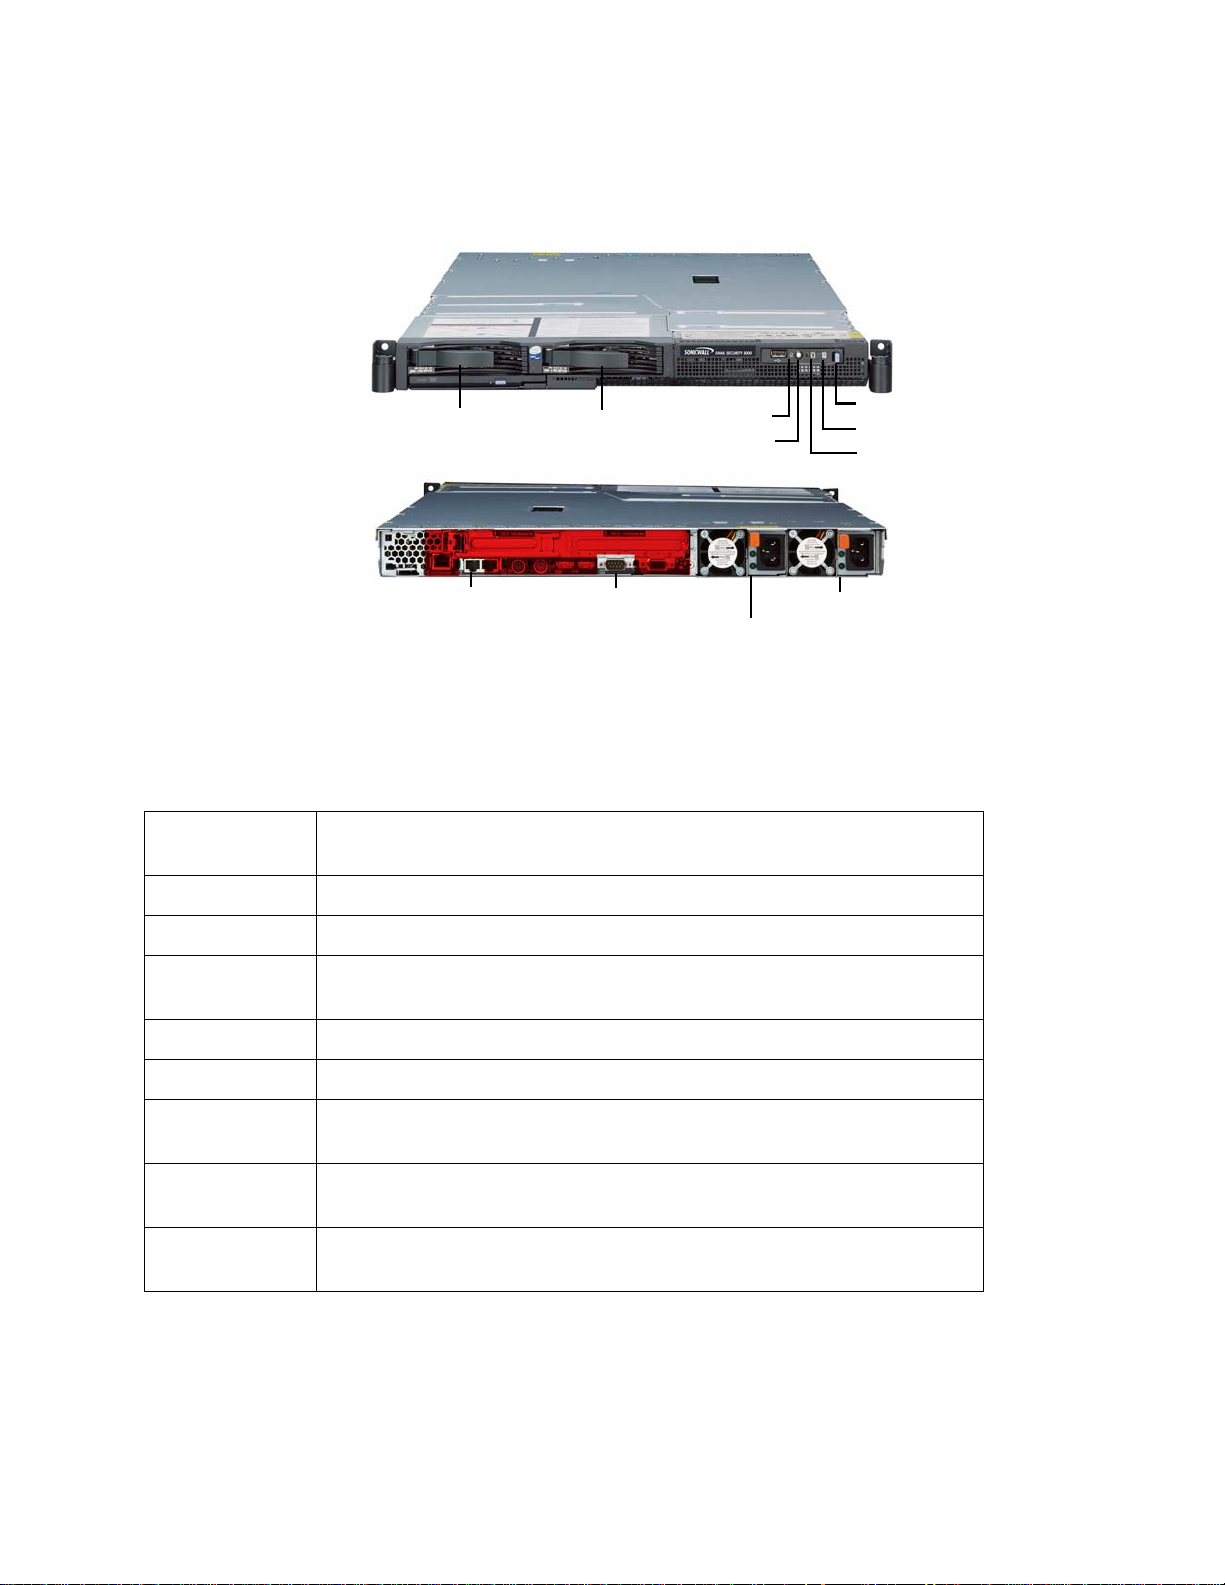
Overview of the SonicWALL Email Security Appliance
SonicWALL Email Security Appliance
SCSI Drive 1
* Alerts are explained in detail in light path diagnostic panel. T o access, push the diagnostic panel
release latch to the left and pull out the panel.
SCSI Drive 2
LAN Port
Serial Port
Power LED
Power But ton
Power Supply 1
Diagnostic Panel Release
Alert LED*
HDD LED
Power Supply 2
Alert: Do not plug devices into any ports (other than those indicated) unless
explicitly instructed to do so by a SonicWALL technical support
representative. Doing so may void your warranty.
SCSI Drive
Bays
Power LED Indicates the SonicWALL Email Security appliance is powered on.
Power Button Allows the SonicWALL Email Security appliance to power on or off.
Diagnostic
Panel
Allows SCSI drives in a RAID array to be hot-swapped should one
drive fail.
Can be pulled out (push release lever to the left) for detailed explanation of alerts.
Alert LED Indicates an alert. See Diagnostic panel for more information.
HDD LED Indicates data transfer to and from the hard disk drive.
LAN Port Allows the SonicWALL Email Security appliance to connect to your
local area network or management station.
Serial Port Allows direct connection to the appliance via terminal services to
use the CLI.
Power Supplies Two power supplies allow the SonicWALL Email Security appliance
to utilize redundant AC power using the supplied power cables.
Page 8
2
Registering Your SonicWALL Email Security Appliance
Register your appliance and activate your licenses for the SonicWALL Email Protection Subscription
and Dynamic Support.
This section contains the following sub-sections:
{
“Before You Register” on page 7
{
“Creating a mysonicwall.com Account” on page 7
{
“Registering Your SonicWALL Email Security Appliance” on page 8
Before You Register
You need a mysonicwall.com account to register the SonicWALL Email Security appliance. To create
a mysonicwall.com account, refer to “Creating a mysonicwall.com Account” on page 7. If you
already have a mysonicwall.com account, go to “Registering Your SonicWALL Email Security
Appliance” on page 8 to register your appliance.
Note:
z
mysonicwall.com registration information is not sold or shared with any other company.
Creating a mysonicwall.com Account
Getting Started Guide 7.0 | 7
Creating a mysonicwall.com account is fast, simple, and F REE. Simply complete an online
registration form.
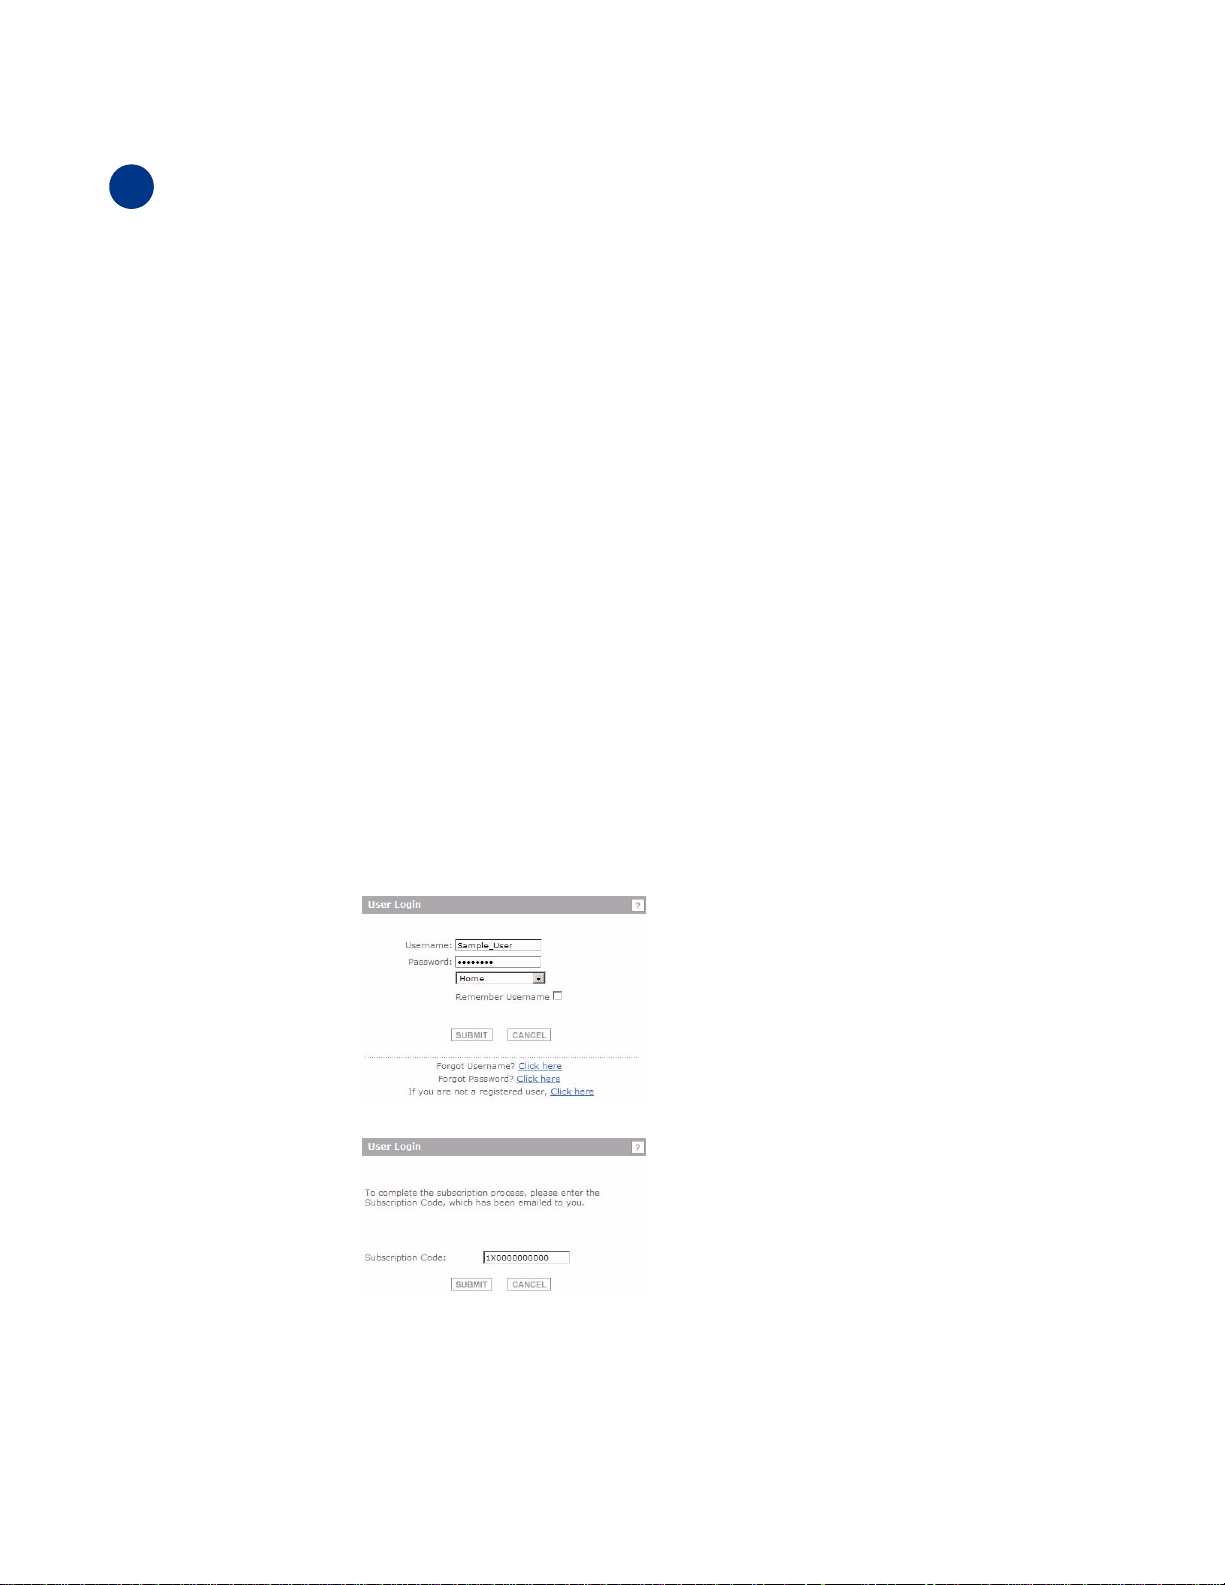
1. In your Web browser, go to
2. In the User Login section, click If you are not a registered user, Click here.
3. Enter the account information, personal information, and preferences and click Submit.
You must enter a valid email address.
4. Follow the prompts to finish creating your account. SonicWALL will email a subscription code to
the email address you entered in the personal information.
5. When you return to the login screen, log in with your new username and password.
6. Confirm your account by entering the subscription code you received by email.
<https://www.mysonicwall.com/>.
Congratulations! You have created and logged into your mysonicwall.com account.
Page 9
8 | Email Security Soft ware
Registering Your SonicWALL Email Security Appliance
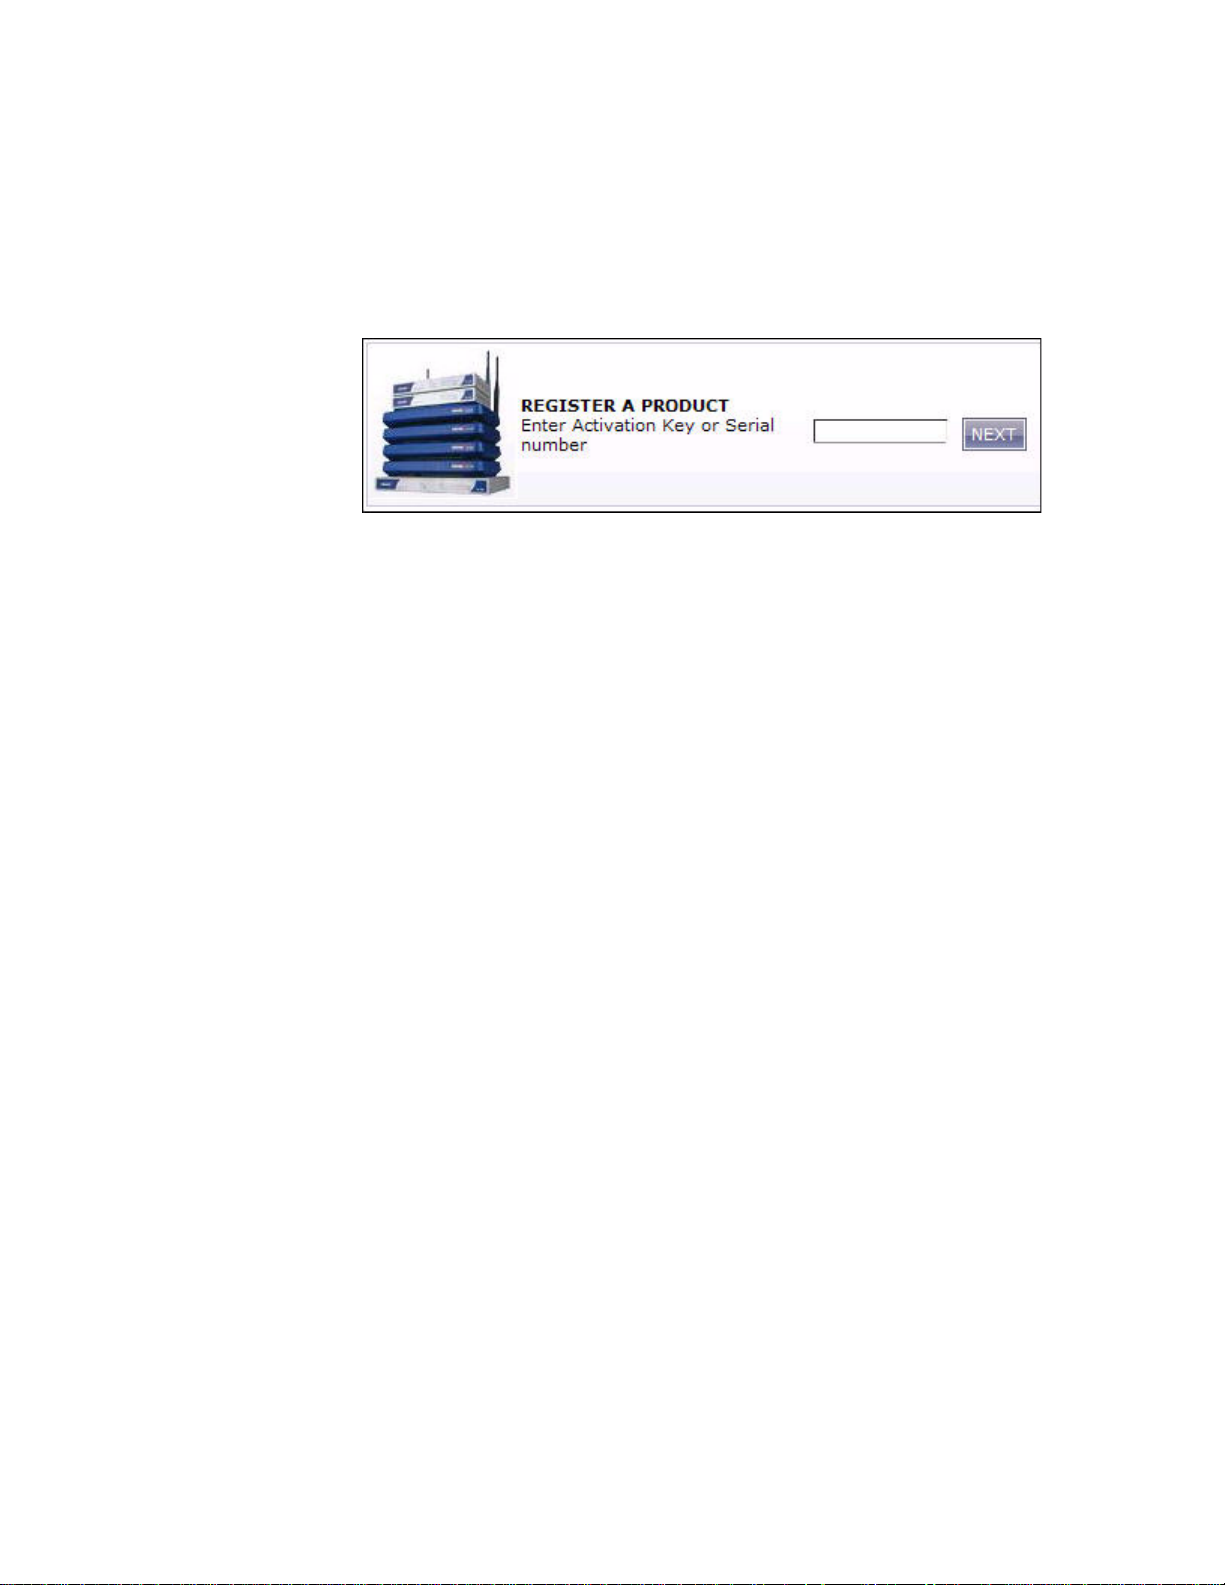
1. Locate your SonicWALL Email Security Software serial number. It is printed on the label on the
top right access panel
2. If you are not already logged into mysonicwall.com, go to
<https://www.mysonicwall.com/> and log in.
3. Enter your serial number in the Quick Register field and click the Next button. Foll ow the onscreen instructions.
4. Confirm your serial number, enter a friendly name for your appliance, and enter your
authentication code in the Quick Register > Add New Product section.
5. Click Register.
6. Follow the online prompts to fill out the survey and complete the registration process.
of your SonicWALL Email Security Appliance.
Page 10
Initial Setup and Configura tio n
3
This section contains the following sub-sections:
z
“Apply Power to the SonicWALL Email Security” on page 9
z
“Connect Directly to the SonicWALL Email Security Appliance” on page 9
z
“Login to the SonicWALL Email Security Appliance” on page 9
z
“Initial System Configuration” on page 10
z
“Activating the Email Security License Subscriptions” on page 12
Apply Power to the SonicWALL Email Security
1. Connect the included standard power cord with the y-split power cord.
2. Plug each of the y-split ends into a power supply on the back of the SonicWALL Email Security
appliance.
3. Plug the power cord into an appropriate power outlet.
4. Press the recessed power but ton on the front bezel to power on the appliance. The entire
sequence may take several minutes to complete.
The Power LED on the front panel lights up green when you power on the SonicWALL Email
Security appliance. The HDD LED lights up and may blink while the appliance performs a series
of diagnostic tests. When the HDD LED is no longer lit, the SonicWALL Email Security appliance is
ready for configuration.
Getting Started Guide 7.0 | 9
If the Alert light stays lit, ensure that BOTH of the power supplies on the back of the SonicWALL
Email Security Appliance are plugged in (use the included y-split cable for this purpose).
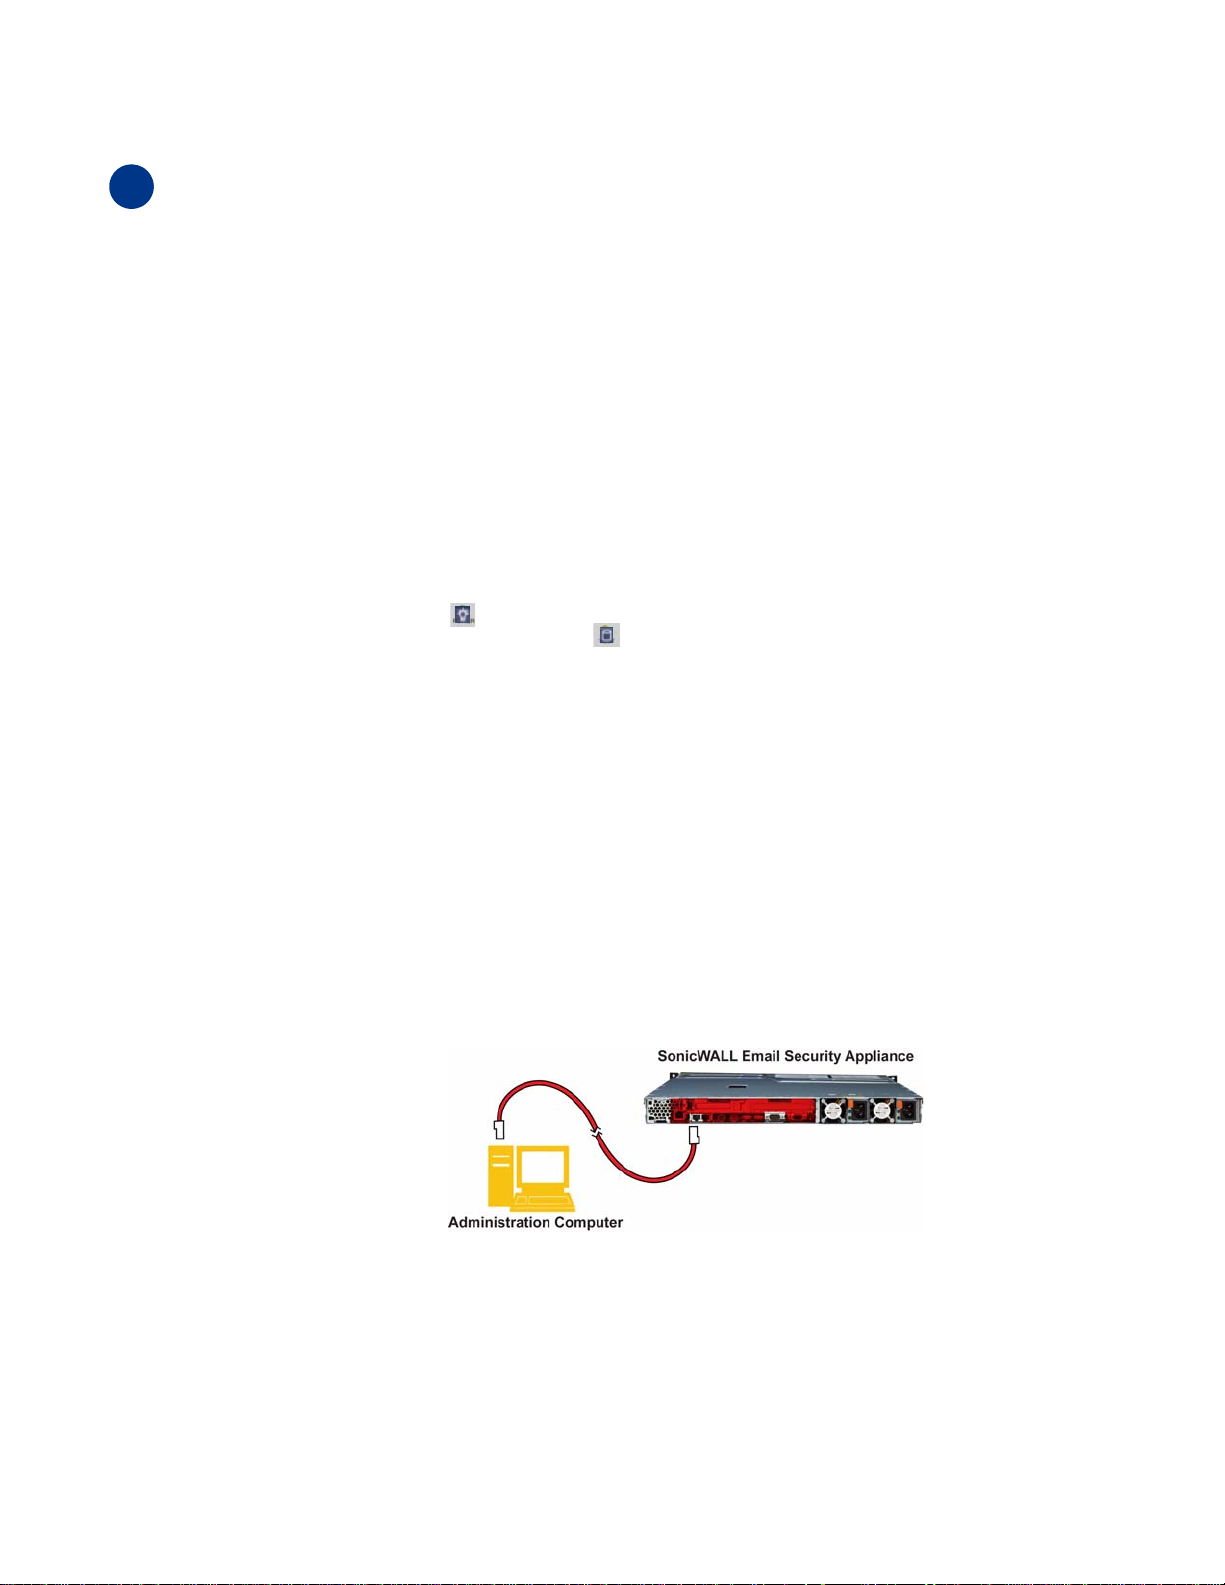
Connect Directly to the SonicWALL Email Security Appliance
The SonicWALL Email Security appliance comes pre-configured with an IP address of
192.168.168.169. Before you can connect your administration station to it, you must configure
your administration computer to have an address in the same subnet.
1. Make a note of your computer’s current network settings.
2. Set the computer you use to manage the SonicWALL Email Security appliance to have a static
IP address in the 192.168.168.x range, such as 192.168.168.50 and a netmask of
255.255.255.0. For help with setting up a static IP address on your computer, refer to
“Troubleshooting” on page 20.
3. Using the supplied crossover cable and the administration computer, connect the computer’s
LAN port to the LAN (1) port on the back of your SonicWALL Email Security appliance.
Login to the SonicWALL Email Security Appliance
1. Open a Web browser on the administration computer.
2. Enter http://192.168.168.169 (the default IP address of the SonicWALL Email Security
appliance) in the Location or Address bar. The SonicWALL Email Security Web management
login screen displays.
Page 11

10 | Email Security Software
Note:
z
Depending on your browser settings, one or more security warnings may display while
connecting to the Email Security Web management interface. Choose to accept the certificates
in order to log into the SonicWALL Email Security appliance.
3. Log into SonicWALL Email Security appliance using “admin” as the user name and
“password” as the password.
Initial System Configuration
1. The first time you log in to the SonicWALL Email Security appliance, you are directed to the
system configuration page. Configure your settings as follows:
Page 12

Monitoring
Getting Started Guide 7.0 | 11
Email address of
the administrator
who receives
The email address of the mail server administrator.
Enter the complete email address.
For example, user@example.com
emergency alerts:
Postmaster for the
MTA:
The email address of the Mail Transfer Agent
administrator who will receive non-deliverable
receipts.
For example, mail@example.com
Name or IP
address of backup
SMTP servers:
Enter fully qualified domain names or IP
addresses.
For example, mail2.example.com or 10.100.0.1
Hostname and Networking
Hostname: Enter a hostname you can use within your network to
address the SonicWALL Email Security appliance.
Enter a fully qualified domain name.
For example, emailsecurity.example.com
Get all network
settings from
DHCP:
Select this if you want your SonicWALL Email Security appliance to get dynamic IP settings from the
DHCP server on your network.
Use the static settings below:
Date and Time
System Date and
Time:
Current Time
Zone:
Available Time
Zones:
Automatically
Adjust for Daylight Savings
Time:
Select this to assign your SonicWALL Email Security
appliance a static IP address.
Enter:
• This machine's IP address
• Primary DNS server IP address (the local DNS server
that has the MX record for your mail server)
• Fallback DNS server IP address
• Default gateway IP address
• Subnet mask
Select the current year, month, day, hour, and
minute.
Displays the currently configured time zone.
Select the time zone for your area.
Select this if your area observes Daylight Saving
Time.
Page 13

12 | Email Security Software
Select the proper time zone to ensure optimal network performance of your SonicWALL Email
Security appliance.
1. Click the Apply Changes button to save this configuration.
2. A popup will display. Click the Continue button to reboot the SonicWALL Email Security
appliance with your new settings.
3. Disconnect the crossover cable from the SonicWALL Email Security appliance.
4. Reset your administration computer’s IP settings to work with your network. For example, if
your network uses DHCP, reset your Local Area Connection to obtain an IP address and DNS
settings dynamically from the server.
5. Reconnect your administration computer to your network. You will use the network to access
the SonicWALL Email Security appliance in the next steps.
Activating the Email Security License Subscriptions
SonicWALL Email Security provides dynamic licensing, which allows you to activate your licenses by
logging into your mysonicwall.com account. The mysonicwall.com server automatically uses the
serial number and authentication code that came with your Email Security appliance.
X To purchase or upgrade your Email Security license subscriptions:
1. Log in to mysonicwall.com.
2. Choose My Products from the left navigation bar. The Add New Product page appears.
3. Enter your serial number, the friendly name if you wish, and choose the product group. The
serial number is found on the tri-fold postcard or email that confirmed your SonicWALL Email
Security order.
4. Click the Register button. The product is added to the list of your registered products. You
can then click on it to add or activate services.
5. You can check that the registration is correct by logging in to your SonicWALL Email Security
administration site and clicking System/License Management. All your license information
should be available. If it is not, click the Test Connectivity to SonicWALL button to check
that you are connected.
Note:
z
If you purchased Total Secure Email, licensing is automatic and you do not need to take any
action at all to activate your licenses.
Page 14

Connecting and Configuring Network Settings
4
This section contains the following sub-sections:
z
“Connecting the SonicWALL Email Secu rity to Your Network” on page 13
z
“The SonicWALL Email Security Interface” on page 14
z
“Changing the Default Administrator Password” on page 14
z
“Using Quick Configuration to Set Up Email Management” on page 15
Connecting the SonicWALL EmailSecurity to Your Network
Your SonicWALL Email Security appliance is designed to operate in most network setups with
minimal configuration. The diagrams below provide a “before” and “after” view of a network using
SonicWALL Email Security.
Mail Flow Before SonicWALL Email Security
Incoming
Email
Getting Started Guide 7.0 | 13
Outgoing
Email
Mail Flow After SonicWALL Email Security
Local
Clients
Incoming
Email
EMAIL SECURITY 8000
Outgoing
Email
1. Plug one end of the provided Ethernet cable into the LAN port on the back of your SonicWALL
Email Security appliance.
2. Plug the other end of the cable into an open port on your network hub or switch.
Note:
z
Your SonicWALL Email Security Appliance will perform better if you follow the shutdown
procedures when you need to power-down. T o shut down your appliance, use the web interface,
or press the power button on the front of the appliance once. Holding down the power button
or unplugging your appliance does not give it time to write all the data in volatile memory to
stable memory, and you may lose settings or data.
Page 15

14 | Email Security Software
The SonicWALL Email Security Interface
This section describes the SonicWALL Email Security user interface.
User’s login
User’s role
Click here to send a
message to SonicWALL
Technical Support
For a detailed SonicWALL Email Security user interface overview, refer to the SonicWALL Email
Security Administrator’s Guide.
Click here to get application
information
Changing the Default Administrator Password
Change the default password for security reasons.
X To change the default password:
1. Login to the SonicWALL Email Security appliance using the IP address you entered in
“Hostname and Networking” on page 11.
2. Enter a new management password into the Password field.
3. Navigate to the System > Administration page.
4. Enter it again in the Confirm Password field.
5. Click Apply Changes.
Click here to change
UI language
Page 16

Getting Started Guide 7.0 | 15
Using Quick Configuration to Set Up Email Management
The Quick Configuration page will walk you step-by-step through the configuration of your
SonicWALL Email Security appliance. Use this window the first time you configure SonicWALL Email
Security if you are installing SonicWALL Email Security as an All-In-One server and have only one
downstream server.
The information you enter for LDAP configuration is used to authenticate users as they log into their
personal Junk Boxes.
For detailed configuration instruct ions, refer to the SonicWALL Email Security Administrator’s Guide.
X To use Quick Configuration:
1. Navigate to the System > Administration page.
2. Click Click Here for Quick Configuration.
3. In the Quick Configuration dialog box under Network Architecture, enter the host name or
IP address and the port into the Inbound destination server fields.
The inbound destination server is the email server that will accept good email after SonicWALL
Email Security removes and quarantines junk email. For example, this could be the IP address
of a Microsoft Exchange server. The default port is 25.
4. For Inbound SMTP setup, select one of the following:
{
Allow SMTP recipient addresses to all domains on inbound path or...
{
This option does not restrict incoming email to any domain.
{
Only allow SMTP recipient addresses to these domains on inbound path
This option allows you to specify the domains to which incoming email will be delivered. In
the text box, type the allowed domains one per line.
5. Click Test Mail Servers to verify connectivity to the downstream Email Security server
specified in preceding steps.
6. Select the Outbound path setup check box to route outbound email across the Internet
using MX records.
7. Under LDAP Configuration, enter a hostname or IP address into the LDAP server name field.
This is often your Exchange server or email server.
Page 17

16 | Email Security Software
8. Select the type of LDAP server from the LDAP server type drop-down list.
9. Enter a valid LDAP login name and password into the Login name and Password fields. Click
What is this? for more information.
10. Click Test LDAP Login and Test LDAP Query to verify your settings.
11. Enter one or more NetBIOS domain name in the NetBIOS domain names field. Click What
is this? for more information.
12. Under Message Management, specify how junk mail will be handled by selecting one of the
following:
{
Quarantine junk - sends junk mail to the user’s junk box
{
Deliver all messages to users - does not separate junk mail from good email
13. Under Junk Box Summary, to send daily summary messages about junk mail caught by
SonicWALL Email Security, select Send daily summaries.
14. To allow users to preview their junk mail messages with unjunking them, select Users can
preview their own quarantined junk mail
Summaries will contain a preview link for each junk email.
15. Type the URL where users can view their email junk boxes in the URL for user view field.
Click Test this Link to verify connectivity.
16. Under Updates, click Test Connectivity to SonicWALL to test your connection to
mysonicwall.com for automated software updates.
17. Click Apply Changes.
.
Page 18

5
Verification and Further Configuration
This section contains the following subsections:
z
“Routing Mail to Your SonicWALL Email Security” on page 17
z
“Verifying Mail from the Internet Through Your SonicWALL Email Security” on page 17
z
“Configuring Outbound Mail Filtering” on page 17
Routing Mail to Your SonicWALL Email Security
For your SonicWALL Email Security appliance to start filtering and monitoring mail, you must reroute mail traffic through your SonicWALL Email Security appliance. Mail traffic must pass from the
Internet to the appliance, and then the appliance sends the good mail on to your mail server.
You ha ve two choi ces to route ma il traffi c to your So nicW ALL Email Secu rity appli ance instead of to
your mail server:
z
Change the MX record in your DNS server to resolve to the IP address of your SonicWALL Email
Security appliance. You may have to work with your ISP to change this record.
z
Create a rule in your firewall or router to route all port 25 (SMTP mail) tr affic to your SonicW ALL
Email Security appliance. Refer to your firewall or router documentation for instructions on
creating rules to route traffic.
Getting Started Guide 7.0 | 17
Verifying Mail from the Internet Through Your SonicWALL Email Security
1. Go to an external mail account, for example Yahoo mail or GMail.
2. Create a new email message:
To: An email address where you receive email that is
on the mail server for which you have configured
the SonicWALL Email Security appliance.
Subject: SonicWALL Email Security Verification Message
Body: SonicWALL Email Security Verification Message
3. Send the message.
4. In the SonicWALL Email Security appliance administrative interface, click the Auditing button
on the top.
5. Check the Inbound auditing reports to make sure the email appears as Delivered.
6. Check the mail account you sent the message to. If you received the message, you have
correctly configured your SonicWALL Email Security appliance.
Configuring Outbound Mail Filtering
Your SonicWALL Email Security appliance can filter outbound mail from your mail server to the
Internet. To configure outbound mail filtering, you configure both your mail server and your
SonicWALL Email Security appliance for the outbound mail path.
Configure the outbound mail destination of your mail server to point to the IP address or host name
of your SonicWALL Email Security appliance. This is typically done by configuring a Smart Host on
your mail server.
The configuration steps for Exchange Server 2003 are provided here. See the documentation on
your mail server for specific instructions.
1. In the Exchange System Manager, navigate to Servers > [servername] > Protocols >
SMTP > Default SMTP Virtual Server (or active server instance).
Page 19

18 | Email Security Software
2. Right-click Default SMTP Virtual Server, and select Properties.
3. Browse to the Delivery tab, and click the Advanced button.
4. In the Smart Host field, enter the FQDN on your SonicWALL Ema il Securi ty applianc e (such a s,
esa.example.com). Note: The Exchange Server must be able to resolve this host name.
5. Click OK.
On your SonicWALL Email Security appliance, in the Server Configuration > Network
Architecture page, configure a separate, outbound path to handle the outbound email flow at the
appliance (if not already configured).
Page 20

Getting Started Guide 7.0 | 19
Configure the path to use the MTA (MX routing or SmartHost) under Destination of Path.
You need to configure something unique between the inbound and outbound path to distinguish
inbound from outbound mail flow. A very simple way to do this is to have them listen on different
ports or enter the IP address of the Exchange Server as the Source IP Contacting Path on the
outbound path.
Example
Given:
10.100.0.10: Exchange Server (exch1.example.com)
10.100.0.100: SonicWALL Email Security appliance (esa.example.com)
You might have two paths like this:
Source IP Listen On Destination
Inbound Any Any:25 (proxy) exch1.example.com:25
Outbound 10.100.0.10 Any:25 MX
In this scenario, any message that arrives at the SonicWALL Email Security appliance from
10.100.0.10 will be treated as an outbound message, handed off to the MTA component in the
system, which will deliver the message via MX-lookup on the domain in the TO field. Messages that
arrive at the SonicWALL Email Security appliance from any other IP address will be treated as an
Inbound message, and delivered directly to the Exchange server. The SonicWALL Email Security
appliance always gives preference to specific matches (for example an exact IP address match takes
precedence over “Any”).
Another example using port numbers to distinguish which path a message should take:
Source IP Listen On Destination
Inbound Any Any:25 (proxy) exch1.example.com:25
Outbound Any Any:2525 MX
Another alternative would be to assign your SonicWALL Email Security appliance multiple IP
addresses, and have it listen on one for inbound and one for outbound.
In all of the above cases, the admin will configure Exchange to deliver outbound email to the IP
address and port number where the SonicWALL Email Security appliance is listening for outbound
mail.
To test your SonicWALL Email Security appliance, click the Auditing button at the top of the
SonicWALL Email Security appliance user interface and search for your sent email to verify it has
been sent and received.
Page 21

20 | Email Security Software
Troubleshooting
6
This section contains the following subsection:
z
Configuring a Static IP Address
Configuring a Static IP Address
Complete the following section based on your operating system in order to configure your
management computer with a static IP address:
Windows XP
1. From the Start menu, highlight Connect To and then select Show All Connections.
2. Open the Local Area Connection Properties window.
3. Double-click Internet Protocol (TCP/IP) to open the Internet Protocol (TCP/IP)
Properties window.
4. Select Use the following IP address and type 192.168.168.50 in the IP address field.
5. Type 255.255.255.0 in the Subnet Mask field.
6. Click OK for the settings to take effect.
Windows 2000
1. From your Windows Start menu, select Settings.
2. Open Network and Dial-up Connections.
3. Click Properties.
4. Highlight Internet Protocol (TCP /IP ) and click Properties.
5. Select Use the following IP address and type 192.168.168.50 in the IP address field.
6. Type 255.255.255.0 in the Subnet Mask field.
7. Click OK for the settings to take effect.
Windows NT
1. From the Start menu, highlight Settings and then select Control Panel.
2. Open Network.
3. Double-click TCP/IP in the TCP/IP Properties window.
4. Select Specify an IP Address and type 192.168.168.50 in the IP address field.
5. Type 255.255.255.0 in the Subnet Mask field.
6. Click OK, and then click OK again.
7. Restart the computer for the changes to take effect.
Page 22

Getting Started Guide 7.0 | 21
SonicWALL Email Security Appliance Regulatory Statemen t and Safety Instructions
Regulatory Model/Type Product Name
1RK10-04D Email Security 8000
This product hardware based on IBM xSeries 336 Type 8837, Model 15U. Refer to safety
documentation in this manual and to the complete IBM Safety and EMC information on the
SonicWALL Resource CD included with this product.
Additional language safety and EMC information can be found on the SonicWALL Resource CD
included with this product.
Safety
Page 23

22 | Email Security Software
Page 24

Getting Started Guide 7.0 | 23
Page 25

24 | Email Security Software
For additional safety and regulatory information, refer to the IBM
documentation located on the SonicWALL Resource CD incl uded with
this product.
Page 26

Getting Started Guide 7.0 | 25
Rack Installation Instructions
Review the documentation that comes with your rack cabinet for safety and cabling information. Before
installing your server in a rack cabinet, review the following guidelines:
v Make sure that the room air temperature is below 35°C (95°F).
v Do not block any air vents; usually, 15 cm (6 in.) of air space in the rear and 5 cm (2 in.) in the front
provides proper airflow.
v Plan the device installation starting at the bottom of the rack cabinet.
v Install the heaviest device in the bottom of the rack cabinet.
v Do not extend more than one device out of the rack cabinet at the same time.
v Remove the rack doors and side panels to provide easier access during installation.
v Connect the server to a properly grounded outlet.
v Do not overload the power outlet when installing multiple devices in the rack cabinet.
v The slide rails in this kit come preset to the correct length for installation in an IBM rack cabinet, and
they are adjustable for other rack cabinets.
v The slide rails are marked (RIGHT/FRONT and LEFT/FRONT) for proper placement on the
rack-cabinet flanges.
This symbol identifies a Caution statement. Always read the information that accompanies this symbol
before you proceed with the installation.
Safety Information, Statement 4
Use safe practices when lifting.
Rack Safety Information, Statement 6
Do not place any objects on top of a
rack-mounted device unless that rack-mounted
device is intended for use as a shelf.
This server does not require any tools for the installation procedure unless you are shipping the server in
the rack cabinet. If you are shipping the server in the rack cabinet, you need a Phillips screwdriver. The
following illustration shows the items that you need for installing the server in a rack cabinet. If any
items are missing or damaged, contact your place of purchase.
≥18 kg (39.7 lb)
≥32 kg (70.5 lb)
≥55 kg (121.2 lb)
Page 27

26 | Email Security Software
1
2
Pins extended through:
• Rack-mount flange
• Rail-mount flange
Pins not extended through:
• Rack-mount flange
• Rail-mount flange
Slide the pins away from the rail-mount flange:
Press behind the slide-rail release latch 1 and
hold it to prevent the rail from sliding back. Press
the tab 2 away from the rail. Press the tab 3
back, and slide the rear rack-bracket pins away
from the rail-mount flange4. Slide the pins back
until the bracket stays in an open position.
Attention: Do not remove tab 5unless you are
installing the rails on a non IBM rail-mount flange
with a thickness greater than 3.175 mm (0.125 in.).
If you remove tab 5, you must insert an M6 screw
through the bottom hole of the rail-mount flange
4 on all four flanges of the rack.
Attach the rear rail-adjustment bracket to the rack:
Place the rack-mount flange 1 between the
rail-mount flange and the rack-bracket pins. Press
the tab 2; the rack-bracket pins snap into place,
sliding through the rack-mount flange1 and
rail-mount flange. Lift the slide-rail release latch
3, and then slide the front rail toward the front of
the rack.
Attention: Make sure that the rail is securely
clamped against the rack-mount flange.
2
Page 28

3
Pins extended through:
• Rack-mount flange
• Rail-mount flange
Pins not extended through:
• Rack-mount flange
• Rail-mount flange
4
Server
Side release
latch
Getting Started Guide 7.0 | 27
Rail-lock
pin
Attach the front rail bracket to the rack:
Press the tab 2 away from the rail. Slide the front
rack-bracket pins 1 away from the rail-mount
flange3 until the front rail bracket stays open.
Place the rack-mount flange 4between the front
rack-bracket pins 1and the rail-mount flange3.
Press the tab 2away from the rail. The pins snap
forward and extend through the rack-mount flange
and the rail-mount flange.
Attention: Make sure that the rail is securely
clamped against the rack-mount flange.
Install the cable-management arm:
Insert the cable-management arm into the five slots
in the rear of the server. When the
cable-management arm is inside all five slots, slide
the cable-management arm to the left by pulling the
locking cam back, away from the server.
Insert the server into the rack cabinet:
Align the server on the slide rails and push the
server into the rack cabinet. If the rail-lock pins are
extended out, pull the side release latches toward
you, which lifts up the rail-lock pins. Push the
server into the rack the remainder of the way.
6
Snap latch
Connect the cables and secure the
cable-management arm to the rack:
Pull the cable-management arm away from the
server, and connect the cables to the server. Route
the cables through the cable-management arm.
Move the cable-management arm toward the rail on
the right side, and snap the latch onto the rail.
Page 29

28 | Email Security Software
7
Extend the cable-management arm and fasten the
cables:
Attention: Make sure that you route Fibre
Channel cables through the tab 1, to ensure
proper bend radius and prevent damage to these
cables.
Extend the cable-management arm by sliding the
server toward the front of the rack. The rail-lock
pins stop the server halfway along the rack. Secure
the cables by using the straps that are attached to
the cable-management arm.
Slide the server back into the rack cabinet.
To remove the server from the rack, reverse these instructions. Store this information with your server
documentation for future use.
8
Secure the server to the rack:
Before you transport the rack cabinet to another
location with the server installed, you must secure
the server to the rack. If necessary, disconnect the
cables from the rear of the server; then, slide the
server out of the rack 150 mm (6 in.) and insert the
M6 screws in each slide rail. Then, secure the server
to the rack cabinet with the M6 screws and
reconnect the cables.
First Edition (July 2004)
Printed in the U.S.A.
IBM is a trademark of the IBM Corporation in the United States, other countries, or both.
© Copyright International Business Machines Corporation 2004. All rights reserved.
US Government Users Restricted Rights – Use, duplication or disclosure restricted by GSA ADP Schedule Contract
with IBM Corp.
(1P) P/N: 25K9195
Page 30

Copyright Notice
Trademarks
Getting Started Guide 7.0 | 29
© 2008 SonicWALL, Inc.
All rights reserved.
Under the copyright laws, this manual or the software described within, cannot be copied, in whole
or part, without the written consent of the manufact urer, except in the normal use of t he software
to make a backup copy. The same proprietary and copyright notices must be affixed to any
permitted copies as were affixed to the original. This exception does not allow copies to be made
for others, whether or not sold, but all of the material purchased (with all backup copies) can be
sold, given, or loaned to another person. Under the law, copying includes translating into another
language or format.
Specifications and descriptions subject to change without notice.
SonicWALL is a registered trademark of SonicWALL, Inc.
Microsoft Windows 98, Windows NT, Windows 2000, Windows XP, Windows Server 2003, Internet
Explorer, and Active Directory are trademarks or registered trademarks of Microsoft Corporation.
Adobe, Acrobat, and Acrobat Reader are either registered trademarks or trademarks of Adobe
Systems Incorporated in the U.S. and/or other countries.
Java is a trademark or registered trademark of Sun Microsystems, Inc. om the U.S. or other
countries.
Apache Tomcat is a trademark of Apache Software Foundation.
Firebird is a registered trademark of the Firebird Foundation, Inc.
Other product and company names mentioned herein may be trademarks and/or registered
trademarks of their respective companies and are the sole property of their respective
manufacturers.
SonicWALL GPL Source Code
GNU General Public License (GPL)
SonicWALL will provide a machine-readable copy of the GPL open source on a CD.
To obtain a complete machine-readable copy, please send your written request, along with a
certified check or money order in the amount of US $25.00 payable to “SonicWALL, Inc.” to:
General Public License Source Code Request
SonicWALL, Inc. Attn: Jennifer Anderson
1143 Borregas Ave.
Sunnyvale, CA 94089
Page 31

30 | Email Security Software
Page 32

Son icWAL L, In c.
1143 Bor regas Aven ue T +1 408.745.9600 w ww.so nicwall .com
Sunny vale CA 94089-1306 F +1 408.745.9300
PN: 232-000703-00 Revision A
©2008 Soni cWALL, Inc . is a reg istered t rademar k of Soni cWALL, Inc . Other product names me ntioned h erein may be trad emarks and/or register ed trad emarks o f their re specti ve compa nies.
Spec ication s and des cription s subjec t to chan ge witho ut notice .
 Loading...