

SonicWALL Email Security 200, Email Security 400, Email Security 500, Email Security 6000, Email Security 300 Getting Started Manual
Page 1

SonicWALL® Email Security
Getting Started Guide
Version 7.1
SonicWALL, Inc.
1143 Borregas Avenue
Sunnyvale, CA 94089-1306
Phone: +1.408.745.9600
Fax: +1.408.745.9300
E-mail: info@sonicwall.com
PN: 232-001700-00 Rev. A
Page 2

Copyright Notice
© 2009 SonicWALL, Inc.
All rights reserved.
Under the copyright laws, this manual or the software described within, can not be copied, in whole or part, without the written consent o f the
manufacturer, except in the normal use of the software to make a backup copy. The same proprietary and copyright notices must be affixed to
any permitted copies as were affixed to the original. This exception does not allow copies to be made for others, whet her or not sold, but all of
the material purchased (with all backup copies) can be sold, given, or loaned to another person. Under the law, copying includes translating
into another language or format.
Specifications and descripti ons subject to change without notice.
Trademarks
SonicWALL is a registered trademark of S onicWALL, Inc.
Other product and company names mentioned herein may be trademarks and/or registered trademarks of their respective companies and are
the sole property of their respective manufacturers.
Limited Warranty
SonicWALL, Inc. warrants that commencing from the delivery date to Customer (but in any case commencing not more than ninety (90) days
after the original shipment by So nicWALL), and continuing for a period of twelve (12) months, that the product will be free from defects i n
materials and workmanship under normal use. This Limited Warranty is not transferable and applies only to the original end user of the product.
SonicWALL and its suppliers' entire liability and Customer's sole and exclusive remedy under this limited warranty will be shipment of a
replacement product. At SonicWALL's discretion the replacement product may be of equal or greater functionality and may be of either new or
like-new quality. SonicWALL's obligations under this warranty are contingent upon the return of the defective product according to the terms of
SonicWALL's then-current Support Services policies.
This warranty does not apply if the product has been subjected to abnormal electrical stress, damaged by accident, abuse, misuse or
misapplication, or has been modifi ed without the written permission of SonicWALL.
DISCLAIMER OF WARRANTY. EXCEPT AS SPECIFIED IN THIS WARRANTY, ALL EXPRESS OR IMPL IED CONDITIONS,
REPRESENTATIONS, AND WARRANTIES INCLUDING, WITHOUT LIMITATION, ANY IMPLIED WARRANTY OR CONDIT ION OF
MERCHANTABILITY, FITNESS FOR A PARTICULAR PURPOSE, NONINFRINGEMENT, SATISFACTORY QUALITY OR ARISING FROM A
COURSE OF DEALING, LAW, USAGE, OR TRADE PRACTICE, ARE HEREBY EXCLUDED TO THE MAXIMUM EXTENT ALLOWED BY
APPLICABLE LAW. TO THE EXTENT AN IMPLIED WARRANTY CANNOT BE EXCLUDED, SUCH WARRANTY IS LIMITED IN DURA TION
TO THE WARRANTY PERIOD. BECAUSE SOME STATES OR JURISDICTIONS DO NOT ALLOW LIMITATIONS ON HOW LONG AN
IMPLIED WARRANTY LASTS, THE ABOVE LIMITATION MAY NOT APPLY TO YOU. THIS WARRANTY GIVES YOU SPECIFIC LEGAL
RIGHTS, AND YOU MAY ALSO HAVE OTHER RIGHTS WHICH VARY FROM JURISDICTION TO JURISDICTION. This di sclaimer and
exclusion shall apply even if the express warranty set forth above fails of its essential purpose.
DISCLAIMER OF LIABILITY. SONICWALL'S SOLE LIABILITY IS THE SHIPMENT OF A REPLAC EMENT PRODUCT AS DESCRIBED IN
THE ABOVE LIMITED WARRANTY. IN NO EVENT SHALL SONICWALL OR ITS SUP PLIERS BE LIABLE FOR ANY DAMAGES
WHATSOEVER, INCLUDING, WITHOUT LIMITATION, DAMAGES FOR LOSS OF PROFITS, BUSINESS INTERRUPTION, LOSS OF
INFORMATION, OR OTHER PECUNIARY LOSS ARISING OUT OF THE USE OR INABILITY TO USE THE PRODUCT, OR FOR SPECIAL,
INDIRECT, CONSEQUENTIAL, INCIDENTAL, OR PUNITIVE DAMAGES HOWEVER CAUSED AND REGARDLESS OF THE THEORY OF
LIABILITY ARISING OUT OF THE USE OF OR INABILITY TO USE HARDWARE OR SOFTWARE EVEN IF SONICWALL OR ITS
SUPPLIERS HAVE BEEN ADVISED OF THE POSSIBILITY OF SUCH DAMAGES. In no event shall SonicWALL or its suppliers' liability to
Customer, whether in contract, tort (including negligence), or otherwise, exceed the price paid by Customer. The foregoing limitations sh all
apply even if the above-stated warra nty fails of its essential purpose. BECAUS E SOME STATES OR JURISDICTIONS DO NOT ALLOW
LIMITATION OR EXCLUSION OF CONSEQUENTIAL OR INCIDENTAL DAMAGES, THE ABOVE LIMITATION MAY NOT APPLY TO YOU.
NOTE: The SonicWALL Email Security software service is an annual subscription which is subject to the terms and conditions of SonicWALL,
Inc.’s applicable subscription agreement and includes:
Product updates, SonicWALL thre at signature updates, and standard technical support for one (1) year from the date of purchase.
SonicWALL Email Security appliances are integr ated hardware and software solutions, which include SonicWALL Email Security software.
SonicWALL Email Security appliances are subject to the terms and conditions of SonicWALL, Inc.’s applicable license agreement. Updates to
the SonicWALL Email Security software, SonicWA LL Spam Signature Updates, and technical support may be purchased on an annual basis.
AntiVirus support is optionally available.
Page 3

SonicWALL Email Security 200, 300, 400, 500, 6000
Getting Started Guide
This Getting Started Guide contains installation procedures and configuration guidelines for
deploying a SonicWALL Email Security appliance on your network.
SonicWALL Email Security provides effective, high-performance and easy-to-use inbound and
outbound email threat protection. Ideal for the small to medium size business, this self-running,
self-updating solution delivers powerful protection against spam, virus and phishing attacks in
addition to preventing leaks of confidential information. Combining anti-spam, anti-phishing,
content filtering, policy management and content compliance capabilities in a single seamlessly
integrated solution, SonicWALL Email Security solutions provide powerful protection without
complexity.
Note:
z
SonicWALL TotalSecure Email provides complete protection from spam, virus attacks and
phishing. Without TotalS ecure Email , to use the spam and phishing protection provided by the
SonicWALL Email Security appliance, you must have a subscription to SonicWALL Email
Protection and Dynamic Support. If you need to purchase a subscription, contact your
SonicWALL vendor.
Please read this entire Getting Started Guide before setting up any of the following appliances:
z
SonicWALL Email Security 200
z
SonicWALL Email Security 300, S onicWALL Email Security 400
z
SonicWALL Email Security 500
z
SonicWALL Email Security 6000 appliance.
Note:
z
An updated version of this guide may exist. Refer to SonicWALL’s Documentation Web site for
complete, updated documentation at:
<http://www.sonicwall.com/Support.html>
.
Page 4

Contents
Getting Started Guide 7.1 | 2
This document contains the following sections:
“Before You Begin” on page 3
1
{
“Check Package Contents” on page 3
{
“What You Need to Begin” on page 3
{
“Record Configuration Information” on page 3
{
“Overview of the SonicWALL Email Security Appliance” on page 5
“Registering Your SonicWALL Email Security Appliance” on page 6
2
{
“Before You Register” on page 6
{
“Creating a mysonicwall.com Account” on page 6
{
“Registering Your SonicWALL Email Security Appliance” on page 7
“Initial Setup and Configuration” on page 8
3
{
“Apply Power to the SonicWALL Email Security” on page 8
{
“Connect Directly to the SonicWALL Email Security Appliance” on page 8
{
“Login to the SonicWALL Email Security Appliance” on page 8
{
“Initial System Configuration” on page 9
{
“Activating the Email Security License Subscriptions” on page 10
“Connecting and Configuring Network Settings” on page 12
4
{
“Connecting the SonicWALL Email Security to Your Network” on page 12
{
“The SonicWALL Email Security Interface” on page 13
{
“Changing the Default Administrator Password” on page 13
{
“Using Quick Configuration to Set Up Email Management” on page 14
“Verification and Further Configuration” on page 16
5
{
“Routing Mail to Your SonicWALL Email Security” on page 16
{
“Verifying Mail from the Internet Through Your SonicWALL Email Security” on page 16
{
“Configuring Outbound Mail Filtering” on page 16
Page 5

1
Before You Begin
Getting Started Guide 7.1 | 3
Check Package Contents
One SonicWALL Email Security appliance
One Getting Started Guide document
One Release Note document
One Thank You card
One SonicWALL Resource CD
One crossover cable (red)
One Ethernet cable (gray)
One power cord*
One RS232 CLI cable
*The included power cord is intended for use in North America only. For European Union (EU)
customers, a power cord is not included.
*Das eingeschlossene Netzkabel ist für Gebrauch in Nordamerikas nur vorgehabt.
Für Europaïsche Union (EU) Kunden, ist ein Netzkabel nicht eingeschlossen.
Any Items Missing?
If any items are missing from your package, contact:
SonicWALL Support
<http://www.sonicwall.com/us/Support.html>
Email:
customer_service@sonicwall.com
What You Need to Begin
z
A computer to use as a management station for initial configuration of SonicWALL Email
Security software
z
Internet Explorer 5.0 or higher
z
An Internet connection
Record Configuration Information
Before continuing, record the following configuration information for your reference:
Page 6

Registration Information
Getting Started Guide 7.1 | 4
Serial Number:
(xxxxxx-xxxxxx)
Authentication Code:
(xxx-xxx)
Networking Information
Ema il Se curi ty IP Addr ess:
Email S e c urity Subn e t Mask:
Gateway IP Address:
DNS Server 1:
Record the serial number found on the
top right access panel of your SonicWALL Email Security appliance.
Record the authentication code found
on the top right access panel of your
SonicWALL Email Security appliance.
Select a free static IP address for your
SonicWALL Email Security appliance
that is within the range of your local
subnet.
Enter the subnet mask for the local
subnet where you are installing your
SonicWALL Email Security appliance.
Record the IP address of your network’s
gateway device (such as your perimeter
firewall/router).
Record your DNS Server information.
DNS Serve r 2 (optional):
Host Name:
Password:
Email Server IP:
LDAP Server IP:
Record the fully qualified domain
name within your network for your
SonicWALL Email Security appliance
(maximum 32 characters).
Select a password for your SonicWALL Email Security appliance
(default is password).
Record the IP address or hostname of
your email server.
Record the IP address or hostname of
your directory services server, such as
LDAP or Microsoft Active Directory.
Page 7

Getting Started Guide 7.1 | 5
Overview of the SonicWALL Email Security Appliance
SonicWALL Email Security Appliance
HDD LED
Power LED
Cooling Fan
Power Supply
* Pressing the reset button for several seconds will result in a reboot of the SonicWALL Email
Security appliance.
Serial Port
LAN Port
Power B utton
Reset Button*
Alert: Do not plug devices into any ports (other than those indicated) unless explicitly
instructed to do so by a SonicWALL technical support representative. Doing so may
void your warranty.
HDD LED Indicates data transfer to and from the hard disk drive.
Power LED Indicates the SonicWALL Email Security appliance is pow-
ered on.
Reset Button Allows reboot of the SonicWALL Email Security appliance.
Power Button Allows the SonicWALL Email Security appliance to power
on (one press) or power off.
Cooling Fan Allows optimal air circulation.
Power Supply Allows the SonicWALL Email Security appliance to conn ect
to AC power using the supplied power cable.
LAN Port Allows the SonicWALL Email Security appliance to conn ect
to your local area network.
Serial Port Allows you to connect directly to the appliance via terminal
services to use the CLI.
Page 8

2
Registering Your SonicWALL Email Security Appliance
Register your appliance and activate your licenses for the SonicWALL Email Protection Subscription
and Dynamic Support.
This section contains the following sub-sections:
z
“Before You Register” on page 6
z
“Creating a mysonicwall.com Account” on page 6
z
“Registering Your SonicWALL Email Security Appliance” on page 7
Before You Register
You need a mysonicwall.com account to register the SonicWALL Email Security appliance. If you
already have a mysonicwall.com account, go to “Registering Your SonicWALL Email Security
Appliance” on page 7 to register your appliance.
Note:
z
mysonicwall.com registration information is not sold or shared with any other company.
Creating a mysonicwall.com Account
Getting Started Guide 7.1 | 6
Creating a mysonicwall.com account is fast, simple, and FREE. Simply complete an online
registration form.
1. In your Web browser, go to
2. In the User Login section, click If you are not a registered user,
3. Enter the account information, personal information, and preferences and click Submit.
Note:
z
You must enter a valid email address.
4. Follow the prompts to finish creating your account. SonicWALL will email a subscription code to
the email address you entered in the personal information.
5. When you return to the login screen, log in with your new username and password.
6. Confirm your account by entering t h e subscription code you received by email.
<https://www.mysonicwall.com/>.
Click here.
Congratulations! You have created and logged into your mysonicwall.com account.
Page 9

Getting Started Guide 7.1 | 7
Registering Your SonicWALL Email Security Appliance
1. Locate your SonicWALL Email Security Software serial number. It should be printed on the
label on the right-side of your SonicWALL Email Security appliance.
2. If you are not already logged into mysonicwall.com, go to
<https://www.mysonicwall.com/
3. Enter your serial number in the Quick Register field and click the small gray arrow. Follow
the on-screen instructions.
4. Confirm your serial number, enter a friendly name for your appliance, and enter your
authentication code in the Quick Register > Add New Product section.
5. Click Register.
6. Follow the online prompts to fill out the survey and complete the registration process.
> and log in.
Page 10

3
Initial Setup and Configuration
In this section, you will:
z
“Apply Power to the SonicWALL Email Security” on page 8
z
“Connect Directly to the SonicWALL Email Security Appliance” on page 8
z
“Login to the SonicWALL Email Security Appliance” on page 8
z
“Initial System Configuration” on page 9
z
“Activating the Email Security License Subscriptions” on page 10
Apply Power to the SonicWALL Email Security
1. Plug the power cord into the back of the SonicWALL Email Security appliance and into an
appropriate power outlet.
2. Turn on the power switch on the front, top, right corner of the appliance.
The Power LED on the front panel lights up green when you power on the Sonic WALL Email
Security appliance. The HDD LED lights up and may blink while the appliance performs a
series of diagnostic tests. When the HDD LED is no longer lit, the SonicWALL Email Security
appliance is ready for configuration.
Getting Started Guide 7.1 | 8
Connect Directly to the SonicWALL Email Security Appliance
The SonicWALL Email Security appliance comes pre-configured with an IP address of
192.168.168.169. Before you can connect your administration computer to it, you must configure
your administration computer to have an address in the same subnet.
1. Make a note of your computer’s current network settings.
2. Set the computer you use to manage the SonicWALL Email Security appliance to have a static
IP address in the 192.168.168.x range, such as 192.168.168.50 and a netmask of
255.255.255.0. For help with setting up a static IP address on your computer, refer to
“Troubleshooting” on page 19.
3. Using the supplied crossover cable and the computer you are using to administer the
SonicWALL Email Security appliance, connect the LAN port on the computer to the LAN port on
the back of your SonicWALL Email Security appliance.
Login to the SonicWALL Email Security Appliance
1. Open a Web browser on the computer you are using to administer the SonicWALL Email
Security appliance.
2. Enter http://192.168.168.169 (the default IP address of the SonicWALL Email Security
appliance) in the Location or Address bar. The SonicWALL Email Security Web management
login screen displays.
Page 11

Getting Started Guide 7.1 | 9
Note:
z
Depending on your browser settings, one or more security warnings may display while
connecting to the Email Security Web management interface. Choose to accept the certificates
in order to log into the SonicWALL Email Security appliance.
3. Log into SonicWALL Email Security appliance using “admin” as the user name and
“password” as the password.
Initial System Configuration
1. The first time you log in to the SonicWALL Email Security appliance, you are directed to the
system configuration page. Configure your settings as follows:
Monitoring
Email address of the
administrator who
receives emergency alerts:
Postmaster for the
MTA:
Name or IP address
of backup SMTP
servers:
The email address of the mail server administrator. Enter
the complete email address.
For example, user@example.com
The email address of the Mail Transfer Agent administrator
who will receive non-deliverable receipts.
For example, mail@example.com
Enter fully qualified domain names or IP addresses.
For example, mail2.example.com or 10.100.0.1
Page 12

Getting Started Guide 7.1 | 10
Hostname and Networking
Hostname: Enter a hostname you can use within your network to
address the SonicWALL Email Security appliance. Enter a
fully qualified domain name.
For example, emailsecurity.example.com
Get all network settings from DHCP:
Select this if you want your SonicWALL Email Security
appliance to get dynamic IP settings from the DHCP server
on your network.
Use the static settings below:
Select this to assign your SonicWALL Email Security appliance a static IP address.
Enter:
z
This machine's IP address
z
Primary DNS server IP address (the local DNS server that has
the MX record for your mail server)
z
Fallback DNS server IP address
z
Default gateway IP address
z
Subnet mask
Date and Time
System Date and
Time:
Current Time Zone: Displays the currently configured time zone.
Available Time
Zones:
Automatically Adjust
for Daylight Savings Time:
Select the current year, month, day, hour, and minute.
Select the time zone for your area.
Select this if your area observes Daylight Saving Time.
Note:
z
To ensure optimal network performance of your SonicWALL Email Security appliance, it is
important that you select the proper time zone.
1. Click the Apply Changes button to save this configuration. The appliance will reboot.
2. Disconnect the crossover cable from the SonicWALL Email Security appliance.
3. Reset your administration computer’s IP settings to work with your network. For example, if
your network uses DHCP, reset your Local Area Connection to obtain an IP address and DNS
settings dynamically from the server.
4. Reconnect your administration computer to your network. You will use the network to access
the SonicWALL Email Security appliance in the next steps.
Activating the Email Security License Subscriptions
SonicWALL Email Security provides dynamic licensing, which allows you to activate your licenses by
simply logging into your mysonicwall.com account. The mysonicwall.com server automatically uses
the serial number and authentication code that came with your Email Security appliance.
Page 13

Getting Started Guide 7.1 | 11
X To purchase or upgrade your Email Security license subscriptions:
1. Log in to mysonicwall.com.
2. Choose My Products from the left navigation bar. The Add New Product page appears.
3. Enter your serial number, the friendly name if you wish, and choose the product group. The
serial number is found on the tri-fold postcard or email that confirmed your SonicWALL Email
Security order.
4. Click the Register button. The product is added to the list of your registered products. You
can then click on it to add or activate services.
5. You can check that the regist ration is correct by logging in to your SonicWALL Email Security
administration site and clicking System/License Management. All your license information
should be available. If it is not, click the Test Connectivity to SonicWALL button to check
that you are connected.
Note
z
If you purchased Total Secure Email, licensing is automatic and you do not need to take any
action at all to activate your licenses.
Page 14
4
Connecting and Configuring Network Settings
This section contains the following sub-sections:
z
“Connecting the SonicWALL Email S ecurity to Your Network” on page 12
z
“The SonicWALL Email Security Interface” on page 13
z
“Changing the Default Administrator Password” on page 13
z
“Using Quick Configuration to Set Up Email Management” on page 14
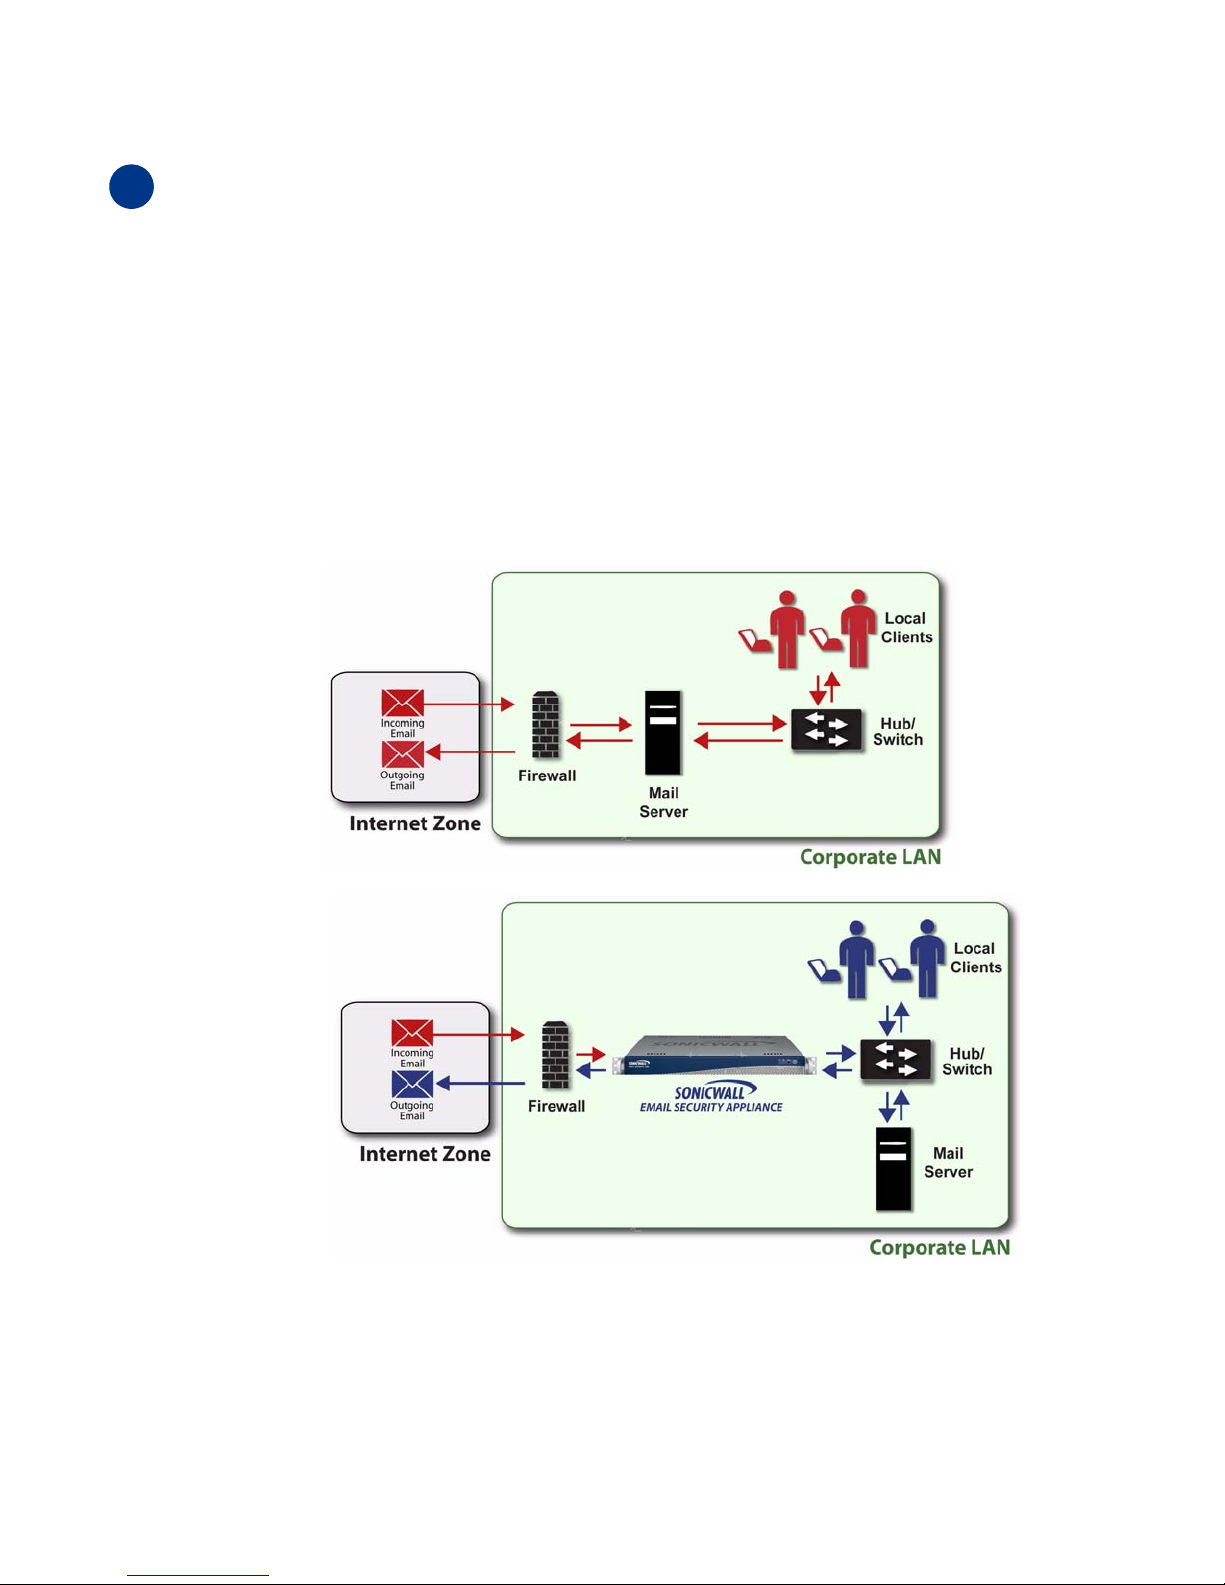
Connecting the SonicWALL EmailSecurity to Your Network
Your SonicWALL Email Security appliance is designed to operate in most network setups with
minimal configuration. The diagrams below provide a “before” and “after” view of a network using
SonicWALL Email Security.
Before and After
Getting Started Guide 7.1 | 12
1. Plug one end of the provided Ethernet cable into the LAN port on the back of your SonicWALL
Email Security appliance.
2. Plug the other end of the cable into an open port on your network hub or switch.
Page 15

The SonicWALL Email Security Interface
This section describes the SonicWALL Email Security user interface.
Getting Started Guide 7.1 | 13
User’s login
User’s role
Click here to send a message
to SonicWALL Technical
Support
Note
z
For a detailed SonicWALL Email Security user interface overview, refer to the Email Security
Appliance Administrator Guide.
Click here to get application
information
Click here to change
the interface language
Changing the Default Administrator Password
Change the default password for security reasons.
X To change the default password:
1. Login to the SonicWALL Email Security appliance using the IP address you en tered in
“Hostname and Networking” on page 10.
2. Navigate to the System > Administration page.
3. Enter a new management password into the Password field.
4. Enter it again in the Confirm Password field.
5. Click Apply Changes.
Page 16

Getting Started Guide 7.1 | 14
Using Quick Configuration to Set Up Email Management
The Quick Configuration page will walk you step-by-step through the configuration of your
SonicWALL Email Security appliance. Use this window the first time you configure SonicWALL Email
Security if you are installing SonicWALL Email Security as an All-In-One server and have only one
downstream server.
The information you enter for LDAP configuration is used to authenticate users as they log into their
personal Junk Boxes.
For detailed configuration instruct ions, refer to the SonicWALL Email Security Administrator’s Guide.
X To use Quick Configuration:
1. Navigate to the System > Administration page.
2. Click Click Here for Quick Configuration.
3. In the Quick Configuration dialog box under Network Architecture, enter the host name or
IP address and the port into the Inbound destination server fields.
The inbound destination server is the email server that will accept good email after SonicWALL
Email Security removes and quarantines junk email. For example, this could be the IP address
of a Microsoft Exchange server. The default port is 25.
4. For Inbound SMTP setup, select one of the following:
{
Allow SMTP recipient addresses to all domains on inbound path or...
{
This option does not restrict incoming email to any domain.
{
Only allow SMTP recipient addresses to these domains on inbound path
This option allows you to specify the domains to which incoming email will be delivered. In
the text box, type the allowed domains one per line.
5. Optionally click Test Mail Servers to verify connectivity to the downstream Email Security
server specified in preceding steps.
6. Select the Outbound path setup check box to route outbound email across the Internet
using MX records.
7. Under LDAP Configuration, enter a hostname or IP address into the LDAP server name field.
This is often your Exchange server or email server.
Page 17

Getting Started Guide 7.1 | 15
8. Select the type of LDAP server from the LDAP server type drop-down list.
9. Enter a valid LDAP login name and password into the Login name and Password fields. Click
What is this? for more information.
10. Click Test LDAP Login and Test LDAP Query to verify your settings.
11. Enter one or more NetBIOS domain name in the NetBIOS domain names field. Click What
is this? for more information.
12. Under Message Management, specify h ow junk mail will be handled by selecting one of the
following:
{
Quarantine junk - sends junk mail to the user’s junk box
{
Deliver all messages to users - does not separate junk mail from good email
13. Under Junk Box Summary, to send daily summary messages about junk mail caught by
SonicWALL Email Security, select Send daily summaries.
14. To allow users to preview their junk mail messages with unjunking them, select Users can
preview their own quarantined junk mail
.
Summaries will contain a preview link for each junk email.
15. Type the URL where users can view their email junk boxes in the URL for user view field.
Click Test this Link to verify connectivity.
16. Under Updates, click Test Connectivity to SonicWALL to test your connection to
mysonicwall.com for automated software updates.
17. Click Apply Changes.
Page 18

5
Verification and Further Configuration
This section contains the following subsections:
z
“Routing Mail to Your SonicWALL Email Security” on page 16
z
“Verifying Mail from the Internet Through Your SonicWALL Email Security” on page 16
z
“Configuring Outbound Mail Filtering” on page 16
Routing Mail to Your SonicWALL Email Security
For your SonicWALL Email Security appliance to start filtering and monitoring mail, you must reroute mail traffic through your SonicWALL Email Security appliance. Mail traffic must pass from the
Internet to the appliance, and then the appliance sends the good mail on to your mail server.
You ha ve two choi ces to route ma il traffi c to your So nicW ALL Email Secu rity applianc e instead of t o
your mail server:
z
Change the MX record in your DNS server to resolve to the IP address of your SonicWALL Email
Security appliance. You may have to work with your ISP to change this record.
z
Create a rule in your firewall or router to route all port 25 (SMTP mail) tr affic to your SonicW ALL
Email Security appliance. Refer to your firewall or router documentation for instructions on
creating rules to route traffic.
Getting Started Guide 7.1 | 16
Verifying Mail from the Internet Through Your SonicWALL Email Security
1. Go to an external mail account, for example Yahoo mail or GMail.
2. Create a new email message:
To: An email address where you receive email that is on the
mail server for which you have configured the SonicWALL
Email Security appliance.
Subject: SonicWALL Email Security Verification Message
Body: SonicWALL Email Security Verification Message
3. Send the message.
4. In the SonicWALL Email Security appliance administrative interface, click the Auditing button
on the top.
5. Check the Inbound auditing reports to make sure the email appears as Delivered.
6. Check the mail account you sent the message to. If you received the message, you have
correctly configured your SonicWALL Email Security appliance.
Configuring Outbound Mail Filtering
Your SonicWALL Email Security appliance can filter outbound mail from your mail server to the
Internet. To configure outbound mail filtering, you configure both your mail server and your
SonicWALL Email Security appliance for the outbound mail path.
Configure the outbound mail destination of your mail server to point to the IP address or host name
of your SonicWALL Email Security appliance. This is typically done by configuring a Smart Host on
your mail server.
The configuration steps for Exchange Server 2003 are provided here. See the documentation on
your mail server for specific instructions.
1. In the Exchange System Manager, navigate to Servers > [servername] > Protocols >
SMTP > Default SMTP Virtual Server (or active server instance).
Page 19

Getting Started Guide 7.1 | 17
2. Right-click Default SMTP Virtual Server, and select Properties.
3. Browse to the Delivery tab, and click the Advanced button.
4. In the Smart Host field, enter the F QDN on your S onicWALL Emai l Security appliance ( such as,
esa.example.com). Note: The Exchange Server must be able to resolve this host name.
5. Click OK.
On your SonicWALL Email Security appliance, in the Server Configuration > Network
Architecture page, configure a separate, outbound path to handle the outbound email flow at the
appliance (if not already configured).
Page 20

Getting Started Guide 7.1 | 18
Configure the path to use the MTA (MX routing or SmartHost) under Destination of Path.
You need to configure something unique between the inbound and outbound path to distinguish
inbound from outbound mail flow. A very simple way to do this is to have them listen on different
ports or enter the IP address of the Exchange Server as the Source IP Contacting Path on the
outbound path.
Example
Given:
10.100.0.10: Exchange Server (exch1.example.com)
10.100.0.100: SonicWALL Email Security appliance (esa.example.com)
You might have two paths like this:
Source IP Listen On Destination
Inbound Any Any:25 (proxy) exch1.example.com:25
Outbound 10.100.0.10 Any:25 MX
In this scenario, any message that arrives at the SonicWALL Email Security appliance from
10.100.0.10 will be treated as an outbound message, handed off to the MTA component in the
system, which will deliver the message via MX-lookup on the domain in the TO field. Messages that
arrive at the SonicWALL Email Security appliance from any other IP address will be treated as an
Inbound message, and delivered directly to the Exchange server. The SonicWALL Email Security
appliance always gives preference to specific matches (for example an exact IP address match takes
precedence over “Any”).
Another example using port numbers to distinguish which path a message should take:
Source IP Listen On Destination
Inbound Any Any:25 (proxy) exch1.example.com:25
Outbound Any Any:2525 MX
Another alternative would be to assign your SonicWALL Email Security appliance multiple IP
addresses, and have it listen on one for inbound and one for outbound.
In all of the above cases, the admin will configure Exchange to deliver outbound email to the IP
address and port number where the SonicWALL Email Security appliance is listening for outbound
mail.To test your SonicWALL Email Security appliance, click the Auditing button at the top of the
SonicWALL Email Security appliance user interface and search for your sent email to verify it has
been sent and received.
Page 21

Troubleshooting
6
This section contains the following subsection:
z
Configuring a Static IP Address
Configuring a Static IP Address
Complete the following section based on your operating system in order to configure your
management computer with a static IP address:
Windows XP
1. From the Start menu, highlight Connect To and then select Show All Connections.
2. Open the Local Area Connection Properties window.
3. Double-click Internet Protocol (TCP/IP) to open the Internet Proto col (TCP/IP)
Properties window.
4. Select Use the following IP address and type 192.168.168.50 in the IP address field.
5. Type 255.255.255.0 in the Subnet Mask field.
6. Click OK for the settings to take effect.
Windows 2000
1. From your Windows Start menu, select Settings.
2. Open Network and Dial-up Connections.
3. Click Properties.
4. Highlight Internet Protocol (TCP /IP) and click Properties.
5. Select Use the following IP address and type 192.168.168.50 in the IP address field.
6. Type 255.255.255.0 in the Subnet Mask field.
7. Click OK for the settings to take effect.
Getting Started Guide 7.1 | 19
Windows NT
1. From the Start menu, highlight Settings and then select Control Panel.
2. Open Network.
3. Double-click TCP/IP in the TCP/IP Properties window.
4. Select Specify an IP Address and type 192.168.168.50 in the IP address field.
5. Type 255.255.255.0 in the Subnet Mask field.
6. Click OK, and then click OK again.
7. Restart the computer for the changes to take effect.
Page 22

Getting Started Guide 7.1 | 20
Rack Mounting the SonicWALL Email Security 200 / 300 / 400 / 500 / 6000
Appliance
The above SonicWALL appliances are designed to be mounted in a standard 19-inch rack mount
cabinet. The following conditions are required for proper installation:
Use the mounting hardware recommended by the rack manufacturer and ensure that the rack
is adequate for the application.
Four mounting screws, compatible with the rack design, must be used and hand tightened to
ensure secure installation. Choose a mounting location where all four mounting holes line up
with those of the mounting bars of the 19-inch rack mount cabinet.
Mount in a location away from direct sunlight and sources of heat. A maximum ambient
temperature of 104º F (40º C) is re commended.
Route cables away from power lines, fluorescent lighting fixtures, and sources of noise such as
radios, transmitters and broadband amplifiers.
The included power cord is intended for use in North America only. For European Union (EU)
customers, a power cord is not included.
Ensure that no water or excessive moisture can enter the unit.
Allow unrestricted airflow around the unit and through the vents on the side of the unit. A
minimum of 1 inch (25.44mm) clearance is recommended.
Mount the SonicWALL appliances evenly in the rack in order to prevent a hazardous condition
caused by uneven mechanical loading.
Consideration must be given to the connection of the equipment to the supply circuit and the
effect of overloading the circuits has minimal impact on overcurrent protection and supply
wiring. Appropriate consideration of equipment nameplate ratings must be used when
addressing this concern.
Reliable grounding of rack-mounted equipment must be maintained. Particular attention must
be given to power supply connections other than direct connections to th e branch circuits such
as power strips.
Weitere Hinweise zur Montage der Modell
Die oben genannten SonicWALL-Modelle sind für eine Montage in einem standardmäßigen 19-ZollRack konzipiert. Für eine ordnungsgemäße Montage müssen die folgenden Bedingungen erfüllt
werden:
z
Vergewissern Sie sich, dass das Rack für die Anwendung geeignet ist, und verwenden Sie das
vom Rack-Hersteller empfohlene Montagezubehör.
z
Verwenden Sie für eine sichere Montage vier passende Befestigungsschrauben, und ziehen Sie
diese mit der Hand an. Montieren Sie das Gerät so, dass sich die Anordnung der Montagelöcher
mit den Löchern der Träger im 19-Zoll-Rack deckt.
z
Wählen Sie für die Montage einen Ort, der keinem direkten Sonnenlicht ausgesetzt ist und sich
nicht in der Nähe von Wärmequellen befindet. Die Umgebungstemperatur darf nicht mehr als
40 °C betragen.
z
Führen Sie die Kabel nicht entlang von Stromleitungen, Leuchtstoffröhren und Störquellen wie
Funksendern oder Breitbandverstärkern.
{
Das eingeschlossene Netzkabel ist für Gebrauch in Nordamerikas nur vorgehabt. Für
Europaïsche Union (EU) Kunden, ist ein Netzkabel nicht eingeschlossen.
z
Stellen Sie sicher, dass das Gerät vor Wasser und hoher Luftfeuchtigkeit geschützt ist.
z
Stellen Sie sicher, dass die Luft um das Gerät herum zirkulieren kann und die Lüftungsschlitze
an der Seite des Gehäuses frei sind. Hier ist ein Belüftungsabstand von mindestens 26 mm
einzuhalten.
z
Bringen Sie die SonicWALL gerade im Rack an, um mögliche Gefahren durch ungleiche
mechanische Belastung zu vermeiden.
Page 23

z
Prüfen Sie den Anschluss des Geräts an die Stromversorgung, damit der Überstromschutz sowie
die elektrische Leitung nicht von einer eventuellen Überlastung der Stromversorgung
beeinflusst werden. Prüfen Sie dabei sorgfältig die Angaben auf dem Aufkleber des Geräts.
{
Vergewissern Sie sich, dass das Gerät sicher im Rack befes tigt ist. Insbeson dere muss auf
nicht direkte Anschlüsse an Stromquellen geachtet werden wie z. B. bei Verwendung von
Mehrfachsteckdosen.
SonicWALL Email Secu ri ty Appliance Regulatory
Statement and Safety Instructions
Regulatory Model/Type Product Name
1RK0F-04A, 1RK0E-041 Email Security 200
Email Security 300
1RK0F-04B, 1RK0E-041 Email Security 400
Email Security 500
Unauthorized Ports
Do not plug devices into any ports (other than those indicate d) unless explicitly instructed t o do so
by a SonicWALL technical support representative. Doing so may void your warranty.
Getting Started Guide 7.1 | 21
FCC Part 15 Class A Notice
This equipment was tested and found to comply with the limits for a Class A digital device, pursuant
to Part 15 of the FCC Rules. These limits are designed to provide reasonable protection against
harmful interference when the equipment is operated in a commercial environment. This equipment
generates, us es, and can radi ate radio frequency energy . And if not installed and used in accordance
with the instruction manual, the device may cause harmful interference to radio communications.
Operation of this equipment in a residential area is likely to cause harmful interference in which
case the user is required to correct the interference at his own expense.
Notice About Modifying Equipment
Alert: Modifying this equipment or using this equipment for purposes not shown in this
manual without the written consent of SonicWALL, Inc. could void the user’s authority to
operate this equipment.
Page 24

BMSI Statement
VCCI Statement
Canadian Radio Frequency Emissions Statement
This Class A digital apparatus complies with Canadian ICES-003.
Getting Started Guide 7.1 | 22
Cet appareil numérique de la classe A est conforme à toutes la norme NMB-003 du Canada.
CISPR 22 (EN 55022) Class A
Complies with EN 55022 Class A and CISPR22 Class A.
Alert: This is a class A product. In a domestic environment, this product may cause radio interference in
which case the user may be required to take adequate measures.
Declaration of Conformity
Application of council Directive Directive 89/336/EEC (EMC) and
72/23/EEC (LVD)
Standards to which conformity is declared EN 55022 (1998) Class A
EN 55024 (1998)
EN 61000-3-2 (2000) + A2
EN 61000-3-3 (1995) + A1
EN 60950-1 (2001) +A11
National Deviations: AT, AU, BE, CH, CN,
CZ, DE, DK, FI, FR, GB, GR, HU, IE, IL,
IN, IT, JP, KR, NL, NO, PL, SE, SG, SI
Regulatory Information for Korea
All products with country code “” (blank) and “A” are made in the USA.
All products with country code “B” are made in China.
All products with country code “C” or “D” are made in Taiwan R.O. C.
Page 25

All certificates held by NetSonic, Inc.
Lithium Battery Warning
The Lithium Battery used in the SonicWALL Internet security appliance may not be replaced by the
user. The SonicWALL must be returned to a SonicWALL authorized service center for replacement
with the same or equivalent type recommended by the manufacturer . If , for an y reason, the battery
or SonicWALL Internet security appliance must be disposed of, do so following the battery
manufacturer's instructions.
Cable Connections
All Ethernet RS232 (Console) cables are designed for intra-building connection to other equipment.
Do not connect these ports directly to communication wiring or other wiring that exits the building
where the SonicWALL is located.
Getting Started Guide 7.1 | 23
German Language Regulatory and Safety Instructions
Hinweis zur Lithiumbatterie
Die in der Internet Security appliance von SonicWALL verwendete Lithiumbatterie darf nicht vom
Benutzer ausgetauscht werden. Zum Austauschen der Batterie muss die SonicWALL in ein von
SonicWALL autorisiertes Service-Center gebracht werden. Dort wird die Batterie durch denselben
oder entsprechenden, vom Hersteller empfohlen en Batterietyp ersetzt. Beachten Sie bei einer
Entsorgung der Batterie oder der SonicWALL Internet Security appliance die diesbezüglichen
Anweisungen des Herstellers.
Kabelverbindungen
Alle Ethernet- und RS232-C-Kabel eignen sich für die Verbindung von Geräten in Innenräumen.
Schließen Sie an die Anschlüsse der SonicWALL keine Kabel an, die aus dem Gebäude herausgeführt
werden, in dem sich das Gerät befindet.
Page 26

Copyright Notice
© 2009 SonicWALL, Inc.
All rights reserved.
Under the copyright laws, this manual or the software described within, cannot be copied, in whole
or part, without the written consent of the manuf acturer, except i n th e n ormal use of t he software
to make a backup copy. The same proprietary and copyright notices must be affixed to any
permitted copies as were affixed to the original. This exception does not allow copies to be made
for others, whether or not sold, but all of the material purchased (with all backup copies) can be
sold, given, or loaned to another person. Under the law, copying includes translating into another
language or format.
Specifications and descriptions subject to change without notice.
Trademarks
SonicWALL is a registered trademark of SonicWALL, Inc.
Other product and company names mentioned herein may be trademarks and/or registered
trademarks of their respective companies and are the sole property of their respective
manufacturers.
SonicWALL GPL Source Code
Getting Started Guide 7.1 | 24
GNU General Public License (GPL)
SonicWALL will provide a machine-readable copy of the GPL open source on a CD.
To obtain a complete machine-readable copy, please send your written request, along with a
certified check or money order in the amount of US $25.00 payable to “SonicWALL, Inc.” to:
General Public License Source Code Request
SonicWALL, Inc. Attn: Jennifer Anderson
1143 Borregas Ave.
Sunnyvale, CA 94089
 Loading...