

Page 1

Cloud Edge Secure Access
Advanced Settings
Page 2

Contents
Networks 4
Private DNS 4
Selecting a Private DNS 4
DNS Filtering 5
Understanding DNS Filtering 5
Activating DNS Filtering 6
Routes 6
Split Tunneling 8
The Default Configuration is Automatic (Full Tunnel) 8
Split tunneling: Automatic Configuration 8
Split Tunneling: Manual Configuration 9
Site-to-Site Interconnectivity 9
IPSec based connections 9
WireGuard based connections 10
Multi-Tunneling 11
Whitelisting Resources 12
Benefits of Whitelisting 12
Microsoft Azure 12
SalesForce 13
AWS Management Console 14
Google Cloud Platform 17
Client-Based Access 19
Manual VPN Keys 19
App Deploy Using an MDM Solution 20
Deploy SonicWall Cloud Edge Windows App Using Central Desktop Management Tools 20
Manage Engine 20
System Center Configuration Manager (SCCM) 21
Automatic Wi-Fi Security 21
How to activate Automatic Wi-Fi Security 21
Enable or Disable Automatic Wi-Fi Security and Manage Trusted Networks 22
Native OS Client 23
MacOS 23
Manual Configuration for Windows 28
Manual Configuration for Chromebook 31
Manual Configuration for iOS 32
Public Servers DNS / Hostname List 35
Android 36
Cloud Edge Advanced Settings
Contents
2
Page 3

Client-less Access (Zero Trust Applications) 40
URL Aliasing 40
Upload domain SSL certificates 40
Creating a URL alias for your application 42
SonicWall Support 43
About This Document 44
Cloud Edge Advanced Settings
Contents
3
Page 4

Topics:
l Private DNS
l DNS Filtering
l Routes
l Split Tunneling
l Site-to-Site Interconnectivity
l Multi-Tunneling
l Whitelisting Resources
1
Networks
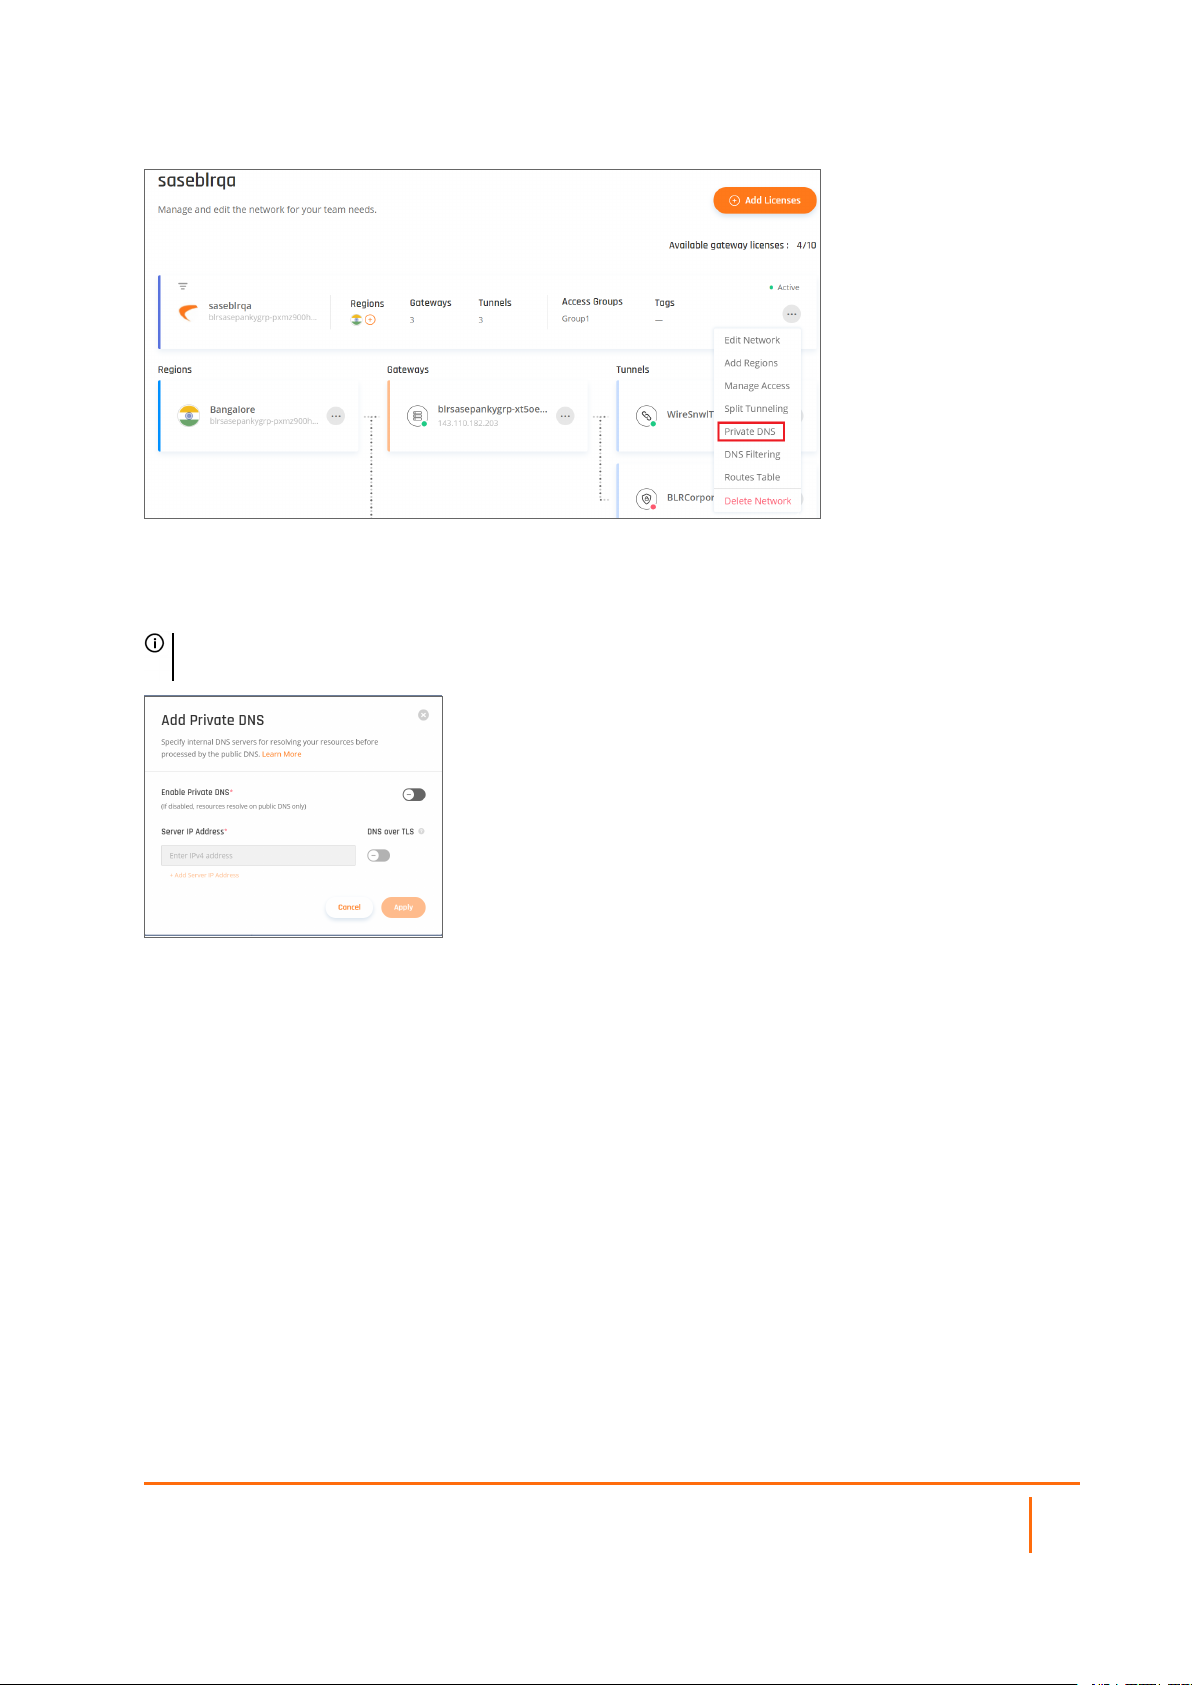
Private DNS
This article describes how to configure a private DNS.
Private DNS will enable you to reach an internal resource by its hostname (as published by your local DNS
server). This can ease your workflow, as you will now longer need to specify the resource's IP address.
NOTE: Do not configure a public DNS server, as by default your traffic will be routed through one, in
case the private DNS server are not able to resolve the address).
Selecting a Private DNS
You can assign a Private DNS to the selected Network (the default is Automatic). This will allow you to utilize
your organization’s DNS servers, as well as local domain names. You can choose to either obtain a DNS
server address automatically or select a primary and secondary DNS address manually.
Cloud Edge Advanced Settings
Networks
4
Page 5
After defining the custom primary and secondary DNS addresses, this information will be highlighted on the
Networkspage.
NOTE: If your DNS server does not have a public IP address, set up a site-to-site connection to the
network containing the server, and enter its internal address.
DNS Filtering
This article describes how you can add many powerful security features to your networks such as DNS
Filtering to further limit exposure on your network.
Understanding DNS Filtering
DNS filtering allows you to block users in your network from navigating to webpage URLs with their internet
browser. Its ability to filter out bad websites and allow access to approved ones is accomplished with
blacklisting and whitelisting tools, respectively, and URLs can be blocked on an individual basis or by
category (gambling, social networks, etc.). When you blacklist a URL with our DNS filtering feature, you are
telling the DNS Resolver not to resolve the website associated with its unique IP address. Instead, it will
display a custom message notifying users that their access to the page is restricted. Accordingly, DNS
filtering is crucial for productivity and protection as well.
Cloud Edge Advanced Settings
Networks
5
Page 6
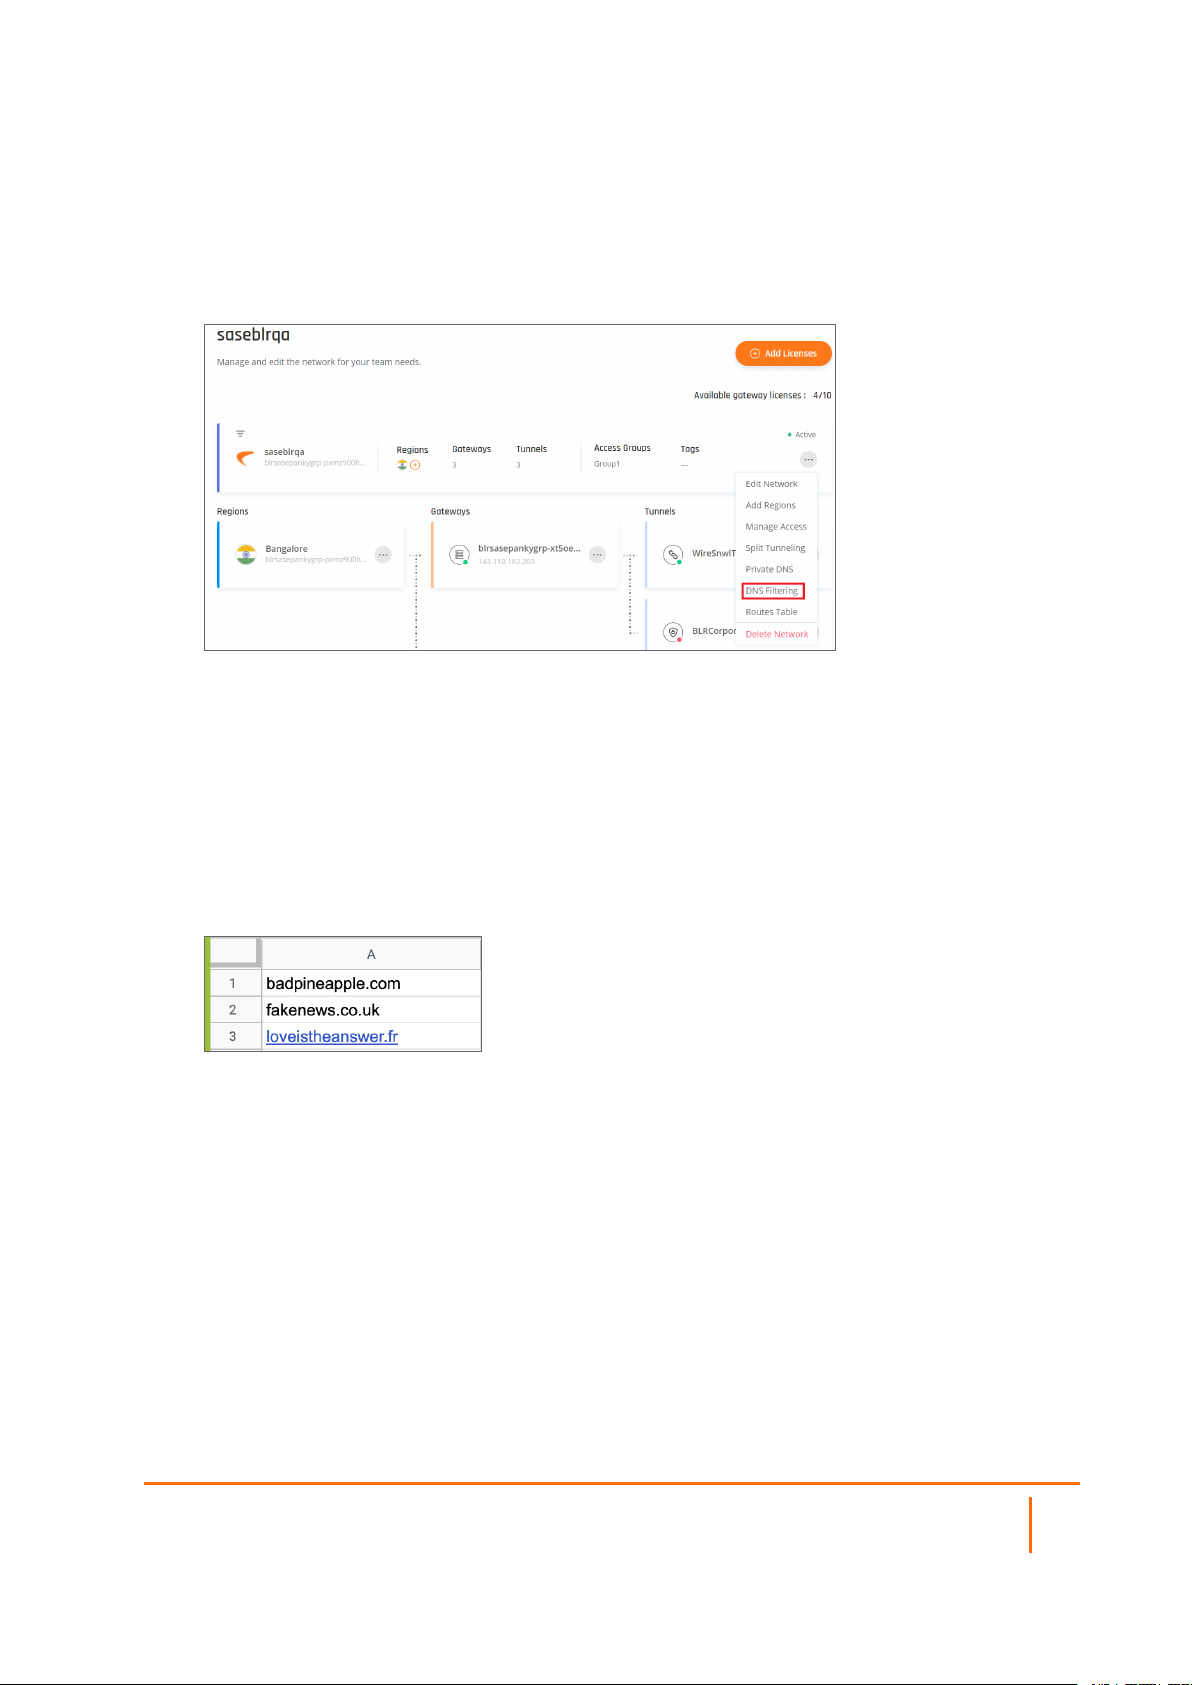
Activating DNS Filtering
1.
Open Networksfrom the Management Platform and navigate to the network on which you'd like to
configure DNS filtering. Select the three-dotted icon on the right side, then select DNS Filtering.
2.
Fill in the following information:
l Enable DNS Filtering.
l URL Blacklist Categories: Block access to websites by content category (select none, one or
more).
l Whitelisted/Blacklisted URLs: Manually enter one or more specific URL(s) you'd like to make sure
stay unblocked/blocked, or upload a .CSV file containing the addresses. Make sure that the .CSV file
contains only one column, and that every cell contains one URL (as shown in the attached example).
The file must contain no more than 1000 addresses. Each address must follow the form domain.com
(that is, without www/http/https prefixes).
3.
Select Apply.
4.
A successful message appears. Once it has been closed the new settings will be applied the next
time a user connects to the network.
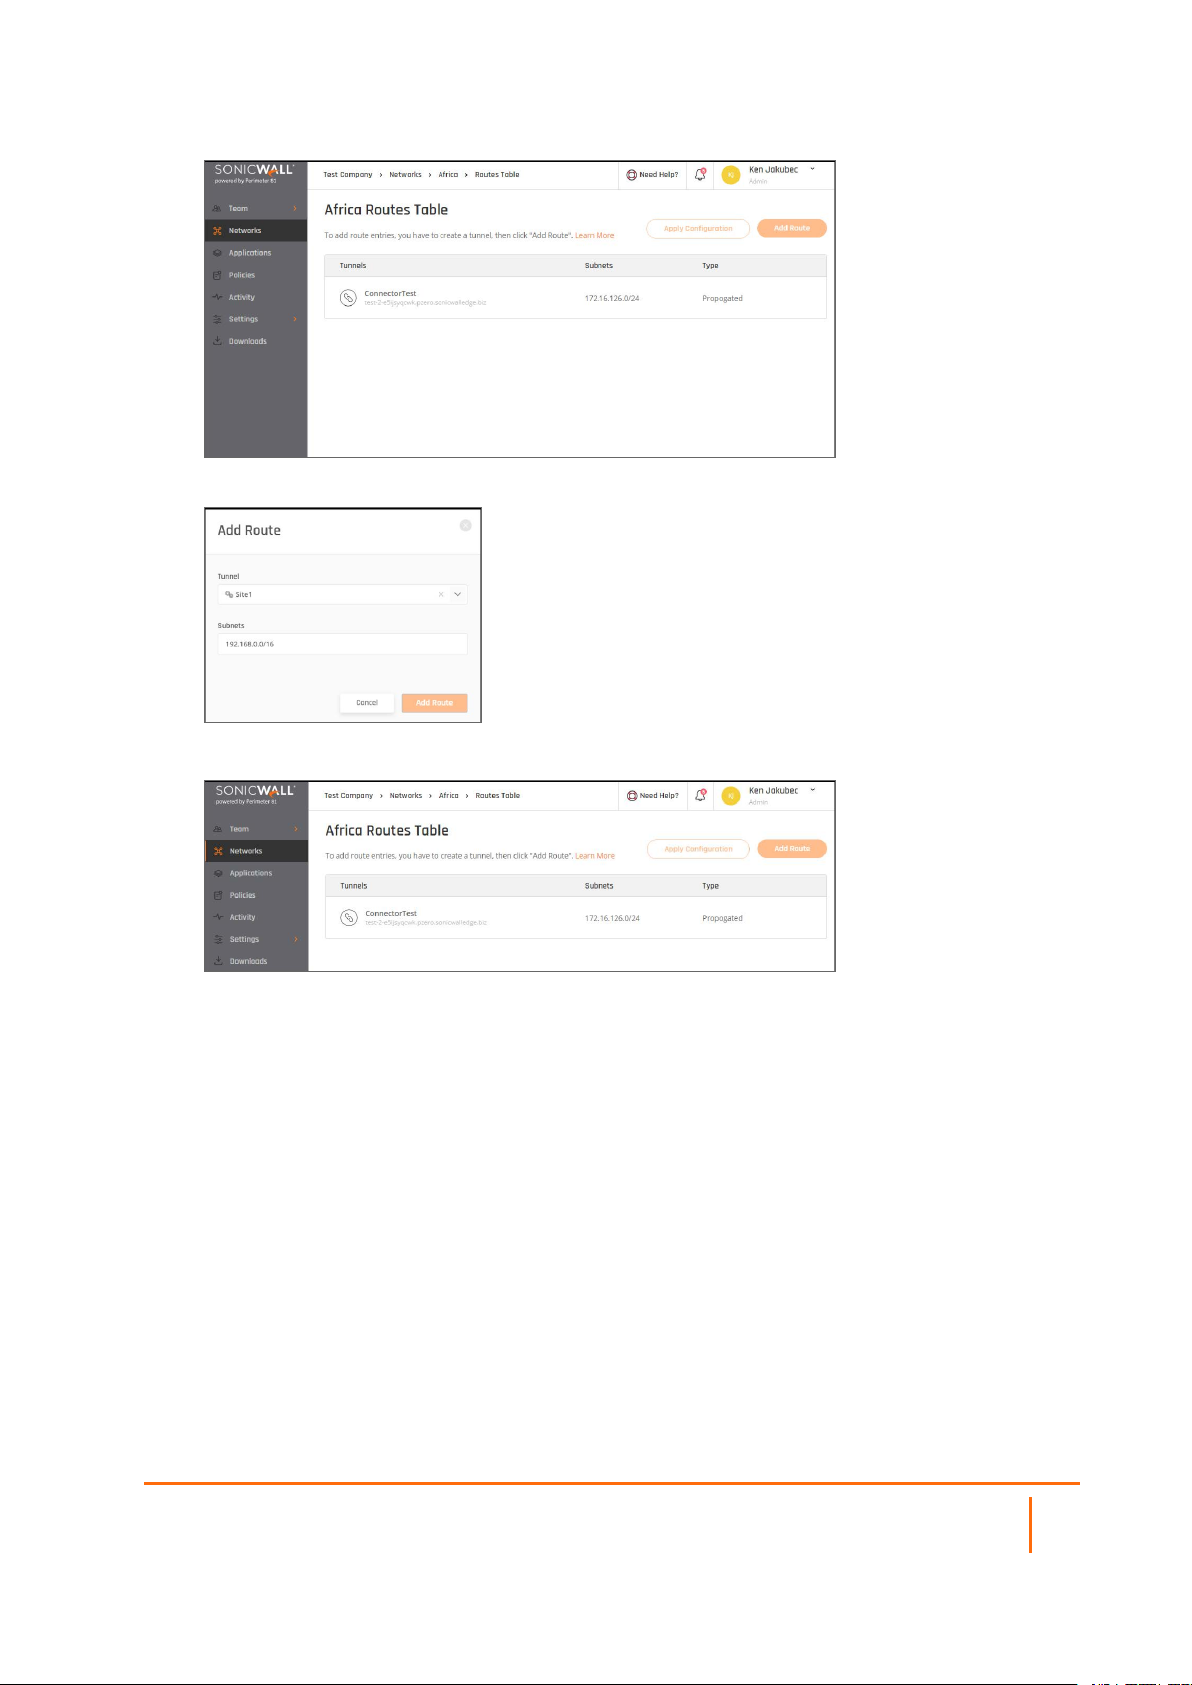
Routes
The article describes how to use routes. In most cases, once you set up the tunnel, you can specify remote
subnets to be automatically added as propagated Routes. However, if you defined the Remote Gateway
Proposal Subnets parameter as 0.0.0.0/0 (any), it is still possible to add manual routes and associate them
with the corresponding tunnel as the exit point.
Please follow the steps below:
Cloud Edge Advanced Settings
Networks
6
Page 7
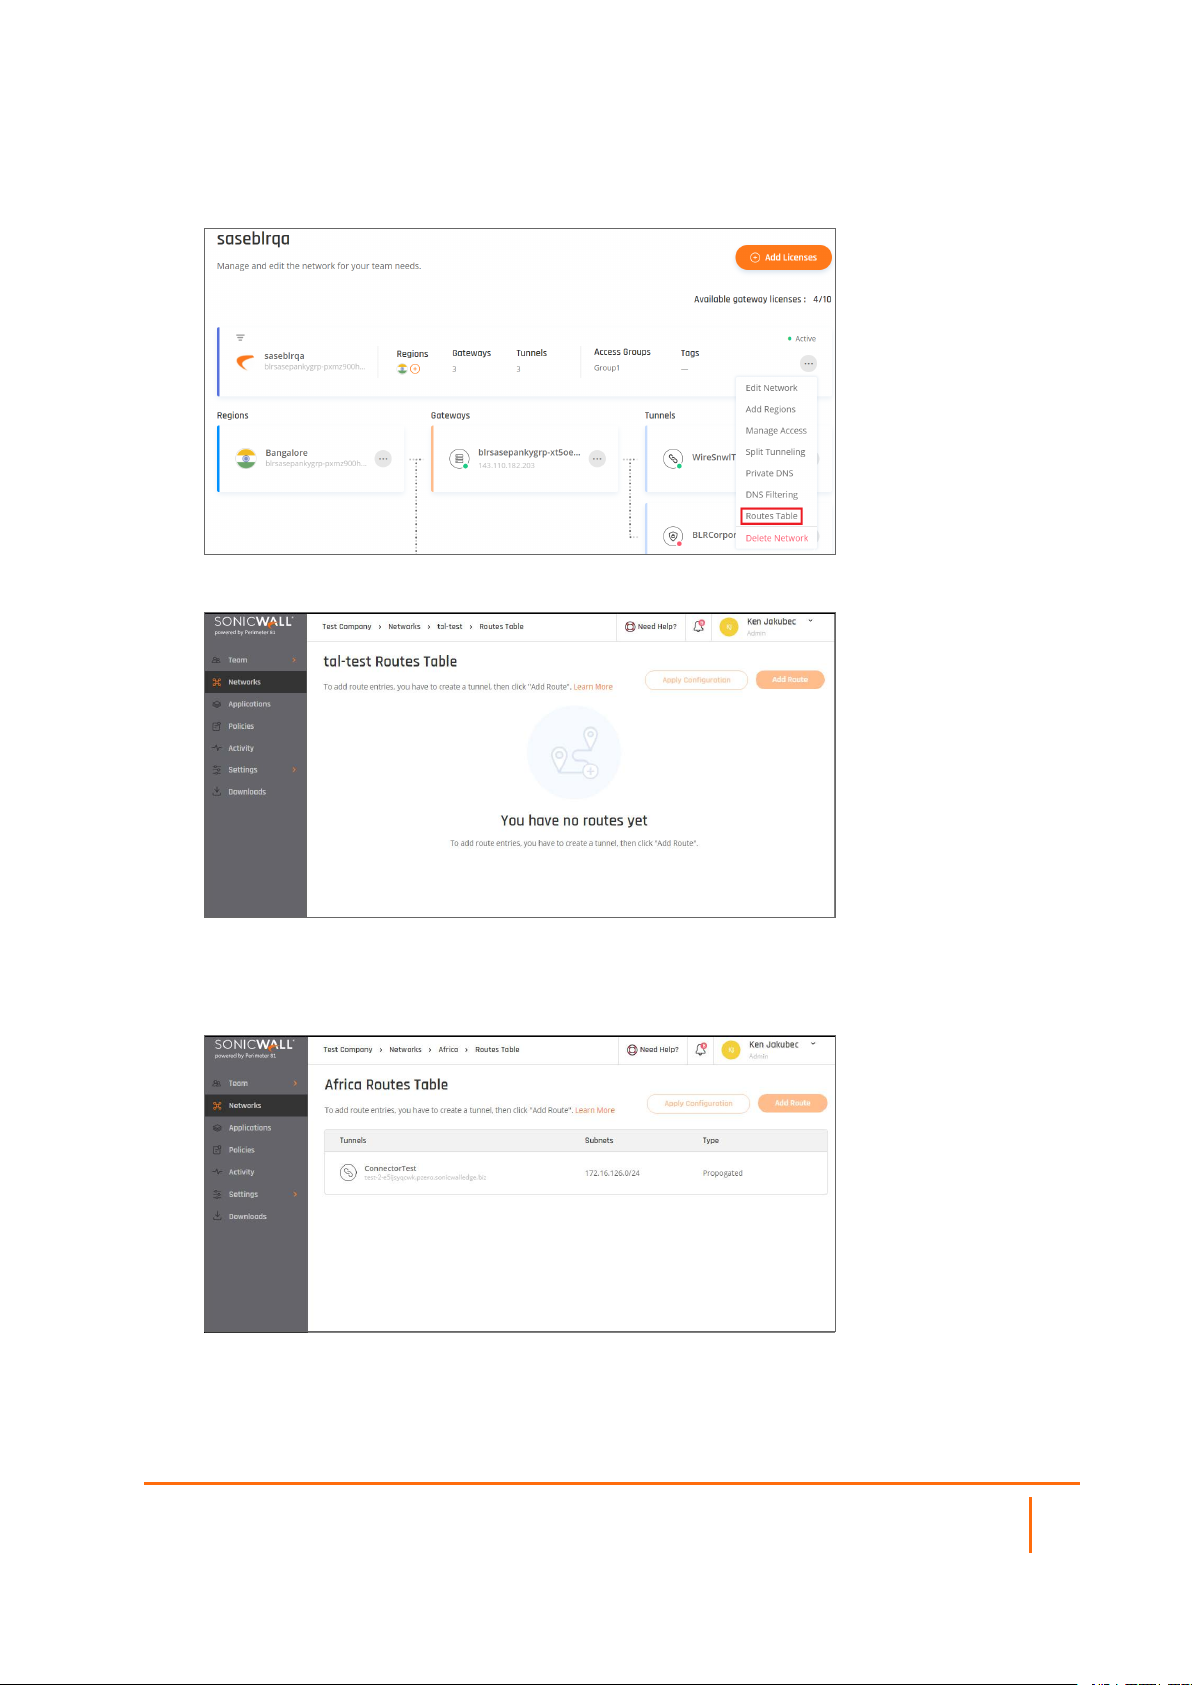
1.
Go to the Networkstab and select the network to which you'd like to add a route. Select the threedotted icon (...), then Routes Table.
The following window displays:
2.
Select Add Route and choose the relevant tunnel.
3.
Insert the desired range for the route then select Add Route.
4.
The route will be added to the table.
5.
Select Apply Configuration.
Cloud Edge Advanced Settings
Networks
7
Page 8
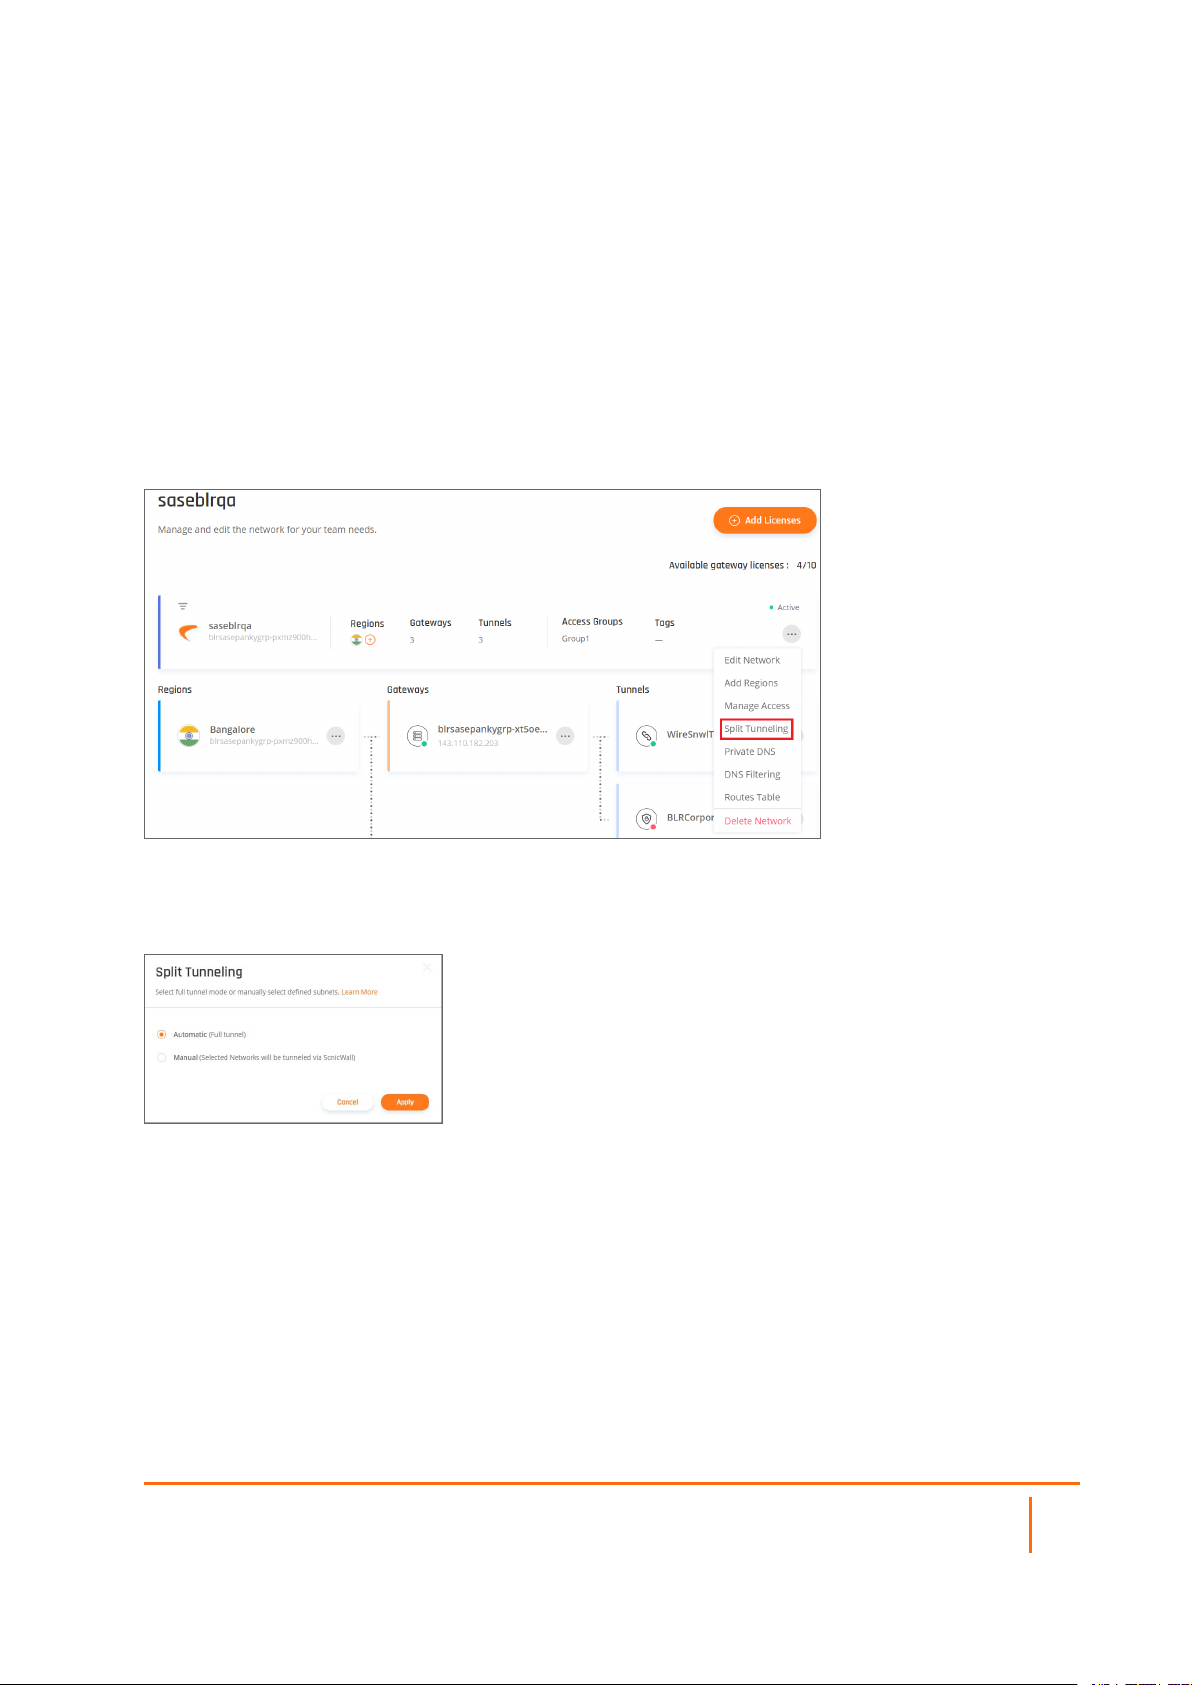
Split Tunneling
This article describes how to incorporate split tunneling into your network. If you would like to select specific
network subnets to go through from the client to the SonicWall network, instead of full tunnel mode (where
all the traffic is encrypted and proxied through the SonicWallnetwork), you will need to manually specify
which subnets you’d like to include through the tunnel.
The Default Configuration is Automatic (Full Tunnel)
Split tunneling: Automatic Configuration
Cloud Edge Advanced Settings
Networks
8
Page 9

Split Tunneling: Manual Configuration
After defining the split tunneling subnets, this information will be available on the Networkspage.
Site-to-Site Interconnectivity
This article describes how to ensure that two sites are connected securely using the SonicWall Platform.
If the two sites are both tunneled to your SonicWallnetwork, you can enable the two to communicate,
regardless of their location or dependency so that both sites will have a full and secure line between them.
Please follow the steps below:
IPSec based connections
1.
Ensure both tunnels are route-based tunnels; that is, they do not depend on a specific internal subnet
to create a handshake between the sites, but a route is configured on each device’s separate Route
Table indicating which subnets to forward into the tunnel.
2.
On the Management Platform, set both tunnel’s “Gateway Proposal Subnets” and “Remote
gateway Proposal Subnets” to ANY (0.0.0.0/0).
This may make the tunnel go down! Please make sure the device you are using supports route-based
VPN. This means the tunnel is set up to 0.0.0.0/0 and a route is added separately.
3.
Make sure the Routes Table on the SonicWallside has all of the routes of all of the sites configured
(Network/ Route Tables) so in case you had them defined within the tunnel module, instead you need
to add them here.
Cloud Edge Advanced Settings
Networks
9
Page 10
4.
Click Add Route and add the routing to the internal LAN subnets that are behind each tunnel.
5.
After you are done, click Apply Configuration.
6.
Go to the first site's (labeled Site1) routing table, and in addition to the route that indicates all
subnets (usually 10.255.0.0/16) to go through the Site to site tunnel, add a route dictating all traffic
that goes to the second site's LAN subnet as well.
7.
Go to the second site's (labeled Site2) routing table, and set up a static route indicating both the LAN
subnet and Site1’s LAN subnet to go through the IPSEC Site-2-Site tunnel.
WireGuard based connections
1.
In order to establish a connection from one resource to another, you'll need to reinstall the connector,
as the default installation (Accessor mode) does not allow it.
Uninstall Commands
l Ubuntu
# Locate the WireGuard packages (the output of this command is the full
package name)
dpkg -l | grep wireguard
Cloud Edge Advanced Settings
Networks
10
Page 11

# Delete all packages found that are associated with WireGuard (replace
pkg with the output from the previous command)
apt-get remove --purge pkg
l CentOS
# Locate the WireGuard packages (the output of this command is the full
package name)
yum list installed | grep wireguard
# Delete all packages found that are associated with WireGuard (replace
pkg with the output from the previous command)
yum remove pkg
2.
Once you successfully removed the files mentioned in the commands above, reboot the machine and
execute the connector installation script (the curl command that you copied from the Management
Platform).
3.
When you reach the 4th step, choose NO (n), which will prevent accessor mode installation.
4.
Proceed with the installation. Make sure to select YES (y) for both IP Forwarding and Routing all
traffic.
5.
Open the route table of the network in which the WireGuard connector is installed (usually your router
or firewall).
6.
Configure a static route dictating all traffic from your SonicWall LAN subnet (10.XXX.0.0/16) to go
through the IP of the machine that hosts the connector.
7.
Open the terminal of the machine that hosts the connector and execute the following command:
Shell
# Temporarily shut the connector down
wg-quick down wg0
# Open the connector's route table.
vi /etc/wireguard/wg0.conf
# Enter the subnets of the resources you'd like to communicate with each
other
set AllowedIPs = <SonicWall Subnet>, <Site1 Subnet>,< Site 2 Subnet>
# Turn the connector up
wg-quick up wg0
# Make sure that the desired change has taken place
wg show
Multi-Tunneling
SonicWall Cloud Edge does not limit the number of tunnels that can be connected to a single gateway, so in
case you only have one gateway in a particular network, but your company's infrastructure consists of a
hybrid environment (a mixture of different on-prem and cloud-based resources) you don't need to worry.
Cloud Edge Advanced Settings
Networks
11
Page 12

IMPORTANT: Before you configure a second tunnel, make sure that the remote network's subnet does
not overlap with the existing network's subnet.
Once the two tunnels are up and running, you'll be able to set up a communication line between the two (see
Interconnectivity).
Whitelisting Resources
Topics:
l Benefits of Whitelisting
l Microsoft Azure
l SalesForce
l AWS Management Console
l Google Cloud Platform
Benefits of Whitelisting
This article describes what whitelisting is. Whitelisting is the practice of explicitly allowing some identified
entities access to a particular privilege, service, mobility, access, or recognition.
While IP whitelisting does not encrypt your data the way a site-to-site connection does, it can come in handy
if you'd like to save time and avoid the trouble to set one up, as it still limits access to your resources - an
entire network or a specific machine or application. Once whitelisting your gateway IP, the resource will be
accessible only for devices using this particular IP, that is, connected to the SonicWall.
Microsoft Azure
This article describes how to whitelistyour SonicWall Cloud Edge Gateway at the Microsoft Azure Portal,
which allows you to restrict access to a certain resource within an Azure Virtual Network to users connected
to the secure SonicWall Cloud Edgegateway only. While this method needs to be applied to every particular
resource, it is a good alternative for those who'd like to avoid setting up a Site-to-Site connection to a VNet.
1.
Open the Azure Portal and select the resource which you'd like to restrict access to.
2.
Navigate to the Networking tab and select Add inbound port rule.
3.
Fill in the following information:
Cloud Edge Advanced Settings
Networks
12
Page 13

l Source: IP Addresses
l Source IP addresses/CIDR ranges: Insert your Gateway IP
l Source port ranges:(all)
l Destination: Any
l Destination port ranges: (all)
l Protocol: Any
l Action: Allow
l Priority:Leave default value
l Name:Connector
l Description:Optional
4.
Select Add rule.
SalesForce
This article describes how to whitelistSalesForce for your network. Trusted IP ranges in Salesforce block
unauthorized access as there are no location restrictions with the platform’s default settings. After specifying
a Trusted IP range, only authorized SonicWall users from your Private Server will have access to Salesforce
resources.
Cloud Edge Advanced Settings
Networks
13
Page 14
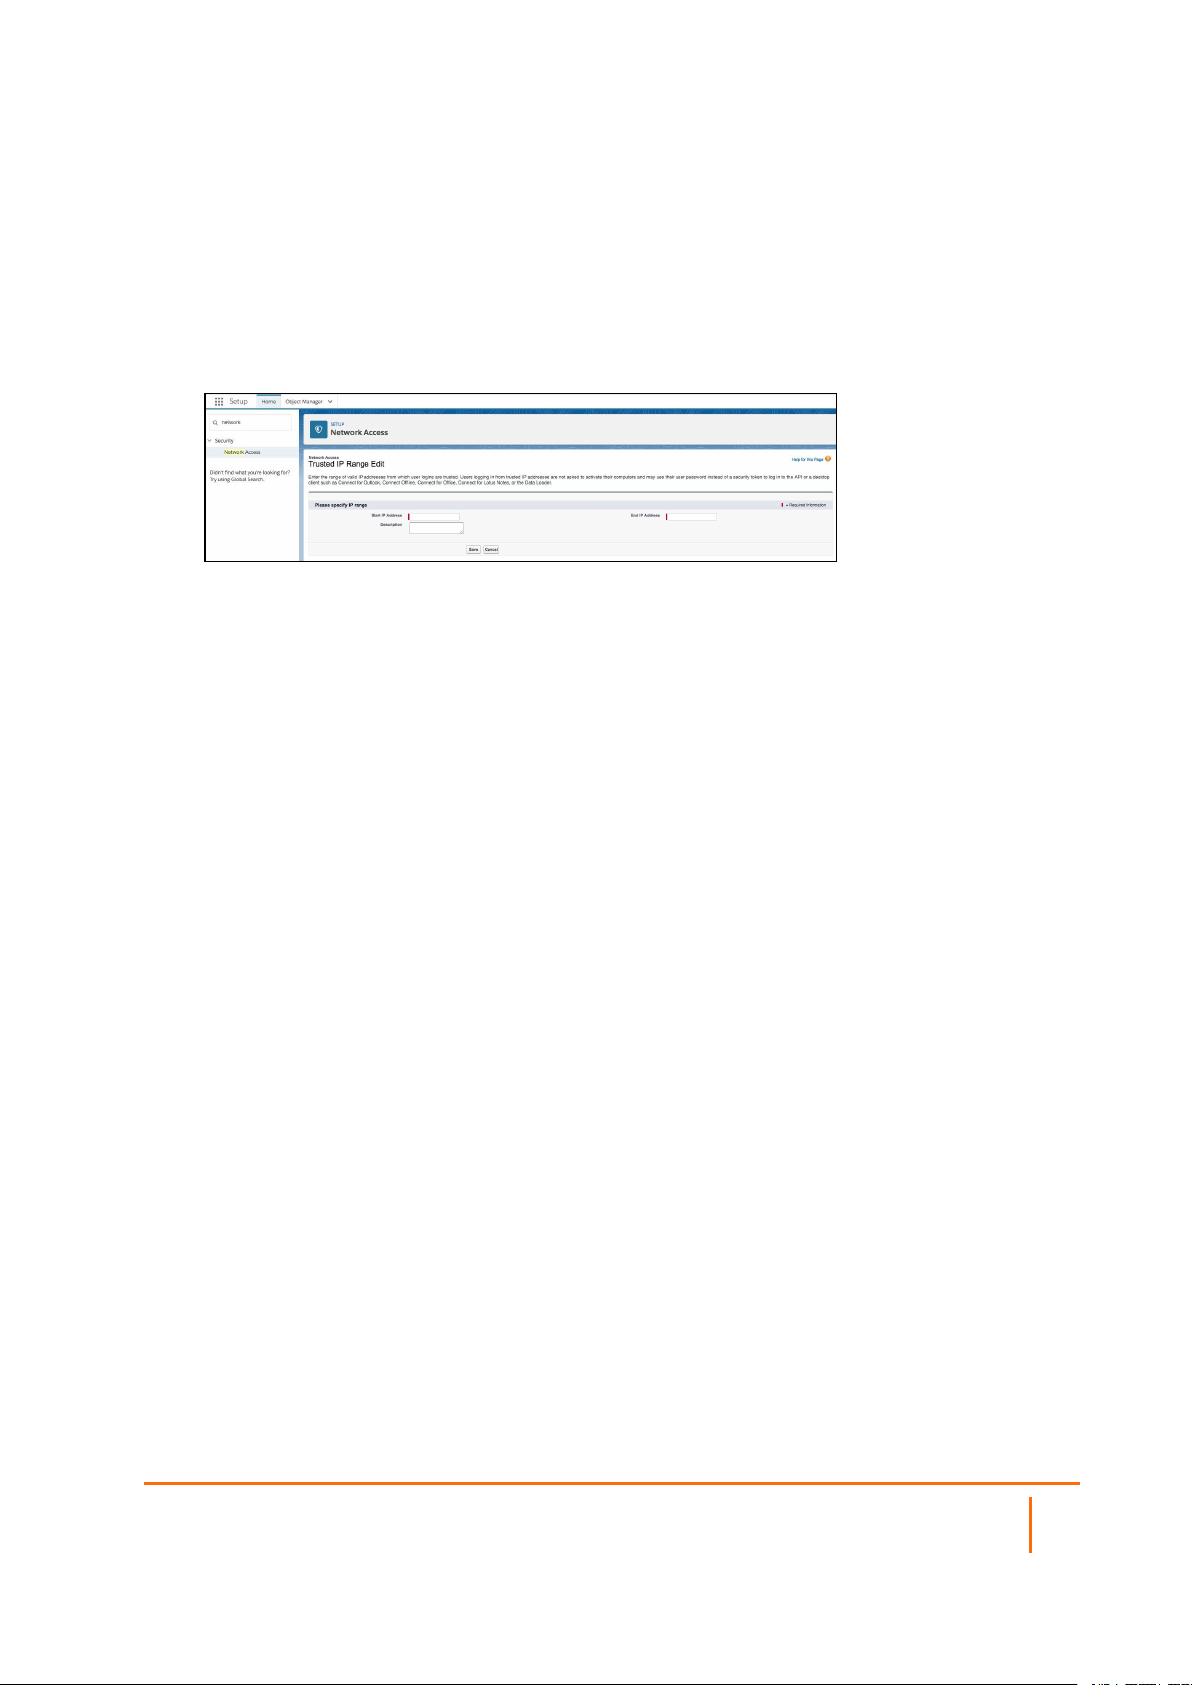
Setting up SalesForce
1.
Navigate to the Setup section of Salesforce and in the Quick Find search box type "Network
Access".
2.
Select New and then fill in the Private Server IP address, entering both the start and end of the IP
range and adding a description.
3.
Select Save.
AWS Management Console
This article describes how to whitelist your SonicWall Cloud Edge Gateway at the AWS Management
Console, which will allow you to restrict the access to a certain resource within a VPC to users connected to
the secure SonicWall Cloud Edge gateway only. While this method needs to be applied to every particular
resource, it is a good alternative for those who'd like to avoid setting up a Site-to-Site connection to a VPC.
l Create a security group
l Attach resources to the security group
Please follow the steps below:
Create a security group
1.
Open the AWS Management Console EC2 dashboard.
2.
Navigate to Security Groups.
Cloud Edge Advanced Settings
Networks
14
Page 15

3.
Select Create and fill in the following information:
l Security group name: Choose an indicative name of your own choice.
l Description: Describe the use case of the group. The description can be up to 255 characters
long.
l VPC: Select the appropriate VPC. If you are using VPC peering, you can later update the rules
for your VPC security groups to reference security groups in the peered VPC. In case you are
using a Transit Gateway, not that spoke Amazon VPCs cannot reference security groups in
other spokes connected to the same AWS Transit Gateway.
Cloud Edge Advanced Settings
Networks
15
Page 16

l Add an inbound rule according to the following
l Type: All traffic
l Protocol: All
l Port range: All
l Source: Custom; Insert your Gateway IP
l Description: (optional)
l Select Create security group.
Attach resources to the security group
1.
Return to the EC2 dashboard.
2.
Select the Instances tab within the Instances section.
3.
Select the instance you'd like to apply the Security Group to. Select Actions /Networking /Change
Security Groups.
Cloud Edge Advanced Settings
Networks
16
Page 17

4.
Select the newly created security group, then select Assign security group.
Google Cloud Platform
This article describes how to whitelistyour SonicWall Cloud EdgeGateway at Google Cloud Platform, which
will allow you to restrict the access to a certain VPC to users connected to the secured SonicWall Cloud
Edgegateway only. The following steps are required:
l Querying your gateway IP address
l Configuring a rule in Google Cloud Platform Firewall
Querying your gateway IP Address
1.
Open the Management Platform.
2.
At the left toolbar, select the Networks tab.
3.
Select the network that contains the gateway which you'd like to whitelist.
4.
Copy the gateway IP as shown in the screenshot.
Configuring a rule in Google Cloud Platform Firewall
1.
Open the GCP console.
2.
In the left toolbar, select VPC network, then Firewall rules.
Cloud Edge Advanced Settings
17
Networks
Page 18

3.
Select Create Firewall Rule, and fill in according to the following:
l Name: Choose an indicative name of your own choice.
l Description: Let other administrators know what this rule serves for (optional).
l Logs: You can choose to log traffic related to the rule (this may lead to additional costs on
Google's side).
l Network: Choose the network that contains the resources that you'd like to whitelist.
l Priority: Leave default values.
l Direction of traffic: Ingress
l Action on match: Allow
l Targets: Depending on your needs, choose the entire network (All instances in the
network) or choose resources that are labeled with a certain tag (Specified target tags).
l Source filter: IP ranges
l Source IP ranges: Paste the IP address of the gateway and add /32, for instance
37.142.39.122/32.
l Second source filter: None
l Protocols and ports: Allow all.
4.
Select Create.
Cloud Edge Advanced Settings
Networks
18
Page 19

Client-Based Access
Topics:
l Manual VPN Keys
l App Deploy Using an MDM Solution
l Deploy SonicWall Cloud Edge Windows App Using Central Desktop Management Tools
l Automatic Wi-Fi Security
l Native OS Client
Manual VPN Keys
2
This article describes how to assign a manual VPN key to the Management Platform.
1.
Select the Team tab in the Management Platform. Then select the Members tab below.
2.
Select the user you'd like to manage. Select the three-dotted menu (...) on the right side of the
window. Then select ManageDevices.
3.
The next page allows the admin to see the devices of users and their VPN keys. You will be able to
create additional Access Keys using Create Access Key.
For your protection, you should never share your secret keys with anyone. As a best practice, we
recommend frequent key rotation.
4.
Select Close when finished. Also, manual VPN keys can be assigned to physical devices, such as
routers, to enable alternative forms of connectivity without the use of client applications.
Cloud Edge Advanced Settings
Client-Based Access
19
Page 20

App Deploy Using an MDM Solution
The deployment process of the connector varies depending on your MDM (Mobile Device Management)
provider and being finished utilizing the public app deployment process.
l Connector for Android: https://static.sonicwalledge.com/apps/android/SonicWallCloudEdge.apk
l Connector for iOS: https://testflight.apple.com/join/oNm74ad7
Below are links to deployment guides for common MDM providers:
l VMWare AirWatch
l MobileIron - the deployment is being done using the App Catalog. Follow the link below for how to
add an app from the public app stores:
http://mi.extendedhelp.mobileiron.com/45/all/en/desktop/App_Catalog.htm
l Microsoft Intune
l JAMF
l Meraki
Deploy SonicWall Cloud Edge Windows App Using Central Desktop Management Tools
This article describes how to deploy the Windows app. If the devices in your organization are managed
through a central desktop management tool you may prefer remote installation instead of having team
members download and install the app on their own.
The following guide contains instructions for ManageEngine and SCCM. If using a different tool, please
contact us via email and our engineers will be happy to provide you with a suitable solution.
Download the MSI application and follow the steps below:
Manage Engine
1.
Navigate to Software Deployment > Install/Uninstall Software Configuration > Computer
configuration.
2.
Provide a name and description for the configuration.
3.
Select the Package.
4.
Select the Operation Type as Install, Uninstall, or Advertise as the case may be.
5.
Specify the user account as which the software needs to be installed as a system user or any specific
user.
6.
If you wish to involve user interaction while deploying the software, enable the appropriate checkbox.
7.
Configure the scheduler settings and choose the deployment policy.
8.
Upon defining the target, select Deploy.
Cloud Edge Advanced Settings
Client-Based Access
20
Page 21

System Center Configuration Manager (SCCM)
1.
In the Configuration Manager console, go to the Software Library workspace, expand Application
Management, and select the Applications node.
2.
From the Home tab, select Create group and select Import Application from the ribbon.
3.
On the General page of the Import Application Wizard, specify the network path to the File to
import.
4.
On the File Content page, select the action to take if this application is a duplicate of an existing
application. Create a new application, or ignore the duplicate and add a new revision to the existing
application.
5.
On the Summary page, review the actions, and finish the wizard.
The new application appears in the Applications node.
Automatic Wi-Fi Security
How to activate Automatic Wi-Fi Security
Our unique Automatic Wi-Fi Security feature proactively protects your team from public Wi-Fi threats by
immediately activating an encrypted VPN connection as soon as a team member's device connects to an
unsecured Wi-Fi network.
Automatic Wi-Fi Security is enabled by default. Users can adjust this configuration locally in their account
when signed into the client application on their devices.
Cloud Edge Advanced Settings
Client-Based Access
21
Page 22

Select the Settings Menu.
Enable or Disable Automatic Wi-Fi Security and Manage Trusted Networks
Enforcing Settings for all users
The team administrator can enforce Automatic Wi-Fi Security or turn it off, for all employees as a generic
configuration on the Management Portal.
Administrators are able to set the default for their workspaces; by selecting the lock, they can block team
members from being able to change it.
1.
Select Settings in the Management Platform on the left side. Then select the Client
Configurations tab.
Cloud Edge Advanced Settings
Client-Based Access
22
Page 23

2.
Select Network Configurations. You will see a toggle switch, allowing the administrator to allow or
restrict access.
Native OS Client
Topics:
l MacOS
l Manual Configuration for Windows
l Manual Configuration for Chromebook
l Manual Configuration for iOS
l Public Servers DNS / Hostname List
l Android
MacOS
Topics:
l IKEv2
l OpenVPN
IKEv2
This article describes how to manually set up the IKEv2 protocol to SonicWall directly in the MacOS system.
l Setting up the network
l Creating a new connection
l Connecting
Please follow the steps below:
Cloud Edge Advanced Settings
Client-Based Access
23
Page 24

Setting up the network
1.
Open the Apple Menu in the upper left corner of your desktop.
2.
Select System Preferences.
3.
In the System Preferences window, select Network.
Creating a new connection
1.
Select (+) to add a new connection.
2.
Select VPN for the Interface.
3.
Select IKEv2 for the VPN Type.
4.
Enter “Connector” for Service Name.
5.
Select Create.
Cloud Edge Advanced Settings
Client-Based Access
24
Page 25

6.
Fill in the following information:
7.
Server address, Remote ID and Local ID fields: Enter the IP Address of the gateway you'd like to
connect to (can be found in the Management Platform under Networks )
8.
Remote ID: Enter your Gateway DNS (as shown in the attached screenshot).
9.
Local ID: Leave blank.
7.
Create a manual VPN key for each user. Leave the MacOS Settings window open. Enter the Team
tab in the Management Portal. Then select the Members tab below.
8.
Select the user you'd like to manage. Select the three-dotted menu (...) on the right side of the
window. Then select Manage Devices.
9.
The next page allows the admin to see the devices of each user and their VPN keys. You will be able
to create additional Access Keys using Create Access Key. For your protection, you should never
share your secret keys with anyone. As a best practice, we recommend frequent key rotation.
10.
Select Close when finished.
11.
Go back to the MacOS VPN settings window and select Authentication Settings.
Cloud Edge Advanced Settings
Client-Based Access
25
Page 26

12.
Select Username, then fill in your Access Key ID as your Username and your Secret Access Key
as your Password. Select OK.
Connecting
1.
Open the Network Settings window.
2.
Select your new connection on the left.
3.
Select Connect.
OpenVPN
This article describes how to manually set up an OpenVPN based connection to your network using
Tunnelblick.
l Install Tunnelblick
l Set up an OpenVPN configuration file
l Securely connect to your Network
Install Tunnelblick
Tunnelblick is a ready-to-use Graphic User Interface (GUI) for OpenVPN on macOS. It provides easy-to-use
control of OpenVPN server and/or client connections.
It runs on all versions of macOS and OS X 10.4 and higher. It comes as a ready-to-use application with all
necessary binaries and drivers (including OpenVPN and tun/tap).
Tunnelblick is free software licensed under the GNU General Public License (GPL) Version 2.
Click here to download the latest version, our visit Tunnelblick's official website.
Once installed, close the application and move on to the next step.
Set up an OpenVPN Configuration File
1.
Download our .ovpn template configuration file.
2.
Open the file (using vim or any text editor of your preference).
3.
Change the gateway IP placeholder (0.0.0.0) to your desired gateway IP (your gateway IP will appear
at the management platform, under the network's page at the networks tab).
Cloud Edge Advanced Settings
Client-Based Access
26
Page 27

Example
Assuming your gateway IP is 123.123.123.123, you'll need to convert this:
...
remote-cert-tls server
remote 0.0.0.0 # Your server IP
resolv-retry infinite
...
into the following:
...
remote-cert-tls server
remote 123.123.123.123 # Your server IP
resolv-retry infinite
...
4.
Once the appropriate change has been made, save the file, and close it.
IMPORTANT: Before moving to the next step, make sure you have a valid pair of Manual VPN Keys.
The Access Key ID will use as your username, and the Secret Access Key will use as the password.
If you're not sure what Manual VPN Keys are, or how to extract them, click here.
Connect to your Network
1.
Double click the modified .ovpn you have downloaded.
2.
Select Only Me or All Users according to your use case.
3.
Fill in your computer's user password, then select OK.
Cloud Edge Advanced Settings
Client-Based Access
27
Page 28

4.
Select the Tunnelblick icon at the top bar of the screen and select the appropriate configuration.
5.
Fill in your Manual VPN Keys, then select OK.
6.
Your connection status will appear at the right top corner of the screen.
Manual Configuration for Windows
This article describes how to set up an L2TP connection to your SonicWall gateway using Windows 10's
native VPN.
l Setting up the network
l Connecting to the Management Platform
Please follow the steps below:
Cloud Edge Advanced Settings
Client-Based Access
28
Page 29

Setting up the network
1.
To add a new VPN for Windows connection, select Start on your desktop and then select system
Settings.
2.
Go to the Network & Internet.
3.
Select VPN from the menu.
4.
Select Add a VPN Connection.
Cloud Edge Advanced Settings
Client-Based Access
29
Page 30

5.
Fill in the required fields with the following information:
l Connection name: Choose an indicative name of your own choice.
l Server name or address: Enter your server DNS or IP. This information can be found in the
Network tab in your Management Platform, as shown below.
l VPN Type: L2TP/IPSec with pre-shared key
l Pre-shared key: SaferVPN2017
l User name and Password: Open the Management Platform, and go to the Team tab. Select
the member for which you'd like to generate a unique pair of username and password, select
the three-dotted menu (...) and choose Manage Devices.
The following screen displays:
6.
Select Create Access Key. Copy the Access Key ID and paste into the User name field. Copy the
Secret Access Key and paste into the Password field.
Cloud Edge Advanced Settings
Client-Based Access
30
Page 31

Connecting to the Management Platform
1.
Once your changes are saved, select the created connection.
2.
Select Connect to start the VPN connection.
\
Manual Configuration for Chromebook
This article describes how to configure SonicWall Cloud Edge with Chromebook manually.
Please follow the steps below:
1.
Log in to your Chrome device.
2.
Select the status bar at the bottom right of your desktop.
3.
Select Settings.
4.
Under the Network section, select Add connection and select Add OpenVPN/L2TP.
Cloud Edge Advanced Settings
Client-Based Access
31
Page 32

5.
Select Add private network and enter the following information in the dialog:
l Server hostname: Open your Management Platform; Go to the Network tab and choose
your Network**.** Copy the desired DNS (appears in the red box in the illustration) and paste it
in the Server hostname field.
l Service Name: Choose an indicative name
l Provider type: Select L2TP/IPsec + Pre-shared key
l Pre-shared key: Enter SaferVPN2017
l Server CA certificate: Select Default
l User certificate: Select None installed
l Username and Password: Enter your Manual VPN Keys as your Username and Password
in the matching fields
NOTE: Only your company manager can issue manual VPN keys (for further instructions see:
How to create Manual VPN Keys).
Other fields are to be left blank.
6.
Select Connect.
Manual Configuration for iOS
This article describes how to manuallyset up the IKEv2 protocol toSonicWalldirectly in the iOS system.
l Setting up
l Connecting
Please follow the steps below:
Cloud Edge Advanced Settings
Client-Based Access
32
Page 33

Setting up
1.
Go to Settings.
2.
Tap on General.
3.
Tap on VPN.
4.
Tap on Add a VPN Configuration.
Cloud Edge Advanced Settings
Client-Based Access
33
Page 34

5.
On the following screen select IKEv2 as the type, and name the Description "Connector".
6.
Fill in according to the following:
l Server: Insert your gateway IP (in the attached example: 185.253.69.200).
l Remote ID: Insert your gateway DNS (in the attached example: knowledgebase-
yyijdeuuqn.pzero.sonicwalledge.com)
These parameters can be found in the Management Platform, under Networks.
l Local ID: Leave blank.
l User Authentication: Username (use your Manual VPN Keys as instructed here).
l Username: Access Key ID
l Password: Secret Access Key
Cloud Edge Advanced Settings
Client-Based Access
34
Page 35

Connecting
1.
From the VPN screen (Settings > General ) turn the connection to ON.
2.
Wait while it connects.
3.
Confirm that the connection is on by checking its Status in the upper left corner of your device's
screen.
Public Servers DNS / Hostname List
This article lists the public servers DNS and hostnames.
Server Location Hostname
U.S.A. - East Coast us1.sx.safersoftware.net
U.S.A. - West Coast us2.sx.safersoftware.net
United Kingdom uk1.sx.safersoftware.net
The Netherlands nl1.sx.safersoftware.net
Australia au1.sx.safersoftware.net
Austria at1.sx.safersoftware.net
Cloud Edge Advanced Settings
Client-Based Access
35
Page 36

Server Location Hostname
Argentina ar1.sx.safersoftware.net
Belgium be1.sx.safersoftware.net
Brazil br1.sx.safersoftware.net
Canada ca1.sx.safersoftware.net
Cyprus cy1.sx.safersoftware.net
Denmark dk1.sx.safersoftware.net
Finland fl1.sx,safersoftware.net
France fr1.sx.safersoftware.net
Germany de1.sx.safersoftware.net
Hong Kong hk1.sx.safersoftware.net
Hungary hu1.sx.safersoftware.net
Israel il1.sx.safersoftware.net
Italy it1.sx.safersoftware.net
Ireland ie1.sx.safersoftware.net
Japan jp1.sx.safersoftware.net
India in1.sx.safersoftware.net
Mexico mx1.sx.safersoftware.net
New Zealand nz1.sx.safersoftware.net
Norway no1.sx.safersoftware.net
Romania ro1.sx.safersoftware.net
Poland pl1.sx.safersoftware.net
Portugal pt1.sx.safersoftware.net
Russia ru1.sx.safersoftware.net
Singapore sg1.sx.safersoftware.net
South Africa za1.sx.safersoftware.net
Spain es1.sx.safersoftware.net
Sweden se1.sx.safersoftware.net
Switzerland ch1.sx.safersoftware.net
Thailand th1.sx.safersoftware.net
Android
This article describes how to connect to your network using OpenVPN for Android instead of using our
designated agent. This may come in handy if you are operating on Android 9 or earlier versions.
Follow the stages described below:
1.
Installing OpenVPN for Android
2.
Configuring the connection
3.
Connecting to the network
Cloud Edge Advanced Settings
Client-Based Access
36
Page 37

Installing OpenVPN for Android
OpenVPN for Android is an open-source client developed by Arne Schwabe. It is targeted at more advanced
users and offers many settings and the ability to import profiles from files and to configure/change profiles
inside the app. The client is based on the community version of OpenVPN.
Start by downloading the client here.
Configuring a connection
1.
Open the application, then select the + sign at the right upper corner of the screen.
2.
Name the profile (according to your own preference).
3.
Fill in the Basic tab according to the following:
l LZO Compression: Ticked.
l Type: Username/Password.
l CA Certificate: Download the certificate, then upload it.
Cloud Edge Advanced Settings
Client-Based Access
37
Page 38

l Username and Password: Fill in your manual VPN Keys (set the Access Key ID as your
username and the Secret Access Key as the password).
l Behaviour on AUTH_FAILED: Disconnect, forget the password.
l Certificate Revoke List: Leave blank.
4.
Fill in the Server List tab according to the following:
5.
Use connection entries in random order to connect: Disabled.
6.
Server Address: Enter your network DNS (you can find it at the network page in the management
platform as shown in the image).
l Server Port: 1194
l Protocol: UDP
7.
For the rest of the fields use default values.
8.
Leave IP and DNS and Routing with default values.
9.
At the Authentication/Encryption tab uncheck Certificate Hostname Check.
10.
Leave the rest of the tabs with default values.
Cloud Edge Advanced Settings
Client-Based Access
38
Page 39

Connecting to a network
Open OpenVPN for Android then go to Profiles then select the desired connection.
Cloud Edge Advanced Settings
Client-Based Access
39
Page 40

3
Client-less Access (Zero Trust
Applications)
Topics:
l URL Aliasing
URL Aliasing
This article describes how to configure a URL alias for a Zero Trust application, thus enabling you to connect
to the application with a domain-associated user-friendly URL.
l Uploading domain SSL certificates
l Creating a URL alias for your application
Upload domain SSL certificates
A domain-validated certificate (DV) is an X.509 digital certificate typically used for Transport Layer Security
(TLS) where the domain name of the applicant is validated by proving some control over a DNS domain.
1.
To add Application Domain Certificates, go to Settings/Certification Manager.
Cloud Edge Advanced Settings
Client-lessAccess( Zero Trust Applications)
40
Page 41

2.
The Upload Certificate screen displays. Fill in the Certificate Body, PrivateKey, and Chain.
3.
Select Validate to ensure this certificate is correct:
4.
Select Apply to upload the certificate.
Cloud Edge Advanced Settings
Client-lessAccess( Zero Trust Applications)
41
Page 42
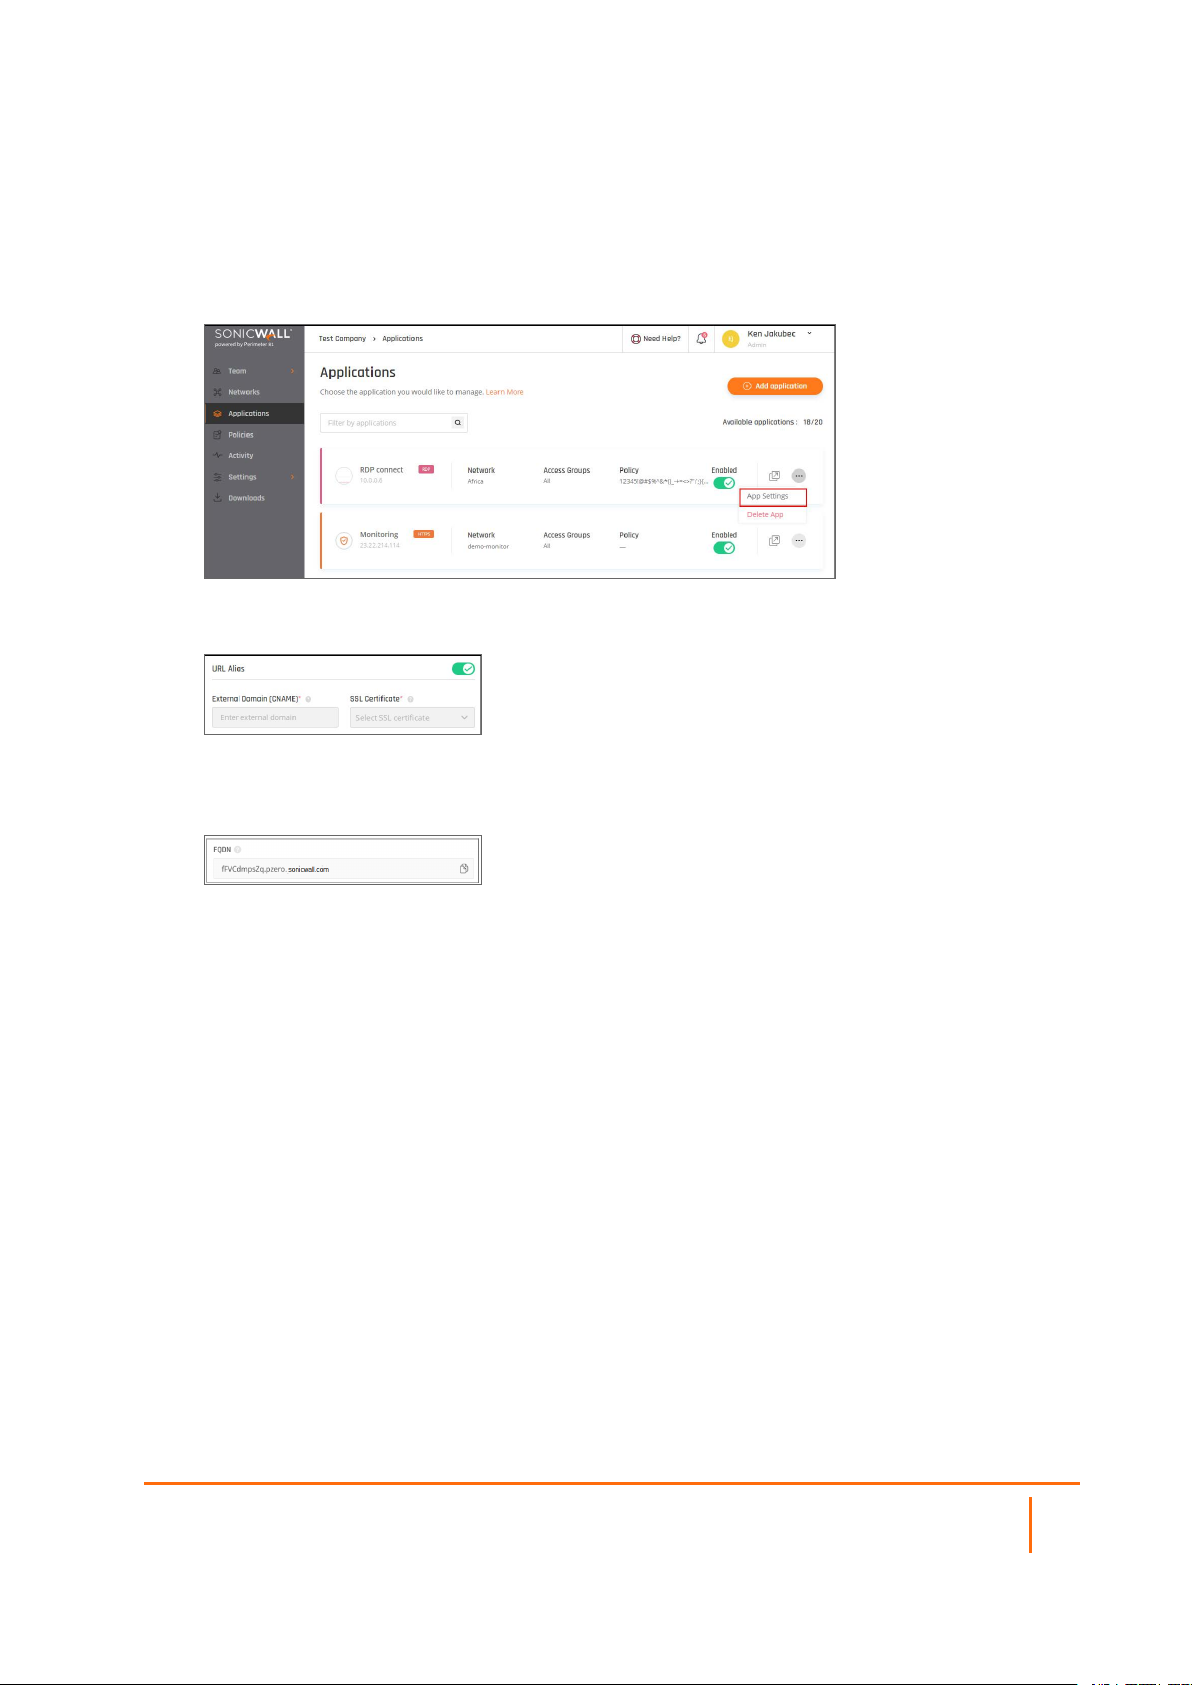
Creating a URL alias for your application
1.
Go to the Applicationstab and select the three-dotted icon beside the application you'd like to set a
URL alias for. Select App Settings.
2.
Enable URL Alias. Choose a CNAME associated with your domain and the correlating certificate (for
example myapplication.mydomain.com).
3.
Go to your DNS administrator (for instance GoDaddy or R53 in AWS). Define a CNAME under your
domain (identical to the CNAME you inserted in the Management Platform) and point it to application
FQDN (the FQDN will appear in the app settings once you click to apply).
Cloud Edge Advanced Settings
Client-lessAccess( Zero Trust Applications)
42
Page 43

SonicWall Support
Technical support is available to customers who have purchased SonicWall products with a valid
maintenance contract.
The Support Portal provides self-help tools you can use to solve problems quickly and independently, 24
hours a day, 365 days a year. To access the Support Portal, go to https://www.sonicwall.com/support.
The Support Portal enables you to:
l View knowledge base articles and technical documentation
l View and participate in the Community forum discussions at
https://community.sonicwall.com/technology-and-support.
l View video tutorials
l Access https://mysonicwall.com
l Learn about SonicWall professional services
l Review SonicWall Support services and warranty information
l Register for training and certification
l Request technical support or customer service
4
To contact SonicWall Support, visit https://www.sonicwall.com/support/contact-support.
Cloud Edge Advanced Settings
43
SonicWall Support
Page 44

About This Document
NOTE: A NOTE icon indicates supporting information.
IMPORTANT: An IMPORTANT icon indicates supporting information.
TIP: A TIP icon indicates helpful information.
CAUTION: A CAUTION icon indicates potential damage to hardware or loss of data if
instructions are not followed.
WARNING: A WARNING icon indicates a potential for property damage, personal injury, or
death.
Cloud Edge Secure AccessAdvanced Settings
Updated - February 2021
232-005538-00 Rev B
Copyright © 2021 SonicWallInc. All rights reserved.
The information in this document ispr ovided in connection with SonicWalland/or its affiliates’products. No license, expressor
implied, by estoppel or otherwise, to any intellectualproper ty right is granted by this document or in connection with the sale of
products. EXCEPT ASSET FORTH IN THE TERMS AND CONDITIONS AS SPECIFIED IN THE LICENSE AGREEMENT FOR
THIS PRODUCT, SONICWALL AND/OR ITS AFFILIATES ASSUME NO LIABILITY WHATSOEVER AND DISCLAIMS ANY
EXPRESS, IMPLIED OR STATUTORY WARRANTY RELATING TO ITS PRODUCTS INCLUDING, BUT NOT LIMITED TO,
THE IMPLIED WARRANTY OF MERCHANTABILITY, FITNESS FOR A PARTICULAR PURPOSE, OR NON-INFRINGEMENT.
IN NO EVENT SHALL SONICWALL AND/OR ITS AFFILIATES BELIABLE FOR ANY DIRECT, INDIRECT, CONSEQUENTIAL,
PUNITIVE, SPECIAL OR INCIDENTAL DAMAGES (INCLUDING, WITHOUT LIMIT ATION, DAMAGES FOR LOSS OF
PROFITS, BUSINESS INT ERRUPTION OR LOSS OF INFORMATION) ARISING OUT OF THE USE OR INABILITY TO USE
THIS DOCUMENT, EVEN IF SONICWALL AND/OR ITS AFFILIATES HAVE BEEN ADVISED OF THE POSSIBILITY OF SUCH
DAMAGES. SonicWall and/or its affiliatesmake no representations or warranties with respect to the accuracy or completeness of
the contents of thisdocument and reserves the right to make changes to specifications and product descriptionsat any time without
notice. and/or itsaffiliatesdo not makeany commitment to update the information contained in thisdocument.
For more information, visit https://www.sonicwall.com/legal.
End User Product Agreement
To view the SonicWallEnd User Product Agreement, go to: https://www.sonicwall.com/legal/end-user- product-agreements/.
Open Source Code
SonicWall Inc. isable to provide a machine-readable copy of open source code with restrictive licensessuch as GPL, LGPL, AGPL
when applicable per license requirements. To obtain a complete machine-readable copy, send your written requests, along with
certified check or money order in the amount of USD 25.00 payable to “SonicWall Inc.”, to:
General Public License Source Code Request
Attn: Jennifer Anderson
1033 McCarthy Blvd
Milpitas, CA 95035
Cloud Edge Advanced Settings
SonicWall Support
44
 Loading...