

Page 1

USER GUIDE
™
SONIC
®
SCENARIST
Page 2

© Copyright 2000–2002 Sonic Solutions. All rights reserved.
Scenarist User Guide — Sonic Part Number 800177 Rev B (12/02)
This manual, as well as the software described in it, is furnished under license and may only be used or copied in accordance with
the terms of such license. The information in this manual is furnished for informational use only, is subject to change without
notice, and should not be construed as a commitment by Sonic Solutions. Sonic Solutions assumes no responsibility or liability for
any errors or inaccuracies that may appear in this book.
Except as permitted by such license, no part of this publication may be reproduced, stored in a retrieval system, or transmitted,
in any form or by any means, electronic, mechanical, recording, or otherwise, without the prior written permission of Sonic
Solutions.
SONIC SOLUTIONS, INC. (“SONIC”) MAKES NO WARRANTIES, EXPRESS OR IMPLIED, INCLUDING WITHOUT LIMITATION THE
IMPLIED WARRANTIES OF MERCHANTABILITY AND FITNESS FOR A PARTICULAR PURPOSE, REGARDING THE SOFTWARE.
SONIC DOES NOT WARRANT, GUARANTEE, OR MAKE ANY REPRESENTATIONS REGARDING THE USE OR THE RESULTS OF
THE USE OF THE SONIC SOFTWARE IN TERMS OF ITS CORRECTNESS, ACCURACY, RELIABILITY, CURRENTNESS, OR
OTHERWISE. THE ENTIRE RISK AS TO THE RESULTS AND PERFORMANCE OF THE SONIC SOFTWARE IS ASSUMED BY YOU.
THE EXCLUSION OF IMPLIED WARRANTIES IS NOT PERMITTED BY SOME STATES. THE ABOVE EXCLUSION MAY NOT APPLY
TO YOU.
IN NO EVENT WILL SONIC, ITS DIRECTORS, OFFICERS, EMPLOYEES, OR AGENTS BY LIABLE TO YOU FOR ANY
CONSEQUENTIAL, INCIDENTAL, OR INDIRECT DAMAGES (INCLUDING DAMAGES FOR LOSS OF BUSINESS PROFITS,
BUSINESS INTERRUPTION, LOSS OF BUSINESS INFORMATION, AND THE LIKE) ARISING OUT OF THE USE OR INABILITY TO
USE THE SOFTWARE EVEN IF SONIC HAS BEEN ADVISED OF THE POSSIBILITY OF SUCH DAMAGES. BECAUSE SOME
STATES DO NOT ALLOW THE EXCLUSION OR LIMITATION OF LIABILITY FOR CONSEQUENTIAL OR INCIDENTAL DAMAGES,
THE ABOVE LIMITATIONS MAY NOT APPLY TO YOU.
Sonic, the Sonic logo, sonic.com, AutoCadence, AutoDVD, cDVD, ConstantQ, DVD Presenter, DVD Producer, DVD Ready, DVD
Studio, Edit-on-DVD, First in DVD, hDVD, OpenDVD, PlantDirect, PrePlay, SonicCare, Sonic Cinema, The Business of DVD, The
Easiest Way to Publish on DVD, The Easiest Way to Record on DVD, The Smartest Way to Publish on DVD, and Where DVD Meets
the Internet are trademarks of Sonic Solutions.
AuthorScript, CinePlayer, eDVD, DVD Creator, DVDit!, MyDVD, OneClick DVD, ReelDVD, Scenarist, and Sonic Solutions, are
registered trademarks of Sonic Solutions.
Scenarist was developed using NeoAccess and NeoShare: © 1992-1996 NeoLogic Systems, Inc. The NeoAccess and NeoShare
Software contained within this program are proprietary to NeoLogic Systems, Inc. and are licensed to Sonic Solutions, Inc. for
distribution only for use in combination with the Sonic Solutions, Inc. software, Scenarist and ReelDVD. NeoLogic Systems, Inc.
makes no warranties whatever, expressed or implied, regarding this product, including warranties with respect to its
merchantability or its fitness for any particular purpose.
Dolby Digital is a trademark of Dolby Laboratories, Inc. Dolby Laboratories encourages use of the Dolby Digital trademark to
identify soundtracks that are encoded in Dolby Digital. This is an effective way to inform listeners of the soundtrack format, and
the use of a standard logo promotes easy recognition in the marketplace. However, like any trademark, the Dolby Digital logo may
not be used without permission. Dolby Laboratories therefore provides a standard trademark license agreement for companies
who wish to use Dolby trademarks. This agreement should be signed by the company that owns the program material being
produced. Recording studios or production facilities which provide audio production or encoding services for outside clients
generally do not require a trademark license. If you would like more information on obtaining a Dolby trademark license, please
contact Dolby Laboratories Licensing Corporation. Information on trademark licensing plus instructions for using the Dolby Digital
trademark and marking audio formats can also be found online at http://www.dolby.com.
Microsoft, Microsoft Windows XP, ME, 2000, 98 and 95, Internet Explorer, and the Microsoft logo are registered trademarks of the
Microsoft Corporation, Inc.
Apple, the Apple logo, Finder, Macintosh, Power Macintosh and QuickTime are registered trademarks of Apple Computer, Inc.
Photoshop is a registered trademark of Adobe Systems Inc.
TARGA is a trademark of Pinnacle Systems, Inc.
Key-Lok II is a trademark of Microcomputer Applications, Inc.
All other company or product names are either trademarks or registered trademarks of their respective owners.
Written and designed at Sonic Solutions, 101 Rowland Way, Novato, CA 94945, USA
Page 3

Contents
1 Introduction
2 Installation
3 Workflow and Work Areas
About the Documentation . . . . . . . . . . . . . . . . . . . . . . . . . . . . . . . . . . . . . . . . . . . . . . 2
Sonic on the Web. . . . . . . . . . . . . . . . . . . . . . . . . . . . . . . . . . . . . . . . . . . . . . . . . . . . . 2
System Requirements . . . . . . . . . . . . . . . . . . . . . . . . . . . . . . . . . . . . . . . . . . . . . . . . . 4
Hard Drive Requirements . . . . . . . . . . . . . . . . . . . . . . . . . . . . . . . . . . . . . . . . . . . . . . 4
Installing the CineMaster C3.0 Card. . . . . . . . . . . . . . . . . . . . . . . . . . . . . . . . . . . . . . . 5
Installing the Dongle . . . . . . . . . . . . . . . . . . . . . . . . . . . . . . . . . . . . . . . . . . . . . . . . . . 7
Installing the Software . . . . . . . . . . . . . . . . . . . . . . . . . . . . . . . . . . . . . . . . . . . . . . . . . 7
Authoring Workflow . . . . . . . . . . . . . . . . . . . . . . . . . . . . . . . . . . . . . . . . . . . . . . . . . 12
Scenarist Data Hierarchy . . . . . . . . . . . . . . . . . . . . . . . . . . . . . . . . . . . . . . . . . . . . . . 13
The Scenarist Main Window . . . . . . . . . . . . . . . . . . . . . . . . . . . . . . . . . . . . . . . . . . . 14
The Asset Manager . . . . . . . . . . . . . . . . . . . . . . . . . . . . . . . . . . . . . . . . . . . . . . . . . . . 25
The Information Window . . . . . . . . . . . . . . . . . . . . . . . . . . . . . . . . . . . . . . . . . . . . . 26
The Property Browser . . . . . . . . . . . . . . . . . . . . . . . . . . . . . . . . . . . . . . . . . . . . . . . . 27
Page 4

iv Contents
Dockable Windows . . . . . . . . . . . . . . . . . . . . . . . . . . . . . . . . . . . . . . . . . . . . . . . . . 29
The Simulation Window . . . . . . . . . . . . . . . . . . . . . . . . . . . . . . . . . . . . . . . . . . . . . . 31
The Edit Window . . . . . . . . . . . . . . . . . . . . . . . . . . . . . . . . . . . . . . . . . . . . . . . . . . . 33
Simulation Window Tools . . . . . . . . . . . . . . . . . . . . . . . . . . . . . . . . . . . . . . . . . . . . 34
4 Preparing Assets
Preparing Video Assets . . . . . . . . . . . . . . . . . . . . . . . . . . . . . . . . . . . . . . . . . . . . . . . 42
Preparing Audio Assets . . . . . . . . . . . . . . . . . . . . . . . . . . . . . . . . . . . . . . . . . . . . . . . 44
Preparing Still Image Assets . . . . . . . . . . . . . . . . . . . . . . . . . . . . . . . . . . . . . . . . . . . 46
Preparing Subpicture Assets . . . . . . . . . . . . . . . . . . . . . . . . . . . . . . . . . . . . . . . . . . . 48
Preparing Subtitle Assets . . . . . . . . . . . . . . . . . . . . . . . . . . . . . . . . . . . . . . . . . . . . . 49
The Bit Budget . . . . . . . . . . . . . . . . . . . . . . . . . . . . . . . . . . . . . . . . . . . . . . . . . . . . . 53
5 Creating Scenarios
About Scenarios . . . . . . . . . . . . . . . . . . . . . . . . . . . . . . . . . . . . . . . . . . . . . . . . . . . . 60
The Project Manager. . . . . . . . . . . . . . . . . . . . . . . . . . . . . . . . . . . . . . . . . . . . . . . . . 61
Creating Scenarios with the Project Wizard . . . . . . . . . . . . . . . . . . . . . . . . . . . . . . . 63
Project Templates. . . . . . . . . . . . . . . . . . . . . . . . . . . . . . . . . . . . . . . . . . . . . . . . . . . 77
Exporting Scenarios . . . . . . . . . . . . . . . . . . . . . . . . . . . . . . . . . . . . . . . . . . . . . . . . . 78
Importing Scenarios . . . . . . . . . . . . . . . . . . . . . . . . . . . . . . . . . . . . . . . . . . . . . . . . . 80
6 Registering Assets
Creating Asset Folders . . . . . . . . . . . . . . . . . . . . . . . . . . . . . . . . . . . . . . . . . . . . . . . 86
Registering Assets in the Data Editor. . . . . . . . . . . . . . . . . . . . . . . . . . . . . . . . . . . . . 87
Registering Assets in the Track and Scenario Editors . . . . . . . . . . . . . . . . . . . . . . . . 92
Objects Created When Registering Assets . . . . . . . . . . . . . . . . . . . . . . . . . . . . . . . . 93
Using Place Holders . . . . . . . . . . . . . . . . . . . . . . . . . . . . . . . . . . . . . . . . . . . . . . . . . 95
7 Creating Video and Still Tracks
Creating Track Folders . . . . . . . . . . . . . . . . . . . . . . . . . . . . . . . . . . . . . . . . . . . . . . 102
Creating Video Tracks . . . . . . . . . . . . . . . . . . . . . . . . . . . . . . . . . . . . . . . . . . . . . . 103
Adding Scenes to Video Tracks. . . . . . . . . . . . . . . . . . . . . . . . . . . . . . . . . . . . . . . . 104
Adding Angles to Video Tracks . . . . . . . . . . . . . . . . . . . . . . . . . . . . . . . . . . . . . . . . 106
Page 5

Creating Slide and Still Show Tracks . . . . . . . . . . . . . . . . . . . . . . . . . . . . . . . . . . . . 107
Showing and Hiding Track Streams . . . . . . . . . . . . . . . . . . . . . . . . . . . . . . . . . . . . . 112
Using Track Stream Defaults . . . . . . . . . . . . . . . . . . . . . . . . . . . . . . . . . . . . . . . . . . 113
8 Adding Subtitles and Closed Captioning
Subtitles . . . . . . . . . . . . . . . . . . . . . . . . . . . . . . . . . . . . . . . . . . . . . . . . . . . . . . . . . . 116
Closed Captioning . . . . . . . . . . . . . . . . . . . . . . . . . . . . . . . . . . . . . . . . . . . . . . . . . . 120
9 Creating Menu Tracks
About Menus . . . . . . . . . . . . . . . . . . . . . . . . . . . . . . . . . . . . . . . . . . . . . . . . . . . . . . 124
Creating Menu Tracks . . . . . . . . . . . . . . . . . . . . . . . . . . . . . . . . . . . . . . . . . . . . . . . 126
16:9 Menu Tracks. . . . . . . . . . . . . . . . . . . . . . . . . . . . . . . . . . . . . . . . . . . . . . . . . . . 130
Button Highlights. . . . . . . . . . . . . . . . . . . . . . . . . . . . . . . . . . . . . . . . . . . . . . . . . . . 132
Button Links. . . . . . . . . . . . . . . . . . . . . . . . . . . . . . . . . . . . . . . . . . . . . . . . . . . . . . . 137
Auto Action . . . . . . . . . . . . . . . . . . . . . . . . . . . . . . . . . . . . . . . . . . . . . . . . . . . . . . . 142
Forced Selected . . . . . . . . . . . . . . . . . . . . . . . . . . . . . . . . . . . . . . . . . . . . . . . . . . . . 143
Forced Activated . . . . . . . . . . . . . . . . . . . . . . . . . . . . . . . . . . . . . . . . . . . . . . . . . . . 144
Contents v
10 Subpicture Colors and Effects
Subpicture Color Mapping. . . . . . . . . . . . . . . . . . . . . . . . . . . . . . . . . . . . . . . . . . . . 146
Subpicture Color Palettes . . . . . . . . . . . . . . . . . . . . . . . . . . . . . . . . . . . . . . . . . . . . 151
Subpicture Effects . . . . . . . . . . . . . . . . . . . . . . . . . . . . . . . . . . . . . . . . . . . . . . . . . . 154
Subpicture Stops . . . . . . . . . . . . . . . . . . . . . . . . . . . . . . . . . . . . . . . . . . . . . . . . . . . 159
11 Authoring in the Scenario Editor
Authoring in the Scenario Editor . . . . . . . . . . . . . . . . . . . . . . . . . . . . . . . . . . . . . . . 162
VTS and Title Folders . . . . . . . . . . . . . . . . . . . . . . . . . . . . . . . . . . . . . . . . . . . . . . . . 167
Title PGCs . . . . . . . . . . . . . . . . . . . . . . . . . . . . . . . . . . . . . . . . . . . . . . . . . . . . . . . . 170
Language Folders. . . . . . . . . . . . . . . . . . . . . . . . . . . . . . . . . . . . . . . . . . . . . . . . . . . 176
Menu PGCs . . . . . . . . . . . . . . . . . . . . . . . . . . . . . . . . . . . . . . . . . . . . . . . . . . . . . . . 177
The First PGC . . . . . . . . . . . . . . . . . . . . . . . . . . . . . . . . . . . . . . . . . . . . . . . . . . . . . . 181
Organizing the Authoring Area . . . . . . . . . . . . . . . . . . . . . . . . . . . . . . . . . . . . . . . . 183
Page 6

vi Contents
12 PGC Links and Jump Commands
PGC Link Commands . . . . . . . . . . . . . . . . . . . . . . . . . . . . . . . . . . . . . . . . . . . . . . . 190
Jump Commands . . . . . . . . . . . . . . . . . . . . . . . . . . . . . . . . . . . . . . . . . . . . . . . . . . 195
Showing and Hiding PGC and Command Links . . . . . . . . . . . . . . . . . . . . . . . . . . . 202
13 Navigation Commands
About Navigation Commands . . . . . . . . . . . . . . . . . . . . . . . . . . . . . . . . . . . . . . . . . 204
Command Groups . . . . . . . . . . . . . . . . . . . . . . . . . . . . . . . . . . . . . . . . . . . . . . . . . 205
Command Types. . . . . . . . . . . . . . . . . . . . . . . . . . . . . . . . . . . . . . . . . . . . . . . . . . . 205
Building Type 1, Type 2, and Type 3 Commands . . . . . . . . . . . . . . . . . . . . . . . . . . 207
14 Navigation Parameters
About Navigation Parameters . . . . . . . . . . . . . . . . . . . . . . . . . . . . . . . . . . . . . . . . . 216
System Parameters . . . . . . . . . . . . . . . . . . . . . . . . . . . . . . . . . . . . . . . . . . . . . . . . . 217
General Parameters. . . . . . . . . . . . . . . . . . . . . . . . . . . . . . . . . . . . . . . . . . . . . . . . . 219
Set Commands . . . . . . . . . . . . . . . . . . . . . . . . . . . . . . . . . . . . . . . . . . . . . . . . . . . . 221
15 Bitwise Compares
Overview of Bitwise Compares . . . . . . . . . . . . . . . . . . . . . . . . . . . . . . . . . . . . . . . 224
Creating a Bitwise Compare Routine . . . . . . . . . . . . . . . . . . . . . . . . . . . . . . . . . . . 225
Testing the Bitwise Compare Routine . . . . . . . . . . . . . . . . . . . . . . . . . . . . . . . . . . 229
16 Copy Protection and Premastering
Copy Protection . . . . . . . . . . . . . . . . . . . . . . . . . . . . . . . . . . . . . . . . . . . . . . . . . . . 234
Parental Levels . . . . . . . . . . . . . . . . . . . . . . . . . . . . . . . . . . . . . . . . . . . . . . . . . . . . 238
Regional Codes. . . . . . . . . . . . . . . . . . . . . . . . . . . . . . . . . . . . . . . . . . . . . . . . . . . . 239
File Systems and Filenames. . . . . . . . . . . . . . . . . . . . . . . . . . . . . . . . . . . . . . . . . . . 240
Jacket Information . . . . . . . . . . . . . . . . . . . . . . . . . . . . . . . . . . . . . . . . . . . . . . . . . 242
Text Data . . . . . . . . . . . . . . . . . . . . . . . . . . . . . . . . . . . . . . . . . . . . . . . . . . . . . . . . 244
Dual-Layer Discs . . . . . . . . . . . . . . . . . . . . . . . . . . . . . . . . . . . . . . . . . . . . . . . . . . . 245
Using the Layout Editor. . . . . . . . . . . . . . . . . . . . . . . . . . . . . . . . . . . . . . . . . . . . . . 248
Page 7

A
The Template Wizard
About the Template Wizard . . . . . . . . . . . . . . . . . . . . . . . . . . . . . . . . . . . . . . . . . . . 258
The Loop Wizard . . . . . . . . . . . . . . . . . . . . . . . . . . . . . . . . . . . . . . . . . . . . . . . . . . . 260
The Branch Wizard . . . . . . . . . . . . . . . . . . . . . . . . . . . . . . . . . . . . . . . . . . . . . . . . . 263
B
AC-3 Encoding
What is Dolby Digital Audio? . . . . . . . . . . . . . . . . . . . . . . . . . . . . . . . . . . . . . . . . . . 268
The AC-3 Encoder . . . . . . . . . . . . . . . . . . . . . . . . . . . . . . . . . . . . . . . . . . . . . . . . . .269
AC-3 Parameter Settings . . . . . . . . . . . . . . . . . . . . . . . . . . . . . . . . . . . . . . . . . . . . . . 274
Batch AC-3 Encoding . . . . . . . . . . . . . . . . . . . . . . . . . . . . . . . . . . . . . . . . . . . . . . . . 277
C
Karaoke Titles
About Karaoke. . . . . . . . . . . . . . . . . . . . . . . . . . . . . . . . . . . . . . . . . . . . . . . . . . . . . 280
Creating a Karaoke Title. . . . . . . . . . . . . . . . . . . . . . . . . . . . . . . . . . . . . . . . . . . . . . 280
Karaoke Commands (SPRM11) . . . . . . . . . . . . . . . . . . . . . . . . . . . . . . . . . . . . . . . .282
D
Video Standards and DVD Regions
Contents vii
Television Video Standards . . . . . . . . . . . . . . . . . . . . . . . . . . . . . . . . . . . . . . . . . . . 286
DVD Regions . . . . . . . . . . . . . . . . . . . . . . . . . . . . . . . . . . . . . . . . . . . . . . . . . . . . . . 286
Video Standards and DVD Regions for Countries/Territories. . . . . . . . . . . . . . . . . . 287
E
Digital Compression
Digital Video Components. . . . . . . . . . . . . . . . . . . . . . . . . . . . . . . . . . . . . . . . . . . . 300
Factors Affecting Video Compression . . . . . . . . . . . . . . . . . . . . . . . . . . . . . . . . . . . 303
MPEG Overview. . . . . . . . . . . . . . . . . . . . . . . . . . . . . . . . . . . . . . . . . . . . . . . . . . . . 305
Glossary
Index
. . . . . . . . . . . . . . . . . . . . . . . . . . . . . . . . . . . . . . . . . . . . . . . . . . . . . . . . . 313
. . . . . . . . . . . . . . . . . . . . . . . . . . . . . . . . . . . . . . . . . . . . . . . . . . . . . . . . . . . . 329
Page 8

viii Contents
Page 9

1
Introduction
Welcome to Sonic Scenarist, the standard for professional DVD production. Scenarist’s
powerful interface gives you full access to the DVD specification for high-end feature film
and commercial DVD production.
In addition to power, Scenarist provides speed and efficiency. Reusable project templates
and flexible architecture ensure maximum throughput for your facility. Scenarist’s flexibility
can save valuable time and money on every project.
Page 10

2 Chapter 1, Introduction
About the Documentation
Sonic Scenarist includes the following documentation:
Scenarist User Guide
hardware, as well as how to use Scenarist to author DVD discs. The guide includes project
planning, asset preparation and importing, building and authoring projects, proofing, and
writing to disc.
Release Notes
issues (which will be resolved in subsequent releases). Please read it carefully to find out
what’s new.
Sonic on the Web
Sonic’s Web site (www.sonic.com) contains a wealth of information about Sonic products
and DVD authoring.
technology, are available at:
http://www.sonic.com/support/whitepapers.htm
If you have specific questions about using Scenarist that aren’t answered by the
documentation, a
http://support.sonic.com/kb.htm
Documents how to install and configure the Scenarist software and
Documents changes from previous versions of Scenarist as well as known
White Papers
Support Knowledgebase
, providing additional background on Sonic products and
is available at:
Sonic continually tests and qualifies computer systems and peripherals for use Scenarist. For
the latest
at:
Configuration Guide
http://www.sonic.com/products/scenarist
on supported systems and devices, visit the Sonic Web site
Page 11

2
Installation
This chapter documents system requirements and installation for Scenarist. It includes the
following topics:
•
•
•
•
•
“System Requirements” on page 4
“Hard Drive Requirements” on page 4
“Installing the CineMaster C3.0 Card” on page 5
“Installing the Dongle” on page 7
“Installing the Software” on page 7
Page 12

4 Chapter 2, Installation
System Requirements
To use Scenarist, you must have a compatible computer with the appropriate peripherals.
For the latest list of recommended CPUs and peripherals, refer to the
Configuration Guide
http://www.sonic.com/products/scenarist/config.asp
Hard Drive Requirements
Storage requirements for a DVD project are a minimum of twice the size of the disc image
plus an additional 4.7 GB for the temporary Root and Mux directories. This equals more than
14 GB for of a single-sided, single-layer disc, and almost 26 GB for a single-sided, dual-layer
disc.
Scenarist
, available from the Sonic Web site at:
Table 1:
Disc Type Delete Root/Mux
Single-Sided
Single Layer
Single-Sided
Dual Layer
Required hard drive space when writing disc images
Directories
When Done?
Yes 4.7 GB 4.7 GB (temp) 4.7 GB 14 GB
No 4.7 GB 4.7 GB 4.7 GB 4.7 GB 18 GB
Yes 8.5 GB 8.5 GB (temp) 8.5 GB 26 GB
No 8.5 GB 8.5 GB 8.5 GB 8.5 GB 34 GB
Asset
Files
Mux
Directory
DVD Root
Directory
Target
Directory
(disc image)
Required
Hard Drive
Space
Page 13

Installing the CineMaster C3.0 Card 5
As seen in Table 1, the required hard drive space is even larger when the DVD Root and
Mux directories are
the same amount of disk space as the disc image. You may want to retain the Mux directory
to allow for faster subsequent disc image writes; and you may want to retain the DVD Root
directory if you want to the proof those files in an application that supports playing DVD
volumes. The option for deleting the DVD Root and Mux directories is in the Layout Editor
(see “Step 2 – Choosing the Target Directories” on page 251).
not
deleted after writing the disc image. These directories each require
Note:
have to reside on the same hard drive. Therefore, four 5 GB hard drives will work just as
well as one 20 GB drive.
The asset files, Mux directory, DVD Root directory, and disc image don’t necessarily
File System Considerations
Because the FAT 16 and FAT 32 file systems do not support files larger than 2 GB, you must
use NTFS to format any hard drives that will hold media assets and disc images.
Installing the CineMaster C3.0 Card
Before installing the Scenarist software, first install the CineMaster C3.0 Decoder card, along
with the CineMaster software included on the Scenarist Installation disc.
To Install the CineMaster C3.0 card:
1
Shut down and power off your computer. Disconnect the power cord.
2
Open the computer (following the manufacturer’s instructions) and locate any available
PCI expansion slot.
3
Remove the slot cover screw and slot cover if necessary.
Page 14

6 Chapter 2, Installation
4
5
6
7
The first time you restart after installing the CineMaster card, the Windows Hardware
Installation wizard launches to install the native drivers.
To install the required CineMaster C3.0 software:
1
2
3
4
Install the CineMaster card (handle the card by its edges; don’t touch the gold
connectors or on-board components). Align the card’s connector fingers with the PCI
slot and press down until the card is seated properly.
Secure the card with the slot cover screw.
Close the computer and attach the power cord.
Power up the computer.
From the Windows Start menu, choose Settings > Control Panel.
In the Control Panel window, double-click the System icon.
In the System control panel, click the Hardware tab and then click Device Manager.
In the Device Manager List, Right-click the CineMaster 3.0 Main driver and choose
Properties from the pop-up menu.
5
Click the Driver tab, then click Update Driver.
6
Insert the Scenarist Installation disc and follow the on-screen instructions to install the
CineMaster C3.0 driver from the disc.
7
Install the CineMaster DVD Player software by running the Setup program on the
Scenarist Installation disc (in the CineMaster Player folder). Follow the on-screen
instructions.
Page 15

Installing the Dongle
Installing the Dongle 7
The included
Scenarist must receive these algorithms from the dongle or it will not run.
To install the dongle:
1
Power down your computer.
2
Remove the printer cable (if applicable) from the parallel port.
3
Attach the dongle to the parallel port and attach the printer cable (if applicable) to the
dongle.
4
Turn on your computer.
Note:
with Scenarist. It is not possible to connect two Sonic dongles to your computer’s parallel
port. To get a Scenarist Activator Code that will work with your existing dongle, contact
Sonic Support (http://support.sonic.com/).
dongle
supplies preset algorithms in response to requests from Scenarist.
If you have an existing Sonic dongle connected to your parallel port, you can use it
Installing the Software
This section documents how to install your Scenarist software. It includes the following
topics:
•
“Logging On in Administrator Mode” on page 8
•
“Uninstalling an Earlier Version of Scenarist” on page 8
•
“Installing and Activating Scenarist” on page 9
Page 16

8 Chapter 2, Installation
Logging On in Administrator Mode
The first step is to log on to your Windows computer with a User name that is a member of
your computer’s local Administrators group.
To log on to your computer in Administrator mode:
1
2
3
If you are upgrading from a previous version of Scenarist, proceed to “Uninstalling an Earlier
Version of Scenarist” on page 8. Otherwise, skip directly to “Installing and Activating
Scenarist” on page 9.
Uninstalling an Earlier Version of Scenarist
Open the Windows Logon Information window and enter “Administrator” for the User
name.
Enter your Password and select your Domain name (the name of your local computer).
Click OK to log on to your computer.
Before you install Scenarist, first uninstall any existing versions of the software.
To uninstall an earlier version of Scenarist:
1
From the Windows Start menu, choose Settings > Control Panel. The Control Panel
window opens.
2
Double-click the Add/Remove Programs icon.
3
Select Scenarist and click Change/Remove.
4
Follow the on-screen instructions.
When the removal process is complete, proceed to “Installing and Activating Scenarist” on
page 9.
Page 17

Installing the Software 9
Installing and Activating Scenarist
If upgrading from an earlier version of Scenarist, make sure to complete the steps in
“Uninstalling an Earlier Version of Scenarist” on page 8, then proceed to the following steps.
To install and activate Scenarist:
1
Insert the Scenarist Installation disc and run the Setup program.
2
Follow the on-screen instructions.
3
When prompted, restart your computer.
4
From the Windows Start menu, choose Programs > Sonic > Scenarist > Scenarist.
5
When prompted, enter the Activator Code. Your Activator Code is sent to you by Sonic
Solutions (or your Sonic reseller) after your Scenarist registration information is received.
The Activator Code is case sensitive and must be entered as such.
If you receive an error message stating that the Activator Code is invalid or the dongle is
missing, please check that you have entered the code correctly and that the parallel port on
your computer is enabled and working. To check this, connect a parallel printer or other
device to the port and make sure the device can actually receive output from your
computer through the parallel port.
Page 18

10 Chapter 2, Installation
Page 19

3
Workflow and Work Areas
This chapter documents the basic workflow for authoring DVD-Video discs in Scenarist and
provides an overview of the different work areas in Scenarist. It includes the following
topics:
•
“Authoring Workflow” on page 12
•
“Scenarist Data Hierarchy” on page 13
•
“The Scenarist Main Window” on page 14
•
“The Asset Manager” on page 25
•
“The Information Window” on page 26
•
“The Property Browser” on page 27
•
“Dockable Windows” on page 29
•
“The Simulation Window” on page 31
•
“The Edit Window” on page 33
•
“Simulation Window Tools” on page 34
Page 20

12 Chapter 3, Workflow and Work Areas
Authoring Workflow
The workflow for authoring a DVD-Video disc in Scenarist mirrors the layout of work areas
in Scenarist (Data Editor, Track Editor, Scenario Editor, and Layout Editor). This workflow
involves registering prepared assets, assembling the assets into tracks, constructing a
scenario with PGCs and navigation commands, and laying out the project for output to disc.
Data
Editor
Register Assets
• Video
• Audio
• Sill images
• Subpictures
• Subtitles
Track Editor
Simulation Window
Assemble Tracks
• Title tracks
• Menu tracks
• Subtitles
• Button highlights
Tracks Scenario DLT/DiscAssets
Scenario Editor
Build Scenario
• First Play
• VMG menus
• VTS menus
• Title tracks
• Navigation
commands
Layout
Editor
Output Project
• Proof/test project
• Copy protection
• PVD/Disc settings
• Layer Break
• Output disc
image
Workflow for authoring in Scenarist
Authoring a DVD title in Scenarist includes the following basic steps:
1
Prepare any assets required for the project, including video, audio, still images,
subpictures, and subtitles.
2
In Scenarist, register assets by dragging them from Windows Explorer to the Data Editor.
Organize the assets with asset folders as desired.
3
Create tracks by dragging video and still image assets from the Asset Manager to the Track
Editor. Add audio and subpicture streams by dragging assets to the Track Editor timeline.
4
Add subtitles to video tracks in the Simulation window, or import them with a subtitle
script.
5
Add button highlights to menu tracks in the Simulation window.
6
Create PGCs by dragging tracks from the Asset Manager to language and title folders in
the Scenario Editor.
Page 21

7 Add navigation commands to set playback order, loop menus, and link menu buttons.
8 Proof the project in the Simulation window. Check the playback order for the project’s
content, test remote control interaction, navigate each of the button highlights, and
verify link destinations.
9 Add copy protection and parental and region management; enter the PVD and Disc
Settings; and, if creating a dual-layer disc, set the Layer Break.
10 Output the disc image to DVD-R or DLT tape.
Scenarist Data Hierarchy
Data objects in Scenarist serve as building blocks for other objects. Disc images are built
from an arrangement of PGCs, which are created from tracks, which are created from assets,
which point to media files on a local hard drive.
Disc Image
Scenarist Data Hierarchy 13
PGCs
Tracks
Assets
Media Files
Scenarist data hierarchy
Page 22

14 Chapter 3, Workflow and Work Areas
The data hierarchy in Scenarist requires that objects referenced by other objects remain
intact. For example, Scenarist will not let you delete an asset that is being used by a track.
Note: If you rename, move, or delete media files referenced by assets, you will not be able
to simulate or build the project. However, as long as the file still exists, you can redefine the
asset’s assigned file in the Property Browser (in the File field).
The Scenarist Main Window
The Scenarist main window has four tabs that access the main work areas: Data Editor, Track
Editor, Scenario Editor, and Layout Editor. Depending on which tab is selected, the available
items in the menus and Tools Bar change. In addition to these four work areas, there are
three additional windows (Asset Manager, Information window, and Property Browser) that
can be displayed either at the bottom of the Scenarist main window or as separate windows
when undocked.
This section includes the following topics:
• “The Data Editor” on page 15
• “The Track Editor” on page 18
• “The Scenario Editor” on page 21
• “The Layout Editor” on page 24
Page 23

The Scenarist Main Window 15
The Data Editor
The Data Editor displays the scenario’s assets and place holders. The Data Editor is
comprised of two sections: the directory area on the left (which can be sorted by type or
name), and the work area on the right. To manage large scenarios with many assets, you can
use asset folders (which can be collapsed and expanded) to organize the assets. When
selecting an asset folder in the directory area, its contents are displayed in the work area, as
either large icons or a list. Assets dragged from Windows Explorer to the Data Editor are
automatically registered and added to the scenario.
Tools Bar
Directory area
Data Editor
Work area
Page 24

16 Chapter 3, Workflow and Work Areas
To sort the Data Editor directory area:
• To sort the contents of an asset folder by file type, Right-click the folder in the directory
area and choose Sort By Type from the pop-up menu.
• To sort the contents of an asset folder by file name, Right-click the folder in the directory
area and choose Sort By Name from the pop-up menu.
To view the Data Editor work area as a list with details:
1 Select View > Details. The assets are displayed in a list with columns for Name, Type, and
File Path.
2 To return to displaying assets as icons, select View > Large Icons.
Page 25

Data Editor Tools
The following tools are active when the Data Editor is selected:
The Scenarist Main Window 17
Property
Browser
Asset
Manager
Simulation
Window
Information
Window
Default
Settings
Erase
Settings
Project
New
Folder
Multi-File
Data
New
Data
Encode
Replace
Place Holder
Encode
List
New Place
Holder
Tools Bar, Data Editor
Erase Erases the selected asset folder, asset, or place holder.
Default Settings Opens the Default Settings dialog.
Project Settings Displays Project Settings in the Property Browser, which include Jacket,
Text Data, Layout, Disc, and Encryption Information.
New Folder Adds a new asset folder.
New Data Opens a dialog where you can select an asset for registration.
Multi-File Data Opens a dialog where you can register a single asset from multiple files. For
more information, see “Registering Assets with the New Multi-File Data Command” on
page 91.
New Place Holder Adds a new place holder that can be used while authoring and later
replaced by an asset. For more information, see “Adding New Place Holders” on page 95.
Encode List Generates an encode list that describes the encoding parameters for the
project’s place holders. For more information, see “Creating an Encode List” on page 98.
Replace Place Holder Replaces place holders with assets. For more information, see
“Replacing Place Holders with Assets” on page 99.
Page 26

18 Chapter 3, Workflow and Work Areas
The Track Editor
The Track Editor is where you create and edit title tracks and menu tracks. The Track Editor
is comprised of two sections: the directory area on the left (which can be sorted by type or
name), and the work area on the right. To manage large scenarios with many tracks, you can
use track folders (which can be collapsed and expanded) to organize the tracks. When
selecting a track folder in the directory area, its contents are displayed in the work area;
when selecting a track in the directory area, its streams are displayed in a timeline (which
can be zoomed) in the work area.
Tools Bar
Directory area
Track Editor
Timeline area
Tracks are created by dragging assets from the Asset Manager to a track folder in Track Editor
directory area. Streams are added to tracks by dragging assets from the Asset Manager to the
track’s timeline. Streams can also be copied and pasted between tracks.
Page 27

The Scenarist Main Window 19
To sort the Track Editor directory area:
• To sort the contents of a track folder by file type, Right-click the folder in the directory
area and choose Sort By Type from the pop-up menu.
• To sort the contents of a track folder by file name, Right-click the folder in the directory
area and choose Sort By Name from the pop-up menu.
To zoom the Track Editor timeline to any of 10 zoom levels:
• To zoom in, choose View > Zoom In, or click the Zoom In button in the Tools Bar.
• To zoom out, choose View > Zoom Out, or click the Zoom Out button in the Tools Bar.
Track Editor Tools
The following tools are active when the Track Editor is selected:
Zoom
Out
Zoom
In
Import
Subtitle
Multiplex
Track
New
Scene
New
Angle
New Audio
Erase
Subpicture
Stream
Stream
New
Time
Code
Show
Main
Stream
Show
Stories
Show
Audio
Streams
Subpicture
Streams
Show
Highlight
Streams
Show
Tools Bar, Track Editor
Erase Erases the selected track folder, track, stream, scene, or slide image.
New
Folder
Verify
Track
Color
Palette
Page 28

20 Chapter 3, Workflow and Work Areas
Time Code Displays the current location of the Timeline indicator. You can change the
location of the Timeline indicator by entering a new location in the Time Code field or by
clicking its Up/Down arrows.
Zoom In Zooms the timeline display to any of 10 zoom levels.
Zoom Out Zooms out the timeline display to any of 10 zoom levels.
New Folder Adds a new track folder.
New Scene Adds a new scene to the selected track at the Timeline indicator location.
New Angle Adds a new angle stream to the selected track.
New Audio Stream Adds a new audio stream to the selected track.
New Subpicture Stream Adds a new subpicture stream to the selected track.
Show Main Stream Shows and hides the main video or still stream.
Show Angles Shows and hides angle streams.
Show Audio Streams Shows and hides audio streams.
Show Subpicture Streams Shows and hides subpicture streams.
Show Highlight Streams Shows and hides button highlight streams.
Multiplex Track Multiplexes the selected track (required when simulating tracks in Hardware
Simulation mode).
Import Subtitle Opens the Subtitle Import dialog, where you can import subtitles to the
selected track. For more information, see “Importing Subtitles” on page 119.
Color Palette Opens the Color Palette Editor, where you can create and edit subpicture color
palettes. For more information, see “Subpicture Color Palettes” on page 151.
Verify Track Verifies whether the track and its assets are DVD compliant. Verification results
appear in the Information window in the General tab.
Page 29

The Scenarist Main Window 21
The Scenario Editor
The Scenario Editor is where you assemble the disc’s structure and navigational elements,
determining how the content will be presented and how the viewer will interact with it.
The Scenario Editor is comprised of two sections: the directory area on the left and the
authoring area on the right (which can be zoomed). Tracks are dragged from the Asset
Manager to language and title folders in the authoring area to create PGCs, which can be
arranged and linked to affect navigation.
Tools Bar
Directory area
Scenario Editor
Authoring area
Selecting an item in the directory area automatically selects and scrolls to the item in the
authoring area. Folders and icons in the authoring area can be collapsed, aligned, and
arranged. For more information, see “Organizing the Authoring Area” on page 183.
Page 30
22 Chapter 3, Workflow and Work Areas
To zoom the Scenario Editor authoring area to one of two zoom levels:
• To zoom in, choose View > Zoom In, or click the Zoom In button in the Tools Bar.
• To zoom out, choose View > Zoom Out, or click the Zoom Out button in the Tools Bar.
Scenario Editor Tools
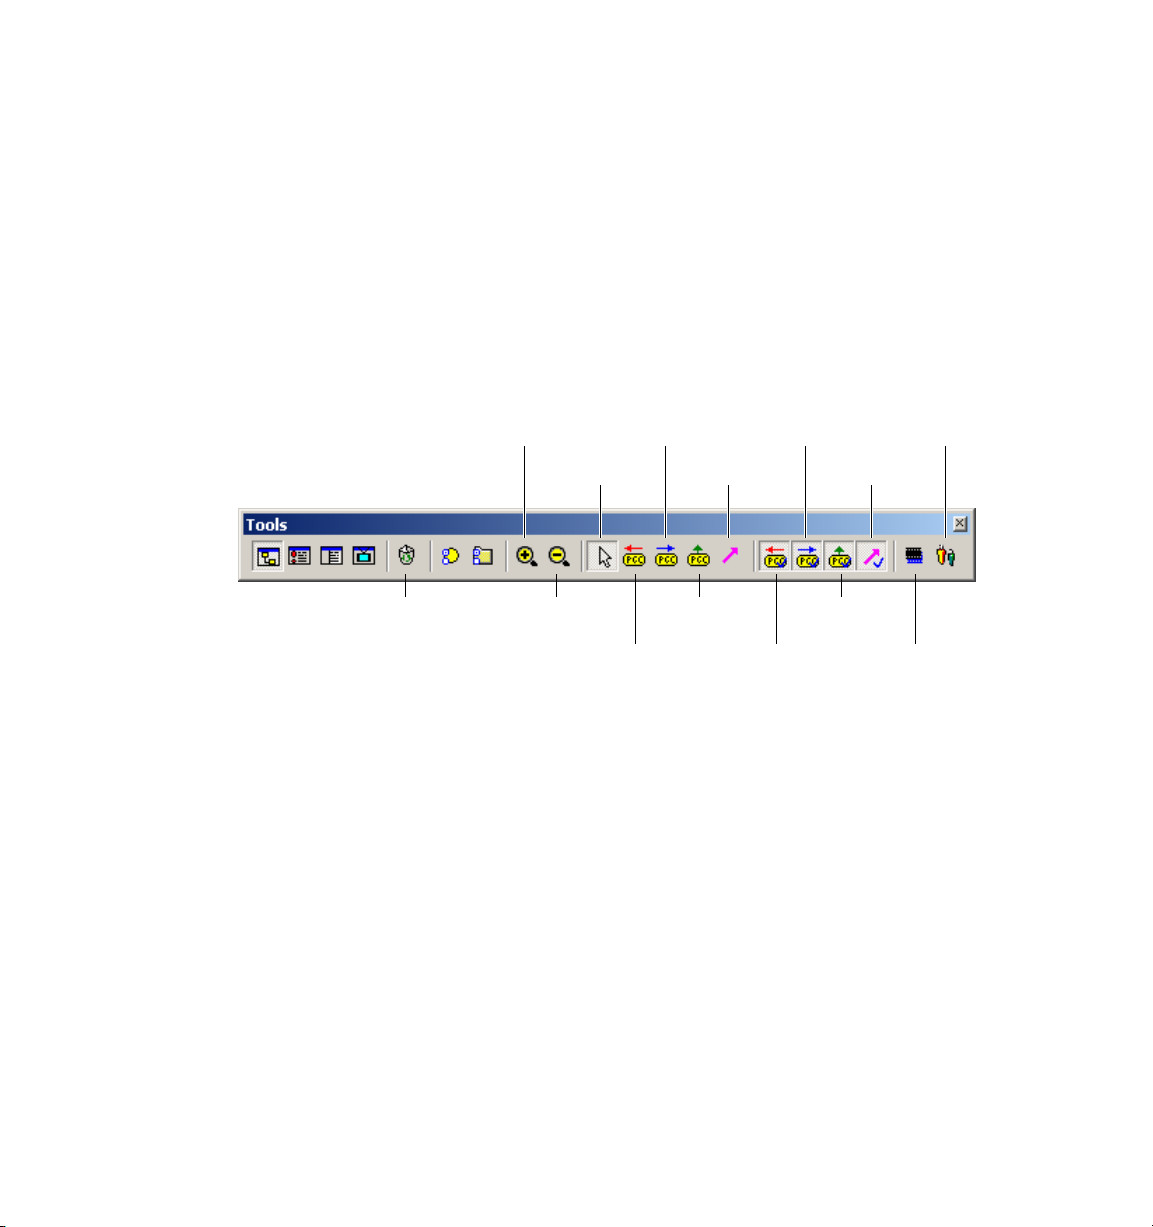
The following tools are active when the Scenario Editor is selected:
Show
Next PGC
Links
Show Go Up
Show
Previous
PGC Links
Show
Command
Links
PGC Links
Parental
Editor
Sort
Tracks
Erase
Zoom
In
Zoom
Out
Select
Previous
PGC Link
Next PGC
Link
Link
Command
Go Up
PGC Link
Tools Bar, Scenario Editor
Erase Erases the selected item.
Zoom In Zooms the authoring area, so the flags for PGC icons are visible.
Zoom Out Zooms out the authoring area, so more folders and PGCs are visible.
Select Selects and moves domain folders and PGC icons.
Previous PGC Link Creates a link that returns play to a PGC that played immediately before
the source PGC. The Previous PGC link is executed when the viewer presses PREV on the
remote control.
Page 31

The Scenarist Main Window 23
Next PGC Link Creates a link that advances play to a PGC that plays immediately after the
source PGC. The Next PGC link is executed when the viewer presses NEXT on the remote
control.
Go Up PGC Link Creates a link that returns play to an earlier PGC, usually at the beginning of
the sequence or at the top of the current major branch. The Go Up PGC link is executed
when the viewer presses RETURN on the remote control
Link Command Creates Pre, Post, Cell, and button links by dragging between PGC icons.
Show Previous PGC Links Shows and hides the red Previous PGC links.
Show Next PGC Links Shows and hides the blue Next PGC links.
Show Go Up PGC Links Shows and hides the green Go Up PGC links.
Show Command Links Shows and hides the pink Command links.
Sort Tracks Opens the Sort Tracks dialog, where you can set the Layer Break and Track Path
for dual-layer discs. For more information, see “Dual-Layer Discs” on page 245.
Parental Editor Opens the Parental Editor dialog, where you can set the Parental Level for
the disc’s content. For more information, see “Parental Levels” on page 238.
Page 32

24 Chapter 3, Workflow and Work Areas
The Layout Editor
The Layout Editor is where you lay out a disc image and premaster it to a DVD-R disc, DLT
tape, or Exabyte tape. The Layout Editor is comprised of two sections: a directory area on
the left that contains Project Information folders, and a work area on the right that contains
three sections, where you choose the disc format, set the Target directories, and specify the
output options. For more information, see “Using the Layout Editor” on page 248.
Layout Editor
Page 33

The Asset Manager
The Asset Manager, which can be docked in the main window or displayed as a separate
window, displays the project’s data assets and tracks. It has two tabs for displaying either the
data assets from the Data Editor or the tracks from the Track Editor. Folders and tracks in the
Asset Manager can be collapsed or expanded by clicking their Plus (+) or Minus (–) symbols.
Assets can be dragged from the Asset Manager to the Track Editor to create tracks or add
streams. Tracks can be dragged from the Asset Manager to the Scenario Editor authoring area
to create PGCs.
The Asset Manager 25
Asset Manager displaying tracks
To view the Asset Manager, do one of the following:
• Select View > Asset Manager.
• Click the Asset Manager button in the Tools Bar (so it becomes selected).
To hide the Asset Manager, do one of the following:
• Deselect View > Asset Manager.
• Click the Asset Manager button in the Tools Bar (so it becomes deselected).
• Right-click in the Asset Manager and choose Hide from the pop-up menu.
Page 34

26 Chapter 3, Workflow and Work Areas
The Information Window
The Information window, which can be docked in the main window or displayed as a
separate window, displays status and error messages for a wide range of Scenarist
operations. There are five tabs in the Information window for displaying the following
message types:
General Displays messages about startup, asset registration, and authoring.
Build Displays messages about multiplexing and layout operations.
Simulation Displays messages during Simulation mode about PGCs that are playing and
navigation commands that are executed.
Import Displays messages when importing scenario scripts.
Export Displays messages when exporting scenario scripts.
Information window displaying General messages
To view the Information window, do one of the following:
• Select View > Information Window.
• Click the Information Window button in the Tools Bar (so it becomes selected).
Page 35

To hide the Information window, do one of the following:
• Deselect View > Information Window.
• Click the Information Window button in the Tools Bar (so it becomes deselected).
• Right-click in the Information window and choose Hide from the pop-up menu.
The Property Browser
The Property Browser, which can be docked in the main window or displayed as a separate
window, displays information and editable properties for the currently selected asset, track,
stream, PGC, language or title folder. You can navigate within the Property Browser to the
available properties by double-clicking fields that have a folder icon, or by clicking the
Parent folder icon in the upper right. You can also lock the Property Browser so its display
does not change when you select a different item.
The Property Browser 27
Property Browser displaying movie scene properties
To view the Property Browser, do one of the following:
• Select View > Property Browser.
• Click the Property Browser button in the Tools Bar (so it becomes selected).
Page 36

28 Chapter 3, Workflow and Work Areas
To hide the Property Browser, do one of the following:
• Deselect View > Property Browser.
• Click the Property Browser button in the Tools Bar (so it becomes deselected).
• Right-click in the Property Browser and choose Hide from the pop-up menu.
To lock the Property Browser:
1 Click the Pushpin button in the upper left of the window, so it becomes selected. The
window becomes locked and will not change its display when a new object is selected.
2 To unlock the window, click the Pushpin button again, so it becomes deselected.
Page 37

Dockable Windows
The Asset Manager, Property Browser, Information window, and Tools Bar can be docked in
the main Scenarist window, or they can be undocked and placed anywhere on-screen as a
separate window. The Simulation window’s dockable windows include the Edit window and
all of the tools.
Dockable Windows 29
Grab
handle
Scenario Editor with docked and undocked windows
Asset Manager,
docked
Property Browser,
undocked
Docked windows can be resized and placed as desired to configure a customized work area.
When docked, dockable windows have grab handles on the left side that can be dragged to
move the window, or double-clicked to temporarily undock the window.
This section includes the following topics:
• “Undocking a Window” on page 30
• “Docking a Window” on page 30
• “Adjusting the Placement of Docked Windows” on page 30
Page 38

30 Chapter 3, Workflow and Work Areas
Undocking a Window
To undock a window, do one of the following:
• Right-click in the window you want to undock and deselect Allow Docking from the
pop-up menu. The window becomes undocked and can be placed anywhere on-screen.
Note: You can also undock a window by double-clicking its titlebar or by dragging the
window, by its grab handle, from the parent window. However, in doing so the Allow
Docking option remains enabled for the window and moving it near its parent window will
cause the window to become docked.
Docking a Window
To dock a window:
1 Right-click in the window you want to dock and select Allow Docking from the pop-up
menu.
2 Do one of the following:
• Double-click the titlebar for the window you want to dock.
• Drag the window you want to dock to its parent window, so its outline appears at the
desired location, and release the mouse button.
Adjusting the Placement of Docked Windows
To adjust the placement of a docked window:
• Drag the grab handle for the window you want to move so its outline appears at the
desired location, then release the mouse button.
Page 39

The Simulation Window
The Simulation window is where you can play individual tracks to audition audio and video
assets and tracks, or play the entire project to check navigation and project flow. Simulation
mode can use either software or hardware emulation to play projects. Software simulation
performance depends on the CPU speed of your computer. Real-time hardware simulation
requires a supported decoder card.
The Simulation Window 31
Tools
Preview area
Simulation window
Edit window
Page 40

32 Chapter 3, Workflow and Work Areas
In Simulation mode, tracks play back in the Simulation window’s preview area, which can
be set displayed at Half Size or normal size. In Design mode, the preview area serves as a
workspace for adding and editing button highlights, button links, subpicture effects, subtitle
text, and navigation commands.
The Simulation window has a number of tools that can be docked above the preview area,
as well as an Edit window (which displays properties for buttons, subpictures, PGC and
navigation commands) that can be docked below the preview area.
To view the Simulation window, do one of the following:
• In the Scenarist main window, select View > Simulation Window.
• Click the Simulation Window button in the Tools Bar (so it becomes selected).
To hide the Simulation window, do one of the following:
• In the Scenarist main window, deselect View > Simulation Window.
• Click the Asset Information Window in the Tools Bar (so it becomes deselected).
• In the Simulation window, choose File > Close.
To set the preview area to Half Size:
1 Select Mode > Half Size, or click the Half Size button in Mode palette (so it becomes
selected).
2 To return the Preview area to normal display, deselect Mode > Half Size, or click the Half
Size button (so it becomes deselected).
Page 41

The Edit Window
The Edit window, which can be docked in the Simulation window or displayed as a separate
window, displays information and editable properties for the currently selected asset, track,
stream, PGC, language or title folder.
The available properties, which vary depending on the selected item, can be navigated by
clicking the appropriate tab at the top of the Edit window. Some of the more common uses
for the Edit window include adding and editing navigation commands, mapping subpicture
colors, and inserting subpicture effects.
The Edit Window 33
Edit window displaying button commands
To view the Edit window:
• In the Simulation window, select View > Edit.
To hide the Edit window,:
• In the Simulation window, deselect View > Edit.
Page 42

34 Chapter 3, Workflow and Work Areas
Edit
Simulation Window Tools
The Simulation window tools are documented in the following sections:
• “Mode Tools” on page 34
• “Player Settings” on page 36
• “Design Tools in Design Mode (Display Color)” on page 37
• “Design Tools in Design Mode (Edit Subtitle Text)” on page 38
• “Design Tools in Simulation Mode” on page 38
• “Clock Tools” on page 39
• “Alignment Tools” on page 40
Mode Tools
The Mode tools set various display options and modes for the Simulation window, including
whether it is in Simulation mode or Design mode.
Always
on Top
Erase
Mode Bar
Half
Size
Design
Mode
Software
Simulation
Hardware
Simulation
Preview
Mode
Normal
Letterbox
Panscan
Wide
Subtitle
Text
Original
Subpicture
TV
Output
Display
Color
PC
Output
Encode
Page 43

Simulation Window Tools 35
Erase Erases the selected item.
Always On Top Keeps the Simulation window on top and visible, even when working in
other applications.
Half Size Sets the Simulation window preview area to Half Size.
Design Mode Mode for creating and editing button highlights, button links, subpicture
effects, subtitle text, and navigation commands.
Software Simulation Provides playback of assets, tracks, or the entire project, with software
emulation, using your computer’s CPU.
Hardware Simulation Provides playback of assets, tracks, or the entire project, with
hardware emulation, using the CineMaster Decoder card. Tracks must be multiplexed before
they can be played with Hardware Simulation.
Preview Mode Provides hardware emulation with real-time multiplexing for assets, tracks, or
the entire project.
Normal Sets the Simulation window preview area to the 4:3 aspect ratio.
Letterbox Sets the Simulation window preview area to the 4:3 letterbox aspect ratio.
Pan Scan Sets the Simulation window preview area to the 4:3 pan and scan aspect ratio.
Wide Sets the Simulation window preview area to the 16:9 anamorphic widescreen aspect
ratio.
Edit Subtitle Text Mode for entering subtitle text. For more information, see “Creating
Subtitles in Scenarist” on page 116.
Original Subpicture Displays the subpicture layer while hiding the background layer. Use
this option when identifying and mapping subpicture colors. For more information, see
“Subpicture Color Mapping” on page 146.
Display Color Displays the background and subpicture layers. Use this option when creating
and editing button highlights and button links.
Encode Encodes the subpicture for the current track. After making changes to a subpicture,
make sure to encode it so the changes are visible when simulating playback.
Page 44

36 Chapter 3, Workflow and Work Areas
Player Settings
The Player Settings control the display and adjustment of angle, audio, and subpicture
streams.
Mute
Audio
Increase
Volume
Subpicture
On/Off
Next
Angle
Next
Audio
Decrease
Volume
Next
Subpicture
Player Settings
Next Angle Switches to the next video angle if the track contains multiple video angles.
Mute Audio Mutes and unmutes the current audio stream.
Next Audio Switches to the next audio stream if the track contains multiple audio streams.
Increase Volume Increases the volume of the current audio stream.
Decrease Volume Decreases the volume of the current audio stream.
Subpicture On/Off Shows and hides the current subpicture stream.
Next Subpicture Displays the next subpicture if the track contains multiple subpicture
streams.
Page 45

Simulation Window Tools 37
Design Tools
The Design Tools change depending on the current mode for the Simulation window.
Design Tools in Design Mode (Display Color)
In Design mode, with the Display Color option selected, the Design Tools let you create and
edit button highlights and button links, and identify subpicture colors.
Pick
Color
New
Button
Select
Add Button
Links
Design Tools, Design mode
Show Button
Links
Pick Color (Eyedropper) Identifies subpicture Original colors so they can be mapped to the
colors for the three button states. For more information, see “Identifying Subpicture Original
Colors” on page 147.
Select The default tool in Design mode. Selects, moves, and resizes button highlights and
subpictures.
New Button Draws rectangular button highlights around subpicture shapes and text. For
more information, see “Button Highlights” on page 132.
Add Button Links Adds links between buttons that determine how buttons are navigated
with the remote control. For more information, see “Button Links” on page 137.
Show Button Links Shows and hides button links. For more information, see “Showing and
Hiding Button Links” on page 140.
Page 46

38 Chapter 3, Workflow and Work Areas
Design Tools in Design Mode (Edit Subtitle Text)
In Design mode, with the Edit Subtitle Text option selected, the Design Tools let you enter
and edit subtitle text. For more information, see “Creating Subtitles in Scenarist” on
page 116.
Add
Subtitle
Text
Subtitle
Font
Subtitle
Font Size
Italic
Underline
Bold
Left
Justified
Right
Justified
Center
Justified
Design Tools, subtitle text entry
Design Tools in Simulation Mode
In Simulation mode, the Design Tools provide playback controls that mirror those found on
most DVD remote controls. These controls include buttons for transport control, button
navigation, and menu access.
Back
Stop
Skip
Fast
Forward
Go Left
Go Up
Enter
Menu
Play
Pause
Rewind
Forward
Skip
Go Right
Design Tools, Simulation mode
Go Down
Title
Return
Page 47

Simulation Window Tools 39
Clock Tools
The Clock tools are used when inserting and editing subtitles, or when scrolling to
subpictures.
Data Time
Code
rack Time
Code
Time Code Next
Previous
Subpicture
Subpicture
Clock Bar
Track Time Code When selected, time code locations are displayed so that the beginning of
the track corresponds to 00:00:00:00.
Data Time Code When selected, time code locations are displayed based on the track’s
embedded time code.
Time Code Displays the current time code location for the selected track. You can go to a
different track location by entering the location in the Time Code field or by clicking its
Up/Down arrows.
Previous Subpicture Goes back to the previous subpicture or subtitle.
Next Subpicture Advances to the next subpicture or subtitle.
Page 48

40 Chapter 3, Workflow and Work Areas
Alignment Tools
The Alignment tools are used to align and resize button highlights. For more information,
see “Button Highlights” on page 132.
Right
Alignment
Bottom
Alignment
Vertical
Alignment
Left
Alignment
Top
Alignment
Alignment palette
Horizontal
Alignment
Page 49

4 Preparing Assets
Before they can be used in Scenarist, video and audio assets must be encoded using DVDcompliant parameters, and still image assets must be saved in the proper file formats.
This chapter documents the encoding and file requirements for video, audio, and still image
assets. It includes the following topics:
• “Preparing Video Assets” on page 42
• “Preparing Audio Assets” on page 44
• “Preparing Still Image Assets” on page 46
• “Preparing Subpicture Assets” on page 48
• “Preparing Subtitle Assets” on page 49
• “The Bit Budget” on page 53
Page 50

42 Chapter 4, Preparing Assets
Preparing Video Assets
After the number and format of audio tracks is known, it is possible to determine how much
bandwidth is left for video (see “The Bit Budget” on page 53). Depending on the length of
the video material and the capacity of the disc (for example, 4.7 GB for a single-side singlelayer disc), the video bit rate is generally set as high as possible without exceeding the
remaining available bandwidth.
The DVD-Video format uses a subset of the MPEG standards, requiring specific image
resolutions, frame rates, aspect ratios, and other parameters. Scenarist only lets you import
DVD-compliant MPEG files, so when you encode video, you must make sure that you set the
parameters correctly. Table 2 lists the encoding requirements for the supported video
formats.
Table 2: Scenarist video stream requirements
Format Frame
Rate
MPEG-1 NTSC
(525/6)
PAL
(625/50)
MPEG-2 NTSC
(525/60)
PAL
(625/50)
29.97 fps 352 x 240 4:3 1.856 Mbps max. 18 frames max.
25 fps 352 x 288 4:3 1.856 Mbps max. 15 frames max.
29.97 fps 720 x 480 4:3,16:9 9.80 Mbps max. 36 fields/
25 fps 720 x 576 4:3,16:9 9.80 Mbps max. 30 fields/
Frame
Size
Aspect
Ratio
Encoding Bit Rate GOP Size
18 frames max.
15 frames max.
The DVD Specification requires that video content within a single volume be set to the same
parameters for the following options:
• Format (MPEG-1 or MPEG-2)
• TV system (NTSC or PAL)
• Aspect ratio (4:3 Standard or 16:9 Widescreen)
• Frame size (352 x 240 or 720 x 480 for NTSC; 352 x 288 or 720 x 576 for PAL)
Page 51

Preparing Video Assets 43
Preparing Assets for Multi-Angle Play
When preparing video assets that will be used for multi-angle play, the following
requirements must be observed:
• Each video angle must have the same duration.
• Each video angle must contain the same GOP structure (same number of fields, frames,
and pattern of I, B and P-frames).
• Each video angle must contain the same number of GOPs.
• Each video angle must be encoded at the same bit rate.
• Each video angle must be encoded with the same type of bit rate (constant or variable).
• Each video angle must be encoded with closed GOPs.
• If video has been encoded at a constant bit rate, each video angle must have the same
vbv_delay initial value.
• The combined bit rate of video, audio, and subpicture data must not exceed 8.0 Mbps
per angle stream. This bit-rate ceiling can decrease by as much as 1.2 Mbps as the
number of video angles increases.
Preparing Assets for Seamless Play
When preparing video assets that play seamlessly, the following requirements must be
observed:
• Each video asset must be encoded at the same bit rate.
• Each video asset must be encoded with the same type of bit rate (constant or variable).
Note: The physical order of video tracks on the disc must be identical to their playback
order. To change the physical placement of video tracks on the disc, see “Dual-Layer Discs”
on page 245.
Page 52

44 Chapter 4, Preparing Assets
Preparing Audio Assets
Supported audio formats in Scenarist include PCM (WAV and AIFF), MPEG-1 Layer 2 (PAL
titles only), Dolby Digital (AC-3), and DTS (Digital Theater System). When preparing audio
for DVD-Video titles, you must balance the disc space and audio bandwidth against the
video quality and play time. Table 3 lists the encoding requirements for the supported audio
formats.
Table 3: Scenarist audio stream requirements
Audio Format NTSC PAL Channels Rate Bits Encoding Bit Rate
PCM yes yes Mono 48 kHz 16 .768 Mbps
Mono 48 kHz 20 .960 Mbps
Mono 48 kHz 24 1.152 Mbps
Mono 96 kHz 16 1.536 Mbps
Mono 96 kHz 20 1.920 Mbps
Mono 96 kHz 24 2.304 Mbps
Stereo 48 kHz 16 1.536 Mbps
Stereo 48 kHz 20 1.920 Mbps
Stereo 48 kHz 24 2.304 Mbps
Stereo 96 kHz 16 3.072 Mbps
Stereo 96 kHz 20 3.840 Mbps
Stereo 96 kHz 24 4.608 Mbps
MPEG-1 Layer 2 no yes Stereo 48 kHz – 64–384 kbps
Dolby Digital (AC-3) yes yes Stereo 48 kHz – 192 kbps (228 kbps for
extended frequ. response)
5.1 48 kHz – 384 kbps or higher
(448 kbps recommended)
DTS (Digital Theater
System)
yes yes 5.1 48 kHz – 768–1536 kbps
6.1 48 kHz – 768–1536 kbps
Page 53

Preparing Audio Assets 45
A brief description of the supported audio formats is include below:
PCM Audio Uncompressed audio format, from one to eight channels, recorded with Pulse
Code Modulation. The DVD Specification supports PCM sample rates of 48 kHz and 96 kHz
with resolutions of 16, 20, or 24 bits. While PCM audio yields higher fidelity than other
formats, its higher bit rates (see Table 3 on page 44) leave less available bandwidth for video.
Note: To use PCM audio at a sample rate of 96 kHz, you must have Scenarist Professional.
Note: Although the DVD Specification supports up to 8 channels of PCM audio, currently,
there are no DVD players that support multi-channel PCM.
MPEG-1 Layer 2 Audio Perceptual coding system by the Moving Picture Experts Group that
delivers compressed two-channel audio. MPEG-1 (along with Dolby Digital) is one of the
mandatory audio compression systems for PAL titles.
Dolby Digital (AC-3) Perceptual coding system by Dolby Laboratories that delivers
compressed multi-channel audio, in a range of formats, at reduced bit rates with acceptable
fidelity. Dolby Digital is perhaps the most common audio format used for DVD-Video, and is
the mandatory audio compression system for NTSC titles. It is also (along with MPEG-1) one
of the mandatory audio compression systems for PAL titles.
DTS Perceptual coding system by Digital Theater Systems that delivers compressed multi-
channel audio in 5.1 and 6.1 formats. DTS was initially developed for theater surround
sound but has also been used in consumer systems.
Page 54

46 Chapter 4, Preparing Assets
Preparing Still Image Assets
Scenarist supports the following still image file formats and sizes, which can be used for still
menus, still and slide shows, subpictures, and subtitles.
File Formats
NTSC Image Sizes
PAL Image Sizes
BMP, GIF, JPEG, PICT, PCD (Photo CD), PSD (Photoshop), SGI, TGA (Targa),
TIFF, and YUV
720 x 480, 704 x 480, 352 x 240
720 x 576, 704 x 576, 352 x 288
Note: Multi-layer Photoshop files are imported as a single, flattened image. Scenarist does
not support LZW-compressed TIFF files.
Note: Still images that are not of the required size are automatically scaled when imported
in Scenarist, which can lead to unwanted stretching, shrinking, or artifacts.
Adjusting for Television Overscan
Television monitors are designed to overscan the screen area, meaning that the outer 5–10%
of the picture on all sides (top, bottom, left and right) is not actually visible to the viewer.
The degree of overscan varies depending on the individual televisions. Overscanning is not
a concern for projects intended for viewing only on computer monitors.
To avoid losing important visual information due to overscan, key graphical elements should
remain within the Action Safe and Title Safe boundaries.
Action Safe Area within which action should be confined to ensure it is visible on most
televisions (typically a 5% margin from each edge).
Title Safe Area within which to place a title or graphical element so that none of it falls
outside the visible region on most television sets (typically a 10% margin from each edge).
Page 55

Preparing Still Image Assets 47
Still Images for 16:9 Widescreen
When creating still images for a 16:9 Widescreen project, special steps are required to
ensure that the images are displayed correctly. You should create the images initially at a
resolution of 960 x 480 for NTSC and 960 x 576 for PAL. Then, just before importing the
image into Scenarist, resize the image to 720 x 480 for NTSC and 720 x 576 for PAL,
therefore recreating the anamorphic squeezing effect that is performed on widescreen
video. When the content is played back, it will be stretched back to its original widescreen
aspect ratio.
Preparing a YUV File
YUV image files (images created using the YUV color space, which is used by the NTSC and
PAL color video standards) lack the information headers and file extensions that exist in
JPEG, TIFF, BMP, and other graphics file formats. Without an information header, Scenarist
cannot read a YUV file. However, Scenarist can handle a YUV file if you perform the
following steps:
• Add a .yuv extension to the file name.
• Adjust the image size to 720 x 480 for NTSC and 720 x 576 for PAL.
Scenarist supports the YUV color space in the ratio 4:2:0 in the sequence, Y data (luma)
followed by U data (color) followed by V data (color). If the original ratio is 4:2:2, it must be
converted to 4:2:0 before Scenarist can use it.
Page 56

48 Chapter 4, Preparing Assets
Preparing Subpicture Assets
A menu consists of a motion or still video background image with a subpicture and highlight
layer. When creating a menu subpicture, the following guidelines must be observed:
• Create subtitle images in a graphics program such as Photoshop.
• Use a maximum of four colors.
• Disable anti-aliasing.
• Create subpicture lettering in pure black, red, or blue, where the RGB values are set 255.
The background color should be white.
• Save the subpicture in BMP, GIF, JPEG, PCD (Photo CD), PICT, PSD (Photoshop), SGI,
TIFF, TGA (Targa), or YUV format.
• A subpicture can be any size (horizontal and vertical resolution) as long as it is smaller
than the video or still image it will overlay.
Note: JPEG compression is a lossy algorithm and is, therefore, not recommended for
subpicture assets.
Page 57

Preparing Subtitle Assets
A subtitle stream is a sequence of subpicture overlays that play over a background video or
still image. Subtitles can utilize several digital effects such as fade in, fade out, scroll, and
wipe.
There are two ways to handle subtitles in Scenarist, either by creating them with Scenarist’s
built-in Subtitle Editor, or by preparing them in an another application and then importing
them to a scenario. This section provides information on how to prepare subtitle assets
outside Scenarist. For detailed information on the subtitle import procedure and how to
create subtitles with the Subtitle Editor, refer to “Creating Subtitles in Scenarist” on
page 116.
Use the following guidelines when preparing subtitle assets:
• Create subtitle images in a graphics program such as Photoshop.
• Save subtitle images in BMP, GIF, JPEG, PCD (Photo CD), PICT, PSD (Photoshop), SGI,
TIFF, TGA (Targa), or YUV format.
• Use a maximum of four colors.
Preparing Subtitle Assets 49
• Image size should not exceed 720 × 480 (NTSC) or 720 × 576 (PAL) pixels.
• Save the image files for a stream of subtitles in the same format and in the same
directory.
• Keep a record of subtitle names, stream numbers, and corresponding start and end time
codes.
Once you have settled on the parameters for your subtitle images, you must name the
images, then identify the colors used in them. Refer to “Subpicture Color Mapping” on
page 146 for a description of this procedure.
Page 58

50 Chapter 4, Preparing Assets
Naming Subtitle Images
Subtitle names identify the image, its location within the subtitle sequence, and the type of
image it is.
Use the following convention for naming subtitle images:
ImageName.subpicture#.ImageFormat
For example, if a motion video clip with the filename Twilight has one subpicture stream, a
series of 150 subtitles, and the images have been saved in the TIFF image format, the
subtitles would be named:
Twilight.1.tif
Twilight.2.tif
Twilight.3.tif
…and so forth.
The 150th image would be named Twilight.150.tif.
Page 59

Preparing Subtitle Assets 51
Creating a Subtitle Script File
To determine which subtitle settings to use for a particular sequence of subtitle images,
Scenarist looks at a subtitle script file (.sst). You can create the script in any text editor. A
typical subtitle script file is shown in Figure 1.
Figure 1: Subtitle script file format
Below are the definitions for the script file settings:
st_format The Identifying number of the subtitle data stream. Scenarist supports subtitle
format 2 only, which allows you to adjust a subtitle’s location in time to action in the video.
SubTitle Name of the subtitle data folder as it appears in Data Editor.
Display_Start When set to Forced, the subtitles are always On. When set to Non_Forced,
subtitles can switched on and off by the viewer with the remote control.
Page 60

52 Chapter 4, Preparing Assets
Pixel_Area The size of the background area for the subtitle image. For NTSC, set to (2 479).
For PAL, set to (2 574).
Display_Area The location of the subtitle image within the background area. For NTSC, set
to (0 2 719 479). For PAL, set to (0 2 719 574).
Color Color codes for the four colors available for subtitle images. The numbers range from
1–16 and reference the color number in the current color palette (SEE “Subpicture Color
Palettes” on page 151).
Contrast Degree of transparency of the subtitle colors. The range is 0–15, where 0 is
transparent and 15 is opaque.
BG, PA, E1, E2 RGB Color values for Background, Pattern, Emphasis 1 and Emphasis 2 colors.
Directory The path to the subtitle image files. If the directory path is changed after the
subtitle script file is created (if the subtitle folder is moved to a new location), Scenarist will
not be able to locate the subtitle folder. In that case, you will need to edit the directory path
in the subtitle script file to set the correct path.
Separator The separator line separates the settings from the list of subtitles. You must use at
least two # signs in this line.
Subtitle List The actual list of subtitles that Scenarist imports into the subpicture stream.
START and END times should not overlap, and subtitles should not cross chapter breaks in a
video track.
SP_NUMBER The number of the subtitle in the subtitle stream.
START The start time of the subtitle.
00:01:05:00 = hour:minute:second:frame
END The end time of the subtitle.
00:01:07:05 = hour:minute:second:frame
FILE_NAME The name of the subtitle image.
Page 61

The Bit Budget
To determine the bit rates you will use when encoding video and audio, you can calculate
the Bit Budget.
There are two factors that constrain your choice of bit rates. One factor is the type of disc
you will use and, therefore, how many bits are available for each second of the content. The
other factor is the maximum bit rate allowed by the DVD-Video format. This is 9.8 MBps
(millions of bits per second), which must be divided between the video and audio streams.
This section includes the following topics:
• “Calculating the Bit Budget” on page 53
• “Media Capacities” on page 55
• “Sample Bit Budget Calculation” on page 57
Calculating the Bit Budget
The Bit Budget 53
The bit budget calculation produces two values that you must use when encoding video:
• Maximum video bit rate
• Average video bit rate
Since video usually requires the largest bandwidth, the best way to calculate a bit budget is
to subtract the audio requirements from the available bandwidth to get the maximum and
average video bit rates. The bit rate for audio depends on the number of audio channels and
the type of audio.
Page 62

54 Chapter 4, Preparing Assets
To calculate the bit budget:
1 Calculate the combined average bit rate for video and audio (see “Media Capacities” on
page 55 for DVD disc sizes):
Disc size: __________ Mbits ÷ Total length of presentation: _________ seconds
Average bit rate = __________ Mbps
Note: If you are creating a hybrid DVD, you must reduce the Disc size by the size of the
ROM content.
2 Calculate the average video bit rate by subtracting the audio requirements (see Table 3
on page 44 for the bit-rate requirements for different types of audio):
Average bit rate: ________ Mbps – Audio bit rate: ________ Mbps
Average video bit rate = __________ Mbps
3 Calculate the maximum video bit rate (for variable bit-rate (VBR) encodes only):
9.8 MBps – Audio bit rate: ________ Mbps
Maximum video bit rate = __________ Mbps
See “Sample Bit Budget Calculation” on page 57 for an example of this calculation.
Page 63

The Bit Budget 55
Media Capacities
Scenarist can output projects to a wide variety of media. The choice of media is driven by
the project’s purpose, length, and budget. Table 4 on page 56 lists the available media and
explains how to best use each type.
Refer to the Disc Size in Mbps column when calculating encoding bit rates. When
calculating how much data will fit on a DVD-ROM, refer to the Computer Disc Size column.
For hybrid DVDs, subtract the size of the ROM content (in bits) from the Disc Size, then use
the resulting value as the disc size in the bit-rate calculation.
Note: The Actual Disc Sizes are somewhat misleading in that they do not follow the
conventions used for other digital media. For DVDs, 1 GB is 1,000,000,000 (109) bytes,
whereas for computers, 1 GB is 1,073,741,824 (230) bytes. Therefore a 4.7 GB computer
hard drive contains about 330 MB more data than a 4.7 GB DVD.
Page 64

56 Chapter 4, Preparing Assets
Table 4: Media capacities
Media Actual
Disc Size
Computer
Disc Size
Disc Size in
Mbps
(less 4% for
headroom)
DVD-R 3.95 GB
DVD-RW 4.7 GB 4.38 GB 36,096
DVD+RW 4.7 GB 4.38 GB 36,096
DVD-5 4.7 GB 4.38 GB 36,096
DVD-10 9.4 GB
DVDRAM
4.7 GB
(4.7 × 2)
4.7 GB
5.2 GB
(2.6 × 2)
3.68 GB
4.38 GB
8.75 GB
(4.38 × 2)
4.38 GB
4.84 GB
(2.42 × 2)
30,336
Mbits
36,096
Mbits
Mbits
Mbits
Mbits
2 × 36,096
Mbits
36,096
Mbits
2 × 19,968
Mbits
Typical
Program
Length
100 min.
120 min.
120 min.
120 min.
120 min.
2 × 120
min.
120 min.
2 × 70
min.
Usage Notes
Good for small production runs, test and
demo discs. The discs work with most settop players and DVD-ROM drives.
Some replication plants can accept DVD
masters on
DVD-R discs.
3.95 GB discs seem to be more compatible
with older players, but are becoming rare.
Same as DVD-R, but discs are rewritable,
like CD-RW.
Same as DVD-RW, but you can overwrite
part or all of the existing content, rather like
recording on videotape.
Mass-produced from a DVD master sent to
a replication plant. The discs work with all
set-top players and DVD-ROM drives.
Double-sided disc mass-produced from two
DVD masters sent to a replication plant. This
requires two projects, one for each side. The
viewer must turn the disc over to play the
other side.
Can be used only in computers with DVDRAM drives, although set-top players may
become available in the future.
5.2 GB discs are double-sided (2.6 GB per
side). A project must fit on one side; to use
both sides you need two projects.
CD-R/RW 682 MB
734 MB
650 MB
700 MB
5,238 Mbits
5,637 Mbits
15 min.
18 min.
Suitable for very short projects.
Playable on almost all computers with a
DVD-ROM or CD-ROM drive.
Page 65

The Bit Budget 57
Sample Bit Budget Calculation
If you have a 100-minute (6000-second) presentation with Dolby Digital stereo audio, and
you want to write it to a DVD-5 disc, here’s how you determine the bit budget:
1 Calculate the average bit rate for both video and audio:
Disc size: 36096 Mbits ÷ Total length of presentation: 6000 seconds
Average bit rate = 6.0 Mbps
2 Calculate the average video bit rate by subtracting the audio requirements:
Average bit rate: 6.0 Mbps – Audio bit rate: 0.192 Mbps
Average video bit rate = 5.808 Mbps
3 Calculate the maximum video bit rate:
9.8 MBps – Audio bit rate: 0.192 Mbps
Maximum video bit rate = 9.608 Mbps
Note: Although in this case you could set the maximum video bit rate to 9.608 Mbps, it is
recommended that you always set the maximum to less than or equal to 9.0 MBps.
Page 66

58 Chapter 4, Preparing Assets
Page 67

5 Creating Scenarios
This chapter documents how to create, manage, import and export scenarios. It includes
the following topics:
• “About Scenarios” on page 60
• “The Project Manager” on page 61
• “Creating Scenarios with the Project Wizard” on page 63
• “Project Templates” on page 77
• “Exporting Scenarios” on page 78
• “Importing Scenarios” on page 80
Page 68

60 Chapter 5, Creating Scenarios
About Scenarios
Scenarist projects are saved in documents called scenarios (.scn). Scenarios contain
information about the project’s assets (video, still images, audio, and subtitles), menu and
track properties, project layout (PGCs, links, and navigation commands), and disc
information and disc layout.
The default directory for saving scenarios is the My Scenarios folder, which is created on the
system hard drive when installing the Scenarist software.
My Scenarios folder
Also saved with scenarios is a cache folder (<Project Name> Cache) that contains encoded
still images (.mps), encoded subpictures (.sp), and subtitle images (.bmp) created in
Scenarist. A scenario’s registered assets remain in their original hard drive locations.
Saving Scenarios
Unlike most software applications, Scenarist dynamically saves scenarios. Each time you
make a change to a project, it is saved to the scenario file. While this ensures that the
changes you make to a scenario are always retained, it requires that you use the Save As
command when revising scenarios that you don’t want to permanently overwrite.
For example, if you have a scenario in a satisfactory state and want to continue working
with it, while being able to return to that state, use the Save As command to save a new
version of the scenario under a different name.
Page 69

The Project Manager
The Project Manager lets you conveniently open recent scenarios, create new scenarios, and
import scenarios from a script. You can specify whether the Project Manager opens by
default when Scenarist is launched.
To specify whether the Project Manager opens when launching Scenarist:
1 Choose Settings > Preference. The Preference dialog opens.
The Project Manager 61
2 Select one of the following options for Starting Up:
• Open the Most Recent Project
• Open Project Manager
3 Click OK to close the Preference dialog.
Page 70

62 Chapter 5, Creating Scenarios
To open a scenario with the Project Manager:
1 Choose File > Project Manager. The Project Manager opens displaying a list of the 16
most recent scenarios.
2 To open a recent scenario, select it and click Open.
3 To open a scenario not listed in the Project Manager, click the Browse button and locate
the scenario, then click Open.
4 To create a new scenario with the Project Wizard, click New.
5 To import a scenario from a script file or DLT tape, click New From Script.
6 To close the Project Manager without opening a scenario, click Cancel.
Page 71

Creating Scenarios with the Project Wizard 63
Creating Scenarios with the Project Wizard
The Project Wizard guides you through a series screens when creating a new scenario. Each
screen asks for setup information for the new scenario and also provides a brief explanation
of the various options.
If you change your mind about any setup options while using the Project Wizard, click Back
to scroll to the screen where you want to make the changes, then click Next to continue
forward. After configuring a Project Wizard screen, you can click Save As Default to
automatically use the same settings for subsequent scenarios; to reset a screen’s settings,
click Reset.
Note: After exiting the Project Wizard, you can later change any of the setup options while
authoring the project.
Page 72

64 Chapter 5, Creating Scenarios
Project Wizard Introduction
To create a new scenario with the Project Wizard:
1 Do one of the following:
• From within the Project Manager, click New.
• With in an existing scenario open, choose File > New.
2 When prompted with the Project Wizard Introduction screen, click Next.
Page 73

Creating Scenarios with the Project Wizard 65
Project Wizard Step 1 – Scenario Name
1 Click the Browse button and enter a scenario name and location, then click Open.
2 Click Next.
Page 74

66 Chapter 5, Creating Scenarios
Project Wizard Step 2 – DVD Application Type
• Select one of the following DVD Application Types, then click Next.
DVD-Video Creates a disc containing DVD-Video data that can be played on a set-top
DVD player or a computer with a DVD-ROM drive and DVD player software.
DVD-ROM Creates a disc containing PC files that can be read by a computer DVD-ROM
drive.
Enhanced DVD (Video Files First) Creates a disc containing DVD-Video data and PC files
(with the video data preceding the PC data) that can be played on either a set-top DVD
player or DVD-ROM drive.
Enhanced DVD (PC Files First) Creates a disc containing DVD-Video data and PC files
(with the PC data preceding the video data) that can be played on either a set-top DVD
player or DVD-ROM drive.
Page 75

Creating Scenarios with the Project Wizard 67
Project Wizard Step 3 – DVD Disc Information
1 Select whether the project will be written to a single- or dual-layer disc:
• For projects smaller than 4.7 GB, select Single Layer Disc.
• For projects larger than 4.6 GB (up to 8.5 GB), select Dual Layer Disc.
2 If using the Dual Layer Disc option, select whether the Track Path is Parallel or Opposite.
For more information about Track Path options, see “Dual-Layer Discs” on page 245.
3 Click Next.
Page 76

68 Chapter 5, Creating Scenarios
Project Wizard Step 4 – Encoding Parameters
1 Configure the Encoding Parameters that will be used for the project’s still images:
• Set the Resolution to either NTSC or PAL. These broadcast standards determine the
number of vertical and horizontal pixels used for still images.
• Set the Aspect Ratio to 4:3, Pan-Scan, or 16:9. These options determine the aspect ratio
used for displaying still images.
2 Click Next.
Page 77

Creating Scenarios with the Project Wizard 69
Project Wizard Step 5 – Subpicture Conversion Color
1 Specify the subpicture (original) colors that will be mapped to the button highlight
colors.
To change a color, click the color you want to change. In the Color dialog, select a basic
color, or add a custom color and select it, then click OK.
These subpicture (original) colors will be the default for each subpicture in the project.
For more information, see “Subpicture Color Mapping” on page 146.
2 Click Next.
Page 78

70 Chapter 5, Creating Scenarios
Project Wizard Step 6 – Default Palette
1 Specify the 16 colors for the Default Palette that will be used for displaying subpictures
and button highlights.
To change a color, click the color you want to change. In the Color dialog, select a basic
color, or add a custom color and select it, then click OK.
This will be the Default Palette for subpictures and subtitles. However, additional palettes
can later be defined; subpictures and subtitles can use any of the defined color palettes.
For more information, see “Subpicture Color Palettes” on page 151.
2 Click Next.
Page 79

Creating Scenarios with the Project Wizard 71
Project Wizard Step 7 – Subpicture Color and Contrast
1 Select the color and contrast values to which the original subpicture colors will be
mapped. This will determine how button highlights will appear when displayed normally
(not selected and not activated).
• To map a subpicture color, click the color you want to map (E2, E1, P, or Bg) and select
the new color from the menu of Default Palette colors.
• To set the contrast (its transparency) for a subpicture color, drag its horizontal slider to
the percentage of contrast you want.
These subpicture color mappings will be the default for each subpicture in the project.
However, each subpicture can have its own color definitions. For more information, see
“Subpicture Color Mapping” on page 146.
2 Click Next.
Page 80

72 Chapter 5, Creating Scenarios
Project Wizard Step 8 – Button Color and Contrast
1 Select the color and contrast values that will be used to display button highlights when
they are selected and activated.
• To set a Selection or Action color, click the color you want to change (E2, E1, P, or Bg)
and select the new color from the menu of Default Palette colors.
• To set a Selection or Action contrast (its transparency), drag its horizontal slider to the
percentage of contrast you want.
These button highlight colors will be the default for each subpicture in the project.
However, each subpicture can have its own color definitions. For more information, see
“Subpicture Color Mapping” on page 146.
2 Click Next.
Page 81

Creating Scenarios with the Project Wizard 73
Project Wizard Step 9 – Video Title Sets
1 Enter the number of VTS folders that the new scenario will contain.
Each scenario must contain at least one VTS and no more than 99 VTSs. You can later add
(or delete) additional VTSs. For more information, see “Adding VTS Folders” on page 167.
2 Click Next.
Page 82

74 Chapter 5, Creating Scenarios
Project Wizard Step 10 – Directories
• Specify the Target Directories that will be used when outputting the project. For each
directory, click the Browse button and select a folder, then click Next.
You can skip this step if you want and specify the Target directories later in the Layout
Editor. For more information, see “Step 2 – Choosing the Target Directories” on
page 251.
Target Destination for the disc image file (created from the files in the DVD Root
directory). Once this directory is specified, the DVD Root and Mux directories are
automatically defined. The folder chosen as the Target Directory must be created outside
of Scenarist before it can be selected here.
DVD Root Destination for the VIDEO_TS folder, which contains the video object files and
information files, from which the final disc image will be written. This directory is only
written to when working with a DVD-Video or Enhanced DVD project.
Page 83

Creating Scenarios with the Project Wizard 75
Multiplex Destination for the files created when multiplexing the project. This directory
is only written to when working with a DVD-Video or Enhanced DVD project.
PC Files Contains the project’s ROM files, when writing a DVD-ROM or Enhanced DVD
disc.
Note: For details on the required hard drive space for the Target directories, see “Hard
Drive Requirements” on page 4.
Project Wizard Step 11 – Template Wizard
• Select the Template Type you will use for the scenario and click Next.
To create a blank scenario, select “I Don’t Want To Use Template Wizard.” For information
on the two Template Wizard options (Loop Pattern and Branch Pattern), see Appendix A,
“The Template Wizard.”
Page 84

76 Chapter 5, Creating Scenarios
Project Wizard – Finished
1 In the last Project Wizard screen, review the setup information for the new scenario and
do the following:
• If after reviewing the setup information you need to make changes, click Back to scroll
to the screen where you want to make the changes, then click Next to continue forward.
• If you are happy with the setup information, click Finish to open the new scenario and
begin working with it.
Page 85

Project Templates
If you have a scenario that you want to use as a starting point for other scenarios, you can
save it as a project template. This eliminates the need to use the Project Manager when
creating new scenarios. In addition to basic setup information such as DVD type, disc
information, encoding parameters, and color palettes, project templates also recall assets,
place holders, tracks, PGCs, and navigation data.
To save a project template:
1 Choose File > Save As Template.
2 When prompted, enter a template name and click OK. The project template is saved to
the Project Templates folder inside the Scenarist application folder.
To open a new scenario based on a previously saved project template:
1 Choose File > New From Template.
2 When prompted, select the template you want to open and click OK.
Project Templates 77
Page 86

78 Chapter 5, Creating Scenarios
Exporting Scenarios
You can export scenarios to scripts and archives with the Export command. A script is a text
file that contains the scenario database information, including playback, link, and sync data;
asset and properties information; program playback control data; and project-specific
preferences. An archive, whether saved to a local hard drive or to tape, is a TAR archive file
that contains the scenario script and all assets used in the scenario. Archives are useful for
exchanging projects between facilities, as well as for general backup to a single selfcontained file that is easily restored.
This section includes the following topics:
• “Exporting to a Script” on page 78
• “Exporting to an Archive” on page 79
• “Exporting to Tape” on page 80
Exporting to a Script
To export a scenario to a script file:
1 Choose File > Export. The Export Scenario to Script dialog opens.
2 Select the Export to Script option.
Page 87

Exporting Scenarios 79
3 Click the Script File Browse button. In the Select File dialog, set the File Type to Scripts
(.scp), enter a filename and location for the script, and click Open.
4 Click OK. The scenario is exported and saved as a script file.
Exporting to an Archive
To export a scenario to an archive:
1 Choose File > Export. The Export Scenario to Script dialog opens.
2 Select the Export to Archive option.
3 Click the Tar File Browse button. In the Select File dialog, set the File Type to Script with
Assets (.tar), enter a filename and location for the TAR archive, and click Open.
4 Click OK. The scenario and all of its assets are exported to a TAR archive.
Page 88

80 Chapter 5, Creating Scenarios
Exporting to Tape
To export a scenario to a DLT or Exabyte tape:
1 Choose File > Export. The Export Scenario to Script dialog opens.
2 Select the Export to Tape option.
3 Make sure the destination tape drive is selected in the Tape Drive menu.
4 Click OK. The scenario and all of its assets are exported to a TAR archive and saved to
tape.
Note: Only a single archive can be written to each tape.
Importing Scenarios
You can import scenarios from scripts and archives with the Import command. A script is a
text file that contains the scenario database information, including playback, link, and sync
data; asset and properties information; program playback control data; and project-specific
preferences. An archive, whether saved to a local hard drive or to tape, is a TAR archive file
that contains the scenario script and all assets used in the scenario.
Page 89

Importing Scenarios 81
This section includes the following topics:
• “Importing from a Script” on page 81
• “Importing from an Archive” on page 82
• “Importing from Tape” on page 83
Importing from a Script
To import a scenario from a script:
1 Choose File > Import (or from within the Project Manager, click New from Script). The
Create New Scenario from Script dialog opens.
2 Select the Import From Script option.
3 Click the Script File Browse button. In the Select File dialog, set the File Type to Scripts
(.scp) and select the script file you want to import, then click Open.
4 Click the Scenario File Browse button. In the Select File dialog, enter a filename and
location for the scenario, then click Open.
5 Click OK to import and open the new scenario.
If any of the scenario’s assets cannot be found, the import will fail with an error
message. For details on why an import failed, read the import log in the Information
window (select View > Information Window and click the Import tab).
Page 90

82 Chapter 5, Creating Scenarios
Importing from an Archive
To import a scenario from an archive:
1 Choose File > Import (or from within the Project Manager, click New from Script). The
Create New Scenario from Script dialog opens.
2 Select the Import From Archive option.
3 If importing a Scenarist SGI archive, select the From Scenarist SGI option.
4 Click the Script File Browse button. In the Select File dialog, set the File Type to Script
with Assets (.tar) and select the script file you want to import, then click Open.
5 Click the Restore Folder Browse button. In the Browse for Folder dialog, select a location
for the imported assets and click OK.
6 Click the Scenario File Browse button. In the Select File dialog, enter a filename and
location for the scenario, then click Open.
7 Click OK.
8 When prompted with the required and available disk space for the scenario, click OK to
proceed.
Page 91

Importing Scenarios 83
Importing from Tape
To import a scenario from a DLT or Exabyte tape:
1 Choose File > Import (or from within the Project Manager, click New from Script). The
Create New Scenario from Script dialog opens.
2 Select the Import From Tape option.
3 If importing a Scenarist SGI archive, select the From Scenarist SGI option.
4 If importing an archive from a Unix tape device, specify the Block Size for the device. If
using a Windows tape device, leave the Block Size set to its default of 64.
5 Make sure the source tape drive is selected in the Tape Drive menu.
6 Click the Restore Folder Browse button. In the Browse for Folder dialog, select a location
for the imported assets and click OK.
7 Click the Scenario File Browse button. In the Select File dialog, enter a filename and
location for the scenario, then click Open.
8 Click OK.
9 When prompted with the required and available disk space for the scenario, click OK to
proceed.
Page 92

84 Chapter 5, Creating Scenarios
Page 93

6 Registering Assets
After assets have been prepared, they are registered in Scenarist so you can begin building
tracks from them. This chapter documents how to register assets and includes the following
topics:
• “Creating Asset Folders” on page 86
• “Registering Assets in the Data Editor” on page 87
• “Registering Assets in the Track and Scenario Editors” on page 92
• “Objects Created When Registering Assets” on page 93
• “Using Place Holders” on page 95
Page 94

86 Chapter 6, Registering Assets
Creating Asset Folders
Because projects can contain many assets, as well as a variety of different types of assets, it
is usually a good idea to organize them with folders. Asset folders can be created based on
asset type (Video, Audio, Menus, Slides, Subpictures, etc.), or they can be based on the
tracks and PGCs that will reference the assets (VMG Menu, Title Menu, Main Movie, Slide
Show, etc.).
To create an asset folder:
1 Click the Data Editor tab to display the Data Editor.
2 In the Data Editor directory area, select the folder to which you will add the new asset
folder.
3 Choose New > Folder or click the New Folder button in the Tools Bar.
4 When prompted, enter a name for the new asset folder and click OK.
The new asset folder is created and appears in the directory area and work area.
Page 95

Registering Assets in the Data Editor
Assets can be registered in the Data Editor with the New Data command, the New Multi-File
Data command, or by simply dragging from Windows Explorer to an asset folder. When
registering assets, they are not moved from their original hard drive location, nor are they
copied; assets in Scenarist are merely pointers to the original media.
This section contains the following topics:
• “Registering Assets by Dragging to the Data Editor” on page 87
• “Registering Assets with the New Data Command” on page 89
• “Registering Assets with the New Multi-File Data Command” on page 91
Registering Assets by Dragging to the Data Editor
You can register assets by dragging them from Windows Explorer to an asset folder in the
Data Editor. Any asset type can be registered with this method. You can even drag multiple
files to register them in a single operation. When dragging still image assets, you are
prompted to specify the type of asset to register.
Registering Assets in the Data Editor 87
To register assets by dragging to the Data Editor:
1 Click the Data Editor tab to display the Data Editor.
Page 96

88 Chapter 6, Registering Assets
2 Drag one or more assets from Windows Explorer to an asset folder in the Data Editor
directory area or work area.
3 If registering still images, select the type of object you want to create:
Page 97

Registering Assets in the Data Editor 89
Still Image Registers a still image asset that can be used as a still menu or as an image in
a still show or slide show.
Subpicture with Forced Start Registers a subpicture asset that cannot be turned off by
the viewer. Select this option if you are registering menu subpictures.
Subpicture without Forced Start Registers a subpicture asset that can be turned off by
the viewer. Select this option if you are registering subtitles.
4 If registering multiple still images that will be the same type, select Apply To All.
5 Click OK.
If the assets are DVD compliant, they are registered and appear in the Data Editor directory
area and work area. Messages regarding asset registration are displayed in the General tab of
the Information window.
Registering Assets with the New Data Command
To register assets with the New Data command:
1 Click the Data Editor tab to display the Data Editor.
2 In the Data Editor directory area, select the asset folder to which you will add the asset.
3 Choose New > Data or click the New Data button in the Tools Bar. The Open dialog
opens.
Page 98

90 Chapter 6, Registering Assets
4 To view only files of a certain type in the Open dialog, set the File Of Type menu to the
file type you want to display.
5 Select the asset you want to register and click OK.
6 If registering still images, select the type of object you want to create (for details, see
“Registering Assets by Dragging to the Data Editor” on page 87).
7 If registering multiple still images that will be the same type, select Apply To All.
8 Click OK.
If the asset is DVD compliant, it is registered and appears in the Data Editor directory area
and work area. Messages regarding asset registration are displayed in the General tab of the
Information window.
Page 99

Registering Assets in the Data Editor 91
Registering Assets with the New Multi-File Data Command
The New Multi-File Data command can register multiple, separate video assets as a single,
joined video stream.
To register video assets with the New Multi-File Data command:
1 Click the Data Editor tab to display the Data Editor.
2 In the Data Editor directory area, select the asset folder to which you will add the multi-
file video asset.
3 Choose New > Multi-File Data or click the Multi-File Data button in the Tools Bar.
4 In the Multi-File Data dialog, click Add and select the first video asset you will include in
the new asset, then click Open. The file is added to this multi-file list.
5 Add additional video assets in the order in which you want them to play.
6 Click OK. A single video asset, representing the joined video assets, is registered and
appears in the Data Editor directory area and work area.
Page 100

92 Chapter 6, Registering Assets
Registering Assets in the Track and Scenario Editors
It is possible to register some assets by dragging them from Windows Explorer directly to
the Track Editor and Scenario Editor. When dragging to a track folder in the Track Editor, a
track and scene are created with the asset automatically being registered. When dragging to
a title or language folder in the Scenario Editor, a PGC, program, cell, track, and scene are
created with the asset automatically being registered.
While this may seem to be a more expedient way of working, it not the most logical
approach in the long run. For example, when you drag a video asset from Windows Explorer
directly to the Scenario Editor, it only contains a single cell for the beginning of the track. If
you later add additional scenes to the track in the Track Editor, the scenes must then be
dragged to the Scenario Editor if you want to link to them. However, if a track is first created
in the Track Editor (with the necessary scenes and streams already added), you can then
drag the completed track to the Scenario Editor and each of the required PGC objects (with
a program and cell for each scene) will be created.
In general, it makes most sense to observe the workflow discussed in “Authoring Workflow”
on page 12. First register and organize assets in the Data Editor; next build tracks by adding
streams, scenes, and button highlights in the Track Editor; then create PGCs by dragging
tracks to the Scenario Editor.
Also, not all assets can be registered by dragging to certain destinations in the Track Editor
and Scenario Editor. For example, audio, subpicture, and angle assets cannot be dragged to
the Scenario Editor; they can only be dragged to an asset folder in the Data Editor or a track
timeline in the Track Editor.
 Loading...