

Page 1

SonicDVD Creator
Tutorial
TM
Page 2

©1999 Sonic Solutions. All rights reserved.
Sonic DVD Creator Tutorial - Sonic Part Number 800117 Rev B (3/99)
This manual, as well as the software described in it, is furnished under license and may only be used or copied in
accordance with the terms of such license. The information in this manual is furnished for informational use only, is
subject to change without notice, and should not be construed as a commitment by Sonic Solutions. Sonic Solutions
assumes no responsibility or liability for any errors or inaccuracies that may appear in this book.
Except as permitted by such license, no part of this publication may be reproduced, stored in a retrieval system, or
transmitted, in any form or by any means, electronic, mechanical, recording, or otherwise, without the prior written
permission of Sonic Solutions.
SONIC SOLUTIONS, INC. ("SONIC") MAKES NO WARRANTIES, EXPRESS OR IMPLIED, INCLUDING WITHOUT
LIMITATION THE IMPLIED WARRANTIES OF MERCHANTABILITY AND FITNESS FOR A PARTICULAR PURPOSE,
REGARDING THE APPLE SOFTWARE. SONIC DOES NOT WARRANT, GUARANTEE, OR MAKE ANY
REPRESENTATIONS REGARDING THE USE OR THE RESULTS OF THE USE OF THE SONIC SOFTWARE IN TERMS
OF ITS CORRECTNESS, ACCURACY, RELIABILITY, CURRENTNESS, OR OTHERWISE. THE ENTIRE RISK AS TO THE
RESULTS AND PERFORMANCE OF THE SONIC SOFTWARE IS ASSUMED BY YOU. THE EXCLUSION OF IMPLIED
WARRANTIES IS NOT PERMITTED BY SOME STATES. THE ABOVE EXCLUSION MAY NOT APPLY TO YOU.
IN NO EVENT WILL SONIC, ITS DIRECTORS, OFFICERS, EMPLOYEES, OR AGENTS BY LIABLE TO YOU FOR ANY
CONSEQUENTIAL, INCIDENTAL, OR INDIRECT DAMAGES (INCLUDING DAMAGES FOR LOSS OF BUSINESS
PROFITS, BUSINESS INTERRUPTION, LOSS OF BUSINESS INFORMATION, AND THE LIKE) ARISING OUT OF THE
USE OR INABILITY TO USE THE APPLE SOFTWARE EVEN IF SONIC HAS BEEN ADVISED OF THE POSSIBILITY OF
SUCH DAMAGES. BECAUSE SOME STATES DO NOT ALLOW THE EXCLUSION OR LIMITATION OF LIABILITY
FOR CONSEQUENTIAL OR INCIDENTAL DAMAGES, THE ABOVE LIMITATIONS MAY NOT APPLY TO YOU.
Sonic, Sonic Solutions, the Sonic logo, SonicStudio, Audio 2000, Sonic DVD Creator, First in DVD, DVD Now, DVD
Production Alliance, DVD Ready, Constant Q, High-Density Audio, TimeTwist, Varispeed, MediaNet, and Sonic
LightSpeed are trademarks of Sonic Solutions.
NoNOISE is a registered trademark of Sonic Solutions.
Dolby Digital is a trademark of Dolby Laboratories, Inc.Dolby Laboratories encourages use of the Dolby Digital
trademark to identify soundtracks that are encoded in Dolby Digital. This is an effective way to inform listeners of the
soundtrack format, and the use of a standard logo promotes easy recognition in the marketplace. However, like any
trademark, the Dolby Digital logo may not be used without permission. Dolby Laboratories therefore provides a
standard trademark license agreement for companies who wish to use Dolby trademarks. This agreement should be
signed by the company that owns the program material being produced. Recording studios or production facilities
which provide audio production or encoding services for outside clients generally do not require a trademark license. If
you would like more information on obtaining a Dolby trademark license, please contact Dolby Laboratories Licensing
Corporation. Information on trademark licensing plus instructions for using the Dolby Digital trademark and marking
audio formats can also be found online at http://www.dolby.com.
QuicKeys is a registered trademark of CE Software, Inc.
JL Cooper is a registered trademark of J. L. Cooper Electronics, Inc.
Apple, the Apple logo, Finder, Macintosh, Quadra, and Quicktime are registered trademarks of Apple Computer, Inc.
Acrobat and Photoshop are trademarks of Adobe Systems, Inc.
NuBus is a trademark of Texas Instruments.
All other company or product names are either trademarks or registered trademarks of their respective owners.
Written and designed at Sonic Solutions, 101 Rowland Way, Novato, CA. 94945, USA
Page 3

Contents
1
2
WELCOME TO DVD CREATOR™
Audience . . . . . . . . . . . . . . . . . . . . . . . . . . . . . . . . . . . . . . . . . . . . ix
Related User Documentation . . . . . . . . . . . . . . . . . . . . . . . . . . . . .x
How to Reach Technical Support . . . . . . . . . . . . . . . . . . . . . . . . . .x
Registration . . . . . . . . . . . . . . . . . . . . . . . . . . . . . . . . . . . . . . . . . . xi
EXPLORING DVD CREATOR
DVD Creator at a Glance . . . . . . . . . . . . . . . . . . . . . . . . . . . . . . . 1-1
DVD Creator Quick Tour . . . . . . . . . . . . . . . . . . . . . . . . . . . . . . . 1-2
CREATING A SIMPLE PROJECT
Lesson Two at a Glance. . . . . . . . . . . . . . . . . . . . . . . . . . . . . . . . 2-1
Getting Started . . . . . . . . . . . . . . . . . . . . . . . . . . . . . . . . . . . . . . 2-2
Creating a New Project . . . . . . . . . . . . . . . . . . . . . . . . . . . . . . . . 2-3
Creating a Basic Layout . . . . . . . . . . . . . . . . . . . . . . . . . . . . 2-3
Importing Audio and Video . . . . . . . . . . . . . . . . . . . . . . . . . 2-6
Adding Audio and Video to a PGC . . . . . . . . . . . . . . . . . . . . 2-6
Playing Back the Audio and Video (Proofing) . . . . . . . . . . . 2-8
Adding and Linking PGCs . . . . . . . . . . . . . . . . . . . . . . . . . . 2-11
Page 4

T
ABLE OF CONTENTS IV
Add Audio and Video to the New PGCs . . . . . . . . . . . . . . .2-13
Adding Entry Points (Chapter Points). . . . . . . . . . . . . . . . .2-16
Proofing the Entry Points . . . . . . . . . . . . . . . . . . . . . . . . . .2-18
3
CREATING MENUS
Lesson Three at a Glance. . . . . . . . . . . . . . . . . . . . . . . . . . . . . . .3-2
Creating Menus . . . . . . . . . . . . . . . . . . . . . . . . . . . . . . . . . . . . . .3-3
Importing the Menu Image Files. . . . . . . . . . . . . . . . . . . . . .3-3
Adding the Menu Image files to the Project. . . . . . . . . . . . .3-5
Adding Menu Buttons and Selection Order. . . . . . . . . . . . .3-9
Defining Button Colors and Button Families . . . . . . . . . . .3-11
Assigning Navigation Commands to Buttons . . . . . . . . . .3-14
Proofing the Menu. . . . . . . . . . . . . . . . . . . . . . . . . . . . . . . .3-16
Formatting and Proofing the Project. . . . . . . . . . . . . . . . . . . . .3-17
4
ENCODING VIDEO AND AUDIO
Lesson Four at a Glance. . . . . . . . . . . . . . . . . . . . . . . . . . . . . . . .4-1
Encoding Audio and Video . . . . . . . . . . . . . . . . . . . . . . . . . . . . .4-2
Page 5

Welcome to DVD Creator
Welcome to DVD Creator™ from Sonic Solutions! DVD Creator is the first
DVD production system designed especially for video and multimedia DVD
development.
Each DVD Creator system gives you the tools you need to make DVD-Video
and DVD-ROM disc images, and all systems can be upgraded with additional
features and functions to enhance your production environment.
Audience
This guide is intended for use by multimedia developers and video
professionals who use DVD Creator as their complete production tool for
authoring, video and audio encoding, final product proofing and DVD disc
formatting.
You should be familiar with basic computer terms, such as click, drag,
highlight, etc. We also assume that you understand the basics of how to
maneuver through the Macintosh interface. If not, please review the
tutorials provided by Apple.
™
Page 6

X
Related User Documentation
Please refer to the following documentation for further information:
•
DVD Creator Installation Guide
•
DVD Creator User Guide
How to Reach Technical Support
You will receive software technical support from Sonic Solutions for 90
days at no charge. If you wish to continue receiving support or technical
assistance, please be sure to purchase a SonicCare technical support
contract for your system (a representative will contact you before the 90day period is up).
Sonic Solutions’ Customer Support center is available from 9:00 AM 6:00 PM PST via phone, fax, or email:
Telephone:
Fax:
1.415.893-8008
Email:
Please follow the steps outlined in Chapter 12, where appropraite, and
have the following information ready before contacting customer support:
•
Software version (select the application icon and type
look on the CD-ROM label)
•
Board Serial Numbers - look on the board for the sticker and write the
serial numbers below:
MPEG-2 Encoder:
A-V Processor:
Sonic Dolby Digital Encoder:
1.415.893.7000 or 1.888.SONIC-97 (1.888.766.4297)
dvdsupport@sonic.com
COMMAND
+ I or
Page 7

Registration
To help Sonic assist you more effectively with technical support, and to
receive information about new Sonic DVD Creator product developments,
please log on to Sonic’s on-line registration site:
www.sonic.com/register
R
EGISTRATION XI
.
Page 8

XII
Page 9

1
Exploring DVD Creator
Session Goal:
Completion Time:
Files Needed:
To familiarize you with all of DVD Creator’s tools by guiding
you through the DVD workflow.
About 10 minutes.
None.
DVD Creator at a Glance
AUTHOR
Complete tool for
storyboarding and
creating DVD title’s.
ENCODE
Encode source
tapes into
MPEG-2 video
and Dolby
Digital, MPEG,
or PCM audio.
DVD Creator Launcher
PROOF
Plays back your projects as a quality
check before sending the disc out for
replication.
FORMAT
Takes your completed
project and creates a DVDcompliant file that can then
be copied to a DVD disc or
DLT tape.
Page 10

2E
1-
XPLORING
DVD C
DVD Creator Quick Tour
In this quick tour you will open and explore the four tools that make up
DVD Creator: AUTHOR, ENCODE, PROOF, and FORMAT.
REATOR
Note:
explained in the
1
Double-click the DVD Creator application icon on the Macintosh desktop.
Make sure your DVD Creator system is configured properly as
DVD Creator User Guide
, Chapter 1.
DVD Creator starts up and displays the application launcher.
2
Click
AUTHOR
3
In the AUTHOR window, click
to launch the authoring tool.
New Project
.
Click
AUTHOR
to open
the
authoring
tool
4
In the Save As window, do the following:
•
Locate the external Media Drive.
•
Type
•
Click
Lesson1.as
Save
as the file name.
.
Page 11

DVD C
REATOR QUICK TOUR
The Project Planner is used to setup basic parameters about the new
project and is explained in more detail in Lesson 2.
5
Leave the defaults in the Project Planner and click
Finish
window.
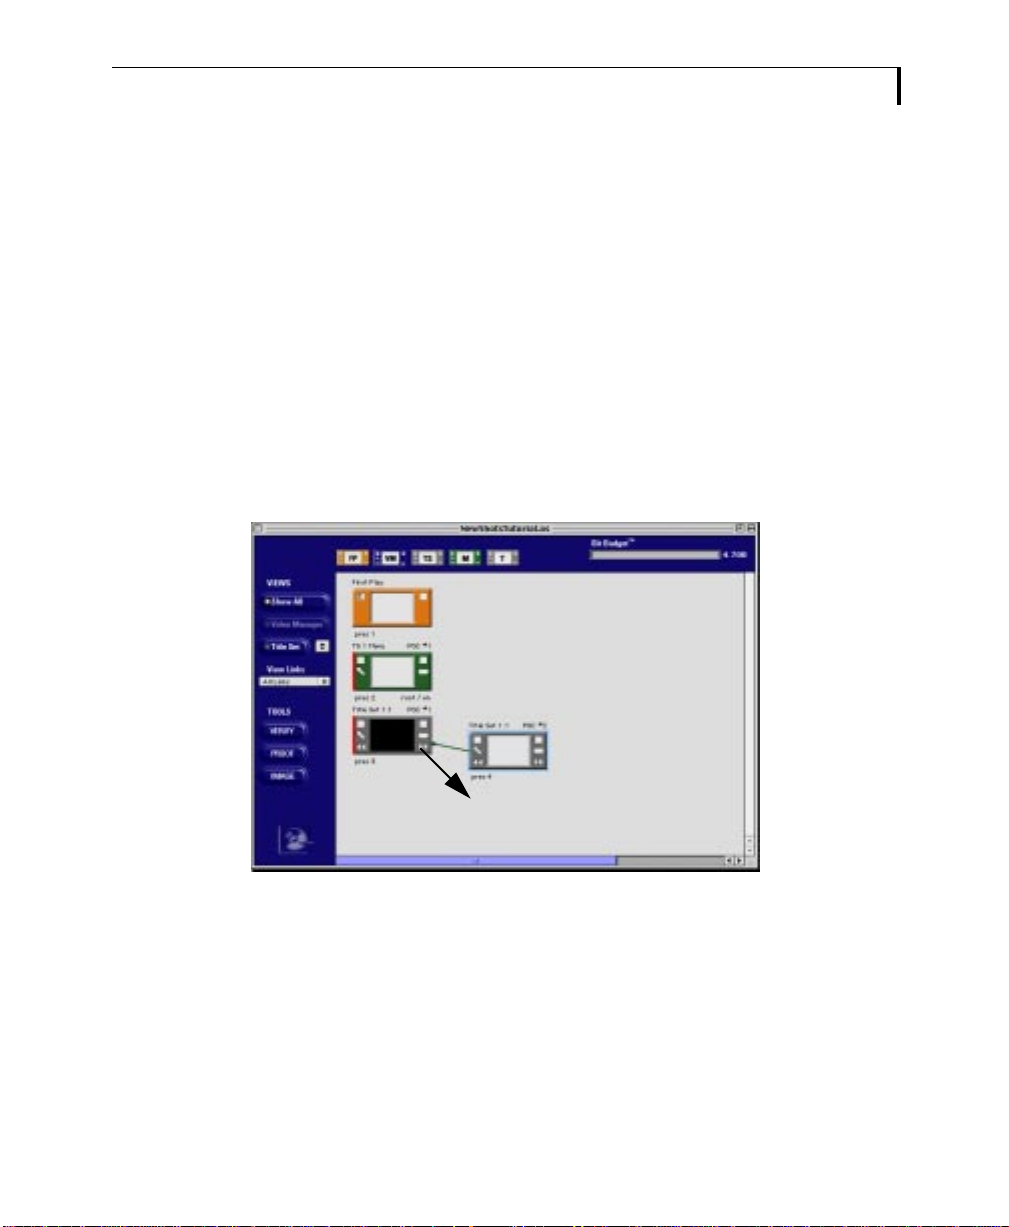
The Layout window appears.
Drag these icons down into
the grey Layout area to see
what happens.
You can also draw links from
existing icons to create new
ones.
in the second
1-
3
Figure 1-1
Exploring the Layout window
The authoring tool allows you to create DVD titles with an intuitive and
graphical interface. From the design stages of a project to the final DVD
disc image, DVD Creator offers creative functionality, icon-based
storyboarding, drag-and-drop editing, on-the-fly playback during authoring,
and project planning assistants.
z
6
Press
+Q to quit the authoring tool and return to the DVD Creator
Launcher.
7
Click
ENCODE
to launch the encoding tool.
Page 12

4E
1-
XPLORING
DVD C
8
REATOR
The Machine Control window appears.
Rewind, Play, Pause,
Stop, and Fast Forward
buttons. Click and hold
the Rewind and Fast
Forward buttons for
more options.
Figure 1-2
The Machine Control window
The machine control window allows you to control the external tape deck
and is described in more detail in Lesson 4.
9
Select
File > New
(z+N).
The Encode Setup window appears.
Select New Video Set to open the
Create Video Set window and set
the video encoding parameters.
Click Cancel to return to this
window.
Select New Audio Set to open
the Edit Audio Set window and set
the audio encoding parameters.
Cclick Cancel to return to this
window.
This is where you enter the start
and end timecodes for the source
tape(s).
Figure 1-3
The Encode Setup window
Page 13
DVD C
REATOR QUICK TOUR
The encoding tool uses MPEG-2 video compression to compress your
video. You can choose from MPEG audio, Dolby Digital, or PCM to encode
your audio.
1-
5
Note:
The secondary windows (Create Video Set and Edit Audio Set) are
described in more detail in Lesson 4. For now, take a few minutes to
acquaint yourself with the interface.
10
When you are ready, press z+Q to quit the encoding tool and return to
the DVD Creator Launcher.
11
Click
PROOF
to launch the proofing tool.
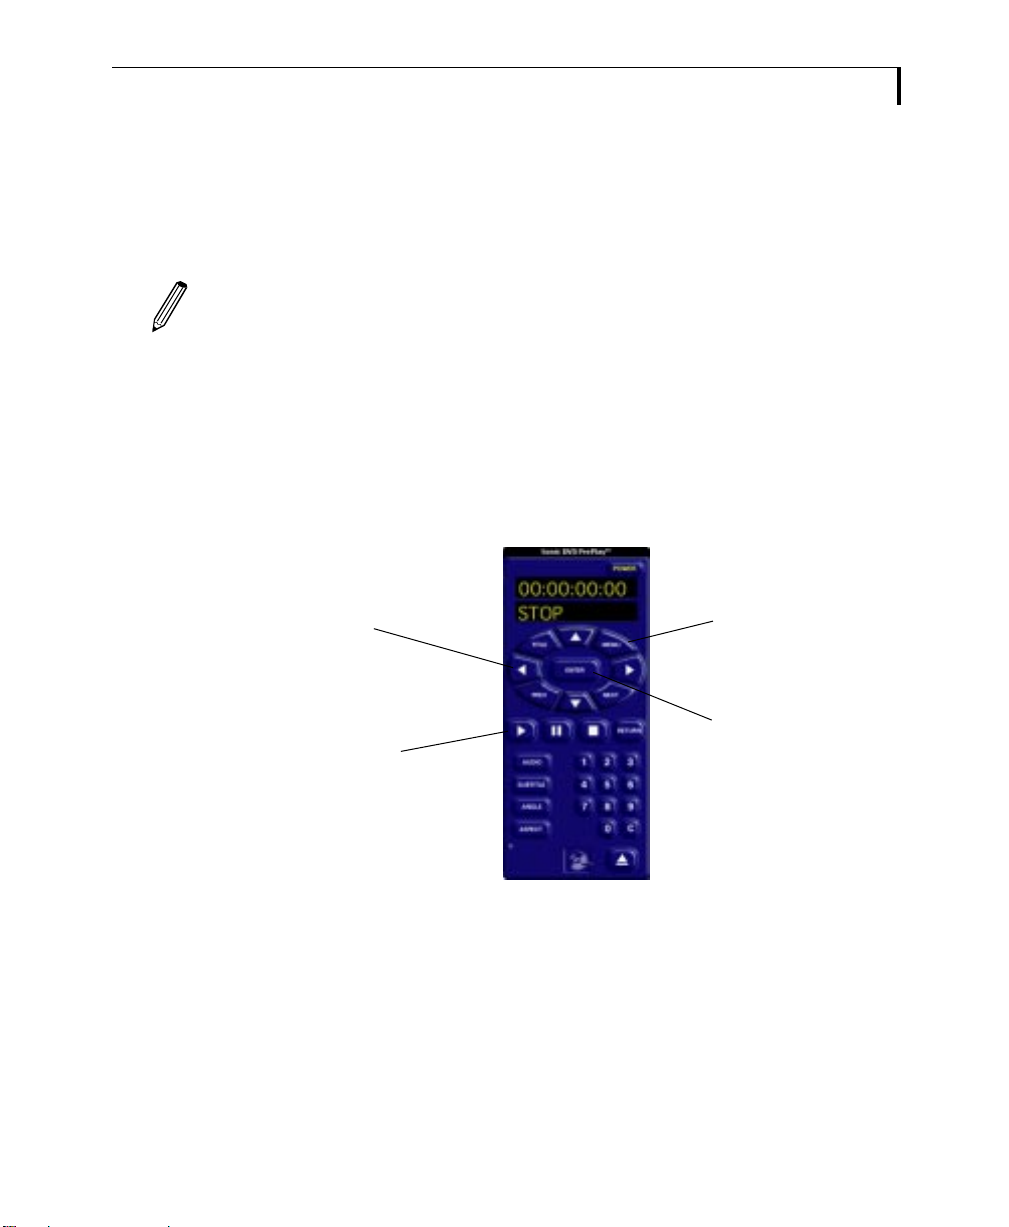
The proofing tool’s onscreen remote control appears.
Use the arrow keys to
navigate through menu
items
Play, Pause, and Stop
video playback
Menu - Displays the
video title set menu
Enter - Selects a
highlighted button
Figure 1-4
The proofing tool’s onscreen remote control
Page 14
6E
1-
XPLORING
DVD C
REATOR
The proofing tool is a virtual DVD player that allows you to view an entire
project from start to finish as it would appear on disc. Once you add some
content to a project in th authoring tool, (for example, audio or video) you
can easily play it back as you would through a DVD Player using the
onscreen remote control.
12
When you are done exploring proofing tool, press z+Q to return to the
DVD Creator Launcher.
13
Click
FORMAT
to launch the formatting tool.
The DVD Format Server window appears.
Figure 1-5
Exploring the formatting tool
Formatting is the final step in preparing a DVD title for shipping. The
formatting tool combines all the elements of your project (the .as file,
audio, video, and subpictures) and creates a single, DVD-compliant file that
can be read by a DVD player or drive.
14
When you are done exploring the formatting tool, press z+Q to return to
the DVD Creator Launcher.
Page 15

DVD C
REATOR QUICK TOUR
Now that you are familiar with DVD Creator’s tools, you are ready to learn
how to create a simple title. You may now:
•
Move on to Lesson 2, Creating a Simple Title, to begin authoring, or
•
Move on to Lesson 4, Encoding Audio and Video, where you will encode
some of your own video material.
1-
7
Page 16

8E
1-
XPLORING
DVD C
REATOR
Page 17

2
Creating a Simple Project
Session Goal:
Completion Time:
Files Needed:
To learn how to author a simple project by creating a basic
layout, adding audio and video, and playing back the
project.
About 30 minutes.
LifeSaver.qt, NightMoves.qt, Pepsi.qt and Tabasco.qt
Lesson Two at a Glance
Create a basic
layout in the
Layout window.
Play back
the project
using
PROOF’s
onscreen
remote.
control
Use the Presentation Editor to add audio and
video tracks to four different PGCs.
Page 18

2C
2-
REATING A SIMPLE PROJECT
Getting Started
In this lesson you will create a simple project using the audio and video
files provided on the Tutorial CD-ROM. To copy the tutor ial files from the
CD-ROM to the Media Drive:
1
Insert the Tutorial CD-ROM into the CD-ROM drive.
2
Copy the folder labeled,
Demo_Material
, to the external Media Drive. You
must have at least 750 MB of available space. The demo material includes
audio and video that has already been encoded (.MPEG and .AC3 files).
These are very large files and copying them to the Media Drive may take up
to 20 minutes.
Note:
Make sure your DVD Creator system is configured properly as
explained in the
DVD Creator User Guide
, Chapter 1.
Page 19

Creating a New Project
For this tutorial, you will do the following:
•
Create a basic layout
•
Import audio and video
•
Add audio and video to a PGC
•
Play back the audio and video (proofing)
• Add and link PGCs
• Add audio and video to the new PGCs
• Add entry points (chapter points)
• Proof the entry points
Creating a Basic Layout
1 Launch the authoring tool from the DVD Creator Launcher.
C
REATING A NEW PROJECT
2-
3
2 In the AUTHOR window, click New Project.
3 In the Save As window, do the following:
• Locate the external media drive.
• Type Lesson2.as as the file name.
• Click Save.
4 In the Project Planner do the following:
• Deselect “Would you like a Video Manager menu?”
• Select “Would you like Title Set menus?” and click Finish.
Page 20

2-4CREATING A S IMPLE P ROJECT
Project Planner Options
Planner Option Description
What kind of DVD are you
making?
Which side is this project for? An entire DVD project cannot span both sides of a disc. Select
Volume If you have more than one DVD disc in a multi-volume set, give
Would you like a First Play
program chain?
Would you like a Video Manager
menu?
Would you like Title Set Menus? A Title Set menu is the root menu for all titles within a Title Set.
How many title sets would you
like?
DVD Creator sets different parameters depending on whether
you are making a movie, a video, etc.
the side this project is intended for. Note - This is different than
layers, projects can span two layers.
it a volume number.
The First Play PGC tells a DVD player what to play first. If there
is no first play PGC, when you insert a DVD disc into a player,
nothing happens until you use the remote control.
The Video Manager menu is typically used as a main menu to
keep track of multiple Title Sets. Each Title Set has its own set
of menus. This project only uses one Title Set so we do not
need a Video Manager menu.
The tutorial contains only one Title Set. You can have up to 99
Titles per disc and every Title Set must have at least one Title.
So, if you have 99 Titles in one Title Set, you can only have one
Title Set on a disc. Conver sely, if you have 1 Title in each Title
Set, you can have 99 Title Sets on a disc.
Page 21

CREATING A N EW PROJECT 2-5
T
k
c
s
a
Based on the project planner options you selected, the Layout window
appears with a First Play PGC, a Title Set Menu object, and a Title Set
object.
PGCs
This is the project layout area
PGCs (Presentation Objects)
he building blocks of DVD titles are PGCs (also
nown as presentation objects or program
hains). PGCs are placeholders for display
information. They typically contain audio, video,
ubpictures, and navigation commands. There
re five different types of PGC icons (First Play,
Video Manager Menu, Title Set Menu, and Title)
that have different functions depending on what
domain they reside in.
For more information on PGCs and domains, see
the DVD Creator User Guide.
Page 22

2-6CREATING A S IMPLE P ROJECT
Importing Audio and Video
Now that you have created PGCs, the next step is to import an audio and
video clip to place into a PGC.
1 Drag and drop lifesaver.qt from the media drive into the Source List.
The length of
the files.
All media assets, audio, video, and graphics, are imported via the Source
List. The Source List is, therefore, a database of all a project’s assets.
The MPEG file is the video
track.
The AC3 file is the Dolby
Digital audio track.
Adding Audio and Video to a PGC
Now that you have imported an audio and video file, it is time to place
them into a PGC.
Page 23

Double-click
the middle of
the Title Set
1:1 icon to
display the
Presentation
Editor.
CREATING A N EW PROJECT 2-7
1 In the Layout Window, double-click the PGC, Title Set 1:1 PGC #1.
The Presentation Editor opens – this is where you add audio, video, and
subpictures within a PGC.
2 Drag and drop the lifesaver.qt.mpeg video file from the Source List to the
Presentation Editor’s Video track. Thumbnails representing the video file
display in the video track.
Drag
lifesaver.qt.
mpeg from the
Source List to
the video track.
Page 24

2-8CREATING A S IMPLE P ROJECT
3 Drag and drop the lifesaver.pcm.ac3 audio file from the Source List to the
Presentation Editor’s audio track.
Drag the
lifesaver.pcm.
ac3 file from
the Source List
to the audio
track.
Figure 2-1 Presentation Editor displaying both video and audio
streams.
4 Close the Presentation Editor by clicking the box in the upper left-hand
corner. The Layout window appears with a thumbnail of the video inside
the Title Set 1:1 icon.
Note: When you add video to a PGC, the fir st frame of video displays in
the center of the object in the Layout window. The video clip you just
added begins with a fade from black, so the frame that appears in the
Layout window is simply black.
5 Save the Project (z+S).
Playing Back the Audio and Video (Proofing)
Now that you have added some material to a PGC, you can play it back to
see what it looks like.
Page 25

CREATING A N EW PROJECT 2-9
1 In the Layout window, select the PGC, Title Set 1:1 PGC #1, and click
Project.
2. Click
Project .
1. Click to
highlight this
PGC.
The proofing tool launches, and after several seconds begin playing the
video and audio streams contained in the PGC.
Page 26

2-10 CREATING A S IMPLE P ROJECT
2 Use the remote control to navigate through the title. It has all of the
features and functionality of a DVD player’s remote control.
Play, Pause, and Stop
video playback.
The Navigation State window displays the status of both System
Parameters and General Parameters. System Parameters display settings
and controls found within the DVD player (such as the default language),
while General Parameters are author-defined variables (to be used for such
things as keeping a game score, tracking user interactivity, and more
complex calculations).
Quit the proofing tool
and return to the Layout
window .
Figure 2-2 Navigation State window.
Page 27
CREATING A N EW PROJECT 2-11
3 When you are done, click Power to closer the proofing tool.
Adding and Linking PGCs
Now that you understand the basics of creating a title (designing a layout
and adding audio and video to a PGC), you are ready to create a more
complex layout by adding more PGCs with additional audio and video
tracks.
1 Click and drag from the right arrow of Title Set 1:1 PGC #1 to an empty
space in the layout window to create a Next link and a new PGC, Title Set
1:1 PGC #2.
Drag in this direction to
create a Next link.
The green line indicates a Next Link from PGC #1.
Page 28

2-12 CREATING A S IMPLE P ROJECT
L
w
Types of Links - Next, Previous, and Return
inking PGCs establishes the order in which they
ill play back. There are three types of links:
• Next - When a viewer presses the Next or
Skip button on a DVD player remote control,
the PGC attached by a Next link plays next.
• Previous - When a viewer presses the
Previous button on a DVD player remote
2 Click and drag the left arrow of PGC #2 to PGC #1 to create a Previous
link.
control, the PGC attached by a Previous link
plays next.
• Return - When a viewer presses the Return
button on a DVD player remote control, the
PGC attached by a Return link plays next.
Drag in this direction to
create a Previous link.
3 Click and drag from PGC #2’s right arrow and release. A new PGC, Title Set
1:1 PGC #3, appears with a green Next Link drawn.
4 Click and drag from PGC #3’s right arrow and release. Now you should
have four PGCs with Next Links connecting them together.
Page 29

CREATING A N EW PROJECT 2-13
5 Add Previous links between PGC #4 and PGC #3, and PGC #3 and PGC #2.
Add Audio and Video to the New PGCs
Now you will add audio and video to each of the new, linked PGCs.
1 Drag the nightmoves_8.qt, pepsi.qt and tabasco.qt files from the
desktop to the Source list.
Add these three files to
the Source List.
DVD Creator adds .ses
(session) to the file
names.
Page 30

2-14 CREATING A S IMPLE P ROJECT
2 Double-click the middle of PGC #2 in the Layout window to display the
Presentation Editor.
3 Drag tabasco.qt.mpeg from the Source List to the video track area and
tabasco.pcm.ac3 from the Source List to the audio track area of the
Presentation Editor.
Note: Or, you can also try dragging the .ses file directly into the track
header area. This will place both the video and audio files (contained in
the .ses file) into the Presentation Editor at the same time.
4 Click the box in the upper left-hand corner of the Presentation Editor to
close the window and return to the Layout window.
5 Repeat steps 2 through 4 to add the pepsi audio and video clips to PGC #3
and the nightmoves audio and video clips to PGC #4.
When you are done, the Layout window should look like this:
6 Click the label under PGC#1, pres 3, to highlight and type LifeSavers.
Press Tab to move to the next PGC label.
Page 31

CREATING A N EW PROJECT 2-15
7 Repeat Step 6 with the other three Title PGCs:
• Rename PGC#4 to Tabasco
• Rename PGC#5 to Pepsi
• Rename PGC#6 to Nightmoves
This will make it easier to keep track of the layout.
8 Save the project (z+S).
Page 32

2-16 CREATING A S IMPLE P ROJECT
Adding Entry Points (Chapter Points)
Entry points are markers within a PGC that allow viewers to jump to
certain points within a video stream using the Next and Previous buttons
on the remote control. (Entr y points can also be used as Chapter Points.)
1 Double-click the Nightmoves PGC in the Layout window to display the
Presentation Editor.
2 Double-click just above the video track in the Entry Point area. This creates
an entry point.
Double-click in
this area to
create an entry
point.
Page 33

3 Double-click the entry point.
By default, the
entry point is
defined as a
Program and
part of a title.
You can name the entry point for
reference purposes (the name
appears next to the entry point in
the Presentation Editor).
Not only do entry points provide “jump to“ points in a title, but they also
separate the video streams into Programs and Cells.
Entry Points - Programs vs. Cells
CREATING A N EW PROJECT 2-17
Defining an entry point as a cell means that
navigation to this specific location can only be
achieved by using the “Link CN” command. Also,
playing through this point will not increment the
chapter counter on the DVD player.
4 Click OK in the Entr y Point Editor to close the window.
Now, define three or four more Entry Points.
5 When you are done close the Presentation Editor to return to the Layout
window and save the project.
Defining an entry point as a program means that
this point can be navigated to by using the “Link
PGN” command or the “Link CN” command.
Only part of TItle Entry Points can increment the
Chapter Display.
Page 34

2-18 CREATING A S IMPLE P ROJECT
Proofing the Entry Points
Now you will use the proofing tool to check that all of the Part of Title
Entry Points function as expected. Using the Next and Previous buttons on
the remote control, you can move between the different entry points.
1 In the Layout window, select the Nightmoves PGC and click Project.
2. Click
Project .
The proofing tool opens and plays the Nightmoves video.
1. Click to
highlight the
Nightmoves
PGC.
2 Use the Next and Previous buttons on the remote control to move from
entry point to entr y point.
3 When you are done, click Power on the remote control to close the
proofing tool.
Page 35

3
Creating Menus
Session Goal: Add a menu to the basic DVD project created in Lesson 2
and format the project.
Completion Time: About 30 minutes
Files Needed: MainMenu.tiff, Overlay.tiff
Page 36

3-2CREATING M ENUS
Lesson Three at a Glance
+=
MainMenu.tiff
(Background Image)
Overlay.tiff
(Overlay Image)
Menu
(Onscreen Menu)
The background image and the
overlay image are superimposed
in the Menu Editor. You will then
add button highlights and
navigation commands in the Menu
Editor.
Page 37

Creating Menus
In this lesson you will create a menu that will allow viewers to select
among the four PGCs created in Lesson 2. You will:
• Import the menu image (TIFF) file
• Add the menu image to a menu PGC
• Add menu buttons and selection order
• Define button colors and button families
• Assign navigation commands to buttons
• Assign button attributes
Importing the Menu Image Files
1 Complete Lesson 2.
2 If necessary, select File > Open and open Lesson2.as.
CREATING M ENUS 3-3
3 Choose Source > Import and open mainmenu.tiff located on the Media
Drive.
Page 38

3-4CREATING M ENUS
4 In the Import Type window, choose the encode parameters for the graphic
file.
Select TIFF if
it is not
already
selected.
The authoring tool encodes the TIFF file into an MPEG still that can be used
as a menu background image.
Select NTSC.
Select 4:3.
Leave Encode Quality
set to 1 Highest.
Click
OK.
Note: DVD Specification can only work with MPEG-encoded images
(stills and MPEG motion video).
Page 39

CREATING M ENUS 3-5
The encoded TIFF is now listed in the Source List as an MPEG still.
The menu’s
background image
TIFF appears in the
Source List.
Adding the Menu Image files to the Project
1 Double-click the video area of the Menu object to display the Presentation
Editor.
Double-click
here to open
the
Presentation
Editor.
Page 40

3-6CREATING M ENUS
2 Drag MainMenu.tif from the Source List to the Video track.
A thumbnail of
the TIFF
appears in the
video track.
A Subpicture
track for a
duration of
twelve frames
(default length)
is created.
3 Double-click the brown subpicture track in the Presentation Editor to
display the Menu Editor.
Page 41

The buttons in
the upper left
corner of the
window allow
you to toggle
different
aspects of the
display on or
off.
The background
image TIFF
displays with a
default
subpicture
overlay in front.
CREATING M ENUS 3-7
The Menu Editor appears. This is where you will add the subpicture overlay
and button highlights.
• Video Display - Toggles the background picture on and off.
• Subpicture Display - Toggles the subpicture on and off.
• Button Display - Toggles the subpicture display area on and off.
• Safety Zone Display - Toggles the television safety area on and off.
Page 42

3-8CREATING M ENUS
4 Choose Menu Editor > Select Sub-pictur e.
5 In the Open window, locate Overlay.tiff on the media dr ive, and click OK.
Now the Menu
Editor displays
both the
background and
overlay TIFFs
as they will look
when played
back on a DVD
player.
Figure 3-1 Background Tiff with subpicture overlay
6 Display only the overlay you just imported by clicking all the display
buttons except the subpicture button, (second from the top).
Toggle off all
the display
buttons except
the subpicture
display to view
the subpicture
image only.
Page 43
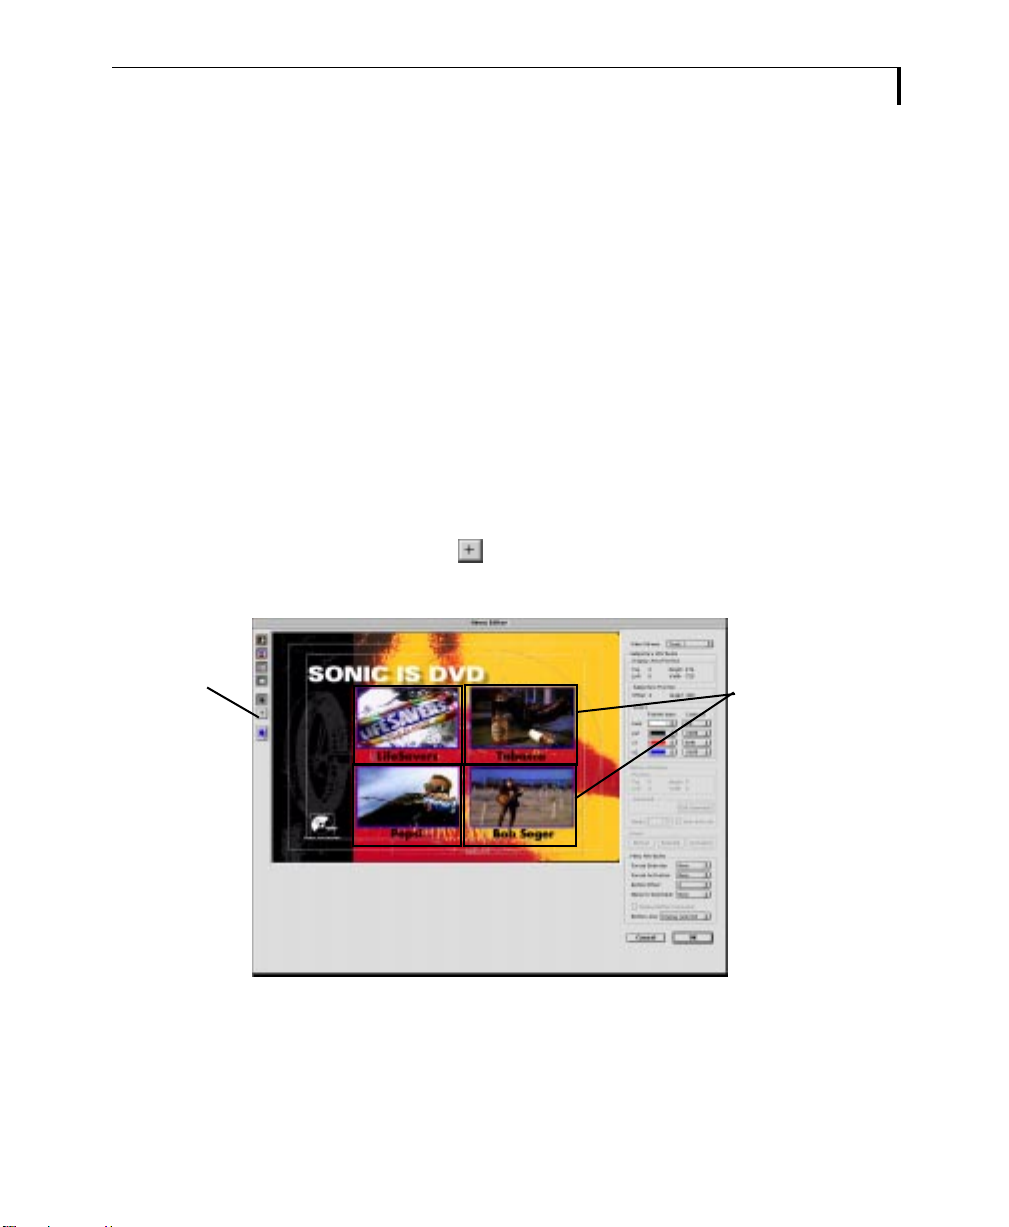
Click the
button
tool.
CREATING M ENUS 3-9
Adding Menu Buttons and Selection Order
Now that you have added the menu’s background image and the subpicture
overlay, you are ready to draw the button highlight areas. The button
highlight areas are the selectable areas on a menu.
You will create four buttons to play back the PGCs created in Lesson 2 (one
that plays the LifeSavers PGC, one that plays the Pepsi PGC, one that plays
the Tabasco PGC, and one that plays the Nightmoves PGC). This involves:
• Drawing four buttons
• Linking the buttons to the appropriate PGCs
1 Toggle all four display buttons back on, to display the background image,
the subpicture overlay, and all the display areas.
2 Click the Button tool ( ) to draw a rectangle around the four button
areas:
Draw four b uttons ,
one around each
picture along with
its text. By
including the text,
you can change
the selection and
activation colors of
the text as well as
the color of the
subpicture
overlay’s squares.
Page 44

3-10 CREATING M ENUS
It’s OK if the buttons overlap other artwork in the background image, as
long as they do not overlap other parts of the subpicture overlay. When you
define selection and activation colors, they affect text and images on the
subpicture overlay (not the background image).
3 Use the Selection ( ) tool to reposition the buttons as needed.
Now that you have drawn your buttons, you will define the order they will
be highlighted (selected) when a viewer uses the arrow keys on a DVD
remote control.
ENTER
4 Select Menu Editor > Auto Route Buttons.
5 In the Auto Route Buttons window, do the following:
Select to link
the first and
last buttons so
that scrolling
continues top
to bottom in a
circular
fashion.
Arrow keys on a
DVD Player
remote control
In the Menu Editor, draw
links from button to
button to program the
highlight order
Figure 3-2 Creating button selection (highlight) order
Page 45

CREATING M ENUS 3-11
The buttons are now programmed so that viewers can scroll through them
from top to bottom with the arrow keys on a DVD player’s remote control.
Defining Button Colors and Button Families
Now that you have defined selection movement between the menu
buttons, you will define how the buttons will appear when they are
selected, activated, and normal (not selected or activated).
Button families allow you to define different background, pattern, E1, and
E2 colors for each button state:
• selected
• activated
• normal
Each menu can have up to 36 buttons and each button can be placed in
one of the three families.
Page 46
3-12 CREATING M ENUS
.
Background, Pattern, E1, and E2 colors
The ’Colors’ section
in the right column of
the window allows
you to change the
Normal color settings
for all buttons in the
current family.
Overlay TIFFs must be created with four colors: white, black, red, and blue.
These colors are mapped to specific controls within the Menu Editor:
• White = Background color
• Black = Pattern
• Red = E1 (Emphasis 1)
• Blue = E2 (Emphasis 2).
After the TIFF is imported into the Menu Editor, you can change these
colors using the 16-color palette in the Menu Editor.
Setting normal colors:
But first, you must set up normal colors, as shown in the following step.
Page 47

CREATING M ENUS 3-13
1 Set E2 to 0 percent contrast.
2 Choose Menu Editor > Edit Button Families. The Button Families
window appears.
When menu buttons are selected onscreen, they
will be highlighted with these colors.
When menu buttons are activated onscreen, they
will be highlighted with these colors.
3 In the Selection Colors area, change e2 to the dark blue that matches the
Normal setting. Set e2’s Contrast setting to 100%.
4 In the Action Colors area, set patter n and e2 to white.
5 Click OK, and return to the main Menu Editor screen.
Page 48

3-14 CREATING M ENUS
6 Click Normal, Selection, and Activate in the Proof area of the Menu
Editor to see how the buttons display in these different states.
How the button appears
when neither selected nor
activated.
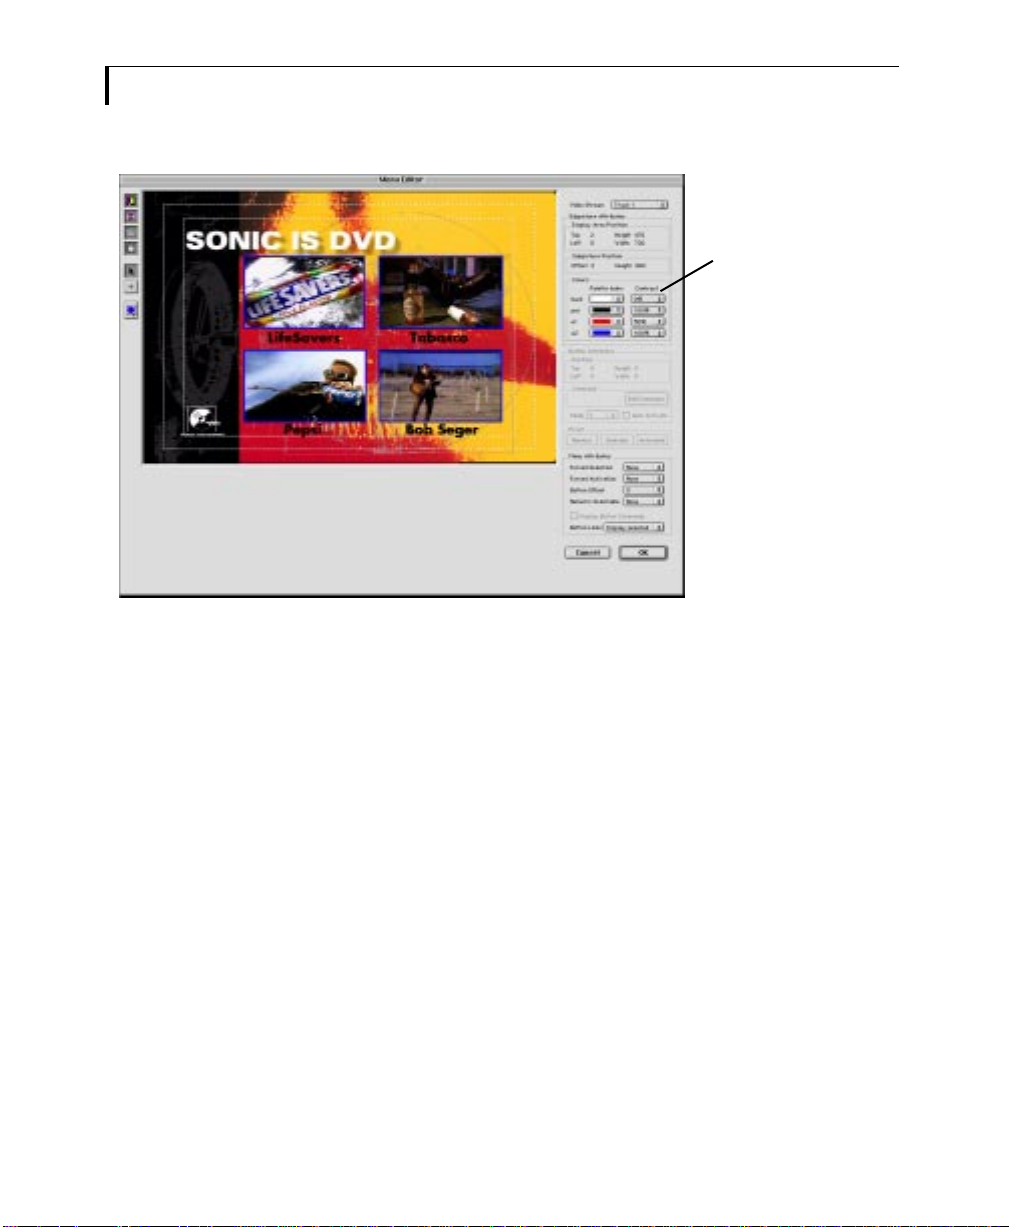
Assigning Navigation Commands to Buttons
Now you will assign commands to each button, so that when activated, it
will perform the correct function. In this case, we want each button to
jump to a particular PGC when activated by a viewer.
1 Double-click the LifeSavers button in the Menu Editor. The Command Editor
displays.
How the button appears
when selected.
How the button appears
when activated.
Page 49

2 In the Command Editor, do the following:
1. Select Jump
VTS PTT.
3 Repeat steps 1 and 2 for the other buttons so that:
CREATING M ENUS 3-15
3. Click OK.
• The Tabasco Button jumps to 1:1 #2, "Tabasco":PG 1.
2. Select 1:1
#1,
"Lifesavers":PG
1. This directs
playback to the
LifeSav ers
PGC. PG1
directs
playback to
Entry Point 1
within PGC #1
(LifeSavers
object).
• The Pepsi Button jumps to 1:1 #3, "Pepsi":PG 1.
• The Bob Seger Button jumps to 1:1 #4, "Nightmoves":PG 1.
Now, each of the four buttons will play the appropriate PGC when
activated.
Page 50

3-16 CREATING M ENUS
Proofing the Menu
1 In the Layout window, click to highlight the video area of the Menu PGC
and click PROOF.
2. Click
Proof .
The proofing tool opens, and displays the menu.
1. Click to highlight
the menu PGC.
2 Use the remote control’s arrow keys to select different menu buttons and
press Enter to activate buttons.
Page 51
FORMATTING AND PROOFING THE P ROJECT 3-17
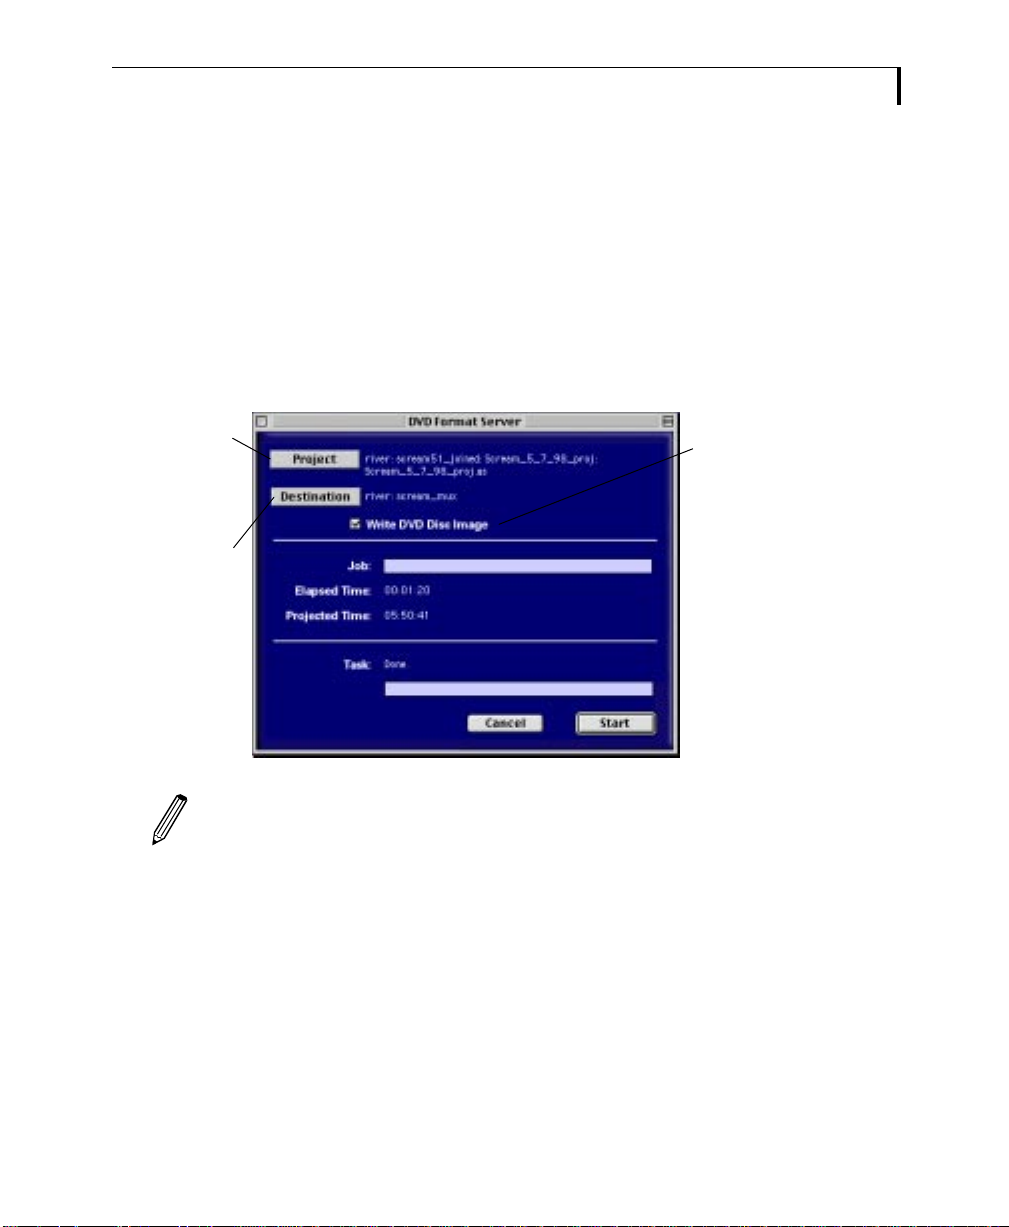
Formatting and Proofing the Project
When a project is complete, you compile all of its assets into one file (a
disc image) to proof and send out to a plant for replication. In this section,
you will format the project and play it back with the proofing tool to see
the differences between proofing a formatted and an unformatted project.
1 Click FORMAT in the DVD Creator launcher.
2 In the DVD Format Server window, do the following:
1. Click to
select the
tutorial
authoring script
(Lesson2.as)
2. Click to
select an
folder on the
media drive to
multiplex the
project.
empty
3 Click Start. The formatting tool begins multiplexing the files. This should
4 When formatting completes, open the proofing tool and open
3. Select Write DVD
Disc Image .
Note: The Destination folder must be empty.
take about six minutes (the duration of all the video clips). The imaging
tool starts as well, and should take about three to four minutes.
Lesson2.image (located on the media drive).
5 Play Lesson2.image back using the onscreen remote control.
Page 52

3-18 CREATING M ENUS
Page 53

4:
Session Goal: To learn how to use the encoding tool by encoding a two-
Completion Time: About 30 minutes
Files Needed: None. You will generate files from your own video tapes.
Encoding Video and Audio
minute segment of tape.
Lesson Four at a Glance
Machine Control
The Encode Setup Window
This is where you set the audio and
video encoding attributes.
Machine Control
allows you to
navigate through
the tape in the
source deck.
Encoder Control
List
Movie Control
Movie Control allows you to navigate
through the encoded audio or video files.
The ECL shows
the results of an
encode - video
thumbnails and
encoding bit rate.
Page 54

4-2ENCODING V IDEO AND AUDIO
Encoding Audio and Video
In this lesson you will use your own source tapes to create a two-minute
segment of MPEG-2 video with Dolby Digital stereo audio.
1 Launch the encoding tool.
2 Insert a tape into the video deck.
3 Use the Machine Control window to start, stop, and cue the source tape.
Toggles the monitor
display between the
source video (input)
and the encoded
MPEG video
(decoder.)
Click to jump to
the timecode
entered in the
In, Out, or
Cue field.
4 Choose File > New.
Slider bar – drag to
move through the video
timeline.
Select the source material’s
timecode format (PAL,
NTSC, drop-frame, or NTSC
non-drop-frame.)
Frame forward and
frame back.
Rewind, Play, Pause,
Stop, and Fast Forward
buttons. Click and hold
the Rewind and Fast
Forward buttons for
more options.
Page 55

Timecode Formats
V
ENCODING A UDIO AND V IDEO 4-3
ideo Formats
• NTSC - The North American video standard is
29.97 frames per second (fps).
• PAL - The European video standard is 25
frames per second (fps).
5 In the Encode Setup window, select New Video Set from the Video
Settings list.
Drop Frame vs. Non-Drop Frame
NTSC video is actually 29.97002997 frames per
second. In order to keep the timecode count
accurate with a 24-hour clock, frames 0 and 1 are
omitted (dropped) from the count at the start of
every minute, except 0, 10, 20, 30, 40, and 50
minutes. Non-drop frame is 29.97 frames per
second without alteration (no frames dropped).
Select New Video Set.
Page 56
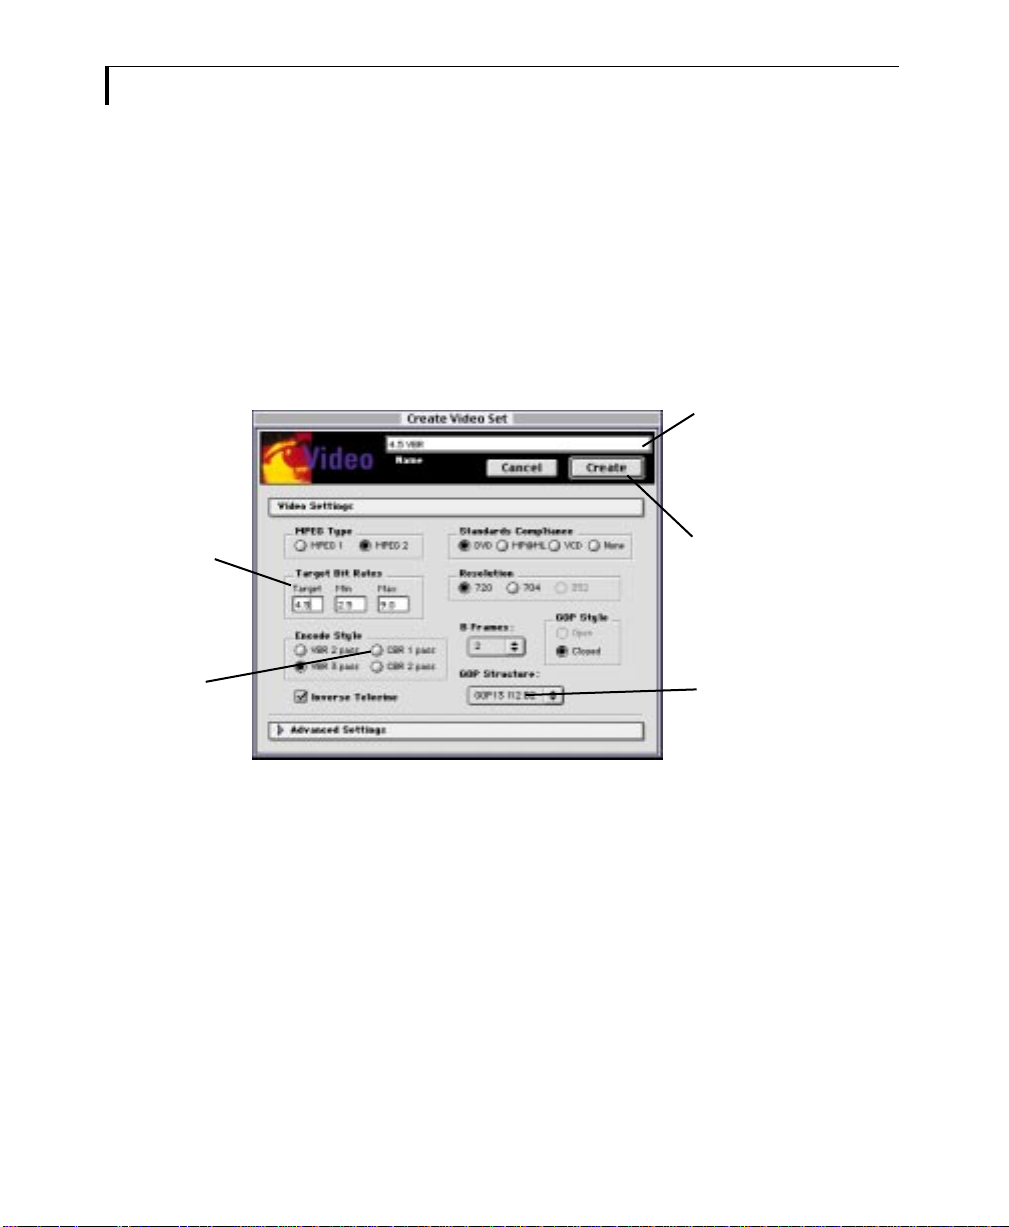
4-4ENCODING V IDEO AND AUDIO
6 In the Create Video Set window, do the following:
• In the Name field, type CBR_1Pass.
• In the Encode Style box, select CBR 1 Pass.
• In the Target Bit Rate box, enter 6.0 (for CBR encodes, the Maximum Bit
Rate is not used).
• From the GOP Structure list, select GOP 13 I12 B2.
• Click Create.
3. Enter 6.0
as the Target
Bit Rate.
1. Type CBR_1Pass.
5. Clic k Create after
making your choices.
2. Select
CBR 1 Pass.
4. Select GOP 13 I12
B2.
Page 57

VBR vs. CBR
V
v
T
ENCODING A UDIO AND V IDEO 4-5
BR (Variable Bit-rate) encoding and CBR
(Constant Bit-rate) encoding are two options for
encoding video. Bit rate is the speed at which the
ideo, audio, and interactivity stream off the disc.
he maximum rate is 9.8 Megabits per second.
CBR encoding allots the same number of bits per
scene through the entire encode. With this
process, you can fit about an hour of video on a
4.7 GB disc.
7 In the Encode Setup window, select New Audio Set from the Audio
Settings list.
To get more video in the same amount of space,
VBR encoding is used. The VBR encoding process
allots only as many bits per scene as is needed.
The amount needed is based on an analysis pass
of the source video where the encoder
determines what content is difficult to compress
and what is easy. The result is a lower average
bit-rate, but the same high quality. With VBR, you
can get about 2 hours of video on the same
4.7 GB disc.
Page 58

4-6ENCODING V IDEO AND AUDIO
D
t
8 In the Create Audio Set window, do the following:
• Type DolbyDigital in the Name field.
• In the Audio Format box, select Dolby Digital.
• Select 192 as the encoding Bit Rate.
• Click SAVE.
1. Type DolbyDigital.
2. Select
Dolby Digital.
DVD Audio Types
VD Creator allows you to encode audio into
hree DVD-compliant formats:
• Dolby Digital Stereo - This is the most
common audio format.
• MPEG-2 Stereo Audio - MPEG stereo is an
9 In the Encode Setup window, do the following:
• Enter the name of the source tape.
• Type a start and an end timecode so that you are encoding two minutes
worth of material (the exact timecodes will vary depending on the
source tape).
4. Click Save.
3. Select 192.
alternate compressed audio format.
• PCM Stereo - This is the only uncompressed
audio format and, as such, takes up much
more space than Dolby Digital or MPEG
audio.
• Click OK.
Page 59

ENCODING A UDIO AND V IDEO 4-7
10 In the Save As window, do the following:
• Locate the Media drive
• Type Lesson4.qt as the file name.
• Click OK.
11 Choose Encode from the Encode menu (z+E).
12 A window displays and prompts you for added information. When you are
done, click OK.
The encoding process begins. Because this is a CBR 1 pass encode, the
encoding process will take the length of the material or, in this case, two
minutes. If we had chosen CBR 2 pass, the encoding process would take
two times the length of the material, or four minutes.
When the encoding process completes, a thumbnail for each frame of
video appears in the (Encoder Control List) ECL window.
The average encoding bitrate for the session.
Use these
buttons to zoom
in or out of the
video timeline.
Thumbnails of
the video
frames.
Graph of the
encoding bit
rate used for
each frame of
video.
Page 60
4-8ENCODING V IDEO AND AUDIO
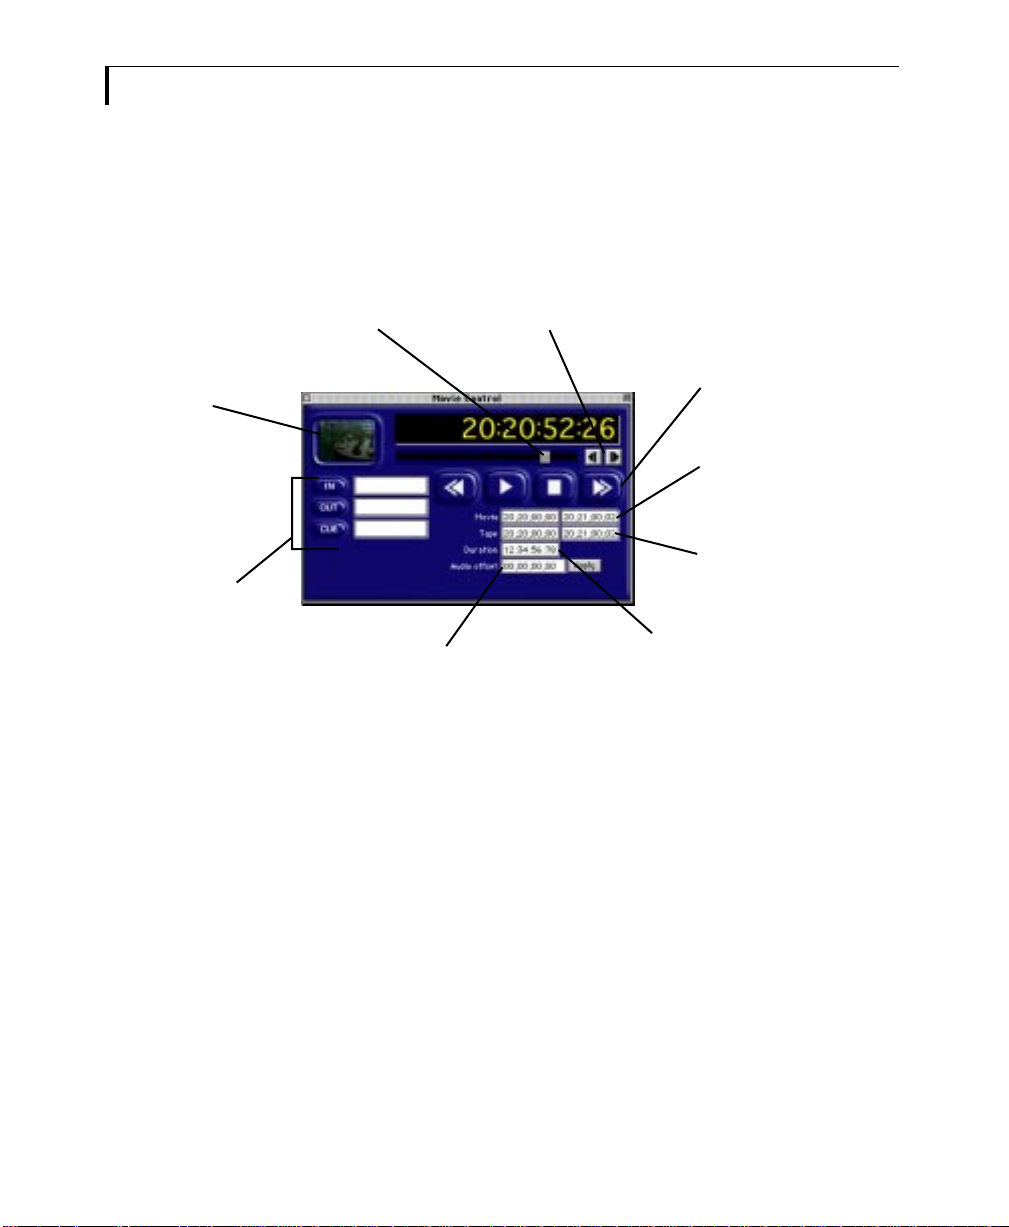
Also, the Movie Control window appears.
13 Use the Movie Control window to play back the audio and video files you
just encoded.
Thumbnail of current
frame.
Click to jump to
the timecode
entered in the
In, Out, or
Cue field.
Congratulations! You have successfully encoded MPEG video with Dolby
Digital audio and played it back.
Slider bar – drag to
move through the video
timeline.
Allows you to shift the audio forward
or backward on its timeline to sync
with any corresponding video if the
two were encoded separately and with
different timecodes.
Frame forward
and frame back.
Rewind, Play, Pause,
Stop, and Fast Forward
buttons. Click and hold
the Rewind and Fast
Forward buttons for
more options.
Displays the start and
end timecodes of the
encoded MPEG stream.
Displays the start and
end timecodes of the
source tape.
The length of the
encoded MPEG stream.
 Loading...