


i-F2 FCC Regulations
FCC Declaration of Conformity Statement
This device complies with Part 15 of the FCC Rules. Operation is subject to the following two conditions: (1) this device may not cause harmful interference, and (2) this device must accept any interference received, including interference that may cause undesired operation.
Radio and Television Interference
This equipment has been tested and found to comply with the limits for a Class B digital device, pursuant to Part 15 of the FCC Rules. These limits are designed to provide reasonable protection against harmful interference in a residential installation. This equipment generates, uses, and can radiate radio frequency energy and, if not installed and used in accordance with the instructions, may cause harmful interference to radio communications. However, there is no guarantee that interference will not occur in a particular installation. If this equipment does cause interference to radio or television reception, which can be determined by turning the equipment off and then on, the user is encouraged to try to correct the interference by one or more of the following measures:
•Increase the separation between the equipment and receiver.
•Connect the equipment to a different outlet so that the equipment and receiver are on different branch circuits.
•Consult the dealer or an experienced radio/TV technician for help.
Changes or modifications not expressly approved by Sonic Impact could void the user’s authority to operate the equipment.
THIS CLASS B DIGITAL APPARATUS COMPLIES WITH CANADIAN ICES-003.
Sonic Impact Technologies LLC |
© Sonic Impact Technologies LLC |
2555 State Street |
i-F2 is a trademark of Sonic |
San Diego, California 92101 |
Impact Technologies LLC |
USA |
iPod® is trademark of Apple |
|
Computer, Inc., registered in the |
www.si-technologies.com |
U.S. and other countries |
 Important operating and maintenance (servicing) instructions.
CAUTION: To prevent electrical shock do not use the (polarized) plug with an extension cord, receptacle or other outlet unless the blades can be fully inserted to prevent blade exposure.

WARNING: TO REDUCE THE RISK OF FIRE OR ELECTRIC SHOCK, DO NOT EXPOSE THIS I-F2 TO RAIN OR MOISTURE
IMPORTANT i-F2 SAFETY INSTRUCTIONS
1.Read instructions --All Safety and operating instructions should be read before the i-F2 is used.
2.Retain instructions--The operating instructions should be retained for future reference.
3.Heed warnings--All warnings in the operating instructions should be read and adhered to.
4.Follow instructions--All operating instructions should be followed.
5.WARNING: Avoid water and moisture--Keep away from all liquids. To reduce the risk of fire or electric shock, do not expose the i-F2 to rain or moisture.
6.Location--The i-F2 should be placed in a stable, level location, away from external heat sources and with adequate ventilation. Do not expose the i-F2 to temperature or humidity extremes. Protect from exposure to dirt, sand, and dust. Note that the speakers are magnetically shielded to prevent distortion of TVs and computer monitors, but keep magnetic storage media at least four inches from the i-F2 to avoid data loss.
7.Power supply--When not powering off the internal rechargeable battery, the i-F2 should only be connected to the power supply provided with your unit or as described in the operating instructions and as marked on the i-F2.
8.Power cord use and care--Power cords should be located so that they are not likely to be walked on or crushed by placing other objects on top of them. Check all attachments regularly. Do not bypass the proper grounding or polarization of the power plug. If your i-F2 is not to be used for an extended period of time, unplug and stow the power cord.
9.TO PREVENT THE RISK OF ELECTRIC SHOCK AND DAMAGE TO THE UNIT, DO NOT REMOVE THE SPEAKER GRILLES OR OPEN THE UNIT FOR SERVICING EXCEPT TO REPLACE THE RECHARGEABLE LITHIUM ION AS INSTRUCTED IN THIS MANUAL. PLEASE REFER SERVICING TO QUALIFIED SONIC IMPACT PERSONNEL.
10.Cleaning--Use only a soft dry cloth. Do not use cleaning chemicals of any kind.
11.Lightning Storms--Unplug the apparatus during lightning storms to prevent accidental damage.
12.Accessories--Only use attachment accessories specified by Sonic Impact Technologies.
13.Damage Requiring Service--The i-F2 should be serviced by qualified service person when:
·The power-supply cord or the plug has been damaged.
·Objects have fallen onto or liquid has been spilled into the i-F2.
·The i-F2 has been exposed to rain.
·The i-F2 does not appear to operate normally or exhibits a marked change in performance.
·The i-F2 has been dropped or the enclosure has been damaged.
14.Servicing--The user should not attempt to service the i-F2 themselves. Servicing should be referred to a qualified service person or returned to the dealer. For questions about warranty and service call Sonic Impact Technologies, LLC at service@si-technologies.com .
ONE-YEAR LIMITED WARRANTY
Sonic Impact Technologies warranties that all of its products are free from defects in material and workmanship in the course of normal and reasonable use for a term of one year from the date of purchase.
This warranty is the exclusive and only warranty in effect relative to Sonic Impact Technologies powered i-F2 speaker system and any other warranties, either expressed or implied, are invalid. Neither Sonic Impact Technologies, LLC nor any authorized Sonic Impact Technologies, LLC reseller are responsible for any incidental damages incurred in the use of the speakers. (This limitation of incidental or consequential damage is not applicable where prohibited.)
Sonic Impact Technologies, LLC’s obligation under this warranty does not apply to any defect, malfunction or failure as a result of misuse, abuse, improper installation, use with faulty or improper equipment or the use of the speaker systems with any equipment for which they were not intended.
The terms of this warranty apply only if the i-F2 speaker systems are returned to the respective authorized Sonic Impact Technologies, LLC reseller where they were purchased.
CUSTOMER SERVICE
For service or warranty of the electronics please contact: service@si-technologies.com
PACKAGE CONTENTS
i-F2 System |
AC Power |
Stereo |
iPod® Adapter |
Remote |
Manual |
Quick |
|
Adapter |
Cable |
Sleeves |
|
|
Connect |
|
|
|
|
|
|
Instructions |
·Built-in lithium ion battery
·9V@2.0A power adapter
·3.5mm stereo cable
·iPod 3G/ iPod 4G / iPod Photo/iPod nano/iPod Mini/ iPod video adapter sleeves
·Instruction manual
·Remote
·Quick connect instructions
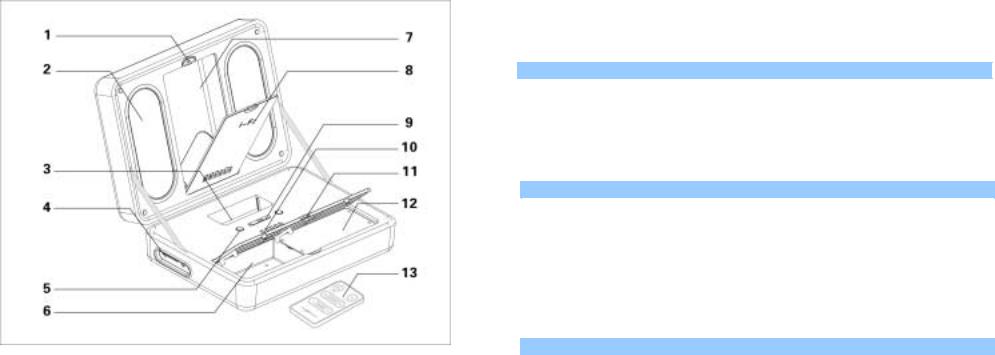
i-F2 Diagram:
1.Compartment Lock
2.Speaker Driver UniPod
3.iPod®30 Pin Docking Station
4.Input Jacks
5.Volume Controls
6.Headphone/Remote Compartment
7.iPod® Storage Compartment
8.iPod® Storage Compartment Door iPod
9.Power On/Off and LED
10.Battery Life Indicator LED
11.Battery Cover Lid
12.Lithium Ion Battery
13.Remote
LOCATING AND SETTING UP YOUR i-F2 SYSTEM
Position i-F2 system on a stable, level surface. The i-F2 system can be placed close to video displays such as TVs and computer monitors without distorting the image, but keep magnetic storage media (such as drives, disks, and tapes) at least four inches away to avoid data loss.
Make sure that the plastic clips securing the hinge straps are secure. If necessary, adjust the tension of the release button on the clips by pressing in through the hole on the back of the clip, using the tip of a ball point pen. Note that you can open the i-F2 completely flat by releasing both clips.
CONNECTING TO YOUR i-F2
Warning: Ensure that i-F2 system is in the POWER OFF mode before making any connections and before docking the iPod into the i-F2 system. To ensure proper operation, please carefully follow the connection sequence as described below and in the order indicated.
Attach the iPod adapter sleeve, provided with your i-F2, that matches the model of your iPod. Each sleeve will be marked with the iPod models. An iPod model with a 30 PIN connector can be connected directly to the 30 pin docking station located on the i-F2 system. An older iPod model without a 30 PIN connector can be connected via the AUDIO IN port located at the side of your i-F2 case and by using the 3.5 mm stereo cable, included. When you’re sure that either method of connection has been made you are ready to play the i-F2 speakers.
POWER
The i-F2 can operate using the rechargeable built-in Lithium ion battery. You may bypass the battery and use the external AC 9V@1.8A power adapter included with your i-F2. The AC adapter will power your unit, recharge the Lithium ion battery and recharge your iPod in the 30 pin connector station all simultaneously.
To use external power by power adapter:
When the iPod is connected to the i-F2 system, insert the AC adapter barrel connector into the jack marked DC IN 9V , and then insert the universal power adaptor blade end into your AC power

wall jack. Your i-F2 is ready to play. When docked, your iPod will also recharge when using the AC adapter.
To use the rechargeable, built-in, Lithium ion battery supply:
The i-F2 system has a powerful, rechargeable Lithium ion battery built into the case. Utilizing this independent power source, you can play your iPod for hours between charges. Please note that recharging of the iPod does not occur when powering off the Lithium ion battery.
START PLAYING
1.With your iPod seated in the docking station, or connected via the 3.5 mm stereo cable, slide the power switch  on the front panel to “AUTO ON” position to turn the i-F2 on. The LED display will turn green.
2.Turn on your iPod, adjust the volume using the volume adjustment on the i-F2, and play your favorite tunes. (Note that the iPod’s volume control is bypassed when docked in the i-F2.)
VOLUME CONTROL
The  buttons on the front panel are the master volume controls for the i-F2 system. Press and hold “+”to increase the volume and then “-”to decrease the volume. The volume will start at the volume position every time you re-start the i-F2 system.
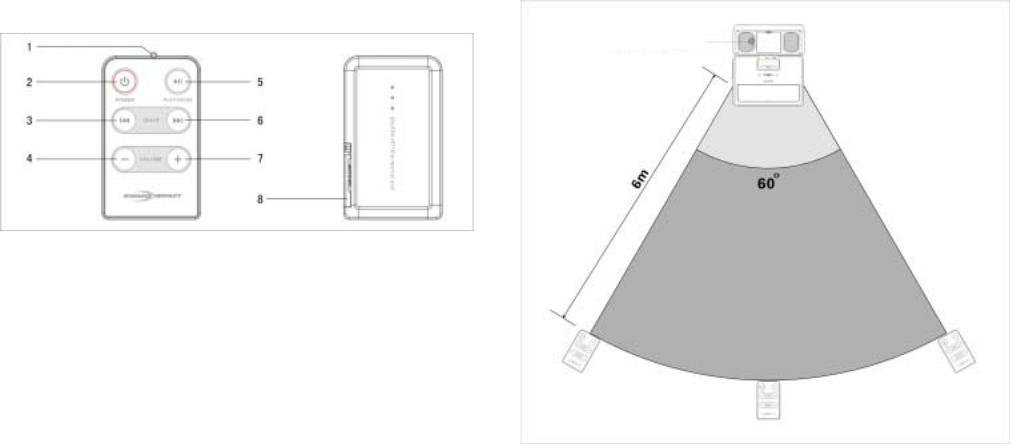
REMOTE USAGE
Specified remote included in i-F2 system can do normal operations to ipod player and i-F2 system
1.Remote is located in the Headphone & Remote compartment. Please follow the illustration in the Quick Connect instruction to take it out or put it in
2.Special remote uses one button battery to fully realize the functions of the audio system. Please refer to the illustration in the Quick Connect instruction to replace the dead battery
1 Infrared Transmit Head
2 Power On/ Power Off
3 Prev
4 Vol-
5 Play/ Pause
6 Next
7 Vol+
8 Battery Nog
3. While using the remote, please ensure that the Infrared transmit head is rightly aimed at the reception head on the i-F2 system, at the distance of 6M, at the angle of 60 .The area shadowed in the graph is the valid scope for the remote.

4. Put the remote back to the compartment after using to avoid any loss
POWER OFF
When not in use and to minimize power consumption, please set the power switch to the “OFF”
position . Please note that the i-F2 has an “AUTO SHUT-DOWN (STANDBY) function which prevents excess power consumption during idle play.
AUTO SHUT-DOWN (STANDBY):
When the power switch is set at the “AUTO ON”position, the i-F2 system will shut down automatically and goes into standby mode if an audio signal is not detected within 5 minutes. The LED on the power
switch will then turn to red  The LED will automatically turn to green
  when an audio signal is detected and the i-F2 system will automatically power on. Power consumption will be reduced in this “standby” mode, but we suggest that you shut down the i-F2 system completely when not in use for an extended period of time to save battery life.
DATA TRANSFER:
Note that you can download and upload music while your iPod is docked in the i-F2’s docking station, using the iPod Dock Connector to Fire Wire Cable that came with your iPod. Simply plug that cable into the port located on the left side of the i-F2, and plug the other end into your computer. Follow the instructions that were included with your iPod to download, upload, and manage your music
BUILT-IN LITHIUM BATTERIES
1.The i-F2 system uses a rechargeable built-in 8.4V @2000mAH Lithium ion battery.
2.A. Prior to your first use of the i-F2 powered off of the Lithium ion battery, you must fully charge the battery. Plug in the 9V@2.0A AC into an AC wall outlet and insert the barrel connector at the
end of the adapter cable into the socket marked  on the side of i-F2 system. A first time full charge will take 6-8 hours.
B. To recharge, connect the AC power adapter as described above. A full recharge will take 4-6 hours. With the iPod docked, both the battery and the iPod will be recharged simultaneously,
3.The i-F2 system has a row of LED lights that serve as battery life indicators.
high power |
moderate power |
slight power |
WARNING: charge required: |
4.The i-F2 system has a low power warning function. When the “charge required” indicator turns red, it is a warning that the system will soon go into the SHUT-DOWN mode. The system will operate again after power has been charged and the unit is turned back on.
5.While the i-F2 system is being charged, the power indicator lights will blink in sequence until the last light at the right end stops blinking. The charging is now completed. Under normal use, the i- F2 Lithium battery can last 8 hours
6.When the built-in Lithium ion battery no longer charges or lasts a very short time after charged, it implies that the effective battery life is coming to an end and a replacement is necessary. (Please refer to the section Battery Replacement).
7 Specs for built-in lithium ion battery: |
Nominal Voltage:7.0V |
Nominal Capacity:2000mAh |
Max.Charging Voltage:8.4V |
GB/T 18287-2000 |
|
Warning:
·Re-charge using only the assigned adapter included with the i-F2 and as described in the user manual. Over-charge and reverse
charging of the battery is prohibited.
·Use battery only for the specified i-F2 device.
·Short circuit is prohibited; the discharge voltage is not allowed to go below 5.0V
. Use i-F2 system and battery recharged should be between -5° – 30° C, within 70% humidity condition ·Do not expose the battery to fire or excessive heat. Do not pierce the battery, strike with a hard object or subject it to heavy impact. Avoid
direct contact of the terminals with water or metal objects. Disassemble, refit and solder of battery is prohibited.
·Storage and charging should be between -5° – 25° C and within 70% humidity, battery life indicators should be moderate power. Battery should be recharged and discharged completely every three months.
·Don’t use the built-in lithium ion battery if you detect a peculiar smell, color change or change of the physical shape
·If liquid leaks from the battery and comes in contact with the skin, immediately rinse the liquid from the skin with water.
·The battery should be recycled or disposed of properly
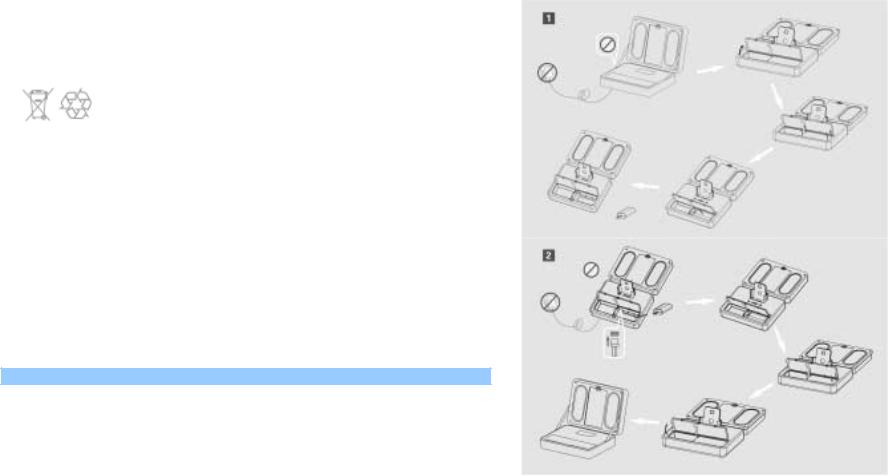
BATTERY REPLACEMENT
Please note the following illustration on how to replace the rechargeable built-in Li –ion batteries.

SPECIFICATION
The excellent sound quality of the i-F2 comes from our highly professional design, which includes a customized Hi-Fi Neodymium driver, digital amp, and the latest digital equalizer circuitry Specifications:
Power output: 2W*2
Speaker channel 2 channel stereo output
Impedance 12Ω
Frequency 120Hz-20KHz
Signal to noise ratio: 85dB±2 (0.5M & 1W)
Speaker Drivers neodymiummagnetic drivers @ 1.25” X 4
TROUBLE SHOOTING
SYMPTOM |
POSSIBLE PROBLEM |
SOLUTION |
Power |
Power is not turned on |
Position the power switch to the “on” position. |
LED not |
Universal power supply |
Plug the universal power supply into a wall outlet and plug |
lit when |
cord isn’t connected to |
the power supply connector into AC input jack on the side of |
AC |
a wall outlet and/ or |
the i-F2 system. |
adapter |
the power supply |
|
plugged |
connector is not |
|
in |
plugged into jack on |
|
|
the back of the i-F2 |
|
|
system. |
|
|
Surge protector (if |
If the universal power supply cord is plugged into a surge |
|
used) isn’t powered |
protector, make sure the surge protector is switched on. |
|
on. |
|
|
Wall outlet is not |
Plug another device into a wall outlet (same outlet) to |
|
functioning. |
confirm the outlet is working. |
SYMPTOM |
POSSIBLE PROBLEM |
SOLUTION |
The |
Warning: Charge |
Charge the batteries before re-playing i–Fusion system. |
battery |
required. |
|
life |
|
|
indicator |
|
|
at the left |
|
|
end turns |
|
|
red |
|
|
Remote |
Remote t is out of the |
Remove it to the valid scope |
no |
valid scope |
|
function |
Some object disturbs |
Remove the object or remove the remote to the valid scope |
|
between the i-F2 and |
w/o any disturbance between. |
|
the remote |
|
|
The battery inside the |
Replace the battery(Refer to the illustrations in the Quick |
|
remote is dead |
Connect instruction for detail operation) |
No sound |
Power is not turned on. |
Verify the universal power supply cord is plugged into a wall |
from the |
|
outlet and the AC input jack on the side of the i-F2 system. |
speakers |
|
Verify rechargeable battery is charged if the universal power |
|
|
supply isn’t being used. |
|
|
Verify the power switch has been positioned to the “ON” |
|
|
position, the stand-by button has been pushed and the LED is |
|
|
illuminated. |
|
Volume is set too low. |
Press the “+” button to increase the volume. |
|
|
Check volume level on alternate audio source device and set |
|
|
at mid-level. |
|
iPod is not seated into |
Remove iPod and re-seat it in the docking station. |
|
the docking station. |
|
SYMPTOM |
POSSIBLE PROBLEM |
SOLUTION |
No sound |
Power is not turned on. |
Verify the universal power supply cord is plugged into a wall |
from the |
|
outlet and the AC input jack on the side of the i-F2 system. |
speakers |
|
Verify rechargeable battery is charged if the universal power |
|
|
supply isn’t being used. |
|
|
Verify the power switch has been positioned to the “ON” |
|
|
position, the stand-by button has been pushed and the LED is |
|
|
illuminated. |
|
Volume is set too low. |
Press the “+” button to increase the volume. |
|
|
Check volume level on alternate audio source device and set |
|
|
at mid-level. |
|
iPod is not seated into |
Remove iPod and re-seat it in the docking station. |
|
the docking station. |
|
|
3.5mm stereo cable is |
Connect 3.5mm stereo cable to the audio source. Make sure |
|
not connected to an |
the signal cable is inserted firmly into the correct jacks. |
|
audio source (when not |
|
|
using docking station). |
|
|
3.5mm stereo cable is |
Make sure the 3.5mm stereo cable is connected and fully |
|
connected to wrong |
inserted in the “line-out”, “audio out”, or the headphone |
|
output on audio source |
jack on your sound card or other audio source. |
|
When not using |
|
|
docking station). |
|
|
Problem with audio |
Test the speakers on another audio source by removing the |
|
source. |
3.5mm stereo cable from the audio source and connecting it |
|
|
to the “line out”, “audio out” or the headphone jack of a |
|
|
different audio source (e.g., portable CD, cassette player or |
|
|
FM radio). |
Crackling |
Bad connection |
Check if iPod is properly seated in the docking station. Check |
sound |
|
connection of the 3.5mm stereo cable if not using the |
from |
|
docking station. Make sure it is connected to “Line out”, |
speakers |
|
“audio out”, or the headphone jack on your sound card or |
|
|
other audio source – and NOT “speaker-out”. |
SYMPTOM |
POSSIBLE PROBLEM |
SOLUTION |
|
A problem with your |
Unplug the 3.5mm stereo cable from the audio source. Plug |
|
audio source |
the cable into the headphone jack of an alternate source |
|
|
(e.g., Walkman, Discman or FM radio). |
Crackling |
Volume level in |
Check the operating system volume level and decrease it if |
sound |
operating system is set |
necessary. |
from |
too high. |
|
speakers |
|
|
(when |
|
|
connecte |
|
|
d to PC or |
|
|
laptop). |
|
|
Sound is |
Volume level on i-F2 |
Decrease the volume in the i-F2 system. |
distorted |
system is set too high. |
|
|
Sound source is |
WAV and MID files are often of poor quality; therefore |
|
distorted. |
distortion and noise are easily noticed with high-powered |
|
|
speakers. Try a different audio source such as a music CD. |
|
|
|
|
|
Recharge battery and/or use AC adapter. |
|
Battery power is low. |
|
Sound is |
Volume level in |
Check the operating system volume level and decrease it if |
distorted |
operating system is set |
necessary. |
(when |
too high. |
|
connecte |
|
|
d to PC or |
|
|
laptop) |
|
|
Radio |
Too close to a radio |
Move your speakers to see if the interference goes away. |
interferen |
tower |
|
ce |
|
|
SYMPTOM |
POSSIBLE PROBLEM |
SOLUTION |
Clips |
Tension of release |
Insert the tip of a ball point through the hole in the back of |
securing |
button needs |
the clip and push in. This will tighten the tension on the |
hinge |
adjustment. |
release button. |
straps |
|
|
releasing. |
|
|
i-F2 et règlement de la FCC
Déclaration de conformité FCC
Cet appareil est conforme à la section 15 du règlement de la FCC. Son utilisation est sujette aux deux conditions suivantes : (1) cet appareil ne doit causer aucune interférence nuisible, et (2) cet appareil doit accepter toute interférence reçue, y compris les interférences pouvant affecter son fonctionnement.
Interférences avec la radio et la télévision
Les tests réalisés sur cet appareil ont montré qu'il respecte les limites imposées aux dispositifs numériques de Classe B, conformément à la section 15 du règlement de la FCC. Ces limites ont pour objet d'assurer une protection raisonnable contre les interférences nuisibles dans les installations chez les particuliers. Cet appareil génère, utilise et peut émettre de l’énergie radiofréquence et, s’il n’est pas installé et utilisé conformément aux instructions, peut provoquer des interférences nuisibles dans les communications radio. Cependant, il n'est pas garanti qu'aucune interférence ne se produira dans une installation donnée. Dans le cas où cet appareil émettrait des interférences affectant la réception de programmes radiophoniques ou télévisés, ce qui peut s'observer en éteignant puis en rallumant l’appareil, l'utilisateur peut tenter de corriger cette interférence en adoptant une ou plusieurs des mesures suivantes :
• Augmentez la distance entre l’appareil et le récepteur.
• Branchez l’appareil dans une autre prise de courant que celle où le récepteur est branché.
• Consultez le distributeur ou un technicien radio/télévision qualifié pour toute assistance. Tout changement ou modification non expressément approuvé(e) par Sonic Impact peut retirer le droit d'utiliser cet appareil.
CET APPAREIL NUMÉRIQUE DE CLASSE B EST CONFORME AUX NORMES CANADIENNES
ICES-003.
Sonic Impact Technologies LLC |
©Sonic Impact Technologies LLC |
2555 State Street |
i-F2 est une marque commerciale de Sonic |
San Diego, California 92101 |
Impact Technologies LLC |
USA |
iPod® est une marque commerciale appartenant à Apple, Inc., déposée |
www.si-technologies.com |
aux États-Unis et dans d'autres pays |
|
 Instructions d’utilisation et de maintenance (réparation) importantes.
[i-Ranger•i-Chargez•i-Télécharger•i-Lecture]
ATTENTION : afin de prévenir tout risque d’électrocution, n’utilisez pas la fiche (polarisée) avec une rallonge ou une prise de courant si la fiche ne peut pas y être complètement insérée.
AVERTISSEMENT : AFIN DE RÉDUIRE LE RISQUE D’INCENDIE OU D’ÉLECTROCUTION, N’EXPOSEZ L'I-F2 NI À LA PLUIE NI À L’HUMIDITÉ.
INSTRUCTIONS DE SÉCURITÉ IMPORTANTES CONCERNANT L’i-F2
1.Lisez les instructions--Toutes les instructions de sécurité et de fonctionnement doivent être lues avant d’utiliser l’i-F2.
2.Conservez les instructions--Les instructions d’utilisation doivent être conservées pour toute référence future.
3.Tenez compte des avertissements--Tous les avertissements figurant dans les instructions d’utilisation doivent être lus et pris en compte.
4.Suivez les instructions--Toutes les instructions d’utilisation doivent être suivies.
5.AVERTISSEMENT : évitez l’eau et l’humidité--Maintenez votre appareil éloigné de tout liquide. Afin de réduire le risque d’incendie ou d’électrocution, n’exposez l’i-F2 ni à la pluie ni à l’humidité.
6.Emplacement--L’i-F2 doit être posé sur une surface stable et horizontale, éloigné de toute source de chaleur externe et avec une ventilation adéquate. N’exposez pas l’i-F2 à une température ou à une humidité extrême. Protégez-le de la saleté, du sable et de la poussière. Notez que les hautparleurs sont blindés magnétiquement pour prévenir la distorsion des téléviseurs et des moniteurs d’ordinateur. Maintenez tout dispositif de stockage magnétique à au moins 10 cm de l’i-F2 afin d’éviter toute perte de données.
7.Alimentation--Lorsqu’il n'est pas alimenté par la batterie interne rechargeable, l’i-F2 ne doit être branché qu’à l’aide du câble d’alimentation fourni avec votre unité ou comme décrit dans les instructions d'utilisation et comme indiqué sur l’i-F2.
8.Utilisation et entretien du câble d’alimentation--Les câbles d’alimentation doivent être placés de sorte qu’on ne risque pas de marcher ni de poser d’objets dessus. Vérifiez régulièrement toutes les connexions. Ne déjouez pas les fonctions de mise à la terre et de polarisation de la fiche d’alimentation. Si votre i-F2 ne sera pas utilisé pendant une période prolongée, débranchez et rangez le câble d’alimentation.
9.AFIN D’ÉVITER TOUT RISQUE D’ÉLECTROCUTION ET DE DOMMAGES À L’UNITÉ, NE RETIREZ PAS LES GRILLES DES HAUT-PARLEURS ET N’OUVREZ PAS L’UNITÉ POUR ESSAYER DE LA RÉPARER, SAUF POUR REMPLACER LA BATTERIE LITHIUM-ION RECHARGEABLE COMME DÉCRIT DANS CE MANUEL. VEUILLEZ CONFIER LES RÉPARATIONS AU PERSONNEL QUALIFIÉ DE SONIC IMPACT.
10.Nettoyage--Utilisez uniquement un chiffon doux et sec. N’utilisez aucun type de produit chimique de nettoyage.
11.Orages--Débranchez l’appareil pendant les orages afin d’éviter tout dommage accidentel.
12.Accessoires--N’utilisez que les accessoires indiqués par Sonic Impact Technologies.
13.Dommages nécessitant réparation--L’i-F2 doit être réparé par une personne qualifiée dans les cas suivants :
· Le câble d’alimentation électrique ou la fiche a été endommagé(e).
·Des objets ou des liquides sont tombés sur l’i-F2.
·L’i-F2 a été exposé à la pluie.
·L’i-F2 ne semble pas fonctionner normalement ou présente un changement notable dans ses performances.
·L’i-F2 est tombé ou le boîtier a été endommagé.
15.Réparation--L’utilisateur ne doit pas essayer de réparer lui-même l’i-F2. La réparation doit être confiée à une personne qualifiée, ou bien l’appareil doit être renvoyé au revendeur. Pour toute question sur la garantie et les services, contactez Sonic Impact Technologies, LLC à service@sitechnologies.com.
GARANTIE LIMITÉE D'UN AN
Sonic Impact Technologies garantit que tous ses produits sont exempts de vices de matériaux ou de fabrication, dans le cadre d’une utilisation normale et raisonnable, pour une durée d’un an à partir de la date d’achat.
Cette garantie est la seule et unique garantie en vigueur pour le système de haut-parleurs i-F2 alimenté de Sonic Impact Technologies. Aucune autre garantie, expresse ou tacite, n’est valide. Sonic Impact Technologies, LLC ainsi que tous les revendeurs agréés de Sonic Impact Technologies, LLC déclinent toute responsabilité en cas de dommages accessoires survenus lors de l’utilisation des hautparleurs. (Cette exclusion des dommages accessoires ou indirects n’est pas applicable là où la loi l’interdit.)
La responsabilité de Sonic Impact Technologies, LLC, dans le cadre de cette garantie, ne sera pas engagée en cas de défaut, dysfonctionnement ou panne résultant d’une mauvaise utilisation, d’un abus, d’une installation incorrecte, d’une utilisation avec un équipement défectueux ou inapproprié, ou de l’utilisation du système de haut-parleurs avec un équipement autre que ceux pour lesquels il a été conçu.
Les termes de cette garantie ne sont applicables que si le système de haut-parleurs i-F2 est renvoyé au revendeur agréé de Sonic Impact Technologies, LLC auprès duquel il a été acheté.
SERVICE CLIENTÈLE
Pour tout service ou pour la garantie de l’appareil, veuillez contacter : service@si-technologies.com

CONTENU DE L'EMBALLAGE |
Schéma du i-F2 : |
|
|
Système i-F2 Adaptateur |
Câble |
Adaptateurs |
Télécommande Manuel |
Instructions |
CA |
Stéréo |
pour iPod® |
de connexion |
rapide |
·Batterie lithium-ion intégrée
·Adaptateur d’alimentation de 9 V à 2,0 A
·Câble stéréo de 3,5 mm
·Adaptateurs pour iPod 3G/ iPod 4G / iPod Photo/iPod nano/iPod Mini/ iPod vidéo
·Manuel d’instructions
·Télécommande
·Instructions de connexion rapide
14. Verrou du compartiment
15. Haut-parleurs à double équipage mobile
16. Station d'ancrage à 30 broches pour l'iPod®
17. Prises d’entrée
18. Commandes du volume
19. Compartiment pour le casque / la télécommande
20. Compartiment de rangement de l’iPod®
21. Porte du compartiment de rangement de l’iPod®
22. Marche / Arrêt et voyant

23.Voyant de la batterie
24.Cache de la batterie
25.Batterie lithium-ion
26.Télécommande
EMPLACEMENT ET CONFIGURATION DE VOTRE SYSTÈME i-F2
Posez votre système i-F2 sur une surface stable et horizontale. Le système i-F2 peut être placé à côté d’écrans vidéo tels que des téléviseurs et des moniteurs d’ordinateur sans entraîner de distorsion de l’image, mais maintenez les dispositifs de stockage magnétique (tels que les disques durs, disquettes et cassettes) à au moins 10 cm afin d’éviter toute perte de données.
Assurez-vous que les pinces en plastique qui maintiennent les bandes charnière sont bien fermées. Si nécessaire, réglez la tension du bouton d’ouverture des pinces en insérant la pointe d’un stylo-bille dans l’orifice situé à l’arrière de la pince, puis en appuyant. Notez que vous pouvez ouvrir l’i-F2 complètement en ouvrant les deux pinces.
CONNEXION À VOTRE i-F2
Avertissement : assurez-vous que le système i-F2 est dans le mode POWER OFF (ARRÊT) avant de réaliser toute connexion et d’ancrer l’iPod. Afin d’assurer un fonctionnement correct, veuillez suivre attentivement les instructions de connexion décrites ci-dessous ainsi que l’ordre indiqué.
Connectez l’adaptateur pour iPod, fourni avec votre i-F2, qui correspond à votre modèle d'iPod. Chaque adaptateur porte le nom du modèle d’iPod auquel il correspond. Les modèles d’iPod avec un connecteur à 30 broches peuvent être connectés directement à la station d’ancrage à 30 broches située sur le système i-F2. Les modèles plus anciens d’iPod dépourvus de connecteur à 30 broches peuvent être connectés via le port AUDIO IN (ENTRÉE AUDIO), situé sur le côté du boîtier de votre i-F2, en utilisant le câble stéréo de 3,5 mm fourni. Une fois la connexion réalisée au moyen de l'une ou l'autre de ces méthodes, vous êtes prêt à écouter de la musique sur les haut-parleurs du i-F2.
ALIMENTATION
L’i-F2 peut fonctionner en utilisant la batterie lithium-ion rechargeable intégrée. Au lieu d'utiliser la batterie, vous pouvez utiliser l’adaptateur d’alimentation CA de 9 V à 1,8 A fourni avec votre i-F2. L’adaptateur CA alimentera votre unité, rechargera la batterie lithium-ion et rechargera votre iPod dans la station d’ancrage à 30 broches, le tout simultanément.
Pour utiliser une source d’alimentation externe à l’aide de l’adaptateur :
Lorsque l’iPod est connecté au système i-F2, insérez le connecteur de l’adaptateur CA dans la prise libellée DC IN 9V (ENTRÉE CC 9 V)  , puis branchez la fiche située à l’autre extrémité de
l’adaptateur d’alimentation universel dans une prise de courant CA murale. Votre i-F2 est prêt à fonctionner. Lorsqu’il est ancré, votre iPod se recharge quand vous utilisez l’adaptateur CA.
Pour utiliser l’alimentation de la batterie lithium-ion rechargeable intégrée :
Le système i-F2 possède une puissante batterie lithium-ion rechargeable intégrée. Cette source d’alimentation indépendante vous permet d’utiliser votre iPod pendant plusieurs heures entre les charges. Veuillez noter que votre iPod ne se recharge pas lorsque l’alimentation provient de la batterie lithium-ion.
COMMENCER LA LECTURE
3. Avec votre iPod installé dans la station d’ancrage, ou connecté à l’aide du câble stéréo de 3,5 mm, mettez l’interrupteur d’alimentation  situé sur le panneau frontal sur la position
« AUTO ON » (MARCHE AUTOMATIQUE) pour allumer l’i-F2. Le voyant s’allume en vert.
4.Allumez votre iPod, réglez le volume en utilisant les commandes de réglage du volume situées sur l’i-F2, et écoutez vos airs favoris. (Notez que le réglage du volume de l’iPod est ignoré lorsqu’il est ancré dans l’i-F2.)
RÉGLAGE DU VOLUME
Les boutons  situés sur le panneau frontal sont les commandes de réglage du volume maître pour le système i-F2. Maintenez la touche « + » appuyée pour augmenter le volume, et la touche « - » pour le baisser. À chaque fois que vous allumerez le système i-F2, le volume démarrera à 30 % du volume maximal.
UTILISATION DE LA TÉLÉCOMMANDE
La télécommande fournie avec le système i-F2 peut être utilisée pour toutes les opérations normales de l'iPod et du système i-F2.
1.La télécommande est située dans le compartiment prévu pour le casque et la télécommande. Veuillez vous référer à l'illustration figurant dans les instructions de connexion rapide pour la sortir ou la ranger.
2.La télécommande utilise une pile bouton pour contrôler toutes les
fonctions du système audio. Veuillez vous référer à l'illustration figurant dans les instructions de connexion rapide pour remplacer la pile lorsqu'elle est vide.
9 Tête d'émission infrarouge
10 |
Marche / Arrêt |
11 |
Précédent |
12 |
Vol- |
13 |
Lecture / Pause |
14 |
Suivant |
15 |
Vol+ |
16 Cache du compartiment de la pile
3. Pour utiliser la télécommande, veillez à ce que la tête d'émission infrarouge soit orientée directement vers la tête de réception du système i-F2, à une distance inférieure à 6 mètres et à un angle de moins de 60º. La zone grisée du schéma ci-contre illustre le secteur de fonctionnement de la télécommande.
Tête de reception Télécommande
4. Après l'emploi, remettez la télécommande dans son compartiment pour éviter de la perdre.
 Loading...