

Page 1
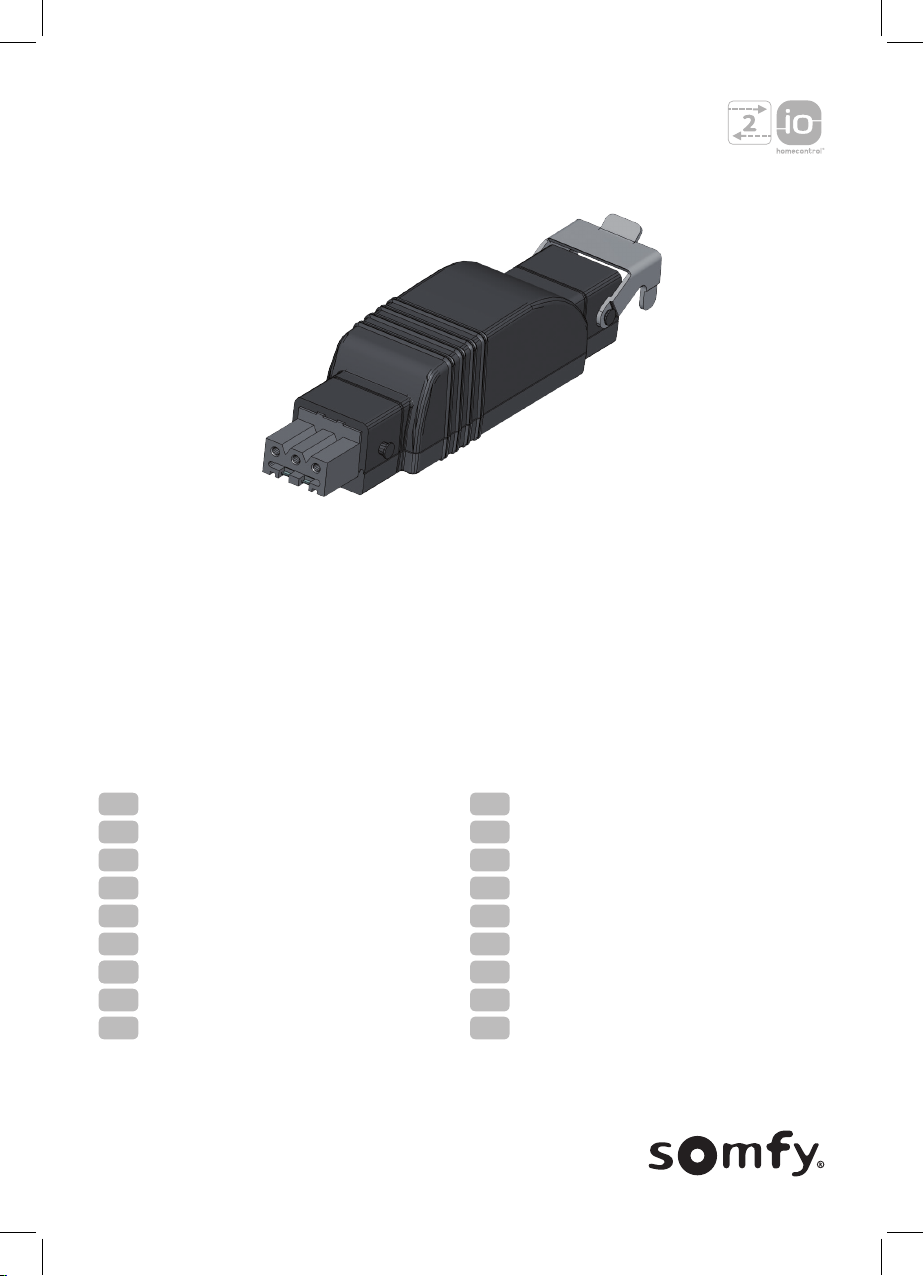
SLIM IO RECEIVER
SCREEN+PLUG
FR
Notice
DE
Anleitung
EN
Instructions
IT
Manuale
ES
Manual
PT
Instruções
PTEL
Εγχειρίδιο
NL
Handleiding
FI
Käyttöohje
DA
Brugsvejledning
NO
Bruksanvisning
SV
Bruksanvisning
TR
Kılavuz
PL
Instrukcja
CS
Návod
HU
Útmutató
RO
Manual
SK
Návod na použitie
Page 2

Page 3
Slim io Receiver Screen + Plug
EN
ORIGINAL INSTRUCTIONS
These instructions apply to all versions of the Slim io Receiver Screen + Plug, which are available in
the current catalogue.
CONTENTS
1. Introduction 22
1.1. Scope of application 22
1.2. Liability 22
2. Installation 23
2.1. Installation recommendations 23
2.2. Fitting the Slim io Receiver Screen + Plug 23
3. Wiring 23
4. Commissioning 24
4.1. Identifying setting steps already
completed 24
4.2. Pre-programming the Somfy io local
control point 25
4.3. Checking the motor's direction of rotation 25
4.4. Setting the time of functioning 25
4.5. Programming the first Somfy io local
control point 26
5. Operation and maintenance 26
5.1. Up and Down buttons 26
5.2. STOP function 26
5.3. Favourite position (my) 26
5.4. Adding/deleting Somfy io control points
and io sensors 27
5.5. Replacing a lost or broken iohomecontrol® Somfy control point 27
6. Tips and recommendations 27
6.1. Questions on the Slim io Receiver Screen
+ Plug 27
6.2. Restoring the original configuration 28
7. Technical data 29
GENERAL
Safety instructions
Danger
Indicates a danger which may result in immediate death or serious injury.
Warning
Indicates a danger which may result in death or serious injury.
Precaution
Indicates a danger which may result in minor or moderate injury.
Attention
Indicates a danger which may result in damage to or destruction of the product.
Non contractual images.
21Copyright© 2017 SOMFY ACTIVITE SA, Société Anonyme.. All rights reserved.
Page 4

EN
Slim io Receiver Screen + Plug
1. INTRODUCTION
1.1. SCOPE OF APPLICATION
The Slim io Receiver Screen + Plug is a receiver equipped with io homecontrol® Radio Technology.
It is used to control all types of external vertical blinds with standard motors supplied with 230V
(please contact your dealer for further information). The Slim io Receiver Screen + Plug is used to
open and close external vertical blinds.
Its small size enables it to be discretely installed near the product it is controlling through a direct
supply cable connection.
The Slim io Receiver Screen + Plug can be used as:
• individual control - one Slim io Receiver Screen + Plug io is controlled by one control point,
• multiple control - one Slim io Receiver Screen + Plug is controlled by several control points,
• group control - several Slim io Receiver Screen + Plug are controlled by a single control point.
The Slim io Receiver Screen + Plug can be controlled either by one control point or by an automatic
control device.
1.2. LIABILITY
Before installing and using the receiver, please read these instructions carefully. In addition to the
instructions provided in this guide, please also comply with the instructions set out in the enclosed
Safety instructions document.
The receiver must be installed by a home motorisation and automation professional, in accordance
with Somfy’s instructions and the applicable regulations in the country of installation.
Any operation of the receiver outside the scope of application described above is prohibited. Such
operation shall exclude Somfy from all liability and invalidate the Somfy warranty, as will any failure
to comply with the instructions given herein and in the enclosed Safety instructions document.
After installing the receiver, the installer must inform his customers of the operating and
maintenance conditions for the receiver and must pass the operating and maintenance
instructions on to them, as well as the enclosed Safety instructions document. Any After-Sales
Service operation on the receiver requires intervention by a home motorisation and automation
professional.
Should any doubt arise during installation of the receiver or for additional information, consult a
Somfy contact or visit www.somfy.com.
22 Copyright© 2017 SOMFY ACTIVITE SA, Société Anonyme.. All rights reserved.
Page 5

Slim io Receiver Screen + Plug
EN
2. INSTALLATION
A
B
C
A
B
OFF
2.1. INSTALLATION RECOMMENDATIONS
• Minimum distance (X) between a Slim io Receiver
Screen + Plug and the ground:
X = 150cm
• Minimum distance (Y) between a Slim io Receiver
Screen + Plug and a radio control point:
Y = 30cm
• Minimum distance (Z) between two Slim io Receiver
Screen + Plug units:
Z = 20cm
2.2. FITTING THE SLIM IO RECEIVER SCREEN + PLUG
Warning
Comply with current standards and legislation when installing.
Attention
The Slim io Receiver Screen + Plug must be installed, protected from rain and in clement
weather conditions, out of sight and out of the reach of children.
1) Turn off the power supply.
2) Disconnect the motor cable quick connection (A) from the
power supply cable quick connection (B).
3) Connect the Slim io Receiver Screen + Plug between the motor
cable (A) and the power supply cable (B).
• Motor = motor side (A)
• Supply 230V = power supply side (B)
4) Lock the securing hooks (C).
Attention
Ensure that the two quick connections are engaged correctly.
5) Place the Slim io Receiver Screen + Plug in the awning bracket
to conceal it.
6) Fit the Slim io Receiver Screen + Plug (using rilsan cables for example).
Z
Y
X
3. WIRING
Attention
• Cables routed through a metal internal wall must be protected and insulated by sleeving or
sheathing.
• Secure the cables to prevent any contact with moving parts.
• If the receiver is used outdoors and if the power supply cable is of the H05-VVF type, run the
cable in a UV-resistant duct, e.g. trunking.
• Leave the receiver power supply cable accessible: it must be easily replaceable.
Warning
Always make a loop in the power supply cable to prevent water from entering the receiver.
23Copyright© 2017 SOMFY ACTIVITE SA, Société Anonyme.. All rights reserved.
Page 6

EN
Slim io Receiver Screen + Plug
ON
A
B
123
1 Blue Neutral
2 Black Live
3 - -
Green/yellow Earth
Ø ≥ 0.75 mm²
B
1 Blue Neutral
2 Black Up
3 Brown Down
Green/yellow Earth
3
To ensure that the radio signal is transmitted correctly, it is necessary to pull the Slim io Receiver
Screen + Plug supply cable out of the motorised product by at least 30cm.
4. COMMISSIONING
This guide only describes commissioning using a Somfy io local control.
For commissioning using any other io control point, refer to the corresponding guide.
Prerequisite: The end limits of the motor are already set.
4.1. IDENTIFYING SETTING STEPS ALREADY COMPLETED
Only one motor should be powered at a time.
Switch on and follow procedure 4.1.1 or 4.1.2, depending on the
reaction of the motorised product.
A
2
1
4.1.1. The motorised product moves briefly
The linear travel is set and no Somfy control points have been
programmed.
Go to § 4.5.
4.1.2. The motorised product does not move
Press the Up or Down button and follow procedure 4.1.2.1 or
4.1.2.2, depending on the reaction of the motorised product.
4.1.2.1. The motorised product still does not move
The linear travel is not set and the Somfy control point has not been
programmed.
Go to § 4.2.
4.1.2.2. The motorised product raises or lowers completely by pressing and holding the
The linear travel is set and the Somfy control point has been
programmed.
Go to § 5.
24 Copyright© 2017 SOMFY ACTIVITE SA, Société Anonyme.. All rights reserved.
Up or Down button
4.5
4.1.2.1 /
4.1.2.2
4.2
5
Page 7

Slim io Receiver Screen + Plug
EN
4.2. PREPROGRAMMING THE SOMFY IO LOCAL CONTROL POINT
2 s
• Press the Up and Down buttons simultaneously.
The motorised product moves briefly.
The Somfy local io control point is pre-programmed to the
motor.
4.3. CHECKING THE MOTOR'S DIRECTION OF ROTATION
1) Press the Up button on the control point:
• If the motorised product raises, the direction of rotation is
correct.
• If the motorised product lowers, the direction of rotation is
incorrect:
- Press the "my" button on the control point until the
motorised product moves. The direction of rotation is
modified.
2) Press the Up button on the control point to check the direction
of rotation.
4.4. SETTING THE TIME OF FUNCTIONING
4.4.1. Automatic mode
This mode is not advised when the receiver is used with Nina,
Tahoma, or Connexoon.
1) Check the rotation direction of the motor (see § 4.3).
2) Press the Up and Down buttons simultaneously for at least
5 seconds.
3) Press the "my" button for at least 2 seconds.
The motorised product moves briefly and
Time of functioning T(f) = 4min.
4) Go to § 4.5.
2 s
5 s
4.4.2. Manual mode
The time of functioning is measured during the setting.
This mode is used in order to have better precision when the receiver is used with Nina, Tahoma, or
Connexoon.
Attention
The motor must be previously set.
1) Check the rotation direction of the motor (see § 4.3).
2) Press the Up and Down buttons simultaneously for at least
5 seconds.
The motorised product moves briefly and the manual mode is
activated.
3) Press and hold the Up button and let the motorised product
reach its up end limit.
4) Briefly press the Up and Down buttons simultaneously.
The motor goes downward and calculates its Time of
functioning T(f).
5 s
25Copyright© 2017 SOMFY ACTIVITE SA, Société Anonyme.. All rights reserved.
Page 8

EN
Slim io Receiver Screen + Plug
5) When the motor arrives at its down end limit, press the "my"
button for at least 2 seconds.
The motorised product moves briefly.
Time of functioning = T(f) (Max = 4min).
6) Go to § 4.5.
4.5. PROGRAMMING THE FIRST SOMFY IO LOCAL CONTROL POINT
4.5.1. Using a pre-programmed Somfy io local control point
• Briefly press the PROG button on this control point.
The motorised product moves briefly.
The control point is programmed.
4.5.2. Aer a power cut
1) Press the Up and Down buttons simultaneously on the new
control point until the motorised product moves.
2) Briefly press the PROG button on this control point.
The motorised product moves briefly.
The control point is programmed.
5. OPERATION AND MAINTENANCE
5.1. UP AND DOWN BUTTONS
Breifly press the Up or Down button to raise or lower the motorised
product fully.
2 s
5.2. STOP FUNCTION
The motorised product is moving.
• Briefly press the "my" button on the control point.
The motorised product stops automatically.
5.3. FAVOURITE POSITION MY
Besides the upper and lower positions, an intermediate position known as the "favourite position
(my)" may be programmed in the receiver.
5.3.1. Setting the favourite position (my)
1) Place the motorised product in the requested favourite position
(my).
2) Press the "my" button on the control button until the motorised
product moves.
The favourite position (my) has been programmed.
or
my
5.3.2. Using the favourite position (my)
• Briefly press the "my" button.
The motorised product starts to move, then stops. The
position of the motorised product then complies with the
favourite (my) position programmed.
26 Copyright© 2017 SOMFY ACTIVITE SA, Société Anonyme.. All rights reserved.
Page 9

Slim io Receiver Screen + Plug
EN
5.3.3. Modifying the favourite position (my)
1) Place the motorised product in the required new favourite
or
position (my).
2) Press the "my" button on the control button until the motorised
product moves.
The new favourite position (my) has been programmed.
5.3.4. Deleting the favourite position (my)
1) Briefly press the "my" button.
The motorised product will start to move and stop in the
favourite position (my).
2) Press the "my" button on the control button until the motorised
product moves.
The favourite position (my) has been deleted.
or
5.4. ADDING/DELETING SOMFY IO CONTROL POINTS AND IO SENSORS
Refer to the corresponding guide.
5.5. REPLACING A LOST OR BROKEN IOHOMECONTROL® SOMFY CONTROL
POINT
To replace a lost or broken io-homecontrol® control point, consult a home motorisation and
automation professional.
6. TIPS AND RECOMMENDATIONS
6.1. QUESTIONS ON THE SLIM IO RECEIVER SCREEN + PLUG
Observations Possible causes Solutions
The motorised
product does not
operate.
The motorised
product stops too
soon or too late.
The "my" position is
not working.
I can't delete the
"my" position with
my Easy Sun io
control point.
The wiring is incorrect. Check the wiring of the the Slim io
The motor is in heat protection
mode.
The Somfy io control point battery
is low.
The control point is not compatible. Check for compatibility and replace
The Somfy io control point used
has not been programmed into the
receiver.
The end limits have been incorrectly
set.
The "my" position is deleted. Program the "my" position.
Your control point is too old (IndexE
or older).
Receiver Screen + Plug and modify it
if necessary.
Wait until the motor cools down.
Check whether the battery is weak
and replace it if necessary.
the control point if necessary.
Use a programmed control point or
program this control point.
Readjust the end limits.
Delete the "my" position with
another paired control point.
my
my
27Copyright© 2017 SOMFY ACTIVITE SA, Société Anonyme.. All rights reserved.
Page 10

EN
Slim io Receiver Screen + Plug
ON
15 s
5 s
Observations Possible causes Solutions
I have a wind
The sensor is paired/set. There is radio interference or the
sensor and the
motorised product
rises to the upper
end limit every
hour.
Despite the
The battery of the Somfy io wind
sensor is weak.
The sensor is not paired/set. Refer to the corresponding guide to
presence of a wind
sensor, when
it is windy, the
motorised product
does not reach the
upper position.
I don't think the
position between
the end limits is
accurate.
The linear travel setting is incorrect. Reset the linear travel.
The motor is close to the thermal
limit.
6.2. RESTORING THE ORIGINAL CONFIGURATION
Attention
Only switch off power (double cutout) for the motorised product to be reset.
This reset deletes all programmed control points, sensors, linear travel and resets the
motorised product’s favourite (my) position.
1) Position the motorised product at its half-way position.
sensor is out of reach. Position the
the Slim io Receiver Screen + Plug
outside the head rail.
Check whether the battery is weak
and replace it if necessary.
pair/set the sensor.
Wait until the motor cools down.
OFF
2) Cut the power supply for 2seconds.
2 s
3) Switch the power supply back on for 5 to 15seconds.
OFF
4) Cut the power supply for 2seconds.
2 s
ON
5) Switch the power supply back on.
The motorised product moves for a few seconds.
28 Copyright© 2017 SOMFY ACTIVITE SA, Société Anonyme.. All rights reserved.
Page 11

Slim io Receiver Screen + Plug
EN
6) Press the PROG button on the Somfy io-homecontrol® local
control point for ≈7s until the motorised product moves up
and down twice.
The receiver is reset to its original configuration.
7. TECHNICAL DATA
Power supply
Index protection rating
Electrical insulation Class I
Maximum number of associated control points
and sensors
Radio frequency 868-870 MHz io-homecontrol®, two-way
Frequency bands and maximum power used 868.000MHz - 868.600MHz ERP < 25mW
Operating temperature
Number of operating cycles 10000
Pollution index 2
Maximum power 690W
Rated current 3A
Rated impulse withstand voltage 2500V
Duty type S3
Switch type
220 - 240V / 50Hz
IP 54
9
Tri-band
868.700MHz - 869.200MHz ERP < 25mW
869.700MHz - 870.000MHz ERP < 25mW
- 30°C à + 70°C
29Copyright© 2017 SOMFY ACTIVITE SA, Société Anonyme.. All rights reserved.
Page 12

EN
Slim io Receiver Screen + Plug
PTI (Proof Tracking Index) > 175V
Cooling condition No forced cooling
Protection device No protection device
Break type Microbreak
Load type >,
Design Independently mounted switch
Glow wire temperatures 850°C
Coating type for PCB Type A
CTest conditions Simulated with a practically resistive load
Somfy hereby declares that the radio equipment covered by these instructions is in
compliance with the essential requirements of Radio Directive 2014/53/EU and the
other essential requirements of the applicable European Directives.
The full text of the EU declaration of conformity is available at www.somfy.com/ce.
30 Copyright© 2017 SOMFY ACTIVITE SA, Société Anonyme.. All rights reserved.
 Loading...