

Page 1
www.somfy.com
Power 1 X 2,5 DC RTS Receiver
EN
Operating and installation guide
SV
Installations- och bruksanvisning
FI
Asennus- ja käyttöopas
NO
Installasjonsguide og brukerveiledning
Installations- og betjeningsvejledning
DA
Руководство по установке использованию
RU
Ref : 5061636X03
Page 2
EN
SOMFY hereby declares that this product complies with the essential requirements and other relevant provisions of Directive 1999/5/EC. A Declaration of Conformity is available at the web address
www.somfy.com/CE. Suitable for use in EU, CH and NO.
SV
Härmed intygar Somfy att produkten uppfyller huvudkraven och övriga relevanta bestämmelser i
direktivet 1999/5/EG. Ett CE-dokument nns på Internetadressen www.somfy.com/ce. Gäller i EU,
Schweiz och Norge.
FI
Täten Somfy ilmoittaa, että laite on direktiivin 1999/5/CE olennaisten vaatimusten ja muiden asiaankuuluvien määräysten mukainen. Ilmoitus vaatimusten täyttymisestä on luettavissa
Internet-osoitteessa www.somfy.com, otsikon CE alta. Voimassa EU:n alueella, Sveitsissä ja
Norjassa.
NO
Somfy erklærer herved at dette utstyret oppfyller nødvendige krav og alle relevante bestemmelser
i direktivet 1999/5/EC. Et CE-dokument nnes tilgjengelig på www.somfy.com/ce.
Kan brukes i EU, Sveits og Norge.
DA
Hermed erklærer Somfy, at apparatet er i overensstemmelse med de væsentlige krav, samt med
de andre relevante bestemmelser i direktivet 1999/5/CE. En CE erklæring kan konsulteres på
internetadressen www.somfy.com/ce.
Anvendelig i EU, CH og NO.
RU
Настоящим фирма Somfy удостоверяет, что изделие соответствует основным требованиям
и иным относящимся к нему положениям директивы Европейской Комиссии 1999/5/CE.
Сертификат соответствия доступен по адресу интернет-сайта www.somfy.com/ce.
Применим в странах Европейского Союза, Швейцарской Конфедерации и в странах северовосточной Европы.
Installation instructions page 2
Installationsanvisningar sida 14
Asennusohjeet sivu 26
Installasjonsguide side 38.
Monteringsvejledninger side 50
Руководство по установке страница 62
Page 3

- Ce guide est disponible en téléchargement dans d’autres langues depuis le
site internet Somfy :
- Diese Anleitung steht in anderen Sprachen zum Herunterladen auf der
Somfy-Internetseite zur Verfügung:
- Questa guida è disponibile per il download in altre lingue sul sito Internet
www.somfyarchitecture.com
Somfy:
- Deze gids kunt u in andere talen downloaden vanaf de Somfy website:
www.somfyarchitecture.com
- This guide is available to download in other languages from the Somfy
website :
- Para descargar la presente guía en otros idiomas, acceda al sitio web de
Somfy:
- Este guia está disponível para transferência noutros idiomas a partir do sítio
web da Somfy:
- Den här informationen nns tillgänglig för hämtning på andra språk på
Somfys webbplats:
- Tämä opas voidaan ladata muilla kielillä Somfyn internet-sivuilta:
www.somfyarchitecture.com
- Denne guiden er tilgjengelig for nedlasting på andre språk på Somfys
nettsted:
- Denne vejledning kan hentes på andre sprog på Somfys hjemmeside:
www.somfyarchitecture.com
- Tohoto průvodce si můžete stáhnout v dalších jazycích na internetové
stránce společnosti Somfy:
- Ръководството може да се свали от интернет сайта на Somfy и на други
езици:
- Niniejsza instrukcja jest dostępna w innych językach i można ją pobrać ze
strony internetowej Somfy:
- Ez az útmutató más nyelveken is letölthető a Somfy internetes oldaláról:
www.somfyarchitecture.com
- Ο οδηγός αυτός διατίθεται για λήψη (download) σε άλλες γλώσσες στον
ιστότοπο Somfy:
www.somfyarchitecture.com
www.somfyarchitecture.com
www.somfyarchitecture.com
www.somfyarchitecture.com
www.somfyarchitecture.com
www.somfyarchitecture.com
www.somfyarchitecture.com
www.somfyarchitecture.com
www.somfyarchitecture.com
www.somfyarchitecture.com
www.somfyarchitecture.com
- يمكنك تحميل هذا الدليل بلغات أخرى من خلال موقع الإنترنت الخاص
بسومفي:
- Данное руководство на других языках можно загрузить с интернет-сайта
Somfy:
www.somfyarchitecture.com
www.somfyarchitecture.com
1Copyright © 2009 Somfy SAS. All rights reserved - V0 - 09/2009
Page 4
SAFETY AND IMPORTANT INFORMATION
• This Somfy product must be installed by a professional motorisation and home automation
installer, for whom these instructions are intended.
• Before installation, check that this product is compatible with the associated equipment
and accessories.
• These instructions describe how to install, commission and use this product.
• Moreover, the installer must comply with current standards and legislation in the country in
which the product is being installed, and inform his customers of the operating and maintenance conditions for the product.
• Any use outside the sphere of application specied by Somfy is not approved. Such use,
or any failure to comply with the instructions given herein will invalidate the warranty, and
Somfy refuses to accept liability.
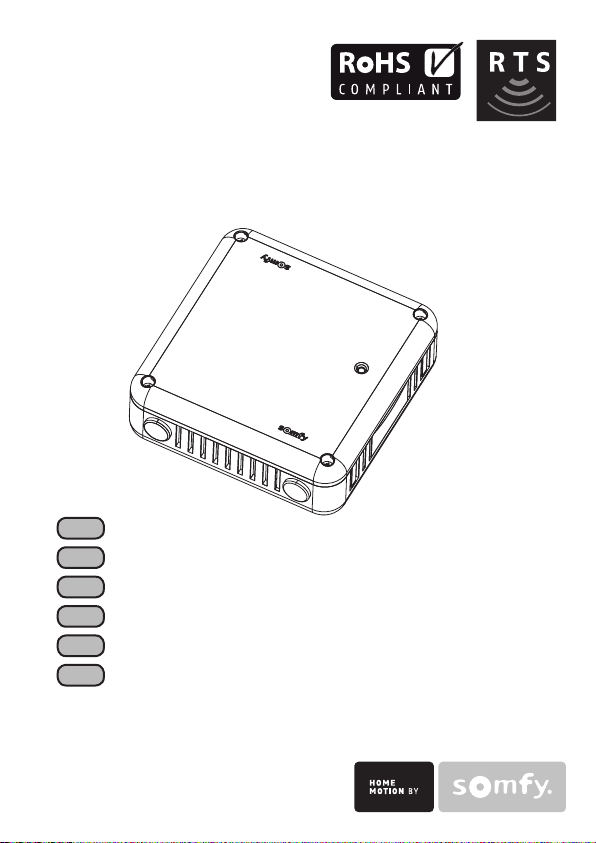
PRODUCT DESCRIPTION
The Power 1x2,5DC RTS Receiver is a receiver with integrated power supply and equipped
with Radio Technology Somfy (RTS).
It allows 24V wire operated motors to work with the Somfy range of control points and
sensors equipped with Radio Technology Somfy (RTS).
ENVIRONMENT
Damaged electric products and batteries should not be disposed of with
normal household waste.
Make sure to drop them in specially provided containers or at an authorized
organization that will ensure they are recycled
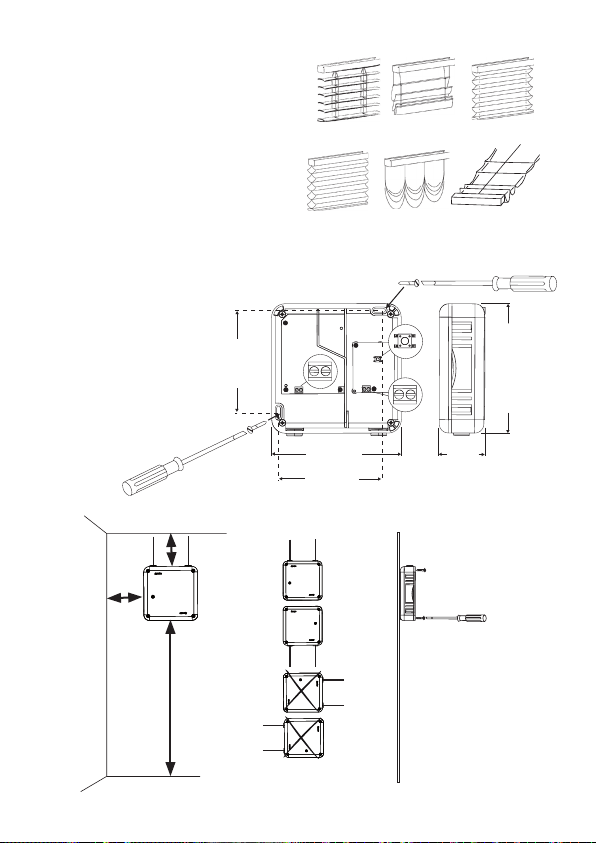
A COMPATIBLE APPLICATIONS
1) Compatible controls
The Power 1x2,5DC RTS Receiver is compatible with all Somfy RTS transmitters
with a maximum of 12 transmitters and 3 sensor per DC RTS Receiver.
2 Copyright © 2009 Somfy SAS. All rights reserved - V0 - 09/2009
Page 5

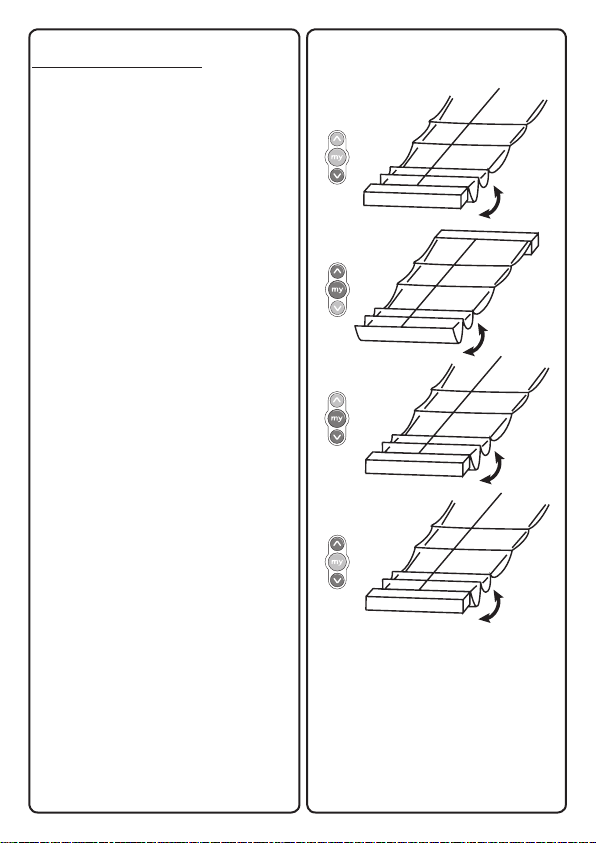
2) Compatible blinds:
A
C
B
155 mm
+/-0,75
155 mm +/-0,75
53,6 mm
+/-0,38
121 mm
122 mm
a. Venetian blinds
b. Roman shades
c. Pleated shades
d. Cellular shades
e. Ballon shades
f . Pinoleum shades
B INSTALLATION AND WIRING
A : 198 - 255V ~ 50Hz 0.5A
B : 24V TBTS +/- 5% 2.5A
C : PROG -Taste
3 cm
3 cm
a b c
d e f
150 cm
3Copyright © 2009 Somfy SAS. All rights reserved - V0 - 09/2009
Page 6
A few denitions
Choosing the type of mode :
The Power 1x2,5DC RTS Receiver is designed to work with 2 modes:
Venetian blind mode or roller blind mode.
The Power 1x2,5DC RTS Receiver is set by default to work in Venetian blind mode.
This feature allows setting the Power 1x2,5DC RTS Receiver to be set according to
the type of blind you are working with.
Motor rotation direction :
It is possible, during installation or future adjusting, to change the rotation direction of
the motor with the remote control. This will allow to link the upward motion of the blind
with the raise button on the remote control.
Tilting using the Modulis scroll wheel :
This feature can only be used with a Modulis remote control.
It allows to associate the direction of the scroll wheel with the desired orientation of
the slats.
Timer setting for raising and lowering of the blind :
The objective is to adjust the operation time of the blind when raising and lowering. It
does not replace the limit switches.
This adjustment allows optimising the blind operation and to set automatically a My
position. Without this, the My position can not be used.
Sun sensor operation:
This feature can only be used in the roller blind mode.
It is possible to use a RTS sunlight sensor to automatically operate the blind (ex:
close the blinds when the sun comes out).
For the sensor to operate at its best the parameters can be adjusted.
My position:
The My position corresponds to the user’s favorite position of the blind in given
situations: for example, adjusting the position of the blind in order to work on your
computer in mid-day by lowering the blinds half-way, etc...
Setting the slat speed tilting fonction:
This feature can only be used with a standard 3 buttons remote control and in the
venitian blind mode.
To orient the blades on a Venetian blind, you can press-and-hold the up and down
buttons on the remote control.The tilting speed can be adjusted.
Adjusting the scroll wheel movement on the remote control:
This feature can only be used with a Modulis remote control.
To tilt the slats on a Venetian blind, you can use the scroll wheel on the Modulis
remote control.This feature allows the scroll wheel sensitivity to be adjusted.
Disappearing sun position:
This feature can only be used with Venetian blinds.
It allows the slats to be set an horizontal position in case the sun disappears.
This feature requires the use of a sun sensor.
Privacy feature:
This feature allows the sun automatic operation to be activated or disactivated when
the blind is closed in order to maintain your privacy. This feature requires the use of a
sun sensor.
p6
p6
p6
p8
p7
p9
p10
p10
p11
p12
4 Copyright © 2009 Somfy SAS. All rights reserved - V0 - 09/2009
Page 7

C ADJUSTING THE BLIND
2x0,75mm
2
2x0,25mm
2
End limits are operated by the motor and its
accessories and not by the Power 1x2,5DC
RTS Receiver.
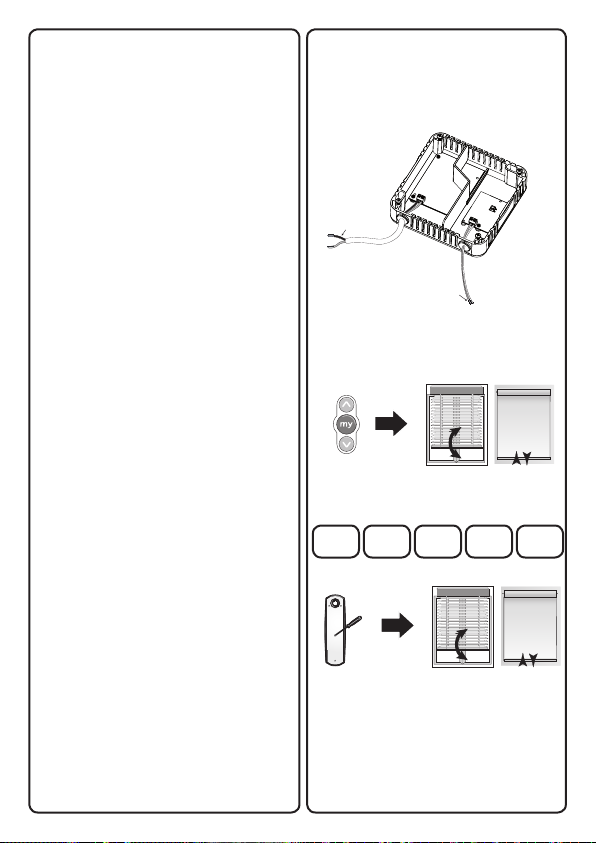
C.1) Connect the Power 1x2,5DC RTS
Receiver (It is necessary to take all the pre-
cautions of use to protect the Power 1x2.5DC
RTS Receiver from the electrostatic dischar-
ges).
If several motors are connected to the Power
1x2,5DC RTS Receiver, the adjustment will
be commun to all the motors.
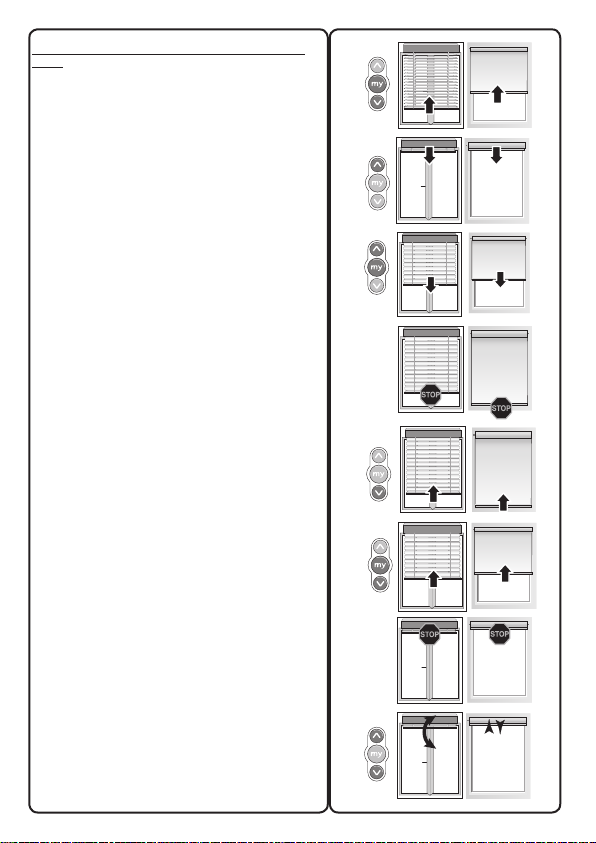
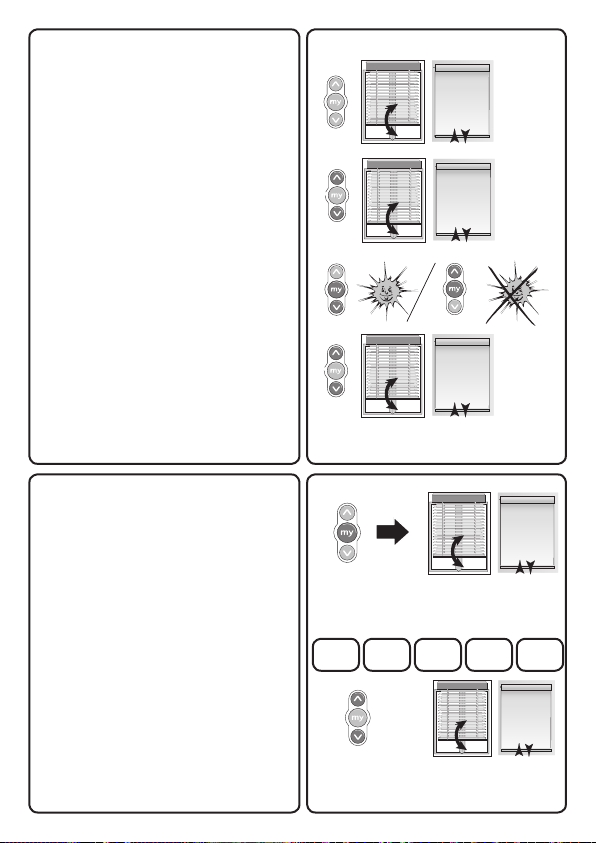
C.2) Setting through the remote control:
Remark: When controlling through a
remote control, all Power 1 X 2,5 DC RTS
Receiver are adjusted at the same time if
several Power 1 X 2,5 DC RTS Receiver are
connected.
Pairing:
Briey press the Up and Down buttons on the
remote control.
The blind moves up and down.
The remote control is temporarily saved.
Settings:
Refer to steps:
C3a: Choosing the type of blind :
C3b: Motor rotation direction :
C3c: Orientation using the dial :
C3d: Sun sensor operation :
C3e: Duration of raising and lowering of the
blind
Saving:
Briey press the programming button on the
remote control.
The blind moves up and down.
The remote control is permanently saved.
C3a C3b C3c C3d C3e
5Copyright © 2009 Somfy SAS. All rights reserved - V0 - 09/2009
Page 8

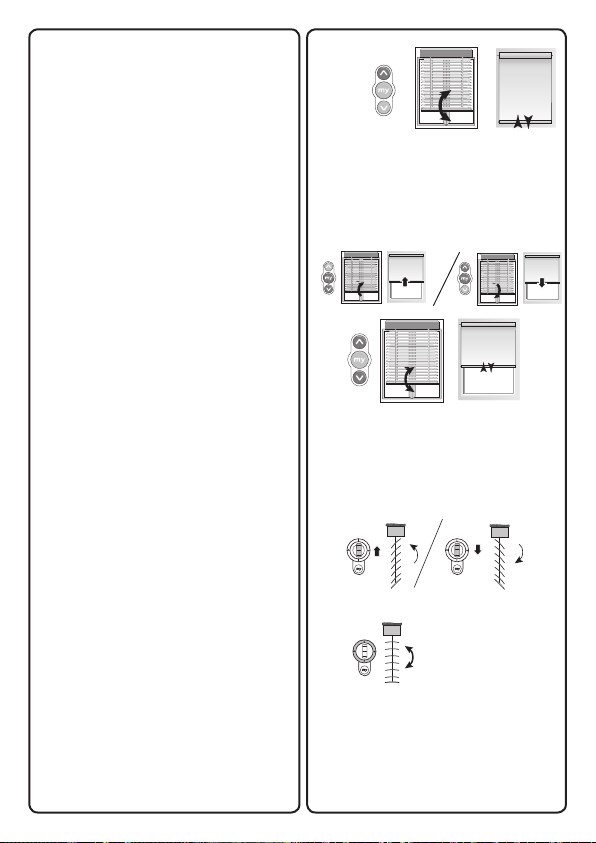
C.3) Adjusting or readjusting the blind:
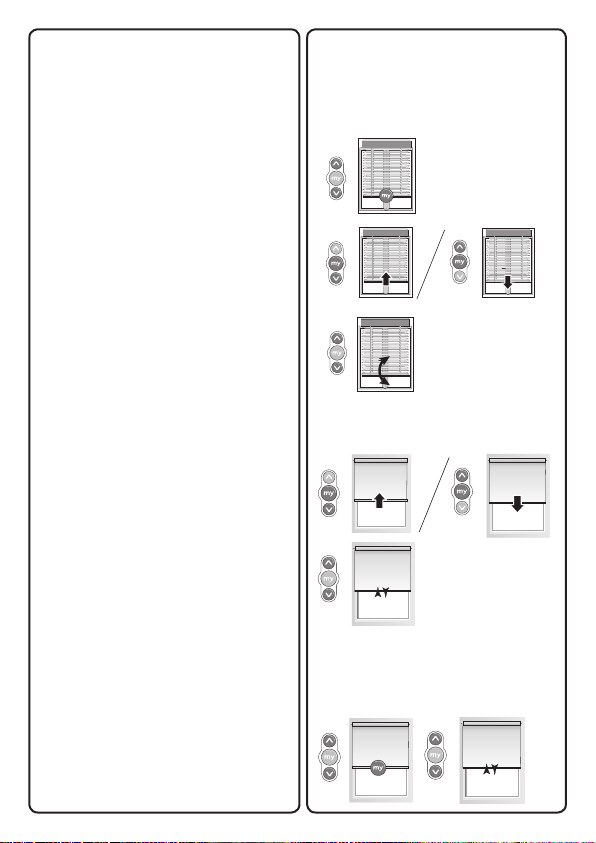
C.3.a) Choosing the type of mode :
To skip from one mode to the other, press
the My and Down buttons for approximately
2 seconds until the blind moves up and down.
The Power 1 X 2,5 DC RTS Receiver in
roller mode :
The UP and Down movement is without stop
at the down end limit.
The Power 1 X 2,5 DC RTS Receiver in
Venetian mode :
During the Up and Down movement, there is
a stop at the down end limit.
C.3.b) Motor rotation direction :
Press the Up or Down button to verify the
rotation direction.
If the direction is incorrect, press the My
button for approximately 2 seconds until the
blind moves up and down.
Verify the rotation direction using the Up and
Down buttons.
This operation can be repeated several
times.
The direction is inverted every time the My
button is pressed for 2 seconds.
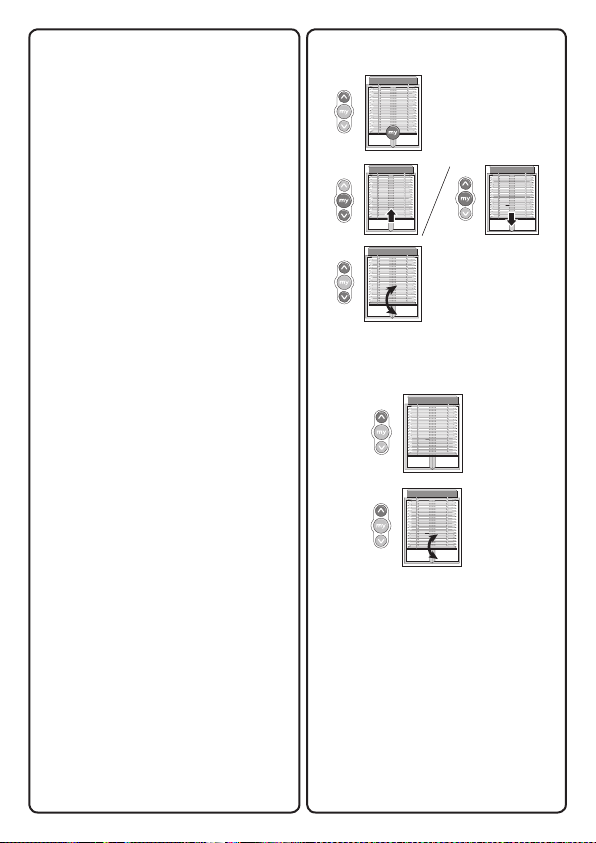
C.3.c) Tilting using the Modulis Scroll wheel :
Use the scroll wheel to verify the slats tilting.
If the direction is incorrect, press the Up and
Down buttons for approximately 2 seconds
until the blind moves up and down. The Scroll
wheel operational position has been inverted.
This operation can be repeated several
times.
The operational position is inverted every
time the Up and Down buttons are pressed
for approximately 2 seconds.
Note: The slat tilting behaviour is independent of the motor rotation direction.
6 Copyright © 2009 Somfy SAS. All rights reserved - V0 - 09/2009
Page 9
C.3.d) Sun sensor operation :
The operational direction is set by default for
a motor installed at the top of the blind.
The operational direction can be programmed
for a product where the motor is installed at
the bottom of the blind.
To modify the direction:
Press the My and Up buttons for
approximately 2 seconds until the blind
moves up and down.
Press the Down button for approximately 2
seconds until the blind moves up and down
to set the Power 1x2,5DC RTS Receiver in
inverted sensor mode (in case motor is at the
bottom of the blind).
Press the Up button for approximately 2
seconds until the blind moves up and down
to set the Power 1x2,5DC RTS Receiver in
normal sensor mode (in case motor is at the
top of the blind).
Press the My button for approximately 2
seconds until the blind moves up and down
to conrm the sensor mode selection .
7Copyright © 2009 Somfy SAS. All rights reserved - V0 - 09/2009
Page 10
C.3.e) Timer setting for raising and lowering the
blind:
1) Take to upper end-stop of the blind. The blind
automatically stops at the mechanical end-stop.
2) Briey press the My and Down buttons: the
end-product lowers (for 10 seconds) and stops.
You can stop the blind prior to the 10 seconds by
pressing the Stop button.
3) If the blind is not at its lowest position, press the
Down button until the blind reaches
the lowest position set mechanically. The blind
lowers as long as the button is pressed and held
for a maximum duration of 10 seconds.
Nb: Only the length of time the button is held is
saved. Time is not measured once the blind is
stopped.
4) Once the end-product is at the lowest position
release the Down button.
Nb: If the Down button remains held as the
mechanical stops down position is reached, time
continues to be measured and the blind does not
move.
5) Briey press the My and Up buttons: The
endproduct
rises (for 10 seconds) and stops. You can
stop the blind prior to the 10 seconds by pressing
the Stop button.
Nb: Pressing the My and Up buttons conrms the
down motion duration.
6) If the blind is not at its upper position, press
the Up button until the blind reaches the upper
position set mechanically. The blind rises as long
as the button is pressed and held for a maximum
duration of 10 seconds.
Nb: Only the length of time the button is held is
saved. Time is not measured once the blind is
stopped.
7) Once the end-product is at the upper position
release the Up button.
Nb: If the Up button remains held as the mechanical
stops up position is reached, time continues to
be measured.
8) To nalize the setting of up and down motion
duration, press the My button for approximately
2 seconds until the blind moves up and down.
Durations are conrmed,
saved and a favorite position (My) is automatically
set.
(1)
(2)
(3)
(4)
(5)
(6)
(7)
(8)
8 Copyright © 2009 Somfy SAS. All rights reserved - V0 - 09/2009
Page 11
D USE
D.1) My position :
The My position varies according to the type
of blind.
Venetian mode:
After adjusting the duration of up and down
motions, the My position is the following one :
lower position, slats position at about 45° (for
a Venetian with 25 mm slats and CTS 25).
The user can readjust this position.
Rolling mode:
After adjusting the duration of up and down
motions, the My position is the following one
3/4 closed.
The user can readjust this position.
Readjusting the position:
To readjust the My position the blind must
be in any position except the current My
position.
Venetian mode:
Press the My button for approximatly 5
seconds.
The blind goes to the existing My position.
Using the Up or Down buttons, or the scroll
wheel when using a Modulis remote control,
to readjust the My position.
Press the My button for approximately 2
seconds until the blind moves up and down.
The new My position is saved.
Rolling mode:
Using the Up or Down buttons select the new
desired position.
Press the My button for approximately 5
seconds until the blind moves up and down,
the new position is saved.
Deleting the position (for venitian or roller
mode):
By briey pressing the My button take the
blind to the current My position.
Press the My button for approximately 5
seconds until the blind moves up and down.
The position has been deleted.
9Copyright © 2009 Somfy SAS. All rights reserved - V0 - 09/2009
Page 12

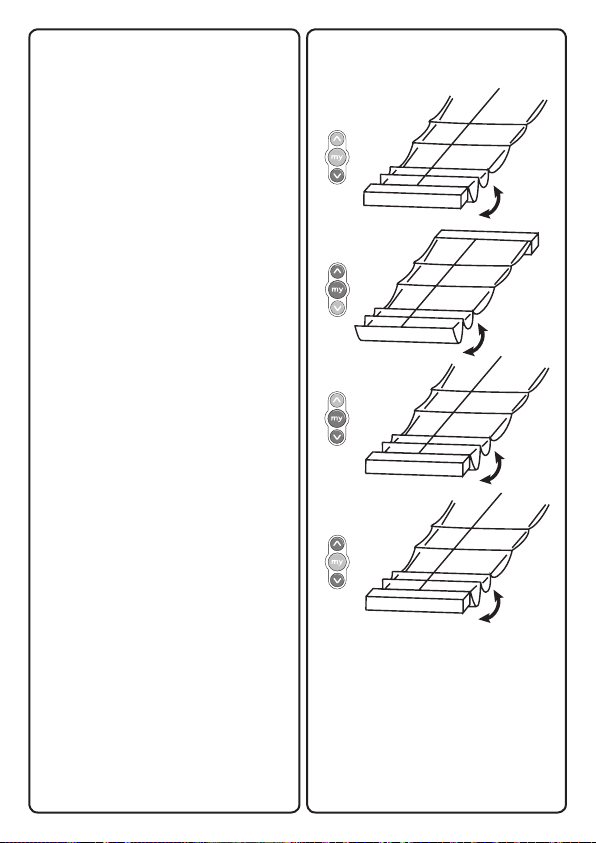
D.2) Setting the slat speed tilting fonction :
6s
6s
Press the Up, Down and My buttons for
approximately
2 seconds until the blind moves up and down.
Press the Up button for approximately 2
seconds.
The blind moves up and down in 6 second
cyles.
Using the Up and Down buttons to readjust
the speed. Each time a button is pressed the
orientation speed is changed: variation is in
real time during the adjustment.
Once the suitable speed has been reached,
press the My button for approximately 2
seconds until the blind moves up and down.
The new orientation speed has been saved.
D.3) Adjusting the scroll wheel movement on
the remote control :
Press the Up, Down and My buttons for
approximately
2 seconds until the blind moves
up and down.
Press the Down button for approximately 2
seconds until the blind moves up and down.
Using the Up and Down buttons to readjust
the scroll wheel movement.
The result can be test in live with the scroll
wheel.
Press the My button for approximately 2
seconds until the blind moves up and down.
The new dial movement has been saved
10 Copyright © 2009 Somfy SAS. All rights reserved - V0 - 09/2009
Page 13
D.4) Disappearing sun position :
This feature requires the use of a sun sensor.
This function is used only for Venetian blinds.
In order to have a Disappearing sun position,
an up and down duration as well as a My
position must be saved.
Press the Down and My buttons for
approximately 2 seconds.
The blind goes to My position.
Using the Up and Down buttons to adjust the
Disappearing sun position (slat in horizontal
position).
Press the My button for approximately
5 seconds until the blind moves up and
down. The Disappearing sun position has
been saved.
Readjusting the position: :
To readjust the No sun position, repeat pre-
vious procedure (1st time setting).
Deleting the position:
Press the Down and My buttons for
approximately 2 seconds.
The blind goes to My position.
Press the Down and My buttons for
approximately 5 seconds until the blind
moves up and down.
The No sun position has been deleted.
Note: If the My position is deleted, the No sun
position is automatically deleted also.
11Copyright © 2009 Somfy SAS. All rights reserved - V0 - 09/2009
Page 14
2 X
D.5) Privacy feature :
By default, the privacy feature is activated.
When the user sends the blind to lower
position, the automatic sun operation is
deactivated.
Press the Up, Down and My buttons until the
blind moves up and down.
Press the My button until the blind moves up
and down.
Press the Up button for approximately 2
seconds until the blind moves up and down
to activate the automatic sun operation (No
privacy function).
Press the Down button for approximately 2
seconds until the blind moves up and down
to deactivate the automatic sun operation
(Privacy function on).
Press the My button for approximately 5
seconds until the blind moves up and down
to conrm your selection.
E READJUSTING THE BLIND
Entering readjustment mode:
To enter readjustment mode, simultaneously
press the up and down buttons for
approximately 5 seconds until the blind
moves up and down.
Settings:
Refer to steps:
C3a: Choosing the type of blind:
C3b: Motor rotation direction:
C3c: Orientation using the dial:
C3d: Sun sensor operation:
C3e: Duration of raising and lowering of the
blind.
Conrming settings:
To conrm settings, press the My button
for approximately 5 seconds until the blind
moves up and down twice.
C3a C3b C3c C3d C3e
12 Copyright © 2009 Somfy SAS. All rights reserved - V0 - 09/2009
Page 15
A
B
2 X
3 X
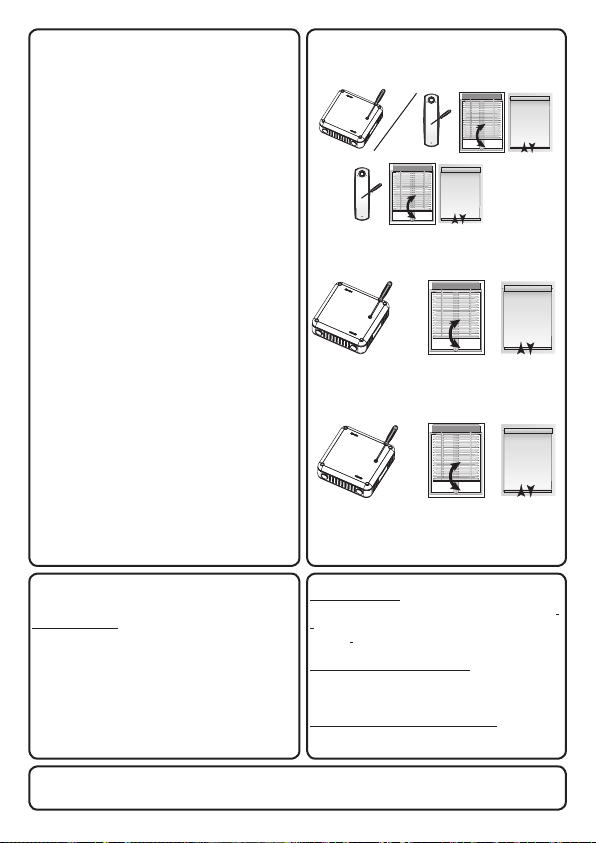
F ADDING AND DELETING
F.1) Adding or deleting a transmitter or a
sensor.
Press the programming button on the Power
1x2,5DC RTS Receiver or the transmitter
A until the blind moves up and down. Then
press the programming button on transmitter
B. It is either saved if the transmitter is new or
deleted if the transmitter is recognized.
Remark : If no remote control is paired, You
can use this mode for the 1st pairing.
F.2) Deleting all transmitters and sensors.
Press the programming button on the Power
1x2,5DC RTS Receiver for approximately
7 seconds. The blind moves up and down
twice:
First time for approximately 2 seconds.
Second time for approximately 7 seconds.
All transmitters have been deleted.
F.3) Back to factory mode
Press the programming button on the Power
1x2,5DC RTS Receiver for approximately
12 seconds. The blind moves up and down
three times:
First time for approximately 2 seconds.
Second time for approximately 7 seconds.
Third time for approximately 12 seconds.
All transmitters and sensors are deleted, up
and down motion durations are deleted.
The product settings are back to default
factory conguration.
G TROUBLE SHOOTING
Nothing works:
Check the wiring (cf SDEV-FICA 38RO).
Check the motor.
Check the power supply.
Check the battery of the transmitter.
Check the compatibility of the transmitter.
Check that the transmitter has been properly
recorded.
TECHNICAL DATA : page 74
No My position:
The My position can only be programmed if
the timer for raising and lowering the blind
are set.
Problem with the functions :
Check you are in the right mode (Venetian
or Roller).
Lost in your programming mode:
Just make a complete reset and start
again.
13Copyright © 2009 Somfy SAS. All rights reserved - V0 - 09/2009
Page 16

SÄKERHET OCH VIKTIG INFORMATION
• Den här produkten från SOMFY bör installeras av en fackman inom motorisering och
automatisering av utrustning för bostadsfastigheter, och den här anvisningen är avsedd för
fackmannen.
• Innan produkten installeras ska du kontrollera att den är kompatibel med tillhörande
utrustning och tillbehör.
• Den här anvisningen beskriver hur produkten installeras, tas i drift och sedan används.
• Installatören ska också följa gällande normer och lagar i installationslandet samt informera
sina kunder om produktens användning och underhåll.
• All användning utanför det användningsområde som denierats av SOMFY är olämplig.
Sådan användning skulle, i likhet med varje avvikelse från instruktionerna i denna anvis-
ning, innebära att SOMFYS garantiansvar bortfaller.
PRODUKTBESKRIVNING
Power 1x2,5DC RTS Receiver är en transformator med integrerad Radio Technology Somfy
(RTS) mottagare. 24V kabelbundna motorer och kan via denna styras av RTS
fjärrkontroller och sensorer.
MILJÖN
Skadade elektriska och elektroniska produkter och använda batterier får inte
kastas bland hushållssoporna.
Lämna in dem till återvinningsstationen så att de tas om hand på rätt sätt.
A KOMPATIBLA APPLIKATIONER
1) Kompatibla fjärrkontroller:
Power 1 X 2,5 DC RTS Receiver är kompatibel med sändarna Somfy RTS, med max.
12 sändare och 3 givare med Power 1 X 2,5 DC RTS Receiver.
14 Copyright © 2009 Somfy SAS. All rights reserved - V0 - 09/2009
Page 17
2) Kompatibla produkter:
A
C
B
155 mm
+/-0,75
155 mm +/-0,75
53,6 mm
+/-0,38
121 mm
122 mm
a. Persienn
b. Plisségardiner
c. Avdelade gardiner
d. Hissgardin
e. Romersk hissgardin
f. Träpersienn
B INSTALLATION OCH KABLAGE
A : 198 - 255V ~ 50Hz 0.5A
B : 24V TBTS +/- 5% 2.5A
C : PROG -Taste
3 cm
3 cm
a b c
d e f
150 cm
15Copyright © 2009 Somfy SAS. All rights reserved - V0 - 09/2009
Page 18
Några förklaringar
Val av gardintyp:
Power 1 X 2,5 DC RTS Receiver kan fungera i två lägen:
Persiennläge eller rullgardinsläge.
Power 1 X 2,5 DC RTS Receiver är inställd på persiennläge som standard.
Med den här funktionen kan man ställa in Power 1 X 2,5 DC RTS Receiver i enlighet
med den typ av gardin som används.
Motorns rotationsriktning:
När systemet installeras eller när inställningarna görs om kan man ändra motorns
rotationsriktning med hjälp av fjärrkontrollen. Detta är användbart om man vill koppla
höjningen av gardinen till fjärrkontrollens upp-knapp.
Rattens funktionsriktning:
Den här funktionen gäller endast fjärrkontroller av typen Modulis.
Den används för att justera rattens funktionsriktning i förhållande till lamellernas
önskade riktning.
Gardinens höjnings- och sänkningstid:
Syftet är att justera gardinens funktionstid vid höjning och sänkning, inte att ställa in
ändlägena.
Med den här inställningen kan du optimera användningen av gardinen och automatiskt ställa in ett My-läge. Utan den här inställningen kan du inte använda ett My-läge.
Solsensorernas funktion:
Du kan använda en RTS solsensor för att styra gardinen automatiskt vid sol.
För att sensorn ska fungera så bra som möjligt kan du ställa olika parametrar»
My-lägen:
Läget My motsvarar gardinens favoritläge i vissa situationer: t.ex. gardinens läge när
du arbetar vid datorn mitt på dagen, då gardinen är till hälften nedsänkt etc.
Inställning av lamellernas riktningshastighet:
Den här funktionen nns endast i standardfjärrkontroller med tre knappar och i
persiennläge.
När du vill justera persiennens lameller kan du trycka in upp- eller ned-knappen på
fjärrkontrollen en längre stund. Riktningshastigheten kan justeras.
Justering av fjärrkontrollrattens steg:
Den här funktionen gäller endast fjärrkontroller av typen Modulis.
När du vill rikta in en persienns lameller, kan du använda ratten på fjärrkontrollen
Modulis. Med den här funktionen kan du ställa in rattens känslighet.
Molnläge:
Den här funktionen gäller endast för persienner. Med den kan du ställa in lamellernas
läge om solen går i moln.
Funktionen kräver att man har en solsensor.
Läge för avskildhet:
Med den här funktionen kan du aktivera eller avaktivera den automatiska solfunktionen för att undvika insyn.
Funktionen kräver att man har en solsensor.
p18
p18
p18
p20
p19
p21
p22
p22
p23
p24
16 Copyright © 2009 Somfy SAS. All rights reserved - V0 - 09/2009
Page 19
C INSTÄLLNING AV GARDINEN
2x0,75mm
2
2x0,25mm
2
Gränslägen är inställda på motorerna och/
eller dess tillbehör och är inte relaterade til
Power 1 x 2,5 DC RTS Receiver
C.1) Anslut Power 1 x x2,5 DC RTS Receiver
(OBS! följ instruktionsanvisningarna för
att skydda Power 1 x 2,5 DC RTS
Receiver mot elektrostatiska urladdningar).
Om mer än en motor är ansluten till Power 1
x 2,5 DC RTS Receiver kommer alla motorer
att gå samtidigt.
C.2) Programmering med fjärrkontrol:
Notera:
När programmering sker med fjärrkontroll
kommer alla anslutna Power 1 x 2,5 DC RTS
Receivers att programmeras på samma gång
Sammankoppling:
Tryck kort in, och släpp genast upp- och ned-
knapparna på fjärrkontrollen.
Gardinen gör en upp- och nedrörelse.
Fjärrkontrollen har registrerats tillfälligt.
Inställning:
Se steg:
C3a: Val av gardintyp
C3b: Motorns rotationsriktning
C3c: Rattens funktionsriktning
C3d: Solsensorernas funktion
C3e: Gardinens höjnings- och sänkningstid
Programmering:
Tryck kort in programmeringsknappen på
fjärrkontrollen.Gardinen gör en upp- och
nedrörelse. Fjärrkontrollen har registrerats.
C3a C3b C3c C3d C3e
17Copyright © 2009 Somfy SAS. All rights reserved - V0 - 09/2009
Page 20
C.3) Inställning eller nyinställning av
gardinen:
C.3.a) Val av gardintyp:
När du vill gå från ett läge till ett annat,
tryck på My- och ned-knapparna i cirka två
sekunder tills gardinen gör en upp- och
nedrörelse.
Om gardinen gör en snabb upp- och
nedrörelse är Power 1 X 2,5 DC RTS Receiver i rullgardinsläget.
Om gardinen gör en långsam upp- och
nedrörelse är Power 1 X 2,5 DC RTS Receiver i persiennläget.
C.3.b) Motorns rotationsriktning:
Tryck på upp- eller ned-knappen för att
kontrollera rotationsriktningen.
Om riktningen är felaktig, tryck in knappen
My i två sekunder tills gardinen gör en
uppoch nedrörelse.
Kontrollera att rotationsriktningen är korrekt
med hjälp av upp- eller ned-knappen.
Den här åtgärden kan utföras era gånger.
Varje tvåsekunderstryckning på knappen My
ändrar rotationsriktningen.
C.3.c) Rattens funktionsriktning:
Vrid ratten för att kontrollera lamellernas
riktning. Om riktningen är felaktig, tryck på
upp- och ned-knapparna i cirka 2 sekunder
tills gardinen gör en upp- och nedrörelse.
Rattens funktionsriktning har ändrats.
Den här åtgärden kan utföras era gånger.
Varje tvåsekunderstryckning på upp- och
ned-knapparna ändrar rattens funktionsriktning.
Anm.: Rattens funktionsriktning är fristående
från motorns rotationsriktning.
18 Copyright © 2009 Somfy SAS. All rights reserved - V0 - 09/2009
Page 21
C.3.d) Solsensorernas funktion:
«den här funktionen fungerar endast i Rull-
gardins läge»
Som standard styrs funktionsriktningen av
en motor som sitter högst upp på gardinen.
Du kan programmera funktionsriktningen
för en produkt vars motor är placerad längst
ner på gardinen.
Om du vill ändra riktningen:
Tryck på upp-knappen och My-knappen i
cirka två sekunder tills gardinen gör en
uppoch nedrörelse.
Tryck på ned-knappen i cirka två sekunder
tills gardinen gör en upp- och nedrörelse
för att ställa in Power 1 X 2,5 DC RTS Recei-
ver i läget med omvänd sensor (motor längst
ner på gardinen).
Tryck på upp-knappen i cirka två sekunder
tills gardinen gör en upp- och nedrörelse
för att ställa in Power 1 X 2,5 DC RTS Recei-
ver i läget med vanlig sensor (motor högst
upp på gardinen).
Tryck på knappen My i cirka två sekunder
tills gardinen gör en upp- och nedrörelse för
att bekräfta valet av sensorns läge.
19Copyright © 2009 Somfy SAS. All rights reserved - V0 - 09/2009
Page 22
C.3.e) Gardinens höjnings- och sänkningstid:
1) Låt gardinen gå till det övre ändläget.
Gardinen stannar automatiskt på det mekaniska
stoppet.
2) Tryck kort in My- och ned-knapparna: den
bärande delen sänks ner (i tio sekunder)
och stannar sedan. Sänkningen kan avbrytas
innan de 10 sekunderna har förutit
genom att du trycker på knappen Stop.
3) Om gardinen inte har nått sitt nedersta
läge, tryck på ned-knappen tills gardinen
når det mekaniskt reglerade nedre läget.
Sänkningen fortsätter så länge knappen är
intryckt, max. tio sekunder per tryckning.
Obs! Endast trycktiderna sparas. Det nns
ingen tidmätning när gardinen står stilla.
4) Så snart den bärande delen är i det
nedre läget släpper du ned-knappen.
Obs! Om man fortsätter att trycka på
ned-knappen, fortsätter tidmätningen och
gardinen rör sig inte.
5) Tryck kort in My- och upp-knapparna:
den bärande delen höjs upp (i tio sekunder)
och stannar sedan. Höjningen kan avbrytas
innan de 10 sekunderna har förutit genom
att du trycker på knappen Stop.
Obs! När du trycker på My- och upp-knapparna
bekräftas sänkningstiden.
6) Om gardinen inte har nått sitt översta
läge, tryck på upp-knappen tills gardinen
når det mekaniskt reglerade översta läget.
Höjningen utförs så länge knappen är intryckt,
max. tio sekunder per tryckning.
Obs! Endast trycktiderna sparas. Det nns
ingen tidmätning när gardinen står stilla.
7) När den bärande delen är i det övre läget
släpper du upp-knappen.
Obs! Om du fortsätter att trycka in uppknappen,
fortsätter tidmätningen.
8) När du ska avsluta inlärningen av
höjnings- och sänkningstiderna, tryck på
My-knappen i cirka två sekunder tills gardinen gör
en upp- och nedrörelse. Tiderna
bekräftas, minneslagras och ett favoritläge
läggs automatiskt till.
(1)
(2)
(3)
(4)
(5)
(6)
(7)
(8)
20 Copyright © 2009 Somfy SAS. All rights reserved - V0 - 09/2009
Page 23

D ANVÄNDNING
D.1) My-lägen:
DMy-läget är olika beroende på gardintyp.
I persiennläge:
När du har ställt in tiden för höjning och
sänkning
är My-läget följande: nedre läge, lamellerna
vinklade cirka 45° (för en persienn
med lameller på 25 mm och en CTS 25).
Användaren kan ändra detta läge.
I rullgardinsläge:
När du har ställt in tiden för höjning och
sänkning är My-läget: 3/4 nedsänkt.
Detta läge kan ändras av användaren.
Användaren kan ändra detta läge.
Nyinställning:
Om du vill göra en ny inställning av My-läget
måste gardinen vara i det övre läget.
Persiennläge:
Tryck på My-knappen i cirka fem sekunder:
Gardinen yttar sig till det bentliga Myläget.
Använd upp-knappen, ned-knappen eller
ratten om det är en fjärrkontroll av typen
Modulis och ställ in My-läget igen.
Tryck in My-knappen i cirka fem sekunder
tills gardinen gör en upp- och nedrörelse.
Det nya My-läget har programmerats.
Rullgardinsläge:
Använd upp- eller ned-knappen och ställ in
gardinen till det önskade läget.
Tryck in My-knappen i cirka fem sekunder
tills gardinen gör en upp- och nedrörelse.
Det nya läget har programmerats.
Radering:
Gå till det aktuella My-läget med hjälp av en
kort tryckning på My-knappen.
Tryck in My-knappen i fem sekunder tills
gardinen gör en upp- och nedrörelse. Läget
har raderats.
21Copyright © 2009 Somfy SAS. All rights reserved - V0 - 09/2009
Page 24

D.2) Inställning av lamellernas riktningshas-
6s
6s
tighet:
Tryck på upp-knappen, ned-knappen och
My-knappen i cirka två sekunder tills per-
siennen
gör en upp- och nedrörelse.
Tryck på upp-knappen i cirka två sekunder:
Persiennen gör upp- och nedrörelser i
cykler om sex sekunder.
Använd upp- eller ned-knapparna och
ställ in persiennens hastighet igen. Varje
tryckning varierar riktningshastigheten: Den
varierar i realtid under inställningen.
När persiennen har den hastighet du önskar,
tryck på knapparna My i cirka två sekunder
tills persiennen gör en upp- och nedrörelse:
Den nya riktningshastigheten har programmerats.
D.3) Justering av fjärrkontrollrattens steg:
Tryck på upp-knappen, ned-knappen och
My-knappen i cirka två sekunder tills persien-
nen gör en upp- och nedrörelse.
Tryck på ned-knappen i cirka två sekunder
tills persiennen gör en upp- och nedrörelse.
Använd upp- och ned-knapparna och ställ in
rattens steg igen.
Du kan när som helst testa inställningen
med fjärrkontrollens ratt.
Tryck på My-knappen i cirka två sekunder
tills persiennen gör en upp- och nedrörelse.
Rattens nya steg har programmerats.
22 Copyright © 2009 Somfy SAS. All rights reserved - V0 - 09/2009
Page 25

D.4) Molnläge:
Funktionen kräver att man har en solsensor.
Läget kan endast användas med persienner.
Om du ska kunna registrera ett molnläge,
måste persiennens höjnings- och sänkningstider vara programmerade, liksom ett
My-läge.
Tryck in ned-knappen och My-knappen i
cirka två sekunder:
Persiennen ställs in i läget My.
Med hjälp av upp- eller ned-knapparna
justerar du molnläget (persiennens lameller
i horisontellt läge).
Tryck på My-knappen i cirka fem sekunder
tills persiennen gör en upp- och nedrörelse.
Molnläget har programmerats.
Nyinställning:
Om du ska ställa in molnläget igen, gör du
på samma sätt som vid den första inställningen.
Radering:
Tryck in ned-knappen och My-knappen i
cirka två sekunder.
Persiennen ställs in i molnläget.
Tryck på ned-knappen och My-knappen i
cirka fem sekunder tills persiennen gör en
upp- och nedrörelse.
Molnläget har raderats.
Anm.: Om du raderar My-läget raderas
molnläget automatiskt.
23Copyright © 2009 Somfy SAS. All rights reserved - V0 - 09/2009
Page 26

2 X
D.5) Funktion för avskildhet:
Funktionen för avskildhet är aktiv som
standard.
När användaren ställer in gardinen i det
nedre läget, avaktiveras solautomatiken.
För att aviktivera avskildhetsfunktionen.
Tryck på upp-knappen, ned-knappen och
My-knappen tills gardinen gör en upp- och
nedrörelse.
Tryck på My-knappen tills gardinen gör en
upp- och nedrörelse.
Tryck på upp-knappen i cirka två sekunder
tills gardinen gör en upp- och nedrörelse för
att godkänna solautomatiken.
För att aktivera avskildhetsfunktionen.
Tryck på ned-knappen i cirka två sekunder
tills gardinen gör en upp- och nedrörelse för
att spärra solautomatiken.
Tryck på My-knappen i cirka fem sekunder
tills gardinen gör en upp- och nedrörelse för
att bekräfta valet.
E NYINSTÄLLNING AV GARDINEN
Gå till läget för nyinställning:
När du vill gå till läget för nyinställning av
gardinen, tryck på upp- och ned-knapparna
i cirka fem sekunder tills gardinen gör en
upp- och nedrörelse.
Inställning:
Se steg:
C3a: Val av gardintyp
C3b: Motorns rotationsriktning
C3c: Rattens funktionsriktning
C3d: Gardinens höjnings- och sänkningstid
C3e: Solsensorernas funktion
Bekräfta nyinställningarna:
När du ska bekräfta gardinens nyinställnin-
gar, tryck på knappen My i cirka 5 sekunder
tills gardinen gör en DUBBEL upp- och
nedrörelse.
C3a C3b C3c C3d C3e
24 Copyright © 2009 Somfy SAS. All rights reserved - V0 - 09/2009
Page 27

A
B
2 X
3 X
F LÄGGA TILL OCH TA BORT
F.1) Lägga till eller ta bort en sändare eller
en sensor.
Tryck på programmeringsknappen på Power
1 X 2,5 DC RTS Receiver eller på sändare
A tills gardinen gör en upp- och nedrörelse.
Tryck sedan på programmeringsknappen på
sändare B. Denna programmeras om det är
en ny sändare, respektive raderas om det är
en känd sändare
F.2) Radera alla sändare eller sensorer.
Tryck in programmeringsknappen på Power 1
X 2,5 DC RTS Receiver i cirka sju sekunder.
Gardinen gör två upp- och nedrörelser:
Den första efter cirka två sekunder.
Den andra efter cirka sju sekunder.
Alla sändare har raderats.
F.3) Återgång till fabriksläge.
Tryck in programmeringsknappen på Power 1
X 2,5 DC RTS Receiver i cirka tolv sekunder.
Gardinen gör
tre upp- och nedrörelser:
Den första efter cirka två sekunder.
Den andra efter cirka sju sekunder.
Den tredje efter cirka tolv sekunder.
Alla sändare och sensorer samt höjningsoch
sänkningstiderna raderas.
Produktens fabrikskonguration återställs.
G FELSÖKNING
Ingenting fungerar:
Kontrollera kablaget.
Kontrollera motorn.
Kontrollera matningen.
Kontrollera fjärrkontrollens batteri.
Kontrollera sändarens kompatibilitet.
Kontrollera att fjärrkontrollen har programmerats
korrekt.
Kontrollera att antennen inte har gått av.
TEKNISKA DATA : sida 74
Inget My-läge:
My-läget kan endast programmeras om
gardinens höjnings- och sänkningstider
har programmerats.
Problem med funktionerna:
Kontrollera läget (persienn eller rullgardin).
Du tappar bort dig i programmeringen:
Radera hela minnet och börja om med
programmeringen igen.
25Copyright © 2009 Somfy SAS. All rights reserved - V0 - 09/2009
Page 28

TURVALLISUUS JA TÄRKEÄÄ TIETOA
• Tämän SOMFY-laitteen asennuksen saa suorittaa asuintilojen motorisoinnin ja automatisoinnin ammattilainen, jolle tämä asennusopas on suunnattu.
• Varmista ennen asennusta, että laite sopii yhteen muiden laitteiden ja varusteiden kanssa.
• Tässä asennusoppaassa kerrotaan laitteen asennuksesta, käyttöönotosta ja
käyttötavoista.
• Asentajan tulee noudattaa asennuksesta annettuja standardeja ja voimassa olevaa
kansallista lainsäädäntöä, ja selittää tuotteen käyttöolosuhteet ja huoltoohjeet asiakkaille.
• Kaikki SOMFYN määrittelemän sovellusalueen ulkopuolinen käyttö on kielletty.
Vaatimusten vastainen käyttö ja tämän ohjeen ohjeiden laiminlyönti peruuttaa SOMFYN
vastuun ja takuun.
TUOTTEEN KUVAUS
Power 2,5 DC RTS Receiver on varustettu muuntajalla ja Radio
Technology Somfy (RTS) vastaanottimella. Se mahdollistaa 24V moottoreiden
toimimisen Somfy RTS tekniikkaan perustuvien ohjauslaitteiden
kanssa.
YMPÄRISTÖ
Vahingoittuneita sähkö- ja elektroniikkalaitteita, tai käytettyjä
paristoja ei saa hävittää talousjätteiden mukana.
Vie ne keräyspisteeseen tai kierrätykslaitokseen
A YHTEENSOPIVAT SOVELLUKSET
1) Yhteensopivat säätimet
Power 1 X 2,5 DC RTS Receiver sopii yhteen kaikkien Somfy RTS -lähettimien
kanssa. Lähettimiä voi olla enintään 12 kpl ja antureita 3 kpl, yhtä 24 V:n Power 1 X
2,5 DC RTS Receiver kohden.
26 Copyright © 2009 Somfy SAS. All rights reserved - V0 - 09/2009
Page 29

2) Yhteensopivat kaihtimet:
A
C
B
155 mm
+/-0,75
155 mm +/-0,75
53,6 mm
+/-0,38
121 mm
122 mm
a. Sälekaihtimet
b. Vekkikaihtimet
c. Paperiset laskoskaihtimet
d. Muotoillut laskoskaihtimet
e. Laskoskaihtimet
f. Pinoleum-tyyppiset kaihtimet
B ASENNUS JA JOHDOTUS
A : 198 - 255V ~ 50Hz 0.5A
B : 24V TBTS +/- 5% 2.5A
C : PROG -Taste
3 cm
3 cm
a b c
d e f
150 cm
27Copyright © 2009 Somfy SAS. All rights reserved - V0 - 09/2009
Page 30

IJoitakin määritelmiä
Kaihtimen tyypin valinta:
Power 1 X 2,5 DC RTS receiver voi toimia kahdessa eri tilassa lopputuotteen
mukaisesti:
Sälekaihdintilassa tai rullakaihdintilassa.
Power 1 X 2,5 DC RTS Receiver oletusasetuksena on sälekaihdintila.
Tällä toiminnolla Power 1 X 2,5 DC RTS Receiver voidaan muuttaa toimimaan käytettävän kaihtimen tyypin mukaan.
Moottorin pyörimissuunta:
Vastaanottimen asennuksen tai uudelleensäädön yhteydessä moottorin pyörimissuunta
voidaan muuttaa kaukosäätimen avulla. Tarkoitus on saada kaihdin nousemaan,
kun kaukosäätimen painiketta ylös painetaan.
Säätörullan käyttösuunta:
Toiminnon avulla voit vaihtaa rullan pyörityssuunnan vastaamaan toivomaasi säleiden
kääntymissuuntaa.
Kaihtimen nousu- ja laskuaika:
Tarkoitus on tallentaa vastaanottimeen kaihtimen noston ja laskun toiminta-aika.
Tällä säädöllä kaihtimen toiminta voidaan säätää optimaaliseksi ja My-asento
asetetaan automaattisesti. My-asentoa ei voida käyttää ilman tätä säätöä.
Aurinkoanturien toiminta:
Toiminto on säädetty oletuksena ylöspäin liikkuvalle tuoteelle, jonka moottori sijaitsee
ylhäällä.
Kaihtimen automaattiseen ohjaukseen voidaan käyttää voidaan RTS -aurinkoanturia
(esim.: kaihdin sulkeutuu auringon tullessa esiin).
Mikäli moottori sijaitsee kaihtimen alaosassa, voi asetuksen muuttaa.
My-asento:
My-asento on käyttäjän asettama mieliasento tiettyjä tilanteita varten: esimerkiksi kun
tietokoneella työskennellään täydessä päivänvalossa, kaihtimet lasketaan puoleenväliin jne.
Säleiden kääntönopeuden säätö:
Toiminto on käytettävissä vain 3 -painikkeisella kaukosäätimellä ja vain sälekaihdin-
tilassa!
Kun sälekaihtimen säleitä halutaan säätää, se voidaan tehdä painamalla kaukosäätimen ylös- ja alas-painikkeita pitkään. Kääntönopeutta voidaan säätää.
Kaukosäätimen säätörullan askelmien säätö:
Toiminto on käytettävissä vain Modulis -rullakaukosäätimellä ja vain sälekaihdinti-
lassa!
Kun sälekaihtimen säleitä halutaan säätää, se voidaan tehdä Modulis-kaukosäätimen
säätörullan avulla. Tämän toiminnon avulla säädetään säätörullan herkkyyttä.
Auringonpaisteen katoamisasento:
Toiminto mahdollistaa säleiden automaattisen avaamisen auringon kadotessa.
Toiminto vaatii erillisen aurinkoanturin.
Yksityisyysasento:
Tämän toiminnon avulla auringonsuoja-automatiikka voidaan kytkeä käyttöön tai pois
käytöstä aihtimen ollessa suljettuna yksityisyydensuojaustarkoituksessa.
Toiminto vaatii erillisen aurinkoanturin.
p30
p30
p30
p32
p31
p33
p34
p34
p35
p36
28 Copyright © 2009 Somfy SAS. All rights reserved - V0 - 09/2009
Page 31

C KAIHTIMEN SÄÄTÖ
2x0,75mm
2
2x0,25mm
2
(Perusasetukset. Vaativat siirtymisen
säätötilaan ja säätöjen vahvistamisen.)
Raja-asennot määritellään moottorin ja/tai
erillisen rajayksikön avulla eikä Power 2,5 DC
RTS receiver kautta.
C.1) Kytke Power 2,5 DC RTS vastaanotin
verkkovirtaan.
(Staattisen sähkön muodostumista on
vältettävä.)
Jos vastaanottimeen on kyteketty useampia
moottoreita, niiden säätö tapahtuu yhtäaikaa.
C.2) Käyttöönotto kaukosäätimen avulla:
Jos käyttöönotto suoritetaan kaukosäätimen
avulla, niin kaikki Power 2,5 DC RTS
vastaanottimet,,jotka ovat kytkettynä, ohjelmoidaan samaan aikaan.
Ohjelmointi:
Paina lyhyesti kaukosäätimen painikkeita
ylös ja alas.
Kaihdin tekee edestakaisen liikkeen.
Kaukosäädin on rekisteröity väliaikaisesti.
Säätö:
Katso seuraavat vaiheet:
C3a: Kaihtimen tyypin valinta
C3b: Moottorin pyörimissuunta
C3c: Säätörullan käyttösuunta
C3d: Aurinkoanturien toiminta
C3e: Kaihtimen nousu- ja laskuaika
C3a C3b C3c C3d C3e
Kaukosäätimen tallentaminen:
Paina lyhyesti kaukosäätimen
ohjelmointipainiketta, kaihdin tekee
edestakaisen liikkeen. Kaukosäädin on
rekisteröity pysyvästi.
29Copyright © 2009 Somfy SAS. All rights reserved - V0 - 09/2009
Page 32

C.3) Kaihtimen säätö ja uudelleensäätö:
C.3.a) Kaihtimen tyypin valinta:
Siirry tilasta toiseen painamalla painikkeita
My ja alas noin 2 s. ajan, kunnes kaihdin
tekee edestakaisen liikkeen.
Jos kaihtimen liike on nopea, Power 1 X 2,5
DC RTS Receiver on rullakaihdintilassa.
Jos kaihtimen liike on hidas, Power 1 X 2,5
DC RTS Receiver on sälekaihdintilassa.
C.3.b) Moottorin pyörintäsuunta:
Paina painiketta ylös tai alas vahvistaaksesi
pyörimissuunnan.
Jos suunta on väärä, paina My-painiketta
2 s., kunnes moottori tekee edestakaisen
liikkeen.
Varmista ylös- ja alas-painikkeista, että
pyörimissuunta on oikea.
Toimenpide voidaan tehdä useita kertoja.
Jokainen My-painikkeen 2 s. kestävä
painallus muuttaa pyörimissuunnan.
C.3.c) Säätörullan käyttösuunta:
Kierrä säätörullaa varmistaaksesi säleiden
säätösuunnan. Jos suunta on väärä, paina
ylös- ja alas-painikkeita noin 2 s., kunnes
kaihdin tekee edestakaisen liikkeen.
Säätörullan toimintasuunta kääntyy.
Toimenpide voidaan tehdä useita kertoja.
Jokainen noin 2 s. mittainen ylös- tai
alaspainikkeen painaminen vaihtaa
säätörullan toimintasuunnan.
Huomaa: Säätörullan toimintasuunta ei riipu
moottorin pyörimissuunnasta.
30 Copyright © 2009 Somfy SAS. All rights reserved - V0 - 09/2009
Page 33

C.3.d) Aurinkoanturien toiminta:
Oletusarvoisesti toimintasuunta on säädetty
kaihtimen yläosaan asetetulle moottorille.
Toimintasuunta voidaan ohjelmoida
vastaamaan kaihtimen alaosaan kiinnitettyä
moottoria.
Säädön muuttamiseksi:
Paina ylös- ja My-painiketta noin 2 s. ajan,
kunnes kaihdin tekee edestakaisen liikkeen.
Paina alas-painiketta noin 2 s. ajan, kunnes
kaihdin tekee edestakaisen liikkeen.
säätääksesi Power 1 X 2,5 DC RTS
vastaanottimen käänteiseen anturitilaan
(moottori kaihtimen alaosassa).
Paina ylös-painiketta noin 2 s. ajan, kunnes
kaihdin tekee edestakaisen liikkeen
säätääksesi Power 1 X 2,5 DC RTS
vastaanottimen normaaliin anturitilaan
(moottori kaihtimen yläosassa).
Paina My-painiketta noin 2 s., kunnes
kaihdin tekee edestakaisen liikkeen
vahvistaaksesi anturitilan valinnan.
31Copyright © 2009 Somfy SAS. All rights reserved - V0 - 09/2009
Page 34

C.3.e) TKaihtimen nousu- ja laskuaika:
1) Mene kaihtimen ylä-ääriasentoon.
Kaihdin pysähtyy automaattisesti mekaaniseen
ääriasentoon.
(1)
2) Paina lyhyesti My- ja alas-painikkeita:
laite laskeutuu (10 s. ajan) ja pysähtyy.
Laskeutuminen voidaan keskeyttää Stop-painikkeella ennen kuin 10 s. on kulunut.
3) Jos kaihdin ei ole ala-asennossaan,
paina alas-painiketta, kunnes kaihdin on
mekaanisesti säädetyssä ala-asennossaan.
Kaihdin laskee, kun painiketta painetaan
enimmillään 10 s. ajan painallusta kohti.
Huomaa: Vain painallusajat tallentuvat. Aikaa
ei mitata, kun kaihdin on pysähtyneenä.
4) Kun laite on ala-asennossa, päästä alaspainike.
Huomaa: Jos alas-painikkeen painamista
jatketaan, ajan mittaus jatkuu eikä kaihdin liiku.
5) Paina lyhyesti My- ja ylös-painikkeita:
Laite nousee (10 s. ajan) ja pysähtyy.
Nousu voidaan keskeyttää Stop-painikkeella
ennen kuin 10 s. on kulunut.
Huomaa: Kun painetaan painikkeita My ja
ylös, laskeutumisaika on vahvistettu.
6) Jos kaihdin ei ole yläasennossaan,
paina ylös-painiketta, kunnes kaihdin on
mekaanisesti säädetyssä yläasennossaan.
Kaihdin nousee, kun painiketta painetaan
enimmillään 10 s. ajan painallusta kohti.
Huomaa: Vain painallusajat tallentuvat. Aikaa
ei mitata, kun kaihdin on pysähtyneenä.
7) Kun laite on yläasennossa, päästä ylöspainike.
Huomaa: Jos ylös-painikkeen painamista
jatketaan, ajan mittaus jatkuu.
8) Lopeta nousu- ja laskuaikojen opetus
painamalla My-painiketta noin 2 s., kunnes
kaihdin tekee edestakaisen liikkeen. Ajat on
vahvistettu, tallennettu muistiin ja mieliasento on
määritelty automaattisesti.
(2)
(3)
(4)
(5)
(6)
(7)
(8)
32 Copyright © 2009 Somfy SAS. All rights reserved - V0 - 09/2009
Page 35

D KÄYTTÖ
(Käyttäjän asetukset. Tehdään siirtymättä
kohdassa C mainittuun säätötilaan.)
D.1) My-asennot:
My-asento riippuu kaihtimen tyypistä.
Sälekaihdintila:
Kun nousu- ja laskuajat on määritelty,
My-asento on seuraava: Ala-asennossa,
säleiden kulma noin 45° (sälekaihtimessa,
jonka säleet 25 mm ja jossa on CTS 25).
Käyttäjä voi muokata tätä asentoa.
Rullakaihdintilassa:
Kun nousu- ja laskuajat on määritelty,
My-asento on:
Laskettuna 3/4 koko korkeudesta.
Käyttäjä voi säätää tämän asennon
uudelleen.
Käyttäjä voi muokata tätä asentoa.
Uudelleensäätö:
Kaihtimen on oltava yläasennossa
My-asennon uudelleensäätöä varten.
Sälekaihdintila:
Paina My-painiketta noin 5 s.
Kaihdin menee voimassa olevaan
Myasentoon.
Käytä ylös- tai alas-painikkeita tai Moduliskaukosäätimessä
säätörullaa My-asennon
säätämiseen.
Paina My-painiketta noin 5 s., kunnes
kaihdin tekee edestakaisen liikkeen.
Uusi My-asento on tallennettu.
Rullakaihdintila:
Aseta haluttu uusi asento ylös- ja alaspainikkeilla.
Paina My-painiketta noin 5 s., kunnes
kaihdin tekee edestakaisen liikkeen ja uusi
asento on tallennettu.
Poistaminen:
Mene nykyiseen My-asentoon My-painikkeen
lyhyellä painalluksella.
Paina My-painiketta 5 s, kunnes kaihdin
tekee edestakaisen liikkeen. My -asento on
poistettu
33Copyright © 2009 Somfy SAS. All rights reserved - V0 - 09/2009
Page 36

D.2) Säleiden kääntönopeuden säätö:
6s
6s
Paina ylös-, alas- ja My-painikkeita noin 2
s. ajan, kunnes kaihdin tekee edestakaisen
liikkeen.
Paina ylös-painiketta noin 2 s.:
Kaihdin tekee edestakaisia liikkeitä 6 s.
sykleissä.
Säädä kaihtimen nopeus uudelleen ylös- ja
alas-painikkeilla. Jokainen painallus
muuttaa kääntönopeutta: Se vaihtelee
reaaliajassa säädön aikana.
Kun nopeus on sopiva, paina My-painiketta
noin 2 s., kunnes kaihdin tekee edestakaisen
liikkeen: Uusi kääntönopeus on tallennettu.
D.3) Kaukosäätimen säätörullan askelmien
säätö:
Paina ylös-, alas- ja My-painikkeita noin 2
s. ajan, kunnes kaihdin tekee edestakaisen
liikkeen.
Paina alas-painiketta noin 2 s. ajan, kunnes
kaihdin tekee edestakaisen liikkeen.
Säädä säätörullan askeleet ylös- ja
alas -painikkeilla.
Säätöjä voidaan testata koska tahansa
kaukosäätimen säätörullalla.
Paina My-painiketta noin 2 s., kunnes
kaihdin tekee edestakaisen liikkeen.
Säätörullan uudet askeleet on tallennettu.
34 Copyright © 2009 Somfy SAS. All rights reserved - V0 - 09/2009
Page 37

D.4) Auringonpaisteen katoamisasento:
Toiminto vaatii aurinkoanturin.
Sitä käytetään vain sälekaihtimissa.
Jotta voit tallentaa auringonpaisteen
katoamisasennon, kaihtimen noston ja laskun
toiminta-aika, sekä My-asento on ensin
tallennettava.
Paina alas- ja My-painikkeita noin 2 s.:
Kaihdin menee My-asentoon.
Säädä auringonpaisteen katoamisasento
käyttämällä painikkeita ylös ja alas (kaihtimen
säleet ovat vaakasuorassa).
Paina My-painiketta 5 s., kunnes kaihdin
tekee edestakaisen liikkeen. Auringonpaisteen
katoamisasento on tallennettu.
Uudelleensäätö:
Säätääksesi auringonpaisteen katoamisasentoa
uudelleen, toimi samoin kuin
ensimmäisen säädön yhteydessä.
Poistaminen:
Paina alas- ja My-painikkeita noin 2 s.
Kaihdin menee auringonpaisteen
katoamisasentoon.
Paina alas- ja My-painiketta noin 5 s. ajan,
kunnes kaihdin tekee edestakaisen liikkeen.
Auringonpaisteen katoamisasento on
poistettu.
Huomaa: Jos My-asento poistuu,
auringonpaisteen katoamisasento poistuu
automaattisesti.
35Copyright © 2009 Somfy SAS. All rights reserved - V0 - 09/2009
Page 38

2 X
D.5) Yksityisyystoiminto:
Yksityisyystoiminto on aktivoitu oletuksena.
Kun käyttäjä säätää kaihtimen ala-asentoon
alas-painikkeella, aurinkoautomatiikka
kytkeytyy pois päältä.
Paina ylös-, alas- ja My-painikkeita, kunnes
kaihdin tekee edestakaisen liikkeen.
Paina My-painiketta, kunnes kaihdin tekee
edestakaisen liikkeen.
Paina ylös-painiketta noin 2 s., kunnes
kaih-din tekee edestakaisen liikkeen salliakseen
aurinkoautomatiikan toiminnan.
Paina alas-painikketta noin 2 s., kunnes
kaih-din tekee edestakaisen liikkeen estääkseen
aurinkoautomatiikan toiminnan.
Paina My-painiketta noin 5 s., kunnes kaihdin
tekee edestakaisen liikkeen valinnan
vahvistamiseksi.
E KAIHTIMEN UUDELLEENSÄÄTÖ
Siirtyminen uudelleensäätötilaan:
Päästäksesi säätämään kaihdinta uudelleen,
paina ylös- ja alas-painikkeita noin
5 s., kunnes kaihdin tekee edestakaisen
liikkeen.
Säätö:
Katso seuraavat vaiheet:
C3a: Kaihtimen tyypin valinta
C3b: Moottorin pyörimissuunta
C3c: Säätörullan käyttösuunta
C3d: Kaihtimen nousu- ja laskuaika
C3e: Aurinkoanturien toiminta
Vahvista uudelleen tehdyt säädöt:
Vahvista kaihtimen uudelleen tehdyt säädöt
painamalla My-painiketta noin 5 s. ajan,
kunnes kaihdin tekee KAKSI edestakaista
liikettä.
C3a C3b C3c C3d C3e
36 Copyright © 2009 Somfy SAS. All rights reserved - V0 - 09/2009
Page 39

A
B
2 X
3 X
F LISÄYS JA POISTO
F.1) Lähettimen tai anturin lisäys tai poisto.
Paina Power 1 X 2,5 DC RTS Receiver tai
ohjelmoidun lähettimen A ohjelmointipainiketta, kunnes kaihdin tekee edestakaisen
liikkeen.
Paina sitten uuden lähettimen B
ohjelmointipainiketta. Se tallennetaan, jos
kyseessä on uusi lähetin tai poistetaan, jos
kyseessä on tunnettu lähetin.
Huom! Jos ensimmäistä kaukosäädintä ei ole
ohjelmoitu, voit käyttää tätä tilaa ensimmäiseen
ohjelmointiin.
F.2) Pyyhi kaikki lähettimet tai anturit.
Paina Power 1 X 2,5 DC RTS vastaanottimen
ohjelmointipainiketta noin 7 s. Kaihdin tekee
kaksi edestakaista liikettä:
Ensimmäinen kestää noin 2 s.
Toinen kestää noin 7 s.
Kaikki lähettimet on poistettu.
F.3) Tehdasasetusten palautus
Paina Power 1 X 2,5 DC RTS vastaanottimen
ohjelmointipainiketta noin 12 s. Kaihdin tekee
kolme edestakaista
liikettä:
Ensimmäinen kestää noin 2 s.
Toinen kestää noin 7 s.
Kolmas kestää noin 12 s.
Kaikki lähettimet ja anturit on poistettu,
nousu- ja laskuajat on poistettu.
Laitteen asetukset ovat siinä tilassa, kun ne
olivat sen lähtiessä tehtaalta.
G KORJAUS
Mikään ei toimi:
Tarkasta johdot.
Tarkasta moottori.
Tarkista virransyöttö.
Tarkasta kaukosäätimen paristo.
Tarkasta lähettimen yhteensopivuus.
Tarkasta, että kaukosäädin on tallennettu
oikein.
Tarkasta, ettei antenni ole katkennut.
TEKNISET TIEDOT :
sivu 30
Ei My-asentoa:
My-asentoa ei ole voitu tallentaa, jos
kaihtimen nousu- ja laskuaikoja ei ole
tallennettu.
Ongelma seuraavissa toiminnoissa:
Tarkasta tila (sälekaihdintila tai rullakaihdintila).
Ohjelmoinnin katoaminen:
Tyhjennä koko muisti ja aloita ohjelmointi
uudestaan.
37Copyright © 2009 Somfy SAS. All rights reserved - V0 - 09/2009
Page 40

SIKKERHET OG VIKTIG INFORMASJON
• Dette produktet fra SOMFY skal installeres av fagfolk, og denne installasjonsguiden
er beregnet på dem.
• Før du begynner monteringen, må du kontrollere dette produktets samsvar med tilknyttet
utstyr og tilbehør.
• Installasjonsguiden beskriver installasjon, idriftsetting og bruksmåte for produktet.
• Installatøren skal dessuten følge (eller overholde) gjeldende normer og lovgiving i instal-
lasjonslandet og informere kundene om hvordan produktet skal brukes og vedlikeholdes.
• Enhver anvendelse utenom bruksområdet som er fastsatt av Somfy, betraktes som ikke
hensiktsmessig bruk. I likhet med enhver annen manglende overholdelse av instruksjonene
i denne anvisningen, vil en slik bruk medføre at Somfys ansvar og garanti opphører.
PRODUKTBESKRIVELSE
Power 1 X 2,5 DC RTS er en mottager med inntegrert strømforsyning og med Radio Tech-
nology Somfy ( RTS).Tillater 24V kabelbaserte motorer å brukes sammen med alle Somfy
kontroller og sensorer utstyrt med Radio Technology Somfy (RTS).
MILJØVERN
Ødelagte elektriske og elektroniske produkter og brukte batterier skal ikke
kastes i husholdningsavfallet.
De skal leveres inn på en samlestasjon eller en godkjent sentral for å sikre at
de blir resirkulert.
A KOMPATIBLE ENHETER
1) Kompatible fjernkontroller:
Power 1x2,5DC RTS-mottagaren är kompatibel med sändarna Somfy RTS, med
max. 12 sändare och 3 givare med mottagare RTS DC 24V.
38 Copyright © 2009 Somfy SAS. All rights reserved - V0 - 09/2009
Page 41

2) Kompatible solskjermingsenheter:
A
C
B
155 mm
+/-0,75
155 mm +/-0,75
53,6 mm
+/-0,38
121 mm
122 mm
a. Persienner
b. Plisségardiner
c. Trepersienner
d. Båtgardiner
e. Liftgardiner
f. Pinoleum-persienner
B INSTALLASJON OG KABLING
A : 198 - 255V ~ 50Hz 0.5A
B : 24V TBTS +/- 5% 2.5A
C : PROG -Taste
3 cm
3 cm
a b c
d e f
150 cm
39Copyright © 2009 Somfy SAS. All rights reserved - V0 - 09/2009
Page 42

Nyttig informasjon
Valg av solskjerming:
Power 1 X 2,5 DC RTS mottageren kan fungere i to modus:
Med persienner og med rullegardiner.
Som standard er Power 1 X 2,5 DC RTS mottageren innstilt i persiennemodus.
Med denne funksjonen kan du innstille Power 1 X 2,5 DC RTS mottageren etter den
typen solskjerming du bruker.
Motorens rotasjonsretning:
Motorens rotasjonsretning kan endres med fjernkontrollen, både under montering
og senere. Dette kan gjøres slik at rullegardinen eller persiennen heves ved trykk på
oppknappen på fjernkontrollen.
Scrollhjulets driftsretning:
Denne funksjonen gjelder bare for Modulis-fjernkontroll.
Med den kan du stille inn dreiebryterens driftsretning slik at den stemmer med ønsket
retning på lamellene.
Hevetid og senketid:
Hensikten er å stille inn driftstiden for persiennen eller rullegardinen ved heving og
senking, ikke stille inn endeposisjonene.
Med denne innstillingen kan du optimalisere driften av utstyret og automatisk
bestemme en My-posisjon. Uten denne innstillingen er det ikke mulig å bruke en
My-posisjon.
Bruk av solsensorene:
Denne funksjonen gjelder bare for rullegardiner.
En RTS-solsensor kan brukes til å styre rullegardinene automatisk (for eksempel:
Lukke rullegardinen hvis sola kommer frem).
Det går an å justere solsensorens parametere slik at den fungerer best mulig.
My-posisjoner:
My-posisjonen er utstyrets favorittposisjon i forskjellige situasjoner: Du kan for eksem-
pel justere posisjonen når du skal arbeide ved datamaskinen midt på dagen ved
å senke rullegardinen eller persiennen halvveis osv.
Innstilling av lamellhastigheten:
Denne funksjonen gjelder bare for persienner og fjernkontroller med tre knapper.
Når man vil snu lamellene på en persienne, kan man gjøre det ved å trykke lenge på
opp- eller nedknappen på fjernkontrollen. Hastigheten lamellene beveger seg med,
kan justeres.
Justering av trinnene på fjernkontrollens scrollhjul:
Denne funksjonen gjelder bare for Modulis-fjernkontroll.
Når man vil snu lamellene på en persienne, kan dette gjøres ved hjelp av
scrollhjulet på Modulis-fjernkontrollen. Med denne funksjonen kan du justere bryte-
rens følsomhet.
Posisjon skygge:
Denne funksjonen gjelder bare for persienner. Med den kan du stille inn en posisjon
av lamellene i tilfelle sola forsvinner.
Denne funksjonen krever bruk av en solsensor.
Funksjon privatliv:
Med denne funksjonen kan du aktivere eller ikke aktivere solautomatikken av hensyn
til privatlivet.
Denne funksjonen krever bruk av en solsensor.
p42
p42
p42
p44
p43
p45
p46
p46
p47
p48
40 Copyright © 2009 Somfy SAS. All rights reserved - V0 - 09/2009
Page 43

C INNSTILLING AV SOLSKJERMINGEN
2x0,75mm
2
2x0,25mm
2
Endeposisjonene blir styrt av motoren og
tilbehøret, og ikke av Power 1x2,5 DC RTS
mottageren.
C.1) Tilkobling av Power 1x2,5 DC RTS
Receiver: Connect the Power 1x2,5DC RTS
Receiver (Det er nødvendig og utvise forsiktighet for å beskytte Power 1x2,5DC RTS
Receiver fra feilkoblinger)
Hvis ere motorer er tilkoblet til Power 1x
2,5DC RTS Receiver vil programeringen bli
lik på alle motorene..
C.2) Programmering via fjernkontroll:Merk:
Ved betjening via fjernkontroll, er alle Power
1 x 2,5 DC RTS Receivere justert likt hvis
ere Power 1 x2,5 DC RTS Receivere er
tilkoblet.
Tilpasning:
Trykk kort på oppknappen og nedknappen
på fjernkontrollen.
Utstyret gjør en opp og ned-bevegelse.
Fjernkontrollen er registrert midlertidig.
Innstilling:
Se følgende punkter:
C3a: Valg av solskjerming:
C3b: Motorens rotasjonsretning
C3c: Scrollhjulets rotasjonsretning
C3d: Bruk av solsensorene
C3e: Hevetid og senketid for utstyret
Registrering :
Trykk kort på programmeringsknappen
på fjernkontrollen. Utstyret gjør en opp og
ned-bevegelse. Fjernkontrollen er registrert
permanent.
C3a C3b C3c C3d C3e
41Copyright © 2009 Somfy SAS. All rights reserved - V0 - 09/2009
Page 44

C.3) Innstilling eller justering av utstyret:
C.3.a) Valg av type solskjerming:
For å skifte fra en modus til den andre
trykker du på My-knappen og nedknappen
i omtrent to sekunder helt til utstyret gjør en
opp- og nedbevegelse.
Hvis opp og ned-bevegelsen er rask, er
RTS DC-mottakeren i rullegardinmodus.
Hvis opp og ned-bevegelsen er langsom, er
RTS DC-mottakeren i persiennemodus.
C.3.b) Motorens rotasjonsretning:
Trykk inn opp- eller nedknappen for å kontrol-
lere rotasjonsretningen.
Hvis retningen er feil, trykker du i to sekunder
på My-knappen helt til utstyret gjør en
opp- og nedbevegelse.
Kontroller at rotasjonsretningen er riktig ved
hjelp av opp- eller nedknappen.
Denne operasjon kan gjentas ere ganger.
Hver gang du trykker på My-knappen i to
sekunder, endres rotasjonsretningen.
C.3.c) Driftsretning for scrollhjulet:
Drei bryteren rundt for å kontrollere hvilken
retning lamellene beveger seg i. Hvis
retningen
er feil, trykker du på opp- og nedknappene
i ca. to sekunder helt til utstyret gjør
en opp- og ned bevegelse. Scrollhjulets
driftsretning er endret.
Denne operasjonen kan gjentas ere
ganger.
Hver gang du trykker ca. to sekunder på
opp- og nedknappene endres scrollhjulets
rotasjonsretning.
Merk: Scrollhjulets driftsretning er uavhengig
av motorens rotasjonsretning.
42 Copyright © 2009 Somfy SAS. All rights reserved - V0 - 09/2009
Page 45

C.3.d) Bruk av solsensorene:
Som standard reguleres rotasjonsretningen
ut fra en motor som er plassert på toppen
av persiennen eller rullegardinen.
Du kan programmere rotasjonsretningen
for produkter som har motoren plassert
nederst.
For å endre driftsretningen gjør du slik:
Trykk på oppknappen og My-knappen i
omtrent to sekunder helt til utstyret gjør en
opp- og nedbevegelse.
Trykk på nedknappen i omtrent to sekunder
helt til utstyret gjør en opp- og ned-bevegelse
for å stille inn 24 V DC RTS-modulen
i omvendt sensormodus (motor nede på
utstyret).
Trykk på oppknappen i omtrent to sekunder
helt til utstyret gjør en opp- og ned-bevegelse
for å stille inn 24 V DC RTS-modulen i
normal modus (motor oppe på utstyret).
Trykk på My-knappen i ca. to sekunder helt
til utstyret gjør en opp og ned-bevegelse for
å bekrefte valget av sensormodus.
43Copyright © 2009 Somfy SAS. All rights reserved - V0 - 09/2009
Page 46

C.3.e) Utstyrets hevetid og senketid:
1) Kjør utstyret helt til øvre endestopp. Utstyret
stanser automatisk på det mekaniske
endestoppet.
2) Trykk kort på My-knappen og nedknappen:
Utstyret går nedover (i ti sekunder) og
stanser. Du kan stanse senkingen før det er
gått ti sekunder ved å trykke på stoppknappen.
3) Hvis utstyret ikke er i nedre endeposisjon,
trykker du på nedknappen helt til
utstyret når den mekanisk innstilte nedre
endeposisjonen. Senkingen utføres så
lenge man trykker på knappen i maksimalt ti
sekunder per trykk.
NB! Det er bare trykktidene som blir registrert.
Tiden måles ikke når utstyret er i ro.
4) Når utstyret er i nedre endeposisjon
slipper du nedknappen.
NB! Hvis man fortsetter å trykke på nedknappen,
vil målingen av tiden fortsette, men utstyret
beveger seg ikke.
5) Trykk kort på My-knappen og oppknappen:
Utstyret går oppover (i ti sekunder) og stanser.
Du kan stanse hevingen før det er gått ti sekunder
ved å trykke på stoppknappen.
NB! Når du trykker på My- og oppknappen,
bekreftes senketiden.
6) Hvis utstyret ikke er i øvre endeposisjon,
trykker du på oppknappen helt til utstyret
når den mekanisk innstilte øvre endeposisjonen.
Hevingen utføres så lenge man trykker på
knappen
i maksimalt ti sekunder per trykk.
NB! Det er bare trykktidene som blir registrert.
Tiden måles ikke når utstyret er i ro.
7) Når utstyret er i øvre endeposisjon,
slipper du oppknappen.
NB! Hvis du fortsetter å trykke på oppknappen,
fortsetter målingen av tiden.
8) For å avslutte programmeringen av hevetid
og senketid, trykker du på My-knappen i
omtrent to sekunder helt til utstyret gjør en
opp og ned-bevegelse. Tidene blir bekreftet,
lagret og en favorittstilling blir automatisk
tildelt.
(1)
(2)
(3)
(4)
(5)
(6)
(7)
(8)
44 Copyright © 2009 Somfy SAS. All rights reserved - V0 - 09/2009
Page 47

D BRUK
D.1) My-posisjoner:
My-posisjonen varierer avhengig av om det
gjelder rullegardiner eller persienner.
Persienner:
Etter innstillingen av heve- og senketid er
My-stillingen som følger: Nedre endeposis-
jon, lamellene omtrent 45° (gjelder persienner
med 25 mm lameller og CTS 25).
Brukeren kan endre denne posisjonen.
Rullegardiner:
Etter innstillingen av heve- og senketid er
My-stillingen: 3/4 nede.
Denne posisjonen kan endres av brukeren.
Brukeren kan endre denne posisjonen.
Justering:
For å kunne justere My-posisjonen må
utstyret være i øvre endeposisjon.
Persienner:
Trykk på My-knappen i ca. 5 sekunder:
Persiennen går til gjeldende My-posisjon.
Du kan nå justere My-posisjonen ved hjelp
av oppknappen og nedknappen eller
scrollhjulet på en Modulis-fjernkontroll.
Trykk på My-knappen i omtrent fem
sekunder helt til persiennen gjør en opp- og
nedbevegelse.
Den nye My-posisjonen er registrert.
Rullegardiner:
Bruk opp- og nedknappene til å plassere
rullegardinen i ønsket posisjon.
Trykk på My-knappen i ca. fem sekunder
helt til rullegardinen gjør en opp- og nedbevegelse;
den nye posisjonen er registrert.
Sletting:
Gå til gjeldende My-posisjon med et kort
trykk på My-knappen.
Trykk på My-knappen i fem sekunder helt
til utstyret gjør en opp- og nedbevegelse;
posisjonen er slettet.
45Copyright © 2009 Somfy SAS. All rights reserved - V0 - 09/2009
Page 48

D.2) Innstilling av lamellhastigheten:
6s
6s
Trykk på oppknappen, nedknappen og
My-knappen i omtrent to sekunder helt til
persiennen gjør en opp og ned-bevegelse.
Trykk på oppknappen i ca. to sekunder:
Persiennen gjør opp og ned-bevegelser
med sykluser på seks sekunder.
Du kan nå justere persiennens hastighet
ved hjelp av opp- og nedknappene. For
hvert trykk endres lamellhastigheten: Den
varierer i reell tid under innstillingen.
Når du er fornøyd med hastigheten, trykker
du på My-knappen i ca. to sekunder helt til
persiennen gjør en opp- og nedbevegelse:
Den nye lamellhastigheten er registrert.
D.3) Justering av trinnene på fjernkontrollens
dreiebryter:
Trykk på oppknappen, nedknappen og
My-knappen i omtrent to sekunder helt til
persiennen gjør en opp og ned-bevegelse.
Trykk på nedknappen i omtrent to sekunder
helt til utstyret gjør en opp- og nedbevegelse.
Du kan nå justere trinnene på scrollhjulet
ved hjelp av opp- og nedknappene.
Du kan når som helst teste innstillingen ved
hjelp av scrollhjulet på fjernkontrollen.
Trykk på My-knappen i omtrent to sekunder
helt til utstyret gjør en opp og ned-bevegelse.
De nye trinnene på scrollhjulet er
registrert.
46 Copyright © 2009 Somfy SAS. All rights reserved - V0 - 09/2009
Page 49

D.4) Posisjon skygge:
Denne funksjonen krever bruk av en
solsensor.
Den kan bare brukes for persiennene.
For å kunne registrere en posisjon skygge,
må persiennens heve- og senketid være
registrert og dessuten en My-posisjon.
Trykk på nedknappen og My-knappen i ca.
to sekunder:
Persiennen går til My-posisjonen.
Du kan nå justere skyggeposisjonen
(vannrette lameller) ved hjelp av opp- og
nedknappene.
Trykk på My-knappen i omtrent fem sekunder
helt til persiennen gjør en opp- og
nedbevegelse. Skyggeposisjonen er registrert.
Justering:
For å endre skyggeposisjonen går du frem
på samme måte som under den første
reguleringen.
Sletting:
Trykk på nedknappen og My-knappen i ca.
to sekunder
Persiennen går til skyggeposisjonen.
Trykk på nedknappen og My-knappen i
omtrent fem sekunder helt til persiennen
gjør en opp og ned-bevegelse.
Skyggeposisjonen er slettet.
Merk: Hvis du sletter My-posisjonene, vil
skyggeposisjonen bli slettet automatisk.
47Copyright © 2009 Somfy SAS. All rights reserved - V0 - 09/2009
Page 50

2 X
D.5) Funksjon privatliv:
Som standard er funksjonen privatliv
aktivert.
Når brukeren sender utstyret i lav
endeposisjon, deaktiveres solautomatikken.
Trykk på oppknappen, nedknappen og
My-knappen helt til utstyret gjør en opp og
ned-bevegelse.
Trykk på My-knappen helt til utstyret gjør en
opp og ned-bevegelse.
Trykk på oppknappen i ca. to sekunder helt til
utstyret gjør en opp og ned-bevegelse for å
aktivere solautomatikken.
Trykk på nedknappen i ca. to sekunder helt til
utstyret gjør en opp og ned-bevegelse for å
koble ut solautomatikken.
Trykk på My-knappen i omtrent fem
sekunder helt til utstyret gjør en opp og
nedbevegelse for å bekrefte valget.
E JUSTERING AV SOLSKJERMINGEN
Skift til justering:
For å skifte til justering av utstyret trykker du
på oppknappen og nedknappen i omtrent
fem sekunder helt til utstyret gjør en opp og
ned-bevegelse.
Innstilling:
Se følgende punkter:
C3a: Valg av solskjerming:
C3b: Motorens rotasjonsretning
C3c: Scrollhjulets driftsretning
C3d: Hevetid og senketid for utstyret
C3e: Bruk av solsensorene
Bekrefte justeringene:
For å bekrefte de nye innstillingene av
utstyret trykker du på My-knappen i ca. fem
sekunder helt til utstyret gjør en DOBBEL opp
og ned-bevegelse.
C3a C3b C3c C3d C3e
48 Copyright © 2009 Somfy SAS. All rights reserved - V0 - 09/2009
Page 51

A
B
2 X
3 X
F LEGGE TIL OG SLETTE
F.1) Legge til eller slette en sender eller en
sensor.
Trykk på programmeringsknappen for RTSmodulen eller sender A helt til utstyret gjør
en opp og ned-bevegelse. Deretter trykker
du på programmeringsknappen for sender B.
Denne er enten registrert, hvis det dreier seg
om en ny sender, eller slettet hvis det dreier
seg om en kjent sender.
Merk: Hvis ingen fjernkontroller er samkjørte,
kan du bruke denne stillingen for den første
samkjøringen.
F.2) Slette alle senderne eller sensorene.
Trykk på programmeringsknappen på RTS-
modulen i ca. sju sekunder. Utstyret gjør to
opp og ned-bevegelser:
Den første etter omtrent to sekunder.
Den andre etter omtrent sju sekunder.
Alle senderne er slettet.
F.3) Tilbakestilling til fabrikkmodus
Trykk på programmeringsknappen på RTS-
modulen i ca. 12 sekunder. Utstyret gjør tre
opp og ned-bevegelser:
Den første etter omtrent to sekunder.
Den andre etter omtrent sju sekunder.
Den tredje etter omtrent 12 sekunder.
Alle senderne og sensorene er slettet,
hevetiden og senketiden er slettet.
Produktet er tilbakestilt til fabrikkoppsettet.
G FEILSØKING
Ingenting virker:
Kontroller kablingen.
Kontroller motoren.
Kontroller transformatoren.
Kontroller batteriet på fjernkontrollen.
Kontroller kompatibiliteten til senderen.
Kontroller at fjernkontrollen er riktig registrert.
Kontroller at antennen ikke er kuttet av.
Technical DATA :
side 74.
Ingen My-posisjon:
My-posisjonen kan bare programmeres
dersom hevetiden og senketiden for
utstyret har vært registrert.
Problem med funksjonene:
Kontroller modus (persienne eller rullegardin).
Programmeringen er borte:
Slett minnet helt og start programmeringen
på nytt.
49Copyright © 2009 Somfy SAS. All rights reserved - V0 - 09/2009
Page 52

SIKKERHED OG VIGTIGE OPLYSNINGER
• Dette Somfy-produkt skal installeres af en autoriseret elinstallatør inden for motorisering
og automatisering af boligen, og denne monteringsvejledning er tiltænkt den autoriserede
elinstallatør, der installerer produktet.
• Før enhver installation skal man kontrollere kompatibiliteten af dette produkt med det
dertilhørende udstyr og tilbehør.
• Denne monteringsvejledning beskriver installationen, idriftsættelsen af, og brugsbetingelserne for dette produkt.
• Elinstallatøren skal desuden installere produktet i overensstemmelse med (eller i henhold
til) normerne og de gældende lovgivninger i brugerlandet, og informere sine kunder om
brugsbetingelserne for, og vedligeholdelsen af produktet.
• Al anden anvendelse end den, der er deneret af Somfy, er i uoverensstemmelse
med forskrifterne. Ved anden anvendelse bortfalder Somfy’s ansvar og garanti, hvilket også
er tilfældet, hvis forskrifterne i nærværende monteringsvejledning ikke følges.
PRODUKTBESKRIVELSE
Den Kraft RTS Byde velkommen er en byde velkommen hos helstøbt kraft skaffe og
udstyret med Radio Teknologi Somfy RTS ). Sig tillader 24V ledning opereret motorer hen
til operere med den Somfy omfang i kontrol hovedsagen og sensor udstyret med Radio
Teknologi Somfy RTS ).
MILJØBESKYTTELSE
Ødelagte elektriske og elektroniske produkter og brugte batterier
må ikke kasseres sammen med husholdningsaffaldet.
De skal aeveres på en indsamlingsstation eller en godkendt
miljøstation, så de genvindes korrekt.
A KOMPATIBLE ENHEDER
1) Kompatible fjernbetjeninger:
Power 1x2,5DC RTS-modtageren bruges sammen med maks. 12 Somfy RTS-sendere
og maks. tre sensorer for hver 24 V DC RTS-modtager.
50 Copyright © 2009 Somfy SAS. All rights reserved - V0 - 09/2009
Page 53

2) Kompatible solafskærmningsenheder:
A
C
B
155 mm
+/-0,75
155 mm +/-0,75
53,6 mm
+/-0,38
121 mm
122 mm
a. Persienner
b. Plisségardiner
c. Træpersienner
d. Bådgardiner
e. Liftgardiner
f. Pinoleum-persienner
B INSTALLATION OG KABLING
A : 198 - 255V ~ 50Hz 0.5A
B : 24V TBTS +/- 5% 2.5A
C : PROG -Taste
3 cm
3 cm
a b c
d e f
150 cm
51Copyright © 2009 Somfy SAS. All rights reserved - V0 - 09/2009
Page 54

Praktiske oplysninger
Valg af solafskærmning:
Power 1x2,5DC RTS Receiver kan fungere i to tilstande:
Med persienner og med rullegardiner.
Som standard er Power 1x2,5DC RTS Receiver indstillet i persiennetilstand.
Med denne funktion kan du indstille Power 1x2,5DC RTS Receiver efter den type
solskærm du bruger.
Motorens rotationsretningr:
Motorens rotationsretning kan ændres med fjernbetjeningen, både under montering
og senere. Dette kan gøres, så rullegardinet eller persiennen hæves, når du trykker
på op-knappen på fjernbetjeningen.
Driftsretning for drejeafbryderen::
Denne funktion gælder kun for Modulis-fjernbetjeninger.
Med den kan du indstille drejeafbryderens driftsretning, så den svarer til den ønskede
retning på lamellerne.
Udstyrets hæve- og sænketid:
Hensigten er at indstille driftstiden for persiennen eller rullegardinet ved hævning og
sænkning og ikke indstille endepositionerne.
Med denne indstilling kan du optimere driften af udstyret og automatisk bestemme en
My-position. Uden denne indstilling er det ikke muligt at bruge en My-position.
Brug af solsensorerne:
Denne funktion gælder kun for rullegardiner.
En RTS-solsensor kan bruges tila t styre rullegardinerne automatisk (for eksempel:
lukke rullegardinerne, hvis solen kommer frem).
Solsensorens parametre kan indstilles, så de fungerer bedst muligt.
My-positioner:
My-positionen er udstyrets favoritposition i forskellige situationer: Du kan for eksempel
justere postionen, når du skal arbejde ved computeren midt på dagen ved at
sænke rullegardinet eller persiennen halvvejs osv.
Indstilling af lamelhastigheden:
Denne funktion gælder kun for persienner og fjernbetjeninger med tre knapper.
Når man vil dreje lamellerne på en persienne, kan man gøre det ved at trykke længe
på op- eller nedknappen på fjernbetjeningen. Hastigheden, lamellerne bevæger sig
med, kan justeres.
Justering af trinene på fjernbetjeningens drejeafbryder:
Denne funktion gælder kun for Modulis-fjernbetjeninger.
Hvis du vil dreje lamellerne på en persienne, kan det gøres ved hjælp af drejeafbryderen på Modulis-fjernbetjeningen. Med denne funktion kan du justere afbryderens
følsomhed.
Position skygge:
Denne funktion gælder kun for persienner. Med den kan du indstille en position for
lamellerne, hvis solen forsvinder.
Denne funktion kræver brug af en solsensor.
Funktion privatliv:
Med denne funktion kan du aktivere eller deaktivere solautomatikken af hensyn til
privatlivet.
Denne funktion kræver brug af en solsensor.
p54
p54
p54
p56
p55
p57
p58
p58
p59
p60
52 Copyright © 2009 Somfy SAS. All rights reserved - V0 - 09/2009
Page 55

C INDSTILLING AF SOLAFSKÆRM-
2x0,75mm
2
2x0,25mm
2
NINGEN
Slut ramme er opereret af den motor og
dens tilbehør og ikke af den Kraft RTS Byde
velkommen.
C.1) Sammenknytte den Kraft RTS Byde
velkommen ( den er nødvendig hen til holde
en hel sikkerhedsforanstaltninger i hjælp hen
til sikre den Kraft RTS Byde velkommen af
den electrostatic affyrer ) adskillige motorer
er sammenhængende hen til den Kraft RTS
Byde velkommen , den indstilling vil være
kommune hen til en hel motorer.
C.2) Start via fjernbetjeningen:
bemærke Hvor kontrollerer igennem en sen
kontrol , al Kraft X DC RTS Byde velkommen
er justeret samtidig selv om adskillige Kraft
X DC RTS Byde velkommen er sammenhængende.
Tilpasning:
Tryk kort på op-knappen og nedknappen på
fjernbetjeningen.
Udstyret foretager en op- og nedadgående
bevægelse.
Fjernbetjeningen er registreret midlertidigt.
Indstilling:
Se følgende punkter:
C3a : Valg af solafskærmning:
C3b : Motorens rotationsretning
C3c : Drejeafbryderens driftsretning
C3d : Brug af solsensorerne:
C3e : Hævetid og sænketid:
Registrering:
Tryk kort på programmeringsknappen på
fjernbetjeningen. Udstyret foretager en opog
nedadgående bevægelse. Fjernbetjeningen
er registreret permanent.
C3a C3b C3c C3d C3e
53Copyright © 2009 Somfy SAS. All rights reserved - V0 - 09/2009
Page 56

C.3) Indstilling eller justering af udstyret:
C.3.a) Valg af typen af solskærm:
Hvis du vil skifte far den ene tilstand til den
anden, skal du trykke på My- og ned-knappen
i cirka to sekunder, indtil udstyret foretager
en op- og nedadgående bevægelse.
Hvis op- og ned-bevægelsen er hurtig, er
RTS DC-modtageren i rullegardintilstand.
Hvis op- og ned-bevægelsen er langsom, er
RTS DC-modtageren i persiennetilstand.
C.3.b) Motorens rotationsretningr:
Tryk op- eller nedknappen ind for at
kontrollere rotationsretningen.
Hvis retningen er forkert, skal du trykke i to
sekunder på My-knappen, indtil udstyret
foretager
en op- og nedadgående bevægelse.
Kontrollér, at rotationsretningen er rigtig ved
hjælp af op- eller nedknappen.
Denne handling kan gentages ere gange.
Hver gang du trykker på My-knappen i to
sekunder, ændres rotationsretningen.
C.3.c) Driftsretning for drejeafbryderen:
Drej afbryderen rundt for at kontrollere, hvilken retning lamellerne bevæger sig i. Hvis
retningen er forkert, skal du trykke på op- og
nedknapperne i ca. to sekunder, indtil
udstyret foretager en op- og nedadgående
bevægelse. Drejeafbryderens driftsretning
er ændret.
Denne handling kan gentages ere gange.
Hver gang du trykker ca. to sekunder på
opog nedknapperne, ændres
drejeafbryderens rotationsretning.
Bemærk! Drejeafbryderens rotationsretning
er uafhængig af motorens rotationsretning.
54 Copyright © 2009 Somfy SAS. All rights reserved - V0 - 09/2009
Page 57

C.3.d) Brug af solsensorerne:
Som standard reguleres rotationsretningen
ud fra en motor, som er placeret på toppen
af persiennen eller rullegardinet.
Du kan programmere rotationsretningen
for produkter, som har motoren placeret
nederst.
Hvis du vil ændre driftsretningen, skal du
gøre som følger:
Tryk på opknappen og My-knappen i cirka
to sekunder, indtil udstyret foretager en opog
nedadgående bevægelse.
Tryk på nedknappen i cirka to sekunder,
indtil udstyret foretager en op- og nedad-
gående bevægelse for at indstille 24 V
DC RTS-modulet i omvendt sensortilstand
(motor nede på udstyret).
Tryk på nedknappen i cirka to sekunder,
indtil udstyret foretager en op- og nedad-
gående bevægelse for at indstille 24 V DC
RTS-modulet i normal tilstand (motor oppe
på udstyret).
Tryk på My-knappen i cirka 2 sekunder,
indtil udstyret foretager en op- og nedad-
gående bevægelse for at bekræfte valget af
sensortilstand.
55Copyright © 2009 Somfy SAS. All rights reserved - V0 - 09/2009
Page 58

C.3.e) Udstyrets hæve- og sænketid:
1) Kør udstyret helt til den øverste endeposition.
Udstyret standser automatisk på det
mekaniske endestop.
2) Tryk kort på My-knappen og nedknappen:
Udstyret kører nedad (i ti sekunder)
og standser. Du kan standse sænkningen,
før der er gået ti sekunder, ved at trykke på
stopknappen.
3) Hvis udstyret ikke er i nederste endeposition,
trykker du på nedknappen, indtil
udstyret når den mekanisk indstillede nedre
endeposition. Sænkningen udføres, mens
du trykker på knappen i maks. ti sekunder
pr. tryk.
Bemærk! Det er kun trykketiderne, der
registreres. Tiden måles ikke, når udstyret
står stille.
4) Når udstyret er i nederste position, skal
du slippe nedknappen.
Bemærk! Hvis du fortsætter med at
trykke på nedknappen, vil målingen af tiden
fortsætte, men udstyret bevæger sig ikke.
5) Tryk kort på My-knappen og opknappen:
Udstyret kører opad (i ti sekunder) og
standser. Du kan standse hævningen, før
der er gået ti sekunder, ved at trykke på
stopknappen.
Bemærk! Når du trykker på My- og opknappen,
bekræftes sænketiden.
6) Hvis udstyret ikke er i øverste endeposition,
trykker du på opknappen, indtil udstyret
når den mekanisk indstillede øvre endeposition.
Hævningen udføres, mens du trykker
på knappen i maks. ti sekunder pr. tryk.
Bemærk! Det er kun trykketiderne, der
registreres. Tiden måles ikke, når udstyret
står stille.
7) Når udstyret er i øverste position, skal du
slippe opknappen.
Bemærk! Hvis du fortsætter med at trykke
på opknappen, fortsætter målingen af tiden.
8) Hvis du vil afslutte programmeringen
af hævetid og sænketid, skal du trykke
på My-knappen i cirka to sekunder, indtil
udstyret foretager en op- og nedadgående
bevægelse. Tiderne bekræftes og gemmes,
og en favoritposition tildeles automatisk.
(1)
(2)
(3)
(4)
(5)
(6)
(7)
(8)
56 Copyright © 2009 Somfy SAS. All rights reserved - V0 - 09/2009
Page 59

D BRUG
D.1) My-positioner:
My-positionen varierer, afhængigt af om der
er tale om rullegardiner eller persienner.
Persienner:
Efter indstillingen af hæve- og sænketiden
er My-stillingen som følger: Nedre endeposi-
tion, lamellerne cirka 45° (gælder persienner
med 25 mm lameller og CTS 25).
Brugeren kan ændre denne position.
Rullegardiner:
Efter indstillingen af hæve- og sænketiden
er My-stillingen som følger: 3/4 nede.
Denne position kan ændres af brugeren.
Brugeren kan ændre denne position.
Justering:
Før My-positionen kan ændres, skal udstyret
være i den øverste position.
Persienner:
Tryk på My-knappen i cirka fem sekunder:
Persiennen kører til den pågældende
Myposition.
Du kan nu justere My-positionen ved hjælp
af opknappen og nedknappen eller drejeaf-
bryderen på en Modulis-fjernbetjening.
Tryk på My-knappen i cirka fem sekunder,
indtil udstyret foretager en op- og nedad-
gående bevægelse.
Den nye My-position er registreret.
Rullegardiner:
Brug op- og nedknapperne til at placere
rullegardinet i den ønskede position.
Tryk i fem sekunder på My-knappen, indtil
udstyret foretager en op- og nedadgående
bevægelse; den nye position er registreret.
Sletning:
Gå til den relevante My-position med et kort
tryk på My-knappen.
Tryk på My-knappen i fem sekunder, indtil
udstyret foretager en op- og nedadgående
bevægelse; den nye position er registreret.
57Copyright © 2009 Somfy SAS. All rights reserved - V0 - 09/2009
Page 60

D.2) Indstilling af lamelhastigheden:
6s
6s
Tryk på opknappen og nedknappen i cirka
to sekunder, indtil udstyret foretager en opog
nedadgående bevægelse.
Tryk på opknappen i cirka to sekunder:
Persiennen foretager en op- og nedadgående
bevægelse med cyklusser på seks
sekunder.
Du kan nu justere persiennens hastighed
ved hjælp af op- og nedknapperne. For
hvert tryk ændres lamelhastigheden: Den
varierer i reel tid under indstillingen.
Når du er tilfreds med hastigheden, trykker
du på My-knappen i ca. to sekunder, indtil
persiennen foretager en op- og nedadgående
bevægelse: Den nye lamelhastighed er
registreret.
D.3) Justering af trinene på fjernbetjeningens
drejeafbryder:
Tryk på opknappen og nedknappen i cirka
to sekunder, indtil udstyret foretager en opog
nedadgående bevægelse.
Tryk på nedknappen i cirka to sekunder,
indtil udstyret foretager en op- og nedad-
gående bevægelse.
Du kan nu justere trinene på drejeafbryderen
ved hjælp af op- og nedknapperne.
Du kan når som helst teste indstillingen
ved hjælp af drejeafbryderen på fjernbetje-
ningen.
Tryk på My-knappen i cirka to sekunder,
indtil udstyret foretager en op- og nedad-
gående bevægelse.
De nye trin på drejeafbryderen er registreret.
58 Copyright © 2009 Somfy SAS. All rights reserved - V0 - 09/2009
Page 61

D.4) Position skygge:
Denne funktion kræver brug af en solsensor.
Den kan kun bruges til persienner.
For at kunne registrere en position for
skygge skal persiennens hæve- og sænketid
være registreret sammen med en
My-position.
Tryk på nedknappen og My-knappen i cirka
to sekunder:
Persiennen går til My-position.
Du kan nu justere skyggepositionen
(vandrette lameller) ved hjælp af op- og
nedknapperne.
Tryk på My-knappen i cirka fem sekunder,
indtil udstyret foretager en op- og nedad-
gående bevægelse. Skyggepositionen er nu
registreret.
Justering:
For at ændre skyggepositionen går du frem
på samme måde som under den første
regulering.
Sletning:
Tryk på nedknappen og My-knappen i cirka
to sekunder:
Persiennen går til skyggeposition.
Tryk på nedknappen og My-knappen i cirka
fem sekunder, indtil udstyret foretager en
op- og nedadgående bevægelse.
Skyggepositionen er nu slettet.
Bemærk! Hvis du sletter My-positionen,
slettes skyggepositionen automatisk.
59Copyright © 2009 Somfy SAS. All rights reserved - V0 - 09/2009
Page 62

2 X
D.5) Funktion privatliv:
Som standard er funktionen privatliv
aktiveret.
Når brugeren sender udstyret i lav endeposition, deaktiveres solautomatikken.
Tryk på opknappen og nedknappen, indtil
udstyret foretager en op- og nedadgående
bevægelse.
Tryk på My-knappen, indtil udstyret foretager
en op- og nedadgående bevægelse.
Tryk på opknappen i ca. to sekunder, indtil
udstyret foretager en op- og nedadgående
bevægelse for at aktivere solautomatikken.
Tryk på nedknappen i ca. to sekunder, indtil
udstyret foretager en op- og nedadgående
bevægelse for at deaktivere solautomatikken.
Tryk på My-knappen i cirka fem sekunder,
indtil udstyret foretager en op- og
nedadgående bevægelse for at bekræfte
valget.
E JUSTERING AF SOLSKÆRMEN
Skift til justering:
Hvis du vil skifte til justering af udstyret, skal
du trykke på op- og nedknappen i cirka fem
sekunder, indtil udstyret foretager en op- og
nedadgående bevægelse.
Indstilling:
Se følgende punkter:
C3a : Valg af solafskærmning:
C3b : Motorens rotationsretning
C3c : Drejeafbryderens driftsretning
C3d : Hævetid og sænketid:
C3e : Brug af solsensorerne:
Bekræft indstillingerne:
Hvis du vil bekræfte indstillingerne af udsty-
ret, skal du trykke på My-knappen i cirka 5
sekunder, indtil udstyret foretager en DOBBELT op- og nedadgående bevægelse.
C3a C3b C3c C3d C3e
60 Copyright © 2009 Somfy SAS. All rights reserved - V0 - 09/2009
Page 63

A
B
2 X
3 X
F TILFØJE OG SLETTE
F.1) Tilføje og slette en sender eller en
sensor.
Tryk på programmeringsknappen for RTSmodulen eller sender A, indtil udstyret foretager
en op- og nedadgående bevægelse.
Derefter trykker du på programmeringsknappen for sender B. Denne er enten
registreret, hvis det drejer sig om en ny
sender, eller slettet, hvis det drejer sig om
en kendt sender.
Bemærke : Selv om ikke sen kontrol er par ,
Jer kunne hjælp indeværende måde nemlig
den 1st par.
F.2) Slette alle sendere eller sensorer.
Tryk på programmeringsknappen på RTSmo-
dulet i cirka syv sekunder. Udstyret foretager
to op- og nedadgående bevægelser:
Den første efter cirka to sekunder.
Den anden efter cirka syv sekunder.
Alle sendere er slettet.
F.3) Tilbagestilling til fabrikstilstand
Tryk på programmeringsknappen på RTSmo-
dulet i cirka 12 sekunder. Udstyret foretager
tre op- og nedadgående bevægelser:
Den første efter cirka to sekunder.
Den anden efter cirka syv sekunder.
Den tredje efter cirka 12 sekunder.
Alle sendere og sensorer er slettet, og
hæve- og sænketiden er slettet.
Produktet er tilbagestillet til fabriksopsætningen.
G FEJLSØGNING
Intet fungerer:
Kontrollér kablingen(cf SDEV-FICA 38RO).
Kontrollér motoren.
Kontrollér strømforsyningen.
Kontrollér batteriet til fjernbetjeningen.
Kontrollér kompatibiliteten af senderen.
Kontrollér, at fjernbetjeningen er registreret
korrekt.
TEKNISKE OPLYSNINGER : SIDE 74
Ingen My-position:
My-positionen kan kun programmeres, hvis
udstyrets hæve- og sænketid har været
registreret.
Problem med funktionerne:
Kontrollér tilstanden (persienne og rullegardin).
Programmeringen er tabt:
Slet hukommelsen helt, og gentag programmeringen.
61Copyright © 2009 Somfy SAS. All rights reserved - V0 - 09/2009
Page 64

МЕРЫ БЕЗОПАСНОСТИ И ВАЖНАЯ ИНФОРМАЦИЯ
• Данное изделие фирмы Somfy должно устанавливаться специалистом по
еханизации и автоматизации жилых помещений с соответствующим допуском, для
которого предназначена настоящая инструкция.
• Перед установкой данного изделия убедитесь в его совместимости с
соответствующим оборудованием и принадлежностями.
• В настоящей инструкции изложены установка, пуско-наладка и порядок эксплуатации
данного изделия.
• Специалист, устанавливающий изделие, должен выполнять требования
действующих нормативных и законодательных актов соответствующей страны и
информировать клиентов об условиях эксплуатации, подключения и технического
обслуживания изделия.
• Любое использование изделия вне области применения, определенной фирмой
Somfy, не допускается. Такое использование, равно как и несоблюдение указаний
настоящей инструкции, освобождает фирму Somfy от ответственности и от
гарантийных обязательств.
ОПИСАНИЕ ИЗДЕЛИЯ
Power 1x2,5 DC RTS Receiver - это радиоприёмник стандарта RTS (Radio Technology
Somfy) с интегрированным блоком питания.
Применяется для всей линейки приводов Somfy на 24 В для управления и применения
с радиодатчиками RTS (Radio Technology Somfy).
ОХРАНА ОКРУЖАЮЩЕЙ СРЕДЫ
Электрические и электронные изделия, такие как использованные
элементы питания, не должны выбрасываться вместе с бытовыми
отходами.
Сдавайте их на пункт сбора или в сертифицированный центр для
обеспечения их утилизации.
A - ВАРИАНТЫ СОВМЕСТИМОСТИ
1) Совместимые пульты управления:
Радиоприёмнкик Power 1x2,5DC RTS Receiver совместим с радиопередатчиками
Somfy RTS, с возможностью программирования до 12-ти радиопередатчиков и
3-х радиодатчиков RTS на один радиоприёмнки.
62 Copyright © 2009 Somfy SAS. All rights reserved - V0 - 09/2009
Page 65

2) Совместимые типы конструкций:
A
C
B
155 mm
+/-0,75
155 mm +/-0,75
53,6 mm
+/-0,38
121 mm
122 mm
a. Жалюзи
b. Плиссе
c. Сотовые плиссе
d. Подъемная штора
e. Римская штора
f. Французская штора
B - УСТАНОВКА И ПОДКЛЮЧЕНИЕ
A : 198 - 255В ~ 50Гц 0.5A
B : 24В откл. TBTS +/- 5% 2.5A
C : PROG
3 cm
3 cm
a b c
d e f
150 cm
63Copyright © 2009 Somfy SAS. All rights reserved - V0 - 09/2009
Page 66

Описание:
Выбор режима эргономики конструкции:
Power 1x2,5 DC RTS Receiver может работать в двух режимах:
В режиме управления жалюзи или в режиме управления рулонной шторой.
По умолчанию радиоприёмник настроен на режим управления жалюзи.
Эта функция позволяет настроить Power 1x2,5 DC RTS Receiver в соответствии с
типом используемой конструкции.
Проверка направления вращения привода:
При установке конструкции или при ее перенастройке можно изменить
направление вращения привода с помощью радиопульта дистанционного
управления. Это делается для того, чтобы подъём шторки соответствовал
нажатию клавиши «Вверх» радиопередатчика RTS.
Проверка направления вращения scroll lock (вращающегося колёсика):
Эта функция возможна только для радиопульта дистанционного управления
серии Modulis.
Она позволяет установить правильное направление вращения Scroll lock,
относительно нужного направления поворота ламелей жалюзи.
Продолжительность времени подъема и опускания шторы:
Функция позволяет настроить продолжительность времени подъема и
опускания полотна конструкции, а не настраивать конечные положения.
Эта функция позволяет оптимизировать работу конструкциии и автоматически
настраивать промежуточное положение My. Без этой настройки положение My
невозможно использовать.
Подключение радиодатчиков освещенности:
Эта функция активируется только для рулонной шторы.
Радиодатчик освещенности RTS можно использовать для автоматического
управления шторой (пример: закрывать её при солнечном свете, превышающем
пороговое значение освещенности).
Для обеспечения наилучшей работы этого радиодатчика возможна настройка
его параметров.
Промежуточное положение My:
Положение My соответствует предпочтительному положению полотна
конструкции в определенных ситуациях: например, для работы на компьютере в
солнечный день и т.п.
Настройка скорости поворота ламелей жалюзи:
Эта функция настраиваетсят только на 3-кнопочных версиях радиопередатчиков
RTS в режиме работы жалюзи.
Если нужно изменить ориентацию ламелей жалюзи, это можно сделать
продолжительными нажатиями на клавиши «Вверх» или « Вниз»
радиопередатчика RTS. Скорость поворота ламелей жалюзи пластин может
быть отрегулирована.
Регулировка чувствительности вращения scroll lock:
Эта функция действует только для радиопередатчиков дистанционного
управления серии Modulis.Если нужно изменить ориентацию ламелей жалюзи,
это можно сделать вращением scroll lock дистанционного управления Мodulis.
Эта функция позволяет настраивать чувствительность вращения scroll lock.
Функция «закат»:
Эта функция активируется только для жалюзи. Она позволяет изменять
положение ламелей жалюзи в случае захода солнца.
Для реализации этой функции необходимо использовать датчик освещенности.
Функция «инкогнито»:
Эта функция позволяет активировать или неактивировать «солнечную»
автоматику, чтобы скрыть внутренний интерьер от наружного наблюдателя.
Для реализации этой функции необходимо использовать датчик освещенности.
64 Copyright © 2009 Somfy SAS. All rights reserved - V0 - 09/2009
p66
p66
p66
p68
p67
p69
p70
p70
p71
p72
Page 67

C НАСТРОЙКА СОЛНЦЕЗАЩИТНОЙ
2x0,75mm
2
2x0,25mm
2
КОНСТРУКЦИИ
Конечные положения определяются
электроприводами и соответствующими
аксессуарами, а не Power 1x2,5DC RTS
Receiver
C.1) Подключение Power 1x2,5 DC
RTS Receiver (это необходимо для
защиты Power 1x2.5 DC RTS Receiver от
электростатических разрядов).
Если к Power 1x2,5 DC RTS Receiver
подключены несколько приводов, то
регулирование и управление возможно
только всей группой приводов.
C.2) Настройка с помощью
дистанционного управления: замечание:
управляя несколькими Power 1 X 2,5 DC
RTS Receiver Вы управляете ими так, как
если бы несколько Power 1 X 2,5 DC RTS
Receiver были подключены между собой.
Ввод в эксплуатацию при помощи
радиопередатчика RTS:
Одновременно нажмите на клавиши
«Вверх « и «Вниз» радиопередатчика
дистанционного управления RTS.
Полотно конструкции движется коротко в
такте вверх - вниз.
Радиопульт дистанционного управления
временно запрограммирован.
Ввод в эксплуатацию:
См. выполнение этапов:
C3a: Выбор типа эргономики конструкции
C3b: Определение направления
вращения привода
C3c: Определение направления
вращения scroll lock
C3d: Настройка датчиков освещенности
C3e: Настройка продолжительности
подъема и опускания конструкции
Регистрация:
Кратковременно нажмите на
кнопку программирования пульта
дистанционного управления. Полотно
конструкции движется коротко в такте
вверх - вниз.
Пульт дистанционного управления
окончательно запрограммирован.
C3a C3b C3c C3d C3e
65Copyright © 2009 Somfy SAS. All rights reserved - V0 - 09/2009
Page 68

C.3) Программирование или
перепрограммирование конструкции:
C.3.a) Выбор типа эргономики
конструкции:
Для переключения с одного режима
эргономики на другой, нажмите
одновременно на клавиши «My» и «Вниз»
примерно на 2 секунды, пока полотно
конструкции движется коротко в такте
вверх-вниз. Если движение вверх - вниз
происходит быстро, Power 1x2,5 DC RTS
Receiver настроен на режим управления
рулонной шторой. Если движение вверхвниз происходит медленно, то выбран
режим управления жалюзи.
C.3.b) Проверка направления вращения
привода:
Нажмите на кнопку «Вверх» или «Вниз»
для проверки направления вращения.
Если направление неправильное,
нажмите на клавишу My примерно на
2 секунды, пока полотно конструкции
коротко движется в такте
вверх-вниз.
С помощью клавиш подъема или
опускания проверьте правильность
выбора направления вращения. Эта
операция может быть проведена
несколько раз. Каждое нажатие на
2 секунды на клавишу My изменяет
направление вращения привода.
C.3.c) Проверка направления вращения
scroll lock:
Поверните scroll lock для проверки
направления
ориентации ламелей жалюзи. Если
направление вращения неправильное,
нажмите на клавиши «Вверх» и «Вниз»
примерно на 2 секунды, пока
полотно конструкции коротко движется в
такте вверх-вниз.
Направление работы scroll lock изменено.
Эта операция может быть проведена
несколько раз. Каждое нажатие примерно
на 2 секунды на клавиши «Вверх» и
«Вниз» изменяет направление работы
scroll lock.
Примечание: направление
использования scroll lock не зависит от
направления вращения привода.
66 Copyright © 2009 Somfy SAS. All rights reserved - V0 - 09/2009
Page 69

C.3.d) Работа алгоритма работы датчиков
освещенности:
По умолчанию направление вращения
настроено для радиодатчика,
установленного сверху конструкции.
Возможна настройка направления
вращения для изделия с приводом,
установленным внизу шторы. Для
активации изменения эргономики
расположения нажмите на кнопки
«Вверх» и «My» примерно на 2 секунды
до тех пор, пока полотно конструкции
коротко движется в такте вверх - вниз.
Нажмите на кнопку «Вниз» примерно на
2 секунды, пока полотно конструкции
коротко движется в такте вверх -вниз,
для того, чтобы настроить Power 1x2,5
DC RTS Receiver нав режим эргономики
нижнего расположения солнечного
датчика.
Нажмите на кнопку «Вверх» примерно
на 2 секунды, пока полотно совершит
короткое
движение в такте вверх - вниз, для
настройки Power 1x2,5 DC RTS Receiver на
режим нормального расположения
радиодатчика (когда он установлен сверху
конструкции) . Для запоминания
эргономики положения
радиодатчика нажмите на кнопку «My»
примерно на 2 секунды, пока полотно
конструкции снова выполнит короткое
движение в такте вверх-вниз.
67Copyright © 2009 Somfy SAS. All rights reserved - V0 - 09/2009
Page 70

C.3.e) Настройка продолжительности
подъёма и опускания конструкции:
1) Поднимите полотно конструкции в верхнее
конечное положение. Полотно останавливается
автоматически при механическом упоре.
2) Кратковременно нажмите на клавиши «My»
и «Вниз»: изделие опускается (в течение
примерно 10 секунд), затем останавливается.
Можно остановить опускание до истечения 10
секунд, нажав на клавишу «My».
3) Если полотно не опустилось до своего
нижнего конечного положения, нажмите на
кнопку«Вниз» и удерживайте ее, пока полотно
не опустится до установленного механическим
путем нижнего конечного положения.
Опускание осуществляется
,пока нажата клавиша «Вниз», с максимальной
продолжительностью 10 секунд для каждого
нажатия.
Примечание: учитывается только
продолжительность нажатия. Когда полотно
остановлено - время не учитывается.
4) Как только полотно опустится до
нижнего конечного положения, отпустите
клавишу «Вниз».
Примечание: если продолжать удерживать
клавишу «Вниз», отсчет времени
продолжается, но конструкция не двигается.
5) Кратковременно нажмите на клавиши
«My»
и «Вверх»: полотно конструкции поднимается
(в течение примерно 10 секунд), затем
останавливается. Можно остановить подъем до
истечения 10 секунд, нажав на клавишу «My».
Примечание: подъем осуществляется ,пока
нажата клавиша «Вверх».
6) Если полотно не поднялось до
верхнего конечного положения, нажмите на
клавишу
«Вверх» и удерживайте ее, пока полотно не
дойдет до установленного механическим
путем верхнего конечного положения. Подъем
осуществляется,
пока нажата клавиша «Вверх», с максимальной
продолжительностью 10 секунд для каждого
нажатия.
Примечание: учитывается только
продолжительность нажатия. Когда полотно
остановлено - время не учитывается.
7) Когда полотно окажется в верхнем
конечном положении, отпустите клавишу
«Вверх». Примечание: если продолжать
удерживать клавишу «Вверх», отсчет времени
продолжается, но конструкция не двигается.
8) Для завершения программирования
продолжительности подъема и
опускания , нажмите на клавишу «My»
примерно на 2 секунды, пока полотно
выполнит короткое движение в такте
вверх-вниз. Продолжительность
движения и промежуточное положение
запрограммированы.
68 Copyright © 2009 Somfy SAS. All rights reserved - V0 - 09/2009
(1)
(2)
(3)
(4)
(5)
(6)
(7)
(8)
Page 71

D ИСПОЛЬЗОВАНИЕ
D.1) Промежуточные положения My:
Положения My различаются в
зависимости от типа конструкций.
В режиме управления жалюзи:
после настройки продолжительности
подъема и опускания промежуточное
положение My оказывается следующим:
нижнее конечное положение, угол
наклона ламелей жалюзи близок к
45° (для жалюзи с ламелями 25 мм и
системой CTS 25).
Пользователь может изменить это
положение.
В режиме управления рулонной шторой:
после настройки продолжительности
подъема и опускания промежуточное
положение My оказывается следующим:
3/4 высоты конструкции от нижнего
конечного положения.
Пользователь может изменить это
положение.
Изменение промежуточного положения:
п
полотно конструкции должно находиться
в верхнем конечном положении.
Для режима управления жалюзи:
нажмите на клавишу «My» примерно на 5
секунд:
Полотно опустится в ранее настроенное
промежуточное положение My.
С помощью клавиш «Вверх»,
«Вниз» или с помощью scroll lock,в
случае использования радиопульта
дистанционного управления Мodulis,
установите новое
положение My. Нажмите на клавишу
«My» примерно на 5 секунд, пока
полотно конструкции движется коротко в
такте вверх-вниз. Новое промежуточное
положение My запрограммировано.
Для режима управления рулонной
шторой:
с помощью клавиш «Вверх» и
«Вниз» установите новое промежуточное
положение My. Нажмите на клавишу
My примерно на 5 секунд, пока полотно
конструкции движется коротко в такте
вверх-вниз. Новое промежуточное
положение My запрограммировано.
Удаление настройки:
кратковременным нажатием на кнопку
«My» приведите шторку в настроенное
положение My.
Нажмите на кнопку My примерно на 5
секунд, пока полотно конструкции
движется коротко в такте вверх - вниз,
после чего положение будет удалено из
памяти.
69Copyright © 2009 Somfy SAS. All rights reserved - V0 - 09/2009
Page 72

D.2) Настройка скорости поворота
6s
6s
ламелей жалюзи:
Нажмите одновременно на клавиши
«Вверх», «Вниз» и «My» примерно на
2 секунды, пока полотно конструкции
движется коротко в такте вверх -вниз.
Нажмите на клавишу «Вверх» примерно
на 2 секунды: полотно начинает
подниматься и опускаться циклами по 6
секунд.
С помощью клавиш «Вверх» и «Вниз»
настройте скорость движения полотна.
Каждое нажатие клавиши «Вверх»
увеличивает скорость поворота, а каждое
нажатие клавиши «Вниз» уменьшает
её. При достижении необходимой
скорости поворота ламелей , нажмите на
клавишу «My» примерно на 2 секунды,
пока полотно конструкции движется
коротко в такте
вверх -вниз. Новая скорость поворота
запрограммирована.
D.3) Регулировка чувствительности
поворота Scroll Lock радиопередатчика
серии Modulis:
Нажмите одновременно на весь диск
«Вверх», «Вниз» и клавишу «My»
примерно на 2 секунды, пока полотно
конструкции
движется коротко в такте вверх - вниз.
Нажмите на клавишу «Вниз» примерно
на
2 секунды, до тех пор пока полотно
конструкции повторно
движется коротко в такте вверх - вниз.
С помощью клавиш «Вверх» и «Вниз»
отрегулируйте шаг scroll lock, вращением
которого можно проверить настройку в
любой момент.
Нажмите на клавишу «My» примерно на 2
секунды, пока пока полотно движется
коротко в такте вверх - вниз.
Новая чувствительность scroll lock
запрограммирована.
70 Copyright © 2009 Somfy SAS. All rights reserved - V0 - 09/2009
Page 73

D.4) Функция «закат»:
Для реализации этой функции
необходимо использовать радиодатчик
освещенности. Она применима только
при выборе типа эргономики жалюзи.
Для активации функции «закат»
предварительно должны быть
запрограммированы продолжительность
подъема и опускания конструкции, а
также промежуточное положение My.
Нажмите на клавиши «Вверх» и «My»
примерно на 2 секунды:
полотно переместится в положение My.
С помощью клавиш «Вверх» и «Вниз»
установите положение для заката солнца
(ламели жалюзи горизонтальны).
Нажмите на клавишу «My» примерно на 5
секунд, пока полотно конструкции
движется коротко
в такте вверх - вниз. Функция «закат»
запрограммирована.
Изменение положения «закат»:
Для перепрограммирования положения
«закат» последовательность действий
такая же, как и при первоначальной
настройке.
Для удаление положения «закат»:
нажмите на клавиши «Вниз» и «My»
примерно на 2 секунды.
Жалюзи переместятся в положение
«закат».
Нажмите на клавиши «Вниз» и «My»
примерно на 5 секунд, пока полотно
конструкции
коротко движется в такте вверх -вниз.
Положение «закат» удалено из памяти.
Примечание: если из памяти удаляется
промежуточное положение My, то
положение «закат»
также автоматически удаляется.
71Copyright © 2009 Somfy SAS. All rights reserved - V0 - 09/2009
Page 74

2 X
D.5) Функция «инкогнито»:
По умолчанию функция «инкогнито»
активирована.
Когда пользователь опускает полотно в
нижнее конечное положение,
«солнечная»
автоматика отключается и визуальный
контроль внутренних помещений
становится невозможен.
Нажмите на клавиши «Вверх», «Вниз»
и «My» и удерживайте их, пока полотно
конструкции движется коротко в такте
вверх -вниз.
Нажмите на клавишу «My» и удерживайте
ее, пока полотно конструкции движется
коротко в такте вверх -вниз.
Для активации «солнечной» автоматики
нажмите на клавишу «Вверх» примерно
на 2 секунды, пока полотно конструкции
движется коротко в такте вверх -вниз.
Для деактивации «солнечной» автоматики
нажмите на клавишу «Вниз» примерно на
2 секунды, пока полотно конструкции
движется коротко в такте вверх -вниз.
Для подтверждения выбора нажмите на
клавишу «My» примерно на 5 секунд, пока
полотно конструкции движется коротко в
такте вверх -вниз.
E Перепрограммирование изделия
Вход в режим перепрограммирования:
Для входа в режим перепрограммирования
настроек нажмите на клавиши «Вверх»
и «Вниз» примерно на 5 секунд, пока
полотно конструкции движется коротко в
такте вверх -вниз.
Настройка:
См. выполнение этапов настройки:
C3a: выбор типа конструкции
C3b: выбор направления вращения
привода
C3c: выбор направления вращения scroll
lock
C3d: настройка продолжительности
подъема и опускания конструкции
C3e: активация радиодатчиков
освещенности
Подтверждение перепрограммирования:
Для подтверждения режима
перепрограммирования нажмите на
клавишу My примерно на 5 секунд, пока
полотно конструкции дважды коротко
движется в такте вверх -вниз.
C3a C3b C3c C3d C3e
72 Copyright © 2009 Somfy SAS. All rights reserved - V0 - 09/2009
Page 75

A
B
2 X
3 X
F ДОБАВЛЕНИЕ И УДАЛЕНИЕ
радиопередатчиков
F.1) Добавление или удаление
радиопередатчиков или радиодатчиков.
Нажмите на кнопку Prog на Power 1x2,5 DC
RTS Receiver или радиопередатчике
А и удерживайте ее, пока полотно
конструкции движется коротко в такте
вверх вниз. Затем нажмите на кнопку Prog
радиопередатчика В. Радиопередатчик
В запрограммирован, если речь идет о
новом радиопередатчике, или удален из
памяти, если речь идет о ранее
запрограммированном радипередатчике
RTS.
Замечание: если никакое дистанционное
управление не подключено, Вы можете
использовать этот режим для 1-ого
подключения.
F.2) Удаление всех радиопередатчиков или
радиодатчиков.
Нажмите на кнопку программирования
на Power 1x2,5 DC RTS Receiver примерно
на 7 секунд. , пока полотно конструкции
двухкратно коротко движется в такте вверх
-вниз:
1-й раз примерно на 2-й секунде, 2-й
раз примерно на 7-й секунде. Все
радиопередатчики удалены из памяти.
F.3) Возврат в заводской режим
Нажмите на кнопку программирования
на Power 1x2,5 DC RTS Receiver примерно
на 12 секунд, пока полотно конструкции
трёхкратно коротко движется в такте вверх
- вниз:
1-й раз примерно на 2-й секунде,
2-й раз примерно на 7-й секунде,
3-й раз примерно на 12-й секунде.
Все радиопередатчики и радиодатчики
удалены, значения продолжительности
подъема и опускания удалены.
приведено в режим заводской поставки.
Нет функции промежуточного
G УСТРАНЕНИЕ НЕИСПРАВНОСТЕЙ
Ничего не функционирует:
Проверьте подключение электропитания и
привода (cf SDEV-FICA 38RO).
Проверьте батарею радиопередатчика
дистанционного управления RTS.
Проверьте совместимость
радиопередатчика.
Проверьте правильность
программирования
радиопередатчика дистанционного
управления.
положения My:
Промежуточное положение My может
быть запрограммировано, только
если ранее запрограммирована
продолжительность подъема и пускания
полотна конструкции.
Нарушения функций и режимов
управления:
Проверьте режим программирования
(управление жалюзи или управление
рулонной шторой).
Ошибки программирования:
Выполните полную очистку памяти и
перевод в режим заводской поставки и
проведите программирование сначала.
ТЕХНИЧЕСКИЕ ХАРАКТЕРИСТИКИ : страница 74
73Copyright © 2009 Somfy SAS. All rights reserved - V0 - 09/2009
Page 76

BOX
INPUT
OUTPUT
RADIO
PROTOCOL
Material
Color
Size
Protection factor
Weight (net)
Range of supply voltage
Frequency
No load power consumption
Max wire size for terminals
Fuse
Nominal load (maximum continuous current)
Voltage
Ripple (peak to peak)
Total regulation
Max wire size for terminals
Fuse
Type
frequency
plastic
white
155 x 155 x 53,6 (mm)
IP20
450gr
198-255 V AC
50 Hz
0,7 W
1,5 mm²
Fuse
2,5A
24Vdc SELV regulated
< 500mV
+ / - 5% (22,8V to 25,2V)
1,5 mm²
Autorecovery
Somfy RTS protocol
433,42MHz
POWER SUPPLY
SPECIFICATIONS
STANDARDS
TEMPERATURE
RANGE
CONNECTORS
INSTALLATION
DISTANCE
74 Copyright © 2009 Somfy SAS. All rights reserved - V0 - 09/2009
Type SMPS (switching mode pwr
Standards reference
Insulation class
Working / running time
Storage
Rate of humidity relative
Input
Output
Distance mini between a motor
and a receiver
Distance mini between the oor
and the receiver
Distance mini between 2
receivers
supply)
EN50022 classB EN 61058
Class II
-10°C to +55°C / 7min ON,
30min OFF, 7min ON
-30°C to +80°C
85% HR at 30°C
screw terminal:IEC320 C8 (2P)
screw terminal
30 cm
1,5 m
30 cm
Page 77

75Copyright © 2009 Somfy SAS. All rights reserved - V0 - 09/2009
Page 78

76 Copyright © 2009 Somfy SAS. All rights reserved - V0 - 09/2009
Page 79

77Copyright © 2009 Somfy SAS. All rights reserved - V0 - 09/2009
Page 80

Somfy worldwide
Argentina: Somfy Argentina
Tel: +55 11 (0) 4737-3700
Australia: Somfy PTY LTD
Tel: +61 (2) 8845 7200
Austria: Somfy GesmbH
Tel: +43 (0) 662 / 62 53 08 - 0
Belgium: Somfy Belux
Tel: +32 (0) 2 712 07 70
Brasil: Somfy Brasil Ltda
Tel: +55 11 3695 3585
Canada: Somfy ULC
Tel: +1 (0) 905 564 6446
China: Somfy China Co. Ltd
Tel: +8621 (0) 6280 9660
Croatia : Somfy Predstavništvo
Tel: +385 (0) 51 502 640
Cyprus : Somfy Middle East
Tel: +357(0) 25 34 55 40
Czech Republic:
Somfy, spol. s.r.o.
Tel: (+420) 296 372 486-7
Denmark: Somfy Nordic
Danmark
Tel: +45 65 32 57 93
Export: Somfy Export
Tel: + 33 (0)4 50 96 70 76
Tel: + 33 (0)4 50 96 75 53
Finland: Somfy Nordic AB
Finland
Tel: +358 (0)9 57 130 230
France : Somfy France
Pour les professionnels :
Tel. : +33 (0) 820 374 374
Pour les particuliers :
Tel. : +33 (0) 810 055 055
Germany: Somfy GmbH
Tel:
+49 (0) 7472 930 0
Greece: Somfy Hellas S.A.
Tel: +30 210 6146768
Hong Kong: Somfy Co. Ltd
Tel: +852 (0) 2523 6339
Hungary : Somfy Kft
Tel: +36 1814 5120
India: Somfy India PVT Ltd
Tel : +(91) 11 4165 9176
Indonesia: Somfy Jakarta
Tel: +(62) 21 719 3620
Iran: Somfy Iran
Tel: +98-217-7951036
Israel: Sisa Home Automation Ltd
Tel: +972 (0) 3 952 55 54
Italy: Somfy Italia s.r.l
Tel: +39-024847181
Japan: Somfy KK
Tel: +81 (0)45 481 6800
Jordan: Somfy Jordan
Tel: +962-6-5821615
Kingdom of Saudi Arabia:
Somfy Saoudi
Riyadh :
Tel: +966 1 47 23 020
Tel: +966 1 47 23 203
Jeddah :
Tel: +966 2 69 83 353
Kuwait: Somfy Kuwait
Tel: +965 4348906
Lebanon: Somfy Lebanon
Tel: +961 (0) 1 391 224
Malaisia: Somfy Malaisia
Tel:+60 (0) 3 228 74743
Mexico: Somfy Mexico SA
de CV
Tel: 52 (55) 4777 7770
Morocco: Somfy Maroc
Tel: +212-22443500
Netherlands: Somfy BV
Tel: +31 (0) 23 55 44 900
Norway: Somfy Nordic Norge
Tel: +47 41 57 66 39
Poland: Somfy SP Z.O.O.
Tel: +48 (22) 50 95 300
Portugal: Somfy Portugal
Tel. +351 229 396 840
Romania: Somfy SRL
Tel.: +40 - (0)368 - 444 081
Russia: Somfy LLC.
Tel: +7 495 781 47 72
Serbia: SOMFY Predstavništvo
Tel: 00381 (0) 25 841 510
Singapore: Somfy PTE Ltd
Tel: +65 (0)6383 3855
Slovak republic: Somfy, spol.
s r.o.
Tel: +421 337 718 638
Tel: +421 905 455 259
South Korea: Somfy JOO
Tel: +82 (0) 2594 4331
Spain: Somfy Espana SA
Tel: +34 (0) 934 800 900
Sweden: Somfy Nordic AB
Tel: +46 (0)40 16 59 00
Switzerland: Somfy A.G.
Tel: +41 (0) 44 838 40 30
Syria: Somfy Syria
Tel: +963-9-55580700
Taïwan: Somfy Development
and Taiwan Branch
Tel: +886 (0) 2 8509 8934
Thailand: Bangkok Regional
ofce
Tel: +66 (0) 2714 3170
Tunisia: Somfy Tunisia
Tel: +216-98303603
Turkey: Somfy TurkeyMah.
Tel: +90 (0) 216 651 30 15
United Arab Emirates:
Somfy Gulf Jebel Ali Free Zone
Tel: +971 (0) 4 88 32 808
United Kingdom: Somfy
Limited.
Tel: +44 (0) 113 391 3030
United States: Somfy Systems
Tel: +1 (0) 609 395 1300
Somfy SAS, capital 20.000.000 Euros,
RCS Annecy 303.970.230 09/2009
 Loading...