

Page 1
Simplicity without limits
TM
Instructions
Page 2
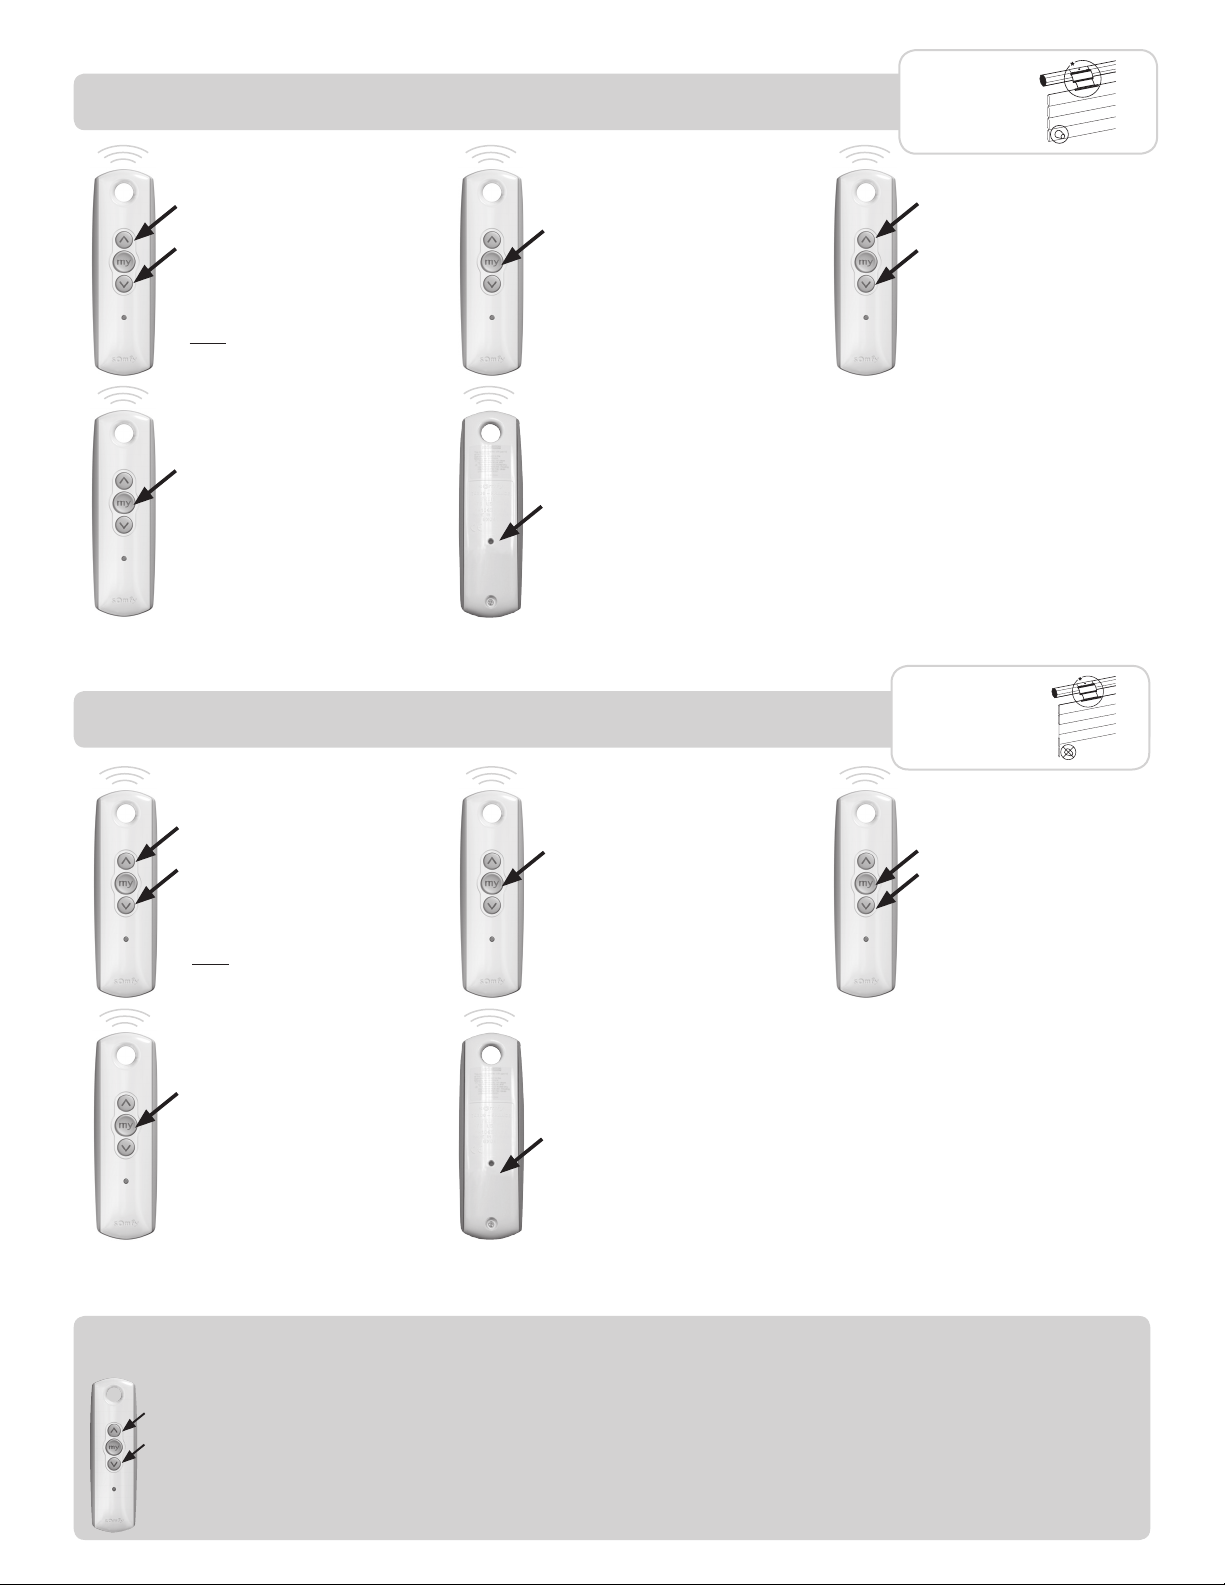
Auto Set Both Limits
To allow the OXIMO to auto set its limits, the product
must have rigid links and bottom stops.
Rigid link at top,
bottom stop
STEP 1
Wake the motor by pressing
the UP and DOWN buttons
simultaneously until the
motor jogs.
Note: After every command
the motor will jog to confirm.
STEP 4
Press and hold the MY button
until the motor jogs to confirm
the limit setting.
Top Limit Set by User, Bottom Limit Auto Set
STEP 2
Check the direction of rotation
with the UP or DOWN button. If
needed, change the direction of
rotation by pressing and holding
the MY button until the motor
jogs.
STEP 5
Press and hold the PROGRAM
button on the back of the
transmitter until the motor jogs.
The buttons no longer have to
be held for the motor to run. The
motor will auto detect the non-set
limit from the physical stop.
To allow the OXIMO to auto set the bottom limit,
the product must have rigid links.
STEP 3
Press the UP and DOWN buttons
simultaneously until the motor
jogs.
Rigid link at top,
no bottom stop
STEP 1
Wake the motor by pressing
the UP and DOWN buttons
simultaneously until the
motor jogs.
Note: After every command
the motor will jog to confirm.
STEP 4
Press and hold the MY button
until the motor jogs to confirm
the limit setting.
General Information
ADJUSTING THE LIMITS AFTER THE MOTOR HAS BEEN PROGRAMMED.
STEP 2
Check the direction of rotation
with the UP or DOWN button. If
needed, change the direction of
rotation by pressing and holding
the MY button until the motor
jogs.
STEP 5
Press and hold the PROGRAM
button on the back of the
transmitter until the motor jogs.
The buttons no longer have to be
held for the motor to run. The
motor will auto detect the non-set
limit from the physical stop.
STEP 3
Run the motor to the desired
upper limit. Press the MY and
DOWN buttons simultaneously
until the motor starts to run
downward. Use the MY button
to stop the motor.
To change the upper limit, run the motor to its upper limit and let it stop. Press the UP and DOWN buttons simultaneously until the motor jogs.
Run the motor to the new desired upper limit. Press and hold the MY button until the motor jogs. Check the new limit.
To change the lower limit, run the motor to its lower limit and let it stop. Press the UP and DOWN buttons simultaneously until the motor jogs.
Run the motor to the new desired lower limit. Press and hold the MY button until the motor jogs. Check the new limit.
Page 3

Bottom Limit Set by User, Top Limit Auto Set
To allow the OXIMO to auto set the top limit,
the product must have a bottom stop.
Standard link at
top, bottom stop
STEP 1
Wake the motor by pressing
the UP and DOWN buttons
simultaneously until the
motor jogs.
Note: After every command
the motor will jog to confirm.
STEP 4
Press and hold the MY button
until the motor jogs to confirm
the limit setting.
Both Limits Set by User
STEP 2
Check the direction of rotation
with the UP or DOWN button. If
needed, change the direction of
rotation by pressing and holding
the MY button until the motor
jogs.
STEP 5
Press and hold the PROGRAM
button on the back of the
transmitter until the motor jogs.
The buttons no longer have to
be held for the motor to run. The
motor will auto detect the non-set
limit from the physical stop.
STEP 3
Run the motor to the desired
lower limit. Press the MY and
UP buttons simultaneously
until the motor starts to run
upward. Use the MY button
to stop the motor.
Standard link at top,
no bottom stop
STEP 1
Wake the motor by pressing
the UP and DOWN buttons
simultaneously until the
motor jogs.
Note: After every command
the motor will jog to confirm.
STEP 4
Use the UP or DOWN button
to run the motor to the exact
desired lower limit. Press the MY
and UP buttons simultaneously
until the motor starts to run.
Use the MY button to stop the
motor.
IMPORTANT: The programming button in step 6 will not work until the limits have been confirmed per step 5.
General Information
To add or delete a remote/channel, press the PROGRAMMING button on the back of an already programmed remote/channel until
the motor jogs. Next, press the PROGRAMMING button on the back of the remote/channel you wish to add or delete until the motor jogs.
STEP 2
Check the direction of rotation
with the UP or DOWN button. If
needed, change the direction of
rotation by pressing and holding
the MY button until the motor
jogs.
STEP 5
Press and hold the MY button
until the motor jogs to confirm
the limit settings.
Note: Until this step, the up or
down limit can be adjusted by
repeating step 3 or step 4.
STEP 3
Run the motor to the desired
upper limit. Press the MY and
DOWN buttons simultaneously
until the motor starts to run
downward. Use the MY button
to stop the motor near the
desired lower limit.
STEP 6
Press and hold the PROGRAM
button on the back of the
transmitter until the motor jogs.
The buttons no longer have to
be held for the motor to run.
Double check the limits are in
the desired position.
To reset the motor to factory mode, start with the motor connected to power. Cut power for 2 seconds, reconnect power for 10 seconds,
cut power for 2 seconds and then reconnect power. The motor should jog or start to run. (If this does not happen, repeat the power cuts
until the motor does run). Allow the motor to stop on its own. (Do not press stop, up or down or you will have to repeat the double power
cut). Once the motor stops on its own, press and hold the PROGRAMMING button until the motor jogs twice.
Page 4

www.somfypro.com
SOMFY SYSTEMS INC
SOMFY NORTH AMERICAN HEADQUARTERS
121 Herrod Blvd.
Dayton, NJ 08810
P: (800) 22-SOMFY (76639)
NJ: (609) 395-1300
F: (609) 395-1776
FLORIDA
6100 Broken Sound Pkwy. N.W.
Suite 14
Boca Raton, FL 33487
P: (800) 22-SOMFY (76639)
F: (561) 995-7502
CALIFORNIA
15291 Barranca Parkway
Irvine, CA 92618-2201
P: (800) 22-SOMFY (76639)
F: (949) 727-3775
SOMFY ULC
SOMFY Canada Division
5178 Everest Drive
Mississauga, Ontario L4W2R4
P: (800) 66-SOMFY (76639)
CN: (905) 564-6446
F: (905) 238-1491
Somfy is the leading global manufacturer of strong, intelligent, quiet motors
and electronic controls for interior and exterior window coverings with more than
110 million motors produced since 1980. For more than four decades, Somfy
engineers have designed products for both the commercial and residential markets
to motorize window coverings such as interior shades, wood blinds, draperies,
awnings, rolling shutters, exterior solar screens and projection screens. Somfy
motorization systems are easily integrated with security, HVAC and lighting systems
providing total home or building automation.
P-0018
© Copyright Somfy Systems, Inc. 10/2014 IMAGES: © Somfy SAS/Sémaphore
 Loading...