

Page 1
We reserve the right to make changes due to technical improvements.
1
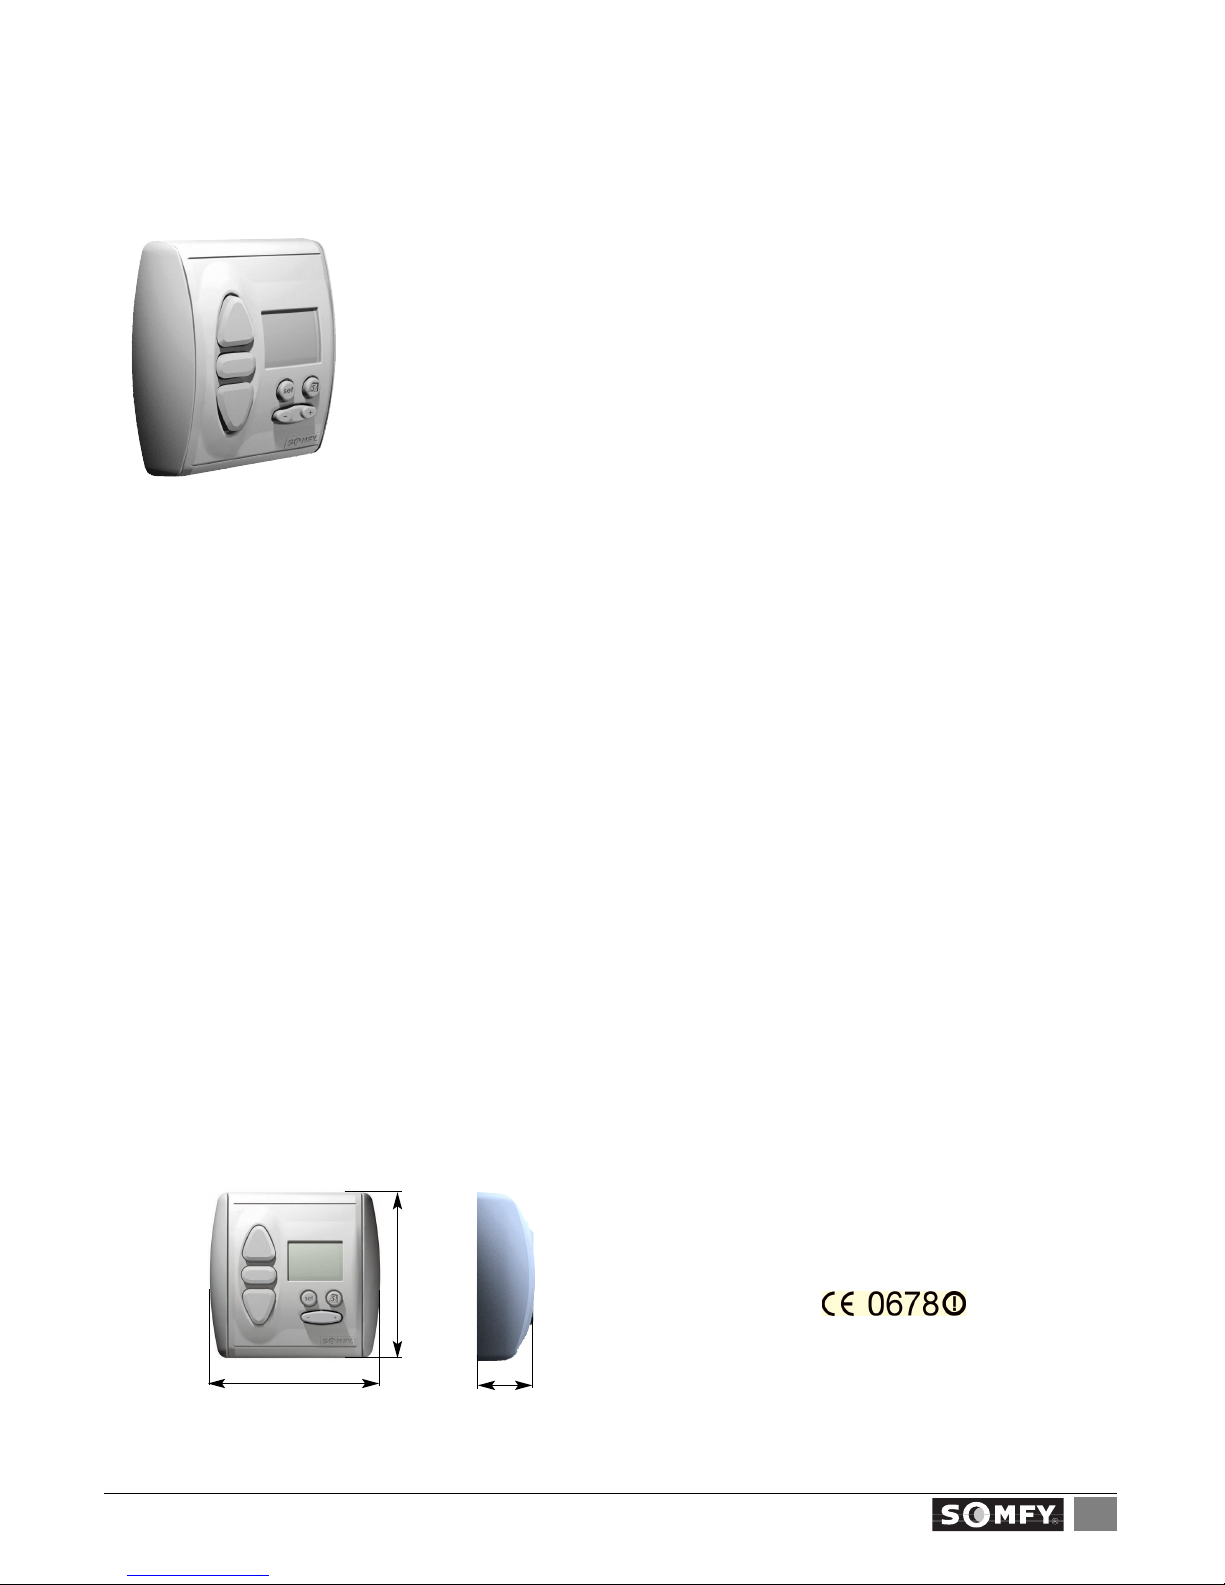
Chronis RTS/RTS L
Supply:
Degree of protection:
Operating temperature:
Environmental conditions:
2 x 1,5 V DC (Type :AAA LR03)
IP 30
+5°C to +40°C
dry living areas.
80 mm
80 mm
27 mm
INSTALLATION
guide
Ref.9007503B
inteoCHRONIS RTS / RTS “L”
1
Characteristics:
Chronis RTS/RTS Lhas several functions, which can fulfil individual requirements at the touch of a button:
Weekly program
set different times for automatic opening and closing of your roller shutters every day of the week.
Holiday security
set random times to give the impression of an occupied house.
Cosmic
roller shutters are activated automatically according to the times the sun rises and sets.
OFF setting
The automatic control can be turned off at the touch of a button.
A detailed description of each mode of operation is given under point 4 “Programming”.
All functions of the Chronis RTSalso apply for the Chronis RTS Lfor light sensor.Please read the instructions included
with the light sensor .
Chronis RTS/RTS L is the programmable radio time switch in the new inteo-control range
from SOMFY,which controls your electrically operated roller shutters or external blinds.
Operating commands are transmitted by radio signal,significantly reducing the cost of installation.
The radio signal has a range of up to 300 metres in free field,or 20 metres through two concrete walls in buildings.
Hereby, SOMFY, declares that this equipment is in
compliance with the essential requirements and other
relevant provisions of Directive 1999/5/EC.
A Declaration of Conformity is available at the web address
www.somfy.com
Heading
CE
Page 2
2.1
We reserve the right to make changes due to technical improvements.
Chronis RTS/RTS L
2
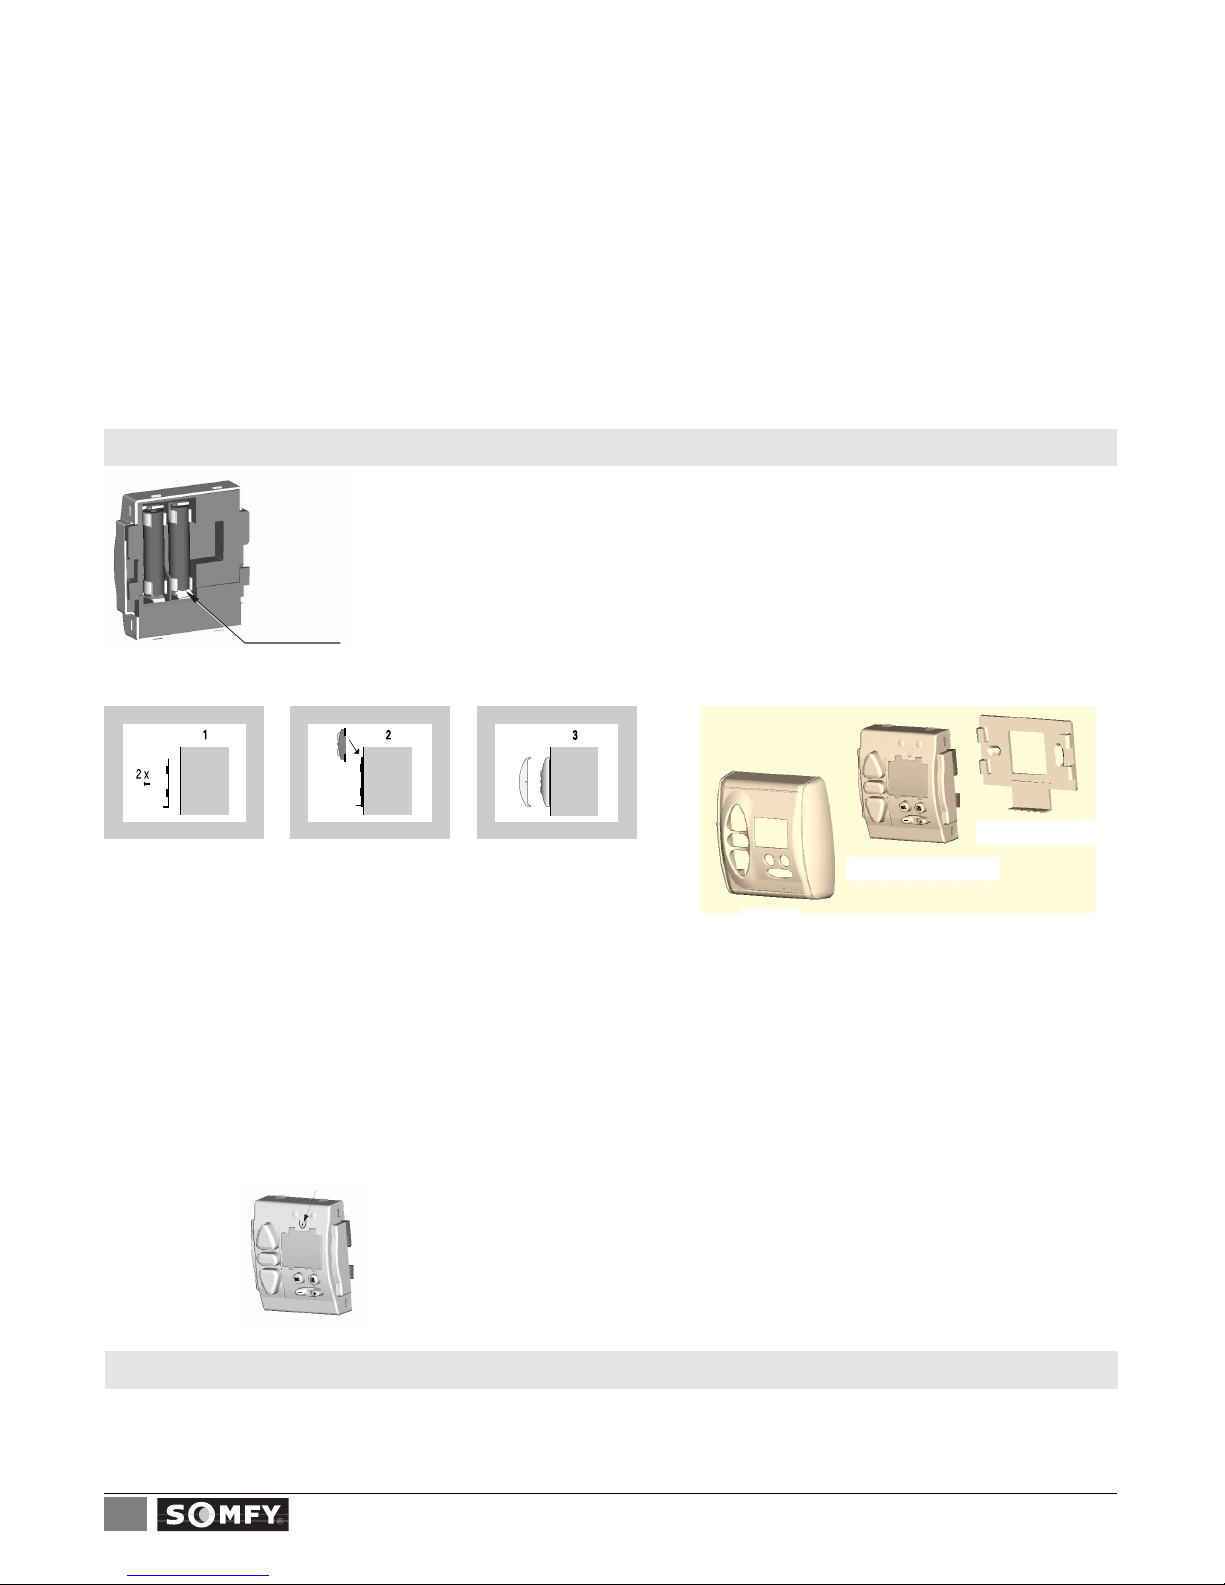
Assembly
1.)Fix wall mounting
plate to the wall
using two screws
3.)Place the cover.2.)Slide the Chronis
RTS/RTS L onto
the wall mounting
plate from above
The range of radio control is limited by laws regulating radio devices and by building design. When planning,please ensure that there is adequate radio
reception.
In order not to affect quality of reception,a minimum distance of 30 cm between a Chronis RTS/RTS L unit and a radio receiver should be maintained.
Chronis RTS/RTS L should not be installed in the immediate vicinity of metal surfaces. Powerful local transmitter equipment (e.g.cordless headphones)
with a transmission frequency identical to the Chronis RTS/RTS L can affect its function.
Insulating strip
The equipment is delivered with the batteries installed.
An insulating strip is placed between the battery pole and the contact.
This must be removed before installation,then the time is shown on the display.
Cover
Chronis RTS / RTS L
Wall mounting plate
Tip: Before assembly ,check that there is adequate radio reception at the intended location.
Programming button
The procedure for tuning a Chronis RTS to a radio receiver depends on the type of receiver used. It is important to follow step by step the detailed description of the relevant
programming procedure in the instructions which accompany each individual SOMFY
RTS radio receiver .
– Activate your chosen receiver (please refer to the installation guide of the relevant receiver).
– Press the programming button on the Chronis RTS/RTS L.
– “Prog”will appear on the display.Hold down the button until the RTS receiver confirms the tuning process.
2
Installation:
3
Radio programming:
4.2 Setting operation mode3.1 T uning
Page 3

We reserve the right to make changes due to technical improvements.
3
Chronis RTS/RTS L
UP button
STOP/IP button
DOWN button
Display
SET button
Calendar button
Programming button
4.1 First use
When setting or changing values:
➜ Values which flash can be changed.
➜ Always press to end and store entered values.
➜ If no information is entered for approx.20 seconds,the programming menu quits automatically.
Information entered before this will not be stored.
Before setting the time and date,check whether the equipment’s summer/winter time setting is correct.
Winter time is the factory default setting.
Setting the date
1. Press briefly ➜ date displayed (if no information entered
within 10 seconds,display jumps back to time)
2. Press briefly ➜ day flashes.
Set day using button
3. Press briefly ➜ month flashes.
Set month using button
4. Press briefly ➜ year flashes.
Set year using button
5. Press briefly (save) ➜ time displayed.
The day of the week is set automatically . The day/month/year
selection can be gone through in reverse order using the DOWN
+-+-+
-
Setting summer or winter time
The corresponding setting is shown on the display as “S”for summer time or
“W”for winter time.
Changing from winter to summer time
1.Press briefly ➜ time flashes.
2.Press for more than 5 seconds ➜ display shows “S”for summer time.
3.Press briefly (save) ➜time displayed
Changing from summer to winter time
1.Press briefly ➜ time flashes.
2.Press for more than 5 seconds ➜ display shows “W”for winter time.
3.Press briefly (save) ➜ time displayed.
Hour
Summer/Winter time
Next command
and time
Day
Month
Year
Min.
Current day
1 : Monday
2 : Tuesday
3 : Wednesday
4 : Thursday
5 : Friday
6 : Saturday
7 : Sunday
4.2 Setting operation mode
The Chronis RTS/RTS L has 5 different operating modes:
4.2.1 Weekly programme ( )
Roller shutters are opened or closed automatically at individually set times.
– Default opening time is set at 6:00,default closing time is 20:00.
– Different times can be entered for every day of the week. The display always shows the day of the week (or all weekdays) for which the entered time applies.
Changing the weekly programme (if required)
1.Press and maintain until display shows the weekly programme (if not already set).
2.Press briefly ➜ time flashes.
3.Press briefly ➜ UP switching time flashes.
4.Press until the desired day of the week or all weekdays are selected *
5.Set UP time using button.
6.Press briefly ➜ DOWN switching time flashes.
7.Set DOWN time using button.
If required,use button to select the next week day and repeat steps (3) to (7).
8.Press briefly (save) ➜ time displayed.
+-+
-
4
Timer programming:
Setting the date
1.Press briefly ➜ date displayed (if no information entered within
10 seconds,display jumps back to time)
2.Press briefly ➜ day flashes.
Set day using button
3.Press briefly ➜ month flashes.
Set month using button
4.Press briefly ➜ year flashes.
Set year using button
5.Press briefly (save) ➜ time displayed.
The day of the week is set automatically. The day/month/year selection can be gone through in reverse order using the DOWN button.
+-+-+
-
Setting the time
1.Press briefly ➜ time flashes
2.Set time using button
3.Press briefly (save) ➜ time displayed
+
-
4.2 Setting operation mode
1 :Monday
2 :T uesday
3 :Wednesday
4 :Thursday
5 :Friday
6 :Saturday
7 :Sunday
*
Page 4

If the UP or DOWN time is set between 23:59 and 0:00 using the button (see step (5) and (7)),the display shows .The OFF setting allows
the automatic opening and closing of roller shutters to be turned off intentionally for specific days.
T o speed up setting of your weekly programme:
a.) Set the UP and DOWN times for the whole week
Follow steps (1) – (8),but at step (4) select all weekdays.Save by pressing
b.) Setting the UP and DOWN times for the weekend
Follow steps (1) to (8) again for the weekend,but at step (4) select Saturday and Sunday
Save by pressing
4.2.2 Holiday security setting (SEC)
– To make your house appear occupied while you are away,open and close the roller shutters at random times. The switching times set in the weekly programme for the automatic opening and closing of your roller shutters will be delayed or brought forward by +/- 15 minutes every day.
Press and maintain until (SEC) appears on the display.
+
-
4.2.3 Cosmic 1 (COS 1)
– Open and close your roller shutters at sunrise and sunset every day. Additional differential timesand cut-off times
allow you to programme roller shutters to open and close according to your individual requirements.
– By entering a differential time,opening and closing can be adjusted independently by up to +/- 1h 59 mins.relative to
sunrise and sunset times.
Note
We reserve the right to make changes due to technical improvements.
Chronis RTS/RTS L
4
Jan. Apr. July Oct. Dec.
5:00
7:00
9:00
16:00
19:00
22:00
Differential tim
e
Sunrise
Sunset
Close
Open, e.g. 1 hour after sunrise,
with a differential time of +1h
5:00
Jan. Apr. July Oct. Dec.
7:00
9:00
16:00
19:00
22:00
Sunrise
Cut-off time for closing
Sunset
Shut-off time
Close
Cut-off time for opening
If you do not wish these cut-off times to affect the opening or closing,and you want the roller shutters to be operated at sunrise and sunset and
only with the corresponding differential times,you can set the cut-off time to OFF . To switch the cut-off time to “OFF”,the cut-off time must be
set to between 23:59 and 0:00 using the button.
+
-
Entering a differential time
1.Press and maintain until the display shows (COS 1) (if not already set)
2.Press briefly ➜ time flashes and next switching command is displayed
3.Press briefly ➜ UP differential time flashes
4.Change UP differential time using button
5.Press briefly ➜ DOWN differential time flashes
6.Change DOWN differential time using button
7.Press briefly (differential times are stored) ➜time is displayed
There is no default differential time !
+-+
-
Entering cut-off times
1.Press and maintain until the display shows (COS 1) (if not already set)
2.Press briefly ➜ time flashes and the next switching command is displayed
3.Press twice quickly ➜UP cut-off time flashes
4.Change UP cut-off time using button
5.Press twice quickly ➜DOWN cut-off time flashes
6.Change DOWN cut-off time using button
7.Press briefly (cut-off times are saved) ➜time is displayed
The factory default setting is 6:00 for UP cut-off time and OFF for DOWN cut-off time !
+-+
-
4.2.4 Cosmic 2 (COS 2)
Cosmic 2 always opens the roller shutters at the times set individually in the weekly programme and closes them at the times set for Cosmic 1.
The cut-off and differential times set in Cosmic 1 are observed.
No changes can be made in Cosmic 2.
Page 5

4.2.5 OFF mode
In this operating mode,only manual commands are carried out.
– Switching to OFF mode
Press the “+“ on the button briefly ➜display shows OFF.
– Switching from OFF mode to automatic mode
Press the “-“ on the button briefly ➜display shows the time.
+-+
-
We reserve the right to make changes due to technical improvements.
5
Chronis RTS/RTS L
It is possible to operate the system manually at any time using the UP,DOWN and STOP/IP buttons.
Commands:
Pressing the UP or DOWN direction buttons will move the blind in the desired direction.
STOP command:
While the motor is running,a command can be stopped by pressing the STOP/IP button.
Depending on the receiver used,an intermediate position (IP) can also be called up using this button.
Chronis RTS/RTS Lis powered by two standard 1.5 V alkaline manganese batteries (Micro/AAA type).
Battery life is approx.3 years with an average of 4 commands per day. As the battery power decreases,the display contrast will fade. If the display is illegible,the batteries must be changed.
Changing the batteries:
– Carefully remove the cover of the Chronis RTS/RTS L using a small screwdriver (for RTS L,first disconnect the light sensor).
– Slide the Chronis RTS/RTS L unit upwards out of the mounting plate.
– Change the dead batteries,which are located on the back of the Chronis RTS/RTS L unit. Observe the polarity specified on the
unit!
– Please dispose of the dead batteries at an appropriate collection point.
After changing the batteries,the date and time must be reset.
The switching time settings will be stored permanently .
5
Manual operation
6
Battery
Page 6

Check whether the insulating strip has been removed from the
batteries.
T ake out and reinstall the batteries.
T ake out and reinstall the batteries.
Increase transmission repeat rate.
(see chapter 7 “Diagnosis menu:rts”).
Change the position of the Chronis RTS/RTS L unit.
Set transmission repeat rate to zero.
Change to blinds mode
(see chapter 7 “Diagnosis menu:rts”).
Nothing is shown on the display
The clock does not work
Automatic commands are not carried out
Automatic commands are repeated unnecessarily
Blinds are not always operated by automatic commands
We reserve the right to make changes due to technical improvements.
Chronis RTS/RTS L
6
What do I do if
This menu allows the unit to be checked and additional functions to be set.
T o access the menu,press + + simultaneously until appears on the display.To change the menu options,press . If no information is
entered for approx.20 seconds,the diagnosis menu quits automatically .
7
Diagnosis menu
The menu options :
➜➜ Display test.
➜➜ Change weekday German (dEU) / international (Int).
➜Save change and exit.
➜➜ Change between roller shutters (Stn) / venetian blinds (Eub).
➜➜ Set transmission repeat rate.the signal for automatic commands is repeated according to the number of beams shown.
➜ Save change and exit.
➜➜ Shows the software version.
➜ Exit.
+
-
 Loading...