

SOMFY 2400625 User Manual
- 1 -
Copyright © 2008 Somfy SAS. All rights reserved.
IP 54
433.42 MHz
3 Vdc
+
3V
CR 2450
+ 60°C
- 20°C
Australia : SOMFY
PTY LTD
(61) 2 9638 0744
Austria : SOMFY GesmbH
(43) 662 62 53 08
Belgium : SOMFY BELUX
(32) 2 712 07 70
Brasil : SOMFY BRASIL
STDA
(55 11) 6161 6613
Canada : SOMFY ULC
(1) 905 564 6446
Cyprus : SOMFY MIDDLE
EAST
(357) 25 34 55 40
Czech Republic : SOMFY
Spol s.r.o.
(420) 296 372 486-7
Denmark : SOMFY AB
DENMARK
(45) 65325793
Finland : SOMFY AB
FINLAND
(358) 957 13 02 30
France : SOMFY FRANCE
Actipro : (33) 820 374 374
Germany : SOMFY GmbH
(49) 7472 9300
Greece : SOMFY HELLAS
(30) 210 614 67 68
Hong Kong : SOMFY
Co. Ltd
(852) 25236339
Hungary : SOMFY Kft
(36) 1814 5120
India : SOMFY INDIA
PVT Ltd
(91) 11 51 65 91 76
Italy : SOMFY ITALIA s.r.l
(39) 024 84 71 84
Japan : SOMFY KK
+81-45-475-0732
Lebanon : cf. Cyprus -
somfy middle east
(961) 1 391 224
Mexico : SOMFY MEXICO
SA de CV
(52) 55 5576 3421
Morocco : SOMFY MAROC
(212) 22 95 11 53
Netherlands : SOMFY BV
(31) 23 55 44 900
Norway : SOMFY
NORWAY
(47) 67 97 85 05
Poland : SOMFY SP Z.O.O
(48) 22 618 80 56
Portugal : SOMFY
PORTUGAL
(351) 229 396 840
Russia : cf. Germany -
SOMFY GmbH
(7) 095 781 47 72, (7) 095
360 41 86
Singapore : SOMFY
PTE LTD
(65) 638 33 855
Slovaquia : cf. Czech
Republic - SOMFY Spol
s.r.o.
(420) 296 372 486-7
South Korea : SOMFY
JOO
(82) 2 594 4333
Spain : SOMFY ESPANA SA(34) 934 800 900
Sweden : SOMFY AB
(46) 40 165900
Switzerland : SOMFY A.G.
(41) 18 38 40 30
Taïwan : SOMFY TAIWAN
(886) 2 8509 8934
Turkey : SOMFY TURKEY
+90 216 651 30 15
UAE : SOMFY GULF
+971 4 88 32 808
United Kingdom : Somfy
LTD
(44) 113 391 3030
United States : SOMFY
SYSTEMS Inc
(1) 609 395 1300
Somfy SAS dans un souci constant d’évolution et d’amélioration peut modifier le produit sans préavis.
Photos non contractuelles.
Somfy SAS in a constant concern of evolution and improvement may modify the product without prior
notice. Non contractual pictures.
Somfy SAS, capital 20.000.000 Euros, RCS Annecy 303.970.230 12/2009
FR
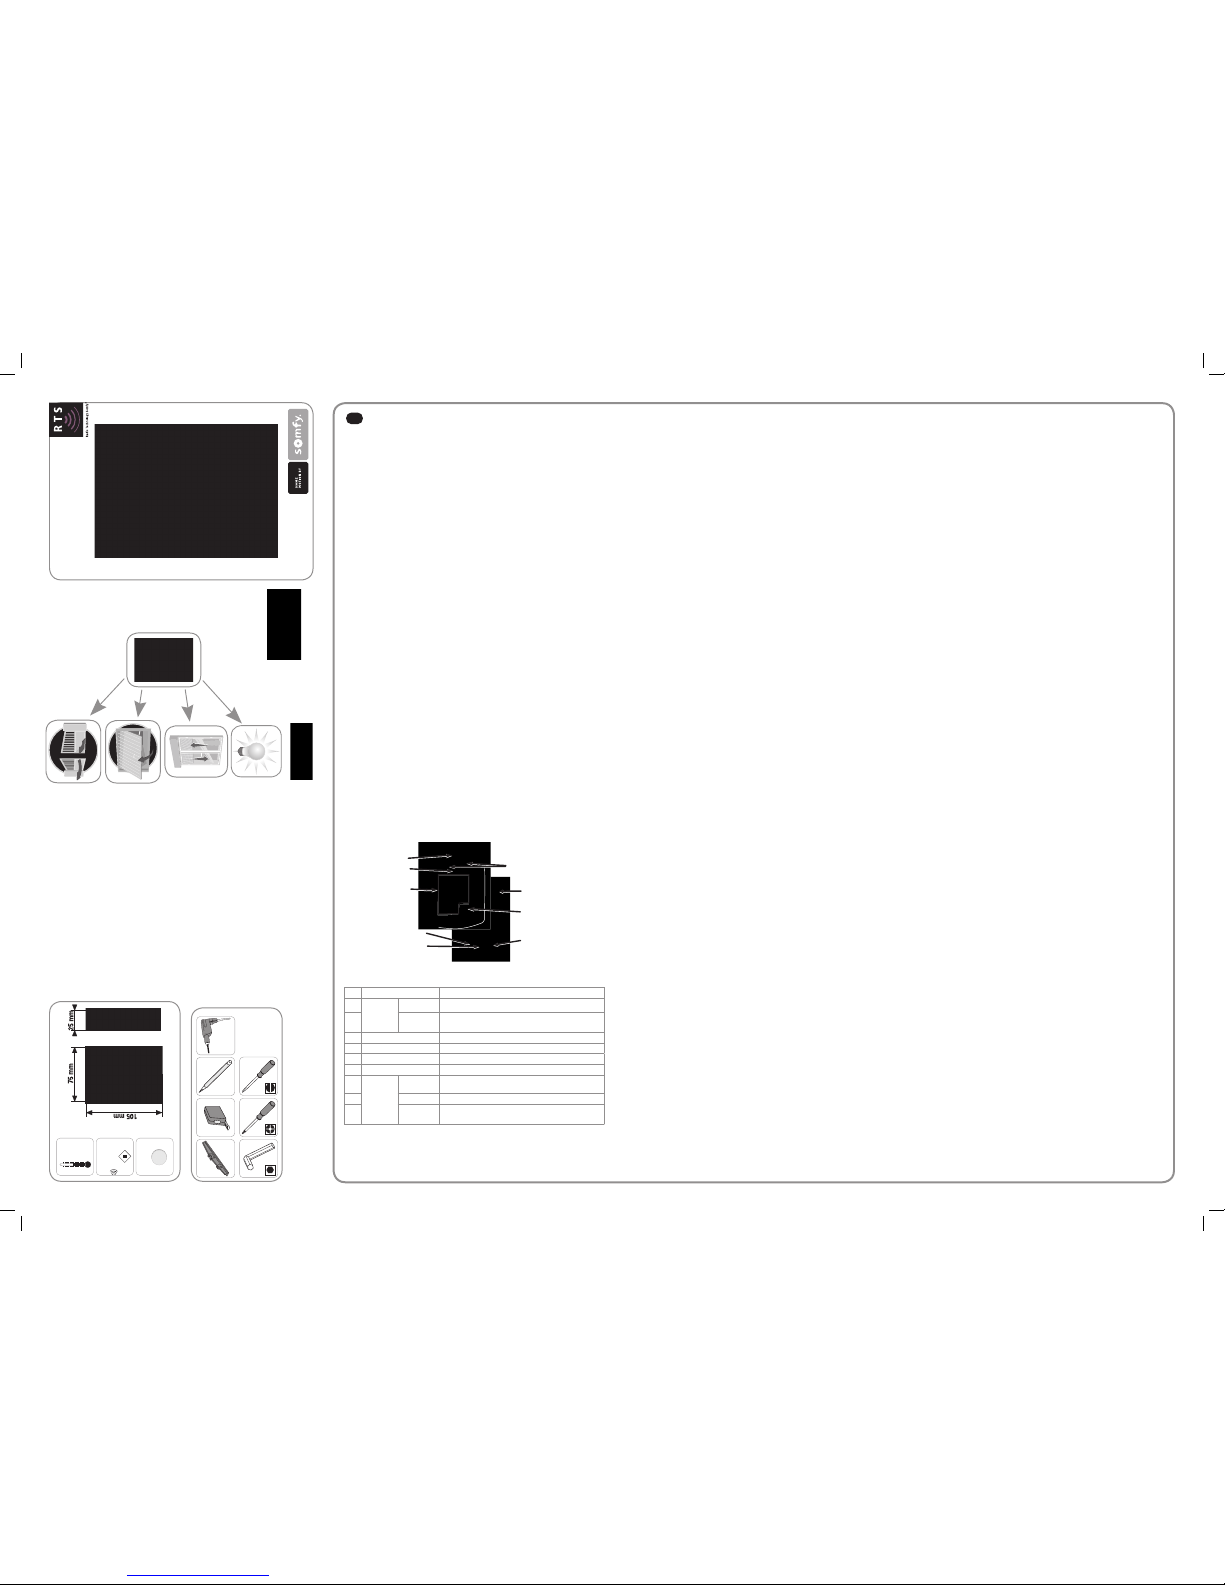
Principes de fonctionnement
Le Digipad radio RTS est une commande murale sans fil à accès codé.
Le Digipad permet de commander 2 moteurs distincts à l’aide de 2 touches de
commande. Il est compatible avec tous les moteurs, même ceux antérieurs à 2006
(cf. paragraphe 2.2.).
Des codes utilisateurs limitent l’usage des touches de commande aux personnes
autorisées :
1 code principal valable pour les 2 touches de commande,•
2 codes secondaires par touche de commande pour donner un accès •
partiel et momentané à la propriété (l’enregistrement de codes secondaires
est optionnel).
Les codes utilisateurs de 4, 5 ou 6 caractères, au choix, se composent avec les
chiffres de 0 à 9 et le A.
Le Digipad est muni d’une fonction rétro-éclairage des touches en cas de faible
luminosité.
Le Digipad fonctionne avec une pile 3V, type CR 2450.
Conformité
Par la présente, Somfy déclare que l’appareil est conforme aux exigences
essentielles et aux autres dispositions pertinentes de la directive 1999/5/
CE. Une déclaration de conformité est mise à disposition à l’adresse internet
www.somfy.com/ce. Utilisable en UE, CH et NO.
Sécurité
Généralité
Toujours lire cette notice d’installation et les consignes de sécurité avant de
commencer l’installation de ce produit Somfy.
Avant toute installation, vérifier la compatibilité de ce produit avec les équipements
et accessoires associés.
Cette notice décrit l’installation, la mise en service et le mode d’utilisation de ce
produit.
Toute utilisation hors du domaine d’application défini par Somfy est non conforme.
Elle entraînerait, comme tout irrespect des instructions figurant dans cette notice,
l’exclusion de la responsabilité et de la garantie Somfy.
Somfy ne peut être tenu responsable des changements de normes et standards
intervenus après la publication de cette notice.
Consignes générales de sécurité
Ne pas laisser les enfants jouer avec le système de commande.
Conditions d’utilisation
Ne jamais installer le produit à proximité de surfaces métalliques.
Contrôler la portée radio avant de fixer le produit. La portée radio est limitée par les
normes de régulation des appareils radio.
L’utilisation d’appareil radio (par exemple un casque radio hi-fi) utilisant la même
fréquence peut réduire les performances du produit.
Description
N° Nom Fonction
1
Voyant
haut Information sur l’émission d’une commande radio
2
bas
Information sur l’état du Digipad
(clignotant = verrouillé)
3
Touches de commande Commande de moteur (1 touche par moteur)
4
Touches alpha-numériques Saisie de code
5
Antenne
6
Touche SET Accès au mode programmation
7
Touches
RESET
Mise en service du Digipad (pour une 1ère utilisation)
Verrouillage du Digipad
8
PROG Mémorisation d’un moteur pour store ou volet roulant
9
ADR
Changement de radio (pour un moteur antérieur à 2006)
Réinitialisation du Digipad (retour à la configuration usine)
1. Mettre en service (pour une 1ère utilisation) [fig.A]
Ouvrir le Digipad avec la clé fournie.1.
Appuyer sur la touche RESET.2.
Vérifier que le Digipad soit mis en service en appuyant sur une touche du 3.
clavier. Si le voyant du bas s’allume, le Digipad est mis en service. S’il ne s’allume
pas, appuyer à nouveau sur la touche RESET et vérifier qu’il soit mis en service.
2. Mémoriser le Digipad
Le Digipad fonctionne comme un émetteur classique (par exemple une télécommande),
la notice du moteur peut donc être utilisée pour mémoriser le Digipad.
2.1. Préconisations
Ne pas toucher l’antenne pendant les opérations de mémorisation.
Pour mémoriser le Digipad sur l’électronique d’un moteur Axovia, poser le Digipad
sur la cible pendant l’opération.
Le Digipad se verrouillant automatiquement au bout de 30 s, l’appui sur la touche
de commande à mémoriser sur l’électronique du moteur doit être réalisé avant la fin
de ce délai.
2.2. Mémoriser le Digipad sur un moteur postérieur à 2006 [fig.B]
Réaliser l’opération décrite page I ou II selon le moteur concerné.
Suite à cette opération, un apprentissage des courses est nécessaire pour les
moteurs Axovia, SGS, SGA, SLD (début de l’apprentissage vantaux entre-ouverts
pour vérifier le démarrage en ouverture).
2.3. Cas des moteurs Axovia et Axorn antérieurs à 2006 [fig.C]
En 2006, Somfy a changé son protocole radio pour moteurs de portail et porte de
garage.
Le Digipad est compatible avec les protocoles radio antérieur et postérieur à 2006.
Chaque touche de commande peut être configurée individuellement.
a) Changer de protocole radio sur une touche de commande du Digipad
Taper le code principal (000000 sur un Digipad neuf ou réinitialisé) et valider 1.
avec la touche SET.
Appuyer sur la touche ADR.2.
Pendant que le voyant clignote (10 s), appuyer sur la touche de commande 3.
souhaitée. Le protocole radio est changé pour cette touche de commande du
Digipad.
b) Mémoriser le Digipad sur le moteur antérieur à 2006
Taper le code principal (000000 sur un Digipad neuf ou réinitialisé) et valider 1.
avec la touche SET.
Se référer ensuite aux instructions de mémorisation de télécommandes de 2.
la notice du moteur Axovia ou Axorn antérieur à 2006. Pour les autres moteurs
antérieurs à 2006, nous consulter.
Astuce [fig.D]
Pour savoir dans quel protocole radio est une touche, taper le code principal et faire
un appui long (20 s) sur la touche.
Si le voyant du haut clignote 10 s puis :
s’éteint => le protocole radio est postérieur à 2006,•
reste allumé => le protocole radio est antérieur à 2006.•
3. Changer le code principal [fig.E]
Par défaut, le code principal est 000000 sur un Digipad neuf.
Pour changer le code principal :
Taper le code principal et valider avec la touche SET.1.
Appuyer sur la touche SET jusqu’à ce que le voyant du bas s’allume (environ 7 2.
s). Le voyant du bas reste allumé.
Taper le code de votre choix et valider avec la touche SET. Le voyant du bas 3.
s’éteint puis se rallume.
Taper à nouveau ce code et valider avec la touche SET. Le voyant du bas 4.
s’éteint.
Le code principal est enregistré.
4. Utiliser le Digipad
Les commandes ne sont actives que si les touches de commande sont
déverrouillées.
4.1. Déverrouillage
Le code principal permet de déverrouiller les 2 touches de commande pour autoriser
la commande de 2 moteurs.
Un code secondaire permet de déverrouiller une seule touche de commande à la
fois.
4.2. Verrouillage
Le Digipad se verrouille automatiquement 30 s après le dernier appui sur une touche
de commande.
4.3. Utiliser le Digipad
Taper le code principal ou secondaire. 1.
Appuyer sur la touche de commande du moteur à actionner. Le voyant du haut 2.
clignote.
Les appuis successifs sur une même touche de commande entraînent le
fonctionnement suivant du moteur : Ouverture, Stop, Fermeture, Stop, Ouverture ...
Pour les moteurs de portail ou de porte de garage dotés d’une fonction ouverture
totale ou partielle, si elle est programmée, chaque touche de commande permet le
fonctionnement en ouverture partielle (appui court < 1 s) ou totale (appui long > 2 s).
5. Fixer le Digipad [fig.F]
Avant de fixer le Digipad, vérifier son bon fonctionnement depuis l’emplacement de
fixation prévu.
Coller le joint néoprène à l’arrière du Digipad.1.
Maintenir le fond du Digipad contre le mur et repérer les trous de perçage. 2.
Fixer le fond du Digipad au mur.3.
Refermer le Digipad.4.
6. Codes secondaires
L’attribution d’un code secondaire à une touche de commande permet d’autoriser
l’accès à une partie seulement de la propriété (par exemple en attribuant le code
secondaire à la touche de commande du portail de la propriété). L’autorisation
d’accès peut être temporaire, le code secondaire pouvant être effacé à tout moment
par le propriétaire.
6.1. Enregistrer un code secondaire [fig.G]
Taper le code principal et valider avec la touche SET.1.
Appuyer sur la touche SET jusqu’à ce que le voyant du bas s’allume 2.
(environ 7 s). Le voyant du bas reste allumé.
Appuyer sur la touche de commande à laquelle un code secondaire doit être 3.
attribué.
Taper un code secondaire et valider avec la touche SET. Le voyant du bas 4.
s’éteint puis se rallume.
Taper à nouveau ce code et valider avec la touche SET. Le voyant du bas 5.
s’éteint.
Pour vérifier la validité du code secondaire : 6.
attendre 30 s le verrouillage automatique du Digipad (ou ouvrir le Digipad et •
appuyer sur la touche RESET),
déverrouiller le Digipad avec le code secondaire,•
appuyer sur la touche de commande associée à ce code :•
si le voyant du haut clignote, le code secondaire est valide,–
si le voyant du bas clignote, le code secondaire n’est pas valide. –
Recommencer la procédure d’enregistrement d’un code secondaire.
6.2. Effacer un code secondaire connu [fig.H]
Taper le code principal et valider avec la touche SET.1.
Appuyer sur la touche SET jusqu’à ce que le voyant du bas s’allume (environ 7 s).2.
Appuyer sur la touche de commande à laquelle le code secondaire est 3.
attribué.
Taper le code secondaire à effacer.4.
Appuyer sur la touche SET jusqu’à ce que le voyant du bas s’éteigne (environ 10 s).5.
6.3. Effacer tous les codes secondaires [fig.I]
Taper le code principal et valider avec la touche SET.1.
Appuyer sur la touche SET jusqu’à ce que le voyant du bas s’allume (environ 7 s).2.
Appuyer sur la touche SET jusqu’à ce que le voyant du bas s’éteigne (environ 10 s).3.
7. Dépannages
7.1. Aucun mouvement
Le voyant du haut reste éteint => pile usée : la changer. [fig. J]
Le voyant du haut clignote à l’appui => changer le protocole radio sur la touche de
commande.
[fig. C]
7.2. Code principal oublié et réinitialisation complète [fig. K]
Le Digipad doit être réinitialisé : effacement des mémorisations, retour des codes et
du protocole radio en configuration d’usine.
Pour réinitialiser le Digipad :
Ouvrir le Digipad avec la clé fournie.1.
Appuyer sur la touche ADR (environ 10 s). Le voyant du haut s’allume pendant 2.
l’appui puis les 2 voyants clignotent 7 fois. Le Digipad est réinitialisé.
Refermer le Digipad.3.
Recommencer l’installation complète : mémorisations, changement de code 4.
principal, etc.
7.3. Erreurs de saisie de code
7.3.1. Début de saisie de code incorrect
Poursuivre en saisissant le bon code et valider avec la touche SET ou appuyer sur
une touche de commande. Seuls les derniers chiffres tapés seront pris en compte.
7.3.2. Plusieurs saisies de codes erronés
Le voyant du bas clignote rapidement à l’appui sur n’importe quelle touche.
5 codes erronés différents ont été saisis successivement. Par sécurité, le Digipad est
verrouillé pendant 5 min.
Attendre 5 min.
PROG ADR RESET
1
2
3
4
5
6
7
8
9
www.somfy.com
5046086D
- 2 -
Copyright © 2008 Somfy SAS. All rights reserved.
EN
Operating principles
The RTS radio Digipad is a wireless, wall-mounted control with
coded access.
The Digipad enables 2 different motors to be operated with
2 control buttons. It is compatible with all motors, even those
manufactured before 2006 (see paragraph 2.2.).
User codes limit the use of the control buttons to authorised
persons:
1 main code for the 2 control buttons,•
2 secondary codes for each control button to give partial, •
brief access to the property (recording secondary codes is
optional).
User codes with a choice of 4, 5 or 6 characters, can be composed
using numbers 0 to 9 and the letter A.
In the event of a low level of luminosity, the Digipad buttons are
fitted with backlighting.
The Digipad is fitted with a 3V, CR 2450 type battery.
Conformity
Somfy hereby declares that this product complies with the essential
requirements and other relevant provisions of Directive1999/5/EC.
A Declaration of Conformity is available at the web address
www.somfy.com/ce. Suitable for use in EU, CH and NO.
Safety
General information
Always read this installation guide and safety instructions before
installing this Somfy product.
Never begin installing without first checking the compatibility of this
product with the associated equipment and accessories.
This guide describes how to install, commission and operate this
product.
Any usage outside of applications defined by Somfy constitutes
non-compliance, and is therefore not covered by the guarantee. In
this event, as for all usage not consistent with the instructions given
herein, Somfy accepts no responsibility for harm or damage.
Somfy cannot be held responsible for any changes in standards
which come into effect after the publication of this guide.
General safety advice
Do not let children play with the control system.
Operating conditions
The product should never be installed close to metal surfaces.
Check the radio range before securing the product. The radio range
is limited by the radio appliance control standards.
The use of a radio appliance (e.g. a set of Hi-Fi radio headphones)
operating on the same frequency might be detrimental to the
product’s performance.
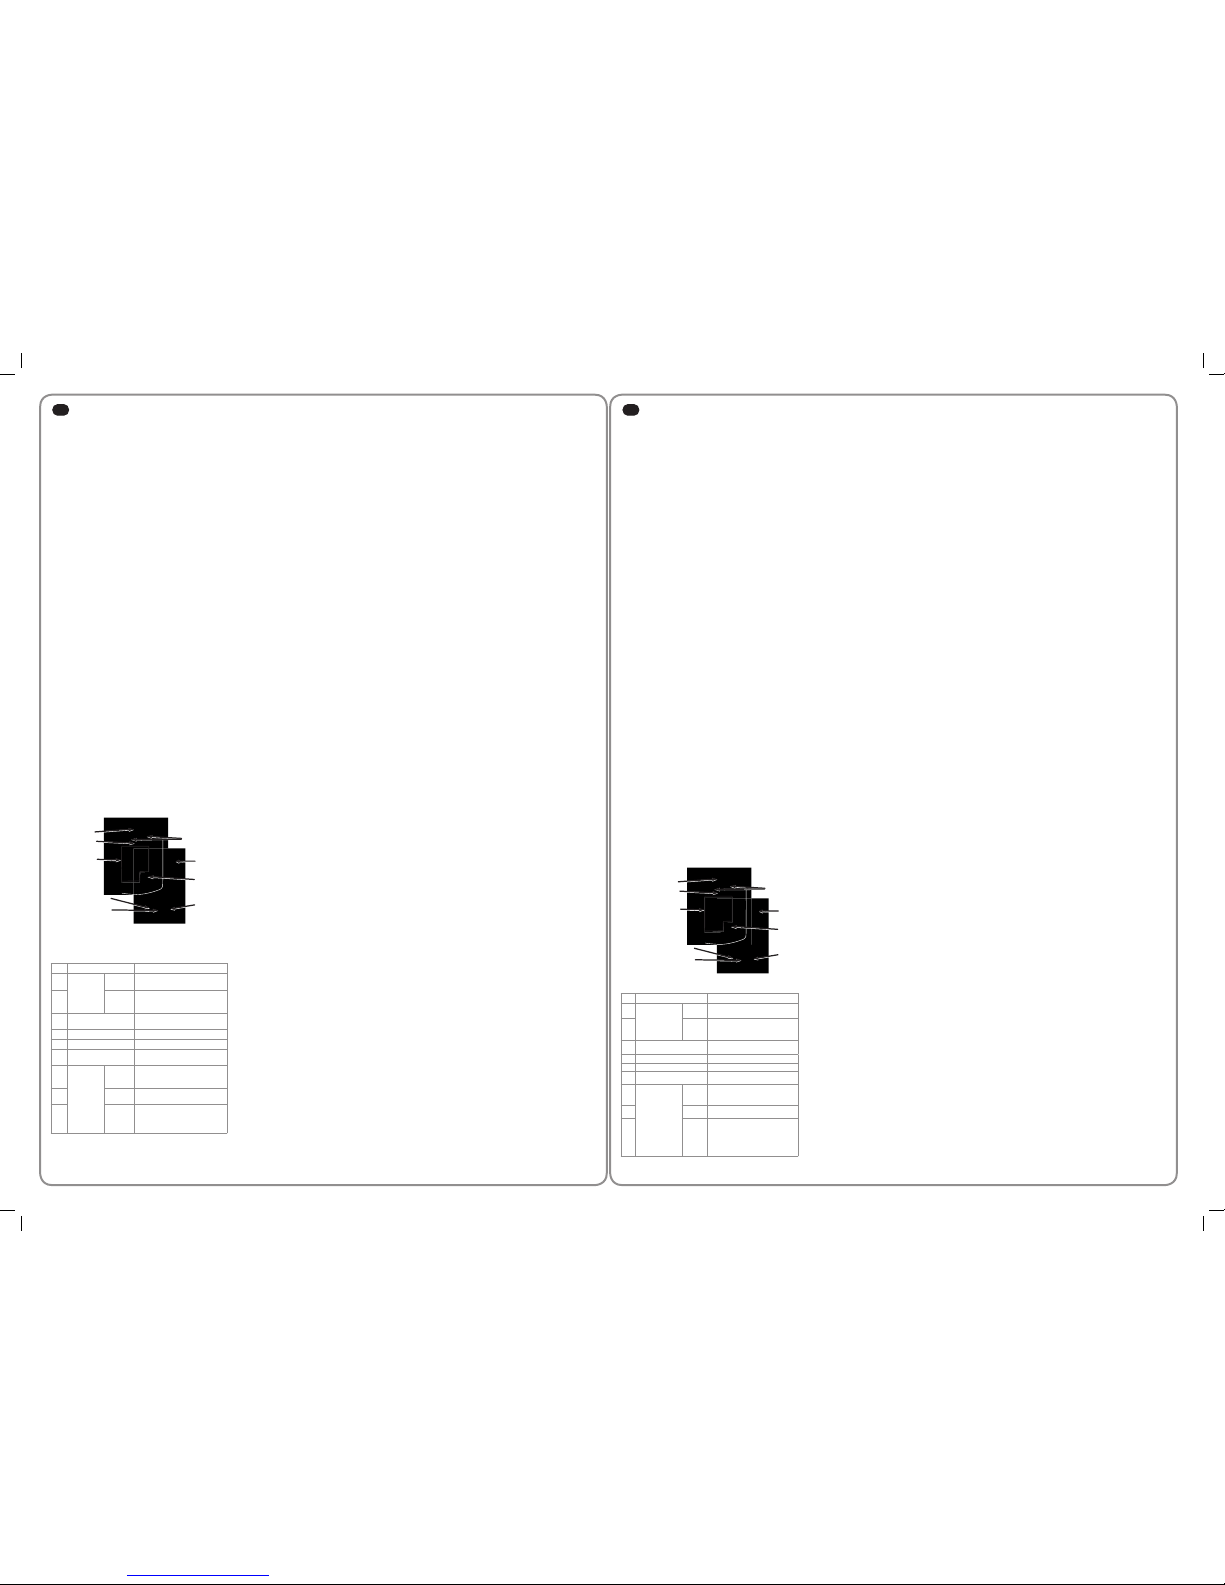
Description
No. Name Function
1
Indicator
light
upper
Information on the transmission
of a radio command
2
lower
Information on the Digipad
status
(flashing = locked)
3
Control buttons
Motor control
(1 button per motor)
4
Alpha-numeric buttons Entering the code
5
Aerial
6
SET button Access to programming mode
7
Buttons
RESET
Commissioning the Digipad
(for first use)
Locking the Digipad
8
PROG
Memorisation in a blind or roller
shutter motor
9
ADR
Changing the radio (for a motor
manufactured before 2006)
Resetting the Digipad
(restoring factory settings)
1. Commissioning (for first use) [fig.A]
Open the Digipad with the key provided.1.
Press the RESET button.2.
Check that the Digipad has been commissioned by pressing 3.
on one of the keypad buttons. If the lower indicator light comes
on, the Digipad has been commissioned. If it does not come
on, press the RESET button again and check that it has been
commissioned.
2. Memorising the Digipad
The Digipad works like a standard transmitter (for example a
remote control), therefore, the guide for the motor can be used to
memorise the Digipad.
2.1. Recommendations
Do not touch the aerial during memorisation operations.
To memorise the Digipad in the electronics of an Axovia motor,
place the Digipad on the target during the operation.
The Digipad automatically locks after 30 seconds, therefore, the
control button to be memorised in the motor electronics must be
pressed before the end of this time delay.
2.2. Memorising the Digipad in a motor manufactured
after 2006 [fig.B]
Carry out the operation described on page I or II depending on the
motor in question.
After this operation, it is necessary to program the travel for the
Axovia, SGS, SGA, SLD motors (begin auto learning with gate
leaves in intermediate position to check they start opening).
2.3. Pre-2006 Axovia and Axorn motors [fig.C]
In 2006, Somfy changed its radio protocol for gate and garage
door motors.
The Digipad is compatible with radio protocols from before and
after 2006. Each control button can be configured individually.
a) Changing the radio protocol on a control button of the
Digipad
Enter the main code (000000 on a new or reset Digipad) and 1.
confirm with the SET button.
Press the ADR button.2.
While the light is flashing (10 s), press the required control 3.
button. The radio protocol is changed for this control button on
the Digipad.
b) Memorising the Digipad in a pre-2006 motor
Enter the main code (000000 on a new or reset Digipad) and 1.
confirm with the SET button.
Then refer to the remote control memorising instructions in 2.
the guide for the Axovia or Axorn pre-2006 motor. For other
pre-2006 motors, please consult us.
Tip [fig.D]
To find out the radio protocol of a button, enter the main code and
press and hold the button (20 seconds).
If the upper light flashes for 10 seconds then:
turns off => the radio protocol is post-2006,•
stays on => the radio protocol is pre-2006.•
3. Changing the main code [fig.E]
By default, the main code is 000000 on a new Digipad.
To change the main code:
Enter the main code and confirm with the SET button.1.
Press the SET button until the lower li ght turns on 2.
(approximately 7 seconds). The lower light remains on.
Enter the chosen replacement code and confirm with the SET 3.
button. The lower light will turn off then come on again.
Enter the code again and confirm with the SET button. 4.
The lower light will turn off.
The main code is recorded.
4. Using the Digipad
The controls are only active if the control buttons are unlocked.
4.1. Unlocking
The main code allows the 2 control buttons to be unlocked to allow
control of 2 motors.
A secondary code allows one control button to be unlocked at a
time.
4.2. Locking
The Digipad locks automatically 30 seconds after a control button
is last pressed.
4.3. Using the Digipad
Enter the main or secondary code. 1.
Press the control button of the motor to be actuated. The 2.
upper light will flash.
Successive presses of the same control button will lead to the
following movements of the motor: Open, Stop, Close, Stop,
Open, etc.
For gate or ga rage door motors equipped with to tal or
partial op ening func tion, if programmed, each control button
allows operation of partial (short press < 1 second) or total
(long press > 2 seconds) opening.
5. Mounting the Digipad [fig.F]
Before mounting the Digipad, check it operates correctly from its
intended mounting location.
Stick the neoprene seal to the back of the Digipad.1.
Hold the base of the Digipad against the wall and mark the 2.
drilling holes.
Mount the Digipad base to the wall.3.
Close the Digipad.4.
6. Secondary codes
Allocation of a secondary code to a control button makes it
possible to authorise partial access to the property (for example,
by allocating the secondary code to the control button for the gate
of the property). Access authorisation can be temporary as the
secondary code can be cleared by the owner at any time.
6.1. Programming a secondary code [fig.G]
Enter the main code and confirm with the SET button.1.
Press the SET button until t he lower light turns on 2.
(approximately 7 seconds). The lower light remains on.
Press the control button to which a secondary code must 3.
be allocated.
Enter a secondary code and confirm with the SET button. 4.
The lower light will turn off then come on again.
Enter the code again and confirm with the SET button. 5.
The lower light will turn off.
To check the validity of the secondary code: 6.
wait for 30 seconds for automatic locking of the Digipad •
(or open the Digipad and press the RESET button),
unlock the Digipad with the secondary code,•
press the control button associated with this code.•
if the upper light flashes, the secondary code is –
correct,
if the lower li ght f lashes, the se condary code i s –
incorrect. Restart the programming procedure for a
secondary code.
6.2. Clearing a known secondary code [fig.H]
Enter the main code and confirm with the SET button.1.
Press the SET button until t he lower light turns on 2.
(approximately 7 seconds).
Press the control button to which the secondary code is 3.
allocated.
Enter the secondary code to be cleared.4.
Press the SET button until the lower light turns off 5.
(approximately 10 seconds).
6.3. Clearing all secondary codes [fig.I]
Enter the main code and confirm with the SET button.1.
Press the SET button until t he lower light turns on 2.
(approximately 7 seconds).
Press the SET button until the lower light turns off 3.
(approximately 10 seconds).
7. Repairs
7.1. No movement
The upper light stays off => worn battery: replace it. [fig. J]
The upper light flashes when a control button is pressed => change
the radio protocol of the control button. [fig. C]
7.2. Main code forgotten and full reset [fig. K]
The Digipad must be reset: stored settings cleared, codes and
radio protocol reset to factory settings.
To reset the Digipad:
Open the Digipad with the key provided.1.
Press the ADR button (approximately 10 seconds). The 2.
upper light will come on when the button is pressed and then
the 2 lights will flash 7 times. The Digipad is reset.
Close the Digipad.3.
Repeat t he full install ation p rocedure: programming , 4.
changing main code, etc.
7.3. Code entry errors
7.3.1. Beginning of code entry incorrect
Continue by entering the correct code and confirm with the SET
button or press a control button. Only the last digits entered will
be taken into account.
7.3.2. Several incorrect code entries
The lower light flashes quickly whenever any button is pressed.
5 different incorrect codes have been entered successively. As a
safety measure, the Digipad will remain locked for 5 minutes.
Wait 5 minutes.
PROG ADR RESET
1
2
3
4
5
6
7
8
9
DE
Funktionsweise
Das RTS Funk-Digipad ist eine schnurlose Wandbedieneinheit mit
Codezugang.
Mit dem Digipad können 2 ver schiedene Antriebe üb er
2 Bedientasten gesteuert werden. Es ist mit allen Antrieben
kompatibel, auch mit den en, die vor 2006 gebaut wu rden
(siehe Abschnitt 2.2.).
Die Benutzercodes beschränken den Zugriff auf die Bedientasten
auf berechtigte Personen:
1 Hauptcode für die 2 Bedientasten,•
2 Sekundärcodes für jede Bedientaste, um nur begrenzt •
und vorübergehend Einlass zu gewähren (die Speicherung
von Sekundärcodes ist optional).
Die wahlweise aus 4, 5 oder 6 Zeichen bestehenden Benutzercodes
setzen sich aus den Zahlen von 0 bis 9 und dem A zusammen.
Die Tastenhinterleuchtung ermöglicht es, das Digipad auch bei
geringer Helligkeit zu bedienen.
Das Digipad funktioniert mit einer 3V-Batterie, Typ CR 2450.
Konformitätserklärung
Hiermit erklä rt Somfy, dass das Ge rät den wichti gsten
Anforderungen und anderen maßgeblichen Bestimmungen der
Richtlinie 1999/5/EG entspricht. Die Konformitätserklärung ist unter
der Internetadresse www.somfy.com/ce verfügbar. Verwendbar in
der EU, der Schweiz und Norwegen.Sicherheitshinweise
Sicherheitshinweise
Allgemeines
Lesen Sie unbe dingt diese Mo ntageanleit ung u nd die
Sicherheitshinweise bevor Sie mit der Installation dieses SomfyProdukts beginnen.
Vor der Montage muss die Kompatibilität dieses Produkts mit den
dazugehörigen Ausrüstungs- und Zubehörteilen geprüft werden.
Diese Anleitung beschreibt die Installation, die Inbetriebnahme und
die Bedienung dieses Produkts.
Jede Verwendung , die nicht dem von Som fy bestimm ten
Anwendungsbereich entspricht, gilt als nicht bestimmungsgemäß.
Im Falle einer nicht bestimmungsgemäßen Verwendung, wie auch
bei Nicht-Befolgung der Hinweise in dieser Anleitung, entfällt die
Haftung und Gewährleistungspflicht von Somfy.
Somfy kann für Norm- und Standa rdänderungen, die nach
Veröffentlichung dieser Anleitung vorgenommen wurden, nicht zur
Verantwortung gezogen werden.
Allgemeine Sicherheitshinweise
Lassen Sie Kinder nicht mit dem Bediensystem spielen.
Installationsbedingungen
Installie ren Sie das Produkt nie in der Nähe von
Metalloberflächen.
Kontrolli eren Sie die Fun kreichwei te, bevor Sie das
Produkt fests chrauben. Die Funkreichwe ite wird d urch die
Regulierungsnormen für Funkgeräte eingeschränkt.
Die Verwendung von Funkgeräten (z.B. eines Hifi-Funkkopfhörers)
mit derselben Frequenz kann die Leistu ngen des Produkts
einschränken.
Beschreibung
Nr. Name Funktion
1
Kontrollleuchte
oben
Information zur Absendung
eines Funkbefehls
2
unten
Information zum Zustand des
Digipad
(Blinken = verriegelt)
3
Bedientasten
Antriebsbedienung
(1 Taste pro Antrieb)
4
Alphanumerische Tasten Code-Eingabe
5
Antenne
6
SET-Taste
Zugang zum
Programmierungsmodus
7
Tasten
RESET
Inbetriebnahme des Digipad
(bei der ersten Nutzung)
Sperrung des Digipad
8
PROG
Speicherung eines Markisenbzw. Rollladenantriebs
9
ADR
Änderung der Funkfrequenz
(bei Antrieben, die vor 2006
gebaut wurden)
Rücksetzung der
Einstellungen des Digipads auf
Werkeinstellungen
1. Erste Inbetriebnahme [Abb.A]
Öffnen Sie das Digipad mit dem mitgelieferten Schlüssel.1.
Drücken Sie die RESET-Taste.2.
Überprüfen Sie, ob das Digipad eingeschaltet ist, indem 3.
Sie auf eine Taste der Tastatur drücken. Leuchtet die untere
Kontrollleuchte auf, ist das Digipad eingeschaltet. Leuchtet
Sie nicht auf, drücken Sie erneut auf die RESET-Taste und
überprüfen Sie, ob es eingeschaltet ist.
2. Einlernen des Digipads
Das Digipad funktioniert wie ein herkömmlicher Funksend er
(z.B. eine Fernbedienung); die Betriebsanleitung des Antriebs kann
somit zum Einlernen des Digipads verwendet werden.
2.1. Empfehlungen
Die Antenne während des Einlernvorgangs nicht berühren.
Im Falle des Antriebs Axovia, d as Digipad während des
Einlernvorgangs auf dem Zielobjekt platzieren.
Da die automatische Sperre des Digipads nach 30 Sek. aktiv
wird, muss vor Ablauf dieser Zeit auf die zu programmierende
Bedientaste gedrückt werden.
2.2. Einlernen des Digipads bei Antrieben die nach
2006 gebaut wurden [Abb.B]
Befolgen Sie, je nach Motor, die Anweisungen auf Seite I bzw. II .
Nach diesem Vorgang müssen für folgende Motoren die Laufwege
eingelernt werden Axovia, SGS, SGA, SLD (Lernvorgang mit
halboffenen Torflügeln beginnen, um den Startvorgang in geöffneter
Stellung zu überprüfen).
2.3. Antriebe Axovia und Axorn, Baujahr vor 2006
[Abb.C]
2006 hat Somfy das Funkprotok oll für Garten- und
Garagentorantriebe geändert.
Das Digipad ist mit den vor und nach 2006 gültigen Funkprotokollen
kompatibel. Jede Bed ientaste kann indiv iduell programmier t
werden.
a) Änderung des Funkprotokolls für eine Bedientaste des
Digipads
Geben Sie den Hauptcode ein (000000 auf einem neuen 1.
Digipad oder nach einem Reset) und bestätigen Sie mit der
SET-Taste.
Drücken Sie die ADR-Taste.2.
Drücken Sie auf die gewünschte Bedientaste, solange die 3.
Kontrollleuchte blinkt (10 Sek.). Das Funkprotokoll wird für
diese Bedientaste des Digipads geändert.
b) Einlernen des Digipads bei Antrieben die vor 2006 gebaut
wurden
Geben Sie den Hauptcode ein (000000 auf einem neuen 1.
Digipad oder nach einem Reset) und bestätigen Sie mit der
SET-Taste.
Siehe dann die Anweisungen zum Einlernen von Funksendern 2.
in den Anleitungen der Antriebe Axovia bzw. Axorn, Baujahr vor
2006. Bei allen anderen Antrieben mit einem Baujahr vor 2006,
wenden Sie sich bitte an uns.
Tipp [Abb.D]
Um zu erfahren, welches Funkprotokoll für eine Taste eingestellt
ist, den Hauptcode eingeben und die Taste 20 Sek. gedrückt
halten.
Wenn die obere Kontrollleuchte 10 Sek. blinkt und dann:
erlischt => nach 2006 gültiges Funkprotokoll,•
weiterhin leuchtet => vor 2006 gültiges Funkprotokoll.•
3. Änderung des Hauptcodes [Abb.E]
Bei einem neuen Digipad ist standardmäßig der Hauptcode 000000
eingestellt.
Um den Hauptcode zu ändern:
Geben Sie den Hauptcode ein und bestätigen Sie mit der 1.
SET-Taste.
Drücken Sie auf die SET-Taste, bis die untere Kontrollleuchte 2.
aufleuchtet (ca. 7 Sek.). Die untere Kontrollleuchte bleibt an.
Geben Sie einen Code Ihrer Wahl ein und bestätigen Sie mit 3.
der SET-Taste. Die untere Kontrollleuchte erlischt und leuchtet
dann wieder auf.
Geben Sie erneut den gewünschten Code ein und bestätigen 4.
Sie mit der SET-Taste. Die untere Kontrollleuchte erlischt.
Der neue Hauptcode ist gespeichert.
4. Bedienung des Digipad
Die Bedienelemente sind erst nach Freigabe der Bedientasten
aktiv.
4.1. Freigabe
Mit dem Hauptcode können die 2 Bedientasten entsperrt werden,
um die Steuerung von zwei Antrieben zu ermöglichen.
Ein Sekundärcode ermöglicht es, nur eine Bedientaste auf einmal
zu entsperren.
4.2. Tastensperre
Die Tasten des Digipad werden 30 Sek. nach der letzten Betätigung
einer Bedientaste automatisch gesperrt.
4.3. Bedienung des Digipad
Geben Sie den Haupt- oder Sekundärcode ein. 1.
Drücken Sie auf die Bedientaste des betreffenden Antriebs. 2.
Die obere Kontrollleuchte blinkt.
Auf mehrfaches Drücken ein und derselben Taste reagiert der
Antrieb wie folgt: Öffnen, Stopp, Schließen, Stopp, Öffnen ...
Bei Garten- oder G aragentorantrieben , die über eine Volloder Teilöffnungsfunktion verfügen, ermöglicht jede Taste, bei
entsprechender Programmierung, die Teilöffnung (kurzes Drücken
< 1 Sek.) oder die Vollöffnung (langes Drücken > 2 Sek.) des
Tores.
5. Anbringung des Digipad [Abb.F]
Überprüfen Sie, bevor Sie es anbringen, ob das Digipad an der für
die Montage vorgesehen Stelle richtig funktioniert.
Kleben Sie die Neoprendichtung auf die Rückseite des 1.
Digipads.
Halten Sie den Boden des Digipads an der Wand an und 2.
markieren Sie die Bohrlöcher.
Befestigen Sie den Boden des Digipads an der Wand.3.
Schließen Sie das Digipad wieder.4.
6. Sekundärcodes
Durch die Zuweisung eines Sekundärcodes, kann der Zugang auf
nur einen Teil des Grundstücks beschränkt werden (z.B. indem
der Bedientaste des Gartentores ein Sekundärcode zugewiesen
wird). Die Zutrittsberechtigung kann zeitlich begrenzt werden, da
der Sekundärcode jederzeit durch den Besitzer gelöscht werden
kann.
6.1. Speichern eines Sekundärcodes [Abb.G]
Geben Sie den Hauptcode ein und bestätigen Sie mit der 1.
SET-Taste.
Drücken Sie auf die SET-Taste, bis die untere Kontrollleuchte 2.
aufleuchtet (ca. 7 Sek.). Die untere Kontrollleuchte bleibt an.
Drücken Sie auf die Bedientaste, der ein Sekundärcode 3.
zugewiesen werden soll.
Geben Sie den Sekundärcode ein und bestätigen Sie mit 4.
der SET-Taste. Die untere Kontrollleuchte erlischt und leuchtet
dann wieder auf.
Geben Sie erneut den gewünschten Code ein und bestätigen 5.
Sie mit der SET-Taste. Die untere Kontrollleuchte erlischt.
Um die Gültigkeit des Sekundärcodes zu überprüfen: 6.
warten Sie 30 Sek., bis die automatische Sperre des •
Digipad aktiv ist (oder öffnen Sie das Digipad und drücken
Sie auf die RESET-Taste),
entsperren Sie das Digipad mit dem Sekundärcode,•
drücken Sie auf die Taste, der der Code zugewiesen •
wurde:
blinkt die obere Kontrollleuchte, ist der Sekundärcode –
gültig,
blinkt die untere Kontrollleuchte, ist der Sekundärcode –
nicht gü ltig. B eginnen Sie erneut den Vorgang zur
Speicherung eines Sekundärcodes.
6.2. Löschen eines bekannten Sekundärcodes
[Abb.H]
Geben Sie den Hauptcode ein und bestätigen Sie mit der 1.
SET-Taste.
Drücken Sie auf die SET-Taste, bis die untere Kontrollleuchte 2.
aufleuchtet (ca. 7 Sek.).
Drücken Sie auf die Bedientaste, der der Sekundärcode 3.
zugewiesen wurde.
Geben Sie den zu löschenden Sekundärcode ein.4.
Drücken Sie auf die SET-Taste, bis die untere Kontrollleuchte 5.
erlischt (ca. 10 Sek.).
6.3. Löschen aller Sekundärcodes [Abb.I]
Geben Sie den Hauptcode ein und bestätigen Sie mit der 1.
SET-Taste.
Drücken Sie auf die SET-Taste, bis die untere Kontrollleuchte 2.
aufleuchtet (ca. 7 Sek.).
Drücken Sie auf die SET-Taste, bis die untere Kontrollleuchte 3.
erlischt (ca. 10 Sek.).
7. Problembehebungen
7.1. Keine Bewegung
Die obere Kontrollleuchte bleibt aus => Batterie leer: Batterie
austauschen. [Abb. J]
Bei Betätigung blinkt die obere Kontrollleuchte => das Funkprotokoll
für die Bedientaste ändern. [Abb. C]
7.2. Hauptcode vergessen und vollständiges Reset
[Abb. K]
Die Einstellungen des Digipad müssen zurückgesetzt werden:
Löschung der Pro grammierung, Rückkehr zu de n wer kseitig
eingestellten Codes und Funkprotokoll.
Für ein Reset des Digipads:
Öffnen Sie das Digipad mit dem mitgelieferten Schlüssel.1.
Drücken Sie auf die ADR-Taste (ca. 10 Sek.). Die obere 2.
Kontrollleuchte leuchtet während der Betätigung auf, danach
blinken beide Kontrollle uchten 7 Mal. Der Reset wurde
durchgeführt.
Das Digipad wieder schließen.3.
Beginnen Sie erneut mit der Installation: Programmierungen, 4.
Änderung des Hauptcodes, etc.
7.3. Fehler bei der Code-Eingabe
7.3.1. Anfang des eingegebenen Codes falsch
Fahren Sie fort, indem Sie den richtigen Code eingeben und
bestätigen Sie mit der SET-Taste oder drücken Sie auf eine
Bedientaste. Es werden nur die Zahlen, die zuletzt eingegeben
wurden, berücksichtigt.
7.3.2. Wiederholte falsche Code-Eingaben
Die untere Kontrollleuchte blinkt schnell, wenn eine der Tasten
gedrückt wird.
5 verschiedene falsche Codes wurden nacheinander eingegeben.
Zur Sicherheit wird das Digipad 5 Min. lang gesperrt.
5 Min. warten.
PROG ADR RESET
1
2
3
4
5
6
7
8
9
 Loading...