

Page 1

Soltron Space Cab
User manual
Page 2

Soltron Space Cab - User manual
Nome File: USER MANUAL SOL_US021105
Revisione: 02/11/2005
Page 3

Soltron Space Cab - User manual
INDEX
1. INTRODUCTION................................................................................................................ 2
IMPORTANT ............................................................................................................................ 2
WARRANTY.............................................................................................................................2
2. EQUIPMENT DATA ........................................................................................................... 3
3. COMPULSORY PRECAUTIONS ...................................................................................... 5
EXPOSURE SCHEDULE......................................................................................................... 5
WARNINGS.............................................................................................................................. 6
SAFETY RULES ......................................................................................................................7
CLEANING...............................................................................................................................7
4. INSTALLATION ................................................................................................................. 8
PACKAGING............................................................................................................................8
CABIN....................................................................................................................................... 9
HOW TO INSTALL THE UNIT............................................................................................... 10
5. FUNCTIONING MODE..................................................................................................... 17
OPERATING INSTRUCTIONS..............................................................................................17
PROGRAMMING ...................................................................................................................18
REMOTE CONTROL CONNECTION.................................................................................... 21
ROUTINE AND EXTRAORDINARY MAINTENANCE........................................................... 22
MAINTENANCE REGISTER.................................................................................................. 23
6. NOTES .............................................................................................................................27
Page 4

Soltron Space Cab - User manual
1. INTRODUCTION
In thanking and congratulating on your choice, with this manual we are illustrating in the simplest
possible way the general instructions for use and maintenance of the vertical solarium Soltron Space
Cab.
IMPORTANT
IMPORTANT: before installing the equipment, carefully read the present manual and follow the
technical operating instructions and advice contained in it
The material contained in this document is given exclusively for informative purposes and is subject to
modification without notice. Despite the maximum attention paid in preparing the document, JK
Products, Inc. is not responsible for any damage deriving from errors or omissions or from the use of
this information.
Keep this manual and all the attached documentation in an accessible place known to all the
operators.
WARRANTY
The equipment is warranted for a period of 12 months.
The warranty is limited to the repair or replacement of the faulty part and is not valid for malfunctions
due to incorrect use and/or tampering and repairs carried out by unauthorized persons.
The warranty does not cover elements due to normal use like starters and lamps.
The warranty does not cover costs of labour and possible shipment costs. However, there is a 90 day
labour warranty.
The warranty is cancelled if the instructions contained in the present manual are not followed.
The warranty becomes effective from the date given in the delivery document.
2
Page 5

Soltron Space Cab - User manual
2. EQUIPMENT DATA
Model Soltron Space Cab
Phase 3 + PE (three-phase) 1+PE (single-phase)
Voltage supply 220 V ac 220V ac
Amperage 34 A 58 A
Frequency 60 Hz
lamps 48x 180W 2mt
Unit dimensions (door closed)
Length x width x height
48” X 40” X 94” (1200 x 1000 x 2350 millimeters)
Unit dimensions (door opened)
Length x width x height
52” X 51” X 94” (1290 x 1265 x 2350 millimeters)
Installation site in dry rooms with sufficient air supply (more than 1,177 CFM –
2000m
3
/h)
Relative air humidity
≤70 %
Ambient temperature
≤30°C (86 °F)
ATTENTION!
The unit must not be operated in case of faulty of control panel
or some broken parts
Electrical connection
Mains voltage 220 V / three-phase / 60 Hz 220 V / single-phase / 60 Hz
Needed cable cross section 4 x 8 AWG 3 x 4 AWG
3
Page 6

Soltron Space Cab - User manual
Accessories
Lamps (number of) Cosmedico VHR 9K90 (48)
UV protective eyewear
(number of)
Schmerler 2255 dark red (1)
Acrylics are special glass panels for this kind of use, with a high UV transmittance. Despite of superior
production technology, sometimes minor spots, air bubbles or micro-fine hairline cracks can occur
with use. These occurrences are material-dependent and unavoidable in processing, however have
not significant effect on the final effect and can not be recognized as defects.
For replacement of lamps, eyewear or parts, contact:
JK Products and Services
1, Walter Kratz Drive
Jonesboro, AR 72401
(877) 786 5267
This unit is intended as exclusive use in the US and Canada, and can not be exported or operated in
other countries. The manufacturer shall bear no responsibility in case of non-observance.
Here is a copy of the label on the unit:
4
Page 7

Soltron Space Cab - User manual
3. COMPULSORY PRECAUTIONS
DANGER Ultraviolet radiation.
Follow instruction to avoid overexposure.
As with natural sunlight overexposure can cause eye and skin injury and allergic reactions. Repeated
exposure may cause premature aging of the skin and skin cancer.
WEAR PROTECTIVE EYEWEAR; FAILURE TO MAY RESULT IN SEVERE BURNS OR LONG
TERM INJURY TO THE EYES.
Medication or cosmetics may increase your sensitivity to ultra-violet radiation. Consult a physician
before using sunlamps; if you are using medications or have a history of skin problems or believe you
are especially sensitive to sunlight. If you do not tan in the sun, you are unlikely to tan from the use of
this product.
This unit utilizes UV lamps. Replace only with Cosmolux VHR 9K90.
When using this booth, stand upright on center of the floor. Minimum use distance is 6 inches or 15,25
centimetres from acrylic. Operation of this device below the recommended minimum distance for
use may result in overexposure.
EXPOSURE SCHEDULE
Recommended Exposure schedule
Skin type Week 1 Week 2 Week 3 Week 4 Weekly
II – fair 2 4 6 8 10
III- average 2 4 6 8 10
IV – brown 2 6 8 10 10
V – dark brown 2 6 8 10 10
Maximum exposure time is 10 minutes.
Here is a brief description of skin types:
Skin type II (fair): This is the individual that usually burns easily and severely, tans
minimally or lightly and peels.
Skin type III (average): Often referred to as “Average” complexion, burns moderately and tans
about average.
Skin type IV (brown): This individual burns minimally, tans easily and above average with
each exposure.
Skin type V (dark brown): This individual’s system rarely burns, tans easily and substantially.
Tanning can begin on regular basis. An appearance of tanning normally appears after a few
exposures and maximizes after 4 weeks of exposure following the recommended schedule for your
skin type.
Use protective eyewear SCHMERLER 2255 Dark Red or equivalent as defined under. 21CFR
1040.20.2(b) (6).
Read instruction booklet before using lamps.
5
Page 8

Soltron Space Cab - User manual
WARNINGS
Occasionally, persons using the tanning system will experience a slight reddening of the skin - usually
in small patches - after the second or third session. This redness is often accompanied by an itching
sensation. This may be nothing more than a heat “rash” caused by heat from the lamps within the
system.
It should go away within approximately 24 hours and should not reappear. This “rash” can be
lessened or prevented by applying moisturizer lotion to the affected area after the tanning session is
completed.
Increasing tanning also requires an extension of the exposure time or after a certain degree of tanning
has been achieved, a further intensification is not possible.
However, the tanning time may not be extended as desired within the scope of the permissible
exposure schedule!
Therefore, only a certain degree of final tanning dependent on the skin type can be achieved without
endangering your health.
Special attention must be paid in cases of marked individual sensitivity to ultraviolet radiation
and if medicines or cosmetics are used; in this case it is recommended to previously consult a
doctor.
Exposure to UV rays is inadvisable after hair-removal or particular treatments.
Exposure is strongly unadvised to pregnant persons.
Before carrying out the tanning treatment remove any cosmetic products and make up (do not use
products containing alcohol), do not spray perfumes and deodorants. Remove any jewelry and contact
lenses.
During exposure always wear protective glasses. If the eyes are inadequately protected they can
develop superficial inflammation (reddening), after excessive exposure, and in certain cases there
could be damage to the retina; repeated exposure could cause cataracts.
Do not expose yourself to the sun on the same day on which a tanning system has been used.
Only one person can be exposed to the product at a time. Always use the special protection glasses,
one pair is provided with each system.
The following picture shows the correct position of the body inside the cabin:
YES NO
6
Page 9

Soltron Space Cab - User manual
SAFETY RULES
Before turning the appliance on, the salon operator must perfectly know the position and function of all
the controls and the characteristics of the equipment. Moreover, the operator must have carefully read
and fully understand the content of this manual.
The salon operator is responsible for informing users on possible risks during tanning.
The operator has to follow indications on labels attached to the unit; these labels must not be
removed.
Installation and extraordinary maintenance of the unit has to be done by qualified technicians.
It is absolutely prohibited to obstruct the ventilation ducts of the equipment.
This device is intended to be used with the following lamps:
Cosmolux VHR 9K90
Provided eyewear are SCHMERLER 2255 Dark Red or equivalent as defined under. 21CFR
1040.20.2(b) (6).
For replacement of lamps, eyewear or parts, contact:
JK Products and Services
1, Walter Kratz Drive
Jonesboro, AR 72401
(877) 786 5267
Lamps, eyewear and other components have to be replaced by original manufacturer parts.
Any tampering or unauthorized replacement of one or more parts or units of the equipment, the use of
accessories or consumable materials other than the originals in any case are not recommended by
the manufacturer. Use of non-compliant components could represent an accident risk and relieves
can represent an accident risk and relieves the manufacturer of any liability.
This unit is intended as exclusive use in the US and Canada, and can not be exported or operated in
other countries. The manufacturer shall bear no responsibility in case of non-observance.
CLEANING
For maximum efficiency of your tanning unit, periodic cleaning of lamps, reflectors and the inside
of acrylics is required. Refer to relamping instructions for acrylic removal.
The breaker for the tanning system must be switched off before removing acrylics, lamps or
engaging in the maintenance of the product.
For cleaning acrylics do not use dry cloth, it can scratch the acrylic surface. Before cleaning remove
rings, watches and bracelet
CAUTION: Do not use excessive amounts of water, any abrasive cleaners, or any spray cleaners
that carry label warnings regarding reactions to contact with skin!
Do not use products containing alcohol.
7
Page 10
Soltron Space Cab - User manual
4. INSTALLATION
PACKAGING
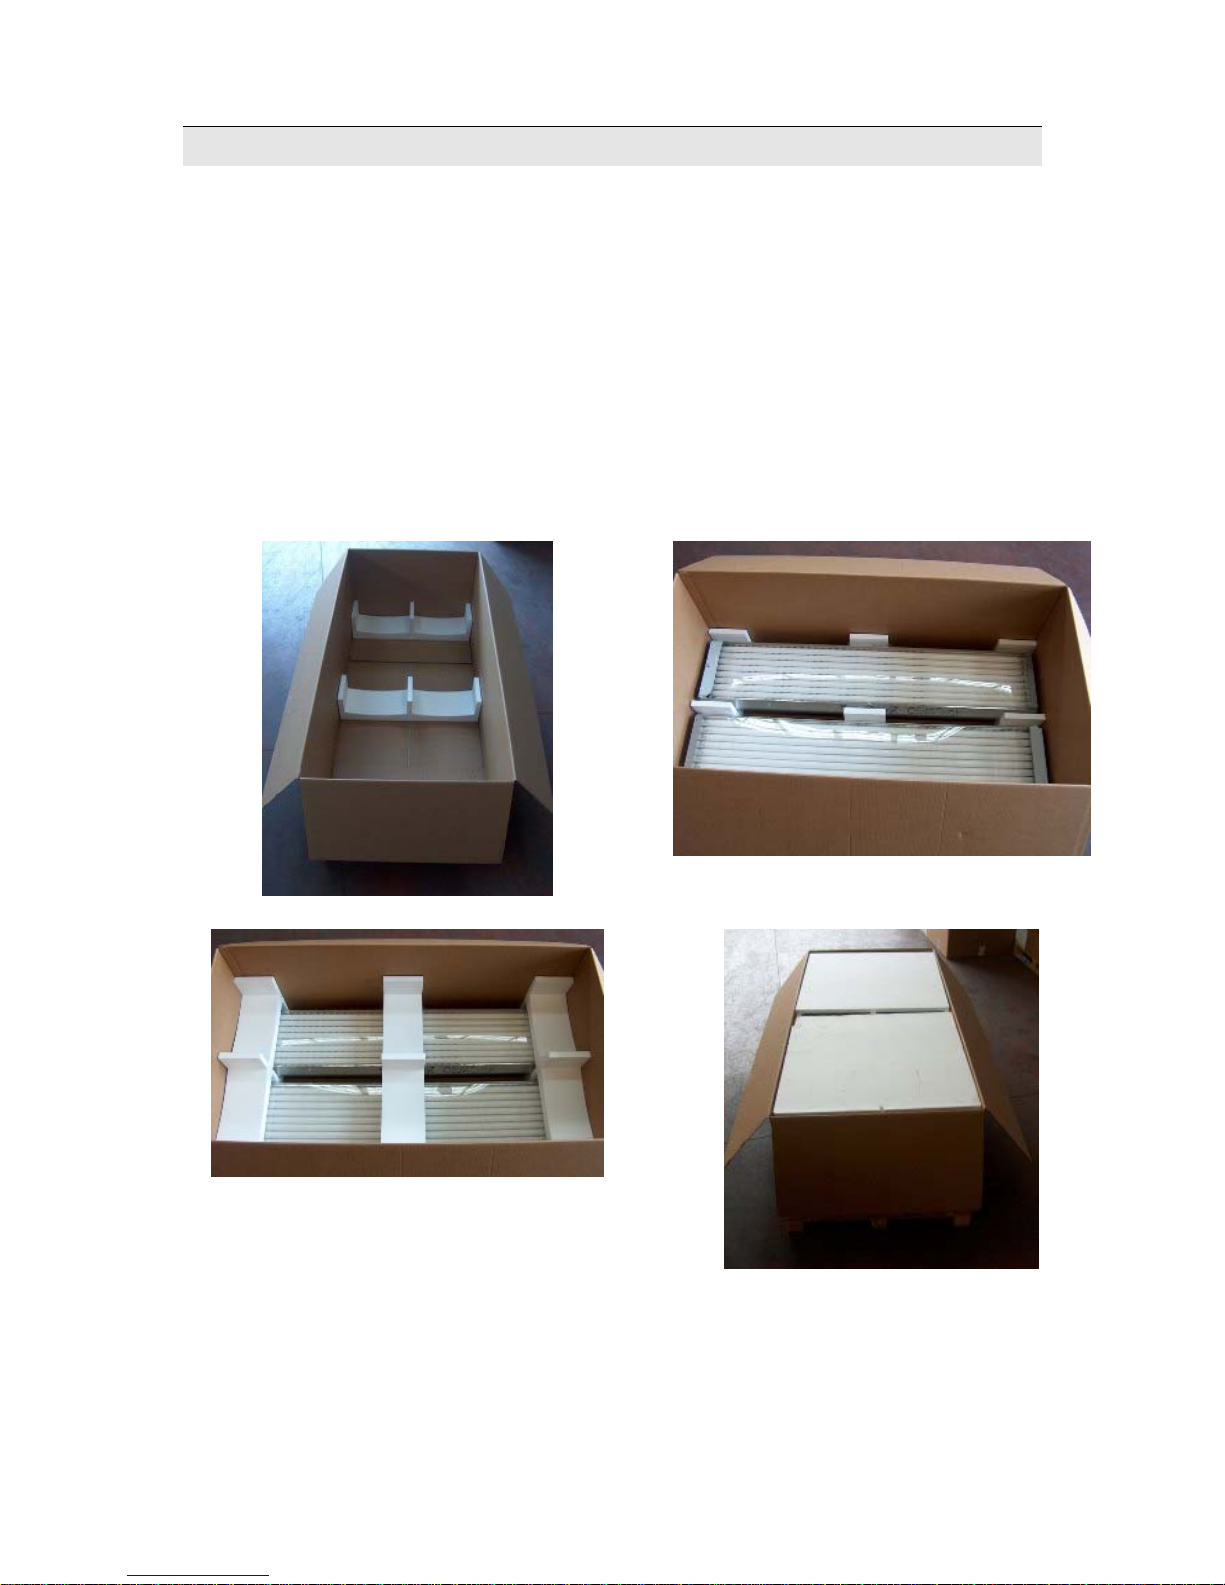
The pacakging for Soltron Space Cab is so composed:
1 pallette 88” X 44” X 37”(high) (2200 x 1100 x 930(high) mm)
1 pallette 48” X 40” X 14”(high) (1200 x 1000 x 360(high) mm)
The external boxes are in Vulcan cardboard, this means a high robustness and a high resistance to
hits;
The parts inside are placed on special polyester seats, that allow to insert in one box 6 panels with
tubes without risk of damaging: the polyester seats make the panels separated one to each other and
make that the weight of the upper panels do not impact on the panels below but on the seats.
8
Page 11
Soltron Space Cab - User manual
CABIN
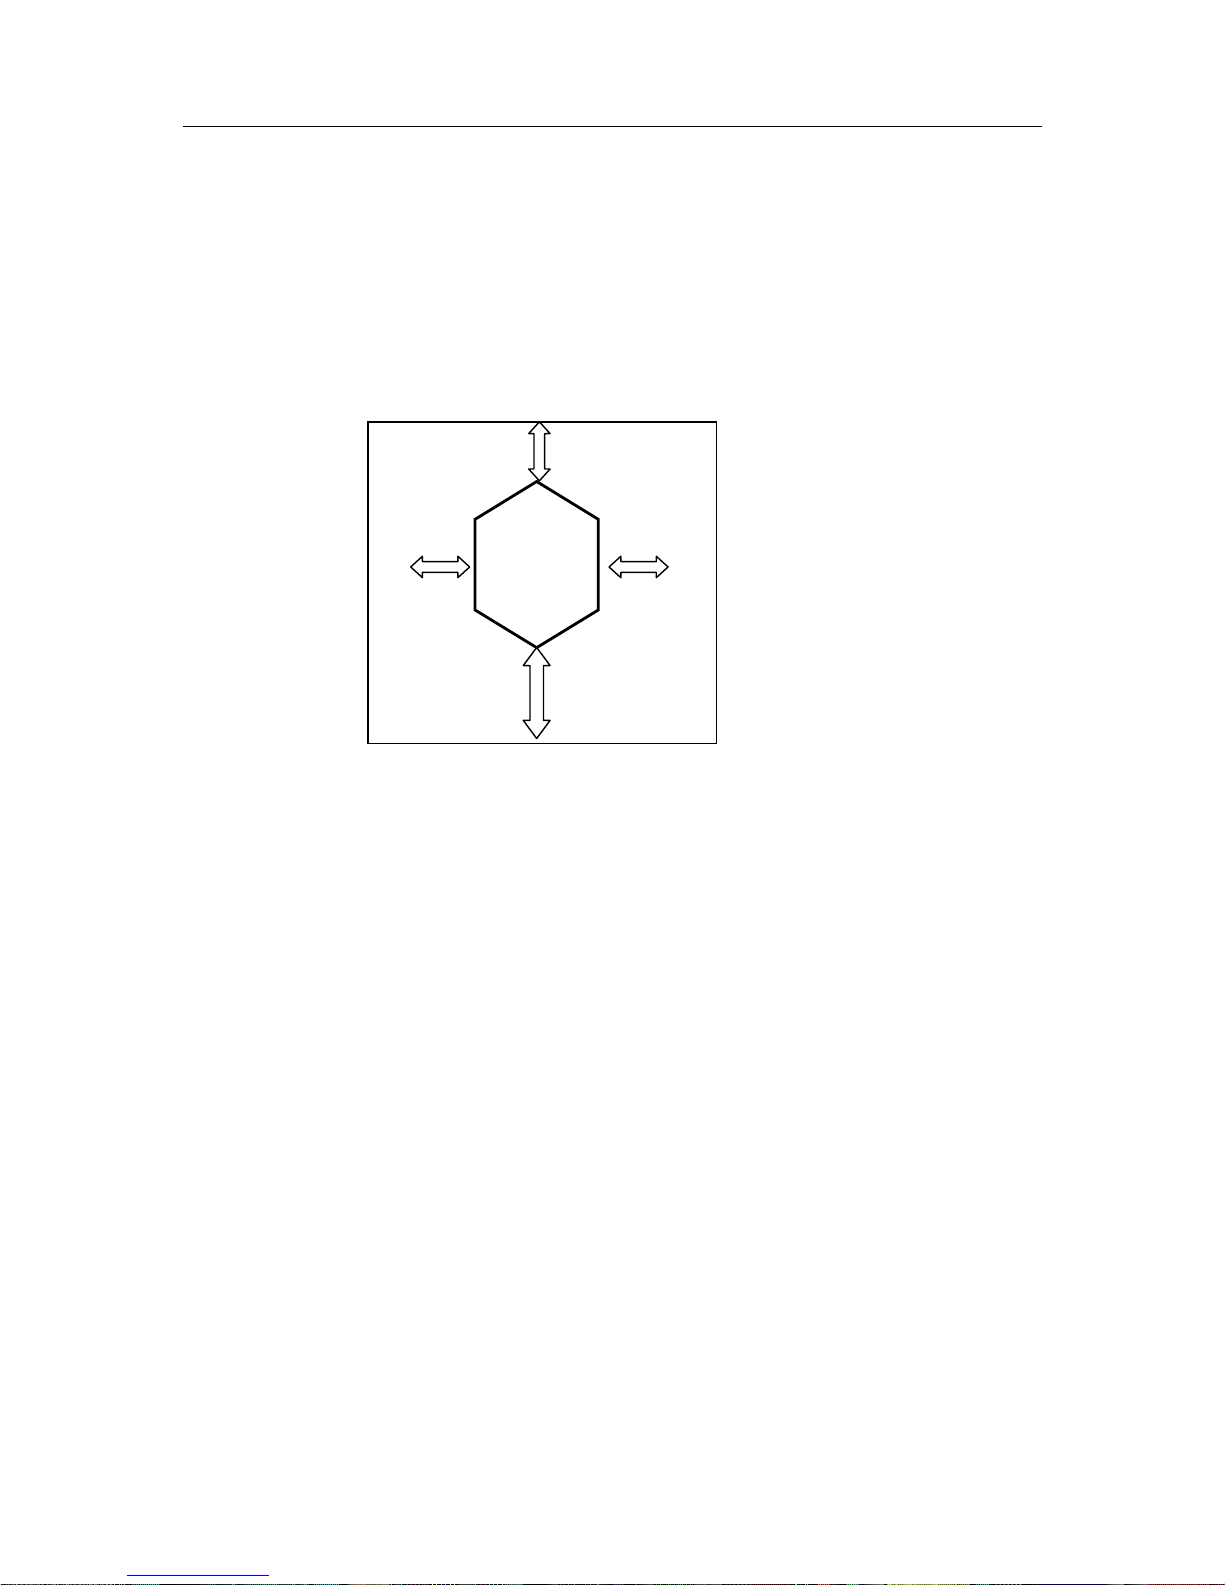
The ventilation of the room must be adequate. The room will have a possible duct for exhausting hot
air produced by the tanning equipment out.
For optimum performance of the tanning system it is advisable to comply with the measurements
(distances) given below:
40” (100cm)
20” (50 cm
)
120 cm
20”
(50 cm)
(
50 cm) 20”
9
Page 12
Soltron Space Cab - User manual
HOW TO INSTALL THE UNIT
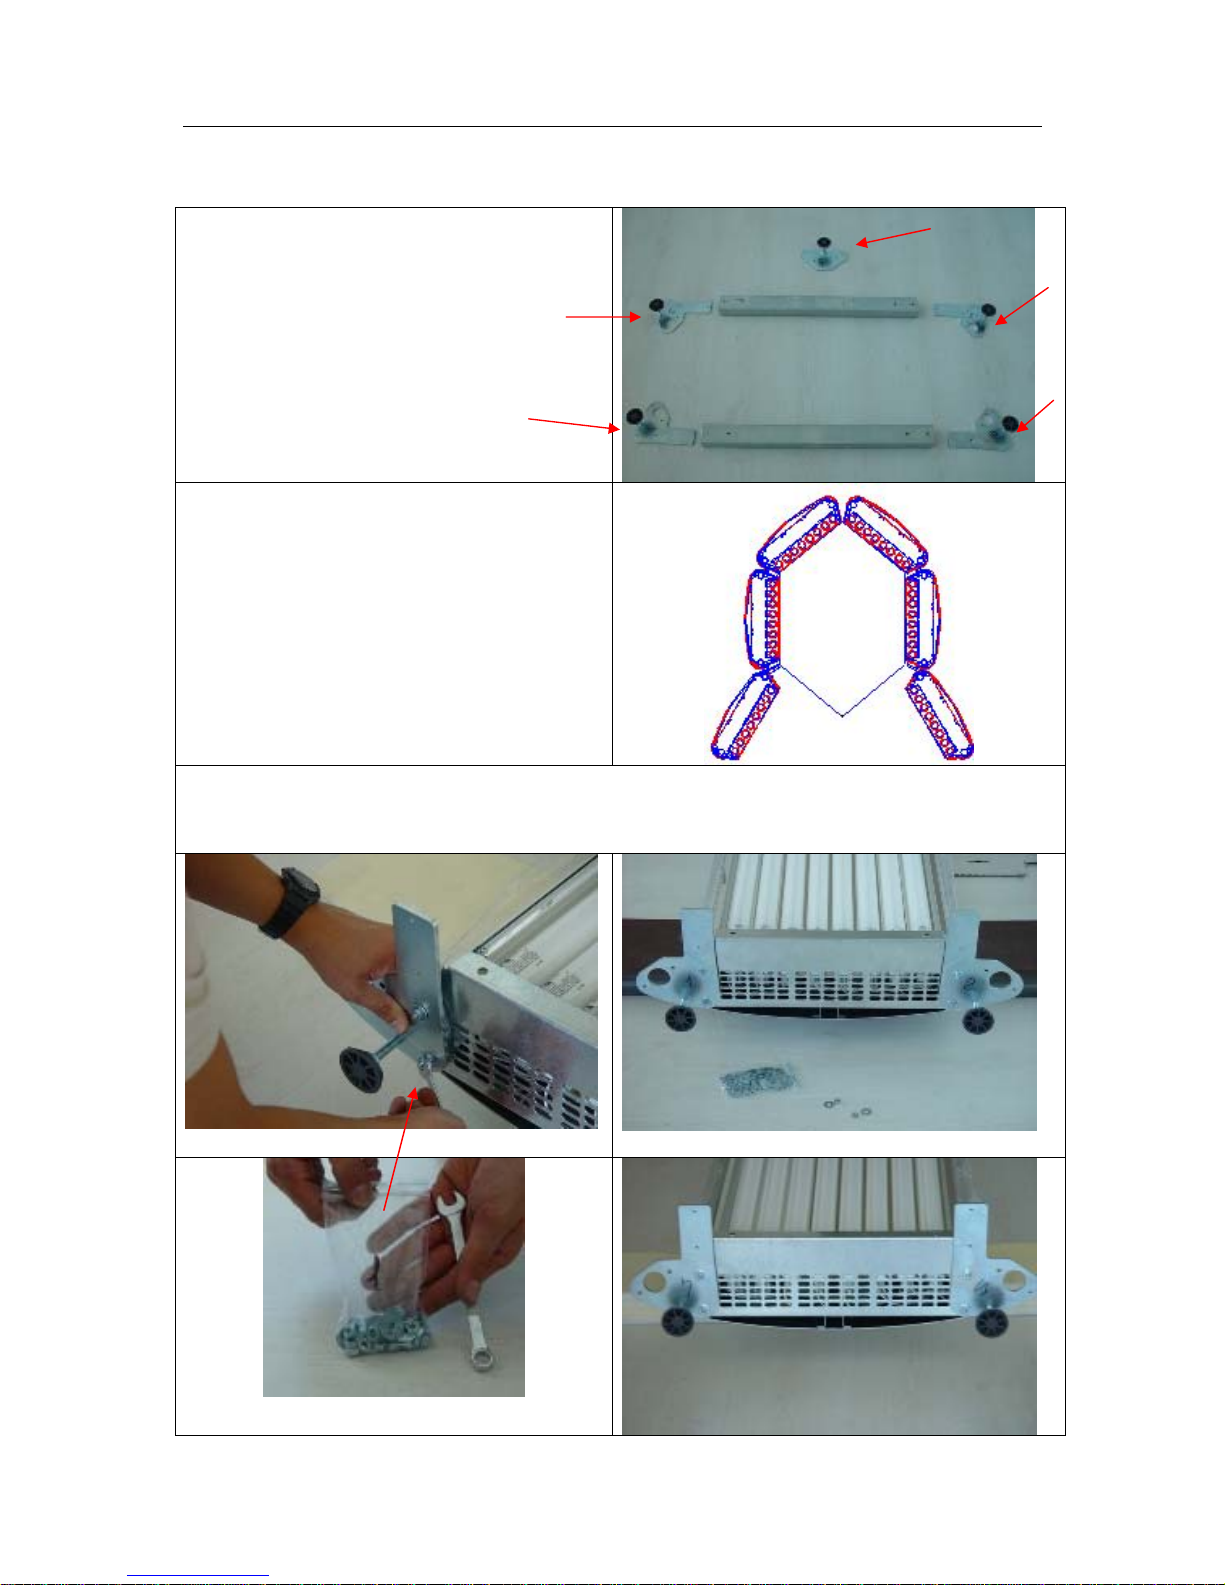
Take out from the package the metal brackets.
The brackets are numbered too as shown on the
right.
Each panel of the unit is assigned a number from
1 to 6 (see on the right), so you can see which is
the right position of the panel.
Fix the brackets on the bottom side of panel 2 (brackets number 1 and 2) and panel 5 (brackets
number4 and 5), and insert the feet. For fixing brackets use nuts from bag 1B.
C
D
B
E
A
4
3
2
5
1
6
Panel2
1B
Panel5
10
Page 13
Soltron Space Cab - User manual
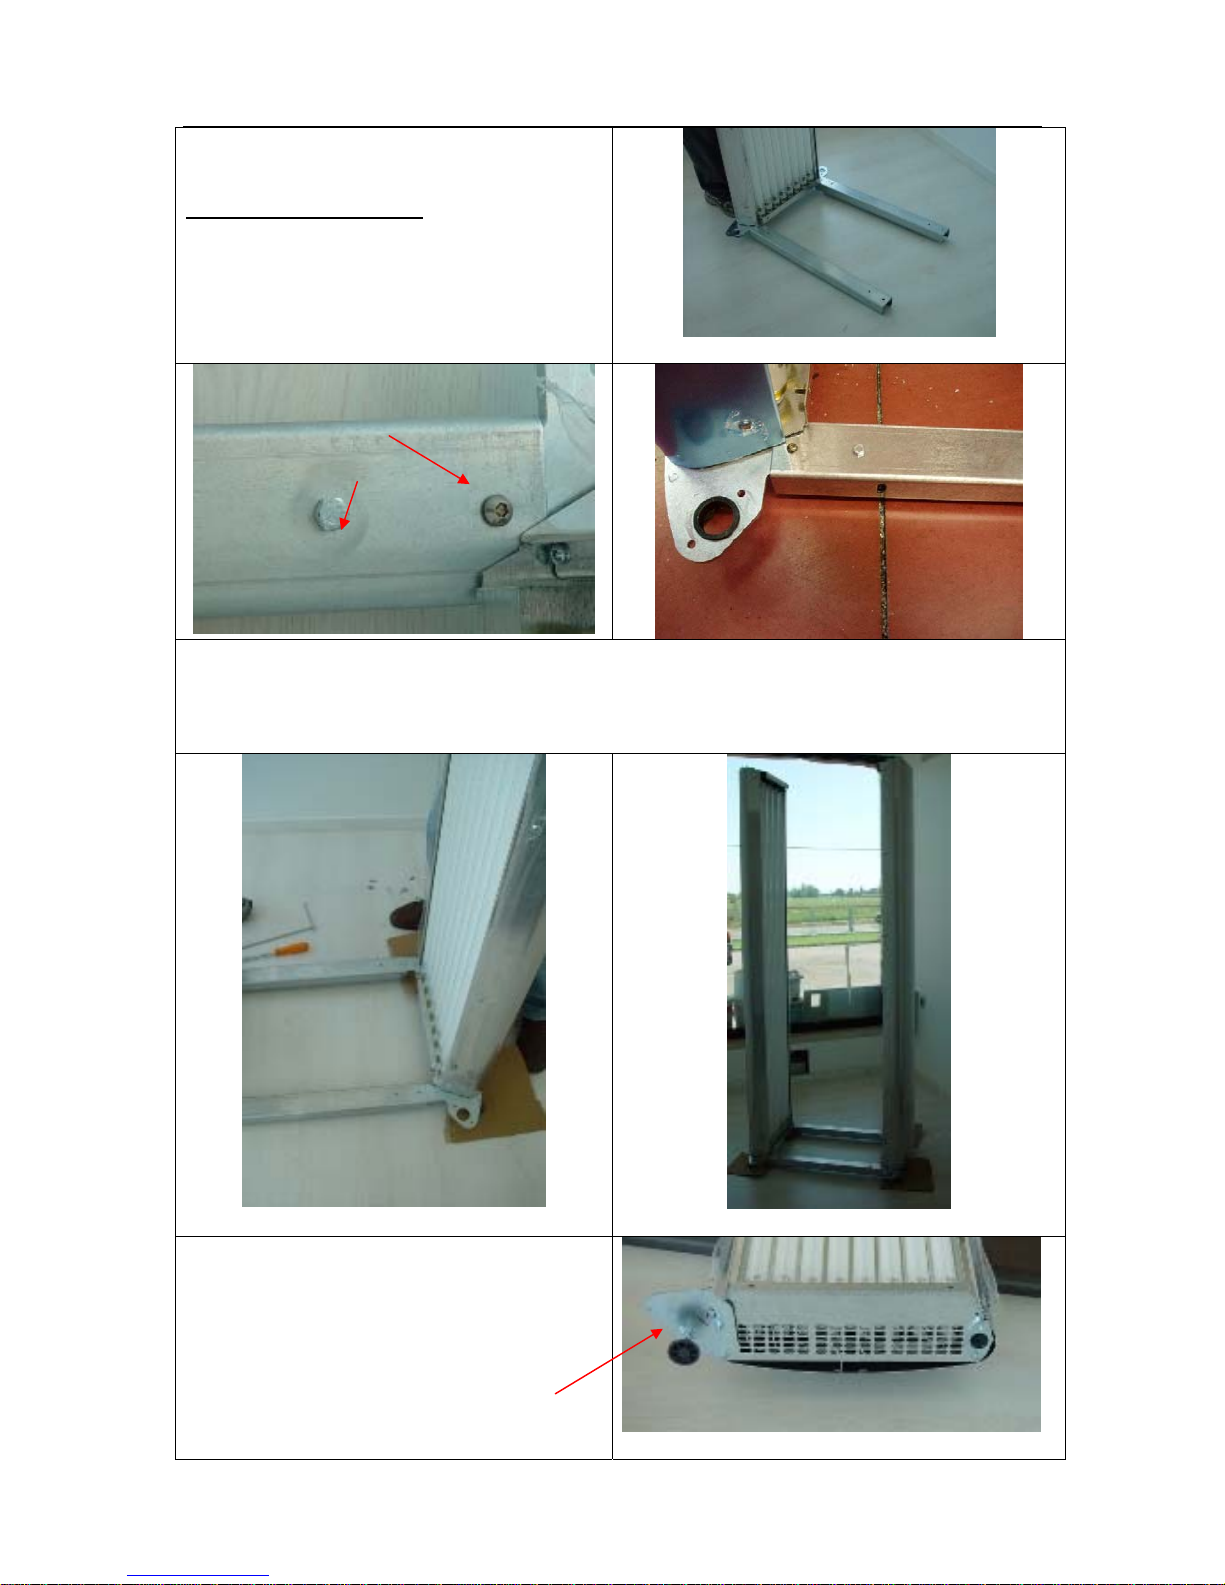
Insert the 2 long metal brackets on panel 2, then
fix them with screws in bag 1A (see below);
Do not attach all at this time.
Connect panel5 to panel 2 inserting panel5 into long brackets as shown below, without completely
tightening the screws.
At the end of this operation the two panels can stand up by themselves.
On the bottom side of panel 4 attach bracket
number 3 with the foot, as shown on the right.
1A
11
Page 14
Soltron Space Cab - User manual
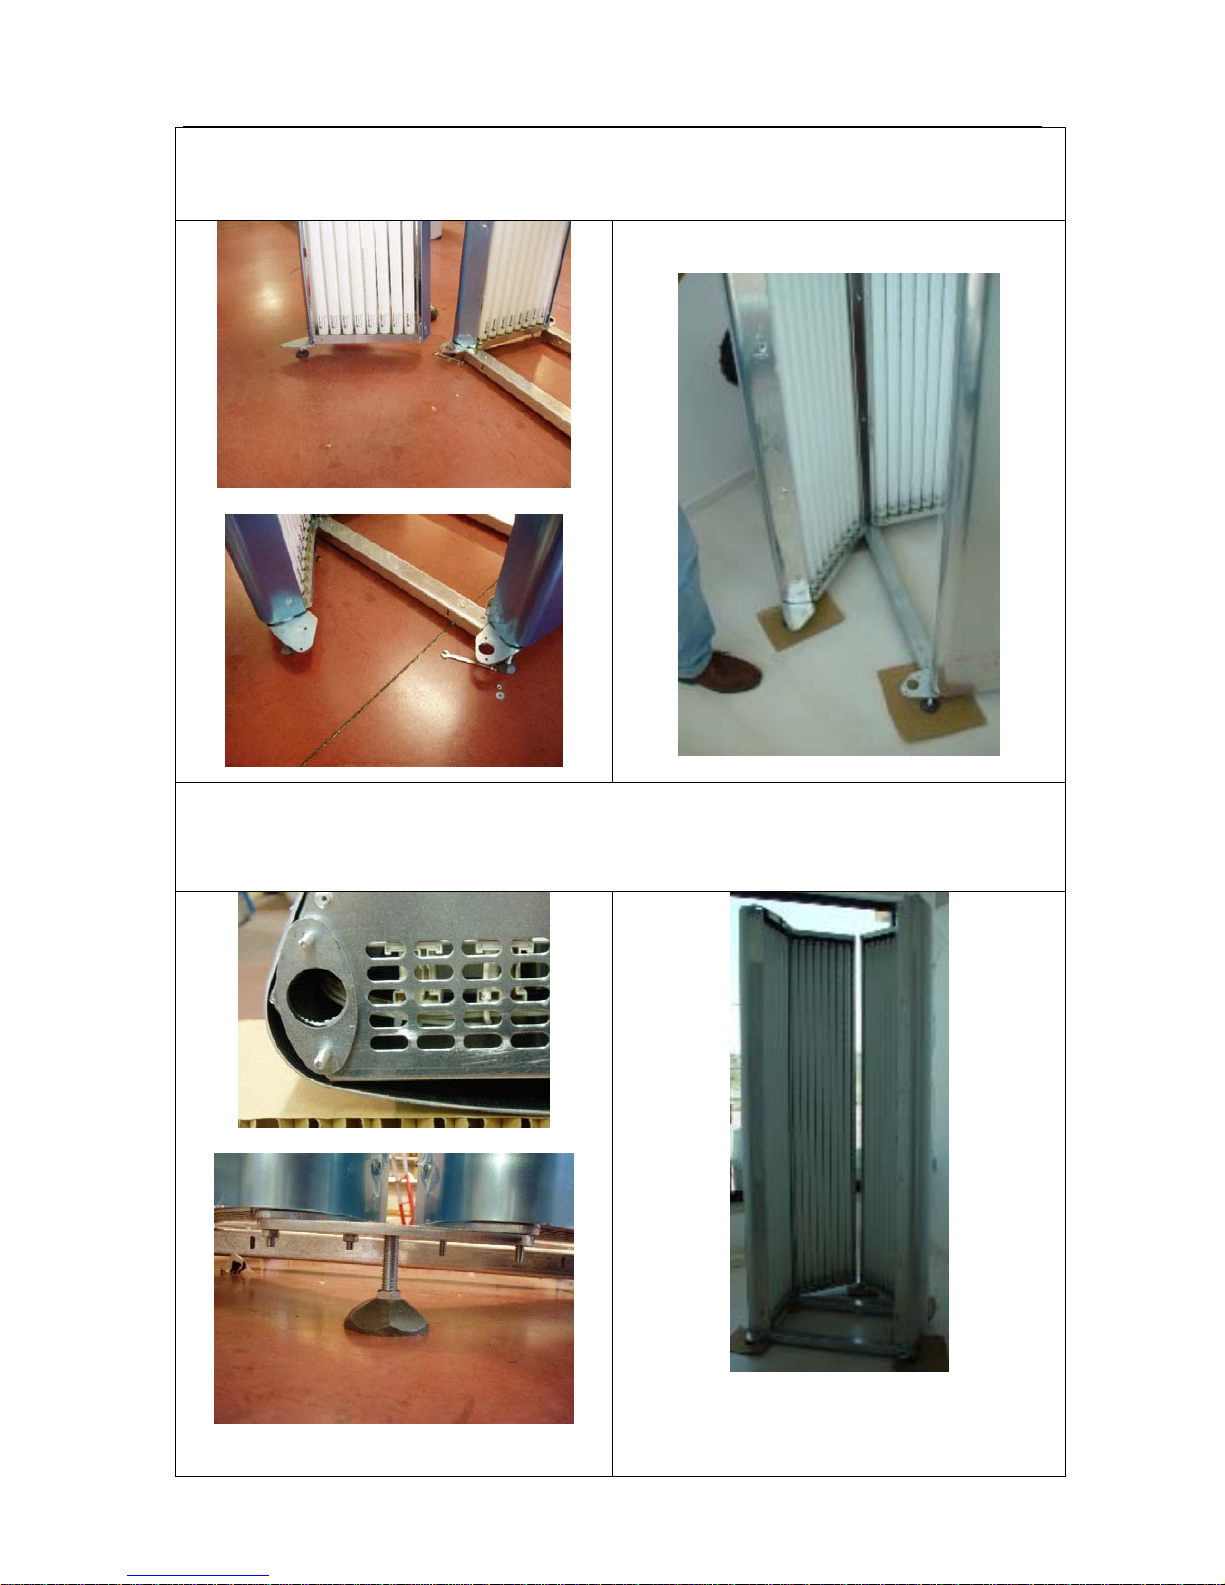
Attach panel 4 to panel 5. Insert 2 screws into the bottom of the panel. M6 nuts should be attached to
the screws and not securely fastened at this time.
Panel 3 has no brackets on the bottom, it has to be inserted between panel 2 and 4. Carefully place the
screws on the bottom of the panels through the access holes in the mounting plate. Secure the panel in
its place using the M6 nuts from the bottom.
12
Page 15
Soltron Space Cab - User manual
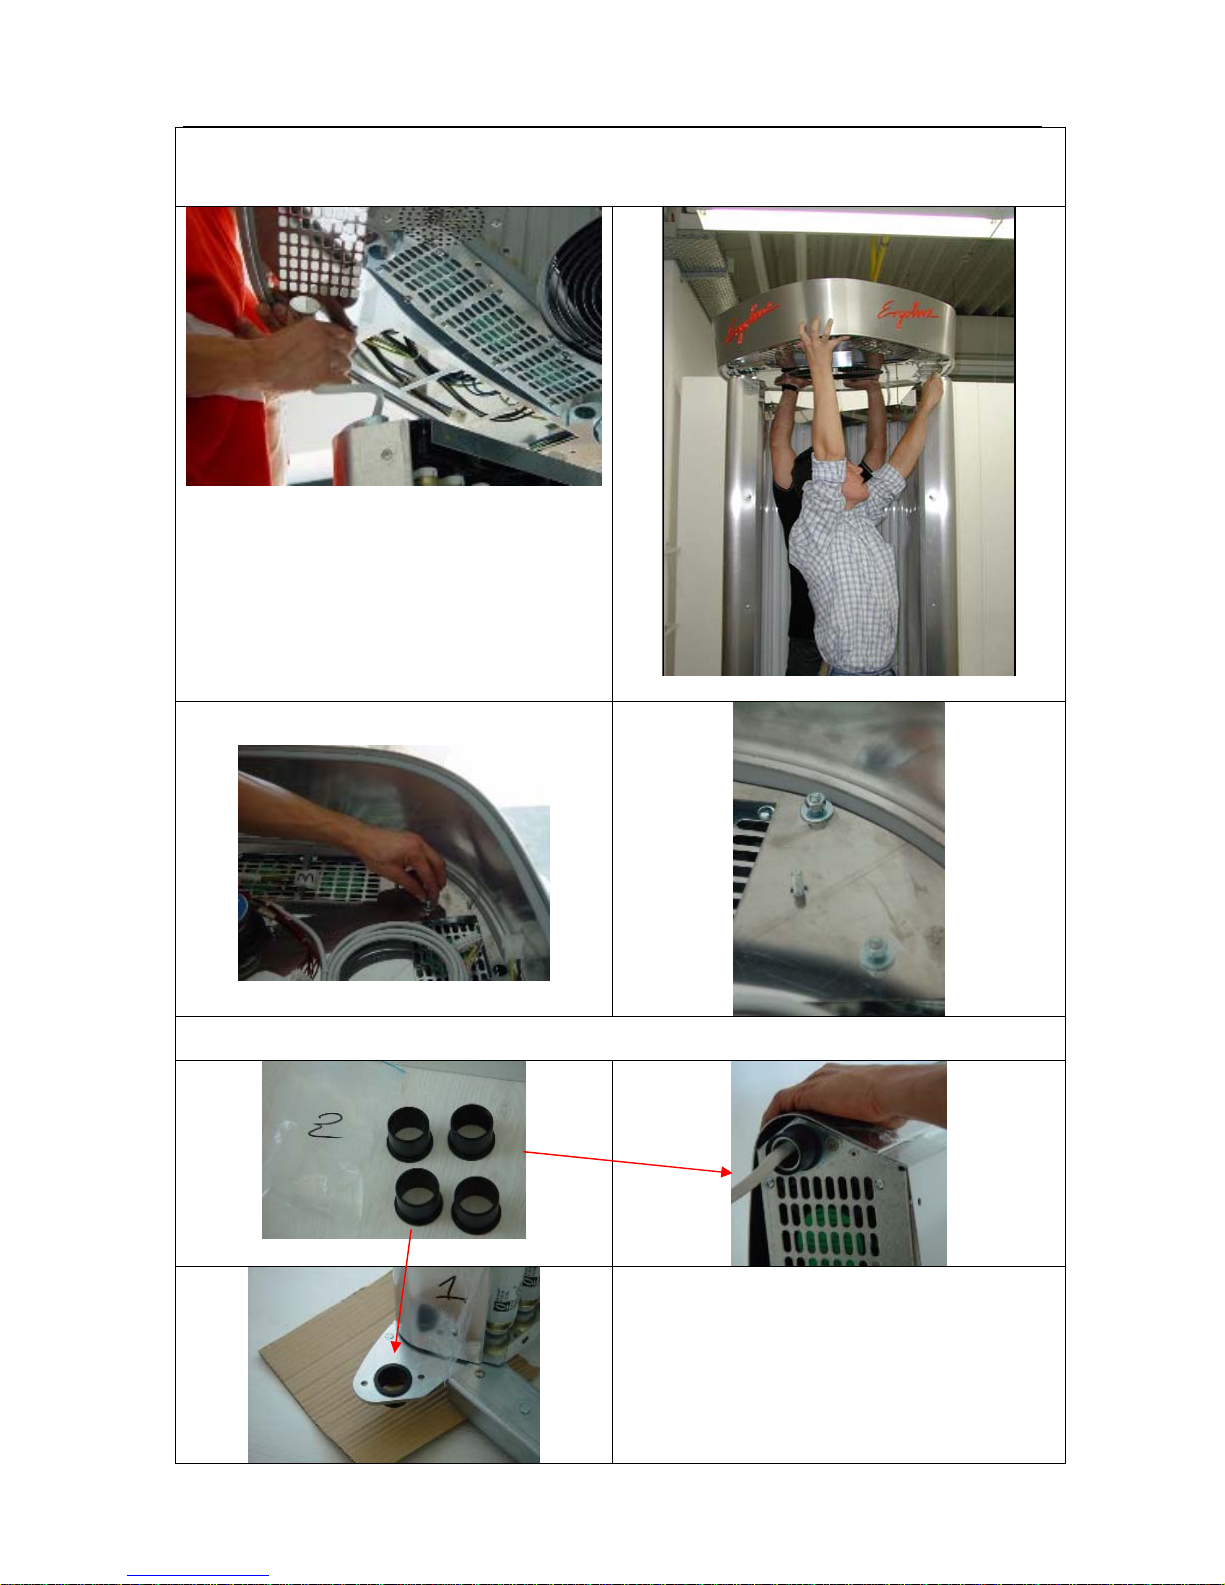
osition the roof over t four panels. Power cables for each panel should pass through the holes P he
provided in the roof.
Insert M6 nuts on rear side without tightening
them all the way.
sert plastic cylinders on the top side of panel 1 and 6 (doors); In
13
Page 16
Soltron Space Cab - User manual
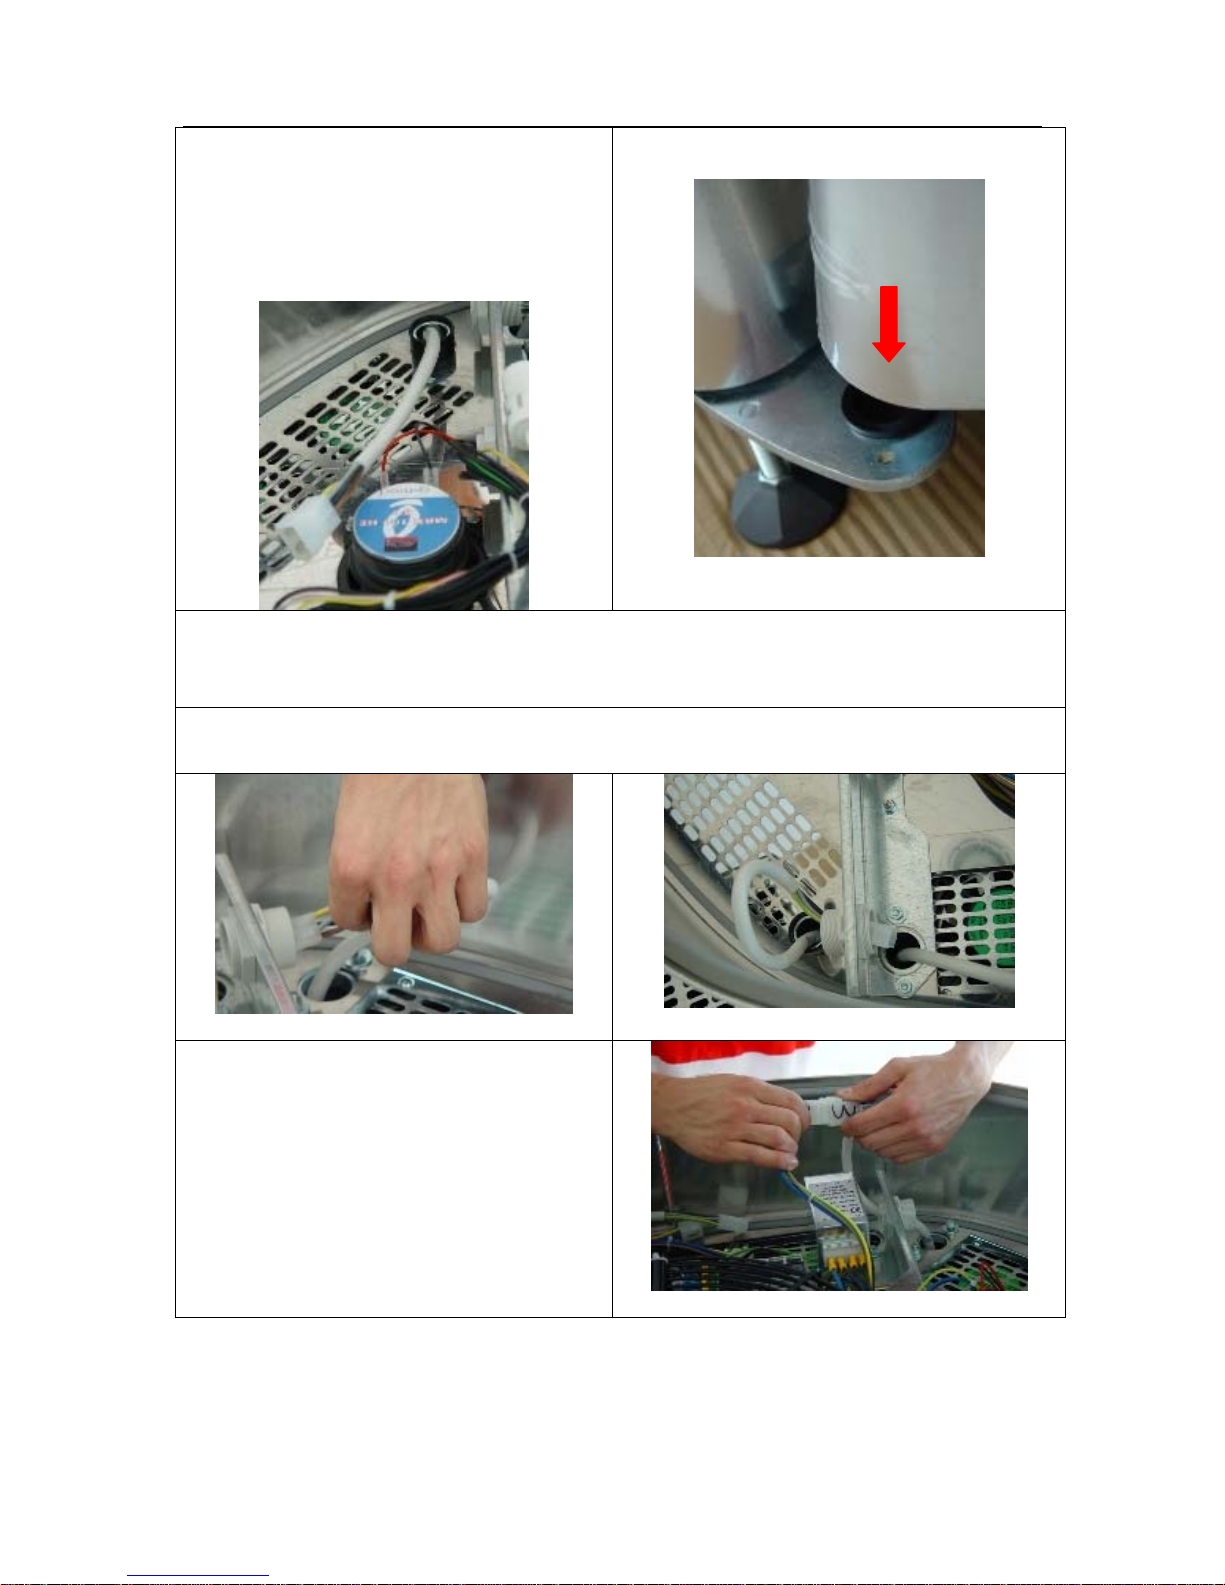
Insert the door: first insert the bottom side (see
picture on the right),
then raise the front of the roof and insert the top
of the door (remember the cable trough the hole,
see picture below).
Repeat the same operation with the second door.
Now you can tighten the nuts on the roof.
Insert cables from the panel through the roof.
Connect white plastic connectors with the same
number.
14
Page 17
Soltron Space Cab - User manual
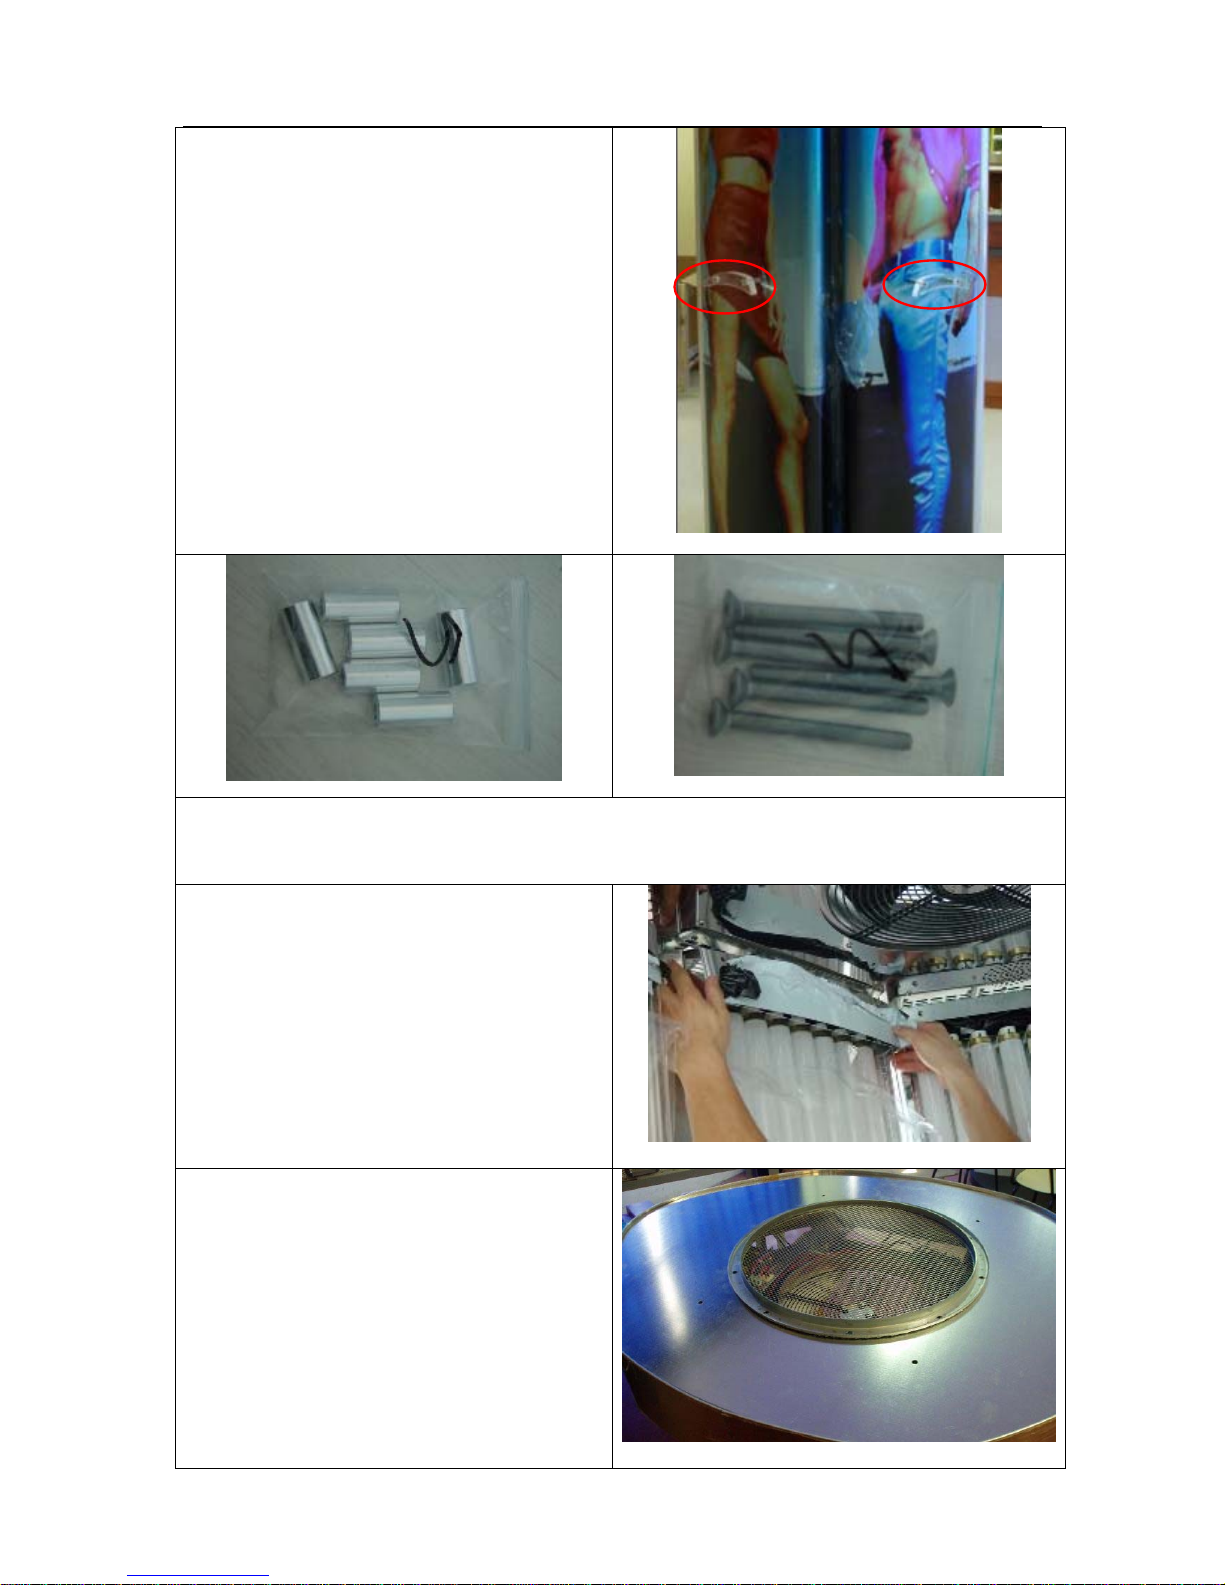
Take the external handle and fix it on the left door
using screws on bag 4 and aluminium cylinders
on bag 5; take care on fixing step by step one all
screw, otherwise you can damage the handle.
Fix the 2 internal handles with screws on bag 6 to the doors;
Fix the 2 internal support handles with screws on bag 7 to the internal side of the roof;
Remove plastic covers from internal side of
panels (acrylics and metal covers).
Put the metal cover on the top.
15
Page 18
Soltron Space Cab - User manual
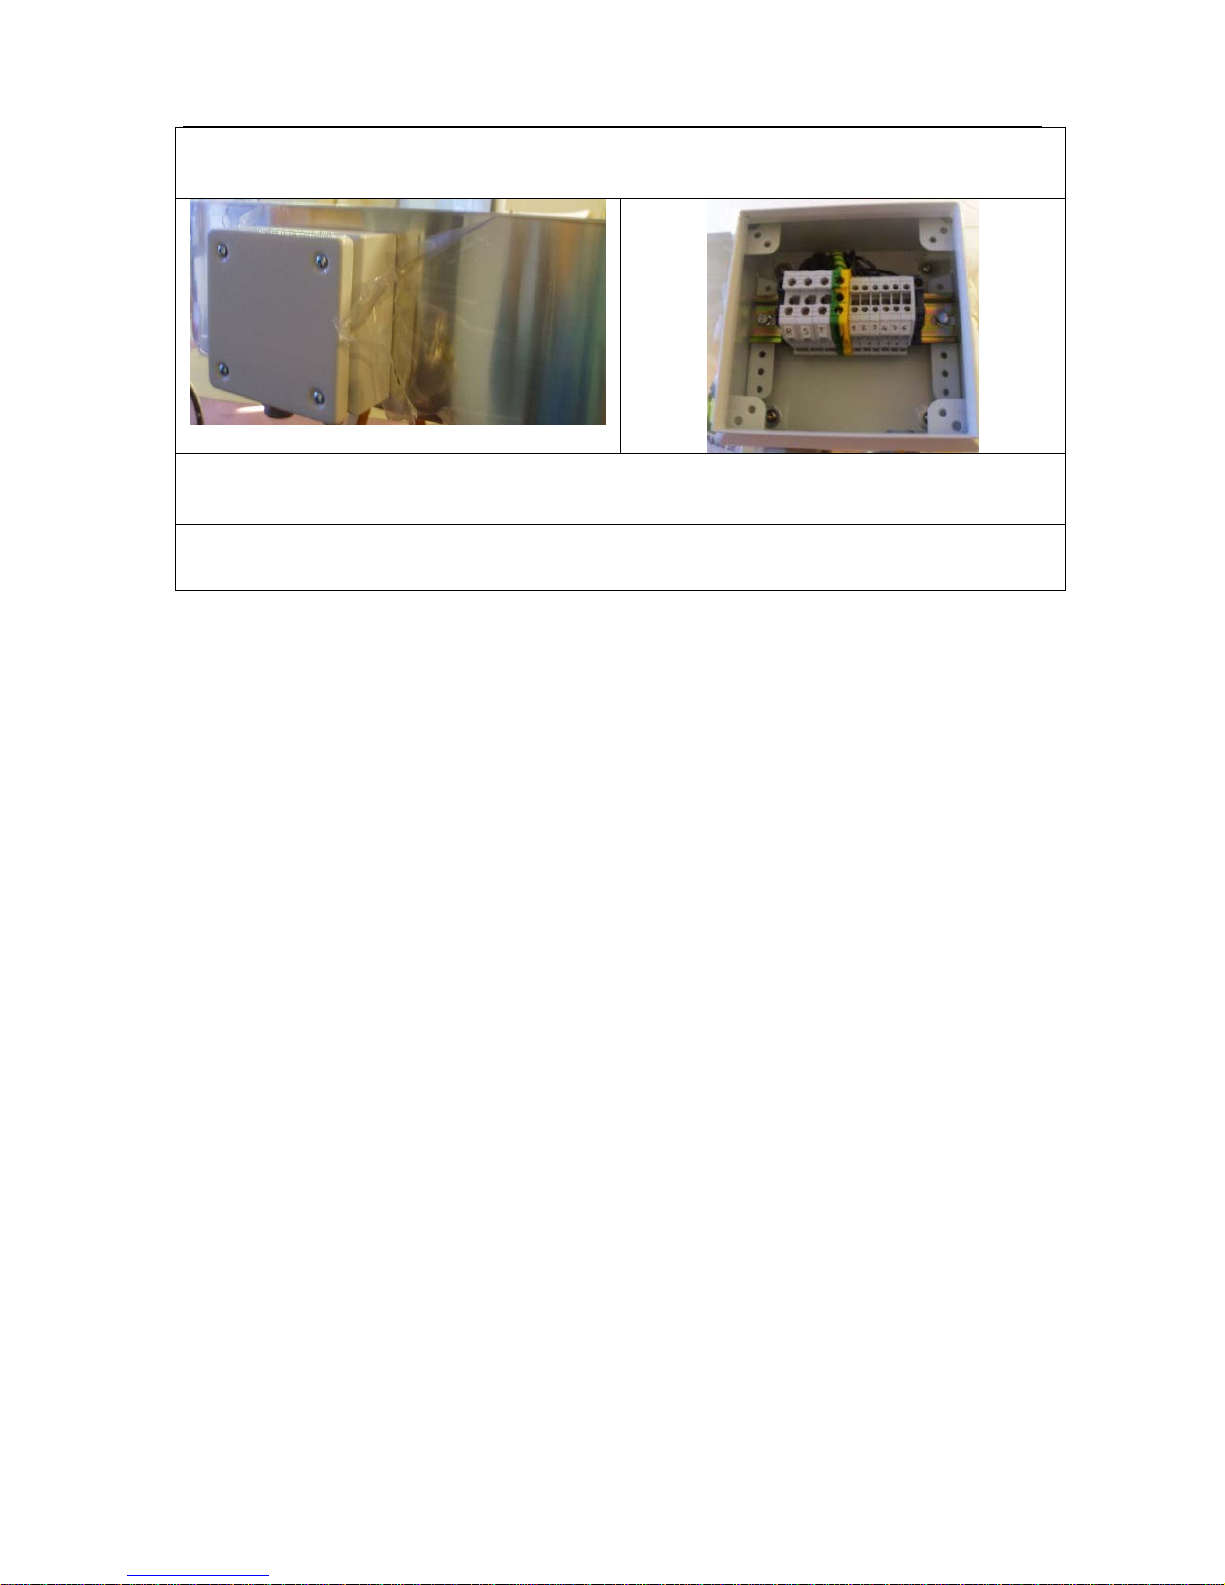
Remove the box cover from the side of the roof, and connect power supply to box connectors;
Repeat the same operation with the 6-pole connector to external timer if needed;
Switch on the unit, check that all lamps, fans and the main ventilator are on.
16
Page 19
Soltron Space Cab - User manual
5. FUNCTIONING MODE
The purpose of this chapter is to describe how the system works, giving a detailed description of
several pages on the display and of several steps during a treatment; it’s also possible to setup some
features of the unit.
The electronic control device mainly carries out the function of a timer: it enables a tanning treatment
of programmed duration to be carried, automatically switching on and off of the lamps and the cooling
fans of the tanning system.
Implemented in the electronic device are also meters in which the equipment activity times are
memorized and that can be used for controlling takings.
OPERATING INSTRUCTIONS
Before approaching the unit for a tanning session, please read carefully chapter 3 on
“compulsory precautions”.
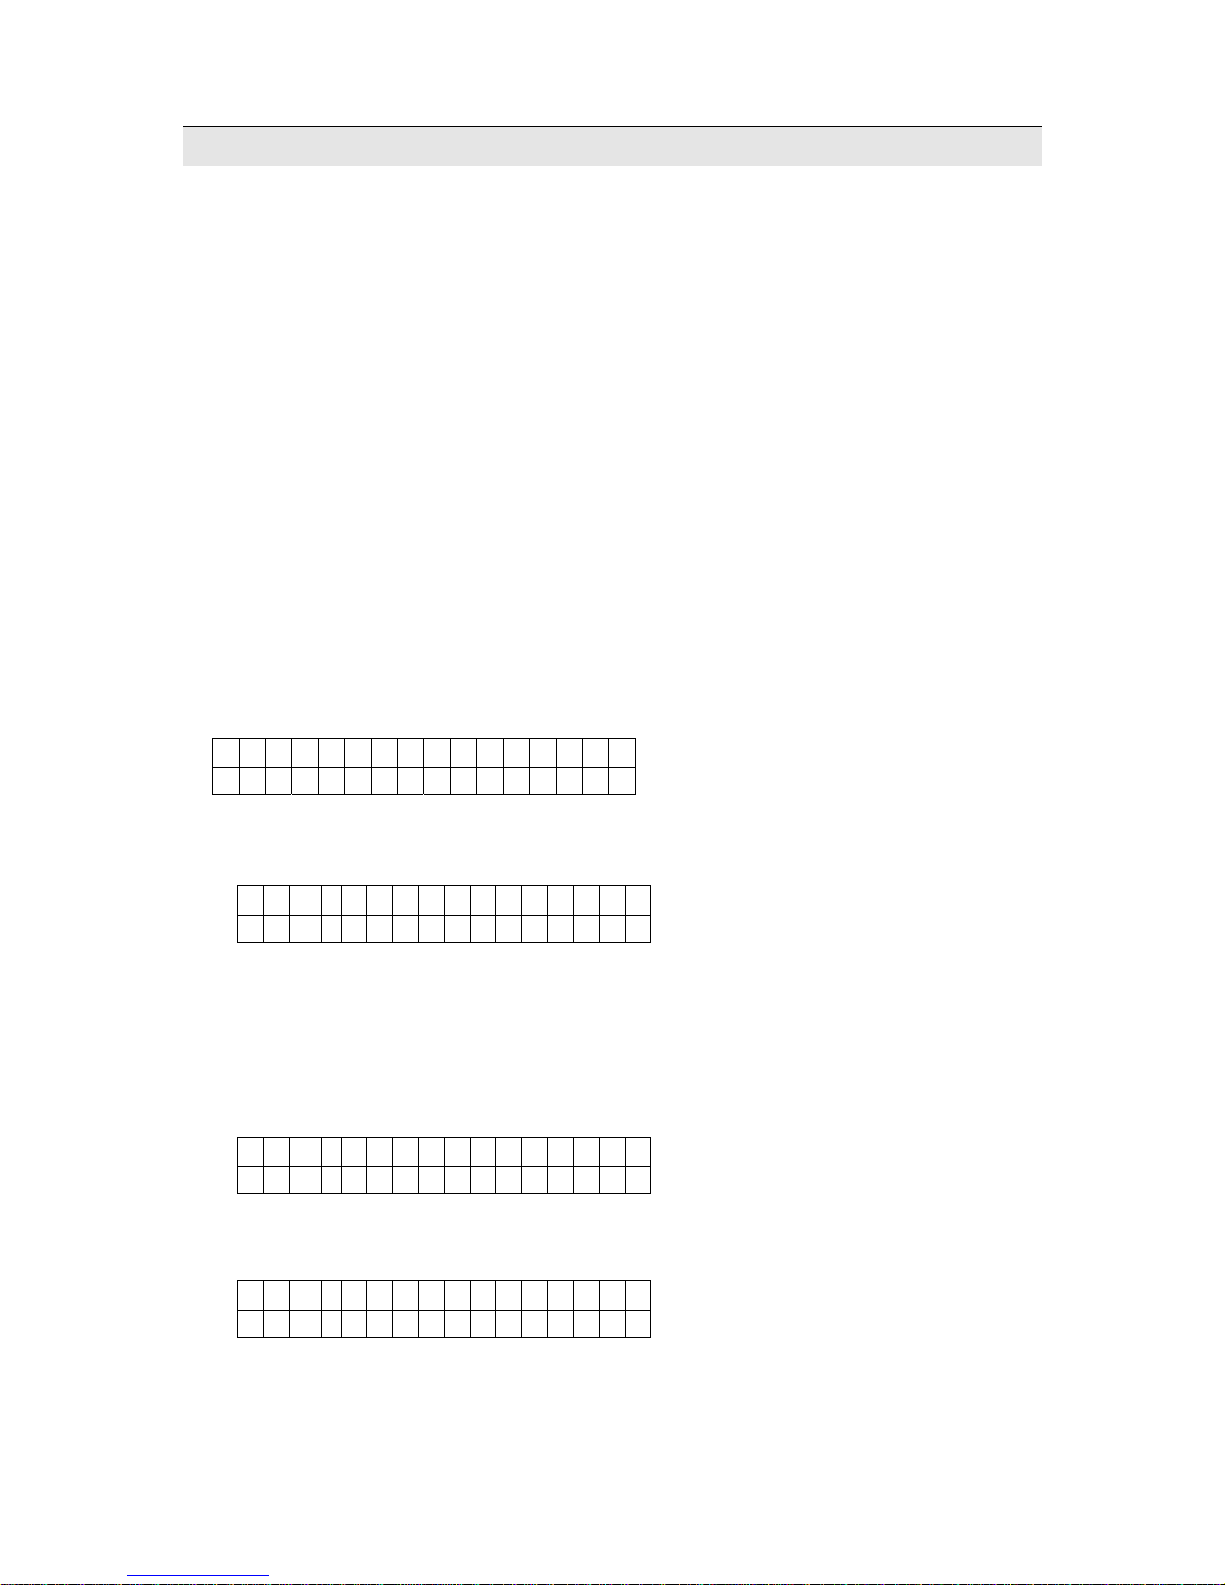
The first page you can see shows as the following:
1
S ol t r o n
S T A RT
This page will come back automatically if you do not press any button for 3 minutes (of course not
during the tanning session!); pressing one of the 4 buttons you can enter the following page:
2
S E S S I O N : 1 0:00
S T A RT ESC
press ESC for going back to page 1
The treatment duration shown on the display is the last one you have entered in the service menu;
Pressing START button the page below will be shown, and you can listen the following vocal
message:
“Welcome, we hope you enjoy your pleasant moment of relaxation while you tan. Please make sure
you removed all make up, and contact lenses and you’re wearing protective goggles. To control the
ventilation, use the dial on the lower right of the panel”.
2a T I M E R E M 1 0:00
Vocal message running
S T A R T S T O P
If you press the START button a second time during voice speaking, the session begins immediately,
otherwise it begins automatically at the end of the message; the following page appears:
2b T I M E R E M 0 9:48
Decreasing time is shown
STOP
At half time of the session you’ll listen the following vocal message:
“You’re now halfway through your sunbed session”.
When 10 seconds to the end are missing, you can hear the following vocal message:
“Your session is now ending. Thank you and goodbye”.
17
Page 20
Soltron Space Cab - User manual
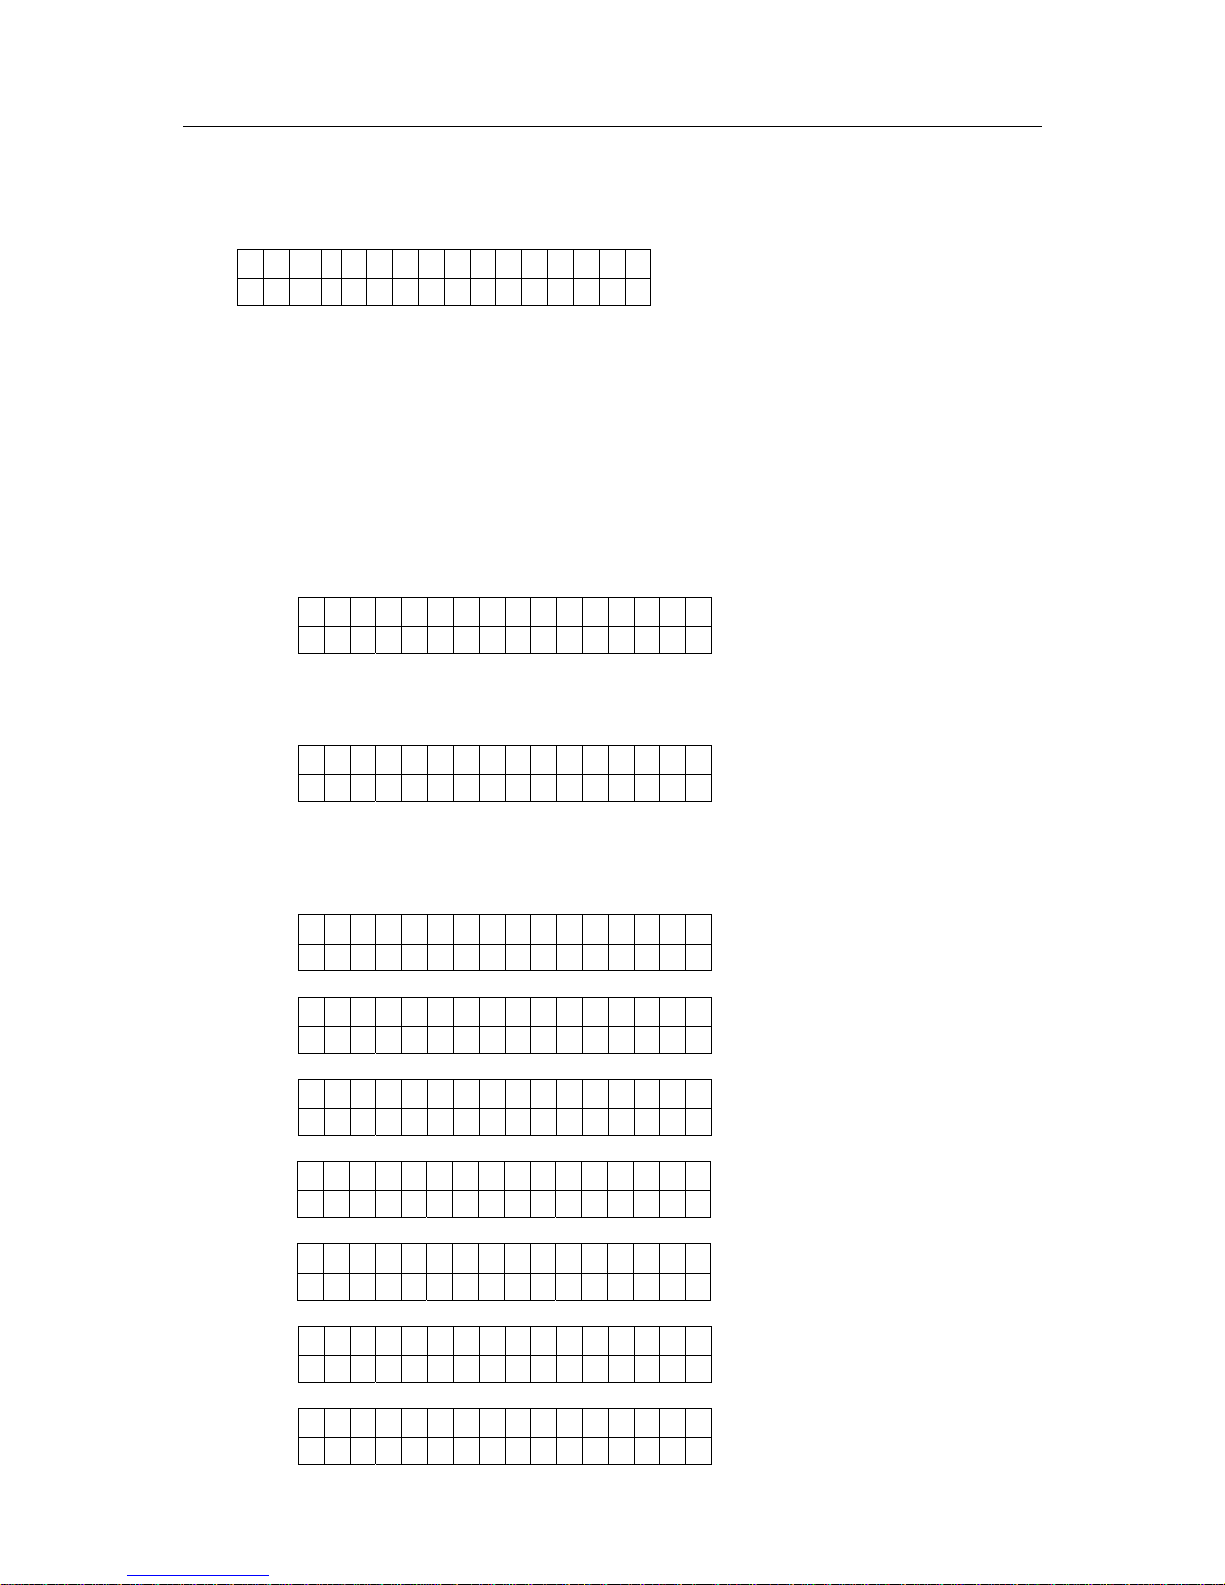
Pressing STOP button the session terminates, and if there’s a cooling time set up the following page
will be shown:
2c P O S T S E S S ION
C O O L I N G
At the end the program will come back to page 1.
All operations shown before can be executed without any access key.
PROGRAMMING
Using the access key you can enter inside the service menu: insert the key and press any button, the
following page will be displayed:
3 S E R V I C E M E N U
ENT
Removing the access key, from any page you’ll come back to page 1;
Pressing ENT next page appears:
4 S E S S I O N : 1 0 : 0 0
< > E N T E S C
press ESC for going back to page 1
Selecting buttons < or > you can shift to several functions of the menu, and after the last page you’ll
find the first one again:
5 M I N U T E S : 0 0 2 3 1
< > R E S E S C
press ESC for going back to page 1
6 L A M P H O U R S 0 0 0 0 3
< > R E S E S C
press ESC for going back to page 1
7 U N I T H O U R S 0 0 0 0 3
< > ESC
press ESC for going back to page 1
8 C O O L I N G
< > E N T E S C
press ESC for going back to page 1
9 R E M O T E C O N T R O L
< > E N T E S C
press ESC for going back to page 1
10 V E R S I O N : E N G 0 1
< > ESC
press ESC for going back to page 1
11 A U D I O S Y S T E M
< > E N T E S C
press ESC for going back to page 1
18
Page 21
Soltron Space Cab - User manual
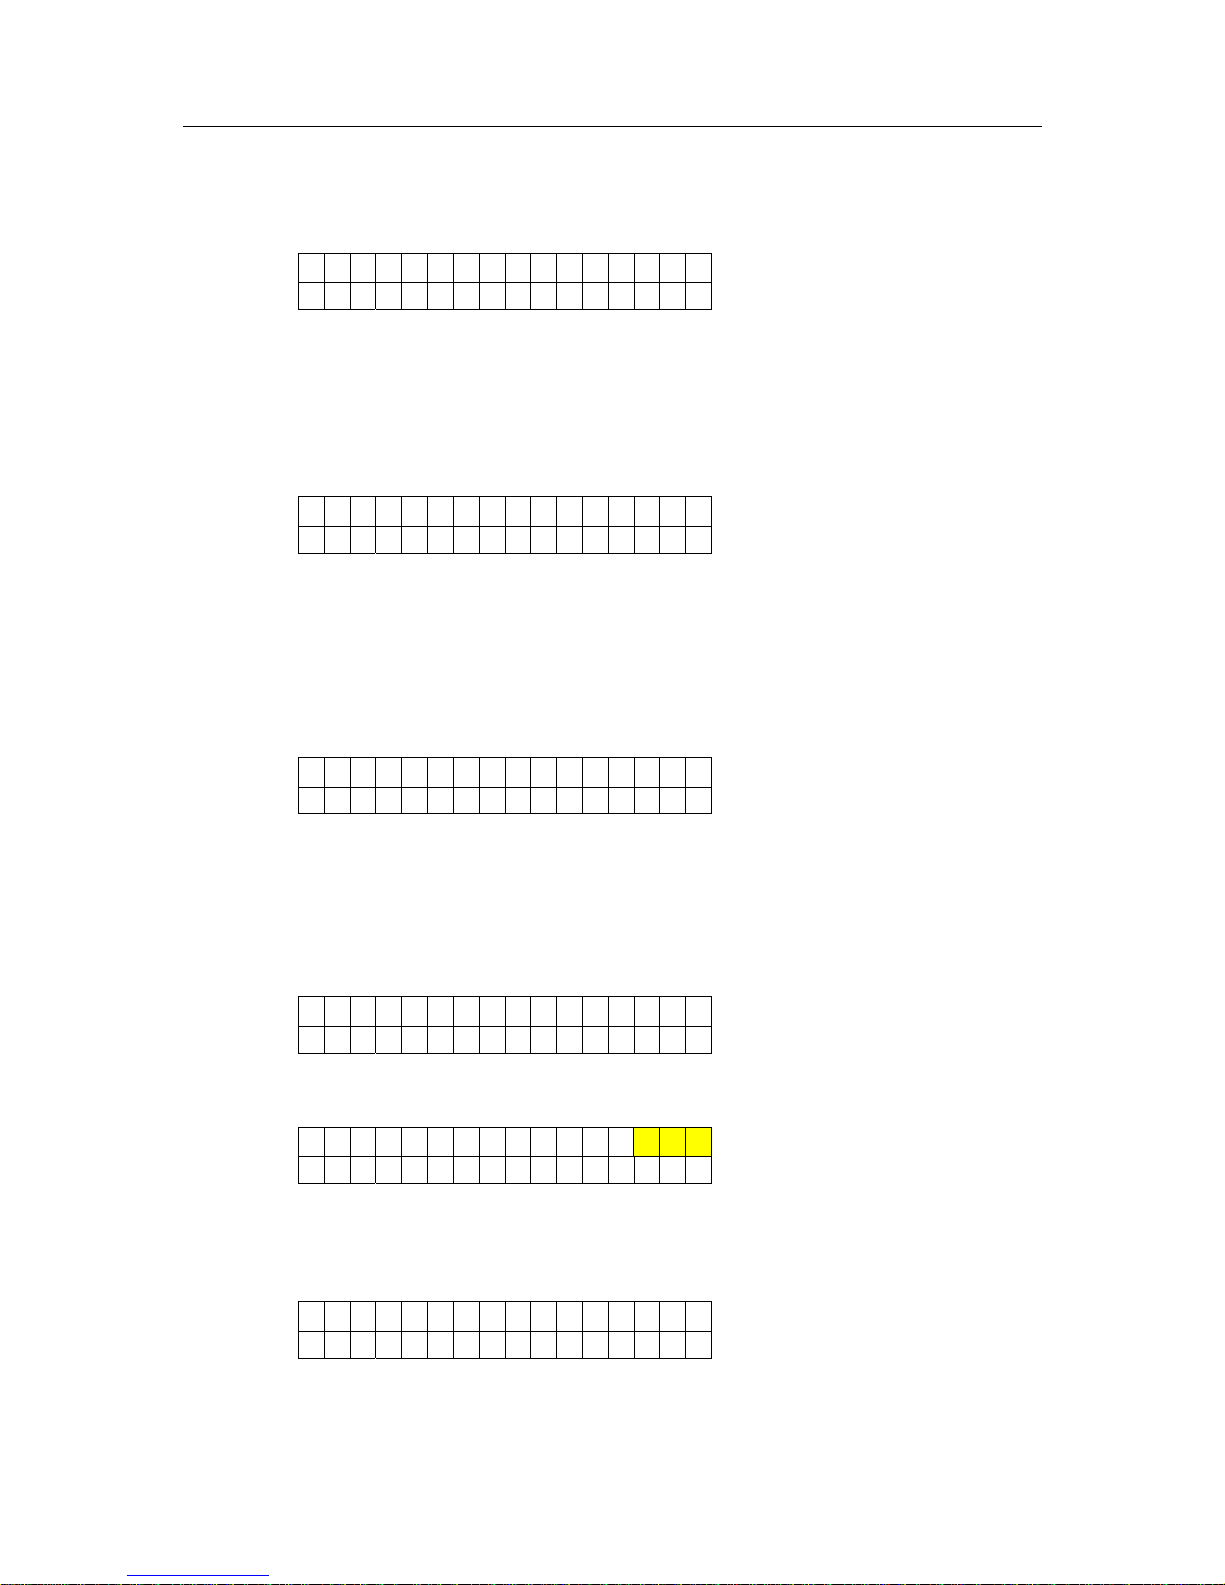
From page 5:
5 M I N U T E S : 0 0 2 3 1
< > R E S E S C
press ESC for going back to page 1
This value is a minute counter, you can reset this value when you need.
Keeping pressed RES button for at least 3 seconds minutes value will be reset to 00000;
From page 6:
6 L A M P H O U R S 0 0 0 0 3
< > R E S E S C
press ESC for going back to page 1
This value is a hour counter, you can reset this value when you need (for example when
replacing lamps).
Keeping pressed RES button for at least 3 seconds lamp hours value will be reset to 00000;
From page 7:
7 U N I T H O U R S 0 0 0 0 3
< > ESC
press ESC for going back to page 1
This value is a hour counter, but this is not erasable: this represent the total life of the unit.
Keeping pressed RES button for at least 3 seconds lamp hours value will be reset to 00000;
From page 8:
8 C O O L I N G
< > E N T E S C
press ESC for going back to page 1
Press ENTER for the next page:
8a C O O L I N G :
1 8 0
Value 180 is blinking
< > M E M O E S C
press ESC for going back to page 8
Pressing < or > buttons you can modify the cooling value with steps of 30 seconds , from a
minimum of 180 to a maximum of 300 seconds;
Pressing MEMO button you can see for some seconds the following page:
P A R A M E T E R
P R O G R A M M E D
If the sentence PARAMETER NOT PROGRAMMED appears, please repeat the operation;
19
Page 22
Soltron Space Cab - User manual
From page 11:
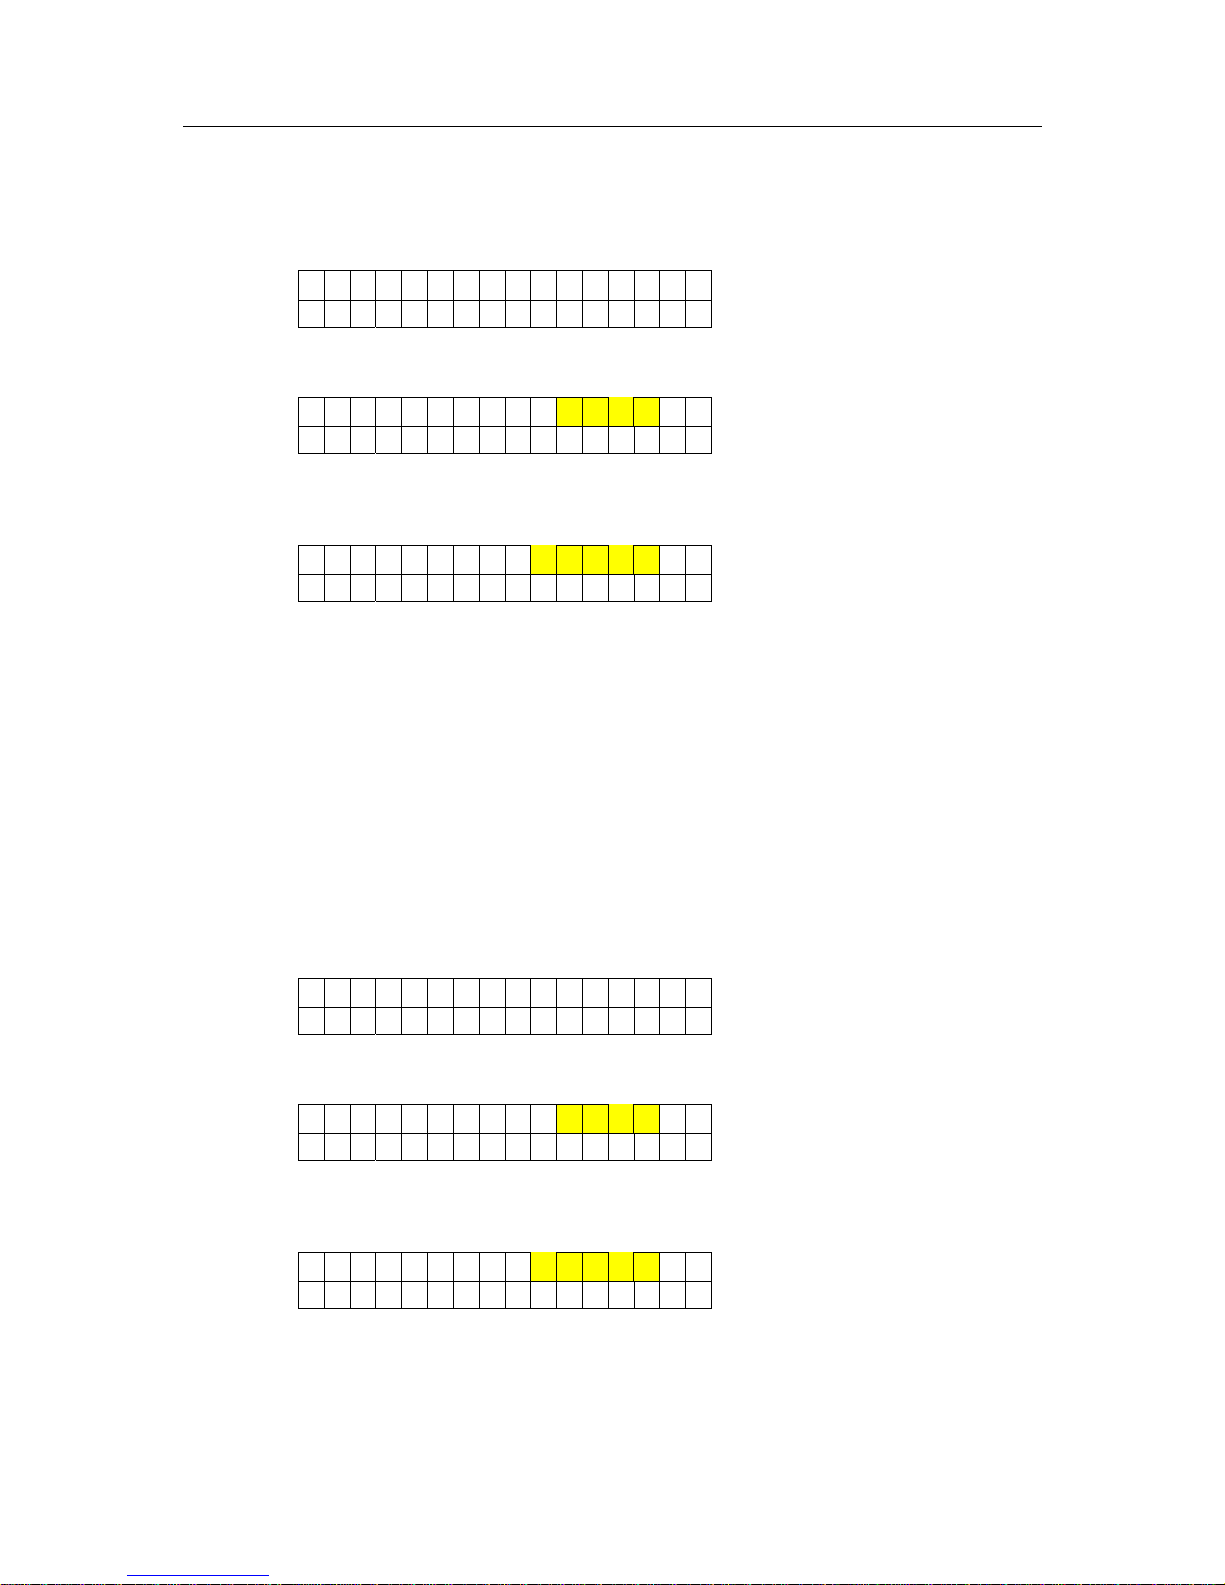
11 A U D I O S Y S T E M
< > E N T E S C
press ESC for going back to page 1
Pressing ENT button the following page will appear:
11a A U D I O : E N A B
ENAB is blinking
< > M E M O E S C
press ESC for going back to page 11
Selecting < or > you can choose between ENAB and DISAB, that means that vocal messages
are active or not:
11b A U D I O : D I S A B
DISAB is blinking
< > M E M O E S C
press ESC for going back to page 11
Pressing MEMO button the chosen option is saved.
From page 9:
9 R E M O T E C O N T R O L
< > E N T E S C
press ESC for going back to page 1
Pressing ENT button the following page will appear:
9a R E M O T E : E N A B
ENAB is blinking
< > M E M O E S C
press ESC for going back to page 9
Selecting < or > you can choose between ENAB and DISAB, that means you the unit is
controlled by an external timer (remote control enabled) or by the internal one (disable):
9b R E M O T E : D I S A B
DISAB is blinking
< > M E M O E S C
press ESC for going back to page 9
Pressing MEMO button the chosen option is saved.
20
Page 23
Soltron Space Cab - User manual
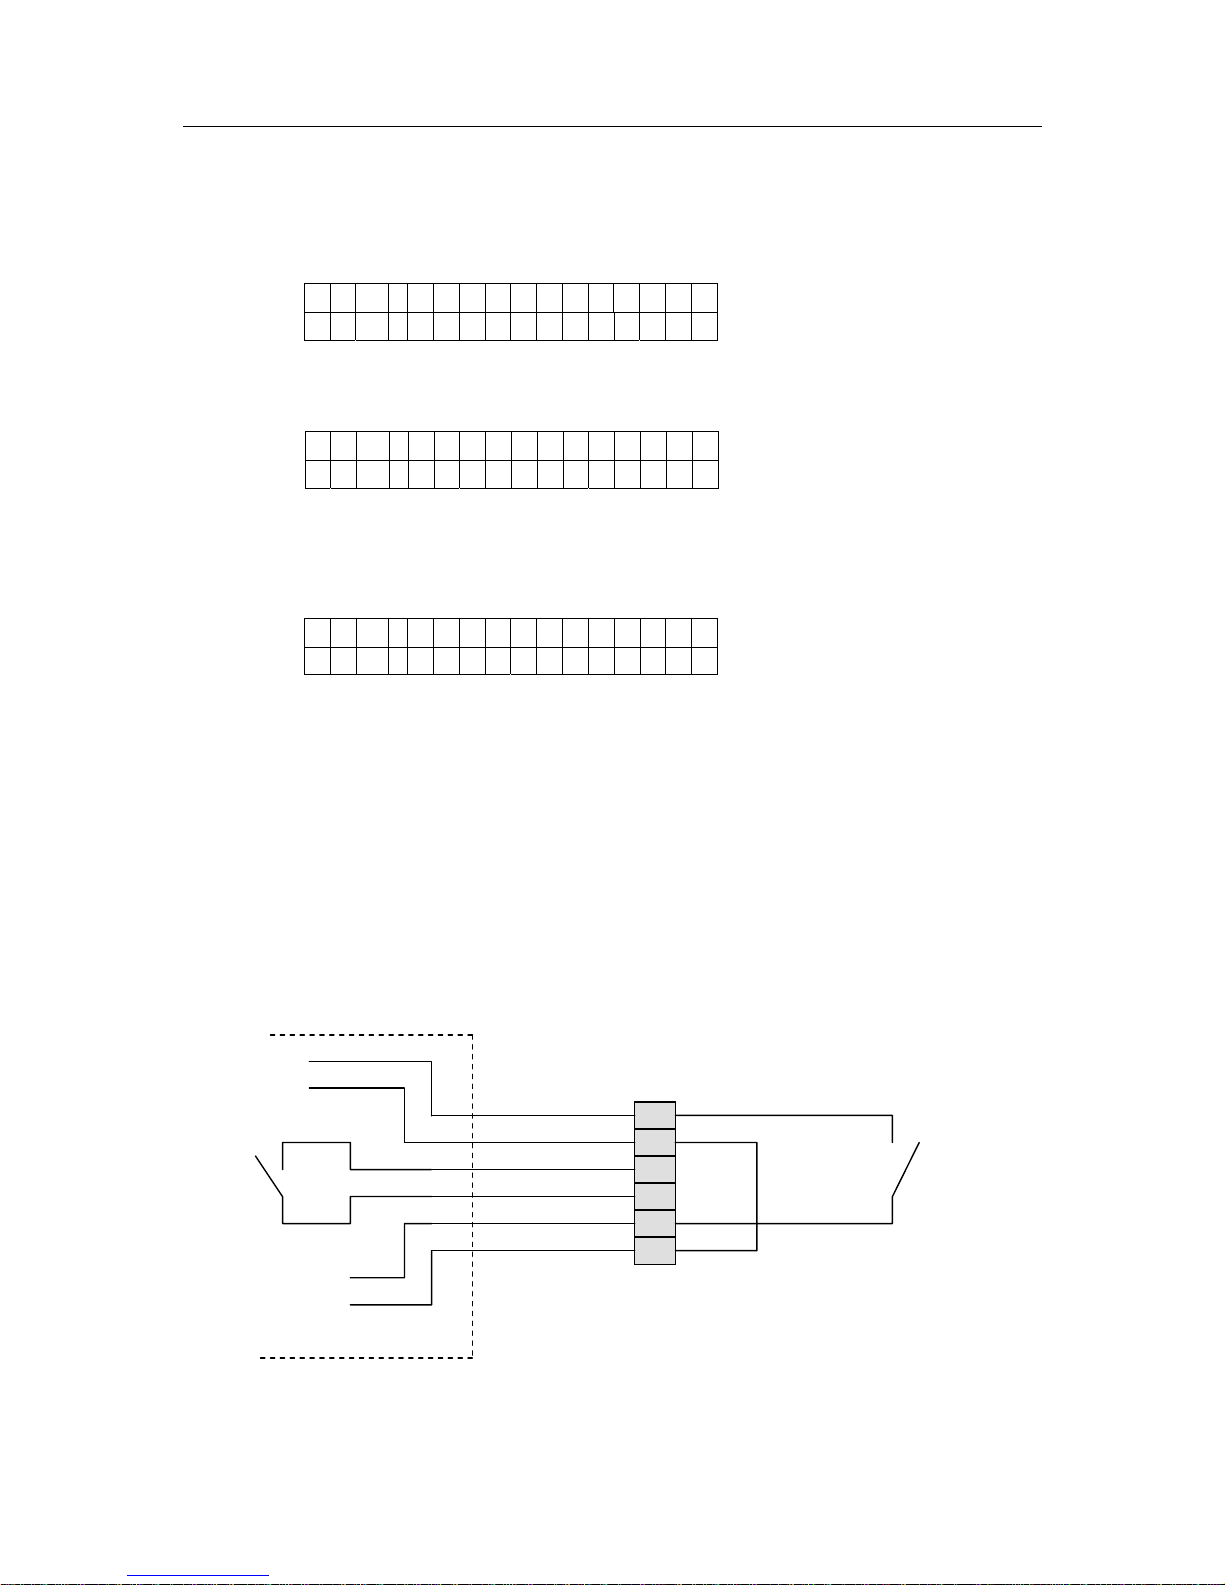
If the remote control function is enabled, the display will appear as the following page:
1
S o l t r
o n
S TART
This page will come back after 3 minutes without pressing any button; pressing one of the 4
buttons the following page will appear:
12
T I M E R E M 00:00
S TART ESC
press ESC for going back to page 1
Pressing START button a free potential switch will be closed (start command), and this switch
will remain closed for 5 seconds and then will open again;
If a start arrives from the external connector, the session begins:
12a T I M E R E M 00:13
Increasing time is displayed
STOP
At the end of the treatment (or pressing STOP button), page 2b will be displayed (cooling).
REMOTE CONTROL CONNECTION
On the external side you have a 6-pole connector, on the top back of the unit, to allow the interfacing
to the external control.
In the drawing below you can see how to connect the unit to a generic external control.
Soltron Space Cab
230V ac L
N
Input 230Vac L1
For start from N1
external control
Internal
start
1
2
5
6
3
4
External
start
21
Page 24

Soltron Space Cab - User manual
ROUTINE AND EXTRAORDINARY MAINTENANCE
To keep the solarium efficient, carry out the following simple operations:
The unit has to be disconnected from power supply before cleaning acrylics or lamps or
engaging in the maintenance of the product.
Clean the lamps with specific products for cleaning glass surfaces.
Clean the acrylic without using detergent products containing alcohol (the surface could become dull
and therefore stop a part of the UV).
Various suitable products are readily available on the market for this purpose.
Clean the equipment (especially the parts in contact) with non-aggressive disinfectant products.
Various suitable products are readily available on the market for this purpose.
Periodically make sure that the air intakes are not blocked with dust or other materials (tissues, etc.).
Periodically replace the lamps and the starters (normally between 400 and 600 hours of use).
For replacing lamps and starters:
• Disconnect the unit from power supply;
• Unscrew and remove the 2 screws on the upper side of one acrylic panel and remove the
metal cover;
• Unscrew (without removing) the 2 screws on the lower side of the acrylic panel;
• Lift up the acrylic from screws and store in a safe place to avoid damage;
• Remove the lamps by turning them 90° and pulling out from lamp holders;
• Install new lamps by repeating the same operations in reverse.
• Clean lamps and acrylics before closing the panel;
• Power the tanning system on after completing the process.
All operation that access electrical parts have to be completed by a qualified technician.
Before accessing inside the unit disconnect power supply.
For replacement of lamps, eyewear or parts, contact:
JK Products and Services
1, Walter Kratz Drive
Jonesboro, AR 72401
(877) 786 5267
22
Page 25
Soltron Space Cab - User manual
MAINTENANCE REGISTER
Model of equipment:
Serial No.:
Intervention No:
Date of intervention:
Total hours of operation:
Type of intervention: Lamp replacement Starter replacement
Other______________________________________________________________________________
Next intervention in________________ hours
Notes ____________________________________________
____________________________________________
____________________________________________
Stamp and signature of authorized
technician
Model of equipment:
Serial No.:
Intervention No.:
Date of intervention:
Total hours of operation:
Type of intervention: Lamp replacement Starter replacement
Altro______________________________________________________________________________
Next intervention in________________ hours
Notes ____________________________________________
____________________________________________
____________________________________________
Stamp and signature of authorized
technician
Model of equipment:
Serial No.:
Intervention No.:
Date of intervention:
Total hours of operation:
Type of intervention: Lamp replacement Starter replacement
Other______________________________________________________________________________
Next intervention in________________ hours
Notes ____________________________________________
____________________________________________
____________________________________________
Stamp and signature of authorized
technician
23
Page 26
Soltron Space Cab - User manual
Model of equipment:
Serial No.:
Intervention No:
Date of intervention:
Total hours of operation:
Type of intervention: Lamp replacement Starter replacement
Other______________________________________________________________________________
Next intervention in________________ hours
Notes ____________________________________________
____________________________________________
____________________________________________
Stamp and signature of authorized
technician
Model of equipment:
Serial No.:
Intervention No.:
Date of intervention:
Total hours of operation:
Type of intervention: Lamp replacement Starter replacement
Altro______________________________________________________________________________
Next intervention in________________ hours
Notes ____________________________________________
____________________________________________
____________________________________________
Stamp and signature of authorized
technician
Model of equipment:
Serial No.:
Intervention No.:
Date of intervention:
Total hours of operation:
Type of intervention: Lamp replacement Starter replacement
Other______________________________________________________________________________
Next intervention in________________ hours
Notes ____________________________________________
____________________________________________
____________________________________________
Stamp and signature of authorized
technician
24
Page 27
Soltron Space Cab - User manual
Model of equipment:
Serial No.:
Intervention No:
Date of intervention:
Total hours of operation:
Type of intervention: Lamp replacement Starter replacement
Other______________________________________________________________________________
Next intervention in________________ hours
Notes ____________________________________________
____________________________________________
____________________________________________
Stamp and signature of authorized
technician
Model of equipment:
Serial No.:
Intervention No.:
Date of intervention:
Total hours of operation:
Type of intervention: Lamp replacement Starter replacement
Altro______________________________________________________________________________
Next intervention in________________ hours
Notes ____________________________________________
____________________________________________
____________________________________________
Stamp and signature of authorized
technician
Model of equipment:
Serial No.:
Intervention No.:
Date of intervention:
Total hours of operation:
Type of intervention: Lamp replacement Starter replacement
Other______________________________________________________________________________
Next intervention in________________ hours
Notes ____________________________________________
____________________________________________
____________________________________________
Stamp and signature of authorized
technician
25
Page 28
Soltron Space Cab - User manual
Model of equipment:
Serial No.:
Intervention No:
Date of intervention:
Total hours of operation:
Type of intervention: Lamp replacement Starter replacement
Other______________________________________________________________________________
Next intervention in________________ hours
Notes ____________________________________________
____________________________________________
____________________________________________
Stamp and signature of authorized
technician
Model of equipment:
Serial No.:
Intervention No.:
Date of intervention:
Total hours of operation:
Type of intervention: Lamp replacement Starter replacement
Altro______________________________________________________________________________
Next intervention in________________ hours
Notes ____________________________________________
____________________________________________
____________________________________________
Stamp and signature of authorized
technician
Model of equipment:
Serial No.:
Intervention No.:
Date of intervention:
Total hours of operation:
Type of intervention: Lamp replacement Starter replacement
Other______________________________________________________________________________
Next intervention in________________ hours
Notes ____________________________________________
____________________________________________
____________________________________________
Stamp and signature of authorized
technician
26
Page 29

Soltron Space Cab - User manual
6. NOTES
27
Page 30

Soltron Space Cab - User manual
28
 Loading...