

SOLTRON Ergoline AFFINITY 900 Temptronic, Soltron L-70, Ergoline AFFINITY 700 (AC plus), Soltron XL-75 Operating Instructions Manual
Page 1
A F F I N I T Y S e r i e s 7 0 0 / 9 0 0
S o l t ron L-7 0 / S o l t ron XL-7 5
o r Custom Designs
S
U
O
P
X
E
R
E
12 min
T
E
I
M
O P E R ATI N G I N STRUCTIONS
Page 2

Page 3
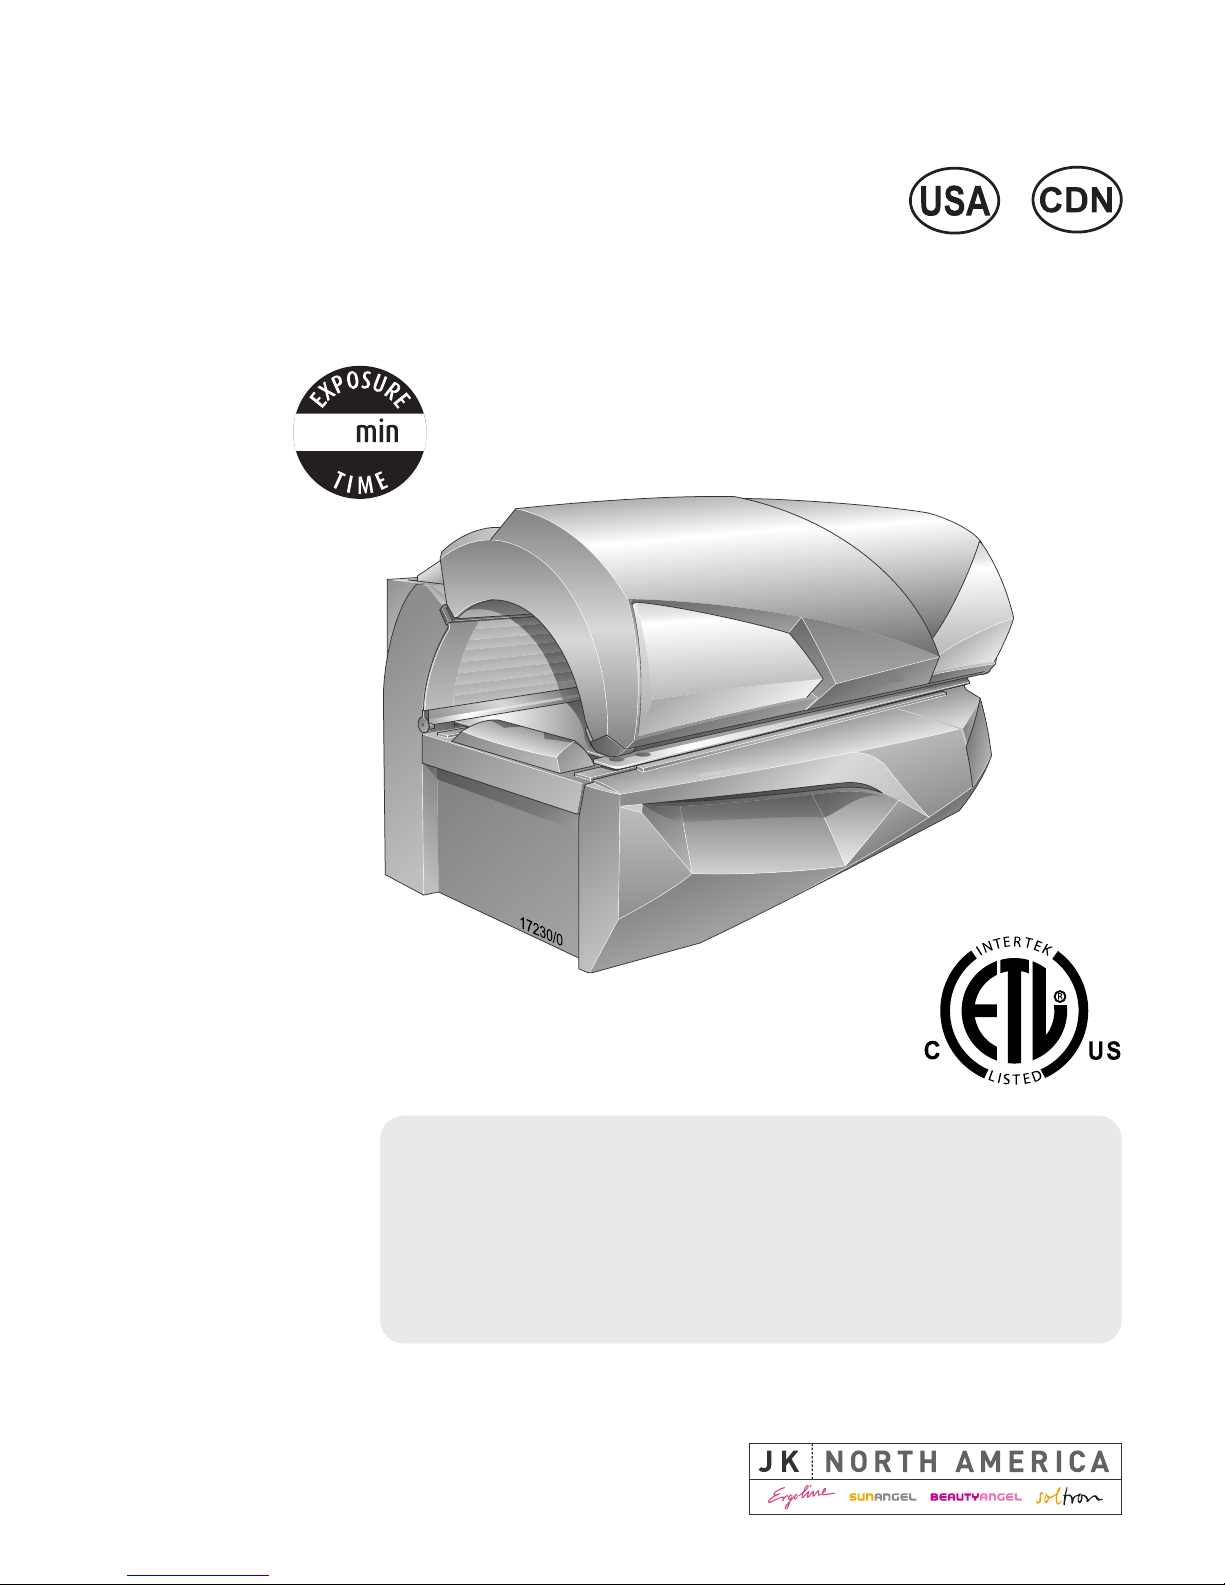
Type 155023316XXXXXX35
Ergoline AFFINITY 700 (AC plus)
Soltron L-70 (AC plus)
or Custom Designs
Type 155033316XXXXXX35
Ergoline AFFINITY 900 Temptronic
Soltron XL-75 Temptronic
or Custom Designs
Operating Instructions
1015420-00 / us / 11.2014
12
Page 4

Contact information
2/78
Contact information
Technical Service JK Products & Services, Inc.
#1 Walter Kratz Drive
Jonesboro, AR 72401
Phone: 800-445-0624 (toll-free)
Fax: 870-935-9046
e-mail: [email protected]
http://support.jkamerica.com
WARNING!
Read these operating instructions.
Failure to observe these instructions:
• may result in serious injury and death,
• can result in damage to the device and the
environment.
– For the safety of yourself and others, read and observe
all instructions contained herein before operating the
tanning system.
– Please make the instructions and additional information
available to anyone who operates or services the tanning system.
Copyright
The copyright remains with JK-Holding GmbH.
The contents may not be duplicated (in whole or part), distributed or utilized
for competition purposes without authorization or disclosed to other parties.
The right to make technical changes in regard to the figures and information
contained in this instruction manual is reserved!
NOTE:
Type 155023316XXXXXX35 / Type 155033316XXXXXX35
The XXXXXXX are place holders for digits 0-9.
Page 5

Table of contents
11/2014 1015420-00 Operating instructions – 3/78
Table of contents
1 Important information on tanning ................................................ 6
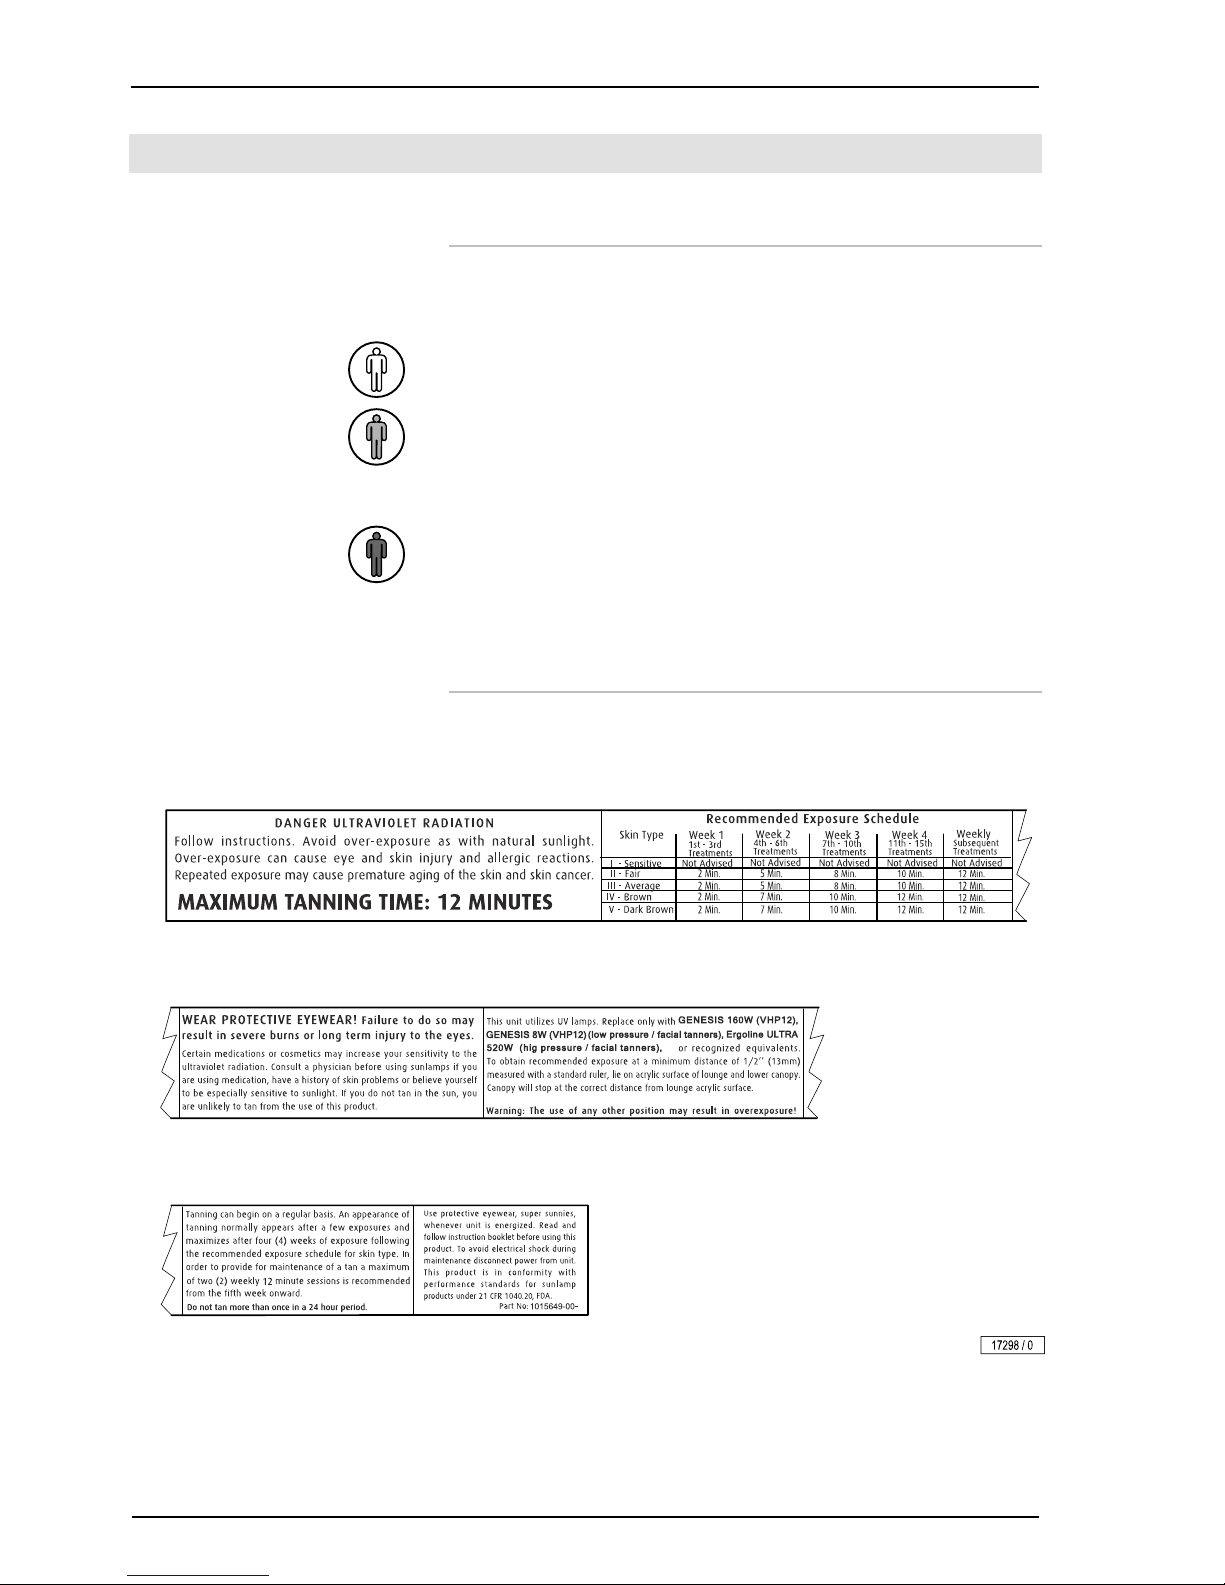
1.1 Skin types ....................................................................................... 6
1.2 Tanning times .................................................................................. 6
2 General ........................................................................................... 7
2.1 Definitions ....................................................................................... 7
2.2 Identify your tanning device ............................................................ 7
3 Safety notes ................................................................................... 8
3.1 Description of warning signs ........................................................... 8
3.2 Instructions pertaining to a risk of fire, electric shock, or injury ....... 9
3.3 Instructions pertaining to a risk of damage to the machine ........... 12
4 Information for the studio operator ........................................... 13
4.1 Intended use ................................................................................. 13
4.2 Contraindication ............................................................................ 13
4.3 Foreseeable misuse ...................................................................... 13
4.4 Obligations of the studio operator ................................................. 13
4.5 Staff training .................................................................................. 14
4.6 Guidelines ..................................................................................... 14
4.7 Installation location ........................................................................ 14
4.7.1 Ventilation ..................................................................................... 14
4.7.2 Setup location ............................................................................... 14
4.8 Export ............................................................................................ 15
4.9 MP3 music .................................................................................... 15
4.10
Disposal ........................................................................................ 16
4.10.1 Environmental regulations – disposal of lamps ............................. 16
4.11 Instruction signs on the device ...................................................... 16
4.12 Technical modifications ................................................................. 16
5 Description .................................................................................. 17
5.1 Scope of delivery ........................................................................... 17
5.1.1 Optional ......................................................................................... 17
5.2 Equipment ..................................................................................... 17
5.3 Device description ......................................................................... 18
5.4 Accessories (optional) ................................................................... 19
5.5 Function description ...................................................................... 19
6 Operation ..................................................................................... 20
6.1 Mandatory reading ........................................................................ 20
6.2 Use the tanning device – but use it properly! ................................ 21
6.3 Operation overview ....................................................................... 22
6.3.1 Type 155023316XXXXXX35 AC ................................................... 22
6.3.2 Type 155033316XXXXXX35 TEMPTRONIC ................................ 22
Page 6

Table of contents
4/78
6.3.3 Navigation unit ............................................................................... 23
6.3.4 Navigation ..................................................................................... 23
6.4 Functions ....................................................................................... 25
6.4.1 Operating panel ............................................................................. 25
6.5 Start ............................................................................................... 28
6.5.1 Preparation time ............................................................................ 28
6.5.2 Interrupt or end tanning session .................................................... 28
6.6 Connect MP3 player ...................................................................... 29
7 Cleaning and maintenance ......................................................... 30
7.1 Safety instructions for cleaning and maintenance ......................... 30
7.2 Faults............................................................................................. 31
7.3 Cleaning ........................................................................................ 32
7.3.1 Disinfection .................................................................................... 32
7.3.2 Cleaning of surfaces ...................................................................... 32
7.3.3 Filter panels and lamps ................................................................. 33
7.4 Cleaning plan ................................................................................ 33
7.5 Maintenance .................................................................................. 34
7.5.1 Acrylic panel .................................................................................. 35
7.6 Maintenance plan .......................................................................... 35
7.7 Cleaning and maintenance work preparation ............................... 38
7.7.1 Lift up the acrylic panel and remove the partition .......................... 38
7.7.2 Remove the canopy panel ............................................................. 39
7.7.3 Remove the side section panel ..................................................... 40
7.7.4 Open the bed base ........................................................................ 41
7.8 Instructions for replacing the lamps ............................................... 42
7.8.1 Low pressure lamps ...................................................................... 43
7.8.2 Starter ............................................................................................ 44
7.8.3 High pressure lamps and filter panels ........................................... 44
7.9 Cleaning or replacing UV lamps in the base ................................. 46
7.10 Cleaning or replacing the UV lamps in the side section ................ 46
7.11 Cleaning or replacing UV lamps and filter panels in the canopy ... 47
7.12 Cleaning or replacing the UV lamps and filter panels in the
shoulder tanner ............................................................................ 48
7.13 Cleaning the filters in the base ...................................................... 49
7.14 Cleaning the canopy filter mats ..................................................... 50
7.15 Cleaning the filter mats in shoulder tanner .................................... 51
7.16 Air conditioning: Empty the condensation
tank and clean the filter ................................................................. 53
7.17 AQUA / AROMA SYSTEM maintenance ....................................... 55
7.17.1 Changing the AROMA canister ..................................................... 56
7.17.2 Replacing the AQUA SYSTEM canister ........................................ 57
Page 7

Table of contents
11/2014 1015420-00 Operating instructions – 5/78
8 Technical data ............................................................................. 59
8.1 Power rating, electrical specifications and noise level .................. 59
8.2 Dimensions ................................................................................... 60
8.3 Lamp configuration ........................................................................ 62
8.3.1 Type 155023316XXXXXX35 ......................................................... 62
8.3.2 Type 155033316XXXXXX35 ......................................................... 63
8.4 Spare parts and accessories ......................................................... 64
9 JK-Products, Inc. – Limited Warranty ....................................... 65
9.1 Limited Acrylic Warranty ............................................................... 66
9.2 Warranty Claims ............................................................................ 66
9.2.1 Policy & Procedures ...................................................................... 66
9.2.2 Labor Warranty Claim/Credit Procedures ..................................... 67
9.3 Limited Lifetime Warranty ............................................................. 68
10 Appendix ...................................................................................... 71
10.1 Signs and stickers on the device ................................................... 71
11 Index ............................................................................................. 77
Page 8
Important information on tanning
6/78
1 Important information on tanning
1.1 Skin types
Skin type I (Sensitive):
Invariably gets sunburn, accepts little natural sunlight and does not tan.
Skin type II (Fair):
Gets sunburn easily and severely, tans minimally or lightly and peels.
Skin type III (Average):
Often referred to as 'Average' complexion, gets moderate sunburns and tans
about average.
Skin type IV (Brown):
Seldom gets sunburns, tans easily and above average with each exposure.
Skin type V (Dark Brown):
This individual's system rarely gets sunburns, tans easily and substantially.
1.2 Tanning times
This product is in conformity with performance standards for sunlamp
products under 21 CFR 1040.20.
Page 9

Genera
l
11/2014 1015420-00 Operating instructions – 7/78
2 General
2.1 Definitions
Operator
People who provide tanning devices to users on a commercial basis. The
operator is responsible for the orderly operation of the device as well as compliance with the maintenance intervals.
User
A person who uses the tanning device at a commercial location.
Staff
People who are responsible for the operation, cleaning as well as general
maintenance work and who instruct the users in the operation of the devices.
Electrician
A person with suitable professional training, knowledge and experience and
knowledge of the applicable regulations which enable them to identify and
avoid the dangers which can arise from working with electricity.
Authorized, trained and qualified staff
Qualified staff from an external company who have been trained and authorized by the manufacturer for assembly and maintenance work with specific
tanning devices.
2.2 Identify your tanning device
For contact with Customer Services, please write down the device number of
your tanning device, see page 71.
Page 10
Safety notes
8/78
3 Safety notes
3.1 Description of warning signs
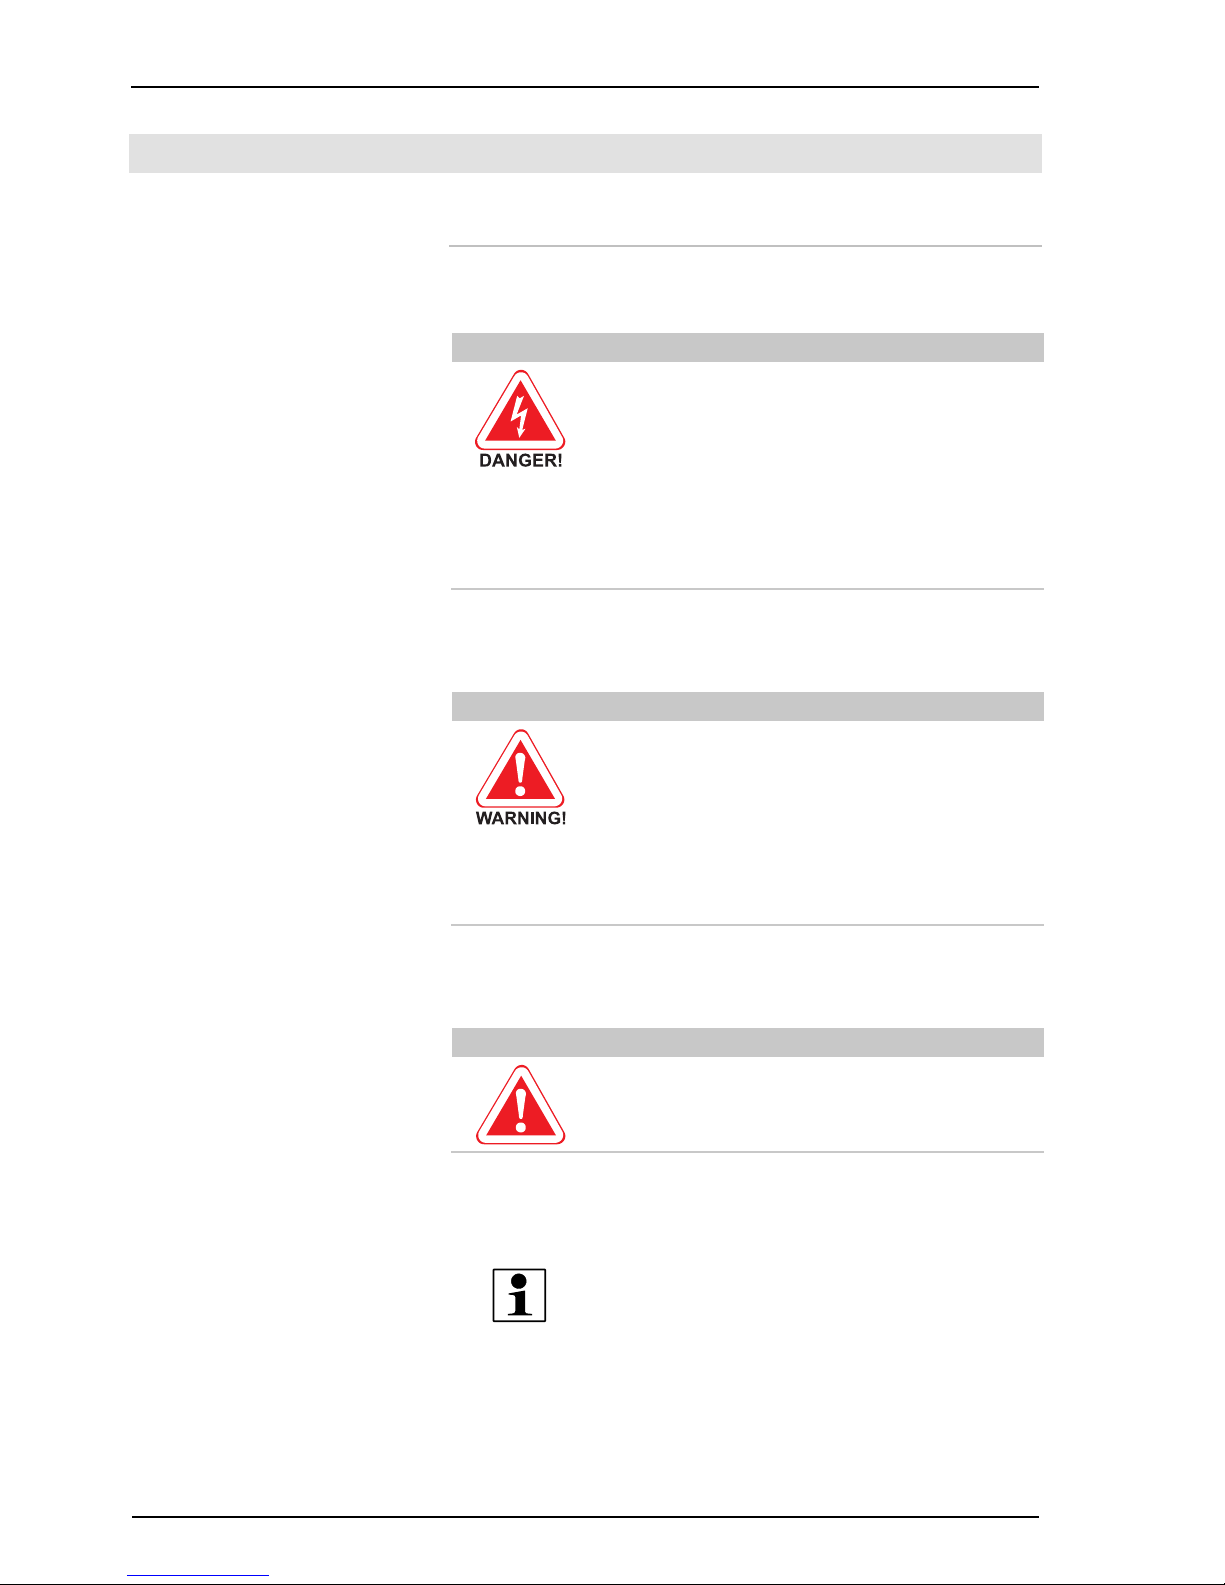
Danger notices, damage to persons:
DANGER!
Type and source of danger, e.g. 'DANGER – High
voltage!'
Description of the consequences, e.g. 'You can be killed or
injured by an electric shock!'
Countermeasures:
– Disconnect device from power supply before opening.
– Do not reach into the inside with the device switched
on.
Warning notices, damage to persons:
WARNING!
Type and source of danger, e.g. 'WARNING – hot
surface!'
Description of the consequences, e.g. 'You can burn your
hand (skin, face)!'
Countermeasures:
– Do not touch hot parts and nearby surfaces.
– Wait until hot parts and surfaces have cooled down.
Caution notices, damage to property:
CAUTION!
The word 'Caution' with this label points out that danger for
devices, materials and the environment can be expected
here.
Important information:
NOTE:
This symbol does not identify safety notices, but states information for a better understanding of the processes.
Page 11
Safety notes
11/2014 1015420-00 Operating instructions – 9/78
3.2 Instructions pertaining to a risk of fire,
electric shock, or injury
DANGER – HIGH VOLTAGE!
You can be killed or injured by an electric shock!
Assembly and electrical connection must comply with
national and local regulations.
– The device may only be assembled, installed, up
g
raded
or repaired by specially trained and instructed personnel.
WARNING!
Unprotected tanning may result in eye injury and eye
diseases!
The unprotected eye can become inflamed on the surface,
and in certain cases the retina can be damaged by excessive radiation. Cataracts can form after repeated exposure
to radiation.
– Inform users to use the included protective
gogg
les
that block UV.
WARNING!
Follow instructions!
Failure to use protective e
y
ewear may result in severe burns
or other eye injury. If discomfort develops, discontinue use
and consult a physician.
–
A
person who does not tan in the sun most likely will not
tan from the use of this device. Persons with very sensitive skins
(
skin type I) must not use the unit as their skin
may be too sensitive for the lowest dosage. Damage to
the skin (e.g. sunburn) may occur.
– Individuals with acute sunburn, individuals who have
had or have skin cancer, or individuals who are at increased risk of skin cancer, must not use the system.
– Seek medical advice if you experience any unexpected
effects, including itching, from using this UV device.
– The tanning device must never be used if a filter panel
is missing or damaged, or the timer is defective!
– UV light from the sun or UV systems can cause injuries
to the skin or eyes. This effect is dependent on the sensitivity of the individual's skin and on the type and
amount of UV light.
– As with natural sunlight, overexposure can cause eye
and skin injury, sunburn, and allergic reactions.
– Repeated exposure may cause premature aging of the
skin and skin cancer.
Page 12

Safety notes
10/78
WARNING!
Follow instructions!
– Medications
(
taken internally or otherwise) or cosmetics
applied to the skin, may increase sensitivity to ultraviolet light.
– A person having a history of skin problems should con-
sult a physician before use.
WARNING!
Danger of long-term consequences!
– Overexposure should be avoided.
– Persons repeatedly exposed to ultraviolet sunlamp
products should be regularly evaluated for skin cancer.
– While there is no immediate clinical evidence of UV
exposure and its effects upon expectant mothers, it is
stron
gly
advised that expectant mothers be discouraged
from using the tanning unit.
WARNING!
Infections can be transferred through skin contact.
All items/equipment components, with which the user can
come into contact during tanning, must be disinfected after
every tanning session:
– Protective goggles
– Acrylic panel
– Handles and control panel
– MP3 cable
– Adjustable air nozzles
– Use only approved cleaners to disinfect the tanning
system and its components.
Page 13

Safety notes
11/2014 1015420-00 Operating instructions – 11/78
WARNING!
Danger of ultra violet radiation.
Ultra violet radiation - follow instructions.
Failure to use protective eyewear may result in severe
burns or other eye injury - if discomfort develops, discontinue use and consult a physician.
– As with natural sunlight, overexposure can cause eye
injury and sunburn;
– Repeated exposure may cause premature aging of the
skin and skin cancer;
– Medications or cosmetics applied to the skin, may in-
crease sensitivity to ultra violet light;
– A person who does not tan in the sun most likely will
not tan from the use of this device;
– A person having a history of skin problems should
consult a physician before use;
– Overexposure should be avoided; and
– Children, the elderl
y
, or fair skinned people who always
burn easil
y
and either never tan or tan minimally should
not use this equipment.
– The appliance is not allowed to be used by more than
one person at the same time.
NOTE:
Occasionally, persons using the tanning device will experience a slight reddening of the skin – usuall
y
in small patches
– after the second or third session. This redness is often
accompanied by an itching sensation. This may be nothing
more than a very limited heat 'rash' caused by heat from the
lamps within the device and it should go away within
approximately 24 hours and not reappear. This rash can
be lessened or prevented by applying moisturizing lotion to
the affected area after the tanning session is completed.
Follow instructions.
The time between the first two tannin
g
sessions must be
at least 24 hours.
Increasing tanning also requires an extension of the
exposure time (= radiation time). After a certain degree
of tanning has been achieved a further intensification is
not possible. The session time may not be extended to
exceed the scope of the permissible radiation doses!
Only a certain degree of tanning, dependent on the skin
type, can be achieved without endangering your health.
Inform users about proper tanning.
Page 14

Safety notes
12/78
3.3 Instructions pertaining to a risk of
damage to the machine
CAUTION!
Danger of overheating by obstruction of the air routing!
– Do not change, obstruct or block the air inflow and
outflow area to the device or make any unauthorized
changes to the device. The manufacturer shall bear no
liability for damage or injuries resulting from such actions.
– Before putting a tanning device into operation, the
transport pallet must be removed from under the device. Danger of overheating by obstruction of the air
routing.
Page 15

Information for the studio operato
r
11/2014 1015420-00 Operating instructions – 13/78
4 Information for the studio operator
4.1 Intended use
The tanning device is intended exclusively for cosmetic tanning of the human
skin.
This device is used for tanning one adult person at a time.
The user must wear suitable eye protection to block UV radiation during
tanning.
Any other use shall be considered improper. The manufacturer cannot be
held liable for damage or injuries resulting from misuse. The operator bears
the sole risk for this.
The proper use also includes compliance with the manufacturer's instructions,
operating and maintenance conditions. This device may only be operated,
maintained and repaired by persons familiar with these tasks and who are
aware of the dangers involved.
4.2 Contraindication
This sunlamp product is contraindicated for use on persons under the
age of 18 years.
This sunlamp product must not be used if skin lesions or open wounds
are present.
4.3 Foreseeable misuse
The following uses of the device are explicitly prohibited:
Multiple people may not use the device at the same time.
People with body weight of more than 300 lb (135 kg) may not use the
device.
Exceeding the specified tanning times may result in burns and long-term
skin damage.
When the device is in use no other people may remain in the room. This
includes both children and adults.
4.4 Obligations of the studio operator
As the operator you are responsible for informing users on possible risks
of tanning.
All danger and safety labels attached to the device must be observed! Do
not remove them!
No safety equipment (e.g. panel switch) may be removed, deactivated, or
otherwise bypassed as it can impair the safe operation of the device!
The device may only be used when in completely operational condition!
It is the operator's responsibility to ensure the tanning system is handled
properly.
Page 16
Information for the studio operator
14/78
4.5 Staff training
As the operator you are obligated to train your personnel and instruct them in
the established legal and accident prevention regulations. Ensure that your
staff have understood and observe these instructions. This includes:
information regarding intended use and foreseeable misuse
safety instructions
operating instructions
cleaning and maintenance instructions
– Please make the instructions and additional information from the manu-
facturer available to the staff at their workplace.
– Regularly check your staff's safety consciousness of the risks, taking into
account your operating instructions.
– Please ensure that the cleaning intervals are complied with, in particular
cleaning after every use.
– Please ensure that your staff provide your customers with appropriate
advice, in particular regarding tanning times, possible risks and the operation of the device.
4.6 Guidelines
This product is in conformity with the performance standards for sunlamp
products under 21 CFR 1040.20, FDA and listed with ETL and CAN/CSA 22.2
No. 224.
4.7 Installation location
4.7.1 Ventilation
CAUTION!
Danger of failure!
Danger of overheating by obstruction of the air routing.
– Observe the ventilation information to avoid serious
system malfunctions.
You can obtain data regarding the air supply and ventilation from the customer service department (see page 2).
4.7.2 Setup location
CAUTION!
Salty air! Contaminated air!
Device damage due to corrosion of the housing and electrical components.
– Do not install the device at swimming pools.
– Do not operate the device in locations with aggressive
environmental conditions (e.g. air containing chlorine).
Page 17
Information for the studio operato
r
11/2014 1015420-00 Operating instructions – 15/78
CAUTION!
Damage to the device possible!
Where there are great differences in temperature between
the transport route and the installation site the device may
not be put into operation immediately after being set up.
– Wait at least 2 hours before connecting the device to
the power supply.
Danger of failure!
Danger of overheating by obstruction of the air routing.
– Observe the ventilation information to avoid serious
system malfunctions.
Environmental conditions
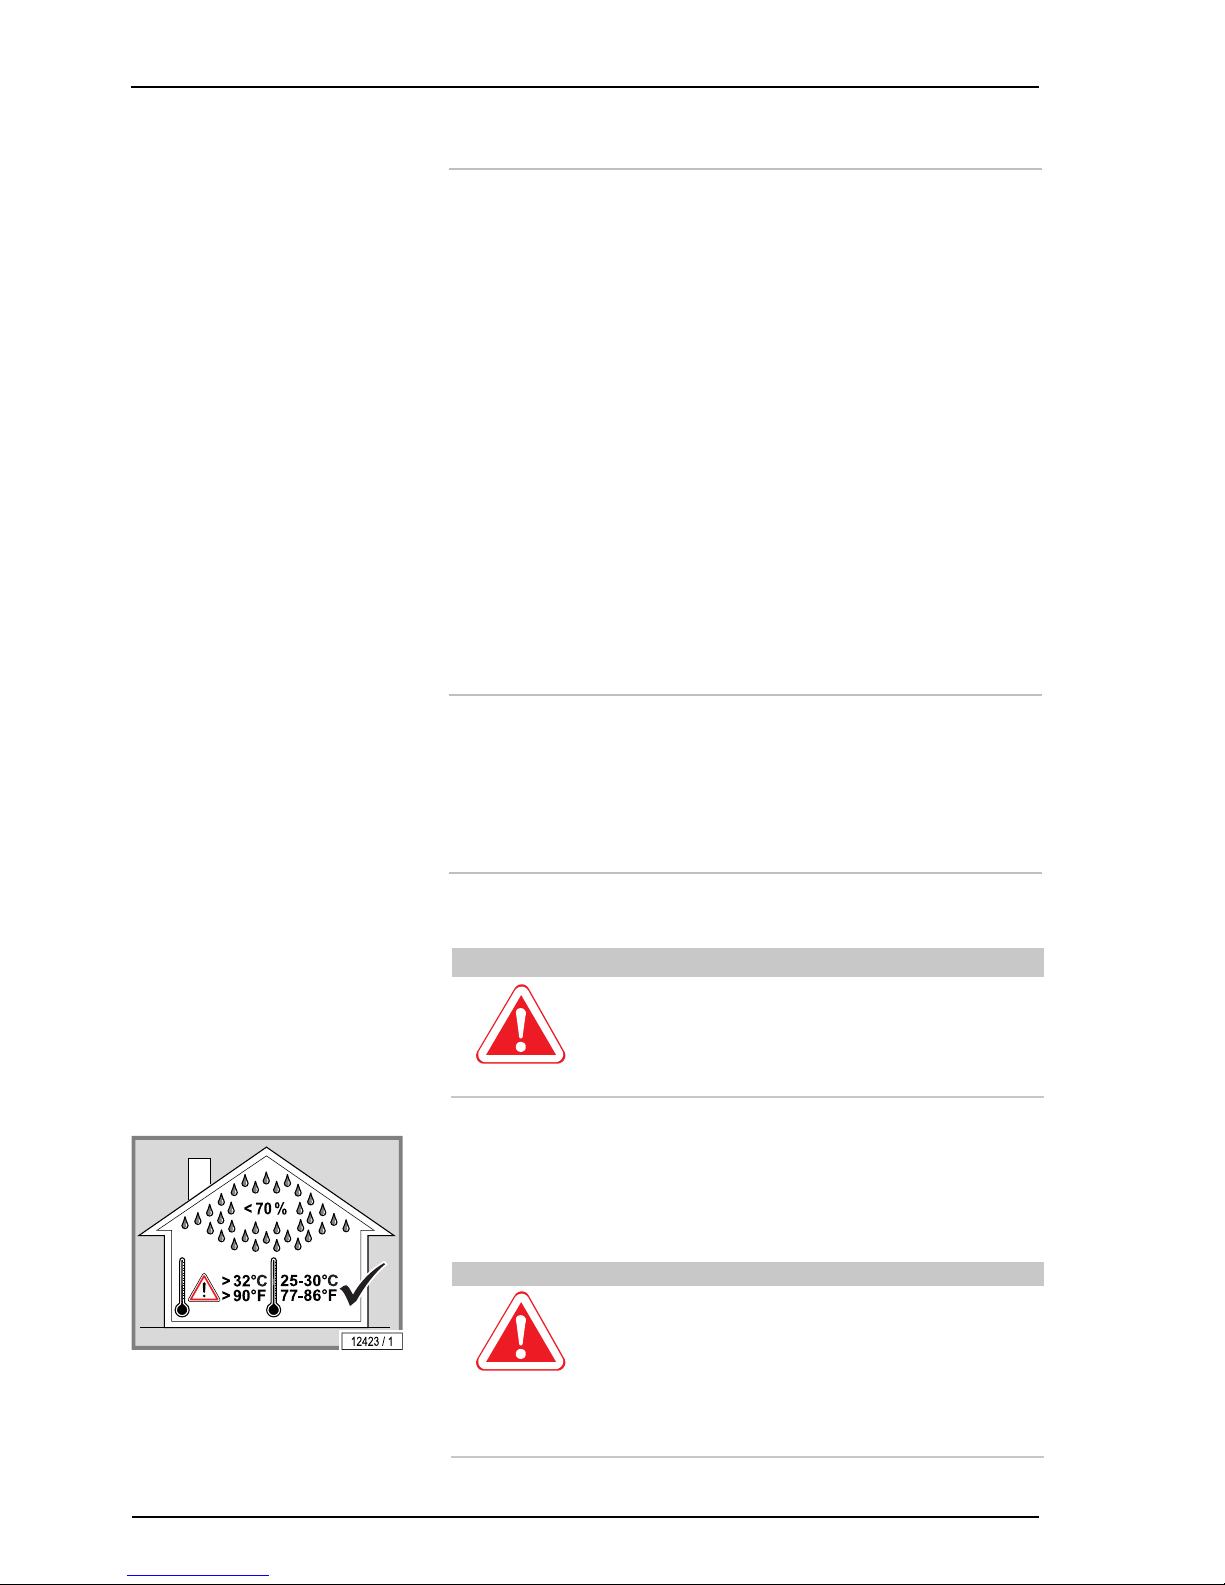
Optimum ambient temperature: Between 68 °F (20 °C) and 95 °F (35 °C)
Storage temperature: Between 5 °F (-15 °C) and +140 °F (+60 °C)
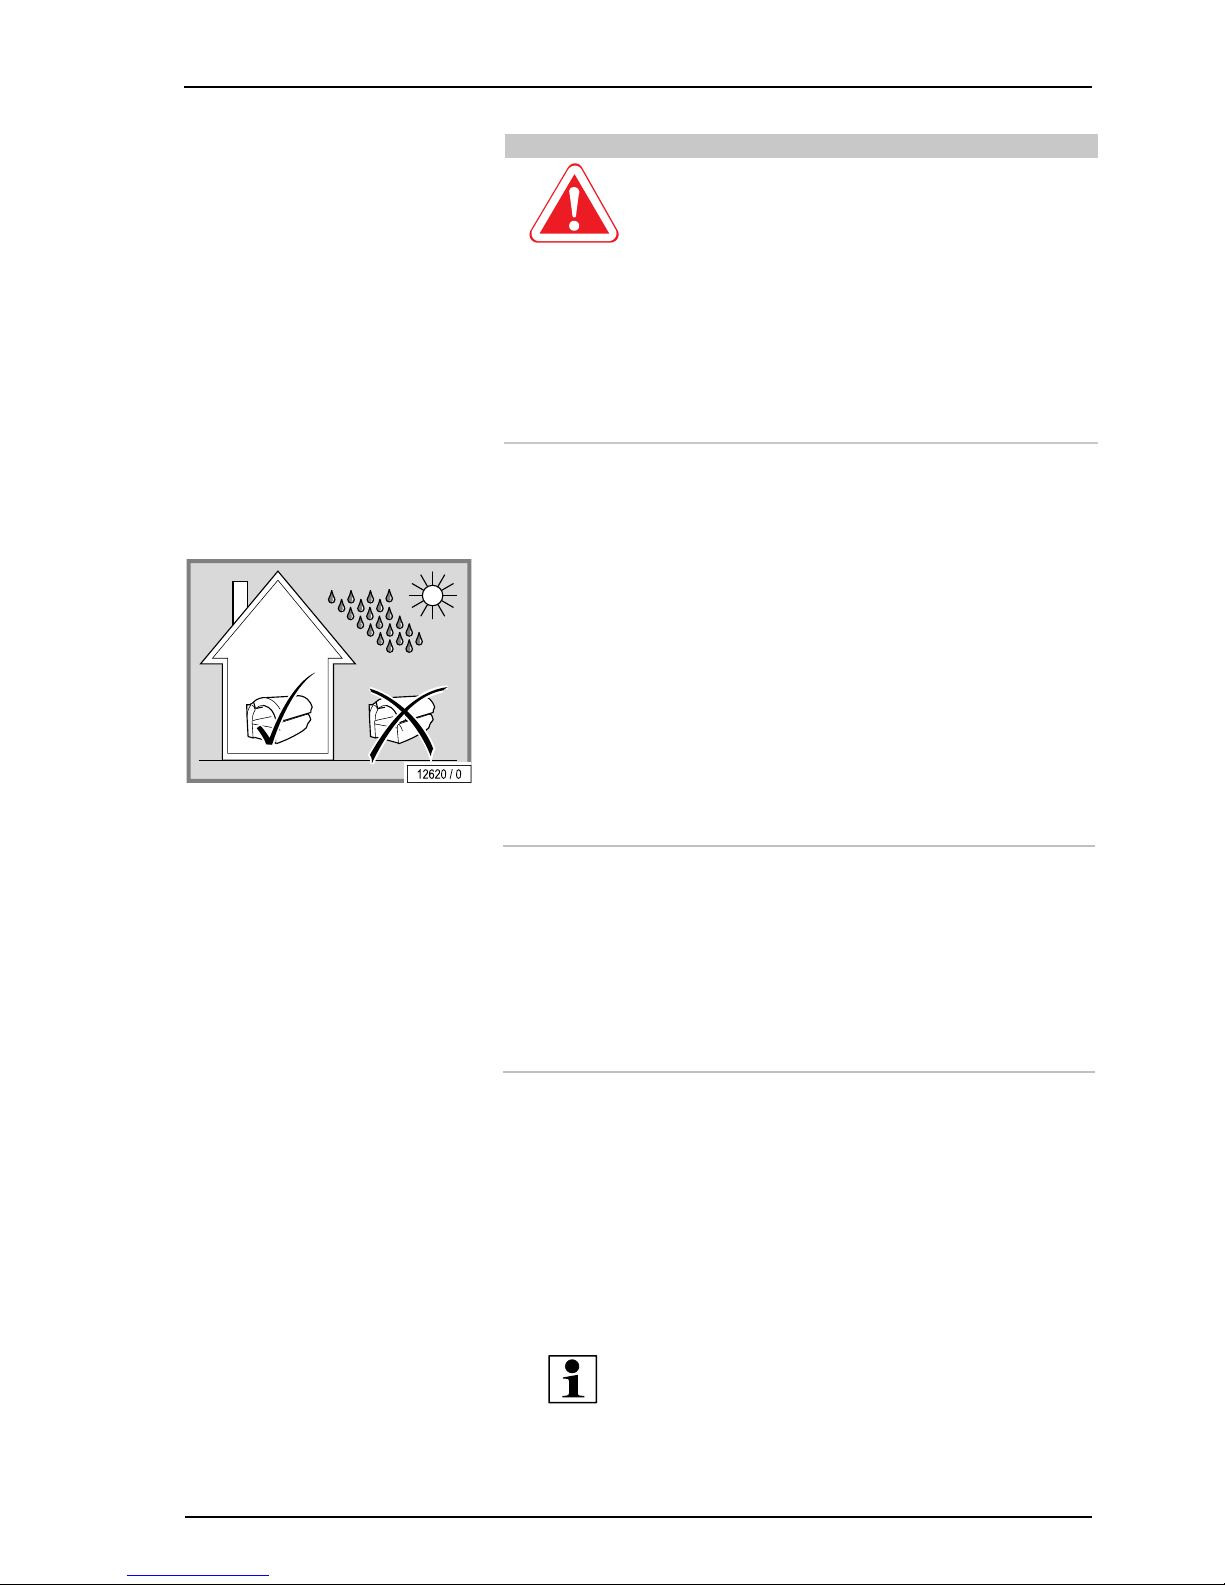
The device is not to be used outdoors.
Adaptation of the unit is required for operating altitudes greater than 6500 ft /
2000 m above sea level in order to guarantee trouble-free operation.
The device is not suitable for operation in mobile facilities (ships, buses,
trains). Adaptation of the unit is required in order to guarantee trouble-free
operation when used in mobile facilities.
Please contact the customer service department without fail before putting the
device into operation - see page 2.
4.8 Export
This device is exclusively intended for use in the USA and Canada and may
not be exported to other countries and operated there! The manufacturer
assumes no liability whatsoever in the event of non-compliance. High liability
risks may occur for the exporter and/or the operator in the event of noncompliance.
4.9 MP3 music
The personal use of an MP3 player or a smartphone during tanning is not a
public broadcast in copyright terms, so that there is no obligation for registration or payment by the studio owner to the corresponding copyright owning
company. Copyright laws apply to the owner of the MP3 player or smartphone.
The same regulations apply for the official use of MP3 music files as for other
music sources: As studio owner you are only allowed to use original audio
obtained from legal sources. Proof of the legitimacy of any MP3 audio used
should be available for viewing upon demand of any regulatory body. Please
refer to http://www.riaa.com for more information.
NOTE:
Pre-recorded SD cards which are delivered as accessories
for a JK audio system are also subject to payment obligation
for commercial usage.
Page 18

Information for the studio operator
16/78
4.10 Disposal
4.10.1 Environmental regulations – disposal of
lamps
UV low pressure lamps and UV high pressure lamps contain fluorescent materials and other waste containing mercury.
According to the national waste disposal laws and in accordance with the
municipal waste regulations, proof must be provided of the proper disposal of
UV lamps.
Contact your local environmental agency for assistance with the disposal of
UV lamps.
4.11 Instruction signs on the device
See Appendix page 71.
4.12 Technical modifications
The device has been constructed in accordance with current safety regulations. The illustrations and specifications on these instructions are subject to
technical modifications which are required in order to improve the device.
Unauthorized modifications and changes to the device and its control unit are
prohibited.
Use only OEM spare parts.
Page 19

Description
11/2014 1015420-00 Operating instructions – 17/78
5 Description
5.1 Scope of delivery
Tanning device
Lamps
Air conditioning system (Type 155023316XXXXXX35: option, Type
155033316XXXXXX35: standard)
Connecting lead
Protective goggles
Suction cup for filter panels
Allen-key
Technical documentation (folder with instructions, brochures for error
codes and default settings and additional documentation)
5.1.1 Optional
Audio system (with Voice Guide)
Shoulder tanner
Shoulder tanner with audio system (with Voice Guide)
Central exhaust air socket
5.2 Equipment
Device equipment varies depending on the model.
In this description, all standard and optional components/functions are taken
into account which must be observed during operation and/or when performing maintenance.
The control panel also differs according to the varying equipment:
Only those buttons that are visible can be operated, i.e. the corresponding
function must be included in the device's equipment.
Page 20
Description
18/78
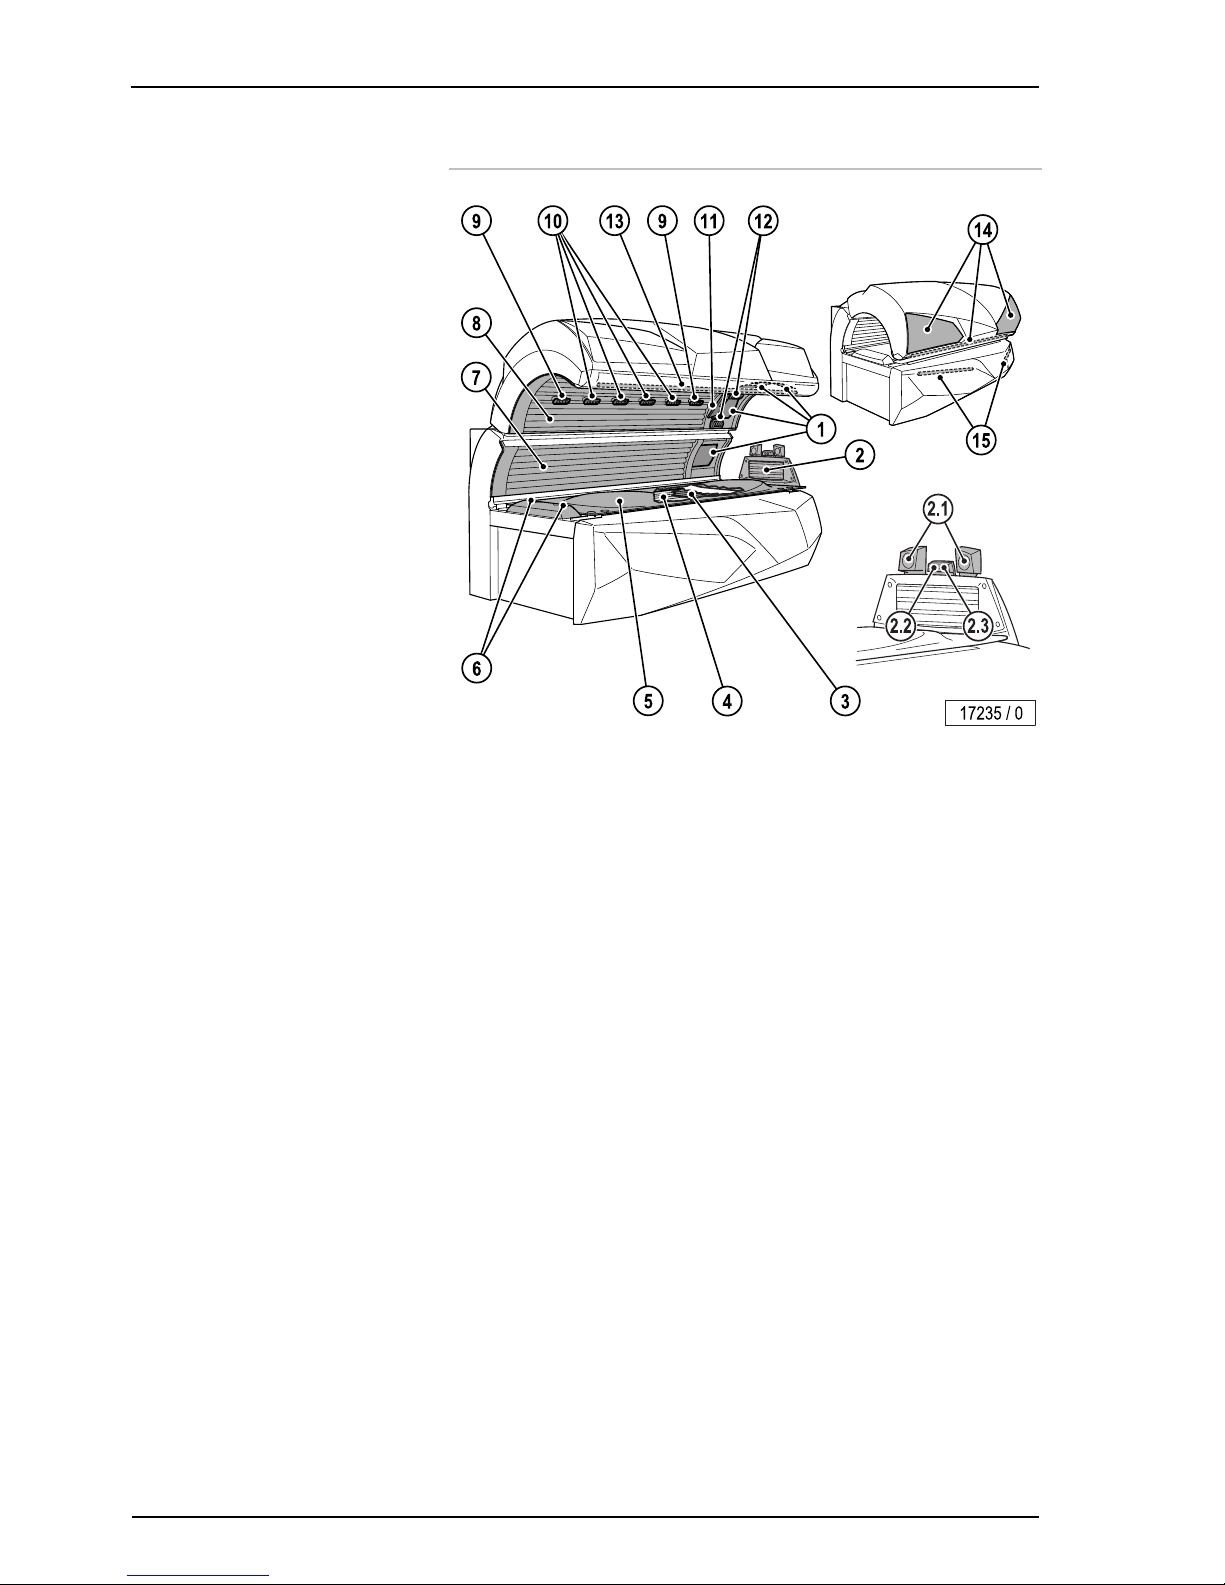
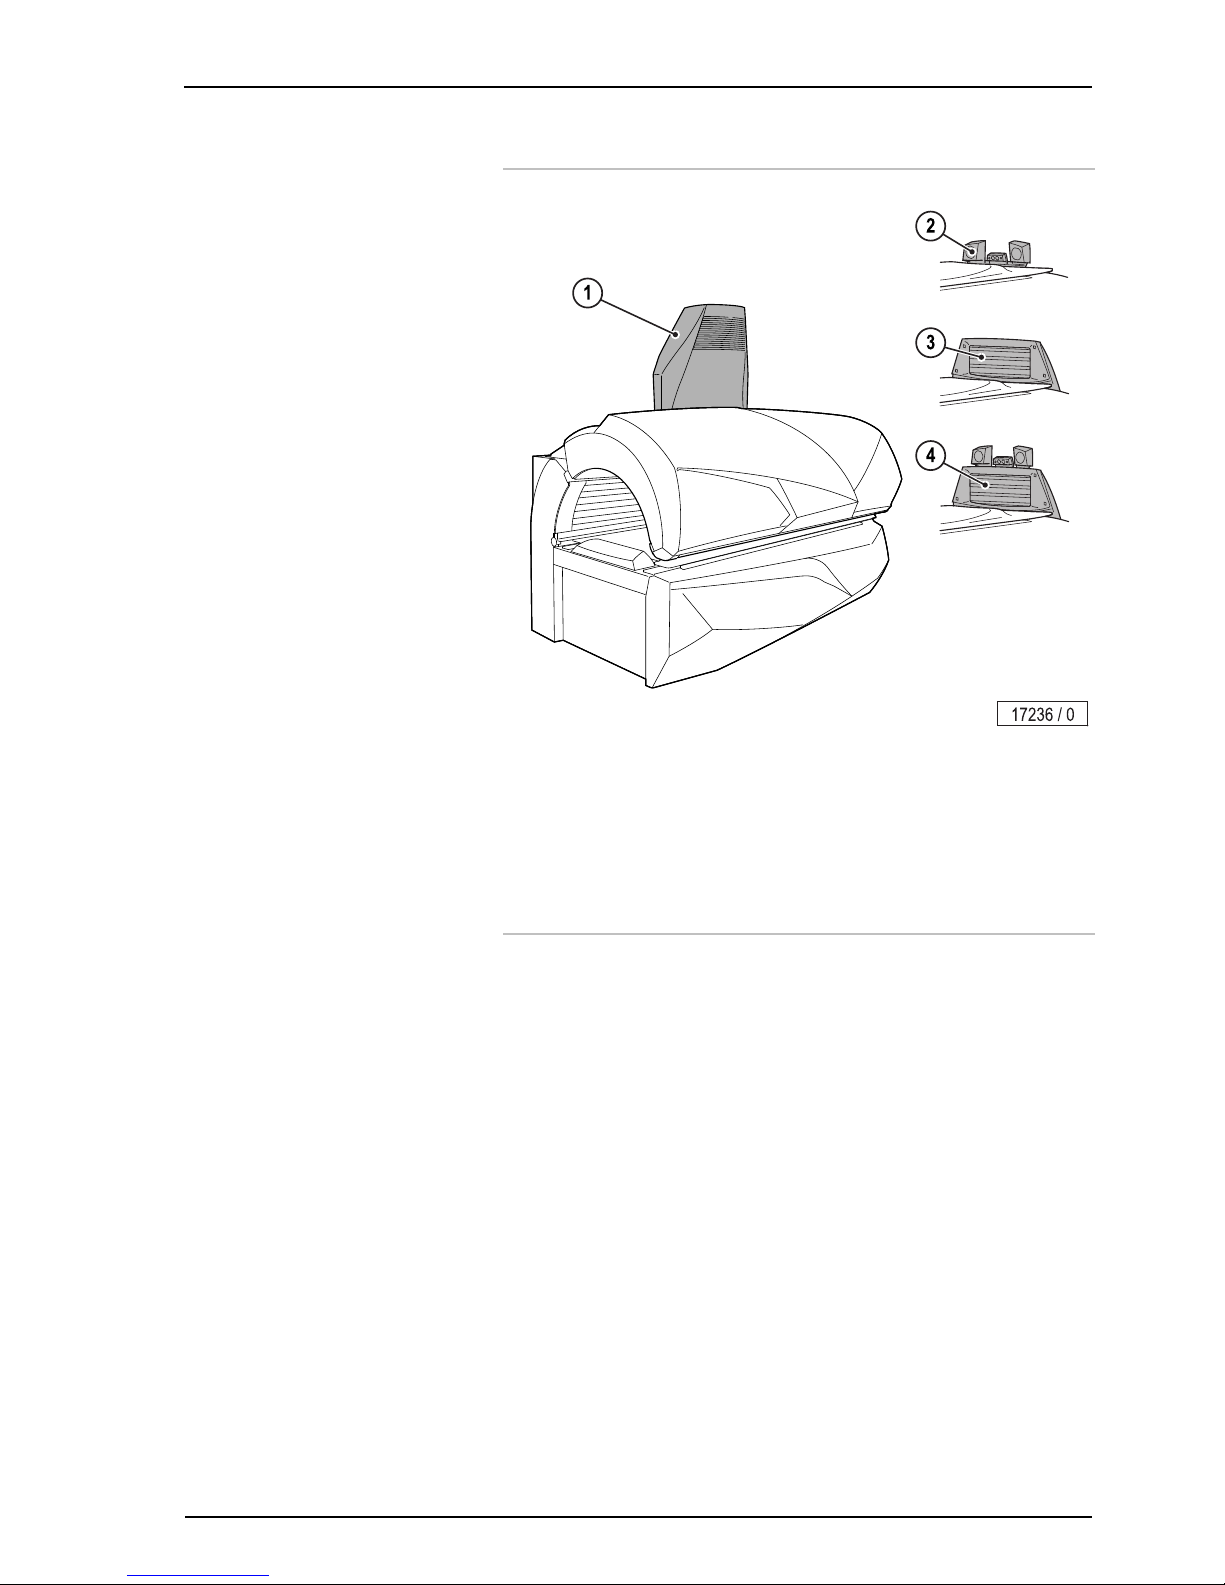
5.3 Device description
1. Facial tanner (UV high pressure lamps + UV low pressure lamps)
2. Shoulder tanner with audio system (optional)
loudspeaker (2.1), headphone connection (2.2), MP3-connction (2.3)
3. UV low pressure lamps, base
4. Partition (only for devices with air conditioning)
5. Acrylic panel base
6. Body cooling air nozzles, foot end
7. UV low pressure lamps, side section
8. UV low pressure lamps, canopy
9. Body cooling air nozzles (Type 155023316XXXXXX35)
Body cooling air nozzles / nozzles AQUA / AROMA SYSTEM
(Type 155033316XXXXXX35)
10. Body cooling air nozzles
11. Operating panel
12. Adjustable air nozzles – Facial cooling/AROMA
13. Interior lighting (LED white)
14. Accent lighting, canopy (LED)
15. Accent lighting, front panel (LED)
Page 21
Description
11/2014 1015420-00 Operating instructions – 19/78
5.4 Accessories (optional)
1. Central exhaust air socket
2. Audio system (with Voice Guide)
3. Shoulder tanner
4. Shoulder tanner with audio system (with Voice Guide)
5.5 Function description
Tanning
The primary technical components of a tanning device are an artificial source
of UV radiation, a variety of filters and reflectors as well as a mechanical
structure with a defined active surface.
Different tanning results can be achieved in varying strength tanning devices.
This is due to the different strength UV lamps and the different UV-A and UVB proportions of the UV radiation. The UV-A proportion primarily generates a
superficial tan, which appears rapidly and is intensive but also fades more
rapidly, the UV-B radiation is primarily responsible for more long-term tanning
results. The disadvantage of the UV-B radiation is that the tan does not become visible until one or two days after visiting the tanning salon. Therefore,
the appropriate tanning device is to be selected depending on the desired
tanning goal.
The tanning devices described here primarily emit UV-A radiation and are
equipped with additional UV-B lamps (low pressure UV lamps in the face
tanners).
Page 22

Operation
20/78
6 Operation
6.1 Mandatory reading
Always read and follow all instructions for proper usage prior to allowing anyone to use the tanning device. The operating instructions included with this
device must always be followed to prevent possible injuries.
Inform users
– to use provided UV-blocking protective eyewear whenever the equipment
is energized.
– to follow the exposure schedule in accordance with their skin type. Fail-
ure to do so may result in overexposure.
A tanning system is not a toy. You cannot vary the strength of the lamps in
your unit.
Should you have any questions regarding the proper use of your tanning
system, contact Global Service USA at:
Phone: 800-445-0624 (toll-free)
Mon - Fri. 8:00 a.m. to 7:00 p.m. (CT)
Sat. 8:00 a.m. to 3:00 p.m. (CT)
WARNING!
Danger of skin injuries and skin diseases.
– The tanning device must never be used when a filter
panel is missing or damaged, or the timer is defective!
NOTE:
When describing the operation, the tanning device is often
shown with the canopy open. During tanning the canopy
must always be closed.
Proper operation is not possible with the canopy open.
Page 23

Operation
11/2014 1015420-00 Operating instructions – 21/78
6.2 Use the tanning device – but use it
properly!
A few things need to be noted to in order to obtain maximum enjoyment from
a tanning device. Here are some answers to frequently asked questions.
Make-up in the tanning device?
Please do not wear make-up. Clean skin absorbs UV light better.
A wide variety of materials is found in cosmetics. Whether these are emulsifi-
ers, greases, or fragrances - in conjunction with UV radiation, these can
cause skin allergy reactions.
Remove all make-up. This is essential. Make-up clogs the pores in the face.
The UV light from a tanning device re-opens these clogged pores so that not
only does the light penetrate the skin, but also the allergenic components of
the make-up.
A further negative consequence of make-up is that the appearance of the skin
deteriorates irreversibly over a period of time. However good make-up looks in conjunction with UV light, it causes more harm than good. Therefore remove all make-up before a session in your tanning device - it will be much
better applied afterwards.
Showering after leaving the tanning device?
The browning is in the skin, not on it. Therefore you cannot wash it off. Treat
your skin to a moisturizing cream after showering.
Are medications and the tanning device compatible?
It is known that some medications increase the skin's sensitivity to UV light.
This probability is particularly high with antibiotics, sulphonamides, psychiatric
drugs, tranquillizers, anti-diabetes treatments and diuretics. Sun creams
which contain psorale or kumarin also increase skin sensitivity. If you are in
any doubt, first ask your doctor - then you can enjoy the sun at no risk.
Contact lenses in the tanning device?
The answer is: Yes! Like any other tanning device user, contact lens wearers
should also wear special protective goggles which protect the eyes against
UV radiation. To guarantee better protection, wearers of glasses and contact
lenses can ask their optician for exchange contact lenses with UV protection.
The UV-A and UV-B filters built into exchange contact lenses will protect the
cornea and the internal parts of the eye against almost 100 % of the energy in
UV radiation.
This will benefit tanning device users not only in the open air, but on the tanning device itself. You can wear these contact lenses on the tanning device
without any restrictions. For more information, ask your optician or optometrist.
Page 24
Operation
22/78
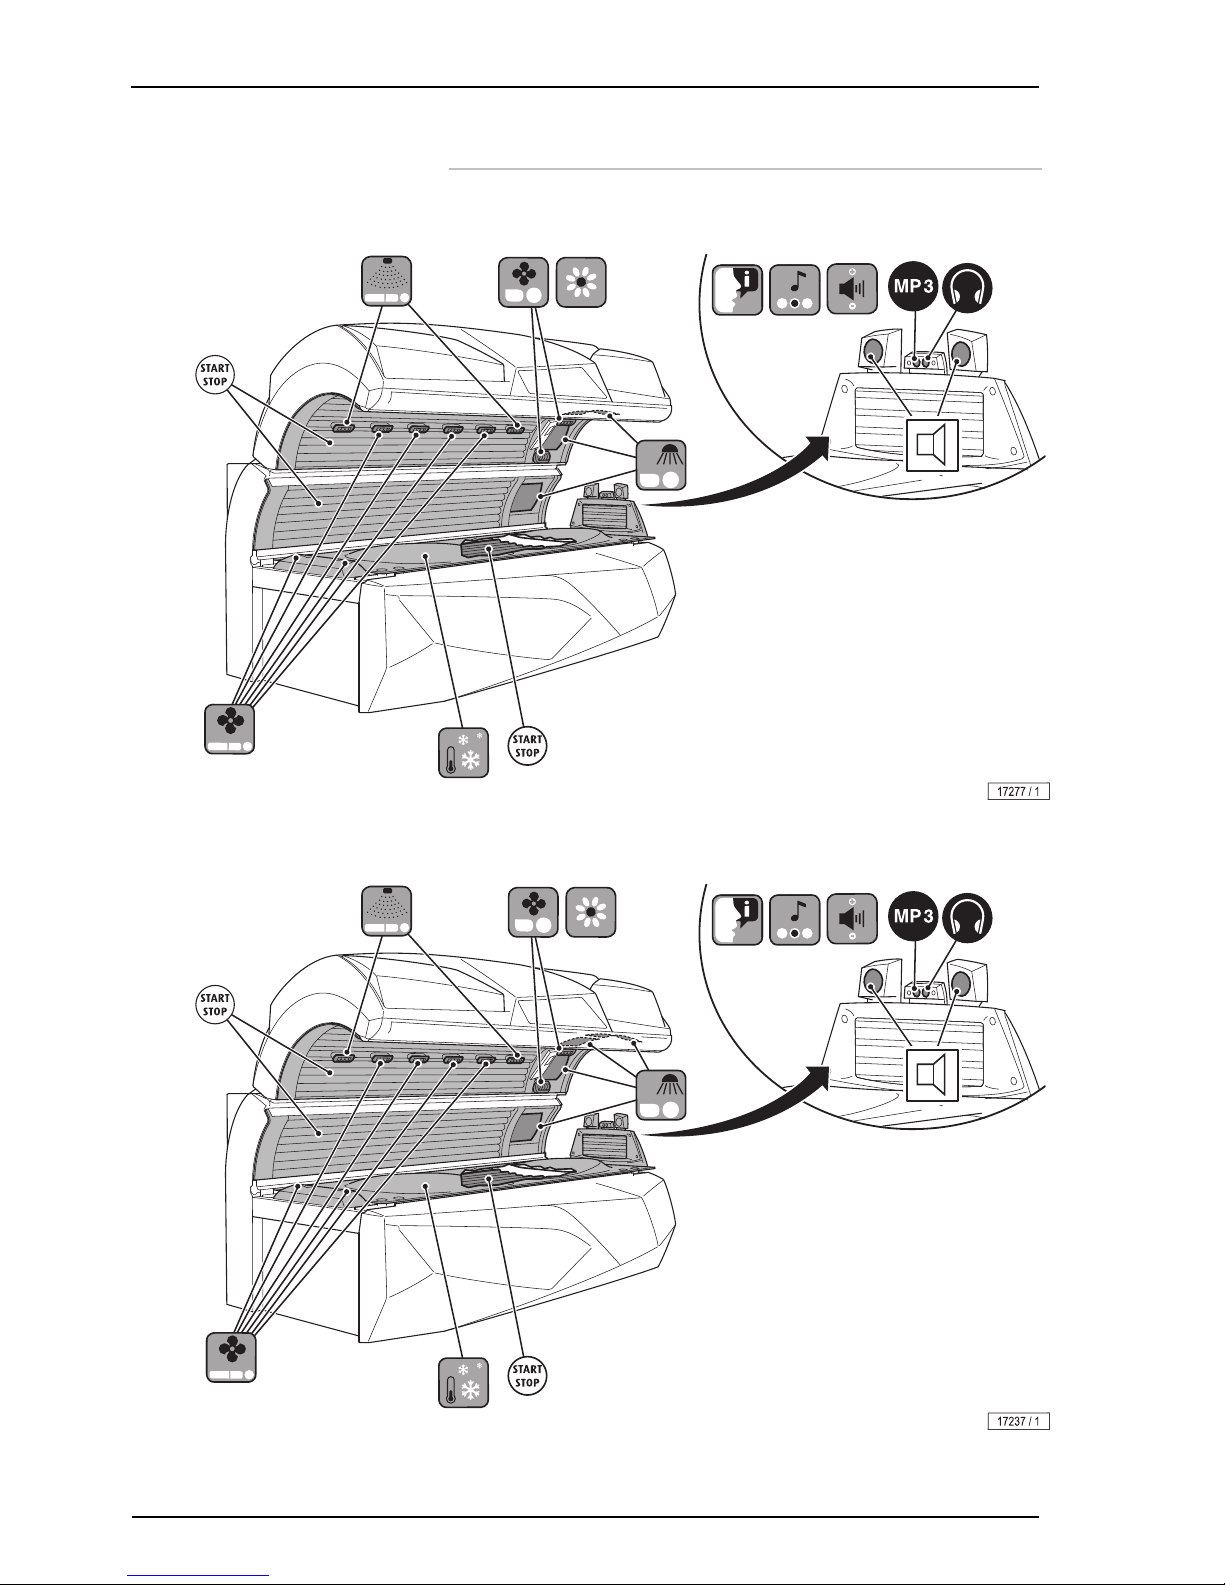
6.3 Operation overview
6.3.1 Type 155023316XXXXXX35 AC
6.3.2 Type 155033316XXXXXX35 TEMPTRONIC
Page 25
Operation
11/2014 1015420-00 Operating instructions – 23/78
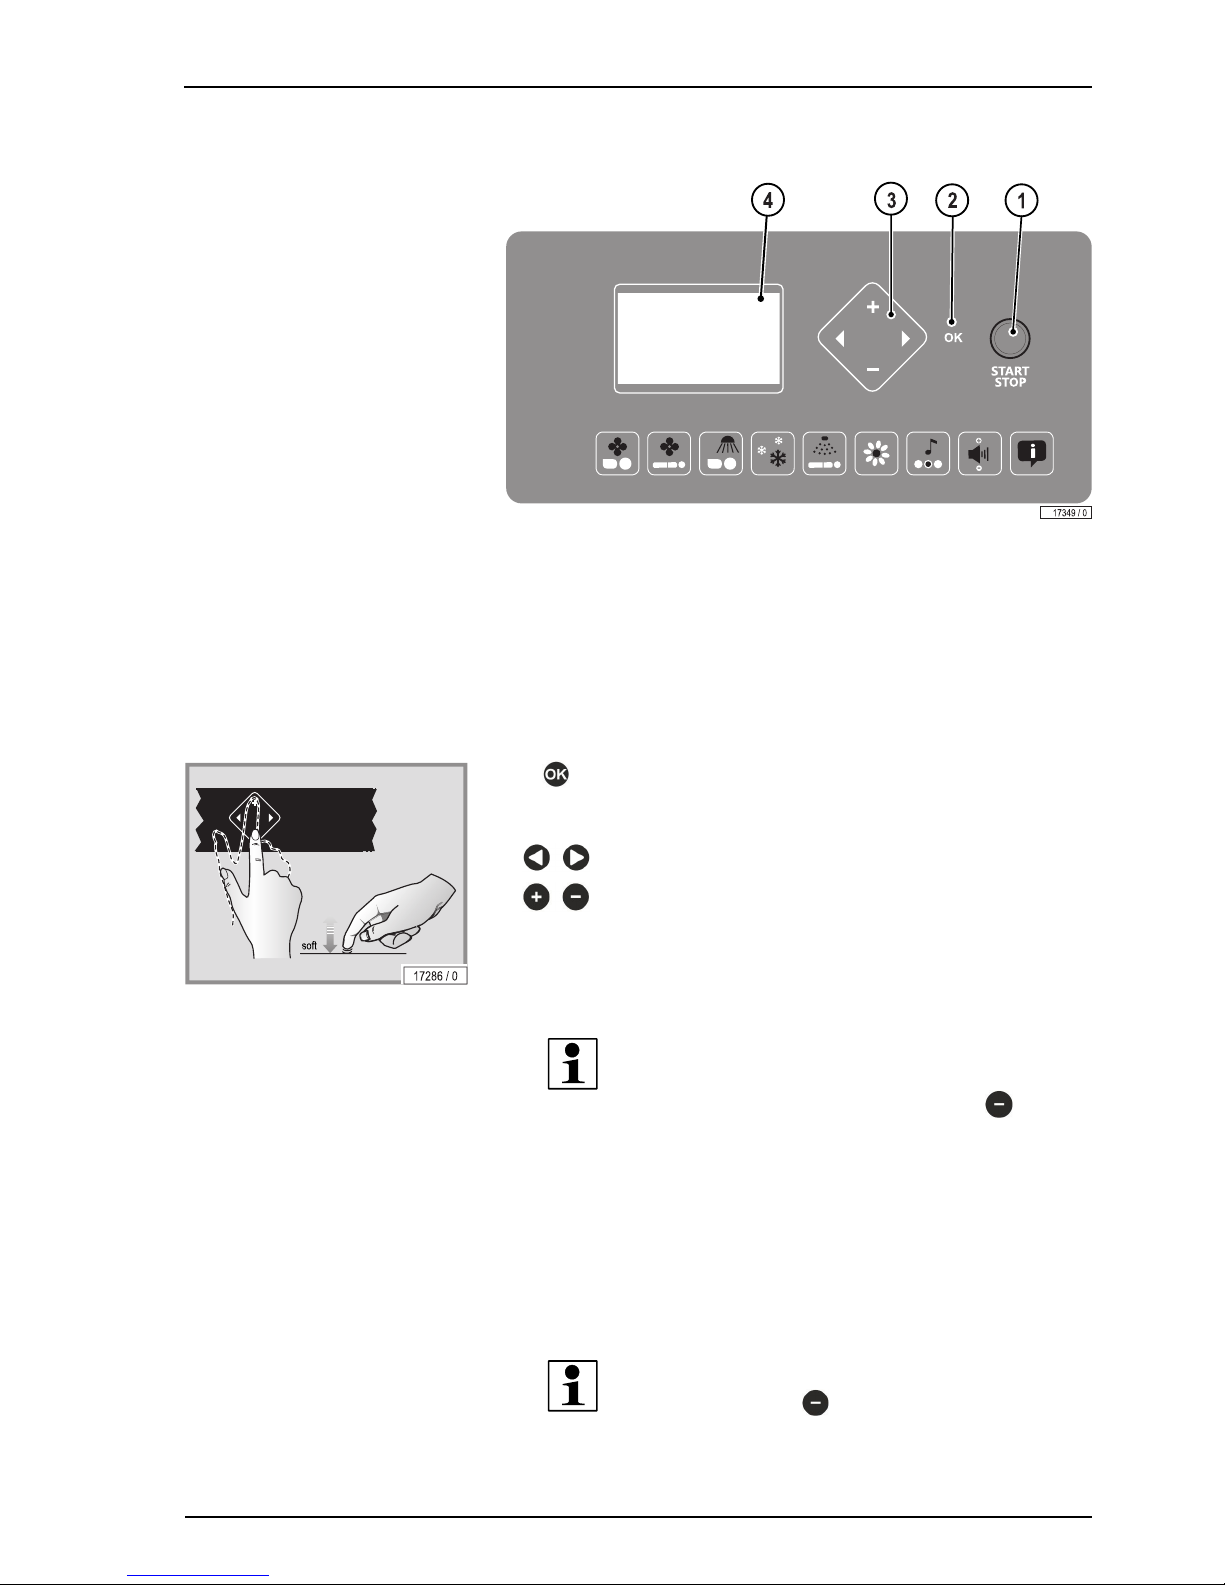
6.3.3 Navigation unit
1. START/STOP button
2. OK button
3. Feature selection
4. Display – Functions …
6.3.4 Navigation
Acknowledge selection.This button's availability is displayed
on the Operating panel, depending on the function that has
been selected.
Select device function.
Functions or settings can be activated, deactivated or
changed.
Information about the setting options can be found in the separate user manual 'Professional Setup Manager' in the folder Technical Documentation.
NOTE:
To open the Professional Setup Manager, press the button
for approximately 3 seconds in standby mode
.
All of the pictograms displayed on the screen are illuminated in default mode
after the device starts up.
The relevant pictogram will start to flash after a device function has been
selected. The settings or selection options available for the selected function
will be displayed on the screen.
If the START/STOP button is pressed and held for 3 seconds while in standby
mode, the accent lighting switches off or back on.
NOTE:
Pressing and holding
for 3 seconds activates the demo
mode. This allows
y
ou to demonstrate the following functions
without tanning.
Page 26
Operation
24/78
NOTE:
If a button is not pressed within 8 seconds, the settings return to default mode.
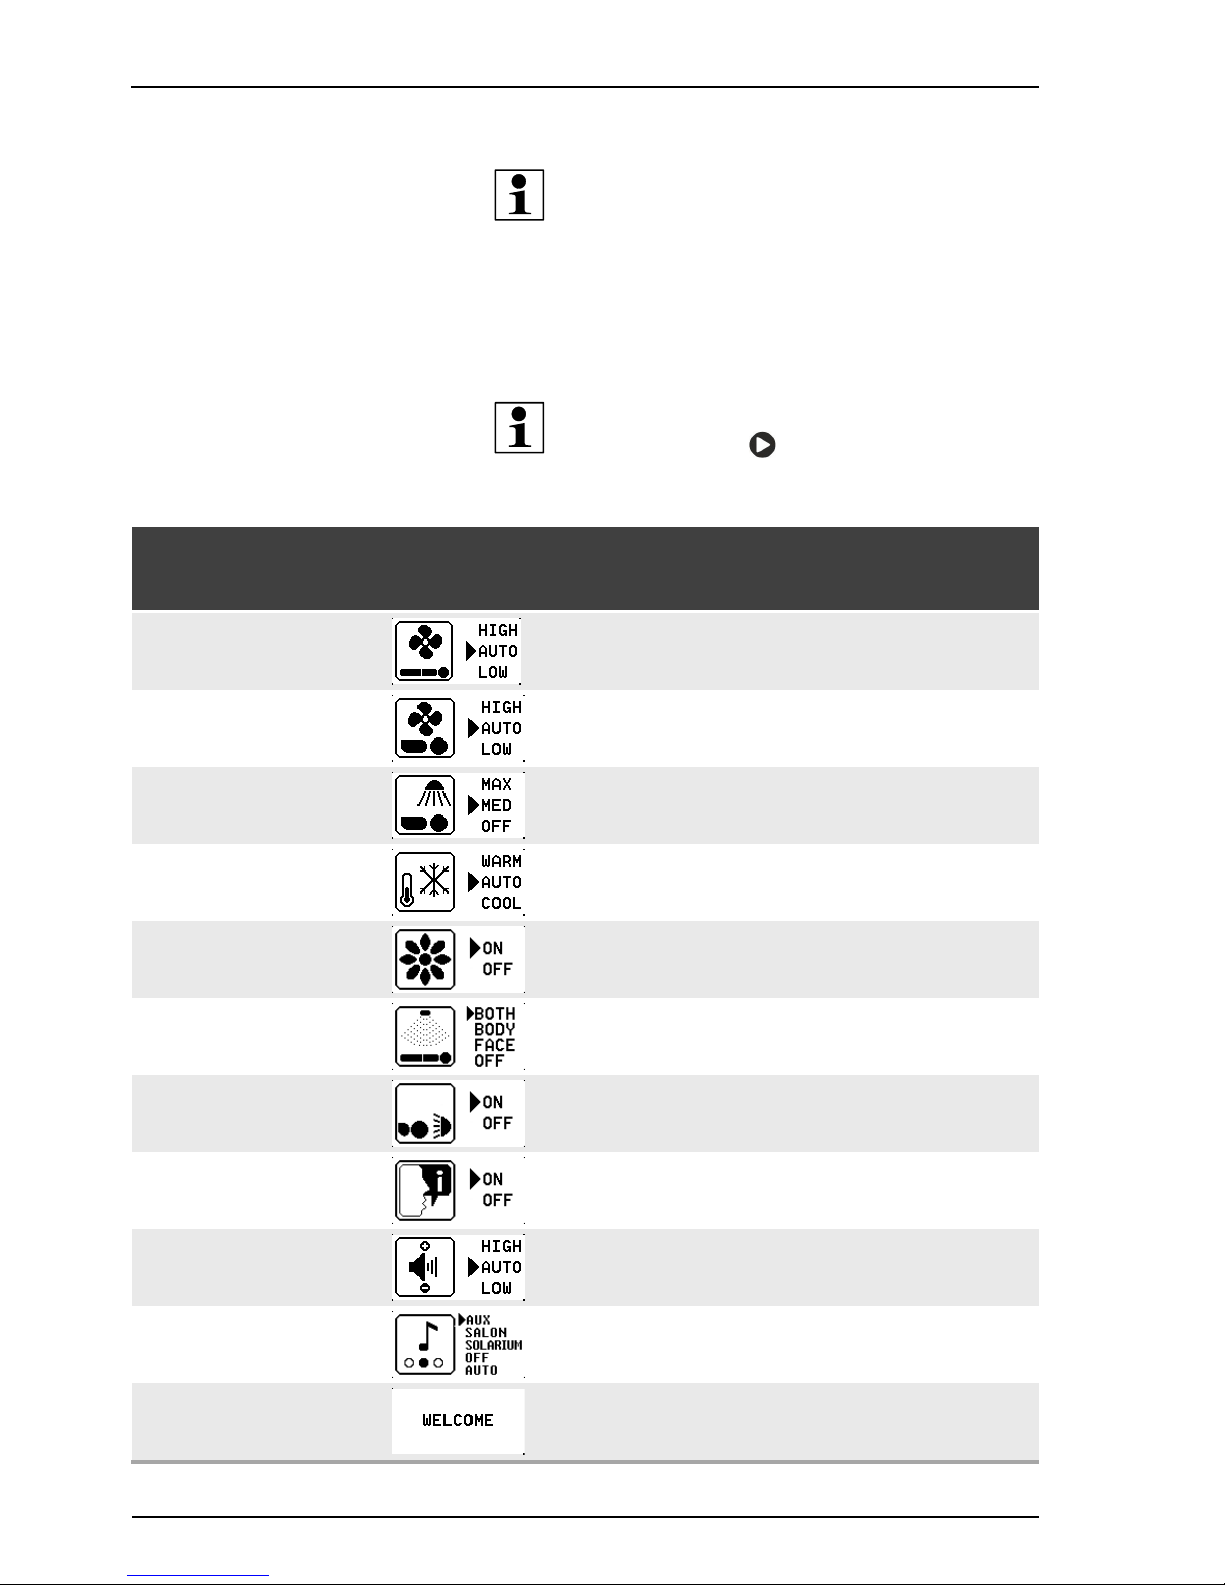
User settings overview
All of a device's available functions can be pre-set on the control panel. Fine
adjustment is carried out during use.
NOTICE:
Pressing and holding
for 3 seconds opens the 'User
settings' overview.
Function Pictogram
selection /
key sequence
Description /
display
Body fan
Pre-select low or high cooling or set to automatic.
Face fan
Pre-select low or high cooling or set to automatic.
Facial tanner
Select maximum or medium power or switch off.
Climatronic/
Air conditioning
Pre-select low or high temperature or set to automatic.
AROMA
Switch AROMA on or off
AQUA SYSTEM
Switch the AQUA SYSTEM body and head nozzles on or
off together or individually
Shoulder tanner
Switch the shoulder tanner on or off
Voice Guide
Switch the Voice Guide on or off
Volume
Basic volume setting: Loud, quiet or automatic.
Audio system
Select the audio system or switch off
Welcome Welcome text in standby mode
Page 27
Operation
11/2014 1015420-00 Operating instructions – 25/78
6.4 Functions
6.4.1 Operating panel
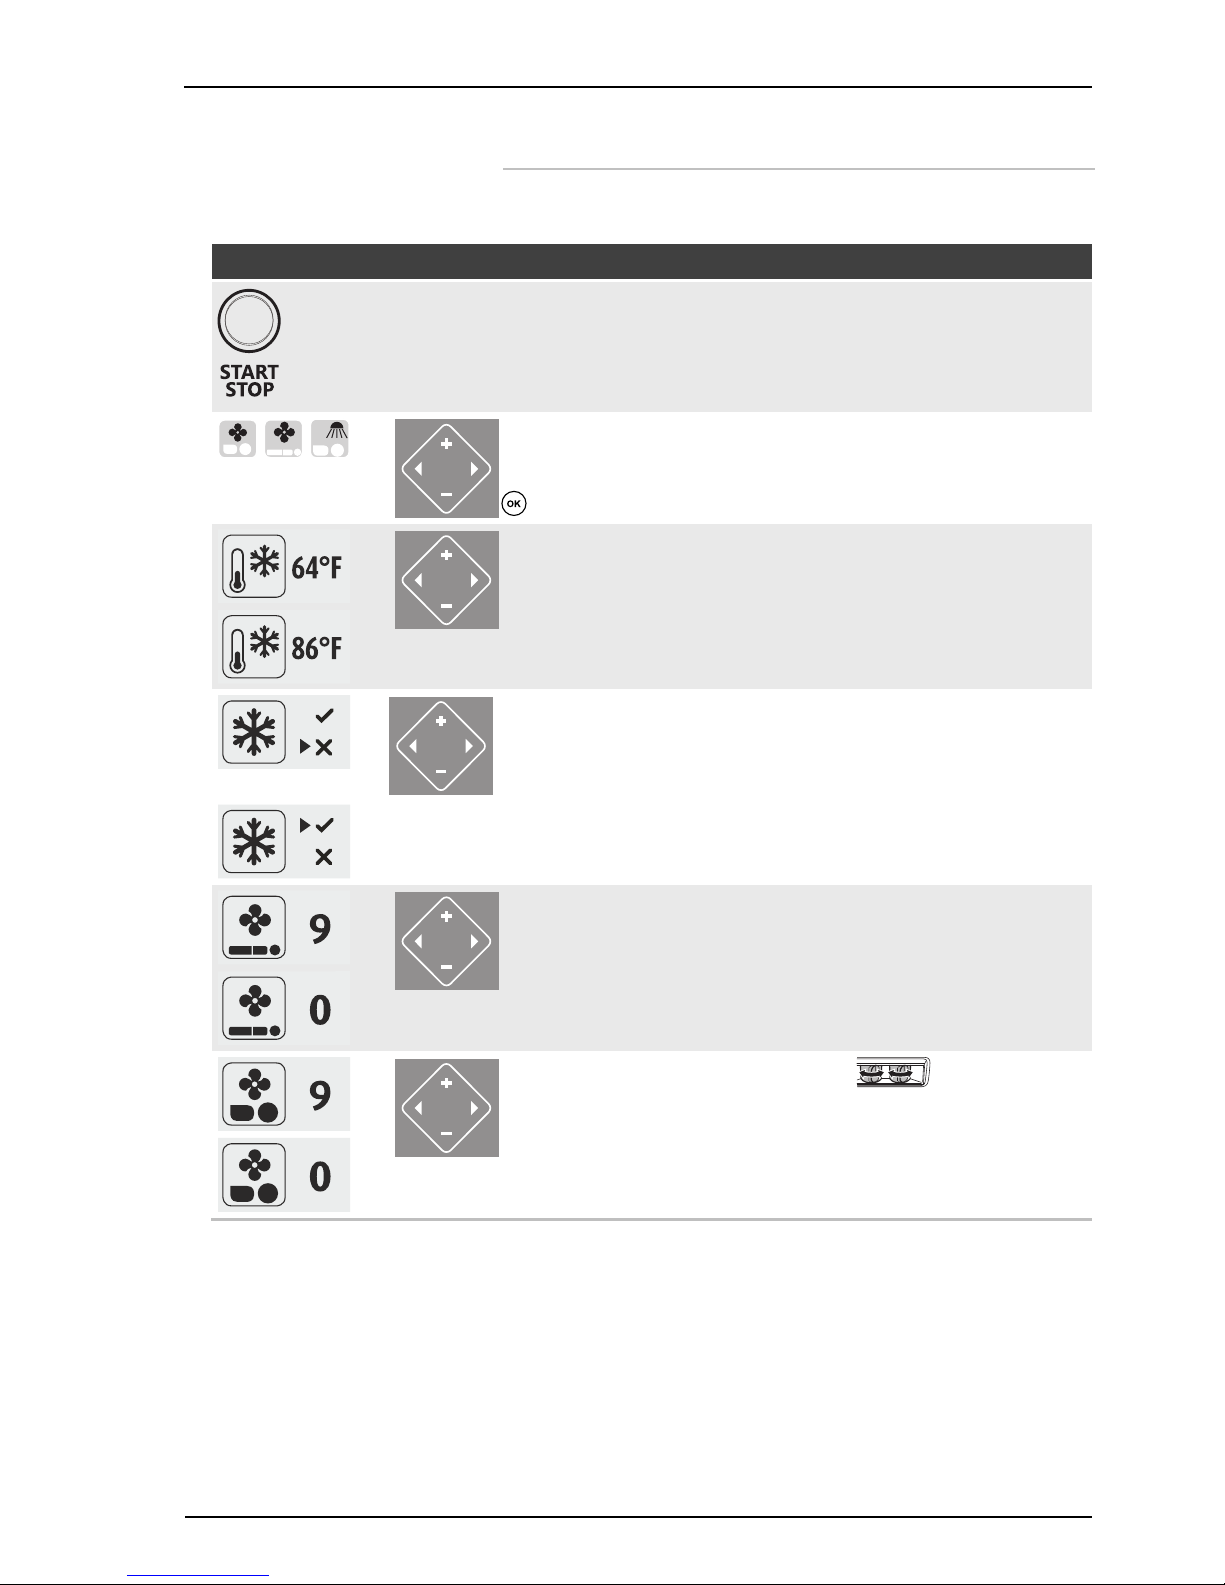
Icon Key Function / Description Information
UV lamps:
Switches the UV lamps on / off during
the tanning session
The tanning time continues to
run
if the UV lamps are switched
off
during tanning session.
…
Select function.
Facial fan, Body fan, Facial tanner …
Temptronic:
Regulate the temperature,
64 - 86 °F / 18 – 30 °C
At start-up: 68 °F / 20 °C
If the automatic air conditioning
(Temptronic) fails, the acrylic
glass panel is cooled without
adjustment control. The user
can only switch the cooling
system on or off in this case.
To switch the air conditioning
AC Plus unit off:
Press the minus button for 3 seconds
To switch the air conditioning unit on:
Press the plus button for 1 seconds
During tanning the air conditioning can only be switched
back on after 3 minutes.
Select Body fan:
Regulate the body fan,
levels 0 - 9
Facial fan:
Regulate the facial fan,
levels 0 - 9
The face cooling air
nozzles can be adjusted manually.
Page 28
Operation
26/78
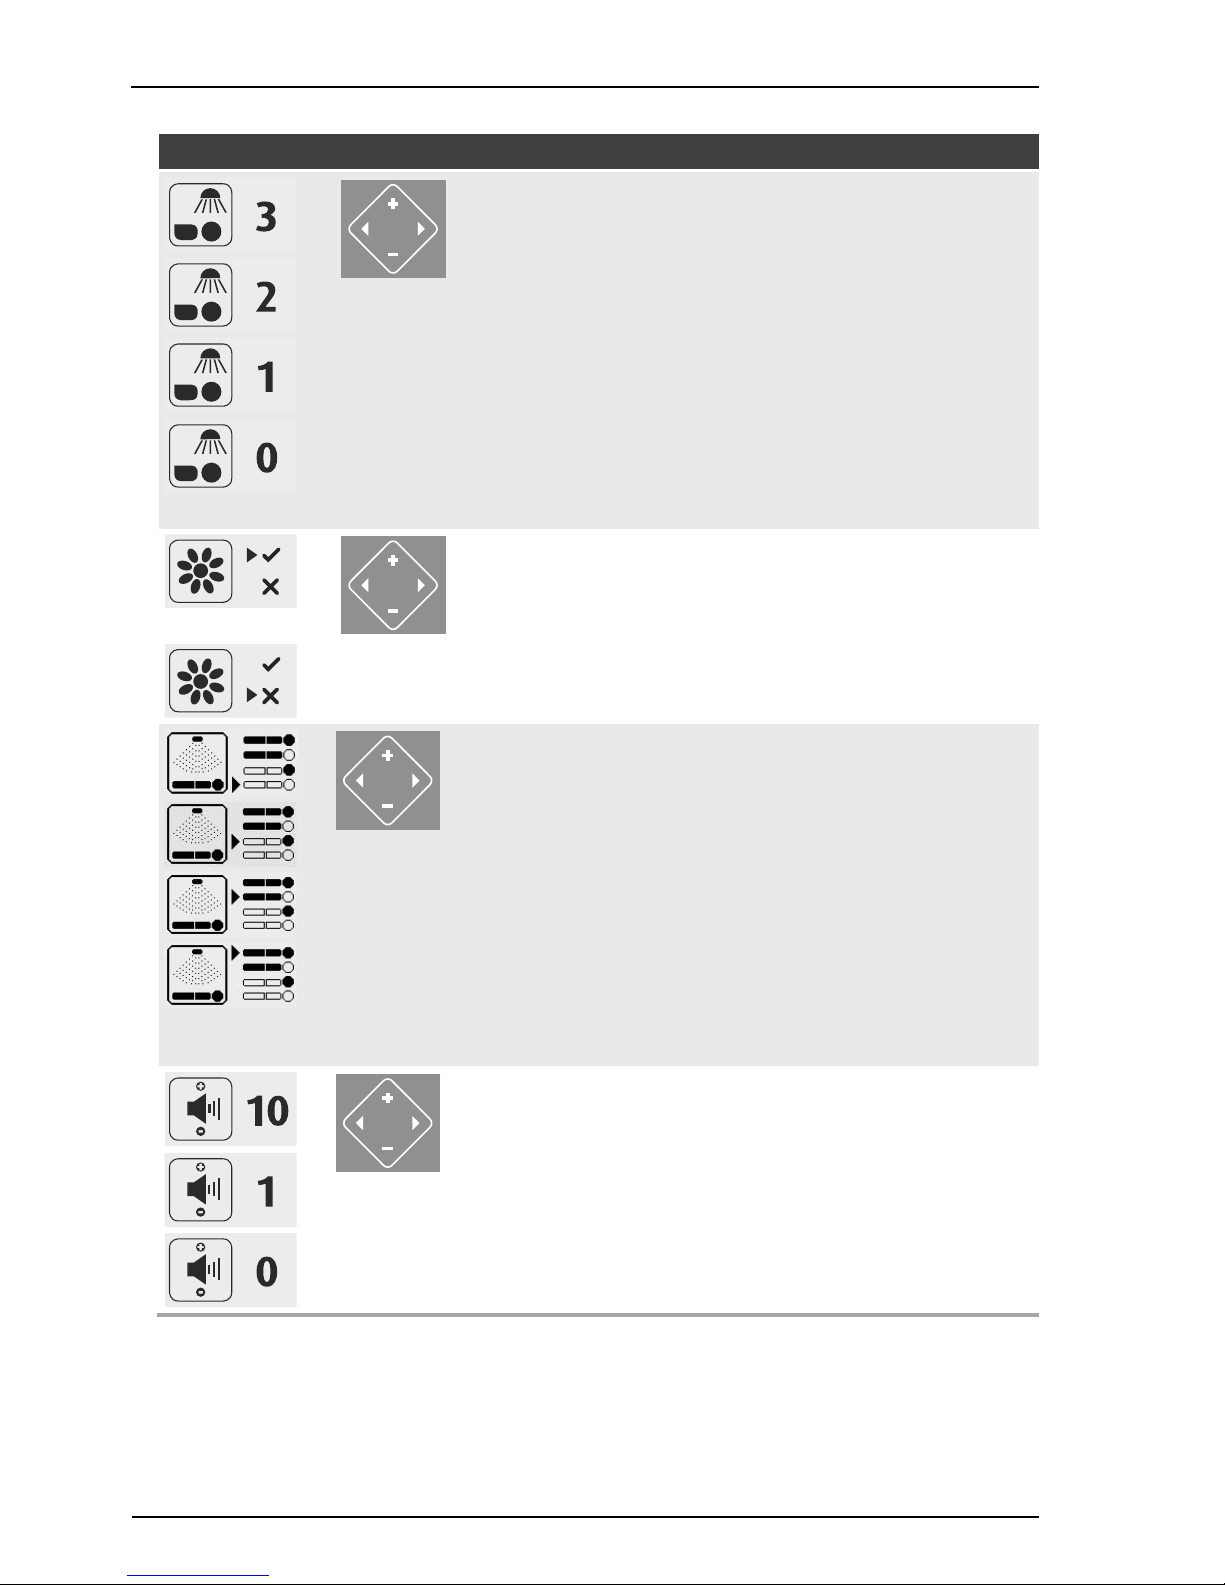
Icon Key Function / Description Information
Facial tanner:
Regulate the facial tanner,
levels 0 – 3
Switch the facial tanner off: Hold button
‘minus’ for 3 seconds
Switch the facial tanner on: Hold button
‘plus’ for 1 second
1 minute until up to maximum
power, then return to the previous setting before switching
off.
AROMA:
Switch the AROMA on:
Hold button ‘plus’ for 1 second.
Switch the AROMA off:
Hold button ‘minus’ for 1 second
AQUA SYSTEM
Switch the AQUA SYSTEM head noz-
zle on:
Touch button ‘plus’
Switch the AQUA SYSTEM head nozzle off and body nozzle on:
Touch button ‘plus’
Switch the AQUA SYSTEM body nozzle and head nozzle on:
Touch button ‘plus’
Switch the AQUA SYSTEM nozzles
off:
Touch button ‘minus’
Volume control:
Levels 1 – 14
Volume off:
Hold button ‘minus’ for 3 seconds
Page 29
Operation
11/2014 1015420-00 Operating instructions – 27/78
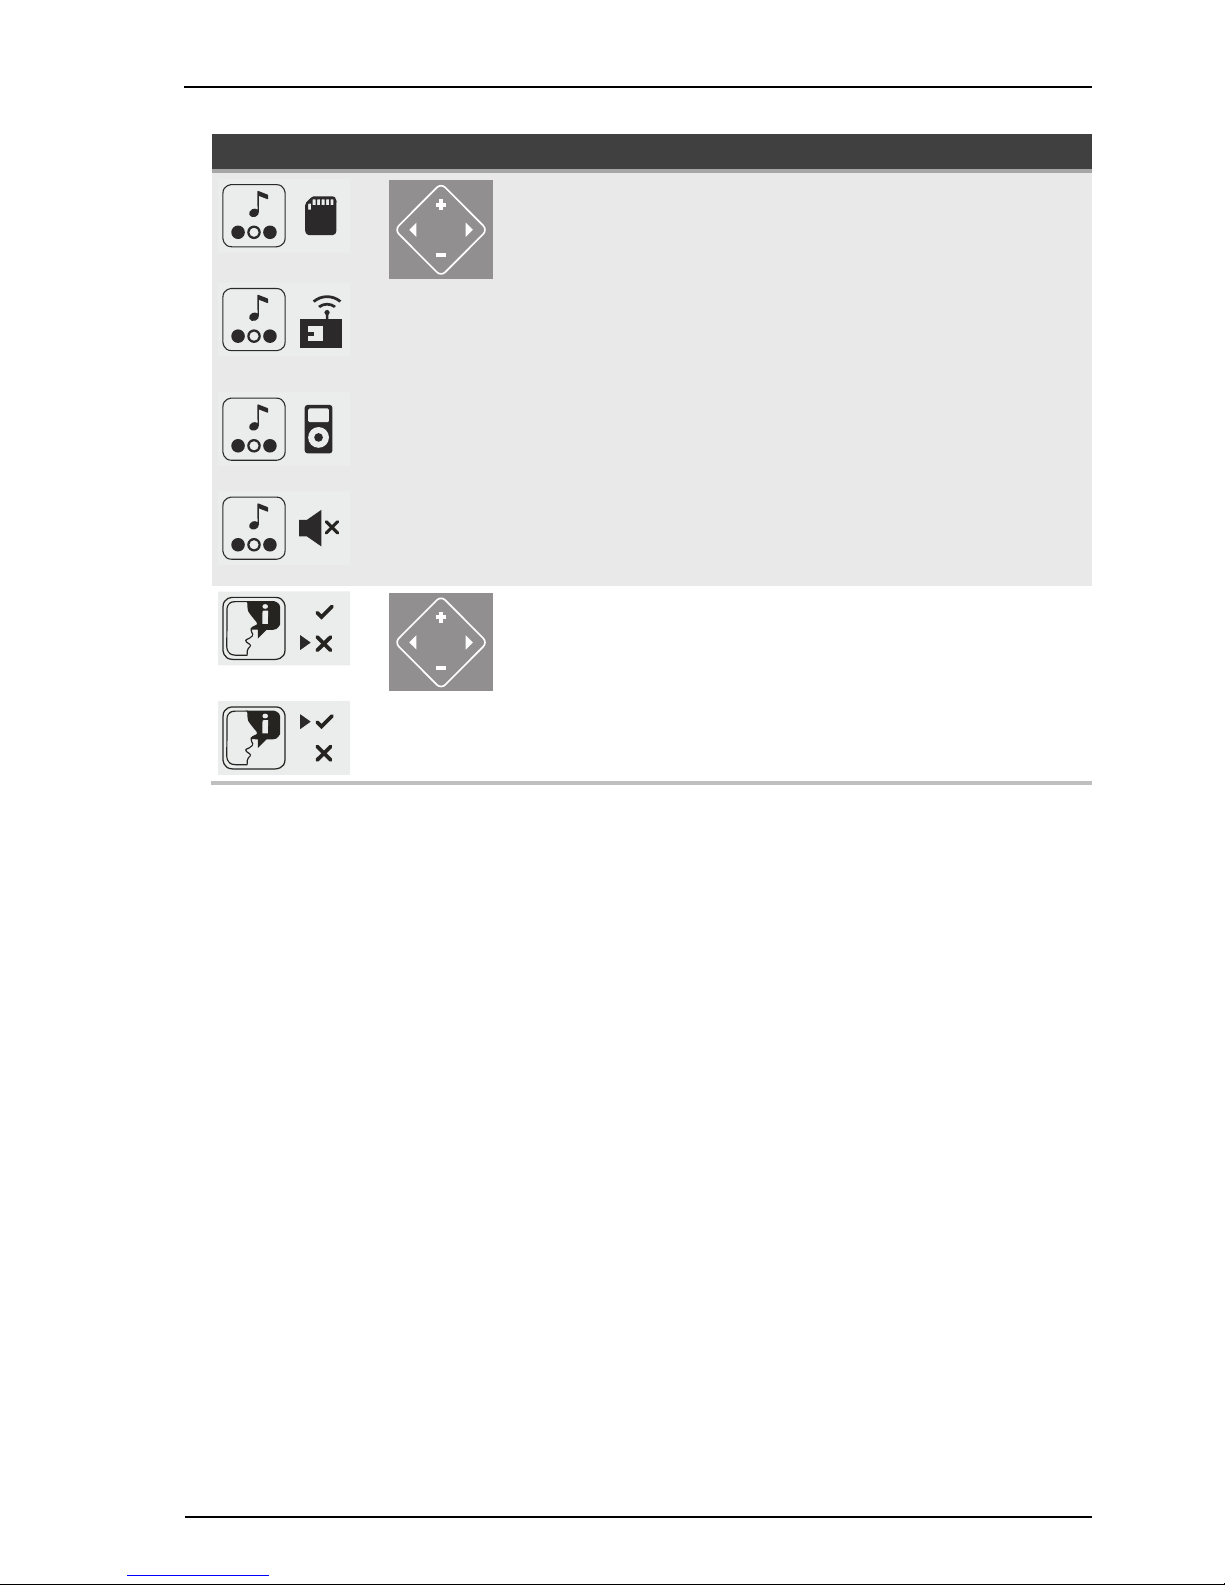
Icon Key Function / Description Information
Audio system
Select SD card:
Touch button ‘plus’
Select Studio channel:
Touch button ‘plus’
Select own music (e.g. MP3 player)
AUX:
Touch button ‘plus’
Switch off:
Hold button ‘minus’
The +/- buttons can be used to
select titles for internal music in
demo mode and during tanning.
Switch the Voice Guide off:
Hold button ‘minus’
Switch the Voice Guide on:
Hold button ‘plus’
The Voice Guide provides
acoustic device operating help
and is only available if an audio
system is fitted.
Voice Guide is switched on as
a standard item during standby and tanning.
Page 30
Operation
28/78
6.5 Start
The device is started automatically with an internal or external timer.
NOTE:
Timer instructions see separate manual
(order no. 1008370-..).
6.5.1 Preparation time
Before the UV lamps turn on, you have a few minutes to prepare yourself.
During the preparation time you can switch on the UV lamps at any time by
pressing the START/STOP button.
– Remove your clothes and all jewelry.
– Remove make-up and other cosmetics.
– Remove glasses. Contact lenses can be worn under the protective
goggles.
– Put on the protective goggles.
– Lie down on the bed surface.
– Close the canopy.
– Press the START/STOP button.
Settings on start-up:
UV lamps
Facial tanner
Shoulder tanner
Body cooling
Facial cooling
Audio system
Voice Guide
6.5.2 Interrupt or end tanning session
The tanning session ends automatically after the preset time has run down.
The internal body cooling fan continues to run for approx. three (3) minutes to
sufficiently cool the device.
– To interrupt a tanning session, press and hold button START/STOP any-
time during a session.
– Press START/STOP again to restart the lamps.
Page 31
Operation
11/2014 1015420-00 Operating instructions – 29/78
6.6 Connect MP3 player
DANGER!
Danger of hearing damage!
Using earphones or headphones at high volume can result
in permanent hearing damage.
– Do not set the volume too high.
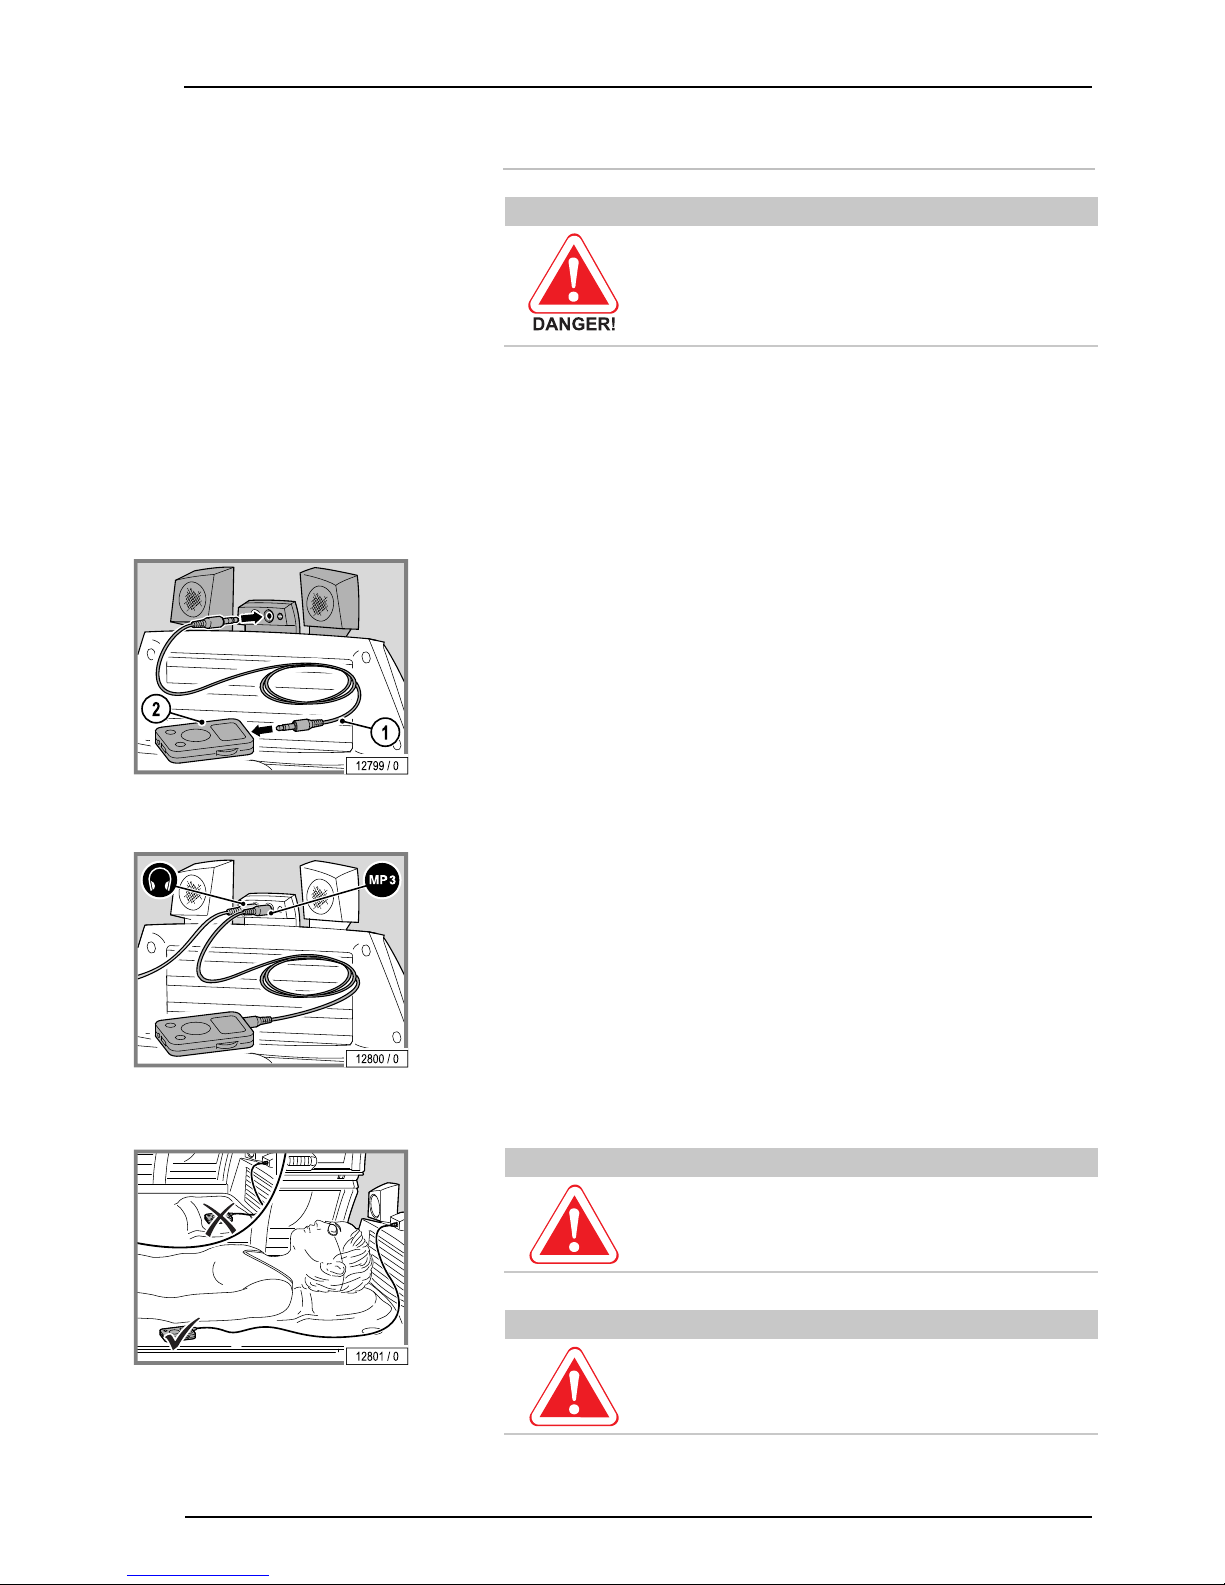
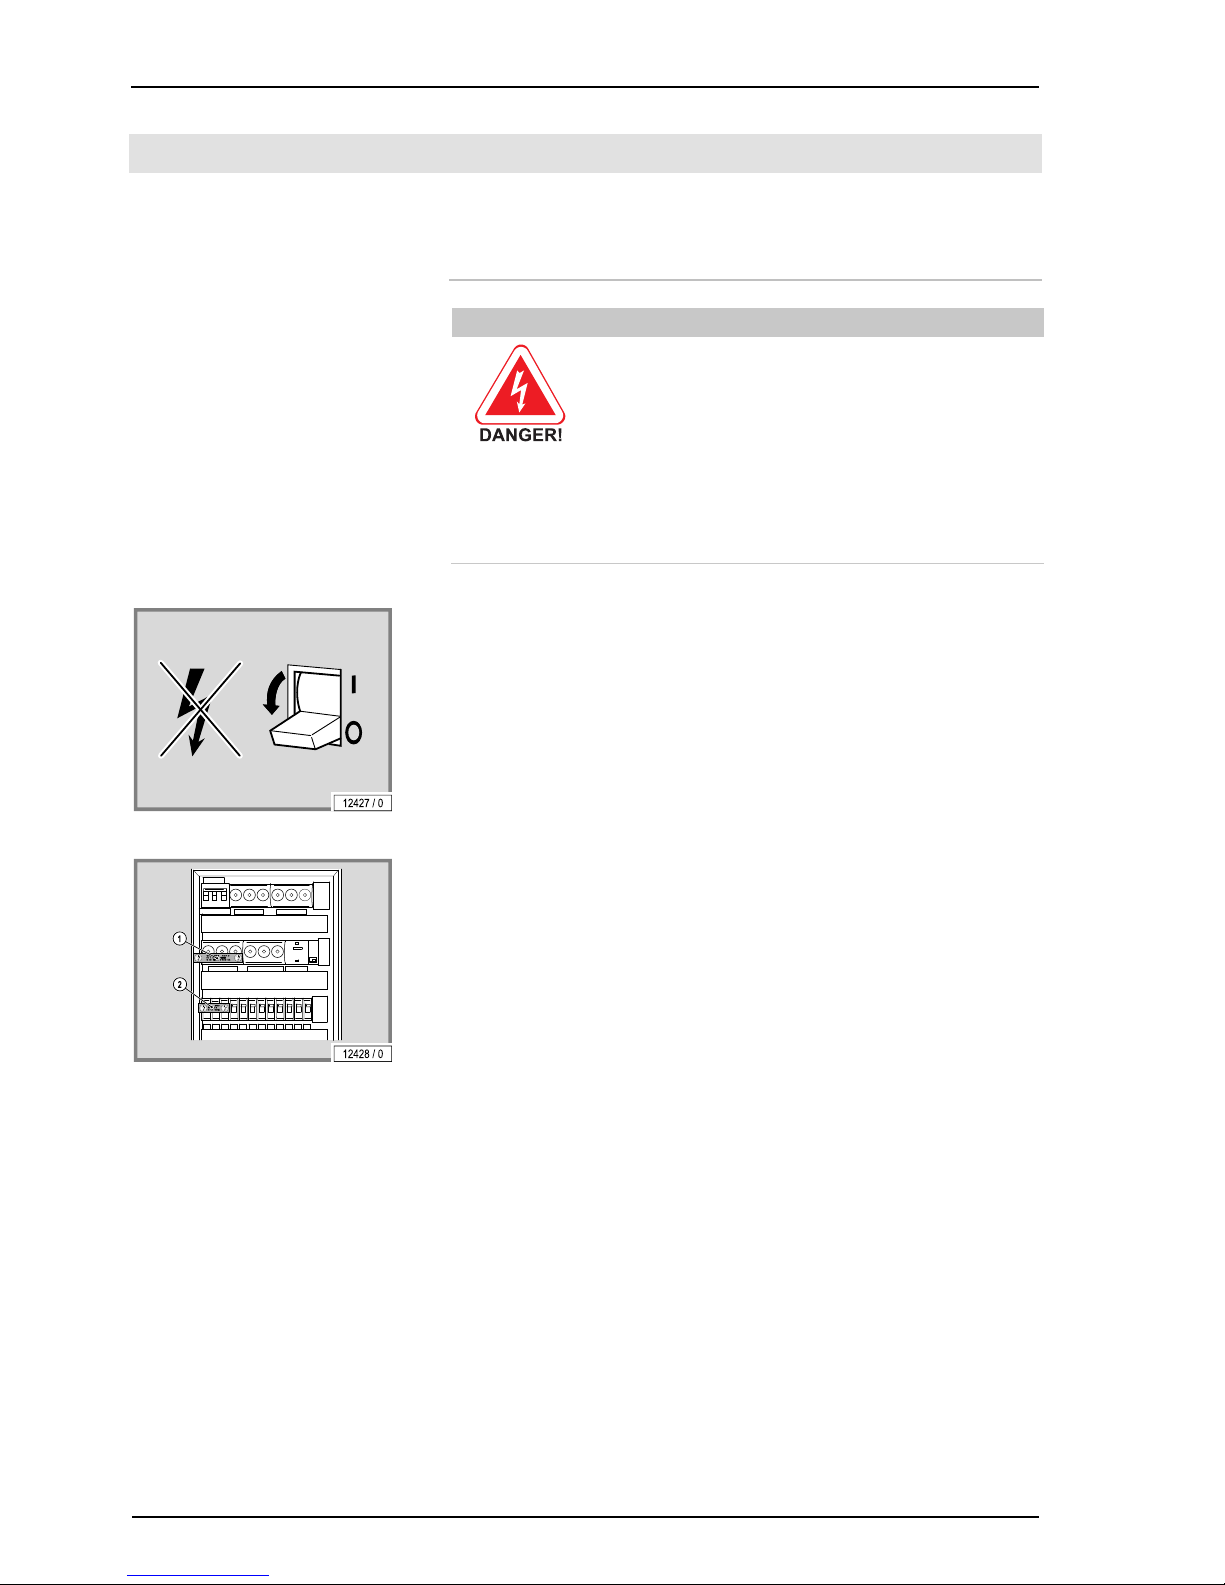
The user can connect their own private MP3 player or smartphone to the
device.
1. Jack plug (JK Part # 4630911001-..) provided for use by the studio operator (2 x 3.5 mm stereo jack plug).
2. MP3 player or smartphone connection: see the documentation from the
manufacturer of the MP3 player or smartphone.
Connecting:
– Insert the MP3 cable (stereo jack plug) in the audio system.
– Plug the MP3 cable into the MP3 player or smartphone.
– Select the music title and then start.
– Where necessary, set the volume level on the MP3 player or smartphone
so that the sound signal from the MP3 player or smartphone is recognized by the audio system.
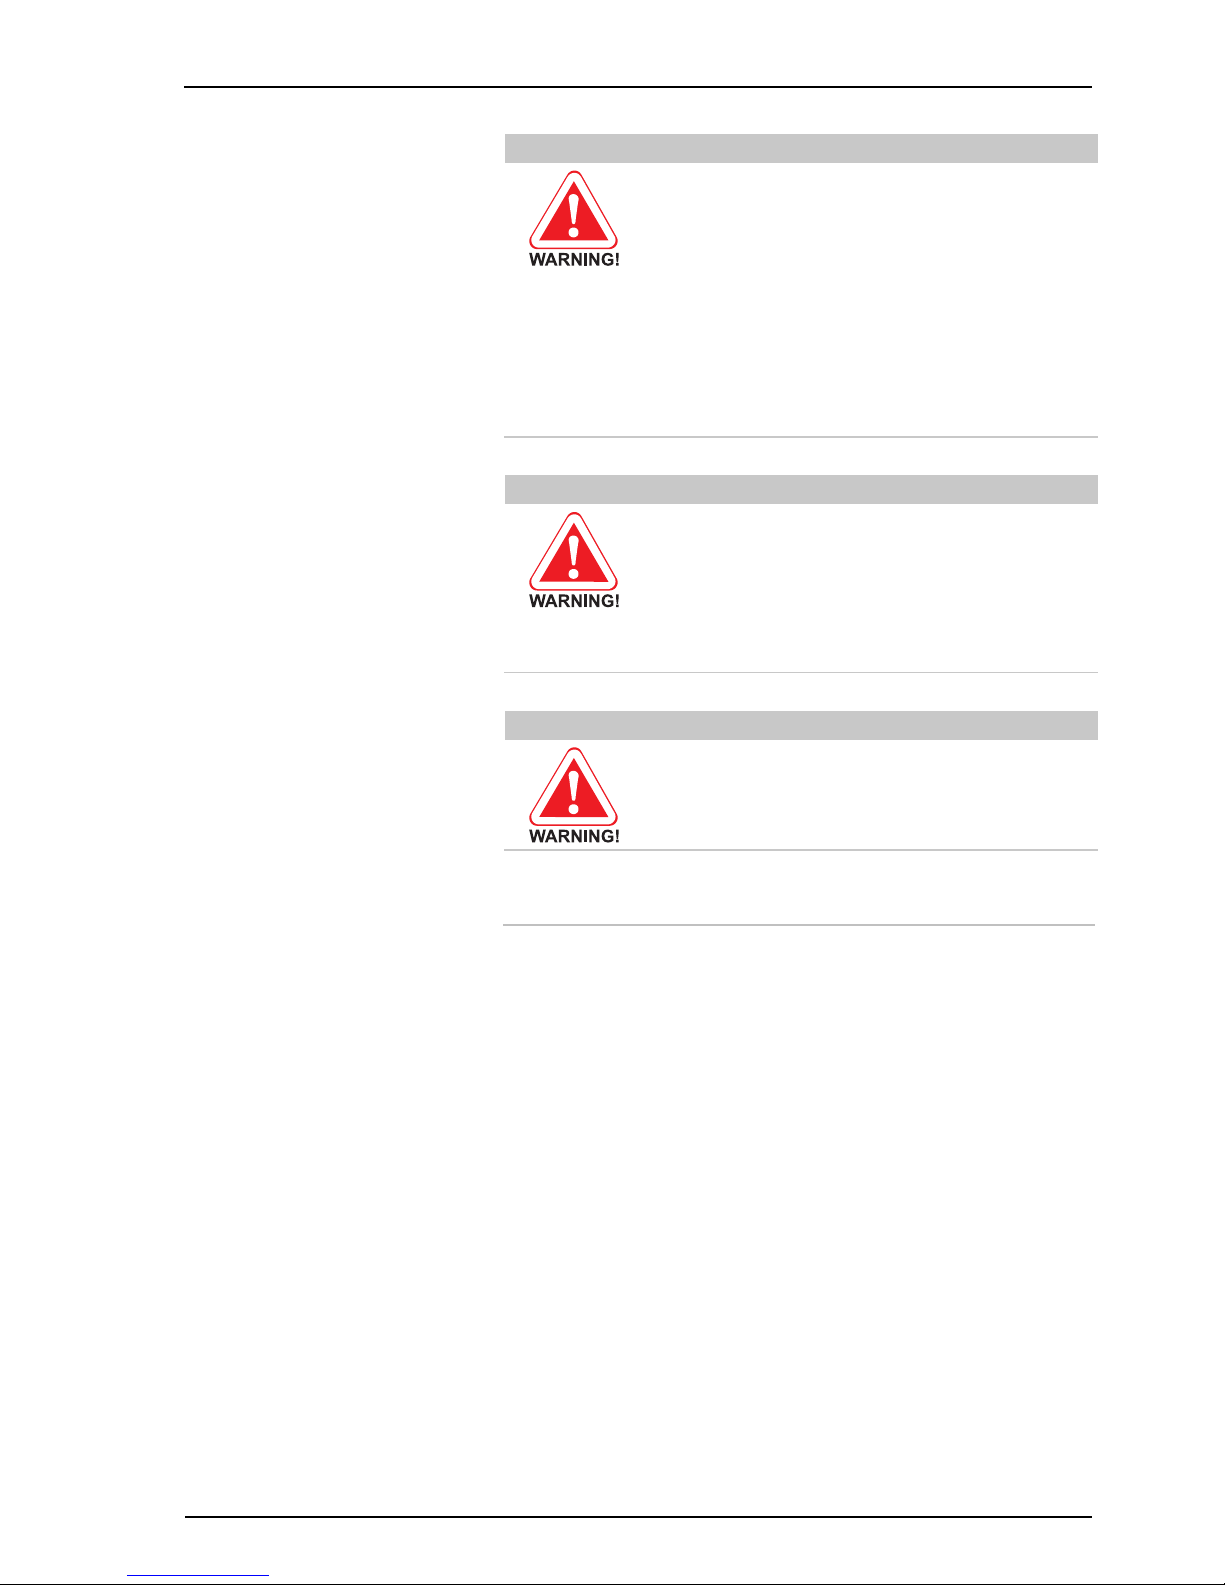
CAUTION!
The heat might damage your MP3 player or smartphone!
– Do not position the unit so that it receives direct tannin
g
radiation.
CAUTION!
Cable may be torn off, connectors may be damaged!
– Do not pull on cable when unplugging MP3 player or
smartphone.
Page 32
Cleaning and maintenance
30/78
7 Cleaning and maintenance
7.1 Safety instructions for cleaning and
maintenance
DANGER – HIGH VOLTAGE!
You can be killed or injured by an electric shock!
During maintenance work there is a risk of touching live
parts and receiving a fatal electric shock.
– Disconnect device from power supply before opening.
– Do not reach behind covers and do not open the device
with the device switched on.
– Refit any safety devices (e.g. switches) after the work
has been completed.
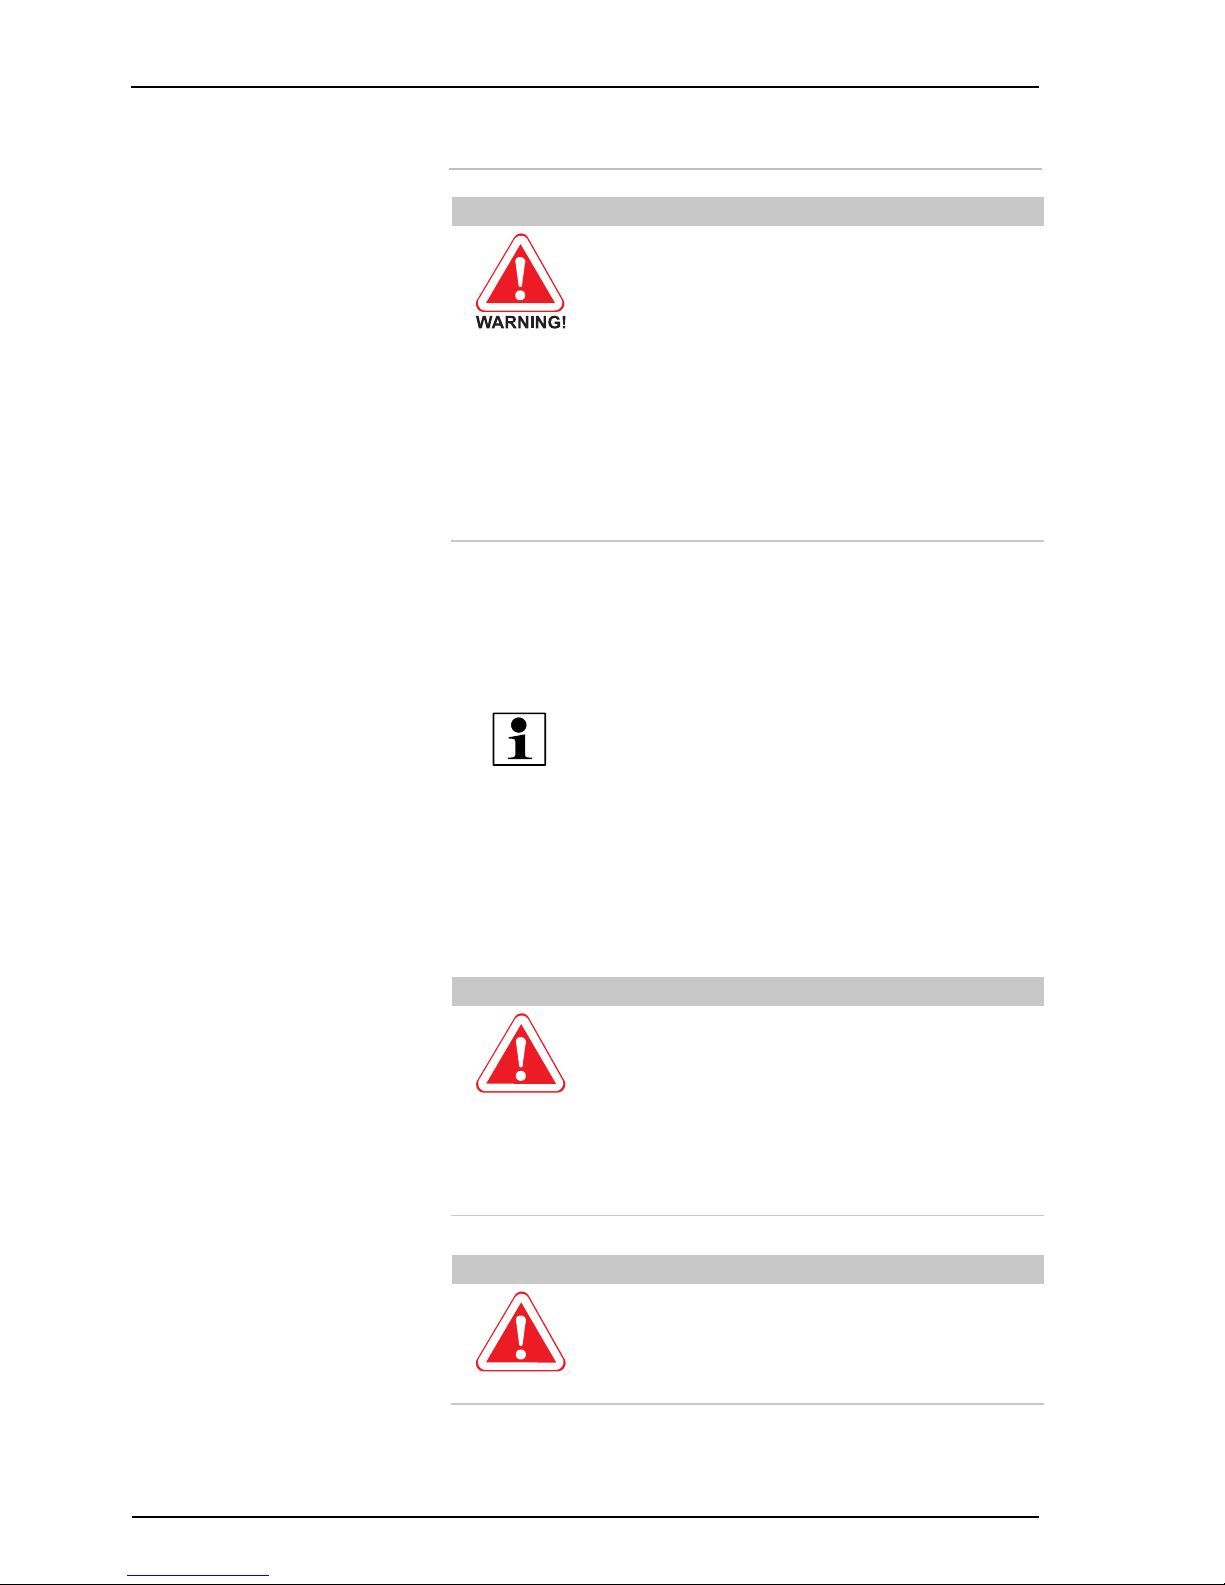
If work is to be performed on the devices, they must be deenergized. That
means that all live cables must be switched off.
Switching off the device alone is insufficient, as certain points may remain
energized. Therefore, switch off fuses before performing any work and – if
possible – remove them.
Accidental reactivation can result in serious accidents. Immediately after
deenergizing, secure all switches or fuses used for deenergizing against being switched on again.
– Lock the fuse box with a padlock.
In case of circuit breakers which cannot be unscrewed, a strip of adhesive
tape may be applied over the actuation lever with the wording 'Do not switch,
danger!'.
A prohibition sign with the text:
'Work in progress!'
'Place: ..............................'
'Sign may only be removed by: ............'
must always be securely mounted immediately.
It is imperative that you, the owner and/or operator, check all components for
any signs of wear which may occur through normal use.
– Observe the cleaning and maintenance schedule specified in the tables
in Chapter 7.4 and 7.6.
– Only replace UV low-pressure lamps with the original type or compatible
lamps.
Should you require any assistance or need additional information, please
call Global Service USA at 800-445-0624 (toll-free), Monday through Friday
8:00 a.m. - 7:00 p.m. CT, Saturday 8:00 a.m. to 3:00 p.m.
Page 33
Cleaning and maintenance
11/2014 1015420-00 Operating instructions – 31/78
WARNING!
Injuries and damage due to improper maintenance!
If the maintenance intervals for the UV lamps are exceeded
or incompatible UV lamps are installed, the share of UVB
radiation may increase. Sunburn and other skin damage
may result.
Improper maintenance can cause the device to be dama
g
ed
or to become unusable.
– Always comply with the specified maintenance inter-
vals.
– Follow the cleaning instructions.
WARNING!
Danger of burns from hot lamps and device parts!
If the tanning device was operated before being switched off
and opened, lamps and housing parts may be hot.
– Before replacing lamps or other spare parts, wait until
lamps and metal parts of the device have cooled down
sufficiently.
WARNING!
Danger of pinching!
When opening and closing the panels and covers, you can
pinch your fingers.
7.2 Faults
Error codes are output to the display to simplify troubleshooting:
If a fault occurs, the error code flashes on the display.
If several errors occur, the error messages are displayed alternately.
Error elimination is acknowledged by pressing the START/STOP button.
If the error cannot be cleared, contact Customer Service (see page 2) or
your local service provider.
More detailed information regarding the error description and solutions is
available in 'Error Codes' (order no. 1011831-..).
Page 34
Cleaning and maintenance
32/78
7.3 Cleaning
WARNING!
Infections can be transferred through skin contact.
All items/equipment components, with which the user can
come into contact during tanning, must be disinfected after
every tanning session:
– Protective goggles
– Acrylic panel
– Handles and control panel
– MP3 cable
– Adjustable air nozzles
– Use only approved cleaners to disinfect the tanning
system and its components.
7.3.1 Disinfection
For hygienic proper disinfection, use a specially developed disinfectant cleaner (such as Lucasol).
NOTE:
For thorough disinfection, the product must be allowed to
remain in contact with the surface being disinfected for a
specified amount of time. Follow the manufacturer's instructions for use.
7.3.2 Cleaning of surfaces
Acrylic panel
CAUTION!
Do not rub with a dry cloth – danger of scratching!
– For hygienic proper cleaning of acrylic surfaces, use a
specially developed disinfectant cleaner.
Other cleaning agents, especially concentrated disinfectants or solvents (e.g. Lysoform, ethyl alcohol or other liquids containing alcohol) must never be used for
cleaning.
Failure to observe this voids all warranty claims.
CAUTION!
Acrylic panels unusable due to soiling!
Soiling on the panels is burned in by the hot lamps and
results in the long term in unserviceable panels.
– Remove fingerprints and other soiling carefully.
Page 35
Cleaning and maintenance
11/2014 1015420-00 Operating instructions – 33/78
Plastic surfaces
For cleanin
g
the remaining painted and unpainted plastic surfaces, it is best to
use warm water and a cloth. Never use aggressive cleaning agents containing alcohol or essential oils. These may lead to damages not covered by the
warranty.
During cleaning a slight discoloration of the cloth by the rubber seals should
be expected for production-related reasons.
Prevent damage to the acrylic and plastic surfaces.
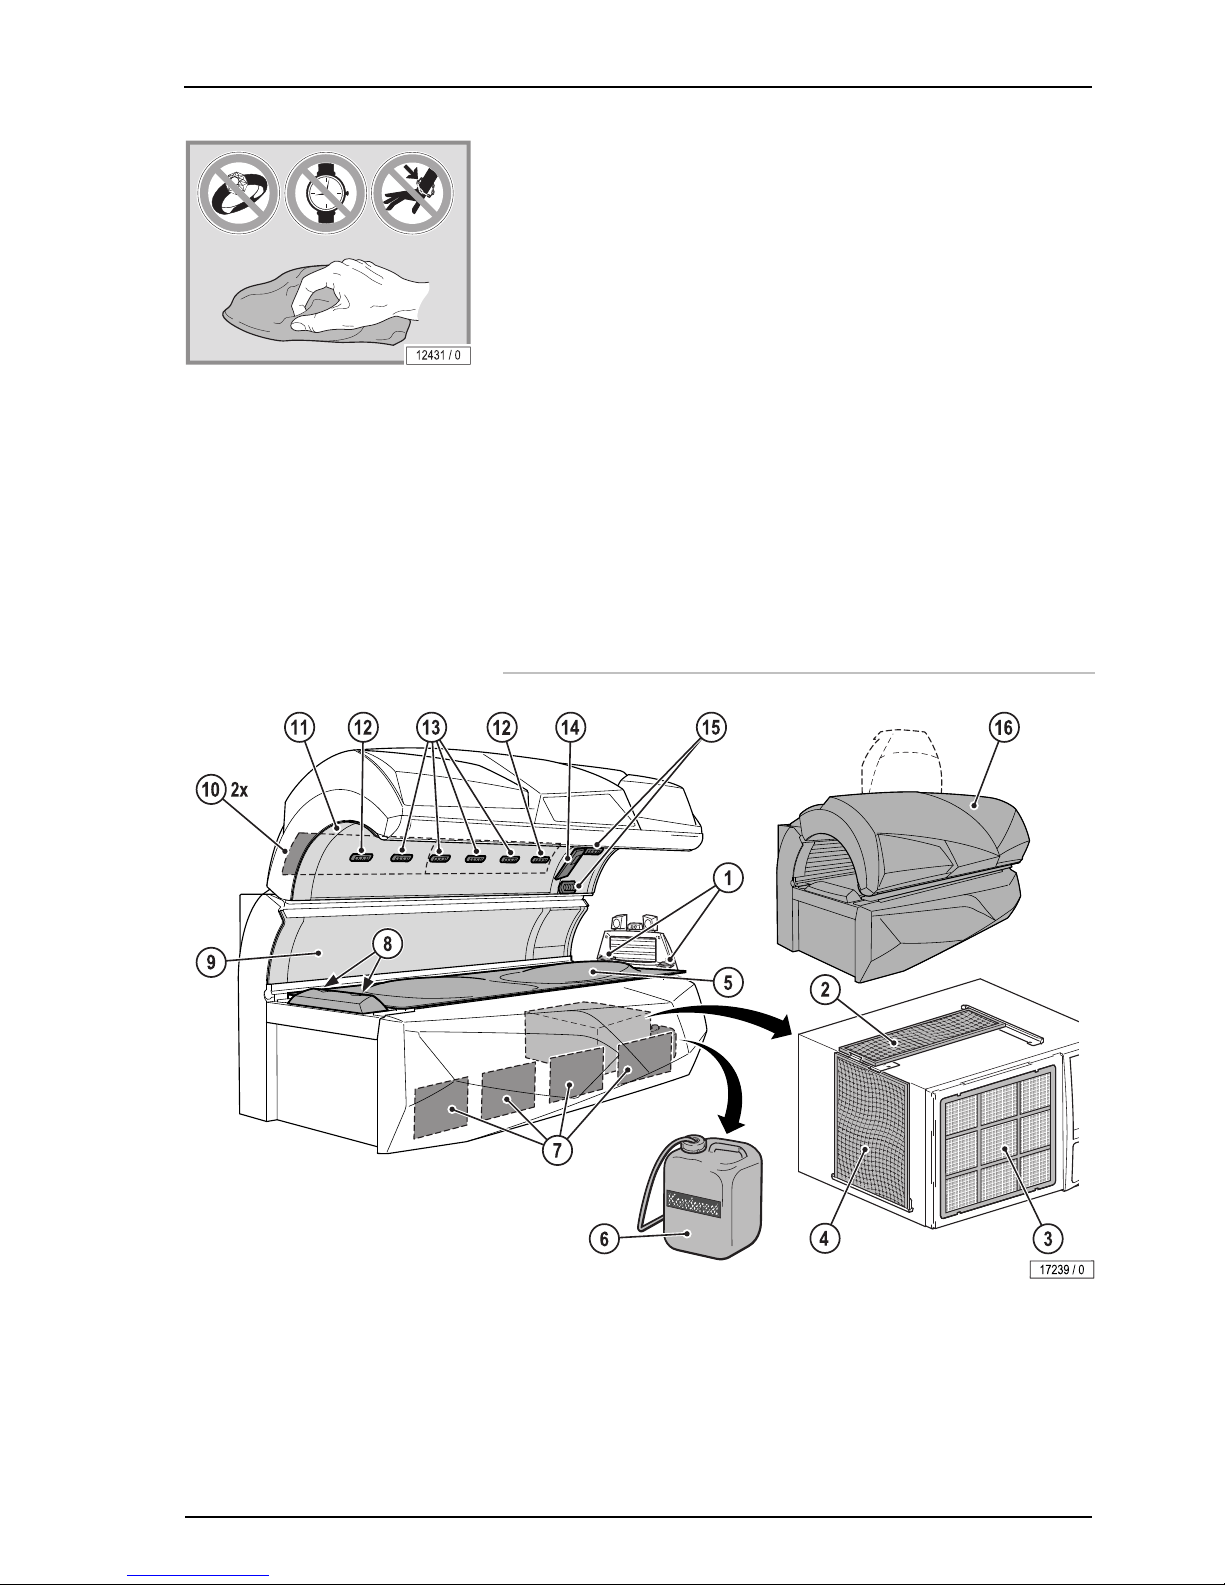
– Remove rings, watches, bracelets etc. before starting cleaning work.
7.3.3 Filter panels and lamps
UV low pressure lamps and filter panels can be cleaned with a damp
cloth (without additional cleaning agents) where necessary.
UV high pressure lamps can be cleaned with ethyl alcohol where neces-
sary.
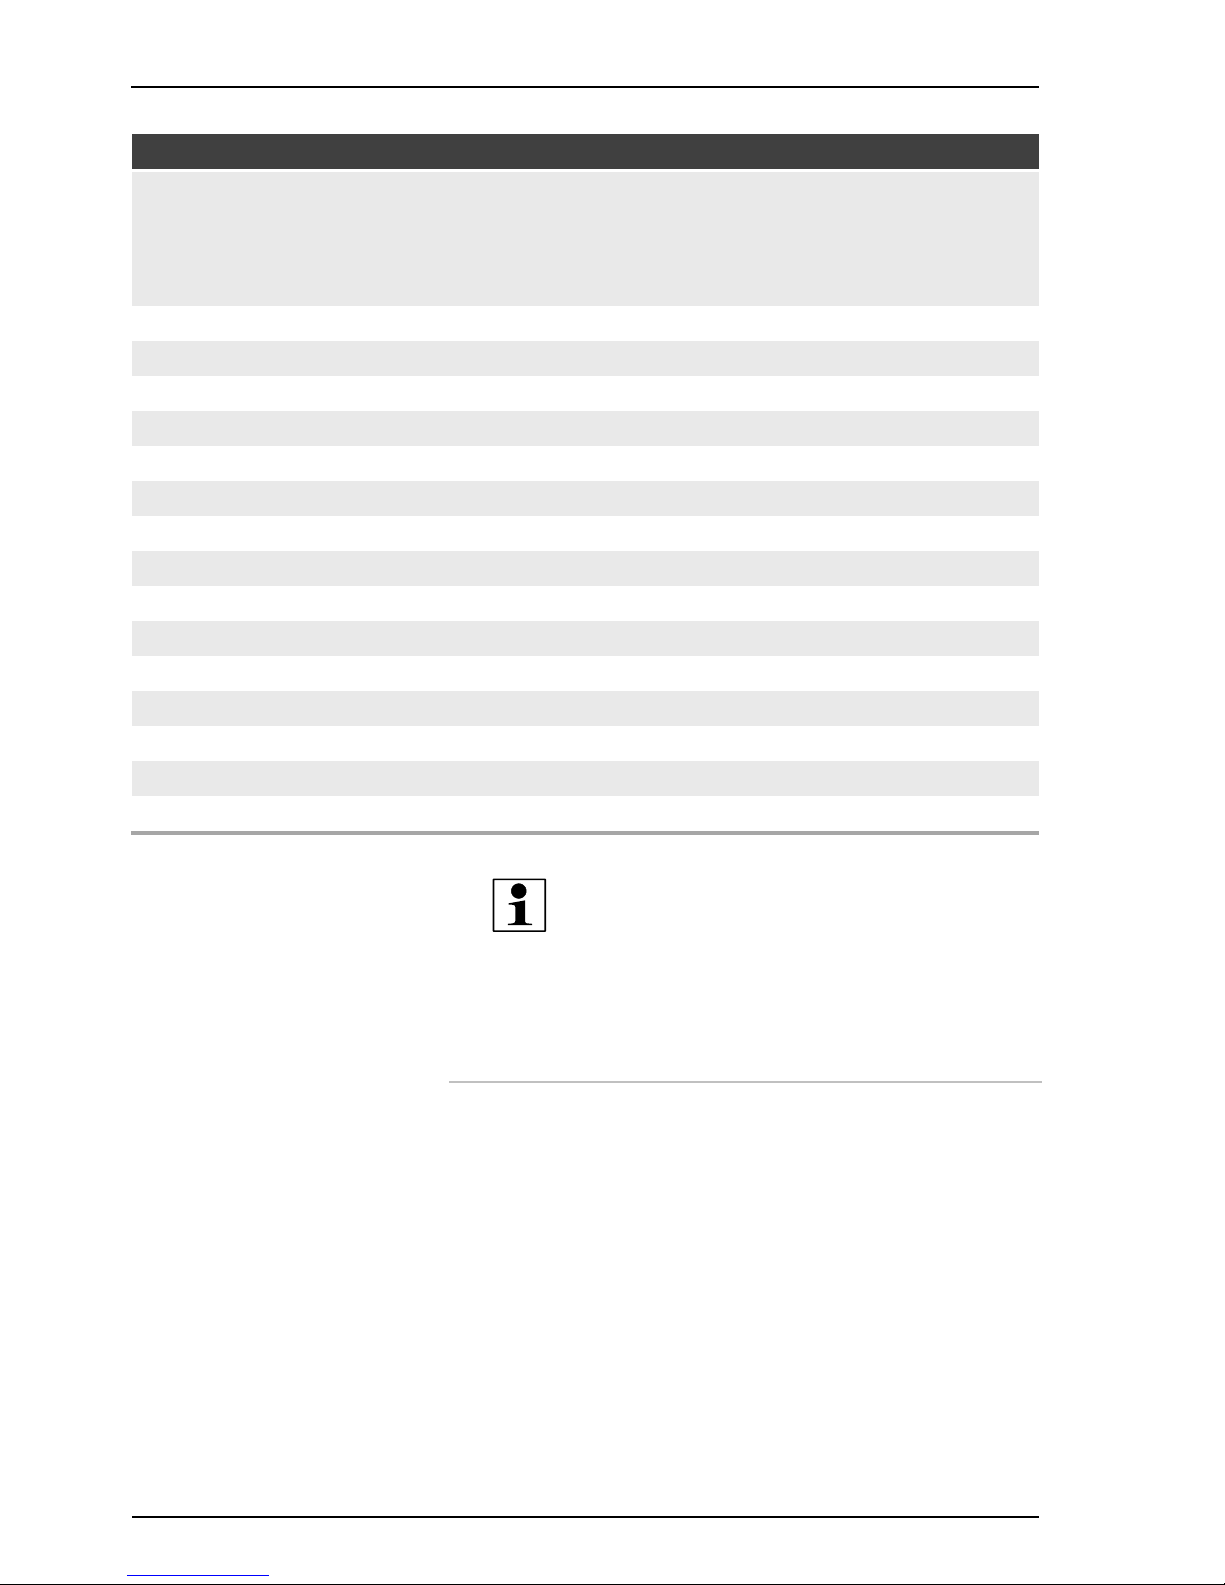
7.4 Cleaning plan
Page 36
Cleaning and maintenance
34/78
Component Interval Activity See page
After each
tanning session
When necessary
50 h
1 Adjustable air nozzles X Cleaning and disinfection 32
2 Acrylic panel X Cleaning and disinfection 32
14 Operating panel X Cleaning and disinfection 32
Multifunction control panel X Cleaning and disinfection 32
Protective goggles X Cleaning and disinfection 32
MP3 cable X Cleaning and disinfection 32
6 Condensation tank X Empty 51
8 Body cooling air nozzles, foot end X Clean 32
9, 11, 16 Surfaces X Cleaning and disinfection 32
12 Nozzles AQUA / AROMA SYSTEM X Clean 32
13 Body cooling air nozzles X Clean 32
2-4 Filter X Remove and clean filter 51
7 Filter X Remove and clean filter 49
10 Filter X Remove and clean filter 50
1 Filter X Remove and clean filter 51
NOTE:
If desired, you may set the unit to require that cleaning be
confirmed after each tanning session by pressing the
START/STOP button (when the cool-down time for the main
fan has finished).
7.5 Maintenance
Maintenance and care play a major role in deciding the devices performance
and appearance over its useful life. Diligent compliance at the specified intervals is absolutely necessary to ensure the proper operation of your tanning
system.
The current operating hours of the parts requiring maintenance can be displayed in the Professional Setup Manager – see separate instructions ' Professional Setup Manager ' (order no. 1013630).
Please note that the device must be inspected regularly by a JK authorized
representative every 12 months (from date of installation) to maintain its
proper condition!
Page 37

Cleaning and maintenance
11/2014 1015420-00 Operating instructions – 35/78
7.5.1 Acrylic panel
CAUTION!
Cosmetics may cause cracks to form on the surface!
Over the long-term cosmetics or sunscreens cause damage
(e.g. crack formation on the surface).
– Ensure that cosmetics and sunscreens are removed
before tanning.
The acrylic panels for the tanning devices are produced of acrylic glass developed especially for this application. The acrylics used feature a particularly
high UV permeability and resistance, as well as an easy-care, hygienic surface that is gentle on the skin.
The acrylic panels are formed to device-specific shapes in a technically complex production process. Despite state-of-the-art production know-how, the
presence of minor spots, air bubbles or streaks in the acrylic panels is unavoidable. In addition, hairline cracks can occur on the acrylic panel during
operation.
These occurrences are material-related and are unavoidable in processing.
However, they have no significant effect on use and are therefore not accepted as defects.
Over the course of time the acrylic panel will become discolored as a result of
usage and must be replaced by customer-service personnel on a regular
basis.
The optional partition (only for devices with an air conditioning unit) works as
a UV filter and must be replaced by customer-service personnel on a regular
basis.
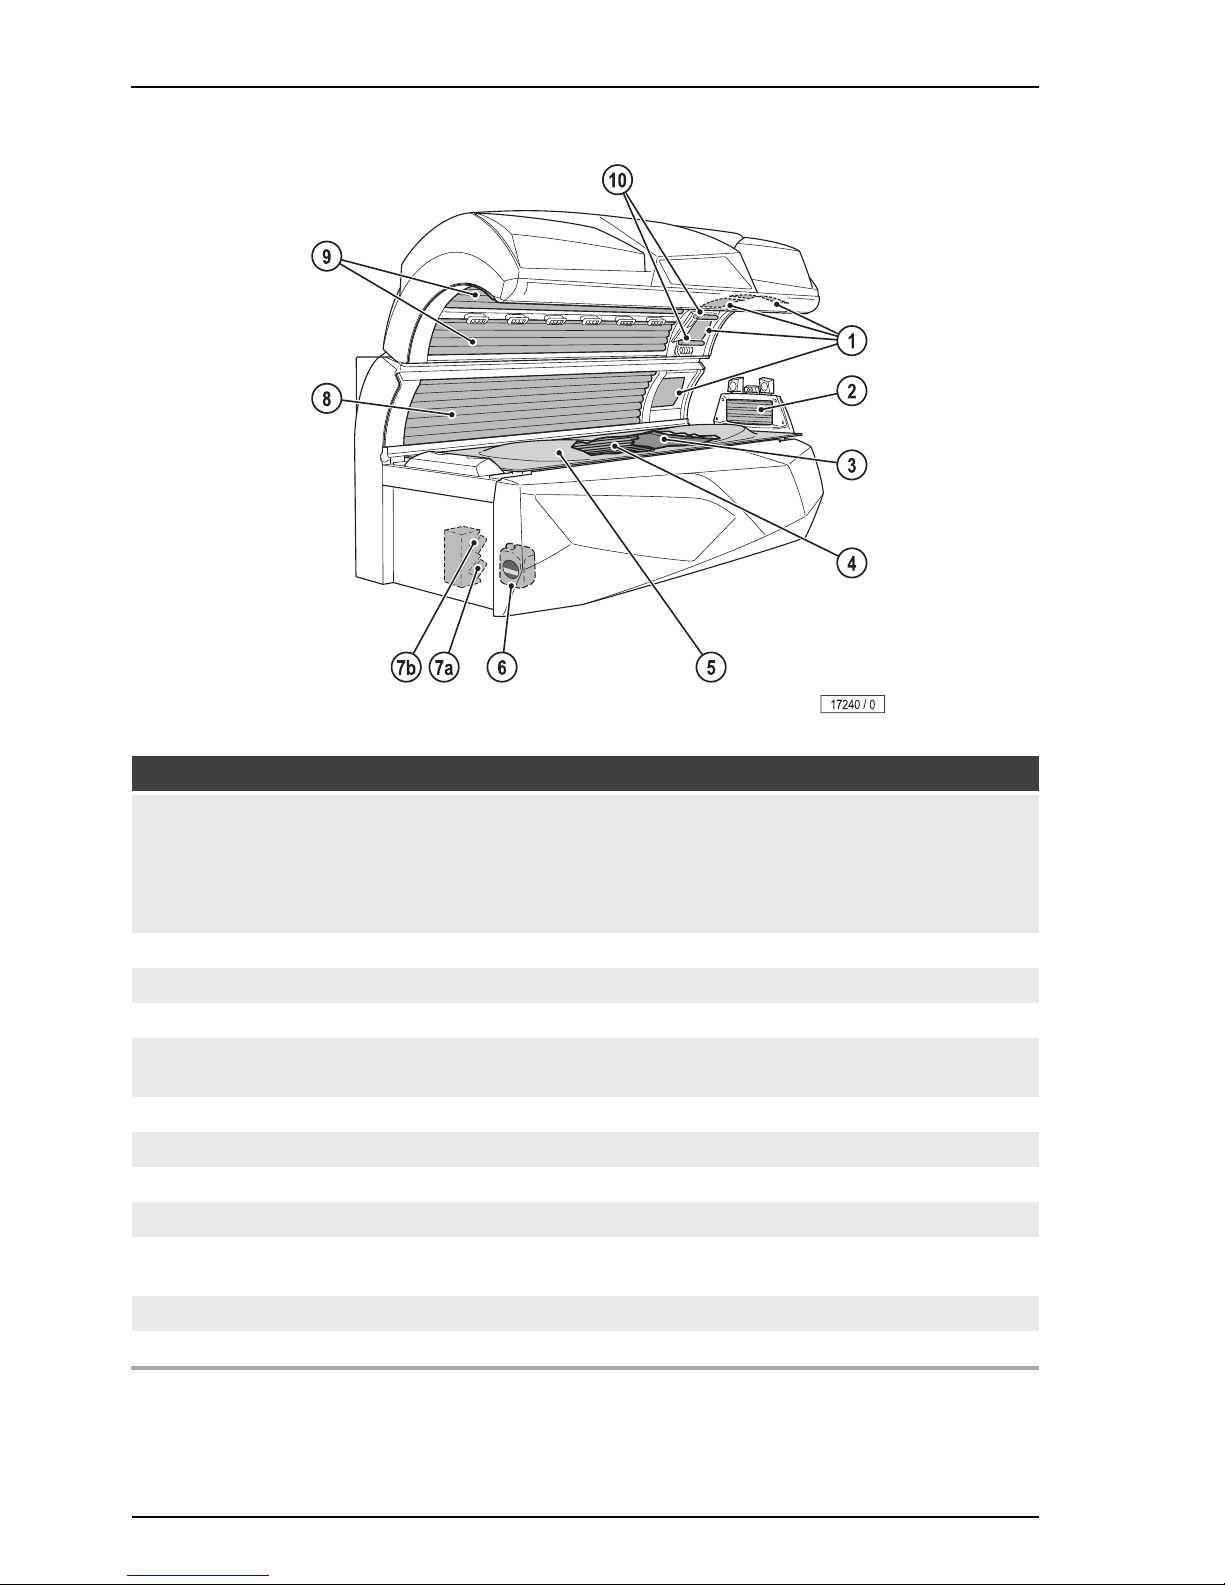
7.6 Maintenance plan
CAUTION!
Only use OEM spare parts of the same type! The use of
other parts will void the manufacturer's warranty!
Any liability is excluded in case of damage or injury proven
to be the result of the use of non-genuine spare parts.
Page 38
Cleaning and maintenance
36/78
Component Interval Activity See page
When necessary
300 h
500 h
750 h
1000 h
1500 h
3000 h
6 AQUA SYSTEM X Replace 55, 57
7a-7b AROMA canister X Replace 55
1 Facial tanner UV high pressure lamps X Replace 46, 47
10 Facial tanner UV-B low pressure lamps
(TYPE B)
X Replace 47
2 Shoulder tanner UV low pressure lamps X Replace 48
3 UV low pressure lamps, base X Replace 46
8 UV low pressure lamps, side section X Replace 46
9 UV low pressure lamps, canopy X Replace 47
1 Starter, UV low pressure lamps facial tan-
ner
X Replace 47
5 Acrylic panel X Replace 35
4 Partition X Replace 35
Page 39
Cleaning and maintenance
11/2014 1015420-00 Operating instructions – 37/78
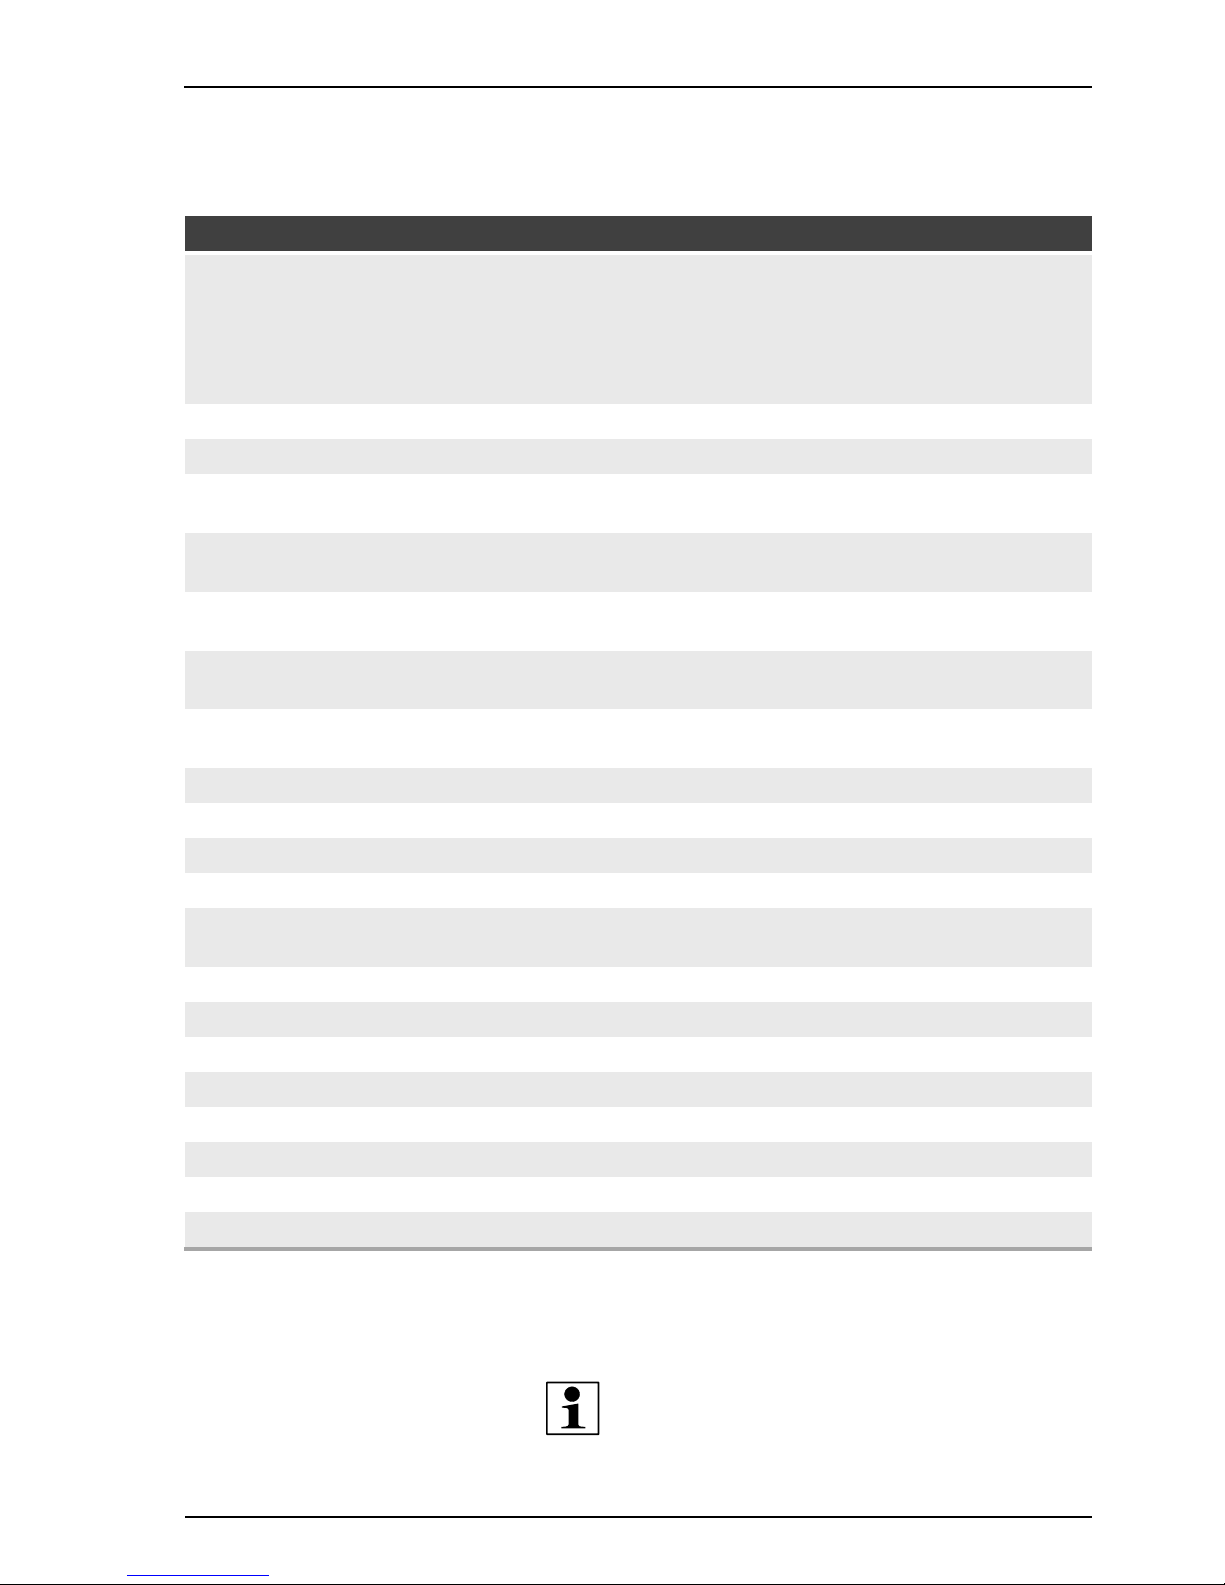
In addition to the maintenance plan on page 36, the following items should be
checked to ensure safe operation and use of your tanning system.
Component Interval1) Activity
250 h / 3 months
500 h / 6 months
2500 h / 1 year
5000 h / 5 years
10000 h / 10 years
1 Springs X Inspect and replace as necessary
Springs X Replace
2 Bolts and fasteners of the canopy
hinge mechanism
X Inspect and replace as necessary
Bolts and fasteners of the canopy lift
mechanism
X Inspect and replace as necessary
Bolts and fasteners of the canopy
hinge/lift mechanism
X Replace
3 Bolts and fasteners of the base/tank
hinge/lift mechanism
X Inspect and replace as necessary
Bolts and fasteners of the base/tank
hinge/lift mechanism
X Replace
4 Cylinders X Inspect and replace as necessary
Cylinders X Replace
5 Chassis and associated fasteners X Inspect and replace as necessary
Chassis and associated fasteners X Replace
6 Wiring and associated plugs / termi-
nal connections
X Inspect and replace as necessary
7 Acrylic panels2) X Inspect and replace as necessary
Acrylic panels2) X Replace
8 Acrylic support(s) X Inspect and replace as necessary
Acrylic support(s) X Replace
9 High pressure filter glass X Inspect and replace as necessary
High pressure filter glass X Replace
10 High pressure lamp holder X Inspect and replace as necessary
High pressure lamp holder X Replace
1) Interval must be repeated after each inspection or replacement
(i.e. 1st: 3 months, 2nd: 6 months, 3rd: 9 months, etc.)
2) The schedule for acrylic replacement listed refers only to the condition of the acrylic
relating to safety and does not address the efficacy of UV transmission.
NOTE:
If the device is in service for longer than 10 years, it must be
completely overhauled by a trained service technician.
Page 40
Cleaning and maintenance
38/78
7.7 Cleaning and maintenance work
preparation
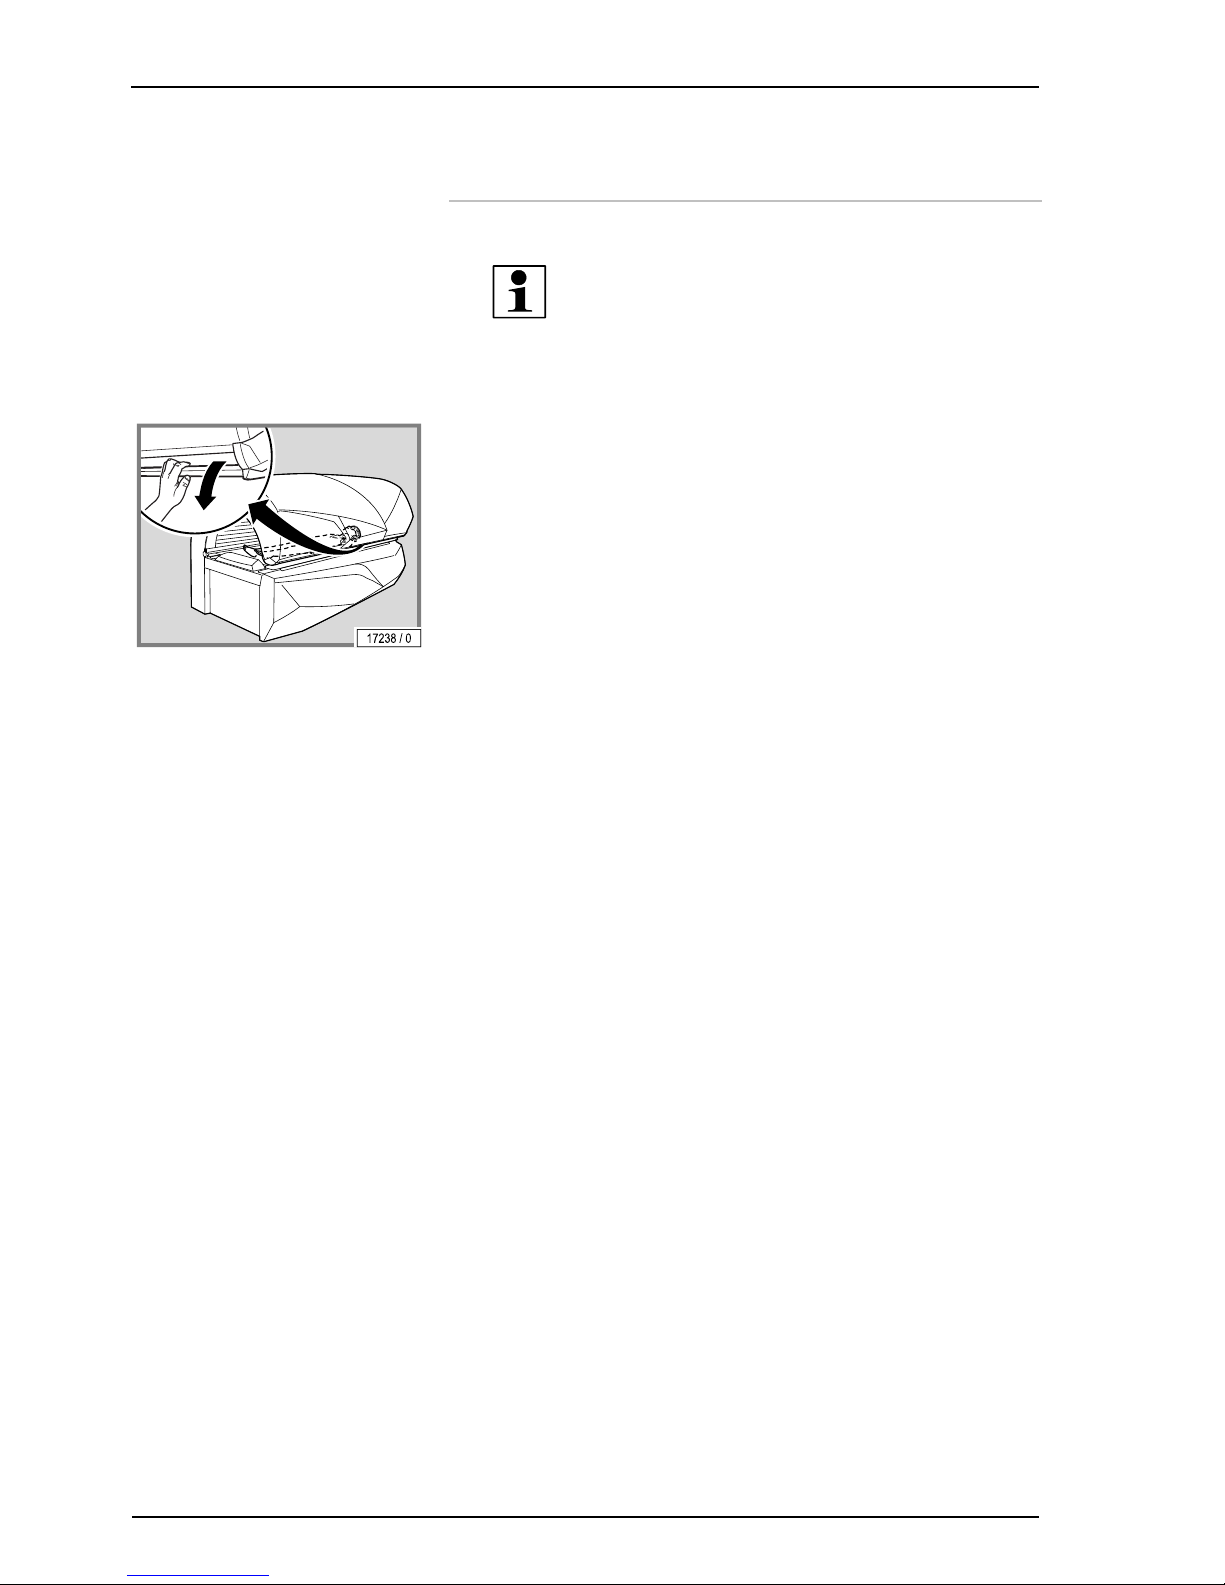
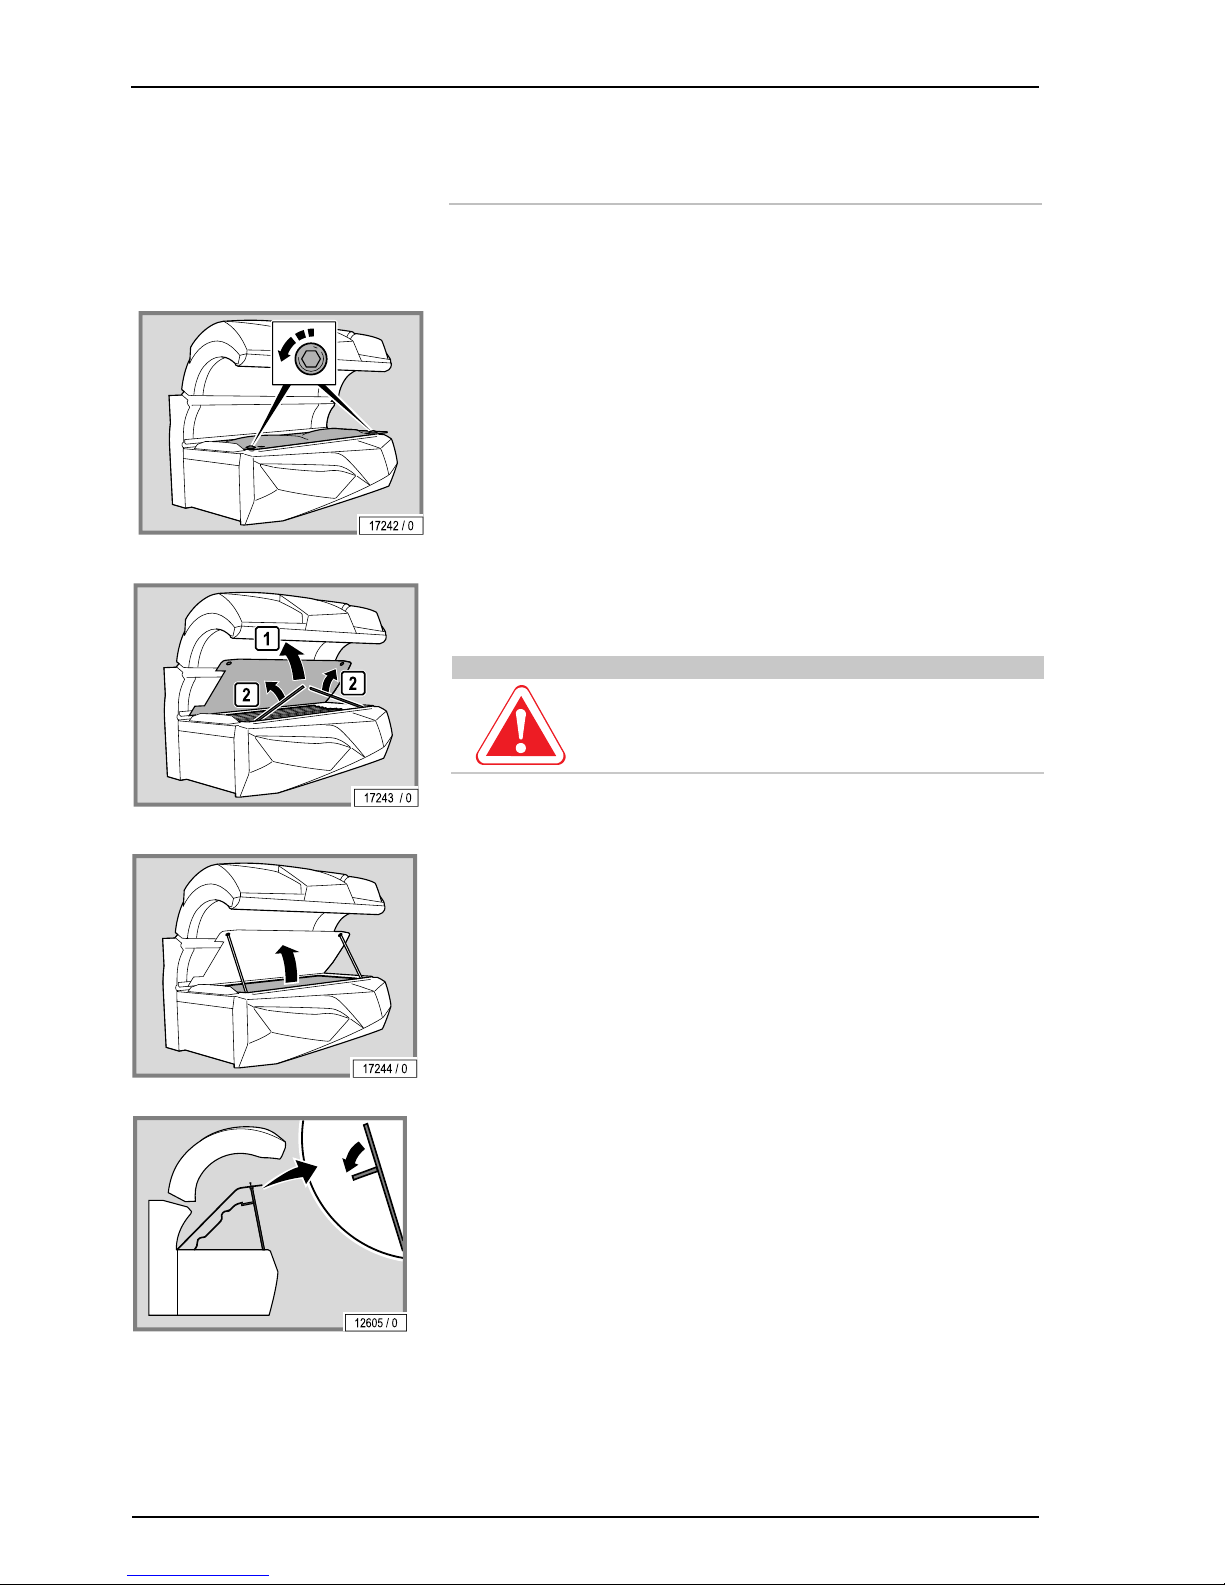
7.7.1 Lift up the acrylic panel and remove the
partition
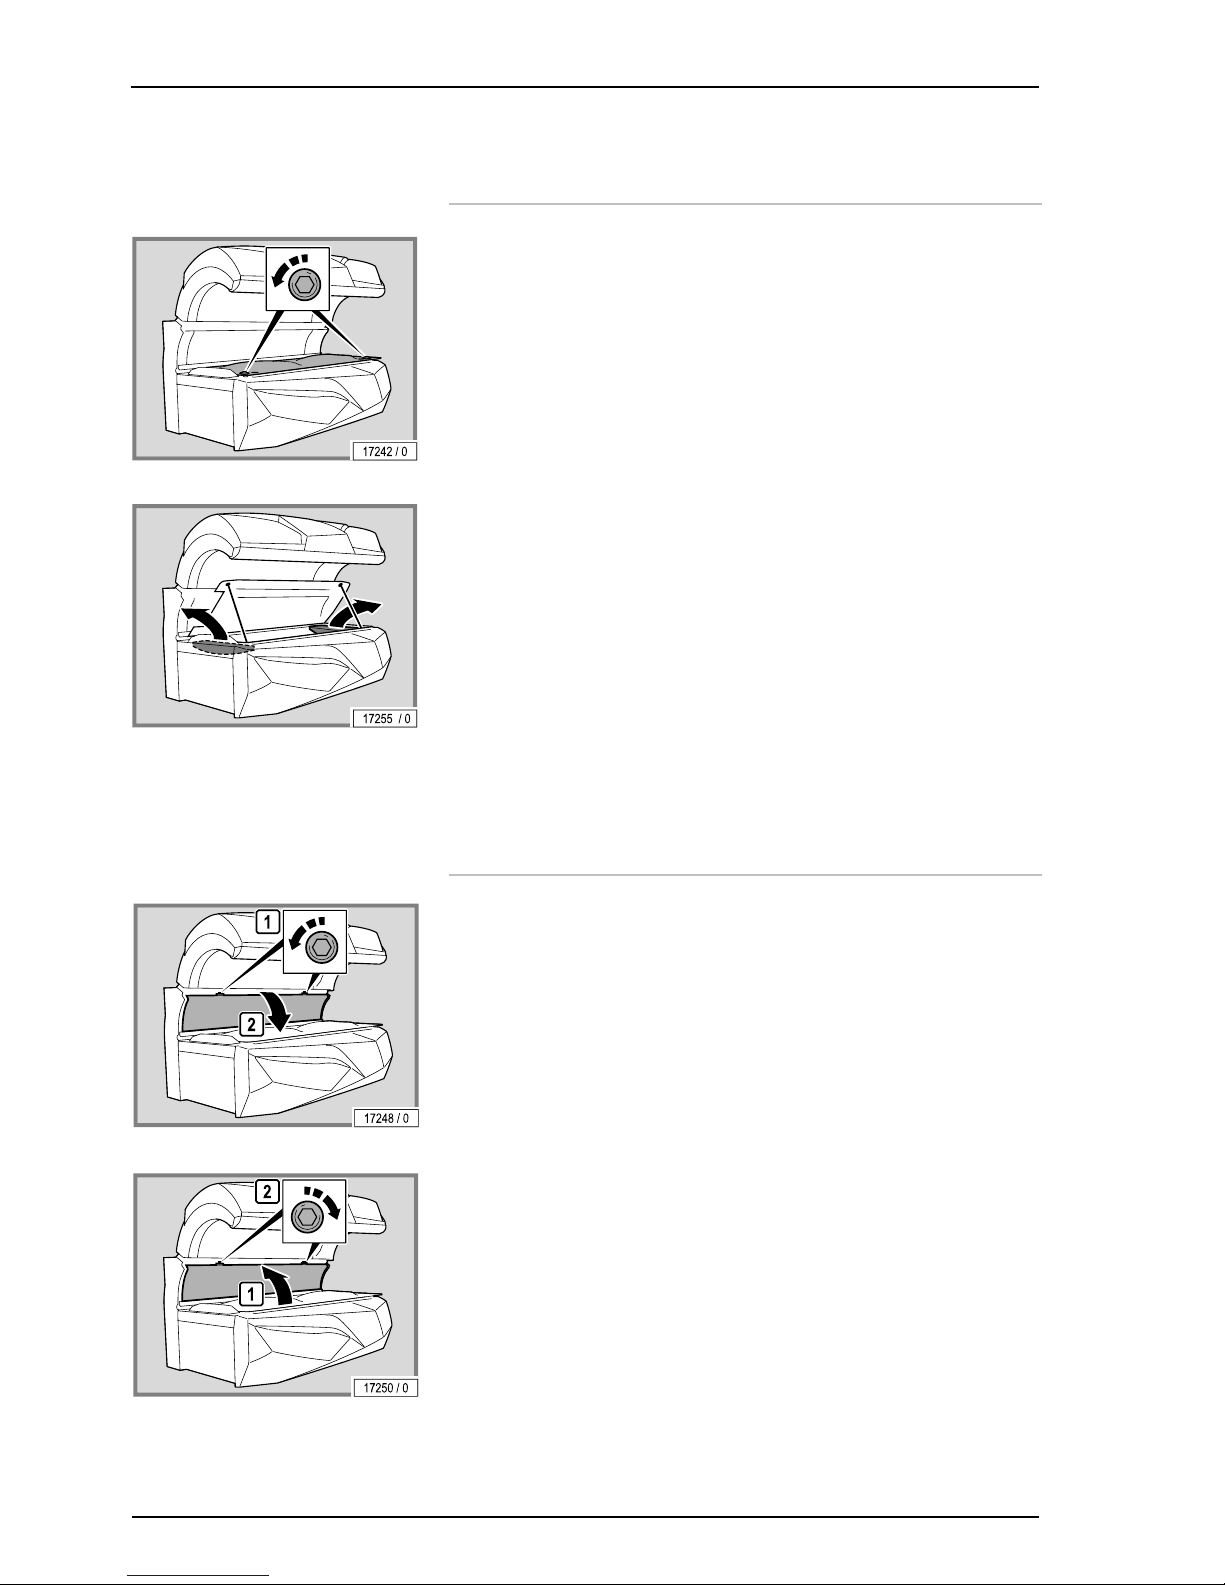
– Remove the screws.
– Lift up the acrylic panel.
Lift up the supports and prop the acrylic panel on them.
CAUTION!
Risk of scratching!
– Use the recesses provided on the acrylic panel.
– Lift up the partition (only for devices with an air conditioning unit).
– Fold out the supports.
– Prop the partition on the supports.
The assembly is the same process in reverse order.
When assembling the device please note:
– Remove fingerprints and other soiling carefully.
Page 41
Cleaning and maintenance
11/2014 1015420-00 Operating instructions – 39/78
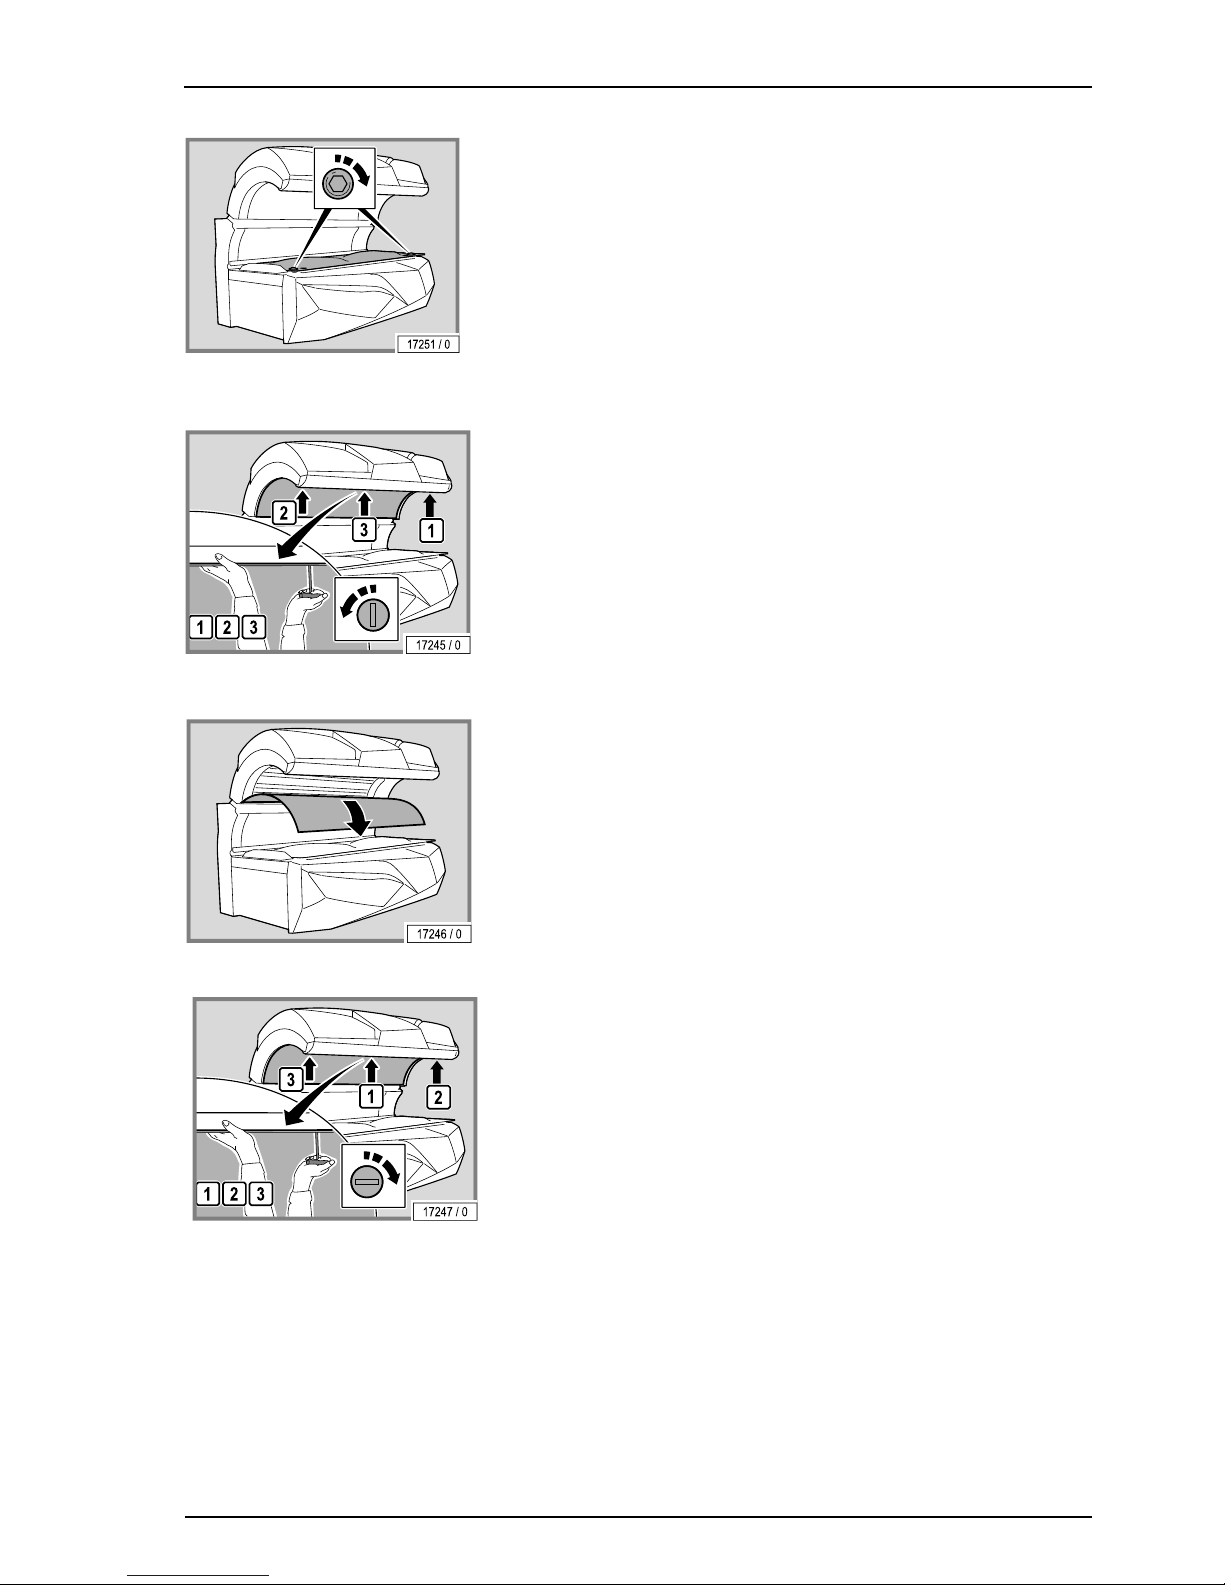
– Replace and retighten the screws.
7.7.2 Remove the canopy panel
– Turn the locks through 90°: first the outer locks, then the lock in the mid-
dle.
– Support the canopy panel with one hand so that it does not fall down.
– Carefully lower the canopy panel on the scratch protection (service kit).
The assembly is the same process in reverse order.
When assembling the device please note:
– Support the canopy panel with one hand so that it does not fall down.
– Replace and retighten the screws. Replace the middle screw first and
then the outer screws.
– Remove fingerprints and other soiling carefully.
Page 42
Cleaning and maintenance
40/78
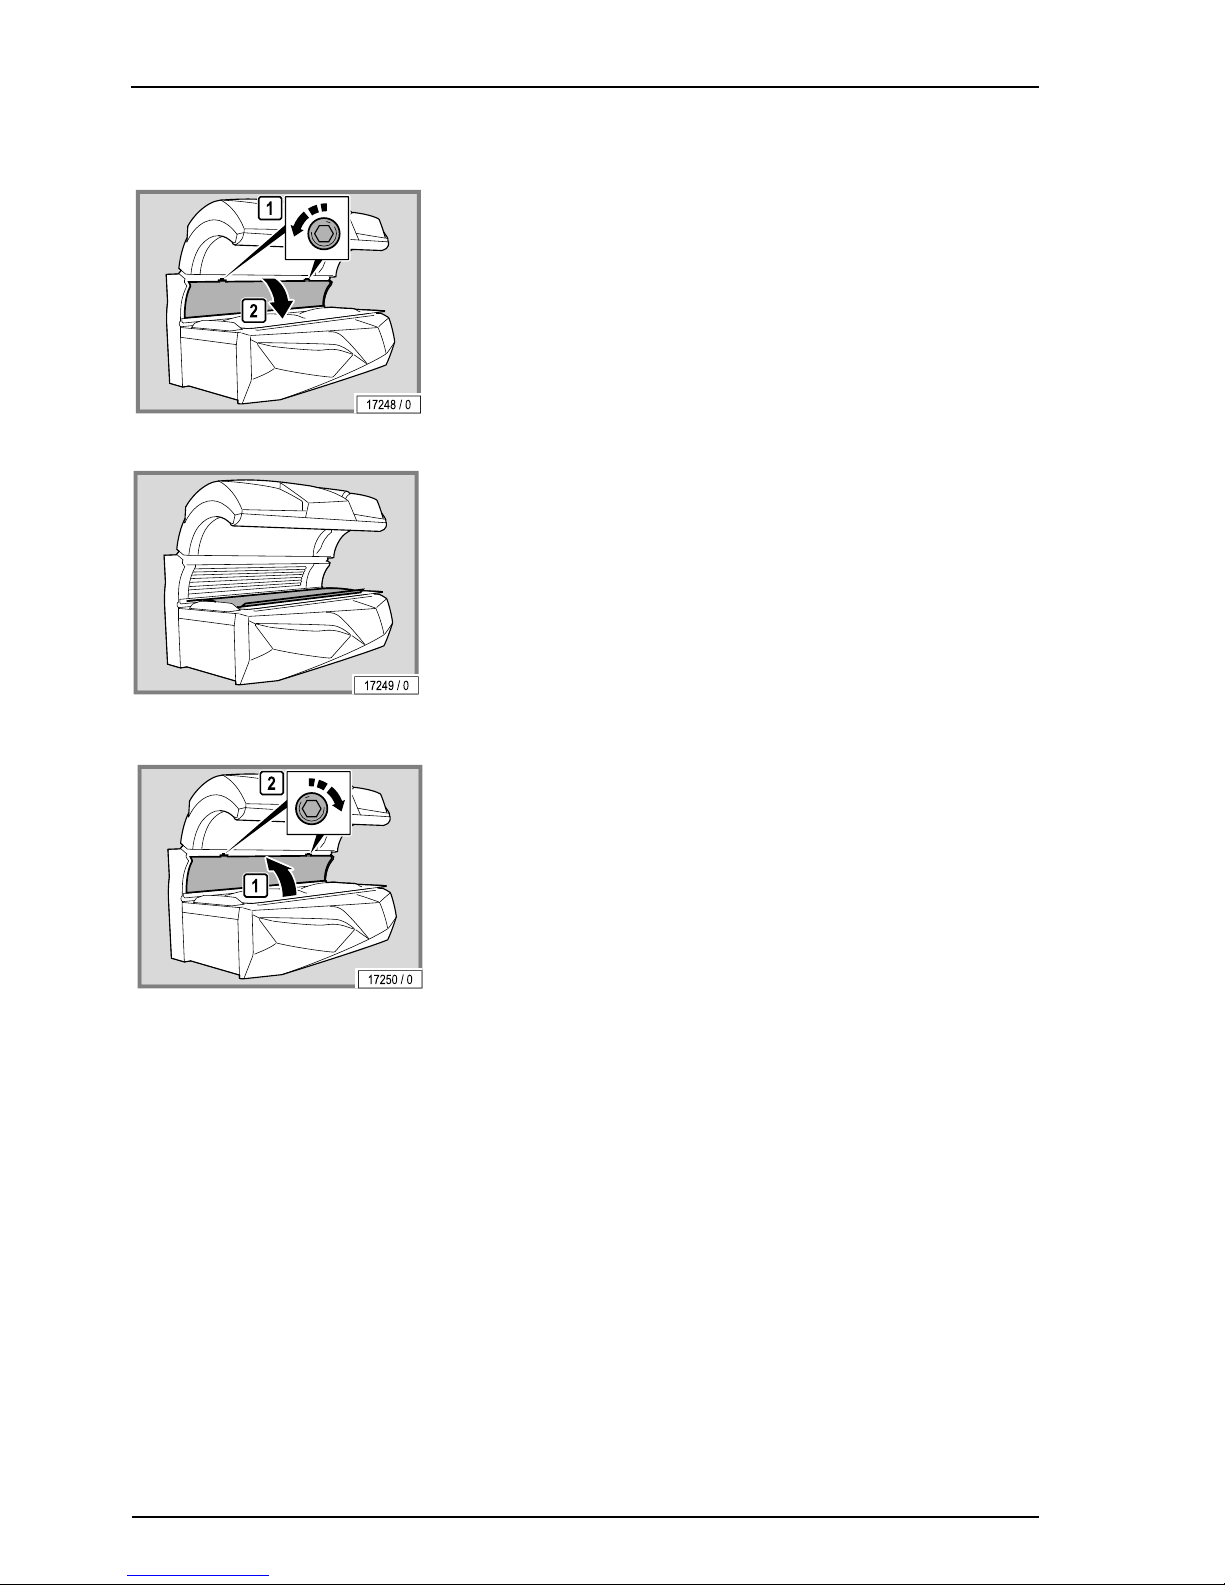
7.7.3 Remove the side section panel
– Turn the locks through 90°.
– Open the panel and lay it down carefully.
When assembling the device please note:
– Re-lock the locks.
– Remove fingerprints and other soiling carefully.
Page 43
Cleaning and maintenance
11/2014 1015420-00 Operating instructions – 41/78
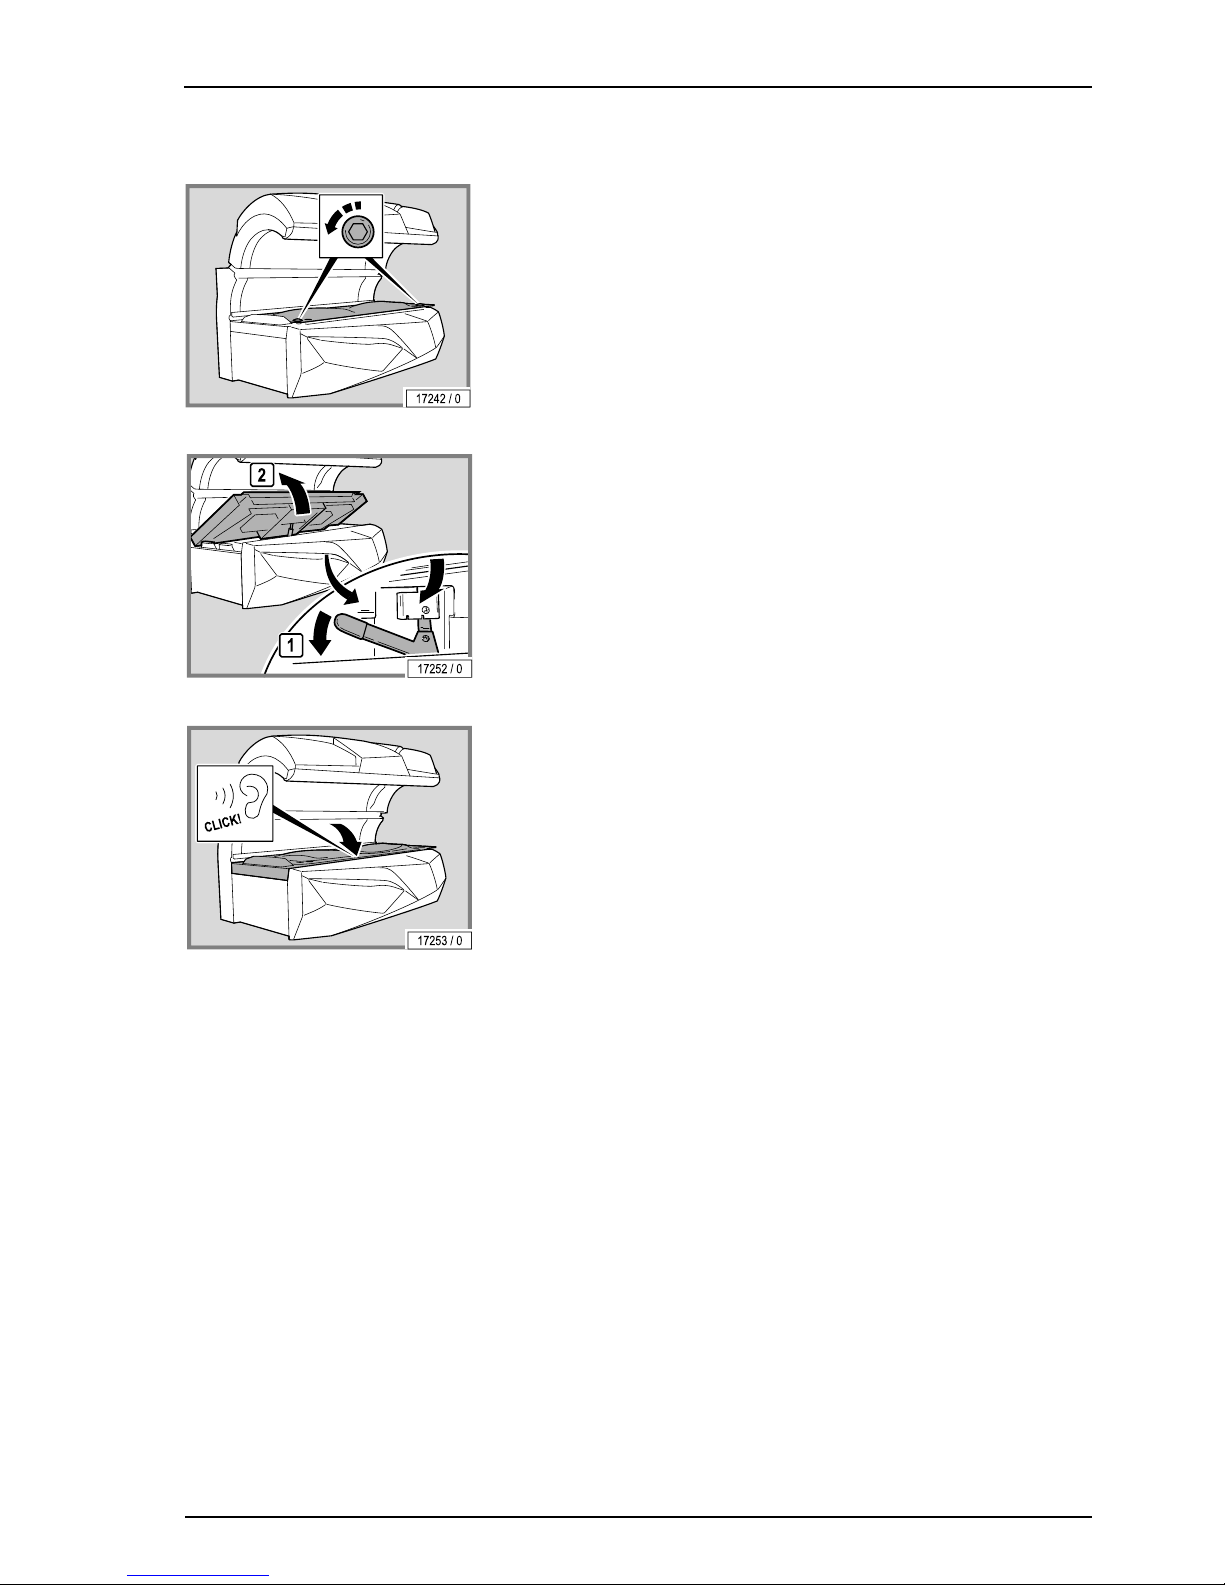
7.7.4 Open the bed base
– Remove the screws.
– Press the bed base gently downwards.
– Release the lock at the head end.
The assembly is the same process in reverse order.
When assembling the device please note:
– The bed base must lock with an audible click when closed.
Page 44

Cleaning and maintenance
42/78
7.8 Instructions for replacing the lamps
WARNING!
Danger of burns from hot lamps and device parts!
If the tannin
g
device was operated before being switched off
and opened, lamps and housing parts may be hot.
– Before replacing lamps or other spare parts, wait until
lamps and metal parts of the device have cooled down
sufficiently.
UV filters are used in order to control the UV radiation, e.g. the filter panels in
the facial tanner. However, the filter effect decreases over the course of time.
You must adhere to the replacement intervals specified in the maintenance
plan.
NOTE:
Small quantities of mercury can escape if the bulb/lamp
glass breaks!
Please comply with the following instructions:
Immediately disconnect the device from the mains pow-
er.
Children must leave the room immediately.
Ventilate the room for at least 15 minutes.
Put on disposable gloves.
With the window open: Collect the glass shards and
escaped mercury in a sealable container.
Bring the container to a collection site for waste lamps.
Page 45
Cleaning and maintenance
11/2014 1015420-00 Operating instructions – 43/78
7.8.1 Low pressure lamps
WARNING!
Danger of burns from hot lamps and device parts!
If the tannin
g
device was operated before being switched off
and opened, lamps and housing parts may be hot.
– Before replacing lamps or other spare parts, wait until
lamps and metal parts of the device have cooled down
sufficiently.
Replace faulty UV low pressure lamps immediately. Install replacement
lamps to the outer edges of the tanning area.
Always replace the entire set of lamps after the specified operating time.
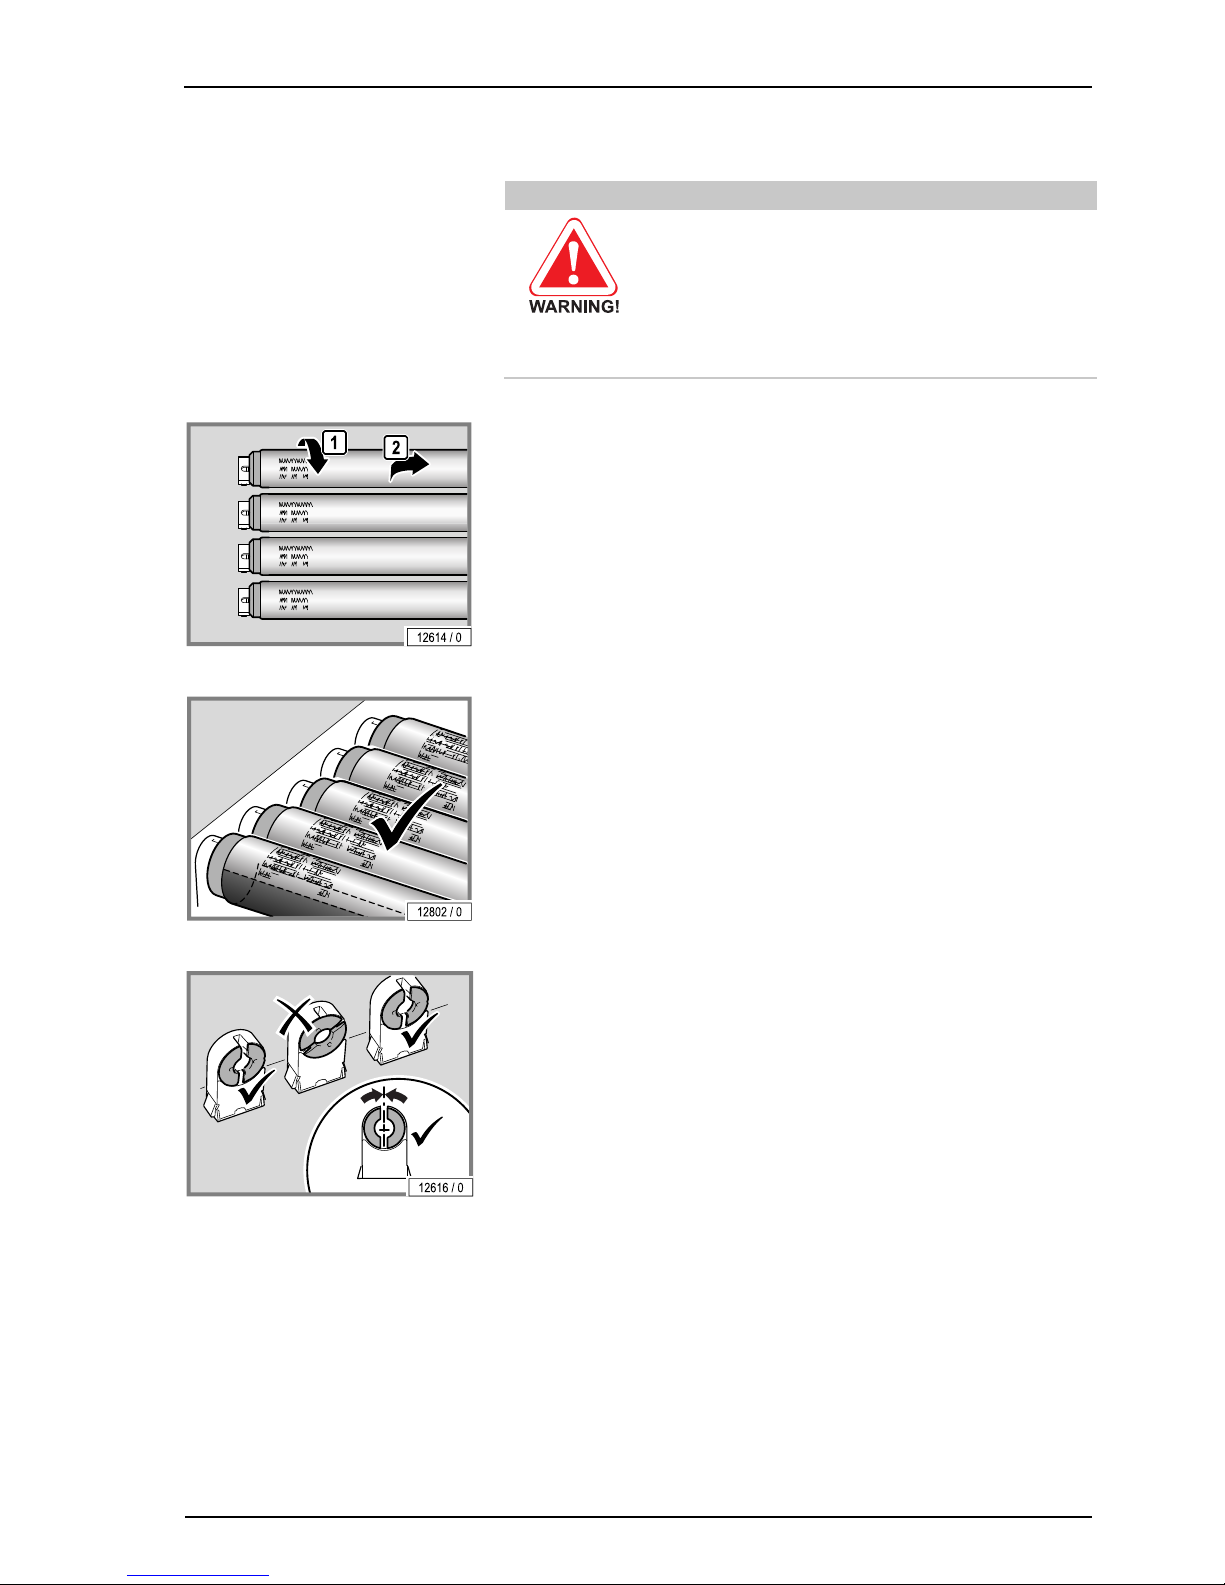
– Turn 90° and carefully remove from the socket.
– UV low pressure lamps possess a reflector which directs the light out-
wards. The lamps must be mounted in such a way that the rear side of
the reflector is located on the device side.
– Push the pins vertically into the socket from above.
Page 46
Cleaning and maintenance
44/78
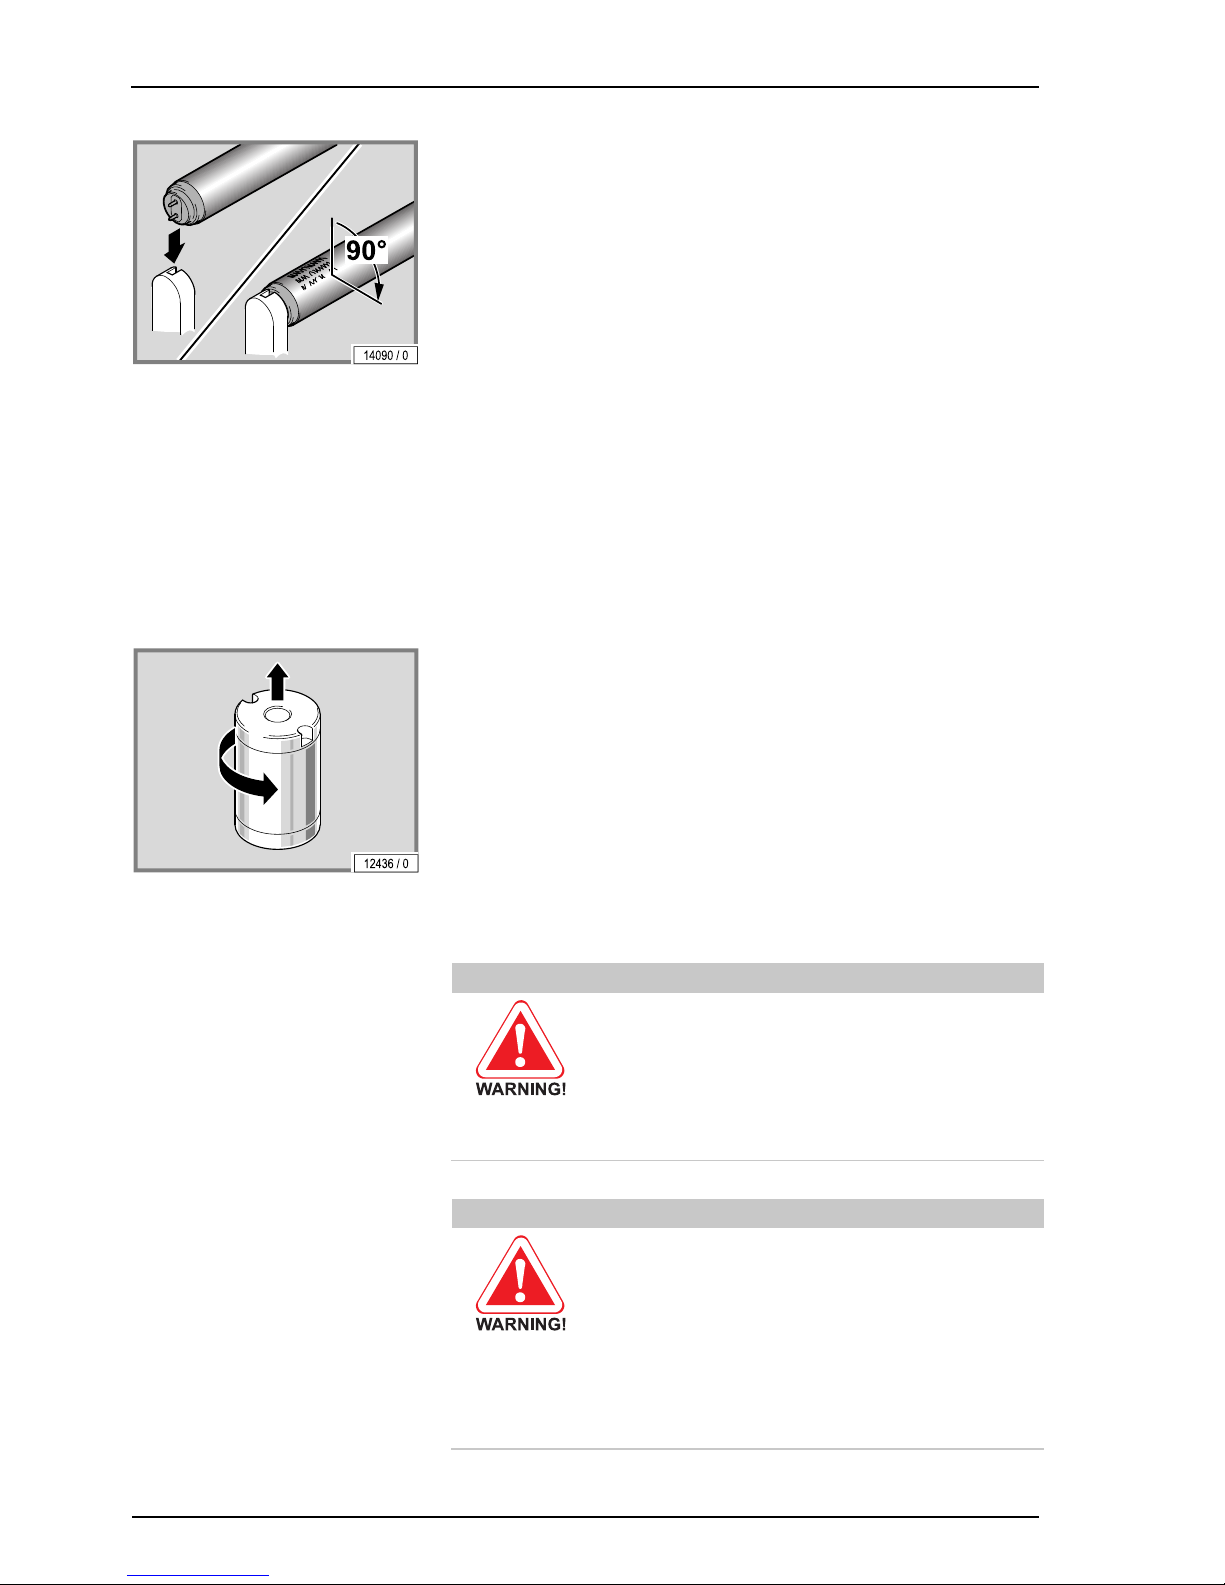
– Turn the lamp 90°.
The lettering must be oriented towards the outside (i.e. towards the tanning room or towards the user).
7.8.2 Starter
Replace faulty starters immediately.
You can recognize a faulty starter by the blackened ends of the lamps or
when the lamps can no longer be started.
Operating a lamp with a faulty starter significantly shortens its service life. The
lamp loses power and may begin to flicker under certain circumstances.
The starters are located in either one of the two lamp sockets or are visible
when the lamps are removed.
– Turn 90° and carefully remove from the socket.
7.8.3 High pressure lamps and filter panels
WARNING!
Danger of burns from hot lamps and device parts!
If the tannin
g
device was operated before being switched off
and opened, lamps and housing parts may be hot.
– Before replacing lamps or other spare parts, wait until
lamps and metal parts of the device have cooled down
sufficiently.
WARNING!
Fire hazard due to overheated lamps!
Non-approved high pressure lamps can explode. Hot lamp
components can set other parts on fire. People can be killed
or severely injured due to smoke inhalation and fire.
– Only fit the high pressure lamps specified by the manu-
facturer.
– Clean the inside of the device regularly. Dust particles
are flammable!
Page 47
Cleaning and maintenance
11/2014 1015420-00 Operating instructions – 45/78
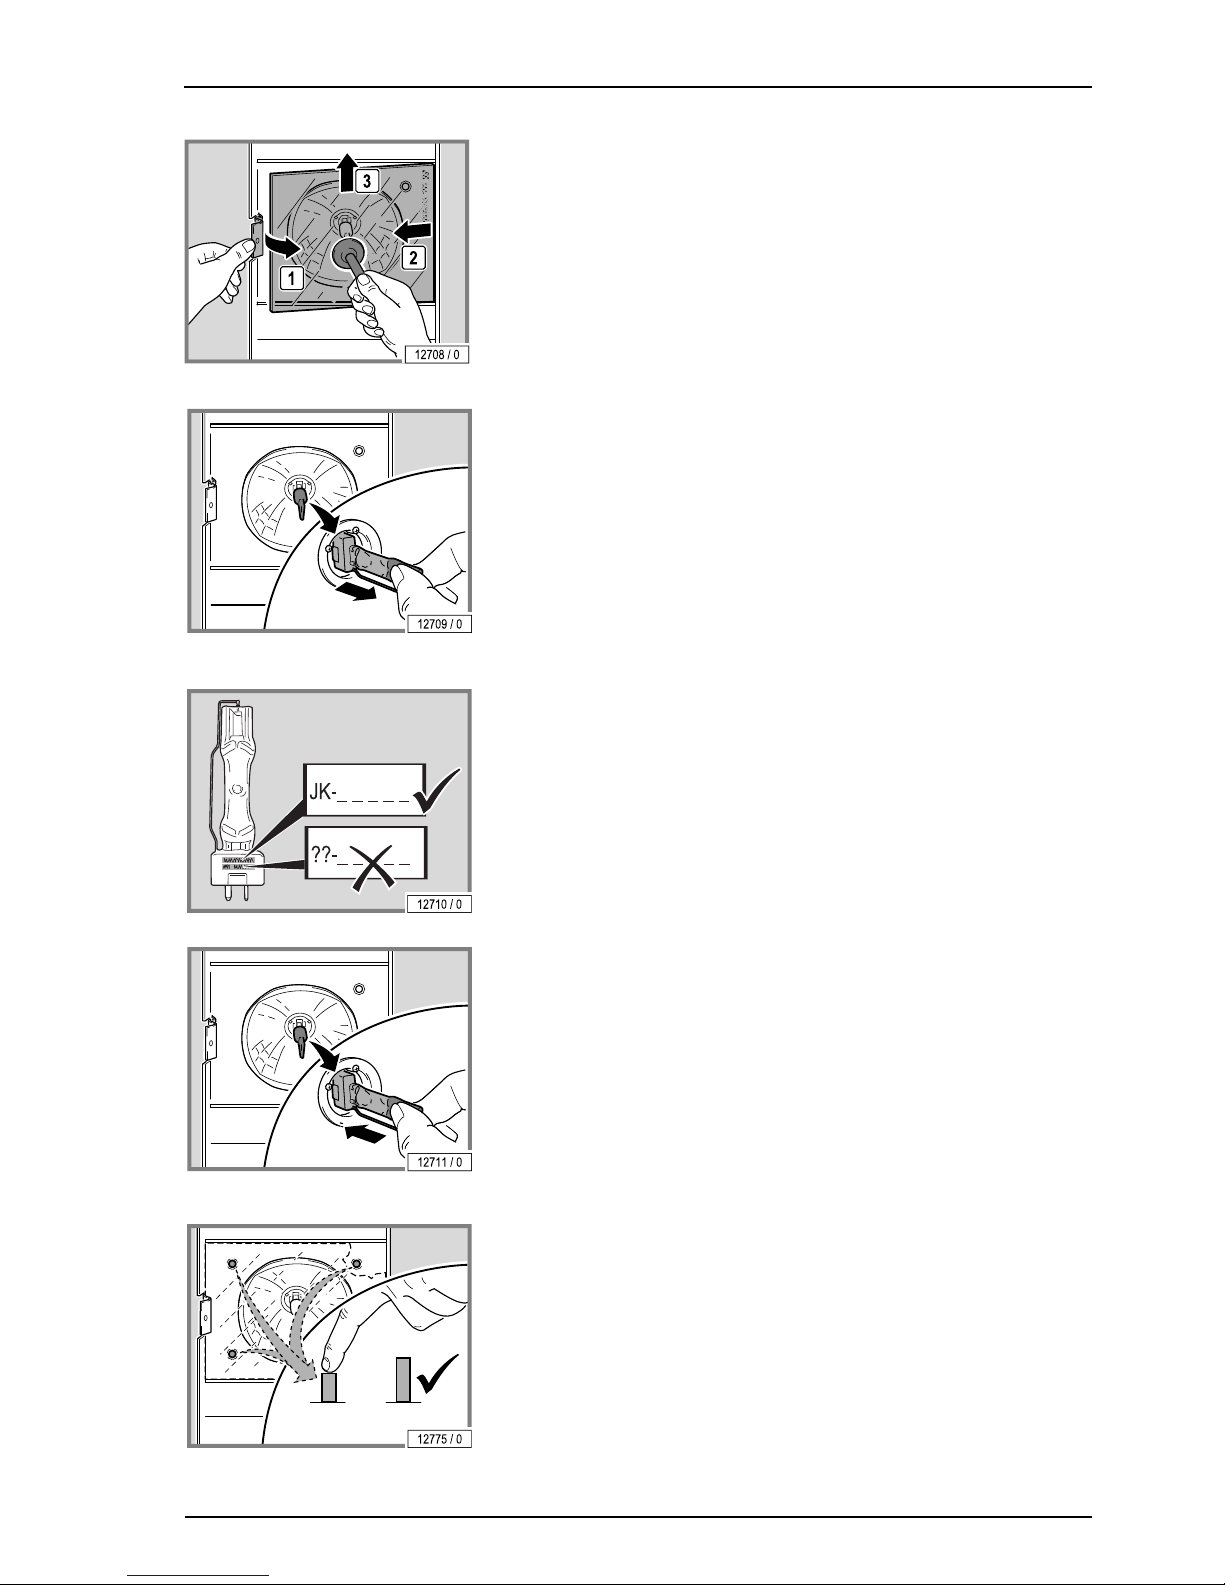
– Release the clamping holder.
– Lift the filter panel, pull it out of the guide and remove it.
– Unplug the UV lamps.
– Clean the reflector.
– Only utilize original UV lamps.
– Only touch new lamps in the handling zone.
– Test the safety switch to ensure that it works.
The safety switch ensures that the device switches off in the event of a
faulty filter panel or when a filter panel is missing.
– Press the button.
If the button springs back automatically then it is functional.
– Replace the filter panel.
Page 48
Cleaning and maintenance
46/78
7.9 Cleaning or replacing UV lamps in the
base
– Lift up the acrylic panel and the partition: see page 37.
– Remove the lamp covers at the head and foot ends.
Replacing lamps: see page 43.
The assembly is the same process in reverse order.
7.10 Cleaning or replacing the UV lamps in
the side section
– Removing the side section panel: see page 40.
Replacing lamps:
UV low pressure lamps: see page 43.
UV high pressure lamps and filter panels: see page 44.
When assembling the device please note:
– Re-lock the locks.
Page 49
Cleaning and maintenance
11/2014 1015420-00 Operating instructions – 47/78
7.11 Cleaning or replacing UV lamps and
filter panels in the canopy
– Removing the canopy panel: see page 39.
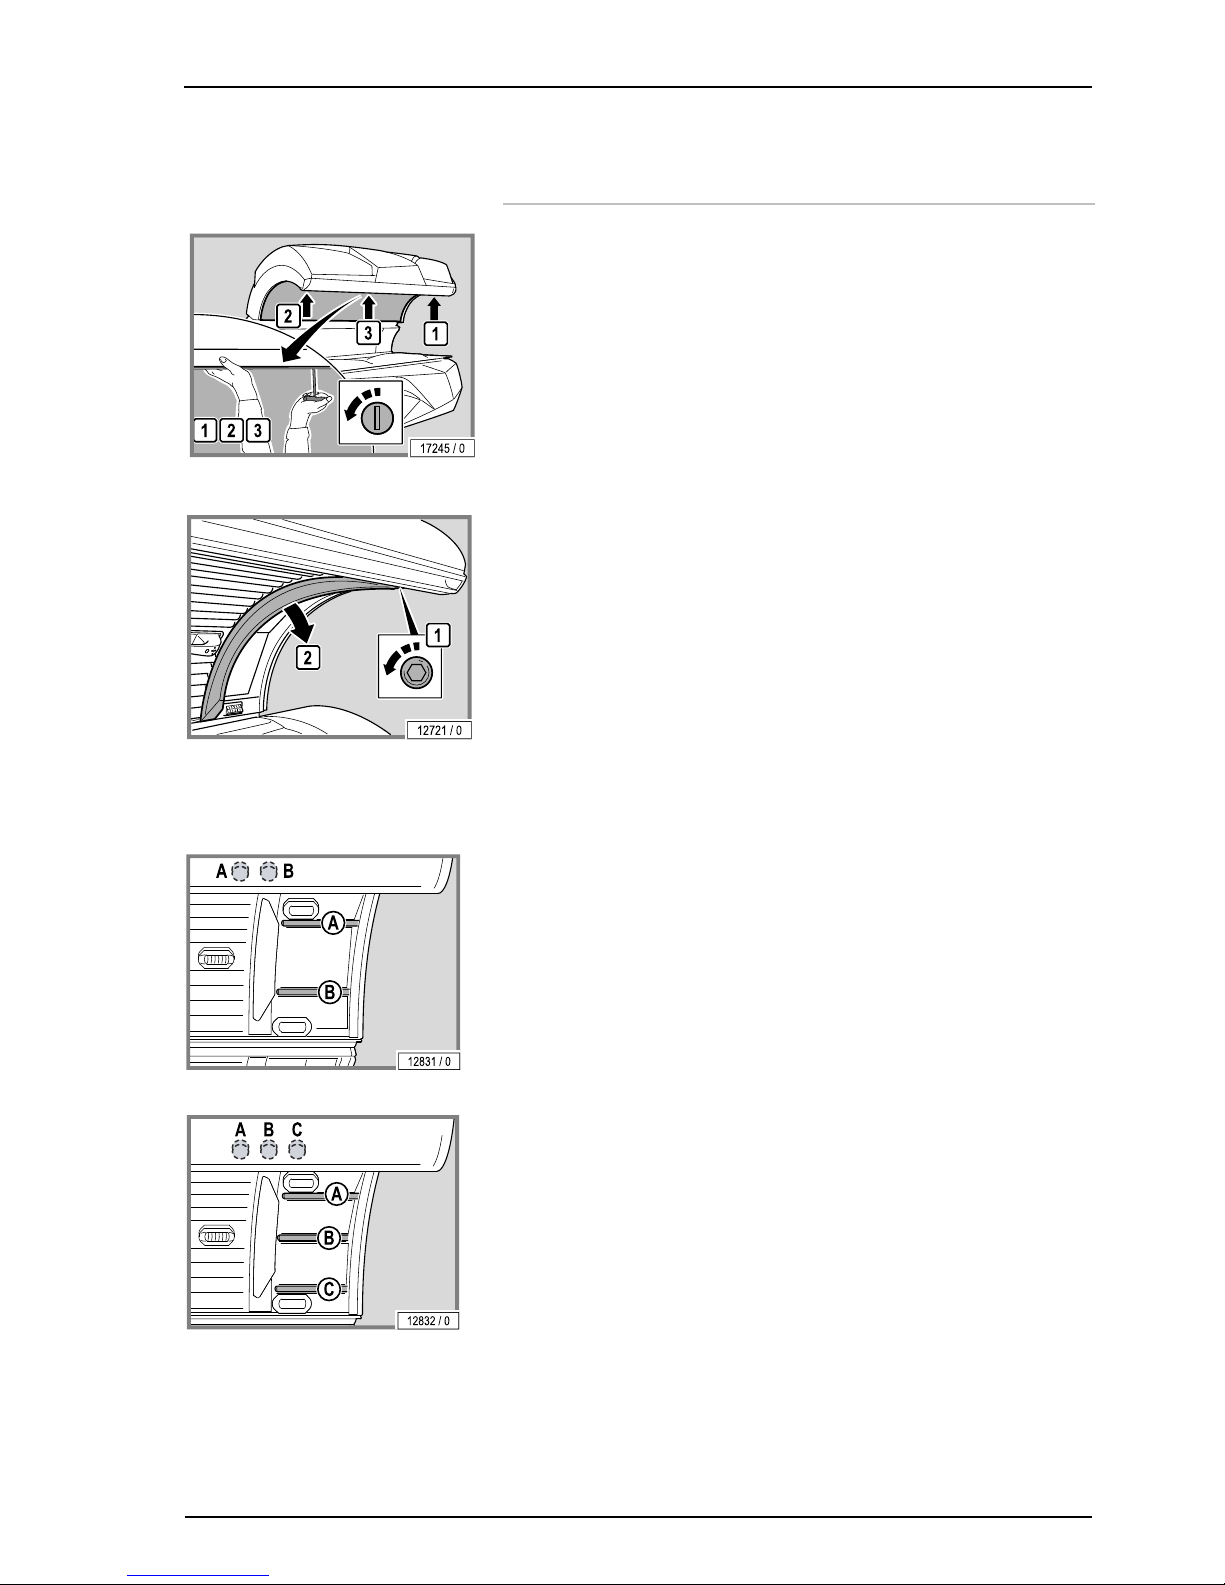
– Remove the screws and then remove the lamp cover.
The following components listed in the maintenance plan are fitted in the
canopy:
UV low pressure lamps: see page 43.
Facial tanner UV high pressure lamps and filter panels: see page 44.
Facial tanner filter panels
Facial tanner UV low pressure lamps and the associated starters
The facial tanner's UV low pressure lamps must be removed first so that the
UV high presure lamps and the filter panels can be changed.
Type 155023316XXXXXX35:
These devices have 2 UV low pressure lamps in the facial tanner.
– Remove the lamps.
Type 155033316XXXXXX35:
These devices have 3 UV low pressure lamps in the facial tanner.
– Remove the lamps.
Page 50
Cleaning and maintenance
48/78
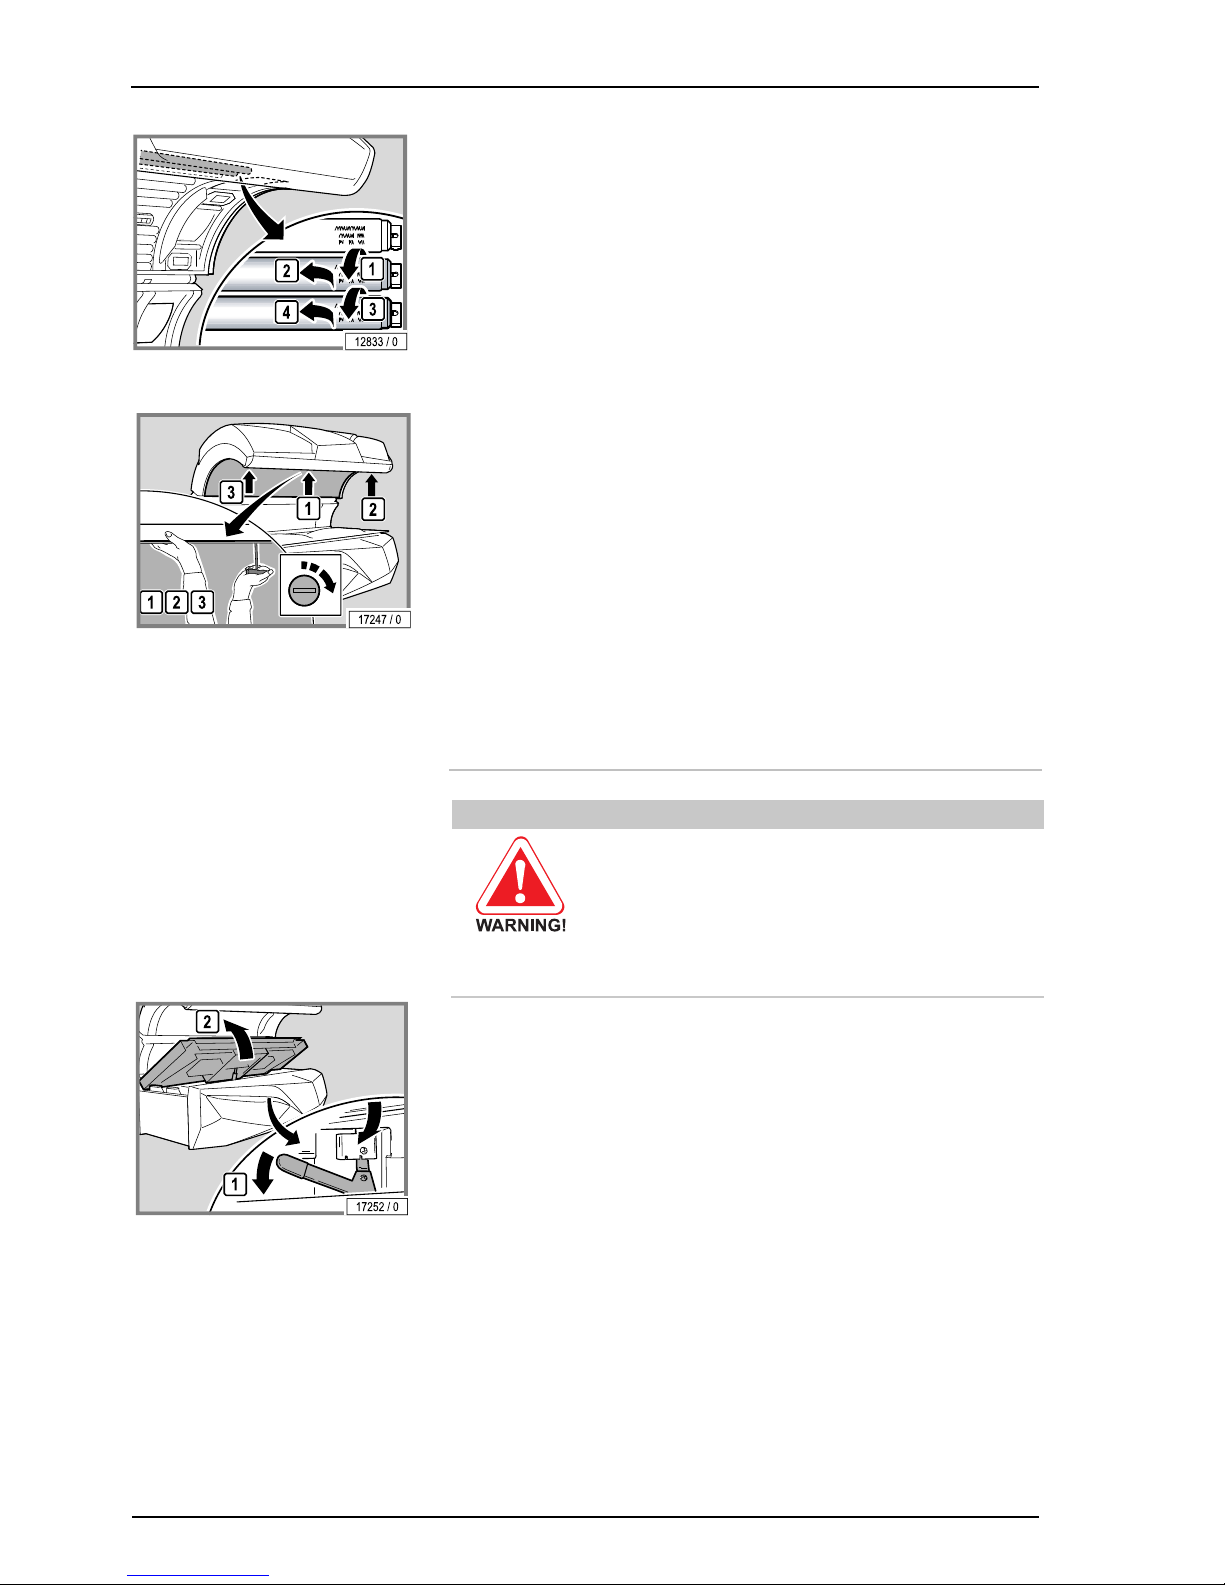
– Remove the two upper low pressure lamps in the canopy so that you can
thenaccess the facial tanner's low pressure lamp starter.
Replacing the lamps: see page 43.
Replacing the starters: see page 44.
UV high pressure lamps and filter panels: see page 44.
The assembly is the same process in reverse order.
When assembling the device please note:
– Support the canopy panel with one hand so that it does not fall down.
– Replace and retighten the screws. Replace the middle screw first and
then the outer screws.
7.12 Cleaning or replacing the UV lamps
and filter panels in the shoulder
tanner
WARNING!
Danger of burns from hot lamps and device parts!
If the tanning device was operated before being switched off
and opened, lamps and housing parts may be hot.
– Before replacing lamps or other spare parts, wait until
lamps and metal parts of the device have cooled down
sufficiently.
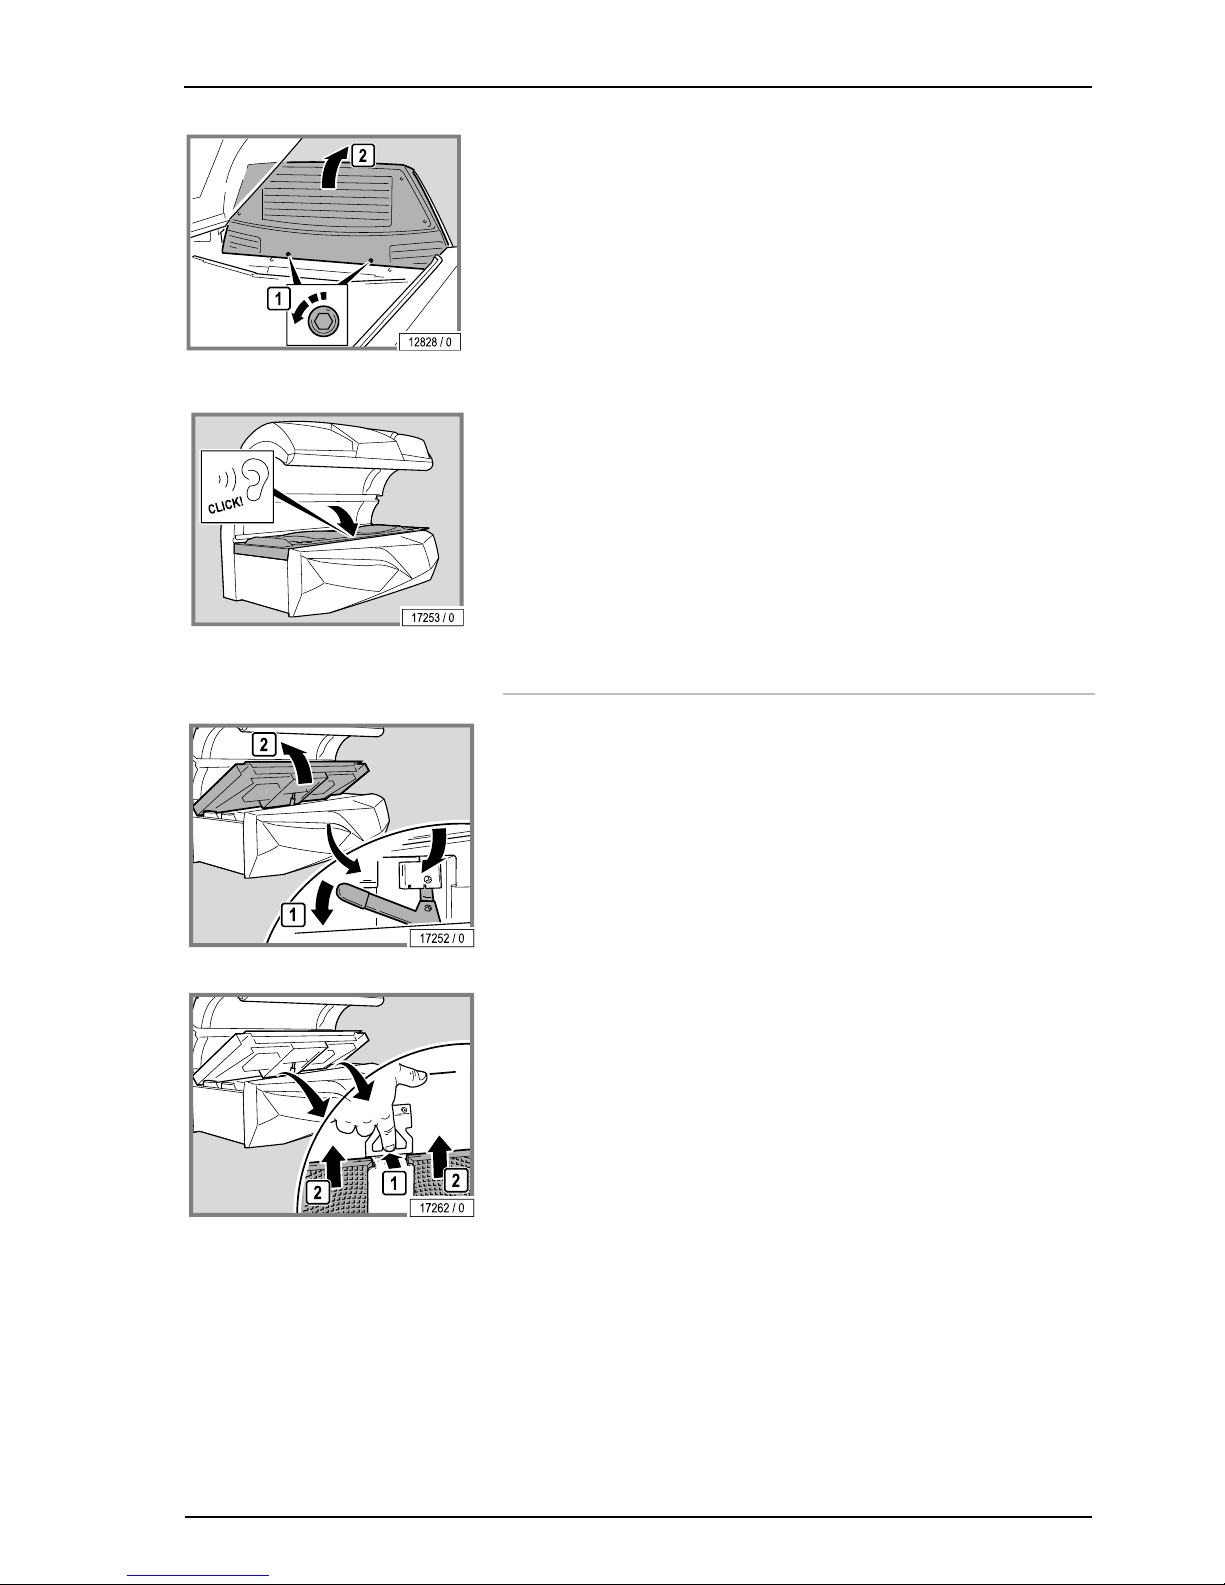
– Opening the bed base: see page 41.
Page 51
Cleaning and maintenance
11/2014 1015420-00 Operating instructions – 49/78
– Remove the screws and then remove the lamp cover.
Replacing lamps: see page 43.
Replacing starters: see page 44.
The assembly is the same process in reverse order.
When assembling the device please note:
– The bed base must lock with an audible click when closed.
7.13 Cleaning the filters in the base
– Opening the bed base: see page 41.
– Remove the filters.
Page 52
Cleaning and maintenance
50/78
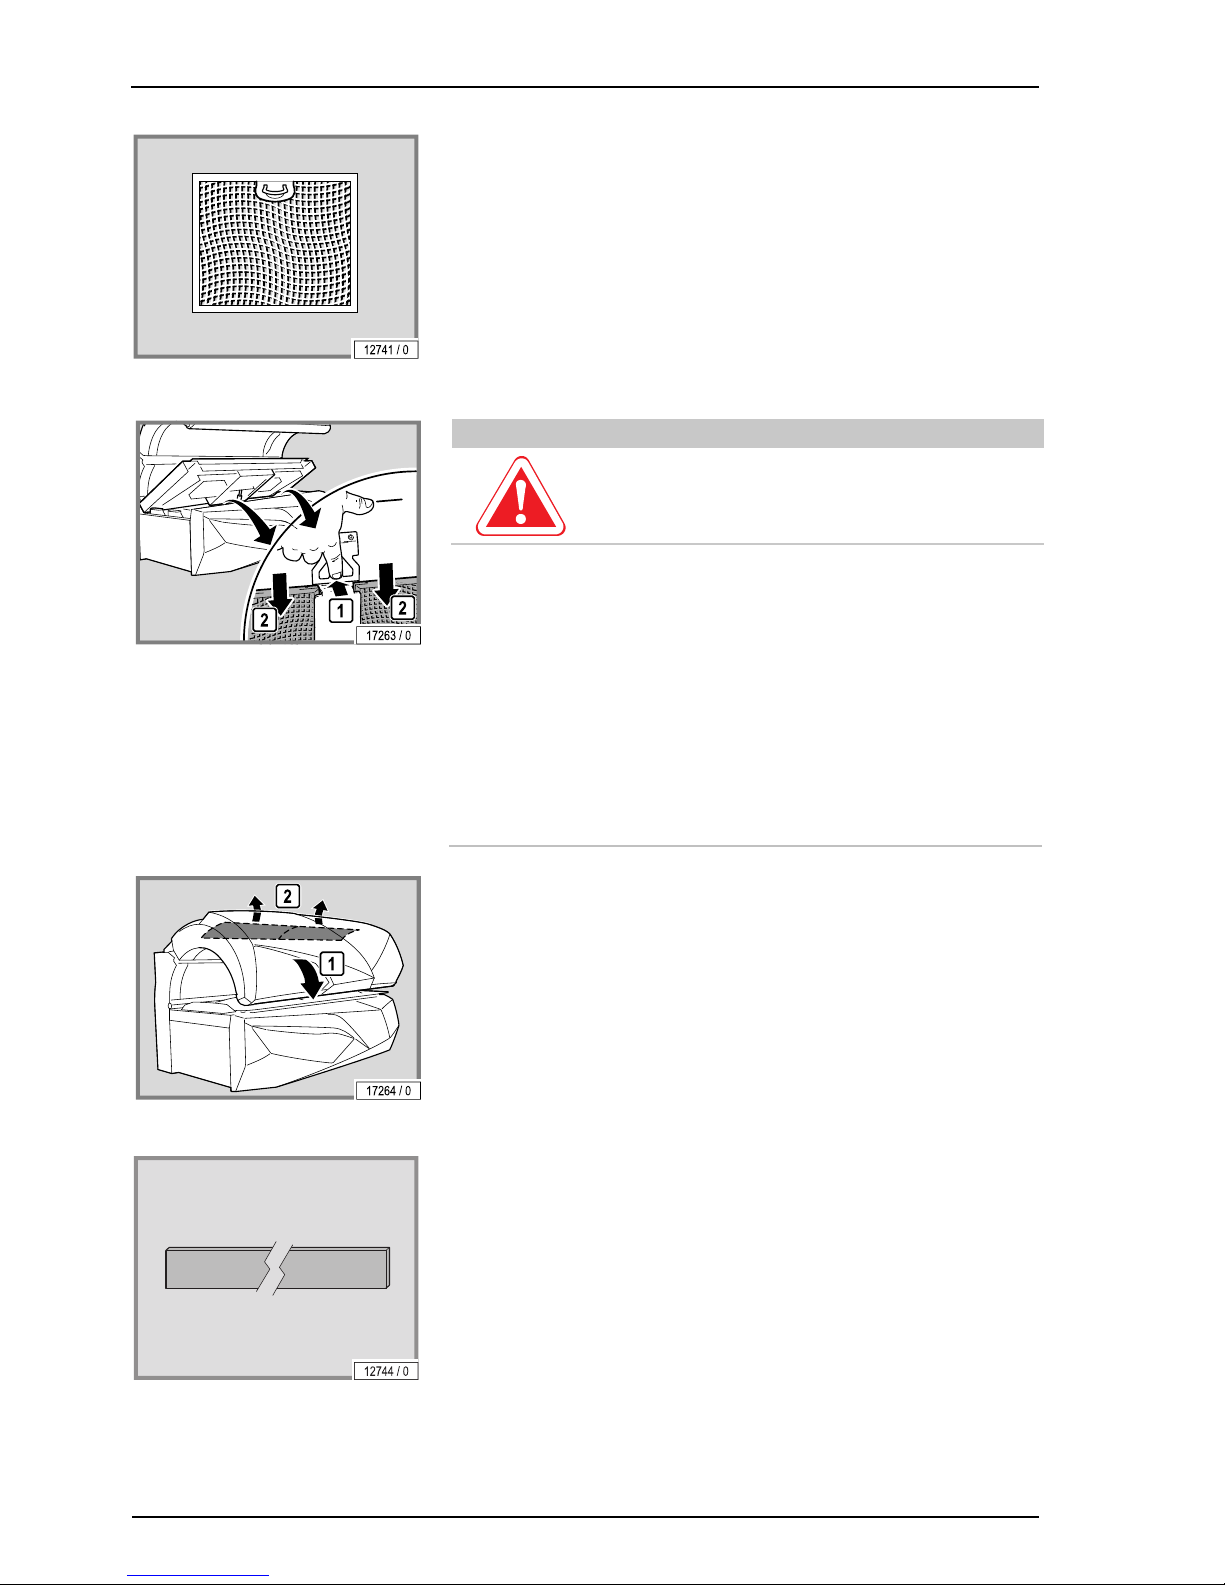
– Cleaning the filters when wet or dry.
Dry cleaning: Vacuum cleaner (depending on the degree of soiling)
Wet cleaning: Use water and detergent or put in a dish-washer
CAUTION!
The device may be damaged by moisture!
The cleaned filters must be dry before they are replaced.
– Reinstall the cleaned and dried filters.
– Close the bed base. You should hear the bed base click into place.
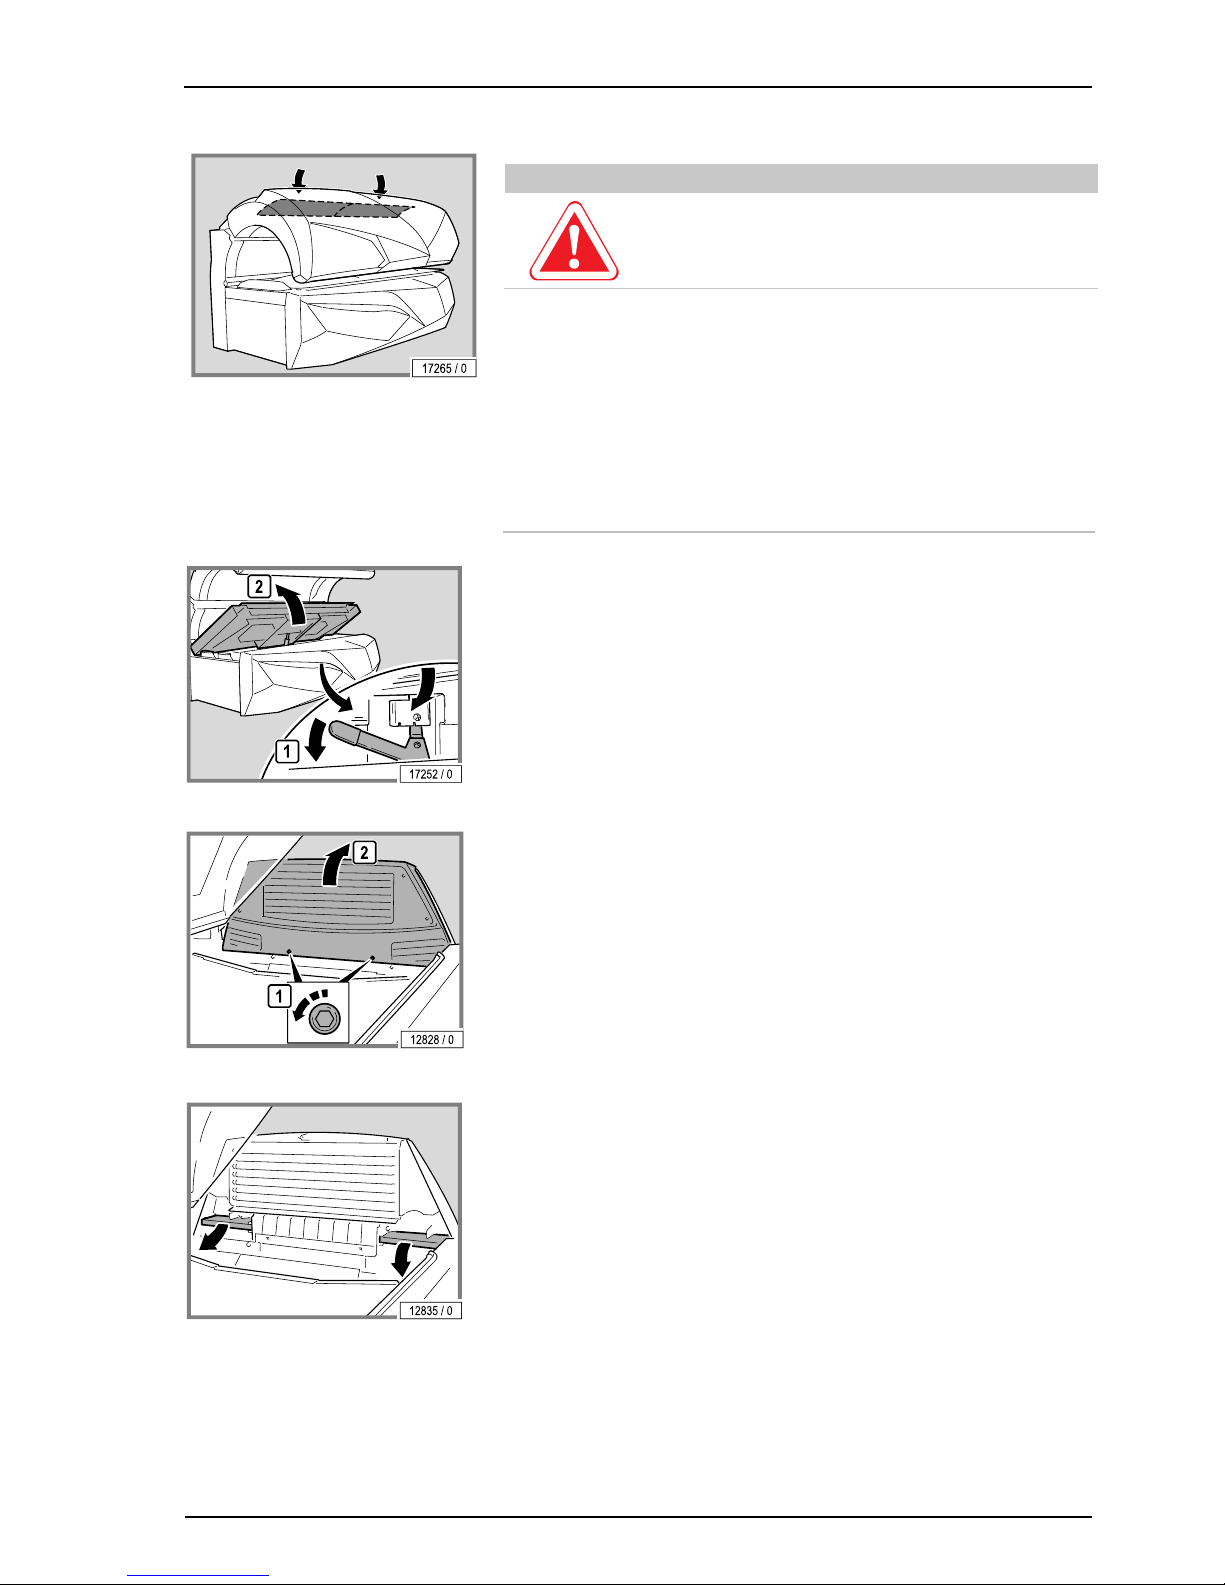
7.14 Cleaning the canopy filter mats
– Remove the filter mats fitted at the back of the canopy.
– Dry or moist clean the filter mats or replace with new ones.
Dry cleaning: Vacuum cleaner (depending on the degree of soiling)
Moist cleaning: Water and detergent
– Do not clean in the dish-washer!
Page 53
Cleaning and maintenance
11/2014 1015420-00 Operating instructions – 51/78
CAUTION!
The device may be damaged by moisture!
The cleaned filters must be dry before they are replaced.
– Reinstall the cleaned and dried filter mats.
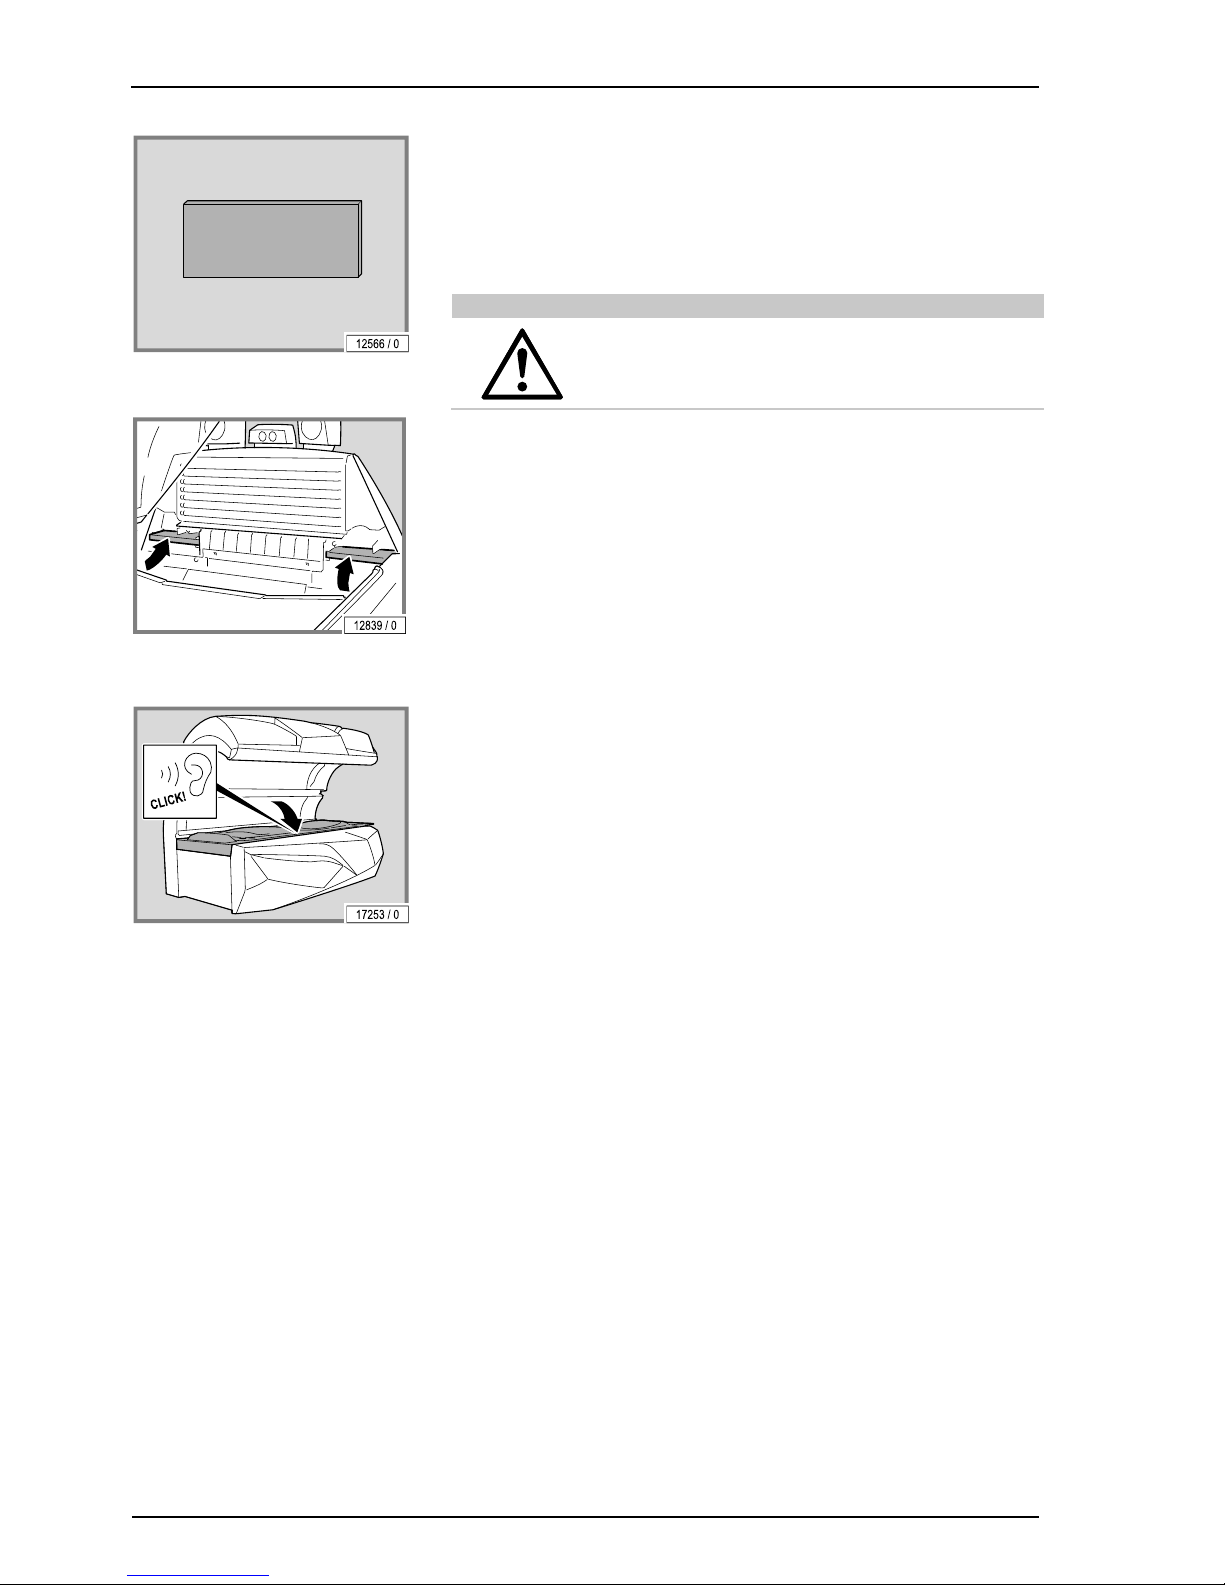
7.15 Cleaning the filter mats in shoulder
tanner
– Opening the bed base: see page 41.
– Remove the screws and then remove the lamp cover.
– Remove the filter mats.
Page 54
Cleaning and maintenance
52/78
– Dry or moist clean the filter mats or replace with new ones.
Dry cleaning: Vacuum cleaner (depending on the degree of soiling)
Moist cleaning: Water and detergent
– Do not clean in the dish-washer!
WARNING!
The device may be damaged by moisture!
The cleaned filters must be dry before they are replaced.
– Refit the cleaned and dried filter mats.
The assembly is the same process in reverse order.
When assembling the device please note:
– The bed base must lock with an audible click when closed.
Page 55
Cleaning and maintenance
11/2014 1015420-00 Operating instructions – 53/78
7.16 Air conditioning: Empty the
condensation tank and clean the filter
CAUTION!
Damage to the device through soiled filters and cooling
fins!
Regularly check the filter grill and cooling fins on the air
conditioning system and clean if necessary.
We recommend using the specially manufactured fin comb,
art-no. 15720470, to clean the cooling fins.
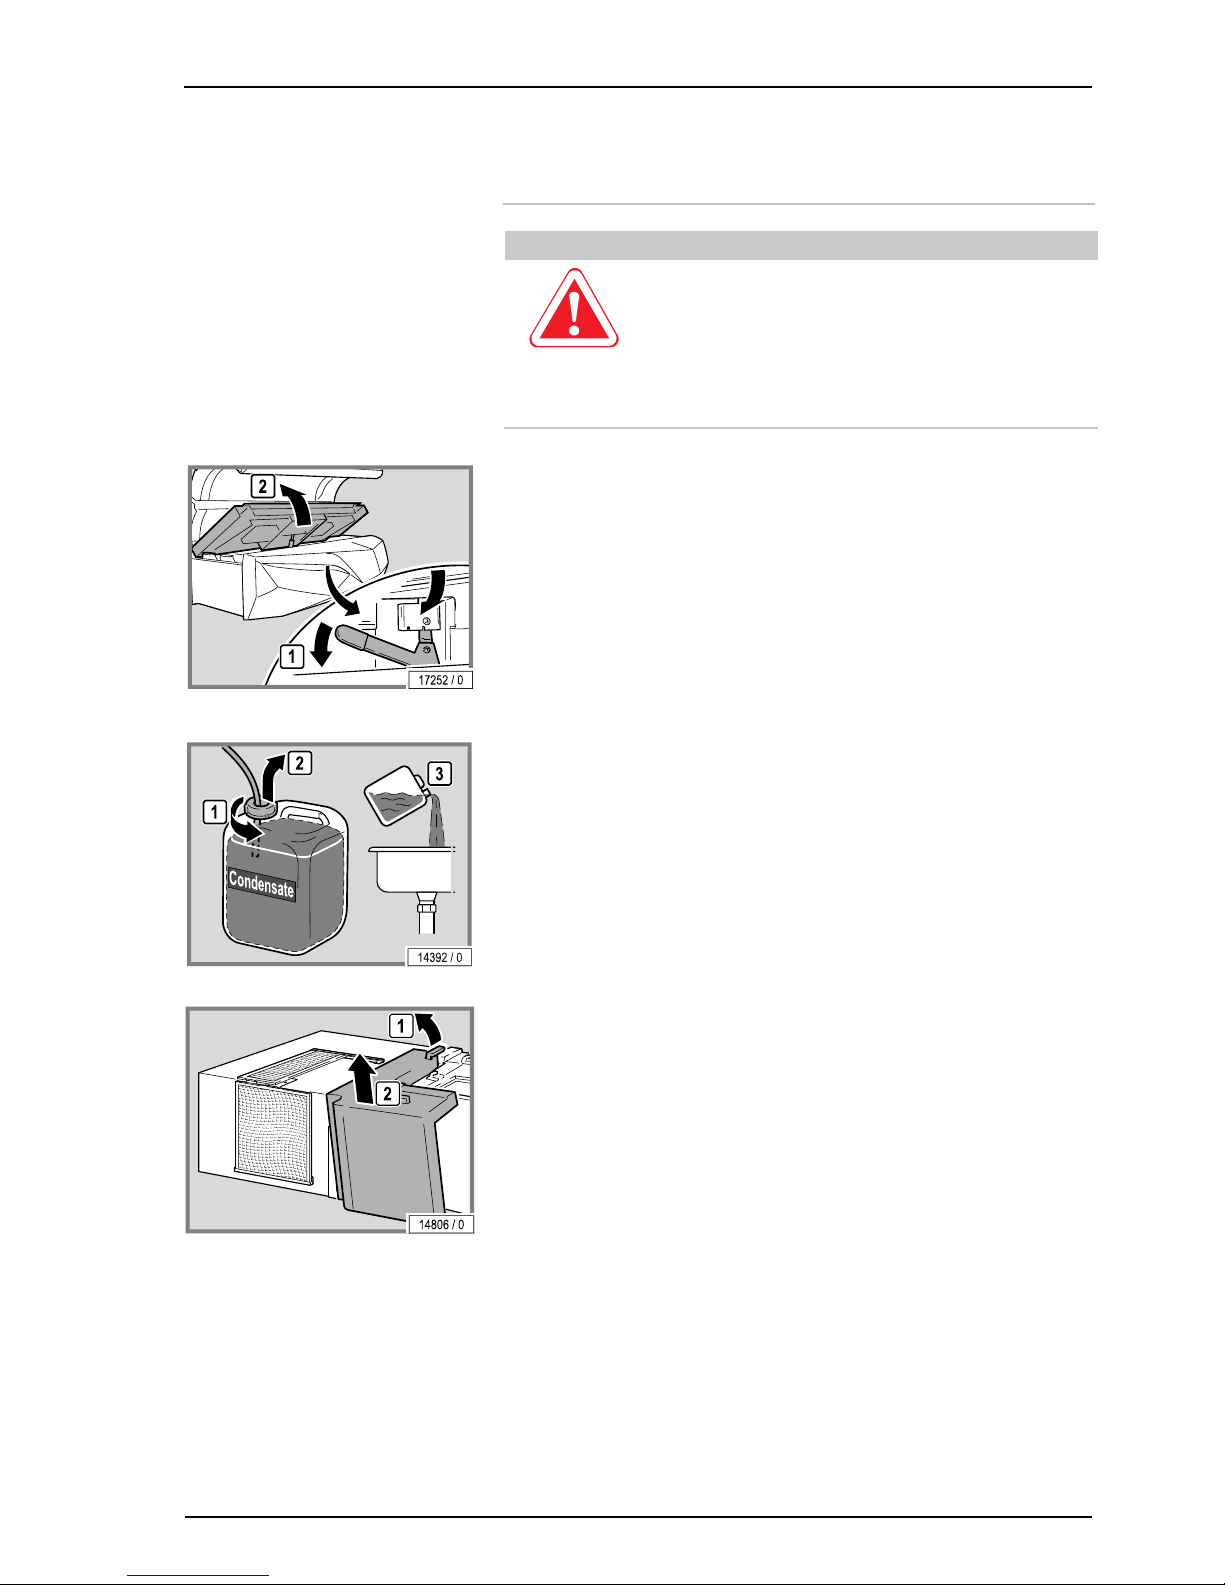
– Opening the bed base: see page 41.
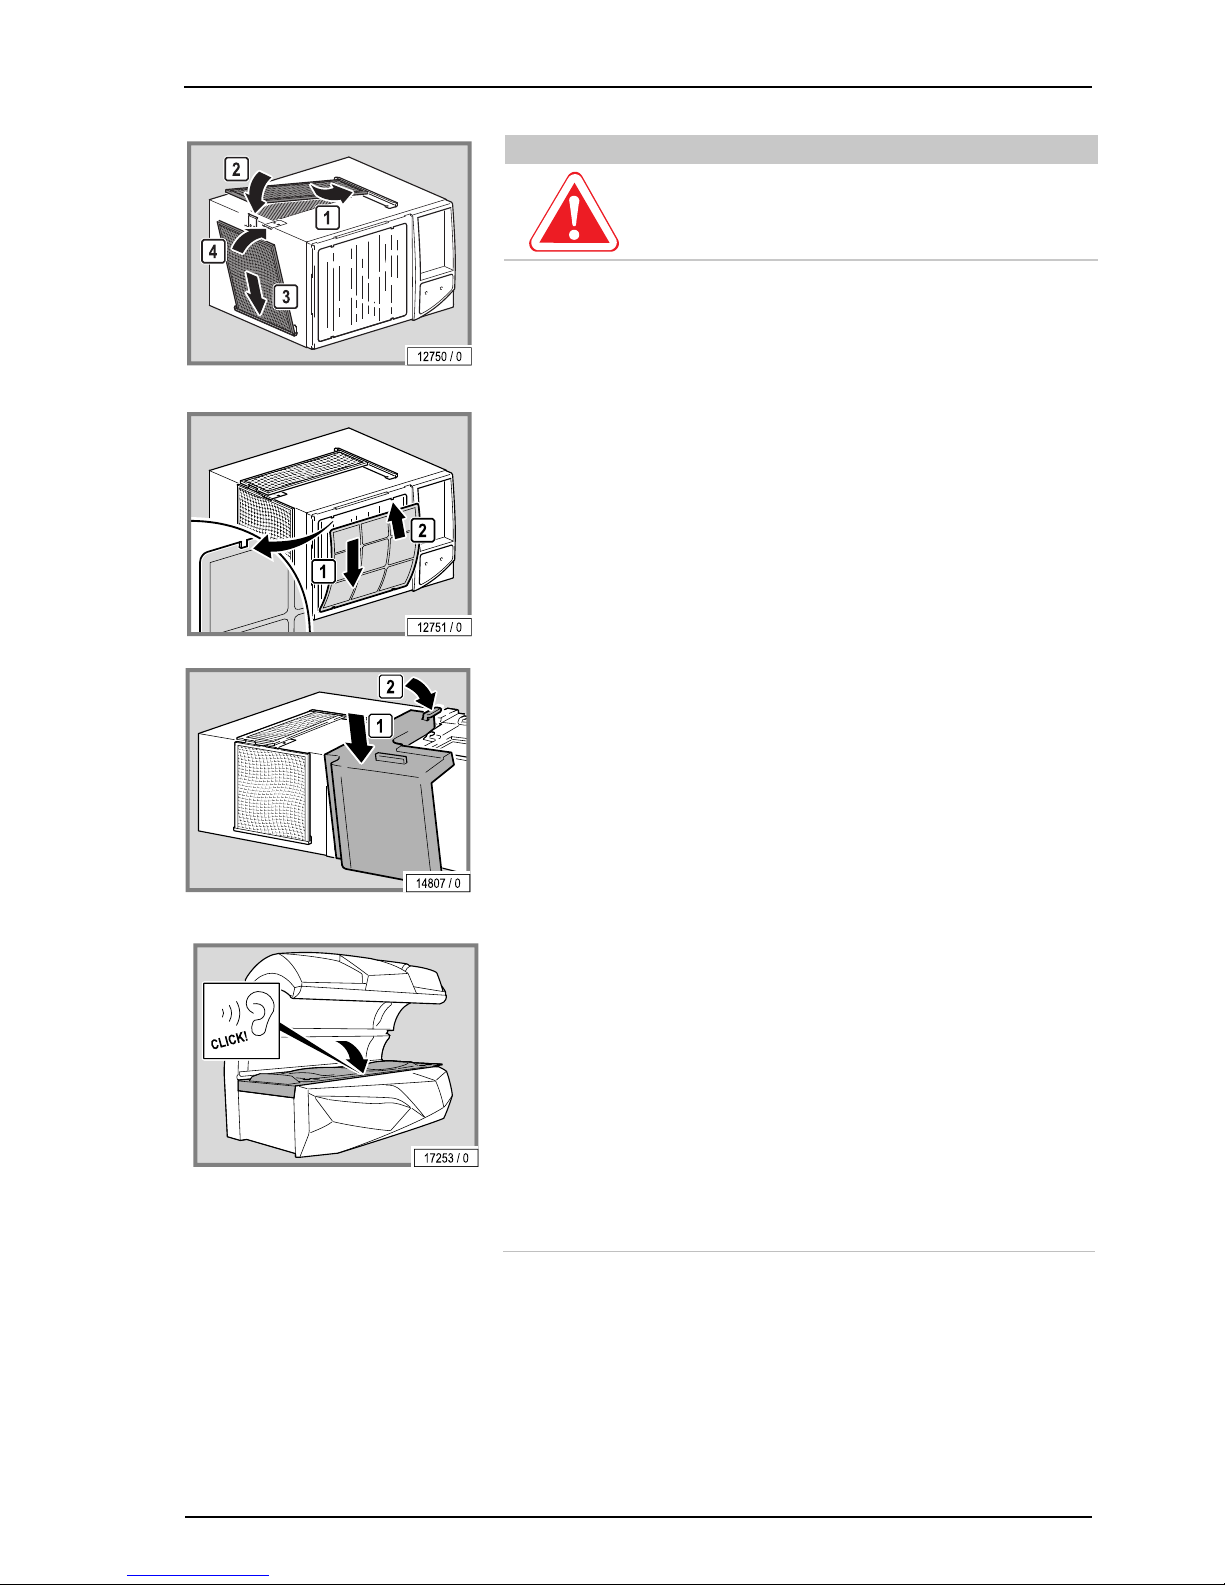
– Bring the condensation tank forwards.
– Disconnect the hose on the condensation tank.
– Empty the condensation tank.
Type 155033316XXXXXX35:
– Remove the cover.
Page 56
Cleaning and maintenance
54/78
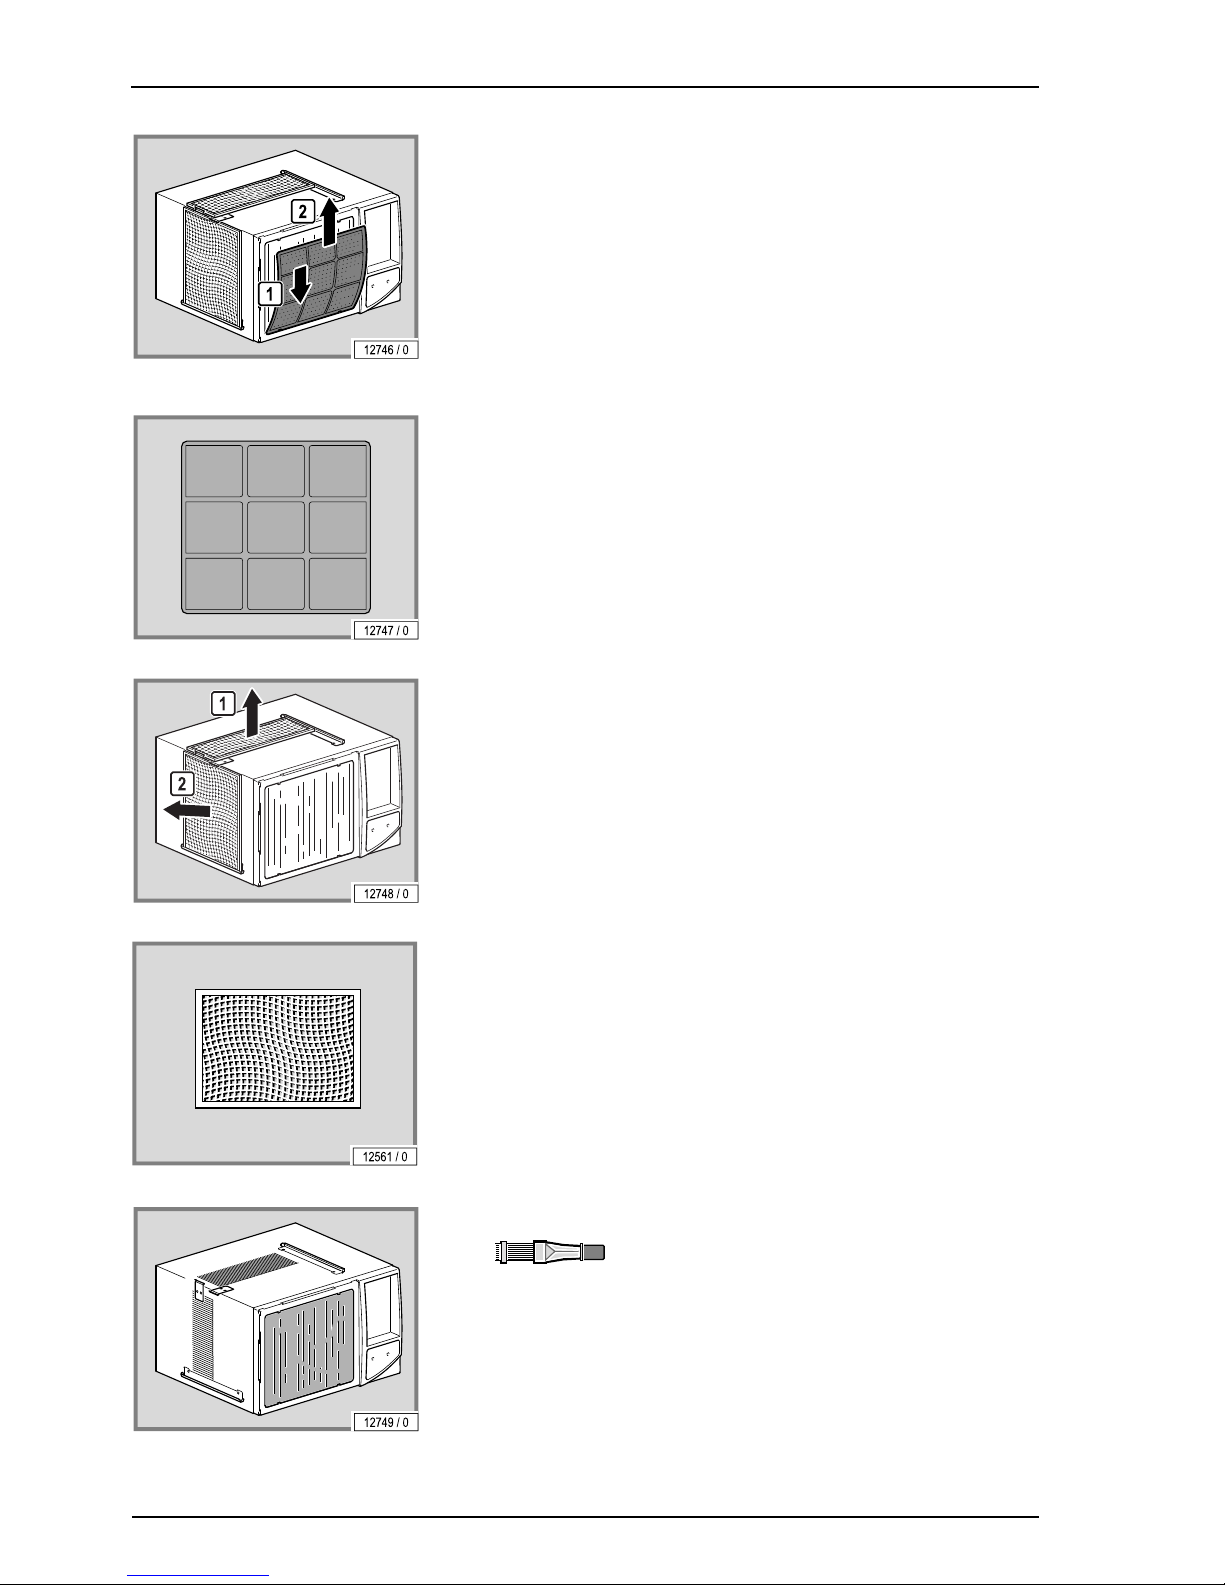
– Remove the filter from the holder.
– Cleaning the filter when moist or dry.
Dry cleaning: Vacuum cleaner (depending on the degree of soiling)
Moist cleaning: Water and detergent
– Do not clean in the dish-washer!
– Remove the filters from the holder.
– Cleaning the filters when wet or dry.
Dry cleaning: Vacuum cleaner (depending on the degree of soiling)
Wet cleaning: Use water and detergent or put in a dish-washer
– Use a fin comb to clean the air conditioning's dirty cooling fins.
Page 57
Cleaning and maintenance
11/2014 1015420-00 Operating instructions – 55/78
CAUTION!
The device may be damaged by moisture!
The cleaned filters must be dry before they are replaced.
– Reinstall the cleaned and dried filters.
– Ensure that the filters are correctly positioned in the holder.
Type 155033316XXXXXX35:
– Attach the cover.
– Connect the condensation tank to the hose.
– Refit the condensation tank.
– Close the bed base. You should hear the bed base click into place.
7.17 AQUA / AROMA SYSTEM maintenance
The AQUA SYSTEM function sprays a fine mist of AQUA SOLAR WITH
SKIN+ ADDITIVE into the interior of the device for body cooling (see 'AQUA
SYSTEM PRODUCT INFORMATION', order no. 1011201-..).
Page 58
Cleaning and maintenance
56/78
WARNING!
Customer health hazard!
Water that has been contaminated with bacteria can cause
skin rashes and other allergic reactions in device users.
– Therefore you must never fill the AQUA SYSTEM
canister with tap water or other liquids.
– Only replace the AQUA SYSTEM canister with a
genuine canister.
– Do not add any liquid that remains in the old canister to
the new canister!
– Ensure that the maximum temperature specified is not
exceeded during transport and storage.
– Note the expiration date on the canister.
This AQUA / AROMA SYSTEM also includes the 'RELAX' fragrance, which is
distributed through the head nozzles. Another fragrance called 'CABIN' is
distributed within the cubicle.
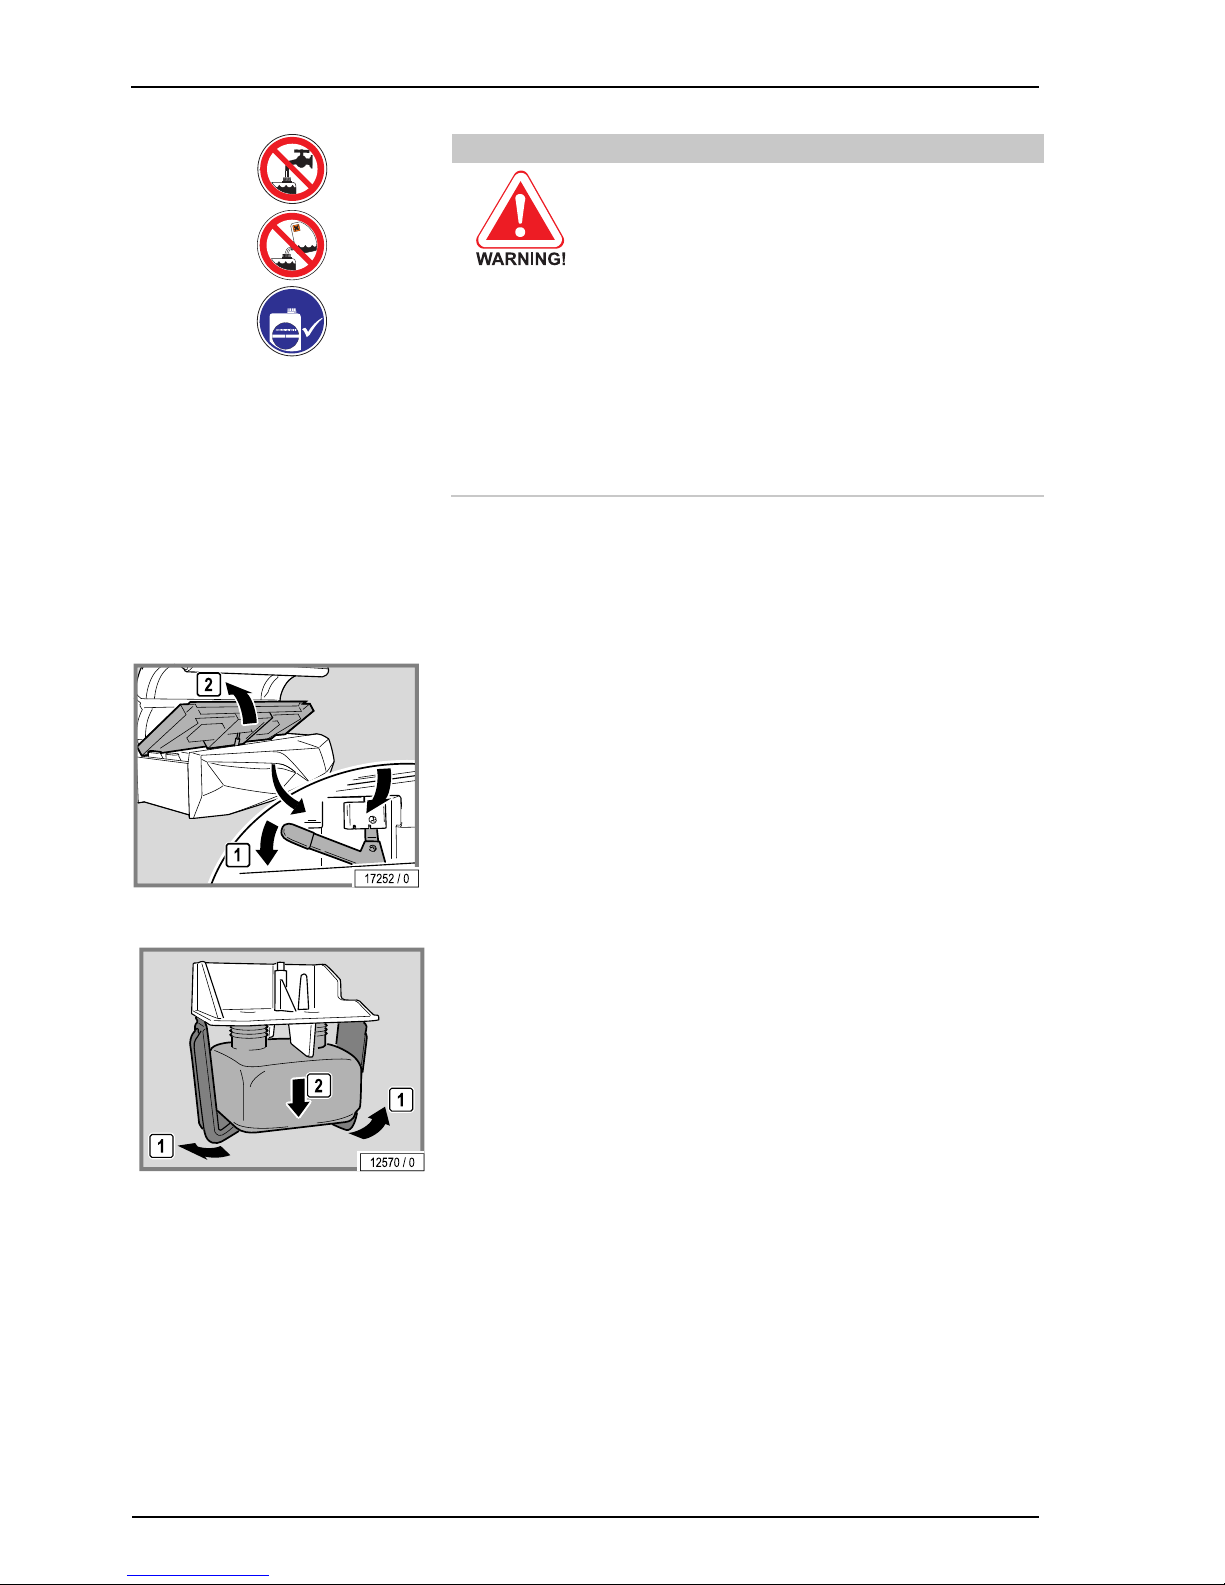
7.17.1 Changing the AROMA canister
– Opening the bed base: see page 41.
– Remove the AROMA canister.
Page 59
Cleaning and maintenance
11/2014 1015420-00 Operating instructions – 57/78
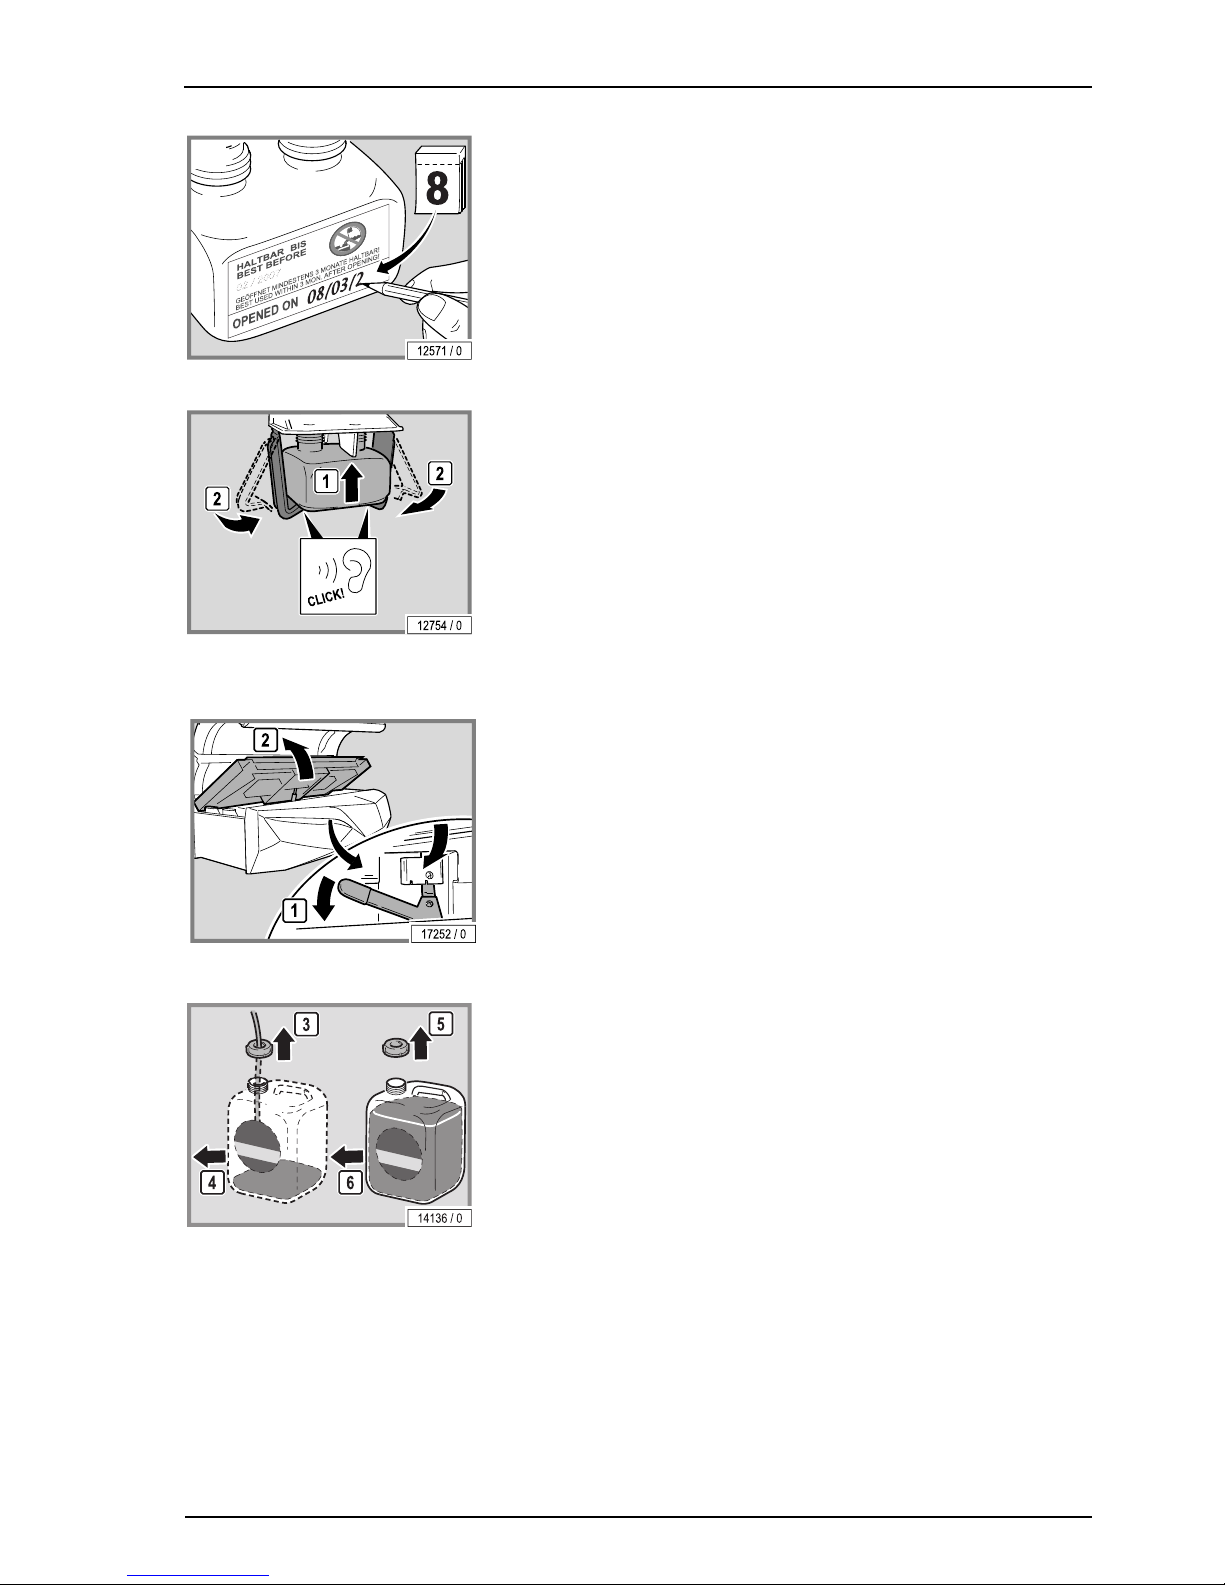
– Unscrew the lid on the new canister.
– Write the date on the canister.
– Fit the canister in the holder.
– Close the bed base. You should hear the bed base click into place.
7.17.2 Replacing the AQUA SYSTEM canister
– Opening the bed base: see page 41.
– Remove the canister.
– Unscrew the lid on the new canister.
– Remove the lid with the hose from the old canister.
Page 60
Cleaning and maintenance
58/78
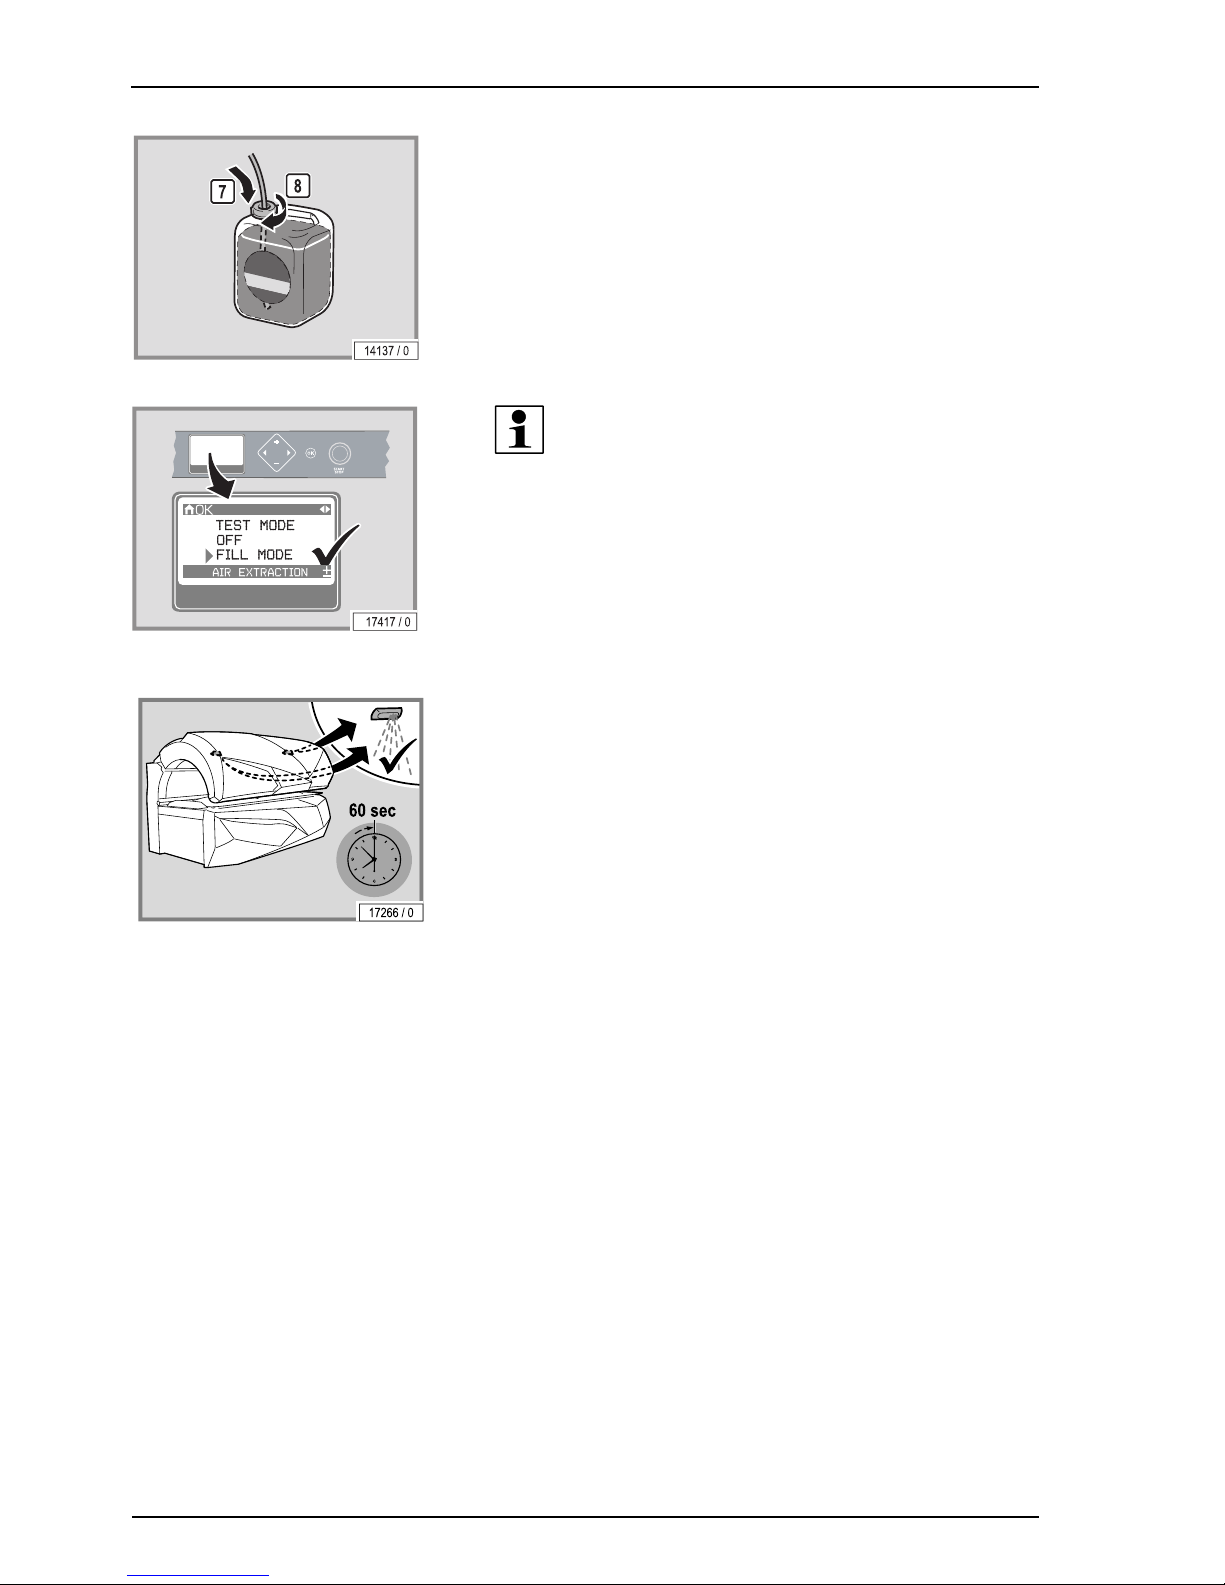
– Screw the lid with the hose onto the new canister.
– Push the hose well down so that it touches the bottom of the canister.
– Put the canister back in the device.
– Close the bed base. You should hear the bed base click into place.
Venting
NOTE:
To ventilate, access to the Professional Setup Manager is
required.
– Go to the Professional Setup Manager.
– Activate the fill mode in the AQUA MIST AROMA menu
– Close the canopy.
The system will now be ventilated for 1 minute. AQUA SYSTEM liquid will be
released from the nozzles during this period.
– Test the AQUA SYSTEM function afterwards. Repeat the ventilation
process if it does not work.
Page 61

Technical data
11/2014 1015420-00 Operating instructions – 59/78
8 Technical data
8.1 Power rating, electrical specifications
and noise level
Type 155023316XXXXXX35
Nominal power consumption: 12,600 W
Rated frequency: 60 Hz
Rated voltage: 230 V 3 phase 230 V 1 phase
Rated fuses: 40 amp 3-pole 80 amp 2-pole
Noise level at 1 m distance from
the device (without exhaust air):
67.2 dB(A)
Noise level in device: <81 dB(A)
Load on the acrylic panel: max. 300 lb / 135 kg
Weight: approx. 1,157 lb / 525 kg
Type 155023316XXXXXX35 AC PLUS
Nominal power consumption: 13,700 W
Rated frequency: 60 Hz
Rated voltage: 230 V 3 phase 230 V 1 phase
Rated fuses: 50 amp 3-pole 80 amp 2-pole
Noise level at 1 m distance from
the device (without exhaust air):
67.2 dB(A)
Noise level in device: <81 dB(A)
Load on the acrylic panel: max. 300 lb / 135 kg
Weight: approx. 1,173 lb / 532 kg
Type 155033316XXXXXX35 Temptronic
Nominal power consumption: 17,000 W
Rated frequency: 60 Hz
Rated voltage: 230 V 3 phase 230 V 1 phase
Rated fuses: 50 amp 3-pole 80 amp 2-pole
Noise level at 1 m distance from
the device (without exhaust air):
68.9 dB(A)
Noise level in device: <81 dB(A)
Load on the acrylic panel: max. 300 lb / 135 kg
Weight: approx. 1,334 lb / 605 kg
Page 62
Technical data
60/78
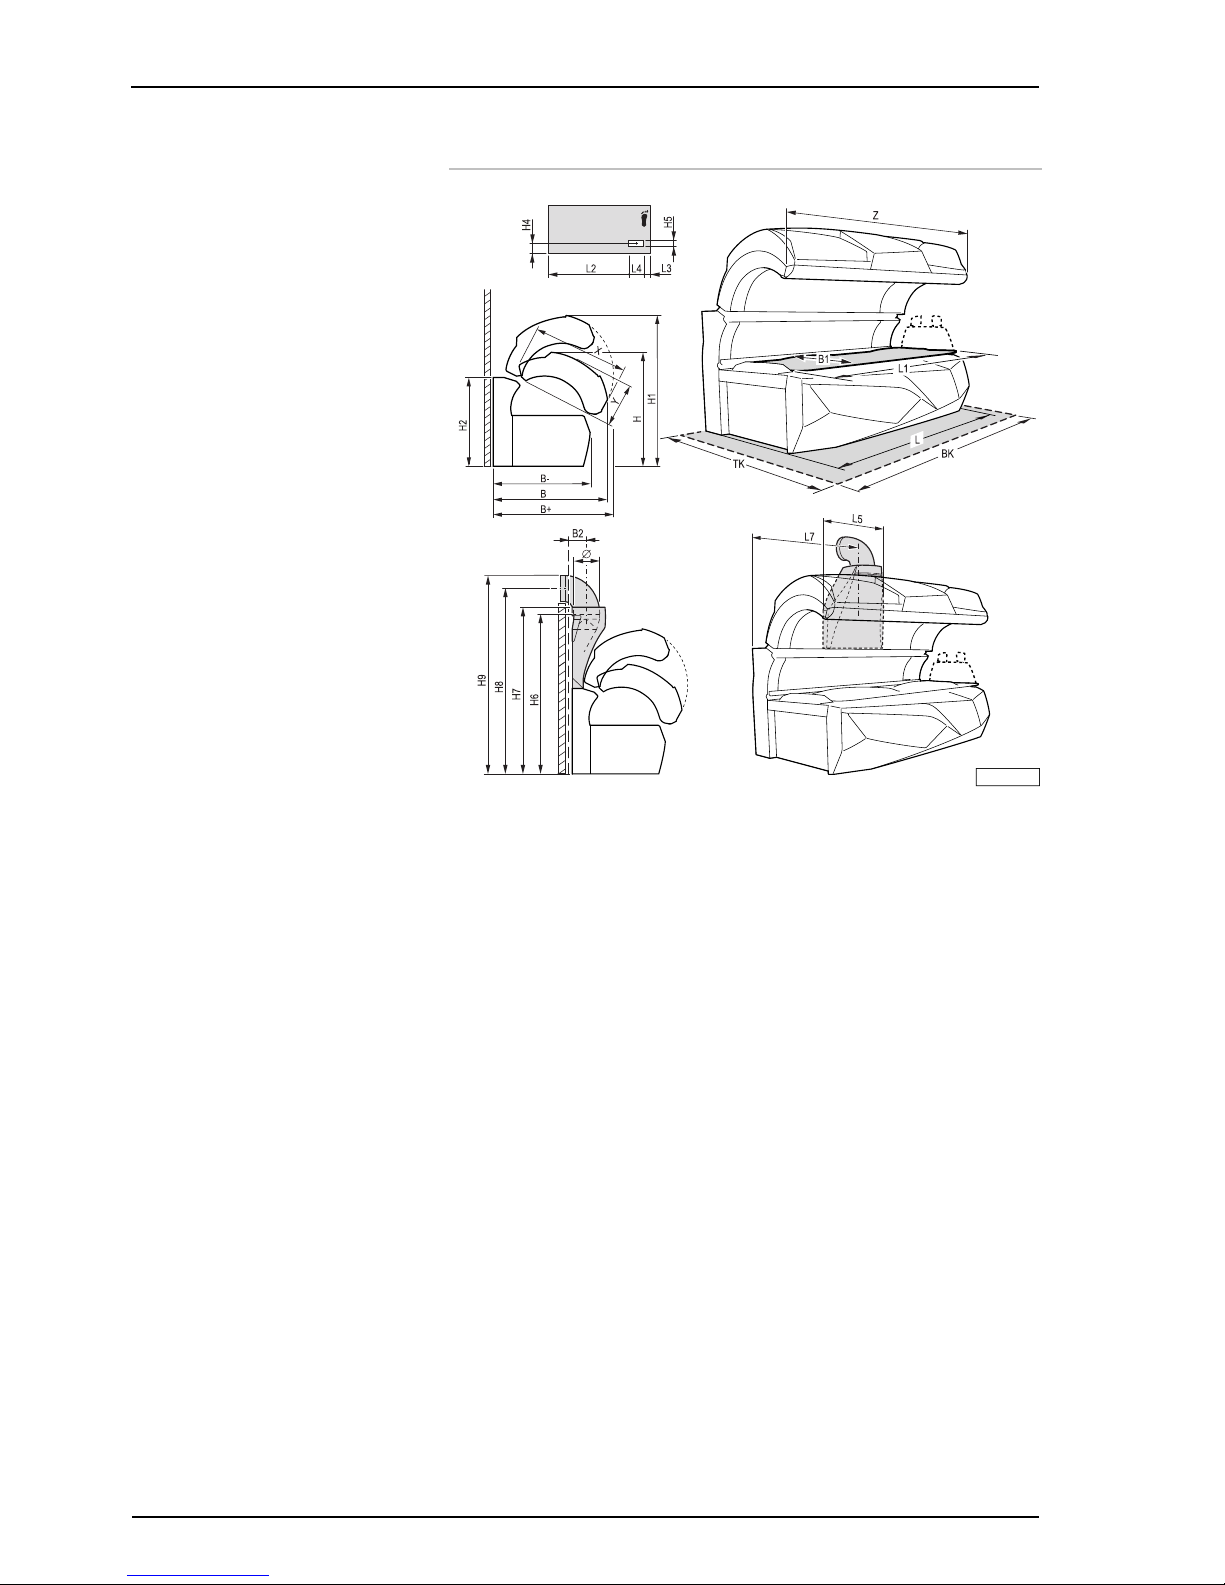
8.2 Dimensions
17401 / 0
Type 155023316XXXXXX35: Type 155033316XXXXXX35:
B + = 54 1/4 in 1378 mm 58 4/16 in 1479 mm
B = 52 5/16 in 1328 mm 56 10/16 in 1439 mm
B - = 51 9/16 in 1309 mm 55 2/16 in 1400 mm
B 1 = 31 1/2 in 800 mm 31 1/2 in 800 mm
B 2 = 7 6/16 in 188 mm 7 6/16 in 188 mm
L + = 92 ½ in 2350 mm 92 ½ in 2350 mm
L = 89 in 2260 mm 89 in 2260 mm
L 1 = 78 12/16 in 2000 mm 78 12/16 in 2000 mm
L 2 = 68 2/16 in 1730 mm 68 2/16 in 1730 mm
L 3 = 9 6/16 in 238 mm 9 6/16 in 238 mm
L 4 = 10 7/16 in 265 mm 10 7/16 in 265 mm
L 5 = 34 2/16 in 867 mm 34 2/16 in 867 mm
L 6 (L7) = 43 15/16 in 1116 mm 43 15/16 in 1116 mm
H = 55 1/2 in 1410 mm 57 11/16 in 1465 mm
H 1 = 68 11/16 in 1745 mm 72 2/16 in 1832 mm
H 2 = 42 7/16 in 1078 mm 42 7/16 in 1078 mm
Page 63

Technical data
11/2014 1015420-00 Operating instructions – 61/78
Type 155023316XXXXXX35: Type 155033316XXXXXX35:
H 4 = 15 12/16 in 400 mm 15 12/16 in 400 mm
H 5 = 4 1/2 in 114 mm 4 1/2 in 114 mm
H 6 = 74 5/16 in 1887 mm 74 5/16 in 1887 mm
H 7 = 77 11/16 in 1974 mm 77 11/16 in 1974 mm
H 8 = 86 1/2 in 2197 mm 86 1/2 in 2197 mm
X 43 6/16 in 1101 mm 47 2/16 in 1197 mm
Y 22 1/2 in 572 mm 22 1/2 in 626 mm
Z 89 in 2260 mm 89 in 2260 mm
11 13/16 in 300 mm 11 13/16 in 300 mm
BK = 94 1/2 in 2400 mm 94 1/2 in 2400 mm
TK = 90 9/16 in 2300 mm 90 9/16 in 2300 mm
Page 64
Technical data
62/78
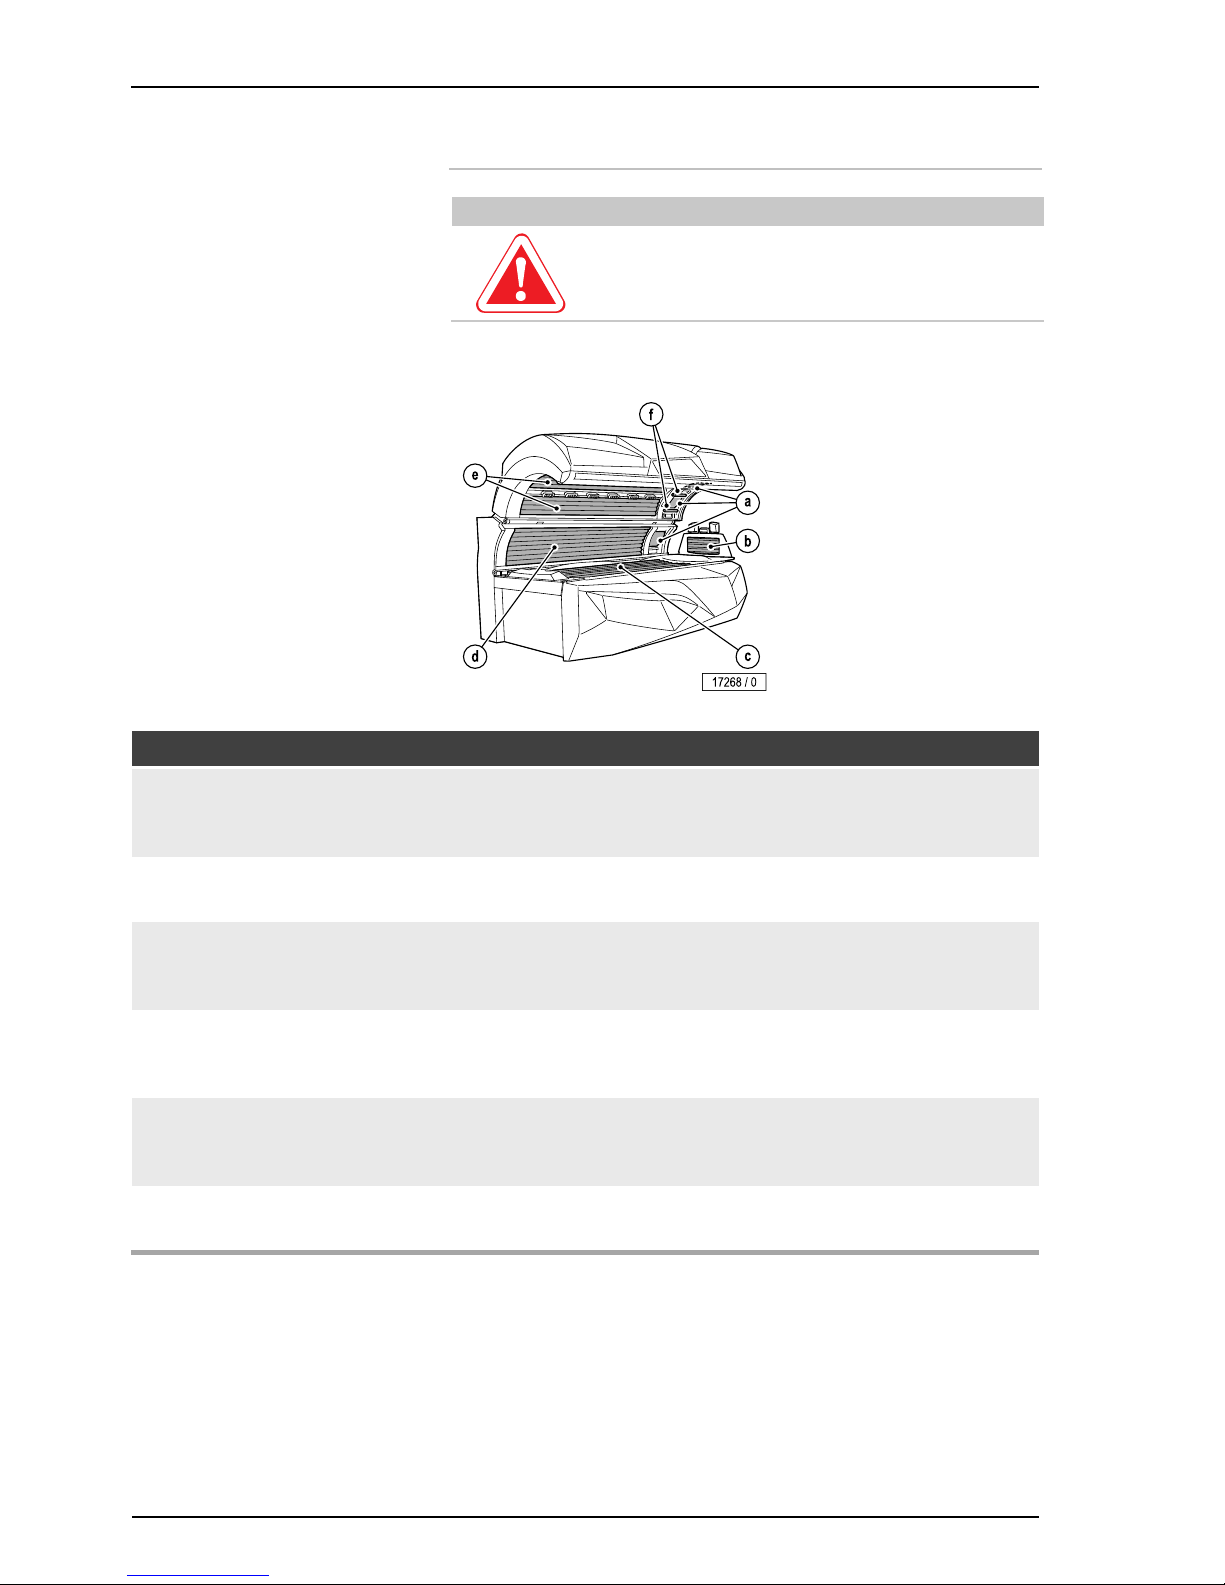
8.3 Lamp configuration
CAUTION!
The use of other UV lamps and filter panels voids the
operating license!
8.3.1 Type 155023316XXXXXX35
Installed lamps
Number Description Length Power Control Order no.
a) 3
3
UV high pressure lamps Ergoline ULTRA
C12645
Filter panels Ultra Performance
520 W 420 W / 360 W /
260 W / 0 W
12645-..
1001524-..
b) 7 7 UV low pressure lamps Genesis VHP12 25W
Starter S10 (4-65 W)
21 in
0.52 m
25 W 25 W 1015623-..
10047-..
c) 18
18
UV low pressure lamps Genesis VHP12
160 W
Starter (120-180 W)
71 in
1.80 m
160 W 160 W 1508603-..
12637-..
d) 8
8
UV low pressure lamps Genesis VHP12
160 W
Starter (120-180 W)
71 in
1.80 m
160 W 160 W 1508603-..
12637-..
e) 20
20
UV low pressure lamps Genesis VHP12
160 W
Starter (120-180 W)
71 in
1.80 m
160 W 160 W 1508603-..
12637-..
f) 2 2 UV low pressure lamps Genesis VHP12 8 W
Starter S10 (5-65 W)
0.31 m 8 W 8 W / 0 W 1508604-..
10047-..
Page 65
Technical data
11/2014 1015420-00 Operating instructions – 63/78
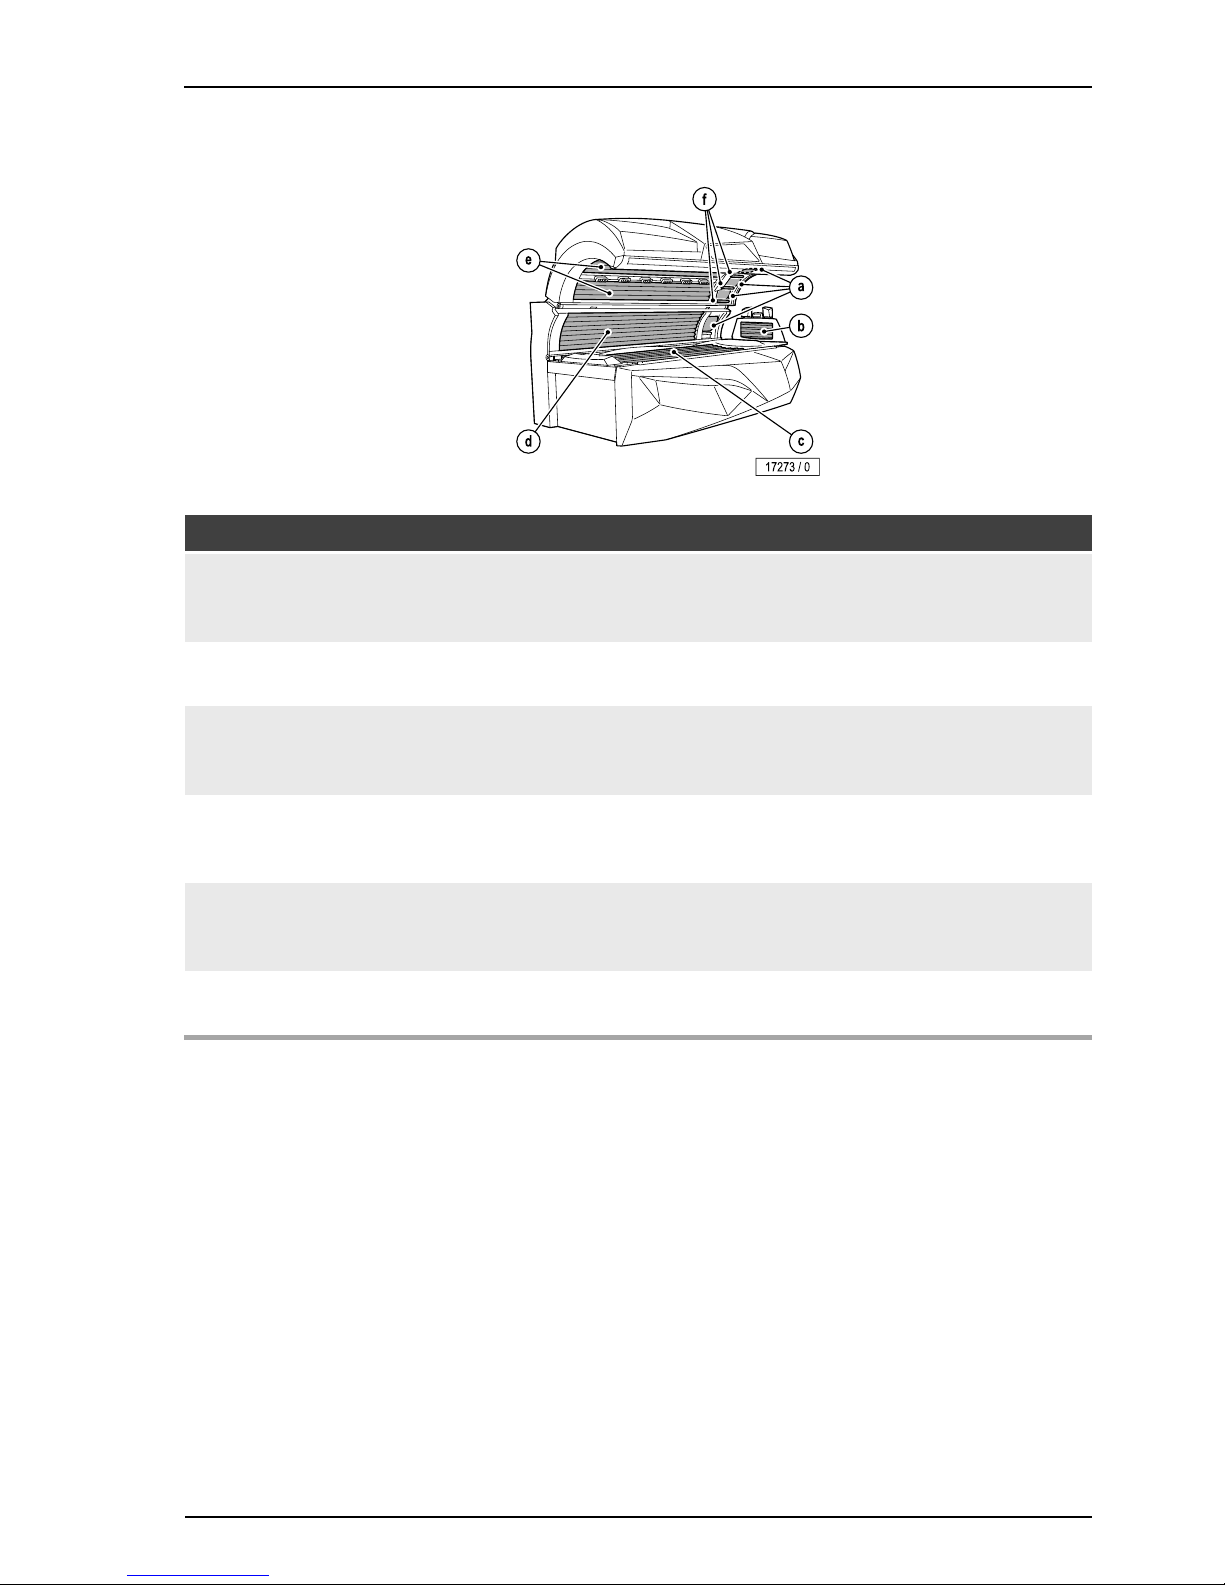
8.3.2 Type 155033316XXXXXX35
Installed lamps
Number Description Length Power Control Order no.
a) 4
4
UV high pressure lamps Ergoline ULTRA
C12645
Filter panels Ultra Performance
520 W 420 W / 360 W /
260 W / 0 W
12645-..
1001524-..
b) 7 7 UV low pressure lamps Genesis VHP12 25W
Starter S10 (4-65 W)
21 in
0.52 m
25 W 25 W 1015623-..
10047-..
c) 18
18
UV low pressure lamps Genesis VHP12
160 W
Starter (120-180 W)
71 in
1.80 m
160 W 160 W 1508603-..
12637-..
d) 8
8
UV low pressure lamps Genesis VHP12
160 W
Starter (120-180 W)
71 in
1.80 m
160 W 160 W 1508603-..
12637-..
e) 24
24
UV low pressure lamps Genesis VHP12
160 W
Starter (120-180 W)
71 in
1.80 m
160 W 160 W 1508603-..
12637-..
f) 3 3 UV low pressure lamps Genesis VHP12 8 W
Starter S10 (5-65 W)
0.31 m 8 W 8 W / 0 W 1508604-..
10047-..
Page 66
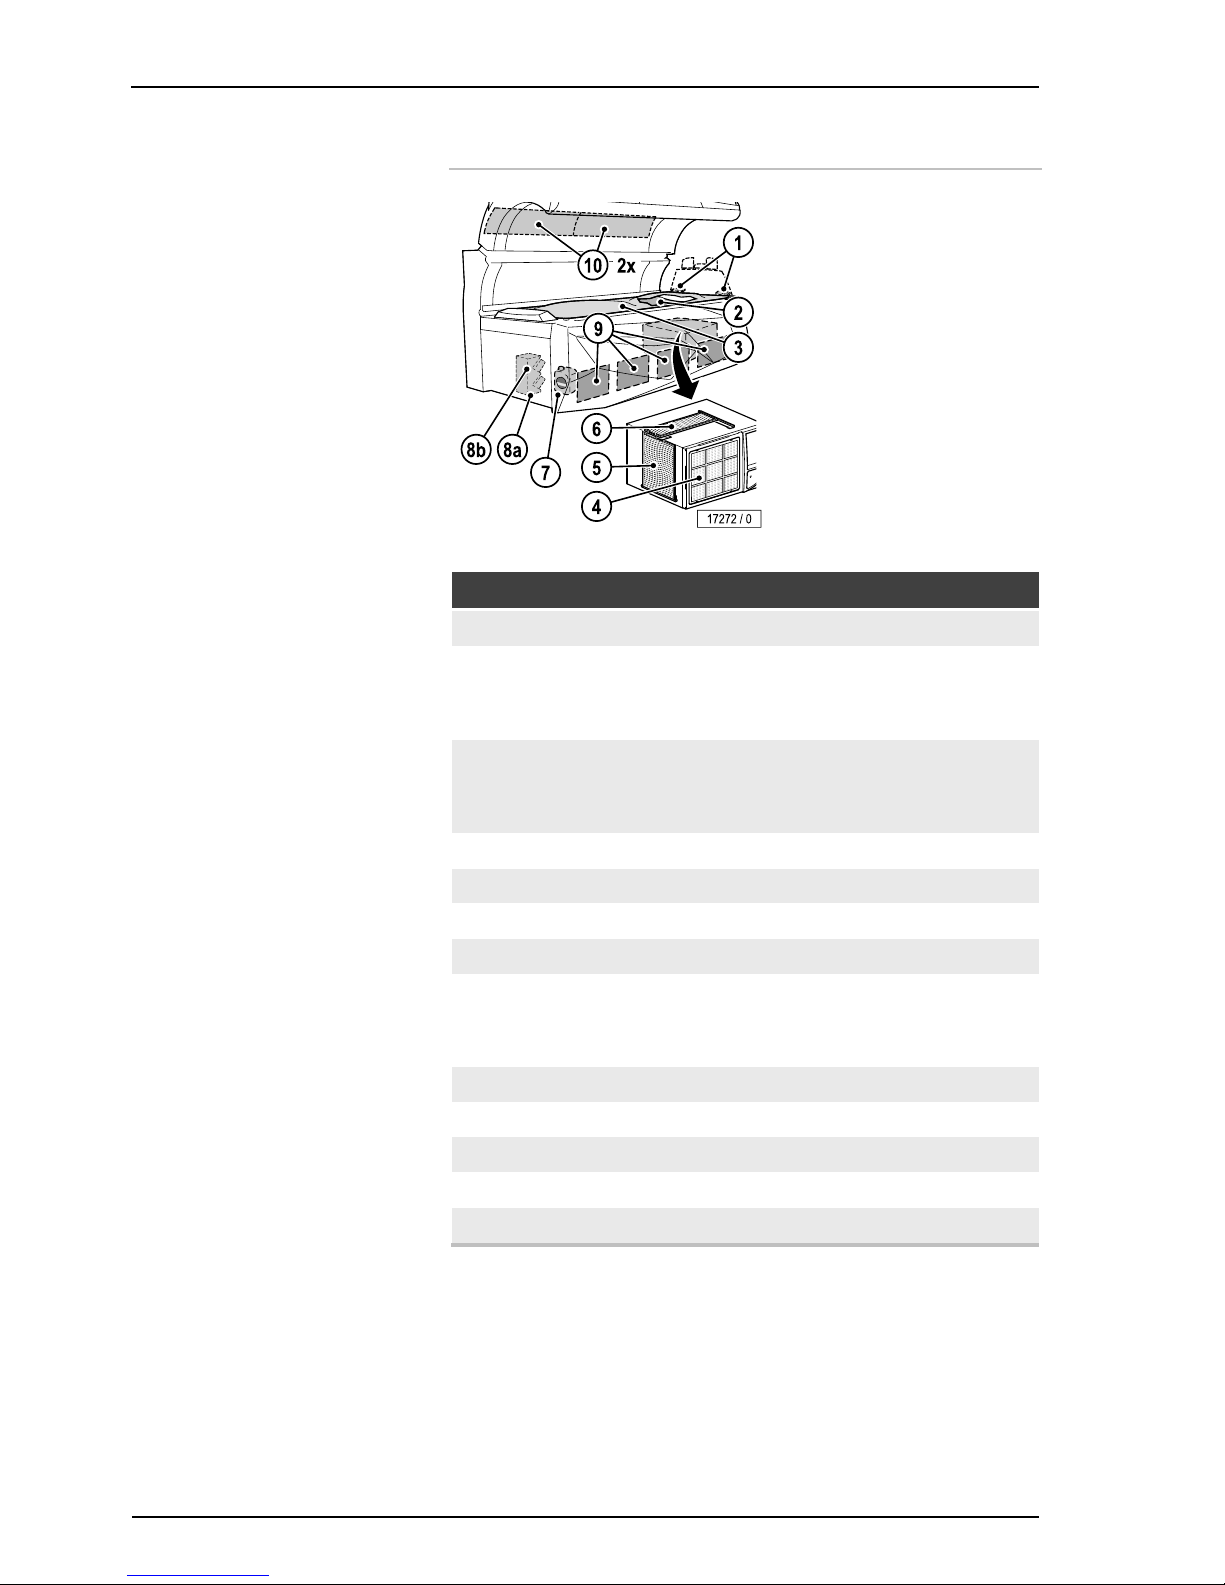
Technical data
64/78
8.4 Spare parts and accessories
Number Description Order no.
1 2 Filter 800278-..
2 1 Partition
Type 155023316XXXXXX35
Type 155033316XXXXXX35
800666-..
800665-..
3 1 Acrylic panel
Type 155023316XXXXXX35
Type 155033316XXXXXX35
1000744-..
1000756-..
4 1 Filter –
5 1 Filter 51937-..
6 1 Filter 55567-..
7 1 AQUA SYSTEM, 1.59 gal (6 l) 3652603-..
8
a)
b)
1 AROMA, 3.38 fl oz (100 ml)
CABIN
RELAX
701358-..
701357-..
9 4 Filter 51937-..
10 2 Filter 800601-..
1 Protective goggles 84592-..
1 MP3 cable 1001855-..
1 Allen-key 83828-..
Page 67

JK-Products, Inc. – Limited Warrant
y
11/2014 1015420-00 Operating instructions – 65/78
9 JK-Products, Inc. – Limited Warranty
JK-Products, Inc. warrants its products to be free from defects in materials
and workmanship under intended normal use as described in the unit's Operation and Instruction Manual, for a period of three (3) years from date of sale.
This Limited Warranty applies only to the original purchaser of the equipment
through JK-Products, Inc. or its authorized dealer or distributor, and is not
transferable.
Global Service USA obligations under this warranty are limited to repair or
replacement of any defective part without charge for that part to the original
purchaser, with the following exceptions:
A Fluorescent lamps are warranted against defects for a period of thirty
(30) days from date of sale.
B Only parts obtained through JK-Products, Inc., its authorized dealers
or distributors may be used. Transportation costs for parts shipped to the
consumer and the return of defective parts to Global Service USA are not
included.
C Labor will be furnished without charge for ninety (90) days from date
of purchase only. All labor and related charges must be authorized by Global
Service USA prior to start of repairs, and must coincide with Global Service
USA established rates and time allotment policy.
D Acrylic: Refer to Manufacturer's Acrylic Warranty Policy.
It is imperative that the original customer completes and returns the enclosed
warranty card within 10 days after purchase to insure valid registration and
coverage for potential claims.
If the warranty card is not registered, proof of purchase from JK-Products, Inc.
or its authorized dealer or distributor will be required prior to any consideration
on warranty claims. This could result in service delays.
This warranty is extended to the individual or legal entity, whose name appears on the warranty registration card filed with Global Service USA, or
whose name appears on the original sale document and may not be transferred to any other individual or legal entity.
This warranty does not apply to any failure of the product, or any parts of the
product due to alterations, modifications, misuse, abuse, accident, improper
maintenance, improper installation, acts of God or if the serial number on the
product has been removed, altered or defaced. Adequate packaging must be
used for returned goods to prevent freight damage.
There are no warranties which extend beyond the description on the
face hereof. There is no express or implied warranty of fitness of merchantability.
The remedies provided in this limited warranty are the exclusive remedies provided to the purchaser by Global Service USA and are provided
in substitution of all other remedies. Consequential and incidental damages are excluded.
No person, firm or corporation is authorized to obligate JK-Products, Inc. for
any liability in connection with the sale or use of these goods.
JK Products & Services, Inc. makes no guarantees on income, return on
investment, market conditions, performance, etc. with any undertaking using
its products and services. Past performance is not indicative of future results.
Page 68

JK-Products, Inc. – Limited Warranty
66/78
9.1 Limited Acrylic Warranty
JK Products, Inc. warrants its acrylic sheets to be free from defects in material
and workmanship, under intended normal use, for a period of one (1) year
from date of sale of the tanning bed. Due to the tanning lotions, cosmetics,
disinfectant and improper cleaners used on tanning surfaces that cannot be
controlled by JK Products, Inc., after the first thirty (30) days of warranty period acrylic will be subject to a prorated cost to the consumer.
JK Products, Inc. obligations do not include transportation charges on replacement acrylic.
JK Products, Inc. assumes no liability for the cost of removing defective
sheets or installing replacement sheets, or for damage to persons or property.
To make a claim, contact an authorized dealer or distributor of JK-Products,
Inc. or Global Service USA with the model number, the serial number, and the
date of purchase of the bed in which the acrylic will be used.
There are no warranties which extend beyond the description on the
face hereof. There is no express or implied warranty of fitness or merchantability.
The remedies provided in this limited warranty are the exclusive remedies provided to the purchaser by Global Service USA and are provided
in substitution of all other remedies. Consequential and incidental damages are excluded.
JK Products & Services, Inc.
#1 Walter Kratz Drive
Jonesboro, AR 72401
Phone: 800-445-0624 (toll-free)
Fax: 870-935-9046
e-mail: [email protected]
http://support.jkamerica.com
9.2 Warranty Claims
9.2.1 Policy & Procedures
1. When to file a Warranty Claim:
In the event that your tanning system is not functioning properly under intend-
ed normal use as described in the unit's Operation and Instruction Manual,
you may then have established cause to file a Warranty Claim.
NOTE:
Both the tanning system and legal registered owner must
meet the criteria established under JK Products, Inc. Limited
Warranty as described in this manual before any Warranty
Claim will be considered.
Page 69

JK-Products, Inc. – Limited Warrant
y
11/2014 1015420-00 Operating instructions – 67/78
2. Where to call to place a Warranty Claim:
JK-Products, Inc. is supported nationwide by an extensive dealer/distributor
network through whom the majority of our units are sold. These dealers/distributors are required by contract to stock sufficient parts to meet the
various warranty and nonwarranty needs of their customers.
Therefore, in order for you to properly file a Warranty Claim, you must locate
the name and phone number of the dealer/distributor through whom you purchased your unit. Normally this information can be easily located either on
your paid invoice or other proof of purchase documentation that you received
when taking delivery of the unit.
Next, notify the dealer/distributor of the serial number, model number and
date unit was purchased. This will initiate the Warranty Claim process.
Upon determination of the problem, your dealer/distributor can then supply
you with the part(s) and proper instructions to return your unit to working order.
Each dealer/distributor has their own internal procedure for handling Warranty
Claims and credits.
NOTE:
JK-Products, Inc., the manufacturer, does not involve itself in
the direct handling of a Warranty Claim except where mitigating circumstances apply and where required by law.
NOTE:
If part returned to Global Service USA proves to be operational and not defective, or if product code numbers on part
do not correspond with individual unit date on file with Global
Service USA, then a 30% restocking fee will be charged in
addition to the retail purchase price of part.
Acknowledgment of the Agreement is not required for acceptance of the foregoing stipulations.
9.2.2 Labor Warranty Claim/Credit Procedures
Global Service USA furnishes labor without charge for a period of 90 days
from date of purchase. All labor and related charges must be authorized by
Global Service USA prior to start of repairs, and must coincide with Global
Service USA established rates and time allotment policy.
Please contact our Service Department for authorization and billing procedures.
Page 70

JK-Products, Inc. – Limited Warranty
68/78
9.3 Limited Lifetime Warranty
Global Service USA warrants specific individual components of the tanning
system against defects in materials and workmanship for the life of the product. Coverage is limited to units purchased after November 1, 1994.
This warranty is restricted to the following components only:
Steel Back Panels
Structural Steel Frame Components
Exterior Steel Body.
NOTE:
Components are warranted on an individual basis and not as
they may effect the complete product.
Warranty coverage does not include cosmetic abnormalities such as scratches, nicks, dents, rust, oxidation of paint or other cosmetic changes that do not
interfere with the designed function of the unit.
This warranty does not include failure of the product due to alteration, modifications, misuse, abuse, improper maintenance, improper installation or repair.
This warranty is not transferable and is only applicable to the original purchaser named on a completed and registered warranty record at JK-Products,
Inc. headquarters.
JK Products, Inc. obligations do not include transportation charged on the
shipping of new components to the customer or on the return of defective
components of the manufacturer. All freight charges must be paid by the
customer.
There are no warranties which extend beyond the description on the face
hereof. There is no express or implied warranty of fitness or merchantability.
The remedies provided in this limited warranty are the exclusive remedies
provided to the purchaser by Global Service USA and are provided in substitution of all other remedies. Consequential and incidental damages are excluded.
NOTE:
Any misuse, abuse, modification, alteration, improper
maintenance, improper installation, etc. of this product or its
intended use will subject said party to direct responsibility
and liabilities for any and all consequences resulting from
such action. Furthermore, such actions will void all warranties and may relieve Global Service USA of any liabilities
relating to said product.
Page 71
JK-Products, Inc. – Limited Warrant
y
11/2014 1015420-00 Operating instructions – 69/78
Page 72
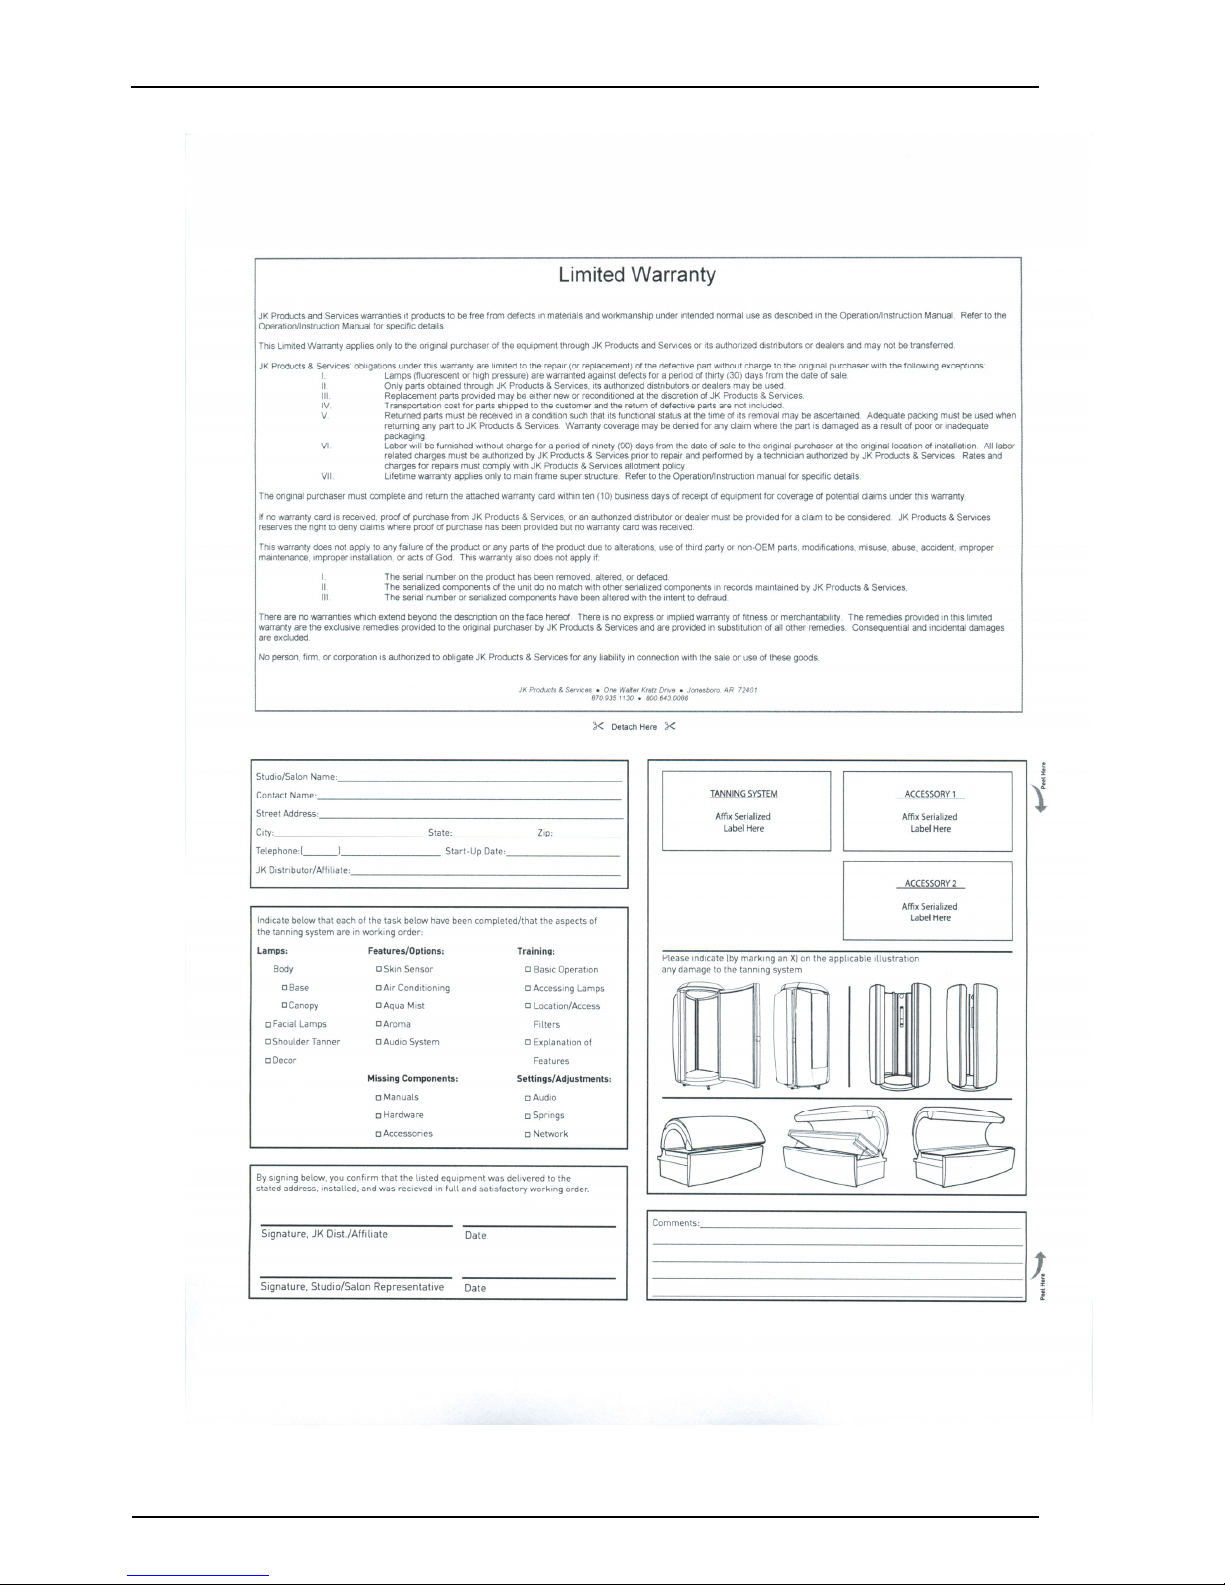
JK-Products, Inc. – Limited Warranty
70/78
Page 73
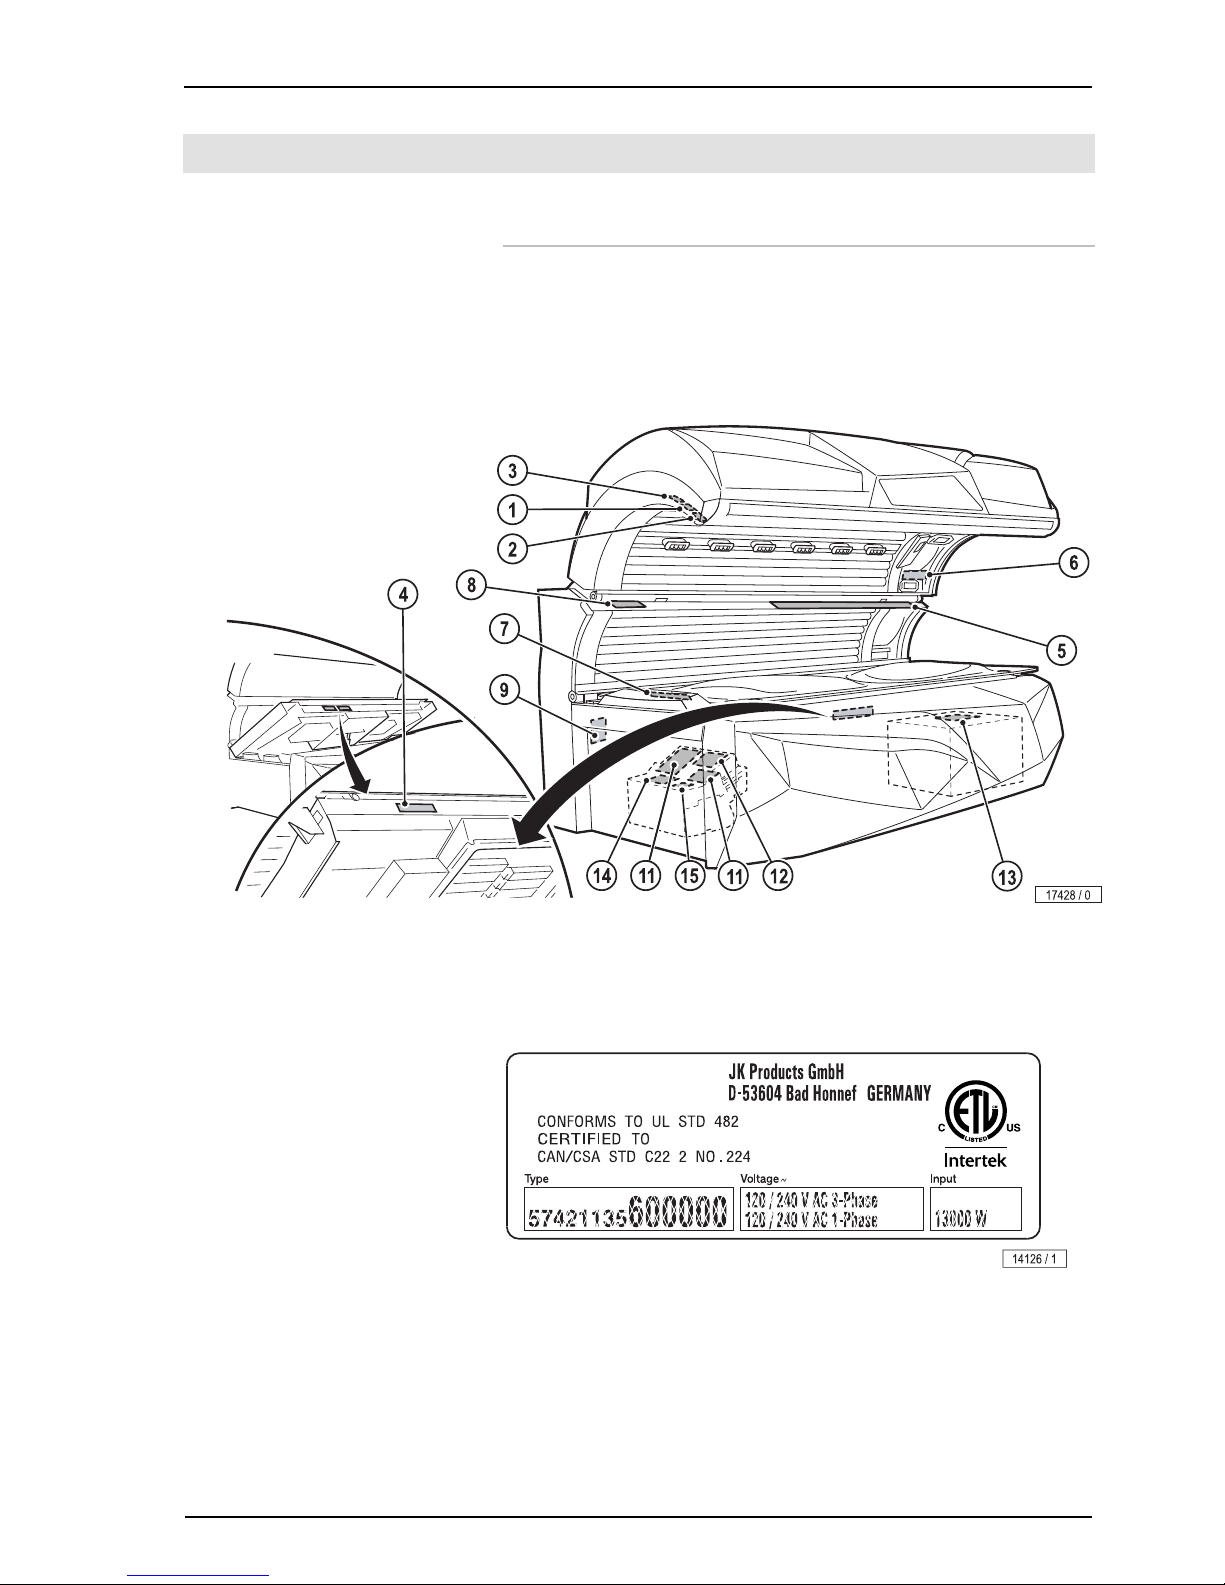
A
ppendi
x
11/2014 1015420-00 Operating instructions – 71/78
10 Appendix
10.1 Signs and stickers on the device
Signs which warn of danger areas are attached to the device. The signs
shown below are examples. Ensure that the instruction signs are always
clearly recognizable and easily legible. Any missing instruction signs or stickers must be replaced.
1: Name plate
The name plate is attached to the interior side of the canopy. It contains
important information for identifying the device (e. g. the serial number =
Serial-No.) and the conformity mark.
Page 74
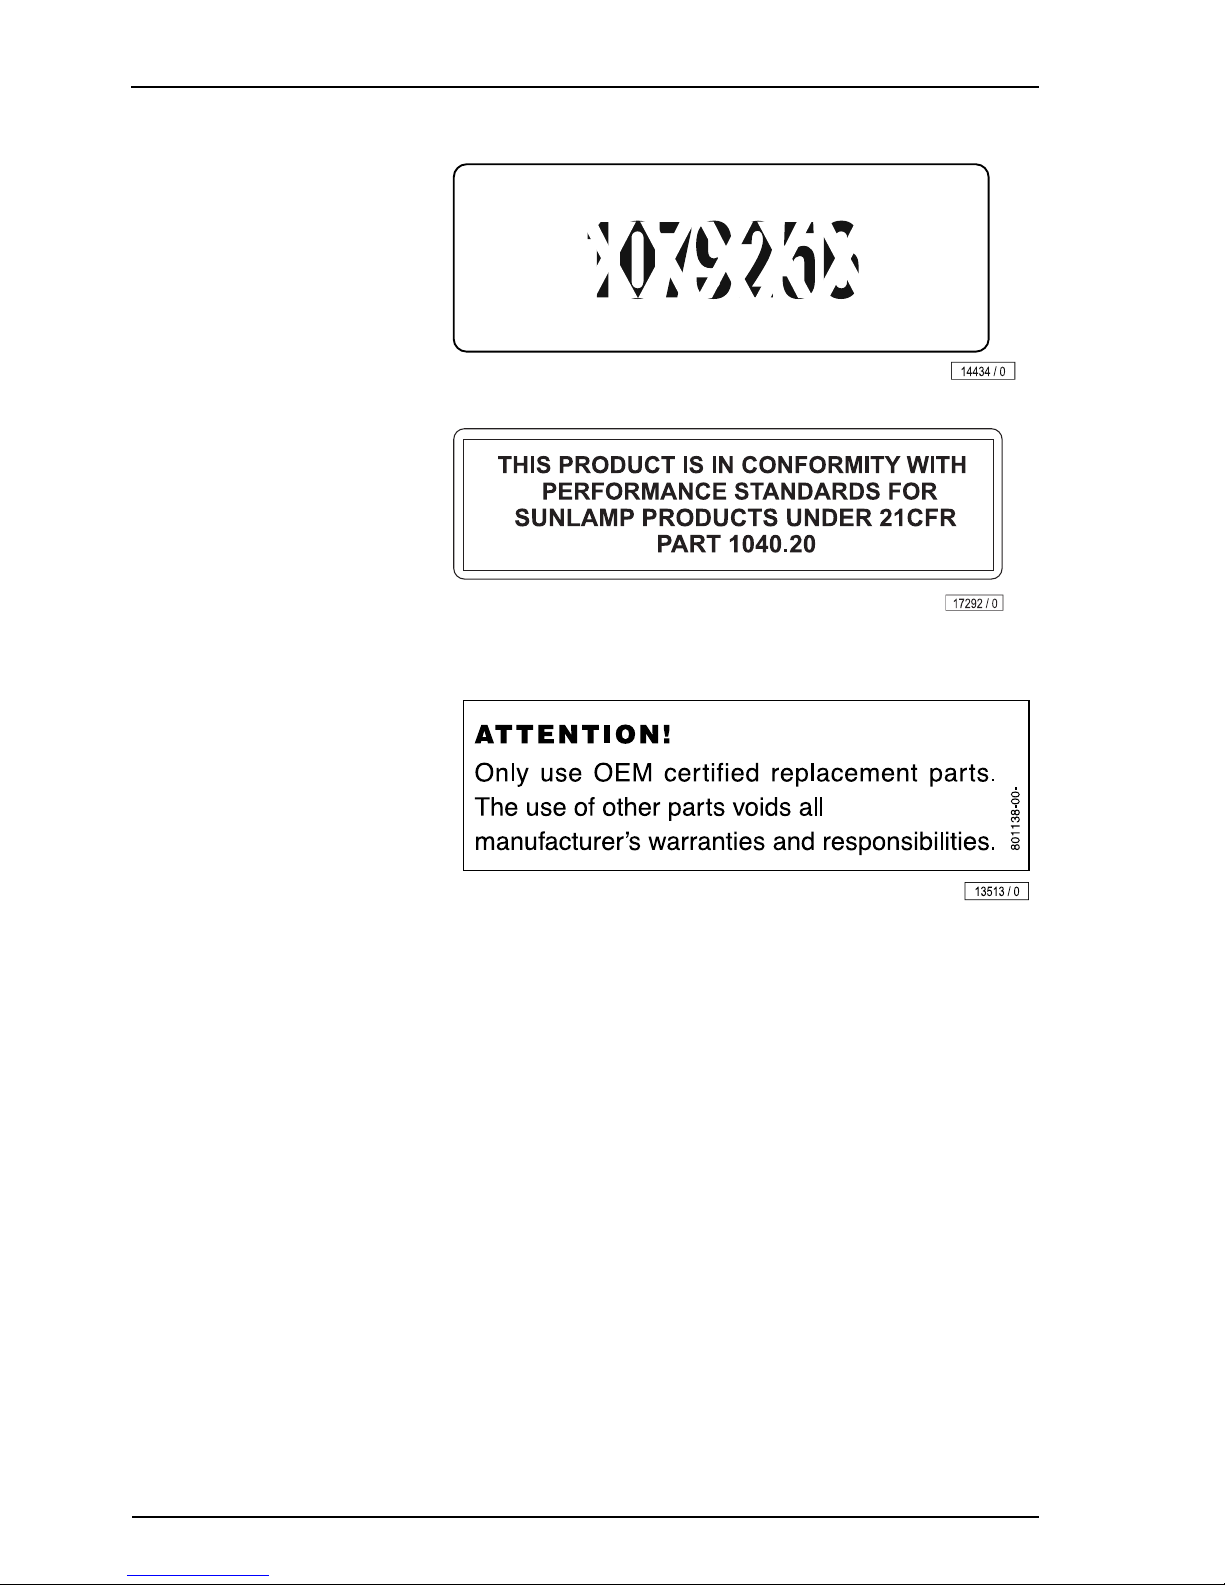
A
ppendix
72/78
2: Module plate
3: Standards
4: OEM Parts sticker (801138-..)
The sticker is mounted on the bottom edge at the front of the bed base and at
the control box.
Page 75
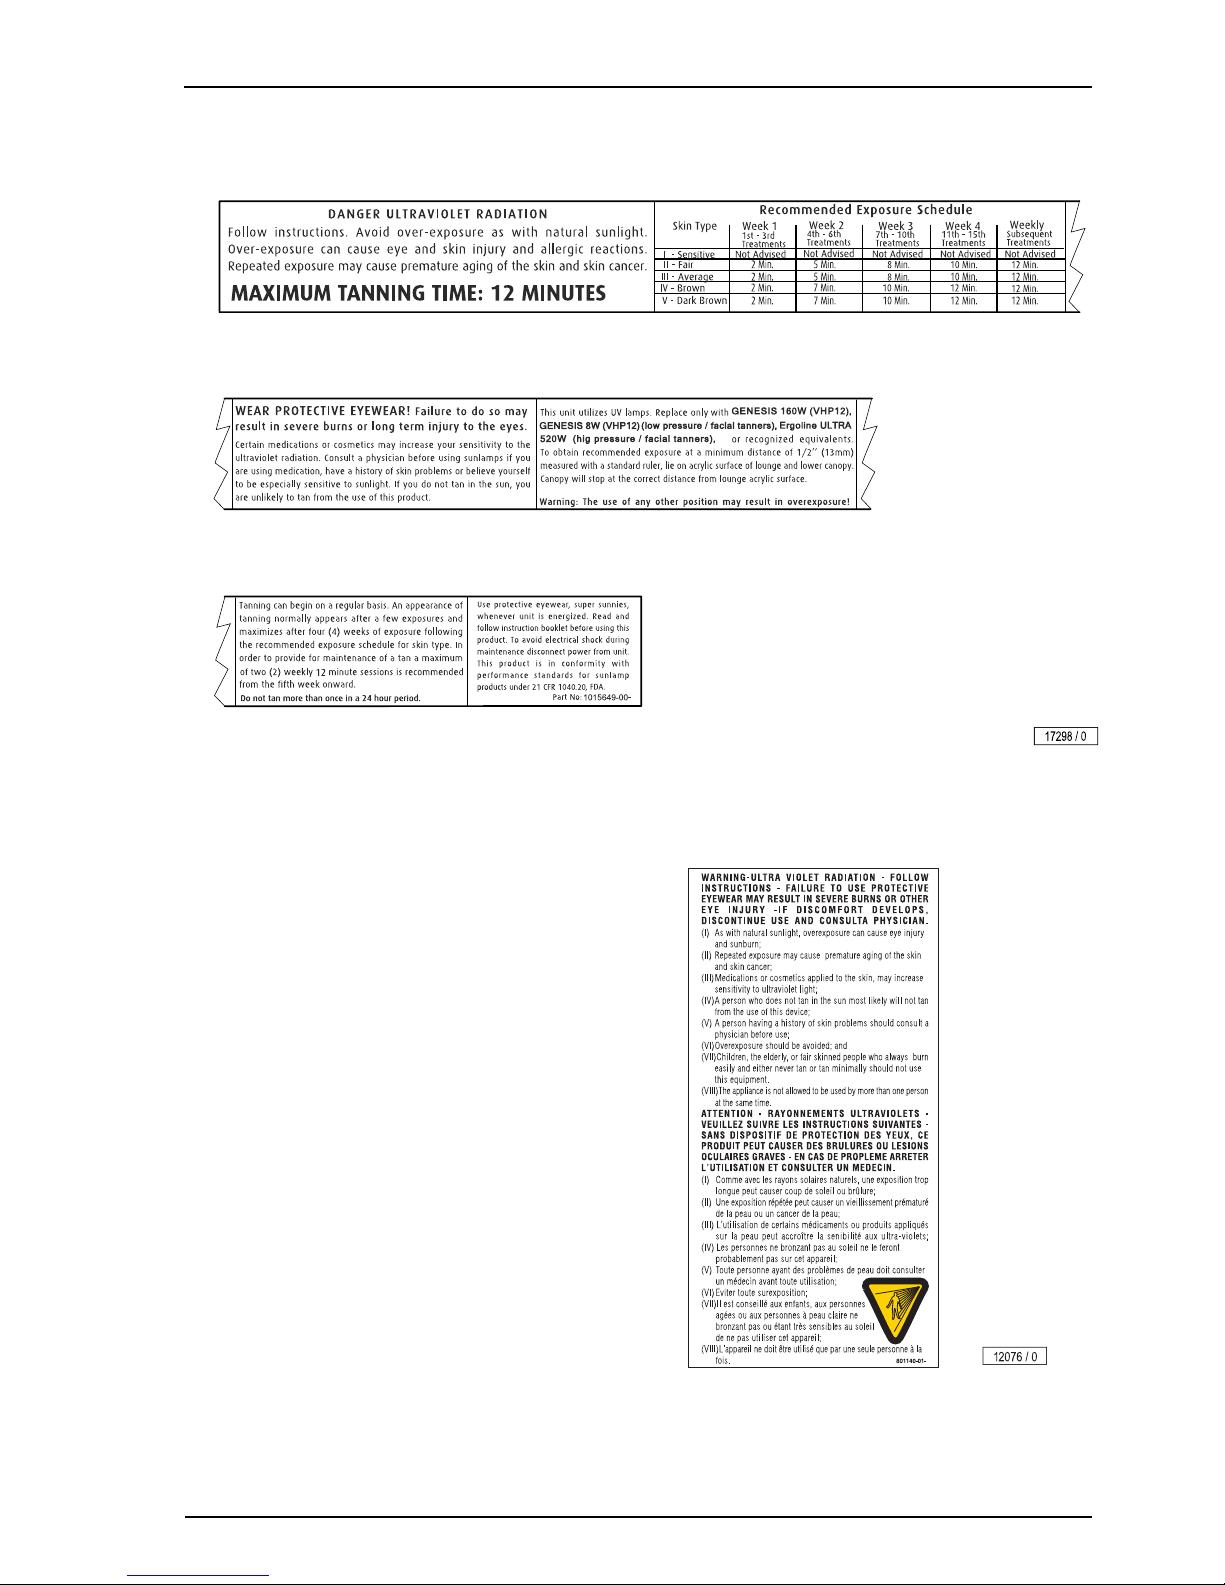
A
ppendi
x
11/2014 1015420-00 Operating instructions – 73/78
5: Exposure label
6: Warning sticker (801140-..)
Page 76
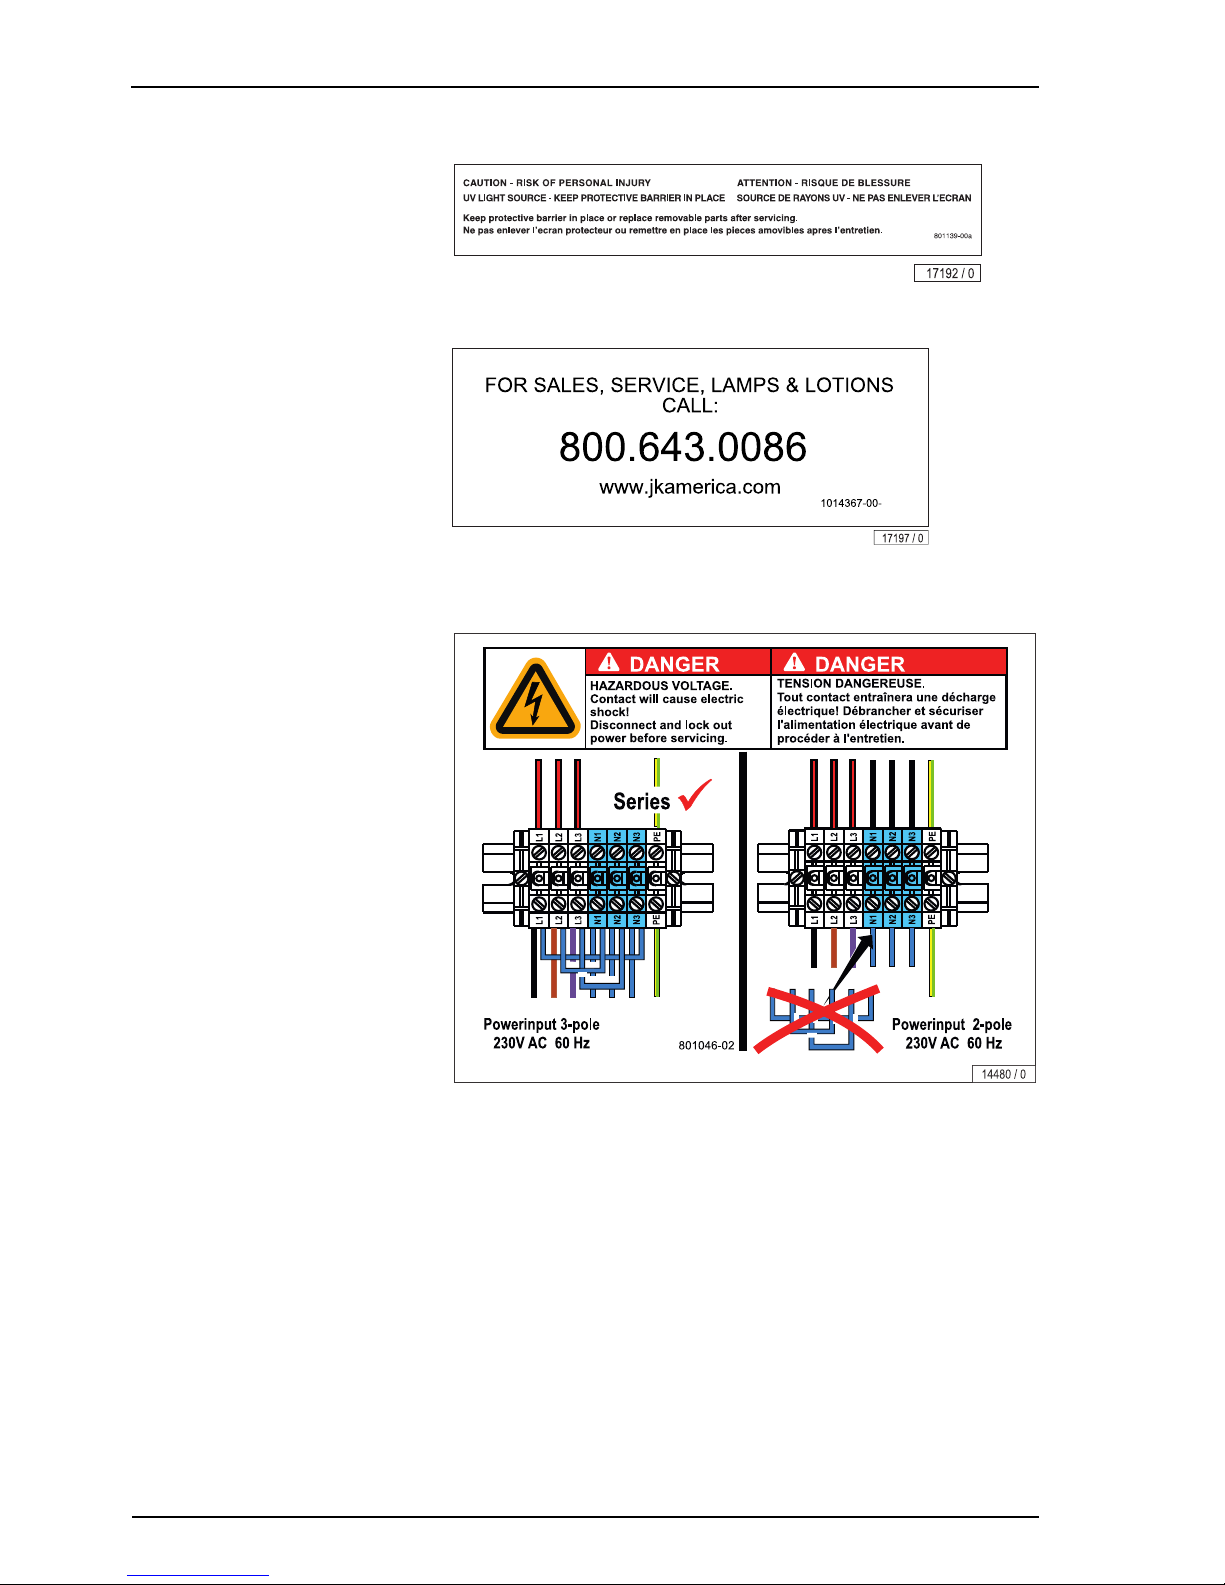
A
ppendix
74/78
7: Lamp cover base sticker (801139-..)
8: Sticker (1014367-..)
9: USA mains connection sticker
The sticker is mounted on the rear panel at the left.
10: Power unit components sticker (1501531-..)
The sticker is mounted on the control box.
11: Connection terminal block sticker (1001767-..)
The sticker is mounted on the control box.
12: Ballast sticker (800704-..)
The sticker is mounted on the control box.
Page 77
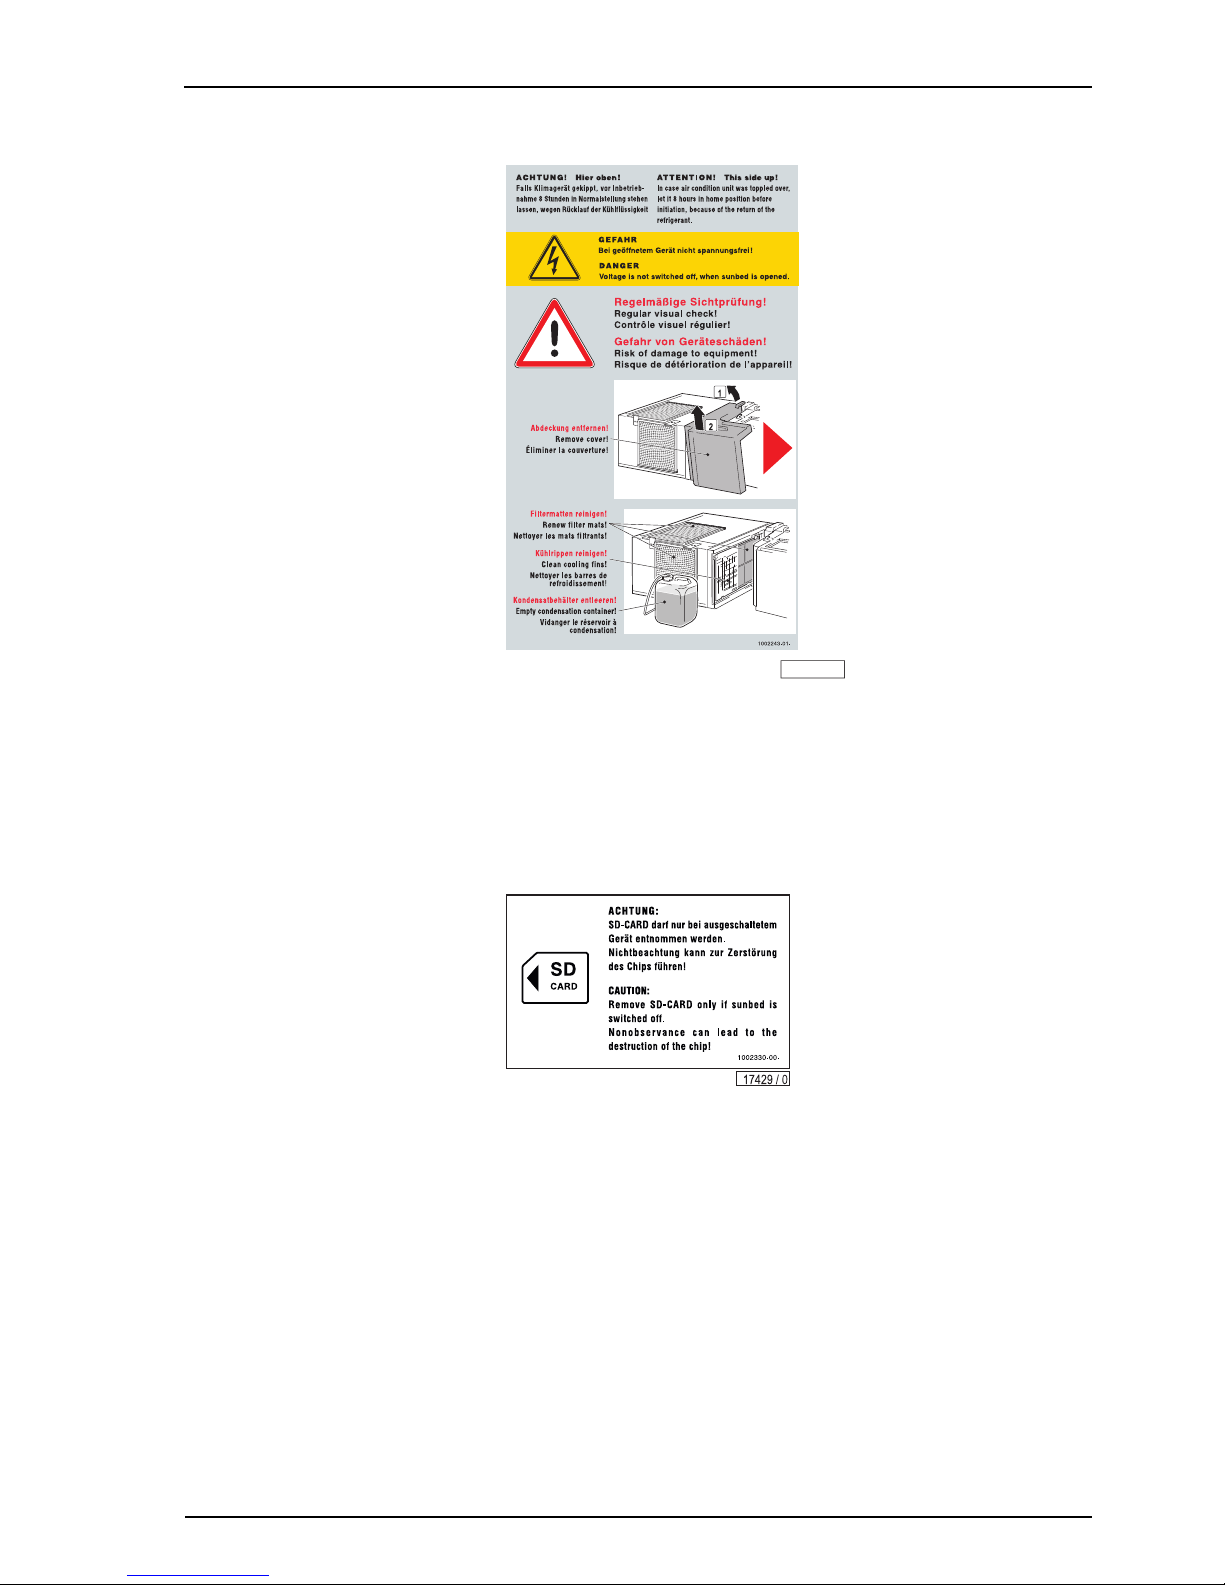
A
ppendi
x
11/2014 1015420-00 Operating instructions – 75/78
13: Air conditioning sticker (1002243-..)
13435 / 0
The sticker is mounted on the air conditioning.
14: ‘Only use original spare parts’ sticker (1002328-..)
The sicker is mounted on the controller support.
15: SD card sticker (1002330-..)
The sticker is mounted on the controller support.
Page 78
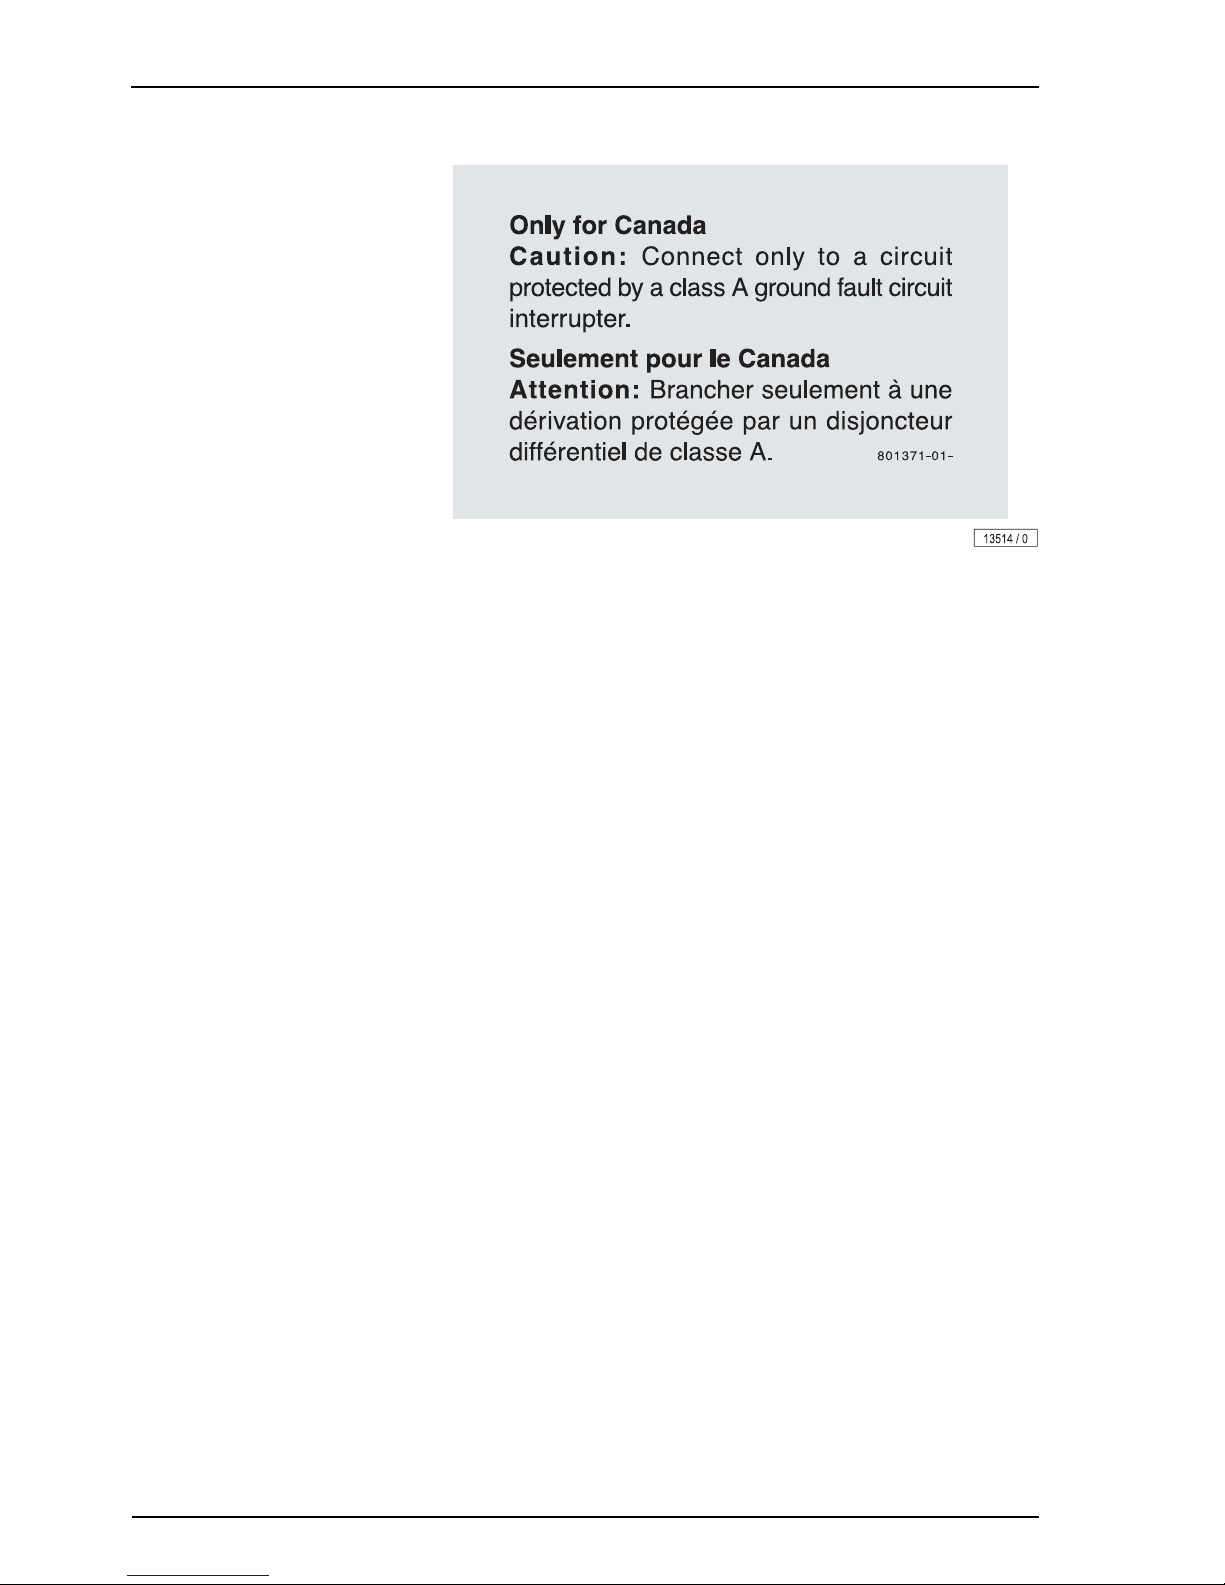
A
ppendix
76/78
Canada warning sticker (801371-..)
The sticker is mounted on the rear panel.
Page 79

Inde
x
11/2014 1015420-00 Operating instructions – 77/78
11 Index
A
Accessories ......................... 19, 64
Acrylic glass (maintenance) ...... 32
Acrylic panel (product
information) ............................... 35
Acrylic panel, load ..................... 59
Adolescents ........................ 13, 20
AQUA / AROMA SYSTEM
maintenance ............................. 55
Assembly .................................. 14
C
Changing the AROMA
canister ..................................... 56
Changing the starter ................. 44
Cleaning .............................. 30, 32
Air conditioning .................... 53
Air conditioning filter ............ 53
Filter .................................... 49
Filter mats ...................... 50, 51
Lamps, filter panels ............. 33
Cleaning / replacing the
UV lamps
Base .................................... 46
Facial tanner ........................ 47
Shoulder tanner ................... 48
Side section ......................... 46
Cleaning intervals ..................... 33
Cleaning overview ..................... 33
Cleaning the filter .......... 49, 50, 51
Connect MP3 player ................. 29
Contact lenses .......................... 21
Copy protection ......................... 15
D
Definitions ................................... 7
Demo-Modus ............................ 23
Description ................................ 18
Device description ..................... 18
Dimensions ............................... 60
Disinfection ............................... 32
Disposal .................................... 16
E
Electric shock .............................. 9
Electrical specifications ............. 59
Electrician ................................... 7
Empty the condensation tank .... 53
Equipment ................................. 17
Exhaust air ventilation ............... 14
Export ........................................ 15
Eye damage .............................. 20
F
Facial tanner
Cleaning/replacing ............... 47
Fault codes ............................... 31
Faults ........................................ 31
Filter panels .............................. 44
Cleaning/replacing ... 46, 47, 48
Foreseeable misuse .................. 13
Functions .................................. 25
G
Glasses ..................................... 21
Guidelines ................................. 14
H
High pressure lamps,
danger of fire! ............................ 44
I
Injury ........................................... 9
Installed lamps .......................... 62
Instruction signs ........................ 16
Intended use ............................. 13
Itching ....................................... 20
L
Lamp configuration ................... 62
Lamps ....................................... 13
Lift up the acrylic panel ............. 38
Light sensitivity .......................... 20
Page 80

Index
78/78
M
Maintenance ................. 30, 32, 34
Maintenance overview.............. 35
Make-up ................................... 21
Medications .............................. 20
MP3 music ............................... 15
O
Open the bed base ................... 41
Operating altitude ..................... 14
Operating overview .................. 22
Operator ..................................... 7
Operator's obligations .............. 13
P
Plastic surfaces (maintenance) 32
Play rights ................................ 15
Power rating ............................. 59
Product information .................. 13
Protective measures when
performing maintenance work .. 30
Q
Qualified staff ............................. 7
R
Recycling .................................. 16
Remove the canopy panel ........ 39
Remove the side section
panel ........................................ 40
Replace the UV low pressure
lamps ........................................ 43
Replacing the AQUA
SYSTEM canister ..................... 57
Replacing the lamps ................. 42
Risk of injury ............................. 20
S
Safety notices ............................. 9
Scope of delivery ...................... 17
Setup ........................................ 14
Setup location .......................... 14
Sickness ................................... 20
Skin types ................................... 6
Spare parts ......................... 35, 64
Staff ............................................ 7
Staff training ............................. 14
Start tanning ............................. 28
Start-up settings ....................... 28
Sunburn .................................... 20
T
Tanning times ............................. 6
Technical Service ....................... 2
Transport .................................. 14
U
UV lamps .................................. 62
V
Ventilation ................................ 14
W
Warning signs, description ......... 8
Page 81

Page 82
1015420
J K - P ro d u c t s & S e r v i c e s , I n c .
1 Walter Kratz Drive
Jonesboro, AR 72401
Phone: 800.643.0086 (Toll-free)
Fax: 870.935.3618
Website: www.jkamerica.com
E-Mail: ergoline@sunergoline.com
A F F I N I T Y S E R I E S
7 0 0 / 9 0 0
A D VA N C E D P e r fo r m a n ce
S o l t r o n L-7 0 / X L-7 5
 Loading...