

Page 1
Bedienungsanleitung
User’s manual
Mode d’emploi
Page 2
BASL - 02 - V03 Page 29
User manual
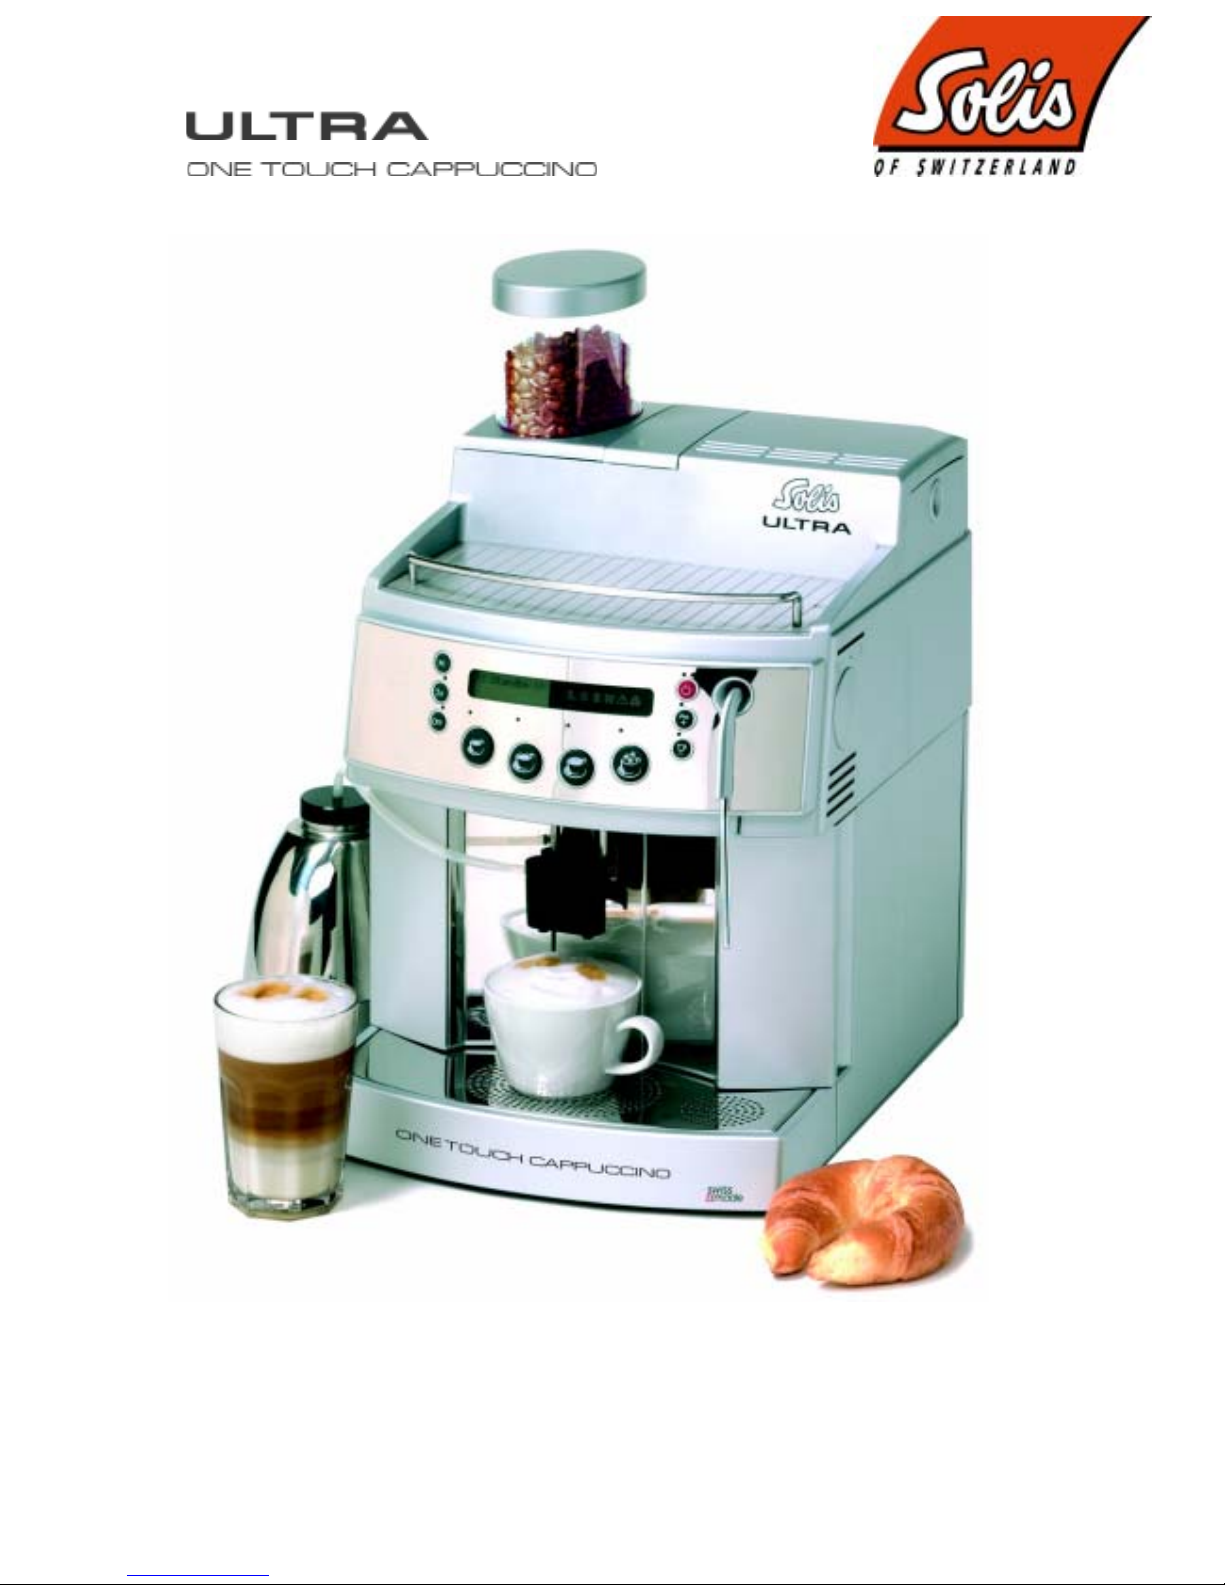
Dear Customer
With this new coffee machine you have purchased a
fully automatic espresso coffee machine of Swiss
quality.
If you read through these operating instructions
carefully and comply with them, then you and your
guests will obtain much pleasure from this coffee
machine. Keep these instructions in a safe place close
at hand. If there are any unclear points or should you
require additional information please consult your local
dealer. He will be pleased to advise you.
Solis LTD
1 THE USER MANUAL
This manual will inform you in detail on programming,
commissioning, use and cleaning of your new machine. It also
contains important safety instructions to ensure safe use. We
therefore recommend that you read all instructions carefully
before commissioning the machine and that you keep them
handy for future reference. These operating instructions cannot
take into consideration every possible use. For further
information, or in the event of problems that are not covered in
these operating instructions, or not covered in sufficient detail,
please consult an authorised specialist. Keep the operating
instructions in a safe place and hand them on to a subsequent
owner.
Important!
Prior to commissioning the machine, carefully read
the chapter "Safety instructions". The
manufacturer rejects any liability for damages that
are caused by improper use of the machine.
Performance of the coffee machine depends to a great extent on
proper use and careful maintenance of the machine.
In the interests of further technical development, the right is
reserved to make structural or design changes to the machine.
Deutsch 1 - 28
English
29 - 56
Français
57 - 84
Publisher: Solis Ltd.
CH-8152 Glattbrugg
Version: Version 03 / August 2005
Designed and edited by: Solis Ltd.
CH-8152 Glattbrugg
© Copyright by Solis Ltd.
CH-8152 Glattbrugg
All rights reserved, including translation into other languages.
This manual may not be copied, photocopied or distributed, in
whole or in part, by any means, nor transmitted electronically,
without the publisher’s written consent.
All informations, illustrations, and specifications in this manual
are based on the latest product information available at the time
of publication approval. Solis Ltd reserves the right to change
the content at any time without prior notice.
FR
UK
DE
Page 3

Page 30 BASL - 02 - V03
User manual
UK
Table of contents
Text Page
1 The user manual.........................................29
2 Safety Instructions.....................................31
2.1 Safety notes.................................................................... 31
2.2 Hygiene ..........................................................................32
3 Product description....................................33
3.1 Over view........................................................................ 33
3.2 Included in Shipment...................................................... 34
3.3 Overview accessories..................................................... 34
3.4 The control panel............................................................ 35
3.5 Indicators and their significance ..................................... 35
3.5.1 The display-Symbols ...................................................... 35
3.5.2 Display messages ..........................................................36
3.6 Technical data ................................................................ 37
3.7 Tips and interesting facts about coffee........................... 37
4 Operation.....................................................37
4.1 Putting your appliance into operation and using it for the
first time .......................................................................... 37
4.2 Installation of the milk suction nozzle ............................. 38
4.3 Coffee preparation with coffee beans............................. 39
4.4 Coffee preparation with powdered coffee....................... 39
4.5 Hot water preparation..................................................... 39
4.6 Steam preparation .......................................................... 40
4.7 Preparation Cappuccino................................................. 40
4.8 Re-dosing milk foam....................................................... 40
4.9 Pre-heating cups ............................................................40
4.10 Grinder settings ..............................................................40
5 Care and cleaning.......................................40
5.1 Daily and weekly cleaning .............................................. 41
5.2 Drip tray cleaning............................................................ 41
5.3 Beverage output cleaning............................................... 41
5.4 Cleaning the grinder ....................................................... 41
5.5 Rinsing the brewing unit and the beverage outlet system
........................................................................................ 41
5.6 Rinsing the Cappuccino system ..................................... 42
5.7 Daily cleaning cappuccino system ................................. 42
5.8 Cleaning .........................................................................43
5.9 Descaling........................................................................ 45
5.10 Installation / disassembly of foamer head ......................46
5.11 Foam nozzle / milk suction nozzle cleaning .................46
6 Programming ..............................................47
6.1 Programming overview................................................... 47
6.2 Product programming ..................................................... 48
6.3 Programming the machine: general settings.................. 49
6.4 Programming the machine: protected settings............... 49
7 Problems and possible causes.................50
8 Servicing and maintenance work .............50
8.1 Service request............................................................... 50
9 Options........................................................51
9.1 Coin slot option............................................................... 51
9.2 Bean container option..................................................... 51
9.3 Feet option...................................................................... 51
9.4 Mains water connection option....................................... 52
9.5 Installation plan............................................................... 53
Table of contents
Text Page
10 APPENDIX...................................................54
10.1 Conformity declaration....................................................54
10.2 Cleaning agent................................................................54
10.2.1 Cleaning tabs "Solitabs" .................................................54
10.2.2 Cleaning tabs for milk systems ....................................... 54
10.2.3 Liquid descaling agent Solipol ........................................54
10.3 Environmental aspects ...................................................55
10.4 Address...........................................................................55
Page 4

BASL - 02 - V03 Page 31
User manual
UK
2 SAFETY INSTRUCTIONS
2.1 Safety notes
Only operate the appliance
after instruction or after having
read the enclosed user
manual.
Please read the notes
attentively.
Place the coffee machine on a
stable, level surface. Avoid hot
or warm surfaces. Choose a
position beyond the reach of
children and pets.
Never permit current-carrying
parts to come into contact with
water.
Never spray the machine with
water or other liquids. For
cleaning, never immerse the
machine in water or any other
liquid. Do not operate the
appliance with wet hands.
Children rarely understand the
potential hazards associated
with electrical appliances. For
that reason, you should never
leave children unsupervised
where electrical equipment is
present.
Be careful when touching the
steam nozzle as it becomes
hot when in use. Please use
the handles provided.
Do not touch hot surfaces.
Let the appliance cool down
before dismantling or removing
any parts. This applies to the
cleaning as well (danger of
scalding).
People who are not familiar
with these operating
instructions, as well as
children or people under the
influence of alcohol, drugs or
medication may not operate
the machine.
The mains cable must not be
drawn around corners or over
sharp edges, or be jammed,
and should not rest on or hang
from warm objects.
Place the coffee machine on a
stable, level surface. Avoid hot
or warm surfaces. Choose a
position beyond the reach of
children and pets.
(See paragraph 3.6 Technical
data Page 37)
Only connect the machine to
an earthed socket. For your
safety we recommend the use
of a faulty-current circuit
breaker (obtainable in the
electrical trade).
Never put a machine with a
defective cable into use. When
an additional extension cable
is used this must likewise be in
a faultless condition and
should be so arranged that
nobody can trip over it. Keep
children and pets well away.
Never insert the power plug
into the socket when wet and
do not touch the plug with wet
hands. To protect people from
fire, electric shock and injuries,
never immerse connecting
cables or plugs in water or any
other liquid.
Do not leave the machine
switched on and unattended.
On grounds of safety and
saving of energy you are
recommended to switch the
machine off overnight and
during absences. For short
absences the appliance can
be switched to stand-by mode
with the operating switch
.
For appliances connected to
the water supply, the water tap
must be closed.
Pull the mains plug if the
appliance is not used for a
longer period of time.
900'128.001
900'009.001 900'006.002
900'128.001
900'128.001
900'128.001
Page 5
Page 32 BASL - 02 - V03
User manual
UK
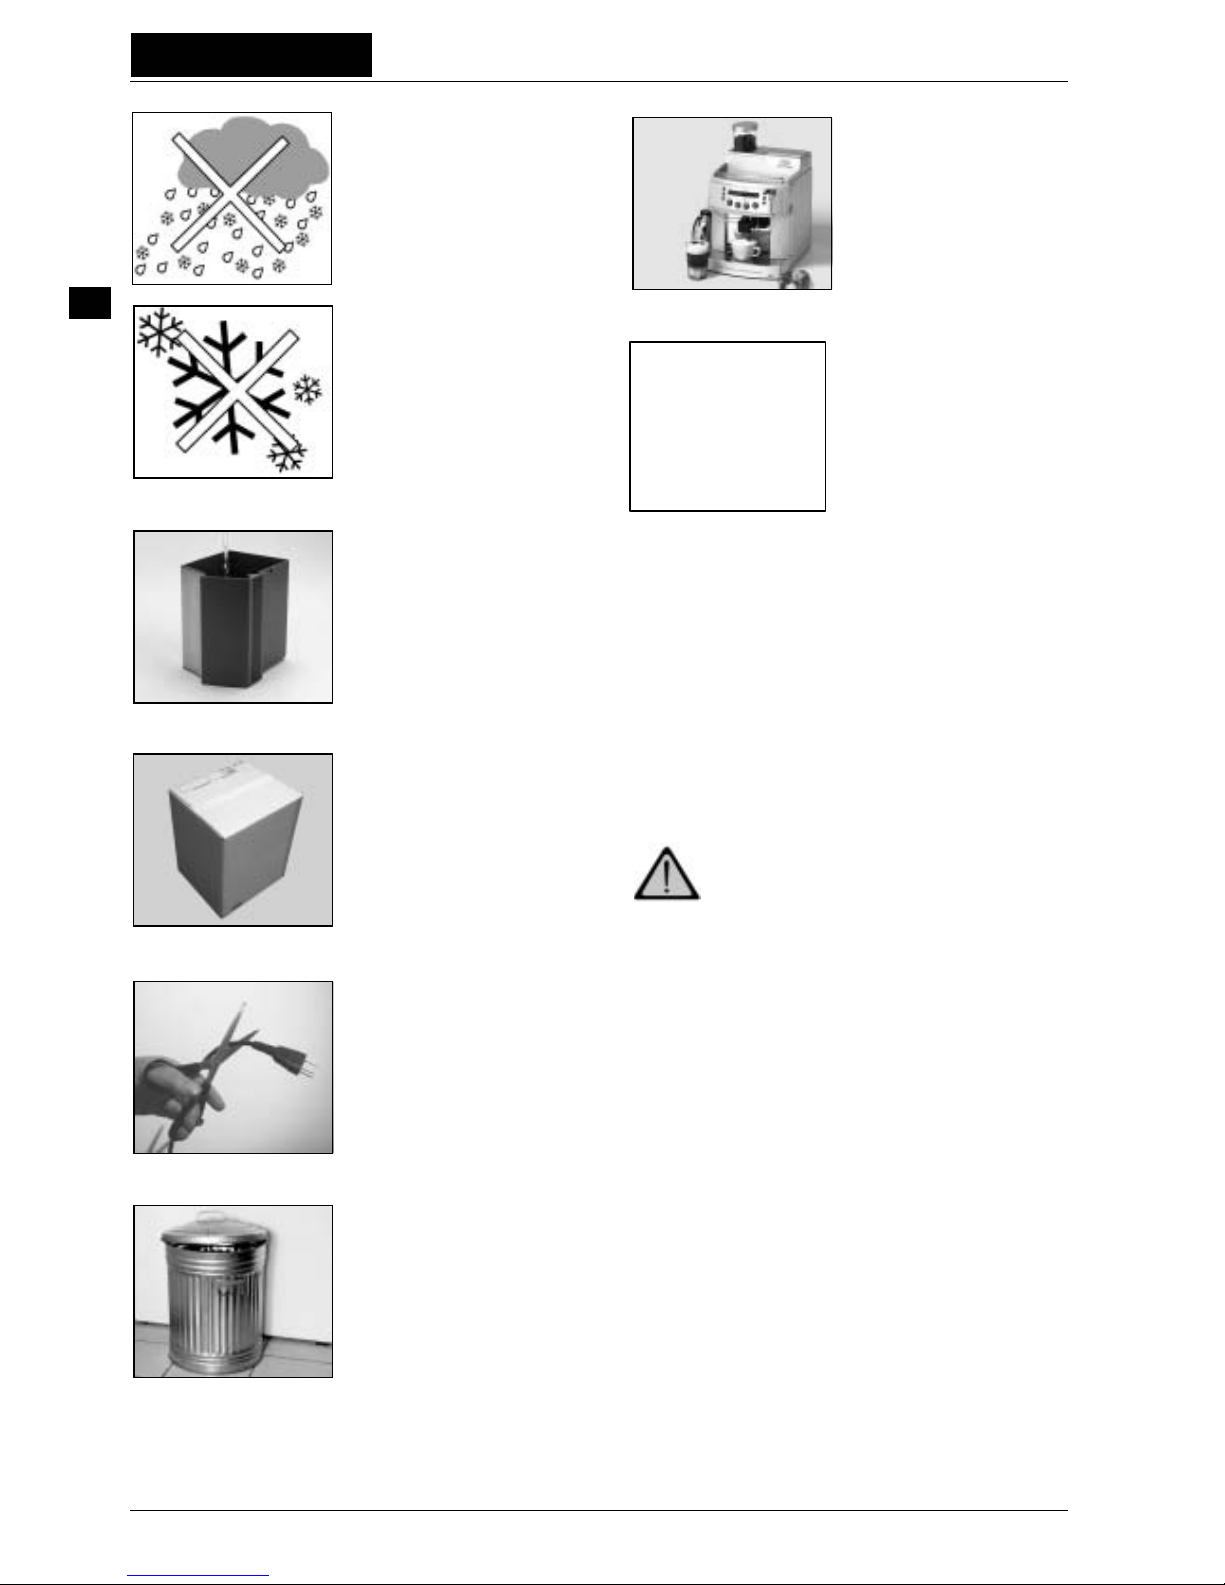
Do not expose the appliance
to external climatic conditions
(rain, snow, frost etc.).
Protect the machine against
frost and never leave it
overnight in a motor car,
otherwise there is a danger of
frost damage.
Never put the machine into
operation without water.
The original packaging has
been designed to be especially
robust so that the machine can
be dispatched by the postal
service. Therefore please keep
the packaging materials in
case it is necessary to return
the machine.
On grounds of safety worn-out
machines should be made
unusable. For this purpose,
withdraw the mains plug and
cut though the connection
cable. Then take the machine
away for proper disposal.
Old machines still contain
usable substances. Therefore,
do not simply hand over your
machine to the nearest waste
disposal site. Instead, ask your
service technician or the town
administration about the
possibilities of recycling. In no
circumstances should the machine be placed in the refuse
container for household
rubbish.
The appliance is intended for
the preparation of coffee, hot
water and steam and must not
be used for any other
purposes. The appliance is
designed for domestic and
commercial use. If it is used
for commercial purposes, the
warranty conditions will
change. Please observe the
guarantee conditions.
Appliances with damaged
connecting cable or plug,
appliances in other than
perfect condition or appliances
damaged in any way may not
be put into operation. In the
case of damage, the appliance
must only be opened by an
authorized service technician
and repaired with original
spare parts and accessories. If
not, the manufacturer declines
all liability. Using accessories
that are not recommended by
the manufacturer can lead to
fire, electric shock, personnel
injuries.
2.2 Hygiene
The International HACCP (Hazard Analysis and Critical Control
Point) regulations contain food hygiene guidelines. Many
countries have further national hygiene regulations in addition to
HACCP.
In principle, coffee machines must be operated in accordance
with HACCP and with any national and industry hygiene
regulations in force.
Attention:
Do not use raw milk. Use only pasteurised or
UHT milk. Homogenized milk must always be
used.
Milk that has already been heated up or for
which the expiry date has lapsed may not be
used.
When using packaged milk, it is recommended
for hygienic reasons that the milk be used
directly from the original packaging.
The milk must be at a temperature of approx.
3 ° - 5 °C It will not be possible to serve a highquality product if you do not follow this
guideline.
900'012.001
900'016.001 900'014.001 900'130.001 900'131.001
SERVICE
Page 6
BASL - 02 - V03 Page 33
User manual
UK
3 PRODUCT DESCRIPTION
3.1 Over view
1 Coffee bean container
2 Filler funnel (with cover) for powdered coffee
3 Cup stand
4 Service door 2-parts
5 Hot water nozzle
6 Brewing unit with drawer for coffee grounds
7 Water tank
8 Integral turntable
9 Drip tray with level indicator
10 Cup grill
11 Grounds container
12 Beverage outlet (coffee / milk)
13 Control panel
14 Mains switch O-I
15 Grinding degree with indicator grinding degree
16 Display of quantity dispensed in drip tray
17 Foamer head (disassembled)
4
6
12
13
14
1
16
8
17
Page 7
Page 34 BASL - 02 - V03
User manual
UK
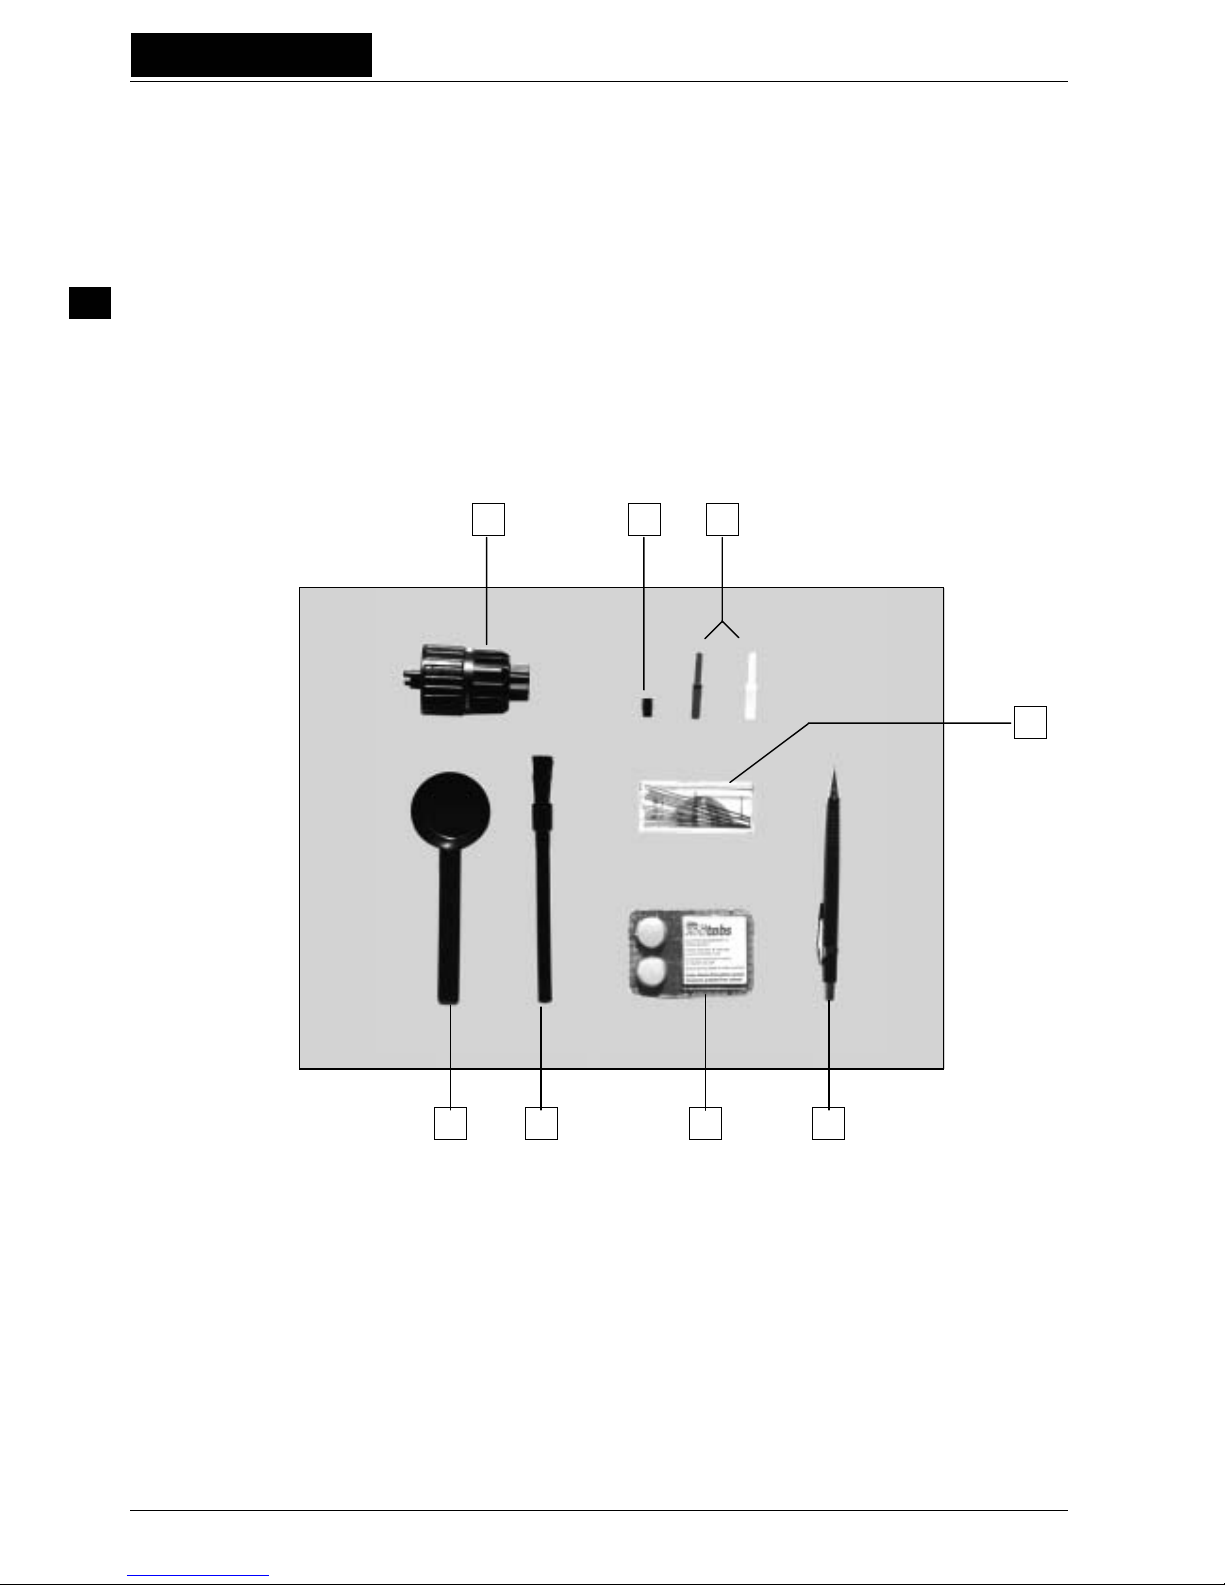
3.2 Included in Shipment
Pcs. Part
1 User manual
1 Cleaning & Descaling card
1 Multi-tool setting button
1 Measuring spoon for ground coffee
1 Cleaning tablet
1 Cleaning brush
1 Brush set (10 pcs.)
1 Blast valve tenon cleaner
1 Milk foam nozzle
2 Milk suction nozzle
Subject to change without notice!
3.3 Overview accessories
1. Blast valve tenon cleaner
2. Milk suction nozzle
brown = Diameter 1.5 mm
transparent = Diameter 1.7 mm
3. Milk foam nozzle
4. Brush set
5. Multi-tool setting button
6. Cleaning brush
7. Measuring spoon for ground coffee
8. Cleaning tablet
4
187
3
6
5 2
Page 8
BASL - 02 - V03 Page 35
User manual
UK
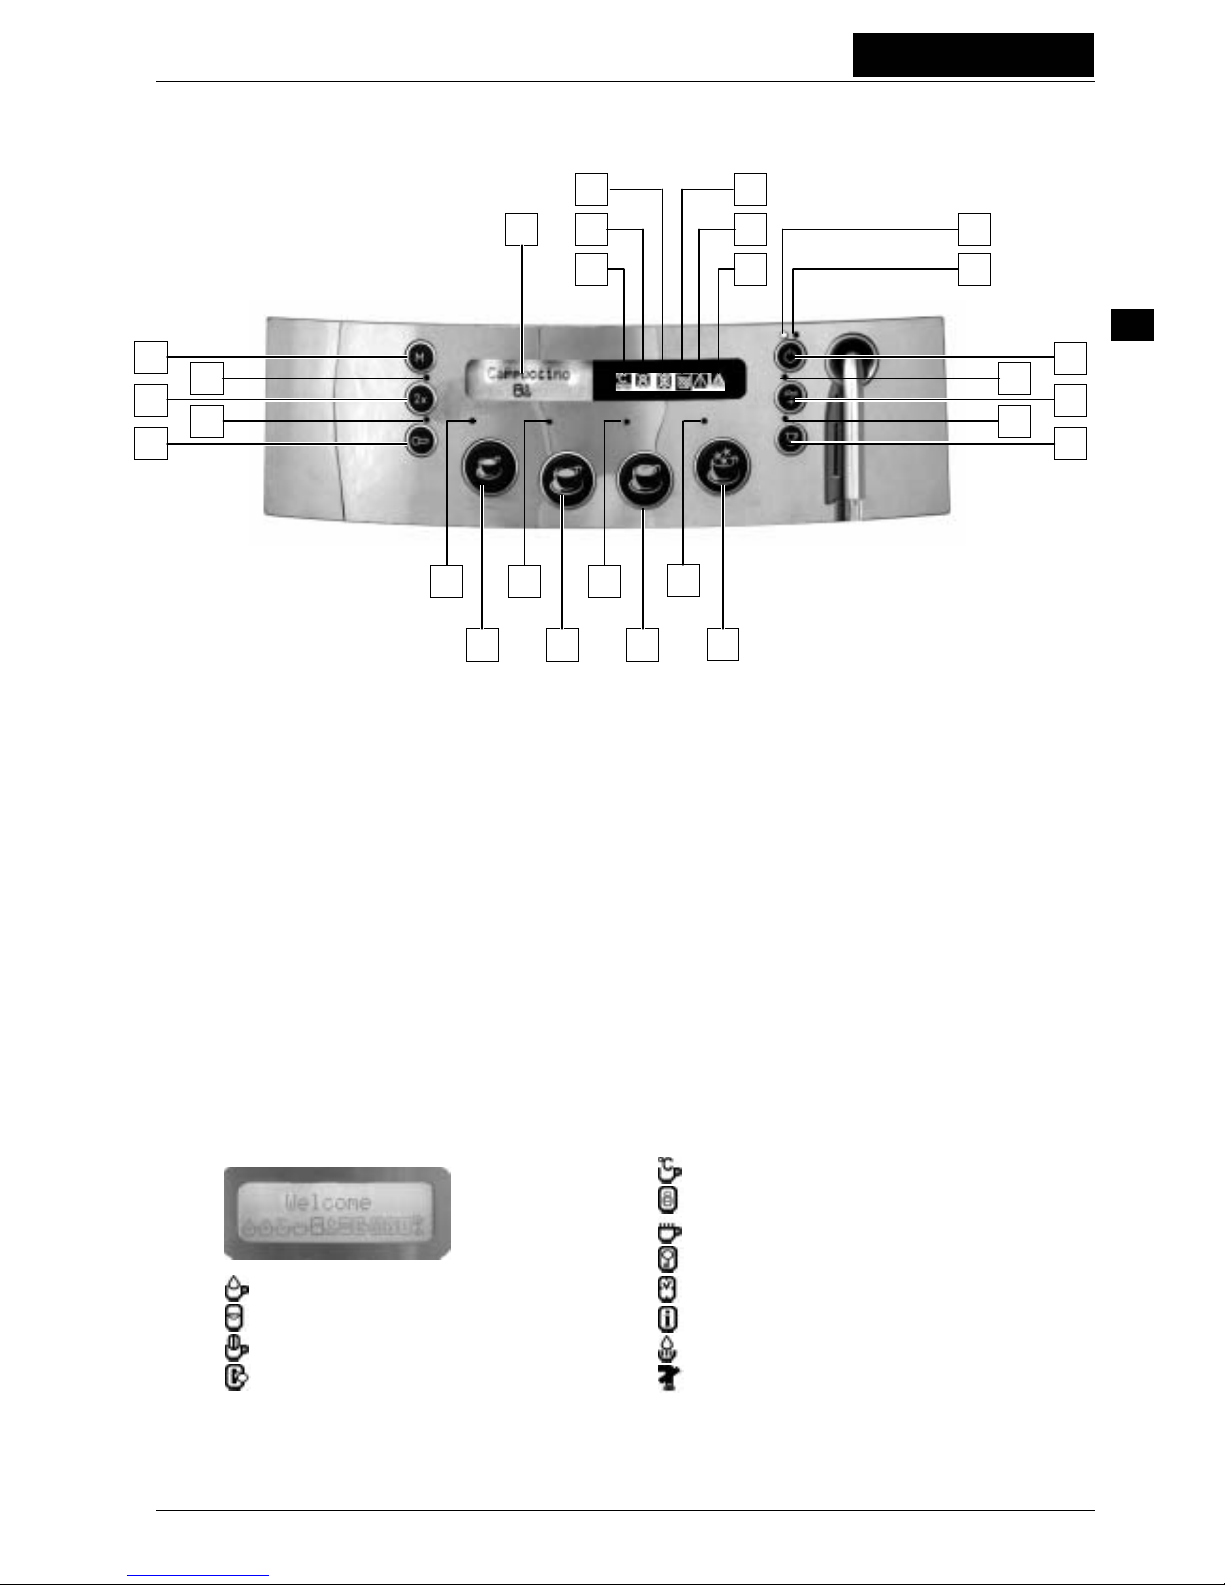
3.4 The control panel
1 Operating button ON/OFF
1a Ready-to-use indicator
1b Standby indicator
2 Cleaning/rinsing/decalcifying button
2a Cleaning/rinsing indicator
3 Product button hot water
3a Hot water indicator
4 Product button milk foam
4a Milk foam indicator
5 Cappuccino serving button
5a Cappuccino indicator
6 Café crème serving button
6a Café crème indicator
7 Espresso serving button
3.5 Indicators and their significance
3.5.1 The display-Symbols
Water quantity indicator
Language indicator
Coffee grinding time indicator
Coin unit indicator (Option)
7a Espresso indicator
8 Powdered coffee preselection for drawing of
products 5, 6, 7
8a Powdered coffee monitoring indicator
9 Button for double drawings for products 6, 7, 8
9a Double drawings indicator
10 Programming button
11 Display indicator
12 Lack-of-beans monitoring indicator - red
13 Grounds container monitoring indicator - red
14 Lack-of-water monitoring indicator - red
15 Fault / Brewing unit monitoring indicator - red
16 Temperature monitoring indicator - green
17 Decalcifying monitoring indicator - red
Temperature monitoring indicator
Operating indicator (Option)
Milk foam quantity indicator
PIN code indicator
Switching-off time indicator
Service number indicator
Preinfusion switched on indicator
Steam switched off indicator
900'127.001
1a
1b
4
11
7a 6a 5a
4a
16
14
12
17
15
13
2a
3a
9a
8a
Page 9
Page 36 BASL - 02 - V03
User manual
UK
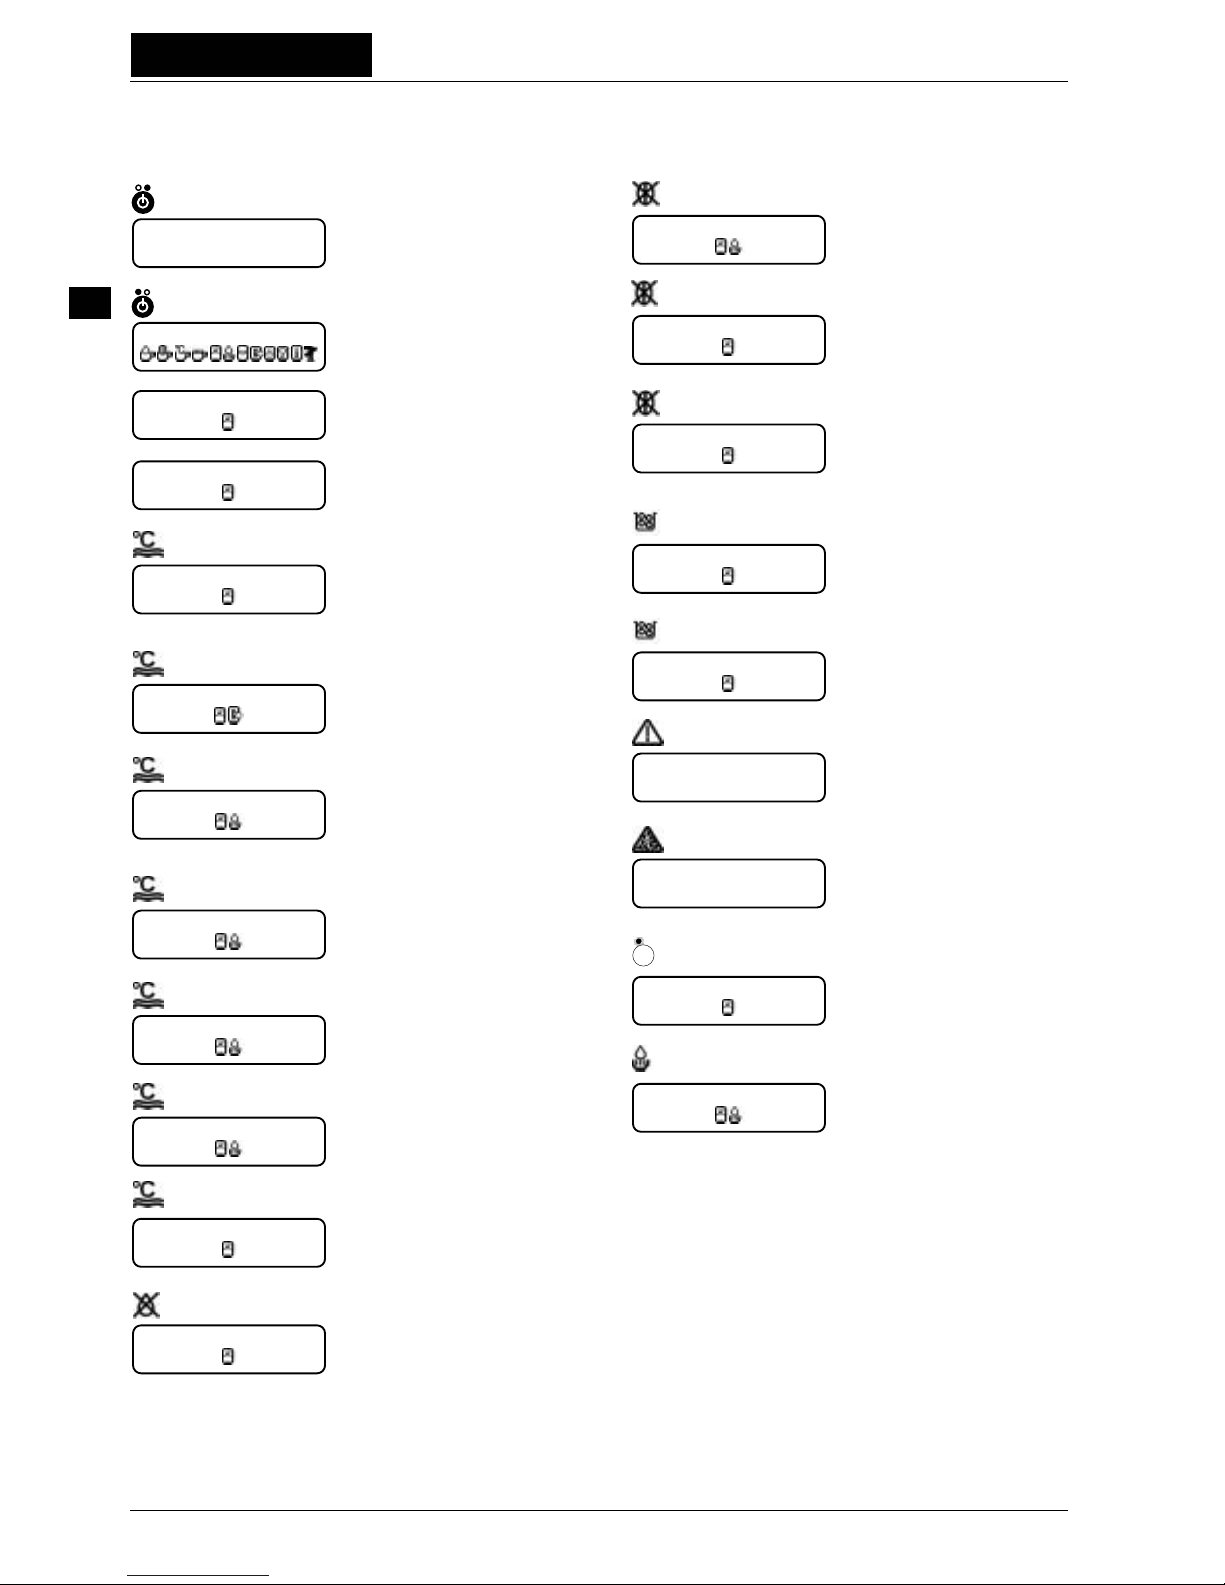
3.5.2 Display messages
LAMP DISPLAY SIGNIFICANCE
The machine is in standby
mode; it is now consuming very
little energy.
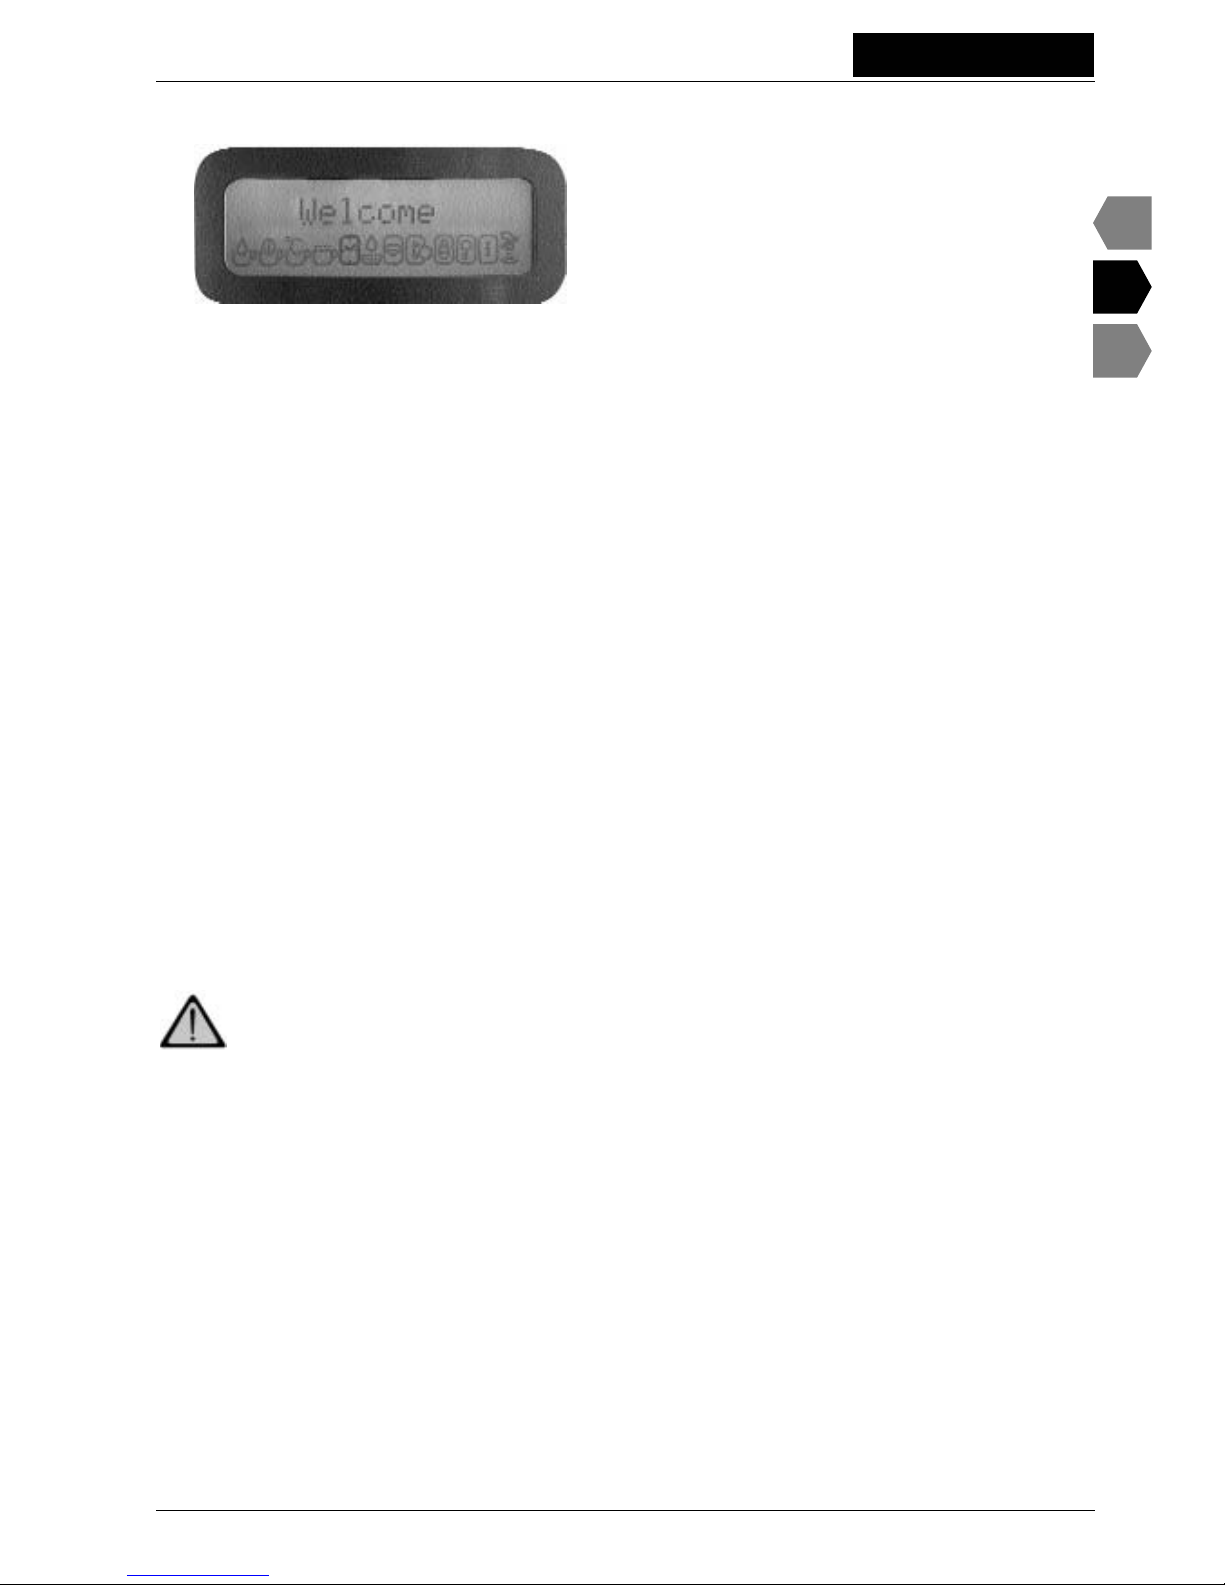
Welcome on switching on.
An automatic rinse takes place
when switching on, or the rinsing
programme is active.
The machine is being heated up;
the necessary operating
temperature has not yet been
reached
The machine is ready for use.
The green lamp indicates the
optimal operating temperature.
The machine is now ready for
operation and the payment
system is activated. The green
lamp indicates the optimal
operating temperature.
Drawing of espresso after
pressing the relevant product
button.
Drawing of coffee after pressing
the relevant product button.
Drawing of cappuccino after
pressing the relevant product
button.
Drawing of milk after pressing
the product button.
Drawing of hot water.
Flashes:
The water tank is empty or not
correctly inserted.
Illuminated:
Air in the water system
(See chapter 7 Problems and
possible causes, Page 50).
LAMP DISPLAY SIGNIFICANCE
The beans container is empty.
Further drawing only possible
after filling it.
The lid to the beans container is
not closed correctly.
The grinder is blocked. For
clearance see Operating
Instructions, section. 5.4,
Cleaning the grinder Page 41.
The grounds container is full.
Further drawing only possible
after emptying it.
The grounds container is not
correctly inserted.
The side door is open. Drawing
only possible after closing it.
The machine must be descaled,
or the descaling programme is
active.
The machine must be cleaned,
or the cleaning programme is
active.
The display alternates with the
current display. Report the
machine to customer service.
(See paragraph 8.1 Service
request Page 50)
Hatch open
Descaling
<< Standby >>
Welcome
Heating
Ready
Coffee
Cappuccino
Milk
Hot water
No beans
Grinder lid
Container full
Rinse
Espresso
Container
Service !!!
Cash
Lit
Flashes
Flashes
Water tank
Flashes
Grinder block.
Cleaning
Flashes
Flashes
≈
+
Page 10

BASL - 02 - V03 Page 37
User manual
UK
3.6 Technical data
Voltage/Output:
Machine-specific data (voltage
/ capacity) is posted on the
serial plate. This is mounted
underneath the cable cover on
the machine back panel.
(Display example)
TYPE 518
SERIES no. 2
2200W
230VAC 60Hz
S
+
SZ1
V
D E
000000000
(Display example)
max. voltage variation +5%/-10%
Water tank:
2.4 litres, or mains water connection as option
Dimensions ( W x H x D ):
Standard model: 314 x 508 x 403 mm
Option coin slot: 415 x 415 x 403 mm
Option mains water connection: 314 x 508 x 460 mm
Cable: 1,1 m
Weight standard model: 15,7 kg
Safety tests: international test certification
Current connection:
Do not use a multipoint socket.
But especially not if other equipment such as air conditioning
units, computers, typewriters or copiers are connected that can
create parasitic frequencies.
Do not over-load the power connection.
The connected users must not exceed the current (amperes) of
the fuse.
3.7 Tips and interesting facts about coffee
A good coffee result does not depend on the machine alone, but
rather also involves the water, the type of coffee, the grinding,
the temperature, etc. Pay special attention to the following tips:
• Always use fresh coffee and dark roastings.
• Coffee should always be stored in a closed container in a cool
place.
• If the coffee flows too quickly or too slowly then this is mostly
due to the wrong degree of grinding.
Coffee flows too quickly: set grinding degree to lower
figure, e.g. pos. 2
Coffee flows too slowly: set grinding degree to higher
figure, e.g. pos. 5
Recommended setting: works setting 3 - 4
Important: Adjust the grinding degree when
the grinder is running.
• Coffee tastes best from pre-warmed cups. For this, see section
4.9 Page 40.
4 OPERATION
4.1 Putting your appliance into operation
and using it for the first time
4.1.1 Place the packaging
on the floor with the number
facing upwards, carefully cut
open the adhesive tape.
(Caution: do not cut deeply
with the knife otherwise the
machine may be damaged).
Remove as much of the
protective material from the
cardboard box as possible and
lift the coffee machine out of
the cardboard box (ideally with
the help of someone else).
4.1.2 Place the machine on
a stable and horizontal
surface. Never place it on a
hot or warm surface. Select a
location inaccessible to
children and pets.
4.1.3 Insert the drip tray into
the machine to the stop.
4.1.4 Fill up the water tank
with cold water (max. 2.4
litres), insert it into the front of
the machine and press on it
firmly so that the valve on the
rear side opens.
Note:
With the option mains water
connection you can not take
the water tank out.
Attention:
Fill up only with fresh, cold
water, never with mineral
water, milk or other liquids.
4.1.5 Draw out the
connecting cable behind the
machine to the required length
(the remainder can be pushed
back into the special cable
compartment) and connect the
machine to an earthed socket.
Never insert the power plug
into the socket when wet and
do not touch the plug with wet
hands.
900'014.001
Page 11

Page 38 BASL - 02 - V03
User manual
UK
4.1.6 Close the lid of the
cable compartment.
Attention:
The mains cable must not
be drawn around corners or
over sharp edges, or be
jammed, and should not rest
on or hang from warm
objects.
4.1.7 Switch on mains
switch O-I. The machine is
now under current but only in
standby operation.
This action is not necessary
with the coin slot option.
4.1.8 Now press the
operating button ON/OFF
.
The relevant indicator (1a)
lights up and the machine
starts heating up. At the same
time the water pump starts
and fills the system with water,
as well as automatically
ventilating the machine.
4.1.9 Fill coffee beans into
the beans container (Quantity
approx. 500g). Seal the beans
container well with the lid.
Note:
Only pure coffee beans may
be used. Coffee with a
caramelized or aromatized
content must not be used.
If the monitoring indicator
blinks and the message
"Grinder lid" appears, then the
lid has not been fitted properly
and the machine is blocked
from preparing coffee.
4.1.10 Operational
readiness
When the temperature
monitoring indicator
lights
up green and the message
"Ready" appears in the
display, then the machine is
ready to use.
Note:
When the machine is put into
operation, it automatically
executes a rinse of the
brewing unit. This rinse always
takes place when the machine
has been switched on from a
cold state. During the rinsing
process (display message
Rinse) the machine is blocked
for the preparation of coffee.
If programmed:
Whenever the appliance is
switched off, an automatic
rinse cycle is performed. The
indicator flashes green. The
appliance is then automatically
switched to Standby mode
(the indicator (1b) flashes red)
4.1.11 Now press dispenser
button 6 and the first coffee is
delivered. This coffee
however, is not tasty, as the
coffee channel of the grinder
must first be filled. Please only
drink the next coffee that is
dispensed.
Attention:
Never take the machine into
operation without water. On
hygienic grounds you are
recommended, after long
breaks such as holiday
periods, to first rinse the
machine through by means
of the hot water nozzle
before using it again.
If during the rinsing process
the
appears, the water tank
is incorrectly located and there
is air in the system. Insert the
water tank correctly and vent
the machine by pressing the
hot water button
. Wait until
a steady water jet comes out.
Then press the hot water
button
again - the function
indicator disappears when a
coffee product button is
pressed.
4.2 Installation of the milk suction nozzle
You have received two milk suction nozzles (brown and
transparent) They have different passage diameters.
4.2.1 Milk suction nozzle
Push the milk suction nozzle
into the milk tube until it stops.
Important:
Without the milk suction
nozzle there is a risk that the
milk tube adheres to the
container bottom.
900'018.001
Ready
_
_
Page 12

BASL - 02 - V03 Page 39
User manual
UK
4.3 Coffee preparation with coffee beans
4.3.1 A precondition is that
the machine is ready for
operation according to point
4.1 Initial operation, i.e. the
tank is filled with water, the
bean container is filled with
beans, the temperature control
display
is illuminated in
green and the display
message "Ready" is displayed.
4.3.2 Place the cup under
the beverage outlet and press
the desired product button.
The machine is equipped with
an automatic pre-brewing
system. The coffee powder is
only moistened, the outlet is
briefly stopped and then the
actual brewing cycle begins.
Note:
At any time you may terminate
coffee delivery by briefly
pressing the selected
dispenser button. Large mugs
or coffee glases can be used
as well. Loosen the lock and
push the beverage outlet
upwards. (after use place the
outlet back to its usual
position.)
If you would like to draw 2
cups simultaneously, first
press the
button and then
the desired product selection
button. (6, 7)
4.4 Coffee preparation with powdered coffee
(e.g. decaffeinated coffee, 2nd type of coffee)
Attention:
Never use water-soluble,
freeze-dried instant coffee or
similar products. Never spoon
more than maximum 1 or 2
level measuring spoonfuls of
ground coffee into the filling
funnel. The filling funnel is not
designed to hold a permanent
supply. The ground (e.g.
decaffeinated) coffee you put
into the coffee maker is
funneled directly into the
brewing system.
4.4.1 Press the button for
powdered coffee, the red
monitoring indicator (8a) lights
up.
4.4.2 After you have placed
the cup below the beverage
outlet now also press the
required product button. The
display message "Powdered
coffee" appears and the red
monitoring indicator (8a)
blinks.
4.4.3 Remove the lid of the
charging hopper for powdered
coffee and place a max. of 1
or 2 level measuring spoons of
powdered coffee for 1 or 2
cups in the hopper (use the
supplied measuring spoon).
Then press the
button for
powdered coffee once again.
The coffee process operates
automatically.
Note:
If for about 1 minute after
pressing the powdered coffee
button no additional product
button is pressed, the red
monitoring indicator for
powdered coffee extinguishes
itself. In this case press the
powdered coffee button once
again and press the relevant
product button.
4.4.4 If you would like to
draw 2 cups simultaneously,
first press the
button, and
then the powdered coffee
button and then the required
product selection button.
4.5 Hot water preparation
4.5.1 For example for tea or
bouillon etc., it is
preconditioned that the
machine is ready for operation
according to point 4.1, i.e. the
water tank and bean container
are filled, and the temperature
control display
shows a
green light. The display
message “ready” is shown.
4.5.2 Place the glass or cup
under the hot water nozzle
and press the
button. The
hot water now flows out
automatically.
Note:
At any time, you have the
option to prematurely
terminate the output by
pressing the selected product
button.
900'030.001
Ready
Ready
_
2x
2x
Page 13

Page 40 BASL - 02 - V03
User manual
UK
4.6 Steam preparation
Steam output is not possible
for the machine with
cappuccino.
4.7 Preparation Cappuccino
4.7.1 It is preconditioned
that the machine is ready for
operation according to point
4.1, i.e. the water tank and
bean container are filled, the
temperature control display
shows a green light, the
display message „ready“ is
shown….
…and the foamer head tube is
placed in the milk container.
4.7.2 Place the cup under
the beverage outlet and press
the desired product button.
After the milk foam has been
dispensed the brewing
procees begins.
Attention:
You cannot end the
cappuccino output early.
The cappuccino is
dispensed in full.
However, you can shorten the
output by pressing the
cappuccino button.
Note:
You can also use very large
cups or coffee glass.
4.8 Re-dosing milk foam
4.8.1 If requested, you can
obtain milk foam by pressing
the button
at any time.
The display shows "Milk“
4.9 Pre-heating cups
Besides your choice of coffee blend and the quality of your water
supply, the correct cup temperature is a major factor in ensuring
you receive an excellent cup of coffee.
4.9.1 Store your clean cups
on the cup preheating stand to
keep them warm. They are
heated by indirect radiation
from the appliance heating
system.
4.9.2 An alternative method
to quickly pre-heat cups when
necessary is to rinse them out
with hot water drawn from the
hot water nozzle. The coffee
machine needs to be in Ready
mode.
We especially recommend this
method for small coffee
quantities (e.g. espresso).
4.10 Grinder settings
Your coffee machine leaves our factory preset to the optimum
values for most types of coffee beans. However, you also have
the option to adjust the grinding settings to suit your personal
preferences.
Attention:
The grinding degree is only
to be set during grinding
operation.
Use the special multifunctional
tool (included with the
machine) to move the fineness
setting to the required position.
The display shows the current
value:
Grinder setting 1 = fine / turn clockwise
Grinder setting 6 = coarse / turn counter-clockwise
Factory setting grinding degree 3-4 average grind!
If the coffee is ground more finely, the brewing time increases
(the coffee becomes stronger) as does the amount of froth.
5 CARE AND CLEANING
As well as extending the life of your appliance, always keeping
your coffee machine in a clean and proper condition will directly
reward you through the resulting excellence of the coffee you will
enjoy.
The appliance has a built-in automatic rinse programme as well
as a compulsory regular cleaning programme, which combined
with the additional option of thoroughly cleaning the brewing unit
by hand guarantees that you can keep your coffee machine in an
optimally clean condition
Important:
Observe the general hygiene regulations according to HACCP!
(See paragraph 2.2 Hygiene Page 32)
900'047.001
Ready
Page 14

BASL - 02 - V03 Page 41
User manual
UK
Note:
If you are going to be away for a lengthy period such as on
holiday, we recommend that you run the rinse programme before
you switch off the appliance.
5.1 Daily and weekly cleaning
The fresh water tank (7), the
drip tray (9), the cup grill (10)
and the grounds container (11)
must be cleaned regularly.
Use hot water for this and, if
necessary, a non-abrasive
detergent.
Attention:
Do not clean in the
dishwasher!
5.2 Drip tray cleaning
If the level display sticks out of
the drip tray, it must be
emptied due to a danger of
overflow. Carefully pull the drip
tray out from the guide and
clean it with hot water and with
a non-abrasive cleaning agent,
if necessary.
5.3 Beverage output cleaning
The beverage outlet is
removable to permit cleaning.
Use hot water with, if
necessary, a non-abrasive
cleaning agent.
(see section 5.7.1)
5.4 Cleaning the grinder
Normally the grinder cleans itself. It is sufficient merely to
remove larger grinding residues from the beans container with
the supplied brush.
Attention:
In no circumstances put water into the beans container, t his
damages the grinding discs.
Tiny stones occasionally get mixed up with even the finest
blends of coffee beans. To prevent them damaging the blades,
the appliance has an integral electronic stone detection function
which cuts out the motor to prevent damage to the grinder. If a
stone gets stuck, the mill stops and the malfunction is displayed
via the control display
and the message "Mill block" is
displayed. Follow these steps to clear the blockage:
5.4.1 Unplug the appliance
at the mains socket.
5.4.2 Remove the remaining
beans from the beans
container
5.4.3 Using the special
multifunctional tool, grasp the
square end of the grinding
discs spindle and slowly turn
the discs in a clockwise
direction until the stone or
foreign body is released and
can be removed. It is easiest
to remove the foreign body
with a vacuum cleaner.
5.4.4 Remove the
multifunction adjustment tool
from the beans container and
refill with fresh coffee beans.
Then close the container lid
and reinsert the mains plug
into the mains socket.
5.5 Rinsing the brewing unit and the
beverage outlet system
5.5.1 Automatic rinsing
The brewing unit and the coffee system are automatically rinsed
when switching on or switching off the device (the automatic
switch-on and switch-off rinsing can be activated and/or
deactivated by a service technician or a service office
independently of each other.
5.5.2 Manual rinsing
(For machine with
Cappuccino, also see section
5.6.1.1 Page 42 )
You always have the
possibility to rinse the brewing
unit and the coffee outlet
system with the button
(Rinsing/Cleaning). This takes
about 1 minute and is
displayed by the display
message "Rinsing". The
machine is again ready for use
as soon as the message
"Ready" appears.
To start rinsing, press 1 x
briefly on the button
(Rinsing / Cleaning).
900'049.001
900'006.002
900'051.001 900'052.001
900
'
125.00
≈
+
≈
+
Page 15

Page 42 BASL - 02 - V03
User manual
UK
5.6 Rinsing the Cappuccino system
Important:
For hygiene reasons, the "foamer head with tube"
should be cleaned immediately after usage.
5.6.1 Manual rinsing of the Cappuccino outlet
system
5.6.1.1 The button (Rinsing/Cleaning) has several
features programmed to it on the Cappuccino
model:
Press the button briefly (Rinsing /
Cleaning) as follows:
1x = Rinsing brewing unit
Display: "Rinsing"
2x = Rinsing Cappuccino
Display: "Capp. Rinsing"
3x = Manual cleaning
Cappuccino
Display: "Capp. Cleaning"
If you pressed the wrong
button, press on until the
desired message appears in
the display.
If the button is not pressed within 3 seconds, the selected
menu starts automatically.
(The multiple programming for the rinsing and the manual
Cappuccino cleaning can be activated and/or deactivated by
either a service technician or service office independently of
each other).
5.6.1.2 Place the tube in the
container with fresh, cold
water (approx. 1.5 dl)
Place a cup (approx. 1.5 dl
capacity) under the foamer
head.
5.6.1.3 Press the
button
2x briefly (Rinsing /
Cleaning). Rinsing of the
Cappuccino system is started.
5.7 Daily cleaning cappuccino system
Important:
For hygienic reasons, the "foamer head with hose" must be
cleaned once a day (preferably at the end of the business day)
with the cleaning agent:
Note:
A precondition is that the
machine is ready for operation
according to point 4.1 on initial
operation, i.e. the tank is filled
up with water and the
temperature control display
is illuminated in green and the
display message "Ready" is
shown.
5.7.1 Dismantle the
foamer head and thoroughly
clean each part by hand under
running water.
Reassemble the foamer head
and fit it back onto the
machine.
5.7.2 Fill the cleaning
container with approximately
3 dl of warm water
(approx. 50° C) and then add
1 cleaning tab for milk systems
(see the cleaning tab container
label for the correct dosage).
Example of dosage:
Water = 3 dl
Tab = 1 pc.
Place the foamer head tube in the cleaning container. The tube
end must be touching the bottom of the cleaning container!
Place a container (approx. 0.5 litre Capacity) under the foamer
head.
5.7.3 The button (Rinsing/Cleaning) has several features
programmed to it on the Cappuccino model:
(see section 5.6.1.1)
5.7.4 Press the button
3x briefly (Rinsing /
Cleaning). The cleaning
program starts.
The display shows "Capp.
Cleaning"
(Cleaning duration
approximately 40 seconds)
Wait until "Rinsing" appears on
the display.
5.7.5 Rinse out the
cleaning container thoroughly
with fresh water and fill it with
fresh cold water.
Ready
≈
+
≈
+
≈
+
≈
+
≈
+
≈
+
≈
+
Page 16

BASL - 02 - V03 Page 43
User manual
UK
5.7.6 Press the button
1x briefly (Rinsing /
Cleaning). The system is
rinsed.
(Rinse duration approx. 40
seconds)
Wait until "Ready" appears on
the display.
5.8 Cleaning
5.8.1 Manual cleaning of
the brewing unit
After 250 cups of coffee, the
monitor lamp (2a) flashes to
indicate that cleaning is
necessary. Although you can
continue to order coffees, it is
advisable to run the cleaning
cycle promptly. At least once a
week, at the latest when
function indicator light of the
cleaning program is
flashing
.
5.8.2 Switch to standby
mode and wait until the turnoff flush cycle (if programmed)
is completed and the red LED
on the button
is illuminated.
5.8.3 Open the service
access hatch (4) on the side of
the coffee machine and press
the handle (marked Press) to
release and remove the
brewing unit.
5.8.4 Remove the brewing
unit from the machine by
moving it upward and remove
the plastic tray for powder
residue.
5.8.5 Turn the thread on the
brewing unit head counterclockwise to the stop using the
Multitool adjusting knob. The
two strainers then lie free and
can be cleaned hygienically.
5.8.6 Now clean the brewing
unit with the included brush to
remove residue and rinse it
well under warm running
water. Then let the brewing
unit dry completely.
Attention:
In no circumstances may
the brewing unit be cleaned
in the dishwasher!
5.8.7 If any coffee remains
are left in the service
compartment, these are best
removed with the aid of a
vacuum cleaner.
5.8.8 After successful
cleaning, insert the plastic tray
for residues and the brewing
unit again.
Note:
If the brewing unit cannot be
replaced properly, please
adjust it by using the multi-tool
setting button.
5.8.9 Move the brewing unit
to the normal position i.e. push
the extractor completely in and
close the door. On switching
on the appliance, the brewing
unit is automatically moved to
the correct position.
5.8.10 Switch the machine
back on by using the operating
button . The corresponding
indicator (1a) is illuminated.
900'000.001
900'049.001
900'070.002
900'058.002
≈
+
≈
+
Page 17

Page 44 BASL - 02 - V03
User manual
UK
Important:
If when switching on the
machine again the monitoring
indicator
blinks and the
message "Door open"
appears, then the brewing unit
has not been correctly inserted
or the door is not correctly
closed.
5.8.11 Automatic cleaning
program
Before starting the cleaning
programme, please fill the
water tank. Also empty the
drip tray. Then place a large
container beneath the
beverage outlet (which you
can incidentally remove or
retract for cleaning).
5.8.12 Now press on the
cleaning button
for at least
4 seconds, until the message
"Tablet" appears. Place both
halves of the cleaning tablet
into the filler funnel for coffee
powder.
5.8.13 Press once again the
cleaning button
. The
cleaning programme now
proceeds automatically and
this is indicated by the display
message "Cleaning"
Attention:
Under no circumstances
should you switch the
appliance off while the
cleaning programme is
running
Note:
If during the cleaning process the indicator signals insufficient
water
, refill the water tank and re-install it. The process will be
completed automatically.
Once the cleaning process is
completed (this takes about 6
minutes), your coffee machine
is ready for use again. The
end of the programme is
indicated by the display
message "Ready".
Note:
If a milk product was dispensed, the Cappuccino system
cleaning starts directly after the coffee system cleaning. The
following message is displayed "Capp. Cleaning"
5.8.14 Dismantle the foamer
head and thoroughly clean
each part by hand under
running water.
Reassemble the foamer head
and fit it back onto the
machine.
(see paragraph 5.10
Installation / disassembly of
foamer head page 46.)
5.8.15 Fill the cleaning
container with approximately
3 dl of warm water (approx.
50° C) and then add
1 cleaning tab for milk systems
(see the cleaning tab container
label for the correct dosage).
Example of dosage:
Water = 3 dl
Tab = 1 pc.
Place the foamer head tube
into the cleaning container.
The tube end must be
touching the bottom of the
cleaning container! Place a
container (approx. 0.5 litre
capacity) under the foamer
head.
5.8.16 Press the
button
1x briefly (Rinsing /
Cleaning). The cleaning
program starts.
The display shows "Cleaning"
(Cleaning duration
approximately 45 seconds)
Wait until "Rinsing water"
appears on the display.
5.8.17 Rinse out the cleaning
container thoroughly with fresh
water and fill it with fresh cold
water.
5.8.18 Press the button
1x briefly (Rinsing /
Cleaning). The system is
rinsed.
The display shows "Rinse"
(Rinse duration approx. 45
seconds)
Wait until "Ready" appears on
the display.
900'062.003
≈
+
≈
+
≈
+
≈
+
Page 18

BASL - 02 - V03 Page 45
User manual
UK
5.9 Descaling
After not more than 1350
coffee outputs, the descaling
display will start to blink.
Although you can continue to
serve coffee, it is
recommended to perform a
descaling at this point.
Attention: The decalcification program may not be
interrupted when initiated!
Important: The removal of limescale is an inevitable task
even if you use a water filter. If your local water
supply is exceptionally hard, you may need to
run the decalcifying programme before this
output total is reached. Your coffee machine has
an in-built automatic decalcifying programme
which makes the control of limescale
considerably easier.
Attention: In machines with a fixed water supply, the
decalcification must be performed by a
service technician.
Attention: The use of vinegar for decalcifying purposes
is expressly prohibited as this would damage
the coffee machine.
This programme lasts
approximately 40 minutes.
5.9.1 Switch off the machine
at the operating button
, the
LED on the operating button
illuminates red and the
word “Standby” appears on
the display.
5.9.2 Remove the grounds
container and the water
container.
5.9.3 Now pour water and
then the decalcifying agent in
a ratio of 2:1 into the water
tank (dosage example: Water
= 1500 ml – liquid descaling
agent = 750 ml).
Put the water tank back in the
machine
5.9.4 Disassemble the
foamer head and push the
beverage outlet to its highest
position.
(see paragraph 5.10
Installation / disassembly of
foamer head page 46.)
5.9.5 Place a large
container beneath the
beverage outlet.
(The amount running out is 2.0
litres)
5.9.6 Now press the
cleaning button for at least
5 seconds until the
decalcifying process starts.
The wording “Decalcifying x%”
appears on the display and
the red and green LEDs on
the button and the
display are illuminated. The
decalcifying program runs
automatically.
5.9.7 As soon as the
cleaning button LED
flashes and the message
“fresh water” appears on the
display, thoroughly rinse out
the water tank with fresh
water. Fill the water tank with
fresh, cold water and insert it
back into the machine.
5.9.8 Place a large
container beneath the
beverage outlet.
(The amount running out is 2.0
litres)
5.9.9 Now briefly press the
cleaning button . “Rinsing”
now appears on the display.
Once the decalcifying program
has ended the LED in the
display
and the green
LED on the button are
extinguished. “Standby” is on
the display.
Important:
If the “water low” indicator
flashes during the decalcifying
process, please top up the
water and reinsert the tank.
The cleaning program will
continue to run automatically.
ca. 40 Min.
900'062.002
900'121.001
900'121.001
≈
+
≈
+
≈
+
Page 19

Page 46 BASL - 02 - V03
User manual
UK
5.9.10 Insert the grounds
container.
5.9.11 Reassemble the
foamer head and fit it back
onto the machine.
Important:
Regular decalcifying will
protect your coffee machine
from expensive repairs. Any
damage to the appliance
resulting from omission of this
treatment, failure to follow the
correct procedure or from noncompliance with these
instructions is excluded from
warranty cover.
5.10 Installation / disassembly of foamer
head
5.10.1 Disassemble the
foamer head by slightly
pressing the outlet cup
between thumb and index
finger. Pull the outlet downwards.
5.10.2 Swivle the foam
chamber away from the outlet
cup before pulling it
downwards.
Now you can unscrew the pipe
from the foam chamber and
remove the milk tube as well
as the tube nipple.
5.10.3 Clean all parts under
clean, warm running water.
5.10.4 Reinstall the foamer
head by repeating steps
5.10.1 to 5.10.2 in reverse
order.
5.11 Foam nozzle / milk suction nozzle
cleaning
5.11.1 Clean foam nozzle
Clean the foam nozzle and
pierce it with the blast valve
tenon cleaner.
5.11.2 Clean the milk
suction nozzle
Clean and pierce the milk
suction nozzle with the brush.
Page 20

BASL - 02 - V03 Page 47
User manual
UK
6 PROGRAMMING
Your coffee machine is pre-programmed at the factory for ideal
results. However, you have the possibility to program the unit
according to your individual preferences.
The following elements can be programmed in regard to the
product (see also Programming overview):
Water Quantity - Coffee Quantity - Preinfusion function
In addition, you can also individually program various functions
of the machine.
Notes:
• If no entry is made during the course of the programming, after
30 seconds the machine automatically switches to the next
programming step, or to the "Ready" mode.
• Running through the programming by means of the
programming button
is only possible in a forwards
direction; backwards movements cannot be effected.
• Machine programming at the
level can only be executed
by means of a personal PIN code.
• Your customer adviser will be pleased to answer your
questions and to advise you on more extensive programming.
6.1 Programming overview
Product, 2x, C
Ready
+0% ###
+0% #.## s
Preinfusion ON
Ready
Select product button
Select water quantity with +/-
Select coffee quantity with +/-
Switch on/off with +/-
English
Temp. 86°C
Standby 1 h
++## ##
Ready
General settings
Select language with +/-
Select brewing temperature
with +/-
Select time until standby mode
with +/-.
Telephone no. for service.
Code 0000
Counter status
Keylock
Descaling ON
Prog.prod. ON
Prog. sys. ON
Counter ON
Change price
Acc. syst. ON
Select program level
Reset to 0 with
Lock individual product buttons
with +/-
Enable descaling with +/-
Enable key re-programming
with +/-
Enable programming of general
settings with +/-
Switch meter display for the
dispenser keys on/off with +/-
Amend product price with +/(only with coin slot)
Access code: Select each digit
using +/- and confirm with
End of programming
End of programming
Switching on/off the coin
acceptor unit with +/- (only with
coin slot)
Protected settings
Ready
End of programming
+ 0% ##
+ 0% #.## s
Select water quantity with +/-
Select coffee quanity with +/-
Machine with Cappuccino
Preinfusion ON
Switch on/off with +/-
+0% #.## s
Ready
Measure foam quantity with +/-.
End of programming
Machine with cappuccino
Machine with cappuccino
+ 0% #.## s
Measure milk quantity with +/-
Coffee->Milk
Set coffee-milk order with +/-
Ready
End of programming
+0% #.## s
Ready
Select water quantity with +/-
End of programming
Machine with cappuccino
Descaling OFF
Setting the decalcification
values with +/-.
Factory set.
Reset the coffee machine with
+ to the factory settings (Cancel
with
).
Change code
New code: set each digit with
+/- and confirm with
10:29:10
01.07.2005
Reinig. 00.00
Enter Date with +/-
Not applicable.
Enter time with +/-
Page 21

Page 48 BASL - 02 - V03
User manual
UK
6.2 Product programming
For programming the product buttons
proceed
as follows:
Machine with cappuccino
Display Entry
Press the programming
button
.
Press the desired product
button:
Select the water quantity (ml)
with + / -. Continue with the
programming button
.
Select the coffee quantity
(grinding duration) with + / -.
Continue with the programming
button
.
Switch the preinfusion on or off
with + / -. Continue with the
programming button
.
The programming is ended.
Machine with cappuccino Æ To program the "Cappuccino"
product button
, proceed as follows:
Display Entry
Press the programming
button
.
Press the desired product
button:
Select the water quantity (ml)
with + / -. Continue with the
programming button
.
Select the coffee quantity
(grinding duration) with + / -.
Continue with the programming
button
.
Switch the preinfusion on or off
with + / -. Continue with the
programming button
.
Measure the milk quantity with
+/-. Continue with the
programming button
.
Display Entry
Select the order of the coffee or
milk output with +/- :
Coffee -> Milk
Coffee + Milk
Milk -> Coffee
Continue with the programming
button
.
The programming is ended.
Machine with cappuccino Æ To program the "Milk foam"
product button
, proceed as follows:
Display Entry
Press the programming
button
.
Press the desired product
button:
Measure the milk foam quantity
with +/-. Continue with the
programming button
.
The programming is ended.
Machine with cappuccino Æ To program the "Hot water"
product button
, proceed as follows:
Display Entry
Press the programming
button
.
Press the desired product
button:
Measure the hot water with +/-.
Continue with the programming
button
.
The programming is ended.
Ready
Product, 2x C
+ 0% ##
+ 0% #.## s
Preinfusion ON
Ready
Ready
Product, 2x C
+ 0% ##
+ 0% #.## s
Ready
Preinfusion ON
+ 0% #.## s
Coffee->Milk
Ready
Product, 2x C
+ 0% #.## s
Ready
Ready
Product, 2x C
+ 0% #.## s
Ready
Page 22

BASL - 02 - V03 Page 49
User manual
UK
6.3 Programming the machine: general
settings
Display Entry
Press the programming
button
.
Press the programming level
button
.
Select the desired programming
language with + / -. Continue
with the programming button
.
Select the desired brewing
temperature with + / -. Continue
with the programming button
.
Select the period till standby
mode with + / -. Continue with
the programming button
.
The telephone number for any
service support appears.
Continue with the programming
button
.
Enter time (HH:MM:SS) with +/-.
Continue with the programming
button
.
Enter date (DD.MM.YY) with +/-.
Continue with the programming
button
.
Not applicable. Continue with
the programming button
.
The programming is ended.
6.4 Programming the machine: protected
settings
By means of a personal code these settings can be made
inaccessible to third parties. On delivery, no code has been
programmed.
Display Entry
Press the programming
button
.
Press the programming level
button
.
Access code: Select each digit
using + / - and confirm with
.
Reset to 0 with
. Continue
with the programming button
.
Lock individual product buttons
with + / -. Continue with the
programming button
.
Display Entry
Enable access for executing the
decalcifying programme with + /
-. Continue with
.
Enable access for product
programming (product buttons)
with + / -. Continue with
.
Enable access to system
programming (general settings)
with + / -. Continue with
.
Switch the meter display for
product buttons on/off with + / (Counting continues in the
background). Continue with
.
You can set the decalcification
requirement depending on water
hardness with +/-. Continue with
.
OFF = Switched off
0° - 5° dH
6° - 10° dH
11° - 15° dH
16° - 20° dH
>20° dH
Only coin slot option. Amend
price for each product button
with + / -. Confirm each button
with
.
Option coin slot only: Switch
the free drawing on or off with + /
-. Continue with
.
Change the access code: set
each digit with + / - and confirm
with + / -
. Continue with .
If necessary, you can reset the
coffee machine to the factory
settings. All previously set
values are reset (Counter
excluded).
Press + button:
The following message is
displayed:
"Execute?"
button = Cancel
+ button = Select factory
setting
The programming is ended.
Ready
Product, 2x C
English
Temp. 86 ° C
++## ##
Ready
Ready
Product, 2x C
Code ####
Counter status
Descaling ON
Prog.prod. ON
Prog. sys. ON
Counter ON
Change price
free product ON
Change code
Ready
Standby 1h
Descaling OFF
Factory settings
Keylock
10:29:10
01.07.2005
Reinig. 00.00
Page 23

Page 50 BASL - 02 - V03
User manual
UK
7 PROBLEMS AND POSSIBLE
CAUSES
A requirement for trouble-free functioning is the regular cleaning
and decalcifying of the machine in accordance with our
recommendations.
Please read the following information carefully before you send
your coffee machine back for repair. This will often solve the
problem and save you a lot of time and trouble.
1. Appliance does not respond when the switch is pressed.
• The 0-1 mains power switch is not switched on.
• The power cable is not properly connected or you have a
defective fuse.
2. The
indicator flashes.
• The brewing unit is not correctly inserted or the service
access hatch is not properly closed - check these!
3. The monitoring indicator
lights up together with a
message on the display.
• A malfunction has occurred, which can only be cleared by
an authorised specialist.
4. Monitoring indicators light up / blink, display messages
appear.
• Read about control displays on page 35, point Indicators
and their significance.
5. The pump emits a loud noise and / or the
indicator lights.
The water tank is incorrectly located and there is air in the
system. Insert the water tank correctly and vent the
machine by pressing the hot water button
. Waite until a
steady water jet comes out. Then press the hot water
button
again - the function indicator disappears when a
coffee product button is pressed.
Note: It is completely normal if during operation the
water pump occasionally initiates, it automatically
refills the system.
6. No milk foam
• The foam nozzle at the milk foamer is clogged.
Clean and pierce it with the blast valve tenon.
• Milk suction nozzle (brown or transparent) clogged.
Clean with brush
7. Milk foam with big bubbles.
• The milk is too warm, it was not placed in the refrigerator
after the last product serving.
(3
○
C – 5 ○C)
• O-ring at milk foamer defective.
Check and, if necessary, replace.
• Suction tube defective.
8. Milk foam to cold
• Milk suction nozzle damaged or wrong milk suction nozzle
is installed.
9. The coffee obtained has no froth
• You are using an unsuitable coffee blend or the coffee is
stale.
• The quantity of coffee you have set to be ground is too
small.
• The cups are too cold, use the preheating function.
• You did not wait for the appliance to reach its correct
operating temperature.
• Temperature too low. Reprogram temperatures.
• Grind too coarse.
10. Swivelling steam and hot water nozzle is blocked.
• Clean the nozzle.
11. You cannot remove or replace the brewing unit.
• The brewing unit is not in home position. Close the service
access hatch and switch the coffee machine on.
• Use the special multifunctional tool to reset the brewing
unit as you replace it. You have probably moved one of the
unit’s elements.
12. The appliance does not respond when you press any button
although it is switched on.
• The appliance has been switched on from cold and has
not yet reached its operating temperature.
• The automatic rinse programme is currently running, the
cleaning indicator 2a is lit up.
• A control display according to point 3.5 Indicators and their
significance on page 35, is eliminated. Remedy defects
If the problem cannot be resolved despite checking these points,
please contact an authorized sales or repair office.
Please read the last page of this operating manual.
8 SERVICING AND
MAINTENANCE WORK
A condition for proper function is regular cleaning and
decalcification of the coffee machine according to our
recommendations. However, even with best care, every coffee
machine is subject to natural wear after intensive and long-term
usage. Regular checks by an authorized service office extend
the life of your coffee machine and ensure the quality of the
coffee produced.
8.1 Service request
The service request only appears if this feature was
programmed by the service office or by the service technician.
If the service request has been programmed and the number of
programmed products has been dispensed, the display message
"Service" alternates with the normal display message.
When Service request appears in the display:
The machine service has to be carried out. Contact a customer
service authorised by the manufacturer.
- The service request can only be reset by a service technician.
- Coffee machine is not blocked, beverages can still be served.
_
_
Page 24

BASL - 02 - V03 Page 51
User manual
UK
9 OPTIONS
Your personal customer service representative will be
happy to give you more information on this and other
options.
9.1 Coin slot option
(see section 9 „OPTIONS“)
9.2 Bean container option
There are various bean containers available with a capacity of
up to 1000g.
9.3 Feet option
The feet option is for machines with a fixed water supply. The
feet are needed to ensure there is enough place underneath the
machine for all connections.
Page 25

Page 52 BASL - 02 - V03
User manual
UK
9.4 Mains water connection option
For larger quantities of drawings from the coffee machine, a
fixed mains water connection is explicitly recommended.
In principle, a fixed mains water connection is possible where
there are lines of supply and drainage. The ideal hardness of the
water for trouble-free use of the fixed mains water connection is
8-12°fH / 5-7°dH.
Depending on the hardness of the water, an appropriate filter
must be installed.
Special feature: In place of the customary water tank a
screwed-down tank panel is mounted, which is only removed for
decalcifying.
9.4.1 Site requirements for mains water connection
There are certain minimum site requirements for a fixed mains
water connection. All the parts listed below are included in the
supply kit for the mains water connection option and will be
installed by your authorised service technician.
(See Installation plan on page 53)
9.4.2 This package contains:
•SOLIS ULTRA with fixed connection to water supply
•Connection set
•Original SOLIS ULTRA user’s manual
IMPORTANT SAFETY INFORMATION
The SOLIS ULTRA with fixed connection to water supply is preassembled ready for connection. The hose and accessories
(connection set) must be installed locally as specified in the
instructions given by SOLIS AG below. SOLIS AG will not accept
any guarantee claims if the appliance is incorrectly installed.
Note: Shut off the water faucet if you are likely to be away for
any length of time. (Risk of water damage).
9.4.3 Installation
a) Place the appliance on a flat, solid base.
b) Check that the voltage indicated on the rating plate is the
same as the mains electricity supply voltage. (See users
manual, page 37, point 3.6).
c) The water supply connection point is located at the rear
side of the appliance at the bottom left corner. The
appropriate connecting elements are included in the
connection set. Wind teflon tape around the threaded joints
or use the sealing agent included in the set to ensure that
they are sealed. (SOLIS AG cannot accept any liability for
water damage caused by incorrect installation.)
d) The pressure-relief valve is to be installed right after the
water faucet, as shown in the plan. To ensure optimum
functioning of the appliance, the pressure-relief valve has
already been correctly set at our factory (2.5 bar). Do not
alter this setting.
e) After connecting the pressure hose to the water supply,
open the water faucet briefly before connecting the hose to
the machine so as to clean the hose and the connecting
elements. This ensures that no dirt gets into the SOLIS
ULTRA.
f) Remove the plastic cover from the appliance connection
point. Connect the pressure hose to the appliance with
inserted seal.
g) Connect the plug to the mains power supply. The SOLIS
ULTRA is now ready to operate. (See user‘s manual, page
37, point 4.1.5).
9.4.4 Starting up the SOLIS ULTRA
Proceed as per the original user‘s manual.
IMPORTANT:
If the insufficient water control indicator lights up during
operation, this may mean that:
The water filter in the pressure hose is dirty.
Shut off water faucet. Remove water filter in pressure hose
and clean or decalcify if necessary. Reinsert water filter
and reconnect pressure hose. Open water faucet.
NOTE: Do not operate the SOLIS ULTRA without a water
filter.
Brewing unit is blocked
(Coffee powder residues or coffee is ground too fine).
Start cleaning program.
If, contrary to expectations, the insufficient water control
indicator does not go out, please take your SOLIS ULTRA
to an authorised service office (e.g. SOLIS customer
service).
Care and maintenance
Please refer to the original user‘s manual.
9.4.5 Adjusting the “decalcify appliance“ control
indicator
5 – 7 dH is the ideal water hardness level for good coffee.
If you use a water softening unit there is no need to
decalcify the appliance after 1325 cups of coffee. The
SOLIS ULTRA is fitted with a control system which allows
you to adjust the reminder to decalcify the appliance in line
with water hardness.
Procedure: as per the original user’s manual: protected
settings. (See page 49, point 6.4)
"Ready"
Î , continue with as often as
“Descaling“ appears,
set the decalcification requirement with +/- and confirm
with
.
OFF = switched off
0-5 dH = 4625 products
6-10 dH = 3325 products
11-15 dH = 2325 products
16-20 dH = 1325 products (factory setting)
>20 dH = 625 products
9.4.6 Descaling
Procedure: Switch the appliance to standby mode.
• Disassemble the foamer head and push the beverage
outlet to its highest position.
• Remove waste coffee container.
• Shut OFF water faucet.
• Disassemble water reservoir cover:
- Open side door and remove the brewing unit.
- Loosen both screws on the centre wall and remove the
water reservoir cover.
- Insert brewing unit and close side door.
• Carefully loosen the front connecting element near the
magnetic valve. Connect the silicon hose to the connecting
element and place it in a container of decalcifying agent.
• Start decalcifying procedure: As per original user‘s manual
(See Page 45, point 5.9).
Once the decalcifying program has ended:
• Detach silicon hose, assemble connecting element with
sealing bolt and reconnect to the water supply. Open water
faucet.
• Switch on appliance. After checking tightness, reassemble
the water reservoir cover.
Page 26

BASL - 02 - V03 Page 53
User manual
UK
9.5 Installation plan
Page 27

Page 54 BASL - 02 - V03
User manual
UK
10 APPENDIX
10.1 Conformity declaration
These products comply with the requirements of the EU
Directives.
73/23/EWG Electrical equipment designed for use within
certain voltage limits.
89/336/EWG Electromagnetic Compatibility
Information on the declaration of conformity can be obtained
from the manufacturer:
See last page of these instructions.
10.2 Cleaning agent
10.2.1 Cleaning tabs "Solitabs"
Attention!
Before using the „cleaning tab“ please read the information
on the packaging.
Purpose:
For the daily cleaning of the coffee system
Use:
- Keep cleaning tablet away from children and unauthorized
persons.
- Do not swallow!
- Do not eat or drink while using the cleaning tablet.
- Never mix cleaning tablet with other chemicals (cleaning
agents)!
- Do not eat or drink while using the cleaning tablet.
- Wash hands and face immediately before breaks and after
using the cleaning tablet.
Emergency information:
Ask the distributing company or a customer service authorised
by the distributor for the telephone number of the emergency
information centre (toxicological information centre) in your
country.
If your country has no such or similar institution, call the following
number in Switzerland for information in emergencies:
++41 44 251 51 51 (Toxicological Information Centre)
http://www.toxi.ch
(German/French/English)
First aid:
See "HEALTH AND SAFETY DATA SHEET"
Note:
Important note for physicians:
If possible show the doctor the cleaning agent label.
Storage of the cleaning tablet:
- Keep out of the reach of children and unauthorised persons.
- Protect from heat, direct light and moisture.
- Do not store together with acids.
- Store only in original packaging.
- Do not store together with food, beverages and other items of
human consumption.
- Comply with the respective statutory regulations regarding
storage of chemicals (cleaning agents).
10.2.2 Cleaning tab for milk systems
Attention!
Before using the „cleaning tab for milk systems“ please
read the information on the packaging.
Purpose:
For the weekly cleaning of the milk pipe system
Use:
- Keep the „cleaning agent“ away from children and
unauthorized persons.
- Do not swallow!
- Never mix the „cleaning tab“ with other chemicals (cleaning
agents)!
- Do not eat or drink while using the „cleaning tab“.
- Fill the cleaning container with approximately 3 dl of warm
water (approx. 50° C) and then add 1 cleaning tab for milk
systems (see the cleaning tab container label for the correct
dosage)
- When using the “cleaning tab”, ensure that there is sufficient
ventilation.
- Wash hands and face immediately before breaks and after
using the “cleaning tab”.
Emergency information:
Ask the distributing company or a customer service authorized
by the distributor for the telephone number of the emergency
information centre (toxicological information centre) in your
country.
If your country has no such or similar institution, call the following
number in Switzerland for information in emergencies:
++41 44 251 51 51 (Toxicological Information Centre)
http://www.toxi.ch
(German/French/English)
Note:
Important note for physicians:
If available, show the information on the packaging to the
attending doctor.
Storage of the „cleaning agent“:
- Keep out of the reach of children and unauthorised persons.
- Store protected from warmth, light and humidity.
- Do not mix cleaning agents.
- Do not store together with food, beverages and other items of
human consumption.
- Store only in original packaging.
- Comply with the respective statutory regulations regarding
storage of chemicals (cleaning agents).
10.2.3 Liquid descaling agent Solipol
Attention!
Before using the decalcifying agent please read the
information on the packaging.
Purpose:
For decalcification of the coffee machine
Page 28

BASL - 02 - V03 Page 55
User manual
UK
Use:
- Keep the “decalcifying agent” away from children and
unauthorized persons.
- Do not swallow!
- Never mix the “decalcifying agent” with other chemicals
(cleaning agent)!
- Do not eat or drink while using the “decalcifying agent”.
- When diluting with water, first add the water (not warmer than
20 °C) and then carefully add the “decalcifying agent”.
- When using the “decalcifying agent” ensure that there is
sufficient ventilation.
- Wash hands and face immediately before breaks and after
using the “decalcifying agent.
Emergency information:
Ask the distributing company or a customer service authorized
by the distributor for the telephone number of the emergency
information centre (toxicological information centre) in your
country.
If your country has no such or similar institution, call the following
number in Switzerland for information in emergencies:
++41 44 251 51 51 (Toxicological Information Centre)
http://www.toxi.ch
(German/French/English)
Note:
Important note for physicians:
If available, show the information on the packaging to the
attending doctor.
Storage of the “weekly cleaning agent ":
- Keep out of the reach of children and unauthorised persons.
- Store protected from warmth, light and humidity.
- Do not store together with lye (alkaline).
- Do not store together with food, beverages and other items of
human consumption.
- Store only in original packaging.
- Comply with the respective statutory regulations regarding
storage of chemicals (cleaning agents).
10.3 Environmental aspects
Packaging:
The machines are shipped in reusable cartons.
Coffee grounds:
The coffee grounds can be composted.
Cleaning agents:
If no re-use is possible, cleaning agents and their packaging
must be disposed of in line with local laws and regulations.
Energy consumption:
The energy consumption corresponds to the technical state of
the art at the time the machine was developed.
Disposal:
The machines must be disposed off correctly and in accordance
with local laws and regulations.
10.4 Address
Switzerland:
Solis Ltd.
Europastrasse 11
CH-8152 Glattbrugg
Switzerland
Phone : ++41 44 874 64 64
Fax : ++41 44 874 64 99
Internet : http://www.solis.ch
/ www.solis.com
Mail : info@solis.ch
Germany:
SOLIS DEUTSCHLAND GmbH
Marienstrasse 10
78054 VS-Schwenningen
Germany
Phone : ++49 7720 9997-0
Fax : ++49 7720 9997-27
Internet : http://www.solis.de
Mail: : info@solis.de
Page 29

Page 56 BASL - 02 - V03
User manual
UK
 Loading...