

Page 1

2
Bedienungsanleitung
Mode d’ emploi
Istruzioni per l’uso
Operating Instructions
2–23
24–45
46–67
68–89
Page 2

SOLIS MASTER TOP
Operating Instructions
68
PLEASE OBSERVE THE SAFETY INSTRUCTIONS.
Dear Customer,
Congratulations on acquiring this new SOLIS MASTER TOP
FULLY AUTOMATIC ESPRESSO MACHINE, a Swiss quality
product. Please read these instructions carefully and follow
them. By doing so, you and your guests will truly enjoy your
SOLIS MASTER TOP. Please keep these instructions in a
safe place. If you are not sure about anything or would like
more information, please ask your local dealer or us. We are
always ready to help.
SOLIS LTD
Table of contents:
Legend, control panel, control indicators, page 69 –71
indicator explanations
1.0 Safety instructions page 72 –73
2.0 General comments page 73
3.0 Starting up/Before using for first time page 74 –75
4.0 Making coffee with beans page 75
5.0 Making coffee with ground coffee page 76
6.0 Making hot water page 76
7.0 Making steam page 77
8.0 Programming page 78
8.1 Water quantity page 78
8.2 Coffee quantity page 78–79
8.3 Temperature page 79
9.0 Special programming functions page 80
9.1 Pre-brewing page 80
9.2 Rinsing function page 80
9.3 Stand-by function page 80 –81
9.4 Status indicator page 81
9.5 Standard programming by manufacturer page 81
10.0 Adjustment of grinder page 81–82
11.0 Pre-heating the cups page 82
12.0 Care and cleaning page 82 –85
13.0 Decalcifying page 86 –87
14.0 Trouble-shooting page 87– 88
15.0 Service and maintenance page 88
16.0 Useful tips for coffee page 88
17.0 Recommended accessories page 89
18.0 Technical data page 89
Page 3
SOLIS MASTER TOP
Operating Instructions
69
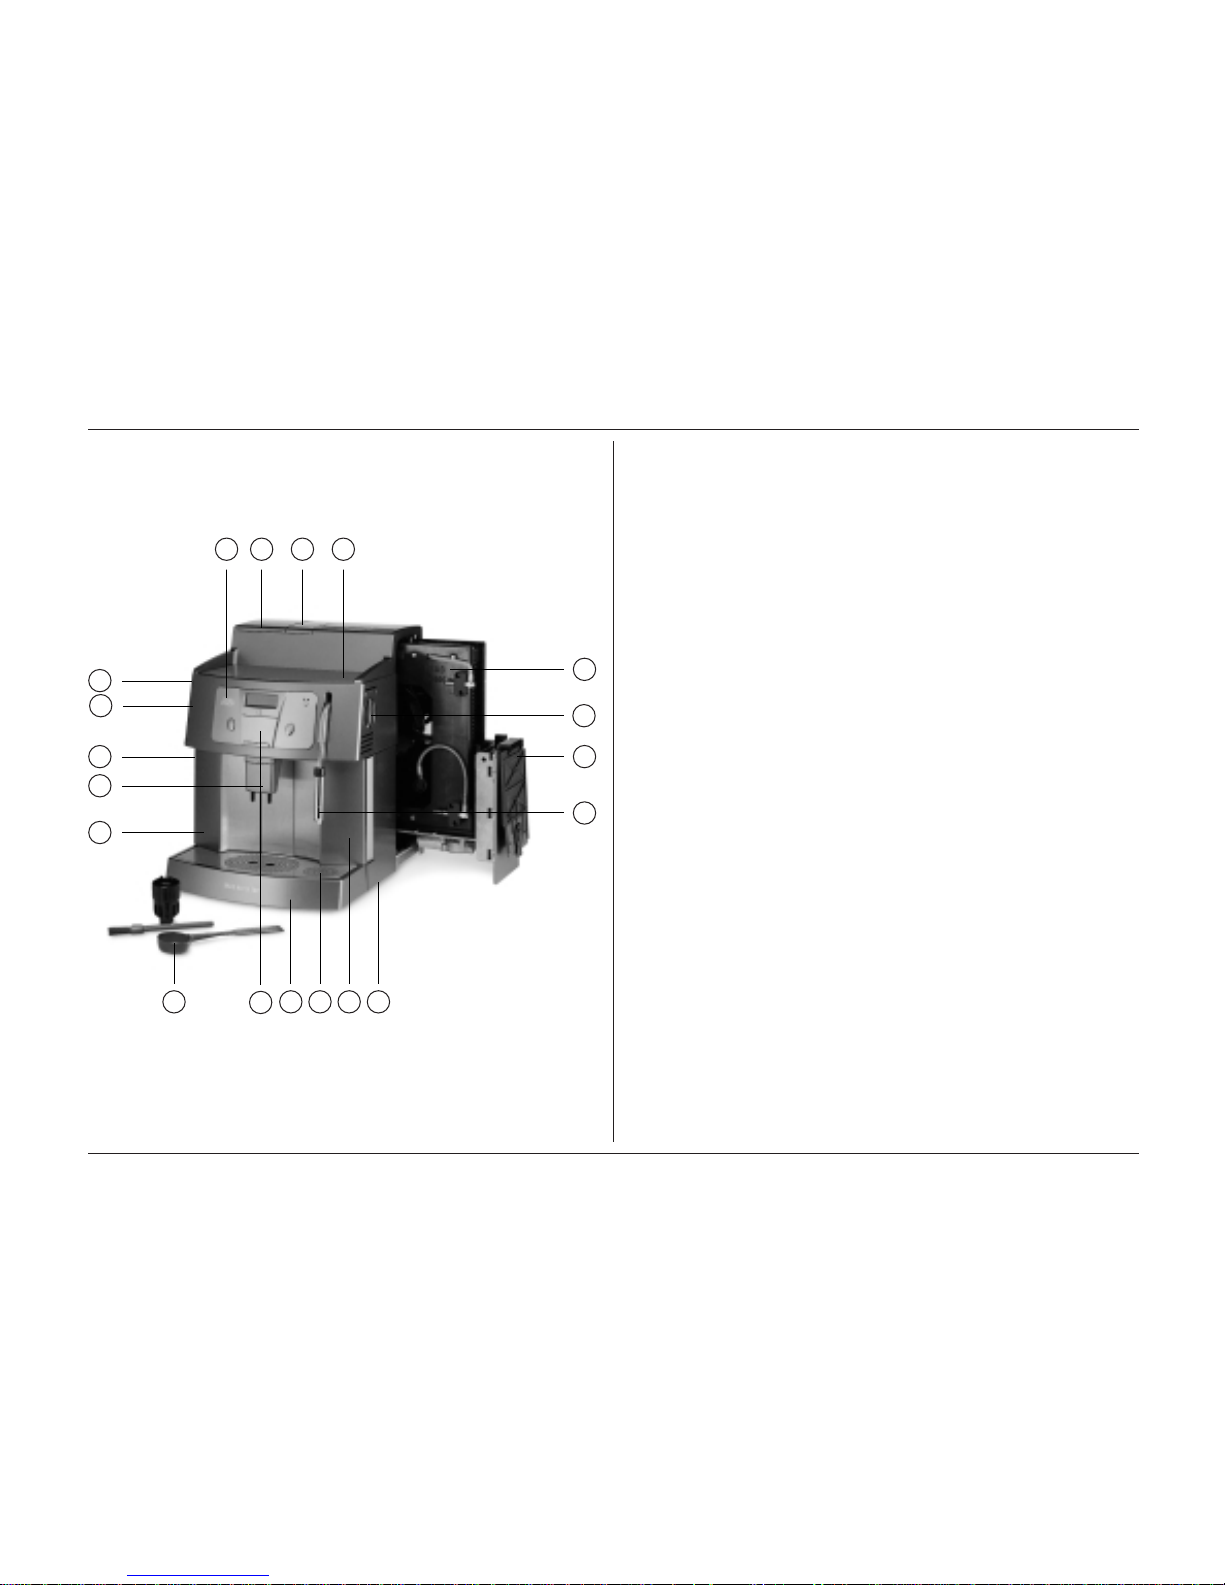
Legend:
1 Removable water container
2 Warming plate for cups
3 Swiveling steam and hot-water nozzle
with cappuccino nozzle
4 Hot-water/steam knob
5 Cup tray
6 Removable drip tray with fill-level indicator
7 Removable container for waste coffee
8 Bean-container with cover
9 Funnel for ground coffee with cover
10 Grinding adjustment
10a Indicator for grinding adjustment
11 Main switch O–I
12 Built-in rotating ring
13 Control panel
14 Service door (2 parts)
15 Brewing unit with drawer for waste coffee
16 Removable and adjustable coffee delivery system
17 Accessories: measuring spoon, multi-tool
adjustment knob and cleaning brush
18 Panel cover
1 125
6
17
9 28
13
10
10 a
11
16
7
15
4
14
3
18
Page 4

SOLIS MASTER TOP
Operating Instructions
11 9
1310 12 14 1a 1b
1
2
8
15 7 6 5 4 3
70
Page 5
SOLIS MASTER TOP
Operating Instructions
Open panel cover, so that all keys and LEDs are visible.
Control panel:
1 Operating switch ON/OFF
1a Indicator: ON/OFF
1b Indicator: stand-by
2 Selector key for café crème 1 or 2 cups
3 Cleaning key
4 Pre-selector for ground coffee for products 2,8 and 9
5 Quantity keys +/- for programming
6 Decalcifying key
7 Programming key
8 Selector key for espresso 1 or 2 cups
9 Selector key for pot of coffee
10 Indicator: espresso 1 or 2 cups
11 Indicator: ground coffee
12 Indicator: pot of coffee
13 Indicator: café crème 1 or 2 cups
14 Indicator: cleaning/rinsing
15 Panel cover (open)
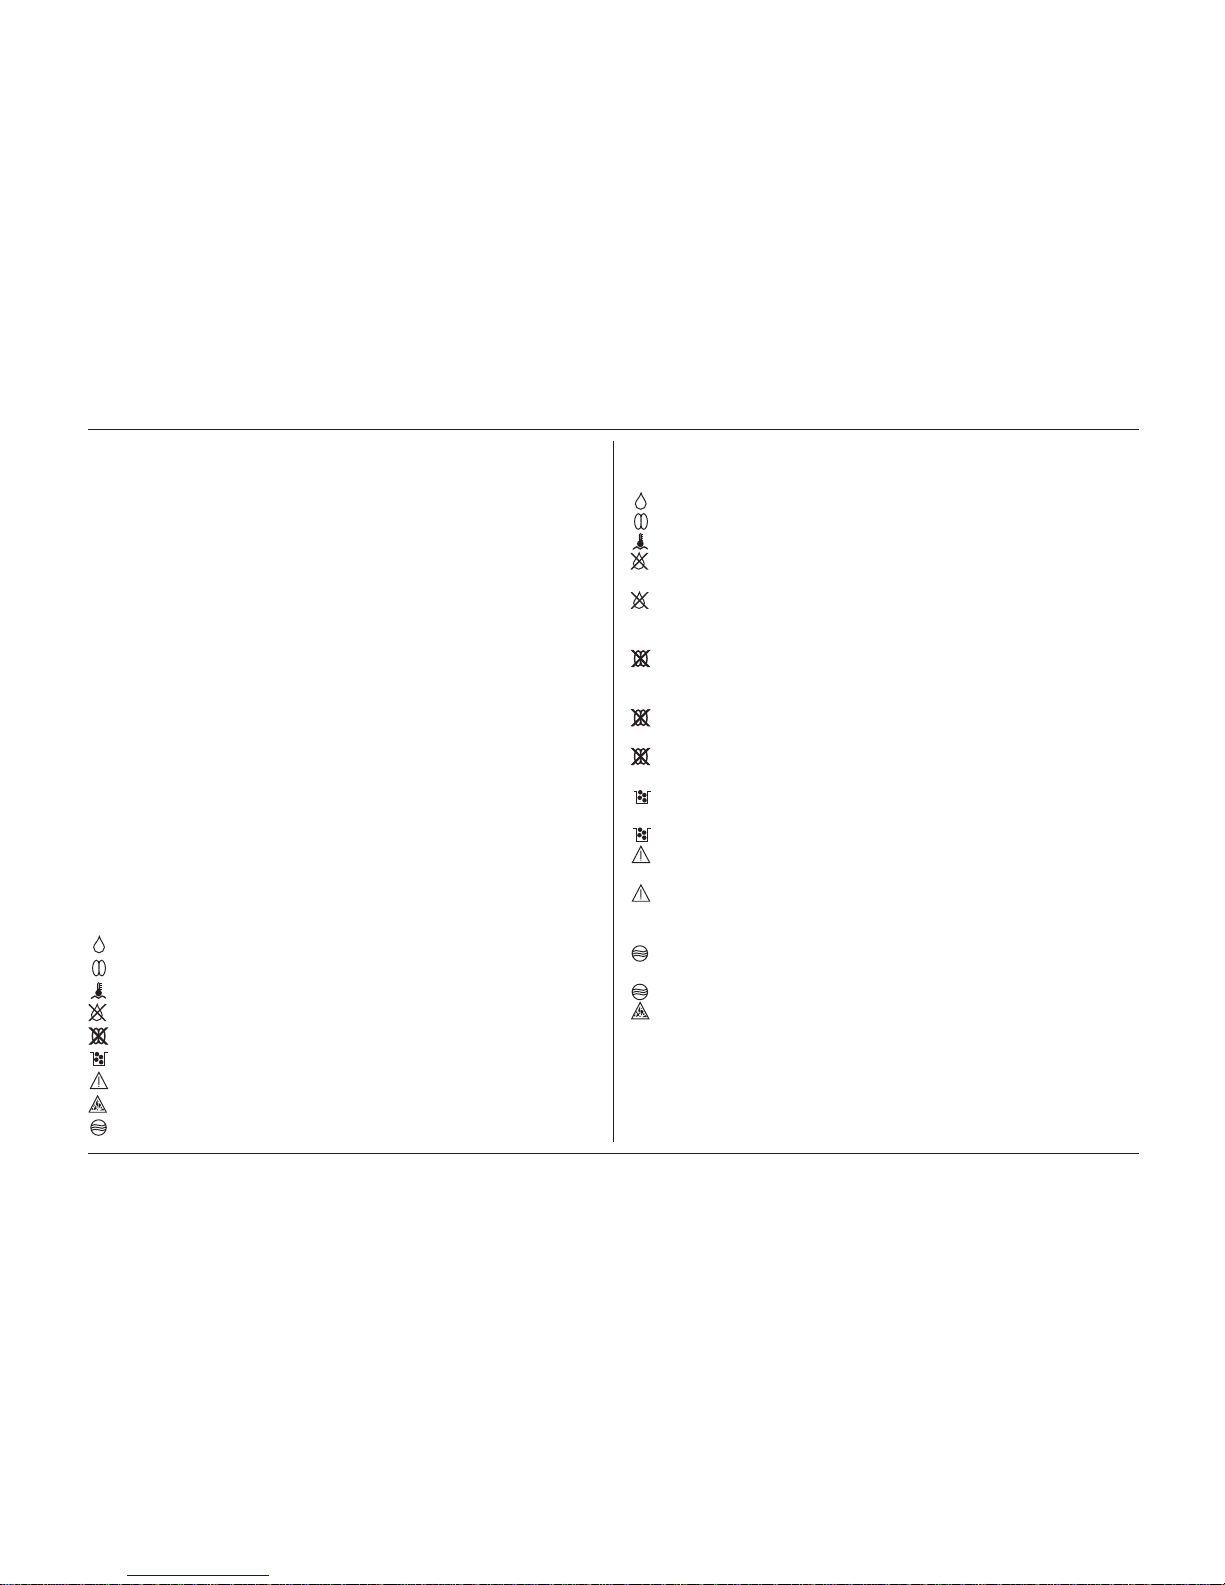
Control indicators:
1– 6 Programmed value indicators
Control indicator for water quantity programming
Control indicator for coffee quantity programming
Temperature indicator green
Control indicator insufficient water
Control indicator insufficient beans
Control indicator waste coffee container full
Control indicator malfunctioning/brewing unit
Control indicator decalcifying
Control indicator cleaning/rinsing
Indicator explanations:
1–6 The LED indicators 1– 6 display the programmed values for
coffee quantity, temperature, stand-by and status.
Lit when programming water quantity.
Lit when programming coffee quantity.
Indicates the correct operating temperature.
Flashes as soon as there is too little water in the tank or the
tank is removed.
Lit as soon as pump is unable to pump water. In this case
the appliance must first be vented (see trouble-shooting
14.0 point 4).
Lit as soon as bean container is empty. Switches off as
soon as container is re-filled and an appropriate selector
key is pressed.
Flashes if bean container cover is removed or is not
properly positioned.
+1 Lit when the grinder is blocked. (To clear, see point 12.3,
grinder cleaning.)
Lit when waste coffee container is full, switches off
automatically after emptying and refitting the container.
Flashes if waste coffee container is removed.
Flashes if brewing unit is not properly inserted or if service
door is not properly closed.
Lit together with a number on the programming
indicator. This indicates a serious malfunction of the unit.
In this case, please contact the SOLIS customer service.
Flashes as soon as cleaning is required after
250 operations.
*8* Lit when the cleaning or rinsing program is in operation.
Indicates that decalcifying is necessary. Switches off as
soon as the decalcifying program is completed.
• Stand-by indicator. Lit if appliance has been switched off
with operating switch. In the stand-by mode the appliance
uses very little electricity.
71
Page 6
SOLIS MASTER TOP
Operating Instructions
SERVICE
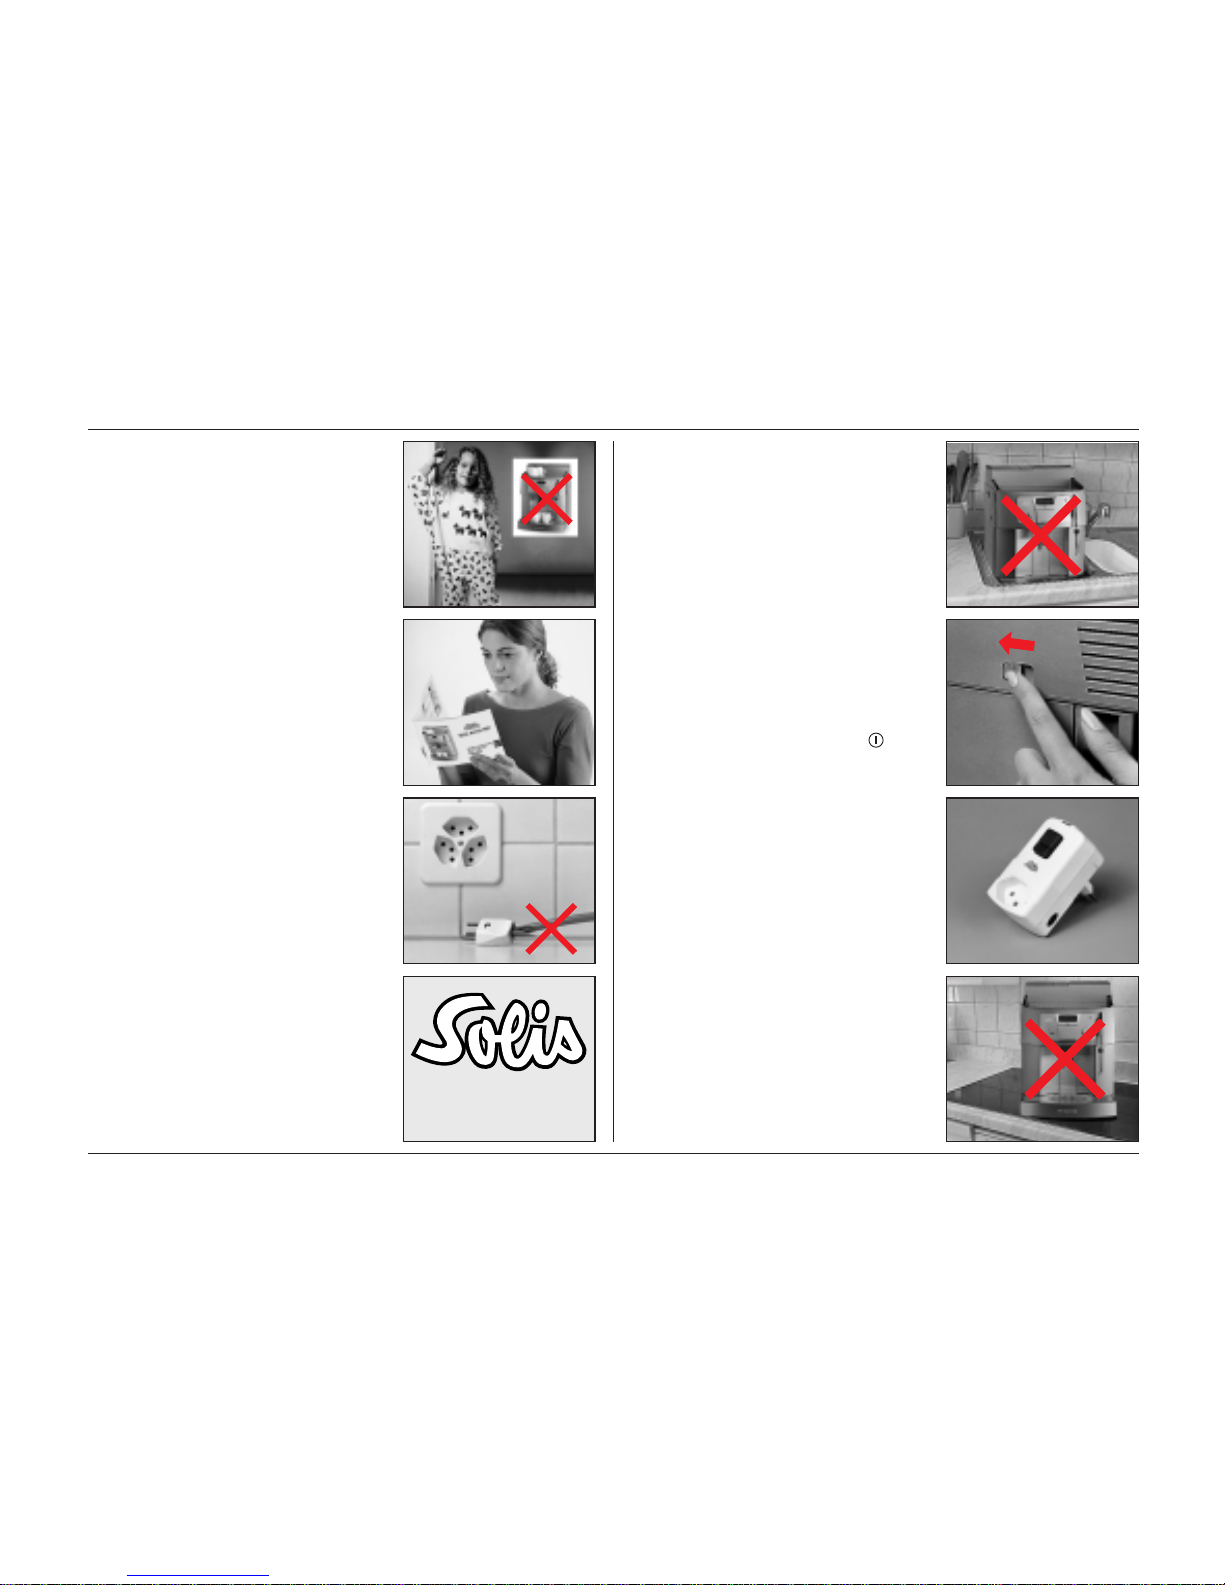
1.0 Safety instructions
Children do not understand how dangerous electrical appliances can be. For that
reason, children should never be allowed
around electrical appliances without
supervision.
Do not use the appliance without first
studying the user manual or being shown
how to operate it.
Never use an appliance with a faulty
cord. When using an extension cord,
this must also be in perfect condition.
Place extension cords in such a way
that tripping over it is not possible.
Keep children and domestic animals
away from the appliance.
In the case of damage, the appliance
must only be opened by an authorized
service technician and repaired with
original spare parts and accessories. If
not the manufacturer declines all liability.
This also applies to damaged cords
since special tools are required.
Do not immerse the appliance in water
and do not use the appliance with wet
hands.
The appliance should not be left
switched on without supervision.
For safety and energy-saving reasons
we recommend that the appliance be
switched off over-night and during
absences (for short absences, the
appliance can be switched to stand-by
mode with the operating switch ). For
appliances connected to the water
supply, the water tap must be closed.
The socket to which the appliance is
connected must be earthed. For your
safety, we recommend the use of an
earth leakage safety adapter (available
from your electrical store).
Place the appliance on a firm, level
surface. The surface must not be warm
or hot. Choose a position, which is out
of reach of children and pets.
72
Page 7

SOLIS MASTER TOP
Operating Instructions
Be careful when touching the steam
nozzle as it becomes hot when in use
(danger of scalding).
Before cleaning the appliance, always
remove the mains plug. Do not allow
the cord to come into contact with hot
parts of the appliance.
Do not expose the appliance to external
climatic conditions (rain, snow, frost
etc.).
When you unpack the appliance, please
check that the voltage indicated on the
rating plate is the same as your mains
supply.
2.0 General comments
Do not operate the appliance without
water.
The appliance is intended for the preparation of coffee, hot water and steam
and must not be used for any other
purpose. The appliance is designed for
domestic and commercial use. If it
is used for commercial purposes, the
warranty conditions will change.
Please observe the guarantee conditions.
The original packaging has been made
especially strong so that the appliance
can be sent by post. Please retain
the packaging in case it should be
necessary to return the appliance.
The appliance may be damaged by
frost. For this reason, it must be protected against frost and should not be left
overnight in a car during winter.
73
Page 8
SOLIS MASTER TOP
Operating Instructions
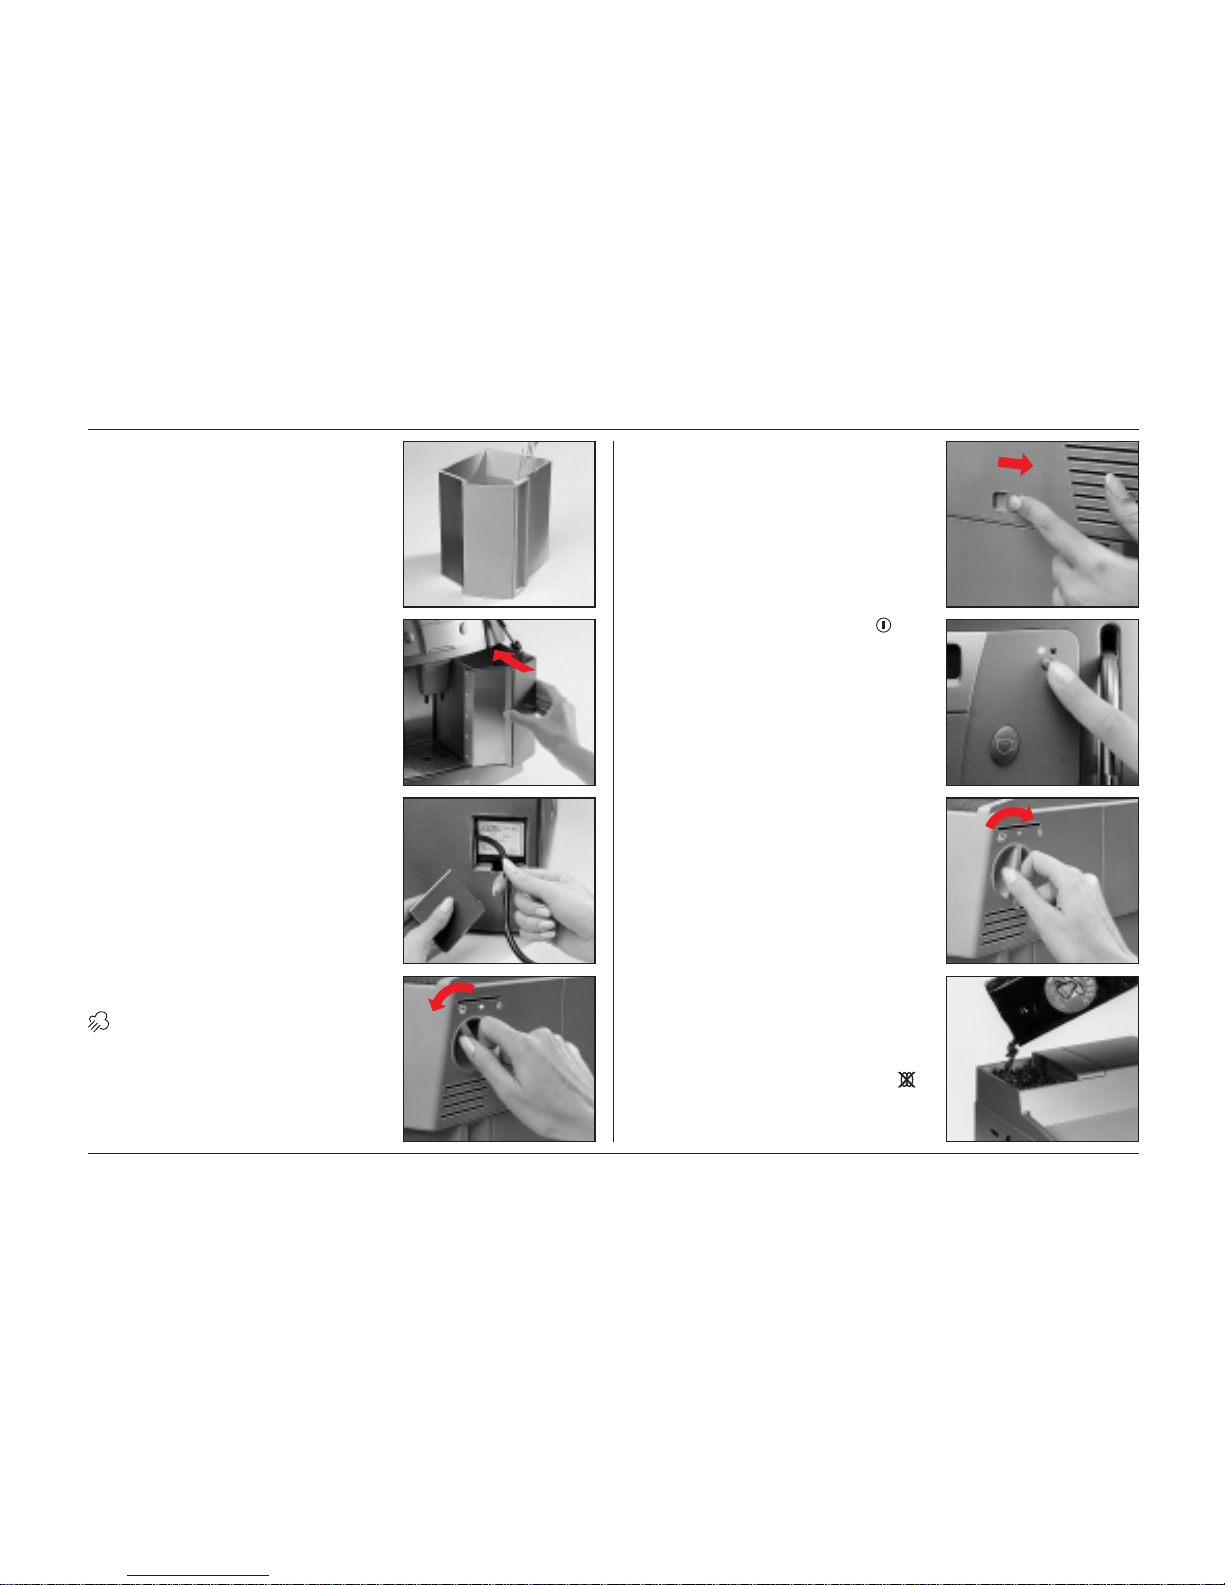
3.0 Starting up/Before using for
the first time
3.1 Fill the water container with cold
water (max. 2.4 liters). Insert it in the
appliance from the front and press home
firmly so that the valve at the back
opens.
Note: Use only fresh cold water to fill
the container. Do not use mineral water,
milk or any other liquid.
3.2 Pull the required length of cord
out from the back of the appliance.
Leave the rest in the special cable
compartment. Connect the appliance
to an earthed socket. Close the cable
compartment with the cover.
3.3 Make sure that the hot water/
steam knob is in the steam position
to ensure that automatic venting can
occur after switching on the appliance.
3.4 Turn the main switch O –I ON. The
appliance is now switched on but in
the stand-by mode.
3.5 Press the operating switch .
The appropriate indicator (1a) is lit and
the appliance heats up. At the same
time, the water pump starts to operate
and fills the system with water and
the appliance is vented automatically.
3.6 As soon as the automatic venting
is completed (water pump stops operat-
ing), close the hot water /steam knob
again. Note: the automatic venting func-
tions only provided the hot water/steam
knob is turned to the steam position. If
this is not the case, the knob must be
turned to the steam position.
3.7 Fill the bean container with beans
(max. 320 g). Close the bean container
with the cover. Note: Only pure coffee
beans may be used. Coffee with a
caramelized or aromatized content must
not be used. If the control indicator
flashes, the cover is not properly closed
and the appliance will not operate.
74
Page 9

SOLIS MASTER TOP
Operating Instructions
3.8 The appliance is ready to operate
only when the green temperature indicator is lit. Note: When operating the
appliance an automatic rinsing of the
brewing unit takes place. The rinsing
operation takes place whenever the
appliance is switched on from cold.
During the rinsing operation (indicated
with the control indicator (14),
the appliance cannot make coffee.
3.9 Press selector key 2 and the first
coffee will be produced. The first cup of
coffee after initially operating the unit
is not fit for consumption since the
grinder must first be filled. Please only
consume the subsequent cups of coffee.
Important:
Never operate the appliance without
water. For reasons of hygiene, we
recommend to rinse the unit after any
long period of non-use (e.g. after holidays). For this purpose, place a large
container under the hot water nozzle
and turn the knob to the hot water
position. Allow approx. 2 dl of water to
flow and close the knob again. This
operation is also necessary if the
water reservoir has not been properly
inserted and the indicator is lit.
4.0 Making coffee with beans
It is assumed that the appliance is ready
to operate in accordance with point 3.0
Starting up, i.e. the reservoir is filled with
water, the bean container is filled with
beans and the temperature indicator
shows green.
4.1 When the appliance is ready to
operate, place 1 or 2 cups on the drip
tray and press the appropriate switch.
By pressing the espresso (8) or café
crème (2) key once or twice, one respectively two cups will be produced. The
SOLIS MASTER TOP is equipped with
an automatic pre-brewing system. The
ground coffee is pre-wet, the flow of
water is briefly stopped and only then
will the actual brewing operation start.
Note: You have the possibility to stop
the brewing operation any time by briefly
pressing the appropriate selector key.
With the SOLIS MASTER TOP you also
have the option to use very large cups or
even tall glasses. Simply push back the
coffee delivery system (Do not forget to
position the coffee delivery system in the
normal position again).
75
Page 10

SOLIS MASTER TOP
Operating Instructions
5.0 Making coffee with ground coffee
(2nd type of coffee)
Remove the cover from the ground
coffee funnel and place max. 1 or 2 level
measuring spoons of ground coffee
(for 1 or 2 cups) in the funnel (only use
the measuring spoon supplied with the
appliance).
5.1 Press the selector key ground
coffee (4). (The yellow control indicator
(11) will be lit).
5.2 After having placed 1 or 2 cups on
the drip tray, also press the desired
selector key (1 x for 1 cup, 2 x for
2 cups). The brewing cycle will be com-
pleted automatically.
Note: If after pressing the selector key
for ground coffee no additional selector
key is pressed within approx. 2 minutes,
the yellow control indicator for ground
coffee will be switched off. In this case,
again press the selector key for ground
coffee as well as the appropriate selector
key.
Important: Never use water-soluble,
freeze-dried instant coffee or similar
products. Use only pure ground coffee
beans without additives. Never put
more than 1 or 2 level measuring
spoons of ground coffee in the funnel
at a time. This is not a storage container
and the ground coffee must be used at
once.
6.0 Making hot water
For tea, broth etc. It is assumed that the
appliance is ready to operate in accordance with point 3.0 Starting up, i.e. the
reservoir is filled with water and the temperature indicator shows green.
6.1 Place glass or cup directly underneath the hot water/steam nozzle and
turn the knob to the hot water position
. Hot water will now flow automatically.
6.2 When sufficient hot water has
been obtained, close the knob.
Note: Do not turn the knob beyond the
middle position since otherwise it will be
in the steam position.
76
Page 11

SOLIS MASTER TOP
Operating Instructions
7.0 Making steam
For heating milk and cappuccino or other
drinks. It is assumed that the appliance
is ready to operate in accordance with
point 3.0 Starting up, i.e. the reservoir is
filled with water and the temperature
indicator shows green.
Note: With the SOLIS MASTER TOP you
can obtain steam at the same time as
making coffee. This is possible thanks to
a separate heating system for steam.
7.1 Turn the knob slowly to the steam
position and let the condensed
water run into the drip tray and then turn
the knob to the off position. Then swing
the steam nozzle outwards and immerse
into the liquid to be heated. Slowly open
the rotary knob and heat the liquid by
making circular movements from bottom
to top.
7.2 When no more steam is required,
turn the knob slowly off again. Swing
the steam nozzle back to the drip tray.
Note: It is recommended that after use,
the steam nozzle is immediately cleaned
of any residues. Following this, draw
approx. 0.5 dl of hot water, as this will
prevent any possible clogging up of the
nozzle.
Important: The steam nozzle will
become very hot when drawing hot
water or steam. To prevent scalding,
avoid direct contact with the skin.
7.3 Making steam with the special
Cappuccino steam nozzle (accessory).
It is preferable to use this special steam
nozzle. Simply insert it from below over
the steam nozzle and proceed as per
point 7.1. Thanks to this special nozzle,
your beverage will be heated in the
shortest possible time. Ideal for the
preparation of Cappuccino. For cleaning,
the outer part of the nozzle can be
dismantled.
77
Page 12

SOLIS MASTER TOP
Operating Instructions
2X
8.0 Programming
Your SOLIS MASTER TOP is pre-programmed at the factory for ideal results.
However, you have the possibility to
program the unit according to your individual preferences.
8.1 Programming of water quantity for
the selector keys 2, 8 and 9.
Proceed as follows:
a) Press the programming key
once. The control LED is lit
b) Place a cup under the coffee delivery
system and press the appropriate
selector key (2, 8 or 9).
c) When the cup is filled to the desired
level, press the programming key
again.
The new water quantity is now
programmed until you change it by
re-programming the unit.
IMPORTANT: Programming for 2 cups
is not necessary, as this is automatically
derived from the programming for one
cup!
8.2 Programming of coffee quantity
for the selector keys 2, 8 and 9. The
strength of the coffee is determined by
the amount of coffee used and this
depends on the duration of grinding.
For every selector key you can freely
program the quantity of coffee to be used.
Proceed as follows:
a) Press the programming key
twice. The control LED is lit.
b) Press the desired selector key
(2, 8 or 9).
c) The coffee quantity set is now indicat-
ed in the programming display with a
value of from 1 to 6.
Coffee quantity display
1 (min.) approx. 6 g approx. 9 g
6 (max.) approx. 12 g approx. 16 g
78
Page 13

SOLIS MASTER TOP
Operating Instructions
3X
d) Adjust the desired coffee quantity with
the +/- quantity selector key.
e) By pressing the programming key
the selected coffee quantity is programmed. The coffee quantity is now
programmed until you change it by
re-programming the unit.
IMPORTANT: The programming of the
coffee quantity for the double products is
automatically derived from the programming of the single products.
8.3 Temperature programming (value
from 1 to 6)
Your appliance is adjusted to a medium
temperature. If you wish to change the
operating temperature, please proceed
as follows:
a) Press the programming key three
times. The temperature set is now
indicated in the programming display
with a value of from 1 to 6.
b) The desired temperature can now be
adjusted with the +/- keys, whereby
6 represents the maximum and 1 the
minimum temperature.
c) By pressing the programming key
the selected temperature is programmed.
The temperature is now programmed
until you change it by re-programming
the unit.
79
Page 14

SOLIS MASTER TOP
Operating Instructions
9.0 Special programming functions
9.1 Pre-brewing function. The standard factory settings include the
pre-brewing function for the products 1 espresso, 2 espressos and
one café crème which allows optimum use of the ground coffee.
However you have the option of switching this function off for the
mentioned selector keys. For the pot of coffee product, pre-brewing
can be included if required. (Note: For the product 2 café crèmes,
pre-brewing cannot be included.)
a) Switch off the appliance at the main
O–I switch (11) and switch it on again.
The appliance is now in the stand-by
mode.
b) Press the desired selector key and
keep it depressed. Switch on the
appliance with the operating key
(1). To re-install the pre-brew function,
repeat the described operation.
IMPORTANT: If the pre-brewing function
is included for 1 espresso, it is also
included for 2 espressos.
9.2 Rinsing function
After switching on the appliance from
cold, the unit is automatically rinsed.
On switching the appliance to standby
or when the appliance automatically
switches to standby, the appliance is
also rinsed. The green LED (1a) flashes
during the rinsing procedure.
9.3 Stand-by mode setting
The appliance switches automatically to
stand-by mode after five hours of nonuse (the indicator is lit). You may change
the time according to your wishes or
switch off the stand-by function completely.
a) Switch off the appliance at the main
O–I switch (11) and switch it on again.
The appliance is now in the stand-by
mode.
b) Keep the programming key and
pre-ground key depressed and
simultaneously switch on the appliance with the operating key .
c) The time set is now displayed (1– 6) on
the programming display and can be
changed with the +/- keys.
1=1h / 2=2h / 3=3h / 4=4h / 5=5 h
6= automatic stand-by mode is switched
off.
80
Page 15

SOLIS MASTER TOP
Operating Instructions
d) By pressing the programming key ,
the new value is programmed.
The new stand-by time is now programmed until you change it by re-programming the unit.
Note: For safety and energy-saving reasons we recommend that, after switching
to standby (final rinse is made), the appliance be switched off at the main switch
over-night and during absences. For
short absences, the appliance can be
switched to the stand-by mode with the
operating key . For appliances connected to the water supply, the water tap
must be closed.
9.4 Status indicator
a) By pressing the programming key
in stand-by mode, the following
pre-set functions will be displayed:
– if the product indicators are lit =
the pre-brew function is operational,
– if the indicator cleaning/rinsing is lit =
rinsing function is operational,
– the programming display indicates the
time after which the appliance will
automatically switch to the stand-by
mode.
9.5 Standard programming by the
manufacturer
The appliance is programmed by the factory such that, under normal circumstances,
perfect results are achieved. If you have
changed the pre-set values with your individual programming, you can revert to the
standard pre-set values if required.
a) Switch off the appliance at the main
O-I switch (11) and switch it on again.
The appliance is now in the stand-by
mode.
b) Keep the programming key (7) and
the selector key espresso (2)
depressed and simultaneously switch
on the appliance with the operating
key (1). All the factory pre-set standard values are now set again.
10.0 Grinder adjustment
The grinder is pre-set by the factory in
such a way that perfect results are
achieved with most coffee beans.
However, you have the possibility to
individually adjust the grinder.
81
Page 16

SOLIS MASTER TOP
Operating Instructions
Using the multi- tool setting head you
can adjust the grinder to the desired
position. The actual position is indicated
on the display:
Position 1 = fine/turn clockwise
Position 6 = coarse/turn anti-clockwise
The grinder is pre-set by the factory to
position 3–4, which means an average
fineness.
Important: The position of the grinder
may only be adjusted when the
grinder is running.
11.0 Cup pre-warming
For perfect results, not only the blend
of coffee and the quality of the water are
important but also the temperature.
11.1 Place the cups on the cup
warming plate (indirect heating by the
radiation of the heating system).
11.2 For fast pre-warming of cups, we
recommend that you rinse the cups with
hot water from the hot water nozzle.
12.0 Care and cleaning
If you always keep your SOLIS MASTER
TOP machine clean, you will be sure of
good quality coffee and will extend the
useful life of the appliance. The SOLIS
MASTER TOP is equipped with an automatic rinsing program and a fixed cleaning program. Together with the possibility
of an additional manual hygienic cleaning
of the brewing unit, you have the assurance of perfect cleanliness of the appliance.
12.1 Daily and weekly care
Regularly clean the water reservoir (1),
the drip tray (6), the cup tray (5) and the
container for waste coffee (7). Simply
use hot water and, when necessary, a
non-scouring detergent.
Do not clean in the dishwasher!
82
Page 17

SOLIS MASTER TOP
Operating Instructions
12.2 Cleaning the coffee delivery
system
The coffee delivery system can be
removed for cleaning. Use hot water
and, if required, a non-scouring detergent. Under normal conditions,
monthly cleaning is recommended.
12.3 Cleaning the grinder
Normally, the grinder cleans itself. It is
sufficient to remove residues from the
container with the brush supplied. Under
no circumstances put water in the
bean container, as this will damage
the grinding discs.
Even with the most exclusive coffee
blends it can happen that the beans
contain minute stones. The grinder is
equipped with an electronic stone
sensor, which prevents any damage to
the grinding discs. If a stone is caught in
the grinding discs, the grinder will stop
and the malfunction will be indicated on
the control display +1.
Clean the grinder as follows:
1. Unplug the appliance at the mains
supply.
2. Remove the remaining beans from
the bean container.
3. Using the multi-tool setting head,
turn the grinding discs slowly
clockwise until you can remove the
stone or other foreign body.
It is easiest to remove the foreign
body with a vacuum cleaner.
12.4 Cleaning of the brewing unit
a) Rinsing of the brewing unit. This is
done automatically when the appliance is switched on and off. The rinsing operation takes approx. 1 minute
and is shown by the indicator (14).
83
Page 18

SOLIS MASTER TOP
Operating Instructions
b) Manual cleaning of the brewing
unit. At least once or twice a month,
at the latest when the indicator
flashes (after 250 operations)
the brewing unit should be cleaned as
follows:
1. Switch appliance into stand-by mode
and wait until the final rinse is finished
and the red LED is on.
2. Open the service door on the side (14)
and completely withdraw the brewing
unit by pressing the handle (marked
«press»).
3. Remove the brewing unit upward
from the appliance. The waste coffee
drawer (15) can now also be removed
for cleaning.
4. Clean residue from the brewing unit
with the brush supplied and thoroughly rinse in running warm water. Leave
to dry completely.
Do not clean in the dishwasher!
5. If there are still coffee residues in the
service compartment, they are best
removed with a vacuum cleaner.
6. After the cleaning is complete, insert
the waste coffee drawer and replace
the brewing unit. Note: If the brewing
unit cannot be replaced correctly, it
was probably moved during cleaning.
In this case, please adjust with the
built-in lever.
7. Move the brewing unit to the normal
position i.e. push the extractor
completely in and close the door.
On switching on the appliance, the
brewing unit is automatically moved
to the correct position.
84
Page 19

SOLIS MASTER TOP
Operating Instructions
min.
4sec.
Important: If the control indicator
flashes after switching on the appliance,
the brewing unit is not properly inserted
or the door is not properly closed.
12.5 Cleaning program (indicator
flashes).
After 250 operations, the indicator (14)
flashes and indicates that cleaning is
required. Even though you may continue
to make coffee, it is recommended to
clean the unit as soon as possible.
Before starting the cleaning program,
fill the water tank completely. Please
also empty the drip tray. Now put
a large container under the coffee
delivery system. (For this purpose, the
coffee delivery system can be moved
back or removed completely).
Proceed as follows:
1. Put a SOLITAB cleaning tablet (no
poison class) and the small yellow
circular sponge in the funnel for
ground coffee.
2. Press the cleaning key (3) for at
least 4 seconds until the cleaning program starts. The cleaning program will
now proceed automatically and is
shown by the indicator .
Do not interrupt the cleaning
process!
After completion of the cleaning process,
which will take about 5 minutes, the
appliance is again ready to make coffee.
The completion of the cleaning
program will be indicated when the
indicator is no longer lit.
Important: If during the cleaning process
the indicator signals insufficient water
, refill the water tank and re-install.
The process will be completed automatically. Under no circumstances should
the appliance be switched off during
the cleaning program!
12.6 Do not forget to manually clean the
brewing unit as described under point
12.4 b.
85
Page 20

SOLIS MASTER TOP
Operating Instructions
Note: If the brewing unit cannot be
properly reinserted, it has probably been
unintentionally moved during cleaning.
In this case, please adjust with the builtin lever.
13.0 Decalcifying (control indicator
flashes).
At the latest after 1325 operations the
indicator will flash and indicates that
decalcifying is required. Even though you
may continue to make coffee, it is recommended to decalcify the unit as soon
as possible.
Note: It is always necessary to decalcify
the unit even when using a water filter.
If the water you are using is particularly
hard, you may decalcify the appliance
earlier. It would be an advantage to use
the SOLIS AQUA-SELECT water filter.
The SOLIS MASTER TOP is equipped
with an automatic decalcifying program,
which simplifies the process considerably. The decalcifying program takes
approx. 45 minutes.
Please proceed as follows:
1. Switch off the appliance at the main
O–I switch (11) and switch it on
again. The appliance is now in the
stand-by mode.
2. Remove the container for waste
coffee.
3. Pour the decalcifying agent
SOLIPOL in a 1:1 mixture (1 liter
Solipol and 1 liter water) into the
water container.
4. Put a large container under the steam
nozzle and open/turn the knob
forward to the steam symbol !
Let the residual steam escape.
The knob must remain in the steam
position during the whole decalcifying process!
86
Page 21

SOLIS MASTER TOP
Operating Instructions
mind.
5sec.
5. Press the decalcifying selector key
(6) for at least 5 seconds until the
decalcifying process starts. The
decalcifying program will run automatically. Please do not interrupt the
decalcifying program! During the
decalcifying program the indicator
will be lit.
6. When the insufficient water and
decalcifying indicators
flash, thoroughly rinse the water
tank, refill with fresh water and
replace.
7. Now press the decalcifying key
again. The entire system will be rinsed
with clean water until the decalcifying
indicator is extinguished.
8. After completion, close the hot
water/steam knob and replace the
waste coffee container.
The unit is now decalcified and after
putting into service is ready for making
coffee.
Important: Regular decalcification of
your appliance avoids expensive repairs.
Any damage caused by an omission to
decalcify, incorrect handling and failure
to follow the instructions contained in
this User’s Manual will not be covered by
the warranty. In particular, do not use
vinegar to decalcify the appliance under
any circumstances. This would severely
damage the appliance.
14.0 Trouble-shooting and possible causes
Before returning the appliance for repair, please read the following
points carefully. This will often solve the problem and save you a lot
of difficulties.
1. Operating switch does not switch on the appliance
– The main switch O–I on the side is not switched on.
– The appliance is not properly connected. Check the fuse.
2. Control indicator flashes
– Brewing unit is not properly inserted or the door is not properly
closed. Check!
If the control indicator flashes together with a number on the
control display:
– This indicates a problem which can only be solved by the
SOLIS after-sales-service or an authorized technician.
3. Control indicators are lit/flashing
– Please see the explanations on control indicators
4. Pump creates loud noises and/or the control indicator is lit
– Water tank is not properly installed. There is air in the system.
Properly install the water tank and vent the appliance by turn-
ing the hot water/steam knob to the position hot water until a
regular jet of hot water emerges. Close the knob and the con-
trol indicator will be extinguished if a selector key is pressed.
87
Page 22

SOLIS MASTER TOP
Operating Instructions
Note: It is quite normal for the pump to occasionally start up automatically during operation. It automatically fills the system with
water.
5. Coffee has no foam
– Unsuitable coffee blend is used or coffee is no longer fresh.
– The coffee quantity selected is insufficient.
– Cups are too cold. Pre-warm.
– The correct operating temperature has not been reached.
– The temperature is too low. Re-program the temperature.
– The grinding is too coarse.
6. Hot water/steam nozzle obstructed
– Clean nozzle openings with thin needle.
7. Brewing unit cannot be removed or re-installed
– Brewing unit is not in initial position. Close the service door and
switch on the appliance.
– On replacing, adjust the brewing unit with the built-in lever,
since it may have been moved inadvertently.
8. Appliance is not reacting to pressing the operating keys
although it is switched on
– Operating temperature has not been reached during first use.
– The automatic rinsing program has not been completed and
the indicator is lit.
– A control indicator is lit - see explanation on control indicators.
Correct the fault.
If the problem cannot be solved after checking these points, please
contact your dealer or the SOLIS after-sales service directly. We are
happy to assist you.
The SOLIS HOTLINE: Tel. 01/874 64 14 (for Switzerland only)
15.0 Service and maintenance
To ensure trouble-free and satisfactory operation, it is essential that
the appliance is cleaned and decalcified regularly in accordance
with our recommendations. Despite regular care, every espresso
machine is subject to normal wear-and-tear after intensive use for a
long period. Regular checks by the SOLIS after-sales service center
or any other authorized service center will extend the useful life of
your appliance and ensure perfect coffee quality.
In Switzerland, send the appliance to:
SOLIS PRODUZIONE SA, Customer Service,
Centro SOLIS, 6850 Mendrisio
Tel. 091/646 16 65 / 646 81 36, Fax 091/646 03 62
For repairs in all other countries in which SOLIS products are
sold, send the appliance to the customer service center of the
SOLIS branch indicated on the warranty card.
Important: In accordance with our warranty conditions, any service
work may only be carried out by the SOLIS after-sales service center or any other authorized service center. Please use the special
SOLIS Service Order Form.
16.0 Useful tips about coffee
Good coffee depends not only on the appliance but also on the
water, the blend of coffee, the grinding, the temperature etc.
You should keep the following tips in mind:
– Always use fresh coffee and dark roasts, such as the SOLIS
products specially blended for use with espresso machines.
– Coffee should always be stored in a closed container in a cool
place.
– If the coffee flows too quickly or too slowly, the reason is usually
an incorrect grinding adjustment.
Coffee flows too quickly: adjust the grinder to a lower position,
e.g. pos. 2
Coffee flows too slowly: adjust the grinder to a higher position,
e.g. pos. 5
88
Page 23

SOLIS MASTER TOP
Operating Instructions
Recommended position: 3-4 as originally adjusted by the factory
Important: the grinder position may only be adjusted while the
grinder is running.
– Coffee tastes best when you use pre-warmed cups. Please see
point 11.0.
17.0 Recommended accessories
To simplify the care and maintenance of
your SOLIS MASTER TOP, we recommend:
Water filter SOLIS AQUA-SELECT:
helps to reduce the water hardness and
therefore helps to prevent premature
calcification.
Cleaning tablets SOLIS SOLITABS:
Cleaning tablets especially suitable
for espresso machines. Effectively
remove coffee fat and residues and
with regular use ensures a perfect
result (no poison class).
Decalcifying agent SOLIS SOLIPOL:
Especially suitable for the easy
decalcifying of espresso machines.
CAFE SOLIS coffee blends: a variety
of exclusive blends specially selected for
espresso machines. They guarantee
good coffee.
SOLIS storage tin: specially designed to
store opened packets of coffee.
In Switzerland, these accessories are
available from specialist stores, supermarkets and department stores or directly from SOLIS MAIL SA, 6850 Mendrisio
Tel. 091/646 80 51, Fax. 091/646 25 32
In all other countries in which SOLIS products are sold, these
accessories can also be obtained through the trade or directly from
the SOLIS subsidiaries indicated on the warranty card.
18.0 Technical data
Voltage: 230 V (USA: 115 V)
Power consumption: 2200 Watts (two separate heating systems)
Water reservoir: 2.4 liters (2.5 quarts)
Dimensions: (H x W x D) 415 x 310 x 395 mm
(16.3 x 12.2 x15.6 inches) incl. rotating ring
Cable length: 1.1 m (43.3 inches)
Weight: 15.7 kg (35 lbs)
Safety Certification: SEV and international safety approvals
This product complies with the EMI regulations of the
European Community (89/336/EWG) in accordance with
the separate declaration of conformity.
89
Page 24

SOLIS-Gesellschaften und Kundendienstzentralen:
Sociétés et centres de service après-vente SOLIS:
Società e centri di servizio clientela SOLIS:
SOLIS Subsidiaries and Service Centres:
Schweiz/Suisse / Svizzera/Switzerland
SOLIS AG
Solis-Haus Tel. 01/810 18 18
8152 Glattbrugg-Zürich Fax 01/ 810 30 70
E-Mail: info@solis.ch
Internet: www.solis.ch
Deutschland/Allemagne /Germania/ Germany
SOLIS DEUTSCHLAND GmbH
Am Krebsgraben 18 Tel. (07721) 8406-0
78048 VS-Villingen Fax (07721) 8406-33
E-Mail: info@solis.de
Internet: www.solis.de
002.20
 Loading...