

Page 1
SSL UF8
User Guide
www.solidstatelogic.com
SSL UF8
Page 2

Visit SSL at:
www.solidstatelogic.com
© Solid State Logic
All rights reserved under International and Pan-American Copyright Conventions.
SSL® and Solid State Logic® are registered trademarks of Solid State Logic.
SSL UF8™ is a trademark of Solid State Logic.
All other product names and trademarks are the property of their respective owners and are hereby acknowledged.
Pro Tools
®
is a registered trademark of Avid®.
Live™ is a trademark of Ableton® AG.
Logic Pro® and Logic® are registered trademarks of Apple
®
Inc.
Studio One® is a registered trademark of Presonus® Audio Electronics Inc.
Cubase™ and Nuendo™ are trademarks of Steinberg® Media Technologies GmbH.
®
Mackie
is a registered trademark of LOUD Technologies® Inc.
BOSS® is a registered trademark of Roland® Corporation.
No part of this publication may be reproduced in any form or by any means, whether mechanical or electronic, without the
written permission of Solid State Logic, Begbroke, OX5 1RU, England.
As research and development is a continual process, Solid State Logic reserves the right to change the features and
specifications described herein without notice or obligation.
Solid State Logic cannot be held responsible for any loss or damage arising directly or indirectly from any error or omission in
this manual.
PLEASE READ ALL INSTRUCTIONS, PAY SPECIAL HEED TO SAFETY WARNINGS.
E&OE
Revision 1.5 - January 2021
Page 3

Table of Contents
Overview 5
What is SSL UF8? 5
Features 5
Using This User Guide Effectively 5
Safety Notices 5
Get-Started 6
Unpacking 6
Fitting The Stands (Optional) 6
Rack Mount Kit 7
UF8 Physical Specification 7
Connecting Your UF8 Hardware 8
Downloading SSL 360° Software 9
Installing SSL 360° Software 9
System Requirements 11
Registering Your UF8 11
UF8 YouTube Tutorials 11
Keyboard Identify (Mac Only) 10
Contents
UF8 Hardware Layout 12
Front Panel 12
Connector Panel 15
SSL 360° Software Overview 16
Overview & Home Page 16
UF8 Page 18
DAW Communication 21
SSL V-MIDI Ports 21
DAW Protocols 21
Pro Tools with UF8 - Tutorial 22
SSL 360° Setup 22
Pro Tools Setup 22
LCD Layout 23
Tutorial 24
Logic with UF8 - Tutorial 33
SSL 360° Setup 33
Logic Setup 33
LCD Layout 35
Tutorial 36
Cubase/Nuendo with UF8 - Tutorial 44
SSL 360° Setup 44
Cubase Setup 44
LCD Layout 46
Tutorial 47
Ableton Live with UF8 - Tutorial 56
SSL 360° Setup 56
Live Setup 56
LCD Layout 57
SSL UF8 User Guide
Page 4

Contents
Tutorial 58
Studio One with UF8 - Tutorial 64
SSL 360° Setup 64
Studio One Setup 64
LCD Layout 66
Tutorial 67
UF8 LCD Messages 78
SSL 360° Software Messages 79
SSL Support - FAQs, Ask a Question and Compatibility 80
Safety Notices 81
SSL UF8 User Guide
Page 5

Overview
Overview
What is SSL UF8?
SSL UF8 is a scalable hardware control surface offering the essential DAW control you need, with room to add USB keyboard
shortcut sequences to suit your own workflow. UF8 features 8 high-quality, motorised touch-sensitive faders accompanied by 8
endless rotary encoders and 8 high-quality colour LCD TFTs for clear visual feedback at all times. A large multi-purpose master
encoder allows navigation of DAW sessions, track scrolling and mouse wheel emulation to give hands-on control of plug-ins.
Signature SSL workflow and ergonomics developed from a 40+ year legacy in production innovation have never been more
accessible.
Features
• 8 x 100 mm high quality, touch-sensitive motorised faders.
• 8 x rotary endless rotary encoders with push.
• 8 x high-resolution colour displays.
• Backlit RGB soft-feel rubber buttons.
• All metal enclosure, finished with a brushed anodised top plate.
• Expandable - Connect up to 4 UF8s to create a 32-channel control surface.
• Works out of the box with the following major DAWs: Pro Tools, Logic, Cubase, Nuendo, Studio One, Ableton Live.
• Up to 3 different DAWs can be connected simultaneously and switched between using the Layer keys.
• DAW communication via HUI for Pro Tools. SSL software provides further workflow enhancements with the addition of features
such as Channel and Plug-in Modes.
• DAW communication via MCP/MCU for Logic, Cubase, Nuendo, Studio One and Ableton Live.
• A large multi-purpose notched encoder allows for DAW timeline navigation, track banking and mouse wheel emulation for
even more hands-on control.
• Customisable user keys ready to assign your favourite DAW commands or keyboard shortcuts.
• 2 x assignable foot-switch inputs.
• Included stands allow for 6 different elevation angles. Or, use without stands.
• Optional 19” 6U rackmount kit available.
• Connects to your computer via hi-speed USB – no need to deal with computer networks or ethernet cables.
• Powered by the SSL 360° Software application.
Using This User Guide Effectively
This User Guide will take you through the process of getting up-and-running with your UF8 control surface. The Get-Started section
will guide you through unboxing, attaching the stands and installing SSL 360°, the intelligent software command centre that drives
UF8. This section also provides information on registering your UF8 surface, which will allow you access to any additional software
that your UF8 purchase provides.
The Hardware Layout section provides an overview of the UF8 surface, to help familiarise yourself with the names of controls
and how they are laid out. SSL 360° Software Overview provides detail on the SSL 360° software and what functionality you can
expect from it. DAW Communication provides the essential technical information on how UF8 (via SSL 360°) communicates with
your DAW and last but not least, the DAW Tutorials sections provide you with the configuration steps you need to take inside your
DAW to connect UF8, whilst also guiding you through how UF8 interacts with your chosen DAW.
Safety Notices
Please read the Important Safety Notices at the end of this User Guide before use.
SSL UF8 User Guide
5
Page 6
Get-Started
Get-Started
Unpacking
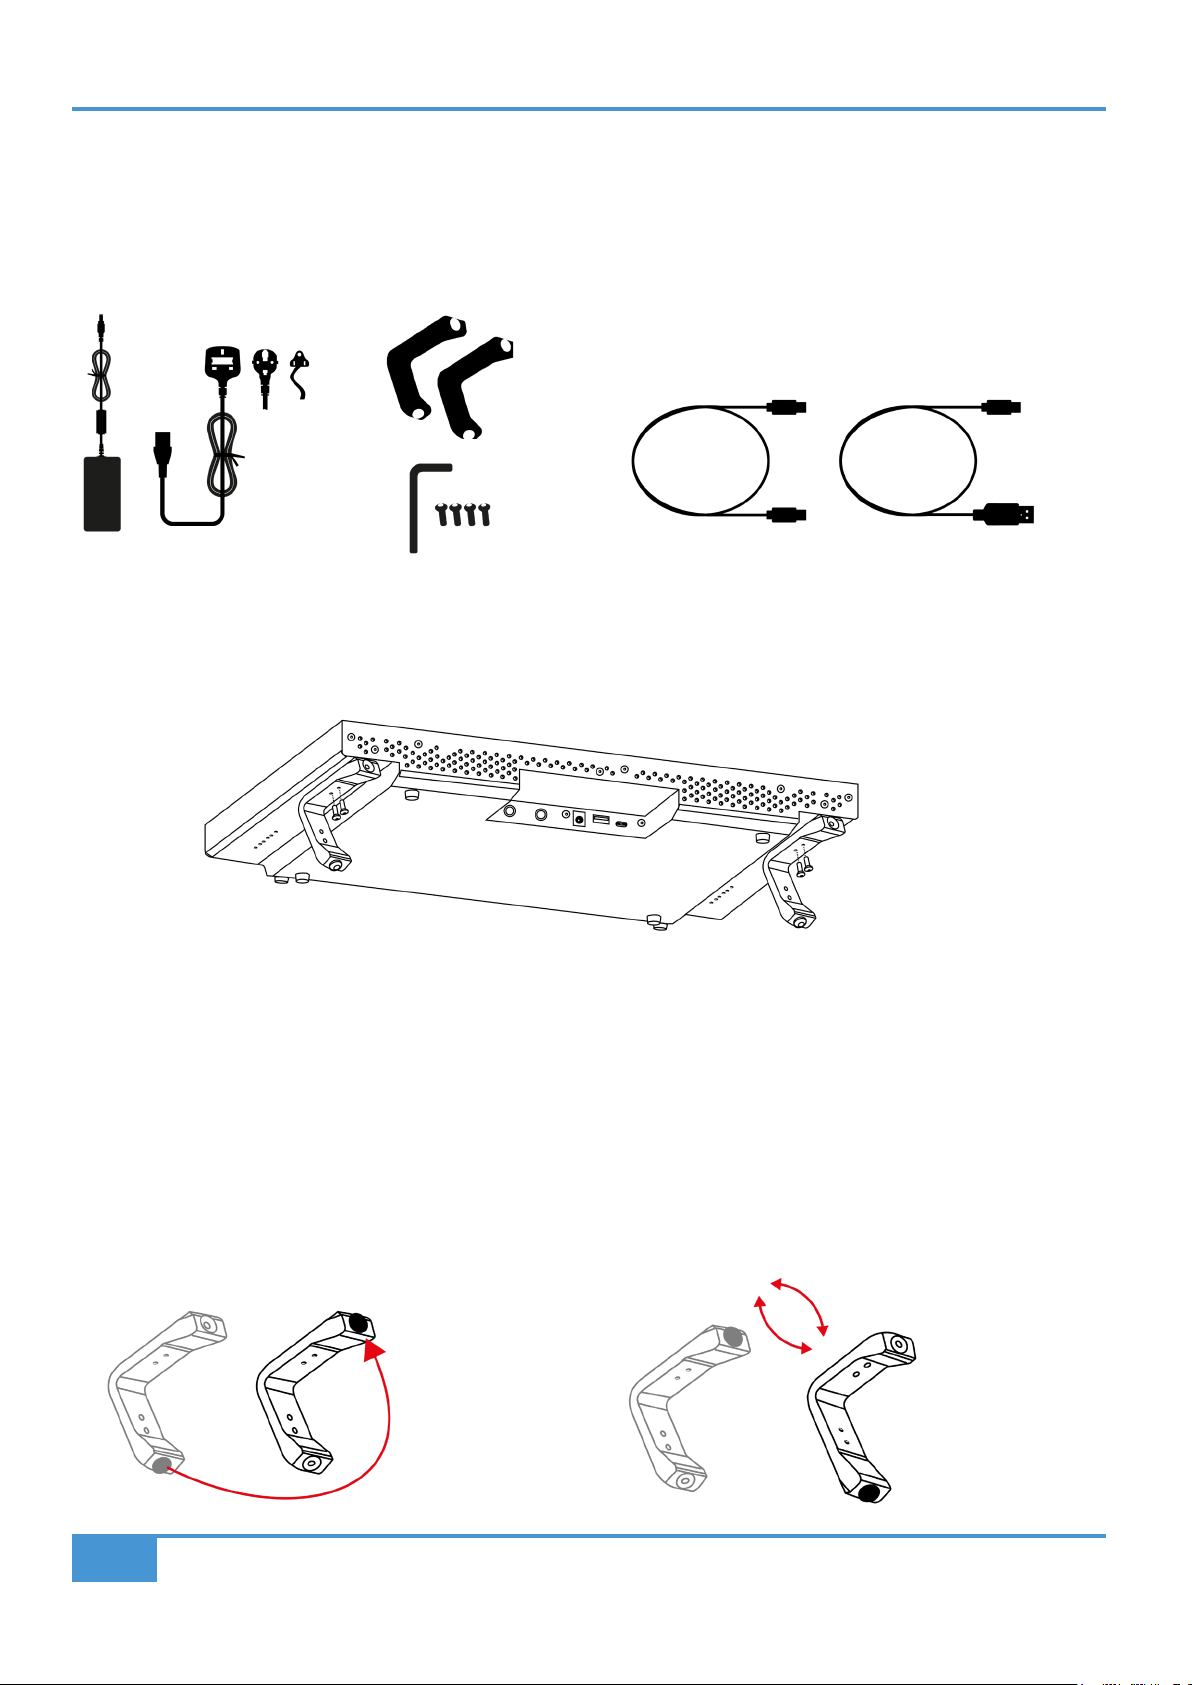
The unit has been carefully packed and inside the box you will find the following items in addition to your UF8 control surface:
2 x Stands
12 volts, 5 A Power Supply
and IEC Cable
1 x Hex Key
4 x Screws
1.5 m C to C USB Cable 1.5 m C to A USB Cable
Fitting The Stands (Optional)
UF8 has been designed to be used with or without the included screw-in stands, depending on your preference. Attaching the
included screw-in stands has the added benefit of angling the unit towards you. Three different fixing positions (the holes are
arranged in pairs) allow you to choose an angle that is best for your setup. Use 2 screws per stand. Please be careful not to over-
tighten to avoid stripping the screw threads. For those with a torque measuring device, tighten to 0.5 Nm.
Additional Elevation Angles
If you need a steeper angle of elevation, you can rotate the stands and fix them to the chassis using the shorter side. This gives
you three additional angle options to choose from.
1. Unscrew the rubber feet and move to the other end 2. Rotate the stands so that the short side fixes to the chassis
6
SSL UF8 User Guide
Page 7
Get-Started
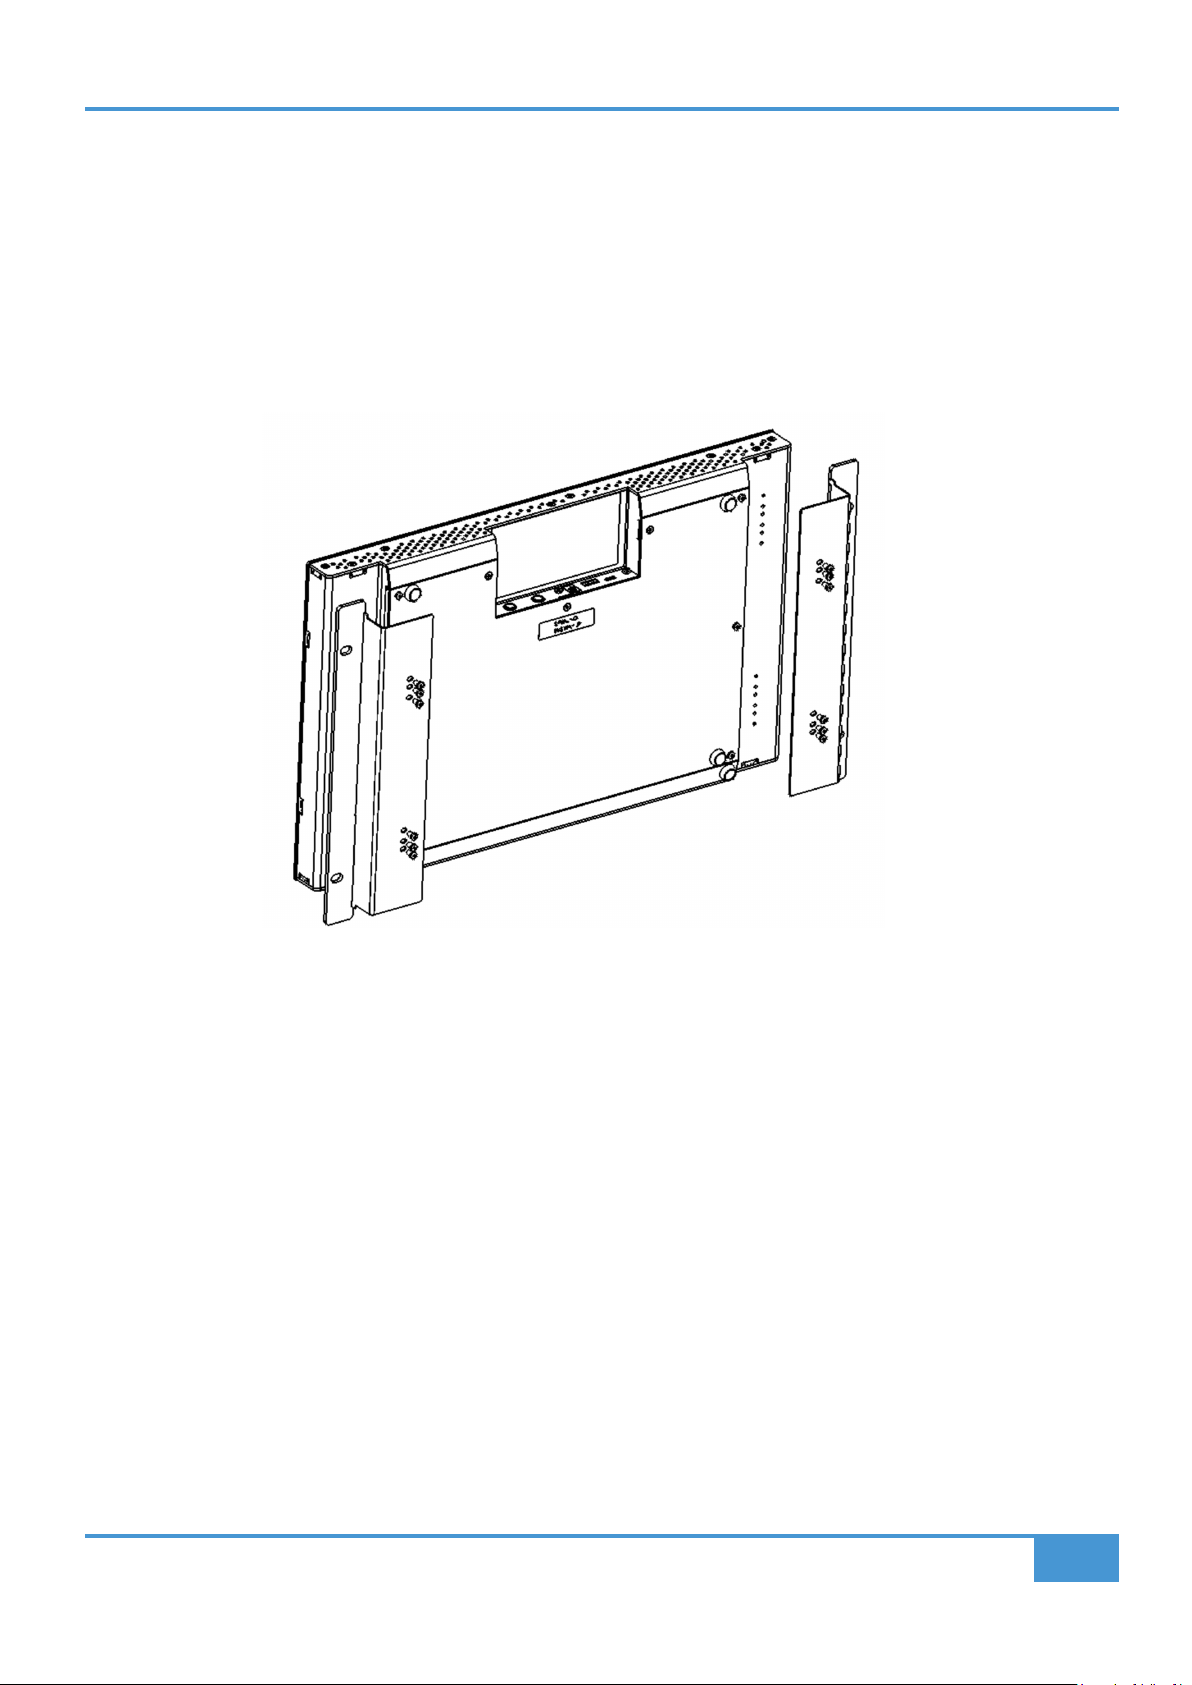
Rack Mount Kit
A 19" in rack mount kit is available for purchase separately should you wish to rack mount your UF8. When rack-mounted, UF8
occupies 6U of space.
Attaching the rack mount ears
The kit contains a set of metal racking ears and 12 screws, which should be secured to the chassis using the lower 3 screw holes at
the top and bottom of each side (6 in total per side), as pictured below. Please be careful not to over-tighten to avoid stripping
the screw threads.
UF8 Physical Specification
Dimensions
17” x 10.5” x 2.4” / 431 x 266 x 62.7 mm (Width x Depth X Height)
Weight
Unboxed - 2.9 kg / 6.4 lbs
Boxed - 5.0 kg / 11.02 lbs
SSL UF8 User Guide
7
Page 8
Get-Started
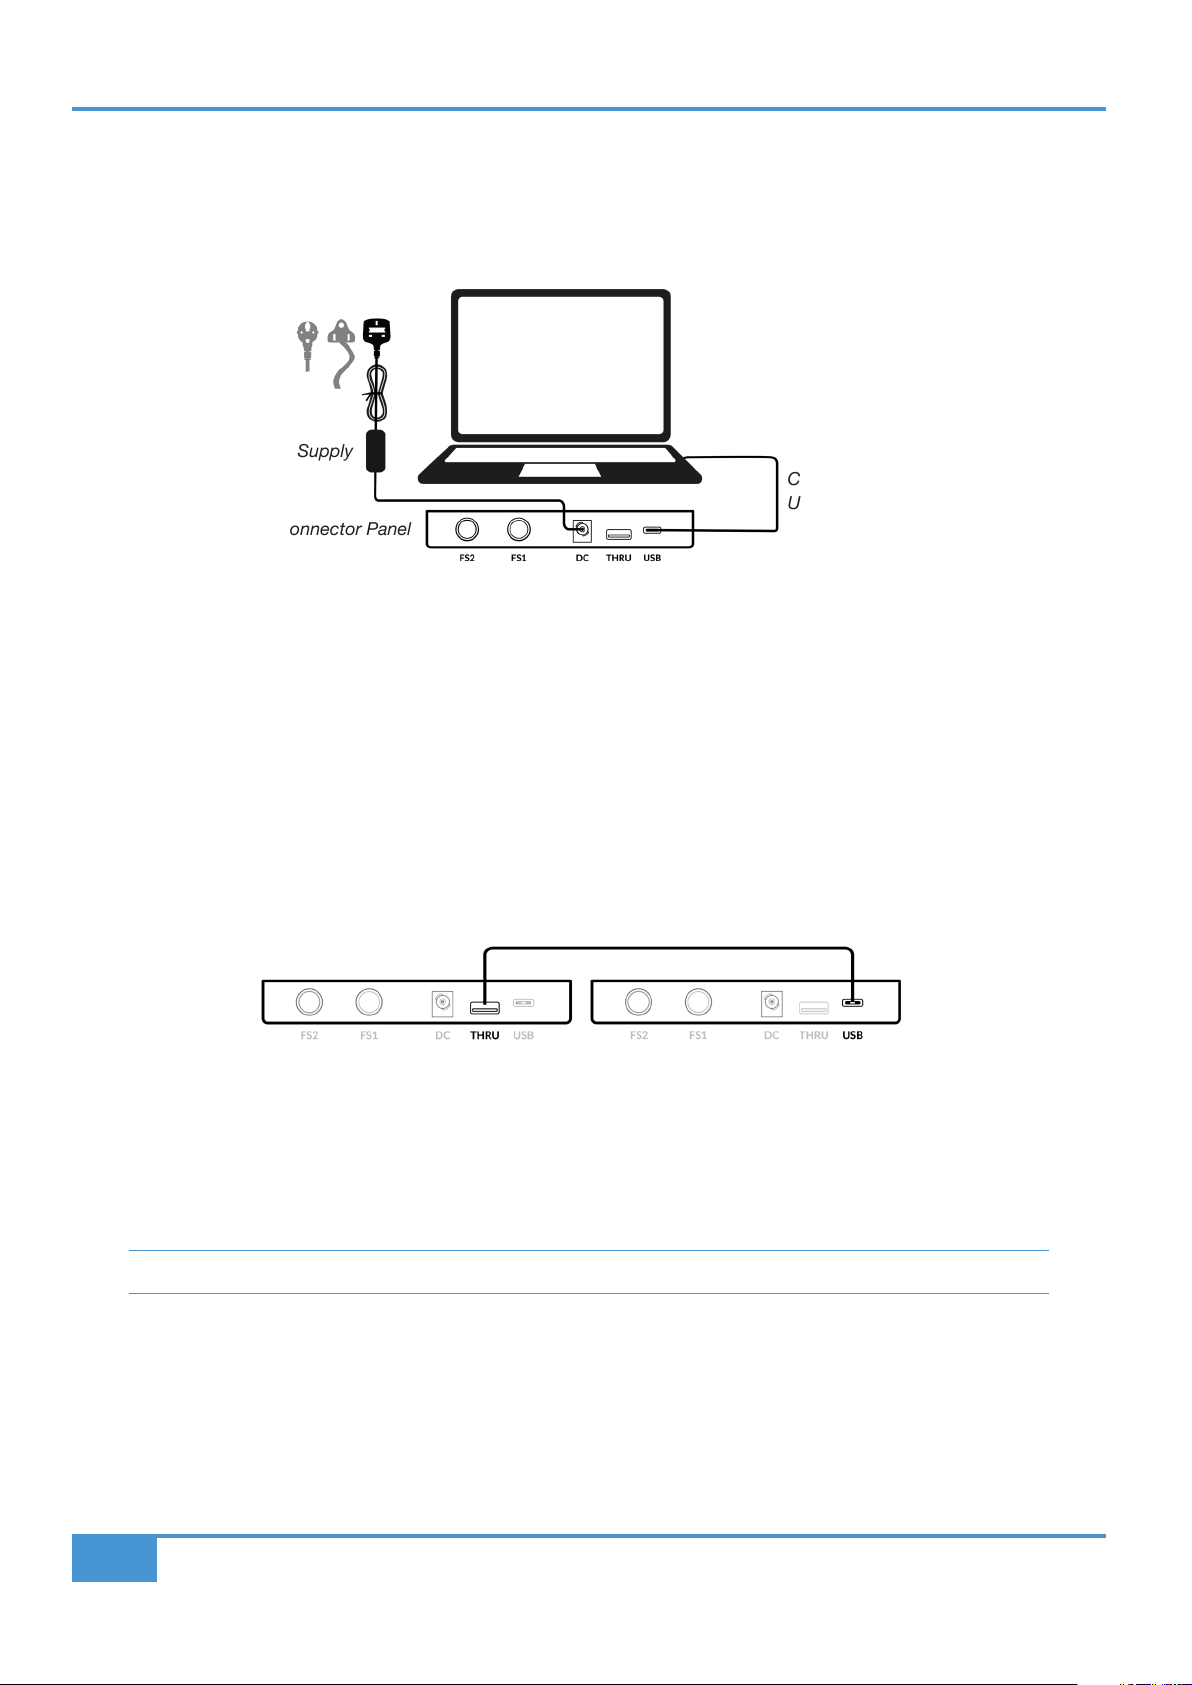
Connecting Your UF8 Hardware
1. Connect the included power supply to the DC socket on the connector panel.
2. Connect one of the included USB cables from your computer to the USB socket.
Power Supply
C to C / C to A
USB Cable
UF8 Connector Panel
USB Cables
Please use one of the provided USB cables ('C' to 'C' or 'C' to 'A') to connect UF8 to your computer. The type of USB port you
have available on your computer will determine which of the two included cables you should use. Newer computers may have 'C'
ports, whereas older computers may have 'A'. Please ensure that you are connecting to the port labelled USB on UF8, which is a
'C' type connection.
Connecting Multiple UF8s
If you are using more than one UF8, you can use the THRU port (USB 'A' type) to link communication across multiple units. This
means that only one USB port is required at your computer.
C to A USB Cable
1st UF8 2nd UF8
Theoretically, you can chain 4 UF8s together in the way described above. However, by doing so you may exceed the number of
hub tiers permitted by your PC/Mac computer. As such, you may need to connect your 3rd/4th UF8 unit directly to another USB
port on your computer. The same applies regarding the use of USB hubs; the 3rd/4th UF8(s) may need to be plugged directly into
a different USB port on your computer.
Tip: The THRU port can also be used to plug in USB dongles that are often required for DAW software.
How Many UF8s Can I Use?
A maximum of 4 UF8s can be used to create a 32-channel control surface.
8
SSL UF8 User Guide
Page 9
Get-Started
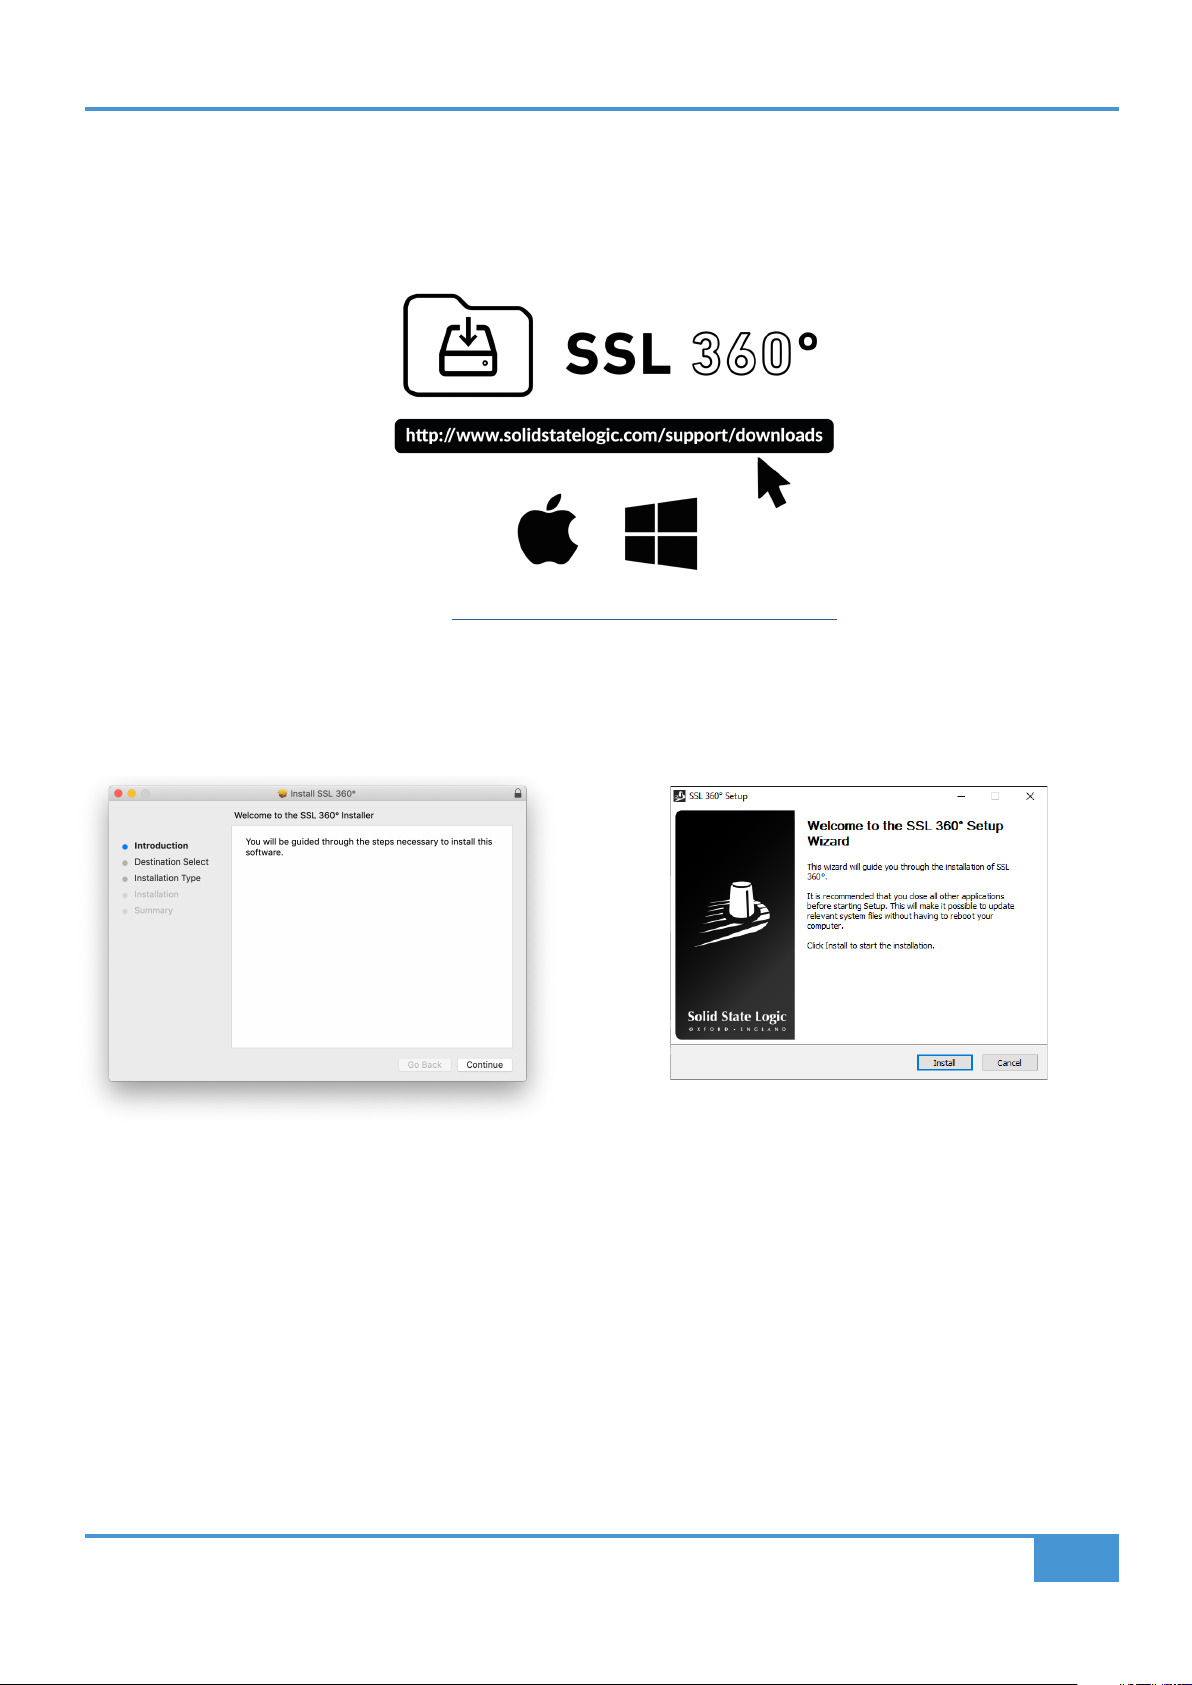
Downloading SSL 360° Software
UF8 requires the SSL 360° software to be installed on your computer in order to function. SSL 360° is the brains behind your
UF8 control surface. Once you have connected your UF8 hardware to your computer as described on the previous page, please
download SSL 360° from the SSL website.
1. Go to www.solidstatelogic.com/support/downloads
2. Select UF8 from Products drop-down list.
3. Download the SSL 360° software for your Mac or PC.
Installing SSL 360° Software
Mac
1. Locate the downloaded SSL 360°.dmg on your
computer.
2. Double-click to open the .dmg.
3. Double-click to run the SSL 360°.pkg.
4. Proceed with the installation, following the on-screen
instructions.
Windows
1. Locate the downloaded SSL 360°.exe on your
computer.
2. Double-click to run the SSL 360°.exe.
3. Proceed with the installation, following the on-screen
instructions.
System Requirements
Computer operating systems and hardware are constantly changing. Please search for 'UF8 Compatibility' in our online FAQs to
check if your system is currently supported.
SSL UF8 User Guide
9
Page 10
Get-Started
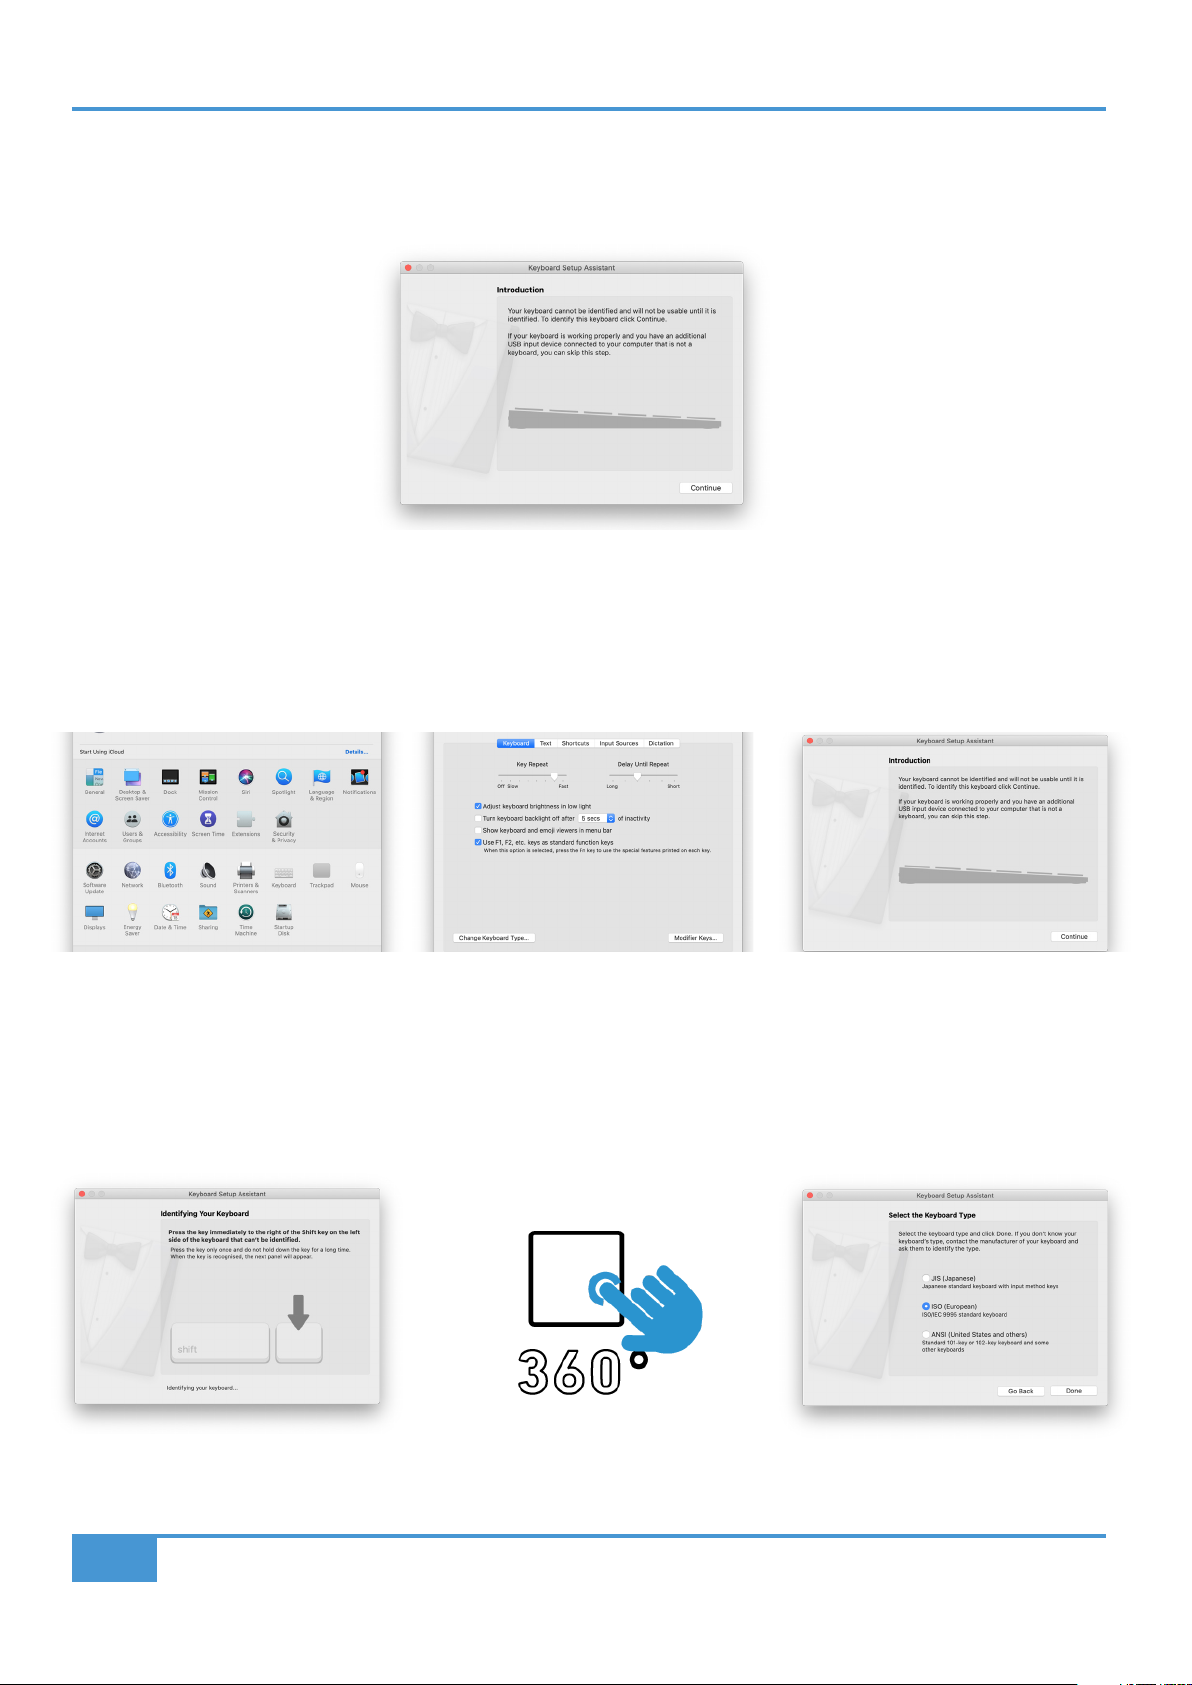
Keyboard Identify (Mac Only)
One of the special features of UF8 is its ability to trigger keyboard command sequences of your favourite DAW shortcuts. These
are assigned using the SSL 360° software and this is covered later in this User Guide.
When you first plug in your UF8, Mac OS will present the above 'Keyboard Setup Assistant' window because Mac OS wants you
to identfy which region (Europe, America or Japan) this, as yet unidentified, keyboard is from. If you connected your UF8 to your
computer before installing SSL 360° software, you need to close this setup assistant because SSL 360° needs to be installed
on your computer in order to continue through this setup process. To make the Keyboard Setup Assistant appear again once
SSL 360° is installed, do the following: Open up Mac's 'System Preferences' > Go to 'Keyboard' > Click 'Change Keyboard Type'
(please note, your UF8 must be connected to your computer via a USB cable) and click 'Continue'.
STEP 1: Go to System Preferences and
click 'Keyboard'.
• When presented with 'Identifying Your Keyboard' and you are being asked to 'Press the key immediately to the right of the Shift
Key', at this point, press and hold the 360° key on UF8 for 3 seconds until the key lights orange.
• This will move you through to the final step of the process, where you can choose the appropriate option (Europe, America or
Japan) for your region and then click 'Done'.
STEP 4: When presented with the message 'Press the key immediately to the
right of the Shift Key', press and hold the 360° key on UF8 for 3 seconds until it
lights orange.
STEP 2: Click 'Change Keyboard Type' STEP 3: Click 'Continue'.
STEP 5: Select your region and click
'Done'.
10
SSL UF8 User Guide
Page 11
Get-Started
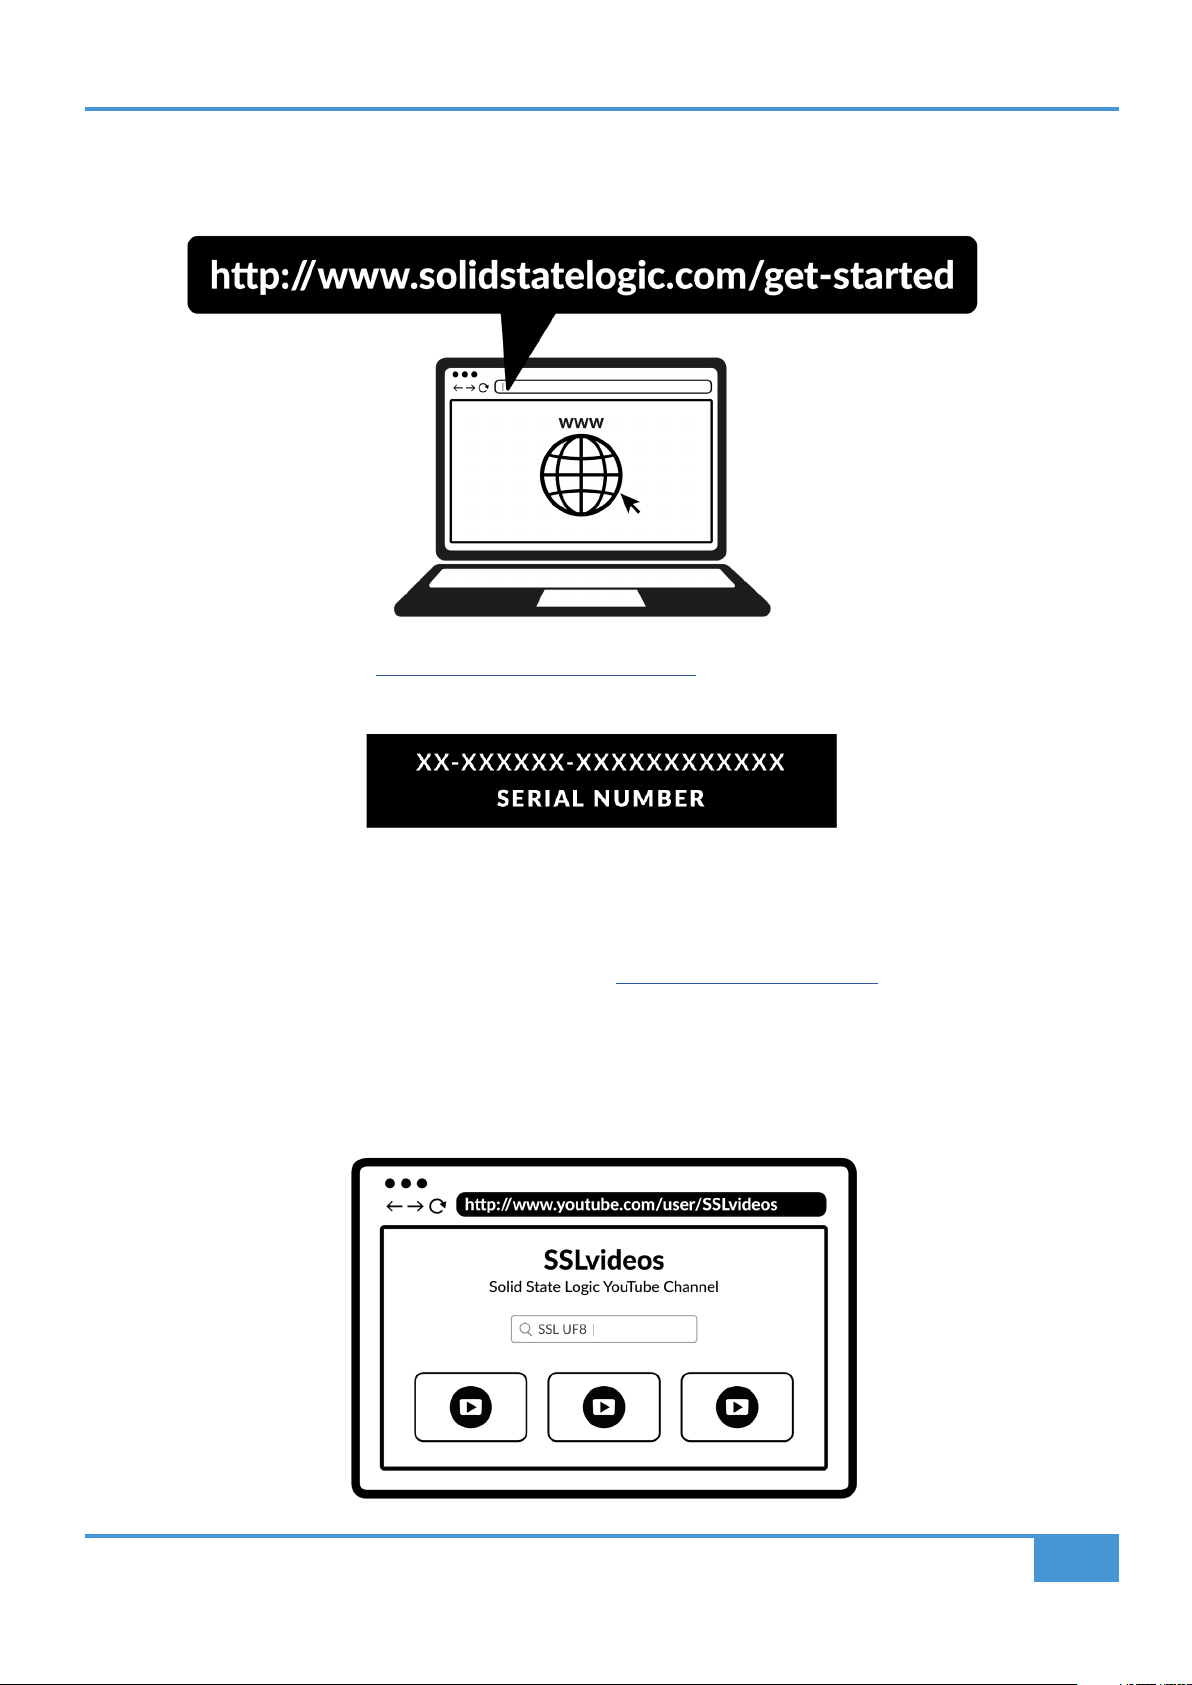
Registering Your UF8
Register your UF8 for the best possible experience and to gain access to any additional software in your SSL user account.
To register your product, head to www.solidstatelogic.com/get-started and follow the on-screen instructions. During the
registration process, you’ll need to input the serial number of your unit. This can be found on the label on the base of your unit.
Please note: Xs are used to demonstrate the format of the serial number. The actual serial number will contain a mixture of letters
and numbers.
Once you have completed registration and logged-in, all of your software content will be available in your user area. You can return
to this area at any time by logging back into your SSL account at www.solidstatelogic.com/login should you wish to download
the software another time.
UF8 YouTube Tutorials
The SSL YouTube channel hosts in-depth tutorials on how to setup and use UF8 with your DAW.
SSL UF8 User Guide
11
Page 12
Product Overview & Features
UF8 Hardware Layout
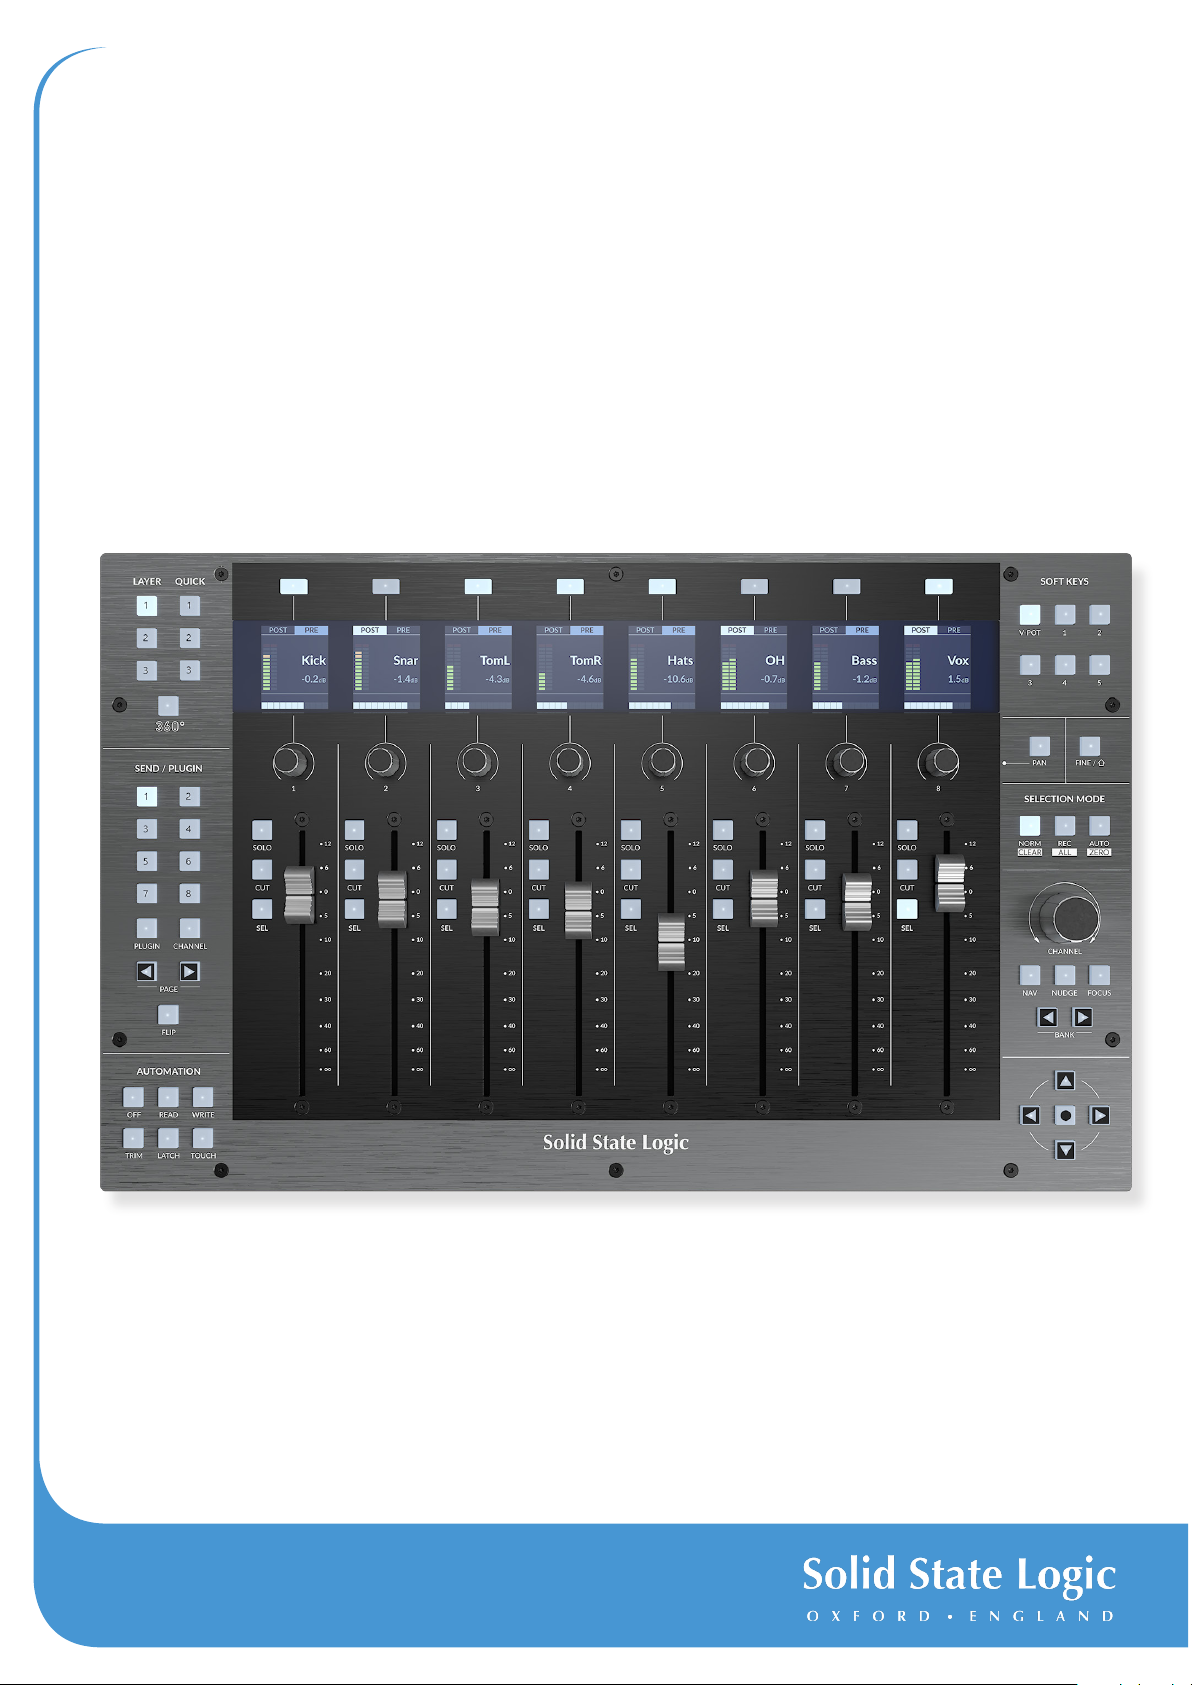
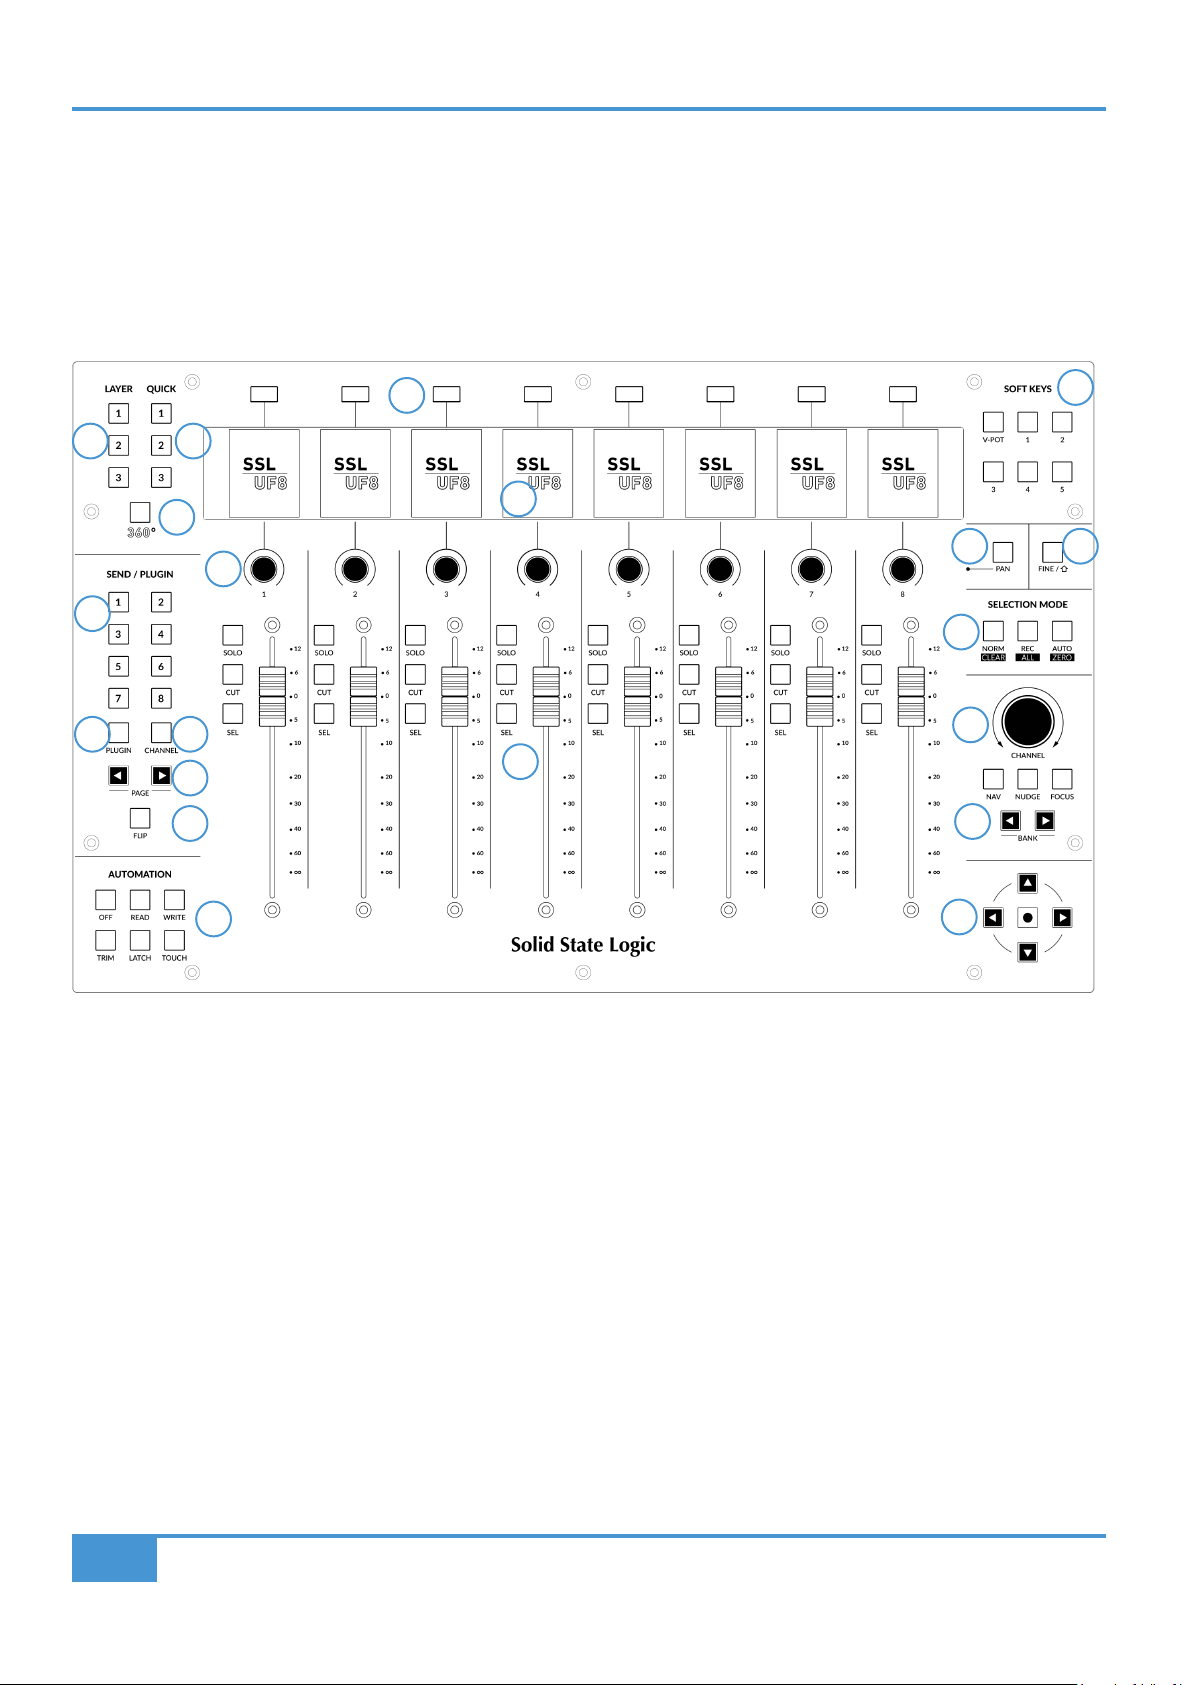
Front Panel
This section will help familiarise yourself with the front panel controls of the UF8 surface. It is intended to be an overview, rather
than a comprehensive explanation of each function or mode. For more detail on the integration of features with each DAW, please
refer to the DAW Tutorials sections of this User Guide.
1 2
3
11
1312
14
15
19
4
6
8 9
7
10
17
16
18
20
5
1 - LAYER Keys 1-3
Control of up to 3 DAWs can be configured and switched between using these keys on the UF8 surface.
2 - QUICK Keys 1-3
User-assignable keys that can be mapped to any of the available HUI/MCU commands in SSL 360°, or alternatively any keyboard
shortcut sequence of your choosing.
3 - 360° Key
Opens/minimises the SSL 360° software on your computer screen.
4 - 8 x Soft Keys
A line of 8 soft keys allow access to various V-POT parameters or, up to 40 user-assignable keys per UF8. The label for the function
of each key is displayed in the top section of the LCD below.
5- SOFT KEYS
Determines the operating mode of the 8 top-row soft keys. Keys labelled 1-5 provide access to User Banks 1-5. V-POT puts the
top-row soft keys into V-POT mode. See DAW tutorial sections for more information.
12
SSL UF8 User Guide
Page 13

Product Overview & Features
6 - 8 x colour LCD TFTs provide visual feedback including metering, track names, V-POT readouts, track record-arm states and
more.
7 - 8 x V-POTS
"V-Pot" is short for "virtual pot" and these are used to control various DAW parameters including Pan position, Send levels and
Plug-in parameters.
8 - PAN Key
Assigns the DAW's Pan controls to the V-Pots.
9- FINE / SHIFT Key
For most DAWs, this key either engages a FINE mode of control for the parameter currently assigned to the V-Pots, or it acts as a
Shift Key. The function of this key varies between DAWs.
10 - SELECTION MODE Keys
Determines the behaviour of the SEL (Select) keys. These Selection Mode keys also perform secondary functions in Pro Tools and
Logic when pressed and held, and are used in combination with the SOLO, CUT and SEL keys.
11 - SEND / PLUGIN 1-8 Keys
The behaviour of these keys varies for each DAW. Please see the relevant DAW Tutorial section for more information.
12 - PLUGIN Key
The behaviour of the PLUGIN key varies for each DAW. Please see the relevant DAW Tutorial section for more information.
13 - CHANNEL Key
The behaviour of the CHANNEL key varies for each DAW. Please see the relevant DAW Tutorial section for more information.
14 - PAGE < and > Keys
The behaviour of the PAGE < > keys varies for each DAW. Please see the relevant DAW Tutorial section for more information.
15 - FLIP Key
FLIP is used to assign the current V-Pot parameter to the fader and can be used for tasks such as riding send levels.
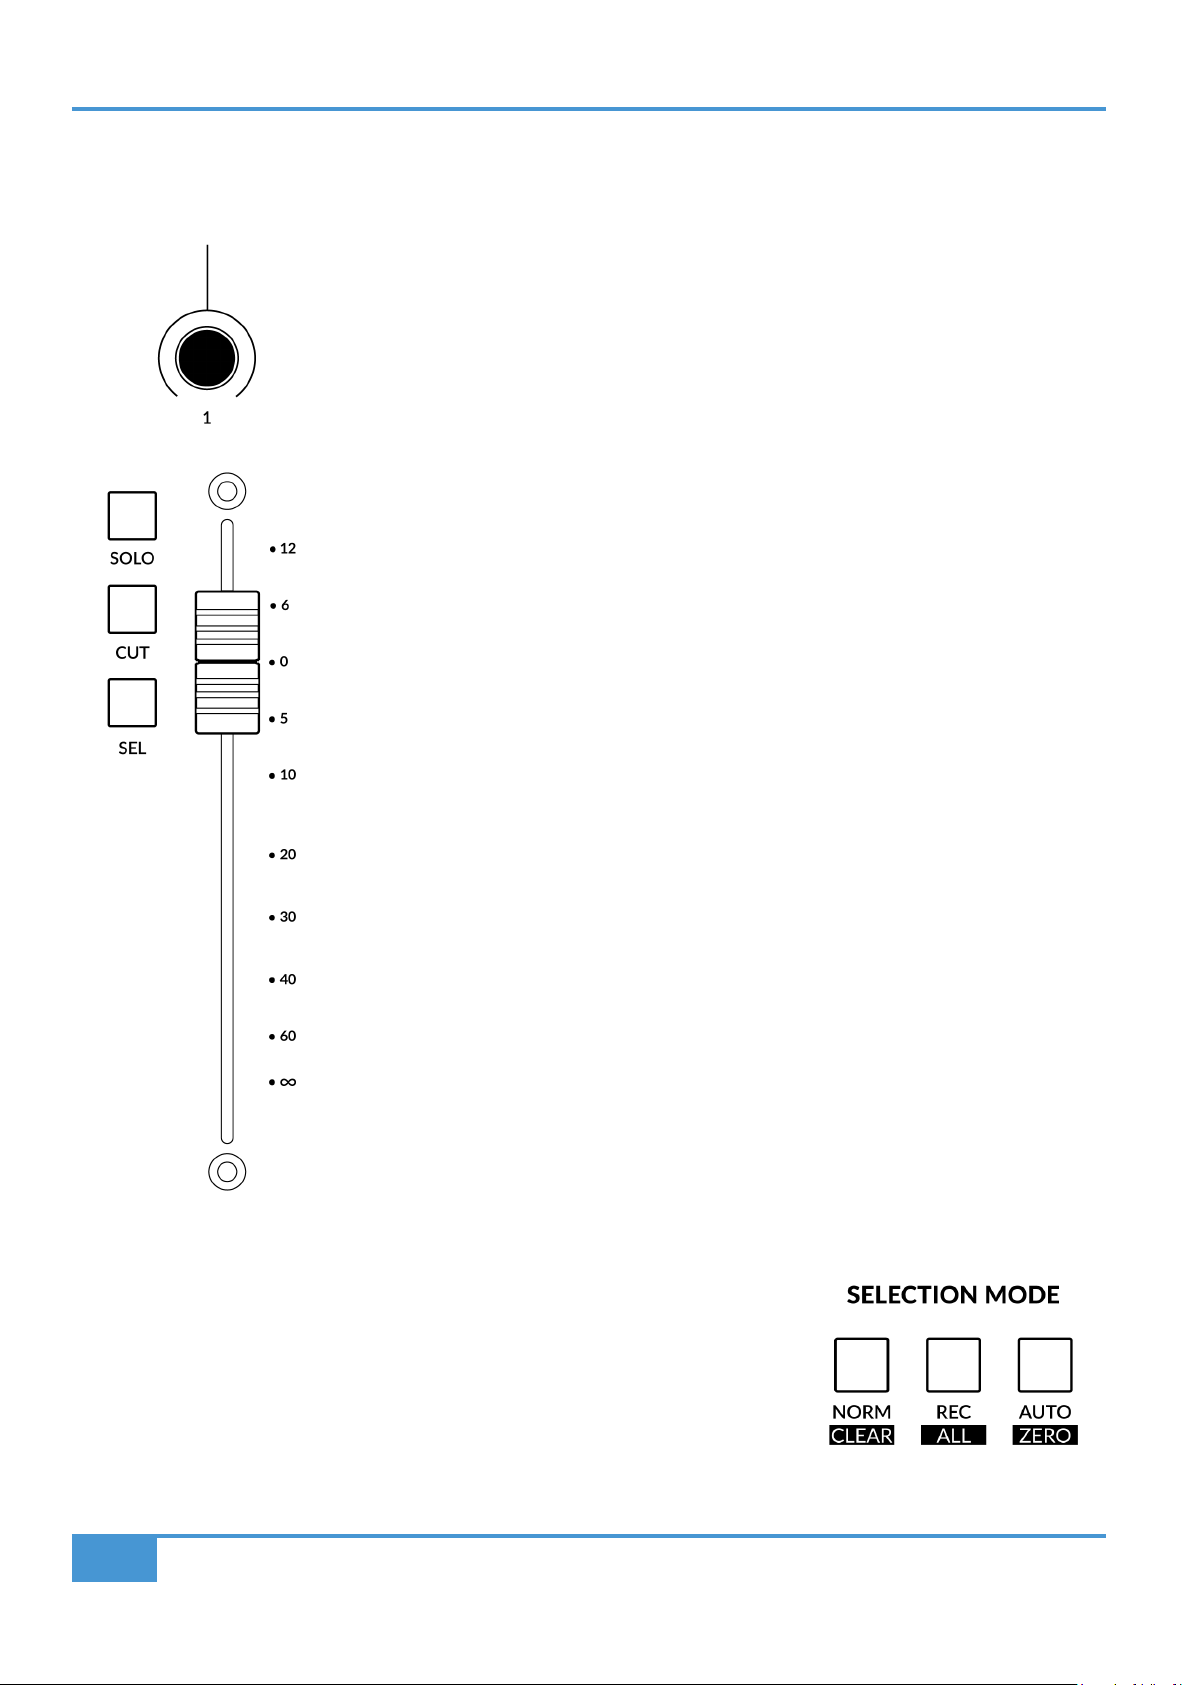
16 - SOLO, CUT, SEL and 100 mm Motorised Faders
The most common controls found in all DAWs. Please note that the function of the SEL keys depends on the currently active
SELECTION MODE.
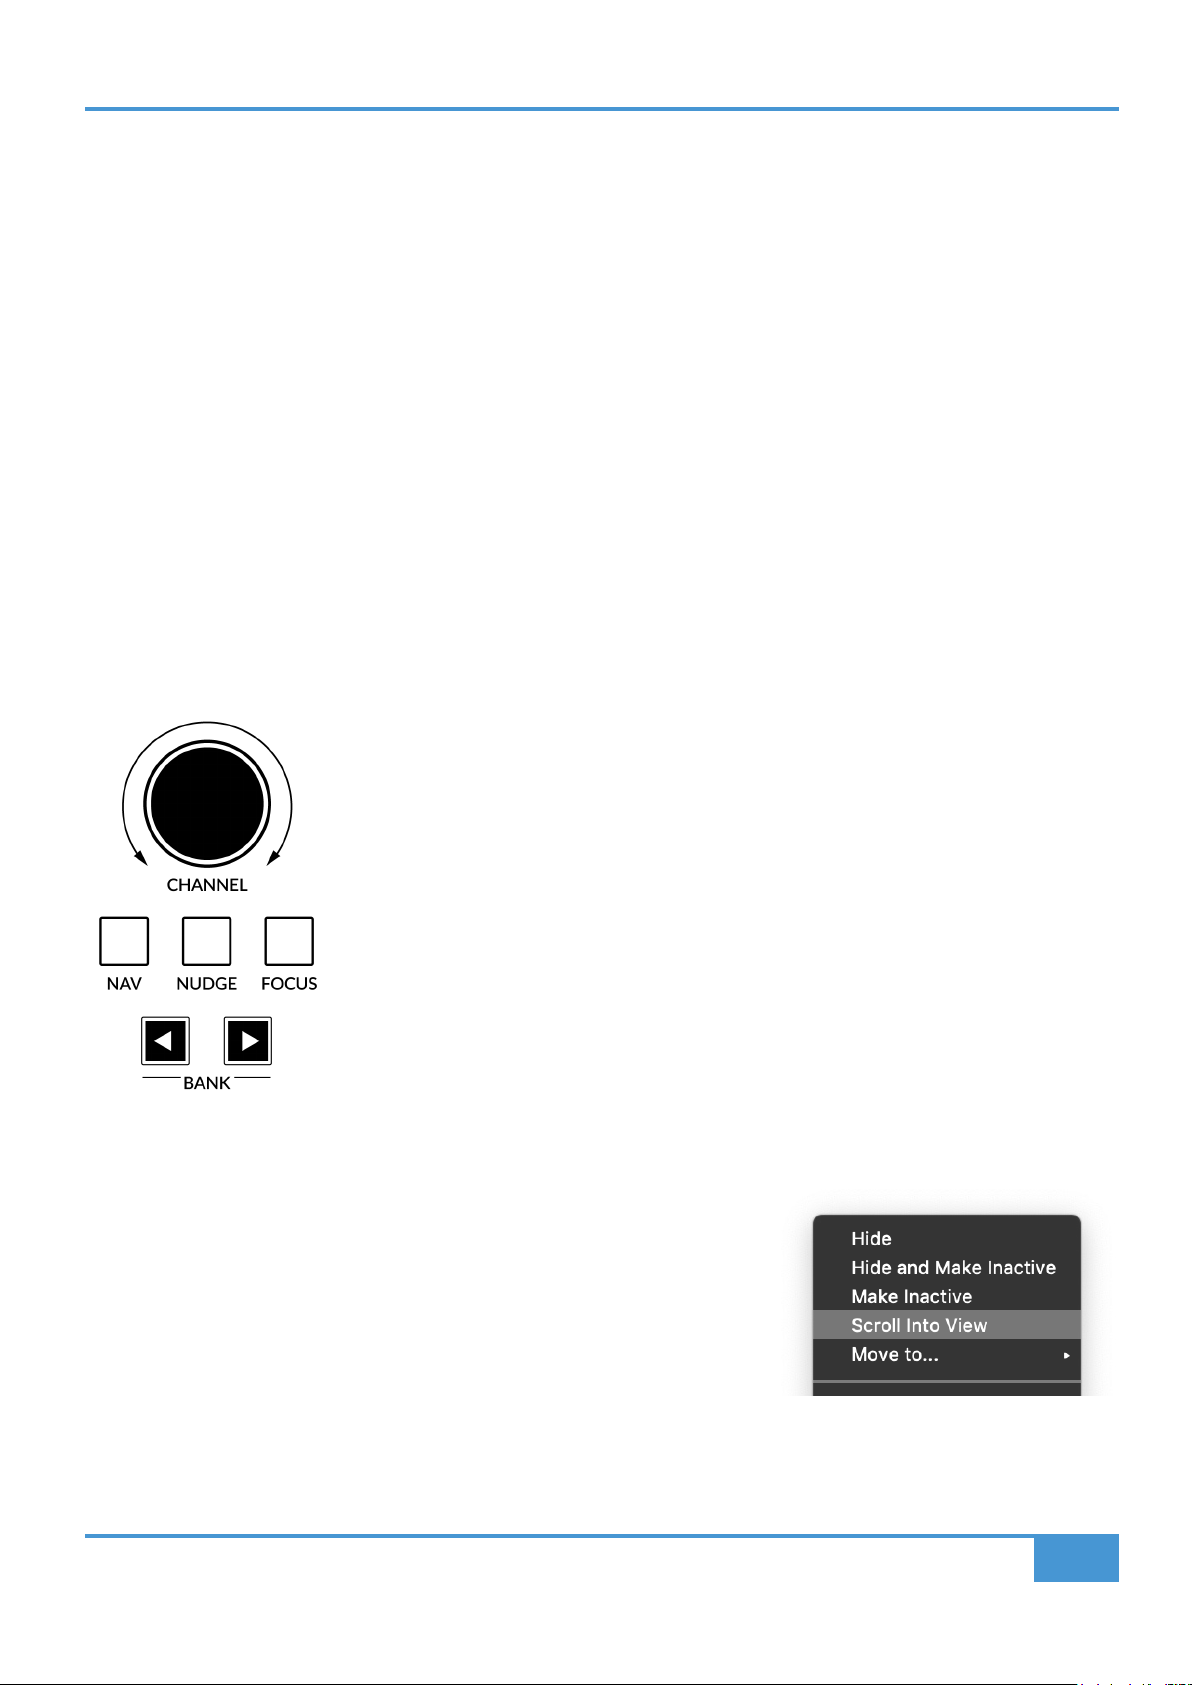
17 - Large Notched CHANNEL Encoder
The large encoder can function in several different modes:
• Standard Mode - Push the encoder itself to return to CHANNEL mode. Moving the encoder will bank DAW tracks one at a time.
• NAV Mode - 'Nav' is short for Navigation. In this mode, the encoder allows you to move the playhead cursor along your DAW
timeline.
• NUDGE Mode - This mode is only supported by Pro Tools. It allows you to use the encoder to move selected audio regions
by the currently set Nudge value.
• FOCUS Mode - This mode turns the operation of the large encoder into a mouse wheel scroll emulation and is great for
controlling plug-ins. Simply hover your computer mouse over the desired control and turn the encoder. The sensitivity of this
mode will be determined by your computer's mouse scroll sensitivity settings.
SSL UF8 User Guide
13
Page 14

Product Overview & Features
18 - BANK < > Keys
These keys allow you to bank through the tracks in your DAW, bringing them onto your UF8 control surface(s). Banking works in
groups of 8/16/24/32, depending on the DAW and the number of UF8s you have connected.
19 - AUTOMATION Keys
These keys provide access to the various automation modes available in each DAW. Please note that when working in Pro Tools,
the SELECTION MODE must be in AUTO before these keys become active.
20 - Navigation Arrows and Mode Key
These keys perform various functions including DAW timeline zooming and important tasks such as selection of plug-in slots (Logic
only). Please refer to the DAW Tutorials section for more information.
"Nice to meet you, where you been? I could show you incredible things." - Taylor Swift, Blank Space.
14
SSL UF8 User Guide
Page 15
Product Overview & Features
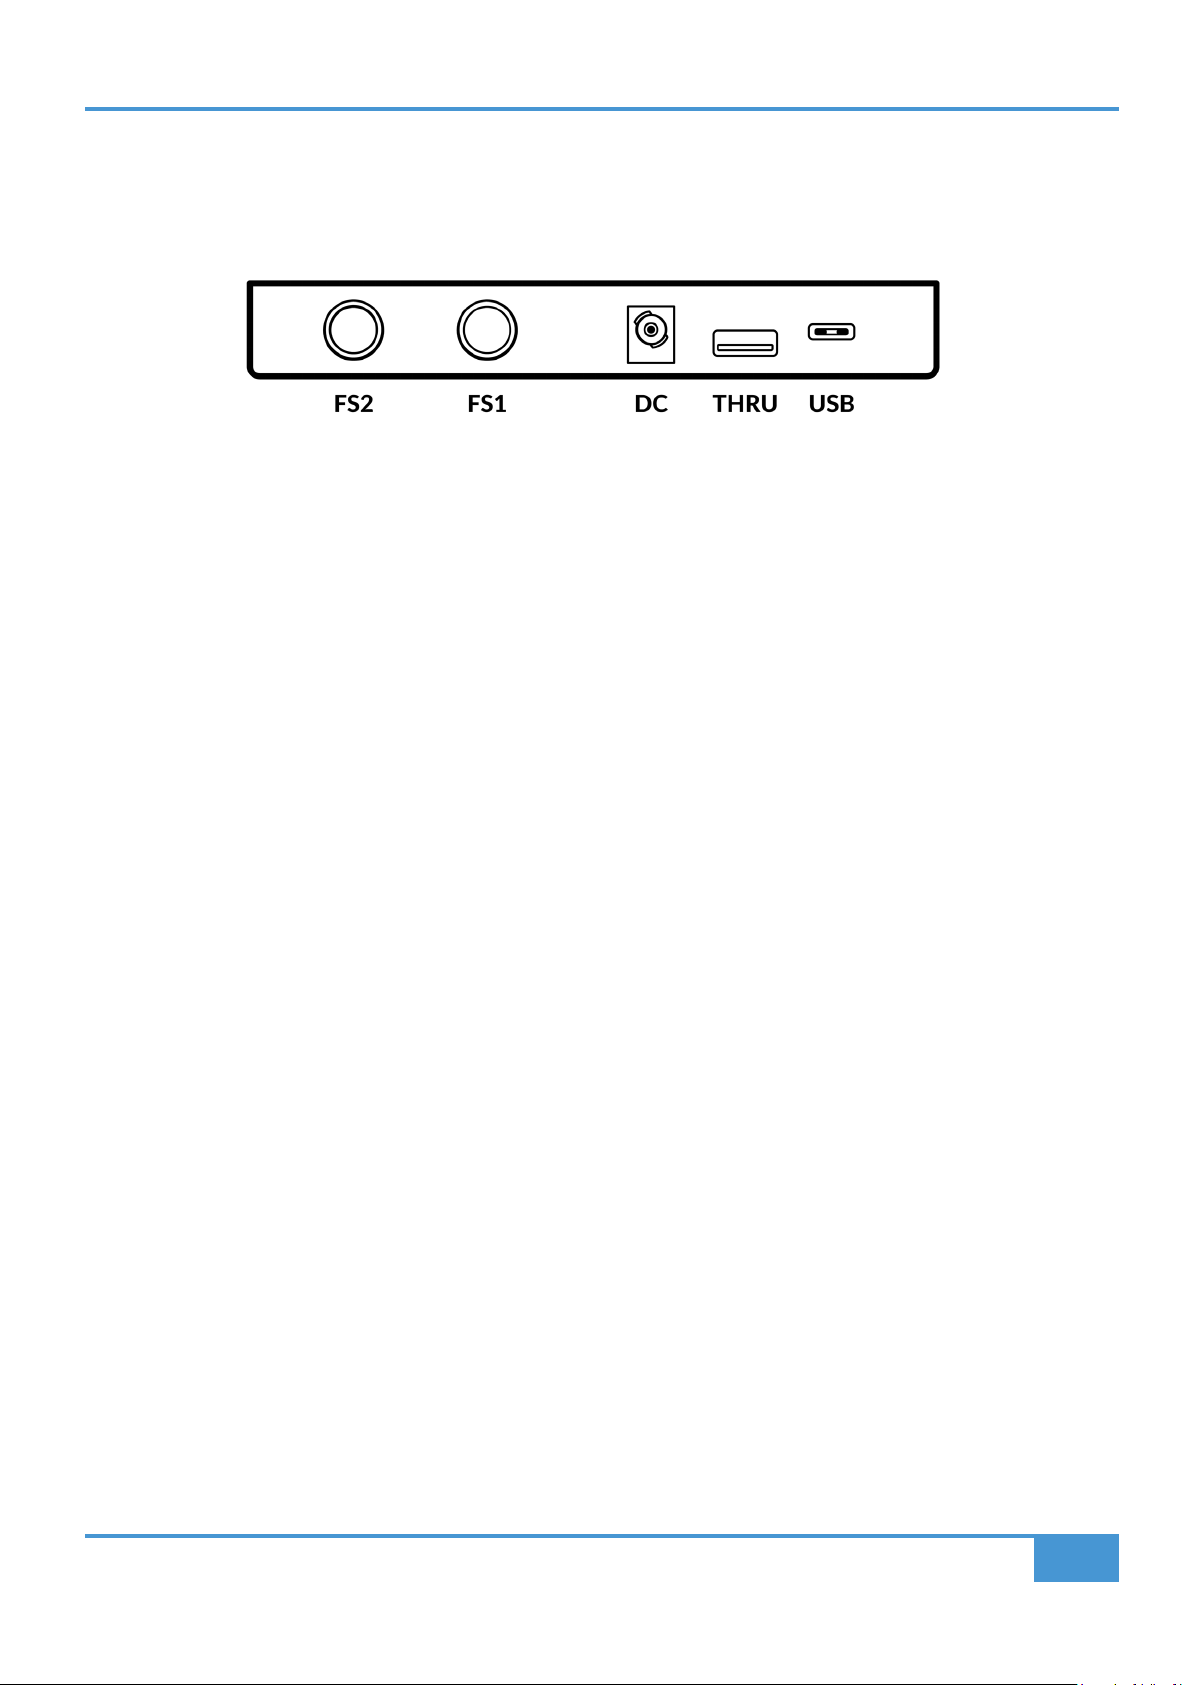
Connector Panel
The recessed section hosts UF8's connectors.
USB - 'C' Type Connector
Connect one of the included USB cables from your computer to the USB port on UF8. This handles all of the communication
between your DAW and UF8, via the SSL 360° software application.
THRU - 'A' Type Connector
The THRU connector can be used to chain multiple UF8s together, without needing to plug each unit into your computer or a hub
individually. It can also be used to plug in USB dongles.
DC Connector
Use the included DC Power Supply to provide power for your UF8.
FS1 & FS2 - 1/4" Jack Connectors
These allow for the connection of foot-switches, which can be used to trigger DAW commands or user-assigned keyboard shortcut
sequences.
UF8 has been tested with popular foot-switches such as the BOSS FS-6 (other brands are available), whose foot-switch behaviour
(or polarity as it is often referred to), is a 'normally closed' switch. In some cases, these foot-switches offer the ability to change
the polarity.
Please use a foot-switch designed for 'normally closed' operation and also, to ensure full compatibility use a momentary action
foot-switch, or choose a foot-switch that can be set to momentary. This will ensure correct operation with assigned DAW commands.
SSL UF8 User Guide
15
Page 16
Product Overview & Features
SSL 360° Software Overview
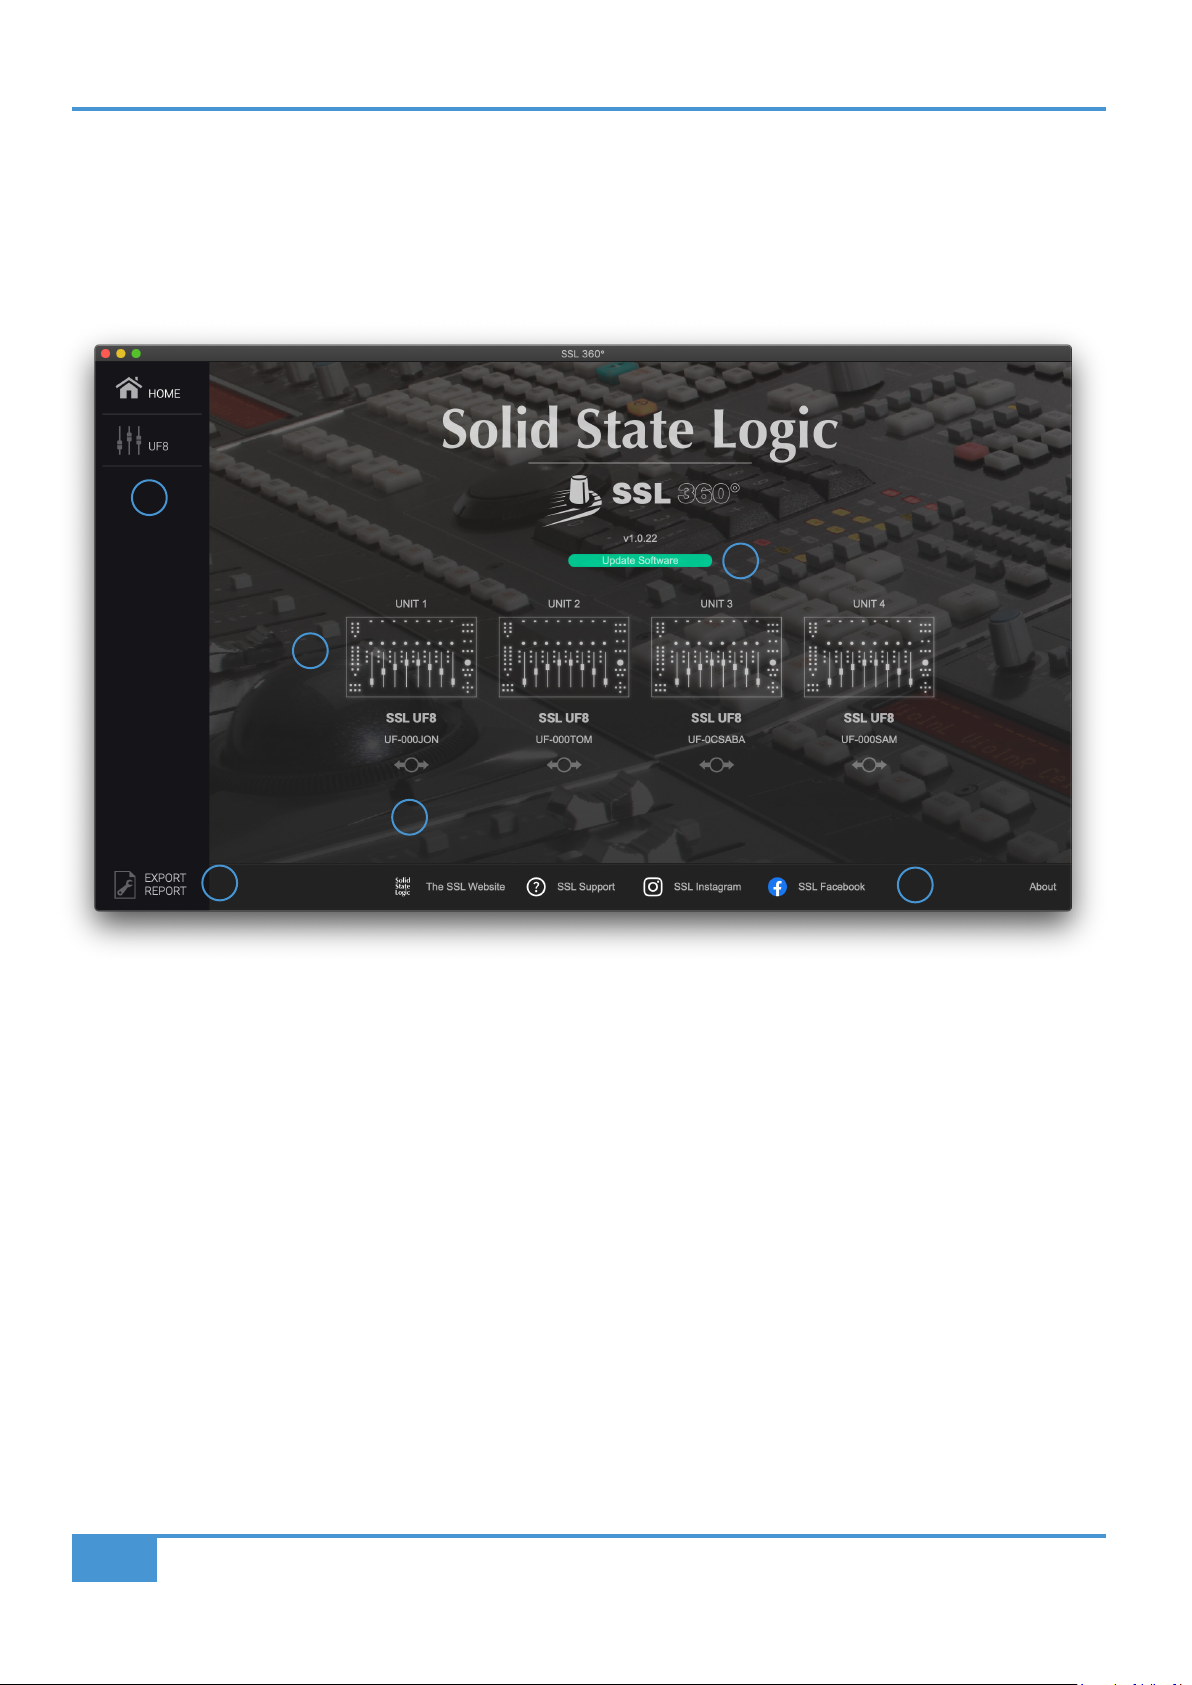
Overview & Home Page
SSL 360° software is not only the 'brains' behind the UF8 control surface, it is also the command centre from which new versions
of software and firmware can be downloaded for your 360° compatible device.
1
2
3
4
5
The HOME screen:
1 - Menu Toolbar
This toolbar allows you to navigate through the various pages of SSL 360°.
2 - Software Version Number & Update Software Button
This area displays the version number of SSL 360° that is running on your computer. When software updates become available,
the Update Software button (pictured above) will appear. Click this to download and update your software.
3 - Connected Units
This area shows any UF8s that are connected to your computer, along with their respective serial numbers. Please allow 10-15
seconds for units to be discovered once they are plugged in.
6
16
SSL UF8 User Guide
Page 17

Product Overview & Features
Identify & Drag To Re-Order
Usefully, there is a built-in feature that allows you to identify each UF8 control surface and re-order if appropriate. Clicking your
mouse down on the image of each connected UF8 will temporarily override that unit's LCDs to display the SSL UF8 logo. If your
UF8s are not arranged in the order you want, you can simply drag and drop on-screen to re-arrange.
Clicking the mouse down on a connected UF8 image will cause all the displays on that particular UF8 to momentarily
show the SSL UF8 logo, helping you identify each UF8 control surface.
4 - Firmware Updates Area
If a firmware update becomes available for your UF8 unit, then an Update Firmware button will appear below each unit. Click on
the button to start the firmware update process, being sure to not disconnect the power or USB cable(s) whilst it is in progress.
5 - EXPORT REPORT
Should you encounter any issues with your UF8 or SSL 360° software, you may be asked by a support agent to use the EXPORT
REPORT feature. This feature generates a text file containing the essential information about your computer system and UF8(s),
alongside technical log files relating to SSL 360° activity, which may help to diagnose any issues. When you click EXPORT
REPORT, you'll be asked to choose a destination on your computer to export the generated .zip file to, which you can then forward
onto the support agent.
6 - SSL Socials
The bar at the bottom has quick links to the SSL website, Support section and SSL Socials.
This space is intentionally almost entirely blank... it's a tradition.
SSL UF8 User Guide
17
Page 18
Product Overview & Features
UF8 Page
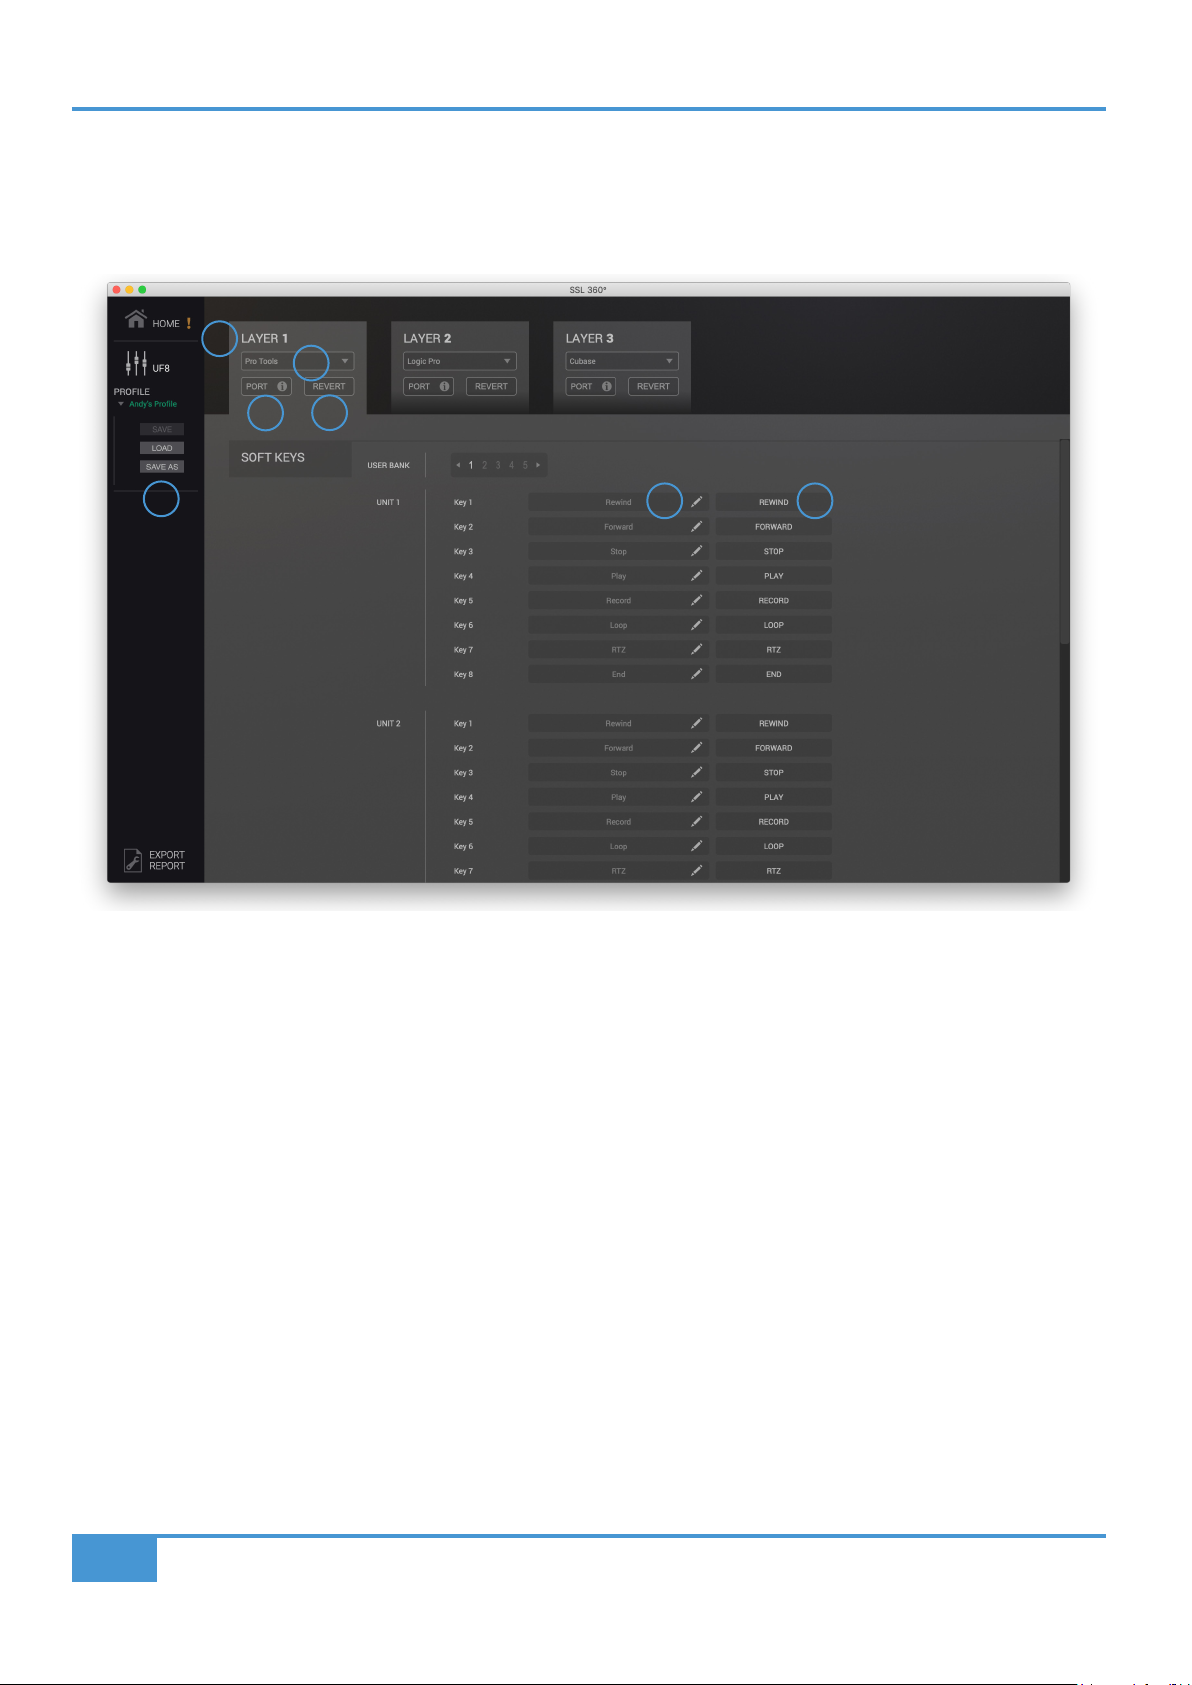
The UF8 page can be selected from the menu toolbar on the left-hand side and is where you configure UF8 to work with your
DAW(s). It is also the place where you can customise any of the user-assignable keys. Customised DAW profiles can then be saved
and loaded as .xml files should you need to work on another computer with SSL 360° installed.
1
2
3
7
1 - LAYER Tabs
UF8 can be configured for 3 different DAWs simultaneously, with each DAW occupying what is called a 'Layer'. If you only use one
DAW, then it is likely you'll only need one layer. If using multiple DAWs, simply click in the LAYER 2 or LAYER 3 tabs to configure
as appropriate.
4
5 6
2 - DAW Profile Selection
Use the drop-down list to select your DAW for the chosen layer.
3 - PORT INFO
Clicking on PORT INFO provides some basic instructions on how to configure your SSL V-MIDI ports correctly (useful as a
reminder). If you are configuring UF8 for the first time, please refer to the more detailed explanations found at the start of each
DAW Tutorial section as the PORT INFO does not cover every detail.
4- REVERT
Allows you to revert this Layer to the factory-shipped DAW profile.
5 - DAW Command/Keyboard Shortcut Assignments
Clicking on the pen symbol will allow you to change the assignment of any of the user-assignable keys. See the next page for
more information.
18
SSL UF8 User Guide
Page 19
Product Overview & Features
6 - Short Label
Using your computer keyboard, you can type the label that you wish to appear on the UF8 LCD just below the User Key.
7 - Profile Name and SAVE/LOAD/SAVE AS Buttons
Allows you to save your customised DAW profiles as an .xml file to your computer or any connected hard-drives. The name of the
currently active profile is shown above these buttons. If you have made any changes to the saved profile, then an asterisk (*) is
appended to indicate this.
Built-in Auto-Saving Feature
Changes you make to the software are automatically stored in the background, so you don't need to worry about remembering to
save each time you change something in SSL 360° software.
User-Assignable Keys
A number of keys on UF8 are user-assignable and can be changed from their factory shipped assignments. Each UF8 unit has
the following user-assignable keys:
5 x banks of 8 Top-Row Soft Keys, accessed by SOFT KEY buttons 1-5 in the top-right of UF8.
3 x QUICK Keys
2 x Foot-switches
All of these keys can have either DAW commands or keyboard
shortcut sequences assigned to them.
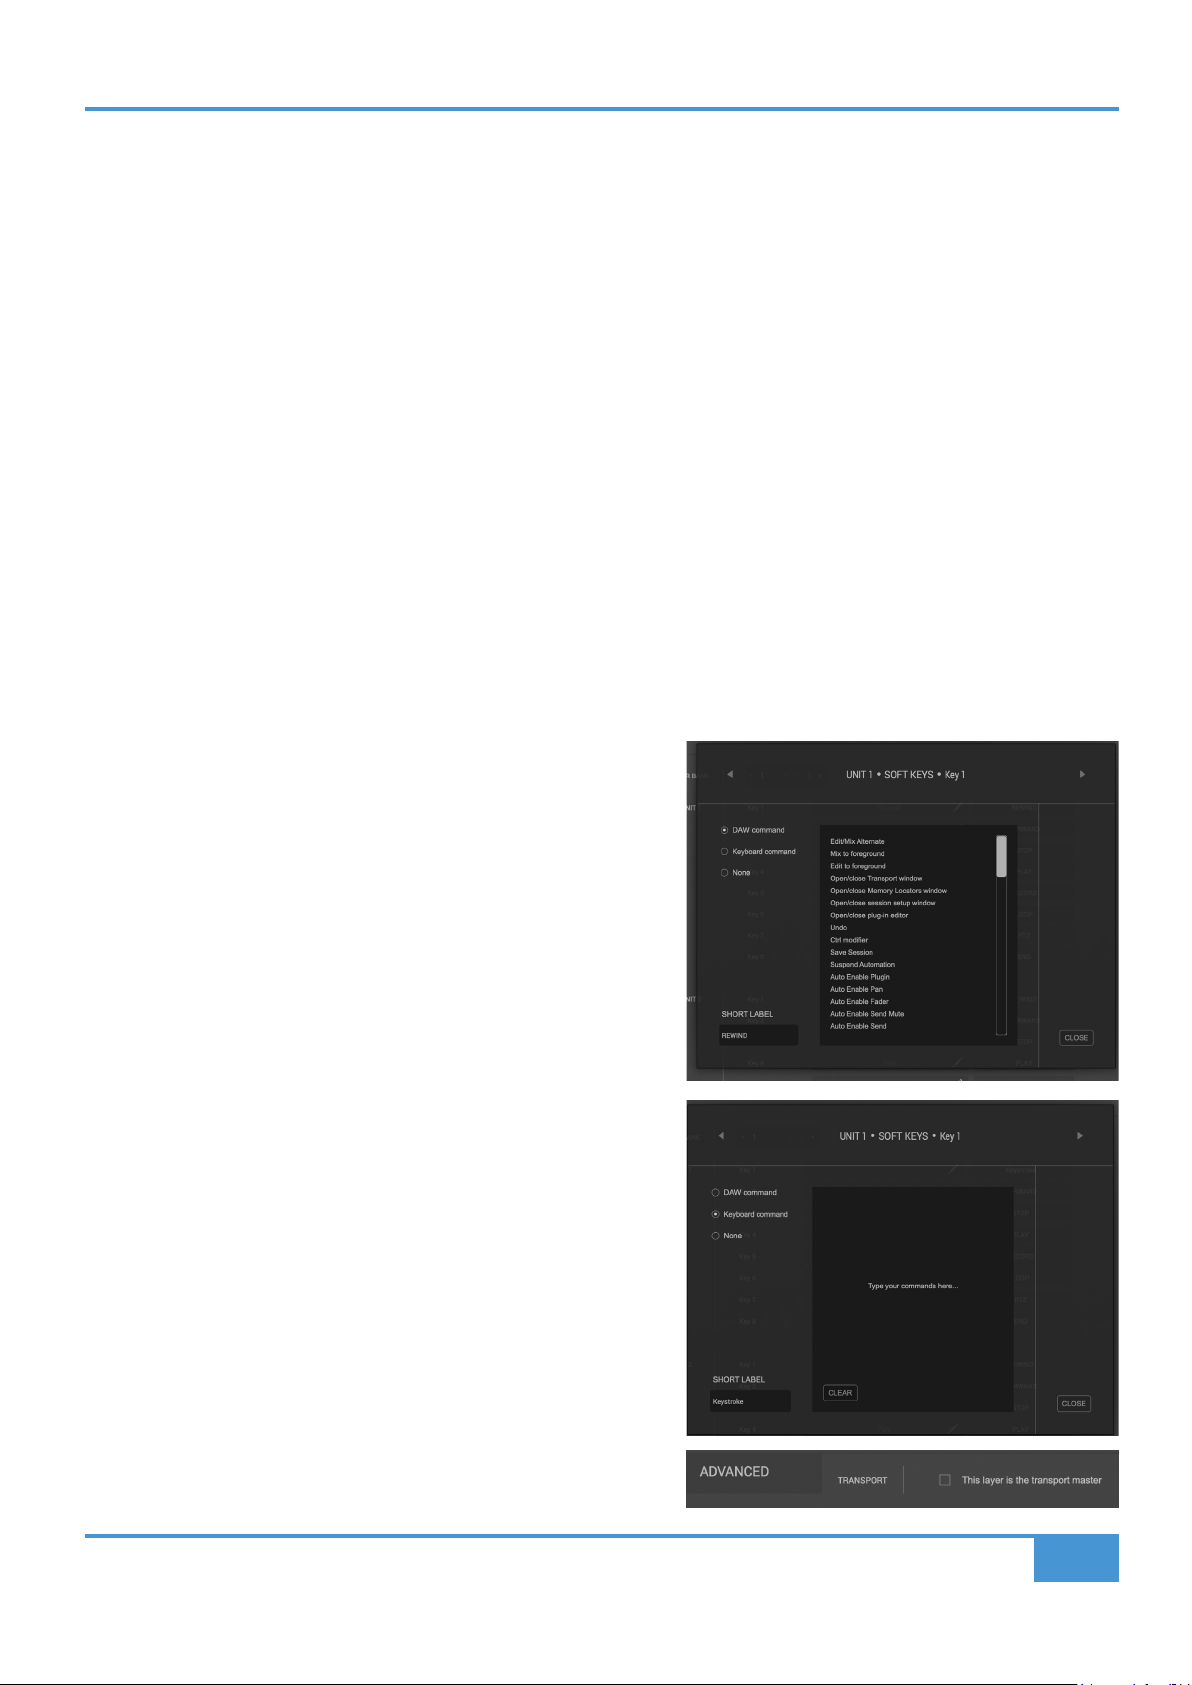
Assigning DAW Commands
Clicking on the pen symbol for any user-assignable key will bring
up a pop-up window, from which DAW command can be selected
using the radio buttons on the left-hand side. To assign a different
DAW command to the button in question, simply select one from
the list of available HUI/MCU commands. The SHORT LABEL text
field allows you to enter the label you want to appear on the LCD to
accompany this command. The list of available commands depends
on the selected DAW.
Assigning Keyboard Shortcut Sequences
If you would like to assign a keyboard shortcut sequence, select
the Keyboard command option. Once selected, simply click your
mouse cursor into the area that says 'Type your commands here...'
and use your keyboard to enter the desired key press or sequence.
Should you make a mistake and need to start again, you can use the
CLEAR button. The SHORT LABEL text field allows you to enter the
label you want to appear on the LCD to accompany this keyboard
shortcut sequence.
ADVANCED Setup Options
Transport Master
If you are running multiple DAWs that are linked using MIDI timecode,
then you can designate 1 of the 3 DAW profile layers to be transport
master. This means that the transport keys will always trigger from the
DAW assigned as Transport Master, even if your UF8 is controlling a
different DAW Layer.
SSL UF8 User Guide
19
Page 20
Product Overview & Features
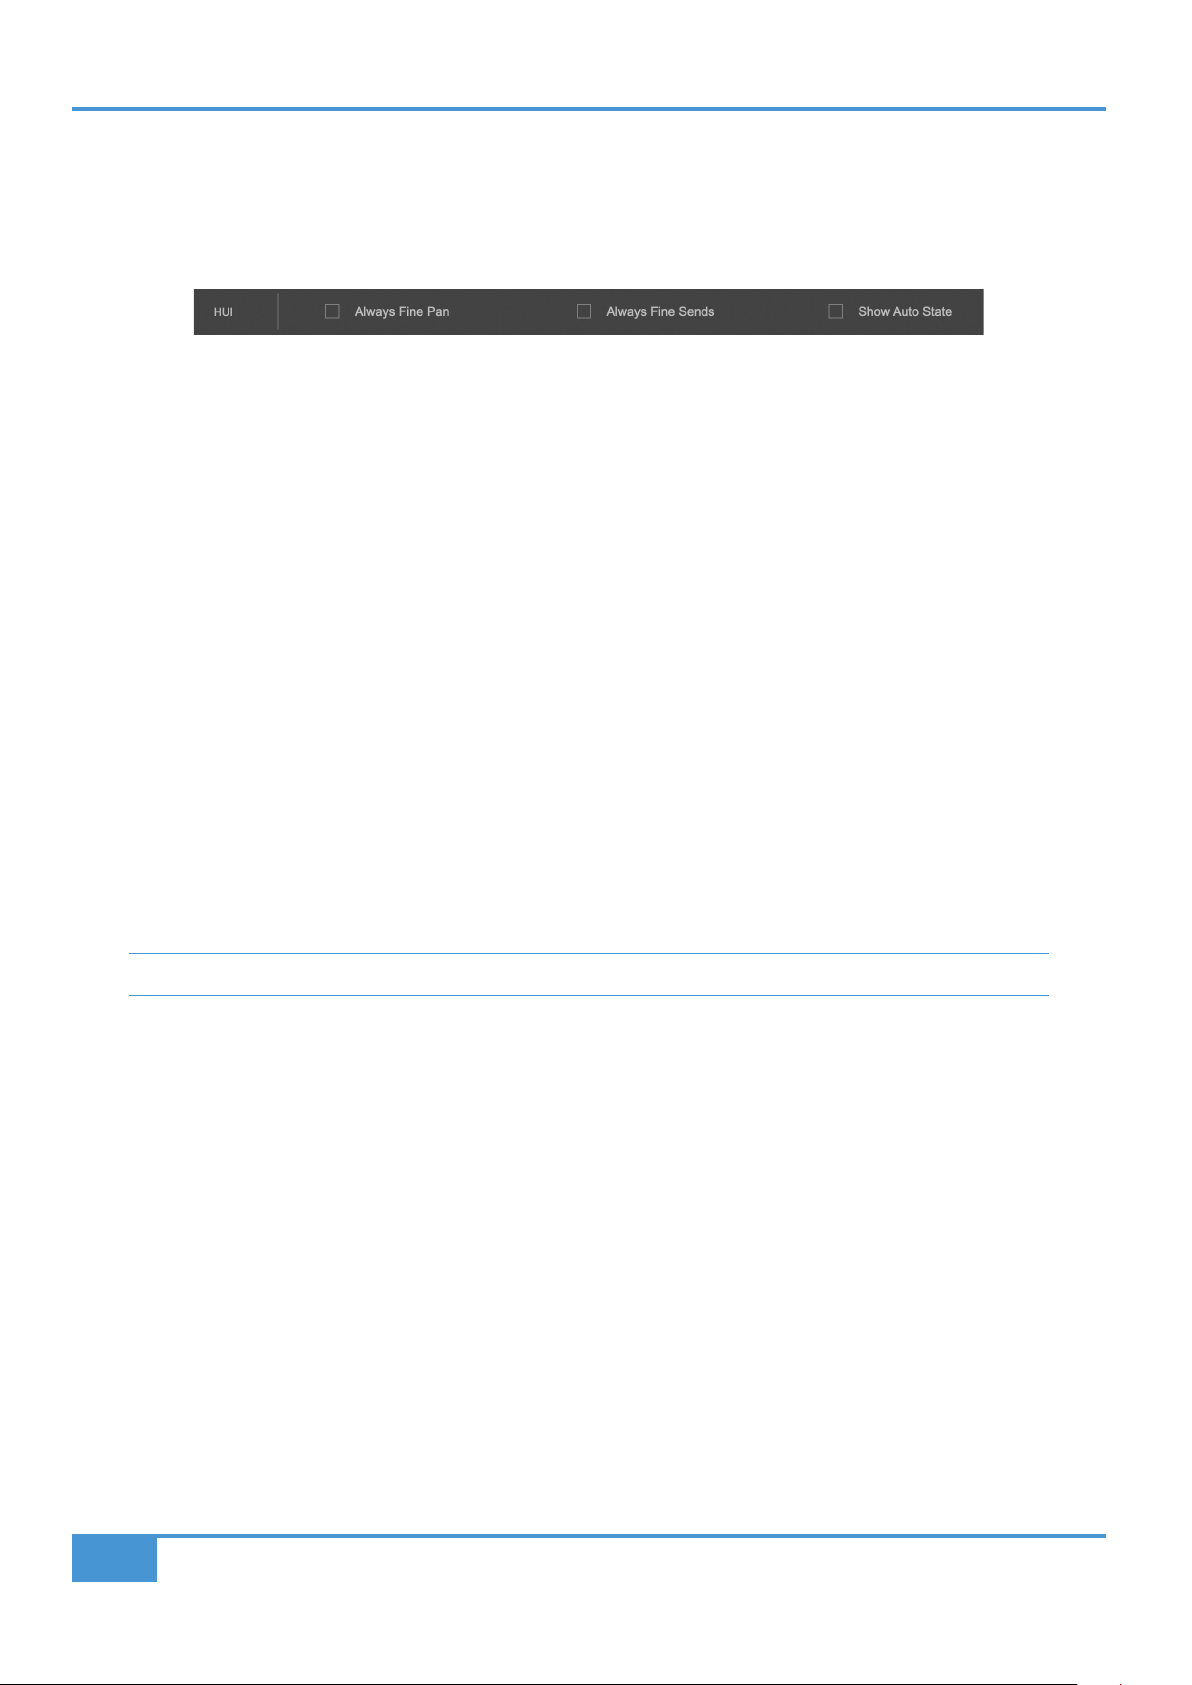
ADVANCED Setup Options - HUI
The following tick-box options are presented for Pro Tools profile selections only:
Always Fine Pan - Enabling this option will automatically change the operation of the V-Pots to FINE mode when controlling pans.
This will also cause the Pan position to be displayed on the LCD whilst being turned.
Always Fine Sends - Enabling this option will automatically change the operation of the V-Pots to FINE mode when controlling
Sends. This will also cause the Send level to be displayed on the LCD whilst being turned.
Show Auto State - Enabling this option will display an indication of the Pro Tools automation state (READ/WRITE/TRIM) per channel,
just above the DAW metering on the LCD at all times. If TRIM is engaged, the indication will flash between TRIM and READ or
TRIM and WRITE.
"I wish I was blank, I wish I was blank, I wish I could thank, I wish I was blank" - Blank, The Smashing Pumpkins.
20
SSL UF8 User Guide
Page 21
Product Overview & Features
DAW Communication
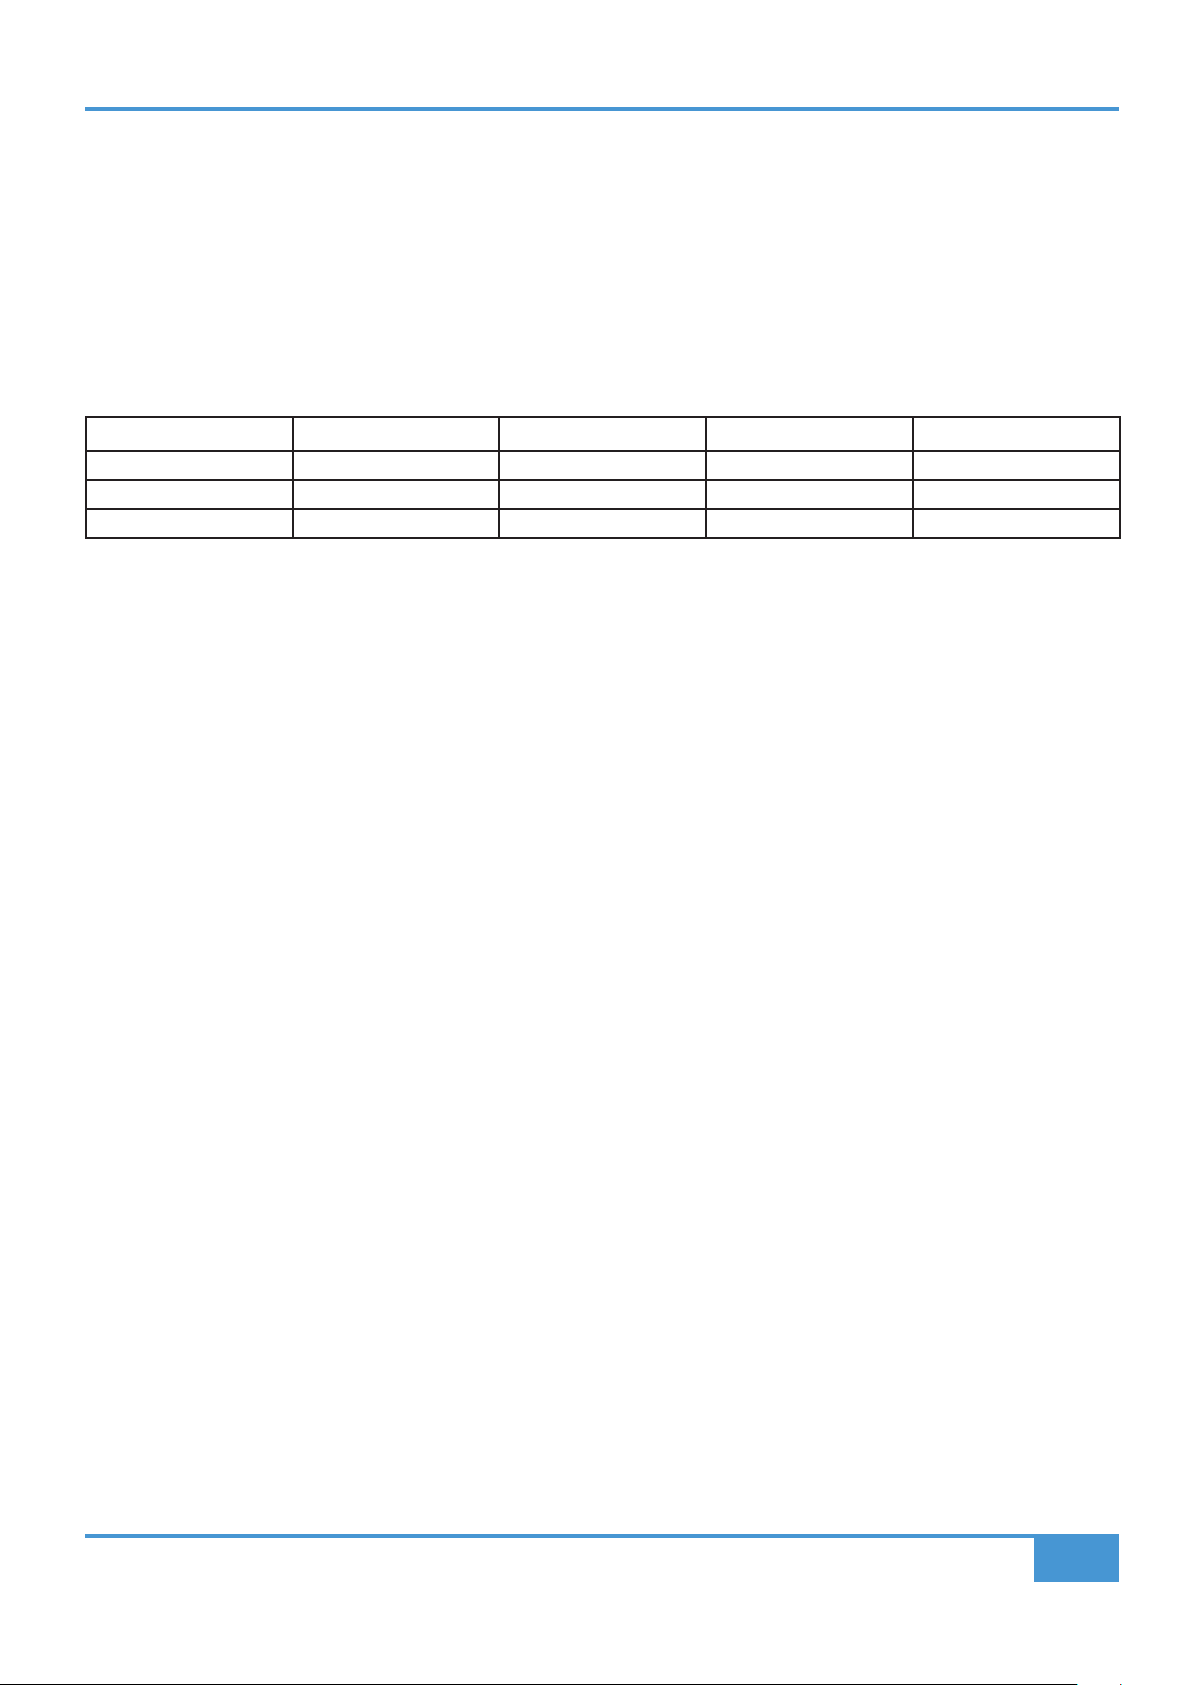
SSL V-MIDI Ports
UF8 communicates with your DAW using hi-speed USB MIDI communication via a specialised MIDI driver, installed as part of the
SSL 360° software. The driver is presented on your computer system as 'virtual' midi ports called SSL V-MIDI.
The number of SSL V-MIDI Ports you'll need to configure in your DAW depends upon the number of UF8s you have connected.
The table below illustrates how the SSL 360° software maps the virtual midi ports to each of your connected UF8s.
DAW LAYER 1st UF8 Unit 2nd UF8 Unit 3rd UF8 Unit 4th UF8 Unit
1 SSL V-MIDI Port 1 SSL V-MIDI Port 2 SSL V-MIDI Port 3 SSL V-MIDI Port 4
2 SSL V-MIDI Port 5 SSL V-MIDI Port 6 SSL V-MIDI Port 7 SSL V-MIDI Port 8
3 SSL V-MIDI Port 9 SSL V-MIDI Port 10 SSL V-MIDI Port 11 SSL V-MIDI Port 12
Each DAW varies slightly in the way in which it requires MIDI controller(s) to be setup and these steps are covered in detail in each
of the DAW Tutorials.
DAW Protocols
SSL V-MIDI provides the means of communication between UF8 and the DAW but the protocol (or in other words 'language') that is
being spoken depends on the DAW's preferred method of communication with external control surfaces. Furthermore, even DAWs
that use the same protocol vary in their application of that protocol (you could draw an analogy to varying dialects found within
different geographical regions of the same country). Each DAW Tutorial will aim to guide you through each DAW's implementation
of the protocol that they have chosen to implement and how it applies to UF8.
HUI
The HUI (Human User Interface) protocol is the way in which Pro Tools communicates with UF8. In addition to the HUI protocol, we
have added a number of features such as CHANNEL and PLUGIN mode, which provide an enhanced workflow for those using
UF8 with Pro Tools.
MCP/MCU
The MCP (Mackie Control Protocol), also commonly referred to as MCU, is the way in which many DAWs such as Logic, Cubase/
Nuendo, Live and Studio One communicate with UF8. The implementation of MCU differs between DAWs and traditionally, if you
had an MCU control surface and were not using Logic, you would have to place a special overlay onto the surface so that the
buttons were labelled with the correct functions. With UF8 we have designed the surface in such a way to eliminate the need for
any special overlays, in part by using the top-zone of the LCDs to provide labels for the functions hosted on the buttons that reside
just above. The functions and labelling of the buttons dynamically change, as appropriate, depending on the currently loaded
DAW profile.
SSL UF8 User Guide
21
Page 22
Pro Tools Tutorial
Pro Tools with UF8 - Tutorial
The following tutorial guides you through configuring and using the default Pro Tools profile on LAYER 1 of UF8. If you wish to
configure Pro Tools on a different layer, please refer to the DAW Communication section of this User Guide to ensure your DAW is
configured for the correct SSL V-MIDI ports.
SSL 360° Setup
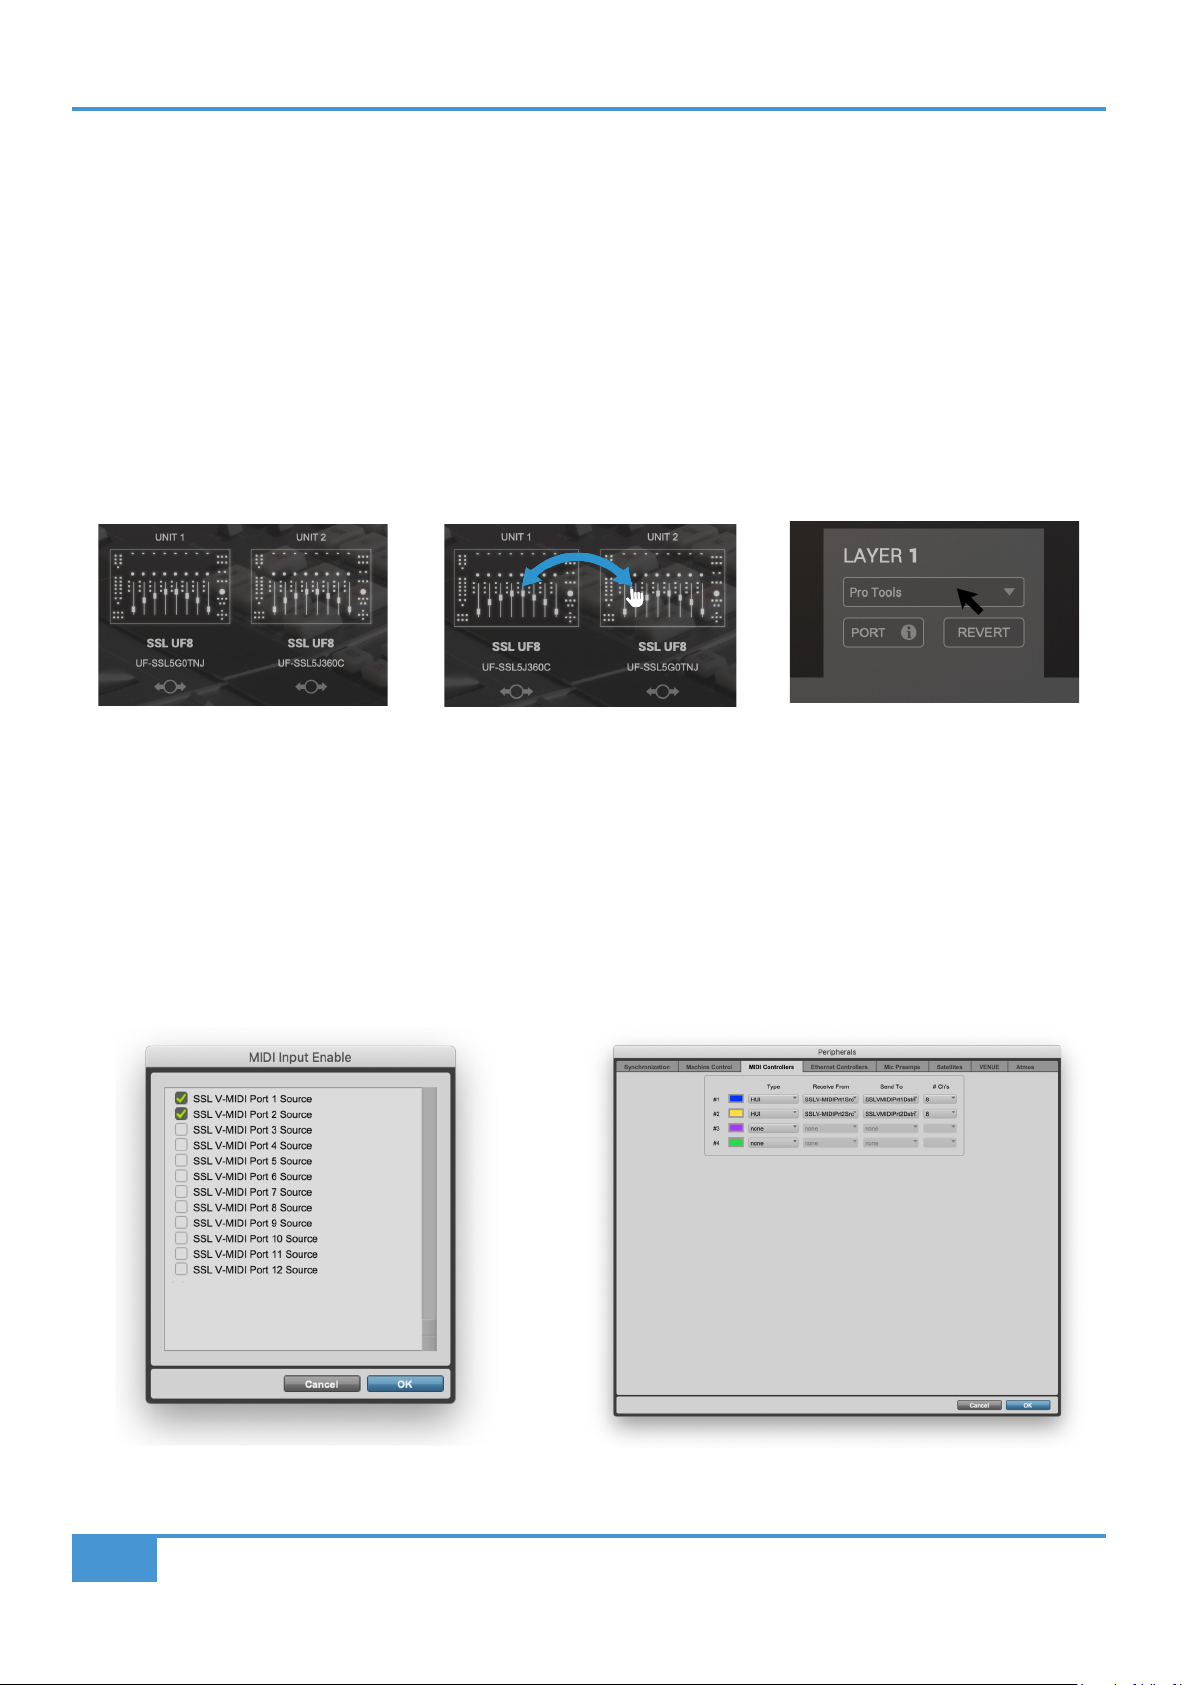
1. Open the SSL 360° application on your Mac or Windows computer and on the HOME page check that any UF8s you have
connected to your computer are present - outline images of each UF8 appear on screen.
2. If you have multiple UF8s connected, click down on the image of each unit to check that the UF8s are arranged in the correct
order. If units need to be re-ordered, then click and drag with your mouse to re-arrange.
3. Go to the UF8 page and set LAYER 1 to Pro Tools using the drop-down list.
STEP 1 : Open SSL 360° application.
Connected UF8s appear on-screen.
STEP 2 : Click and drag to re-order
units if necessary.
STEP 3 : Select the default Pro Tools
DAW profile from the UF8 page.
Pro Tools Setup
4. Open Pro Tools. Go to the Setup Menu > MIDI > MIDI Input Devices... . In this list, ensure that any SSL V-MIDI Ports you need
are ticked. e.g. If you have 1 UF8, just tick SSL V-MIDI Port 1 Source. If you have 2 UF8s, tick SSL V-MIDI Port 1 Source and
SSL V-MIDI Port 2 Source etc.
5. Go to the Setup Menu > Peripherals > MIDI Controllers tab. Configure each UF8 unit as a HUI Type. Set the first unit to
Receive From SSL V-MIDI Port 1 Source and then Send To as SSL V-MIDI Port 1 Destination. Repeat for all subsequent
UF8s, incrementing the port number each time.
STEP 4 : Enable SSL V-MIDI Port(s) in Pro Tools.
22
STEP 5 : Setup each UF8 as a HUI Controller, incrementing
the SSL V-MIDI port number for each additional HUI.
SSL UF8 User Guide
Page 23
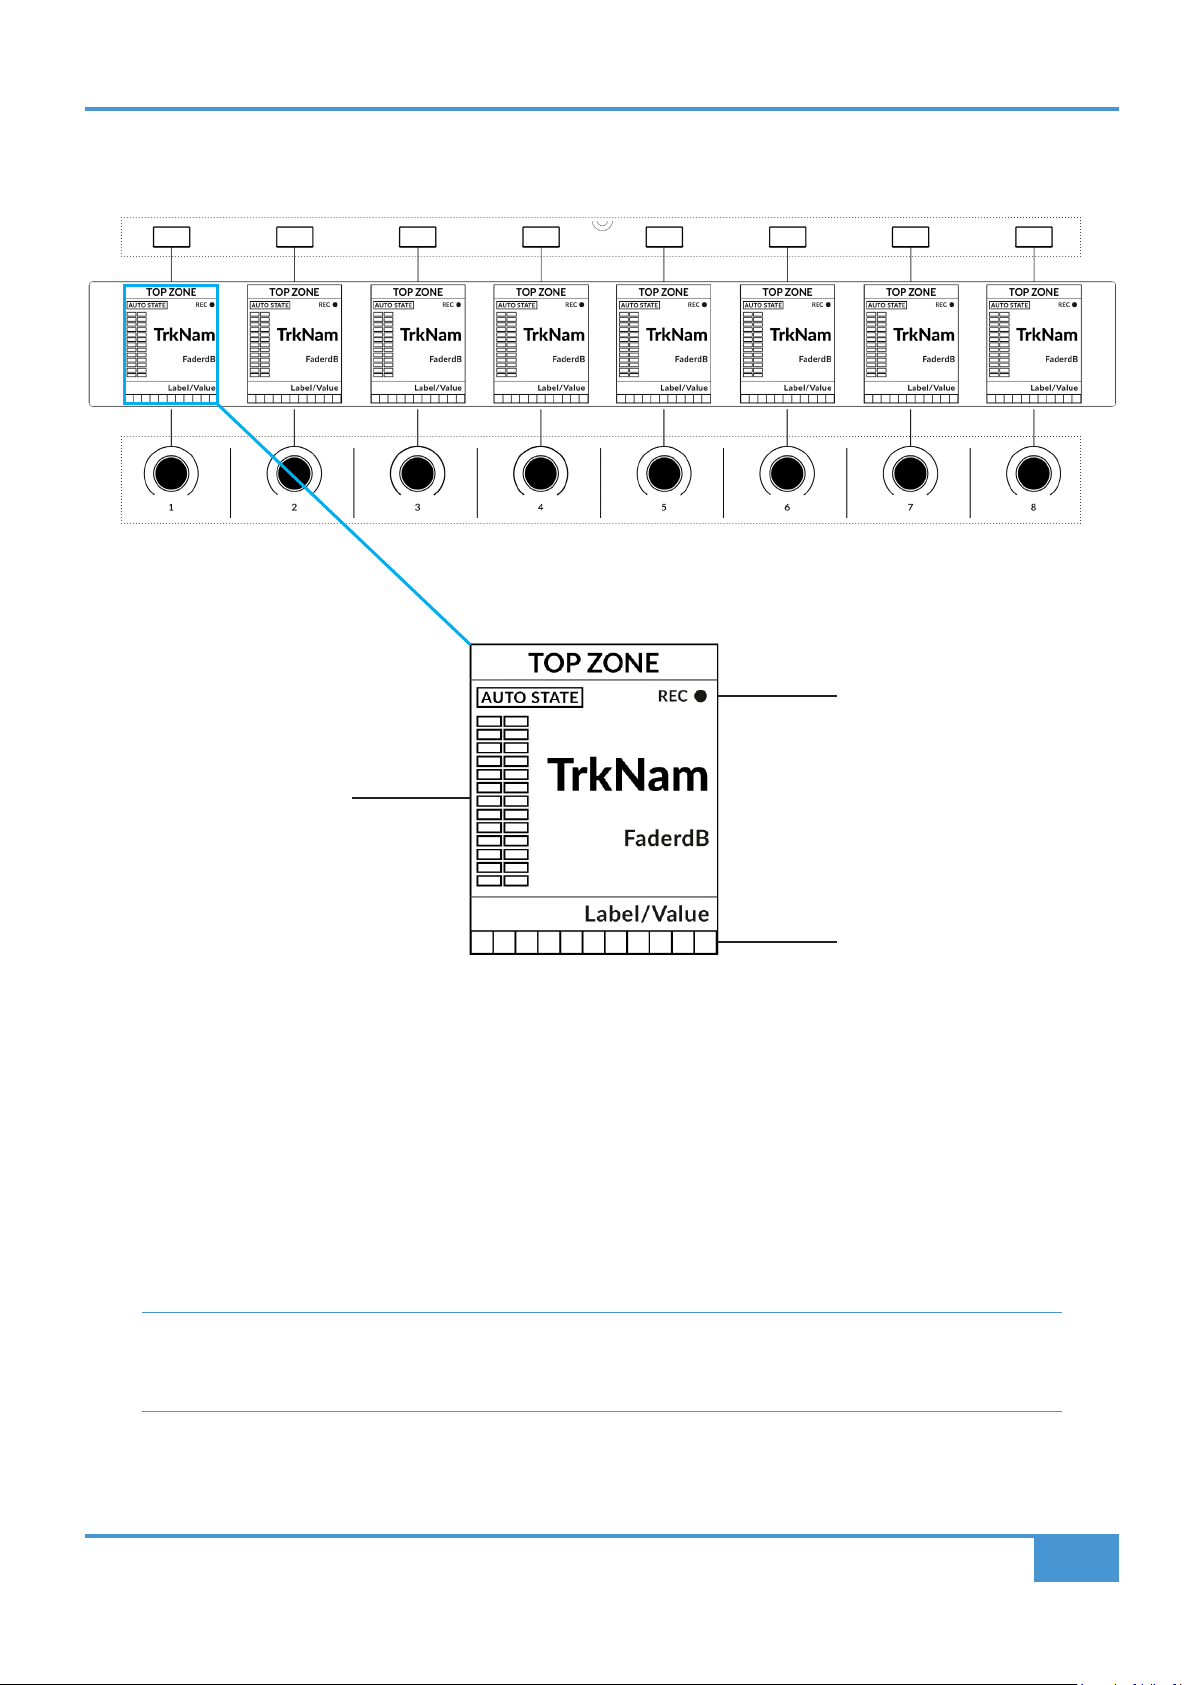
LCD Layout
Pro Tools Tutorial
Soft Keys
V-Pot Encoders
Track Record-Enabled
DAW Track Metering
V-Pot Readout Bar
Enlarged view of LCD screen
Top Zone - Provides a label for the function assigned to the soft key directly above.
Auto State - Shows the current automation state of the track (when Show Auto is enabled in SSL 360°).
Track Record Enabled (REC) - Indicates that the track has been record-enabled.
TrkNam - Displays the 4-character track name.
FaderdB - Provides a readout of the current fader position.
Label/Value - Displays a label or value readout for the parameter currently assigned to the V-Pot.
DAW Track Metering - 12-segment track metering + clip
V-Pot Readout Bar - Displays the position of the currently assigned V-Pot function.
Track Metering Power Tip: The F1 command, available in the DAW commands list SSL 360° will clear clips on the
track metering. You can assign this command to any of the Quick Keys or User keys on UF8. Alternatively, you'll find
this command pre-assigned to the 6th Soft Key in User Bank 3.
SSL UF8 User Guide
23
Page 24
Pro Tools Tutorial
Tutorial
This section guides you through using UF8 with Pro Tools.
V-Pot
At the top of each strip is the V-Pot (virtual pot). The function of the V-Pot varies, depending on
which V-Pot assignment mode is currently active (Pan, Send etc). These modes are explained
on the pages that follow.
100 mm Motorised Fader
Motorised, touch-sensitive faders provide physical control of your Pro Tools tracks and are
great for balancing mix levels and riding volume automation.
Solo, Cut & Sel (Select)
Each strip contains SOLO, CUT and SEL keys corresponding to the solo, mute and select
features for each track in Pro Tools.
In Use:
When solo'ing tracks, expect the CUT keys of UF8 to flash on all tracks that are not solo'd.
Double-pressing a SEL key will open up the Pro Tools re-name track window on your computer
screen.
The non-contiguous selection of multiple SEL keys can achieved by pressing and holding the
first SEL key you want to select and then pressing subsequent SEL keys.
Holding the Shift/All modifier key (found within SOFT KEY User Bank 3) and pressing the SEL
keys will allow you to select a contiguous range of SEL keys.
Holding the Opt/Alt modifier key (also found within SOFT KEY User Bank 3) and pressing a
SEL key will allow you to toggle the selection of all SEL keys.
Selection Mode
The primary purpose of the NORM, REC and AUTO keys in the SELECTION MODE section
is to determine the behaviour of the SEL keys. These 3 modes inter-cancel.
NORM - The SEL keys behave as normal track selection functions of Pro Tools.
REC - The SEL keys become track record-arm buttons.
AUTO - The SEL keys become Automation Select keys and can be used in conjunction with
the AUTOMATION state keys found on the bottom-left corner of UF8.
24
SSL UF8 User Guide
Page 25
Pro Tools Tutorial
Secondary Functions Of The Selection Mode Keys
You will notice that there are additional labels beneath the SELECTION MODE keys - CLEAR, ALL and ZERO. These functions
are accessed by a press and hold action and provide useful additional workflow features:
Clear Solos -
Clear Mutes/Cuts -
Clear Selection Keys -
Record-Arm All Tracks -
Zero Fader(s) -
Zero All Faders -
Press and hold CLEAR and then press any SOLO key to clear solos.
Press and hold CLEAR and then press any CUT key.
Press and hold CLEAR and then press any active SEL key.
Press and hold ALL and then press any SEL key.
Press and hold ZERO and then press SEL key. This will also work if you have multiple tracks selected.
Press and hold the ALL and ZERO keys together and then press any SEL key.
Channel Encoder
By default, the CHANNEL encoder is used to move your DAW tracks across the UF8 surface, in increments of one channel at a
time. If you find yourself in NAV, NUDGE or FOCUS modes, simply push the CHANNEL encoder to return to CHANNEL mode.
Nav
Pressing the NAV key changes the CHANNEL encoder to operate the playhead position in Pro
Tools, allowing you to navigate through your session.
Nudge
Pressing the NUDGE key puts the CHANNEL encoder into Nudge mode, which will allow you to
move selected audio regions backwards and forwards by the Nudge value you have set within
Pro Tools.
Focus
Pressing the FOCUS key puts the CHANNEL encoder into Focus mode, which emulates the scroll
function of a mouse. This can be a really nice way of controlling plug-ins or anything else on screen
that responds to a mouse scroll operation. Simply open a plug-in, hover your computer mouse
over a control and turn the encoder for hands-on control. The sensitivity of FOCUS mode will vary
depending on what plug-in or on-screen element you are controlling. You can use the mouse scroll
sensitivity setting in your computer preferences to adjust to taste.
Scroll Into View
The 'Scroll Into View' feature offered by Pro Tools is a handy way to select a track within
Pro Tools and make it the rst track on your UF8 surface.
In Pro Tools, simply right-click with your mouse in the selected track area (white area)
and choose 'Scroll Into View'.
SSL UF8 User Guide
25
Page 26
Pro Tools Tutorial
Bank Keys
The BANK < > keys allow you to move tracks across your UF8 control surface(s) in multiples of 8, depending on how many UF8s
are connected. e.g. 8 for one UF8, 16 for 2 UF8s etc.
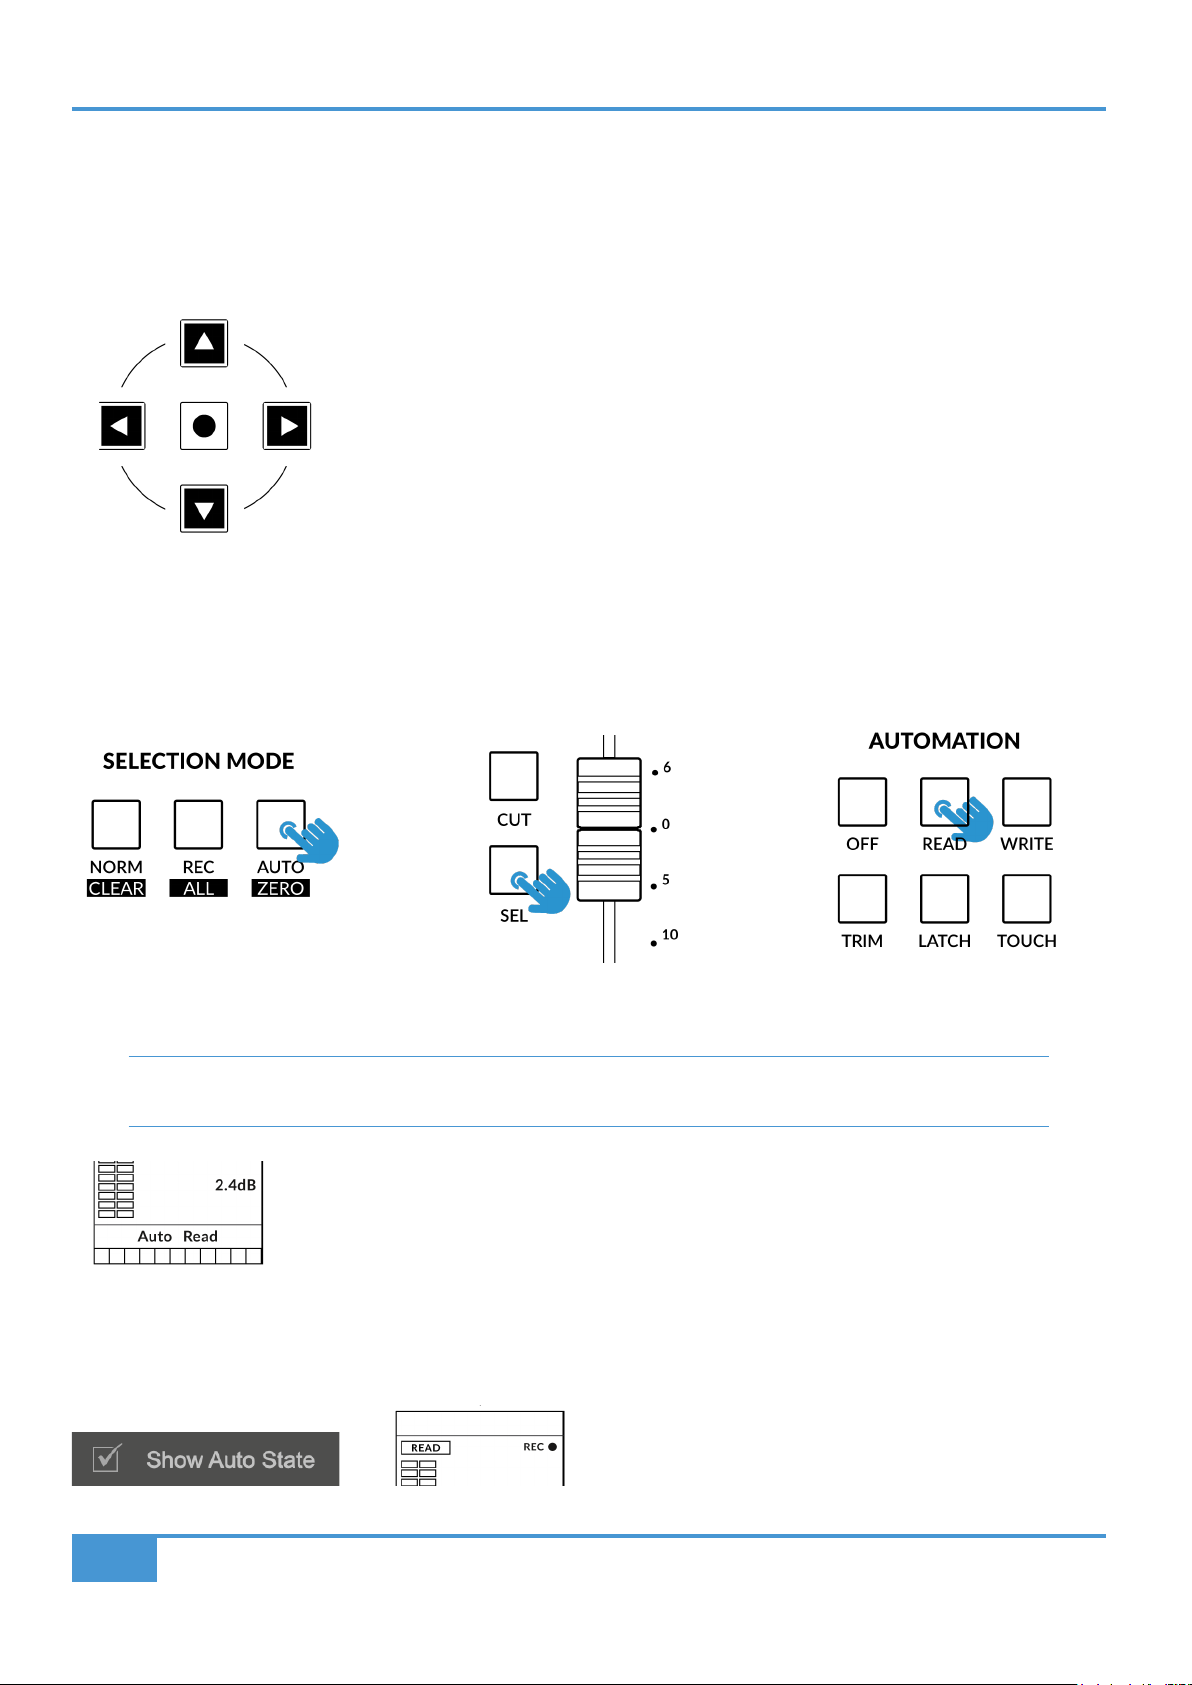
Cursor Keys and Mode Key
In the lower-right corner of your UF8 are the Cursor keys with the Mode key in the centre.
When the Mode key is lit the cursor keys perform horizontal and vertical zooming.
Pressing the Mode key again, the left and right cursors move between audio clip edit points, or,
tab between transients if Tab To Transient is active in Pro Tools. Up and down will move the edit
cursor between tracks.
Automation
You can select the automation mode for each track directly from UF8. To do this, you will first need to put the surface into AUTO
(Automation) SELECTION MODE. Then, select a track you want to change the automation state of using the SEL key(s). Finally,
press the desired automation state from the AUTOMATION keys in the lower-left corner of UF8.
STEP 1 : Select AUTO Selection Mode.
STEP 2: Use the SEL key(s) to
select track(s).
Multiple tracks can be selected at once using the Shift/All (contiguous) and Opt/Alt modifier keys (all). Non-contiguous
selections can be achieved pressing and holding the first SEL key and then pressing subsequent SEL keys.
Selected tracks will show their current automation state next to the Auto text in the lower section of the
LCD. Please note that V-Pots have no functionality when AUTO selection mode is active. You must return
to NORM or REC.
STEP 3: Select the desired
automation state.
Show Auto State
Within SSL 360°, on the UF8 page under ADVANCED there is the tick-box option for Show Auto State. Enabling this will provide a
constant indication (regardless of selection mode) of the current automation state of each track in the top-left of the LCD - READ,
WRITE or TRIM.
26
SSL UF8 User Guide
Page 27

Quick Keys
The three QUICK keys located at the top-left of UF8 are user-assignable keys that are best used for access
to your most frequently needed DAW commands or keyboard shortcuts. By default, they are assigned to the
following commands but can of course be changed in SSL 360°.
Default Quick Key Assignments:
1 - Toggle Edit and Mix Window
2 - Toggle Floating Transport Window Open/Close
3 - Toggle Session Setup Window Open/Close
Pan
Pressing the PAN key once will assign the V-Pots to control the track pans. The V-Pot readout bar will display the
pan position on the LCD. Press the PAN key again (it will pulse) to toggle the V-Pots into controlling the right-hand
pan for stereo tracks. Pushing a V-Pot will default a pan to the centre position.
Pro Tools Tutorial
Fine
Press and hold the FINE key whilst turning a V-Pot that is controlling Pans or Sends, to operate in a fine
resolution. Doing this will also show you the current Pan or Send value on the LCD. Ignore the Shift label, this
is applicable for when UF8 is working with Cubase.
If you prefer the FINE behaviour and would like FINE mode to be engaged automatically every time you turn a V-Pot
in Pan or Send modes, you can enable the 'Always Fine Pan' and/or 'Always Fine Sends' in SSL 360°, on the UF8
page under ADVANCED settings.
Sends
Number keys 1-5 in the SEND / PLUGIN section will allow you to control send levels A-E on the V-Pots.
The V-Pot readout bar will display the Send position on the LCD. Pushing on the V-Pot will default a
send to 0 dB. Keys 6-8 are disabled as they are not made available for control by Pro Tools.
1 = Send A
2 = Send B
3 = Send C
4 = Send D
5 = Send E
Pre/Post
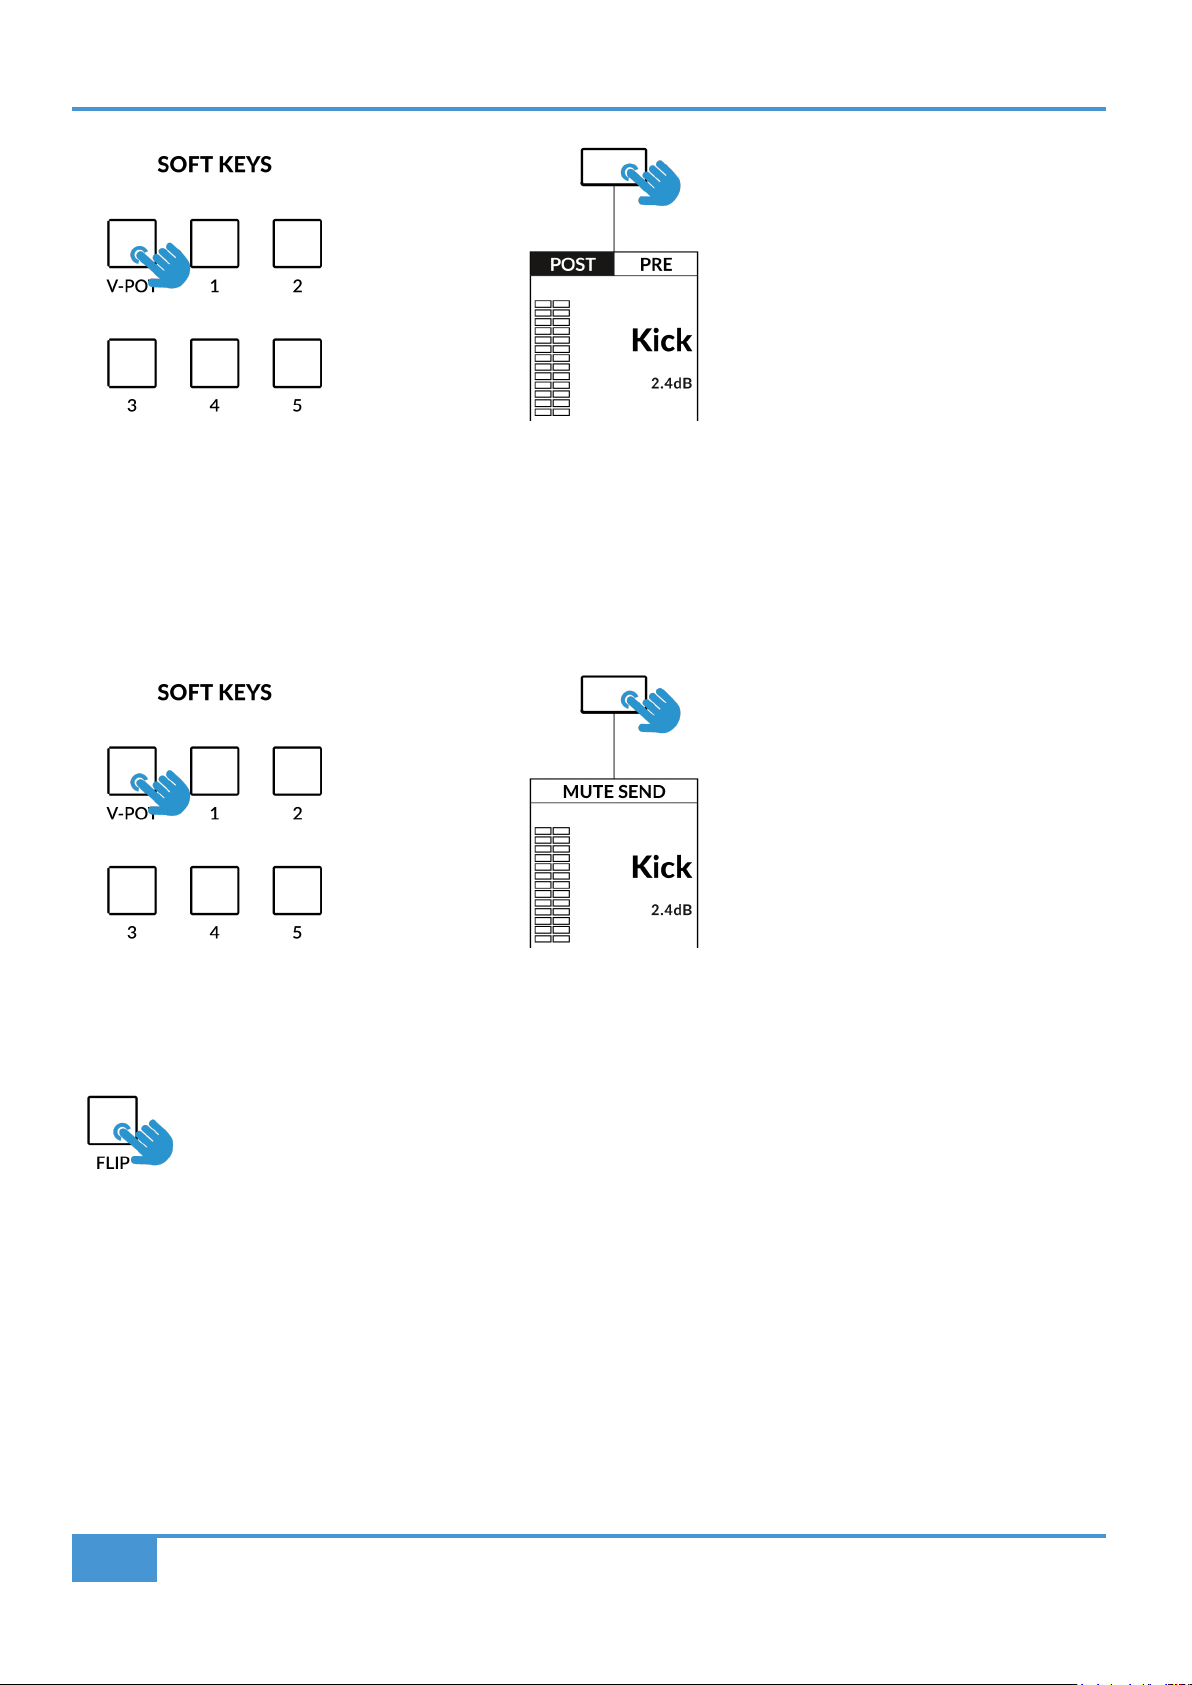
Sends can be toggled between their pre/post state using the Soft Keys on UF8. Ensure the Soft Keys are in V-Pot mode, by pressing
the V-POT button in the SOFT KEYS selection area, then simply use the relevant Soft Key to toggle between post/pre states for
each Send as desired.
SSL UF8 User Guide
27
Page 28
Pro Tools Tutorial
STEP 1 : Select V-POT Soft Keys Mode.
STEP 2: Use the Soft Keys to toggle Sends
between post and pre.
Send Mutes
The Soft Keys can also be used to toggle Send Mutes on/off. Simply press the V-POT button a second time to toggle into Send
Mute Mode.
STEP 1 : Press V-POT a second time to
toggle Soft Keys keys into Send Mute Mode.
STEP 2: Use the Soft Keys to toggle Send Mutes
on/off.
28
Flip
Sends can be flipped to the faders using the FLIP key. This is useful for riding Send levels or creating headphone
mixes using faders instead of V-Pots. In FLIP mode, the V-Pots control the Pan of the currently selected Send.
SSL UF8 User Guide
Page 29

Pro Tools Tutorial
Channel Mode
Channel Mode allows you to access Sends A-E and the Pan of the selected track, all from one place. This is a unique UF8 control
feature, that utilises the touch-sense encoders to automatically switch send selection.
1. To enter and exit Channel Mode, press the CHANNEL key.
2. Select a track that you wish to control the Sends and Pans on using a SEL key.
3. Use V-Pots 1-5 to control Sends A-E or V-Pot 8 to control Pan.
STEP 1 : Enter Channel Mode
by pressing the CHANNEL key.
STEP 2: Use a SEL key to
select a track.
STEP 3: Use V-Pots 1-5 to control Sends A-E and V-Pot 8 to control Pan.
Working in Channel Mode
• Channel Mode turns the SEL keys and LCDs purple to indicate that you're working in Channel Mode.
• All non-selected tracks are dimmed on the LCDs to make it clear that you're working with Sends & Pan on the selected track.
• The V-Pot readout bar, together with a bus name label will appear on screen whilst the V-Pot is being touched and revert to
the idle screen state 3-seconds after touch is released.
• Pre/Post States can also be toggled for each send using the corresponding Soft Key.
• Simultaneous adjustment of more than one V-Pot and FLIP mode are not possible in Channel Mode.
SSL UF8 User Guide
29
Page 30

Pro Tools Tutorial
Plug-in Mode
Plug-in Mode provides a smart way of accessing plug-in parameters for Inserts A-E of the selected track, whilst automatically
opening the plug-in GUI at the same time.
1. To enter and exit Plug-in Mode, press the PLUGIN key.
2. Use a SEL key to select a track.
3. Press one of the number keys 1-5 (corresponding to Insert Slots A-E).
STEP 1 : Enter Plug-in Mode by
pressing the PLUGIN key.
STEP 2 : Use a SEL key to
select a track.
STEP 3 : Select an insert
slot using the number keys.
Working in Plug-in Mode
• Plug-in Mode turns the SEL keys and LCDs cyan to indicate that you're working in Plug-in
Mode.
• In the Pro Tools session, you will see the currently selected insert slot on screen have a thin
blue outline around it - please note when working in Plug-in Mode, you will not see the Pro
Tools track selection itself change.
• All non-selected tracks are dimmed on the LCDs to make it clear you're working on the
selected track only.
• The parameters of each plug-in will be laid out on V-Pots 1-4 and Soft Keys 1-4.
• Use the PAGE < > keys or the 8th V-Pot to access the various pages of parameters for each plug-in.
• Pro Tools' Compare and Bypass plug-in features can be actioned using Soft Keys 7 and 8.
• The F5 command, available in the DAW commands list (also pre-assigned to the 7th Soft Key in User Bank 3) allows you to
toggle the V-Pots between Fixed and Velocity-Sensitive modes, which apply to controlling plug-ins specifically.
Use the Page keys to
move through the plug-in
parameter pages
30
SSL UF8 User Guide
Page 31

Pro Tools Tutorial
• Although you cannot select Insert Slots F-J directly from UF8 (Pro Tools does not make them available), once you have selected
a track and opened a plug-in in Slots A-E using the number keys, you can click with your mouse on-screen in Pro Tools on any
Insert Slot in F-J and the UF8 surface will be able to control the parameters.
• When automating plug-in parameters in Plug-in Mode, any plug-in parameters in a write-ready automation state will show the
current V-Pot bar segment flashing, before changing to become solid when writing automation.
When working with multiple UF8s, the tracks on which you want to control the plugin(s) must be banked down to the
first UF8 surface.
User Bank Pre-Assignments
User Banks 1-5 allow you access to various DAW commands or keyboard shortcuts on the 8 soft
keys along the top of UF8. These can of course be changed to any of the available DAW commands
or your own keyboard shortcut sequences in the UF8 page of SSL 360°.
Select User Banks using Keys 1-5 in the SOFT KEYS section.
User Bank 1
User Bank 2
User Bank 3
User Bank 4
User Bank 5 (Empty)
SSL UF8 User Guide
31
Page 32

Pro Tools Tutorial
Assignable DAW Commands List - Pro Tools
The following DAW commands are available in SSL 360° to assign to any of the user-assignable keys.
Edit/Mix Alternate
Mix to foreground
Edit to foreground
Open/close Transport window
Open/close Memory Locators window
Open/close Session Setup window
Open/close plug-in editor
Undo
Ctrl Modifier
Save Session
Suspend Automation
Auto Enable Plug-in
Auto Enable Pan
Auto Enable Fader
Auto Enable Send Mute
Auto Enable Send
Auto Enable Mute
Option/Alt modifier
Cmd/Fine modifier
Shift/All modifier
Edit Tool
Edit Mode
Fkey 1
Fkey 5
Fkey 8/Esc
Audition
Audition Pre
Audition In
Audition Out
Audition Post
RTZ
End
Online
Loop
Quick Punch
Forward
Rewind
Stop
Play
Record
Next Marker
Previous Marker
Last Marker
Reset Marker
Edit Capture
Edit Separate
Edit Cut
Edit Copy
Edit Paste
Edit Delete
Status Auto
Status Monitor
Status Group
Group Suspend
Group Create
Play Foot-switch
Record Foot-switch
Scrub
Shuttle
Default
Kpad Clr
Kpad =
Kpad *
Kpad -
Kpad +
Kpad .
Kpad Enter
Kpad 0
Kpad 1
Kpad 2
Kpad 3
Kpad 4
Kpad 5
Kpad 6
Kpad 7
Kpad 8
Kpad 9
32
SSL UF8 User Guide
Page 33

Logic Tutorial
Logic with UF8 - Tutorial
The following tutorial guides you through configuring and using the default Logic profile on LAYER 1 of UF8. If you wish to configure
Logic on a different layer, please refer to the DAW Communication section of this User Guide to ensure your DAW is configured for
the correct SSL V-MIDI ports.
SSL 360° Setup
1. Open the SSL 360° application on your Mac or Windows computer and on the HOME page check that any UF8s you have
connected are present - outline images of each UF8 appear on screen.
2. If you have multiple UF8s connected, click down on the image of each unit to check that the UF8s are arranged in the correct
order. If units need to be re-ordered, then click and drag with your mouse to re-arrange.
3. Go to the UF8 page and set Layer 1 to Logic using the drop-down list.
STEP 1 : Open SSL 360° application.
Connected UF8s appear on-screen.
STEP 2 : Click and drag to re-order
units if necessary.
STEP 3 : Select the default Logic
DAW profile from the UF8 page.
Logic Setup
4. Open Logic. Go to Control Surfaces > Preferences... and then go to the Advanced tab. Make sure Control Surfaces is
ticked under Additional Options.
5. Within the same Preferences menu, go to the Control Surfaces > General tab and ensure that 'Multiple Controls Per
Parameter' is set to '1' and 'Only when all parameters fit one page' is unticked. Also, increase 'Maximum MIDI Bandwidth' to
100%.
6. Go to the Help Tags tab and ensure that 'Parameter name' and 'Parameter value' are both unticked.
STEP 4 : On the 'Advanced Tab', tick
'Control Surfaces' in the 'Additional
Options' section.
SSL UF8 User Guide
STEP 5 : On the 'Control Surfaces' >
'General' tab ensure that 'Multiple Controls
per Parameter' is set to '1' and 'Only when
all parameters fit on one page' is unticked.
Set 'Maximum MIDI Bandwidth' to 100%.
STEP 6 : On the 'Control Surfaces' > Help
Tags' tab, ensure that 'Parameter name'
and 'Parameter value' are both unticked.
33
Page 34

Logic Tutorial
7. Go to Preferences > MIDI and select the Inputs tab. In this list, ensure that any SSL V-MIDI Ports you need are ticked. e.g. If
you have 1 UF8, just tick SSL V-MIDI Port 1 Source. If you have 2 UF8s, tick SSL V-MIDI Port 1 Source and SSL V-MIDI Port 2
Source etc.
Versions of Logic preceding 10.5 may not have the 'Inputs' tab available. If so, you can skip this step, as all MIDI
ports default to be turned on.
8. Go to the Control Surfaces > Setup. Click New > Install... from the drop-down list in the top-left of the window. From the list,
choose Mackie Designs | Mackie Control | Logic Control and click the Add button. Click on the image of the Mackie Control that
has been added to the window and in the device setup options list on the left-hand side, configure the Output Port to SSL V-MIDI
Port 1 Destination and set the Input Port to SSL V-MIDI Port 1 Source.
Subsequent UF8s should be set up as extender units i.e. Mackie Designs | Mackie Control Extender | Logic Control and their
input and output ports increased incrementally for each UF8. e.g. a second UF8 is set up as a Mackie Control Extender, with
Input and Output Ports assigned to SSL V-MIDI Port 2.
STEP 7 : Enable SSL V-MIDI Port(s) in Logic.
If you're working with a version of Logic that precedes
10.5, then skip this step.
If you do not see the device setup options list on the left-hand side, press 'i' on your computer keyboard to show it.
Ensure that each Mackie Control Extender (additional UF8) has the 'Fader Bank Offset' setting in the device setup
options list set to '8' for the second UF8, '16' for the third and '24' for the fourth.
Ensure that 'Channel Strip View Mode' is set to 'Arrange' in the device setup options list, to ensure that UF8 follows
the order of tracks in your Logic arrangement.
STEP 8 : Set up the first UF8 as a Mackie Control Unit and
subsequent UF8s as Mackie Control Extenders, incrementing the
SSL V-MIDI Port number for each Extender.
34
SSL UF8 User Guide
Page 35

LCD Layout
Logic Tutorial
Soft Keys
V-Pot Encoders
Selected Track /
Track Record-Enabled
DAW Track Metering
V-Pot Readout Bar
Enlarged view of LCD screen
Top Zone - Provides a label for the function assigned to the soft key directly above.
Selected Track / Track Record-Enabled (REC) - In Logic, the REC text follows the currently selected track. If the track is record-
enabled, the REC text pulses.
UpLCD - Displays the 6-character track name.
LowLCD - Displays a label or value readout for the parameter currently assigned to the V-Pot.
DAW Track Metering - 12-segment track metering + clip
V-Pot Readout Bar - Displays the position of the currently assigned V-Pot (encoder) function.
SSL UF8 User Guide
35
Page 36

Logic Tutorial
Tutorial
This section guides you through using UF8 with Logic.
Before You Start...
The information in this Logic Tutorial sets out the key features of using UF8 with
Logic.
For complete, in-depth coverage of all the functions and features you can
control in Logic using UF8, please refer to the Logic Help Menu > Logic Pro
Control Surface Support document. Open the document and go to the Mackie
Control section.
V-Pot
At the top of each strip is the V-Pot (virtual
pot). The function of the V-Pot varies,
depending on which V-Pot assignment mode is
currently active (Pan, Send etc) but it is typically used for tasks such as controlling Pan position,
Send levels, Plug-in parameters or scrolling through parameter options/lists.
The V-Pot has a push function, which is typically used for either defaulting the position of a
parameter being controlled or confirming the selection of a parameter being chosen.
The Mackie Control section of the Logic Pro
Control Surfaces Support contains a full Mackie
Control Protocol guide.
100 mm Motorised Fader
Motorised, touch-sensitive faders provide physical control of your Logic tracks and are great for
balancing mix levels and writing automation.
Solo, Cut & Sel (Select)
Each strip contains SOLO, CUT and SEL keys corresponding to the solo, mute and select
features for each track in Logic.
In Use:
When solo'ing tracks, expect the CUT keys of UF8 to flash on all tracks that are not solo'd if the
Logic Control Surface preference 'Flash Mute and Solo Buttons' is ticked.
In Logic MCP (Mackie Control Protocol), only one track can be selected using the SEL key at a
time.
Selection Mode
The primary purpose of the NORM and REC keys in the SELECTION MODE section is to
determine the behaviour of the SEL keys.
NORM - The SEL keys behave as the standard track selection function of Logic.
REC - The SEL keys become track record-arm buttons.
AUTO - Disabled. This key only applies for Pro Tools profiles.
36
SSL UF8 User Guide
Page 37

Logic Tutorial
Secondary Functions Of The Selection Mode Keys
You will notice that there are additional labels beneath the SELECTION MODE keys. These functions are accessed by a press and
hold action and provide useful additional workflow features in Logic:
Clear Solos
Press and hold CLEAR and then press any SOLO key.
Clear Mutes/Cuts
Press and hold CLEAR and then press any CUT key.
Zero Fader
Press and hold ZERO and then press a SEL key (SEL key must not be currently selected one).
Channel Encoder
By default, the CHANNEL encoder is used to move your DAW tracks across the UF8 surface, in increments of 1 channel at a time.
If you find yourself in NAV or FOCUS modes, simply push the CHANNEL encoder to return to CHANNEL mode.
Nav
Pressing the NAV key changes the CHANNEL encoder to operate the playhead position in Logic,
allowing you to navigate through your session.
Nudge
Disabled. Only applies to Pro Tools profiles.
Focus
Pressing the FOCUS key puts the CHANNEL encoder into Focus mode, which emulates the scroll
function of a mouse. This can be a really nice way of controlling plug-ins or anything else on screen
that responds to a mouse scroll operation. Simply open a plug-in GUI, hover your computer mouse
over a control and turn the encoder for hands-on control.
The sensitivity of FOCUS mode will vary depending on what plug-in or on-screen element you are controlling. You
can use the mouse scroll sensitivity setting in your computer preferences to adjust to taste.
Bank Keys
The BANK < > keys allow you to move tracks across your UF8 control surface(s) in multiples of 8, depending on how many UF8s
are connected. e.g. 8 for one UF8, 16 for 2 UF8s etc.
SSL UF8 User Guide
37
Page 38

Logic Tutorial
Cursor Keys and Mode Key
In the lower-right corner of UF8 are the Cursor keys with the Zoom key in the centre.
When the Zoom key is lit the cursor keys perform horizontal and vertical zooming.
Pressing the Zoom key again, the up and down and left and right cursor keys are used to navigate
through parameter functions and pages in V-Pot assignment modes (Sends, Plug-ins etc).
The next page of this User Guide provides more information on using the cursor keys in
conjunction with 'Channel View' and 'Mixer View' in Logic's Mackie Control implementation.
Automation
You can select the automation mode for each track directly from UF8. To do this, select a track you want to change the automation
state of using the SEL key(s). Then, press the desired automation mode from the AUTOMATION keys in the lower-left corner of UF8.
STEP 1: Select a track using SEL key STEP 2: Select the desired automation state.
Tip: Hold the OPTION modifier (pre-assigned within SOFT KEY User Bank 3 as 'Opt') and then press one of the
AUTOMATION keys to assign all tracks to a particular automation mode.
Quick Keys
The three QUICK keys located at the top-left of UF8 are user-assignable keys that are best used for access
to your most frequent DAW commands or keyboard shortcuts. By default, they are assigned to the following
commands but they can of course be changed in SSL 360°.
Default Quick Key Assignments:
1 - Show/hide Mixer within the Arrange window.
2 - Switch to 'AUX' view mode (one of the 'Global View' modes) - which shows only Aux tracks within the mixer.
3 - Global View Mode On/Off - Enters and exits 'Global View' Mode.
Fine
Press and hold the FINE key whilst turning a V-Pot that is controlling Send Levels for finer control. This key also
functions as the Cmd/Alt modifier, allowing you to access secondary functions on many Mackie Control commands.
Please refer to the Mackie Control section of the Logic Pro Control Surfaces Support User Guide for more info.
38
SSL UF8 User Guide
Page 39

Logic Tutorial
V-Pot Assignment Modes
UF8 offers direct access to the six main Mackie Control V-Pot assignment modes. These V-Pot assignment modes are accessed
via the keys labelled below: 1. PAN, 2. SEND, 3. INSTRUMENT, 4. EQ, 5. TRACK and 6. PLUGIN. For an in-depth explanation of
each V-Pot assignment mode, please refer to the Mackie Control section Logic Pro Control Surface Support document.
2 3 4 5
1
6
Channel View & Mixer View
Each V-Pot assignment mode can operate in two different ways - 'Channel View' or 'Mixer View'. Pressing
the currently active V-Pot assignment key will toggle between the two view modes.
Let's take SEND mode as an example. The first time you press the SEND key, you will be put into 'Mixer
View'. In this view, you can control one Send parameter (Destination/Level/Pan/Mute) for all tracks using
the V-Pots. In 'Mixer View' the Left and Right cursor keys move between the next and previous parameter
and the Up and Down cursor keys change the Send Slot selection e.g. Send 1, Send 2, Send 3 etc. Ensure
the Zoom key is not active.
Pressing the SEND key again will toggle you into 'Channel View' which, by contrast, presents multiple
Send parameters (Destination/Level/Pan/Mute) for the currently selected track across V-Pots. In 'Channel
View', the Left and Right cursor keys will move between parameter pages and the Up and Down cursor
keys will change the selected track (as long as the central Zoom key is not lit).
The cursor keys
are integral to
operating in
Channel View and
Mixer View.
Pressing and holding a V-Pot Assignment Key
Many of the V-Pot assignment keys have a press and hold feature. For example, press and hold the SEND key to display a sub-
menu of options on the LCDs. In this particular example, 'Level' is presented above V-Pot 2, so pushing V-Pot 2 (whilst keeping
SEND held down), assigns the V-Pots to control Send levels. This offers an alternative method of achieving the same task as using
the cursor keys in 'Mixer View'.
SSL UF8 User Guide
39
Page 40

Logic Tutorial
Send / Plugin and Channel Key - How To Tell If You're In Channel View or Mixer View
The numbered keys in the SEND / PLUGIN section and the CHANNEL key are used to display if you are operating in 'Channel
View' or 'Mixer View'. On a traditional Mackie Controller, this information would be displayed on the 2-digit Assignment, or 'Mode
Display'.
Mixer View
In 'Mixer View' the currently selected slot number (e.g. Send Slot
or Plug-in Slot), will light the corresponding number key.
Channel View
In 'Channel View' the CHANNEL key will light.
40
SSL UF8 User Guide
Page 41

Logic Tutorial
Page Keys
The PAGE < > keys offer no functionality in the Logic UF8 profile and are therefore disabled.
Flip
Pressing the FLIP key will engage or disengage one of Logic's three possible Flip modes - 'Flip', 'Swap'
or 'Zero'. These are useful for various reasons, the most obvious 'Flip' feature allowing you to control V-Pot
parameters such as Send levels or Plug-in parameters on the faders instead of the V-Pots. The Flip mode
used is configured in the Mackie Control Surface Setup.
Group, Marker and Nudge
Soft Keys 5, 6 and 7 in the V-POT Soft Key bank allow access to Mackie Control 'Group', 'Marker' and 'Nudge' functions.
For a detailed breakdown of exactly how GROUP, MARKER, NUDGE or any of the other Mackie Control commands
operate, please refer to the Mackie Control section of the Logic Pro Control Surface Support document.
User Bank Pre-Assignments
User Banks 1-5 allow you access to various DAW commands or keyboard shortcuts on the 8 soft
keys along the top of UF8. These can of course be changed to any of the available DAW commands
or your own keyboard shortcut sequences in the UF8 page of SSL 360° .
Select User Banks using Keys 1-5 in the SOFT KEYS section.
User Bank 1
User Bank 2
SSL UF8 User Guide
41
Page 42

Logic Tutorial
User Bank 3
User Bank 4
User Bank 5
"Oh, tell me now, where was my fault, in loving you with my whole heart?" - White Blank Page, Mumford & Sons.
42
SSL UF8 User Guide
Page 43

Assignable DAW Commands List - Logic
The following DAW commands are available in SSL 360° to assign to any of the User or Quick Keys.
Logic Tutorial
Track
Pan/Surround
EQ
Send
Plugin
Instrument
Flip
Global
Name/Value
SMPTE/Beats
F1
F2
F3
F4
F5
F6
F7
F8
MIDI Tracks
Inputs
Audio Tracks
Audio Instruments
Aux
Busses
Outputs
User
Shift
Option
Control
Alt
Read
Write
Touch
Latch
Trim
Save
Undo
Group
Cancel
Enter
Marker
Nudge
Cycle
Drop
Replace
Click
Solo
Forward
Rewind
Stop
Play
Record
Scrub
Play Foot-switch
Record Foot-switch
SSL UF8 User Guide
43
Page 44

Cubase/Nuendo Tutorial
Cubase/Nuendo with UF8 - Tutorial
The following tutorial guides you through configuring and using the default Cubase/Nuendo profile on LAYER 1 of UF8. If you wish
to configure Cubase on a different layer, please refer to the DAW Communication section of this User Guide to ensure your DAW
is configured for the correct SSL V-MIDI ports.
SSL 360° Setup
1. Open the SSL 360° application on your Mac or Windows computer and on the HOME page check that any UF8s you have
connected are present - outline images of each UF8 appear on screen.
2. If you have multiple UF8s connected, click down on the outline image of each unit to check that the UF8s are arranged in the
correct order. If units need to be re-ordered then click and drag to re-arrange.
3. Go to the UF8 page and set Layer 1 to Cubase using the drop-down list.
STEP 1 : Open SSL 360° application.
Connected UF8s appear on-screen.
STEP 2 : Click and drag to re-order
units if necessary.
STEP 3 : Select the default Cubase
DAW profile from the UF8 page.
Cubase Setup
4. Open Cubase. Go to Studio > Studio Setup...
5. Click the + symbol in the top-left of the window and select Mackie Control from the drop-down list. Set the MIDI Input to SSL
V-MIDI Port 1 Source and set MIDI Output to SSL V-MIDI Port 1 Destination. Click Apply. If you only have one UF8, skip
to step 10.
6. If you have multiple UF8s, repeat step 5 - adding another Mackie Control and incrementing the SSL V-MIDI Port number for
the MIDI Input and MIDI Output each time - e.g. the second UF8 would be set to SSL V-MIDI Port 2.
STEP 4 : Open the Studio > Studio
Setup... menu in Cubase.
44
STEP 5 : Add a Mackie Control
and configure MIDI Input and MIDI
Output to SSL V-MIDI Port 1. Click
Apply.
STEP 6 : If you have multiple UF8s,
add more Mackie Control units and
increment SSL V-MIDI Port number.
SSL UF8 User Guide
Page 45

Cubase/Nuendo Tutorial
If you have multiple UF8s and have followed Steps 1-6 you will notice that, even though you have configured multiple Mackie
Controllers on different SSL V-MIDI Ports and clicked Apply, the UF8s in front of you are mirroring the same bank of tracks. This is
due to a peculiarity of Cubase's Mackie Control Setup. To correct this, please now do the following:
7. Change MIDI Input and MIDI Output on the first Mackie Control to SSL V-MIDI Port 2 and click Apply.
8. Change the MIDI Input and MIDI Ouptut on the second Mackie Control to SSL V-MIDI Port 1 and click Apply.
9. To make Cubase refresh the LCDs on UF8, press any of the Soft Keys in the V-POT bank such as FX Send or EQ.
STEP 7 : Select the first Mackie Control and
change it to be configured for SSL V-MIDI
Port 2.
10. Next, go to Studio > More Options and click on Mackie Control and Mackie Control 2, ensuring both small pop-up windows
that appear have Cubase selected, instead of Compatibility. This is important as UF8 has been designed to work with Steinberg's
latest implementation of the Mackie Control Protocol and must be in Cubase mode to ensure all features work as expected.
STEP 10 : Ensure that the Mackie Controls are configured for 'Cubase' mode, via the drop-down available in the 'Studio' > 'More
Options' menu.
11. As a final step, go to Studio Setup > MIDI Port Setup and deactivate the In 'ALL MIDI Inputs' option for your SSL V-MIDI Ports
and click OK. This will ensure that MIDI Instrument Tracks set to receive from ALL MIDI Inputs do not pickup MIDI data from UF8.
STEP 8 : Select Mackie Control 2
and change it to be configured for
SSL V-MIDI Port 1.
STEP 9 : Force Cubase to update
UF8's LCD Screens by changing
V-POT assignment mode on UF8
e.g. press FX SEND.
SSL UF8 User Guide
STEP 11 : Disable In 'ALL MIDI Inputs' for SSL V-MIDI Ports
45
Page 46

Cubase/Nuendo Tutorial
LCD Layout
Soft Keys
V-Pot Encoders
Selected Track /
Track Record-Ready
DAW Track Metering
V-Pot Readout Bar
Enlarged view of LCD screen
Top Zone - Provides a label for the function assigned to the soft key button directly above.
Selected Track / Track Record-Enabled (REC) - In Cubase, the REC text follows the currently selected track and also indicates
the track is Record-Ready.
UpLCD - Displays the 6-character track name or information regarding the current V-Pot assignment, depending on the current
mode.
LowLCD - Displays name or value information for the V-Pots, depending on which mode or page is selected.
DAW Track Metering - 12-segment track metering + clip
V-Pot Readout Bar - Displays the position of the currently assigned V-Pot (encoder) function.
46
SSL UF8 User Guide
Page 47

Tutorial
This section guides you through using UF8 with Cubase.
Before You Start...
The information in this Cubase Tutorial sets out the key features of
using UF8 with Cubase.
For complete, in-depth coverage of all the functions and features you
can control in Cubase using UF8, please refer to the Mackie MCU
Pro section of Steinberg's Remote Control Devices PDF document,
available via the Cubase/Nuendo Help menu.
V-Pot
At the top of each strip is the V-Pot (virtual pot). The function of the V-Pot varies, depending
on which V-Pot assignment mode is currently active (Pan, FX Send etc) but is typically used
for tasks such as controlling pan position, send levels, plug-in parameters or scrolling through
parameter options/lists.
Cubase/Nuendo Tutorial
The Cubase Help menu can be used to find the link to
the 'Remote Control Devices' document shown below
The V-Pot has a push function, which by default operates the track Monitor function when the
V-Pot assignment mode is Pan.
100 mm Motorised Fader
Motorised, touch-sensitive faders provide physical control of your Cubase tracks and are great
for balancing mix levels and writing automation.
Solo, Cut & Sel (Select)
Each strip contains SOLO, CUT and SEL keys corresponding to the solo, mute and select
features for each track in Cubase.
Tip:
The Solo Defeat MCU function (pre-assigned to Quick Key 3) can be used to clear all solos.
Pressing and hold the MCU Shift function (the FINE / SHIFT key) and pressing Solo Defeat
(Quick Key 3) can be used to clear all mutes.
Selection Mode
The primary purpose of the NORM and REC keys in the SELECTION MODE section is to
determine the behaviour of the SEL keys.
NORM - The SEL keys select a track in Cubase.
REC - The SEL keys record-arm multiple tracks.
AUTO - Disabled. This key only applies for Pro Tools profiles.
SSL UF8 User Guide
47
Page 48

Cubase/Nuendo Tutorial
You will notice that there are additional labels beneath the SELECTION MODE keys. These functions have no purpose in the
Cubase UF8 profile.
Channel Encoder
By default, the CHANNEL encoder is used to move your DAW tracks across the UF8 surface, in
increments of 1 channel at a time. If you find yourself in NAV or FOCUS modes, simply push the
CHANNEL encoder to return to CHANNEL mode.
Nav
Pressing the NAV key changes the CHANNEL encoder to operate the playhead position in
Cubase, allowing you to navigate through your session.
Nudge
Disabled. Only applies to Pro Tools profiles.
Focus
Pressing the FOCUS key puts the CHANNEL encoder into Focus mode, which emulates the scroll
function of a mouse. This can be a really nice way of controlling plug-ins or anything else on screen
that responds to a mouse scroll operation. Simply open a plug-in GUI, hover your computer mouse
over a control and turn the encoder for hands-on control.
The sensitivity of FOCUS mode will vary depending on what plug-in or on-screen element you are controlling. You
can use the mouse scroll sensitivity setting in your computer preferences to adjust to taste.
Bank Keys
The BANK < > keys allow you to move tracks across your UF8 control surface(s) in multiples of 8, depending on how many UF8s
are connected. e.g. 8 for one UF8, 16 for 2 UF8s etc.
Cursor Keys and Mode Key
In the lower-right corner of UF8 are the Cursor keys with the Zoom key in the centre.
When the Zoom key is lit the cursor keys perform horizontal and vertical zooming.
Pressing the Zoom key again, the cursor keys mirror the actions of the cursor keys on your
computer keyboard in Cubase.
48
SSL UF8 User Guide
Page 49

Cubase/Nuendo Tutorial
Automation
You can select the automation mode for each track directly from UF8. To do this, select a track you want to change the automation
mode of using the SEL key. Then, press the desired automation mode from the AUTOMATION keys in the lower-left corner of UF8.
Press READ or WRITE again to toggle on/off.
Note that READ and WRITE are the only automation keys that apply to Cubase, so all other keys in this section are disabled when
using Cubase.
STEP 1: Select a track using SEL key STEP 2: Select the desired automation state.
Quick Keys
The three QUICK keys located at the top-left of UF8 are user-assignable keys that are best used for access
to your most frequent DAW commands or keyboard shortcuts. By default, they are assigned to the following
commands but they can of course be changed in SSL 360°.
Default Quick Key Assignments:
1 - Show/hide Mix Console Window.
2 - Show/hide Edit Window.
3 - Solo Defeat - clears any solos.
Fine / Shift Key
The key labelled FINE / SHIFT is programmed to execute Cubase's MCU SHIFT command (ignore the 'FINE'
text). This command, when used in combination with other MCU functions or V-Pot assignment modes, provides
access to alternative/additional functionality.
Please refer to the Mackie MCU Pro section of the Cubase Remote Control Devices PDF for more information.
SSL UF8 User Guide
49
Page 50

Cubase/Nuendo Tutorial
Page Keys
The PAGE < > keys allow you to move through the various parameter pages that are available within each
V-Pot assignment mode (or 'Parameter Group' as Cubase refers to them). The current page selection is
displayed on UF8's LCDs.
Important
UF8's PAGE < > are actioning the same MCU commands that are referred to in Cubase's MCU implementation document as
CHANNEL < >. The action is the same but on UF8, we chose to label the keys differently.
Flip
Pressing the FLIP key switches the functions of the V-Pots and faders. This is useful for various reasons,
including tasks such as controlling Send levels or Plugin parameters on the faders instead of the V-Pots.
Fader Bank Keys
Number keys 1-8 provide access to Cubase's MCU Fader Bank 1-8 commands (you can ignore the
SEND / PLUGIN label as this applies only to Pro Tools / Logic UF8 profiles).
By default, this means that keys 1-8 apply your first 8 Channel Visibility settings to the UF8 surface.
With the FINE / SHIFT key held, keys 1-8 apply specific channel types (Audio, Groups, FX Channels,
MIDI etc) to the UF8 surface.
Please reference Cubase Remote Control Devices documentation for more information.
Channel Key
This key serves no purpose for Cubase profiles on UF8 and is therefore disabled.
50
SSL UF8 User Guide
Page 51

Cubase/Nuendo Tutorial
V-Pot Assignment Modes
UF8 offers direct access to the main modes of Cubase's Mackie Control implementation. For an in-depth explanation of how to use
each V-Pot assignment mode, please refer to the Mackie MCU Pro section of Steinberg's Remote Control Devices document.
2 3 4 5 6 7 8 9
1
10
Nomenclature Table
The column 'Cubase/Nuendo MCU Function', contains the MCU function names as referred to in Steinberg's Remote Control
Devices documentation. These names are taken from the Cubase/Nuendo overlays that are placed onto a Mackie Controller
(replacing the default Logic labels). The Cubase MCU implementation has evolved over the years and as such, some of the labels
don't quite match the functionality, so we have presented the most intuitive labels possible on UF8 to make operation easier. For
example the 'FIRST' key on a Mackie Control with a Cubase overlay accesses controls for routing so we have labelled our key
ROUTING instead.
Mode Cubase/Nuendo MCU Function UF8 Label
1 PAN PAN
2 LAST FX SEND
3 EQ EQ
4 DYN/FX/AUX STRIP
5 INSTRUMENT VST INSTRUMENTS
6 NAME/VALUE NAME/VALUE
7 FIRST ROUTING
8 SENDS FX INSERT
9 MASTER MASTER INSERT
10 PLUGINS PLUGIN
SSL UF8 User Guide
51
Page 52

Cubase/Nuendo Tutorial
Name/Value
Strictly speaking, the NAME/VALUE function is not a V-Pot assignment mode by itself but it does have the useful function of
displaying parameter values on the LCD screens. Without engaging this, parameter values are shown when a V-Pot is turned.
Example - Controlling Sends
It is beyond the scope of this User Guide to cover all of the different V-Pot assignment modes within the Cubase MCU implementation,
however an example of controlling Sends is presented below.
Send Settings - Selected Channel
LCD 3 displays the selected track name Page Number
• Press the FX SEND key. This mode allows you to control all the Send parameters for the currently selected track using the
V-Pots - e.g. all the Send levels on the selected track.
• Use the PAGE keys to move between parameter pages.
52
SSL UF8 User Guide
Page 53

Cubase/Nuendo Tutorial
Send Settings - Global
Alternatively, Global mode provides you with access to the advanced send settings for the tracks currently on the UF8 surface.
For example, you can control a send parameter (e.g. level), of FX Send 1 across multiple tracks at once using the V-Pots.
Selected FX Send Send Parameter Page Number
• This is an example of a V-Pot assignment mode that is accessed by pressing and holding the SHIFT MCU Command (the key
labelled FINE/SHIFT on UF8).
• Press and hold the FINE/SHIFT key and then press the FX SEND key. This will select FX Send 1 but you can move through
the rest of the FX Sends by continuing to keep FINE/SHIFT held and repeatedly pressing the FX SEND key
• Use the PAGE keys to move between parameter pages.
Each V-Pot assignment mode may vary slightly in terms of how it operates so it's important to refer to the Mackie
MCU Pro section of Steinberg's Remote Control Devices PDF for more information.
SSL UF8 User Guide
53
Page 54

Cubase/Nuendo Tutorial
User Bank Pre-Assignments
User Banks 1-5 allow you access to various DAW commands or keyboard shortcuts on the 8 soft
keys along the top of UF8. These can of course be changed to any of the available DAW commands
or your own keyboard shortcut sequences in the UF8 page of SSL 360°.
Select User Banks using Keys 1-5 in the SOFT KEYS section.
User Bank 1
User Bank 2
User Bank 3
User Bank 4
User Bank 5
Function Select Keys 1-8 (F1 - F8)
In the Studio Setup... menu within Cubase, where the Mackie Control ports are configured during setup, you can program the
F1 - F8 keys found in User Bank 5 to any of the extensive list of Cubase commands made available in the User Commands table
- choose a category and then a command from that category. Each F key can be shifted using the FINE/SHIFT key, giving you a
total of 16 user commands plus the optional 'User A' and 'User B' foot pedals.
54
SSL UF8 User Guide
Page 55

Cubase/Nuendo Tutorial
Assignable DAW Commands List - Cubase/Nuendo
The following DAW commands are available in SSL 360° to assign to any of the User or Quick Keys. Labels in brackets are added
to clarity what the function does.
First (Routing)
Pan
EQ
Last (FX Sends)
Plugins (IFX Inserts)
Dyn/FX/Aux (Strip)
Flip
Edit (Window)
Name/Value
SMPTE/Beats
F1
F2
F3
F4
F5
F6
F7
F8
Fader Bank 1
Fader Bank 2
Fader Bank 3
Fader Bank 4
Fader Bank 5
Fader Bank 6
Fader Bank 7
Fader Bank 8
Undo
Redo
Save
Revert
Read
Write
Project
Mixer
Sends (FX IFX 1st Insert)
Instruments (VSTs)
Master (Insert)
Motors
Solo Defeat
Shift
Left
Right
Cycle
Punch
Previous
Add
Next
Forward
Rewind
Stop
Play
Record
Scrub
User A
User B
SSL UF8 User Guide
55
Page 56

Live Tutor ial
Ableton Live with UF8 - Tutorial
The following tutorial guides you through configuring and using the default Live profile on LAYER 1 of UF8. If you wish to configure
Live on a different layer, please refer to the DAW Communication section of this User Guide to ensure your DAW is configured for
the correct SSL V-MIDI ports.
SSL 360° Setup
1. Open the SSL 360° application on your Mac or Windows computer and on the HOME page check that any UF8s you have
connected are present - outline images of each UF8 appear on screen.
2. If you have multiple UF8s connected, click down on the outline image of each unit to check that the UF8s are arranged in the
correct order. If units need to be re-ordered then click and drag to re-arrange.
3. Go to the UF8 page and set Layer 1 to Ableton Live using the drop-down list.
STEP 1 : Open SSL 360° applicaton.
Connected UF8s appear on-screen.
STEP 2 : Click and drag to re-order
units if necessary.
STEP 3 : Select the default Ableton
Live DAW profile from the UF8 page.
Live Setup
4. Open Live. Go to Preferences > Link MIDI...
5. From the Control Surface drop-down list select MackieControl. Set the Input to SSL V-MIDI Port 1 Source and set Output
to SSL V-MIDI Port 1 Destination.
6. If you have multiple UF8s, use drop-down lists 2-4 to add subsequent MackieControl XTs, incrementing the SSL V-MIDI Port
number for the Input and Output each time - e.g. the second UF8 would be set to SSL V-MIDI Port 2.
STEP 4 : Go the Preferences menu
and click on the Link MIDI tab.
56
STEP 5 : Add a MackieControl and
configure for SSL V-MIDI Port 1 on
Input and Output
STEP 6 : If you have multiple UF8s,
add MackieControl XT units and
increment SSL V-MIDI Port number
each time.
SSL UF8 User Guide
Page 57

LCD Layout
Live Tutor ial
Soft Keys
V-Pot Encoders
Track Record-Enabled
DAW Track Metering
V-Pot Readout Bar
Enlarged view of LCD screen
Top Zone - Provides a label for the function assigned to the Soft Key button directly above.
Track Record-Enabled (REC) - In Live, the REC text appears when a track is record-enabled.
UpLCD - Normally displays the 6-character track name or parameter being controlled by the V-Pot, depending on the current
mode. When a fader is moved the word 'Volume' appears here.
LowLCD - Displays a label or value readout for the parameter currently assigned to the V-Pot, unless a fader is moved, in which
case the fader dB value is shown.
DAW Track Metering - 12-segment track metering + clip
V-POT readout bar - Displays the position of the currently assigned V-Pot (encoder) function.
SSL UF8 User Guide
57
Page 58

Live Tutor ial
Tutorial
This section guides you through using UF8 with Live.
V-Pot
At the top of each strip is the V-Pot (virtual pot). The function of the V-Pot varies, depending on which V-Pot assignment mode is
currently active (Pan, Send etc) but is typically used for tasks such as controlling Pan position, Send levels, Plug-in parameters or
scrolling through parameter options/lists.
The V-Pot has a push function, which is typically used for defaulting the position of the
parameter being controlled.
100 mm Motorised Fader
Motorised, touch-sensitive faders provide physical control of your Live tracks and are great for
balancing mix levels and writing automation.
Touching a single fader will cause the LowLCD area to display a fader dB
readout, instead of the V-Pot parameter readout.
Solo, Cut & Sel (Select)
Each strip contains SOLO, CUT and SEL keys corresponding to the solo, mute and select
features for each track in Live.
Selection Mode
The primary purpose of the NORM and REC keys in the SELECTION MODE section is to determine the behaviour of the SEL keys.
NORM - The SEL keys select a track in Live.
REC - The SEL keys act as record-arm keys.
AUTO - Disabled. This key only applies for Pro Tools profiles.
The secondary labels CLEAR, ALL and ZERO do not apply for Live's UF8 integration.
58
SSL UF8 User Guide
Page 59

Live Tutor ial
Channel Encoder
By default, the CHANNEL encoder is used to move your DAW tracks across the UF8 surface, in increments of 1 channel at a time.
If you find yourself in NAV or FOCUS modes, simply push the CHANNEL encoder to return to CHANNEL mode.
Nav
Pressing the NAV key changes the CHANNEL encoder to operate the playhead position in Live,
allowing you to navigate through your session.
Nudge
Disabled. Only applies to Pro Tools profiles.
Focus
Pressing the FOCUS key puts the CHANNEL encoder into Focus mode, which emulates the scroll
function of a mouse. This can be a really nice way of controlling plug-ins or anything else on screen
that responds to a mouse scroll operation. Simply open a plug-in GUI, hover your computer mouse
over a control and turn the encoder for hands-on control.
The sensitivity of FOCUS mode will vary depending on what plug-in or on-screen element you are controlling. You
can use the mouse scroll sensitivity setting in your computer preferences to adjust to taste.
Bank Keys
The BANK < > keys allow you to move tracks across your UF8 control surface(s) in multiples of 8, depending on how many UF8s
are connected.
Cursor Keys and Mode Key (Launching Clips and Zooming)
In the lower-right corner of UF8 are the Cursor keys with the Mode key in the centre. The function of these keys depends on the
current view in Live.
Session View
When working in Session View, the cursor keys allow you to navigate up, down, left and right to
highlight the clip you want to launch and the Mode key in the middle allows you to launch clips.
Arrangement View
When the Mode key is lit the left and right cursor keys perform horizontal zooming in/out and
the up and down cursor keys increase/decrease the track height of the currently selected track.
SSL UF8 User Guide
Pressing the Mode key again, the up and down cursor keys change the selected track and the
left and right cursor keys move the cursor left/right.
59
Page 60

Live Tutor ial
Launch Scenes (Use the FINE / SHIFT key)
The key labelled FINE / SHIFT is programmed to execute the Launch Scene function in Live. Simply use the
cursor keys to navigate to the scene you want and press the FINE / SHIFT key to launch the scene.
Automation
The AUTOMATION keys in the bottom-left of UF8 do not apply for Live and are therefore disabled.
Quick Keys
The three QUICK keys located at the top-left of UF8 are user-assignable keys that are best used for access
to your most frequent DAW commands or keyboard shortcuts. By default, they are assigned to the following
commands but they can of course be changed in SSL 360°.
Default Quick Key Assignments:
1 - BTA - Back to Arrangement
2 - Session/Arrangement Window Toggle
3 - Return Tracks - Toggles UF8 faders between controlling standard Audio/MIDI tracks or the Return Tracks.
Page Keys
The PAGE < > keys allow you to move through the various parameter pages when controlling Devices
(Plug-ins) within Live.
Flip
Pressing the FLIP key switches the functions of the V-Pots and faders. This is useful for various reasons,
including tasks such as controlling Send Levels or Plug-in parameters on the faders instead of the V-Pots.
Send / Plugin 1-8 Keys
The SEND / PLUGIN 1-8 keys serve no purpose for Live profiles on UF8 and are therefore disabled.
Channel Key
This key serves no purpose for Live profiles on UF8 and is therefore disabled.
60
SSL UF8 User Guide
Page 61

Live Tutor ial
V-Pot Assignment Modes
UF8 offers direct access to the Live's main Mackie Control V-Pot assignment modes. These V-Pot assignment modes are accessed
via the keys labelled below: 1. PAN, 2. SEND, 3. I/O, 4. PLUGIN.
2 3
1
4
1 - PAN
Assigns the Pan controls to the V-Pots on UF8. Pushing a V-Pot will default it to the centre position.
2 - SEND
Assigns the Send controls for the currently selected track to the V-Pots on UF8. Pushing a V-Pot will default the Send to off.
3 - I/O
Allows you to set the I/O settings for each track on the V-Pots. Pressing the I/O key repeatedly will cycle through the following
options: Input Type, Input Source, Output Type and Output Destination.
4 - PLUGIN (Devices)
Live's own instruments and also third party audio plug-ins can be controlled directly from UF8. Once you have pressed the PLUGIN
key to enter this mode, do the following:
• Select the track on which you want to control the plug-in.
• The name(s) of the plug-ins will appear in the LowLCD section of UF8's LCD(s).
• Push the V-Pot of the plug-in you wish to control.
• The parameters of the plug-in will be assigned across the V-Pots. Pushing a V-Pot defaults the parameter. You can also use
FLIP key to put the plug-in controls onto the faders.
• If there are more than 8 plug-in parameters, you can access them via the PAGE < > keys.
• Once you have finished, press the PLUGIN key again to return to viewing the names of the plug-ins you have on the currently
selected track.
SSL UF8 User Guide
61
Page 62

Live Tutor ial
User Bank Pre-Assignments
User Banks 1-5 allow you access to various DAW commands or keyboard shortcuts on the 8 soft keys
along the top of UF8. These can of course be changed to any of the available DAW commands or your
own keyboard shortcut sequences in the UF8 page of SSL 360°.
Select User Banks using Keys 1-5 in the SOFT KEYS section.
User Bank 1
User Bank 2
User Bank 3
User Bank 4
Unassigned
User Bank 5
Unassigned
62
SSL UF8 User Guide
Page 63

Assignable DAW Commands List - Live
The following DAW commands are available in SSL 360° to assign to any of the User or Quick Keys.
I/O
Pan
Page Left
Send
Device
Page Right
Flip
Return Tracks
Shift
Option
Control
Alt
Arr/SS (Arrangement/Session View Toggle)
Track/Clip
Browser
Detail
Undo
BTA (Back To Arrangement)
Draw
Redo
Add Locator
Follow
Previous Loc (Locator)
Next Loc (Locator)
Cycle
Punch In
Punch Out
Start
End
Rewind
Forward
Stop
Play
Record
Launch Clip
Launch Scene
Live Tutor ial
SSL UF8 User Guide
63
Page 64

Studio One Tutorial
Studio One with UF8 - Tutorial
The following tutorial guides you through configuring and using the default Studio One profile on LAYER 1 of UF8. If you wish to
configure Studio One on a different layer, please refer to the DAW Communication section of this User Guide to ensure your DAW
is configured for the correct SSL V-MIDI ports.
SSL 360° Setup
1. Open the SSL 360° application on your Mac or Windows computer and on the HOME page check that any UF8s you have
connected are present - outline images of each UF8 appear on screen.
2. If you have multiple UF8s connected, click down on the outline image of each unit to check that the UF8s are arranged in the
correct order. If units need to be re-ordered then click and drag to re-arrange.
3. Go to the UF8 page and set Layer 1 to Studio One using the drop-down list.
STEP 1 : Open SSL 360° application.
Connected UF8s appear on-screen.
STEP 2 : Click and drag to re-order
units if necessary.
STEP 3 : Select the default Studio
One DAW profile from the UF8 page.
Studio One Setup
4. Open Studio One. Go to Preferences > External Devices and click on the Add... button.
5. In the Add Device window, select Mackie Control and set Receive From to SSL V-MIDI Port 1 Source and set Send To to
SSL V-MIDI Port 1 Destination. Click OK.
6. If you have multiple UF8s, go back to the Add Device window and select Mackie Control Extender for subsequent UF8s,
incrementing the SSL V-MIDI Port each time - e.g. the second UF8 would be set to SSL V-MIDI Port 2 for Receive From and
Send To.
STEP 4 : Go the Preferences menu
and click on the External Devices
tab.
64
STEP 5 : Add a Mackie Control and
configure for SSL V-MIDI Port 1 on
Receive From and Send To.
STEP 6 : If you have multiple UF8s,
add Mackie Control Extender units
and increment SSL V-MIDI Port
number each time.
SSL UF8 User Guide
Page 65

Studio One Tutorial
7. As the final step when setting up multiple UF8s, you need to move the Mackie Control and Mackie Control Extender you
have configured into what Studio one refers to as a Control Surface Group. To do this, click on the Placement... button in the
Preferences > External Devices window and click and drag the Mackie Control and Mackie Control Extender images into Group
1.
STEP 7 : Go to Control Surface Placement setup and click and drag the Mackie Control and Mackie Control Extender(s)
and move them up into Group 1.
SSL UF8 User Guide
65
Page 66

Studio One Tutorial
LCD Layout
Soft Keys
V-Pot Encoders
Track Record-Enabled
DAW Track Metering
V-Pot Readout Bar
Enlarged view of LCD screen
Top Zone - Provides a label for the function assigned to the Soft Key button directly above.
Track Record-Enabled (REC) - In Studio One, the REC text appears when a track is record-enabled.
UpLCD - Displays the 6-character track name or parameter being controlled by the V-Pot, depending on the current mode.
LowLCD - Displays a fader value or value readout for the parameter currently assigned to the V-Pot, depending on the current
mode.
DAW Track Metering - 12-segment track metering + clip.
V-POT Readout Bar - Displays the position of the currently assigned V-Pot (encoder) function.
66
SSL UF8 User Guide
Page 67

Studio One Tutorial
Tutorial
This section guides you through using UF8 with Studio One.
Before You Start...
The information in this Studio One Tutorial sets out the key features of using UF8 with Studio One.
Any aspect not covered in this guide can be found in the "Studio One - Mackie Control Support" document, available from the
Presonus website.
V-Pot
At the top of each strip is the V-Pot (virtual pot). The function of the V-Pot varies, depending
on which V-Pot assignment mode is currently active and is typically used for tasks such as
controlling Pan position, Pend levels and Plug-in parameters
The V-Pot has a push function, which is typically used for defaulting the position of the
parameter being controlled.
100 mm Motorised Fader
Motorised, touch-sensitive faders provide physical control of your Studio One tracks and are
great for balancing mix levels and writing automation.
When the V-Pots are controlling Pans, the LowLCD section displays a fader dB
readout.
Solo, Cut & Sel (Select)
Each strip contains SOLO, CUT and SEL keys corresponding to the solo, mute and select
features for each track in Studio One.
Selection Mode
The primary purpose of the NORM and REC keys in the SELECTION MODE section is to
determine the behaviour of the SEL keys.
NORM - The SEL keys select a track in Studio One.
REC - The SEL keys act as record-arm keys.
AUTO - Disabled. This key only applies for Pro Tools profiles.
The secondary labels CLEAR, ALL and ZERO do not apply for Studio One's UF8
integration.
SSL UF8 User Guide
67
Page 68

Studio One Tutorial
Channel Encoder
By default, the CHANNEL encoder is used to move your DAW tracks across the UF8 surface, in increments of 1 channel at a time.
If you find yourself in NAV or FOCUS modes, simply push the CHANNEL encoder to return to CHANNEL mode.
Nav
Pressing the NAV key changes the CHANNEL encoder to operate the playhead position in Studio
One, allowing you to navigate through your session.
Nudge
Disabled. Only applies to Pro Tools profiles.
Focus
Pressing the FOCUS key puts the CHANNEL encoder into Focus mode, which emulates the scroll
function of a mouse. This can be a really nice way of controlling plug-ins or anything else on screen
that responds to a mouse scroll operation. Simply open a plug-in GUI, hover your computer mouse
over a control and turn the encoder for hands-on control.
The sensitivity of FOCUS mode will vary depending on what plug-in or on-screen element you are controlling. You
can use the mouse scroll sensitivity setting in your computer preferences to adjust to taste.
Bank Keys
The BANK < > keys allow you to move tracks across your UF8 control surface(s) in multiples of 8, depending on how many UF8s
are connected.
Cursor Keys and Mode Key
In the lower-right corner of UF8 are the Cursor keys with the Zoom key in the centre.
When the Zoom key is lit the left and right cursor keys perform horizontal and vertical track
zooming.
Pressing the Zoom key again, the up and down cursor keys change the selected track and the
left and right cursor keys change the selected audio clip in the Arrangement View.
68
SSL UF8 User Guide
Page 69

Studio One Tutorial
Solo Clear (Use the FINE / SHIFT key)
The key on UF8 labelled FINE / SHIFT is programmed to execute the Solo Clear function in Studio One.
Automation
You can select the automation mode for each track directly from UF8. To do this, select a track you want to change the automation
mode of using a SEL key. Then, press the desired automation mode from the AUTOMATION keys in the lower-left corner of UF8.
The TRIM key does not apply for Studio One and is therefore disabled.
STEP 1: Select a track using SEL key STEP 2: Select the desired automation state.
Quick Keys
The three QUICK keys located at the top-left of UF8 are user-assignable keys that are best used for access
to your most frequent DAW commands or keyboard shortcuts. By default, they are assigned to the following
commands but they can of course be changed in SSL 360°.
Default Quick Key Assignments:
1 - Toggles the Console Window on/off
2 - Toggles the Inputs View on/off within the Console Window.
3 - Open/Closes the Channel Editor Window - used for plug-ins.
Page Keys
The PAGE < > keys select the previous and next device in an open plug-in editor (Channel Editor
Window).
Flip
Pressing the FLIP key swaps the functions of the V-Pots and faders. This is useful for various reasons,
including tasks such as controlling Send levels or Plug-in parameters on the faders instead of the V-Pots.
SSL UF8 User Guide
69
Page 70

Studio One Tutorial
V-Pot Assignment Modes
UF8 offers direct access to Studio One's five main Mackie Control V-Pot assignment modes. These V-Pot assignment modes are
accessed via the keys labelled below: 1. PAN, 2. SEND, 3. INSERT BYPASS, 4. TRACK and 5. PLUGIN.
2 3 4
1
5
1 - PAN
Assigns the Pan controls to the V-Pots on UF8. Pushing a V-Pot will default the Pan position to centre.
2 - SEND
Assigns the Send controls to the V-Pots. Pushing the V-Pot defaults the Send to 0 dB.
The first press of the SEND key will place the Sends of the selected
track across the V-Pots and their values will be displayed in the
LowLCD zone. The CHANNEL key on UF8 will also light.
The CHANNEL key lights to let you know the V-Pots
are controlling the Sends on the selected track.
Repeatedly pressing the SEND key will cycle the V-Pots through controlling a specific Send 'slot' across
all tracks at once. The particular send slot being controlled is reflected by the lighting of the SEND /
PLUGIN Number Keys 1-8 on the left-hand side.
Repeatedly press the SEND key to cycle the V-Pots
into controlling a particular Send slot across all
tracks.
70
SSL UF8 User Guide
Page 71

As you repeatedly press the SEND key the number of
the Send 'slot' the V-Pots are controlling is reflected
by UF8 lighting the corresponding number key.
3 - INSERT BYPASS
The V-Pots allow you to Bypass FX Insert Slots for the selected track.
4 - TRACK
The V-Pots allow you to control a number of functions of the selected track:
• V-Pot 1 - Bypass All FX Insert Slots
• V-Pot 2 - Monitor on/off
• V-Pot 3 - Input Source
• V-Pot 4 - Output Source
• V-Pot 5 - Send Slot 1 Bypass
• V-Pot 6 - Send Slot 2 Bypass
• V-Pot 7 - Send Slot 3 Bypass
• V-Pot 8 - Send Slot 4 Bypass
Studio One Tutorial
5 - PLUGIN
Sets the V-Pots to 'Control Link' Mode.
In Studio One, you customise which plug-in parameters are controlled on the V-Pots of UF8 for each and every plug-in you want to
control. When you press the PLUGIN key for the first time, no plug-in parameters will be available because you need to configure
whilst in 'Control Link' Mode.
We'll walk through the process on the following pages...
SSL UF8 User Guide
71
Page 72

Studio One Tutorial
Setting Up Plug-In Control
1. Open up a plug-in you want to configure to be controlled by UF8's V-Pots and click the cog near the top-right.
Click the cog
2. Click the small down arrow near the top-left and make sure 'Recently Touched' is ticked from the drop-down list.
Click the down arrow
3. Click the small down arrow across to the right and select 'Control' from the drop-down list.
Click the down arrow
Tick 'Recently Touched'
Select 'Control'
72
SSL UF8 User Guide
Page 73

4. The External Devices Window will appear. Each blue block within the window represents a V-Pot.
5. With your mouse, adjust a plug-in parameter that you want to assign to one of the 8 V-Pots.
Studio One Tutorial
Each block represents
a V-Pot
Adjust a parameter - in
this example, we're
moving the LF Gain
control
6. Click down on the small hand symbol and drag it across to one of the blocks in the External Devices window.
Click and drag
from the small
hand symbol
into the External
Devices window
SSL UF8 User Guide
73
Page 74

Studio One Tutorial
7. The control has been successfully assigned to the first V-Pot. Repeat the process with other parameters and other plug-ins as
you desire.
Successfully
assigned control
to V-Pot 1
74
SSL UF8 User Guide
Page 75

User Bank Pre-Assignments
User Banks 1-5 allow you access to various DAW commands or keyboard shortcuts on the 8 soft keys
along the top of UF8. These can of course be changed to any of the available DAW commands or your
own keyboard shortcut sequences in the UF8 page of SSL 360°.
Select User Banks using Keys 1-5 in the SOFT KEYS section.
User Bank 1
User Bank 2
Studio One Tutorial
User Bank 3
User Bank 4
User Bank 5 (F1-F8 Function keys)
SSL UF8 User Guide
75
Page 76

Studio One Tutorial
Function Select Keys 1-8 (F1 - F8)
User Bank 5 is pre-assigned to F keys 1-8. The functions of the F keys can be changed in Studio One in the External Devices
window (the same window used to assign plug-in parameters to V-Pots). If you have changed an F key away from its default
assignment, you can of course re-label the key in SSL 360° using the Short Label text entry box, so the correct function names show
on UF8's LCDs.
Right-click on the button and click 'Assign Command...' to change the function
of any of the F keys.
76
SSL UF8 User Guide
Page 77

Studio One Tutorial
Assignable DAW Commands List - Studio One
The following DAW commands are available in SSL 360° to assign to any of the User or Quick Keys. Labels in brackets are added
to clarify what a command does when it may not be obvious according to the original Mackie Control label.
Track
Pan Sur
EQ (Insert Bypass)
Send
Plugin
Flip
Global View
Name/Value
SMPTE/Beats
F1 (Show Inputs)
F2 (Show Track)
F3 (Console)
F4 (Open Channel)
F5 (Add Insert)
F6 (Add Send)
F7 (Show Channel Editor)
F8 (Toggle Floating Window)
Audio Tracks
Audio Instruments
Aux (FX Channels)
Busses
Outputs
User (Remote Banks)
Shift
Option
Control
Alt
Read/Off
Write
Touch
Latch
Save
Undo
Cancel
Enter
Marker
Cycle
Drop (Auto Punch)
Click
Solo (Clear)
Forward
Rewind
Stop
Play
Record
Play Foot-switch
Record Foot-switch
SSL UF8 User Guide
77
Page 78

Troubleshooting & FAQs
UF8 LCD Messages
The LCDs of UF8 show certain information, depending on UF8's status.
Booting / UF8 Identify
This message is displayed when you power up UF8, accompanying the 'fader wave'.
You also see this state when you're clicking to identify UF8s from the HOME page of the SSL 360° software.
'Awaiting Connection to SSL 360° Software'
'UF8 Initialisation Complete' means that the UF8 hardware boot sequence has completed. 'Awaiting Connection to SSL 360°' means
that UF8 is waiting for the SSL 360° software to start running on the computer. You may see this message appear when logging
onto your computer, before the operating system has finished loading your user-profile and start-up items. You may also see this
message if you are yet to plug a USB cable from your UF8 into your computer.
'Layer Set To None'
If you see this message, you have not yet chosen a DAW profile for the UF8 Layer. Head to the UF8 page and select the DAW you
are using from the drop-down list.
'Waiting For DAW' (Pro Tools only)
If you have configured a Layer for Pro Tools but Pro Tools is closed or you have yet to configure UF8 as a MIDI controller in Pro
Tools, then you will see this message.
78
SSL UF8 User Guide
Page 79

Troubleshooting & FAQs
'SSL 360° Connection Lost. Attemping to Reconnect'
The LCD message above means that communication between SSL 360° and UF8 has been lost. If you experience this, then check
that your USB cable connecting UF8 and 360° has not been removed. Re-connect if so.
SSL 360° Software Messages
If the HOME page of SSL 360° is displaying the message 'NO DEVICES CONNECTED', then be sure to check that the USB cable
from your computer to the USB port on UF8 has not come loose.
If the HOME page of SSL 360° is displaying the message 'SOMETHING WENT WRONG... PLEASE EXIT AND RE-LAUNCH SSL
360°', then please quit SSL 360° and re-launch. If that does not work then restart your computer.
SSL UF8 User Guide
79
Page 80

Troubleshooting & FAQs
SSL Support - FAQs, Ask a Question and
Compatibility
Visit the Solid State Logic Help Centre to check compatibility with your system and find answers to your questions:
www.solidstatelogic.com/support
80
Thank you
Don’t forget to register your UF8 for the best possible experience.
www.solidstatelogic.com/get-started
SSL UF8 User Guide
Page 81

Safety Notices
Safety Notices
General Safety
• Read these instructions.
• Keep these instructions.
• Heed all warnings.
• Follow all instructions.
• Do not use this apparatus near water.
• Clean only with dry cloth.
• Do not block any ventilation openings. Install in accordance with the manufacturer's instructions.
• Do not install near any heat sources such as radiators, heat registers, stoves or other apparatus (including amplifiers) that
produce heat.
• Do not defeat the safety purpose of the polarized or grounding-type plug. A polarized plug has two blades with one wider than
the other. A grounding type plug has two blades and a third grounding prong. The wide blade or the third prong are provided
for your safety. If the provided plug does not fit into your outlet, consult an electrician for replacement of an obsolete outlet.
• Protect the adapter and power cord from being walked on or pinched particularly at plugs, convenience receptacles, and the
point where they exit from the apparatus.
• Only use the attachments/accessories recommended by the manufacturer.
• Unplug this apparatus during lightning storms or when unused for long periods of time.
• Refer all servicing to qualified service personnel. Servicing is required when the apparatus has been damaged in any way,
such as power-supply cord or plug is damaged, liquid has been spilled or objects have fallen into the apparatus, the apparatus
has been exposed to rain or moisture, does not operate normally, or has been dropped.
• Do NOT modify this unit, alterations may affect performance, safety and/or international compliance standards.
• SSL does not accept liability for damaged caused by maintenance, repair or modification by unauthorised personnel.
Installation Notes
• When using this apparatus place it on a secure level surface.
• Always allow free flow of air around the unit for cooling. We recommend the use of rackmount kit available from SSL.
• Ensure that no strain is placed on any cables connected to this apparatus. Ensure that all such cables are not placed where
they can be stepped on, pulled or tripped over.
WARNING: To reduce the risk of fire or electric shock do not expose this apparatus to rain or moisture.
ATTENTION: Afin de réduire les risques de choc électrique,ne pas exposer cet appareil à l'humidité ou à la pluie.
Power Safety
• UF8 is supplied with an external 12 V DC desktop power supply with a 5.5 mm plug to connect to the unit. A standard IEC
mains lead is provided to power the DC supply however if you decide to use a mains cable of your choice, bear in mind the
following:
1) The adapter power cord should ALWAYS be earthed with the earth on the IEC socket.
2) Please use-compliant 60320 C13 TYPE SOCKET. When connecting to supply outlets ensure that appropriate sized
conductors and plugs are used to suit local electrical requirements.
3) Maximum cord length should be 4.5 m (15').
4) The cord should bear the approval mark of the country in which it is to be used.
• Connect only to an AC power source that contains a protective earthing (PE) conductor.
• Only connect units to single phase supplies with the neutral conductor at earth potential.
• Both the mains plug and appliance coupler can be used as the disconnect device, ensure that the mains plug is connected
to an unobstructed wall outlet and is permanently operable.
SSL UF8 User Guide
81
Page 82

Safety Notices
General Safety
ATTENTION! The desktop power supply must always be earthed. Refer to the User Guide for further details.
CAUTION! No user-serviceable parts inside. In the event of damage to the unit or power supply contact Solid
State Logic. Service or repair must be done by qualified service personnel only.
CE Certification
UF8 is CE compliant. Note that any cables supplied with SSL equipment may be fitted with ferrite rings at each
end. This is to comply with the current regulations and these ferrites should not be removed.
FCC Certification
• Do not modify this unit! The product, when installed as indicated in the instructions contained in the installation manual, meets
FCC requirements.
• Important: This product satisfies FCC regulations when high quality shielded cables are used to connect with other equipment.
Failure to use high quality shielded cables or to follow the installation instructions may cause magnetic interference with
appliances such as radios and televisions and will void your FCC authorisation to use this product in the USA.
• This equipment has been tested and found to comply with the limits for a Class B digital device, pursuant to part 15 of the
FCC Rules. These limits are designed to provide reasonable protection against harmful interference in a residential installation.
This equipment generates, uses and can radiate radio frequency energy and, if not installed and used in accordance with
the instructions, may cause harmful interference to radio communications. However, there is no guarantee that interference
will not occur in a particular installation. If this equipment does cause harmful interference to radio or television reception,
which can be determined by turning the equipment off and on, the user is encourage to try to correct the interference by one
or more of the following measures:
1) Reorient or relocate the receiving antenna.
2) Increase the separation between the equipment and receiver.
3) Connect the equipment into an outlet on a circuit different from that to which the receiver is connected.
4) Consult the dealer or an experienced radio/TV technician for help.
Industry Canada Compliance
This Class B digital apparatus complies with Canadian ICES - 003.
RoHS Notice
Solid State Logic complies with and this product conforms to European Union's Directive 2011/65/EU on Restrictions of Hazardous
Substances (RoHS) as well as the following sections of California law which refer to RoHS, namely sections 25214.10, 25214.10.2,
and 58012, Health and Safety Code; Section 42475.2, Public Resources Code.
82
SSL UF8 User Guide
Page 83

Safety Notices
Instructions for disposal of WEEE by users in the European Union
The symbol shown here, which is on the product or on its packaging, indicates that this product must not be
disposed of with other waste. Instead, it is the user's responsibility to dispose of their waste equipment by
handing it over to a designated collection point for recycling of waste electrical and electronic equipment. The
separate collection and recycling of your waste equipment at the time of disposal will help to conserve natural
resources and ensure that is recycled in a manner that protects human health and the environment. For more
information about where you can drop off your waste equipment for recycling, please contact your local city
office, your household waste disposal service or where you purchased the product.
WARNING: Cancer and Reproductive Harm - www.P65Warnings.ca.gov
Evaluation of apparatus based on altitude not exceeding 2000 m. There may be some potential safety hazard
if the apparatus is operated at altitude exceeding 2000 m.
Evaluation of apparatus based on temperate climate conditions only. There may be some potential safety hazard
if the apparatus is operated in tropical climate conditions.
Electromagnetic Compatibility
EN 55032:2015, Environment: Class B, EN 55103-2:2009, Environments: E2 - E4.
Electrical Safety: UL/IEC 62368-1:2014.
WARNING: Operation of this equipment in a residential environment could causes radio interference.
Environmental
Temperature: Operating: +1 to 30 degrees Celsius. Storage: -20 to 50 degrees Celsius.
Further information
For additional information, install and user guides, knowledge base and technical support visit www.solidstatelogic.com
SSL UF8 User Guide
83
Page 84

www.solidstatelogic.com
SSL UF8
 Loading...