


SSL 2
User Guide
www.solidstatelogic.com
SSL 2

Visit SSL at:
www.solidstatelogic.com
© Solid State Logic
All rights reserved under International and Pan-American Copyright Conventions
SSL® and Solid State Logic® are ® registered trademarks of Solid State Logic.
SSL 2™ and SSL 2+™ are trademarks of Solid State Logic.
All other product names and trademarks are the property of their respective owners and are hereby acknowledged.
Pro Tools
®
is a registered trademark of Avid®.
Live Lite™ is a trademark of Ableton AG.
Guitar Rig™ is a trademark of Native Instruments GmbH.
Loopcloud™ is a trademark of Loopmasters®.
ASIO™ is a trademark and software of Steinberg Media Technologies GmbH.
No part of this publication may be reproduced in any form or by any means, whether mechanical or electronic,without the
written permission of Solid State Logic, Oxford, OX5 1RU, England.
As research and development is a continual process, Solid State Logic reserves the right to change the features and
specifications described herein without notice or obligation.
Solid State Logic cannot be held responsible for any loss or damage arising directly or indirectly from any error or omission in
this manual.
PLEASE READ ALL INSTRUCTIONS, PAY SPECIAL HEED TO SAFETY WARNINGS.
E&OE
Jan 2021

Introduction
Introduction to SSL 2
Congratulations on purchasing your SSL 2 USB audio interface. A whole world of recording, writing and production awaits you!
We know you’re probably keen to get up-and-running, so this User Guide is set out to be as informative and useful as possible. It
should provide you with a solid reference for how to get the best out of your SSL 2. If you get stuck, don’t worry, the support section
of our website is full of useful resources to get you going again.
From Abbey Road To Your Desktop
SSL equipment has been at the heart of record production for the best part of four decades. If you have ever stepped foot inside
of a professional recording studio or perhaps watched a documentary following the making of any kind of classic album, then the
chances are that you have already seen an SSL console before. We are talking about studios like Abbey Road; musical home to The
Beatles, Larrabee; birthplace of Michael Jackson’s legendary ‘Dangerous’ album or Conway Recording Studios, which regularly
hosts the world's biggest artists such as Taylor Swift, Pharrell Williams and Daft Punk. This list goes on and covers thousands of
SSL-equipped studios worldwide.
Of course, today, you no longer need to head into a big commercial studio to get started recording music - all you need is a laptop,
a microphone and an audio interface... and that’s where SSL 2 comes in. Over forty years' experience in manufacturing the finest
audio consoles the world has ever seen (and heard!) brings us to this new and exciting point. With SSL 2, you can now begin your
musical journey recording on an SSL, from the comfort of your own desktop...wherever that may be!
Technical Excellence Breeds Creative Freedom
No one understands the recording process better than us. The widespread success of SSL consoles such as the SL4000E/G,
SL9000J, XL9000K and more recently AWS and Duality, is built upon a thorough and detailed understanding of what musicians
all over the world need to be creative. It’s really simple, the recording equipment should be as invisible as possible in the session.
Creative ideas need to flow and technology has to allow those ideas to be captured effortlessly into the computer. Workflow is
paramount and a great sound is essential. SSL consoles are designed with workflow at their heart, to ensure that the artist’s vision is
ready to be captured whenever inspiration strikes. SSL audio circuitry is engineered to the highest standards to provide impeccable
sound quality; capturing every last note, every change in dynamics and every musical nuance.
Standing On The Shoulders Of Giants
SSL equipment has always evolved to meet the exacting needs and demands of the best producers all over the world. As a
company, we are constantly innovating and developing our products to make sure that they continue to meet and exceed new
benchmarks. We have always listened carefully to user feedback to ensure that we are creating audio products that are referred to
by professionals as ‘instruments in their own right’. The technology should provide a platform for the creator and that platform needs
to aid, not hinder the musical performance because at the end of the day, a great song is nothing without a great performance.
The Start Of Your SSL Journey...
So here we are at the start of a new chapter with SSL 2 and SSL 2+, putting our many years of experience into some fresh audio
creation tools designed to allow you to focus on being creative whilst we take care of the sound. You will be following in the
footsteps of artists with many thousands of hit records between them. Records that were and continue to be engineered, mixed
and produced on SSL consoles; from Dr. Dre to Madonna, Timbaland to Green Day, from Ed Sheeran to The Killers, whatever your
musical influences... you are in safe hands.
SSL 2 User Guide
1

Table of Contents
Introduction to SSL 2 1
Overview 3
What is SSL 2? 3
Features 3
Get-Started 4
Unpacking 4
USB Cables & Power 4
USB Hubs 4
System Requirements 4
Registering Your SSL 2 5
What is the SSL Production Pack? 5
Quick-Start / Installation 6
Can't Hear Anything? 7
Selecting SSL 2 As Your DAW's Audio Device 8
Pro Tools | First Setup 8
Ableton Live Lite Setup 8
Contents
Front Panel Controls 9
Input Channels 9
Monitoring Section 10
Rear Panel Connections 11
How-To / Application Examples 12
Connections Overview 12
Connecting Your Monitors and Headphones 13
Selecting Your Input and Setting Levels 14
Dynamic Microphones 14
Condenser Microphones 14
Keyboards and Other Line-Level Sources 15
Electric Guitars and Basses (Hi-Impedance Sources) 15
Monitoring Your Inputs 16
When To Use The STEREO Switch 16
Setting Up Your DAW To Record 17
Low Latency - Using The Monitor Mix Control 17
What is Latency in relation to recording sound? 17
How To Use The Monitor Mix Control When Recording & Playing Back 17
Hearing Double? 18
DAW Buffer Size 18
Sample Rate 19
SSL USB Control Panel (Windows Only) 19
Safe Mode 19
Specications 20
Audio Performance Specifications 20
Digital Audio 21
Physical 21
Troubleshooting, FAQs, Important Safety Notices 22
SSL 2 User Guide

Introduction
Overview
What is SSL 2?
SSL 2 is a USB-powered audio interface that enables you to get studio-quality audio into and out of your computer with minimal
fuss and maximum creativity. On Mac, it's class-compliant - this means that you don't need to install any software audio drivers.
On PC, you'll need to install our SSL USB Audio ASIO/WDM driver, which you'll find on our website - see the Quick-Start section
of this guide for more information on getting up-and-running.
Once you've done this, you'll be ready to start connecting your microphones and musical instruments to the Combo XLR-Jack
inputs on the rear panel. The signals from these inputs will be sent into your favourite music creation software / DAW (Digital Audio
Workstation). The outputs from the tracks in your DAW session (or indeed your favourite media player) can be sent out of the
monitor and headphone outputs on the rear panel, so you can hear your creations in all their glory, with stunning clarity.
Features
• 2 x SSL-designed microphone preamps with unrivalled EIN performance and huge gain range for a USB-powered device
• Per channel Legacy 4K switches - analogue colour enhancement for any input source, inspired by the 4000-series console
• A professional-grade headphone output, with plenty of power
• 24-bit / 192 kHz AD/DA Converters - capture and hear all the detail of your creations
• Easy-to-use Monitor Mix Control for critical low-latency monitoring tasks
• 2 x balanced monitor outputs, with stunning dynamic range
• SSL Production Pack Software Bundle: including SSL Native Vocalstrip 2 and Drumstrip DAW plug-ins, plus much more!
• USB 2.0, bus-powered audio interface for Mac/PC - no power supply required
• K-Lock Slot for securing your SSL 2
SSL 2 vs SSL 2+
Which one is right for you, the SSL 2 or the SSL 2+? The table below will help you to compare and contrast the differences between
SSL 2 and SSL 2+. Both have 2 input channels for recording and balanced monitor outputs for connecting to your speakers. The
SSL 2+ gives you 'that little bit more', with an additonal professional high-powered headphone output, complete with independent
level control, making it perfect for when you are recording with another person. Furthermore, this additional headphone output can
be configured to provide a different headphone mix. SSL 2+ also features additional outputs for easy connection to DJ mixers and
finally, traditional MIDI input and MIDI outputs, for connecting to drum modules or keyboards.
Feature SSL 2 SSL 2+
Best Suited For Individuals Collaborators
Mic/Line/Instrument Inputs 2 2
Legacy 4K Switches Ye s Yes
Balanced Stereo Monitor Outputs Yes Yes
Unbalanced Outputs - Yes
Headphone Outputs 1 2
Low- Latency Monitor Mix Control Yes Ye s
MIDI I/O - Yes
USB Bus-Powered Yes Yes
SSL 2 vs SSL 2+ comparison at a glance
SSL 2 User Guide
3

Get-Started
Get-Started
Unpacking
The unit has been carefully packed and inside the box you will find the following items:
• SSL 2
• Quickstart/Safety Guide
• 1m 'C' to 'C' USB Cable
• 1m 'A' to 'C' USB Cable
USB Cables & Power
Please use one of the provided USB cables ('C' to 'C' or 'C' to 'A') to connect the SSL 2 to your computer.
The connector on the rear of SSL 2 is a 'C' type. The type of USB port you have available on your computer
will determine which of the two included cables you should use. Newer computers may have 'C' ports,
whereas older computers may have 'A'. As this is a USB 2.0 compliant device, it will make no difference to
the performance as to which cable you use.
SSL 2 is powered entirely from the computer's USB-bus power and therefore requires no external power
supply. When the unit is receiving power correctly, the green USB LED will light a steady green colour. For
best stability and performance, we recommend using one of the included USB cables. Long USB cables
(especially 3m and above) should be avoided as they tend to suffer from inconsistent performance and
are unable to provide steady and reliable power to the unit.
USB Hubs
Wherever possible, it is best to connect SSL 2 directly to a spare USB port on your computer. This will give
you the stability of an uninterrupted supply of USB power. However, if you do need to connect via a USB
2.0 compliant hub, then it is recommended that you choose one of high enough quality to provide reliable
performance - not all USB hubs were created equally. With SSL 2, we've really pushed the limits of audio
performance on a USB bus-powered interface and as such, some low-cost self-powered hubs might not
always be up to the task. Usefully, you can check out our FAQs at solidstatelogic.com/support to see
which hubs we've succesfully used and found to be reliable with SSL 2.
USB Power LED
Safety Notices
Please read the Important Safety Notices at the end of this User Guide before use.
System Requirements
Mac and Windows operating systems and hardware are constantly changing. Please search for 'SSL 2 Compatibility' in our online
FAQs to see if your system is currently supported.
4
SSL 2 User Guide

Get-Started
Registering Your SSL 2
Registering your SSL USB audio interface will grant you access to an array of exclusive software from us and other industry-leading
software companies - we call this incredible bundle the 'SSL Production Pack' .
To register your product, head to www.solidstatelogic.com/get-started and follow the on-screen instructions. During the
registration process, you’ll need to input the serial number of your unit. This can be found on the label on the base of your unit.
Please note: the actual serial number begins with the letters 'S2'
Once you have completed registration, all of your software content will be available in your logged-in user area. You can return to
this area at any time by logging back into your SSL account at www.solidstatelogic.com/login should you wish to download the
software another time.
What is the SSL Production Pack?
The SSL Production Pack is an exclusive software bundle from SSL and other third-party companies. To find out more please visit
the SSL 2 product pages on the website.
What's Included?
DAWs
➤ Avid Pro Tools® | First + an exclusive SSL collection of AAX plug-ins
➤ Ableton® Live Lite™
Virtual Instruments, Samples & Sample Players
➤ Native Instruments® Hybrid Keys™ & Komplete Start™
➤ 1.5GB of complimentary samples from Loopcloud™, curated especially by SSL
SSL Native Plug-ins
➤ SSL Native Vocalstrip 2 and Drumstrip DAW Plug-in Full Licenses
➤ 6-month extended trial of all other SSL Native Plug-ins in the range (including Channel Strip, Bus Compressor, X-Saturator
and more)
SSL 2 User Guide
5

Get-Started
Quick-Start / Installation
1. Connect your SSL USB audio interface to your computer using one of the included USB cables.
2. Go to ‘System Preferences’ then ‘Sound’ and select
'SSL 2’ as the input and output device (drivers are not
required for operation on Mac)
3. Open up your favourite media player to begin
listening to music or open up your DAW to begin
creating music
2. Download and install the SSL USB ASIO/WDM audio
driver for your SSL 2. Go to the following web address:
www.solidstatelogic.com/support/downloads
3. Go to ‘Control Panel’ then ‘Sound’ and select ‘SSL 2
USB’ as the default device on both the ‘Playback’ and
‘Recording’ tabs
6
SSL 2 User Guide

Get-Started
Can't Hear Anything?
If you have followed the Quick-Start steps but are still not hearing any playback from your media player or DAW, check the position
of the MONITOR MIX control. In the left-most position, you will hear only the inputs you have connected. In the right-most position
you will hear the USB playback from your media player/DAW.
In your DAW, ensure that ‘SSL 2’ is selected as your audio device in the audio preferences or playback engine
settings. Don't know how? Please see the next page...
.
SSL 2 User Guide
7

Get-Started
Selecting SSL 2 As Your DAW's Audio Device
If you have followed the Quick-Start / Installation section then you are ready to open up your favourite DAW and start creating.
Included in the SSL Production Pack are copies of Pro Tools | First and Ableton Live Lite DAWs but you can of course use any DAW
that supports Core Audio on Mac or ASIO/WDM on Windows.
No matter which DAW you are using, you need to ensure that SSL 2 is selected as your audio device in the audio preferences/
playback settings. Below are examples in Pro Tools | First and Ableton Live Lite. If you are unsure, please refer to your DAW's User
Guide to see where these options can be found.
Pro Tools | First Setup
Open up Pro Tools | First and go to the 'Setup' menu
and choose 'Playback Engine...'. Make sure that SSL 2
is selected as the 'Playback Engine' and that 'Default
Output' is Output 1-2 because these are the outputs that
will be connected to your monitors.
Note: On Windows, ensure that 'Playback Engine' is set to
'SSL 2 ASIO' for the best possible performance.
Ableton Live Lite Setup
Open up Live Lite and locate the 'Preferences' panel.
Make sure that SSL 2 is selected as the 'Audio Input
Device' and 'Audio Output Device' as shown below.
Note: On Windows, ensure that the Driver Type is set to
'ASIO' for the best possible performance.
8
SSL 2 User Guide

Front Panel Controls
Input Channels
This section describes the controls for Channel 1. The controls for Channel 2
are exactly the same.
+48V
This switch enables phantom power on the combo XLR connector, which will
be sent down the XLR microphone cable to the microphone. Phantom power
is required when using condenser microphones. Dynamic microphones do not
require phantom power to operate.
LINE
This switch changes the source of the channel input to be from the balanced
Line input. Connect line-level sources (such as keyboards, synth modules)
using a TRS Jack cable into an input on the rear panel.
HI-Z
This switch changes the impedance of the Line input to be more suitable for
guitars or basses. This feature only works when the LINE switch is also engaged.
Pressing HI-Z on its own without LINE engaged will have no effect.
Product Overview & Features
LED METERING
5 LEDs show the level at which your signal is being recorded into the computer.
It is good practice to aim for the '-20' mark (the third green meter point) when
recording. Occasionally going into '-10' is fine. If your signal is hitting '0' (top
red LED), that means it is clipping, so you'll need to lower the GAIN control or
output from your instrument. Scale markings are in dBFS.
GAIN
This control adjusts the pre-amp gain applied to your microphone or instrument.
Adjust this control so that your source is lighting all 3 green LEDs most of the
time whilst you are singing/playing your instrument. This will give you a healthy
recording level into the computer.
LEGACY 4K - ANALOGUE ENHANCEMENT EFFECT
Engaging this switch allows you to add some extra analogue 'magic' to your input when you need it. It injects a combination of
high-frequency EQ-boost, together with some finely tuned harmonic distortion to help enhance sounds. We have found it to be
particularly pleasant on sources such as vocals and acoustic guitar. This enhancement effect is created completely in the analogue
domain and is inspired by the kind of extra character the legendary SSL 4000-series console (often referred to as '4K') could add
to a recording. The 4K was renowned for many things, including a distinctive 'forward', yet musical-sounding EQ, as well as its
ability to impart a certain analogue 'mojo'. You will find that most sources become more exciting when the 4K switch is engaged!
'4K' is the abbreviation given to any SSL 4000-series console. 4000-series consoles were manufactured between
1978 and 2003 and are widely regarded as one of the most iconic large-format mixing consoles in history, due to
their sound, flexibility and comprehensive automation features. Many 4K consoles are still in use today by the world's
leading mix engineers like Chris Lord-Alge (Green Day, Muse, Keith Urban), Andy Wallace (Biffy Clyro, Linkin Park,
Coldplay) and Alan Moulder (The Killers, Foo Fighters, Them Crooked Vultures).
SSL 2 User Guide
9

Product Overview & Features
Monitoring Section
This section describes the controls found the monitoring section. These controls affect what you hear through your monitor speakers
and the headphone output.
MONITOR MIX (Top-Right Control)
This control directly affects what you hear coming out of your
monitors and headphones. When the control is set to left-most
position labelled INPUT, you will hear only the sources you
have connected to Channel 1 and Channel 2 directly, without
latency.
If you are recording a stereo input source (e.g. a stereo
keyboard or synth) using Channels 1 and 2, press the
STEREO switch so that you hear it in stereo. If you are only
recording using one Channel (e.g. a vocal recording), make
sure that STEREO is not pressed, otherwise you will hear the
vocal in one ear!
When the MONITOR MIX control is set to the right-most
position labelled USB, you will hear only the audio output
from your computer's USB stream e.g. music playing from
your media player (e.g. iTunes/Spotify/Windows Media Player)
or the outputs of your DAW tracks (Pro Tools, Live, etc).
Positioning the control anywhere in-between INPUT and USB
will give you a variable blend of the two options. This can be
really useful when you need to record with no audible latency.
Please refer to the How-To / Application Examples section
for more information on using this feature.
GREEN USB LED
Illuminates solid green to indicate that the unit is succesfully receiving power over USB.
MONITOR LEVEL (Large Blue Control)
This large blue control directly affects the level sent out of OUTPUTS L (Left) and R (Right) to your monitors. Turn the knob to make
the volume louder. Please note the MONITOR LEVEL goes to 11 because it's one louder.
PHONES
This control sets the level for the PHONES headphones output.
10
SSL 2 User Guide

Rear Panel Connections
Product Overview & Features
5
4
1 - INPUTS 1 & 2 : Combo XLR / 1/4" Jack Input Sockets
This is where you connect your input sources (microphones, instruments, keyboards) to the unit. Once connected, your inputs are
controlled using front panel Channel 1 and Channel 2 controls respectively. The combo XLR / 1/4" Jack socket contains an XLR
and a 1/4" Jack in one connector (the Jack socket is the hole in the middle). If you are connecting a microphone, then use an XLR
cable. If you want to connect an instrument directly (bass guitar/guitar) or keyboard/synth, then use a Jack cable (TS or TRS Jacks).
Please note that line-level sources (synths, keyboards) can only be connected to the Jack socket. If you have
a line-level device that outputs on XLR, then please use a XLR to Jack cable to connect it.
2 - BALANCED LINE OUTPUTS 1 & 2 : 1/4" TRS Jack Output Sockets
These outputs should be connected to your monitors if you are using active monitors or to a power amp if using passive monitors.
The level at these outputs is controlled by the large blue control on the front panel labelled MONITOR LEVEL. For the best
perfromance, use 1/4" TRS jack cables to connect your monitors.
3 - PHONES: 1/4" Output Jack
Headphone output, with independent level control from the front panel control labelled PHONES.
4 - USB 2.0 Port : 'C' Type Connector
Connect this to a USB port on your computer, using one of the two cables provided in the box.
3
2
1
5 - K : Kensington Security Slot
The K slot can be used with a Kensington Lock to secure your SSL 2.
SSL 2 User Guide
11
How-To / Application Examples
How-To / Application Examples
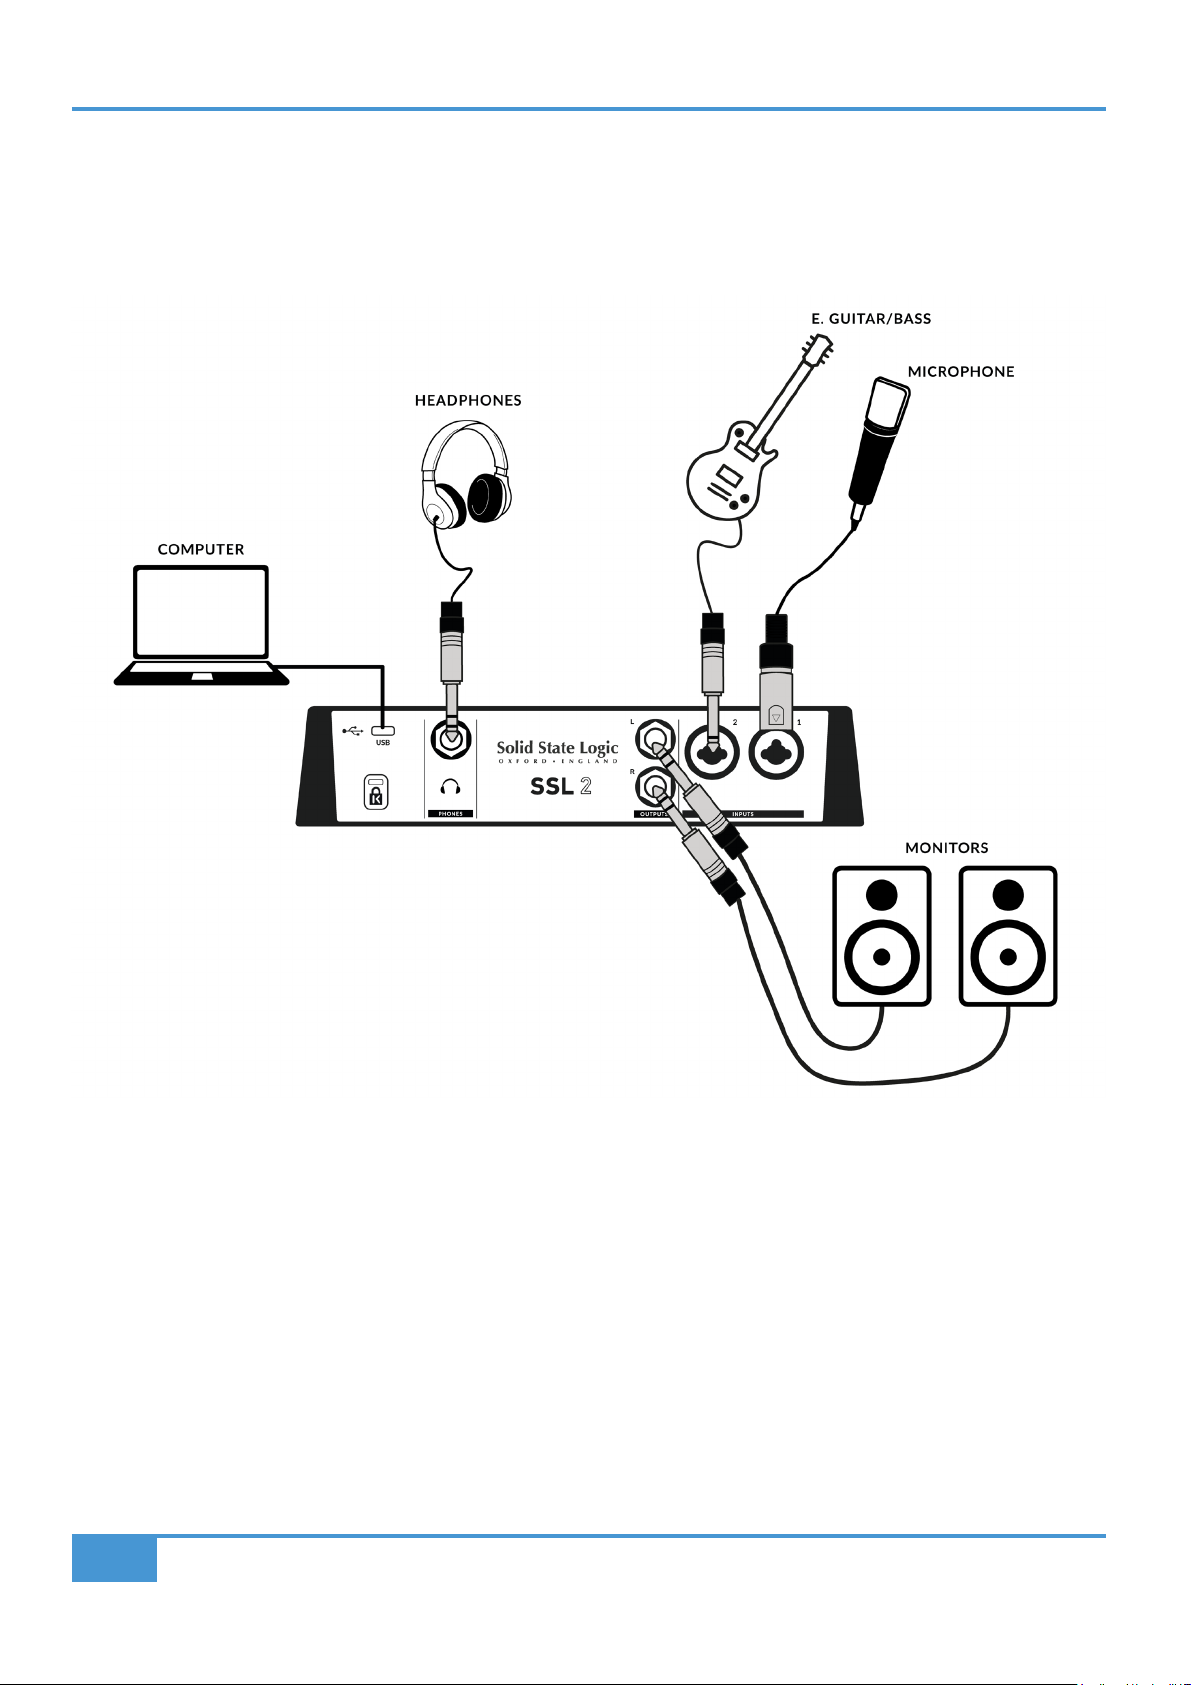
Connections Overview
The diagram below illustrates where the various elements of your studio connect to SSL 2 on the rear panel.
This diagram shows the following:
• A microphone plugged into INPUT 1, using an XLR cable
• An electric guitar/bass plugged into INPUT 2, using a TS jack cable (standard instrument cable)
• Monitor speakers plugged into OUTPUT L (Left) and OUTPUT R (Right), using TRS jack cables (balanced cables)
• A pair of headphones connected to PHONES
• A computer connected to the USB 2.0, 'C' Type port using one of the provided cables
12
SSL 2 User Guide

How-To / Application Examples
Connecting Your Monitors and Headphones
The diagram below shows where to connect your monitors and headphones up to your SSL 2. It also shows the interaction of the
front panel controls with the various output connections on the rear.
• The large front panel MONITOR LEVEL control affects the output level of the balanced TRS jack outputs L and R. We
recommend that you connect your monitors to these outputs.
• The front panel PHONES control affects the level output on the rear PHONES connector.
SSL 2 User Guide
13

How-To / Application Examples
Selecting Your Input and Setting Levels
Dynamic Microphones
Plug your microphone into INPUT 1 or INPUT 2 on the rear panel using an XLR cable.
1. On the front panel, make sure that none of the top 3 switches (+48V, LINE, HI-Z) are pressed down.
2. Whilst singing or playing your instrument that has been mic'd up, turn the GAIN control up until you consistently get 3 green
lights on the meter. This represents a healthy signal level. It's OK to light up the amber LED (-10) occasionally but make sure
you don't hit the top red LED. If you do, you'll need to turn the GAIN control down again to stop clipping.
3. Push the LEGACY 4K switch to add some extra analogue character to your input, if you need it.
14
Condenser Microphones
Condenser microphones require phantom power (+48V) to work. If you're using a condenser
microphone, you'll need to engage the +48V switch. LINE and HI-Z should remain unpressed.
You'll notice the top red LEDs blink whilst phantom power is applied. The audio will be muted
for a few seconds. Once phantom power has been engaged, proceed with steps 2 and 3 like
before.
SSL 2 User Guide

How-To / Application Examples
Keyboards and Other Line-Level Sources
• Plug your keyboard/line-level source into INPUT 1 or INPUT 2 on the rear panel using a jack
cable.
• Returning to the front panel, make sure that +48V is not pressed.
• Engage the LINE switch.
• Follow Steps 2 and 3 on the previous page to set your levels for recording.
Electric Guitars and Basses (Hi-Impedance Sources)
• Plug your guitar/bass into INPUT 1 or INPUT 2 on the rear panel using a jack cable.
• Returning to the front panel, make sure that +48V is not pressed.
• Engage both the LINE switch and the HI-Z switch.
• Follow Steps 2 and 3 on the previous page to set your levels for recording.
When recording an electric guitar or bass, engaging the HI-Z switch alongside the LINE switch changes the
impedance of the input stage to better suit these types of sources. Specifically, it will help retain the high frequency
detail.
SSL 2 User Guide
15

How-To / Application Examples
Monitoring Your Inputs
Once you have selected the correct input source and have a healthy 3 green LEDs of signal coming in, you're ready to monitor
your incoming source.
1. First, ensure that the MONITOR MIX control is rotated towards the side labelled INPUT.
2. Secondly, turn up the PHONES control to listen on headphones. If you want to listen through your monitor speakers, turn up
the MONITOR LEVEL control.
CAUTION! If you are using a microphone, and monitoring the INPUT be careful about turning the MONITOR LEVEL
control up because this can cause a feedback loop if the microphone is close to your speakers. Either keep the
monitor control at a low-level or monitor through headphones.
When To Use The STEREO Switch
If you are recording a single source (a single microphone into one channel) or two
independent sources (such as a microphone on the first channel and a guitar on
the second channel), leave the STEREO switch unpressed, so that you hear the
sources in the middle of the stereo image. However, when you are recording a
stereo source such as the left and right sides of a keyboard (coming into channels 1
and 2 respectively), then pressing the STEREO switch will allow you to monitor the
keyboard in true stereo, with CHANNEL 1 being sent to the left side and CHANNEL
2 being sent to the right side.
16
SSL 2 User Guide

How-To / Application Examples
Setting Up Your DAW To Record
Now that you have chosen your input(s), set the levels and can monitor them, it's time to record into the DAW. The following image
is taken from a Pro Tools | First session but the same steps will apply to any DAW. Please consult your DAW's User Guide for it's
operations. If you have not already done so, please ensure that SSL 2 is the selected Audio Device in your DAW's audio setup.
Setting Up Your DAW Tracks
• Set up new audio track(s) in your DAWs.
• Set the appropriate input on your DAW track(s): Input 1 = Channel 1, Input 2 = Channel 2.
• Record Arm the tracks you are recording.
• You are ready to hit record and do a take.
Low Latency - Using The Monitor Mix Control
What is Latency in relation to recording sound?
Latency is the time it takes for a signal to pass through a system and then be played out again. In the case of recording, latency
can cause the performer significant issues as it results in them hearing a slightly delayed version of their voice or instrument, some
time after they actually played or sung a note, which can be very off-putting when trying to record.
The main purpose of the MONITOR MIX control is to provide you with a way of hearing your inputs before they pass into the
computer, with what we describe as 'low-latency'. It is, in fact, so low (under 1ms) that you will not hear any perceivable latency
when playing your instrument or singing into the microphone.
How To Use The Monitor Mix Control When Recording & Playing Back
Often when recording, you'll need a way of balancing the input (microphone/instrument) against the tracks playing back from the
DAW session.
Use the MONITOR MIX control to balance
how much of your 'live' input you are hearing
with low-latency in the monitors/headphones,
against how much of the DAW tracks you have
to perform against. Setting this correctly will
help enable either yourself or the performer
to produce a good take. To put it simply, turn
the knob to the left to hear 'more me' and to
the right for 'more backing track'.
SSL 2 User Guide
17

How-To / Application Examples
Hearing Double?
When using the MONITOR MIX to monitor the live input, you'll need to mute the
DAW tracks you are recording onto, so that you do not hear the signal twice.
When you want to listen back to what you have just recorded, you'll need to un-
mute the track you have recorded onto, to hear your take.
This space is intentionally almost blank
DAW Buffer Size
From time to time, you may need to alter the Buffer Size setting in your
DAW. Buffer Size is the amount of samples stored/buffered, before being
processed. The bigger the Buffer Size, the more time the DAW has to
process the incoming audio, the smaller the Buffer Size, the less time the
DAW has to process the incoming audio.
Generally speaking, higher buffer sizes (256 samples and above) are
preferrable when you have been working on a song for some time and
have built up several tracks, often with processing plug-ins on them. You'll
know when you need to increase the buffer size because your DAW will
start producing playback error messages and is unable to playback, or it
plays back audio with unexpected pops and clicks.
Lower buffer sizes (16, 32 and 64 samples) are preferrable when you
want to record and monitor processed audio back from the DAW with
as little latency as possible. For instance, you want to plug an electric
guitar directly into your SSL 2, put it through a guitar amp simulator plug-in
(like Native Instruments' Guitar Rig Player) and then monitor that 'affected'
sound whilst you record, instead of just listening to the 'dry' input signal
with the Monitor Mix.
Record Tracks Muted
Pro Tools | First offers 'Record' (low buffer size)
or 'Playback' (larger) Buffer Sizes
18
Ableton Live Lite Example set to 256 Samples
SSL 2 User Guide

How-To / Application Examples
Sample Rate
What is meant by Sample Rate?
All musical signals coming into and out of your SSL 2 USB audio interface need to converted between analogue and digital. Sample
rate is a measure of how many 'snapshots' are taken in order to build a digital 'picture' of an analogue source being captured into
the computer, or deconstruct a digital picture of an audio track to play back out of your monitors or headphones.
The most common sample rate that your DAW will default to is 44.1 kHz, which means that the analogue signal is being sampled
44,100 times per second. SSL 2 supports all major sample rates including 44.1 kHz, 48 kHz, 88.2 kHz, 96 kHz, 176.4 kHz and
192 kHz.
Do I need to change the Sample Rate?
The pros and cons of using higher sample rates are beyond the scope of this User Guide but in general, the most common sample
rates of 44.1 kHz and 48 kHz are still what many people choose to produce music at, so this is the best place to start.
One reason to consider increasing the sample rate you work at (e.g. to 96 kHz) is that it will lower the overall latency introduced by
your system, which could be handy if you need to monitor guitar amp simulator plug-ins or lots or virtual instruments through your
DAW. However, the trade-off of recording at higher sample rates is that it requires more data to be recorded onto the computer, so
this results in much more hard-drive space being taken up by the Audio Files folder of your project.
How do I change the Sample Rate?
You do this in your DAW. Some DAW's allow you to change the sample rate after you have created a session - Ableton Live Lite
for instance allows this. Some require you to set the sample rate at the point at which you create the session, like Pro Tools | First.
SSL USB Control Panel (Windows Only)
If you're working on Windows and have installed the USB Audio Driver required to make the unit operational, you will have noticed
that as part of the installation the SSL USB Control Panel will be installed onto your computer. This Control Panel will report details
such as what Sample Rate and Buffer Size your SSL 2 is running at. Please note that both Sample Rate and Buffer size will be taken
control of by your DAW when it is opened.
Safe Mode
One aspect you can control from the SSL USB Control
Panel is the tickbox for Safe Mode on the 'Buffer
Settings' tab. Safe mode defaults to ticked but can be
unticked. Unticking Safe Mode will reduce the overall
Output Latency of the device, which may be useful if
you are looking to achieve the lowest possible roundtrip
latency in your recording. However, unticking this may
cause unexpected audio clicks/pops if your system is
under strain.
SSL 2 User Guide
19

Specications
Specications
Audio Performance Specications
Unless specified otherwise, default test configuration:
Sample Rate: 48kHz, Bandwidth: 20 Hz to 20 kHz
Measurement device output impedance: 40 Ω (20 Ω unbalanced)
Measurement device input impedance: 200 kΩ (100 kΩ unbalanced)
Unless otherwise quoted all figures have a tolerance of ±0.5dB or 5%
Microphone Inputs
Frequency Response ± 0.1 dB
Dynamic Range (A-Weighted) 110.5 dB
THD+N (@ 1kHz) < 0.0015 % @ -8 dBFS, < 0.005 % @ -1 dBFS
EIN (A-Weighted, 150 Ω termination) -130.5 dBu
Maximum Input Level +5.5 dBu
Gain Range 62 dB
Input Impedance 1.2 kΩ
Line Inputs
Frequency Response ± 0.05 dB
Dynamic Range (A-Weighted) 110.5 dB
THD+N (@ 1kHz) < 0.0015 % @ -8 dBFS, < 0.005 % @ -1 dBFS
Maximum Input Level +24 dBu
Gain Range 62 dB
Input Impedance 10 kΩ
Instrument Inputs
Frequency Response ± 0.05 dB
Dynamic Range (A-Weighted) 110.5 dB
THD+N (@ 1kHz) < 0.0015 % @ -8 dBFS, < 0.005 % @ -1 dBFS
Maximum Input Level +15 dBu
Gain Range 62 dB
Input Impedance 1 MΩ
Monitor Outputs (Balanced)
Frequency Response ± 0.05 dB
Dynamic Range (A-Weighted)
THD+N (@ 1kHz) < 0.0012% @ -8 dBFS, < 0.002 % @ -1 dBFS
Maximum Output Level +12.5 dBu
Output Impedance 1 Ω
111.5 dB
20
SSL 2 User Guide

Specications
Headphone Output
Frequency Response ± 0.05 dB
Dynamic Range
THD+N (@ 1kHz) < 0.0015% @ -8 dBFS, < 0.0020% @ -1 dBFS
Maximum Output Level +10 dBu
Output Impedance 10 Ω
110 dB
Digital Audio
Supported Sample Rates 44.1 kHz, 48 kHz, 88.2 kHz, 96 kHz, 176.4 kHz, 192 kHz
Clock Source Internal
USB USB 2.0
Low-Latency Monitor Mix Input to Output: < 1ms
Roundtrip Latency at 96 kHz Windows 10, Reaper: < 4ms (Safe Mode Off)
Mac OS, Reaper: < 5.2ms
Physical
Analogue Inputs 1&2
Connectors XLR "Combo' for Microphone/Line/Instrument on rear panel
Input Gain Control Via front panel
Microphone/Line/Instrument Switching Via front panel switches
Phantom Power Via front panel switches
Legacy 4K Analogue Enhancement Via front panel switches
Analogue Outputs
Connectors 1/4" (6.35 mm) TRS jacks on rear panel
Stereo Headphone Output 1/4" (6.35 mm) TRS jack on rear panel
Monitor Outputs L/R Level Control Via front panel
Monitor Mix Input - USB Blend Via front panel
Monitor Mix - Stereo Input Via front panel
Headphones Level Control Via front panel
SSL 2 User Guide
21

Specications
Rear Panel Miscellaneous
USB 1 x USB 2.0, 'C' Type Connector
Kensington Security Slot 1 x K-Slot
Front Panel LEDs
Input Metering Per Channel - 3 x green, 1 x amber, 1 x red
Legacy 4K Analogue Enhancement Per Channel - 1 x red
USB Power 1 x green
Weight & Dimensions
Width x Depth x Height 234mm x 157mm x 70mm (including knob heights)
Weight 880g
Box Dimensions 265mm x 198 x 104mm
Boxed Weight 1.18kg
Troubleshooting & FAQs
Frequently Asked Questions and additonal support contacts can be found on the Solid State Logic Website at:
www.solidstatelogic.com/support
22
SSL 2 User Guide

Safety Notices
Important Safety Notices
General Safety
• Read these instructions.
• Keep these instructions.
• Heed all warnings.
• Follow all instructions.
• Do not use this apparatus near water.
• Clean only with dry cloth.
• Do not install near any heat sources such as radiators, heat registers, stoves or other apparatus (including amplifiers) that
produce heat.
• Unplug this apparatus during lightning storms or when unused for long periods of time.
• Install in accordance with the manufacturer’s instructions.
• Only use attachments/accessories recommended by the manufacturer.
• Refer all servicing to qualified service personnel. Servicing is required when the apparatus has been damaged in any way,
such as liquid has been spilled or objects have fallen into the apparatus, the apparatus has been exposed to rain or moisture,
does not operate normally, or has been dropped.
• Do NOT modify this unit, alterations may affect performance, safety and/or international compliance standards.
• Ensure that no strain is placed on any cables connected to this apparatus. Ensure that all such cables are not placed where
they can be stepped on, pulled or tripped over.
• SSL does not accept liability for damage caused by maintenance, repair or modification by unauthorised personnel.
WARNING: To prevent possible hearing damage, do not listen at high volume levels for long periods. As a guide to setting the
volume level, check that you can still hear your own voice, when speaking normally while listening with the headphones.
____________________________________________________________________________________________________________________
EU Compliance
SSL 2 and SSL 2+ Audio Interfaces are CE compliant. Note that any cables supplied with SSL equipment may be
fitted with ferrite rings at each end. This is to comply with the current regulations and these ferrites should not be
removed.
Electromagnetic Compatibility
EN 55032:2015, Environment: Class B, EN 55103-2:2009, Environments: E1 - E4.
Audio input and output ports are screened cable ports and any connections to them should be made using braid-screened cable
and metal connector shells in order to provide a low impedance connection between the cable screen and the equipment.
RoHS notice
Solid State Logic complies with and this product conforms to European Union’s Directive 2011/65/EU on Restrictions of Hazardous
Substances (RoHS) as well as the following sections of California law which refer to RoHS, namely sections 25214.10, 25214.10.2,
and 58012, Health and Safety Code; Section 42475.2, Public Resources Code.
____________________________________________________________________________________________________________________
Instructions for disposal of WEEE by users in the European Union
SSL 2 User Guide
The symbol shown here, which is on the product or on its packaging, indicates that this product must not be
disposed of with other waste. Instead, it is the user’s responsibility to dispose of their waste equipment by handing
it over to a designated collection point for recycling of waste electrical and electronic equipment. The separate
collection and recycling of your waste equipment at the time of disposal will help to conserve natural resources and
ensure that it is recycled in a manner that protects human health and the environment. For more information about
23

Safety Notices
where you can drop off your waste equipment for recycling, please contact your local city office, your household waste disposal
service or where you purchased the product.
____________________________________________________________________________________________________________________
FCC Compliance
This device complies with part 15 of the FCC Rules. Operation is subject to the following two conditions: (1) This device may not
cause harmful interference, and (2) this device must accept any interference received, including interference that may cause
undesired operation.
For USA – to the user
• Do not modify this unit! This product, when installed as indicated in the instructions contained in the installation manual,
meets FCC requirements.
• Important: This product satisfies FCC regulations when high quality shielded cables are used to connect with other equipment.
Failure to use high quality shielded cables or to follow the installation instructions may cause magnetic interference with
appliances such as radios and televisions and will void your FCC authorisation to use this product in the USA.
• Note: This equipment has been tested and found to comply with the limits for a Class B digital device, pursuant to part 15
of the FCC Rules. These limits are designed to provide reasonable protection against harmful interference in a residential
environment. This equipment generates, uses and can radiate radio frequency energy and, if not installed and used in
accordance with the instructions, may cause harmful interference to radio communications. However, there is no guarantee
that interference will not occur in a particular installation. If this equipment does cause harmful interference to radio or
television reception, which can be determined by turning the equipment off and on, the user is encouraged to try to correct
the interference by one or more of the following measures:
• Reorient or relocate the receiving antenna.
• Increase the separation between the equipment and receiver.
• Connect the equipment into an outlet on a circuit different from that to which the receiver is connected.
• Consult the dealer or an experienced radio/TV technician for help.
____________________________________________________________________________________________________________________
Industry Canada Compliance
This Class B digital apparatus complies with Canadian ICES-003. Cet appareil numérique de la classe B est conforme à la norme
NMB-003 du Canada.
____________________________________________________________________________________________________________________
Evaluation of apparatus based on altitude not exceeding 2000m. There may be some potential safety hazard if the
apparatus is operated at altitude exceeding 2000m.
Evaluation of apparatus based on temperate climate conditions only. There may be some potential safety
hazard if the apparatus is operated in tropical climate conditions.
__________________________________________________________________________________________________________________
Environmental
Temperature: Operating: +1 to 40ºC Storage: -20 to 50ºC
24
SSL 2 User Guide

www.solidstatelogic.com
SSL 2
 Loading...