

Page 1
MadiXtreme. Hi-speed MADI I/O
Installation Guide
EN
DE
FR
Installations-Handbuch
Guide d’Installation
Guia de Instalación
Guida di Installazione
MadiXtreme. This is SSL.
ES
IT
JP
Page 2

Page 3

English 1
Deutsch 9
Francais 17
Espanol 25
Italiano 33
41
EN
DE
FR
ES
IT
JP
1
Page 4

Safety and Installation Considerations
This section contains definitions, warnings, and practical information to ensure a safe working environment.
Please take time to read this section before installing or using this unit. Please do not dispose of these instructions.
General Safety
• Read these instructions.
• Keep these instructions.
• Heed all warnings.
• Follow all instructions.
• Do not use this apparatus near water.
• Do not expose this apparatus to rain or moisture.
• Do not block any ventilation openings. Install in accordance with the
manufacturer’s instructions.
• Do not install near any heat sources such as radiators, heat registers,
stoves or other apparatus (including amplifiers) that produce heat.
• There are no user-adjustments, or user-serviceable items, on this
apparatus.
• Adjustments or alterations to this apparatus may affect the
performance such that safety and/or international compliance
standards may no longer be met.
2
Caution
• To reduce the risk of electric shock, do not perform any servicing
other than that contained in these Installation Instructions unless you
are qualified to do so. Refer all servicing to qualified service
personnel.
Installation Notes
• When installing this apparatus, place the host system into which it is
to be installed on a secure level surface.
• To prevent damage from static electricity when installing this
apparatus, either to the host system or to this apparatus, always take
proper anti-static precautions. Always use an anti-static wristband. If
in doubt, please refer to qualified service personnel.
• Take care of rough or sharp edges when accessing the inside of the
host system.
• Never install or remove this apparatus whilst the host system is
powered. Always remove the power cord from the host system prior
to accessing this apparatus.
• If in doubt about installing this apparatus, please refer to qualified
service personnel.
Page 5

Un-pack
MadiXtreme. Hi-speed MADI I/O
Installation Guide
Installations-Handbuch
Guide d’Installation
Guia de Instalación
Guida di Installazione
MadiXtreme. This is SSL.
EN
DE
FR
ES
IT
JP
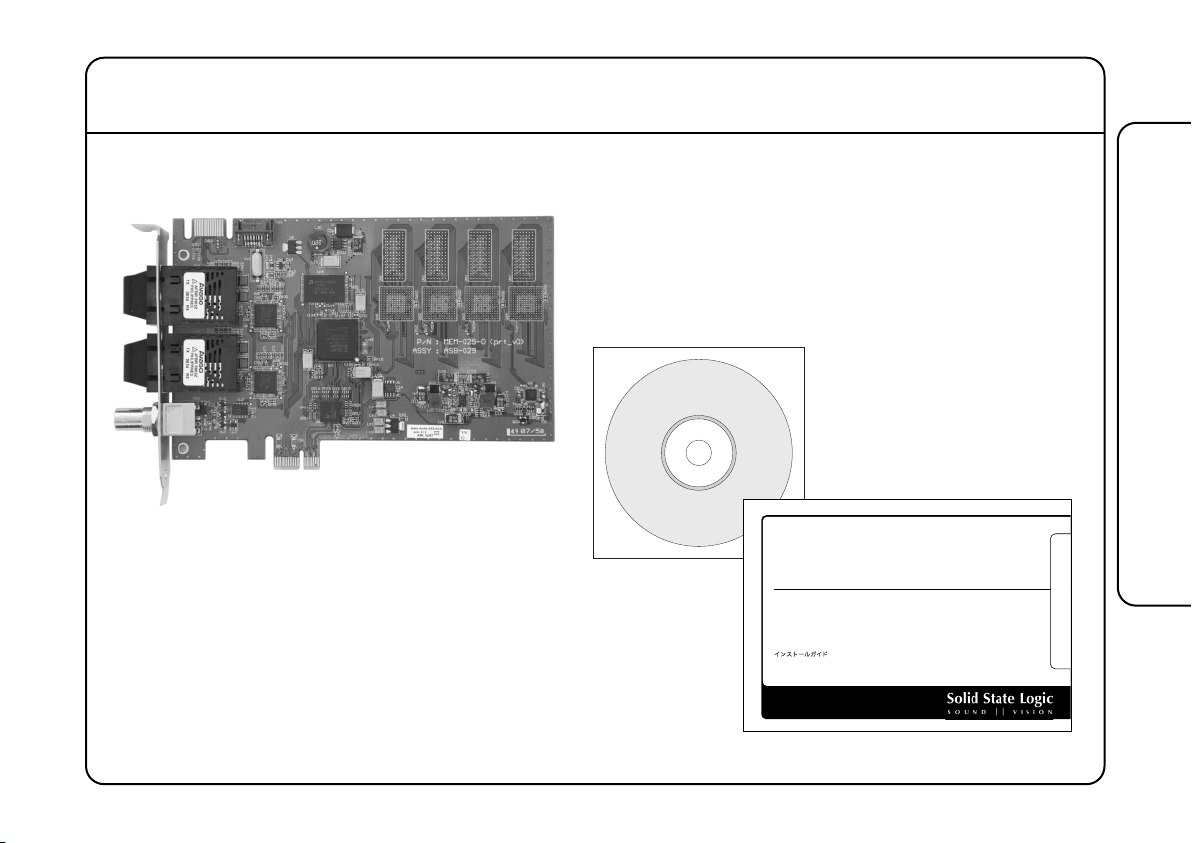
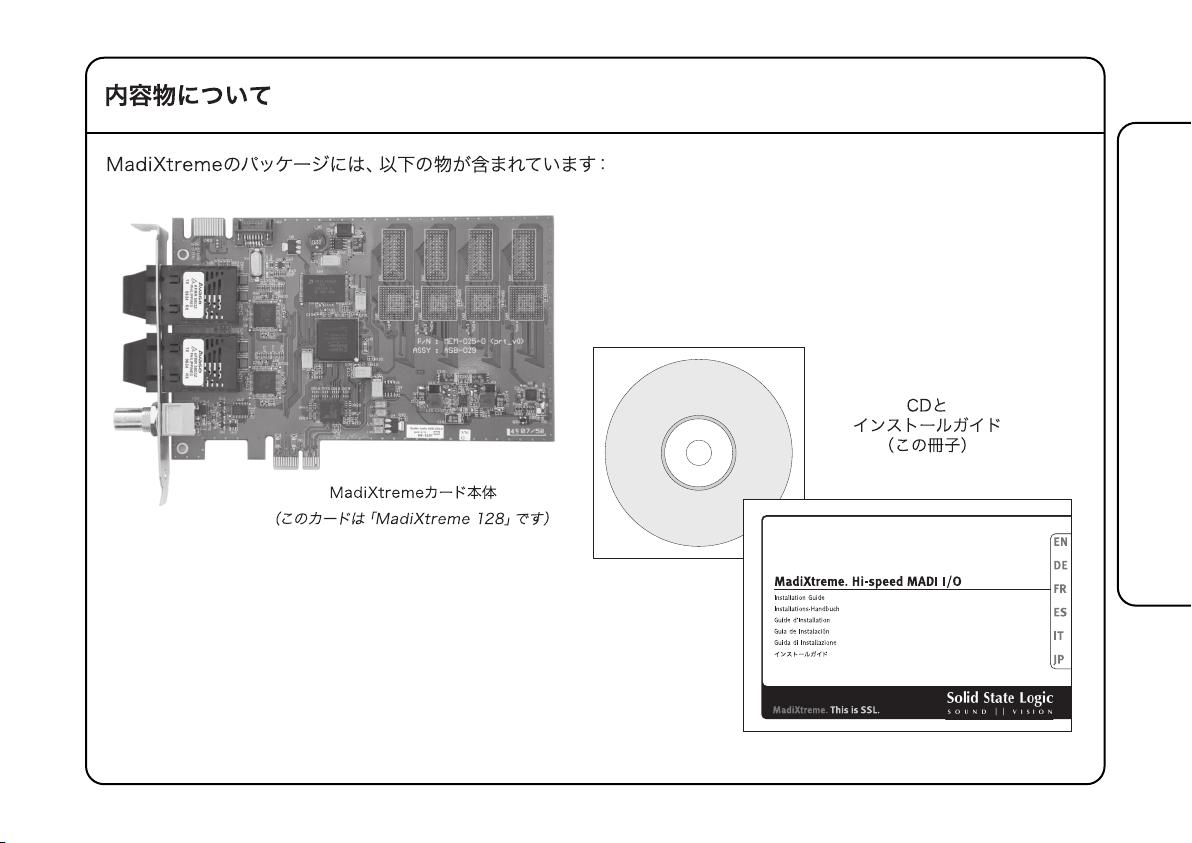
Your MadiXtreme box should contain the following:
MadiXtreme card
(MadiXtreme 128 shown here)
CD &
Installation Guide
(this document)
EN
DE
FR
ES
IT
JP
3
Page 6
Simplified Software Installation *
Mac
1. Place the MadiXtreme installation CD in your CD/DVD
drive.
2. Double click the CD icon to view the CD content.
3. Launch the MadiXtreme Installer by double clicking the
MadiXtreme Installer icon.
4. Follow the on-screen instructions.
* More in-depth software installation instructions will be found in the MadiXtreme Reference Guide included
on the MadiXtreme CD or available for download from www.solid-state-logic.com.
PC
To avoid un-necessary complication, it is important that
the MadiXtreme driver is installed before the card is fitted
in the computer.
1. Place the MadiXtreme Installation CD in your CD/DVD
drive.
2. Double click the CD icon to view the CD content – if
Autorun is enabled this will happen automatically.
3. Locate and run the DrvSetup program. Click on Update
to install the MadiXtreme driver.
4. Follow the on-screen instructions, making sure to
attend to all warnings as required to ensure that the
driver installation completes.
4
Page 7
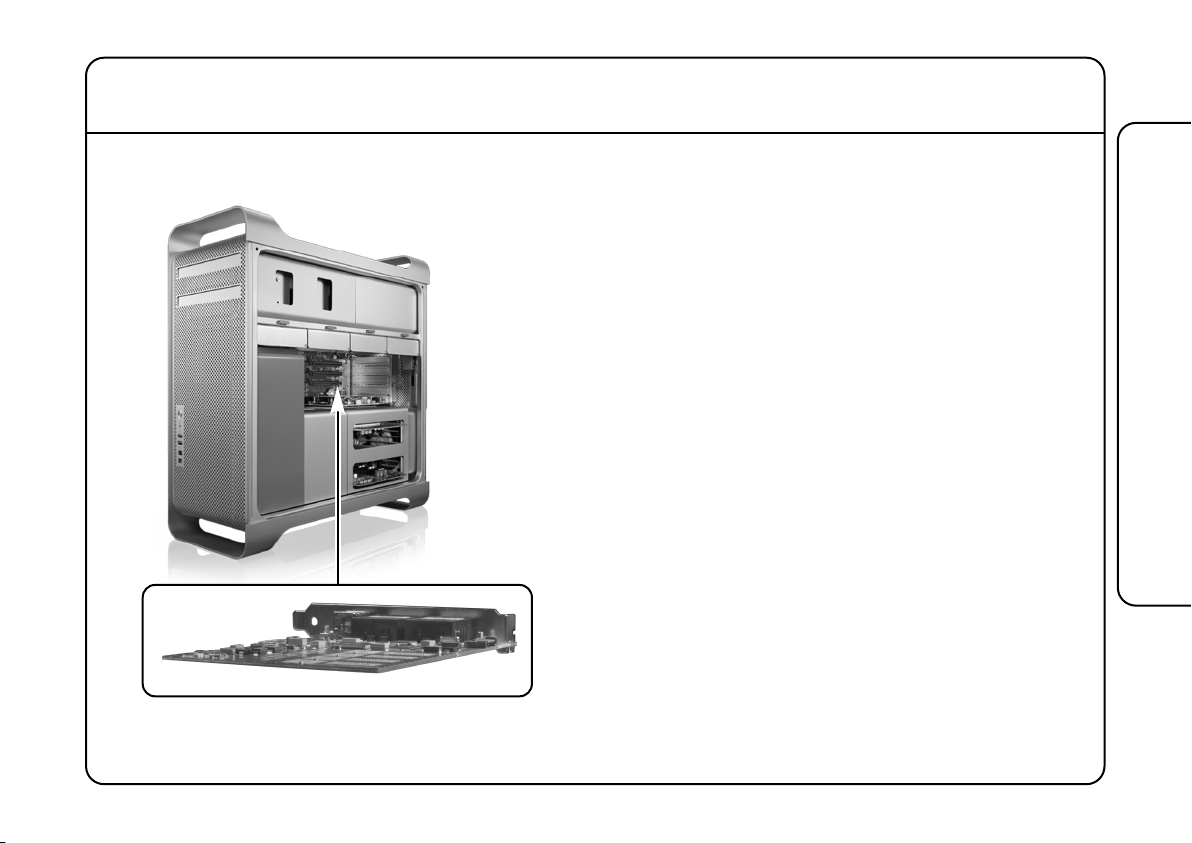
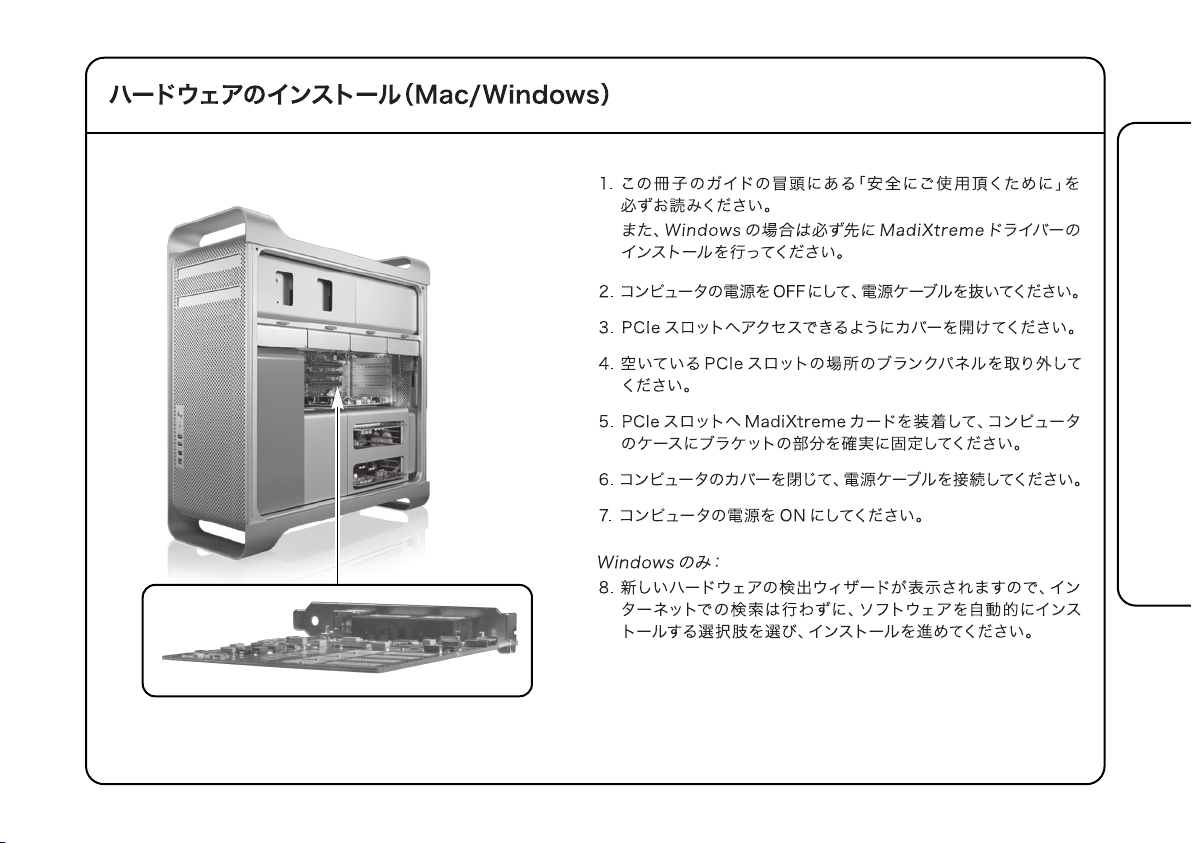
Hardware Installation (Mac or PC)
1. Please read and understand the Safety and Installation
Considerations on page 1.
that the MadiXtreme driver has been pre-installed.
2. Power down the computer and remove the power cord.
3. Remove the cover(s) to gain access to the PCIe sockets.
4. Locate a free PCIe socket and ensure that the rear panel
blanking plate is removed.
If installing in a PC, ensure
EN
DE
FR
5. Plug your MadiXtreme card into the PCIe socket and
secure the mounting bracket to the computer case.
6. Re-fit the cover(s) to the computer and re-connect the
power cord.
7. Switch the computer on.
For Windows XP only:
8. The Found New Hardware Wizard will prompt you to
complete the driver installation. Follow the on-screen
instructions using the pre-loaded driver(s), making sure
to attend to all warnings as required to ensure that the
driver installation completes.
ES
IT
JP
5
Page 8
This equipment has been tested and found to comply with the limits for a Class B digital device, pursuant to part 15 of the FCC Rules.
AA
Tested To Comply
w
ith FCC Standards
FOR HOME OR OFFICE USE
These limits are designed to provide reasonable protection against harmful interference in a residential installation. This equipment
generates, uses and can radiate radio frequency energy and, if not installed and used in accordance with the instructions, may cause
harmful interference to radio communications. However, there is no guarantee that interference will not occur in a particular installation.
If this equipment does cause harmful interference to radio or television reception, which can be determined by turning the equipment off and on, the user is encouraged
to try to correct the interference by one or more of the following measures:
• Reorient or relocate the receiving antenna.
• Increase the separation between the equipment and receiver.
• Connect the equipment into an outlet on a circuit different from that to which the receiver is connected.
• Consult the dealer or an experienced radio/TV technician for help.
Instructions for Disposal of WEEE by Users in the European Union
The symbol shown here is on the product or on its packaging, which indicates that this product must not be disposed of with other waste. Instead, it is
the user’s responsibility to dispose of their waste equipment by handing it over to a designated collection point for recycling of waste electrical and
electronic equipment. The separate collection and recycling of your waste equipment at the time of disposal will help to conserve natural resources and
ensure that it is recycled in a manner that protects human health and the environment. For more information about where you can drop off your waste
equipment for recycling, please contact your local city office, your household waste disposal service or where you purchased the product.
Standards Conformance
This apparatus fully conforms with the current protection requirements of the European community council directives on EMC and LVD.
Warranty
Pursuant to the Solid State Logic Terms and Conditions, under European consumer law the purchaser has full statutory warranty rights for two years from the date of
delivery of the product. The warranty is valid only in those Member States of the European Union (EU) who have adopted the applicable EU law into their national
legislation, otherwise a warranty term of one year will apply. The applicable national legislation governing the sale of consumer goods is not affected by this warranty.
Warranty claims will only be accepted if the purchased product has been used for its intended purpose. Any purchased product used for an unintended purpose will
not be eligible for warranty protection. For all warranty inquiries or claims please address the claim to us if the purchase was directly from us or otherwise to the
dealer from which you purchased the product within a period of two months from the date on which you detected its lack of conformity with the terms of the warranty.
Please include your original proof of purchase when initiating the claim.
Out of Warranty Repairs
In the event of a fault arising after the warranty period has expired the unit should be returned to Solid State Logic either directly or via your local dealer. You will be
charged for the time spent on the repair (at Solid State Logic's current repair rate) plus the cost of parts and shipping. Note that no units can be accepted for repair
without prior arrangement (see below).
All Returns
• No unit will be accepted for repair by Solid State Logic unless accompanied by a valid RMA (Return Material Authorisation) number, obtainable from Solid State
Logic prior to shipping.
• All units should be shipped to Solid State Logic in suitable rigid packaging – Solid State Logic cannot be held responsible for any damage caused by shipping units
in other packaging. In such cases Solid State Logic will return the unit in a suitable box, which you will be charged for.
• Please include all items – such as this booklet, CDs etc. – originally provided with unit.
6
Page 9
Specifications
Physical *
Depth 168mm / 6.6"
Width 1 slot (18.5mm / 0.7")
Height 99mm / 3.9"
Boxed size 320mm x 220mm x 65mm
12.60" x 8.66" x 2.56"
Boxed weight 0.52kg / 1.15 pounds
* All values are approximate
Environmental
Temperature Operating: +5 to 30 deg. C
Non-operating: –20 to 50 deg. C
Max. gradient: 15 deg. C/hour
Relative Operating: 20 to 80 %
Humidity Non-operating: 5 to 90 %
Max. wet bulb: 29 deg. C
(non-condensing)
Vibration Operating: < 0.2 G (3 – 100Hz)
Non-operating,
power off: < 0.4 G (3 – 100Hz)
Shock Operating: < 2 G (10ms max.)
Non-operating: < 10 G (10ms max.)
Altitude Operating: 0 to 3000m
(above sea level) Non-operating: 0 to 12000m
Connections
System Single x1 PCIe slot
MADI Twin SC type chassis socket
Glass Multimode Fibre 50/125µ or 62.5/125µ
Wordclock 75Ω BNC, Zin = 75Ω, 3V3/5V TTL compatible
Driver Models
Mac Core Audio
PC ASIO 2, WDM, MME, GSIF2, DWave
System Requirements
Mac
• PowerPC G4/G5 or Intel
• OS X ‘Tiger’ Version 10.4.11 or greater
• OS X ‘Leopard’ Version 10.5.4 or greater
PC
• Pentium IV or equivalent, 1GHz or higher
• Windows XP SP2 or higher (32bit only)
• Windows Vista (32bit only)
• 512MB RAM
• 1 spare PCIe slot
• VGA colour screen (1024 x 768 pixels or higher)
• Internet connection (for product registration and software upgrade)
EN
DE
FR
ES
IT
JP
7
Page 10

Sicherheits- und Installationsanweisungen
Dieses Kapitel enthält Bestimmungen, Vorsichtsmassnahmen und praktische Informationen um ein sicheres Arbeitsumfeld zu garantieren.
Bitte nehmen Sie sich die Zeit, dieses Kapitel zu lesen, bevor Sie das Gerät installieren und benutzen. Bitte bewahren Sie diese Anweisungen auf.
Allgemeine Sicherheit
• Lesen Sie diese Anweisungen.
• Behalten Sie diese Anweisungen.
• Beachten Sie die Warnungen.
• Folgen Sie sämtlichen Anweisungen.
• Benutzen Sie das Gerät nicht in der Nähe von Wasser.
• Setzen Sie das Gerät keiner Feuchtigkeit oder Regen aus.
• Die Lüftungsöffnungen nicht blockieren. Den Herstellerangaben
zufolge installieren.
• Nicht in der Nähe von Hitzequellen einbauen, wie Heizungen,
Wärmespeichern, Öfen oder anderen Geräten (inkl. Verstärkern) die
Hitze erzeugen.
• Es gibt keinerlei Einstellungen oder vom Anwender zu wartende Teile
im Inneren des Gerätes. Die Abdeckungen dürfen nicht entfernt
werden. Durch das Entfernen selbiger wird die Garantie ungültig.
• Einstellungen oder Änderungen am Gerät können die Leistung derart
beeinflussen, dass die Sicherheit und/oder die Konformität mit
internationalen Standards nicht mehr erreicht wird.
8
Vorsicht
• Um eine Gefährdung durch Stromschlag zu vermeiden, führen Sie nur
Arbeiten durch, die in dieser Installationsanleitung beschrieben
werden. Überlassen Sie jegliche Wartungsarbeiten, vor allem im
Geräteinneren, ausschließlich qualifizierten Service Mitarbeitern.
Hinweise zur Installation
• Stellen Sie Ihr Host-System für den Einbau der Karte auf einen
sicheren, ebenen Untergrund.
• Um während des Einbaus Schäden an Host-System oder Karte durch
statische Elektrizität zu vermeiden, treffen Sie die geeigneten
antistatischen Vorsichtsmaßnahmen. Benutzen Sie immer ein
Antistatik-Armband. Bei Zweifel wenden Sie sich bitte an qualifiziertes
Service-Personal.
• Achten Sie auf raue oder scharfe Kanten im Inneren des Host-Systems.
• Keinesfalls darf die Karte bei eingeschaltetem Host-Computer einoder ausgebaut werden. Ziehen sie vor dem Anschließen der Karte
immer das Netzkabel des Host-Systems.
• Sollten Zweifel über den Einbau der Karte bestehen, wenden Sie sich
bitte an qualifiziertes Service-Personal.
Page 11
Auspacken
MadiXtreme. Hi-speed MADI I/O
Installation Guide
Installations-Handbuch
Guide d’Installation
Guia de Instalación
Guida di Installazione
MadiXtreme. This is SSL.
EN
DE
FR
ES
IT
JP
Ihre MadiXtreme-verpackung sollte Folgendes enthalten:
Die MadiXtreme Einheit
(Abgebildet ist eine MadiXtreme 128)
CD &
Installationsanleitung
(dieses Dokument)
EN
DE
FR
ES
IT
JP
9
Page 12
Vereinfachte Software Installation *
Mac:
1. Legen Sie die MadiXtreme Installations-CD in Ihr
CD/DVD Laufwerk ein.
2. Zur Ansicht des CD-Inhalts klicken Sie bitte doppelt auf
das CD-Symbol.
3. Starten Sie den MadiXtreme Installationsvorgang mit
Klick auf das MadiXtreme-Installer Symbol.
4. Folgen Sie den Anweisungen auf dem Bildschirm
Installationsvorgang mit Klick auf das MadiXtremeInstaller Symbol.
* Eine detaillierte Installations-Anleitung finden Sie im MadiXtreme Referenz Handbuch, welches Sie auf der
beigelegten MadiXtreme CD finden oder online auf unserer Webseite: www.solid-state-logic.com
PC
Bitte installieren Sie den MadiXtreme Treiber bevor Sie
die Karte in den PC einbauen. Dies vereinfacht die
Installation und vermeidet unnötige Komplikationen.
1. Bitte legen Sie die MadiXtreme Installations CD in Ihr
CD/DVD-Laufwer.
2. Suchen Sie das Programm DrvSetup und öffne es.
3. Klicken Sie auf Update um den MadiXtreme Treiber zu
installieren.
4. Bitte folgen Sie den Anweisungen und bestätigen alle
Warnhinweise (evtl. mehrfach) mit Ja, trotzdem
installieren... (oder ähnlich), bis die Installation
abgeschlossen ist.
.
10
Page 13

Einbau der Karte (Mac oder PC)
1. Bitte lesen Sie zunächst die Sicherheits- und
Installations-Hinweise auf Seite 8 und fahren Sie nur
fort, wenn Sie diese auch verstanden haben.
die Installation auf einem PC durchführen möchten,
empfehlen wir dringend, erst den Treiber zu installieren,
bevor Sie die Karte einbauen.
Falls Sie
2. Schalten Sie den Computer aus und entfernen Sie das
Netzkabel.
3. Entfernen Sie die Gehäuseabdeckung(en) um Zugang
zu den PCIe-Slots zu bekommen.
4. Suchen Sie einen freien PCIe-Slot und vergewissern Sie
sich, dass das rückseitige Schutzblech am Gehäuse
entfernt wird.
5. Stecken Sie Ihre MadiXtreme-Karte in den PCIe-Slot und
befestigen Sie mit der Haltevorrichtung die Karte am
Computer-Gehäuse.
6. Schließen Sie den Computer wieder mit dem(n)
Gehäusedeckel(n) und verbinden Sie das Netzkabel.
7. Schalten Sie den Computer ein.
Installation auf Windows XP Systemen:
8. Der Dialog Neue Hardware gefunden öffnet sich. Folgen
Sie den Anweisungen und installieren Sie die Treiber
automatisch, falls Sie die Treiberinstallation wie oben
beschrieben, schon vor dem Einbau der Karte
durchgeführt haben. Antworten Sie bitte auf alle
nachfolgenden Fragen mit Ja, trotzdem Installieren bis
die Installation beendet ist.
EN
DE
FR
ES
IT
JP
11
Page 14

Europäische Union – Information zur Entsorgung von Elektroschrott
Konformitätserklärung
Dieses Gerät ist völlig konform mit den aktuellen Schutzforderungen der Richtlinien des Rates der Europäischen Gemeinschaften über EMV und
Niederspannung.
Dieses Symbol weist darauf hin, dass dieses Produkt entsprechend den geltenden gesetzlichen Vorschriften und getrennt vom Hausmüll entsorgt werden
muss. Geben Sie dieses Produkt zur Entsorgung bei einer offiziellen Sammelstelle ab. Bei einigen Sammelstellen können Produkte zur Entsorgung
unentgeltlich abgegeben werden. Durch getrenntes Sammeln und Recycling werden die Rohstoff-Reserven geschont, und es ist sichergestellt, dass beim
Recycling des Produkts alle Bestimmungen zum Schutz von Gesundheit und Umwelt eingehalten werden. Für weitere Informationen über die Adresse von
Recyclingzentren, kontaktieren sie bitte ihre Gemeindeverwaltung, ihre Müllabfuhr oder ihren Händler.
Gewährleistung
Entsprechend der Solid State Logic Liefer- und Zahlungsbedingungen und den europäischen Regelungen für Endverbraucher hat der Erwerber zwei Jahre gesetzliche
Gewährleistungsansprüche ab dem Lieferdatum. Die Gewährleistung gilt nur in den Mitgliedsländern der europäischen Union (EU), in denen das entsprechende
europäische Recht ratifiziert wurde. Ein ggf. anwendbares nationales Gewährleistungsrecht für den Verkauf von Konsumenten Gütern bleibt von dieser Gewährleistung
unberührt. Gewährleistungsansprüche können nur geltend gemacht werden, wenn die erworbenen Produkte bestimmungsgemäß eingesetzt wurden. Produkte die
zweckentfremdet eingesetzt wurden, werden durch die Gewährleitung nicht abgedeckt. Bitte richten Sie Ihre Gewährleistungsansprüche innerhalb von zwei Monaten
nach dem Auftreten des Gewährleistungsfalles direkt an uns, wenn Sie das Gerät direkt bei uns gekauft haben bzw an den Händler von dem Sie das Gerät gekauft
haben. Bitte legen Sie der Inanspruchnahme der Gewährleistung den Kaufbeleg bei.
Reparaturen ausserhalb der Gewährleistung
Bei Auftreten eines Fehlers nach Ablauf der Gewährleistungsdauer, sollte das Gerät direkt oder über den Händler vor Ort an Solid State Logic zurückgeschickt werden.
Die Berechnung erfolgt entsprechend der erforderlichen Reparaturdauer (zu den jeweils geltenden Stundensätzen) sowie den erforderlichen Teilen und dem Versand.
Bitte beachten Sie das keine Geräte ohne vorherige Vereinbarung repariert werden können (siehe unten).
Alle Rücksendungen
• Geräte können nicht ohne gültige RMA (Return Material Authorization) Nummer repariert werden. Diese Nummer erhalten Sie vor dem Versand von Solid State Logic.
• Alle Geräte müssen in geeigneten und stabilen Verpackungen an Solid State Logic geschickt werden. Solid State Logic kann nicht für Schäden aufgrund ungeeigneter
Verpackungen haftbar gemacht werden. Bei ungeeigneten Verpackungen werden die Geräte von Solid State Logic in geeigneten Verpackungen zurückgeschickt. Die
entstehenden Kosten werden entsprechend weiterberechnet.
• Bitte legen Sie alle Teile bei, die im ursprünglichen Lieferumfang enthalten waren, also auch diese Anleitung, die CD's etc.
12
Page 15

Technische Daten
Abmessungen *
Tiefe 168mm / 6,6 Zoll
Breite 1 Slot (18,5mm / 0,7 Zoll)
Höhe 99mm / 3,9 Zoll
Verpackungsmass 320mm x 220mm x 65mm
12,60" x 8,66" x 2,56"
Verpackungsgewicht 0,52kg / 1,15 Pfund
* alle Werte sind genähert
Umfeld
Temperatur Betrieb: +5 bis 30 Grad C
Ruhezustand: –20 bis 50 Grad C
Max. Schwankung: 15 grad C/stunde
Luftfeuchtigkeit Betrieb: 20 bis 80%
Ruhezustand: 5 bis 90%
Max. wet bulb: 29 grad C
(nicht-kondensierend)
Vibration Betrieb: < 0,2 G (3 – 100Hz)
Ruhezustand,
ausgeschaltet: < 0,4 G (3 – 100Hz)
Stoss Betrieb: < 2 G (10ms max.)
Ruhezustand: < 10 G (10ms max.)
Höhe (über Betrieb: 0 – 3000m
Meeresspiegel) Ruhezustand: 0 – 12000m
Anschlüsse
System Ein PCIe Slot (x1)
MADI Dual SC Verbinder,
Glassfaser Multimode 50/125µ oder 62.5/125µ
Wordlock 75Ω BNC, Zin = 75Ω, 3V3/5V TTL kompatibel
Kompatible Treiber
Mac Core Audio
PC ASIO 2, WDM, MME, GSIF2, DWave
Systemvoraussetzungen
Mac
• PowerPC G4/G5 oder Intel
• OS X ‘Tiger’ Version 10.4.11 oder höher
• OS X ‘Leopard’ Version 10.5.4 oder höher
PC
• Pentium IV oder äquivalent, 1GHz oder höher
• Windows XP SP2 oder höher (nur 32 Bit)
• Windows Vista (nur 32 Bit)
• 512MB Ram
• 1 freier PCIe-Slot
• VGA Farbe Schirm (1024 x 768 Pixel oder stark)
• Internetanschluss (für Produktregistrierung und Softwareupgrade)
EN
DE
FR
ES
IT
JP
13
Page 16

Instructions de Sécurité et d’Installation
Cette section contient des définitions, avertissements et informations pratiques pour garantir un environnement de travail sûr.
Veuillez s’il vous plaît prendre le temps de lire ce chapitre avant d’installer et d’utiliser l’appareil. Veuillez conserver ces instructions.
Sécurité Générale
• Lisez ces instructions.
• Conservez ces instructions.
• Respectez les avertissements.
• Suivez toutes les instructions.
• Ne pas utiliser l’appareil près de l’eau.
• Ne pas exposer cet appareil à la pluie ou l’humidité.
• Ne pas bloquer les ouvertures pour la ventilation. Installer selon les
instructions du constructeur.
• Ne pas installer près d’une source de chaleur telle que radiateur,
poêle ou autre appareil (par exemple amplificateur) produisant de la
chaleur.
• Il n’y a pas de réglages à effectuer ou de pièces à entretenir par
l’utilisateur sur cet carte.
• Tout réglage ou toute modification de cet appareil risque d’affecter
son fonctionnement, de sorte que sa sécurité d’emploi et sa
conformité aux standards internationaux ne pourraient plus être
assurées.
14
Attention
• Afin de minimiser le risque d’électrocution, n’effectuez aucune
opération d’entretien en dehors de celles qui sont décrites dans ce
Manuel d’Installation, à moins que vous ne soyez qualifié pour le
faire. Confiez toute la maintenance à un personnel qualifié.
Conseils d’Installation
• Lors de l'installation de cette carte, placez le système hôte dans
lequel elle doit être installée sur une surface plate et stable.
• Afin d'éviter les dommages pouvant être causés par l'électricité
statique lors de l'installation, soit à cette carte soit au système hôte,
prenez toujours les précautions appropriées. Utilisez toujours un
bracelet antistatique. En cas de doute, veuillez vous adresser à un
personnel qualifié.
• Attention aux bords rugueux ou coupants lorsque vous accédez à
l'intérieur du système hôte.
• N'installez ou ne retirez jamais cette carte alors que le système hôte
est sous tension. Retirez toujours le câble d'alimentation du système
hôte avant d'accéder à cette carte.
• En cas de doute concernant l'installation de cette carte, veuillez vous
adresser à un personnel qualifié.
Page 17

Déballer
MadiXtreme. Hi-speed MADI I/O
Installation Guide
Installations-Handbuch
Guide d’Installation
Guia de Instalación
Guida di Installazione
MadiXtreme. This is SSL.
EN
DE
FR
ES
IT
JP
Votre emballage MadiXtreme doit contenir ce qui suit:
La carte PCIe MadiXtreme
(Illustration: MadiXtreme 128)
CD & Manuel
d’Installation
(ce document)
EN
DE
FR
ES
IT
JP
15
Page 18

Installation Logicielle Simplifiée *
Mac:
1. Mettez le CD d'installation MadiXtreme dans votre
lecteur de CD/DVD.
2. Double-cliquez l'icône du CD pour en voir le contenu.
3. Lancez le programme d'installation MadiXtreme en
double-cliquant son icône.
4. Suivez les instructions à l'écran.
* Des instructions plus approfondies concernant l'installation logicielle sont fournies dans le
document MadiXtreme Reference Guide, inclus sur le CD MadiXtreme ou téléchargeable depuis le
site www.solid-state-logic.com
.
PC
Pour éviter des complications inutiles, il est important
aavvaannt
d'installer le pilote MadiXtreme
t
d'installer la carte
dans l'ordinateur.
1. Insérez le CD d'installation MadiXtreme dans votre
lecteur CD/DVD.
2. Double-cliquez l'icône du CD pour en voir le contenu.
Si la fonction d'exécution automatique est active ceci
se produira automatiquement.
3. Localisez et lancez le programme DrvSetup. Cliquez
Update pour installer le pilote MadiXtreme.
4. Suivez les instructions à l'écran, en vous assurant de
répondre à tous les avertissements de telle sorte que
l'installation continue jusqu'à son terme.
16
Page 19

Installation Hardware (Mac ou PC)
1. Veuillez lire attentivement les Instructions de Sécurité
et d'Installation en page 14.
assurez-vous que le pilote MadiXtreme ait été préinstallé.
2. Éteignez l'ordinateur et retirez le cordon d'alimentation.
3. Retirez le(s) panneau(x) amovible(s) du boîtier
permettant d'accéder aux connecteurs PCIe.
4. Localisez un connecteur PCIe disponible et assurezvous que la plaque d'obturation correspondante sur le
panneau arrière est retirée.
5. Insérez votre carte PCIe MadiXtreme dans le connecteur
PCIe et fixez sa plaque arrière au boîtier de l'ordinateur.
6. Réinstallez le(s) panneau(x) amovible(s) et reconnectez
le cordon d'alimentation.
7. Allumez l'ordinateur.
Pour Windows XP seulement:
8. L'Assistant d'Ajout de Matériel vous demandera de
terminer l'installation des pilotes. Suivez les
instructions à l’écran en utilisant les pilotes préinstallés, et en vous assurant de répondre à tous les
avertissements de telle sorte que l'installation continue
jusqu'à son terme.
Si vous installez sur PC,
EN
DE
FR
ES
IT
JP
17
Page 20

Informations pour la collecte/l’élimination de DEEE dans l’Union Européenne:
Déclaration de conformité
Cet appareil est entièrement conforme aux prescriptions de protection des directives du Conseil CEE sur la compatibilité électromagnétique et la
basse tension
Ce symbole qui se trouve sur le produit indique qu’il ne doit pas être jeté avec les ordures normales. Il est de la responsabilité de l’utilisateur de disposer
de leurs déchets électroniques auprès d’un point de collecte désigné pour le recyclage de DEEE (Déchets d’équipements électriques et électroniques). La
collecte séparée et le recyclage des DEEE vont aider à conserver des ressources naturelles et assurer que le recyclage se fait en respectant la santé humaine
et l’environnement. Pour savoir plus sur les points de collecte, veuillez contacter votre administration communale, votre service des ordures ou votre
détaillant.
Garantie
Conformément aux Modalités et Conditions de Solid State Logic dans le cadre de la loi européenne concernant les consommateurs, l’acheteur bénéficie des pleins
droits de la garantie légale pendant deux ans à compter de la date de livraison du produit. La garantie est valable uniquement dans les Etats Membres de l’Union
Européenne (UE) qui ont incorporé dans leur législation nationale la loi applicable dans l’UE. La législation nationale applicable à la vente des biens de consommation
n’est pas remise en cause par cette garantie. Les réclamations sous garantie ne seront acceptées que si le produit acheté a été utilisé uniquement pour remplir la
fonction pour laquelle il a été conçu. Tout produit ayant été utilisé pour remplir une fonction non conforme à sa destination première perdra le bénéfice de la garantie.
Pour tous renseignements ou réclamations sous garantie, veuillez vous adresser à nous si l’achat a été effectué directement auprès de nous, ou dans le cas contraire
au revendeur auquel vous avez acheté le produit, sous une période de deux mois à partir de la date à laquelle vous avez détecté son défaut de conformité avec les
termes de la garantie. Veuillez fournir votre preuve d’achat originale lors du dépôt de votre réclamation.
Réparations Hors-Garantie
En cas de problème se produisant après l’expiration de la période de garantie, l’unité doit être retournée à Solid State Logic, soit directement, soit par l’intermédiaire
de votre revendeur. Le temps de réparation vous sera facturé (au tarif en vigueur de Solid State Logic), ainsi que le coût des pièces et celui du transport. Veuillez
noter qu’aucune unité ne peut être acceptée pour réparation sans accord préalable (voir ci-dessous).
Retours
• Aucune unité ne sera acceptée pour réparation par Solid State Logic sans être accompagnée d’un numéro RMA (Retour de Matériel Autorisé) valide, qui peut être
obtenu auprès de Solid State Logic avant expédition.
• Toutes les unités doivent être envoyées à Solid State Logic dans un emballage rigide approprié. Solid State Logic ne peut être tenu pour responsable d’aucun
dommage consécutif au transport d’unités dans tout autre emballage. Dans un tel cas Solid State Logic retournera l’unité dans un emballage approprié, qui vous
sera facturé.
• Veuillez inclure tous les accessoires – tels que ce manuel, CD etc. – initialement fournis avec l'appareil.
18
Page 21

Spécifications
Mesures *
Profondeur 168mm / 6,6"
Largeur 1 Connecteur (18,5mm / 0,7")
Hauteur 99mm / 3,9"
Taille emballage 320mm x 220mm x 65mm
12,60" x 8,66" x 2,56"
Poids emballage 0,52kg / 1,15 livres
* Toutes valeurs approximatives
Environnement
Température En marche: +5 à 30 deg C
A l’arrêt: –20 à 50 deg C
Augment. max.: 15 deg C/heure
Humidité rel. En marche: 20 à 80%
A l’arrêt: 5 à 90%
Max. wet bulb: 29 deg C
(non condensant)
Vibration En marche: < 0,2 G (3 – 100Hz)
A l’arrêt: < 0,4 G (3 – 100Hz)
Choc En marche: < 2 G (10 ms max.)
A l’arrêt: < 10 G (10 ms max.)
Altitude (au de. En marche: 0 – 3000m
niv. de la mer) A l’arrêt: 0 – 12000m
Connections
Système Un emplacement PCIe x1
MADI Connecteur de type SC
Fibre de Verre Multimode 50/125µ ou 62.5/125µ
WordClock 75Ω BNC, Zin = 75Ω, 3V3/5V compatible TTL
Types de Pilotes
Mac Core Audio
PC ASIO 2, WDM, MME, GSIF2, DWave
Système Requis
Mac
• PowerPC G4/G5 ou Intel
• OS X ‘Tiger’ Version 10.4.11 ou plus
• OS X ‘Leopard’ Version 10.5.4 ou plus
PC
• Pentium IV ou équivalent, 1GHz ou plus
• Windows XP SP2 ou plus (uniquement 32bit)
• Windows Vista (uniquement 32bit)
• 512MO Mém. vive
• 1 emplacement PCIe libre
• Écran couleur VGA (1024 x 786 Pixel ou plus)
• Connection Internet (pour l’enregistrement du produit et les mises à jour du
système d’exploitation)
EN
DE
FR
ES
IT
JP
19
Page 22

Instrucciones de seguridad e instalación
Esta sección incluye definiciones, advertencias e informaciones practicas para garantizar un ambiente de trabajo seguro.
Es importante leer estas instrucciones antes de instalar y operar esta unidad. Por favor guarden estas instrucciones.
Seguridad General
• Lean las instrucciones.
• Guarden las instrucciones.
• Sigan las advertencias.
• Sigan todas las instrucciones.
• No utilicen el aparato cerca del agua.
• No exponga el aparato a la lluvia o a la humedad.
• No bloquee las aberturas de la ventilación. Instalar según las
instrucciones del constructor.
• No instalarlo cerca de una fuente de calor como radiadores, estufas
u otros aparatos (incluyendo amplificadores) que producen calor.
• Usted no necesita hacerle ajustes en el interior ni existen piezas que
requieran un servicio de parte del usuario en este aparato.
• Los ajustes o cambios que usted haga a este aparato podría afectar
su rendimiento y la seguridad y/o alterar la conformidad a los
estándares internacionales.
20
Precaución
• Para reducir el riesgo de descarga eléctrica, no realice revisiones
excepto las incluidas en las instrucciones de instalación a no ser que
se encuentre cualificado para llevar a cabo las mismas, o bien
consulte todas las revisiones con personal de servicio cualificado.
Notas de Instalación
• Al instalar el aparato, coloque el sistema huésped en el que va a ser
instalado sobre una superficie plana.
• Para evitar el daño que pudiera producir la electricidad estática al
instalar el aparato, bien en el sistema huésped en el que se va a
instalar o en el mismo aparato, asegúrese de tomar siempre las
precauciones antiestáticas necesarias. Utilice siempre una muñequera
antiestática. Ante la duda, consulte con personal cualificado.
• Tenga cuidado con bordes desiguales o cortantes cuando acceda al
interior del sistema donde se va a instalar el aparato.
• Nunca instale o extraiga este aparato mientras el sistema huésped
esté encendido. Desenchufe siempre el cable de conexión conectado
al sistema antes de acceder al aparato.
• Si tiene alguna duda acerca de la instalación, por favor consulte con
personal cualificado.
Page 23

Desembalar
MadiXtreme. Hi-speed MADI I/O
Installation Guide
Installations-Handbuch
Guide d’Installation
Guia de Instalación
Guida di Installazione
MadiXtreme. This is SSL.
EN
DE
FR
ES
IT
JP
Su embalaje MadiXtreme debe contener lo que sigue:
La unidad MadiXtreme
(Imagen: MadiXtreme 128)
CD & Instrucciones
de Instalación
(este documento)
EN
DE
FR
ES
IT
JP
21
Page 24
Instalación del Software Simplificada *
Mac:
1. Inserte el CD de instalación de MadiXtreme en la
unidad CD/DVD.
2. Haga doble clic en el icono de CD para ver el contenido
del CD.
3. Comience la instalación de MadiXtreme haciendo doble
clic en el icono Instalar MadiXtreme.
4. Siga las instrucciones que aparecen en pantalla.
* Se pueden encontrar instrucciones de instalación del software más detalladas en la Guía de Referencia
MadiXtreme que se incluye en el CD MadiXtreme o que se puede descargar desde www.solid-state-logic.com.
PC
Para evitar complicaciones innecesarias, es importante
que el control de dispositivo MadiXtreme esté instalado
antes de Introducir la tarjeta en el ordenador.
1. Coloque el CD de instalación de MadiXtreme en la
unidad CD/DVD.
2. Haga doble clic en el icono de CD para ver el contenido
del CD. Si está en modo Autorun esto sucederá de
modo automático.
3. Localice y ejecute el programa DrvSetup. Haga clic en
actualizar para instalar el controlador de dispositivo
MadiXtreme.
4. Siga las instrucciones que aparecen en pantalla, y
preste atención a los avisos que aparezcan para
asegurarse de que la instalación del controlador sea
completada.
22
Page 25

Instalación del Hardware (Mac o PC)
1. Por favor lea y asegúrese de que comprende las
instrucciones de seguridad e instalación de la
página 20.
que el controlador de dispositivo MadiXtreme haya sido
preinstalado.
Si lo está instalando en un PC, asegúrese de
2. Apague el ordenador y desenchufe el cable de
conexión.
3. Quite la(s) cubierta(s) para tener acceso a los slots
(ranuras) de PCIe (Conectores de Componentes
Periféricos).
4. Localice un slot de PCIe que esté disponible y
asegúrese de haber extraído la chapa del panel
posterior.
5. Enchufe la tarjeta MadiXtreme en la ranura de PCIe y
sujete firmemente la montura del soporte a la caja del
ordenador.
6. Vuelva a colocar la(s) cubierta(s) del ordenador y
conecte de nuevo el cable.
7. Encienda el ordenador.
Para Windows XP sólo:
8. El Asistente de instalación de nuevo hardware le pedirá
que complete la instalación del controlador de
dispositivo. Siga las Instrucciones que aparecen en
pantalla usando el o los controladores instalados
previamente y preste atención a los avisos que
aparezcan para asegurarse de que la instalación del
controlador sea completada.
EN
DE
FR
ES
IT
JP
23
Page 26
Informaciones para la recolección/eliminación de DEEE en la Unión Europea
Conformidad de estándares
Este aparato cumple totalmente con los requisitos actuales de la protección de las directivas del consejo CEE relativas a la baja tensión y la
compatibilidad electromagnética.
Este símbolo que se encuentra sobre el producto indica que no debe ser tirado a la basura normal. Es la responsabilidad del usuario de poner su
desechos en un lugar designado para la recuperación y transformación de DEEE (Desechos de equipos eléctricos y electrónicos). La recolección separada
y la recuperación de los DEEE va a ayudar a conservar los recursos naturales y asegurar que la recuperación se hace respectando la salud humana y el
medio ambiente. Para saber mas sobre los lugares de recolección de DEEE diríjase a la administración de su comuna, servicio de basuras o a su comercio.
Garantía
De conformidad con los términos y condiciones de Solid State Logic en el marco establecido la ley de consumidores europea, el comprador goza de una garantía de
dos años desde la fecha de envío del producto. Esta garantía es válida sólo en aquellos estados miembros de la Unión Europea (UE) que hayan adoptado y aplicado
la ley de la UE dentro de su legislación nacional. La legislación nacional aplicable que regula la venta de bienes de consumo no se verá afectada por esta garantía.
Sólo se aceptarán reclamaciones dentro del periodo de garantía si el producto ha sido empleado para su propósito original. Cualquier producto que se emplee para
un propósito que no es el suyo propio no tendrá derecho a la cobertura que proporciona la garantía. Por favor envíenos sus preguntas o reclamaciones en relación
a la garantía directamente si adquirió el producto de Solid State Logic, o bien al proveedor, dentro de un periodo de dos meses desde la fecha en que se dio cuenta
de que el producto no cumplía los términos de la garantía. Por favor incluya la prueba de compra original cuando realice la reclamación.
Reparaciones fuera de garantía
En caso de avería una vez que el periodo de garantía haya expirado, la unidad se podrá enviar a Solid State Logic bien directamente o a través del proveedor local.
Se le cobrará por el tiempo empleado en reparar la avería (según las tarifas de reparación vigentes de Solid State Logic) más el coste de las piezas de repuesto y el
envío. No se aceptará ninguna unidad para su reparación sin un acuerdo por adelantado (véase el párrafo siguiente).
Todas las devoluciones
• Solid State Logic no aceptará ninguna unidad para su reparación a menos que vaya acompañada de un número de autorización de devolución de material (RMA
en sus siglas inglesas), que puede obtener de Solid State Logic antes del envío.
• Todas las unidades deberán enviarse a Solid State Logic dentro de un embalaje rígido apropiado. Solid State Logic no se hará responsable de daños a las unidades
enviadas en otro tipo de embalaje. En dicho caso Solid State Logic devolverá la unidad en una caja apropiada que deberá ser abonada por el comprador.
• Por favor incluya todos los elementos que acompañan originalmente a la unidad, tales como este cuadernillo, CDs, etc.
24
Page 27

Datos Técnicos
Medidas *
Profundidad 168mm / 6,6"
Ancho 1 Slot (18,5mm / 0,7")
Alto 99mm / 3,9"
Tamaño embalaje 320mm x 220mm x 65mm
12,60" x 8,66" x 2,56"
Peso embalaje 0,52kg / 1,15 libras
* valores aproximados
Medio Ambiente
Temperatura Funcionando: +5 a 30 grados C
Conectado: –20 a 50 grados C
Variación. max.: 15 grados C/hora
Humedad rel. Funcionando: 20 à 80%
Conectado: 5 à 90%
Max. wet bulb: 29 grados C
(non-condensados)
Vibración Funcionando: < 0,2 G (3 – 100 Hz)
Apagado: < 0,4 G (3 – 100 Hz)
Choque Funcionando: < 2 G (10ms max.)
Conectado: < 10 G (10ms max.)
Altura (sobre Funcionando: 0 – 3000mts
nivel del mar) Conectado: 0 – 12000mts
Conexiones
Sistema Sencilla x1 slot PCIe
MADI Chasis socket twin tipo SC t
Fibra de vidrio Multimode 50/125µ o 62.5/125µ
Wordclock 75Ω BNC, Zin = 75Ω, 3V3/5V TTL compatible
Modelos de controlador de dispositivo
Mac Core Audio
PC ASIO 2, WDM, MME, GSIF2, DWave
Requisitos del Sistema
Mac
• PowerPC G4/G5 o Intel
• OS X ‘Tiger’ Versión 10.4.11 o más
• OS X ‘Leopard’ Versión 10.5.4 o más
PC
• Pentium IV o equivalente, 1GHz o más
• Windows XP SP2 o más (sólo 32bits)
• Windows Vista (sólo 32bits)
• 512MB de memoria RAM
• 1 PCIe slot adicional
• Pantalla del color de VGA (1024 x 768 pixeles o más)
• Conexión Internet (para registrar el producto y actualizar el software)
EN
DE
FR
ES
IT
JP
25
Page 28

Installazione e Sicurezza
Questa sezione contiene tutte le informazioni pratiche, gli avvisi e le indicazioni per assicurarvi un ambiente di lavoro efficiente e sicuro.
Si prega di leggere attentamente questa sezione prima di installare o utilizzare l’unità. Attenzione a non perdere queste istruzioni.
Sicurezza: Generale
• Leggete queste istruzioni.
• Conservate queste istruzioni.
• Fate attenzione a tutti gli avvisi.
• Seguite le istruzioni.
• Non utilizzate il dispositivo vicino all’acqua.
• Non esponete il dispositivo a pioggia o umidità.
• Non ostruite i fori di ventilazione. Installate il dispositivo seguendo
le istruzioni riportate.
• Non collocate il dispositivo vicino a fonti di calore come termosifoni,
stufe o altri oggetti (compresi amplificatori) che producono calore.
• Non ci sono regolazioni o impostazioni da effettuare su questo
apparato.
• Regolazioni o modifiche del dispositivo possono influenzare le
prestazioni andando a far sì che gli standard internazionali di
sicurezza e/o di conformità possano non essere più soddisfatti.
26
Attenzione
• Per ridurre il rischio di una scossa elettrica, non eseguire alcuna
operazione oltre a quelle contenute in questo Manuale di Installazione
a meno che non sei una persona qualificata a farlo. Fare riferimento
a servizi che possono essere eseguiti da personale tecnico qualificato.
Note riguardo all’installazione
• Quando si installa questo apparato, posizionare il computer su cui
deve essere installato su un piano sicuro.
• Mentre si installa questo apparato, per prevenire danni causati da
cariche elettrostatiche causate al computer o all'apparato stesso,
bisogna sempre prendere le dovute precauzioni antistatiche. Usare
sempre il bracciale antistatico. Se si è in dubbio, prego rivolgersi al
personale di assistenza tecnica qualificata.
• Quando si accede all'interno del computer, fare attenzione ad angoli
spesso spigolosi e taglienti.
• Non istallare o rimuovere questo apparato mentre il computer è
acceso. Disconnettere sempre il cavo di alimentazione del computer
prima di accedere a questo apparato.
• Se si è in dubbio riguardo l'installazione di questo apparato, prego
rivolgersi al personale di assistenza tecnica qualificata.
Page 29

La Confezione
MadiXtreme. Hi-speed MADI I/O
Installation Guide
Installations-Handbuch
Guide d’Installation
Guia de Instalación
Guida di Installazione
MadiXtreme. This is SSL.
EN
DE
FR
ES
IT
JP
La confezione di ‘MadiXtreme’ contiene le seguenti cose:
L’unità MadiXtreme
(MadiXtreme 128 indicato qui)
CD & Guida di
Installazione
(questo documento)
EN
DE
FR
ES
IT
JP
27
Page 30
Installazione Semplificata del Software *
Mac:
1. Inserire il CD di installazione del MadiXtreme nel tuo
driver CD/DVD.
2. Cliccare due volte sull'icona CD e visionare i contenuti.
3. Lanciare il programma d'intallazione di MadiXtreme
cliccando due volte sull'icona MadiXtreme Installer.
4. Seguire le istruzioni che appaiono sullo schermo.
* Le istruzioni più approfondite di installazione del software saranno trovate nella Guida di Riferimento di
MadiXtreme inclusa sul MadiXtreme CD o scaricate dal sito www.solid-state-logic.com.
PC
Per evitare complicazioni inutili, è importante che il driver
di MadiXtreme sia installato prima del montaggio della
scheda nel computer.
1. Inserire il CD dell'installazione di MadiXtreme nel vostro
lettore CD/DVD.
2. Cliccare due volte sull'icona CD e visionare i contenuti.
Se Autorun è abilitato questo avverrà automaticamente.
3. Individuare ed avviare il programma DrvSetup.
Selezionare Update per installare il driver di
MadiXtreme.
4. Seguire le istruzioni sullo schermo, assicurandosi di
attenersi a tutti gli avvisi quanto basta per accertarsi
che l'installazione del driver si completi.
28
Page 31

Installazione di Hardware (Mac o PC)
1. Prego leggere e capire le considerazioni
dell'installazione e di sicurezza alla pagina 26.
installa in un PC, accertarsi che il driver di MadiXtreme
sia stato preinstallato.
2. Spegnere il computer e staccare il cavo di alimentazione.
3. Togliere i coperchi per avere accesso ai connettori PCIe.
4. Localizzare un connettore PCIe libero e assicurarsi di
rimuovere il pannello cieco.
5. Inserire la tua scheda MadiXtreme nel connettore PCIe
e avvitare la staffa di fissaggio al contenitore del
computer.
6. Rimontare i coperchi del computer e connettere il cavo
di alimentazione.
7. Riaccendere il computer.
Solo per Windows XP:
8. Per completare l'installazione del driver selezionare il
apparirà il messaggio Found New Hardware Wizard.
Seguire le istruzioni sullo schermo usando i driver
caricati precedentemente, assicurandosi di attenersi a
tutti gli avvisi quanto basta per accertarsi che
l'installazione del driver si completi.
Se si
EN
DE
FR
ES
IT
JP
29
Page 32

Istruzioni riguardanti la direttiva WEEE per gli utenti dell’Unione Europea
Standard di Conformità
Questo apparecchio completamente è conforma ai requisiti correnti di protezione delle direttive del Consiglio della Comunità Europea su EMC e
su LVD.
In conformità a quanto sancito dalla Direttiva europea 2002/96/EC, nota anche come WEEE (Waste Electrical and Electronic Equipment), la presenza di
questo simbolo sul prodotto o sulla confezione indica che il prodotto non deve in alcun modo essere smaltito nei normali cassonetti di raccolta. Al
contrario, è responsabilità dell'utente provvedere al corretto smaltimento del prodotto in appositi punti di raccolta destinati al riciclaggio delle
apparecchiature elettriche ed elettroniche inutilizzate. La raccolta differenziata di tali rifiuti consente di ottimizzare il recupero e il riciclaggio di materiali
riutilizzabili, riducendo nel contempo i rischi legati alla salute dell'uomo e l'impatto ambientale. Per maggiori informazioni sul corretto smaltimento del
prodotto, contattare l'autorità locale o il rivenditore presso cui è stato acquistato il prodotto.
Garanzia
L‘acquirente ha diritto, in conformità alle condizioni e termini della Solid State Logic e secondo la legge europea del consumatore, alla garanzia di due anni a partire
dalla data della consegna del prodotto. La garanzia è valida soltanto negli stati membri dell’ Unione Europea (UE) che hanno adottato nella loro legislazione la legge
applicabile all’Unione Europea (UE). La legislazione nazionale applicabile riguardo la vendita di merci di consumo è influente a questa garanzia. I reclami della garanzia
saranno accettati soltanto se il prodotto comprato è stato usato per il relativo scopo progettato. Qualunque prodotto comprato ed usato per uno scopo diverso da
quello previsto non avrà diritto ad una copertura di garanzia. Per tutte le richieste di informazioni o risarcimento danni prego indirizzare le richieste direttamente a
noi se l’acquisto è stato diretto, altrimenti al commerciante da cui avete comprato il prodotto. Questo deve avvenire entro due mesi a partire dalla data in cui avete
rilevato la mancanza di conformità con i termini della garanzia. In caso di reclamo si prega di includere il documento originale della prova d‘acquisto.
Riparazioni fuori garanzia
Nel caso in cui si riscontra il difetto dopo che periodo di garanzia è scaduto, l’unità dovrebbe essere rinviata alla Solid State Logic direttamente o attraverso il vostro
commerciante locale. Vi sarà addebitato il tempo necessario per la riparazione (alle tariffa corrente della Solid State Logic per le riparazione) più il costo delle parti
e del trasporto. Prego notare che nessuna unità può essere accettata per la riparazione senza precedenti accordi (vedi sotto).
Tutte le spedizioni
• Nessuna unità sarà accettata per la riparazione dalla Solid State Logic se non accompagnata da un numero valido di RMA (autorizzazione di materiale di ritorno),
ottenuto prima della spedizione dalla Solid State Logic.
• Tutte le unità dovrebbero essere spedite alla Solid State Logic in un imballaggio rigido adatto. Se le unità è spedita in altro tipo di imballaggio la Solid State Logic
non può essere giudicata responsabile di qualsiasi eventuale danno provocato. In tale caso la Solid State Logic restituirà l’unità in una scatola adatta, e vi sarà
addebitato il relativo costo.
• Prego includere tutti gli elementi originariamente forniti – incluso questo opuscolo, CD etc.
30
Page 33

Specifiche
Fisiche *
Profondità 168mm / 6.6 pollici
Larghezza 1 Slot (18.5mm / 0.7")
Altezza 99mm / 3.9 pollici
Dimensioni 320mm x 220mm x 65mm
confezione 12.60" x 8.66" x 2.56"
Peso confezione 0.52kg / 1.15 libbre
* Tutti i valori sono approssimati
Ambientali
Temperatura Operatività: da +5°C a 30°C
Non operatività: da –20°C a 50°C
Gradiente Max.: 15°C /Ora
Umidità Relativa Operatività: da 20 a 80 %
Non operatività: da 5 a 90 %
Max. wet bulb: 29°C
(non-condensing)
Vibrazioni Operatività: < 0.2 G (3 – 100Hz)
Non operatività,
power off: < 0.4 G (3 – 100Hz)
Shock Operatività: < 2 G (10mSec. Max.)
Non operatività: < 10 G (10mSec. Max.)
Altitudine (sul Operatività: da 0 a 3000m
livellodel mare) Non operatività: da 0 a 12000m
Connettori
Sistema Singola scheda x1 PCIe slot
MADI Presa da pannello tipo Twin SC
Fibra Multimode 50/125µ o 62.5/125µ
Wordclock 75Ω BNC, Zin = 75Ω, 3V3/5V TTL compatible
Modelli di Driver
Mac Core Audio
PC ASIO 2, WDM, MME, GSIF2, DWave
Requisiti di Sistema
Mac
• PowerPC G4/G5 o Intel
• Mac OS X ‘Tiger’ Versione 10.4.11 o superiore
• Mac OS X ‘Leopard’ Versione 10.5.4 o superiore
PC
• Pentium IV o equivalente, 1GHz o superiore
• Windows XP SP2 o superiore (32bit solo)
• Windows Vista (32bit solo)
• 512MB RAM
• 1 spare PCIe slot
• Schermo di colore di VGA (1024 x 768 pixel o più)
• Connessione a Internet (per la registrazione del prodotto e aggiornamenti
software)
EN
DE
FR
ES
IT
JP
31
Page 34

32
Page 35
EN
DE
FR
ES
IT
JP
33
Page 36

34
Page 37
EN
DE
FR
ES
IT
JP
35
Page 38

36
Page 39

EN
DE
FR
ES
IT
JP
37
Page 40

Visit SSL at: www.solid-state-logic.com
82S6MC620A
All Rights reserved under International and Pan-American Copyright Conventions
MadiXtreme is a trademark of Solid State Logic
All other product names and trademarks are the property of their respective owners and are
No part of this publication may be reproduced in any form or by any means, whether mechanical
or electronic, without the written permission of Solid State Logic, Oxford, OX5 1RU, England
As research and development is a continual process, Solid State Logic reserves the right to
change the features and specifications described herein without notice or obligation.
Solid State Logic cannot be held responsible for any loss or damage arising directly or indirectly
from any error or omission in this manual.
© Solid State Logic
hereby acknowledged
E&OE
 Loading...