

Page 1
installation manual
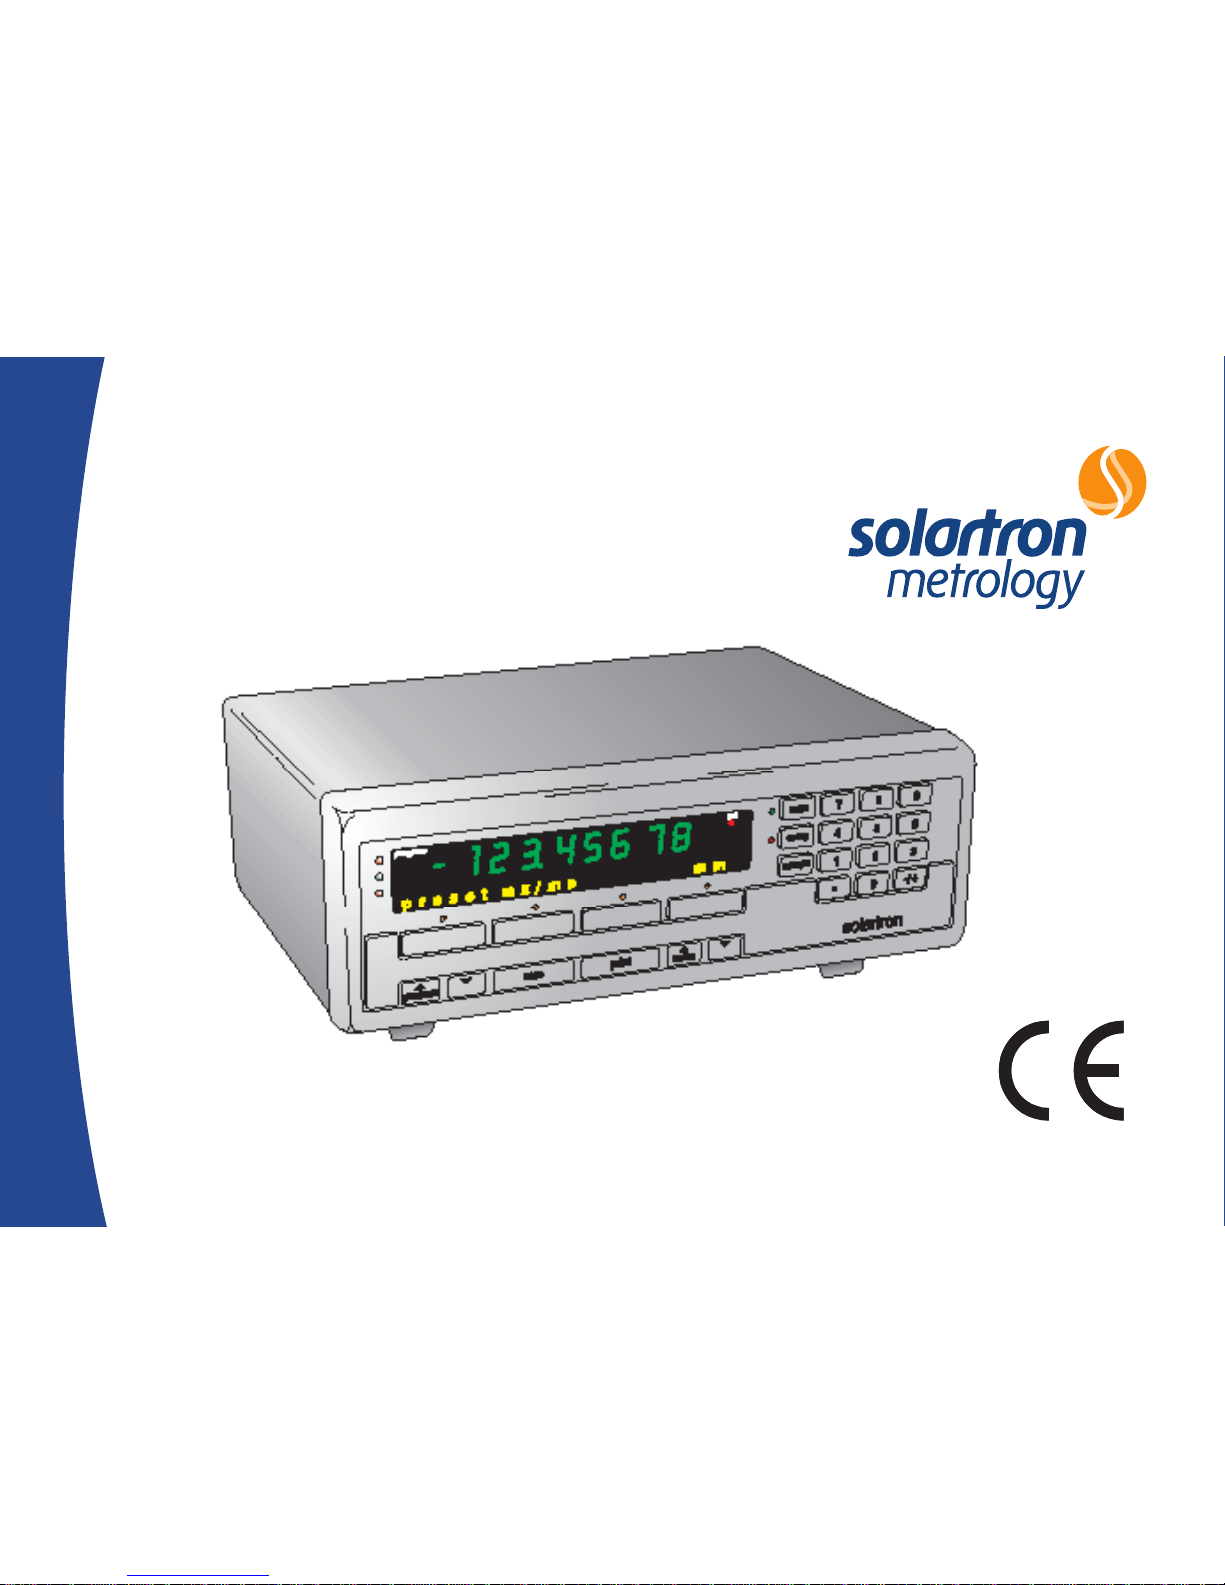
Model No. DR600 & DR700
Digital Readout
Page 2

1.0 Index
2
Section Title Page
1.0 Index . . . . . . . . . . . . . . . . . . . . . . . 2
2.0 Safety Summary . . . . . . . . . . . . . . . 3
3.0 Service & Repair . . . . . . . . . . . . . . 5
4.0 Measurement Configurations . . . . . 6
5.0 Digital Readout Interface . . . . . . . . 7
6.0 Probe Interface/
Orbit Network Connections . . . . . . . 9
7.0 RS232 . . . . . . . . . . . . . . . . . . . . . . . 10
8.0 Input/Output Connections . . . . . . . . 13
9.0 Motor Drive Connections . . . . . . . . . 17
10.0 General Specification . . . . . . . . . . . . 18
Return of Goods
Part No. 502001 Issue 6
1.0 Index
Page 3
Part No. 502001 Issue 6
3
2.0: Safety Summary
2.0: Safety Summary
This Equipment is designed as Safety Class I
apparatus to comply with EN61010-1.
Service Safety
This equipment has been designed and tested to
meet the requirements of the Low Voltage Directive
(1997) and has been supplied in a safe condition.
This manual contains information and warnings
that must be followed by the user to ensure safe
operation and to retain the apparatus in a safe
condition.
Terms in this Manual
WARNING statements identify conditions or
practices that could result in personal injury
or loss of life.
CAUTION statements identify conditions or
practices that could result in damage to the
equipment or other property.
Symbols in this Manual
This symbol indicates where applicable
cautionary or other information is to be
found.
Power source Apply no more than 265V rms
(AC) between supply conductors or conductor
and ground.
Page 4
Part No. 502001 Issue 6
4
2.0: Safety Summary
2.0: Safety Summary (continued)
WARNING: Do not operate in an explosive
atmosphere
WARNING: Do not remove covers or panels
To avoid personal injury, do not remove covers
and panels. Do not operate the equipment without
the covers and panels fitted. There are no internal
adjustments required during commissioning the
equipment.
Warning: Danger arising from loss of ground
During a fault condition and upon loss of protective
ground (earth) connection, all accessible conducting
parts - including controls that might appear to be
insulated - can render an electric shock.
CAUTION: Use correct Fuse
To avoid a fire hazard, use the correct
fuse type, voltage and current rating as
specified for the equipment. Refer fuse
replacement to qualified service personnel.
Grounding the equipment
The unit is grounded through the mains lead:
to avoid electric shock, plug the power lead into
a properly-wired receptacle before connecting to
the input or output terminals. A protective ground
connection by the way of the grounding conductor
in the power lead is essential for safe operation.
Page 5

Part No. 502001 Issue 6
5
3.0: Service & Repair
3.0: Service & Repair
Replacing the fuse
At the rear right of the Digital Readout
remove the fuse cover of the IEC320
connector and replace the fuse with the
same 20mm type and value.
This equipment contains no user serviceable
parts other than the fuse.
This equipment must be returned to your Solartron
dealer for all other service and repair.
Dismantling the unit will invalidate the warranty.
Page 6

Part No. 502001 Issue 6
6
3.0: Handling & Maintenance
4.0: Measurement Congurations
Individual probe - connection of one Linear
Encoder or Digital Probe.
Probe pair - connection of 2 probes
configured as A+B or A-B.
Probes may be plugged directly into the rear panel
recessed receptacle.
Multiple probes - up to 10 individual probes
or probe pairs (A+B or A-B)
each allocated to a program.
DR600 only
Scan - connection of up to 30 probes
(Linear Encoders and/or
Digital Probes) and allocated
to a single program.
DR700 only
Gauging mode - connection of up to 30 probes
(Linear Encoders and/or Digital
Probes) each with its own limits
and preset. Global Pass/Fail.
Refer to Digital Readout User Manual to configure
the options.
To connect more than 2 probes to the Digital
Readout, use the Orbit Network Connection
System.
When more than 10 probes are connected to
the Digital Readout a supplementary power supply
interface module will be required
(Solartron Part No. 911173).
Page 7

Part No. 502001 Issue 6
7
RS 232
IEC 320 CONNECTOR
85V - 264V
15W max
INPU T/
OUTPUT
CONNECTOR
CONNECTOR
PROBE INTERFA CE/
ORBIT NETW ORK
CONNECTORS
Earth stud p rovided
for bonding to machine
safety earth.
(CAU TION: DO NOT USE
FOR CONNECTION TO LVD T
OR HALF BRIDGE GA UGING
PROBES)
MOTO R DRIVE CONNECTION
5.0: Digital Readout Interface
5.0: Digital Readout Interface
Probe(s) must be identified to the Digital Readout
when first installed. Simply press probe tip when
prompted.
5.1 Connecting 1 or 2 Probes
To connect a Linear Encoder or Digital Probe
ensure cable from Probe Interface Electronics (PIE)
is at bottom of unit and plug into either left hand or
right hand side of recessed receptacle.
Page 8

Part No. 502001 Issue 6
8
5.0: Digital Readout Interface
(continued)
5.0: Digital Readout Interface (continued)
5.2: Connecting up to 30 probes
Installation using T-CON
solartron
69
51
Mixed probe
capability
solartron
ORBIT Network
Plug cable into either lefthand
or righthand side of recessed
receptacle in rear panel
9-way cable
zero
motor
print
setup 456
escape 123
0-/+
enter789
solartron
program
preset mx/mn mm
refprogram
. Accessories
T-CON part number 971000
9 pin (m/f) cable 1.5m 006869
9 pin (m/f) cable 5m 803664
Page 9

Part No. 502001 Issue 6
9
6.0: Probe Interface/Orbit
Network Connections
6.0: Probe Interface/Orbit Network Connections
Connector type: 9 way D-sub female
Pin Function
1 0V
2 RS485(A)
3 RS485(B)
4 0V
5 0V
6 +5V
7 +5V
8 +5V
9 0V
1
2
6
3
7
4
8
5
9
1
2
6
3
7
4
8
5
9
View from rear of unit
Page 10

Part No. 502001 Issue 6
10
7.0: RS232
7.0: RS232
(Allows measurement readings to be sent
to printer or PC)
Connector type 25 way D-sub female
7.1: Pin Assignment
Pin Signal Assignment
1 CHASSIS GND Chassis ground
2 TXD Transmitted data
3 RXD Received data
4 RTS Request to send
5 CTS Clear to send
6 DSR Data set ready
7 SIGN GND Signal ground
20 DTR Data terminal ready
7.2: Voltage Levels
TXD and RXD voltage levels
logic level (active) -3V to -15V
logic level (not active) +3V to +15V
RTS, CTS, DSR and DTR voltage levels
logic level (active) +3V to +15V
logic level (not active) -3V to -15V
7.3 Connection Cable
Simple connection between Digital Readout
and printer or PC
(No flow control or Xon/Xoff flow control)
13
2120191817161514 25
24
2322
1211109876
5
4321
11Chassis gnd
RTS/CTS Control = no
&
DTR/DSR Control = no
in RS232 menu
22TXD
33RXD
7
Digital Readout Printer or PC
7 Signal gnd
Page 11

Part No. 502001 Issue 6
11
7.0: RS232 (continued)
7.0: RS232 (continued)
Connection between Digital Readout & printer
or PC using RTS/CTS and DTR/DSR
7.4: Baud Rate 300, 600, 1200, 2400, 4800,
9600, 19200, 28800, 57600
7.5: Data Format 1 start bit
7 data bits
none/odd/even parity
1 or 2 stop bits
Note: Baud rate and data format options are
defined in RS232 menu. Ensure settings
are the same as on the connected serial
device.
7.6 Message format Digital Readout to PC or
printer
Message:<Displayed Measurement>
Initiated by<Send Measurement>command or by
pressing print key
1 9 10 20 21 22 23
Text Reading U S R
Message terminated by [carriage return]
[line feed]
Key:
Text: ASCII text dependant on mode
of operation (Bytes 1 to 9)
Reading: ASCII representation of the
reading, leading zero.s replaced
by spaces (Bytes 10 to 20)
U = units " for inches (Byte 21) space for mm
R = range lamps '>. out of tolerance - high (Byte 23)
'=. in tolerance
'<. out of tolerance - low
DR700 only
If scaling applied (not 1.000) S in byte 22.
Blank if no scaling.
Page 12

Part No. 502001 Issue 6
12
7.0: RS232 (continued)
7.0: RS232 (continued)
PC or printer to Digital Readout
Command Character Description
<Send
Measurement>
STX Requests displayed
measurement to be sent
<X ON> DC3 Stop transmission
of message
<X OFF> DC1 Restart transmission
of message
Freeze display •
The numeric display reading can be programmed
to 'freeze' when RS232 option is selected in ext
menu.
Display frozen and updated by each •
freeze = RS232
<Send Measurement> command on RS232
interface in ext menu
Page 13

Part No. 502001 Issue 6
13
8.0: Input/Output Connections
8.0: Input/Output Connections
Allows remote switches or inputs to be used in
place of Digital Readout keys and displayed value
to be frozen. Range Lamp status can be used to
control external relays.
Input/Output (25 way D-sub Male connector)•
Viewed from rear of unit
Inputs
High +3.9V to +15V (max)
Low -0.5V + 0.9V (lo~5mA)
Pin Assignment
2 Remote ZERO
3 Remote LOAD
4 Remote PRINT
5 Remote Reset MAX/MIN/DIFF registers
6 Remote display
MAX/MIN/DIFF/ACTUAL. key press cycles
7 Remote Freeze Display
8 Remote Program Up
9 Remote Program Down
22
Remote MOTOR
23
Remote MOTOR
24 Unassigned
25 Unassigned
13
2120191817161514 25
24
2322
1211109876
5
4321
Page 14

Part No. 502001 Issue 6
14
8.0: Input/Output Connections
(continued)
8.0: Input/Output Connections (continued)
Remote ZERO:• Performs same function
aspressing zero key when input is taken low
then high.
Remote LOAD:• Performs same function as
pressing load soft key when input is taken low
then high in Operation mode preset or Max/min
menu.
Remote PRINT:• Performs same function as
pressing print key when input is taken low
then high.
Remote MAX/MIN/DIFF:• Performs same
function as pressing soft key that cycles
through actual/maximum/minimum/difference in
Operation mode Max/min menu, when input is
taken low, then high.
Remote RESET:• Performs same function as
pressing reset soft key in Operation mode Max/
min menu, when input is taken low, then high.
Remote Freeze•
The Digital Readout can be programmed
to freeze the displayed reading as follows:
Display frozen and updated by each negative •
going edge on Remote Freeze Display signal.
freeze = remote neg edge in ext menu.
Display frozen while Remote Freeze Display •
signal is low.
freeze = remote low in ext menu.
Page 15

Part No. 502001 Issue 6
15
8.0: Input/Output Connections
(continued)
8.0: Input/Output Connections (continued)
Remote Program Up/Down performs the •
same function as pressing the program
program keys when input is taken low
then high.
Motor• /Motor performs the same function
as pressing
the motor motor keys when input
is held low.
Input Schematic •
Active low, edge triggered.•
Only one input to be active at a time. •
If a series of functions is being processed then •
tmin may be prolonged.
Outputs
High +32V (max) •
Ic ≤ =10µA
Low ≤ +0.4V •
Ic ≤ 100mA
Pin Function
15 Not assigned
16 Range lamps: Within tolerance
17 Range lamps: Low
18 Range lamps: High
19 Do not connect
20 Do not connect
Input
+5V
1K
Io
10K
0V
0V
0V
0V
t
min ≥ 20mSec
Page 16

Part No. 502001 Issue 6
16
8.0: Input/Output Connections
(continued)
8.0: Input/Output Connections (continued)
Misc. •
Pin Function
1 0V
10 0V
11 Unused
12 Unused
13 Unused
14 Unused
21 Unused
Output schematic •
Outputs
Open Collector, active low •
Range lamps within tolerance/low/high operate •
on actual limit set values with no hysteresis
Delay until signal output: • ≤ 50mSec
(If a series of functions is being processed this
may be prolonged)
Page 17

Part No. 502001 Issue 6
17
9.0: Motor Drive Connections
9.0: Motor Drive Connections
Provides dc power for probe motor drive.
Pin Function
1 Motor +
2 Motor -
3 12V
4 0V
5 Spare
5 way DIN female connector viewed from rear
of unit.
When motor • key or remote Motor
selected then
Motor + = 0V
Motor - = +12V
When motor • key or remote Motor
selected then
Motor + = +12V
Motor - = 0V
When no motor keys or inputs• selected then
Motor + = 0V
Motor - = 0V
Maximum current from +12V is 100mA•
1 3
2
4 5
Page 18

Part No. 502001 Issue 6
18
10.0: General Specication
10.0: General Specication
ENVIRONMENTAL
Operating Temperature (°C) 0 to 40 deg. C
Storage Temperature (°C) -20 to 60 deg. C
Humidity 0 to 95% non condensing
Safety Rating EN61010-1
IP Rating
Front panel module IP65
Complete unit IP40
EMC
Emission EN50081-1
Immunity EN50082-2
Power supply via IEC 320 Connector
Line voltage 85V to 264V
Line frequency 47Hz to 440Hz
Power 15W max
Line fuse 2A T
Fuse size 20mm
Nominal Dimensions
Width 235mm
Height 80mm (96mm incl. feet)
Depth 190mm
Weight 2.3kg
 Loading...