

Softride 26247 User Manual [en, es, fr]

DURA RACK INSTRUCTIONS
Model #26247
Important This bike rack is designed for use in a 2” or 1.25” receiver and designed to hold a maximum of four bikes. Do not
use this rack for anything other than carrying bicycles. Do not exceed your vehicle’s receiver load ratings for any
reason. This rack cannot be used on Class 1 vehicle receivers. Reference the instruction manual for proper use of
this rack.
Warning Check the tightness of bolts and nuts periodically as they may loosen slightly during normal use.
DO NOT drive the vehicle with the bike rack in the lowered position.
This rack CANNOT be mounted and used on the rear of trailers.
This rack MUST be removed from the vehicle before going through a car wash.
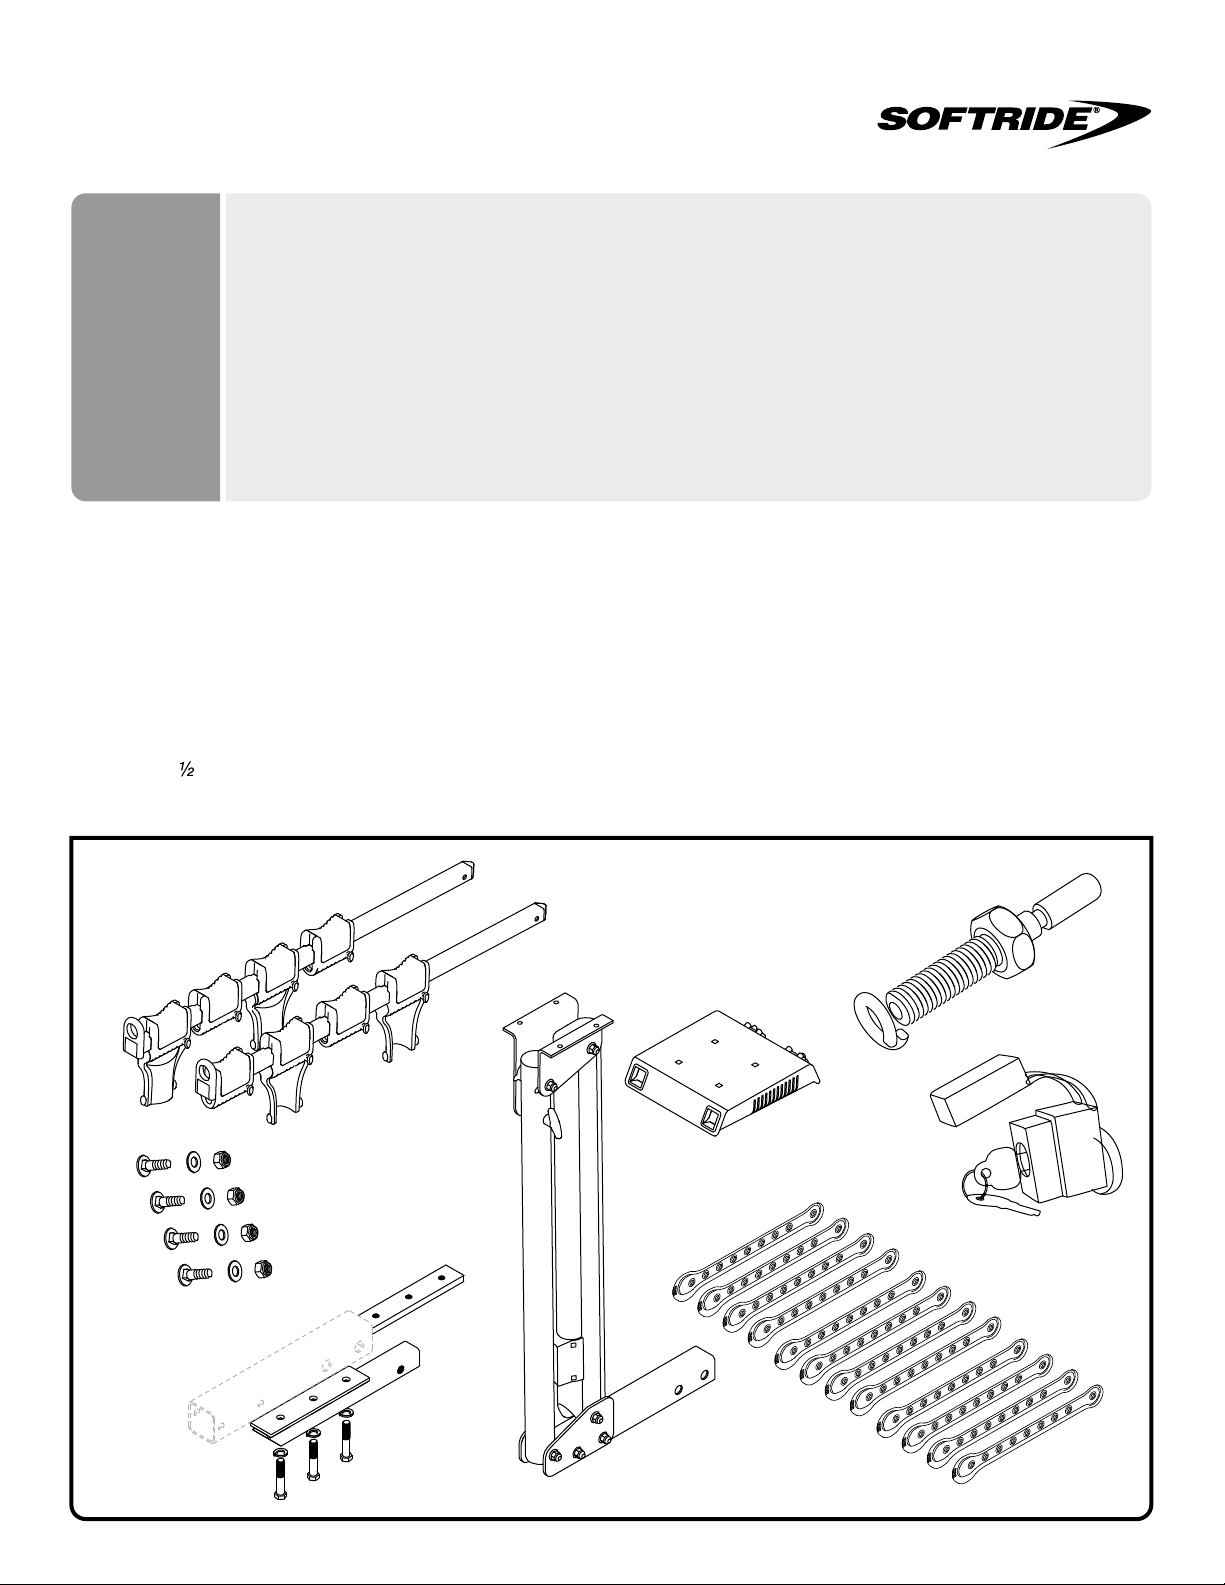
PARTS INCLUDED
(A) Main rack assembly
(B) Top plate
(C) Bike rack arms (2)
(D) Arm straps (12)
(E) Carriage bolts and lock washers (4 each)
(F) Hitch lock with keys
(G) Hitch bolt with lock washer (5/8” for 2” rack, ” for 1.25” rack)
(H) 1.25” Hitch Bar
(C)
(B)
(A)
TOOLS REQUIRED
13mm socket with extension
Adjustable wrench (2)
Screw driver
(G)
(E)
(D)
(F)
(H)
DURA RACK INSTRUCTIONS
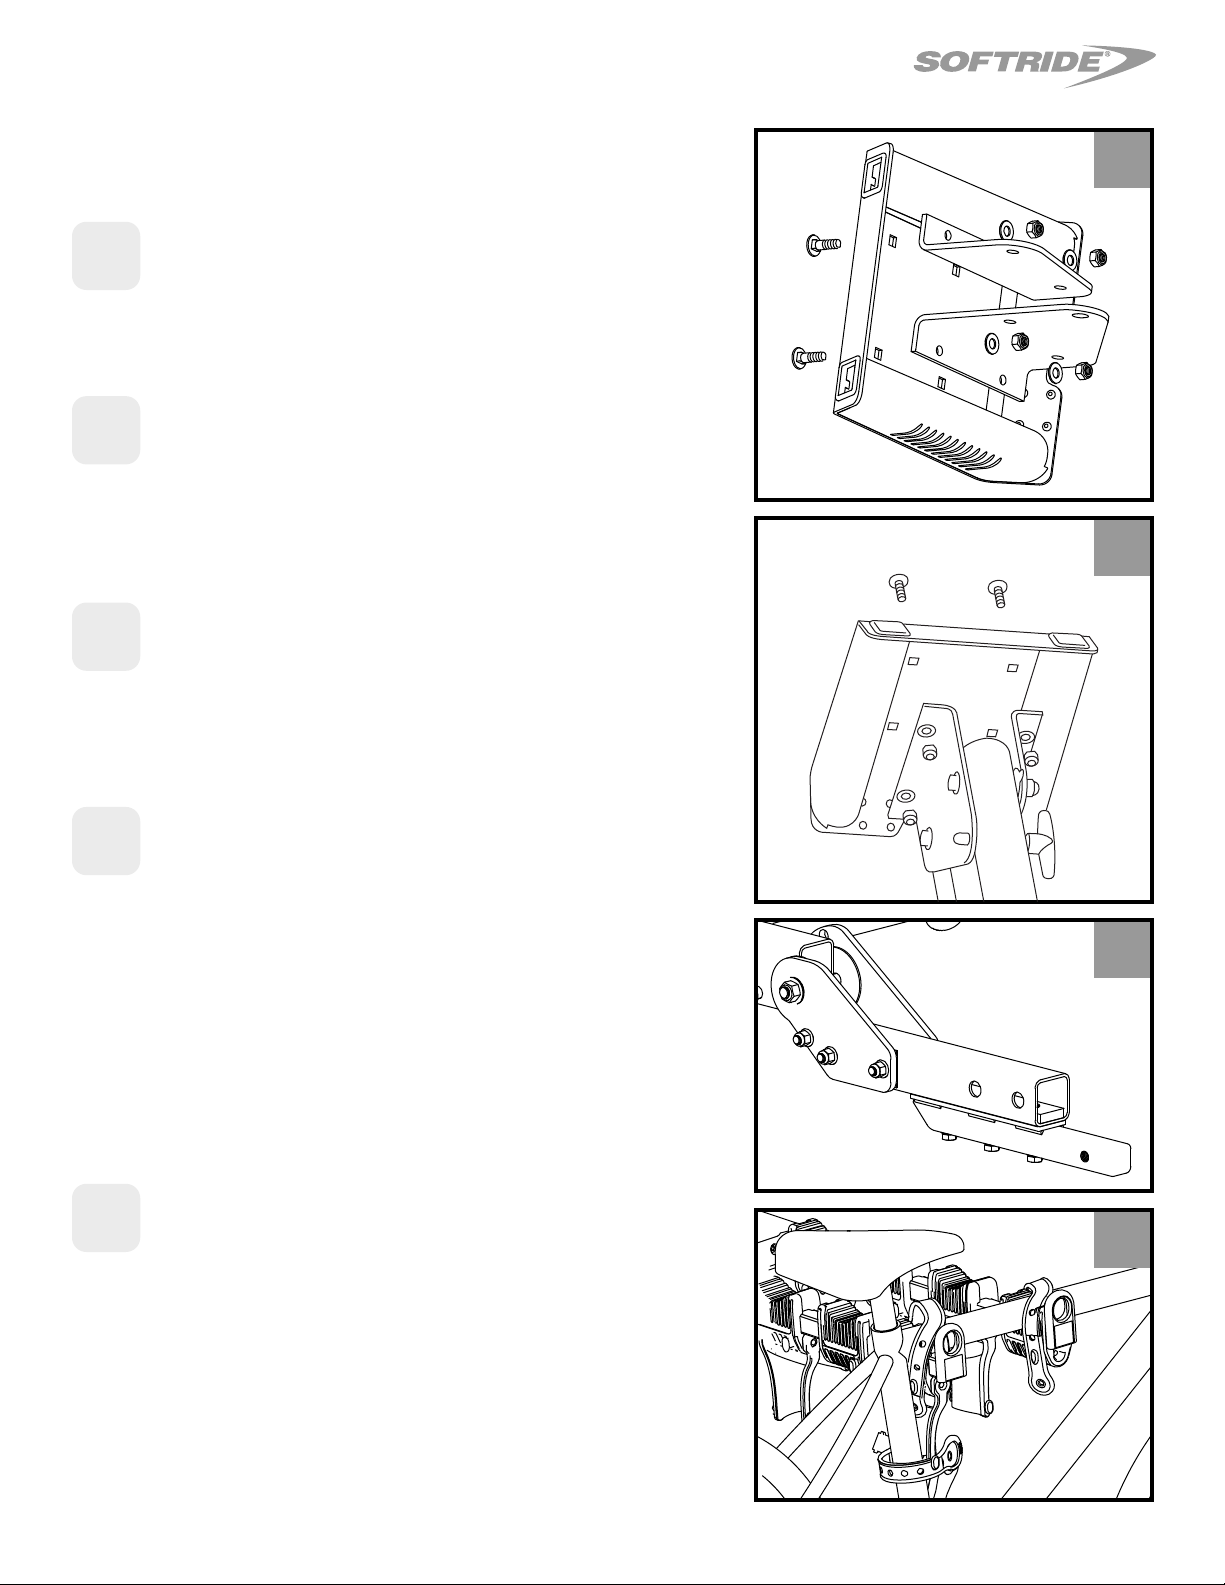
Assembly Of Rack
Begin assembly of rack by loading the carriage
1
2
3
bolts into the 4 holes in the top plate. Place the
top plate on the floor, top side down.
Position the main rack assembly on the top
plate, aligning the mounting holes of the top
plate with the holes in the brackets on the main
assembly.
Be sure the cable lock can be accessed from the
rear after the top plate has been secured. Place
the lock washers and lock nuts on the carriage
bolts and tighten them to 12 foot pounds.
FOUR CARRIAGE BOLTS
1
2-3
4
5
To convert your 2” rack to a 1.25” rack you will
need to add on the 1.25” assembly to the 2”
hitch bar. Remove the nut holder from the inside
of the 2” hitch bar assembly. Slide the threeholed nut plate inside the 2” hitch bar, aligning
the holes. Pass the three bolts through the lock
washer and 1.25” hitch bar and tighten to the
nut plate. Make sure the three bolts are tightened securely and recheck the tightness of the
bolts from time to time.
Place the straps on the bike arms.
FOUR
NUTS
FOUR WASHERS
4
5
2
DURA RACK INSTRUCTIONS
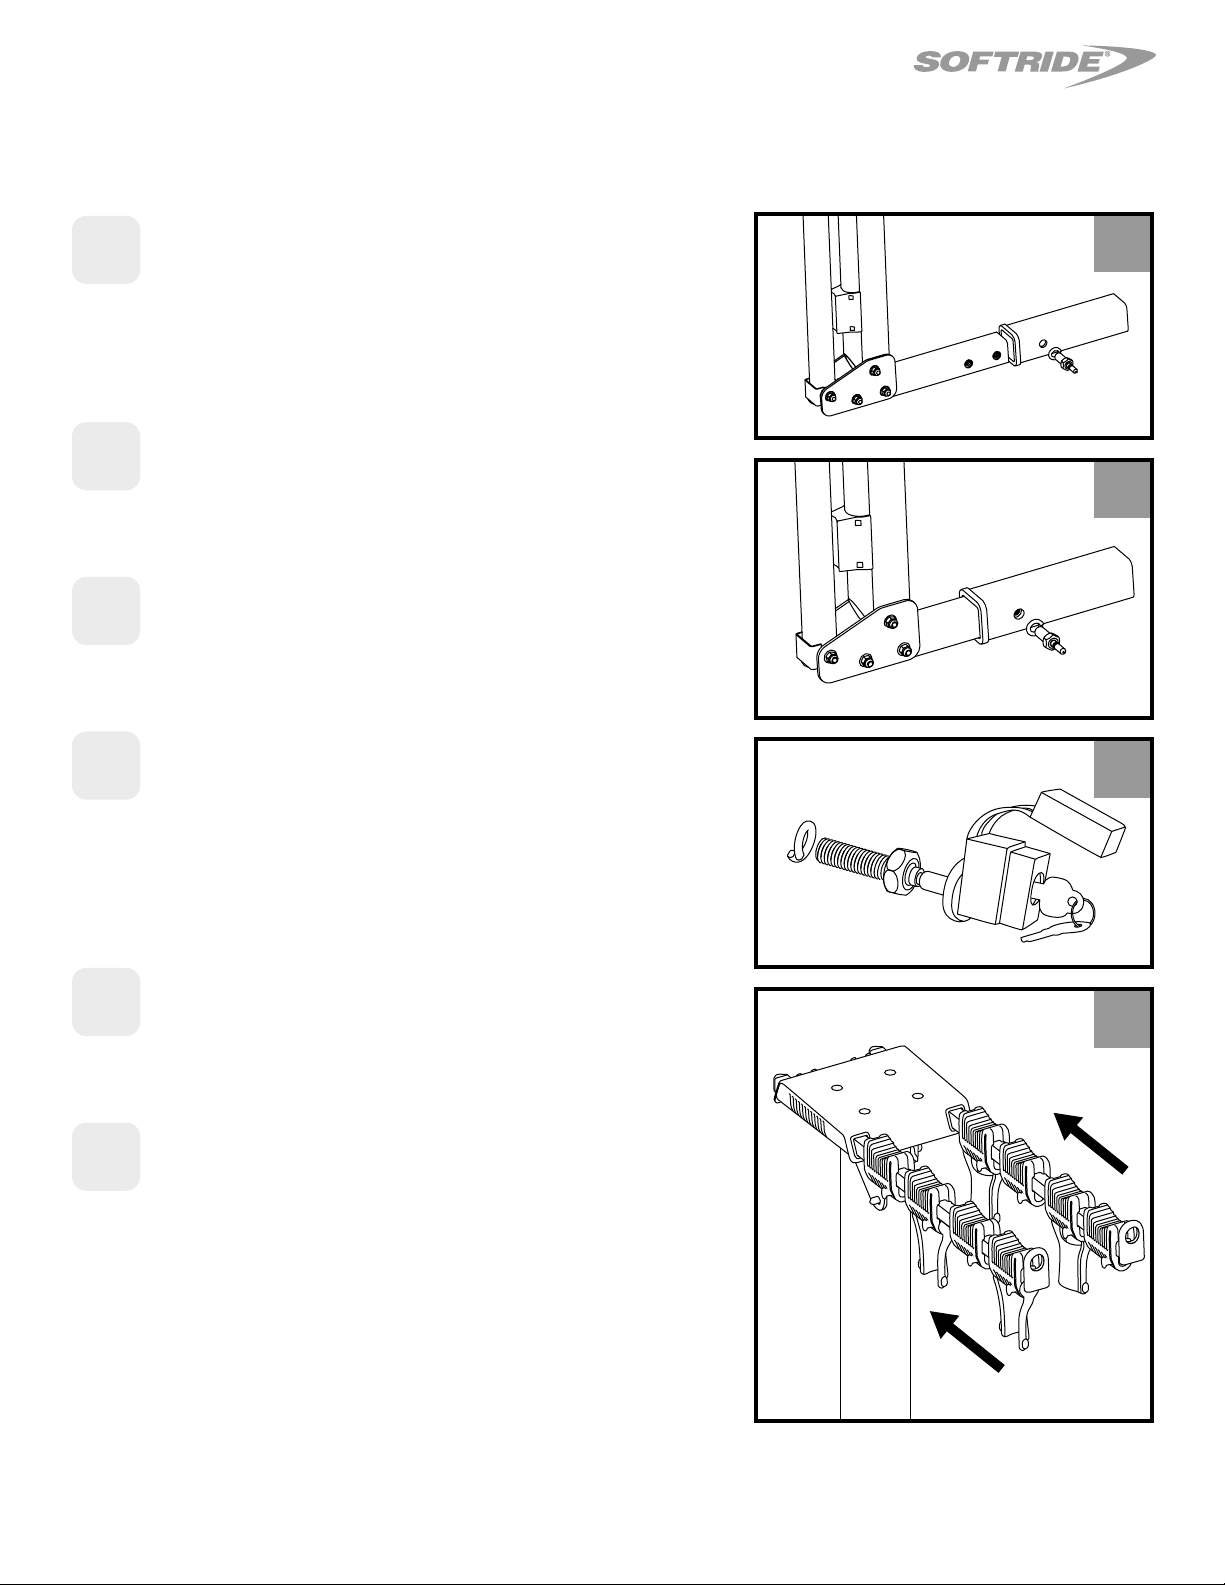
Installation Of The Rack
1
2
3
4
For 2” racks only. Check to make sure that the
nut inside the rack hitch bar is aligned with the
hole in the hitch bar. Adjust with a screw driver if
necessary.
Slide the rack into the receiver hitch of the
vehicle.
Line up the hole in the hitch bar with the hole in
the receiver hitch.
Place the lock washer on the hitch bolt and
thread it into the nut in the hitch bar. For 2”
racks tighten the hitch bolt to 60 foot pounds.
For the 1.25” rack, tighten the hitch bolt to 40
foot pounds.
2-3
4
5
5
6
To lock the bike rack to the vehicle, press the
hitch lock over the bolt stud.
The bike arms must be oriented so that the
inside curved surface of the anti-sway bracket is
facing outward. Slide the arms into the top
plate until you hear a click which indicates they
have locked into the auto lock mechanism.
6
3
DURA RACK INSTRUCTIONS
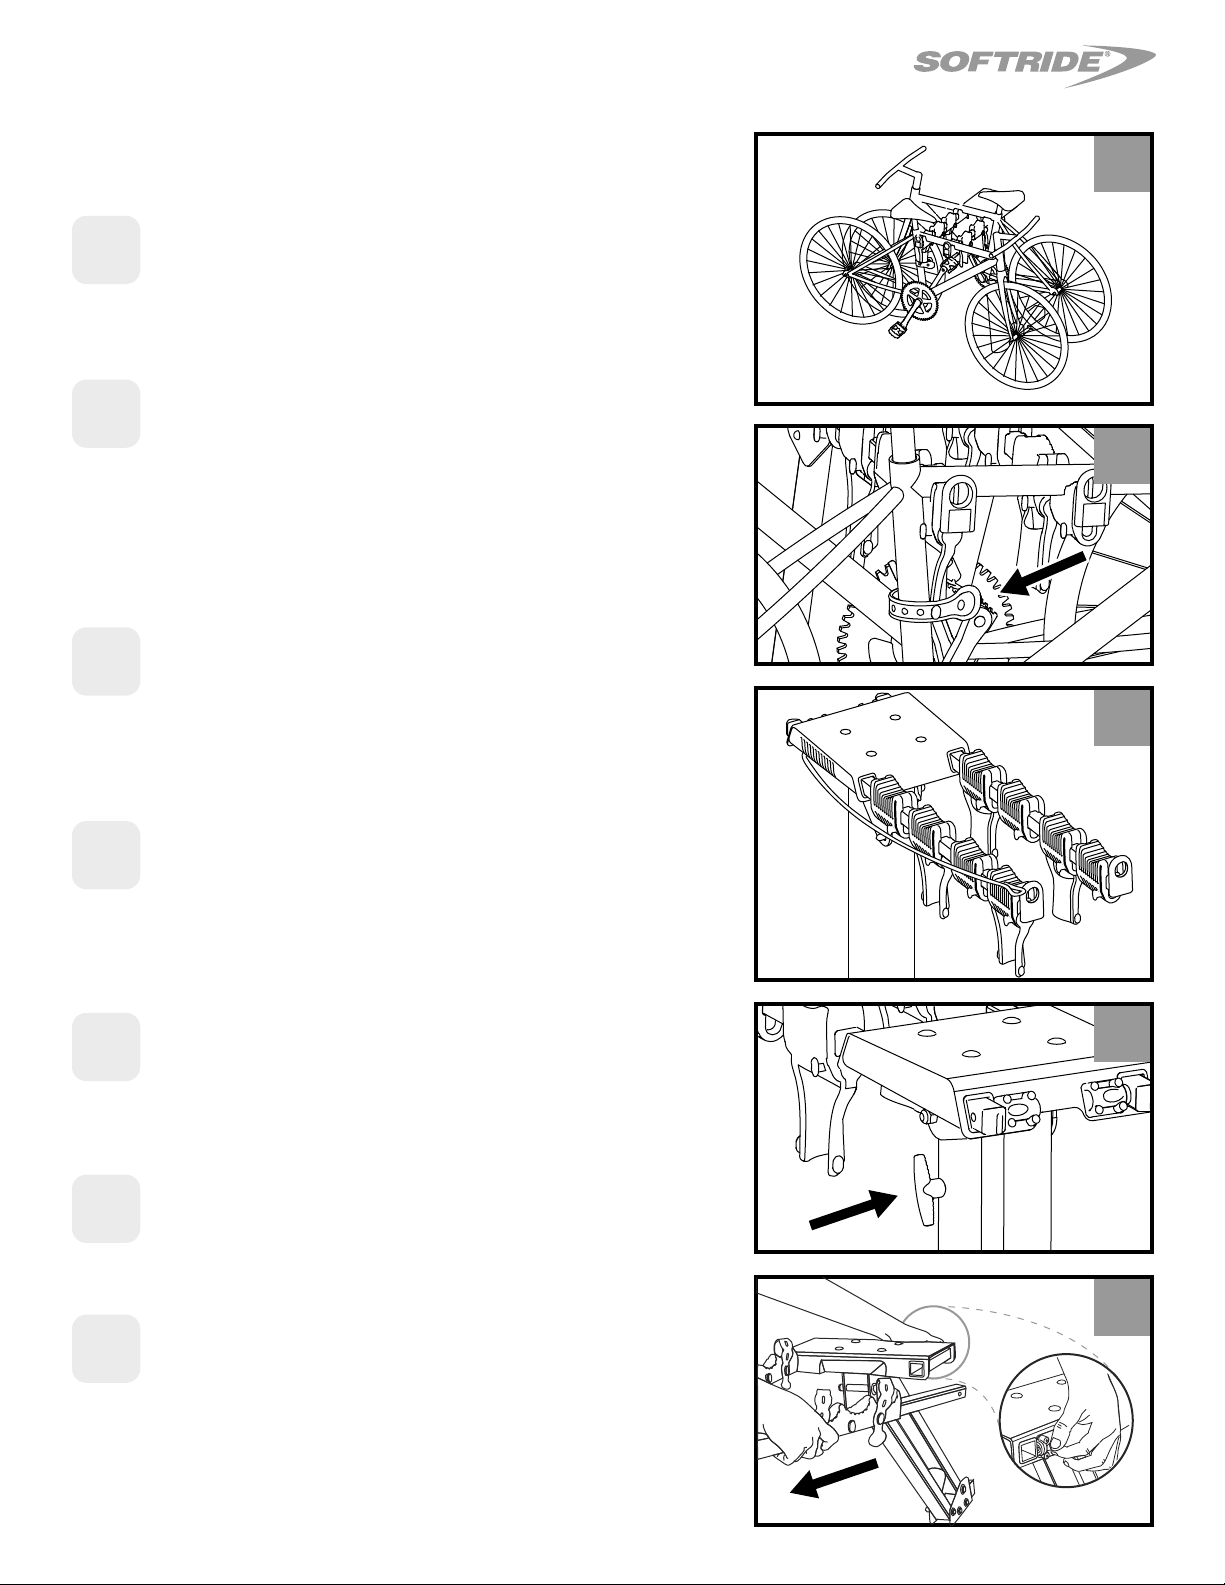
Use Of Rack
Place bicycles onto the rack starting at the point
1
2
3
closest to the vehicle. Alternate the direction the
bikes are facing when mounted on the rack.
Position the seat post tube in the anti-sway
cradle. Attach the bikes to the block and antisway mechanism using the straps provided. The
bike may be off center on the rack. It is important that the anti-sway cradle is flush the bicycle
seat tube.
To utilize the cable lock, pull it out of the upright
and along the side of the top plate, over the
bicycle top tubes and attach it to the yellow bail
on the end of one of the arms using a padlock.
1
2
3
4
5
6
7
To lower the rack, grasp the release lever and
while pushing the rack toward the vehicle pull
the lever out. Supporting the arms of the rack,
lower the unit.
To raise the rack, push the arms of the rack up
and toward the vehicle until you hear the pull pin
click back into place.
When not carrying bikes, remove the arms and
store.
To remove the arms, press the release lever on
the auto lock feature on the back of the top
plate and pull the arm out.
4
7
Questions? E-mail us at info@softride.com.
4
INSTRUCTIONS DU SUPPORT DURA
Model #26247
Important Ce support est conçu pour être utilisé sur une barre d’attelage de 2 po ou 1,25 po et pour recevoir jusqu’à quatre
bicyclettes. Il ne doit pas être utilisé à une autre fin. Ne dépassez jamais la charge de base de la barre d’attelage
de votre véhicule. Ce support ne peut pas être utilisé sur les barres d’attelage des véhicules de classe 1.
Consultez le manuel d’instructions pour connaître le bon usage de ce support.
Avertissement Vérifiez régulièrement si les boulons et les écrous sont bien serrés, car ils peuvent se desserrer avec le temps.
Ne CONDUISEZ PAS avec le support à bicyclettes baissé.
Ce support NE PEUT PAS être installé et utilisé à l’arrière des remorques.
ENLEVEZ le support du véhicule pour utiliser les lave-autos automatiques.
PIÈCES COMPRISES
(A) Support
(B) Plaque supérieure
(C) Bras de support (2)
(D) Courroies (12)
(E) Boulons de carrosserie (4) avec rondelles de blocage
(F) Serrure antivol avec clés
(G) Boulon d’attelage avec rondelle de blocage (5/8 po pour support de
2 po, po pour support de 1,25 po)
(H) 1.25po barre d'attelage
(C)
(B)
(A)
OUTILS REQUIS
Douille de 13 mm avec rallonge
2 clés à molette ou 1 clé ouverte de 7/8 po
Tournevis
(G)
(E)
(D)
(F)
(H)
 Loading...