

Page 1
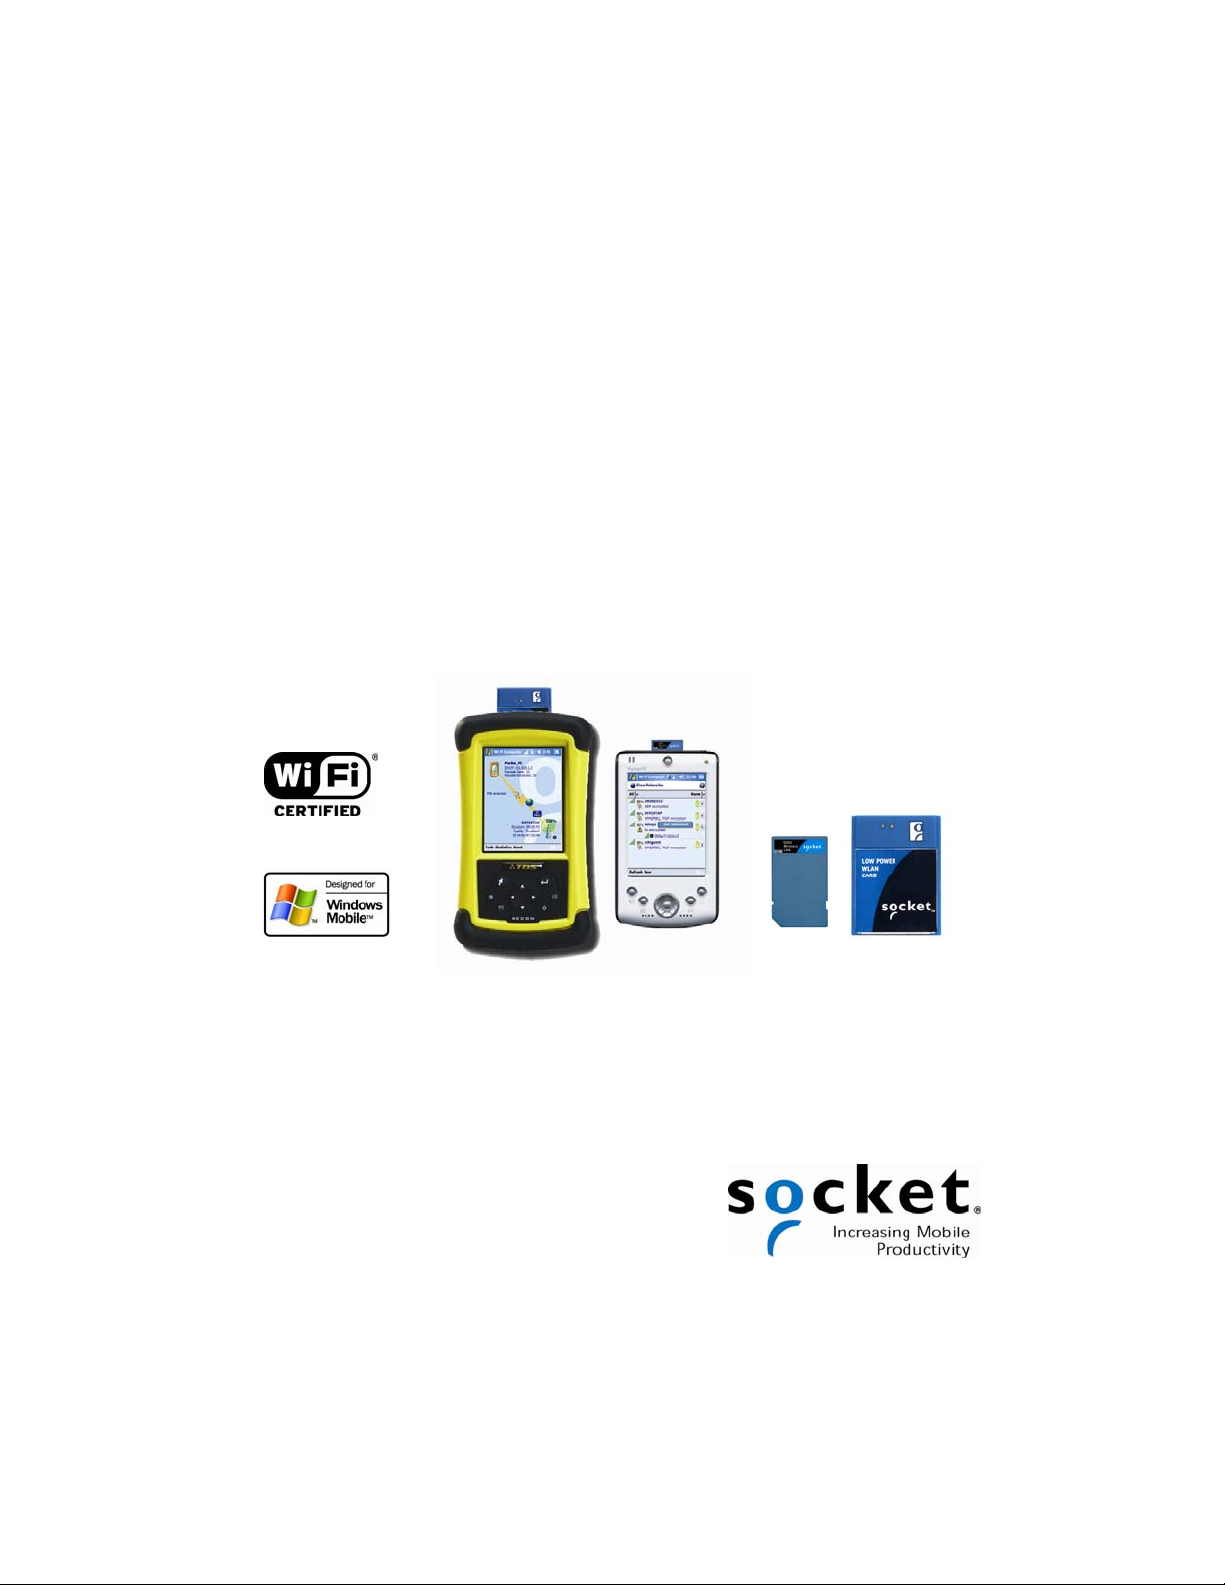
Socket® Wi-Fi® Products
For Windows Mobile
• Hardware: Go Wi-Fi!™
Versions E300, E500, P300, P300x, P500, and P500x
• Software: Wi-Fi Companion
User’s Guide
Page 2

5/2007 Document # 6410-00170 N
Copyright Notice
Copyright © 2007 Socket Communications, Inc. dba Socket Mobile, Inc.
All rights reserved.
Socket, the Socket logo and Battery Friendly are registered trademarks of
Socket Communications, Inc. dba Socket Mobile, Inc. Wi-Fi Companion
and Go Wi-Fi! are trademarks of Socket Communications, Inc. dba Socket
Mobile, Inc. Wi-Fi is a registered trademark of the Wi-Fi Alliance. All
other brand and product names are trademarks of their respective holders.
Reproduction of the contents of this manual without the permission of
Socket Mobile is expressly prohibited. Please be aware that the products
described in this manual may change without notice.
Feel free to contact SOCKET MOBILE at:
Socket Mobile, Inc.
39700 Eureka Drive
Newark, CA 94560
USA
Other than the above, Socket Mobile can assume no responsibility for
anything resulting from the application of information contained in this
manual.
Socket Mobile requests that you refrain from any applications of Go Wi-Fi!
or Wi-Fi Companion that are not described in this manual. Please refrain
from disassembling the card. Disassembly of this device will void the
product warranty.
You can track new product releases, software updates and technical
bulletins by visiting the Socket website at: www.socketmobile.com.
2
Page 3

Table of Contents
Copyright Notice 2
1 | Introduction 4
2 | Software Installation 7
3 | Open or WEP-Enabled Networks 9
STEP 1: Prepare Wi-Fi Hardware 10
STEP 2: Start Wi-Fi Companion 12
STEP 3: Find and Connect to a WLAN 13
STEP 4: Connect Automatically to Your Network 16
4 | WPA or 802.1x Networks 18
STEP 1: Prepare Network Information 19
STEP 2: Install Authentication Certificate(s) 20
STEP 3: Prepare Wi-Fi Hardware 22
STEP 4: Start Wi-Fi Companion 24
STEP 5: Find a WLAN and Create a Profile 25
5 | Wi-Fi Companion 31
Turn Wireless Radio On/Off 32
View IP Addresses 33
Find Networks 34
Enable Power Save 36
Install Personal Certificate for EAP-TLS 37
Manage Certificates 38
Ping 39
Trace Route 41
View Rates, Graphs, Tables 43
View Help Files 46
Appendix A Specifications 47
Appendix B Safety and Usage Tips 55
Appendix C Network Information 57
Appendix D Troubleshooting 59
Appendix E Technical Support 60
Limited Warranty 61
Limited Software Warranty 62
Disclaimer 63
Regulatory Compliance for Go Wi-Fi! 64
3
Page 4
1 | Introduction
Socket Wi-Fi products for Windows Mobile are the perfect tools to connect
to enterprise and public Wi-Fi systems, so you can access email, the
Internet, and corporate servers from your favorite Pocket PC.
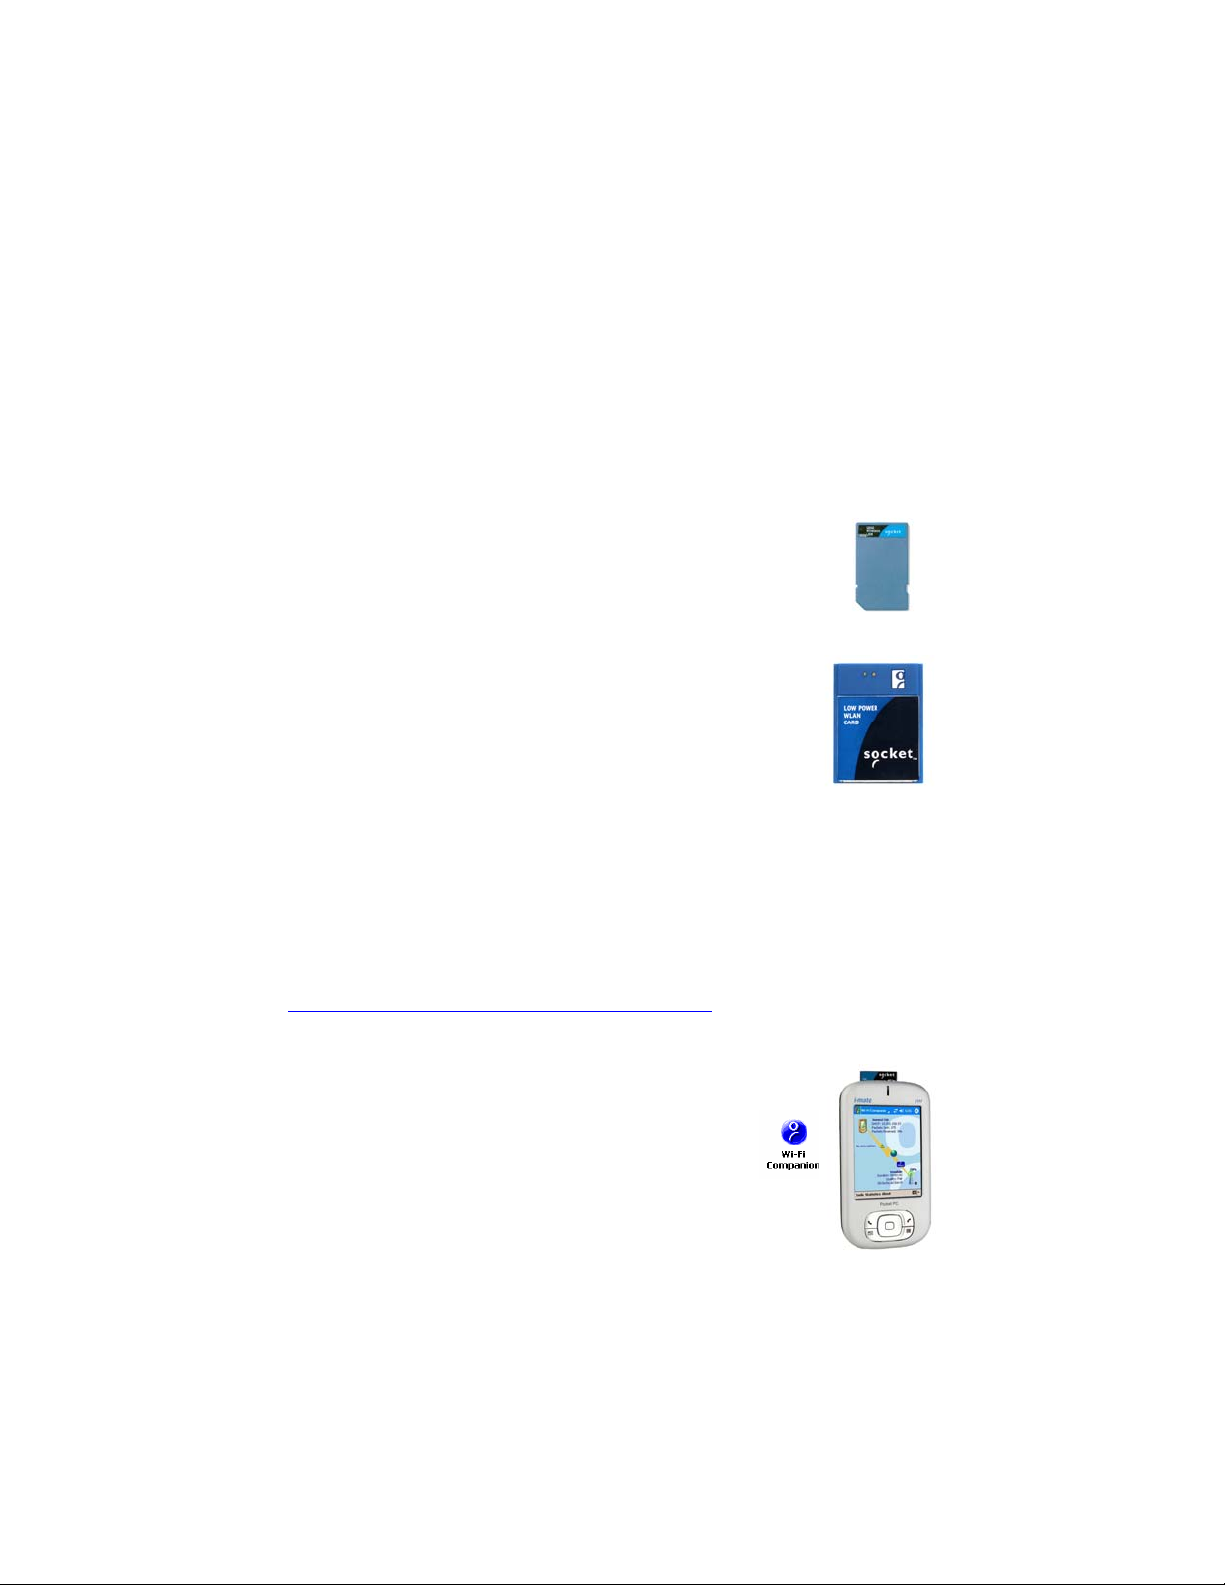
Socket Go Wi-Fi!
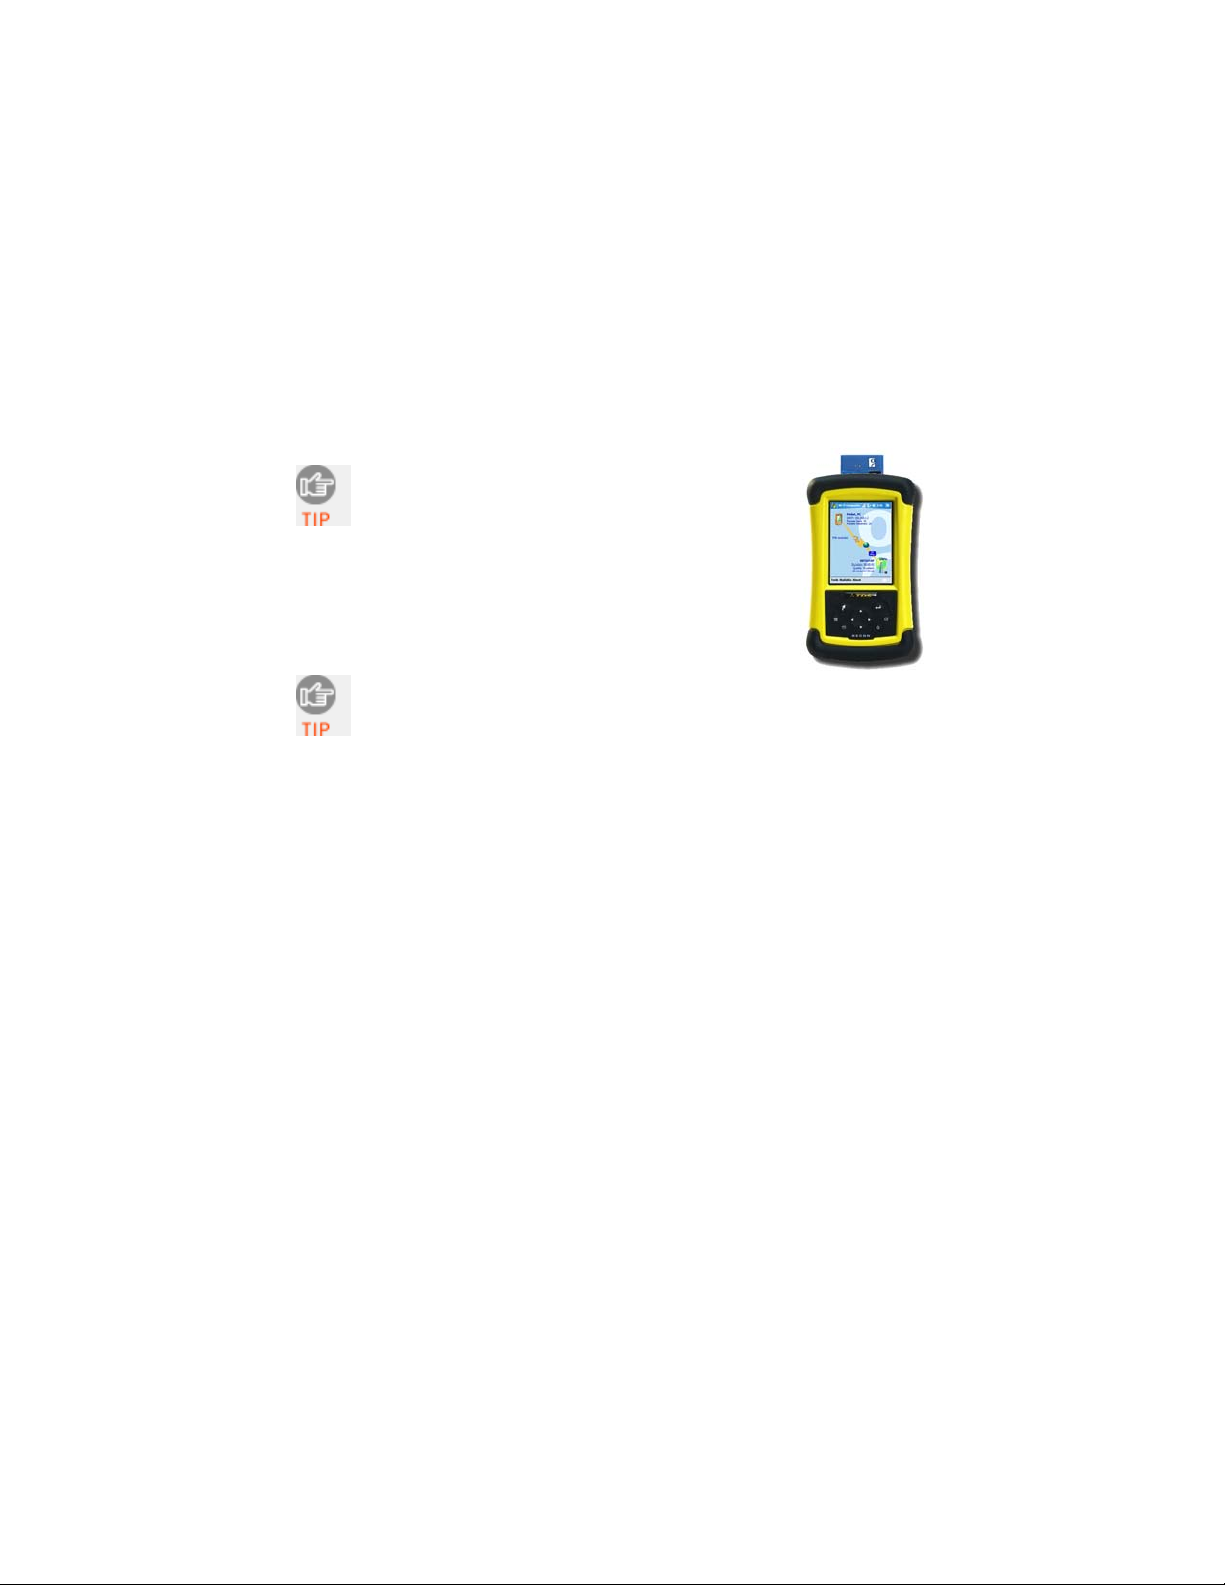
Available in both Secure Digital (SD) and CompactFlash
(CF) form factors, Socket Go Wi-Fi! wireless LAN cards
use Direct Sequence Spread Spectrum (DSSS) technology
to provide a high-capacity network and are Wi-Fi Certified
to interoperate with other Wi-Fi products. The E300 and
E500 conform to IEEE 802.11b specifications with data
rates up to 11 Mbps. The P300, P300x, P500 and P500x
comply with IEEE 802.11b/g with data rates up to 54
Mbps.
The Battery Friendly® Go Wi-Fi! cards were designed to use
minimal power, so you can use them longer without having
to stop and recharge your Pocket PC.
The cards work with these types of WLAN security:
• Open systems
• 40/64-bit or 128-bit WEP encryption
• 802.1x with EAP-TLS or PEAP
• WPA and WPA-PSK
Socket Go Wi-Fi! P300 and P500 also support AES and WPA-2
Enterprise. Odyssey Client from Juniper Networks is required. For more
information, please visit:
www.juniper.net/customers/support/products/oac.jsp
Socket Wi-Fi Companion
Socket Wi-Fi Companion is an intuitive and graphical
utility for either the SoMo 650 handheld computer or a
Windows Mobile-base device enhanced with a Go WiFi! card. The software enables you to find WLANs in
range, view their properties in detail, and connect
whenever your favorite networks are available. You
can even manage power settings to maximize battery
life. Plus, diagnostic tools and connection statistics are
provided for advanced users.
(Windows Mobile 2003SE and 5.0 only)
4
Page 5

System Requirements
Note: For information about support for MontaVista Linux and Real-Time
Operating Systems (RTOS), please contact the Socket OEM Group at
www.socketmobile.com/contact
Minimum device requirements for Go Wi-Fi! E300, P300 or P300x
(SD cards):
• Windows Mobile 2003, 2003SE or 5.0
• Available SDIO slot
• For Windows Mobile 2003/2003SE, SDIO Now! software from
BSQUARE is required in ROM
• Software installation requires a host computer with either Windows
Vista or ActiveSync 4.0 or greater. Alternatively, advanced users can
install a CAB file.
Minimum device requirements for Go Wi-Fi! E500, P500 or P500x
(CF cards):
• Windows Mobile 2003, 2003SE or 5.0
• Available CF or PC Card slot (PC Card adapter required for PC slot)
• Software installation requires a host computer with either Windows
Vista or ActiveSync 4.0 or greater. Alternatively, advanced users can
install a CAB file.
• The Go Wi-Fi! E500 only connects to access points or radios that use
long preamble. Every 802.11b/g access point supports long preamble,
and most are configured this way by default.
Product Registration
Socket recommends that all customers register their Socket products.
Registered users receive the following benefits:
• Priority for technical support
• Special offers for future products and product upgrades
• The latest new product information
Register online at: www.socketmobile.com/support/support/new.
Software updates:
www.socketmobile.com/support/downloads
CHAPTER 1: INTRODUCTION 5
Page 6

Go Wi-Fi! Status Indicator LEDs
E300/P300 Link LED
LED LED Behavior Meaning
Off Radio disabled/cannot transmit.
Link
Slow flash Radio on, not connected.
On Connected
E500 LEDs
LED LED Behavior Meaning
Off Radio disabled/cannot transmit.
Power
Green
Flashing Radio on, using Power Save Mode
On
Radio on, not using Power Save
Mode
Off Radio disabled/cannot transmit.
Activity
Amber
Slow flash Radio on, no data traffic.
Rapid flash
Connected. Faster flash denotes
greater network activity.
P500 LEDs:
LED LED Behavior Meaning
Power
Green
Activity
Blue
Off Power off.
On Power on.
Off Not connected.
Flashing Transmitting/receiving data.
On Connected.
6
Page 7

2 | Software Installation
Follow these instructions to install the software into your Windows Mobilebased device.
If you are using the SoMo 650, software installation is not required because
Wi-Fi Companion is pre-loaded on the device.
ADVANCED USERS: For CAB file installation instructions, please refer to
the README file in the installation CD.
1. If your device already has an older version of Socket WLAN software,
you must completely remove it before you install the new software.
Remove both the utility and the card drivers.
• Make sure the WLAN card is not in the Pocket PC.
• Tap Start | Settings | System tab | Remove Programs.
• Select the WLAN card drivers and tap Remove.
• Repeat to remove the WLAN utiity.
• Soft reset the Pocket PC by pressing the reset button.
2. Use a serial/USB connection cable or cradle to make an active connection
between your device and a host PC.
• If your host computer is running Windows Vista, use the Windows
Mobile Device Manager.
• If your host computer is running Windows 2000/XP, ActiveSync
3. Insert the installation CD into your host PC. Use My Computer or
4.0 or greater is required.
Windows Explorer to access your CD-ROM drive.
Alternatively, if you downloaded the software from Socket’s website,
extract and save the contents to your computer. Remember where you
save the software.
CHAPTER 2: SOFTWARE INSTALLATION 7
Page 8
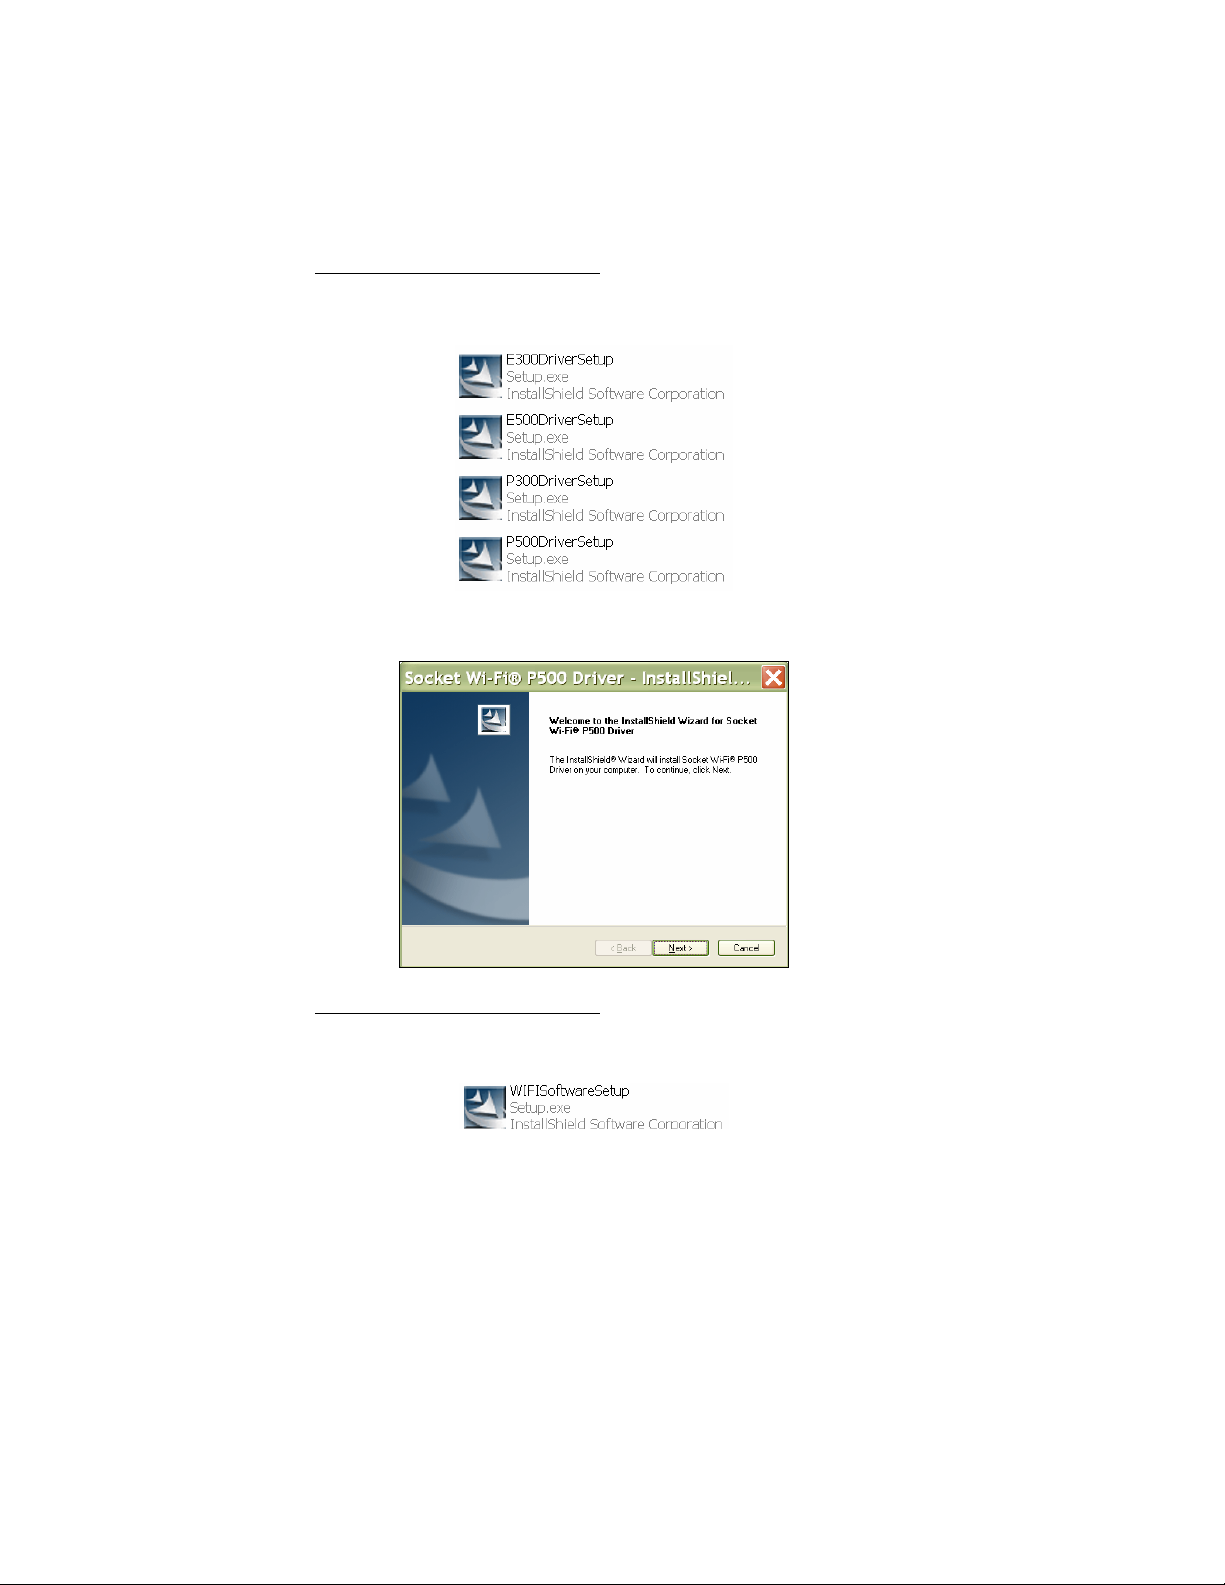
4. If you plan to use Socket Go Wi-Fi!
, you must install the card drivers
first, then install Wi-Fi Companion. In the CD contents, click on the
correct DriverSetup.exe file for your version of Socket Go Wi-Fi!
5. The InstallShield Wizard will begin. Follow the wizard to install the
software.
6. If you plan to use Socket Go Wi-Fi!
, after installing the card drivers,
install Wi-Fi Companion. Return to the CD contents and click on
WIFISoftwareSetup.exe. Follow the wizard to install the software.
7. After software installation, disconnect the Pocket PC from the host PC.
8. Soft reset the Pocket PC by pressing the reset button.
8
Page 9
3 | Open or WEP-Enabled Networks
This section covers how to use Wi-Fi Companion to find, configure and
connect your Pocket PC to a WLAN running an open system or WEP
encryption. Before you begin the instructions in this chapter, make sure you
have installed the software, as described in Chapter 2.
For help using the software, tap
Start | Help.
Connection Summary
STEP 1: Prepare Wi-Fi Hardware.
STEP 2: Start Wi-Fi Companion.
STEP 3: Find a WLAN and create a profile.
STEP 4: Connect automatically to your network.
CHAPTER 3: OPEN OR WEP-ENABLED NETWORKS 9
Page 10
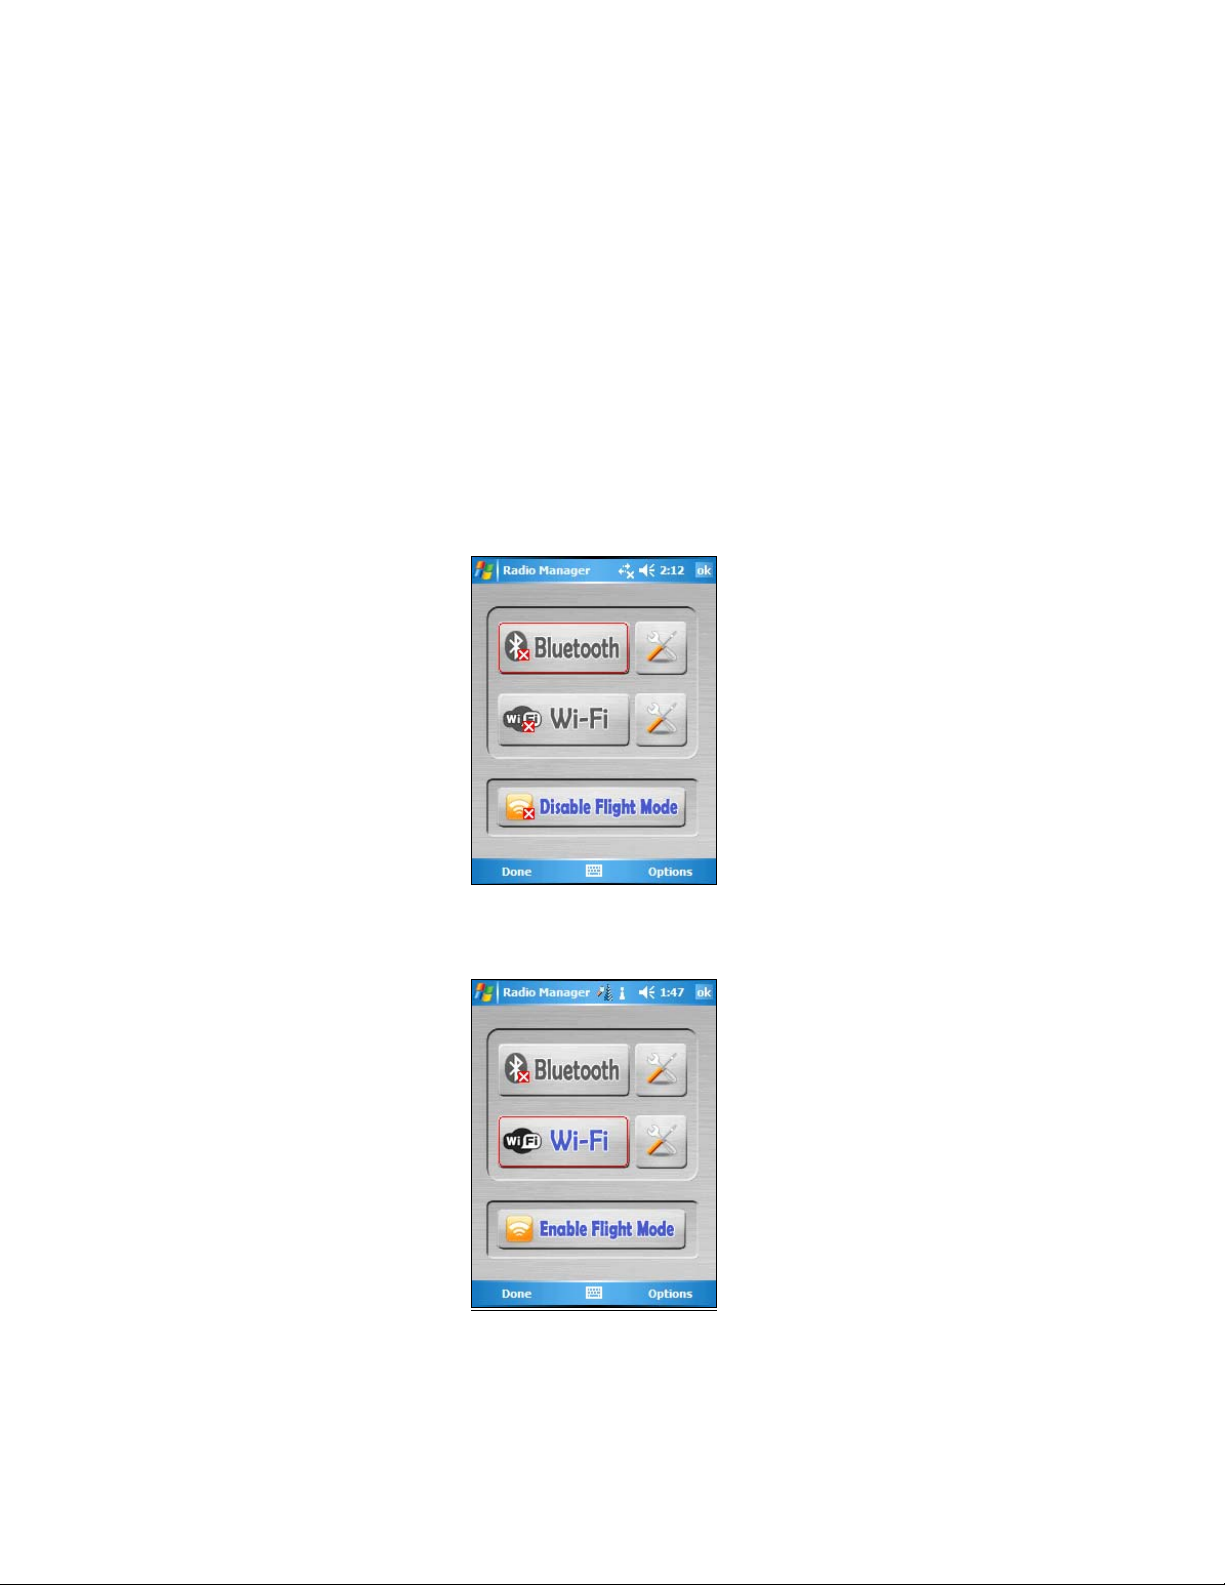
STEP 1: Prepare Wi-Fi Hardware
SoMo 650
Turn on the Wi-Fi radio built into the SoMo 650.
1. Press the button on the right side of the SoMo 650. By default, it is
programmed to launch the Radio Manager. Alternatively, you can tap on
the Wi-Fi icon in the Today screen.
2. In the Radio Manager, enable Wi-Fi. The Wi-Fi button should have a
red “x” to indicate that Wi-Fi is disabled. Tap on the Wi-Fi button.
3. The “x” will vanish to indicate that Wi-Fi has been enabled, and the W i-
Fi LED will turn green.
10
Page 11
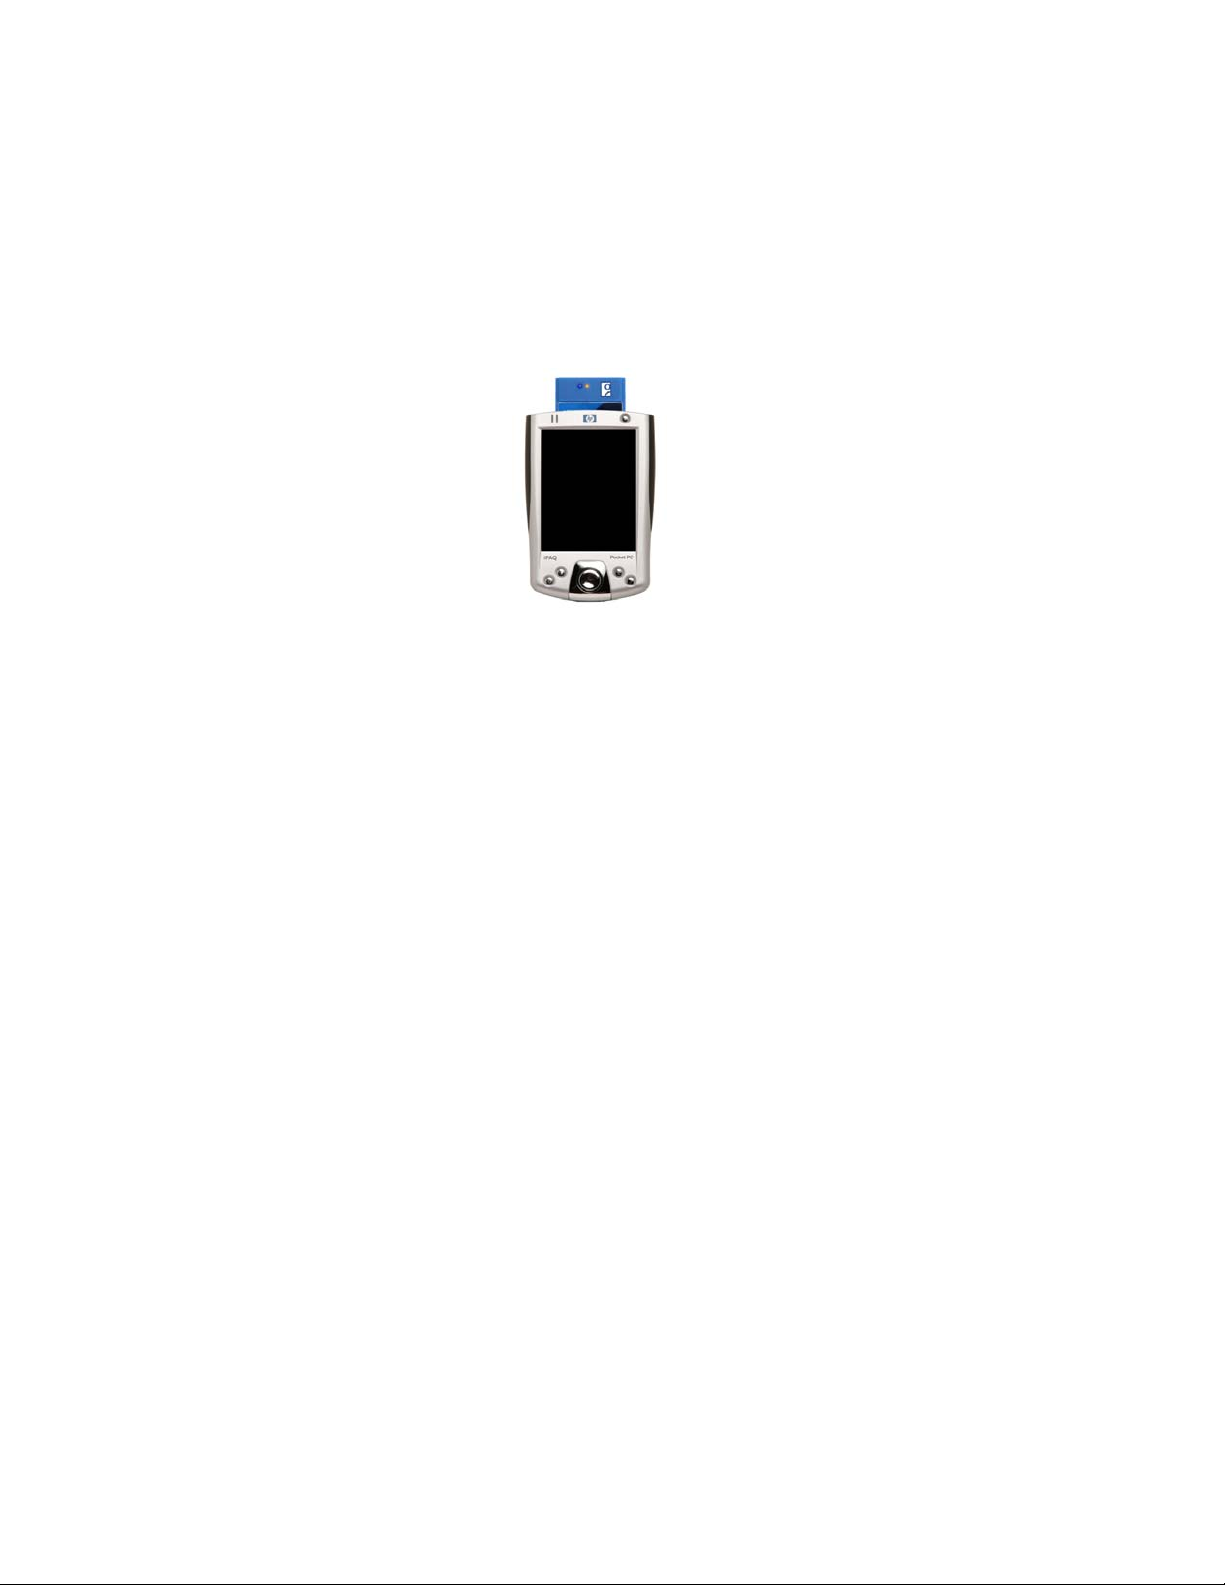
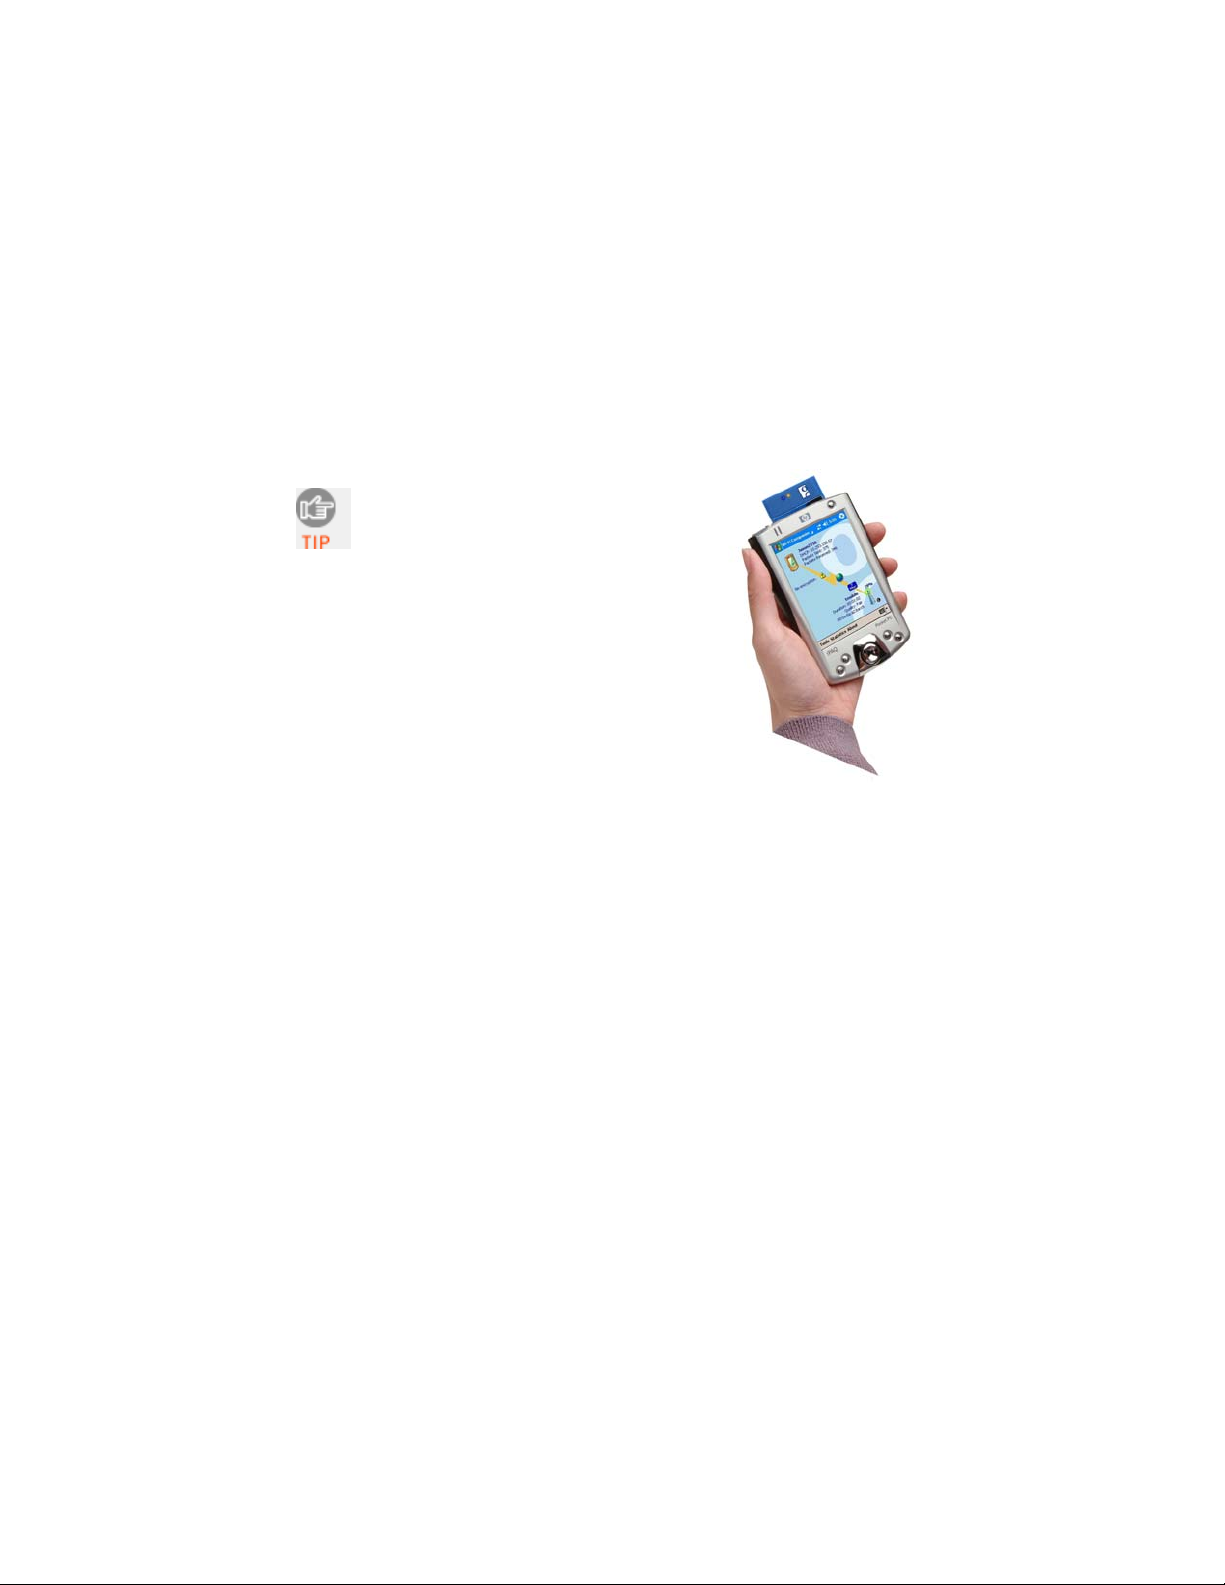
Go Wi-Fi!
Insert the card into the card slot of your device. Make sure the card is
positioned correctly in the slot. In most cases, it should be right-side up. Do
not use excessive force, or damage may occur.
Note: To remove an SD card, press it into the slot. A spring will push the
card out. Do not remove the card by simply pulling, or damage may occur.
CHAPTER 3: OPEN OR WEP-ENABLED NETWORKS 11
Page 12
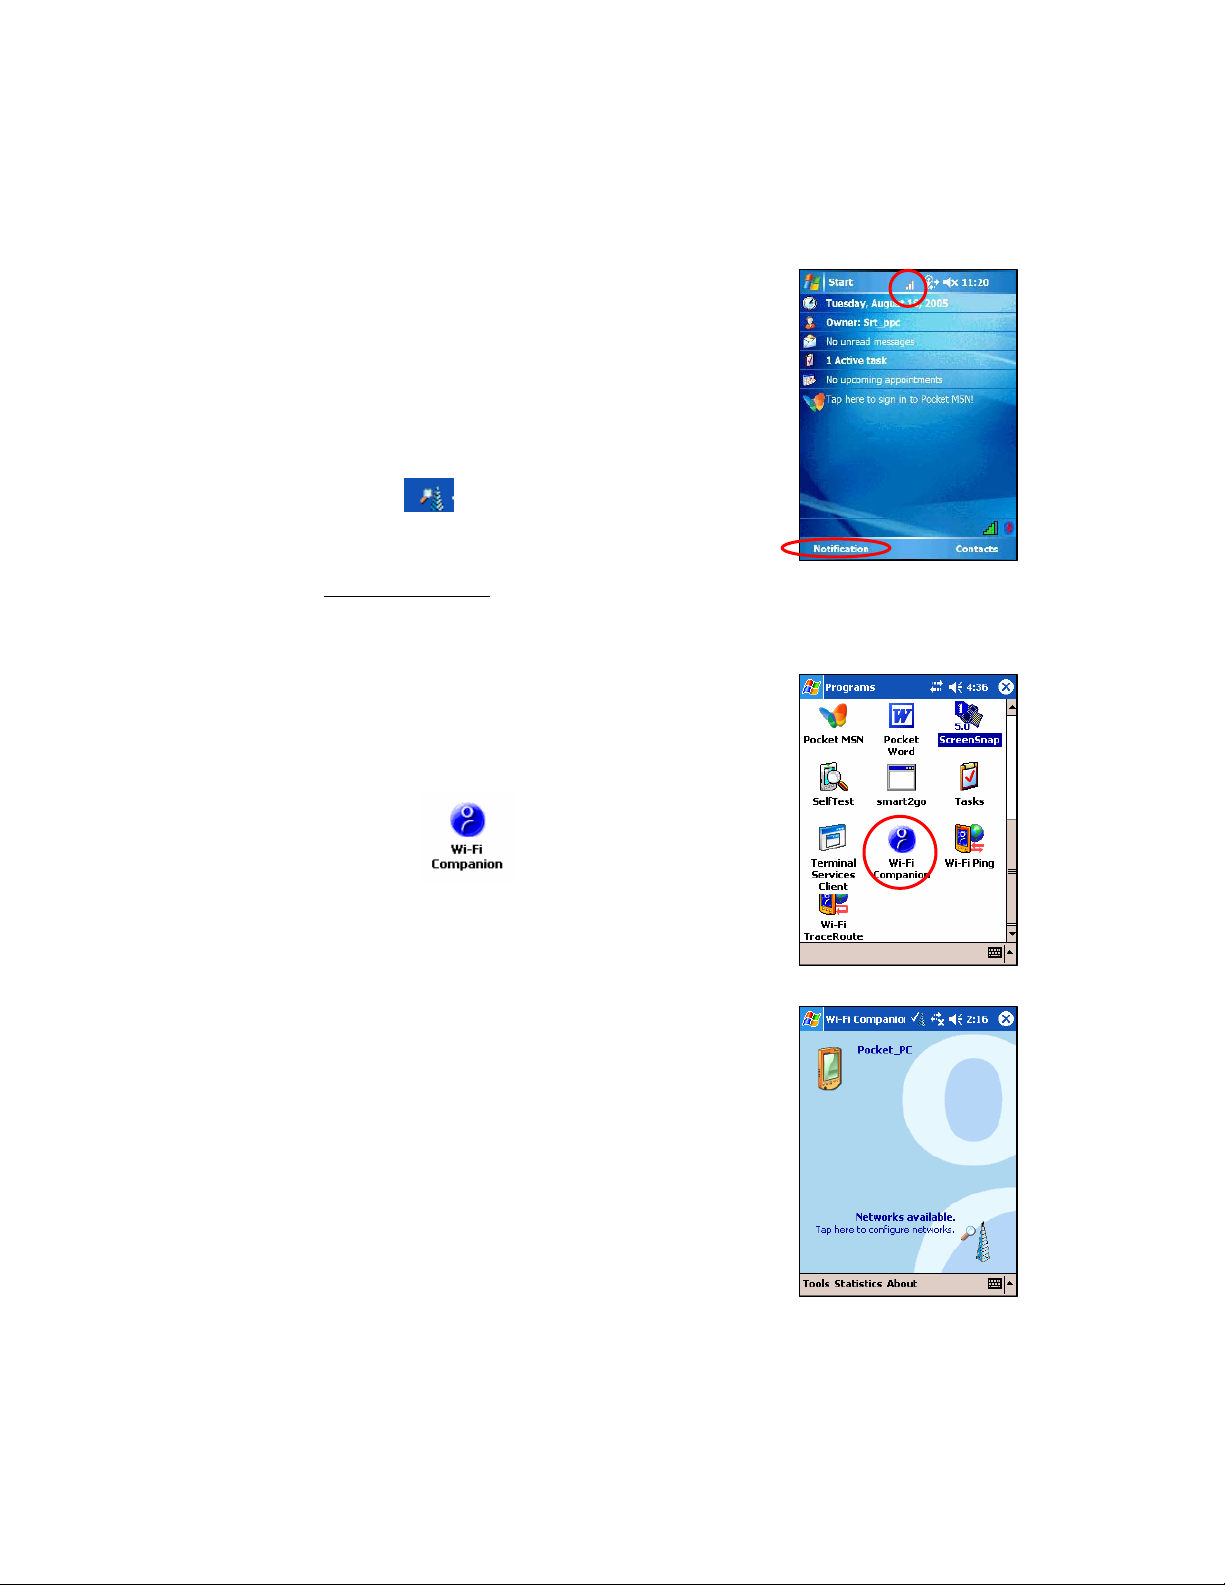
STEP 2: Start Wi-Fi Companion
1. After you insert the WLAN card or turn on the
WLAN radio of your Pocket PC, Wi-Fi
Companion will automatically launch, indicated
by the Socket status icon at the top of the screen.
Tap on the icon. The icon varies depending on
your connection status.
Socket status icon,
search mode.
Windows Mobile 5.0
: You can also tap Notification
at the bottom of the Today screen to access the
main screen of Wi-Fi Companion.
Alternatively, you can manually start the
program by tapping:
Start | Programs | Wi-Fi Companion.
2. The main screen o f Wi-Fi Companion will
appear.
12
Page 13
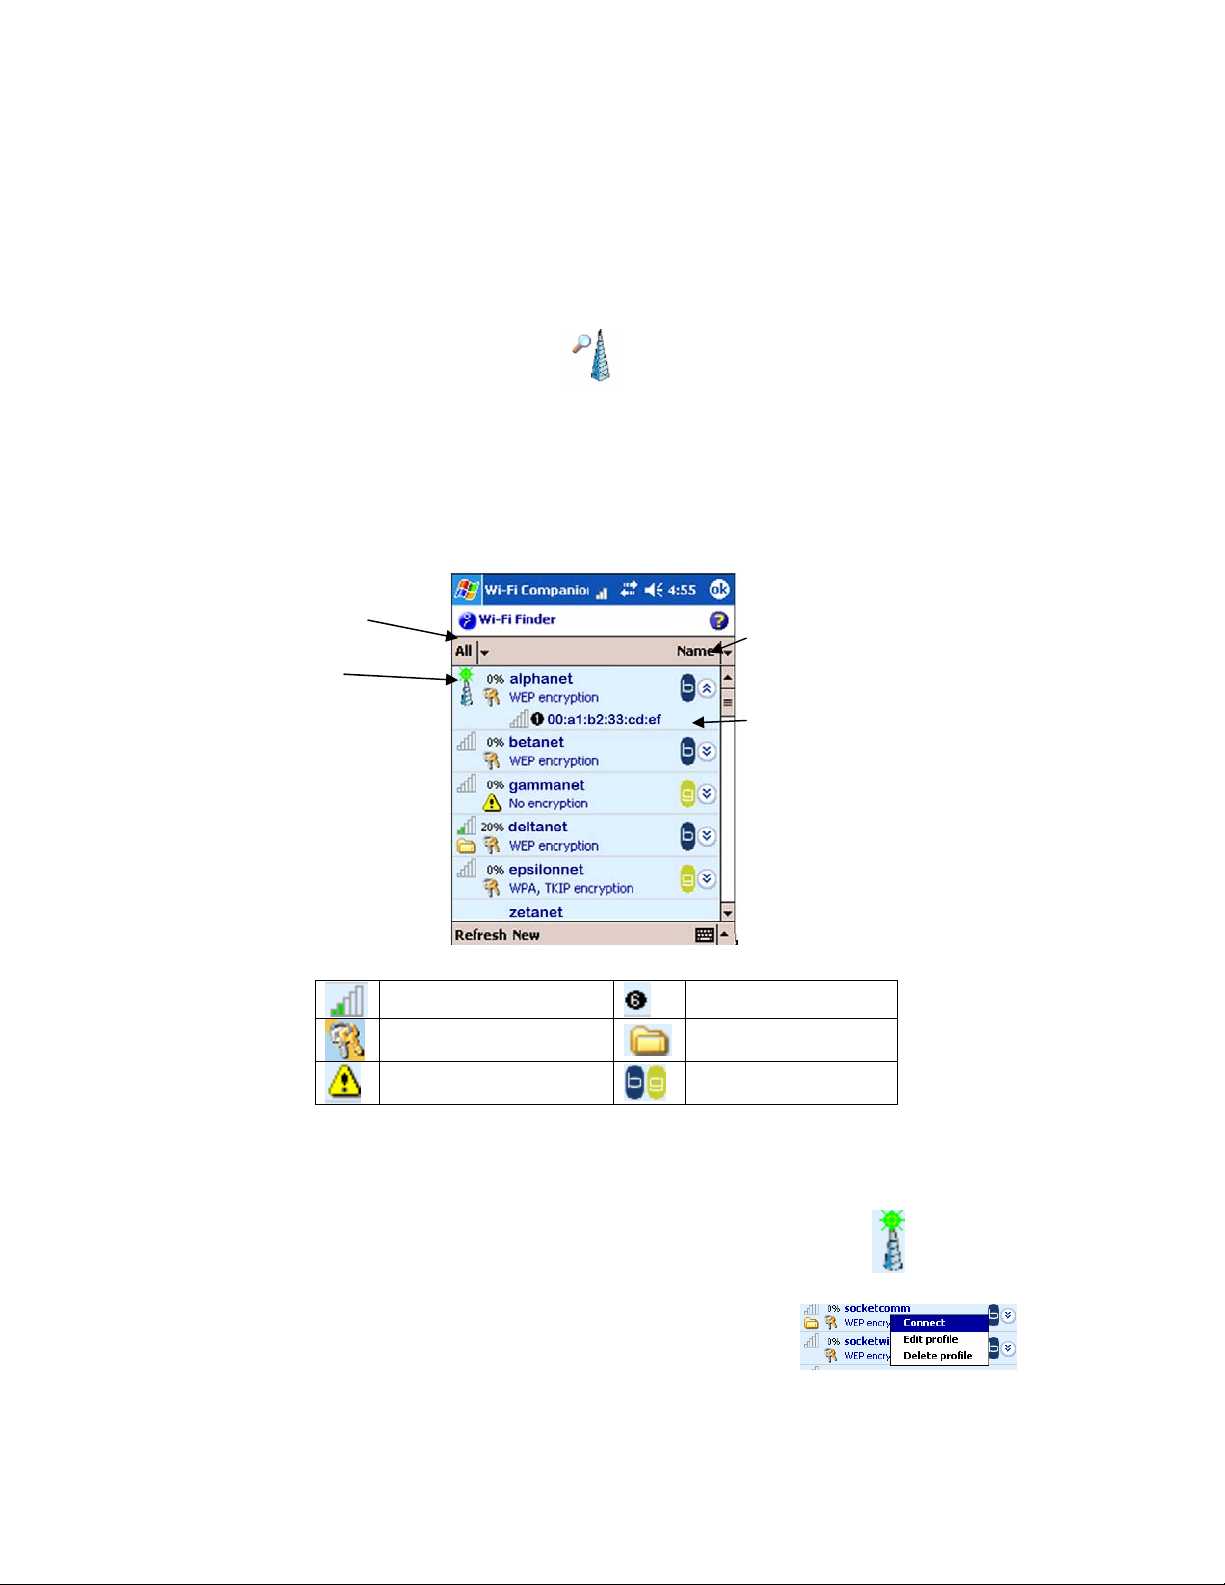
STEP 3: Find and Connect to a WLAN
1. In the main screen of Wi-Fi Companion, tap on the large tower icon, or
tap Tools | Wi-Fi Finder.
2. Wi-Fi Finder will list WLANs detected in range. Tap on any WLAN in
the list to view additional properties.
If desired, tap on the Type or Sort by drop-down menus to change how
the list is displayed. By default, All types are displayed, sorted by Name.
If your WLAN is not listed, tap Refresh.
Tap to filter the
list by type.
Current
connection.
Tap on any listing to
expand details.
Tap and hold stylus
on any listing to
manage profiles
and/or connect.
Signal strength of strongest
AP/ad hoc radio
WEP encryption, WPA (PSK),
WPA (TKIP) or 802.1x
No encryption
Channel number
Profile saved
802.11b, 802.11g
3. If Wi-Fi Finder cannot find your WLAN because its SSID is hidden, tap
New at the bottom of the screen to create a new profile for your network.
4. If your WLAN has a profile (indicated by a folder icon), Wi-Fi
Companion may have already connected to it, indicated by a
tower icon with a green burst on top.
Tap to sort the list.
Tap on the MAC
address line to view
AP Details.
CHAPTER 3: OPEN OR WEP-ENABLED NETWORKS 13
Page 14
To connect to a WLAN with a profile, tap and
hold your stylus on the WLAN in the list. In
the pop-up menu, tap Connect.
5. If your WLAN does not
have a profile (no folder
icon), tap and hold your stylus on the WLAN in
the list, then tap Get connected to create a profile
for the selected SSID.
Creating a WLAN Profile
After you tap New or Get connected in Wi-Fi Finder, you will be directed to
Wireless Zero Config (WZC), the wireless connection editor built into Windows
Mobile, to create a WLAN profile. For help with WZC, please refer to your
Pocket PC manual. Consult with your network administrator to determine the
settings needed to connect to your network.
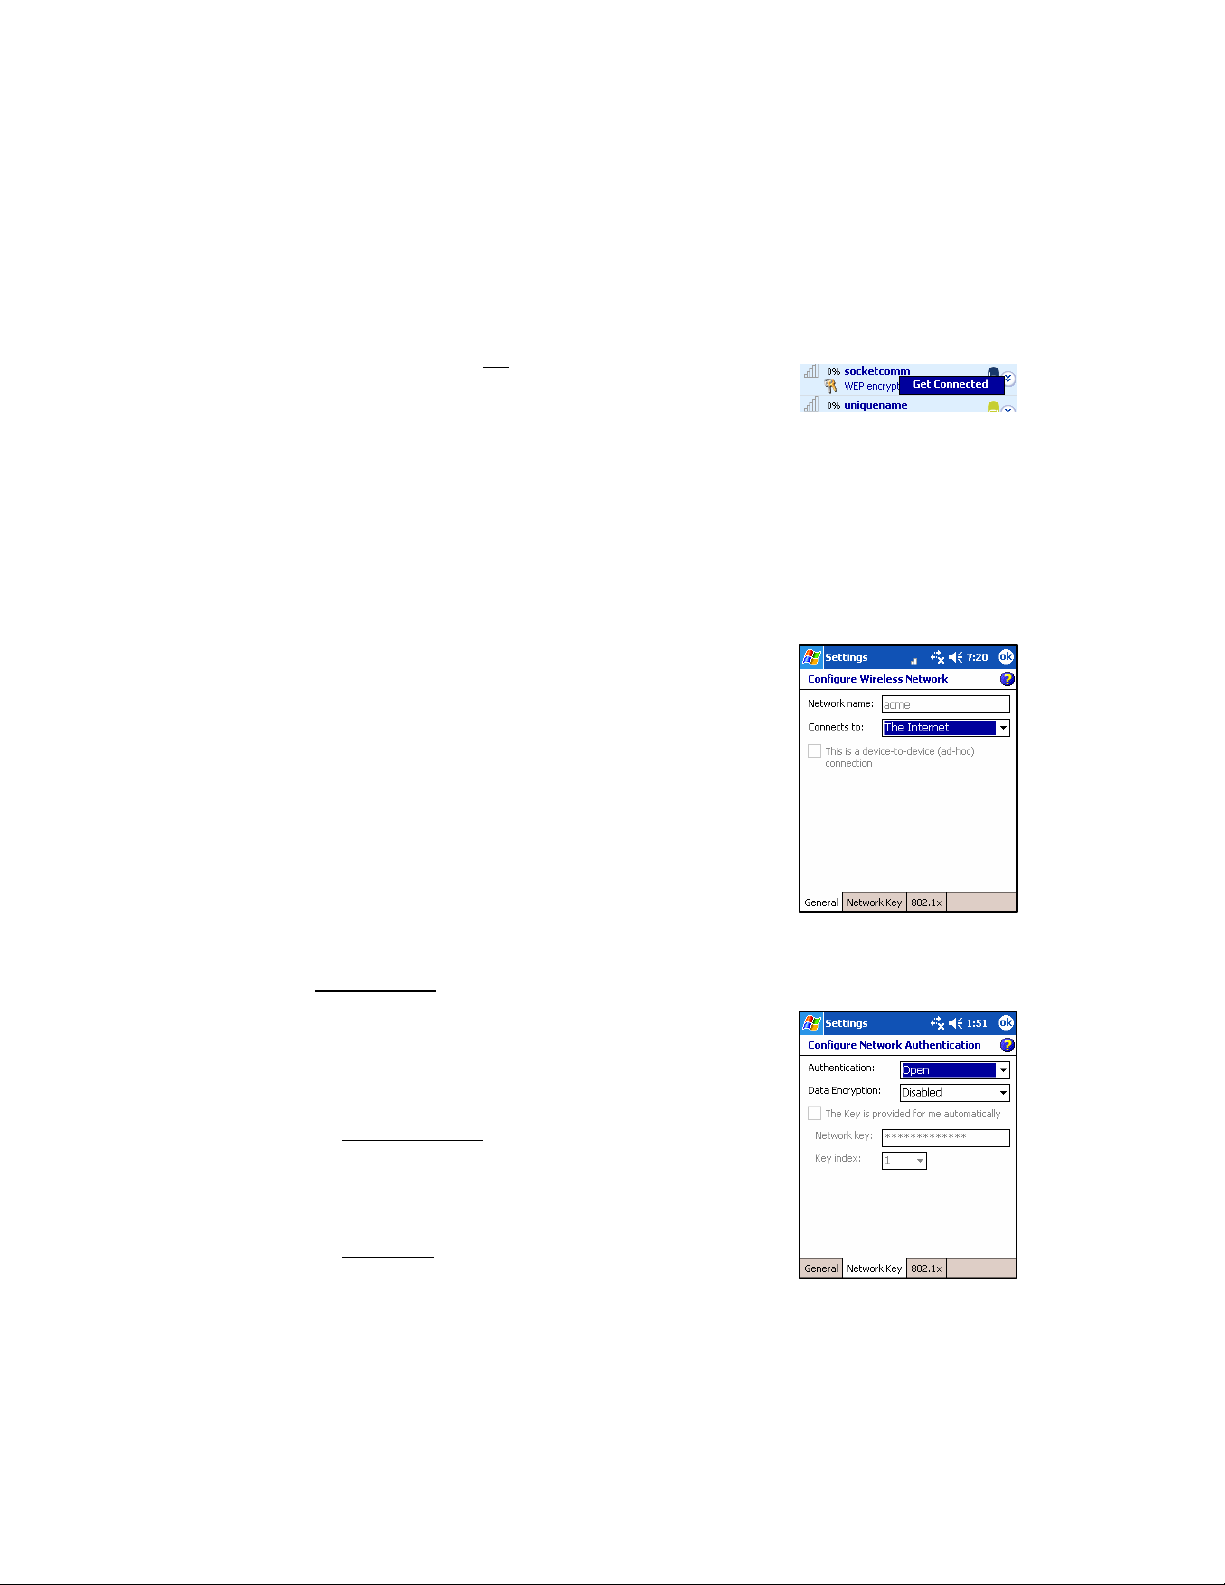
1. In the Configure Wireless Network screen,
enter the Network name (SSID) if it isn’t
already provided. The SSID is case-sensitive.
Connects to:
Select either The Internet or Work.
Note: In most cases, you should select
The Internet. For a VPN/proxy server, refer to
your Pocket PC manual for instructions.
2. Follow the appropriate instructions for your type of
network to enter the necessary security settings.
Open Networks
Depending on your Pocket PC version, your device
may show two or three tabs at the bottom of the
screen. If your device shows three tabs, enter the
following settings:
¾ Network Key tab:
Authentication: Select Open.
Data Encryption: Select Disabled.
¾ 802.1x tab:
Do not enter any settings. Tap ok.
14
Page 15
If your device shows two tabs, enter the following
settings:
¾ Authentication tab:
Uncheck all boxes. Tap ok.
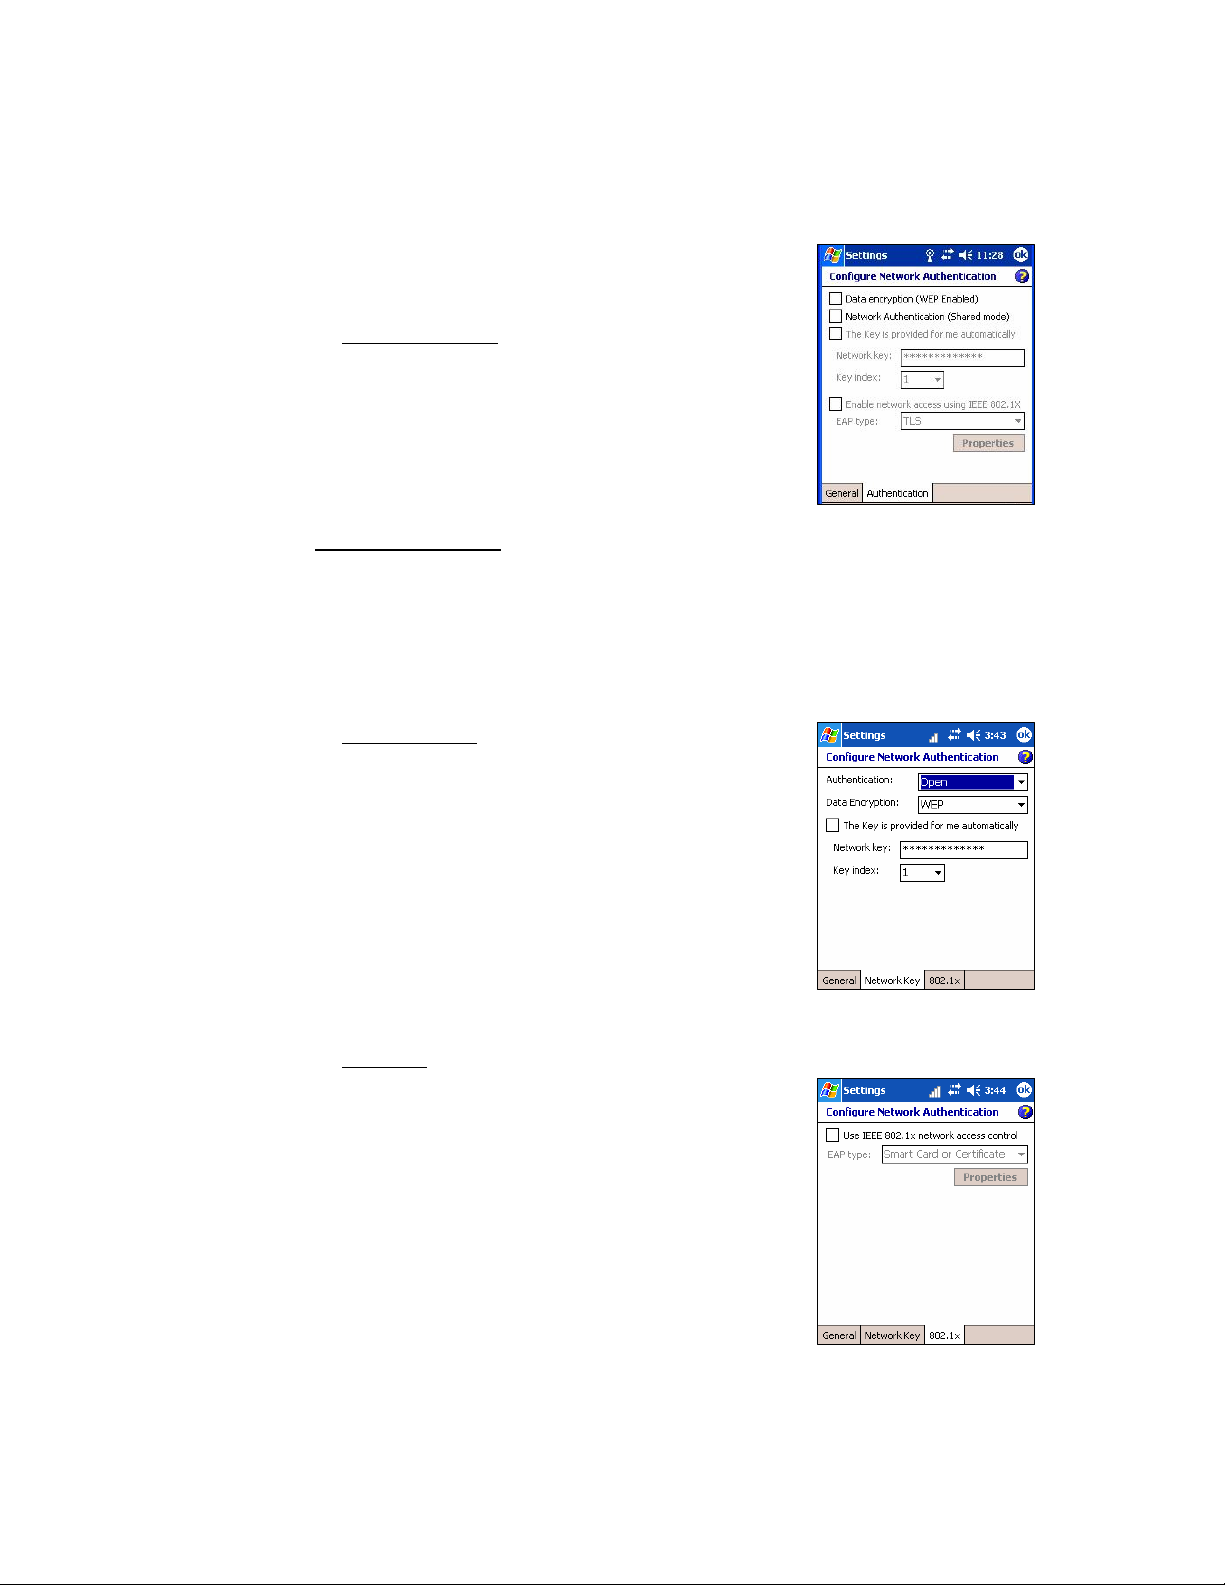
WEP-Enabled Networks
Make sure your WEP key has the correct length. For 40/64-bit WEP, the key
length is 10 hexadecimal or 5 ASCII characters. For 128-bit WEP, the key
length is 26 hexadecimal or 13 ASCII characters.
Depending on your Pocket PC version, your device may show two or three tabs
at the bottom of the screen. If your device shows three tabs, enter the following
settings:
¾ Network Key tab
• Authentication: Select Open.
• Data Encryption: Select WEP.
T
• he Key is provided for me automatically:
Uncheck. Enter the Network key and Key index.
Use the correct key length.
¾ 802.1x tab
Uncheck Use IEEE 802.1x network access control
and tap ok.
CHAPTER 3: OPEN OR WEP-ENABLED NETWORKS 15
Page 16
If your device shows two tabs, enter the following settings:
¾ Authentication tab
• Data encryption: Check.
• Network Authentication: Check if your network is
set up for this. In most cases, you should uncheck.
• The key is provided to me automatically: Uncheck.
Enter the Network key and Key index. Use the
correct key length.
• Enable network access using IEEE 802.1X:
Uncheck. Tap ok.
STEP 4: Connect Automatically to Your Network
1. After you enter the settings and tap ok, your device will automatically
try to connect. You may see the Socket status icon at the top of your
screen change from “networks available” to “networks out of range but
configured.”
2. When your Pocket PC has connected, the following will occur:
• The Socket status icon will change to 1-5 bars.
• The “x” will vanish from the connection icon.
• In Wi-Fi Finder, the WLAN will appear first in the list, showing a
signal tower with a green burst on top.
Note: After you save a profile for a WLAN, Wi-Fi Companion will
automatically try to connect to it whenever you insert the WLAN card or
turn on the WLAN radio built into your Pocket PC.
3. Tap ok to return to the main screen.
Socket Status Icons
Associated or Connected. Number of
bars indicates signal strength.
Networks available.
Searching for networks.
Networks out of range
but configured.
16
Page 17
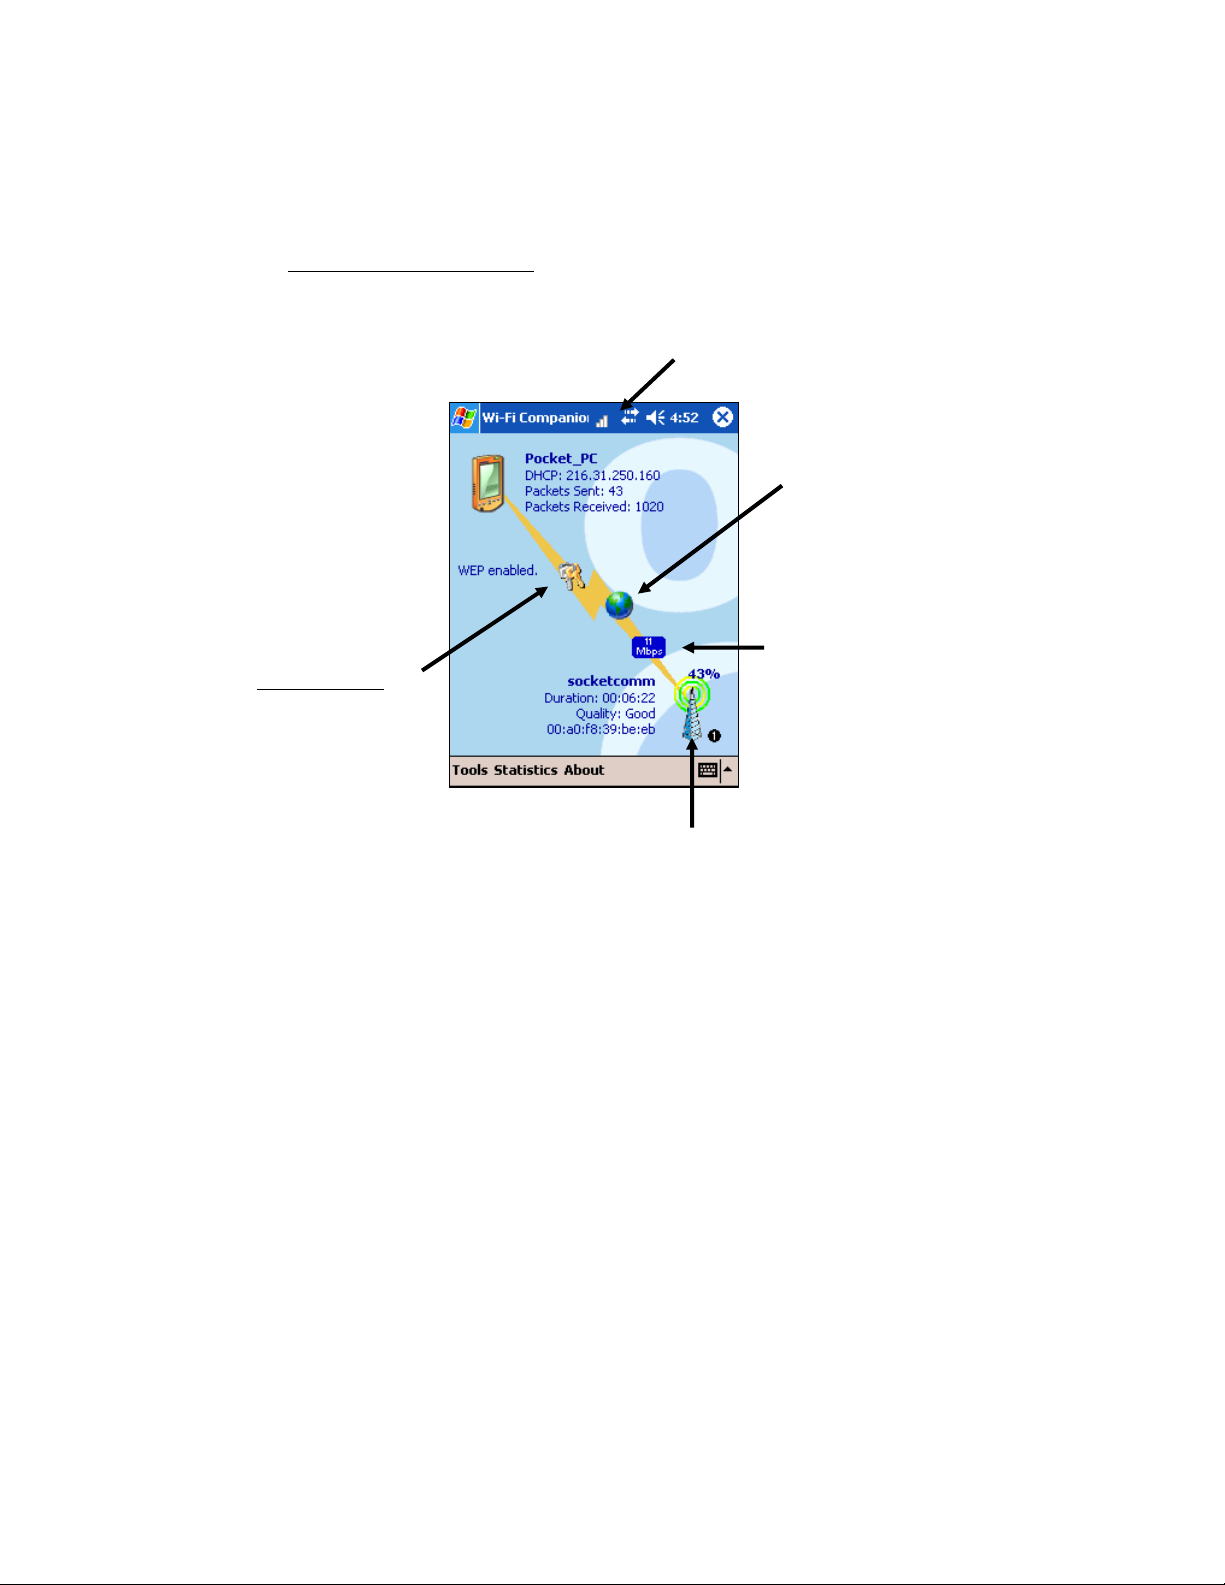
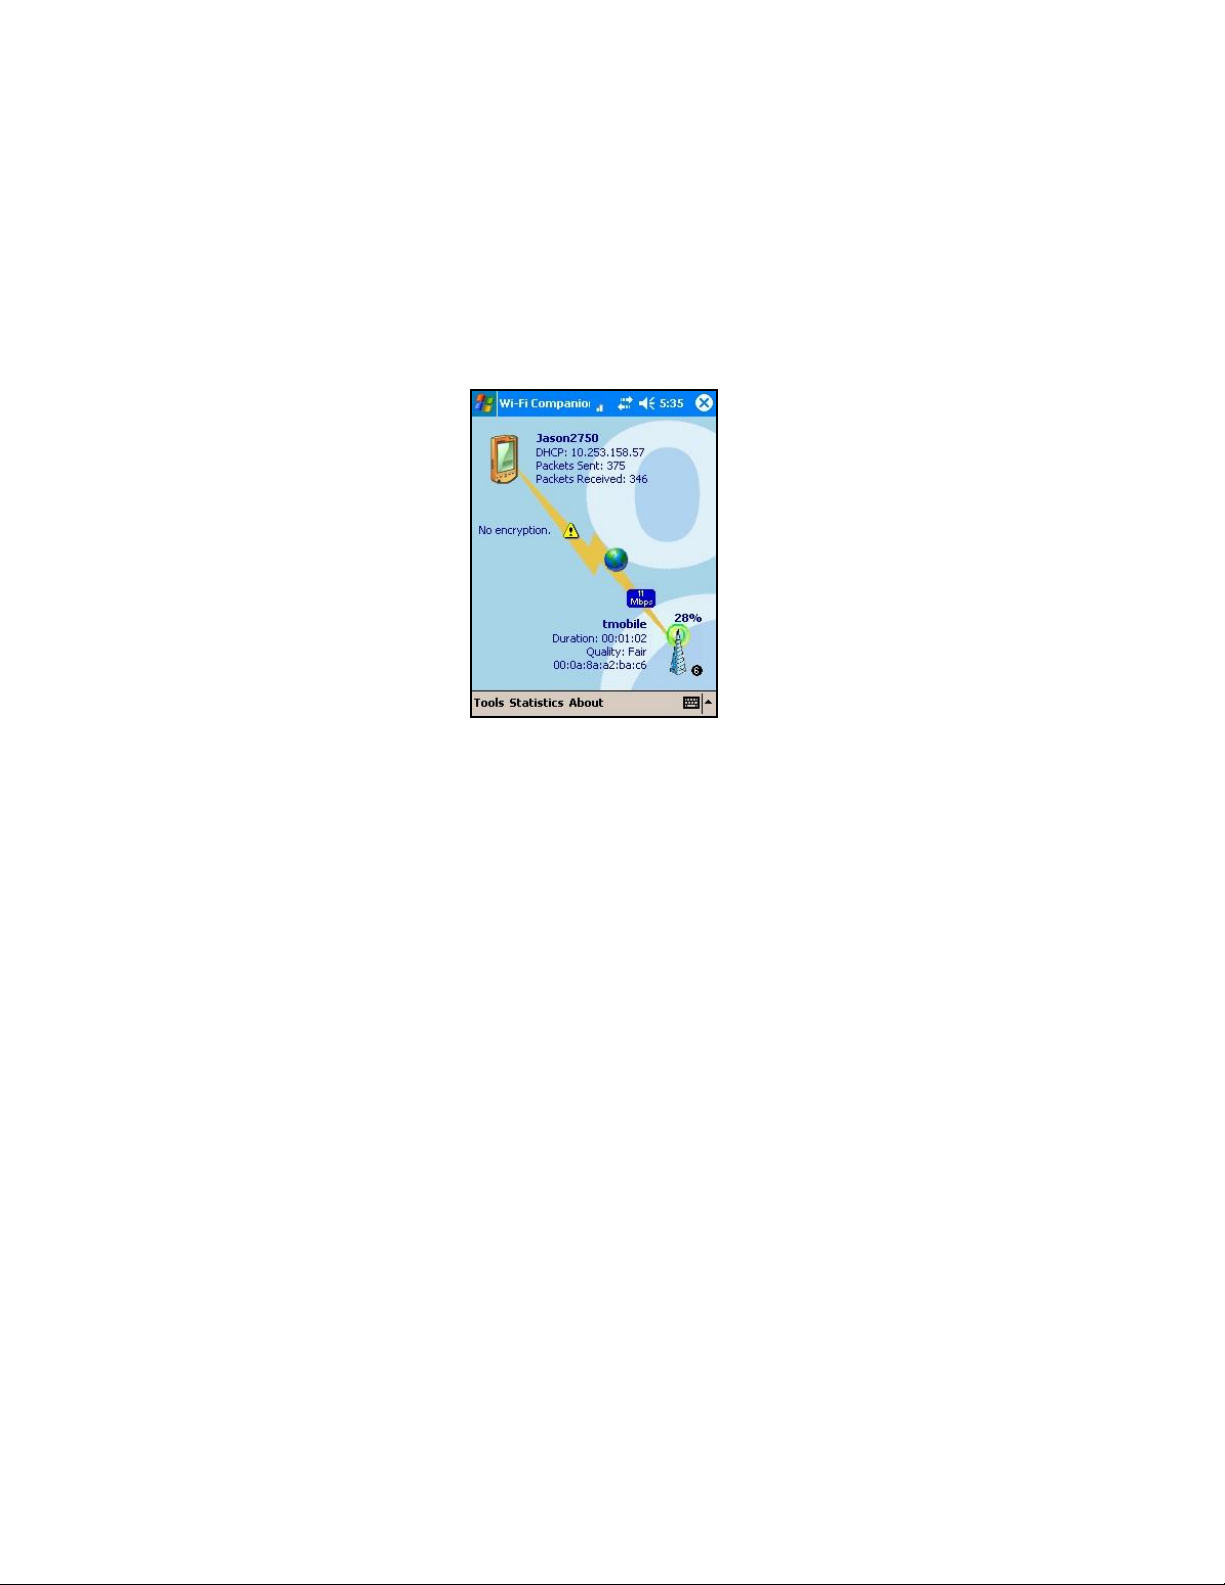
Main Screen of Wi-Fi Companion
The screen content varies depending on your connection status.
Socket status icon. Tap to access
this screen from outside the utility.
Your device properties.
• Device name
• IP address
• Packets sent and
received
The icon always
appears regardless
of connection status.
Tap to view more
IP addresses. For
P300/P500, also tap to
turn the radio on/off
Encryption status.
Tap to access a
certificate
management utility
for WPA or 802.1x if
needed.
}
Access point/remote device properties.
• SSID
• Connection duration
• Signal quality rating and percentage
• MAC address (also known as BSSID)
• Channel number (in black circle)
Tap for Wi-Fi Finder.
Internet ready.
Tap to access email,
the Internet, ping or
trace route. Icon
appears only when
Internet access is
ready.
Data rate. Tap to
view signal
strength and data
rate distribution.
CHAPTER 3: OPEN OR WEP-ENABLED NETWORKS 17
Page 18
4 | WPA or 802.1x Networks
This section covers how to use Socket Wi-Fi Companion to configure and
connect your Pocket PC to a WLAN running WPA or 802.1x with PEAP or
EAP-TLS authentication. Before you begin the instructions in this chapter,
be sure to install the software, as described in Chapter 2.
WPA is supported by Windows Mobile 5.0 and
2003 Second Edition devices as well as some
Windows Mobile 2003 (original version)
devices with an updated ROM from the device
manufacturer. If your device supports WPA,
WPA and WPA-PSK options will appear in the
“Configure Wireless Networks” screen.
For help using the software, tap Start | Help.
Connection Summary
STEP 1: Prepare network information.
STEP 2: Install authentication certificate(s).
STEP 3: Insert Go Wi-Fi! or turn on WLAN radio.
STEP 4: Find a WLAN and create a profile.
STEP 5: Connect automatically to your network.
18
Page 19

STEP 1: Prepare Network Information
Verify Device and Network Compatibility
Some Pocket PCs can only connect to certain types of WPA and 802.1x
networks. Check with your Pocket PC manufacturer. Your Pocket PC may only
be able to connect to WPA and 802.1x networks that satisfy requirements such
as:
• Windows Internet Information Service (IIS)
• Windows Internet Authentication Service (IAS)
• Windows Certification Authority (CA) with automatic approval and correct
Pocket PC certificate format (via MS certificate template)
• Access point configured only for WPA or 802.1x (i.e., no multi-mode support
or static 128-bit WEP keys)
Prepare Security Settings
If the network is compatible, ask the administrator for the necessary security
settings:
Wireless network name, known as SSID (case sensitive)
Authentication type, user name, password, domain
Pre-Shared Key, key format (hex or ASCII)
Use of either DHCP or Static IP to assign IP addresses
Authentication permission restrictions (e.g., domain administrators only)
For a Network Information Form that you can send to your network
administrator, go to any of the following:
• Appendix C of this User’s Guide
• Docs folder on the CD
If your network only allows domain administrators to authenticate, ask
your network administrator to assign you this privilege.
Obtain Authentication Certificate(s)
Ask the network administrator for a copy of the root certificate from a Trusted
Root Authority (no intermediary authority) if required. Installation
instructions begin on the next page.
EAP-TLS only
network to install a personal certificate. Installation instructions begin
on the next page.
: You also need to set up a cabled connection to the
CHAPTER 4: WPA OR 802.1X 19
Page 20
STEP 2: Install Authentication Certificate(s)
If your network uses PEAP authentication, you need to install only a root
certificate. If your network uses EAP-TLS authentication, you need to
install both a root and a personal certificate.
Install a Root Certificate
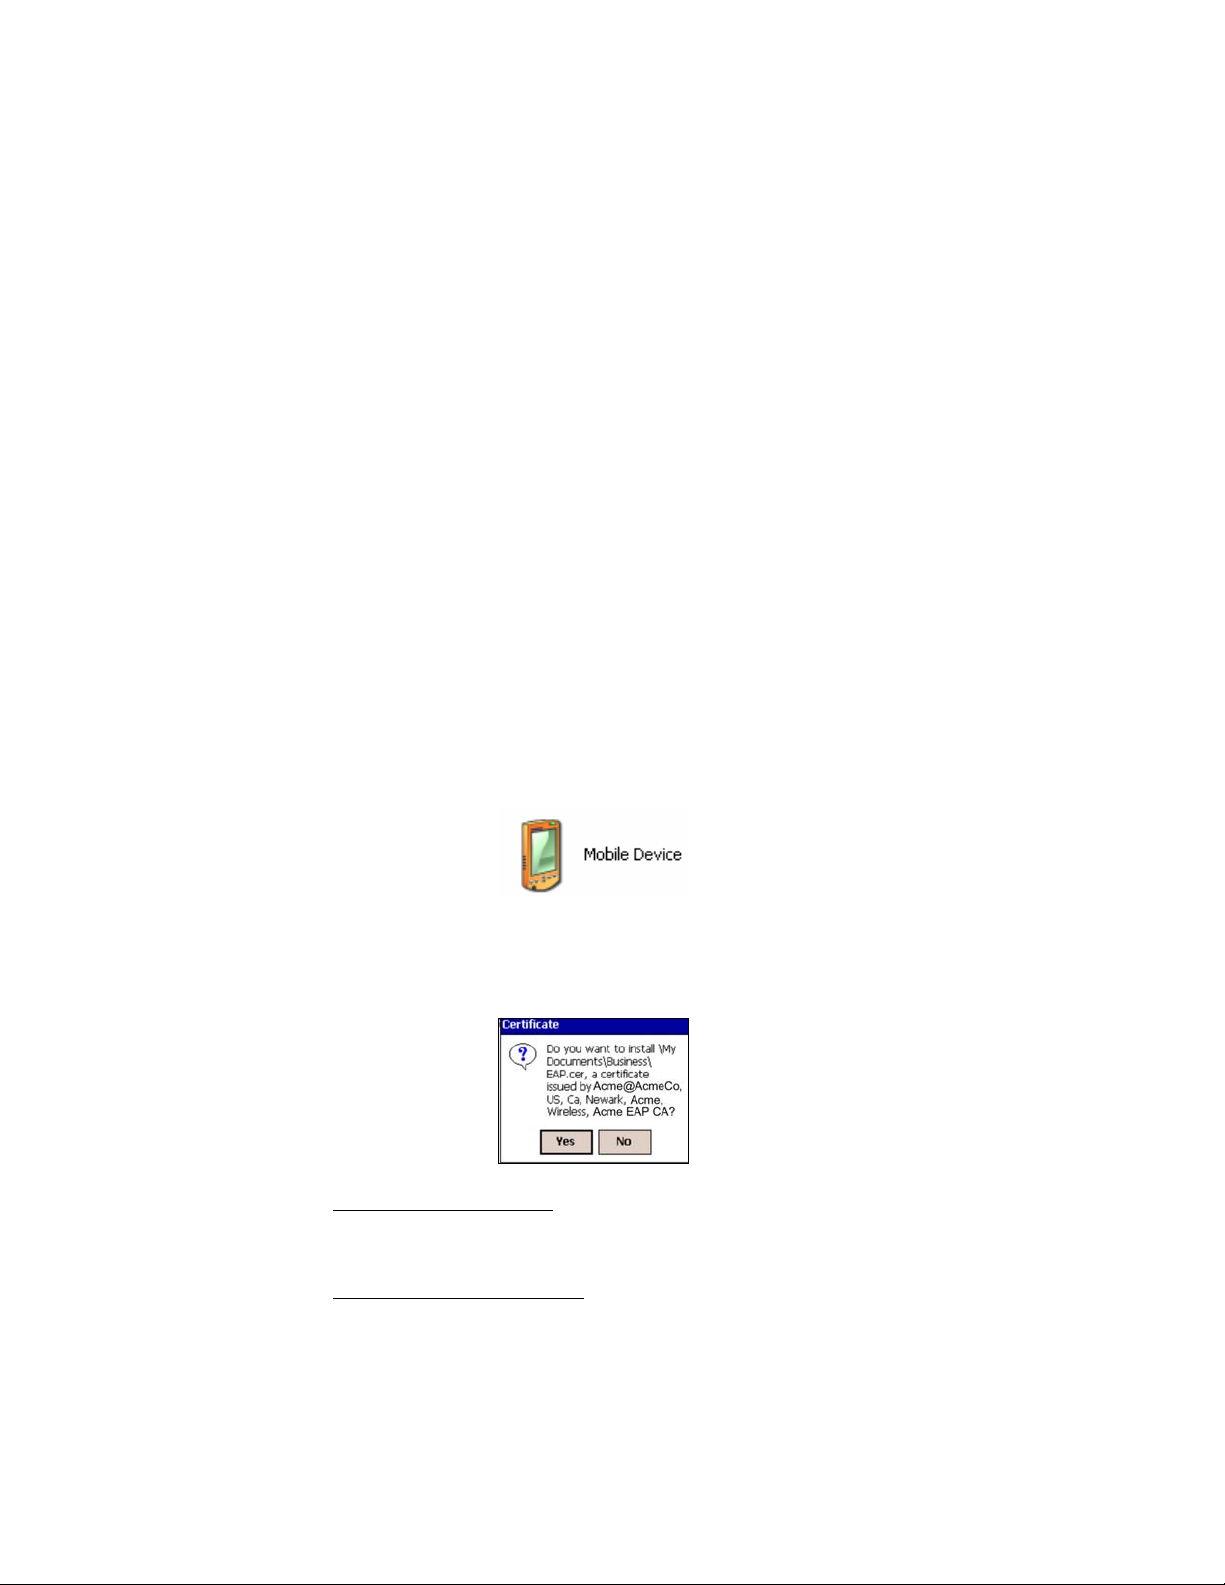
1. If you have not done so already, get a root (server) certificate from
your network administrator. The root certificate must come from a
Trusted Root Authority (not an intermediary authority).
2. If Socket Go Wi-Fi! is inserted into your Pocket PC, remove it.
3. Use a serial/USB cable or cradle and make an active connection
between your Pocket PC and host PC.
• If your host computer is running Windows Vista, use the Windows Mobile
Device Center.
• If your host computer is running Windows 2000/XP, ActiveSync 4.0 or
greater is required.
4. Use My Computer or Windows Explorer to access your Mobile Device
and copy the root certificate into your Pocket PC. Remember where
you save the certificate.
5. On your Pocket PC, use File Explorer to navigate to the file location.
Tap on the certificate.
6. A message will ask if you want to install the certificate. Tap Yes.
• If your network uses PEAP
, disconnect your Pocket PC from the host PC.
Soft reset the Pocket PC by pressing the reset button. Now you are ready
for Step 3, preparing the Wi-Fi hardware.
• If your network uses EAP-TLS, you also need to install a personal
(client) certificate.
20
Page 21

Install a Personal Certificate
1. To install a personal certificate, start Wi-Fi Companion.
Tap Start | Programs | Wi-Fi Companion.
2. In the main screen of Wi-Fi Companion, tap on
the keys icon if present. Alternatively, you can
tap Tools | Certificates | Enroll.
3. Enter the User, Password, and Server provided by
your network administrator. In the User field,
enter your domain and user name in the format
shown, using a backslash (“\”) between the
domain and user name.
Note: In the Server field, enter either the name or
the IP address (using standard dot notation) of
the server running Certificate Services on your
network.
4. Tap Retrieve. After your Pocket PC retrieves a
personal certificate, tap ok.
5. Disconnect the Pocket PC from the host PC.
CHAPTER 4: WPA OR 802.1X 21
Page 22

STEP 3: Prepare Wi-Fi Hardware
SoMo 650
Turn on the Wi-Fi radio built into the SoMo 650.
1. Press the button on the right side of the SoMo 650. By default, it is
programmed to launch the Radio Manager. Alternatively, you can tap
on the Wi-Fi icon in the Today screen.
2. In the Radio Manager, enable Wi-Fi. The Wi-Fi button should have a
red “x” to indicate that Wi-Fi is disabled. Tap on the Wi-Fi button.
3. The “x” will vanish to indicate that Wi-Fi has been enabled, and the Wi-
Fi LED will turn green.
22
Page 23

Go Wi-Fi!
Insert the card into the card slot of your device. Make sure the card is
positioned correctly in the slot. In most cases, it should be right-side up. Do
not use excessive force, or damage may occur.
Note: To remove an SD card, press it into the slot. A spring will push the
card out. Do not remove the card by simply pulling, or damage may occur.
CHAPTER 4: WPA OR 802.1X 23
Page 24

STEP 4: Start Wi-Fi Companion
1. After you insert the WLAN card or turn on the
WLAN radio of your Pocket PC, Wi-Fi
Companion will automatically launch, indicated
by the Socket status icon at the top of the screen.
Tap on the icon. The icon varies depending on
your connection status.
Socket status icon,
search mode.
Windows Mobile 5.0
: You can also tap
Notification at the bottom of the Today screen to
access the main screen of Wi-Fi Companion.
Alternatively, you can manually start the
program by tapping:
Start | Programs | Wi-Fi Companion.
2. The main screen o f Wi-Fi Companion will
appear.
24
Page 25

STEP 5: Find a WLAN and Create a Profile
1. In the main screen of Wi-Fi Companion, tap on the tower icon, or tap
Tools | Wi-Fi Finder.
2. Wi-Fi Finder will list WLANs detected in range. Tap on any WLAN in
the list to view additional properties.
Tap to filter the
list by type.
Current
connection.
Tap on any listing to
expand details.
Tap and hold stylus
on any listing to
manage profiles
and/or connect.
Tap to sort the list.
Tap on the MAC
address line to view
AP Details.
Signal strength of strongest
AP/ad hoc radio
WEP encryption, WPA (PSK),
WPA (TKIP) or 802.1x
No encryption
Channel number
Profile saved
802.11b, 802.11g
If desired, tap on the Type or Sort by drop-down menus
to change how the list is displayed. By default, All types
are displayed, sorted by Name.
If your WLAN is not listed, tap Refresh.
3. If Wi-Fi Finder cannot find your WLAN because its
SSID is hidden, tap New to create a new profile for
your network.
CHAPTER 4: WPA OR 802.1X 25
Page 26

4. If your WLAN has a profile (indicated by a folder icon),
Wi-Fi Companion may have already connected to it,
indicated by a tower icon with a green burst on top.
To connect to a WLAN with a profile, tap and hold your
stylus on the WLAN in the list. In the pop-up menu, tap
Connect.
5. If your WLAN does not have a profile (no folder icon),
tap and hold your stylus on the WLAN in the list, then tap
Get connected to create a profile for the selected SSID.
Creating a WLAN Profile
After you tap New or Get connected in Wi-Fi Finder, you will be directed
to Wireless Zero Config (WZC), the wireless connection ed itor built into
Windows Mobile, to create a WLAN profile. For help with WZC, please
refer to your Pocket PC manual.
Enter the settings needed to connect to your network. Consult with your
network administrator for help. For a Network Information Form you can
send to your network administrator, refer to Appendix C.
1. In the Configure Wireless Network screen, enter the
Network name (SSID) if it isn’t already provided. The
SSID is case-sensitive.
Connects to:
Select either The Internet or Work.
Note: In most cases, you should select
The Internet. For a VPN/proxy server, refer to your
Pocket PC manual for instructions.
26
Page 27
2. Follow the appropriate instructions for your type of network to enter the
necessary security settings.
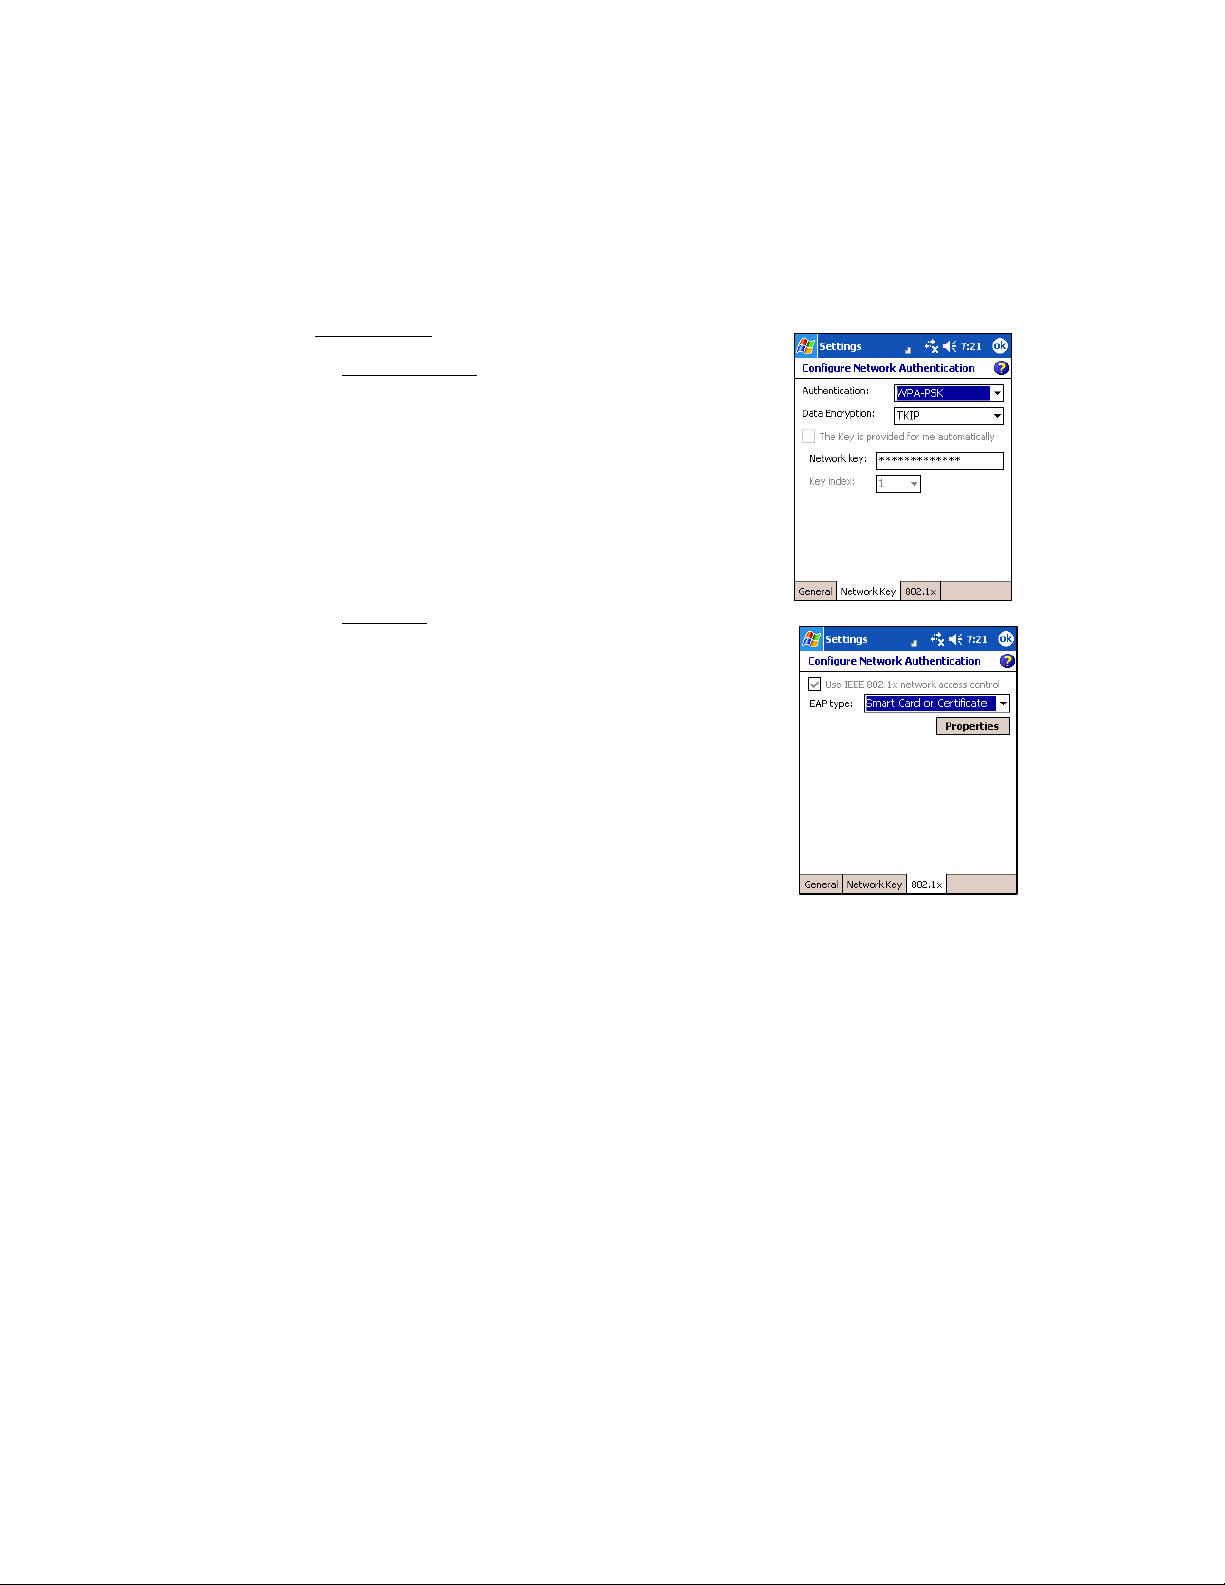
WPA Networks
¾ Network Key tab
• Authentication: Select the correct WPA
type, either WPA or WPA-PSK.
If using WPA-PSK, also enter the Network
key. The key length must be either 64 hex
or 8-63 ASCII characters.
• Data Encryption: Select TKIP.
¾ 802.1x tab
• Use IEEE 802.1x network access control:
Check.
• EAP Type: Select the type of EAP
authentication used by your network,
either PEAP or Smart Card or Certificate
(EAP-TLS)
When done, tap ok.
CHAPTER 4: WPA OR 802.1X 27
Page 28

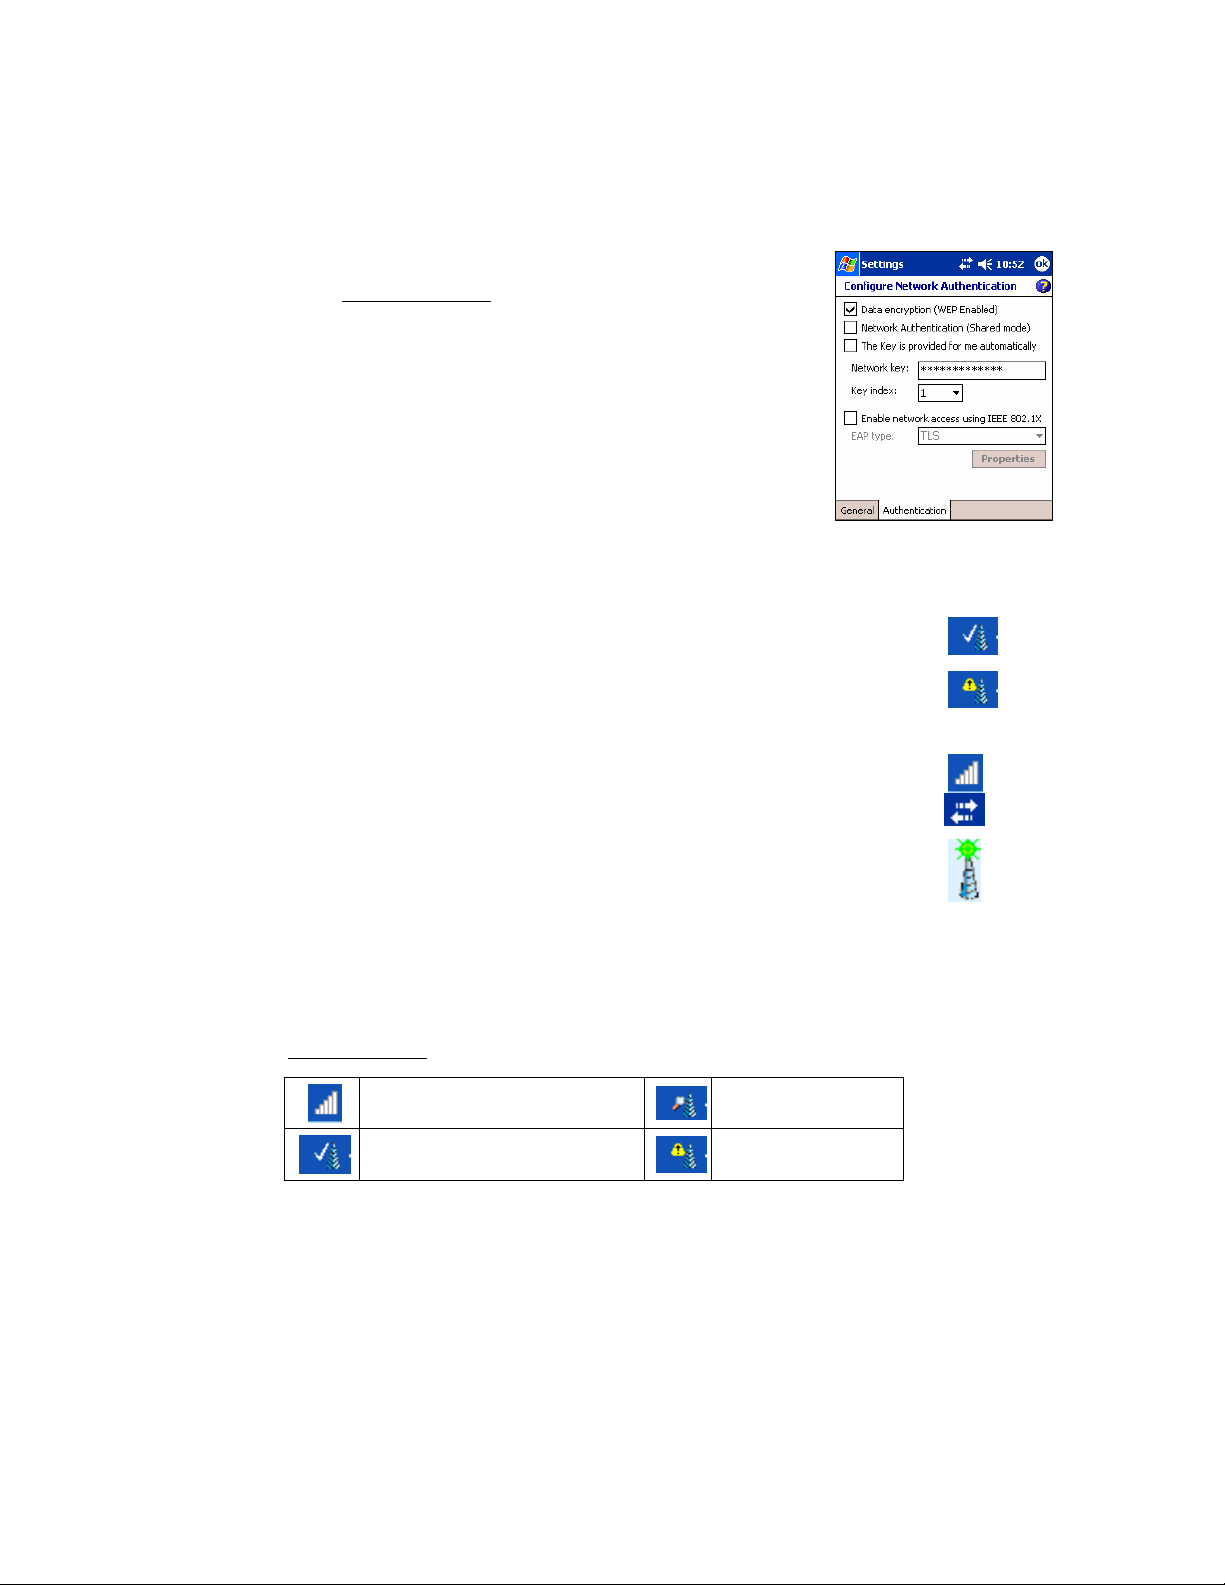
802.1x Networks
Depending on your Pocket PC 2003 version, your device may show two
or three tabs at the bottom of the screen.
If your device shows three tabs, enter the following settings:
¾ Network Key tab
• Authentication: Select Open.
• Data Encryption: Select WEP.
T
• he Key is provided for me automatically:
Check if the key is automatically
provided, otherwise uncheck.
¾ 802.1x tab
• Use IEEE 802.1x network access control:
Check.
• EAP Type: Select the correct EAP type for
your network, either PEAP or Smart Card
or Certificate (EAP-TLS)
• When done, tap ok.
If your device shows two tabs, enter the following settings:
¾ Authentication tab
• Data encryption (WEP Enabled): Check.
• Network Authentication (Shared mode): Uncheck.
• The key is provided to me automatically: Check.
• Enable network access using IEEE 802.1x.
Check. Select the correct EAP type for
your network.
• When done, tap ok.
28
Page 29

Automatic Connection
1. After you enter the necessary security settings and tap ok, your
device will automatically try to connect.
You may see the Socket status icon at the top of your screen
change from “networks available” to “networks out of range but
configured.”
2. When your Pocket PC has connected, the following will occur:
Th
• e Socket status icon will change to 1-5 bars.
• The “x” will vanish from the connection icon.
• In Wi-Fi Finder, the WLAN will appear first in the list,
showing a signal tower with a green burst on top.
Note: After you save a profile for a WLAN, Wi-Fi Companion
will automatically try to connect to it whenever you insert the
WLAN card.
3. Tap ok to view the main screen of Wi-Fi Companion.
Socket Status Icons
Associated or Connected. Number of
bars indicates signal strength.
Networks available.
Searching for networks.
Networks out of range
but configured.
CHAPTER 4: WPA OR 802.1X 29
Page 30

Main Screen of Wi-Fi Companion
The screen content varies depending on your connection status.
Socket status icon. Tap to access
this screen from outside the utility.
Your device properties.
• Device name
• IP address
• Packets sent and
received
The icon always
appears regardless
of connection status.
Tap to view more
IP addresses For
P300/P500, also tap to
turn the radio on/off.
Encryption status.
Tap to access a
certificate
management utility
for WPA or 802.1x if
needed.
}
Access point/remote device properties.
• SSID
• Connection duration
• Signal quality rating and percentage
• MAC address (also known as BSSID)
• Channel number (in black circle)
Tap for Wi-Fi Finder.
Internet ready.
Tap to access email,
the Internet, ping or
trace route. Icon
appears only when
Internet access is
ready.
Data rate. Tap to
view signal
strength and data
rate distribution.
30
Page 31
5 | Wi-Fi Companion
This chapter explains how to use the different features of Wi-Fi
Companion.
The utility allows you to do the following:
• Turn wireless radio on/off
• View IP addresses
• Find networks
• Enable power save
• Ping
• Trace route
• Enroll a personal certificate for EAP-TLS
• Manage certificates
• View rates
• View graphs
• View tables
• View Help files
CHAPTER 6: WI-FI COMPANION 31
Page 32

Turn Wireless Radio On/Off
You may want to turn off the radio to save power or if you are entering an
area with radio restrictions (e.g., on an airplane).
SoMo 650
1. Open the Radio Manager. Press the button on the right side of the
SoMo. Alternatively, tap on the Wi-Fi icon in the Today screen .
2. In the Radio Manager, tap Enable flight mode.
3. To turn the radio on again, in Radio Manger tap Disable flight mode.
Go Wi-Fi!
1. In the main screen of Wi-Fi Companion, tap and hold your stylus on the
device icon. In the pop-up menu, tap Turn Radio OFF.
2. To turn the radio on again, tap on the device icon again and in the pop-
up menu, tap Turn radio ON.
32
Page 33

View IP Addresses
You can only view IP address data if the WLAN card is actively
connected to a WLAN network.
.
1. Whenever your device has connected to a WLAN, the main screen of
Wi-Fi Companion will display the device’s IP address, labeled as either
“DHCP” or “static.” To view more comprehensive IP address
information, do either of the following:
• Tap on the device icon.
• Tap Tools | IP Addresses.
2. The IP Addresses screen will appear, reporting Gateway, DNS server,
DHCP server, and other IP address assignments.
Note: Lease information
appears only if a network
uses DHCP.
3. If your network uses DHCP, the Renew and Release functions will be
enabled at the bottom of the screen.
• Renew: Tap to get a new IP address and/or to update related lease data.
• Release: Tap to release the IP address from the DHCP server.
CHAPTER 4: WI-FI COMPANION 33
Page 34

Find Networks
1. In the Wi-Fi Companion main screen, tap on the signal tower icon.
Alternatively, tap Tools | Wi-Fi Finder.
2. The WLAN card will begin searching for networks in range.
3. After the search, a list of discovered networks will be displayed.
Tap to filter the
list by type.
Current
connection.
Tap on any listing to
expand details.
Tap and hold stylus
on any listing to
manage profiles
and/or connect.
Tap to sort the list.
Tap on the MAC
address line to view
AP Details.
Signal strength of strongest
AP/ad hoc radio
WEP encryption, WPA (PSK),
WPA (TKIP) or 802.1x
No encryption
Channel number
Profile saved
802.11b, 802.11g
34
Page 35

4. If desired, you can perform a variety of functions in the Show Networks
screen:
• To begin another search for networks in range, tap Refresh.
• To configure network profiles, tap on a WLAN in the list. In the
pop-up menu, tap Get Connected if no profile exists yet, or tap Edit
Profile if a profile has already been saved for the WLAN .
This will direct you to the Configure Wireless Networks screen of
Wireless Zero Config.
5. To exit Wi-Fi Finder, tap ok.
CHAPTER 4: WI-FI COMPANION 35
Page 36

Enable Power Save
Wi-Fi Companion offers both automatic and manual power management for
the Wi-Fi radio.
1. In the main screen of Wi-Fi Companion, tap Tools | Power save.
2. The Power Save screen will appear. If desired, check the box Manage
the radio power automatically for automatic power management. Wi-Fi
Companion will enable best performance when charging and best power
savings when running on batteries.
Otherwise, uncheck the box and use the slider to manually choose your
power setting.
3. Tap ok.
36
Page 37

Install Personal Certificate for EAP-TLS
Wi-Fi Companion a quick link to the Cert Enroll utility, which helps you
install a personal certificate, required to connect to 802.1x networks
running EAP-TLS authentication.
1. In the main screen of Wi-Fi Companion, tap Tools | Certificates | Enroll.
2. The Personal Certificate Enrollment screen will appear. For help using
the utility, pleaser refer to Chapter 3.
CHAPTER 4: WI-FI COMPANION 37
Page 38

Manage Certificates
Windows Mobile includes a built-in utility for managing authentification
certificates for WPA, AES, and 802.1x networks. Wi-Fi Companion provides
quick links to the Microsoft certificate management utility.
1. In the main screen of Wi-Fi Companion, you can quickly access the
Microsoft certificate management utility by either of two methods:
• If the card is currently connected to a WLAN, the security status icon
will appear as a pair of keys if the correct security settings have been
configured, otherwise an error symbol will appear. Tap on the icon.
• Tap Tools | Certificates | Manage.
2. The Manage Certificates utility will appear. For help installing certificates
for WPA or 802.1x, refer to Chapters 3. For more information about the
certificate management utility, refer to your Pocket PC manual.
38
Page 39

Ping
Use Ping to perform an ICMP ping to another address on the network. Ping
is useful as a diagnostic tool to establish Layer 3 connectivity to another
network node. In the continuous ping mode, it can also be used as a site
survey tool to determine the edge of WLAN range or to look for spots with
no coverage (dead spots).
1. In the main screen of Wi-Fi Companion, tap Tools | Utilities | Ping.
2. The Ping screen will appear. Tap Tools | Configure.
3. In the Configure Ping screen, enter the appropriate settings:
• Address: Enter a target address in the form of an IP address or a
URL that can be resolved by a Domain Name System (DNS). For
convenience, the last address used is the default, and the drop-down
list shows prior addresses used.
• Size: Select a packet size, from 32 bytes up to 65550.
• Content: Select the packet payload data — either All 00, All FF
(hexadecimal), or Random.
• Repeat: Select a repeat number of pings, from a minimum of 5 to a
maximum of Continuous.
• Verify Data: Select either Yes or No.
• Tap ok.
CHAPTER 4: WI-FI COMPANION 39
Page 40

4. The main Ping screen will reappear. Tap Start.
5. The ping test will begin. For each successful ping, the Roundtrip Time
(RTT) will be shown. A line graph will display the series of RTTs for
the last 24 pings.
If a ping is not successful within 2 seconds, a timeout will be displayed.
6. To stop the test, tap Stop. A prompt will report statistics of the test
results. View the statistics and tap ok.
To view the statistics again, tap Tools | Statistics.
40
Page 41

Trace Route
The Trace Route tool traces a packet from the Pocket PC to an Internet
host, showing each hop and how long it takes to reach the destination. This
allows the user to figure out where the longest delays are occurring if
performance appears slow.
1. In the main screen of Wi-Fi Companion, tap Tools | Utilities | Trace Route.
2. The Trace Route screen will appear. Tap Tools | Configure.
3. In the Configure Trace Route screen, enter the appropriate settings:
• Address: Enter a target address in the form of an IP address or a
URL that can be resolved by a Domain Name System (DNS). For
convenience, the last address used is the default, and the drop-down
list shows prior addresses used.
• Max hops: Select the maximum number of hops (default is 20).
• Resolve IP: Indicate whether you want to resolve the IP address from
a URL (default is Yes).
• Tap ok.
4. In the main Trace Route screen, tap Start.
CHAPTER 4: WI-FI COMPANION 41
Page 42

5. The Trace Route test will begin. For each successful hop, the hop time,
host name and IP address are shown. Tap Stop to stop the trace at any
time, or let the trace run until it is complete.
6. When the trace is complete, the Statistics dialog box will report the best
hop, worst hop, average hop, and number of timeouts. Tap ok to close
the box.
To view the statistics again, tap Tools | Statistics.
To view the full host name for any of the hops, simply tap on the hop in
the list.
42
Page 43

View Rates
Note: You can only view statistical rate information if the WLAN
card is actively connected to a WLAN network.
1. Whenever your device has connected to a WLAN, the main screen of
Wi-Fi Companion will display the connection’s data rate. To view more
comprehensive data rate information, do either of the following:
• Tap on the data rate icon.
• Tap Statistics | Rates.
2. The Rates screen will appear, reporting the current signal strength, signal
quality, and a history of the relative number of packets sent at the 12
possible 802.11b/g connection speeds. Additionally, the screen shows the
current BSSID and connection duration.
The green arrow
indicates the current
network speed.
3. By default, the Pocket PC will refresh the rate information every second. To
configure the refresh rate to something different, tap Configure at the bottom
of the screen.
CHAPTER 4: WI-FI COMPANION 43
Page 44
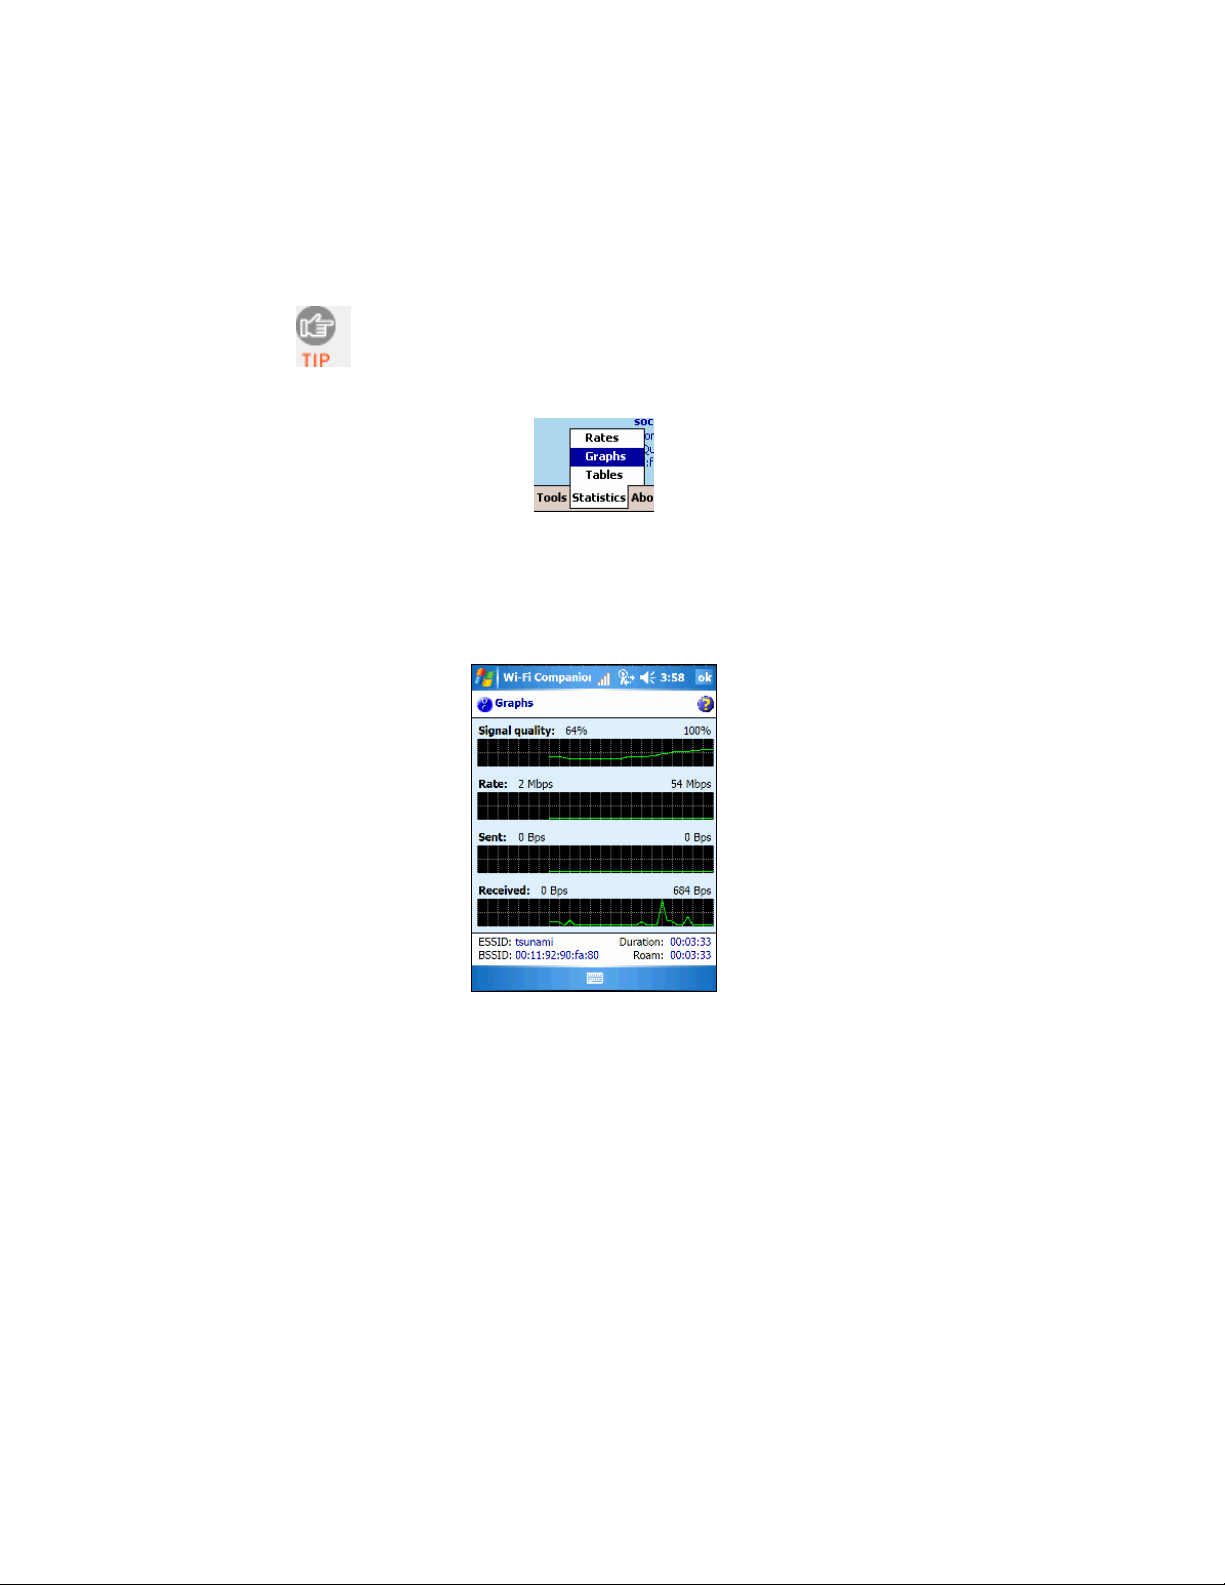
View Graphs
You can only view the statistical graphs if the WLAN card is
actively connected to a WLAN network.
1. In the main screen of Wi-Fi Companion, tap Statistics | Graphs.
2. The Graphs screen will appear, displaying scrolling line graphs of the
signal quality, rate, and sent and received data rates.
Note: Square screen devices will only show the signal quality and sent and
received data rates.
Two numbers are reported with each graph: the current value (displayed
on the left side, after the graph title) and the maximum value (displayed
on the far right). For the Sent and Received graphs, the maximum value
may change.
3. By default, the Pocket PC will refresh the graph information every
second. To configure the refresh rate to something different, tap
Configure at the bottom of the screen.
44
Page 45

View Tables
You can only view the statistical tables if the WLAN card is
actively connected to a WLAN network.
1. In the main screen of Wi-Fi Companion, tap Statistics | Tables.
2. The Tables screen will appear, displaying a table of comprehensive
information about the current connection.
The table is divided into five screens: IP, TCP, UDP, ICMP, and
Interface. Almost all of the information presented in the tables relates to
performance and error counts.
Tap on a column header to sort the data.
Reset: Tap to reset the contents of the Current column to zero.
Refresh: Tap to refresh the data of the open table. By default, the data
will refresh every time you open a new table (e.g., when you switch
between the different tabs).
CHAPTER 4: WI-FI COMPANION 45
Page 46

View Help Files
There are two ways to access Help files for Wi-Fi Companion.
• To view a list of all the Help files, make sure Wi-Fi Companion is
running and tap Start | Help.
• To view a Help file for the screen of Wi-Fi Companion that is currently
open, tap on the Help button
. Except for the main screen, all screens
of Wi-Fi Companion feature a Help button.
46
Page 47

Appendix A
Specifications
Go Wi-Fi! E300 (802.11b SD card)
Physical Characteristics:
Card Dimensions: 1.57 x 0.94 x 0.08 in (40 x 24 x 2.1 mm)
Total Weight: 0.1 oz (4 g)
Operating Temperature: +14 to +158 °F (0 to +70 °C)
Storage Temperature: -22 to +176 °F (-30 to +80 °C)
Power Consumption (3.3 V Supply):
Transmission: 187 mA
Receive: 146 mA
Power-Saving Idle (listening): 15.8 mA
Power-Saving Sleep: 0.92 mA
Hardware Support:
• Windows Mobile 5.0 with SDIO slot
• Windows Mobile 2003/2003SE with SDIO slot and SDIO Now! software
from BSQUARE in ROM
• For information about support for MontaVista Linux and Real-Time
Operating Systems (RTOS), please submit an online inquiry to Socket
OEM group at
Compatible Processors:
• Intel XScale
• Samsung MIPS
• Texas Instruments OMAP
Interface Standards: SDIO
Standards Conformance:
Wi-Fi Certified — Enterprise Edition
Meets 802.1x requirements
SDIO 1.1
Transmit Power Output: 32 mW nominal, 40 mW maximum
www.socketmobile.com/contact/
APPENDIX A: SPECIFICATIONS | 47
Page 48

Receiver Sensitivity:
1 Mbps: -91 dBm
11 Mbps: -83 dBm
Data Rate:
Complies with 802.11b specification to provide data rates up to
11 Mbps, with range and throughput optimized by Dynamic
Rate Scaling to 5.5, 2, and 1 Mbps
Frequency Range: 2.4-2.5 GHz band
Range:
Indoors: Approx. 300 feet (100 m) (typical office environment)
Outdoors: Approx. 1,000 feet (300 m)
Access Protocol: Carrier Sense Multiple Access with Collision
Avoidance Protocol (CSMA/CA)
Security Encryption/Authentication Hardware Support:
40/64-bit and 128-bit WEP data encryption
802.1x with EAP-TLS or PEAP
Wi-Fi Protected Access (WPA), WPA with Pre-Shared Key
(WPA-PSK)
Software Included: Socket WLAN CD
Hardware Warranty: One year
Certification/Compliance:
FCC: Part 15, subpart C
Industry Canada RSS210
Europe: CE Mark, R&TTE Directive
Australia: C-Tick
48 | APPENDIX A: SPECIFICATIONS
Page 49

Go Wi-Fi! E500 (802.11b CF card)
Physical Characteristics:
CF Type I Size: 56.6 x 42.8 x 3.3 mm
Total Weight: 13.6 g
Operating Temperature: 32 to 158 °F (0 to 70 °C)
Storage Temperature: +5 to 185 °F (-15 to +85 °C)
Power Consumption (3.3 V Supply):
Idle (listening): <20 mA
Transmission: 265 mA
Interface Standards:
CompactFlash Interface: CompactFlash Type I
With CompactFlash-to-PC Card Adapter: PCMCIA, Type II
Standards Conformance:
Wi-Fi Certified — Enterprise Edition
Meets 802.1x requirements
CompactFlash Spec. 2.0
Output Power: 40 mW maximum
Data Rate: Complies with 802.11b specification to provide data rates up
to 11 Mbps, with range and throughput optimized by Dynamic Rate Scaling
to 5.5, 2, and 1 Mbps
Frequency Range: U.S., Europe, and Japan product covering 2.4-2.5
GHz, programmable for different country regulations
Range: Approx. 300 feet (100 m) (typical office environment)
Access Protocol: Carrier Sense Multiple Access with Collision Avoidance
Protocol (CSMA/CA)
Security Encryption/Authentication Hardware Support:
40-bit and 128-bit WEP data encryption
802.1x with EAP-TLS or PEAP
Wi-Fi Protected Access (WPA), WPA-PSK (Pre-Shared Key)
Operating System Support:
Windows Mobile 2003, 2003SE and 5.0
Software Included: Installation CD
Warranty: CompactFlash Card: One year
APPENDIX A: SPECIFICATIONS | 49
Page 50

Certification/Compliance:
FCC: Part 15, subpart C
ETS 300 328
ETS 300 826
TX Maximum Radiated EIRP:
U.S.: FCC Part 15.247
Europe: ETS 300 328
Canada: IC RSS210
TX Out-of-Band Emissions:
U.S.: FCC Part 15.247, 15.205, 15.209
Europe: ETS 300 328
50 | APPENDIX A: SPECIFICATIONS
Page 51

Go Wi-Fi! P300/P300x (802.11b/g SD card)
Physical Characteristics:
Card Dimensions: 1.57 x 0.94 x 0.08 in (40 x 24 x 2.1 mm)
Total Weight: 226.8 g
Operating Temperature: +32 to +158 °F (0 to +70 °C)
Storage Temperature: +5 to +185 °F (-20 to +85 °C)
Power Consumption (3.3 V Supply):
Idle: <20 mA (estimated)
Transmission: 265 mA (peak)
Hardware Support:
• Windows Mobile 5.0 with SDIO slot
• Windows Mobile 2003/2003SE with SDIO slot and SDIO Now! software
from BSQUARE in ROM
• For information about support for MontaVista Linux and Real-Time
Operating Systems (RTOS), please submit an online inquiry to Socket
Development Services at
Interface Standards: SDIO 1.1 or greater
Standards Conformance:
Wi-Fi Certified — Enterprise Edition
Meets 802.1x requirements
WPA-2 Enterprise (certification pending)
CCX v1/v2
IEEE 802.11b and 802.11g
Transmit Power Output:
CCK: 13 dBm (typical)
OFDM: 15 dBm (typical)
Tx Maximum Radiated:
CCK: 15 dBm (estimated)
EIRP: 15 dBm (estimated)
Data Rate:
802.11g: Data rate dynamically shifts between 54, 48, 36, 24,
18, 12, 9 and 6 Mbps based on signal strength, for maximum
availability and reliability of connection. OFDM with BPSK,
QPSK, 16-QAM and 54-QAM (at 6/9, 12/18, 24/36, and 48/54
Mbps, respectively)
802.11b: Data rate dynamically shifts between 11, 5, 5M, 2M,
and 1 Mbps based on signal strength, for maximum availability
www.socketmobile.com/contact/
APPENDIX A: SPECIFICATIONS | 51
Page 52

and reliability of connection. (802.11g: DSSS with BPSK,
QPSK, and CCK (at 1,2, and 5.5/11 Mbps, respectively)
Frequency Range:
North America: 2.412-2.462 GHz, channels 1-11
Europe ETSI: 2.412-2.472 GHz, channels 1-13
Japan: 2.412-2.484 GHz, channels 1-14
Indoor Range: Approx. 300 ft (100 m) (typical office environment)
Access Protocol: Carrier Sense Multiple Access with Collision
Avoidance Protocol (CSMA/CA)
Security Encryption/Authentication Hardware Support:
40/64-bit and 128-bit WEP data encryption
802.1x with EAP-TLS or PEAP
Wi-Fi Protected Access (WPA), WPA with Pre-Shared Key
(WPA-PSK)
AES, WPA2
Software Included: Socket WLAN CD
Hardware Warranty: One year
Certification/Compliance:
FCC: Part 15, Subpart C
Industry Canada RSS210
Europe: CE: EN 300 328, EN 301 489-17
TELEC: pending
52 | APPENDIX A: SPECIFICATIONS
Page 53

Go Wi-Fi! P500/P500x (802.11b/g CF card)
Physical Characteristics:
CF Type I Size: 56.1 x 42.8 x 3.3 mm)
Total Weight: 13.6 g
Operating Temperature: 32 to 158 °F (0 to 70 °C)
Storage Temperature: +5 to 185 °F (-20 to +85 °C)
Power Consumption (3.3 V Supply):
Idle: <20 mA (estimated)
Transmission: 265 mA (peak)
Transmit Power:
CCK: 13 dBm typical
OFDM: 15 dBm typical
Interface Standards:
CompactFlash Interface: CompactFlash Type I
With CompactFlash-to-PC Card Adapter: PCMCIA, Type II
Standards Conformance:
Wi-Fi Certified — Enterprise Edition
Meets 802.1x requirements
WPA2-Enterprise (certification pending)
CCX v1/v2 (certification pending)
IEEE 802.11b and 802.11g
CompactFlash Spec. 2.0
802.11g: Data rate dynamically shifts between 54, 48, 36, 24, 18, 12, 9 and
6 Mbps based on signal strength, for maximum availability and reliability
of connection. OFDM with BPSK, QPSK, and CCK (at 1, 2, and 5/11
Mbps, respectively)
802.11b: Data rate dynamically shifts between 11, 5, 2, and 1 Mbps based
on signal strength, for maximum availability and reliability of connection.
DSSS with BPSK, QPSK, 16-QAM and 54-QAM (at 6/9, 12/18, 24/36, and
48/54 Mbps, respectively)
Frequency Range:
North America: 2.412-2.462 GHz, channels 1-11
Europe ETSI: 2.412-2.472 GHz, channels 1-13
Japan: 2.412-2.484 GHz, channels 1-14
Programmable for different country regulations
Indoor Range: Approx. 300 feet (100 m) (typical office environment)
APPENDIX A: SPECIFICATIONS | 53
Page 54

Access Protocol: Carrier Sense Multiple Access with Collision Avoidance
Protocol (CSMA/CA)
Operating System Support:
Windows Mobile 2003, 2003SE and 5.0
For information about support for MontaVista Linux, Real Time Operating
Systems (RTOS), Linux 2.4/2.6, uITRON or ThreadX, please submit an
online inquiry to Socket Development Services at:
www.socketmobile.com/contact/
Software Compatibility: Windows COM port
Software Included: Installation CD
Warranty: CompactFlash Card: One year
Certification/Compliance:
FCC: Part 15, subpart C
CE: EN 300 328, EN 301 489-17
Industry Canada: RSS210
Telec
TX Maximum Radiated EIRP:
CCK: 15 dBm (estimated)
OFDM: 17 dBm (estimated)
54 | APPENDIX A: SPECIFICATIONS
Page 55

Appendix B
Safety and Usage Tips
Please observe these Safety and Usage Tips while using Socket Go Wi-Fi!
Product Care
• Do not expose this product to liquid, moisture or extreme humidity.
• Do not expose this product to extreme high or low temperatures.
• Do not drop, throw or try to bend this product, as rough treatment could
damage it.
• Do not attempt to disassemble this product - a broken seal will void the
warranty. The product does not contain consumer serviceable
components. Should your Go Wi-Fi! need service, please contact
Socket technical support at:
www.socketmobile.com/support/support/new
product, log in, click on the Technical Support tab, and click Create New
Ticket.
• Treat this product with care. Keep in a clean, dry and dust-free place.
• Changes or modifications of this product, not expressly approved by
Socket, may void the user’s authority to operate the equipment.
Antenna Care
Do not place a metallic shield around your Go Wi-Fi! card since it will
reduce the radio transmission efficiency.
Efficient Use
For optimum performance, please make sure that there is no metallic
surrounding your Go Wi-Fi! card.
Driving
RF energy may affect some electronic systems in motor vehicles, such as
car stereo, safety equipment, etc. Check with your vehicle manufacturer’s
representative to be sure that your Go Wi-Fi! card will not affect the
electronic system in your vehicle.
Aircraft
• Turn off the Go Wi-Fi! before boarding any aircraft.
• To prevent interference with communications systems, you must not use
your Go Wi-Fi card while the plane is in the air.
• Do not use it on the ground without permission from the crew.
. After registering your
APPENDIX B: SAFETY AND USAGE TIPS | 55
Page 56

Radio Frequency Exposure
Your Go Wi-Fi! is a radio transmitter and receiver. When in operation, it
communicates with 802.11b-equipped devices by receiving and
transmitting radio frequency (RF) magnetic fields in the frequency range
2.4 to 2.5 GHz. The maximum output power of the radio transmitter is less
than 75 mW.
The Go Wi-Fi! unit is designed to be in compliance with the RF exposure
limits set by national authorities and international health agencies when
installed or used separately from other antennas or radio transmitters.
Operation of this device excludes body-worn holsters, belt clips, or similar
operating configurations, as described in the FCC filing.
56 | APPENDIX B: SAFETY AND USAGE TIPS
Page 57

Appendix C Network Information
Consult with your network administrator, or have them complete this form.
1. What is the network’s wireless network name, known as SSID?
Note: The name is case-sensitive, maximum length 32 characters.
2. What type of security does your WLAN use? Check one of the boxes A-
F below.
A Open System (no settings needed, proceed to Question 4)
WEP-40
B
WEP-128
C
WPA-PSK
D
WEP-PEAP
E
WEP-EAP/TLS
F
3. If you checked B, C, D, E or F, please provide the necessary settings.
[B] What is the WEP-40 key?
40-bit (10 characters): _ _ _ _ _ _ _ _ _ _
[C] What is the WEP-128 key? What is the key index?
128-bit (26 characters):
_ _ _ _ _ _ _ _ _ _ _ _ _ _ _ _ _ _ _ _ _ _ _ _ _ _
Key index: 1, 2, 3 or 4
[D] What is the WPA-PSK key? What is the key format?
Key: ____________________________________
Key Format:
Hexadecimal. Key length must be 64 characters.
ASCII. Key length must be 8-63 characters.
APPENDIX C: NETWORK INFORMATION | 57
Page 58

[E-F] 802.1x Authentication only
IMPORTANT! Get the required authentication certificate(s)
from your network administrator!
Specify the following 802.1x settings:
WEP key: The WEP key is provided automatically
I must enter the WEP key and key index
WEP Key: _______________________
Key index: 1, 2, 3 or 4
Authentication:
Certificate” in configuration menu.
EAP-TLS May appear as “Smart Card or
PEAP
User name: ____________________Server:________________
(network login) (certificate server)
Password: ____________________ Domain: ________________
4. Does the network require that you use a static IP address?
NO. If No, then you do not need any of the settings below.
YES. If Yes, then please specify the following:
(a) Mobile Computer IP address: _____ . _____ . _____ . _____
(b) Subnet Mask: _____ . _____ . _____ . _____
(c) Gateway: _____ . _____ . _____ . _____
(d) DNS: _____ . _____ . _____ . _____
(e) WINS*: _____ . _____ . _____ . _____
*For Remote ActiveSync Only
: If your server does NOT have use WINS
services, use the IP address of the host PC instead of a WINS address.
58 | APPENDIX C: NETWORK INFORMATION
Page 59

Appendix D
Troubleshooting
SYMPTOM: My device does not recognize the card after I insert it.
POSSIBLE REASONS SOLUTION
The card driver was not installed
or installed incorrectly.
SYMPTOM: The Socket status icon doesn’t appear after I
insert the card into my Pocket PC.
POSSIBLE REASONS SOLUTION
Your mobile computer may be
frozen.
The WLAN card may not be
properly aligned in the card slot.
SYMPTOM: My device is not receiving a valid IP address.
POSSIBLE REASONS SOLUTION
The DHCP request was not
successful in receiving an IP
address
The SSID may be incorrect. Check and re-enter the SSID. It is
In Infrastructure operating mode,
WEP encryption may not match
access point settings.
SYMPTOM: My device does not associate with an access
point known to be within range.
POSSIBLE REASONS SOLUTION
The SSID may be incorrect. Check and re-enter the SSID.
In Infrastructure operating mode,
WEP encryption may not match
access point settings.
AP may require short preamble. Change access point to long preamble.
Install the software properly.
Remove the WLAN Card. Soft reset the
device by pressing the reset button.
Remove and carefully re-insert the card
in the slot.
Remove and reinsert the card or soft
reset the mobile computer.
case-sensitive. Alternatively, try using
an SSID of “any”.
Check with your company IT
department to confirm access point
security settings.
Try using an SSID of “any”.
Check with your company IT
department to confirm access point
security settings.
APPENDIX D: TROUBLESHOOTING | 59
Page 60

Appendix E Technical Support
If you have trouble using the WLAN software, tap Start | Help to view Help
files. For Wi-Fi Companion, you can also tap the Help button
for
information about the open screen.
If you need further assistance with Wi-Fi Companion or the Go Wi-Fi!
card, Socket has two technical support resources to help you. Please note
that support is available only in English.
Socket On-Line Support
Socket On-Line Support (SOS) is a comprehensive knowledge database and
the best place to start for technical support. No registration is required. To
access SOS, please visit:
www.socketmobile.com/support/faq.
Technical Support
IMPORTANT!
To obtain technical support, you must first register your product online
at www.socketmobile.com/support/support/new.
After product registration, log in. Click on the Technical Support tab. Click
Create New Ticket to submit an online inquiry for technical support. You
can log in anytime to track the progress of your request. If we cannot
resolve your inquiry online, we can arrange for a support engineer to call
you at a specific time.
802.1x only
: If you have trouble connecting to an 802.1x network, ask your
network administrator for the event log and access point log, if supported.
Send the log(s) to Socket technical support with your request for help..
60 | APPENDIX E: TECHNICAL SUPPORT
Page 61

Limited Warranty
Socket Communications Incorporated (Socket) warrants this product against defects
in material and workmanship, under normal use and service, for one (1) year from
the date of purchase.
Incompatibility is not a defect covered by Socket’s warranty. During the warranty
period, Socket will, at its option, repair or replace the defective product at no charge
when furnished with proof of retail purchase, provided that you deliver the product
to Socket or to an authorized Socket Service Center.
The returned product must be accompanied by a return material authorization
(RMA) number issued by Socket or by Socket's Authorized Service Center. If you
ship the product, you must use the original container or equivalent and you must pay
the shipping charges to Socket. Socket will pay surface shipping charges back to
any location in the contiguous United States. This warranty applies only to the
original retail purchaser and is not transferable.
Socket may, at its option, replace or repair the product with new or reconditioned
parts and the returned product becomes Socket's property. Socket warrants the
repaired or replaced products to be free from defects in material or workmanship for
ninety (90) days after the return shipping date, or for the remainder of the original
warranty period, whichever is greater.
This warranty does not cover the replacement of products damaged by abuse,
accident, misuse or misapplication, nor as a result of service or modification other
than by Socket.
SOCKET IS NOT RESPONSIBLE FOR INCIDENTAL OR CONSEQUENTIAL
DAMAGES RESULTING FROM BREACH OF ANY EXPRESS OR IMPLIED
WARRANTY, INCLUDING DAMAGE TO PROPERTY AND, TO THE EXTENT
PERMITTED BY LAW, DAMAGES FOR PERSONAL INJURY. THIS
WARRANTY IS IN LIEU OF ALL OTHER WARRANTIES INCLUDING
IMPLIED WARRANTIES OF MERCHANTABILITY AND FITNESS FOR A
PARTICULAR PURPOSE.
Some states do not allow limitation of implied warranties, or the exclusion or
limitation of incidental or consequential damages, so that the above limitations or
exclusions may not apply to you. This warranty gives you specific legal rights and
you may also have other rights which vary from state to state.
This product may contain fully tested, recycled parts, warranted as if new.
For warranty information, please visit:
www.socketmobile.com/support
61
Page 62

Limited Software Warranty
LIMITED WARRANTY. SOCKET warrants that the original disk or CD ROM is
free from defects for 90 days from the date of delivery of the SOFTWARE.
CUSTOMER REMEDIES. SOCKET’S entire liability and your exclusive remedy
shall be, at SOCKET’S option, either (a) return of the price paid or (b) replacement
of the SOFTWARE which does not meet SOCKET’S Limited Warranty and which
is returned to SOCKET with a copy of your receipt. Any replacement SOFTWARE
will be warranted for the remainder of the original warranty period or 30 days,
whichever is longer. THESE REMEDIES ARE NOT AVAILABLE OUTSIDE OF
THE UNITED STATES OF AMERICA.
NO OTHER WARRANTIES. SOCKET disclaims all other warranties, either
express or implied, including but not limited to implied warranties of
merchantability and fitness for a particular purpose, with respect to the
SOFTWARE and the accompanying written materials. This limited warranty gives
you specific legal rights. You may have others which vary from state to state.
NO LIABILITY FOR CONSEQUENTIAL DAMAGES. In no event shall SOCKET
or its suppliers be liable for any damages whatsoever (including, without limitation,
damages for loss of business profits, business interruption, loss of business
information, or other pecuniary loss) arising out of the use of or inability to use the
SOFTWARE, even if SOCKET has been advised of the possibility of such
damages. Because some states do not allow the exclusion or limitation of liability
for consequential or incidental damages, the above limitation may not apply to you.
EXPORT LAW ASSURANCES. You may not use or otherwise export or reexport
the SOFTWARE except as authorized by United States law and laws of the
jurisdiction in which the SOFTWARE was obtained. In particular, but without
limitation, none of the SOFTWARE may be used or otherwise exported or
reexported (a) into (or to a national or resident of) a United States embargoed
country or (b) to anyone on the U.S. Treasury Department’s list of Specially
Designated Nationals or the U.S. Department of Commerce’s Table of Denial
Orders. By using the SOFTWARE, you represent and warrant that you are not
located in, under control of, or a national or resident of any such country or on any
such list.
GOVERNMENT END USERS. If the SOFTWARE is supplied to the U. S.
Government, the SOFTWARE is classified as “restricted computer software” as
defined in clause 52.227-19 of the FAR. The U. S. Government ‘s rights to the
SOFTWARE are as provided in clause 52.227-19 of the FAR.
CONTROLLING LAW AND SEVERABILITY. This License shall be governed by
the laws of the United States and the State of California. If for any reason a court of
competent jurisdiction finds any provision, or portion thereof, to be unenforceable,
the remainder of this License shall continue in full force and effect.
62
Page 63

Disclaimer
EXCEPT TO THE EXTENT EXPRESSLY WARRANTED BY SOCKET
COMMUNICATIONS, INC, THIS PRODUCT IS PROVIDED "AS IS"
WITHOUT WARRANTY OF ANY KIND, EXPRESS OR IMPLIED,
INCLUDING WITHOUT LIMITATION, THE IMPLIED WARRANTIES
OF MERCHANTABILITY OR FITNESS FOR A PARTICULAR
PURPOSE. EXCEPT TO THE EXTENT REQUIRED BY LAW,
SOCKET DOES NOT ASSUME ANY PRODUCT LIABILITY ARISING
OUT OF, OR IN CONNECTION WITH, THE APPLICATION OR USE
OF ANY PRODUCT OR APPLICATION DESCRIBED HEREIN.
63
Page 64

Regulatory Compliance for Go Wi-Fi!
Socket Go Wi-Fi! is designed to be compliant with the rules and regulations
in locations where they are sold and will be labeled as required. This
product is type approved users are not required to obtain license or
authorization before using.
Radio Frequency Interference Requirements
This device complies with part 15 of the FCC rules. Operation is subject to
the following conditions: (1) This device may not cause harmful
interference, and (2) this device must accept any interference received,
including interference that may cause undesired operation.
CAUTION: Changes or modifications to the device not expressly approved
by Socket Communications can void the user's authority to operate the
equipment.
This equipment is also ETS 300 328 and ETS 300 826 compliant. These
limits are designed to provide reasonable protection against harmful
interference when the equipment is operated in a commercial environment.
This equipment generates, uses, and can radiate radio frequency energy
and, if not installed and used in accordance with the instruction manual,
may cause harmful interference to radio communications. Operation of this
equipment in a residential area is likely to cause harmful interference in
which case the user will be required to correct the interference at his or her
own expense.
If this equipment does cause harmful interference to radio or television
reception, which can be determined by turning the equipment off and on,
the user may try to correct the interference by one or more of the following
measures:
• Reorient or relocate the receiving antenna of the radio or television.
• Increase the distance separating the equipment and the receiver.
• Connect the equipment to an outlet on a different branch circuit than
that of the receiver.
• Consult the dealer or an experienced radio/TV technician for help.
The user may find the following booklet helpful:
How to Identify and Resolve Radio-TV Interference Problems
This booklet is available from the U.S. Government Printing Office,
Washington, D.C. 20402.
64
Page 65

Antenna Co-location Instructions
The antenna(s) used for this transmitter must not be co-located or operating
in conjunction with any other antenna or transmitter. End-users and
installers must be provided with installation instructions and tran smitter
operating conditions for satisfying RF exposure compliance.
Radio Frequency Interference Requirements – Canada
This Class B digital apparatus meets the requirements of the Canadian
Interference-Causing Equipment Regulations. Cet appareil numérique de la
Classe B respecte toutes les exigencies du Reglement sur le Matériel
Brouilleur du Canada.
NOTE: This device has been tested and complies with FCC, CE and IC
radio-frequency (RF) exposure limits for body-worn operation. SAR
compliance for body-worn operation has been established for PDA
configurations with a CompactFlash slot and a 1.0 cm minimum separation
distance between the WLAN Card and the user’s body. In order to comply
with FCC, CE and IC RF exposure requirements for body-worn operation,
this device must be used with a PDA utilizing a body-worn accessory that
contains no metallic components and maintains a minimum separation
distance of 1.0 cm between the WLAN Card and the user’s body. This
device has not been evaluated for RF exposure compliance with any
Smartphone or PDA with built-in phone capability that enables use of this
device to be held and transmitting next to the head. This device must not be
co-located or operating in conjunction with any other antenna or
transmitter.
CE Marking & European Union Compliance
Products intended for sale within the European Union are marked with a
CEMark which indicates compliance to applicable Directives and European
Normes (EN), as follows. Amendments to these Directives or ENs are
included: Normes (EN), as follows:
Applicable Directives:
• Electromagnetic Compatibility Directive 89/336/EEC
• Low Voltage Directive 73/23/EEC
Applicable Standards:
• EN 300 328 v1.6.1 2004-11 Electromagnetic compatibility and Radio
spectrum Matters (ERM); Wideband transmission systems; Data
transmission equipment operating in the 2.4 GHz ISM band and using
wide band modulation techniques; Harmonized EN covering essential
requirements under article 3.2 of the R&TTE Directive
• EN 301 489-17 v1.2.1 2002-08 Electromagnetic compatibility and
Radio spectrum Matters (ERM); ElectroMagnetic Compatibility (EMC)
65
Page 66

standard for radio equipment and services; Part 17: Specific conditions
for 2,4 GHz wideband transmission systems and 5 GHz high
performance RLAN equipment
• EN 301 489-17 v1.11 (2000-09) Specified Conditions for Wideband
Data and HIPERLAN Equipment
• EN61000-4-2: 1995 – Electrostatic Discharge
• EN61000-4-3: 1996 – Radiated Electromagnetic Field
• ANSI C95.1 Safety Levels with Respect to Human Exposure to RF
Electromagnetic Fields 300 KHz to 300 GHz
Product Disposal
Your device should not be placed in municipal waste. Please
check local regulations for disposal of electronic products.
66
Page 67

5/2007 Printed in U.S.A.
 Loading...