


English
INSTRUCTION MANUAL
READ INSTRUCTIONS IN FULL BEFORE USE
HeroMD MNL Type1 V2 Jun16

English
Important: This portable baby breathing monitor may not be able to detect all life-threatening events.
SNUZA is a registered trademark of
Snuza International (Pty) Ltd
Unit 11 Roeland Square
Roeland Street
Cape Town 8001
South Africa
Made in South Africa
Patented
Advena Ltd.
Thorne Widgery House
33 Bridge Street
Hereford, HR4 9DQ, UK
Reg No. 3517275. VAT # GB702590065
Patent nos:
2008212520 | 2,677,990 | EP 2124748 |08709966.9/2124748 | 200300 |2009-548789 | MX/a/2009/008469 | 578560 | 2,009,134,887 | 2009/05652 | 2359364 | 8,461,996
|
|
|
English |
CONTENTS |
|
||
|
|||
1. |
IMPORTANT – READ FIRST! .............................................................. |
1 |
|
2. |
Introduction ............................................................................................ |
3 |
|
3. |
Precautions and Contra-indications ....................................................... |
5 |
|
4. |
Parts Identification .................................................................................. |
6 |
|
5. |
Quick Start Guide ................................................................................... |
7 |
|
6. |
Diaper (Nappy) Fitment ......................................................................... |
8 |
|
7. |
Fitting your HeroMD (Medical Device) .................................................... |
8 |
|
8. |
Operation ............................................................................................. |
10 |
|
|
8.1 |
Startup ............................................................................................ |
10 |
|
8.2 |
Monitoring ...................................................................................... |
11 |
|
8.3 |
Clothing ......................................................................................... |
13 |
9. |
Settings ................................................................................................ |
13 |
|
|
9.1 |
Audible Tick .................................................................................... |
13 |
|
9.2 |
Rouse Warning............................................................................... |
14 |
|
9.3 |
Movement-Rate Warning ............................................................... |
14 |
10. Battery ................................................................................................... |
15 |
||
|
10.1 Battery Indicator ........................................................................... |
15 |
|
|
10.2 Battery Life ................................................................................... |
15 |
|
|
10.3 Replacing the Battery ................................................................... |
15 |
|
11. |
Maintenance ......................................................................................... |
17 |
|
|
11.1 Disposal........................................................................................ |
17 |
|
|
11.2 Cleaning and Storage................................................................... |
17 |
|
12. |
Troubleshooting.................................................................................... |
18 |
|
13. |
Disclaimer............................................................................................. |
18 |
|
14. |
Guarantee............................................................................................. |
19 |
|
15. |
Technical Description ........................................................................... |
20 |
|
English
1. IMPORTANT – READ FIRST!
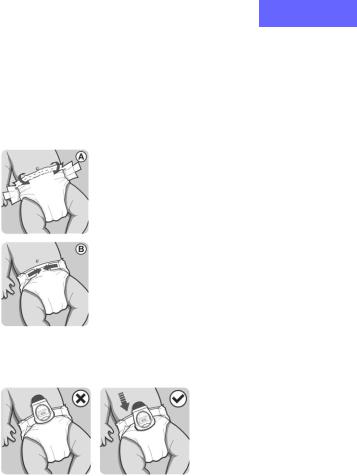
It is essential that HeroMD’s coloured flexible tip containing the breathing sensor maintains constant contact with baby’s tummy.
ALWAYS:
Use the correct size diaper (nappy). If it is too loose, HeroMD may lose contact.
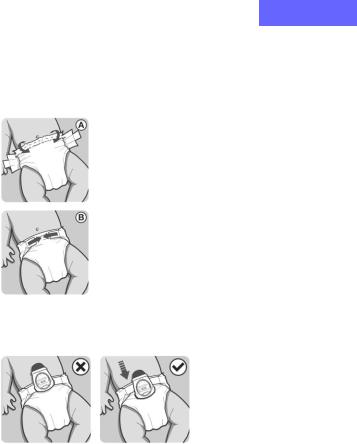
Fold the top of the diaper over before attaching HeroMD to ensure a firm grip. Use the diaper adjusters to provide a snug fit around the tummy.
Firmly clip HeroMD onto the folded diaper waistband, using the full extent of the clip.
1
English
Ensure that HeroMD sits squarely on the diaper, and that the Breathing Sensor (1) is in contact with baby’s tummy.
Press the ON/OFF button (6) to start monitoring.
Always follow the above procedure to ensure that your baby’s breathing is being monitored, and to prevent false alarms caused by lack of contact with baby’s tummy.
NOTE:
Handle HeroMD with care to prevent damage to clip or sensor.
2
English
2. INTRODUCTION
Intended use:
HeroMD is a breathing monitor for the detection of infant breathing cessation.
Intended user:
This equipment is intended to be operated by the baby’s caregiver. The caregiver must have a good understanding of the instructions and safety measures contained in the user manual.
Usage environment:
Home Safety
HeroMD safely and conveniently monitors your baby's breathing movement while sleeping to provide an early intervention opportunity in the event of any interruption in baby’s breathing.
HeroMD should be clipped onto your baby's diaper (nappy) for total portability. No cords, wires, sensor pads, flat surface or external power are required.
Clip on, switch on and experience peace of mind.
HeroMD detects even the slightest abdominal movement and will alert you if your baby’s breathing rate falls to less than 8 breaths per minute (this warning can be disabled), or if no breathing is detected at all for a period of 20 seconds. HeroMD will first vibrate gently after 15 seconds in an attempt to rouse the baby.
3

English
If the vibration succeeds in rousing the baby and breathing is detected after such an event, on each detected breath the Breathing Indicator Light (3) will flash red. After three vibration/rouse events, the Rouse Warning will alert you to the fact that your baby’s breathing movements have stopped for 15 seconds on three occasions. The Rouse Warning is characterized by a short beep and flashing of the red Breathing Indicator Light (3) every 2 seconds. Monitoring will continue when the Rouse Warning is active but will require the caregiver to attend to the baby to investigate. The Rouse Warning alarm can be reset by briefly pressing either the ON/OFF or MODE/OFF buttons, or by turning the device off and then back on. The rouse warning feature can be disabled during monitoring by pressing the MODE/OFF button for 2 seconds indicated by a single beep, flashing of the red Breathing Indicator Light (3) and Alarm Indicator Light (4). When the device is turned off and on again, the settings revert to the rouse warning feature being enabled.
4

English
3.PRECAUTIONS AND CONTRA-INDICATIONS
This device is not intended to prevent or monitor a disease or condition such as Obstructive Apnea.
Movement from external sources such as being pushed in a pram or travelling in a vehicle or aircraft may be detected by HeroMD ’s sensor. HeroMD should not be relied upon where external sources of movement are present.
The monitored baby must sleep in his/her own separate bed as the monitor may detect the breathing or movement of any other person sharing the bed with the baby, and will not alarm as long as it detects that movement, even if the baby stops breathing.
Radio transmitters such as cell phones, audio and video baby monitors, cordless phones, walkie-talkies, wireless routers, etc. may cause interference with the monitor’s ability to detect breathing or movement. The monitor should not be placed within 2 meters of other transmitting devices.
No modification of this device is allowed.
A single device should be dedicated for use with one baby only.
Small parts that have become detached for some unlikely reason may result in a choking hazard.
In case your baby develops skin sensitivity where the device makes contact with your baby’s skin, refer to section 8.3. If the skin sensitivity persists, contact us via www.snuza.com.
Keep out of reach of pets, pests and other children as damage to the device might cause it to not perform as intended.
Do not insert anything into the Sound Emission Hole (2).
Do not allow any liquid to enter the Sound Emission Hole.
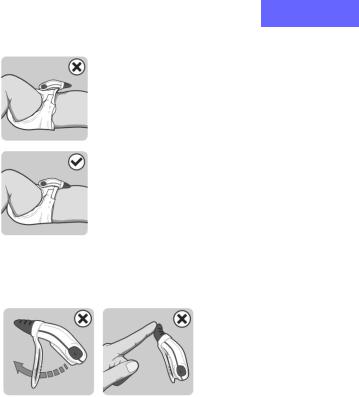
Avoid bending the breathing sensor unnecessarily (fig 1).
Do not use undue force to bend the clip (fig 2).
Do not pull the Battery Cover Release Clip (10) beyond the Guard Rail (11).
5

English
4.PARTS IDENTIFICATION FRONT
|
|
|
|
|
|
|
|
|
(1) |
Breathing Sensor |
|
|
|
|
|
|
|
|
|
||
(2) |
Battery Indicator Light |
|
|
|
|
|
(3) |
Breathing Indicator Light |
||
|
|
|
|
|
(4) |
Alarm Indicator Light |
||||
|
|
|
|
|
|
|
|
|||
(5) |
Sound Emission Hole |
|
|
|
|
|
||||
|
|
|
|
|||||||
(6) |
ON/OFF Button |
|
|
|
|
|
|
(7) |
MODE/OFF Button |
|
|
||||||||||
REVERSE
(12) Applied Part
(8)Diaper/Nappy Clip
(9)Battery Cover
(10)Battery Cover Release Clip
(11)Clip Guard Rail
6

English
5.QUICK START GUIDE
5.1Important: Use the correct diaper size and make sure it fits snugly (see Section 6 Diaper/Nappy Fitment).
5.2Do not switch the monitor on when clipped onto your baby’s diaper.
5.3Place the monitor on a flat, stationary surface. Switch on by briefly pressing the ON/OFF button (6).
5.4A start-up test will illuminate the indicator lights, vibrate the stimulator, play 3 audible tones, perform a battery test, and perform a sensor test.
5.5When the sensor has been tested, a startup tone is heard.
5.6Clip HeroMD onto the diaper so that the Breathing Sensor (1) is in direct contact with the baby’s tummy (see Section 7 Fitting your HeroMD).
5.7The Breathing Indicator Light (3) flashes on each movement. See Section 8.2 Monitoring for a full description.
5.8If breathing is not detected for 15 seconds, the vibrating stimulator will attempt to rouse the baby.
5.9If breathing resumes within 5 seconds after a vibration, the Breathing Indicator Light (3) will flash red to indicate that there has been a 15-second period of no breathing.
5.10After three vibrations, the Rouse Warning is activated – HeroMD beeps every 2 seconds and the Breathing Indicator Light (3) flashes red with every beep.
5.11If the period of no breathing reaches 20 seconds, the full audible alarm will sound, HeroMD will vibrate and the Alarm Indicator Light (4) will flash red.
5.12The caregiver must attend to the baby.
5.13The alarm can only be deactivated by switching the monitor off.
5.14To switch off the monitor, press both the ON/OFF (6) and MODE/OFF (7) buttons simultaneously. A shutdown tone will be heard and monitoring will stop.
7
English
6.DIAPER/NAPPY FITMENT
Important: Correct diaper fitment is essential for the operation of HeroMD. The thin flap of material at the top of the diaper must be folded over the thicker part before the diaper is closed (this is the section to which HeroMD will be attached). The diaper should fit snugly on the baby with the top of the diaper just below the belly button. Loose fitting diapers will gape, causing the monitor to lose contact with the baby and false alarm. A very ‘full’ or wet diaper may also cause it to gape. If baby sleeps on his or her side, HeroMD should be placed off-center of the navel and the mattress.
7.FITTING YOUR HEROMD
When attaching your Snuza monitor you should put your fingers in between the baby’s diaper and the baby’s skin. Make sure that the monitor is clipped securely onto the diaper and away from the baby’s skin when clipped on in order not to harm the baby.
Ensure that the Battery Cover (9) is secure. Clip your HeroMD all the way onto the diaper to the full extent of the clip, as shown:-
8

English
Make sure that the Breathing Sensor (1) is in contact with the baby’s tummy around the belly button area, although closer to the sides may suit different sleeping positions.
The World Health Organisation (WHO) recommends that babies be placed to sleep on their back unless advised otherwise by a doctor. See http://www.who.int/en/
9

English
8.OPERATION
8.1Startup
HeroMD must not be switched on while clipped onto your baby’s diaper. The monitor must be placed on a flat, stationary surface during the self-test.
Switch on by briefly pressing the ON/OFF button (6).
A startup-test will run which will test all indicator lights, the vibration stimulator, the audible alarm and the battery level. If a failure of any item is detected, the Self-Test Failure Alarm will sound and the device cannot be used.
After the battery test, the Battery Indicator Light will flash 3 times with simultaneous single-tone beep. The colour of the Battery Indicator Light has the following meaning:
|
Green |
Battery OK |
|
|
|
|
|
|
|
|
Battery nearing depletion – the monitor can |
|
Yellow/Orange |
be used but the battery must be replaced as |
|
|
soon as possible. |
|
|
Battery flat – HeroMD cannot be used, |
|
Red |
replace battery. The Low Battery Signal will |
|
|
immediately commence. |
If the battery indicator is either green or yellow/orange, HeroMD will proceed to test the sensor. The sensor self-test can last between 1 and 40 seconds, if the device does not detect zero movement.
The sensor test is indicated by a beep every 2 seconds and flashing of the red Breathing Indicator Light (3) and Alarm Indicator Light (4). The device must be placed on a stationary surface during this test. If the 40 second limit is reached then the self-test Failure Alarm will sound and the device cannot be used.
10

English
If the sensor test passes, a startup tune will be heard with simultaneous flashing of the green Breathing Indicator Light (3) indicating that monitoring has commenced and HeroMD can be positioned on the baby’s diaper/nappy
(see section 7 Fitting your HeroMD).
Warning: Ensure that the battery level is high enough for proper operation (i.e. green or orange light). Otherwise, DO NOT use the monitor. If the battery is too flat to operate, the Battery Indicator Light (2) will flash red accompanied by a short beep every second. Change the battery before further use (see Section 10.3 Replacing the Battery).
To switch OFF, press both the ON/OFF button (6) and the MODE/OFF button (7) simultaneously.
8.2Monitoring
During monitoring, the Breathing Indicator Light (3) provides information about your baby’s breathing, while the Alarm Indicator Light (4) alerts you to potential problems.
If there is no breathing detected then the alarm indicator light will flash red every 3 seconds. If breathing is detected then the Breathing Indicator Light
(3) flashes with each breath:-
|
Green on each |
Breathing detected with no prior |
|
breath |
rouse event. |
|
|
Breathing rate below 8 breaths per |
|
|
minute. If the breathing rate |
|
Yellow and |
increases to over 8 breaths per |
|
breathing rate alarm |
minute, breathing indicator light will |
|
(Dual-tone beep |
reset to green (normal) and the |
|
every second) |
warning will stop. To disable this |
|
|
function, see Section 9.3 Breathing |
|
|
rate warning. |
|
|
There has been at least one incident |
|
Red on each breath |
of no breathing for 15 seconds, |
|
|
where breathing was detected after |
11 |
|
|

|
|
|
English |
|
|
|
|
|
|
|
|
|
|
|
|
|
the vibration (see below). |
|
|
♪ |
|
The Rouse Warning indicates that |
|
|
Red and Rouse |
there has been 3 vibration/rousing |
|
||
|
|
|||
|
Warning Alarm |
incidents. To disable this function, |
|
|
|
|
see Section 9.2 Rouse Warning. |
|
|
The Alarm Indicator Light (4) signifies the following:- |
|
|||
|
|
|
|
|
|
|
If no movement is detected at all for |
|
|
|
|
15 seconds, HeroMD gently vibrates |
|
|
|
|
in an attempt to rouse the baby. The |
|
|
|
|
Alarm Indicator Light (4) flashes red |
|
|
|
Flashes red with |
simultaneously with a beep. If |
|
|
|
breathing movement is detected |
|
||
(( )) |
vibrating stimulus |
|
||
again within the next 5 seconds, the |
|
|||
|
and 5 short beeps |
|
||
|
Breathing Indicator Light (3) will flash |
|
||
|
|
|
||
|
|
red on each subsequent breathing |
|
|
|
|
movement. This is an indication that |
|
|
|
|
there has been an incident of no |
|
|
|
|
breathing movement for 15 seconds. |
|
|
|
|
If no breathing movement at all is |
|
|
|
|
detected for a further 5 seconds after |
|
|
|
|
the vibration stimulus (20 seconds in |
|
|
|
|
total), the Alarm Indicator Light (4) |
|
|
)) |
Flashes red and |
flashes red and the high-priority |
|
|
audible alarm sounds. The operator |
|
|||
alarm sounds |
|
|||
must attend to the baby immediately. |
|
|||
|
|
|
||
|
|
The alarm can be deactivated by |
|
|
|
|
turning HeroMD off completely (press |
|
|
|
|
ON/OFF (6) and MODE/OFF (7) |
|
|
|
|
buttons simultaneously). |
|
|
12

English
NOTE: It is recommended that the parent / caregiver is trained to deal with situations where the baby has, for example, suffered from a prolonged apnea event.
8.3Clothing
HeroMD can be clipped onto the folded waistband of the diaper or the waistband of elasticated pants, as long as the Breathing Sensor (1) touches the baby in the tummy area.
The soft sensor tip on the monitor is made from medical grade silicone and is hypoallergenic. In the unlikely event that a red friction mark is noticed on the baby’s skin where the monitor was positioned, then we recommend that a thin layer of clothing is placed between the baby’s skin and the monitor, but ensure that the Sensor maintains contact. The position of the monitor must also be changed to a different location on the tummy, away from where the red mark was noticed and preferably closer to the side.
The monitor can also be used if baby is dressed in light clothing (for example, a Babygro) over the nappy or pants to which HeroMD is attached.
Too much clothing may attenuate or muffle the alarm. Make sure
the alarm can be heard if baby is covered in clothing and/or blankets.
9.SETTINGS
9.1AudibleTick
This feature causes HeroMD to emit an audible 'tick' on each breathing movement. To enable the Audible tick, ensure that HeroMD is switched ON, then press the MODE/OFF button (7) briefly (less than 1 second). To increase the volume of the tick, press the MODE/OFF button once again for medium volume and again for high volume. To turn off, briefly press the
MODE/OFF button a fourth time – HeroMD will give a louder beep. This 13

English
feature may be used with a baby sound monitor to enable you to ‘hear’ baby’s movements from a distance.
9.2Rouse Warning
During monitoring, if no breathing movement is detected for 15 seconds, HeroMD vibrates gently in an attempt to rouse the baby. If breathing movement resumes within the next 5 seconds, the Breathing Indicator Light
(3)will flash red on each subsequent breathing movement as an indication that there has been an event of no breathing for 15 seconds. With the Rouse Warning enabled, after 3 such vibration and successful rousing incidents, the Breathing Indicator Light (3) will flash red every 2 seconds with a simultaneous audible beep. This alerts you to the fact that your baby has stopped breathing for 15 seconds on three occasions and has then resumed breathing movement after HeroMD has vibrated.
Note:- Monitoring will continue while the Rouse Warning is sounding. The Rouse Warning is automatically enabled each time HeroMD is switched ON. To disable this feature, ensure that HeroMD is switched ON, then press and hold the MODE/OFF button (7) for at least 2 seconds until a tone is heard with a brief vibration and a simultaneous flash of the red Breathing Indicator Light (3) and Alarm Indicator Light (4). If you want to enable the warning again, switch HeroMD off completely (press both ON/OFF (6) and MODE/OFF (7) buttons simultaneously), then switch it ON again (the rouse warning is enabled by default when HeroMD is switched on).
9.3Breathing-rate Warning
The Breathing-rate Warning alerts you if there are less than 8 breathing movements per minute. The warning is identified by the Breathing Indicator Light (3) flashing yellow with a simultaneous dual-tone audible beep every second. This feature is automatically enabled each time HeroMD is switched ON. To disable this warning during monitoring, ensure that HeroMD is switched ON, then press and hold the ON/OFF button (6) for more than 2 seconds until there is a brief double-beep with short vibration and a
14

English
simultaneous flash of the yellow Breathing Indicator Light (3) and Alarm Indicator Light (4). If you want to enable the warning again, switch HeroMD off completely (press both ON/OFF (6) and MODE/OFF (7) buttons simultaneously), then switch it ON again. The Breathing-rate Warning is enabled by default when HeroMD is switched on.
10.BATTERY
10.1Battery Indicator
If the battery becomes depleted during monitoring, the Battery Indicator Light (2) will flash as follows:-
3 audible beeps
♪every 4 seconds and red flash every 2 seconds
The battery is nearing depletion.
Replace battery before further use (see Section 10.3 Replacing the Battery).
10.2Battery Life
The life of the replaceable battery depends entirely on usage. Battery life will vary significantly depending on the average daily duration of use and/or alarm duration and/or number of alarms. Turning on and off unnecessarily shortens the battery life. If the number of alarms is high, check diaper fitment.
Please note that the product guarantee does not apply to the battery. The typical operating time before the battery needs replacement is 4 - 6 months when used on average 8 hours per day.
10.3Replacing the Battery
For all MD models: use a CR2 (CR15270) battery available from most retail outlets (please see our website www.snuza.com for information about batteries and details of your national distributor).
15

English
10.3.1 Use your fingernail or a small flat implement. With a pinching action (Figure 2 and Figure 3), gently pull back the Battery Cover Release Clip (10) on the underside of the monitor and lift the Battery Cover at the same time (Figure 4).
Fig 1 |
Fig 2 |
Fig 3 |
Fig 4 |
10.3.2Remove the depleted battery by gently tapping HeroMD on your hand with the battery cover opening towards the ground.
10.3.3Insert the new battery, negative end first, as shown in Figure 5.
Ensure that the polarity is correct (align the positive end ‘+’ of the battery with the ‘+’ symbol in the battery housing, as indicated). Replace the Battery Cover and ensure that it is correctly closed (Figure 6).
16

English
Fig 5 |
Fig 6 |
|
Do not use the monitor without the Battery Cover in place.
10.3.4Test the unit by switching on and ensuring that the Battery Indicator Light (2) flashes green.
10.3.5If the unit starts alarming after the battery has been replaced, simply press the ON/OFF and OFF/MODE buttons simultaneously to turn it off.
NOTE: Incorrect placement of the battery may result in a safety hazard; please follow the instructions as above.
11.MAINTENANCE
11.1Disposal
The device, battery and packaging material must be disposed of in accordance with your country’s laws governing the disposal and recycling of batteries.
11.2Cleaning and Storage
Gently wipe with a damp cloth to remove any dirt. A mild soap may be used for stubborn dirt.
17
English
Do not use any other cleaning agents as they may contain damaging chemicals.
The monitor is splash resistant, not waterproof. Do not immerse in water. If it gets wet, dry it off immediately.
When changing the battery, dirt that is trapped between the battery replacement hatch and the case may be cleaned with a dry cotton bud once the Battery Cover (9) has been removed. Be sure that the rubber seal is free of dirt before replacing the Battery Cover, as this could compromise the seal.
When not in use, keep your HeroMD in its protective case. Do not store in a damp area.
12.TROUBLESHOOTING
Check incorrect fitment and placing of HeroMD on baby’s diaper (see Section 6 Diaper/Nappy Fitment and Section 7 Fitting your HeroMD).
Battery failure. The Battery Indicator Light (2) will show red (see Section 10.3 Replacing the Battery).
Please visit our website www.snuza.comfor further information.
13.DISCLAIMER
Customers use this monitor at their own risk and Snuza International (Pty) Ltd, its members, employees, agents, contractors, representatives, manufacturers, distributors and associates ("SNUZA") shall not be held liable for any loss, damage or injury suffered by the customer or any other person arising from, or in connection with, the use or manufacture of the monitor, including loss, damage or injury suffered by the customer or any other person as a result of any defects in respect of the monitor, and all warranties, and any other liability from whatsoever cause arising, are hereby excluded and the customer hereby indemnifies Snuza International (Pty) Ltd in respect of any such liability.
18

English
14.GUARANTEE
Snuza International (Pty) Ltd guarantees this product to be free from defects in materials and workmanship for a period of 12 months from the original date of purchase, verified by a sales receipt. Our guarantee liability shall be limited to replacing the unit free of charge and does not include transport costs. Our guarantee extends to all countries in which this product is supplied. By the act of operating this product, the user accepts all resulting liability. We reserve the right to modify the provisions of this guarantee at any time without notice. This guarantee does not cover the battery, incorrect application, tampering, misuse or transport damage.
19
English
15. TECHNICAL DESCRIPTION
|
|
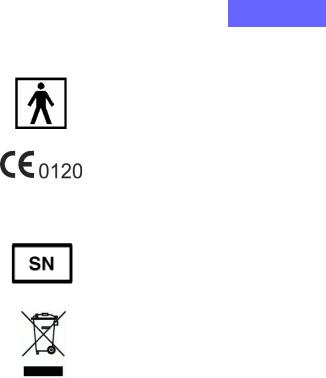
Type BF applied part |
|
|
|
|
|
CE marking according to Annex II of MDD |
|
|
93/42/EEC |
|
|
|
IP52 |
|
IP52 The enclosure of the monitor is |
|
protected against the ingress of dripping |
|
|
|
|
|
|
water |
|
|
Device Serial Number (the first two |
|
|
numbers indicate the year of |
|
|
manufacture) |
|
|
|
|
|
See the Disposal section for proper |
|
|
disposal of the monitor |
|
|
|
Typical service life |
|
HeroMD has an expected service life of 2 |
|
|
years from the date of manufacture |
Environmental Conditions |
|
Permissible environmental operating |
|
|
conditions: |
|
|
· Temperature: 5 ºC TO 40 ºC. |
|
|
· Humidity: 15% TO 93%, Non |
|
|
Condensing |
|
|
· Air pressure: 700HPA TO 1060HPA |
|
20 |
|

|
|
DeutschEnglish |
|
|
|
|
|
|
|
|
|
Permissible environmental |
· 25 °C without relative humidity control; |
|
|
conditions of transport and storage |
and |
|
|
after having removed the device |
+70°C at a relative humidity up to 93%, |
|
|
from its protective packaging and |
non-condensing |
|
|
subsequently between uses: |
|
|
|
Power Source: |
Internally Powered |
|
|
Battery Specification: |
Common name: CR2 |
|
|
|
IEC: CR17355 |
|
|
|
3.0 Volt |
|
|
|
800 mAh |
|
|
|
Size (mm): 26 x 15 x 15 |
|
|
|
Lithium |
|
|
Sound pressure level: |
75dBm at 10cm |
|
|
Scan the following QR code to see the electromagnetic compatibility tables:
http://us.snuza.com/wp-content/uploads/2016/07/Snuza-HeroMD- Electromagnetic-Compatibility-Table.pdf
Contact Us:
For assistance with using or maintaining HeroMD or to report unexpected operation or events, contact us via:
Internet: |
www.snuza.com/contact.php |
Email: |
support@snuza.com |
Tel: |
+27 (0)21 461 8530 |
Address: |
Unit 11 Roeland Square, Roeland Street, Cape Town 8001, |
|
South Africa |
|
21 |
Français
Moniteur de respiration portatif
NOTICE D’UTILISATION
LISEZ ENTIEREMENT ET ATTENTIVEMENT LE MANUEL D’INSTRUCTION
AVANT LA MISE EN SERVICE
22
Français
Important : Ce moniteur de respiration portatif peut ne pas détecter certains dangers mortels.
SNUZA est une marque déposée et
 Snuza International (Pty) Ltd
Unit 11 Roeland Square
Roeland Street
Cape Town 8001
South Africa
Fabriqué en Afrique du Sud
Breveté
Advena Ltd.
Thorne Widgery House
33 Bridge Street
Hereford, HR4 9DQ, UK
Reg No. 3517275. VAT # GB702590065
Les numéros de brevets :
2008212520 | 2,677,990 | EP 2124748 |08709966.9/2124748 | 200300 |2009-548789 | MX/a/2009/008469 | 578560 | 2,009,134,887 | 2009/05652 | 2359364 | 8,461,996
23
|
|
Français |
CONTENU |
|
|
|
||
1. |
IMPORTANT – A LIRE AVANT TOUTE UTILISATION! .................... |
25 |
2. |
Introduction .......................................................................................... |
27 |
3. |
Précautions et contre-indications ......................................................... |
28 |
4. |
Identification des Éléments .................................................................. |
30 |
5. |
Guide de Démarrage Rapide ............................................................... |
31 |
6. |
Installation de la Couche ..................................................................... |
32 |
7. |
Positionnement de votre HeroMD ......................................................... |
32 |
8. |
Functionnement ................................................................................... |
34 |
|
8.1 Démarrage...................................................................................... |
34 |
|
8.2 Supervision .................................................................................... |
35 |
|
8.3 Vêtements ..................................................................................... |
37 |
9. |
Réglages ............................................................................................. |
38 |
|
9.1 « tic » Sonore ................................................................................. |
38 |
|
9.2 l’Avertisseur de Réveil par Stimulation........................................... |
38 |
|
9.3 l’Avertisseur de Mouvement Faible ................................................ |
39 |
10. Batterie .................................................................................................. |
40 |
|
|
10.1 Indicateur d’État de la Batterie ..................................................... |
40 |
|
10.2 Durée de Vie de la Batterie .......................................................... |
40 |
|
10.3 Remplacement de Batterie ........................................................... |
40 |
11. |
Maintenance ......................................................................................... |
42 |
|
11.1 Destruction ................................................................................... |
42 |
|
11.2 Nettoyage et Stockage ................................................................. |
43 |
12. |
Dépannage ........................................................................................... |
44 |
13. |
Avis de non Responsabilité .................................................................. |
44 |
14. |
Garantie................................................................................................ |
44 |
15. |
Description Technique.......................................................................... |
45 |
|
24 |
|
Français
1.IMPORTANT – A LIRE AVANT TOUTE UTILISATION!
Si la procédure ci-dessus est toujours respectée, vous pouvez être sûr que les mouvements abdominaux comportant le détecteur de respiration de votre bébé sont surveillés, et que les fausses alarmes causées par le manque de contact entre le capteur et le ventre du bébé seront évitées.
IL FAUT TOUJOURS :
Utilisez une couche de taille correcte. Si elle est trop large, le contact avec le détecteur HeroMD risque d’être insuffisant.
Pliez la partie supérieure de la couche avant de fixer le HeroMD afin de garantir une fixation ferme. Utilisez le système de réglage de la couche pour permettre une fixation ferme autour du ventre.
Fixez fermement le détecteur HeroMD sur la ceinture de la couche pliée en enfonçant totalement la pince du détecteur HeroMD.
25

Français
Vérifiez que le détecteur Hero est placé au centre de la couche et que le détecteur de respiration (1) est en contact avec le ventre de bébé.
Appuyez sur le bouton ON/OFF (6) pour activer le contrôle.
REMARQUE:
Manipuler l’appareil HeroMD avec précaution pour éviter d’endommager le détecteur ou le clip d’attache.
26

Français
2. INTRODUCTION
Usage prévu :
Snuza HeroMD est un moniteur respiratoire, qui détecte quand un bébé cesse de respirer.
Utilisateur prévu :
Cet appareil est prévu pour être utilisé par la personne s’occupant du bébé. La personne doit avoir une bonne connaissance des instructions et des consignes de sécurité indiquées dans le manuel d’utilisation.
Environnement d’utilisation :
En sécurité à la maison
HeroMD surveille les mouvements respiratoires de votre bébé pendant son sommeil, de façon pratique et sans danger, pour vous permettre d’agir très tôt en cas d’arrêt respiratoire.
HeroMD devrait être fixé sur le rebord supérieur replié de la couche de votre bébé pour une parfaite mobilité. Pas de fils électriques, des câbles, de fréquences radio ou d’alimentations électriques externes ne sont nécessaire.
Fixez le, allumez le et soyez serein.
HeroMD détecte le moindre mouvement abdominal et peut également vous avertir si les mouvements abdominaux le rythme respiratoire de votre bébé a une
27
 Loading...