


OVERVIEW
1)READ THE OWNER’S MANUAL CAREFULLY. Know your snowplow. Learn its applications and limitations.
2)KEEP AWAY FROM CHILDREN AND PETS. Be sure children and pets are kept a safe distance from the plow operating area.
3)DO NOT ABUSE THE SNOWPLOW. Follow the guidelines set forth in this manual. Do not force the snowplow to do a job it was not designed for.
4)MAINTAIN THE SNOWPLOW. Keep the snowplow clean and lubricated when the unit is not in use to avoid corrosion. Cover the winch when not in use (if stored outside).
5)INSPECT THE PLOW BEFORE EACH USE. Check the alignment of all moving parts and check for any loose bolts that may affect the operation.
6)NEVER SIT OR RIDE ON THE SNOWPLOW. Serious injury could occur.
7)ONLY USE ORIGINAL EQUIPMENT PARTS AND ACCESSORIES. Consult the owner’s manual for the recommended accessories. The use of improper accessories may cause hazards.
*ASSEMBLY INSTRUCTIONS: PAGES 7 TO 13*
TROUBLESHOOTING PAGE 14
CAUTION: READ BEFORE YOU PLOW
ALWAYS check that the hitch pins pass through the appropriate holes in the mounting forks. IF THE PLOW IS INCORRECTLY ATTACHED TO THE MOUNTS, IT WILL PULL AWAY FORM THE VEHICLE AND FALL OFF.
Not for commercial use.
Lights are recommended if plowing at night.
Do not plow at speeds above 10 mph (16 km/hr) as this may cause your engine to overheat.
Do not drive on public roadways with plow attached.
Install safety hook when transporting plow in raised position.
Avoid all obstacles be familiar with the terrain.
For best results plow every 3 to 6 inches of snowfall.
Keep hands and feet clear of blade and winch.
Lower the blade when parked.
 WARNING: Do not attempt to operate the snowplow until you have thoroughly read and completely understood all instructions contained in this manual. Improper operation can result in personal injury or damage to your plow and vehicle. As Snowbear Plows Inc. does not assemble or install this snowplow we cannot be held responsible for personal injury or damages that may occur with product misuse.
2
INSTALLING YOUR VEHICLE MOUNTING HARNESS
Overview:
Our snowplow mounts are unique because they use existing holes and attachment points on your vehicles frame. Use only Snowbear Certified mounts with your Snowbear personal snowplow.
All of the mount kits have been designed using manufacturer’s frame specifications as well as actual frame measurements. However based on our experience, we know that these measurements are not always the same and can easily vary by ¼” or more.
We have attempted to compensate for some of these inconsistencies by providing slots in our support brackets wherever possible. You may however still need to adjust the holes in your mounting brackets, or vehicle frame. This can be easily done by using a file, a small grinder, or drill.
Before beginning your installation check the assembly drawing inside of the box to confirm that you have the proper mount for your vehicle. The accessory package of your vehicle (e.g. XLT, Custom, Sport, Extended Cab, SLT, etc.) does not affect the frame specifications. Manufacturers tend to have many models, but few platforms. Our mounts are designed around these frames and platforms.
Installation:
Many customers find that the mount installation is intimidating because they are not familiar with the underside of their vehicles. In general, a mounting harness consists of a cross member (shipped with your plow hardware) and a set of custom brackets to attach the crossmember to the vehicle.
Begin by loosely attaching the brackets to the frame of the vehicle, then loosely attach the cross member to the two brackets.
Be careful not to pinch any wires or hoses between the plow mount and your vehicle frame.
When the parts are all in place, push the assembly back as far as possible (as though you were the plow) and begin to tighten the hardware.
NOTE: We supply standard grade 5 bolts and lock nuts which will appear tight as you thread them onto the bolts, THIS IS NORMAL.
Operation:
After plowing for the first time, we recommend that you re tighten the bolts on the mounting harness. On most vehicles the components will “seat” into each other after the first use.
2WD vehicles and vehicles equipped with Sport package will normally have a lower ground clearance due to the tire size as well as the suspension package. You should expect a reduction in ground clearance at the front of your vehicle, because the mounting tubes must be exposed below the lowest part of your vehicles body. Adding an extra helper spring, or increasing the tire size will give you the extra clearance you may need. Minimal ground clearance does not affect your ability to plow, but it does mean you must use extra caution when plowing. Avoiding any raised or uneven areas that your plow hardware may get caught up on will ensure trouble free use.
With some applications the mounting forks on the cross member will point slightly downward after use, this is a normal part of the “SEATING” process and will not affect the operation of the plow. (In most cases steel shims can be used to bring the forks back up, but you should be careful not to make them point upwards or it will be difficult to install your plow.
Your plow is designed to move freshly fallen snow. It is not suitable for smashing through piles of ice, or grading sand and gravel.
WARNING:
If you overload the mounting harness it is designed to yield or break before your plow or vehicle’s frame is severely damaged. It is especially important to exercise caution with heavier full sized trucks to ensure that you will receive years of trouble free service from your personal snowplow.
Snowbear mounts are an essential part of the Snowbear plow and are designed and manufactured to specifically fit Snowbear snowplows. These mounts are not designed to fit other manufacturers' plows. Using a Snowbear mount on a non Snowbear product will void the Snowbear mount warranty. Using a non Snowbear mount on Snowbear snowplows will void the manufacturer warranty for the Snowbear snowplow. Snowbear will not provide assistance to customers using Snowbear mounts or snowplows with non Snowbear products.
Snowbear Plows Inc. cannot be held responsible, and disclaims any liability, for any personal injury or damages that may occur in connection with such use of any unapproved products with Snowbear products.
3
PLOWING INSTRUCTIONS
The Snowbear Snowplow is intended for light duty, personal use only. It can be used to effectively clear snow from parking lots, lane ways and driveways quickly and with minimal effort.
To obtain many years of trouble free service from your Snowplow, be sure to observe these basic plowing instructions.
1.Before beginning to plow check that the hitch pins are properly installed through the holes on the mounting forks under the vehicle. To check this pull forward on the plow. If the plow moves from the vehicle when pulled the hitch pins are not correctly installed.
2.Plow promptly after every 3 6 inches of accumulation during heavy snowfalls.
3.Plow immediately after each snowfall. The plow cannot be used to break through ice.
4.Exercise caution and be familiar with the area that you are plowing. Hidden obstacles can damage both the plow and your vehicle.
5.Stay clear of all obstacles by at least 3 feet (walls, telephone poles, gate, etc.) as your vehicle may slip sideways on ice causing the plow to strike the obstacle.
6.Never ram a pile of snow. Your unit is not designed to move blocks of ice and attempting to do so will void your warranty and may cause damage to your vehicle.
7.Do not exceed 10 mph (16 km/hr). Excessive speeds can overload the plow or cause you to lose control of your vehicle.
8.When you encounter drifts of snow, proceed by raising the plow to remove the top layer of snow, then remove the base on successive passes.
9.If your plow hops when plowing reduce your speed.
10.Your plow is designed to trip forward if it is overloaded or if it encounters a small obstacle buried in the snow. The plow will automatically reset itself. If you are unsure as to why it tripped, examine the snow pile for a hidden obstacle before proceeding with caution.
11.Always lift the plow before backing up.
12.Always lower the plow when parked.
13.Remove the plow from your vehicle after each use and do not allow ice or snow to accumulate on the winch.
14.THE SNOWPLOW IS NOT INTENDED FOR TRANSPORTATION ON PUBLIC ROADS. To drive on the highway with a plow attached most states and provinces require the installation of a lighting kit complete with turn signals. A safety chain is also required, which would not allow the plow to fall off the front of the truck. Always consult your local regulatory agency for their particular requirements.
Note: Driving at speeds above 10 mph (16 km/hr) with the plow attached may cause your engine to overheat.
4

PLOWING LANE WAYS
Note: To ensure easy maintenance of lane ways throughout the winter season, plow your lane ways as widely as possible during the first snowfalls.
Technique:
Set the plow on an angle and proceed down the lane close to the edge where the snow will be piled. Be careful to stay clear of ditches, trees, buildings and any other obstacles that may run parallel with the lane way.
At the end of the lane way, turn the vehicle around and without changing the angle of the plow, return on the other side of the lane way to accumulate a second pile of snow. Repeat this action to push the snow pile back further.
PLOWING PARKING AREAS
 Hint: Always plow parking areas as widely and as deeply as possible during the first snowfalls.
Technique:
Generally, working from the center to one side and then from the center again to the other side.
Do this by setting the plow on an angle and proceed down the center of the parking lot until you reach the far edge.
Lift the plow and back up to the position that you started from. Now, plow a parallel and slightly overlapping path.
After you have plowed half the parking lot, exit the vehicle, adjust the plow to the opposite angle and starting from the center again, work progressively in a lateral direction, towards the outer edge of the parking lot.
Note: When approaching the end of the lot, reduce your speed and stop before the blade slams the snow pile. Your plow should not be used to stack the snow.
ASSEMBLY TOOLS REQUIRED
RATCHETING WRENCH
9/16” SOCKET
3/4” SOCKET
15/16” SOCKET
3/8” OPEN ENDED WRENCH 1 1/16” OPEN ENDED WRENCH
5

SNOWPLOW PARTS LIST
Before you begin please verify that all of the parts below have been included with your plow. Your plow is packaged in three boxes.
Avant que vous commenciez svp vérifiez que toutes les pièces ci dessous ont été incluses avec votre charrue. Votre charrue est empaquetée dans des trois boîtes. Antes de que usted comience por favor verifique que todas las piezas abajo se hayan incluido con su arado. Su arado se empaqueta en tres cajas.
Item |
Quantity |
Description |
Part Number |
Item |
Quantity |
Description |
Part Number |
1 |
8.00 |
1/2 13 x 1.50" HHCS |
N/A |
29 |
N/A |
CHAIN LINK |
N/A |
|
|
|
|
|
|
|
|
2 |
14.00 |
1/2 FLAT WASHER (2 FOR CASTER KIT) |
N/A |
30 |
2.00 |
14" HEAVY DUTY CABLE TIES |
N/A |
|
|
|
|
|
|
|
|
3 |
17.00 |
1/2 13 LOCKING HEX NUT |
N/A |
31 |
1.00 |
35A BREAKER BRACKET |
297 042 |
|
|
|
|
|
|
|
|
4 |
16.00 |
3/8 16 X 1.00 CARRIAGE BOLT, BLACK |
N/A |
32 |
6.00 |
6" HEAVY DUTY CABLE TIES |
N/A |
|
|
|
|
|
|
|
|
5 |
38.00 |
3/8 16 LOCKING HEX NUT |
N/A |
33 |
1.00 |
5/8 X 4.00 HITCH PIN W/ CLIP |
N/A |
|
|
|
|
|
|
|
|
6 |
18.00 |
3/8 16 X 1.00 HHCS |
N/A |
34 |
1.00 |
35A CIRCUIT BREAKER |
263 347 |
|
|
|
|
|
|
|
|
7 |
2.00 |
1/2 13 HEX NUT |
N/A |
35 |
1.00 |
WINCH UNIT + MODULE + WIRED REMOTE |
263 282 |
|
|
|
|
|
|
|
|
8 |
1.00 |
.637 X .797OD X 1.50 SLEEVE |
N/A |
36A |
1.00 |
60" BLADE LH |
297 611 |
|
|
|
|
|
|
|
|
9 |
1.00 |
5/8 18 X 2 1/2 HHCS |
N/A |
36B |
|
72" BLADE LH |
297 580 |
|
|
|
|
|
|
|
|
10 |
2.00 |
5/8 FLAT WASHER |
N/A |
37A |
1.00 |
60" BLADE RH |
297 610 |
|
|
|
|
|
|
|
|
11 |
1.00 |
5/8 18 LOCKING HEX NUT |
N/A |
37B |
|
72" BLADE RH |
297 579 |
|
|
|
|
|
|
|
|
12 |
4.00 |
5/16 18 X 1.00 HHCS |
N/A |
38 |
1.00 |
LOWER A FRAME |
297 745 |
|
|
|
|
|
|
|
|
13 |
14.00 |
5/16 18 NYLON LOCK NUT (8 FOR CASTER KIT) |
N/A |
39 |
1.00 |
UPPER A FRAME |
297 753 |
|
|
|
|
|
|
|
|
14 |
5.00 |
1/2 13 X 1.25 HHCS |
N/A |
40 |
1.00 |
HD WINCH ARM |
297 740 |
|
|
|
|
|
|
|
|
15 |
2.00 |
1/2 13 X 2.00 HHCS |
N/A |
41 |
1.00 |
HD WINCH ARM |
297 741 |
|
|
|
|
|
|
|
|
16 |
1.00 |
5/16 18 U BOLT (RELEASE HANDLE) |
N/A |
42 |
1.00 |
WINCH MOUNT |
297 595 |
|
|
|
|
|
|
|
|
17 |
1.00 |
3/8 16 U BOLT (WINCH STRAP) |
N/A |
43 |
1.00 |
RELEASE HANDLE |
297 008 |
|
|
|
|
|
|
|
|
18 |
3.00 |
1/2 X 2.00 CLEVIS PIN |
N/A |
44 |
1.00 |
RELEASE ROD |
297 632 |
|
|
|
|
|
|
|
|
19 |
5.00 |
1/8" HITCH PIN CLIP (2 FOR CASTER KIT) |
N/A |
45 |
1.00 |
2" HOLLOW SHANK RECEIVER |
324 135 |
|
|
|
|
|
|
|
|
20 |
2.00 |
1/2 13 EYE BOLT (4.5") |
262 930 |
46 |
2.00 |
12" SNOWPLOW SPRING |
297 094 |
|
|
|
|
|
|
|
|
21 |
4.00 |
3/8 16 X 3/4 HHCS, ZP |
N/A |
47A |
1.00 |
60" SCRAPER BAR (2PC) |
297 617/618 |
|
|
|
|
|
|
|
|
22 |
2.00 |
D CLIP (2 FOR CASTER KIT) |
N/A |
47B |
1.00 |
72" SCRAPER BAR (2PC) |
297 649/650 |
|
|
|
|
|
|
|
|
23 |
1.00 |
D SHACKLE |
N/A |
48 |
1.00 |
LIGHT DUTY SKID SHOE KIT (60/72") |
297 158 |
|
|
|
|
|
|
|
|
24 |
1.00 |
CARABINER |
N/A |
49 |
1.00 |
BLADE STIFFENER (60/72/82/84") |
297 633 |
|
|
|
|
|
|
|
|
25 |
8.00 |
5/16 18 X .75 HHCS (8 FOR CASTER KIT) |
N/A |
50 |
1.00 |
UTV WIRE EXTENSION KIT |
263 282 |
|
|
|
|
|
|
|
|
26 |
6.00 |
1/2 13 X 1.00 HHCS (2 FOR CASTER KIT) |
N/A |
51 |
2.00 |
CASTER STAND |
297 788 |
|
|
|
|
|
|
|
|
27 |
1.00 |
5/16 18 X 1.00 HHCS, ZP |
N/A |
52 |
2.00 |
LOCKING PIN W/RETAINER |
363 016 |
|
|
|
|
|
|
|
|
28 |
2.00 |
1/2 X 1.25 CLEVIS PIN (2 FOR CASTER KIT) |
N/A |
53 |
1.00 |
60/72" UPPER BLADE STIFFENER |
297 918 |
|
|
|
|
|
|
|
|
*Snowbear limited reserves the right to change products or part numbers without prior notification, and under no obligation to incorporate such changes into previously manufactured products
*Snowbear a limité des réservations la droite de changer des produits ou des numéros de la pièce sans avis préalable, et sous aucune obligation d'incorporer de tels changements aux produits précédemment manufacturés
*Snowbear limitó reservas la derecha de cambiar productos o números de parte sin la notificación anterior, y bajo ninguna obligación de incorporar tales cambios en productos previamente manufacturados

#14, X3 |
2 |
3 |
1 |
|
DET. A |
||
|
|
37 |
|
|
|
USE 1/2" H/W TO |
|
|
14 |
|
|
|
ATTACH BLADES |
|
|
|
|
|
|
#2, X6 |
|
TOGETHER |
|
|
A |
|
|
|
2 |
|
|
#3, X3 |
36 |
|
4 |
|
|
|
|
|
46 |
|
|
#4, |
X12 |
|
|
|
|
|
|
DET. B |
|
#5, X12 |
B |
ATTACH SCRAPER |
5 |
|
BAR USING 1" H/W |
||||
|
|
|
PROVIDED |
|
|
21 |
DET. E |
6 |
|
53 |
||
5 |
USE 3/8X3/4 H/W |
|
|
|
|
TO ATTACH UPPER |
|
|
|
BLADE SUPPORT |
|
#3, X4 |
|
|
47 |
|
|
E |
|
|
|
|
|
#5, X12 |
|
|
|
#21, X4 |
|
|
|
|
6 |
C |
|
|
|
DDET. D |
|
#6, X8 |
|
|
|
|
|
|
USE 3/8X1.0" H/W |
|
|
|
TO ATTACH LOWER |
|
48 |
|
BLADE SUPPORT |
|
|
|

 2
2
3
5
3
DET. C
USE 3/8X1.0" H/W TO ATTACH SKID SHOE PLATE TO BLADE. THEN 1/2" H/W TO ATTACH SKID SHOE TO PLATE
5
#9, X1
#10, X2
#11, X1
#8, X1
9
10
8
38 10
11
3
INSERT RELEASE PIN ON UPPER A-FRAME INTO ARCHED BRACKET ON LOWER A-FRAME
37
CONNECT UPPER AND LOWER A-FRAME USING 5/8 X 2.5" BOLT AND SLEEVE, WASHER, AND LOCK NUT
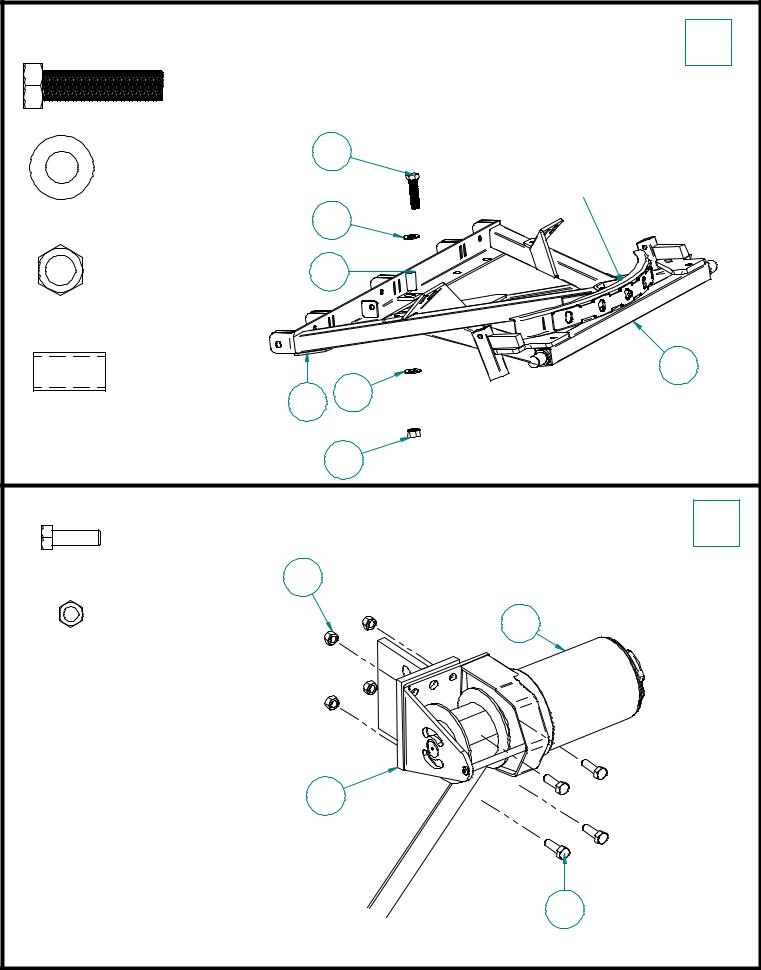
#12, X4 |
|
ATTACH WINCH TO WINCH MOUNTING |
4 |
|
|
||
|
|
BRACKET USING 5/16 H/W PROVIDED |
|
|
13 |
ENSURE STRAP IS WOUND IN THE |
|
|
DIRECTION ILLUSTRATED BELOW. |
|
|
|
|
|
|
#13, X4 |
|
34 |
|
|
|
|
41
12
 Loading...