

Page 1

NOTICE D’EMPLOI
Tondeuse autoporté
YT2452F
Avertissement !
Lire et comprendre le présent manuel dans son intégralité avant d’utiliser cette machine ou
de procéder à son entretien et à son contrôle.
Conserver ce manuel avec soin afi n de pouvoir le consulter pour l’utilisation, l’entretien, ou
le contrôle de cette machine.
Yvan Béal - 21, av. de l’Agricu lture - B. P. 16
Z.I. du Brézet - 63014 Clermont-Ferrand Cedex 2
Tél : 04 73 91 93 51 - Téléco pie : 04 73 90 23 11
www.yvanbeal.fr - E-mail : info@yvanbeal.fr
R.C.S. Cl ermont- Fd B 304 973 8 86 S.A. S. au capi tal de 612 000 €
01-00
Page 2
3
C
B
A
6
A
B
4
7
A
D
B
C
A
B
E
5
A
2
Page 3
8
C
A
B
9
E
A
C
D
B
3
Page 4

4
Page 5

CONTENTS
Front Cover .................................................................................................................1
Illustrations .................................................................................................................2
Operator Safety ..........................................................................................................6
Features and Controls .............................................................................................13
Operation ..................................................................................................................17
Maintenance .............................................................................................................20
Troubleshooting .......................................................................................................22
Speci cations ...........................................................................................................24
Warranty ....................................................................................................................25
General Information
Thank you for purchasing this quality-built SNAPPER riding mower. We’re pleased that you’ve placed your confidence in the
SNAPPER brand. When operated and maintained according to the instructions in this manual, your SNAPPER product will
provide many years of dependable service.
This manual contains safety information to make you aware of the hazards and risks associated with riding mowers and
how to avoid them. This riding mower is designed and intended only for cutting grass and is not intended for any other
purpose. It is important that you read and understand these instructions thoroughly before attempting to start or operate the
equipment. Save these original instructions for future reference.
Product Reference Data
Record your model name/number, manufacturer’s
identification numbers, and engine serial numbers in the
space provided for easy access. These numbers can be
found in the locations shown.
When contacting your authorized dealer for
replacement parts, service, or information you MUST
have these numbers.
PRODUCT REFERENCE DATA
Model Description Name/Number
Unit MFG Number Unit SERIAL Number
Mower Deck MFG Number Mower Deck SERIAL Number
Dealer Name Date Purchased
ENGINE REFERENCE DATA
Engine Make Engine Model
Engine Type/Spec Engine Code/Serial Number
CE Identification Tag
A. Manufacturer’s Identification Number
B. Manufacturer’s Serial Number
C. Power Rating in Kilowatts
D. Maximum Engine Speed in Rotations per Minute
E. Manufacturer’s Name and Address
F. Year of Manufacture
G. CE Compliance Logo
H. Mass of Unit in Kilograms
I. Guaranteed Sound Power in Decibels
A
Part No. xxxxxxx
B
E
xxxxxxxxxxxxxxx
Serial No. xxxxxxxxxx
xxxxxxxxxxxxxxxxxxxxxxx
xxxxxxxxxxxxxxxxxxxxxxx
xxxxxxxxxxxxxxxxxxxxxxx
xxxxxxxxxxxxxxxxxxxxxxx
xxx
20xx
F
dB
kg: xxx
kW: x.xx
xxxx max
G
I
H
C
D
The Illustrated Parts List for this machine can be downloaded from www.snapper.com. Please provide model and serial
number when ordering replacement parts.
Copyright © 2010 Briggs & Stratton Power Products Group, LLC
Milwaukee, WI, All rights reserved.
SNAPPER is a trademark of Briggs & Stratton Power Products
Group, LLC Milwaukee, WI USA.
en
5
Page 6

Operator Safety
Congratulations on purchasing a superior-quality piece of lawn and
garden equipment. Our products are designed and manufactured to
meet or exceed all industry standards for safety.
Power equipment is only as safe as the operator. If it is misused, or
not properly maintained, it can be dangerous! Remember, you are
responsible for your safety and that of those around you.
Use common sense, and think through what you are doing. If you are
not sure that the task you are about to perform can be safely done
with the equipment you have chosen, ask a professional: contact
your local authorized dealer.
Read the Manual
The operator’s manual contains important safety information you
need to be aware of BEFORE you operate your unit as well as
DURING operation.
Safe operating techniques, an explanation of the product’s features
and controls, and maintenance information is included to help you get
the most out of your equipment investment.
Be sure to completely read the Safety Rules and Information found on
the following pages. Also completely read the Operation section.
Operating Safety
Children
Tragic accidents can occur with children. Do not allow them
anywhere near the area of operation. Children are often
attracted to the unit and mowing activity. Never assume that
children will remain where you last saw them. If there is a
risk that children may enter the area where you are mowing,
have another responsible adult watch them.
DO NOT GIVE CHILDREN RIDES ON THIS UNIT! This
encourages them to come near the unit in the future while it
is running, and they could be seriously hurt. They may then
approach the unit for a ride when you are not expecting it,
and you may run over them.
6
Reverse
Do not mow in reverse unless
absolutely necessary. Always look
down and behind before and while
traveling in reverse
even with the mower
blades disengaged.
www.snapper.com
Page 7
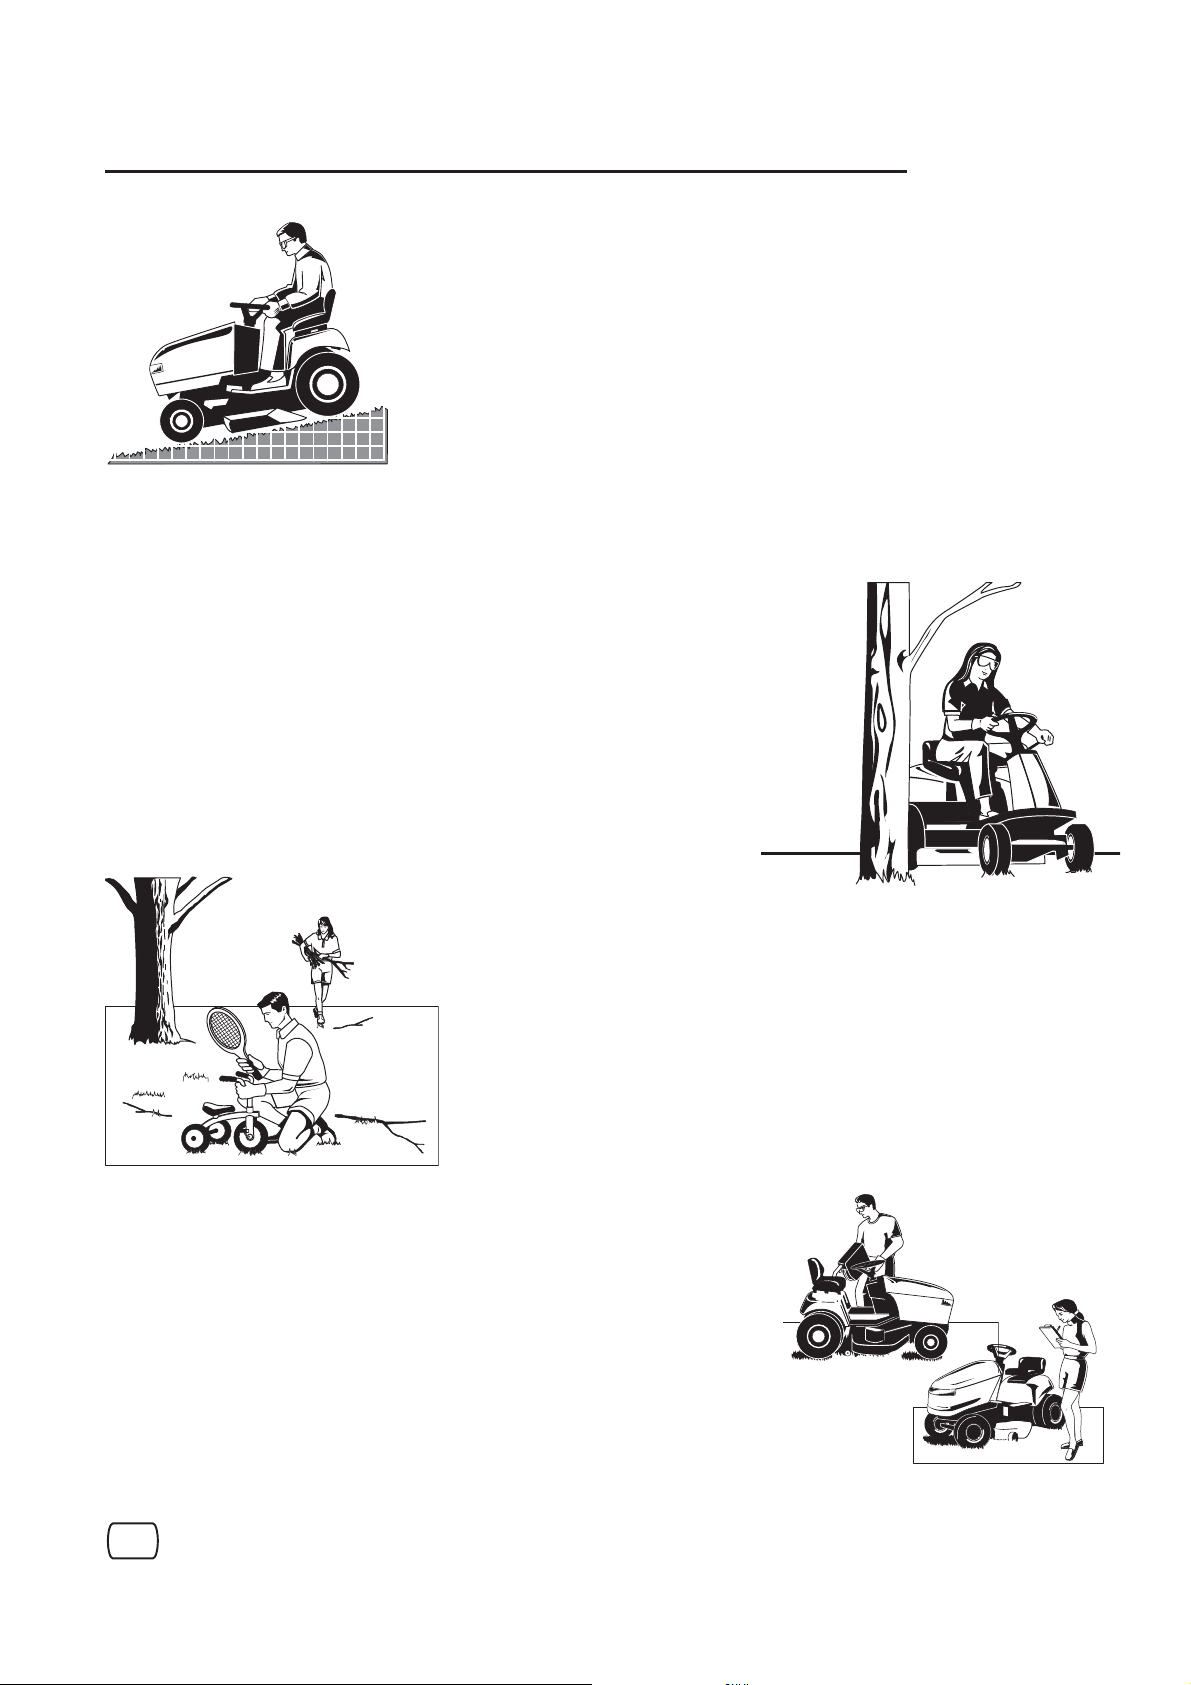
Slope Operation
You could be seriously injured or even killed if you use this unit on too
steep an incline. Using the unit on a slope that is too steep or where you
don’t have adequate traction can cause you to lose control or roll over.
A good rule of thumb is to not operate on any slope you cannot back up
(in 2-wheel drive mode). You should not operate on inclines with a slope
greater than a 3.5 foot rise over a 20 foot length. Always drive up and
3.5 ft
(1,5 m)
20.0 ft (6,0 m)
down slopes: never cross the face.
Also note that the surface you are driving on can greatly impact stability
and control. Wet grass or icy pavement can seriously affect your ability to
control the unit.
If you feel unsure about operating the unit on an incline, don’t do it. It’s
not worth the risk.
Moving Parts
This equipment has many moving parts that can injure you or someone else.
However, if you are seated in the seat properly, and follow all the rules in this book,
the unit is safe to operate.
The mower deck has spinning mower blades that can amputate hands and feet.
Do not allow anyone near the equipment while it is running!
To help you, the operator, use this equipment safely, it is equipped with an
operator-present safety system. Do NOT attempt to alter or bypass the system.
See your dealer immediately if the system does not pass all the safety interlock
system tests found in this manual.
Operator Safety
Thrown Objects
This unit has spinning mower blades. These blades can pick up and throw
debris that could seriously injure a bystander. Be sure to clean up the area to
be mowed BEFORE you start mowing.
Do not operate this unit without the entire grass catcher or discharge guard
(deflector) in place.
Also, do not allow anyone in the area while the unit is running! If someone
does enter the area, shut the unit off immediately until they leave.
Fuel and Maintenance
Gasoline is extremely flammable. Its vapors are also extremely flammable
and can travel to distant ignition sources. Gasoline must only be used
as a fuel, not as a solvent or cleaner. It should never be stored any place
where its vapors can build up or travel to an ignition source like a pilot light.
Fuel belongs in an approved, plastic, sealed gas can, or in the tractor fuel
tank with the cap securely closed. Spilled fuel needs to be cleaned up
immediately.
Proper maintenance is critical to the safety and performance of your unit. Be
sure to perform the maintenance procedures listed in this manual, especially
periodically testing the safety system.
en
7
Page 8

Operator Safety
Read these safety rules and follow them closely. Failure to obey these rules could result in loss of control
of unit, severe personal injury or death to you, or bystanders, or damage to property or equipment.
This mowing deck is capable of amputating hands and feet and throwing objects.
The triangle in text signifies important cautions or warnings which must be followed.
GENERAL OPERATION
1. Read, understand, and follow all instructions in the
manual and on the unit before starting.
2. Do not put hands or feet near rotating parts or under
the machine. Keep clear of the discharge opening at
all times.
3. Only allow responsible adults, who are familiar with
the instructions, to operate the unit (local regulations
can restrict operator age).
4. Clear the area of objects such as rocks, toys, wire,
etc., which could be picked up and thrown by the
blade(s).
5. Be sure the area is clear of other people before
mowing. Stop the unit if anyone enters the area.
6. Never carry passengers.
7. Do not mow in reverse unless absolutely necessary.
Always look down and behind before and while
travelling in reverse.
8. Never direct discharge material toward anyone. Avoid
discharging material against a wall or obstruction.
Material may ricochet back toward the operator. Stop
the blade(s) when crossing gravel surfaces.
9. Do not operate the machine without the entire grass
catcher, discharge guard (deflector), or other safety
devices in place.
10. Slow down before turning.
11. Never leave a running unit unattended. Always
disengage the PTO, set parking brake, stop engine,
and remove keys before dismounting.
12. Disengage blades (PTO) when not mowing. Shut off
engine and wait for all parts to come to a complete
stop before cleaning the machine, removing the grass
catcher, or unclogging the discharge guard.
13. Operate the machine only in daylight or good artificial
light.
14. Do not operate the unit while under the influence of
alcohol or drugs.
15 Watch for traffic when operating near or crossing
roadways.
16. Use extra care when loading or unloading the unit into
a trailer or truck.
17. Always wear eye protection when operating this unit.
18. Data indicates that operators, age 60 years and
above, are involved in a large percentage of power
equipment-related injuries. These operators should
evaluate their ability to operate the equipment safely
enough to protect themselves and others from injury.
19. Follow the manufacturer’s recommendations for wheel
weights or counterweights.
20. Keep in mind the operator is responsible for accidents
occurring to other people or property.
21. All drivers should seek and obtain professional and
practical instruction.
22. Always wear substantial footwear and trousers. Never
operate when barefoot or wearing sandals.
23. Before using, always visually check that the blades
and blade hardware are present, intact, and secure.
Replace worn or damaged parts.
24. Disengage attachments before: refueling, removing
an attachment, making adjustments (unless the
adjustment can be made from the operator’s position).
25. When the machine is parked, stored, or left
unattended, lower the cutting means unless a positive
mechanical lock is used.
26. Before leaving the operator’s position for any reason,
engage the parking brake (if equipped), disengage the
PTO, stop the engine, and remove the key.
27. To reduce fire hazard, keep the unit free of grass,
leaves, & excess oil. Do not stop or park over dry
leaves, grass, or combustible materials.
TRANSPORTING AND STORAGE
1. When transporting the unit on an open trailer, make
sure it is facing forward, in the direction of travel. If the
unit is facing backwards, wind lift could damage the
unit.
2. Always observe safe refueling and fuel handling
practices when refueling the unit after transportation
or storage.
3. Never store the unit (with fuel) in an enclosed poorly
ventilated structure. Fuel vapors can travel to an
ignition source (such as a furnace, water heater, etc.)
and cause an explosion. Fuel vapor is also toxic to
humans and animals.
8
4. Always follow the engine manual instructions for
storage preparations before storing the unit for both
short and long term periods.
5. Always follow the engine manual instructions for
proper start-up procedures when returning the unit to
service.
6. Never store the unit or fuel container inside where
there is an open flame or pilot light, such as in a water
heater. Allow unit to cool before storing.
www.snapper.com
Page 9

Operator Safety
SLOPE OPERATION
Slopes are a major factor related to loss-of-control and tip-over
accidents, which can result in severe injury or death. Operation
on all slopes requires extra caution. If you cannot back up the
slope or if you feel uneasy on it, do not operate on it.
Control of a walk-behind or ride-on machine sliding on a
slope will not be regained by the application of the brake. The
main reasons for loss of control are: insufficient tire grip on
the ground, speed too fast, inadequate braking, the type of
machine is unsuitable for its task, lack of awareness of the
ground conditions, incorrect hitching and load distribution.
1. Mow up and down slopes, not across.
2. Watch for holes, ruts, or bumps. Uneven terrain could
overturn the unit. Tall grass can hide obstacles.
3. Choose a slow speed so that you will not have to stop
or change speeds while on the slope.
4. Do not mow on wet grass. Tires may loose traction.
5. Always keep unit in gear especially when traveling
down slopes. Do not shift to neutral and coast
downhill.
6. Avoid starting, stopping, or turning on a slope. If tires
lose traction, disengage the blade(s) and proceed
slowly straight down the slope.
7. Keep all movement on slopes slow and gradual. Do
not make sudden changes in speed or direction,
which could cause the machine to rollover.
8. Use extra care while operating machines with grass
catchers or other attachments; they can affect the
stability of the unit. Do not use on steeps slopes.
9. Do not try to stabilize the machine by putting your foot
on the ground (ride-on units).
10. Do not mow near drop-offs, ditches, or embankments.
The mower could suddenly turn over if a wheel is over
the edge of a cliff or ditch, or if an edge caves in.
11. Do not use grass catchers on steep slopes.
12. Do not mow slopes you cannot back up them.
13. See your authorized dealer/retailer for
recommendations of wheel weights or counterweights
to improve stability.
14. Remove obstacles such as rocks, tree limbs, etc.
15. Use slow speed. Tires may lose traction on slopes
even through the brakes are functioning properly.
16. Do not turn on slopes unless necessary, and then,
turn slowly and gradually downhill, if possible.
17. Four Wheel Drive Models: Four Wheel Drive improves
access to dangerously sloped terrain, increasing
the possibility of roll-over. If the machine stops while
going uphill, stop the blades and back down slowly.
Avoid sudden turns.
TOWED EQUIPMENT (RIDE-ON UNITS)
1. Tow only with a machine that has a hitch designed for
towing. Do not attach towed equipment except at the
hitch point.
2. Follow the manufacturer’s recommendations for weight
limit for towed equipment and towing on slopes.
3. Never allow children or others in or on towed equipment.
4. On slopes, the weight of the towed equipment may
cause loss of traction and loss of control.
5. Travel slowly and allow extra distance to stop.
6. Do not shift to neutral and coast down hill.
WARNING
Never operate on slopes greater than 17.6 percent
(10°) which is a rise of 3-1/2 feet (106 cm) vertically in
20 feet (607 cm) horizontally.
When operating on slopes use additional wheel
weights or counterweights. See your dealer/retailer
to determine which weights are available and
appropriate for your unit.
Select slow ground speed before driving onto
slope. In addition to front weights, use extra caution
when operating on slopes with rear-mounted grass
catchers.
Mow UP and DOWN the slope, never across the
face, use caution when changing directions and DO
NOT START OR STOP ON SLOPE.
CHILDREN
Tragic accidents can occur if the operator is not alert to the
presence of children. Children are often attracted to the unit
and the mowing activity. Never assume that children will
remain where you last saw them.
1. Keep children out of the mowing area and under the
watchful care of another responsible adult.
2. Be alert and turn unit off if children enter the area.
3. Before and during reverse operation, look behind and
down for small children.
4. Never carry children, even with the blade(s) off. They
may fall off and be seriously injured or interfere with
safe unit operation. Children who have been given
rides in the past may suddenly appear in the mowing
area for another ride and be run over or backed over
by the machine.
5. Never allow children to operate the unit.
6. Use extra care when approaching blind corners,
shrubs, trees, or other objects that may obscure
vision.
EMISSIONS
1. Engine exhaust from this product contains chemicals
known, in certain quantities, to cause cancer, birth
defects, or other reproductive harm.
2. Look for the relevant Emissions Durability Period and
Air Index information on the engine emissions label.
IGNITION SYSTEM
1. This spark ignition system complies with Canadian
ICES-002.
en
9
Page 10

Operator Safety
SERVICE AND MAINTENANCE
Safe Handling of Gasoline
1. Extinguish all cigarettes, cigars, pipes, and other
sources of ignition.
2. Use only approved gasoline containers.
3. Never remove the gas cap or add fuel with the engine
running. Allow the engine to cool before refueling.
4. Never fuel the machine indoors.
5. Never store the machine or fuel container where there
is an open flame, spark, or pilot light such as near a
water heater or other appliance.
6. Never fill containers inside a vehicle or on a truck bed
with a plastic bed liner. Always place containers on the
ground away from your vehicle before filling.
7. Remove gas-powered equipment from the truck or
trailer and refuel it on the ground. If this is not possible,
then refuel such equipment on a trailer with a portable
container, rather than from a gasoline dispenser
nozzle.
8. Keep nozzle in contact with the rim of the fuel tank or
container opening at all times until fueling is complete.
Do not use a nozzle lock-open device.
9. If fuel is spilled on clothing, change clothing
immediately.
10. Never over-fill the fuel tank. Replace gas cap and
tighten securely.
11. Use extra care in handling gasoline and other fuels.
They are flammable and vapors are explosive.
12. If fuel is spilled, do not attempt to start the engine but
move the machine away from the area of spillage and
avoid creating any source of ignition until fuel vapors
have dissipated.
13. Replace all fuel tank caps and fuel container caps
securely.
Service & Maintenance
1. Never run the unit in an enclosed area where carbon
monoxide fumes may collect.
2. Keep nuts and bolts, especially blade attachment
bolts, tight and keep equipment in good condition.
3. Never tamper with safety devices. Check their proper
operation regularly and make necessary repairs if they
are not functioning properly.
4. Keep unit free of grass, leaves, or other debris buildup. Clean up oil or fuel spillage. and remove any fuelsoaked debris. Allow machine to cool before storage.
5. If you strike an object, stop and inspect the machine.
Repair, if necessary, before restarting.
6. Never make adjustments or repairs with the engine
running.
7. Check grass catcher components and the discharge
guard frequently and replace with manufacturer’s
recommended parts, when necessary.
8. Mower blades are sharp. Wrap the blade or wear
gloves, and use extra caution when servicing them.
9. Check brake operation frequently. Adjust and service
as required.
10. Maintain or replace safety and instructions labels, as
necessary.
11. Do not remove the fuel filter when the engine is hot
as spilled gasoline may ignite. Do not spread fuel line
clamps further than necessary. Ensure clamps grip
hoses firmly over the filter after installation.
12. Do not use gasoline containing METHANOL, gasohol
containing more than 10% ETHANOL, gasoline
additives, or white gas because engine/fuel system
damage could result.
13. If the fuel tank must be drained, it should be drained
outdoors.
14. Replace faulty silencers/mufflers.
15. Maintain or replace safety and instruction labels as
necessary.
16. Use only factory authorized replacement parts when
making repairs.
17. Always comply with factory specifications on all
settings and adjustments.
18. Only authorized service locations should be utilized for
major service and repair requirements.
19. Never attempt to make major repairs on this unit
unless you have been properly trained. Improper
service procedures can result in hazardous operation,
equipment damage and voiding of manufacturer’s
warranty.
20. On multiple blade mowers, take care as rotating one
blade can cause other blades to rotate.
21. Do not change engine governor settings or overspeed the engine. Operating the engine at excessive
speed can increase the hazard of personal injury.
22. Disengage drive attachments, stop the engine,
remove the key, and disconnect the spark plug wire(s)
before: clearing attachment blockages and chutes,
performing service work, striking an object, or if the
unit vibrates abnormally. After striking an object,
inspect the machine for damage and make repairs
before restarting and operating the equipment.
23. Never place hands near the moving parts, such as a
hydro pump cooling fan, when the tractor is running.
(Hydro pump cooling fans are typically located on top
of the transaxle).
24. Units with hydraulic pumps, hoses, or motors:
WARNING: Hydraulic fluid escaping under pressure
may have sufficient force to penetrate skin and cause
serious injury. If foreign fluid is injected into the skin
it must be surgically removed within a few hours by a
doctor familiar with this form of injury or gangrene may
result. Keep body and hands away from pin holes or
nozzles that eject hydraulic fluid under high pressure.
Use paper or cardboard, and not hands, to search
for leaks. Make sure all hydraulic fluid connections
are tight and all hydraulic hoses and lines are in good
condition before applying pressure to the system. If
leaks occur, have the unit serviced immediately by
your authorized dealer.
25. WARNING: Stored energy device. Improper release of
springs can result in serious personal injury. Springs
should be removed by an authorized technician.
26. Models equipped with an engine radiator: WARNING:
Stored energy device. To prevent serious bodily injury
from hot coolant or steam blow-out, never attempt to
remove the radiator cap while the engine is running.
Stop the engine and wait until it is cool. Even then, use
extreme care when removing the cap.
10
www.snapper.com
Page 11

Operator Safety
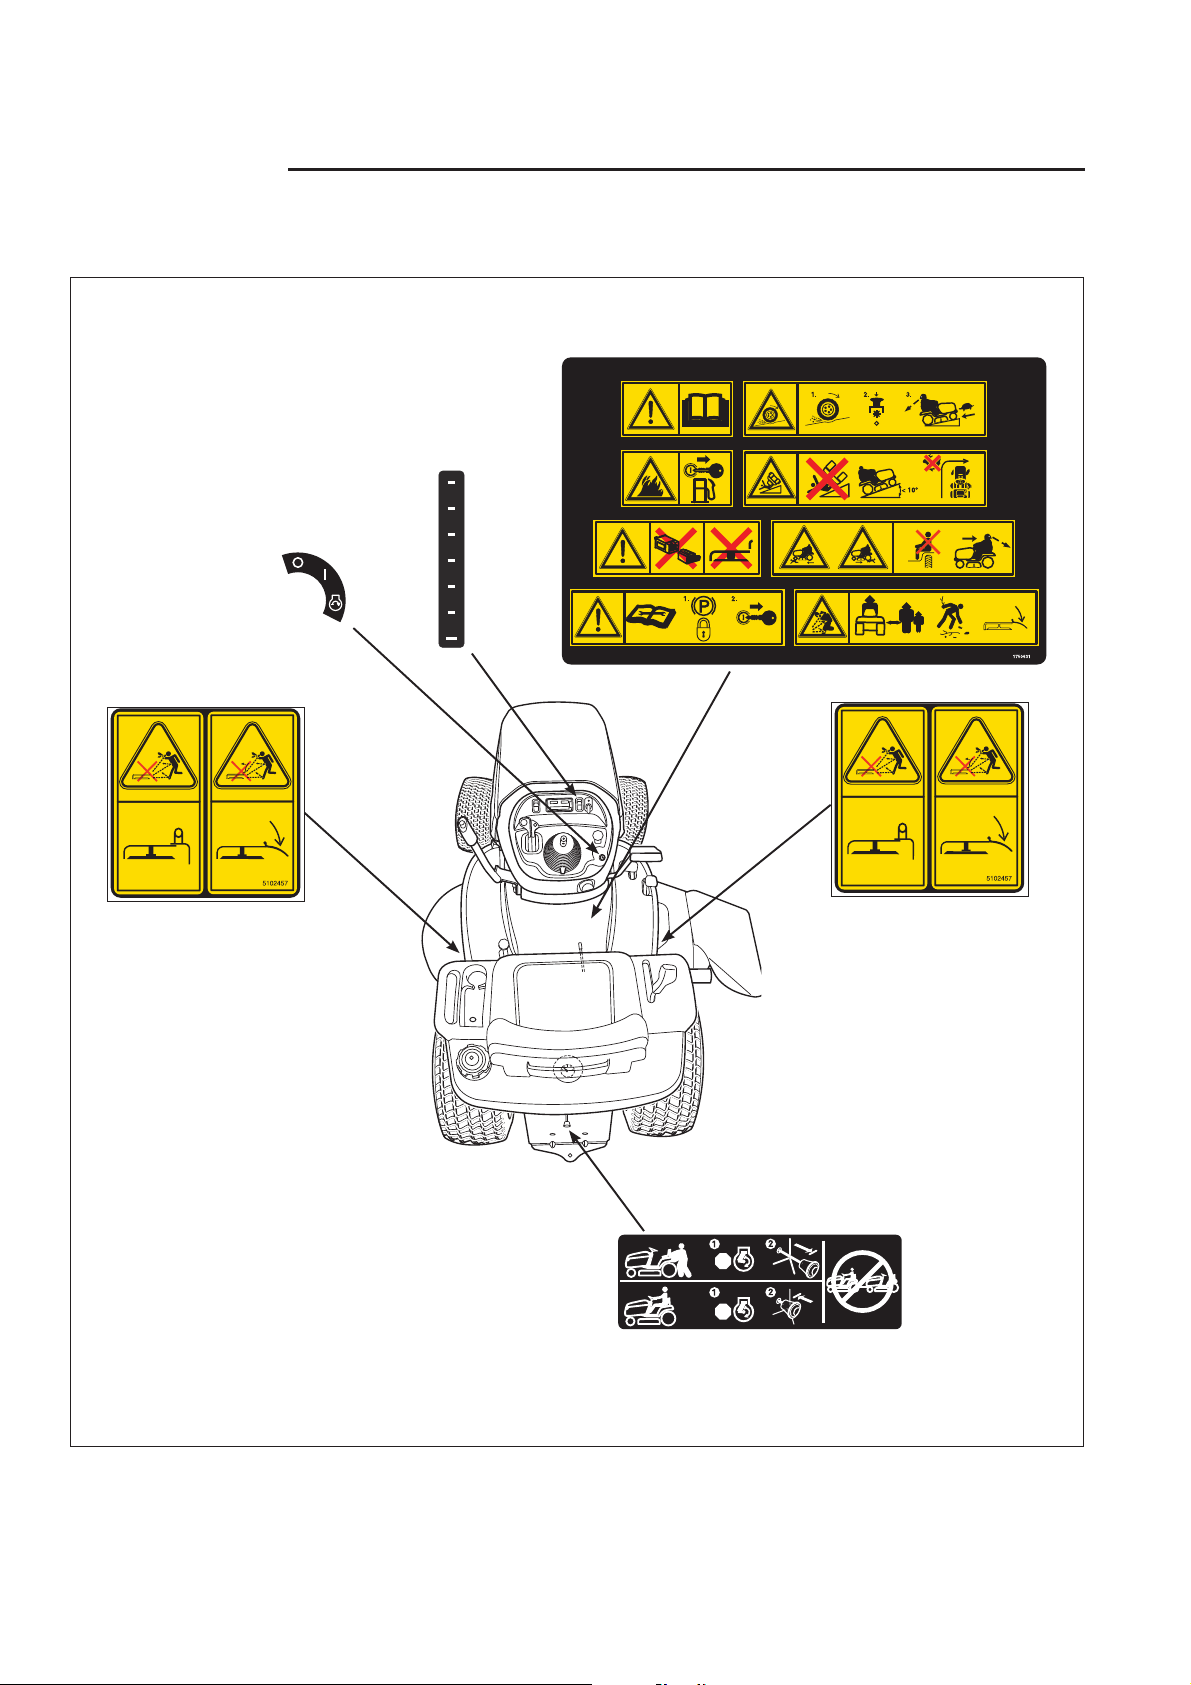
Safety Decals
All DANGER, WARNING, CAUTION and instructional
messages on your rider and mower should be carefully
read and obeyed. Personal bodily injury can result when
these instructions are not followed. The information is for
your safety and it is important! The safety decals below
are on your rider and mower.
Safety Icons
Warning: Read Operator’s Manual.
Read and understand the Operator’s
Manual before using this machine.
Danger: Thrown Objects.
This machine is capable of throwing
objects and debris. Keep bystanders
away.
Warning: Remove Key Before
Servicing.
Remove the key and consult technical
literature before performing repairs or
maintenance.
If any of these decals are lost or damaged, replace them
at once. See your local dealer for replacements.
These labels are easily applied and will act as a constant
visual reminder to you, and others who may use the
equipment, to follow the safety instructions necessary for
safe, effective operation.
Danger: Dismemberment.
This mower deck can amputate
limbs. Keep hands and feet away
from blades.
Danger: Fire Hazard.
Do not add fuel while engine is hot
or running. Stop engine and allow to
cool for 3 minutes prior to adding fuel.
Danger: Hot Surface.
Allow machine to cool before
touching this area.
Danger: Machine Rollover.
Do not use this machine on slopes
greater than 10°.
Danger: Dismemberment.
This machine can amputate limbs.
Keep bystanders and children away
when engine is running.
Danger: Carbon Monoxide
Poisoning.
Do not operate the engine in an
unventilated area.
en
11
Page 12
Operator Safety
OO
TT
OO
Decal Locations
Ignition Switch
Positions
Part No. 1722806
Decal Cutting
Height
Part No. 1737541
1
2
3
4
5
6
+
Operating Instructions,
Part No. 1750631
Danger, Rotating Blades,
Part No. 5102457
Danger, Rotating Blades,
Part No. 5102457
SS
PP
SS
Transmission
Release
Part No. 1723160
1723160
Figure 1
12
www.snapper.com
Page 13

Features and Controls
12V
Control Functions
Throttle Control
The throttle controls engine speed. Move the throttle
forward to increase engine speed and back to decrease
engine speed. Always operate at FULL throttle.
Choke
Close the choke for cold starting. Open the choke
once the engine starts. A warm engine may not require
choking. Move the lever forward to close the choke.
Figure 2
Headlights
The light switch turns the tractor headlights on and off.
Reverse Mowing Option RMO
The Reverse Mowing Option allows for mowing (or use of
other PTO driven attachments) while traveling in reverse.
If you choose to mow or operate another attachment in
reverse, turn the RMO key after the PTO is engaged. The
L.E.D. light will illuminate, and the operator can then mow
in reverse. Each time the PTO is disengaged the RMO
needs to be reactivated if desired.
en
13
Page 14

Features and Controls
PTO Switch
The PTO (Power Take-Off) switch engages and
disengages attachments that use the PTO. To engage the
PTO, pull UP on the switch. Push DOWN to disengage.
Note that the operator must be seated firmly in the tractor
seat for the PTO to function.
Ignition Switch
The ignition switch starts and stops the engine, it has
three positions:
OFF Stops the engine and shuts off the
electrical system.
RUN Allows the engine to run and powers the
electrical system.
START Cranks the engine for starting.
NOTE: Never leave the ignition switch in the RUN
position with the engine stopped–this drains the battery.
Brake Pedal
Depressing the brake pedal applies the tractor brake.
Ground Speed Pedals
The tractor’s forward ground speed is controlled by the
forward ground speed control pedal. The tractor’s reverse
ground speed is controlled by the reverse ground speed
control pedal.
Depressing either pedal will increase ground speed. Note
that the further down the pedal is depressed, the faster
the tractor will travel.
Parking Brake
The parking brake knob is used to lock the parking brake
when the tractor is stopped. Fully depressing the brake
pedal and pulling up on the knob engages the parking
brake
Mower Height of Cut Adjustment
The cutting height is adjustable between 1.0” and 4.0”
(2,5 and 10,0 cm).
The cutting height adjustment switch controls the mower
cutting height. This same switch also controls the spout
rotator motor when a snowthrower is installed. The arrows
on the switch correspond to the direction of adjustment
(UP arrow raises cutting height, RIGHT arrow rotates
the spout right, etc). When the adjustment indicator has
reached the end of its travel, release the switch; holding
the switch down will damage the motor.
Cruise Control
The cruise control is used to lock the ground speed
control in forward. Move the lever forward until the
desired ground speed is reached. To disengage the
cruise control move the lever back. In the event you need
to stop quickly, depressing the brake pedal will also return
the cruise control to neutral.
Seat Adjustment Lever
The seat can be adjusted forward and back. Move the
lever, position the seat as desired, and release the lever
to lock the seat into position.
Transmission Release Valve Lever
The transmission release valve lever deactivates the
transmission so that the tractor can be pushed by hand.
See PUSHING THE TRACTOR BY HAND.
Fuel Tank
To remove the cap, turn counterclockwise. The fuel
gauge is part of the dashboard.
12V
Power Outlet
The power outlet is 12V-DC. Accessory must be rated at
14 amps or less.
Differential Lock Pedal
Depressing this pedal locks the transmission differential,
locking both rear wheels into “drive”.
Use this feature if the tractor is stuck because one
wheel is slipping. Engage the differential lock at slow
ground speeds only.
Attachment Lift Control Lever
When using the mower deck, lift the deck off the ground
while transporting to and from the job site. DO NOT cut
with the mower in the raised, transport position.
The attachment lift control lever raises and lowers
attachments that utilize the tractor’s manual lift linkage.
To lower an attachment: pull the lever back slightly,
depress the release button, and push the lever forward
until it locks in the lowered position. To raise an
attachment: push the lever forward slightly, depress the
release button, then pull the lever back until it locks in the
raised position.
14
www.snapper.com
Page 15
Features and Controls
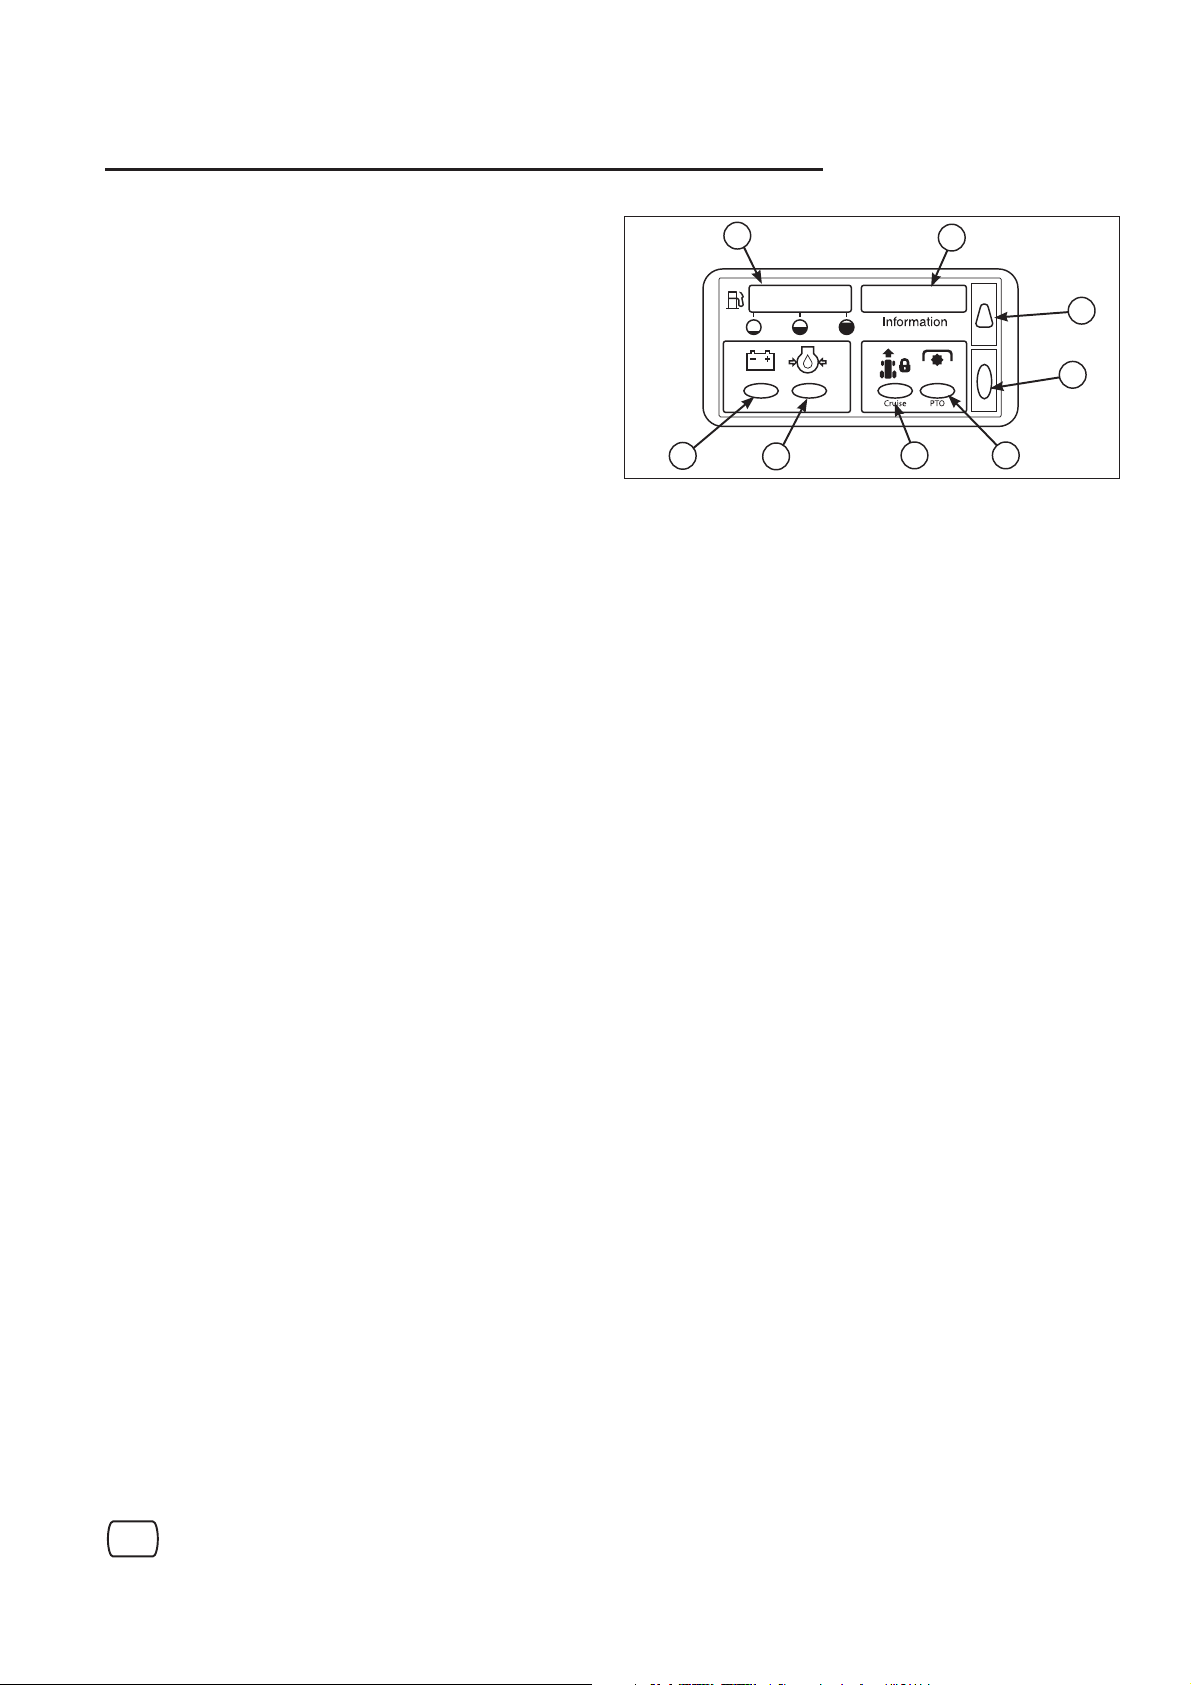
Dashboard Display and Functions
A. FUEL LEVEL
Indicates the amount of fuel in the fuel tank. Left is empty;
right is full.
B. HOUR METER / CLOCK / SERVICE INDICATOR
Displays the clock, hour meter, and maintenance reminder.
The hour meter measures the number of hours the key has
been in the RUN position. The hour meter will flash an initial
oil change indicator at 5 hours, and a lubrication reminder
every 50 hours. These reminders display for approximately
two hours and will automatically reset themselves.
NOTE: The hour meter will register the passage of time
when the key is in the RUN position, even if the engine is not
running. The hour meter has a self contained power source
so the total hours are always visible.
C. SELECT BUTTON
Used to set the clock and reset the maintenance reminder.
D. SET BUTTON
Used to set the clock and reset the maintenance reminder.
E. PTO LIGHT
Indicates the PTO switch is in the ON position.
F. CRUISE CONTROL LIGHT
Indicates that the cruise control is engaged.
G. LOW OIL PRESSURE LIGHT
Indicates that the engine oil pressure is low. The light will
turn on when the tractor is first started and then go out. IF
THIS LIGHT TURNS ON WHILE THE TRACTOR IS IN USE,
TURN THE ENGINE OFF IMMEDIATELY. Contact your
authorized dealer for service.
H. LOW VOLTAGE LIGHT
Indicates that the electrical system voltage is low. The light will
turn on when the tractor is first started and then go out. IF THIS
LIGHT TURNS ON WHILE THE TRACTOR IS IN USE,
TURN THE ENGINE OFF IMMEDIATELY. Contact your
authorized dealer for service.
A
H
G
B
D
C
F E
Dashboard Display
Functions
Display Total Running Hours When the key switch is
first turned to the RUN position, all warning indicators will
light and the total running hours will be displayed. Be sure all
lights are functioning.
Display PTO Hours Turn the key OFF, engage the PTO,
and turn the key to RUN (engine off).
Set the Clock Start the engine, leave the engine running.
Depress the select button (C) for three (3) seconds and
release. Depress set button and HOLD to advance time.
Depress select button to select minutes. Depress and HOLD
set button (D) to advance time. Leave alone for 5 seconds
and clock will activate. Shut off engine.
Demonstration Mode With the engine off, hold down the
set button (D) and turn the key switch to RUN.
Maintenance Reminder A maintenance reminder will
display in the information window (B) after the first 5 hours
of operation, and then after every 50 hours. The reminder
will automatically reset after 5 hours. The reminder can be
manually reset by turning the key switch from OFF to RUN
(with engine off) and then depressing the set (D) and select
(C) buttons simultaneously for 5 seconds.
en
15
Page 16

Features and Controls
Parking Brake Function
Applying the Parking Brake See Figure 3. To lock the
parking brake, release the ground speed pedals (A), fully
depress the brake pedal (B), pull UP on the parking brake
knob (C), and then release brake pedal.
Releasing the Parking Brake See Figure 3. To release
the parking brake, fully depress the brake pedal (B) and
push the parking brake knob (C) DOWN.
Automatic Controlled Traction
w/o 4WD
What is Automatic Controlled Traction?
Automatic Controlled Traction (ACT) is an exclusive feature of
our transmissions that provides improved traction. ACT applies
a preset amount of torque to both rear wheels even if one
starts slipping (a transmission without ACT will lose traction
completely if one rear wheel starts slipping). This preset torque
is just enough to provide additional traction, and still allow
the wheels to turn at different speeds in a tight turn without
damaging the lawn.
What to Expect from Your ACT Tractor
For the most part, while using your tractor you will not notice
ACT working, and you will simply become accustomed to
increased traction an ACT transmission provides.
Under certain circumstances the ACT system limit can be
exceeded, and one of the rear wheels may slip (for instance
if trying to turn up a hill while accelerating). This is normal. If
you start to lose traction, do not speed up. Instead, slow to
a stop, straighten the steering wheel, and slowly accelerate.
Stopping the tractor allows the transmission to regain more
traction.
12 Volt Power Outlet
The 12-volt accessory plug is located in the left side pod. It
can be used to power small electronic devices. The accessory
must be rated at 14 amps or less.
NOTE: Operating a 12-volt accessory, especially with the
engine at idle, may cause battery discharge. When not using
the accessory plug it must be covered with the rubber plug
to prevent moisture from causing a short circuit. Entrance of
water into plug can cause a short circuit.
16
www.snapper.com
Page 17

Operation
Safety Interlock System Tests
This unit is equipped with safety interlock switches and
other safety devices. These safety systems are present for
your safety: do not attempt to bypass safety switches, and
never tamper with safety devices.
WARNING
If the unit does not pass a safety test, do not
operate it. See your authorized dealer.
Test 1 — Engine should NOT crank if:
• PTO switch is ON, OR
• Brake pedal is NOT fully depressed (parking brake OFF),
OR
• The cruise control lever is NOT in NEUTRAL.
Test 2 — Engine SHOULD crank and start if:
• Operator is sitting in seat, AND.
• PTO switch is OFF, AND
• Brake pedal is fully depressed (parking brake ON), AND
• The cruise control lever is in NEUTRAL.
Test 3 — Engine should SHUT OFF if:
• Operator rises off seat
Test 4 — Check Mower Blade Stopping Time
Mower blades and mower drive belt should come to a
complete stop within five seconds after electric PTO switch
is turned OFF. If mower drive belt does not stop within five
seconds, see an authorized dealer.
Test 5 — Check Reverse Mow Option RMO
• Engine should shut off if reverse travel is attempted if
the PTO has been switched on and RMO has not been
activated.
• RMO light should illuminate when RMO has been
activated.
Adding Fuel
1. Remove the fuel cap (A, Figure 4).
2. Fill the tank. Do not overfill. Leave room in the tank for
fuel expansion. Refer to your engine manual for specific
fuel recommendations.
3. Install and hand tighten the fuel cap.
WARNING
Gasoline is highly flammable and must be handled
with care. Never fill the tank when the engine is still
hot from recent operation. Do not allow open flame,
smoking or matches in the area. Avoid overfilling
and wipe up any spills.
Do not use gasoline containing
METHANOL, gasohol containing more than
10% ETHANOL, gasoline additives, or white
gas because engine/fuel system damage
could result.
Starting the Engine
1. While sitting in the operator’s seat, fully depress the
brake pedal or set the parking brake.
2. Make sure that your feet are not depressing the ground
speed control pedals and that the cruise control lever is
in neutral.
3. Disengage the PTO clutch.
4. Set the throttle to FULL.
5. Close the choke.
NOTE: A warm engine may not require choking.
6. Insert the ignition key and turn it to START.
7. After the engine starts, move the engine throttle control
to half speed. Warm up the engine by running it for at
least 30 seconds.
8. Set throttle to FULL.
NOTE: In the event of an emergency the engine can be
stopped by simply turning the ignition switch to STOP.
Use this method only in emergency situations. For
normal engine shut down follow the procedure given in
STOPPING THE TRACTOR AND ENGINE.
Stopping the Tractor and Engine
1. Return the ground speed control(s) to neutral.
2. Disengage the PTO and wait for all moving parts to stop.
3. Move the throttle control to SLOW position and turn the
ignition key to OFF. Remove the key.
en
17
Page 18

Operation
Driving the Tractor
1. Sit in the seat and adjust the seat so that you can
comfortably reach all the controls and see the
dashboard display.
2. Engage the parking brake.
3. Make sure the PTO switch is disengaged.
4. Start the engine (see STARTING THE ENGINE).
5. Disengage the parking brake and release the
brake pedal.
6. Depress the forward ground speed control pedal to
travel forward. Release the pedal to stop. Note that the
further down the pedal is depressed the faster the tractor
will travel.
7. Stop the tractor by releasing the ground speed control
pedals, setting the parking brake, and stopping the
engine (see STOPPING THE TRACTOR AND ENGINE).
Mowing
1. Set the mower cutting height to the desired level
and set the gauge wheels to the appropriate position
(if equipped).
2. Engage the parking brake. Make sure the PTO switch
is disengaged.
3. Start the engine (see STARTING THE ENGINE).
4. Set the throttle to FULL.
5. Engage the PTO (Mower Deck).
6. Begin mowing.
7. When finished, shut off the PTO and raise the mower
using the attachment lift control lever.
8. Stop the engine (see STOPPING THE TRACTOR
AND ENGINE).
If an operator chooses to mow in reverse, the RMO system
can be used. To use the Reverse Mowing Option (RMO) turn
the RMO key after the PTO is engaged. The L.E.D. light will
illuminate, and the operator can then mow in reverse. Each
time the PTO is engaged the RMO needs to be reactivated if
desired. The key should be removed to restrict access to the
RMO feature.
Attachment Operation in Reverse
If an operator chooses to operate a PTO driven attachment
in reverse, the RMO system can be used. To use the
Reverse Mowing Option (RMO) turn the RMO key after
the PTO is engaged. The L.E.D. light will illuminate, and
the operator can then operate the attachment in reverse.
Each time the PTO is disengaged the RMO needs to be
reactivated if desired. The key should be removed to restrict
access to the RMO feature.
Pushing the Tractor by Hand
1. Disengage the PTO and turn the engine off.
2. Pull the transmission release (B, Figure 4) back
approximately 2-1/2” (6 cm) to lock into released position.
3. The tractor can now be pushed by hand.
DO NOT TOW TRACTOR
Towing the unit will cause transmission
damage. • Do not use another vehicle to
push or pull this unit. • Do not actuate the
transmission release valve lever while the
engine is running.
Mowing in Reverse
WARNING
The engine will shut off if the reverse ground speed
pedal is depressed while the PTO is on and the
RMO has not been activated. The operator should
always turn the PTO off prior to driving across
on roads, paths or any area that maybe used by
other vehicles. Sudden loss of drive could create a
hazard.
WARNING
Mowing in reverse can be hazardous to bystanders.
Tragic accidents can occur if the operator is not
alert to the presence of children. Never activate
RMO if children are present. Children are often
attracted to the unit and the mowing activity.
18
www.snapper.com
Page 19

Operation
Adjusting Mower Cutting Height
The cutting height is adjustable between 1.0” and 4.0” (2,5
and 10,0 cm).
The cutting height adjustment switch (A, Figure 5) controls
the mower cutting height. This same switch also controls
the spout rotator motor when a snowthrower is installed.
The arrows on the switch correspond to the direction of
adjustment (UP arrow raises cutting height, RIGHT arrow
rotates the spout right, etc). When the adjustment indicator
has reached the end of its travel, release the switch; holding
the switch down will damage the motor.
Attaching a Trailer
The maximum horizontal drawbar force allowed is
444 Newton. The maximum vertical drawbar force is
222 Newton. This equates to a 396 lbs (180 kg) trailer on a
10 degree hill. Secure the trailer with an appropriately sized
clevis pin (A, Figure 6) and clip (B).
Storage
WARNING
Never store the unit with fuel in an enclosed,
poorly ventilated structure. Fuel vapors can travel
to an ignition source such as a furnace, water
heater, etc. and cause an explosion.
Fuel vapor is also toxic to humans and animals.
Before you store your unit for the off-season, read the
Maintenance and Storage instructions in the Safety Rules
section, then perform the following steps:
• Disengage the PTO, set the parking brake, & remove the
key.
• Perform engine maintenance and storage measures
listed in the engine owner’s manual. This includes
draining the fuel system, or adding stabilizer to the fuel
(do not store a fueled unit in an enclosed structure - see
warning).
• Battery life will be increased if it is removed, put in a cool,
dry place and fully charged about once a month. If the
battery is left in the unit, disconnect the negative cable.
Before starting the unit after it has been stored:
• Check all fluid levels. Check all maintenance items.
• Perform all recommended checks and procedures found
in the engine owner’s manual.
• Allow the engine to warm up for several minutes before
use.
en
19
Page 20

Maintenance
Maintenance Chart
TRACTOR AND MOWER
Every 8 Hours or Daily
Check safety interlock system
Clean debris off tractor and mower deck
Clean debris from engine compartment
Every 25 Hours or Annually *
Check mower blade stopping time
Check tractor and mower for loose hardware
Check tire pressure
Every 50 Hours or Annually *
Check tractor brakes
Clean battery and cables
See Dealer Annually to
Lubricate tractor and mower
Check mower blades **
* Whichever comes first
** Check blades more often in regions with sandy soils or
high dust conditions.
ENGINE
First 5 Hours
Change engine oil - see engine manual
Every 8 Hours or Daily
Check engine oil level - see engine manual
Every 25 Hours or Annually *
Clean engine air filter and pre-cleaner **
Every 50 Hours or Annually *
Change engine oil
Replace oil filter
Annually
Replace air filter
Replace pre-cleaner
See Dealer Annually to
Inspect muffler and spark arrester
Replace spark plug
Replace fuel filter
Clean engine air cooling system
* Whichever comes first
** Clean more often in dusty conditions or when airborne
debris is present.
Check Tire Pressures
The tire pressure should be checked periodically. The
maximum inflation is stamped on the sidewall of the tires. Do
not exceed the maximum tire pressure.
Size
Front: 16 x 6.5-8
Rear: 23 x 10.5-12
Tire Pressure
20
Check Mower Blade Stopping Time
Mower blades and mower drive belt should come to a
complete stop within five seconds after the electric PTO
switch is turned off.
1. With tractor in neutral, PTO disengaged and operator in
seat, start the engine.
2. Look over the left-hand footrest at the mower drive belt.
Engage the PTO and wait several seconds. Disengage
the PTO and check the amount of time it takes for the
mower drive belt to stop.
3. If mower drive belt does not stop within five seconds, see
your dealer.
Engine Maintenance
Refer to the engine owner’s manual for all engine
maintenance procedures and recommendations.
www.snapper.com
Page 21

Maintenance
Cleaning the Battery and Cables
WARNING
When removing or installing battery cables,
disconnect the negative cable FIRST and reconnect
it LAST. If not done in this order, the positive terminal
can be shorted to the frame by a tool.
1. Disconnect the cables from the battery, negative cables
first (A, Figure 7) then the cover and positive cables (B).
2. Loosen the wingnut and washer (D).
3. Pivot the hold-down rod (C) up and away from battery.
Secure to steering tower.
4. Remove the battery (E).
5. Clean the battery compartment with a solution of baking
soda and water.
6. Clean the battery terminals and cable ends with a wire
brush and battery terminal cleaner until shiny.
7. Reinstall the battery (E) in the battery compartment.
Secure with the battery hold-down rod (C) and wingnut &
washer (D).
8. Re-attach the battery cables, positive cables and cover
first (B) then the negative cables (A).
9. Coat the cable ends and battery terminals with petroleum
jelly or non-conducting grease.
Battery Charging
WARNING
Keep open flames and sparks away from the
battery; the gasses coming from it are highly
explosive. Ventilate the battery well during
charging.
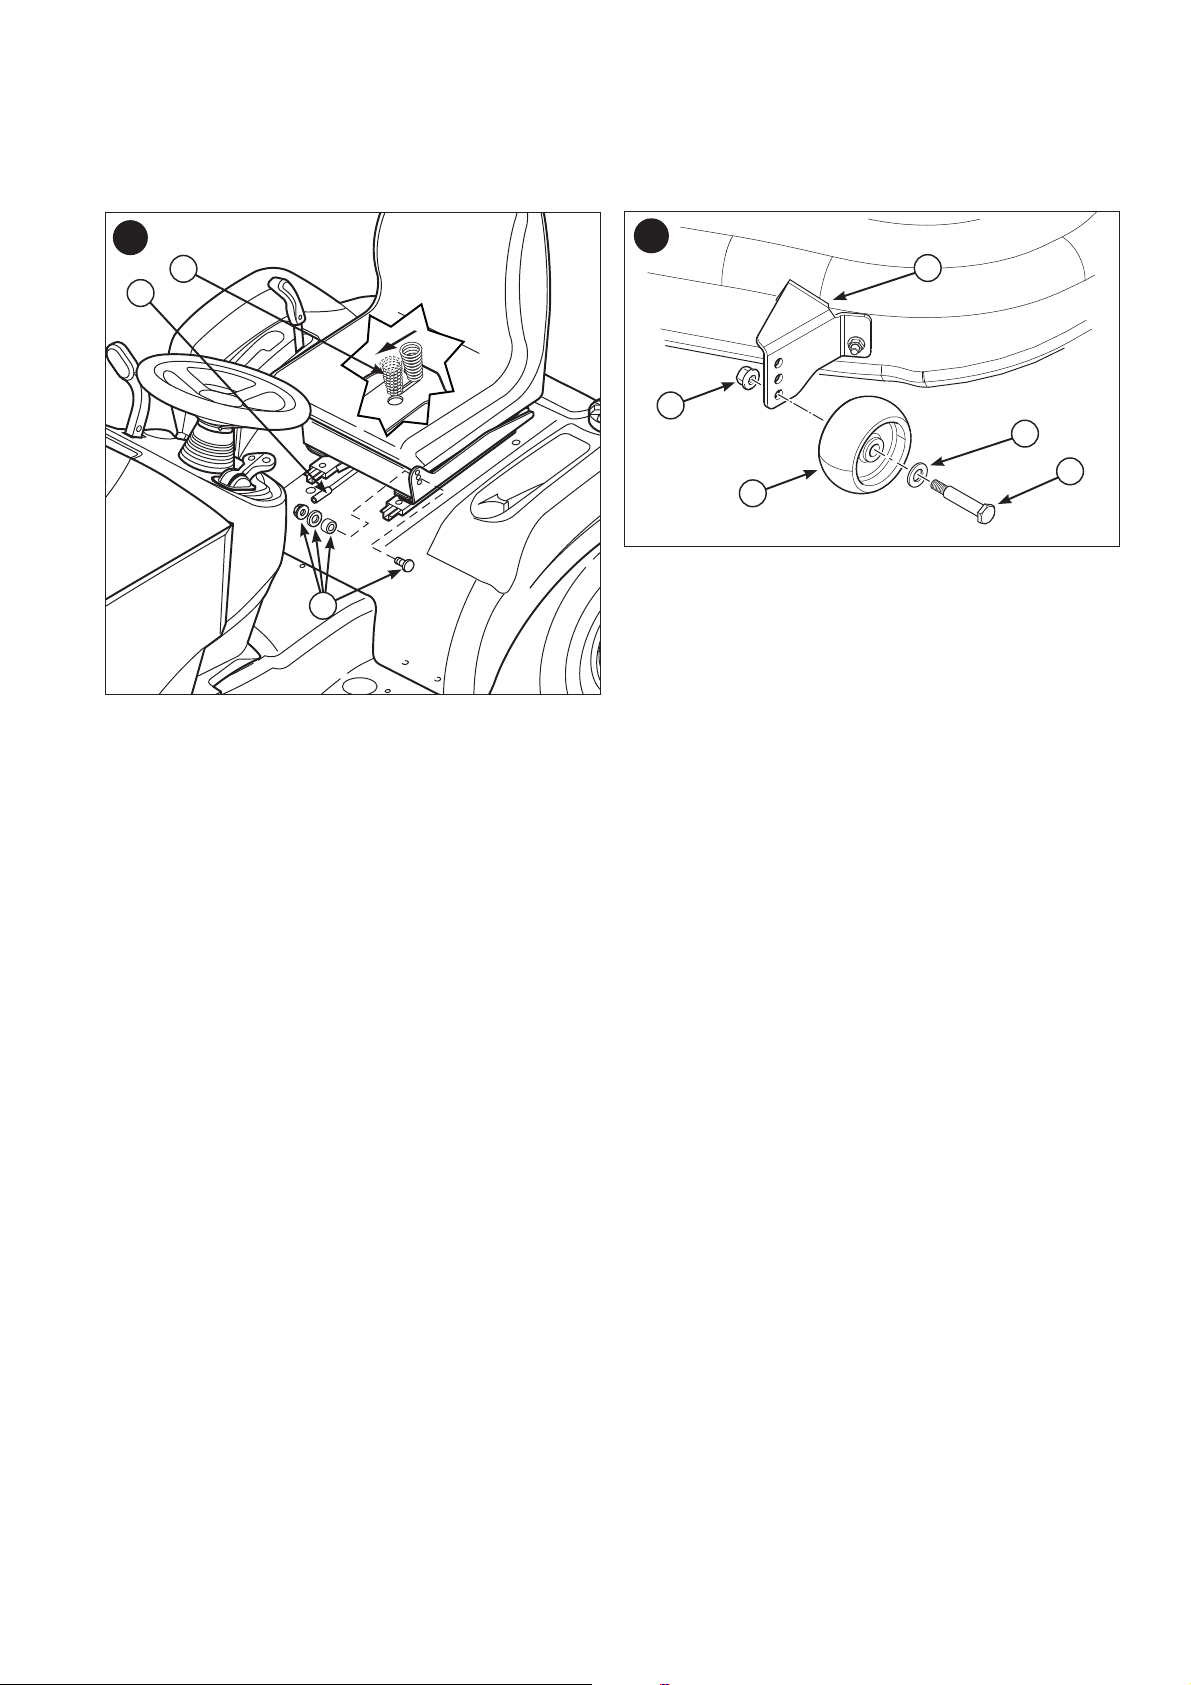
Seat Adjustment
Pitch Adjustment
The pitch of the seat can be adjusted to one of three
positions. To adjust, remove the carriage bolts, spacers,
washers, and nuts (B, Figure 8) from the hinge and reinstall
them in the desired holes.
Seat Slide Adjustment
The seat can also be adjusted forward and back. Move the
lever (A, Figure 8), position the seat as desired, and release
the lever to lock the seat into position.
Seat Spring Adjustment
The seat springs (C, Figure 8) can be adjusted to provide a
softer or firmer ride. Tilt the seat forward and slide the spring
assembly (C) forward for a softer ride, and back for a firmer
ride.
Manual Lift Assist Adjustment
If the manual lift does not function properly, see your dealer.
Mower Gauge Wheels
The mower gauge wheels can be placed in several positions
depending on the height of cut. When using higher cutting
heights, set the wheels in the lower position. When using
lower cutting heights, set the wheels in the upper position.
1. Remove the locknut (A, Figure 9), gauge wheel (B),
washer (C), and shoulder bolt (D). Change position of
gauge wheel to desired height.
2. Insert shoulder bolt (D) through washer (C) gauge wheel
(B), and gauge wheel bracket (E). Secure with locknut
(A). Repeat Steps 1 & 2 for all gauge wheels.
A dead battery or one too weak to start the engine may
be the result of a defect in the charging system or other
electrical component. If there is any doubt about the cause
of the problem, see your dealer. If you need to replace the
battery, follow the steps under Cleaning the Battery and
Cables.
To charge the battery, follow the instructions provided by
the battery charger manufacturer as well as all warnings
included in the safety rules sections of this book. Charge
the battery until fully charged. Do not charge at a rate higher
than 10 amps.
en
21
Page 22

Troubleshooting
Troubleshooting
While normal care and regular maintenance will extend
the life of your equipment, prolonged or constant use may
eventually require that service be performed to allow it to
continue operating properly.
The troubleshooting guide below lists the most common
problems, their causes, and remedies.
See the information on the following pages for
instructions on how to perform most of these minor
adjustments and service repairs yourself. If you prefer,
all of these procedures can be performed for you by your
local authorized dealer.
Troubleshooting the Tractor
PROBLEM LOOK FOR REMEDY
Brake pedal not depressed. Fully depress brake pedal.
PTO (electric clutch) switch is in ON position. Place in OFF position.
Cruise control engaged. Move knob to NEUTRAL/OFF position.
Out of fuel.
Engine flooded. Disengage the choke.
Engine will not
turnover or start.
Engine starts hard or
runs poorly.
Engine knocks.
Excessive oil
consumption.
Fuse is blown. See authorized dealer.
Battery terminals require cleaning. See Cleaning the Battery and Cables.
Battery discharged or dead. Recharge or replace battery.
Wiring loose or broken.
Solenoid or starter motor faulty. See authorized dealer.
Safety interlock switch faulty. See authorized dealer.
Water in fuel. See authorized dealer.
Gas is old or stale. See authorized dealer.
Fuel mixture too rich. Clean air filter.
Engine has other problem. See authorized dealer.
Low oil level. See engine manual.
Using wrong grade oil. See engine manual.
Engine running too hot. See authorized dealer.
Using wrong grade oil. See engine manual.
Too much oil in crankcase. Drain excess oil.
WARNING
To avoid serious injury, perform maintenance
on the tractor or mower only when the engine is
stopped and the parking brake engaged.
Always remove the ignition key, disconnect the
spark plug wire and fasten it away from the plug
before beginning the maintenance, to prevent
accidental starting of the engine.
If engine is hot, allow it to cool, then refill
the fuel tank.
Visually check wiring. If wires are frayed or
broken, see authorized dealer.
22
www.snapper.com
Page 23

Troubleshooting
Troubleshooting the Tractor Continued
PROBLEM LOOK FOR REMEDY
Brake will not hold. Internal brake worn. See authorized dealer.
Tractor steers hard or
handles poorly.
Engine exhaust is
black.
Engine runs, but tractor
will not drive.
Troubleshooting the Mower
Steering linkage is loose. See authorized dealer.
Improper tire inflation. See Check Tire Pressure section.
Front wheel spindle bearings dry. See authorized dealer.
Dirty air filter. See engine manual.
Choke closed. Open choke.
Ground speed control pedals not depressed. Depress pedals.
Transmission release lever in PUSH position. Move into DRIVE position.
Mower drive belt is broken. See authorized dealer.
Parking brake is engaged. Disengage parking brake.
Traction drive belt is broken or slipping. See authorized dealer.
PROBLEM LOOK FOR REMEDY
Mower will not raise. Lift linkage not properly attached or damaged. See authorized dealer.
Mower cut is uneven.
Mower cut is rough
looking.
Engine stalls easily
with mower engaged.
Excessive mower
vibration.
Engine runs and
tractor drives, but
mower will not drive.
Mower not leveled properly. See authorized dealer.
Tractor tires not properly inflated. See Check Tire Pressure.
Engine speed too slow. Set to full throttle.
Ground speed too fast. Slow down.
Mower has other problem. See authorized dealer.
Engine speed too slow. Set to full throttle.
Ground speed to fast. Slow down.
Dirty or clogged air filter. See engine manual.
Cutting height set too low.
Discharge chute jamming.
Engine not up to operating temperature. Run engine for several minutes to warm-up.
Starting mower in tall grass. Start the mower in a cleared area.
Mower has other problem. See authorized dealer.
PTO not engaged. Engage the PTO.
Mower has other problem. See authorized dealer.
Cut tall grass at maximum cutting height
during first pass.
Cut grass with discharge pointing toward
previously cut area.
en
23
Page 24

Specifications
ENGINE
Briggs & Stratton
Make Briggs & Stratton®
Model Professional Series
Displacement 44.2 cu in. (724 cc)
Electrical System Alternator: 12 volt, 16 amp
Battery: 340 CCA
Oil Capacity 64 oz (1,9 L)
TM
CHASSIS
Fuel Tank Capacity 4.0 Gallons (15,1 L)
Front Wheels Tire Size: 16 x 6.50-8
Rear Wheels Tire Size: 23 x 10.5 -12
PARTS AND ACCESSORIES
Contact an authorized dealer for parts and accessories.
K66 TRANSMISSION
Type Hydrostatic Tuff Torq K66
Hydraulic Fluid 10w 30 Premium Engine Oil
Capacity 2.6 qt (2,5 L)
Speeds Forward: 0-5.8 MPH (9.3 km/h)
@ 3400 rpm Reverse: 0-3.5 MPH (5.6 km/h)
Continuous Torque 310 ft-lbs (419 Nm)
Output
Drawbar Rating 440 lbs (200 Kg)
Maximum Weight 697 lbs (316 Kg)
on Axle
DIMENSIONS
Overall Length 75” (190,5 cm)
Overall Width 39” (99 cm)
Height At Top of Seat: 50” (127 cm)
24
www.snapper.com
Page 25

en
25
Page 26

26
Page 27

INHALT
Vordere Einband ........................................................................................................1
Abbildungen ...............................................................................................................2
Betriebssicherhei ....................................................................................................... 6
Funktionen und Steuerungen .................................................................................13
Betrieb .......................................................................................................................17
Wartung .....................................................................................................................20
Fehlersuche und -behebung ...................................................................................22
Technische Daten ....................................................................................................24
Garantie .....................................................................................................................25
Allgemeine Informationen
Vielen Dank, dass Sie sich für den Kauf dieses qualitativ hochwertigen Aufsitzmähers von SNAPPER entschieden haben
und Ihr Vertrauen auf unsere Marke gesetzt haben. Bedienen und warten Sie das Produkt gemäß den Angaben dieser
Bedienungsanleitung, damit ein zuverlässiger und jahrelanger Betrieb gewährleistet ist.
Dieses Handbuch beinhaltet Sicherheitsinformationen, um Ihnen die Gefahren und Risiken im Zusammenhang
mit Aufsitzmähern bewusst zu machen, und Ihnen zu vermitteln, wie man sie vermeidet. Dieser Aufsitzmäher wurde
ausschließlich zum Schneiden von Gras entwickelt und sollte zu keinem anderen Zweck verwendet werden. Es ist wichtig,
dass Sie sich diese Bedienungsanleitung durchlesen und sie verstehen, bevor Sie die Maschine in Betrieb nehmen oder
nutzen. Bewahren Sie diese Original-Bedienungsanleitung für späteres Nachschlagen auf.
Produktdaten
Geben Sie den Namen und die Nummer des Modells,
die Identifikationsnummern des Herstellers und die
Seriennummern des Motors in den entsprechenden Feldern
an. Diese Nummern stehen auf den jeweiligen abgebildeten
Teilen.
Sie MÜSSEN über diese Angaben verfügen, um
Ersatzteile, Serviceleistungen oder Informationen vom
zugelassenen Fachhändler zu erhalten.
PRODUKTDATEN
Modellbezeichnung, Name/Nummer
Nummer der Baueinheit Seriennummer
Baugruppennummer der
Schneidwerkabdeckung
Händlername Kaufdatum
MOTORANGABEN
Motorbezeichnung Motormodell
Motortyp/Spezif. Motorkennzeichen/Seriennummer
Seriennummer der Schneidwerkabdeckung
CE Identifikationsetikett
A. Indenti kationsnummer des Herstellers
B. Seriennummer des Herstellers
C. Nutzleistung in Kilowatt
D. Maximale Motorendrehzahl in Umdrehung pro Minute
E. Name und Adresse des Herstellers
F. Herstellungsjahr
G. CE-Qualitätslogo
H. Masseneinheit in Kilogramm
I. Gwährte Schalleistung in Dezibel
A
Part No. xxxxxxx
B
E
xxxxxxxxxxxxxxx
Serial No. xxxxxxxxxx
xxxxxxxxxxxxxxxxxxxxxxx
xxxxxxxxxxxxxxxxxxxxxxx
xxxxxxxxxxxxxxxxxxxxxxx
xxxxxxxxxxxxxxxxxxxxxxx
xxx
20xx
F
dB
kg: xxx
kW: x.xx
xxxx max
G
I
H
C
D
Die Liste der abgebildeten Bauteile für diese Maschine kann unter diesem Link runtergeladen werden: www.snapper.com.
Bitte geben Sie das Modell und die Seriennummer bei der Bestellung von Ersatzteilen an.
Copyright © 2010 Briggs & Stratton Power Products Group, LLC
Milwaukee, WI, USA, Alle Rechte vorbehalten.
SNAPPER ist eine Handelsmarke der Gruppe Briggs & Stratton Power Products
Group, LLC Milwaukee, WI USA.
de
5
Page 28

Betriebssicherhei
Sichere Bedienung
Herzlichen Glückwunsch zum Kauf eines qualitativ hochwertigen Rasenund Gartengeräts. Unsere Produkte sind so konstruiert und hergestellt,
dass sie alle Sicherheitsstandards der Branche erfüllen oder übertreffen
Der Bediener ist für die Sicherheit von Geräten mit Kraftantrieb
verantwortlich. Falscher Gebrauch und mangelhafte Wartung können
zu Gefahren führen! Denken Sie stets daran, dass Sie nicht nur für Ihre
eigene Sicherheit, sondern auch für die von umstehenden Personen
verantwortlich sind.
Lassen Sie gesunden Menschenverstand walten und durchdenken Sie
Ihre Vorgehensweise. Wenn Sie sich nicht sicher sind, ob eine geplante
Aufgabe mit dem Gerät sicher ausgeführt werden kann, fragen Sie einen
Fachmann: Wenden Sie sich an Ihren Vertragshändler..
Handbuch sorgfältig lesen
Das Bedienungshandbuch enthält wichtige Sicherheitsinformationen, mit denen Sie sich VOR
dem Betrieb des Geräts vertraut machen sollten und die WÄHREND
des Betriebs einzuhalten sind.
Das Handbuch enthält sichere Bedienungsverfahren, eine
Erläuterung der Merkmale und Bedienungselemente sowie
Wartungsinformationen, um Ihnen zu helfen, Ihr Gerät optimal
einzusetzen.
Lesen Sie die Sicherheitsvorschriften und -informationen auf
den folgenden Seiten gründlich durch. Lesen Sie außerdem den
gesamten Abschnitt zum Betrieb.
Kinder
Vermeiden Sie tragische Unfälle mit Kindern! Halten Sie Kinder
aus dem Mähbereich fern. Kinder interessieren sich für das
Gerät und den Mähvorgang. Gehen Sie niemals davon aus,
dass Kinder dort bleiben, wo sie zuletzt gesehen wurden.
Wenn sich Kinder in der Nähe des Mähbereichs aufhalten,
müssen sie von einem anderen verantwortungsbewussten
Erwachsenen beaufsichtigt werden.
LASSEN SIE KINDER NICHT AUF DEM GERÄT MITFAHREN!
Dies kann Kinder dazu ermutigen, sich auch bei anderen
Gelegenheiten dem laufenden Gerät zu nähern, wodurch sie
schwer verletzt werden können. Wenn ein Kind mitfahren darf,
kann es sich dem Gerät auch einmal nähern, wenn Sie es nicht
erwarten, und dadurch überfahren werden.
6
Rückwärtsfahren
Mähen Sie nur dann beim
Rückwärtsfahren, wenn dies
unbedingt notwendig ist. Schauen
Sie vor und während des
Rückwärtsfahrens
stets nach unten und
hinten, auch wenn
die Mähmesser
ausgekuppelt sind.
www.snapper.com
Page 29

Betrieb am Hang
Der Betrieb dieses Geräts an einem Hang mit zu großer Steigung kann zu
schweren oder sogar tödlichen Verletzungen führen. Wenn Sie das Gerät
an einem Hang mit zu großer Steigung oder unzureichender Bodenhaftung
benutzen, können Sie die Kontrolle über das Gerät verlieren und umkippen.
Als Faustregel gilt, dass Sie das Gerät nicht an einem Hang benutzen sollten,
den Sie nicht (im Zweirad-Antriebsmodus) rückwärts hinauffahren können.
Sie sollten das Gerät außerdem nicht an einem Hang benutzen, dessen
3.5 ft
(1,5 m)
20.0 ft (6,0 m)
Steigung 1 Meter auf einer Länge von 6 Metern überschreitet. Fahren Sie an
Hängen stets auf- und abwärts, niemals schräg.
Beachten Sie außerdem, dass die Bodenoberfläche die Stabilität und
Kontrolle beeinflusst. Nasses Gras oder ein vereister Fahrweg kann Ihre
Fähigkeit zur Kontrolle des Geräts stark beeinträchtigen.
Wenn Sie sich vor oder während der Benutzung des Geräts an einem Hang
nicht sicher fühlen, sollten Sie kein Risiko eingehen und das Gerät nicht am
Hang benutzen.
Bewegliche Teile
Dieses Gerät ist mit zahlreichen beweglichen Teilen ausgestattet, die Sie und
andere Personen verletzen können. Die Sicherheit bei der Bedienung des Geräts ist
jedoch gewährleistet, wenn Sie ordnungsgemäß auf dem Fahrersitz sitzen und alle
Sicherheitsvorschriften in diesem Handbuch beachten.
Das Mähwerk verfügt über rotierende Mähmesser, die Hände und Füße abtrennen
können. Halten Sie sich selbst und andere Personen von diesen Teilen fern, während
das Mähwerk läuft!
Dieses Gerät ist mit einem Fahreranwesenheits-Sicherheitssystem ausgestattet, um
die sichere Bedienung durch den Fahrer zu gewährleisten. Das System darf NICHT
modifiziert oder umgangen werden. Wenn die in diesem Handbuch beschriebenen
Prüfungen des Sicherheits-Verblockungssystems nicht wie angegeben ausgeführt
werden, wenden Sie sich sofort an Ihren Vertragshändler.
Betriebssicherhei
Herausgeschleuderte Objekte
Dieses Gerät verfügt über rotierende Mähmesser. Die Messer können
Gegenstände und Geröll aufnehmen und herausschleudern, was zu schweren
Verletzungen von umstehenden Personen führen kann. Beräumen Sie den
Mähbereich, BEVOR Sie mit den Mäharbeiten beginnen.
Benutzen Sie dieses Gerät nur, wenn der vollständige Grasfangbehälter bzw.
Auswurfschutz (Prallblech) installiert ist.
Halten Sie außerdem andere Personen aus dem Mähbereich fern, wenn das
Mähwerk läuft. Wenn sich jemand dem Mähbereich nähert, stellen Sie das
Mähwerk sofort ab, bis die Personen den Mähbereich wieder verlassen haben.
Kraftstoff und Wartung
Benzin ist äußerst leicht entflammbar. Benzindämpfe sind ebenfalls äußerst
leicht entflammbar und können an eine weit entfernte Zündquelle gelangen.
Benzin darf nur als Kraftstoff und nicht als Lösungs- oder Reinigungsmittel
verwendet werden. Kraftstoff nicht an einem Ort lagern, an dem sich
Dämpfe sammeln oder an eine Zündquelle, wie z. B. eine Zündflamme,
gelangen können. Kraftstoff muss in einem genehmigten, abgedichteten
Kunststoffkanister oder im Kraftstofftank des Traktors mit fest verschlossenem
Deckel gelagert werden. Verschütteten Kraftstoff sofort aufwischen.
Die ordnungsgemäße Wartung ist kritisch für die Sicherheit und
Funktion Ihres Geräts. Stellen Sie sicher, dass die in diesem Handbuch
enthaltenen Wartungsverfahren, besonders die regelmäßige Prüfung des
Sicherheitssystems, ordnungsgemäß durchgeführt werden.
de
7
Page 30

Betriebssicherhei
Lesen Sie bitte diese Sicherheitsvorschriften und befolgen Sie sie genau. Die Nichtbeachtung dieser Vorschriften
kann dazu führen, dass Sie die Kontrolle über das Gerät verlieren, sowie zu schweren Personenschäden oder Tod des
Bedieners oder von in der Nähe befindlichen Dritten oder Sachbeschädigung oder Beschädigung des Geräts.
Mähwerk kann Hände und Füße abtrennen und Gegenstände schleudern
Vorsichts- oder Achtungshinweise hin, die befolgt werden müssen.
Dieses
. Dreiecke im Text weisen auf wichtige
ALLGEMEINER BETRIEB
1. Vor der Inbetriebnahme müssen Sie die in diesem Handbuch
und auf dem Gerät befindlichen Anweisungen lesen,
verstehen und befolgen.
2. Hände und Füße dürfen keinesfalls in die Nähe von
Rotationsteilen oder unterhalb des Gerätebereichs geraten.
Halten Sie sich stets von den Auswurföffnungen fern.
3. Gestatten Sie nur verantwortungsbewussten Erwachsenen,
die die Anweisungen kennen, den Betrieb des Geräts (das
Alter des Bedieners kann auf Grund örtlicher Bestimmungen
Begrenzungen unterliegen).
4. Entfernen Sie Gegenstände, wie Steine, Spielzeug, Draht
usw., die von den Messern bzw. dem Messer aufgenommen
und geschleudert werden können, aus dem Mähbereich.
5. Vergewissern Sie sich vor dem Mähen, dass sich im
Mähbereich keine Personen befinden. Halten Sie das Gerät
an, wenn jemand den Mähbereich betritt.
6. Lassen Sie niemals andere Personen mitfahren.
7. Mähen Sie nicht während des Rückwärtsfahren, außer, es
ist absolut notwendig. Schauen Sie beim Rückwärtsfahren
immer nach unten und nach hinten.
8. Achten Sie darauf, dass der Auswurf des Schnittguts nicht auf
Personen erfolgt. Vermeiden Sie es, das Schnittgut auf eine
Wand oder dergleichen auszuwerfen. Das Schnittgut könnte
auf den Bediener zurückprallen. Halten Sie das/die Messer
an, wenn Sie über Schotterflächen fahren.
9. Benutzen Sie das Gerät nur, wenn das Grasfanggerät,
der Auswurfschutz (Prallblech) und andere
Sicherheitsvorrichtungen angebracht sind.
10. Verlangsamen Sie vor dem Wenden die Geschwindigkeit.
11. Lassen Sie ein laufendes Gerät nie unbeaufsichtigt. Kuppeln
Sie vor dem Absteigen die Zapfwellenkupplung immer aus,
ziehen Sie die Parkbremse an, stellen Sie den Motor ab und
ziehen Sie den Schlüssel ab.
12. Wenn der Mäher nicht eingesetzt wird, müssen die Messer
(Zapfwellenkupplung) ausgekuppelt werden. Schalten Sie
den Motor ab und warten Sie, bis alle Teile zum Stillstand
gekommen sind, bevor Sie das Gerät reinigen, den
Grasfangbehälter entfernen und den Auswurfschutz von
Schnittgut reinigen.
13. Setzen Sie das Gerät nur in Tageslicht oder in gutem
künstlichen Licht ein.
14. Benutzen Sie das Gerät nicht, wenn Sie sich unter dem
Einfluss von Alkohol oder Medikamenten befinden.
15. Achten Sie auf den Verkehr, wenn Sie das Gerät in der Nähe
von Straßen benutzen oder eine Straße überqueren.
16. Seien Sie beim Auf- oder Abladen des Geräts auf einen
Anhänger oder Lastwagen besonders vorsichtig.
17. Tragen Sie stets Augenschutz, wenn Sie dieses Gerät
benutzen.
18. Aus Erfahrungswerten geht hervor, dass Bediener, die
60 Jahre alt oder älter sind, einen hohen Prozentsatz der
mit Aufsitzmähern zusammenhängenden Verletzungen
darstellen. Diese Altersgruppe sollte ihre Fähigkeiten für die
sichere Bedienung eines Aufsitzmähers zum eigenen Schutz
und dem Schutz anderer vor Verletzungen prüfen.
19. Befolgen Sie die Empfehlungen des Herstellers hinsichtlich
Radgewichten und Gegengewichten.
20. Denken Sie daran, dass der Bediener für Unfälle mit anderen
Personen oder Sachschäden verantwortlich ist.
21. Fachliche und praktische Anweisungen sind für alle Fahrer
ratsam.
22. Es müssen immer feste Schuhe und lange Hosen getragen
werden. Das Gerät darf nicht barfuß oder mit Sandalen
bedient werden.
23. Vergewissern Sie sich vor dem Einsatz stets durch
Sichtprüfung, ob die Messer und die Messerbefestigungsteile
vorhanden, intakt und sicher sind. Tauschen Sie abgenutzte
oder beschädigte Teile aus.
24. Kuppeln Sie vor der Durchführung folgender Tätigkeiten
Zubehörteile aus: Auftanken, Demontage eines Zusatzes,
Durchführung von Einstellungen (es sei denn, die Einstellung
kann vom Fahrersitz aus vorgenommen werden).
25. Wenn das Gerät geparkt, untergestellt oder unbeaufsichtigt
ist, muss, wenn keine zwangsläufige mechanische Sperre
benutzt wird, die Mähvorrichtung abgesenkt werden.
26. Wenn Sie den Bedienerplatz aus welchem Grunde auch
immer verlassen, ziehen Sie vor dem Absteigen die
Parkbremse an, kuppeln Sie die Zapfwellenkupplung ein,
stellen Sie den Motor ab und ziehen Sie den Schlüssel ab.
27. Halten Sie das Gerät zur Verminderung der Feuergefahr
immer von Gras, Blättern und überschüssigem Öl frei.
Stoppen oder parken Sie nicht über trockenen Blättern, Gras
oder brennbaren Materialien.
TRANSPORT UND UNTERSTELLEN
1. Wenn dieser Traktor auf einem offenen Anhänger
transportiert wird, muss das Gerät unbedingt nach vorne
in die Fahrtrichtung ausgerichtet sein. Wenn der Traktor
nach hinten ausgerichtet ist, könnte die Haube durch
Windeinwirkung beschädigt werden.
2. Beachten Sie immer die Vorschriften für das sichere
Betanken des Geräts und den sicheren Umgang mit
Kraftstoff, wenn Sie das Gerät nach dem Transport und dem
Unterstellen betanken.
3. Stellen Sie das Gerät (mit Kraftstoff) nie in einem
schlecht belüfteten, geschlossenen Raum unter.
Benzindämpfe könnten zu einer Zündquelle (wie z.B. Ofen,
Warmwasserbereiter, usw.) gelangen und eine Explosion
verursachen. Benzindämpfe sind für Menschen und Tiere
giftig.
8
4. Befolgen Sie stets die Anweisungen im Motorhandbuch
hinsichtlich der Vorbereitungen für ein Unterstellen des
Geräts, bevor Sie das Gerät für kurze oder lange Zeiträume
unterstellen.
5. Befolgen Sie stets die Anweisungen im Motorhandbuch
hinsichtlich des ordnungsgemäßen Vorgehens bei der
Wiederinbetriebnahme des Geräts.
6. Stellen Sie das Gerät oder den Kraftstoffbehälter nie in
einem Raum ab, in dem sich eine offene Flamme oder eine
Zündflamme, wie z.B. von einem Warmwasserbereiter,
befindet. Lassen Sie das Gerät vor dem Unterstellen
abkühlen.
www.snapper.com
Page 31

Betriebssicherhei
BETRIEB AM HANG
Abhänge spielen eine Hauptrolle bei Unfällen, die durch einen Verlust
der Kontrolle über das Gerät oder das Umkippen des Geräts verursacht
werden und schwere Verletzungen oder Tod zur Folge haben können. Die
Arbeit an Abhängen bedarf besonderer Vorsicht.
Wenn Sie den Abhang nicht rückwärts hinauffahren können oder Sie sich
unsicher fühlen, sollten Sie den Abhang nicht befahren.
Durch den Einsatz der Bremse können Sie über einen auf einem Abhang
rutschenden Aufsitzmäher nicht die Kontrolle wiedererlangen. Die
Hauptgründe für den Verlust der Kontrolle sind: Unzureichender Griff
der Reifen, zu hohe Geschwindigkeit, ungenügende Bremstätigkeit,
die Geräteart ist für den Einsatz ungeeignet, mangelnde Kenntnis der
Bodenbeschaffenheit, unrichtige Anhänge- und Lastverteilung.
1. Mähen Sie an Hängen vertikal, nicht diagonal.
2. Achten Sie auf Löcher, Furchen oder Erhebungen. Das Gerät
könnte sich auf unebenem Gelände überschlagen. In hohem Gras
könnten Hindernisse verborgen sein.
3. Wählen Sie einen niedrigen Gang, so dass Sie auf dem Hang nicht
stoppen oder schalten müssen.
4. Mähen Sie nicht auf nassem Gras. Die Reifen könnten nicht greifen.
5. Nehmen Sie nie den Gang heraus, insbesondere nicht, wenn Sie
bergab fahren. Legen Sie nicht den Leerlauf ein, da die Bremskraft
des Motors dadurch nicht genutzt werden kann.
6. Vermeiden Sie es, an einem Hang anzufahren, anzuhalten oder zu
wenden. Sollten die Räder nicht mehr greifen, kuppeln Sie das/die
Messer aus und fahren Sie langsam weiter den Hang hinunter.
7. Achten Sie darauf, dass die Bewegungen am Hang langsam und
gleichmäßig ausgeführt werden. Nehmen Sie keine plötzlichen
Geschwindigkeits- oder Richtungsänderungen vor, wodurch sich
das Gerät überschlagen könnte.
8. Seien Sie besonders vorsichtig, wenn Sie das Gerät mit
Grasfanggeräten oder anderem Zubehör verwenden, da die
Stabilität dadurch beeinträchtigt werden könnte.
9. Versuchen Sie nicht, das Gerät zu stabilisieren, indem Sie Ihren
Fuß auf den Boden geben.
10. Mähen Sie nicht in der Nähe von steilen Abhängen, Gräben oder
Aufschüttungen. Der Mäher könnte sich plötzlich überschlagen,
wenn ein Rad über die Kante eines steilen Abhangs oder eines
Grabens gerät oder wenn eine Aufschüttung einbricht.
11. Verwenden Sie auf steilen Abhängen keine Grasfanggeräte.
12. Führen Sie keine Mäharbeiten an einem Hang durch, den Sie nicht
rückwärts hinauffahren können.
13. Lassen Sie sich von Ihrem Vertragshändler wegen Radgewichten
oder Gegengewichten zur Verbesserung der Stabilität beraten.
14. Entfernen Sie Hindernisse, wie Steine, Baumstämme, usw.
15. Fahren Sie langsam. Am Hang kann es vorkommen, dass die
Reifen trotz ordnungsgemäß funktionierender Bremsen nicht
greifen.
16. Wenden Sie nicht an Hängen. Wenn dies unvermeidlich ist,
wenden Sie, wenn möglich, langsam und gleichmäßig bergab.
ANHÄNGER
1. Zusatzgeräte dürfen nur mit einem Fahrzeug mit
Anhängevorrichtung gezogen werden. Zum Ziehen darf nur die
Anhängevorrichtung verwendet werden.
2. Befolgen Sie die Empfehlungen des Herstellers hinsichtlich
Gewichtsbeschränkungen des angehängten Geräts und zum
Ziehen an Hängen.
3. Auf angehängten Zusatzgeräten dürfen keine Personen,
insbesondere keine Kinder, mitgenommen werden.
4. An Hängen kann das Gewicht des angehängten Geräts zu einem
Traktionsverlust führen, oder Sie können die Gewalt über das
Fahrzeug verlieren.
5. Fahren Sie langsam und kalkulieren Sie eine längere Bremsstrecke
ein.
6. Legen Sie nicht den Leerlauf ein, da die Bremskraft des Motors
dadurch nicht genutzt werden kann.
ACHTUNG
Benutzen Sie das Gerät nie an Abhängen, deren horizontales
Gefälle mehr als 17,6% (10 Grad) beträgt, was einem
vertikalen Gefälle von einem 106 cm auf 607 cm horizontal
entspricht.
Benutzen Sie beim Einsatz an Abhängen zusätzliche
Radgewichte oder Gegengewichte. Lassen Sie sich von
Ihrem Vertragshändler beraten, welche Gewichte ggf. für
Ihr Gerät verfügbar und geeignet sind.
Wählen Sie eine niedrige Grundgeschwindigkeit, bevor
Sie auf den Abhang fahren. Lassen Sie bei der Arbeit an
Abhängen mit einem hinten montierten Grasfanggerät
zusätzlich zu den vorderen und hinteren Gewichten
besondere Vorsicht walten.
Mähen Sie am Abhang in VERTIKALER Richtung,
niemals diagonal. Seien Sie bei einem Richtungs wechsel
besonders vorsichtig und STOPPEN ODER STARTEN SIE
NIE AM HANG.
KINDER
Wenn sich der Bediener nicht der Anwesenheit von Kindern bewusst ist,
können tragische Unfälle passieren. Kinder werden vom Gerät und dem
Mähvorgang oft angezogen. Gehen Sie nie davon aus, dass Kinder dort
verweilen, wo Sie sie zum letzten Mal gesehen haben.
1. Halten Sie Kinder vom Mähbereich fern und unter Aufsicht eines
anderen verantwortungsbewussten Erwachsenen.
2. Seien Sie auf der Hut und stellen Sie das Gerät ab, wenn Kinder
den Mähbereich betreten.
3. Schauen Sie vor und während des Rückwärtsfahrens nach hinten
und unten und halten Sie nach kleinen Kindern Ausschau.
4. Nehmen Sie niemals Kinder mit, selbst dann nicht, wenn das/
die Messer nicht in Betrieb sind. Kinder können herunterfallen
und sich schwer verletzen oder den sicheren Betrieb des
Geräts stören. Kinder, die bereits mitfahren durften, können
plötzlich im Mähbereich auftauchen, weil sie wieder mitfahren
möchten und vom Gerät überfahren werden, insbesondere beim
Rückwärtsfahren.
5. Erlauben Sie Kindern niemals, das Gerät zu bedienen.
6. Seien Sie besonders vorsichtig, wenn Sie sich toten Winkeln,
Buschwerk, Bäumen oder anderen Gegenständen nähern, die die
Sicht versperren könnten.
SCHADSTOFFEMISSION
1. In den Motorabgasen dieses Produkts sind Chemikalien enthalten,
die in bestimmten Mengen bekanntermaßen Krebs erregend sind,
zu bei der Geburt vorhandenen Schäden oder anderen negativen
Einflüssen auf die Fortpflanzung führen.
2. Achten Sie auf die entsprechenden Emissionsbeständigkeits- und
Luftindexangaben auf dem Motorabgasschild.
ZÜNDSYSTEM
1. Dieser Ottomotor entspricht Canadian ICES-002 [kanadische
Vorschriften ICES-002].
de
9
Page 32

Betriebssicherhei
SERVICE UND WARTUNG
Sicherer Umgang mit Kraftstoff.
1. Brennende Zigaretten, Zigarren, Pfeifen und andere
Brandquellen dürfen sich nicht in der Nähe von Kraftstoff
befinden.
2. Verwenden Sie nur zugelassene Kraftstoffbehälter.
3. Nehmen Sie nie den Deckel des Kraftstoffbehälters ab oder
betanken Sie das Gerät nicht, wenn der Motor läuft. Motor vor
dem Nachtanken abkühlen lassen.
4. Das Gerät darf nie in Innenräumen betankt werden.
5. Stellen Sie das Gerät oder den Kraftstoffbehälter nie in einem
Bereich unter, in dem sich eine offene Flamme, Funken oder
Zündflamme befinden, wie z. B. in der Nähe eines Boilers
oder anderer Geräte.
6. Behälter dürfen niemals im Fahrzeuginnern oder auf einer
Ladefläche mit Kunststoffauskleidung gefüllt werden. Stellen
Sie Behälter vor dem Füllen immer auf den Boden, vom
Fahrzeug entfernt.
7. Entfernen Sie benzinbetriebene Geräte vom Lastwagen oder
Anhänger und nehmen Sie das Auftanken auf dem Boden
vor. Falls dies nicht möglich ist, tanken Sie diese Geräte mit
einem tragbaren Behälter auf einem Anhänger auf; benutzen
Sie keinen Benzineinfüllstutzen einer Tanksäule.
8. Achten Sie darauf, dass die Tülle stets mit dem Rand des
Benzintanks oder der Behälteröffnung in Kontakt ist, bis das
Betanken abgeschlossen ist. Benutzen Sie keine Vorrichtung
zum Offenhalten der Tülle.
9. Falls Benzin auf die Kleidung verschüttet wird, muss die
Kleidung sofort gewechselt werden.
10. Der Tank darf nie überfüllt werden. Bringen Sie den Deckel
des Kraftstoffbehälters wieder sicher an.
11. Seien Sie beim Umfang mit Benzin oder anderen Kraftstoffen
besonders vorsichtig. Sie sind entflammbar und die Dämpfe
sind explosionsgefährdet.
12. Wenn Kraftstoff verschüttet wurde, dürfen Sie nicht den
Versuch unternehmen, den Motor zu starten. Bringen Sie
das Gerät aus dem Bereich, in dem der Kraftstoff verschüttet
wurde und vermeiden Sie es, eine Zündquelle herzustellen,
bis die Kraftstoffdämpfe verflogen sind.
13. Bringen Sie den Tankdeckel und den Deckel des
Kraftstoffbehälters wieder sicher an.
Service und Wartung
1. Lassen Sie das Gerät nie in einem geschlossenen Raum
laufen, in dem sich Kohlenmonoxiddämpfe ansammeln
könnten.
2. Schrauben und Muttern, insbesondere die Schrauben des
Mähwerks, müssen immer fest angezogen und in gutem
Zustand sein.
3. Sicherheitsvorrichtungen dürfen niemals verändert werden.
Überprüfen Sie die Sicherheitsvorrichtungen regelmäßig auf
ordnungsgemäße Funktion und nehmen Sie bei Bedarf die
notwendigen Reparaturen vor.
4. Halten Sie das Gerät frei von Gras, Blättern, usw. Wischen
Sie verschüttetes Öl oder Kraftstoff auf.
5. Halten Sie an und untersuchen Sie das Gerät, wenn Sie einen
Gegenstand berühren. Nehmen Sie eventuell notwendige
Reparaturen vor, bevor Sie das Gerät wieder einsetzen.
6. Nehmen Sie nie Einstellungen oder Reparaturen vor, wenn
das Gerät läuft, es sei denn, dies ist im Handbuch des
Motorherstellers angegeben.
7. Die Bauteile des Grasfangbehälters unterliegen Abnutzung,
Beschädigung und Verschleiß, wodurch die sich bewegenden
Teile freigelegt oder Gegenstände weggeschleudert werden
könnten. Überprüfen Sie die Bauteile häufig und ersetzen Sie
sie, wenn nötig, mit den vom Hersteller empfohlenen Teilen.
8. Mähmesser sind scharf und man kann sich daran
schneiden. Umwickeln Sie die (das) Messer, wenn Sie daran
Servicearbeiten durchführen, oder tragen Sie Handschuhe.
Gehen Sie dabei besonders vorsichtig vor.
9. Überprüfen Sie häufig die Funktion der Bremse. Stellen Sie
die Bremse ein und warten Sie sie nach Vorschrift.
10. Halten Sie Sicherheits- und Anweisungsaufkleber instand
oder ersetzen Sie sie ggf.
11. Ölfilter nicht bei heißem Motor entfernen, da sich das
verschüttete Benzin entzünden könnte. Öffnen Sie die
Schellen der Kraftstoffleitungen nicht mehr als nötig.
Vergewissern Sie sich, dass die Schellen nach dem Einbau
des Filters fest auf dem Schlauch sitzen.
12. Benutzen Sie kein Benzin, das METHANOL, Gasohol
oder mehr als 10 % ETHANOL, Benzinzusätze oder
tetraethylbleifreies Benzin enthält, da dies zu Schäden am
Motor oder am Kraftstoffsystem führen kann.
13. Wenn der Benzintank entleert werden muss, muss dies im
Freien durchgeführt werden.
14. Defekte Auspuffanlagen müssen ausgetauscht werden.
15. Verwenden Sie für Reparaturarbeiten nur werkseitig
genehmigte Ersatzteile.
16. Beachten Sie bei allen Ein- und Nachstellungen immer die
technischen Angaben des Herstellers.
17. Benutzen Sie für umfangreiche Service- und
Reparaturarbeiten nur zugelassene Service-Niederlassungen.
18. Unternehmen Sie nie den Versuch, an diesem Gerät
umfangreiche Reparaturen durchzuführen, wenn Sie dafür
keine ordnungsgemäße Ausbildung haben. Nicht fachgerecht
durchgeführte Servicearbeiten können zu Betriebsgefahren,
Beschädigungen des Geräts und der Nichtigkeit der
Herstellergarantie führen.
19. Seien Sie im Umgang mit Mähern mit mehreren Messern
vorsichtig, da durch die Rotation eines Messers die Rotation
der anderen Messer verursacht werden kann.
20. Ändern Sie nicht die Einstellungen des Drehzahlmessers und
überdrehen Sie den Motor nicht. Durch überhöhte Drehzahlen
erhöht sich die Verletzungsgefahr.
21. Trennen Sie vor der Durchführung folgender Arbeiten die
Antriebszubehörteile, halten Sie den Motor an, ziehen Sie
den Zündschlüssel ab und trennen Sie das/die Zündkabel:
Reinigung verstopfter Zusatzgeräte und Auswurfschächte,
Wartungsarbeiten, wenn der Aufprall mit einem Gegenstand
vorgekommen ist oder wenn das Gerät abnormal vibriert.
Untersuchen Sie nach einem Aufprall das Gerät auf Schäden
und führen Sie vor dem Neustart und dem Einsatz des Geräts
die notwendigen Reparaturen durch.
22. Halten Sie Ihre Hände stets vom hydrostatischen
Pumpenventilator fern, wenn der Traktor läuft. Der Ventilator
befindet sich oberhalb der Transachseleinheit.
23. Geräte mit Hydraulikpumpen, -schläuchen oder -motoren:
ACHTUNG: Unter Druck austretende Hydraulikflüssigkeit
kann u. U. so stark spritzen, dass die Haut durchdrungen
wird und ernsthafte Verletzungen entstehen. Wenn
Fremdflüssigkeit in die Haut eindringt, muss sie innerhalb
einiger weniger Stunden von einem Arzt, der mit dieser Art
von Verletzung vertraut ist, chirurgisch entfernt werden, da
ansonsten eine Gewebsnekrose eintreten kann. Körper und
Hände von Nadellöchern oder Düsen, die Hydraulikflüssigkeit
unter hohem Druck spritzen, fern halten. Bei der Suche nach
Leckagen Papier oder Pappe verwenden, nicht die Hände.
Sicherstellen, dass alle Hydraulikflüssigkeitsanschlüsse fest
sitzen und dass alle Hydraulikschläuche und -leitungen sich
in gutem Zustand befinden, bevor das System unter Druck
gesetzt wird. Wenn Leckagen auftreten, muss das Gerät
sofort von Ihrem Vertragshändler repariert werden.
24. ACHTUNG: Energiespeichervorrichtung. Das unsachgemäße
Lösen von Federn kann zu ernsthaften Verletzungen führen.
Federn sollten nur von einem Vertragshändler ausgebaut
werden.
25. Modelle mit einem Motorkühler: ACHTUNG:
Energiespeichervorrichtung. Um ernsthafte
Körperverletzungen durch heißes Kühlmittel oder
austretenden Dampf zu vermeiden, darf auf keinen Fall
versucht werden, den Kühlerdeckel bei laufendem Motor
abzunehmen. Den Motor stoppen und warten, bis er
abgekühlt ist. Selbst dann muss beim Abnehmen des
Deckels äußerst vorsichtig vorgegangen werden.
10
www.snapper.com
Page 33

Betriebssicherhei
SICHERHEITSAUFKLEBER
Lesen und befolgen Sie sämtliche Hinweise
auf GEFAHREN, WARNUNGEN und
VORSICHTSMASSNAHMEN und die auf Ihrem
Aufsitzmäher und Mähwerk befindlichen Anweisungen
genau. Eine Nichtbefolgung dieser Anweisungen kann
Personenschäden zur Folge haben. Diese Informationen
dienen Ihrer Sicherheit und sind von größter Wichtigkeit!
Auf Ihrem Aufsitzmäher und Mähwerk befinden sich die
unten abgebildeten Sicherheitsaufkleber.
Sicherheitssymbole
Achtung: Benutzerhandbuch lesen.
Vor dem Gebrauch dieser Maschine
das Benutzerhandbuch lesen und
verstehen.
Gefahr: Umherschleudern von
Gegenständen.
Diese Maschine kann Gegenstände
und Schmutzteile umherschleudern.
Umstehende Personen fern halten.
Achtung: Vor der Wartung
Schlüssel abziehen.
Vor der Durchführung von Reparaturen
oder Wartungsarbeiten den Schlüssel
abziehen und die technischen
Handbücher konsultieren.
Falls einer dieser Aufkleber verloren geht oder beschädigt
wird, müssen Sie ihn umgehend ersetzen. Setzen Sie
sich hierfür mit Ihrem Vertragshändler in Verbindung.
Diese Aufkleber sind leicht anzubringen und dienen als
ständige visuelle Erinnerung für Sie und andere, die das
Gerät benutzen, die für einen sicheren und effektiven
Betrieb notwendigen Sicherheitsanweisungen zu
befolgen.
Gefahr: Abtrennen von
Gliedmaßen.
Dieses Mähwerk kann Gliedmaßen
abtrennen. Hände und Füße von
Messern entfernt halten.
Gefahr: Brandgefahr.
Wenn der Motor heiß ist oder läuft,
keinen Kraftstoff nachfüllen. Den
Motor anhalten und 3 Minuten
abkühlen lassen, bevor Sie ihn
betanken.
Gefahr: Heiße Oberfläche.
Vor Berühren dieses Bereichs
Maschine abkühlen lassen.
Gefahr: Umkippen der Maschine.
Diese Maschine nicht auf Gefällen von
mehr als 10 Grad verwenden.
Gefahr: Abtrennen von
Gliedmaßen.
Diese Maschine kann Gliedmaßen
abtrennen. Bei laufendem Motor
umstehende Personen und Kinder fern
halten.
de
Gefahr: Kohlenmonoxidvergiftung.
Den Motor nicht in einem unbelüfteten
Bereich laufen lassen.
11
Page 34

Betriebssicherhei
OO
TT
OO
Lage der Aufkleber
Betriebsanleitung,
Teilenr. 1750631
Aufkleber
Teilenr. 1737541
Zündschalterstellungen,
Teilenr.
Vorsicht, Klemmstelle,
Teilenr. 5102457
1722806
1
2
3
4
5
6
+
Vorsicht, Klemmstelle,
Teilenr. 5102457
SS
PP
SS
1723160
Kraftstoffanzeige,
Teilenr. 1723160
Abb. 1
12
www.snapper.com
Page 35

Funktionen und Steuerungen
12V
Steuerungsfunktionen
Gashebel
Der Gashebel kontrolliert die Motordrehzahl. Die
Motordrehzahl erhöht sich, wenn Sie den Gashebel nach
vorne bewegen, und sie verringert sich, wenn Sie den
Gashebel nach hinten bewegen. Immer in „Vollgas“ fahren.
Choke
Den Choke für den Kaltstart schließen. Den Choke
öffnen, sobald der Motor startet. Bei warmem Motor ist die
Anwendung des Chokes ggf. nicht notwendig. Bewegen Sie
den Hebel zum Schließen des Chokes nach vorne.
Abb. 2
Scheinwerferschalter
Durch den Lichtschalter werden die Lichter des Traktors einund ausgeschaltet.
Mähen beim Rückwärtsfahren (RMO)
Die Rückwärtsmähoption (RMO) ermöglicht das Mähen
(oder die Verwendung anderer zapfwellenbetriebener
Anbaugeräte) beim Rückwärtsfahren. Zum Mähen oder
Betreiben eines anderen Anbaugeräts während der
Rückwärtsfahrt den RMO-Schlüssel drehen, nachdem die
Zapfwelle eingekuppelt wurde. Die LED-Leuchte leuchtet auf
und der Bediener kann nun beim Rückwärtsfahren mähen.
Wenn die Zapfwelle ausgekuppelt wird, muss die RMO-
Funktion erneut aktiviert werden (falls gewünscht).
de
13
Page 36

Funktionen und Steuerungen
Zapfwellenkupplungsschalter
Mit dem Zapfwellenkupplungsschalter werden Zusatzgeräte,
die die Zapfwellenkupplung benutzen, ein- und
ausgekuppelt. Zum Auskuppeln der Zapfwellenkupplung,
den Zapfwellenkupplungsschalter HERAUSZIEHEN. Zum
Auskuppeln HINEINDRÜCKEN.
Zündschalter
Mit dem Zündschalter wird der Motor gestartet und
gestoppt. Der Schalter hat drei Stellungen:
Aus Stoppt den Motor und stellt das
Elektrosystem ab.
Lauf Erlaubt dem Motor zu laufen und
versorgt das Elektrosystem mit Strom.
Start Kurbelt den Motor zum Starten an.
HINWEIS: Lassen Sie die Zündung bei abgestelltem Motor
nie in der Stellung „Lauf“; die Batterie wird dadurch entleert.
Bremspedal
Durch Hinunterdrücken des Bremspedals kommen die
Traktorbremsen zum Einsatz.
Grundgeschwindigkeitspedale
Die Vorwärts-Grundgeschwindigkeit des Traktors wird durch
das Vorwärts-Grundgeschwindigkeitspedal reguliert. Die
Rückwärts-Grundgeschwindigkeit des Traktors wird durch
das Rückwärts-Grundgeschwindigkeitspedal reguliert.
Die Grundgeschwindigkeit wird erhöht, wenn eines der
Pedale betätigt wird. Je weiter das jeweilige Pedal nach
unten gedrückt wird, desto schneller fährt der Traktor.
Parkbremse
Der Parkbremsenknopf wird zur Feststellung
der Parkbremse benutzt, wenn der Traktor stillsteht. Zum
Einkuppeln der Parkbremse das Bremspedal ganz nach
unten drücken und den Knopf herausziehen.
Schnitthöheneinstellung
Die Schnitthöhe kann zwischen 2,5 und 10,0 cm (1,0 und
4,0”) stufenlos verstellt werden.
Die Schnitthöhe des Mähwerks wird mit dem SchnitthöhenEinstellschalter eingestellt. Bei Installation einer
Schneefräse dient dieser Schalter der Einstellung
des Auswurfdrehungsmotors. Die Pfeile am Schalter
entsprechen der Richtung der Einstellung (mit dem
AUFWÄRTS-Pfeil wird die Schnitthöhe erhöht, mit dem
RECHTEN Pfeil wird der Auswurf nach rechts gedreht
usw.). Wenn die Einstellungsanzeige am Ende des
Einstellbereichs angelangt ist, den Schalter freigeben.
Andernfalls wird der Motor beschädigt.
Automatische
Geschwindigkeitsregelung
Die automatische Geschwindigkeitsregelung wird
zur Einstellung einer gleichbleibenden VorwärtsGrundgeschwindigkeit benutzt. Bewegen Sie den Hebel
nach vorne, bis die gewünschte Grundgeschwindigkeit
erreicht wurde. Zum Auskuppeln ziehen Sie den Hebel
nach hinten. Falls Sie plötzlich anhalten müssen, kann
die automatische Geschwindigkeitsregelung auch durch
Niederdrücken des Bremspedals wieder in Neutral gebracht
werden.
Sitzeinstellungshebel
Der Sitz kann nach vorne und nach hinten verschoben
werden. Bewegen Sie den Hebel, bringen Sie den Sitz in die
gewünschte Position, und lassen Sie den Hebel los, um den
Sitz zu arretieren.
Getriebeausrückhebel
Der Getriebeausrückhebel deaktiviert das Getriebe, so
dass der Traktor von Hand geschoben werden kann. Siehe
„Traktor von Hand schieben“.
Kraftstofftank
Nach links drehen, um die Kappe zu entfernen. Die
Kraftstoffanzeige ist Teil des Armaturenbretts.
12V
Steckdose
Die Steckdose liefert 12 Volt Gleichstrom. Das Zubehör
muss für eine Stromaufnahme von max. 14 A ausgelegt
sein.
Differentialsperrpedal
Durch Niederdrücken des Pedals wird das Getriebe differential
gesperrt, wodurch die beiden hinteren Räder auf „Antrieb“
eingestellt sind.
Verwenden Sie dieses Merkmal, wenn der Traktor
steckengeblieben ist, weil ein Rad rutscht. Kuppeln Sie die
Differentialsperre nur bei niedriger Grundgeschwindigkeit ein.
Zubehörhub-Steuerhebel
Heben Sie das Mähwerk stets an, wenn es nicht eingesetzt
wird (Strecke vom und zum Mäheinsatz). Setzen Sie das
Mähwerk NICHT ein, wenn es sich in der angehobenen
Transportposition befindet.
Der Zubehörhub-Steuerhebel hebt und senkt Zubehör,
das das manuelle Hubgestänge des Traktors benutzt.
Absenken von Zubehör: Hebel leicht nach hinten bewegen,
den Freigabeknopf hineindrücken und den Hebel nach
vorne bewegen, bis er in der abgesenkten Position arretiert.
Anheben von Zubehör: Hebel leicht nach vorne bewegen,
den Freigabeknopf hineindrücken und den Hebel nach
hinten bewegen, bis er in der angehobenen Position
arretiert.
14
www.snapper.com
Page 37

Funktionen und Steuerungen
Armaturenbrett-Anzeigefunktionen
Wenn der Zündschlüssel in die Stellung „Lauf“ gedreht wird,
leuchten die Warnanzeigen auf und die Gesamtzahl der
Einsatzstunden wird angezeigt. Achten Sie darauf, dass alle
Anzeigeleuchten funktionieren.
A. Kraftstoff-Füllstand
Zeigt die im Kraftstofftank befindliche Kraftstoffmenge
an. Links ist leer, rechts ist voll. Die letzten beiden Striche
blinken, wenn der Tank fast leer ist.
B. Stundenzähler / Uhr / Service-Anzeige
Zeigt die Uhr, den Stundenzähler und eine
Wartungserinnerung an.
Der Stundenzähler zählt, wie viele Stunden der Schlüssel
in der RUN-Position steht. Der Stundenzähler blendet
nach 5 Stunden eine erste Ölwechselanzeige und alle
50 Stunden eine Schmierungserinnerung ein. Diese
Erinnerungsmeldungen werden ca. zwei Stunden lang
angezeigt und stellen sich dann automatisch zurück.
HINWEIS: Der Stundenzähler erfasst die Zeit, wenn sich
der Schlüssel in der Position RUN befindet, selbst wenn
der Motor nicht läuft. Der Stundenzähler hat eine eigene
Stromversorgung, sodass die Gesamtzahl der Stunden
immer sichtbar ist.
C. Taste „Auswahl“
Wird zum Einstellen der Uhr benutzt.
D. Taste „Einstellen“
Wird zum Einstellen der Uhr benutzt.
E. Zapfwellenkupplungsschalterleuchte
Zeigt an, dass sich der Zapfwellenkupplungsschalter in der
Stellung „Ein” befindet.
F. Automatische Geschwindigkeitsregelungsleuchte
Zeigt an, daß die automatische Geschwindigkeitsregelung
eingekuppelt ist.
G. Niedrige Öldruckleuchte
Zeigt an, daß der Motoröldruck niedrig ist. Leuchtet beim
Starten des Traktors auf und erlischt dann. WENN DIESE
LEUCHTE BEI BENUTZUNG DES TRAKTORS LEUCHTET,
MUSS DER MOTOR SOFORT ABGESTELLT WERDEN.
Setzen Sie sich mit Ihrem Vertragshändler in Verbindung.
H. Niedrige Spannungsanzeige
Zeigt an, dass die Spannung des Elektrosystems niedrig
ist. Leuchtet beim Starten des Traktors auf und erlischt
dann. WENN DIESE LEUCHTE BEI BENUTZUNG DES
TRAKTORS LEUCHTET, MUSS DER MOTOR SOFORT
ABGESTELLT WERDEN. Setzen Sie sich mit Ihrem
Vertragshändler in Verbindung.
A
H
Armaturenbrettanzeige
Sonderfunktionen
Zur Anzeige der Betriebszeit insgesamt gehen Sie
folgendermaßen vor - Den Schlüssel in die Position OFF
stellen. Den Schlüssel in die Position RUN stellen und in
dieser Position belassen.
Zur Anzeige der Anzahl der Betriebsstunden wurde die
Zapfwellenkupplung eingekuppelt - Den Schlüssel in die
Position OFF stellen. Die Zapfwellenkupplung einkuppeln.
Den Schlüssel in die Position RUN stellen.
Einstellen der Uhr - Motor anlassen und laufen lassen.
Den Auswahlknopf (C) drei (3) Sekunden lang drücken und
loslassen. Den Einstellknopf drücken und HALTEN, um die
Zeit vorzustellen. Die Auswahltaste drücken, um Minuten zu
wählen. Den Einstellknopf (D) drücken und HALTEN, um die
Zeit vorzustellen. 5 Sekunden lang warten und die Uhr wird
aktiviert. Motor ausschalten.
Zur Vorführung aller Funktionen der Instrumententafel
gehen Sie folgendermaßen vor - Den Schlüssel in die
Position OFF stellen. Die Einstelltaste drücken und gedrückt
halten (D). Den Schlüssel in die Position RUN stellen und die
Einstelltaste loslassen. Den Schlüssel in die Position OFF
stellen, um die Vorführung zu beenden.
Wartungserinnerung - Im Informationsfenster (B) wird
nach den ersten 5 Betriebsstunden eine Wartungserinnerung
eingeblendet. Anschließend wird sie alle 50 Stunden
angezeigt. Die Erinnerungsmeldung wird nach 5 Stunden
automatisch zurückgesetzt. Die Erinnerungsmeldung kann
manuell zurückgesetzt werden, indem der Schlüsselschalter
von der Position OFF (Aus) in die Position RUN gestellt wird
(bei ausgeschaltetem Motor) und dann Einstellknopf (D) und
Auswahlknopf (C) gleichzeitig 5 Sekunden lang gedrückt
werden.
G
F E
B
C
D
de
15
Page 38

Funktionen und Steuerungen
Parkbremsfunktionen
Parkbremse einsetzen - Siehe Abb. 3. Die Parkbremse
wird angezogen, indem Sie die Grundgeschwindigkeitspedale (A) freigeben, das Bremspedal (B) vollständig nach
unten drücken, und den Knopf für die Parkbremse (C)
HERAUSZIEHEN und dann das Bremspedal freigeben.
Lösen der Parkbremse - Siehe Abb. 3. Die Parkbremse
wird gelöst, indem Sie das Bremspedal (B) vollständig
nach unten drücken und den Knopf für die Parkbremse (C)
HINEINDRÜCKEN.
Automatisch gesteuerte traktion
(w/o 4WD)
Was ist eine automatisch gesteuerte Traktion?
Bei der automatisch gesteuerten Traktion handelt es sich
um ein Merkmal, das nur unsere Getriebe aufweisen
und wodurch die Traktion verbessert wird. Durch die
automatisch gesteuerte Traktion wird auf beide Hinterräder
ein voreingestelltes Drehmoment übertragen, selbst wenn ein
Rad durchzudrehen beginnt. (Ein Getriebe ohne automatisch
gesteuerte Traktion verliert vollkommen an Traktion, wenn
ein Rad durchzudrehen beginnt.) Das voreingestellte
Drehmoment reicht gerade aus, um zusätzliche Traktion
zu geben; die Räder können sich jedoch bei einer scharfen
Wende unterschiedlich schnell drehen, ohne Schäden am
Rasen hervorzurufen.
12 Volt Steckdose
Die 12-Volt-Zubehörbuchse befindet sich in der linken
Instrumentenverkleidung. Sie kann zur Speisung von kleinen
elektronischen Geräten verwendet werden. Das Zubehör
muss für eine Stromaufnahme von max. 14 A ausgelegt sein.
HINWEIS: Der Betrieb eines 12-Volt-Zubehörgeräts
kann, besonders beim Leerlaufbetrieb des Motors, zum
Entladen der Batterie führen. Wenn die Zubehörbuchse
nicht verwendet wird, muss sie mit dem Gummistopfen
verschlossen werden, um Eindringen von Feuchtigkeit und
Kurzschlüsse zu verhindern. Eindringen von Wasser in die
Buchse kann einen Kurzschluss.
Das können Sie von Ihrem Traktor mit
automatisch gesteuerter Traktion erwarten
Bei der Benutzung Ihres Traktors werden Sie den Einsatz der
automatisch gesteuerten Traktion meist nicht bemerken. Sie
werden sich einfach an die erhöhte Traktion gewöhnen, die
ein Getriebe mit automatisch gesteuerter Traktion bietet.
Unter bestimmten Umständen können die Beschränkungen
des Systems mit automatisch gesteuerter Traktion
überschritten werden und eines der Hinterräder fängt an
durchzudrehen (z.B. wenn Sie einen Hang hinauffahren und
dabei beschleunigen.) Das ist normal. Beschleunigen Sie
nicht, wenn die Traktion anfängt nachzulassen. Kommen Sie
statt dessen zum Stillstand, richten Sie das Lenkrad aus und
beschleunigen Sie langsam. Wenn der Traktor angehalten
wird, kann das Getriebe mehr Traktion wiedererlangen.
16
www.snapper.com
Page 39

Betrieb
SicherheitsVerblockungssystem
Das Gerät ist mit Sicherheits-Verblockungs schaltern und
anderen Sicherungen ausgestattet. Diese Sicherheits systeme
sind für Ihre Sicherheit vorhanden. Versuchen Sie nicht,
Sicherheitsschalter zu umgehen, und machen Sie sich nie an
Sicherungsvorrichtungen zu schaffen. Überprüfen Sie deren
Funktionsfähigkeit regelmäßig.
WARNUNG!
Wenn das Gerät den Sicherheitstest nicht besteht, dürfen
Sie es nicht in Betrieb nehmen.
Test 1 - Motor DARF NICHT starten, wenn:
• die Zapfwellenkupplung eingekuppelt ist ODER
• das Bremspedal NICHT vollständig niedergedrückt ist (oder
die Parkbremse nicht eingekuppelt ist), ODER
• die automatische Geschwindigkeitsregelung NICHT in NullStellung ist.
Test 2 - Motor MUSS durchdrehen und starten, wenn:
• der Fahrer auf dem Sitz sitzt UND
• die Zapfwellenkupplung NICHT eingekuppelt ist UND
• das Bremspedal vollständig niedergedrückt ist (oder die
Parkbremse eingekuppelt ist) UND
• die automatische Geschwindigkeitsregelung in Null-Stellung
ist.
Test 3 - Motor muss STOPPEN, wenn:
• Der Bediener sich vom Sitz erhebt.
Test 4 - Stoppzeit der Mäher-Klinge überpüfen
Die Mähwerkmesser und der Antriebsriemen des Mähwerks
müssen innerhalb von fünf Sekunden, nachdem der Zapfwellenkupplungsschalter in die Stellung „Aus“ gebracht
wurde zu einem vollkommenen Stillstand kommen. Wenn
der Antriebsriemen des Mähwerks nicht innerhalb von fünf
Sekunden zum Stillstand kommt, setzen Sie sich bitte mit Ihrem
Vertragshändler in Verbindung.
Test 5 - Prüfung der RMO-Funktion (Mähen beim
Rückwärtsfahren)
• Der Motor muss ausgehen, wenn der Bediener bei
eingekuppelter Zapfwelle und nicht aktivierter RMOFunktion versucht, rückwärts zu fahren.
• Die RMO-Leuchte muss aufleuchten, wenn die RMOFunktion aktiviert ist.
Kraftstoff einfüllen
1. Kraftstofftankdeckel abnehmen (A, Abb. 4).
2. Tank füllen. Nicht überfüllen. Im Tank Platz für
Ausdehnung des Benzins lassen. BenzinsortenEmpfehlungen sind im Motorhandbuch zu finden.
3. Kraftstofftankdeckel anbringen und mit der Hand anziehen.
WARNUNG!
Bezin ist leicht entzündlich und muss vorsichtig
gehandhabt werden. Den Tank nicht füllen,
wenn der Motor noch heiß ist. Im Bereich, in
dem aufgetankt wird, keine offenen Flammen,
Streichhölzer verwenden und nicht rauchen. Nicht
zuviel Kraftstoff nachfüllen und Verschüttungen
sofort aufwischen.
Keinen Benzin verwenden, der METHANOL,
Gasohol oder mehr als 10% ETHANOL,
Benzinzusätze oder verbleiten Benzin
enthält, da dies zu Schäden am Motor bzw.
Kraftstoffsystem führen kann.
Motor starten
1. Im Fahrersitz sitzen, das Bremspedal ganz durch
drücken oder die Parkbremse anziehen.
2. Sicherstellen, dass die Fahrgeschwindigkeitspedale
nicht nieder gedrückt werden und dass der Hebel für
die automatische Geschwindigkeitsregelung in der
Neutralstellung ist.
3. Die Zapfwellenkupplung auskuppeln.
4. Den Gashebel auf VOLLGAS stellen.
5. Den Choke schließen.
HINWEIS: Bei warmem Motor ist die Anwendung des
Chokes ggf. nicht notwendig.
6. Den Schlüssel in den Zündschalter stecken und auf
START drehen.
7. Nach dem Anlassen des Motors den Gashebel auf halbe
Motornenndrehzahl einstellen. Den Motor mindestens 30
Sekunden lang warm laufen lassen.
8. Den Gashebel auf VOLLGAS stellen.
HINWEIS: Bei einem Notfall kann der Motor gestoppt
werden, indem der Zündschalter in die Stellung
STOP gedreht wird. Diese Methode darf jedoch nur in
Notsituationen angewendet werden. Zum normalen
Abstellen des Motors die Anleitungen im Abschnitt
TRAKTOR UND MOTOR ANHALTEN befolgen.
Traktor und Motor anhalten
1. Die Fahrgeschwindigkeit-Bedienelemente auf Neutral
stellen.
2. Die Zapfwelle auskuppeln und warten, bis alle bewegten
Teilen zum Stillstand gekommen sind.
3. Den Gashebel auf LANGSAM stellen und den
Zündschalter auf AUS drehen. Den Zündschlüssel
abziehen.
de
17
Page 40

Betrieb
Traktor fahren
1. Auf dem Sitz Platz nehmen und diesen so einstellen,
dass alle Bedienelemente bequem erreicht werden
können und die Armaturenbrettanzeige gut sichtbar ist.
2. Die Parkbremse anziehen.
3. Sicherstellen, dass die Zapfwelle ausgekuppelt ist.
4. Den Motor anlassen (siehe MOTOR STARTEN).
5. Parkbremse lösen und Bremspedal freigeben.
6. Für Vorwärtsfahrt das VorwärtsFahrgeschwindigkeitspedal drücken. Das Pedal zum
Stoppen freigeben. Je weiter das Pedal nach unten
gedrückt wird, desto schneller fährt der Traktor.
7. Den Traktor durch Loslassen der
Fahrgeschwindigkeitspedale anhalten, die Parkbremse
betätigen und den Motor abstellen (siehe TRAKTOR
UND MOTOR ANHALTEN).
Mähen
1. Das Mähwerk auf die gewünschte Schnitthöhe einstellen
und die Führungsräder (sofern vorhanden) in die
entsprechende Stellung bringen.
2. Die Parkbremse einkuppeln. Sicherstellen, dass die
Zapfwelle ausgekuppelt ist.
3. Den Motor anlassen (siehe MOTOR STARTEN).
4. Den Gashebel auf VOLLGAS stellen.
5. Die Zapfwelle einkuppeln (Mähwerk).
6. Mit dem Mähen beginnen. Im Abschnitt LC sind
Hinweise zu Mähmustern, Rasenpflege und
Informationen zur Fehlerbehebung zu finden.
7. Nach Beendigung des Mähvorgangs die
Zapfwelle auskuppeln und das Mähwerk mit dem
Zusatzgeräthubhebel anheben.
8. Den Motor abstellen (siehe TRAKTOR UND MOTOR
ANHALTEN).
Mähen beim Rückwärtsfahren
Zum Mähen beim Rückwärtsfahren kann der Bediener das
RMO-System verwenden. Diese Option wird durch Drehen
des RMO-Schlüssels aktiviert, nachdem die Zapfwelle
eingekuppelt wurde. Die LED-Leuchte leuchtet auf und der
Bediener kann nun beim Rückwärtsfahren mähen. Wenn
die Zapfwelle ausgekuppelt wird, muss die RMO-Funktion
erneut aktiviert werden (falls gewünscht). Der Schlüssel
kann abgezogen werden, um die Aktivierung der RMOFunktion zu verhindern.
Betrieb von Anbaugeräten beim
Rückwärtsfahren
Zum Betreiben eines zapfwellenbetriebenen Anbaugeräts
beim Rückwärtsfahren kann der Bediener das RMO-System
verwenden. Diese Option wird durch Drehen des RMOSchlüssels aktiviert, nachdem die Zapfwelle eingekuppelt
wurde. Die LED-Leuchte leuchtet auf und der Bediener kann
nun das Anbaugerät beim Rückwärtsfahren verwenden. Wenn
die Zapfwelle ausgekuppelt wird, muss die RMO-Funktion
erneut aktiviert werden (falls gewünscht). Der Schlüssel kann
abgezogen werden, um die Aktivierung der RMO-Funktion zu
verhindern.
Traktor von Hand Schieben
1. Zapfwellenkupplung auskuppeln und Motor abstellen.
2. Den Getriebeausrückhebel ca. 6,4 cm zurückziehen, um
den Hebel in der freigegebenen Position zu arretieren
(B, Abb. 4).
3. Der Traktor kann nun mit der Hand geschoben werden.
Traktor nicht abschleppen
Abschleppen des Traktors führt zu Getriebeschäden.
• Benutzen Sie zum Schieben oder Abschleppen des
Traktors kein anderes Fahrzeug. • Betätigen Sie den
Getriebeausrückhebel nie bei laufendem Motor.
WARNUNG!
Wenn das Rückwärtsfahrpedal betätigt wird, während
die Zapfwelle eingekuppelt ist, die RMO-Funktion jedoch
nicht aktiviert wurde, wird der Motor abgestellt. Der
Bediener sollte die Zapfwelle stets auskuppeln, bevor
Straßen, Wege oder anderes Gelände, die/das von
anderen Fahrzeugen benutzt werden/wird, überquert
oder befahren werden. Ein plötzlicher Verlust des
Antriebs kann zu einer Gefahrensituation führen.
WARNUNG
Mähen beim Rückwärtsfahren erhöht die Gefahr für
andere Personen. Unzureichende Aufmerksamkeit des
Bedieners in der Nähe von Kindern kann zu tragischen
Unfällen führen. Die RMO-Funktion nicht aktivieren,
wenn sich Kinder in der Nähe befinden. Kinder
interessieren sich für den Traktor und Mäharbeiten.
18
!
www.snapper.com
Page 41

Betrieb
Einstellung Der Mähwerkhöhe
Die Schnitthöhe kann zwischen 2,5 und 10,0 cm (1,0 und
4,0”) stufenlos verstellt werden.
Die Schnitthöhe des Mähwerks wird mit dem SchnitthöhenEinstellschalter eingestellt (A, Abb. 5). Bei Installation
einer Schneefräse dient dieser Schalter der Einstellung
des Auswurfdrehungsmotors. Die Pfeile am Schalter
entsprechen der Richtung der Einstellung (mit dem
AUFWÄRTS-Pfeil wird die Schnitthöhe erhöht, mit dem
RECHTEN Pfeil wird der Auswurf nach rechts gedreht usw.).
Wenn die Einstellungsanzeige am Ende des Einstellbereichs
angelangt ist, den Schalter freigeben. Andernfalls wird der
Motor beschädigt.
Einen Anhänger anbringen
Die maximale horizontale Lastbegrenzung der Zugstange
beträgt 444 N. Die maximale vertikale Lastbegrenzung der
Zugstange beträgt 222 N. Das entspricht einem Anhänger
mit 180 kg Gewicht auf einem Geländeanstieg von 10
Grad. Den Anhänger mit einem ausreichend bemessenen
Lastbolzen (A, Abb. 6) und Splint (B) befestigen.
Unterstellen
WARNUNG!
Die Maschine (mit Kraftstoff) nie in einem
schlecht belüfteten, geschlossenen Raum
unterstellen. Kraftstoffdämpfe könnten zu einer
Zündquelle (wie z. B. einem Ofen, Warmwasserbereiter usw.) gelangen und eine Explosion
verursachen.
Kraftstoffdämpfe sind für Menschen und Tiere
giftig.
Vor dem Unterstellen des Traktors am Ende der
Arbeitssaison die Wartungs- und Unterstellungs-anleitungen
im Abschnitt „Sicherheitsvorschriften“ durchlesen und dann
folgende Schritte durchführen:
• Zapfwelle auskuppen, Parkbremse einkuppeln und
Zündschlüssel abziehen.
• Die Motorwartungs- und Unterstellungsaufgaben
durchführen, die im Motorenhandbuch angeführt sind.
Dazu gehört das Entleeren der Kraftstoffanlage, bzw.
das Zugeben von Kraftstoffstabilisator (die aufgetankte
Maschine nicht in einem geschlossenen Raum
unterstellen - siehe Achtungshinweis).
• Die Batterienutzungsdauer wird verlängert, wenn die
Batterie ausgebaut, an einem kühlen, trockenen Ort
aufbewahrt und einmal monatlich voll geladen wird.
Wenn die Batterie im Traktor eingebaut bleibt, das
Minuskabel abtrennen.
Bevor die Maschine nach dem Unterstellen in Betrieb
genommen wird:
• Flüssigkeitsstände prüfen. Sämtliche
Wartungsmaßnahmen durchführen.
• Alle Motorwartungs- und Unterstellungsaufgaben
durchführen, die im Motorenhandbuch empfohlen
werden.
• Motor vor dem Einsatz einige Minuten lang warm laufen
lassen.
de
19
Page 42

Wartung
Wartungstabelle
ZUGMASCHINE UND MÄHER
Alle 8 stunden oder täglich
Sicherheitsverriegelungssystem überprüfen
Zugmaschie und Mähergehäuse reinigen
Sichtbare Ablagerungen von der Motorkammer entfernen
Alle 25 stunden oder jährlich *
Stoppzeit der Mäher-Klinge überpüfen
Überprüfung der Zugmaschine/des Mähers auf
lose Gegenstände
Reifendruck prüfen
Alle 50 stunden oder jährlich *
Bremsen der Zugmaschine überprüfen
Batterie und Kabel säubern
Suchen Sie Ihren Händler einmal jährlich auf, um
Zugmaschine und Mäher schmieren
Mäherklingen überprüfen **
* Je nachdem, was zuerst eintritt
** Überprüfen Sie die Klingen in Gegenden mit sandigen
Böden oder starkem Staub öfter
MOTOR
Erste 5 Stunden
Wechseln Sie das Motoröl - sehen Sie Maschinenhandbuch
Alle 8 Stunden oder täglich
Prüfen Sie den Ölstand des Motors
Alle 25 Stunden oder jährlich *
Reinigen Sie den Motorluftfilter und Vorreiniger **
Alle 50 Stunden oder jährlich *
Wechseln Sie das Motoröl - sehen Sie Maschinenhandbuch
Wechseln Sie den Ölfilter
Jährlich
Wechseln Sie den Luftfilter aus
Wechseln Sie den Vorreiniger aus
Suchen Sie Ihren Händler einmal jährlich auf, um
Untersuchen Sie Schalldämpfer und Funkenfänger
Wechseln Sie die Zündkerze aus
Wechseln Sie den Kraftstofffilter aus
Reinigen Sie das Luftkühlsystem
* Je nachdem, was zuerst eintritt
** Bei staubigen Umwelbedigungen oder wenn in der Luft
schwebende feste Teilchen vorhanden sind, häufiger
reinigen.
Reifendruck prüfen
Der Reifenluftdruck muss regelmäßig überprüft werden.
Der maximale Luftdruck ist auf der Seitenwand der Reifen
eingeprägt. Der maximale Reifenluftdruck darf nicht
überschritten werden.
Reifengröße
Vorne: 16 x 6,5-8
Hinten: 23 x 10,5-12
Reifenluftdruck
20
Messerbremse prüfen
Die Mährwerksmesser und der Antriebsriemen des
Mähwerks müssen innerhalb von fünf Sekunden, nachdem
der elektrische Zapfwellenschalter in die Stellung AUS
geschaltet wurde, vollständig zum Stillstand kommen.
1. Den Traktor in den Leerlauf schalten, die Zapfwelle
auskuppeln und im Fahrersitz sitzend den Motor
anlassen.
2. Über die linke Fußraste auf den Mähwerksantriebsriemen blicken. Die Zapfwelle einkuppeln und einige
Sekunden lang warten. Die Zapfwelle auskuppeln und
prüfen, wie lange es dauert, bis der Antriebsriemen zum
Stillstand kommt.
3. Wenn der Antriebsriemen nicht innerhalb von fünf
Sekunden zum Stillstand kommt, Vertragshändler
aufgesucht werden.
Motorwartung
Wartungsanweisungen und -empfehlungen finden Sie im
Motorhandbuch. gereinigt werden.
www.snapper.com
Page 43

Wartung
Batterie und Kabel reinigen
WARNUNG!
Beim Anbringen bzw. Abtrennen der Batteriekabeln
das Minuskabel immer ZUERST abtrennen bzw.
ZULETZT anschließen. Andernfalls kann der
Pluspol durch ein Werkzeug am Fahrzeugrahmen
kurzgeschlossen werden.
1. Kabel von der Batterie abtrennen, Minuskabel zuerst (A,
Abb. 7), anschließend Abdeckung und Pluskabel (B).
2. Flügelmutter und Unterlegscheibe (D) lockern.
3. Niederhalter (C) nach oben und von der Batterie weg
schwenken. Am Lenkturm sichern.
4. Batterie (E) ausbauen.
5. Batteriefach mit einer Lösung aus Natriumbikarbonat und
Wasser reinigen.
6. Batteriepole und Kabelenden mit Drahtbürste und
Polklemmenreiniger reinigen, bis sie glänzen.
7. Batterie (E) wieder im Batteriefach einbauen. Mit
Niederhalter (C) und Flügelmutter und Unter-legscheibe
(D) befestigen.
8. Batteriekabel wieder anbringen: erst Pluskabel und
Abdeckung (B), danach Minuskabel (A).
9. Kabelenden und Batteriepole mit Vaseline oder nicht
leitendem Schmiermittel überziehen.
Sitzeinstellung
Neigungseinstellung
Die Neigung des Sitzes kann auf drei verschiedene
Positionen eingestellt werden. Um die Einstellung
vorzunehmen, entfernen Sie die Schlossschrauben,
Abstandsstücke, Unterlegscheiben und Muttern (B, Abb. 8)
vom Gelenk und bringen Sie sie in der gewünschten Position
wieder an.
Sitzschienenstellung
Der Sitz kann vorwärts und rückwärts verstellt werden.
Hebel (A, Abb. 8) bewegen, Sitz in die gewünschte Position
bringen und Hebel loslassen. Der Sitz arretiert in der
gewünschten Position.
Sitzfedereinstellung
Die Sitzfedern (C, Abb. 8) können fester oder weicher
eingestellt werden. Kippen Sie den Sitz nach vorne und
schieben Sie den Federnbausatz (C) nach vorne, um ein
weicheres Fahrverhalten zu erreichen, und nach hinten, um
ein festeres Fahrverhalten zu erreichen.
Einstellung der Manuellen
Hubunterstützung
Wenn der manuelle Aufzug nicht ordnungsgemäß
funktioniert, muss der Händler aufgesucht werden.
Batterieladung
WARNUNG!
Offene Flammen und Funken von der Batterie
fern halten. Die der Batterie entweichenden Gase
sind hoch explosiv. Die Batterie während des
Aufladens gut lüften.
Eine leere Batterie oder eine Batterie, die zu schwach ist
um den Motor zu starten, kann für Fehler im Ladesystem
oder in anderen elektrischen Bauteilen verantwortlich sein.
Sollten Zweifel an der Ursache des Problems bestehen,
den Händler verständigen. Falls die Batterie ersetzt werden
muss, die Schritte unter Batterie und Kabel reinigen.
Zum Laden der Batterie die Anleitungen befolgen, die
vom Hersteller des Ladegeräts bereit gestellt werden;
außerdem alle Warnhinweise im Abschnitt mit den
Sicherheitsvorschriften dieses Handbuchs beachten. Die
Batterie vollständig aufladen. Keine Ladestromstärke von
mehr als 10 A verwenden.
Einstellungen Mähwerk
Die Mähwerk-Führungsräder können je nach Schnitthöhe
in zwei Positionen eingestellt werden. Bei höheren Schnittpositionen die Räder in die untere Position einstellen.
Bei niedrigeren Schnittpositionen, die Räder in die obere
Position einstellen. Einstellung:
1. Sicherungsmutter (A, Abb. 9), Höheneinstellungsrad (B),
Unterlegscheibe (C) und Ansatzbolzen (D) ausbauen.
Position des Höheneinstellungsrads auf gewünschte
Höhe einstellen.
2. Ansatzbolzen (D) durch Unterlegscheibe (C),
Höheneinstellungsrad (B) und Halterung (E)
führen. Mit Sicherungsmutter (A) sichern. Für alle
Höheneinstellungsräder Schritte 1 u. 2 wiederholen.
de
21
Page 44

Fehlersuche und -behebung
Fehlersuche
Während eine normale Pflege und regelmäßige Wartung die
Benutzungsdauer des Traktors verlängern, wird es durch
fortgesetzte oder ständige Benutzung notwendig, einen
Service durchzuführen, auf Grund dessen die Maschine
wieder ordnungsgemäß eingesetzt werden kann.
In den nachstehenden Richtlinien zur Fehlerbehandlung
werden die üblichsten Probleme sowie Ursachen und
Abhilfen angeführt.
Auf den folgenden Seiten sind Anleitungen zum Durchführen
der meisten dieser geringfügigen Einstellungen und
Reparaturen zu finden. Diese können aber auch von Ihrem
örtlichen Vertragshändler durchgeführt werden.
Um ernsthafte Verletzungen zu vermeiden, dürfen
Wartungsarbeiten am Traktor oder Mähwerk
nur dann durchgeführt werden, wenn der Motor
abgestellt und die Parkbremse eingekuppelt ist.
Immer den Zündschlüssel abziehen, das Zündkabel
abziehen und von der Zündkerze entfernt
befestigen, bevor mit Wartungsarbeiten begonnen
wird, damit ein versehentliches Starten des Motors
unmöglich ist.
WARNUNG!
Fehlersuche und-behebung bei der Zugmaschine
PROBLEM ÜBERPRÜFEN PROBLEMLÖSUNG
Bremspedal nicht durchgedrückt. Bremspedal vollständig durchdrücken.
Der Motor überträgt
oder startet nicht.
Antriebswellenkupplungsschalter
(elektrische Kupplung) steht in der
Position EIN.
Fahrkontrolle ist eingekuppelt. Bewegen Sie den Knopf in die Stellung NEUTRAL/AUS.
Kraftstoff ist alle. Lassen Sie den Motor abkühlen, wenn er heiß ist, und dann
Motor abgesoffen. Kuppeln Sie die Klingen aus.
Sicherung durchgebrannt. Suchen Sie einen autorisierten Händler auf.
Batterieanschlüsse müssen gereinigt
werden.
Batterien sind leer oder tot. Laden Sie die Batterie neu auf oder ersetzten Sie sie.
Kabel lose oder gebrochen. Sichtinspektion der Kabel durchführen. Falls die Kabel
Stellen Sie ihn auf die Position AUS.
füllen Sie den Kraftstofftank wieder auf.
Sieh hierzu im Abschnitt Reinigen der Batterie und Kabel.
gebrochen oder ausgefranst sind, wenden Sie sich an einen
autorisierten Händler.
Der Motor startet
schwer oder läuft
schlecht.
Motor klopft.
22
Zylinderspule oder
Startermotorschaden.
Sicherheitsverriegelungsschalter
defekt.
Wasser im Kraftstoff. Suchen Sie einen autorisierten Händler auf.
Kraftstoff ist alt oder abgestanden. Suchen Sie einen autorisierten Händler auf.
Kraftstoffgemisch zu stark. Den Luftfilter reinigen.
Der Motor hat ein anderes Problem. Suchen Sie einen autorisierten Händler auf.
Niedriger Ölstand. Sehen Sie Maschinenhandbuch.
Es wurde Öl mit dem falschen Grad
verwendet.
Suchen Sie einen autorisierten Händler auf.
Suchen Sie einen autorisierten Händler auf.
Sehen Sie Maschinenhandbuch.
www.snapper.com
Page 45

Fehlersuche und -behebung
Fehlersuche und-behebung bei der Zugmaschine (Fortsetzung)
PROBLEM ÜBERPRÜFEN PROBLEMLÖSUNG
Motor läuft zu heiß. Suchen Sie einen autorisierten Händler auf.
Zu hoher Ölverbrauch.
Motorauspuff ist
schwarz.
Motor läuft aber die
Zugmaschine fährt
nicht.
Parkbremse lässt sich
nicht feststellen.
Zugmaschine lenkt
schlecht oder lässt sich
nicht gut handhaben.
Es wurde Öl mit dem falschen Grad
verwendet.
Zuviel Öl im Motorgehäuse. Lassen Sie überschüssiges Öl ab.
Den schmutzigen Luftfilter reinigen. Sehen Sie Maschinenhandbuch.
Choke geschlossen. Den Choke öffnen.
Die Grundgeschwindigkeitspedale
sind nicht durchgedrückt.
Die Übertragungs-Lösehebel stehen
in der Position SCHIEBEN.
Mäher-Antriebsriemen ist gerissen. Suchen Sie einen autorisierten Händler auf.
Parkbremse ist eingerastet. Lösen Sie die Parkbremse.
Der Fahrantriebsriemen ist gerissen
oder rutscht.
Bremse abgenutzt. Suchen Sie einen autorisierten Händler auf.
Lenkstange ist locker. Suchen Sie einen autorisierten Händler auf.
Reifendruck stimmt nicht. Siehe hierzu im Abschnitt Überprüfen des Reifendrucks.
Achslager der Vorderräder sind
trocken.
Sehen Sie Maschinenhandbuch.
Pedale durchdrücken.
Hebel in die Position FAHRE bringen.
Suchen Sie einen autorisierten Händler auf.
Suchen Sie einen autorisierten Händler auf.
Fehlersuche beim Mäher
PROBLEM ÜBERPRÜFEN PROBLEMLÖSUNG
Mäher lässt sich nicht
anheben.
Der Schnitt ist uneben.
Der Schnitt sieht grob
aus.
Motor stirbt leicht
ab wenn der Mäher
angestellt ist.
Übermäßige Vibration
des Mähers.
Notor läuft und
Zugmaschine fährt,
der Mäher fährt jedoch
nicht.
Hebegestänge ist nicht richtig
befestigt oder beschädigt.
Der Mäher ist nicht richtig nivelliert. Suchen Sie einen autorisierten Händler auf.
Die Reifen der Zugmaschine sind nicht
richtig aufgepumpt.
Motorgeschwindigkeit zu niedrig. Setzen Sie die Geschwindigkeit auf Vollgas.
Grundgeschwindigkeit zu schnell. Verlangsamen.
Der Mäher hat ein anderes Problem. Suchen Sie einen autorisierten Händler auf.
Motorgeschwindigkeit zu niedrig. Setzen Sie die Geschwindigkeit auf Vollgas.
Grundgeschwindigkeit zu schnell. Verlangsamen.
Schmutziger oder verstopfter Luftfilter. Sehen Sie Maschinenhandbuch.
Schnitthöhe ist zu niedrig eingestellt. Schneiden Sie hohes Gras während des ersten Schnitts
Auswurfkanal verstopft. Geschnittenes Gras mit Ausstoß zeigt in Richtung des
Motor hat keine Betriebstemperatur. Lassen Sie den Motor einige Minuten lang warm laufen.
Starten des Mähers in hohem Gras. Starten Sie den Mäher in einem bereinigten Bereich.
Der Mäher hat ein anderes Problem. Suchen Sie einen autorisierten Händler auf.
PTO nicht eingekuppelt. PTO einkuppeln.
Der Mäher hat ein anderes Problem. Suchen Sie einen autorisierten Händler auf.
Suchen Sie einen autorisierten Händler auf.
Siehe hierzu im Abschnitt Überprüfen des Reifendrucks.
bei maximaler Schnitthöhe.
vorher geschnittenen Bereiches.
de
23
Page 46

Technische Daten
MOTOR
Briggs & Stratton
Hersteller Briggs & Stratton®
Modell Professional SeriesTM
Hubraum 724 cc (44,2 cu in.)
Elektrik Generator: 12 volt, 16 amp
Batterie: 340 A Kaltstart
Öleinfüllmenge 1,9 L (64 oz)
CHASSIS
Kraftstofftank 15,1 L (4.0 Gal)
Reifengröße
- Vorne 16 x 6,50-8
- Hinten 23 x 10,5-12
OPTIONEN UND ZUBEHÖR
Für nähere Informationen kontaktieren Sie einen
autorisierten händler.
GETRIEBE K66
Hersteller Tuff Torq K66 (Hydro)
Hydraulikflüssigkeit 10W-30 Super-Motoröl
Öleinfüllmenge 2,5 L (2,6 qt)
Geschwindigkeit Vorwärts: 9,3 km/h (0-5,8 MPH)
bei 3400 U/min. Rückwärts: 5,6 km/h (0-3,5 MPH)
Ständige DrehmomentAusgangsleistung 419 Nm (310 ft-lbs)
Zugstangenauslegung 200 kg (440 lbs)
Maximales Achsgewicht 316 kg (697 lbs)
ABMESSUNGEN
Länge 190,5 cm (75”)
Breite 99 cm (39”)
Höhe (am Sitz oben) 127 cm (50”)
24
www.snapper.com
Page 47

de
25
Page 48

26
www.snapper.com
Page 49

CONTENU
Couverture ..................................................................................................................1
Illustrations .................................................................................................................2
Sécurité de l’opérateur ..............................................................................................6
Fonctions et commandes ........................................................................................13
Fonctionnement .......................................................................................................17
Entretien ....................................................................................................................20
Dépannage ................................................................................................................22
Spécifications ...........................................................................................................24
Garantie .....................................................................................................................25
Généralités
Merci d’avoir acheté cette acheté cette tondeuse autoportée construit avec la qualité SNAPPER. Nous sommes heureux
que vous ayez placé votre confiance dans la marque SNAPPER. Si vous utilisez et entretenez le produit conformément aux
instructions du manuel, vous pourrez l’utiliser pendant de nombreuses années.
Ce manuel contient des informations relatives à la sécurité afin que vous connaissiez les dangers et risques qui sont liés
aux tondeuses autoportées et la façon de les éviter. Cette souffleuse à neige est conçue à l’intention seulement pour souffler
la neige et n’est pas pour autres intentions. C’est important que vous lisez et comprenez ces instructions complètement avant
d’essayer de mettre en marche ou de faire fonctionner cet équipement. Conservez ces instructions d’origine pour vous y
reporter dans le futur.
Données de référence du produit
Noter le nom/numéro du modèle, les numéros d’identification
du fabricant et les numérosde série du moteur dans l’espace
prévu pour accès facile. Ces numéros se trouvent aux
emplacements illustrés.
Lorsque l’on contacte le distributeur homologué pour
obtenir des pièces de rechange, des réparations ou
toute information, il FAUT avoir ces numéros.
DONNÉES DE RÉFÉRENCE DU PRODUIT
Nom/Numéro de désignation du modèle
Numéro de fabricant d’unité Numéro de SÉRIE d’unité
Numéro de fabricant du plateau de coupe
de tondeuse
Nom du distributeur Date d’achat
DONNÉES DE RÉFÉRENCE DU MOTEUR
Marque du moteur Modèle du moteur
Type/Spécifi cations du moteur Numéro de code/série du moteur
Numéro de SÉRIE du plateau de coupe de
tondeuse
Étiquettes d’identification CE
A. Numéro d’identi cation du fabricant
B. Numéro de série du fabricant
C. Puissance nominale en kilowatts
D. Régime maximum du moteur en tours par minute
E. Nom et adresse du fabricant
F. Année de fabrication
G. Logo de conformité CE
H. Masse d’unités en kilogrammes
I. Puissance acoustique en décibels garantie
A
Part No. xxxxxxx
B
E
xxxxxxxxxxxxxxx
Serial No. xxxxxxxxxx
xxxxxxxxxxxxxxxxxxxxxxx
xxxxxxxxxxxxxxxxxxxxxxx
xxxxxxxxxxxxxxxxxxxxxxx
xxxxxxxxxxxxxxxxxxxxxxx
xxx
20xx
F
dB
kg: xxx
kW: x.xx
xxxx max
G
I
H
C
D
La liste des pièces détachées pour cette machine peut être téléchargée à partir de www.snapper.com. Veuillez
fournir le modèle et le numéro de série au moment de commander les pièces de rechange.
Copyright © 2010 Briggs & Stratton Power Products Group, LLC
Milwaukee, WI, Tous droits réservés.
SNAPPER est une marque déposée de Briggs & Stratton Power Products
Group, LLC Milwaukee, WI USA.
fr
5
Page 50

Sécurité de l’opérateur
Sécurité d’utilisation
Nous vous félicitons d’avoir acheté ce matériel de jardinage de qualité supérieure. Nos produits sont conçus et fabriqués pour respecter
ou dépasser toutes les normes de sécurité en vigueur
Le matériel à moteur n’est jamais plus sûr que la personne qui
l’utilise. Tout emploi abusif ou défaut d’entretien peut le rendre dangereux ! Gardez à l’esprit que c’est vous qui êtes responsable de
votre sécurité et de celle des personnes qui vous entourent.
Faites preuve de bon sens et réfléchissez bien à ce que vous faites.
Si vous n’êtes pas sûr que la tâche prévue peut être effectuée sans
danger avec le matériel choisi, adressez-vous à un professionnel :
contactez le revendeur agréé le plus proche.
Lisez le manuel
Le manuel d’instructions contient des renseignements importants sur la sécurité qu’il vous
faut connaître AVANT d’utiliser la machine ainsi que PENDANT son
utilisation.
Le manuel présente les techniques d’utilisation préconisées, les
caractéristiques et commandes du produit, ainsi que les opérations
d’entretien, afin de tirer le meilleur de votre investissement.
Veillez à lire complètement les Règles de sécurité et informations
figurant aux pages suivantes. Lisez également la section Utilisation
en entier.
Enfants
Des accidents graves peuvent se produire en présence
d’enfants. Ne pas les laisser s’approcher de la zone
d’utilisation de la machine. Les enfants sont souvent attirés
par les machines et les travaux de tonte. Ne jamais supposer qu’un enfant restera sans bouger de l’endroit où il se
trouve. S’il existe un risque que des enfants entrent dans la
zone de tonte, les faire surveiller par un autre adulte responsable.
NE PAS PROMENER LES ENFANTS AVEC LA
MACHINE ! Ceci les encouragera à s’en approcher à
l’avenir lorsqu’elle est en marche, ce qui présente un risqué de blessure grave. Il peuvent alors s’approcher de la
machine lorsqu’on ne s’y attend pas et se faire renverser.
6
Marche arrière
Ne pas tondre en marche arrière,
sauf si cela est absolument nécessaire. Toujours regarder en arrière
et vers le bas lors
des déplacements
en marche arrière,
même si les lames
sont débrayées.
www.snapper.com
Page 51

Travail sur les pentes
L’utilisation de la machine sur un terrain trop en pente présente un danger
de blessure grave, voire de mort. L’utilisation de la machine sur un terrain
trop en pente ou sur lequel l’adhérence des pneus n’est pas suffisante
peut causer une perte de contrôle ou un renversement.
Une bonne règle de base consiste à ne pas travailler sur une pente qu’on
ne peut pas remonter en marche arrière (en mode 2 roues motrices). Ne
pas utiliser la machine sur les talus dont la pente présente une éléva-
3.5 ft
(1,5 m)
20.0 ft (6,0 m)
tion de plus de 1 m sur une distance de 6 mètres. Toujours monter ou
descendre les talus : ne jamais s’y déplacer transversalement.
Par ailleurs, la surface sur laquelle on conduit peut grandement influencer
la stabilité et le contrôle de la machine. L’herbe mouillée ou une chaussée
verglacée peuvent gravement nuire à la maîtrise du véhicule.
En cas d’appréhension à utiliser la machine sur un talus, ne pas se forcer
à le faire. Cela n’en vaut pas le risque.
Pièces en mouvement
Cette machine comporte de nombreuses pièces mobiles susceptibles de blesser
l’utilisateur ou d’autres. Toutefois, lorsqu’on est assis correctement sur le siège et
qu’on respecte les règles du manuel, l’utilisation de la machine est sans danger.
La tondeuse comporte des lames tournantes capables d’amputer des mains ou des
pieds. Ne laisser personne s’approcher de la machine pendant la marche !
Pour aider l’utilisateur à utiliser ce matériel en toute sécurité, la machine est équipée
d’un système de sécurité à détecteur de conducteur. NE PAS tenter de modifier ou
court-circuiter ce système. Consulter le revendeur immédiatement si le système ne
satisfait pas à tous les essais de verrouillage de sécurité décrits dans ce manuel.
Sécurité de l’opérateur
Projection d’objets
La machine comporte des lames de tonte tournantes. Ces lames peuvent
heurter et projeter des débris pouvant gravement blesser une personne
présente. Veiller à nettoyer la zone à tondre AVANT de commencer à tondre.
Ne pas utiliser la machine sans qu’elle soit munie du collecteur d’herbe complet ou du déflecteur.
En outre, ne permettre la présence de personne dans la zone durant la
marche de la machine ! Si quelqu’un y entre, éteindre immédiatement la
machine jusqu’à son départ.
Carburant et entretien
L’essence est extrêmement inflammable. Ses vapeurs sont aussi extrêmement inflammables et peuvent se propager jusqu’à des sources d’inflammation
éloignées. N’utiliser l’essence qu’à titre de carburant, pas comme solvant ou
nettoyant. Ne pas l’entreposer dans des endroits où ses vapeurs peuvent
s’accumuler ou se propager jusqu’à une source d’inflammation (veilleuse, par
ex.). L’essence doit être contenue dans un bidon en plastique hermétique
homologué ou dans le réservoir d’essence du tracteur avec le bouchon correctement fermé. Nettoyer immédiatement l’essence renversée.
L’entretien est essentiel à la sécurité et au bon fonctionnement de la machine.
Veiller à effectuer les procédures d’entretien figurant dans le manuel, notamment à tester régulièrement le système de sécurité.
fr
7
Page 52

Sécurité de l’opérateur
Lire ces règles de sécurité et les respecter scrupuleusement. Le non respect de ces règles peut résulter en une perte
du contrôle de la machine, des blessures graves ou mortelles à l’utilisateur ou aux personnes se trouvant à proximité
ou en des dommages aux biens matériels ou à l’équipement. Cette tondeuse peut couper les mains et les pieds et
projeter des objets. Tout au long du texte, le triangle accompagne des mises en garde importantes qui doivent
être respectées.
GENERALITES SUR LE FONCTIONNEMENT
1. Lire, veiller à bien comprendre et suivre toutes les instructions
contenues dans le manuel et apposées sur la machine avant
la mise en marche.
2. Ne pas approcher les mains ou les pieds des pièces en
mouvement ou du dessous la machine. Éloignez-vous de
l’ouverture de la sortie d’herbe à tout moment.
3. L’utilisation de cette machine doit être réservée à des adultes
responsables, familiarisés avec le manuel d’utilisation (se
renseigner sur l’âge requis par la réglementation locale pour
la conduite du tracteur).
4. Débarrasser la zone de travail de tous objets, tels que pierres,
jouets ou fils métalliques, susceptibles d’être happés et projetés par la (les) lame(s).
5. S’assurer que personne ne se trouve dans la zone de travail
avant de commencer la tonte. Arrêter la machine si quelqu’un
pénètre dans la zone de travail.
6. Ne jamais transporter de passagers.
7. Ne tondre en marche arrière qu’en cas d’absolue nécessité. Toujours regarder derrière soi et vers le bas avant toute
manœuvre en marche arrière.
8. Ne jamais diriger ce qui sort du déflecteur vers une personne
quelconque. Éviter de diriger le déflecteur contre un mur ou
une obstruction. Les matériaux peuvent faire des ricochets en
direction de l’opérateur. Arrêter la ou les lames lorsque vous
traversez des surfaces couvertes de gravier.
9. Ne pas faire marcher la machine sans que tout l’ensacheur
d’herbe, le carter de la goulotte (déflecteur) ou autres dispositifs de sécurité soient mis en place.
10. Ralentir avant d’effectuer un tournant.
11. Ne jamais laisser une machine en marche sans surveillance.
Toujours désengager la PDF, serrer le frein de stationnement,
arrêter le moteur et retirer la clé de contact avant de descendre de la machine.
12. Débrayer les lames (PDF) lorsque vous ne tondez pas.
Arrêter le moteur et attendre que toutes les pièces en mouvement soient complètement arrêtées avant de nettoyer la
machine, d’enlever l’ensacheur d’herbe ou de déboucher le
carter de la goulotte.
13. Ne faire marcher la machine que pendant la lumière du jour
ou sous un bon éclairage artificiel.
14. Ne pas faire marcher la machine alors que vous êtes sous
l’influence de boissons alcoolisées ou de drogues.
15. Faire attention à la circulation lorsque vous vous trouvez près
d’une route ou d’un croisement.
16. Se montrer particulièrement prudent lors du chargement ou
déchargement de la machine sur une remorque ou un camion.
17. Toujours porter des lunettes de protection lorsque vous faites
marcher cette machine. 18. Les statistiques indiquent qu’un
pourcentage important des accidents corporels liés à la conduite de ce type de véhicules concerne des opérateurs âgés
de 60 ans et plus. Ces personnes doivent évaluer soigneusement leur aptitude à conduire ce tracteur-tondeuse pour leur
sécurité et celle des autres.
19. Suivre les recommandations du fabricant en ce qui concerne
les poids et les contrepoids des roues.
20. Ne pas oublier que l’opérateur de la machine est responsable
pour les accidents qui se produisent à d’autres personnes ou
à la propriété.
21. Tous les conducteurs doivent chercher et obtenir des instructions pratiques et professionnelles.
22. Toujours porter de bonnes chaussures et de bons pantalons.
Ne jamais faire marcher la machine alors que vous êtes pieds
nus ou que vous portez des sandales.
23. Toujours vérifier visuellement, avant utilisation, que les lames
et la quincaillerie des lames sont présentes, intactes et bien
attachées. Remplacer les pièces usées ou endommagées.
24. Désengager les accessoires avant de mettre de l’essence,
d’enlever un accessoire, de procéder à un réglage (sauf si le
réglage peut être effectué depuis le poste de conduite).
25. Quand la machine est garée, remisée ou laissée sans surveillance, abaisser le dispositif de coupe, si aucun verrouillage
mécanique positif n’est utilisé.
26. Avant de quitter le siège de la machine pour une raison
quelconque, engager le frein de stationnement, débrayer la
prise de force, arrêter le moteur et enlever la clé.
27. Pour réduire les risques d’incendie, débarrasser la machine
de toutes herbes et feuilles, et enlever tout trop-plein d’huile.
Ne pas s’arrêter ni se garer sur des feuilles mortes, de l’herbe
sèche ou sur des matériaux inflammables.
TRANSPORT ET REMISAGE
1. Pour le transport sur une remorque découverte, placer le
tracteur dans le sens de la marche. Si le tracteur est transporté
dans le sens opposé à la circulation, la force du vent pourrait
endommager le capot.
2. Toujours observer les règles de sécurité d’alimentation et de
manipulation du carburant lors de l’approvisionnement de la
machine après le transport ou le remisage.
3. Ne jamais remiser la machine (avec du carburant) dans un
local mal ventilé. Les vapeurs d’essence peuvent entrer en
contact avec une source d’allumage (chaudière, chauffeeau, etc.) et causer une explosion. De plus, ces vapeurs sont
toxiques pour les personnes et les animaux.
8
4. Toujours suivre les instructions du manuel du moteur pour les
préparations au remisage, qu’il soit à court ou long terme.
5. Toujours suivre les instructions du manuel du moteur pour
les procédures correctes de démarrage lors de la remise en
service de la machine.
6. Ne jamais remiser la machine ou un bidon de carburant dans
un local où se trouve une flamme vive, telle que la veilleuse
d’un chauffe-eau. Toujours laisser la machine refroidir avant le
remisage.
www.snapper.com
Page 53

Sécurité de l’opérateur
TRAVAIL SUR LES PENTES
Les terrains en pente sont l’une des principales causes de la perte
de contrôle ou du retournement des machines qui peuvent résulter
en des blessures graves ou mortelles. Toute utilisation sur pentes
exige une prudence accrue. S’il n’est pas possible de remonter la
pente en marche arrière ou si cela ne semble pas très sûr, ne pas y
engager la machine.
Freiner ne suffit pas pour regagner le contrôle d’un tracteur qui se
met à glisser sur un terrain en pente. Les causes principales de la
perte de contrôle sont : adhérence au sol des pneus insuffisante,
vitesse trop élevée, mauvais freinage, machine non conçue pour
l’activité entreprise, mauvaise estimation des conditions du terrain,
mauvais attelage et mauvaise répartition de la charge.
1. Il faut monter ou descendre les pentes avec la tondeuse et
non aller transversalement.
2. Faire attention aux trous, ornières ou bosses. Un terrain
irrégulier peut renverser la machine. De l’herbe haute peut
cacher des obstacles.
3. Choisir une vitesse lente de telle sorte que vous ne serez pas
obligé de vous arrêter ou de changer de vitesse alors que
vous êtes sur la pente.
4. Ne pas tondre de l’herbe mouillée. Les pneus risquent de
perdre leur traction.
5. Toujours garder la machine embrayée surtout lorsque vous
descendez des pentes. Ne pas passer au point mort ni
descendre en roue libre.
6. Éviter de démarrer, d’arrêter ou de tourner sur une pente. Si
les pneus perdent leur traction, débrayer la ou les lames et
descendre la pente en ligne droite et lentement.
7. Que tous vos mouvements sur pentes soient lents et petit à
petit. Ne pas effectuer de brusque changement de vitesse ou
de direction, ce qui risquerait de renverser la machine.
8. Faire extrêmement attention lorsque vous faites marcher la
machine avec un ensacheur à herbe ou un autre accessoire,
ceux-ci peuvent affecter la stabilité de la machine.
9. Ne pas essayer de stabiliser la machine en mettant votre
pied sur le sol.
10. Ne pas tondre près de dépôts, de fossés ou de talus. La
tondeuse risque de se renverser subitement si une roue se
trouve au-dessus du bord d’une falaise ou d’un fossé ou si un
bord s’enfonce.
11. Ne pas utiliser d’ensacheurs d’herbe sur pentes abruptes.
12. Ne pas tondre sur des pentes que vous ne pouvez pas
remonter en marche arrière.
13. Consulter votre concessionnaire autorisé pour les recommandations en matière de poids ou de contrepoids de pneu
pour améliorer la stabilité.
14. Ôter les obstacles tells que pierres, branches d’arbre, etc…
15. Utiliser une vitesse lente. Les pneus peuvent perdre leur traction sur les pentes même si les freins fonctionnent correctement.
16. Ne pas effectuer de tournant sur pentes sauf si c’est nécessaire, et alors, tourner lentement et petit à petit en allant vers
le bas, si possible.
ÉQUIPEMENT REMORQUÉ
1. Ne remorquer qu’avec une machine qui a un attelage fait
pour le remorquage. N’attacher un équipement remorqué
qu’au point d’attelage.
2. Suivre les recommandations du fabricant pour ce qui est de
la limite des poids pour les équipements remorqués et pour
le remorquage sur pentes.
3. Ne jamais permettre à des enfants ou à d’autres personnes
de se trouver dans ou sur des équipements remorqués.
AVERTISSEMENT
Ne jamais utiliser la machine sur des pentes supérieures
à 17,6 pour cent (10 degrés), ce qui représente une
dénivellation de 106 cm sur une longueur de 607 cm.
Pour l’utilisation sur des terrains en pente, installer des
masses supplémentaires ou des contrepoids sur les roues.
Consulter le concessionnaire autorisé pour déterminer quels
contrepoids et masses sont disponibles et peuvent être
utilisés sur une machine donnée.
Engager la gamme basse de vitesse de déplacement avant
de conduire sur une pente. Outre l’usage de masses avant
et arrière, redoubler de prudence lors de l’utilisations sur des
pentes avec un sac à herbe monté à l’arrière.
Tondre DANS LE SENS de la pente, jamais en travers de
celle-ci et procéder avec précaution lors des changements
de direction. NE PAS DEMARRER NI S’ARRETER SUR
UNE PENTE.
4. Sur pente, le poids de l’équipement remorqué peut causer
une perte de traction et une perte de contrôle.
5. Se déplacer lentement et laisser suffisamment de distance
pour s’arrêter.
6. Ne pas mettre au point mort ni descendre en roue libre.
ENFANTS
Des accidents graves peuvent se produire si l’opérateur ne fait pas
très attention à la présence d’enfants. Les enfants sont souvent
attirés par les machines et les travaux de tonte. Ne jamais supposer
qu’un enfant restera sans bouger à l’endroit où il se trouve.
1. Garder les enfants à l’écart de la zone de tonte et sous la surveillance attentive d’un autre adulte responsable.
2. Rester vigilant et arrêter la machine si des enfants pénètrent
dans la zone de travail.
3. Avant et pendant toute manœuvre en marche arrière,
s’assurer qu’aucun enfant ne se trouve derrière la machine.
4. Ne jamais transporter d’enfants, même si la ou les lames ne
tournent pas. Ils peuvent tomber et se blesser gravement ou
interférer avec le fonctionnement de sécurité de l’appareil.
Des enfants que l’on a transportés auparavant peuvent
brusquement apparaître sur la surface de tonte pour se faire
transporter de nouveau : ils risquent d’être écrasés par la
machine en marche avant ou en marche arrière.
5. Ne jamais laisser un enfant utiliser la machine.
6. Procéder avec la plus grande prudence à l’approche de virages sans visibilité, de buissons, d’arbres ou d’autres objets
pouvant gêner la visibilité.
EMISSIONS
1. Les gaz d’échappement de ce produit contiennent des substances chimiques qui, en quantité suffisante, peuvent causer
le cancer, des malformations à la naissance ou d’autres
problèmes liés à la reproduction.
2. Lire les informations concernant la durée de vie des émissions et les indices d’air sur l’étiquette du contrôle des émissions du moteur.
SYSTÈME D’IGNITION
1. Ce système d’ignition est en conformité avec le ICES-002
canadien.
fr
9
Page 54

Sécurité de l’opérateur
ENTRETIEN ET MAINTENANCE
Manipulation sans danger de l’essence
1. Éteindre toutes cigarettes, cigares, pipes et autres sources
d’ignition.
2. N’utiliser que des bidons d’essence approuvés.
3. Ne jamais enlever le bouchon d’essence et ne jamais faire
le plein lorsque le moteur est en marche. Laisser le moteur
refroidir avant de refaire le plein.
4. Ne jamais faire le plein à l’intérieur d’un bâtiment.
5. Ne jamais remiser la machine ou un bidon d’essence là où se
trouve une flamme vive, des étincelles ou une lampe pilote
telle qu’ils en existent à proximité de chauffe-eau ou autres
appareils.
6. Ne jamais remplir les bidons à l’intérieur d’un véhicule ou sur
un plancher de camion fait de matières plastiques. Toujours
placer les bidons sur le sol loin de votre véhicule avant de
faire le plein.
7. Descendre vos équipements à moteur à essence du camion
ou de la remorque et faire le plein sur le sol. Si cela n’est
pas possible, faire alors le plein de ces équipements sur une
remorque avec un bidon portable, plutôt que depuis la buse
d’une borne à essence.
8. Garder la buse en contact avec le bord du réservoir
d’essence ou de l’ouverture du bidon à tout moment jusqu’à
ce que vous ayez fini de faire le plein. Ne pas utiliser de dispositif de buse avec ouverture et fermeture.
9. Si de l’essence a été renversée sur des vêtements, les
changer immédiatement.
10. Ne jamais trop remplir le réservoir d’essence. Remettre le
bouchon d’essence et bien serrer.
11. Faire bien attention lorsque vous manipulez de l’essence ou
d’autres carburants. Ils sont inflammables et les vapeurs sont
explosives.
12. Si de l’essence a été renversée, ne pas essayer de démarrer
le moteur mais éloigner la machine de l’endroit où l’essence a
été renversée et éviter de créer des sources d’ignition jusqu’à
ce que les vapeurs d’essence se soient évaporées.
13. Remettre en place tous les bouchons de réservoir à essence
et tous les bouchons de bidons d’essence en les serrant bien.
Service & Maintenance
1. Ne jamais faire marcher la machine dans un endroit fermé où
des vapeurs d’oxyde de carbone risquent de s’accumuler.
2. Veiller à ce que les écrous et boulons, surtout les boulons
d’attachement des lames, soient bien serrés et garder
l’équipement en bon état.
3. Ne jamais essayer de modifier ou d’enlever les dispositifs de
sécurité. Vérifier régulièrement le bon fonctionnement de ces
dispositifs et faire les réparations nécessaires s’ils ne fonctionnent pas bien.
4. Ôter de la machine tout amoncellement d’herbe, de feuilles
ou autres débris. Nettoyer tout renversement d’huile.
5. Arrêter et inspecter l’équipement si vous avez frappé un objet.
Réparer, si nécessaire, avant de remettre en route.
6. Ne jamais effectuer de réglages ou de réparations alors que
le moteur tourne, sauf si cela est indiqué expressément dans
le manuel du fabricant du moteur.
7. Les composants de l’ensacheur à herbe sont sujets à usure,
aux dégâts et à la détérioration, ce qui peut exposer certaines
pièces mobiles ou permettre la projection d’objets. Vérifier
fréquemment les composants et les remplacer avec des
pièces recommandées par le fabricant lorsque nécessaire.
8. Les lames de tondeuse sont tranchantes et peuvent couper.
Envelopper la ou les lames ou porter des gants et procéder
avec la plus grande prudence lors de leur entretien.
9. Vérifier fréquemment le fonctionnement des freins. Effectuer
les entretiens et réglages selon le besoin.
10. Effectuer la maintenance des étiquettes de sécurité ou de
mode d’emploi ou les remplacer si nécessaire.
11. Ne pas enlever le filtre à essence lorsque le moteur est
brûlant car l’essence renversée peut s’enflammer. Ne pas
placer les serre-joints de la conduite d’essence plus loin que
nécessaire. S’assurer que ceux-ci serrent fermement les tuyaux au-dessus du filtre après l’installation.
12. Ne pas utiliser d’essence contenant du MÉTHANOL, de
l’essence contenant plus de 10% d’ÉTHANOL, d’additifs à
essence ou de l’essence blanche parce que des dégâts au
système de carburation et au moteur peuvent se produire.
13. S’il faut vidanger le réservoir à essence, il faut le faire dehors.
14. Remplacer les silencieux et les pots d’échappement
défectueux.
15. N’utiliser que des pièces de rechange agréées par l’usine
pour les réparations.
16. Toujours se conformer aux spécifications d’usine pour tout
réglage ou ajustement.
17. Les entretiens et réparations majeurs doivent exclusivement
être confiés à un centre de dépannage agréé.
18. Ne jamais tenter d’effectuer des entretiens ou des réparations majeurs sur cette machine sans avoir reçu la formation
adéquate. Des procédures incorrectes peuvent résulter en
un fonctionnement dangereux, des dégâts à l’équipement et
l’annulation de la garantie du fabricant.
19. Faire attention sur les modèles à lames multiples, où la rotation d’une lame peut entraîner celle des autres lames.
20. Ne pas modifier les paramètres du régulateur du moteur ni
régler le moteur en sur-régime. Faire fonctionner le moteur
à une vitesse excessive entraîne un plus grand risque
d’accidents corporels.
21. Désengager les accessoires d’entraînement, arrêter le
moteur, retirer la clé de contact et débrancher le fil de la (des)
bougie(s) d’allumage : avant le nettoyage de tout ce qui pourrait bloquer les accessoires et la goulotte de déflecteur, avant
toute activité d’entretien, si la machine vibre anormalement,
ou après avoir heurté un objet. Dans ce dernier cas, inspecter
la machine et, si nécessaire, effectuer les réparations avant
de redémarrer et de faire fonctionner l’unité.
22. Ne jamais mettre les mains près du ventilateur de refroidissement de la pompe hydrostatique quand le tracteur est en
marche. Ce ventilateur se trouve au-dessus de l’essieu arrière.
23. Les appareils à pompes, tuyaux ou moteurs hydrauliques :
AVERTISSEMENT : Le fluide hydraulique qui s’échappe sous
pression peut avoir suffisamment de force pour pénétrer la
peau et causer de graves blessures. Si un fluide étranger est
injecté dans la peau, il faut qu’il soit enlevé par des moyens
chirurgicaux dans les heures qui suivent par un médecin qui
a une connaissance de ce genre de blessure sinon de la
gangrène risque de se produire. Éloigner votre corps et vos
mains des trous de goupille ou des buses qui éjectent du fluide hydraulique sous pression élevée. Utiliser du papier ou du
carton, et non vos mains, pour voir où se trouvent les fuites.
S’assurer que toutes les connexions de fluide hydraulique
sont bien serrées et que toutes les conduites et tuyaux sont
en bon état avant de mettre le système sous pression. Si des
fuites se produisent, faire réparer immédiatement l’appareil
par votre concessionnaire autorisé.
24. AVERTISSEMENT : Appareil à énergie emmagasiné. Tout
relâchement incorrect de ressorts peut causer de graves
blessures corporelles. Seul un concessionnaire autorisé peut
enlever les ressorts.
25. Modèle équipé de radiateur pour moteur : AVERTISSEMENT
: Appareil à énergie emmagasiné. Pour éviter de sérieuses
blessures corporelles provenant de liquide de refroidissement
brûlant ou de sortie brusque de vapeur, ne jamais essayer
d’enlever le bouchon du radiateur alors que le moteur tourne.
Arrêtez le moteur et attendez qu’il soit froid. Même dans ce
cas, il faut faire extrêmement attention lorsque vous enlevez
le bouchon du radiateur.
10
www.snapper.com
Page 55

Sécurité de l’opérateur
Autocollants de securite
Toutes les mises en garde (DANGER, AVERTISSEMENT
et ATTENTION) et messages d’instructions placés sur le
tracteur et la tondeuse doivent être lus attentivement et
respectés. Le non respect de ces instructions peut entraîner
des risques de blessures. Ces informations visent à la
sécurité de l’opérateur et sont donc très importantes ! Les
autocollants de sécurité ci-dessous sont apposés sur le
tracteur et la tondeuse.
Icônes de sécurité
Avertissement : Lire le manuel
d’utilisation.
Lire et comprendre le manuel d’utilisation
avant d’utiliser la machine.
Danger : Objets projetés.
Cette machine est capable de projeter des
objets et des débris. Tenir les spectateurs
à distance.
Avertissement : Retirer la clé avant
toute réparation.
Retirer la clé et consulter la documentation
technique avant d’effectuer toute
réparation ou tout entretien.
Tout autocollant perdu ou endommagé est à remplacer
immédiatement. Consulter le concessionnaire agréé pour
obtenir des autocollants de rechange.
Ces autocollants sont faciles à appliquer et rappellent
constamment à l’utilisateur de respecter les instructions
nécessaires à la sécurité et à l’efficacité d’utilisation.
Danger : Démembrement.
Le plateau de coupe de cette tondeuse
peut amputer des membres. Tenir les
mains et les pieds à l’écart des lames.
Danger : Risques d’incendie.
Ne pas ajouter de carburant quand le
moteur est encore chaud ou en cours
de fonctionnement. Arrêter le moteur et
laisser refroidir pendant trois (3) minutes.
Puis faire l’appoint.
Danger : Surface chaude.
Laisser la machine refroidir avant tout
contact avec cette zone.
Danger : Renversement de la machine.
Ne pas utiliser cette machine sur des
pentes supérieures à 10°.
Danger : Démembrement.
Cette machine peut amputer des membres.
Garder les spectateurs et les enfants à
distance lorsque le moteur tourne.
Danger : Empoisonnement au
Monoxyde de Carbone.
Ne pas manipuler l’engin au sein d’une
zone non ventilée.
fr
11
Page 56

Sécurité de l’opérateur
OO
TT
OO
Emplacement des autocollants
Autocollant
Référence 1737541
Instructions d’utilisation,
Réf. 1750631
Positions de la
clé de contact,
Réf. 1722806
Attention, Point de pincement, Réf. 5102457
1
2
3
4
5
6
+
Attention, Point de pincement, Réf. 5102457
SS
PP
SS
1723160
Débrayage
transmission,
Réf. 1723160
Figure 1
12
www.snapper.com
Page 57

Fonctions et commandes
12V
Fonctions des commandes
Manette des gaz
La manette des gaz contrôle le régime moteur. Pousser la
manette des gaz vers l’avant pour augmenter le régime, et
vers l’arrière pour le baisser. Toujours tondre à plein régime.
Starter
Fermer le starter pour les démarrages à froid. Ouvrir le
starter une fois que le moteur démarre. L’usage du starter
peut ne pas être nécessaire lorsque le moteur est chaud.
Déplacer le levier vers l’avant pour fermer le starter.
Figure 2
Commutateur de phare
Ce commutateur permet d’allumer et d’éteindre les feux du
tracteur.
Option de tonte en marche arrière (RMO)
L’option de tonte en marche arrière, ou RMO (Reverse
Mowing Option), permet de tondre (ou d’utiliser d’autres
accessoires sur la prise de force) tout en se déplaçant en
marche arrière. Pour tondre ou utiliser un autre accessoire
en marche arrière, tourner la clé RMO après avoir embrayé
la prise de force. Le témoin lumineux s’allume, le conducteur
peut alors tondre en marche arrière. Chaque fois que la prise
de force est débrayée, la RMO doit être
fr
13
Page 58

Fonctions et commandes
Interrupteur PDF
L’interrupteur PDF permet d’enclencher ou de désenclencher
les accessoires utilisant la PDF. Pour engager la PDF,
RELEVER l’interrupteur. Pour la désengager, APPUYER sur
l’interrupteur.
REMARQUE : l’opérateur doit être bien assis sur le siège du
tracteur pour que la PDF fonctionne.
Contacteur démarrage
Le contacteur démarrage permet de démarrer ou d’arrêter le
moteur. Il présente trois positions :
Arrêt Arrête le moteur et met le circuit
électrique hors tension.
Marche Permet au moteur de fonctionner et met
le circuit électrique sous tension.
Démarrage Lance le moteur pour le démarrage.
REMARQUE : ne jamais laisser le contacteur démarrage
en position Marche lorsque le moteur est arrêté car cela
décharge la batterie.
Pédale de frein
Appuyer sur cette pédale pour serrer le frein du tracteur.
Régulateur de vitesse
Le régulateur de vitesse permet de maintenir une vitesse de
marche avant constante. Faire glisser le levier du régulateur
de vitesse vers l’avant jusqu’à la vitesse de déplacement
désirée. Pour désengager le régulateur de vitesse, ramener
le levier à fond en arrière. Noter que s’il est nécessaire de
stopper brusquement, il suffit d’appuyer à fond sur la pédale
de frein pour désengager le régulateur de vitesse en le
ramenant à la position point mort.
Réglage du siège
Le siège peut être réglé d’avant en arrière. Actionner
le levier, mettre le siège sur la position désirée et relâcher le
levier pour le verrouiller en place.
Levier à valve de débrayage de la
transmission
Le levier à valve de débrayage de la transmission désactive
la transmission de manière à pouvoir pousser le tracteur à la
main. Voir « Pousser le tracteur à la main ».
Réservoir de carburant
Pour retirer le bouchon, tourner vers la gauche. La jauge de
carburant fait partie du tableau de bord.
Pédales de vitesse de marche
La vitesse de marche avant du tracteur est contrôlée par
la pédale de commande de vitesse de marche avant. La
vitesse de marche arrière du tracteur est contrôlée par la
pédale de commande de vitesse de marche arrière.
Appuyer sur l’une ou l’autre pédale pour augmenter la
vitesse de marche. Noter que plus la pédale est enfoncée,
plus le tracteur se déplacera rapidement.
Frein de stationnement
Le bouton du frein de stationnement sert à
verrouiller le frein de stationnement lorsque le tracteur est à
l’arrêt. Appuyer à fond sur la pédale de frein et tirer le bouton
pour enclencher le frein de stationnement.
Réglage de hauteur de coupe
La hauteur de coupe est réglable à l’infini, de 2,5 à 10,0 cm
(1,0 à 4,0”) terminées.
Le commutateur de réglage de hauteur de coupe
contrôle la hauteur de coupe de la tondeuse. Le même
commutateur contrôle également le moteur de rotation du
bec lorsqu’une souffleuse à neige est installée. Les flèches
sur le commutateur correspondent au sens du réglage (la
flèche UP/HAUT remonte la hauteur de coupe, la flèche
RIGHT/DROITE oriente le bec vers la droite, etc). Lorsque
l’indicateur de réglage a atteint la fin de sa course, relâcher
le commutateur ; maintenir le commutateur enfoncé
endommagera le moteur
Pédale de blocage de différentiel
Appuyer sur cette pédale pour bloquer le différentiel de
transmission, en verrouillant les deux roues arrière en
« marche ».
Utiliser cette fonction si le tracteur est coincé parce que
l’une des roues patine. Engager la pédale de blocage
de différentiel à des vitesses de déplacement lentes
uniquement.
12V
Prise de courant
La prise fournit une tension de 12 V continus. L’accessoire
doit être d’intensité nominale 14 A ou moins.
Levier de relevage d’accessoires
Lors de l’utilisation de la tondeuse, soulever la
tondeuse du sol lors de son transport à destination et
en provenance du chantier. NE PAS couper lorsque la
tondeuse se trouve en position relevée de transport.
Le levier de relevage d’accessoires relève et abaisse
les accessoires qui utilisent la timonerie de relevage
manuel du tracteur. Pour abaisser un accessoire : tirer
légèrement le levier vers l’arrière, enfoncer sur le bouton
de déclenchement et appuyer le levier vers l’avant jusqu’à
ce qu’il se verrouille en position abaissée. Pour relever
un accessoire : enfoncer légèrement le levier vers l’avant,
appuyer sur le bouton de déclenchement et tirer ensuite le
levier vers l’arrière jusqu’à ce qu’il se bloque en position
relevée réactivée pour être utilisée.
14
www.snapper.com
Page 59

Fonctions et commandes
Fonctions de l’affichage du tableau
de bord
La première fois que la clé de contact est mise en position
de marche, tous les voyants témoins s’allumeront et le total
d’heures de fonctionnement s’affichera. S’assurer du bon
fonctionnement de tous les voyants.
A. Jauge de carburant
Indique le niveau de carburant dans le réservoir. Vers la
gauche, le réservoir est vide ; vers la droite, le réservoir est
plein. Les deux dernières barres clignoteront lorsque le
réservoir est presque vide.
B. Compteur d’heures / Horloge / Indicateur
de service
Affiche l’horloge, le compteur d’heures et le rappel
d’entretien.
Le compteur d’heures mesure le nombre d’heures pendant
lequel la clé a été sur RUN. Le compteur d’heures fera
clignoter un indicateur initial de changement d’huile après
5 heures et un rappel de graissage toutes les 50 heures.
Ces rappels seront affichés pendant environ 2 heures et se
remettront automatiquement à zéro.
REMARQUE : Le compteur d’heures enregistrera la durée
pendant laquelle la clé sera sur RUN. même si le moteur ne
tourne pas. Le compteur d’heures a une source indépendante d’électricité si bien que le nombre total d’heures est
toujours visible.
C. Bouton Sélectionner
A utiliser pour mettre l’horloge à l’heure.
D. Bouton Régler
A utiliser pour mettre l’horloge à l’heure.
E. Témoin de PDF
Indique que le commutateur de PDF est en position de
marche.
F. Témoin de régulateur de vitesse
Indique que le régulateur de vitesse est engagé.
G. Témoin de basse pression d’huile
Indique que la pression d’huile moteur est basse. Le voyant
s’allumera lorsqu’on fait démarrer le tracteur pour
la première fois et s’éteindra ensuite. SI CE VOYANT
S’ALLUME PENDANT QUE LE TRACTEUR EST EN
MARCHE, COUPER LE MOTEUR IMMEDIATEMENT.
Contacter un concessionnaire agréé pour entretien.
H. Voyant de basse tension
Indique que la tension du circuit électrique est basse. Le
voyant s’allumera lorsqu’on fait démarrer le tracteur pour
la première fois et s’éteindra ensuite. SI CE VOYANT
S’ALLUME PENDANT QUE LE TRACTEUR EST EN
MARCHE, COUPER LE MOTEUR IMMEDIATEMENT.
Contacter un concessionnaire agréé pour entretien.
B
C
A
D
H
Affichage du tableau de bord
G
F E
Fonctions spéciales
Pour afficher le total des heures de marche :
Mettre la clé sur OFF (Arrêt). Mettre la clé sur RUN (Marche)
et la laisser sur RUN (Marche).
Pour afficher le nombre d’heures pendant lequel la
prise de force a été embrayée.
Mettre la clé sur OFF (Arrêt). Embrayer la prise de force.
Mettre la clé sur RUN (Marche).
Configurer l’horloge :
Démarrer le moteur, laisser le moteur tourner. Appuyer
sur le bouton Sélection C pendant trois (3) secondes et
relâcher. Appuyer sur le bouton Set (Configuration) et TENIR
APPUYÉ pour faire avancer les heures. Appuyer sur le
bouton Sélection pour sélectionner les minutes. Appuyer et
TENIR APPUYE le bouton de configuration (D) pour avancer
le temps. Ne rien faire pendant 5 secondes et l’horloge
s’activera. Arrêter le moteur.
Pour avoir une démonstration de toutes les fonctions
du tableau de bord :
Mettre la clé sur OFF (Arrêt). Appuyer et tenir le bouton de
configuration (D). Mettre la clé sur RUN (Marche) et relâcher
le bouton de configuration. Mettre la clé sur OFF (Arrêt) pour
terminer la démonstration.
Rappel d’entretien :
Le rappel d’entretien apparaîtra sur la fenêtre d’information
(B) après les 5 premières heures de marche et ensuite
toutes les 50 heures. Le rappel d’entretien se remettra à
zéro après 5 heures. Il peut être remis à zéro manuellement
en tournant la clé de OFF à RUN (alors que le moteur
est arrêté) et en appuyant ensuite sur les bouton D
(configuration) et C (Sélection) simultanément pendant
5 secondes.
fr
15
Page 60

Fonctions et commandes
Fonction du frein de stationnement
Serrage du frein de stationnement - Voir la Figure 3. Pour
verrouiller le frein de stationnement, relâcher les pédales de
vitesse de déplacement (A), appuyer à fond sur la pédale de
frein (B), TIRER le bouton de frein de stationnement (C) et
relâcher la pédale de frein.
Desserrage du frein de stationnement - Voir la Figure 3.
Pour desserrer le frein de stationnement, appuyer à fond sur
la pédale de frein (B) et ENFONCER le bouton de frein de
stationnement (C).
Traction a commande automatique
(w/o 4WD)
Qu’est-ce que la Traction à commande
automatique ?
La Traction à commande automatique (ACT) est une
caractéristique exclusive de nos transmissions qui offre
une traction améliorée. L’ACT applique une quantité
prédéterminée de couple aux deux roues arrière même si
l’une d’entre elles commence à patiner. (Une transmission
sans ACT perdra complètement sa traction si une roue
arrière commence à déraper.) Ce couple prédéterminé est
suffisant pour offrir une traction supplémentaire et permettre
quand même aux roues de tourner à des vitesses différentes
dans un virage serré et ce, sans endommager la pelouse.
12 V Prise de courant
La prise accessoire 12 V se trouve dans le carénage
gauche. Elle permet d’alimenter de petits appareils électroniques. L’accessoire doit être d’intensité nominale 14 A ou
moins.
REMARQUE : L’utilisation d’un accessoire 12 V, en particulier lorsque le moteur est au ralenti, peut décharger la batterie. Lorsqu’elle n’est pas utilisée, la prise accessoire doit être
couverte par le bouchon en caoutchouc pour écarter tour
risque de court-circuit causé par l’humidité. La pénétration
d’eau dans la prise peut entraîner un court-circuit.
Caractéristiques d’un tracteur ACT
La plupart du temps, lors de l’utilisation du tracteur, l’ACT
ne se remarque pas, on s’habitue simplement à la traction
accrue que permet une transmission ACT.
Dans certains cas, la limite du système ACT peut être
dépassée, et l’une des roues arrière risque de patiner (par
exemple, si on essaie de tourner dans une montée en
accélérant). Ceci est normal. En cas de perte de traction,
ne pas accélérer. Au lieu de cela, ralentir pour s’arrêter,
redresser le volant et accélérer lentement. Arrêter le tracteur
pour permettre à la transmission de reprendre davantage de
traction.
16
www.snapper.com
Page 61

Fonctionnement
Tests de systeme de verrouillage
de securite
Cette machine est équipée de commutateurs de verrouillage
et autres dispositifs de sécurité. Ces systèmes sont destinés
à assurer la sécurité de l’opérateur. Ne pas tenter de mettre
les commutateurs de sécurité hors service et ne jamais
altérer les dispositifs de sécurité.
AVERTISSEMENT
Si l’un des tests de sécurité de la machine échoue, ne
l’utilisez pas. Consultez votre revendeur agréé.
Test 1 - Le moteur NE DOIT PAS démarrer si :
• le commutateur de PDF est en position de marche OU
• si la pédale de frein n’est pas complètement enfoncée (ou si
le frein de stationnement n’est pas serré) OU
• si le levier de régulateur de vitesse n’est pas au point mort.
Test 2 - Moteur DOIT tourner et démarrer si :
• l’opérateur est assis sur son siège ET
• le commutateur de PDF n’est pas en position de marche ET
• si la pédale de frein est complètement enfoncée (ou le frein
de stationnement serré) ET
• si le régulateur de vitesse est en position point mort.
Test 3 - Le moteur doit S’ARRÊTER si :
• L’opérateur se lève de son siège.
Test 4 - Contrôle du temps d’arrêt des lames de tondeuse
Mower blades and mower drive belt should come to a comLes
lames de la tondeuse et leur courroie d’entraînement doivent
parvenir à l’arrêt complet dans les cinq secondes suivant la
mise en position d’arrêt du commutateur de PDF. Si la courroie
de la tondeuse ne s’arrête pas dans les cinq secondes, consulter le concession naire agréé.
Test 5 - Contrôle de l’option de tonte en marche arrière
(RMO):
• Le moteur doit s’arrêter en cas de tentative de déplacement
en marche arrière alors que la prise de force (PTO) est en
marche et que la RMO n’est pas activée.
• lorsque l’opérateur se lève du siège lorsque la pédale de
frein N’EST PAS complètement enfoncée (ou si le frein de
stationnement est désengagé).
Ajouter du carburant
1. Ouvrir le bouchon du réservoir (A, Figure 4).
2. Remplir le réservoir. Ne pas faire déborder. Laisser
assez de place dans le réservoir pour la dilatation du carburant. Voir les conseils spécifiques au carburant dans le
manuel du moteur.
3. Remettre le bouchon du réservoir en place et le serrer à
la main.
AVERTISSEMENT
L’essence est extrêmement inflammable et doit être
manipulée avec précaution. Ne jamais faire l’appoint
de carburant alors que le moteur est encore chaud.
Ne pas permettre de flamme nue, cigarette allumée
ni allumettes au voisinage. Eviter de trop remplir le
réservoir et essuyer tout débordement éventuel.
Pour écarter les risques de dommage du moteur/
circuit de carburant, ne pas utiliser d’essence
contenant du MÉTHANOL, de carburol contenant
plus de 10 % d’ÉTHANOL, d’additifs pour
carburants ni d’essence C (blanche).
Démarrer le moteur
1. En étant assis sur le siège du tracteur, enfoncer complètement la pédale de frein ou serrer le frein de stationnement.
2. Veiller à ne pas appuyer sur les pédales de déplacement
avec les pieds et s’assurer que le levier du régulateur de
vitesse est au point mort.
3. Désengager la PDF.
4. Mettre la manette des gaz à plein régime.
5. Fermer le starter.
REMARQUE : le starter peut ne pas être nécessaire si le
moteur est chaud.
6. Introduire la clé de contact et la tourner en position de
DÉMARRAGE.
7. Une fois le moteur en marche, mettre la manette des
gaz à mi-régime. Laisser chauffer le moteur pendant au
moins 30 secondes.
8. Mettre la manette des gaz à PLEIN RÉGIME.
REMARQUE : en cas d’urgence, le moteur peut être arrêté
en tournant simplement la clé de contact en position ARRÊT.
N’utiliser cette méthode que pour les cas d’urgence. Pour
l’arrêt normal du moteur, suivre la procédure indiquée dans
la section « ARRÊTER LE TRACTEUR ET LE MOTEUR ».
Arrêter le tracteur et le moteur
1. Ramener la ou les commandes de déplacement au point
mort.
2. Désengager la PDF et attendre l’arrêt complet de toutes
les pièces en mouvement.
3. Ramener la manette des gaz en position BAS régime et
mettre la clé de contact sur ARRÊT. Enlever la clé.
fr
17
Page 62

Fonctionnement
Conduire le tracteur
1. S’asseoir sur le siège et le régler de façon à atteindre
toutes les commandes et à voir le tableau de bord sans
effort.
2. Serrer le frein de stationnement.
3. S’assurer que la PDF est débrayée.
4. Démarrer le moteur (voir « DÉMARRER LE MOTEUR »).
5. Desserrer le frein de stationnement et relâcher la pédale
de frein.
6. Appuyer sur la pédale de déplacement avant pour
avancer. Relâcher la pédale pour s’arrêter. Noter que
plus la pédale est enfoncée, plus la vitesse du tracteur
est élevée.
7. Pour arrêter le tracteur, relâcher les pédales de déplacement, serrer le frein de stationnement et arrêter le moteur
(voir « ARRÊTER LE TRACTEUR ET LE MOTEUR »).
Tondre
1. Régler la hauteur de coupe au niveau désiré et régler les
roulettes-guides à la position appropriée, le cas échéant.
2. Serrer le frein de stationnement. S’assurer que la PDF
est débrayée.
3. Démarrer le moteur (voir « DÉMARRER LE MOTEUR »).
4. Mettre la manette des gaz à PLEIN RÉGIME.
5. Engager la PDF (carter de coupe).
6. Commencer à tondre.
7. Une fois la tonte terminée, désengager la PDF et relever
le carter de coupe à l’aide du levier de levage.
8. Arrêter le moteur (voir « ARRÊTER LE TRACTEUR ET
LE MOTEUR »).
Tondre en marche arrière
AVERTISSEMENT
Le moteur s’éteint si la pédale de vitesse en marche
arrière est enfoncée alors que la prise de force est
embrayée mais que l’option RMO n’est pas activée. Veiller
à toujours débrayer la prise de force avant de traverser
des routes, chemins ou autres zones susceptibles d’être
utilisées par d’autres véhicules. La perte soudaine
d’entraînement peut constituer un danger.
Pour tondre en marche arrière, le système RMO doit être
utilisé. Pour activer l’option RMO (Reverse Mowing Option),
tourner la clé RMO après avoir embrayé la prise de force.
Le témoin lumineux s’allume, le conducteur peut alors tondre en marche arrière. Chaque fois que la prise de force
est débrayée, la RMO doit être réactivée pour être utilisée.
Enlever la clé pour restreindre l’accès à la fonction RMO.
Utilisation d’accessoires en marche
arrière
Pour faire fonctionner un accessoire sur la prise de force
en marche arrière, le système RMO doit être utilisé. Pour
activer l’option RMO (Reverse Mowing Option), tourner
la clé RMO après avoir embrayé la prise de force. Le
témoin lumineux s’allume, le conducteur peut alors utiliser
l’accessoire en marche arrière. Chaque fois que la prise
de force est débrayée, la RMO doit être réactivée pour être
utilisée. Enlever la clé pour restreindre l’accès à la fonction
RMO.
Pousser le tracteur a la main
1. Désengager la PDF et arrêter le moteur.
2. Tirer le levier de débrayage de la transmission en arrière
d’environ 6,4 cm pour le verrouiller en position débrayée
(Figure 4).
3. Le tracteur peut maintenant être poussé à la main.
NE PAS REMORQUER LE TRACTEUR
Remorquer l’unité endommagera la transmission. • Ne pas utiliser un autre véhicule pour
pousser ou tirer cette unité.
• Ne pas activer le levier de soupape de débrayage de transmission pendant que le moteur
tourne.
AVERTISSEMENT
La tonte en marche arrière peut être dangereuse pour
les personnes présentes. Des accidents tragiques
peuvent se produire lorsque l’utilisateur n’est pas
conscient de la présence d’enfants. Ne jamais activer la
RMO en présence d’enfants.Les enfants sont souvent
attirés par la machine et par l’activité de tonte.
18
www.snapper.com
Page 63

Fonctionnement
Reglage de la hauteur de la tondeuse
La hauteur de coupe est réglable à l’infini, de 2,5 à 10,0 cm
(1,0 à 4,0”) terminées.
Le commutateur de réglage de hauteur de coupe (A, Figure
5) contrôle la hauteur de coupe de la tondeuse. Le même
commutateur contrôle également le moteur de rotation du
bec lorsqu’une souffleuse à neige est installée. Les flèches
sur le commutateur correspondent au sens du réglage (la
flèche UP/HAUT remonte la hauteur de coupe, la flèche
RIGHT/DROITE oriente le bec vers la droite, etc). Lorsque
l’indicateur de réglage a atteint la fin de sa course, relâcher
le commutateur ; maintenir le commutateur enfoncé
endommagera le moteur.
Fixation d’une remorque
La force de barre d’attelage horizontale maximum
admissible est de 444 Nm. La force de barre d’attelage
verticale maximum est de 222 Nm. Ceci correspond à une
remorque de 180 kg sur une pente de 10 degrés.
Remisage
AVERTISSEMENT
Ne jamais remiser la machine (avec de l’essence)
dans un local fermé et mal aéré. Les vapeurs
d’essence peuvent atteindre une source
d’inflammation (chaudière, chauffe-eau, etc.) et
provoquer une explosion.
Les vapeurs d’essence sont également toxiques
pour les personnes et les animaux.
Avant de remiser la machine en fin de saison, lire les instructions d’entretien et remisage de la section Règles de sécurité, puis procéder comme suit :
• Désengager la PDF, serrer le frein de stationnement et
retirer la clé.
• Suivre les instructions d’entretien et de remisage du
moteur figurant dans le manuel du moteur. Ceci inclut
une vidange du circuit de carburant ou l’ajout d’un
stabilisateur dans le carburant (ne pas entreposer un
véhicule rempli d’essence dans un local fermé - voir
l’avertissement ci-dessus).
• La durée de service de la batterie sera prolongée si elle
est déposée, placée dans un endroit frais et sec et complètement rechargée une fois par mois. Si la batterie est
laissée dans la machine, débrancher le câble négatif.
Avant de démarrer la machine après l’avoir remisée :
• Vérifier tous les niveaux de liquides. Vérifier tous les
points de maintenance.
• Effectuer l’ensemble des contrôles et procédures conseillés figurant dans le manuel du moteur.
• Laisser le moteur chauffer plusieurs minutes avant toute
utilisation.
fr
19
Page 64

Entretien
Tableau d’entretien
TRACTEUR ET TONDEUSE
Toutes les 8 heures ou chaque jour
Contrôler le système de verrouillage de sécurité
Nettoyez le tracteur et le plateau de coupe de
la tondeuse
Nettoyez les débris du compartiment moteur
Toutes les 25 heures ou tous les ans *
Contrôle du temps d’arrêt des lames de tondeuse
Vérifiez que les accessoires du tracteur ou de la
tondeuse ne soient pas desserrés
Vérification de la pression des pneus
Toutes les 50 heures ou tous les ans *
Contrôle des freins de tracteur
Nettoyer la batterie et les câbles
Voir le revendeur tous les ans pour
Lubrifiez le tracteur et la tondeuse
Vérifiez/remplacez les lames de la tondeuse **
* Selon la première éventualité
** Vérifier plus fréquemment les lames dans les régions
ayant des sols sablonneux ou dans lesquelles il y a
beaucoup de poussière.
MOTEUR
Premier 5 heures
Changer l’huile moteur - voir le manuel de moteur
Toutes les 8 heures ou chaque jour
Vérifier le niveau d’huile moteur
Toutes les 25 heures ou tous les ans *
Nettoyez le filtre à air et le dépoussiéreur **
Toutes les 50 heures ou tous les ans *
Changer l’huile moteur
Remplacez le filtre à huile
Tous les ans
Changer le filtre à air
Remplacez le dépoussiéreur
Voir le revendeur tous les ans pour
Inspectez le pot d’échappement
Remplacez la bougie
Remplacez le filtre à carburant
Nettoyer l’installation de refroidissement de l’air
* Selon la première éventualité
** Dans un environnement poussiéreux ou quand
des débris sont en suspension dans l’air, nettoyez
plus fréquemment
Contrôle de la pression des pneus
La pression des pneus doit être vérifiée périodiquement. La
pression de gonflage maximal est indiquée sur le flanc des
pneus. Ne pas dépasser la pression maximale.
Taille
Avant: 16 x 6,5-8
Arrière: 23 x 10,5-12
Pression des pneus
20
Verification du frein des lames
Les lames et la courroie d’entraînement de la tondeuse
doivent s’arrêter complètement dans les cinq secondes qui
suivent le désengagement de la PDF.
1. Le tracteur étant au point mort, la PDF désengagée et
l’opérateur assis sur le siège, démarrer le moteur.
2. Regarder la courroie d’entraînement de la tondeuse
par dessus le repose-pied de gauche. Engager la PDF
et attendre quelques secondes. Désengager la PDF
et vérifier quel est le temps nécessaire pour que la
courroie d’entraînement de la tondeuse s’immobilise
complètement.
3. Si la courroie d’entraînement de la tondeuse ne s’arrête
pas dans les cinq secondes, réajuster l’embrayage ou
consulter le concessionnaire agréé.
Maintenance du moteur
Toutes les procédures de maintenance et recommandations
sont spécifiées dans le manuel du moteur.
www.snapper.com
Page 65

Entretien
Nettoyage de la batterie et des câbles
AVERTISSEMENT
Lors du branchement ou débranchement des câbles
de batterie, toujours débrancher le câble négatif EN
PREMIER et le rebrancher EN DERNIER. Si cet ordre
n’est pas respecté, la borne positive risque d’être
mise en court-circuit avec le châssis par un outil.
1. Débrancher les câbles de la batterie, le câbles négatifs
en premier (A, Figure 7) puis le cache et les câbles positifs (B).
2. Desserrer l’écrou à ailettes et la rondelle (D).
3. Relever la tige de maintien (C) pour la dégager de la batterie. La bloquer sur la colonne de direction.
4. Déposer la batterie (E).
5. Nettoyer le logement de batterie avec une solution de
bicarbonate de soude et d’eau.
6. Nettoyer les bornes de la batterie et les cosses des
câbles avec une brosse métallique et un nettoyant pour
bornes de batterie jusqu’à ce que le métal brille.
7. Remettre la batterie (E) en place dans son logement. La
fixer avec la tige de maintien (C) et l’écrou à ailettes et la
rondelle (D).
8. Rebrancher les câbles de batterie, les câbles positifs et le
cache (B) en premier, puis les câbles négatifs (A).
9. Enduire les cosses des câbles et les bornes de la batterie de vaseline ou d’une graisse non conductrice.
Recharge de la batterie
AVERTISSEMENT
Garder la batterie à l’écart de flammes nues
ou d’étincelles. Les gaz qu’elle dégage sont
extrêmement explosifs. Recharger la batterie dans
un endroit bien ventilé.
Une batterie déchargée ou trop faible pour démarrer le
moteur peut être le résultat d’une panne du circuit de charge
ou de tout autre composant électrique. En cas de doute sur
la cause du problème, consulter le concessionnaire. Si la
batterie doit être changée, suivre les instructions « Nettoyage
de la batterie et des câbles ».
Pour recharger la batterie, suivre les instructions du fabricant
du chargeur de batterie en respectant toutes les mises en
garde figurant dans les sections sur la sécurité de ce manuel. Recharger la batterie jusqu’à sa charge maximale. Ne
pas la charger à un intensité supérieure à 10 A.
Reglage du siege
Réglage de l’inclinaison
L’inclinaison du siège peut être réglée sur une des trois
positions. Pour la régler, retirer les boulons mécaniques,
écarteurs, rondelles et écrous (B, Figure 8) de la charnière et
les remonter dans les trous souhaités.
Réglage du coulisseau du siège
Le siège peut être réglé d’avant en arrière. Actionner le
levier (A, Figure 8), mettre le siège sur la position désirée et
relâcher le levier pour le verrouiller en place.
Réglage des ressorts du siège
Les ressorts du siège (C, Figure 8) peuvent être réglés pour
procurer une conduite plus douce ou plus ferme. Incliner le
siège vers l’avant et faire glisser l’ensemble de ressort (C)
vers l’avant pour une conduite plus douce, vers l’arrière pour
une conduite plus ferme.
Reglage de l’aide au relevage manuel
La tension du ressort de l’aide au relevage manuel. Se
l’ascenseur manuel ne fonctionne pas correctement,
consulter le concessionnaire.
Reglages de la tondeuse
Les roulettes-guides de la tondeuse peuvent être placées
dans deux positions différentes en fonction de la hauteur de
coupe. Pour des niveaux de coupe hauts, régler les roulettes
en position basse. Pour des niveaux de coupe bas, régler les
roulettes en position haute. Pour effectuer le réglage :
1. Enlever le contre-écrou (A, Figure 9), la roue
d’ajustement (B), les rondelles (C) et le boulon d’epaule
(D). Changer la position de la roue d’ajustement à la
hauteur désirée.
2. Insérer le boulon d’épaule (D) dans les rondelle (C),
la roue d’ajustement (B), and le support de la roue
d’ajustement (E). Serrer au moyen du contre-écrou
(A). Répéter les étapes 1 & 2 pour toutes les roues
d’ajustement.
fr
21
Page 66

Dépannage
Dépannage
Bien que l’entretien normal et la maintenance régulière
assurent une longévité accrue à l’équipement, un usage prolongé ou constant peut, au bout d’un certain temps, nécessiter certaines réparations pour permettre au matériel de
continuer de fonctionner correctement.
Le guide de dépannage qui suit contient la liste des problèmes les plus courants, avec leurs causes et les actions
correctives.
Les pages suivantes contiennent des instructions permettant
d’effectuer soi-même ces réglages et réparations mineurs.
Au besoin, toutes ces procédures peuvent être confiées au
concessionnaire agréé.
Pour écarter les risques de blessures graves,
ne travailler sur le tracteur ou le carter de coupe
qu’avec le moteur arrêté et le frein de stationnement
engagé.
Toujours retirer la clé de contact, débrancher le
câble de bougie et l’attacher à l’écart de cette
dernière avant de commencer le travail, afin
d’empêcher tout démarrage intempestif du moteur.
AVERTISSEMENT
Dépannage du tracteur
PROBLÈME VÉRIFIEZ SOLUTION
Pédale de frein pas enfoncée. Enfoncer complètement la pédale de frein.
Moteur ne tourne
pas ou ne démarre
pas.
Le commutateur de prise de force
(embrayage électrique) est sur la
position MARCHE.
Régulateur de vitesse engagé. Amenez le bouton de commande sur la position POINT
Panne de carburant. Si le moteur est chaud, laisser refroidir et refaire le plein
Moteur noyé. Débrayez le starter.
Un fusible a sauté. Voir un revendeur agréé.
Bornes de la batterie sales. Voir la section Nettoyage de la batterie et des câbles.
Batterie déchargée ou morte. Rechargez ou changez la batterie.
Câble désserré ou sectionné. Vérifiez visuellement le câblage. S’il y a des câbles effilochés
Bobine ou démarreur défectueux. Voir un revendeur agréé.
Contacteur de verrouillage de
sécurité défectueux.
Placer en position ARRÊT.
MORT/ARRÊT.
de carburant.
ou cassés, consultez un revendeur agréé.
Voir un revendeur agréé.
Moteur démarre
difficilement ou
ne fonctionne pas
bien.
Détonations au
niveau du moteur.
22
Eau dans le carburant. Voir un revendeur agréé.
Essence vieille ou éventée. Voir un revendeur agréé.
Mélange trop riche. voir le manuel de moteur
Le moteur a un autre problème. Voir un revendeur agréé.
Niveau d’huile insuffisant. Voir le manuel de moteur
Huile de type incorrect. Voir le manuel de moteur
www.snapper.com
Page 67

Dépannage du tracteur (suite)
PROBLÈME VÉRIFIEZ SOLUTION
Moteur trop chaud. Voir un revendeur agréé.
Consommation
excessive d’huile.
Échappement du
moteur est noir.
Le frein de
stationnement ne
tient pas.
Direction du
tracteur dure
ou difficile à
manœuvrer.
Huile de type incorrect. Voir le manuel de moteur
Excès d’huile dans le carter moteur. Vidanger l’excédent d’huile.
Filtre à air encrassé. Voir le manuel de moteur
Starter fermé. Ouvrir le starter.
Frein interne usé. Voir un revendeur agréé.
Tringlerie de direction desserrée. Voir un revendeur agréé.
Pneus mal gonflés. Voir la section Vérifier la pression des pneus.
Paliers de fusées du roue avant secs. Voir un revendeur agréé.
Dépannage de la tondeuse
PROBLÈME VÉRIFIEZ SOLUTION
La tondeuse ne
s’élève pas.
Coupe de tondeuse
irrégulière.
Tringlerie de levage mal fixée ou
endommagée.
Carter de coupe pas de niveau. Voir un revendeur agréé.
Pneus du tracteur mal gonflés. Voir la section Vérifier la pression des pneus.
Voir un revendeur agréé.
Dépannage
Coupe de tondeuse
irrégulière.
Moteur cale
facilement
lorsque tondeuse
embrayée.
Vibrations
excessives de
la tondeuse.
Le moteur tourne
et le tracteur se
déplace, mais la
tondeuse n’est pas
entraînée.
Régime moteur trop bas. Mettre à plein régime.
Vitesse de déplacement excessive. Ralentir.
La tondeuse a un autre problème. Voir un revendeur agréé.
Régime moteur trop bas. Mettre à plein régime.
Vitesse de déplacement trop rapide. Ralentir.
Filtre à air encrassé ou obstrué. Voir le manuel de moteur
Hauteur de coupe réglée trop bas. Tondre les herbes hautes à la hauteur de coupe maximale
lors d’un premier passage.
Goulotte d’éjection obstruée. Tondre en dirigeant l’éjecteur vers une zone déjà tondue.
Moteur pas à sa température
de fonctionnement.
Démarrage de la tonte dans des herbes
hautes.
La tondeuse a un autre problème. Voir un revendeur agréé.
La PDF n’est pas embrayée. Embrayez la PDF.
La tondeuse a un autre problème. Voir un revendeur agréé.
Faire tourner le moteur quelques minutes pour le
laisser chauffer.
Engager les lames de coupe dans une zone dégagée.
fr
23
Page 68

Spécifications
MOTEUR
Briggs & Stratton
Marque Briggs & Stratton®
Modèle Professional Series
Cylindrée 724 cc (44,2 cu in.)
Circuit électrique Alternateur : 12 volts, 16 amps
Batterie: capacité de démarrage
à froid - 340 A
Contenance en huile 1,9 L (64 oz)
TM
CHASSIS
Réservoir de carburant 15,1 L (4,0 Gal)
Taille de pneus
- Avant 16 x 6,50-8
- Arrière 23 x 10,50-12
PIÈCES ET ACCESSOIRES
Veuillez joindre un revendeur agréé pour obtenir plus de
détails.
TRANSMISSION K66
Marque Tuff Torq K66 (hydrostatique)
Fluide hydraulique Huile moteur 10W-30 Premium
Contenance en huile 2,5 L (2,6 qt)
Vitesses à 3400 tr/min Marche avant : 0 - 9,3 km/h
(0-5,8 MPH)
Marche arrière : 0 - 5,6 km/h
(0-3,5 MPH)
Puissance totale continue 419 Nm (310 ft-lbs)
Puissance nominale de
tige d’attelage 200 kg (440 lbs)
Poids maximum sur essieu 316 kg (697 lbs)
DIMENSIONS
Longueur hors tout 190,5 cm (75”)
Largeur hors tout 99 cm (39”)
Hauteur (en haut du siège) 127 cm (50”)
24
www.snapper.com
Page 69

fr
25
Page 70

26
www.snapper.com
Page 71

INDICE
Copertina frontale ......................................................................................................1
Illustrazioni .................................................................................................................2
Sicurezza dell’operatore ............................................................................................ 6
Caratteristiche e comandi .......................................................................................13
Conduzione ...............................................................................................................17
Manutenzione ...........................................................................................................20
Individuazione e correzione dei problemi .............................................................22
Dati tecnici ................................................................................................................24
Garanzia ....................................................................................................................25
Informazioni di carattere generale
La ringraziamo per avere acquistato questa falciatrice con seggiolino SNAPPER di qualità. Siamo lieti che abbia posto la sua
fiducia nel marchio SNAPPER. Se viene usato e mantenuto seguendo le istruzioni contenute nel presente manuale, questo
prodotto SNAPPER le darà molti anni di servizio affidabile.
Il presente manuale contiene istruzioni sulla sicurezza finalizzate a rendere l’utente consapevole dei pericoli e dei
rischi associati alle falciatrici con seggiolino e sul modo di evitarli. Questa falciatrice con seggiolino e stata progettata e
destinata unicamente per tagliare l’erba e non per alcun altro scopo. È importante leggere e comprendere completamente
queste istruzioni prima di cercare di avviare o utilizzare la macchina. Conservare queste istruzioni originali per futuro
riferimento.
Dati di riferimento del prodotto
Per averli facilmente a portata di mano, annotare nome/
numero del modello, numeri di riconoscimento del produttore
e numeri di matricola del motore nello spazio apposito. Detti
numeri si trovano nelle posizioni indicate.
Quando ci si mette in contatto con il concessionario
autorizzato locale per ordinare pezzi di ricambio, per
richiedere interventi o per ottenere informazioni si
DEVONO avere a disposizione questi numeri.
DATI DI RIFERIMENTO DE PRODOTTO
Numero/Nome di descrizione del motore
Codice del PRODUTTORE dell’unità Numero di MATRICOLA dell’unità
Codice del PRODUTTORE dell’accessorio
di falciatura
Nome del concessionario Data di acquisto
DATI DI RIFERIMENTO DE MOTORE
Marca del motore Modello del motore
Tipo/Dati del motore Numero di matricola/codice del motore
Numero di MATRICOLA dell’elemento di
falciatura
Targhetta di riconoscimento CE
A. Codice di riconoscimento del produttore
B. Numero di matricola del produttore
C. Potenza nominale in kW
D. Velocità massima del motore in giri al minuto
E. Indirizzo e nome del produttore
F. Anno di produzione
G. Simbolo di conformità CE
H. Massa dell’unità in kg
I. Potenza acustica in decibel garantita
A
Part No. xxxxxxx
B
E
xxxxxxxxxxxxxxx
Serial No. xxxxxxxxxx
xxxxxxxxxxxxxxxxxxxxxxx
xxxxxxxxxxxxxxxxxxxxxxx
xxxxxxxxxxxxxxxxxxxxxxx
xxxxxxxxxxxxxxxxxxxxxxx
xxx
20xx
F
kg: xxx
kW: x.xx
xxxx max
G
dB
I
H
C
D
La lista delle parti illustrate di questa macchina può essere scaricata da www.snapper.com. Quando si ordinano pezzi di
ricambio fornire modello e numero di serie.
Copyright © 2010 Briggs & Stratton Power Products Group, LLC
Milwaukee, WI, tutti i diritti riservati.
SNAPPER è un marchio commerciale di Briggs & Stratton Power Products
Group, LLC Milwaukee, WI USA.
it
5
Page 72

Sicurezza dell’operatore
Funzionamento sicuro
Congratulazioni per l’acquisto di un attrezzo da giardino di qualità
superiore. I nostri prodotti sono concepiti e fabbricati per soddisfare
e superare tutti gli standard di sicurezza del settore.
Gli attrezzi elettrici sono sicuri solo se usati in modo adeguato
dall’operatore. Se utilizzati male o qualora vengano a mancare
gli interventi di manutenzione previsti, possono essere pericolosi!
Ricordare che gli operatori sono sempre responsabili della propria
incolumità e di quella degli astanti.
Adottare buon senso e pensare sempre bene a quello che occorre
fare. Qualora vi siano dubbi su un’operazione da compiere con
l’attrezzo selezionato, rivolgersi ad un professionista del mestiere e
contattare il proprio concessionario autorizzato di zona.
Leggere il manuale
Il manuale dell’operatore contiene importanti informazioni sulla sicurezza di cui occorre
essere a conoscenza PRIMA di azionare l’unità e DURANTE il funzionamento.
Sono incluse tecniche di funzionamento sicure, una spiegazione
delle funzioni e dei comandi del prodotto ed informazioni sulla
manutenzione per garantire la massima soddisfazione con
l’investimento fatto.
Accertarsi di leggere completamente le regole e le informazioni sulla
sicurezza contenute nelle pagine che seguono. Leggere inoltre l’intera
sezione sul funzionamento.
Bambini
In presenza di bambini possono verificarsi incidenti
tragici. Tenere i bambini a debita distanza dall’area di
funzionamento. I bambini sono spesso attratti verso l’unità e
le attività di giardinaggio. Non presumere mai che i bambini
restino dove gli si chiede di stare. Qualora vi sia il rischio che
bambini si avvicinino all’area in cui si taglia l’erba, chiedere
ad un altro adulto di sorvegliarli.
EVITARE DI FAR SALIRE I BAMBINI SULL’UNITÀ! Questo
li incoraggia ad avvicinarsi in futuro all’unità accesa,
con grave pericolo di ferirsi. Essi potrebbero decidere di
avvicinarsi all’unità improvvisamente, correndo il rischio di
essere schiacciati.
6
Retromarcia
Non procedere in retromarcia a
meno che non sia assolutamente
necessario. Guardare sempre in basso
ed all’indietro prima e
durante l’attivazione
della retromarcia,
anche con le lame del
tagliaerba disinserite.
www.snapper.com
Page 73

Funzionamento su pendii
L’utilizzo di questa unità in zone troppo inclinate potrebbe causare gravi
danni o persino morte. L’utilizzo di un’unità su un pendio troppo inclinato,
o in mancanza di trazione adeguata può causare la perdita del controllo
o il ribaltamento dell’unità.
Come regola generale non procedere su un pendio in cui non si possa
tornare indietro (in modalità a 2 ruote matrici). Non azionare l’unità su
pendii con un’inclinazione superiore a 1 metro su una lunghezza di 6
3.5 ft
(1,5 m)
20.0 ft (6,0 m)
metri. Su un pendio procedere sempre su e giù, mai in trasversale.
Notare inoltre che la superficie percorsa può incidere notevolmente
sulla stabilità e sul controllo dell’unità. Erba bagnata o ghiaccio possono
compromettere gravemente la capacità di controllare l’unità.
In caso di dubbi sul funzionamento dell’unità su un pendio, fermarsi. Non
vale la pena rischiare.
Parti in movimento
Questa unità include parti mobili che possono causare lesioni all’operatore o
agli astanti. Tuttavia, stando seduti in modo corretto ed attenendosi alle regole
contenute in questo manuale, l’unità è sicura.
La base del tagliaerba dispone di lame per tagliaerba girevoli che potrebbero
amputare mani e piedi. Evitare la presenza di astanti in prossimità dell’unità in
funzione!
Questa unità è dotata di un sistema di presenza operatore. NON tentare di alterare
o ignorare questo sistema. Qualora l’unità non superi tutte le prove del sistema
di interbloccaggio di sicurezza contenute in questo manuale, rivolgersi subito al
proprio concessionario.
Sicurezza dell’operatore
Oggetti lanciati
Questa unità è dotata di lame per tagliaerba girevoli in grado di raccogliere e
lanciare detriti, con gravi lesioni agli astanti. Accertarsi di pulire l’area in cui
tagliare l’erba PRIMA di cominciare.
Non azionare questa unità senza aver dapprima montato il raccoglitore
dell’erba o il deflettore.
Durante l’azionamento dell’unità, tenere tutti a debita distanza! Se qualcuno si
avvicina all’area in questione, spegnere immediatamente l’unità.
Carburante e manutenzione
La benzina è estremamente infiammabile. I suoi vapori sono estremamente
infiammabili e possono raggiungere facilmente fonti di accensione distanti.
Usare la benzina solo come carburante, non come solvente o detergente.
Non conservarla mai in luoghi in cui i suoi vapori potrebbero accumularsi o
raggiungere fonti di accensione quali una luce pilota. Il carburante va tenuto
in un contenitore approvato in plastica con guarnizione, oppure nel serbatoio
del trattore con il tappo ben chiuso. Pulire subito eventuali fuoriuscite di
carburante.
La sicurezza e le prestazioni adeguate dell’unità dipendono da interventi di
manutenzione regolari. Eseguire le procedure di manutenzione elencate in
questo manuale, in particolare le prove periodiche del sistema di sicurezza.
it
7
Page 74

Sicurezza dell’operatore
Leggere queste norme di sicurezza e seguirle scrupolosamente. Il mancato rispetto di queste indicazioni potrebbe
provocare la perdita di controllo dell’unità con conseguenti ferite o addirittura la morte per l’utilizzatore o eventuali
astanti, o danni ai beni materiali o all’equipaggiamento. Questo piatto di taglio può amputare mani o piedi e
scagliare oggetti. Il triangolo inserito nel testo indica importanti avvertenze o precauzioni di sicurezza a cui ci si
deve attenere.
INFORMAZIONI GENERALI SUL
FUNZIONAMENTO
1. Prima di avviare il trattorino, leggere, comprendere e
osservare tutte le istruzioni contenute in questo manuale.
2. Non tenere le mani o piedi in prossimità degli organi in
rotazione o sotto la macchina. Mantenersi sempre a distanza
dal bocchettone di scarico.
3. L’unità deve essere adoperata solo da persone adulte a
conoscenza delle istruzioni (le leggi locali possono porre un
limite all’età dell’operatore).
4. Eliminare dall’area di lavoro oggetti quali sassi, giocattoli,
fili di ferro, ecc., che potrebbero essere raccolti e scagliati
violentemente dalle lame.
5. Prima di eseguire il taglio, accertarsi che nell’area di lavoro
non si trovino altre persone. Se qualcuno entra nell’area di
lavoro, arrestare immediatamente la macchina.
6. Non trasportare passeggeri.
7. Non procedere a marcia indietro a meno che non sia
assolutamente necessario. Guardare sempre verso il basso e
dietro prima e durante la retromarcia.
8. Non scaricare verso le persone. Evitare di scaricare verso
un muro o una barriera. Il materiale potrebbe rimbalzare e
colpire l’operatore. Durante la marcia sulla ghiaia fermare la/
le fresa/e.
9. Non utilizzare la macchina senza il collettore, la paratia di
scarico (deflettore) o altri dispositivi di sicurezza.
10. Prima di eseguire una curva, rallentare.
11. Non lasciare mai il trattorino incustodito. Prima di lasciare
la macchina, arrestare sempre la presa di forza, innestare
il freno a mano, spegnere il motore e togliere la chiave dal
quadro.
12. Quando non si sta tagliando l’erba, disinnestare le lame
(presa di forza). Prima di pulire la macchina, di rimuovere
il collettore o pulire la paratia di scarico fermare il motore e
attendere che tutti gli organi di movimento si siano fermati
completamente.
13. Utilizzare la macchina solo di giorno o in condizioni di buona
illuminazione.
14. Non usare la macchina se in stato di ebbrezza o sotto l’effetto
di stupefacenti.
15. Durante la marcia in prossimità di strade o in
attraversamento, fare attenzione al traffico.
16. Prestare molta attenzione durante il caricamento o lo
scaricamento dell’unità da un carrello o da un rimorchio.
17. Durante l’uso utilizzare sempre una mascherina di protezione
per gli occhi.
18. Le statistiche indicano che gli operatori sessantenni o di età
superiore vengono coinvolti in una grossa percentuale di
incidenti e riportano ferite dovute alle operazioni di taglio.
Questi operatori dovrebbero valutare attentamente la propria
capacità di condurre il trattorino in modo da proteggere se
stessi e altre persone da eventuali incidenti.
19. Per quanto riguarda i pesi e contrappesi delle ruote si
raccomanda di attenersi alle istruzioni fornite dal produttore.
20. Ricordare che l’operatore è l’unico responsabile per gli
incidenti causati a persone o cose.
21. Tutti gli operatori dovrebbero cercare di ottenere istruzioni di
carattere pratico e professionale.
22. Indossare sempre scarpe e pantaloni resistenti. Non operare
l’unità a piedi scalzi o con i sandali.
23. Prima di utilizzare l’unità, controllare sempre visivamente che
le lame e la minuteria della lama del piatto siano presenti,
intatte e salde. Sostituire i pezzi usurati o danneggiati.
24. Scollegare gli accessori prima di: eseguire il rifornimento di
carburante, rimuovere un accessorio, eseguire le regolazioni
(a meno che la regolazione non possa essere eseguita dalla
posizione dell’operatore).
25. Quando la macchina viene parcheggiata, immagazzinata
oppure lasciata incustodita, abbassare il dispositivo di taglio a
meno che non venga utilizzato un blocco meccanico positivo.
26. Prima di lasciare il posto di guida per qualunque motivo,
disinnestare la presa di forza, innestare il freno a mano,
spegnere il motore e togliere la chiave.
27. Per ridurre il pericolo di incendi, fare in modo che sull’unità
non siano presenti erba, foglie e olio in eccesso. Non
fermarsi o parcheggiare su foglie o erba secca, o su materiali
infiammabili.
TRASPORTO ED IMMAGAZZINAMENTO
1. Quando l’unità viene trasportata su un rimorchio aperto,
accertarsi che la parte anteriore del trattorino sia rivolta nella
direzione di avanzamento. Se la parte anteriore del trattorino
è rivolta nella posizione opposta, eventuali raffiche di vento
potrebbero danneggiare il cofano.
2. Quando viene effettuato il rifornimento di carburante dopo il
trasporto o l’immagazzinamento, rispettare sempre le norme
di sicurezza adeguate.
3. Non immagazzinare mai l’unità (con carburante) in un
ambiente chiuso e scarsamente arieggiato. I vapori
di carburante potrebbero raggiungere una sorgente
infiammabile (quale una caldaia, uno scaldaacqua ecc.) e
causare un’esplosione. Inoltre i vapori di carburante sono
tossici alle persone e agli animali.
8
4. Prima di immagazzinare l’unità per periodi brevi o lunghi,
attenersi sempre alle istruzioni relative alle procedure di
preparazione e contenute nel manuale del motore.
5. Quando l’unità viene rimessa in esercizio, attenersi sempre
alle istruzioni concernenti le procedure corrette di avviamento
dell’unità contenute nel manuale del motore.
6. Non immagazzinare mai il trattorino o il serbatoio della
benzina in luoghi in cui sono presenti fiamme aperte o una
fiamma pilota quale, ad esempio, uno scaldacqua. Fare
raffreddare l’unità prima di immagazzinarla.
www.snapper.com
Page 75

Sicurezza dell’operatore
AZIONAMENTO SU PENDENZE
Le pendenze del terreno sono la causa più frequente di eventuali
ribaltamenti o delle perdite di controllo che possono a loro volta
provocare lesioni gravi o mortali. Su tutte le pendenze, è necessario
procedere con estrema cautela. Se non è possibile retrocedere o se
non ci si sente sicuri su una pendenza, non azionare l’unità.
Il controllo della guida in caso di slittamento dell’unità su pendenze
non verrà ripristinato applicando il freno. Le cause principali
correlate alla perdita di controllo sono: aderenza insufficiente dei
pneumatici al terreno, guida eccessivamente veloce, frenaggio
inadeguato, tipo di macchina inadatto alle operazioni, condizioni del
terreno non idonee alla rasatura, attacchi e distribuzione del carico
incorretti.
1. Non procedere mai in diagonale lungo i tratti in salita/discesa.
2. Fare attenzione a buche, solchi o salti. Marciando su terreni
sconnessi si corre il rischio di rovesciare la macchina. L’erba
alta può nascondere gli ostacoli.
3. Selezionare un rapporto basso in modo da non dover fermare
o cambiare marcia in salita/discesa.
4. Non lavorare sull’erba bagnata. I pneumatici possono
perdere aderenza.
5. Tenere sempre la marcia inserita, specialmente nei tratti in
discesa. Non mettere la marcia in folle nei tratti in discesa.
6. Evitare di partire, fermarsi e svoltare sui tratti in pendenza.
Se i pneumatici perdono aderenza, disinnestare la/le fresa/e
e procedere lentamente in senso rettilineo lungo il tratto in
pendenza.
7. Durante la marcia in salita/discesa tutti i movimenti devono
essere lenti e graduali. Non fare movimenti bruschi,
cambiando direzione o velocità all’improvviso, poiché la
macchina potrebbe rovesciarsi.
8. Usare estrema cautela durante l’uso della macchina con
collettori o altri accessori montati, poiché la macchina può
risultare meno stabile.
9. Non cercare di stabilizzare la macchina mettendo il piede a
terra.
10. Non tagliare l’erba in prossimità di scarpate, fossi o argini. In
caso di cedimento del terreno, o se una delle ruote dovesse
cadere oltre il bordo di una scarpata o fosso, la macchina
potrebbe rovesciarsi.
11. Non utilizzare i collettori su tratti molto ripidi.
12. Non lavorare lungo tratti in discesa che non si è in grado di
ripercorrere in salita.
13. Consultare il rivenditore autorizzato più vicino per chiedere
consigli sui pesi o contrappesi da applicare alle ruote per
migliorare la stabilità del veicolo.
14. Rimuovere gli eventuali ostacoli, come pietre, rami, ecc.
15. Procedere a bassa velocità. In salita e discesa i pneumatici
possono perdere aderenza, anche se i freni funzionano
correttamente.
16. A meno che non sia strettamente necessario, evitare di
svoltare lungo i tratti in pendenza. Per cambiare direzione
girare lentamente e gradualmente, se possibile verso il
basso.
AVVERTENZA
Non lavorare mai su pendenze superiori al 17,6% (10 gradi),
percentuale che corrisponde ad una pendenza pari ad
un’altezza di 106 cm verticalmente e 607 cm orizzontalmente.
Nell’utilizzare la macchina su pendenze, utilizzare pesi
aggiuntivi sulle ruote o contrappesi. Rivolgersi al rivenditore per
determinare quali pesi sono disponibili ed appropriati per l’unità.
Selezionare una bassa velocità prima di guidare su un pendio.
Oltre ai pesi anteriori e posteriori, esercitare estrema cautela
quando si utilizza la macchina su pendii con il sistema di
raccolta montato posteriormente.
Tagliare l’erba spostandosi verso l’ALTO o verso il BASSO,
mai perpendicolarmente. Esercitare estrema cautela quando si
cambia direzione. NON FERMARSI O RIPARTIRE SU PENDII.
BAMBINI
Se l’operatore non si accorge dell’eventuale presenza di bambini,
potrebbero verificarsi incidenti gravi. I bambini vengono spesso
attratti dall’unità e dalle operazioni di taglio. Non dare mai per
scontato che i bambini restino fermi in un solo posto.
1. Mantenere i bambini lontano dall’area di taglio ed affidarli alle
cure di un adulto.
2. Prestare attenzione a non fare entrare i bambini nell’area di
lavoro e, se ciò si verifica, spegnere il piatto di taglio.
3. Prima e durante la retromarcia, accertarsi dell’eventuale
presenza di bambini. Durante la retromarcia, guardare
sempre in basso e indietro.
4. Non trasportare ma i bambini, anche con la/le fresa/e
disinserita, poiché potrebbero cadere dal trattorino rimanere
feriti gravemente o compromettere la sicurezza operativa
durante l’uso della macchina. I bambini trasportati in
precedenza potrebbero comparire improvvisamente nell’area
di lavoro per chiedere un altro passaggio, rischiando di
essere investiti o sbattuti a terra dalla macchina.
5. Non lasciare mai che i bambini mettano in funzione l’unità.
6. Prestare particolare attenzione quando ci si avvicina ad
angoli stretti, arbusti, alberi o altri oggetti che potrebbero
ostacolare la visuale.
EMISSIONI
1. Gli scarichi emanati dal motore di questo prodotto
contengono prodotti chimici di cui è noto che, in determinate
quantità, possono provocare tumori, difetti congeniti o altri
danni all’apparato riproduttivo.
2. Verificare le informazioni sul periodo di validità delle
emissioni e dell’indice dell’aria sull’etichetta delle emissioni
del motore.
ACCESSORI PER IL TRAINO
1. Per il traino utilizzare esclusivamente una macchina munita
di gancio apposito. Non attaccare l’attrezzatura da trainare in
punti diversi dal gancio di traino.
2. Per quanto riguarda i limiti di peso per l’attrezzatura trainata e
il traino in salita/discesa, seguire le indicazioni del produttore.
3. Non trasportare bambini o altre persone sopra o dentro le
attrezzature trasportate.
4. In salita/discesa, il peso delle attrezzature trasportate può
determinare una perdita di aderenza con conseguente
perdita del controllo.
5. Avanzare lentamente e tenere conto della distanza in più
prima di fermarsi.
6. Non mettere la marcia in folle nei tratti in discesa.
it
SISTEMA DI ACCENSIONE
1. Questo sistema di accensione a candela è conforme alle
norme canadesi ICES-002.
9
Page 76

Sicurezza dell’operatore
MANUTENZIONE E REGOLAZIONI
Uso sicuro del carburante
1. Spegnere tutte le sigarette, sigari, pipe o altre fonti di calore
che potrebbero provocare la combustione.
2. Utilizzare esclusivamente contenitori per carburante
omologati.
3. Non rimuovere il tappo del serbatoio e fare rifornimento con
il motore acceso. Prima di fare il pieno lasciare raffreddare il
motore.
4. Non fare il pieno in ambienti chiusi.
5. Non riporre la macchina o contenitore del carburante in spazi
chiusi in presenza di fiamme libere o fiamme pilota, ad es. in
prossimità di un boiler o altro elettrodomestico.
6. Non riporre i contenitori all’interno di veicoli o sul pianale di
un autocarro con rivestimento in plastica. Per fare il pieno
i contenitori di carburante vanno sempre depositati a terra
lontano dal veicolo.
7. Togliere i macchinari a gas dall’autocarro o rimorchio e fare il
pieno da terra. Qualora ciò non sia possibile, fare il pieno su
un rimorchio servendosi di un contenitore portatile, piuttosto
che usare direttamente la pompa di benzina.
8. Mantenere il bocchettone della pompa di benzina a contatto
con il bordo del serbatoio del carburante o dell’apertura del
contenitore fino a quando l’operazione di riempimento non
sarà ultimata. Non utilizzare un dispositivo di bloccaggio
bocchettone in posizione aperta.
9. Se si dovesse versare del carburante su un indumento,
cambiarsi immediatamente d’abito.
10. Non riempire eccessivamente il serbatoio. Richiudere il
coperchio del serbatoio e stringere bene.
11. Si raccomanda di usare estrema cautela nel maneggiare la
benzina e altri carburanti. Tali sostanze sono infiammabili, e i
vapori esplosivi.
12. Se si verifica una fuoriuscita di carburante, non cercare di
avviare il motore, ma allontanare la macchina dalla zona
interessata ed evitare di provocare combustioni fino a quando
i vapori di carburante non si saranno dispersi.
13. Chiudere con cura tutti i tappi del serbatoio e dei contenitori
del carburante.
Manutenzione ordinaria e straordinaria
1. Non azionare la macchina in ambienti chiusi in cui potrebbero
accumularsi fumi di monossido di carbonio.
2. Conservare dadi e bulloni, specialmente i bulloni di fissaggio
fresa, stringere e mantenere le attrezzature in buone
condizioni.
3. Non manomettere i dispositivi di sicurezza. Controllare
regolarmente che funzionino correttamente. In caso contrario,
eseguire le necessarie riparazioni.
4. Mantenere pulita la macchina, eliminando i residui di erba,
foglie e altri detriti. Pulire le macchie di olio o carburante.
5. n caso di urti contro oggetti, fermarsi ed ispezionare la
macchina. Se necessario, effettuare le riparazioni del caso
prima di ripartire.
6. Non effettuare interventi di registrazione o riparazione con il
motore in moto, salvo diversamente specificato nel manuale
fornito dalla casa costruttrice del motore.
7. I componenti del sistema di raccolta sono soggetti a
consumo, danni e deterioramento che potrebbero esporre
pezzi in movimento o raccogliere e scagliare corpi estranei.
Controllare frequentemente i componenti e, eventualmente,
sostituirli con i pezzi di ricambio consigliati dal produttore.
8. Le lame di taglio sono affilate e taglienti. Ricoprire le lame o
indossare guanti e prestare particolare attenzione durante le
operazioni di manutenzione.
10. Conservare con cura e, se necessario, sostituire le etichette
con le norme di sicurezza e le istruzioni per l’uso.
11. Non rimuovere il filtro del carburante con il motore caldo,
poiché, qualora venga versata, la benzina potrebbe prendere
fuoco. Non allungare i ganci del tubo del carburante più del
necessario. In seguito all’installazione, verificare che i ganci si
aggancino saldamente sui tubi sopra il filtro.
12. Non utilizzare benzina contenente METANOLO, gasolio
contenente più del 10% di ETANOLO, additivi per benzina o
nafta poiché il motore e il sistema di alimentazione possono
venire danneggiati.
13. Se si presenta la necessità di scaricare il serbatoio,
l’operazione dovrà essere effettuata all’aperto.
14. Se la marmitta/silenziatore di scarico non funziona
correttamente occorre sostituire.
15. Quando vengono effettuate delle riparazioni, utilizzare
esclusivamente i pezzi di ricambio autorizzati.
16. Attenersi sempre alle specifiche della fabbrica per tutto ciò
che riguarda le impostazioni e le regolazioni.
17. Per le operazioni di riparazione e manutenzione più
importanti, occorre recarsi solo in officine autorizzate.
18. Non tentare mai di effettuare riparazioni importanti su questa
unità a meno che non si è addestrati adeguatamente.
Procedure di manutenzione non corrette possono causare un
funzionamento pericoloso, danni alle cose e l’annullamento
della garanzia da parte del produttore.
19. Nei piatti di taglio con più lame, prestare attenzione alla
rotazione delle lame che possono fare ruotare le altre lame.
20. Non modificare le impostazioni di regolazione del motore
e non fare girare il motore ad una velocità eccessiva. Se il
motore viene azionato ad una velocità troppo elevata, i rischi
di incidenti e lesioni personali aumentano.
21. Scollegare gli accessori, arrestare il motore, rimuovere la
chiave e scollegare i fili della candela prima di: rimuovere le
ostruzioni dagli accessori e gli scivoli, eseguire operazioni
di manutenzione o se l’unità vibra in modo anomalo o dopo
avere urtato contro un oggetto. Se viene colpito un oggetto,
non avviare e azionare la macchina senza avere controllato
precedentemente la presenza di eventuali danni all’unità ed
eseguito le riparazioni necessarie.
22. Quando l’unità è in funzione, non appoggiare mai le mani
sulla ventola di raffreddamento della pompa idrostatica. La
ventola di raffreddamento è posizionata nella parte superiore
dell’asse di trasmissione.
23. Trattorini con pompe idrauliche, tubi flessibili o motori
idraulici: ATTENZIONE: Il liquido idraulico che fuoriesce
in presenza di pressione può avere una forza sufficiente
per penetrare nella pelle e provocare gravi ferite. Se ciò
si verifica, il liquido deve essere rimosso chirurgicamente
da un medico a conoscenza di questo tipo di infortunio nel
giro di poche ore. In caso contrario si rischia la cancrena.
Tenere le mani e il corpo a distanza dai fori e dagli ugelli da
cui potrebbe fuoriuscire liquido idraulico in pressione. Per
ricercare eventuali perdite servirsi di pezzi di carta o cartone,
non lavorare a mani nude. Controllare che tutti i collegamenti
di erogazione del fluido dell’impianto idraulico siano ben
stretti e che tutte le tubazioni idrauliche siano in buono stato
prima di portare in pressione l’impianto. In caso di perdite,
richiedere immediatamente l’intervento di un rivenditore
autorizzato per le riparazioni.”
24. ATTENZIONE: l’unità contiene energie pericolose. Se
smontate in modo improprio, le molle potrebbero provocare
gravi ferite, pertanto devono essere smontate esclusivamente
da un rivenditore autorizzato.
25. Modelli con radiatore motore: ATTENZIONE: l’unità contiene
energie pericolose. Per evitare gravi incidenti provocati dal
refrigerante caldo o dal vapore, non svitare mai il tappo del
radiatore con il motore in moto. Fermare il motore e attendere
che si raffreddi. Anche in questo caso, fare molta attenzione
mentre si rimuove il tappo.
10
www.snapper.com
Page 77

Sicurezza dell’operatore
Decalcomanie di sicurezza
Leggere con attenzione ed attenersi a tutti i messaggi che
indicano PERICOLO, AVVERTENZA e ATTENZIONE,
nonché i messaggi relativi alle istruzioni presenti sul
trattorino e sul piatto di taglio. Se non ci si attiene a tali
istruzioni, si possono subire gravi lesioni personali. Queste
informazioni concernono la sicurezza dell’utente e sono
importanti! Le seguenti decalcomanie di sicurezza si trovano
sul trattorino e sul piatto di taglio.
Icone di sicurezza
Avvertenza: Leggere il manuale per
l’operatore.
Prima di usare questa macchina, leggere
e comprendere il Manuale per l’operatore.
Pericolo: Oggetti scagliati.
Questa unità è capace di scagliare oggetti
e detriti. Tenere lontani gli astanti.
Avvertenza: Togliere la chiave prima
di eseguire la manutenzione.
Togliere la chiave e consultare la
documentazione tecnica prima di fare
riparazioni o eseguire procedure di
manutenzione.
Se una qualsiasi di queste decalcomanie è assente o
danneggiata, sostituirla immediatamente. Per i pezzi di
ricambio, contattare il rivenditore autorizzato.
Queste decalcomanie possono essere applicate facilmente
e servono a ricordare costantemente all’utente e a tutti gli
eventuali operatori il rispetto delle istruzioni di sicurezza
necessarie per un funzionamento sicuro ed efficace dell’unità.
Pericolo: Smembramento.
Il piano per falciatura è capace di
amputare gli arti. Tenere mani e piedi
lontani dalle lame.
Pericolo: Pericolo d’incendio.
Non fare rifornimento con il motore caldo
o in marcia. Arrestare il motore e lasciar
raffreddare per tre (3) minuti prima di
aggiungere carburante.
Pericolo: Superfici estremamente
calde.
Lasciar raffreddare la macchina prima di
toccare la superficie.
Pericolo: Cappottata della macchina.
Non usare la macchina su terreni con
pendenza superiore ai 10°.
Pericolo: Smembramento.
Questa macchina può amputare gli arti.
Tenere lontani astanti e bambini quando il
motore è in marcia.
Pericolo: Avvelenamento da ossido di
carbonio.
Non mettere in moto il motore in un’area
non ventilata.
it
11
Page 78

Sicurezza dell’operatore
OO
TT
OO
Posizione delle decalcomanie
Decalcomania Posizioni
dell’interruttore
di accensione
N. di parte
1722806
Codice 1737541
1
2
3
4
5
6
+
Istruzioni operative,
N. di parte 1750631
Attenzione, punti
di pizzicatura,
N. di parte 5102457
SS
PP
SS
Rilascio
trasmissione
N. di parte 1723160
Attenzione, punti
di pizzicatura,
N. di parte 5102457
1723160
Figura 1
12
www.snapper.com
Page 79

Caratteristiche e comandi
12V
Funzioni di controllo
Acceleratore
L’acceleratore controlla la velocità del motore. Spostare
l’acceleratore in avanti per aumentare la velocità del
motore e indietro per diminuirla. Utilizzare sempre a regime
massimo.
Valvola dell’aria
Chiudere la valvola dell’aria per l’avviamento a freddo.
Aprirla quando il motore si è avviato. Potrebbe non essere
necessario chiudere l’aria a motore caldo. Per chiudere la
valvola, portare la leva in avanti.
Figura 2
Interruttore dei fari
L’interruttore luminoso accende e spegne i fari del trattorino.
Opzione di falciatura in retromarcia
(RMO)
L’opzione di falciatura in retromarcia consente di falciare
(o di usare altri accessori azionati da PTO) mentre si va a
marcia indietro. Quando si decide di falciare o usare un altro
accessorio a marcia indietro, girare la chiavetta dell’RMO
dopo che il PTO è stato inserito. La spia a LED si accenderà
e l’operatore puotrà spostarsi a marcia indietro. L’opzione
RMO deve essere riattivata, se la si desidera riusare, ogni
volta che il PTO viene disinserito.
it
13
Page 80

Caratteristiche e comandi
Interruttore della presa di forza
L’interruttore della presa di forza innesta e disinnesta gli
accessori che utilizzano la presa di forza. Per innestare
la presa di forza, tirare l’interruttore verso l’alto. Per
disinnestare, spingere verso il basso.
NOTA: per azionare la presa di forza, l’operatore deve
essere seduto stabilmente sul sedile del trattorino.
Interruttore di accensione
L’interruttore di accensione avvia ed arresta il motore.
Ha tre posizioni:
Spento Arresta il motore e disattiva il sistema
elettrico.
Avviato Fa girare il motore ed alimenta il
sistema elettrico.
Avviamento Avvia il motore.
NOTA: non lasciare mai l’interruttore di accensione nella
posizione di avviato quando il motore è fermo poiché la
batteria si scarica.
Pedale del freno
Per azionare il freno del trattorino, premere il pedale del
freno.
Pedali della velocità di marcia
Il pedale di avanzamento controlla la velocità in avanti del
trattorino. Il pedale della retromarcia controlla la velocità
all’indietro.
Premendo un pedale la corrispondente velocità aumenta.
Notare che a maggiore corsa del pedale corrisponde una
maggiore velocità del trattorino.
Freno di stazionamento
La manopola del freno di stazionamento serve
a bloccare il freno quando il trattorino è fermo. Il freno di
stazionamento viene innestato premendo completamente il
pedale del freno e tirando la manopola verso l’alto.
Regolazione dell’altezza di taglio del piatto
L’altezza di taglio è regolabile all’infinito in un intervallo
compreso tra 2,5 e 10,0 cm (1,0 e 4,0”).
l’interruttore di regolazione dell’altezza di taglio controlla
l’altezza di taglio della falciatrice. Lo stesso interruttore
comanda anche il motore di rotazione dello scarico quando
sia installato lo spazzaneve. Le frecce sull’interruttore
corrispondono alle direzioni di regolazione (la freccia SU
aumenta l’altezza di taglio, la freccia DESTRA ruota lo
scarico a destra e così via). Rilasciare l’interruttore quando
l’indicatore di regolazione ha raggiunto il fine corsa; se si
continua a tenere l’interruttore spinto si può danneggiare il
motore.
Controllo della velocità
Il controllo della velocità viene usato per bloccare ad un
valore fisso il comando velocità di marcia. Portare la leva
in avanti finché viene raggiunta la velocità di avanzamento
desiderata. Per disinnestare il controllo della velocità,
portare indietro la leva. Se fosse necessario fermarsi
rapidamente, premendo il pedale del freno si porta anche in
folle il controllo della velocità.
Regolazione del sedile
Il sedile può essere regolato in avanti ed all’indietro.
Spostare la leva, sistemare il sedile nella posizione
desiderata e rilasciare la leva per bloccare il sedile in
posizione.
Leva di disinnesto della trasmissione
La leva di disinnesto della trasmissione libera la
trasmissione in modo che sia possibile la manovra a spinta.
Fare riferimento a “Spinta del trattorino a mano” nella
sezione “Funzionamento del trattorino”.
Serbatoio del carburante
Per togliere il tappo, ruotarlo in senso antiorario. L’indicatore
del carburante fa parte del cruscotto.
12V
Presa di corrente
La presa di corrente è da 12 V c.c. L’accessorio deve
avere una portata nominale di 9 ampere o meno.
Pedale del blocco del differenziale
Premendo il pedale si blocca il differenziale della
trasmissione, trasmettendo il movimento ad ambedue le
ruote posteriori.
Usare questa funzione se il trattorino è bloccato in quanto
una ruota scivola. Usare il blocco del differenziale solo a
bassa velocità.
Leva di sollevamento dell’accessorio
Se si utilizza il piatto di taglio, sollevarlo da terra nel
trasporto da e verso il luogo di lavoro. NON tagliare con il
piatto di taglio nella posizione sollevata di trasporto
La leva di sollevamento dell’accessorio alza e abbassa
gli accessori che usano il meccanismo di sollevamento
manuale. Per abbassare un accessorio tirare leggermente
indietro la leva, premere il pulsante di sgancio e spingere
la leva in avanti finché si blocca nella posizione inferiore.
Per alzare un accessorio spingere leggeremente la leva in
avanti, premere il pulsante di sgancio, quindi tirare indietro la
leva finché si blocca nella posizione superiore.
14
www.snapper.com
Page 81

Caratteristiche e comandi
Funzioni del display sul cruscotto
Appena l’interruttore a chiave viene ruotato nella posizione
di avviato, si accendono tutte le spie di avvertenza ed è
visualizzato il totale delle ore di funzionamento. Verificare
che tutte le spie funzionino.
A. Indicatore del carburante
Segnala la quantità di carburante nel serbatoio. A sinistra è
vuoto, a destra pieno. Quando il serbatoio è quasi vuoto, gli
ultimi due segmenti lampeggiano.
B. Contaore / Orologio / Indicatore di manutenzione
Visualizza l’orologio, il contaore e l’avviso di manutenzione.
Il contaore conteggia le ore in cui la chiave rimane in
posizione RUN. Allo scadere delle 5 h il contaore emette
un lampeggio iniziale di segnalazione cambio olio ogni 50 h
emette il lampeggio di segnalazione lubrificazione. Questi
avvisi rimangono visualizzati per circa 2 h, dopodiché
scompaiono automaticamente.
NOTA: il contagiri registra il tempo che trascorre mentre
la chiave è in posizione RUN, anche se il motore non è in
moto. Il contaore è dotato di una batteria interna, pertanto il
numero di ore totali rimane sempre leggibile.
C. Pulsante di selezione
Usato per impostare l’orologio.
D. Pulsante di impostazione
Usato per impostare l’orologio.
E. Spia della presa di forza
Indica che l’interruttore della presa di forza è nella posizione
di innestata.
F. Spia del controllo della velocità
Indica che il controllo della velocità è innestato.
G. Spia di bassa pressione dell’olio
Indica che la pressione dell’olio del motore è bassa. La
spia si accende appena viene avviato il trattorino e quindi
si spegne. SE QUESTA SPIA SI ACCENDE DURANTE
IL FUNZIONAMENTO DEL TRATTORINO, SPEGNERE
IMMEDIATAMENTE IL MOTORE. Rivolgersi al rivenditore
autorizzato per manutenzione.
H. Spia di bassa tensione
Segnala che la tensione del circuito elettrico è bassa. La
spia si accende appena viene avviato il trattorino e quindi
si spegne. SE QUESTA SPIA SI ACCENDE DURANTE
IL FUNZIONAMENTO DEL TRATTORINO, SPEGNERE
IMMEDIATAMENTE IL MOTORE. Rivolgersi al rivenditore
autorizzato per manutenzione.
B
A
H
Display del cruscotto
G
F E
C
D
Funzioni speciali
Per visualizzare il numero totale di ore di lavoro
procedere come segue:
Girare la chiave di avviamento in posizione di spegnimento
(OFF). Portare la chiave in posizione di avviamento (RUN) e
lasciarla in tale posizione.
Per visualizzare il numero totale di ore in cui la presa di
forza è rimasta inserita procedere come segue:
Girare la chiave di avviamento in posizione di spegnimento
(OFF). Disinnestare la presa di forza. Portare la chiave in
posizione di avviamento (RUN).
Avviare il motore e lasciarlo in moto - Tenere
premuto il pulsante di selezione (C) per tre (3) secondi,
quindi rilasciarlo. Premere il pulsante di impostazione
e MANTENERE PREMUTO per incrementare i numeri
corrispondenti alle ore. Premere il pulsante di selezione per
selezionare i minuti. Premere il pulsante di impostazione
(D) e MANTENERE PREMUTO per incrementare i numeri
corrispondenti ai minuti. Attendere 5 secondi senza
effettuare alcuna operazione. L’orologio verrà attivato.
Spegnere il motore.
Per eseguire una dimostrazione delle funzioni della
plancia porta-strumenti procedere come segue:
Girare la chiave di avviamento in posizione di spegnimento
(OFF). Tenere premuto il pulsante di impostazione (D, Figura
3). Portare la chiave in posizione di avviamento (RUN) e
rilasciare il pulsante di impostazione. Portare la chiave in
posizione di spegnimento per terminare la dimostrazione.
Impostare l’orologio.
Avviso di manutenzione - Dopo le prime 5 h di lavoro,
e successivamente ogni 50 h, nella finestra informativa
del display appare un avviso per indicare la necessità
di effettuare la procedura di manutenzione (B). L’avviso
scompare automaticamente dopo 5 h. L’avviso può essere
eliminato manualmente portando la chiave da OFF a RUN
(a motore spento). Quindi premere contemporaneamente il
pulsante di impostazione (D) e il pulsante di selezione (C)
per 5 secondi.
it
15
Page 82

Funzioni e controlli
Funzionamento del freno di
stazionamento
Innesto del freno di stazionamento - Vedere la Figura
3. Per bloccare il freno di stazionamento, rilasciare i pedali
della velocità di marcia (A), premere a fondo il pedale del
freno (B), tirare la manopola del freno di stazionamento (C)
verso l’ALTO e rilasciare il pedale del freno.
Disinnesto del freno di stazionamento - Vedere la Figura
3. Per disinnestare il freno di stazionamento, premere a
fondo il pedale del freno (B) e spingere la manopola del
freno di stazionamento (C) verso il BASSO.
Trazione controllata automatica (w/o 4WD)
Cos’è la trazione controllata automatica?
La trazione controllata automatica è una caratteristica
esclusiva delle nostre trasmissioni che fornisce una
maggiore aderenza. La trazione controllata automatica
applica una coppia prestabilita ad ambedue le ruote
posteriori, anche se una di esse inizia a scivolare. (Una
trasmissione senza trazione controllata automatica
perde totalmente l’aderenza se una delle ruote posteriori
inizia a scivolare.) Questa coppia prestabilita è quella
appena sufficiente a fornire l’aderenza aggiuntiva e
contemporaneamente permettere alle ruote di girare a
velocità diverse in una curva stretta, senza danneggiare il
prato.
12 V c.c. Presa di corrente
La presa dell’accessorio da 12 volt si trova sul lato sinistro.
Può essere usato per alimentare piccoli elettrodomestici.
L’accessorio deve avere una portata nominale di 14 ampere
o meno.
NOTA: il funzionamento di un accessorio da 12 volt,
soprattutto con il motore al minimo, può scaricare la batteria.
Quando non si utilizza l’accessorio, la presa va coperta
con il tappo in gomma per impedire che l’umidità causi un
cortocircuito. L’infiltrazione di acqua nella presa può causare
un cortocircuito.
Differenze nell’uso di un trattorino con trazione
controllata automatica
Prevalentemente, nell’uso del trattorino non si noterà il
funzionamento della trazione controllata automatica e si
acquisirà semplicemente l’abitudine alla maggiore trazione
fornita dalla trasmissione con la trazione controllata
automatica.
In alcune condizioni i limiti del sistema della trazione
controllata automatica potrebbero essere superati e una delle
ruote posteriori potrebbe scivolare (se, ad esempio, si tenta
si fare una curva in salita mentre si accelera). È normale.
Quando si inizia a perdere aderenza, non accelerare.
Decelerare invece fino a fermarsi, raddrizzare il volante e
accelerare lentamente. Arrestando il trattorino si permette
alla trasmissione di riprendere maggiore aderenza.
16
www.snapper.com
Page 83

Conduzione
Test del sistema di interblocchi di
sicurezza
Questa unità è dotata di interruttori di sicurezza e di altri
dispositivi di sicurezza. Questi dispositivi di sicurezza sono
presenti per la vostra sicurezza, non tentare mai di forzare o
di alterare i sistemi di sicurezza.
AVVERTENZA
Non usare l’unità se non supera tutti i test di sicurezza.
Rivolgersi al rivenditore autorizzato locale.
Test 1 - Il motore NON deve girare se:
• La presa di forza è innestata OPPURE
• Il pedale del freno non è del tutto premuto (o il freno di
stazionamento non è innestato) OPPURE
• La leva del controllo della velocità NON è in folle.
Test 2 - Il motore DOVREBBE girare e avviarsi se:
• l’operatore è seduto sul sedile, E
• La presa di forza NON innestata E
• Il pedale del freno è del tutto premuto (o il freno di
stazionamento è innestato) E
• La leva del controllo della velocità è in folle.
Test 3 - Il motore deve SPEGNERSI se:
• L’operatore si alza liberando il sedile.
Test 4 - Controllare il tempo di arresto delle llame di
falciatura
Le lame e la cinghia di trasmissione del piatto di taglio
dovrebbero arrestarsi completamente entro cinque secondi
dopo che l’interruttore della presa di forza è stato spento.
Se la cinghia di trasmissione del piatto non si arresta entro
cinque secondi, rivolgersi al rivenditore.
Test 5 - Controllo dell’opzione di falciatura in
retromarcia (RMO):
• Il motore si spegnerà se si cerca di andare in retromarcia
quando il PTO è stato attivato e l’opzione RMO non lo è
stata.
• La spia luminosa RMO si accenderà quando l’opzione
RMO è stata attivata.
Aggiunta di carburante
1. Togliere il tappo di rabbocco (A, Figura 4).
2. Rabboccare il serbatoio. Non eccedere. Lasciare spazio
nel serbatoio per consentire l’espansione del carburante.
Consultare il manuale del motore per consigli sul
carburante specifico.
3. Installare e serrare a mano il tappo di rabbocco.
AVVERTENZA
La benzina è altamente infiammabile e va trattata
con cura. Non rabboccare mai il serbatoio con il
motore ancora caldo da un recente funzionamento.
Evitare fiamme aperte, fumo o fiammiferi intorno
all’unità. Evitare di rabboccare in eccedenza e pulire
eventuali fuoriuscite.
Non usare benzina contenente METANOLO,
gasolio contenente più del 10% di ETANOLO,
additivi di benzina e gas bianco, onde evitare
danni all’impianto motore/carburante.
Avvio del motore
1. Stando seduti al posto dell’operatore, premere
fino in fondo il pedale del freno o inserire il freno di
stazionamento.
2. Accertarsi che i piedi non stiamo premendo i pedali di
controllo della velocità di avanzamento sul terreno e che
la leva di controllo crociera non sia in folle.
3. Disinserire la frizione della PTO.
4. Portare l’acceleratore nella posizione a tutto gas, FULL.
5. Chiudere la bobina d’arresto.
NOTA: Un motore caldo non richiede l’intervento della
bobina d’arresto.
6. Inserire la chiavetta di accensione e portarla in posizione
START.
7. Dopo l’avvio del motore, portare il controllo
dell’acceleratore a metà regime. Riscaldare il motore
lasciandolo girare per almeno 30 secondi.
8. Portare l’acceleratore nella posizione FULL.
NOTA: in casi di emergenza è possibile arrestare il motore
portando l’interruttore di accensione nella posizione di
arresto, STOP. Adottare questo metodo solo in situazioni
di emergenza. Per l’arresto motore regolare attenersi
alla procedura indicata nella sezione ARRESTO DEL
TRATTORE.
Arresto del trattore e motore
1. Riportare il controllo velocità di avanzamento sul terreno
in folle.
2. Disinserire la PTO ed attendere che tutte le parti si
arrestino.
3. Spostare il controllo dell’acceleratore sulla posizione
lenta, SLOW e portare la chiave di accensione sulla
posizione OFF. Rimuovere la chiavetta.
it
17
Page 84

Conduzione
Guida del trattore
1. Sedersi e regolare il sedile in modo da poter comodamente
raggiungere i controlli e vedere il cruscotto.
2. Inserire il freno di stazionamento.
3. Accertarsi che l’interruttore della PTO sia disinserito.
4. Avviare il motore (consultare la sezione AVVIO DEL
MOTORE).
5. Disinserire il freno di stazionamento e rilasciare il pedale
del freno.
6. Premere il pedale di controllo velocità di avanzamento
sul terreno per procedere in avanti. Rilasciare il pedale
per arrestare. Notare che premendo ulteriormente il
pedale, il trattore procede più velocemente.
7. Arrestare il trattore rilasciando i pedali di controllo
velocità di avanzamento, impostando il freno di
stazionamento ed arrestando il motore (consultare la
sezione ARRESTO DEL TRATTORE E MOTORE).
Taglio dell’erba
1. Impostare l’altezza di taglio del tagliaerba sul livello
desiderato ed impostare le ruote di livello sulla posizione
desiderata (se in dotazione).
2. Inserire il freno di stazionamento. Accertarsi che
l’interruttore della PTO sia disinserito.
3. Avviare il motore (consultare la sezioneAVVIO DEL
MOTORE).
4. Portare l’acceleratore nella posizione A TUTTO GAS.
5. Inserire la PTO (base del tagliaerba).
6. Cominciare a tagliare l’erba.
7. Al termine, disattivare la PTO e sollevare il tagliaerba
usando la leva di controllo di sollevamento degli accessori.
8. Arrestare il motore (consultare la sezione ARRESTO
DEL TRATTORE E MOTORE).
Falciatura in retromarcia
AVVERTENZA
Il motore si spegnerà se il pedale di retromarcia a terra
viene premuto con il PTO inserito ma senza l’opzione
RMO attivata. L’operatore deve sempre disinserire
il PTO prima di attraversare strade, sentieri, o altre
aree che possono essere usate da veicoli. La perdita
improvvisa di potenza potrebbe creare una situazione
pericolosa.
Se l’operatore decide di falciare in retromarcia, si può
usare il sistema RMO. Per usare l’opzione di falciatura in
retromarcia (RMO), girare la chiavetta dell’RMO dopo avere
inserito il PTO. La spia a LED si accenderà e l’operatore può
spostarsi a marcia indietro. L’opzione RMO deve essere
riattivata, se la si desidera riusare, ogni volta che il PTO
viene disinserito. La chiavetta deve essere rimossa per
impedire l’accesso alla funzione RMO.
Opzione funzionamento in
retromarcia
Se l’operatore decide di usare in retromarcia un accessorio
azionato da PTO, si può usare il sistema RMO. Per usare
l’opzione di falciatura in retromarcia (RMO), girare la
chiavetta dell’RMO dopo avere inserito il PTO. La spia a
LED si accenderà e l’operatore potrà usare l’accessorio a
marcia indietro. L’opzione RMO deve essere riattivata, se la
si desidera riusare, ogni volta che il PTO viene disinserito.
La chiavetta deve essere rimossa per impedire l’accesso alla
funzione RMO.
Spinta del trattorino a mano
1. Disinnestare la presa di forza e spegnere il motore.
2. Bloccare la leva di disinnesto della trasmissione nella
posizione di disinnestata tirandola indietro di circa 6,4 cm
(B, Figura 4).
3. Il trattorino può quindi essere spinto a mano.
NON TRAINARE IL TRATTORINO
Il traino dell’unità danneggerebbe la trasmissione.
• Non servirsi di un altro veicolo per spingere
o trainare il trattorino. • Non azionare la leva di
disinnesto della trasmissione quando il motore è
avviato.
AVVERTENZA
La falciatura in retromarcia può essere pericolosa per
gli astanti. Se l’operatore non presta attenzione alla
presenza di bambini si possono verificare incidenti
tragici.Non attivare mai l’opzione RMO (falciatura in
retromarcia) quando ci sono bambini. I bambini sono
attratti dall’unità al lavoro e dall’attività che la circonda.
18
www.snapper.com
Page 85

Conduzione
Regolazione dell’altezza del piatto di
taglio
L’altezza di taglio è regolabile all’infinito in un intervallo
compreso tra 2,5 e 10,0 cm (1,0 e 4,0”).
(A, Figura 5) l’interruttore di regolazione dell’altezza di
taglio controlla l’altezza di taglio della falciatrice. Lo stesso
interruttore comanda anche il motore di rotazione dello
scarico quando sia installato lo spazzaneve. Le frecce
sull’interruttore corrispondono alle direzioni di regolazione
(la freccia SU aumenta l’altezza di taglio, la freccia DESTRA
ruota lo scarico a destra e così via). Rilasciare l’interruttore
quando l’indicatore di regolazione ha raggiunto il fine corsa;
se si continua a tenere l’interruttore spinto si può danneggiare
il motore.
Attacco di un rimorchio
La forza massima della barra di traino orizzontale consentita
è 444 Newton. Quella verticale è 222 Newton. Questo
equivale ad un rimorchio di 180 kg (396 libbre) su una collina
con dislivello di 10 gradi. Fissare il rimorchio con un perno
con testa di dimensioni giuste (A, Figura 6) e morsetto (B).
Rimessaggio
AVVERTENZA
Non riporre mai l’unità (con carburante) in una
struttura chiusa e scarsamente ventilata. I vapori
del carburante possono raggiungere una fonte
di accensione (caldaia, boiler, ecc) e causare
un’esplosione.
I vapori sono inoltre tossici per esseri umani ed
animali.
Prima di riporre l’unità a fine stagione, leggere le istruzioni
per la manutenzione ed il rimessaggio nella sezione sulle
regole sulla sicurezza, quindi procedere come segue:
• Disattivare la PTO, inserire il freno di stazionamento e
togliere la chiavetta.
• Eseguire le misure di manutenzione e rimessaggio del
motore elencate nel manuale del proprietario del motore.
Queste includono lo spurgo dell’impianto del carburante,
o l’aggiunta di stabilizzante al carburante (non riporre
un’unità con carburante in una struttura chiusa - Leggere
il messaggio di avvertenza).
• Per prolungare la vite utile della batteria, rimuoverla,
riporla in un luogo fresco ed asciutto, caricandola
completamente una volta al mese circa. Se la batteria
non viene estratta dall’unità, scollegare il cavo negativo.
Prima di avviare l’unità dopo un periodo di rimessaggio:
• Controllare il livello di tutti i fluidi. Controllare tutti i
componenti.
• Eseguire tutti i controlli e le procedure consigliati e
riportati nel manuale del proprietario del motore.
• Prima dell’uso, attendere che il motore si riscaldi per
diversi minuti.
it
19
Page 86

Manutenzione
Tabella della manutenzione
TRATTORE E ELEMENTO DI FALCIATURA
Ogni 8 ore o una volta al giorno
Controllo del sistema di interbloccaggio di sicurezza
Pulire trattore e piano di falciatura
Pulire il vano motore da eventuali detriti
Ogni 25 ore o una volta l’anno *
Controllare il tempo di arresto delle lame di falciatura
Controllare che non ci siano pezzi allentati sul trattore/
elemento di falciatura
Controllare la pressione delle gomme
Ogni 50 ore o una volta l’anno *
Controllare i freni del trattore
Pulire la batteria e i cavi
Rivolgersi al concessionario per
Lubrificare il trattore e l’elemento di falciatura
Controllodelle lame di falciatura **
* Quello dei due che viene prima
** Nelle regioni con suoli sabbiosi o in condizioni di
polvere abbondante, controllare le lame più spesso.
MOTORE
Prime 5 ore
Cambio d’olio del motore (vedi il manuale del motore)
Ogni 8 ore o una volta al giorno
Controllo di livello dell’olio motore
Ogni 25 ore o una volta l’anno *
Pulire filtro dell’aria e pre-filtro **
Ogni 50 ore o una volta l’anno *
Cambio d’olio del motore
Sostituire il filtro dell’olio
Annualmente
Sostituzione del filtro dell’aria
Sostituire il pre-filtro
Rivolgersi al concessionario per
Ispezionare la marmitta
Sostituire la candela
Sostituire il filtro del carburante
Pulire il sistema di raffreddamento aria del motore
* Quello dei due che viene prima
** In presenza di polvere o di detriti aerotra sportati pulire
più spesso
Controllo della pressione dei
pneumatici
La pressione degli pneumatici deve essere controllata
periodicamente. La pressione massima è riportata sulla
parete laterale degli pneumatici. Non superare la pressione
massima degli pneumatici.
Dimensioni
Anteriori: 16 x 6,5-8
Posteriori: 23 x 10,5-12
Pressione dei pneumatici
20
Controllo del freno delle lame
Le lame e la cinghia di trasmissione del piatto di taglio
devono arrestarsi completamente entro cinque secondi dal
disinnesto dell’interruttore della presa di forza.
1. Avviare il motore con la trasmissione in folle, la presa di
forza disinnestata e l’operatore in posizione.
2. Osservare la cinghia di trasmissione del piatto di taglio
guardando sopra al poggiapiede sinistro. Innestare la
presa di forza e aspettare diversi secondi. Disinnestare la
presa di forza e verificare quanto tempo trascorre prima
che la cinghia di trasmissione del piatto di taglio si arresti.
3. Se la cinghia di trasmissione del piatto non si arresta
entro cinque secondi, regolare di nuovo la frizione
oppure rivolgersi al rivenditore.
Manutenzione del motore
Per tutte le procedure e raccomandazioni di manutenzione
del motore fare riferimento al manuale del motore.
www.snapper.com
Page 87

Manutenzione
Pulitura della batteria e dei cavi
AVVERTENZA
Durante la rimozione o l’installazione dei cavi della
batteria, scollegare per PRIMO il cavo negativo
e ricollegarlo per ULTIMO. Se non si procede
in questo ordine, il terminale positivo può fare
cortocircuito con il telaio quando toccato da un
attrezzo.
1. Scollegare i cavi dalla batteria, cominciando dai
cavi negativi (A, Figura 7) e quindi quelli della e positivi
(B).
2. Allentare il dado ad alette e la rondella (D).
3. Ruotare l’asta di tenuta (C) verso l’alto ed allontanarla
dalla batteria. Fissare alla torretta dello sterzo.
4. Rimuovere la batteria (E).
5. Pulire il vano della batteria con una soluzione di
bicarbonato ed acqua.
6. Pulire i terminali della batteria e le estremità dei cavi con
una spazzola metallica e detergente, fino a farli brillare.
7. Reinstallare la batteria (E) nel vano. Fissare con l’asta di
tenuta (C) ed il dado con alette e rondella (D).
8. Riattaccare i cavi della batteria, cominciando da quelli
positivi e la copertura (B) e quindi quelli negativi (A).
9. Rivestire le estremità dei cavi ed i terminali della batteria
con vaselina o grasso non conduttivo.
Carica della batteria
AVVERTENZA
Tenere fiamme aperte o scintille lontano dalla
batteria; i gas che ne provengono sono altamente
esplosivi. Ventilare bene la batteria durante la
carica.
Una batteria inutilizzabile o troppo debole per avviare il
motore potrebbe essere il risultato di un difetto nell’impianto
di carica o in un altro componente elettrico. In caso di
dubbi sulla causa del problema, rivolgersi al proprio
concessionario. Se occorre sostituire la batteria, attenersi
alle fasi delineate nella sezione Pulitura della batteria e dei
cavi.
Per caricare la batteria, attenersi alle istruzioni del
fabbricante del caricabatteria e rispettare tutti i messaggi
di avvertenza inclusi nelle sezioni sulle regole sulla
sicurezza contenute in questo manuale. Caricare la batteria
completamente. Non caricare ad un livello superiore a 10
ampere.
Regolazione del sedile
Regolazione longitudinale del sedile
Il sedile può essere regolato longitudinalmente in tre
posizioni. Per effettuare la regolazione, smontare dalla
cerniera i bulloni, i distanziali, le rondelle e i dadi (B,
Figura 8) e rimontarli nei fori del caso.
Regolazione del sedile
Il sedile può essere regolato in avanti ed all’indietro.
Spostare la leva (A, Figura 8), sistemare il sedile nella
posizione desiderata e rilasciare la leva per bloccare il sedile
in posizione.
Regolazione delle molle del sedile
Le molle del sedile (C, Figura 8) possono essere regolate i
modo che siano più morbide o più rigide. Inclinare il sedile in
avanti e fare scorrere l’assieme delle molle (C) in avanti per
avere un sedile più morbido, indietro per più rigido.
Regolazione del sollevamento
manuale assistito
Se l’elevatore manuale non funziona correttamente,
rivolgersi al proprio concessionario.
Regolazioni del piatto di taglio
Le ruote indicatrici del piatto di taglio possono essere
collocate in due posizioni a seconda dell’altezza di taglio. Se
vengono utilizzate altezze di taglio superiori, mettere le ruote
indicatrici nella posizione inferiore. Se vengono utilizzate
altezze di taglio inferiori, mettere le ruote indicatrici nella
posizione superiore.
1. Rimuovere il dado di serraggio (A, Figura 9), la rotellina
regolatrice (B), le rondella (C) e la vite ad anello (D).
Variare la posizione della rotellina regolatrice in modo da
ottenere l’altezza desiderata.
2. Infilare la vite ad anello (D) attraverso le rondella (C), la
rotellina regolatrice (B) e la staffa della rotellina regolatrice
(E). Fissare per mezzo del dado di serraggio (A). Ripetere
i passaggi 1 & 2 per tutte le rotelline regolatrici.
it
21
Page 88

Individuazione e correzione dei problemi
Individuazione dei problemi
Sebbene cure e manutenzione regolari prolunghino la vita
utile dell’apparecchiatura, l’utilizzo prolungato o costante
richiede in ultima analisi un intervento di manutenzione per
garantirne il funzionamento continuo e corretto.
La guida all’individuazione dei problemi che segue elenca i
problemi più comuni, la loro causa ed i rimedi consigliati.
Consultare le informazioni contenuti nelle pagine seguenti
per istruzioni su come eseguire la maggior parte di
queste regolazioni ed effettuare direttamente gli interventi
manutenzione. Se lo si preferisce, tutte queste procedure
possono essere eseguite dal proprio concessionario di zona.
Onde evitare lesioni gravi, eseguire la manutenzione
sul trattore o sul tagliaerba solo quando si è
arrestato il motore e si è inserito il freno di
stazionamento.
Rimuovere la chiavetta di accensione, scollegare
il filo della candela ed allontanarlo dalla candela
prima di procedere alla manutenzione, onde
prevenire l’avvio accidentale del motore.
AVVERTENZA
Individuazione e correzione dei problemi del trattore
PROBLEMA ESAMINARE RIMEDIO
Pedale del freno non premuto. Premere fino in fondo il pedale del freno.
Il motore non gira o
non si avvia.
Il motore fa fatica a
partire e funziona
male.
Il motore batte in
testa.
Consumo d’olio
eccessivo.
Lo scarico del
motore è nero.
L’interruttore della PTO (frizione
elettrica) è nella posizione di
acceso, ON.
Controllo crociera attivato. Spostare la manopola sulla posizione di folle/spento,
Carburante esaurito. Se il motore è molto caldo, attendere che si raffreddi e
Motore ingolfato. Chiudere la valvola dell’aria.
Il fusibile è rotto. Rivolgersi al rivenditore autorizzato.
Pulire i terminali della batteria. Vedere la sezione Pulizia della batteria e dei cavi.
Batteria scarica o inutilizzabile. Ricaricare o sostituire la batteria.
Cablaggio allentato o rotto. Controllare visivamente i cavi. Se sono consumati o rotti,
Solenoide o motorino dello
starter difettoso.
Interruttore di interblocco di
sicurezza difettoso.
Acqua nel carburante. Rivolgersi al rivenditore autorizzato.
Benzina vecchia o stagnante. Rivolgersi al rivenditore autorizzato.
Miscela di carburante troppo ricca. Pulire il filtro dell’aria.
Il motore ha altri problemi. Rivolgersi al rivenditore autorizzato.
Livello dell’olio basso. Vedi il manuale del motore
Utilizzato il grado di olio sbagliato. Vedi il manuale del motore
Il motore è troppo caldo. Rivolgersi al rivenditore autorizzato.
Utilizzato il grado di olio sbagliato. Vedi il manuale del motore
Troppo olio nel basamento. Spurgare l’olio in eccesso.
Filtro dell’aria sporco. Vedere la sezione Manutenzione del filtro dell’aria.
Bobina d’arresto chiusa. Aprire la bobina d’arresto.
Portarlo in posizione di spento, OFF.
FOLLE/OFF.
rabboccare il serbatoio.
rivolgersi a un rivenditore autorizzato.
Rivolgersi al rivenditore autorizzato.
Rivolgersi al rivenditore autorizzato.
22
www.snapper.com
Page 89

Individuazione e correzione dei problemi
Individuazione e correzione dei problemi del trattore (segue)
PROBLEMA ESAMINARE RIMEDIO
Pedali di controllo della velocità di
avanzamento sul terreno non premuti.
Leva di rilascio della trasmissione in
Il motore è avviato
ma il trattore non si
muove.
Il freno di parcheggio
non tiene.
Il trattore sterza a
fatica o viene guidato
a fatica.
posizione SPINTA.
La cinghia della falciatrice è rotta. Rivolgersi al rivenditore autorizzato.
Il freno di stazionamento è inserito. Disinserire il freno di stazionamento.
La cinghia di trasmissione della trazione
è rotta o slitta.
Freno interno usurato. Rivolgersi al rivenditore autorizzato.
La tiranteria dello sterzo è allentata. Rivolgersi al rivenditore autorizzato.
Gonfiaggio pneumatici inadeguato. Vedere la sezione Controllo della pressione delle
Cuscinetti del mandrino delle ruote
anteriori asciutti.
Individuazione e correzione dei problemi dell’elemento di falciatura
Premere i pedali.
Spostare in posizione di GUIDA.
Rivolgersi al rivenditore autorizzato.
gomme.
Rivolgersi al rivenditore autorizzato.
PROBLEMA ESAMINARE RIMEDIO
L’elemento di
falciatura non si alza.
La falciatura non è
uniforme.
La falciatura ha un
aspetto grossolano.
Il motore si arresta
facilmente quando
l’elemento di falciatura
è impegnato.
Eccessive vibrazioni
del tagliaerba.
Il motore gira e il
trattore si sposta, ma
la tagliaerba non si
muove.
La tiranteria di sollevamento non è
attaccata o è danneggiata.
Il tagliaerba non è livellato
correttamente.
Le gomme del trattore non sono
adeguatamente gonfie.
Regime motore troppo lento. Impostare a tutto gas.
Velocità di avanzamento sul terreno
troppo rapida.
Il tagliaerba ha altri problemi. Rivolgersi al rivenditore autorizzato.
Regime motore troppo lento. Impostare a tutto gas.
Velocità di avanzamento sul terreno
troppo rapida.
Filtro dell’aria sporco o ostruito. Vedi il manuale del motore
L’altezza di taglio è troppo bassa. Durante la prima passata tagliare l’erba all’altezza di
Scivolo di scarico intasato. Tagliare l’erba con lo scarico puntato verso l’area tagliata
Il motore non è alla temperatura
d’esercizio.
Il tagliaerba comincia nell’erba alta. Avviare il tagliaerba in una zona pulita.
Il tagliaerba ha altri problemi. Rivolgersi al rivenditore autorizzato.
PTO non innestato. Innestare PTO.
Il tagliaerba ha altri problemi. Rivolgersi al rivenditore autorizzato.
Rivolgersi al rivenditore autorizzato.
Rivolgersi al rivenditore autorizzato.
Vedere la sezione Controllo della pressione delle
gomme.
Ridurre la velocità.
Ridurre la velocità.
taglio massima.
in precedenza.
Far girare il motore per alcuni minuti per riscaldarlo.
it
23
Page 90

Dati tecnici
MOTORE
Briggs & Stratton
Marca Briggs & Stratton®
Modello Professional Series
Corsa 724 cc (44,2 cu in.)
Sistema elettrico Alternatore: 12 volt, 16 amp,
Batteria: corrente di avviamento
a freddo di 340 A
Capacità olio 1,9 L (64 oz)
TM
CHASSIS
Capacità carburante 15,1 L (4,0 Gal)
Dimensione pneumatici
- Anteriori 16 x 6,50-8
- Posteriori 23 x 10,5-12
PEZZI DI RICAMBIO E ACCESSORI
Per dettagli, rivolgersi a un rivenditore autorizzato.
TRASMISSIONE K66
Marca Tuff Torq K66 (idrostatico)
Fluido idraulico Olio per motore 10W-30
Capacità olio 2,5 L (2,6 qt)
Velocità @ 3400 giri/min Marcia in avanti: 0-9,3 km/h
(0-5,8 MPH)
Retromarcia: 0-5,6 km/h
(0-3,5 MPH)
Coppia a regime 419 Nm (310 ft-lbs)
Portata della barra di traino 200 kg (440 lbs)
Peso massimo sull’asse 316 kg (697 lbs)
DIMENSIONI
Lunghezza complessiva 190,5 cm (75”)
Larghezza complessiva 99 cm (39”)
Altezza
(dalla parte più alta del sedile) 127 cm (50”)
24
www.snapper.com
Page 91

it
25
Page 92

26
www.snapper.com
Page 93

INHOUD
Voorblad ......................................................................................................................1
Illustraties ...................................................................................................................2
Veiligheid van de gebruiker ......................................................................................6
Functies en bedieningselementen .........................................................................13
Bediening ..................................................................................................................17
Onderhoud ................................................................................................................20
Problemen oplossen ................................................................................................22
Speci caties .............................................................................................................24
Garantie .....................................................................................................................25
Algemene informatie
Hartelijk dank voor de aankoop van deze hoogwaardige SNAPPER-zitgrasmaaier. We zijn blij dat u vertrouwen stelt in
het SNAPPER-merk. Uw SNAPPER-product zal u vele jaren betrouwbare diensten bewijzen, wanneer u het gebruikt en
onderhoudt zoals vermeld in de instructies in deze handleiding.
Deze handleiding bevat veiligheidsinformatie om u te wijzen op de gevaren en risico’s verbonden met zitgrasmaaiers en
hoe u deze kunt vermijden. Deze zitgrasmaaier is alleen ontworpen en bedoeld voor het grasmaaien en voor geen enkel
ander doel. Het is belangrijk dat u deze instructies leest en begrijpt voordat u de maaier probeert te starten of te bedienen.
Bewaar deze originele instructies voor toekomstig gebruik.
CE-identificatieplaatjeProductreferentiegegevens
Noteer de naam en het nummer van uw model, de
identificatienummers van de fabrikant en de serienummers
van de motor in de daartoe voorziene ruimte zodat u ze bij de
hand hebt. Deze nummers vindt u op de afgebeelde locaties.
Wanneer u contact opneemt met uw erkend verdeler
voor reserveonderdelen, herstellingen of informatie,
MOET u over deze nummers beschikken.
PRODUCTREFERENTIEGEGE ENS
Omschrijvende benaming/nummer van het model
PRODUCTNUMMER van het toestel SERIENUMMER van het toestel
PRODUCTNUMMER van het maaidek SERIENUMMER van het maaidek
Naam van de verdeler Aankoopdatum
MOTORREFERENTIEGEGE ENS
Merk van de motor Motormodel
Motortype/-specificatie Code/serienummer van de motor
A. Productidentificatienummer van de fabrikant
B. Serienummer van de fabrikant
C. Nominaal vermogen in kilowatt
D. Maximale motorsnelheid in toeren per minuut
E. Naam en adres van de fabrikant
F. Jaar van fabricage
G. CE-logo (als bevestiging dat aan de CE-vereisten wordt
voldaan)
H. Gewicht van het toestel in kilogram
I. Gegarandeerd geluidsniveau in decibel
A
Part No. xxxxxxx
B
E
xxxxxxxxxxxxxxx
Serial No. xxxxxxxxxx
xxxxxxxxxxxxxxxxxxxxxxx
xxxxxxxxxxxxxxxxxxxxxxx
xxxxxxxxxxxxxxxxxxxxxxx
xxxxxxxxxxxxxxxxxxxxxxx
xxx
20xx
F
dB
kg: xxx
kW: x.xx
xxxx max
G
I
H
D
C
De geïllustreerde onderdelenlijst voor deze machine kan worden gedownload op www.snapper.com. Geef het model en
serienummer aan als u vervangende onderdelen bestelt.
Copyright © 2010 Briggs & Stratton Power Products Group, LLC
Milwaukee, WI, Alle rechten voorbehouden.
SNAPPER is een handelsmerk van Briggs & Stratton Power Products
Group, LLC Milwaukee, WI VS.
nl
5
Page 94

Veiligheid van de gebruiker
Veilig gebruik
Gefeliciteerd met de aankoop van een stuk tuingereedschap van
superieure kwaliteit. Onze producten zijn ontworpen en vervaardigd om
aan alle industrienormen te voldoen en deze zelfs te overtreffen.
Elektrische apparaten zijn enkel en alleen veilig als ze op veilige wijze worden
gebruikt. Als ze op de verkeerde wijze worden gebruikt of niet behoorlijk
worden onderhouden, kunnen ze gevaarlijk zijn! Vergeet niet, u bent
verantwoordelijk voor uw eigen veiligheid en die van de personen rondom u.
Gebruik uw gezond verstand en denk goed na over waar u mee bezig
bent. Als u er niet zeker van bent dat het karwei dat u gaat opknappen
veilig kan worden uitgevoerd met het gereedschap dat u hebt gekozen,
raadpleeg een vakman: neem contact op met uw plaatselijke erkende
verdeler.
Lees de handleiding
De gebruikershandleiding bevat belangrijke veiligheidsinformatie waar u zowel voor als
TIJDENS het gebruik van het gereedschap van op de hoogte moet
zijn.
Hierin vindt u veilige gebruiksaanwijzingen, een beschrijving
van de kenmerken en bedieningsknoppen van het product en
onderhoudsinformatie. Deze informatie zal u helpen het meeste uit
uw apparatuur te halen.
Lees de Veiligheidsvoorschriften en -informatie op de volgende
bladzijden helemaal door. Lees ook het hoofdstuk Bediening volledig.
Kinderen
Kinderen kunnen het slachtoffer worden van tragische ongelukken.
Houd ze uit de buurt van de plaats waar u werkt. Kinderen voelen zich
vaak aangetrokken tot het apparaat en het grasmaaien. Ga er nooit
van uit dat kinderen op de plaats zullen blijven waar u ze het laatst
hebt gezien. Als de kans bestaat dat kinderen in de buurt kunnen
komen van de plaats waar u aan het maaien bent, zorg er dan voor
dat een andere verantwoordelijke volwassene toezicht op hen houdt.
LAAT KINDEREN NOOIT MEERIJDEN OP DE ZITMAAIER! Dit
moedigt hen aan om ook in de buurt van het apparaat te komen
terwijl de motor draait, waardoor ze ernstig gewond kunnen raken. Ze
kunnen dan naar het apparaat toe komen om mee te rijden als u het
niet verwacht, waardoor u hen zou kunnen overrijden.
6
Achteruit
Nooit achteruit maaien, tenzij dit
absoluut nodig is. Kijk voor en
tijdens het achteruitrijden steeds
omlaag en
achterom, ook
wanneer de
maaimessen
uitgeschakeld
zijn.
www.snapper.com
Page 95

Veiligheid van de gebruiker
Gebruik op een helling
U kunt ernstig gewond raken of zelfs om het leven komen als u dit
apparaat op een te steile helling gebruikt. Het gebruik van de maaier op
een te steile helling of een plaats waar u niet voldoende tractie hebt, kan
ervoor zorgen dat u de controle over de maaier verliest of kantelt.
Een goede vuistregel is de maaier nooit te gebruiken op een helling
waarop u niet achteruit kunt rijden (in de stand 2-wielaandrijving). Gebruik
3.5 ft
(1,5 m)
20.0 ft (6,0 m)
Bewegende delen
Dit apparaat heeft veel bewegende delen die u of iemand anders kunnen verwonden. Als
u echter behoorlijk op de stoel zit en alle voorschriften in deze brochure volgt, kunt u het
apparaat veilig gebruiken.
Het maaidek is uitgerust met draaiende maaimessen die handen en voeten kunnen
amputeren. Laat niemand in de buurt van het apparaat terwijl de motor draait!
Om u, de gebruiker, te helpen dit apparaat veilig te gebruiken, is het uitgerust met een
veiligheidssysteem dat detecteert wanneer de gebruiker aanwezig is. Probeer NIET om het
systeem te wijzigen of te omzeilen. Raadpleeg onmiddellijk uw verdeler als het systeem niet
alle in deze handleiding vermelde veiligheidstests voor vergrendelingssystemen doorstaat.
de maaier nooit op hellingen die meer dan 1 m stijgen over een lengte
van 6 m. Rijd altijd loodrecht op en af hellingen, nooit zijwaarts.
Houd er ook rekening mee dat het oppervlak waarop u rijdt een grote
invloed heeft op de stabiliteit en de controle. Nat gras of een met ijs
bedekt wegdek kunnen ervoor zorgen dat u de maaier niet goed onder
controle hebt.
Als u zich onzeker voelt over het gebruik van de maaier op hellingen, doe
het dan niet. Het is het risico niet waard.
Weggeslingerde voorwerpen
Dit apparaat heeft draaiende maaimessen. Deze messen kunnen rondslingerende
voorwerpen opnemen en wegslingeren, waardoor omstanders ernstig gewond
kunnen raken. Zorg ervoor dat u het te maaien gebied opruimt VOORDAT u
begint te maaien.
Het apparaat niet gebruiken zonder de opvangbak of afvoerbeschermer
(deflector).
Laat ook niemand in de buurt van de maaier komen terwijl de motor draait! Als er
toch iemand in de buurt komt, schakel de maaier dan onmiddellijk uit en wacht tot
hij/zij weer weg is.
Brandstof en onderhoud
Benzine is uiterst ontvlambaar. Benzinedampen zijn ook zeer ontvlambaar en
kunnen verre ontstekingsbronnen bereiken. Benzine mag enkel als brandstof
worden gebruikt, niet als oplos- of reinigingsmiddel. Het mag nooit worden
bewaard op plaatsen waar de dampen kunnen opbouwen of een ontstekingsbron,
zoals een waakvlam, kunnen bereiken. Brandstof moet worden bewaard in een
goedgekeurde afgesloten plastic benzinekan of in de brandstoftank van de tractor
met de dop stevig dichtgedraaid. Gemorste brandstof moet onmiddellijk worden
opgeruimd.
Behoorlijk onderhoud is uitermate belangrijk voor de veiligheid en de prestaties
van uw apparaat. Zorg ervoor dat u de onderhoudsprocedures in deze
handleiding uitvoert, vooral het periodiek testen van het veiligheidssysteem.
nl
7
Page 96

Veiligheid van de gebruiker
Lees deze veiligheidsvoorschriften aandachtig en leef ze strikt na. Als u zich niet aan deze veiligheidsvoorschriften
houdt, kan dat tot gevolg hebben dat u de controle over de machine verliest, dat u schade veroorzaakt aan
eigendommen of gereedschap en dat uzelf en/of omstanders gewond raken met mogelijk de dood tot gevolg. Dit
maaidek kan handen en voeten amputeren en voorwerpen wegslingeren. Het driehoekje in de tekst duidt op
belangrijke waarschuwingen waarmee rekening moet worden gehouden.
WERKING ALGEMEEN
1. Vooraleer u met de trekker begint te werken, moet u alle
richtlijnen en uitleg in de handleiding gelezen en op de
machine begrepen hebben en alle voorzorgsmaatregelen
zorgvuldig opgevolgd hebben.
2. Plaats nooit uw handen of voeten in de buurt van draaiende
onderdelen of onder de machine. Blijf altijd uit de buurt van
de afvoeropeningen.
3. Laat enkel volwassenen met een groot
verantwoordelijkheidsgevoel die bovendien ook vertrouwd
zijn met de machine, werken met de trekker. In bepaalde
gebieden kunnen trouwens ook leeftijdsbeperkingen gelden
voor het werken met een dergelijke machine.
4. Zorg ervoor dat er zich in de buurt waar u gaat werken geen
rotsen, speelgoed en/of andere obstakels bevinden die de
goede werking van de machine zouden kunnen hinderen.
Het gevaar bestaat trouwens dat deze voorwerpen door het
maaidek zouden worden rondgeslingerd.
5. Vooraleer u begint te maaien, moet u ervoor zorgen dat er
zich geen andere mensen in de buurt bevinden. Komt er
iemand naar u toe, dan dient u de trekker te stoppen en de
motor stil te leggen.
6. Voer geen passagiers mee op de trekker.
7. Maai niet terwijl u achteruit rijdt, tenzij dit absoluut
noodzakelijk is. Kijk voor en tijdens het achteruitrijden naar
achteren en naar beneden.
8. Richt de materiaalafvoer nooit op iemand. Vermijd het
materiaal af te voeren tegen een muur of een hindernis.
Het materiaal kan terugkaatsen naar de gebruiker. Leg het
maaidek stil wanneer u over een ondergrond met kiezelsteen
moet rijden.
9. Werk nooit met de machine zonder dat het volledige
grasopvangsysteem, de afvoerafscherming (deflector) of
andere veiligheidssystemen keurig op hun plaats gemonteerd
zijn.
10. Vertraag vooraleer u een bocht neemt.
11. Laat de trekker nooit achter met draaiende motor. Schakel
altijd eerst de PTO-koppeling uit, activeer de parkeerrem, leg
de motor stil en trek de sleutels uit het contact vooraleer u van
de trekker stapt.
12. Schakel het maaidek (PTO) uit wanneer u niet maait.
Leg de motor stil en wacht tot alle onderdelen volledig tot
stilstand zijn gekomen alvorens de machine te reinigen, het
grasopvangsysteem te verwijderen of de afvoerafscherming
vrij te maken.
13. Werk met deze machine enkel tijdens het daglicht of bij goed
kunstlicht.
14. Werk nooit met de machine terwijl u onder invloed bent van
drugs, geneesmiddelen of alcohol.
15. Let goed op het verkeer wanneer u in de buurt van een
openbare weg werkt of deze moet oversteken.
16. Wees extra voorzichtig als u de machine op een
aanhangwagen of in een vrachtwagen laadt.
17. Draag altijd oogbescherming terwijl u met deze machine
werkt.
18. Uit statistische gegevens blijkt dat vooral 60-plussers
betrokken zijn in een groot aantal ongelukken met trekkers
en maaiers. Het behoort tot de verantwoordelijkheid van alle
bestuurders in kwestie om zo precies mogelijk te bepalen of
ze nog wel of niet meer in staat zijn een dergelijke machine
veilig te besturen en hun omgeving te vrijwaren van mogelijke
ongelukken.
19. Volg de aanbevelingen van de fabrikant in verband met
wielgewichten of tegengewichten.
20. Denk eraan dat het steeds de bestuurder van de trekker is die
verantwoordelijk zal worden gesteld voor ongelukken die hij
veroorzaakt aan derden of goederen van derden.
21. Alle bestuurders moeten ervoor zorgen dat ze een
professionele en praktijkgerichte opleiding krijgen om met
deze machine te werken.
22. Draag bij het werken met de trekker en de maaier steeds
een lange broek en beschermend schoeisel. Werk nooit
blootsvoets of op sandalen.
23. Vooraleer u de maaier gebruikt, moet u nagaan of de
maaibladen nog intact zijn, of ze niet beschadigd of
versleten zijn en of ze nog goed vastzitten. Versleten en/
of beschadigde onderdelen moeten onmiddellijk worden
vervangen.
24. Schakel hulpstukken altijd uit als u een van volgende
handelingen wenst te verrichten: bijtanken, een hulpstuk
regelen of verwijderen (tenzij de regeling kan gebeuren van
op de berijdersstoel).
25. Als u de machine parkeert, opbergt of om een bepaalde
redden onbeheerd achterlaat, moet u het maaidek steeds
volledig laten zakken, tenzij het maaidek mechanisch
vergrendeld wordt.
26. Alvorens de berijdersstoel te verlaten, om eender welke
reden, moet u de parkeerrem activeren, de aftakas
uitschakelen, de motor stilleggen en de sleutel uit het contact
verwijderen.
27. Om brandgevaar te verminderen, moet u ervoor zorgen dat
de machine vrij blijft van gras, bladeren en overtollige olie.
Stop of parkeer de machine niet boven droge bladeren, gras
of brandbaar materiaal.
TRANSPORT EN BERGING
1. Als u deze trekker transporteert op een open aanhangwagen,
moet u ervoor zorgen dat hij met de voorzijde in de rijrichting
staat. Mocht de trekker achterwaarts op de aanhangwagen
staan, dan kan de wind de motorkap optillen en deze ernstig
beschadigen.
2. Neem de nodige veiligheidsvoorschriften in acht als u de
trekker na transport of berging weer vult met brandstof.
3. Stal de machine nooit (met benzine) in een besloten, slecht
geventileerde ruimte. Brandstofdampen kunnen bij een
ontstekingsbron (zoals een verwarmingsketel, boiler enz.)
komen en een ontploffing veroorzaken. Brandstofdampen
zijn ook giftig voor mens en huisdier.
8
4. Neem voor het bergen van de trekker altijd de richtlijnen van
de motorleverancier in acht. U vindt deze richtlijnen in de
handleiding van uw motorleverancier. Volg deze richtlijnen
zowel voor een berging van korte duur als wanneer u de
machine voor langere duur opbergt.
5. Als u de machine weer in dienst stelt na een periode van
inactiviteit moet u ervoor zorgen dat u alle richtlijnen van uw
motorleverancier zo precies mogelijk navolgt.
6. Berg de machine of de brandstofvoorraad nooit op in een
plaats waar ze in contact zouden kunnen komen met vuur,
vonken of een waakvlam, van bv. bij een geiser. Laat de
machine volledig afkoelen vooraleer u ze opbergt.
www.snapper.com
Page 97

Veiligheid van de gebruiker
GEBRUIK OP HELLINGEN
In heel wat gevallen heeft het verlies van controle over de trekker
of ongelukken, zoals het omkantelen van de trekker, precies te
maken met hellingen. Dergelijke ongelukken resulteren meestal in
zware verwondingen met mogelijk de dood tot gevolg. U dient dus
extra voorzichtig te zijn als u werkt op hellingen. Als u de helling
niet achteruit op kunt of als u zich niet veilig voelt, doet u er goed
aan niet op de helling te werken. Als u begint weg te glijden op een
helling kunt u de controle over uw machine niet meer terugkrijgen
door op de rem te gaan staan.
De voornaamste oorzaken die tot het verlies van controle over uw
machine kunnen leiden, zijn de volgende: onvoldoende grip van de
wielen, te hoge rijsnelheid, ongepast remgedrag, verstrooidheid,
een machine gebruiken die niet geschikt is voor de taak die u wenst
uit te voeren, verkeerd aangebrachte hulpstukken en een ongelijke
verdeling van de lading.
1. Maai hellingen door recht naar boven en recht naar beneden
te rijden. Rij nooit zijdelings op de flank van de helling.
2. Kijk uit voor kuilen, groeven of schokken. Op oneffen
ondergrond kan de machine omkantelen. In hoog gras
kunnen hindernissen verborgen zijn.
3. Kies een lage versnelling, zodat u niet hoeft te stoppen of
schakelen terwijl u op een helling werkt.
4. Maai niet wanneer het gras nat is. De banden kunnen hun
grip verliezen.
5. Laat de machine altijd in versnelling, in het bijzonder wanneer
u hellingen afrijdt. Schakel niet naar neutraal om de helling af
te rollen.
6. Vermijd starten, stoppen of draaien op een helling. Indien de
banden hun grip verliezen, schakel dan het maaidek uit en
rijd langzaam in een rechte lijn de helling af.
7. Voer alle bewegingen op hellingen langzaam en geleidelijk
uit. Verander niet bruusk van snelheid of richting, want
hierdoor kan de machine kantelen.
8. Wees extra voorzichtig wanneer u werkt met een machine
met een grasopvangsysteem of een ander hulpstuk, want de
stabiliteit van de machine kan hierdoor worden beïnvloed.
9. Probeer nooit de machine te stabiliseren door uw voet op de
grond te plaatsen.
10. Maai niet in de buurt van sterke hellingen, sloten of
ophogingen. De maaier zou plots kunnen kantelen indien een
wiel over de rand van een afgrond of sloot geraakt, of indien
een rand inzakt.
11. Gebruik geen grasopvangsystemen op steile hellingen.
12. Maai geen hellingen waarop u niet kunt achteruit rijden.
13. Neem contact op met uw erkende verdeler voor de
aanbevolen wielgewichten of tegengewichten ter verbetering
van de stabiliteit.
14. Verwijder hindernissen zoals rotsen, grote takken enz.
15. Werk langzaam. De banden kunnen hun grip verliezen op
hellingen, ook wanneer de remmen correct werken.
16. Draai niet op hellingen. Als dit niet kan worden vermeden,
draai dan langzaam en geleidelijk naar beneden toe indien
mogelijk.
VOORTGETROKKEN UITRUSTING
1. Trek uitsluitend met een machine die voorzien is van een
trekhaak. Maak voortgetrokken uitrusting enkel vast aan een
trekhaak en nergens anders aan de machine.
2. Volg de aanbevelingen van de fabrikant in verband met het
maximaal toegelaten gewicht van voortgetrokken uitrusting
en het trekken van voortgetrokken uitrusting op hellingen.
3. Laat kinderen of andere personen nooit in of op de
voortgetrokken uitrusting klimmen.
4. Op hellingen kunnen de banden onder het gewicht van
de voortgetrokken uitrusting hun grip verliezen, zodat de
machine onbestuurbaar wordt.
5. Rij langzaam en houd rekening met een extra lange
remafstand.
6. Schakel niet in neutraal om de helling af te rollen.
WAARSCHUWING
Gebruik de machine nooit op hellingen met meer dan
17,6% stijgingspercentage (10 graden), d.w.z. hellingen
waarbij over een afstand van 607 cm een hoogteverschil
van 106 cm overwonnen wordt.
Als u de machine gebruikt op hellingen moet u extra
wielgewichten of tegengewichten gebruiken. Neem contact
op met uw geautoriseerd verdeler om na te gaan welke
gewichten voor uw machine beschikbaar zijn en welke
geschikt zijn om het werk in kwestie uit te voeren.
Kies de lage versnelling voordat u op de helling begint te
rijden. Zelfs indien u extra wielgewichten of tegengewichten
geplaatst hebt, moet u op hellingen vooral voorzichtig
zijn als u achter op de trekker een grasopvangsysteem
geïnstalleerd hebt.
Maai hellingen door recht naar BOVEN en recht naar
BENEDEN te rijden, NOOIT zijdelings tegen de flank van
de helling. Wees voorzichtig als u van richting verandert en
STOP of VERTREK NIET op een helling.
KINDEREN
Als de bestuurder van de trekker niet aandachtig genoeg is, kunnen
er zich tragische ongelukken voordoen met spelende kinderen.
Kinderen voelen zich nu eenmaal vaak aangetrokken door de
machine en het maaien. Hou kinderen dus steeds in de gaten en
hou er rekening mee dat ze zich niet noodzakelijk meer op dezelfde
plek bevinden als enkele ogenblikken voordien.
1. Hou kinderen weg uit het maaigebied en zorg ervoor dat ze
onder het toezicht staan van een volwassene met een groot
verantwoordelijkheidsgevoel.
2. Wees attent en zet de machine uit als kinderen dichterbij
komen.
3. Kijk voor en tijdens het achteruitrijden naar beneden en naar
achteren.
4. Laat nooit kinderen meerijden, zelfs niet met de maaibladen
gedemonteerd. Ze zouden van de machine kunnen vallen
en ernstig letsel oplopen of door hun handelingen het veilige
gebruik van de machine in het gedrang brengen. Kinderen
die vroeger ooit hebben meegereden, kunnen plotseling in
het maaigebied komen om nogmaals mee te rijden en lopen
zo het gevaar om overreden te worden.
5. Laat de trekker ook nooit door kinderen besturen.
6. Wees extra voorzichtig bij dode hoeken, struiken, bomen
en andere voorwerpen die de zichtbaarheid zouden kunnen
belemmeren.
EMISSIES
1. De uitlaatgassen van deze machine bevatten stoffen die
schadelijk zijn voor de gezondheid en die bij bepaalde
hoeveelheden kanker kunnen veroorzaken of kunnen leiden
tot misvormingen en/of andere genetische afwijkingen bij de
geboorte.
2. Informatie over de duurzaamheidsperiode van de relevante
emissies en de luchtindex vindt u op het emissiselabel van de
motor.
ONTSTEKINGSSYSTEEM
1. Dit ontstekingssysteem door middel van een elektrische vonk
is conform de Canadese norm ICES-002.
nl
9
Page 98

Veiligheid van de gebruiker
ONDERHOUD EN NAZICHT
Veilig omgaan met benzine
1. Doof alle sigaretten, sigaren, pijpen en andere mogelijke
ontstekingsbronnen.
2. Gebruik enkel goedgekeurde benzinerecipiënten.
3. Verwijder nooit de tankdop of tank nooit terwijl de motor
draait. Laat de motor afkoelen alvorens te tanken.
4. Tank nooit binnen, maar altijd buiten.
5. Plaats de machine of de brandstofrecipiënt nooit in de
buurt van een open vlam, vonken, of een waakvlam, zoals
bijvoorbeeld in de buurt van een geiser of een ander toestel.
6. Vul de recipiënten nooit in een voertuig of op de laadvloer
van een vrachtwagen met een kunststoffen bodembekleding.
Plaats recipiënten altijd op de grond, weg van uw voertuig,
alvorens ze te vullen.
7. Verwijder benzineaangedreven machines van de
vrachtwagen of de aanhangwagen en tank ze vol op de
grond. Indien dit niet mogelijk is, vul de machines dan op een
aanhangwagen met een draagbare recipiënt in plaats van met
het tankpistool.
8. Houd het tankpistool de hele tijd in contact met de rand van
de brandstoftank of de opening van de recipiënt totdat deze
gevuld is. Gebruik geen pistoolvergrendel/openingssysteem.
9. Indien u brandstof op uw kleren morst, moet u onmiddellijk
andere kleren aantrekken.
10. Overvul de tank nooit. Plaats de tankdop terug en zet hem
goed vast.
11. Wees extra voorzichtig in de omgang met benzine en andere
brandstoffen. Zij zijn ontvlambaar en de dampen die ze
ontwikkelen zijn ontplofbaar.
12. Indien er brandstof wordt gemorst, probeer dan niet de
motor te starten, maar verplaats de machine, weg van
de plaats waar gemorst werd, en zorg er nauwgezet voor
op geen enkele manier vonken te veroorzaken zolang de
brandstofdampen niet volledig zijn verdampt.
13. Plaats alle doppen zorgvuldig terug op de brandstoftank(s) en
de brandstofrecipiënt(en).
Service en onderhoud
1. Laat de machine nooit draaien in een gesloten ruimte waar de
koolstofmonoxidedampen zich kunnen ophopen.
2. Zorg ervoor dat de moeren en bouten, in het bijzonder de
bevestigingsbouten van de maaibladen, altijd goed vast staan
en houd het materieel in goede toestand.
3. Knoei nooit met de veiligheidssystemen. Controleer
regelmatig of ze naar behoren werken en voer de nodige
herstellingen uit indien ze niet goed werken.
4. Houd de machine vrij van gras, bladeren of andere
vuilophoping. Ruim gemorste olie of brandstof op.
5. Stop, leg de motor stil en controleer de machine nadat ze een
voorwerp geraakt heeft. Voer herstellingen uit indien nodig,
alvorens te herstarten.
6. Voer nooit afstellingen of herstellingen uit terwijl de motor
draait, tenzij uitdrukkelijk het tegendeel is vermeld in de
handleiding van de motorfabrikant.
7. De onderdelen van het grasopvangsysteem staan bloot
aan slijtage en allerlei vormen van beschadiging, waardoor
bewegende onderdelen zichtbaar kunnen worden of objecten
unnen worden rondgeslingerd. Controleer deze onderdelen
op regelmatige basis en vervang ze desnoods door de
wisselstukken die de fabrikant daarvoor aanbeveelt.
8. Maaibladen zijn heel scherpe voorwerpen die diepe
snijwonden kunnen veroorzaken. Wikkel de maaibladen in
een omhulsel of draag handschoenen als u ze vastneemt.
Wees ook extra voorzichtig als u onderhoudswerkzaamheden
uitvoert aan de maaibladen.
9. Controleer regelmatig of de rem nog goed werkt. Voer
eventueel de nodige regelingen of herstelwerkzaamheden uit.
10. Onderhoud of vervang de veiligheids- en aanwijzingslabels
indien nodig.
11. Verwijder de brandstoffilter niet wanneer de motor heet is,
want gemorste benzine kan ontsteken. Plaats de klemmen
voor de brandstofleiding niet verder uit elkaar dan nodig.
Controleer of de klemmen de slang stevig over de filter
vasthouden na de installatie.
12. Gebruik geen benzine met METHANOL of gasohol met meer
dan 10% ETHANOL of benzineadditieven of wasbenzine,
want de motor/het brandstofsysteem kan hierdoor schade
oplopen.
13. Indien de brandstoftank moet worden afgetapt, doe dit dan
buiten.
14. Vervang een defecte knaldemper.
15. Gebruik bij het uitvoeren van herstelwerkzaamheden
uitsluitend door de fabrikant goedgekeurde wisselstukken.
16. Hou bij het uitvoeren van regelingen en
herstelwerkzaamheden altijd rekening met de specificaties en
instellingen opgegeven door de fabrikant.
17. Grote onderhouds- en herstelwerkzaamheden laat u best
gebeuren in erkende en door de fabrikant goedgekeurde
service centers.
18. Voer zelf geen grote herstelwerkzaamheden aan
deze machine uit tenzij u daarvoor de noodzakelijke
technische opleiding gekregen hebt. Verkeerd uitgevoerde
onderhoudswerkzaamheden kunnen tot gevaarlijke situaties,
schade aan de machine en een nietigverklaring van de
garantie leiden.
19. Denk er bij een maaidek met meer dan één blad aan dat het
éne blad het andere in beweging kan zetten.
20. Verander niets aan het motormanagement van de motor en
voer de motor niet op. Hoge motorsnelheden verhogen het
risico op ongelukken.
21. Koppel aangedreven hulpstukken los, leg de motor stil,
haal de sleutel uit het contact en maak de draden van
de ontstekingsbougies los in volgende gevallen: als u
ophopingen van gras en andere materialen in de uitvoer
wenst te verwijderen, als u onderhoudswerkzaamheden
wenst uit te voeren, als u een voorwerp geraakt hebt of
als de machine abnormaal begint te trillen. Hebt u een
voorwerp geraakt, dan moet u nagaan of de machine
schade opgelopen heeft en deze herstellen vooraleer u
de machine opnieuw mag opstarten en doorgaan met de
werkzaamheden.
22. Plaats uw handen nooit in de buurt van de koelventilator
van de hydrostatische pomp terwijl de motor nog loop. Deze
ventilator bevindt zich aan de bovenzijde van de aandrijfas.
23. Machines met hydraulische pompen, slangen of motoren:
WAARSCHUWING: Hydraulische vloeistof die onder
druk ontsnapt, kan voldoende kracht hebben om de huid
te doorboren en ernstig letsel te veroorzaken. Als een
lichaamsvreemde vloeistof in de huid wordt geïnjecteerd,
moet deze binnen enkele uren chirurgisch worden verwijderd
door een arts die vertrouwd is met deze vorm van letsel.
Zoniet kan koudvuur optreden. Houd uw lichaam en handen
weg van pengaten of openingen waaruit hydraulische
vloeistof onder hoge druk wordt verstoven. Gebruik voor het
opsporen van lekken papier of karton en niet uw handen.
Zorg ervoor dat alle hydraulische- vloeistofverbindingen goed
vast staan en dat alle hydraulische slangen en leidingen in
goede staat verkeren alvorens het systeem onder druk te
zetten. In geval van een lek dient u de machine onmiddellijk
te laten nazien door een geautoriseerd verdeler.
24. WAARSCHUWING: Energieaccumulator De veren op
verkeerde wijze losmaken kan ernstig letsel veroorzaken.
Veren mogen enkel door een geautoriseerd verdeler worden
verwijderd.
25. Modellen met een motorradiator: WAARSCHUWING:
Energieaccumulator Ter voorkoming van ernstig lichamelijk
letsel door hete koelvloeistof of een stoomlek mag u nooit de
radiatordop proberen verwijderen terwijl de motor draait. Leg
de motor stil en wacht tot hij afgekoeld is. Zelfs dan moet u
nog uiterst voorzichtig zijn wanneer u de dop verwijdert.”
10
www.snapper.com
Page 99

Veiligheid van de gebruiker
Veiligheidsplaatjes
Alle waarschuwingsboodschappen (GEVAAR,
WAARSCHUWING en OPGEPAST) en richtlijnen die
aangebracht zijn op uw trekker en maaidek moet u grondig
lezen en in acht nemen. Worden deze instructies niet
opgevolgd, dan bestaat gevaar voor lichamelijk letsel.
Deze informatie is voor uw eigen veiligheid bedoeld en is
uitermate belangrijk ! De hierna afgebeelde veiligheidsplaatjes bevinden zich op uw trekker en maaidek.
Sikkerhedssymboler
Advarsel: Se
Betjeningsvejledningen.
Læs og forstå betjeningsvejledningen
før brug af maskinen.
Fare: Udslyngende genstande.
Denne maskine er i stand til at kaste
genstande og andet materiale. Hold
omkringstående væk.
Als één van deze plaatjes is afgegaan of beschadigd, moet
u het onmiddellijk vervangen. Vraag uw geautoriseerd
verdeler om vervanging.
De plaatjes zijn gemakkelijk aan te brengen en vormen
zowel voor uzelf, als voor andere gebruikers een
permanente herinnering aan de vereiste veiligheidsvoorschriften, wat voor een veilige en efficiënte bediening
van de machine noodzakelijk is.
Fare: Fare for amputering.
Denne maskine kan amputere
lemmer. Hold hænder og fødder
borte fra knivene.
Fare: Brandfare.
Brændstof må ikke påfyldes, mens
motoren er varm eller går. Stands
motoren og lad den køle af i 3
minutter, før du fylder brændstof på.
Advarsel: Fjern startnøglen før
servicearbejde.
Fjern nøglen og gennemlæs
den tekniske vejledning, før
du udfører reparationer eller
vedligeholdelsesarbejde.
Fare: Fare for at vælte.
Brug ikke denne maskine på
skråninger over 10°.
Fare: Fare for amputering.
Denne maskine kan amputere
lemmer. Hold omkringstående,
deriblandt børn borte, når motoren går.
Fare: Varme komponenter.
Lad motoren køle af, før du berører
området.
Fare: Kulilteforgiftning.
Lad ikke motoren gå i et dårligt
ventileret område.
nl
11
Page 100

Veiligheid van de gebruiker
OO
TT
OO
Locatie van de waarschuwingsstickers
Maaihoogte
stuknr. 1737541
Gebruiksaanwijzing,
stuknr. 1750631
Contactsleutelstanden
stuknr. 1722806
Opgepast, knelpunt
stuknr. 5102457
1
2
3
4
5
6
+
Opgepast, knelpunt
stuknr. 5102457
SS
PP
SS
1723160
Vrijgavehendel
voor transmissie
stuknr. 1723160
Figuur 1
12
www.snapper.com
 Loading...