


OWNER’S MANUAL
MANUEL DE
L’UTILISATEUR
Model • Modèle 3.3SM4R
CAUTION:
Read and follow all safety rules and operating instructions before first use of this product.
PRÉCAUTION:
Veuillez lire attentivement les consignes de sécurité et les instructions d'utilisation avant l'utilisation initiale de ce produit.
ALL REFRIGERATORS |
|
• Before Putting Into Use .............................................................. |
2 |
• Important .................................................................................... |
2 |
• Placing and Installation............................................................... |
3 |
• Refrigerator bracket & Microwave installation ........................... |
4 |
• Description of the Appliance....................................................... |
5 |
• Operation Control ...................................................................... |
6 |
• Maintenance and Cleaning ........................................................ |
7 |
• Changing the Direction of opening the Door ............................. |
8 |
• Trouble Shooting Guide ............................................................. |
9 |
• Bulb Replacement ...................................................................... |
10 |
• WARRANTY .............................................................................. |
11 |
LES TOUT RÉFRIGÉRATEURS |
|
• Avant la mise en marche ........................................................... |
13 |
• Important .................................................................................... |
13 |
• Placement et installation ............................................................ |
14 |
• Support du réfrigérateur et installation du micro-ondes ............. |
15 |
• Description de l’appareil ............................................................. |
16 |
• Contrôle du fonctionnement ....................................................... |
17 |
• Entretien et nettoyage ................................................................ |
18 |
• Changer le sens d’ouverture de la porte ................................... |
19 |
• Guide de dépannage ................................................................. |
20 |
• Changer l’ampoule ..................................................................... |
21 |
• GARANTIE ................................................................................. |
22 |
3.3SM4R
25.04.14

All Refrigerators
This Refrigerator is for domestic use only and is intended for storing fresh foods at temperatures higher than 0° / 32°F.
SAVE THESE INSTRUCTIONS
Before Putting Into Use .................................... |
2 |
Maintenance and Cleaning ............................... |
7 |
Instructions for Use |
|
Automatic Defrosting of the Refrigerator |
|
Tips for Energy Savings |
|
Cleaning the Appliance |
|
Important ............................................................ |
2 |
Switch Off the Appliance When Not In Use |
|
Placing and Installation .................................... |
3 |
Changing the Direction of the |
|
Choosing the Right Place |
|
Door Opening (swing) ...................................... |
8 |
Placing the Self-standing Appliance |
|
Trouble-Shooting Guide ................................... |
9 |
Connection to Power Supply |
|
Bulb Replacement ............................................. |
10 |
Refrigerator bracket & Microwave |
|
Warranty............................................................... |
11 |
Installation .......................................................... |
4 |
|
|
Description of the Appliance ........................... |
5 |
|
|
Operation Control ............................................. |
6 |
|
|
Temperature Selection |
|
|
|
1

Before Putting Into Use
•Before connecting the appliance to electrical power supply, let it stand for about 2 hours, which will reduce the possibility of malfunctions in the cooling system due to transport handling.
•Clean the appliance thoroughly, especially in the interior (See Cleaning and Maintenance).
•In case the interior accessories are not correctly placed, rearrange them as described in chapter "Description of the Appliance".
Instructions for Use
These instructions for use are intended for the user. They describe the appliance and correct operating procedures for safe use.
SAVE THESE INSTRUCTIONS
Tips for Energy Savings
•Try not to open the door too often, especially when the weather is hot and humid. Once you open the door, close it as soon as possible. This is especially important if you have an upright model.
•Every now and then check if the appliance is sufficiently ventilated (adequate air circulation behind the appliance).
•Set the thermostat from higher to lower settings as soon as possible (depends on how loaded the appliance is, ambient temperatures, etc.)
•Before loading the appliance with packages of fresh foods, make sure that they are cooled to ambient temperature. (excluding soups).
•Ice and frost layers increase energy consumption, so clean the appliance as soon as the frost layer is 1/8- 1/4 inch thick.
•If the gasket is damaged or the door seal is poor, energy consumption is substantially higher. To restore efficiency, replace the gasket.
•Always consider instructions stated in sections Positioning and Energy Saving Tips, otherwise the energy consumption is substantially higher.
Important
Read all safety information before using
 IMPORTANT WARNING!
An empty refrigerator is a very dangerous attraction to children. Remove the gasket, latches, lids or doors from unused appliances, or take some other action that will guarantee the appliance harmless.
DANGER: Risk of child entrapment. Before you throw away your old refrigerator:
•Take off the doors.
•Leave the shelves in place so that children may not easily climb in.
DON’T WAIT! DO IT NOW!
 WARNING! EXPLOSION HAZARD!
Risk of fire or explosion due to puncturing of refrigerant tubing. Do not use sharp objects to aid in defrost. Please handle with care. Keep flammable materials and vapors such as gasoline away from the refrigerator. Use nonflammable cleaner.
Disposal of this unit should be in accordance with federal and local regulations.
2
Important
Read all safety information before using
•The appliance must be properly connected to an electrical power supply. (See: Connection to Power Supply).
•Always disconnect the appliance from the power supply before cleaning the appliance or replacing the light bulb. WARNING: repairs should be preformed by qualified service personnel only.
•Do not defrost the appliance with other electric appliances (for example a hair dryer) and never attempt to scrape/remove ice/frost with sharp objects.
•The rating plate containing Model No/Serial No and other technical data specific to this unit, is located either inside the appliance or outside on the rear wall.
•The refrigerator system of the appliance is filled with refrigerant and insulating substances which should be separately treated and processed. Call your nearest authorized service agent or specialized servicing center. If you are unable to locate one, contact your local authorities or your distributor. Be careful not to damage the tubes on the rear wall of the appliance (danger of pollution).
Please ensure that component parts shall be replaced with like components and that servicing shall be done by factory authorized service personnel, so as to minimize the risk of possible ignition due to incorrect parts or improper service.
Placing and Installation
Choosing the right place
Place the appliance in a dry and regularly ventilated room. Never place the appliance near heat emitting devices (e.g. cooking appliances, radiators, water heaters or similar devices) and do not expose to direct sunlight.
The appliance should be positioned at least 1.2 inches (3 cm) away from electric or gas cooking appliances and at least 12 inches away from oil or coal fired stoves. If this is not possible, use an appropriate insulation barrier.
WARNING
Instructions pertaining to the risk of fire, electric shock, or injury to persons.
Grounding Instructions
This appliance must be grounded. In the event of an electrical short circuit, grounding reduces the risk of electrical shock by providing an escape wire for the electrical current. This appliance is equipped with a cord having a grounding wire with a grounding plug. The plug must be plugged into an outlet that is properly installed and grounded.
Installation
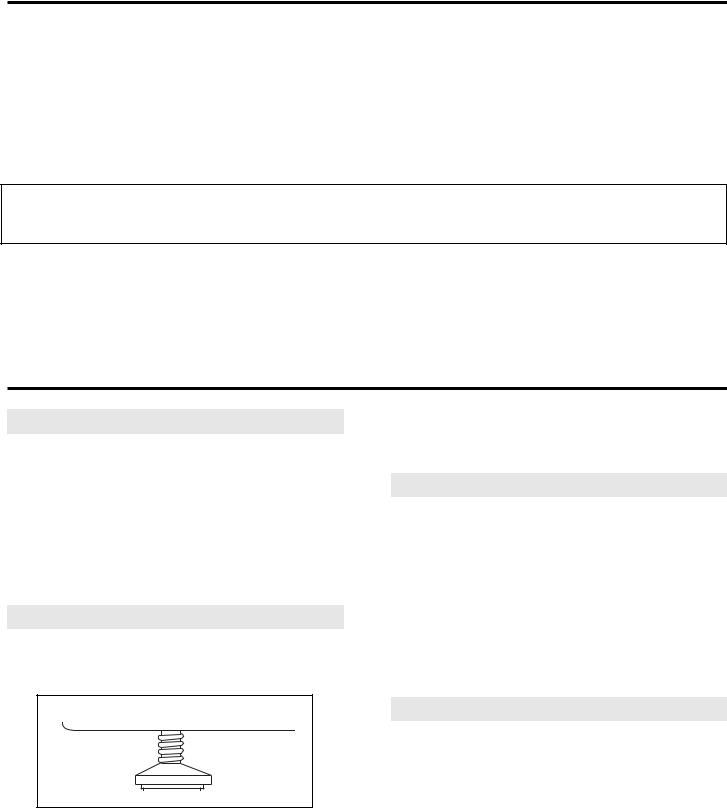
Place the appliance firmly on a solid base. Some appliances have adjustable feet on the front side; use them to level the appliance.
WARNING - Improper use of the grounding plug can result in a risk of electric shock. Consult a qualified electrician or serviceman if the grounding instructions are not completely understood, or if doubt exists as to whether the appliance is properly grounded.
Connection to Power Supply
Connect the appliance power cord and plug to a properly grounded wall outlet. The required nominal voltage and frequency are indicated on the rating plate (inside the unit or on the exterior rear wall of the unit).
DO NOT USE AN EXTENSION CORD
Use an exclusive 115V wall outlet. Do not connect your refrigerator to extension cords or together with any other appliance in the same wall outlet. Do not splice the cord.
3
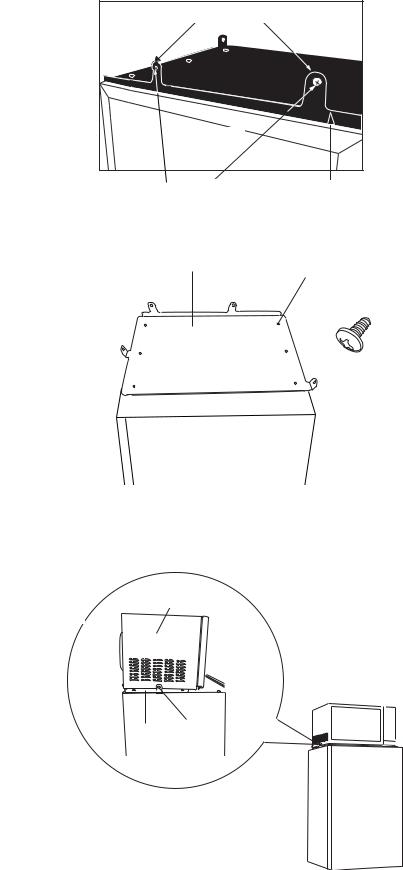
REFRIGERATOR BRACKET & MICROWAVE INSTALLATION
1. Place the bracket on top of the refrigerator with its rear lip with two loops facing upward. The rear lip of the bracket should be lined up with the back edge of the refrigerator, with the two side loops facing up to accept the microwave.
2 LOOPS FACING UPWARDS |
|
BACK OF |
|
REFRIGERATOR |
|
SCREWS |
BRACKET |
2. With the bracket lined up as stated above the preset holes on top of the refrigerator should be lined up with the holes on the bracket. Attach the bracket to the refrigerator using the six screws that come supplied with the refrigerator.
BRACKET |
HOLES FOR SCREWS |
|
SCREWS (x6) come with refrigerator
REFRIGERATOR
3. Place the microwave oven on top of the refrigerator and inside the two upright loops on the sides and in front of the two upright loops on the back of the bracket. Line up the holes on each side and on the back of the bracket and attach the microwave using the screws supplied. The two back screws come supplied with the refrigerator while the two side screws are already on the microwave. Please remove the two microwave screws prior to placing the microwave oven on top of the refrigerator.
SIDE VIEW |
MICROWAVE |
FRONT VIEW
Bracket Screws
REFRIGERATOR
4
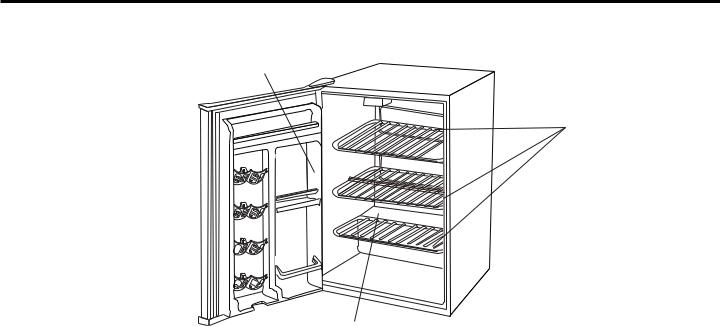
Description of the Appliance
B
beer.
Of the Refrigerator
interior of
of
 the refrigerator
cooling plate mounted in the plate there is a channel and water
the defrost blockage. A
clean of food p  clogged,
is opened, off
C
3.3SM4R
(A) Plastic Coated Shelves
Odor resistant, rustproof, and removable for easy cleaning.
(B) Door Liner
The door liner consists of tall, medium,and large bottles, cans or jars, The canstor door liner holds 355ml cans of pop. juice or beer.
Illumination in the Interior Of the Refrigerator
(C) Defrost Water Outlet
The interior of the refrigerator is cooled with a cooling plate mounted in the rear wall. Under the plate there is a channel and an outlet for defrost water
Regularly check the defrost water outlet and the drain channel for blockage. They should always be kept free and clean of food particles. If the drain outlet does become clogged, use a plastic straw to dean it.
The light for illuminating the interior of the refrigerator is on. when the door is opened, off when the door is closed.
5
Operation Control
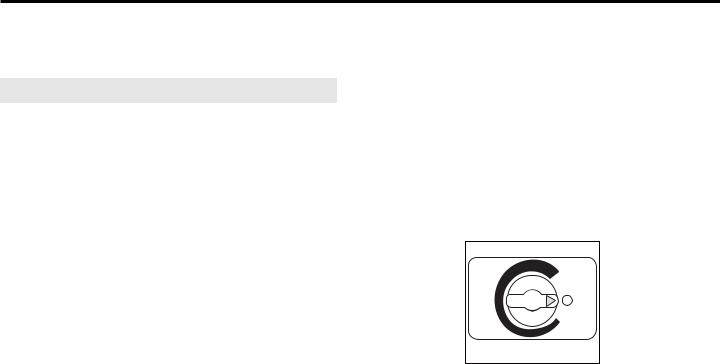
The temperature of the refrigerator is controlled by setting thermostat knob to a desired setting.
Temperature Selection
To start the refrigerator, turn the temperature control knob to the position corresponding to the desired cooling (on the graduated blue dial ) Fig A
The refrigerator temperature will vary depending on the quantity of the food stored and on the frequency with which the door is opened.
To turn the control to the "OFF" position, rotate the control knob to the "0° position. If the refrigerator has been left out of use for some time, set the control to maximum for 2-3 hours before turning to the desired position. If the refrigerator is not being used for long time periods, disconnect the plug and leave the door partially open. This will help to reduce mold/mildew from accumulating inside the refrigerator cabinet.
•Changes in ambient room temperature will affect internal refrigerator temperatures (choose correct setting of the thermostat knob).
•In STOP (0) position the appliance does not operate (cooling system is switched off), yet power supply is not interrupted (the light is on , when you open the refrigerator door).
•Temperature in the refrigerator also depends on how often the door is opened.
FIG A
6

Maintenance and Cleaning
Automatic Defrosting of the
Refrigerator
There is no need to defrost the refrigerator, because ice depositing on the inner back wall is defrosted automatically.
Ice build-up on the inner back wall during the compressor operation; will (when the compressor has cycled off) defrost automatically Defrost water collects inside the drain through passing through the drain outlet in the inner back wall into a drain pan situated above the compressor, from where it evaporates.
Cleaning the Appliance
Disconnect the power bar before cleaning the appliance.
Do not use coarse or aggressive cleaning agents as you can damage the surface.
Clean the exterior with water and detergent. Remove the detachable accessories in the interior of the appliance and dean with water and liquid detergent. Plastic parts cannot be washed in dishwashers.
Wash the interior of the appliance with lukewarm water, adding one or two spoonfuls of vinegar. After cleaning, connect the appliance to power supply and reload it.
Switch Off the Appliance When
Not In Use
If you do not intend to use the appliance for long periods of time, (vacations) set the thermostat knob to the STOP (0) position, disconnect the power supply, take out the foods and defrost and clean the appliance. Leave the door slightly open.
7
 Loading...