


MODEL GT SERIES
ENERGY STAR
INSTALLATION, OPERATING
AND MAINTENANCE MANUAL
Modulating, Direct Vent, Gas-Fired Condensing Boilers
Natural Or Propane
150,000 to 399,000 Btuh Input
GTIOM-3
see note
gama
WARNING: If the information in this manual is not followed exactly, a fi re or explosion
may result causing property damage, personal injury or loss of life.
Do not store or use gasoline or other fl ammable vapors and liquids in the vicinity of
this or any other appliance.
WHAT TO DO IF YOU SMELL GAS:
• Do not try to light any appliance.
• Do not touch any electrical switch. Do not use any phone in your building.
• Immediately call your gas supplier from a neighbor’s phone. Follow the gas supplier’s
instructions.
• If you cannot reach your gas supplier, call the fi re department.
Installation and service must be performed by a qualifi ed installer, service agency or
the gas supplier.
WARNING: Installation and service must be performed by a qualifi ed installer, service
agency or the gas supplier in accordance with all local and national codes. Failure to
comply with this warning can result in a fi re or explosion causing property damage,
personal injury or loss of life!
WARNING: It is the responsibility of the homeowner to keep the vent terminal clear
of snow and ice. Failure to comply with this warning can result in excessive levels of
carbon monoxide causing severe personal injury or death!
ENERGY STAR
INSTALLER: THESE INSTRUCTIONS MUST BE AFFIXED ADJACENT TO THE BOILER.
CONSUMER: RETAIN THESE INSTRUCTIONS FOR FUTURE REFERENCE PURPOSES.
Note: For LP gas use conversion kit: GT82650-1 on GT-150 & 200, GT83017-1 on GT-400
WESTCAST, INC.
260 NORTH ELM STREET WESTFIELD, MA 01085
TEL. (413) 562-9631 FAX (413) 562-3799

GT INSTALLATION AND OPERATION INSTRUCTIONSPage 2
CONTENTS
Before You Start ................................................. page 2
Boiler Ratings & Capacities ...............................page 2
Boiler Location ................................................... page 3
Clearances to Combustible Construction ..........page 3
Combustion Air ..................................................page 4
General Venting Guidelines ...............................page 4
Horizontal Direct Vent Systems .........................page 5
Vertical Direct Vent Systems ............................... page 9
Condensate Drain ............................................page 10
General Plumbing Guidelines .......................... page 11
Primary Loop Plumbing ...................................page 13
Multiple Boiler Primary Loop Plumbing ........... page 13
Secondary Loop Plumbing ..............................page 13
Gas Supply Piping ...........................................page 18
Electrical Wiring ............................................... page 19
Sentry 2100 Controller ....................................page 26
Boiler Set Up ...................................................page 29
Operating Instructions .....................................page 29
Boiler Checking & Adjusting ............................page 33
Gas Pressure Adjustment ................................page 33
Boiler Maintenance .......................................... page 34
Wall Hung Conversion .....................................page 35
Trouble Shooting .............................................page 36
Replacement Parts ..........................................page 41
To obtain the safe, dependable, efficient operation
and long life for which this boiler was designed, these
instructions must be read, understood and followed.
Direct all questions to your Smith distributor or to the
Customer Service Department, 260 North Elm Street,
Westfi eld, MA 01085. Always include the model and serial
numbers from the rating plate of the boiler in question.
The owner should maintain a record of all service work
performed with the date and a description of the work
done. Include the name of the service organization for
future reference.
Where required by the authority having jurisdiction, the
installation must conform to the Standard for Controls
and Safety Devices for Automatically Fired Boilers,
ANSI/ASME CSD-1.
The installation must conform to the requirements of the
authority having jurisdiction or, in the absence of such
requirements, to the National Fuel Gas Code, ANSI
Z223.1-latest revision. In Canada, the installation must
be in accordance with the requirements of CSA B149.1
or B149.2 Installation Code for Gas Burning Appliances
and Equipment.
BEFORE YOU START
WARNING: This manual must be read and
fully understood before installing, operation
or servicing this boiler! Failure to follow these
instructions could result in a fi re or explosion
causing extensive property damage, personal
injury or death!
These instructions cover the GT Series gas fi red, direct
vent, low pressure, hot water boiler. GT boilers have been
design certifi ed by CSA for use with natural and propane
gas under the latest edition of ANSI-Z21.13/CSA 4.9,
Gas-Fired Low Pressure Steam and Hot Water Boilers.
Each unit has been constructed and hydrostatically
tested for a maximum working pressure of 30 psi,
207 kPa, in accordance with Section IV of the ASME
Boiler and Pressure Vessel Code. Each boiler has been
equipped with a 30 psi, 207 kPa pressure relief valve.
This manual covers the application, installation, operation
and maintenance of a GT Series low pressure hot water
boiler.
If installed in the Commonwealth of Massachusetts, you
MUST FOLLOW the additional instructions contained in
Smith’s instruction sheet MA IOM. If you don’t have a
copy call your Smith distributor or Smith.
BOILER RATINGS & CAPACITIES
Before undertaking the installation of the GT check the
boiler rating plate to ensure that the boiler is the proper
size for the job.
Also ensure that the boiler has been set up for the type
of gas available at the installation site. Other important
considerations are the availability of an adequate
electrical supply, fresh air for combustion and proximity
a suitable outside wall.
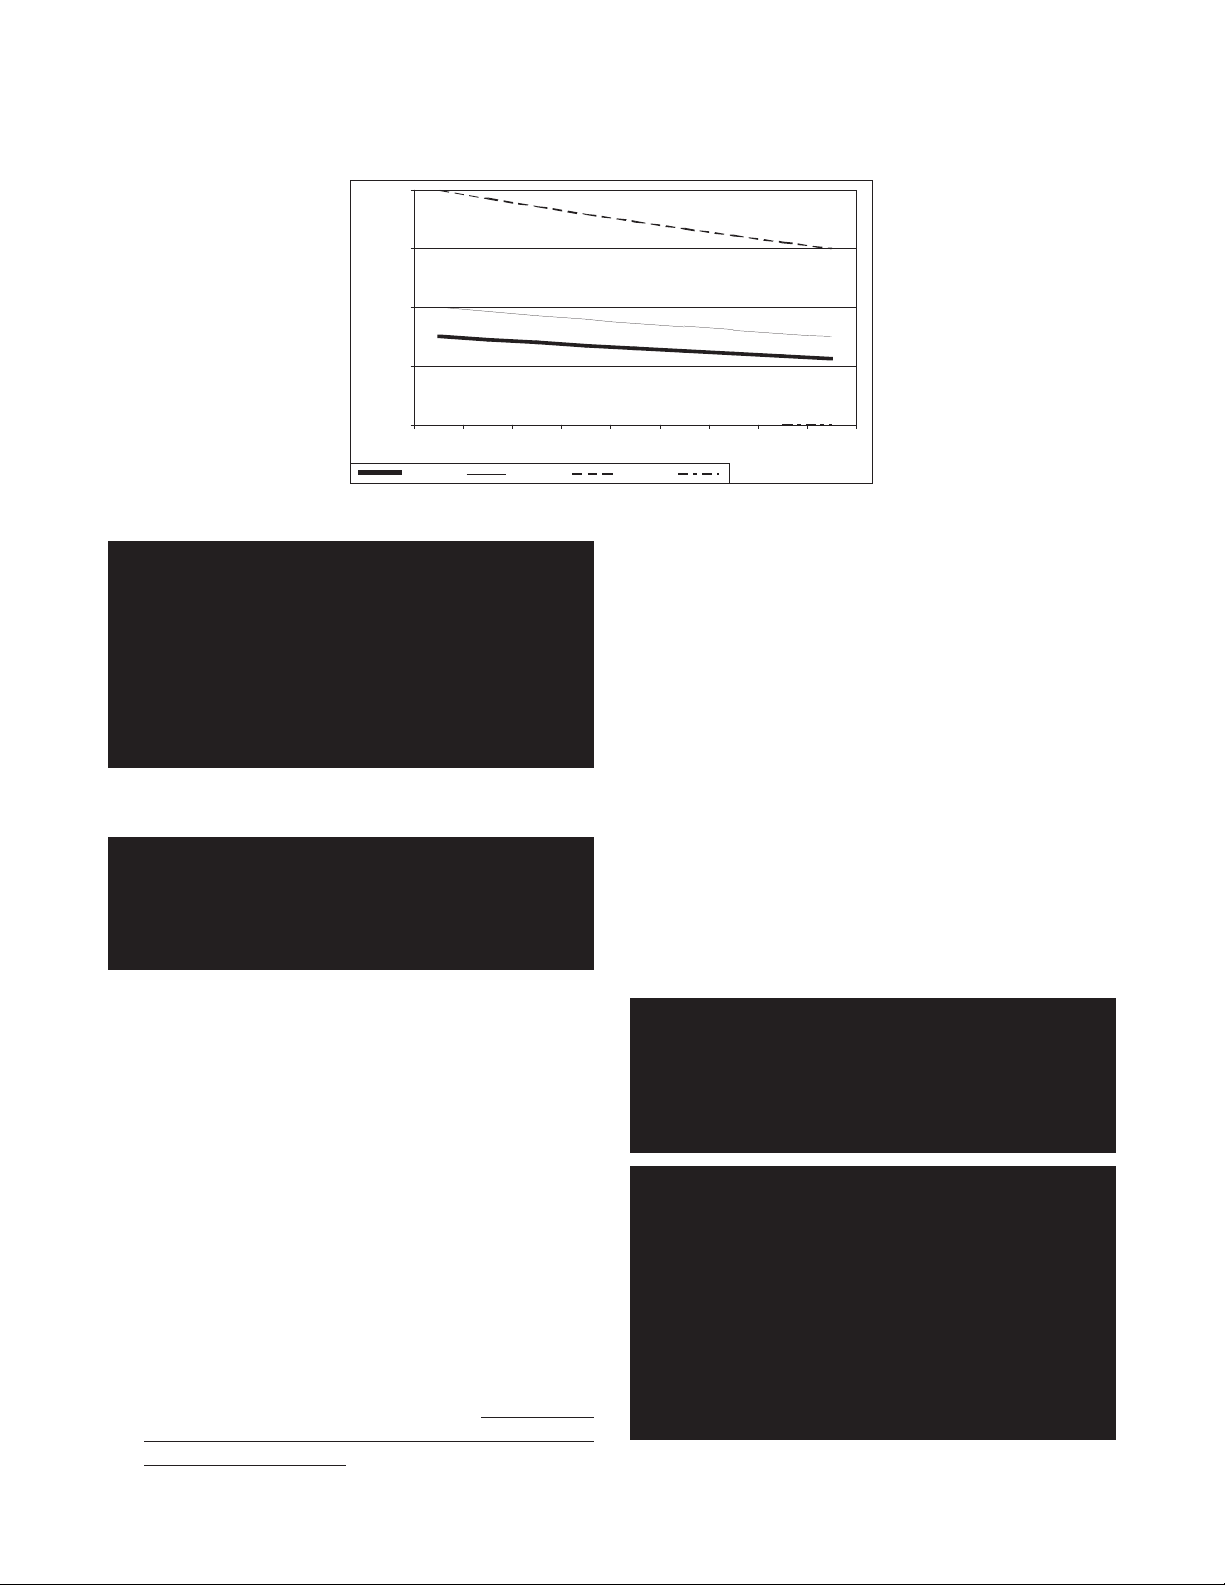
High Altitude Operation
The GT boiler is designed to operate to capacity in
installations with 2000 ft, 610 m of elevation or less. At
elevations higher than 2000 ft, 610 m the unit will de-rate
due to the lower air density, see Figure 1.
NOTE: It is the Installers responsibility to check
the combustion, and to adjust the combustion in
accordance to Operating Instructions Section.
GT INSTALLATION AND OPERATION INSTRUCTIONS Page 3
Figure 1- Input vs Elevation Graph
400
300
)hbM( tupnI
200
100
0
GT-15 0 GT-200 GT-400
0-2000 3000 4000 5000 6000 7000 8000 9000 10000
Elevation (ft)
WARNING: At elevations greater than 2000 ft,
660 m, the combustion of the GT must be checked
with a calibrated combustion analyzer to ensure
safe and reliable operation. Consult the Operating
Instructions Section for instructions on adjusting
the input to provide proper operation. Failure to
comply with this warning can result in excessive
levels of carbon monoxide causing severe
personal injury or death!
BOILER LOCATION
WARNING: The clearances to combustible
construction listed in Table 1 must be maintained.
Failure to comply with this warning can result in
a extensive property damage, severe personal
injury or death!
CAUTION: This boiler is designed to operate only
in residential and commercial heating systems. It is
not intended for:
1. Outdoor installations, or unheated spaces, which
can cause freezing.
2. Process heating of potable water, or any other
fl uids.
3. Un-pressurized, and gravity feed heating
systems.
4. Heating systems with very low pressures or
fl ow.
Improper use or installation will seriously damage
the boiler, voiding warranty!
1. Locate the boiler in an area that provides good
access to the unit. Keep in mind that servicing may
require the removal of jacket panels. Accessibility
clearances should take precedence over fire
protection clearances. Table 1 lists the minimum
clearances for servicing, however 24 in, 610 mm is
recommended.
2. An optimum site will be level, central to the hot water
piping system and close to an outside wall.
NOTE: This boiler is designed for direct placement
on a combustible fl oor. Never install this boiler on
carpeting!
3. DO NOT install this boiler in a location that would
subject any of the gas ignition components to direct
contact with water or excessive moisture during
operation or servicing. The boiler location ambient
temperature must be no less than 50°F, 10°C
including the condensate line.
4. NEVER store objects on or around the boiler.
5. This boiler may be wall mounted. See the Wall Hung
Conversion section listed in the table of contents.
WARNING: Never store combustible materials,
gasoline or any product containing fl ammable
vapors or liquids in the vicinity of the boiler.
Failure to comply with this warning can result
in extensive property damage, severe personal
injury or death!
WARNING: Liquefied Petroleum, LP, gas is
heavier than air; it is imperative that your boiler
is not installed in a pit or similar location that
will permit heavier than air gas to collect. Local
Codes may require appliances fueled with LP
gas be provided with an approved means, of
removing unburned gases from the room. Check
your local codes for this requirement. Failure to
comply with this warning can result in extensive
property damage, severe personal injury or
death!

GT INSTALLATION AND OPERATION INSTRUCTIONSPage 4
Table 1 - Clearances
Combustible Service
Clearance Clearance
Surface in mm in mm
Front 0 0 24 610
Back 0 0 0 0
Sides 0 0 12 305
To p 0 0 12 305
Bottom - 150 & 200 0 0 12 305
Bottom - 400 0 0 0 0
Flue Pipe - enclosed 2 51 n/a n/a
Flue Pipe - in free air 0 0 n/a n/a
COMBUSTION AIR
WARNING: This boiler must be supplied with
combustion air in accordance with Section 5.3,
Air for Combustion & Ventilation, of the latest
revision of the National Fuel Gas Code, ANSI
Z223.1/NFPA 54 and all applicable local building
codes. Failure to provide adequate combustion
air for this boiler can result in excessive levels
of carbon monoxide which can result in severe
personal injury or death!
WARNING: Never operate this boiler unless the
air intake is connected to the outdoors. Failure to
comply with this warning can result in excessive
levels of carbon monoxide causing severe
personal injury or death!
WARNING: Each boiler must have it’s own intake
air system. Common intake air systems are not
to be used! Improper installation can result in
excessive levels of carbon monoxide which can
cause severe personal injury or death!
To operate properly and safely this boiler requires a
continuous supply of air for combustion. NEVER store
objects around the air inlet!
One of the following materials is to be used for the air
intake pipe:
• GT-150 & 200: 3 in, 76 mm, PVC Sch.40 pipe or
Galvanized Steel pipe.
• GT-400: 4 in, 102 mm or 6 in 152 mm, PVC Sch.40
pipe or Galvanized Steel pipe.
See Table 2 for the maximum equivalent air intake
system length.
CAUTION: Combustion air contaminated with fl uorocarbons or other halogenated compounds such as
cleaning solvents, refrigerants, chloride, fl ouride,
bromine or iodine will result in the formation of
acids in the combustion chamber. These acids will
cause premature failure of the boiler voiding the
warranty!
GENERAL VENTING GUIDELINES
WARNING: The vent installation must be in
accordance with Part 7, Venting of Equipment, of
the latest revision of the National Fuel Gas Code,
ANSI Z223.1/NFPA 54 applicable provisions of
the local building codes. Improper venting can
result in excessive levels of carbon monoxide
which can result in severe personal injury or
death!
NOTE: Compliance with code requirements doesn’t
insure a satisfactory installation; good common
sense must also be applied.
WARNING: Each boiler must have it’s own vent
system. Common positive pressure vent systems
are not to be used! Improper installation can
result in excessive levels of carbon monoxide
which can cause severe personal injury or
death!
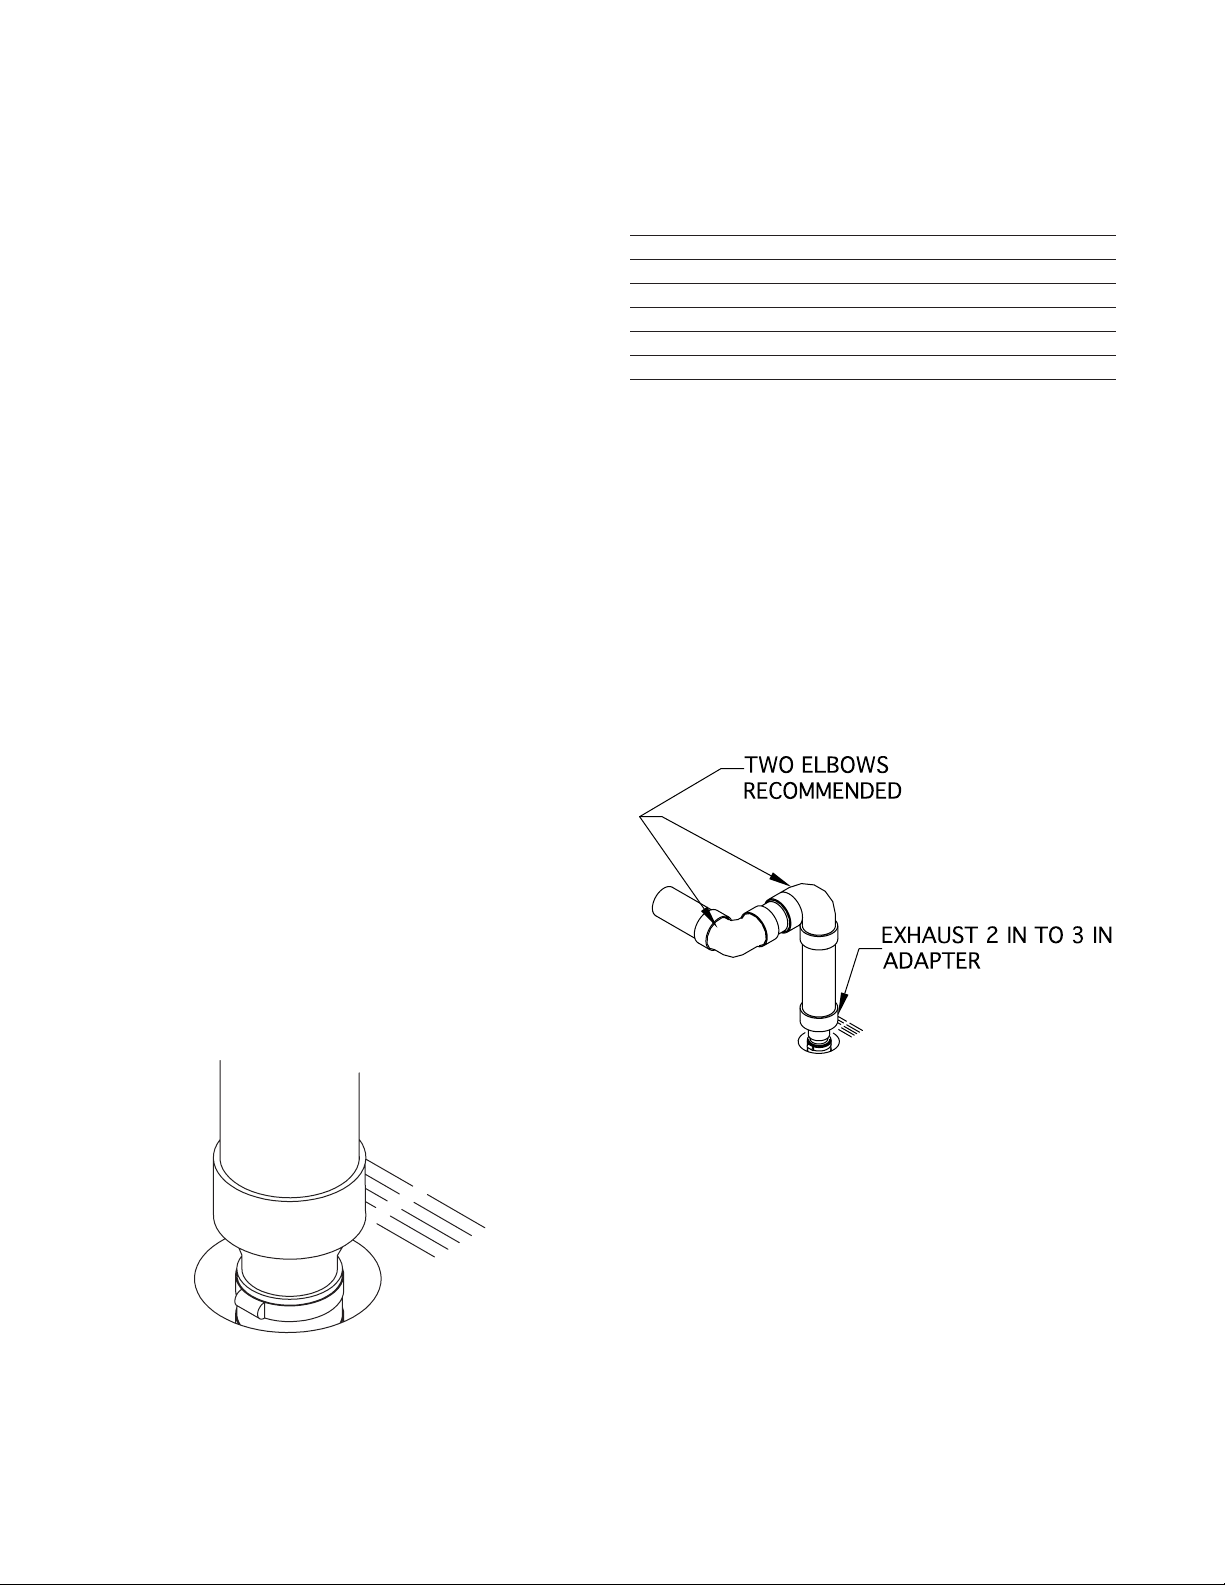
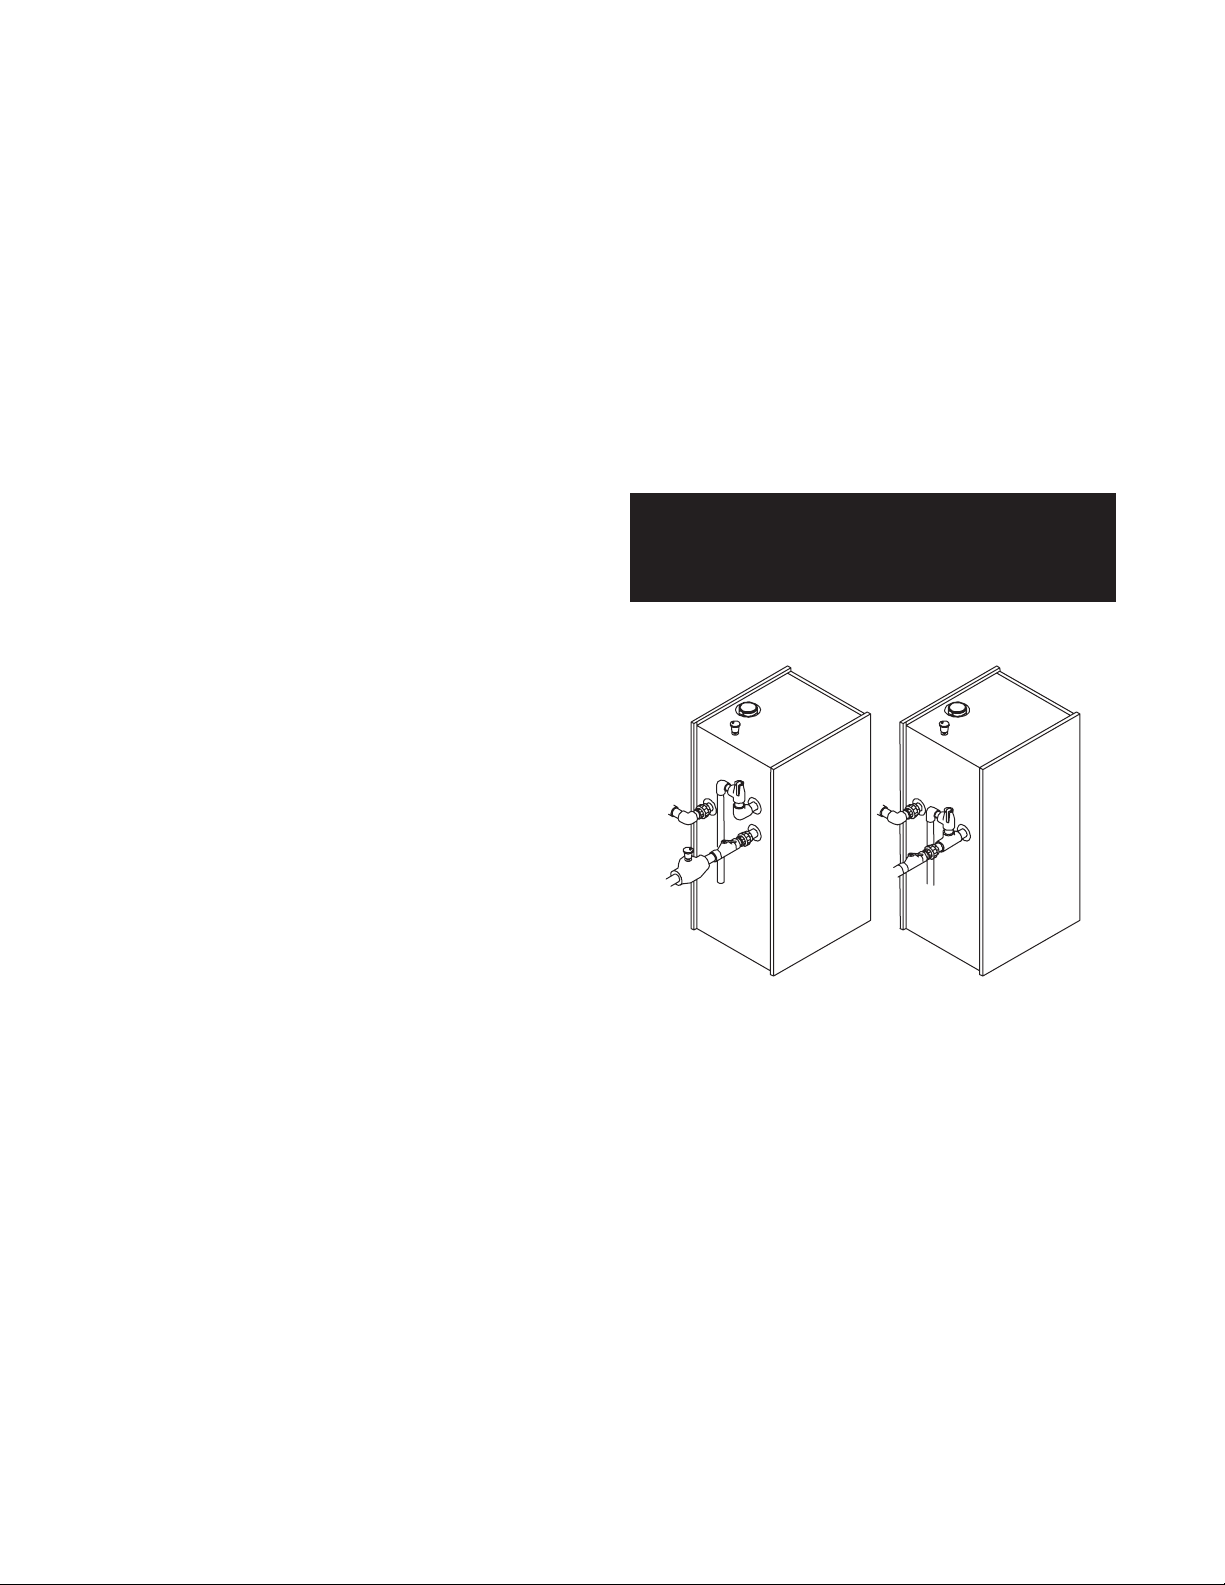
Use appropriate adapters to increase the 11⁄2 in,
38 mm air inlet collar to 3 in, 76 mm at the boiler,
GT-150 & 200, Figure 2. Use a 2 in, 51 mm to 4 in,
102 mm adapter on the GT-400. Terminate the air inlet
system per the instructions found in the venting sections
that follow.
Figure 2 - Air Inlet System Attachment
WARNING: Field supplied piping and fittings
are required to complete installation. The
combustion air and vent pipe and fi ttings must
conform to ANSI and ASTM standard D1785
for schedule 40 PVC, D2665 for PVC-DWV, and
D2661 for ABS-DWV. Pipe cement and primer
must conform to ASTM standard D2564 for PVC
or D2235 for ABS. Improper venting can result in
excessive levels of carbon monoxide which can
result in severe personal injury or death!
GT INSTALLATION AND OPERATION INSTRUCTIONS Page 5
The GT condensing gas boiler is a high efficiency
boiler utilizing induced power venting. It is designed
to be vented directly to the outdoors using the venting
methods and materials detailed in this section. The
vent system must be both gas tight and watertight. All
horizontal vent piping must be sloped back to the boiler
a minimum of 1/4 in/ft, 21mm/m of vent.
NOTE: Steps must be taken to ensure that condensate
does not collect in the venting system or the boiler
will not operate properly.
This boiler may be vented using the following materials,
but local codes must be followed:
• GT150 & 200: 3 in, 76 mm, PVC Sch.40 solid core
pipe, CPVC Sch.40 pipe, AL29-4C Flex Stainless Vent
or AL29-4C Rigid Stainless Vent.
• GT-400: 4 in, 102 mm or 6 in, 152 mm, PVC Sch.40
solid core pipe, CPVC Sch.40 pipe, AL29-4C Flex
Stainless Vent or AL29-4C Rigid Stainless Vent.
CAUTION: All vent systems must be fully supported
by the building structure. The vent connection and
vent piping MUST be perfectly aligned to the boiler
connection, Figure 3. It MUST NOT APPLY ANY
WEIGHT OR LATERAL FORCE TO THE FLUE BOX or
the fl ue box will be damaged voiding the warranty!
Table 2 - Vent & Air Intake System Sizing
Model Equivalent Combined Vent & Air Intake
Number System Length (see note)
GT-150 105 ft, 32 m
GT-200 105 ft, 32 m
GT-400 4" - 30 ft, 9 m 6" - 65 ft, 20 m
PGT-150 50 ft, 15 m
PGT-200 50 ft, 15 m
PGT-400 4" - 30 ft, 9 m 6" - 65 ft, 20 m
Note: Subtract 5 ft, 1.5 m, for each 90° elbow except for the vent and
air intake elbows. These don’t need to be considered. The length of
the air inlet system must never exceed the length of the vent system.
The vent system length may exceed the air inlet system length by no
more than 20 equivalent ft, 6.1 equivalent m.
HORIZONTAL
DIRECT VENT SYSTEMS
Read the information in the GENERAL VENTING
GUIDELINES section. It is recommended that two
elbows be used, so that the 1/4 in/ft, 21mm/m slope of
the horizontal vent system does not affect the vertical
plumb of the pipe connected to the boiler, Figure 4.
Figure 4 - Vent System Attachment
Appropriate adapters must be used to increase the
2 in, 51 mm vent collar to 3 in, 76 mm at the boiler,
GT-150 & 200, Figure 3. On the GT-400 the 4 in,
102 mm long 4 inch diameter ABS pipe provided with
the boiler must be inserted into the exhaust connection
on the top of the boiler and tightened in place with the
supplied clamp.
Figure 3- Vent Pipe To Boiler Attachment
The maximum combined equivalent vent and intake
pipe lengths are listed in Table 2. The length specifi ed
is the equivalent vent length added to the equivalent
intake length.
When horizontal vent runs exceed 5 ft, 1.5m, they must
be supported at 3 ft, 0.9 m, intervals with overhead
hangers, 4 ft, 1.2 m for 6" pipe. The vent system must
be pitched down, toward the boiler, 1/4 in/ft, 21mm/m.
of vent. Structural penetrations must be made using
approved thimbles.

GT INSTALLATION AND OPERATION INSTRUCTIONSPage 6
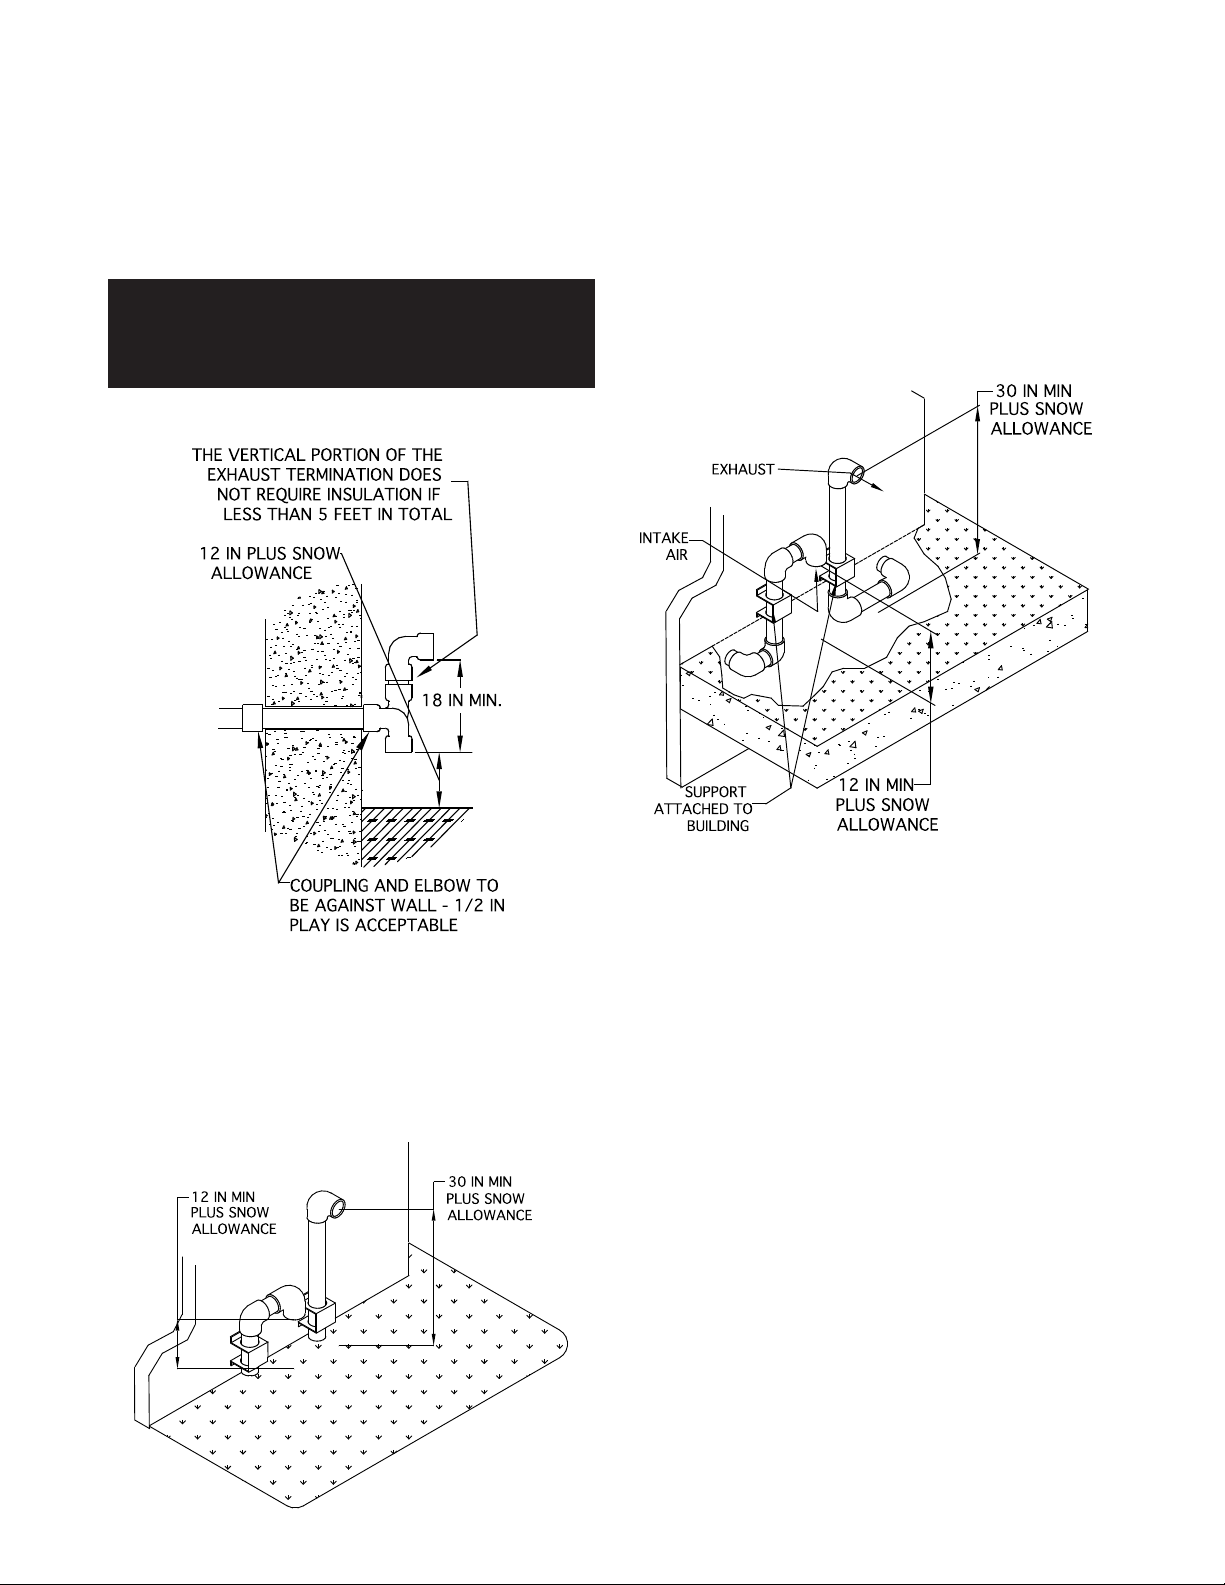
The vent terminal shall not terminate:
• Directly above a paved sidewalk or a paved drive-way
that is located between two buildings, and that serves
both buildings;
• Less than 7 ft, 2.1 m above grade where located
adjacent to a paved driveway or public walkway.
• Within 3 ft, 0.9 m, horizontally of a window or door that
can be opened, or non-mechanical air supply inlet to
any building.
• Within 6 ft, 1.8 m, of a mechanical air supply inlet to
any building or roof eve containing soffi t openings.
• Above a meter/regulator assembly within 3 ft, 0.9 m,
horizontally of the vertical centerline of the regulator.
• Within 6 ft, 1.8 m, of any gas service regulator vent
outlet.
• Less than 30 in, 762 mm, plus snow allowance above
grade, or any surface that will support snow, ice, or
debris. The exhaust must be a minimum of 18 in,
457 mm, above the air inlet, and the air inlet must
always be a minimum of 12 in, 305 mm. plus snow
allowance above any surface that will support
snow. A 24 in, 610 mm, plus snow allowance is
highly recommended. Consult your weather offi ce,
for the maximum typical snowfall for your region.
• Underneath a verandah, porch, or deck.
• So situated that the fl ue gases are directed towards
brickwork, siding, or other construction, in such
a manner that may cause damage from heat or
condensate from the fl ue gases.
• Less than 3 ft, 0.9 m, from an inside corner of an
L-shaped structure including walls and fences.
Under normal operating conditions this appliance will
produce a plume of water vapor, and should be taken
into consideration when selecting an adequate vent
terminal location. A 3 ft, 0.9 m, diameter stainless,
plastic, or vinyl shield can be used to fl ash the exterior
of the residence to protect is from damage.
Consult your weather office for the maximum typical
snowfall for your region. For example, in Boston MA the
maximum typical snowfall is 12 in, 305 mm. Therefore
the inlet must be 24 in, 610 mm, above any surface
that will support snow and the exhaust must be 42 in,
1067 mm, above this surface.
The horizontal centerline distance between the inlet
and exhaust terminals must be a minimum of 4 in,
102 mm. If the horizontal distance between the inlet
and exhaust is more than 12 in,
vertical separation by the same amount to prevent fl ue
gas recirculation.
For example, if the horizontal separation is 24 in,
610 mm, a minimum vertical separation of 18 in,
457mm, + 12 in, 305mm, = 30 in, 762 mm is required,.
If the horizontal distance is greater than 6 ft, 1.8 m,
no additional vertical spacing is required. The vertical
separ-ation is never required to be greater then 36 in,
914 mm.
Figure 5 - Horizontal Terminal Locations
305 mm, increase the
Separate Air Intake and Vent Terminals
It is highly recommended that the air intake and vent
terminals not be located where they will be exposed to
normal prevailing winds. Both terminals must be on the
same wall.
The vent terminal must be a minimum of 18 in,
457 mm above the air inlet terminal. The air inlet terminal
must always be a minimum of 12 in, 305 mm, plus the
snow allowance above any surface that will support
snow, however a snow allowance of two feet is highly
recommended Figure 5, 6, 7 & 8.
GT INSTALLATION AND OPERATION INSTRUCTIONS Page 7
When penetrating an outside wall the air intake and vent
pipes must be constrained as shown in Figure 6. The
openings through which the air intake and vent pipes
pass must be properly sealed to prevent products of
combustion from entering the building.
WARNING: Failure to properly install and seal
the air intake and vent system can result in
excessive levels of carbon monoxide which can
cause severe personal injury or death!
Figure 6 - Wall Penetration Detail
For installations that have to exit the foundation below
grade excavate the site as shown in Figure 8 to a point
below where the pipes exit the building. Maintain the
proper vent clearances as outlined above. Attach the vent
and air intake pipes to the outside of the building using
special bracket 82075. Ensure that the wall penetrations
are properly sealed before backfi lling the site.
Figure 8 - Below Grade Installation
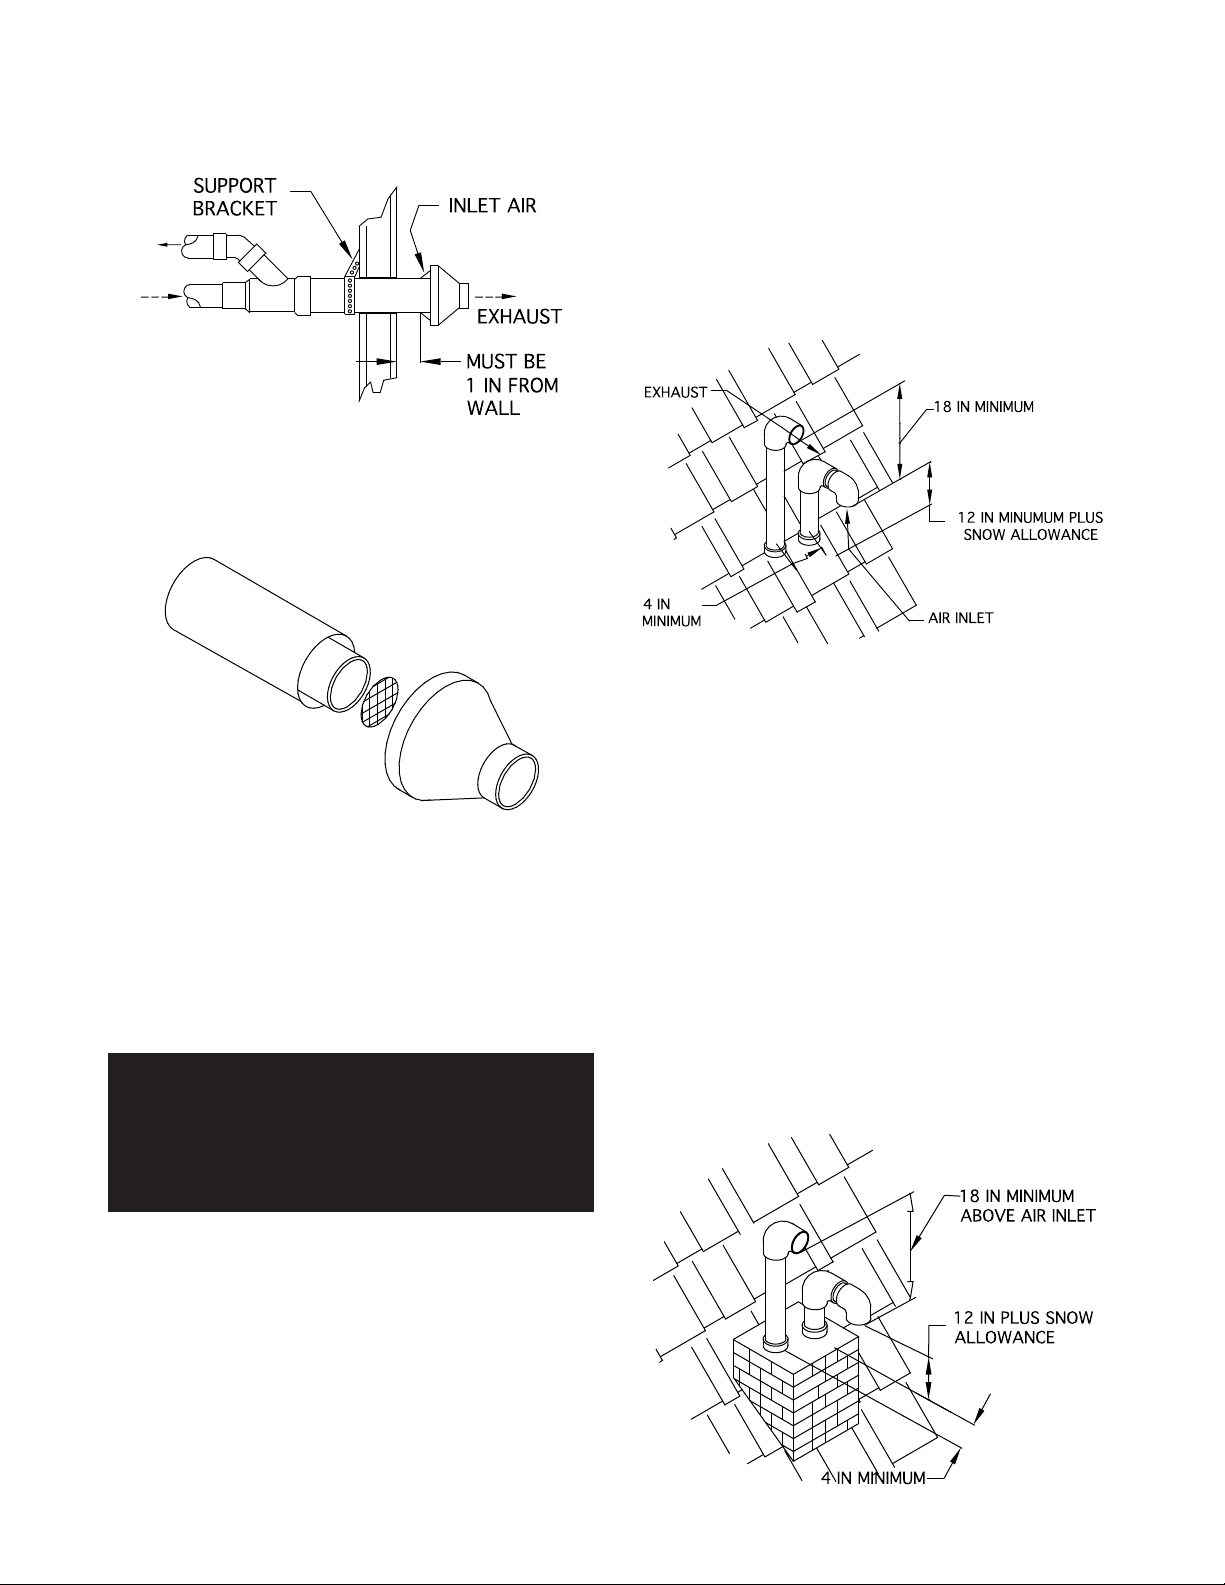
In some cases it may be necessary to attach the air
intake and vent pipes to the outside wall for added rigidity,
Figure 7. If this is the case, special bracket GT-82075
must be ordered for each pipe. Proper clearances must
be maintained.
Figure 7 - Air Intake & Vent Pipe Attachment
If required, the air intake and vent systems may be run
along an outside wall, Figure 9, providing the following
conditions are met:
1. The maximum length on the outside of the building
is not more than 20 ft, 6.1 m.
2. All normal termination clearances are maintained.
3. The entire vent system external to the building is
insulated using closed cell foamed polyolefi n tubing
having a minimum wall thickness of 1/2 in, 13 mm.
4. The air intake and vent systems are supported
every 24 in, 610 mm.
5. The air intake and vent systems are sloped 1/4 in/ft,
21mm/m back toward the boiler.

GT INSTALLATION AND OPERATION INSTRUCTIONSPage 8
Figure 9 - External Air Intake and Vent Systems
SUPPORTS EVERY 24 IN
EXHAUST
20 FOOT MAX OUTSIDE
USING ONLY 3" PIPE ON
THE 150 & 200 AND 4"
INLET
12 IN ABOVE MAXIMUM
SNOW LINE
PIPE ON THE 400
The debris screens provided with the boiler must be
installed in both the air intake and vent terminals. Install
the screens in the outer most opening then glue a 1 in,
25 mm length of pipe into the opening to retain them,
Figure 10.
Figure 10 - Debris Screen Installation
Figure 11- Horizontal Concentric Terminal Location
Figure 12 - Vertical Concentric Terminal Location
Concentric Air Intake and Vent Terminal
GT-150 & 200 Only
If a concentric terminal is used it must be Smith part
number GT-82666 or York part number 1CT0303. The
concentric terminal must be located at least 12 in, 305
mm, above the normal snow line, Figure 11. Position the
air intake pipe on the top or to the side to prevent rain
from entering the boiler, Figure 13.
When terminals from multiple boiler installations exit a
common wall the following conditions must apply:
1. If limited to two terminals the horizontal centerline
distance must be 4 in, 102 mm, or greater than
24 in, 610 mm, to prevent flue gas recirculation.
For more than two terminals located along a
horizontal plane, the centerline distance between
them must be 24 in, 610 mm, Figure 11.
2. If the terminals are located in a vertical plane the
centerline distance between them must be at least
48 in, 1220 mm, Figure 12.
When penetrating an outside wall the concentric terminal
must be constrained as shown in Figure 13. The opening
through which the concentric terminal passes must be
properly sealed to prevent products of combustion from
entering the building. The air intake of the boiler must
be connected to the terminal!
WARNING: Failure to properly install and seal the
concentric terminal can result in excessive levels
of carbon monoxide which can cause severe
personal injury or death!
GT INSTALLATION AND OPERATION INSTRUCTIONS Page 9
Figure 13 - Wall Penetration Detail
The debris screen provided with the boiler must be
installed in the concentric terminal as shown in Figure
14.
Figure 14 - Debris Screen Installation
VERTICAL DIRECT VENT SYSTEMS
Read the information in the GENERAL VENTING
GUIDELINES section before proceeding.
The GT can be vented vertically directly through the
building’s roof or through a dormant chimney used as
a chase, Figures 15 & 16. All roof penetrations must be
properly fl ashed and sealed.
WARNING: Under no conditions, shall this boiler
vent gases directly into a masonry chimney
nor can an active chimney be used as a chase.
Failure to comply with this warning can result in
excessive levels of carbon monoxide which can
cause severe personal injury or death!
Consult your weather office for the maximum typical
snowfall for your region. For example, in Boston MA the
maximum typical snowfall is 12 in, 305 mm. Therefore
the inlet must be 24 in, 610 mm, above any surface that
will support snow. The exhaust must be 42 in, 1067 mm,
above this surface.
Figure 15 - Two Pipe Through the Roof
The horizontal centerline distance between the inlet
and exhaust terminals must be a minimum of 4 in,
102 mm. If the horizontal distance between the inlet
and exhaust is more than 12 in, 305 mm, increase
the vertical separation by the same amount. For
example, if the horizontal separation is 24 in, 610 mm,
a minimum vertical separationof 30 in, 762 mm,
is required, 18 in, 457 mm, + 12 in, 305 mm, = 30 in,
762 mm. If the horizontal distance is greater then
6 ft, 1.8 m no additional vertical spacing is required.
The vertical separation is never required to be greater
then 36 in, 914 mm.
A dormant chimney can be used as a chase through
which the air intake and vent pipes can be run, Figure
16. The chimney must not be connected to a fi replace,
water heater or any other heating appliance.
Figure 16 - Two Pipe Using Dormant Chimney
Separate Air Intake and Vent Terminals
The discharge of the vent terminal must point away
from the pitch of the roof. The vent terminal must be a
minimum of 18 in, 457 mm, above the air inlet terminal.
The vent terminal must also be 24 in, 610 mm, above
any roof surface within a horizontal distance of 10 ft,
3 m. The air inlet terminal must always be a minimum
of 12 in, 305 mm, plus the snow allowance above
any surface that will support snow, however a snow
allowance of 24 in, 610 mm, is highly recommended
Figures 15 & 16.

GT INSTALLATION AND OPERATION INSTRUCTIONSPage 10
Install and seal a rain cap over the dormant chimney
opening to prevent water from entering the building.
Use only ABS, PVC
sch.40
, CPVC, or AL294C pipe for the
air inlet and vent systems as stated previously. Ensure
that the air inlet and vent system lengths are within the
maximums specifi ed in Table 2.
The debris screens provided with the boiler must be
installed in both the air intake and vent terminals. Install
the screens in the outer most opening then glue a 1 in,
25 mm, length of pipe into the opening to retain them,
Figure 9.
Concentric Air Intake and Vent Terminal
GT-150 & 200 Only
If a concentric terminal is used it must be Smith part
number GT-82666 or York part number 1CT0303. The
concentric terminal must be located at least 24 in, 610
mm, above the normal snow line, Figure 17. The building
structure must support the air inlet and vent systems. All
roof penetrations must be properly fl ashed and sealed. A
dormant chimney can be used as a chase through which
the air intake and vent pipes can be run. All previous
instructions and warnings apply.
When terminals from multiple boiler installations exit a
roof the following conditions must apply:
Figure 18 - Multiple Concentric Through the Roof
CONDENSATE DRAIN
WARNING: The condensate siphon must be
connected to the boiler per the following
instructions or combustion gases will enter
the room. This can result in excessive levels
of carbon monoxide which can cause severe
personal injury or death!
If limited to two terminals the horizontal centerline
distance must be 4 in, 102 mm or greater than 24 in,
610 mm, to prevent flue gas recirculation. For more
than two terminals located along a given plane, the
centerline distance between them must be 24 in,
610 mm, Figure 18.
Figure 17 - Concentric Through the Roof
This unit produces water as a byproduct of combustion.
Much of this water condenses on the heat exchanger
and in the venting system. Condensate must be drained
from the boiler into a household drain as shown in
Figure 19.
Figure 19 - Condensate Piping
NOTE: Check with your municipality, or local gas
company to determine if disposal of untreated
combustion condensate is permitted. If not, the
condensate will have to be neutralized with lime
crystals, marble chips or phosphate chips.

GT INSTALLATION AND OPERATION INSTRUCTIONS Page 11
The following are important rules that must be followed
when constructing the condensate system:
1. Connect the condensate trap to the drain using
1/2 in, 13 mm, silicone, rubber, reinforced nylon, or
PEX tubing. Long runs must be properly pitched
and supported to prevent blockage.
2. Do not use nylon tubing, as it will collapse, blocking
drainage. This could damage the boiler.
3.
Do not seal the opening between the condensate pipe
and the condensate drain pipe, Figure 19. In the event
of a blocked drain the opening will allow the condensate
to overfl ow and prevent the boiler from fl ooding.
4. Never have the drain pipe higher than the hole in the
back cabinet, this will fl ood the boiler.
5. Never allow the drain to freeze or become blocked.
This will cause condensate to fill the combustion
chamber resulting in a no heat condition and damage
to the boiler.
6. NEVER use copper, steel, or galvanized piping in
the construction of the condensate system.
7. When a condensate pump is used or required, select
a pump that is designed for residential furnaces.
GENERAL PLUMBING GUIDELINES
If connecting this boiler to a system containing cast iron
radiation, be sure to add a strainer to the system to trap
any sediment that may dislodge. Failure to do this could
harm the heat exchanger and void the warranty! The
use of non-oxygen barrier radiant tubing is acceptable,
provided that non-ferrous pipe, valves, and fi ttings are
used throughout the entire hydronic system.
CAUTION: All heating system piping must be
installed in accordance with the ANSI/ASME Boiler
and Pressure Vessel Code, Section IV. All applicable
local codes and ordinances must also be followed. If
the boiler is installed above any radiation elements
it must be fitted with a low water cutoff device
installed above the normal boiler water level!
CAUTION: This boiler must have adequate water
flowing through it whenever the burner is on.
Failure to do this will damage the unit and void the
warranty!
CAUTION: All systems must be fl ushed to remove
sediment, flux, filings and other foreign matter.
Use products such as Fernox “Superfl oc” for new
installations and CHR “Central Heating Restorer”
for retrofits. Also add an inhibitor to the system
water to prevent limestone and magnetite deposits
from forming and to protect the boiler from galvanic
corrosion. An inhibitor such as CHP, “Central
Heating Protector” from Fernox is recomended.
If connecting this boiler to a system containing
cast iron radiation, be sure to add a strainer to the
system to trap any sediment that may dislodge.
Failure to do this could harm the heat exchanger
and void the warranty!
The use of non-oxygen barrier radiant tubing is
acceptable, provided that non-ferrous pipe, valves,
and fi ttings are used throughout the entire hydronic
system. Failure to comply with these instructions
will seriously damage the boiler, voiding warranty!
CAUTION: The boiler fittings cannot support any
weight. The plumbing system must be supported by
the building structure. A wrench must be used to
hold the boiler fi ttings when installing the heating
system piping. Failure to do so can seriously
damage the boiler, voiding warranty!
The GT hot water boiler comes from the factory ready
to be piped to the heating system. The boiler must be
used only in a Primary/Secondary pumping system to
avoid cycling problems in systems that have poor fl ow
or heating zones with very small capacities.
CAUTION: A 11⁄4 in, 32 mm, primary loop system
must be used for GT-150 & 200 models regardless of
the confi guration of the secondary system design.
A 11⁄2 in, 38 mm, primary loop system must be used
for the GT-400. Failure to properly plumb the boiler
may void the warranty!
GT INSTALLATION AND OPERATION INSTRUCTIONSPage 12
Understand and follow the plumbing requirements
provided in this section. Keep serviceability in mind
when installing plumbing around the boiler cabinetry.
Install fi ttings that will allow the system to be fl ushed if
needed during annual check-ups. Add an inhibitor to the
system water to prevent lime and magnetite deposits
from forming, and to protect the boiler from galvanic
corrosion. A minimum clearance of 1 in, 25 mm must
be maintained between heating system pipes and all
combustible construction. All heating system piping must
be supported by suitable hangers not the boiler. The
thermal expansion of the system must be considered
when supporting the system. A minimum system
pressure of 12 psig, 84 kPa must be maintained.
Hot water boilers are designed to operate with airless
water in the system. The GT boiler is provided with
a 1/8 in, 3 mm, air vent located on the top of the unit.
This air vent is intended to vent the boiler on initial
startup. This device will NOT continuously vent air
collecting in the primary loop and is not intended
to be the primary venting device. The air scoop as
shown in Figure 21 is the primary venting location. It is
recommended that an additional air scoop be used in
the secondary plumbing. If air continues to be a problem
an air scrubber must be used.
Pressure Relief Valve
Each boiler is equipped with a 30 psi pressure relief
valve that must be piped in accordance with the ANSI/
ASME Boiler and Pressure Vessel Code, Section IV to
prevent scalding of persons with hot liquid or vapor in
the event of a discharge, see Figure 20.
Support the relief valve discharge piping to prevent
strain on the valve body. Leave the open end of the relief
valve discharge pipe visible for periodic inspection.
NOTE: The discharge pipe diameter must be the
same at the relief valve output diameter. Never
restrict the outlet relief valve.
WARNING: Never install any type of valve
between the boiler and the relief valve or an
explosion causing extensive property damage,
severe personal injury or death may occur!
Figure 20 - Relief Valve Piping
NOTE: Only inhibited propylene glycol solutions
should be used if freeze protection is required.
Avoid using mixtures greater than 30%, unless
the size of the boilers’ circulator(s) is increased
accordingly. Under no circumstances should a 50%
mixture be exceeded.
Non ASME GT-150 All ASME Models
GT INSTALLATION AND OPERATION INSTRUCTIONS Page 13
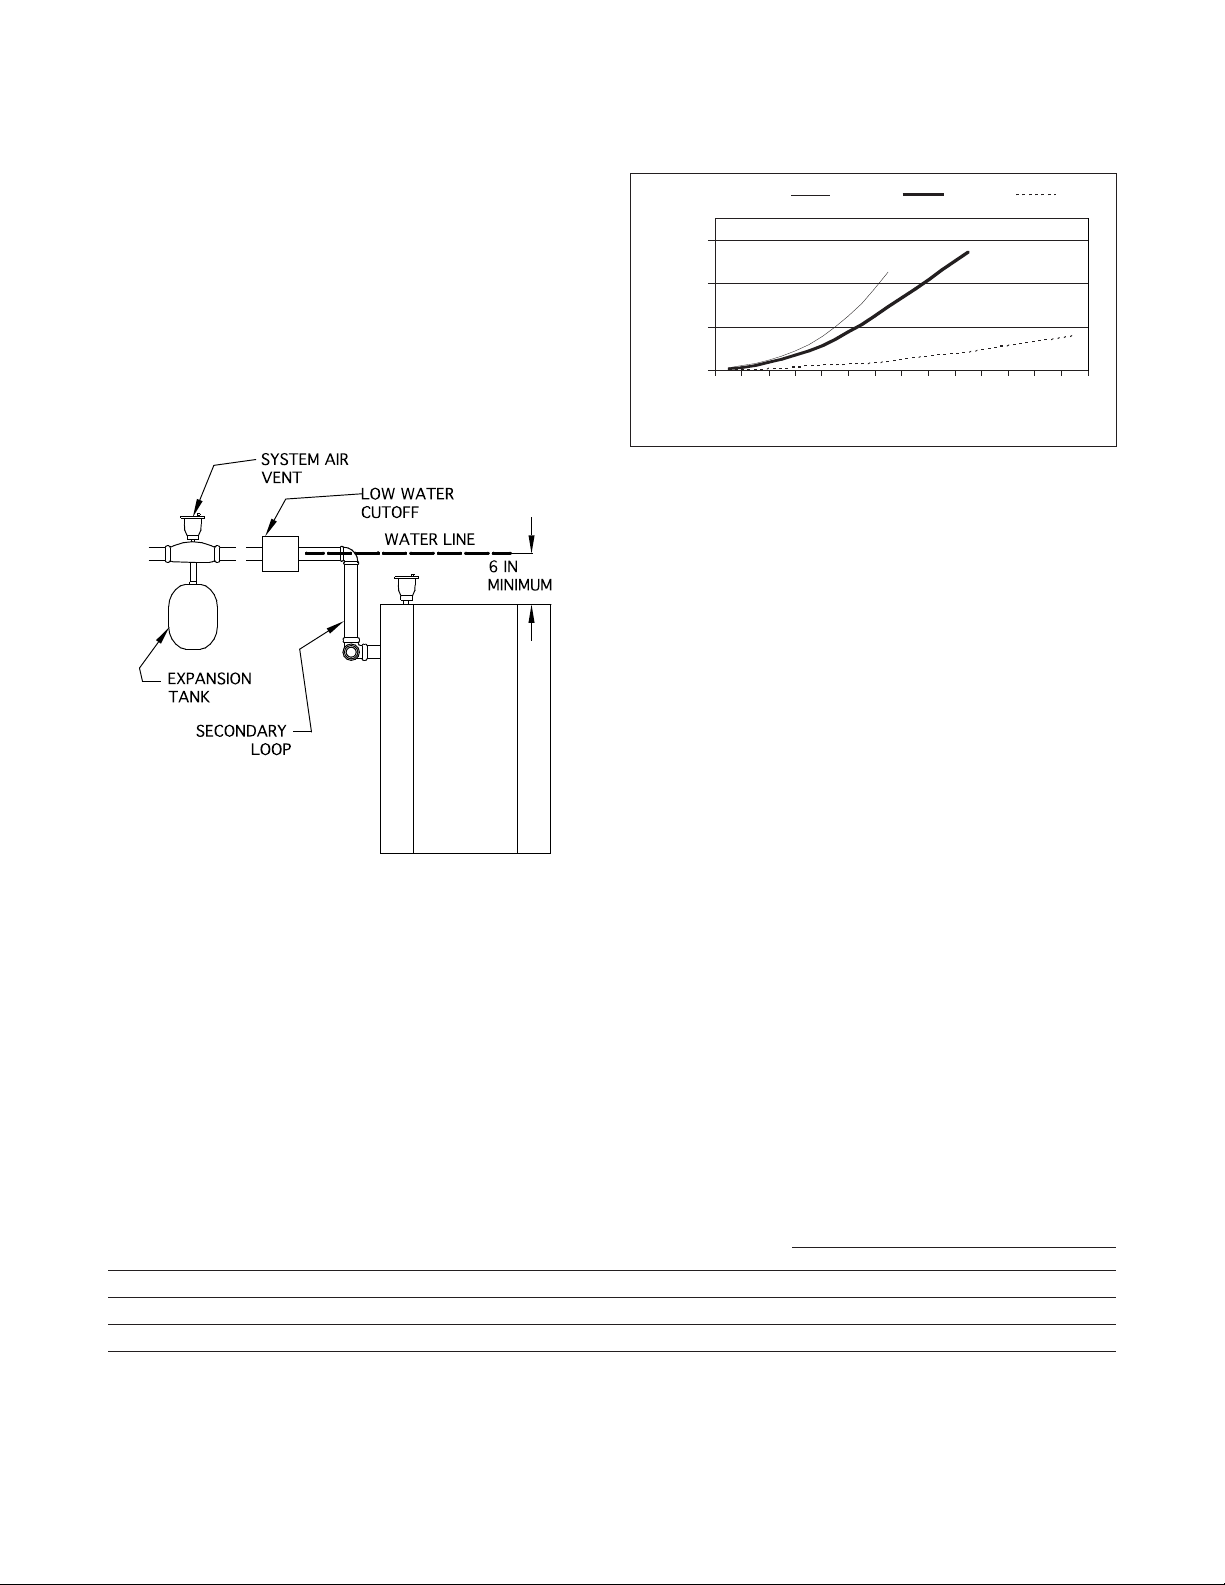
Low Water Cut Off, LWCO
If a LWCO is used ensure that the water line of the “Low
Water Cutoff” is at least 6 in, 152 mm, above the top of the
boiler, Figure 21. It is recommended that the LWCO be
situated so that it can be tested without removing water
from the boiler. Tri-cocks and a gauge glass are highly
recommended. Valves shall not be installed between
the LWCO and the boiler. Use an air vent if installed as
per our diagram to be used as a vacuum breaker and to
eliminate air upon fi lling.
Figure 21 - LWCO & Air Vent Piping
Figure 22 - Boiler Head Loss
GT-150 GT-200 GT-400
60
daeH fo teeF
40
20
0
2 4 6 8 10 12 14 16 18 20 22 24 26 27
GPM us
Table 3 lists the recommended circulators for use as the
primary and indirect loop pumps.
Figure 23 shows the proper way to plumb a primary loop
for single boiler installations.
MULTIPLE BOILER PRIMARY LOOP
Figure 24 shows the proper way to plumb a primary loop
for multiple boiler installations.
SECONDARY LOOP PLUMBING
Figures 25 and 26 show some typical primary/ secondary
piping systems. It is the responsibility of the installing
contractor to determine which system best meets the
need of the installation. Contractor modifi cations to these
instructions may be required, based upon the existing
PRIMARY LOOP PLUMBING
This low mass boiler requires a continuous minimum
water fl ow for proper operation. The heat exchanger in
this boiler is more restrictive than a conventional boiler.
The system pump must be sized to overcome the head
loss of the boiler, Figure 22. Greater consideration must
be given to the capabilities of the circulating pump(s) in
the primary-loop. This includes the pump used for an
indirect tank.
Table 3 - Recommended Primary and Indirect Loop Circulators
Minimum Max. Temp. Minimum Primary &
Restriction Flow Rise Indirect Pump Size
Model Head Loss GPM, L/s °F, °C
GT-150 7 ft at 6 GPM, 2.1 m at 0.4 L/s 6, 0.4 45, 25 NRF-33 UP 26-64 0010
GT-200 10 ft at 8 GPM, 3 m at 0.5 L/s 8, 0.5 45, 25 PL-36 UP 26-99 0011
GT-400 10 ft at 20 GPM, 3 m at 1.25 L/s 13, 0.8 57, 45 PL-36 UP 26-99 0011
piping and system design.
B&G Grundfos Taco
GT INSTALLATION AND OPERATION INSTRUCTIONSPage 14
Figure 23 - Single Boiler with Indirect Hot Water Heater
NOTES:
1. All piping and pumps must be supported so that no loads or stresses are applied to boiler heat exchanger. To make boiler service easy
use Unions or fl exible Vibration Isolation Kit.
2. This boiler is provided with a 1/8" vent that is not intended for continuous system venting.
3. For continuous system venting use a cast iron air scoop, for excessive air conditions use a Spirovent. Do not fi re boiler until all air is
purged from the system piping. Heat exchanger damage caused by air is not covered by warranty.
4. See Table 3 for boiler pump fl ow requirements. This pump is wired to terminals C1-L2.
5. See Table 3 for Indirect Water Heater pump fl ow requirements. This pump is wired to terminals AP-L2.
6. Set pressure reducing valve to 12 PSI.
7. Use 30 psi relief valve max. Locate where discharge will not cause injury or damage. Follow local codes.
8. Add an inhibitor to protect system. (CHP from Fernox)
9. Boiler circuit piping must be sized large enough to handle maximum fl ow through unit.
10. Suggested piping. When installing an indirect water heater consult manufacturer’s manual for full details.
11. Do not install any valves between the Vacuum Relief valve and the tank.
12. Do not operate boiler with service valves closed isolating the boiler from the expansion tank.
13. Failure to follow these instructions will result in heat exchanger damage: All fl ux and contaminants must be fl ushed from piping before
connecting boiler. Do not connect this boiler to older systems with cast iron radiation without installing a fi ne particulate separator. TYP:
Spirotrap Junior Model TDN 125 FT. Do Not use non-oxygen barrier radiant tubing.
Notice: This drawings show suggested piping confi guration and valving. Check with local codes and ordinances for specifi c requirements.
Pump
Gate Valve Backflow-Prevention
Ball Valve
Pressure
Reducing
Valve
Check Valve
Pressure
Relief Valve
Thermometer
Union Automatic
Air Vent
Heating
Load
Drain Valve
(Typ.)
Device
Differential Pressure
Bypass Valve
Spirotrap
Fine Particulate
Separator

GT INSTALLATION AND OPERATION INSTRUCTIONS Page 15
Figure 24 - Multiple Boiler Installation
NOTES:
1. All piping and pumps must be supported so that no loads or stresses are applied to boiler heat exchanger. To make boiler service easy
use Unions or fl exible Vibration Isolation Kit.
2. This boiler is provided with a 1/8" vent that is not intended for continuous system venting.
3. For continuous system venting use a cast iron air scoop, for excessive air conditions use a Spirovent. Do not fi re boiler until all air is
purged from system piping. Heat exchanger damage caused by air is not covered by warranty.
4. See Table 3 for boiler pump fl ow requirements. This pump is wired to terminals C1-L2.
5. Indirect Water Heater pump is wired to terminals AP-L2.
6. Set pressure reducing valve to 12 PSI.
7. Use 30 psi relief valve max. Locate where discharge will not cause injury or damage. Follow local codes.
8. Add an inhibitor to protect system. (CHP from Fernox)
9. Boiler circuit piping must be sized large enough to handle maximum fl ow through unit.
10. Do not operate boiler with service valves closed isolating the boiler from the expansion tank.
11. Failure to follow these instructions will result in heat exchanger damage. All fl ux and contaminants must be fl ushed from piping before
connecting boiler. Do not connect this boiler to older systems with cast iron radiation without installing a fi ne particulate separator. TYP:
Spirotrap Junior Model TDN 125 FT. Do not use non-oxygen barrier radiant tubing.
Notice: This drawings show suggested piping confi guration and valving. Check with local codes and ordinances for specifi c requirements.
Pump
Gate Valve Backflow-Prevention
Ball Valve
Pressure
Reducing
Valve
Check Valve
Pressure
Relief Valve
Thermometer
Union Automatic
Air Vent
Heating
Load
Drain Valve
(Typ.)
Device
Differential Pressure
Bypass Valve
Spirotrap
Fine Particulate
Separator

GT INSTALLATION AND OPERATION INSTRUCTIONSPage 16
Figure 25 - Multiple Zones Using Circulators
NOTES:
1. All piping and pumps must be supported so that no loads or stresses are applied to boiler heat exchanger. To make boiler service easy
use Unions or fl exible Vibration Isolation Kit.
2. This boiler is provided with a 1/8" vent that is not intended for continuous system venting.
3. For continuous system venting use a cast iron air scoop, for excessive air conditions use a Spirovent. Do not fi re boiler until all air is
purged from the system piping. Heat exchanger damage caused by air is not covered by warranty.
4. See Table 3 for boiler pump fl ow requirements. This pump is wired to terminals C1-L2.
5. Indirect Water Heater pump is wired to terminals AP-L2.
6. Set pressure reducing valve to 12 PSI.
7. Use 30 psi relief valve max. Locate where discharge will not cause injury or damage. Follow local codes.
8. Add an inhibitor to protect system. (CHP from Fernox)
9. Boiler circuit piping must be sized large enough to handle maximum fl ow through unit.
10. Do not operate boiler with service valves closed isolating the boiler from the expansion tank.
11. Failure to follow these instructions will result in heat exchanger damage: All fl ux and contaminants must be fl ushed from piping before
connecting boiler. Do not connect this boiler to older systems with cast iron radiation without installing a fi ne particulate separator. TYP:
Spirotrap Junior Model TDN 125 FT. Do Not use non-oxygen barrier radiant tubing.
Notice: This drawings show suggested piping confi guration and valving. Check with local codes and ordinances for specifi c requirements.
Expansion
Tan k
Pump
Zone
Valve
Ball Valve
Check Valve
Automatic
Air Vent
Heating
Load
Drain Valve
(Typ.)
Differential Pressure
Bypass Valve
Spirotrap
Fine Particulate
Separator

GT INSTALLATION AND OPERATION INSTRUCTIONS Page 17
Figure 26 - Multiple Zones Valves with Bypass Valve
Note: Velocity noise may be
a problem when the entire
output of the system pump is
fl owing through the zone with
the highest pressure drop.
Adjust the differential bypass
valve to eliminate noise.
NOTES:
1. All piping and pumps must be supported so that no loads or stresses are applied to boiler heat exchanger. To make boiler service easy
use Unions or fl exible Vibration Isolation Kit.
2. This boiler is provided with a 1/8" vent that is not intended for continuous system venting.
3. For continuous system venting use a cast iron air scoop, for excessive air conditions use a Spirovent. Do not fi re boiler until all air is
purged from system piping. Heat exchanger damage caused by air is not covered by warranty.
4. See Table 3 for boiler pump fl ow requirements. This pump is wired to terminals C1-L2.
5. Indirect Water Heater pump is wired to terminals AP-L2.
6. Set pressure reducing valve to 12 PSI.
7. Use 30 psi relief valve max. Locate where discharge will not cause injury or damage. Follow local codes.
8. Add an inhibitor to protect system. (CHP from Fernox)
9. Boiler circuit piping must be sized large enough to handle maximum fl ow through unit.
10. Do not operate boiler with service valves closed isolating the boiler from the expansion tank.
11. Failure to follow these instructions will result in heat exchanger damage. All fl ux and contaminants must be fl ushed from piping before
connecting boiler. Do not connect this boiler to older systems with cast iron radiation without installing a fi ne particulate separator. TYP:
Spirotrap Junior Model TDN 125 FT. Do not use non-oxygen barrier radiant tubing.
Notice: This drawings show suggested piping confi guration and valving. Check with local codes and ordinances for specifi c requirements.
Expansion
Tan k
Pump
Zone
Valve
Ball Valve
Check Valve
Automatic
Air Vent
Heating
Load
Drain Valve
(Typ.)
Differential Pressure
Bypass Valve
Spirotrap
Fine Particulate
Separator

GT INSTALLATION AND OPERATION INSTRUCTIONSPage 18
GAS SUPPLY PIPING
The GT hot water boiler comes from the factory ready
to be piped to the gas supply. The National Fuel Gas
Code, ANSI Z223.1/NFPA 54 and local codes for gas
piping requirements and sizing must be followed. If for
any reason the boiler is not for the type of gas available
at the installation site, call the nearest Smith distributor
to resolve the problem.
Figure 27 depicts the proper way to connect the boiler to
the gas supply piping. The manual shut-off valve MUST be
installed in the supply piping. It should be approximately
5 ft, 1.5 m, above the fl oor. Provide a sediment trap/drip
leg at the bottom of the vertical section of the gas supply
pipe. A ground joint union should be installed between
the boiler gas controls and the supply piping. Each of
these items is needed to ensure long life and ease of
servicing. Always use a pipe sealant that is suitable for
use with LP gas. Flexible gas piping is recommended if
accepted by the local codes. Make sure the gas piping
doesn’t hinder boiler access.
CAUTION: Always use a wrench on the gas valve
body when making gas connections to it. Never overtighten the piping entering the gas valve body or the
gas valve will be damaged voiding the warranty!
CAUTION: The gas piping must be properly supported
by the building structure and not by the boiler or the
gas valve will be damaged voiding the warranty!
Figure 27 - Gas Supply Piping
Safe lighting and other performance criteria were met
with the gas manifold and control assembly provided on
the boiler when the boiler underwent tests specifi ed in
ANSI Z21.13/CSA 4.9. All gas connections MUST be leak
tested before putting the boiler into operation.
WARNING: Never use an open fl ame to test for
gas leaks. Always use an approved leak detection
method. Failure to comply with this WARNING
could result in an explosion!
Table 4 - Gas Pipe Capacity
Nominal
Iron Pipe 10' 20' 30' 40' 50' 60' 80' 100' 150'
Size
3/4" 278 190 152 130 115 105 90 79 64
1" 520 350 285 245 215 195 170 150 120
1 1/4" 1050 730 590 500 440 400 350 305 250
1 1/2” 1600 1100 890 760 670 610 530 460 380
Note: Maximum pipe capacity in ft3/hr is based on a 0.60 specifi c gravity
gas at a pressure of 0.5 psig and a 0.3" WC pressure drop.
Pipe Length
Gas Pipe Capacity (ft3/hr)
Table 5 - Equivalent Pipe Length Chart
Nominal
Iron
Pipe (branch fl ow) (full port)
Size
3/4" 2.06 4.12 0.48 1.25
1" 2.62 5.24 0.61 1.60
1 1/4" 3.45 6.90 0.81 2.15
1 1/2" 4.02 8.04 0.94 2.50
Tee Gate Valve
90°
Equivalent length of pipe fi ttings in feet
Type of Pipe Fitting
Gas Cocks
Table 4 should be used to ensure that the gas supply
piping is sized properly. If more than one appliance is
supplied by the same supply pipe, the piping must be
sized based on the maximum possible demand. Do not
neglect the pressure drop due to pipe fi ttings. Table 5
should be used in conjunction with Table 4 to ensure that
the gas supply piping is sized properly.
Whenever the gas supply piping is pressure tested the
boiler gas controls must be protected. If the test pressure
is equal to, or less than 1/2 psi, 3.5 kPa, isolate the boiler
by closing it’s manual shut off valve, see Figure 27. If the
test pressure is greater than 1/2 psi, 3.5 kPa, disconnect
the boiler and it’s individual shut-off valve from the gas
supply piping.
WARNING: Failure to protect the gas valve from
excessive pressure can damage the gas valve
which can cause a fi re or explosion!

GT INSTALLATION AND OPERATION INSTRUCTIONS Page 19
ELECTRICAL WIRING
CAUTION: Label all wires prior to disconnection
when servicing controls. Wiring errors can cause
improper and dangerous operation!
The electrical connections to this boiler must be made
in accordance with all applicable local codes and the
latest revision of the National Electrical Code, ANSI/
NFPA-70. Install a separate 120 volt 15 amp circuit
for the boiler, Figures 28 and 29. A properly rated shutoff switch should be located at the boiler. The boiler
must be grounded in accordance with the authority
having jurisdiction, or if none, the latest revision of
the National Electrical Code, ANSI/NFPA-70. Line
voltage fi eld wiring of any controls or other devices must
conform to the temperature limitation of type T wire
at 95°F, 35°C, above room temperature.Use copper
conductors with a minimum size of #14 awg. Low voltage
wiring must not be less than #18 awg with a neoprene,
thermoplastic or other equivalent insulation having a
minimum insulation thickness of 0.012 in, 3 mm.
Schematic and ladder diagrams of the boilers wiring are
shown in Figures 33 & 34.
Before supplying 120 volts to the boiler, do a continuity
check between all the wires and the ground to make sure
that there are no electrical shorts that could damage the
Sentry 2100 board.
Never use magnetic tip screwdriver near the Sentry
2100.
Verify that the wires connected to the Sentry TC and
AC terminals are not grounded, or have any voltage
applied to them, or voltage to ground - dry contact
closure only.
Ensure that the probe wire is not damaged.
CAUTION: Damage to the electrical system
components caused by improper wiring will void
the warranty!
Thermostat Installation
ALWAYS follow the instructions included with the
thermostat to be used to control the boiler. Proper
location of the thermostat will ensure effi cient trouble-free
operation of the boiler. Mount the thermostat to an inside
wall at a height approximately fi ve feet above the fl oor.
CAUTION: The contact capacity of outputs C1 or A
is 3 amps with a maximum inrush of 6 amps. If the
amp draw of the pumps exceeds these maximums,
a pump controller, or isolation relay must be used
to prevent damage to the boiler. Damage caused by
improper wiring will void the warranty!
Figure 28 - Basic Heating System Wiring
Avoid placing the thermostat in areas that will not provide
p
an accurate measurement of the room temperature.
Locating the thermostat behind a door, in an alcove,
close to a source of thermal radiation or in a drafty area
will cause poor or sporadic heating.

GT INSTALLATION AND OPERATION INSTRUCTIONSPage 20
Figure 29 - Basic Heating System and Indirect Tank Wiring
Multiple 4 Wire Zone Valves
Figure 30 shows the basic multiple zoned system uses
normally closed four (4) wire zone valves. This wiring
system is used with the piping shown in Figure 26.
When there is a call for heat the room thermostat closes
the circuit to the zone valve motor, thus opening the zone
valve. When the zone valve is opened, the end switch
closes the circuit between terminals T and C on the
Sentry 2100 control. The Sentry 2100 provides power to
the primary and secondary pumps via terminal C
. Once
1
these pumps are on, the burner fi res.
Once the room thermostat is satisfi ed, it breaks power
to the zone valve motor. The end switch opens the circuit
between terminals T and C shutting down the pumps
and the burner.
Multiple Zones w/ Taco Valve Controller
Models ZVC403 to ZVC 406
Figure 31 shows the basic multiple zoned system using
normally closed 2, 3 or 4 wire Taco zone valves. This
wiring system is used with the piping as shown in Figure
26.
When there is a call for heat the room thermostat closes
the circuit between the TT terminals on the Taco zone
controller. The controller energizes the appropriate zone
valve and closes the circuit between terminals T and C on
the Sentry 2100 control. The Sentry 2100 provides power
to the primary and secondary pumps via terminal C1.
Once these pumps are on, the burner fi res.
Once the room thermostat is satisfi ed, it breaks power
to the zone valve motor. The end switch opens the circuit
between terminals T and C shutting down the pumps
and the burner.

GT INSTALLATION AND OPERATION INSTRUCTIONS Page 21
Figure 30 - Multiple 4 Wire Zone Valves

GT INSTALLATION AND OPERATION INSTRUCTIONSPage 22
Figure 31 - Multiple Zones w/ Taco Valve Controller, Models ZVC403 to ZVC 406

GT INSTALLATION AND OPERATION INSTRUCTIONS Page 23
Multiple Zone Pump Controller
Models Taco SR504, Argo ARM 861 Series
Figure 32 shows the basic multiple zoned system using
circulating pumps. This wiring system is used with the
piping as shown in Figures 25.
When there is a call for heat the room thermostat
closes the circuit between the TT terminals on the pump
controller. The controller energizes the appropriate
circulating pump and closes the circuit between terminals
T and C on the Sentry 2100 control. The Sentry 2100,
provides power to the primary pump via terminal C1.
Once these pumps are on, the burner fi res.
Figure 32 - Multiple Zone Pump Controller, Models Taco SR504, Argo ARM 861 Series
Once the room thermostat is satisfi ed, it breaks power
to the TT terminal of the pump controller de-energizing
the XX contacts. The circuit between terminals T and C
opens shutting down the pumps and the burner.

GT INSTALLATION AND OPERATION INSTRUCTIONSPage 24
Figure 33 - Boiler Ladder Diagram

GT INSTALLATION AND OPERATION INSTRUCTIONS Page 25
Figure 34 - Boiler Connection Diagram

GT INSTALLATION AND OPERATION INSTRUCTIONSPage 26
SENTRY 2100T CONTROLLER
CAUTION: The T4.0 controller can only be used
on the GT-400 and the T2.0 on the GT-150 & 200.
Misapplication of the controller will result in
improper boiler operation.
The Sentry 2100T controller is the central controller for
the GT boiler. The Sentry handles all of the combustion
logic, along with the energy management functions.
The Sentry 2100T operates in two different modes,
Conventional or Reset, see Figures 35 & 36. The mode is
automatically determined by the presence of the outdoor
sensor. When the Sentry 2100T detects the presence of
the outdoor sensor the controller will operate in the Reset
Mode. If the outdoor sensor is not installed, the controller
will operate in the Conventional Mode.
NOTE: If the outdoor sensor is connected after the
boiler has been started power to the boiler must be
shut off and then turned back on.
Boiler Modulation
The GT boiler employs a pneumatic modulation system.
This modulation system increases or decreases the
speed of the blower to meet the heating demand. The
gas valve pressure regulator senses the air pressure
and adjusts the gas fl ow to ensure correct combustion.
The term “Set Point” is used to indicate the desired
temperature that the GT will maintain by increasing or
decreasing the input.
Indirect Water Heaters
The Sentry 2100 comes with an input and output for
a 120-volt indirect pump. When the A and C terminals
are closed, dry contact, the boiler will go immediately
to indirect domestic mode, whereby the indirect pump
is activated, and the boiler will modulate to the LO
setpoint.
Sentry Display
The Sentry 2100T contains four green lights that illuminate
to indicate the boilers state of operation, Figure 37.
Figure 37 - 2100T Display Screen
Burner/Bruleur - Indicates that the ignition system is
activated.
Circ. - Indicates that the heating pump is energized.
Circ. Aux.- Indicates a call for DHW, and Indirect pump
or 3-way valve is activated.
Thermostat Demand - Indicates that terminals T-C are
closed, iniating a call for heat.
The LED screen will display one of four values. A light will
illuminate above the function to indicate what information
is being displayed.
Water Temp - Indicates that the display is showing the
boiler water temperature.
Air - if the air sensor is used. When illuminated, indicates
that the display is showing outdoor air temperature.
Gas Input Value - Indicates the current input level. Figure
38 must be used to determine the actual input. GT-150
use 46 to 240, GT-200 use 40 to 240 and GT-400 use
35 to 195.
DHW Temp. - indicates that there is a call for domestic
hot water.
Figure 35 - Conventional Mode Operation Chart
T-C & A-C Open T-C Closed & A-C open T-C Closed & A-C Closed T-C Open & A-C Closed
Condition Standby
Set Point — HI L0 L0
Burner On — HI - DIF LO-10 LO-10
Burner Off — HI + 10 200°F 200°F
Heat Circ. Off On Off Off
Aux. Circ. Off Off On On
Heating Only Domestic Only Domestic Only
Figure 36 - Reset Mode Operation Chart
T-C & A-C Open T-C Closed & A-C open T-C Closed & A-C Closed T-C Open & A-C Closed
Condition Standby Heating Only Domestic Only Domestic Only
Set Point
Burner On — HI
Burner Off — HI
Heat Circ. (C1) Off On Off Off
Aux. Circ. (Ap) Off Off On On
— HI
Calc.
L0 L0
Calc
- DIF LO-10 LO-10
Calc
+ 10 200°F 200°F

GT INSTALLATION AND OPERATION INSTRUCTIONS Page 27
Figure 38 - Input Conversion Chart
400
350
300
)s'000( UTB
250
200
150
100
50
0
240 215 190 165 140 115 90 65 48 40
Display Data - Input conversion chart
LED Dis pl ay
Setting Sentry 2100T control
Programming is accomplished by a series of three push
buttons located on the bottom side of the control. To
enter the programming mode, press the function key
once, “RUN” should be displayed on the screen. To scroll
through the various menu options depress ↑. To alter the
value of a menu option press “Function” once while the
menu option is displayed, and the current value will be
displayed, then use ↑ for up, and ↓ for down, until the
desired value is obtained. To enter the selected value
press “Function”, which will return to the menu and store
the new setting. When all desired values are set, scroll to
the “RUN” menu option, and press Function, which exits
the Programming Mode and initiates normal operation.
If the control is left in the Program Mode longer than 30
seconds without receiving any input the unit will turn off.
Press “Function” once to continue programming or to
restart boiler operation.
Below is a list of functions and a description of what
they control:
RUN - Stores Values & initiates
LO - Boiler Setpoint for DHW, 80 - 200°F, 27 - 93°C
HI - Boiler Setpoint for Heating, 80 - 200°F, 27 - 93°C
DIF - Differential, 1 - 40°F, -17°C - 4°C
RES - Sets Outdoor Reset Curve Slope,
70°F, 21°C to HI
SFS - Sets Starting Gas Input Value, 60 to 100
GT150 & 200 is 60 to 100
GT-400 is 45 to 90
HFS - Sets Highest Gas Input Value, 100 to 240
GT-150 & 200 is 100 to 240
GT-400 is 90 to 195
LFS - Sets Lowest Gas Input Value, 40 to 100
GT-150 & 200 is 40 to 100 (see note)
GT-400 is 35 to 90
GT-150 GT-200
GT-400
Recommended Settings
When programming the Sentry 2100T determine
what the hottest boiler temperature required for the
coldest day will be. This will be the HI SETTING. If
an indirect tank is used for domestic hot water, DHW,
determine the minimum boiler temperature required
to ensure an adequate supply of hot water. This is the
LO SETTING. The LO SETTING is only used during
a call for DHW, when A and C terminals are closed.
Set the LO to the temperature required for the Indirect
Water Heater. 140 °F, 60°C or at least 30°F, -1°C higher
than the indirect Aquastat is recommend.
WARNING: Proper control settings must be used
to prevent water supplied for domestic use from
exceeding 130°F, 54°C or a scald injury will occur!
When higher water temperatures are required
for appliances such as a dishwasher, a mixing
valve or some other tempering means must be
installed. Households with small children may
require water temperatures less than 120°F, 49°C.
Local codes must be complied with!
Table 6 - Recommend System Temperatures
Hi Dif RES
System °F, °C °F, °C °F, °C
Finned Tube Baseboard 190, 88 20, 11.7 85, 29
Cast Iron Radiators 150, 66 20, 11.7 85, 29
Radiant 130, 54 20, 11.7 85, 29
Outdoor Sensor (10K)
The outdoor sensor should be installed to take advantage
of the energy saving features of the Sentry Controller.
Install the sensor on the north, or coldest side of the
building out of direct sun. It must be at least 10 ft, 3 m
from the vent terminal or other source of heat.
NOTE: LFS must not be set below 48 on the GT150
model. To start the control operation return to
“RUN” on the menu and press “Function”. Normal
operation will begin.

GT INSTALLATION AND OPERATION INSTRUCTIONSPage 28
Determining Reset Temperature HI
Calc
Once the Sentry 2100T control identifi es the presence
of a good outdoor sensor, the control will automatically
reduce the HI setting based upon the outdoor
temperature. For example, if Hi = 200°F, 93°C, RES =
70°F, 21°C and the Air Temperature = 32°F, 0°C, the HI
setpoint, HI
, would be calculated as follows:
Calc
RESET RATIO
= (High Setting - RES)/RES
= (200°F, 93°C - 70°F, 21°C) /70°F, 21°C
= 1.85
RESET TEMPERATURE HI
Calc
=[(RES-Outdoor Air) x Reset Ratio] + RES
=[(70°F, 21°C - 32°F, 0°C) x 1.85] + 70°F, 21°C
=[70.6°F, 21°C] + 70°F, 21°C
=140.6 F, 42°C
Figures 39 - Reset Curve For Res = 85 °F, 29°C
NOTE: The design temperature is 0°F, -18°C outside
air, so at 0°F, -18°C or less, the hi setting is used,
and not surpassed.
Figures 39 & 40 are examples of reset temperatures
based upon different set points and outdoor air temperatures. The vertical axis is the water temperature that
the boiler will maintain and is also the Hi setting of the
Sentry 2100T control. The Horizontal axis is the outdoor
air temperature.
Figures 40 - Reset Curve For Res = 70 °F, 21°C

GT INSTALLATION AND OPERATION INSTRUCTIONS Page 29
BOILER SET UP
NOTE: Before starting the boiler, turn off the
electrical supply going to it. Make sure that gas is
available at the gas valve inlet. Open the valves in
the hot water return and supply piping. Failure to
take these precautions will prevent the boiler from
operation properly.
Fill the boiler and all of the radiation with water. Make
sure that the system is completely purged of air, see
GENERAL PLUMBING GUIDELINES.
Review these instructions and make sure that the boiler
installation complies with ALL of the instructions up to
this point.
OPERATING INSTRUCTIONS
The GT boiler employs a pneumatic modulation system.
This modulation system increases or decreases the
speed of the blower to meet the heating demand. The
gas valve pressure regulator senses the air pressure and
adjusts the gas fl ow to ensure correct combustion.
WARNING: Before operating read and understand the instructions contained in this manual.
Do not attempt to operate this boiler if it has
not been installed in accordance with the
guidelines set forth in this manual. Read and
fully understand the operating instructions in
the “For Your Safety Read Before Operating”
section of this manual. Failure to comply with
this WARNING could result in a fi re or explosion
causing severe personal injury or death!
Do not use this appliance if any part has been under
water. Immediately call a qualified service technician
to inspect the appliance and to replace any part of the
control system and any gas control that has been under
water.
NOTE: The GT was tested with Natural Gas having a
heating value of 1020 BTU per cubic foot. For areas
with lower heating values, a combustion test is
required to obtain optimum operation.
WARNING: The input Screw MUST NEVER BE
ADJUSTED without verifying proper combustion
with a calibrated combustion analyzer. Failure to
comply with this warning can result in excessive
levels of carbon monoxide which can cause
severe personal injury or death!
Table 7 contains the range for the CO, CO2 and NOx that
should be in a fl ue gas sample of a properly operating
boiler at maximum input.
Table 7 - Normal Flue Gas Composition
Natural Gas Propane
Carbon Dioxide CO2 % 8-9.5 9-10.5
Carbon Monoxide CO ppm 25-175 25-175
NOX ppm 10-50 10-50
Note: At maximum fan speed of 240 on the Sentry
display
Should overheating occur or the gas supply fail to shut
off, do not turn off or disconnect the electrical supply to
the pump. Instead, shut off the gas supply at a location
external to the appliance.

GT INSTALLATION AND OPERATION INSTRUCTIONSPage 30
The gas supply pressure to the boiler while running
at maximum rate must be between 4 to 9 in, 102 to
229 mm, W.C. for natural gas installations; 9 to 12 in, 229
to 305 mm, W.C. for propane installations. This pressure
can be measured on the gas valve using a manometer,
Figure 41 or 42. Ensure that the regulator is capable of
maintaining this pressure under all operating conditions.
The gas valve is also equipped with a manifold pressure
port, Figure 41 or 42.
Figure 41 - Gas Valve Layout, GT-150 & 200
Figure 42 - Gas Valve Layout, GT-400
Manifold Pressure
Line Pressure
Ignition System
A. Connect a manometer to the line pressure port
shown in Figure 41 or 42. Make sure that the gas
supply piping has been purged of air and that all
gas joints up to the gas valve have been thoroughly
checked for leaks. Wait at least fi ve minutes for any
gas to dissipate before turning on the electrical
power.
B. Read, understand and follow the operating
instructions below.
C. Raise the thermostat at least 5 degrees above the
room temperature. The boiler should enter the prepurge mode before energizing the silicon carbide
igniter. Once the igniter is hot, the main gas valve
will open and the burner should light. If the burner
fails to light the system will make three more ignition
attempts. If the burner has not lit after the last
ignition try, the gas valve will close and the system
will go into lock out. DO NOT attempt to reset the
system until the ignition system has been inspected
and the problem resolved. Once the problem has
been resolved and 5 minutes have passed since
the last ignition attempt, reset the system by turning
the thermostat to it’s lowest setting and then back
to where it was or by momentarily interrupting the
electrical power to the boiler.
D. With the burner in operation close the manual shutoff
valve in the gas supply line. As soon as the burner
fl ame goes out, open the manual shutoff valve. A
normal ignition sequence should take place.
Input Screw
E. With the burner in operation, interrupt the power to the
control circuit by lowering and raising the thermostat.
A normal ignition sequence should follow.
F. To test the ignition safety shutoff device, close the
manual shutoff valve in the gas supply line. Within 6
seconds of main burner fl ame extinction, the main
gas valve solenoid should close with an audible noise.
The igniter should glow and make three attempts at
ignition. After unsuccessfully attempting to light the
burner the ignition module should lock out.

GT INSTALLATION AND OPERATION INSTRUCTIONS Page 31
Figure 43 - Operational Flow Chart
Energizes 3 way
diverter valve
Energizes Primary
Pump (C1)
Error
ASC
24 Volt signal
to blower
Error
ASO
Sentry 2100
Modulates fan based
upon setpoint and
programming
120v Power
Applied
Combi model
Open
Hi pressure
N. C. switch on
GT 400 only
Igniter warm-up
5 seconds
Combi or
indirect
Indirect
Water
Heater
Closed
Power to ignitor
120v from S1
Power to Gas valve
Displays version
t2.0 or t4.0
Indirect thermostat or flow
switch closes A-C
(Call for Domestic)
Energizes Indirect Pump
(Ap) turns off C1
Closed
Open
Closed
NONC
Prepurge
Air
Switches
Open
Greater than 1.0 microA
Sentry 2100
Sentry 2100
Fan to SFS (75)
IGNITION MODULE
S1 L1 L2 S2 W MV GND
Boiler in
standby Mode
Awaiting
Input
Sentry 2100
Flame Probe
Signal <1 microA
Thermostat End switch
or relay closes T-C
(Call for Heat)
Energizes Primary
Pump (C1)
(Call for Ignition)
Sentry 2100
24 V
Manifold & Stack Limit
(GT 150 & GT 200)
Manifold Limit & Flow
Switch
(GT 400)
24 V
Three retries
for flame
Less than
1.0 microA
Call for flame ends

GT INSTALLATION AND OPERATION INSTRUCTIONSPage 32
FOR YOUR SAFETY READ BEFORE OPERATING
WARNING: If you do not follow these instructions exactly, a fi re or explosion may result
causing property damage, personal injury or loss of life.
A. This appliance does not have a pilot. It is equipped
with an ignition device which automatically lights
the burner. Do not try to light the burner by hand.
B. BEFORE OPERATING smell all around the
appliance area for gas. Be sure to smell next to
the fl oor because some gas is heavier than air
and will settle on the fl oor.
WHAT TO DO IF YOU SMELL GAS
• Do not try to light any appliance.
• Do not tough any electric switch; do not use any
phone in your building.
• Immediately call your gas supplier from a neighbor’s
phone. Follow the gas suppliers instructions.
OPERATING INSTRUCTIONS
1. STOP! Read the safety information above.
2. Turn off all electric power to the appliance.
3. Set the thermostat to lowest setting.
4. This appliance is equipped with an ignition device,
which automatically lights the burner. Do not try
to light the burner by hand!
• If you cannot reach your gas supplier, call the fi re
department.
C. Use only your hand to push in or turn the gas
control knob. Never use tools. If the knob will not
push in or turn by hand, don’t try to repair it, call
a qualifi ed service technician. Force or attempted
repair may result in a fi re or explosion.
D. Do not use this appliance if any part has been
under water. Immediately call a qualifi ed service
technician to inspect the appliance and to replace
any part of the control system and any gas control
that has been under water.
5. Remove control access panel.
6. Turn the manual gas supply shut off valve clock-
wise to the full “OFF” position.
7. Wait fi ve (5) minutes to clear out any gas. Then
smell for gas, including near the fl oor. If you
then smell gas STOP! Follow “B” in the safety
information above. If you don’t smell gas, go to
the next step.
GAS IN
MANIFOLD
PRESSURE
out
INPUT
SCREW
LINE
PRESSURE
TO TURN OFF GAS TO APPLIANCE
1. Turn off all electric power to the appliance.
2. Set the thermostat to lowest setting.
3. Remove control access panel.
8. Turn the manual gas supply shut off valve
counter-clockwise to “ON”.
9. Replace control access panel.
10. Turn on all electric power to the appliance.
11. Set thermostat to desired setting.
12. If the appliance will not operate, follow the instruct-
tions “TO TURN OFF GAS TO APPLIANCE” and
call your service technician or gas supplier.
4. Turn the manual gas supply shut off valve clock-
wise to the full “OFF” position.
5. Replace control access panel.

GT INSTALLATION AND OPERATION INSTRUCTIONS Page 33
BOILER CHECKING
& ADJUSTMENT
Input Rate
Gas appliances are rated based on sea level operation
with no adjustment required at elevations up to 2000 ft,
610 m. At elevations above 2000 ft, 610 m, input ratings
should be reduced by 4% for each 1000 ft, 305 m, above
sea level. Check the input rate as follows:
NATURAL GAS:
1. Turn off all other gas appliances that use the same
gas meter as the boiler.
2. Call the gas company for the gas heating value.
3. Start the boiler and let it run for 15 minutes.
4. Using the gas meter and a stopwatch, clock the time
that it takes to burn 10 cubic feet of gas and divide
the time by 10.
5. Insert the heating value and the time, in seconds,
into the formula below.
Input Rate = Heating Value(Btu/ft3)(3600 s/hr)
Flow Rate(s/ft3)
EXAMPLE: If the heating value = 1000 Btu/ft
and the fl ow rate = 18 s/ft
Input Rate = (1000 Btu/ft3)(3600 s/hr)
18 s/ft
3
Input Rate = 200,000 Btu/hr
If the computed rate deviates by more than 5% from the
rated input value of the unit adjust the gas valve pressure
according to the GAS PRESSURE ADJUSTMENT
instructions that follow.
3
3
Gas Pressure Adjustment
Optimum results are obtained when the boiler is operated
at its full input rating. If adjustment is necessary the
following steps must be followed:
1. Connect a fl ue gas analyzer to the vent pipe.
2. Rotate the input adjustment screw clockwise to
decrease the manifold pressure, counterclockwise
to increase it, Figure 41 or 42. The input screw on
the GT-150 & 200 is a multi turn needle valve. From
fully open to fully closed is approximately 17 turns.
A typical adjustment is 0 to 1 turn for natural gas,
0 to 3 turns for LP. The input screw on the GT-400
turns a geared ball valve with a 4 to 1 ratio. Two turns
will take the valve from fully open to fully closed.
0 to 1/4 turn is a typical adjustment. Never force
the input adjustment screw or the gas valve will be
damaged!
3. For natural gas the CO
reading should fall between
2
8% and 9.5% with a CO reading of less than 175
ppm air free. For LP gas the CO2 reading should fall
between 9% and 10.5% with a CO reading of less
than 175 ppm air free.
Main Burner Flame
A properly adjusted main burner fl ame will produce a
tight blue fl ame pattern about 1/2 in, 13 mm, tall from
the burner’s surface, Figure 44. A yellow fl oating or tall
stringy fl ame is not normal and must be corrected.
WARNING: Yellow, fl oating fl ames indicate a lack
of combustion air. DO NOT operate the boiler until
the problem is solved or severe personal injury
or death may occur!
Figure 44 - Burner Flame
PROPANE GAS:
The input rate for LP units is factory set based on the
orifi ce size. Use the factory supplied kit to convert the
boiler to LP. A combusiton analyzer must be used to
ensure that the CO2 reading falls between 9% and 10.5%
with a CO reading of less than 175 ppm air free.
CAUTION: Never increase the input to the boiler
above that for which it is rated. Doing so can cause
premature failure of the boiler!
Thermostat Adjustment
Set the heat anticipator to 1.1 amps when controlling
the boiler directly. For zoned systems set the heat
anticipator to match the amp draw of the zone valves or
pump relays.

GT INSTALLATION AND OPERATION INSTRUCTIONSPage 34
BOILER MAINTENANCE
The boiler should be cleaned and inspected once a year,
before each heating season.
CAUTION: Servicing, inspection and adjustment
must be done by a trained technician in accordance
with all applicable local and national codes. Improper
servicing or adjustment could damage the boiler!
Controls
Use a soft brush and/or a vacuum cleaner to ensure that
the electrical components are free from dust or deposits
that would impair the boiler’s performance.
Heat Exchanger Cleaning
Natural Gas - once every two years.
Propane - once per year.
The burner door should be removed so the combustion
chamber can be inspected for flue gas blockage,
see BURNER REMOVAL & REPLACEMENT below.
Once the burner has been removed remove the heat
exchanger baffle. Blockage of the heat exchanger
will reduce the boiler’s capacity/firing rate and can
negatively impact on how smooth and efficiently the
burner lights. Vacuum out any loose build-up and clean
the heat exchanger surface with an appropriate cleaner
for combustion chambers such as Sotin 300. Use a
nylon or other non-metallic brush to loosen the sulfate
incrustations and any other contaminates. Rinse with
water allowing the solution to exit via the condensate
drain. This process may warrant removing the insulation
disc from the back of the heat exchanger.
Heat Exchanger Flushing
Listen for water fl ow noises that indicate a drop in the
boiler water fl ow rate. The boiler and hydronic system
may need to be fl ushed to eliminate hard water scale. A
de-scalar such as Fernox DS-40 is recommend.
1. Close the manual shutoff valve in the gas supply line
and turn off electrical power to the boiler.
2. Remove the front and left jacket panels.
3. Disconnect the wires going to the igniter, fl ame rod,
ground rod, blower and gas valve.
4. Carefully disconnect the gas piping at the union,
Figure 27.
5. Carefully disconnect the air inlet piping at the valve,
Figure 2.
6. Remove the nuts used to attach the burner to the
heat exchanger.
7. Carefully slide the burner out of the unit.
8. Inspect the burner for damage or signs of
deterioration. Use a brush or vacuum cleaner
to remove any debris from the burner ports.
9. DO NOT install a damaged or badly corroded burner,
replace it.
10. Inspect the ceramic burner disc for signs of damage
or deterioration and replace it if necessary.
11. Inspect the burner door gasket for signs of damage
or deterioration and replace it if necessary.
12. Inspect the ignition components for signs of damage
or deterioration and replace them if necessary.
13. Reassemble the unit following the removal steps in
reverse order.
14. All gas connections MUST be leak tested before
putting the boiler into operation.
WARNING: Never use an open fl ame to test for
gas leaks. Always use an approved leak detection
method. Failure to comply with this WARNING
could result in an explosion!
15. Confi rm proper operation of the boiler and replace
the jacket panels.
Condensate System
Ensure that the condensate removal system is clean,
sound and working properly.
Burner Removal & Replacement
WARNING: The ceramic door disc on the rear
of the burner contains crystalline silica. Wear
proper respiration protection when servicing
the burner and gently handle the burner and
its disc to prevent inhalation of airborne fi bers.
Crystalline silica fi bers have been identifi ed as
carcinogenic, or possibly carcinogenic when
inhaled.
CAUTION: The burner should not be removed unless
there is a problem with it. Careless handling can
damage the burner!
Vent System
The entire vent system must be thoroughly inspected
for any signs of blockage, damage or leaks. Immediately
replace any unsound vent system piping. Remove any
foreign matter in or near the vent and air inlet terminals
that might obstruct them.
Low Water Cutoff
If the system has been equipped with a low water cut-off
device, follow the manufacturer’s instructions for cleaning
and to confi rm proper operation
Relief Valve
The relief valve should vent water when the test lever is
lifted. It should not weep or discharge water at normal
system pressure. NEVER try to clean or repair the relief
valve! If the valve fails replace it!

GT INSTALLATION AND OPERATION INSTRUCTIONS Page 35
out
out
Aquastat High Limit
The aquastat high limit controls the maximum water
temperature in the boiler. If the water temperature
reaches the set temperature before the demand for heat
has been met, the aquastat high limit should shut the
burners off. The outlet water temperature should never
exceed 220°F, 104°C. If the aquastat high limit fails to
function properly replace it.
WALL HUNG CONVERSION
This boiler is certifi ed to be either mounted on the fl oor
as supplied, or mounted on a wall.
For wall mounting, perform the following steps.
1. Ensure that the desired location provides adequate
room for the clearance, see Table 1, venting, and
servicing.
2. Remove the right stainless steel panel, and
discard.
3. You will see that underneath the panel, the boiler frame
has mounting holes, designed for wall attachment.
4. The boiler must be mounted so the lag bolts enter
the studs of the wall. If this is not possible use a 3/4"
thick of plywood approximately 24 in, 610 mm, wide
by 36 in, 914 mm, high.
5. Install two #14-3" lag bolts three quarters of the
way into the surface, to the height you desire for
mounting.
6. Lift the boiler onto the wall, and tighten the top lag
bolts.
7. Once the unit is level, install the bottom two #14-3"
lag bolts.
8. Remove the Air Inlet Pipe assembly and Metering
elbow from the gas valve-venturi assembly, Figure
45.
Figure 45 - Air Inlet Pipe Removal
Figure 46 - Gas Valve Rotation
NEW LOCATIONS
FOR SCREWS
out
out
REMOVE SCREWS
AND ROTATE 90°
RE-INSTALL SCREWS
IN NEW LOCATIONS
1/2 IN THREADED
CONNECTION
10. Reattach the gas valve-venturi assembly to the side
of the blower making sure the gasket is correctly
orientated.
11. Re-install the Air Inlet Pipe assembly and Metering
elbow from the gas valve-venturi assembly, in the
vertical position, Figure 47.
Figure 47 - Air Inlet Pipe Installation
12. Install the gas line as per Figure 48 and follow
the instructions in the GAS PIPING section of this
manual.
9. Remove the two screws attaching the gas valveventuri assembly to the side of the blower and rotate
the valve 90° so the 1/2" threaded connection is
pointing down, Figure 46. Pay close attention to how
the cork gasket is aligned.
Figure 48 - Gas Supply Piping

GT INSTALLATION AND OPERATION INSTRUCTIONSPage 36
TROUBLE SHOOTING
This section is intended to assist the service technician in detecting and correcting common errors. The Sentry 2100
is equipped with an internal diagnostic system that verifi es control operation. The following series of error codes has
been developed to aid in diagnosing control problems:
Problem Detected Problem Solution
ER1 On Display
ER2 On Display
ER3 On Display
ER5 On Display
DHW Problem
The Safety High Limit of 215°F, 102°C,
has been reached.
Water Probe... The water probe is
transmitting an invalid signal - closed
circuit.
Water probe...Sentry is sensing an open
circuit at water probe. Or, the wiring to the
outdoor probe is grounded.
The control has determined an Indirect
water heater problem; the boiler has
cycled off 10 times during a single call
for domestic. The Indirect call will now be
ignored until power is reset or the indirect
call is interrupted.
1. Check to see if water is dripping on the
sensor.
2. Reduce the Hi setting (and/or) ensure
that there is proper water circulation in
the system.
Check wiring
Check wiring. (Note: ER3 will be
displayed if temperature sensed is
less then 32°F, 0°C.)
Note: If problem is corrected by resetting
power, Sentry control had locked-up;
contact Smith.
1. Not enough fl ow to keep boiler from
tripping on limit. Verify that a min. of
6 GPM, 0.4 L/s, fl ow is going through
boiler & indirect circuit.
2. Reduce indirect Aquastat setting,
or Increase difference between (Lo
Setting) and (indirect Aquastat setting).
3. Indirect limit or wiring failure.
ER6
Burner shuts off
before set-point
temperature is
reached (and burner
light goes out)
“Flame Lock Out”
Sentry has sensed a lack of 24V to the
gas valve during operation or a Fenwal
ignition lockout.
Reset calculation being used to
lower HI setting.
Thermostat is satisfi ed
1. There is a problem in the ignition
sequence; it could be caused by a
faulty igniter, fl ame sensor, gas valve or
improper line pressure or combustion.
Check ignition sequence to determine
which component is not functioning.
(Sentry will retry ignition sequence
1 hour after ER6 code originally
occurs or if control is reset)
2. Check for 24V between B on terminal
block and F1 on Sentry plug, if not
present a limit has tripped (see wiring
diagram).
3. the Flow Switch on the GT-400 is also
in the 24V circuit. Check for proper
water fl ow and fl ow switch operation.
If OD probe is being used, the HI setting will
be calculated using formula in Section 8.
1. If the thermostat demand light is
turning off, the thermostat has satisfi ed.
2. If DHW temp light is turning off; the
aquastat or call for domestic has been
satisfi ed.

GT INSTALLATION AND OPERATION INSTRUCTIONS Page 37
Problem Detected Problem Solution
ASO
Indicates that the
Air Switch is Open
ASC
Indicates that the
Air Switch is Closed
This is displayed when the boiler is
expecting the air switch to be closed by a
differential pressure generated when the
combustion blower turns on. It can occur
momentarily during normal operation.
A problem is indicated when ASO is
displayed continuously.
This is displayed when the boiler has
turned the blower off and is expecting
the air switch to be open. It can occur
momentarily during normal operation.
A problem is indicated when ASC is
displayed continuously.
1. Are the vinyl tubes connected between
the air switch and the ports on the inlet
pipe. Negative side of switch connects
to the port on the 1 1/2 in, 38 mm,
ABS elbow.
2. Check for blockage on the intake and
exhaust vents.
3.
If fan is running, air switch may be faulty,
ensure that it’s set for 0.2 in, 5.1 mm WC.
The GT-400 condensate drain switch
must be set at 3 in, 76 mm WC.
4. If fan is not running, check 120V wiring
to blower, if ok remove low voltage
harness from blower, if blower fails to
start, replace blower, if blower does
start problem may be with blower or
Sentry control.
1. Is the fan running. If so check for 24V
between C and D terminals, see wiring
diagrams. If 24V is not present replace
transformer.
2. Check venting termination with
required venting described in manual.
Ignition Sequence
not activated when
burner light is on
(Fan is on and
Fenwal not fl ashing)
Check for 24 Volts between terminal B1
on Sentry & Ground.
Check for 24 Volts between terminal F1
on Sentry & Ground.
Water Safety Limit trips (Automatic reset)
Located in the supply manifold inside the
boiler cabinet.
1. If there is 24V, indicates faulty wiring
between BI and W1 on Fenwal, or
faulty Fenwal.
2. If 24V is not present proceed to next
step.
1. If 24V exists here but not at B1,
indicates faulty relay inside Sentry,
contact NTI, replace control.
2. If 24V is not present check for 24V
at transformer.
3. If 24V exists at transformer, check
wiring and safety limits. If 24V not
present at transformer, check wiring
and replace transformer if necessary.
May be caused by an error in the reading
of the water temperature by the Sentry
control. Watch cycle, and ensure the
Sentry is displaying the correct water
temperature and is modulating.
This device protects the boiler from
overheating due to a lack of fl ow passing
through the unit when the burner is on.
FLOW MUST NEVER BE BLOCKED BY
ANY VALVES INCLUDING MIXING OR
ZONE VALVES.
Install unit as described in this manual.

GT INSTALLATION AND OPERATION INSTRUCTIONSPage 38
Problem Detected Problem Solution
Ignition Sequence
not activated when
burner light is on
(Fan is on and
Fenwal not fl ashing)
continued
Two Flashes on
Fenwal
Three Flashes on
Fenwal
Stack Safety Limit Trips (Automatic Reset)
Located on the front of the fl ue box.
The Fenwal controller thinks that there is a
fl ame prior to ignition.
Indicates Ignition Lockout.
This device protects the integrity of the
plastic venting material.
If the temperature of the fl ue gases
exceeds 225°F, 107°C, the limit will cut
power to the control. Blocked internal
tubes can increase the stack temperature
to an unacceptable level. Flush out the
boiler.
If the combustion sequence is normal,
and there is no fl ame prior to ignition, the
Fenwal control is defective, and must be
replaced.
If the condensate drain gets blocked,
the boiler will become fl ooded, and
terminate operation, as the fl ame rod
becomes immersed. This will damage
the fl ame probe. To correct, free the drain
blockage, and permanently prevent it from
reoccurring. Remove and dry off the probe.
Reinstall the probe and try for ignition, if
it fails to ignite, leave the fan run for up to
three hours to dry out the insulation and
probe.
Boiler will not stay
lit.
Boiler bangs or
hisses
Indicates lack of a good fl ame signal. In
order to stay running the fl ame signal must
be at least 0.7 micro Amps.
Bangs or sounds like a kettle while burner
is running indicating insuffi cient fl ow.
Reset Boiler so it will attempt to ignite.
Check for proper operation of ignition
components. Make sure igniter glows and
gas valve opens.
Check for proper line pressure at gas
valve when it opens.
If boiler lights check for fl ame signal
between FC1 And FC2 on Fenwal control.
If lower then 1.2 micro amps see Boiler
will not stay lit below.
Check combustion properties.
If the Burner light on the Sentry is going
out, go to “Burner shutting off”.
Check condensate drain for blockage and
check the inlet piping for ingested snow
or water (if the fl ame rod gets wet, it may
need to be replaced). Check for resistance
from fl ame rod to ground, must be an
open circuit (O.L).
Check for proper polarity of line and
neutral wiring to the boiler.
Ensure the plumbing is as shown in
manual. Check to see if pumps are faulty
or end switches are stuck. This problem
can lead to boiler overheating!

GT INSTALLATION AND OPERATION INSTRUCTIONS Page 39
Problem Detected Problem Solution
Sentry Controller
Locks-up
Display Goes Blank
Boiler Lights rough
or pulsates
Excessive noise, current, or voltage spikes
in the 120V power supply.
No power to control or control failure.
Typically an imbalance in the air to gas
ratio.
Check for voltage at the wires going to the
A-C-T terminals of the Boiler.
Check the magnitude of the line voltage
power supply.
Check the Amp draw of output C1 and Ap
(max 3 Amp).
Check the Amp draw of control on start-up
(max 6 Amps)
Contact Smith.
Check for 120V between terminals L1 and
L2 at Sentry.
If 120V exists turn power off and remove
line voltage harness from Sentry. Then
check for resistance between L1 and L2
of control, if the circuit is open (O.L) the
internal fuse has blown. Check for shorts
in wires leading to circulators prior to
replacing controller.
If 120V not present, check wiring and for
120V at source.
Ensure that the venting lengths are in
compliance with the venting sections
above.
Ensure that the line pressure during
operation does not drop more than 20%
from the static line pressure.
Momentarily remove the intake vent from
the boiler during ignition, if unit lights
smoothly with intake vent disconnected
reconnect and check for proper
combustion if unit maintains smooth
operation after ignition. Calibrate for
proper combustion. If problem persists
contact Smith.
Fan appears to be
creating a noise in
the housing
Slight vibration can cause noise in the
residence. This is not a warranty issue.
Making a rubbing noise. This is not a
warranty issue.
Use fl exible gas line to insolate the
vibration noises between the gas valve
and the line.
Don’t hang gas lines from fl oor joists.
Use rubber insulators with gas line
supports.
If gas valve is not held when the gas
nipple is connected, the force of tightening
the fi tting can damage the valve, and warp
the fan housing.
If pipe is used, the gas line must not
create any forces to the valve, either
vertically (weight of line), or horizontally
(misaligned connection)

GT INSTALLATION AND OPERATION INSTRUCTIONSPage 40
The following are the thermister curves for diagnosing
the water and outdoor air sensors.
1. Measure the resistance of the thermister when
disconnected.
2. Using the appropriate chart, fi nd the resistance and
move vertically for the water probe or horizontally for
the air probe until the line is intersected.
3. Move 90 degrees to the corresponding temperature.
4. If the temperature is plus or minus 10°F, - 12 °C,
then the probe is operating correctly.

GT INSTALLATION AND OPERATION INSTRUCTIONS Page 41
REPLACEMENT PARTS LIST
Replacement parts are available from your stocking wholesaler. Homeowners must contact their
local installer or wholesaler.
Figure 48 - Replacement Parts Exploded View - Models GT150 and GT200
30
27A
27
2
8
11C
15
13
3
6
11B
11
11A
18
18A
SIOM-151
6B
12
7
26
19A
19B
19
20
9
1
1A
10
22
4
14
16
28
28A
32
5A
5
5B
17
29
Item Part Number Description
1 GT-82657 Premix burner, 135.8 – 150 Only
1 GT-82658 Premix burner, 200.6 – 200 Only
1A GT-82761 Premix Burner Gasket
2 GT-82457 Transformer, 24V
3 GT-82013 Sentry 2100
4 GT-82052 Blower #RG130 – 150 Only
4 GT-82661 Blower #RG148/1200 – 200 Only
5 GT-82054 Gas Valve (CVI) VK8115F1134B
5A GT-82065 Gas Valve 1/2" npt elbow
5B GT-82600 Gas Valve Vent connection
6 GT-82662 Air switch Huba @ .15"wc.
7 GT-82671
7 GT-83035
Thermister #T7335C2016 1 Mohm (150-200)
Thermister NTC 1/4" NPT, 1 Mohm (150ASME)
8 GT-82058 Ignition Moduel Fenwal #2465H
9 GT-82708 IGNITER, #601, c/w SS Heat shield
10 GT-82762 Rauscchert Flame Rod
11 GT-82763 Composit Flue Box
11A GT-82764 Composit Flue Box Gasket
11B GT-82765 Composit Flue Outlet Gasket
11C GT-83291-1 Flue Adapter Assembly
12 GT-82659 Manifold Limit, 1/8BSP, Brass (150-200)
12 GT-82992 Manifold Limit, 1/4NPT, Brass (150 ASME)
13 GT-82596 150 non-ASME Heat Exchanger
13 GT-83012 150 ASME Heat Exchanger
13 GT-82647 200 Heat Exchanger
14 GT-82650 LP orifi ce 5.20mm – 150-200 Only
15 GT-82660 Stack Limit, 1/4BSP, SS, 190F, Dif=30
16 GT-82766 Blower gasket 150 Only
Item Part Number Description
16 GT-82719 Blower gasket 200 Only
17 GT-82622-1 Inlet Pipe assembly
18 GT-82127 Condensate nylon Y
18A GT-82913 Siphon Condensate Trap
19 GT-82767 Cast aluminum Burner door
19A GT-82769 Ceramic burner door disc
19B GT-82770 Burner door gasket
20 GT-82768 Igniter gasket
22 GT-82771 Extended air tube
27 GT-82754 Complete Control panel & Harness
27A GT-82754-1 PCB Optocoupler
28 GT-82054-1 CVI Venturi 01 – 150-200 Only
28A GT-82054-2 CVI Venturi Gasket
29 GT-82104-1 Air metering Elbow
30 GT-81027-1 Sentry 2100 (10k) Outdoor Air Sensor
31 GT-83223
1/8NPT Water Pressure Switch (after 5-1-06)
31 GT-83223-1 1/4NPT Water Pressure Switch (150 ASME)
32 GT-83112
Divider Plate Insulation c/w washer and screw
A GT-82976-A Stainless steel Top
B GT-82976-B Electrical box cover
C GT-82976-C Stainless steel Left side
D GT-82976-D Stainless steel Right side
E GT-82976-E Stainless steel Front Door
F GT-82976-F Galvanized Right Side
G GT-82976-G Galvanized Bottom base
H GT-82976-H Bottom Base support
I GT-82976-I Galvanized Back

GT INSTALLATION AND OPERATION INSTRUCTIONSPage 42
REPLACEMENT PARTS LIST
Replacement parts are available from your stocking wholesaler. Homeowners must contact their
local installer or wholesaler.
Figure 49 - Replacement Parts Exploded View - Model GT400
31
32
33
30
34
36
Reverse
6C
Angle
15
30
14A
7
12
8
3
2
23
19A
19B
19
20
9
1
1A
22
16
25
4
24
SIOM-152
Item Part Number Description
1 GT-83173 Premix Burner (For 400)
1A GT-82761 Premix Burner Gasket
2 GT-82457 Transformer, 24V
3 GT-83171 Sentry 2100 Assembly
4 GT-82994 EBM BLOWER #RG148/E
5 GT-82989 Gas Valve VR8615VB 1044B
5A GT-82991 Gas Valve Adapter, 3/4" NPT
5B GT-83194 Gas Valve Connector O-ring
GT-83016 Gas Valve Harness
6 GT-82662 Air switch Huba @ 0.2"wc.
6C GT-82539 Air Vent
7 GT-83035 Thermister NTC 1/4" NPT, 1Mohm
8 GT-82058 Ignition Module (Fenwal)
9 GT-82708 IGNITER, #601, c/w SS Heat shield
10 GT-82762 Flame Rod Rauschert
11 GT-82906 Air Switch 604.E421180 set @ 3" wc
12 GT-82992 Limit Switch, 1/4"NPT, (Manifold)
13 GT-82926 400 Heat Exchanger, ASME
14 GT-82993 Gas Valve Orifi ce, 8.0mm, NG
14A GT-83017 Gas Valve Orifi ce, 6.2mm, LP
15 GT-81887 Flow Switch, FS-10C
16 GT-82766 Blower Gasket
11
6
10
5
21
26
13
37
17A
17
18
14
5B
5A
28
29
Item Part Number Description
17 GT-83037 TEE NYLON 3/4"HB to 3/4"
17A GT-83038 ADAPTER NYLON, 3/4" x 1/4"
18 GT-82913 SIPHON CONDENSATE TRAP
19A GT-82769 Burner Door Ceramic Disc
19B GT-82770 Burner Door Viton Gasket
20 GT-82768 Igniter Gasket
21 GT-83034 Exhaust Test Plug
22 GT-83195 Extended Air Tube
23 GT-83141 Control Panel, Complete
24 GT-82990 CVI Venturi
25 GT-83106 O-ring, Venturi to Blower
26 GT-83001 Test Port Retaining Clamp
27 GT-82754-1 PCB Optocoupler
28 29 GT-83170-1 Air Metering Assembly
30 GT-81027-1 Sentry 2100 (10K) Outdoor Probe
31 GT-83018 Vent Screen, 4"
32 GT-83019 Vent Screen, 6"
33 GT-83013 Nipple, 1-1/4" x 8", Brass
34 GT-83005 1-1/4"x 1-1/4"x 3/4" Tee Brass
35 GT-13701 RELIEF VALVE 3/4" #335 30 PSI
36 GT-82148 PRESSURE GAUGE 0-30 PSI
37 GT-83112 Divider Insul. (c/w washer & screw)

GT INSTALLATION AND OPERATION INSTRUCTIONS Page 43

WESTCAST, INC.
260 NORTH ELM STREET WESTFIELD, MA 01085
TEL. (413) 562-9631 FAX (413) 562-3799
 Loading...