

Page 1
Gebruik‐
saanwijzing
User Manual
Notice d'utili‐
sation
Benutzerin‐
formation
Koelkast
Refrigerator
Réfrigérateur
Kühlschrank
U3L080P
Page 2

CONTENTS
Safety information 13
Safety instructions 14
Operation 15
First use 16
Daily use 16
Hints and tips 17
Care and cleaning 18
Troubleshooting 20
Installation 21
Technical information 22
Subject to change without notice.
SAFETY INFORMATION
Before the installation and use of the appliance, carefully read
the supplied instructions. The manufacturer is not responsible
if an incorrect installation and use causes injuries and
damages. Always keep the instructions with the appliance for
future reference.
Children and vulnerable people safety
• This appliance can be used by children aged from 8 years
and above and persons with reduced physical, sensory or
mental capabilities or lack of experience and knowledge if
they have been given supervision or instruction concerning
use of the appliance in a safe way and understand the
hazards involved.
• Do not let children play with the appliance.
• Cleaning and user maintenance shall not be made by
children without supervision.
Keep all packaging away from children.
•
13
General Safety
This appliance is intended to be used in household and
•
similar applications such as:
Farm houses; staff kitchen areas in shops, offices and
–
other working environments
By clients in hotels, motels, bed and breakfast and other
–
residential type environments
Keep ventilation openings, in the appliance enclosure or in
•
the built-in structure, clear of obstruction.
Page 3
14
• Do not use mechanical devices or other means to accelerate
the defrosting process, other than those recommended by
the manufacturer.
• Do not damage the refrigerant circuit.
• Do not use electrical appliances inside the food storage
compartments of the appliance, unless they are of the type
recommended by the manufacturer.
• Do not use water spray and steam to clean the appliance.
• Clean the appliance with a moist soft cloth. Only use neutral
detergents. Do not use abrasive products, abrasive cleaning
pads, solvents or metal objects.
• Do not store explosive substances such as aerosol cans
with a flammable propellant in this appliance.
• If the supply cord is damaged, it must be replaced by the
manufacturer, its Authorised Service Centre or similarly
qualified persons in order to avoid a hazard.
SAFETY INSTRUCTIONS
Installation
WARNING! Only a qualified
person must install this
appliance.
• Remove all the packaging.
• Do not install or use a damaged
appliance.
• Obey the installation instruction supplied
with the appliance.
• Always be careful when you move the
appliance because it is heavy. Always
wear safety gloves.
• Make sure the air can circulate around
the appliance.
• Wait at least 4 hours before connecting
the appliance to the power supply. This
is to allow the oil to flow back in the
compressor.
• Do not install the appliance close to
radiators or cookers, oven or hobs.
• The rear of the appliance must stand
against the wall.
• Do not install the appliance where there
is direct sunlight.
• Do not install this appliance in areas that
are too humid or too colds, such as the
construction appendices, garages or
wine cellars.
• When you move the appliance, lift it by
the front edge to avoid scratching the
floor.
Electrical connection
WARNING! Risk of fire and
electrical shock.
• The appliance must be earthed.
• Make sure that the electrical information
on the rating plate agrees with the
power supply. If not, contact an
electrician.
• Always use a correctly installed
shockproof socket.
• Do not use multi-plug adapters and
extension cables.
• Make sure not to cause damage to the
electrical components (e.g. mains plug,
mains cable, compressor). Contact the
Authorised Service Centre or an
Page 4
15
electrician to change the electrical
components.
• The mains cable must stay below the
level of the mains plug.
• Connect the mains plug to the mains
socket only at the end of the installation.
Make sure that there is access to the
mains plug after the installation.
• Do not pull the mains cable to
disconnect the appliance. Always pull
the mains plug.
Use
WARNING! Risk of injury,
burns, electrical shock or fire.
• Do not change the specification of this
appliance.
• Do not put electrical appliances (e.g. ice
cream makers) in the appliance unless
they are stated applicable by the
manufacturer.
• Be careful not to cause damage to the
refrigerant circuit. It contains isobutane
(R600a), a natural gas with a high level of
environmental compatibility. This gas is
flammable.
• If damage occurs to the refrigerant
circuit, make sure that there are no
flames and sources of ignition in the
room. Ventilate the room.
• Do not let hot items to touch the plastic
parts of the appliance.
• Do not store flammable gas and liquid in
the appliance.
• Do not put flammable products or items
that are wet with flammable products in,
near or on the appliance.
• Do not touch the compressor or the
condenser. They are hot.
Care and cleaning
WARNING! Risk of injury or
damage to the appliance.
• Before maintenance, deactivate the
appliance and disconnect the mains
plug from the mains socket.
• This appliance contains hydrocarbons in
the cooling unit. Only a qualified person
must do the maintenance and the
recharging of the unit.
• Regularly examine the drain of the
appliance and if necessary, clean it. If
the drain is blocked, defrosted water
collects in the bottom of the appliance.
Disposal
WARNING! Risk of injury or
suffocation.
• Disconnect the appliance from the mains
supply.
• Cut off the mains cable and discard it.
• Remove the door to prevent children
and pets to be closed inside of the
appliance.
• The refrigerant circuit and the insulation
materials of this appliance are ozonefriendly.
• The insulation foam contains flammable
gas. Contact your municipal authority for
information on how to discard the
appliance correctly.
• Do not cause damage to the part of the
cooling unit that is near the heat
exchanger.
Internal light
• The type of lamp used for this appliance
is not suitable for household room
illumination
OPERATION
Switching on
1. Insert the plug into the wall socket.
2. Turn the Temperature regulator
clockwise to a medium setting.
Page 5
16
Switching off
To turn off the appliance, turn the
temperature regulator to the "O" position.
Temperature regulation
The temperature is regulated automatically.
A medium setting is generally
the most suitable.
However, the exact setting
should be chosen keeping in
mind that the temperature inside
the appliance depends on:
• room temperature,
• how often the door is
opened,
• the quantity of food stored,
• the location of the appliance.
FIRST USE
Cleaning the interior
Before using the appliance for the first time,
the interior and all internal accessories
should be washed with lukewarm water
and some neutral soap to remove the
typical smell of a brand-new product, then
dried thoroughly.
1. Turn the Temperature regulator toward
lower settings to obtain the minimum
coldness.
2. Turn the Temperature regulator toward
higher settings to obtain the maximum
coldness.
CAUTION! If the ambient
temperature is high or the
appliance is fully loaded, and the
appliance is set to the lowest
temperatures, it may run
continuously causing frost to
form on the rear wall. In this
case the dial must be set to a
higher temperature to allow
automatic defrosting and
therefore reduced energy
consumption.
CAUTION! Do not use
detergents or abrasive powders,
as these will damage the finish.
DAILY USE
WARNING! Refer to Safety
chapters.
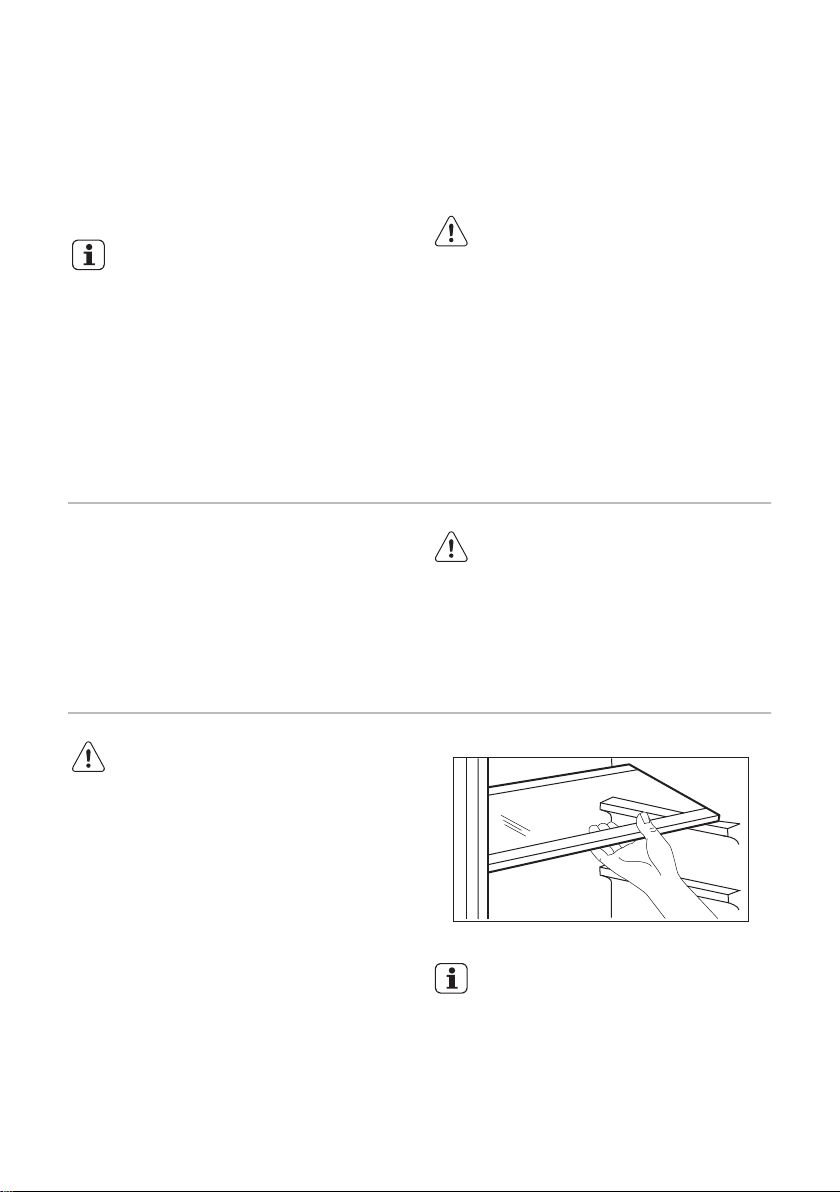
Movable shelves
The walls of the refrigerator are equipped
with a series of runners so that the shelves
can be positioned as desired.
Do not move the glass shelf
above the vegetable drawer and
the bottle shelf to ensure correct
air circulation.
Page 6
OK
OK
A
B
17
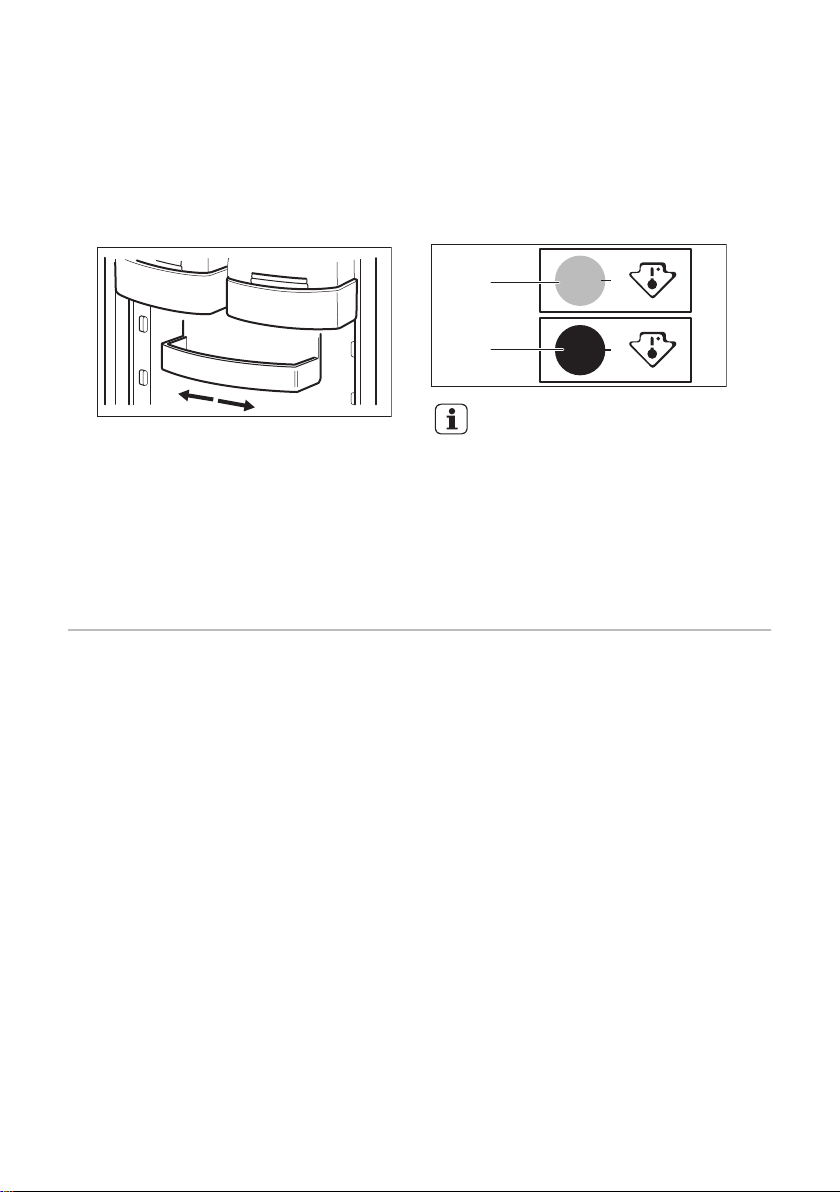
Positioning the door shelves
To permit storage of food packages of
various sizes, the door shelves can be
placed at different heights.
1. Gradually pull the shelf in the direction
of the arrows until it comes free.
2. Reposition as required.
This model is equipped with a variable
storage box which can be moved
sideways.
Temperature indicator
For proper storage of food the refrigerator is
equipped with the temperature indicator.
The symbol on the side wall of the
HINTS AND TIPS
Normal operating sounds
The following sounds are normal during
operation:
• A faint gurgling and bubbling sound from
coils sound when refrigerant is pumped.
• A whirring and pulsating sound from the
compressor when refrigerant is pumped.
• A sudden cracking noise from inside
appliance caused by thermic dilatation (a
natural and not dangerous physical
phenomenon).
• A faint click noise from the temperature
regulator when the compressor switches
on or off.
Hints for energy saving
• Do not open the door frequently or leave
it open longer than absolutely necessary.
• If the ambient temperature is high and
the Temperature Regulator is set to low
temperature and the appliance is fully
loaded, the compressor may run
appliance indicates the coldest area in the
refrigerator.
If “OK” is displayed (A), put fresh food into
area indicated by symbol, if not (B), adjust
the temperature controller to a colder
setting and wait 12 hours before checking
the temperature indicator again.
After putting fresh food into the
appliance or after opening the
door repeatedly or for a long
period, it is normal for the
indicator not to show "OK"; wait
at least 12 hours before
readjusting the temperature
controller.
continuously, causing frost or ice on the
evaporator. If this happens, set the
Temperature Regulator toward warmer
settings to allow automatic defrosting
and so a saving in electricity
consumption.
Hints for fresh food refrigeration
To obtain the best performance:
• do not store warm food or evaporating
liquids in the refrigerator
• do cover or wrap the food, particularly if
it has a strong flavour
• position food so that air can circulate
freely around it
Hints for refrigeration
Useful hints:
• Meat (all types) : wrap in polythene bags
and place on the glass shelf above the
vegetable drawer.
Page 7
PF
18
• For safety, store in this way only one or
two days at the most.
• Cooked foods, cold dishes, etc..: these
should be covered and may be placed
on any shelf.
• Fruit and vegetables: these should be
thoroughly cleaned and placed in the
special drawer(s) provided.
• Butter and cheese: these should be
placed in special airtight containers or
CARE AND CLEANING
WARNING! Refer to Safety
chapters.
General warnings
CAUTION! Unplug the
appliance before carrying out
any maintenance operation.
This appliance contains
hydrocarbons in its cooling unit;
maintenance and recharging
must therefore only be carried
out by authorized technicians.
The accessories and parts of
the appliance are not suitable for
washing in a dishwasher.
Periodic cleaning
CAUTION! Do not pull, move or
damage any pipes and/or
cables inside the cabinet.
wrapped in aluminium foil or polythene
bags to exclude as much air as possible.
• Bottles: these need a cap and should be
stored on the door bottle shelf, or (if
equipped) on the bottle rack.
• Bananas, potatoes, onions and garlic, if
not packed, must not be kept in the
refrigerator.
3. Rinse and dry thoroughly.
4. If accessible, clean the condenser and
the compressor at the back of the
appliance with a brush.
This operation will improve the
performance of the appliance and save
electricity consumption.
Defrosting of the refrigerator
Frost is automatically eliminated from the
evaporator of the refrigerator compartment
every time the motor compressor stops,
during normal use. The defrost water drains
out through a trough into a special
container at the back of the appliance, over
the motor compressor, where it evaporates.
It is important to periodically clean the
defrost water drain hole (F) situated under
the salad drawers to prevent the water
overflowing and dripping onto the food
inside. Use the special cleaner provided (P),
which you will find already inserted into the
drain hole.
CAUTION! Take care of not to
damage the cooling system.
CAUTION! When moving the
cabinet, lift it by the front edge
to avoid scratching the floor.
The equipment has to be cleaned regularly:
1. Clean the inside and accessories with
lukewarm water and some neutral soap.
2. Regularly check the door seals and
wipe clean to ensure they are clean and
free from debris.
Page 8
C AB
2
1
A
B
19
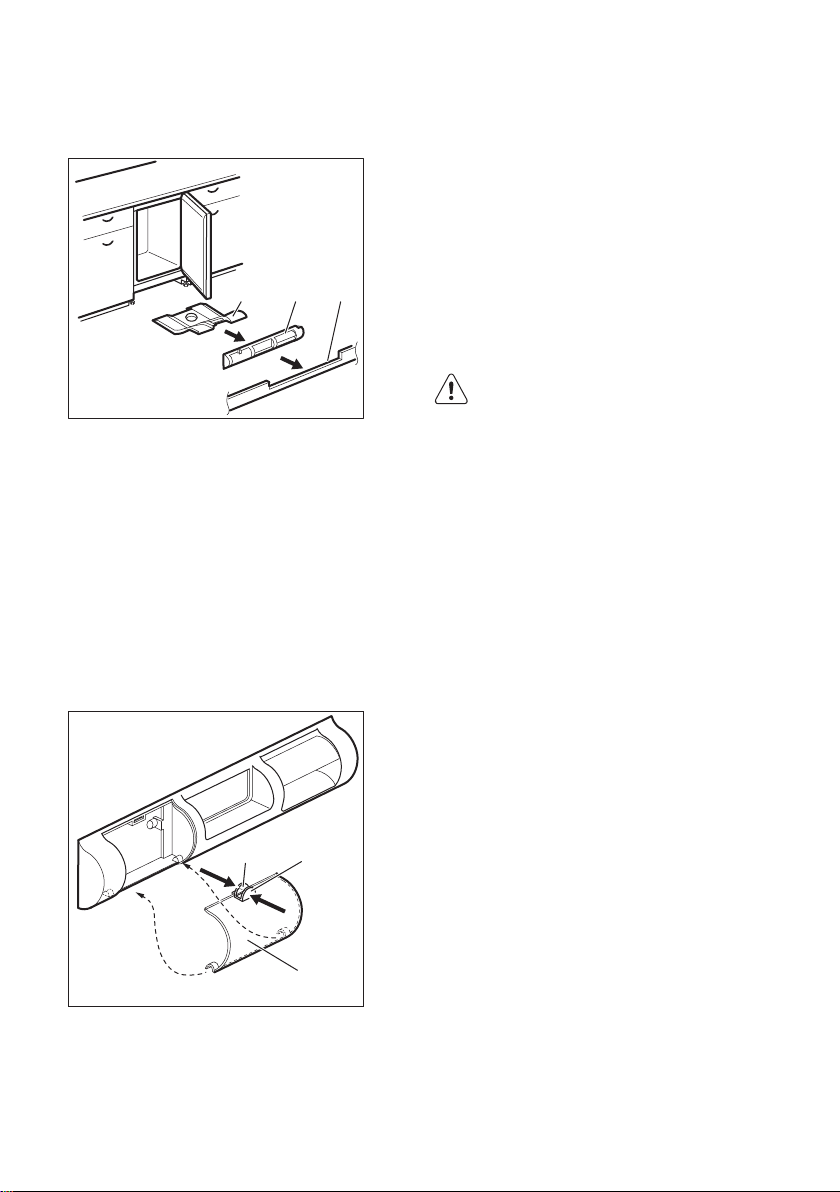
Cleaning the air channels
1. Remove the plinth (A), then the
ventilation grid (B).
2.
Clean the ventilation grid. (Refer to
"Cleaning the ventilation filter ". )
3.
Carefully pull the air deflector out (C),
checking that there is no water left from
the defrosting.
4.
Clean the lower part of the appliance
with a vacuum cleaner.
Cleaning the ventilation filter
The filter can be removed for washing.
The appliance is equipped with an air inlet
filter (1) and an air outlet duct (2) on the
ventilation grid.
1. Pinch flaps (a) and (b) with fingers.
2. Pull the filter down.
3. Pull the filter out.
4. To replace the filter reverse the process.
Periods of non-operation
When the appliance is not in use for long
periods, take the following precautions:
1. Disconnect the appliance from
electricity supply.
2. Remove all food.
3. Leave the door/doors open to prevent
unpleasant smells.
WARNING! If the cabinet will be
kept on, ask somebody to
check it once in a while to
prevent the food inside from
spoiling in case of a power
failure.
Page 9
20
TROUBLESHOOTING
WARNING! Refer to Safety
chapters.
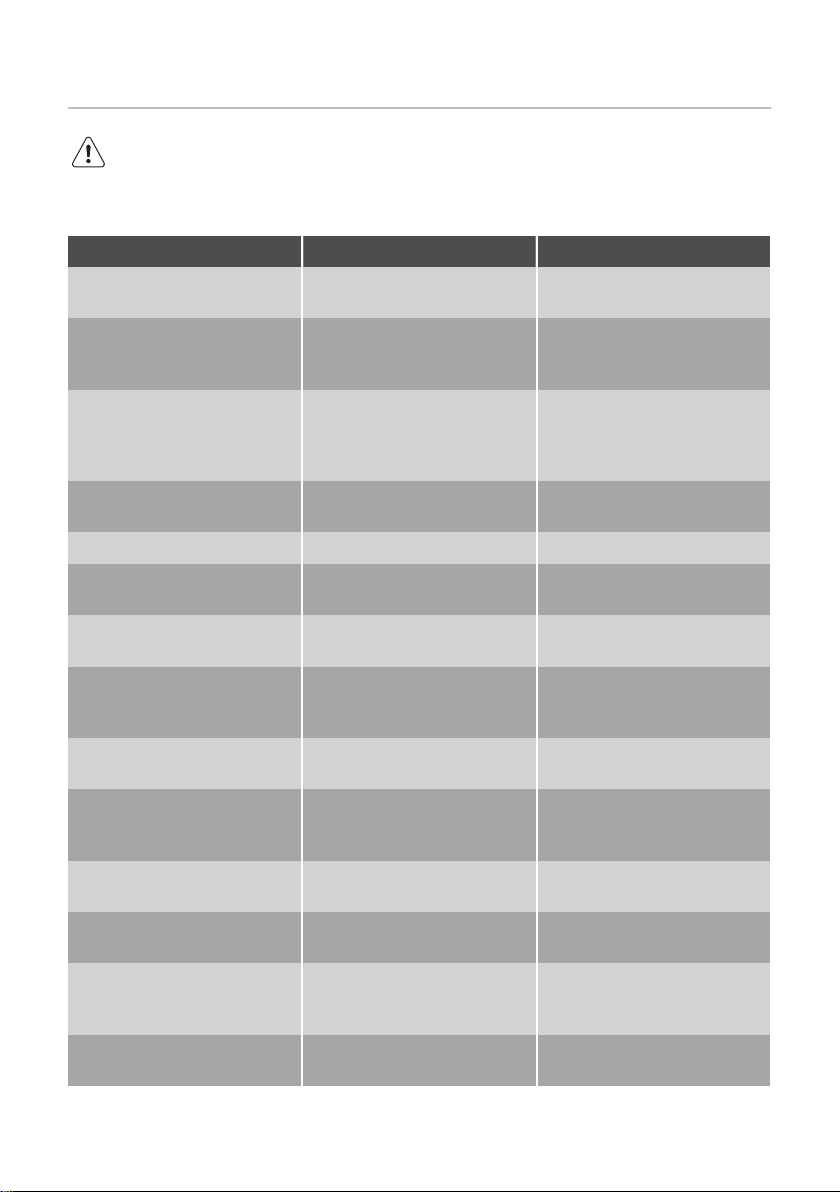
What to do if...
Problem Possible cause Solution
The appliance does not operate.
The mains plug is not con-
There is no voltage in the
The appliance is noisy. The appliance is not suppor-
The lamp does not work. The lamp is in stand-by. Close and open the door.
The compressor operates
continually.
Many food products to be
The room temperature is too
Food products placed in the
Water flows into the refrigerator.
The temperature in the appliance is too low/too high.
The appliance is switched off. Switch on the appliance.
Connect the mains plug to
nected to the mains socket
correctly.
mains socket.
ted properly.
The lamp is defective. Refer to "Replacing the
Temperature is set incorrectly.
frozen were put in at the
same time.
high.
appliance were too warm.
The door is not closed correctly.
The water outlet is clogged. Clean the water outlet.
Food products prevent that
water flows into the water
collector.
The temperature regulator is
not set correctly.
the mains socket correctly.
Connect a different electrical
appliance to the mains sock-
et. Contact a qualified electri-
cian.
Check if the appliance stands
stable.
lamp".
Refer to "Operation" chapter.
Wait some hours and then
check the temperature again.
Refer to climate class chart
on the rating plate.
Allow food products to cool
to room temperature before
storing.
Refer to "Closing the door".
Make sure that food prod-
ucts do not touch the rear
plate.
Set a higher/lower tempera-
ture.
Page 10

Problem Possible cause Solution
The door is not closed correctly.
The food products' temperature is too high.
Many food products are stored at the same time.
The door has been opened
often.
There is no cold air circulation in the appliance.
Refer to "Closing the door".
Let the food products tem-
perature decrease to room
temperature before storage.
Store less food products at
the same time.
Open the door only if neces-
sary.
Make sure that there is cold
air circulation in the appli-
ance.
21
If the advice does not lead to
the desired result, call the
nearest Authorized Service
Centre.
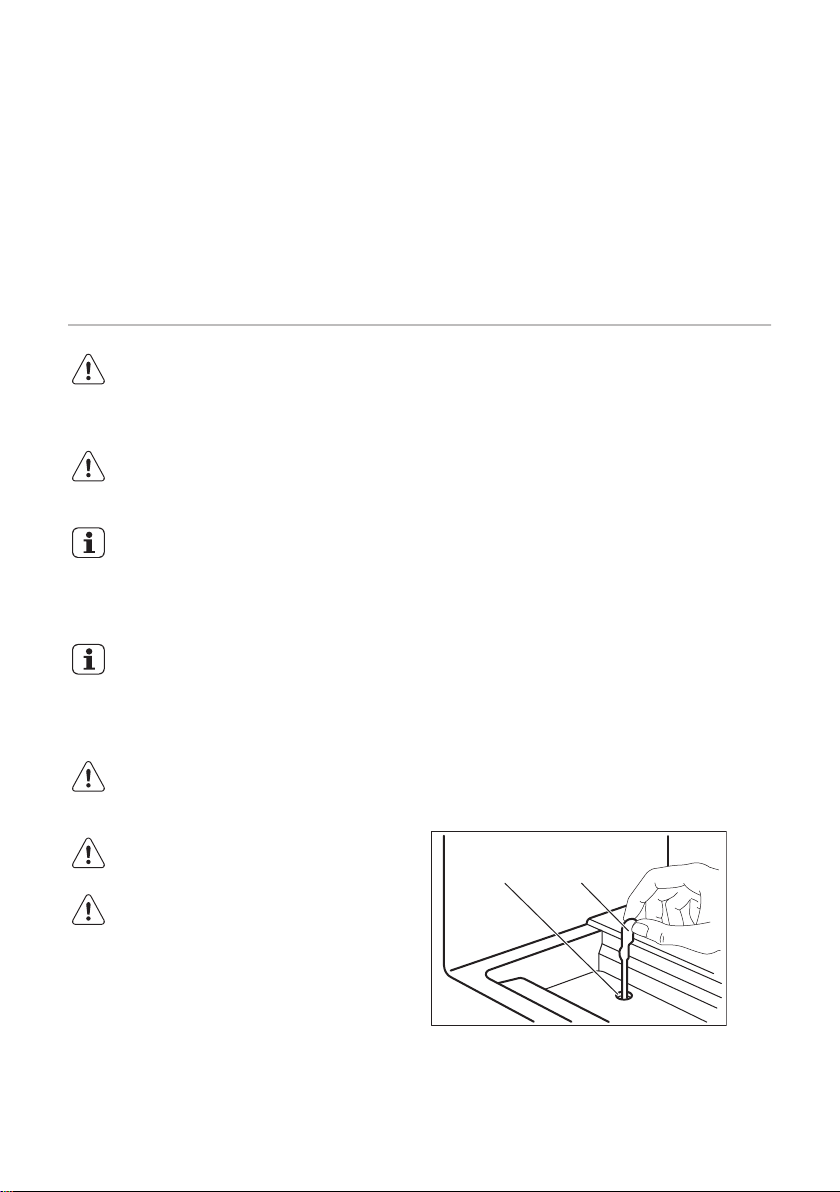
Replacing the lamp
Disconnect the plug from the mains socket.
1. Remove the screw from the lamp cover.
2. Remove the lamp cover (refer to the
illustration).
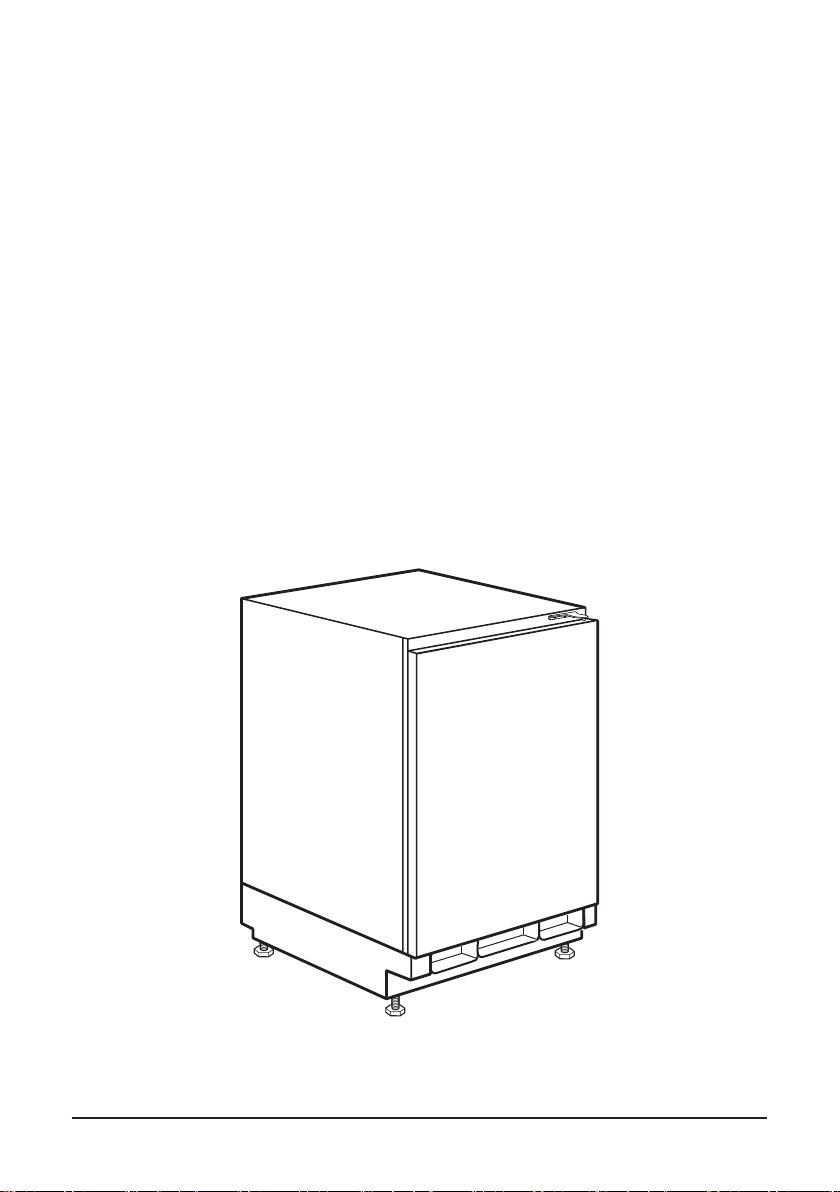
INSTALLATION
WARNING! Refer to Safety
chapters.
Location
Refer to the assembly
instructions for the installation.
3. Replace the used lamp with a new lamp
of the same power and specifically
designed for household appliances (the
maximum power is shown on the lamp
cover).
4. Install the lamp cover.
5. Tighten the screw to the lamp cover.
6. Connect the plug to the mains socket.
7. Open the door.
Make sure that the light comes on.
Closing the door
1. Clean the door gaskets.
2.
If necessary, adjust the door. Refer to
"Installation".
3.
If necessary, replace the defective door
gaskets. Contact the Authorised
Service Centre.
To ensure best performance, install the
appliance well away from sources of heat
such as radiators, boilers, direct sunlight
etc. Make sure that air can circulate freely
around the back of the cabinet.
Page 11

22
Positioning
This appliance can be installed in a dry, well
ventilated indoor where the ambient
temperature corresponds to the climate
class indicated on the rating plate of the
appliance:
Climate
class
SN +10°C to + 32°C
N +16°C to + 32°C
ST +16°C to + 38°C
T +16°C to + 43°C
Ambient temperature
Some functional problems might
occur for some types of models
when operating outside of that
range. The correct operation
can only be guaranteed within
the specified temperature range.
If you have any doubts
regarding where to install the
appliance, please turn to the
vendor, to our customer service
or to the nearest Authorised
Service Centre.
Electrical connection
• Before plugging in, ensure that the
voltage and frequency shown on the
rating plate correspond to your domestic
power supply.
• The appliance must be earthed. The
power supply cable plug is provided with
a contact for this purpose. If the
domestic power supply socket is not
earthed, connect the appliance to a
separate earth in compliance with
current regulations, consulting a qualified
electrician.
• The manufacturer declines all
responsibility if the above safety
precautions are not observed.
• This appliance complies with the E.E.C.
Directives.
TECHNICAL INFORMATION
Technical data
Dimensions of the recess
Height mm 815
Width mm 560
Depth mm 550
Voltage Volts 230 - 240
Frequency Hz 50
The technical information are situated in the
rating plate, on the external or internal side
of the appliance and in the energy label.
Page 12

ENVIRONMENT CONCERNS
23
Recycle the materials with the symbol .
Put the packaging in applicable containers
to recycle it. Help protect the environment
and human health and to recycle waste of
electrical and electronic appliances. Do not
dispose appliances marked with the symbol
with the household waste. Return the
product to your local recycling facility or
contact your municipal office.
Page 13
Installation Instruction
Montageanweisung
Instructions d’installation
Istruzioni di installazione
Installationsvejledning
Instruções de instalação
Instrucciones de instalación
Installatie-instructies
Инструкции за инсталиране
Pokyny k instalaci
Οδηγίες εγκατάστασης
Paigaldusjuhis
Asennusohjeet
Upute za instalaciju
Üzembe helyezési útmutató
Įrengimo instrukcija
Uzstādīšanas norādījumi
Monteringsanvisning
Wskazówki dotyczące instalacji
Instrucţiuni de instalare
Указания по установке
Pokyny na inštaláciu
Navodila za namestitev
Udhëzime Instalimi
Упутство за инсталирање
Installationsanvisningar
Montaj Talimatları
Інструкція з установки
Page 14

2
EN
Warning! Before proceeding with installation, read the safety information in the
User Manual.
DE
Achtung! Lesen Sie vor Beginn der Installation die Sicherheitshinweise in der
Gebrauchsanweisung.
BG
Внимание! Преди да пристъпите
към инсталирането, прочетете
информацията за безопасност в
Ръководството за потребителя.
CS
Upozornění! Před začátkem instalace
si přečtěte bezpečnostní informace v
návodu k použití.
FR
Attention! Veuillez lire les consignes de
sécurité que contient la Notice d’utilisation avant d’installer l’appareil.
IT
Attenzione! Prima di procedere all’instal-nzione! Prima di procedere all’installazione, leggere le istruzioni di sicurezza
contenute nel Libretto Istruzioni.
DA
Vigtigt! L�s brugsanvisningens instruk-igt! L�s brugsanvisningens instruktioner vedrørende sikkerhed, før installationen påbegyndes.
PT
Atenção! Antes de continuar a instalação,
leia as informações de segurança no Manual de Utilizador.
ES
¡Atención! Antes de realizar la instala-nción! Antes de realizar la instalación, lea la información de seguridad del
Manual del usuario.
NL
Waarschuwing! Lees de veiligheidsinfor-aarschuwing! Lees de veiligheidsinformatie in de gebruikershandleiding voordat u met de installatie begint.
EL
Προειδοποίηση! Πριν συνεχίσετε με την
εγκατάσταση, διαβάστε τις πληροφορίες
ασφάλειας στο εγχειρίδιο χρήστη.
ET
Hoiatus! Enne paigaldamist lugege läbi
kasutusjuhendis olevad ohutusjuhised.
FI
Varoitus! Ennen kuin aloitat asennuksen,
lue käyttöohjeen sisältämät turvallisuusohjeet.
HR
Upozorenje! Prije instalacije pročitajte
sigurnosne informacije u Uputama za
uporabu.
HU
Vigyázat! Mielőtt továbblépne az üzembe
helyezéssel, olvassa el a biztonsági információkat a felhasználói kéziköny-
vben.
DE
LT
Įspėjimas! Prieš montuodami perskaitykite saugos informaciją naudojimo in-
strukcijoje.
Page 15

3
LV
Brīdinājums! Pirms turpināt uzstādīšanu,
izlasiet lietotāja rokasgrāmatā ietverto
drošības informāciju.
DESRSL
Opozorilo! Pred nadaljevanjem z namestitvijo preberite varnostna navodila v navodilih za uporabo.
NO
Advarsel! Les sikkerhetsinformasjonene i
bruksanvisningen før du begynner installasjonen.
PL
Ostrzeżenie! Przed rozpoczęciem instalacji należy przeczytać informacje
dotyczące bezpieczeństwa podane w Instrukcji obsługi.
RO
Atenţie! Înainte de a trece la instalare,
citiţi informaţiile privind siguranţa din
Manualul Utilizatorului.
RU
Внимание! Перед тем как приступать
к установке, прочтите информацию по
технике безопасности в руководстве
пользователя.
SK
Upozornenie! Pred inštaláciou si
prečítajte bezpečnostné pokyny v návode
na používanie.
SQ
Paralajmërim! Përpara se të kryeni instalimin, lexoni të dhënat e sigurisë në Manualin e Përdorimit.
Упозорење! Пре него што приступите
инсталирању уређаја, прочитајте
информације о безбедности у Упутству
за употребу.
SV
Varning! Läs säkerhetsanvisningarna i
bruksanvisningen innan du fortsätter med
installationen.
TR
Uyarı! Montaj işlemine başlamadan önce,
kullanma kılavuzundaki güvenlik bilgiler-
ini okuyunuz.
UK
Увага! Перед початком встановлення
прочитайте інформацію щодо безпеки
у Посібнику користувача.
Page 16

4
22x
2x
1x
2x
A
B
C
D
E
F
1x
4x
Page 17

5
(600)
820 - 890
A = 820
580
(600)
580
550
600
B = 890
a = 100
b = 170
25
580
25 - 80
Page 18

6
1.
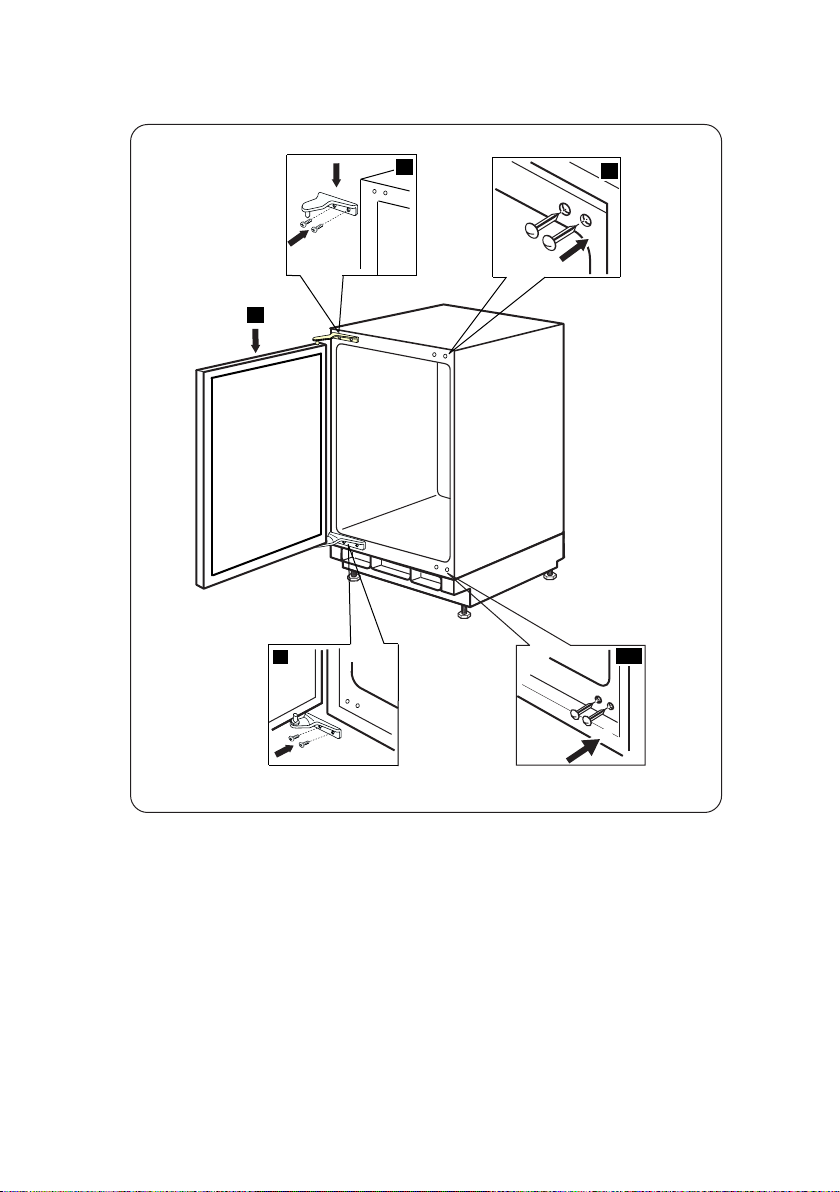
Page 19

7
2.
4.
1
2
3
4
5
Page 20
8
8
7
9
6
10
Page 21

9
180°
4.
3.
Page 22

10
4.
C
C
C
D
C
Page 23

11
5.
Page 24

12
6.
42mm
B
B
Page 25

13
8.
Ea
Eb
Ec
Ed
5
m
m
5
m
m
50 mm
90
°
90
°
50 mm
9.
PR33
Ec
Ea
10.
7.
Ea
8mm
Eb
Ed
Eb
11.
12.
Eb
90°
Page 26

14
14.
Page 27

F
100-170 mm
16.
15.
15
25
25
Page 28

211620060-A-102009
 Loading...