

1
Translation of the original instructions
SMEG thanks you for choosing one of
its products.
Read all the instructions in this manual carefully to become familiar with the right
conditions for the proper use of your dishwasher.
This manual is an integral part of the dishwasher and must always be kept intact together with the
appliance. Read all the information contained in this manual carefully before using the appliance
Installation must be done by qualified staff in compliance with the relevant regulations.
This appliance is intended for professional use and complies with the machinery directive
2006/42/EC, the international electrical and mechanical safety standards (CEI-EN-IEC 60335-258/61770) and the electromagnetic compatibility standard (CEI-IEC-EN 55014-1/-2, 61000-3;4,
50366).
The appliance is designed for washing tableware (plates, cups, bowls, oven dishes, glasses and
cutlery) and similar catering items; any other use constitutes misuse. The manufacturer declines all
liability for uses other than those stated above.
1 PRODUCT IDENTIFICATION AND SAFETY AND OPERATING WARNINGS
1.1 Brand and model (or type)
Professional dishwasher
Brand: Smeg
Model: SW260/262/264
Edition (revision) of user manual
19 390 5043 14
04/03/2020
Manual Ed.
Date
1.2 Name and address of manufacturer or distributor
Smeg S.p.A.
Via Leonardo da Vinci, 4 - 42016 Guastalla (RE) Tel. +39 0522 8211 - Fax + 39 0522 821453
website: www.smegfoodservice.com, email: foodservice@smeg.it
Info:
INFORMATION AND SERVICE FOR SMEG PROFESSIONAL DISHWASHERS
Our Sales Department staff will be able to provide you with information about prices and special offers.
Our After-Sales Department will be able to provide you with guidance about keeping your device functioning
correctly and put you in touch with your nearest authorised Service Centre. Our entire product offering can be
viewed at the above website.
2
1.3 Declaration of conformity to product standards
This appliance is marked in compliance with European Directive 2002/96/EC on waste electrical and electronic
equipment (WEEE). Make sure that this product is scrapped correctly to safeguard the environment and health.
Decommission the appliance in compliance with local waste management regulations. For further information
on the treatment, recovery and recycling of this product, contact the local authority, domestic waste collection
service, or your Smeg reseller. The appliance must be connected to earth in compliance with electrical safety
regulations. The manufacturer is not liable for any injury or damage caused by failure to comply with the
instructions given in this manual, misuse, tampering with even a single part of the appliance, or the use of nongenuine spare parts.
2 SYMBOLS
This symbol instructs the user to read the instructions in the manual with care.
This symbol appears next to information important for the safety of people and the
appliance.
This symbol is applied to some parts which contain live electrical components and indicates
the risk of electric shock.
This symbol is applied close to the terminal used to earth the appliance's electrical system.
This symbol appears next to important information. Read the instructions provided with
care and comply with the procedures and rules described.
This symbol appears next to information and technical instructions intended for the
qualified staff who are to install, commission and test the appliance and carry out any
repairs.
This symbol indicates that at the end of its working life, the appliance must be consigned
to a disposal plant for recovery and recycling in accordance with the relevant legislation in
the country of installation. Contact a specialist centre for disposal.
Transport and unpacking
This symbol indicates a hot surface hazard

3
3 PRODUCT CHARACTERISTICS
3.1 Application, general functions and intended use
Dishwasher intended exclusively for professional use, must be used by authorised and trained staff.
Designed for washing tableware (plates, cups, bowls, oven dishes and cutlery) and similar catering items, and
complies with international electrical and mechanical safety codes.
Certain dishwasher models may feature high temperature cycles which perform thermal disinfection, but they
MUST NOT be used for washing any type of medical device.
3.2 Dimensions, weight and handling instructions Dimensions in mm.
INSTALLATION AND POSITIONING
Bring the dishwasher to the installation site, remove the packaging and check the appliance and components
for damage; any damage found must be reported to the transporter in writing.
Disposal instructions for the packaging materials are given elsewhere in this manual.
When the product is decommissioned it must not be dumped in the environment; it must be disposed of in
accordance with the established regulations. All metal parts are in stainless steel and can be removed. The plastic
parts are marked with a symbol identifying the material used, as applicable.
WARNING
Any adjustments, maintenance, etc. must be done with the appliance disconnected from its power supply.
The appliance may be ordered with a build-in top, if necessary. The product is 30 mm lower than indicated.
The appliance weighs from 65 to 75 kg, depending on the version and options.
fig. 1 – Diagram, overall dimensions and clearances
BUILT-UNDER INSTALLATION
fig. 2 – Diagram, built-under

4
IMPORTANT Models equipped with condensers must be supplied with cold water in the specified
temperature range if the condenser itself is to work properly, hardness < 40° f (21° dh)
BACK PANEL CONNECTIONS
ID
Description
A
Hot water supply hose (red collar)
B
Cold water supply hose (blue collar)
C
Power supply cable
D
Steam condenser drain hose (as applicable)
E
Dishwasher drain hose
F
Peristaltic pump P1 priming hose and P1 tank detergent sensor cable (OPTIONAL)
G
Peristaltic pump P2 priming hose and P2 tank detergent sensor cable (OPTIONAL)
H
System earth.
H
fig. 3 – Diagram, back panel connections and hookup.
The dishwasher is supplied without a power plug, with a cable fitted with pre-isolated terminals.
The electrical hookup to the power supply must be done with an industrial type plug.
The plug and its installation must be supplied by the user.
The plug must be rated for the power cable and the electrical specifications of the H07RN-F dishwasher.
MASTER POWER SWITCH
Each appliance must be fitted with a MASTER SWITCH.
Characteristics of the circuit breaker
a) Multi-pole: must disconnect all live wires;
b) Easily accessible by the user;
c) Easy to operate (no tools required);
d) Located in the immediate vicinity of the appliance;
e) Clearly marked as master switch. The appliance is equipped with overcurrent protection.
However, it is advisable to install the following in the room's electrical enclosure: a dedicated
protection device (e.g. thermal cutout or fuses on each phase, rated for the electrical specifications
given above).

5
3.3 Technical characteristics (power, plumbing)
3.3.1 Electrical connections - see technical data plate
Legend of abbreviations used for the electrical connections.
Three phase/single phase version models:
POWER SUPPLY
CHARACTERISTICS
THERMAL CUTOUT
POWER CABLE
400V 3N~ / 50Hz / 12A / 7000W
3P+N, 16A, 230/400V, 6kA
5X2.5 mm²
230V 3~ / 50Hz / 19A / 7000W
3P, 20A, 230/400V, 6kA
4X2.5 mm²
230V 1N~ / 50Hz / 16A / 3500W
1P+N, 20A, 230/400V, 6kA
3X2.5 mm²
230V 1N~ / 50Hz / 12A / 2800W
1P+N, 16A, 230/400V, 4.5kA
3X2.5 mm²
Models: SWT262 M/ SW262M (single phase versions)
POWER SUPPLY
CHARACTERISTICS
THERMAL CUTOUT
POWER CABLE
230V 1N~ / 50 Hz / 30A / 7000W
1P+N, 32A, 230/400V, 6kA
3X6 mm²
3.3.2 Plumbing connections
Legend of abbreviations used for the plumbing connections
ABBREVIATION
Type: FILL/DRAIN
WATER TYPE
CW
FILL CYCLE
Cold water hose – CW – Temperature >5°C <30°C
DW
FILL CYCLE
Hot water hose – DW – Temperature max. 60°C
d
DRAIN
Dishwasher drain hose – d
cd
DRAIN
Steam condenser drain hose - cd (as applicable)
FILL CYCLE - WATER SUPPLY FITTINGS
The dishwasher has two water supply hoses, one for the mains water supply and one for hot water.
The hoses are designed for connection to 3/4’’ gas threaded fittings.
Use the supplied filter, A in the figure, when connecting the end of the fill hose.
fig. 4 – Fit the provided filters when connecting the hose
POSITION OF FILL COCKS
The fill cocks must be located next to the appliance, in an easily accessible position. Refer to the following figure,
the recommended dimensions are:
N.B.: to prevent blockages and damage, if the water hose is new or has not been used for a long time, make sure
that the water is pure and clear before making the hookup.
6
CAUTION – MAINS WATER HARDNESS
To be done by the user: check the mains water hardness.
Only if the hardness of the mains water is known can the Smeg technician set the dishwasher's
parameters for the integrated water softener.
You should run regular checks (e.g. once or twice a year) of the mains water quality to ensure that
the initial values are maintained and adjust the dishwasher's settings if necessary.
DW: HOT WATER – this connection is optional but highly recommended; if hot water is available, using it reduces
the dishwasher cycle times to a minimum
CAUTION – NO HOT WATER
If no hot water supply is available, connect the hose to the cold water intake
3.4 Drain hose connections
The dishwasher has one or more drain hoses, depending on the model.
Rubber terminal for dia. 21mm (1/2”) hose clamp.
The drain hoses are indicated as:
d - dishwasher drain hose – d (drain tank)
cd - steam condenser drain hose – cd (condenser drain)
The following table and diagram summarise the situation.
fig. 5 – Diagram, the drain connections may be made on the right or left of the appliance,
always complying with the specified maximum distance from the product
7
N. DRAIN HOSES
Dimension “I”
Distance of drain from side of
appliance [cm]
DRAIN TYPE AND DIMENSION “H” ABOVE
GROUND LEVEL [cm]
Type
Hmin
Hmax
1
50
d
65
80
2
50
d
65
80
cd
65
80
fig. 6 – Drain connection. Drain connections – 65 cm < H < 80 cm. Height difference “X”: only use original drain hoses and the “hose guide” elbows
provided. The dimension “X” between the drain fitting and the highest point of the hose must not exceed 20cm: X < 20 cm.
WARNING
The drain connection must comply with international regulations: our company declines any
liability should improper use of the dishwasher result in environmental pollution.
General instructions for installing the drain
Make sure to use a drain with siphon. When installing the drain connection, take the following precautions:
• Since the drain water temperature can be as high as 95°C (models with thermal disinfection), the end of the
drain hose must be fixed permanently to the hose fitting, using the hose clamps provided.
• The drain hose may not have tight bends or constrictions.
• The end of the drain hose must be at a height off the surface supporting the dishwasher which complies with
specifications.
• It may not be submerged in water.
• The internal diameter of the drain pipe must be no less than 40 mm.
• We recommend using a drain pipe of 50 mm diameter.
• Do not install extensions to the drain hose supplied with the appliance. Extension can result in a return flow
back into the tank.
8
3.5 Noise
Sound pressure level: LpA <70 dB (A)
3.6 Protection rating (IP)
The dishwasher is guaranteed IPX1
3.7 Environmental conditions (storage and operating)
Operation use indoors
Altitude: up to 1,000 m above sea level
Ambient temperature: 10°C - 35°C
Max. relative humidity: 80% for temperatures up to 31°C, decreasing linearly to 50% at 35°C.
Storage: 0°C - 40°C, relative humidity < 80%, decreasing linearly to 50% at 40°C.
3.8 Safety precautions and instructions
The nameplate with the technical data, serial number and mark is in a visible position on the inside
border of the door. Never remove this nameplate.
Never leave packaging residues unattended in the home. Separate waste packaging materials by
type and consign them to the nearest recycling centre.
The appliance must be connected to earth in compliance with electrical system safety regulations.
The manufacturer declines all liability for injury or damage deriving from a non-existent or defective
earth connection.
If the appliance is installed on flooring with a covering, make sure that the bottom openings are
not obstructed.
Once no longer in use, the appliance must be rendered unusable. Cut the power cable after pulling
the power plug out of the mains socket. Disable/render harmless any parts which may be hazardous
for children (locks, doors, etc.).
This appliance is marked in compliance with European Directive 2002/96/EC on waste electrical
and electronic equipment (WEEE). Make sure that it is scrapped correctly to safeguard the
environment and health. The symbol on the product or technical documentation indicates that
the product is not to be treated as ordinary domestic waste but must be delivered to an authorised
sorted waste management and recycling facility for electrical and electronic equipment.
Decommission the appliance in compliance with local waste management regulations. For further
information on the treatment, recovery and recycling of this product, contact the local authority,
domestic waste collection service, or your Smeg reseller.
Do not use equipment which has been damaged during transport! In case of doubt, contact your
reseller. The appliance must be installed and hooked up in accordance with the manufacturer's
instructions or by a qualified technician.
9
This dishwasher may only be used by adults. Use by persons with reduced mental and/or physical
capabilities is only permitted under the supervision of a person responsible for their safety. Keep
children away from detergents and packaging materials (plastic bags, polystyrene, etc.), and never
allow them to approach or play with the dishwasher, since it might contain detergent residues
capable of causing permanent damage to the eyes, mouth and throat, and even leading to
suffocation.
Never place solvents such as alcohol or turpentine, which are potentially explosive, inside the
appliance. Never load dishes dirty with ash, wax or paint.
Leaning or sitting on the open door of the dishwasher can tip it over, putting people in danger.
Never leave the dishwasher door open; people might trip over it.
Do not drink any water remaining in the dishes or dishwasher after a washing program.
Knives and other kitchen equipment with sharp edges must be placed in the basket with their tips
downwards, or horizontally in the top basket; take care not to injure yourself on any sharp edges
protruding from the baskets.
Models with acquastop.
The acquastop device prevents flooding in the event of water leaks. Once the acquastop device has
tripped, you must contact a qualified technician to troubleshoot the problems.
Immediately after installation, test the appliance as instructed later in this manual. If the appliance
does not operate, disconnect it from its power supply and contact your local service centre. Never
attempt to repair the appliance yourself.
The appliance satisfies all established safety regulations governing electrical equipment. Any
technical checks are to be done only by specialised and authorised technical staff: repairs done by
unauthorised persons not only void the warranty but may be hazardous to the user.
Replace any faulty parts only with genuine spare parts. The manufacturer is not liable in any way
for damage resulting from the use of unauthorised spare parts.
The manufacturer declines all responsibility for injury or damage caused by failure to comply with the above
regulations or deriving from tampering with even just one part of the appliance and the use of non-original spare
parts.

10
4 PREPARING THE APPLIANCE FOR USE
4.1 Removing the packaging, inspection
After removing the packaging (straps, cardboard, wooden base and PVC cover) check the condition of the
appliance; the filling and drain hoses, power cable, and metal parts must all be securely fixed and undamaged
4.2 Scrapping the packaging material
The packaging components (plastic bags, expanded polystyrene, nails, etc.) must not be left within reach of
children and pets since they are potentially dangerous. All packaging materials used are environment-friendly.
They can be kept without constituting any hazard, or may be disposed of at a specialist waste disposal centre.
Plastic components suitable for recycling are marked as follows: PE polyethylene: external packaging film, bag
containing the instructions, protective bags. PP polypropylene: straps. PS expanded polystyrene: protective
corners, cover. Wooden and cardboard components can be disposed of in accordance with the relevant
regulations.
4.3 Installing the appliance
The dishwasher must be installed by an authorised technician. Do not install a dishwasher which has been
damaged during transport. Do not install the dishwasher near to sources of heat (e.g. gas burners, stoves,
fireplaces, etc) since they can damage it. When installing the dishwasher in a compartment next to one or more
other appliances, it is essential to comply with all the recommendations provided by the appliance’s
manufacturer (clearances, installation procedures, etc.). If the dishwasher is installed in a raised position, make
sure that the unit and dishwasher are installed properly and do not constitute a hazard. Do not install the
dishwasher in areas subject to freezing temperatures or at risk of explosion. Use only professional furnishings
and units in the vicinity of the dishwasher. Any other types of furnishing may be damaged. Immediately after
installation, test the appliance as instructed later in this manual. If the appliance does not operate, disconnect
it from the mains and contact your local service centre. Never attempt to repair the appliance yourself.
4.4 Preliminary settings and adjustments
The electrical protection system must undergo a functional test before the appliance is put into operation. The
appliance must be installed and/or inspected by qualified staff, who will start it up for the first time and provide
the relevant operating instructions.
4.4.1 Opening the door
We consider the door opening procedure here to facilitate access to the interior of the machine.
The remaining controls are covered in the following paragraphs.
The machine is equipped with an automatic door lock.
Do not force the door open, rather proceed as follows:
• Connect the machine to its power supply.
• Hold the button marked On/Off down for 2 seconds to turn the machine on.
• Press the Open door button: the machine beep when the signal is received; release the button and the
door will open of its own accord after a few seconds.
DOOR OPEN BUTTONS
On/Off
Open door
11
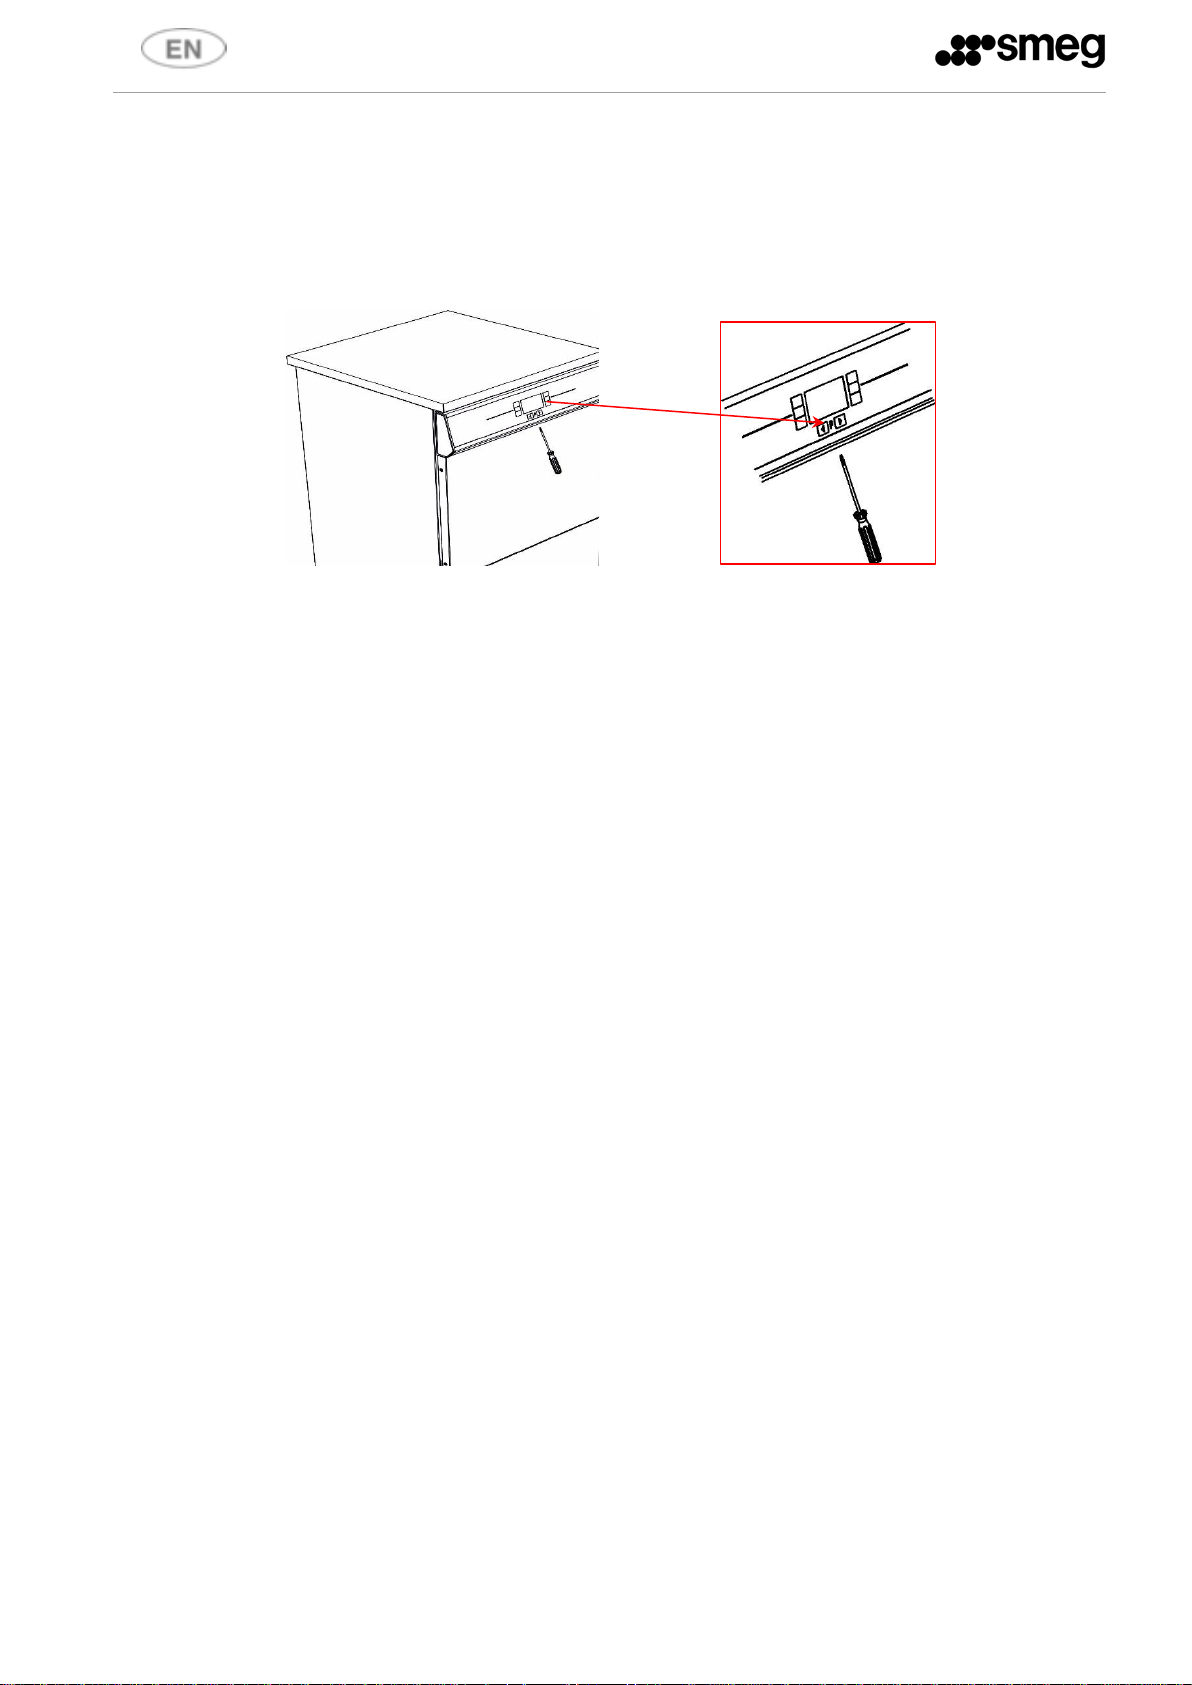
Manual door release
In case of malfunction or power failure, the door can be opened manually by using a screwdriver in the opening
mechanism; take care not to damage the dishwasher when doing so.
1. This can only be done with the machine in stand-by, not while a cycle is running.
2. Caution: before opening the machine manually, disconnect it from its power supply.
3. Insert the screwdriver into the bottom central hole in the control panel, as shown below.
4. Push the pin upwards until the mechanism releases.
fig. 7 – Diagram, manually releasing the lock in case of emergency.
4.5 Operator and technician authorisations
The appliance may only be installed, serviced or repaired by a technician authorised to do so by the
Manufacturer.
Repairs done by unauthorised persons not only void the warranty but may be hazardous to the user.
Only use original Smeg spare parts when replacing components.
4.6 Precautions before use
First start-up
The electrical protection system must undergo a functional test before the appliance is put into operation. The
appliance must be installed and/or inspected by qualified staff, who will start it up for the first time and provide
the relevant operating instructions.
Preparing for use (important)
If the detergent and rinse aid dispensers are present, put the external detergent and rinse aid containers in place
and insert the respective intake hoses on the rear of the appliance into them.
Red hose: detergent, white hose: rinse aid.
N.B.: charge the pumps as instructed below.
4.7 Precautions when the appliance is not in use
If the dishwasher is not being used
If you intend to leave the dishwasher out of use for a long time, proceed as follows.
This is particularly advisable if the machine is not to be used for more than 24 hours.
• Run a SHORT program without load
• If the dishwasher is to be out of use for a fairly long period of time, the detergent and rinse aid dispenser
devices must be emptied to prevent crystallisation and damage to the pumps: Remove the intake hoses
from the detergent and rinse aid containers and place them in a container of clean water, then perform
a few wash cycles followed by a complete pump-out. Finally, turn off the master switch, close the water
intake valve and leave the door ajar until the interior is completely dry. The detergent and rinse aid
intake hoses must be put back into the containers when the dishwasher is returned to service, taking
care not to swap them over (red hose = detergent, blue hose = rinse aid).
• Disconnect the electricity supply.
• Leave the door slightly open in order to prevent the formation of unpleasant odours inside the wash
tank.

12
Use after a period of disuse
If the appliance has not been used for a long time, proceed as follows before running a cycle. See instructions in
point 7
5 OPERATING INFORMATION AND INSTRUCTIONS
5.1 Safe use
After the installation procedure described above, note that the dishwasher is intended for professional use only
and may only be used by authorised staff.
DANGER - HOT SURFACES
The dishwasher can run heat disinfection cycles at water temperatures up to 93°C. It may occur
that water remains in the tank in case of malfunction; avoid contact with the skin due to the danger
of scalding and irritation due to toxic chemical products. Never touch the heating elements in the
tank. Contact authorised Smeg technical staff in case of malfunction.
5.2 Using the water softener
The quantity of lime in the water (which indicates its hardness) causes whitish marks on dry dishes and dishes
also tend to lose their shine over time. The dishwasher is equipped with an automatic water softener which
removes the substances that cause hardness from the water with the aid of regenerating salt.
fig. 8 – The salt container is accessible with the door open; filling the water softener container with salt.
When using water of medium hardness, the salt container should be refilled after approximately 20 wash cycles.
The salt container can hold approximately 1 kg of salt grains.
The container is situated at the bottom of the dishwasher.
Remove the lower basket and undo the salt container cap by turning it anticlockwise and pour in the salt using
the funnel supplied. Do not allow salt to spill into the interior of the dishwasher. Remove any salt residues
around the opening before screwing the cap back on.
ATTENTION
• The first time the dishwasher is used, a litre of water must be poured into the tank with the
salt. Each time the salt container is refilled, make sure that the cap is securely closed. The
mixture of water and detergent must not get into the salt tank, as this would impair operation
of the regeneration system. In this case warranty cover will be forfeited.
• Use only granular salt for dishwashers.
• Do not use table salt, since it contains insoluble substances which can compromise the
operation of the softener system over time.
• The salt container should be refilled before starting the wash program. This way, the excess
saline solution will be immediately removed by the water; prolonged presence of salt water
inside the tank may lead to corrosion. Run a prewash cycle to achieve the same purpose, if
necessary.
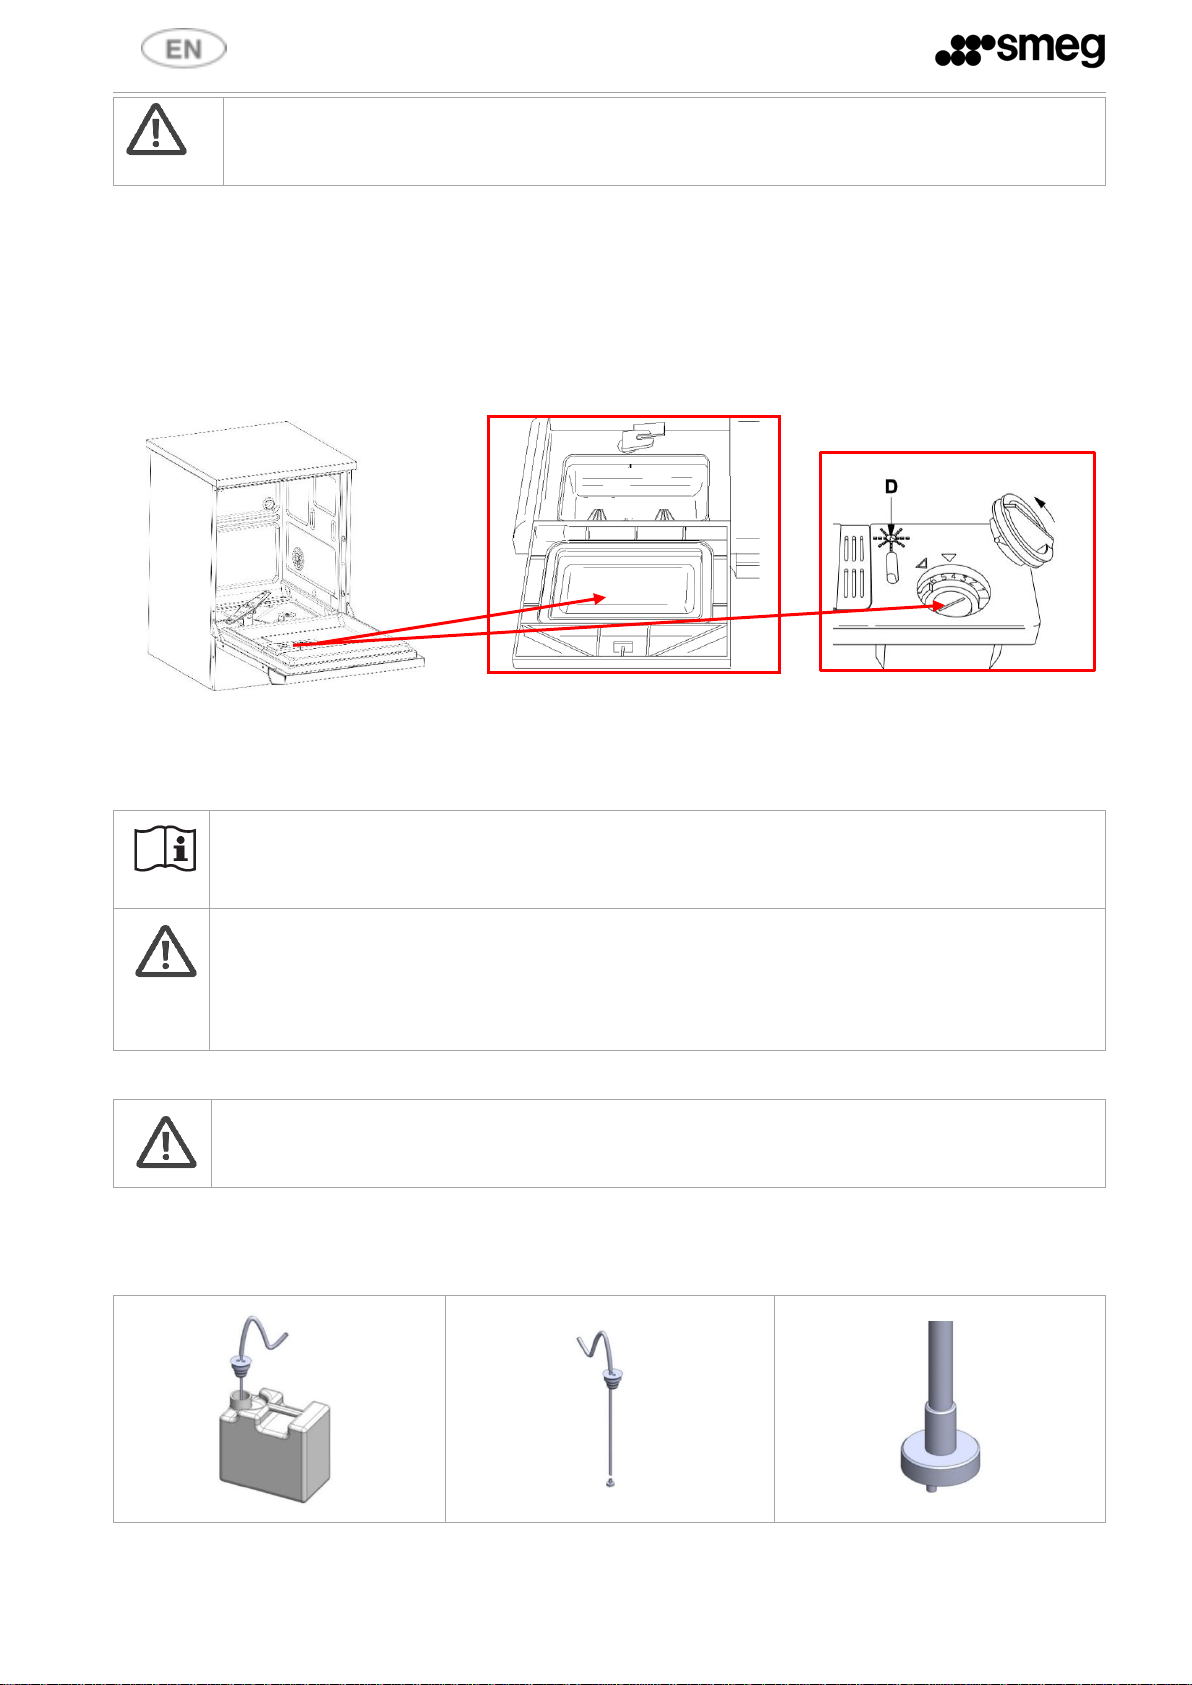
13
IMPORTANT
The appliance is only able to operate if the softener contains salt; the wash program cannot be
started if the light is on.
5.3 Using detergent and rinse aid
The machine is equipped with a device for dosing the detergent and rinse aid, mounted inside the door. Except
for the prewash cycle, you must fill the dispenser with the proper amount of detergent before each wash.
WARNING: If optional peristaltic pumps P1 and P2 are installed, do not use the door dispenser since it is
disabled electrically (the door remains always shut)
Open the cover of the detergent dispenser with its lever. Now fill with detergent and close again carefully.
To fill up the rinse aid, remove the cap and fill to the level shown by the indicator (D).
MAX
MIN
fig. 9 – Powder detergent and rinse aid dispenser, accessible with the door open.
During the wash cycle, the dispenser will open automatically.
It is important to use good quality detergents to obtain good results. Keep the detergent containers closed and
in a dry place to prevent lumps forming, as these can compromise the wash.
IMPORTANT!
Use powder detergent and not detergent tablets for short cycles
WARNING!
Always keep the detergent safety sheets to hand so that they can be easily consulted by the
operator if needed.
Swallowing or inhaling detergents may cause injuries to the nose, mouth and throat. If detergent
has been inhaled or swallowed, seek medical advice immediately.
5.3.1 Correct use of the peristaltic pumps – OPTIONAL
WARNING
The peristaltic pumps must be installed by a technician authorised to do so by Smeg.
After installation, they must be enabled (see SET-UP)
In this case, do not use the door dispenser; the machine must be hooked up to the detergent (red hose) and
rinse aid (transparent hose) containers.
After the containers have been opened, they must not be kept for too long since the detergent loses its power
and can form lumps which compromise the wash cycle.
14
During the installation and when replacing a completely empty container of fluid, run the service
program (Prg.8) to load the fluid. The hose running from the container to the pump must be charged
to ensure that the product is batched properly in wash cycles.
Whenever the type of detergent or rinse aid is changed, it is ABSOLUTELY ESSENTIAL to flush out
the peristaltic pumps by placing the external intake pipes in water for a few cycles.
Always use only products specifically recommended for use in a professional dishwasher.
Failure to comply with this recommendation leads to forfeiture of the warranty entitlement on the
appliance’s water system.
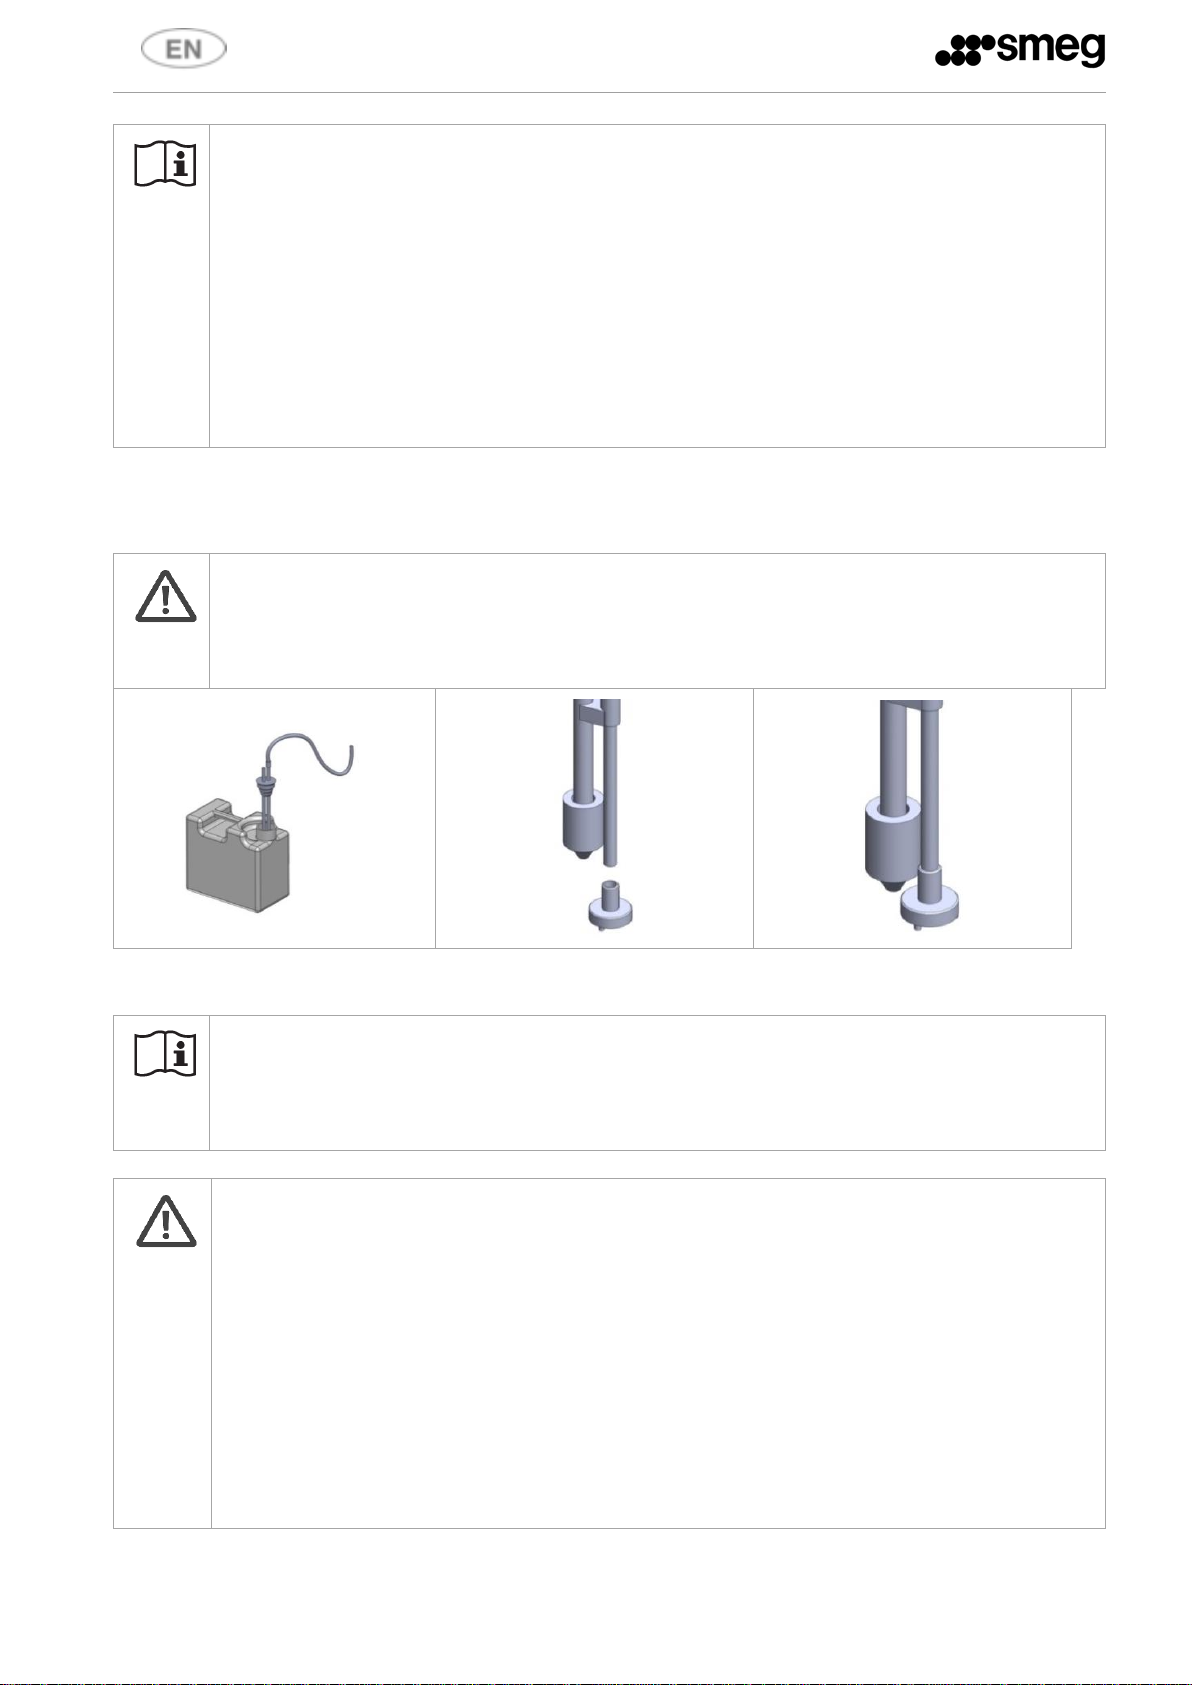
5.3.2 Tank level sensors - OPTIONAL
The machine can be equipped with level sensors in the detergent and rinse aid intake hoses
WARNING
The level sensors must be connected electrically to the terminal block on the inside of the rear strut
(there is a sensor connection for each peristaltic pump).
This must be done by a technician authorised to do so by Smeg.
fig. 10 – Configuration with LEVEL SENSOR: Detergent intake nozzle with integrated level sensor. The intake nozzle is fitted with a filter; make sure this is
always properly located to prevent lumps being drawn up.
ATTENTION
If the can level sensors are not fitted: check the levels of product in the cans / bottles to ensure
that programs are not performed without detergent or rinse aid.
WARNING
It is essential that the label on the intake hose match the type of chemical product in use.
Connection errors, which lead to the mixture of diverse chemical products in the intake circuit can
irremediably damage the circuit and void the warranty for the parts in question (peristaltic pumps,
detergent suction and delivery circuit)
The intake hose is supplied with an intake filter. The filter is secured to the hose with a light
interference fit. Make sure the filter is present and properly located to ensure that the detergent
intake system can operate properly.
Check from time to time that the silicone hose is properly secured to the stainless steel intake
pipe, and that there are no leaks. Use proper clamping equipment (such as plastic pull ties) to
secure the silicone hose to the stainless steel pipe.

15
5.4 Description of controls and wash programs
5.4.1 Controls
All the dishwasher's control and monitoring equipment is located on the front panel.
CONTROL PANEL SWT262
CONTROL PANEL SWT260/260M
CONTROL PANEL SWT260X/264X
CONTROL PANEL SYMBOLS
SYMBOL
MEANING
SYMBOL
MEANING
On/Off
Drain
Auto open
(where applicable)
Repeat
(where applicable)
Dry
(where applicable)
Additional prewash
function
(where applicable)
Open door
Start/Stop
Select
5.4.2 Detailed description
BUTTONS
DESCRIPTION
On/Off
The button is enabled with the door open or closed.
The button turns the interface on/off, thus permitting the dishwasher to be operated.
Brief press: shows the time left to the end of the current cycle.
Hold the button down for 2 seconds to turn it on or off.
Once on, the dishwasher displays the program ID (e.g. “Pr 03”).
When the interface is switched off, the display reads “OFF”.
When the door is open the display shows four dashes and the other buttons are disabled.

16
BUTTONS
DESCRIPTION
If the dishwasher is switched off with water still in the tank, “OFF” flashes; at the end of the
phase it is displayed steadily.
The dishwasher is still powered up even with the interface turned off.
Auto Open function – open door at end of cycle
This button sets the door open function - see below for restrictions when running a heat
disinfection cycle.
The button is not enabled for the prewash and service cycles.
It is alternative to the Repeat function.
There is no need to press the button for every cycle; it remains active once pressed.
Dry function – (ONLY ON MODELS with drying)
The button is sued to set the drying function and is only active in programs which use this
option – see programs table.
It is an alternative to the Repeat function.
There is no need to press the button for every cycle; it remains active once pressed.
The door opens automatically on correct completion of the drying procedure.
Extra rinse function (where applicable)
This button is used to set an additional cold prewash at the beginning of each cycle.
There is NO need to press the button for every cycle; it remains active once pressed.
Start/Stop
Starts a new cycle or pauses the current one. When the cycle starts or pauses, a double beep
will sound. The button is also used (again holding it down) to confirm the value of a
dishwasher parameter during modification.
Drain
Once a wash cycle has terminated, pressing this button drains the water, runs a regeneration
cycle (as applicable) and automatically turns the dishwasher off.
Confirm with the Start/Stop button; the display will read “UnLo” (Unload).
With automatic regeneration, “OFF” and “R” will flash until the end of the phase.
Repeat function (where applicable)
Pressing this button reuses the water from the most recent rinse for the next cycle's
wash to speed up operation, in programs which have this option. This is not available
if you have selected drying or automatic open at end of cycle.
Open door
The door opens automatically with an electric lock, and is only possible when certain
conditions obtain.
Simply press the button; the door opens when it is released.
Button active even with device "OFF"
Select
Press the button > to go to the next program or < to the previous one; the selection cycles
from last to first and vice-versa depending on direction; the selected program is displayed
with “Pr” and the program number.
Hold down the button to scroll through the programs quickly.

17
5.5 Indicator light – Meaning
fig. 11 – In the display area of the control panel: central digit area and indicator light around the perimeter
Led symbol
ON THE
DISPLAY
Meaning
No detergent (only if the level sensor is installed in the container)
No rinse aid for door liner dispenser or external level sensor - depending on
version installed
No salt: you must add salt. The wash cycle cannot be started until salt is added and
the LED goes out
Regeneration: indicates that the resin is almost exhausted; run a regeneration
cycle. There are two ways to regenerate the resin:
a) Press the ON/OFF button to switch off the appliance, OFF will flash on the
display until the regeneration cycle has completed (about 5 minutes).
b) Perform a complete pump-out (See 5.4.2) and wait until the appliance has
finished fully draining and regenerating (about 8 minutes). During
regeneration, “OFF” and “R” flash on the display.
During the regeneration phase the LED will flash - Duration of phase: approx.
6'
Function selected: indicates that the corresponding function is selected,
depending on the model:
left: automatic door opening at end of cycle or drying selected
right: Repeat function or additional prewash.
Start/Stop: wash cycle enabled/disabled.
1: 16
If the dishwasher is stopped
The value gives the nominal cycle duration. The time led also turns on. The
duration is approximate, depending on load, intake water temperature and
power connection.
If a cycle is running
Remaining cycle time.
Led symbol
ON THE
DISPLAY
Meaning
The selected cycle includes a final heat disinfection step – see table of
programs – only on models with this option. Flashes during thermal
disinfection
Alarm
The dishwasher encounters an anomaly - caused by a malfunction or
anomalous conditions. The display shows the number of the alarm. In the
alarms table in this manual, each code is matched with the components which
may have caused the event as an aid to troubleshooting. Record all alarms and
inform technical service accordingly in case of need.

18
tECH
The machine has exceeded the set number of hours of operation since
installation or its last service: contact technical service for routine
maintenance.
Press Start/Stop to ignore the warning and continue using the machine.
Run scheduled service as soon as possible to keep the machine in good
working order.
5.6 Loading tableware
Examples
Bottom basket
Top basket
fig. 12 – Example loads

19
5.7 Upper basket height adjustment
The upper basket’s height can be adjusted so that larger dishware can be placed in the lower basket.
1) Pull out the basket.
2) Open the retaining clip on both rails (see
white circle).
3) Remove it and reposition it by inserting the
upper wheels in the rail.
4) Close the retaining clip on both rails.
Upper basket in low position Upper basket in high position

20
5.8 Selecting the washing program
Select the program available, referring to the models and versions in the next point,
depending on the type of soiling and the amount of tableware loaded into the baskets
To run a program:
1. If the dishwasher is off, switch it on by pressing the On/Off button (hold down for 2 seconds).
2. Close the door by pressing it in until it clicks closed. The buttons are only enabled when the door is
closed.
3. Select the required program with the selection buttons.
4. You can now view the nominal program duration by pressing the ON/OFF button.
5. Press the Start/Stop button to start the cycle
6. The start of the cycle is confirmed by two beeps.
7. Once the program has terminated, the display reads “End” alternating with the code of the program just
run.
NOTE - DISPLAY CONTENTS WITH CYCLE RUNNING
While the cycle is running, the following appear on the display 5 second intervals, in this order:
- Code of current program, e.g P3
- Time remaining e.g.: 26
- Temperature in tank e.g.: 55 °C
For models with dryer only:
During drying, the temperature displayed is the air temperature at the tank intake; this
temperature refers to the pipe only and is not constant across the tank
NOTE – PROGRAM RUN TIMES
The run times displayed on the control panel are approximate; the temperature and pressure of
the water supply, as well as the tableware load, will affect the actual duration
The times provided refer to the machine operating with a 400V three-phase electricity supply and
55°C hot water supply, with no load.
If the peristaltic kit is installed, the cycle time is extended by at least one minute.
This does not include the times of the initial resin washing phases
If necessary, a resin regeneration cycle is run at the end of each program and a resin wash at the
start of the next, to ensure that the softener system works properly.
If the Repeat function is selected, these cycles do not run automatically, but must be selected by
the operator when the warning message displays on the control panel (R).
If the Repeat function is enabled, leave the door ajar after unloading the dishes if the appliance is
not to be reused immediately; if it will not be used for some time, perform a drain cycle before
reusing it to prevent foaming.

21
5.8.1 Models: SWT262
PROGRAM
(FIRST SET)
Type of soiling
Thermal disinfection
Powder detergent
(when a detergent
peristaltic pump is not
installed)
P 1
Lightly soiled dishes
Medium temperature, short
20 grams
P 2
Heavily soiled dishes
Medium temperature, short
25 grams
P 3
Lightly soiled dishes
Medium temperature, long
20 grams
P 4
Heavily soiled dishes
Medium temperature, long
25 grams
P 5
Lightly soiled dishes
High temperature, short
20 grams
P 6
Heavily soiled dishes
High temperature, long
25 grams
P 7
Program for rinsing to prevent soil from drying
-
P SEr (service)
Service program, for use only for filling the peristaltic circuit
(if optional peristaltic pumps are installed)
First set of programs
PROGRAM
PREWASH
WASH
(°C/time)
INTERMEDIATE
RINSE
FINAL RINSE
(°C/time)
ADDITIONAL
PREWASH
FUNCTION
AUTO-OPEN
FUNCTION
AVAILABLE
DISPLAYED CYCLE TIME
WITH
ADDITIONAL
PREWASH
STANDARD
Pr 01
X
60° /3’
-
85° /1’ X X
25
20
Pr 02
X (**)
65° /3’
X (**)
85° /1’ X X
34
30
Pr 03
X
60° /3’
-
85° /3’ X X
27
22
Pr 04
X (**)
65° /5’
X (**)
85° /3’ X X
38
34
Pr 05
X
60°/5’
-
93° /5’ X X
33
28
Pr 06
X (**)
65°/5’
X (**)
93°/ 10’
X X 47
43
Pr 07
X (**) - - - - - -
7
Second set of programs
PROGRAM
PREWASH
WASH
(°C/time)
INTERMEDIATE
RINSE
FINAL RINSE
(°C/time)
ADDITIONAL
PREWASH
FUNCTION
AUTO-OPEN
FUNCTION
AVAILABLE
DISPLAYED CYCLE TIME
WITH
ADDITIONAL
PREWASH
STANDARD
Pr 1
-
45 ° /1’
-
55° /1’ X X
12
8
Pr 2
-
55 ° /1’
-
62° /1’ X X
15
10
Pr 3
X
60 ° /3’
-
85° /3’ X X
27
22
Pr 4
X (**)
65 ° /5’
X (**)
85° /3’ X X
38
34
Pr 5
X
60°/5’
-
93 ° /5’ X X
33
28
Pr 6
X (**)
65°/5’
X (**)
93°/10’ X X
47
43
Pr 7
X (**) - - - - - -
7
N.B.: water is always taken in by means of the hot water hose except in phases marked ** – if hot water is not
available, cold water is taken in and the cycle lasts longer than the stated time
For particularly stubborn or partially dried soiling, select for an additional cold prewash

22
5.8.2 Models: SWT260X
PROGRAM
(FIRST SET)
Type of soiling
Powder detergent
(when a detergent
peristaltic pump is not
installed)
P 1
Specifically for glasses
15 grams
P 2
Lightly soiled dishes, washed immediately after use.
20 grams
P 3
Normally soiled dishes, washed immediately after use
20 grams
P 4
Heavily soiled dishes
25 grams
P 5
Normally soiled dishes, with final thermal disinfection
25 grams
P 6
Heavily soiled dishes, with final thermal disinfection
25 grams
P 7
Program for rinsing to prevent soil from drying
-
P SEr (service)
Service program, for use only for filling the peristaltic circuit
(if optional peristaltic pumps are installed)
First set of programs
PROGRAM
PREWASH
WASH
(°C/extens.)
INTERMEDIATE
RINSE
FINAL RINSE
(°C/time)
REPEAT FUNCTION
AVAILABLE
DRYING
FUNCTION
DISPLAYED CYCLE TIME *
AS AN
ALTERNATIVE TO
DRYING
AS AN
ALTERNATIVE TO
REPEAT
WITH REPEAT
ACTIVE
STANDARD
WITH DRYING
Pr 01
-
45 ° /1’
-
55 ° /1’
(X)
(X) 6 8
18
Pr 02
-
55° /2’
-
62 ° /1’
(X)
(X) 8 10
26
Pr 03
-
60° /2’
-
65 ° /1’
(X)
(X)
10
12
33
Pr 04
X (**)
65 ° /5’
-
70° /1’ - X - 24
44
Pr 05
-
60°/5’
X
93 ° /5’ - X - 30
60
Pr 06
X (**)
65°/5’
X
93°/10’ - X - 43
77
Pr 07
X (**)
- - - - - - 7
-
Second set of programs
PROGRAM
PREWASH
WASH
(°C/extens.)
INTERMEDIATE
RINSE
FINAL RINSE
(°C/time)
REPEAT
FUNCTION
AVAILABLE
DRYING
FUNCTION
DISPLAYED CYCLE TIME *
AS AN
ALTERNATIVE TO
DRYING
AS AN
ALTERNATIVE TO
REPEAT
WITH REPEAT
ACTIVE
STANDARD
WITH DRYING
Pr 1
-
55° /2’
-
60° /1’
(X)
(X) 8 10
30
Pr 2
-
55° /3’
-
cold /2’
**
- - - 9 -
Pr 3
-
55° /3’
-
70° /1’
(X)
(X)
11
13
34
Pr 4
cold/4’
(**)
60° /2’
-
85° /1’ - X - 22
43
Pr 5
40°C/2’
60°/5’
-
85° /3’ - X - 25
46
Pr 6
-
60°/5’
50°/1’
93 °/5’ - X - 28
49
Pr 7
-
65°/5’
50°/1’
93°/10’ - X - 34
55
N.B.: water is always taken in by means of the hot water hose except in phases marked ** – if hot water is not
available, cold water is taken in and the cycle lasts longer than the stated time

23
5.8.3 Models: SWT260/260M
First set of programs
PROGRAM
PREWASH
WASH
(°C/extens.)
INTERMEDIATE
RINSE
FINAL RINSE
(°C/time)
REPEAT FUNCTION
AVAILABLE
AUTO-OPEN
FUNCTION
DISPLAYED CYCLE TIME*
AS AN ALTERNATIVE
TO AUTO-OPEN
AS AN ALTERNATIVE
TO REPEAT
WITH REPEAT
ACTIVE
STANDARD
Pr 01
-
45 ° /1’
-
55 ° /1’
(X)
(X) 6 8
Pr 02
-
55° /2’
-
62 ° /1’
(X)
(X)
8
10
Pr 03
-
60° /2’
-
65 ° /1’
(X)
(X)
10
12
Pr 04
X (**)
65 ° /5’
-
70° /1’ - X - 24
Pr 05
-
60°/5’
X
93 ° /5’ - X - 30
Pr 06
X (**)
65°/5’
X
93°/10’ - X - 43
Pr 07
X (**)
- - - - - - 7
Second set of programs
PROGRAM
PREWASH
WASH
(°C/extens.)
INTERMEDIATE
RINSE
FINAL RINSE
(°C/time)
REPEAT FUNCTION
AVAILABLE
AUTO-OPEN
FUNCTION
DISPLAYED CYCLE TIME
AS AN ALTERNATIVE
TO AUTO-OPEN
AS AN ALTERNATIVE
TO REPEAT
WITH REPEAT
ACTIVE
STANDARD
Pr 1
-
45 ° /1’
-
55 ° /1’
(X)
(X) 6 8
Pr 2
-
55° /2’
-
62 ° /1’
(X)
(X)
8
10
Pr 3
-
60° /2’
-
85° /1’ - X - 17
Pr 4
X (**)
65 ° /5’
-
85 ° /5’ - X - 32
Pr 5
-
60°/5’
X
93 ° /5’ - X - 30
Pr 6
X (**)
65°/5’
X
93°/10’ - X - 43
Pr 7
X (**)
- - - - - - 7
N.B.: water is always taken in by means of the hot water hose except in phases marked ** – if hot water is not
available, cold water is taken in and the cycle lasts longer than the stated time

24
5.8.4 Models: SWT264X
PROGRAM
(FIRST SET)
Name
Type of soiling
Powder detergent
(when a detergent
peristaltic pump is not
installed)
P 1
Glasses
Specifically for glasses
15 grams
P 2
Beer glasses
Beer glasses, cold final rinse
20 grams
P 3
Energy
Normally soiled dishes, washed immediately after use
20 grams
P 4
Universal
Dishes with normal dirt
25 grams
P 5
Universal Plus
Heavily soiled dishes, final thermal disinfection
25 grams
P 6
Hygienic
Heavily soiled dishes, final thermal disinfection at high
temperature
30 grams
P 7
Ultra Hygienic
Heavily soiled dishes, lengthy final thermal disinfection
at high temperature
30 grams
P 8 (service)
Service
Service program, for use only for filling the peristaltic pump circuit (with
peristaltic pump optional fitted)
First set of programs
PROGRAM
PREWASH
WASH
(°C/extens.)
INTERMEDIATE
RINSE
FINAL RINSE
(°C/time)
REPEAT
FUNCTION
AVAILABLE
DRYING
FUNCTION
DISPLAYED CYCLE TIME *
AS AN
ALTERNATIVE TO
DRYING
AS AN
ALTERNATIVE TO
REPEAT
WITH REPEAT
ACTIVE
STANDARD
WITH DRYING
Pr 01
-
55° /2’
-
60° /1’
(X)
(X) 8 10
30
Pr 02
-
55° /3’
-
cold /2’
**
- - - 9 -
Pr 03
-
55° /3’
-
70° /1’
(X)
(X)
11
13
34
Pr 04
cold/4’
(**)
60° /2’
-
85° /1’ - X - 22
43
Pr 05
40°C/2’
60°/5’
-
85° /3’ - X - 25
46
Pr 06
-
60°/5’
50°/1’
93 °/ 5’ - X - 28
49
Pr 07
-
65°/5’
50°/1’
93°/10’ - X - 34
55
Second set of programs
PROGRAM
PREWASH
WASH
(°C/extens.)
INTERMEDIATE
RINSE
FINAL RINSE
(°C/time)
REPEAT FUNCTION
AVAILABLE
DRYING
FUNCTION
DISPLAYED CYCLE TIME *
AS AN
ALTERNATIVE TO
DRYING
AS AN
ALTERNATIVE TO
REPEAT
WITH REPEAT
ACTIVE
STANDARD
WITH DRYING
Pr 1
-
45 ° /1’
-
55 ° /1’
(X)
(X) 6 8
18
Pr 2
-
55° /2’
-
62 ° /1’
(X)
(X) 8 10
26
Pr 3
-
60° /2’
-
65 ° /1’
(X)
(X)
10
12
33
Pr 4
X (**)
65 ° /5’
-
70° /1’ - X - 24
44
Pr 5
-
60°/5’
X
93 ° /5’ - X - 30
60
Pr 6
X (**)
65°/5’
X
93°/10’ - X - 43
77
Pr 7
X (**)
- - - - - - 7
-
N.B.: water is always taken in by means of the hot water hose except in phases marked ** – if hot water is not
available, cold water is taken in and the cycle lasts longer than the stated time

25
5.8.5 Models: SWT264
PROGRAM
(FIRST SET)
Name
Type of soiling
Powder detergent
(when a detergent
peristaltic pump is not
installed)
P 1
Glasses
Specifically for glasses
15 grams
P 2
Beer glasses
Beer glasses, cold final rinse
20 grams
P 3
Energy
Normally soiled dishes, washed immediately after use
20 grams
P 4
Universal
Dishes with normal dirt
25 grams
P 5
Universal Plus
Heavily soiled dishes, final thermal disinfection
25 grams
P 6
Hygienic
Heavily soiled dishes, final thermal disinfection at high
temperature
30 grams
P 7
Ultra Hygienic
Heavily soiled dishes, lengthy final thermal disinfection
at high temperature
30 grams
P 8 (service)
Service
Service program, for use only for filling the peristaltic pump circuit (with
peristaltic pump optional fitted)
First set of programs
PROGRAM
PREWASH
WASH
(°C/extens.)
INTERMEDIATE
RINSE
FINAL RINSE
(°C/time)
REPEAT FUNCTION
AVAILABLE
AUTO-OPEN
FUNCTION
DISPLAYED CYCLE TIME*
AS AN ALTERNATIVE
TO AUTO-OPEN
AS AN ALTERNATIVE
TO REPEAT
WITH REPEAT
ACTIVE
STANDARD
Pr 01
-
55° /2’
-
60° /1’
(X)
(X)
8
10
Pr 02
-
55° /3’
-
cold /2’
**
- - -
9
Pr 03
-
55° /3’
-
70° /1’
(X)
(X)
11
13
Pr 04
cold/4’(**)
60° /2’
-
85° /1’ - X - 22
Pr 05
40°C/2’
60°/5’
-
85° /3’ - X - 25
Pr 06
-
60°/5’
50°/1’
93 °/ 5’ - X - 28
Pr 07
-
65°/5’
50°/1’
93°/10’ - X - 34
Second set of programs
PROGRAM
PREWASH
WASH
(°C/extens.)
INTERMEDIATE
RINSE
FINAL RINSE
(°C/time)
REPEAT FUNCTION
AVAILABLE
AUTO-OPEN
FUNCTION
DISPLAYED CYCLE TIME
AS AN ALTERNATIVE
TO AUTO-OPEN
AS AN ALTERNATIVE
TO REPEAT
WITH REPEAT
ACTIVE
STANDARD
Pr 1
-
45° /1’
-
55° /1’
(X)
(X) 6 8
Pr 2
-
55° /2’
-
62° /1’
(X)
(X)
8
10
Pr 3
-
60° /2’
-
65° /1’
(X)
(X)
10
12
Pr 4
X (**)
65° /5’
-
70° /1’ - X - 24
Pr 5
-
60°/5’
X
93° /5’ - X - 30
Pr 6
X (**)
65°/5’
X
93°/10’ - X - 43
Pr 7
X (**)
- - - - - - 7
N.B.: water is always taken in by means of the hot water hose except in phases marked ** – if hot water is not
available, cold water is taken in and the cycle lasts longer than the stated time

26
5.9 Drying cycle (where applicable)
The drying cycle runs at the end of the wash program, see table of programs.
If the current program includes drying, the respective indicator light turns on.
The drying phase subdivides into 3 steps
Step 1
Step 2
Step 3
Characteristics
The fan speed is reduced (1/4 - 1/2
of full speed) to aid the controlled
venting of steam from the tank
(tank_T > 75°C)
Time and temperature equal to
target values set by the program.
Fan at full speed.
Load and
heating
element cooling
phase.
t_1 = 10 minutes
t_2 = programmed_time
t_3 = 4 minutes
Once the option has been activated by pressing , step 2 can be reduced by pressing , with the
following subdivision:
A B C
D
Complete drying, as
programmed.
25% reduction
50% reduction
75% reduction
EXAMPLE:
Drying program, duration 20’; temperature in tank 78°C before start of drying; condition “C”;
10’ + 10’+ 4 total 24’ of drying, compared to 34’ for standard condition.
1. Drying can be activated and step 2 reduced even with the cycle in progress, but not once
drying has started;
2. Once reduction has been set, it remains in force for all cycles (where envisaged) and in all
conditions (power on, "OFF" status and program change);
3. If no selection is made for 5", the system returns to the condition displayed/selected
previously;
5.10 Repeat (as applicable)
The Repeat function speeds up operation by reusing the last rinse water for the next wash.

27
5.11 End of cycle
Once the program has terminated, the display reads “End” alternating with the program code
The “End” message only displays if all steps of the program have concluded successfully; it does not display if
the program has been paused, if a malfunction has compromised the result of the wash, or if the auto open
option is enabled.
The end of the signal is confirmed by a beep sounding.
If auto open is enabled, the door opens automatically and 4 horizontal dashes display. Auto open is
not enabled if alarms occur during the program or if Repeat is enabled. The respective indicator
light turns on to confirm that the option has been enabled.
If the drying option has been activated, the LED next to it is on: For programs which include this
option, the indicator light is:
1. Steady on when a program is running or has terminated successfully;
2. Flashing if drying is interrupted, during cooling, or at end of cycle due to a power failure or forced
interruption.
5.11.1 Performing resin regeneration
When the “R” symbol is lit, a complete pump-out cycle should be performed as soon as possible; the appliance
will then regenerate the resins automatically.
5.12 Interrupting a running program
A program may be interrupted while it is running by pressing the Start/Stop button.
While the machine is paused, the display reads “S” followed by the program code.
5.12.1 Pausing a program
A program may be paused while it is running by pressing the Start/Stop button.
The response of the machine to such a command depends on the conditions in the tank, for instance:
• If the tank temperature is less than 75°C: the door can be opened and the program can be
restarted from where it left off by pressing the Start/Stop button.
• If the interior temperature is greater than 75°C, you must confirm again to open the door and
the machine warns you of the interior temperature on the display and by beeping.
5.12.2 Interrupting a program
A program may be interrupted in 2 ways:
1. By setting the machine to “OFF”, after pausing it (see § PAUSING A PROGRAM); in this case, a reset is
run when the machine is turned on again;
2. By pausing the program (see § PAUSING A PROGRAM) and then proceeding as follows

28
5.13 Reset procedure
The RESET procedure runs a water fill/drain cycle to restore the dishwasher to a safe condition in case of
malfunction or an interrupted program.
We also recommend running a RESET when an alarm occurs.
The Reset cycle can also be run for its own sake, regardless of whether an alarm has occurred or not.
N.B.: the RESET procedure can only be run with the door CLOSED.
When an error occurs, generally the device manages the anomaly itself: in this case the alarm code
flashes on the display until the problem has been dealt with: no reset commands are accepted
during this time.
Any RESET forced by the user will not be accepted until the problem has been dealt with and the
alarm code on the display is “steady”.
5.13.1 Running a RESET procedure
In case of alarm or with the dishwasher stopped: press and hold down the Start/Stop and DRAIN buttons
together for 2 seconds, until a beep sounds.
The display reads "P-" and the RESET starts.
At the end of the procedure, the display flashes "E-" alternating with the program number, if you are resetting
a previously interrupted program, or “End” alternating with “P –“ if you have reset the machine of your own
accord.
ATTENTION
If you are unable to run a RESET, before contacting technical service please turn the machine off
and on and try again.

29
6 SETUP MODE AND FUNCTIONS
The dishwasher has a set-up mode for changing its settings.
The washing parameters are not password protected, but the configuration parameters are.
6.1 Entering set-up mode
6.1.1 Entering the USER menu
To enter the wash settings menu, hold down the DRAIN button until the control panel displays “unlo” and then
flashes “Set”: release and press the button again immediately, this accesses the USER menu.
In the USER menu, the following options can be scrolled with buttons A (up) and B (down):
USER menu options
Description
SET
Sets the dishwasher parameters – see Par. “Set” PARAMETERS for details
Coun
Total hours of operation counter (read only, cannot be modified).
This parameter displays on two consecutive screens. The thousands value is
followed by “t”, the unit value by “u”.
PrEn
Setting which allows display and selection only of the wash programs of interest.
To enter a specific option, press the Start/Stop button.
To return to a higher level, press Open Door.
6.1.2 SET menu
The display reads Set.
To select this option, press .
The Set option has a variety of individual settings.
Set
PARAMETER
DESCRIPTION
POSSIBLE USER
ACTION
POSSIBLE
TECHNICIAN
ACTION
1 –
Detergent pump P1 batching.
The grams/litre are set with this parameter; the
default value is 3, equivalent to 3.6 grams/litre.
(Max value of 10, equivalent to 12 grams/litre)
Increase/decrease the setting with the Select buttons.
X
X
2 –
Rinse aid pump P2 batching.
The grams/litre are set with this parameter; the
default value is 0.5, equivalent to 0.5 grams/litre.
(Max value 1, equivalent to 1 gram/litre)
Increase/decrease the setting with the Select buttons.
X
X
3 –
Water hardness
Set the hardness in °f, in steps of 5. Range: 0-65°f. The
default is 40°f.
Attention: Make sure that the value corresponds to
the actual hardness of the water supply.
X
X

30
Set
PARAMETER
DESCRIPTION
POSSIBLE USER
ACTION
POSSIBLE
TECHNICIAN
ACTION
4 –
Additive dispensing type setting
- dd (detergent and rinse aid dispenser on door)
- PP (peristaltic pumps)
- dP (door dispenser and peristaltic pumps)
Enabling the peristaltic pumps (PP) disables the
powder dispenser (dd), while in "dP" mode both
accessories operate
DEFAULT: dP
X
X
5 –
Program set selection
- S I: Standard programs (Pr 01, Pr 02, ..)
- S 2: Alternative programs (Pr 1, Pr 2, ….)
X
X
SEr
Entering the configuration menu
Access to this menu is reserved for technicians for
setting up the dishwasher, and is password protected.
-- X
Table of peristaltic pump batching settings:
SET 1 – Detergent
SET 2 – Rinse aid
Value
grams / litre of water
Value
grams / litre of water
1
1.2
01
0.1
2
2.4
02
0.2
3
default
3.6
03
0.3
4
4.8
04
0.4
5
6
05
default
0.5
6
7.2
06
0.6
7
8.4
07
0.7
8
9.6
08
0.8
9
10.8
09
0.9
10
12
1
1
Move from one parameter to the next with the A and B buttons; change the settings with and ;
confirm them by holding down .
To quit Set mode, hold down .

31
6.1.2.1 Water hardness settings “SET 3“
SET 3 Parameters
Value °f
°d
0 0 5 3 10 6
15 8
20 11
25 14
30 17
35 20
40
(DEFAULT)
22.5
45 25
50 28
55 31
60 34
65 37
6.1.3 Coun menu
The display reads Coun.
This menu displays the total number of cycles run with the dishwasher.
To display them, hold down . The value displays in two successive screens. The thousands value is
followed by “t”, the unit value by “u”.
The parameter is read only and cannot be modified.

32
6.1.4 PrEn Menu
By means of the appropriate settings, the “PrEn” parameter allows the user to only display and start
the programs actually of interest, belonging to the selected SET of programs.
Once the menu has been selected, the operator can scroll through the programs available.
The first 2 digits of the display show the program number and the second 2 the “on” or “oF” value (e.g.
“06:on”) depending on whether or not the program currently selected is enabled.
By default: all programs are enabled, “on”. To disable the display of a program, set “oF” next to its
number (e.g. “06:oF”) using the Modification buttons and confirm with the Start/Stop button.
The service program is identified as “SE”
At least 1 program is always enabled for every SET of programs.
The procedure is similar to that in use for the setup parameters.
Step
Button
Action
1
Start/Stop – hold down to access the option.
To access the PrEn parameters, hold down when the “PrEn” setup option appears on the display.
2
A and B buttons – quick press - Select the programs to be enabled/disabled.
3
-
Buttons for Selection - Modification of the selected parameter (switch from “on” to “oF” to
disable display of the program on the screen).
4
Start/Stop – hold down to confirm the modification.
If the modification is not confirmed, it is not possible to move on to
modification of the next/previous program.
5
Door opening – hold down to quit the screen for display/modification.
7 CLEANING AND ROUTINE MAINTENANCE
7.1 General precautions
DISCONNECTING THE ELECTRICITY AND WATER SUPPLIES
Before you start: shut off electrical power to the device with the master switch on the control panel
or by disconnecting its power cable, and close the water supply cocks.
CLEARANCE
You must provide clearance of at least 1m2 in front of the machine for maintenance.
Work done on the appliance by unauthorised persons is not covered by warranty and is at the
client's sole expense and responsibility
.
During maintenance and cleaning: if appropriate, use personal protection equipment.

33
7.2 Description of maintenance and cleaning by the operator
7.2.1 At each use
1. Check the operation of the spray arms and check that the water outlet holes are clean by eye.
2. Check the detergent and rinse aid levels (if peristaltic pumps are installed)
3. At the end of the working day, clean the filters as described below
7.2.2 Monthly check
1. Check the condition of the water supply solenoid valve filters: clean them, if necessary, by running hot
water through them in the opposite direction.
2. Check the condition of the intake hoses and tank filters (as applicable)
7.2.3 Once a year
At the end of the warranty period and every year thereafter and whenever message (tECH) displays, contact
your nearest Smeg authorised service centre for a complete check-up.
7.2.4 Lengthy periods out of use
If the dishwasher is to be out of use for a fairly long period of time, the detergent and rinse aid dispenser devices
must be emptied to prevent crystallisation and damage to the pumps:
Remove the intake hoses from the detergent and rinse aid containers and place them in a container of clean
water, then perform a few wash cycles followed by a complete pump-out.
Finally, turn off the master switch, close the water intake valve and leave the door ajar until the interior is
completely dry.
The detergent and rinse aid intake hoses must be put back into the containers when the dishwasher is returned
to service, taking care not to swap them over (red hose = detergent, blue hose = rinse aid).
Do not direct jets of water or steam directly at the appliance since they could cause damaging
infiltrations of liquids.
Maintenance work not covered by the warranty, which does not cover replacement of parts subject
to normal wear and tear.
7.3 CLEANING THE APPLIANCE and its parts
General cleaning
Clean the outer surfaces and door-lining of the dishwasher regularly using a soft, damp cloth or with a normal
detergent suitable for painted surfaces.
Clean the door gaskets with a damp sponge.
After cleaning: run a wash cycle without a load to eliminate any detergent residue.

34
Cleaning the water intake filter
Water intake filter A on the cock must be cleaned from time to time; this should be done 1 every 2 – 6 months,
depending on the quantity of water used. Close the water supply cock, unscrew the end of the water intake
hose, remove filter A and clean it carefully under running water. Reassemble filter A and carefully screw the
water intake hose back into position.
Take care not to spill water from the free end of the hose.
fig. 13 – water intake filter A
Cleaning the spray arms
The spray arms are easily removed by undoing the knurled nut securing them to the rotary shaft, so that the
nozzles can be cleaned to prevent blockages.
Wash the spray arms and nozzles under clean running water and carefully reinstall them, checking that their
rotation is in no way impeded.
Recommended spray arm cleaning interval: once a week.
fig. 14 – Lower spray arm: disassemble and clan to ensure effective washing.
Cleaning the filter unit
The filter unit is composed of a filter element which collects large sized particles and a larger external filter. To
ensure that the appliance operates effectively, it is extremely important to keep the filters clean. Inspect them
frequently (for instance, if washing glassware with paper labels, inspect them after each cycle – in normal
conditions, they should be cleaned once a week) and remove any deposits which may compromise their
operation.
fig. 15 – Chamber drain filter, disassembly procedure and view of parts.

35
External circular filter
To remove this filter:
• take hold of the conical filter's tabs and turn anticlockwise (box A)
• Without pressing the tabs, lift the assembly (box B).
When cleaning this filter, the others should also be cleaned.
To install the filters:
• Reposition the external steel filter;
• Insert the soft conical filter into the steel filter by pressing its external edges slightly (box A);
• Rotate the cone-shaped filter clockwise as far as possible, about 90°.
Good maintenance tips
• The filters should be cleaned under running water using a stiff brush.
• It is essential to clean the filters thoroughly in accordance with the instructions provided above: the
appliance cannot function if the filters are clogged.
• Restore the filters before running a wash cycle.
7.4 Description of maintenance and cleaning by the authorised technician
Described in document reserved for authorised technicians
7.5 Diagnostics, reporting and troubleshooting
7.5.1 ELIMINATING SMALL FAULTS
In some cases it is possible to remedy minor problems by referring to the following instructions.
1. If the program does not start, check that:
• The dishwasher is connected to the mains.
• There is no power outage.
• The water cock is open.
• The dishwasher door is properly closed.
2. If water is left inside the dishwasher, check that:
• The drain hose is not kinked.
• The drain trap is not blocked.
• The dishwasher filters are not clogged.
3. If the load is not properly cleaned, check that:
• The correct amount of detergent has been added.
• The salt container is not empty.
• The tableware has been loaded correctly.
• The selected program is suitable for the type and degree of soiling.
• All filters are clean and correctly installed.
• The spray arm nozzles are not clogged.
• There is nothing obstructing the rotation of the spray arms.
• Check that the salt container cap is properly closed.
4. If the tableware does not dry properly or remains matt, check that:
• The rinse aid intake filter is clean
• The rinse aid container is not empty.
• The rinse aid dispenser setting is correct.
• The detergent used is of good quality and has not lost its effectiveness (for example, through incorrect
storage, with the box left open).
• Check that the salt container cap is properly closed.

36
5. If the tableware is streaky, stained or similar, check that:
• The rinse aid dispenser setting is not too high.
6. If there are traces of rust in the dishwasher:
• The tank is made of stainless steel, and therefore any rust marks are due to external elements (fragments
of rust from the water pipes, etc.). Special products are available to remove such marks.
• Check that the detergent dose being used is correct. Certain detergents can be more corrosive than others.
• Check that the salt container cap is properly closed.
If the problem persists after following the troubleshooting instructions above, call the nearest Authorised
Service Centre.
8 ALARMS
We list the dishwasher's alarms below, divided into "FATAL" and "NON-FATAL".
- In the first case, FATAL ALARMS the control panel displays "AF" followed by the alarm code.
- In the second case, NON-FATAL ALARMS, these are simple warnings and not malfunctions; the
message "A-" displays, followed by the alarm code. Press Start/Stop to continue using the machine.
ALARM EVENTS - READ CAREFULLY
When an alarm event occurs, the dishwasher automatically runs a safety shutdown. In such cases,
the alarm code on the display flashes until automatic handling has terminated: THE MACHINE
CANNOT BE RESET WHEN IT IS IN THIS CONDITION.
Any RESET forced by the user will not be accepted until the problem has been dealt with and the
alarm code on the display is “steady”.
When an alarm is reported: Identify the code and its meaning in this table, along with the
suggested countermeasures. Apply the countermeasures for the case in question.
The user is typically required to proceed as follows:
1. First execute the DEFAULT PROCEDURE.
2. If the alarm does not cancel itself, execute the RESTORE PROCEDURE.
1. DEFAULT PROCEDURE
If the alarm event is due to a momentary anomaly, the situation can be resolved as follows:
Turn the machine off and then on again with the On/Off button. The display flashes “OFF” while the
anomaly is being handled automatically. At the end of the process, the “OFF” displays steadily.
2. RESTORE PROCEDURE for AF alarms (displayed without flashing):
1. Run a RESET.
2. If the alarm message disappears after the RESET: you can resume normal operation after
having turned the machine off and on again with the On/Off button.
3. if the alarm message persists after the RESET: turn the machine off and on again with the
On/Off button and by disconnecting the power supply (wait at least 10 seconds before
turning it back on again).
4. If the alarm returns when the machine is turned back on: try the RESET again.
If the alarm persists even after this RESET procedure:
1. Close the water supply cock.
2. Disconnect the machine from its power supply.
3. Check that the machine is properly hooked up (water and power) and that the initial
installation conditions have not changed.
4. Contact Smeg technical service.

37
ALARM ID
DESCRIPTION
USER ACTION
AF:01
Water not heated within time
allowed.
User: run the DEFAULT PROCEDURE described above. If the
alarm does not reset, run the RESTORE PROCEDURE.
AF:05
Operating temperature sensor
TL1 has generated an
anomalous signal (sensor
"open").
User: run the DEFAULT PROCEDURE described above. If the
alarm does not reset, run the RESTORE PROCEDURE.
AF:07
Drying temperature sensor TA1
is generating an abnormal signal
(sensor “open”).
User: run the DEFAULT PROCEDURE described above. If the
alarm does not reset, run the RESTORE PROCEDURE.
AF:09
Partial pump-out not successful
User: run the DEFAULT PROCEDURE described above. If the
alarm does not reset, run the RESTORE PROCEDURE.
AF:11
No cold water during filling.
Check the water supply:
1. Check that the intake cock is open.
2. Check the water supply pressure.
3. Check the position of the intake hoses.
Run the DEFAULT PROCEDURE described above. If the alarm
does not reset, run the RESTORE PROCEDURE.
AF:12
No hot water
Check the hot water supply:
1. Check that the intake cock is open.
2. Check the water supply pressure.
3. Check the position of the intake hoses.
Run the DEFAULT PROCEDURE described above. If the alarm
does not reset, run the RESTORE PROCEDURE.
AF:17
Cold water filling time not
correct.
Run the checks and procedures specified in AF:11
AF:18
Hot water filling time too long.
The device is taking too long to
take in hot water.
Run the checks and procedures specified in AF:12
AF:23
Not enough water. Tank water
level too low.
Run the checks and procedures specified in AF:11
Also check for leaks - check for water on the floor around the
machine.
If you find any leaks: immediately close all supply cocks and
contact technical service.
AF:25
Water circuit malfunction
User: run the DEFAULT PROCEDURE described above. If the
alarm does not reset, run the RESTORE PROCEDURE.
Then open the door and check that there is not too much
foam in the tank (reduce the amount of rinse aid) and that
the tank filter is clean (proceed as shown in fig. 16).
AF:29
Tank does not empty within set
time.
Check the drain connection, in particular the height of the
drain fittings in relation to specifications, and check for kinks
and restrictions along the drain hose.
Check that the tank filter is clean - fig. 16
AF:30
During the working cycle, the
tank water level exceeds the
safety level. Water safety level.
Check the machine's water supply:
1. Supply pressure.
2. Hookup, as specified in this manual.
User: run the DEFAULT PROCEDURE described above. If the
alarm does not reset, run the RESTORE PROCEDURE.
If you find any leaks: immediately close all supply cocks and
contact technical service.

38
ALARM ID
DESCRIPTION
USER ACTION
AF:32
Water standing in washing
chamber with device in standby.
User: run the DEFAULT PROCEDURE described above. If the
alarm does not reset, run the RESTORE PROCEDURE.
If you find any leaks: immediately close all supply cocks and
contact technical service.
AF:33
Anomalous water filling in the
steam condenser. No water in
steam condenser.
Indicates that there is no water in the steam condenser when
it is expected to be there.
Check the water supply:
1. Supply pressure.
2. Hookup, as specified in this manual.
3. Obstructions and restrictions along the hoses.
Run the DEFAULT PROCEDURE described above. If the alarm
does not reset, run the RESTORE PROCEDURE.
AF:34
Steam condenser water
drainage failure.
Check the drain hookup:
1. Height and position of drain fittings
2. Hookup, as specified in this manual.
3. Obstructions and restrictions along the hoses.
User: run the DEFAULT PROCEDURE described above. If the
alarm does not reset, run the RESTORE PROCEDURE.
AF:54
Door opening detected with
cycle in progress. Door interlock
microswitch malfunction.
1. Make sure to close the door properly before running a
wash cycle.
2. Do not force the door open during a cycle, always use the
appliance's controls to pause the cycle and open the door.
3. Make sure there are no objects jammed between the door
and the dishwasher tank which are stopping the door closing.
3. Run the DEFAULT PROCEDURE described above. If the
alarm does not reset, run the RESTORE PROCEDURE.
AF:56
Door lock fault, no automatic
open.
Make sure to close the door properly before running a wash
cycle.
Try opening the device again with the Open door button.
If necessary, use the manual door release procedure
described in this manual.
Run the DEFAULT PROCEDURE described above. If the alarm
does not reset, run the RESTORE PROCEDURE.
A:58
Dryer heating failure. Only on
mod. SWT260X
User: run the DEFAULT PROCEDURE described above. If the
alarm does not reset, run the RESTORE PROCEDURE.
A:67
Dryer motor “cooling”
malfunction. Cooling is included
at the end of the drying phase
to bring the load processed and
the heating elements to a safe
temperature. Only on mod.
SWT260X
User: run the DEFAULT PROCEDURE described above. If the
alarm does not reset, run the RESTORE PROCEDURE.
AF:74
Aquastop tripped (if installed)
User: run the DEFAULT PROCEDURE described above. If the
alarm does not reset, run the RESTORE PROCEDURE.
AF:78
Restore fail. Motherboard
problem.
User: run the DEFAULT PROCEDURE described above. If the
alarm does not reset, run the RESTORE PROCEDURE.

39
ALARM ID
DESCRIPTION
USER ACTION
AF:84
Dryer temperature reading
higher than actual temperature.
Only on mod. SWT260X
Wait for the automatic alarm handling procedure to
terminate.
A RESET cycle cannot be run while alarm AF:84 is being
handled by the system.
Do not disconnect power: automatic heating malfunction
handling in progress with heating element cooling cycle.
Only when this procedure has terminated may you run the
DEFAULT PROCEDURE described above.
AF:96
Tank water level incorrect.
Check the water intake and drain fittings and that they are
compliant with specifications.
If you notice any leaks around the appliance, close all water
cocks.
User: run the DEFAULT PROCEDURE described above. If the
alarm does not reset, run the RESTORE PROCEDURE.
N.B.:
The drying system alarms (A 58, A 67) display at the end of the cycle, and reset when the door is opened.
If the messages persist, contact your local authorised service centre.

40
Index
1 PRODUCT IDENTIFICATION AND SAFETY AND OPERATING WARNINGS .................................................. 1
1.1 Brand and model (or type) ...................................................................................................................... 1
1.2 Name and address of manufacturer or distributor ................................................................................. 1
1.3 Declaration of conformity to product standards..................................................................................... 2
2 SYMBOLS ............................................................................................................................................. 2
3 PRODUCT CHARACTERISTICS ................................................................................................................ 3
3.1 Application, general functions and intended use .................................................................................... 3
3.2 Dimensions, weight and handling instructions Dimensions in mm. ....................................................... 3
3.3 Technical characteristics (power, plumbing) ........................................................................................... 5
3.3.1 Electrical connections - see technical data plate............................................................................. 5
3.3.2 Plumbing connections ..................................................................................................................... 5
3.4 Drain hose connections ........................................................................................................................... 6
3.5 Noise ........................................................................................................................................................ 8
3.6 Protection rating (IP) ............................................................................................................................... 8
3.7 Environmental conditions (storage and operating) ................................................................................ 8
3.8 Safety precautions and instructions ........................................................................................................ 8
4 PREPARING THE APPLIANCE FOR USE ................................................................................................. 10
4.1 Removing the packaging, inspection ..................................................................................................... 10
4.2 Scrapping the packaging material ......................................................................................................... 10
4.3 Installing the appliance .......................................................................................................................... 10
4.4 Preliminary settings and adjustments ................................................................................................... 10
4.4.1 Opening the door .......................................................................................................................... 10
Manual door release...................................................................................................................................... 11
4.5 Operator and technician authorisations ............................................................................................... 11
4.6 Precautions before use .......................................................................................................................... 11
4.7 Precautions when the appliance is not in use ....................................................................................... 11
5 OPERATING INFORMATION AND INSTRUCTIONS ................................................................................ 12
5.1 Safe use .................................................................................................................................................. 12
5.2 Using the water softener ....................................................................................................................... 12
5.3 Using detergent and rinse aid ............................................................................................................... 13
5.3.1 Correct use of the peristaltic pumps – OPTIONAL......................................................................... 13
5.3.2 Tank level sensors - OPTIONAL ...................................................................................................... 14
5.4 Description of controls and wash programs.......................................................................................... 15
5.4.1 Controls ......................................................................................................................................... 15
5.4.2 Detailed description ...................................................................................................................... 15
5.5 Indicator light – Meaning ...................................................................................................................... 17
5.6 Loading tableware ................................................................................................................................. 18
5.7 Upper basket height adjustment ........................................................................................................... 19
5.8 Selecting the washing program ............................................................................................................. 20

41
5.8.1 Models: SWT262 ............................................................................................................................ 21
5.8.2 Models: SWT260X .......................................................................................................................... 22
5.8.3 Models: SWT260/260M ................................................................................................................. 23
5.8.4 Models: SWT264X .......................................................................................................................... 24
5.8.5 Models: SWT264 ............................................................................................................................ 25
5.9 Drying cycle (where applicable) ............................................................................................................ 26
5.10 Repeat (as applicable) ........................................................................................................................... 26
5.11 End of cycle ............................................................................................................................................ 27
5.11.1 Performing resin regeneration ...................................................................................................... 27
5.12 Interrupting a running program ............................................................................................................ 27
5.12.1 Pausing a program ......................................................................................................................... 27
5.12.2 Interrupting a program .................................................................................................................. 27
5.13 Reset procedure .................................................................................................................................... 28
5.13.1 Running a RESET procedure .......................................................................................................... 28
6 SETUP MODE AND FUNCTIONS ........................................................................................................... 29
6.1 Entering set-up mode ............................................................................................................................ 29
6.1.1 Entering the USER menu ............................................................................................................... 29
6.1.2 SET menu ....................................................................................................................................... 29
6.1.2.1 Water hardness settings “SET 3“ ............................................................................................... 31
6.1.3 Coun menu .................................................................................................................................... 31
6.1.4 PrEn Menu ..................................................................................................................................... 32
7 CLEANING AND ROUTINE MAINTENANCE ........................................................................................... 32
7.1 General precautions .............................................................................................................................. 32
7.2 Description of maintenance and cleaning by the operator................................................................... 33
7.2.1 At each use .................................................................................................................................... 33
7.2.2 Monthly check ............................................................................................................................... 33
7.2.3 Once a year .................................................................................................................................... 33
7.2.4 Lengthy periods out of use ............................................................................................................ 33
7.3 CLEANING THE APPLIANCE and its parts ............................................................................................... 33
7.4 Description of maintenance and cleaning by the authorised technician .............................................. 35
7.5 Diagnostics, reporting and troubleshooting .......................................................................................... 35
7.5.1 ELIMINATING SMALL FAULTS ........................................................................................................ 35
8 ALARMS ............................................................................................................................................ 36

42

43

44
 Loading...