

Page 1
Cooker
Hood
Model SAH490SS/SAH460SS-1
Instruction manual
Page 2
Page 3

Know your cooker hood
Please read these instructions before using your cooker hood
8
1.120mm to 125mm ducting adaptor
2.Outlet connection 3.Main body assembly
4.Motor assembly 5.Outside frame
6.Front panel 7.Telescopic board
8.Filter
Information
Congratulations on the
purchase of our Cooker hood,
which is
many superior features that
permit you the fullest
expression of your living.
Before installing and/or using
the cooker hood carefully read
all the instructions.
designed to include
Page 4
Page 5

Page 6

Installation
Ensure the power has been turned off before beginning this installation.
5
If you are using a duct. Please first push out the duct hole and fix the damper flap
on the air outlet of the hoods.
Information
Connect
universal
hose, easy
selecting the
venting
direction
Page 7

6
If you are installing the hood with
a duct you will need to provide
a hole for the duct. Please use
the template provided to locate
the hole.
Hood installation:
Put the Hood at the correct
position, fix the self-tapping with
washer follow the middle four
holes on top board inside of the
hoods. Caution: Take care not to
damage parts inside the hood.
Information
When
drilling
into wall
or ceiling,
do not
damage
electrical
wiring or
other
hidden
utilities.
SELF TAPPING SCREW
7
Page 8

The cooker hood is fully convertible for different
Vertical flue is the most common
8
Connect the
the air duct.This hood comes with
an adaptor to allow flexibility in
duct sizes, but should not be less than
125 mm diameter.
hose (not supplied) with
method of installation.If
your kitchen has
above, the
run up through
and attic to a roof cap.
venting options.
an attic space
ducting may be
the cupboard
9
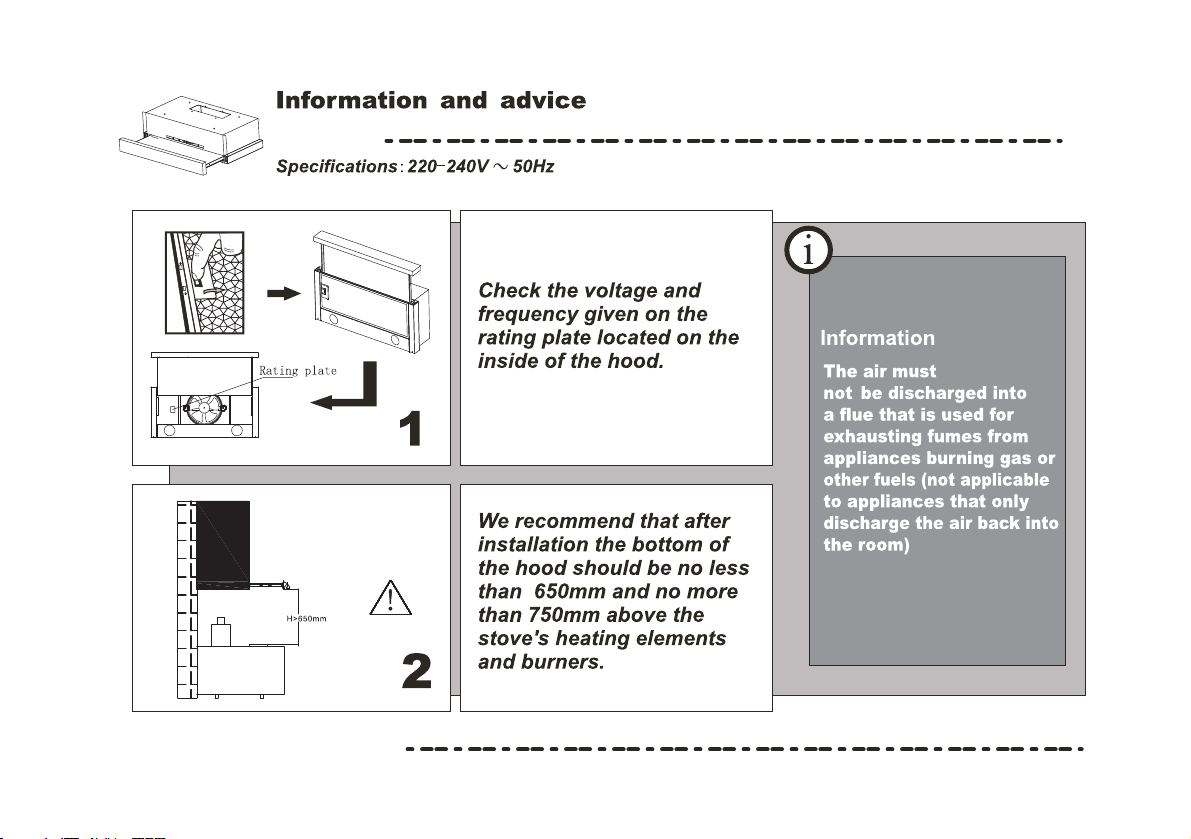
Information
The air must
not be
discharged
into a flue
that is used
for
exhausting
fumes from
appliances
burning gas
or other
fuels.
Page 9

Controls:
Lamp switch
The hood is turned on when you pull out the slide. The lamp
switch is located on the left side of the hood.
The fan switch is located on the right side .The
fan has 3 settings: off , low speed , high speed.
Motor switch
10
Information
Do not
touch the
light bulb
within half
an hour
after
appliance
use.
The lamp
shall not be
covered
with thermal
insulation or
other
material.
Page 10

PIC-1
PIC-2
Replacing Lamp:
1. Switch off the hoods and remove the plug;
2.Pull out the telescopic board, take off the lamp and
remove the connection unit;
3.Replace new lamp, turning in a clockwise direction,
fit the connection unit.
Information
There is a
fire risk if
cleaning is
not carried
out in
accordance
with the
instructions.
Page 11

* The appliances is not intended for use by young children or infirm persons
unless they have been adequately supervised by a responsible person to ensure
that they can use the appliance safely.
* Young children should be supervised to ensure that they do not play with the
appliance.
The manufacturer shall decline all responsibility if the foregoing
recommendations and instruction regarding installation, maintenance and use are
not observed and respected when using the cooker hood.
 Loading...