

Page 1
IT
FR
GB
DE
ES
NL
DK
ISTRUZIONI PER L’USO
MODE D’EMPLOI
DIRECTIONS FOR USE
GEBRAUCHSANWEISUNG
MODO DE EMPLEO
GEBRUIKSAANWIJZING
BRUGSANVISNING
FRIGGITRICE DA INCASSO
FRITEUSE ENCASTRABLE
BUILT-IN FRYER
EINBAUFRITEUSE
FREIDORA EMPOTRABLE
INBOUWFRITEUSE
FRITØSE TIL INDBYGNING
Page 2

ITALIANO …………………………………………………………….. 4 – 12
FRANÇAIS …………………………………………………………… 14 – 22
ENGLISH ..................................................................................... 24 – 32
DEUTSCH .................................................................................... 34 – 42
ESPANOL …………………………………………………………….. 44 – 52
NEDERLANDS ……………………………………………………….. 54 – 62
DANSKE ………………………………………………………………. 64 – 72
Page 3

Table of contents
1. Installation instructions ………………………………………………….. 24
2. Fitting ……………………………………………………………………… 25
3. Assembly …………………………………………………………………. 26
4. Important advice …………………………………………………………. 30
5. Some suggestions ………………………………………………………. 31
6. Maintenance ……………………………………………………………… 32
GB
23
Page 4
GB
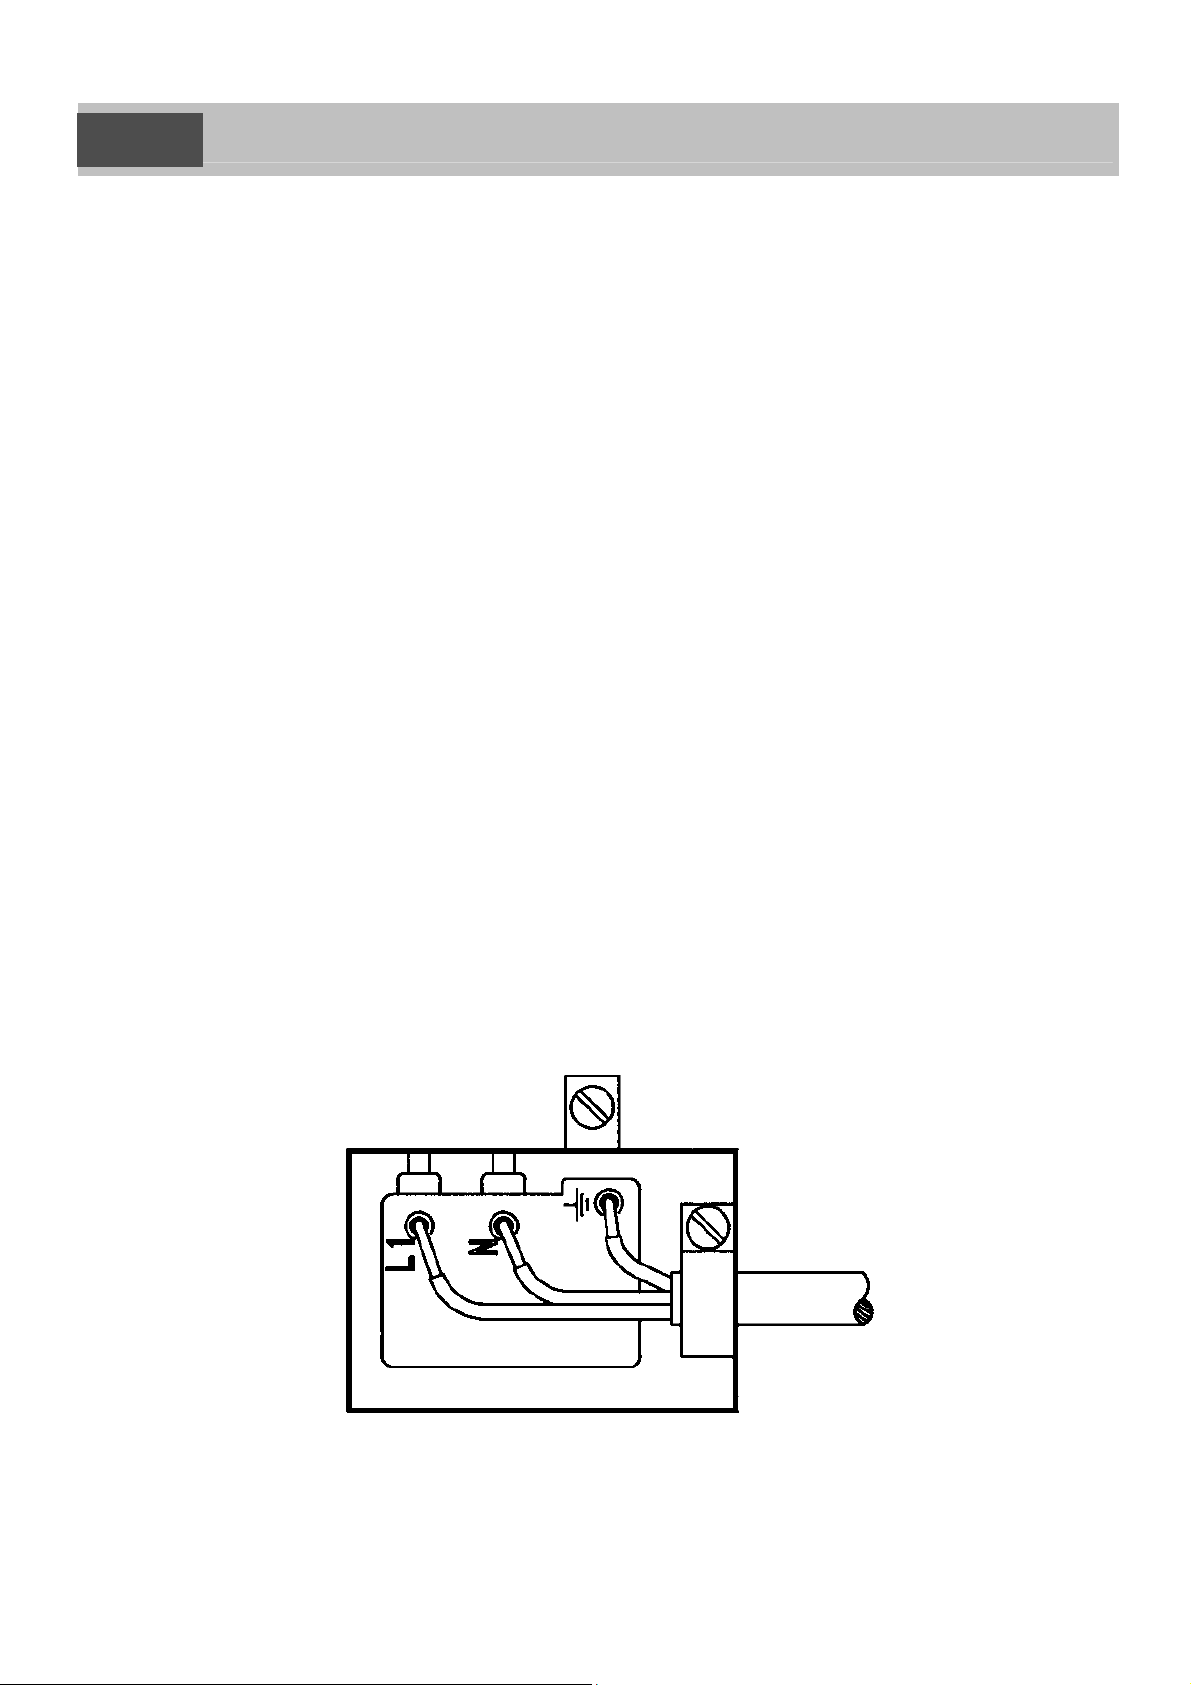
1. Installation instructions
• It is necessary to provide a bipolar cut-off device in your power supply
circuit, where the opening of the contacts is more than 3 mm.
• The plug must be accessible after installation.
• If the supply lead is damaged, it must be replaced by an equivalent
lead (H05RNF 3x1mm²) available from the after-sales department.
• A 16-ampere fuse is necessary.
• Your PGF30F fryer uses 2,200 watts. It is therefore absolutely
necessary for your electric wiring system to be able to supply that
power without danger. IT IS VITAL that your fryer is connected to
earth.
IT IS ABSOLUTELY IMPERATIVE TO LEAVE A SPACE OF AT LEAST
5 CM BETWEEN THE BOTTOM OF THE FRYER AND THE FIRST
SHELF OF THE KITCHEN UNIT.
ELECTRICAL CONNECTION
24
Page 5

2. Fitting
GB
This fryer is built into a work surface or kitchen unit by simply cutting a
hole the corresponding shape.
Any support may be suitable : brickwork, timber, metal, granite, laminate,
etc.
Dimensions of appliance : 512 x 310 mm.
Dimensions of hole cut in work surface : 494 X 292 mm
25
Page 6

GB
3. Assembly
1. Bolt
2. Heating element
3. Oil bowl
4. Basket
5. Heater control light
6. Thermostat
7. on/off indicator light
8. Hinge
26
Page 7
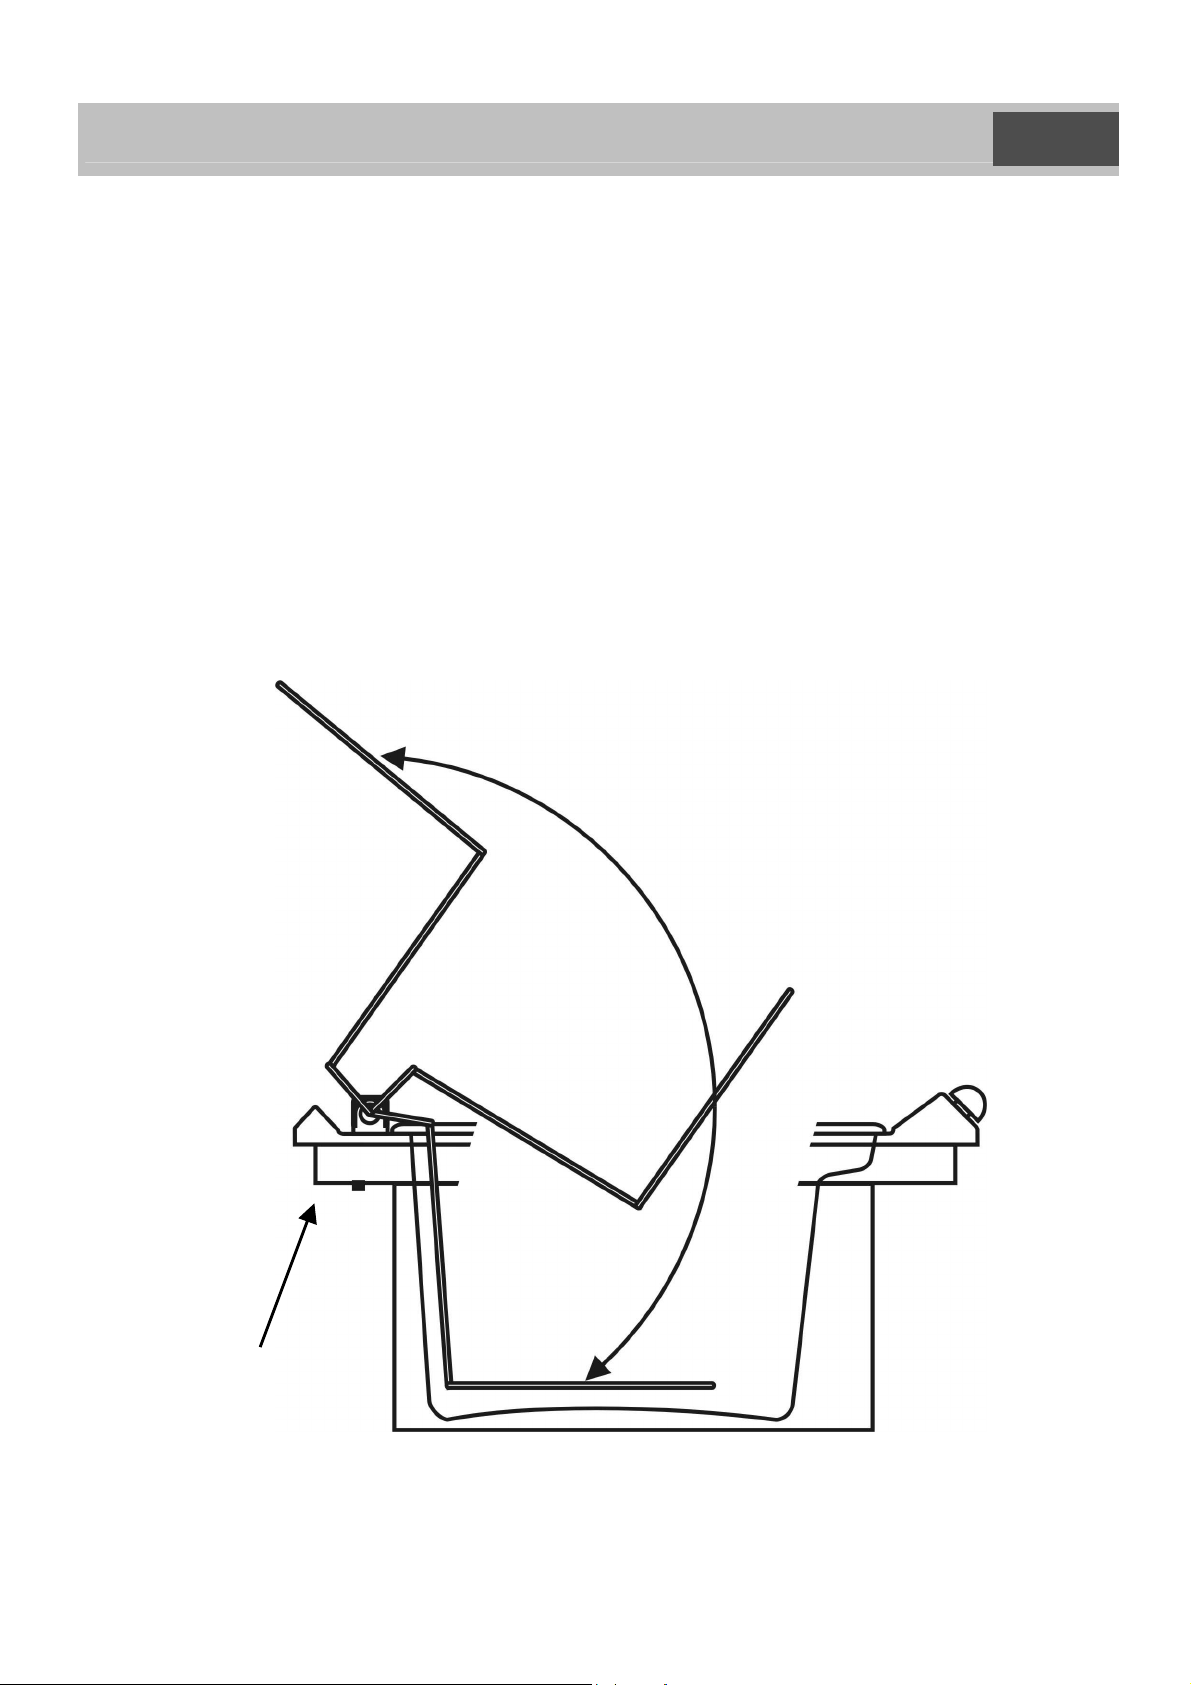
FIG. 2
T.S.
3. Assembly
GB
The fitting plate is fixed into the work surface. It is then ready to receive,
in order :
1. the anti-emulsion oil bowl
2. the heating element, which you pivot on its hinge towards the bottom,
in order to position it in the bowl
3. the basket.
27
Page 8

GB
3. Assembly
The stainless steel anti-emulsion bowl
The stainless steel bowl constitutes a major component of your cold zone
fryer. The very special shape has been specifically devised and
designed, to maximise use of the characteristics of the cold zone and to
offer a maximum of safety, by avoiding any overflow during use of the
fryer. This exclusive model has been registered.
All the aesthetic characteristics which give the bowl its unique
appearance (curves, slopes, and differences of level) in fact correspond
to technical requirements. The principal objective was to overcome
bubbles of emulsion which occur on the sudden introduction of particles
of ice or water into the oil bath. This sometimes occurs when cooking
products which are frozen or which contain too much water.
There are 5 zones in this bowl :
The bottom of the bowl : All around the perimeter of the bottom of the
bowl, an 11 mm channel has been inset, in
order to gather and store debris. This
particular shape permits a reduction of 0.4
litre in the volume of oil in the cold zone.
Furthermore, the channel gives the bowl
excellent stability when taken out.
The cold zone : The layer of oil located below the element is
not affected by any movement. Using all the
heating power, the temperature reaches 70°C
in the debris-collection channel.
The hot zone : The hot volume of approximately 3 litres of
oil, permanently stirred by convection
movement, enables 750 grams of pommes
frites to be held at a single time without any
major cooling.
28
Page 9

3. Assembly
GB
The emulsion zone : With a volume of approximately 5 litres, it
allows emulsions, which are produced with the
use of frozen products or food which is too full
of water, to develop without risk of overflow.
The balls of emulsion are broken up on the
edge of the latter zone, thus avoiding the
disasters which the emulsion of boiling oil might
otherwise cause.
The drainage and recovery zone : It is here that all the splashes are
recovered which sometimes arise during
cooking. This zone, with its sloping curves,
drains all the small drops back into the frying
bath.
Overheat prevention
The safety thermostat is a second temperature measurement. In the
event of a problem, it automatically cuts off the electric supply to the
fryer. Reconnection is not automatic. It must be carried out manually by
a Smeg-approved engineer (Fig. 2/T.S.). He must likewise make a
complete change of the frying bath.
Basket
There are 2 different positions for the fryer basket: one position during
use and another position at rest
whereby the handle does not
remain in the oil. In order to go
from one position to another, you
should unfasten the handle from
its housing and attach it to the
hooks provided for this purpose.
29
Page 10

If you use solid vegetable or animal fat, it is absolutely
necessary to melt it in advance before pouring it into
the bowl.
GB
4. Important advice
1. The level to which the bowl is filled must be between the minimum (3
litres) and maximum (3,5 litres) marks engraved on the vertical side
wall of the bowl.
2. The fryer element may not be operated in the open air : it must
always be submerged in oil or fat. Consequently, blocks or fat may
never be melted directly on the element.
Warning :
3. If you use fat and not oil in your fryer, it is advisable (using a knife or a
fork) to make holes in the fat before starting the fryer. That will avoid
splashing if air bubbles are caught inside. Proceed carefully in order
not to strike the probes placed on the heating element.
4. The appliance is not intended for use by young children or infirm
persons without supervision.
Young children should be supervised to ensure that they do not
play with the appliance.
5. The symbol on the product or on its packaging indicates that this
product may not be treated as household waste. Instead it shall be
handed over to the applicable collection point for the recycling of
electrical and electronic equipment. By ensuring this product is
disposed of correctly, you will help prevent potential negative
consequences for the environment and human health, which could
otherwise be caused by inappropriate waste handling of this product.
For more detailed information about recycling of this product, please
contact your local city office, your household waste disposal service
or the shop where you purchased the product.
30
Page 11
5. Some suggestions
GB
The ideal frying temperature is between 140° et 180°C. Above those
temperatures, oil quickly deteriorates.
If you use a temperature which is too low, food surfaces are not sealed,
and fat penetrates.
It goes without saying that the thicker the pieces to be cooked are, the
longer they must stay in the frying bath. It is therefore advisable to
choose a cooking temperature which allows food to be cooked in depth
without burning it on the outside.
The temperature you have chosen is reached when the green light goes
out.
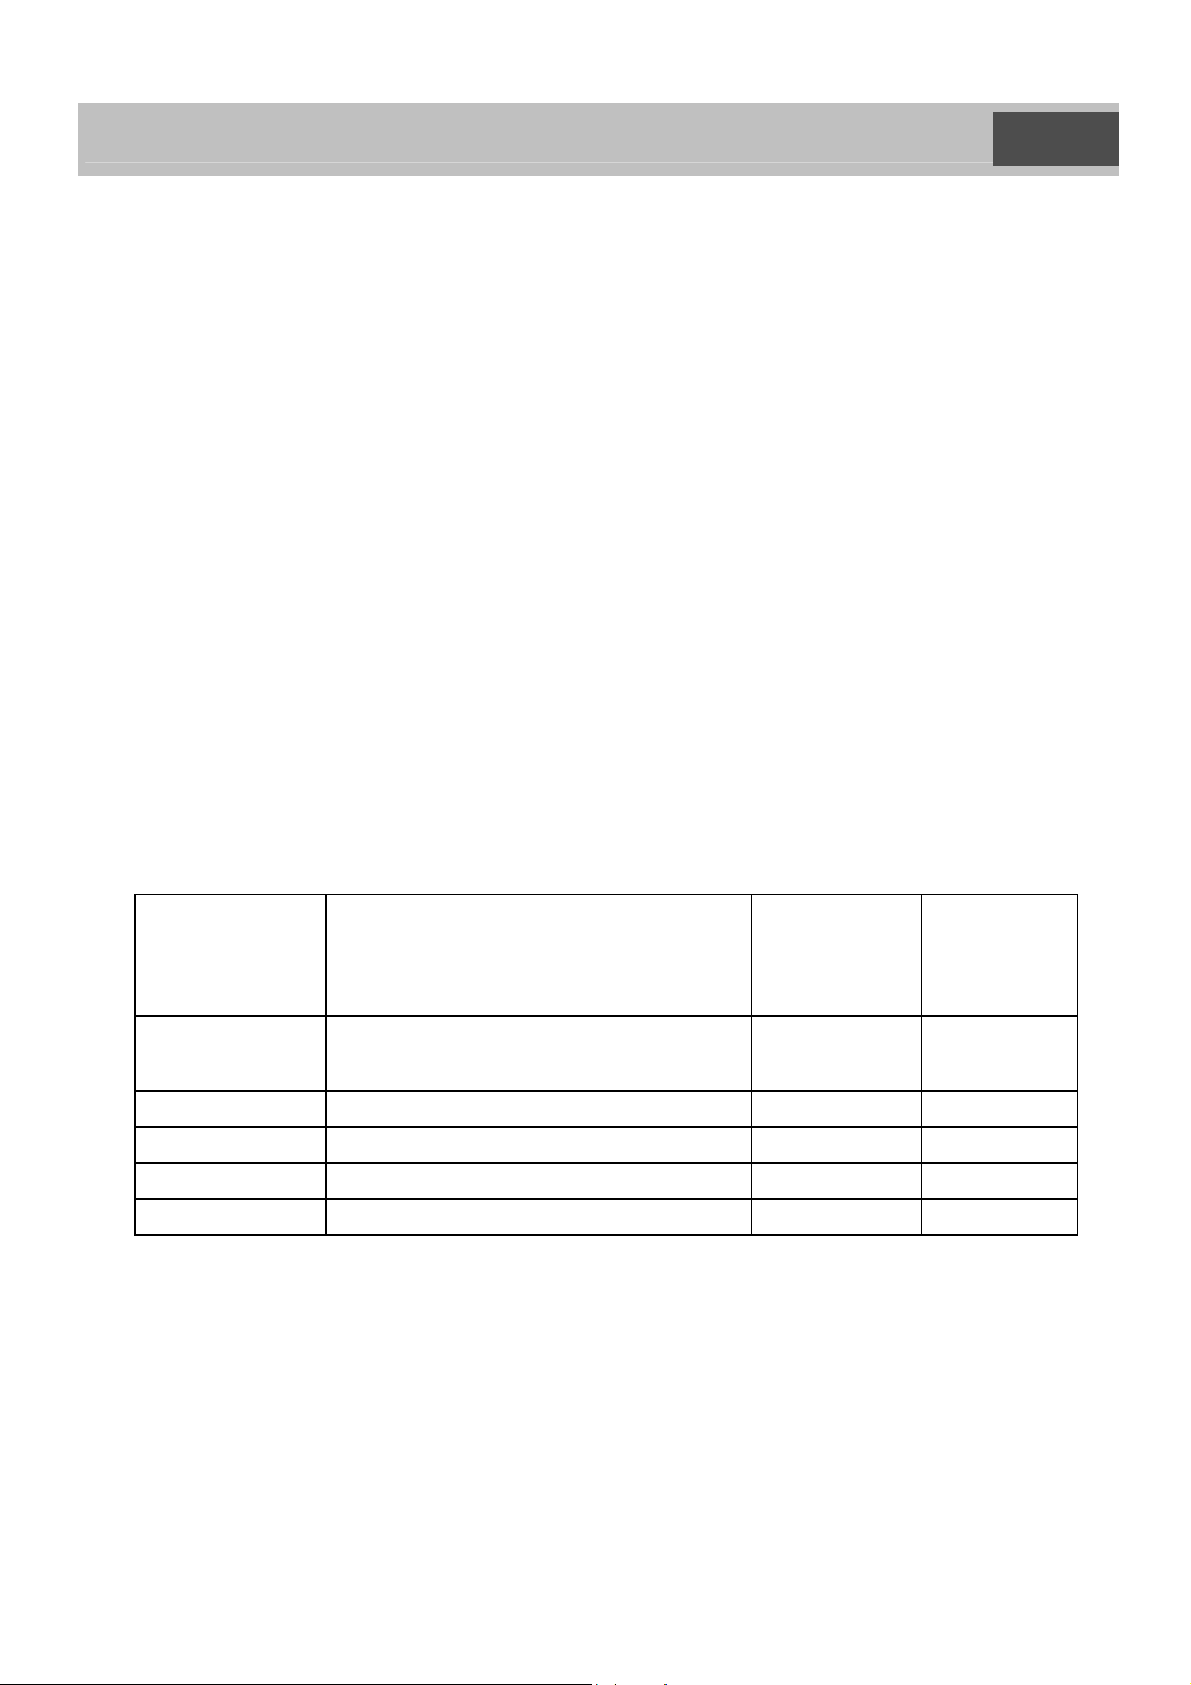
Position the knob according to the type of food to be cooked.
These positions may vary in relation to the quantity used, and the
personal taste of the consumer.
THERMOSTAT
POSITION
PREPARATION
french fried potatoes
140°C
160°C
(blanching)
Chicken legs and wings * *
170°C rissoles, fisch * *
180°C croquettes, cheese fondues 250 gr 350 gr
180°C french fried potatoes (frying) 500 gr 750 gr
* These values depend essentially on volume. Please ensure that food is
full immersed in the frying bath
Optimum
quantities
500 gr 750 gr
Maximum
quantities
31
Page 12

GB
6. Maintenance
Before any maintenance, disconnect the appliance and let it cool.
The fryer can be completely dismantled (proceed in the reverse order to
that for Assembly). All the pieces may be simply maintained. A
« drainer » position has been devised, to permit the heating element to
be secured during cleaning.
Hinge : the « drainer » position
The aluminium hinge which permits the turning of the element during
maintenance is fitted with a stainless steel securing bolt. This piece
runs to the right and secures the element, which is held
“suspended” above the bowl during the time necessary for disposing
of the fat.
Cover
A stainless steel cover entirely covers the anti-emulsion bowl. It
must be withdrawn during use of the appliance.
The fitting plate : clean it with products intended for the maintenance of
stainless steel. If you wish to keep its good appearance, avoid scourers
and abrasive detergents.
The bowl and the stainless steel cover may be treated with detergents
like all dishes. Do not hesistate to place them in the dish-washer.
The basket : may be treated with detergents like all dishes.
Attention: in order to avoid problems with oxidation after washing the
basket must be dried thoroughly, or dipped in oil.
The element : clean it with a damp cloth.
32
Page 13

MEFRPGF30F REV. 01
 Loading...