

Page 1
JLFSMC603
JLFSMC605
Multi function cooker
Instruction manual
Page 2

Important safety information
Thank you for purchasing this appliance.
This manual is an integral part of the
appliance and therefore must be kept in its
entirety and in an accessible place for the
whole working life of the cooker.
Please read the instructions and warnings
carefully before use to ensure safe and
satisfactory operation of this product.
Installation must be carried out by qualified
personnel in accordance with the
regulations in force. This appliance is
intended for domestic uses and conforms to
current regulations in force.
Retain this information for future reference.
The appliance has been built to carry out the
following functions: cooking and heating-up
of food. All other uses are considered
improper. The manufacturer declines all
responsibility for improper use.
All control knobs must be turned to the ‘Off’
position when the cooker is not in us e. If the
cooker is not to be used for a period of time,
such as holidays, the electricity and gas
supplies should be switched off or
disconnected
Never use this appliance for heating room.
Do not obstruct ventilation openings and
heat dispersal slits.
Never lift or drag cooker by the oven
handles as damage may occur.
Before the appliance is put into operation, all
the labels and protective films applied inside
or outside must be removed.
The cooker is not suitable for use by
children. Keep children away from the
cooker when in use.
Never put inflammable objects in the oven:
they could be accindetaly lighted and cause
fires.
Do not use inflammable liquid (alcohol,
petrol etc) near the cooker when it is in use.
In case of a crack being detected in the
glazed ceramic hob, immediately disconnect
from mains and contact the nearest servicing
centre.
Do not use the cooker if the electricity
supply cable is damaged. The cable must be
replaced by qualified personnel.
During use the appliance becomes very hot.
Take care not to touch the heating elements
inside the ovens.
As with all electrical appliances, you should
not:
• Touch the cooker with wet or damp
hands.
• Use the cooker in bare feet.
• Operate the cooker on an extension lead.
• Exposure the cooker to the elements
(rain, sun etc).
If a fault occurs, switch off electricity to the
cooker, turn off the gas supply and contact
the John Lewis branch from which you
purchased your appliance. Always insist on
genuine spare parts.
2
Page 3

Contents
For the user
Important safety information 2
Guide to using the instruction manual 3
Environmental information 4
Description of the appliance 5
The control panel 6
Using your appliance 7
Before the first use 7
Use of the Ovens 7
Oven functions 8
Using the grill 9
Automatic programmer 10
Use of the hob 12
Cleaning your appliance 14
Cleaning stainless steel 14
Ordinary daily cleaning 14
Food stains or residues 14
Cleaning the oven 14
Cleaning the door glazing 14
Cleaning the hob components 14
Extraordinary maintenance 17
Replacement of light bulb 17
Removing the door 17
Oven door seal 18
For the installer
Installation of the appliance 20
Distances 20
Electrical connection 20
Gas connection 21
Adaptation to different types of gas 22
Levelling the appliance 24
Rear top skirtboard 24
Wall fixing 24
Installation checklist 25
Guide to using the
instruction manual
Safety instructions
Hints and tips
Environmental information
Something not working 19
3
Page 4
Environmental information
Our product's packing is made of
non-polluting materials, which are
therefore compatible with the
environment and recyclable.
Please help by disposing of the
packaging correctly. You can
obtain the addresses of collection,
recycling and disposal centres
from your retailer or from the
competent local organisations.
Warning! Do not discard the
packaging or any part of it, or
leave it unattended. It can
constitute a suffocation hazard
for children, especially the plastic
bags.
Your old appliance also needs to be disposed
of correctly.
Important: hand over your appliance to the
local agency authorised for the collection of
electrical appliances no longer in use.
Correct disposal enables intelligent recovery
of valuable materials.
Before disposing of your appliance it is
important to remove doors and leave
shelves in the same position as for use, to
ensure that children cannot accidentally
become trapped inside during play. It is also
necessary to cut the connecting cable to the
power grid, removing it along with the plug.
Pursuant to Directives 2002/95/
EC, 2002/96/EC and 2003/108/EC
relating to the reduction of the
use of hazardous substances in
electrical and electronic
appliances, as well as to the
disposal of refuse, the crossed out
bin symbol on the appliance
indicates that at the end of the
useful life of the product, it must
be collected separately from
other refuse. Therefore, at the
end of the product's working life,
the user must deliver it to the
appropriate differentiated
collection centres for electrical
and electronic waste, or deliver it
back to the retailer when
purchasing an equivalent product,
on a one-for-one basis. Adequate
differentiated collection for the
subsequent forwarding of the
decommissioned product to
recycling, processing and
ecologically compatible disposal
contributes to avoiding possible
negative effects on the
environment and on health, and
promotes recycling of the
appliance's constituent materials.
Illicit disposal of the product by
the user will lead to the
application of administrative
sanctions.
4
Page 5
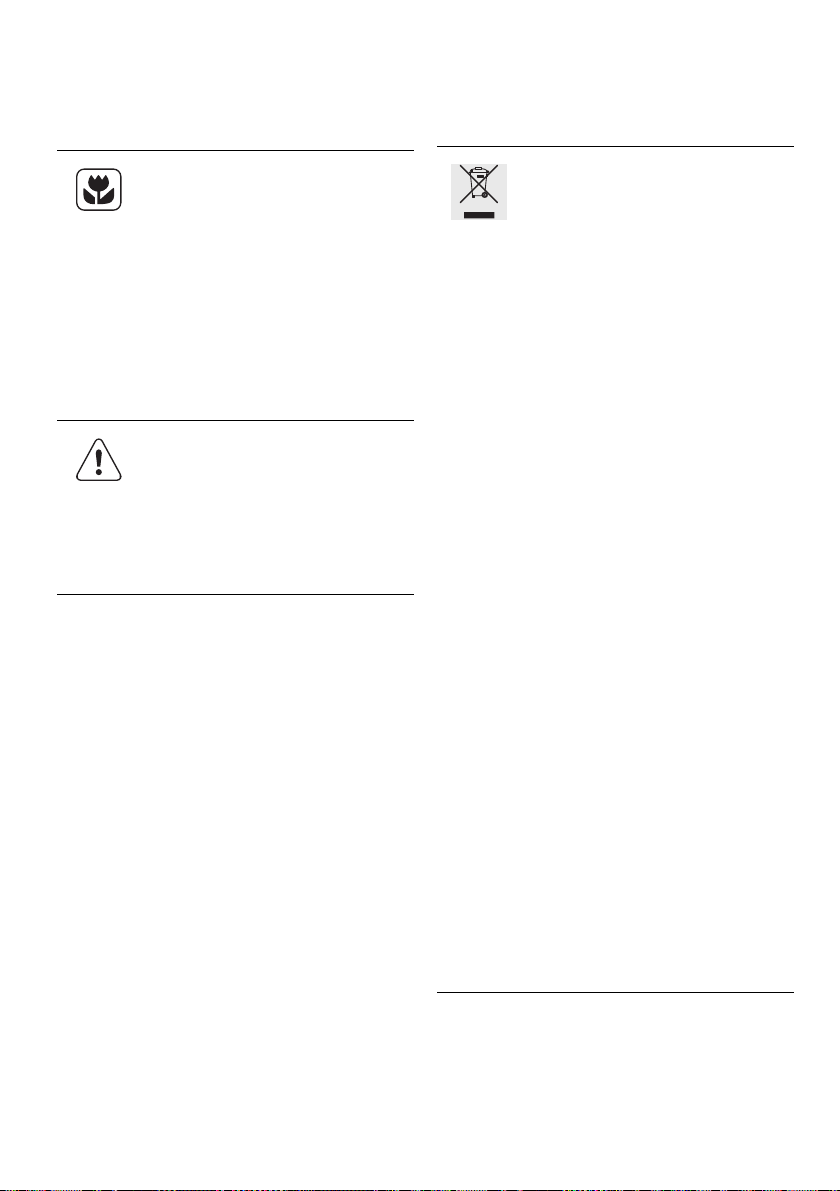
Description of the appliance
1 Front control panel
2 Oven light (auxiliary oven)
3 Oven guide for shelf and pan (auxiliary
oven)
4 Oven door (auxiliary oven)
5Oven light
6Oven fan
7 Oven guide for shelf and pan
8 Oven door
5
Page 6
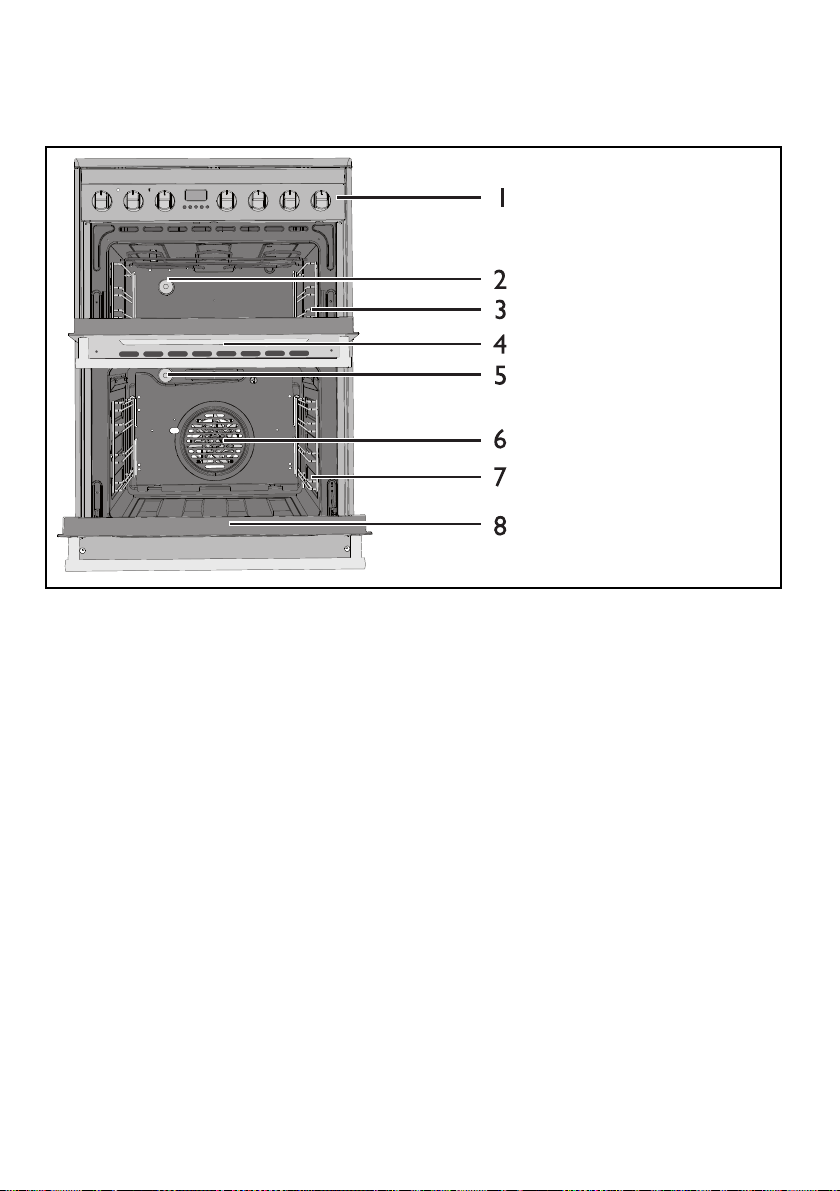
The control panel
1 Oven thermostat knob
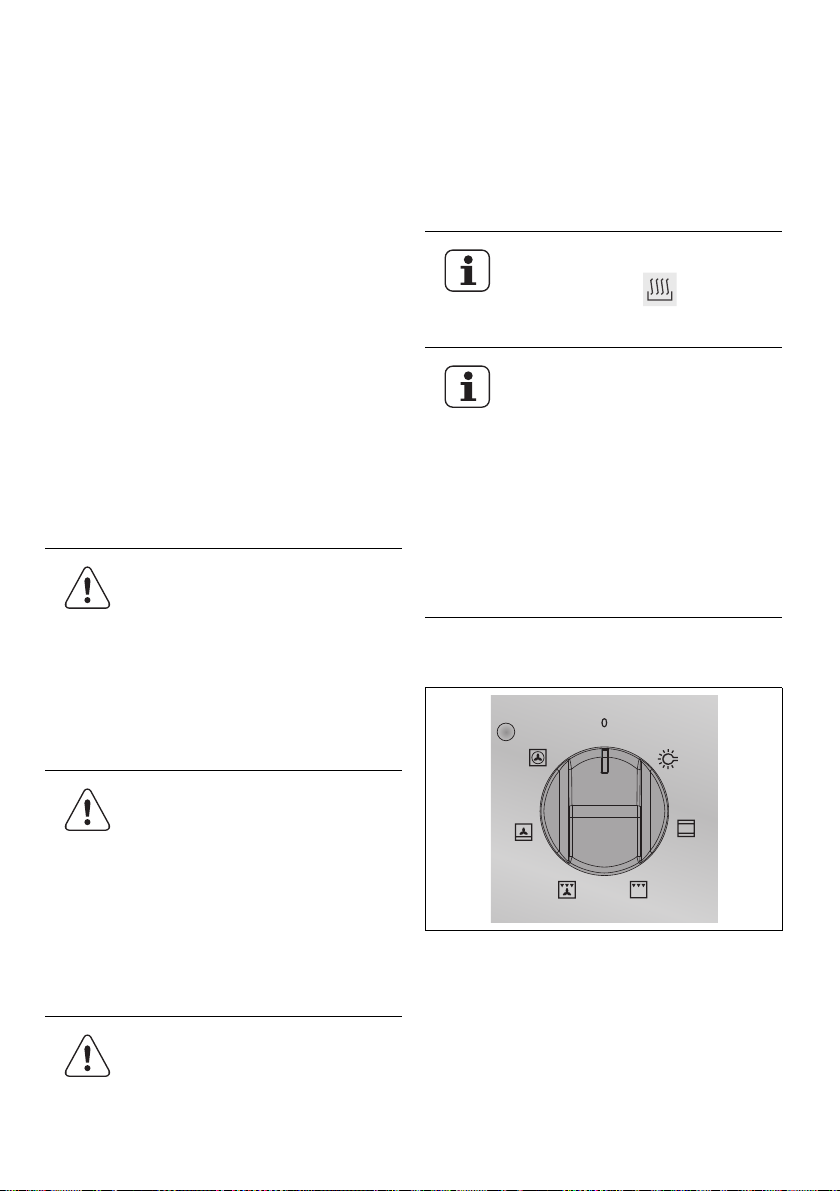
2Oven function knob
3 Auxiliary oven function/thermostat knob
4 Automatic programmer
5 Front left cooking zone knob
6 Rear left cooking zone knob
7 Rear right cooking zone knob
8 Front right cooking zone knob
6
Page 7
Using your appliance
Before the first use
• Remove all packaging and accessories
from inside the ovens.
• The inside of the appliance should be
cleaned to remove all manufacturing
residues.
• Using the oven for the first time, heat
them to the maximum temperature for as
long as it takes to burn off any production
oil residues which could give a nasty
flavour to the food.
Use of the Ovens
Warning! To prevent problems
caused by steam in the oven, open
the door in two stages: half open
(5 cm approx.) for 4-5 seconds
and then fully open.
Keep your face and head away
from the door when opening.
Do not leave the grill pan or
other dishes on the oven base as
damage to the oven may occur.
Before using the oven make sure
that the symbol ; appears on
the display.
The appliance is equipped with a
cooling system which
automatically comes on upon a
few minutes after the oven has
been turned on.
Fans cause a steady outflow of air
from above the door which may
continue for a brief period of time
even after the oven has been
turned off.
To use the main oven:
Caution! During cooking, do not
cover the bottom of the oven
with aluminium or tin foil and do
not place pans or oven trays on it
as this may damage the enamel
coating. If you wish to use
greaseproof paper, place it so that
it will not interfere with the hot
air circulation inside the oven.
Caution! Never cook on the
oven base. Always place dishes
and trays onto an oven shelf.
1 Turn the function selecor knob clockwise
to the desired function.
2 Turn the temperature selector knob
clockwise to the desired temperature.
The orange light comes on to indicate that
the oven is warming up. When it goes out
7
Page 8
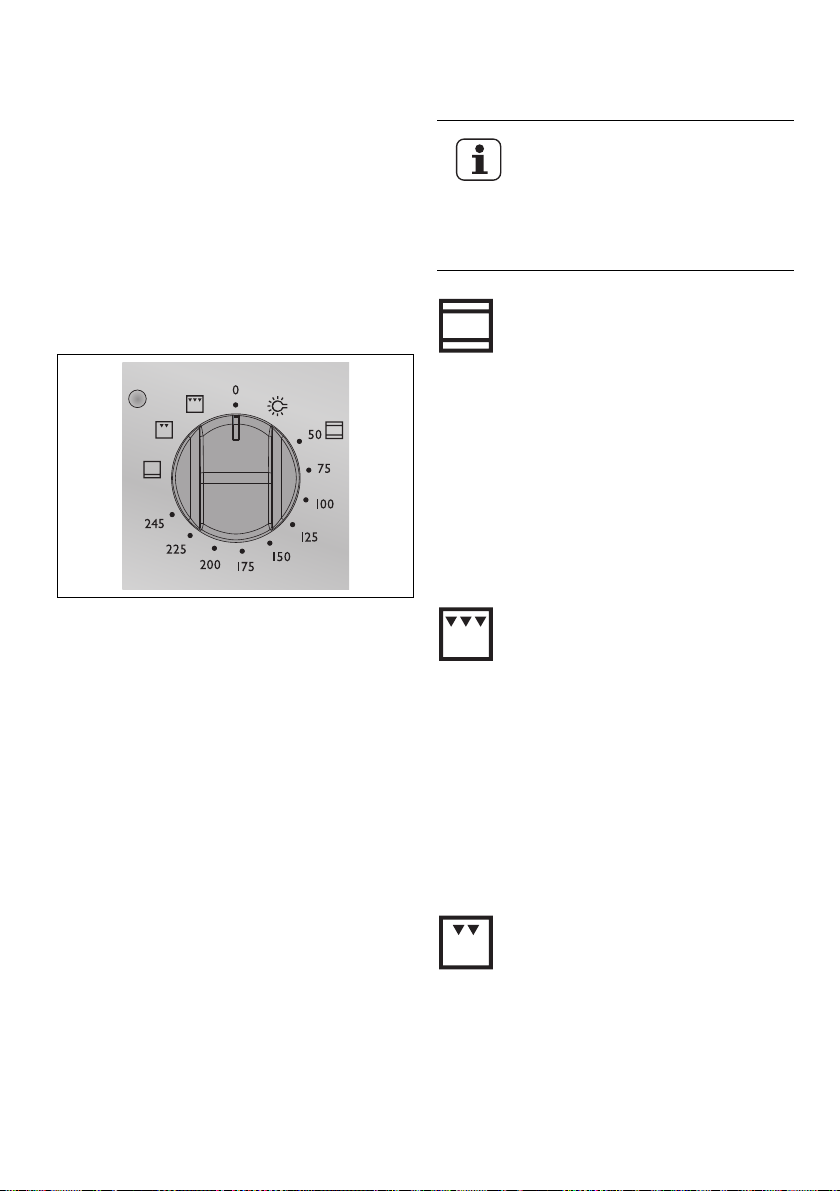
it means that the required temperature
has been reached.
Oven functions
Intermittent going on and off of the light
means that the oven temperature is being
constantly maintained at the programmed
level.
3 To turn the oven off, turn the function
slector and temperature knobs,
anticlockwise back to “0”.
To use the auxiliary oven:
1 Turn the function selector knob clockwise
to the desired function.
2 The temperature can be selected only for
the static function.
The orange light comes on to indicate that
the oven is warming up. When it goes out
it means that the required temperature
has been reached.
Intermittent going on and off of the light
means that the oven temperature is being
constantly maintained at the programmed
level.
3 To turn the oven off, turn the function
slector and temperature knobs,
anticlockwise back to “0”.
When using any of the functions
in the main or auxiliary oven
(except grilling) it is always
recommended that you pre-heat
the oven.
Static (main - auxiliary)
As the heat comes from above and below at
the same time, this system is particularly
suitable for certain types of food.
Traditional cooking, also known as static or
thermal radiation cooking, is suitable for
cooking just one dish at a time. Perfect for all
types of roasts, bread and cakes and in any
case particularly suitable for fatty meats such
as goose and duck.
Grill (main - auxiliary)
The heat coming from the grill element gives
perfect grilling results, especially for thin and
medium thickness meat and, in combination
with the rotisserie (when present), it allows
the food to be browned evenly at the end of
cooking.
Perfect for sausages, ribs and bacon.
This function enables large quantities of
food, particularly meat, to be grilled evenly.
Small grill (auxiliary)
Using only the heat released from the
central element, this function enables small
portions of meat and fish to be grilled for
making kebabs, toasted sandwiches and all
types of grilled vegetable side dishes.
8
Page 9
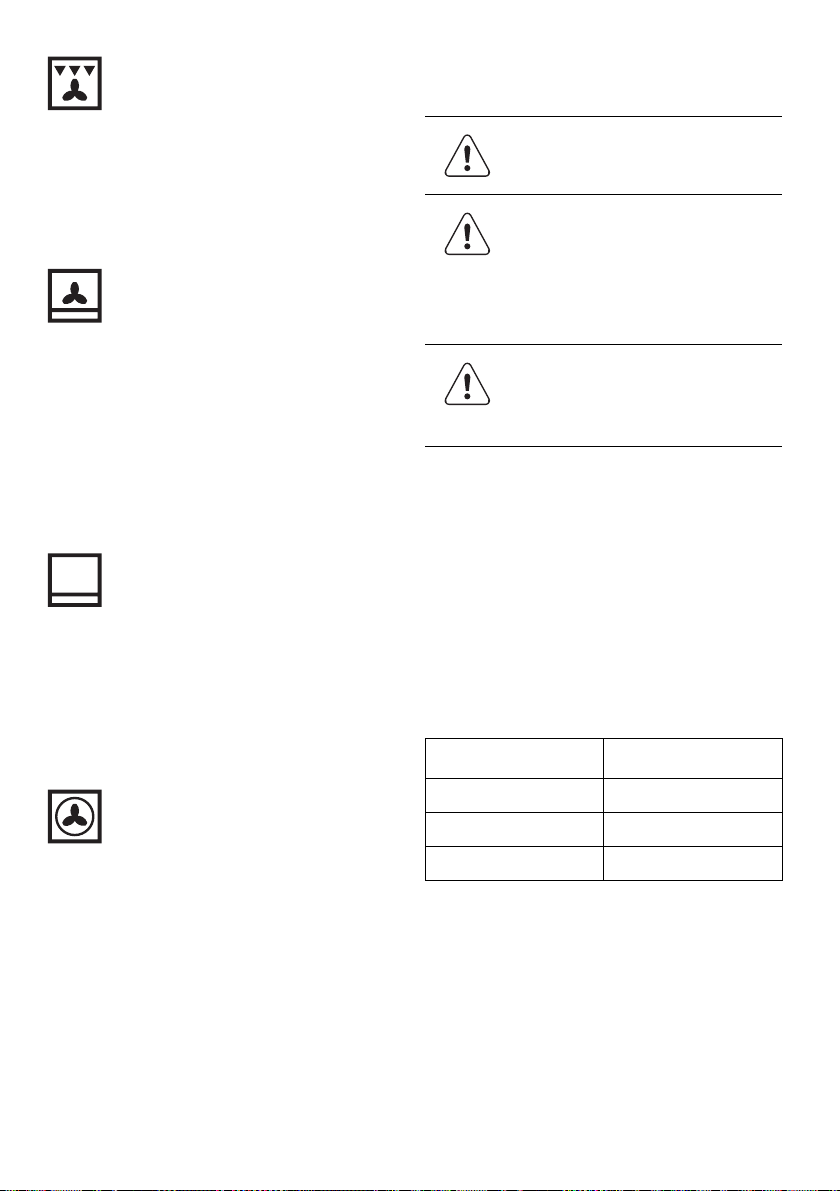
Fan-assisted grill (main)
Using the grill
The air produced by the fan softens the
strong heatwave generated by the grill, giving
perfect grilling even with very thick foods.
Perfect for large cuts of meat (e.g. shin of
pork).
Fan-assisted bottom
(main)
The combination of the fan with just the
lower heating element allows cooking to be
completed more rapidly. This system is
recommended for sterilising or for finishing
off the cooking of foods which are already
well-cooked on the surface, but not inside,
which therefore need a little more heat.
Perfect for any type of food.
Bottom (auxiliary)
The heat coming solely from the bottom
makes it possible to complete the cooking of
foods that require a greater basic
temperature, without affecting their
browning. Perfect for cakes, pies, tarts and
pizzas.
Warning! Keep the oven door
closed during grilling.
Warning! During and after use
of the grill the accessible parts can
be very hot; it is therefore
necessary to keep children away
from the appliance.
Caution! The duration of
cooking should not last more than
30 minutes.
Once the grill is lit leave the oven to heat up
for five minutes before placing the food
inside.
Food should be flavoured and basted with oil
or melted butter before cooking. An oven
dish should be used to contain the sauces.
The food should be placed on the oven shelf
which is positioned on one of the guides
supplied with the different ovens, following
the instructions below:
Food Grille on the shelf
Circular (main)
The combination of the fan and the circular
element (incorporated in the rear of the
oven) enables different foods to be cooked
on several levels, as long as they need the
same temperature and cooking time. Hot air
circulation ensures instant and uniform
distribution of heat. It will be possible, for
instance, to cook fish, vegetables and biscuits
simultaneously (on different levels) without
mixing smells and flavours.
Flat or thin meat 3
Rolled roast joints 2 - 3
Poultry 3
9
Page 10

Automatic programmer
1 Minute-timer key
2 Cooking period key
Minute counter:
The programmer can be used as a simple
minute counter:
1 Keep pressed the “minute timer” key.
2 Use the or keys to select the
lenght of time required. The symbol
will appear on the display.
After set-up, to see the remaining
time, press the “minute timer”
key.
Use as a minute counter does not
interrupt functioning of the oven
at the end of the programmed
time.
3 End time key
4 Decrease time key
5 Increase time key
Before setting the programmer
for semi/automatic cooking,
activate the desired function and
temperature.
Set the clock:
When using the oven for the first time, or
after a power failure, the display flashes
regularly and indicates 00:00. Press the keys
“cooking period” key and “end time key” at
the same time the keys or : each
single press changes the time by 1 minute
either up or down.
To set the oven to switch off
automatically after a set period:
(only for main oven)
Use this function if you have already started
cooking and want the oven to switch-off at
the end of cooking time.
(for example after 45 minutes)
1 Press the “cooking period” key, the
display lights up, showing 00:00.
2 Use the or keys to set the
desired cooking time. The ‘A’ simbol will
appear on the display, and the current
clock time will be shown.
After set-up, to see the cooking
time remaining, press the
“cooking period” key; to see the
end of cooking time press the key
“end time key”.
10
Page 11

To set the oven to switch off
automatically at a set time:
Use this function if you have already started
cooking and want the oven to switch-off at a
set time. (for example at 19.30).
will appear on the display, and the current
clock time will be shown.
5 Select the oven function and temperature
required for your dish.
1 Press the “end time” key, the display lights
up, showing the current time.
2 Use the or keys to set the
desired cooking end time. The ‘A’ simbol
will appear on the display, and the current
clock time will be shown.
After set-up, to see the cooking
end time, press the “end time”
key.
To set the oven to start and
finish at preset times:
Use this function to start and finish cooking
automatically. For example, the recipe may
require 50 minutes cooking time and it will
be ready at 20:00. In this case the
programmer will calculate the start time to
be at 19:10 and will start and end
automatically.
1 Press the “cooking period” key, the
display lights up, showing 00:00.
2 Use the or keys to set the
desired cooking time. The ‘A’ simbol will
appear on the display, and the current
clock time will be shown.
After set-up, to see the cooking
time remaining, press the
“cooking period” key; to see the
end of cooking time press the
“end time” key.
At the end of automatic cooking
When cooking is over, the oven will
automatically switch off and, at the same
time, an intermittent alarm will sound.
Press the “minute timer” key to silence it.
The alarm mode switches off
automatically after seven minutes.
They can be manually deactivated
by pressing the “cooking period”
key and “end time” key together.
To switch off the appliance, rotate
all the knobs to ‘0’ position.
Erase of set data
Once the programmer has been set, press
the key of the function to be cancelled.
Next press the key until the display
shown 00:00. Time cancellation will be
considered as end of cooking time by the
programmer.
3 Select the time that the oven has to be
switched off. Press the “end time” key, the
display lights up, showing the current time.
4 Use the or keys to set the
desired cooking end time. The ‘A’ simbol
Adjusting alarm volume
The acoustic alarm has three different
settings. These can be operated, while the
alarm is sounding , by pressing the key.
11
Page 12

Use of the hob
Caution! Before lighting the hob
burners check that the flame caps
are in the correct position and
that their burner caps are in place,
making sure that the holes A in
the flame caps correspond to the
spark plugs and thermocouples.
To prevent deterioration of the hob the
appliance is equipped with a raised pan stand
to be placed underneath pans more than 26
cm in diameter.
The supplied reduction rest is used also for
small pans.
Lighting of the hob burners
This optional grid is for use with "woks"
(Chinese pans).
The drawing next to each knob shows the
corresponding burner. The appliance has an
electronic lighting device. Simply press and
turn the knob anticlockwise to the minimum
flame symbol , until the flame is lit. Hold the
knob down for a few seconds to allow the
thermocouples to heat up. The burner may
go out when the knob is released: this is
because the thermocouple has not been
sufficiently heated. Repeat the operation
holding down the knob a little longer. This
operation is not necessary for burners
12
Page 13

without thermocouples.
Burners ø min. (cm) ø max. (cm)
In the event of a power failure the
burners can be lit with a match or
gas lighter.
The flame failure devices will
continue to function normally.
Practical advice for using the
hob burners
For better use of the burners and lower gas
consumption, use covered vessel that are
proportional in size to the burner to prevent
the flame from licking the sides. When water
reaches the boiling point, lower the flame so
that it doesn't overflow. To avoid burns or
damage to the hob, all vessels or griddle
plates must be placed within the perimeter
of the hob. All vessels must have a flat and
smooth bottom. When using fats or oils, be
extremely careful that they don’t overheat
and catch fire.
If the flame accidentally goes out, turn off the
control knob and wait at least 1 minute
before trying to re-light the burner.
1 Auxiliary 12 14
2 Semi rapid 16 24
3 Triple crown 18 26
When using for the first time, it is
advisable to heat up the cooking
hob to its maximum temperature
for enough time so as to burn off
any possible oily manufacturing
residues, the smell of which could
otherwise be absorbed by the
food.
Diameter of the vessels to be
used on each burner
13
Page 14

Cleaning your appliance
Warning! Before any
intervention, disconnect the
power supply of the device
Caution! Never use a steam jet
to clean the appliance.
Cleaning stainless steel
To keep stainless steel in good condition, it
must be cleaned regularly when you are
done using the cooker, after it has cooled.
Ordinary daily cleaning
To clean and preserve the stainless steel
surfaces, always use only specific products
that do not contain abrasives or chlorinebased acids.
How to use: pour the product on a damp
cloth and wipe the surface, rinse thoroughly
and dry with a soft cloth or deerskin.
Cleaning the oven
For best oven upkeep clean
regularly after having allowed to
cool. Take out all removable
parts.
• Clean the oven grill with hot water and
non-abrasive detergent. Rinse and dry.
• Clean the internal walls of the oven with a
soft ammoniac-soaked cloth. Rinse and
dry. If there are still stains or drops, place
a damp ammoniac-soaked cloth on the
bottom of the oven, close the door and
after a few hours wash the oven with hot
water and liquid detergent. Rinse and dry.
• Do not allow residues of sugary foods
(such as jam) to set inside the oven. If left
to set for too long, they might damage the
enamel lining of the oven.
Food stains or residues
Do not use metallic sponges or sharp
scrapers: they will damage the surface.
Use normal non-abrasive products for steel,
and a wooden or plastic tool if necessary.
Rinse thoroughly and dry with a soft cloth or
deerskin.
Do not allow residues of sugary foods (such
as j am) to s et i nsi de t he oven. If left to set for
too long, they might damage the enamel
lining of the oven.
The oven should be operated at
the maximum heat setting for 15/
20 minutes after use of specific
products, to burn off the residues
left inside the oven.
14
Page 15

Cleaning the door glazing
The door glazing should always be kept
thoroughly clean. Use absorbent paper
towels, remove stubborn dirt with a damp
sponge and ordinary detergent.
Caution! When cleaning, the
appliance must be dried
thoroughly since detergent and
water drips might damage its
operation and appearance.
Cleaning the hob
components
Replace the flame-spreader crowns,
checking that they are positioned in their
housing with their respective caps, taking
care that flame-spreader holes A
correspond to the spark plugs and the
thermocouples.
Grids
Remove the grids and clean them in warm
water with a non-abrasive detergent, taking
care to remove any encrustations. Replace
them on the hob.
Continuous contact of the grids with the
flame can cause the enamel near the hot
areas to be altered. This is completely
natural and does not compromise the
functionality of the component.
Burner caps and flame cap
crowns
The caps and flame-spreader crowns are
extractable to facilitate cleaning. Wash them
in hot water with non-abrasive detergent,
taking care to remove any encrustations, and
wait until they are perfectly dry.
Caution! do not wash these
components in the dishwasher.
The spark plugs and
thermocouples
To function properly the spark plugs and
thermocouples must always be clean. Check
them regularly and clean with a damp cloth if
necessary. Any dry residues can be removed
with a toothpick or a needle.
The burners
The burners can be left to soak in hot water
and detergent.
The cooking hob should be
regularly cleaned; best after every
use, once the residual heat signal
lamps have gone off.
Smudges from aluminium-bottom pans can
be easily cleaned off with a cloth dampened
in vinegar.
Remove any burnt residues after cooking
15
Page 16

with the scraper provided; rinse with water
and wipe dry with a clean cloth. Regular use
of the scraper considerably reduces the
need for chemical detergents for the daily
cleaning of the hob. Never use abrasive or
corrosive detergents (e.g. cleaning powders,
oven sprays, spot-removers, wire sponges).
16
Page 17

Extraordinary maintenance
The oven may require extraordinary
maintenance or replacement of parts subject
to wear such as seals, bulbs, and so on. The
following instructions describe how to carry
out these minor maintenance operations.
Warning! Before any
intervention, disconnect the
power supply of the device.
Replacement of light bulb
Removing the door
1 Open the door completely
2 Fit the pins (supplied) into the holes from
the inside.
1 Remove cover A by twisting
anticlockwise.
2 Replace bulb B with another similar bulb
(25 W).
3 Refit the cover A.
Caution! Only use oven bulbs
(T300 °C).
3 Close the door to an angle of about 45°,
lift it and remove it from its seat.
17
Page 18

4 To replace, fit the hinges into the grooves
provided, then lower the door until it
comes to rest and extract the pins.
Caution! Take care when
removing the doors, they can be
heavy.
Oven door seal
To permit thorough cleaning of the oven,
the seal may be removed.
Once the door has been taken off, lift the
tabs at the corners as shown in the figure.
18
Page 19

Something not working
Probem Possible causes What to do?
The oven doesn't
work
- The oven is not wired in or switch
on at the wall.
- There is a power failure. - Check power supply.
- An automatic cooking program has
been set.
-The oven is dirty.
- Switch on at the wall.
- Set the programmer back to the off
position.
- Clean the oven once cooking is
finished. Let it cool first.
The oven smokes
Steam and
condensation settle on
the food and the oven
cavity
The timer keeps
flashing
The timer does not
work
- Food has spilled over. - Use a larger dish.
- Food (meat) is spitting excessively. - Reduce temperature setting.
- The dish has been left inside the oven
too long.
- There has been a power failure. - Reset the clock.
- Incorrect setting. - Check the instruction for timer.
- Leave dishes inside the oven no
longer than 15 - 20 minutes after the
cooking is completed.
19
Page 20

Installation of the appliance
Distances
Caution! This appliance may be
installed next to a wall which is
higher than the appliance, with a
minimum distance of 50 mm from
the side of the appliance, as
shown in the diagram showing the
correct installation conditions.
Any wall cupboards or shelves
must be at a distance of at least
750 m above the work surface.
Electrical connection
Caution! Check that the voltage
and dimensioning of the supply
line correspond to the
characteristics shown on the
plate fixed to the rear protective
cover of the appliance.
This plate must never be
removed.
Caution! If the appliance is
connected to the supply by means
of a fixed connection, install a
multipolar cut-out device on the
line, with contact opening
distance equal to or greater than
3 mm, located near the appliance
and in an easily reachable
position.
The connection terminals are located at the
rear of the appliance. For electrical
connections see following diagram.
For operation on Cable type H05V2V2
220-240V 3~
five-core cable
(4 x 1.5 mm²)
20
Page 21

380-415V2N~
four-core cable
(4 x 1.5 mm²)
220-240V ~
three-core cable
(3 x 2.5 mm²)
Complete wiring up to power supply with an
appropriately rated five-core plug (see data
plate) or, in case of operation from a 220240V power supply, with a three-core plug.
Make sure that plug and wall socket are of
the same type and are in conformity with
regulations in force. Make sure that the
appliance is properly earthed. Before
powering, check that the power line is
properly earthed. Avoid using adapters or
shunters.
Gas connection
Combustion gas discharge
Combustion gases may be discharged by
means of hoods connected to a natural
draught chimney or a fan extraction system.
An efficient extraction system requires
precise planning by an authorised specialist
and must comply with the distances and
positions indicated by the regulations. After
installation, the specialist must issue a
certificate of compliance.
Connecting to natural and LPG
gas
Caution! For the gas connection,
see the type of appliance supply
tube.
Free exagonal connector:
Ventilation requirements
The appliance may only be installed in a
permanently ventilated room as specified by
the relevant regulations. The air flow into
the room where the appliance is installed
must be sufficient for proper gas combustion
and room ventilation. The air vent,
protected by gratings, must be of suitable
size (see relevant regulations) and located so
that they cannot be even partially
obstructed.
The kitchen must be kept properly
ventilated to disperse the heat and humidity
produced by cooking processes: in
particular, a window should be opened or
the speed of any fans increased after
prolonged use.
Make the connection to the appliance using
flexible bayonet style hose in accordance to
B.S. 669. The hose connection at the rear of
the appliance has a ½” BSP internal thread.
Please use seal C between the flexible
connection L and the appliance supply tube
B. When making the connection, make sure
that no stress of any kind is applied to the
cooker and that the hose does not touch any
sharp edges.
21
Page 22

If connecting to LPG the bayonet hose must
have red bands on it.
operation with other types of gas the burner
nozzles must be changed and the minimum
flame adjusted on the gas taps.
Smooth welded connector:
Make the connection to the appliance using
a flexible bayonet style hose in accordance
to B.S. 669. The hose connection at the rear
of the appliance has a ½” BSP internal
thread. Always apply a suitable sealing
substance (such as Teflon tape) between the
flexible connection L and the appliance
supply tube B. When making the connection,
make sure that no stress of any kind is
applied to the cooker and that the hose does
not touch any sharp edges.
Replacement of nozzles on the
hob
To change the nozzles, proceed as described
below:
1 Extract the grids and remove all the caps
and flame-spreader crowns;
2 Unscrew the burner nozzles with a 7 mm
socket wrench;
3 Replace the nozzles according to the type
of gas to be used
4 Replace the burners in the correct
position.
If connecting to LPG the bayonet hose must
have red bands on it.
Adaptation to different
types of gas
Warning! Before performing
any cleaning or maintenance
work, disconnect the appliance
from the mains.
The cooker hob is preset for natural gas G20
(2H) at a pressure of 20 mbar. In the case of
22
Page 23

Burner and nozzle
characteristics table
Rated
Burner
Auxiliary 1.0 50 30 350 73 71
Semi rapid 1.75 65 33 450 127 125
Triple crown 3.2 94 65 1500 233 229
Burner
Auxiliary 1.0 72 350
Semi rapid 1.75 97 450
Triple crown 3.2 133 1500
heating
capacity
(kW)
Rated
heating
capacity
(kW)
LPG – G30/G31 28/37 mbar
Nozzle
diameter
1/100 mm
Nozzle diameter 1/100 mm Reduced Flowrate (W)
By-pass mm
1/100
NATURAL GAS – G20 20 mbar
Reduced
flowrate
(W)
Flowrate
g/h G30
Flowrate
g/h G31
23
Page 24

Levelling the appliance
For proper performance the appliance must
be leveled. The appliance is leveled by
adjusting the four legs to ensure a perfectly
level plane for the unit. To accomplish this,
screw or unscrew the legs.
Rear top skirtboard
3 Secure the skirt to the top by tightening
screws A.
Wall fixing
Caution! Always install the rear
top skirtboard which is an integral
part of the appliance.
1 Loosen nuts B.
2 Position the skirt C above the top, taking
care to align it correctly.
1 Stretch out the chain attached to the
cooker horizontally so that the other end
touches the wall.
2 Mark the wall in the position where the
hole is to be drilled.
3 Drill the hole, insert the finned dowels and
attach the chain.
4 Move the cooker up against the wall.
24
Page 25

Installation checklist
The qualified technician should complete
this checklist and leave it with the owner of
the cooker.
Date of installation:
Cooker model numer:
Cooker serial number:
Please tick to confirm that the following
checks have been completed:
The cooker is level
Gas soundness checks complete
Simmer settings checked and
adjusted if necessary
All gas burners tested
Name of qualified technician:
Corgi registration number (if applicable):
Company name:
Company address:
Telephone number:
Signed:
Date:
Ignition of burners tested
Auto programmer left in manual
mode
Customer briefed on how to use the
cooker
User manual and installation
instructions left with the owner
25
Page 26

Page 27

Repairs - after sales service
Your appliance comes with a three year
guarantee, if it is not working properly
consult the fault finding guides within
this instruction book (Something not
working). If a fault occurs which you can
not resolve through following the advice
and information contained within this
instruction manual, the next step is to
contact our extended warranty
administrators on
0844 871 7771
They will give you details for your local
Service engineer. Before calling out an
engineer, please ensure you have read
the details under the heading
"Something Not Working".
When you contact your local service
engineer you will need to give the
following details:
1 Your name, address and post code.
IMPORTANT: If you call out an
engineer to a fault listed below, or
to repair a fault caused by
incorrect use or installation, a
charge will be made even if the
appliance is under guarantee.
Spare parts
Always insist on genuine spare parts.
An authorised service engineer should
service this product, and only genuine
spare parts should be used.
Under no circumstances should you
attempt to repair the appliance yourself.
Repairs carried out by inexperienced
persons may cause injury or serious
malfunctioning.
Contact your local John Lewis branch.
2 Your telephone number.
3 Clear and concise details of fault.
4 The purchase date and found on your
receipt.
5 The model and serial number of the
appliance.
So that you always have these numbers
at hand, we recommend you to make a
note of them here:
Mod. : ............................................................
PNC : ............................................................
S.N. : .............................................................
Page 28

John Lewis Partnership
171 Victoria Street
London SW1E 5NN
www.johnlewis.com
ANC Number JLFSMC603
JLFSMC605
Date 0310
 Loading...