

Page 1

60802001GB.fm Page 17 Wednesday, November 15, 2006 2:11 PM
PRODUCT DESCRIPTION
8
B
7
6
C
1
A
5
2
4
3
A) Refrigerator compartment
(for storage of fresh food and beverages)
Shelves (partly height adjustable)
1.
Fruit and vegetable drawer with moisture control
2.
(if provided)
Refrigerator inner door
3.
Rating plate (at the side of crisper drawer)
4.
Defrost water drain
5.
Fan (if provided)
6.
CONTROLS
C
Thermostat
1.
Light switch
2.
Bulb cover
3.
Fast freeze button with LED: Press this button (if
4.
provided) when the ambient temperature is below
16°C and/or 12 hours before placing food in the
freezer (see instructions for use).
Switch off the button after use.
B) Freezer compartment (if supplied)
(marked with symbol for storing fresh
food, frozen food and making ice cubes)
Grid (inside the compartment)
7.
Ice cube tray (inside the compartment)
8.
C) Controls
Reference scale
5.
11
Page 2
60802001GB.fm Page 18 Wednesday, November 15, 2006 2:11 PM
HOW TO OPERATE THE REFRIGERATOR
COMPARTMENT
This appliance is a refrigerator with a star freezer compartment.
Optimal appliance performance is obtained at ambient temperatures between +10° C and
+38°C.
Switching on the appliance
Once the power plug is inserted in the mains socket, unless the thermostat is set to symbol z the inside light
switches on each time the door is opened.
Once the temperature has been set – see next chapter – the appliance is ready for use.
To adjust the temperature:
• thermostat set to z: no refrigeration, no light.
• thermostat set to 1: minimum refrigeration.
• thermostat set to
• thermostat set to 7: maximum refrigeration.
Important
• To freeze food and/or when the ambient temperature is
The low temperature LED (4) lights up.
• Switch off the LED (4) as soon as the temperature returns
• Thermostat adjustment (1) will depend on where the appliance is installed, ambient temperature and
frequency of door opening.
: medium refrigeration.
3-4
below 16°C
above 16°C
, press the button (4).
.
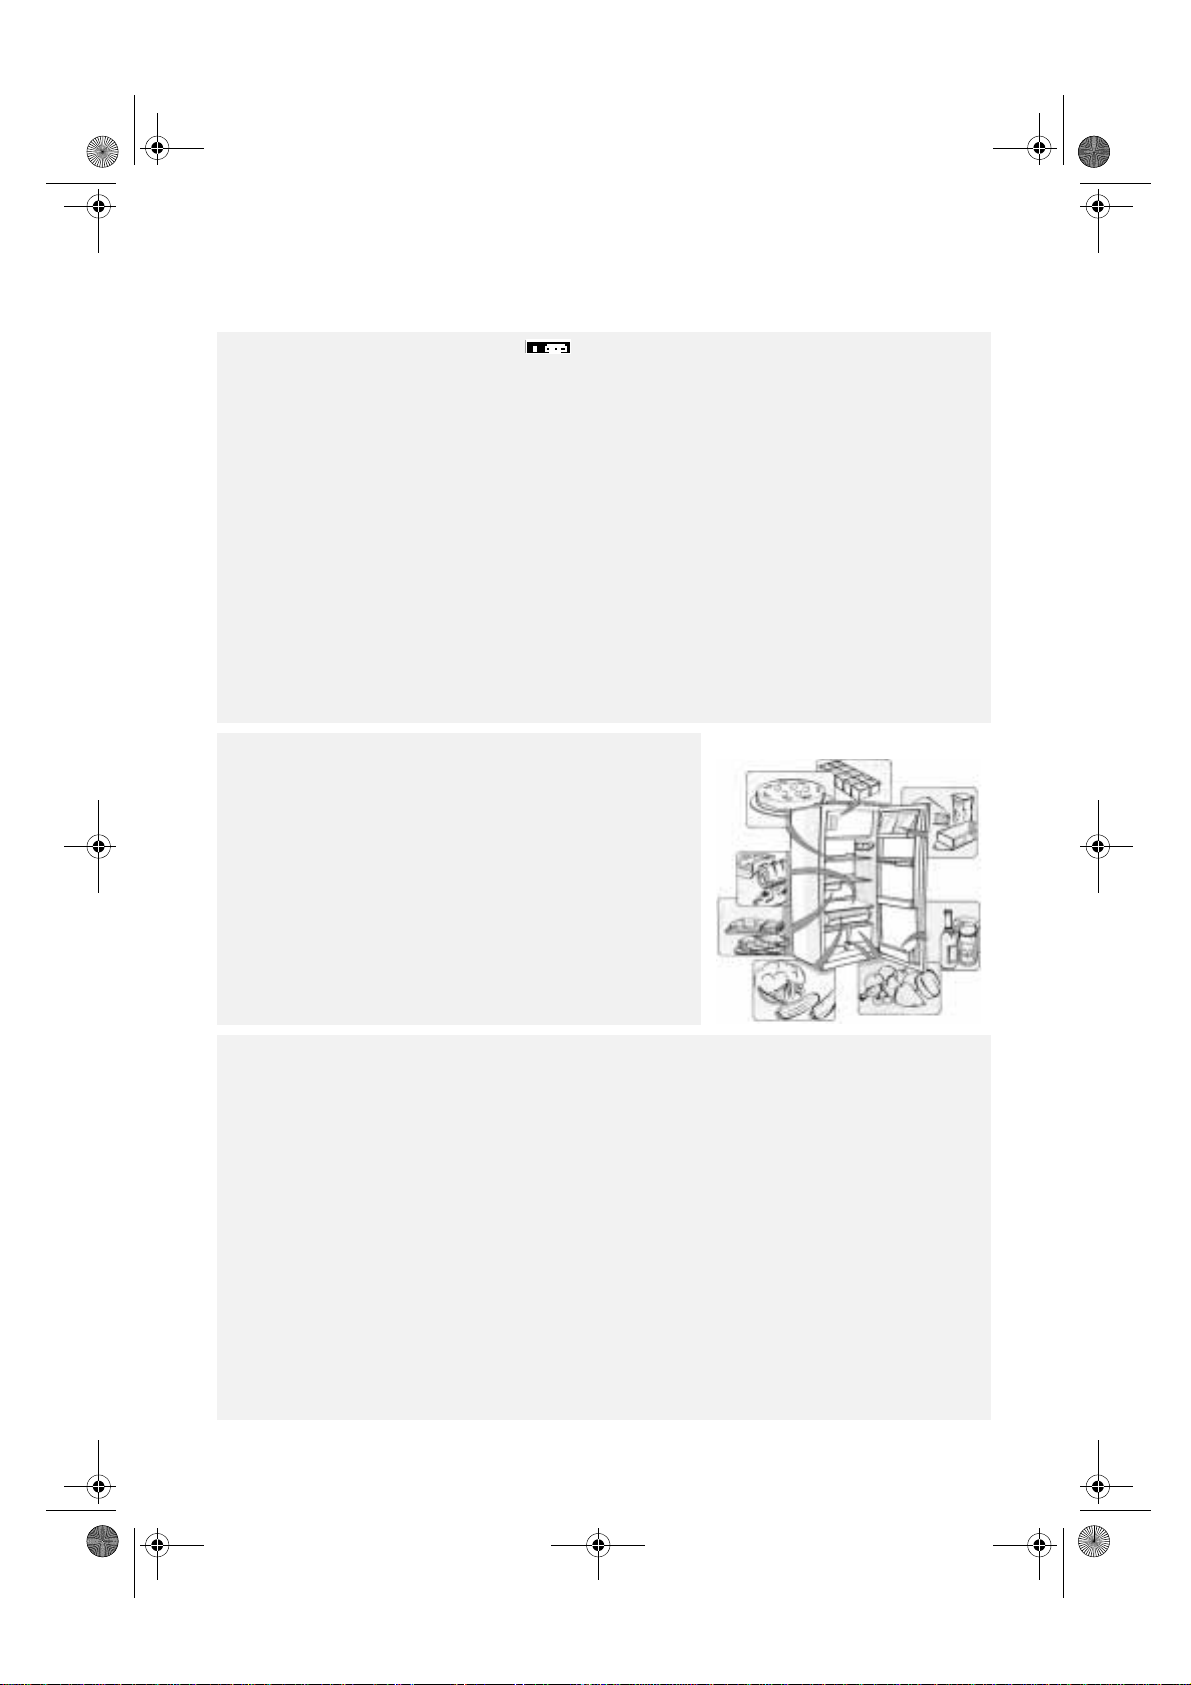
How to use the refrigerator compartment:
!
Position the food as illustrated in the figure:
Cooked food
1.
Dairy products, preserves, cheese, butter
2.
Fish, meat
3.
Sliced cold meat
4.
Fruit, vegetables, salad
5.
Small jars, eggs
6.
Tubes, small jars
7.
Small bottles
8.
Bottles
9.
:
Note
• Cover food to prevent it drying out.
• Hot food must be allowed to cool properly before being placed in the refrigerator.
• Make sure sufficient space is left for air to circulate around the food.
Defrosting of the refrigerator compartment is completely automatic.
Fan
The fan guarantees a uniform temperature inside the refrigerator compartment to create
optimal food storage conditions.
Button-operated fan (if present):
To activate the fan, press the corresponding button (6a). We recommend the fan is
switched on whenever the ambient temperature exceeds 27-28°C, or if water droplets
begin to form on the glass shelves, or in very humid conditions.
Remember to switch off the fan when the ambient temperature drops.
Note: do not place food in front of the the air inlet grille (6b).
The fan will ONLY run if the compressor is working.
!
12
Page 3

60802001GB.fm Page 19 Wednesday, November 15, 2006 2:11 PM
HOW TO USE THE FREEZER COMPARTMENT
The freezer compartment can be used for freezing fresh food.
The quantity of fresh food that can be frozen in 24 hours is shown on the rating plate.
Freezing fresh food:
Press the freeze button (4) 12 hours before placing food in the freezer. The freeze function LED (4) lights up.
•
Set the thermostat (1) to 3-4.
•
If your appliance is equipped with a grid, position food to be frozen as indicated in
•
position food as illustrated in
Arrange the fresh food on the grid, leaving sufficient space around each pack for the air to circulate and
A
avoiding contact with already frozen food (
Arrange the food centrally in the compartment , ensuring it does not come into contact with
B
already frozen food. Leave a space of approx. 20 mm around packages (
After 24 hours press the button (4) to switch off. Reset the thermostat (1) to the normal position.
•
Fig. 2
.
).
Fig.1
).
Fig. 2
Fig. 1
, otherwise
Fig. 2Fig. 1
When purchasing frozen food products:
Ensure that the packaging is not damaged (fr ozen food in dama ged packagin g may ha ve deter iorated). I f
•
the package is swollen or has damp patches, it may not have been stored under optimal conditions and
defrosting may have already begun.
When shopping, leave frozen food purchases until last and transport the products in a thermally insulated
•
cool bag.
Place the items in the compartment as soon as you get home.
•
If food has defrosted even partially, do not re-freeze it. Consume within 24 hours.
•
Avoid, or reduce temperature variations to the minimum. Respect the best-before date on the package.
•
Always observe the storage information on the package.
•
Making ice cubes
Fill the ice cube tray 2/3 full and place it in the compartment .
•
Do not use sharp or pointed instruments to detach the tray if it is stuck to the freezer bottom .
•
Bend the ice tray slightly to remove the cubes.
•
The table alongside shows the recommended maximum
storage time for frozen fresh foods.
MONTHS FOOD
13
Page 4

60802001GB.fm Page 20 Wednesday, November 15, 2006 2:11 PM
HOW TO DEFROST THE APPLIANCE
Before defrosting, unplug the appliance from the mains or disconnect the electrical power supply.
Defrosting of the refrigerator compartment is completely automatic. Droplets of water on the
rear wall of the refrigerator compartment indicate that the periodic automatic defrost cycle is in
progress. The defrost water is automatically routed to a drain outlet and into a container from
which it evaporates.
Clean the defrost water drain outlet regularly using the tool supplied with the appliance in order to ensure
defrost water is removed correctly.
Defrosting the compartment
Defrost the compartment once or twice a year or when the ice formation is excessive.
It is perfectly normal for ice to form. The amount and speed at which the ice forms depends on ambient
conditions and the frequency with which the door is opened. Ice formation is concentrated at the top of the
compartment and does not affect the efficiency of the appliance.
If possible, defrost the freezer when it is nearly empty.
To switch off the freezer compartment, set the thermostat to z.
•
Remove the food from the freezer compartment and group together in a cool place or in a cool bag.
•
Leave the door open to allow the frost to melt.
•
Clean the interior with a sponge soaked in warm water and/or neutral detergent. Do not use abrasive
•
substances.
Rinse the interior and dry thoroughly.
•
Put the food back into the freezer.
•
Close the door.
•
Plug in the appliance again and switch on following the instructions in chapter “How to operate the
refrigerator compartment”: Adjustments and selections valid before switching off will automatically be
restored.
14
Page 5

60802001GB.fm Page 21 Wednesday, November 15, 2006 2:11 PM
CARE AND MAINTENANCE
Before any cleaning or maintenance operation, unplug the appliance or disconnect it from the
power supply.
• Periodically clean the refrigerator compartment with a sponge moistened with lukewarm wa ter and /or
neutral detergent. Rinse and dry with a soft cloth.
Do not use abrasive products.
• The separators must be cleaned with a damp sponge and not placed in water.
• Clean the inside of the freezer compartment during defrosting.
• Periodically clean the ventilation grilles and the condenser at the rear of the appliance with a vacuum
cleaner or a brush.
• Clean the outside with a soft cloth moistened with water.
Do not use abrasive pastes, scouring pads, stain-removers
(e.g. trichloroethylene, acetone) or vinegar.
Long vacation
Empty the refrigerator completely.
1.
Disconnect the appliance from the power supply.
2.
Defrost and clean the inside.
3.
If the appliance is not used for a long time, the door must remain open to prevent the formation of mould,
4.
unpleasant odours and oxidation.
Clean the appliance.
5.
Clean the inside of the low temperature compartment
•
(in models where available) during defrosting.
Periodically clean the inside of the refrigerator compartment with a sponge moistened with lukewarm
•
water and/or neutral detergent. Rinse and dry with a soft cloth. Do not use abrasive products.
Clean the outside with a moistened cloth. Do not use abrasive pastes, scouring pads, stain-removers (e.g.
6.
acetone, trichloroethylene) or vinegar.
Lamp replacement:
When replacing the lamp, proceed as follows:
Unplug the appliance from the power supply
•
Press the top part of the lamp.
•
Remove the lamp cover.
•
Replace the lamp with one of the same power or of the max. power in watt, specified near the lamp
•
holder.
Refit the lamp cover and wait 5 minutes before reconnecting the appliance.
•
15
Page 6

60802001GB.fm Page 22 Wednesday, November 15, 2006 2:11 PM
TROUBLESHOOTING GUIDE / AFTER-SALES
SERVICE
When you hear these noises
...your appliance is alive!!!
1. Temperature inside the compartments is
not low enough.
Is food preventing the doors from closing
•
properly?
Is the thermostat setting correct?
•
Are the air circulation vents blocked?
•
2. Temperature inside the refrigerator
compartment is too low.
Is the thermostat setting correct?
•
3. The appliance is excessively noisy.
Has the appliance been installed correctly?
•
Are the pipes at the back touching or vibrating?
•
It is normal to hear the noise of the refrigerant
•
liquid in circulation.
4. The appliance is not working?
Is there a power failure?
•
Is the plug properly inserted in the socket?
•
Do the household electrical system protection
•
devices work correctly?
Is the power cord damaged?
•
5. Water collects at the bottom of the
refrigerator compartment.
Is the thermostat setting correct?
•
Is the defrost water drain blocked?
•
6. The inside light is not working.
the checks for point 4, and then:
• Disconnect the appliance from the power supply,
check the light bulb and, if necessary,
replace it with a new one
- traditional light bulb
(25 W max.)
Or
- LED bulb
(with the same characteristics),
only available from the After-Sales Service
Perform
16
Page 7

60802001GB.fm Page 23 Wednesday, November 15, 2006 2:11 PM
AFTER-SALES SERVICE
Before contacting After-Sales Service:
See if you can solve the problem yourself with the
1.
help of the Trouble-shooting guide.
Switch the appliance on again to see if the
2.
problem has been solved. If it has not, disconnect
the appliance from the power supply and wait for
about an hour before switching on again.
If the problem persists after thi s course of action,
3.
contact After-sales Service.
INSTALLATION
Install the appliance away from heat sources.
•
Installation in a hot environment, direct exposure
to the sun or installation near heat sources
(heaters, radiators, cookers) will increase power
consumption and should therefore be avoided.
If this is not possible, the following minimum
•
distances must be respected:
30 cm from coal or paraffin stoves;
•
3 cm from electric and/or gas stoves.
•
Fit the spacers (if supplied) on the rear of the
•
condenser positioned at the back of the appliance.
Install the appliance in a dry, well-ventilated place,
•
and ensure it is level, using the fron t adjustment feet
if necessary.
Clean the interior.
•
Fit the accessories.
•
Specify:
the nature of the problem
•
the model
•
the Service number (the number after the word
•
SERVICE on the rating plate on the inside of the
appliance)
your full address
•
your telephone number and area code
•
Note:
The direction of door opening can be changed.
If this operation is performed by After-sales
Service it is not covered by the warranty.
Electrical connection
• Electrical connections must be made in
accordance with local regulations.
Voltage and power consumption are indicated on
•
the rating plate inside the appliance.
• Regulations require that the appliance is
earthed.
The Manufacturer declines all liabilities for
injury to persons or animals or damage to
property resulting from failure to observe
these regulations.
If the plug and socket are not of the same type, have
•
the socket replaced by a qualified electrician.
Do not use extension leads or adapters.
•
Disconnecting the appliance
It must be possible to disconnect the appliance by
unplugging it or by means of a two-pole switch fitted
upline of the socket.
17
Page 8

60802001GB.fm Page 24 Wednesday, November 15, 2006 2:11 PM
ELECTRICAL CONNECTION
1) For Great Britain only
Warning - this appliance must be earthed
Fuse replacement
If the mains lead of this appliance is fitted with a BS 1363A
13amp fused plug, to change a fuse in this type of plug use an
A.S.T.A. approved fuse to BS 1362 type and proceed as follows:
Remove the fuse cover (A) and fuse (B).
1.
Fit replacement 13A fuse into fuse cover.
2.
Refit both into plug.
3.
Important:
The fuse cover must be refitted when changing a fuse and if the
fuse cover is lost the plug must not be used until a correct
replacement is fitted.
Correct replacement are identified by the colour insert or the
colour embossed in words on the base of the plug.
Replacement fuse covers are available from your local electrical
store.
2) For the Republic of Ireland only
The information given in respect of Great Britain will frequently
apply, but a third type of plug and socket is also used, the
2-pin, side earth type.
3) Socket outlet / plug (valid for both countries)
If the fitted plug is not suitable for your socket outlet, please
contact Whirlpool Service for further in struction. P lease do not
attempt to change plug yourself. This procedure needs to be
carried out by a qualified Whirlpool technician in compliance
with the manufactures instructions and current standard safe ty
regulations.
18
 Loading...