

Page 1
Page 2
Page 3
Page 4

Page 5
Page 6
Page 7
Page 8

Page 9

Page 10
Page 11
Page 12
Page 13
Page 14
Page 15
Page 16

Page 17

Page 18

Page 19

Page 20

Page 21

Page 22

Page 23

Page 24

Page 25

Page 26

Page 27

Page 28

Page 29

Page 30

Page 31

Page 32

Page 33

Page 34

Page 35

Page 36

Page 37

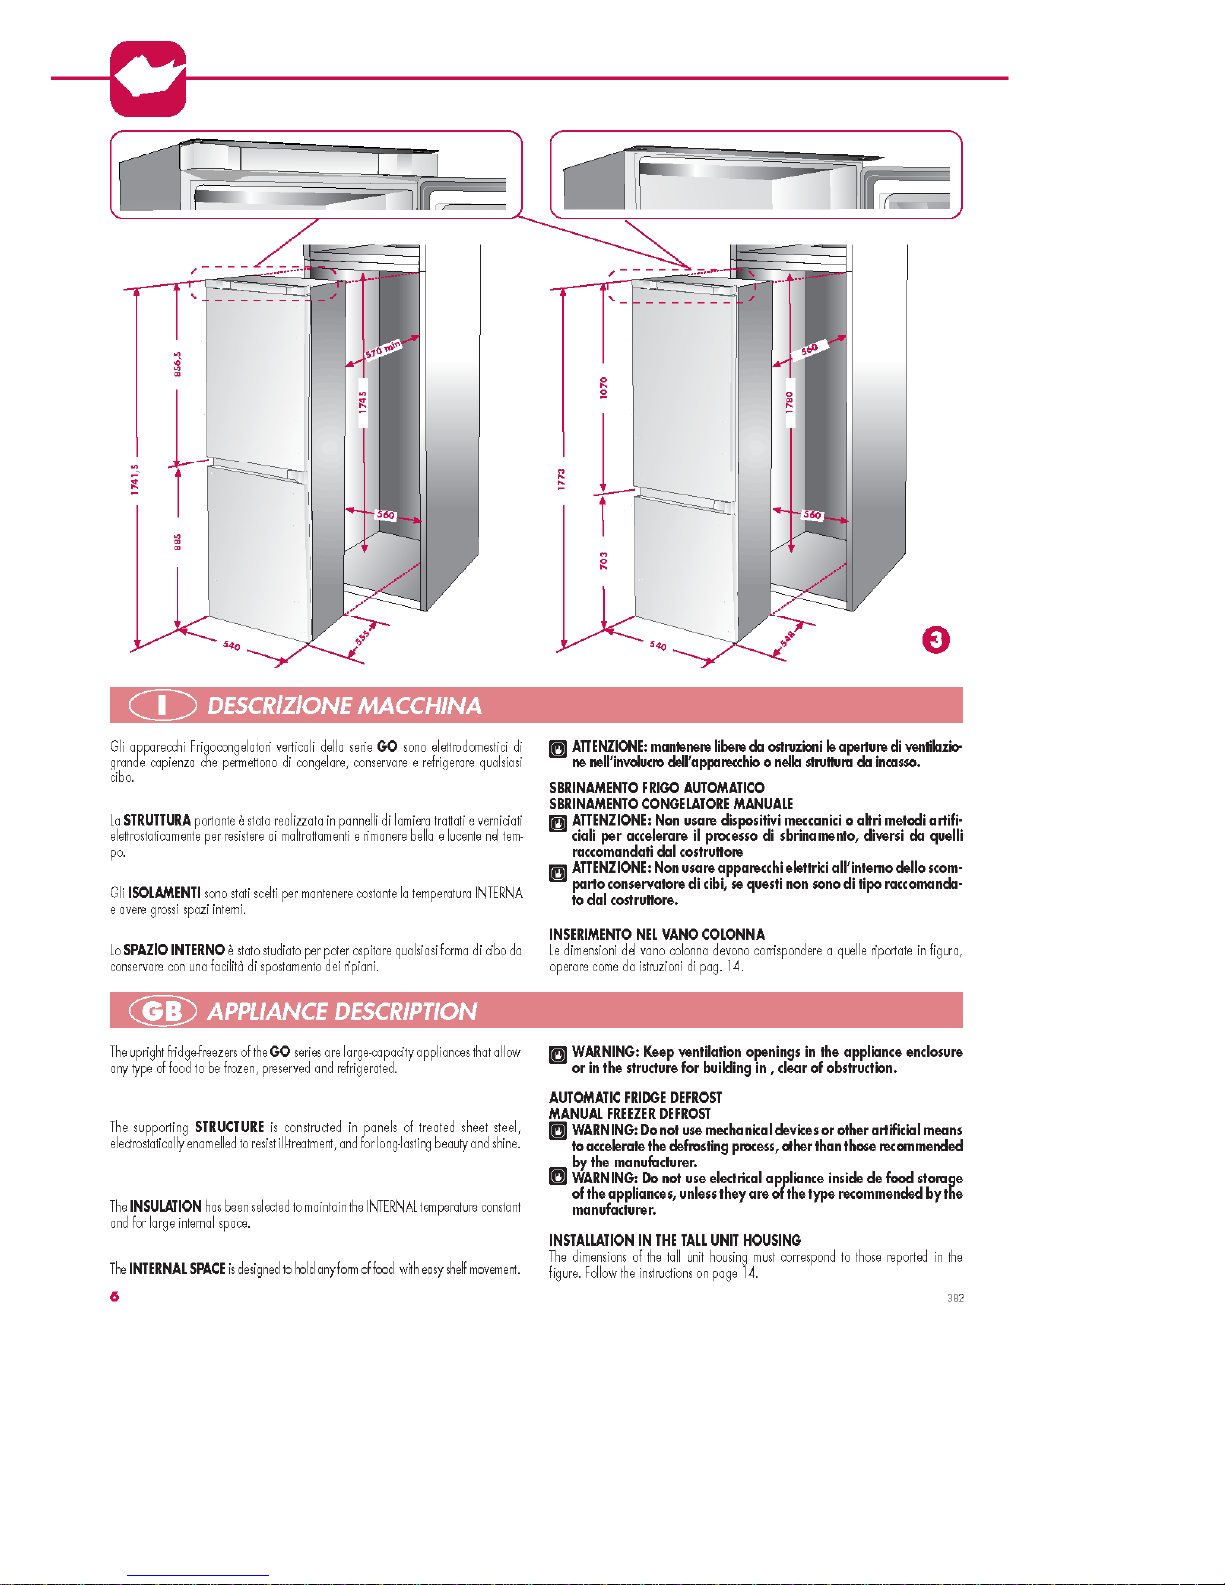
FRIGO-CONGELATORE DA INCASSO INTEGRALE CON PORTE TRAINATE
FLUSH-MOUNTED FRIDGE-FREEZERS WITH PULL-ACTION DOORS
INTEGRIERBARER KOMBI-KUEHLSCHRANK MIT AUSZUGSTUEREN
REFREIGERATEURS COMBINES A ENCASTREMENT INTEGRAL AVEC PORTES TRAÎNÉES
REFIGERADOR-CONGELADOR CON EMBUTIDO COMPLETO CON PUERTAS REMOLCABLES
FRIGORÍFICO-CONGELADOR DE ENCASTRE INTEGRAL COM PORTAS REBOCADAS
I
GB
D
F
ES
P
FCI0605-010
Page 38

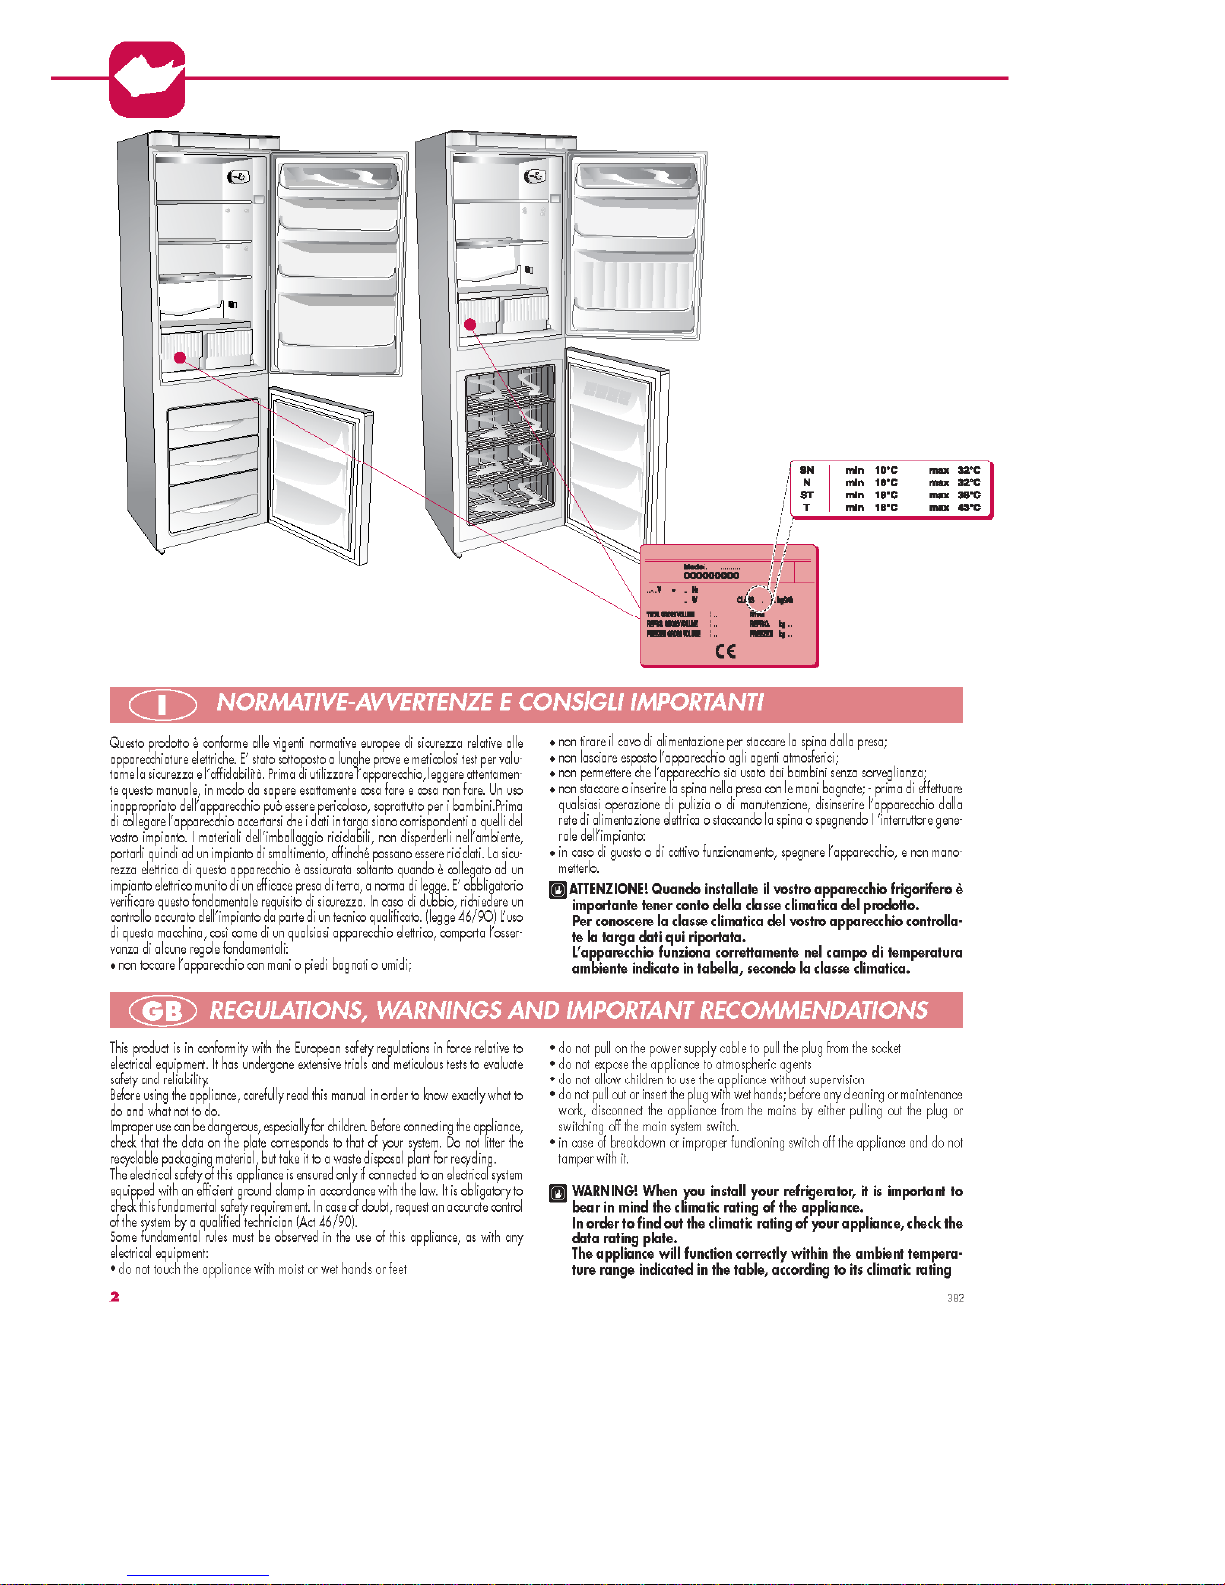
2
FCI0605-020
1
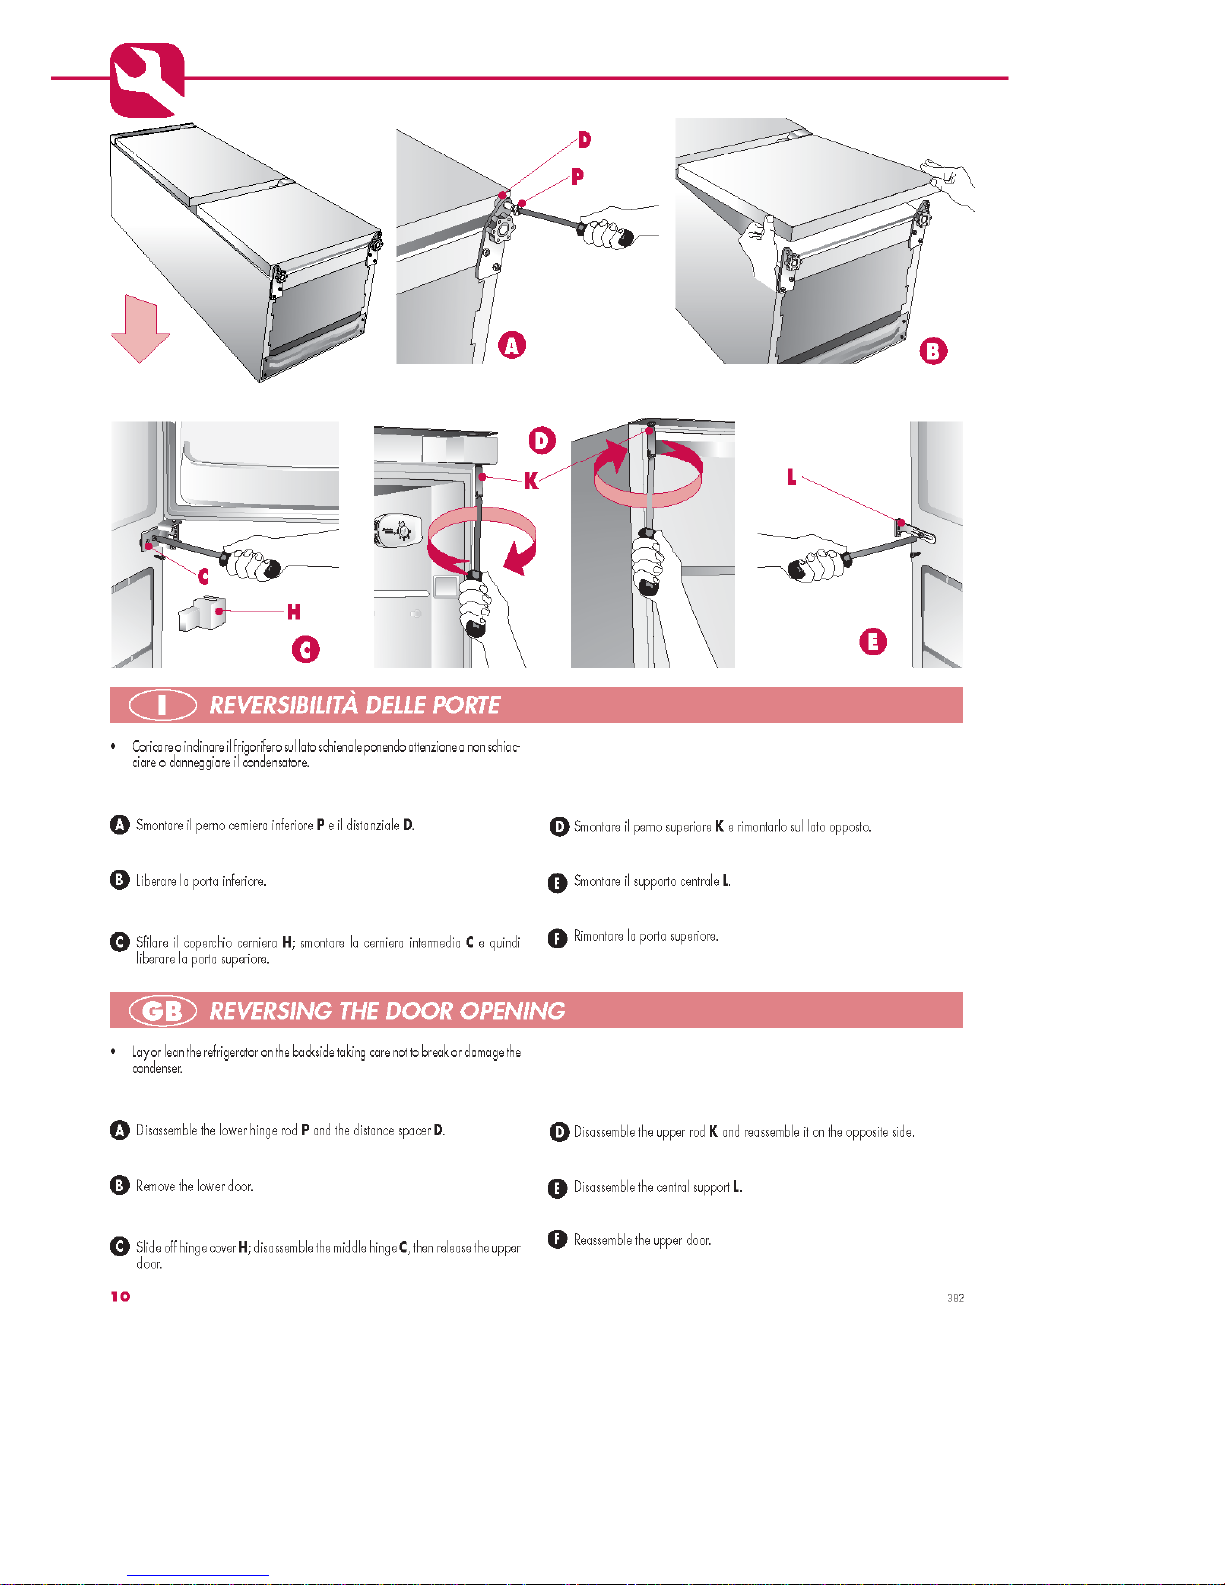
• Coricare o inclinare il frigorifero sul lato schienale ponendo attenzione a non schiacciare o danneggiare il condensatore.
a) Smontare il perno cerniera inferiore P e il distanziale D.
b) Liberare la porta inferiore.
c) Sfilare il coperchio cerniera H; smontare la cerniera inter-
media C e quindi liberare la porta superiore.
d) Smontare il perno superiore K e rimontarlo sul lato oppo-
sto (Fig.3).
e) Smontare il supporto centrale L.
f) Rimontare la porta superiore.
1 REVERSIBILITÀ DELLE PORTE
I
1 REVERSING THE DOOR OPENING
GB
FCI0605-030
FCI0605-040
FCI0605-050
2
3 4
• Lay or lean the refrigerator on the backside taking care not
to break or damage the condenser.
a) Disassemble the lower hinge rod P and the distance spacer
D.
b) Remove the lower door.
c) Slide off hinge cover H; disassemble the middle hinge C,
then release the upper door.
d) Disassemble the upper rod K and reassemble it on the
opposite side (Fig.3).
e) Disassemble the central support L.
f) Reassemble the upper door.
K
L
L
C
P
D
H
Page 39

3
1 WECHSELBARER TUERANSCHLAG
D
1 INVERSION DU SENS D’OUVERTURE DES PORTES
F
1 REVERSIBILIDAD DE LAS PUERTAS
E
1 REVERSIBILIDADE DAS PORTAS
P
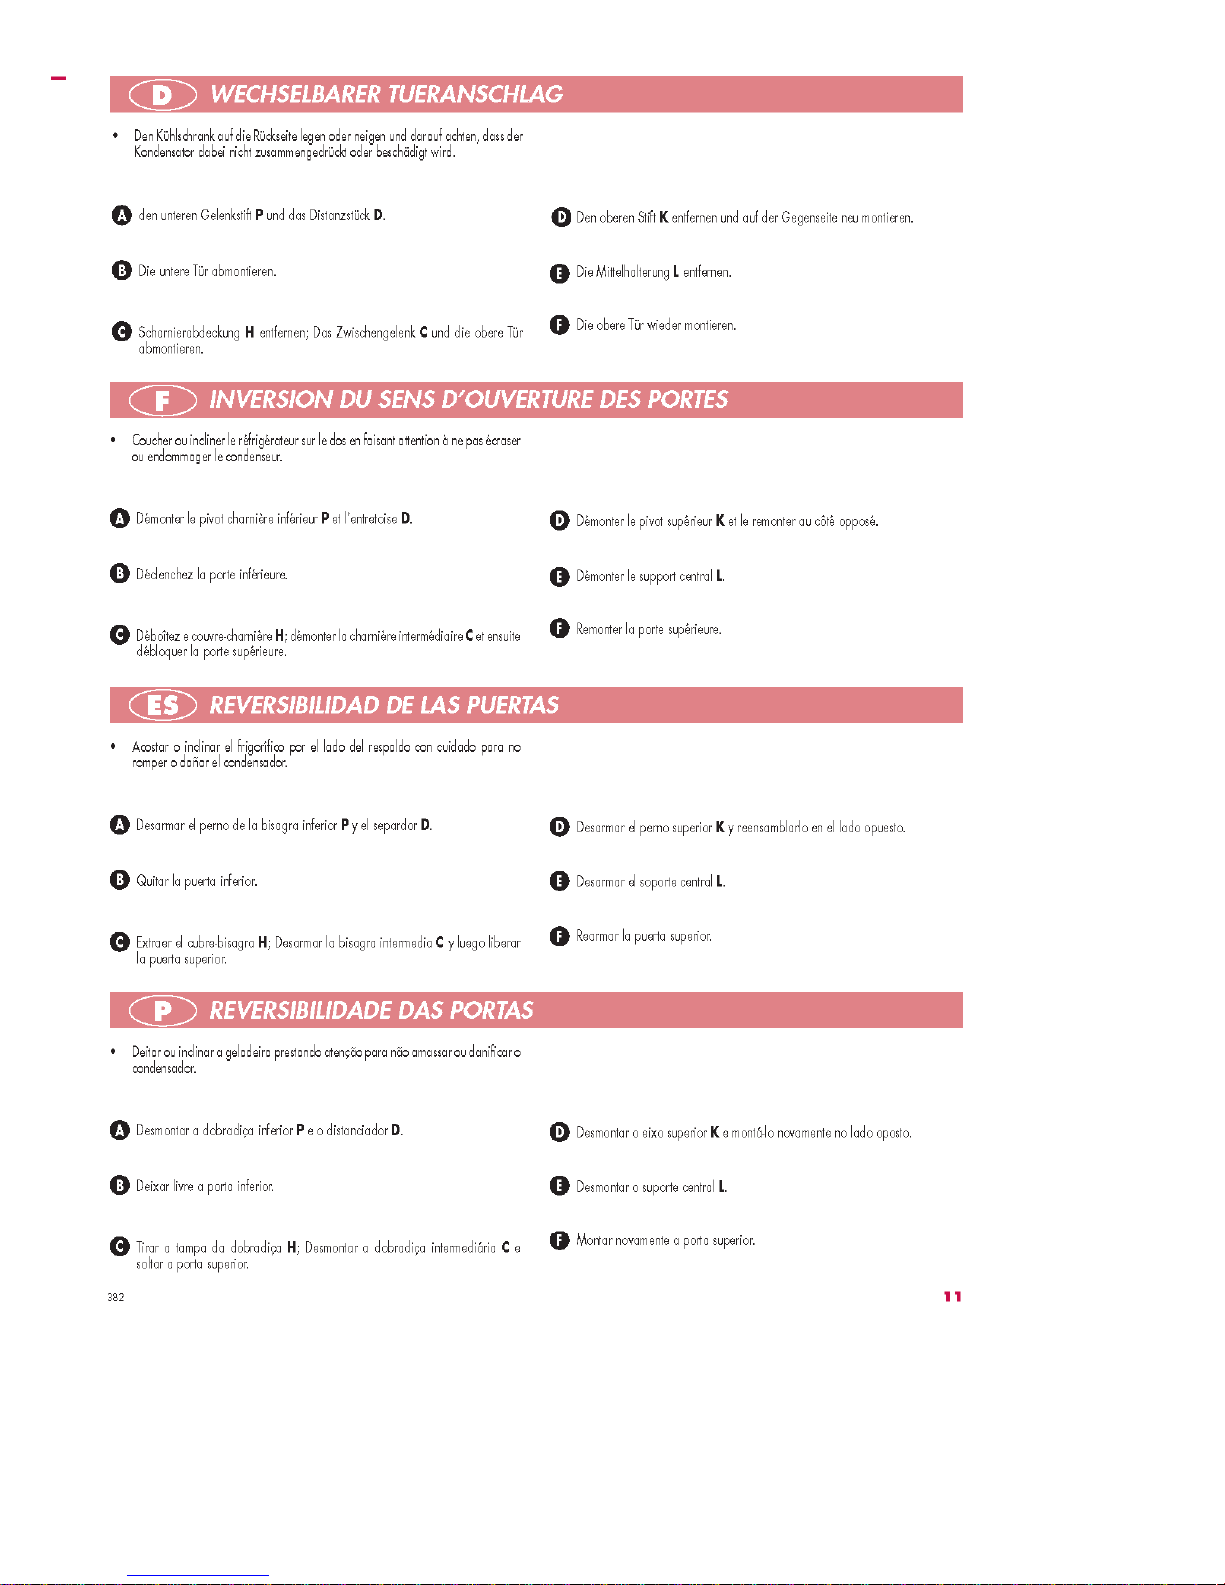
• Deitar ou inclinar a geladeira prestando atenção para não
amassar ou danificar o condensador.
a) Desmontar a dobradiça inferior P e o distanciador D.
b) Deixar livre a porta inferior.
c) Tirar a tampa da dobradiça H; Desmontar a dobradiça
intermediária C e soltar a porta superior.
d) Desmontar o eixo superior K e montá-lo novamente no
lado oposto (Fig.3).
e) Desmontar o suporte central L.
f) Montar novamente a porta superior.
• Acostar o inclinar el frigorífico por el lado del respaldo con
cuidado para no romper o dañar el condensador.
a) Desarmar el perno de la bisagra inferior P y el separdor D.
b) Quitar la puerta inferior.
c) Extraer el cubre-bisagra H; Desarmar la bisagra interme-
dia C y luego liberar la puerta superior.
d) Desarmar el perno superior K y reensamblarlo en el lado
opuesto (Fig.3).
e) Desarmar el soporte central L.
f) Rearmar la puerta superior
• Coucher ou incliner le réfrigérateur sur le dos en faisant
attention à ne pas écraser ou endommager le condenseur.
a) Démonter le pivot charnière inférieur P et l’entretoise D.
b) Déclenchez la porte inférieure.
c) Déboîtez e couvre-charnière H; démonter la charnière
intermédiaire C et ensuite débloquer la porte supérieure.
d) Démonter le pivot supérieur K et le remonter au côté opposé
(Fig.3).
e) Démonter le support central L.
f) Remonter la porte supérieure.
• Den Kühlschrank auf die Rückseite legen oder neigen und
darauf achten, dass der Kondensator dabei nicht
zusammengedrückt oder beschädigt wird.
a) den unteren Gelenkstift P und das Distanzstück D
entfernen.
b) Die untere Tür abmontieren.
c) Scharnierabdeckung H entfernen; Das Zwischengelenk C
und die obere Tür abmontieren.
d) Den oberen Stift K entfernen und auf der Gegenseite neu
montieren (Fig.3).
e) Die Mittelhalterung L entfernen
f) Die obere Tür wieder montieren.
Page 40

4
I
GB
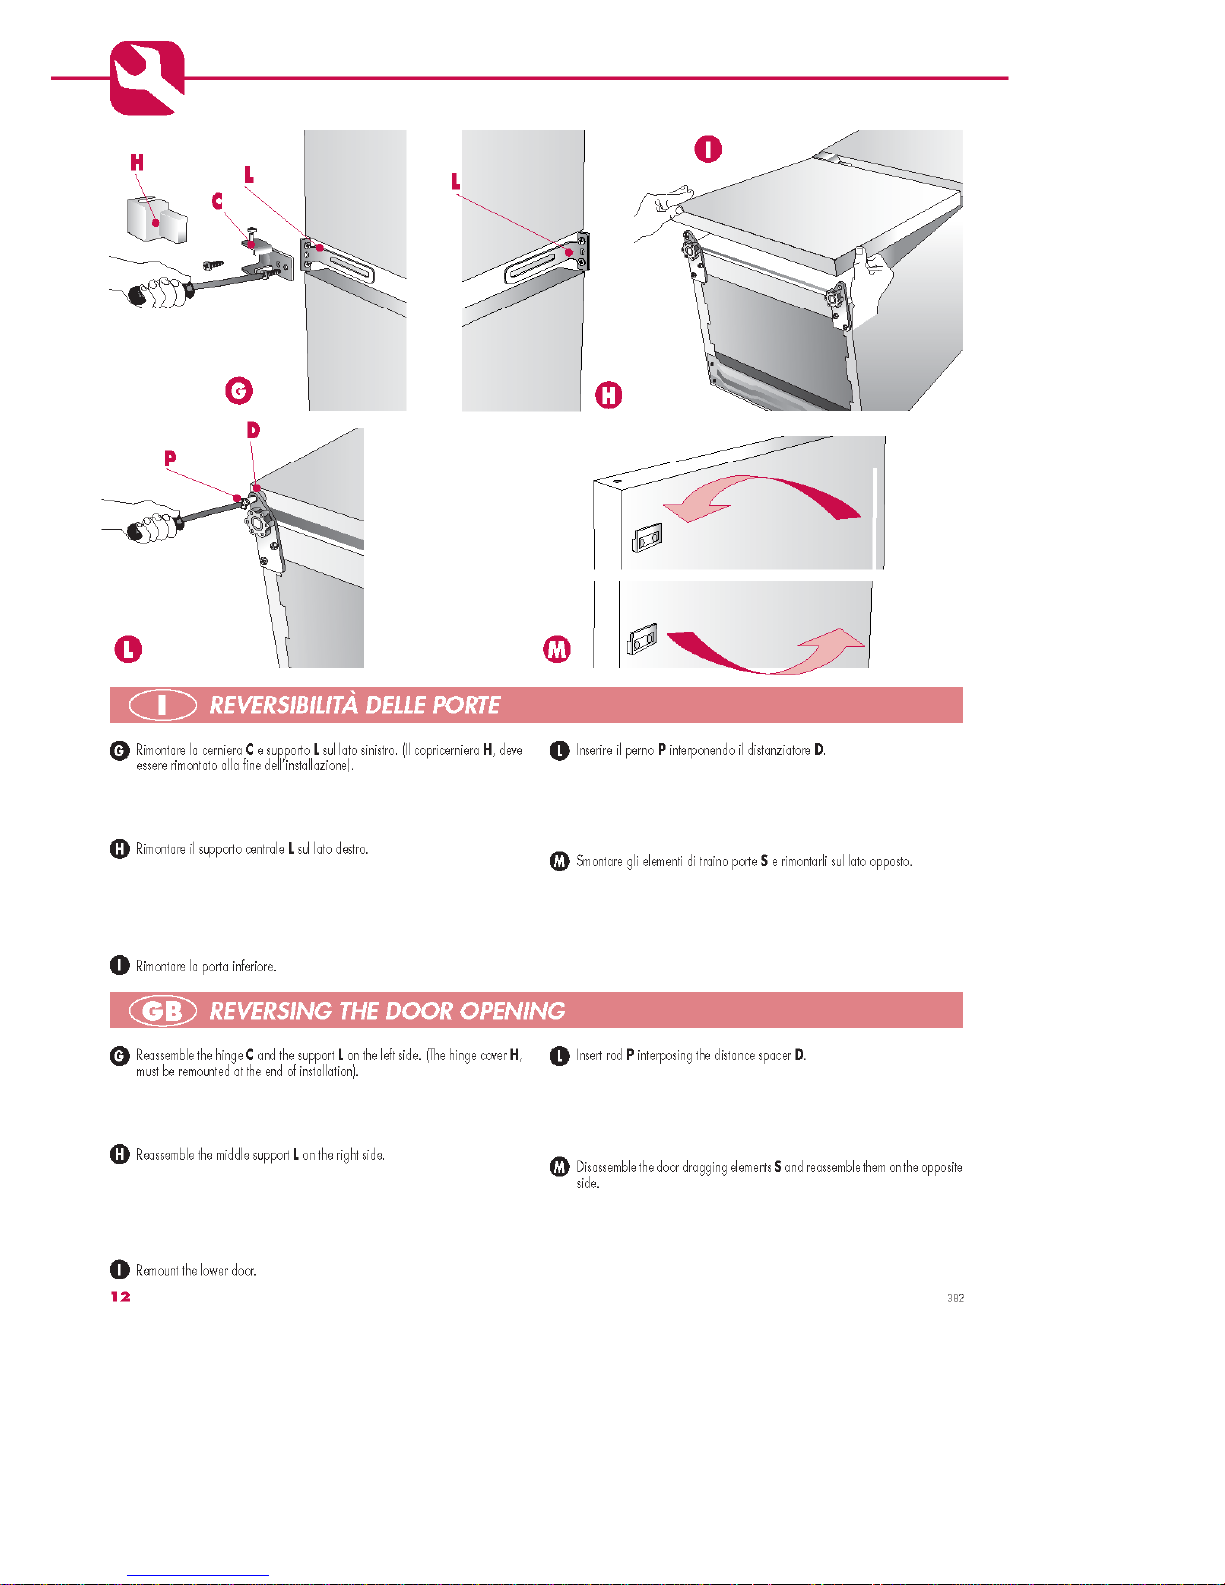
g) Rimontare la cerniera C e supporto L sul lato sinistro. (Il
copricerniera H, fig.2, deve essere rimontato alla fine dell’installazione).
h) Rimontare il supporto centrale C sul lato destro (fig.6).
i) Rimontare la porta inferiore.
l) Inserire il perno P interponendo il distanziatore D.
m) Smontare gli elementi di traino porte S e rimontarli sul lato
opposto.
FCI0605-060
FCI0605-070
FCI0605-080
FCI0605-090
5 6
87
g) Reassemble the hinge C and the support L on the left side.
(The hinge cover H, fig. 2, must be remounted at the end of
installation).
h) Reassemble the middle support C on the right side (fig.6).
i) Remount the lower door.
l) Insert rod P interposing the distance spacer D.
m)Disassemble the door dragging elements S and reassemble
them on the opposite side.
L
L
C
P
D
S
Page 41

5
D
F
E
P
g) Montar novamente a dobradiça C e suporte L no lado es-
querdo (
O cobre-dobradiça H, fig 2, deve ser montado no-
vamente no final da instalação
).
h) Montar novamente o suporte central C no lado direito (fig.
6).
i)
Montar novamente a porta inferior.
l) Inserir o eixo P colocando entre eles o distanciador D.
m) Desmontar os elementos deslizantes S das portas e mon-
tar novamente no lado oposto.
g) Rearmar la bisagra C y soporte L en el lado izquierdo (El
cubre-bisagra H, fig. 2, debe ser reensamblado al final de
la instalación).
h) Rearmar el soporte central C en el lado derecho (fig.6).
i) Reponer la puerta inferior.
l) Introducir el perno P interponiendo el distanciador D.
m) Desarmar los elementos S de remolque puertas y
rearmarlos en el lado opuesto.
g) Remonter la charnière C et support L du côté gauche (Le
couvre-charnière H Fig. 2 doit être remonté à la fin de
l’installation).
h) Remonter le support central C du côté droit (fig.6).
i) Remontez la porte inférieure.
l) Insérer le pivot P en interposant l’intercalaire D.
m) Démonter les éléments de traction portes S et les remonter
au côté opposé.
g) Das Gelenk C und der Halterung L wieder an der linken
Seite montieren (Die Scharnierabdeckung H, Abb.2, muss
am Ende der Installation wieder montiert werden).
h) Die Mittelhalterung C wieder an der rechten Seite montie-
ren (Abb.6).
i) Die untere Tür wieder montieren.
l) Distanzstück D unterlegen und dann Stift P einführen.
m) Die Türzugelemente abmontieren S und wieder an der
Gegenseite montieren.
Page 42

6
FCI0605-100
FCI0605-110
FCI0605-120
2
1000 cm
50mm min
100-150mm
INC0704-150
10mm
50mm min
100-150mm
INC0704-160
50mm min
100-150mm
15mm
INC0704-170
9
10
11
Page 43

7
2 BELÜFTUNG
D
2 AÉRATION
F
2 VENTILACION
E
2 VENTILAÇÃO
P
2 AERAZIONE
I
2 VENTILATION
GB
L’aria riscaldata sul lato posteriore dell’apparecchio deve
potersi scaricare senza impedimenti.
Pertanto in nessun caso si deve restringere o ricoprire la
sezione di passaggio dell’aria.
Sezione minima per l’areazione nello zoccolo e nel vano 100
cm2.
Warm air generated at the rear of the appliance must be able
to escape unhindered.
Under no circumstances therefore, is the cross-sectional area
of the cooling space to be reduced, or covered.
Cross-section of the ventilation opening in the base and of
rear shaft must not to be less than 100 cm
2
.
Die an der Rückseite des Gerätes erwärmte Luft muß
ungehindert abziehen konen.
Deshalb auf keinen Fall Luft querschnitt einengen oder
abdecken Belü ftungsquerschnitt im sckel und schacht min
100 cm
2
.
L’air chaude se dégageant à l’arrière de l’appareil doit pouvoir
s’évacuer librement.
C’est pourquoi il ne faut jamais rèduire ou masquer l’espace
libre.
La surface minimum de la grille d’aération du socle et de
l’espace libre est de 100 cm2.
El aire calentado en el lado posterior del aparato tiene que
poder ser descargado sin interferencias.
Por lo tanto en ningún caso se tiene que restringir o recubrir la
sección de salida del aire.
Sección mínima para la ventilación en el zócalo y en hueco
de la estructura 100 cm
2
.
O ar aquecido sobre o lado posterior do aparelho deve-se
poder descarregar sem impedimentos.
Portanto em nenhum caso se deve tornar mais estreita ou
tapar a seção de passagem do ar.
Seção mínima para a ventilação no rodapé e no vão 100 cm2.
Page 44

8
FCI0605-130
12
FCI0605-150
INC0704-240
FCI0605-180
INC0704-250
13
13.1
13.2
13.3
P
555
560
1774
540
548
50
1045
1773
678
13.4
Page 45

9
3 BEFESTIGUNG DES KUEHLSCHRANKS IM HOCHSCHRANK
D
3 INSTALLATION À L’ INTÉRIEURE DE L’ ÉLÉMENT ARMOIRE
F
3 FIJADO DEL REFRIGERADOR EN EL VANO DEL MODULO
E
3 FIXAÇÃO DO FRIGORIFICO NO VÃO COLUNA
P
3 FISSAGGIO DEL FRIGORIFERO NEL VANO COLONNA
I
3 FASTENING THE REFRIGERATOR INSIDE THE FREE-STANDING CABINET
GB
Dimensioni del vano colonna
Le dimensioni del vano colonna devono corrispondere con
quelle riportate nella figura 12.
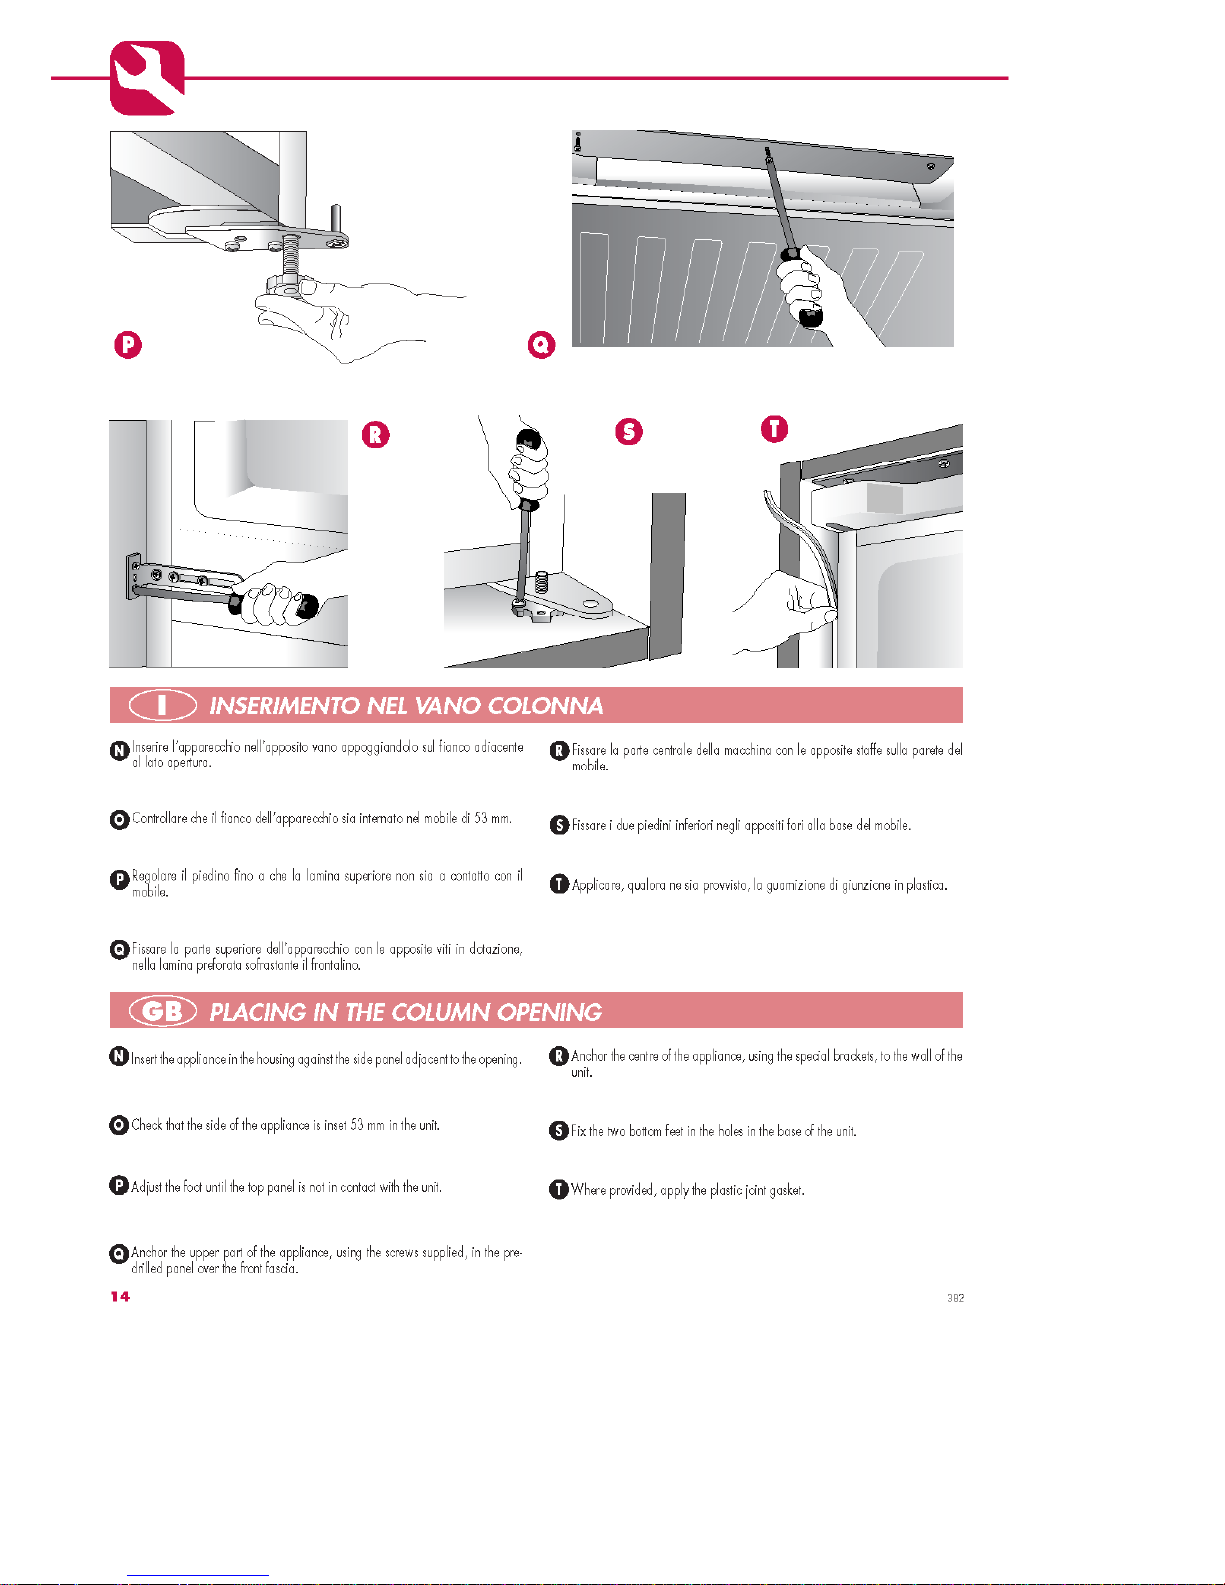
Posizionare il frigorifero nel vano colonna a contatto della
parete sinistra P (fig.13).
Verificare che il frigorifero sia perfettamente a contatto della
superficie inferiore (fig.13.4) e superiore (fig.13.1).
Dimensões do vão coluna
As dimensões do vão coluna devem corresponder às que
estão determinadas nas figuras 12.
Posicionar a geladeira no vão coluna em contacto com a
parede esquerda P (fig.13).
Controlar se a geladeira está perfeitamente em contacto com
a superfície inferior (fig.13.4) e superior (fig. 13.1).
Fixar a geladeira na parte inferior (fig.13.4) e superior (fig.
13.1) com adequados parafusos.
Fixar os estribos centrais às paredes do vão coluna (fig.13.2)
tanto no lado esquerdo quanto no direito (somente para
modelos com dupla porta).
Colocar, então, a guarnição no lado esquerdo (fig. 13.3).
Fissare il frigorifero nella parte inferiore (fig.13.4) e superiore
(fig.13.1) con viti autofilettanti adeguate.
Fissare le staffe centrali alle pareti del vano colonna (fig.13.2)
sia sul lato sinistro che destro (solo modelli con doppia porta).
A questo punto applicare la guarnizione sul lato sinistro
(fig.13.3).
Dimensiones de la cabina columna
Las dimensiones de la cabina columna deben corresponder
con aquellas indicadas en las figuras 12.
Colocar el frigorífico en la cabina columna a contacto con la
pared izquierda P (fig.13).
Verificar que el frigorífico esté perfectamente a contacto con
la superficie inferior (fig.13.4) y superior (fig.13.1).
Fijar el frigorífico en la parte inferior (fig.13.4) y superior
(fig.13.1) con tornillos autorroscantes adecuados.
Fijar las abrazaderas centrales a las paredes de la cabina
columna (fig.13.2) ya sea en el lado izquierdo que derecho
(sólo modelos con doble puerta).
A este punto aplicar la guarnición en el lado izquierdo (fig.13.3).
Dimensions du compartiment colonne
Les dimensions du compartiment colonne doivent
correspondre à celles qui sont reportées dans les figures 12.
Positionner le réfrigérateur dans le compartiment colonne en
contact avec la paroi gauche P (fig.13).
Contrôler que le réfrigérateur soit parfaitement en contact avec
la surface inférieure (fig.13.4) et supérieure (fig.13.1).
Fixer le réfrigérateur dans la partie inférieure (fig.13.4) et
supérieure (fig.13.1) avec des vis taraudeuses appropriées.
Fixer les dispositifs de serrage centraux aux parois du
compartiment colonne (fig.13.2) soit du côté gauche que du
côté droit (seulement modèles avec double porte).
A ce point, appliquer le joint du côté gauche (fig.13.3).
Abmessungen des Einbauraumes
Die Abmessungen des Einbauraumes müssen den der
Abbildungen 12 entsprechen.
Den Kühlschrank in den Einbauraum an die linke Wand P
stellen (Abb.13).
Prüfen, dass der Kühlschrank direkt an der Unterseite
(Abb.13.4) und Oberseite (Abb.13.1) aufliegt.
Den Kühlschrank an der Unter- (Abb.13.4) und Oberseite
(Abb.13.1) mit den passenden selbstschneidenden Schrauben
fixieren.
Die Mittelbügel an den Einbauraumwänden sowohl an der
linken, wie rechten Seite (nur bei Modellen mit Doppeltür) wie
in Abb.13.2 fixieren.
Jetzt die Dichtung an der linken Seite anbringen (Abb.13.3).
Dimensions of the column seat
The column seat dimensions must correspond to those shown
on figures (12-13-14-15).
Place the refrigerator in the column seat, in contact with the
left wall P (fig.16).
Check that the refrigerator makes perfect contact with the lower
(fig.16.4) and upper (fig.16.1) surfaces.
Fix the lower (fig.16.4) and upper (fig.16.1) parts of the
refrigerator with adequate self-tapping screws.
Fix the central clamps to the walls of the column seat (fig.16.2)
on both left and right sides (only double door models).
At this point, apply the gasket on the left side (fig.16.3).
Page 46

10
13
4 FISSAGGIO GUIDE
I
4 FASTENING GUIDE
GB
FCI0605-190
13
FCI0605-200
FCI0605-210
a) Aprire completamente lo sportello del mobile.
b) Posizionare le guide B sovrapponendole per circa 13mm
ai supporti S.
c) Forare lo sportello del mobile e fissare le guide B utilizzan-
do solo i due fori accessibili F.
B
B
F
14
S
a) Open the furniture door completely.
b) Position guide B overlapping it by about 13mm on support
S.
c) Drill the furniture door and fix the guide B using only the
two accessible holes F.
S
Page 47

11
3 BEFESTIGUNG DER LEGEN
D
3 FIXATION DES GUIDES
F
3 FIJADO DE LAS GUIAS
E
4 FIXAÇÃO DAS GUIAS
P
a) Abrir completamente a porta do móvel.
b) Posicionar as guias B colocando-as cerca 13mm sobre os
suportes S.
c) Furar a porta do móvel e fixar as guias B utilizando somente
os dois furos acessíveis F.
a) Abrir completamente la puerta del mueble.
b) Colocar las guías B sobreponiéndolas por casi 13mm a
los soportes S.
c) Perforar la puerta del mueble y fijar la guía B utilizando
sólo los dos agujeros accesibles F.
a) Ouvrir complètement la porte du meuble.
b) Positionner les dispositifs de guidage B en les superposant
aux supports S pour environ 13mm.
c) Percer la porte du meuble et fixer les dispositifs de guidage
B en utilisant seulement les deux trous accessibles F.
a) Die Möbeltür ganz öffnen.
b) Die Schienen B ca.13mm auf die Halterungen S legen.
c) In die Möbeltür ein Loch bohren und die Schienen B nur
an den beiden zugänglichen Löchern F fixieren.
Page 48

460055400
 Loading...