

MANUALE D’USO
INSTRUCTION MANUAL
BRUKSANVISNING
GEBRAUCHSANWEISUNG
NOTICE D’UTILISATION
GEBRUIKSAANWIJZING
MANUAL DE USO
MANUAL DE UTILIZAÇ
ÃO
IT
GB
SV
DE
FR
NL
ES
PT
FRIGORIFERO
REFRIGERATOR
KYL-/FRYSSK
ÅP
KÜHLSCHRANK
RÉFRIGÉRATEUR
KOELKAST
FRIGORIFICO
FRIGORIFICO
1
A
B
1-9
10
11
12
14
13
15
16
22
23
17
18
19
21
20
4
5
6
A
7
2 3
9
8
7
6
5
4
32
1
9000145282
10 11
1312
B
A
220-240V max. 15W, E14
911
8
E-Nr. FD-Nr.

IT Indice
Avvertenze per lo smaltimento e la sicurezza 4, 5
Norme 5
Osservare la temperatura ambiente 5
Installazione dell'apparecchio 6
Conoscere l'apparecchio 7-9
Inserimento e selezione della temperatura 10
Disinserire, mettere fuori servizio l’apparecchio 11
Sistemazione degli alimenti 11, 12
Congelare e conservare 12-14
Pulizia 14
Consigli per il risparmio energetico 15
Avvertenze sui rumori di funzionamento 15
Eliminare da soli piccoli guasti 16, 17
Servizio assistenza clienti 17
GB Index
Disposal and safety information 18, 19
Regulations 19
Observe ambient temperature 19
Installation 20
Getting to know your appliance 21-23
Switching ON and setting temperatures 24
Switching OFF and longer periods of disuse 25
Food arrangement 25, 26
Freezing and storing 26-28
Cleaning 28
Power saving tips 29
Information about operating noises 29
Minor problems and how to rectify them yourself 30, 31
Customer Service 31
SV Innehållsförteckning
Råd beträffande skrotning av gamla
kyl-/frysskåp och säkerhetsanvisningar 32, 33
Bestämmelser 33
Omgivningstemperatur 33
Installation 34
Lär känna ditt nya kyl-/frysskåp 35–37
Slå på strömmen och ställa in temperaturen 38
Stänga av strömmen, ta skåpet ur drift 38
Lägga in matvaror 39
Infrysning och förvaring 40, 41
Rengöring och skötsel 42
Energispartips 42
Råd beträffande driftsljud 43
Enklare fel man själv kan avhjälpa 43, 44
Service 45
DE Inhaltsverzeichnis
Hinweise zur Entsorgung und Sicherheit 46, 47
Bestimmungen 47
Umgebungstemperatur beachten 47
Gerät aufstellen 48
Gerät kennenlernen 49–51
Einschalten und Temperaturwahl 52
Ausschalten, Gerät stillegen 53
Lebensmittel einordnen 53, 54
Gefrieren und Lagern 54-56
Reinigen 56
Energiespartips 57
Hinweise zu Betriebsgeräuschen 57
Kleine Störungen selbst beheben 58, 59
Kundendienst 59
FR Sommaire
Mise au rebut, conseils de sécurité et consignes 60, 61
Conditions 61
Consignes relatives à la température ambiante 61
Installation de l'appareil 62
Faire la connaissance de l’appareil 63-65
Mise en service et sélection de la température 66
Coupure et mise hors service de l’appareil 67
Rangement des aliments 67, 68
Congélation et stockage 68-70
Nettoyage 71
Economies d'énergie 71
Remarques sur les bruits de fonctionnement 72
Réparer soi-même les petites pannes 72, 73
Service après-vente 74
NL Inhoud
Afvoeren van de verpakking en van
uw oude apparaat, veiligheidsvoorschriften
75, 76
Bepalingen 76
Let op de omgevingstemperatuur 76
Plaatsing van het apparaat 77
Kennismaking met het apparaat 78-80
Inschakelen en temperatuurkeuze 81
Uitschakelen en buiten werking stellen
van het apparaat 82
Levensmiddelen inruimen 82, 83
Invriezen en opslaan 83-85
Schoonmaken 85
Tips om energie te besparen 86
Aanwijzingen bij bedrijfsgeluiden 86
Kleine storingen zelf verhelpen 87, 88
Servicedienst 88
ES Indice
Consejos para la eliminación y el desguace
del embalaje de los aparatos usados
Advertencias de seguridad 89, 90
Normativas 90
Prestar atención a la temperatura del entorno 90
Emplazamiento de la unidad 91
Familiarizándose con la unidad 92-94
Conexión del aparato a y selección
de la temperatura 95
Desconexión y paro del aparato 96
Colocación de alimentos 96, 97
Congelar y guardar los alimentos 97-99
Limpieza de la unidad 100
Consejos prácticos para ahorrar energía eléctrica 100
Advertencias sobre los ruidos
de funcionamiento del aparato 101
Pequeñas averías de fácil solución 101, 102
Servicio de Asistencia Técnica 103
PT Índice
Indicações sobre reciclagem e segurança 104, 105
Determinações 105
Ter em atenção a temperatura ambiente 105
Instalação do aparelho 106
Familiarização com o aparelho 107-109
Ligação e selecção de temperatura 110
Desligar e desactivar o aparelho 111
Arrumação dos alimentos 111, 112
Congelação e conservação 112-114
Limpeza 115
Conselhos para poupar energia 115
Indicações sobre ruídos de funcionamento 116
Eliminação de pequenas anomalias 116, 117
Assistência Técnica 118

5
IT
● Non conservare nel vano congelatore
liquidi in bottiglie e lattine, e specialmente
bevande contenenti anidride carbonica.
Le bottiglie e le lattine esplodono.
● Non coprire, né ostruire le aperture di
afflusso e deflusso aria dell’apparecchio.
● Non usare indebitamente lo zoccolo,
i cassetti estraibili, le porte ecc. come
pedana o appoggio.
● Non consentire ai bambini di giocare con
l’apparecchio.
● Se l’apparecchio è dotato di una serratura,
conservare la chiave fuori dalla portata dei
bambini.
● Non mettere in bocca i ghiaccioli ed
i cubetti di ghiaccio presi direttamente
dal vano congelatore (pericolo di ustioni
a causa di temperature molto basse).
● Non toccare i prodotti congelati con
le mani bagnate; gelando per contatto,
le mani possono attaccarsi ai prodotti.
● ATTENTION : les orifices de ventilation
ménagés dans le corps de l'appareil et
contre l'appareil encastré doivent
toujours rester dégagés.
● ATTENTION : veillez à ne pas
endommager les conduites du circuit
frigorifique.
● ATTENTION : n'utilisez aucun appareil
électrique dans les tiroirs à produits
alimentaires de l'appareil, sauf s'il s'agit
d'un type recommandé par le fabricant.
Questo apparecchio contiene il
refrigerante sobutano (R 600a),
un gas naturale altamenta
biodegradabile, ma
combustible. Durante il trasporto e
l’installazione dell’apparecchio prestare
attenzione cheunon vengano danneggiate
parti del circuito di refrigerazione. ln caso
di danni, evitare fiamme o il contatto per
alcuni minuti il locale in cui si trova
l’apparecchio.
Avvertenza: per accelerare lo sbrinamento
non usare alti mezzi meccanici o mezzi
ausiliari vari diversi da quelli
raccomandati dalla casa produttrice.
Norme
L’apparecchio è adatto al raffreddamento
e congelamento di alimenti ed alla
preparazione di ghiaccio.
Esso è destinato all’uso domestico.
Nel caso di uso professionale devono essere
osservate le norme vigenti per l’attività
professionale.
L’apparecchio è conforme alla norma per
la prevenzione degli infortuni per impianti
frigoriferi (VBG 20).
L’apparecchio è conforme alle pertinenti
norme di sicurezza per gli apparecchi elettrici.
L’ermeticità del circuito di raffreddamento
è stata controllata.
Osservare la temperatura
ambiente
Secondo la ”classe climatica” (vedi targhetta
d’identificazione) l’apparecchio può essere
usato alle seguenti temperature ambiente:
(la targhetta d’identificazione si trova a
sinistra in basso nell’apparecchio. Figura
B
)
Classe Temperatura ambiente
climatica da ... a
SN +10 °C a 32 °C
N +16 °C a 32 °C
ST +18 °C a 38 °C
T +18 °C a 43 °C
Se la temperatura ambiente scende al di
sotto del campo di temperatura, nel vano
frigorifero la temperatura si abbassa troppo,
se supera il campo di temperatura ambiente,
nel vano congelatore la temperatura
aumenta troppo.
Se la temperatura ambiente si abbassa al
di sotto della temperatura impostata per il
vano frigorifero, la temperatura nel vano
diventa uguale a quella esterna.
A temperature ambiente inferiori a +10 °C si
possono verificare difficoltà nello sbrinamento
automatico.
Avvertenze per lo smaltimento e la sicurezza
4
IT
Avvertenze per lo smaltimento e la sicurezza
Avvertenze per lo
smaltimento
Gli apparecchi dismessi non sono rifiuti
senza valore. Attraverso lo smaltimento
ecologico possono essere recuperati
materiali pregiati.
Estrarre la spina di alimentazione degli
apparecchi dismessi. Tagliare il cavo di
collegamento e rimuoverlo insieme alla
spina.
Rimuovere la serratura. Si eviterà in questo
modo che i bambini per gioco possano
imprigionarsi e rischiare la vita.
Gli apparecchi frigoriferi e congelatori
contengono refrigeranti e gas nell’isolamento,
che richiedono uno smaltimento appropriato.
Badare che i tubi non vengano danneggiati
fino al regolare smaltimento.
L’imballaggio ha protetto il Vostro nuovo
apparecchio nel trasporto fino a Voi. Tutti
i materiali utilizzati sono compatibili con
l’ambiente e riciclabili. Siete pregati di
collaborare, smaltendo l’imballaggio in
modo ecologicamente corretto.
Non abbandonare l’imballaggio o sue parti ai
bambini per il gioco. Pericolo di soffocamento
da scatole pieghevoli e fogli di plastica.
Informatevi sulle attuali possibilità di
smaltimento presso il Vostro rivenditore
specializzato, oppure presso la Vostra
amministrazione comunale.
Questo apparecchio dispone di
contrassegno ai sensi della direttiva
europea 2002/96/CE in materia di
apparecchi elettrici ed elettronici
(waste electrical and electronic equipment WEEE).
Questa direttiva definisce le norme per la
raccolta e il riciclaggio degli apparecchi
dismessi valide su tutto il territorio
dell’Unione Europea.
Un contributo alla difesa dell’ambiente –
noi utilizziamo carta riciclata.
Avvertenze di sicurezza
Prima di mettere in funzione l’apparecchio, si
prega di leggere attentamente e interamente
le informazioni riportate nelle istruzioni per
l’uso e il montaggio. Esse contengono
importanti avvertenze per l’installazione,
l’uso e la manutenzione dell’apparecchio.
Conservare con cura le istruzioni per l’uso e il
montaggio event. per i successivi proprietari.
La casa produttrice declina ogni
responsabilità in caso d’inosservanza delle
seguenti avvertenze:
● Non mettere in funzione un apparecchio
danneggiato. Nel dubbio interpellare il
fornitore.
● Eseguire l’installazione e l’allacciamento
secondo le istruzioni per il montaggio.
Le condizioni di allacciamento elettrico
ed i dati sulla targhetta d’identificazione
devono coincidere.
● Per la pulizia escludere assolutamente
l’uso di una pulitrice a vapore. Il vapore
può raggiungere parti sotto tensione
dell’apparecchio e provocare un
cortocircuito o una scossa elettrica.
● La sicurezza elettrica dell’apparecchio
è garantita soltanto se il sistema di
collegamento a terra dell’impianto
elettrico domestico è installato a norma.
● Staccare l’apparecchio dalla rete in caso
di guasto, durante la manutenzione e la
pulizia. Estrarre la spina di alimentazione
oppure disinserire l’interruttore di
sicurezza. Tirare la spina di alimentazione
e non il cavo di collegamento.
● Solo il personale specializzato è
autorizzato ad eseguire riparazioni agli
apparecchi elettrici. Le riparazioni
eseguite in modo incompetente possono
causare seri pericoli all’utilizzatore.
● Conservare alcolici ad alta gradazione
solo chiusi ermeticamente ed in posizione
verticale.
Non conservare nell’apparecchio prodotti
contenenti gas propellenti infiammabili
(p. es. erogatori di panna, bombolette spray
ecc.) e sostanze esplosive – pericolo di
esplosione!

7
IT
Conoscere l’apparecchio
Prima di leggere queste istruzioni, aprire
le ultime pagine con le illustrazioni.
Questo libretto d’istruzioni per l’uso
è valido per diversi modelli. Nelle figure
sono possibili differenze nelle dotazioni
e nei dettagli.
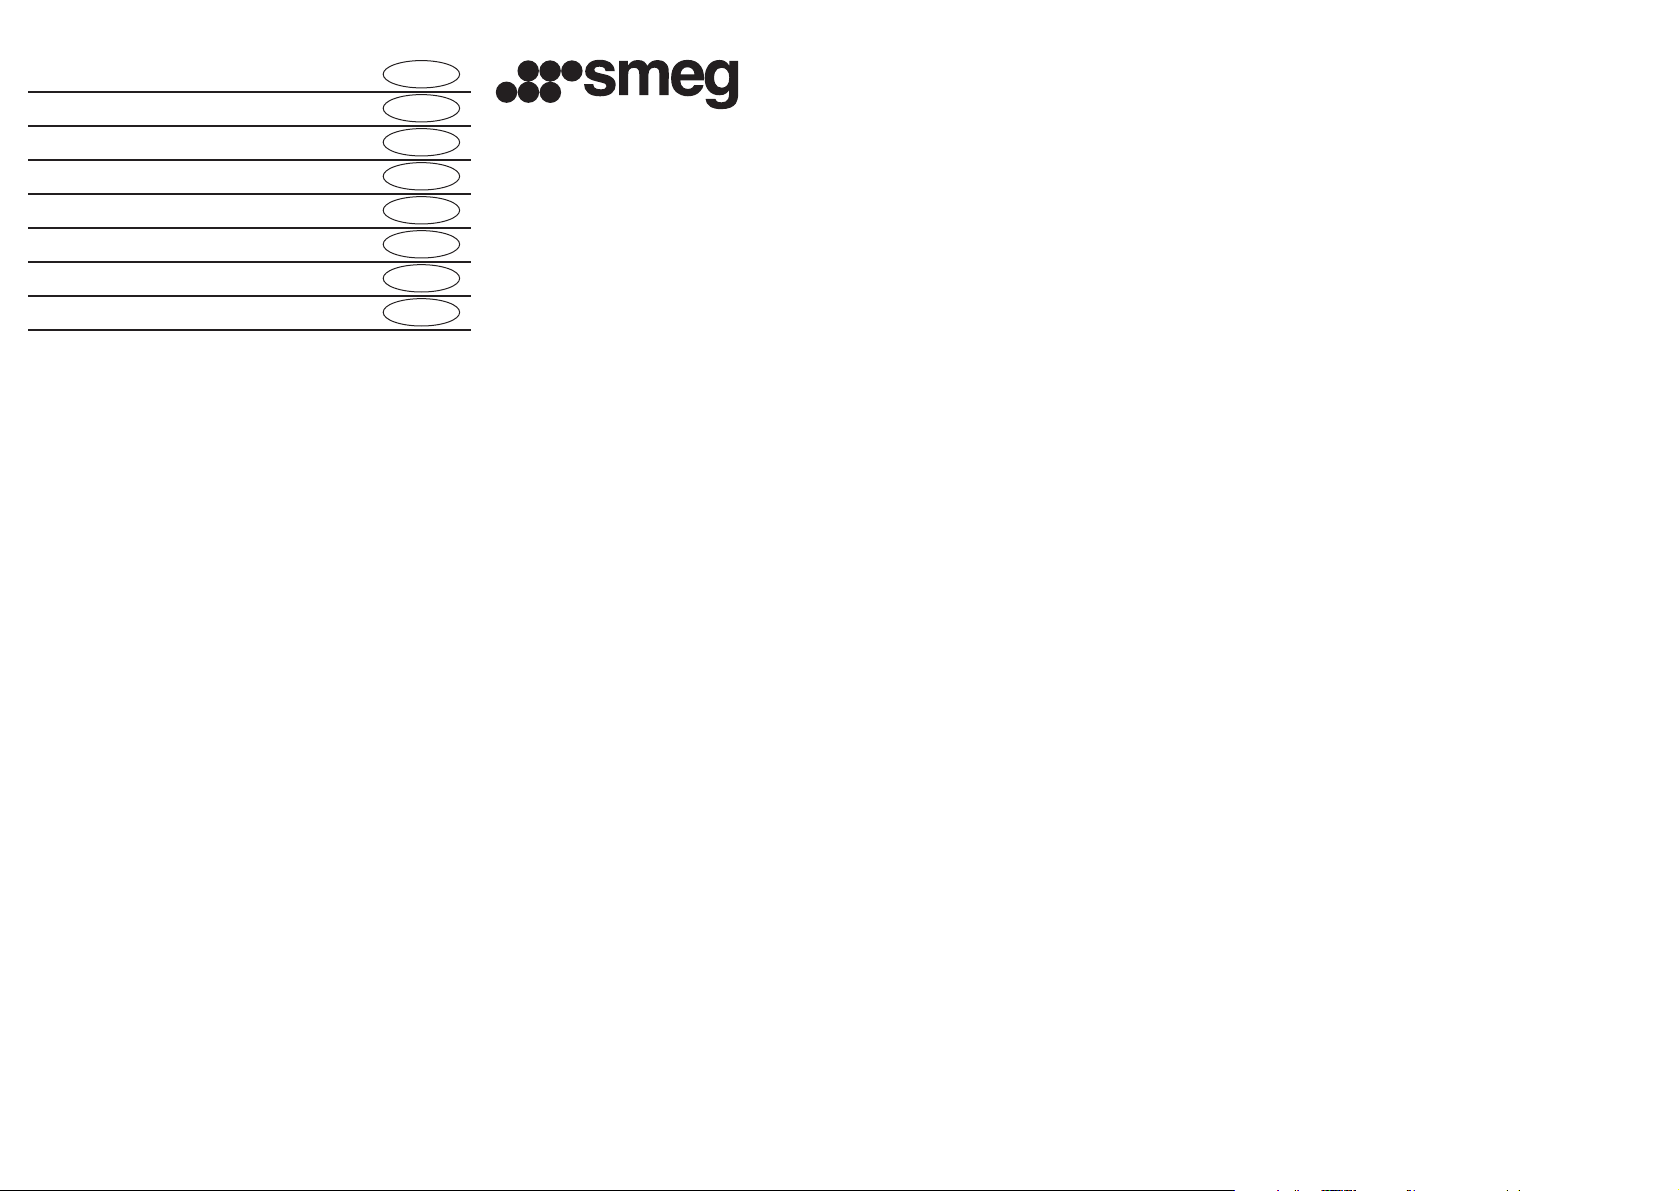
Illustrazione generale
Figura
1
1-9 Pannello comandi
10 Aperture di uscita dell'aria
11 Illuminazione interna
12 Cassetto per bicchieri di iogurt
13 Ripiano
14 Sistema Multiflow
(distributore aria fredda)
15 Cassetto verdura
16 Scomparto "Chiller"
17 Balconcino per lattine e tubetti
18 Portauova
19 Ripiano
20 Fermabottiglie
21 Portabottiglie
22 Vassoio di congelamento
23 Cassetto surgelati
A Vano frigorifero
B Vano congelatore
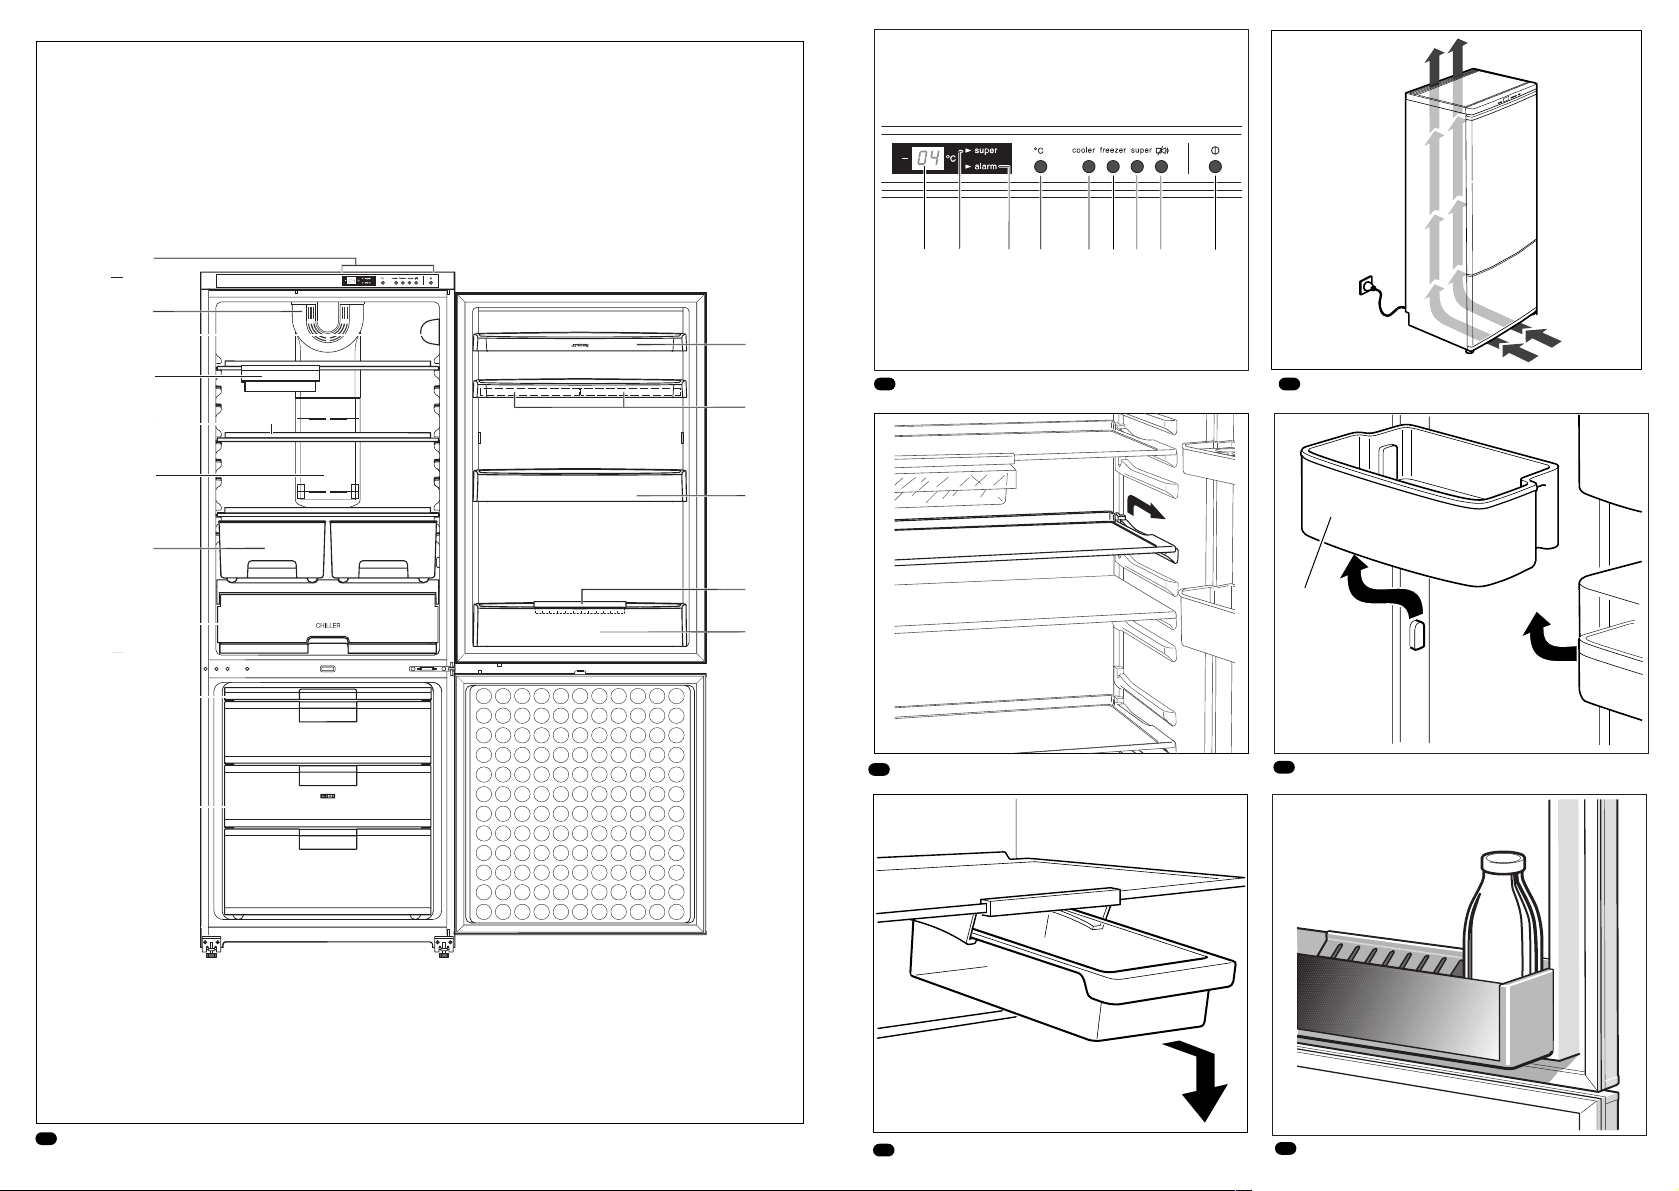
Pannello comandi
(descrizione sintetica)
Figura
2
1 Pulsante
Interruttore principale dell'apparecchio
acceso/spento
2 Pulsante “alarm” (pulsante "Allarme
spento")
a) per disattivare l'allarme acustico
b) per visualizzare la temperatura più alta
raggiunta nel vano congelatore (solo
quando il display 9 lampeggia).
3 Pulsante Super
Per la max. potenza di congelamento
4 Pulsante Freezer
Serve per visualizzare la temperatura
regolata del congelatore.
5 Pulsante Cooler
Serve per visualizzare la temperatura
regolata del frigorifero.
6 Pulsante di regolazione della
temperatura del vano congelatore e
del vano frigorifero
0
C = più freddo, meno freddo
7 Spia “alarm”
Si accende solo in caso di attivazione
della funzione di allarme.
8 Spia "super"
Si accende solo se si preme il pulsante
"super".
9 Display per
a) "Temperatura più alta"
b) "AL" indicazione di (Allarme)
c) Temperatura di regolazione per il
frigorifero
d) Temperatura di regolazione per il
congelatore
6
IT
Installazione dell’apparecchio
Luogo d’installazione
Come luogo d’installazione è idoneo un
ambiente asciutto, arieggiabile. Il luogo
d’installazione non dovrebbe essere esposto
all’irradiazione solare diretta e non deve
trovarsi vicino ad una fonte di calore, come
stufa, calorifero ecc. Se è inevitabile
l’installazione accanto ad una fonte di calore,
è necessario utilizzare un adeguato pannello
isolante, oppure rispettare le seguenti
distanze minime dalla fonte di calore:
da stufe elettriche 3 cm,
da stufe ad olio o carbone 30 cm.
In caso d’installazione accanto ad un altro
frigorifero o congelatore, è necessaria una
distanza minima laterale di 2 cm, al fine di
evitare la formazione di condensa.
L'appoggio dell'apparecchio deve essere
stabile e livellato. Compensare le
disuguaglianze del pavimento per mezzo dei
due piedi a vite sotto il lato anteriore,
figura
C
.
Due rotelle sotto il lato posteriore facilitano
l'introduzione in una nicchia.
Collegamento elettrico
Collegare gli apparecchi solo alla corrente
alternata a 220–240 V/50 Hz, tramite una
presa con contatto di terra installata a
norma. La presa deve essere protetta con
dispositivo di sicurezza da 10 A o superiore.
Per gli apparecchi destinati a paesi non
europei, sulla targhetta d’identificazione si
deve verificare se la tensione di collegamento
e il tipo di corrente corrispondono ai valori
della rete elettrica locale. La targhetta
d’identificazione si trova nel vano frigorifero
sotto a sinistra. FiguraB.
Una sostituzione eventualmente necessaria
del cavo di collegamento alla rete deve
essere eseguita solo dal servizio assistenza
clienti del produttore.
Pericolo! Evitare tassativamente l’allacciamento dell’apparecchio a ”prese
risparmio energetico” elettroniche (per
es. Sava Plug) e ad invertitori, che
convertono la corrente continua in
corrente alternata a 230 V (per es. impianto
d’energia solare, reti elettriche navali).
Aerazione
Figura
3
L’aria riscaldata sulla parete posteriore
dell’apparecchio deve poter defluire
liberamente. Altrimenti il compressore non
raffredda bene e ciò aumenta il consumo di
corrente.
Evitare perciò assolutamente di coprire le
aperture di afflusso e deflusso dell’aria.
Dopo il trasporto ...
Prima di accendere l'apparecchio la prima
volta, tenerlo ca. 1/2 ora verticale.
9
IT
8
IT
Conoscere l’apparecchio
Grazie al sistema automatico Nofrost il
vano congelatore resta libero dal ghiaccio.
Non è più necessario lo sbrinamento.
Funzionamento:
Gli alimenti vengono congelati dall’aria
fredda!
Un evaporatore, che si trova nel sistema
Nofrost, raffredda l’aria nell’apparecchio. Un
ventilatore fa circolare l’aria fredda. Un
secondo ventilatore provvede alla
circolazione dell'aria nel vano frigorifero.
L’umidità contenuta nell’aria si condensa
sull’evaporatore. Se necessario, l’evaporatore viene sbrinato automaticamente.
L’acqua di sbrinamento viene fatta scorrere
sul compressore e qui evapora. Nel vano
congelatore e sugli alimenti non si forma
ghiaccio.
La funzione degli elementi
di comando e controllo
Figura
2
1 Pulsante
Interruttore principale dell’apparecchio,
serve ad inserire ed escludere l’intero
apparecchio.
2 “alarm” Pulsante allarme
Serve per disattivare l'allarme acustico .
L'allarme acustico si attiva se la
temperatura nel vano congelatore è
troppo alta e quindi gli alimenti surgelati
sono in pericolo (contemporaneamente il
display 9 lampeggia).
L'allarme acustico può attivarsi, senza
pericolo per gli alimenti surgelati,
- alla messa in funzione dell'apparecchio,
- all'introduzione di alimenti freschi senza
avere inserito il superfreezer
- e quando la porta del vano congelatore
resta aperta troppo a lungo.
Dopo avere disattivato il segnale acustico
di allarme, l' "allarme acustico" viene
rimesso automaticamente in condizione
di attesa quando nel vano congelatore si
raggiunge la temperatura di
funzionamento regolata.
3 Pulsante "Super"
Serve per accendere e spegnere il
superfreezer. La messa in funzione è
visualizzata sia dall‘indicatore 8 "Super",
sia dal display 9 con "SU". Il superfreezer
serve per congelare grandi quantità di
alimenti freschi e deve essere acceso fino
a 24 ore prima dell‘introduzione degli
alimenti freschi.
Dopo l'inserimento il refrigeratore
funziona continuamente, nel vano
congelatore si raggiunge una temperatura
molto bassa.
4 Pulsante «Freezer»
Serve per visualizzare la temperatura
regolata del congelatore nel display 9
(vedi descrizione dislpay 9d).
Conoscere l’apparecchio
5 Pulsante «Cooler»
Serve per visualizzare la temperatura
regolata del frigorifero nel display 9 (vedi
descrizione dislpay 9c).
6 Pulsante di regolazione della
temperatura del vano frigorifero e del
vano congelatore
a) (La temperatura del frigorifero può essere
regolata da 2 °C a 8 °C). Premere il
pulsante "Cooler" e dopo il pulsante °C.
La temperatura di regolazione è
visualizzata nel display 9. Premere
ripetutamente o mantenere premuto il
pulsante di regolazione, finché non viene
visualizzata la temperatura desiderata.
(La temperatura di regolazione viene
visualizzata in progressione continua da
8 °C a 2 °C. Dopo 2 °C appare di nuovo
8 °C).
b) (La temperatura del congelatore può
essere regolata da -16 °C a -26 °C). Per
regolare la temperatura desiderata del
congelatore premere il pulsante
"Freezer" e dopo il pulsante °C. La
temperatura di regolazione viene
visualizzata nel display 9. Premere
ripetutamente o mantenere premuto il
pulsante di regolazione, finché non viene
visualizzata la temperatura desiderata.
(La temperatura di regolazione viene
visualizzata in progressione continua da
-16 °C a -26 °C. Dopo –26 °C appare di
nuovo –16 °C.
7 Spia “alarm”
Si accende solo se è stata attivata la
funzione di allarme. Ciò avviene se la
temperatura nel vano congelatore è
troppo alta e quindi gli alimenti surgelati
sono in pericolo. Si spegne quando il
vano congelatore ha raggiunto di nuovo
la sua temperatura di funzionamento.
8 Spia "super"
si accende solo se si preme il pulsante
"super" 3 inserendo con ciò il
superfreezer.
Si spegne se si preme di nuovo il
pulsante "super" per disinserire il
superfreezer.
Si spegne automaticamente non prima
di 52 ore dopo l'inserimento del
superfreezer.
9 Display multifunzione
indica diverse temperature
a) Temperatura del congelatore poco
fredda
Se il display 9 lampeggia, al momento
oppure in precedenza, a causa di
un‘interruzione dell‘alimentazione
elettrica o di un guasto, nel congelatore
la temperatura al momento è oppure in
precedenza è aumentata
eccessivamente. Premendo il pulsante
Allarme , nel display 9 appare (senza
intermittenza) per cinque secondi la
temperatura più alta raggiunta nel
congelatore. Poi questo valore scompare.
In seguito il display 9 indica senza
intermittenza la temperatura
programmata del congelatore.
b) «Al» indicazione di (Allarme)
Viene visualizzata quando la temperatura
nel congelatore è troppo alta.
c) Temperatura di regolazione per il
frigorifero
Premendo il pulsante «Cooler» viene
visualizzata la temperatura di regolazione
del frigorifero.
d) Temperatura di regolazione per il
congelatore
Premendo il pulsante «Freezer» viene
visualizzata la temperatura di regolazione
del congelatore.

11
IT
10
IT
Avvertenze
● La temperatura nel vano frigorifero può
oscillare a causa di:
– frequente apertura della porta
dell’apparecchio,
– introduzione di grandi quantità di
alimenti freschi nel vano frigorifero e nel
vano congelatore,
– cambiamenti della temperatura
ambiente,
– modifica della regolazione del selettore
temperatura per il vano congelatore
o a causa del superfreezer.
● Le parti anteriori della carcassa
vengono in parte riscaldate
leggermente; ciò impedisce una
formazione di acqua di condensa nella
zona della guarnizione della porta.
Disinserire
Premere l’interruttore principale, figura 2/1,
per disinserire l’apparecchio.
Mettere fuori servizio
l’apparecchio
Se l’apparecchio resta inutilizzato per un
lungo periodo:
Premere l’interruttore principale figura
2
/1,
pulire l’apparecchio, lasciare la porta aperta.
Disinserire, mettere fuori
servizio l’apparecchio
Inserimento e selezione della temperatura
Figura
2
● Inserire la spina nella presa.
● Premere 1 volta l‘interruttore
principale dell‘apparecchio
Viene emesso un segnale acustico, il
display 9 lampeggia ed indica "AL".
● Premere il “alarm” pulsante
allarme 2
Il segnale acustico cessa. Il display indica
ora per 5 sec. la temperatura attuale.
Nel display 9 appare "AL".
● Regolare la temperatura per il vano
congelatore.
A tal fine premere il pulsante "Freezer" e
subito dopo il pulsante
0
C. Premere il
pulsante
0
C più volte oppure
continuamente, finché non viene
visualizzata la temperatura desiderata
(successione ciclica, dopo -26
0
C
compare di nuovo -16
0
C).
Consigliamo una regolazione della
temperatura del vano congelatore a -20
0
C.
● Regolare la temperatura per il vano
frigorifero.
A tal fine premere il pulsante "Cooler" e
subito dopo il pulsante
0
C. Premere il
pulsante
0
C più volte oppure
continuamente, finché non viene
visualizzata la temperatura desiderata
(successione ciclica, dopo 8
0
C compare
di nuovo 2
0
C).
Consigliamo una regolazione della
temperatura del vano frigorifero a +4
0
C.
Una correzione della temperatura
impostata diventa efficace solo
lentamente.
Sistemazione degli
alimenti
Tenere presente nella
sistemazione
● Fare raffreddare fuori del frigorifero gli
alimenti e le bevande caldi.
● Disporre gli alimenti possibilmente nelle
confezioni o ben coperti. Così si
conservano aroma, colore, umidità
e freschezza, inoltre si evitano
contaminazioni del gusto. Conservare
non confezionati solo verdura, frutta
e insalata nei cassetti per verdura.
● Evitare di ungere le parti di materiale
plastico e la guarnizione della porta con
olio o grasso (altrimenti potrebbero
diventare porose).
● Non conservare nell’apparecchio sostanze
esplosive, e conservare gli alcolici ad alta
gradazione solo ben chiusi e in posizione
verticale.
– Pericolo di esplosione!
● Non conservare nel vano congelatore
bottiglie con liquidi che possono gelare.
Gelando le bottiglie scoppiano.
Esempio di sistemazione
Figura
1
Vano frigorifero (A)
Sui ripiani (13) dall’alto verso il basso
prodotti da forno, alimenti pronti, latticini.
Nel cassetto (14) formaggio, salsiccia,
iogurt.
Nel cassetto verdura (15) verdura, frutta
e insalata.
Nel balconcino (17) bottigliette, lattine.
Nel portabottiglie (20) bottiglie grandi.
Vano congelatore (B)
Sul vassoio di congelamento (22)
conservare piccoli alimenti surgelati,
preparare il ghiaccio.

13
IT
12
IT
Tenere presente
nell’acquisto di alimenti
surgelati
● Fare attenzione alla confezione. Non
dovrebbe essere danneggiata.
● La data di scadenza del prodotto non
deve essere stata superata.
● Il termometro dell’espositore-congelatore
di vendita deve indicare una temperatura
di –18 °C o inferiore.
● Quando si fa la spesa, acquistare per
ultimi gli alimenti surgelati, portarli a casa
al più presto bene avvolti in carta di
giornale o in una borsa termica, e
conservarli subito nel vano congelatore.
Congelare in proprio
alimenti
Se si provvede in proprio al congelamento
degli alimenti, utilizzare solo prodotti
alimentari freschi e integri.
Per il confezionamento sono adatti
Carne e insaccati di carne, pollame e
selvaggina, pesce, verdura, erbe aromatiche,
frutta, prodotti da forno, pizza, pietanze
pronte, resti di alimenti, rosso e bianco
d’uovo.
Non sono adatti per il congelamento
Uova intere nella buccia, panna acida e
maionese, insalate in foglia, ravanelli, rafani
e cipolle.
Scottatura di verdura e frutta
Per conservare colore, gusto, aroma
e vitamina ”C”, verdura e frutta dovrebbero
essere scottate prima della conservazione.
(Per la scottatura immergere verdura e frutta
per breve tempo in acqua bollente. – In
libreria sono in vendita pubblicazioni sul
congelamento, nelle quali si descrive anche
la scottatura.)
Congelare e conservare
Sistemazione degli alimenti
Nei cassetti per surgelati superiori (23)
Conservare alimenti surgelati.
L’attrezzatura interna
I ripiani nel vano frigorifero possono essere
anche spostati, aprendo la porta a 90°.
Per spostarli tirare i ripiani verso avanti,
abbassarli, estrarli e inserirli di nuovo
nella posizione desiderata (figura 4).
Scomparto "Chiller" (figura
8
)
Tirare verso avanti il fondo dello scomparto,
lo sportello si apre.
Tirare verso avanti il fondo del vano, lo
sportello si apre.
Nel Vano a 0
0
C le temperature sono più
basse rispetto al vano frigorifero. In esso
possono verificarsi anche temperature
inferiori a 0
0
C. Ideale per conservare pesce,
carne e salsiccia. Non è idoneo per
insalate, verdure ed alimenti sensibili al
freddo.
Il cassetto piccolo può essere utilizzato per
caricare e scaricare (Figura 6).
I portauova nei contenitori possono essere
sollevati per conservare tubetti, lattine ecc.
Per evitare che le bottiglie cadano durante
l’apertura e chiusura della porta, possono
essere fermate con il fermabottiglie.
Figura7.
Tutti i balconcini e contenitori nella porta
possono essere estratti per la pulizia.
Per estrarli, sollevare balconcini
e contenitori. Figura 5/A.
Confezionare alimenti
Confezionare i prodotti in porzioni adatte
al fabbisogno domestico.
Dividere la verdura e frutta in porzioni non
superiori a 1 kg, e la carne fino a max.
2,5 kg. Le porzioni più piccole gelano
completamente in minor tempo, e la qualità
resta così conservata al meglio anche dopo
lo scongelamento e la preparazione.
Confezionare gli alimenti in confezioni
ermetiche, per evitare che perdano il loro
gusto o che possano seccarsi.
Per il confezionamento sono adatti:
fogli in plastica, fogli tubolari di polietilene,
fogli di alluminio e contenitori per congelare.
Questi prodotti si trovano nel commercio
specializzato.
Non sono adatti:
carta per imballaggio, carta pergamena,
cellofan, sacchetti per rifiuti e sacchetti per
la spesa usati.
Introdurre gli alimenti nella confezione.
Fare uscire completamente l’aria e chiudere
ermeticamente la confezione.
Per la chiusura sono adatti:
anelli di gomma, clip di plastica, fili per legare,
nastri adesivi resistenti al freddo e simili.
I sacchetti e fogli tubolari in polietilene
possono essere saldati con un saldatore per
fogli di plastica.
Prima della conservazione nel vano
congelatore, scrivere sulle confezioni il
contenuto e la data di congelamento.
Max. capacità di
congelamento
Gli alimenti devono congelarsi al più presto
possibile anche nel loro interno. Solo così si
conservano le vitamine, il potere nutritivo,
l’aspetto ed il gusto. Perciò non si deve
superare la capacità massima di
congelamento dell’apparecchio.
Congelare e conservare
Nel cassetto surgelati superiore in 24 ore si
possono congelare le seguenti quantità di
alimenti
negli apparecchi con larghezza 70 cm max. 12 kg
negli apparecchi con larghezza 60 cm max. 9 kg.
Gli alimenti già congelati non devono venire
a contatto con gli alimenti freschi da congelare. Eventualmente spostare gli alimenti.
Fare raffreddare fino a temperatura ambiente
gli alimenti e le bevande caldi, prima
d’introdurli nel vano congelatore.
Sulla targhetta d’identificazione si riportano I
dati sulla massima possibilità di
congelamento secondo la norma attuale
(figura B).
Superfreezer
Se nel vano congelatore sono già conservati
alimenti, qualche ora prima d’introdurre
prodotti freschi deve essere inserito il
superfreezer.
In generale sono sufficienti 4–6 ore. Se si
vuole sfruttare la max. potenza di
congelamento, sono necessarie 24 ore.
Piccole quantità di alimenti (fino a 2 kg)
possono essere congelate senza
superfreezer. Per inserire il superfreezer basta
premere il tasto superfreezer figura 2/3.
Alla messa in funzione il display "super"
s’illumina. Dopo l'inserimento, nel vano
congelatore si raggiunge una temperatura
molto bassa. Il superfreezer si disinserisce
automaticamente ca. 52 ore dopo
l'inserimento.
Sistemazione degli alimenti
Badare sempre che tutti i cassetti di
congelamento siano inseriti completamente
fino all’arresto.
Ciò è importante per una perfetta
circolazione dell’aria nell’apparecchio.

15
ITIT
Avvertenze sui rumori di
funzionamento
Rumori di funzionamento
Per mantenere costante la temperatura
selezionata, ogni tanto il compressore entra
in funzione.
I relativi rumori dipendono dal normale
funzionamento.
Essi si riducono automaticamente non
appena l’apparecchio raggiunge la
temperatura di servizio.
Il ronzio proviene dal motore (compressore).
Può diventare temporaneamente un poco
più forte, quando il motore entra in funzione.
Il gorgoglìo, scroscio o ronzìo derivano dal
refrigerante, che scorre attraverso i tubi.
Il breve scatto si sente sempre quando il
termostato inserisce o disinserisce il motore.
Si può sentire scricchiolìo quando...
- entra in funzione lo sbrinamento
automatico,
- l'apparecchio si raffredda o riscalda
(contrazione/dilatazione dei materiali).
In un apparecchio multizone o No Frost un
leggero fruscìo può provenire dalla corrente
d’aria nell’interno dell’apparecchio.
Se questi rumori di funzionamento
normali fossero troppo forti, è possibile
che vi siano altre cause elementari,
spesso facili da eliminare.
L’appoggio dell’apparecchio non è stabile
Livellare l’apparecchio per mezzo di una
livella a bolla d’aria. Utilizzare a tal fine i piedi
a vite oppure inserire spessori sotto i piedi.
L’apparecchio è in contatto laterale
Allontanare l’apparecchio dai mobili
o apparecchi con i quali è in contatto.
Cassetti, cesti o ripiani vibrano o sono
incastrati
Controllare gli elementi estraibili
e posizionarli correttamente.
Bottiglie e contenitori si toccano tra loro
Separare le bottiglie o i contenitori.
● Installare l’apparecchio in un ambiente
fresco e ben arieggiato, al riparo
dall’irradiazione solare diretta e non vicino
ad una fonte di calore (radiatori ecc.).
● Non ostruire le aperture di afflusso
e deflusso dell’aria dell’apparecchio.
● Disporre i cibi caldi nel vano congelatore
solo dopo il loro raffreddamento
a temperatura ambiente.
● Per sbrinare i prodotti congelati, metterli
nel frigorifero. Così si sfrutta il freddo
accumulato dai prodotti congelati, per
il raffreddamento degli alimenti nel
frigorifero.
● Per prelevare o introdurre prodotti, aprire
la porta dell’apparecchio il tempo più
breve possibile.
La formazione di ghiaccio sulle griglie di
congelamento dipende dalla durata di
apertura della porta.
● Pulire ogni due anni lo scambiatore di
calore (griglia nera) nella parte posteriore
dell’apparecchio.
Consigli per il risparmio
energetico
14
IT
Congelare e conservare
Vassoio di congelamento
Figura
:
Il vassoio di congelamento è idoneo per
conservare vaschette di ghiaccio e per
congelare singolarmente bacche, frutta,
erbe aromatiche ed ortaggi.
Per il congelamento singolo, spargere gli
alimenti uniformemente, senza
ammucchiarli, sul vassoio di congelamento
e lasciarli congelare completamente per ca.
10–12 ore.
Poi versarli in sacchetti per congelati o in
contenitori.
Per scongelare questi alimenti, distribuirli di
nuovo singolarmente senza ammucchiarli.
Scongelamento di alimenti
congelati
Secondo il tipo e lo scopo d’uso, è possibile
scegliere tra le possibilità seguenti:
a temperatura ambiente,
in frigorifero,
nel forno elettrico,
con/senza ventilatore ad aria calda,
nel forno a microonde.
Gli alimenti parzialmente e completamente
scongelati possono essere di nuovo congelati,
se la loro temperatura non è aumentata al di
sopra di +3 °C, per la carne ed il pesce per
oltre un giorno, e per gli altri alimenti surgelati
per oltre tre giorni.
Altrimenti, se il gusto, l’odore e l’aspetto
sono invariati, preparare gli alimenti,
mediante cottura oppure arrosto, in una
pietanza pronta e congelarli di nuovo.
In tal caso, non utilizzare più l’intera durata
max. di conservazione.
Preparazione di ghiaccio
Figura
9
Riempire con acqua per 3/4 la vaschetta per
il ghiaccio e disporla nel vano congelatore.
Per staccare cubetti di ghiaccio torcere
leggermente la vaschetta.
Pulizia
Prima della pulizia, è indispensabile
estrarre la spina di alimentazione, oppure
disinserire il dispositivo di sicurezza.
Non usare pulitrici a vapore o a pressione
di vapore. Il vapore caldo può danneggiare
le superfici e l’impianto elettrico.
– Pericolo di scarica elettrica!
L’acqua di pulizia non deve penetrare nel
pannello di comando e nell’illuminazione.
Per la pulizia dell’intero apparecchio, ad
eccezione della guarnizione della porta, è
adatta acqua tiepida con detersivo delicato,
leggermente disinfettante, p. es. detersivo
per il lavaggio a mano delle stoviglie.
Non sono adatti prodotti contenenti sabbia,
abrasivi o acidi e solventi chimici.
Strofinare la guarnizione della porta solo con
acqua pulita e poi asciugarla accuratamente.
Se possibile, ogni due anni bisognerebbe
pulire con un pennello o con un
aspirapolvere anche lo scambiatore di
calore (griglia nera) nella parte posteriore
dell’apparecchio. Ciò consente di conservare
la piena efficienza dell’apparecchio e di
risparmiare energia elettrica.
IT
16
IT
17
Servizio assistenza clienti
Targhetta d’identificazione
Figura
B
Rivolgendovi al servizio assistenza, siete
pregati d’indicare il numero di prodotto
(E-numero) e il numero di fabbricazione
(FD-numero).
Le due sigle si trovano nel campo con orlo
nero sulla targhetta d’identificazione, in
basso a sinistra nel vano frigorifero, accanto
al cassetto per la verdura.
L’indirizzo e il numero telefonico del servizio
assistenza clienti risultano dall’elenco dei
centri di assistenza clienti, oppure dalla
rubrica telefonica.
Eliminare da soli i piccoli
guasti
dell‘indicazione cessa quando il congelatore
raggiunge di nuovo la sua temperatura di
funzionamento.
Se la porta del vano congelatore è stata
aperta troppo a lungo ed ora il vano
congelatore non raggiunge più la sua
temperatura impostata,
l’evaporatore (generatore del freddo)
è coperto da ghiaccio al punto tale, che
il sistema di sbrinamento automatico non
riesce più a sbrinare la quantità di ghiaccio
formatasi. In questo caso togliere dall’apparecchio i prodotti congelati e conservarli
ben isolati in un posto freddo.
Spegnere l’apparecchio e lasciare la porta
del vano congelatore aperta. Dopo ca.
12 ore il ghiaccio nel sistema di raffreddamento si scioglie. Riaccendere l’apparecchio
e rimettere in esso gli alimenti congelati.
Se non si riesce ad eliminare l'inconveniente
seguendo le avvertenze innanzi dette,
rivolgersi al servizio assistenza clienti.
Non aprite troppo spesso la porta senza
necessità, per evitare perdite di freddo.
Non eseguite personalmente altri lavori,
soprattutto alle parti elettriche
dell’apparecchio.
Non tutti i guasti richiedono l'intervento
del servizio assistenza clienti. Spesso si
tratta solo di eliminare una sciocchezza.
Prima di rivolgersi al servizio assistenza,
si prega di controllare se è possibile
eliminare autonomamente l'inconveniente,
con l'aiuto delle avvertenze seguenti.
In caso d'intervento del servizio assistenza
viene addebitato l'intero diritto fisso di
chiamata del tecnico, anche durante il
periodo di garanzia.
Se il display figura
2
/9 non si accende:
controllare se vi è energia elettrica, se la
spina è inserita correttamente nella presa
e se l’apparecchio è acceso.
Se durante la messa in funzione
dell‘apparecchio viene visualizzata
l‘indicazione (figura
2
/9) «E1»
(intermittente):
nel frigorifero la temperatura è molto alta.
Pochi minuti dopo la messa in funzione
dell‘apparecchio, se si preme il pulsante
Cooler, viene visualizzata la temperatura
regolata del frigorifero. Altrimenti viene
visualizzata l‘indicazione «Al» (temperatura
alta nel frigorifero) oppure la temperatura
regolata del congelatore.
Se durante la messa in funzione
dell‘apparecchio viene visualizzata
l‘indicazione (figura
2
/9) «E2»
(intermittente):
nel congelatore la temperatura è molto alta.
Pochi minuti dopo la messa in funzione
dell‘apparecchio, se si preme il pulsante
Freezer, viene visualizzato «Al» e
successivamente la temperatura regolata del
congelatore. Altrimenti nel display appare la
temperatura regolata del frigorifero.
Se l’illuminazione nel vano frigorifero non
funziona:
– La lampadina ad incandescenza
è fulminata. Estrarre la spina di alimentazione, rimuovere il coperchio (figura
A
/A),
sostituire con una lampadina di max. 15 W,
230 V, portalampada E 14 dello stesso tipo.
– l’interruttore della luce è bloccato
(figura
A
/B). Controllare se il movimento
è possibile, altrimenti rivolgersi al servizio
assistenza clienti.
Se il display figura
2
/9 lampeggia, ma
non viene emesso il segnale acustico,
a causa di un’interruzione di corrente o di
un guasto, in precedenza la temperatura nel
vano congelatore è aumentata troppo.
Premendo il pulsante Allarme , nel
display 9 viene visualizzata (non
intermittente) per cinque secondi la
temperatura più alta, che è stata raggiunta
nel congelatore. Successivamente questo
valore scompare. – Il display 9 indica allora
senza lampeggiare la temperatura
programmata del congelatore.
Se il display ha visualizzato una temperatura
superiore a +3 °C, è necessario controllare
gli alimenti congelati.
Se il gusto, l’odore e l’aspetto sono invariati,
preparare con gli alimenti congelati,
mediante cottura o frittura, una pietanza
pronta e congelare di nuovo.
Non utilizzare più interamente la durata
massima di conservazione.
Se dopo un lungo tempo di
funzionamento lampeggia l‘indicazione
figura
2
/9 e viene emesso il segnale
acustico:
Guasto, nel congelatore la temperatura è
troppo alta!
Nel display è visualizzata la temperatura
programmata del congelatore.
Per disattivare il segnale acustico, premere il
pulsante "Allarme" .
Cause possibili del guasto:
- la fessura di ventilazione in alto
sull‘apparecchio oppure nello zoccolo è
ostruita,
- la porta del frigorifero non è chiusa
correttamente,
- sono stati introdotti alimenti freschi senza
attivare il superfreezer,
- nel congelatore sono stati conservati troppi
alimenti freschi da congelare in una sola
volta,
- alta temperatura ambiente.
Dopo avere eliminato il guasto, premere il
pulsante "Allarme" ; l‘intermittenza
Eliminare da soli i piccoli guasti
19
GB
substances should not be stored inside
this appliance – explosion hazard!
● Liquids in bottles and cans, in particular
carbonated drinks, should never be stored
in the freezer as the bottles and cans will
burst.
● Do not cover or block the vents or grilles
of your appliance.
● Do not use the base panel, pull-out parts,
doors etc. to stand or lean on.
● Do not allow children to play with this
appliance.
● If the appliance is fitted with a lock, keep
the key in a safe place out of the reach of
children.
● Never put ice cubes or ice lollies straight
from the freezer into your mouth. (The low
temperature may cause “freezer burns”.)
● Never touch any frozen food if your hands
are wet, as they may stick to it.
● WARNING: Keep ventilation openings, in
the appliance enclosure or in the built-in
structure, clear of obstruction.
● WARNING: Do not damage the refrigerant
circuit.
● WARNING: Do not use electrical
appliances inside the food storage
compartements of the appliance,unless
they are of the type recommended by the
manufacturer.
This unit contains the coolant
isobutane (R 600a), a natural
gas which is very
environmentally friendly but
also combustible. When transporting and
installing the unit care must be taken to
ensure that none of the refrigeration
circuit components become damaged. In
the event of damage avoid naked flames
or ignition sources and ventilate the room
in which the unit is placed for a few
minutes.
Warning - Do not use mechanical devices
or other artificial means to accelerate the
defrosting process, other than those
recommended dy the manufacturer.
Disposal and safety information
Regulations
The appliance is suitable for refrigerating
and freezing food, and making ice cubes.
It is designed for domestic use.
If using the appliance for commercial
purposes, please observe the statutory
regulations applicable for the trade sector in
question.
The appliance adheres to current German
regulations for the prevention of accidents
caused by refrigerating equipment (VBG 20).
This product meets all the relevant safety
regulations applicable to electrical appliances.
The refrigerating circuit has been leak-tested.
Observe ambient
temperature
Depending on the “climatic category” (see
rating plate), the appliance can be operated
at the following ambient temperatures.
(The rating plate can be found inside the
appliance at the bottom left-hand side.
Fig.
B
).
Climatic Ambient temperature
category from ... to
SN +10 °C to 32 °C
N +16 °C to 32 °C
ST +18 °C to 38 °C
T +18 °C to 43 °C
If the temperature drops below the ambienttemperature range, the refrigerator compartment will become too cold. If the temperature
exceeds the ambient-temperature range, the
freezer compartment will become too warm.
If the ambient temperature drops below the
set temperature in the refrigerator, the latter
will drop to the ambient temperature.
At ambient temperatures below +10 °C,
functional irregularities may occur during
automatic defrosting of the refrigerator
interior.
18
GB
Disposal and safety information
Notes on disposal
Old appliances still have some residual
value. An environment-friendly method
of disposal will ensure that valuable raw
materials can be recovered and used again.
Unplug your old appliance, cut through the
mains cable and throw away cable and plug
together.
Remove the door lock so that children at
play cannot become trapped inside and risk
suffocation.
The refrigerant used in fridge/freezers and
the gases in the insulation material require
special disposal procedures. Ensure that
none of the pipes on the back of the
appliance are damaged prior to disposal.
Your new appliance was protected by
adequate packaging while it was on its way
to you. All materials used for this purpose
are environment-friendly and suitable for
recycling. Please contribute to protecting the
environment by disposing of the packaging
appropriately.
Do not allow children to play with any
parts of the packaging. There is a risk of
suffocation by the cardboard boxes and
plastic wrapping.
Up-to-date information concerning options
for disposing of your old appliance and the
packaging from the new one can be obtained
from your retailer or local council office.
This appliance is labelled in
accordance with European Directive
2002/96/EG concerning used
electrical and electronic appliances
(waste electrical and electronic equipment WEEE). The guideline determines the
framework for the return and recycling of
used appliances as applicable throughout
the EU.
As a contribution to environmental
protection, we use recycled paper.
Safety information
Before starting the appliance for the first
time, you should read the information
contained in the operating and installation
instructions carefully. This information is vital
for the installation, operation and servicing
of the appliance.
Keep the operating and installation
instructions in a safe place and remember to
hand them over to any subsequent owner.
The manufacturer shall not be liable if the
following instructions are not observed:
● Never start up an appliance showing any
signs of damage. If in doubt, consult your
dealer.
● Installation and connection of the
appliance must be carried out according
to the installation instructions. Supply
conditions and data must coincide with
the data on the rating plate.
● Do not under any circumstances use
a steam cleaner on this appliance. The
steam could come into contact with live
parts of the appliance and cause a shortcircuit or electric shock.
● Electrical safety of the appliance is only
guaranteed if the household earthing
system has been installed in compliance
with regulations.
● Disconnect appliance from the mains in
case of malfunction and when cleaning or
servicing the appliance. Either withdraw
the plug or turn off at the fuse. Pull the
plug itself and not the cable.
● Repairs and maintenance of the appliance
should only be performed by a qualified
technician. Incorrect repairs carried out
by someone unqualified are a potential
source of danger that may have critical
consequences for the user of the
appliance.
● Bottles containing high-proof alcoholic
drinks should be properly sealed and
stored standing up.
Products that make use of a flammable
propellant gas (e.g. whipped cream
sprays, aerosols) and explosive
21
GB
Getting to know your appliance
Before reading on, please unfold the pages
at the back of this manual featuring the
illustrations.
These operating instructions apply to
various models. It is possible that some
details of the illustrations do not coincide
exactly with the particular characteristics
of your appliance.
General view
Figure
1
1-9 Control panel
10 Air vent opening
11 Interior light
12 Drawer for yoghurt cartons
13 Shelf
14 Multiflow system
(cold air distributor)
15 Fruit and vegetable container
16 "Chiller" compartment
17 Tray for small cans, tubes
18 Egg rack
19 Shelf
20 Bottle keeper
21 Bottle shelf
22 Freezer tray
23 Frozen-food container
A Fridge section
B Freezer section
Control panel
(Quick guide)
Figure
2
1 button
Appliance main switch for on/off
2 “alarm” button ("alarm off" switch)
a) For switching off the warning buzzer.
b) For displaying the warmest
temperature which has prevailed in the
freezer compartment (only if display 9
flashes).
3 Super button
For maximum freezing capacity.
4 Freezer button
Is used to display the set freezercompartment temperature.
5 Cooler button
Is used to display the set refrigeratorcompartment temperature
6 Temperature selection button for
freezer compartment or refrigerator
compartment
0
C = colder, warmer
7 “alarm” display
Only illuminates if the alarm function is
activated.
8 “super” display
Only illuminates if the "super" button is
pressed.
9 Display for
a) "Warmest temperature"
b) "AL" (Alarm) display
c) Set temperature for
refrigerator compartment
d) Set temperature for freezer
compartment
20
GB
Installation
Siting
A dry and adequately ventilated room is the
best location for installing the appliance.
Remember that the appliance should not be
exposed to direct sunlight, nor should it be
close to a direct source of heat such as a
cooker, radiator, etc. Where installation close
to a heat source is unavoidable, ensure
that a suitable insulating panel is used or
maintain the following minimum clearances
between the appliance and the heat source:
3 cm clearance (electric cookers)
30 cm clearance (oil or coal-fired stoves).
If the appliance is placed next to another
refrigerator or freezer, keep a minimum 2 cm
clearance at the side in order to prevent
condensation.
The appliance must be stable and level. To
compensate for an uneven floor, use the two
height-adjustable feet at the front of the
appliance, Fig. C.
Two castors at the rear of the appliance
facilitate installation into a recess.
Electrical connection
Only connect appliances to a 220–240 V/
50 Hz a.c. supply by means of a safety
socket installed in accordance with
regulations.
Make sure that the socket is protected by
a 10 amp fuse or higher.
With appliances destined for non-European
countries, check the rating plate to make
sure that supply voltage and type of current
indicated coincide with the values of your
power supply. The rating plate is located at
the bottom left of the refrigerator. Figure B.
In the event that the mains cable needs to
be replaced, this must only be carried out by
a service technician of the manufacturer.
Warning! NEVER connect the appliance to
electronic energy saver plugs (e.g. Sava
plug) or to power inverters which convert
the direct current to 230 V alternating
current (e.g. solar equipment, power
supplies on ships).
Ventilation
Figure
3
The warm air generated at the back of
the appliance must be allowed to escape
unhindered. Otherwise the refrigerating
machine will have to work harder which in
turn increases energy consumption. For this
reason, never cover up the vents and grilles.
After shipping ...
Before switching on for the first time, allow
the appliance to set vertically for
approximately 1/2 hour.
23
GB
Getting to know your appliance
7 "alarm" display
This illuminates only if the alarm
function is activated. This occurs if it is
too warm in the freezer compartment,
endangering the frozen-food. It goes out
when the operating temperature of the
freezer compartment is reached again.
8 "super" display
This illuminates if the "super" button 3
is pressed and thus fast-freezing is
switched on.
It goes out again if the "super" button is
pressed again to switch it off.
It goes out automatically at the earliest,
52 hours after switching fast-freezing on.
9 Multi-function display
Displays various temperatures.
a) Freezer-compartment temperature too
warm
If display 9 flashes, the freezer
compartment is or was too warm due to
a power failure or a fault in the freezer
compartment. If the Alarm button is
pressed on display 9 (not flashing), the
warmest temperature which was reached
in the freezer compartment is displayed
for five seconds. Then this value is
deleted. The programmed freezercompartment temperature is then
indicated on display 9 without flashing.
b) "Al" (Alarm) display
Is displayed if the freezer compartment is
too warm.
c) Set temperature for refrigerator
compartment
If the "Cooler" button is pressed, the set
temperature for the refrigerator
compartment is displayed.
d) Set temperature for freezer
compartment
If the "Freezer" button is pressed, the set
temperature for the freezer compartment
is displayed.
22
GB
Getting to know your appliance
The fully automatic NO FROST system
ensures that ice does form inside the
freezer section. There is no longer any
need for defrosting.
How it works:
The food is frozen by a flow of cold air.
The evaporator in the NO FROST system
cools the air inside the appliance. The cold
air is circulated by a fan. A second fan
provides for air circulation in the refrigerator
compartment.The moisture in the air
condenses on the evaporator which is
defrosted fully automatically whenever
necessary.
The thawed water is directed to the
refrigerating unit where it evaporates. The
freezer section and the frozen food inside
are kept free from ice.
Description of control
functions
Figure
2
1 button
Appliance main switch, serves for
switching on and off the entire appliance.
2 "alarm" button
Serves for switching off the warning
buzzer.
The warning buzzer sounds if the freezer
temperature is too warm, i.e. if the
frozen-food is in danger (display 9 flashes
simultaneously).
There are occasions when the warning
buzzer may sound without the frozenfood being in any danger:
- when you start up the appliance
- when placing fresh food in the freezer
without switching on fast freezing
- and if the freezer compartment door is
open too long.
Once the warning buzzer has been
switched off, the "acoustic warning"
automatically returns to stand-by, if the
freezer compartment has reached its
operating temperature again.
3 "Super" button
Used to switch "fast freeze" on and off.
Display 8 "Super" and display 9 "SU"
indicate that "fast freeze" is on. "Fast
freeze" is used to freeze large quantities
of fresh food and should be switched on
up to 24 hours before the fresh food is
placed in the freezer compartment.
The refrigerating unit operates continually
after being switched on, a very low
temperature is achieved in the freezer
compartment.
4 "Freezer" button
Is used to display the set freezercompartment temperature on the display
9 (see description of display 9d).
5 "Cooler" button
Is used to display the set refrigeratorcompartment temperature on display 9
(see description of display 9c).
6 Temperature selection button for
freezer compartment or refrigerator
compartment
a) (The refrigerator compartment
temperature can be adjusted from 2 °C
to 8 °C). Press the "Cooler" button
and then the °C button. The
temperature selection is indicated on
display 9. Repeatedly press or hold
down the selection button until the
required temperature is displayed. (The
temperature selection is displayed
consecutively from 8 °C to 2 °C. 8 °C is
redisplayed after 2 °C).
b) (The freezer compartment temperature
can be adjusted from -16 °C to -26 °C).
To select the required freezer
compartment temperature, press the
"Freezer" button and then the °C
button. The temperature selection is
indicated on display 9. Repeatedly
press or hold down the selection
button until the required temperature is
displayed. (The temperature selection
is displayed consecutively from -16 °C
to -26 °C.

25
GB
Food arrangement
When loading the food,
note the following:
● Allow warm food and beverages to cool
down before storing inside the appliance.
● Ensure that food is well wrapped or
covered before it is stored. This will prevent food from dehydrating, deteriorating
in colour or losing in taste and will help
maintain freshness. It will also prevent
cross-flavouring. Vegetables, fruit and
salad need not be wrapped provided they
are stored in the vegetable bins of the
refrigerator.
● Never let any oil or grease come into
contact with plastic fittings or the door
seal as these materials easily become
porous.
● Never store any explosive substances
inside the appliance. High-proof alcohol
should only be stored upright in tightly
sealed containers.
Danger of explosion!
● Glass bottles containing liquid that can
freeze should never be stored in the
freezer as the glass bursts when the
contents freeze.
Example of food
arrangement
Fig.
1
Refrigerator compartment (A)
Bread, cakes and pastries, ready-made
meals and dairy products, from top to
bottom on the shelves (13).
Cheese, sausages and yoghurt in the
drawer (14).
Fruit, vegetables and salads in the
vegetable container (15).
Small bottles and cans on the shelf (17).
Large bottles on the bottle shelf (20).
Switching OFF
Press the main switch, Figure 2/1. The
whole appliance is then switched off.
Longer periods of disuse
If the appliance is not going to be used for
a longer period of time:
Press the main switch, Figure
2
/1, clean
the appliance and leave the doors open.
Switching OFF and longer
periods of disuse
24
GB
Switching ON and setting temperatures
Fig.
2
● Put the plug in the socket.
● Press appliance main switch 1.
Warning signal is emitted, display 9
flashes and "AL" is indicated.
● Press "alarm " button 2.
Warning signal stops. The current
temperature is now displayed for 5 sec.
"AL" is indicated on display 9.
● Set the temperature for the freezer
compartment.
To do this, press first the "freezer"
button and then press the
0
C button.
Press the
0
C button repeatedly or press
and hold until the desired temperature is
displayed (continuous sequence, after
–26
0
C, –16 0C appears again).We
recommend setting the temperature of
the freezer compartment at –20
0
C.
● Set the temperature for the refrigerator
compartment.
To do this, press first the "cooler" button
5 and then press the
0
C button. Press the
0
C button repeatedly or press and hold
until the desired temperature is displayed
(continuous sequence, after 8
0
C, 2 0C
appears again). We recommend setting
the temperature of the refrigerator
compartment at +4
0
C.
The temperature setting can also only be
corrected slowly.
Note
● The temperature in the refrigerator
compartment may fluctuate because:
– The appliance door is opened frequently
– Large quantities of fresh food are placed
in the refrigerator compartment and/or
freezer compartment
– The ambient temperature changes
– The temperature-selector setting for the
freezer compartment changes or
"super" freeze has been activated.
● To prevent condensation in the area of
the door seal, the sides of the housing
are partially heated.

27
GB
be up to 2.5 kg. Smaller portions freeze
through more quickly and the quality is
thereby maintained better when defrosting
and preparing the food.
It is important to seal food airtight before
freezing to prevent it from losing its taste
or dehydrating.
Suitable wrapping materials:
plastic foil, polyethylene tubular film,
aluminium foil and freezing containers.
These items are available from any dealer.
Unsuitable wrapping materials:
wrapping paper, greaseproof paper, cellophane, bin bags or used carrier bags.
Place food in the wrapping, press out any
air and seal it airtight.
Suitable sealing materials:
rubber bands, plastic clips, string, freezer
tape or similar. Polyethylene tubular film and
bags may be heat-sealed using a special
sealing iron or press.
Before placing in the freezer, each
package should be clearly labelled
with the contents and date of freezing.
Maximum freezing
capacity
Foodstuffs should be frozen right through
as quickly as possible. Only in this way it
is possible to retain vitamins, nutrients,
appearance and taste. You should therefore
never exceed your appliance's maximum
freezing capacity.
Within 24 h a max 12 kg of food for 70 cm
and 9 kg for 60 cm width appliances, can
be
frozen at once in the upper compartments.
Food that is already frozen should never
come into contact with fresh food about
to be frozen.
Allow hot food and drinks to cool down
to room temperature before placing in the
freezer.
Freezing and storing
Information about the max. freezing capacity
according to current standards can be found
on the rating plate (Fig. B).
Fast freezing
If frozen food is already being stored in the
freezer, you should switch on fast freeze
several hours before putting in fresh food
to freeze.
Normally, it will suffice to switch on fast
freeze 4–6 hours ahead. If you are planning
to make full use of maximum freezing
capacity, switch on 24 hours in advance.
Smaller quantities of food (up to 2 kg) can
be frozen without the fast freeze facility. To
switch on "super" freeze, simply press the
"super" freeze button, Fig. 2/3.
The "super" indicator lights up to show that
the fast freeze function is operating.
After switching on, a very low temperature is
achieved in the freezer compartment. Fastfreezing switches off automatically
approximately 52 hours after being
switched on.
Storage of food
Make sure that all the frozen goods
containers are pushed in as far as they will go.
This is important so that the air inside the
freezer can circulate properly.
Freezer tray
Fig.
:
The freezer tray is suitable for storing ice
cube trays and for freezing individual berries,
pieces of fruit, herbs and vegetables.
To freeze individual items of food, distribute
the produce uniformly on the freezer tray
and leave to freeze for approx. 10–12 hours.
Then transfer the produce into freezer bags
or containers.
To thaw, spread out the individual items of
food.
26
GB
Food arrangement
Freezer compartment (B)
Use the freezer tray (22) to store small
frozen goods and make ice cubes.
Use the top frozen goods containers (23)
to store frozen foods.
Interior fittings
The shelves in the refrigerator compartment
can be re-arranged when the door is opened
at a 90° angle. Pull the shelf forwards, lower,
pull out and re-insert in the desired position
(Fig.
4
).
"Chiller" compartment (Fig.
8
)
Pull the base of the compartment forwards,
the flap opens.
The temperature in this compartment is
lower than in the refrigerator compartment.
The temperature may therefore drop below
0 °C. Ideal for storing fish, meat and
sausage.
But not suitable for lettuce, vegetables
and cold-sensitive produce.
The small drawer can be taken out to
facilitate insertion and removal of food
(Figure 6).
The egg racks inserted into the door shelves
can be folded up to enable tubes, small tins,
etc. to be stacked in their place.
The bottle shelf is provided with a retainer
to prevent bottles from falling over when the
door is opened or closed, Figure7.
All trays, racks and containers attached
to the door can be removed for cleaning
purposes.
To remove, simply lift them up, Fig. 5/A.
Note the following when
buying frozen food
● Inspect packaging: it should not be
damaged in any way.
● Make sure the “Best before ...” date has
not expired.
● Check thermometer of the vendor's
freezer. It should read –18 °C or colder.
● Ensure that the frozen foods are the last
items to be bought. Wrap in several layers
of newspaper or place in a thermoinsulated bag and take home at once.
Store frozen products in the freezer without delay.
Freezing at home
If freezing at home, use only foodstuffs which
are absolutely fresh and in perfect condition.
Foodstuffs that freeze well
Meat, cold slices and sausage, poultry and
game, fish, vegetables, aromatic herbs, fruit,
bread and pastries, pizza, precooked meals,
leftovers, egg yolks and whites.
Foodstuffs not suitable for freezing
Whole eggs in their shells, soured cream
and mayonnaise, lettuces, radishes,
horseradish and onions.
Blanching vegetables and fruit
It is advisable to blanch vegetables and fruit
before freezing in order to preserve colour,
flavour, aroma and vitamin C.
(To blanch, bring a large saucepan of water
to a fast boil and completely immerse fruit or
vegetables briefly. Most book stores offer a
wide selection of literature on freezing which
will also deal with blanching.)
Wrapping food
Pack the food in portions suitable for your
household.
Vegetable and fruit portions should be no
heavier than 1 kg, while meat portions can
Freezing and storing

29
GB
● Install the appliance in a cool, dry room with
adequate ventilation. Ensure that it is not
exposed to direct sunlight and never put it
near a direct source of heat (radiator, etc.).
● Never block any vents or grilles on the
appliance.
● Allow warm food to cool down before
placing in the appliance.
● Put frozen food in the refrigerator to thaw.
You can then use the low temperatures
of the frozen products to cool food in the
refrigerator.
● Do not keep the door of the appliance
open for too long when loading or taking
out food.
The shorter the time that the door is
opened, the less ice will form on the
freezer grids.
● Clean the heat exchanger (black grid) at
the back of the appliance every two years.
Power saving tips Information about
operating noises
Operating noises
In order to maintain the pre-set temperature
at a constant level, the appliance compressor
switches on from time to time.
The noises that can be heard while it is
running are perfectly normal.
The noise reduces automatically when the
appliance reaches its operating temperature.
The humming noise is emitted by the motor
(compressor). When the motor switches ON,
the noise may briefly increase in volume.
The bubbling, gurgling or whirring noise is
emitted by the refrigerant as it flows through
the pipes.
The clicking noise can always be heard
when the thermostat switches ON/OFF the
motor.
Cracking noises may occur if ...
- the automatic defrosting is operating.
- the appliance is cooling down or
warming up (material expansion).
A multi-zone or No-Frost appliance may
cause a low hissing noise emitted by the
air flow inside the appliance.
If these noises are excessively loud, the
causes are probably not serious and are
usually very easy to eliminate.
The appliance is not level
Please level the appliance with the aid of
a spirit level. Use the height-adjustable feet
or place packing under the feet.
The appliance is not free-standing
Please move the appliance away from
kitchen units or other appliances.
Drawers, baskets or shelves are loose or
stick
Please check the detachable components
and, if required, refit them.
Bottles and/or receptacles are touching
each other
Please move bottles and/or receptacles
away from each other.
28
GB
Freezing and storing
Thawing frozen food
Depending on the nature of the food and
the preparation or cooking method you are
going to employ, you may choose one of
the following thawing methods:
at room temperature,
in the refrigerator,
in an electric oven,
fan-assisted or not,
in the microwave oven.
Food that has been partially or completely
defrosted can be refrozen provided that
these items are stored at temperatures
below +3 °C and for no longer than one day
where meat and fish is involved, or no longer
than 3 days for other items.
Otherwise, provided that taste, smell and
appearance remain unchanged, you can
boil, fry or process the food further into
a ready-made dish and then refreeze.
Observe that in this case the admissible
shelf-life will be shorter than normal.
Making ice-cubes
Fig.
9
Fill the ice-cube tray three-quarters full with
water and place it in the freezer.
Twist the tray slightly to remove the ice-cubes.
Cleaning
Before cleaning, you should always
unplug the appliance and/or switch off
or disengage the household fuse.
Do not use a steam cleaner. The hot
steam could damage the surface of the
appliance or the electrical components
– electric shock hazard!
Ensure that cleaning water does not get
into the control panel or any of the lights.
Lukewarm water with a little mildly
disinfectant detergent such as washing-up
liquid is ideal for cleaning the entire
appliance, except the door seal. Never use
cleaning agents containing abrasives, acids,
chemical solvents or polishers.
Simply clean the door seal with clear water
and dry thoroughly afterwards.
If possible, the heat exchanger (black grid)
at the back of the appliance should be
cleaned with a brush or vacuum cleaner
every two years. This will maintain the full
efficiency of the appliance and helps to save
electricity.
31
GB
Customer Service
Rating plate
Figure
B
When you call Customer Service you will be
asked for the ‘E’ number and ‘FD’ number
for your appliance.
Both numbers are shown in a box with
a black border on the rating plate. This is
located inside the fridge section, at the
bottom left-hand side next to the vegetable
container.
The address and telephone number of your
nearest Customer Service is listed in the
customer service directory or else in any
telephone directory.
Minor problems and how
to rectify them yourself
frozen goods out of the freezer, wrap them
well to keep them cold and store them
somewhere cool.
Switch off the appliance and open the
freezer section door. After about 12 hours
the ice on the cooling system will have
thawed. Switch the appliance on again and
put the frozen goods back inside.
If you are not able to rectify the problem
with the help of the suggestions listed here,
please call Customer Service.
Do not open the door more often than
necessary, so that the cold temperature
inside is retained for as long as possible.
Do not take any further action, especially
with regard to the electrical parts of the
appliance.
30
GB
Minor problems and how to rectify them yourself
Customer service should NOT be
contacted for every fault. Most faults
are minor. Therefore, before you call
customer service, please check whether
you can eliminate the fault yourself based
on the following information.
A technician who is called out to rectify
a minor fault will charge the customer, even
if the appliance is still under guarantee.
If the display, Fig.
2
/9, does not illuminate:
check that the power is ON, that the plug is
correctly inserted in the socket and that the
appliance is switched ON.
If "E1" (flashing) (Fig.
2
/9) is displayed
while the appliance is being switched on:
The temperature in the refrigerator
compartment is very high. A few minutes
after switching on the appliance, press the
Cooler button to display the set refrigeratorcompartment temperature. Otherwise, "Al"
(freezer compartment is warm) or the set
freezer-compartment temperature is
displayed.
If "E2" (flashing) (Fig.
2
/9) is displayed
while the appliance is being switched on:
The temperature in the freezer compartment
is very high. A few minutes after switching
on the appliance, press the Freezer button
to display "Al" and then the set freezercompartment temperature. Otherwise, the
set refrigerator-compartment temperature is
displayed.
If the refrigerator-compartment light does
not function:
– The light bulb is defective. Pull out
the mains plug and remove the cover
(Fig.
A
/A). Replace the defective light bulb
with a light bulb of the same type
(max. 15 W, 230 V, E14 holder).
– The light switch is sticking (Fig.
A
/B).
Check whether it can be moved. If not,
please call customer service.
If the display, Fig.
2
/9, flashes but the
acoustic signal is not emitted:
the freezer compartment was too warm due
to a power failure or a fault.
When the Alarm button is pressed, the
warmest temperature reached in the freezer
compartment is indicated for five seconds
on display 9 (not flashing). This value is then
cleared. Display 9 then indicates the
programmed freezer compartment
temperature without flashing.
If a temperature greater than +3 °C is
displayed, check the frozen food.
If flavour, odour and appearance have
changed, make a ready-made meal out of
the food and refreeze.
No longer store the frozen produce for the
max. storage period.
If the display fig.
2
/9 flashes and the
warning signal is emitted after the freezer
compartment has been running for a
prolonged period :
Fault, freezer compartment is too warm !
The programmed freezer compartment
temperature is displayed.
To switch off the warning signal, press the
"Alarm" button.
Possible causes of the fault :
- The gap above the appliance or in the base
is blocked,
- The freezer compartment door has not
been closed properly,
- Fresh food was frozen without "fast
freeze",
- Too much fresh food was frozen at once,
- High ambient temperature.
When the fault has been rectified, press the
"Alarm" button; the display stops flashing
when the freezer compartment has reached
its operating temperature again.
If the freezer section door has been kept
open for a long time and the temperature
inside now no longer reaches the pre-set
level,
so much ice has formed on the evaporator
(source of cold temperature) that it cannot
be defrosted by the fully automatic
defrosting system. In this case take the
33
SV
vätskor i kyl- eller frysutrymme –
Explosionsrisk!
● Förvara aldrig vätska i flaskor eller burkar
av glas i synnerhet inte kolsyrade drycker
i frysskåpet. De kan frysa sönder.
● Täck inte för ventilationsöppningarna!
● Stöd dig aldrig på dörren och använd inte
sockel eller utdragslådor som trappsteg.
● Låt inte barn leka med skåpet.
● Förvara nyckel till skåp utrustade med lås
utom räckhåll för barn.
● Stoppa inte isbitar direkt från frysen
i munnen. (Risk för brännskada på grund
av den mycket låga temperaturen!)
● Ta inte med våta händer inuti frysskåpet.
Händerna kan fastna i metalldelar eller
djupfrysta varor.
● OBSERVERA: Täck aldrig för
ventilationsöppningarna i skåpet resp.
inbyggnadsskåpet.
● OBSERVERA: Skada inte rören i
kylkretsen.
● OBSERVERA: Använd aldrig elektriska
apparater i livsmedelsfacken, såvida det
inte handlar om en typ som tillverkaren
rekommenderar.
Detta skáp är mycket
skonsamt mot miljön eftersom
kylkretsen innehåller isobutan
(R 600 a), som är en miljövänlig
men brännbar naturges. Se till at inte
någon del av kylkretsen skadas när
skåpet transporteras och installeras. Vid
skador, undvik öppen eld och olika ty per
av tändare samt vädra utrymmet där
skåpet står under några minuter.
Varning: Använd aldrig andra hjälpmedel
(vassa föremål, värmefläktar eller dylikt)
än de som rekommenderas av tillverkaren
för att påskynda avfrostningen.
Bestämmelser
Detta skåp är endast avsett för förvaring och
infrysning av matvaror och för tillverkning av
istärningar för normalt hushållsbruk.
Skåpet skall stå i ett uppvärmt
bostadsutrymme.
Om det används yrkesmässigt (storhushåll,
restaurang e d) gäller motsvarande
bestämmelser.
Skåpet uppfyller de tyska
arbetarskyddsföreskrifterna för
kylanläggningar (VBG 20).
Skåpet uppfyller säkerhetsbestämmelserna
för elektrisk utrustning.
Köldkretsen är testad med avseende på
täthet.
Omgivningstemperatur
Beroende på ”klimatklass” (se typskylten)
kan skåpet användas vid följande
omgivningstemperaturer: (Typskylten sitter
längst ner till vänster i skåpet. Bild
B
).
Klimatklass Omgivningstemperatur
från … till
SN +10 °C till 32 °C
N +16 °C till 32 °C
ST +18 °C till 38 °C
T +18 °C till 43 °C
Sjunker den omgivande temperaturen under
de nedre temperaturgränserna, blir det för
kallt i kylskåpet. Stiger den omgivande
temperaturen över de övre temperaturgränserna, blir det för varmt i frysdelen.
Sjunker den omgivande rumstemperaturen
under den temperatur som ställts in för
kylskåpet, blir det lika kallt i kylskåpet som
i rummet.
Om den omgivande rumstemperaturen
understiger +10 °C kan det förekomma
störningar i den helautomatiska
avfrostningen.
Råd beträffande skrotning av gamla kyl-/frysskåp
och säkerhetsanvisningar
32
SV
Råd beträffande skrotning av gamla kyl-/frysskåp
och säkerhetsanvisningar
Råd beträffande skrotning
Uttjänta kyl-/frysskåp är inte värdelöst avfall!
Genom miljöriktig skrotning kan värdefulla
råvaror återvinnas.
Dra ut stickkontakten ur vägguttaget. Klipp
av anslutningssladden så nära skåpet som
möjligt och avlägsna sladd och stickkontakt.
Förstör låset. På så vis kan du förhindra att
lekande barn låser in sig i kyl-/frysen och
utsätter sig för livsfara.
Kyl-/frysskåp innehåller kylmedel och gaser
i isoleringen vilket kräver en fackmannamässig skrotning. Se till att rörledningarna
inte skadas innan skåpet skrotas.
Tack vare förpackningen skyddas din nya
kyl/frys på vägen till dig. Allt
förpackningsmaterial är skonsamt mot
naturen och är återanvändbart. Hjälp till
genom att ta hand om
förpackningsmaterialet på ett miljöriktigt sätt.
Låt inte barn leka med emballaget!
Kvävningsrisk på grund av wellpapp och
folie.
Hör med din kommun eller ditt lokala
renhållningsverk om vad som gäller.
Denna enhet är märkt i enlighet med
der europeiska direktivet 2002/96/EG
om avfall som utgörs av eller
innehåller elektroniska produkter
(waste electrical and electronic equipment WEEE).
Direktivet anger ramarna för inom EU giltigt
återtagande och korrekt återvinning av
uttjänta enheter.
Vårt bidrag till en bättre miljö –
vi trycker på returpapper
Säkerhetsanvisningar
Läs noggrant igenom bruks- och
monteringsanvisningarna, både anvisningar,
råd och varningstexter innan skåpet
installeras och tas i bruk. På så sätt får
du viktig information om hur skåpet ska
installeras, användas och skötas.
Spara bruks- och monteringsanvisningarna
så att nästa ägare får ta del av all
information.
Om råden nedan inte följts kan inte
tillverkaren ställas till ansvar.
● Använd inte ett skåp som är skadat.
Ta kontakt med handlaren om du är
tveksam.
● Anslutning och uppställning skall ske
enligt monteringsanvisningen. För att man
ska kunna ansluta skåpet måste spänning
och ström från vägguttaget stämma med
uppgifterna på typskylten.
● Använd under inga omständigheter
en ångrengörare vid rengöring eller
avfrostning av skåpet. Ångan kan nå
spänningsförande delar av skåpet och
orsaka kortslutning eller överslag.
● Elsäkerheten hos skåpet garanteras
endast om det elektriska uttaget är
jordat enligt föreskrifterna.
● Dra alltid ut stickkontakten ur vägguttaget
eller skruva ur säkringen vid rengöring och
i händelse av fel. Dra i stickkontakten, aldrig
i anslutningssladden.
●
Service och reparationer bör endast
utföras av serviceföretag som godkänts
av leverantören. Använd endast reservdelar som tillhandahålles av sådana
företag.
● Starkspritflaskor bör förvaras stående
och väl tillslutna.
Förvara aldrig produkter som innehåller
brännbara drivgaser (t. ex. gräddspray,
sprayflaskor) eller explosiva gaser och
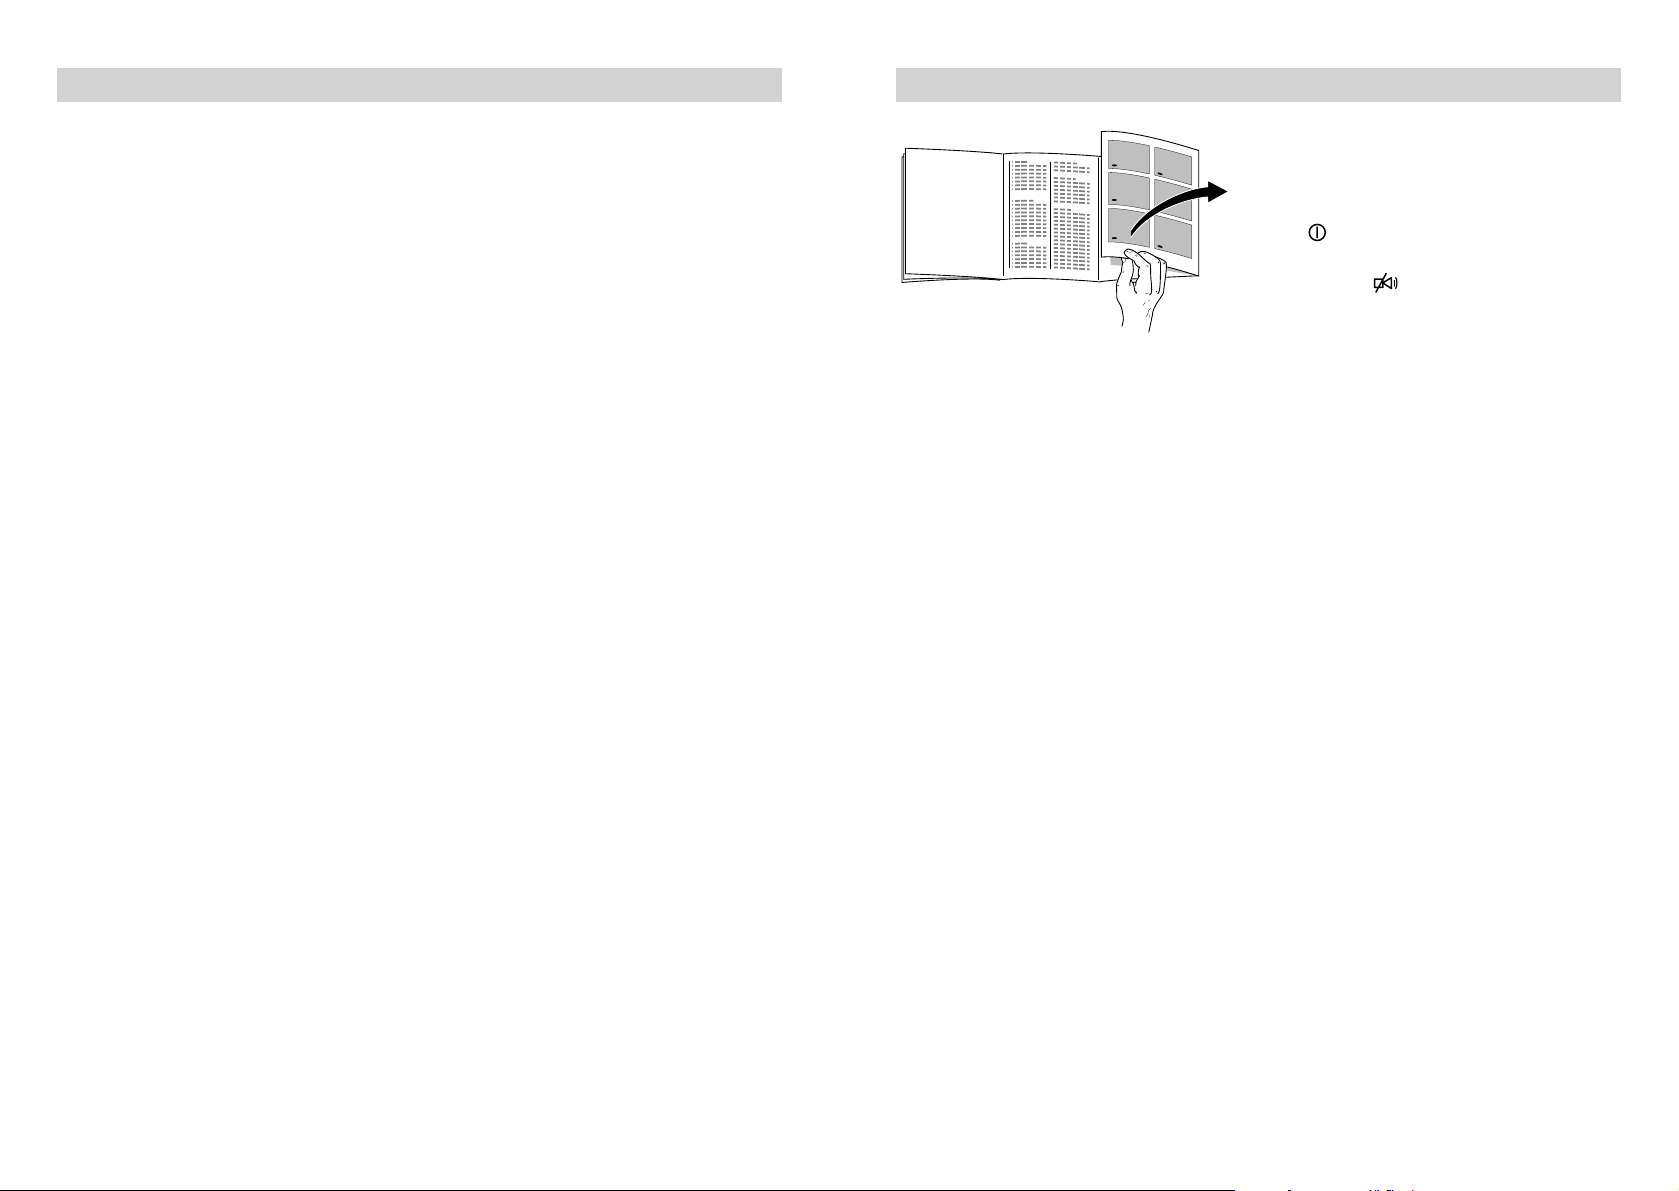
35
SV
Lär känna ditt nya kyl-/frysskåp
Längst bak i bruksanvisningen finns
bilder på skåpet. Vik ut uppslaget och
titta på dem samtidigt som du läser
texten.
Denna bruksanvisning gäller för flera
modeller och därför kan vissa skillnader
förekomma i de detaljer som syns på
bilderna.
Översiktsbild
Bild
1
1-9 Manöverpanel
10 Ventilationsöppningar
11 Innerbelysning
12 Förvaringslåda
13 Hylla
14 Multiflow-system
(Kalluftsfördelare)
15 Grönsakslåda
16 “Chiller” - fach
17 Hylla för små burkar, tuber
18 Äggfack
19 Hylla
20 Flaskhållare
21 Flaskhylla
22 Infrysningsbricka
23 Frysfack
A Kyldel
B Frysdel
Kontrollpanelen
(Översikt)
Bild
2
1 -knappen
Huvudströmbrytaren till/från
2 “alarm” -knappen
a) för att stänga av varningssignalen
b) för att visa den högsta (varmaste)
temperatur som varit i frysutrymmet
(endast när display 9 blinkar).
3 super-knappen
för maximal infrysningskapacitet
4 Freezer-knappen
Med denna knapp visas den inställda
temperaturen i frysdelen.
5 Cooler-knappen
Med denna knapp visas den inställda
temperaturen i kyldelen.
6 Knapp för att ställa in temperaturen i
kyl- resp. frys.
0
C = kallare, varmare
7 "alarm"-lampan
lyser endast när varningsfunktionen
aktiveras.
8 "super"-lampan
lyser endast när "super"-knappen är
intryckt
9 Lampa för
a) "Varmaste temperatur"
b) "AL" (Alarm) - indikator
c) Inställd temperatur i kylen
d) Inställd temperatur i frysen
34
SV
Installation
Placering
Placera skåpet i ett torrt rum med god
ventilation. Ställ det inte i direkt solljus eller
i närheten av en värmekälla (spis, element
etc.). Om detta inte går att undvika måste
lämplig isolerskiva placeras mellan skåp och
värmekälla. Isolerskiva behövs inte om
minimiavstånden är följande:
Till elspis, 3 cm.
Till annan värmekälla, 30 cm.
Om skåpet placeras bredvid ett annat kyleller frysskåp bör avståndet mellan dem
vara minst 2 cm. Detta för att undvika
kondensbildning.
Vi rekommenderar underläggsskivor för
kylenheterna så att rengöringsvatten som
eventuellt rinner ut inte skadar golvet.
Tänk på att plaster av olika typer inte trivs
ihop och att migration kan uppstå
(färgförändringar).
Kyl/frysen måste stå på plant och stadigt
underlag. Justera skåpet med de båda
skruvfötterna i skåpets framkant om golvet
är ojämnt. Bild C.
Tack vare de två hjulen på baksidan går det
lätt att skjuta in skåpet i en nisch.
Elektrisk anslutning
Skåpet får endast anslutas till jordat
vägguttag, 220–240 V/50 Hz växelström.
Vägguttaget ska vara säkrat för 10 A. När
det gäller skåp för icke europeiska länder
måste man noga kontrollera om spänning
och strömtyp på typskylten överensstämmer
med elnätet på platsen. Typskylten sitter
längst ned till vänster i kylskåpet. Bild B.
Om det eventuellt är nödvändigt att byta
nätkabeln måste arbetet göras av fackman.
Varning! Under inga omständigheter får
skåpet anslutas till en elektronisk
”energisparkontakt” (t. ex. Sava Plug) och
till växelriktare som omvandlar likström
till 230 V växelström (t. ex. solelanläggningar eller fartygsnät).
Ventilation
Bild
3
Luften bakom skåpet värms upp och måste
därför kunna ledas bort. I annat fall får
kompressorn arbeta mer, vilket leder till
högre strömförbrukning. Kompressorns
livslängd kan också förkortas. Se därför till
att ventilationsöppningarna ej täcks över!
Efter transporten …
Låt skåpet stå upprätt ungefär en halvtimme
innan det slås på första gången.

37
SV
Lär känna ditt nya kyl-/frysskåp
5 "Cooler"-knappen
Med denna knapp visar display 9 (se
beskrivning 9c) den aktuella
temperaturen i kyldelen.
6 Knapp för att ställa in kyl- respektive
frystemperatur
a)(Kyltemperatur mellan 2 °C och 8 °C
kan ställas in). Tryck in "Cooler"knappen och därefter °C –knappen.
Displayen 9 visar den inställda
temperaturen. Tryck upprepade gånger
på inställningsknappen eller håll den
intryckt tills önskad temperatur visas.
Den inställda temperaturen visas från 8
°C till 2 °C. Efter 2 °C visas åter 8 °C).
b)(Frystemperatur mellan -16 °C och
-26 °C kan ställas in). Tryck in
"Freezer"-kanppen och därefter
°C-knappen för att ställa in önskad
frystemperatur. Displayen 9 visar den
inställda temperaturen. Tryck
upprepade gånger på i
nställningsknappen eller håll den
intryckt tills önskad temperatur visas.
(Den inställda temperaturen visas från
-16 °C till -26 °C. Efter –26 °C visas
åter –16 °C.
7 “Alarm”-lampan
Lampan lyser endast när
varningsfunktionen aktiverats. Detta
inträffar när det blir för varmt i frysen och
de djupfrysta varornas kvalitet är i
farozonen. Den slocknar när frysen åter
nått sin driftstemperatur
8 “super”-lampan
Den lyser endast när “super”-knappen
är intryckt och därmed
infrysningsfunktionen tillslagen.
Stäng av infrysningsfunktionen genom att
trycka en gång till på “super”-knappen.
Då slocknar lampan.
Den slocknar automatiskt tidigast 52
timmar efter det att infrysningsfunktionen
slagits på.
9 Flerfunktionsdisplay
visar olika temperaturer.
a) För hög temperatur (för varmt) i
frysdelen
När display 9 blinkar är det eller har det
varit för varmt i frysen på grund av
strömavbrott eller något fel på frysen. När
du tryckt in Alarm -knappen visar
display 9 (inte blinkande) under fem
sekunder den "varmaste temperatur"
som varit i frysen. Detta värde raderas
därefter. Sedan visar display 9 den
inställda temperaturen i frysdelen (utan
blinkning).
b) "AL" (Alarm)-indikator
visas när det är för varmt i frysdelen.
c) Inställd kyltemperatur
Tryck in "Cooler"-knappen – den
inställda temperaturen för kylfacket visas.
d) Inställd frystemperatur
När "Freezer" – knappen tryckts in visas
den inställda temperaturen för frysfacket.
36
SV
Lär känna ditt nya kyl-/frysskåp
Tack vare det helautomatiska Nofrostsystemet blir det ingen is i frysen. Du
behöver aldrig mer avfrosta skåpet.
Funktionsbeskrivning:
Matvarorna fryses in med hjälp av kalluft.
En förångare som finns i Nofrost-systemet
kyler luften i skåpet. Kalluften cirkulerar tack
vare en fläkt. Ytterligare en fläkt sörjer för
luftcirkulationen i kylen. Den fukt som finns i
luften fälls ut i förångaren. Vid behov
avfrostas förångaren automatiskt.
Smältvattnet leds till kompressorn och
avdunstningsskålen där det avdunstar.
Frysutrymmet och matvarorna förblir isfria.
Vilken funktion har
tangenter och indikatorer?
Bild
2
1 -knappen
Med huvudströmbrytaren slår man till och
från strömmen till hela skåpet.
2 “alarm” -knappen
Tryck in denna knapp för att stänga av
varningssignalen.
Varningssignalen kopplas på när det är
för varmt i frysen och de djupfrysta
varornas kvalitet är i farozonen (samtidigt
blinkar display 9).
Varningssignalen kan utan fara för de
djupfrysta varorna stängas av
- när frysen tas i bruk
- när större mängder färska livsmedel
läggs in utan att infrysningsfunktionen
(super-knappen) kopplas in
– och när frysdörren varit öppen för
länge.
När varningssignalen stängts av, befinner
den sig (display 9) automatiskt i
beredskapsläge så snart frysen åter nått
sin driftstemperatur
3 "Super"-knappen
Tryck på knappen för att sätta på resp.
stänga av infrysningsfunktionen.
Att funktionen är tillslagen visas såväl i
"super"-displayen 8 som med
bokstäverna "SU" i displayen 9. Använd
infrysningsfunktionen för att frysa in
större mängder färska matvaror. Koppla
på funktionen upp till 24 timmar innan
de färska matvarorna läggs in.
Kompressorn kommer nu att vara i gång
hela tiden och temperaturen inne i
frysdelen blir mycket låg.
4 "Freezer"-knappen
Med denna knapp visar display 9 (se
beskrivning 9d) den inställda
temperaturen i frysdelen.

39
SV
Lägga in matvaror
Tänk på följande när du
lägger in matvaror:
● Låt varma maträtter och varma drycker
svalna innan du sätter in dem.
● Låt helst matvarorna ligga kvar i sina
originalförpackningar eller förpacka dem
väl. Därigenom bevaras smakämnen, färg
och färskhet. På så vis undviker man också
att en matvara tar smak av en annan.
Endast grönsaker, frukt och sallad ska
lagras oförpackade i grönsakslådorna.
● Se till att fett och olja (smör, margarin m
m) inte kommer i beröring med skåpets
plastdetaljer eller med tätningslisten runt
dörren (dessa kan annars luckras upp).
● Förvara inte explosiva ämnen i skåpet
och förvara starkspritflaskor stående och
väl tillslutna.
– Explosionsrisk!
● Förvara inte flaskor med vätska som kan
frysa i frysskåpet. Flaskorna kan frysa
sönder.
Exempel på hur du kan
placera matvarorna
Kylskåpet (A)
På hyllorna (13) med början uppifrån –
bakverk, färdiga maträtter, mejerivaror.
I lådan (14) ost, korv, yoghurt.
I grönsakslådan (15) grönsaker, frukt, sallad.
I facket (17) små flaskor, burkar.
I flaskfacket (20) stora flaskor.
Frysskåpet (B)
På infrysningsbrickan (22): förvara mindre
frysförpackningar, göra istärningar.
I de övre lådorna (23) förvara djupfrysta
varor.
Stänga av strömmen
Tryck på huvudströmbrytaren (bild 2/1) för
att stänga av strömmen.
Ta skåpet ur drift
När skåpet inte ska användas under en
längre tid:
Tryck in huvudströmbrytaren (bild
2
/1),
rengör skåpet och låt dörrarna stå öppna.
Stänga av strömmen,
ta skåpet ur drift
38
SV
Bild
2
● Sätt stickkontakten i vägguttaget.
● Tryck på huvudströmbrytaren 1
Varningssignalen ljuder, display 9 blinkar
och visar bokstäverna "AL".
● Tryck på alarmknappen 2
Varningssignalen tystnar. Displayen visar
nu den aktuella temperaturen under 5
sekunder. I displayen 9 visas
bokstäverna "AL".
● Ställ in temperaturen i frysdelen
Tryck in “Freezer”-knappen och därefter
0
C-knappen. Tryck upprepade gånger på
0
C-knappen eller håll den intryckt tills
önskad temperatur visas. (Den inställda
temperaturen visas fortlöpande.
Efter – 26
0
C visas åter –16 0C).
Vi rekommenderar en frystemperatur
om - 18
0
C.
● Ställ in temperaturen i kyldelen
Tryck in “Cooler”-knappen och därefter
0
C-knappen. Tryck upprepade gånger på
0
C-knappen eller håll den intryckt tills
önskad temperatur visas. (Den inställda
temperaturen visas fortlöpande. Efter 8
0
C visas åter 2 0C).Vi rekommenderar en
kyltemperatur om
+ 4
0
C.
Råd
● Temperaturen i kylskåpet kan fluktuera:
– om skåpdörren öppnas ofta
– när större mängder färska livsmedel
läggs in i kyl- och frysskåp
– när omgivningstemperaturen ändras.
– när temperaturväljarinställningen för
frysskåpet ändras eller infrysnings-
funktion (tangenten ”super”) kopplats in.
● Skåpets framsida blir delvis lätt
uppvärmd vilket förhindrar kondens
i närheten av dörrtätningen.
Slå på strömmen och
ställa in temperaturen
Inredningen
Hyllorna i kylskåpet kan vid 90° öppen dörr
flyttas.
Gör så här: Dra hyllan mot dig, vik den nedåt
och dra ut den; sätt in den där du vill ha den.
(bild 4).
“Chiller” - fack (bild
8
).
Dra botten mot dig, luckan öppnas.
I färskkylfacket råder lägre temperatur än
i kylskåpet. Idealiskt för lagring av ömtåliga
varor som fisk, kött och korv.
Den lilla lådan kan tas ut. Hållaren för
yoghurtlådan kan på hyllan skjutas till höger
eller vänster. Bild 6.
Ägginsatserna i facken kan fällas upp för att
ge plats åt tuber, små burkar osv.
Flaskorna ramlar inte omkull när dörren
öppnas och stängs om de säkras med hjälp
av flaskhållaren. Bild 7.
Alla fack i dörren kan tas ut för rengöring.
Lyft uppåt och ta ut enligt bild
5/A
.

41
SV
Lämpliga förpackningsmaterial:
Fryspåsar, aluminiumfolie, fryskartonger,
frysbägare.
Olämpliga förpackningsmaterial:
Omslagspapper, pergamentpapper, cellofan,
soppåsar och begagnade påsar.
Lägg in matvaran i förpackningen, tryck ut
all luft och tillslut väl.
För att försluta förpackningarna lämpar
sig:
Gummiband, plastklämmor, snören, köldtålig
tejp eller liknande. Polyetenpåsar kan
svetsas ihop med en foliesvets.
Märk förpackningarna med innehåll och
infrysningsdatum.
Infrysningskapacitet
Matvaror bör frysas in så snabbt som möjligt
för att bevara vitaminer, näringsvärde,
utseende och smak. Lägg därför inte in mer
varor än skåpet är avsett för.
Följande mängder livsmedel kan inom
loppet av 24 timmar frysas in i den övre
fryslådan
Vid kylskåp med 70 cm bredd max 12 kg
Vid kylskåp med 60 cm bredd max 9 kg
Matvaror som redan är djupfrysta bör inte
komma i beröring med färska matvaror.
Flyttoa om varorna vid behov.
Låt varma maträtter och drycker först svalna
i rumstemperatur innan du lägger in dem
i frysen.
Uppgifter om max. infrysningsförmåga enligt
aktuell norm hitter du på typskylten (Bild B).
Infrysning och förvaring
Tänk på följande när du
köper djupfrysta matvaror
● När du köper djupfrysta varor, tänk på att
kontrollera att förpackningen är hel.
● Kontrollera att bäst-före-datum inte har
gått ut.
● Termometern i affärens frysdisk bör visa
en temperatur lägre än –18 °C.
● Köp de djupfrysta matvarorna sist av allt.
Förpacka dem väl så att de ej tinar.
Transportera hem dem så snabbt som
möjligt och lägg dem i frysskåpet
Själv frysa in små mängder
Använd endast färska och felfria matvaror till
infrysning. Förpacka dem lufttätt så att de
inte förlorar i smak eller blir torra.
Lämpligt att frysa in är t. ex.
Kött och korv, fågel och vilt, fisk, grönsaker,
kryddgrönt, frukt, bakverk, pizza, färdiglagad
mat, matrester, äggula och äggvita.
Olämpligt att frysa in är t. ex.
Hela ägg med skal, majonnäs, bladsallad,
rädisor och lök.
Blanchera frukt och grönsaker
För att färg, smak, arom och C-vitamin ska
bibehållas bör frukt och grönsaker blancheras
(= doppas i kokande vatten) före infrysning.
Förpackning
Packa varorna i portioner som passar ditt
hushåll.
Förpackningar med frukt och grönsaker får
inte vara tyngre än 1 kg och kött inte tyngre
än 2,5 kg. Mindre portioner går snabbare att
frysa in och kvaliteten bibehålls också bäst
vid upptining och tillredning.
Förpacka dem lufttätt så att de inte förlorar
i smak eller blir torra.
40
SV
Infrysning och förvaring
Infrysningsfunktionen
Om du redan förvarar matvaror i frysskåpet
och tänker lägga in större mängder ännu
inte djupfrysta varor, bör infrysningsfunktionen (”super”-tangenten) kopplas in
i förväg.
I allmänhet räcker 4–6 timmar. Tänker du
frysa in den maximala mängden livsmedel
måste den kopplas in 24 timmar i förväg.
Mindre mängder matvaror (upp till 2 kg) kan
läggas in direkt i frysskåpet. Gör så här för
att koppla in infrysningsfunktionen: Tryck på
”super”-tangenten. Bild 2/3.
Efter att funktionen slagits på uppnås en
mycket låg temperatur i frysdelen.
Infrysningsfunktionen stängs automatiskt av
efter ca. 52 timmar.
Förvaring
Se alltid till att alla fryslådorna skjutits in
ordentligt.
Det är viktigt för luftcirkulationen.
Ta kylklamparna från frysbrickan i översta
facket och lägg dem direkt på matvarorna
för att på så sätt fördröja att matvaror börjar
tina i händelse av strömavbrott eller
driftsstörningar.
Infrysningsbricka
Bild
:
Med hjälp av infrysningsbrickan kan du på
ett skonsamt sätt styckefrysa frukt (i bitar),
bär, kryddgrönt och grönsaker.
Fördela jämnt på infrysningsbrickan det som
ska frysas in. Låt stå i frysen 10 till 12
timmar. Paketera i frysbägare.
Bred ut igen vid upptining.
Upptining
Upptining av frysta varor kan ske på olika
sätt beroende på varans art och ändamål:
I rumstemperatur,
i kylskåp,
i ugn (med/utan varmluft)
i mikrovågsugn.
Upptinade matvaror som ej kommit till
användning:
Om smak, lukt och utseende är oförändrade
kan man efter kokning eller stekning på nytt
frysa in varan.
Men man bör i sådana fall inte utnyttja den
maximala lagringstiden.
Istärningar
Bild
9
Ta ut istärningslådan, fyll den till 3/4 med
vatten och sätt tillbaka den i frysen.
Istärningarna lossnar lättare om du böjer lite
på lådan eller håller den under rinnande
vatten ett ögonblick.

43
SV
Rengöring och skötsel
Ta för vana att alltid dra ut stickkontakten
ur vägguttaget eller skruva ur säkringen
när du ska rengöra frysskåpet.
Använd ingen ånga eller ångrengörare.
Den heta ångan kan skada ytan och
elutrustningen.
Frysskåpets elsäkerhet äventyras.
Se till att vatten inte kommer in i
kontrollpanelen eller belysningen.
Använd inga vassa föremål, skurpulver eller
kemiska lösningsmedel utan endast ljummet
vatten med litet diskmedel för hela skåpet
utom tätningslisten.
Använd endast rent vatten till tätningslisten
och torka därefter ordentligt torrt.
Vartannat år bör även värmeväxlaren (svart
galler) på skåpets baksida rengöras med
borste eller dammsugare för att frysen ska få
full effekt och för att spara ström.
● Ställ kyl/frysskåpet i ett svalt rum med
god ventilation. Ställ det inte direkt
i solljus eller i närheten av en värmekälla
(t. ex. element).
● Blockera inte skåpets ventilations-
öppningar.
● Låt varma rätter först svalna innan du
lägger in dem.
● Lägg djupfrysta varor i kylskåpet för
upptining. Då tinar de skonsamt och
vattnar sig mindre. Dessutom utnyttjar du
deras kyla till de matvaror som finns
i kylskåpet.
● Låt dörrarna stå öppna så kort tid som
möjligt när du lägger in eller tar ut
matvaror. Ju kortare tid dörren står
öppen, desto mindre blir isbildningen
på kylelementen.
● Rengör värmeväxlaren (svart galler) på
skåpets baksida vartannat år.
Energispartips
42
SV
Enklare fel man själv kan
avhjälpa
Råd beträffande driftsljud
Driftsljud
För att hålla den temperatur du valt
konstant, sätter skåpet då och då igång
kompressorn.
Ljudet som då uppkommer är normalt och
varierar från skåp till skåp.
Det minskar automatiskt så snart skåpet har
nått driftstemperatur.
Det brummande ljudet kommer från motorn
(kompressorn). Det kan kortvarigt bli högre
när kompressorn slås på.
Ett bubblande, gurglande eller brusande
ljud kommer från kylmedel som strömmar
genom rören.
Det klickande ljudet hörs när termostaten
slår på respektive av kompressorn.
Ett knackande ljud kan uppträda när …
● den automatiska avfrostningen är igång
● skåpet avkyls respektive värms upp
(materialutvidgning).
I ett flerzons- eller No-Frostskåp kan ett lätt
brus härröra från luftströmmen inuti skåpet.
Skulle det vanliga ljudet från kyl-/frysskåpet höras allt för mycket beror det
för det mesta på något som lätt kan
avhjälpas.
Skåpet står ojämnt
Rikta in skåpet med hjälp av ett vattenpass.
Använd skruvfötterna eller lägg något under
fötterna.
Kyl-/frysskåpet ”ligger an”
Rucka lite på kylskåpet så att det inte ligger
an mot intilliggande möbler eller annan
utrustning.
Lådor, korgar eller hyllor vickar eller har
fastnat
Prova med att ta ut uttagbara delar och sätt
eventuellt tillbaka dem igen.
Flaskor och kärl inuti skåpet står för nära
varandra
Flytta isär kärlen.
Det är inte alltid nödvändigt att ringa till
en serviceverkstad. Kanske är det bara
en småsak som behöver åtgärdas. Prova
därför först om felet kan avhjälpas med
hjälp av tabellen nedan.
Den som tillkallar en reparatör för ett
sådant enklare fel får själv betala för
arbetet.
Indikatorn (bild
2
/9) lyser inte:
Kontrollera om strömmen till skåpet är
tillslagen, om stickkontakten sitter ordentligt
i vägguttaget och om skåpet satts på.
När displayen visar "E1" (blinkande)
medan skåpet tas i drift. Bild
2
/9.
I kyldelen råder en mycket hög temperatur.
Några minuter efter der att skåpet tagits i
drift visas den inställda temperaturen i
kyldelen, när Cooler-knappen tryckts in.
Annars visas "Al"-indikatorn (för varmt i
frysdelen) eller den inställda
frystemperaturen.
När displayen visar "E2" (blinkande)
medan skåpet tas i drift. Bild
2
/9.
I frysdelen råder en mycket hög temperatur.
Några minuter efter der att skåpet tagits i
drift visas "Al" och därefter den inställda
temperaturen i frysdelen, när Freezerknappen tryckts in. Annars visas den
inställda kyltemperaturen.
Kylskåpsbelysningen fungerar inte:
– Glödlampan är trasig. Dra ut
stickkontakten ur vägguttaget. Ta av kåpan
(bild
A
/A). Dra ut den trasiga glödlampan.
Byt till ny glödlampa max 15 W, 230 V
(sockel E14).
– Ljusströmbrytaren (bild
A
/B) har fastnat.
Försök få den att röra sig igen. Ring
annars service.
Indikatorn (bild
2
/9) blinkar men
varningssignalen ljuder inte.
Det har varit för varmt i frysskåpet på grund
av strömavbrott eller någon funktionsstörning.

45
SV
Enklare fel man själv kan avhjälpa
När du tryckt in Alarm - knappen visar
display 9 (inte blinkande) under fem
sekunder den "varmaste temperatur" som
varit i frysen. Detta värde raderas därefter.
Sedan visar display 9 den programmerade
frystemperaturen (utan blinkning).
Om de tinat kan man, under förutsättning att
smak, lukt och utseende är oförändrade,
efter kokning eller stekning på nytt frysa in
varan.
Men man bör i sådana fall konsumera varan
i god tid innan den maximala lagringstiden
gått ut.
När displayen Bild
2
/9 blinkar och
varningssignalen ljuder trots att skåpet
varit i drift en längre tid :
Fel: det är för varmt i frysen!
Displayen visar den programmerade
frystemperaturen.
Tryck på "Alarm" - knappen för att
stänga av varningssignalen.
Möjliga orsaker till felet :
- Luftspalten överst i skåpet resp. i sockeln
är övertäckt.
- Dörren till frysen är inte ordentligt stängd,
- Färska matvaror har lagts in utan att
infrysningsfunktionen kopplats på.
- För stor mängd färska matvaror har lagts
in vid ett och samma tillfälle. Hög
omgivningstemperatur
Tryck på "Alarm" - knappen när felet
åtgärdats. Displayen slutar att blinka när
frysen åter nått sin driftstemperatur.
När frysskåpsdörren stått öppen länge
och frysskåpet inte längre uppnår inställd
temperatur.
Kondensorn är så kraftigt nedisad att den
helautomatiska avfrostningen inte längre
klarar av att avfrosta skåpet. I sådana fall
måste de djupfrysta varorna tas ut ur skåpet
och lagras på kall plats.
Koppla sedan ifrån skåpet, öppna dörren.
Efter ca 12 timmar har isen i kylsystemet
tinat. Slå på skåpet igen och lägg in varorna.
Om felet inte kunnat avhjälpas med ledning
av våra anvisningar bör du ringa service.
Öppna inte dörrarna till skåpet i onödan,
eftersom temperaturen då stiger snabbare.
Utför inte på egen hand några ytterligare
arbeten, i synnerhet inte på skåpets
elektriska delar.
44
SV
Typskylt
Bild
B
Anteckna uppgifterna från skåpets typskylt
innan du tar kontakt med serviceverkstaden.
Typskylten sitter längst ner till vänster
i kylskåpet bredvid grönsakslådan. Notera
typnumret (E) och tillverkningsnummer (FD).
Titta i telefonkatalogen eller ta kontakt med
försäljningsstället för uppgift om närmaste
service.
Konsumentbestämmelser
I Sverige gäller av EHL antagna konsumentbestämmelser. Den fullständiga texten finns
hos Din handlare. Spara kvittot!
Service

47
DE
Bestimmungen
Das Gerät eignet sich zum Kühlen und
Gefrieren von Lebensmitteln und zur Eisbereitung.
Es ist für die Verwendung im Haushalt
bestimmt.
Bei Einsatz im gewerblichen Bereich sind die
für das Gewerbe gültigen Bestimmungen zu
beachten.
Es entspricht der Unfallverhütungsvorschrift
für Kälteanlagen (VBG 20).
Es entspricht den einschlägigen
Sicherheitsbestimmungen für Elektrogeräte.
Der Kältekreislauf ist auf Dichtheit geprüft.
Umgebungstemperatur
beachten
Abhängig von der „Klimaklasse“ (siehe
Typenschild) kann Ihr Gerät bei folgenden
Umgebungstemperaturen betrieben werden:
(Das Typenschild befindet sich links unten
im Gerät. Bild
B
)
Klimaklasse Umgebungstemperatur
von ... bis
SN +10 °C bis 32 °C
N +16 °C bis 32 °C
ST +18 °C bis 38 °C
T +18 °C bis 43 °C
Beim Unterschreiten des
Umgebungstemperaturbereiches wird es im
Kühlraum zu kalt, beim Überschreiten im
Gefrierraum zu warm.
Sinkt die Umgebungstemperatur unter die
eingestellte Temperatur im Kühlraum ab,
wird der Kühlraum genauso kalt wie die
Umgebungstemperatur.
Bei Umgebungstemperaturen unter +10 °C
kann es zu Störungen beim
vollautomatischen Abtauen kommen.
● Flüssigkeit in Flaschen und Dosen, im
besonderen kohlensäurehaltige Getränke,
nicht im Gefrierraum lagern. Flaschen
und Dosen platzen.
● Be- und Entlüftungsöffnungen für das
Gerät nicht abdecken oder zustellen.
● Sockel, Auszüge, Türen usw. nicht als
Trittbrett oder zum Abstützen mißbrauchen.
● Kinder nicht mit dem Gerät spielen
lassen.
● Bei Gerät mit Schloß, Schlüssel außer
Reichweite von Kindern aufbewahren.
● Eis am Stiel und Eiswürfel nicht direkt
vom Gefrierraum in den Mund nehmen
(Verbrennungsgefahr durch sehr tiefe
Temperaturen).
● Gefriergut nicht mit nassen Händen
berühren, die Hände könnten daran
festfrieren.
● ACHTUNG: Die Lüftungsöffnungen im
Gehäuse des Geräts bzw. am
Einbaugerät immer freihalten.
● ACHTUNG: Die Leitungen des
Kühlkreislaufs nicht beschädigen.
● ACHTUNG: Keine Elektrogeräte in den
Lebensmittelfächern des Geräts
verwenden, soweit es nicht einem vom
Hersteller empfohlenen Typ entspricht.
Dieses Gerät enthält in
geringer Menge das Kältemittel
Isobutan (R 600a), ein Naturgas
mit hoher
Umweltverträglichkeit aber brennbar.
Beim Transportieren und Aufstellen des
Gerätes darauf achten, daß keine Teile
des Kältemittelkreislaufes beschädigt
werden. Bei Bechädigungen offenes
Feuer oder Zündquellen vermeiden und
den Raum, in dem das Gerät steht, für
einige Minuten durchlüften
Warnung: Zum Beschleunigen der
Abtauung keine anderen mechanischen
Einrichtungen oder sonstige künstlichen
Hilfsmittel als die vom Hersteller
empfohlenen benutzen.
Hinweise zur Entsorgung und Sicherheit
46
DE
Hinweise zur Entsorgung und Sicherheit
Hinweise zur Entsorgung
Altgeräte sind kein wertloser Abfall! Durch
umweltgerechte Entsorgung können
wertvolle Rohstoffe wiedergewonnen
werden.
Bei ausgedienten Geräten Netzstecker
ziehen. Netzkabel durchtrennen und mit
dem Stecker entfernen.
Schloß entfernen. Sie verhindern damit,
daß sich spielende Kinder einsperren und in
Lebensgefahr kommen.
Kältegeräte enthalten Kältemittel und in der
Isolierung Gase, die eine fachgerechte
Entsorgung erfordern. Achten Sie darauf,
daß die Rohre bis zur Entsorgung nicht
beschädigt werden.
Ihr neues Gerät wurde auf dem Weg zu Ihnen
durch die Verpackung geschützt. Alle eingesetzten Materialien sind umweltverträglich
und wieder verwertbar. Bitte helfen Sie mit
und entsorgen Sie die Verpackung
umweltgerecht.
Verpackung und ihre Teile nicht spielenden
Kindern überlassen. Erstickungsgefahr
durch Faltkartons und Folien.
Über aktuelle Entsorgungswege informieren
Sie sich bitte bei Ihrem Fachhändler oder bei
Ihrer Gemeindeverwaltung.
Dieses Gerät ist entsprechend der
europäischen Richtlinie 2002/96/EG
über Elektro- und Elektronikaltgeräte
(waste electrical and electronic
equipment - WEEE) gekennzeichnet.
Die Richtlinie gibt den Rahmen für eine EUweit gültige Rücknahme und Verwertung der
Altgeräte vor.
Ein Beitrag zum Umweltschutz –
wir verwenden Recyclingpapier.
Hinweise zur Sicherheit
Lesen Sie bitte vor Inbetriebnahme des
Gerätes die in der Gebrauchs- und Montageanweisung aufgeführten Informationen
sorgfältig durch. Sie enthalten wichtige
Hinweise für die Installation, den Gebrauch
und die Wartung des Gerätes.
Gebrauchs- und Montageanweisung ggf. für
Nachbesitzer sorgfältig aufbewahren.
Der Hersteller haftet nicht, wenn die
nachstehenden Hinweise nicht beachtet
werden:
● Beschädigtes Gerät nicht in Betrieb
nehmen, im Zweifel beim Lieferanten
rückfragen.
● Anschluß und Aufstellung nach der
Montageanweisung vornehmen.
Elektrische Anschlußbedingungen und
Angaben auf dem Typenschild müssen
übereinstimmen.
● Verwenden Sie zum Reinigen auf keinen
Fall ein Dampfreinigungsgerät. Der
Dampf kann an spannungsführende Teile
des Gerätes gelangen und einen
Kurzschluß oder Stromschlag
verursachen.
● Die elektrische Sicherheit des Gerätes ist
nur gewährleistet, wenn das Erdungssystem der Hausinstallation
vorschriftsmäßig installiert ist.
● Im Fehlerfall, bei Wartung und bei der
Reinigung Gerät vom Netz trennen.
Netzstecker ziehen oder Sicherung
ausschalten. Am Netzstecker ziehen,
nicht am Anschlußkabel.
● Reparaturen an Elektrogeräten dürfen nur
von Fachkräften durchgeführt werden.
Durch unsachgemäße Reparaturen
können erhebliche Gefahren für den
Benutzer entstehen.
● Flaschen mit hochprozentigem Alkohol
nur dicht verschlossen und stehend
lagern.
Erzeugnisse mit brennbaren Treibgasen
(z. B. Sahnespender, Spraydosen) und
explosive Stoffe nicht im Gerät lagern –
Explosionsgefahr!

49
DE
Gerät kennenlernen
Bitte klappen Sie vor dem Lesen die
letzten Seiten mit den Abbildungen aus.
Die Gebrauchsanweisung gilt für mehrere
Modelle, Ausstattungs- und
Detailabweichungen bei den Abbildungen
sind möglich.
Gesamtansicht
Bild
1
1–9 Bedienblende
10 Luftaustrittöffnungen
11 Innenbeleuchtung
12 Schublade für Joghurtbecher
13 Ablage
14 Multiflow System (Kaltluftverteiler)
15 Obst- und Gemüsebehälter
16 "Chiller"-Fach
17 Absteller für kleine Dosen, Tuben
18 Eierablage
19 Ablage
20 Flaschenhalter
21 Flaschenabsteller
22 Gefriertablett
23 Gefriergutbehälter
A Kühlraum
B Gefrierraum
Bedienblende
(Kurzübersicht)
Bild
2
1 -Taste
Geräte-Hauptschalter ein/aus
2 "alarm" -Taste ("alarm-aus"-Taste)
a) zum Abschalten des Warntons
b) zum Anzeigen der wärmsten
Temperatur, die im Gefrierraum
geherrscht hat (nur wenn Anzeige 9
blinkt).
3 super-Taste
für max. Gefrierleistung
4 Freezer-Taste
Dient zum Anzeigen der eingestellten
Gefrierraumtemperatur.
5 Cooler-Taste
Dient zum Anzeigen der eingestellten
Kuehlraumtemperatur.
6 Einstelltaste Gefrierraum- bzw.
Kühlraumtemperatur
0
C = kälter, wärmer
7 Anzeige "alarm"
leuchtet nur, wenn die Alarmfunktion
aktiviert wird.
8 Anzeige „super“
leuchtet nur, wenn „super“-Taste
gedrückt wurde.
9 Anzeige für
a) „Wärmste Temperatur im
Gefrierraum“
b) “AL” (alarm) Anzeige
c) Einstelltemperatur für Kühlraum
d) Einstelltemperatur für Gefrierraum
48
DE
Gerät aufstellen
Aufstellort
Als Aufstellort eignet sich ein trockener,
belüftbarer Raum. Der Aufstellplatz sollte
nicht direkter Sonneneinstrahlung
ausgesetzt und nicht in der Nähe einer
Wärmequelle wie Herd, Heizkörper etc. sein.
Wenn das Aufstellen neben einer
Wärmequelle unvermeidbar ist, verwenden
Sie eine geeignete Isolierplatte oder halten
Sie folgende Mindestabstände zur
Wärmequelle ein.
Zu Elektroherden 3 cm.
Zu Öl- oder Kohleanstellherden 30 cm.
Beim Aufstellen neben einem anderen Kühloder Gefriergerät ist ein seitlicher Mindestabstand von 2 cm erforderlich, um
Schwitzwasserbildung zu vermeiden.
Das Gerät muß fest und eben stehen.
Unebenheiten des Bodens durch die beiden
Schraubfüße an der Vorderkante
ausgleichen, Bild C.
Zwei Rollen auf der Rückseite erleichtern
das Einschieben in eine Nische.
Elektrischer Anschluß
Geräte nur an 220–240 V/50 Hz
Wechselspannung über eine
vorschriftsmäßig installierte
Schutzkontaktsteckdose anschließen. Die
Steckdose muß mit einer 10-A-Sicherung
oder höher abgesichert sein.
Bei Geräten für nichteuropäische Länder
ist auf dem Typenschild zu überprüfen, ob
die Anschlußspannung und Stromart mit den
Werten Ihres Stromnetzes übereinstimmt.
Das Typenschild befindet sich im Kühlraum
links unten. Bild B.
Ein eventuell notwendiger Austausch der
Netzanschlußleitung darf nur durch den
Service des Herstellers erfolgen.
Warnung! Auf keinen Fall darf das Gerät
an elektronische „Energiesparstecker“
(z. B. Sava Plug) und an Wechselrichter,
die Gleichstrom in 230 V Wechselstrom
umwandeln, angeschlossen werden
(z. B. Solaranlagen, Schiffsnetze).
Belüftung
Bild
3
Die an der Rückwand des Gerätes erwärmte
Luft muß ungehindert abziehen können.
Die Kühlmaschine muß sonst mehr leisten,
und das erhöht den Stromverbrauch.
Deshalb auf keinen Fall die Belüftungs- und
Entlüftungsöffnungen abdecken.
Nach dem Transport ...
Vor dem ersten Einschalten, Gerät ca. 1/2
Stunde senkrecht lassen.

51
DE
Gerät kennenlernen
5 "Cooler"-Taste
Dient zum Anzeigen der eingestellten
Kuehlraumtemperatur auf der
Anzeige 9 (siehe Beschreibung Anzeige
9c).
6 Einstelltaste für Kühl- bzw.
Gefrierraumtemperatur
a) (Die Kühlraumtemperatur ist von 2 ºC bis
8 ºC einstellbar). "Cooler"-Taste und
anschliessend ºC –Taste drücken.
Die Einstelltemperatur wird auf der
Anzeige 9 angezeigt. Die Einstelltaste
wiederholt oder ständig drücken, bis die
gewünschte Temperatur angezeigt wird.
(Die Einstelltemperatur wird in
fortlaufender Reihenfolge von 8 ºC bis 2
ºC angezeigt. Nach 2 ºC erscheint wieder
8 ºC).
b) (Die Gefrierraumtemperatur ist von -16 ºC
bis -26 ºC einstellbar). Zum Einstellen der
gewünschten Gefrierraumtemperatur
"Freezer"-Taste und anschliessend die
ºC-Taste druecken.
Die Einstelltemperatur wird auf der
Anzeige 9 angezeigt. Die Einstelltaste
wiederholt oder staendig druecken, bis
die gewünschte Temperatur angezeigt
wird. (Die Einstelltemperatur wird in
fortlaufender Reihenfolge von -16 ºC bis 26 ºC angezeigt. Nach –26 ºC erscheint
wieder –16 ºC.
7 Anzeige "alarm"
Sie leuchtet nur, wenn die Alarmfunktion
aktiviert wurde. Dies geschieht wenn es
im Gefrierraum zu warm, also das
Gefriergut gefährdet ist. Sie erlischt,
wenn der Gefrierraum seine
Betriebstemperatur wieder erreicht hat.
8 Anzeige „super“
Sie leuchtet nur, wenn die „super“ Taste gedrückt und damit das
Supergefrieren eingeschaltet wurde.
Sie erlischt, wenn die „super“-Taste zum
Ausschalten nochmals gedrückt wurde.
Sie erlischt automatisch frühestens
52 Std. nach dem Einschalten des Supergefrierens.
9 Multifunktionsanzeige
zeigt verschiedene Temperaturen an
a) Zu warme Gefrierraumtemperatur
Wenn die Anzeige 9 blinkt, dann ist
oder war es in der Vergangenheit,
bedingt durch einen Stromausfall oder
eine Störung im Gefrierraum, zu warm.
Nach Drücken der Alarm -Taste
wird auf der Anzeige 9 (nicht blinkend)
fünf Sekunden lang die wärmste
Temperatur, die im Gefrierraum
geherrscht hat, angezeigt. Danach
wird dieser Wert gelöscht. Die Anzeige
9 zeigt dann die programmierte
Gefrierraumtemperatur ohne zu
blinken an.
b) "Al" (Alarm) – Anzeige
Wird angezeigt, wenn der Gefrierraum
zu warm ist.
c) Einstelltemperatur für Kuehlraum
Nach Drücken der "Cooler"- Taste
wird die Einstelltemperatur angezeigt.
d) Einstelltemperatur fuer Gefrierraum
Nach Betaetigung der "Freezer" –
Taste wird die Einstelltemperatur
angezeigt.
50
DE
Gerät kennenlernen
Durch das vollautomatische NofrostSystem bleibt der Gefrierraum eisfrei. Ein
Abtauen ist nicht mehr notwendig.
Funktion:
Das Gefriergut wird durch gekühlte Luft
eingefroren!
Ein Verdampfer, der sich im Nofrost-System
befindet, kühlt die Luft im Gerät ab. Die
Kaltluft wird durch einen Ventilator
umgewälzt. Ein zweiter Ventilator sorgt für
die Luftumwälzung im Kühlraum.Die in der
Luft enthaltene Feuchtigkeit schlägt sich am
Verdampfer nieder. Wenn notwendig, wird
der Verdampfer vollautomatisch abgetaut.
Das Tauwasser wird zur Kühlmaschine
geleitet und dort verdunstet. Der
Gefrierraum und die Lebensmittel bleiben
eisfrei.
Die Funktion der Schaltund Kontrollelemente
Bild
2
1 -Taste
Geräte-Hauptschalter, dient zum Ein- und
Ausschalten des gesamten Gerätes.
2 "alarm" -Taste
Dient zum Abschalten des Warntons.
Der Warnton schaltet sich ein, wenn es
im Gefrierraum zu warm, also das
Gefriergut gefährdet ist. (Gleichzeitig
blinkt die Anzeige 9).
Ohne Gefahr für das Gefriergut kann sich
der Warnton einschalten
– bei Inbetriebnahme des Gerätes
– beim Einlegen frischer Lebensmittel
ohne Einschalten des Supergefrierens
– und bei zu lange geöffneter Gefrier-
raumtür.
Nach Abschalten des Warntones wird die
„akustische Warnung“ automatisch neu
in Bereitschaft versetzt, wenn der
Gefrierraum seine Betriebstemperatur
wieder erreicht hat.
3 "Super"-Taste
Dient zum Ein- und Ausschalten des
Supergefrierens.
Die Inbetriebnahme wird sowohl über die
Anzeige 8"Super", als auch über die
Anzeige 9 mit "SU" angezeigt. Das
Supergefrieren dient zum Eingefrieren
grosser Mengen frischer Lebensmittel
und ist bis zu 24 Stunden vor dem
Einlegen der frischen Lebensmittel
einzuschalten.
Die Kältemaschine arbeitet nach dem
Einschalten ständig, im Gefrierraum wird
eine sehr tiefe Temperatur erreicht.
4 "Freezer"-Taste
Dient zum Anzeigen der eingestellten
Gefrierraumtemperatur auf der
Anzeige 9 (siehe Beschreibung Anzeige
9d).

53
DE
Lebensmittel einordnen
Beim Einordnen beachten
● Warme Speisen und Getränke außerhalb
des Gerätes abkühlen lassen.
● Lebensmittel möglichst verpackt oder gut
abgedeckt einordnen. Dadurch bleiben
Aroma, Farbe, Feuchtigkeit und Frische
erhalten, außerdem werden Geschmacksübertragungen vermieden. Unverpackt
sollten nur Gemüse, Obst und Salat in
den Gemüsebehältern gelagert werden.
● Öl und Fett nicht mit den Kunststoffteilen
und der Türdichtung in Berührung
bringen (diese könnten sonst porös
werden).
● Im Gerät keine explosiblen Stoffe auf-
bewahren und hochprozentigen Alkohol
nur verschlossen, stehend lagern.
– Explosionsgefahr!
● Flaschen mit Flüssigkeiten, die gefrieren
können, nicht im Gefrierraum lagern.
Beim Gefrieren platzen die Flaschen.
Einordnungsbeispiel
Bild
1
Kühlraum (A)
In der Schublade (12) Käse, Wurst, Joghurt.
Auf den Ablagen (13) von oben nach unten
Backwaren, fertige Speisen, Molkereiprodukte.
In der Gemüseschale (15) Gemüse, Obst,
Salat.
In dem Absteller (17) kleine Flaschen,
Dosen.
In dem Flaschenabsteller (21) große
Flaschen.
Ausschalten
Hauptschalter Bild 2/1 drücken, damit ist
das Gerät ausgeschaltet.
Gerät stillegen
Wenn das Gerät längere Zeit nicht benutzt
wird:
Hauptschalter Bild
2
/1 drücken, Gerät
reinigen, die Türen geöffnet lassen.
Ausschalten, Gerät stillegen
52
DE
Bild
2
● Stecker in Steckdose stecken.
● Geräte-Hauptschalter 1 drücken.
Warnton ertönt, Anzeige 9 blinkt und
zeigt "AL" an.
● alarm -Taste 2 drücken,
Warnton verstummt. Die Anzeige zeigt
jetzt die aktuelle Temperatur fuer 5 Sek.
an. Auf der Anzeige 9 erscheint "AL".
● Temperatur für den Gefrierraum
einstellen
Dazu die "Freezer"-Taste und
anschliesend die
0
C -Taste drücken.
0
C-Taste mehrmals oder so lange
drücken, bis die gewünschte Temperatur
angezeigt wird (Fortlaufende Reihenfolge,
nach –26
0
C erscheint wieder –16 0C).
Wir empfehlen Ihnen eine Einstellung der
Gefrierraumtemperatur auf -20
0
C.
● Temperatur für den Kühlraum
einstellen
Dazu die "Cooler"-Taste und
anschliessend die
0
C -Taste drücken.
0
C–Taste mehrmals oder so lange
drücken, bis die gewünschte Temperatur
angezeigt wird (Fortlaufende Reihenfolge,
nach 8
0
C erscheint wieder 2 0C). Wir
empfehlen Ihnen eine Einstellung der
Kühlraumtemperatur auf +4
0
C
Die Kühlraumtemperatur verändert sich je
nach Beladung relativ langsam.
Einschalten und Temperaturwahl
Hinweise
● Die Temperatur im Kühlraum kann
schwanken durch:
– häufiges Öffnen der Gerätetür
– Einlegen großer Mengen frischer
Lebensmittel im Kühlraum und
Gefrierraum
– Veränderungen der
Umgebungstemperatur
– Änderung der Temperaturwähler-
Einstellung für Gefrierraum oder durch
Supergefrieren.
● Die Stirnseiten des Gehäuses werden
teilweise beheizt, dies verhindert
Schwitzwasserbildung im Bereich der
Türdichtung.

55
DE
Portionen frieren schneller durch und die
Qualität bleibt beim Auftauen und
Zubereiten so am besten erhalten.
Die Lebensmittel luftdicht verpacken, damit
sie nicht ihren Geschmack verlieren oder
austrocknen.
Zum Verpacken geeignet sind:
Kunststoff-Folien, Schlauchfolien aus
Polyäthylen, Alu-Folien und Gefrierdosen.
Diese Produkte finden Sie im Fachhandel.
Ungeeignet sind:
Packpapier, Pergamentpapier, Cellophan,
Müllbeutel und gebrauchte Einkaufstüten.
Die Lebensmittel in die Verpackung einlegen. Luft völlig herausdrücken und
Packung dicht verschließen.
Zum Verschließen eignen sich:
Gummiringe, Kunststoffklipse, Bindfäden,
kältebeständige Klebebänder oder
ähnliches. Beutel und Schlauchfolien aus
Polyäthylen können mit einem
Folienschweißgerät verschweißt werden.
Vor dem Einlegen in den Gefrierraum den
Inhalt der Gefrierpakete kennzeichnen
und mit dem Einlegedatum versehen.
Max. Gefriervermögen
Lebensmittel sollen möglichst schnell bis
zum Kern durchgefroren werden. Nur so
bleiben Vitamine, Nährwerte, Aussehen und
Geschmack erhalten. Das max. Gefriervermögen Ihres Gerätes deshalb nicht
überschreiten.
Folgende Mengen an Lebensmitteln können
innerhalb von 24 Stunden in der oberen
Gefriergutschale eingefroren werden:
Bei Geräten mit 70 cm Breite max. 12 kg
Bei Geräten mit 60 cm Breite max. 9 kg
Bereits gefrorene Lebensmittel dürfen nicht
mit den frisch einzufrierenden Lebensmitteln
in Berührung kommen.
Heiße Speisen und Getränke vor dem
Einlegen in den Gefrierraum auf Zimmertemperatur abkühlen lassen.
Angaben über das max. Gefriervermögen
nach aktueller Norm finden Sie auf dem
Typchild (Bild B).
Supergefrieren
Lagern bereits Lebensmittel in dem
Gefrierraum, ist einige Stunden vor dem
Einlegen frischer Ware das Supergefrieren
einzuschalten.
Im allgemeinen genügen 4–6 Stunden. Soll
das max. Gefriervermögen genutzt werden,
benötigt man 24 Stunden. Kleinere Mengen
Lebensmittel (bis zu 2 kg) können ohne
Supergefrieren eingefroren werden. Zum
Einschalten des Supergefrierens einfach die
Supergefriertaste Bild 2/3 drücken.
Die „super”-Anzeige zeigt die
Inbetriebnahme an. Nach dem Einschalten
wird im Gefrierraum eine sehr tiefe
Temperatur erreicht. Das Supergefrieren
schaltet sich ca. 52 Std. nach dem
Einschalten automatisch ab.
Lebensmittel lagern
Immer darauf achten, daß alle
Gefriergutschalen bis zum Anschlag ganz
eingeschoben sind.
Wichtig für eine einwandfreie Luftzirkulation
im Gerät.
Gefrieren und Lagern
54
DE
Lebensmittel einordnen
Gefrierraum (B)
Auf dem Gefriertablett (22) kleines
Gefriergut lagern, Eis bereiten.
In den oberen Gefriergutschalen (23)
Gefriergut lagern.
Die Inneneinrichtung
Die Ablagen im Kühlraum können auch bei
90°-geöffneter Tür umgesetzt werden. Zum
Umsetzen Ablage nach vorne ziehen,
absenken, herausnehmen und an
gewünschter Stelle neu einsetzen (Bild
4
).
Chiller - Fach (Bild
8
)
Boden des Faches nach vorne ziehen,
Klappe öffnet sich.
I
n diesem Fach herrschen tiefere
Temperaturen als im Kühlraum. Dabei
können auch Temperaturen unter 0°C
auftreten. Ideal zum Lagern von Fisch,
Fleisch und Wurst.
Nicht für Salate und Gemüse und
kälteempfindliche Waren geeignet.
Die kleine Schublade kann zum Beladen und
Entladen herausgenommen werden (Bild 6).
Die Eiereinsätze in den Behältern können
hochgeklappt werden, dadurch können
Tuben, kleine Dosen usw. gelagert werden.
Damit die Flaschen beim Öffnen und
Schließen der Tür nicht umfallen können,
kann man sie mit dem Flaschenhalter sichern.
Bild 7.
Alle Absteller und Behälter in der Tür können
zum Reinigen herausgenommen werden.
Zum Herausnehmen Behälter und Absteller
anheben. Bild 5/A.
Gefrieren und Lagern
Beim Einkauf von
Tiefkühlkost beachten
● Achten Sie auf die Verpackung, sie sollte
nicht beschädigt sein.
● Das Haltbarkeitsdatum darf nicht
überschritten sein.
● Die Temperaturanzeige der Verkaufstruhe
sollte –18 °C oder kälter anzeigen.
● Tiefkühlkost ganz zum Schluß einkaufen
und gut eingepackt in Zeitungspapier
oder in einer Kühltasche schnell nach
Hause transportieren und in den
Gefrierraum legen.
Lebensmittel selbst
eingefrieren
Werden Lebensmittel selbst eingefroren,
nur frische, einwandfreie Lebensmittel
verwenden.
Zum Eingefrieren geeignet sind
Fleisch- und Wurstwaren, Geflügel und Wild,
Fisch, Gemüse, Kräuter, Obst, Backwaren,
Pizza, fertige Speisen, Speisereste, Eigelb
und Eiweiß.
Zum Eingefrieren nicht geeignet sind
Ganze Eier in der Schale, Sauerrahm und
Mayonnaise, Blattsalate, Radieschen,
Rettiche und Zwiebeln.
Blanchieren von Gemüse und Obst
Damit Farbe, Geschmack, Aroma und Vitamin
„C“ erhalten bleiben, sollte Gemüse und Obst
vor dem Eingefrieren blanchiert werden.
(Beim Blanchieren wird das Gemüse und
Obst kurzzeitig in kochendes Wasser
getaucht – Literatur über das Eingefrieren, in
der auch das Blanchieren beschrieben wird,
gibt es im Buchhandel.)
Lebensmittel verpacken
Die Waren portionsgerecht für Ihren Haushalt
abpacken.
Gemüse und Obst nicht schwerer als 1 kg,
Fleisch bis zu 2,5 kg portionieren. Kleinere

57
DE
Hinweise zu
Betriebsgeräuschen
Betriebsgeräusche
Um die gewählte Temperatur konstant zu
halten, schaltet Ihr Gerät von Zeit zu Zeit
den Kompressor ein.
Die dabei entstehenden Geräusche sind
funktionsbedingt.
Sie verringern sich automatisch, sobald das
Gerät die Betriebstemperatur erreicht hat.
Das Brummen kommt vom Motor
(Kompressor). Es kann kurzfristig etwas
lauter werden, wenn sich der Motor
einschaltet.
Das Blubbern, Gurgeln oder Surren kommt
vom Kältemittel, das durch die Rohre fließt.
Das Klicken ist immer dann zu hören, wenn
der Thermostat den Motor ein- oder
ausschaltet.
Knackgeräusche können auftreten,
wenn...
- die automatische Abtauung erfolgt
- sich das Gerät abkühlt bzw. erwärmt
(Materialausdehnungen)
Bei einem Mehrzonen- oder Nofrost-Gerät
kann ein leises Rauschen von der
Luftströmung im Geräte-Innenraum
herrühren.
Sollten die funktionsbedingten Geräusche
zu laut sein, hat dies womöglich einfache
Ursachen, die sich vielfach ganz leicht
beheben lassen.
Das Gerät steht uneben
Bitte richten Sie das Gerät mit Hilfe einer
Wasserwaage eben ein. Verwenden Sie dazu
die Schraubfüße oder legen Sie etwas unter.
Das Gerät „steht an“
Bitte rücken Sie das Gerät von anstehenden
Möbeln oder Geräten weg.
Schubladen, Körbe oder Abstellflächen
wackeln oder klemmen
Prüfen Sie bitte die herausnehmbaren Teile
und setzen Sie sie eventuell neu ein.
Flaschen oder Gefäße berühren sich
Rücken Sie bitte die Flaschen oder Gefäße
leicht auseinander.
● Gerät in einem kühlen, gut belüfteten
Raum aufstellen, vor direkter
Sonnenbestrahlung schützen und nicht
im Bereich einer Wärmequelle
(Heizkörper etc.) anordnen.
● Die Be- und Entlüftungsöffnungen des
Gerätes nicht zustellen.
● Warme Speisen erst nach dem Abkühlen
in den Gefrierschrank geben.
● Zum Auftauen Gefrierwaren in den
Kühlraum legen. Sie nutzen damit die
Kälte, die in der Gefrierware steckt, zur
Kühlung der Lebensmittel im Kühlraum.
● Zum Be- oder Entladen Gerätetüren so
kurz wie möglich öffnen.
Je kürzer die Gerätetür offensteht, um so
geringer ist die Eisbildung an den
Gefrierrosten.
● Wärmetauscher (schwarzes Gitter) auf
der Geräterückseite alle zwei Jahre
reinigen.
Energiespartips
56
DE
Gefrieren und Lagern
Gefriertablett
Bild
:
Das Gefriertablett eignet sich zum Aufbewahren der Eisschalen und zum einzelnen
Eingefrieren von Beeren, Obststücken,
Kräutern und Gemüse.
Zum einzelnen Eingefrieren Gefriergut auf
dem Gefriertablett gleichmäßig verteilen und
ca. 10 bis 12 Stunden durchfrieren lassen.
Danach in Gefrierbeutel oder Behälter umfüllen.
Zum Auftauen Gefriergut wieder einzeln
nebeneinander ausbreiten.
Auftauen von Gefriergut
Je nach Art und Verwendungszweck kann
zwischen folgenden Möglichkeiten gewählt
werden:
Bei Raumtemperatur,
im Kühlschrank,
im elektrischen Backofen,
mit/ohne Heißluftventilator,
im Mikrowellengerät.
An- und aufgetautes Gefriergut kann erneut
eingefroren werden, wenn Fleisch und Fisch
nicht länger als einen Tag, anderes
Gefriergut nicht länger als drei Tage bei
Temperaturen unter +3 °C gelagert wurden.
Andernfalls, wenn Geschmack, Geruch und
Aussehen unverändert sind, durch Kochen,
Braten oder zu einem Fertiggericht
weiterverarbeiten und erneut eingefrieren.
Die max. Lagerdauer nicht mehr voll nutzen.
Eis bereiten
Bild
9
Die Eisschale zu 3/4 mit Wasser füllen und in
den Gefrierraum stellen.
Zum Herausnehmen der gefrorenen Würfel
aus der Eisschale Schale leicht verwinden.
Reinigen
Vor dem Reinigen grundsätzlich
Netzstecker ziehen bzw. Sicherung
abschalten oder herausschrauben.
Keinen Dampf- oder Dampfdruckreiniger
verwenden. Der heiße Dampf kann die
Oberflächen und die Elektrik beschädigen
– Stromschlaggefahr!
Reinigungswasser darf nicht in die Kontrollarmatur und Beleuchtung gelangen. Zur
Reinigung des gesamten Gerätes außer der
Türdichtung eignet sich lauwarmes Wasser
mit einem milden, leicht desinfizierenden
Reinigungsmittel, z.B. Handspülmittel.
Ungeeignet sind sand-, scheuermittel- oder
säurehaltige Putzmittel bzw. chem.
Lösungsmittel.
Die Türdichtung nur mit klarem Wasser abwischen und danach gründlich trockenreiben.
Wenn möglich, sollte alle zwei Jahre auch
der Wärmetauscher (schwarzes Gitter) auf
der Geräterückseite mit einem Pinsel oder
Staubsauger gereinigt werden. Das erhält
die volle Leistungsfähigkeit des Gerätes und
spart Strom.

59
DE
KundendienstKleine Störungen selbst
beheben
Gerät ausschalten und Gefrierraumtür offen
lassen. Nach ca. 12 Stunden ist das Eis im
Kühlsystem abgetaut. Gerät wieder
einschalten und Gefriergut einlegen.
Kann die Störung anhand der zuvor aufgeführten Hinweise nicht beseitigt werden,
rufen Sie bitte in jedem Fall den
Kundendienst.
Öffnen Sie die Türen nicht unnötig oft, damit
Kälteverlust vermieden wird.
Führen Sie keine weiteren Arbeiten, vor
allem an den elektrischen Teilen des
Gerätes, selbst aus.
Typenschild
Bild
B
Bitte geben Sie bei der Anforderung des
Kundendienstes die E-Nummer und die
FD-Nummer an.
Beide Ziffern finden Sie im schwarzumrandeten Feld des Typenschildes unten
links im Kühlraum neben der Gemüseschale.
Die Anschrift und die Telefonnummer des
Kundendienstes finden Sie im
Kundendienststellen-Verzeichnis oder im
amtlichen Telefonbuch.
58
DE
Kleine Störungen selbst beheben
Nicht jede Störung ist ein Fall für den
Kundendienst. Oft ist nur eine Kleinigkeit
zu beheben. Prüfen Sie deshalb bitte,
bevor Sie den Kundendienst rufen, ob Sie
auf selbst beheben können.
In solchen Fällen muß nämlich auch
während der Garantiezeit der volle Aufwand
des Monteureinsatzes berechnet werden.
Wenn die Anzeige Bild
2
/9 nicht leuchtet:
Prüfen Sie bitte, ob Strom vorhanden ist, der
Stecker richtig in der Steckdose sitzt und ob
das Gerät eingeschaltet ist.
Wenn während der Inbetriebnahme des
Gerätes wird die Anzeige (Bild 2/9) "E1"
(blinkend) angezeigt:
Im Kühlraum herrscht eine sehr hohe
Temperatur. Wenige Minuten nach der
Inbetriebnahme des Gerätes wird die
eingestellte Kühlraumtemperatur angezeigt,
wenn die Cooler – Taste gedrückt wurde.
Andernfalls, wird die "Al" – Anzeige
(Gefrierraum ist warm) oder die eingestellte
Gefrierraumtemperatur angezeigt.
Wenn während der Inbetriebnahme des
Gerätes die Anzeige (Bild 2/9) "E2"
(blinkend) angezeigt wird:
Im Gefrierraum herrscht eine sehr hohe
Temperatur. Wenige Minuten nach der
Inbetriebnahme des Gerätes wird "Al" und
anschließend die eingestellte
Gefrierraumtemperatur angezeigt, wenn die
Freezer – Taste gedrückt wurde.
Im anderen fall der Anzeige die eingestellte
Kühlraumtemperatur.
Wenn die Kühlraumbeleuchtung nicht
funktioniert:
– Die Glühlampe ist defekt. Netzstecker
ziehen, Abdeckung (Bild
A
/A) abnehmen,
Glühlampe max. 15 W, 230 V, Sockel E14
des gleichen Typs auswechseln.
– Der Lichtschalter klemmt (Bild
A
/B).
Prüfen Sie, ob er sich bewegen läßt. Wenn
nicht, rufen Sie bitte den Kundendienst.
Wenn die Anzeige Bild
2
/9 blinkt, das
akustische Warnsignal aber nicht ertönt,
dann war es in der Vergangenheit, bedingt
durch einen Stromausfall oder eine Störung,
im Gefrierraum zu warm.
Nach Druecken der Alarm - Taste wird
auf der Anzeige 9 (nicht blinkend) fuenf
Sekunden lang die wärmste Temperatur, die
im Gefrierraum geherrscht hat, angezeigt.
Danach wird dieser Wert geloescht. – Die
Anzeige 9 zeigt dann die programmierte
Gefrierraumtemperatur ohne zu blinken an.
Wenn die Anzeige wärmer als +3 °C
angezeigt hat, ist das Gefriergut zu
überprüfen.
Wenn Geschmack, Geruch und Aussehen
unverändert sind, Gefriergut durch Kochen,
Braten zu einem Fertiggericht weiterverarbeiten und erneut eingefrieren.
Die max. Lagerdauer nicht mehr voll nutzen.
Wenn nach längerem Betrieb die Anzeige
Bild
2
/9 blinkt und der Warnton ertönt :
Störung, im Gefrierraum ist es zu warm !
Auf der Anzeige wird die programmierte
Gefrierraumtemperatur angezeigt.
Zum Abschalten des Warntones "Alarm"-
Taste druecken.
Moegliche Ursachen der Stoerung :
- der Luftspalt oben am Geraet bzw. im
Sockel ist verdeckt,
- die Gefrierraumtuer ist nicht richtig
geschlossen,
- es wurden frische Lebensmittel ohne
Supergefrieren eingefroren,
- es wurden zu viele frische Lebensmittel auf
einmal zum Gefrieren eingelagert,
- hohe Umgebungstemperatur.
Nach Beheben der Störung "Alarm" Taste drücken; das Blinken der Anzeige
hoert auf, wenn der Gefrierraum seine
Betriebstemperatur wieder erreicht hat.
Wenn die Gefrierraumtür lange Zeit offen
war und nun der Gefrierraum seine
eingestellte Temperatur nicht mehr
erreicht,
ist der Verdampfer (Kälteerzeuger) so stark
vereist, daß das vollautomatische Abtausystem die Eismenge nicht mehr abtauen
kann. In diesem Fall Gefrierwaren aus dem
Gerät herausnehmen und gut isoliert an
einem kühlen Platz lagern.

61
FR
Chantilly et bombes aérosols) ni produits
explosifs – Risque d’explosion!
● Dans le compartiment congélateur, ne
stockez pas de boissons, gazeuses en
particulier, en bouteilles ou en boîtes car
elles éclateraient.
● Ne couvrez et ne bouchez pas les grilles
d’aération de l’appareil.
● Ne vous appuyez pas sur le socle, les
clayettes, les portes, etc. et ne vous en
servez pas comme marche pied.
● Ne laissez pas jouer les enfants avec
l’appareil.
● Si l’appareil est équipé d’une serrure,
rangez la clé hors de portée des enfants.
● Ne portez pas directement à la bouche
les esquimaux ou les glaçons qui sortent
du compartiment congélateur (risque de
brûlures dû à la température très basse).
● Ne touchez pas les aliments congelés
avec les mains mouillées car elles risqueraient de rester collées.
● ATTENTION : les orifices de ventilation
ménagés dans le corps de l'appareil et
contre l'appareil encastré doivent
toujours rester dégagés.
● ATTENTION : veillez à ne pas
endommager les conduites du circuit
frigorifique.
● ATTENTION : n'utilisez aucun appareil
électrique dans les tiroirs à produits
alimentaires de l'appareil, sauf s'il s'agit
d'un type recommandé par le fabricant.
Dans son circuit frigorifiqur, cet
appareil contient de l’isobutane (R
600a), un gaz naturel qui ne
présente pas de risques pour
l’environnement mais qui est inflammable.
Veillez à ce qu’aucune partie du circuit
frigorifique ne soit endommagée lors du
transport et de l’installation. Si l’appareil est
endommagé, évitez les flammes et les
sources d’embrasement. Aérez pendant
quelques minutes la piéce das laquelle se
trouve l’appareil.
Mise en garde: pour raccourcir la duree de
dégivrage, n’utilisez aucun dispositif
mécanique ni accélérateur artificiel de
dégivrage autres que ceux recommandés pae
le fabricant
Conditions
L’appareil est conçu pour refroidir et congeler
les aliments et pour préparer des glaçons.
Il est destiné à un usage exclusivement
domestique.
En cas d’utilisation commerciale, vérifier les
directives régissant le commerce en question.
Cet appareil est conforme aux dispositions
de sécurité régissant les appareils
électriques.
Il satisfait aux consignes de prévention des
accidents applicables aux installations
frigorifiques (VBG 20).
L’étanchéité du circuit frigorifique a été
contrôlée.
Consignes relatives à la
température ambiante
Suivant sa «catégorie climatique» (voir la
plaque signalétique), votre appareil peut
fonctionner dans les températures
ambiantes énoncées ci-après (la plaque
signalétique se trouve en bas à gauche dans
l’appareil. Fig.
B
)
Catégorie Température ambiante
climatique de ... à
SN +10 °C à 32 °C
N +16 °C à 32 °C
ST +18 °C à 38 °C
T +18 °C à 43 °C
Si la température ambiante descend endessous de la plage pour laquelle votre
appareil a été conçu, le compartiment
réfrigérateur devient trop froid. Si elle monte
au-dessus de cette plage, le compartiment
congélateur devient trop chaud.
Si la température ambiante est inférieure à la
température du compartiment réfrigérateur,
ce dernier s’alignera sur la température
ambiante.
En présence de températures ambiantes au
voisinage de +10 °C, la décongélation
automatique du compartiment réfrigérateur
risque d’être perturbée.
Mise au rebut, conseils de sécurité et consignes
60
FR
Mise au rebut, conseils de sécurité et consignes
Conseils pour la mise au
rebut
Les appareils usagés ne sont pas des
déchets sans valeur. Leur élimination dans
le respect de l’environnement permet d’en
récupérer de précieuses matières premières.
Une fois que l’ancien appareil a fini de servir,
débranchez la fiche mâle de la prise de
courant, sectionnez le câble puis enlevez-le
avec la fiche mâle.
Démontez la serrure. Vous empêcherez
ainsi que des enfants ne s’enferment dans
l’appareil et risquent leur vie.
Les réfrigérateurs et congélateurs
contiennent des gaz isolants et des fluides
réfrigérants à éliminer dans les règles de
l’art. Jusqu’à l’enlèvement de l’appareil,
veillez bien à ce que son circuit frigorifique
ne soit pas endommagé.
Pour vous parvenir, votre nouvel appareil
a été conditionné dans un emballage
protecteur. Tous les matériaux qui le
constituent sont compatibles avec
l’environnement et recyclables. Aidez-nous
à recycler l’emballage en respectant
l’environnement.
Ne permettez pas aux enfants de jouer avec
les emballages et ses pièces constitutives.
Ils risquent de s’étouffer avec les cartons
pliants et les feuilles de plastique.
Pour savoir comment vous débarrasser
de l’emballage, veuillez consulter votre
revendeur ou les services administratifs
de votre mairie.
Cet appareil est marqué selon la
directive européenne 2002/96/CE
relative aux appareils électriques et
électroniques usagés (waste
electrical and electronic equipment - WEEE).
La directive définit le cadre pour une reprise
et une récupération des appareils usagés
applicables dans les pays de la CE.
Nous aussi, nous respectons l’environnement: nous utilisons du papier recyclé.
Consignes de sécurité
Avant la mise en service de l’appareil,
veuillez lire attentivement et de bout en bout
les informations exposées dans les notices
d’utilisation et de montage. Elles contiennent
des remarques importantes concernant
l’installation, l’utilisation et l’entretien de
l’appareil.
Conservez les notices d’utilisation et
de montage. Elles pourraient servir
ultérieurement à un autre utilisateur.
Le fabricant décline toute responsabilité si
les consignes et mises en garde ci-après ne
sont pas respectées:
● Ne pas mettre en service un appareil
endommagé. Dans le doute, se renseigner
auprès du revendeur.
● Brancher et monter l’appareil
conformément à la notice de montage.
Les conditions de branchement doivent
être conformes aux indications figurant
sur la plaque signalétique.
● N’utilisez jamais de nettoyeur à vapeur
pour nettoyer votre appareil. Si la vapeur
entre en contact avec des pièces
électroconductrices de l’appareil, elle
peut provoquer un court-circuit ou vous
exposer à un risque d’électrocution.
● La sécurité électrique de l’appareil est
garantie uniquement si le circuit de mise
à la terre de votre maison a été posé
conformément aux prescriptions en
vigueur.
● En cas de panne, lors de l’entretien et
du nettoyage, débranchez l’appareil du
secteur. Débranchez la fiche mâle de la
prise de courant ou coupez le fusible.
Tirez sur la fiche et non pas sur le câble
d’alimentation.
● Les réparations des appareils électriques
doivent être effectuées uniquement par
des spécialistes. Des réparations
inexpertes engendrent de graves risques
pour l’utilisateur.
● Les boissons fortement alcoolisées
doivent être fermées hermétiquement et
stockées verticalement.
Ne stockez dans l’appareil ni produits
contenant des gaz propulseurs
inflammables (par ex. bombes de crème

63
FR
Faire la connaissance de l’appareil
Avant de continuer votre lecture, veuillez
déplier les dernières pages de la présente
notice pour avoir les illustrations sous les
yeux.
La notice d’utilisation est valable pour
plusieurs modèles. Il est donc possible
que vous trouviez de légères différences
entre les illustrations et votre propre
appareil.
Vue générale
Fig.
1
1-9 Bandeau de commande
10 Orifices de sortie d'air
11 Eclairage intérieur
12 Tiroir à pots de yaourts
13 Clayette
14 Système Multiflow (distributeur
d'air froid)
15 Bac à légume
16 Bac "Chiller"
17 Balconnet pour tubes et petites
boîtes
18 Insert à oeufs
19 Clayette
20 Porte-bouteilles
21 Rangement de bouteilles
22 Tablette de congélation
23 Bac à produits surgelés
A Compartiment réfrigérateur
B Compartiment congélateur
Bandeau de commande
(Récapitulatif succinct)
Fig.
2
1 Touche
Interrupteur principal Marche / Arrêt de
l'appareil.
2 “alarm” Touche (Touche "alarme
Arrêt")
a) Elle sert à couper l'alarme sonore.
b) Elle sert à afficher la température la
plus élevée qui a régné dans le
compartiment congélateur (seulement
si l'indicateur 9 clignote).
3 Touche Super
Pour activer la capacité de congélation
maximale.
4 Touche Freezer
Elle sert à afficher la température réglée
régnant dans le compartiment
congélateur.
5 Touche Cooler
Elle sert à afficher la température réglée
régnant dans le compartiment
réfrigérateur.
6 Touche de réglage de la température
dans les compartiments congélateur et
réfrigérateur
0
C = plus froid, moins froid
7 Mention "alarm"
Cette mention ne s'allume que lorsque la
fonction d'alarme s'enclenche.
8 Mention "super"
Cette mention ne s'allume que si vous
avez appuyé sur la touche "super".
9 Indicateur de la
a) Température la plus élevée atteinte
b) Mention "AL" (alarme)
c) Température réglée dans le
compartiment réfrigérateur
d) Température réglée dans le
compartiment congélateur
62
FR
Installation de l’appareil
Lieu d’installation
Pour installer votre appareil, choisissez un
endroit sec et bien aéré. Evitez de placer
l’appareil à un endroit directement exposé
aux rayons solaires ou à proximité d’une
source de chaleur telle une cuisinière, un
radiateur, etc. Si l’installation près d’une
source de chaleur est inévitable, utilisez une
plaque isolante appropriée ou respectez les
distances minimales suivantes:
3 cm par rapport à une cuisinière électrique,
30 cm par rapport à un appareil de
chauffage au fuel ou au charbon.
Si vous placez votre appareil à côté d’un
autre réfrigérateur ou congélateur, laissez
obligatoirement un espace entre eux d’au
moins 2 cm afin d’éviter la formation de
condensation.
Veillez à ce que l'appareil repose parfaitement
d'aplomb sur un sol plan. Si le sol présente des
inégalités, compensez-les à l'aide des deux
pieds à vis situés à l'avant de l'appareil (Fig.
C).Les deux roulettes à l'arrière de l'appareil
permettent de le glisser facilement dans une
niche.
Raccordement électrique
Raccordez l’appareil uniquement au secteur
alternatif de 220–240 V/50 Hz au moyen d’une
prise secteur à contacts de protection installée
conforme. La prise doit être protégée par un
fusible/disjoncteur de 10 A minimum.
Si l’appareil est utilisé dans un pays non
européen, vérifiez si la tension de branchement
et ses caractéristiques indiquées sur la plaque
signalétique concordent avec celles du secteur.
Vous trouverez la plaque signalétique dans
le compartiment réfrigérateur en bas à gauche
(voir fig. B).
S’il faut changer le cordon de branchement
électrique au secteur, ne confiez cette opération
qu’au service après-vente du fabricant.
Attention! Ne branchez en aucun
cas l’appareil à une «prise économie
d’énergie» électronique (par ex. une Sava
Plug) et à un ondulateur qui convertit le
courant continu en courant alternatif de 230
V (par ex. installations solaires, installations
électriques des bateaux).
Ventilation
Fig. 3
L’air entrant en contact avec la paroi
arrière de l’appareil se réchauffe et doit pouvoir
s’évacuer librement. Sinon le
groupe frigorifique se trouverait sollicité
plus fortement, ce qui augmenterait la
consommation de courant. Pour cette raison,
ne recouvrez en aucun cas les orifices
d’aération.
Une fois le transport
terminé ...
Avant d'allumer l'appareil pour la première fois,
laissez-le reposer à la verticale pendant une
environ une demi-heure.

65
FR
Faire la connaissance de l’appareil
température réglée s'affiche dans un
ordre descendant, de 8 à 2 °C. Après 2
°C, 8 °C s'affiche à nouveau).
b) La température du compartiment
congélateur se règle entre -16 et -
26 °C). Pour régler la température
souhaitée, appuyez sur la touche
"Freezer", puis sur la touche °C.
La température réglée apparaît à
l'affichage 9. Appuyez plusieurs fois ou
continuellement sur la touche de
réglage jusqu'à ce qu'apparaisse la
température souhaitée. (La
température réglée s'affiche dans un
ordre descendant, de -16 °C à –26 °C.
Après –26 °C, –16 °C s'affiche à
nouveau).
7 Mention "alarm"
Elle s'allume lorsque la fonction
d'alarme s'est activée. Cela se produit
lorsque la température a excessivement
monté dans le compartiment congélateur
et que les produits congelés risquent de
s'abîmer. Le voyant s'éteint une fois que
le compartiment de congélation a
regagné sa température de service.
8 Mention "super"
Elle ne s'allume que si vous avez
appuyé sur la touche "super" 3 pour
enclencher la supercongélation.
Elle s'éteint si vous appuyez à nouveau
sur la touche "super".
Elle s'éteint automatiquement au plus
tôt 52 heures après enclenchement de la
supercongélation.
9 Indicateur multifonctions
Il permet d'afficher différentes
températures.
a) Température excessive dans le
compartiment congélateur
Lorsque le voyant 9 clignote, cela signifie
que par le passé la température a trop
monté dans le compartiment congélateur
en raison d'une coupure de courant ou
d'un dérangement. Après avoir appuyé
sur la touche Alarme , la température
qui a régné dans le compartiment
congélateur s'affiche pendant cinq
secondes à l'indicateur 9 sans clignoter.
Ensuite, cette température s'efface. A
l'indicateur 9 s'affiche ensuite, sans
clignoter, la température programmée du
compartiment congélateur.
b) Mention "Al" (alarme)
Elle s'affiche lorsqu'il ne fait pas assez
froid dans le compartiment congélateur.
c) Température réglée dans le
compartiment réfrigérateur
Après avoir appuyé sur la touche
"Cooler", la température sur laquelle ce
compartiment a été réglé s'affiche.
d) Température réglée dans le
compartiment congélateur
Après avoir appuyé sur la touche
"Freezer", la température sur laquelle ce
compartiment a été réglé s'affiche.
64
FR
Faire la connaissance de l’appareil
Le système No-Frost entièrement
automatique garde le compartiment
congélateur exempt de givre. L’opération
de dégivrage devient superflue.
Fonctionnement:
L’air refroidi congèle les produits
alimentaires.
L’évaporateur faisant partie du système NoFrost refroidit l’air qui se trouve dans
l’appareil. Un ventilateur brasse ensuite cet
air froid et l’humidité qu’il contient se
dépose sur l’évaporateur. Un second
ventilateur se charge de brasser l'air dans le
compartiment réfrigérateur. Si nécessaire,
l’évaporateur se dégivre automatiquement.
L’eau de dégivrage s’écoule vers le groupe
frigorifique où elle s’évapore. Le
compartiment congélateur et les aliments
restent exempts de glace.
Fonctionnement des
éléments de commutation
et de contrôle
Fig.
2
1 Touche
Interrupteur principal de l'appareil. Il sert
à enclencher et couper l'ensemble de
l'appareil.
2 Touche “alarm”
Elle sert à couper l'alarme sonore.
L'arme sonore s'enclenche lorsque la
température a excessivement monté
dans le compartiment congélateur et que
les produits congelés risquent de
s'abîmer.
(Simultanément l'indicateur 9 clignote)
Dans les cas ci-après également, l'alarme
sonore peut s'enclencher sans que cela
signifie qu'il y a risque pour les aliments
surgelés :
- Vous venez juste de mettre l'appareil en
service,
- Vous venez de ranger une grande
quantité de produits frais,
- La porte est restée ouverte trop
longtemps pendant que vous sortiez ou
rentriez des aliments.
Une fois l'alarme sonore coupée,
l'indicateur 9 qui sert aussi d'alarme
optique se remet automatiquement en
veille une fois que le compartiment
congélateur a atteint sa température de
service.
3 Touche "Super"
Cette touche sert à enclencher et à
éteindre la super-réfrigération.
Les mentions "Super" et "SU"
apparaissant respectivement aux
affichages 8 et 9 indiquent que l'appareil
vient d'entrer en service. La
supercongélation sert à congeler de
grandes quantités d'aliments frais ; vous
devez l'enclencher 24 heures avant le
rangement des aliments frais.
Après l'enclenchement de la
supercongélation, le groupe frigorifique
fonctionne en permanence. Le
compartiment congélateur atteint une
température très basse.
4 Touche "Freezer"
Elle sert à afficher, à l'indicateur 9 (voir la
description de l'indicateur 9d), la
température réglée qui a régné dans le
compartiment congélateur.
5 Touche "Cooler"
Elle sert à afficher, à l'indicateur 9 (voir la
description de l'indicateur 9c), la
température réglée qui a régné dans le
compartiment réfrigérateur.
6 Touche de réglage de la température
des compartiments réfrigérateur et
congélateur
a) (La température du compartiment
réfrigérateur se règle entre 2 et 8 °C).
Appuyez d'abord sur la touche
"Cooler", puis sur la touche °C.
La température réglée apparaît à
l'affichage 9. Appuyez plusieurs fois ou
continuellement sur la touche de
réglage jusqu'à ce qu'apparaisse la
température souhaitée. (La

67
FR
Consignes de rangement
● Laissez refroidir les mets et boissons
chaudes à l’extérieur de l’appareil.
● Rangez les aliments si possible bien
emballés ou bien couverts. Ils garderont
ainsi arôme, couleur, teneur en humidité
et fraîcheur. Vous évitez également de
cette manière que le goût de certains
aliment ne se transmette à d’autres. Seul
les légumes, fruits et salades peuvent
être stockés sans emballage dans le bac
à légumes.
● L’huile et la graisse ne doivent pas entrer
en contact avec les parties en matières
plastiques et le joint de porte (ces
derniers pourraient sinon devenir poreux).
● N’entreposez pas de matières explosives
dans l’appareil. Stockez les boissons
fortement alcoolisées en position
verticale dans des récipients bien fermés.
Risque d’explosion!
● N’entreposez pas dans le compartiment
congélateur des bouteilles remplies de
liquide susceptible de geler. Les bouteilles
éclateraient sous l’effet du gel.
Exemple de rangement
Fig.
1
Compartiment réfrigérateur (A)
Dans le tiroir (12): fromages, charcuterie,
yaourts.
Sur les clayettes (13) de haut en bas:
pâtisseries, plats précuisinés, produits
laitiers.
Dans le bac à légumes (15): fruits et
légumes, salades.
Dans le support (17): petites bouteilles,
boîtes.
Dans le porte-bouteilles (21): les grandes
bouteilles.
Coupure de l’appareil
Appuyez sur l’interrupteur principal, fig.
2
/1. Ceci met l’appareil hors tension.
Mise hors service de
l’appareil
Si l’appareil ne doit pas servir pendant assez
longtemps:
Appuyez sur l’interrupteur principal
(Fig.
2
/1), nettoyez l’appareil puis laissez
les portes ouvertes.
Coupure et mise hors
service de l’appareil
Rangement des aliments
66
FR
Mise en service et sélection de la température
Fig.
2
● Brancher la fiche mâle dans la prise de
courant.
● Appuyez sur l'interrupteur principal 1
de l'appareil
L'alarme sonore retentit, La mention "AL"
clignote à l'affichage 9.
● Appuyer sur la touche 2 “alarm”
L'alarme sonore s'éteint et la température
actuelle apparaît alors à l'affichage 9
pendant 5 secondes. La mention "AL"
apparaît à l'affichage 9.
● Régler la température du
compartiment congélateur
Pour ce faire, appuyez sur la touche
“freezer” puis sur la touche
0
C.
Appuyez constamment ou à plusieurs
reprises sur la touche
0
C jusqu'à ce que
la température voulue s'affiche. (La
température de réglage s'affiche
chronologiquement de -16 à -26
0
C.
Après -26
0
C, l'indicateur revient sur
-16
0
C).
Nous recommandons de régler la
température du compartiment
congélateur sur -20
0
C.
● Régler la température du
compartiment réfrigérateur
Pour ce faire, appuyez sur la touche
“cooler” puis sur la touche
0
C.
Appuyez constamment ou à plusieurs
reprises sur la touche
0
C jusqu'à ce que
la température voulue s'affiche. (La
température de réglage s'affiche
chronologiquement de +8 à +2
0
C. Après
+8
0
C, l'indicateur revient sur +2 0C).
Nous recommandons de régler la
température du compartiment
réfrigérateur +4
0
C.
De même, une correction de la
température réglée n’agit que lentement.
Remarques
● La température régnant dans le
compartiment réfrigérateur peut varier
dans les cas suivants:
– Si vous ouvrez souvent la porte de
l’appareil.
– Si vous rangez de grandes quantités
d’aliments frais dans les compartiments
réfrigérateur et congélateur.
– Si la température ambiante change.
– Si vous avez modifié le réglage du
thermostat du compartiment
congélateur ou avez enclenché la
supercongélation.
● Les parois frontales capotant le
réfrigérateur sont légèrement chauffées
pour empêcher l’apparition de
condensation près du joint de porte.

69
FR
Emballage des produits
frais
Répartissez les aliments en portions
adaptées à votre ménage puis emballez-les.
Le poids de chaque portion ne doit pas
dépasser 1 kg pour les fruits et légumes et
2,5 kg pour la viande. Les petites portions
congèlent plus rapidement et les aliments
gardent leur qualité après décongélation et
préparation.
Emballez les aliments hermétiquement pour
éviter qu’ils perdent leur saveur ou se
dessèchent.
Se prêtent à l’emballage:
Films plastiques, films polyéthylène, feuilles
aluminium et boîtes hermétiques. Vous
trouverez tous ces articles dans le commerce.
N’utilisez pas:
Le papier d’emballage, le papier sulfurisé,
les feuilles de cellophane, les sacs poubelle
et les sacs en plastiques ayant déjà servi.
Placez les aliments frais dans l’emballage,
extrayez l’air et fermez hermétiquement.
Pour fermer l’emballage, vous pouvez
utiliser:
Des élastiques, des clips en plastique, des
ficelles, des rubans adhésifs résistant au
froid. Les sachets et les feuilles en polyéthylène peuvent être fermés à l’aide d’une
thermosoudeuse.
Avant de ranger les sacs dans le
congélateur, collez sur chaque paquet
une étiquette indiquant le contenu et
la date de congélation.
Capacité de congélation
maxi.
Les aliments doivent congeler à coeur aussi
vite que possible pour qu’ils conservent
vitamines, valeur nutritive, aspect et goût.
Pour cette raison, ne dépassez pas la
capacité de congélation maximale de votre
appareil.
Vous pouvez congeler les quantités
suivantes d'aliments en 24 heures, à
condition de les ranger dans le tiroir
supérieur de congélation.
Appareil en 70 cm de large: 12 kg maxi.
Appareil en 60 cm de large: 9 kg maxi.
Ne mettez pas de produits déjà congelés en
contact avec des produits frais.
Laissez refroidir les mets et boissons
chaudes à température ambiante avant de
les placer dans le compartiment
congélateur.
Les indications relatives à la capacité de
congélation maximale selon la norme
actuelle se trouvent sur la plaque
signalétique (fig. B).
Supercongélation
S’il y a déjà des denrées dans le
compartiment congélateur, il faut mettre en
marche le dispositif de «supercongélation»
quelques heures avant de déposer les
denrées fraîches.
En général, 4 à 6 heures suffisent. Si vous
utilisez la capacité de congélation maxi.,
il faut compter 24 heures. Vous pouvez
congeler les petites quantités d’aliments
(jusqu’à 2 kg) sans supercongélation.
Appuyez simplement sur la touche
«Supercongélation», fig. 2/3.
La mention “super” s’allume pour signaler
que la supercongélation s’est activée. Après
l'enclenchement de la supercongélation, le
compartiment congélateur atteint une
température très basse. La supercongélation
se désactive automatiquement, env. 52
heures après son enclenchement.
Congélation et stockage
68
FR
Rangement des aliments
Compartiment congélateur (B)
Sur la tablette de congélation (22):
rangement de petits produits congelés,
préparation de la glace.
Dans les tiroirs supérieurs (23): rangement
des produits congelés.
La disposition intérieure
Dans le compartiment réfrigérateur, vous
pouvez changer les clayettes de place même
lorsque la porte est ouverte à 90°. Pour les
changer de place, tirez-les à vous, abaissezles, extrayez-les puis remettez-les en place
ailleurs (Fig.
4
).
Bac "Chiller" (Fig.
8
)
Tirez le bas du compartiment à vous et la
trappe s’ouvre.
Les températures régnant dans ce
rangement sont plus basses que dans le
compartiment réfrigérateur. Elles peuvent
descendre en-dessous de 0 °C. Elles
conviennent idéalement pour conserver le
poisson, la viande et la charcuterie.
Elles ne conviennent pas aux salades,
légumes et denrées sensibles au froid.
Vous pouvez retirer le petit tiroir pour le
charger et le décharger (Fig. 6).
Pour entreposer des tubes, des petites
boîtes, etc, vous pouvez relever les supports
à œufs fixés sur les bacs.
Pour empêcher que les bouteilles ne
basculent à l’ouverture ou à la fermeture de
la porte, utilisez l’étrier de maintien prévu
à cet effet, Fig. 7.
Vous pouvez retirer tous les supports et
bacs qui se trouvent dans la porte pour les
nettoyer.
Pour retirer les supports et bacs, soulevezles, fig. 5/A.
Congélation et stockage
Attention lors de l’achat
de produits surgelés
● Vérifiez que l’emballage n’est pas abîmé.
● La date de conservation ne doit pas être
dépassée.
● La température indiquée par le thermo-
mètre du congélateur commercial ne doit
pas être supérieure à –18 °C.
● Achetez les produits surgelés en dernier.
Emballez-les dans du papier journal ou
utilisez un sac isotherme pour le transport.
Rangez-les le plus rapidement possible
dans votre compartiment congélateur.
Procéder soi-même à la
congélation de produits
frais
Si vous désirez congeler des aliments,
n’utilisez que des produits frais de première
qualité.
Se prêtent à la congélation:
La viande et les saucisses, les volailles et
le gibier, le poisson, les légumes, les herbes
aromatiques, les fruits, les pâtisseries, les
pizzas, les plat cuisinés, les restes de plat,
le jaune d’œuf, le blanc d’œuf.
Ne se prêtent pas à la congélation:
Les œufs entiers dans leur coquille, la crème
fraîche et la mayonnaise, la salade verte, les
radis, les radis noirs et les oignons.
Le blanchiment des fruits et légumes
Blanchir les fruits et légumes avant la
congélation afin qu’ils conservent couleur,
arôme, goût, et vitamine «C».
(Pour cela, plongez les fruits et légumes
quelques instants dans l’eau bouillante.
Vous trouverez des livres sur la congélation
et le blanchiment dans le commerce.)

71
FR
Nettoyage
Avant de procéder au nettoyage,
débranchez la fiche mâle de la prise
secteur et coupez le fusible.
N’utilisez jamais de nettoyeur à vapeur
ou de nettoyeur haute pression. La
vapeur chaude pourrait endommager
les surfaces et les circuits électriques.
Risque d’électrocution.
Pendant le nettoyage veillez à ce que l’eau
de nettoyage ne s’infiltre pas dans les
éléments de contrôle ou l’éclairage. Pour
nettoyer l’appareil entier (à l’exception
du joint de porte), utilisez de l’eau tiède
additionnée d’un produit de nettoyage doux,
légèrement désinfectant, comme du liquide
pour la vaisselle. N’utilisez pas de poudres
abrasives, récurantes, ni de produits
contenant un acide ou des solvants
chimiques.
Nettoyez le joint de porte exclusivement
avec de l’eau claire et essuyez-le bien.
Tous les deux ans si possible, nettoyez
également l’échangeur thermique (grille
noire) situé contre la paroi arrière de
l’appareil avec un pinceau ou un aspirateur.
Vous maintiendrez ainsi l’appareil en bon
état de fonctionnement et économiserez du
courant.
70
FR
Congélation et stockage
Stockage des aliments
Veillez toujours à bien enfoncer tous les
tiroirs jusqu’à la butée.
Consigne importante pour que l’air circule
impeccablement dans l’appareil.
Tablette de congélation
Fig.
:
La tablette de congélation est conçue pour
ranger les bacs à glaçons et pour congeler
séparément les baies, les fruits en
morceaux, les herbes aromatiques et les
légumes.
Pour congeler les produits, répartissez-les
uniformément sur la tablette puis laissez-les
entièrement congeler pendant 10 à 12
heures env.
Transférez ensuite les produits dans des
sacs de congélation ou dans des récipients.
Pour les décongeler, étalez-les à nouveau
les uns à côté des autres.
Décongélation de produits
surgelés
Selon la nature et l’utilisation des produits
surgelés, vous pouvez choisir entre plusieurs
possibilités:
A température ambiante,
Dans la réfrigérateur,
Dans le four électrique,
Avec/sans chaleur tournante,
Dans le micro-ondes.
Vous pouvez recongeler les produits
partiellement ou totalement décongelés
à condition que leur température n’ait pas
monté au-dessus de 3°C plus d’un jour
(viande, poisson) ou plus de trois jours pour
les autres denrées.
Si le goût, l’odeur et l’aspect sont inchangés,
faites cuire ou rôtir les aliments et congelez
à nouveau les mets cuisinés.
Dans ce cas, consommez-les nettement
avant la date limite de conservation.
Préparation de glaçons
Fig.
9
Remplissez d’eau le bac à glaçons aux 3/4 et
posez-le dans le congélateur.
Les glaçons se démoulent facilement par
simple torsion du bac.
Le réservoir à glaçons (si fourni) vous permet
d’avoir toujours des glaçons à portée de
main.
Le bac à glaçons sert également de
couvercle au réservoir.
● Placez votre appareil dans un endroit frais
et bien aéré. Veillez à ce qu’il ne soit pas
exposé aux rayons solaires et qu’il ne se
trouve pas à proximité d’une source de
chaleur (radiateur etc.).
● N’obstruez pas les grilles d’aération de
l’appareil.
● Laissez refroidir les aliments chauds hors
de l’appareil.
● Placez les produits à décongeler dans le
compartiment réfrigérateur. Vous pouvez
utiliser le froid qu’ils ont emmagasiné pour
refroidir les aliments stockés dans le
réfrigérateur.
● Pour remplir ou vider l’appareil, laissez le
moins longtemps possible les portes
ouvertes.
Moins la porte du congélateur restera
ouverte, moins il y aura formation de givre
sur les grilles de congélation.
● Tous les deux ans, nettoyez l’échangeur
thermique (grille noire) situé contre la paroi
arrière de l’appareil.
Economie d’énergie

73
FR
Réparer soi-même les petites pannes
Toutes les pannes ne nécessitent pas
obligatoirement l’intervention du service
après-vente. Il s’agit souvent d’un
problème mineur. Avant d’appeler le
service après-vente, nous vous
conseillons de lire attentivement les
conseils suivants qui vous permettront
peut-être de remédier au problème.
En effet, si vous faites appel à un technicien
pour le résoudre, sa visite vous sera
facturée au plein tarif même pendant la
période de garantie.
L’indicateur Fig.
2
/9 n’est pas allumé:
Vérifiez si une coupure d’électricité s’est
produite, si la fiche mâle est bien branchée
dans la prise de courant et si l’appareil est
enclenché.
Si pendant la mise en service de l'appareil
la mention «E1» s'affiche en clignotant
(Fig.
2
/9) :
Une température très élevée règne dans le
compartiment réfrigérateur. Quelques
minutes après la mise en service de
l'appareil, la température réglée dans le
compartiment réfrigérateur s'affiche lorsque
vous appuyez sur la touche «Cooler». Sinon
c'est la mention «Al» (compartiment
congélateur pas assez froid) ou la
température réglée dans le compartiment
congélateur qui s'affiche.
Si pendant la mise en service de l'appareil
la mention «E2» s'affiche en clignotant
(Fig.
2
/9) :
Une température très élevée règne dans le
compartiment réfrigérateur. Quelques
minutes après la mise en service de
l'appareil, la mention «Al» s'affiche, puis la
température réglée dans le compartiment
congélateur si vous appuyez sur la touche
«Freezer». Sinon, la température qui
s'affiche est celle du compartiment
réfrigérateur.
L’éclairage du compartiment réfrigérateur
ne fonctionne pas:
– L’ampoule est défectueuse. Débranchez
la fiche mâle de la prise de courant, retirez
la coiffe (fig.
A
/A), remplacez l’ampoule
défectueuse par une ampoule de même
type (15 W, 230 V maxi., culot E14).
– L’interrupteur de l’éclairage est coincé
(fig.
A
/B). Vérifiez s’il se déplace
facilement. Si cel n’est pas le cas,
prévenez le service après-vente.
L’indicateur Fig.
2
/9 clignote mais le
signal sonore ne retentit pas:
Cela signifie que la température a, par
le passé, excessivement monté dans le
compartiment congélateur en raison d’une
coupure de courant ou d’un incident.
Après avoir appuyé sur la touche Alarme
, l'affichage 9 (fixe) indique pendant cinq
secondes la température la plus élevée qui a
régné dans le compartiment congélateur.
Ensuite, l'appareil efface cette valeur.
L'affichage 9 indique la température
programmée pour le compartiment
congélateur, sans clignoter.
Si la température excessive affichée
dépassait +3 °C, vérifiez les produits
congelés.
Si le goût, l’odeur et l’aspect sont
inchangés, faites cuire ou rôtir les aliments
et congelez à nouveau les mets cuisinés.
Dans ce cas, consommez-les nettement
avant la date limite de conservation.
Si l'affichage (Figure 2/9) clignote au bout
d'un temps de service assez long, et que
l'alarme sonore retentit, ceci signifie :
Dérangement, température trop élevée à
l'intérieur du compartiment congélateur !
L'affichage indique la température
programmée pour le compartiment
congélateur.
Pour éteindre l'alarme sonore, appuyez sur
la touche Alarme.
Causes possibles du dérangement :
- L'interstice situé au-dessus de l'appareil
et / ou dans le socle est recouvert
par un objet ;
- La porte du compartiment congélateur
n'est pas correctement fermée ;
- Vous avez congelé des aliments frais sans
utiliser la supercongélation ;
- Vous avez rangé d'un coup une quantité
excessive d'aliments frais à congeler ;
72
FR
Remarques sur les bruits
de fonctionnement
Bruits de fonctionnement
Afin que la température choisie reste
constante, l’appareil enclenche
périodiquement le compresseur.
Les bruits qui en résultent proviennent du
fonctionnement de l’appareil.
Ils diminuent automatiquement dès que
l’appareil a atteint la température de service.
Bourdonnements étouffés
Ces bruits normaux proviennent du moteur
du compresseur. Ils s’intensifient un peut
lorsque le moteur s’enclenche.
Gargouillis et clapotis légers
Ils proviennent de la circulation du fluide
réfrigérant dans les serpentins.
Déclics
Ces déclics sont audibles chaque fois que le
thermostat ordonne l’enclenchement ou la
coupure du moteur.
Des craquements peuvent se faire
entendre lorsque.....
- Le dégrivrage automatique a lieu.
- L'appareil se refroidit ou se réchauffe
(contraction et dilatation des matériaux).
Dans un appareil multi-zones ou No-Frost,
la circulation de l’air à l’intérieur de l’appareil
engendre un léger bruit de fond.
Si les bruits de fonctionnement deviennent
trop forts, vous pouvez peut-être en trouver facilement la cause et les supprimer.
L’appareil n’est pas d’aplomb
Veuillez ajuster l’aplomb de l’appareil à l’aide
d’un niveau à eau. Pour cela, utilisez les
pieds à vis ou placez quelque chose sous
l’appareil pour le caler.
Les parois de l’appareil appuient contre
quelque chose
Veuillez éloigner l’appareil des meubles ou
appareils qu’il touche.
Les tiroirs, paniers ou clayettes ne sont
pas bien fixés ou au contraire coincés
Vérifiez le bon positionnement des pièces
amovibles et remettez-les correctement en
place si nécessaire.
Des bouteilles ou récipients placés dans
l’appareil se touchent
Dans ce cas, éloignez les bouteilles et
récipients légèrement les uns des autres.
Réparer soi-même les
petites pannes
- Température ambiante élevée.
Après avoir remédié au dérangement,
appuyez sur la touche "Alarme" ; l'affichage
s'arrêtera de clignoter lorsque le
compartiment congélateur aura repris sa
température de service.
Si la porte du compartiment congélateur
est restée longtemps ouverte et si ce
dernier n’atteint plus la température
réglée:
L’évaporateur (générateur de froid) est
recouvert d’une couche de glace trop
importante pour que le système de
dégivrage automatique puisse le dégivrer.
Dans ce cas, sortez les aliments surgelés de
l’appareil puis entreposez-les dans un
endroit frais en les isolant bien de la chaleur.
Eteignez l’appareil puis laissez la porte du
compartiment congélateur ouverte. Au bout
de 12 heures, la glace recouvrant le circuit
de refroidissement aura fondu. Remettez
l’appareil en marche puis replacez-y les
aliments surgelés.
Si les conseils qui précèdent ne suffisent
pas à supprimer la panne, appelez le service
après-vente.
N’ouvrez pas la porte inutilement pour éviter
toute déperdition de froid.
Ne tentez jamais de réparer vous-même en
particulier les circuits électriques de
l’appareil.

74
FR
Service après-vente
Plaque signalétique
Fig.
B
Indiquez au technicien du SAV, sur sa
demande, les numéros E et FD de l’appareil.
Vous trouverez ces numéros dans l’encadré
noir de la plaque signalétique se trouvant en
bas à gauche dans le compartiment
réfrigérateur, à côté du bac à légumes.
Vous trouverez l’adresse et le numéro de
téléphone du service après-vente dans le
répertoire d’agences du SAV ou dans
l’annuaire.

75
NL
Afvoeren van de verpakking en van uw oude apparaat,
veiligheidsvoorschriften
Afvoeren van de verpakking
en van uw oude apparaat
Oude apparaten zijn niet per definitie
waardeloos! Door een milieuvriendelijke
afvoer van uw oude apparaat kunnen
waardevolle grondstoffen opnieuw gebruikt
worden.
Bij afgedankte apparaten de stekker uit
het stopcontact trekken, aansluitkabel doorknippen en samen met de stekker verwijderen.
Het slot verwijderen. Hiermee voorkomt
u dat kinderen zichzelf tijdens het spelen in
het apparaat opsluiten en in levensgevaar
geraken.
Koel- en diepvriesapparaten bevatten
koelmiddelen en isolatiegassen die
zorgvuldig moeten worden afgevoerd. Let
erop dat de leidingen tot het moment van
transport niet beschadigd worden.
Uw nieuwe apparaat werd tijdens het
transport naar u door de verpakking
beschermd. Voor de verpakking wordt
gebruik gemaakt van materialen die het
milieu kan verdragen en die geschikt zijn
voor hergebruik. Help daarom mee en zorg
ervoor dat de verpakking milieuvriendelijk
wordt afgevoerd.
Laat kinderen niet met de verpakking en de
onderdelen daarvan spelen. Kans op stikken
door vouwdozen en folie.
U kunt bij de reinigingsdienst in uw
gemeente informeren hoe u uw oude
apparaat en het verpakkingsmateriaal van
het nieuwe apparaat kunt (laten) afvoeren
voor een milieuvriendelijke verwerking.
Dit apparaat is gekenmerkt in
overeenstemming met de Europese
richtlijn 2002/96/EG betreffende
afgedankte elektrische en
elektronische apparatuur (waste electrical
and electronic equipment - WEEE).
De richtlijn geeft het kader aan voor de in de
EU geldige terugneming en verwerking van
oude apparaten.
Onze bijdrage aan het beschermen van
het milieu: wij maken gebruik van
kringlooppapier.
Veiligheidsvoorschriften
Lees voordat u het nieuwe apparaat in
gebruik neemt de gebruiksaanwijzing en het
installatievoorschrift nauwkeurig door. U vindt
daarin belangrijke informatie over installatie,
gebruik en onderhoud van het apparaat.
Bewaar de gebruiksaanwijzing en het
installatievoorschrift voor een eventuele
latere bezitter van het apparaat.
De fabrikant aanvaardt geen aansprakelijkheid als de volgende aanwijzingen niet in
acht worden genomen:
● Een (bijv. tijdens het transport)
beschadigd apparaat niet in gebruik
nemen. In twijfelgevallen eerst contact
opnemen met uw leverancier.
● Het apparaat uitsluitend volgens het
bijgesloten installatievoorschrift plaatsen
en aansluiten. De elektrische aansluitvoorwaarden moeten overeenkomen met
de gegevens op het typeplaatje.
● Bij het schoonmaken nooit een stoom-
apparaat gebruiken. De stoom kan in de
onder spanning staande onderdelen van
het apparaat terechtkomen en kortsluiting
of een electrische schok veroorzaken.
● De elektrische veiligheid van het apparaat
wordt alleen dan gegarandeerd als het
aardingssysteem van de huisinstallatie
volgens de geldende elektrotechnische
voorschriften is geïnstalleerd.
● In geval van een storing, bij onderhoudswerkzaamheden en vóór het schoonmaken
de stekker uit het stopcontact trekken
resp. de zekering in de meterkast
uitschakelen of losdraaien. Altijd aan de
stekker trekken, nooit aan de aansluitkabel.
● Reparaties aan elektrische apparaten
mogen alleen door vakkundige monteurs
worden uitgevoerd. Door ondeskundige
reparatie kan er gevaar voor de gebruiker
ontstaan.
● Dranken met een hoog alcoholpercentage
altijd goed gesloten en rechtop bewaren.
Geen producten met brandbare drijfgassen (zoals spuitbussen met slagroom
en andere spuitbussen) en explosieve
stoffen in het apparaat opslaan – gevaar

77
NL
76
NL
Plaatsing van het apparaat
De juiste plaats
Elke droge, goed te ventileren ruimte is
geschikt. Het apparaat liefst niet in de zon of
naast een fornuis, verwarmingsradiator of
andere warmtebron plaatsen. Is plaatsing
naast een warmtebron niet te vermijden,
maak dan gebruik van een isolerende plaat
of neem de volgende minimumafstanden in
acht:
naast een elektrisch fornuis 3 cm
naast een CV-installatie 30 cm
Bij plaatsing naast een ander koel- of
vriesapparaat moet aan de zijkant ten minste
2 cm ruimte worden opengelaten om het
ontstaan van condensatiewater te vermijden.
Het apparaat moet waterpas en stevig op de
vloer staan. Eventuele oneffenheden in de
vloer d.m.v. de schroefvoetjes aan de
voorkant opheffen (afb. C).
Twee rollen aan de achterkant maken het
gemakkelijker om het apparaat in een nis te
schuiven.
Elektrische aansluiting
Het apparaat uitsluitend via een volgens de
voorschriften aangebracht, randgeaard
stopcontact, met een zekering van
10 ampère of meer, op 220–240 V/50 Hz
wisselstroom aansluiten.
Bij apparaten voor niet Europese landen op
het typeplaatje controleren of de aansluitspanning en de stroomsoort overeenkomen
met de waarden van uw elektriciteitsnet.
Het typeplaatje bevindt zich links onderaan
in het apparaat (afb.B).
Een eventueel noodzakelijke vervanging van
de stroomkabel mag alleen worden
uitgevoerd door de klantenservice van de
fabrikant.
Waarschuwing! Het apparaat mag nooit
worden aangesloten op elektronische
„energiebesparende stekkers” (bijv. Sava
Plug) of omvormers die gelijkstroom omzetten in 230 V wisselstroom (bijv. installaties voor zonneënergie of netwerken
voor schepen).
Ventilatie
Afb.
3
De aan de achterwand van het apparaat
vrijkomende warme lucht moet ongehinderd
afgevoerd kunnen worden. Anders moet de
koelmachine meer presteren waardoor het
energieverbruik toeneemt. De be- en
ontluchtingsopeningen mogen dan ook
nooit worden afgedekt.
Na het transport ...
Het apparaat ca. 1/2 uur rechtop laten staan
voordat het voor het eerst wordt
ingeschakeld.
voor explosie!
● Flessen en blikjes met vloeistoffen –
vooral koolzuurhoudende dranken – niet
in de diepvriesruimte opslaan. De flessen
en blikjes springen!
● De be- en ontluchtingsopeningen mogen
nooit afgedekt worden.
● Plint, uittrekbare manden of laden, deuren
etc. niet als opstapje gebruiken of om op
te leunen.
● Kinderen niet met het apparaat laten
spelen.
● Als u een apparaat met een slot hebt,
bewaar de sleutel dan buiten het bereik
van kinderen.
● IJslollies en ijsblokjes niet direct uit de
diepvriesruimte in de mond nemen
(gevaar voor verbranding door de zeer
lage temperatuur).
● Diepvrieswaren nooit met natte handen
aanraken. Uw handen kunnen eraan
vastvriezen.
● Attentie! De ventilatieopeningen in de
ommanteling van het apparaat resp, aan
het inbouwapparaat altijd vrijhouden.
● Attentie! De leidingen van het koelcircuit
niet beschadigen.
● Attentie! Geen elektrische apparaten in
de levensmiddelenvakken van het
apparaat gebruiken, tenzij een door de
fabrikant aanbevolen type.
Het koelcircuit van dit apparaat
bevat isobutaan (R 600a), een
natuurlijk gas dat in hoge mate
milieuvriendelijk is maar wel
brandbaar. Let erop bij het vervoeren en
verplaatsen van het apparaat dat er geen
onderdelen van het koelcircuit
beschadigd worden. Bij eventuele
beschadigingen open vuur of andere
ontstekingsbronnen vermijden. De ruimte
waarin het apparaat is opgesteld, een
paar minuten luchten.
Waarschuwing: om het ontdooiproces te
versnellen geen andere mechanische
toestellen of kunstmatige hulpmiddelen
gebruiken dan door de fabrikant
aanbevolen.
Bepalingen
Het apparaat is geschikt voor het koelen en
invriezen van levensmiddelen en om
ijsblokjes te maken.
Het is voor huishoudelijk gebruik bestemd.
Bij gebruik voor bedrijfsdoeleinden moeten
de daarvoor geldende bepalingen in acht
worden genomen.
Het apparaat voldoet aan de voorschriften
voor koel- en vriesinstallaties ter voorkoming
van ongevallen (VBG 20).
Dit apparaat voldoet aan de veiligheidsbepalingen voor elektrische apparaten.
Het koelcircuit is op dichtheid gecontroleerd.
Let op de
omgevingstemperatuur
Afhankelijk van de „klimaatklasse” (zie het
typeplaatje) kan het apparaat bij de
volgende omgevingstemperaturen gebruikt
worden: (het typeplaatje bevindt zich links
onderaan in het apparaat. Afb.
B
)
Klimaat- Omgevingstemperatuur
klasse van ... tot
SN +10 °C tot 32 °C
N +16 °C tot 32 °C
ST +18 °C tot 38 °C
T +18 °C tot 43 °C
Als de omgevingstemperatuur lager is, dan
wordt het in de koelruimte te koud; als de
omgevingstemperatuur hoger is, dan wordt
het in de diepvriesruimte te warm.
Als de temperatuur in de ruimte waar het
apparaat staat opgesteld, lager is dan de
ingestelde temperatuur in de koelruimte, dan
wordt het in de koelruimte net zo koud als
de omgevingstemperatuur.
Bij omgevingstemperaturen onder de +10 °C
kan dit tot storingen bij het volautomatische
ontdooien van de koelruimte leiden.
Afvoeren van de verpakking en van uw oude apparaat,
veiligheidsvoorschriften

79
NL
78
NL
Kennismaking met het apparaat
Door het volautomatische No-Frostsysteem zet zich in de diepvriesruimte
geen ijs af. Ontdooien is overbodig.
Functie:
De diepvrieswaren worden door gekoelde
lucht ingevroren!
Een verdamper die zich in het No-Frostsysteem bevindt, koelt de lucht in het
apparaat af. De koude lucht wordt d.m.v.
een ventilator rondgeblazen. Een tweede
ventilator zorgt voor de luchtcirculatie in de
koelruimte. De vochtigheid in de lucht zet
zich af op de verdamper. Indien nodig wordt
de verdamper volautomatisch ontdooid.
Het dooiwater wordt naar de koelmachine
geleid waar het verdampt. In de diepvriesruimte en op de levensmiddelen zet zich
geen ijs af.
Functie van de schakelen controle-elementen
Afb.
2
1 -toets
Hoofdschakelaar, om het hele apparaat in
en uit te schakelen.
2 “alarm” -toets
Dient voor het uitschakelen van het
waarschuwingssignaal.
Het waarschuwingssignaal wordt
geactiveerd wanneer het te warm is in de
vriesruimte en de diepvriesproducten
gevaar lopen (tegelijkertijd knippert
indicatie 9).
Ook als de diepvriesproducten geen
gevaar lopen, kan het
waarschuwingssignaal klinken
- bij ingebruikneming van het apparaat
- bij het toevoegen van verse
levensmiddelen zonder inschakeling van
de supervriesstand
- en als de vriesruimtedeur te lang open
staat.
Na uitschakeling van het
waarschuwingssignaal wordt de
"akoestische waarschuwing" automatisch
weer operationeel zodra de vriesruimte
weer op bedrijfstemperatuur is.
3 "Super"-toets
Om het supervriessysteem in en uit te
schakelen.
De indicaties 8 "Super" en 9 "SU" geven
aan dat het supervriessysteem is
ingeschakeld. Het supervriessysteem
dient voor het invriezen van grote
hoeveelheden verse levensmiddelen en
moet tot 24 uur vóór het inladen van de
verse levensmiddelen worden
ingeschakeld.
De vriesmachine werkt na inschakeling
continu, de vriesruimte bereikt een zeer
lage temperatuur.
Kennismaking met het apparaat
A.u.b. vóór het lezen de laatste bladzijden
met afbeeldingen openvouwen.
Deze gebruiksaanwijzing is op meer dan
één type van toepassing. Afwijkingen in
de afbeeldingen zijn hierdoor niet uitgesloten.
Overzicht
Afb.
1
1-9 Bedieningspaneel
10 Luchtafvoeropeningen
11 Verlichting
12 Lade voor yoghurtbekers
13 Legplateau
14 Multiflow system
(koudeluchtverdeler)
15 Groentelade
16 "Chiller"-vak
17 Legplateau voor blikjes, tubes
18 Eierrekje
19 Legplateau
20 Flessenhouder
21 Flessenvak
22 Vriesplateau
23 Diepvriesvak
A Koelruimte
B Vriesruimte
Bedieningspaneel
(kort overzicht)
Afb.
2
1 -toets
hoofdschakelaar aan/uit
2 “alarm” toets ("alarm-uit"-toets)
a) voor het uitschakelen van het
waarschuwingssignaal
b) voor het weergeven van de hoogste
temperatuur die in het vriesvak heeft
geheerst (alleen wanneer indicatie 9
knippert).
3 Super-toets
voor max. vriesvermogen.
4 Freezer-toets
Om de ingestelde temperatuur in de
diepvriesruimte aan te geven.
5 Cooler-toets
Om de ingestelde temperatuur in de
koelruimte aan te geven.
6 Insteltoets vriesruimte- en
koelruimtetemperatuur
0
C = kouder, warmer
7 Indicatie "alarm"
brandt alleen wanneer de alarmfunctie
wordt geactiveerd
8 Indicatie "super"
Brandt alleen wanneer de "super"-toets
wordt ingedrukt.
9 Indicatie van
a) "warmste temperatuur"
b) Indicatie "AL" (Alarm)
c) insteltemperatuur voor
de koelruimte
d) insteltemperatuur voor
de diepvriesruimte

81
NL
80
NL
Inschakelen en temperatuurkeuze
Afb.
2
● Stekker in het stopcontact steken.
● Hoofdschakelaar 1 indrukken
Het alarmsignaal is te horen, indicatie 9
knippert en geeft "AL" aan.
● “alarm” -toets 2 indrukken
Het alarmsignaal gaat uit. De indicatie
geeft nu gedurende 5 seconden de
actuele temperatuur aan. Op indicatie 9
verschijnt "AL".
● Temperatuur van de vriesruimte
instellen
Hiertoe de "freezer"-toets en daarna de
0
C-toets indrukken. 0C-toets meermaals
indrukken of ingedrukt houden totdat de
gewenste temperatuur wordt
weergegeven (doorlopende weergave, na
–26
0
C wordt –16 0C opnieuw
weergegeven).
Wij raden u aan de
vriesruimtetemperatuur in te stellen op
–20
0
C.
● Temperatuur van de koelruimte
instellen
Hiertoe de "cooler"-toets en daarna de
0
C-toets indrukken. 0C-toets meermaals
indrukken of ingedrukt houden totdat de
gewenste temperatuur wordt
weergegeven (doorlopende weergave, na
8
0
C wordt 2 0C opnieuw weergegeven).
Wij raden u aan de
koelruimtetemperatuur in te stellen op
+4
0
C.
Ook na een correctie van de
temperatuurinstelling verandert de
temperatuur in de koelruimte pas na
geruime.
Kennismaking met het apparaat
4 "Freezer"-toets
Om de ingestelde temperatuur in de
diepvriesruimte op indicatie 9 (zie
beschrijving indicatie 9d) aan te geven.
5 "Cooler"-toets
Om de ingestelde temperatuur in de
koelruimte op indicatie 9 (zie beschrijving
indicatie 9c) aan te geven.
6 Insteltoets voor koelruimte- en
vriesruimtetemperatuur
a) (De temperatuur in de koelruimte is
instelbaar van 2ºC tot 8ºC). De "Cooler"toets en vervolgens de ºC-toets
indrukken. De insteltemperatuur wordt op
indicatie 9 aangegeven. De insteltoets
een aantal keren indrukken of ingedrukt
houden tot de gewenste temperatuur
wordt aangegeven. (De insteltemperatuur
wordt in doorlopende volgorde van 8ºC
tot 2ºC aangegeven. Na 2ºC verschijnt
weer 8ºC).
b) (De temperatuur in de diepvriesruimte is
instelbaar van -16ºC tot -26ºC). Om de
gewenste temperatuur in de
diepvriesruimte in te stellen de
"Freezer"-toets en vervolgens de
ºC-toets indrukken. De insteltemperatuur
wordt op indicatie 9 aangegeven. De
insteltoets een aantal keren indrukken of
ingedrukt houden tot de gewenste
temperatuur wordt aangegeven. (De
insteltemperatuur wordt in doorlopende
volgorde van -16ºC tot -26ºC
aangegeven. Na -26ºC verschijnt weer 16ºC).
7 Indicatie "alarm"
Brandt alleen wanneer de alarmfunctie
is geactiveerd. Dit gebeurt wanneer het te
warm wordt in de vriesruimte en de
diepvriesproducten gevaar lopen. De
indicatie gaat uit zodra de vriesruimte
weer op bedrijfstemperatuur is.
8 Indicatie "super"
Brandt alleen wanneer de "super"-
toets is ingedrukt en daardoor de
supervriesstand is ingeschakeld.
De indicatie gaat uit wanneer de "super"-
toets opnieuw wordt ingedrukt om de
supervriesstand uit te schakelen.
De indicatie gaat op zijn vroegst 52 uur
na inschakeling van de supervriesstand
automatisch uit.
9 Multifunctionele indicatie
Geeft de verschillende temperaturen
weer
a) Te warme temperatuur in de
diepvriesruimte
Als indicatie 9 knippert, dan is of was het
door stroomuitval of een storing in de
diepvriesruimte te warm. Na het
indrukken van de toets Alarm
wordt op indicatie 9 (niet knipperend)
gedurende vijf seconden de warmste
temperatuur aangegeven die in de
diepvriesruimte heeft geheerst. Hierna
wordt deze waarde gewist. Indicatie 9
geeft nu zonder te knipperen de
geprogrammeerde temperatuur in de
diepvriesruimte aan.
b) Indicatie "Al" (Alarm)
Deze geeft aan wanneer het in de
diepvriesruimte te warm is.
c) Insteltemperatuur voor de koelruimte
Na het indrukken van de "Cooler"-toets
wordt de insteltemperatuur voor de
koelruimte aangegeven.
d) Insteltemperatuur voor de
diepvriesruimte
Na het indrukken van de "Freezer"-toets
wordt de insteltemperatuur voor de
diepvriesruimte aangegeven.
Attentie:
● De temperatuur in de koelruimte kan
schommelen
– doordat de deur van het apparaat vaak
geopend werd,
– door het inladen van grote hoeveelheden
verse levensmiddelen in de koelruimte
en de diepvriesruimte,
– door een verandering van de
omgevingstemperatuur,
– door een verandering van de instelling
van de temperatuurkiezer voor de
diepvriesruimte of door inschakelen van
het supervriessysteem.
● De voorzijde van het apparaat wordt
gedeeltelijk licht verwarmd waardoor
de vorming van condensatiewater in
de buurt van de deurafdichting wordt
voorkomen.

83
NL
82
NL
Levensmiddelen inruimenLevensmiddelen inruimen
Attentie bij het inruimen
● Warme dranken en gerechten buiten het
apparaat laten afkoelen.
● De levensmiddelen liefst verpakt of goed
afgedekt bewaren. Hierdoor blijven niet
alleen geur, smaak, kleur en vochtigheid
behouden, maar wordt bovendien
voorkomen dat de opgeslagen levensmiddelen naar elkaar gaan smaken.
Alleen groente, fruit en sla moeten
onverpakt in de groenteladen worden
opgeslagen.
● Zorg dat de kunststof delen en de
deurafdichting niet met olie of vet in
aanraking komen (ze kunnen poreus
worden).
● Geen explosieve stoffen in het apparaat
opslaan. Dranken met een hoog
alcoholpercentage rechtop en goed
gesloten bewaren.
– Gevaar voor explosie!
● Flessen met vloeistoffen die kunnen
bevriezen, niet in de diepvriesruimte
bewaren. De flessen springen!
Een voorbeeld van het
inruimen
afb.
1
Koelruimte (A)
In de lade (12) kaas, worst, yoghurt.
Op de schappen (13) van boven naar
beneden bakwaren, toebereide gerechten,
zuivelproducten.
In de groentebak (15) groente, fruit, salade.
In het vakje (17) kleine flessen, blikken.
In het flessenvak (21) grote flessen.
Vriesruimte (B)
Op het diepvriestableau (22) kleine
diepvriesgerechten bewaren of ijs bereiden.
In de bovenste diepvriesbakken (23)
diepvriesgerechten bewaren.
Indeling van het interieur
De legroosters/plateaus in de koelruimte
kunnen – ook als de deur 90° openstaat –
worden verplaatst: legrooster/plateau naar
voren trekken, iets laten zakken, eruit nemen
en op de gewenste plaats opnieuw erin
zetten (afb.
4
).
"Chiller"-vak (afb.
8
)
Bodem van het vak naar voren trekken, de
klep gaat open.
Bodem van het vak naar voren trekken. De
klep gaat open. In het "Chiller"-vak heersen
lagere temperaturen dan in de koelruimte
waarbij ook temperaturen onder 0
0
C kunnen
optreden. Ideaal voor het bewaren van vis,
vlees en worst.
Niet geschikt voor sla, groente en
koudegevoelige levensmiddelen.
De kleine lade kan eruit genomen worden
om levensmiddelen in- en uit te laden
(afb. 6).
De eierrekjes in de voorraadbakjes kunnen
omhoog geklapt worden waardoor er plaats
is voor tubes, blikjes etc.
Met de flessehouder wordt voorkomen dat de
flessen omvallen bij het openen en sluiten van
de deur (afb. 7).
Alle voorraadbakjes en -rekjes in de deur
kunnen eruit gehaald worden om schoon te
maken: bakje of rekje ietsje optillen en eruit
halen (afb. 5/A).
Uitschakelen van het
apparaat
Hoofdschakelaar (afb. 2/1) indrukken.
Hierdoor is het apparaat uitgeschakeld.
Buiten werking stellen van
het apparaat
Als het apparaat langere tijd niet gebruikt
wordt:
hoofdschakelaar (afb.
2
/1) indrukken,
apparaat schoonmaken en de deuren
openlaten.
Uitschakelen en buiten
werking stellen van het
apparaat
Invriezen en opslaan
Attentie bij het inkopen van
diepvriesprodukten
● Let erop dat de verpakking niet
beschadigd is.
● De op de verpakking aangegeven
houdbaarheidsdatum mag niet verstreken
zijn.
● In de winkel moet de temperatuur in de
diepvrieskist –18 °C of kouder zijn.
● Koop de diepvriesprodukten op het
allerlaatste moment.
Breng ze in kranten gewikkeld of in een
koeltas snel naar huis en leg ze in de
diepvriesruimte.
Levensmiddelen zelf
invriezen
Gebruik uitsluitend verse levensmiddelen als
u zelf gaat invriezen.
Geschikt om in te vriezen:
vlees en worst, gevogelte en wild, vis,
groente, kruiden, fruit, brood en gebak,
pizza, kant en klare gerechten, kliekjes,
eierdooiers en eiwit.
Niet geschikt om in te vriezen:
eieren met schaal, zure room en mayonaise,
sla, radijsjes, rammenas en rettich, uien.
Blancheren van groente en fruit:
groente en fruit moeten vóór het invriezen
geblancheerd worden om te voorkomen dat
kleur, smaak, aroma en vitamine „C”
verloren gaan.
(Blancheren betekent dat de groente of het
fruit kort in kokend water wordt gedompeld.
In de boekhandel zijn boeken over invriezen
verkrijgbaar, waarin ook blancheren wordt
beschreven.).
Verpakken van levensmiddelen
De levensmiddelen in voor uw huishouden
geschikte porties verdelen.
Groente en fruit in porties niet zwaarder dan

85
NL
84
NL
Invriezen en opslaan
1 kg, vlees tot 2,5 kg. Kleinere porties zijn
sneller helemaal bevroren. Zo blijft de
kwaliteit bij het ontdooien en bereiden
het beste behouden.
De levensmiddelen luchtdicht verpakken
zodat ze niet uitdrogen of hun smaak
verliezen.
Voor verpakking geschikt:
kunststof-, polyetheen- en aluminiumfolie,
diepvriesdozen. Deze produkten zijn in de
handel verkrijgbaar.
Niet geschikt:
pakpapier, vetvrij papier, cellofaan, vuilniszakken en gebruikte boodschappentasjes.
De levensmiddelen verpakken, lucht eruit
persen en het geheel van een goede sluiting
voorzien.
Als sluiting geschikt:
elastiekjes, clips van kunststof, touwtjes,
koudebestendig plakband e.d. Zakjes en
folie van polyetheen kunnen met een folielasapparaat worden dichtgelast.
Vermeld op de pakjes inhoud en datum
voordat u ze in de diepvriesruimte legt.
Invriescapaciteit
De levensmiddelen moeten zo snel mogelijk
door en door worden ingevroren. Alleen zo
blijven vitamines, voedingwaarde, kleur
en smaak behouden. Daarom mag de max.
invriescapaciteit van uw apparaat niet
overschreden worden.
De volgende hoeveelheden levensmiddelen
kunnen binnen 24 uur worden ingevroren in
de bovenste diepvriesbak
bij 70 cm brede apparaten max. 12 kg.
bij 60 cm brede aparaten max. 9 kg.
Zorg dat de verse levensmiddelen niet
in aanraking komen met al ingevroren
levensmiddelen.
Warme spijzen en dranken, voordat u ze
in de diepvriesruimte opslaat, op kamertemperatuur laten afkoelen.
Gegevens over de maximale
invriescapaciteit volgens de actuele norm
vindt u op het typeplaatje (Afb. B).
Supervriezen
Als er al levensmiddelen in de diepvriesruimte
liggen, dan moet een paar uur vóór het
inladen van verse levensmiddelen het
supervriessysteem worden ingeschakeld.
Doorgaans is 4 tot 6 uur van tevoren
voldoende. Wilt u de max. invriescapaciteit
benutten, dan moet u het supervriessysteem
24 uur van tevoren inschakelen. Kleinere
hoeveelheden levensmiddelen (tot 2 kg)
kunnen zonder gebruik van het
supervriessysteem worden ingevroren.
Inschakelen van het supervriessysteem:
de supervriestoets (afb.2/3) indrukken.
De indicatie "super" geeft aan dat het
supervriessysteem is ingeschakeld. Na
inschakeling bereikt de vriesruimte een zeer
lage temperatuur. Ca. 52 uur na het
inschakelen wordt de supervriesstand
automatisch uitgeschakeld.
Levensmiddelen opslaan
Let er altijd op dat alle diepvriesladen
helemaal tot de aanslag in de diepvriesruimte zijn geschoven.
Dit is belangrijk voor een goede luchtcirculatie in het apparaat.
Vriestableau
Afb.
:
Op het vriestableau kunt u de ijsbakjes
bewaren en bessen, klein gesneden fruit,
kruiden en groente stuk voor stuk invriezen.
Om stuk voor stuk in te vriezen de
levensmiddelen op het vriestableau
gelijkmatig verdelen en ca. 10 tot 12 uur
door en door laten bevriezen.
Hierna overdoen in diepvrieszakjes of
diepvriesdozen.
Om te ontdooien de levensmiddelen weer
naast elkaar neerleggen.
Invriezen en opslaan
Ontdooien van
diepvrieswaren
Afhankelijk van soort en bereidingswijze
van de levensmiddelen kunt u kiezen uit
de volgende mogelijkheden:
bij omgevingstemperatuur,
in de koelkast,
in de elektrische oven,
met of zonder heteluchtverwarming,
in de magnetronoven.
Geheel of gedeeltelijk ontdooide diepvriesgerechten kunnen opnieuw worden
ingevroren als vlees en vis niet langer dan
één dag en andere diepvriesgerechten niet
langer dan drie dagen zijn bewaard op een
temperatuur lager dan +3 °C.
In andere gevallen de levensmiddelen – als
ten minste geur, smaak en kleur niet
veranderd zijn – koken, braden of op een
andere manier bereiden en opnieuw
invriezen.
De max. bewaartijd van de levensmiddelen
wordt hierdoor bekort.
IJsblokjes maken
Afb.
9
Het ijsbakje voor 3/4 met water vullen en in
de diepvriesruimte zetten.
Door het ijsbakje iets te verbuigen, laten de
ijsblokjes gemakkelijker los.
Schoonmaken
Vóór het schoonmaken altijd de stekker
uit het stopcontact trekken resp. de
zekering uitschakelen of losdraaien.
Geen stoom- of hogedrukapparaten
gebruiken. Door de hete stoom kunnen de
oppervlakte en de electrische onderdelen
beschadigd worden – kans op een
electrische schok!
Zorg dat het sop niet in de controle-armatuur
of de verlichting terechtkomt. Behalve de
deurafdichting kan het hele apparaat met
lauw water met een scheutje mild, licht
desinfecterend reinigingsmiddel (bijv. handafwasmiddel) worden schoongemaakt. Geen
schoonmaakmiddelen gebruiken die zand,
schuurmiddel of zuren bevatten. Ook geen
chemische oplosmiddelen gebruiken.
De deurafdichting alleen met schoon water
afnemen en grondig droogwrijven.
Indien mogelijk om de twee jaar ook de
warmtewisselaar (zwart rooster) aan de
achterkant van het apparaat met een kwast
of met de stofzuiger schoonmaken. Hierdoor
blijft het apparaat optimaal presteren
waardoor u energie bespaart.

87
NL
● Het apparaat in een koele, goed te
ventileren ruimte plaatsen. Niet in de zon
of in de buurt van een warmtebron
(verwarmingsradiator enz.) plaatsen.
● De be- en ontluchtingsopeningen nooit
afdekken.
● Warme gerechten pas nadat ze zijn
afgekoeld in het apparaat zetten.
● Als u diepvrieswaren wilt ontdooien, leg
deze dan eerst in de koelruimte. U benut
hierdoor de in de diepvrieswaren
aanwezige koude voor het koelen van
de levensmiddelen in de koelruimte.
● Bij het in- en uitladen de deuren van het
apparaat zo kort mogelijk openen.
Hoe korter de deur van de diepvriesruimte
geopend wordt, des te minder ijs zich kan
afzetten op de vriesroosters.
● Warmtewisselaar (zwart rooster) aan de
achterkant van het apparaat om de twee
jaar schoonmaken.
Tips om energie te
besparen
86
NL
Aanwijzingen bij
bedrijfsgeluiden
Bedrijfsgeluiden
Om de gekozen temperatuur constant te
houden schakelt uw apparaat van tijd tot
tijd de compressor in.
De geluiden die daarbij ontstaan zijn
normaal.
Zodra het apparaat de bedrijfstemperatuur
heeft bereikt, worden de geluiden
automatisch minder.
Het gebrom komt van de motor
(compressor). Het kan korte tijd iets luider
worden als de motor inschakelt.
Het geborrel, geklok of gebruis komt van
het koelmiddel dat door de leidingen
stroomt.
Het geklik is alleen te horen als de
thermostaat de motor in- of uitschakelt.
Kraakgeluiden kunnen optreden
wanneer...
- automatische ontdooiing plaatsvindt.
- het apparaat afkoelt of opwarmt
(materiaaluitzetting).
Bij een meerzone- of No-Frost-apparaat kan
een zacht geruis te horen zijn van de
luchtstroom in de binnenruimte van het
apparaat.
Als de bedrijfsgeluiden te luid zijn, dan
heeft dit wellicht eenvoudige oorzaken
die vaak heel gemakkelijk kunnen worden
opgeheven.
Het apparaat staat niet waterpas
Het apparaat met behulp van een waterpas
stellen. Gebruik hiervoor de schroefvoetjes
of leg er iets onder.
Het apparaat staat tegen een ander
meubel of apparaat
Het apparaat van het meubel of het
apparaat ernaast wegschuiven.
Laden, manden of legroosters/plateaus
wiebelen of klemmen
Controleer de delen die eruit gehaald
kunnen worden en zet ze eventueel opnieuw
in het apparaat.
Flessen of serviesgoed raken elkaar
De flessen of het serviesgoed los van elkaar
zetten.
– De lichtschakelaar zit klem (afb.
A
/B).
Controleer of deze bewogen kan worden.
Zo niet, neem dan contact op met de
klantenservice.
Als de indicatie (afb.
2
/9) knippert maar
het akoestische waarschuwingssignaal
niet afgaat,
dan was het door het uitvallen van de
stroom of door een storing in de diepvriesruimte te warm.
Na het indrukken van de "Alarm" toets wordt op indicatie 9 (niet knipperend)
gedurende vijf seconden de warmste
temperatuur aangegeven die in de
diepvriesruimte heeft geheerst. Hierna wordt
deze waarde gewist. Indicatie 9 geeft nu
zonder te knipperen de geprogrammeerde
temperatuur in de diepvriesruimte aan.
Als de indicatie warmer dan +3 °C heeft
aangegeven, dan moeten de diepvrieswaren
gecontroleerd worden.
Als smaak, geur en uiterlijk niet veranderd
zijn de diepvrieswaren door koken of braden
tot een kant en klaar gerecht verwerken en
opnieuw invriezen.
De maximale bewaartijd wordt hierdoor bekort.
Als na langer gebruik de indicatie (afb.
2
/9) knippert en het alarmsignaal te
horen is:
Storing – in de diepvriesruimte is het te
warm!
Op de indicatie wordt de geprogrammeerde
temperatuur in de diepvriesruimte
aangegeven.
Om het alarmsignaal uit te schakelen:
"Alarm" -toets indrukken.
Eventuele oorzaken van de storing:
- de ventilatie-opening aan de bovenkant
van het apparaat resp. in de plint is
afgedekt;
- de deur van de diepvriesruimte is niet
goed dicht;
- er werden verse levensmiddelen zonder
supervriezen ingevroren;
- er werden om in te vriezen te veel verse
levensmiddelen in één keer ingeladen;
- hoge omgevingstemperatuur.
Kleine storingen zelf verhelpen
Ga, alvorens de Servicedienst in te
schakelen, aan de hand van de volgende
punten eerst even na of u de storing zelf
kunt verhelpen.
Als u om een monteur vraagt, en het blijkt
dat hij alleen maar een advies (bijv. over
de bediening of het onderhoud van het
apparaat) hoeft te geven om de storing
te verhelpen, dan moet u, ook in de
garantietijd, de volledige kosten van
dat bezoek betalen.
Als de indicatie (afb.
2
/9) niet brandt:
controleer of er stroom is, of de stekker
goed in het stopcontact zit en of het
apparaat is ingeschakeld.
Als tijdens het in gebruik nemen van het
apparaat de indicatie (afb.
2
/9) "E1"
(knipperend) wordt aangegeven:
In de koelruimte heerst een zeer hoge
temperatuur. Een paar minuten na het in
gebruik nemen van het apparaat wordt de
ingestelde temperatuur in de koelruimte
aangegeven als de Cooler-toets werd
ingedrukt. Anders wordt op de indicatie "Al"
(de diepvriesruimte is warm) of de ingestelde
temperatuur in de diepvriesruimte
aangegeven.
Als tijdens het in gebruik nemen van het
apparaat de indicatie (afb.
2
/9) "E2"
(knipperend) wordt aangegeven:
In de diepvriesruimte heerst een zeer hoge
temperatuur. Een paar minuten na het in
gebruik nemen van het apparaat wordt "Al"
en vervolgens de ingestelde temperatuur in
de diepvriesruimte aangegeven als de
Freezer-toets werd ingedrukt. Anders geeft
de indicatie de ingestelde temperatuur in de
koelruimte aan.
Als de verlichting in de koelruimte niet
functioneert:
– De gloeilamp is defect. Stekker uit het
stopcontact trekken, afscherming (afb.
A
/A) verwijderen en de gloeilamp
vervangen door een gloeilamp van
hetzelfde type (max. 15 W, 230 V, fitting
E14).

88
NL
Typeplaatje
Afb.
B
Als u de hulp van de Servicedienst inroept,
geef dan het E-nummer en het FD-nummer
op.
U vindt deze nummers in het zwart omlijnde
gedeelte van het typeplaatje links onderaan
in de koelruimte naast de groentelade.
Adres en telefoonnummer van de Servicedienst kunt u vinden in het telefoonboek of
in de meegeleverde brochure met serviceadressen.
Na het verhelpen van de storing de
"Alarm" -toets indrukken; de indicatie
houdt op met knipperen als in de
diepvriesruimte de bedrijfstemperatuur weer
is bereikt.
Als de deur van de diepvriesruimte te lang
open stond en de ingestelde temperatuur
in de diepvriesruimte niet meer bereikt
wordt, dan heeft zich zoveel ijs op de
verdamper afgezet dat het volautomatische
ontdooisysteem de hoeveelheid ijs niet meer
kan ontdooien. In dit geval de diepvrieswaren
uit het apparaat halen en goed geïsoleerd op
een koele plaats leggen.
Het apparaat uitschakelen en de deur van
de diepvriesruimte open laten staan. Na ca.
12 uur is het ijs in het koelsysteem ontdooid.
Apparaat weer inschakelen en de diepvrieswaren erin leggen.
Als de storing aan de hand van de hiervoor
genoemde punten niet verholpen kan
worden, schakel dan de Servicedienst in.
Om koudeverlies te vermijden de deuren niet
onnodig openen.
Voer zelf geen apparaties aan het apparaat
uit, vooral niet aan de electrische onderdelen.
ServicedienstKleine storingen zelf
verhelpen

89
ES
Consejos para el desguace de los aparatos usados/
Advertencias de seguridad
Consejos para el desguace
del aparato usado
Los aparatos usados incorporan materiales
valiosos que se pueden recuperar, entregando
el aparato a dicho efecto en un centro oficial de
recogida o recuperación de materiales reciclables.
Antes de deshacerse de su aparato usado y
sustituirlo por una unidad nueva, deberá inutilizarlo:
Extraiga para ello el enchufe del aparato de la toma
de corriente. Corte el cable de conexión del aparato
y retírelo conjuntamente con el enchufe.
Desmonte los cierres o cerraduras de la puerta
o inutilícelos a fin de impedir que los niños, al
jugar con la unidad, se encierren en la misma
y se pongan en peligro de muerte (asfixia).
Todos los aparatos frigoríficos y congeladores
contienen gases aislantes y líquidos refrigerantes,
que exigen un tratamiento y eliminación
específicos. Preste atención a que las tuberías del
circuito de frío de su congelador no sufran daños
ni desperfectos antes de haberlo entregado en el
correspondiente Centro Oficial de recogida.
Contribuya activamente a la protección del medio
ambiente cuidándose de que su viejo aparato sea
eliminado o desguazado de un modo respetuoso
con el medio ambiente.
Su nuevo aparato está protegido durante el
transporte hasta su hogar por un embalaje
protector. Todos los materiales de embalaje
utilizados son respetuosos con el medio ambiente
y pueden ser reciclados o reutilizados. Contribuya
activamente a la protección del medio ambiente
insistiendo en unos métodos de eliminación
y recuperación de los materiales de embalaje
respetuosos con el medio ambiente.
No permita que los niños jueguen con el material
del embalaje o parte de sus elementos. ¡Existe
peligro de asfixia a causa de los cartones y las
láminas de plástico!
Su Distribuidor o Administración local le informará
gustosamente sobre las vías y posibilidades más
eficaces y actuales para la eliminación respetuosa
con el medio ambiente de estos materiales.
Este aparato está marcado con la
Directiva europea 2002/96/CE relativa al
uso de aparatos eléctricos y electrónicos
(Residuos de aparatos eléctricos y
electrónicos).
La directiva proporciona el marco general válido
en todo el ámbito de la Unión Europea para la
retirada y la reutilización de los residuos de los
aparatos eléctricos y electrónicos.
Nuestra contribución a la protección del medio
ambiente – empleamos papel reciclado.
Consejos de seguridad
y advertencias de carácter
general
Antes de emplear el aparato nuevo deberán leerse
detenidamente las instrucciones de servicio y de
montaje del congelador. En éstas se facilitan
informaciones y consejos importantes relativos
a su seguridad personal, así como a la instalación,
el manejo y cuidado correctos del aparato.
Guarde las instrucciones de servicio y de montaje
para un posible propietario posterior.
El fabricante no se responsabiliza en absoluto de
eventuales daños y perjuicios que pudieran
producirse en caso de incumplimiento por parte
del usuario de los consejos y advertencias de
seguridad que se facilitan a continuación:
● Si el aparato presentara daños o desperfectos,
no deberá ser puesto en funcionamiento. En
caso de duda, consultar con el distribuidor en
donde adquirió el aparato.
● Efectuar la instalación y conexión del aparato
a la red eléctrica según las correspondientes
«Instrucciones de montaje». Los valores de
conexión de la red eléctrica tienen que
coincidir con los detallados en la placa de
características del aparato.
● No utilizar ningún tipo de limpiadora de vapor
para la limpieza o la descongelación del
aparato. El vapor caliente podría penetrar
en el interior del aparato, accediendo a los
elementos conductores de corriente, y
provocar cortocircuitos o descargas eléctricas.
● La seguridad eléctrica del aparato sólo queda
asegurada si el sistema o circuito de puesta
a tierra de la instalación doméstica ha sido
debidamente instalado.
● En caso de constatar cualquier anomalía
o avería, así como al realizar trabajos de
mantenimiento o limpiar el aparato, deberá
desconectarse éste de la red eléctrica,
extrayendo para ello el enchufe del aparato de
la red de corriente, o desactivando el fusible.
¡No tirar del cable de conexión del aparato,
sino asirlo siempre por el cuerpo del enchufe!
● Las reparaciones que fuera necesario efectuar
sólo podrán ser ejecutadas por electricistas
o técnicos especializados del ramo. Las
reparaciones efectuadas de modo erróneo
o incorrecto, pueden implicar serios peligros
para el usuario.
● En caso de conservar bebidas con un elevado
contenido de alcohol en la unidad, conviene
envasarlas en botellas provistas de un cierre

91
ES
90
ES
Emplazamiento de la unidad
Lugar de emplazamiento
El lugar más adecuado para el emplazamiento
de la unidad combinada es una habitación seca,
dotada de una buena ventilación. Recuerde
además que el aparato no debe instalarse de
forma que reciba directamente los rayos del sol,
ni encontrarse tampoco próximo a focos activos
de calor tales como cocinas, calefacciones, etc.
No obstante, si esto último fuera inevitable, se
habrá de proteger la unidad con un panel aislante
adecuado, o bien observar las siguientes
distancias mínimas de separación con respecto
a la fuente de calor en cuestión:
Cocinas eléctricas, 3 cm
Cocinas de gas-oil o de carbón, 30 cm
En caso de instalar el aparato junto a otro aparato
de refrigeración o congelación, deberá observarse
una distancia mínima de separación lateral de
2 cm, a fin de evitar la formación de agua de
condensación.
El aparato tiene que encontrarse firme-mente
asentado sobre una superficie lisa y llana. Las
irregularidades del suelo pueden compensarse
mediante los soportes roscados delanteros (Fig.
C). Los dos rodillos traseros facilitan la colocación
del aparato en su emplazamiento definitivo.
Conexión eléctrica
Conectar la unidad a una red eléctrica de corriente
alterna de 220–240 V/50 Hz a través de una toma
de corriente instalada reglamentariamente y provista
de puesta a tierra. La toma de corriente debe
estar protegida con un fusible de 10 amperios
como mínimo.
En los aparatos destinados a países fuera del
continente europeo deberá verificarse si los
valores de la tensión de conexión y el tipo de
corriente que figuran en la placa de características
del aparato coinciden con los de la red nacional.
La placa de características del aparato se
encuentra en el lateral inferior izquierdo del
frigorífico (Fig. B).
En caso de que fuera necesario sustituir el cable
de conexión a la red eléctrica del aparato, esto
sólo deberá ser ejecutado por un técnico
especializado de la marca.
¡Atención! No conectar el aparato en ningún
caso a conectores electrónicos para ahorro
energético (por ejemplo Sava Plug, etc.) ni
tampoco a rectificadores inversos que
transforman la corriente continua en corriente
alterna de 230 V (por ejemplo instalaciones de
energía solar, redes eléctricas de buques).
Ventilación
Figura
3
El aire recalentado en la pared posterior del
aparato debe poder escapar libremente. De
lo contrario, el aparato tendrá que aumentar su
rendimiento, provocando un consumo de energía
eléctrica elevado e inútil.
Por esta razón habrá que prestar particular
atención a que las aberturas de ventilación
y aireación no estén nunca obstruidas.
Tras el transporte …
Antes de conectar el aparato por vez primera
deberá dejarlo reposar en posición vertical
durante aprox. 1/2 hora.
hermético y colocarlas siempre en posición
vertical. No guardar productos combinados
con agentes o gases propelentes (expendedores
de nata, sprays) ni materias explosivas en el
aparato – ¡Existe peligro de explosión!
● No guardar en el compartimento de congelación
botellas ni tarros o latas que contengan
líquidos, particularmente bebidas gaseosas.
¡Las botellas y latas pueden estallar!
● No obstruir las rejillas de ventilación y aireación.
● No utilizar el zócalo, los cajones o las puertas
de la unidad como pisaderas o reposapiés.
● No permita que los niños jueguen con la
unidad.
● En caso de disponer el congelador de una
cerradura, guardar la llave fuera del alcance de
los niños.
● No introducir en la boca directamente los
helados, polos o cubitos de hielo extraídos del
congelador. (¡Peligro de quemaduras a causa
de las bajas temperaturas!)
● No tocar los productos congelados con las
manos húmedas a fin de evitar que se queden
adheridas a éstos.
● ¡ATENCIÓN!: No cubrir ni obstruir las aberturas
de ventilación situadas en el cuerpo del
aparato o en el aparato integrable.
● ¡ATENCIÓN!: Prestar atención a no ocasionar
daoos en las tuberías del circuito de frío.
● ¡ATENCIÓN!: No utilizar aparatos eléctricos en
el interior de los compartimentos de alimentos,
a no ser que se trate de modelos
recomendados explícitamente por el
fabricante.
El agente refrigerante empleado en
esta unidad es lsobutano (R 600a).
El lsobutano es us gas natural de
excelente compatibilidad
ambiental, no obstante, se habrá de tener en
cuenta que se trata de un gas de carácter
inflamable. Por consiguiente, cuando se
traslade la unidad o se proceda a su
instalación, observar que no se dañe ninguna
de las pieza que componen el circuito
friogorífico. Si accidentalmente se dañara
alguna pieza, evitar categóricamente exponer
la unidad a llama libre o a fuentes de ignición, y
dejar que el lugar de ubicación ventile unos
minutos.
Atención: No emplear para la descongelación
del aparato dispositivos mecánicos ni
elementos o agentes auxiliares de cualquier
otro tipo distintos de los que hubieran sido
autorizados u homologados explicitamente por
el fabricante.
Normativas
El aparato ha sido diseñado para la refrigeración
y congelación de alimentos, así como para la
preparación de hielo.
Esta unidad combinada frigorífico-congelador está
destinada al uso exclusivo en el ámbito doméstico.
En caso de utilizarla para fines industriales,
deberán tenerse en cuenta las correspondientes
normas y disposiciones.
El aparato cumple las «Normas alemanas de
prevención de accidentes provocados por
equipos e instalaciones frigoríficas VBG 20».
Este aparato cumple estrictamente lo dispuesto
en las normativas de seguridad vigentes para
electrodomésticos.
La estanqueidad del circuito de refrigeración viene
verificada de fábrica.
Prestar atención a la
temperatura del entorno
En función de la clase climática a la que
pertenezca cada aparato (véase al respecto la
placa de características del mismo), éste puede
trabajar bajo los siguientes márgenes de
temperatura del entorno: (La placa de
características del aparato se encuentra
en el lateral inferior izquierdo. Figura
B
)
Clase Temperatura del entorno
climática de ... hasta
SN +10 °C hasta 32 °C
N +16 °C hasta 32 °C
ST +18 °C hasta 38 °C
T +18 °C hasta 43 °C
En caso de descender la temperatura ambiente
por debajo del margen de temperatura inferior
reseñado, la temperatura en el interior del
frigorífico desciende en exceso (demasiado frío).
En caso de superar la temperatura del entorno
los márgenes de temperatura superiores, la
temperatura en el interior del compartimento
de congelación aumenta en exceso (demasiado
calor).
En caso de bajar la temperatura ambiente por
debajo del valor seleccionado para el frigorífico,
el interior del frigorífico alcanza la misma
temperatura que la temperatura del entorno.
En caso de registrarse temperaturas del entorno
inferiores a los +10 °C, pueden producirse
perturbaciones en la función automática de
descongelación.
Consejos para el desguace de los aparatos usados /
Advertencias de seguridad

93
ES
92
ES
Familiarizándose con la unidad
Gracias a la acción del sistema automático
«No-frost», el congelador permanece libre de
hielo, no siendo, pues, necesario efectuar su
descongelación o descarchado.
Funcionamiento:
Los alimentos son congelados mediante el aire
refrigerado.
Un evaporador instalado en el sistema «No-frost»
refrigera el aire. Un ventilador se encarga de hacer
circular el aire frío. Un segundo ventilador se
encarga de asegurar la circulación del aire en el
interior del frigorífico. La humedad contenida en el
aire se precipita en el evaporador. El evaporador
es descongelado automáticamente en caso
necesario.
El agua de descongelación es transportada hasta
el grupo frigorífico, donde se evapora. El interior
del congelador y los alimentos quedan libres de
hielo.
Función de los elementos de
mando y control
Fig.
2
1 Tecla
Interruptor principal para la conexión
y desconexión de todo el aparato.
2 Desactiva la “alarm” acústica.
La alarma acústica se activa en caso de
registrarse en el interior del compartimento de
congelación una temperatura demasiado
elevada y los productos congelados
almacenados en el mismo corren peligro de
deteriorarse a causa de la temperatura
excesivamente elevada que reina en el
congelador. (Al mismo tiempo destella la
pantalla de visualización 9).
La alarma acústica puede activarse, sin
significar por ello ningún peligro de deterioro
inmediato de los alimentos
- al poner en marcha el aparato
- al introducir alimentos frescos en el
congelador sin haber activado la función de
congelación ultrarrápida «super»
- al permanecer abierta la puerta del
congelador durante un tiempo prolongado
Una vez que el sonido de alarma ha sido
desactivado y el congelador ha alcanzado su
temperatura de servicio normal, la alarma
acástica recupera automáticamente su estado
inicial.
3 Tecla «Super» para la congelación
ultrarrápida
Conecta y desconecta la función de
congelación ultrarrápida.
Su activación se muestra tanto a través de la
pantalla de visualización 8 «Super» como a
través de la pantalla de visualización 9 «SU».
Mediante esta función se congelan grandes
cantidades de alimentos frescos. Para ello hay
que activar la función 24 horas antes de
introducir los alimentos frescos en el
compartimento de congelación.
Al estar activada esta función, el grupo
frigorífico funciona continuamente,
alcanzándose en el interior del compartimento
de congelación unas temperaturas muy bajas
(gran frío).
4 Tecla Congelador
Indica en la pantalla de visualización 9 la
temperatura ajustada en el compartimento de
congelación (véase la descripción de la
pantalla de visualización 9d).
5 Tecla Frigorífico
Indica en la pantalla de visualización 9 la
temperatura ajustada en el compartimento
frigorífico (véase la descripción de la pantalla
de visualización 9c).
6 Tecla para la regulación de la temperatura
en el interior del frigorífico y del
compartimento de congelación
a) (La temperatura en el interior del
compartimento frigorífico se puede ajustar de
+2 °C hasta +8 °C). Pulsar la tecla
«Frigorífico» («Cooler») y a continuación la
tecla °C. En la pantalla de visualización 9 se
muestra la temperatura ajustada. Pulsar la
tecla constante o repetidamente, hasta que
aparezca en la pantalla de visualización la
temperatura que se desea ajustar. (La
temperatura ajustada es mostrada de manera
correlativa de + 8 °C hasta + 2 °C. Tras mostrar
+2 °C, vuelve a seoalar +8 °C).
b) (La temperatura del compartimento de
congelación se puede ajustar de -16 °C hasta
-26 °C). Para ajustar la temperatura deseada
en el compartimento de congelación, pulsar la
tecla «Congelador» («Freezer») y a
continuación la tecla °C. En la pantalla de
Familiarizándose con la unidad
Antes de leer estas instrucciones, despliegue
las últimas páginas con las ilustraciones.
Las presentes Instrucciones de servicio son
válidas para diferentes modelos de aparato;
por ello puede ser posible que se describan
detalles y características de equipamiento que
no concuerdan con las de su aparato concreto.
Vista general
Figura
1
1-9 Cuadro de mandos
10 Rejillas de salida del aire
11 Iluminación interior
12 Cajón para guardar los tarros de yogur
13 Bandejas
14 Sistema «Multiflow» para distribución
del aire frío
15 Cajón para la verdura
16 Compartimento “Chiller”
17 Estante para tarros y latas pequeñas
18 Elemento portahuevos
19 Bandejas
20 Barandilla del botellero
21 Botellero
22 Bandeja congeladora
23 Cajón de congelación
A Frigorífico
B Compartimento de congelación
Cuadro de mandos
(Descripción breve)
Figura
2
1 Tecla
Interruptor principal de conexión y
desconexión del aparato
2 Tecla “alarm” (tecla de desconexión de
la alarma acústica
a) desactiva la señal acústica de alarma
b) señala la temperatura más elevada que se
ha registrado en el compartimento de
congelación (sólo en caso de destellar la
pantalla de visualización 9)
3 Tecla de conexión/desconexión de la opción
de congelación ultrarrápida «Super»
activa la máxima potencia de congelación de
la unidad
4 Tecla Congelador
Indica la temperatura ajustada en el
compartimento de congelación.
5 Tecla Frigorífico
Indica la temperatura ajustada en el
compartimento frigorífico.
6 Tecla de ajuste de la temperatura en el
interior del compartimento de congelación
o el frigorífico
0
C = más frío, más calor
7 Piloto «alarm»
se ilumina sólo en caso de estar activada la
función de alarma
8 Piloto «super»
para la función de congelación ultrarrápida
se ilumina sólo cuando la tecla «Super» ha sido
oprimida.
9 Pantalla de visualización
a) «Temperatura más elevada»
b) Piloto «AL» (Alarma)
c) Temperatura ajustada en el
compartimento frigorífico
d) Temperatura ajustada en el
compartimento de congelación

95
ES
94
ES
Advertencias de carácter general
● La temperatura en el interior del frigorífico es
influida por
– el número de veces que se abre la puerta
– la cantidad y la temperatura de los alimentos
frescos introducidos en el compartimento de
congelación y en el frigorífico
– los valores de la temperatura ambiente
– la temperatura ajustada en el compartimento
de congelación o la activación de la función
de congelación ultrarrápida «Superfrío».
● Los lados frontales del cuerpo del aparato
son calentados ligeramente. De este modo
se impide la formación de agua de condensación en la zona de la junta de la puerta.
Conexión del aparato y selección de la temperatura
Figura
2
● Introducir el enchufe del aparato en la toma de
corriente.
● Pulsar el interruptor principal del aparato 1
Se activa la seoal acústica de aviso, la pantalla
de visualización 9 destella y muestra la leyenda
«AL».
● Pulsar la tecla “alarm” 2
Desactiva la alarma acústica. La pantalla de
visualización muestra la temperatura actual
durante cinco segundos. En la pantalla de
visualización 9 muestra ahora la leyenda «AL».
● Ajuste de temperatura en el interior del
compartimento de congelación
Pulsar las teclas «freezer» y «0C». Pulsar
repetida o continuamente la tecla de ajuste de
la temperatura «0C» hasta que en la pantalla
aparezca la temperatura deseada. (La
temperatura ajustada se muestra de forma
correlativa de -26 0C hasta -16 0C; tras señalar
-260C, vuelve a mostrarse el valor -160C.).
Se aconseja seleccionar una temperatura de
-200C.
● Ajuste de la temperatura en el interior del
frigorífico
Pulsar las teclas «cooler» y «0C» . Pulsar
repetida o continuamente la tecla de ajuste de
la temperatura «0C» hasta que en la pantalla
aparezca la temperatura deseada. (La
temperatura ajustada se muestra de forma
correlativa de 8 0C hasta 2 0C; tras señalar 8 0C,
vuelve a mostrarse el valor 2 0C.).
Se aconseja seleccionar una temperatura de
+4 0C.
Cualquier corrección de la temperatura que se
efectuara no desarrolla su efecto
inmediatamente, sino que tarda cierto tiempo
en hacerse notar.
Familiarizándose con la unidad
visualización 9 se muestra la temperatura
ajustada. Pulsar la tecla constante o
repetidamente, hasta que aparezca en la
pantalla de visualización la temperatura que se
desea ajustar (La temperatura ajustada es
mostrada de manera correlativa de –16 °C
hasta –26 °C. Tras mostrar –26 °C, vuelve a
seoalar -16 °C).
7 Piloto «alarm»
Se ilumina sólo cuando la alarma acústica se
activa. Esto sólo ocurre cuando la temperatura
en el interior del compartimento de
congelación es demasiado elevada, es decir,
los productos congelados almacenados en el
mismo corren peligro de deteriorarse a causa
de la temperatura excesivamente elevada que
reina en el compartimento. El piloto se apaga
tan pronto como en el compartimento de
congelación se vuelve a registrar una
temperatura de servicio normal.
8 Piloto «super»
Se ilumina sólo cuando la tecla «super» 3 ha
sido oprimida, activándose la función
«congelación ultrarrápida».
El piloto se apaga en caso de volver a pulsar
la tecla «super» y desactivar la congelación
ultrarrápida.
El piloto se apaga automáticamente pasadas
52 horas tras su conexión.
9 Pantalla de visualización multifunciones
señala diferentes temperaturas
a) Temperatura demasiado elevada en el
interior del compartimento de congelación
Cuando la pantalla de visualización 9 destella,
la temperatura del interior del compartimento
de congelación es demasiado elevada o lo ha
sido en algún momento, debido a un corte o
una avería en el suministro de corriente
eléctrica.
Tras pulsar la tecla «Alarma » la pantalla
de visualización 9 – sin destellar - seoala
durante cinco segundos la temperatura más
elevada (calor) que se ha registrado en el
interior del compartimento de congelación. A
continuación se borra dicha indicación. La
pantalla 9 pasa a seoalar – sin destellar - la
temperatura programada en el compartimento
de congelación.
b) Piloto «Al» (Alarma)
Se ilumina en caso de detectarse una
temperatura excesivamente elevada en el
compartimento de congelación.
c) Temperatura ajustada en el compartimento
frigorífico
Tras pulsar la tecla «Frigorífico» se muestra en
pantalla la temperatura ajustada en el
compartimento frigorífico.
d) Temperatura ajustada en el compartimento
de congelación
Tras pulsar la tecla «Congelador» se muestra
en pantalla la temperatura ajustada en el
compartimento de congelación.

97
ES
96
ES
Puntos a tener en cuenta
al comprar alimentos
ultracongelados
● Prestar atención a que la envoltura del
alimento o producto congelado no presente
ningún tipo de daño.
● Verifique la fecha de caducidad de los
alimentos. Cerciórese de que ésta no ha
vencido.
● La indicación de la temperatura del congelador
del establecimiento en donde adquiera los
alimentos deberá señalar un valor mínimo de
–18° C.
● Al hacer la compra, recuerde que conviene
adquirir los alimentos congelados en el último
momento. Procure transportarlos directamente
a casa envueltos en un papel de periódico o en
una bolsa isotérmica. Una vez en el hogar,
deberá colocarlos inmediatamente en el
compartimento de congelación.
Congelar alimentos frescos
en casa
Si decide congelar usted mismo los alimentos,
utilice únicamente alimentos frescos y en
perfectas condiciones.
Alimentos adecuados para la congelación
Carnes y fiambres, aves y caza, pescado,
legumbres, verduras y hortalizas, hierbas
aromáticas, fruta, pan, bollería y repostería,
pizza, platos cocinados, restos de comidas,
yemas y claras de huevos.
Alimentos que no deben congelarse
Huevos enteros en su cáscara, nata fresca
acidulada y mahonesa, lechugas, rábanos,
rábanos picantes y cebollas.
Colocación de alimentos
Compartimento de congelación (B)
En la bandeja congeladora (22), guardar
alimentos congelados de pequeño tamaño.
En los cajones de congelación superiores (23),
conservar alimentos congelados.
El equipo interior del
frigorífico
Las bandejas del frigorífico se pueden cambiar de
sitio y posición estando abierta la puerta del aparato
en un ángulo de 90°: Desplazar para ello las
bandejas hacia adelante, inclinarlas hacia abajo,
retirarlas de su emplazamiento y colocarlas en la
nueva posición (Fig. 4).
Compartimento “Chiller” (Fig.
8
)
Desplazar el fondo del compartimento hacia
adelante: La trampilla se abre.
Desplazar el fondo del compartimento hacia
adelante: La trampilla se abre.
En el compartimento fresco especial «Chiller» reinan
unas temperaturas inferiores a las del frigorífico,
pudiendo alcanzar hasta valores por debajo de los
0
0
C. Es el lugar ideal para guardar pescado, carne o
embutido.
¡No guardar en este compartimento lechugas,
verduras u otros alimentos sensibles a las bajas
temperaturas!
El compartimento pequeño se puede extraer de su
posición para retirar o introducir los productos o
tarros (Fig. 6).
Los portahuevos pueden colocarse en posición
vertical dentro de los compartimentos en los que
se encuentran, colocándose en ellos tubos, latas
pequeñas, etc.
Con objeto de evitar que las botellas vuelquen al
abrir y cerrar la puerta, pueden asegurarse con la
barandilla protectora (Fig.
7
).
Todos los soportes y estantes de la cara interior
de la puerta pueden extraerse de su posición para
limpiarlos (Fig.
5
/A).
Congelar y guardar los
alimentos
Desconectar el aparato
Pulsar el interruptor principal (Fig. 2/1). El aparato
queda desconectado.
Paro del aparato
En caso de largos períodos de inactividad de la
unidad:
Pulsar el interruptor principal (Fig. 2/1). Limpiar
el aparato. Dejar las puertas abiertas.
Desconexión y paro del
aparato
Colocación de alimentos
Puntos a tener en cuenta al
colocar los alimentos en el
aparato
● Dejar enfriar los alimentos o bebidas calientes
hasta temperaturas ambientes antes de
introducirlos en la unidad.
● Colocar los alimentos empaquetados o bien
cubiertos en la unidad. De este modo se evita
que los alimentos de deshidraten, descoloren
o pierdan su valor nutritivo y aroma. Además
se evita la mezcla de olores y sabores. Las
verduras, frutas y hortalizas se pueden guardar
en los cajones para las verduras, sin necesidad
de envolverlas.
● No permitir que las grasas y aceites entren en
contacto con los elementos de plástico del
interior del frigorífico o la junta de la puerta.
El plástico y la junta de goma son materiales
muy susceptibles a la porosidad.
● No guardar ni almacenar materias explosivas
en el interior de la unidad.
Tenga presente que las bebidas con un alto
grado de alcohol necesitan envases con cierre
hermético; además se deberán colocar
siempre en posición vertical.
– ¡Peligro de explosión!
● No guardar en el compartimento de congelación
botellas ni tarros o latas que contengan
líquidos, particularmente bebidas gaseosas.
¡Las botellas y latas pueden estallar!
Ejemplo de la disposición de
los accesorios en la unidad
Fig.
1
Frigorífico (A)
En el compartimento (12), guardar el queso, el
embutido y los tarros de yogur.
Colocar sobre las bandejas (13), de arriba hacia
abajo, pan y bollería, platos cocinados, productos
lácteos.
En el cajón para la verdura (15), verduras
y hortalizas, frutas y lechugas.
En el estante (17), pequeñas botellas, latas.
En el estante (21), las botellas grandes.

99
ES
98
ES
Conservación de alimentos
Con objeto de no obstaculizar la circulación del
aire en el interior del aparato, hay que cerciorarse
siempre de que todos los cajones de congelación
se encuentren introducidos hasta el tope en el
compartimento de congelación.
Bandeja congeladora
Figura
:
Esta bandeja es particularmente apropiada para
guardar las cubiteras, así como para congelar
individualmente bayas, trozos de frutas, hierbas
finas y verduras.
Para congelar los alimentos individualmente,
colocarlos en la bandeja congeladora,
distribuyéndolos uniformemente sobre la misma
y dejarlos congelar durante unas 10–12 horas.
Guardarlos a continuación en bolsas o recipientes
adecuados.
Para descongelarlos, extender los alimentos
individualmente uno junto al otro.
Descongelación de alimentos
Según el tipo y la naturaleza de su uso, se puede
elegir entre los siguientes procedimientos:
Temperatura ambiente,
En el frigorífico,
En un horno eléctrico,
Con/sin calentador de aire,
Con horno microondas.
Los alimentos que se hayan descongelado o hayan
empezado a descongelarse, se podrán volver
a congelar teniendo en cuenta lo siguiente: En
caso de las carnes y los pescados, sólo podrán
volverse a congelar si no han permanecido más
de un día, en caso de otros productos, tres días,
expuestos a una temperatura superior a los +3°C
De lo contrario, verificar si el aroma, aspecto
y color de los alimentos son satisfactorios. Si no
se constata ninguna alteración, asar, freír, hervir
o preparar con ellos platos cocinados, antes de
volver a congelarlos.
En este caso no se deberá agotar al máximo el
tiempo de caducidad de los productos.
Preparación de cubitos de
hielo
Figura
9
Llenar 3/4 partes de la cubitera de hielo con agua.
Colocarla sobre la rejilla de un compartimento de
congelación previa.
Para retirar los cubitos de hielo de la cubitera,
doblar ésta ligeramente.
Los cubitos de hielo se pueden guardar en el
recipiente correspondiente (en caso de figurar
en el equipo del aparato).
La cubetera sirve en este caso de tapa para el
recipiente para los cubitos de hielo.
Congelar y guardar los alimentosCongelar y guardar los alimentos
Blanqueado (escaldado) de verduras, frutas
y legumbres
En el caso de las verduras, frutas y legumbres es
importante blanquearlas (escaldarlas) antes de su
congelación, para que su sabor, aroma o color no se
deteriore, no pierdan tampoco su valor nutritivo y
conserven al máximo su contenido de vitamina «C».
(Las frutas y verduras se blanquean sumergiéndolas
unos momentos en agua hirviendo – Más detalles
sobre este método podrán hallarse en cualquier
libro o manual de cocina que trate los aspectos
de la congelación de alimentos y en donde se
describa el método del blanqueado.)
Envasado de los alimentos
Envasar los alimentos en porciones (paquetes)
adecuadas al tamaño de las necesidades
normales de su hogar. Los paquetes de verduras
y fruta no deberán pesar más de 1 kg, los de
carne pueden llegar hasta 2,5 kg. Las porciones
de menor tamaño se congelan con mayor rapidez,
quedando así completamente preservada la
calidad al descongelar el producto y prepararlo.
Envasar los alimentos herméticamente para que
no se deshidraten o pierdan su sabor.
Materiales indicados para el envasado de los
alimentos
Láminas de plástico, bolsitas y láminas de
polietileno, papel de aluminio, cajitas y envases
específicos para la congelación de alimentos.
Todos estos productos y materiales se pueden
adquirir en la mayoría de los supermercados,
grandes almacenes o en el comercio especializado.
Materiales no apropiados para el envasado de
alimentos
Papel de empaquetar, papel apergaminado,
celofán, bolsas de la basura y bolsitas de plástico
de la compra ya usadas.
Introducir los alimentos en la envoltura prevista
a dicho efecto, procurando eliminar todo el aire
que pudiera haber en el envase. Cerrarlo
herméticamente.
Materiales apropiados para el cierre de los
envases
Gomitas, clips de plástico, bramante, cinta
adhesiva incongelable, etc. Las bolsitas o láminas
de plástico de polietileno se pueden termosellar
con una soldadora de plásticos.
Antes de introducir los alimentos en el
congelador, marcar claramente los envases,
indicando su contenido y la fecha de
congelación.
Capacidad máxima de
congelación
Para que los alimentos conserven su valor
nutritivo, vitaminas y buen aspecto hay que
congelar el centro lo más rápidamente posible.
Por esta razón no deberá superarse la máxima
capacidad de congelación del aparato.
Las siguientes cantidades de alimentos frescos
pueden congelarse en el cajón de congelación
superior en el curso de 24 horas:
En los modelos con 70 cm de anchura: máx. 12 kg.
En los modelos con 60 cm de anchura: máx. 9 kg.
Procurar que los alimentos congelados que ya
hubiera en su congelador no entren en contacto
con los alimentos frescos que se desean congelar.
Dejar enfriar los alimentos o bebidas calientes
hasta temperaturas ambientes antes de
introducirlos en el congelador.
Las indicaciones sobre la maxima
capacidad de congelación según las normas
más actuales figuran en la placa del aparato
(Figura
B
).
Congelación ultrarrápida
(«Superfrío»)
En caso de guardar productos ya congelados en el
congelador, deberá activarse la opción «Superfrío»
varias horas antes de colocar los alimentos frescos
en el congelador.
En general basta activar dicha opción con
4–6 horas de antelación. Si se desea aprovechar
la capacidad máxima de congelación, se
necesitarán 24 horas. Pequeñas cantidades de
alimentos (hasta 2 kg) se pueden congelar sin
necesidad de activar la congelación ultrarrápida.
Para activar la función «Congelación ultrarrápida»,
basta con pulsar la tecla «Super» (Fig.2/3).
El piloto de aviso para la función “super” se ilumina
para indicar la disposición de funcionamiento.
Activando esta función se alcanzan en el interior del
compartimento de congelación unas temperaturas
muy bajas (gran frío). La función de congelación
ultrarrápida «Super» se desactiva automáticamente
pasadas unas 52 horas tras su activación.

101
ES
100
ES
Advertencias sobre los
ruidos de funcionamiento
del aparato
Ruidos de funcionamiento
del aparato
Con objeto de mantener constante la temperatura
en el interior de su frigorífico, el compresor se
conecta de tiempo en tiempo. Esto origina unos
ruidos que se deben a razones técnicas. Tan
pronto como el aparato ha alcanzado la
temperatura de servicio, la intensidad de estos
ruidos disminuye sensiblemente.
Unos ruidos como de murmullos sordos son
inevitables durante el funcionamiento del
compresor. Pueden aumentar brevemente de
intensidad al conectarse el motor (compresor) del
aparato.
Los ruidos en forma de gorgoteo se producen al
penetrar el líquido refrigerante en los tubos
delgados una vez que ha entrado en
funcionamiento el compresor.
Unos breves ruidos en forma de clic sólo se
escuchan cuando el termostato conecta y
desconecta el compresor.
Unos ruidos en forma de chasquidos pueden
surgir ...
- durante el desescarchado automático del
aparato
- al enfriarse o calentarse el aparato (a causa de l
as dilatación del material).
En el caso de aparatos aptos para diversas zonas
climáticas, así como en las unidades que
incorporan el sistema «No-Frost», puede
escucharse una especie de murmullo o susurro
producido por las corrientes de aire en el interior
del aparato.
En caso de alcanzarse un nivel sonoro
excesivamente elevado durante el
funcionamiento del frigorífico, ello tal vez tenga
una fácil solución.
El aparato se encuentra en posición
desnivelada
Verificar la posición del aparato con ayuda de
un nivel de burbuja y nivelarlo con los soportes
roscados que incorpora o calzándolo.
En caso de estar el aparato en contacto con
muebles u otros aparatos
Separarlo de los muebles o aparatos con los que
estuviera en contacto.
Los cajones, estantes y soportes oscilan
o están agarrotados
Revisar los elementos afectados. En caso
necesario, volverlos a colocar en su posición
correcta.
Las botellas o los recipientes en el aparato
entran en contacto mutuo
Separar algo las botellas y los recipientes.
● Emplazar el aparato en una habitación seca
y fresca, dotada de una buena ventilación.
Recuerde además que el aparato no debe
instalarse de forma que reciba directamente
los rayos del sol, ni encontrarse tampoco
próximo a un foco activo de calor tal como
cocinas, calefacciones, etc.
● Prestar atención a que las aberturas de
ventilación y aireación no estén nunca
obstruidas.
● Dejar enfriar los alimentos o bebidas calientes
hasta temperaturas ambientes antes de
introducirlos en la frigorífico o congelador.
● Descongelar los productos congelados fuera
del compartimento de congelación, por ejemplo
en el frigorífico. De este modo se aprovecha el
frío acumulado en el alimento para refrigerar los
alimentos frescos del frigorífico.
● Al introducir o retirar alimentos del compartimento de congelación, procurar no mantener
abierta la puerta durante demasiado tiempo.
Cuanto menos tiempo esté abierta la puerta,
menos escarcha o hielo se forma en las rejillas
congeladoras.
● Limpiar cada dos años el intercambiador de
calor (rejilla negra) que se encuentra en la parte
posterior del aparato.
Consejos prácticos para
ahorrar energía eléctrica
Limpieza de la unidad
Antes de realizar cualquier trabajo de limpieza,
extraer el enchufe del aparato de la toma de
corriente de la red o desconectar el fusible.
No utilizar ningún tipo de limpiadora de vapor.
El vapor caliente podría dañar las superficies
del aparato o su instalación eléctrica.
¡La seguridad eléctrica de su aparato podría
resultar seriamente afectada! – ¡Peligro de
descargas eléctricas!
Téngase presente que el agua empleada en la
limpieza del aparato no debe penetrar en el cuadro
de mandos ni entrar en contacto con la iluminación. A excepción de la junta de la puerta, podrá
emplearse agua tibia con algo de detergente
desinfectante, como por ejemplo un lavavajillas
manual suave. En ningún caso deberán emplearse
arenilla, agentes frotadores o limpiadores con
ácidos o disolventes químicos.
La junta de la puerta, por su parte, se limpiará sólo
con agua clara, secándola bien a continuación.
Asimismo deberá limpiarse, en caso de que fuera
posible, cada dos años el intercambiador de calor
(rejilla negra) que se encuentra en la parte posterior
del aparato, con ayuda de un pincel o un aspirador
doméstico. Esto contribuye a preservar toda la
potencia y rendimiento de su unidad congeladora.
Además, reduce el consumo de corriente
eléctrica.
Pequeñas averías de fácil
arreglo
Hay pequeñas anomalías que no suponen
necesariamente la existencia de una avería y,
por consiguiente, no requieren la intervención
del Servicio de Asistencia Técnica.
Con frecuencia se trata de pequeñas anomalías
fáciles de subsanar. Para evitar una intervención
innecesaria del servicio técnico, compruebe si
la avería o el fallo que usted ha constatado se
encuentra recogida en los siguientes consejos
y advertencias.
De este forma se evitará usted gastos
innecesarios, dado que en estos casos, los
gastos del técnico no quedan cubiertos por las
prestaciones del servicio de garantía.
La pantalla (Fig. 2/9) no se ilumina:
Verificar si llega corriente a la unidad. Verificar si el
enchufe se asienta correctamente en la toma de
corriente y si se ha conectado la unidad.
Cuando al poner en marcha el aparato destella
la indicación «E1» (Fig.
2
/9):
En el interior del compartimento frigorífico reina
una temperatura muy elevada. Pocos minutos
después de poner el aparato en marcha se
muestra en pantalla la temperatura ajustada en el
compartimento frigorífico si se pulsó previamente
la tecla «Frigorífico». De lo contrario - en caso de
no pulsar dicha tecla -, se ilumina el piloto «Al»
(temperatura demasiado elevada en el
compartimento de congelación) o se muestra la
temperatura ajustada en el compartimento de
congelación.
Cuando al poner en marcha el aparato destella
la indicación «E2» (Fig. 2/9):
En el interior del compartimento de congelación
reina una temperatura muy elevada. Pocos
minutos después de poner el aparato en marcha
se ilumina el piloto «Al» y a continuación la
temperatura ajustada en el compartimento de
congelación – si se pulsó previamente la tecla
«Congelador». De lo contrario - en caso de no
pulsar dicha tecla -, se muestra la temperatura
ajustada en el compartimento frigorífico.
Cuando la iluminación interior del frigorífico no
funciona:
– La lámpara está fundida: Extraer el enchufe del
aparato de la toma de corriente. Retirar la tapa
protectora (Fig. A/A). Sustituir la lámpara fundida
por una nueva del mismo tipo, de 15 W como
máximo y 230 V (base E 14).

103
ES
102
ES
Servicio de Asistencia
Técnica
Placa de características
Fig.
B
En caso de solicitar la intervención del Servicio de
Asistencia Técnica, no olvide indicar número de
producto (Número E) y el de fabricación (Nº FD) de
su unidad.
Ambos números se encuentran en la placa de
características del aparato, emplazada en el lateral
izquierdo interior del frigorífico, junto al cajón para
la verdura.
La dirección y el número de teléfono del Servicio
de Asistencia Técnica más próximo a su domicilio,
figura en la lista de Centros y Delegaciones
Postventa o en la guía telefónica de su localidad.
- se registra una elevada temperatura del entorno.
Tras subsanar la causa de la avería, pulsar la tecla
«Alarma» ; la pantalla de visualización deja de
destellar tan pronto como el compartimento de
congelación ha vuelto a alcanzar su temperatura
de funcionamiento.
Cuando la puerta del congelador ha
permanecido abierta durante largo tiempo y el
congelador no alcanza la temperatura
ajustada.
En el evaporador se ha formado una capa de
hielo tan gruesa que el sistema automático de
descongelación no puede eliminarla. En este caso
deberán extraerse los alimentos y productos
congelados que hubiera en el congelador,
envolviéndolos en varias capas de papel de
periódico o en una manta y colocarlas en un lugar
lo más frío posible.
Desconectar el congelador y dejar la puerta
abierta. Al cabo de aproximadamente 12 horas
se ha descongelado el hielo. Conectar el aparato
e introducir los alimentos nuevamente en el
congelador.
Si la avería persistiera y no se pudiera subsanar en
función de los consejos y advertencias anteriores,
deberá avisarse al Servicio de Asistencia Técnica.
No abra las puertas del congelador inútilmente,
a fin de evitar al máximo las pérdidas de frío.
No intentar más reparaciones por propia cuenta.
Cualquier trabajo de reparación que afecte la
instalación eléctrica deberá ser ejecutado por un
técnico especialista del Servicio de Asistencia
Técnica.
– El interruptor de la iluminación está agarrotado
(Fig. A/B). Verificar si se puede mover. En caso
negativo, avisar al Servicio de Asistencia
Técnica.
Cuando la pantalla de visualización (Fig.
2
/9)
destella, pero la señal acústica no suena
En algún momento anterior se produjo una
elevación de la temperatura en el interior del
compartimento de congelación a causa de un
corte o avería en el suministro de la corriente
eléctrica.
Tras pulsar la tecla Alarma se muestra en la
pantalla de visualización 9 durante cinco
segundos la temperatura mas elevada (calor) que
se ha registrado en el compartimento de
congelación, borrándose a continuación dicho
valor. La pantalla de visualización 9 muestra – sin
destellar – el valor programado para el
compartimento de congelación.
Si la temperatura indicada es superior a los +3 °C,
hay que controlar el estado de los alimentos
congelados.
Verificar si el aroma, aspecto y color de los
alimentos son satisfactorios. Si no se constata
ninguna alteración, asar, freír, hervir o preparar
con ellos platos cocinados, antes de volver
a congelarlos.
En este caso no se deberá agotar al máximo el
tiempo de caducidad de los productos.
Si tras un funcionamiento prolongado del
aparato, la indicación (Fig. 2/9) destella y se
activa la alarma acústica:
¡Avería! ¡La temperatura en el interior del
compartimento de congelación es demasiado
elevada!
En la pantalla de visualización se muestra la
temperatura programada para el compartimento
de congelación.
Para desactivar la alarma acústica, pulsar la tecla
«Alarma» .
Posibles causas de la avería:
- la rendija de ventilación en la parte superior del
aparato o en el zócalo del mismo está
obstruida,
- la puerta del compartimento de congelación no
está cerrada correctamente,
- se han introducido y congelado alimentos
frescos en el compartimento de congelación sin
activar la congelación ultrarrápida,
- se ha introducido una cantidad excesiva de
alimentos frescos en el compartimento de
congelación,
Pequeñas averías de fácil arreglo

105
PT
● Líquidos em garrafas e latas, especial-
mente bebidas gaseificadas, não devem
ser guardadas no congelador. As garrafas
e as latas podem rebentar.
● As grelhas de ventilação do aparelho não
devem estar fechadas nem tapadas.
● Rodapé, gavetas, portas, etc. não devem
ser utilizados como apoio.
● Não permitir que as crianças brinquem
com o aparelho.
● Nos aparelhos com fechadura, mantenha
a respectiva chave fora do alcance das
crianças.
● Não leve à boca gelados ou cubos de
gelo, acabados de retirar do aparelho.
(Perigo de queimaduras, devido
a temperaturas muito baixas.)
● Não mexer em alimentos congelados com
as mãos molhadas, pois estas podem
congelar e ficar agarradas aos alimentos.
● ATENÇÃO: Manter sempre desobstruídas
as aberturas de ventilação no exterior do
aparelho e junto ao aparelho de embutir.
● ATENÇÃO: Não danificar as tubagens do
circuito de frio.
● ATENÇÃO: Não utilizar qualquer aparelho
eléctrico nas zonas do aparelho,
destinadas a alimentos, desde que esse
mesmo aparelho não corresponda a um
tipo recomendado pelo fabricante.
Este aparelho é absolutamente
antipoluente, pois, no seu
circuito de frio foi agora
utilizado o “lsobutan” (R 600a);
tratase de um gás natural com elevada
capacidade de assimilação pelo meio
ambiente, mas, inflamável.
Durante o seu transporte e instalação,
tomar atenção para que nenhum
componente do circuito de frio seja
danificado. Caso se verifiquem danos no
aparelho, evitar chamas livres ou fontes
de ignção nas proximidades deste e
proceder ao arejamento, durante alguns
minutos, do local onde se encontra
instalado o aparelho.
Atenção: para acelerar a descongelação,
não utilize quaisquer dispositivos
mecânicos, ou outros meios auxiliares
artificiais, a não ser aqueles indicados
pelo fabricante.
Determinações
O aparelho destina-se à refrigeração
e congelação de alimentos, bem como
à preparação de gelo.
O aparelho foi concebido para uso doméstico.
Na sua utilização para fins industriais devem
ser observadas as determinações em vigor
para este sector.
O aparelho corresponde às normas de
prevenção de acidentes em instalações de
frio (VBG 20).
Ele corresponde, ainda, às normas de
segurança para aparelhos de frio.
O circuito de frio foi testado quanto à sua
estanquidade.
Ter atenção à temperatura
ambiente
Dependente da «classe climática» (ver
chapa de características), o aparelhos pode
funcionar com as seguintes temperaturas
ambiente: (A chapa de características
encontra-se dentro do aparelho, do lado
esquerdo, em baixo. Fig.
B
)
Classe Temperatura ambiente
climática de ... até
SN +10 °C até 32 °C
N +16 °C até 32 °C
ST +18 °C até 38 °C
T +18 °C até 43 °C
Se a temperatura ambiente baixar para
um valor inferior ao limite mínimo de
temperatura ambiente, ficará demasiado frio
na zona de refrigeração e, se ultrapassar os
limites máximos, ficará demasiado quente
no congelador.
Se a temperatura ambiente baixar para um
valor inferior ao regulado na zona de
refrigeração, esta zona fica tão fria como
a temperatura ambiente.
No caso de temperatura ambiente inferior
a +10 °C, podem surgir anomalias na
descongelação automática.
Indicações sobre reciclagem e segurança
104
PT
Indicações sobre reciclagem e segurança
Indicações sobre
reciclagem
Os aparelhos antigos não são lixo sem valor.
Através de uma reciclagem compatível com
o meio ambiente é possível a recuperação
de matérias primas muito valiosas.
No caso de aparelhos fora de serviço,
retirar a ficha da tomada, cortar o cabo
de alimentação de corrente e afastá-lo,
juntamente com a ficha, das proximidades
do aparelho. Retirar, também, eventuais
fechaduras.
Evitará, assim, que crianças, durante uma
brincadeira, possam ficar fechadas dentro
do aparelho, correndo perigo de morte.
Os aparelhos de frio contêm elementos de
refrigeração e gases de isolamento, que
exigem uma reciclagem especializada.
Tenha atenção para que as tubagens não
sofram danos no transporte até ao centro
de reciclagem.
O seu novo aparelho esteve protegido pela
embalagem até estar na sua posse. Todos
os materiais utilizados na embalagem são
compatíveis com o meio ambiente
e reutilizáveis.
Contribua V. também para a preservação do
meio ambiente e providencie a reciclagem
adequada da embalagem.
Não deixe que as crianças brinquem com
os componentes da embalagem. Existe
o perigo de asfixia com os cartões ou as
películas transparentes.
Para obter mais informações sobre
processos de reciclagem, dirija-se a um
Agente Especializado ou à Câmara
Municipal da sua área de residência.
Este aparelho está marcado em
conformidade com a Directiva
2002/96/CE relativa aos resíduos de
equipamentos eléctricos e
electrónicos (waste electrical and electronic
equipment - WEEE).
A directiva estabelece o quadro para a
criação de um sistema de recolha e
valorização dos equipamentos usados
válido em todos os Estados Membros da
União Europeia.
O nosso contributo para a preservação
do meio ambiente – utilizamos papel
reciclado.
Indicações sobre segurança
Antes de pôr em funcionamento o seu novo
aparelho, leia atentamente as respectivas
instruções de serviço e de montagem. Delas
constam indicações importantes sobre
instalação, uso e manutenção do aparelho.
Guarde em lugar seguro as instruções de
serviço e de montagem, para a eventualidade
do aparelho conhecer outro possuidor.
O fabricante não se responsabiliza, se não
forem respeitadas as indicações e avisos
constantes das instruções de serviço.
● Aparelhos com danos visíveis não devem
ser postos em funcionamento. Em caso
de dúvida, consulte o seu fornecedor ou
os Serviços Técnicos.
● Para a instalação e ligação do aparelho,
devem ser observadas as respectivas
instruções de montagem. As condições
da ligação eléctrica e as indicações
constantes da chapa de características
devem coincidir.
● Nunca utilize, para limpeza, um aparelho
de limpeza a vapor. O vapor pode
infiltrar-se e atingir componentes
condutores de tensão e provocar um
curto-circuito ou um choque eléctrico.
● A segurança eléctrica do aparelho só
é garantida, se o sistema doméstico de
protecção de terra estiver instalado,
segundo as normas.
● Em caso de anomalia e durante
a manutenção e limpeza, o aparelho deve
ser desligado da corrente eléctrica ou
serem desligados os fusíveis. Puxar
sempre pela ficha e nunca pelo cabo.
● As reparações em aparelho eléctricos
só devem ser efectuadas por pessoal
especializado. Reparações mal efectuadas
podem acarretar perigos vários para
o utilizador.
● Frascos com álcool de elevada
percentagem só devem ser guardados no
aparelho, se hermeticamente fechados e
em posição vertical. Perigo de explosão!
Produtos com gás propulsor inflamável
(por ex. natas em spray, etc.), bem como
substâncias explosivas não devem ser
guardados no aparelho. Perigo de
explosão!

107
PT
Familiarização com o aparelho
Antes de iniciar a leitura destas
instruções, desdobre as últimas páginas
com ilustrações.
Estas instruções de serviço aplicam-se
a vários modelos de aparelhos, pelo que
são possíveis alterações de pormenor
nas ilustrações.
Vista geral
Fig.
1
1-9 Painel de comando
10 Aberturas de saída de ar
11 Iluminação interior
12 Gaveta para copos de iogurte
13 Prateleira
14 Sistema Multiflow (distribuidor de
ar frio)
15 Gavetas de legumes
16 Compartimento "Chiller"
17 Prateleira para pequenas caixas e
bisnagas
18 Suporte para ovos
19 Prateleira
20 Suporte de garrafas
21 Prateleira para garrafas
22 Bandeja de congelação
23 Gaveta de congelação
A Zona de refrigeração
B Zona de congelação
Painel de Comandos
(resumo)
Fig.
2
1 Tecla
Interruptor principal ligar/desligar
2 Tecla “alarm” (Tecla de alarme
desligado)
a) Para desligar o aviso acústico
b) Para indicar a temperatura mais
quente, que predominou na zona de
congelação
3 Tecla Super
Para capacidade máx. de congelação
4 Tecla “freezer”
Serve para a indicação da temperatura
regulada para a zona de congelação.
5 Tecla “cooler”
Serve para a indicação da temperatura
regulada para a zona de refrigeração.
6 Tecla de regulação da temperatura nas
zonas de congelação e de
refrigeração.
0
C = mais frio, mais quente
7 Indicação “alarme”
só fica iluminada, se a função de alarme
estiver activada.
8 Indicação “super”
só fica iluminada, se tiver sido premida a
tecla ‘super’.
9 Indicação para
a) "Temperatura mais quente"
b) Inicação "AL" (Alarme)
c) Temperatura regulada para a zona
de refrigeração
d) Temperatura regulada para a zona
de congelação
106
PT
Instalação do aparelho
Local
O aparelho deve ser instalado em local seco
e arejado. Este local não deve estar exposto
à acção directa dos raios solares nem
próximo de fontes de calor, como um fogão,
irradiadores de calor, etc. Se for inevitável a
instalação junto a uma fonte de calor, deverá
ser utilizada uma placa isoladora adequada
ou mantidas as seguintes distâncias mínimas
em relação à fonte de calor.
Em relação a fogões eléctricos 3 cm.
Em relação a fogões a óleo ou a carvão 30 cm.
No caso de instalação junto a outro aparelho
de frio ou de congelação, é necessária uma
distância lateral mínima de 2 cm, para se
evitar a formação de condensação.
O aparelho tem que estar bem fixo e em
posição vertical. Irregularidades do chão
devem ser compensadas através dos dois
parafusos na parte frontal do aparelho,
(Fig. C)
Dois roletos na parte traseira do aparelho
facilitam a introdução deste no nicho.
Ligação eléctrica
Ligar o aparelho apenas à corrente alterna
220–240 V/50 Hz através de uma tomada
com protecção de terra e instalada segundo
as normas. Esta tomada deve estar protegida
com um fusível de 10 A ou superior.
No caso de aparelhos para mercados de
países não europeus, há que verificar, se,
na chapa de características, a tensão de
ligação e o tipo de corrente eléctrica estão
em conformidade com as características da
corrente no país em questão. A chapa de
características encontra-se na zona de
refrigeração, em baixo à esquerda. Fig. B.
A eventual necessidade de substituição do
cabo eléctrico só deve ser efectuada pelos
nossos Serviços Técnicos.
Aviso! O aparelho não pode, de forma
alguma, ser ligado a uma «ficha
electrónica de poupança de energia»
(p.ex. Sava Plug) ou a um ondulador que
transforme a corrente contínua em
corrente alterna de 230 V.
Ventilação
Fig.
3
O ar aquecido na parte posterior do
aparelho tem que poder circular livremente.
Caso contrário, a máquina de frio fica sujeita
a maior esforço, o que provoca um
consumo de energia. As grelhas de
ventilação não devem, por isso, estar
obstruidas.
Depois do transporte ...
antes de ligar o aparelho pela primeira vez,
deverá deixá-lo em posição vertical durante
cerca de 1/2 hora.

109
PT
Familiarização com o aparelho
b) (A temperatura da zona de congelação é
regulável entre -16 °C e -26 °C). Para
regular a temperatura pretendida, premir
a tecla "Freezer" e, de seguida, a tecla
°C. A temperatura regulada é mostrada
na indicação 9. Premir repetidamente ou
manter premida a tecla de regulação até
que seja indicada a temperatura
pretendida. (A temperatura a regular
aparece em sequência contínua de -16
°C a -26 °C . Depois de -26 °C, aparece
de novo -16 °C).
7 Indicação "alarm"
Só fica iluminada, se a função de alarme
tiver sido activada. Isto acontece, se
estiver muito quente na zona de
congelação e os alimentos correrem
perigo de descongelar. Ela apaga-se,
quando a zona de congelação tiver
atingido, de novo, a sua temperatura de
funcionamento.
8 Indicação "super"
Só fica iluminada, se a tecla 3 "super"
tiver sido premida e, assim, tiver sido
activada a supercongelação.
Ela apaga-se, quando a tecla "super"
tiver sido novamente premida, para
desactivação.
Ela apaga-se automaticamente, o mais
tardar 52 horas, após activação da
supercongelação.
9 Indicação de multifunções
Indica várias temperaturas.
a) Temperatura demasiado quente na
zona de congelação
Se a indicação 9 estiver a piscar, então
isso significa que está ou esteve,
anteriormente, demasiado quente na
zona de congelação, devido a uma falha
de energia ou a uma anomalia. Premindo
a tecla Alarm , será mostrada, na
indicação 9 (não a piscar) durante cinco
segundos, a temperatura que
predominou na zona de congelação.
Depois este valor será apagado. A
indicação 9 mostra, então, sem piscar, a
temperatura programada para a zona de
congelação.
b) Indicação «Al» (Alarme)
Surgirá, se a zona de congelação estiver
demasiado quente,
c) Temperatura regulada para a zona de
refrigeração
Premindo a tecla «cooler», será indicada
a temperatura regulada para a zona de
refrigeração.
d) Temperatura regulada para a zona de
congelação
Premindo a tecla «freezer», será indicada
a temperatura regulada para a zona de
congelação.
108
PT
Familiarização com o aparelho
Graças ao sistema «Nofrost», totalmente
automático, não há formação de gelo no
congelador, pelo que não é necessária
a sua descongelação.
Funcionamento:
Os alimentos são congelados devido ao
arrefecimento do ar!
Um evaporador, integrado no sistema
«Nofrost», refrigera o ar dentro do aparelho.
A circulação do ar frio processa-se através
de um ventilador. Um segundo ventilador
providencia a circulação de ar dentro da
zona de refrigeração. A humidade existente
no ar condensa-se no evaporador.
Se necessário, o evaporador descongela
automaticamente.
A água da descongelação é encaminhada
para a máquina de frio e, aí, evaporada.
O congelador e os alimentos mantêm-se
sem gelo.
A função dos elementos de
ligação e de controlo
Fig.
2
1 Tecla
Interruptor principal que serve para ligar
e desligar todo o aparelho.
2 Tecla de “alarm”
Serve para desligar o aviso acústico.
O aviso acústico dispara, se estiver
demasiado quente na zona de
congelação, portanto os alimentos
correm o risco de descongelar
(simultaneamente, a indicação 9 fica a
piscar).
O aviso acústico pode disparar, sem
qualquer perigo para os alimentos
- ao ligar o aparelho pela primeira vez
- ao introduzir alimentos frescos, sem
activar a supercongelação
- e se a porta da zona de congelação
estiver demasiado tempo aberta
Depois de desligar o aviso acústico, o
"aviso acústico" volta a ficar,
automaticamente, pronto a funcionar,
quando a zona de congelação tiver atingido,
de novo, a sua temperatura de
funcionamento.
3 Tecla "Super"
Serve para ligar e desligar a
supercongelação.
O funcionamento é mostrado quer pela
indicação 8 "Super", quer também pela
indicação 9 com "SU". A
supercongelação serve para a
congelação de grande quantidade de
alimentos frescos e deve ser activada até
24 horas antes da colocação dos
alimentos frescos.
Depois da activação, a máquina de frio
trabalha permanentemente e na zona de
congelação é atingida uma temperatura
muito baixa.
4 Tecla «freezer»
Serve para mostrar, na indicação 9, a
temperatura regulada para a zona de
congelação (ver descrição da indicação
9d).
5 Tecla «cooler»
Serve para mostrar, na indicação 9, a
temperatura regulada para a zona de
refrigeração (ver descrição da indicação
9c).
6 Tecla de regulação para a temperatura
das zonas de refrigeração e de
congelação
a) (A temperatura da zona de refrigeração é
regulável entre 2 °C e 8 °C). Premir a
tecla "Cooler" e, de seguida, a tecla °C.
A temperatura regulada é mostrada na
indicação 9. Premir repetidamente ou
manter premida a tecla de regulação até
que seja indicada a temperatura
pretendida. (A temperatura a regular
aparece em sequência contínua de 8 °C
a 2 °C . Depois de 2 °C, aparece de
novo 8 °C).

111
PT
Arrumação dos alimentos
Importante:
● Alimentos e bebidas quentes devem
arrefecer, antes de serem arrumados no
frigorífico.
● Arrumar os alimentos se possível
embalados ou bem tapados. Assim,
é possível conservar o aroma, a cor,
a humidade e a frescura dos alimentos,
evitando, ainda, a propagação de sabores
entre os alimentos. Desembalados,
apenas devem ser guardados legumes,
frutas e saladas na gaveta de humidade.
● Óleo e gordura não devem entrar em
contacto com as peças de plástico do
aparelho nem com o vedante da porta
(estes podem tornar-se porosos).
● Não guardar no aparelho produtos
explosivos.
Álcool de elevada percentagem só deve
ser guardado em recipiente
hermeticamente fechado e ao alto.
– Perigo de explosão!
● Garrafas com líquidos que possam
congelar não devem ser guardadas no
congelador, pois rebentarão ao congelar.
Exemplos de arrumação
Fig.
1
Zona de refrigeração (A)
Na gaveta (12) queijo, charcutaria, iogurtes.
Nas prateleiras (13), de cima para baixo,
artigos de pastelaria, refeições prontas,
lacticínios.
Na gaveta de legumes (15) legumes, fruta,
salada.
Na prateleira (17) frascos pequenos, caixas.
Na gaveta para garrafas (21) garrafas
grandes.
Zona de congelação (B)
No tabuleiro de congelação (22),
Desligar
Premir o interruptor principal Fig. 2/1.
O aparelho fica desligado.
Desactivar o aparelho
Se o aparelho não for utilizado por um longo
período de tempo:
Premir o interruptor principal Fig.
2
/1,
limpar o aparelho e deixar as portas abertas.
Desligar, desactivar
o aparelho
110
PT
Ligação e selecção de temperatura
Fig.
2
● Ligar a ficha à tomada.
● Premir o interruptor principal 1 do
aparelho
O aviso sonoro soa, a indicação 9 está a
piscar e mostra "AL".
● Premir a tecla “alarm” 2.
O aviso sonoro cala-se. A indicação
mostra agora a temperatura actual
durante 5 segundos.. Na indicação 9
aparece "AL".
● Regulação da temperatura para a zona
de congelação
Para isso, premir a tecla "freezer" e, de
seguida, a tecla
0
C. Premir várias vezes
ou manter premida a tecla
0
C, até que
seja indicada a temperatura pretendida
(em sequência contínua, depois de –26
0
C, volta a aparecer –16 0C).
Recomendamos a regulação da
temperatura da zona de congelação para
– 20
0
C.
● Regulação da temperatura para a zona
de refrigeração
Para isso, premir a tecla "cooler" e, de
seguida, a tecla
0
C. Premir várias vezes
ou manter premida a tecla
0
C, até que
seja indicada a temperatura pretendida
(em sequência contínua, depois de 8
0
C,
volta a aparecer 2
0
C). Recomendamos a
regulação da temperatura da zona de
refrigeração para +4
0
C.
Qualquer correcção à temperatura
regulada terá, também, efeito apenas
lentamente.
Notas
● A temperatura na zona de refrigeração
pode variar devido:
– à abertura frequente da porta do
aparelho
– à colocação de grande quantidade de
alimentos frescos na zona de
refrigeração e na zona de congelação
– a alterações na temperatura ambiente
– à alteração da regulação do selector de
temperatura para a zona de congelação
ou devido à activação da
supercongelação.
● As áreas de topo no exterior do
aparelho podem aquecer parcialmente,
o que impede a formação de
condensação na zona do vedante
da porta.

113
PT
Embalar os alimentos
Embalar os alimentos em pequenas
porções, de acordo com as necessidades
da sua família.
As porções de legumes e frutas não devem
ser superiores a 1 kg e, de carne, até 2,5 kg.
As porções pequenas congelam mais
depressa e a qualidade dos alimentos
mantém-se inalterável, quando os mesmos
forem descongelados e cozinhados.
Embalar hermeticamente os alimentos, para
que não percam o seu sabor e não sequem.
Produtos próprios para embalagem:
Películas de plástico, mangas de polietileno,
folhas de alumínio e caixas próprias para
congelação. Estes produtos encontram-se
à venda no comércio da especialidade.
Produtos não apropriados para
embalagem:
Papel de embrulho, papel de pergaminho,
celofane, sacos para lixo e sacos de
compras usados.
Colocar os alimentos dentro da embalagem,
retirar completamente o ar e fechar
a embalagem de forma hermética.
Para fechar as embalagens são
indicados:
Elásticos, clips de plástico, cintas, fitas
autocolantes resistentes à temperatura ou
produtos similares. Sacos e mangas de
polietileno podem ser fechados com um
aparelho próprio para esse efeito.
Antes de arrumar os alimentos no
congelador, deverá identificar o conteúdo
de cada embalagem e escrever a data de
congelação.
Capacidade máxima de
congelação
Os alimentos devem ser congelados até ao
seu núcleo o mais rapidamente possível. Só
assim, se conseguem manter inalteráveis as
vitaminas, os sais minerais, o aspecto e o
sabor. Não deverá, por isso, ultrapassar
nunca a capacidade máxima de congelação
do seu aparelho.
As seguintes quantidades de alimentos
podem ser congeladas em 24 horas na
gaveta superior de congelação.
Aparelhos com 70 cm de largura máx. 12 kg.
Aparelhos com 60 cm de largura máx. 9 kg.
Alimentos já congelados não devem estar
em contacto com alimentos frescos para
congelar.
Alimentos e bebidas quentes devem
arrefecer à temperatura ambiente, antes de
serem colocados no congelador.
La chapa de características encontrará
indicações sobre a capacidade máx. De
congelação, Segundo a Norma actual
(Fig. B).
Supercongelação
Se, no congelador, existirem já alimentos
congelados, a supercongelação deve ser
ligada algumas horas antes da colocação de
alimentos frescos.
Em geral, são suficientes 4 a 6 horas. Se
quiser utilizar a capacidade máxima de
congelação, é necessária uma antecedência
de 24 horas. Pequenas quantidades de
alimentos (até 2 kg) podem ser congeladas,
sem necessidade de activar a supercongelação. Para ligar a supercongelação,
basta premir a respectiva tecla Fig. 2/3.
A indicação “super” mostra que o aparelho
está a trabalha com esta função activada.
Depois da activação, é atingida uma
temperatura muito baixa na zona de
congelação. A supercongelação desliga
automaticamente, cerca de 52 horas depois
da sua activação.
Congelação e conservação
112
PT
Arrumação dos alimentos
conservação de alimentos congelados de
pequena dimensão e preparação de gelo.
Nas gavetas superiores de congelação
(23), conservação de alimentos congelados.
O equipamento interior
As prateleiras na zona de refrigeração
podem ser mudadas de lugar, com a porta
aberta a 90º. Para retirar as prateleiras,
puxá-las para fora, baixá-las ligeiramente,
retirá-las e, depois, colocá-las no local
pretendido (Fig.
4
).
Comparmento “chiller” (Fig.
8
)
Puxando a base da gaveta para a frente,
a tampa abre automaticamente.
Puxar para a frente a base da gaveta, a
tampa abre-se.
Na gaveta "Chiller" predominam
temperaturas mais baixas do que na zona
de refrigeração. Aqui podem mesmo surgir
temperaturas inferiores a 0
0
C. Ideal para a
conservação de peixe, carne e charcutaria.
Não adequado para saladas, legumes e
outros alimentos sensíveis ao frio.
A gaveta pequena pode ser retirada para
fora, para retirar ou colocar alimentos
(Fig. 6).
Os suportes para ovos podem ser elevados,
permitindo, assim, a arrumação de
bisnagas, caixas pequenas, etc.
Para que as garrafas não tombem, com
o abrir e fechar da porta, pode ser utilizado
um apoio Fig. 7.
Todas as prateleiras e suportes, no interior
da porta, podem ser retirados, para limpeza.
Para os retirar, basta elevá-los um pouco
e deslocá-los dos apoios Fig. 5/A.
Congelação e conservação
Na compra de alimentos
ultracongelados, há que
ter atenção ao seguinte:
● Verifique, se a embalagem não está
danificada.
● O prazo de validade não deve estar
ultrapassado.
● O termómetro da arca congeladora, na
loja, deverá indicar uma temperatura
igual ou inferior a –18 ºC.
● Deixar para o fim a compra dos
alimentos congelados. Utilizar um saco
térmico ou folhas de jornal, para os
embrulhar, e transportá-los rapidamente
para casa. Arrumar, imediatamente, os
alimentos no congelador.
Congelação de alimentos
Para congelação, só devem ser utilizados
alimentos frescos e em perfeito estado.
Alimentos adequados para congelação:
Derivados de carne e charcutaria, aves,
caça, peixe, alguns legumes, ervas
aromáticas, artigos de pastelaria, pizzas,
alimentos cozinhados, restos de alimentos,
gemas e claras de ovo.
Alimentos não adequados para
congelação:
Ovos inteiros com casca, natas azedas
e maionese, vegetais de folha para saladas,
rábanos, rabanetes e cebolas.
Branqueamento de legumes e fruta:
Para que os legumes e a fruta conservem
a cor, o sabor, o aroma e a vitamina «C»,
deverão ser, primeiramente, branqueados.
(Para branquear os alimentos, estes devem
ser mergulhados, por breves instantes, em
água a ferver – Nas livrarias encontrará
literatura sobre congelação, onde vem
descrito também o processo de
branqueamento.)

115
PT
Limpeza
Antes de iniciar a limpeza, deverá desligar
a ficha da tomada, o fusível ou o disjuntor.
Nunca utilizar aparelhos de limpeza
a jacto de vapor. O vapor quente pode
danificar a superfície e a parte eléctrica
do aparelho – perigo de choque eléctrico!
A água da limpeza não deve, de forma
alguma, infiltrar-se no painel de comandos
nem no sistema de iluminação. Para limpeza
de todo o aparelho, excepto o vedante da
porta, recomenda-se a utilização de água
morna e um detergente ligeiramente desinfectante, como por ex. detergente para
lavagem manual da loiça. Não são
aconselhados produtos de limpeza ácidos
ou abrasivos nem produtos diluentes.
O vedante da porta deve apenas ser lavado
com água simples e, depois, bem seco.
Se possível, de dois em dois anos, deverá
também ser limpo o permutador de calor
(grelha preta na parte de trás do aparelho).
Utilize um pincel ou um aspirador. Isto
permite obter a eficiência máxima do
aparelho e poupar energia.
114
PT
Congelação e conservação
Armazenar alimentos
Verificar sempre, se as gavetas de congelação
estão introduzidas até ao batente.
Isto é importante, para se conseguir um
circulação perfeita do ar dentro do aparelho.
Tabuleiro de congelação
Fig.
:
O tabuleiro de congelação está indicado
para guardar as cuvetes de gelo e para
a congelação de frutos de baga, bolos de
fruta, ervas aromáticas e legumes.
Para a congelação de alimentos neste
tabuleiro, eles devem ser distribuidos
uniformemente pelo tabuleiro, deixando-os
congelar durante cerca de 10 a 12 horas.
Depois, passá-los para sacos ou recipientes
apropriados.
Para descongelar, distribuir os alimentos
sobre uma superfície.
Descongelação de
alimentos
Conforme o tipo de alimento e a sua
utilização, existem as seguintes possibilidade:
À temperatura ambiente,
no frigorífico,
no forno eléctrico,
com/sem circulação de ar quente,
no aparelho de micro-ondas.
Alimentos descongelados ou que já
começaram a descongelar podem voltar
a ser congelados, se não forem sujeitos
a temperaturas inferiores a 3 ºC por mais
de um dia, no caso de carne ou peixe e por
mais de três dias, no caso de outros
alimentos.
De contrário, se o sabor, o cheiro e o aspecto
se mantiverem, os alimentos deverão ser
cozinhados, podendo, depois, ser, de novo,
congelados.
Neste caso, não utilizar a validade máxima
de conservação dos alimentos.
Preparação de gelo
Fig.
9
Encher a cuvete com água até 3/4 e colocála no congelador.
Para retirar os cubos de gelo da cuvete,
torcer ligeiramente a mesma.
● Instalar o aparelho em local bem arejado,
protegido da acção directa dos raios
solares e afastado de qualquer fonte de
calor (aquecedores, etc.).
● As aberturas de ventilação do aparelho
não podem estar tapadas.
● Os alimentos quentes devem arrefecer,
antes de serem guardados no aparelho.
● Para descongelar alimentos, colocar
estes no frigorífico. O frio libertado dos
alimentos congelados é, assim,
aproveitado para os alimentos no
compartimento de refrigeração.
● Para introduzir ou retirar alimentos,
manter as portas abertas o mínimo
tempo possível.
Quanto menos tempo a porta do
aparelho estiver aberta, menor será
a formação de gelo nas grelhas de
congelação.
● O permutador de calor (grelha preta)
deverá ser limpo, pelo menos, de dois
em dois anos.
Conselhos para poupar
energia

117
PT
Se a indicação Fig. 2/9 estiver a piscar,
mas o sinal acústico não soar, isso
significa que, anteriormente, devido a uma
falha de corrente ou a uma anomalia,
a temperatura esteve muito alta no
congelador.
Premindo a tecla Alarm , aparecea na
indicação 9 (não a piscar) durante cinco
segundos a temperatura mais quente, que
predominou na zona de congelação. Depois
este valor é apagado. – A indicação 9
mostra, então, a temperatura programada
para a zona de congelação, sem piscar.
Se a indicação apresentar um valor superior
a +3 ºC, há que verificar a situação dos
alimentos congelados.
Se o sabor, o cheiro e o aspecto não tiverem
sofrido alteração, deverá cozinhar os
alimentos, não importa por que processo,
e, de novo, congelá-los.
Neste caso, não deverá utilizar o prazo
máximo de conservação.
Se, após funcionamento mais longo, a
indicação Fig.
2
/9 estiver a piscar e soar
o aviso sonoro :
Anomalia, na zona de congelação está
demasiado quente !
Na indicação é mostrada a temperatura
programada para a zona de congelação.
Para desligar o aviso sonoro, premir a tecla
"Alarm" .
Causas possíveis da anomalia :
- o espaço de arejamento na parte superior
do aparelho ou em baixo está tapado,
- a porta da zona de congelação não está
bem fechada,
- foram congelados alimentos frescos, sem
activação da supercongelação,
- foram colocados, de uma só vez,
demasiados alimentos frescos, para
congelação,
- elevada temperatura ambiente.
Após solução da anomalia, premir a tecla
"Alarm" ; a indicação deixa de piscar,
quando a zona de congelação tiver atingido,
de novo, a sua temperatura de
funcionamento.
Eliminação de pequenas anomalias
Nem toda a anomalia é um caso de
assistência técnica. Frequentemente,
trata-se de um problema sem importância.
Antes de recorrer aos Serviços Técnicos,
verifique, se, com a ajuda das indicações
seguintes, é possível solucionar
a anomalia.
Para casos destes, terá que pagar
a deslocação e o tempo do técnico,
mesmo dentro do período de garantia.
Se a indicação Fig.
2/9 não estiver
iluminada
Verifique se há corrente, se a ficha está bem
ligada à tomada e se o aparelho está ligado.
Se, durante o funcionamento do aparelho,
aparecer a indicação «E1» (Fig.
2
/9):
Na zona de refrigeração predomina uma
temperatura muito alta. Poucos minutos
após colocação do aparelho em
funcionamento, será indicada a temperatura
regulada para a zona de refrigeração, se for
premida a tecla «cooler». De contrário, será
mostrada a indicação «Al» (zona de
congelação demasiado quente) ou a
temperatura regulada para a zona de
congelação.
Se, durante o funcionamento do aparelho,
aparecer a indicação «E2» (Fig.
2
/9):
Na zona de refrigeração predomina uma
temperatura muito alta. Poucos minutos
após colocação do aparelho em
funcionamento, aparecerá a indicação «Al»
e, de seguida, será mostrada a temperatura
regulada para a zona de congelação, se for
premida a tecla «freezer». De contrário, será
indicada a temperatura regulada para a zona
de refrigeração.
Se a iluminação da zona de refrigeração
não funcionar:
– A lâmpada de incandescência está
fundida. Desligar a ficha da tomada, retirar
a tampa (Fig.
A
/A) e substituir a lâmpada
por outra do mesmo tipo – máx. 15 W,
230 V, casquilho E 14.
– O interruptor está encravado (Fig.
A
/B).
Verifique, se este se move. Se não, peça
a intervenção da Assistência Técnica.
116
PT
Indicações sobre ruídos
de funcionamento
Ruídos de funcionamento
Para manter constante a temperatura
seleccionada, o seu aparelho liga e desliga,
de vez em quando, o compressor.
Os ruídos daí resultantes são condicionados
pelo funcionamento do aparelho.
Eles diminuem automaticamente, logo que
o aparelho tenha atingido a temperatura de
funcionamento.
O zumbido é provocado pelo motor
(compressor) e pode, por breves instantes,
ser mais intenso, quando o motor liga.
O murmurejar ou zunido é provocado pelo
elemento gerador de frio que passa através
dos tubos.
O «clic» ouve-se, sempre que o termostato
liga ou desliga o motor.
Ruídos de estalos podem surgir,
quando ....
- se processa a descongelação automática.
- o aparelho arrefece ou aquece (expansão
do material)
No caso de um aparelho com várias zonas
ou aparelho Nofrost, pode ouvir-se um
ligeiro sussurro provocado pela corrente
de ar dentro do aparelho.
Se os ruídos provocados pelo funcionamento do aparelho forem muito intensos,
isso pode ser devido a pormenores de
importância mínima, facilmente
solucionáveis.
O aparelho está desnivelado
Alinhe o aparelho com a ajuda de um nível
de bolha de ar. Utilize os pés ajustáveis ou
coloque qualquer coisa sob eles.
O aparelho está encostado
Afaste o aparelho de móveis ou de outros
aparelhos próximos.
Gavetas, cestos ou prateleiras abanam
ou estão presos noutros componentes.
Verifique os componentes salientes e volte
a colocá-los devidamente.
Garrafas ou outros recipientes tocam-se
Separe-os, para que não se toquem.
Eliminação de pequenas
anomalias
Se a porta do congelador tiver estado
muito tempo aberta e o congelador não
conseguir atingir a temperatura
seleccionada,
isso significa que o evaporador (gerador de
frio) ficou de tal modo coberto de gelo, que
os sistema de descongelação, totalmente
automático, não consegue descongelar
a quantidade de gelo existente. Neste caso,
retire os alimentos congelados do
congelador e coloque-os, bem isolados,
em local fresco.
Desligue o aparelho e deixe a porta do
congelador aberta. Após 12 horas, o gelo
descongelou no sistema de frio.
Volte a ligar o aparelho e arrume os
alimentos congelados nas gavetas.
Se, com a ajuda destas indicações, não for
possível solucionar a anomalia, chame,
então, os Serviços Técnicos.
Até que seja remediada a avaria, não abra,
se possível, a porta do aparelho, evitando,
assim, perdas de frio.
Não execute qualquer trabalho no aparelho,
em especial na sua parte eléctrica.

118
PT
Assistência Técnica
Chapa de características
Fig.
B
Quando recorrer aos Serviços Técnicos,
indique sempre o número E o número FD
do seu aparelho.
Estes dados constam da chapa de
características, no campo circundado a
preto. Esta chapa encontra-se na zona de
refrigeração em baixo à esquerda, junto
da gaveta de legumes.
O endereço e o número de telefone do
posto de assistência técnica encontra-se
no índice anexo ou na lista telefónica.
 Loading...