

Page 1

Contents
1. INSTRUCTIONS FOR USE ................................................................ 4
2. SAFETY PRECAUTIONS ................................................................... 6
3. ENVIRONMENTAL RESPONSIBILITY .............................................. 8
4. GET TO KNOW YOUR OVEN............................................................ 9
5. USING THE OVEN ........................................................................... 12
6. CLEANING AND MAINTENANCE .................................................... 15
7. EXTRAORDINARY MAINTENANCE ................................................ 18
8. OVEN INSTALLATION .................................................................... 21
THESE INSTRUCTIONS ARE VALID ONLY FOR THE DESTINATION COUNTRIES
WHOSE IDENTIFYING SYMBOLS ARE INCLUDED ON THE COVER OF THIS
MANUAL.
INSTRUCTIONS FOR THE USER: these instructions contain user
recommendations, a description of the controls and the correct
procedures for cleaning and maintenance of the appliance.
INSTRUCTIONS FOR THE INSTALLER: these are intended for the qualified
technician who must install the appliance, set it functioning and carry out
an inspection test.
3
Page 2
General instructions
1. INSTRUCTIONS FOR USE
THIS MANUAL IS AN INTEGRAL PART OF THE APPLIANCE. IT MUST BE KEPT IN ITS
ENTIRETY AND IN AN ACCESSIBLE PLACE FOR THE WHOLE WORKING LIFE OF
THE APPLIANCE.
CAREFUL READING OF THIS MANUAL AND ALL THE INSTRUCTIONS THEREIN
BEFORE USING THE APPLIANCE IS ESSENTIAL. INSTALLATION MUST BE CARRIED
OUT BY QUALIFIED PERSONNEL IN ACCORDANCE WITH THE REGULATIONS IN
FORCE. THIS APPLIANCE IS INTENDED FOR PROFESSIONAL USE AND
CONFORMS TO THE EEC DIRECTIVES CURRENTLY IN FORCE. THE APPLIANCE
HAS BEEN BUILT TO CARRY OUT THE FOLLOWING FUNCTIONS: COOKING FOOD;
ALL OTHER USES ARE CONSIDERED UNSUITABLE.
THE MANUFACTURER CANNOT BE HELD LIABLE FOR USE OTHER THAN AS
INDICATED.
IF THE APPLIANCE IS INSTALLED ON BOATS OR IN CARAVANS, DO NOT USE IT AS
A ROOM HEATER.
DO NOT USE THIS APPLIANCE FOR HEATING ROOMS.
THIS APPLIANCE IS MARKED ACCORDING TO EUROPEAN DIRECTIVE 2002/96/EC
ON WASTE ELECTRICAL AND ELECTRONIC EQUIPMENT (WEEE).
THIS DIRECTIVE DEFINES THE STANDARDS FOR THE COLLECTION AND
RECYCLING OF WASTE ELECTRICAL AND ELECTRONIC EQUIPMENT APPLICABLE
THROUGHOUT THE EUROPEAN UNION.
NEVER OBSTRUCT THE OPENINGS AND SLITS PROVIDED FOR VENTILATION AND
HEAT DISPERSAL.
DO NOT REST ANY WEIGHT OR SIT ON THE OPEN DOOR OF THE APPLIANCE.
THE IDENTIFICATION PLATE WITH THE TECHNICAL DATA, SERIAL NUMBER AND
BRAND NAME HAS BEEN VISIBLY AFFIXED TO THE APPLIANCE.
DO NOT REMOVE THIS PLATE FOR ANY REASON.
BEFORE THE APPLIANCE IS PUT INTO OPERATION, ALL THE PROTECTIVE FILMS
APPLIED INSIDE OR OUTSIDE MUST BE REMOVED.
TAKE CARE THAT NO OBJECTS ARE STUCK IN THE DOOR OF THE OVEN.
4
Page 3
General instructions
THE APPLIANCE BECOMES VERY HOT INSIDE DURING USE. SUITABLE HEAT-
PROOF GLOVES SHOULD BE WORN FOR ALL OPERATIONS.
TRAYS MUST BE WASHED BEFORE USE WITH A SUITABLE KITCHENWARE
DETERGENT (DO NOT USE ABRASIVE PRODUCTS).
THE OVEN IS DESIGNED FOR A MAXIMUM LOAD OF 3.5 KG.
DO NOT USE STEEL SPONGES AND SHARP SCRAPERS AS THEY WILL
DAMAGE THE SURFACE.
USE NORMAL NON-ABRASIVE PRODUCTS, INCLUDING WOODEN OR
PLASTIC UTENSILS IF NECESSARY. RINSE THOROUGHLY AND DRY
USING A SOFT CLOTH OR A MICROFIBRE CLOTH.
DO NOT ALLOW RESIDUES OF SUGARY FOODS (SUCH AS JAM) TO SET
INSIDE THE OVEN. IF THEY ARE ALLOWED TO SET FOR TOO LONG,
THEY COULD RUIN THE SURFACES.
DO NOT USE PLASTIC KITCHENWARE OR CONTAINERS. THE HIGH
TEMPERATURES INSIDE THE OVEN COULD MELT THE PLASTIC, DAMAGING THE
APPLIANCE.
DO NOT USE SEALED TINS OR CONTAINERS IN THE APPLIANCE. OVERPRESSURE
MAY OCCUR INSIDE THE CONTAINERS DURING COOKING, CREATING A DANGER
OF EXPLOSION.
DO NOT LEAVE THE APPLIANCE UNATTENDED DURING COOKING PROCESSES
WHERE FATS OR OILS COULD BE RELEASED.
FATS AND OILS MAY CATCH FIRE.
DO NOT COVER THE BOTTOM OF THE OVEN WITH ALUMINIUM OR TINFOIL
SHEETS DURING COOKING AND DO NOT PLACE PANS OR TRAYS ON IT TO AVOID
DAMAGE TO THE SURFACE.
ALL COOKING OPERATIONS MUST TAKE PLACE WITH THE DOOR CLOSED.
5
Page 4

General instructions
2. SAFETY PRECAUTIONS
REFER TO THE INSTALLATION INSTRUCTIONS FOR THE SAFETY REGULATIONS
FOR ELECTRIC OR GAS APPLIANCES AND VENTILATION FUNCTIONS.
IN YOUR INTERESTS AND FOR YOUR SAFETY THE LAW REQUIRES THAT THE
INSTALLATION AND SERVICING OF ALL ELECTRICAL APPLIANCES IS CARRIED
OUT BY QUALIFIED PERSONNEL IN ACCORDANCE WITH THE REGULATIONS IN
FORCE.
OUR APPROVED INSTALLERS GUARANTEE A SATISFACTORY JOB.
GAS OR ELECTRICAL APPLIANCES MUST ALWAYS BE DISCONNECTED BY
SUITABLY SKILLED PEOPLE.
BEFORE CONNECTING THE APPLIANCE TO THE POWER GRID, CHECK THE DATA
ON THE PLATE AGAINST THE DATA FOR THE GRID ITSELF.
BEFORE CARRYING OUT INSTALLATION/MAINTENANCE WORK, MAKE SURE THAT
THE APPLIANCE IS NOT CONNECTED TO THE POWER GRID.
THE PLUG TO BE CONNECTED TO THE POWER SUPPLY CABLE AND ITS SOCKET
MUST BE OF THE SAME TYPE AND CONFORM TO THE REGULATIONS IN FORCE.
THE SOCKET MUST BE ACCESSIBLE AFTER THE APPLIANCE HAS BEEN BUILT IN.
NEVER DISCONNECT THE PLUG BY PULLING ON THE CABLE.
IF THE POWER SUPPLY CABLE IS DAMAGED, HAVE IT REPLACED IMMEDIATELY.
IT IS OBLIGATORY FOR ALL ELECTRICAL EQUIPMENT TO BE EARTHED
ACCORDING TO THE METHODS LAID DOWN BY SAFETY REGULATIONS.
IMMEDIATELY AFTER INSTALLATION, CARRY OUT A BRIEF INSPECTION TEST,
FOLLOWING THE INSTRUCTIONS BELOW. SHOULD THE APPLIANCE NOT
FUNCTION, DISCONNECT IT FROM THE ELECTRICITY SUPPLY AND CALL THE
NEAREST TECHNICAL SUPPORT CENTRE.
NEVER ATTEMPT TO REPAIR THE APPLIANCE.
NEVER PUT INFLAMMABLE OBJECTS IN THE OVEN: IF IT IS SWITCHED ON BY
ACCIDENT, IT MAY CAUSE A FIRE.
DURING USE THE APPLIANCE BECOMES VERY HOT. TAKE CARE NOT TO TOUCH
THE HEATING ELEMENTS INSIDE THE OVEN.
THE APPLIANCE
PERSONS.
OPERATION OR PLAY WITH IT AT ANY TIME.
IS DESIGNED FOR PROFESSIONAL USE BY TRAINED
DO NOT LET CHILDREN GO NEAR THE APPLIANCE WHEN IT IS IN
6
Page 5
General instructions
DO NOT INSERT POINTED METAL OBJECTS (CUTLERY OR UTENSILS) INTO THE
SLITS IN THE APPLIANCE.
DO NOT USE STEAM JETS FOR CLEANING THE APPLIANCE.
THE STEAM COULD REACH THE ELECTRONICS, DAMAGING THEM AND CAUSING
SHORT-CIRCUITS.
DO NOT MODIFY THIS APPLIANCE.
DO NOT SPRAY ANY SPRAY PRODUCTS NEAR THE ELECTRICAL APPLIANCE
WHILE IT IS IN OPERATION.
DO NOT USE SPRAY PRODUCTS WHILE THE PRODUCT IS STILL HOT.
The manufacturer cannot be held liable for damage to persons or things caused by
failure to observe the above instructions, by interference with any part of the
appliance or by the use of non-original spare parts.
7
Page 6
Instructions for disposal
3. ENVIRONMENTAL RESPONSIBILITY
3.1 Our environmental responsibility
Pursuant to Directives 2002/95/EC, 2002/96/EC and 2003/108/EC relating to
the reduction of the use of hazardous substances in electrical and electronic
appliances, as well as to the disposal of refuse, the crossed out bin symbol on
the appliance indicates that the product, at the end of its useful life, must be
collected separately from other refuse. Therefore, the user must consign the
product that has reached the end of its working life to the appropriate selective
collection centres for electrical and electronic refuse, or deliver it back to the
retailer when purchasing an equivalent product, on a one for one basis.
Adequate differentiated collection for the subsequent forwarding of the
decommissioned product to recycling, processing and ecologically compatible
disposal contributes to avoiding possible negative effects on the environment
and on health, and promotes recycling of the appliances constituent materials.
The illicit disposal of the product by the user results in the application of
administrative sanctions.
The product does not contain substances in quantities sufficient to be
considered hazardous to health and the environment, in accordance with
current European directives.
3.2 Your environmental responsibility
Our productspackingismadeofnon-pollutingmaterials, which are therefore
compatible with the environment and recyclable. Please help by disposing of the
packaging correctly. You can obtain the addresses of collection, recycling and
disposal centres from your retailer or from the competent local organisations.
Do not discard the packaging or any part of it, or leave it unattended. It can
constitute a suffocation hazard for children, especially the plastic bags.
Your old appliance also needs to be disposed of correctly.
Important: hand over your appliance to the local agency authorised for the
collection of electrical appliances no longer in use. Correct disposal enables
intelligent recovery of valuable materials.
Before disposing of your appliance it is important to remove doors and leave
shelves in the same position as for use, to ensure that children cannot
accidentally become trapped inside during play. It is also necessary to cut the
connecting cable to the power grid, removing it along with the plug.
8
Page 7
Instructions for the user
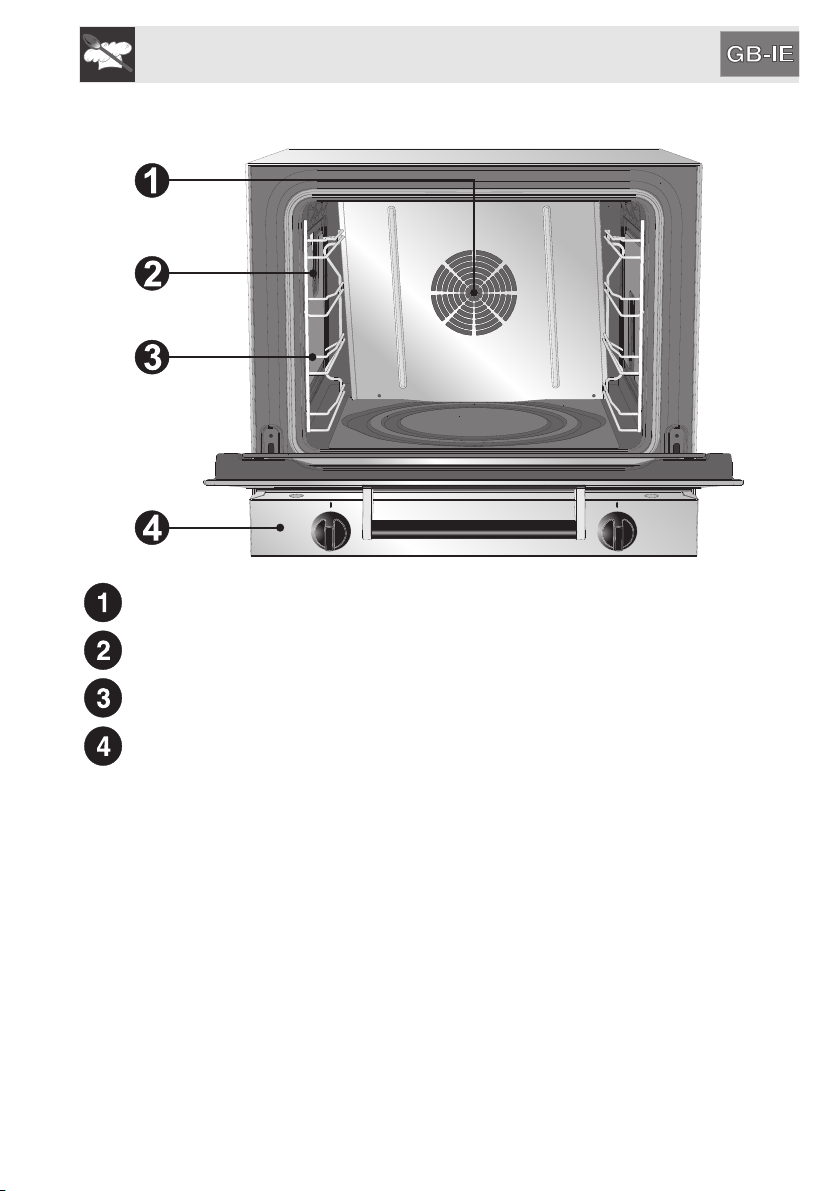
4. GET TO KNOW YOUR OVEN
OVEN FAN
LAMP
RACK AND TRAY SUPPORT RUNNERS
CONTROL PANEL
9
Page 8
Instructions for the user
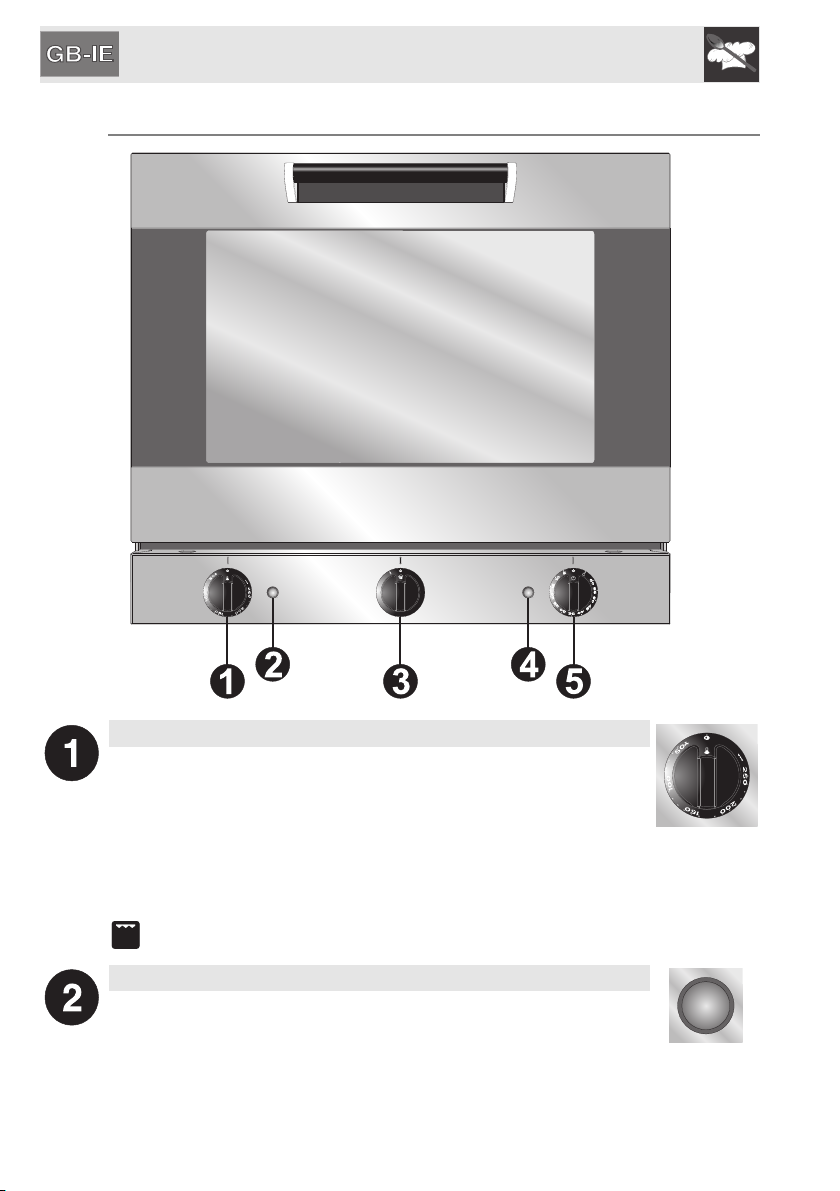
4.1 DESCRIPTION OF CONTROLS
10
THERMOSTAT KNOB
This knob allows to select the most suitable cooking temperature for
the food to be cooked.
The cooking temperature is selected by turning the knob clockwise
to the desired setting between 50° and 250°C. Adjustment is
progressive so that the oven also operates at any intermediate
value.
The grill function can also be activated by turning the knob to the
symbol (only in models with grill).
ORANGE INDICATOR LIGHT
When on, it indicates that the oven is heating up. When the set
temperature is reached, the light goes off. This light will switch on
and off intermittently during cooking, to indicate that the
temperature is being kept constant inside the oven.
Page 9

Instructions for the user
OVEN HUMIDIFCATION KNOB
(on some models only)
This knob allows to select the most suitable amount of steam for the
food to be cooked.
Turning the knob clockwise, the selection options range from the 0
setting (no steam is supplied), to the 1 setting (maximum steam
supply). Steam continues to be supplied until the knob is released;
once released the knob automatically returns to the 0 setting.
Note: The oven thermostat knob must be set between 150°C and
250°C for humidified cooking.
To prevent water from collecting inside the oven, do not use steam
while the grill function is active.
GREEN INDICATOR LIGHT
When off, it indicates the beginning of timed cooking.
When it lights up, timed cooking is complete.
TIMER KNOB
This knob enables manual cooking or the timer to be selected; the
timer switches off the oven automatically at the end of cooking.
For manual control of the cooking time, turn the knob to the
symbol .
To set the cooking time, turn the knob clockwise. Time is expressed
in minutes (5 to 60). Adjustment is progressive so that the time can
also be set to any intermediate value between these numbers.
Upon completion of the cooking cycle, the knob automatically
returns to 0, the oven turns off and a buzzer signal is set off.
11
Page 10

Instructions for the user
5. USING THE OVEN
THE OVEN IS DESIGNED FOR A MAXIMUM LOAD OF 3.5 KG.
5.1 Warnings and general advice
• When using the oven for the first
time, heat it up to its maximum
temperature for a duration long
enough to burn off any oily residues
from the manufacturing process.
• To access food during cooking,
always leave the door open as short
a time as possible to prevent the
temperature in the oven from falling
and ruining the food.
For models with humidifcation function only:
• The hardness of the water to be used during humidification must not exceed
10-11°F. Use tap water that has been treated with a water purification or
softening system.
• To prevent any steam in the oven from causing problems, open the door in
two stages: keep the door ajar (about 5-6 cm) for 4-5 seconds and then open
it fully.
Note: As the oven door is opened, the fan, the heating elements and the steam
dispenser are deactivated automatically.
12
5.2 Internal ventilation (depending on the model)
On some models, the fan rotates in both directions and when the door is opened
it is deactivated automatically, and starts again when the door is closed.
5.3 Inside light
The oven light comes on:
• When the oven door is opened (depending on the model).
• When the thermostat knob is turned.
Page 11

Instructions for the user
5.4 Defrosting
TIMER KNOB
SET TO MANUAL
THERMOSTAT KNOB
SET TO VENTILATION
The movement of air at room temperature causes frozen food to quickly thaw.
This type of thawing is ideal as the taste and appearance of the de-frozen food,
whether previously deep-frozen or frozen in the domestic freezer, remain
unaltered.
5.5 Pre-heating
Before cooking, it is advisable to pre-heat the oven to the desired
temperature for at least 15 minutes.
5.6 Manual cooking
TIMER KNOB
SET TO MANUAL
THERMOSTAT KNOB
AS DESIRED, BETWEEN 50°C AND 250°C
The orange light comes on to indicate that the oven is heating up. Upon the set
temperature being reached, the indicator light goes off. It switches on and off
intermittently to indicate that the temperature is being kept constant.
Example
5.7 Timed cooking
TIMER KNOB
IN A POSITION BETWEEN 5' AND 60'
THERMOSTAT KNOB
AS DESIRED, BETWEEN 50°C AND 250°C
The orange light comes on to indicate that the oven is heating up Upon the set
temperature being reached, the indicator light goes off. It switches on and off
intermittently to indicate that the temperature is being kept constant. Upon
completion of the cooking cycle, the oven automatically turns off, the green light
comes on and the buzzer sounds for a few seconds. To completely turn the
buzzer off, set the thermostat knob to 0.
Example
Example
13
Page 12

Instructions for the user
5.8 Cooking with humidification (on some models only)
OVEN HUMIDIFCATION KNOB
THERMOSTAT KNOB
TIMER KNOB
Oven humidification does not take place if the temperature is lower than 150°C:
temperatures below 150°C cause condensation and consequent dripping.
Therefore, turn the thermostat knob to 150°C and wait until the (orange)
thermostat indicator light switches off before beginning oven humidification.
Set to position 1
(max. 3 sec. at a time)
BETWEEN 150°C AND 250°C
5.9 Cooking with the grill (on some models only)
The heat coming from the grill element gives perfect grilling results above all for
thin and medium thickness meat and allows to give the food an even browning at
the end of the cooking. This function enables large quantities of food,
particularly meat, to be grilled evenly. (Use the 3rd or 4th runner).
TIMER KNOB
IN A POSITION BETWEEN 5' AND 60'
THERMOSTAT KNOB
IN GRILL POSITION
Permits rapid browning of foods. The tray should be placed on the bottom
runner. For short-term cooking of small quantities of food, place the rack in the
third runner from the bottom. For long-term cooking and grills, put the rack in the
lowest runner in accordance with the size of the pieces.
Example
14
The grill function is set to the grilling temperature of approximately 290°C. This
temperature cannot be modified by the user.
Grilling can only take place while the door is closed: opening the oven door
deactivates the heating elements.
Page 13

Instructions for the user
6. CLEANING AND MAINTENANCE
Important:
do not aim jets of water directly against the oven; avoid the use of
pressure jets.
NEVER USE A STEAM JET FOR CLEANING THE APPLIANCE.
Before performing any operations, switch off the power supply to the
oven.
6.1 Cleaning stainless steel
To keep stainless steel in good condition it should be cleaned regularly at the
end of the day. Let it cool first.
To clean and preserve the stainless steel surfaces, always use only specific
products that do not contain abrasives or chlorine-based acids.
How to use: pour the product onto a damp cloth and wipe the surface, rinse
thoroughly and dry with a soft cloth or chamois leather.
Do not use metallic sponges or sharp scrapers as they will damage
the surface.
Use ordinary non-abrasive products for steel, with the aid of wooden
or plastic utensils if necessary.
Rinse thoroughly and dry with a soft cloth or chamois leather.
15
Page 14

Instructions for the user
6.2 Cleaning the oven cavity
To keep the oven in good condition it should be cleaned regularly at the end
of the day. Let it cool first. Take out all removable parts.
Removing the guide frames makes it easier to clean the side
parts of the oven.
To remove the guide frames, pull the frame towards the inside of
the oven to unhook it from its housing A, then slide it out of the
seats at the back B.
• When cleaning is complete, repeat the above procedures in
reverse order to put the guide frames back in.
16
Page 15

Instructions for the user
6.3 Cleaning and removing the door glass
To facilitate cleaning, it is possible to remove the door (see 7.2 Removing the
door) and place it on a canvas, or open it and lock the hinges in order to extract
the glass panels.
The glass panels of the door can be completely removed by following the
instructions provided below.
Removing the internal glass panel:
• Remove the internal glass panel by
pulling it upwards, following the
movement indicated by the arrows.
Doing this detaches the 4 pins attached
to the glass from their slots in the oven
door.
Cleaning:
• It is now possible to clean the external
glass panel and the panels removed
previously. Use absorbent kitchen roll. In
the case of stubborn dirt, wash with a
damp sponge and neutral detergent.
Replacing the glass panels:
• Reposition the internal glass panel,
taking care to centre and insert the 4
pins attached to the glass into their slots
in the oven door by applying slight
pressure.
Warning: before removing the glass panels, make sure that the door hinges
have been locked in the open position as described in “7.2 Removing the door”.
This operation may have to be repeated during the glass removal process if the
door is accidentally freed.
17
Page 16

Instructions for the user
7. EXTRAORDINARY MAINTENANCE
The oven may require extraordinary maintenance or replacement of parts
subject to wear, such as gaskets, bulbs, etc.
The following instructions describe how to carry out these minor maintenance
operations.
Before performing any operations, switch off the power supply to the
oven.
7.1 Replacing the light bulb
If a light bulb needs to be replaced because it
is worn or burnt out, remove the guide
frames; see “6.2 Cleaning the oven cavity”.
Then remove the bulb cover using a tool (e.g.
a screwdriver).
18
Slide out and remove the light bulb.
Replace the bulb with one of the same type
(40W). Replace the cover correctly, so that
the moulded part of the glass is facing the
door.
Press the cover completely down so that it
attaches perfectly to the bulb support.
Use oven bulbs only (T 300°C).
Do not touch the halogen light bulb directly with your fingers, but wrap it
in insulating material.
Page 17

Instructions for the user
7.2 Removing the door
Open the door completely.
Insert two pins into the holes in the two
hinges, away from them, until they engage.
Grasp the door on both sides with both
hands, lift it forming an angle of around 30°
and remove it.
To reassemble the door, put the hinges in
the relevant slots in the oven, making sure
that grooved sections C are resting
completely in the slots. Lower the door and
once it is in place remove the pins from the
holes in the hinges.
7.3 Removing the door seal
To permit thorough cleaning of the oven, the
seal may be removed. Before removing the
seal, take off the door as described above.
Once the door has been taken off, lift the
tabs at the corners as shown in the figure.
19
Page 18

Instructions for the user
7.4 If the oven is not working properly
This product meets the current safety regulations in force for electrical appliances. To
prevent safety hazards for users, all technical inspections or repairs must be carried out by
qualified personnel.
If the appliance is not working properly, before calling Customer Service,
ensure that the procedures listed below have been performed. This will help
to avoid unnecessary expenses.
PROBLEM LIKELY SOLUTION
The oven is not working • The timer knob is positioned on 0.
• The plug is not properly inserted in
the socket.
• The electrical system is damaged or
not working properly.
• The fuses have blown or the circuit
breakers have not been activated.
Foods either take too long or too little to
cook
No steam is being supplied • The control knobs are not in a correct
Moisture forms inside the oven and on
the foods
There is water inside the oven • The device controlling the supply of
• The temperature setting is incorrect.
position.
• The oven door has not been closed
properly.
• The foods are being left in the oven for
too long after cooking. Do not leave
them in the oven for more than 15-20
minutes after the end of the cooking
time.
water inside the oven is not working
properly.
• The dispensing command has been
activated for too long.
20
Page 19

Instructions for the installer
8. OVEN INSTALLATION
The oven must be installed on a free-standing horizontal work top. The distance
from the rear wall must allow easy access to the terminal board for connection of
the power supply cable. Installation must be carried out by a qualified
technician and in compliance with EC DIRECTIVES currently in force.
8.1 Electrical connection
Make sure the voltage and the cross-section of the power cord match the
specifications indicated on the identification plate positioned on the side of the
oven. Do not remove this plate for any reason.
The oven is fitted with an H07RN-F three-core cable for operation at 220-
240V and a power supply plug.
The standard cable is of the three-core 3 x 1.5 mm2 H07RN-F type.
The power supply cable must be replaced by the manufacturer or by an
authorised service centre to prevent any risks.
The plug and wall-mounted socket must be of the same type (in accordance
with current regulations). Make sure that the supply line is suitably earthed.
Avoid the use of adapters and shunts.
If the appliance is connected to the electrical mains supply in a permanent
manner, install a multipolar cut-out device on the line, with contact opening
distance equal to or greater than 3mmlocated near the appliance and in an
easily reachable position.
WARNING: if the phase voltage drops below 190V, the performance of the
oven may suffer, not due to the product itself.
The terminal indicated by this symbol links up parts that are normally earthed.
Connect the appliances appropriately using this terminal in
order to make sure that they are equipotential.
21
Page 20

Instructions for the installer
8.1.1 Safety thermostat
The oven is equipped with a safety device that takes action in case of serious
malfunction. To re-arm the safety device you must contact the technical
assistance service.
The manufacturer cannot be held liable for damage to persons or things
caused by failure to observe the above instructions or deriving from tampering
with any part of the appliance.
8.2 Levelling
Level the oven on the ground using the four adjustable feet. To adjust them,
loosen each foot. The adjustment screws have a range of 10 mm.
8.3 Steam outlet pipe
Depending on the model, there are one or two outlet pipes on the back of the
oven for releasing the steam produced during cooking. These must be left free
of any obstruction.
Avoid crushing them.
22
Page 21

Instructions for the installer
aaaaaaaaaaa
8.4 Hydraulic connection (in model with humidification function
)
only
Connect the water inlet socket on the
back to a water socket with a threaded
¾“ opening, taking care to screw it tightly
to the hose.
If the water piping is new or has been
unused for a long time, before
connection, run the water to make sure it
becomes clear and free of impurities.
Without this precaution, there is a risk
that the water inlet will become clogged
causing damage to the appliance.
It is recommended to supply the oven
with water pressure between: min. 50
kPa and max. 500 kPa.
23
Page 22

Instructions for the installer
8.5 Multiple installations
If installing multiple appliances, position them at least 50 mm away from any
rear walls, and 30 mm away from any side walls.
Side-by-side installation: maintain a distance of at least 50 mm between
appliances.
Stacked installation: Two or more appliances may not be stacked on top of
each other.
24
Warning: the appliance support base must not be over 1.60 m above the floor.
Page 23

Page 24

 Loading...