

SMC Networks SMCSM10-Z User Manual

Copyright ©2013 SMC Networks Page 1
All Rights Reserved
I/M SMCSD10-Z rev. 1.0
6/18/13
1 Product Introduction
The SMCSM10-Z works with the Touchscreen. The
device has an optical sensor capable of detecting
smoke particles in the event of fire. It also
contains an integrated heat sensor that is
triggered if a room experiences a sharp rise in
temperature. When triggered, the SMCSM10-Z
emits an audible alarm.
The SMCSM10-Z meets NFPA 72 field sensitivity
testing requirements without the need for
external meters. Built-in drift compensation
allows the SMCSM10-Z to adjust sensitivity
automatically as it becomes dirty over time. The
drift-compensation feature dramatically
increases the time between cleanings, as well as
reducing the chance of a nuisance alarm.
2 Parts List
Your SMCSM10-Z package includes:
(1) SMCSM10-Z Smoke Alarm
(2) CR123A lithium batteries
(1) Mounting plate
(1) Mounting screws and anchors
(1) This User Guide
3 Tools Required
Flat-Tipped Screw Driver
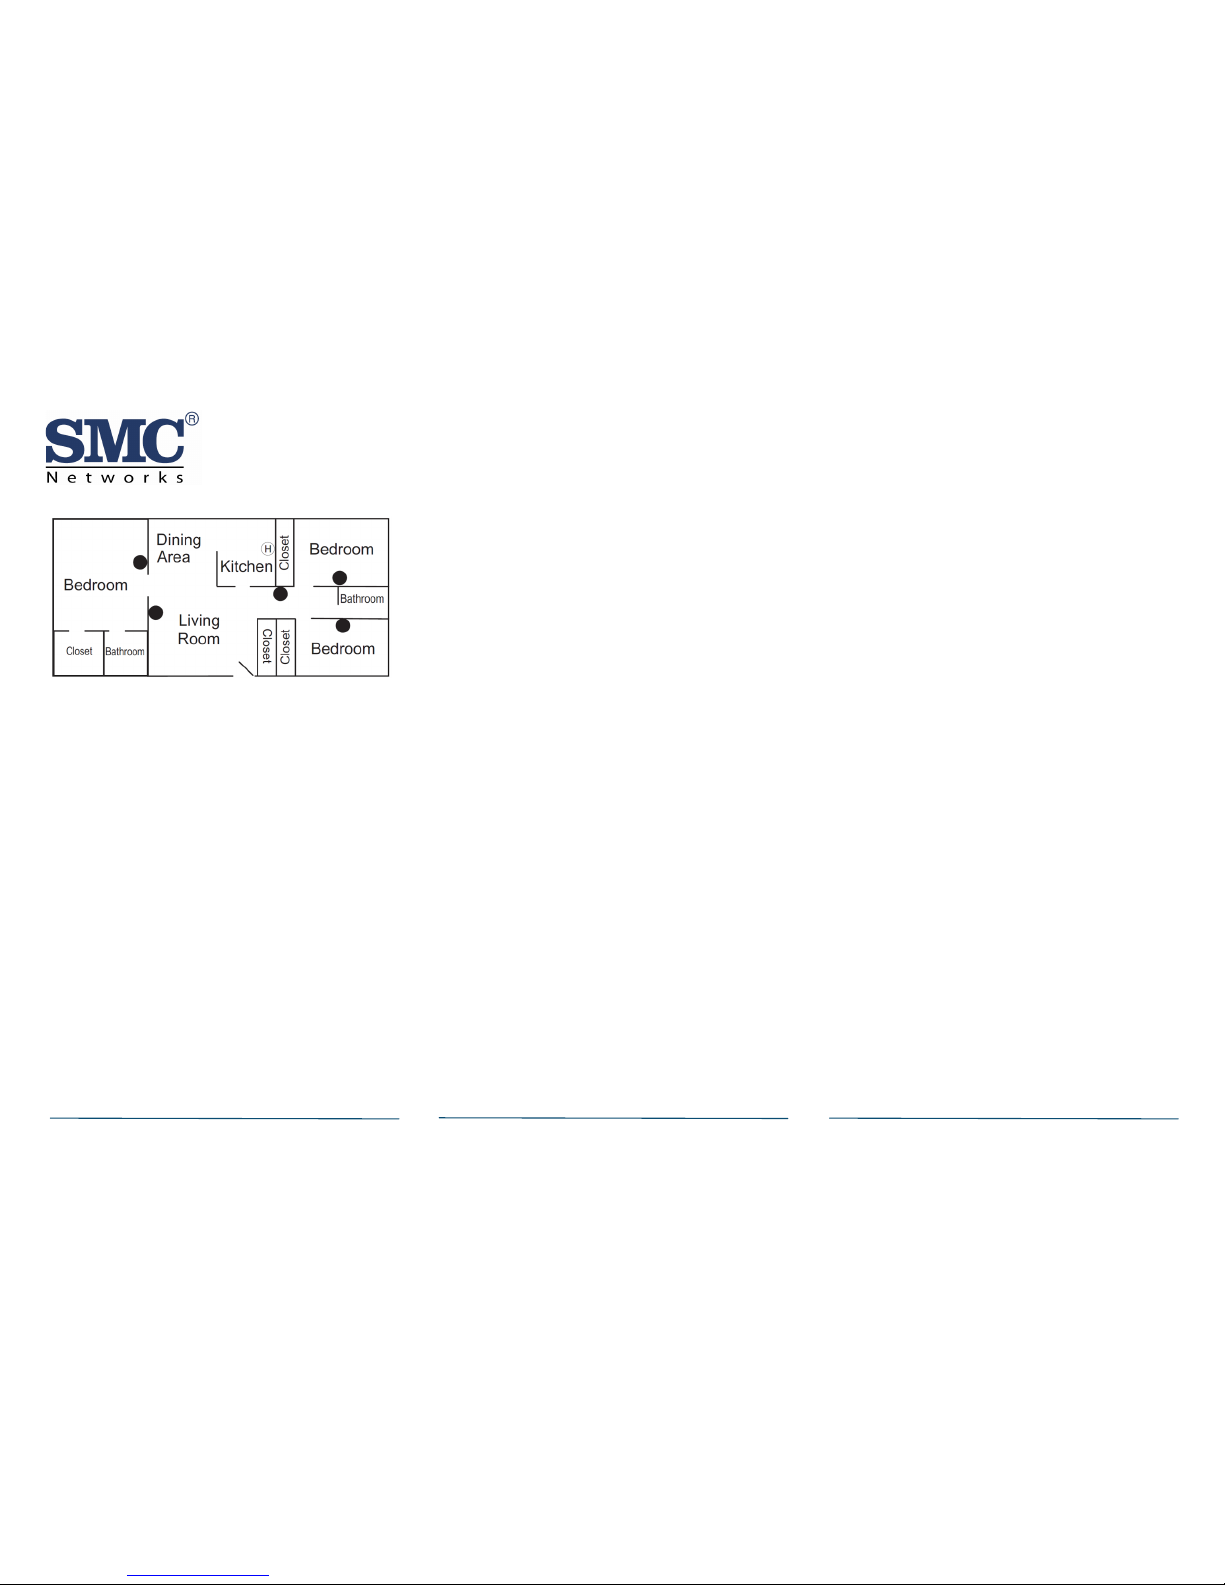
4 Finding a Suitable Location
Review the information in this section to ensure
you get the most out of the SMCSM10-Z. The
information in this User Guide is in accordance
with NFPA 72 and/or CAN/ULC-S529, depending
on country of installation.
Pre-installation Considerations
Install the SMCSM10-Z in accordance with the
National Fire Protection Association’s (NFPA)
Standard 72, Chapters 2 and 8. Depending on the
application, you may need to reference other
chapters of NFPA 72 or NFPA 101.
Choosing an Installation Location
When choosing an installation location, consider:
Use of structure and type of construction
Contents you want to protect and their
burning characteristics
Human occupancy
Total area to be monitored
Ceiling height and surface condition
Air movement and vent locations
Obstructions
Deflections
Recommended Locations
After considering these factors, choose a
location:
Where the temperature range is between 32°
and 104° F (0° and 40° C).
Where the humidity is between 0 and 95%
non-condensing.
Away from ventilation sources that can
prevent smoke from reaching the smoke
alarm.
At least 5 feet (1.5 m) from bathrooms.
When placing the SMCSM10-Z on a ceiling, mount
it in the center of the room or hallway at least 4
inches (10cm) away from any walls or partitions.
SMCSM10-Z Smok e A l arm Guide
Congratulations on purchasing your SMCSM10-Z Smoke Alarm with Heat Detection Sensor.
The SMCSM10-Z Smoke Alarm provides triple protection against fire. It combines a photoelectric smoke detector with an integrated heat detector
that senses both fixed temperature and temperature rate-of-rise within a room. It contains an integrated siren to signal alarms.
SMCSM10-Z Smoke Alarm Guide
Copyright ©2013 SMC Networks Page 2
All Rights Reserved
I/M SMCSM10-Z rev. 1.0
6/18/13
When mounting the SMCSM10-Z on a wall, place
it so the top is 4 to 12 inches (10 to 31cm) below
the ceiling.
In rooms with sloped, peaked, or gabled ceilings,
place the SMCSM10-Z 3 feet (.9 m) down or away
from the highest point of the ceiling.
If mounting to suspended ceiling tile, secure the
tile with the appropriate fastener to prevent tile
removal.
Smoke alarms are not to be used with alarm
guards unless the combination has been
evaluated and found suitable for that purpose.
Note: A smoke alarm does not provide warnings
for fires resulting from explosions, smoking in bed
or other furniture; ignition of flammable liquids,
vapors and gasses; and children playing with
matches or lighters.
Locations to Avoid
Areas where normal ambient temperature is
less than 32°F (0°C), or exceeds 104°F
(40°C).
Dirty, dusty, insect infested areas.
In or near areas with combustion particles
(kitchens, garages, furnaces, hot-water
heaters, gas space heaters).
On the ceiling in rooms next to kitchens,
where there is no transom between the
kitchen and such rooms.
Damp or humid areas, or near bathrooms
with showers.
Near fresh-air inlets or returns or very drafty
areas.
Near heating/air conditioning vents, fans,
and fresh air intakes, which can drive smoke
away from the smoke alarm.
In dead-air spaces at the top of peaked
ceilings or in corners where walls and ceiling
meet. Dead air can prevent smoke from
reaching a smoke alarm.
Within 10 feet (3 m) of fluorescent light
fixtures.
Not suitable for outdoor use.
WARNING! LIMITATIONS OF SMOKE
DECTECTORS
Wireless smoke alarms are very reliable, but may
not work under all conditions. No fire alarm
product provides total protection of life or
property. Smoke alarms are not a substitute for
life insurance.
Smoke alarms require a source of power to work.
This smoke alarm does not operate and the
alarm will not sound if batteries are dead or not
installed properly.
Alarms may not be heard. A sound sleeper or
someone who has taken drugs or alcohol may not
awaken if Touchscreen or Smoke Alarm is
installed outside a bedroom. Closed or partially
closed doors and distance can block sound. This
product is not designed for the hearing impaired.
Smoke alarms may not always activate and
provide warning early enough. Smoke alarms
only activate when enough smoke reaches the
product’s smoke chamber. If a fire starts in a
chimney, wall, roof, on the other side of closed
doors, or on a different level of the property,
enough smoke may not reach the product for it
to alarm.

SMCSM10-Z Smoke Alarm Guide
Copyright ©2013 SMC Networks Page 3
All Rights Reserved
I/M SMCSD10-Z rev. 1.0
6/18/13
Smoke alarms are a significant help in reducing
loss, injury and even death. However, no matter
how good a detection device is, nothing works
perfectly under every circumstance and we must
warn you that you cannot expect a smoke alarm
to ensure that you will never suffer any damage
or injury.
Current studies have shown smoke alarms may
not awaken all sleeping individuals. It is the
responsibility of individuals in the household that
are capable of assisting others to provide aid to
those who may not be awakened by the alarm,
or to those who may be incapable of safely
evacuating the area unassisted.
5 Installing / Replacing Battery
The SMCSM10-Z comes with two 3V Lithium
CR123A batteries preinstalled. When you need to
replace them use the following procedure. Use
batteries specified in this document
specifications or as listed on the battery
compartment cover. Use of a different battery
can have a detrimental effect on the alarm
operation. Constant exposures to high or low
humidity can reduce battery life.
A. Remove the SMCSM10-Z from the mounting
base (see “Mounting the Sensor” on page 4).
B. Slide the battery compartment cover away
from the SMCSM10-Z to unsnap it and lift it
off.
C. If you are replacing batteries, remove and
dispose of the batteries appropriately. Wait
30 seconds after removal before continuing
to the next instruction.
D. Observing proper polarity as indicated in the
battery compartment, insert two new 3V
lithium batteries into the SMCSM10-Z battery
compartment and replace the battery
compartment cover.
Note: Use two new batteries when replacing old
batteries. Do not replace with batteries that were
used previously.
E. Reattach the SMCSM10-Z to the mounting
base and test the system.
F. The SMCSM10-Z ships with a dust cover for
protection on construction sites with dusty
environments. If your product is new, remove
the red plastic dust cover from the SMCSM10Z.
6 Pairing with Touchscreen
Each SMCSM10-Z is programmed with a unique ID
when manufactured. The unique ID is enrolled
into the Touchscreen at the time of installation,
allowing the SMCSM10-Z to communicate with
that specific Touchscreen.
A. From the Home screen, touch the Settings
widget.
B. When the Keypad screen appears, touch the
numbers to enter your keypad code.
C. When the Settings menu appears, use the
keypad to enter the Installer Code (this code
is the same for all Touchscreen installed by
your company).
D. When the Technician keyboard pad appears,
enter your Technician ID and touch Done.
E. When the Technician Settings menu appears,
select Sensors & Zones > Add a
Sensor/Zone. The Locating Sensors screen
appears.
SMCSM10-Z Smoke Alarm Guide
Copyright ©2013 SMC Networks Page 4
All Rights Reserved
I/M SMCSM10-Z rev. 1.0
6/18/13
F. Click Next. The system scans the premise for
wireless sensors that can be added, which
must meet the following requirements:
- Not currently paired with another
Touchscreen
- Is active. New sensors must be activated as
follows; Turn the back cover counterclockwise to remove. Open the battery
compartment. Removing the battery
activation tab to power on the unit.
- Defaulted if previously paired. To default
the sensor, refer to section 9 defaulting
the alarm.
Follow the system prompts to complete the
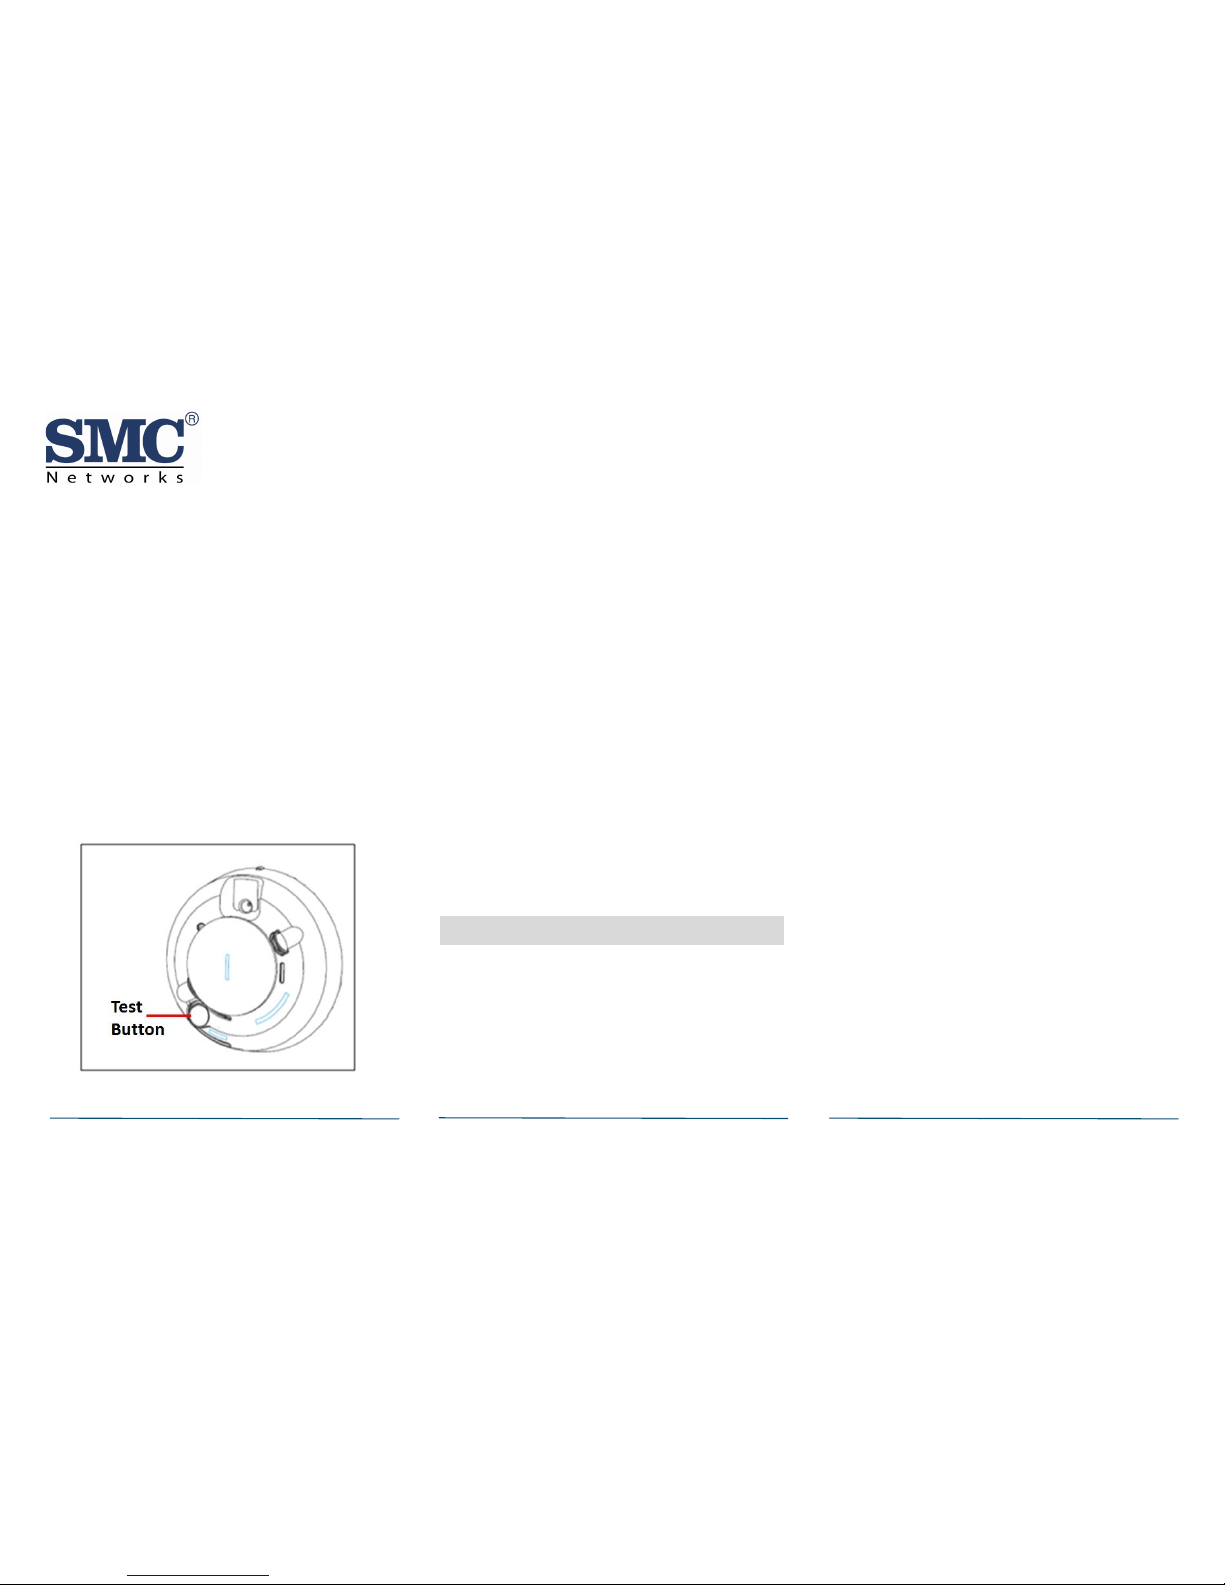
add process. Trip the sensor by pressing and
holding down the Test Button on the front
cover of the alarm for 10 seconds.
G. When all the sensors are found and paired,
tap Done. Any located sensors that were not
paired are released by the Touchscreen and
can be added later. The Wireless Sensors
Located screen shows the number of wireless
sensors found and paired.
H. Tap Next. The Configure Wireless Sensors
screen shows icons of the sensors that were
found and paired.
I. Tap Next. The Add Sensor/Zone Modify
screen appears.
J. To modify a field on the Touchscreen, tap
the field. Use the onscreen keyboard to
enter changes. Tap Next to save changes.
K. When all sensors are configured properly, tap
Return to Menu in the Configure Wireless
Sensors screen.
L. If all sensors have not been configured, the
Modify screen appears for each sensor to let
you review its details. Change the details as
needed or tap Next to cycle through all the
sensors. The sensors are marked as
configured.
7 Mounting the Sensor
The following procedure describes how to mount
the SMCSM10-Z. Add the SMCSM10-Z to the
Touchscreen before physically mounting it in the
desired location.
A. Test communications between the
Touchscreen and the SMCSM10-Z before
permanently mounting the SMCSM10-Z as
follows:
- Hold the SMCSM10-Z where you plan to
install it.
- Press the SMCSM10-Z Test button for 10-
to-15 seconds. The SMCSM10-Z sends a
signal to the Touchscreen.
- At the Touchscreen, verify the signal was
received. A message will appear in the
upper right corner of the Touchscreen for
5 seconds. If no signal is received relocate
the SMCSM10-Z and retest.
B. Using two supplied screws and anchors,
mount the base.
C. Attach the SMCSM10-Z to the mounting base
as follows:
- Line up the raised alignment tab on the lip
of the SMCSM10-Z with the arrow on the
mounting base.
- Insert the SMCSM10-Z into the base and
turn clockwise about 15 degrees until it
snaps into place.
Note: The SMCSM10-Z cannot be attached to the
mounting base if no batteries are installed.
 Loading...