

SMC Networks EZ Networking SMC2621W-P,EZ Networking SMC2621W-U,2621W-P - annexe 1,2621W-U - annexe 1 User Manual

SMC2621W-P
SMC2621W-U

Wireless Print Server
SMC2621W-P
SMC2621W-U
User Guide
From SMC’s line of award-winning connectivity solutions
October 2003

Table of contents
Chapter 1
Introduction . . . . . . . . . . . . . . . . . . . . . . . . . . . . . . . 1
Features . . . . . . . . . . . . . . . . . . . . . . . . . . . . . . . . . . . . . . . . . . .1
Safety Instructions . . . . . . . . . . . . . . . . . . . . . . . . . . . . . . . . . . .3
Package Contents . . . . . . . . . . . . . . . . . . . . . . . . . . . . . . . . . . .4
Models . . . . . . . . . . . . . . . . . . . . . . . . . . . . . . . . . . . . . . . . . . . .5
LED Indicators . . . . . . . . . . . . . . . . . . . . . . . . . . . . . . . . . . . . . .7
Diagnostic Push Button . . . . . . . . . . . . . . . . . . . . . . . . . . . . . . .8
Chapter 2
LAN Installation . . . . . . . . . . . . . . . . . . . . . . . . . . . . 9
Procedure . . . . . . . . . . . . . . . . . . . . . . . . . . . . . . . . . . . . . . . . . .9
Chapter 3
Wireless Print
Server Configuration . . . . . . . . . . . . . . . . . . . . . . 11
Overview . . . . . . . . . . . . . . . . . . . . . . . . . . . . . . . . . . . . . . . . . .11
Using the Windows Wizard . . . . . . . . . . . . . . . . . . . . . . . . . . . .12
Procedure . . . . . . . . . . . . . . . . . . . . . . . . . . . . . . . . . . . .12
Wireless Configuration . . . . . . . . . . . . . . . . . . . . . . . . . . . . . . .15
Chapter 4
Client PC Configuration . . . . . . . . . . . . . . . . . . . . 17
Overview . . . . . . . . . . . . . . . . . . . . . . . . . . . . . . . . . . . . . . . . . .17
Printing Methods . . . . . . . . . . . . . . . . . . . . . . . . . . . . . . .17
Which printing method should I use? . . . . . . . . . . . . . . .18
Checking your Network Protocols (Windows 9x) . . . . . .18
Windows Peer-to-peer Printing . . . . . . . . . . . . . . . . . . . . . . . . .20
Windows 2000/XP Setup . . . . . . . . . . . . . . . . . . . . . . . .20
Windows 9x/ME Setup . . . . . . . . . . . . . . . . . . . . . . . . . .24
PTP Printer Port Setup . . . . . . . . . . . . . . . . . . . . . . . . . .25
Windows SMB Printing . . . . . . . . . . . . . . . . . . . . . . . . . . . . . . .31
Printing from MS-DOS Programs . . . . . . . . . . . . . . . . . .33
Windows with Server-based Print Queues . . . . . . . . . . .36
Macintosh (AppleTalk) . . . . . . . . . . . . . . . . . . . . . . . . . .37
Macintosh OS X . . . . . . . . . . . . . . . . . . . . . . . . . . . . . . .39
i

Table of contents
Chapter 5
BiAdmin Management Utility . . . . . . . . . . . . . . . .41
Requirements . . . . . . . . . . . . . . . . . . . . . . . . . . . . . . . . . . . . . 41
Installation . . . . . . . . . . . . . . . . . . . . . . . . . . . . . . . . . . . . . . . . 41
Operation . . . . . . . . . . . . . . . . . . . . . . . . . . . . . . . . . . . . . . . . . 42
Main Screen . . . . . . . . . . . . . . . . . . . . . . . . . . . . . . . . . . 42
Menus . . . . . . . . . . . . . . . . . . . . . . . . . . . . . . . . . . . . . . 47
Configuration . . . . . . . . . . . . . . . . . . . . . . . . . . . . . . . . . 48
Chapter 6
Web-Based Management . . . . . . . . . . . . . . . . . . .63
Overview . . . . . . . . . . . . . . . . . . . . . . . . . . . . . . . . . . . . . . . . . 63
Preparation . . . . . . . . . . . . . . . . . . . . . . . . . . . . . . . . . . . . . . . 63
Connecting to the Wireless Print Server . . . . . . . . . . . . . . . . . 65
Configuration Screens . . . . . . . . . . . . . . . . . . . . . . . . . . . . . . . 65
AppleTalk . . . . . . . . . . . . . . . . . . . . . . . . . . . . . . . . . . . . 66
NetBEUI . . . . . . . . . . . . . . . . . . . . . . . . . . . . . . . . . . . . . 67
TCP/IP . . . . . . . . . . . . . . . . . . . . . . . . . . . . . . . . . . . . . . 68
Configure Server . . . . . . . . . . . . . . . . . . . . . . . . . . . . . . 70
Wireless Configuration . . . . . . . . . . . . . . . . . . . . . . . . . . 71
Other Screens . . . . . . . . . . . . . . . . . . . . . . . . . . . . . . . . 75
Chapter 7
Special Features . . . . . . . . . . . . . . . . . . . . . . . . . .77
Overview . . . . . . . . . . . . . . . . . . . . . . . . . . . . . . . . . . . . . . . . . 77
Internet Printing Protocol (IPP) . . . . . . . . . . . . . . . . . . . . . . . . 77
IPP Server Configuration . . . . . . . . . . . . . . . . . . . . . . . . 78
IPP Client Setup - Windows 95/98/Me/NT 4.0/XP
IPP Client Setup – Windows 2000/XP . . . . . . . . . . . . . . 82
Using IPP Printers . . . . . . . . . . . . . . . . . . . . . . . . . . . . . 84
Internet Mail Printing . . . . . . . . . . . . . . . . . . . . . . . . . . . . . . . . 86
System Requirements . . . . . . . . . . . . . . . . . . . . . . . . . . 86
Internet Mail Printing Configuration . . . . . . . . . . . . . . . . 88
User Software . . . . . . . . . . . . . . . . . . . . . . . . . . . . . . . . 89
Using the new Port . . . . . . . . . . . . . . . . . . . . . . . . . . . . . 91
Checking the Printer Driver . . . . . . . . . . . . . . . . . . . . . . 92
Printing through the Internet . . . . . . . . . . . . . . . . . . . . . . . . . . 93
. . . . . . . 79
ii

Table of contents
Chapter 8
Troubleshooting . . . . . . . . . . . . . . . . . . . . . . . . . . 95
Overview . . . . . . . . . . . . . . . . . . . . . . . . . . . . . . . . . . . . . . . . . .95
Hardware & LAN Problems . . . . . . . . . . . . . . . . . . . . . . . . . . .95
AppleTalk (Macintosh) . . . . . . . . . . . . . . . . . . . . . . . . . . . . . . .97
Windows Printing Problems . . . . . . . . . . . . . . . . . . . . . . . . . .100
Appendix A
Specifications . . . . . . . . . . . . . . . . . . . . . . . . . . . 107
General Specifications . . . . . . . . . . . . . . . . . . . . . . . . .107
Parallel Port Pin Assignments . . . . . . . . . . . . . . . . . . .108
Protocol Support . . . . . . . . . . . . . . . . . . . . . . . . . . . . . .108
Feature Support . . . . . . . . . . . . . . . . . . . . . . . . . . . . . . . . . . .109
Appendix B
Windows Server Configuration . . . . . . . . . . . . . 111
Windows NT4.0 Server . . . . . . . . . . . . . . . . . . . . . . . . .111
Adding TCP/IP Printing Support . . . . . . . . . . . . . . . . . .111
Adding a TCP/IP Remote Printer . . . . . . . . . . . . . . . . .111
Windows 2000 Server . . . . . . . . . . . . . . . . . . . . . . . . . .112
Appendix C
Unix Systems . . . . . . . . . . . . . . . . . . . . . . . . . . . 115
Overview . . . . . . . . . . . . . . . . . . . . . . . . . . . . . . . . . . . .115
Wireless Print Server IP Address Configuration . . . . . .115
Other Wireless Print Server Configuration . . . . . . . . . .116
Direct Socket Interface Printing . . . . . . . . . . . . . . . . . .117
LPD Printing . . . . . . . . . . . . . . . . . . . . . . . . . . . . . . . . .118
LPD on System V . . . . . . . . . . . . . . . . . . . . . . . . . . . . .119
LPD on Linux . . . . . . . . . . . . . . . . . . . . . . . . . . . . . . . .122
LPD on BSD . . . . . . . . . . . . . . . . . . . . . . . . . . . . . . . . .123
Compliances . . . . . . . . . . . . . . . . . . . . . . . . . . . . . . i
Legal Information and Contacts . . . . . . . . . . . . . . v
iii

This chapter provides an overview of your Wireless Print
Server's features.
Features
Congratulations on the purchase of your new Wireless Print
Server. Your Wireless Print Server was designed to provide a
simple and efficient network printing solution. It is packed with
features, including:
• Versatility
The Wireless Print Server supports up to four protocols: TCP/IP,
SMB (Service Message Block), AppleTalk (EtherTalk), and
NetBEUI. It features an Ethernet interface port and operating
system support includes Unix, Linux, Appletalk, NetWare
(NDPS LPR printing), and Microsoft Windows.
CHAPTER 1
NTRODUCTION
I
• Easy Installation
The Wireless Print Server makes adding printers or plotters
to your network simple.
• Easy Setup
A number of utility programs are supplied to simplify setup.
For Windows 95/98/Me/NT/2000/XP users, the BiAdmin
program makes it easy to configure the Wireless Print Server
for a variety of network and server configurations.
• Web-based Interface
The Web-based interface provides an easy method of
configuration in TCP/IP networks to every model.
• Compact Size
This allows the Wireless Print Server to be used even
where space is limited.
1

Chapter 1 Introduction
• Remote Management Tools
A variety of software tools are provided. In most environments,
both the Wireless Print Server and attached bi-directional
printers can be configured remotely.
• Internet Printing Protocol (IPP) Support
The Wireless Print Server can act as an IPP (Internet Printing
Protocol) Server, allowing clients, suppliers, colleagues and
others to print to your printer from anywhere on the Internet.
Windows IPP Client software is also supplied.
• Wireless LAN Support
Wireless stations supporting the IEEE 802.11b standard can
interoperate with the Wireless Print Server. Both LAN and
WLAN users can print to the attached printer, but if the Print
Server has been set up for Infrastructure mode, they can
access it only separately. The Print Server should be used in
an Ad-Hoc wireless network to be able to access it at the same
time with both kind of connection (Cable and WLAN).
Note:
Refer to the Protocol Support and Feature
Support tables in Appendix A
the models, that support the different features.
for details about
2

Safety Instructions
For your own safety, and to protect your Wireless Print Server,
please observe the following safety advice.
1. Unplug this device from its power source before cleaning.
Use only a slightly dampened cloth for cleaning. Do not use
liquid or aerosol cleaners.
2. Avoid using this product near water. Exposure to water poses
an electric-shock hazard.
3. Do not place the Wireless Print Server on an unstable
surface. The device may fall causing serious damage
to the device.
Safety Instructions
4. This device should only be used with the power supply type
specified on the marking label. If you are not sure of the type
of your local power supply, consult your dealer or the local
power company.
5. Do not pinch, crimp or otherwise damage the power cord.
If exposed to foot traffic, ensures that the cable is properly
shielded and does not pose a tripping hazard.
6. If using an extension cord, make sure the total ampere rating
of the products using the cord does not exceed the extension
cord's ampere rating.
7. Do not attempt to service this device, as opening or removing
casing may expose you to dangerous voltage points or other
risks. Refer all servicing to qualified service personnel.
3

Chapter 1 Introduction
8. The Wireless Print Server should be serviced by qualified
service personnel under the following conditions:
• The power cord is damaged or frayed.
• Liquid has been spilled onto the product.
• The product has been exposed to rain or water.
• The product does not operate normally in accordance
with the operating instructions.
• The device has been dropped or the casing has been
damaged.
Package Contents
You should find the following items packaged with your Wireless
Print Server. If any items are missing, contact your dealer
immediately.
• The Wireless Print Server
• Power Adapter
• CD-ROM containing all support programs and this manual
• Quick Install Guide
4
Models
This manual covers the following Wireless Print Server models.
Details of the LEDs and connections are in this Chapter. Further
Models
details of each model are contained in Appendix A - Specifications
SMC2621W-P Wireless Print Server with Parallel Port
• 1 Parallel Printer Port.
• IEEE802.11b Wireless Station.
• 10/100BASE-T LAN connection.
.
5

Chapter 1 Introduction
SMC2621W-U Wireless Print Server with USB Port
• 1 USB Printer Port.
• IEEE802.11b Wireless Station.
• 10/100BASE-T LAN connection.
6

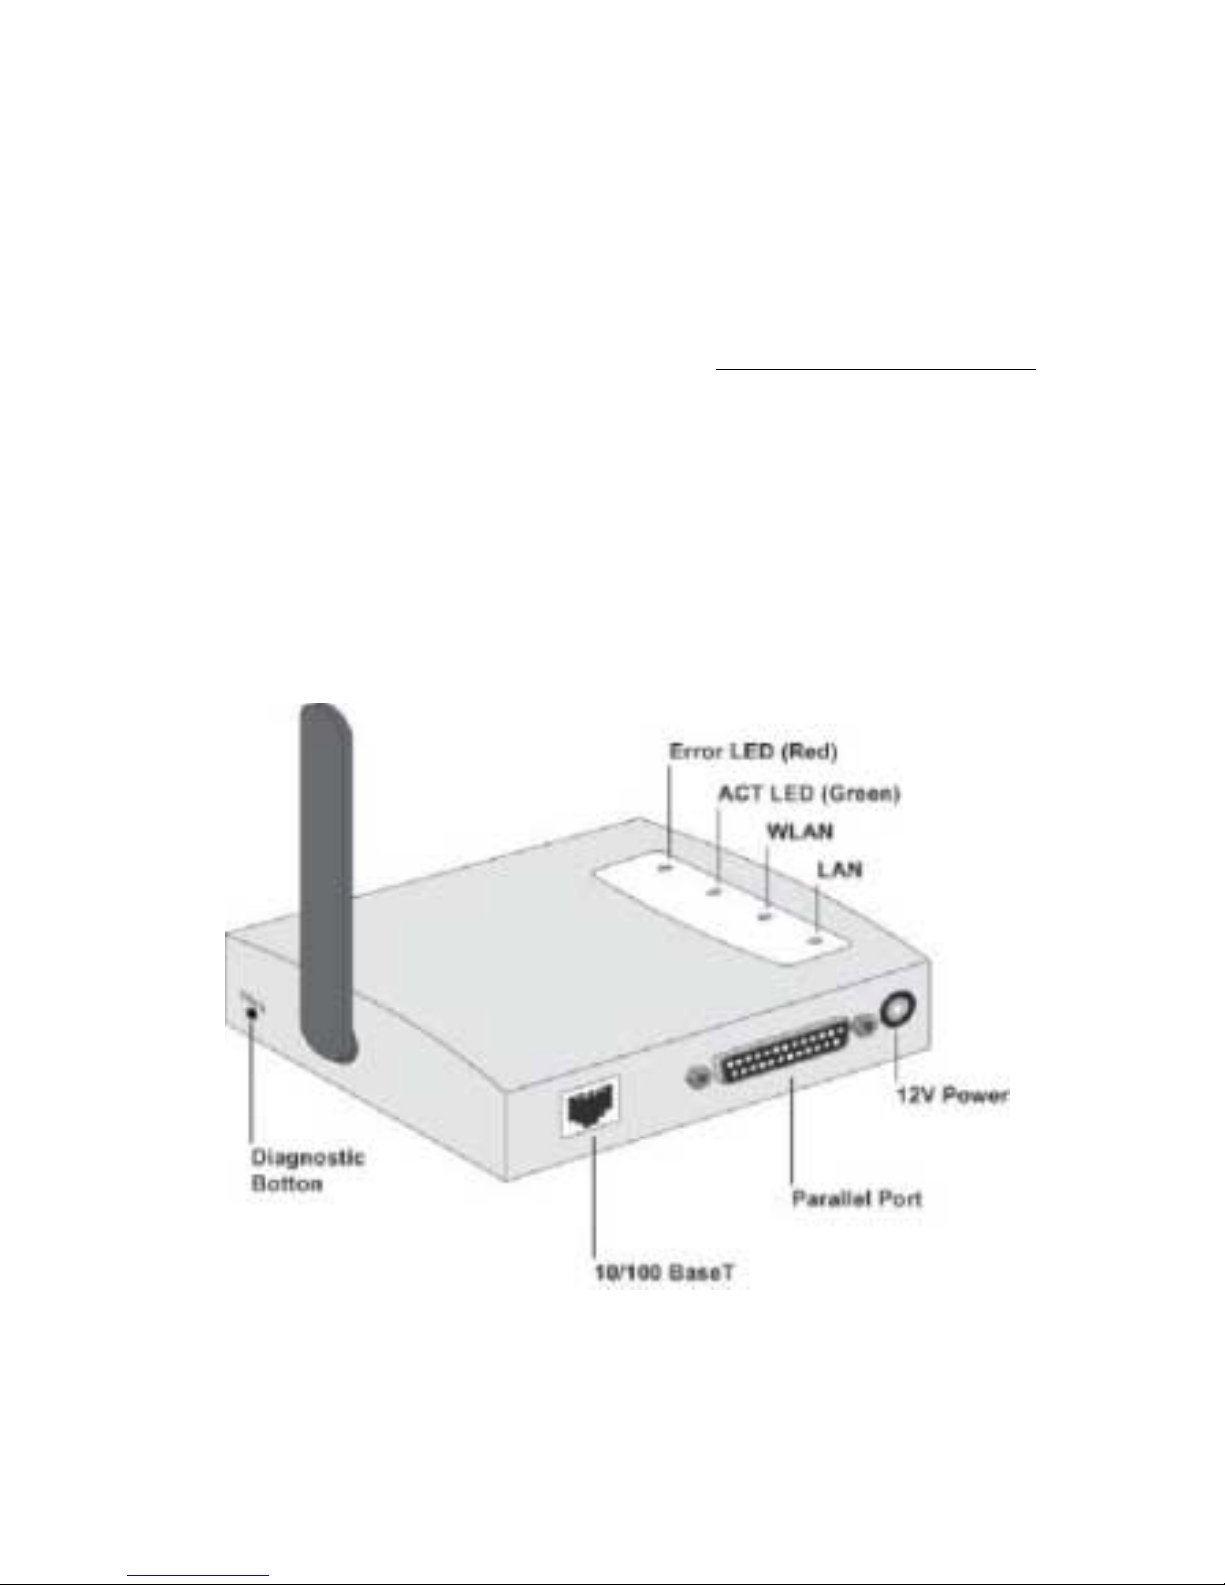
LED Indicators
All models have four LED indicators on the top. The Error
LED is red. The ACT LED is green. The LED indicator modes
are described in the following table.
LED Indicators
ACT LED
(Green)
Off Off No power.
On Off Normal operation – Idle.
Flashing Off Normal operation – transmitting or
On On Hardware error.
Flashing Flashing Firmware upgrade in progress.
LED Description
WLAN ACT
LAN ACT
ERR LED (Red) Status Description
receiving packets from the network.
Off – No Wireless connection available.
On – Wireless connection available.
Flashing – Transmitting or receiving data through the
Wireless LAN.
Off – No LAN connection.
On – LAN connection available.
Flashing – Transmitting or receiving data through the LAN.
7

Chapter 1 Introduction
Diagnostic Push Button
The Wireless Print Server is fitted with a Diagnostic Push Button.
The button is recessed; a pin or paper clip can be used to press
it. This button has 2 functions:
• Restore the factory default settings.
• Print a test page containing all current settings.
To restore the factory default settings:
1. Turn the Wireless Print Server OFF.
2. Press and hold the diagnostic button. While pressing the
button, switch the Wireless Print Server ON.
3.
If you continue pressing the b utton for 10 seconds , a diagnostic
page will be printed, showing the new (default) settings.
To generate a Diagnostic print out
1. Ensure that both the Wireless Print Server and the printer
attached to Port 1 are ON.
2. Press the diagnostic button, and hold it in for 2 seconds.
3. The test page, containing the current settings, will be printed.
Note:
PostScript printers are unable to print this page. If you
have a PostScript printer on Port 1, the test page will
not be printed.
8

CHAPTER 2
This chapter describes how to install the Wireless Print Server in
your Local Area Network.
Procedure
1. Preparation
• Ensure the power is OFF. Do not connect the Wireless Print
Server while power is On.
• Find the Default Server Name for your Wireless Print Server.
The Default Server Name is shown on a sticker on the base
of the device. It consists of 8 letters and/or digits. Record this
name; it may be needed during configuration.
LAN I
NSTALLATION
2. Connect the Printer or Printers
Connect the printer or plotter cable(s) to the appropriate port(s)
on the Wireless Print Server unit. Parallel port cables should be
less than 3 meters long.
9

Chapter 2 LAN Installation
3. Connect the Network Cable
Connect the network cable to the 10/100BASE-T LAN connector
on the Wireless Print Server.
Note:
This will disable the Wireless interface. The Wireless
interface cannot be used for initial configuration.
• After configuration, the LAN interface can be
disconnected if not required.
• To use both the LAN and Wireless interfaces, the
Wireless mode must be changed to "Ad-Hoc".
• To use the LAN interface, the LAN cable needs
to be inserted BEFORE powering ON.
4. Power Up
Plug in the power adapter cable and power up. Start-up will take
only a few seconds.
Use only the Power Supply unit provided with the device.
10
Power Supply units for different models are not
interchangeable.
5. Check the LEDs
• The Red Error LED should flash, then turn Off. When the
Error LED goes off and the ACT LED remains lit or flashes,
the Wireless Print Server is ready.
• For model SMC2621W-U, the Red Error LED will remain
flashing if the Wireless Print Server can't connect to the
USB printer.
• The LAN LED should be ON.
(The WLAN LED will be Off. This is normal, see the
explanation above.)

CHAPTER 3
SERVER CONFIGURATION
This chapter provides an overview of the configuration process.
Overview
The Wireless Print Server is designed to support many different
platforms, and the configuration required would depend upon the
environment in which it is installed.
• The Wireless Print Server usually requires configuration, but
if there's a DHCP server on your network, then the device is just
plug-and-play. A Windows-based setup Wizard is also provided
on the CD-ROM to simplify this task.
W
IRELESS PRINT
• PCs wishing to use the printer attached to the Wireless Print
Server always require configuration. See Chapter 4 - Client PC
Configuration
for details.
• If you wish to use a queue-based printing system using
Windows NT Server/Windows 2000/Windows XP, the
Network Server must be configured as detailed in Appendix B Windows Server Configuration. However, it is not necessary
to use a Network Server-based queue; client PCs can print
directly to the Wireless Print Server using the Peer-to-peer
Printing installed by the User setup option on the CD-ROM.
11

Chapter 3 Wireless Print Server Configuration
Configuration Methods
The following methods are available to perform the required Print
Server configuration:
• Windows-based Wizard - see below for details.
• BiAdmin management utility program - see Chapter 8
for details.
• Web-based setup - see Chapter 6 for details.
Advanced Configuration and Management
The BiAdmin management utility is provided for advanced
configuration and management. This program is installed by
default when the [Administrator] install option is chosen. See
Chapter 5 for details on using BiAdmin.
Using the Windows Wizard
The Windows-based Wizard is supplied on the CD-ROM, and runs
on Windows 95, 98, NT4.0, ME, Windows 2000 and Windows XP.
Using this Wizard is the recommended method to configure the
Print Server.
It can be used to configure the Wireless Print Server for your
Network environment, even if the Print Server does not have
a valid IP address.
Procedure
1. Insert the supplied CD-ROM into your drive. If the setup
program does not start automatically, run SETUP.exe in
the root folder.
12
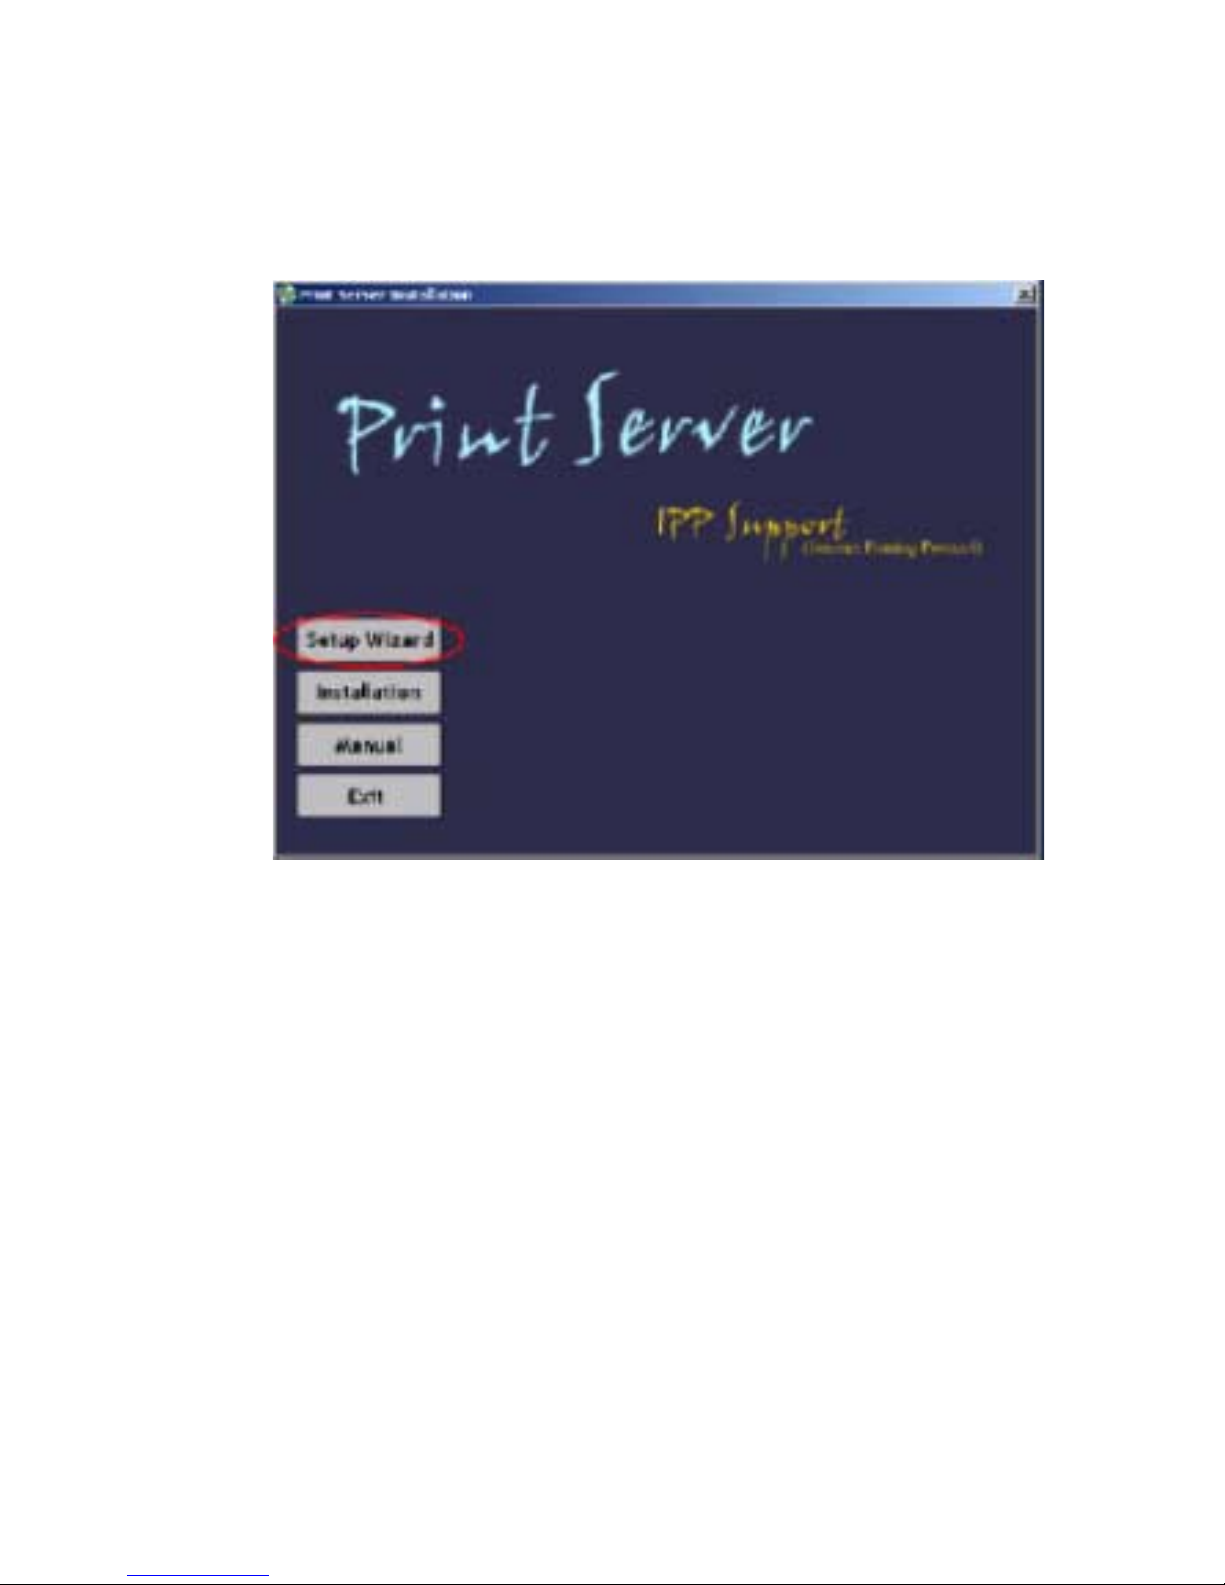
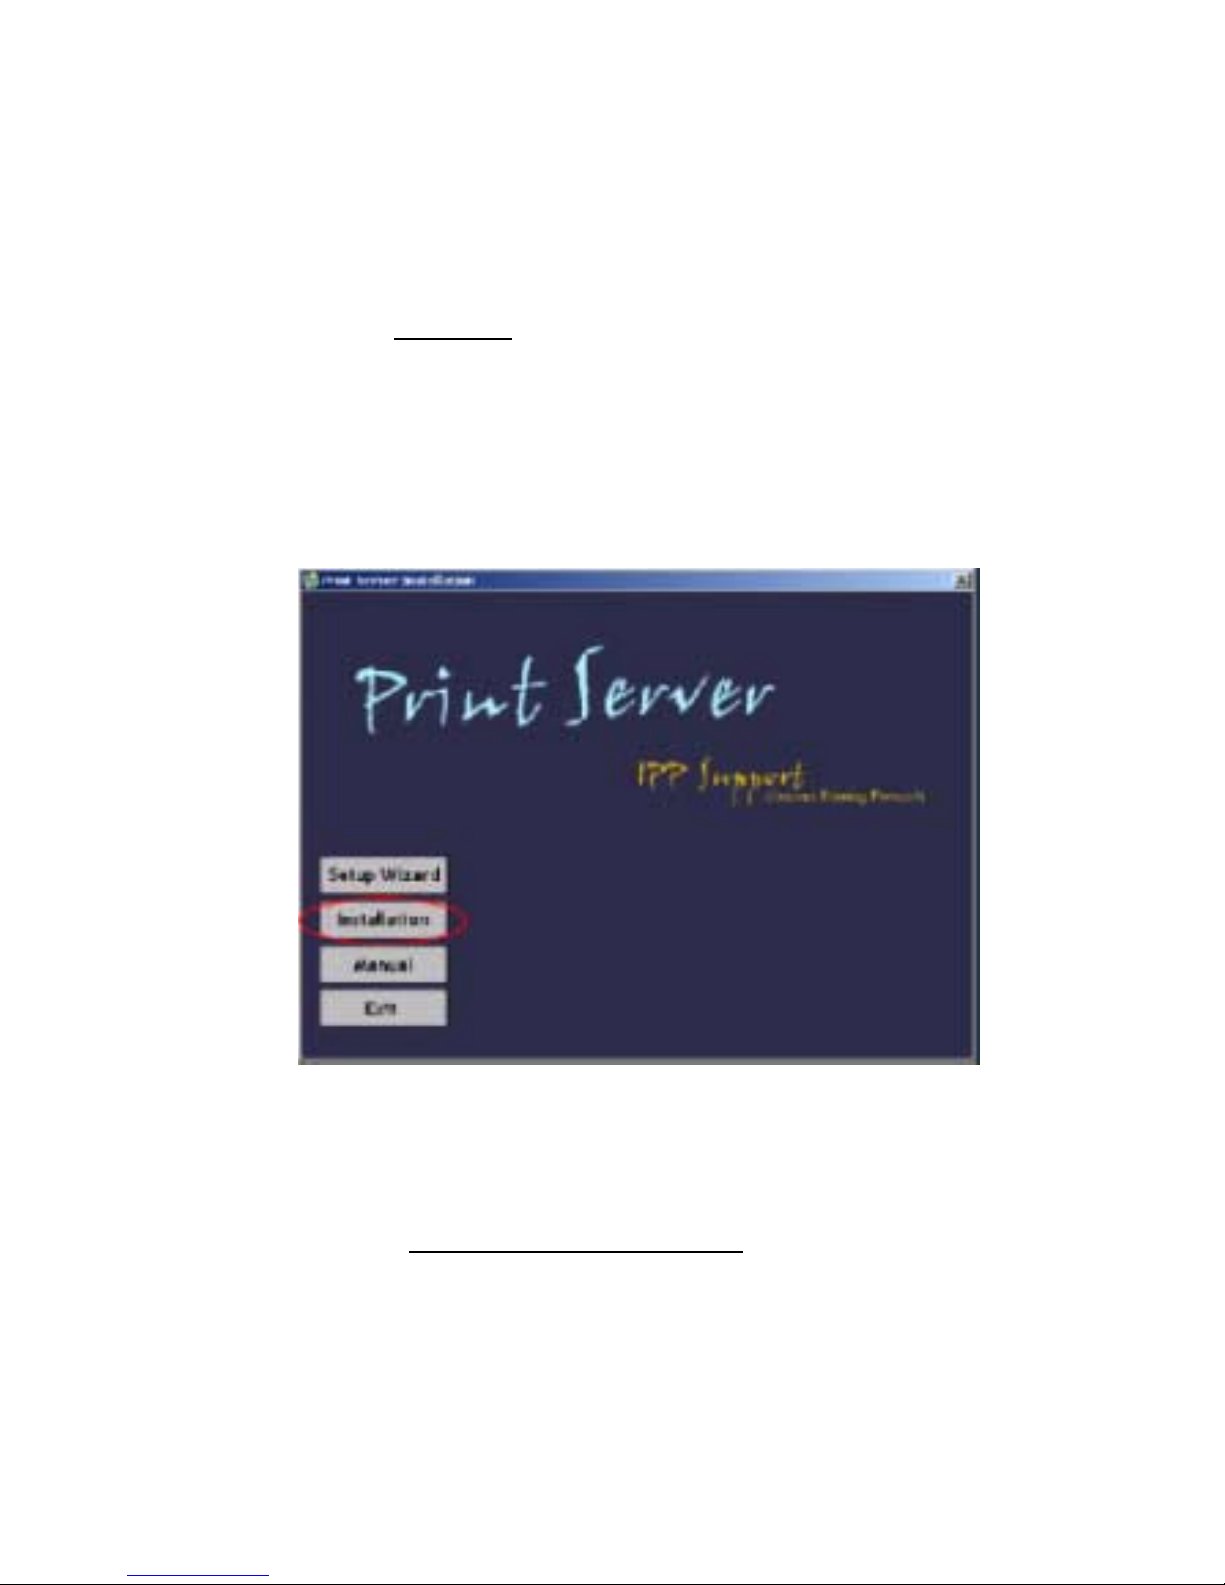
Using the Windows Wizard
2. On the first screen, shown below, click [Setup Wizard].
Figure 1. Wireless Print Server Screen
3. Click [Next] on the first screen of the Wizard, to view a list
of Wireless Print Servers on your LAN.
4. Select your new Wireless Print Server, then click [Next] to
continue.
5. Enter the required data on the following screen.
• Name of the Print Server can be changed if you wish.
• Comment is optional.
• Select or enter the Workgroup name for this Wireless
Print Server.
13

Chapter 3 Wireless Print Server Configuration
6. Click [Next] to configure the [TCP/IP] Screen.
• Select [Obtain IP Address automatically] if your LAN
has a DHCP Server, otherwise select [Fixed IP Address].
• For [Fixed IP Address], enter an unused address from
the range used on your LAN, or click the [Suggest New
Values] Button.
Use the same [Network Mask] and [Gateway] as PCs
on your LAN.
7. On the Wireless Screens, the settings should be set to match
your other Wireless Stations. For details about each setting,
refer to the following section Wireless Configuration.
8. Click [Finish] to save the data to the Wireless Print Server.
Note:
If the desired Wireless Print Server is not listed:
To install the Wizard on your PC, use the
[Installation] option.
• Check all cables to the Wireless Print Server.
• Check the Wireless Print Server's LEDs:
• The Error LED should be OFF and the ACT LED should
be ON or flashing.
• The LAN LED should be ON.
• Check that your PC and the Wireless Print Server are on the
same LAN segment. (If you don't have a Router or Gateway
on your LAN, you only have 1 segment.)
• Check that your PC has either the TCP/IP or NetBEUI network
protocols installed. See Checking your Network Protocols
(Windows 9x) in Chapter 4
for details.
Note:
For the configuration TCP/IP protocol has to be used.
14

Wireless Configuration
Wireless Mode
The Wireless Print Server is a Wireless station, NOT an access
point. Like other Wireless stations, they have 3 modes:
• 802.11 Ad-Hoc mode
No Access Point is used, Wireless stations communicate
directly with each other. This is the current standard.
• Ad-Hoc mode
No Access Point is used, Wireless stations communicate
directly with each other. This is the older standard, and
equires that each Wireless station is set to use the same
r
Channel. (In 802.11 Ad-Hoc mode, a Wireless station will
scan all channels to find compatible Ad-Hoc groups it
can join.)
Wireless Configuration
Note:
Of the two (2) Ad-Hoc modes, 802.11 Ad-Hoc
mode is recommended. If your Wireless LAN
Card doesn't provide 802.11 Ad-Hoc mode, try
Ad-Hoc mode on the PC and 802.11 Ad-Hoc
on the Wireless Print Server. If this fails, select
Ad-Hoc mode on the Wireless Print Server.
• Infrastructure (Default)
All Wireless stations connect to the Access Point. This allows
connection to both other Wireless stations and the wired LAN.
Note:
To use both the LAN and Wireless interfaces,
the Wireless mode must be set to Ad-Hoc. In
Infrastructure mode, connecting a LAN cable
will disable the Wireless interface.
15

Chapter 3 Wireless Print Server Configuration
Required Configuration
SSID
Channel
Ad-Hoc Mode
802.11 Ad-Hoc Mode
If 802.11 Ad-Hoc mode is
configured, the Wireless Print
Server will join any group with
the same SSID.
f there's no Ad-Hoc group available
I
on the environment, the Wireless
Print Server will create the group
by the SSID number value it
configured.
In Ad-Hoc mode, the Wireless Print
Server will join any group with the
same Channel number.
In 802.11 Ad-Hoc mode, the Print
Server will scan all Channels to look
for compatible groups it can join.
If there is no existing Ad-Hoc group
available, the Wireless Print Server
will create the group using its own
Channel number.
Infrastructure Mode
Must match the Access
Point.
Access Point sets the
Channel used.
Wireless stations
automatically locate
the correct channel.
WEP
Settings
Must match the other Wireless
stations.
Must match the Access
Point.
16

C
LIENT
The chapter details the client configuration required on LAN
clients to use the printer or printers attached to the Wireless
Print Server.
Overview
Before performing client configuration, the Wireless Print Server
must be installed on your LAN, and configured as described in
PC C
CHAPTER 4
ONFIGURATION
Chapter 3
printer must be powered ON.
Printing Methods
The Wireless Print Server supports a number of printing methods:
. Both the Wireless Print Server and the attached
• Peer-to-peer Printing
It means that the print jobs are stored (queued) on your PC, and
sent directly to the Wireless Print Server when it is available.
• Server-based Print Queue
It means that all print jobs are stored (queued) on the Network
Server (e.g. Windows NT/2000) and then sent to the Wireless
Print Server. This allows the Network Administrator to modify
the Print Queue. For example, an important job can be moved
to the head of the queue.
• Windows SMB printing
It is a Microsoft standard for using a Network Printer. No
additional software needs to be installed on your Windows
PC, and printing from MS-DOS programs is supported.
However, because the Wireless Print Server cannot store
files, large print jobs may cause problems.
17

Chapter 4 Client PC Configuration
• AppleTalk
AppleTalk is also supported, and normally no configuration
of the Wireless Print Server is required. See the Macintosh
(AppleTalk) section of this chapter for details of client
configuration.
Which printing method should I use?
• If using Windows 95, 98, NT, Me, 2000, or XP, the easiest
method to use is Peer-to-peer Printing.
•
If using Windows, and you need to print from MS-DOS programs,
or you don't wish to install additional software, use SMB.
However, SMB is not suitable for large, complex documents,
so if you need this as well as MS-DOS printing, you should
install BOTH Peer-to-peer Printing and SMB printing. MS-DOS
programs can use the SMB printer, Windows programs should
use Peer-to-peer Printing.
•
If your LAN has Network Servers (e.g. Windows NT, Windows
2000 Server) use the method advised by your Network
Administrator. The Wireless Print Server can print via
queue located on a Network server, if desired.
a
• Unix users
Refer to the Unix Manual on the CD-ROM, in the Manual/Unix
directory.
• Macintosh users
Refer to the Macintosh section of this chapter.
Checking your Network Protocols (Windows 9x)
Your PC must have EITHER the TCP/IP or NetBEUI protocols
installed. (All versions of Windows after Windows 95 have TCP/IP
installed by default.)
• If using the Peer-to-peer Printing, the installation program will
check this for you.
18
Overview
• If using other methods, you must check manually, as follows:
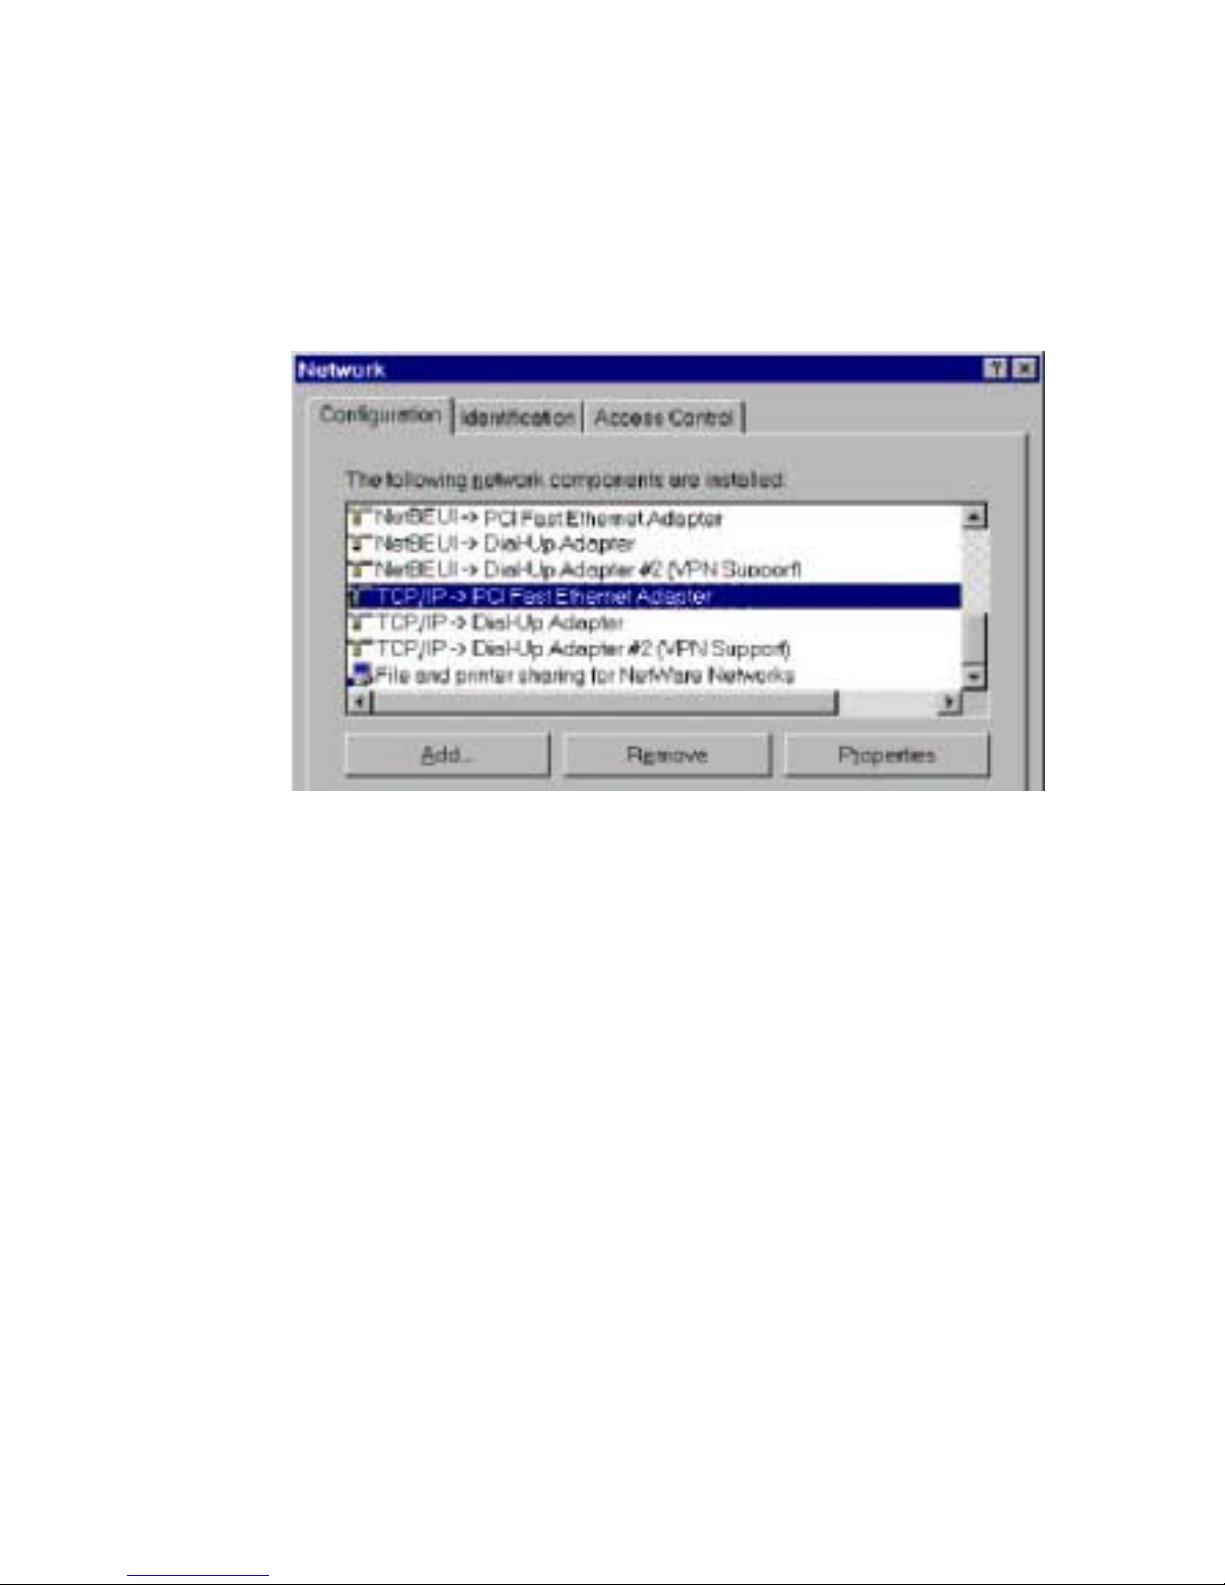
1. Select the [Settings – Control Panel – Network] option on the
[Start] Menu. You should see a screen like the one following:
Figure 2. Network Configuration
• The top line in the list [NetBEUI -> PCI Fast Ethernet Adapter]
indicates that the NetBEUI protocol is installed on this PC.
Your PC will show the name of your Network card rather
than "PCI Fast Ethernet Adapter".
• The highlighted line [TCP/IP -> PCI Fast Ethernet Adapter]
indicates that TCP/IP is installed. Your PC will show the name
of your Network card rather than PCI Fast Ethernet Adapter.
2. If neither line is present:
• Install the NetBEUI protocol by selecting [Add – Protocol –
Microsoft – NetBEUI – OK]. You may be prompted for your
Windows CD-ROM.
19
Chapter 4 Client PC Configuration
• If required, you can also install TCP/IP. However, depending
on your LAN environment, TCP/IP may require further
configuration.
3. If either protocol is already installed, proceed with installation.
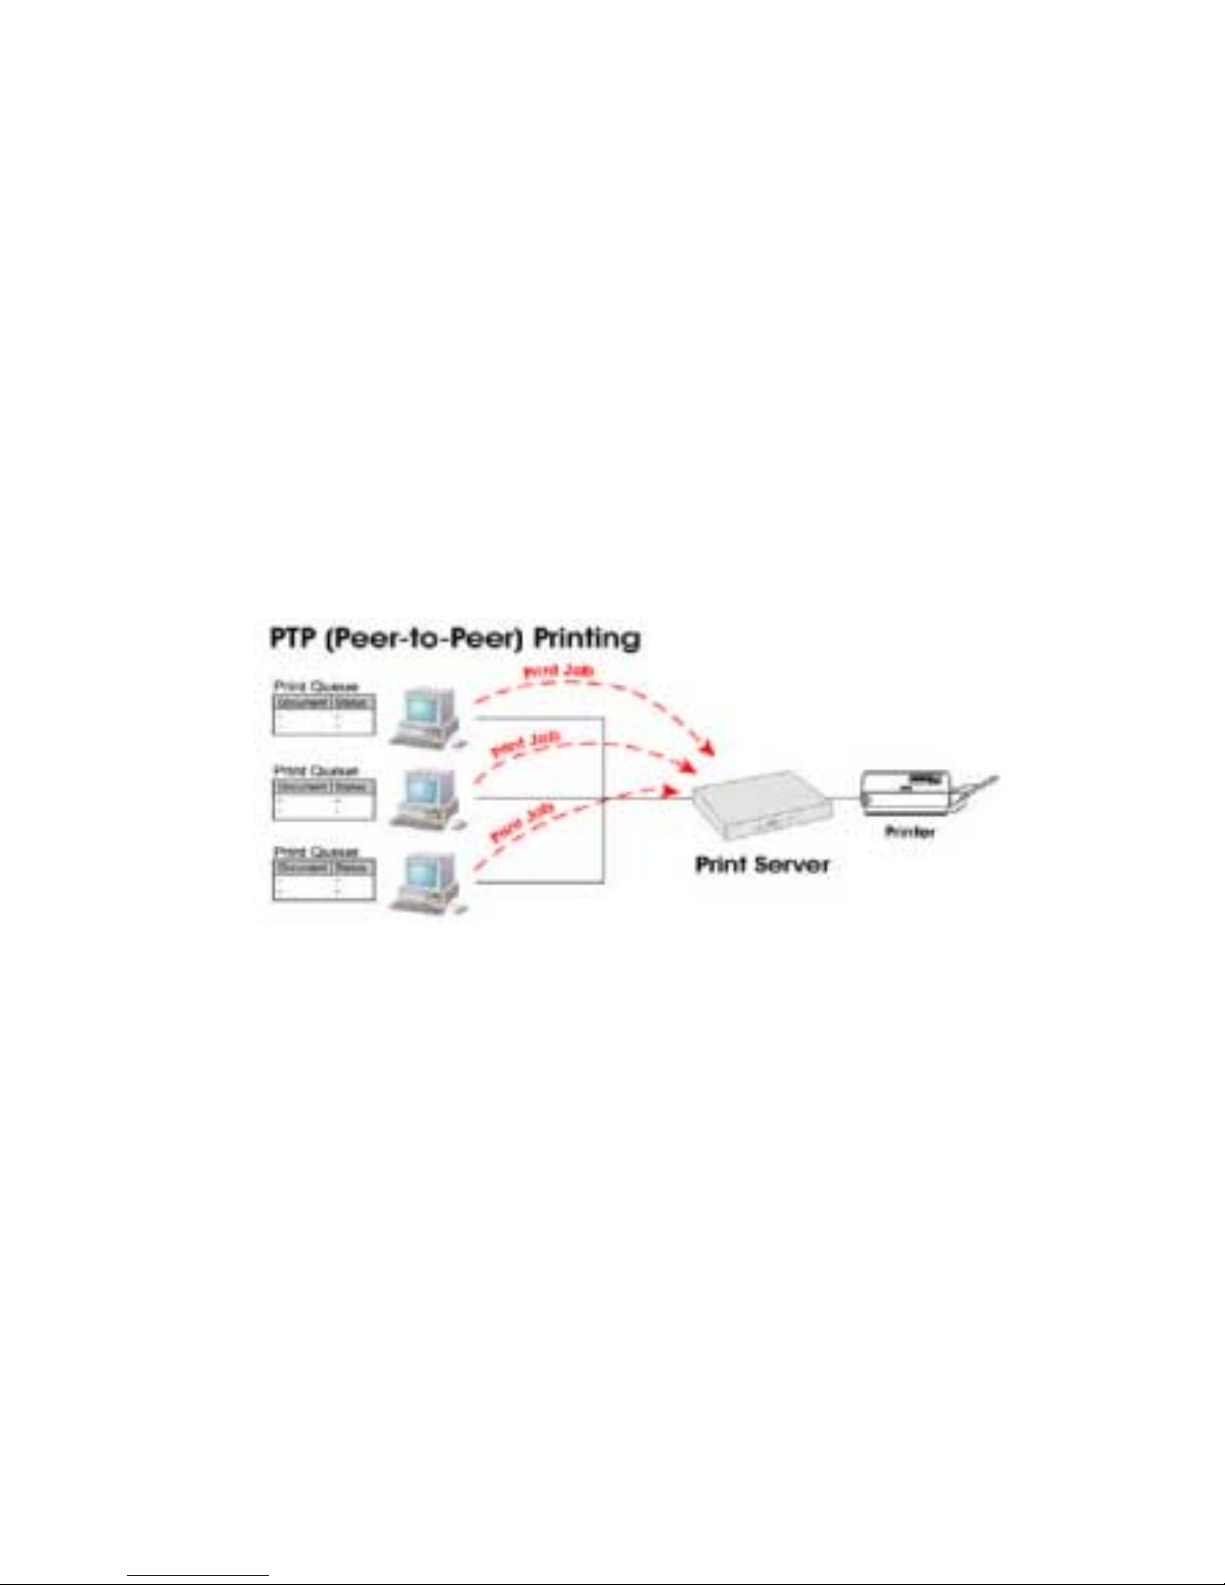
Windows Peer-to-peer Printing
With this printing method, print jobs are stored (queued) on
your PC, and then sent to the Wireless Print Server when it is
available.
Windows 2000 & XP require no additional software.
For other versions of Windows, the supplied PTP (Peer-to-Peer)
Printer Port software must be installed on each PC.
Windows 2000/XP Setup
The recommended printing method is to use LPR, as follows:
1. Open your [Printers] folder, right-click the desired printer and
select [Properties].
20
Figure 3. Peer-to-Peer Printing
Windows Peer-to-peer Printing
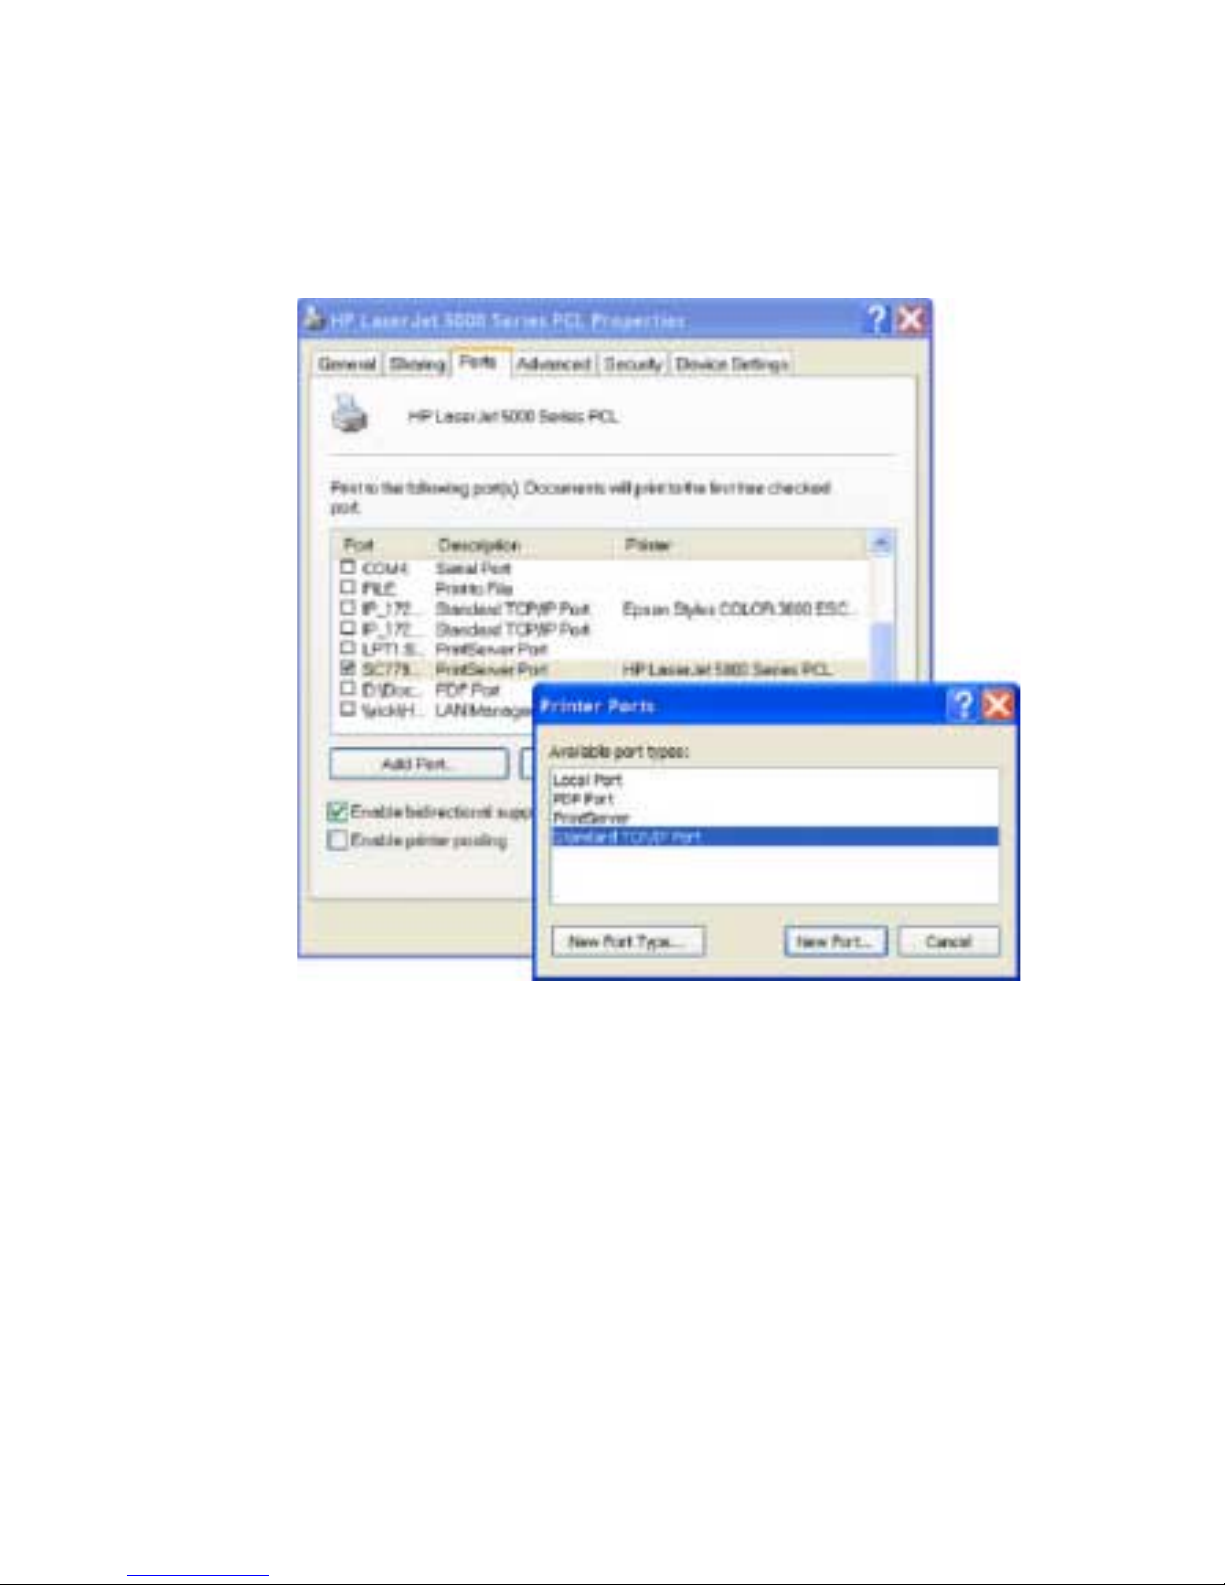
2. When prompted, choose the [Ports] tab and click the
[Add Port] button.
Figure 4. Printer Ports Screen
21
Chapter 4 Client PC Configuration
3. Choose [Standard TCP/IP Port], then click [New Port].
3.
3.
3.
3.
3.
3.
3.
3.
Figure 5. Add Port Screen
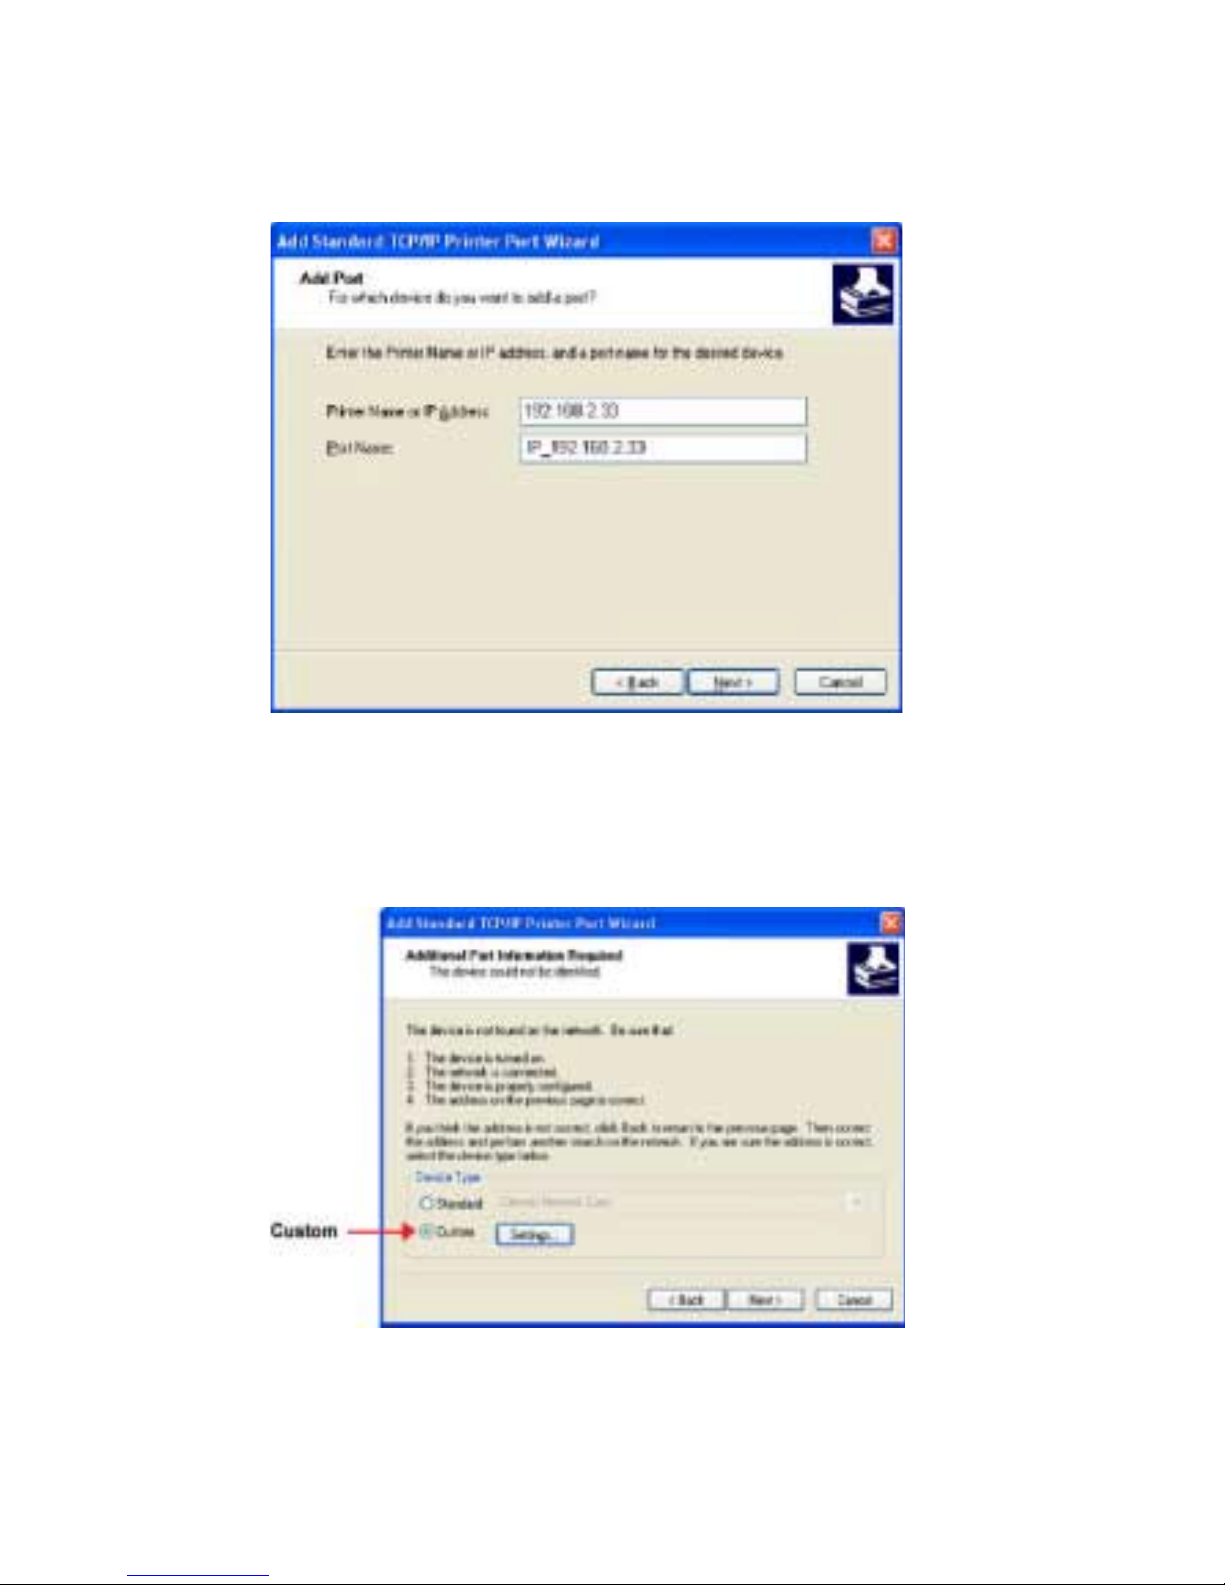
4.
On the [Add Standard TCP/IP Printer Port Wizard] screen
above, enter the IP Address of the Print Server in the
[Printer Name or IP Address] field, then click [Next].
4.
4.
4.
4.
4.
4.
Figure 6. Additional Port Information Screen
22

Windows Peer-to-peer Printing
5.
On this screen, select [Custom], and click the [Settings] button.
Figure 7. Port Settings Screen (LPR byte counting should
b
be enabled if it is needed by the printer)
6. On the above screen:
• Select [LPR] in the [Protocol] section.
• Enter a [Queue Name] (L1 for Port 1, L2 for Port 2 if the
Wireless Print Server has 2 printer ports).
• Ensure the [LPR Byte Counting Enabled] setting is
Checked.
• Click [OK] to confirm your changes and close this screen.
7. Follow the prompts to complete the Wizard.
23
Chapter 4 Client PC Configuration
Windows 9x/ME Setup
Before performing the following procedure, the Wireless Print
Server must be installed on your LAN, and configured as
described in Chapter 3. Both the Wireless Print Server and
the attached printer should be powered ON.
1. Insert the supplied CD-ROM into your drive. If the setup
program does not start, run SETUP.exe in the root folder.
2. Click the [Installation] button, then select the [User Install].
3. Follow the prompts to complete the installation of the
Peer-to-peer Printer Port Driver. (Refer to the Windows
section of Chapter 8 - Troubleshooting if there is a problem
with the installation.)
4. The Print Driver Setup will then run.
In future, you can use [Start – Programs – PrintServer Driver –
Printer Port Setup] to run the program again.
24
Figure 8. Installation Screen
PTP Printer Port Setup
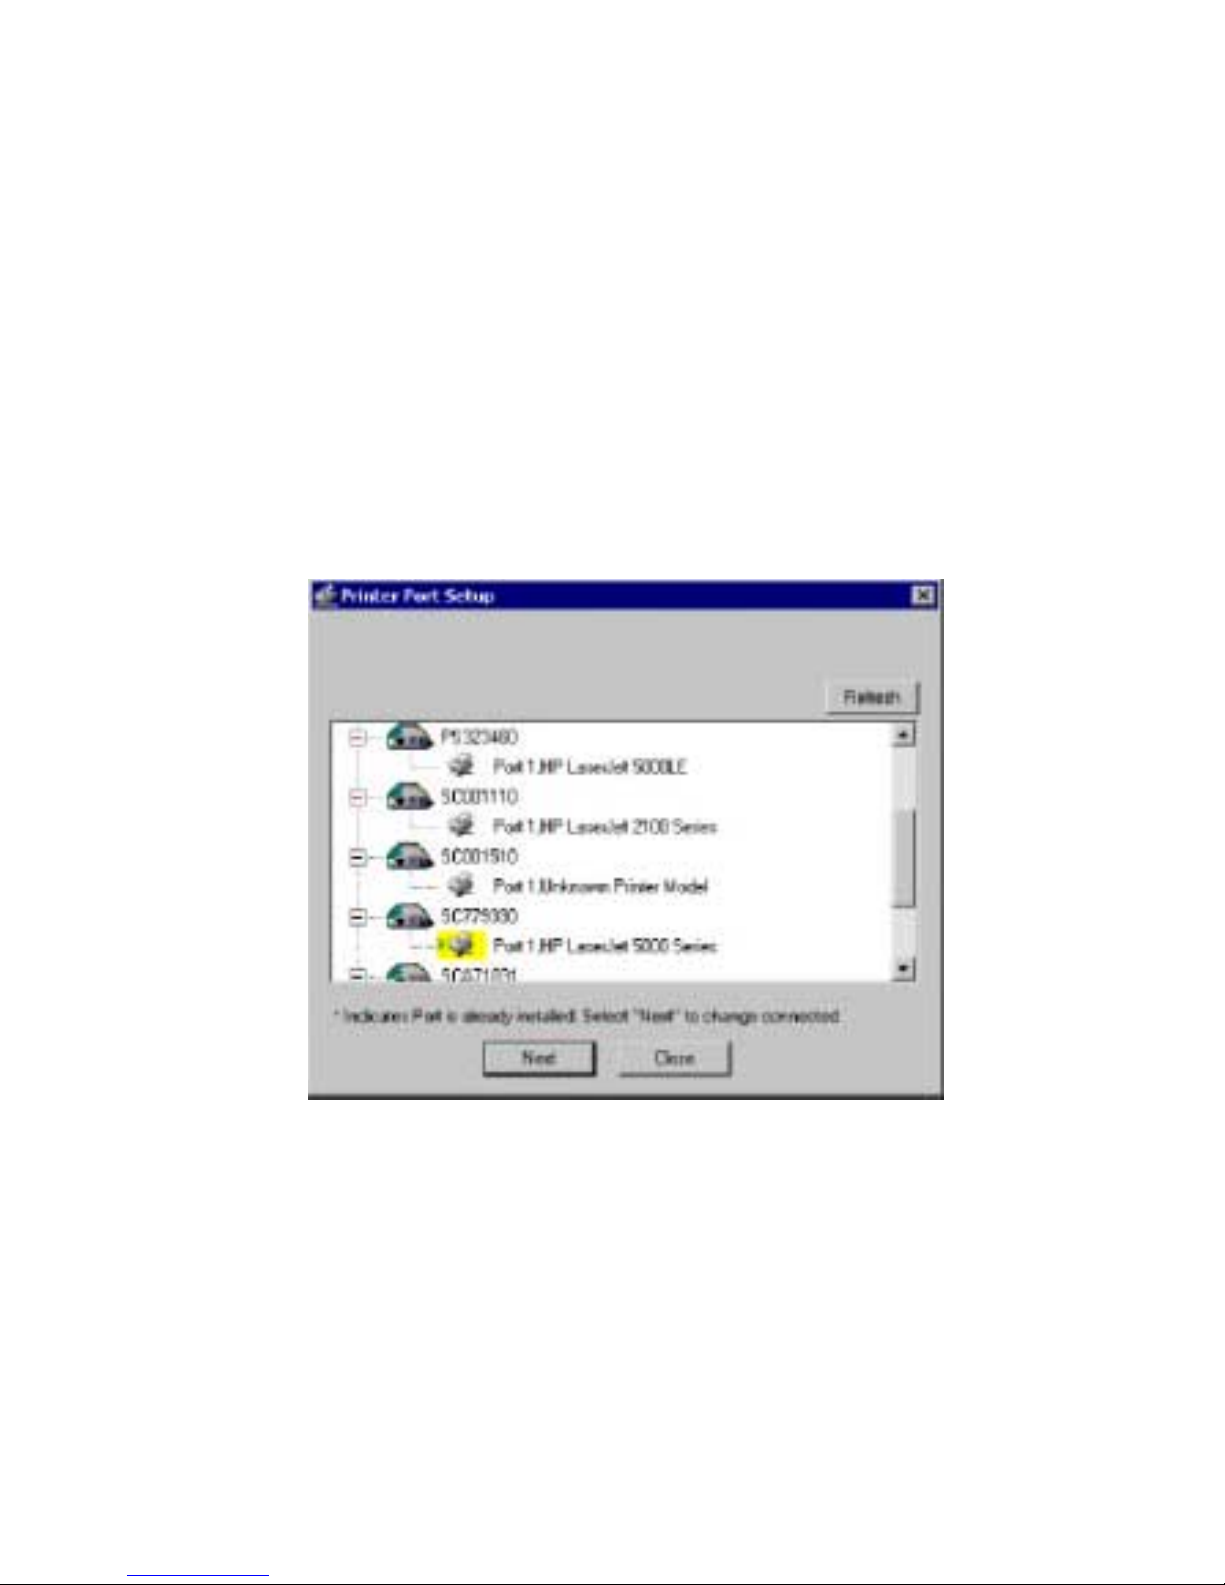
1. The program will search for Printer Servers on the network,
and a screen like the following will be displayed.
• If desired, click [Refresh].
•
The name of the attached printer will be displayed if
possible. If [No printer] is displayed, check that the
printer is properly connected and powered on.
Windows Peer-to-peer Printing
Figure 9. Print Port Setup (Peer-to-peer Printing)
25
 Loading...