

Page 1

Comcast Wireless Cable Modem Gateway
`
FastFind Links
Getting to Know the Gateway
SMCD3GNV User Manual
Installing the Gateway
Preconfiguration Guidelines
Configuring the Gateway
Configuring the Gateway’s mso Interface
Page 2

SMC Networks
20 Mason
Irvine, CA. 92618
U.S.A.
Copyright © 2012 SMC Networks
All Rights Reserved
Information furnished by SMC Networks, Inc. (SMC) is believed to be accurate and reliable. However,
no responsibility is assumed by SMC for its use, or for any infringements of patents or other rights of
third parties which may result from its use. No license is granted by implication or otherwise under
any patent or patent rights of SMC. SMC reserves the right to change specifications at any time
without notice
No part of this publication may be reproduced or transmitted in any form or by any means, electronic
or mechanical, including photocopying and recording, or stored in a database or retrieval system for
any purpose without the express written permission of SMC.
Microsoft and Windows are registered trademarks of Microsoft Corporation. Apple and Macintosh are
registered trademarks of Apple, Inc. All other brands, product names, trademarks, or service marks
are property of their respective owners.
This product (Model :SMCD3G2GNV) includes software code developed by third parties, including
software code subject to the GNU General Public License (“GPL”) or GNU Lesser General Public
License (LGPL”). As applicable, the terms of the GPL and LGPL, and information on obtaining access
to the GPL code and LGPL used in this product, are available to you at http://gpl.smc.com/. The GPL
code and LGPL code used in this product is distributed WITHOUT ANY WARRANTY and is subject to
the copyrights of one or more authors. For details, see the GPL Code and LGPL Code for this product
and the terms of the GPL and LGPL.
SMCD3GNV Wireless Cable Modem Gateway User Manual
May 8, 2012
Page 3

Contents
Preface .................................................................................................................... vii
Key Features ............................................................................................................. viii
Document Organization .............................................................................................. ix
Document Conventions .............................................................................................. ix
Safety and Warnings ............................................................................................ ix
Typographic Conventions ............................................................................................ x
1 Getting to Know the Gateway ............................................................................ 11
Unpacking Package Contents ................................................................................... 12
System Requirements ............................................................................................... 12
Front Panel ................................................................................................................ 13
Rear Panel ................................................................................................................ 15
Top Panel .................................................................................................................. 16
Bottom Panel ............................................................................................................. 16
Using the Reset Button ............................................................................................. 17
2 Installing the Gateway ........................................................................................ 18
Finding a Suitable Location ....................................................................................... 19
Installing a Battery ..................................................................................................... 20
Connecting to the LAN .............................................................................................. 21
Connecting the WAN ................................................................................................. 22
Connecting to the Public Telephone Network ........................................................... 22
Powering on the Gateway ......................................................................................... 23
3 Preconfiguration Guidelines .............................................................................. 24
Configuring Your Computer for TCP/IP ..................................................................... 25
Configuring Microsoft Windows 2000 .................................................................. 25
Configuring Microsoft Windows XP ..................................................................... 26
Configuring Microsoft Windows Vista .................................................................. 27
Configuring Microsoft Windows 7 ........................................................................ 30
Configuring an Apple
Disabling Proxy Settings ........................................................................................... 34
Disabling Proxy Settings in Internet Explorer ...................................................... 34
Disabling Proxy Settings in Firefox ...................................................................... 34
Disabling Proxy Settings in Safari ....................................................................... 35
Disabling Firewall and Security Software .................................................................. 35
Confirming the Gateway’s Online Status ................................................................... 35
®
Macintosh® Computer ..................................................... 33
iii
SMCD3GNV Wireless Cable Modem Gateway User Manual
Page 4

Contents
Confirming Your Computer’s Link Status .................................................................. 35
4 Configuring the Gateway ................................................................................... 36
Accessing the Gateway’s Web Management ............................................................ 37
Understanding the Web Management Interface Menus ............................................ 38
Web Management Interface Menus .......................................................................... 40
Viewing Information About Your Network and Connected Devices ..................... 42
Viewing Information About Your Network and Connections ................................ 43
Viewing the Gateway’s Connection Status .................................................... 44
Viewing Comcast Network Information .......................................................... 46
Viewing and Editing Your Local IP Configuration .......................................... 47
Viewing and Editing Wireless Configuration .................................................. 49
Configuring Firewall Settings ............................................................................... 53
Viewing System Software Settings ...................................................................... 55
Configuring System Hardware ............................................................................. 56
Viewing System Hardware Settings .............................................................. 56
Viewing Battery Settings ................................................................................ 57
Viewing LAN Ethernet Settings ..................................................................... 58
Viewing Wi-Fi Settings ................................................................................... 59
Configuring Your Home Network ......................................................................... 60
Working with Connected Devices ........................................................................ 64
Manually Adding Computers with Static IP Addresses to the Wireless
Network ............................................................................................ 65
Configuring Parental Controls ............................................................................. 68
Blocking Sites and Keywords, and Selecting Trusted Computers ................. 68
Blocking Services .......................................................................................... 75
Managing Devices and Access Types ........................................................... 78
Generating Reports ....................................................................................... 82
Using Advanced Features ................................................................................... 84
Enabling or Disabling Port Forwarding .......................................................... 84
Enabling or Disabling Port Triggering ............................................................ 87
Enabling or Disabling Port Blocking ..............................................................
overing Devices ...................................................................................... 92
Disc
Troubleshooting the Gateway .............................................................................. 94
Defining Log Filters ........................................................................................ 94
Testing Connectivity to Destination and IP Addresses .................................. 96
Restoring or Rebooting the Gateway ............................................................ 98
Changing the Login Password ....................................................................... 99
91
5 Configuring the Gateway’s mso Interface ...................................................... 100
Accessing the Gateway’s Web Management .......................................................... 101
Understanding the Web Management Interface Menus .......................................... 102
iv
SMCD3GNV Wireless Cable Modem Gateway User Manual
Page 5

Contents
Web Management Interface Menus ........................................................................ 104
Configuring the Gateway Settings ..................................................................... 106
Viewing At-a-Glance Configuration Settings................................................ 107
Configuring Email Notifications .................................................................... 108
Configuring Connections ................................................................................... 110
Viewing the Gateway’s Connection Status .................................................. 111
Viewing and Editing Your Local IP Configuration ........................................ 112
Viewing and Editing Wireless Configuration ................................................ 114
Viewing XFINITY Network Information ........................................................ 121
Configuring Firewall Settings ............................................................................. 123
Viewing System Software Settings .................................................................... 125
Configuring Hardware ........................................................................................ 126
Viewing System Hardware Settings ............................................................ 127
Viewing Battery Settings .............................................................................. 128
Viewing LAN Ethernet Settings ................................................................... 129
Viewing Wi-Fi Settings ................................................................................. 130
Configuring Your Home Network ....................................................................... 131
Working with Connected Devices ...................................................................... 135
Manually Adding Computers with Static IP Addresses ................................ 136
Manually Adding Wireless Clients ............................................................... 139
Configuring Parental Controls ........................................................................... 142
Blocking Sites and Keywords, and Selecting Trusted Computers ............... 142
Blocking Services and Selecting Trusted Computers .................................. 148
Managing Devices and Access Types ......................................................... 152
Generating Reports ..................................................................................... 156
Using Advanced Features ................................................................................. 157
Enabling or Disabling Port Forwarding ........................................................ 157
Enabling or Disabling Port Triggering .......................................................... 160
Remote Management .................................................................................. 163
Configuring DMZ Settings ...........................................................................
Configuri
ng Routing Settings ....................................................................... 167
165
Configuring Dynamic DNS Settings ............................................................. 169
Discovering Devices .................................................................................... 171
Troubleshooting the Gateway ............................................................................ 173
Generating Logs .......................................................................................... 174
Testing Connectivity to Destination and IP Addresses ................................ 175
Restoring or Rebooting the Gateway .......................................................... 177
Changing the Login Password ..................................................................... 178
6 Troubleshooting Procedures ........................................................................... 179
Basic Troubleshooting Procedures ......................................................................... 180
Advanced Troubleshooting Procedures .................................................................. 182
v
SMCD3GNV Wireless Cable Modem Gateway User Manual
Page 6

Contents
Troubleshooting Physical Network Problems .................................................... 182
Troubleshooting Configuration Problems .......................................................... 183
Determining Your IP Address ...................................................................... 183
Troubleshooting Software-Interaction Problems ............................................... 187
Specific Troubleshooting Procedures ...................................................................... 188
Unable to Log In to Gateway ............................................................................. 188
Local Networked Devices Unable to Access the Gateway ................................ 188
Unable to Access the Internet ........................................................................... 189
Unable to Access Networked Devices ............................................................... 191
Using the Ping Utility to Troubleshoot ............................................................... 191
Testing the Path from a Computer to the Gateway ..................................... 191
Testing the Path from a Computer to the Internet ....................................... 192
Using Ping on a Macintosh .......................................................................... 193
Gateway Disconnects from the Internet ............................................................ 194
Slow Web Browsing ........................................................................................... 195
Unable to Configure Port Forwarding ................................................................ 195
Unable to Use Pass-thru VPN ........................................................................... 195
Gateway is Not Passing DHCP Address to a computer .................................... 195
Determining a Computer’s MAC Address .......................................................... 196
Microsoft Windows ...................................................................................... 196
Apple Macintosh Windows OS X ................................................................. 197
Wireless Troubleshooting ........................................................................................ 198
Checking the Gateway’s Wireless Connection .................................................. 198
Wireless Range is Low ...................................................................................... 198
Unable to Connect to a Wireless Network Using Windows XP and Vista ......... 199
Achieving Optimal Wireless Performance ......................................................... 201
Guidelines for Improving Your Wireless Network .............................................. 201
Wireless IEEE 802.11n Guidelines .................................................................... 202
Application and Gaming Troubleshooting ............................................................... 204
Connecting to Messenger Services Behind the Gateway .................................
Connecting
to America Online Behind the Gateway ......................................... 204
204
Connecting to XBox Live, PSP, and Nintendo WFC ......................................... 204
Appendix A - Specifications ............................................................................... 205
Appendix B - Compliances ................................................................................. 209
Index ..................................................................................................................... 211
vi
SMCD3GNV Wireless Cable Modem Gateway User Manual
Page 7

Preface
The SMCD3GNV Wireless Cable Modem Gateway is the ideal all-in-one wired and wireless
solution for the home or business environment. SMC is proud to provide you with a powerful,
yet simple communication device for connecting your local-area network (LAN) to the
Internet.
This user manual contains all the information you need to install and configure your new
SMCD3GNV Wireless Cable Modem Gateway.
vii
SMCD3GNV Wireless Cable Modem Gateway User Manual
Page 8

Preface
Key Features
The following list summarizes the Gateway’s key features.
Integrated, CableLabs-compliant DOCSIS 1.1/ 2.0 /3.0 cable modem.
Integrated cable modem port for Internet connection to cable modem service.
Four 10/100/1000 Mbps Auto-Sensing LAN ports with Auto-MDI/MDIX.
High-speed 300 Mbps IEEE 802.11n Wireless Access Point.
Dynamic Host Configuration Protocol (DHCP) for dynamic IP configuration, and Domain
Name System (DNS) for domain name mapping.
One USB 2.0 port.
Two Plain Old Telephone System (POTS) RJ-11 telephone ports to allow Public Switch
Telephone Network (PSTN) analog phone connections.
IEEE 802.11 b/g/n interoperability with multiple vendors.
Wireless WEP, WPA, and WPA2 encryption, Hide SSID, and MAC Filtering.
VPN pass-through support using PPTP, L2TP, or IPSec.
Advanced SPI firewall Gateway for enhanced network security from attacks over the
Internet:
– Firewall protection with Stateful Packet Inspection
– Client privileges
– Hacker prevention
– Protection from denial of service (DoS) attacks
– Network Address Translation (NAT)
Universal Plug and Play (UPnP) enables any UPnP device seamlessly.
Quality of Service (QoS) ensures high-quality performance with existing networks.
Effortless plug-and-play installation.
Intuitive graphical user interface (GUI) configuration, regardless of operating system.
Comprehensive front panel LEDs for network status and troubleshooting.
Compatible with all popular Internet applications.
viii
SMCD3GNV Wireless Cable Modem Gateway User Manual
Page 9

Preface
Document Organization
This document consists of four chapters and two appendixes.
Chapter 1 - describes the contents in the Gateway package, system requirements, and
an overview of the Gateway’s front, rear, top, and bottom panels.
Chapter 2 - describes how to install the Gateway.
Chapter 3 - describes how to configure TCP/IP settings on the computer you will use to
configure the Gateway.
Chapter 4 - describes how to configure the Gateway.
Chapter 6 – provides troubleshooting information you can use in the unlikely event you
encounter a problem with the Gateway.
Appendix A - lists the Gateway’s specifications.
Appendix B - contains compliance information.
Document Conventions
This document uses the following conventions to draw your attention to certain information.
Safety and Warnings
This document uses the following symbols to draw your attention to certain information.
Symbol Meaning Description
Note Notes emphasize or supplement important points of the main text.
Tip Tips provide helpful information, guidelines, or suggestions for performing tasks more
Warning Warnings indicate that failure to take a specified action could result in damage to the
Electric Shock Hazard This symbol warns users of electric shock hazard. Failure to take appropriate
effectively.
device.
precautions such as not opening or touching hazardous areas of the equipment could
result in injury or death.
ix
SMCD3GNV Wireless Cable Modem Gateway User Manual
Page 10

Preface
Typographic Conventions
This document also uses the following typographic conventions.
Convention Description
Bold Indicates text on a window, other than the window title, including menus, menu options, buttons, fields, and labels.
Italic Indicates a variable, which is a placeholder for actual text provided by the user or system. Angled brackets (< >)
are also used to indicate variables.
screen/code Indicates text that is displayed on screen or entered by the user.
< > angled
brackets
[ ] square
brackets
{ } braces Indicates required or expected values.
| vertical bar Indicates that you have a choice between two or more options or arguments.
Indicates a variable, which is a placeholder for actual text provided by the user or system. Italic font is also used to
indicate variables.
Indicates optional values.
x
SMCD3GNV Wireless Cable Modem Gateway User Manual
Page 11

1 Getting to Know the Gateway
Before you install your SMCD3GNV Wireless Cable Modem Gateway, check the package
contents and become familiar with the Gateway’s front and back panels.
The topics covered in this chapter are:
Unpacking Package Contents (page 12)
System Requirements (page 12)
Front Panel (page 13)
Rear Panel (page 15)
Bottom Panel (page 16)
Top Panel (16)
Using the Reset Button (page 17)
11
SMCD3GNV Wireless Cable Modem Gateway User Manual
Page 12

Getting to Know the Gateway
Unpacking Package Contents
Unpack the items in your SMCD3GNV Wireless Cables Modem Gateway contents and
confirm that no items are missing or damaged. Your package should include:
One SMCD3GNV Wireless Cable Modem Gateway
One 2600 mAh battery
One Category 5E Ethernet cable
If any items are missing or damaged, please contact your cable service provider. Keep the
carton, including the original packing material, in case you need to store the product or
return it.
System Requirements
To complete your installation, you will need the following items:
Provisioned Internet access on a cable network that supports cable modem service.
A computer with a wired network adapter with TCP/IP installed.
A Java-enabled Web browser, such as Microsoft Internet Explorer 5.5 or above.
Microsoft
An analog telephone and two RJ-11 cables if you want to connect the Gateway to an
®
Windows® 2000 or higher for USB driver support.
analog telephone and PSTN telephone line.
12
SMCD3GNV Wireless Cable Modem Gateway User Manual
Page 13

Getting to Know the Gateway
Front Panel
The front panel of your SMCD3GNV Wireless Cable Modem Gateway contains a set of lightemitting diode (LED) indicators. These LEDs show the status of the Gateway and simplify
troubleshooting.
Figure 1 shows the front panel of the SMCD3GNV Wireless Cable Modem Gateway. Table 1
describes the front panel LEDs.
Figure 1. Front Panel of the SMCD3GNV Wireless Cable Modem Gateway
13
SMCD3GNV Wireless Cable Modem Gateway User Manual
Page 14

Getting to Know the Gateway
Table 1. Front Panel LEDs
LED Color Description
POWER White ON = power is supplied to the Gateway.
OFF = power is not supplied to the Gateway.
US/DS White Blinking = ranging is in progress.
ON = ranging is complete on 1 channel only.
OFF = scanning for DS channel.
DS White Blinking = scanning for DS channel.
ON = synchronized on 1 channel only.
US and DS Both US and DS blinking together = operator is performing maintenance.
Online White Blinking = cable interface is acquiring IP, ToD, CM configuration.
ON = Gateway is operational.
OFF = Gateway is offline.
WiFi White Blinking = data is transmitting over the Gateway’s Wi-Fi interface.
ON = Wi-Fi is enabled.
OFF = Wi-Fi is disabled.
Tel1 White Blinking = telephone line 1 is in use.
ON = Gateway’s telephone 1 port is online.
OFF = Gateway’s telephone 1 port is not online.
Tel2 White Blinking = telephone line 2 is in use.
ON = Gateway’s telephone 2 port is online.
OFF = Gateway’s telephone 2 port is not online.
Battery White Blinking = Gateway battery power is low. Please apply AC power as soon as possible.
ON = Gateway is operating from battery power.
OFF = Gateway is operating from AC power.
14
SMCD3GNV Wireless Cable Modem Gateway User Manual
Page 15

Getting to Know the Gateway
Rear Panel
The rear panel of your SMCD3GNV Wireless Cable Modem Gateway contains a reset
button and the ports for attaching the supplied power adapter and making additional
connections. Figure 2 shows the rear panel components and Table 2 describes their
meanings.
Figure 2. Rear View of the SMCD3GNV Wireless Cable Modem Gateway
Table 2. SMCD3GNV Wireless Cable Modem Gateway Rear Panel Components
Item Description
Reset button Use this button to reset the power or restore the default factory settings (see “Using the Reset
Button” on page 17).
USB USB 2.0 high-speed port for USB-enabled peripherals.
Tel 1-2 Connect an analog telephone to one port and an analog (PSTN) telephone line to the other port.
Ethernet 1-4 Four 10/100/1000 auto-sensing RJ-45 switch ports. Connect devices on your LAN such as a
computer, hub, or switch to these ports. Each port has two LED lights (see Table 3 on the next
page).
Cable Connect your coaxial cable line to this port.
Power 110 VAC Connect the supplied power cord.
15
SMCD3GNV Wireless Cable Modem Gateway User Manual
Page 16

Getting to Know the Gateway
Table 3. Gigabit Ethernet Connectors LED Indicators
LED Description
Green Indicate 10/100/1000Mbps in use
Amber Indicate 10/100Mbps in use
Top Panel
The top panel of your SMCD3GNV Wireless Cable Modem Gateway has a WPS button for
configuring wireless security automatically. Figure 3 shows the WPS button.
Figure 3. Top View of the SMCD3GNV Wireless Cable Modem Gateway
Bottom Panel
The bottom panel of your SMCD3GNV Wireless Cable Modem Gateway contains a panel for
installing the Gateway’s battery. For information about installing the battery, see “Installing a
Battery” on page 20.
16
SMCD3GNV Wireless Cable Modem Gateway User Manual
Page 17

Getting to Know the Gateway
Using the Reset Button
Using the reset button on the rear panel (see Figure 2 on page 15), you can perform two
types of reset operations with the Gateway:
Software reset – this reset operation power-cycles the Gateway and retains its current
configuration settings.
Factory default reset – this operation remove all overrides made to the Gateway’s factory
default configuration and returns the Gateway to its original factory default settings.
The number of seconds you press the reset button determines which reset operation is
performed. To protect against accidental resets, the reset button is recessed on the
Gateway rear panel.
Note: You can also reset the Gateway and retain its current configuration settings using the
RESET method described under “Restoring or Rebooting the Gateway” on page 98.
To use the reset button to perform a software or factory default reset:
1. Leave power plugged into the Gateway.
2. Find the reset button at the top of the back panel, then use a thin object to press and hold
the reset button as follows:
– To perform a software reset, press the reset button for at least 10 seconds.
– To perform a factory default reset, press the reset button for at least 15 seconds.
3. Release the reset button.
17
SMCD3GNV Wireless Cable Modem Gateway User Manual
Page 18

2 Installing the Gateway
This chapter describes how to install your SMCD3GNV Wireless Cable Modem Gateway.
The topics covered in this chapter are:
Finding a Suitable Location (page 19)
Installing a Battery (page 20)
Connecting to the LAN (page 21)
Connecting the WAN (page 22)
Powering on the Gateway (page 23)
18
SMCD3GNV Wireless Cable Modem Gateway User Manual
Page 19

Installing the Gateway
Finding a Suitable Location
Your SMCD3GNV Wireless Cable Modem Gateway can be installed in any location with
access to the cable network. All of the cables connect to the rear panel of the Gateway for
better organization and utility. The LED indicators on the front panel are easily visible to
provide you with information about network activity and status.
For optimum performance, the location you choose should:
Be close to a working AC power outlet when powering the Gateway using AC power.
Allow at least one foot of space around the sides and top of the Gateway to provide
sufficient air flow around the device.
Not expose the Gateway to a dusty or wet environment.
Be an elevated location such as a high shelf, keeping the number of walls and ceilings
between the Gateway and your other devices to a minimum.
Be away from electrical devices that are potential sources of interference, such as ceiling
fans, home security systems, microwaves, or the base for a cordless phone.
Be away from any large metal surfaces, such as a solid metal door or aluminum studs.
Large expanses of other materials such as glass, insulated walls, fish tanks, mirrors,
brick, and concrete can also affect your wireless signal. For more information about
selecting an optimum location for wireless operation, see “Guidelines for Improving Your
Wireless Network” on page 201.
19
SMCD3GNV Wireless Cable Modem Gateway User Manual
Page 20

Installing the Gateway
Installing a Battery
To install a battery into the Gateway, use the following procedure.
1. Place the Gateway on its side on a table.
2. Remove battery compartment door on the bottom panel and set it aside (see Figure 4).
Figure 4. Removing the Battery Compartment Door
3. Insert the battery into the battery compartment (see Figure 5).
Figure 5. Installing the Battery
4. Close the battery compartment.
Note: Using the Battery menu in the Gateway’s Web interface, you can view status
information about the battery (see “Viewing Battery Settings” on page 57).
SMCD3GNV Wireless Cable Modem Gateway User Manual
20
Page 21

Installing the Gateway
Connecting to the LAN
Using an Ethernet LAN cable, you can connect the Gateway to a desktop computer,
notebook, hub, or switch. The Gateway supports auto-MDI/MDIX, so you can use either a
standard straight-through or crossover Ethernet cable.
1. Connect either end of an Ethernet cable to one of the four Ethernet ports on the rear panel
of the Gateway (see Figure 6).
Figure 6. Connecting to an Ethernet Port on the Gateway Rear Panel
2. Connect the other end of the cable to your computer’s network-interface card (NIC) or to
another network device (see Figure 7).
Figure 7. Connecting the Gateway to the a Laptop or Desktop Computer
21
SMCD3GNV Wireless Cable Modem Gateway User Manual
Page 22

Installing the Gateway
Connecting the WAN
To connect the Gateway to a Wide Area Network (WAN) interface:
3. Connect a coaxial cable to the port labeled Cable on the rear panel of the Gateway from a
cable port in your home or office (see Figure 2 on page 15). Use only manufactured coaxial
patch cables with F-type connectors at both ends for all connections.
4. Hand-tighten the connectors to secure the connection.
5. If the modem was not installed by your cable provider (ISP) or is replacing another cable
modem, contact your cable operator to register the SMCD3GNV. If the modem is not
registered with your cable operator, it will be unable to connect to the cable network
system.
Connecting to the Public Telephone Network
The rear panel of the Gateway has two RJ-11 telephone-style connectors labeled Tel 1 and
Tel 2. Each of these connectors can provide telephone service to multiple telephones, fax
machines, and analog modems.
The maximum number of telephone devices connected to each RJ-11 port is limited by the
total Ringing Load of the telephone devices that are connected. Many telephone devices are
marked with a Ringer Equivalent Number (REN). Each telephone port on the Gateway can
support up to a 5 REN load. The sum of the REN load on all of the telephone devices
attached to each port must not exceed 5 REN
Before you use the Gateway’s RJ-11 connectors to power the analog devices in your home
or office, disconnect the telephone lines from any other provider at the demarcation point. If
the incoming phone line is connected to another provider, such as an incumbent telephone
company, it can result in potentially harmful voltage to the analog telephone line.
Note: The customer or the customer's wire contractor is responsible for adhering to all local
codes for wiring.
To set up the ability to place calls using a regular analog telephone line (PSTN), perform the
following procedure.
1. Disconnect the phone lines from any other provider at the demarcation point, if appropriate.
2. Connect the RJ-11 cable on an analog device to the Tel 1 connector on the rear panel of
the Gateway.
3. Connect the RJ-11 cable on another analog device to the Tel 2 connector on the rear
panel of the Gateway.
22
SMCD3GNV Wireless Cable Modem Gateway User Manual
Page 23

Installing the Gateway
Powering on the Gateway
After making your connections, use the following procedure to power on the Gateway:
1. Connect the supplied power cord to the power port on the rear panel of the Gateway (see
Figure 2 on page 15).
2. Connect the other end of the power adapter to a working power outlet. The Gateway
powers on automatically, the POWER LED on the front panel goes ON, and the other front
panel LEDs show the Gateway’s status (see Table 1 on page 14).
WARNING: Only use the power cord supplied with the Gateway. Using a different power cord
can damage the Gateway and void the warranty.
23
SMCD3GNV Wireless Cable Modem Gateway User Manual
Page 24

3 Preconfiguration Guidelines
After you install your SMCD3GNV Wireless Cable Modem Gateway, use the information in
this chapter to configure the TCP/IP settings on the computer that will be used to configure
the Gateway. This chapter also covers other preconfiguration guidelines you should review
before configuring the Gateway.
The topics covered in this chapter are:
Configuring Your Computer for TCP/IP (page 25)
Disabling Proxy Settings (page 34)
Disabling Firewall and Security Software (page 35)
Confirming the Gateway’s Online Status (page 35)
Confirming Your Computer’s Link Status (page 35)
24
SMCD3GNV Wireless Cable Modem Gateway User Manual
Page 25

Preconfiguration Guidelines
Configuring Your Computer for TCP/IP
Before you configure the Gateway using its Web management interface, configure TCP/IP
settings on the computer that will be used to configure the Gateway. The TCP/IP procedure
to use depends on the operating system installed on the computer.
For Microsoft Windows 2000, see the procedure below
For Microsoft Windows XP, see page 26
For Microsoft Windows Vista, see page 27
For Microsoft Windows 7, see page 30
For Apple Macintosh, see page 33
Configuring Microsoft Windows 2000
Use the following procedure to configure your computer if your computer has Microsoft
Windows 2000 installed.
1. On the Windows taskbar, click Start, point to Settings, and then click Control Panel.
2. In the Control Panel window, double-click the Network and Dial-up Connections icon. If
the Ethernet adapter in your computer is installed correctly, the Local Area Connection
icon appears.
3. Double-click the Local Area Connection icon for the Ethernet adapter connected to the
Gateway. The Local Area Connection Status dialog box appears (see Figure 8).
Figure 8. Local Area Connection Status Window
25
SMCD3GNV Wireless Cable Modem Gateway User Manual
Page 26

Preconfiguration Guidelines
4. In the Local Area Connection Status dialog box, click the Properties button. The Local
Area Connection Properties dialog box appears.
5. In the Local Area Connection Properties dialog box, verify that Internet Protocol (TCP/IP)
is checked. Then select Internet Protocol (TCP/IP) and click the Properties button.
6. Click Obtain an IP address automatically to configure your computer for DHCP.
7. Click the OK button to save this change and close the Local Area Connection Properties
dialog box.
8. Click OK button again to save these new changes.
9. Restart your computer.
Configuring Microsoft Windows XP
Use the following procedure to configure your computer if your computer has Microsoft
Windows XP installed. If you use the Classic interface, where the icons and menus resemble
previous Windows versions, perform the procedure under “Configuring Microsoft Windows
2000” on page 25.
1. On the Windows taskbar, click Start, click Control Panel, and then click Network and
Internet Connections.
2. Click the Network Connections icon.
3. Click Local Area Connection for the Ethernet adapter connected to the Gateway. The
Local Area Connection Status dialog box appears.
4. In the Local Area Connection Status dialog box, click the Properties button (see Figure 9).
The Local Area Connection Properties dialog box appears.
Figure 9. Local Area Connection Status Window
26
SMCD3GNV Wireless Cable Modem Gateway User Manual
Page 27

Preconfiguration Guidelines
5. In the Local Area Connection Properties dialog box, verify that Internet Protocol (TCP/IP)
is checked. Then select Internet Protocol (TCP/IP) and click the Properties button. The
Internet Protocol (TCP/IP) Properties dialog box appears.
6. In the Internet Protocol (TCP/IP) Properties dialog box, click Obtain an IP address
automatically to configure your computer for DHCP. Click the OK button to save this
change and close the Internet Protocol (TCP/IP) Properties dialog box.
7. Click the OK button again to save your changes.
8. Restart your computer.
Configuring Microsoft Windows Vista
Use the following procedure to configure a computer running Microsoft Windows Vista with
the default interface. If you use the Classic interface, where the icons and menus resemble
previous Windows versions, perform the procedure under “Configuring Microsoft Windows
2000” on page 25.
1. On the Windows taskbar, click Start, click Control Panel, and then select Network and
Internet Icon.
2. Click View Networks Status and tasks and then click Management Networks
Connections.
3. Right-click the Local Area Connection icon and click Properties.
4. Click Continue. The Local Area Connection Properties dialog box appears.
5. In the Local Area Connection Properties dialog box, verify that Internet Protocol
(TCP/IPv4) is checked. Then select Internet Protocol (TCP/IPv4) and click the
Properties button (see Figure 10). The Internet Protocol Version 4 Properties dialog box
appears.
27
SMCD3GNV Wireless Cable Modem Gateway User Manual
Page 28

Preconfiguration Guidelines
Figure 10. Local Area Connection Properties Window
6. In the Internet Protocol Version 4 Properties dialog box, click Obtain an IP address
automatically to configure your computer for DHCP (see Figure 11).
Figure 11. Internet Protocol Properties Window
28
SMCD3GNV Wireless Cable Modem Gateway User Manual
Page 29

Preconfiguration Guidelines
7. Click the OK button to save your changes and close the dialog box.
8. Click the OK button again to save your changes.
Figure 12. Local Area Connection Status Window
29
SMCD3GNV Wireless Cable Modem Gateway User Manual
Page 30

Preconfiguration Guidelines
Configuring Microsoft Windows 7
Use the following procedure to configure a computer running Microsoft Windows 7.
1. In the Start menu search box, type: ncpa.cpl
Figure 13. Typing ncpa.cpl in the Start Menu Box
The Network Connections List appears.
Figure 14. Example of Network Connections List
2. Right-click the Local Area Connection icon and click Properties.
3. In the Networking tab, click either Internet Protocol Version 4 (TCP/IPv4) or Internet
Protocol Version 6 (TCP/IPv6), and then click Properties.
30
SMCD3GNV Wireless Cable Modem Gateway User Manual
Page 31

Preconfiguration Guidelines
Figure 15. Local Area Network Connection Properties Dialog Box
4. In the properties dialog box, click Obtain an IP address automatically to configure your
computer for DHCP (see Figure 16).
31
SMCD3GNV Wireless Cable Modem Gateway User Manual
Page 32

Preconfiguration Guidelines
Figure 16. Properties Window
5. Click the OK button to save your changes and close the dialog box.
6. Click the OK button again to save your changes.
32
SMCD3GNV Wireless Cable Modem Gateway User Manual
Page 33

Preconfiguration Guidelines
Configuring an Apple® Macintosh® Computer
The following procedure describes how to configure TCP/IP on an Apple Macintosh running
Mac OS 10.2. If your Apple Macintosh is running Mac OS 7.x or later, the steps you perform
and the screens you see may differ slightly from the following. However, you should still be
able to use this procedure as a guide to configuring your Apple Macintosh for TCP/IP.
1. Pull down the Apple Menu, click System Preferences, and select Network.
2. Verify that NIC connected to the SMCD3GNV is selected in the Show field.
3. In the Configure field on the TCP/IP tab, select Using DHCP (see Figure 17).
4. Click Apply Now to apply your settings and close the TCP/IP dialog box.
Figure 17. Selecting Using DHCP in the Configure Field
33
SMCD3GNV Wireless Cable Modem Gateway User Manual
Page 34

Preconfiguration Guidelines
Disabling Proxy Settings
Disable proxy settings in your Web browser. Otherwise, you will not be able to view the
Gateway’s Web-based configuration menus.
Disabling Proxy Settings in Internet Explorer
The following procedure describes how to disable proxy settings in Internet Explorer 5 and
later.
1. Start Internet Explorer.
2. On your browser’s Tool menu, click Options. The Internet Options dialog box appears.
3. In the Internet Options dialog box, click the Connections tab.
4. In the Connections tab, click the LAN settings button. The Local Area Network (LAN)
Settings dialog box appears.
5. In the Local Area Network (LAN) Settings dialog box, uncheck all check boxes.
6. Click OK until the Internet Options window appears.
7. In the Internet Options window, under Temporary Internet Files, click Settings.
8. For the option Check for newer versions of stored pages, select Every time I visit the
webpage.
9. Click OK until you close all open browser dialog boxes.
Disabling Proxy Settings in Firefox
The following procedure describes how to disable proxy settings in Firefox.
1. Start Firefox.
2. On your browser’s Tools menu, click Options. The Options dialog box appears.
3. Click the Advanced tab.
4. In the Advanced tab, click the Network tab.
5. Click the Settings button.
6. Click Direct connection to the Internet.
7. Click the OK button to confirm this change.
SMCD3GNV Wireless Cable Modem Gateway User Manual
34
Page 35

Preconfiguration Guidelines
Disabling Proxy Settings in Safari
The following procedure describes how to disable proxy settings in Safari.
1. Start Safari.
2. Click the Safari menu and select Preferences.
3. Click the Advanced tab.
4. In the Advanced tab, click the Change Settings button.
5. Choose your location from the Location list (this is generally Automatic).
6. Select your connection method. If using a wired connection, select Built-in Ethernet. For
wireless, select Airport.
7. Click the Proxies tab.
8. Be sure each proxy in the list is unchecked.
9. Click Apply Now to finish.
Disabling Firewall and Security Software
Disable any firewall or security software that may be running on your computer. For more
information, refer to the documentation for your firewall. After you configure the Gateway,
please re-enable your computer firewall.
Confirming the Gateway’s Online Status
Confirm that the Online LED on the Gateway front panel is ON (see Figure 1 on page 13). If
the LED is OFF, replace the coaxial cable connecting the Gateway to the cable service. If
the Online LED does not go ON after several minutes, please contact your cable provider to
confirm that the service is active.
Confirming Your Computer’s Link Status
Be sure there is an Ethernet cable connecting your computer to the Gateway. Then confirm
that the LEDs for the Gateway port connected to your computer are blinking. If the LEDs are
OFF, the connection between your computer and Gateway is not working properly.
35
SMCD3GNV Wireless Cable Modem Gateway User Manual
Page 36

4 Configuring the Gateway
After configuring your computer for TCP/IP and following the preconfiguration guidelines in
Chapter
chapter describes how to use your computer’s Web browser to configure the Gateway.
The topics covered in this chapter are:
Accessing the Gateway’s Web Management (page 37)
Understanding the Web Management Interface Menus (page 38)
3, use that computer’s Web browser to configure your SMCD3GNV Gateway. This
Web Management Interface Menus (page 40)
36
SMCD3GNV Wireless Cable Modem Gateway User Manual
Page 37
Accessing the Gateway’s Web Management
After configuring your computer for TCP/IP and reviewing the guidelines on the previous
page, configure the Gateway using its Web-based management interface. From your Web
browser, log in to the interface to define system parameters, change password settings, view
status windows to monitor network conditions, and control the Gateway and its ports.
To display the SMCD3GNV Wireless Cable Modem Gateway’s Web-based management
screens, use the following procedure.
1. Launch a Web browser.
Note: Your computer does not have to be online to configure the Gateway.
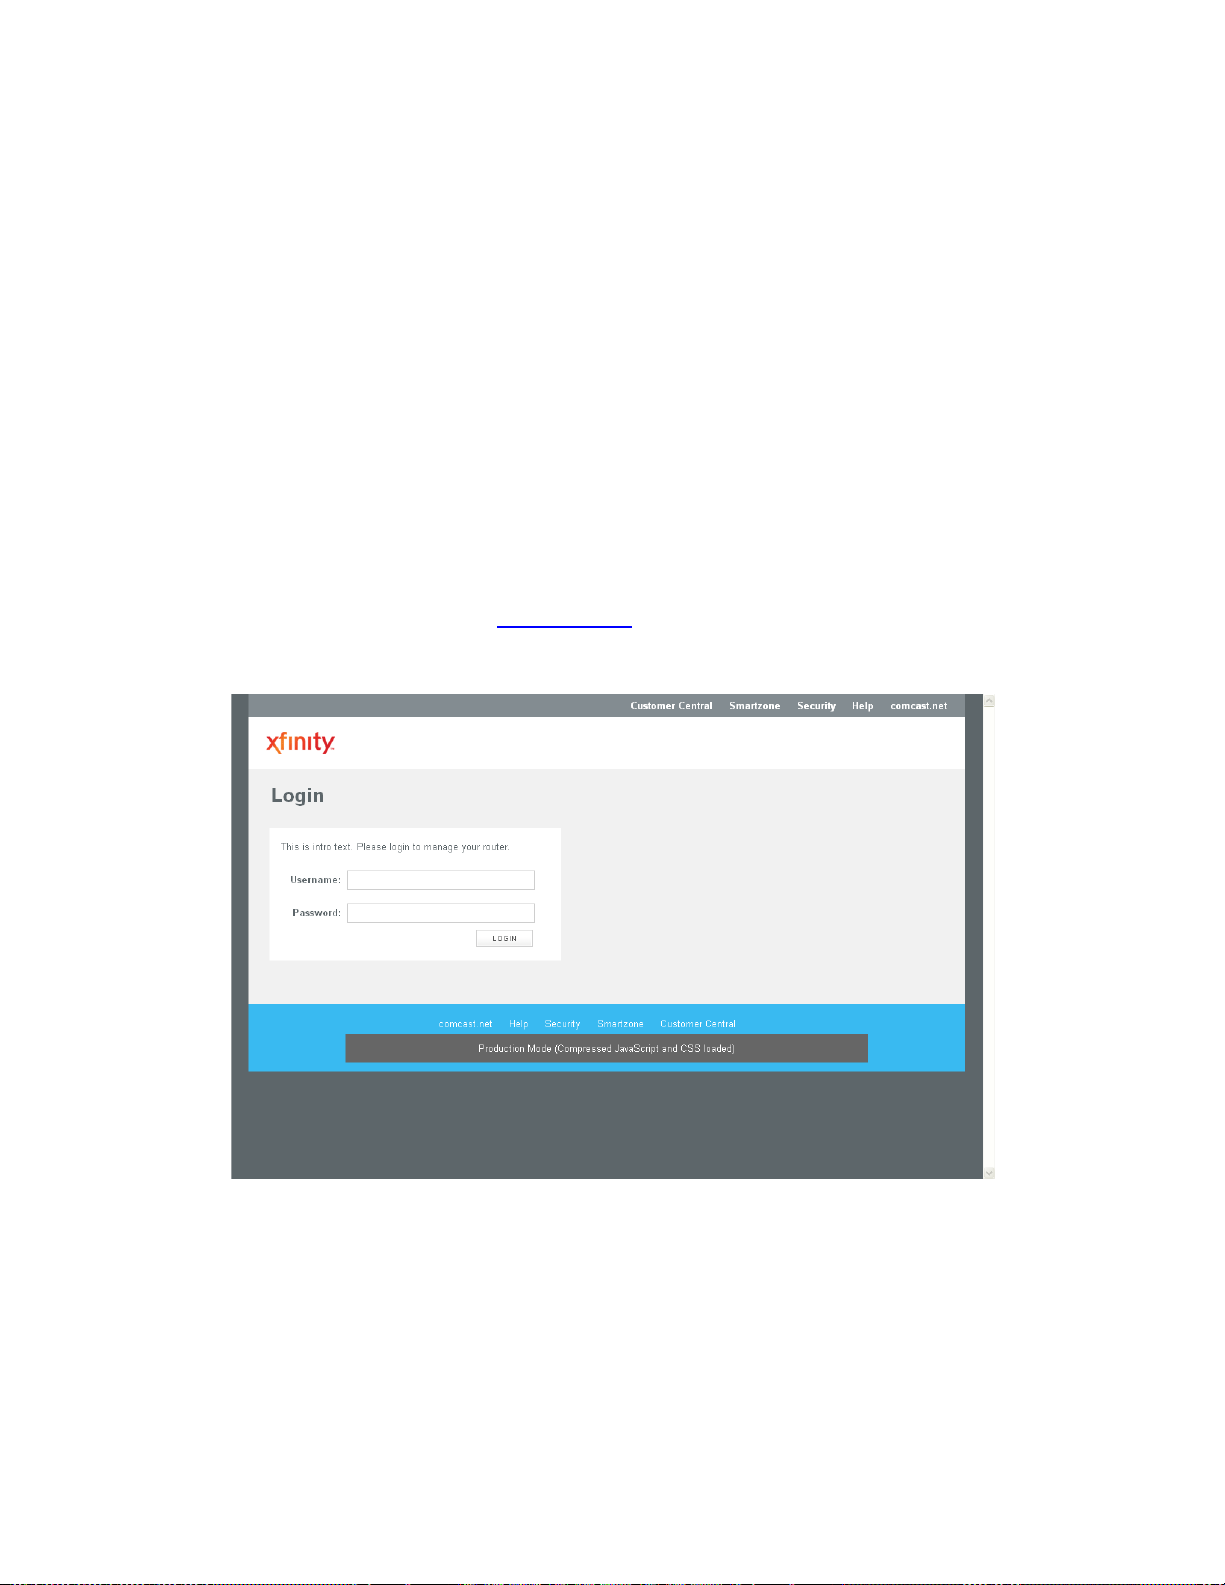
2. In the browser address bar, type
appears (see Figure 18).
http://10.0.0.1 and press the Enter key. The Login screen
Figure 18. Login Screen
3. In the Login User Password screen, enter the default username cusadmin and the default
password highspeed. Both are case sensitive. For security, each password character
appears as a dot (●). After you log in, we recommend you change the default password on
the Change Password menu (see “Changing the Login Password” on page 99).
37
SMCD3GNV Wireless Cable Modem Gateway User Manual
Page 38

Configuring the Gateway
Note: Your cable modem operator may customize the login password, so please check with
your operator for the correct password to use.
4. Click the LOGIN button to access the Gateway’s Web interface. The At a Glance menu
appears, showing connection status information about the Gateway. You can also display
this menu any time by clicking At a Glance in the menu bar.
Understanding the Web Management Interface Menus
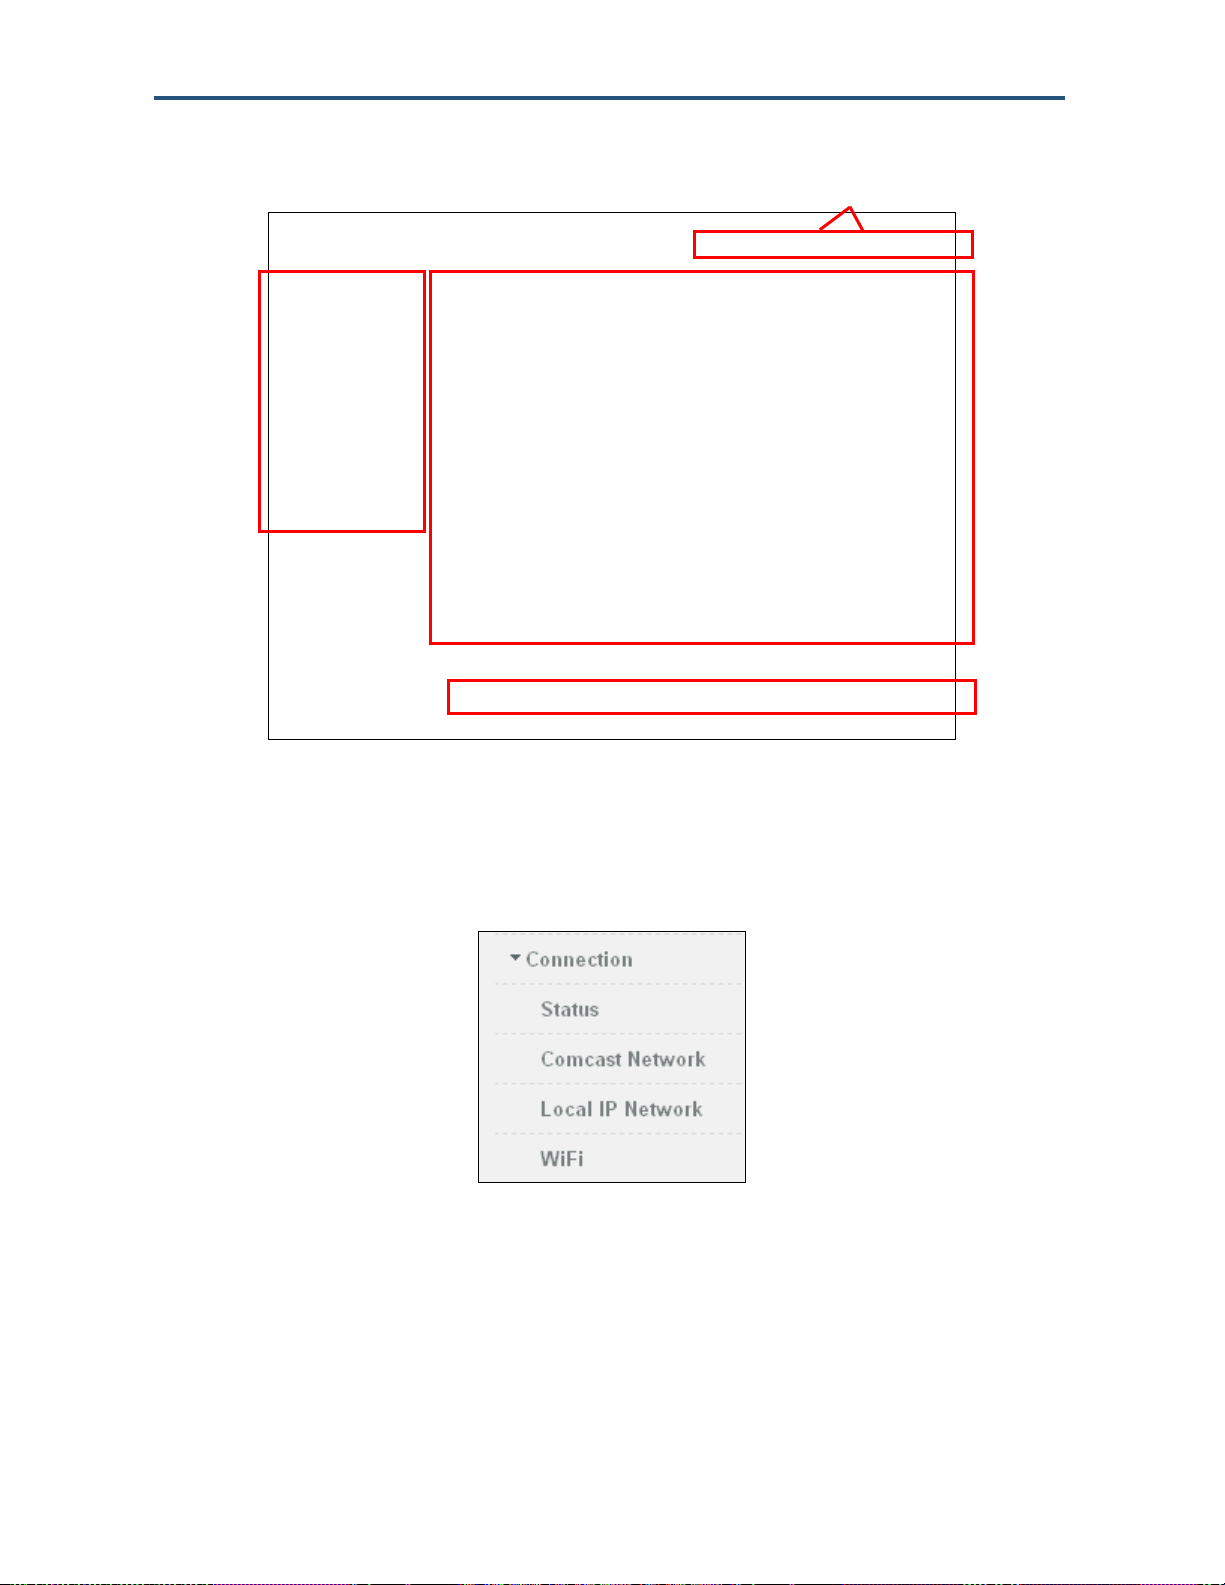
The left side of the management interface contains a menu bar for selecting menus to
configure the Gateway. When you click a menu, information and any configuration settings
associated with the menu appear in the main area (see Figure 19). If the displayed
information exceeds the main area, scroll bars appear to the right of the main area so you
can scroll up and down through the information.
The top of the main area shows the path (or “breadcrumb”) associated with the information
displayed in the main area. For example, if you click the Status submenu in the Connection
menu, Connection > Status appears at the top of the main area.
The top-right area shows the username used to log in to the Web interface, along with links
for changing the login password and logging out of your current session.
Below the login user name and links are status icons that show the:
Percentage of battery power remaining
Gateway’s Internet access
Status of the Gateway’s wireless connection
Firewall security level
A control panel at the bottom of the menu provides links for accessing comcast.net, help,
security, smartzone, and customer central.
Username
38
SMCD3GNV Wireless Cable Modem Gateway User Manual
Page 39
Logout and Change
Menu bar
Configuring the Gateway
Password Buttons
Status icons
Main area
Control Panel
Figure 19. Main Areas on the Web Management Interface
Some menus in the menu bar have submenus associated with them. If you click a menu that
has submenus, the submenus appear below the menu. For example, if you click the
Connection menu, the submenus in Figure 20 appear.
Figure 20. Example of Connection Submenus
39
SMCD3GNV Wireless Cable Modem Gateway User Manual
Page 40
Configuring the Gateway
Web Management Interface Menus
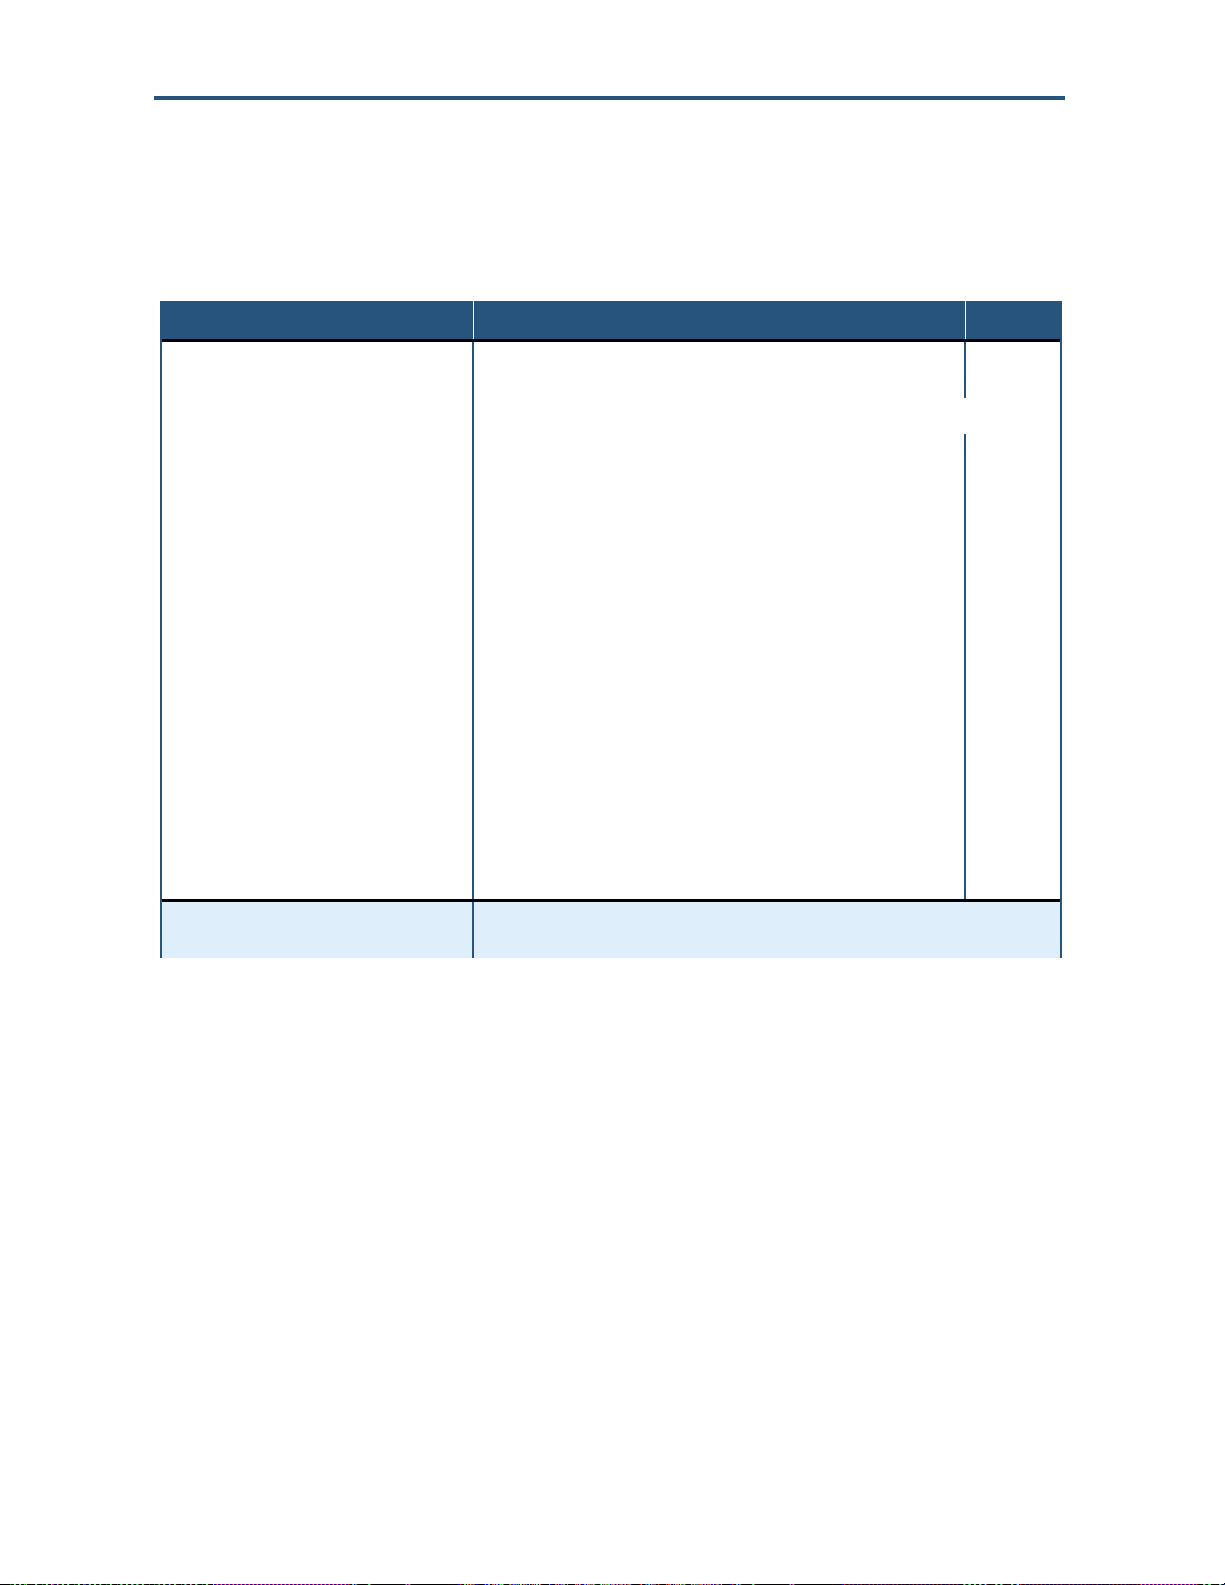
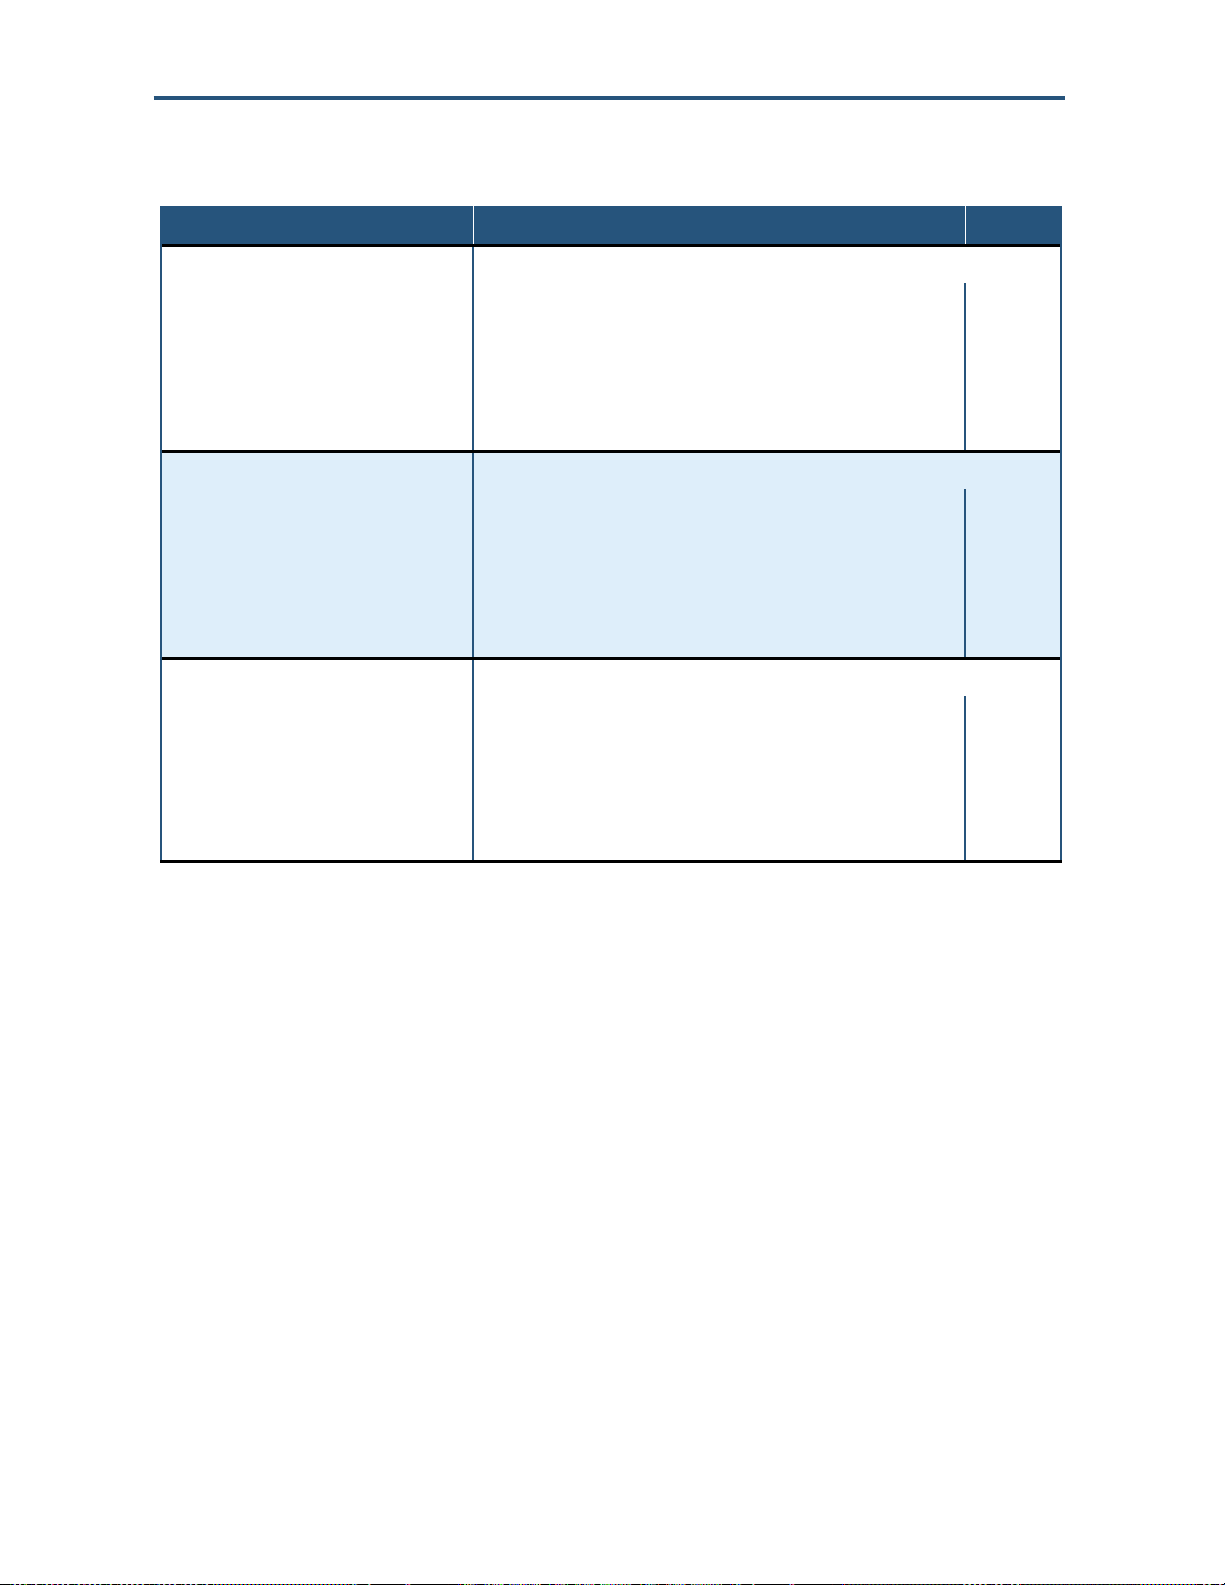
Table 4 describes the menus in the Web management interface.
Table 4. Web Management Interface Menus and Submenus
Menus and Submenus Description See Page
At a Glance Lets you view information about your home network, connected
42
devices, and recent network updates.
Connection Displays submenus that let you:
Connection > Status
• View and edit settings for the local IP network, and view the settings
44
of the Wi-Fi network and Comcast network.
Connection > Comcast Network
• View Comcast network settings and initialization procedures,
46
including cable modem, downstream, and upstream information.
Connection > Local IP Network
Connection > WiFi
Firewall
Ssoftware
Hardware > System Hardware
Hardware > Battery
Hardware > LAN
• View and reset your local IPv4 and IPv6 settings.
• View and edit the Gateway’s basic and advanced wireless settings.
• Configure the security level of the Gateway’s internal firewall.
• View system software information.
• View information about the Gateway system hardware.
• View information about the Gateway’s internal battery.
• View the link status and Media Access Control (MAC) address for
47
49
53
55
56
57
58
each of the four Gateway Ethernet ports.
Hardware > WiFi
Wizard
• View the status and MAC address of the Gateway’s Wi-Fi port.
• Use a wizard to set up your home network.
59
60
Connected Devices Displays the Computer submenu for adding online computers and viewing computers
that are offline.
40
SMCD3GNV Wireless Cable Modem Gateway User Manual
Page 41
Configuring the Gateway
Table 4. Web Management Interface Menus and Submenus
Menus and Submenus Description See Page
Parental Control Displays submenus that let you configure the Gateway for:
Parental Control > Managed Sites
Parental Control > Managed Services
Parental Control > Managed Devices
Parental Control > Reports
• Blocked sites, blocked keywords, and trusted computers.
• Blocked services and trusted computers.
• Managed and blocked devices.
• Generating reports containing selected Log Messages generated
during the user-defined timeframe.
Advanced Displays submenus that let you:
Advanced > Port Forwarding
Advanced > Port Triggering
Advanced > Port Blocking
Advanced > Device Discovery
• Enable or disable the Gateway’s port forwarding feature.
• Enable or disable the Gateway’s port triggering feature.
• Enable or disable the Gateway’s port blocking feature.
• Enable or disable the Gateway’s Universal Plug and Play (UPnP)
feature for dynamic connectivity to devices on the network.
Troubleshooting Displays submenus that let you:
Troubleshooting > Logs Configure log filters, and download and print system logs.
Troubleshooting > Disanostic Tools Tests connectivity to a destination or IP address.
Troubleshooting > Restore/Reboot Gateway Reset the Gateway, reset the Wi-Fi router only, or restore factory
settings.
Troubleshooting > Change Password Change the password used to log in to the Gateway’s Web interface.
68
75
78
82
84
87
91
92
94
96
98
99
41
SMCD3GNV Wireless Cable Modem Gateway User Manual
Page 42
Configuring the Gateway
Viewing Information About Your Network and Connected Devices
The At a Glance menu appears when you log in to the Gateway’s Web interface. You can
also display this menu by clicking Gateway in the menu bar. Figure 21 shows an example of
the At a Glance menu and Table 5 describes the menu.
Figure 21. Example of the At a Glance Menu
Table 5. At a Glance Menu
Option Description
Home Network Shows the status of your home network’s Ethernet and Wi-Fi home status. A green check mark indicates normal
Connected
Devices
Recent Network
Updates
operation. This area also shows the Gateway’s firewall security level. To change this level, see “Configuring
Firewall Settings” on page 53.
Shows the names of the devices connected to the Gateway. A Co nnected Devi ces button opens the Computers
menu for viewing devices that the Gateway automatically detects using DHCP (see page 64).
Displays alert and warning information. A drop-down list lets you view this information for today, yesterday, this
week, or this month.
42
SMCD3GNV Wireless Cable Modem Gateway User Manual
Page 43

Configuring the Gateway
Viewing Information About Your Network and Connections
Using the Gateway menu, you can:
View and edit settings for the local IP network, and view Wi-Fi and Comcast network
status. See page 44.
View Comcast network settings and initialization procedures, including cable modem,
downstream, and upstream information. See page 46.
Configure IPv4 or IPv6 settings for the Gateway. See page 47.
View and edit basic and advanced wireless settings. See page 49.
43
SMCD3GNV Wireless Cable Modem Gateway User Manual
Page 44

Configuring the Gateway
Viewing the Gateway’s Connection Status
The Status menu lets you view and edit the settings for your local IP network. You can also
use this menu to view the status of the Wi-Fi network and Comcast network.
To display the Status menu, click Connection in the menu bar, and then click the Status
submenu. Figure 22 shows an example of the Status menu and Table 6 describes the menu.
Figure 22. Example of the Status Menu
44
SMCD3GNV Wireless Cable Modem Gateway User Manual
Page 45
Configuring the Gateway
Table 6. Status Menu
Option Description
Local IP Network Displays information about the local network. The EDIT button opens the Local IP
WiFi Network Lets you view information about your Wi-Fi network. A VIEW button opens the WiFi menu for
Comcast Network Lets you view information about the Comcast network. A VIEW button opens the Comcast
Configuration menu for viewing and changing IPv4 or IPv6 settings (see “Viewing and Editing
Your Local IP Configuration” on page 47).
viewing the link status and MAC address of the Gateway’s WiFi LAN port (see “Viewing Wi-Fi
Settings” on page 59).
Network menu for viewing the initialization procedures, including cable modem, downstream,
and upstream information (see “Viewing Comcast Network Information” on page 46).
45
SMCD3GNV Wireless Cable Modem Gateway User Manual
Page 46

Configuring the Gateway
Viewing Comcast Network Information
The Comcast Network menu lets you view settings for the Comcast network. This menu also
shows information about the Gateway’s initialization procedures, cable modem settings, and
downstream and upstream information. The information shown on this menu automatically
updates (refreshes) every 10 seconds.
To display the Comcast Network menu, click Gateway in the menu bar, and then click the
Connection and Comcast Network submenus. Figure 23 shows an example of the
Comcast Network menu.
Figure 23. Example of Comcast Network Menu
46
SMCD3GNV Wireless Cable Modem Gateway User Manual
Page 47

Configuring the Gateway
Viewing and Editing Your Local IP Configuration
The Local IP Configuration menu lets you view and change the Internet Protocol (IP)
settings used by the Gateway. Fields are provided for configuring IP version 4 (IPv4) and the
newer IP version 6 (IPv6).
To display the Local IP Configuration menu, click Connection in the menu bar, and then
click the Local IP Network submenu. Figure 24 shows an example of the Local IP
Configuration menu and Table 7 describes the menu.
Figure 24. Example of Local IP Configuration Menu
47
SMCD3GNV Wireless Cable Modem Gateway User Manual
Page 48
Configuring the Gateway
Table 7. Local IP Configuration Menu
Option Description
IPv4
(for computers that use IPv4 Messaging)
Gateway Address IPv4 IP address that the Gateway is to use.
Subnet Mask IPv4 subnet mask that the Gateway is to use.
DHCP Beginning Address Starting IP address range for the pool of allocated for DHCP IP addresses. The first two fields
match the first two octets in the Gateway’s IP address and cannot be changed. The last two
fields let you enter the final two octets in the starting IP address range.
DHCP Ending Address Ending IP address range for the pool of allocated for DHCP IP addresses. The first two fields
match the first two octets in the Gateway’s IP address and cannot be changed. The last two
fields let you enter the final two octets in the ending IP address range.
DHCP Lease Time Amount of time a DHCP network user is allowed connection to the Gateway with their current
dynamic IP address. Default is One Week.
SAVE SETTINGS button After configuring your IPv4 settings, click this button to save them.
RESTORE DEFAULT SETTINGS
Resets the Gateway to the factory default IPv4 settings.
FOR IPV4 button
IPv6
(for computers that use IPv6 Messaging)
Enable IPv6 Check this box to configure the Gateway to use IPv6 settings.
Gateway Address IPv6 IP address that the Gateway is to use.
Subnet Mask IPv6 subnet mask that the Gateway is to use.
DHCP Beginning Address Starting IP address range for the pool of allocated for DHCP IP addresses. The first two fields
match the first two octets in the Gateway’s IP address and cannot be changed. The last two
fields let you enter the final two octets in the starting IP address range.
DHCP Ending Address Ending IP address range for the pool of allocated for DHCP IP addresses. The first two fields
match the first two octets in the Gateway’s IP address and cannot be changed. The last two
fields let you enter the final two octets in the ending IP address range.
DHCP Lease Time Amount of time a DHCP network user is allowed connection to the Gateway with their current
dynamic IP address. Default is One Week.
IPv6 Mode Select the IPv6 mode that the Gateway is to use. Choices are:
• link-local only = allows communication among nodes attached to the same link. Packets
are not forwarded outside the site. (default)
• site-local only = allows communication among nodes within a site or organization.
SAVE SETTINGS button After configuring your IPv6 settings, click this button to save them.
RESTORE DEFAULT SETTINGS
FOR IPV6 button
SMCD3GNV Wireless Cable Modem Gateway User Manual
Resets the Gateway to the factory default IPv6 settings.
48
Page 49

Configuring the Gateway
Viewing and Editing Wireless Configuration
The Wireless menu lets you view and change the Gateway’s basic and advanced wireless
settings. To display the Wireless menu, click Gateway in the menu bar, and then click the
Connection and WiFi submenus. Figure 25 shows an example of the Local IP Configuration
menu and Table 8 describes the menu.
Figure 25. Example of Wireless Menu
49
SMCD3GNV Wireless Cable Modem Gateway User Manual
Page 50
Configuring the Gateway
Table 8. Wireless Menu
Option Description
Private Wireless Network
Name
MAC Address
Shows the name MAC address, and security setting, if any, for each private wireless network
detected. An EDIT button is provided to change these settings.
Security Mode
Private Wireless Basic Setting
Mode Choices are:
• 802.11 b/g = use this setting if you have a combination of IEEE 802.11b and IEEE 802.11g
devices on your network.
• 802.11n = use this setting if you have only IEEE 802.11n devices on your network or want
to limit your network to IEEE 802.11n devices.
• 802.11 b/g/n = use this setting if you have a combination of IEEE 802.11b, IEEE 802.11g,
and IEEE 802.11n devices on your network. (default)
Channel Selection Select how the Gateway will select a channel for communicating over the wireless network.
Choices are:
• Automatic = the Gateway selects the channel automatically. (default)
• Manual = the Gateway uses the channel specified in the Channel option.
Channel If the Channel Selection option is Manual, specify the appropriate channel from the list
provided to correspond with your network settings. Choices are 1, 6, and 11. The default
setting is 6, which refers to radio frequency ranges within the 2.4 GHz range. You can change
this setting if necessary; however, all devices in your wireless network must use the same
channel to work properly.
SAVE BASIC SETTING button Click this button to save your changes to the private wireless basic settings.
Private Wireless Advanced Setting
BG Protection Mode This mode is a protection mechanism that prevents collisions among 802.11b/g modes.
Choices are:
• Auto = BG protection mode goes on or off automatically as needed.
• Always-On = BG protection mode is always on.
• Always-Off = BG protection mode is always off. (default)
IGMP Snooping Enables or disables the Gateway from forwarding multicast traffic intelligently.
• Enable = Gateway listens to IGMP membership reports, queries, and leave messages to
identify the Gateway ports that are members of multicast groups. Multicast traffic will only
be forwarded to ports identified as members of the specific multicast group or groups.
• Disable = Gateway does not analyze all IGMP packets. (default)
Operation Mode Lets you select between Mixed Mode and Green Field.
• Mixed Mode = provides backward compatibility with IEEE 802.11n/a/g/b devices. (default)
• Green Field = used for pure network of 802.11n access points and clients, taking full
advantage of the high-throughput capabilities of the 11n multiple-input multiple-output
(MIMO) architecture.
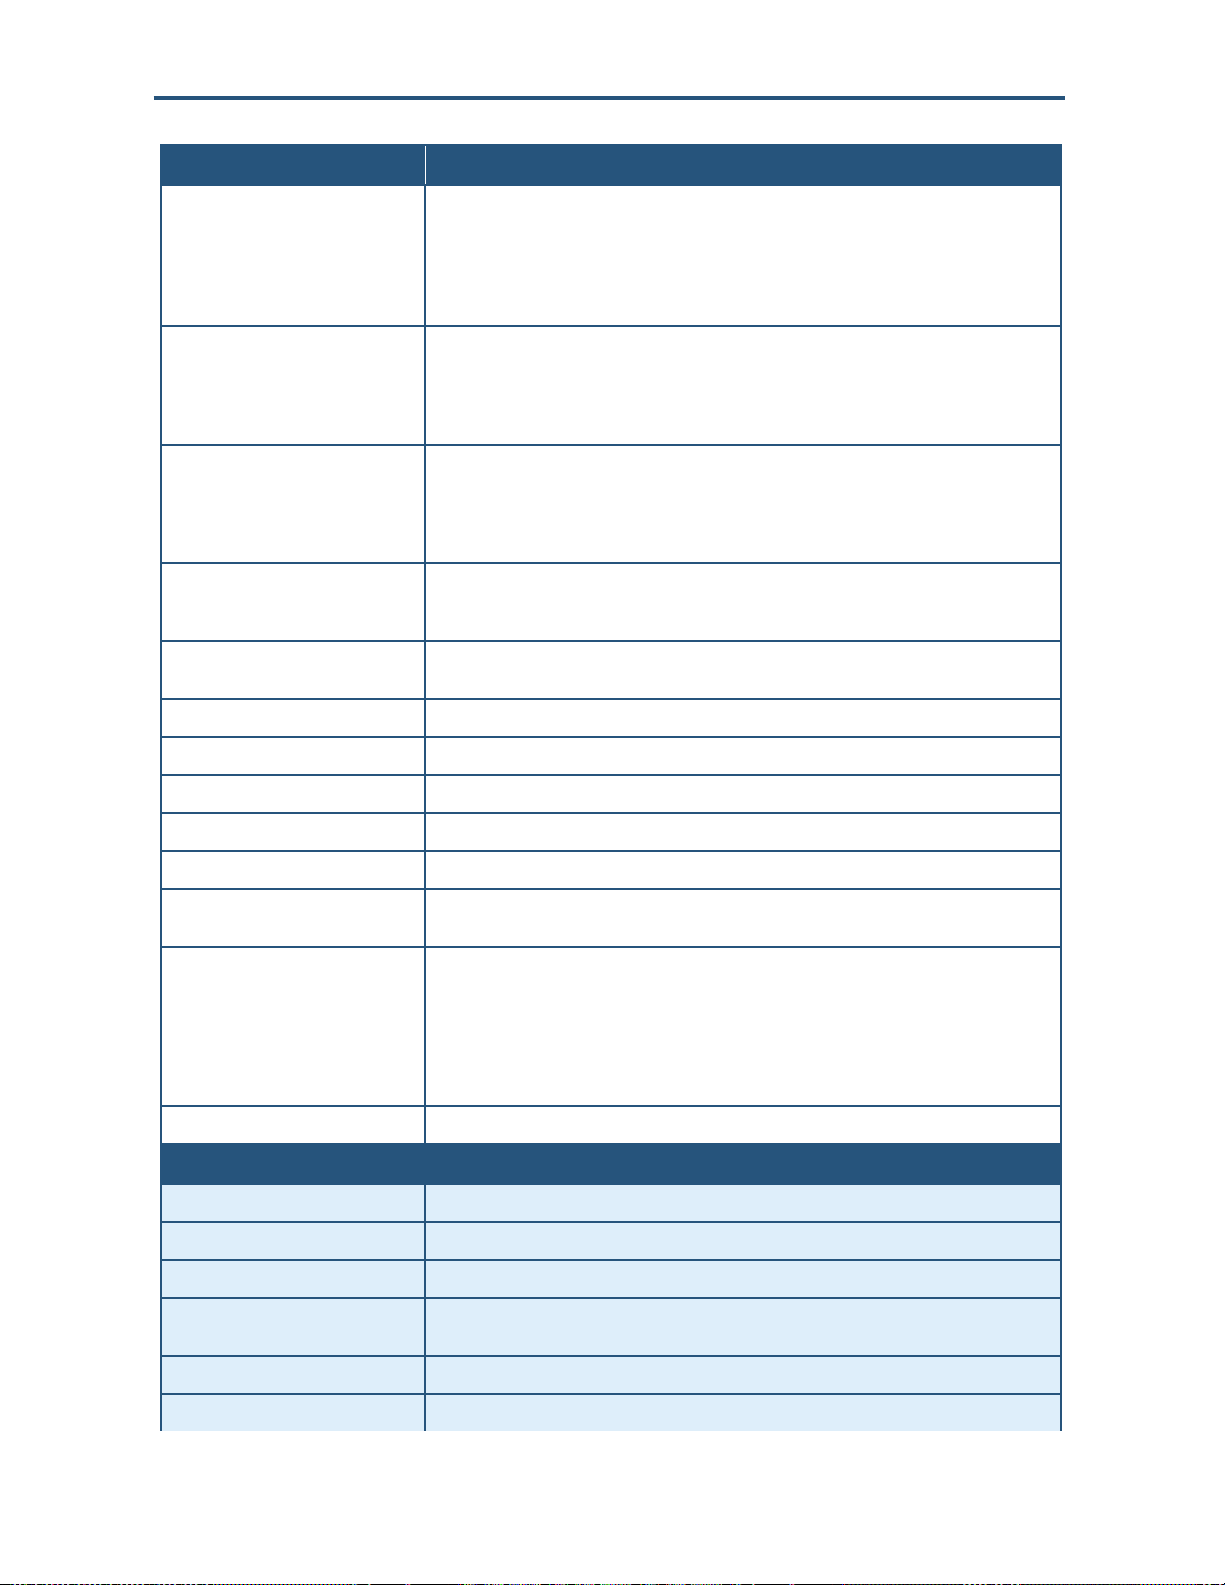
50
SMCD3GNV Wireless Cable Modem Gateway User Manual
Page 51
Configuring the Gateway
Option Description
Channel Bandwidth Select a channel bandwidth of 20 or 20/40.
• 20 = allows only single-channel operation (e.g., 20 MHz).
• 20/40 = allows both single channel operation (20 MHz) and the wider bandwidth operation
(40 MHz) by using two or more adjacent (contiguous channels). A 20/40 BSS is a wireless
network that allows a wider bandwidth operation mode. (default)
Guard Interval The guard interval is the period in nanoseconds that the Gateway listens between packets.
Choices are:
• Long = 800 ns guard interval.
• Short = 400 ns guard interval. (default)
MCS Modulation Coding Scheme (MCS) is a specification of PHY parameters consisting of
modulation order (BPSK, QPSK, 16-QAM, 64-QAM) and FEC code rate (1/2, 2/3, 3/4, 5/6).
MCS is used in the Gateway to define 32 symmetrical settings. MCS provides for potentially
greater throughput. High throughput data rates are a function of MCS, bandwidth, and guard
interval. Default is auto.
Reverse Direction Grant (RDG) Speeds up data transmission between the Gateway and 802.11n access points and clients by
allowing wireless workstations to send/receive data simultaneously, without contending for
shared medium. Default is enable.
Extension Channel Defines a second 20-MHz channel. 40-MHz stations can use this channel in addition to using
the control channel simultaneously.
Aggregation MSDUA (A-MSDU) Enables or disables aggregation of multiple MSDUs in one MPDU. Default is disable.
Auto-Block Ack Enables or disables Auto Block ACL function. Default is enable.
Decline BA Request Enables or disables the BA request function. Default is disable.
HT Tx Stream Select 1 or 2 from the pull-down menu. Default is 2.
HT Rx Stream Select 1 or 2 from the pull-down menu. Default is 2.
WMM Power Save When checked, enables the Gateway’s power-management features for optimizing battery
life. Default is checked.
STBC Space Time Block Coding (STBC) is an 802.11n technique intended to improve the reliability
of data transmissions. With STBC, the data stream is transmitted on multiple antennas, so the
receiving system has a better chance of detecting at least one of the data streams. Choices
are:
• Disable = Gateway does not transmit the same data on multiple antennas. (default)
• Enable = Gateway transmits the same data stream on multiple antennas at the same time.
SAVE ADVANCED SETTING button Click this button to save your changes to the private wireless advanced settings.
WiFi Client Setup Configuration (WP5)
WPS Lets you enable or disable Wi-Fi Protected Setup (WPS) on the Gateway. Default is disabled.
Security A read-only field that shows security information.
Encryption A read-only field that shows the encryption method, if any, used.
WPA Passphrase A read-only field that shows the WPA passphrase used by the Gateway. The passphrase is a
sequence of words or text that can be used to automatically generate WEP keys.
WPS Configured A read-only field that whether WPS has been configured.
AP PIN A read-only field that shows the personal identification number (PIN) for the access point.
51
SMCD3GNV Wireless Cable Modem Gateway User Manual
Page 52
Configuring the Gateway
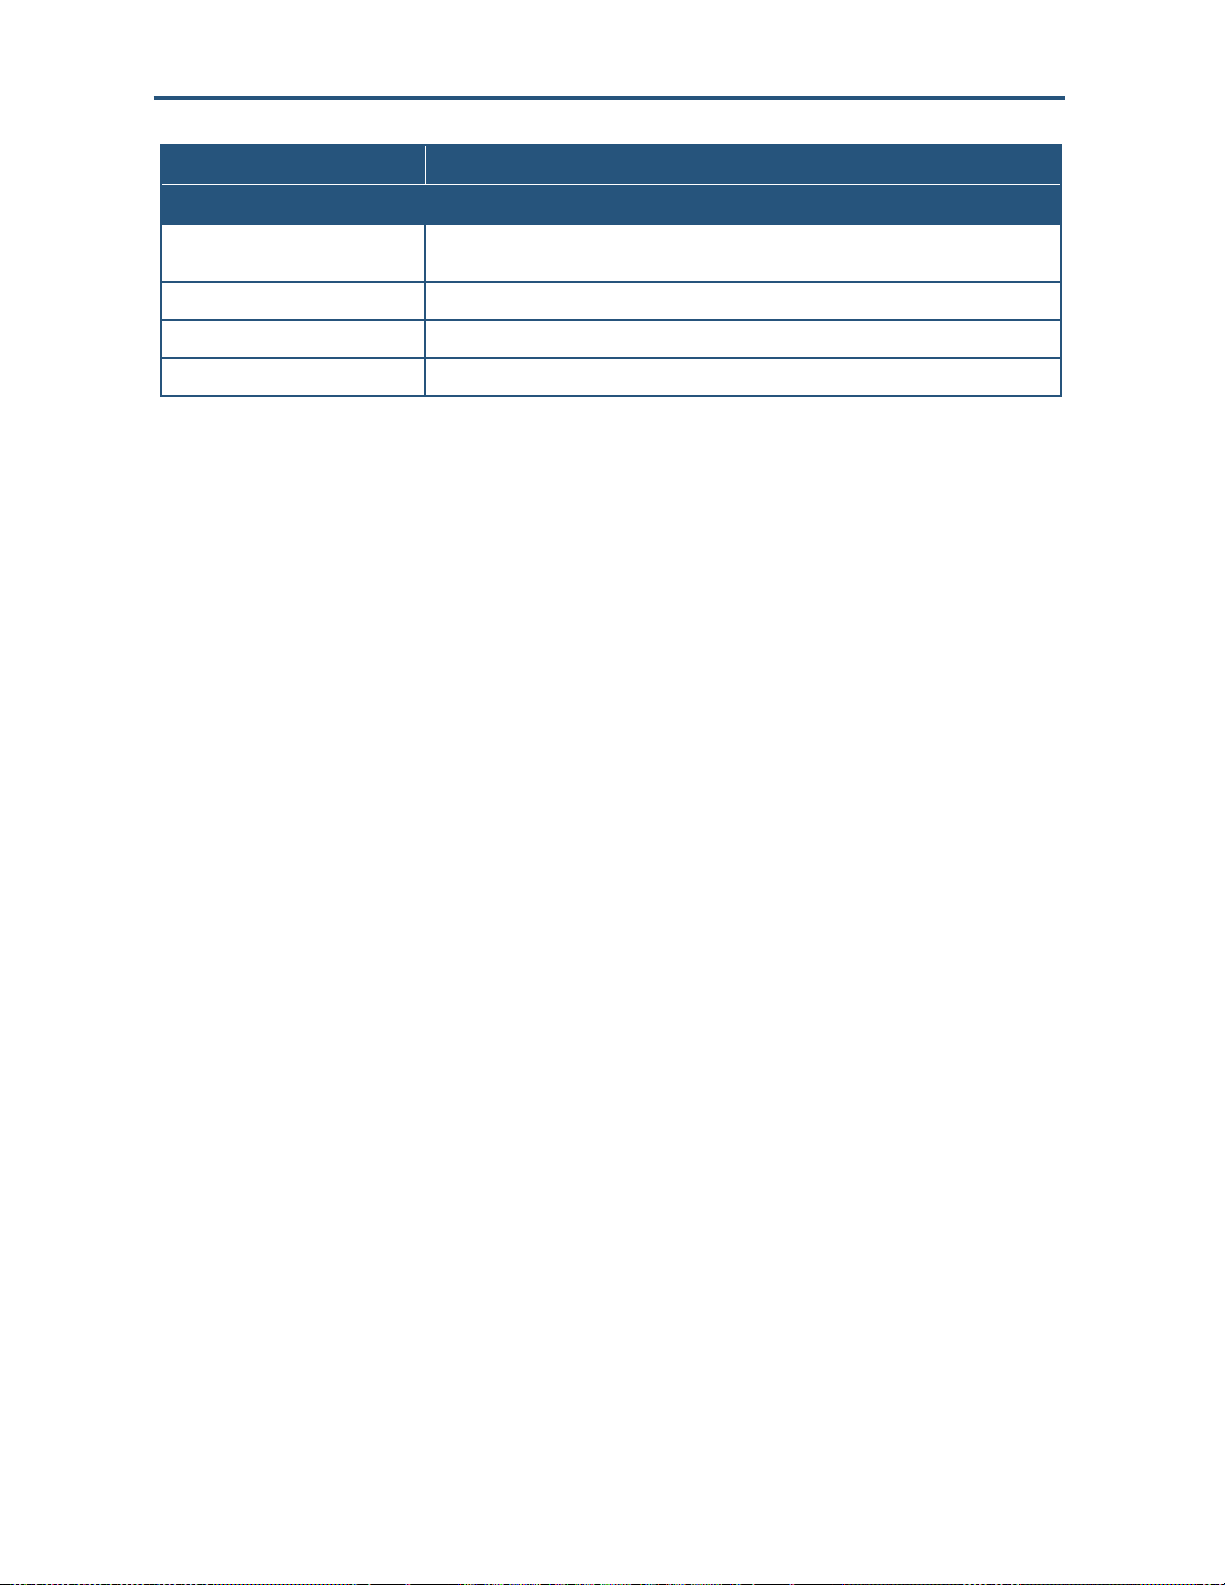
Option Description
Connect to Your WPS-supported Device
Push Button Click this option to use the WPS button on the top panel of the Gateway to configure WPS
PIN Number Click this option if you need to enter a PIN to configure WPS.
Enter Wireless Client’s PIN If you clicked PIN Number, enter the PIN in this field.
Pair with my WiFI Client Click this button to pair (connect) the Gateway’s Wi-Fi settings with your Wi-Fi client.
(see Figure 3).
52
SMCD3GNV Wireless Cable Modem Gateway User Manual
Page 53
Configuring the Gateway
Configuring Firewall Settings
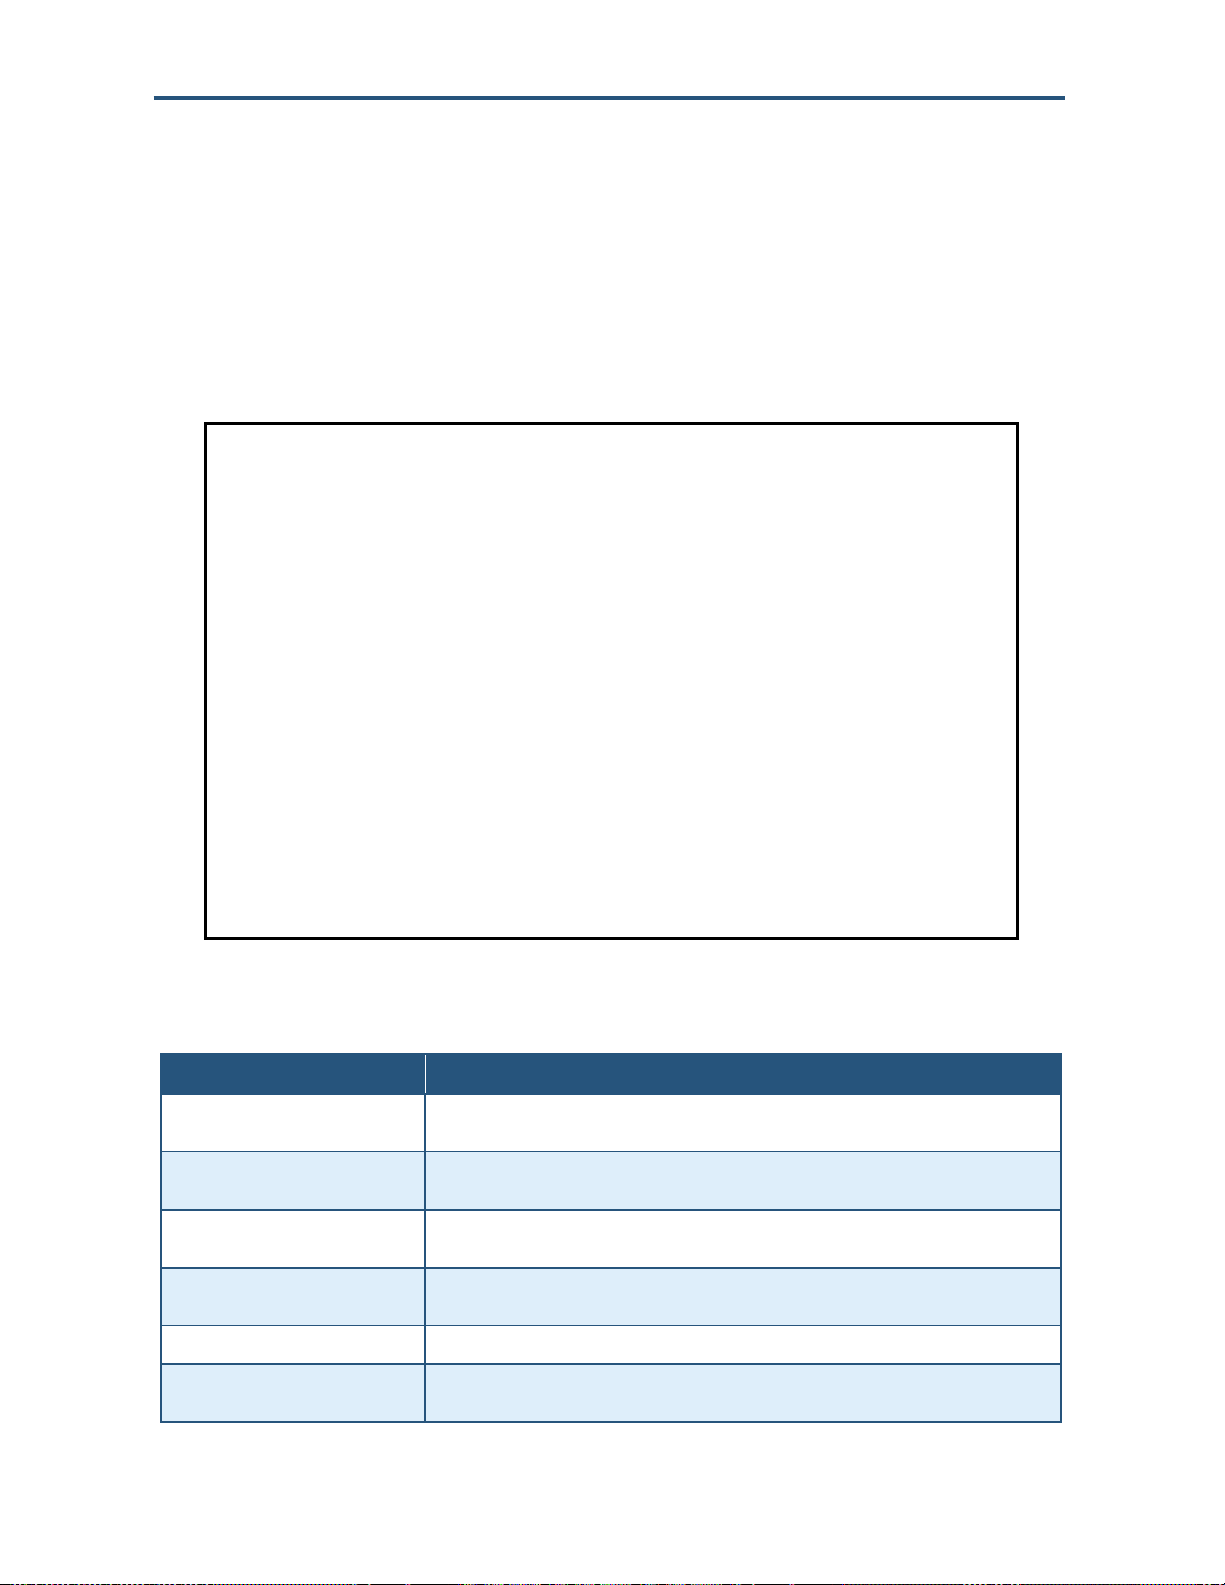
The Firewall menu lets you view and edit the settings for the Gateway’s internal firewall. The
setting you select here is displayed at the top-right area of the Gateway’s Web interface.
To display the Firewall menu, click Gateway in the menu bar, and then click the Firewall
submenu. Figure 26 shows an example of the Firewall menu and Table 9 describes the
menu.
Figure 26. Example of the Firewall Menu
Table 9. Firewall Menu
Option Description
Maximum Security (High) Configures the Gateway’s firewall to the highest setting. Select this setting for environments
Typical Security (Medium) Configures the Gateway’s firewall for typical (medium) security. Select this setting for
Minimum Security (Low) Configures the Gateway’s firewall for minimum (low) security. Select this setting for
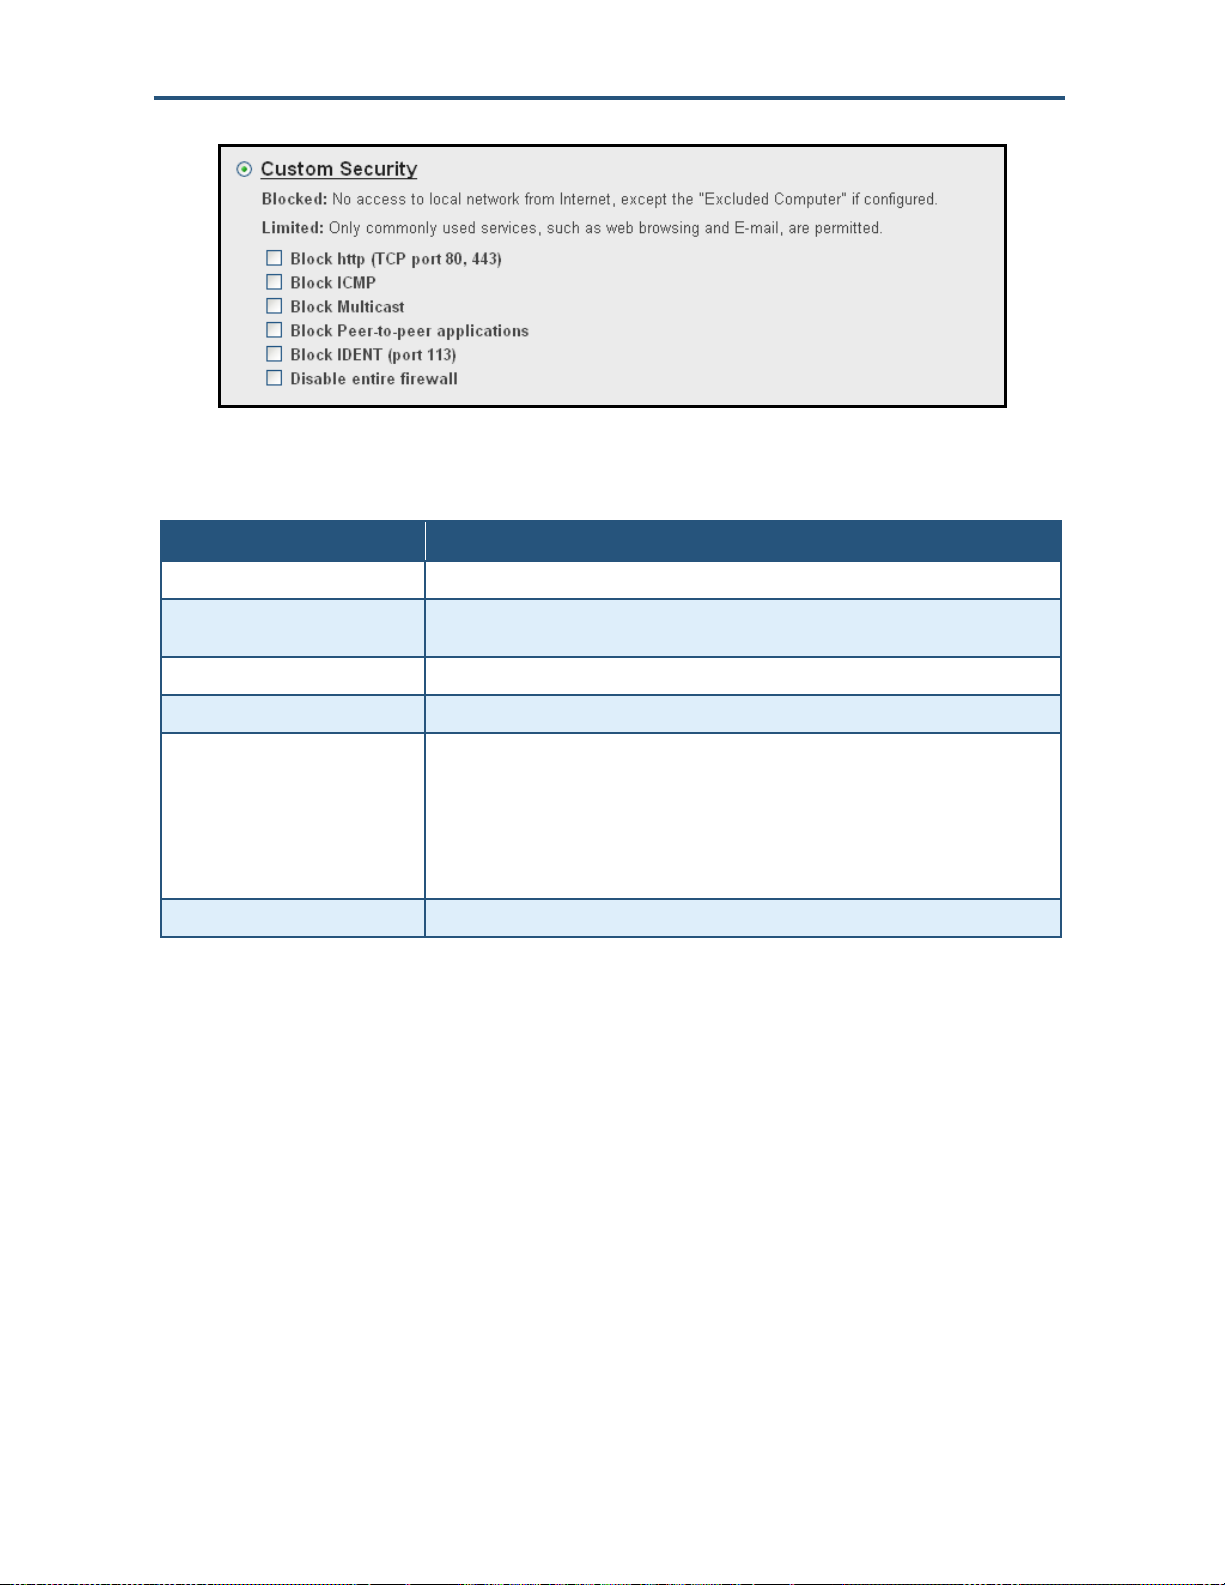
Custom Security Clicking this option displays the custom security settings in Figure 27. For more information,
SAVE SETTINGS button After configuring your firewall settings, click this button to save them.
RESTORE DEFAULT SETTINGS
button
SMCD3GNV Wireless Cable Modem Gateway User Manual
where security is critical.
environments where security is important.
environments where security is not important.
see Table 10.
Resets the Gateway to the factory default firewall settings.
53
Page 54
Configuring the Gateway
Figure 27. Custom Firewall Security Settings
Table 10. Custom Security Settings
Option Description
Block http Blocks Hypertext Transfer Protocol (HTTP) downloads on ports 80 and 443.
Block ICMP Blocks Internet Control Message Protocol (ICMP) traffic at the outer perimeter of the Gateway
Block Multicast Blocks unsolicited multicast packets.
Block Peer-to-peer application Blocks peer-to-peer applications
Block IDENT Blocks identification (Ident) requests from Ident servers on port 113.
Disable entire firewall Disables all of the Gateway’s firewall settings.
to protect against attacks such as cascading ping floods.
Note: Port 113 is associated with Ident. If a client program on a computer connected to the
Gateway contacts a remote server for services such as POP, IMAP, SMTP, or IRC, the
remote server returns a query to the “Ident” server running in many systems listening for
these queries on port 113. Essentially, the remote server is asking your system to identify
itself and you. This means that port 113 is often probed by attackers as a source of your
personal information.
54
SMCD3GNV Wireless Cable Modem Gateway User Manual
Page 55
Configuring the Gateway
Viewing System Software Settings
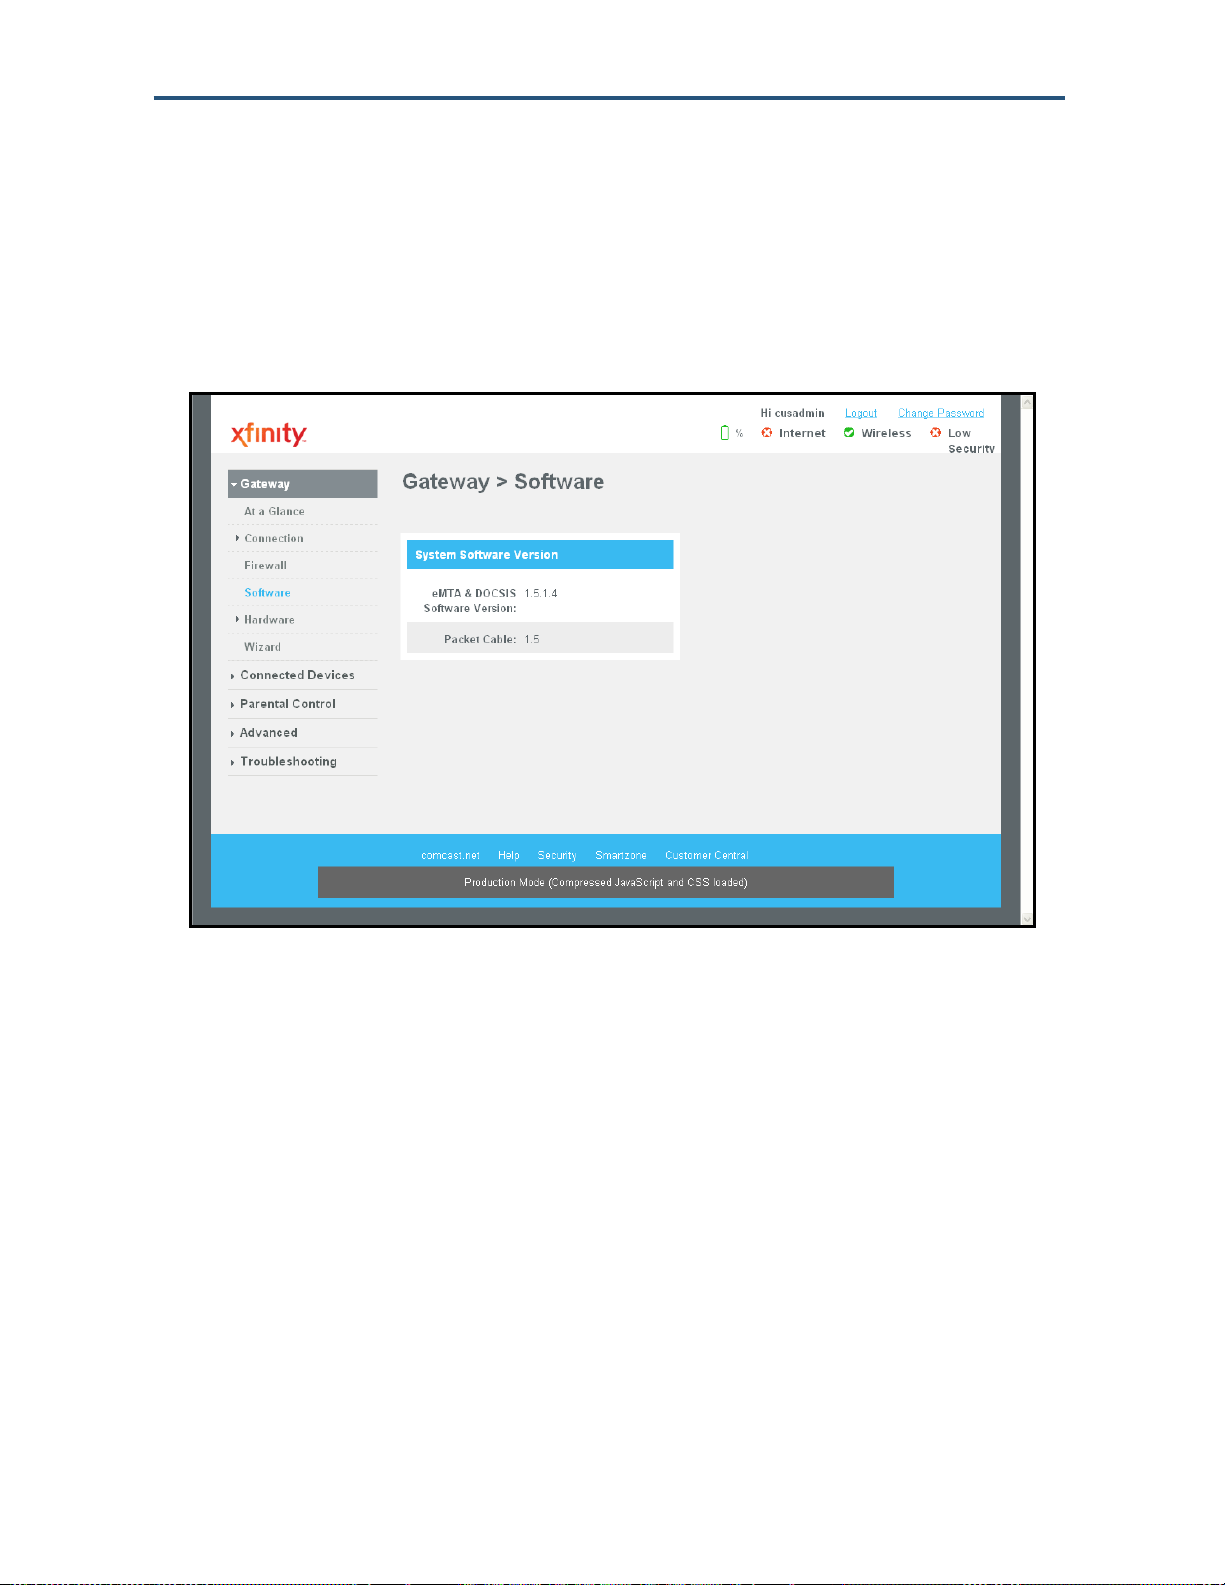
The Software menu is a read-only screen that shows the software version and packet cable
version associated with the Gateway.
To display the Software menu, click Gateway in the menu bar, and then click the Software
submenu. Figure 28 shows an example of the Software menu.
Figure 28. Example of the Software Menu
55
SMCD3GNV Wireless Cable Modem Gateway User Manual
Page 56

Configuring the Gateway
Configuring System Hardware
Using the Hardware menu, you can:
View system hardware information. See page 56.
View information about the Gateway’s internal battery. See page 57.
View the link status and Media Access Control (MAC) address for all four Gateway
Ethernet ports. See page 58.
View the status and MAC address of the Gateway’s Wi-Fi port. See page 59.
Viewing System Hardware Settings
The System Hardware menu is a read-only screen that shows the Gateway’s system
hardware.
To display the System Hardware menu, click Gateway in the menu bar, and then click the
Hardware and System Hardware submenus. Figure 29 shows an example of the System
Hardware menu.
Figure 29. Example of the System Hardware Menu
56
SMCD3GNV Wireless Cable Modem Gateway User Manual
Page 57

Configuring the Gateway
Viewing Battery Settings
The Battery menu is a read-only screen that shows information about the Gateway’s internal
battery.
To display the Battery menu, click Gateway in the menu bar, and then click the Hardware
and Battery submenus. Figure 30 shows an example of the Battery menu.
Figure 30. Example of the Battery Menu
57
SMCD3GNV Wireless Cable Modem Gateway User Manual
Page 58

Configuring the Gateway
Viewing LAN Ethernet Settings
The LAN Ethernet menu is a read-only screen that shows the link status and MAC address
of the Gateway’s four Ethernet ports.
To display the LAN Ethernet menu, click Gateway in the menu bar, and then click the
Hardware and LAN submenus. Figure 31 shows an example of the LAN Ethernet menu.
Figure 31. Example of the LAN Ethernet Menu
58
SMCD3GNV Wireless Cable Modem Gateway User Manual
Page 59

Configuring the Gateway
Viewing Wi-Fi Settings
The WiFi menu is a read-only screen that shows the Wi-Fi link status and MAC address of
the Gateway’s WiFi port.
To display the WiFi menu, click Gateway in the menu bar, and then click the Hardware and
WiFi submenus. Figure 32 shows an example of the WiFi menu.
Figure 32. Example of the WiFi Menu
59
SMCD3GNV Wireless Cable Modem Gateway User Manual
Page 60

Configuring the Gateway
Configuring Your Home Network
The Home Network Wizard menu is part of a 2-page wizard you can use to configure your
home network.
To display the first page of the Home Network Wizard, click Gateway in the menu bar, and
then click the Wizard submenu. Figure 33 shows an example of the first page of the Home
Network Wizard and Table 11 describes the page.
Figure 33. Example of the First Page of the Home Network Wizard
60
SMCD3GNV Wireless Cable Modem Gateway User Manual
Page 61
Configuring the Gateway
Table 11. Home Network Wizard – Step 1
Option Description
Gateway Name The name you want to assign to the Gateway. Assign a name so that this device will not be
Current Password Enter the current case-sensitive password. For security purposes, every typed character
New Password Enter the new password you want to use. The password is case sensitive and can contain
Re-enter New Password Enter the same case-sensitive administrator password you typed in the New Password field.
NEXT PAGE button Click this button to display the second page of the Home Network Wizard (see Figure 34 and
confused with other devices on your wireless network. We recommend you use a name that is
meaningful to you so you can identify the Gateway easily. The Gateway name is case
sensitive and can contain from 8 to 20 alphanumeric characters, but no spaces.
appears as a dot (). The default password is not shown for security purposes. The password
is case sensitive and can contain from 8 to 20 alphanumeric characters, but no spaces.
from 8 to 20 alphanumeric characters, but no spaces. Spaces count as password characters.
For security purposes, every typed character appears as a dot ().
For security purposes, every typed character appears as a dot ().
Table 12).
61
SMCD3GNV Wireless Cable Modem Gateway User Manual
Page 62

Configuring the Gateway
Figure 34. Example of the Second Page of the Home Network Wizard
62
SMCD3GNV Wireless Cable Modem Gateway User Manual
Page 63
Configuring the Gateway
Table 12. Home Network Wizard – Step 2
Option Description
Enter WiFI Network Name Enter the name of your wireless network (typically, the SSID). The Wi-Fi name will make it
Encryption Method The default selection of OPEN means your wireless transmissions are not protected. To
Enter Network Password If you select one of the WEP or WPA encryption settings, enter the password used for
Radius Server Address IP address of the Remote Authentication Dial In User Service (RADIUS) server.
Radius Server Port Port number that RADIUS uses for authentication. Default is 1812.
FINISH button Click this button to complete the Home Network Wizard.
more obvious for others to know which network they are connecting to.
prevent other computers in the area from using your Internet connection, secure your wireless
network by selecting an encryption method from this drop-down list. There are several
encryption methods for wireless settings, including:
• WEP = basic encryption and therefore least secure (i.e., it can be easily cracked, but is
compatible with a wide range of devices including older hardware).
• WPA (WPA-Personal) = one of the highest levels of wireless security for your network.
Select this option if your wireless adapters support WPA.
• WPA-2 (Wi-Fi Protected Access version 2) = second generation of WPA. Select this option
if your wireless adapters support WPA2.
• WPA-Enterprise = provides extremely strong wireless security and adds authentication to
WEP's basic encryption. This option is mainly suited for enterprise users, not home users,
and can be selected if your wireless adapters support WPA-Enterprise.
encryption and decryption.
63
SMCD3GNV Wireless Cable Modem Gateway User Manual
Page 64

Configuring the Gateway
Working with Connected Devices
Using the Computers menu, you can:
View the computers that the Gateway has discovered using DHCP or Home Network
Administration Protocol (HNAP).
Manually add computers with static IP addresses to the wireless network.
Edit computers with static IP addresses
Disconnect online and offline computers from the wireless network.
To display the Computers menu, click Connected Devices in the menu bar. Figure 35
shows an example of the Computers menu.
Figure 35. Example of the Computers Menu
64
SMCD3GNV Wireless Cable Modem Gateway User Manual
Page 65

Configuring the Gateway
Manually Adding Computers with Static IP Addresses to the Wireless Network
To manually add a computer with a static IP address to your wireless network:
5. Under Online Computers, click the ADD COMPUTER WITH STATIC IP button. The Add
Computer menu appears (see Figure 36).
6. Complete the fields in the Add Computer menu (see Table 13).
7. Click SAVE to save your settings (or click CANCEL to discard them). If you click SAVE,
the Computer menu reappears, with the computer you added displayed under Offline
Computers.
8. To add more computers with static IP addresses, repeat steps 1 through 3.
9. To edit an online computer, click the EDIT button next to the computer you want to modify,
edit the settings on the Edit Computer menu (see Figure 37), and click SAVE.
10. To delete an online or offline computer, click the X next to the computer. When the Delete
Computer message appears, click OK to delete the computer or CANCEL to retain it. If
you clicked OK, the computer is removed from the Computers menu.
Figure 36. Example of the Add Computer Menu
65
SMCD3GNV Wireless Cable Modem Gateway User Manual
Page 66
Configuring the Gateway
Table 13. Add Computer Menu
Option Description
Host Name Host name of the computer you want to add.
Connection Read-only field that displays shows the network connection of Ethernet.
MAC Address MAC address of the computer you want to add. Add a colon between each 2-character ID in
Static IP Address Static IP address of the computer you want to add. Add a period between each octet in the IP
Comments Optional comments about the computer.
SAVE button Click this button to save your settings.
CANCEL button Click this button to discard your settings on the Add Computer menu.
the MAC address. For information about obtaining the MAC address of a computer, see
“Determining a Computer’s MAC Address” on page 196.
address.
Figure 37. Example of the Edit Computer Menu
66
SMCD3GNV Wireless Cable Modem Gateway User Manual
Page 67
Configuring the Gateway
Table 14. Edit Computer Menu
Option Description
Host Name Read-only field that shows the host name of the computer you selected.
Connection Read-only field that displays shows the network connection of Ethernet.
Configuration Select whether the selected computer should be discovered by the Gateway using DHCP or a
MAC Address Edit the MAC address of the selected computer. Add a colon between each 2-character ID in
Static IP Address If you selected Static IP for Configuration, enter the computer’s static IP address. Add a
Comments Optional comments about the computer.
SAVE button Click this button to save your settings.
CANCEL button Click this button to discard your settings on the Edit Computer menu.
static IP address. If you select Static IP, enter the static IP address in the Static IP Address
field.
the MAC address.
period between each octet in the IP address.
67
SMCD3GNV Wireless Cable Modem Gateway User Manual
Page 68

Configuring the Gateway
Configuring Parental Controls
Regulating Web browsing can prevent children and workers from accessing dangerous
content on the Internet, or having to make judgment calls over suitable relationships in chatrooms. The fact is, Web sites, chat-room users, and downloaded programs may not have
the best interests of you, your family, or your workers at heart. The unscrupulous may try to
manipulate the people you care about or try to gain trust, which may result in unacceptable
access to your family, your coworkers, your computer, or personal information.
Using the Parental Controls menu, you can prevent access to unwanted Web content by:
Blocking sites and keywords. See page 68.
Blocking services. See page 75.
Blocking devices and access types. See page 78.
You can also define report filters and generate reports. See page 82.
Blocking Sites and Keywords, and Selecting Trusted Computers
Using the Managed Sites menu, you can block access to certain Web sites from local
computers. To display the Managed Sites menu, click Parental Control in the menu bar.
Figure 38 shows an example of the Managed Sites menu.
68
SMCD3GNV Wireless Cable Modem Gateway User Manual
Page 69

Configuring the Gateway
Figure 38. Example of Managed Sites Menu
Blocking Sites
To block sites:
11. If the Managed Sites menu is not displayed, click Parental Control in the menu bar.
12. Next to Enabled Managed Sites, click Enabled.
13. Under Blocked Sites, click ADD. The Add Blocked Domain menu appears (see Figure
39).
14. Complete the fields in the Add Blocked Domain menu (see Table 15).
15. Click SAVE (or click CANCEL to discard your settings). If you clicked SAVE, the blocked
site appears below Blocked Sites on the Managed Sites menu.
16. To block additional sites, repeat steps 3 through 5.
17. To edit a blocked site, click the EDIT button next to the blocked site you want to modify,
edit the settings on the Add Blocked Domain menu (see Table 15), and click SAVE.
18. To delete a blocked site, click the X next to the site. When the Delete URL Block Rule
message appears, click OK to delete the blocked URL or CANCEL to retain it. If you
clicked OK, the URL is removed from the Blocked Sites area on the Managed Sites
menu.
69
SMCD3GNV Wireless Cable Modem Gateway User Manual
Page 70

Configuring the Gateway
Figure 39. Add Blocked Domain Menu
70
SMCD3GNV Wireless Cable Modem Gateway User Manual
Page 71
Configuring the Gateway
Table 15. Add Blocked Domain Menu
Option Description
URL Enter the URL you want blocked.
Always Block? Select whether you want the Gateway to always block this URL. Choices are
• No = the Gateway does not always block this URL. Use the Set Block Time and Set
Blocked Days to instruct the Gateway when to block this URL.
• Yes = the Gateway always blocks this URL until you remove the block. (default)
Set Block Time
Start from If you selected No for Always Block?, select the time when the Gateway is to start blocking
this URL.
End on If you selected No for Always Block?, select the time when the Gateway is to stop blocking
this URL.
Set Blocked Days
Select All Click this link to select all seven days. This link is not available if you selected Yes for Always
Block?
Select None Click this link to deselect all seven days. This link is not available if you selected Yes for
Always Block?
Monday – Sunday Check the check boxes that correspond to the days when you want the Gateway to block this
URL. These checkboxes are not available if you selected Yes for Always Block?
SAVE button Click this button to save your settings.
CANCEL button Click this button to discard your settings on the Add Blocked Domain menu.
71
SMCD3GNV Wireless Cable Modem Gateway User Manual
Page 72

Configuring the Gateway
Blocking Keywords
To block keywords:
19. If the Managed Sites menu is not displayed, click Parental Control in the menu bar.
20. Next to Enabled Managed Sites, click Enabled.
21. Under Blocked Keywords, click ADD. The Add Blocked Keyword menu appears (see
Figure 40).
22. Complete the fields in the Add Blocked Keyword menu (see Table 16).
23. Click SAVE (or click CANCEL to discard your settings). If you clicked SAVE, the blocked
keyword appears below Blocked Keywords on the Managed Keywords menu.
24. To block additional keywords, repeat steps 3 through 5.
25. To edit a blocked keyword, click the EDIT button next to the blocked keyword you want to
modify, edit the settings on the Add Blocked Keyword menu (see Table 16), and click
SAVE.
26. To delete a blocked keyword, click the X next to the keyword. When the Delete Keyword
Block Rule message appears, click OK to delete the blocked keyword or CANCEL to retain
it. If you clicked OK, the keyword is removed from the Blocked Keywords area on the
Managed Keywords menu.
72
SMCD3GNV Wireless Cable Modem Gateway User Manual
Page 73

Configuring the Gateway
Figure 40. Add Blocked Keyword Menu
73
SMCD3GNV Wireless Cable Modem Gateway User Manual
Page 74
Configuring the Gateway
Table 16. Add Blocked Keyword Menu
Option Description
Keyword Enter the keyword you want blocked.
Always Block? Select whether you want the Gateway to always block this keyword. Choices are
• No = the Gateway does not always block this keyword. Use the Set Block Time and Set
Blocked Days to instruct the Gateway when to block this Keyword.
• Yes = the Gateway always blocks this keyword until you remove the block. (default)
Set Block Time
Start from If you selected No for Always Block?, select the time when the Gateway is to start blocking
this keyword.
End on If you selected No for Always Block?, select the time when the Gateway is to stop blocking
this keyword.
Set Blocked Days
Select All Click this link to select all seven days. This link is not available if you selected Yes for Always
Block?
Select None Click this link to deselect all seven days. This link is not available if you selected Yes for
Always Block?
Monday – Sunday Check the check boxes that correspond to the days when you want the Gateway to block this
keyword. These checkboxes are not available if you selected Yes for Always Block?
SAVE button Click this button to save your settings.
CANCEL button Click this button to discard your settings on the Add Blocked Keyword menu.
74
SMCD3GNV Wireless Cable Modem Gateway User Manual
Page 75

Configuring the Gateway
Blocking Services
Using the Managed Services menu, you can block access to certain services from local
computers. This feature can be used to protect children from accessing inappropriate
services.
To display the Managed Services menu, click Parental Control in the menu bar, and then
click the Managed Services submenu. Figure 41 shows an example of the menu.
Figure 41. Example of Managed Services Menu
To block services:
27. If the Managed Services menu is not displayed, click Parental Control in the menu bar,
and then click the Managed Services submenu.
28. Next to Enabled Managed Services, click Enabled.
29. Under Blocked Services, click ADD. The Add Blocked Service menu appears (see Figure
42).
30. Complete the fields in the Add Blocked Service menu (see Table 17).
31. Click SAVE (or click CANCEL to discard your settings). If you clicked SAVE, the blocked
service appears below Blocked Services on the Managed Services menu.
32. To block additional services, repeat steps 3 through 5.
75
SMCD3GNV Wireless Cable Modem Gateway User Manual
Page 76

Configuring the Gateway
33. To edit a blocked service, click the EDIT button next to the blocked service you want to
modify, edit the settings on the Add Blocked Service menu (see Table 17), and click SAVE.
34. To delete a blocked service, click the X next to the service. When the Delete Service Block
Rule message appears, click OK to delete the blocked URL or CANCEL to retain it. If you
clicked OK, the service is removed from the Blocked Services area on the Managed
Services menu.
Figure 42. Add Blocked Service Menu
76
SMCD3GNV Wireless Cable Modem Gateway User Manual
Page 77
Configuring the Gateway
Table 17. Add Blocked Service Menu
Option Description
User Defined Service Enter the service you want blocked.
Protocol The type of protocol associated with the service to be blocked. Choices are:
• TCP (default)
• UDP
• TCP/UDP
Start Port Starting port number on which the block will be applied. If necessary, contact the application
vendor for this information.
End Port Ending port number on which the block will be applied. If necessary, contact the application
vendor for this information.
Always Block? Select whether you want the Gateway to always block this service. Choices are
• No = the Gateway does not always block this service. Use the Set Block Time and Set
Blocked Days to instruct the Gateway when to block this service.
• Yes = the Gateway always blocks this service until you remove the block. (default)
Set Block Time
Start from If you selected No for Always Block?, select the time when the Gateway is to start blocking
this service.
End on If you selected No for Always Block?, select the time when the Gateway is to stop blocking
this service.
Set Blocked Days
Select All Click this link to select all seven days. This link is not available if you selected Yes for Always
Block?
Select None Click this link to deselect all seven days. This link is not available if you selected Yes for
Always Block?
Monday – Sunday Check the check boxes that correspond to the days when you want the Gateway to block this
service. These checkboxes are not available if you selected Yes for Always Block?
SAVE button Click this button to save your settings.
CANCEL button Click this button to discard your settings on the Add Blocked Domain menu.
77
SMCD3GNV Wireless Cable Modem Gateway User Manual
Page 78

Configuring the Gateway
Managing Devices and Access Types
Using the Managed Devices menu, you can enable or disable managed devices and allow
or block all access types. You can also add devices you want to block.
To display the Managed Devices menu, click Parental Control in the menu bar, and then
click the Managed Devices submenu. Figure 43 shows an example of the menu.
Figure 43. Example of Managed Devices Menu
Enabling or Disabling Managed Devices
By default, all managed devices are disabled. To enable them, click Enabled next to Enable
Managed Devices.
Enabling or Disabling Access Types
By default, all access types are blocked. To unblock them, click Allow All next to Access
Type.
78
SMCD3GNV Wireless Cable Modem Gateway User Manual
Page 79

Configuring the Gateway
Adding Blocked Devices
To add devices you want to block:
35. If the Managed Devices menu is not displayed, click Parental Control in the menu bar,
and then click the Managed Devices submenu.
36. Next to Blocked Devices, click ADD BLOCKED DEVICE. The Add Blocked Device menu
appears (see Figure 44).
37. Completed the fields in the Add Block Device menu (see Table 18).
38. Click SAVE (or click CANCEL to discard your settings). If you clicked SAVE, the blocked
device appears below Blocked Devices on the Managed Devices menu.
39. To block additional devices, repeat steps 3 through 5.
40. To edit a blocked device, click the EDIT button next to the blocked device you want to
modify, edit the settings on the Add Blocked Device menu (see Table 18), and click SAVE.
41. To delete a blocked device, click the X next to the service. When the Delete Blocked MAC
Rule message appears, click OK to delete the blocked device or CANCEL to retain it. If
you clicked OK, the device is removed from the Blocked Devices area on the Managed
Devices menu.
79
SMCD3GNV Wireless Cable Modem Gateway User Manual
Page 80

Configuring the Gateway
Figure 44. Add Blocked Device Menu
80
SMCD3GNV Wireless Cable Modem Gateway User Manual
Page 81
Configuring the Gateway
Table 18. Add Blocked Device Menu
Option Description
Auto-Learned Devices To select a device that the Gateway automatically learned, select the device under Auto-
Learned Devices.
Custom Device To select a custom device, enter the name and MAC address of the device in the Computer
Name and MAC Address fields below Custom Device.
Always Block? Select whether you want the Gateway to always block this device. Choices are
• No = the Gateway does not always block this device. Use the Set Block Time and Set
Blocked Days to instruct the Gateway when to block this device.
• Yes = the Gateway always blocks this device until you remove the block. (default)
Set Block Time
Start from If you selected No for Always Block?, select the time when the Gateway is to start blocking
this device.
End on If you selected No for Always Block?, select the time when the Gateway is to stop blocking
this device.
Set Blocked Days
Select All Click this link to select all seven days. This link is not available if you selected Yes for Always
Block?
Select None Click this link to deselect all seven days. This link is not available if you selected Yes for
Always Block?
Monday – Sunday Check the check boxes that correspond to the days when you want the Gateway to block this
device. These checkboxes are not available if you selected Yes for Always Block?
SAVE button Click this button to save your settings.
CANCEL button Click this button to discard your settings on the Add Blocked Device menu.
81
SMCD3GNV Wireless Cable Modem Gateway User Manual
Page 82

Configuring the Gateway
Generating Reports
The Gateway provides a reporting feature for generating reports containing selected log
messages. Using the Reports menu, you can define filters for reports and print or download
reports.
To display the Reports menu, click Parental Control in the menu bar, and then click the
Reports submenu. Figure 45 shows an example of the menu.
Note: You can use the Logs menu to apply log filters to reports. For more information. See
page 94.
Figure 45. Example of Reports Menu
82
SMCD3GNV Wireless Cable Modem Gateway User Manual
Page 83

Configuring the Gateway
Defining Report Filters
The Report Filters area on the Reports menu lets you select the type of Reports you want
to generate and the timeframe that the report is to cover.
To define a report filter:
1. If the Reports menu is not displayed, click Parental Control in the menu bar, and then
click the Reports submenu.
2. Perform the following steps under Report Filters:
a. Using the Report Type drop-down list, select the report to which you want to apply a
filter, Choices are:
All
Managed Sites
Managed Services
Managed Devices
b. By default, the report is generated for today. To change this timeframe, select a
different timeframe from the Time Frame drop-down list.
c. Click GENERATE REPORT to apply the filter.
Printing or Downloading the Report
After defining a report filter, use the following steps under All Reports to print or download
the report:
3. To print the report with the filter applied, click PRINT.
4. To download the report with the filter applied, click DOWNLOAD.
83
SMCD3GNV Wireless Cable Modem Gateway User Manual
Page 84

Configuring the Gateway
Using Advanced Features
Using the Advanced Features menu, you can:
Enable or disable port forwarding. See page 84.
Enable or disable port triggering. See page 87.
Enable or disable port blocking. See page 91.
Use the Gateway’s UPnP feature to auto-discover devices. See page 92.
Enabling or Disabling Port Forwarding
Using the Firewall menu (described on page 53), you can configure the Gateway to create a
firewall between your internal network and the Internet. A firewall keeps unwanted traffic
from the Internet away from your networked computers. There may be times, however, when
you want a “tunnel” to be created through your firewall, so computers on the Internet can
communicate to one of the computers on your LAN using a single port. This is handy for
running Web servers, game servers, FTP servers, or even video conferencing.
Port forwarding allows outside users access to the computers on your LAN using a given
port or range of ports. Using port forwarding, for example, one of your computers could run a
Web server (port 80) while another computer could run an FTP server (port 23) - both using
the same IP address.
You configure the Gateway’s port forwarding feature using the Port Forwarding menu. To
display this menu, click Advanced in the menu bar, and then click the Port Forwarding
submenu in the menu bar. Figure 46 shows an example of the menu.
84
SMCD3GNV Wireless Cable Modem Gateway User Manual
Page 85
Configuring the Gateway
Figure 46. Example of Port Forwarding Menu
Adding a Port Forwarding Rule
To add a port forwarding rule:
1. If the Port Forwarding menu is not displayed, click Advanced in the menu bar, and then
click the Port Forwarding submenu.
2. Confirm that Enabled is selected (green) next to Enable Port Forwarding. If it isn’t click
Enabled.
3. Click the ADD PORT FORWARD button. The Add Service menu appears (see Figure 47).
4. Complete the fields in the Add Service menu (see Table 19).
5. Click SAVE to save your settings (or click CANCEL to discard them). If you click SAVE,
the port forwarding rule appears below Port Forwarding on the Port Forwarding menu.
6. To add more port forwarding rules, repeat steps 3 through 5.
7. To edit a port forwarding rule, click the EDIT button next to the rule you want to modify, edit
the settings on the Add Service menu (see Table 18), and click SAVE.
8. To delete a port forwarding rule, click the X next to the rule. When the Delete Port
Forwarding Rule message appears, click OK to delete the port forwarding rule or CANCEL
to retain it. If you clicked OK, the rule is removed from the Port Forwarding area on the
Port Forwarding menu.
85
SMCD3GNV Wireless Cable Modem Gateway User Manual
Page 86
Configuring the Gateway
Figure 47. Add Service Menu
Table 19. Add Service Menu
Option Description
Service Name Name for identifying the service. The name is for reference purposes only.
Service Type The protocol you want to use with the service. Choices are:
• TCP
• UDP
• TCP/UDP (default)
Service IP Address IP address of the LAN computer or server that is running the service.
Start Public Port Starting number of the port on which the service is provided.
End Public Port Ending number of the port on which the service is provided. This field is unavailable if the
Private Port(s) Numbers of the ports whose traffic the Gateway forwards to the LAN. If there is a range of
Enable Port Range Check this box to enable the private port range specified in Private Port(s).
Gateway is configured for a single public IP port.
ports, enter the starting private port here and check Enable Port Range. The Gateway
automatically calculates the end private port. The LAN computer server listens for traffic/data
on this port (or these ports).
SAVE button Click this button to save your settings.
CANCEL button Click this button to discard your settings on the Add Blocked Device menu.
86
SMCD3GNV Wireless Cable Modem Gateway User Manual
Page 87

Configuring the Gateway
Disabling Port Forwarding
To disable port forwarding:
1. If the Port Forwarding menu is not displayed, click Advanced in the menu bar, and then
click the Port Forwarding submenu.
2. Next to Enable Port Forwarding, click Disabled. The ADD PORT FORWARD button
becomes unavailable and all port forwarding rules that have been defined turn gray to
show they are disabled.
Enabling Port Forwarding
To enable port forwarding:
1. If the Port Forwarding menu is not displayed, click Advanced in the menu bar, and then
click the Port Forwarding submenu.
2. Next to Enable Port Forwarding, click Enabled. The ADD PORT FORWARD button turns
green, and all port forwarding rules that have been defined become available, along with
the EDIT and delete buttons.
Enabling or Disabling Port Triggering
Using the Port Triggering menu, you can configure the Gateway to detect port triggers for
detect multiple-session applications and allow them to pass the firewall. For special
applications, besides the initial communication session, there are multiple related sessions
created during the protocol communications. Normally, a normal treats the triggered
sessions as independent sessions and blocks them. However, the Gateway can co-relate
the triggered sessions with the initial session and group them together in the NAT session
table. As a result, you need only specify which protocol type and port number you want to
track, as well as some other related parameters. In this way, the Gateway can pass the
special applications according to the supplied information.
Assume, for example, that to use H.323 in a Net Meeting application, a local client starts a
session A to a remote host. The remote host uses session A to communicate with the local
host, but it also could initiate another session B back to the local host. Since there is only
session A recorded in the NAT session table when the local host starts the communication,
session B is treated as an illegal access from the outside and is blocked. Using the Special
Application menu, you can configure the Gateway to co-relate sessions A and B and
automatically open the port for the incoming session B.
To display the Port Triggering menu, click Advanced in the menu bar, and then click the
Port Triggering submenu in the menu bar. Figure 48 shows an example of the menu.
87
SMCD3GNV Wireless Cable Modem Gateway User Manual
Page 88
Configuring the Gateway
Figure 48. Example of Port Triggering Menu
Adding a Port Triggering Rule
To add a port triggering rule:
1. If the Port Triggering menu is not displayed, click Advanced in the menu bar, and then
click the Port Triggering submenu.
2. Next to Enable Port Triggering, click Enabled.
3. Click the ADD PORT FORWARD button. The Port Triggering Add menu appears (see
Figure 49).
4. Complete the fields in the Port Triggering Add menu (see Table 20).
5. Click SAVE to save your settings (or click CANCEL to discard them). If you click SAVE,
the port triggering rule appears below Port Triggering on the Port Triggering menu.
6. To add more port triggering rules, repeat steps 3 through 5.
7. To edit a port triggering rule, click the EDIT button next to the rule you want to modify, edit
the settings on the Port Triggering Add menu (see Table 20), and click SAVE.
8. To delete a port triggering rule, click the X next to the rule. When the Delete Port Triggering
Rule message appears, click OK to delete the port triggering rule or CANCEL to retain it. If
you clicked OK, the rule is removed from the Port Triggering area on the Port Triggering
menu.
88
SMCD3GNV Wireless Cable Modem Gateway User Manual
Page 89
Configuring the Gateway
Figure 49. Port Triggering Add Menu
Table 20. Port Triggering Add Menu
Option Description
Service Name Name for identifying the trigger. The name is for reference purposes only.
Service Type The type of protocol you want to use with the trigger. Choices are:
• TCP
• UDP
• TCP/UDP (default)
For example, to track the H.323 protocol, the protocol type should be TCP.
Trigger Port From From port ranges of the special application. For example, to track H.323 protocol, the From
port should be 1720.
Trigger Port To To port ranges of the special application. For example, to track H.323 protocol, the To port
should be 1720.
Target Port From Starting port range for the target port listening for the special application.
Target Port To Ending port range for the target port listening for the special application.
Interval Specify the interval between 50 and 30000 between two continuous sessions. If the interval
exceeds this time interval setting, the sessions are considered to be unrelated.
SAVE button Click this button to save your settings.
CANCEL button Click this button to discard your settings on the Add Blocked Device menu.
89
SMCD3GNV Wireless Cable Modem Gateway User Manual
Page 90

Configuring the Gateway
Disabling Port Triggering
To disable port triggering:
1. If the Port Triggering menu is not displayed, click Advanced in the menu bar, and then
click the Port Triggering submenu.
2. Next to Enable Port Triggering, click Disabled. The ADD PORT TRIGGER button
becomes unavailable and all port triggering rules that have been defined turn gray to show
they are disabled.
Enabling Port Triggering
To enable port triggering:
1. If the Port Triggering menu is not displayed, click Advanced in the menu bar, and then
click the Port Triggering submenu.
2. Next to Enable Port Triggering, click Enabled. The ADD PORT TRIGGER button turns
green, and all port triggering rules that have been defined become available, along with the
EDIT and delete buttons.
90
SMCD3GNV Wireless Cable Modem Gateway User Manual
Page 91

Configuring the Gateway
Enabling or Disabling Port Blocking
By default, all four Ethernet ports on the Gateway are enabled and configured to autonegotiate the highest speed and duplex settings. If these settings prevent the Gateway from
connecting with other devices, you can use the Port Blocking menu to configure the
Gateway’s Ethernet ports to use specific speed and duplex settings. The Port Blocking menu
also let you disable the Ethernet ports. Each port can be configured or disabled
independently of the other Ethernet ports on the Gateway.
To display the Port Blocking menu, click Advanced in the menu bar, and then click the Port
Blocking submenu in the menu bar. Figure 50 shows an example of the menu.
Figure 50. Example of Port Blocking Menu
To change a port from its default settings, perform the following procedure on the row that
corresponds to the Ethernet port you want to configure.
1. Under the Auto Negotiate column, select No.
2. Under the Mode column, select Full for full-duplex or Half for half-duplex to force the
selected port to use the duplex setting you select.
3. Under Speed, select the fixed speed that the port will use.
4. To disable the port, check the checkbox in the Disable Port column.
5. Click the SAVE button.
91
SMCD3GNV Wireless Cable Modem Gateway User Manual
Page 92

Configuring the Gateway
Note: If you disable the port through which you are accessing the Gateway’s Web interface,
you are disconnected and your session ends. You can reconnect to the Gateway using one of
the other enabled LAN ports.
Discovering Devices
Using the Device Discovery menu, the Gateway can obtain protocol addresses of
neighboring devices and discover the platform of those devices.
To display the Device Discovery menu, click Advanced in the menu bar, and then click the
Device Discovery submenu in the menu bar. Figure 51 shows an example of the menu and
Table 21 describes it.
Figure 51. Example of Device Discovery Menu
92
SMCD3GNV Wireless Cable Modem Gateway User Manual
Page 93
Configuring the Gateway
Table 21. Device Discovery Menu
Option Description
Enable UPnP Determines whether the Gateway uses its UPnP feature to communicate with other devices or
Advertisement Period How often the Gateway broadcasts its UPnP information (if UPnP is enabled). This value can
Time To Live A counting mechanism to determine how long a packet is valid before it reaches its
Enable Zero Config Determines whether zero configuration is enabled or disabled. Zero configuration networking
your operating system.
• Enabled = allows the Gateway to use its UPnP feature to communicate with other devices
or your operating system. (default)
• Disabled = prevents the Gateway from using its UPnP feature to communicate with other
devices or your operating system. Also, may be disabled if your operating system does not
support UPnP.
range from 1 to 1440 minutes. The default period is 30 minutes. Shorter durations ensure that
control points have current device status at the expense of additional network traffic. Longer
durations can compromise the freshness of the device status, but can significantly reduce
network traffic.
destination. Each time a TCP/IP packet passes through a router, it decrements its Time To
Live count. When the count reaches zero, the packet is dropped by the router. This ensures
that errant routing and looping aimless packets will not flood the network. The number of hops
can range from 1 to 255. The default value is 5 hops, which should be fine for most networks.
If you notice that some devices are not being updated or reached correctly, you might want to
increase this value slightly.
automatically creates a usable IP network, without manual operator intervention or special
configuration servers. It allows nonexpert users to connect computers, networked printers,
and other network devices and expect a functioning network to be established automatically.
• Enabled = enables support for zero configuration.
• Disabled = disables support for zero-configuration (default)
SAVE button Click this button to save your settings.
93
SMCD3GNV Wireless Cable Modem Gateway User Manual
Page 94

Configuring the Gateway
Troubleshooting the Gateway
Using the Troubleshooting menu, you can:
Define log filters. See page 94.
Test connectivity to a destination or IP address. See page 96.
Reset the Gateway, reset your Wi-Fi router, or restore the Gateway to its factory default
settings. See page 98.
Change the password used to log in to the Gateway’s Web interface. See page 99.
Note: For additional troubleshooting procedures, see Chapter 6.
Defining Log Filters
Using the Logs menu, you can define the filters applied to the Gateway’s system, event, and
firewall logs. You can also specify the timeframe to be covered by the logs, as well as
download and print the logs.
To display the Logs menu, click Troubleshooting in the menu bar, and then click the Logs
submenu in the menu bar. Figure 52 shows an example of the menu.
Figure 52. Example of the Logs Menu
94
SMCD3GNV Wireless Cable Modem Gateway User Manual
Page 95

Configuring the Gateway
Defining Log Filters
The Log Filters area on the Logs menu lets you select the type of logs you want to generate
and the timeframe that the log is to cover.
To define a log filter:
1. If the Logs menu is not displayed, click Troubleshooting in the menu bar, and then click
the Logs submenu.
2. Perform the following steps under Log Filters:
a. Using the Log Type drop-down list, select the log to which you want to apply a filter,
Choices are:
System Logs
Event Logs
Firewall Logs
b. By default, the log is generated for today. To change this timeframe, select a different
timeframe from the Time Frame drop-down list.
c. Click SHOW LOGS to apply the filter.
Printing or Downloading Log
After defining a log filter, use the following steps under System Logs to print or download
the log:
1. To print the log with the filter applied, click PRINT.
2. To download the log with the filter applied, click DOWNLOAD.
95
SMCD3GNV Wireless Cable Modem Gateway User Manual
Page 96

Configuring the Gateway
Testing Connectivity to Destination and IP Addresses
There may be times when you encounter a problem trying to reach a certain destination. If
you examine the Gateway’s configuration and operation and everything looks fine, the
problem might be with a router up the line from the Gateway or with the line itself.
To help you identify such issues, the Network Diagnostic Tools menu lets you test
connectivity to a destination or IP address. To display the Network Diagnostic Tools menu,
click Troubleshooting in the menu bar, and then click the Diagnostic Tools submenu in
the menu bar. Figure 53 shows an example of the menu.
Figure 53. Example of the Network Diagnostic Tools Menu
96
SMCD3GNV Wireless Cable Modem Gateway User Manual
Page 97

Configuring the Gateway
Testing Connectivity to a Destination Address
To test the Gateway’s connectivity to a destination address:
1. If the Network Diagnostic Tools menu is not displayed, click Troubleshooting in the menu
bar, and then click the Diagnostic Tools submenu.
2. Under Test Connectivity Results, enter a destination address in the Destination
Address field.
Note: This procedure assumes that the destination address you enter is valid and
operational.
3. Click the TEST CONNECTIVITY button. The Packets Sent and Packets Received
counters show whether packets the number of packets sent and received during the test.
4. To stop the test, click the STOP button.
If the test is successful, you know that the destination you are having difficulty reaching is
alive and physically reachable. If there are routers between the Gateway and the destination
you are having difficulty reaching, the problem might be at one of the routers.
Testing Connectivity to an IP Address
To test the Gateway’s connectivity to an IP address:
5. If the Network Diagnostic Tools menu is not displayed, click Troubleshooting in the menu
bar, and then click the Diagnostic Tools submenu.
6. Under Check for IP Address Results, enter an IP address in the IP Address field.
Note: This procedure assumes that the IP address you enter is valid and operational.
7. Click the CHECK FOR IP ADDRESSES button. The Connectivity indicator shows the
results of the test.
8. To stop the test, click the STOP button.
If the test is successful, you know that the IP address you are having difficulty reaching is
alive and physically reachable. If there are routers between the Gateway and the IP address
you are having difficulty reaching, the problem might be at one of the routers.
97
SMCD3GNV Wireless Cable Modem Gateway User Manual
Page 98
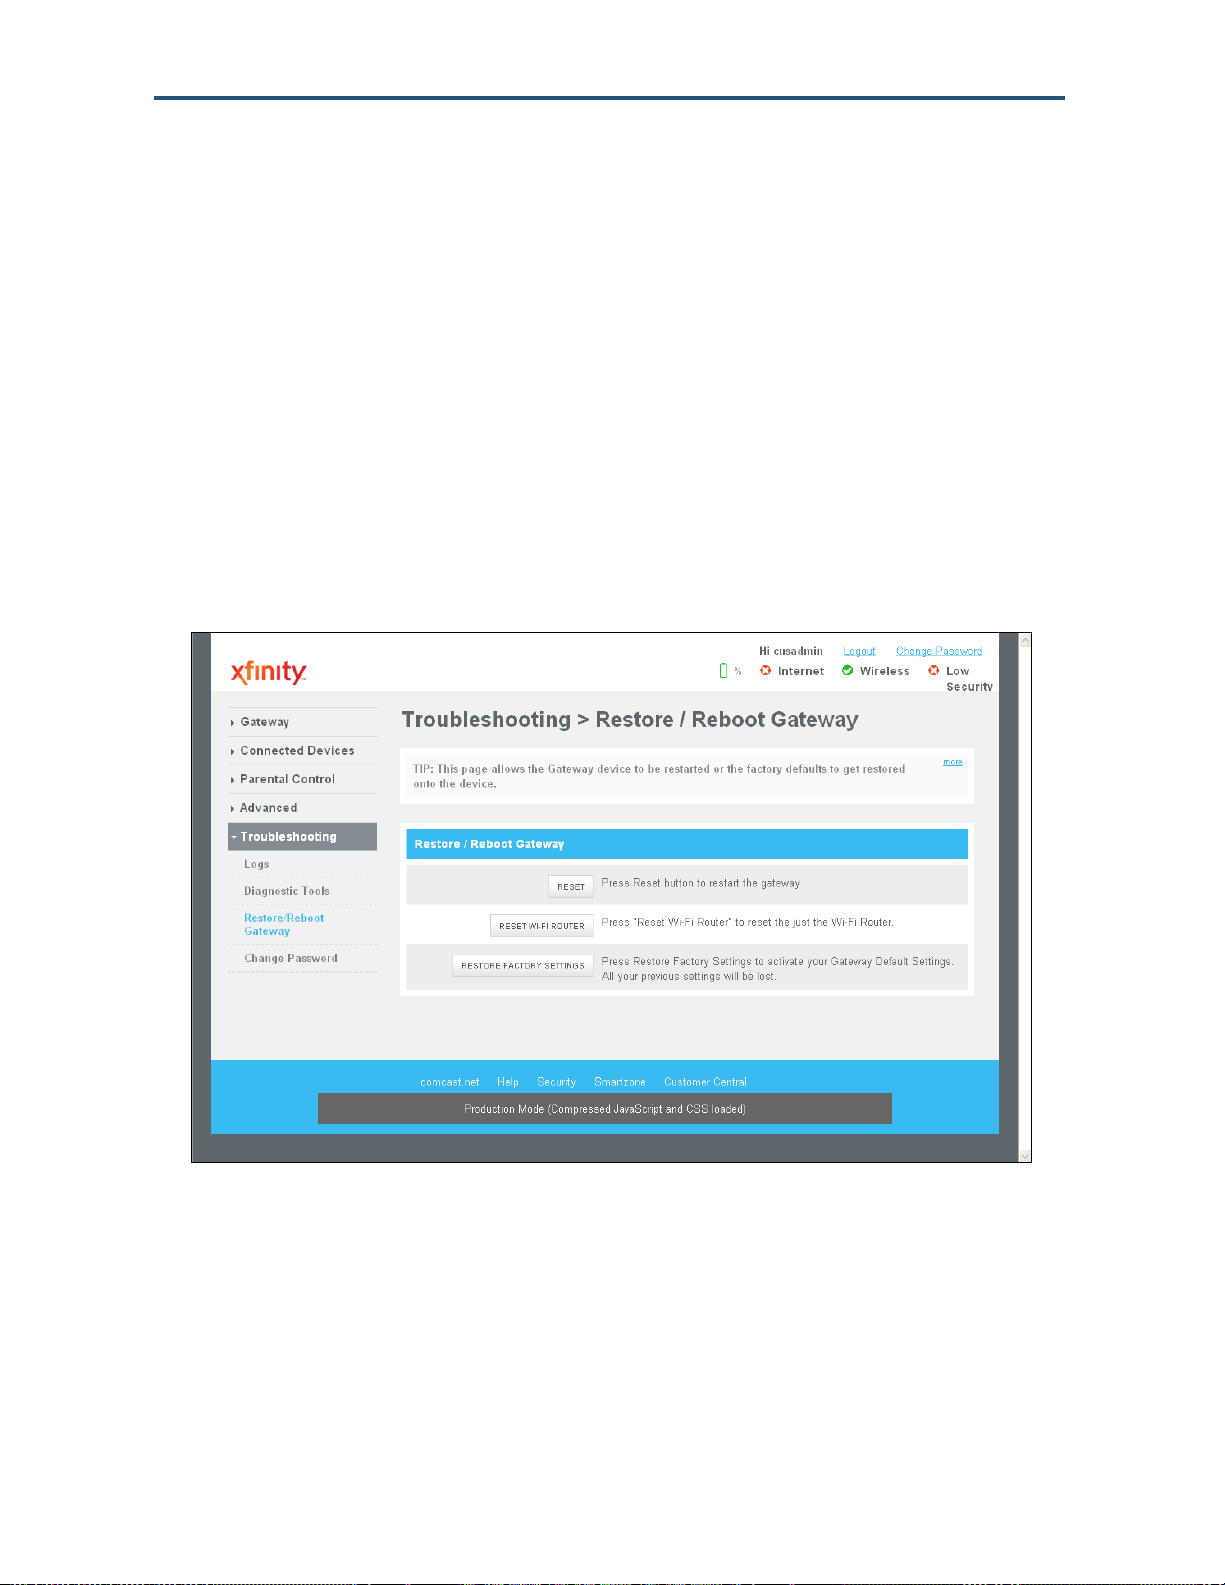
Configuring the Gateway
Restoring or Rebooting the Gateway
The Restore / Reboot Gateway menu provides buttons for performing the following activities:
RESET - restarts the Gateway while keeping any overrides you made to the Gateway’s
factory default settings.
RESET WI-FI Router - resets the Wi-Fi router without affecting the Gateway.
RESTORE FACTORY SETTINGS - returns the Gateway to its factory default settings.
Any overrides you made to the default settings will be removed. This button in
functionally equivalent to using the reset button to reset the Gateway (see “Using the
Reset Button” on page 17).
To display the Network Diagnostic Tools menu, click Troubleshooting in the menu bar, and
then click the Restore Reboot Gateway submenu in the menu bar. Figure 54 shows an
example of the menu.
Figure 54. Example of the Restore / Reboot Gateway Menu
98
SMCD3GNV Wireless Cable Modem Gateway User Manual
Page 99
Configuring the Gateway
Changing the Login Password
The Change Password menu lets you change the password used to log in to the Gateway’s
Web interface. For security, we recommend you change the default log in password the first
time you log in to the Web management interface to protect the Gateway from being
tampered with.
To display the Change Password, click Troubleshooting in the menu bar, and then click the
Change Password submenu in the menu bar. Figure 55 shows an example of the menu
and Table 22 describes the menu.
Figure 55. Example of the Change Password Menu
Table 22. Change Password Menu
Option Description
Current Password Enter the current case-sensitive administrator password. For security purposes, every typed
character appears as a dot (). The default password is not shown for security purposes.
New Password Enter the new case-sensitive administrator password you want to use. A password can
contain alphanumeric characters and spaces. For security purposes, every typed character
appears as a dot ().
Re-enter New Password Enter the same case-sensitive administrator password you typed in the New Password field.
For security purposes, every typed character appears as a dot ().
SAVE button Click this button to save your settings.
CANCEL button Click this button to discard your settings on the Change Password menu.
99
SMCD3GNV Wireless Cable Modem Gateway User Manual
Page 100

5 Configuring the Gateway’s mso Interface
After configuring your computer for TCP/IP and following the preconfiguration guidelines in
Chapter
the Gateway’s mso interface. This chapter describes how to use your computer’s Web
browser to configure the Gateway.
The topics covered in this chapter are:
Accessing the Gateway’s Web Management (page 37)
3, use that computer’s Web browser to configure your SMCD3GNV Gateway using
Understanding the Web Management Interface Menus (page 38)
Web Management Interface Menus (page 40)
100
SMCD3GNV Wireless Cable Modem Gateway User Manual
 Loading...