

Page 1

SMC2482W
Page 2

Copyright
Information furnished by SMC Networks, Inc. (SMC) is believed to be accurate and
reliable. However, no responsibility is assumed by SMC for its use, nor for any
infringements of patents or other rights of third parties which may result from its use.
No license is granted by implication or otherwise under any patent or patent rights of
SMC. SMC reserves the right to change specifications at any time without notice.
Copyright © 2002 by
SMC Networks, Inc.
38 Tesla
Irvine, California 92618
All rights reserved. Printed in Taiwan
Trademarks
SMC is a registered trademark; and EZ Connect is a trademark of SMC Networks, Inc.
Other product and company names are trademarks or registered trademarks of their
respective holders.
Page 3

Page 4

Compliances
FCC Class B
Federal Communication Commission Interference Statement
This equipment has been tested and found to comply with the
limits for a Class B digital device, pursuant to Part 15 of the FCC
Rules. These limits are designed to provide reasonable protection against harmful interference in a residential installation.
This equipment generates, uses and can radiate radio frequency
energy and, if not installed and used in accordance with the
instructions, may cause harmful interference to radio communications. However, there is no guarantee that interference will
not occur in a particular installation. If this equipment does
cause harmful interference to radio or television reception,
which can be determined by turning the equipment off and on,
the user is encouraged to try to correct the interference by one
of the following measures:
•Reorient or relocate the receiving antenna.
•Increase the separation between the equipment and receiver.
•Connect the equipment into an outlet on a circuit different
fromthat to which the receiver is connected.
•Consult the dealer or an experienced radio/TV technician for
help.
FCC Caution: FCC Caution: Any changes or modifications not
expressly approved by the party responsible for compliance
could void the user's authority to operate this equipment.
This device complies with Part 15 of the FCC Rules. Operation is
subject to the following two conditions: (1) This device may not
cause harmful interference, and (2) this device must accept any
interference received, including interference that may cause
undesired operation.
1
Page 5

2
IMPORTANT NOTE
FCC Radiation Exposure Statement: This equipment complies
with FCC radiation exposure limits set forth for an uncontrolled
environment.This equipment should be installed and operated
with minimum
distance 20cm between the radiator & your body.
This transmitter must not be co-located or operating in conjunction with any other antenna or transmitter.
Industry Canada - Class B
This digital apparatus does not exceed the Class B limits for
radio noise emissions from digital apparatus as set out in the
interference-causing equipment standard entitled “Digital
Apparatus,” ICES-003 of the Department of Communications.
Cet appareil numérique respecte les limites de bruits radioélectriques applicables aux appareils numériques de Classe B prescrites dans la norme sur le matérial brouilleur:“Appareils
Numériques,” NMB-003 édictée par l’Industrie.
Page 6

3
Warranty
Limited Warranty Statement: SMC Networks, Inc. (“SMC”) war-
rants its products to be free from defects in workmanship and
materials, under normal use and service, for the applicable warranty term. All SMC products carry a standard 90-day limited
warranty from the date of purchase from SMC or its Authorized
Reseller. SMC may, at its own discretion, repair or replace any
product not operating as warranted with a similar or functionally equivalent product, during the applicable warranty term. SMC
will endeavor to repair or replace any product returned under
warranty within 30 days of receipt of the product.
The standard limited warranty can be upgraded to a Limited
Lifetime* warranty by registering new products within 30 days
of purchase from SMC or its Authorized Reseller. Registration
can be accomplished via the enclosed product registration card
or online via the SMC web site. Failure to register will not affect
the standard limited warranty. The Limited Lifetime warranty
covers a product during the Life of that Product, which is
defined as the period of time during which the product is an
“Active” SMC product. A product is considered to be “Active”
while it is listed on the current SMC price list. As new technologies emerge, older technologies become obsolete and SMC will,
at its discretion, replace an older product in its product line with
one that incorporates these newer technologies. At that point,
the obsolete product is discontinued and is no longer an
“Active” SMC product. A list of discontinued products with their
respective dates of discontinuance can be found at:
http://www.smc.com/index.cfm?action=customer_service_warranty
All products that are replaced become the property of SMC.
Replacement products may be either new or reconditioned. Any
replaced or repaired product carries either a 30-day limited warranty or the remainder of the initial warranty, whichever is
longer. SMC is not responsible for any custom software or
Page 7

4
firmware, configuration information, or memory data of
Customer contained in, stored on, or integrated with any products returned to SMC pursuant to any warranty. Products
returned to SMC should have any customer-installed accessory
or add-on components, such as expansion modules, removed
prior to returning the product for replacement. SMC is not
responsible for these items if they are returned with the product.
Customers must contact SMC for a Return Material
Authorization number prior to returning any product to SMC.
Proof of purchase may be required. Any product returned to
SMC without a valid Return Material Authorization (RMA) number clearly marked on the outside of the package will be
returned to customer at customer’s expense. For warranty
claims within North America, please call our toll-free customer
support number at (800) 762-4968. Customers are responsible for
all shipping charges from their facility to SMC. SMC is responsible
for return shipping charges from SMC to customer.
Page 8

5
WARRANTIES EXCLUSIVE: IF AN SMC PRODUCT DOES NOT OPERATE AS WARRANTED ABOVE, CUSTOMER’S SOLE REMEDY SHALL BE REPAIR OR REPLACEMENT OF THE PRODUCT IN QUESTION, AT SMC’S OPTION. THE FOREGOING
WARRANTIES AND REMEDIES ARE EXCLUSIVE AND ARE IN LIEU OF ALL OTHER
WARRANTIES OR CONDITIONS, EXPRESS OR IMPLIED, EITHER IN FACT OR BY
OPERATION OF LAW, STATUTORY OR OTHERWISE, INCLUDING WARRANTIES
OR CONDITIONS OF
MERCHANTABILITY AND FITNESS FOR A PARTICULAR PURPOSE. SMC NEITHER
ASSUMES NOR AUTHORIZES ANY OTHER PERSON TO ASSUME FOR IT ANY
OTHER LIABILITY IN CONNECTION WITH THE SALE, INSTALLATION, MAINTENANCE OR USE OF ITS PRODUCTS. SMC SHALL NOT BE LIABLE UNDER THIS
WARRANTY IF ITS TESTING AND EXAMINATION DISCLOSE THE ALLEGED
DEFECT IN THE PRODUCT DOES NOT EXIST OR WAS CAUSED BY CUSTOMER’S
OR ANY THIRD PERSON’S MISUSE, NEGLECT, IMPROPER INSTALLATION OR
TESTING, UNAUTHORIZED ATTEMPTS TO REPAIR, OR ANY OTHER CAUSE
BEYOND THE RANGE OF THE INTENDED USE, OR BY ACCIDENT, FIRE, LIGHTNING, OR OTHER HAZARD.
LIMITATION OF LIABILITY: IN NO EVENT,WHETHER BASED IN CONTRACT OR
TORT (INCLUDING NEGLIGENCE), SHALL SMC BE LIABLE FOR INCIDENTAL,
CONSEQUENTIAL, INDIRECT, SPECIAL, OR PUNITIVE DAMAGES OF ANY KIND,
OR FOR LOSS OF REVENUE, LOSS OF BUSINESS, OR OTHER FINANCIAL LOSS
ARISING OUT OF OR IN CONNECTION WITH THE SALE, INSTALLATION, MAINTENANCE, USE, PERFORMANCE, FAILURE, OR INTERRUPTION OF ITS PRODUCTS, EVEN IF SMC OR ITS AUTHORIZED RESELLER HAS BEEN ADVISED OF
THE POSSIBILITY OF SUCH DAMAGES. SOME STATES DO NOT ALLOW THE
EXCLUSION OF IMPLIED WARRANTIES OR THE LIMITATION OF INCIDENTAL OR
CONSEQUENTIAL DAMAGES FOR CONSUMER PRODUCTS, SO THE ABOVE
LIMITATIONS AND EXCLUSIONS MAY NOT APPLY TO YOU.
THIS WARRANTY GIVES YOU SPECIFIC LEGAL RIGHTS, WHICH MAY VARY
FROM STATE TO STATE. NOTHING IN THIS WARRANTY SHALL BE TAKEN TO
AFFECT YOUR STATUTORY RIGHTS.
SMC Networks will provide warranty service for one year following discontinuance from the active SMC price list. Under the limited lifetime warranty, internal and external power supplies, fans,
and cables are covered by a standard one-year warranty from
date of purchase.
SMC Networks, Inc.
38 Tesla
Irvine, CA 92618
Page 9

6
Product Registration
Please register your EZ Connect Turbo 2.4GHz 11/22 Mbps
Wireless Bridge online to activate your warranty:
Registration website:
http://www.smc.com/index.cfm?action=customer_service_
new_registration
Page 10

7
Congratulations on your purchase of this EZ Connect™ Turbo
2.4GHz 11/22 Mbps Auto-Sensing Wireless Bridge.The EZ
Connect™ Turbo Wireless Bridge supports multiple modes for
different wireless solutions.To provide wireless connectivity to
one or more buildings, the SMC2482W offers both point-topoint and point-to-multi-point Bridging options. If you need to
set up a temporary wireless network or expand an existing one,
the SMC2482W also supports a full-featured Access Point mode.
Plug-and-Play installation, Web-based Configuration Wizard, and
Windows-based EZ Installation Wizard allow users to easily set
up this Wireless Bridge in minutes. By offering both a Windowsbased and Web-based administration utility, the EZ Connect
Turbo Wireless Bridge can be managed from any PC on your
network.To secure this wireless connection, the EZ Connect
Turbo Wireless Bridge supports 64/128/256-bit Wired Equivalent
Privacy (WEP) encryption.
Feature Highlights:
•IEEE 802.11b high-speed wireless connection up to 22 Mbps
•Supports extra Packet Binary Convolutional Coding (PBCC)
modulation technique
•Removable Antennas for use with add-on high gain antennas
•Plug-and-Play installation
• 64/128/256-bit WEP encryption and MAC address filtering
function to ensure secure wireless data transmission
•Supports a maximum of 253 users
•Offers multiple operating modes (Access Point, Point-to-Point,
Point-to-Multi-Point) for wireless configuration flexibility
Page 11

8
Compatibility:
•IEEE 802.3, 802.3u
•IEEE 802.11b
•Wi-Fi Complaint
The EZ Connect
TM
Turbo Wireless Bridge package includes the
following:
•One EZ Connect™ Turbo 11/22 Mbps Wireless Bridge
•One CD containing EZ Installation Wizard, Utility Software and
Complete Documentation
•One Power Adapter
•One Manual
Minimum Requirements:
•An A/C power outlet (100 – 240V, 50 – 60Hz), to supply power
to the EZ Connect
TM
Turbo Wireless Bridge.
•An available RJ-45 port on a 10BASE-T/100BASE-TX Ethernet
device.
Page 12
9
Section 1 | Getting Started
Site Location
Choose a location for your EZ Connect Turbo Wireless Bridge. In
Bridge mode, the best location for the SMC2482W is at the edge
of your wireless coverage area. In Access Point mode, the best
location is at the center of your wireless network.
Connect the Ethernet cable
The EZ Connect Turbo Wireless Bridge should be connected to a
network switch or hub that is connected to a DHCP server, or
connected to a Barricade Broadband Router. Use a standard
Category 5 UTP Ethernet cable with an RJ-45 connector to connect the Bridge to one of router, hub, or switch.
Connect the power cable
Connect the power adapter cable to the 5V DC power socket on
the rear panel.
Warning: Use only the power adapter supplied with the
SMC2482W. Using another power adapter will cause
damage to the unit and void the warranty.
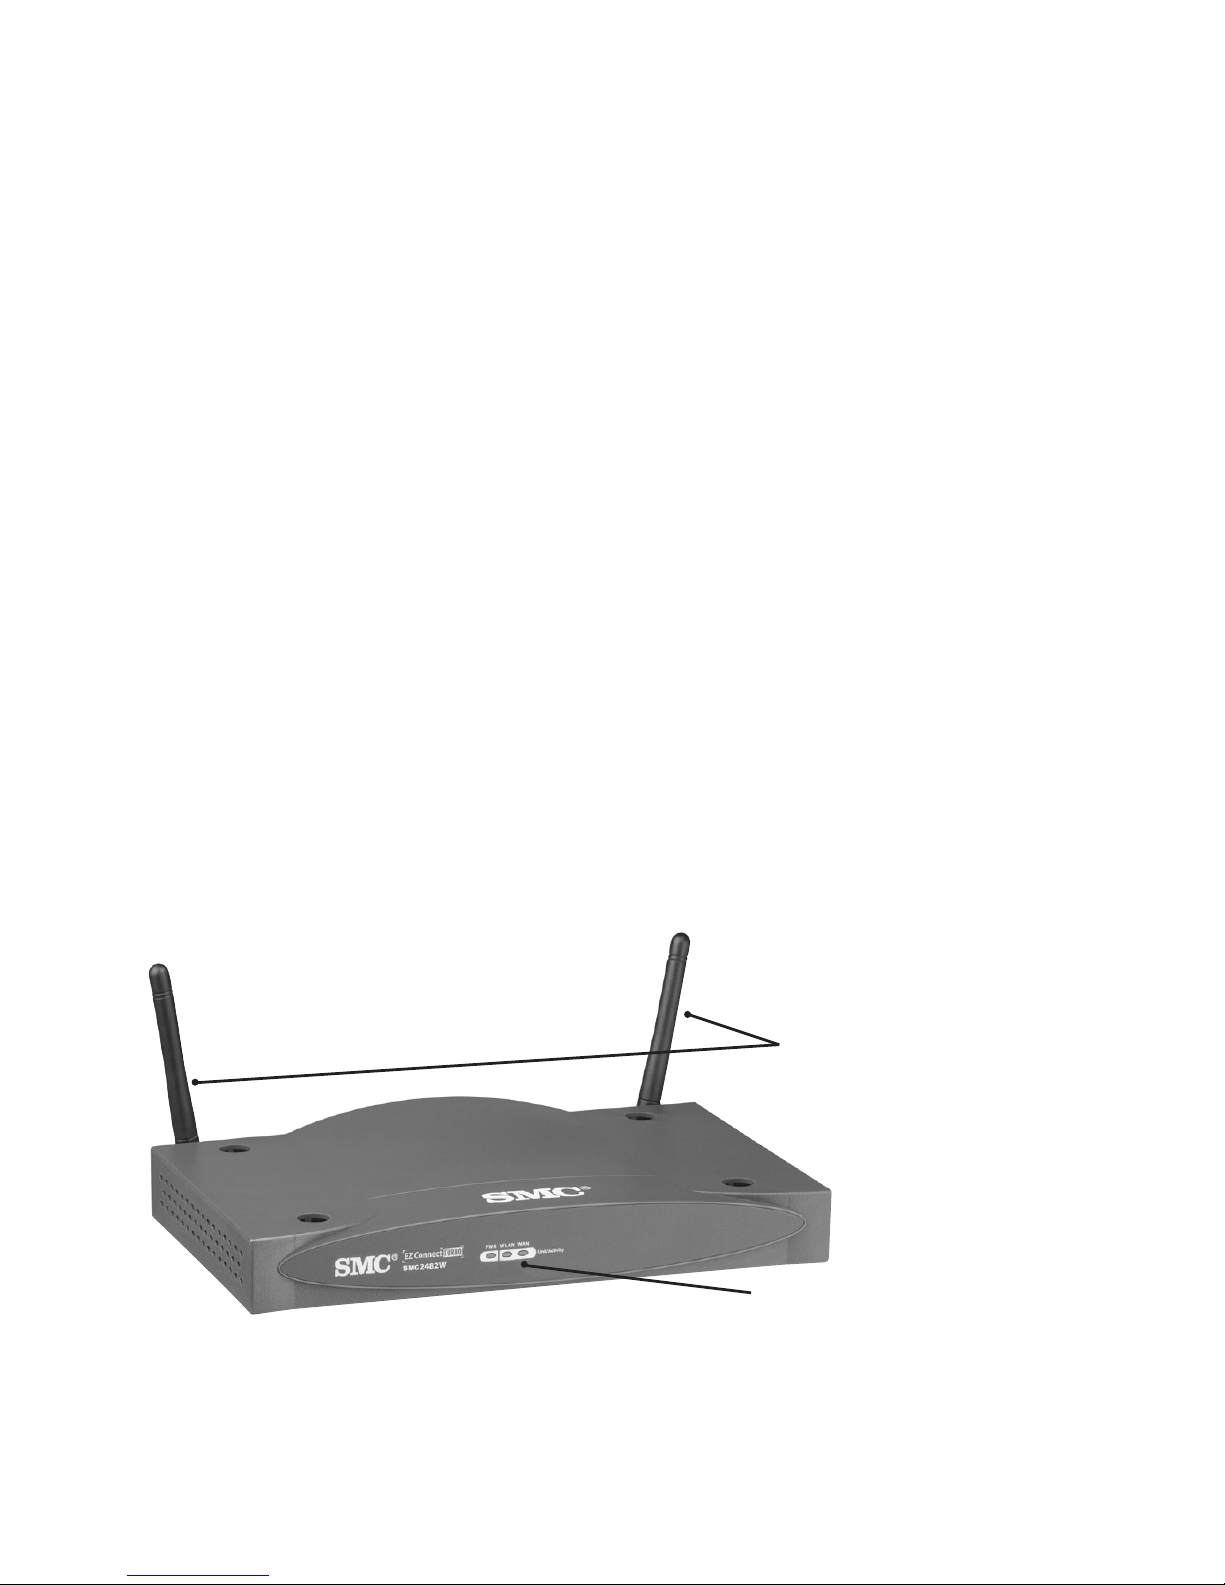
Antennas
LED Indicator lights:
•Power
•Wireless Transmit/Receiver
•Ethernet Link/Activity
Page 13

1.1 | EZ Connect Turbo 11/22 Mbps Wireless Bridge
LED Indicators
The preceding diagram shows the LED indicator lights on the EZ
Connect Turbo Wireless Bridge.The EZ Connect Turbo Wireless
Bridge has 2 removable antennas, which are adjustable for best
wireless reception.
The front of the Wireless Bridge has 3 labeled indicator lights.
When you connect your Bridge to your network, these lights will
be on, off, or blinking, indicating the following states.
1.2 | Resetting the SMC2482W EZ ConnectTMTurbo
11/22 Mbps Wireless Bridge
To correct temporary connectivity problems, the SMC2482W
Wireless Bridge can be reset by the following methods:
•The physical reset button on the back of the unit.
•You can reset the unit or reset the unit to factory defaults
using the Web-based Utility.
Using the Reset button on the back of the SMC2482W
1. Locate the [Reset] button on the back of the Wireless Bridge.
2. Unplug the power from the back of the Wireless Bridge for
5 seconds.
Light On Off Blinking
LAN Ethernet Connection No Ethernet Data being sent or
Connection received over
Ethernet connection
WLAN Wireless Connection No Wireless Data being sent or
Connection received over
wireless connection
Power Receiving Power Not Receiving N/A
Power
10
Page 14
11
3. Hold down the [Reset] button which is located on the back of
the device.You may need to use a pin or other pointed object
to hold the button down.
4. Plug the power connector into the Wireless Bridge while
holding down the [Reset] button.
5. The “TX/RX” LED will be solid, then flash 5-6 times.
6. Then the “LINK/ACT” LED will blink quickly several times.
7. Release the [Reset] button.
8. Unplug the power from the Wireless Bridge for 2 seconds, and
then plug the power back in.
9. The Wireless Bridge will reboot and the LEDs will return to the
normal status.
Using the Web-based Utility
1. Log into the SMC2482W Web-based Utility. (See section 4.2
for more information)
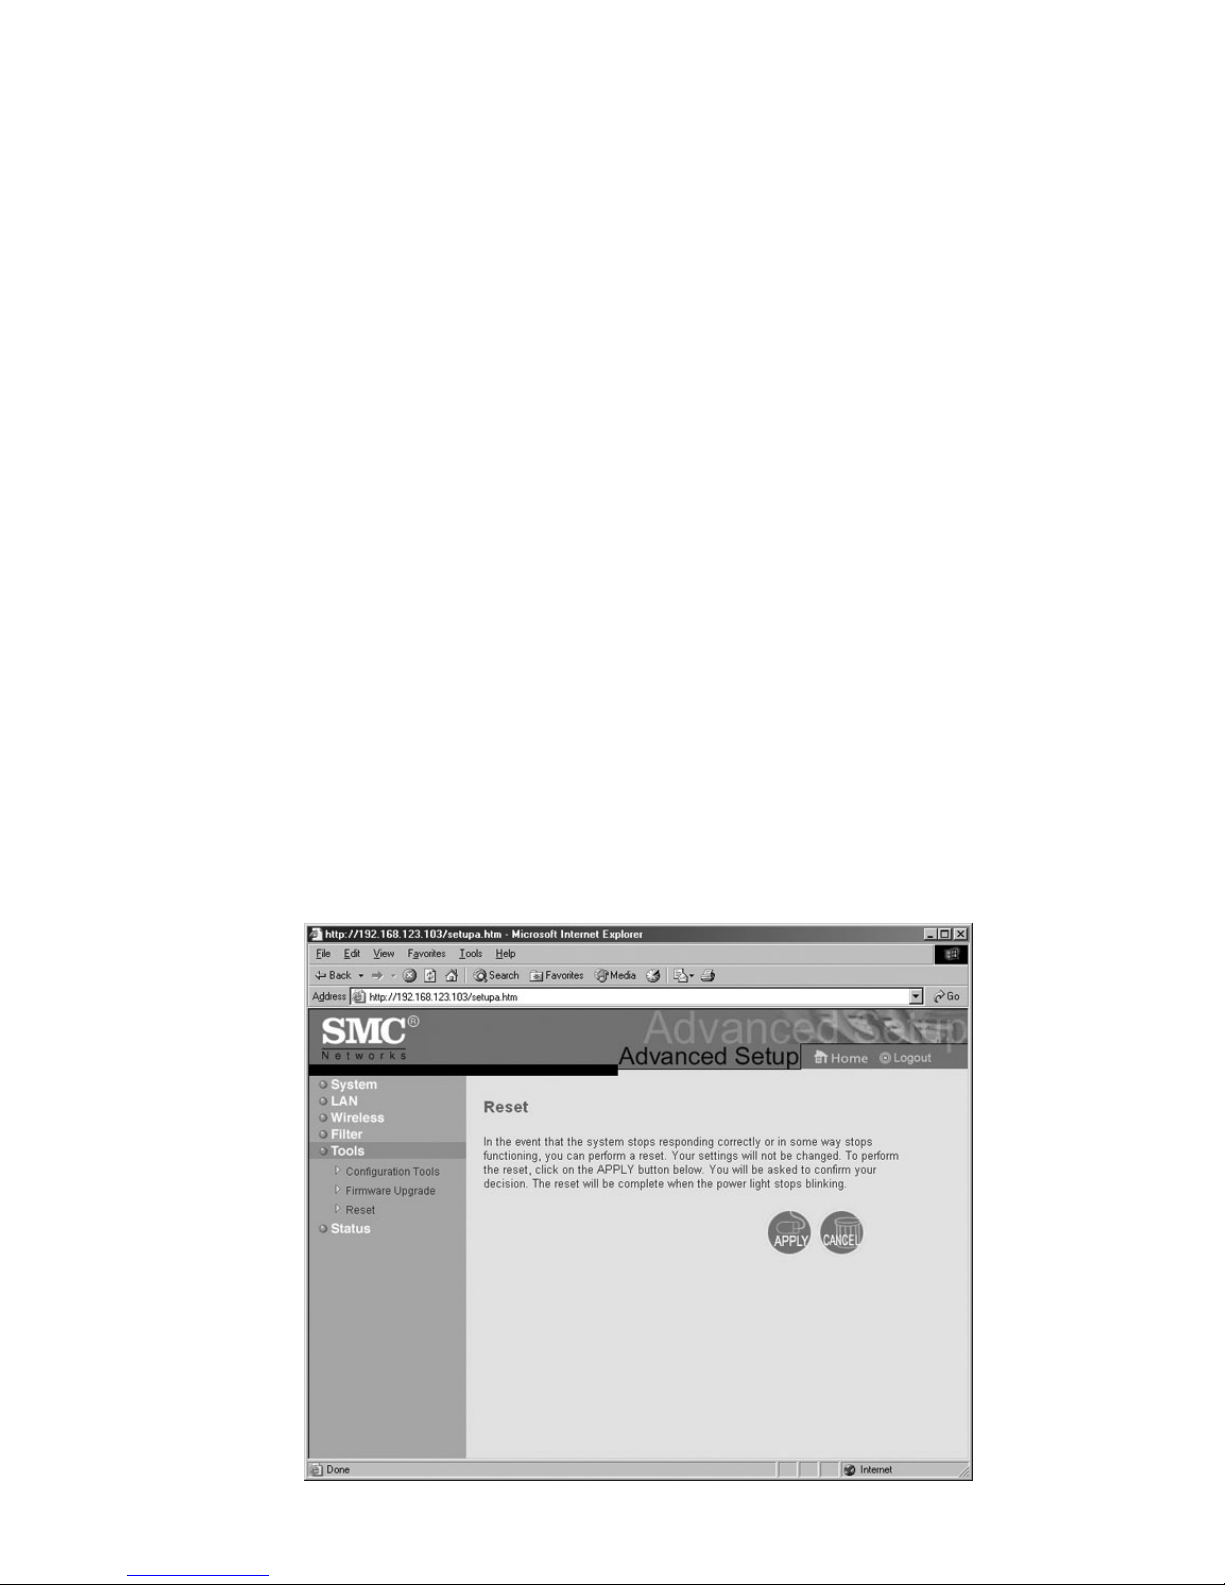
2. Click on [Tools] link on the left hand navigation menu, and
then click the [Reset] option.
Page 15
12
3. Click the [APPLY] button to complete the reset process.
4. The unit will reboot and reset the SMC2482W.
Using the Web-based Utility to reset the SMC2482W to
factory defaults
1. Log into the SMC2482W using the Web-based Utility.
(See section 4.2 for more information)
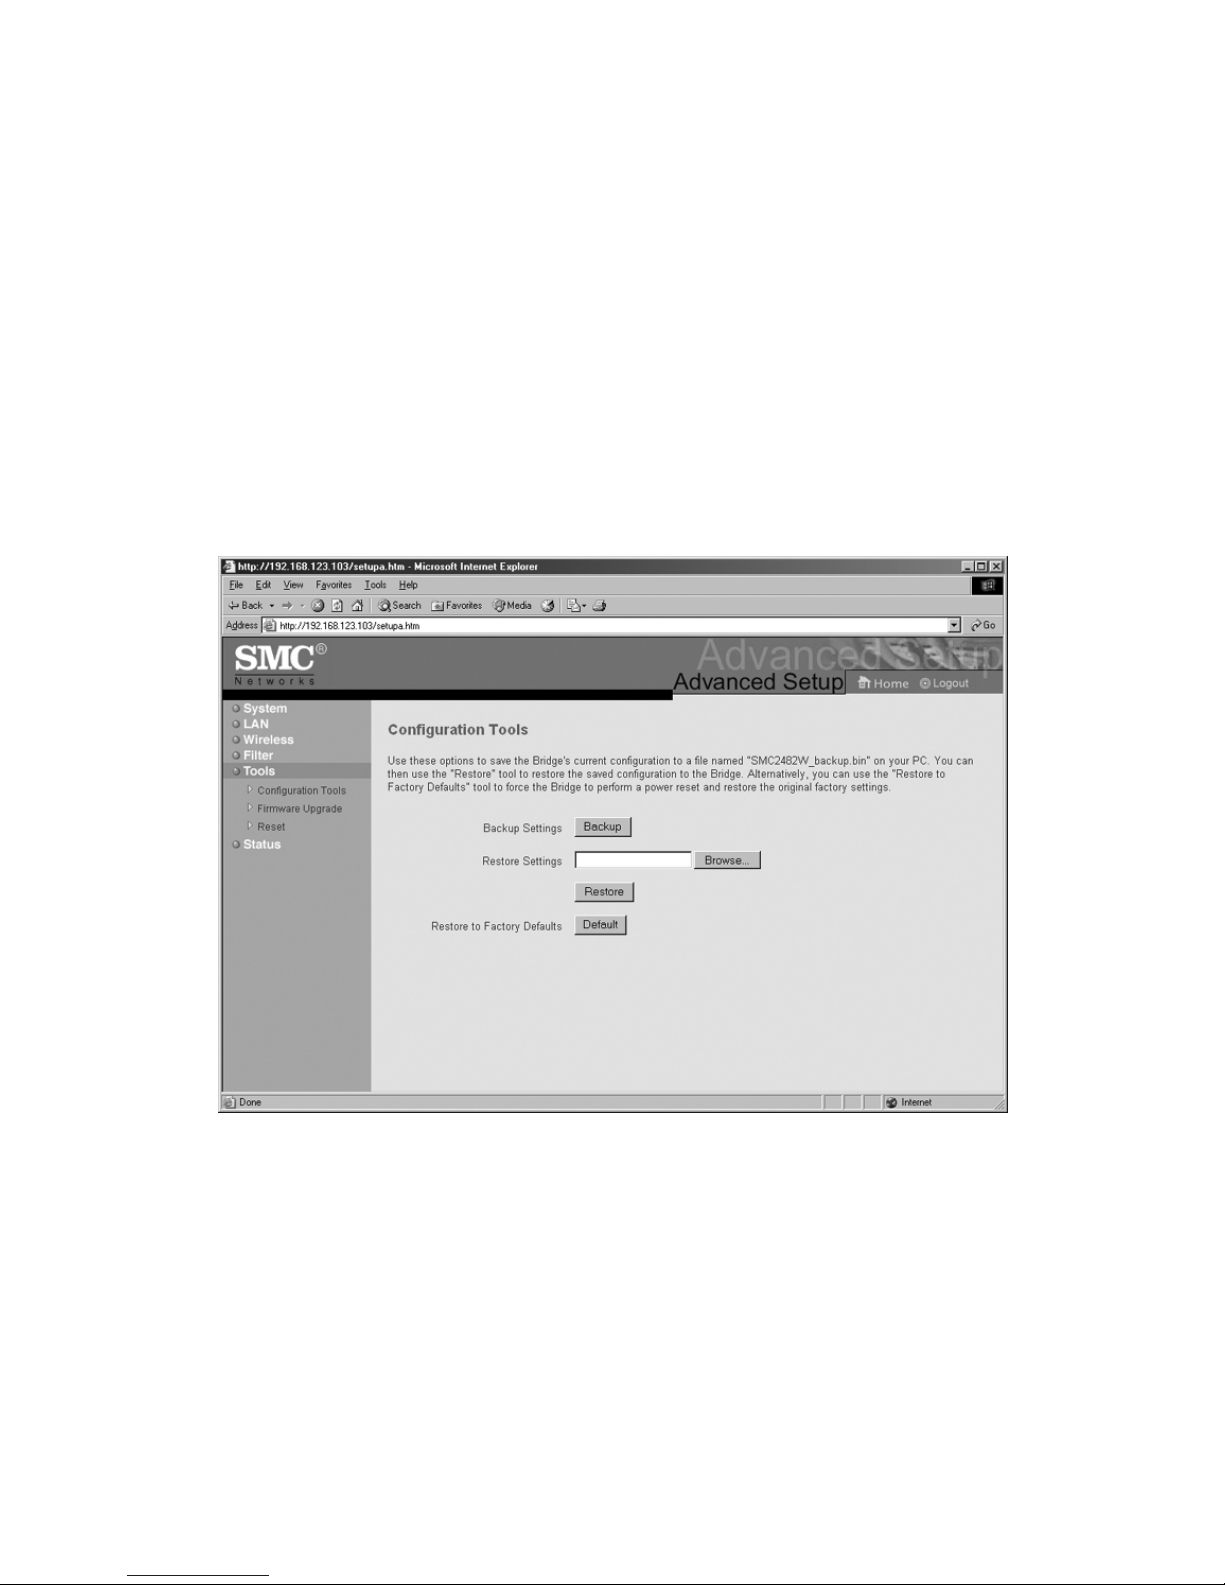
2. Click on [Tools] link on the left hand navigation menu, and
then click the [Configuration Tools] option.
3. Click the [Default] button to reset the unit to factory defaults.
4. The unit will reboot and reset the SMC2482W to factory default.
Note: If you set the SMC2482W to be DHCP-enabled and
changed the IP address or wireless settings on the
SMC2482W, you will need to use the Windows Utility to
re-configure the device so you can access the Web-based
Utility again.
Page 16

13
Section 2 |Understanding Wireless Connections
The EZ Connect Turbo Wireless Bridge is based on the IEEE
802.11b Wi-Fi standard, which uses radio transmission for net-
work connectivity.These 802.11b radio waves travel in all directions, and can transmit through walls and floors.Wireless transmission operating range and data throughput rate are based on
several factors, as described below in the following section.
2.1 | Recommendations for Best Wireless Performance
The following information will help you achieve the best wireless range, coverage, and transmission rate for the SMC2482W:
•Radio signals can travel farther outside of buildings, and the
best performance is when wireless components are in direct
line-of-sight to one another.
•Putting wireless components in high places helps avoid
obstacles and provides better connectivity.
•Building construction such as metal framing, stucco, and
concrete walls and floors will reduce radio signal strength.
Try to avoid putting the Wireless Bridge next to walls, large
solid objects; or next to large metal objects such as computer
cases, monitors, and appliances (i.e. microwave ovens).
•Wireless signal range, speed, and strength can be affected by
interference from neighboring wireless networks and
devices. Electro-magnetic devices that operate in the 2.4GHz
frequency range, such as radios, and cordless phones, may
also interfere with wireless transmission.
2.2 | Adjusting the Antennas
The antennas on the SMC2482W can be adjusted for best radio
reception. Start with the antennas pointing straight up, and
adjust each antenna if wireless reception is poor. Certain areas,
such as directly below the antennas, get relatively poor reception. Pointing the antennas toward another wireless component
does not improve reception.
Page 17

Important: Enable wireless security Wired Equivalent Privacy
(WEP) to protect your network from unwanted
access. For more information, see section 6 for
instructions on how to configure WEP on the
SMC2482W.
2.3 | Wireless Distance Table
The following distance table shows the interaction between
wireless coverage area and transmission speed for SMC2482W
under typical installation circumstances.
*Outdoors Environment: A line-of-sight environment with no
interference or obstruction between the EZ Connect Turbo
Wireless Bridges.
**Indoor Environment: A typical office or home environment
with floor to ceiling obstructions between the EZ Connect
Turbo Wireless Bridges.
Speed (Mbps) Outdoor Environment* Indoor Environment**
11 Mbps 528ft (160m) 236 ft (72m)
5.5 Mbps 640 ft (195m) 240 ft (73m)
2 Mbps 837 ft (255m) 240 ft (73m)
1 Mbps 1155 ft (350m) 246 ft (75m)
14
Page 18

2.4 | Understanding Wireless Security (WEP)
Anyone within range of your wireless network is a potential
security risk. Without wireless security options configured on
your network, a person outside of your physical location but
within your wireless range may be able to access the network
and any data that is being transmitted over it. SMC Networks
wireless devices support the wireless security standard called
Wired Equivalent Privacy (WEP) to prevent unauthorized users
from accessing your network over a wireless connection.This
security feature uses a secure network key, called a WEP key.The
WEP key encrypts wireless data so that it is only readable by
other computers that have the matching WEP key.The WEP key
is stored on each wireless device, so that data can be encrypted
and decrypted as it is transmitted over the network.
If you are transferring private information over this wireless
connection, it is recommended to enable WEP for your EZ
Connect Turbo Wireless Bridge. For more information about WEP
and security, see section 6.
Section 3 | Setup
Typical uses for the SMC EZ Connect Turbo Wireless Bridge:
•Connecting multiple locations with a wireless signal
•Wireless office for extension of Ethernet range
•Setting up temporary networks quickly
The EZ Connect Turbo Wireless Bridge default configuration is:
SSID: WLAN
Wireless Adapter Name: SMC
IP Address: DHCP
Subnet Mask: DHCP
Gateway: DHCP
15
Page 19

16
The SMC2482W is a Plug-and-Play device.When you plug this
Wireless Bridge into your network, it will automatically get an IP
address from your DHCP server and begin to provide wireless
connections based on your current network IP configuration.
3.1 | Verify Equipment and Permissions
At computer that you want to install the EZ ConnectTMTurbo
Wireless Bridge Utility software, please have the following items
available:
•The EZ Connect
TM
Turbo Wireless Bridge CD-ROM
•These installation instructions
Before you proceed with the Utility setup, verify the following:
•You have administrator privileges on the computer that you
are working on. On computers running Windows 2000 or
Windows XP, you must be a member of the Administrator
group to install software and change network settings. If
you cannot run setup, click Log Off from the Start menu,
and then log on with an administrator’s account. If you
don’t have administrator access please contact your system
administrator.
•Disable any Anti-Virus or other software applications that
could hinder the installation process.
To install the Wireless Bridge Utility program, insert the
“SMC2482W Utility and Documentation” CD-ROM into your
CD-ROM drive. If the CD does not start automatically after a few
seconds, open My Computer, double-click the CD-ROM icon, and
then double-click Setup.exe. The Welcome splash screen should
appear.
Page 20

17
3.2 | Installing the Utility Software
1. At the splash screen, click the [Install Utility] option to
launch the Installation Wizard.
2. Click the [Next >] button to confirm the installation.
3. Configure the install location, and then click the [Next >]
button to continue.
Page 21

18
* It is recommended that you choose the default folder name.
4. Click the [Finish] button to complete the installation process.
Page 22

19
Section 4 | Accessing the SMC2482W
The EZ ConnectTMTurbo Wireless Bridge can be configured and
managed by using two different utilities.
•Windows Utility
•Web-based Utility
4.1 | Using the Windows Utility
1. Click [Start],then [Programs],then [SMC2482W Bridge
Utility],then [SMC2482W Bridge Utility].
2. The Utility will search your network for the EZ Connect
TM
Turbo Wireless Bridge. When the SMC2482W is located, you
can view the current settings and make changes as needed.
Note: If the utility does not locate your Wireless Bridge on the
first scan, click the [Refresh] button.
Page 23

20
3. Once you have logged into the Windows Utility, you can:
•View link and device information
•See the available EZ Connect
TM
Turbo Wireless Bridges
(SMC2482W) in your network if you have more than one
SMC2482W installed.
•Configure wireless settings, operating mode,TCP/IP
settings
•Configure wireless security (WEP)
4.2 | Using the Web-based Utility
1. Launch your web browser. (i.e. Internet Explorer or Netscape)
2. In the Address Bar, type in the IP address that is configured
on your Wireless Bridge.
Page 24

21
Note: The SMC2482W is DHCP-enabled by default. If you do not
know the IP address that was assigned by your DHCP
server, please use the Windows Utility or look at your
DHCP client list to get the correct IP address to use. If you
do not have a DHCP server on your network, then the
SMC2482W will auto-assign itself an IP address of:
192.168.2.55.
3. Log into the Web-based Utility.The factory default password
for the SMC2482W is “default”,all lower-case.
4. Once logged into the Web-based Utility, you can:
•Configure wireless settings and TCP/IP settings
•Configure Operating Mode
•Configure wireless security (WEP)
•Configure MAC address filtering
•Change administrator password
•View connection status and Bridge information
•Reset/Restore Wireless Bridge
•Upgrade Firmware
Page 25

22
Section 5 | Configure
The SMC2482W EZ Connect Turbo Wireless Bridge can be configured from both the Windows and Web-based utility. Since
the EZ Connect Turbo Wireless Bridge ships with the default
configuration of DHCP-enabled, it will auto-configure itself to
any network setting.
5.1 | Configure the Wireless Bridge using
Windows-based Utility
1. Log into the SMC2482W using the Windows-based Utility.
(See section 4.1 for more information)
2. On “LINK INFORMATION” page you will see detailed
information about the SMC2482W you are accessing.To
change your wireless settings click the [AP Settings] button.
Page 26

23
3. From this section, you can configure the following settings:
• SSID
•Channel
•AP Name
•Operating Mode
•Advanced Settings
Note: For more information on the different operating modes,
see section 5.4.
4. Click [Apply] button to save your settings.
5. To change your IP settings, click the [IP Settings] button.
6. From this section, you can configure the following settings:
•DHCP/Fixed IP address configuration
•IP Address
•Subnet Mask
•Gateway
7. Click [Apply] button to save your settings.
Page 27

24
5.2 | Configure the Wireless Bridge using Web-based
Utility (Setup Wizard)
1. Log into the SMC2482W Web-based Utility.
(See section 4.2 for more information)
2. Click on [Setup Wizard] link.
3. The Setup Wizard will guide you through the basic
configuration settings for the SMC2482W.Through the
wizard, you can configure the following settings:
• SSID
•Channel
•Operating Mode
•Wired Equivalent Privacy (WEP)
Page 28

25
4. The first step in the Setup Wizard is to configure SSID and
wireless channel (default wireless channel is 6).
Note: For more information on the different operating modes,
see section 5.4.
5. When you have completed this step, click the [NEXT] button.
Page 29

6. The second step in the Setup Wizard is to configure WEP
encryption:
Note: If this is your first experience with wireless networking, it
is a good idea to keep WEP disabled until you have the
connection up and running.Then enable this security
feature on all of the Wireless Bridges.
7. When you have completed this step, click the [FINISH] button to
save the settings and reboot the Wireless Bridge. When you do
this, the Wireless Bridge will log you out of the Web-based Utility.
26
Page 30

27
5.3 | Configure the Wireless Bridge using Web-based
Utility (Advanced Setup)
The Advanced Setup option provides more configuration
options for the SMC2482W Wireless Bridge.
1. Log into the SMC2482W Web-based Utility.
(See section 4.2 for more information)
2. Click on [Advanced Setup] link.
3. To change the IP configuration on the SMC2482W, click on
the [LAN] link on the left hand navigation menu.
From this section, you can configure the following:
•Static IP or DHCP Configuration
For static IP settings, you can configure:
•IP Address
•Subnet Mask
•Gateway
Page 31

28
4. When you have completed configuring these settings, click
the [APPLY] button to save the settings and reboot the
Wireless Bridge.
5. To configure wireless settings, click on the [Wireless] link on
the left hand navigation menu, and then choose the
[Configuration] option.
From this section, you can configure:
•AP Name
• SSID
•Transmission Rate
•Basic Rate
•Channel
•Preamble
•Beacon Interval
•RTS Threshold
•Fragmentation Threshold
•DTIM Interval
•Authentication Type
•Antenna
• SSID Broadcast
Note: Definitions of these settings can be found in the Glossary
section at the end of this User Guide.
6. When you have completed configuring these settings, click
the [APPLY] button to save the settings and reboot the
Bridge.
Page 32

29
5.4 | SMC2482W Operating Modes
The EZ Connect Turbo Wireless Bridge has 3 operating modes to
provide a flexible wireless solution for any situation. The
support modes are:
•Point-to-Point Bridge
•Point-to-Multi-Point Bridge
•Access Point
Below is an outline of each operating mode and a basic
configuration.
Point-to-Point Bridge
The operating mode is configured when you need to connect
two locations with a wireless connection. This operating mode
needs to be configured on both units.To configure a Point-toPoint connection you need the MAC address of each SMC2482W
unit. To setup this connection, follow the steps below:
1. Log into the SMC2482W Windows Utility or Web-based Utility.
2. Set the operating mode to: Point-to-Point
3. Set the MAC Address of the SMC2482W that you are connecting
to in the MAC Address text input box. This is the MAC
address that is listed in the Status section of the SMC2482W
Web-based Utility.
4. Install the Wireless Bridge units in each location, and then
connect the LAN port on the Wireless Bridge to a port on the
wired network in that location.
Point-to-Multi-Point Bridge
The operating mode is configured when you need to connect
more than two locations with a wireless connection. This operating mode needs to be configured on each SMC2482W used.
To setup this connection, follow the steps below:
1. Log into the SMC2482W Windows Utility or Web-based Utility.
2. Set the operating mode to: Point-to-Multi-Point
3. Install the Wireless Bridge units in each location, and then
connect the LAN port on the Wireless Bridge to a port on the
wired network in that location.
Page 33

Access Point
The operating mode is configured when you need to add a
wireless connection to your network or extend the coverage of
an existing wireless network. To setup this operating mode, follow the steps below:
1. Log into the SMC2482W Windows Utility or Web-based Utility.
2. Set the operating mode to: Access Point
3. Set the SSID
4. Install the SMC2482W at the center of your wireless network
to provide the best coverage
Section 6 | Security
Wired Equivalent Privacy (WEP) is used to protect your data as it
is transmitted over the wireless connection. The EZ Connect
Turbo Wireless Bridge supports 3 levels of encryption, 64-/128/256-bit, and both HEX and ASCII formats. Please refer to the
chart below for the each key and formats requirements
The SMC2482W also supports MAC address filtering security
feature when operating in Access Point mode.This feature
allows you to block unrecognized MAC address access to your
wireless network.
Note: The MAC Filtering option is only available using the
Web-based Utility and in Access Point mode.
64-bit 128-bit 256-bit Character
Limits
ASCII 5 characters 13 characters 29 characters 0-9 A-Z
HEX 10 characters 26 characters 58 characters 0-9 A-F
30
Page 34

6.1 | Configure WEP using Windows-based Utility
1. Log into the SMC2482W using the Windows-based Utility.
(See section 4.1 for more information)
2. Click on the [WEP Settings] button.
3. Check the [Data Encryption] checkbox.
Under the WEP Settings section, you can configure:
•WEP Key Length
•HEX or ASCII format
•Set Key Number to use
Note: For information on WEP Key structures, see Section 6.
31
Page 35

32
6.2 | Configure WEP using Web-based Utility
1. Log into the SMC2482W Web-based Utility.
(See section 4.2 for more information)
2. Click on [Advanced Setup] link.
3. Click on [Wireless] link on the left hand navigation menu,
and then select the [Encryption] option.
4. To enable WEP, choose the WEP key length you want to use.
5. Then set the WEP key format.
6. Enter in the WEP key you want to use, based on the key
length and format.
7. Select the WEP key you want to use by clicking the button
next to the Key number.
8. When you have completed configuring these settings, click
the [APPLY] button to save the settings and reboot the
Wireless Bridge.
Note: Once you enable WEP, please make sure you have the
same settings configured on all the Wireless Bridges that
you are using to connect each location.
Page 36

33
6.3 | Configure MAC Filtering using Web-based
Utility (Access Point mode)
1. Log into the SMC2482W Web-based Utility.
(See section 4.2 for more information)
2. Click on [Advanced Setup] link.
3. Click on [Filter] link on the left hand navigation menu.
4. Check the [Enable] option.
5. Enter in the MAC address of the clients/users that you want
to have access to your wireless network.
Note: On the MAC Filtering option, there is a Connection list
option. This drop-down menu will list all of the clients
connecting to the AP who received a DHCP IP address. If
you want to add one of these users to the MAC table,
simply select them in the drop-down menu and select the
ID that you want to copy them and click the [Copy to]
button.
Page 37

34
Section 7 | EZ Connect Turbo Wireless
Bridge Information
Both the Windows Utility and Web-based Utility provide information about the EZ Connect Turbo Wireless Bridge.The information below outlines which information can be found in
which utility:
Windows Utility:
•AP Name
• SSID
•IP Address
•Channel
•WEP (Enable/Disable)
•Utility Version
Web Utility:
LAN Information
•IP Settings
•IP Configuration
SYSTEM Information
•Firmware version
• SSID
•AP Name
•MAC Address
•Channel
•WEP (Enable/Disable)
•Network Activity Log
Page 38

35
7.1 | View Wireless Bridge information using
Windows-based Utility
1. Log into the SMC2482W using the Windows-based Utility.
(See section 4.1 for more information)
2. The default page of the Windows-based Utility displays all of
the information outlined above.
Page 39

36
7.2 | View Wireless Bridge information using
Web-based Utility
1. Log into the SMC2482W using the Web-based Utility.
(See section 4.2 for more information)
2. Click on [Advanced Setup] link.
3. Click on [Status] link on the left hand navigation menu.
Page 40

37
Section 8 | Changing the Password
on the SMC2482W
For network security, it is a good idea to change the EZ
ConnectTMTurbo Wireless Bridge’s default password. To change
the password on your SMC2482W, follow the steps outlined
below:
1. Log into the SMC2482W using the Web-based Utility.
(See section 4.2 for more information)
2. Click on [Advanced Setup] link.
3. The default page is the [System] section. Click on
[Password Settings] option.
Note: From this section, you can also change the idle Time-Out
option. This is the amount of time that Web-based Utility
will stay logged in without activity.
Page 41

38
Section 9 | Upgrading the SMC2482W
The EZ ConnectTMTurbo Wireless Bridge is upgradeable through
the Web-based Utility. Please verify that you have the latest
firmware available from http://www.smc.com.
1. Log into the SMC2482W using the Web-based Utility.
(See section 4.2 for more information)
2. Click on [Advanced Setup] link.
3. Click on [Tools] link on the left hand navigation menu, and
then click the [Firmware Upgrade] option.
4. Click the [Browse…] button and browse to the location on
you computer where you have the latest SMC2482W (.bin)
firmware saved.
Page 42

39
5. When you have the correct installation path, click the
[APPLY] button to begin the upgrade process.
6. Click [OK] to the pop-up dialog boxes to begin the upgrade
process.
Warning: Do not turn the power off during the upgrade
process.This will damage the unit.
7. When the upgrade process has completed, verify the new
version by logging into either the Windows or Web-based
Utility.
Page 43

40
Section 10 | Backing up and Restoring the
Wireless Bridge
The EZ ConnectTMTurbo Wireless Bridge offers a configuration
backup and configuration restore option through the Webbased Utility.This feature will allow you to save all of your configuration settings to a separate file, so you can easily configure
multiple Wireless Bridges with the same configuration.
10.1 | Back-up the SMC2482W configuration
1. Log into the SMC2482W using the Web-based Utility.
(See section 4.2 for more information)
2. Click on [Advanced Setup] link.
3. Click on [Tools] link on the left hand navigation menu, and
then click the [Configuration Tools] option.
4. Click the [Backup] button to save the Bridge
configuration file.
5. When prompted, save the “SMC2482W_backup.bin” file on
your computer.
Page 44

41
10.2 | Restore the SMC2482W configuration from
“SMC2482W_backup.bin” file
1. Log into the SMC2482W using the Web-based Utility.
(See section 4.2 for more information)
2. Click on [Advanced Setup] link.
3. Click on [Tools] link on the left hand navigation menu, and
then click the [Configuration Tools] option.
4. Click the [Browse…] button and locate the SMC2482W
“SMC2482W_backup.bin” located on your computer.
5. Click the [Restore] button to begin the restoration process.
Page 45

42
Section 11 | Uninstalling the SMC2482W
Windows Utility
If you need to uninstall the EZ Connect Wireless Turbo Wireless
Bridge Windows Utility program, please follow the steps below:
1. Click [Start],then [Programs], choose [SMC2482W Bridge
Utility],and then select [Uninstall].
2. To complete the uninstall process, when prompted by the
[Confirm File Deletion] dialog box, click [OK] to continue.
3. The uninstall process will begin.
4. Click [Finish] to complete the uninstall process.
Page 46

Section 12 | Technical Specifications
Data Rate
•Up to 22Mbps with Auto Fallback
to 11/5.5/2/1 Mbps
Operating Range
•Up to 1,155 feet
Interface
•RJ-45 – 10/100 Mbps
•Power Jack – 2.5mm
Network Configuration
•Infrastructure
Configuration and Management
•Web and Windows-based
Radio Signal Type
•Direct Sequence Spread Spectrum
(DSSS)
Media Access Protocol
•CSMA/CA (Collision Avoidance)
with ACK
Security
•64-/128-/256-bit Wired Equivalent
Privacy (WEP)
RF Frequency
• 2400MHz – 2497 MHz –
Japan Band
• 2400MHz – 2483.5MHz –
North America, Europe
• 2455MHz – 2475MHz – Spain
• 2446.5MHz – 2483.5MHz – France
Operating Channel
• 11 Channels (US, Canada)
• 13 Channels (Europe)
• 14 Channels (Japan)
RF Output Power
• 16 -18 dBm
Antenna Gain
•2 dBi
Sensitivity
•-80 dBm @ 22 Mbps PBCC
•-85 dBm @ 11Mbps PBCC
•-82 dBm @ 11Mbps CCK
Frequency Stability
•Within + 25 ppm
Data modulation type
•BPSK (1 Mbps)
•QPSK (2 Mbps)
•CCK (5.5/11 Mbps)
•PBCC (5.5/11/22 Mbps)
Antenna Type
•2 Removable Antennas
with Diversity
Power Consumption
•Operation:Maximum 1.05 A
•Standby: 600mA +/- 20mA
Dimension
• 198 x 150 x 61.5 mm
Weight
•1.5 lbs
Compliance
•FCC Class B
•CE
•Industry Canada
•Wi-Fi Compliant
Tem pe ra tu re Range
•Operating: -0 C - +50 C
•Storage: -20 C - +70 C
Humidity
•Operating:0% to 70%
•Storage:0% to 95% Non-condensing
Warranty
•Limited Lifetime Warranty
Page 47

44
Section 13 | Troubleshooting
This section provides possible solutions to issues regarding the
installation and operation of your EZ Connect Turbo Wireless
Bridge. If the solution you are looking for is not listed here,
please visit SMC Networks web site at www.smc.com.
Before you begin troubleshooting your EZ Connect Turbo
Wireless Bridge, please make sure you are running the latest
firmware.You can download the latest firmware from
www.smc.com.
1. If you are not able to connect to the Wireless Bridge through
a Web Browser, please check the following:
•First,make sure the computer trying to connect to the
SMC2482W is in the correct network range. By default, the
SMC2482W has an IP address of 192.168.2.55.
•Second, you can use the Utility to scan for the SMC2482W
and change the IP address to an available IP address on
your network.
2. If you are not able to scan for the Wireless Bridge with the
Utility while it is connected to your hub, switch, router, you
can connect it directly to your computer with a crossover
cable to test the connection. Also make sure all firewall software is turned off and that all LEDs are on for the SMC2482W.
3. If you are not able to gain wireless access to the SMC2482W
Wireless Bridge, you will first need to check and configure the
correct mode. Wireless clients can connect to the SMC2482W
while it is in Access Point mode. If the Wireless Bridge is set to
either Point-to-Point or Point-to-Multi-Point Bridge mode,
then only another SMC2482W can connect with the correct
settings.
4. Please see Section 1.2 for the SMC2482W reset procedure.
Page 48

45
Section 14 | Glossary
802.11 - 802.11 refers to a family of specifications developed by
the IEEE for wireless LAN technology. 802.11 specifies the
over-the-air interface used between a wireless client and a base
station or between two wireless clients.The IEEE accepted the
specification in 1997.
802.11b - An extension to 802.11 that applies to wireless LANS
and provides 11 Mbps transmission (with a fallback to 5.5, 2 and
1 Mbps) in the 2.4 GHz band. 802.11b uses only DSSS.
Antenna Selection- This selection is for choosing which
antenna transmits data.
Authentication Type- You may choose between Open System,
Shared Key, and Both. The Authentication Type default is set to
Open System. Shared Key is when both the sender and the
recipient share a secret key. All points on your network must use
the same authentication type. It is recommended that you use
the default setting.
Beacon Interval- This value indicates the frequency interval of
the beacon. A beacon is a packet broadcast by the Access Point
to keep the network synchronized. A beacon includes the
wireless LAN service area, the AP address, the Broadcast
destination addresses, a time stamp, Delivery Traffic Indicator
Maps, and the Traffic Indicator Message (TIM).
Channel- Refers to a communications path between two
computers or devices. It can refer to the physical medium or to a
set of properties that distinguishes one channel from another.
For example, wireless channels refer to particular frequencies at
which radio signals are transmitted on. Wireless Networks in the
US have 11 channels to choose from. If an “Auto” channel is
selected the device will automatically located and configure the
best possible channel.
Page 49

46
DHCP (Dynamic Host Configuration Protocol) - A protocol for
assigning dynamic IP addresses to devices on a network.With
dynamic addressing, a device can have a different IP address
every time it connects to the network. In some systems, the
device's IP address can even change while it is still connected.
DHCP also supports a mix of static and dynamic IP addresses.
DNS (Domain Name System) - Is the system that is used to
translate Internet domain names into Internet Protocol (IP)
addresses. A domain name is a meaningful and easy-to-remember
“handle”for an Internet address.
DSSS (Direct-Sequence Spread Spectrum) - Is a transmission
technology used in wireless transmissions where a data signal
at the sending station is combined with a higher data rate bit
sequence, or chipping code, that divides the user data according
to a spreading ratio.The chipping code is a redundant bit
pattern for each bit that is transmitted, which increases the
signal's resistance to interference. If one or more bits in the
pattern are damaged during transmission, the original data can
be recovered due to the redundancy of the transmission.
DTIM Interval- This value indicates the interval of the Delivery
Traffic Indication Message (DTIM). A DTIM field is a countdown
field informing clients of the next window for listening to broadcast and multicast messages.When the Access Point has
buffered broadcast or multicast messages for associated clients,
it sends the next DTIM with a DTIM Interval value. Access Point
Clients hear the beacons and awaken to receive the broadcast
and multicast messages.
Dynamic IP Address - An IP address that is automatically
assigned to a client station in a TCP/IP network, typically by a
DHCP server. Network devices that serve multiple users, such as
servers and printers,are usually assigned static IP addresses.
FHSS (Frequency-Hopping Spread Spectrum) - Is transmission
technology used in wireless transmissions where the data signal
Page 50

47
is modulated with a narrowband carrier signal that "hops" in a
random but predictable sequence from frequency to frequency
as a function of time over a wide band of frequencies.The signal
energy is spread in time domain rather than chopping each bit
into small pieces in the frequency domain. This technique
reduces interference because a signal from a narrowband
system will only affect the spread spectrum signal if both are
transmitting at the same frequency at the same time. If
synchronized properly, a single logical channel is maintained.
Firmware - Code that is written onto read-only memory (ROM)
or programmable read-only memory (PROM). Once firmware
has been written onto the ROM or PROM, it is still new settings
remain even when the device is turned off.
Fragmentation Threshold- This specifies the maximum size a
data packet will be before splitting and creating a new packet
and should remain at its default setting of 2,346. A smaller
setting means smaller packets, which will create more packets
for each transmission. Only minor modifications of this value are
recommended.
IEEE - The Institute of Electrical and Electronics Engineers, pronounced I-triple-E, is an organization that develops standards
that often become national and international standards.
IP Address - An identifier for a computer or device on a TCP/IP
network. Networks using the TCP/IP protocol route messages
based on the IP address of the destination. The format of an IP
address is a 32-bit numeric address written as four numbers separated by periods. Each number can be zero to 255. For example,
192.168.2.25 is a valid an IP address.
IPCONFIG - A utility that provides for querying, defining and
managing IP addresses within a network.This utility is usually
run from the DOS prompt and is the perfect tool for troubleshooting connection issues.
Page 51

48
LAN - A local area network (LAN) is a group of computers and associated devices that share a common communications line and
typically share the resources of a single processor or server
within a small geographic area (for example, within an office
building).
MAC Address - Short for Media Access Control address, a hardware address that uniquely identifies each node of a network. In
IEEE 802 networks, the Data Link Control (DLC) layer of the OSI
Reference Model is divided into two sublayers: the Logical Link
Control (LLC) layer and the Media Access Control (MAC) layer.
The MAC layer interfaces directly with the network media.
Consequently, each different type of network media requires a
different MAC layer.
Ping (Packet INternet Groper) - A utility to determine whether
a specific IP address is accessible. It works by sending a packet
to the specified address and waiting for a reply. PING is used primarily to troubleshoot Internet connections.
Preamble Type- The preamble defines the length of the CRC
block for communication between the Access Point and a roaming Network Card. (High network traffic areas should use the
shorter preamble type.) All wireless points (nodes) on your network should use the same preamble type.
RJ-45 - Short for Registered Jack-45, an eight-wire connector
used commonly to connect computers into local-area networks
(LAN), especially Ethernets. RJ-45 connectors look similar to the
RJ-11 connectors used for connecting telephone equipment,
only wider.
RTS Threshold- This value should remain at its default setting of
2,432. Should you encounter inconsistent data flow, only minor
modifications are recommended.
Roaming – Is the ability to move from one AP coverage area to
another without interruption in service or loss in connectivity.
Page 52

49
Static IP Address - A permanent IP address that is assigned to a
node in a TCP/IP network.
Subnet Mask - The method used for splitting IP networks into a
series of subgroups, or subnets.The mask is a binary pattern
that is matched up with the IP address to turn part of the host
ID address field into a field for subnets.
SSID Broadcast- For security purposes, this selection can be disabled, allowing only those wireless network cards with the
Access Point’s SSID to communicate with the Access Point. By
default, this selection is enabled, allowing all wireless network
cards in your wireless network to communicate with the Access
Point.
TCP (Transmission Control Protocol) - TCP is one of the main
protocols in TCP/IP networks. Whereas the IP protocol deals only
with packets,TCP enables two hosts to establish a connection
and exchange streams of data.
TCP/IP (Transmission Control Protocol/Internet Protocol) - TCP
is one of the main protocols in TCP/IP networks.Whereas the IP
protocol deals only with packets,TCP enables two hosts to establish a connection and exchange streams of data.
Transmission Rates- The basic transfer rates should be set
depending on the speed of your wireless network.You must
select 1-2 (MBps) if you have older 802.11 compliant equipment
on your network, such as wireless adapters that support only 1
or 2 Mbps. Selecting 1-2 (MBps), however, does not limit the
basic transfer rates of faster adapters.
UDP (User Datagram Protocol) - UDP is a connectionless protocol that, like TCP, runs on top of IP networks. Unlike TCP/IP,
UDP/IP provides very few error recovery services, offering
instead a direct way to send and receive datagrams over an IP
network.
Page 53

50
WEP (Wired Equivalent Privacy) - Is a security protocol for
wireless local area networks (WLANs) defined in the 802.11b
standard.
WINIPCFG - Configuration utility based on the Win32 API for
querying,defining, and managing IP addresses within a network.
A commonly used utility, under Windows 95, 98, and Me, for
configuring networks.
WLAN - Acronym for wireless local-area network. A type of localarea network that uses high-frequency radio waves rather than
wires to communicate between nodes.
Page 54

FOR TECHNICAL SUPPORT, CALL:
From U.S.A. and Canada (24 hours a day, 7 days a week)
(800) SMC-4-YOU; (949) 679-8000; Fax: (949) 679-1481
From Europe (8:00 AM - 5:30 PM UK Time)
44 (0) 118 974 8700; Fax: 44 (0) 118 974 8701
INTERNET
E-mail addresses:
techsupport@smc.com
european.techsupport@smc-europe.com
Driver updates:
http://www.smc.com/index.cfm?action=tech_support_drivers_downloads
World Wide Web:
http://www.smc.com/
http://www.smc-europe.com/
For Literature or Advertising Response, Call:
U.S.A. and Canada: (800) SMC-4-YOU; Fax (949) 679-1481
Spain: 34-93-477-4935; Fax 34-93-477-3774
UK: 44 (0) 118 974 8700; Fax 44 (0) 118 974 8701
France: 33 (0) 41 38 32 32; Fax 33 (0) 41 38 01 58
Italy: 39 02 739 12 33; Fax 39 02 739 14 17
Benelux: 31 33 455 72 88; Fax 31 33 455 73 30
Central Europe: 49 (0) 89 92861-0; Fax 49 (0) 89 92861-230
Switzerland: 41 (0) 1 9409971; Fax 41 (0) 1 9409972
Nordic: 46 (0) 868 70700; Fax 46 (0) 887 62 62
Northern Europe: 44 (0) 118 974 8700; Fax 44 (0) 118 974 8701
Eastern Europe: 34 -93-477-4920; Fax 34 93 477 3774
Sub Saharan Africa: 27-11 314 1133; Fax 27-11 314 9133
North Africa: 34 93 477 4920; Fax 34 93 477 3774
Russia: 7 (095) 290 29 96; Fax 7 (095) 290 29 96
PRC: 86-10-6235-4958; Fax 86-10-6235-4962
Taiwan: 886-2-2659-9669; Fax 886-2-2659-9666
Asia Pacific: (65) 238 6556; Fax (65) 238 6466
Korea: 82-2-553-0860; Fax 82-2-553-7202
Japan: 81-45-224-2332; Fax 81-45-224-2331
Australia: 61-2-9416-0437; Fax 61-2-9416-0474
India: 91-22-8204437; Fax 91-22-8204443
If you are looking for further contact information, please visit www.smc.com or
www.smc-europe.com.
Model Number: SMC2482W
38 Tesla
Irvine, CA 92618
Phone: (949) 679-8000
 Loading...