

Page 1

CMS-30100
Page 2

Table of Contents
English .....................................................................................................................
Nederlands ..............................................................................................................
Deutsch....................................................................................................................
Français....................................................................................................................
Italiano.....................................................................................................................
Polski .......................................................................................................................
iii
xx
xxxvii
liv
lxxi
lxxxviii
Page 3

Table of Contents
Table of Contents
1 Safety ................................................................................................................................................................... 4
1.1 Installation Safety ................................................................................................................................................. 4
1.2 Operation Safety................................................................................................................................................... 4
2 Parts Description .................................................................................................................................................. 5
3 Installation ........................................................................................................................................................... 6
3.1 Install the monitor ................................................................................................................................................ 6
3.1.1 Mounting.................................................................................................................................................. 6
3.1.2 Wiring....................................................................................................................................................... 6
3.1.3 Insert the MicroSD card (not included).................................................................................................... 6
3.2 Install the camera ................................................................................................................................................. 6
3.2.1 Mounting.................................................................................................................................................. 6
3.2.2 Wiring....................................................................................................................................................... 7
4 On-screen menu ................................................................................................................................................... 8
5 Setting up your device .......................................................................................................................................... 9
5.1 Add a camera........................................................................................................................................................ 9
5.2 Select WIFI channel (if required) .......................................................................................................................... 9
6 System operation ................................................................................................................................................. 10
6.1 Video Playback...................................................................................................................................................... 10
6.2 System Setup ........................................................................................................................................................ 11
6.2.1 Language .................................................................................................................................................. 11
6.2.2 Time Setup ............................................................................................................................................... 11
6.2.3 Wireless Internet...................................................................................................................................... 12
6.2.4 Wireless Channel...................................................................................................................................... 12
6.2.5 Camera Audio Enable............................................................................................................................... 13
6.2.6 Volume setup ........................................................................................................................................... 13
6.2.7 Auto Close ................................................................................................................................................ 14
6.3 Add a camera........................................................................................................................................................ 14
6.4 Record setup......................................................................................................................................................... 15
6.4.1 Record Schedule....................................................................................................................................... 15
6.5 Alarm setup........................................................................................................................................................... 16
6.6 System manage..................................................................................................................................................... 16
6.6.1 System Info............................................................................................................................................... 16
6.6.2 Factory Setting ......................................................................................................................................... 17
6.6.3 Upgrade.................................................................................................................................................... 17
6.6.4 IPC Upgrade.............................................................................................................................................. 17
7 Setting up the mobile app..................................................................................................................................... 18
8 Declaration of Conformity .................................................................................................................................... 19
CMS-30100_IM iii
Page 4

1 | Safety
1 Safety
1. Please read these instructions carefully before installing and using the product.
2. Do not cut the power supply cable to extend it; the device (transformer) will not
work with a longer cable. Do not plug in the device until all the wiring has been finished.
1.1 Installation Safety
1. Keep children and bystanders away while installing the products. Distractions can
cause you to lose control.
2. Do not overreach when installing this product. Keep proper footing and balance at
all times. This enables better control in unexpected situations.
3. This product is not a toy. Mount it out of reach of children.
1.2 Operation Safety
1. Do not operate electrically powered products in explosive atmospheres, such as in
the presence of flammable liquids , gases, or dust. Electrically powered products
create sparks which may ignite the dust or fumes.
2. The warnings, precautions, and instructions discussed in this instruction manual
cannot cover all possible conditions and situations that may occur. It must be understood by the operator that common sense and caution are factors which cannot be built into this product, but must be supplied by the operator.
3. Do not expose the Power Adapter of this product to rain or wet conditions. Water
entering the Power Adapter will increase the risk of electric shock.
4. Do not abuse the Power Cord. Never use the cord for unplugging the plug from the
outlet. Keep cord away from heat, oil, sharp edges or moving parts. Damaged or
entangled cords increase the risk of electric shock.
5. The adapter must match the outlet. Never modify the plug in any way. Unmodified
plugs and matching outlets will reduce risk of electric shock.
4 CMS-30100_IM
Page 5

2 Parts Description
Camera
1. Antenna
2. LED light
3. Lens
4. Day/night sensor
5. Microphone
6. Speaker
Monitor
1. Antenna
2. Touch screen
3. Microphone
4. LED battery indicator
5. LED recording indicator
6. USB slot
7. MicroSD slot
8. On/Off switch for battery use
9. AC adaptor input
10. Stand
Parts Description | 2
Frequency: 2.4GHz
Maximum transmission power: 17.63dBm
CMS-30100_IM 5
Page 6

3 | Installation
3 Installation
Before doing the fixed installation, it is recommended that you consider the following:
Connect everything to familiarize yourself with the units.
Check the wireless coverage at the intended mounting locations by temporarily placing
the units.
3.1 Install the monitor
3.1.1 Mounting
The monitor is designed to stand on a table or any flat surface.
a) Pull out the stand leg on the back of the monitor.
b) Pull the two antennas on the back of the monitor to an upright position.
c) Place on any flat surface.
3.1.2 Wiring
The monitor is portable and can be used on battery power, AC power or both. When
the AC adapter is connected the battery charges until full and then operates directly
from the AC adapter.
Batteries must be purchased separately.
Battery type: 18650
3.1.3 Insert the MicroSD card (not included)
To record video, a MicroSD card is required.
a) Locate the MicroSD card slot on the right side of the monitor.
b) Insert the MicroSD card (It will only fit when in the correct position).
c) A class 10 MicroSD card with a maximum storage of 128gb is recommended.
3.2 Install the camera
3.2.1 Mounting
The camera can be mounted in any direction and on any surface that can hold its
weight. The camera must be mounted near access to mains power or an extension
may be needed.
To mount the camera, you will need the following tools:
ü A suitable screwdriver for the included screws.
ü A drill and suitable drill bit for the included screw plugs.
a) Position the camera where desired.
b) Mark the screw positions with a pen.
c) Drill the necessary holes.
6 CMS-30100_IM
Page 7

d) Insert the plugs.
e) Drill a sufficiently sized hole to pull the cables.
f) Pull the required cables through the hole.
g) Mount the included antenna onto the camera.
h) Fasten the camera with the screws.
In case that you wish to run the cable on the outside of the wall, a weatherproof connection box is required.
3.2.2 Wiring
The camera is wireless and only requires an electrical connection.
Things to consider when wiring the camera:
– The cable connection must be done indoors or inside a weather proof connection
box, mounted on the outside.
– The hole should be sealed with filler to avoid water ingress.
– It is recommended to pull all cables through the hole. The re-set button can be left
outside but it is not recommended.
Installation | 3
CMS-30100_IM 7
Page 8
4 | On-screen menu
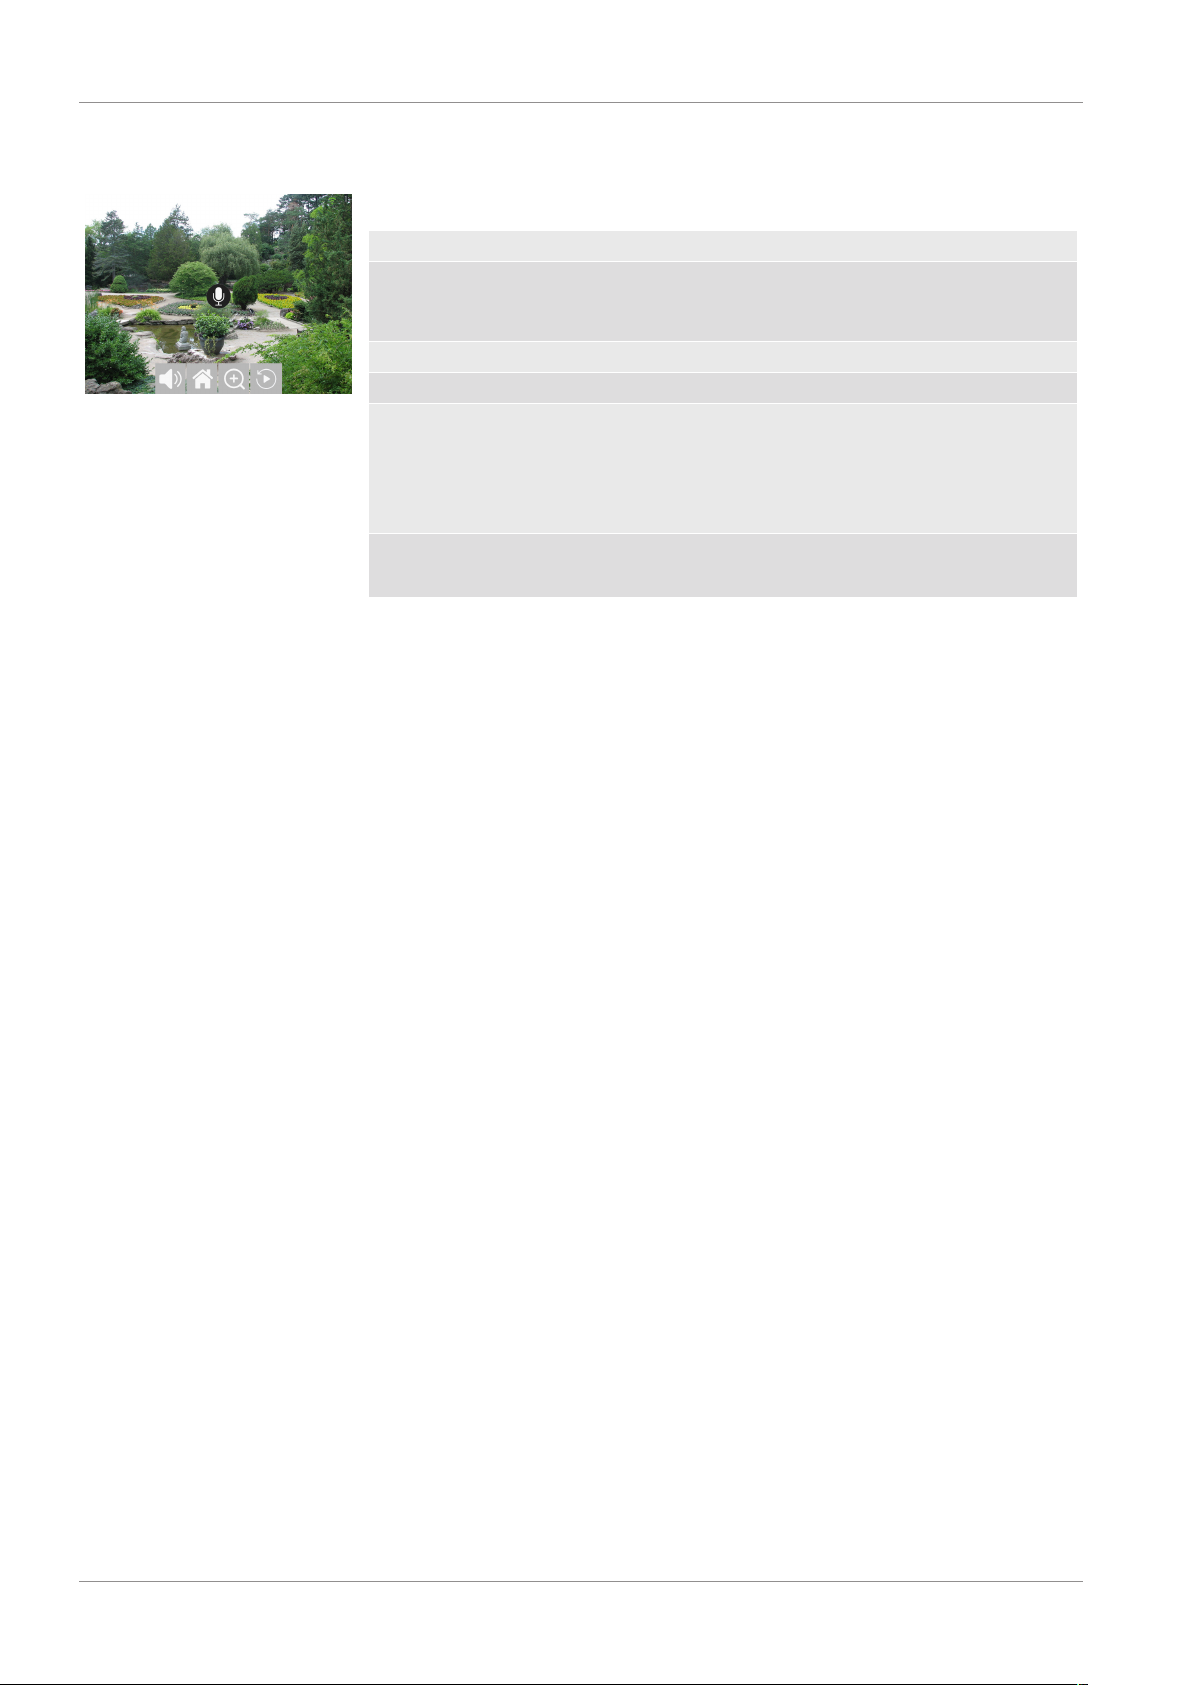
Illustration1: On screen menu
4 On-screen menu
The on screen menu appears when you tap in the video feed.
Button Description
Microphone Press and hold to enable communication with the currently
watched camera. (Make sure camera microphone is enabled, See
section “Camera Audio Enable”.)
Mute Select to mute/unmute the monitor speakers
Main menu Select to enter the main menu
Zoom Select to Zoom the video feed.
Tap once to select the zoom mode.
Tap again in the image to zoom.
Select the (-) icon to exit the zoom mode.
Playback Select to enter the Playback menu.
This will allow you to view recordings.
8 CMS-30100_IM
Page 9
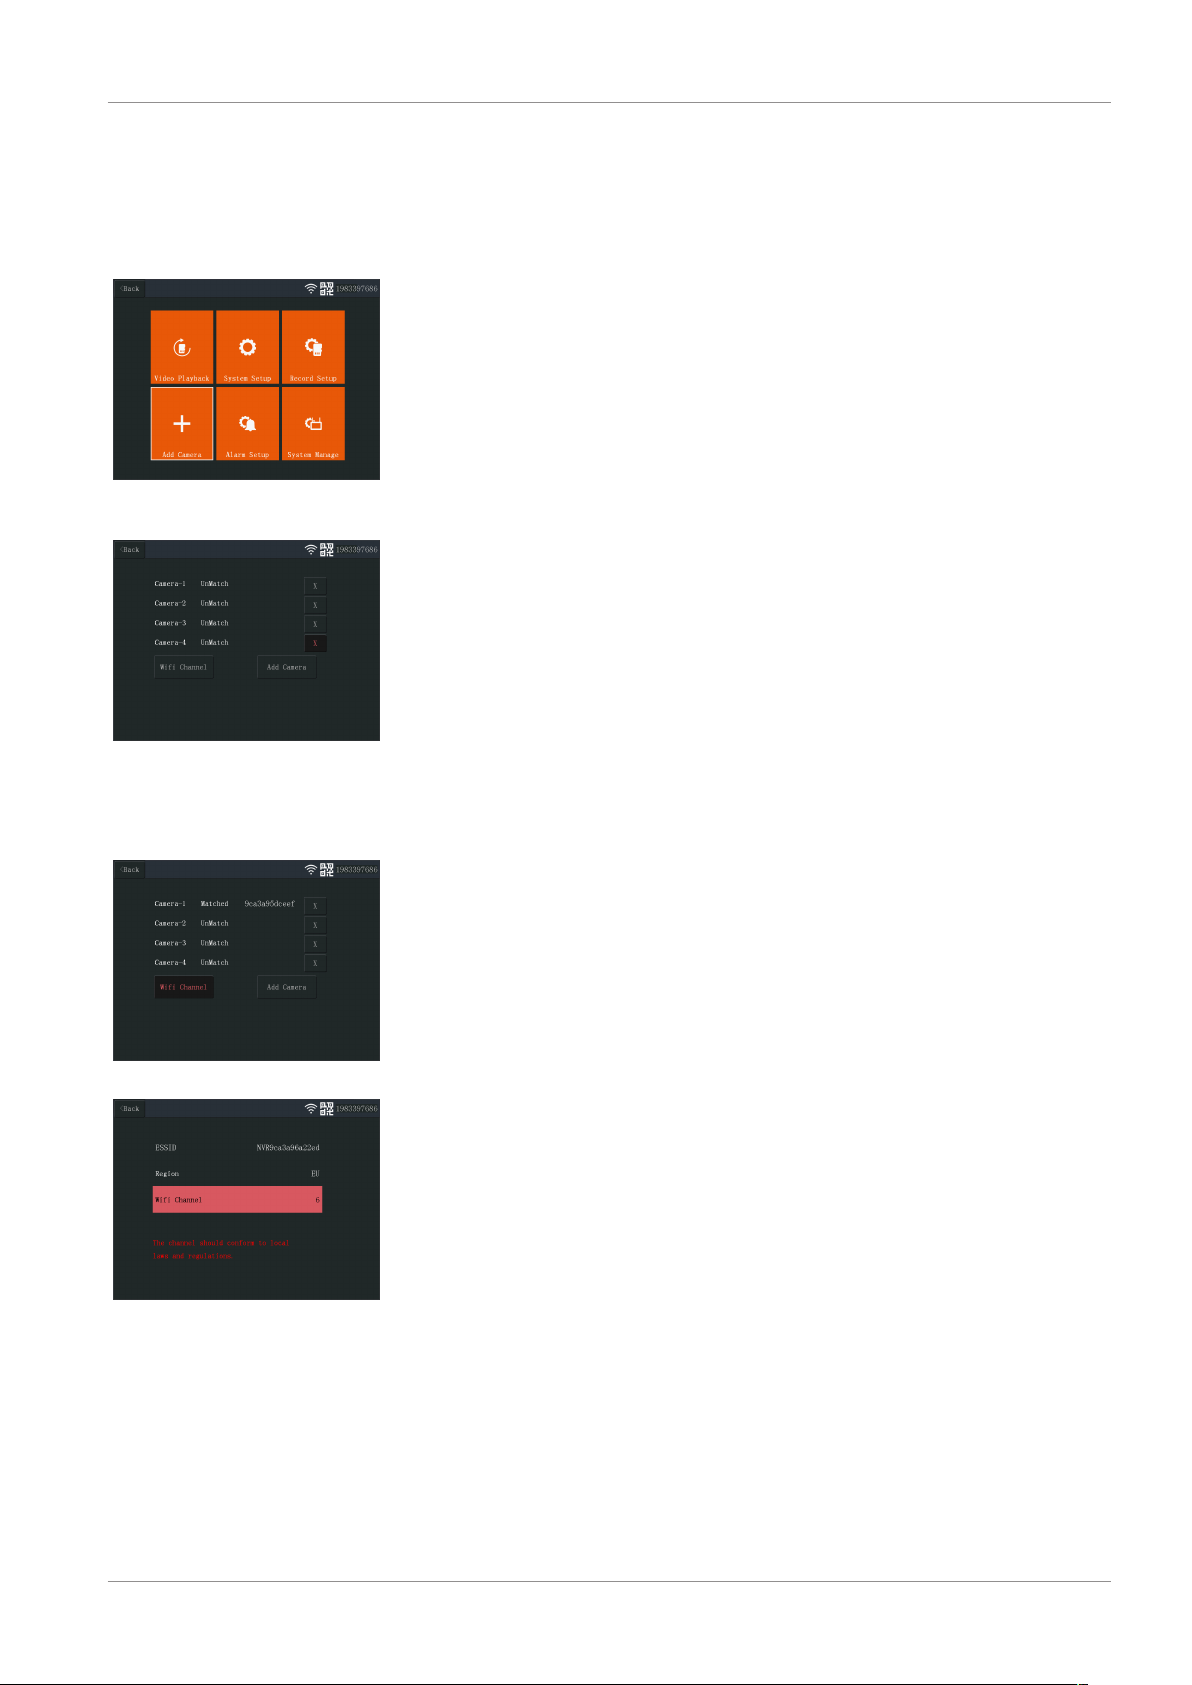
Illustration2: Main menu - Add
Camera
Setting up your device | 5
5 Setting up your device
5.1 Add a camera
The monitor can pair up to 4 cameras. To add a camera do the following procedure:
a) Turn the camera on by connecting it to the mains supply.
b) Wait for 30 seconds.
c) You will now hear “Start configuration mode”.
ð NOTE: If you do not hear the voice, press the re-set button on the camera for
6 seconds until you hear “Restore factory settings”.
d) On the monitor from the main menu: Select “Add Camera”.
e) Select “Add Camera”. (This must be done within x minutes from resetting the cam-
era.)
f) On the camera: If the above steps are done correctly, you will hear:
- “Wireless settings, please wait”
- “Wireless connection successful”
g) On the monitor: Wait for the pairing to complete.
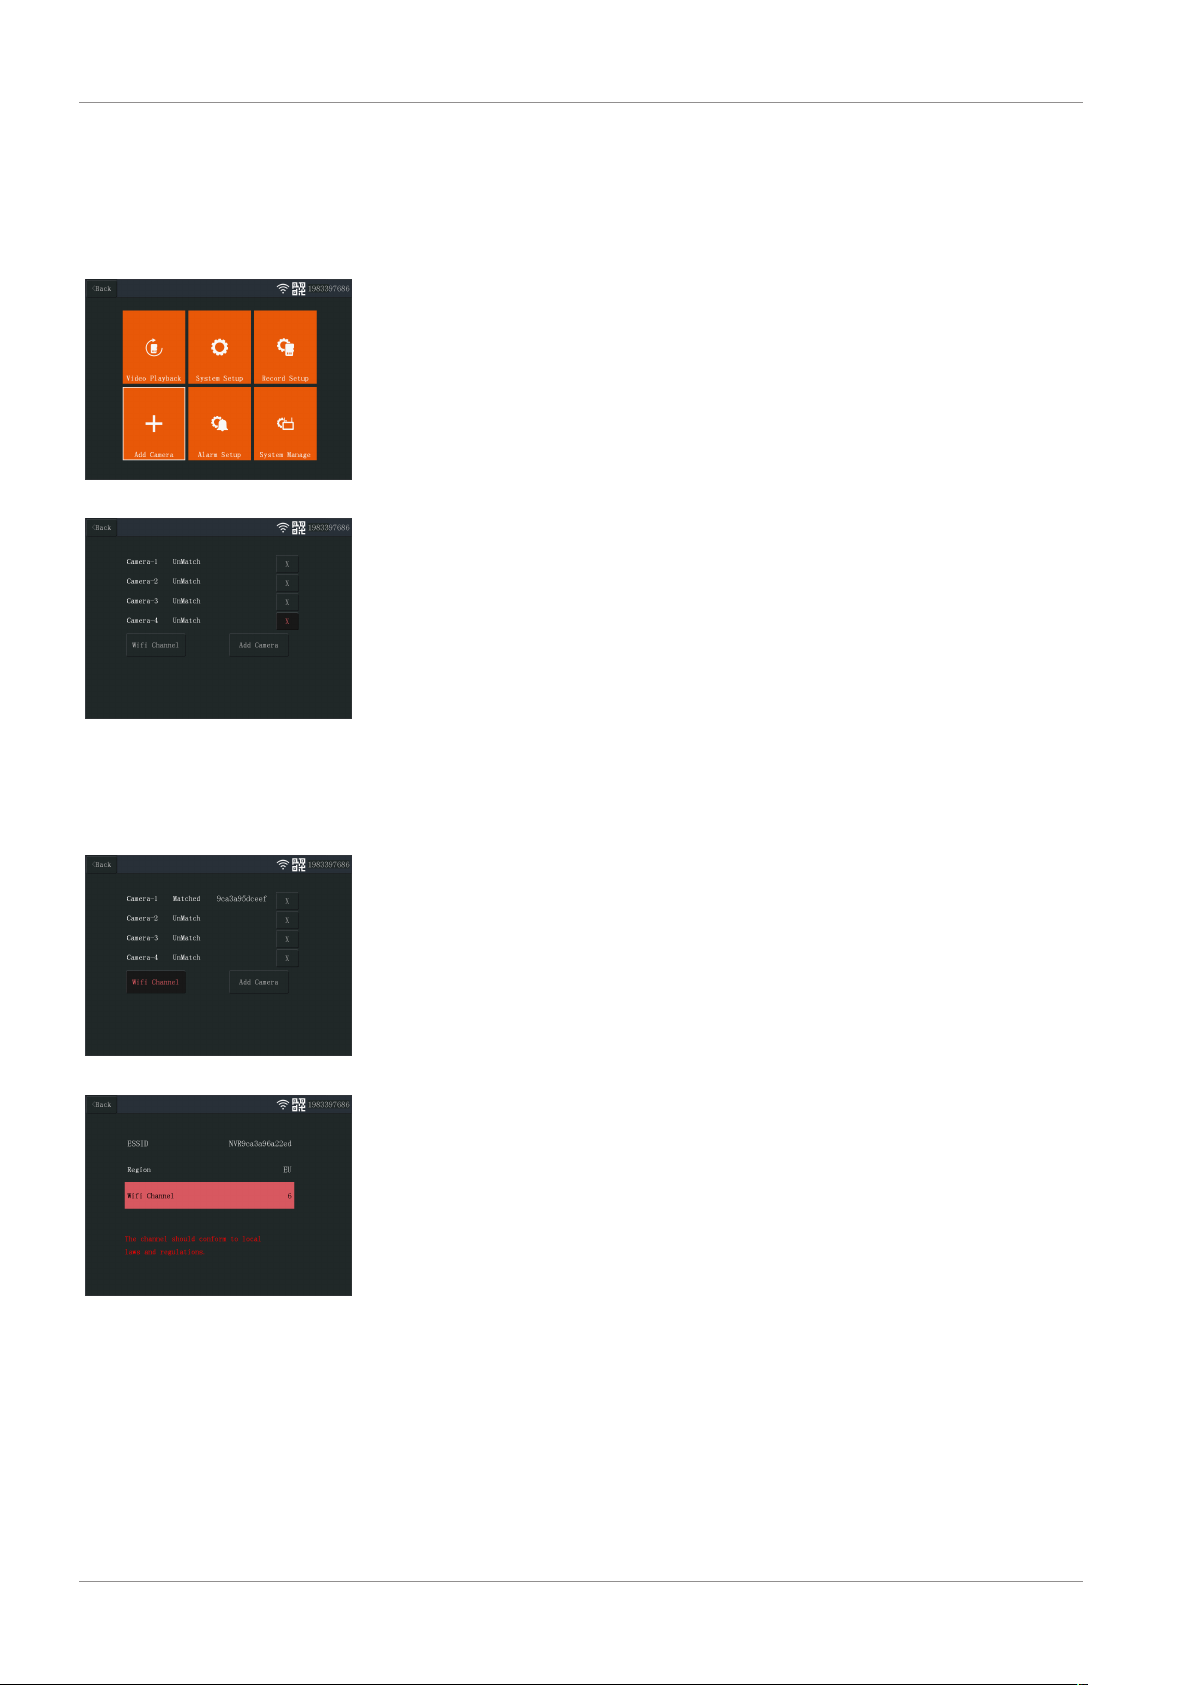
Illustration3: Add Camera
5.2 Select WIFI channel (if required)
Illustration4: Wifi channel
Illustration5: Select wifi channel
If there are many Wi-Fi networks in your area and you are experiencing bad reception,
change the Wi-Fi channel by doing the procedure below:
a) From the main menu: Select “Add Camera”.
b) Select “Wifi Channel”
c) Select “Wifi Channel”
d) Select a channel from the list. (Try different channels if the reception problem per-
sists.)
CMS-30100_IM 9
Page 10

6 | System operation
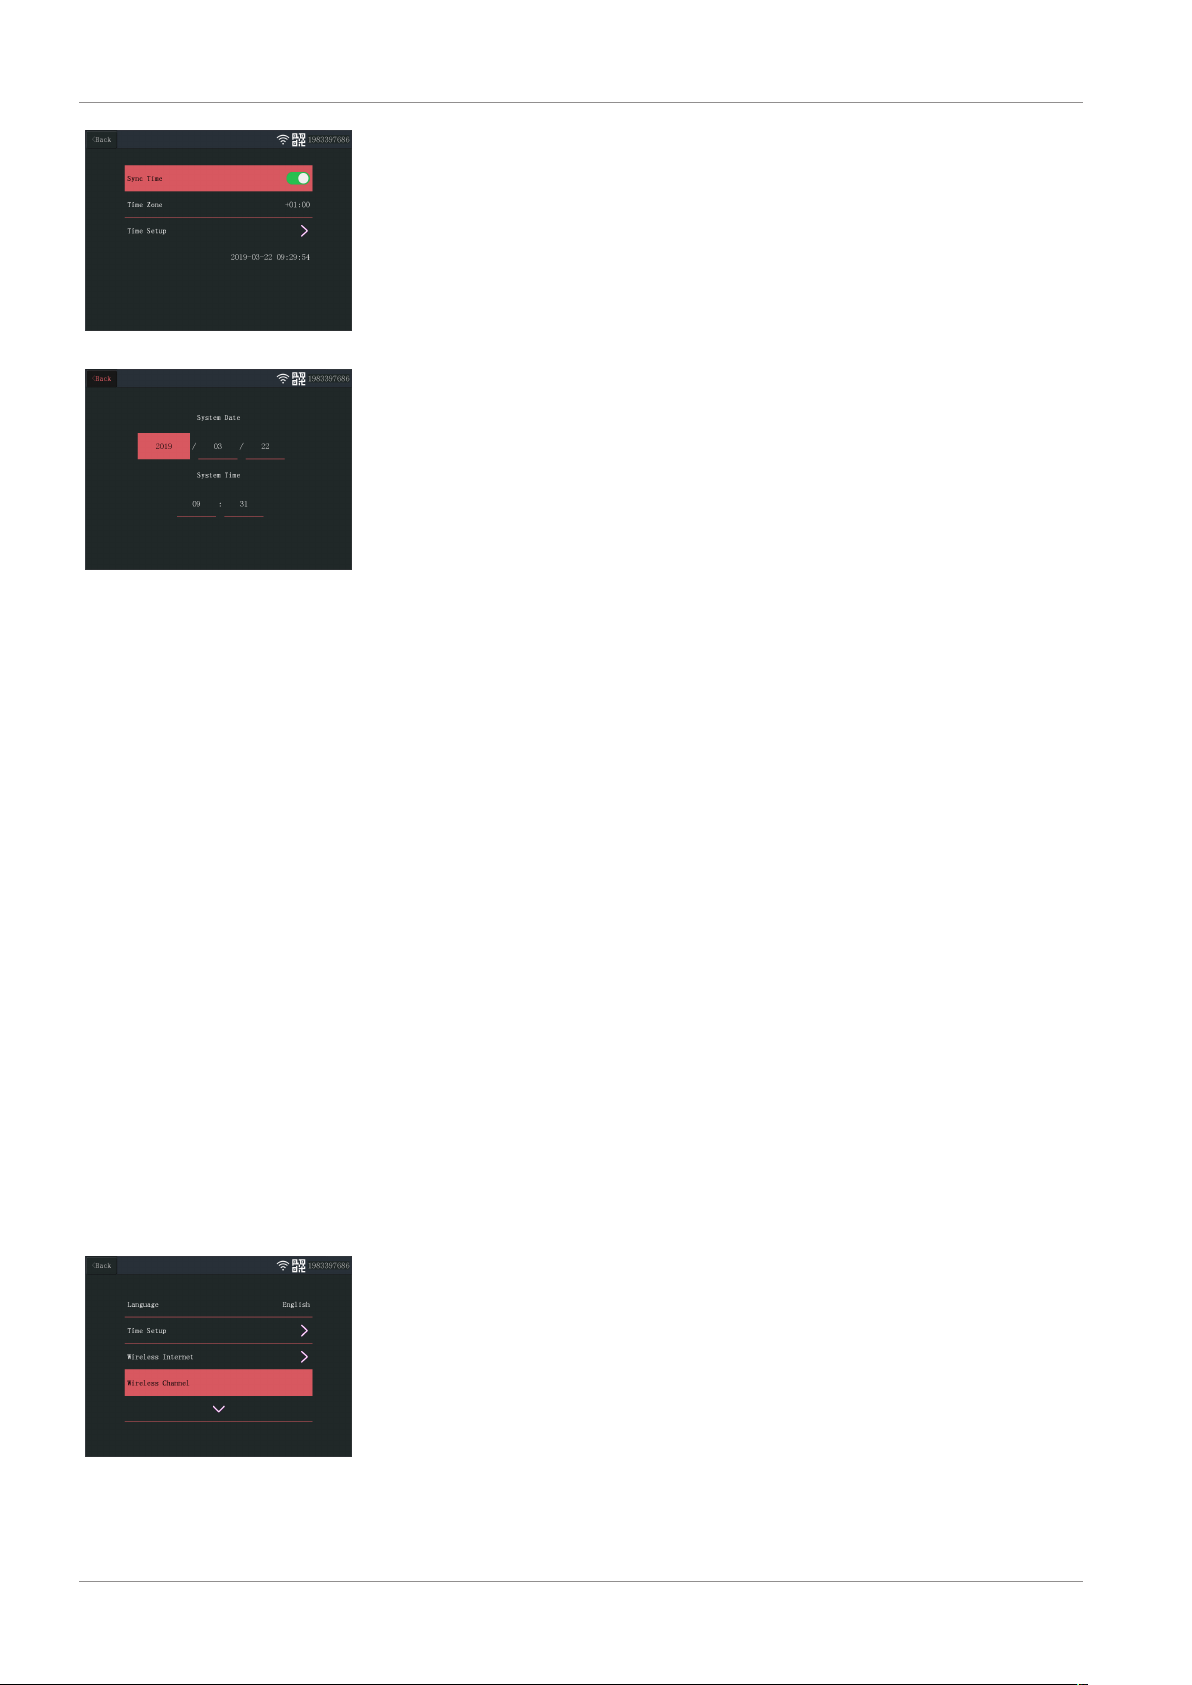
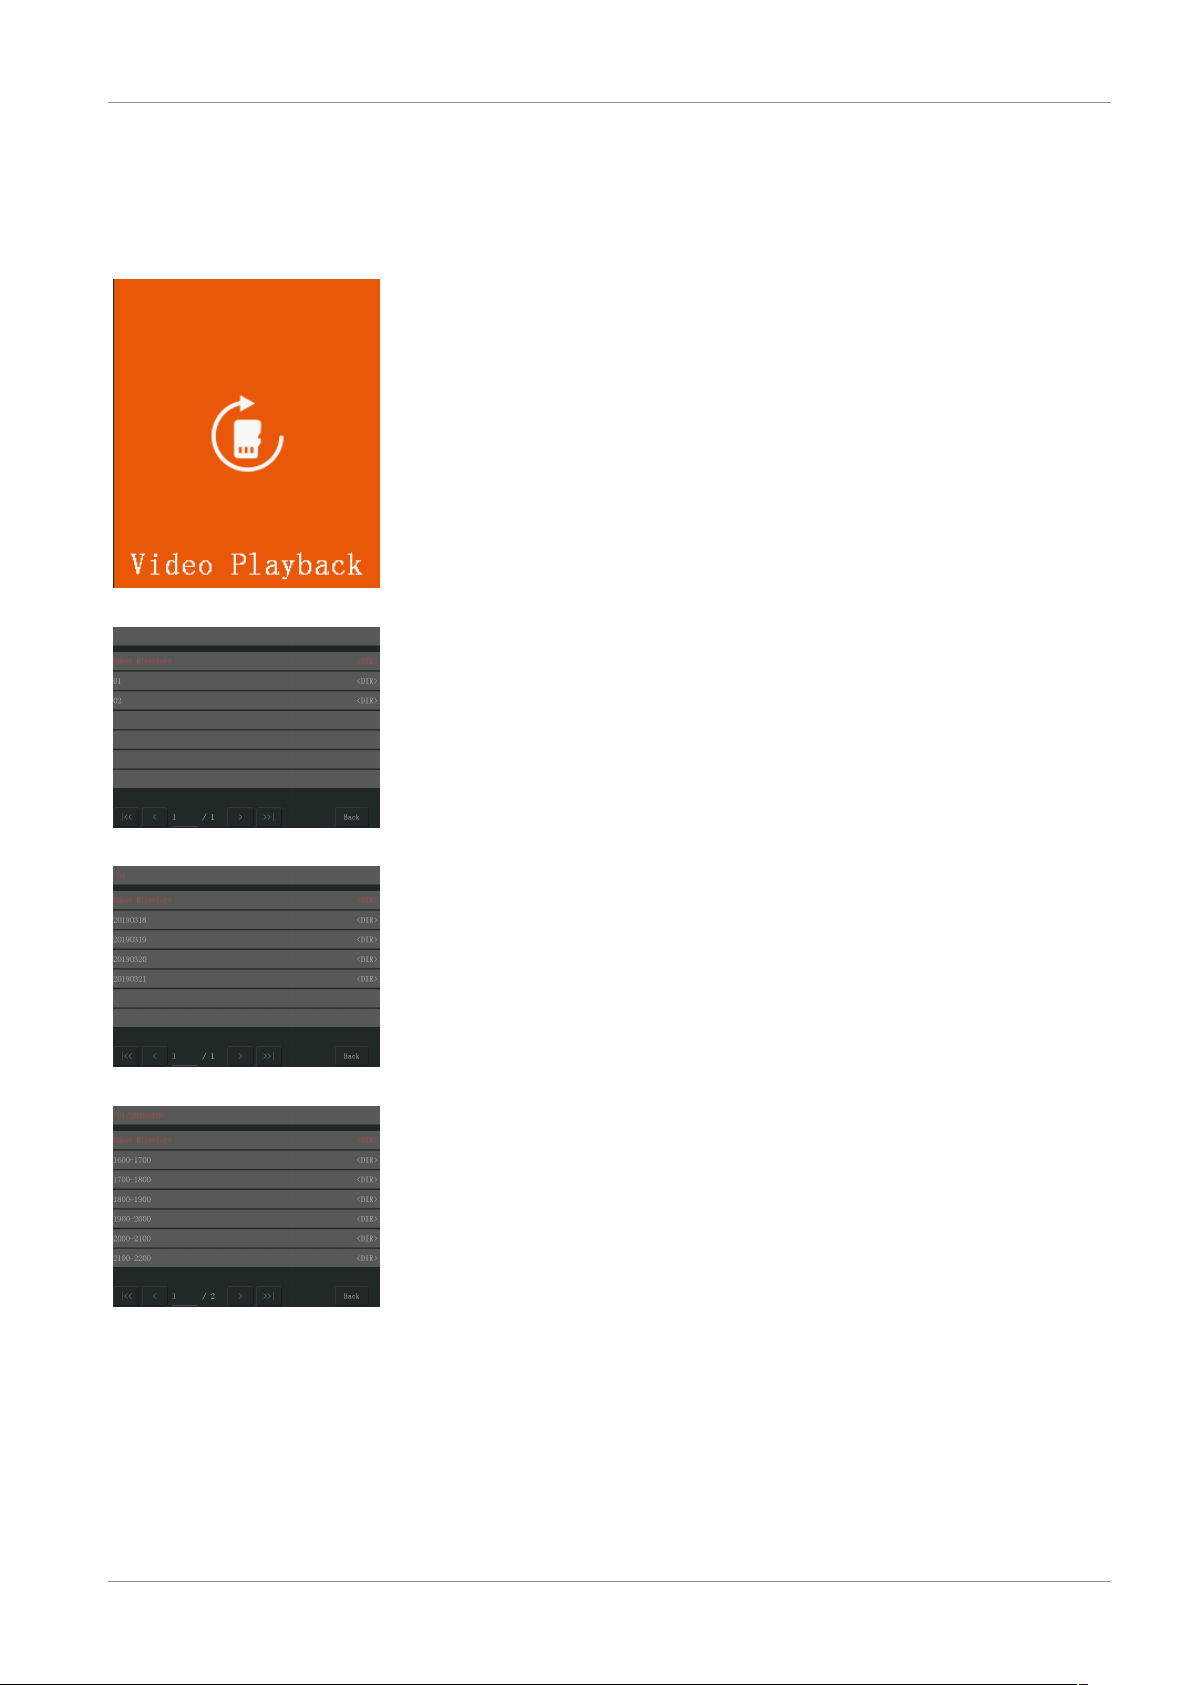
6.1 Video Playback
Illustration6: Video playback icon
6 System operation
The monitor will start recording video depending on the settings in “Record Setup”. To
view the recordings do the procedure below:
a) From the main menu: Select “Video Playback”.
b) Select the camera folder (1-4) you wish to view recordings from. (Up to 4 cameras
are supported).
c) Select the folder with the desired date.
d) Select the folder with the desired time.
e) Select the desired file to view the recording.
Illustration7: Main directory
Illustration8: Date direcotory
Illustration9: Time directory
10 CMS-30100_IM
Page 11
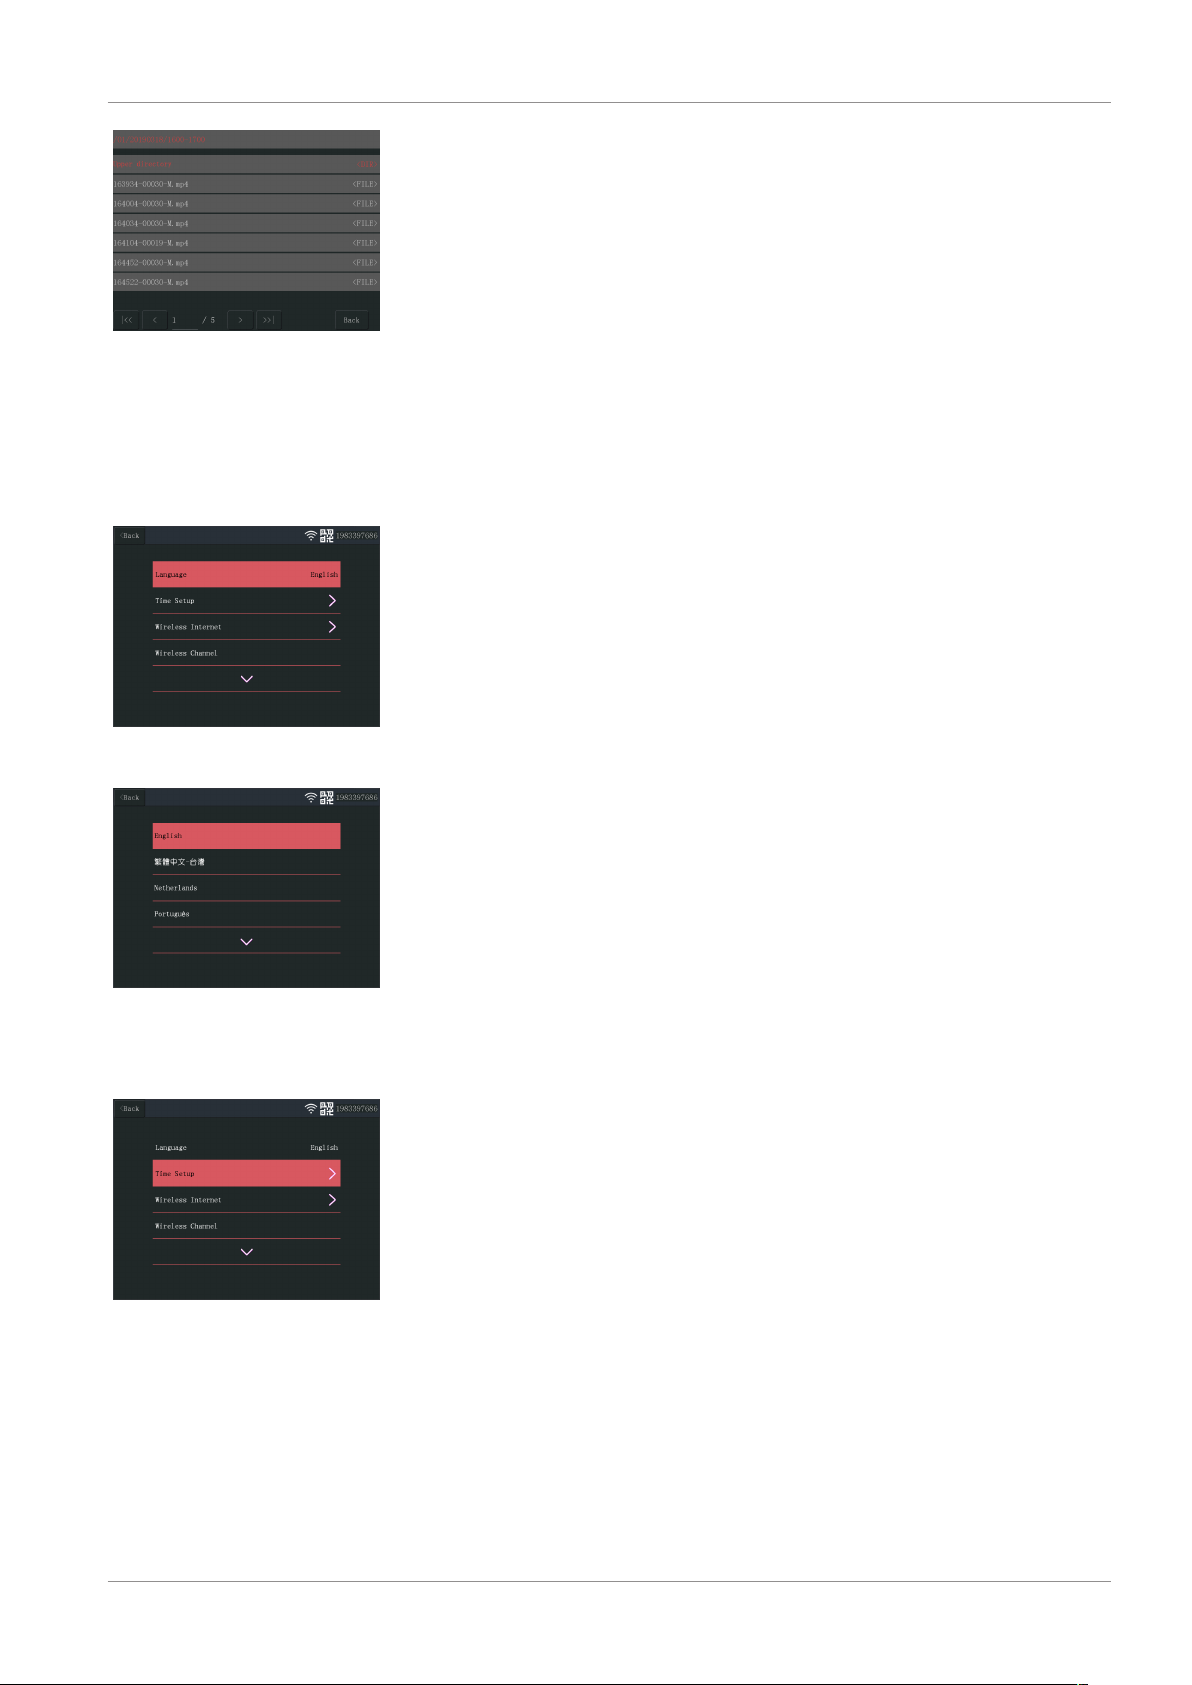
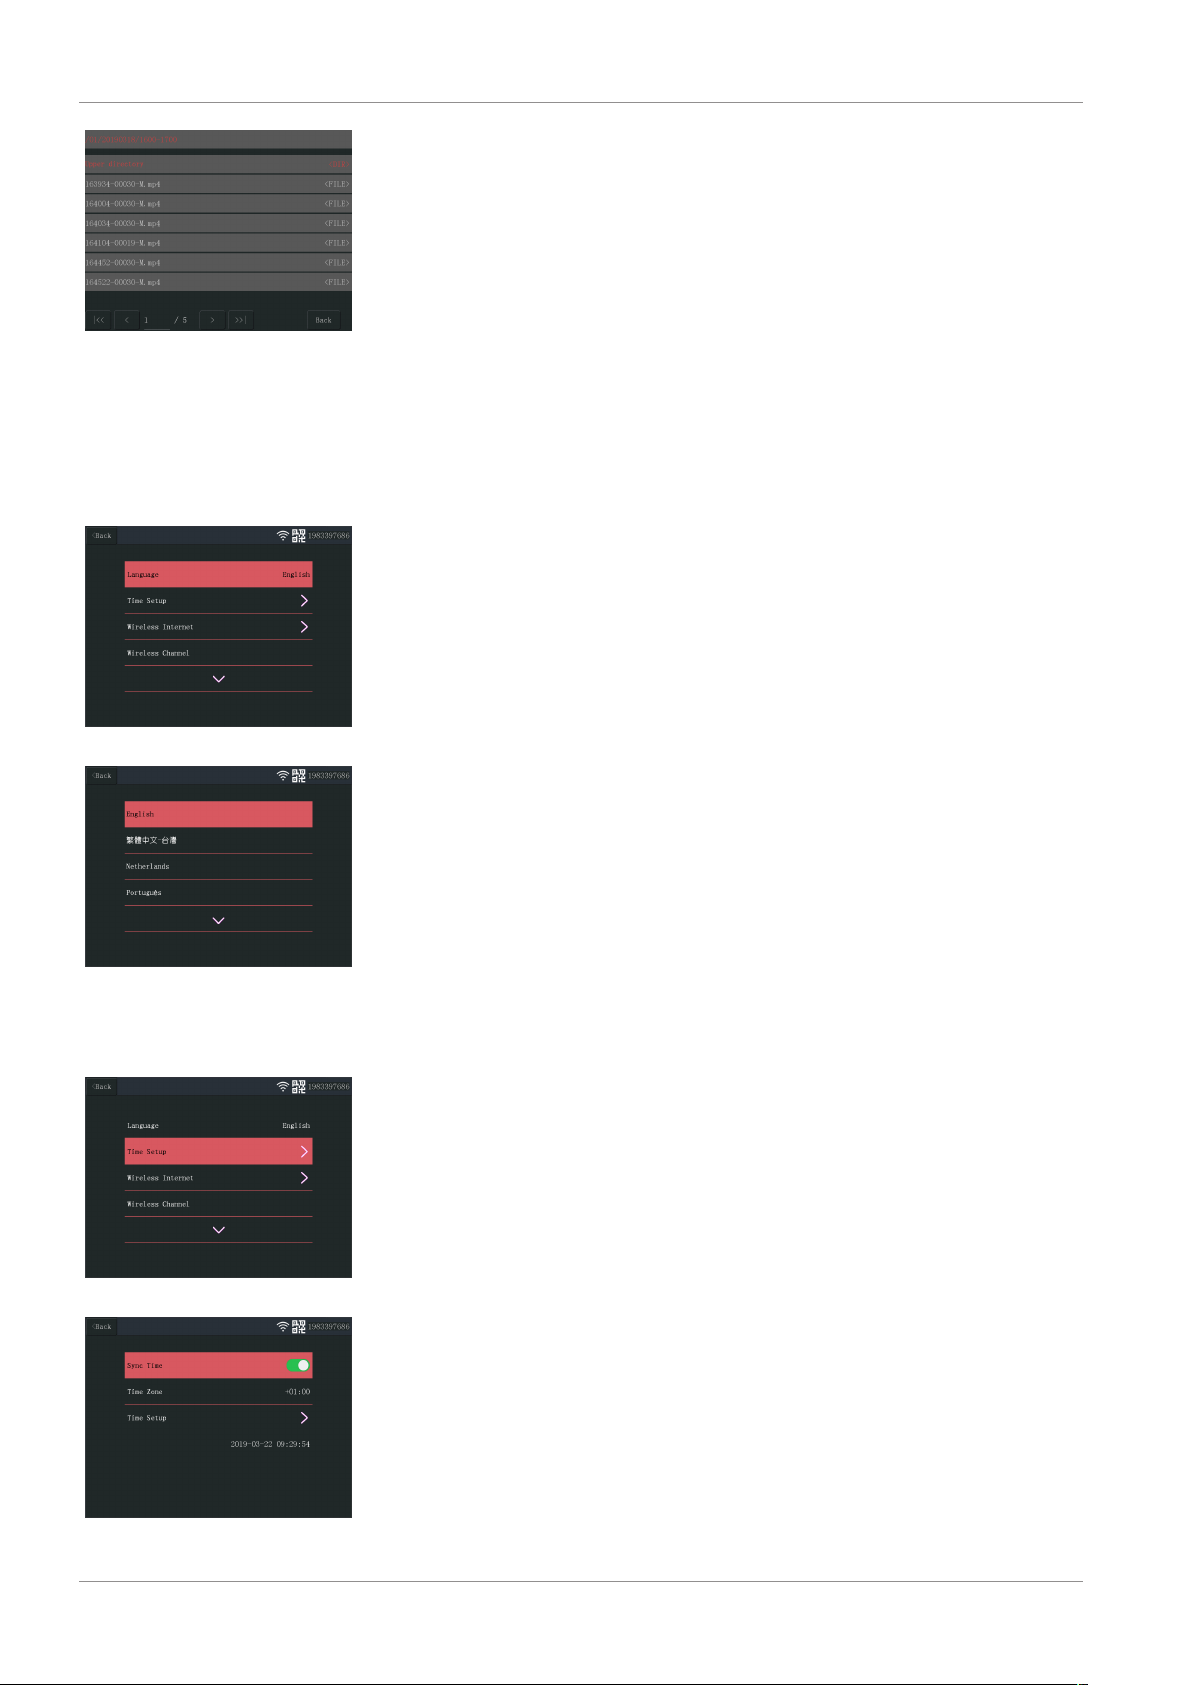
Illustration10: File directory
System operation | 6
6.2 System Setup
6.2.1 Language
The monitor supports a wide range of languages that you can select from the “System
Setup”.
a) From the main menu: Select “System Setup”.
b) Select “Language”.
c) Select the desired language from the list.
Illustration11: System setup language
Illustration12: Language selection
6.2.2 Time Setup
Illustration13: Select Time Setup
The date and time can be set manually or by syncing to the internet.
a) From the main menu: Select “System Setup”.
b) Select “Time Setup”.
c) Choose whether to sync time automatically or not. (Syncing automatically requires
the monitor to be connected to the internet. See section “Wireless Internet”.
d) Select time zone. (This must be done even if you choose to sync time automatic-
ally.)
e) Select “Time Setup” if you choose to manually set up your time and date. (This op-
tion is only available if “Sync Time” is set to off.
CMS-30100_IM 11
Page 12
6 | System operation
Illustration14: Time Setup
Illustration15: Date Time Setup
(manual)
6.2.3 Wireless Internet
Do the procedure below to enable the wireless internet connection. This feature is optional but it enables you to use the following features:
– App connectivity
– Time and date synchronization.
a) Make sure that you have an internet connected WIFI router, your password and
router name (SSID) available.
b) From the main menu: Select “System Setup”.
c) Select “Wireless Internet”.
d) Enable WLAN.
e) Select “Hotspot list”.
f) Find and select your wireless router.
g) Type your password.
ð NOTE: Only 2.4GHz networks are supported
h) Download the “SW360” app.
i) Open the app, register as a new user and follow the instructions given in the app.
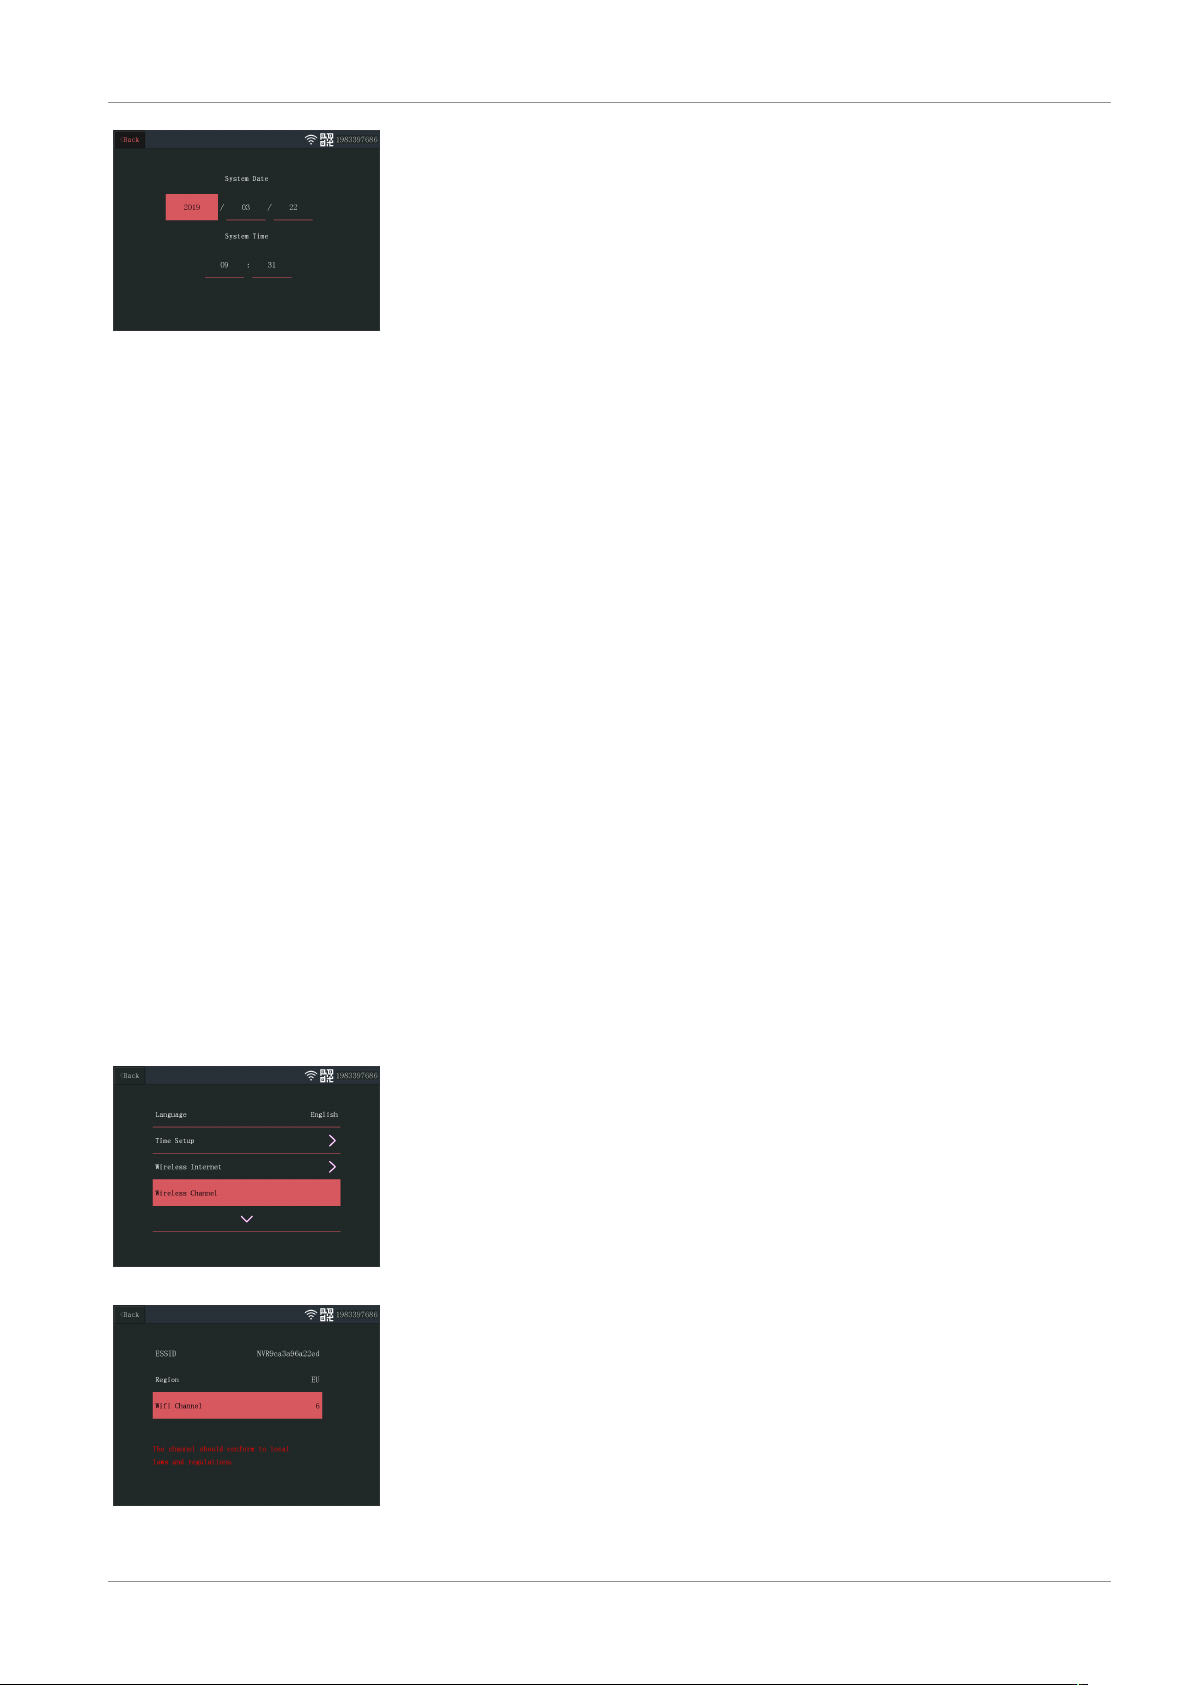
6.2.4 Wireless Channel
In some cases the range of the wireless signal can be obstructed by other wireless networks occupying the same channel. If you experience a lower range than expected,
changing the channel may provide a solution.
a) From the main menu: Select “System Setup”.
b) Select “Wireless Channel”.
c) Select “Wifi channel”.
d) Select a new channel. (The Wifi router is usually set to automatically detect the
Illustration16: Select Wireless
Channel
12 CMS-30100_IM
channel. If not the channel must also be changed on the router manually).
Page 13
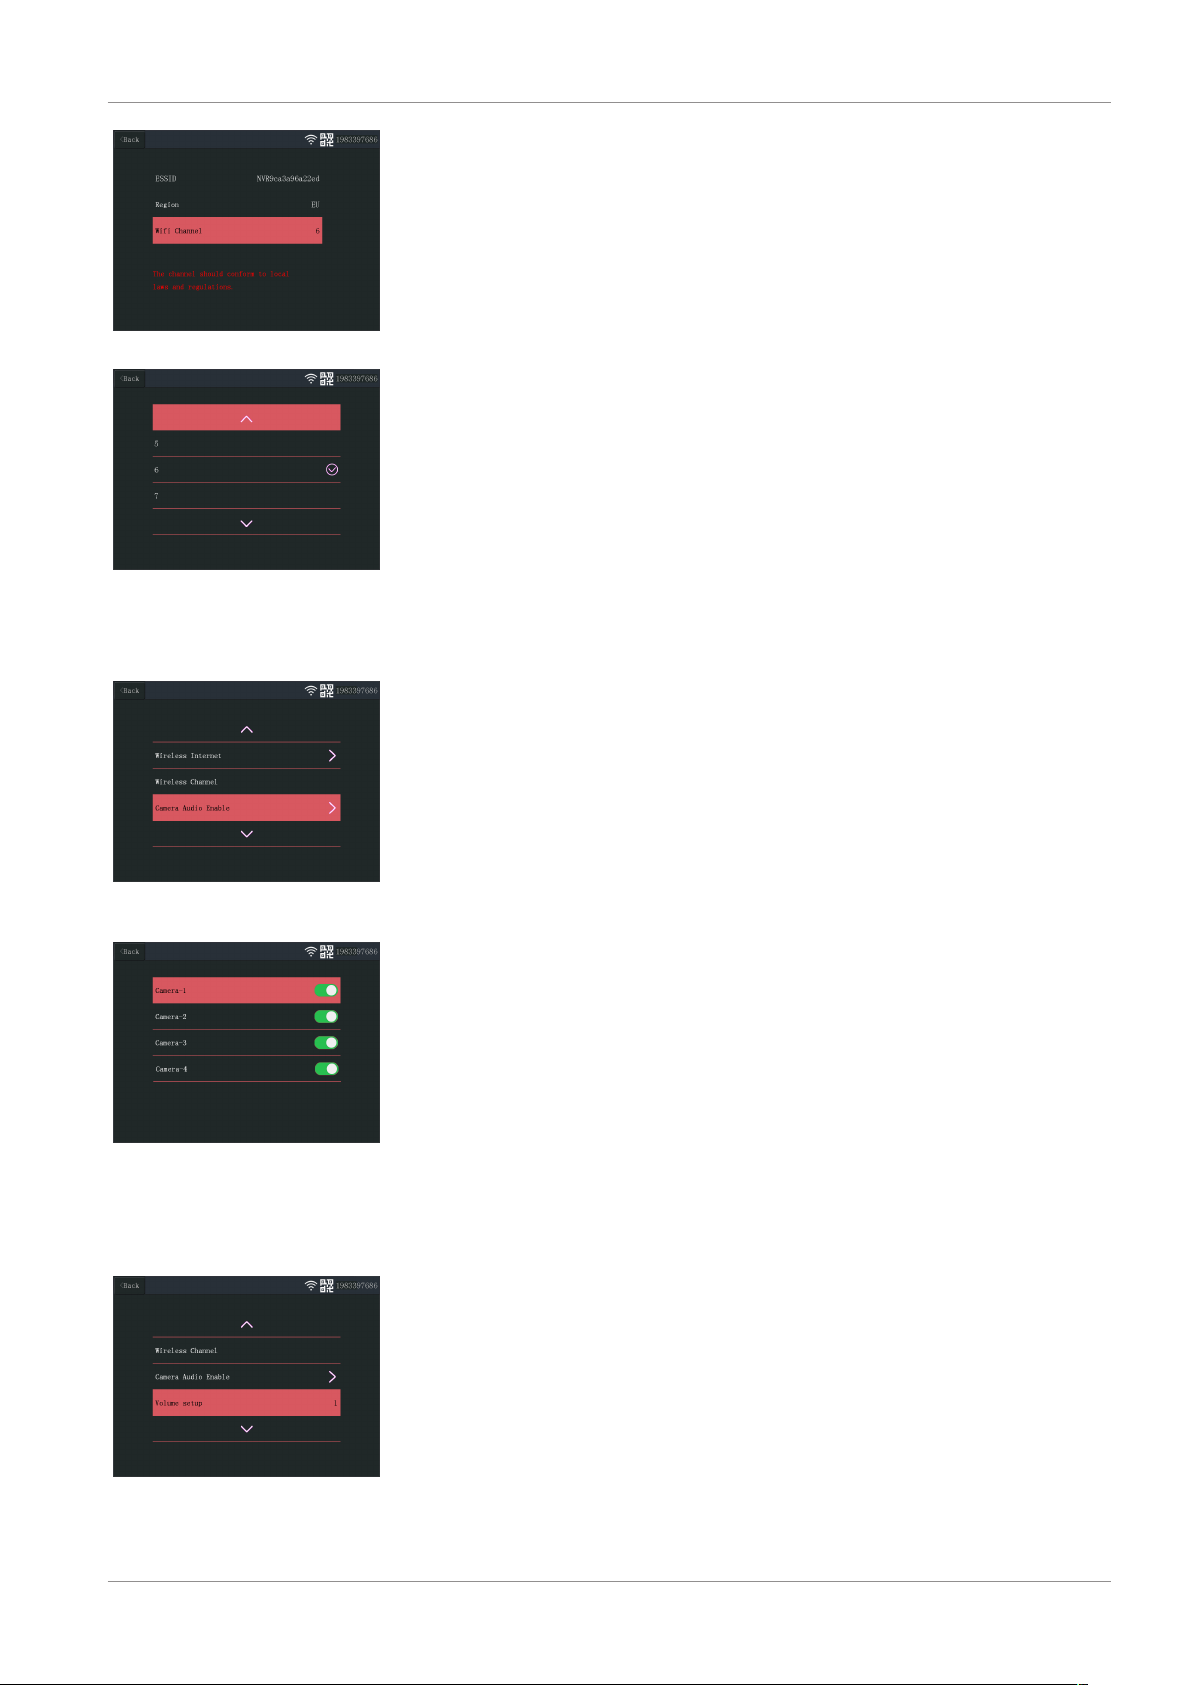
Illustration17: Wifi Channel
Illustration18: Channel List
System operation | 6
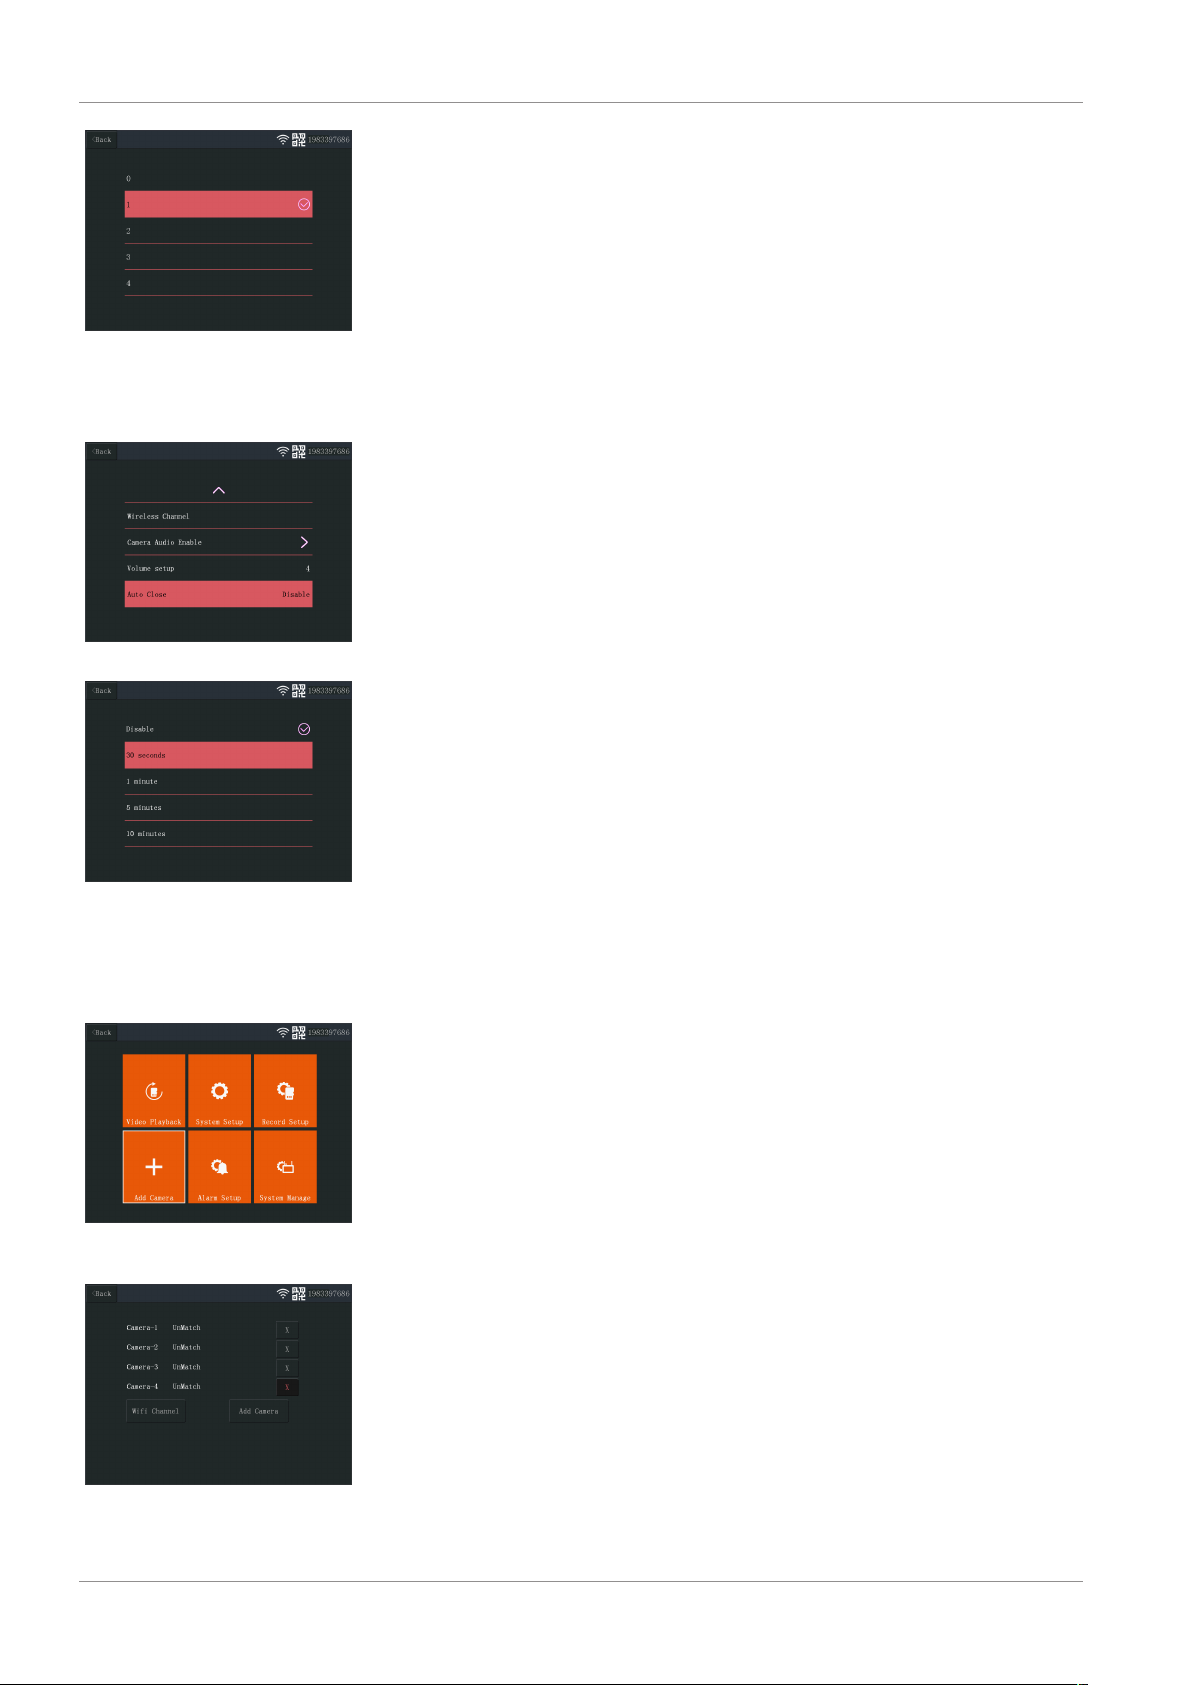
6.2.5 Camera Audio Enable
Illustration19: Camera Audio Enable
Illustration20: Enable - Disable
camera audio
6.2.6 Volume setup
The camera microphone can be enabled or disabled from this menu. It is important to
note that if the camera microphone is disabled, 2-way communication with the camera
is no longer possible.
a) From the main menu: Select “System Setup”.
b) Select “Camera Audio Enable”.
c) Select the relevant camera and pull the slider to the on or off position.
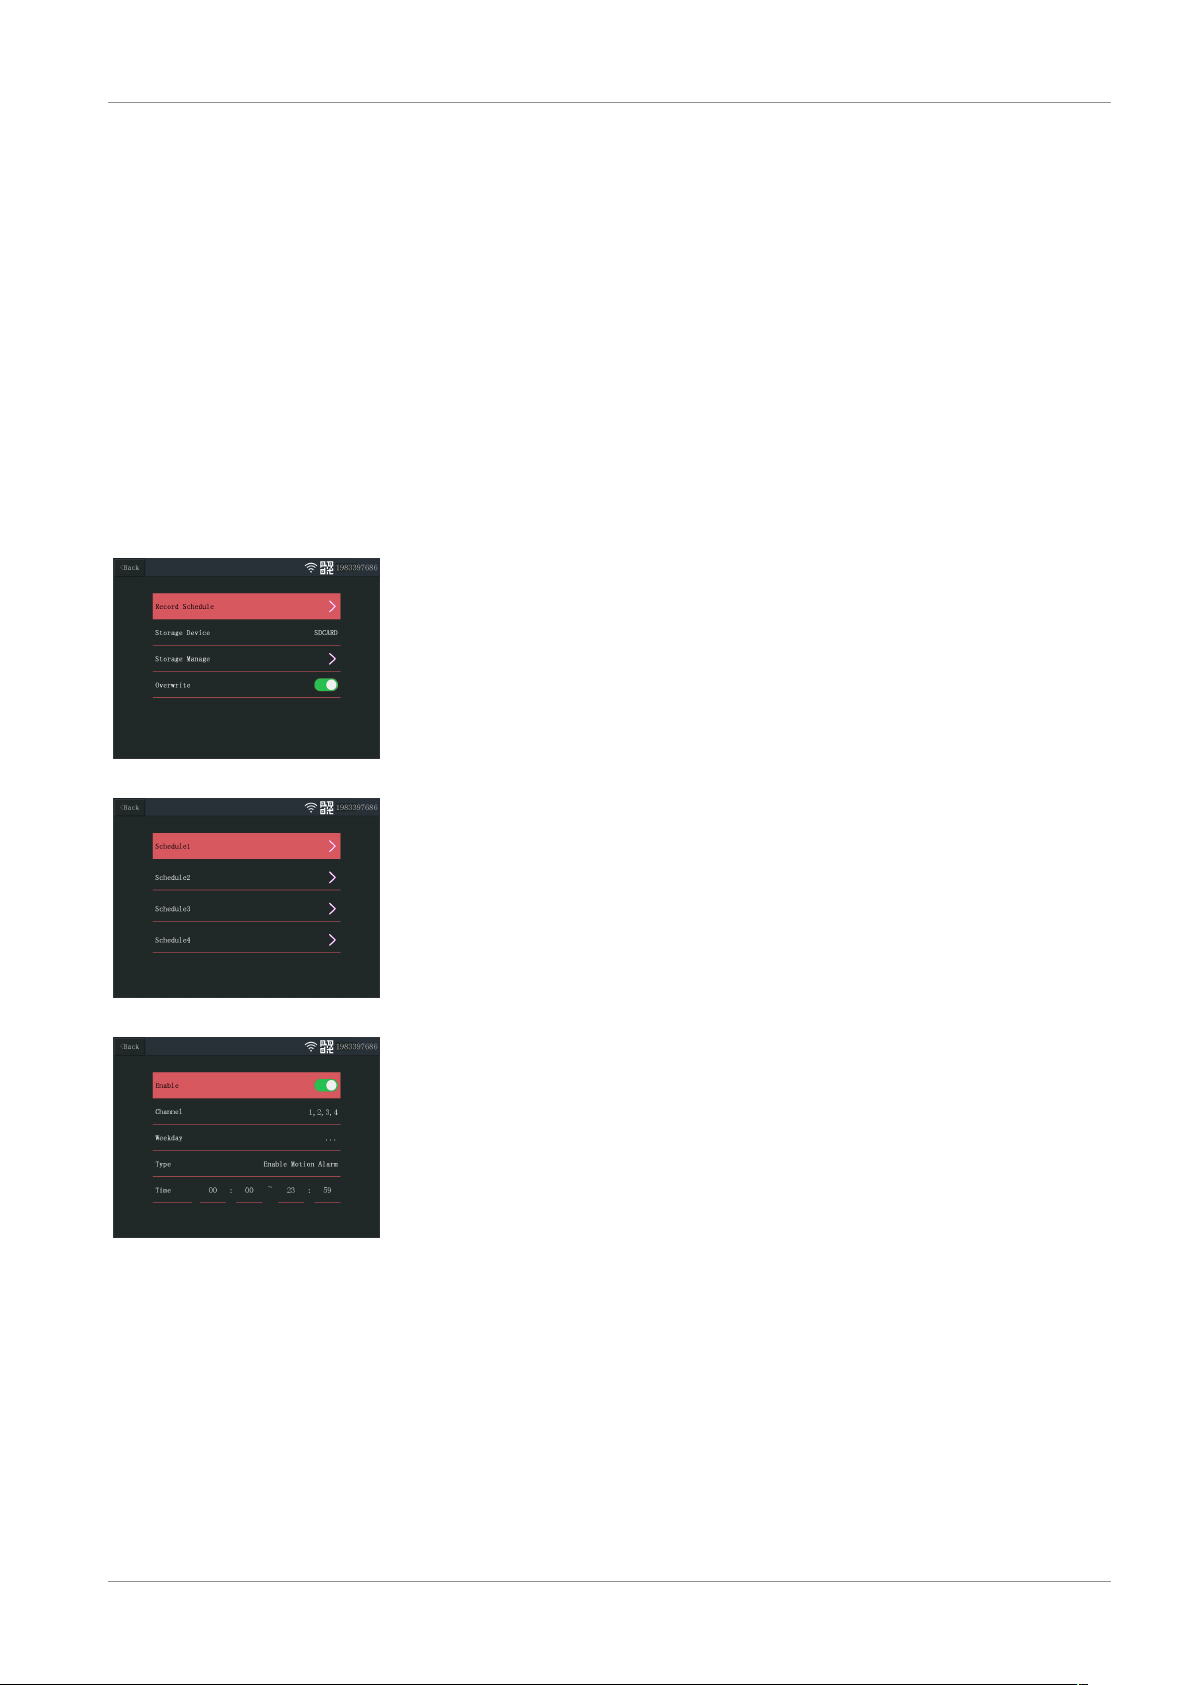
The volume setup allows the volume of the monitor to be increased or decreased.
a) From the main menu: Select “System Setup”.
b) Select “Volume Setup”.
c) Set the volume by selecting a numbered volume value (0-4). Setting the value to 0
will mute the monitor speakers completely.
Illustration21: Volume setup
CMS-30100_IM 13
Page 14
6 | System operation
Illustration22: Altering the volume
6.2.7 Auto Close
Illustration23: Auto close
The auto close function enables/disables the screen time out. When the auto close
function is enabled, it turns off the monitor screen after a set time while the system is
running in normal operation.
a) From the main menu: Select “System Setup”.
b) Select “Auto Close”
c) Select a duration before time out (the duration starts after the last interaction
with the monitor).
Note: If the monitor is running on batteries, it is recommended to have a short time
out duration to save power.
Illustration24: Auto close (time out)
duration
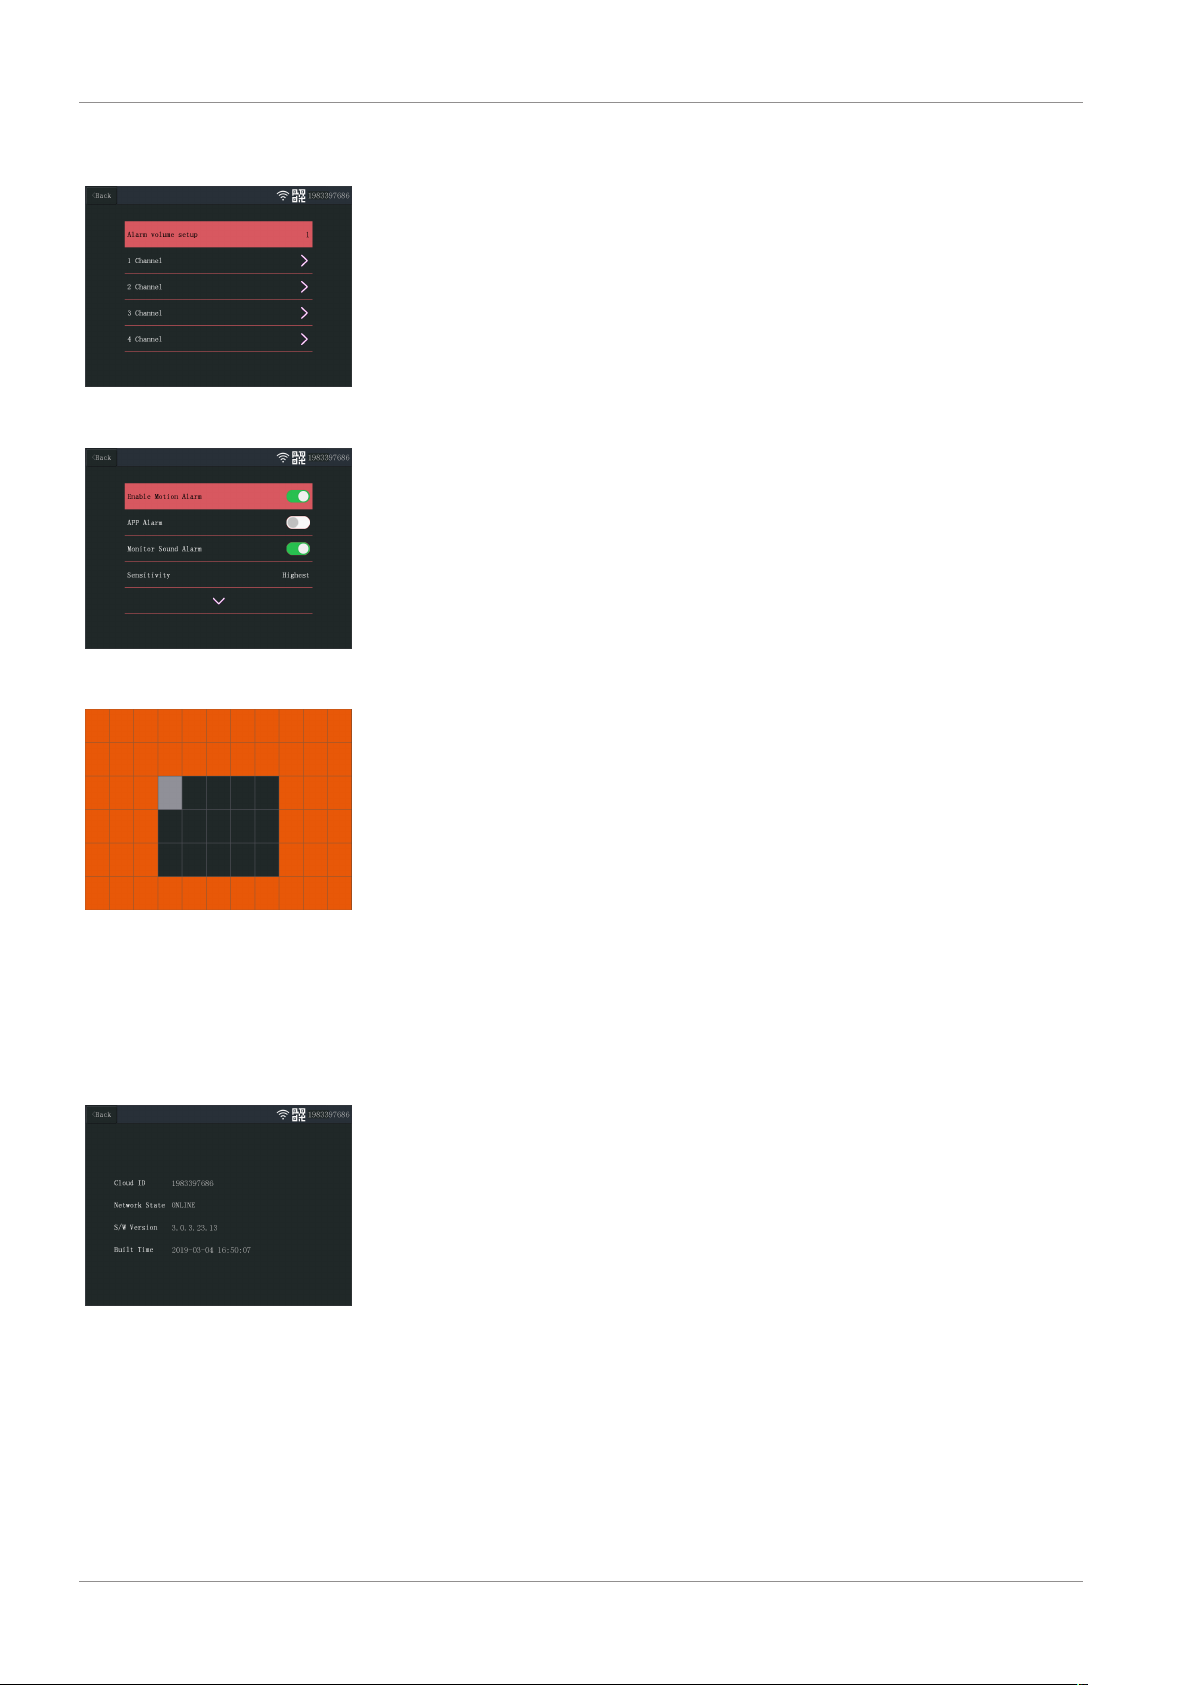
6.3 Add a camera
Illustration25: Main menu - Add
Camera
The monitor can pair up to 4 cameras. To add a camera do the following procedure:
a) Turn the camera on by connecting it to the mains supply.
b) Wait for 30 seconds.
c) You will now hear “Start configuration mode”.
ð NOTE: If you do not hear the voice, press the re-set button on the camera for
6 seconds until you hear “Restore factory settings”.
d) On the monitor from the main menu: Select “Add Camera”.
e) Select “Add Camera”. (This must be done within x minutes from resetting the cam-
era.)
f) On the camera: If the above steps are done correctly, you will hear:
- “Wireless settings, please wait”
- “Wireless connection successful”
g) On the monitor: Wait for the pairing to complete.
Illustration26: Add Camera
14 CMS-30100_IM
Page 15
6.4.1 Record Schedule
Illustration27: Record Schedule
System operation | 6
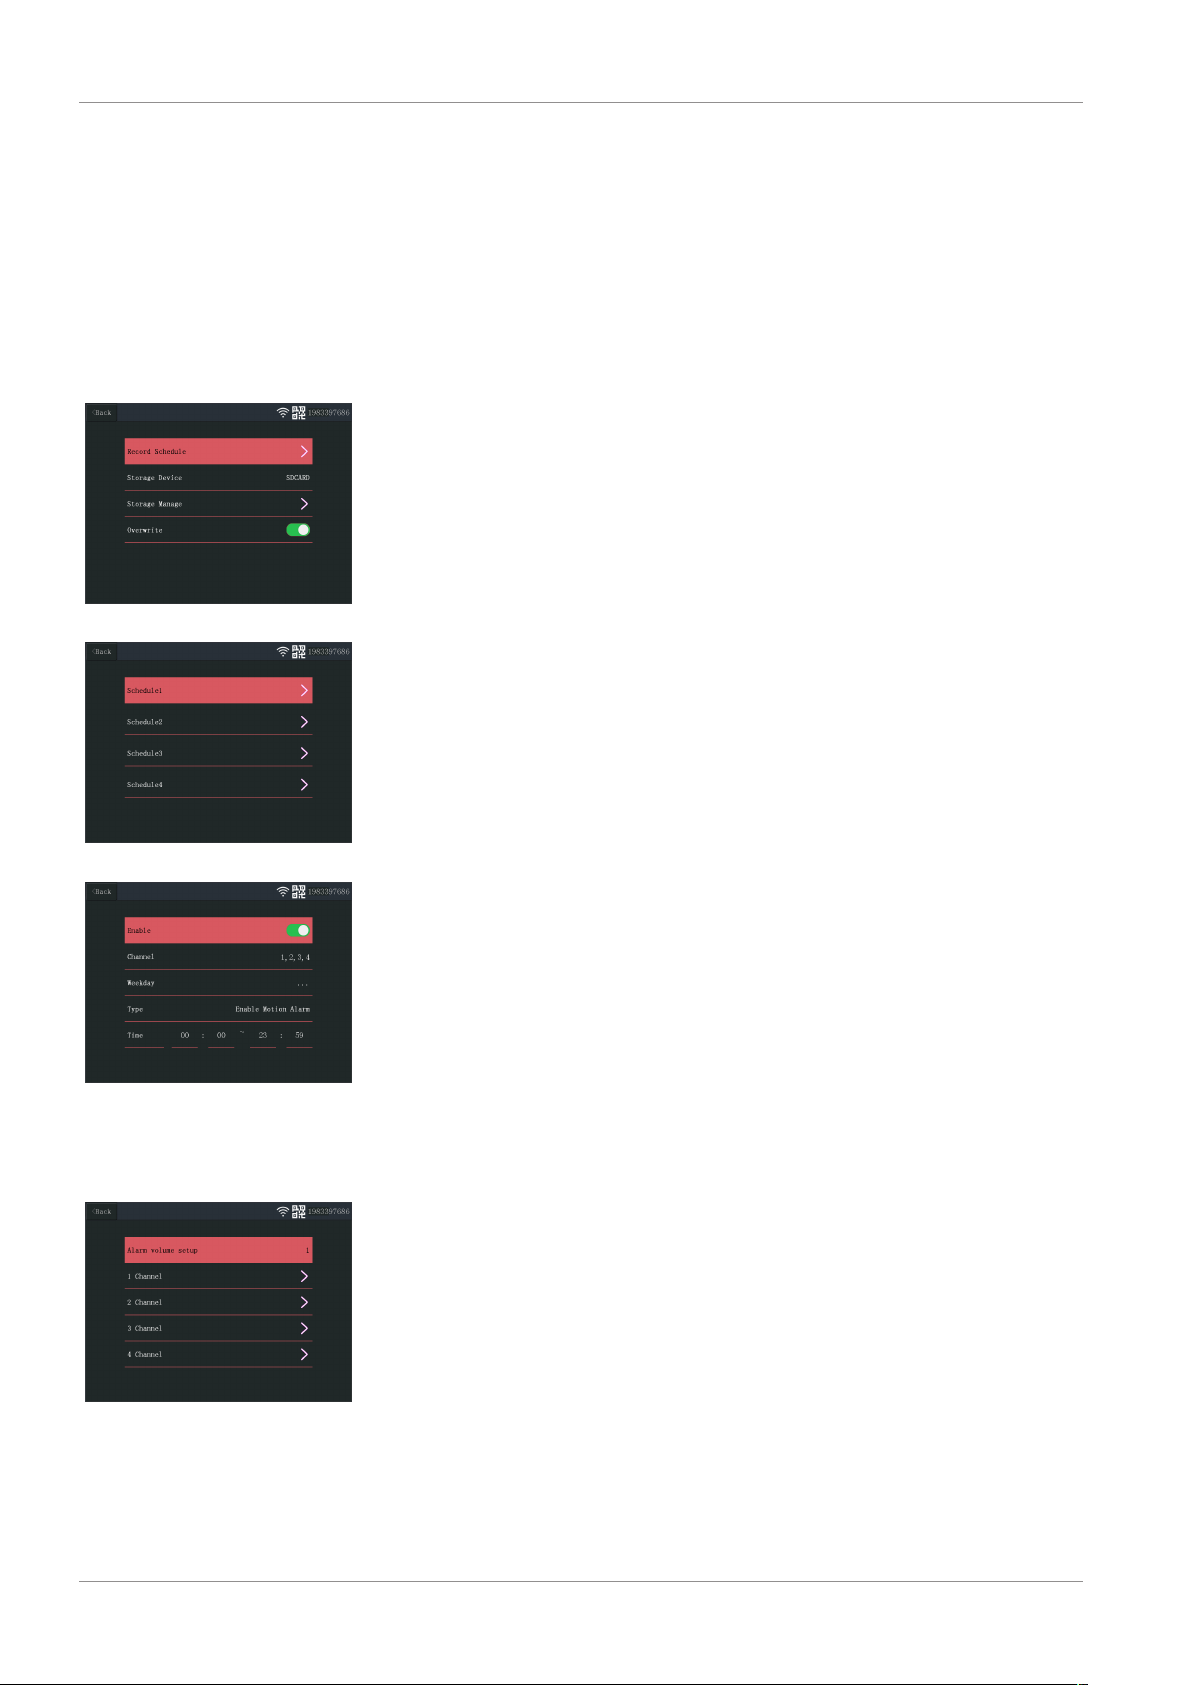
6.4 Record setup
The system can be set up to record video in different modes. It supports up to 4 separate schedules where each schedule can be set in different modes, using 1 or more installed cameras. See section “Record Schedule”.
To configure the record setup settings, do the procedure below.
a) From the main menu: Select “Record Setup”.
b) Select storage device. (This is only relevant if you have inserted a MicroSD card.)
c) Select “Storage Manage” to see the current memory use and format the MicroSD
card.
d) Select “Overwrite” to enable/disable the monitor to overwrite older recordings
when the memory runs out.
To make a recording schedule, do the procedure below.
a) From the main menu: Select “Record Setup”.
b) Select “Record Schedule”.
c) Select schedule 1-4.
d) Enable the selected schedule by moving the slider (it will turn green when en-
abled).
e) Select “channel” (cameras).
f) Select the “channel” (camera(s)) that you want to record from).
g) Select “Weekday”.
h) Select the days that you want to record on, from the list.
i) Select “Time” and insert the time frame of which you want to record.
Note: The “Type” only has one option (Enable motion alarm) and it is enabled by default.
Illustration28: Schedule 1-4
Illustration29: Schedule settings
CMS-30100_IM 15
Page 16
6 | System operation
6.5 Alarm setup
Illustration30: Alarm setup channels
Illustration31: Alarm setup channel
settings
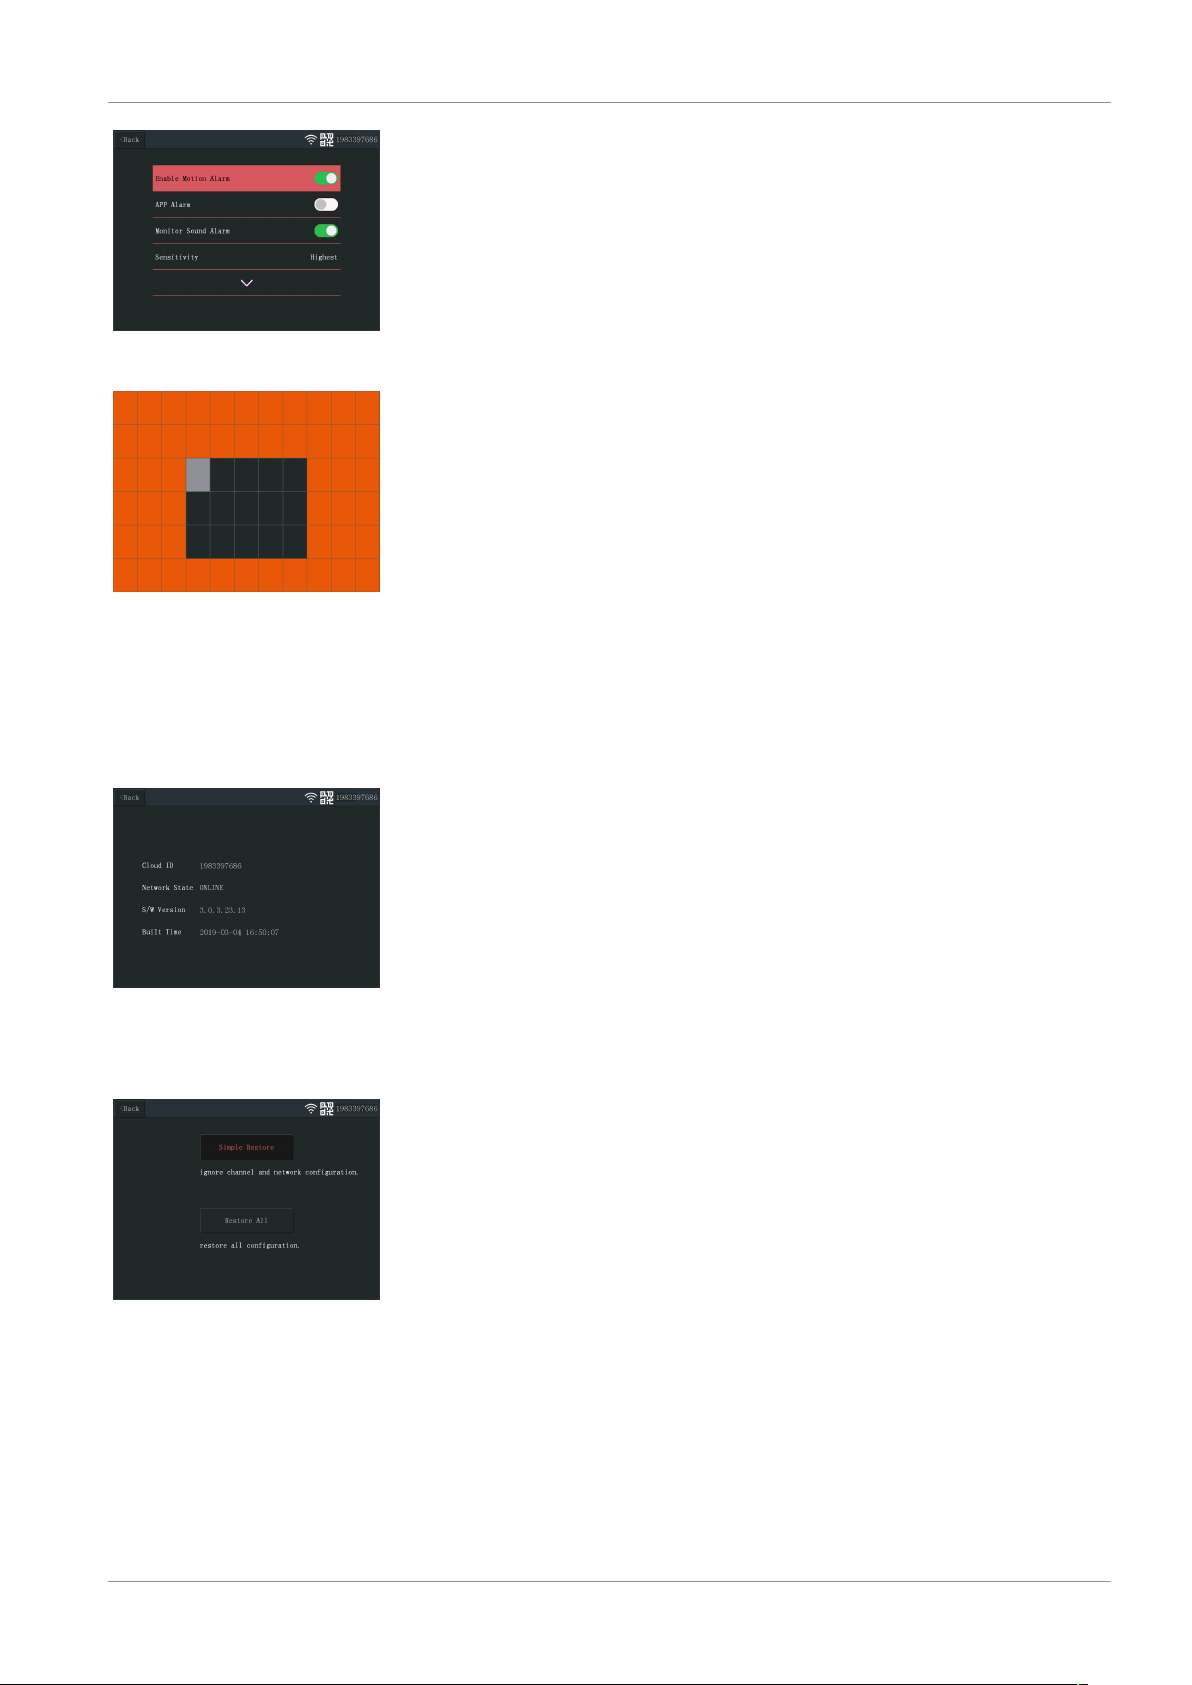
The monitor has an alarm function that can be set to trigger when motion is detected.
To set the alarm, do the procedure below.
a) From the main menu: Select “Alarm Setup”.
b) Select “Alarm volume setup”.
c) Set the desired alarm volume. (The alarm volume overrides any other sound set-
tings if triggered.)
d) Select the “Channel” (camera) that you want to use to trigger the alarm.
e) Enable the “Enable Motion Alarm” by moving the slider (it will turn green when
enabled).
f) Enable the “APP Alarm” by moving the slider (it will turn green when enabled) if
you wish to receive alarms on your mobile device. (See section “Setting up the mo-
bile app”)
g) Enable the “Monitor Sound Alarm” if you wish to get an audible alarm from the
monitor.
h) Select the “Sensitivity” to set the sensitivity of the motion detector.
i) Select “Area Edit” to mask areas that you do not want to trigger the alarm. (This is
useful if you have trees or traffic etc. that is always seen by the camera.)
Note: Areas marked in orange will not trigger the motion alarm.
Illustration32: Area Edit
Illustration33: System Info
6.6 System manage
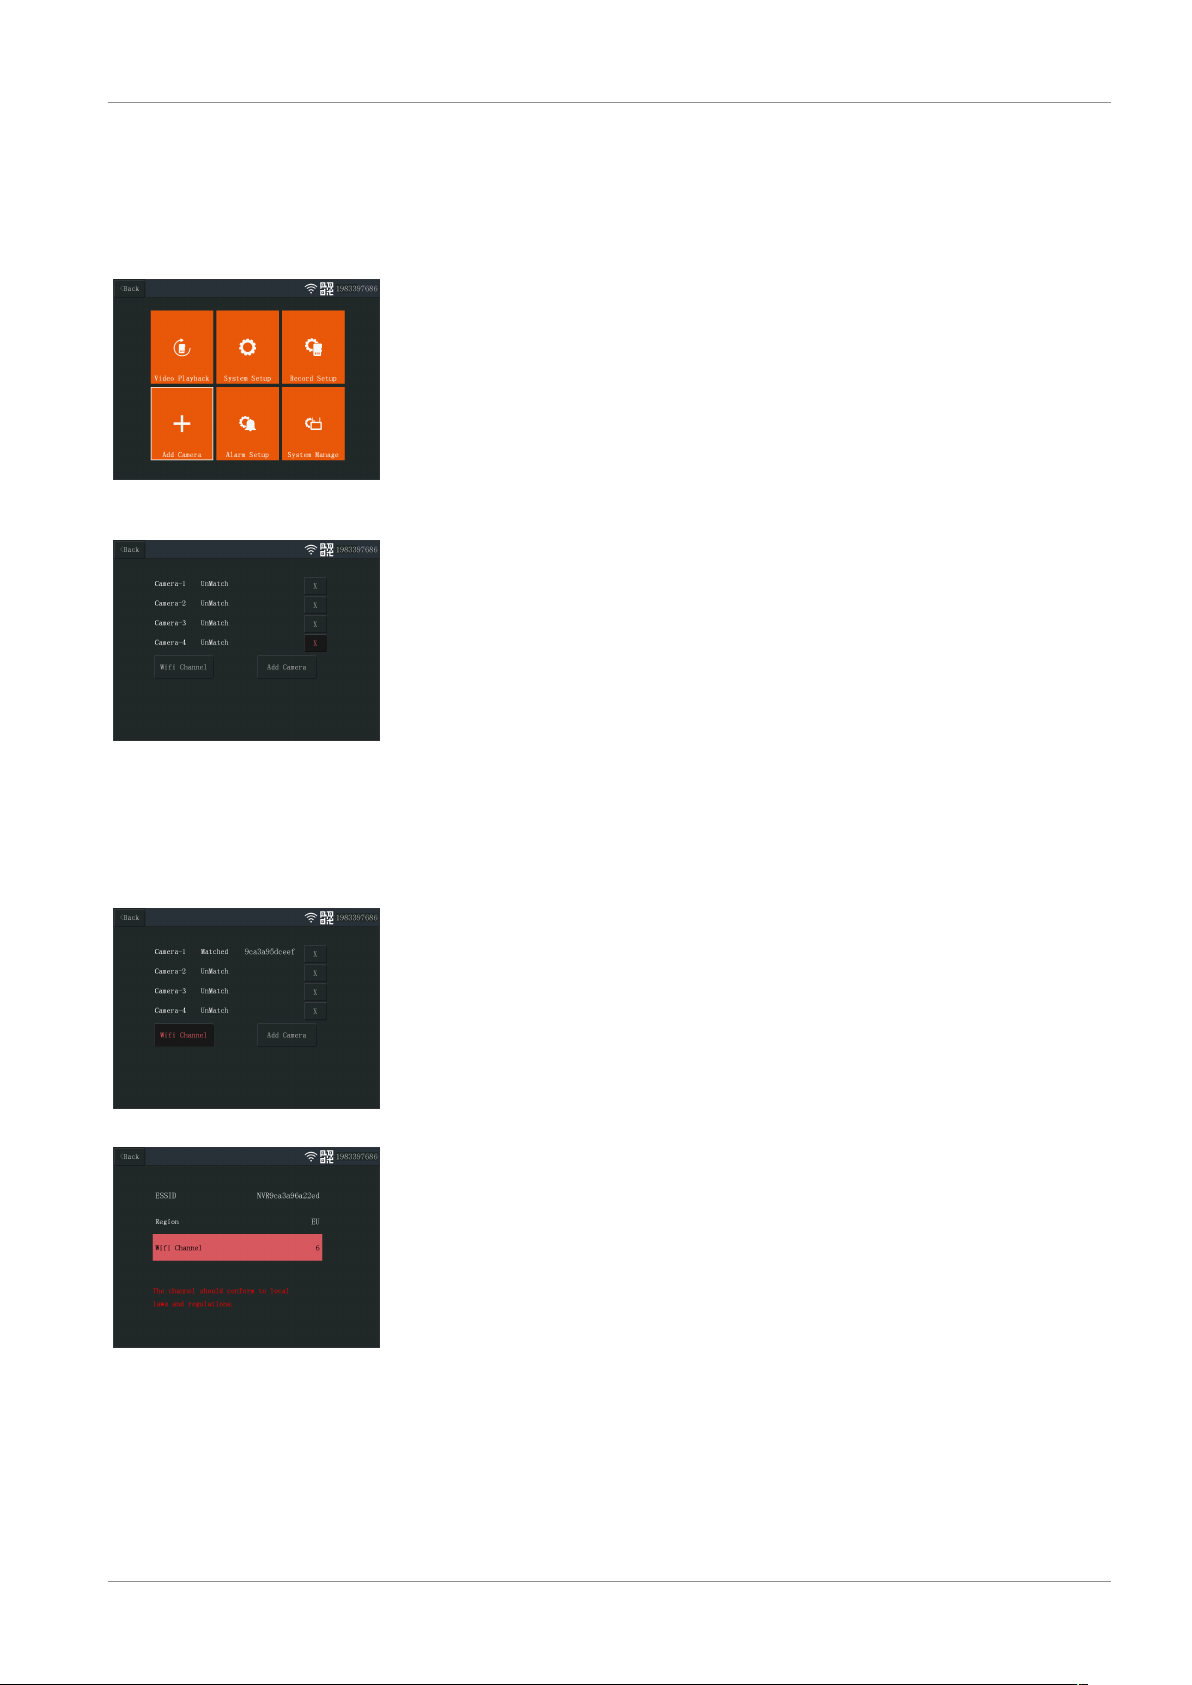
6.6.1 System Info
The system info provides information about the monitor. This information is mainly
used when support is required. To view the system info, do the procedure below.
a) From the main menu: Select “System Manage”.
b) Select “System Info”.
16 CMS-30100_IM
Page 17

Illustration34: Factory Setting
System operation | 6
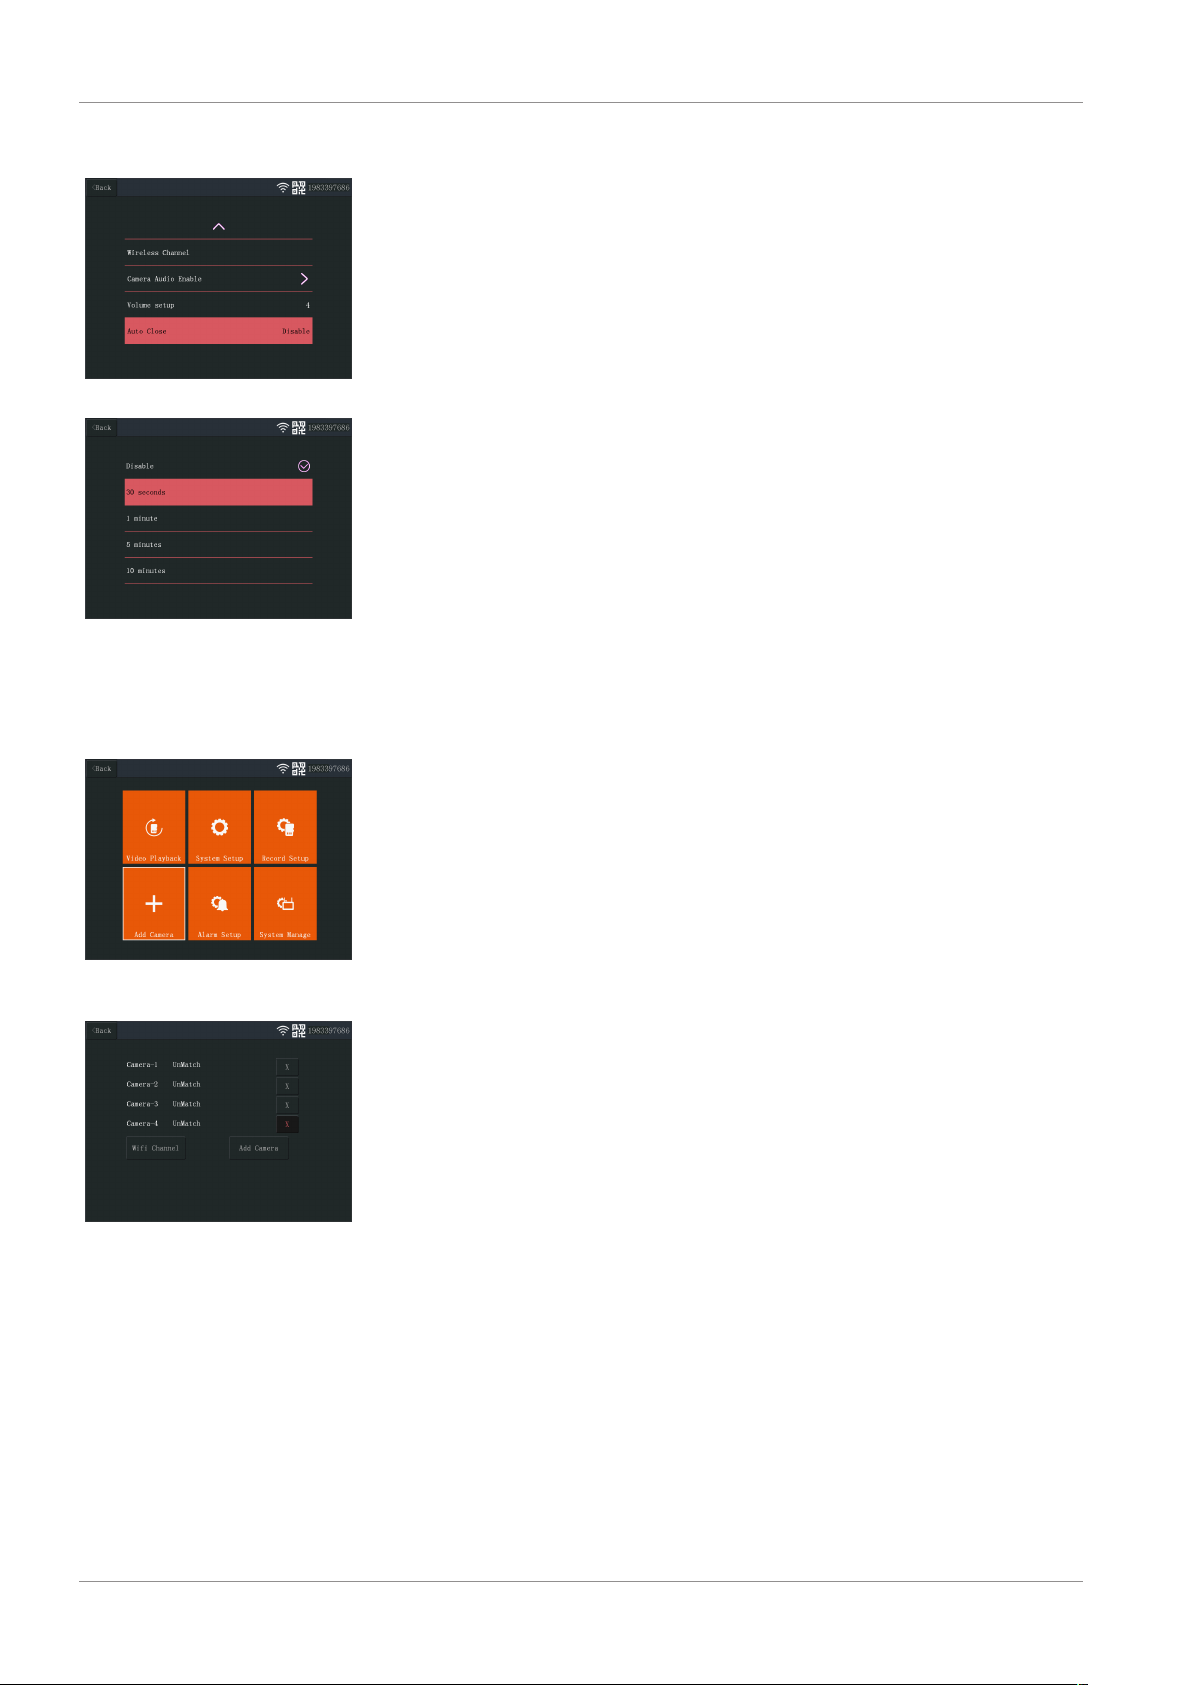
6.6.2 Factory Setting
This menu allows the user to restore the factory settings at two levels.
– “Simple Restore” will reset all settings except your paired cameras and Wifi set-
tings.
– “Restore All” will reset all settings including your paired cameras and Wifi settings.
– To restore your system, do the procedure below.
a) From the main menu: Select “System Manage”.
b) Select “Factory Setting”.
c) Select “Simple Restore” or “Restore All”.
6.6.3 Upgrade
The “Upgrade” menu allows the user to update the monitor firmware using a MicroSD
card. This is not recommended and is mainly used when required by support.
6.6.4 IPC Upgrade
The “IPC Upgrade” menu allows the user to update the camera firmware using a MicroSD card. This is not recommended and is mainly used when required by support.
CMS-30100_IM 17
Page 18

7 | Setting up the mobile app
7 Setting up the mobile app
The system supports the mobile app “SW360”. The app can be used as an additional
monitor on your mobile device. To set up the mobile app, do the procedure below.
a) Connect the monitor to a wifi network. (See section “Wireless Internet”.)
b) Connect your mobile device to the same network.
c) Download the “SW360” app.
d) Open the app, register as a new user and follow the instructions given in the app.
e) Log in to the app.
f) Select the (+) icon to add a new device.
g) Select the monitor in the device list.
h) Select the device that appears in the list (normally a 10 digit number).
Note: Your device should now be added. To learn more about SW360, see the app
manual.
18 CMS-30100_IM
Page 19

Declaration of Conformity | 8
8 Declaration of Conformity
Hereby, Smartwares Europe declares that the radio equipment type CMS-30100 is in
compliance with Directive 2014/53/EU
The full text of the EU declaration of conformity is available at the following internet
address: www.smartwares.eu/doc
CMS-30100_IM 19
Page 20

Inhoudsopgave
Inhoudsopgave
1 Veiligheid ............................................................................................................................................................. 21
1.1 Veilige installatie................................................................................................................................................... 21
1.2 Veilig gebruik ........................................................................................................................................................ 21
2 Beschrijving van onderdelen................................................................................................................................. 22
3 Installatie ............................................................................................................................................................. 23
3.1 De monitor installeren.......................................................................................................................................... 23
3.1.1 Montage................................................................................................................................................... 23
3.1.2 Bedrading ................................................................................................................................................. 23
3.1.3 De MicroSD-kaart plaatsen (niet meegeleverd)....................................................................................... 23
3.2 De camera installeren........................................................................................................................................... 23
3.2.1 Montage................................................................................................................................................... 23
3.2.2 Bedrading ................................................................................................................................................. 24
4 On-screen menu ................................................................................................................................................... 25
5 Uw apparaat configureren.................................................................................................................................... 26
5.1 Een camera toevoegen ......................................................................................................................................... 26
5.2 Wifikanaal selecteren (indien vereist) .................................................................................................................. 26
6 Systeembediening ................................................................................................................................................ 27
6.1 Videoweergave ..................................................................................................................................................... 27
6.2 Systeeminstellingen.............................................................................................................................................. 28
6.2.1 Taal........................................................................................................................................................... 28
6.2.2 Tijdconfiguratie ........................................................................................................................................ 28
6.2.3 Draadloos internet ................................................................................................................................... 29
6.2.4 Draadloos kanaal...................................................................................................................................... 29
6.2.5 Camera-audio inschakelen....................................................................................................................... 30
6.2.6 Volumeconfiguratie.................................................................................................................................. 30
6.2.7 Automatisch sluiten ................................................................................................................................. 31
6.3 Een camera toevoegen ......................................................................................................................................... 31
6.4 Opnameconfiguratie............................................................................................................................................. 31
6.4.1 Opnameschema ....................................................................................................................................... 32
6.5 Alarmconfiguratie ................................................................................................................................................. 32
6.6 Systeem beheren .................................................................................................................................................. 33
6.6.1 Systeeminfo.............................................................................................................................................. 33
6.6.2 Fabrieksinstellingen ................................................................................................................................. 33
6.6.3 Upgrade.................................................................................................................................................... 33
6.6.4 IPC-upgrade.............................................................................................................................................. 34
7 De mobiele app configureren................................................................................................................................ 35
8 Conformiteitsverklaring........................................................................................................................................ 36
xx CMS-30100_IM
Page 21

1 Veiligheid
1. Lees deze instructies zorgvuldig door voordat u het product installeert en gebruikt.
2. Knip de voedingskabel niet door om deze te verlengen. Het apparaat (de transformator) werkt niet met een langere kabel. Sluit het apparaat pas aan op de voeding
nadat alle bedrading is voltooid.
1.1 Veilige installatie
1. Houd kinderen en omstanders uit de buurt tijdens de installatie van de producten.
Als u wordt afgeleid, kunt u de controle verliezen.
2. Zorg dat u bij de installatie van dit product overal goed bij kunt en niet hoeft te reiken. Zorg ervoor dat u stabiel staat en dat u uw evenwicht niet verliest. Zo kunt u
de controle beter bewaren in onverwachte situaties.
3. Dit product is geen speelgoed. Bevestig het buiten het bereik van kinderen.
1.2 Veilig gebruik
Veiligheid | 1
1. Bedien elektrisch aangedreven producten niet in explosiegevaarlijke omgevingen,
zoals in de nabijheid van brandbare vloeistoffen, gassen of stof. Elektrisch aangedreven producten produceren vonken, die stof of dampen tot ontbranding kunnen
brengen.
2. De waarschuwingen, voorzorgsmaatregelen en instructies in deze gebruiksaanwijzing kunnen niet alle mogelijke omstandigheden en situaties dekken die zich kunnen voordoen. Het moet de bediener duidelijk zijn dat gezond verstand en behoedzaamheid factoren zijn die niet in dit product kunnen worden ingebouwd en
de verantwoordelijkheid van de bediener zijn.
3. Stel de stroomadapter van dit product niet bloot aan regen of natte omstandigheden. Water dat in de stroomadapter komt, vergroot het risico op elektrische
schokken.
4. Gebruik het netsnoer niet op een verkeerde manier. Trek de stekker nooit aan het
snoer uit het stopcontact. Houd het snoer uit de buurt van hitte, olie, scherpe randen of bewegende delen. Beschadigde snoeren of snoeren die in de war zijn geraakt, vergroten het risico op elektrische schokken.
5. De adapter moet geschikt zijn voor het stopcontact. De stekker mag op geen enkele wijze worden aangepast. Ongewijzigde stekkers en geschikte stopcontacten verkleinen het risico op elektrische schokken.
CMS-30100_IM 21
Page 22

2 | Beschrijving van onderdelen
2 Beschrijving van onderdelen
Camera
1. Antenne
2. Ledlamp
3. Lens
4. Dag-/nachtsensor
5. Microfoon
6. Luidspreker
Monitor
1. Antenne
2. Touchscreen
3. Microfoon
4. Led-batterij-indicator
5. Led-opname-indicator
6. USB-sleuf
7. MicroSD-sleuf
8. Aan/uit-schakelaar voor batterijgebruik
9. AC-adapteringang
10. Standaard
22 CMS-30100_IM
Page 23

3 Installatie
Voordat u de vaste installatie uitvoert, wordt het aanbevolen het volgende in overweging te nemen:
Verbind alle elementen met elkaar om uzelf bekend te maken met de apparaten.
Controleer de draadloze dekking op de gewenste montagelocaties door de apparaten
tijdelijk te plaatsen.
3.1 De monitor installeren
3.1.1 Montage
De monitor is ontworpen om op een tafel of ander vlak oppervlak te worden gezet.
a) Trek de standaard aan de achterkant van de monitor uit.
b) Zet de twee antennes aan de achterkant van de monitor recht overeind.
c) Zet de monitor op een vlak oppervlak.
Installatie | 3
3.1.2 Bedrading
De monitor is draagbaar en kan op accuvoeding, op netspanning of beide worden gebruikt. Als de AC-adapter is aangesloten, wordt de accu opgeladen tot deze vol is en
werkt de monitor op de AC-adapter.
Batterijen moeten afzonderlijk worden aangeschaft.
Type batterij: 18650
3.1.3 De MicroSD-kaart plaatsen (niet meegeleverd)
Voor het opnemen van video is een MicroSD-kaart vereist.
a) Zoek de MicroSD-kaartsleuf aan de rechterzijde van de monitor.
b) Plaats de MicroSD-kaart (deze past alleen in de juiste richting).
c) Een Class 10 MicroSD-kaart met een maximale opslagcapaciteit van 128GB wordt
aanbevolen.
3.2 De camera installeren
3.2.1 Montage
De camera kan in elke gewenste richting worden gemonteerd, en op elk oppervlak dat
het gewicht van de camera kan dragen. De camera moet in de buurt van een voedingspunt worden gemonteerd. Als dit niet het geval is, is een verlengsnoer mogelijk vereist.
Voor de montage van de camera hebt u het volgende gereedschap nodig:
ü Een geschikte schroevendraaier voor de meegeleverde schroeven
ü Een boor en een geschikte boorbit voor de meegeleverde pluggen
a) Plaats de camera op de gewenste locatie.
CMS-30100_IM 23
Page 24

3 | Installatie
b) Markeer de posities van de schroeven met een pen.
c) Boor de gaten.
d) Plaats de pluggen.
e) Boor een gat dat groot genoeg is voor de kabels.
f) Trek de vereiste kabels door het gat.
g) Monteer de meegeleverde antenne op de camera.
h) Zet de camera vast door de schroeven aan te draaien.
Als u de kabels langs de buitenzijde van de muur wilt leiden, is een weerbestendige
verbindingsdoos vereist.
3.2.2 Bedrading
De camera werkt draadloos. Hij hoeft alleen aangesloten te zijn op de voeding.
Aandachtspunten bij de bedrading van de camera:
– De kabelverbindingen moeten zich binnen bevinden, of in een weerbestendige
verbindingsdoos buiten.
– Het gat moet worden opgevuld met vulmiddel om te voorkomen dat er water kan
binnendringen.
– Het wordt aanbevolen alle kabels door het gat te trekken. De resetknop kan buiten
worden gelaten, maar dit wordt niet aanbevolen.
24 CMS-30100_IM
Page 25

1: On-screen menu
On-screen menu | 4
4 On-screen menu
Het on-screen menu wordt weergegeven als u op de videofeed tikt.
Knop Beschrijving
Microfoon Ingedrukt houden om communicatie met de momenteel bekeken
camera mogelijk te maken. (Zorg ervoor dat de cameramicrofoon
is ingeschakeld. Raadpleeg de sectie 'Camera-audio inschakelen'.)
Dempen Selecteren om de monitorluidsprekers te dempen/in te schake-
len
Hoofdmenu Selecteren om het hoofdmenu te openen
Zoom Selecteren om in of uit te zoomen op de videofeed.
Eén keer tikken om de zoommodus te selecteren.
Opnieuw op het beeld tikken om te zoomen.
Pictogram (-) selecteren om de zoommodus af te sluiten.
Weergave Selecteren om het weergavemenu te openen
Hier kunt u opnamen bekijken.
CMS-30100_IM 25
Page 26
5 | Uw apparaat configureren
5 Uw apparaat configureren
5.1 Een camera toevoegen
2: Hoofdmenu - Camera toevoegen
3: Camera toevoegen
U kunt maximaal 4 camera's koppelen met de monitor. Ga als volgt te werk om een camera toe te voegen:
a) Schakel de camera in door deze op de voeding aan te sluiten.
b) Wacht 30seconden.
c) U hoort nu het volgende: 'Start configuration mode' (Configuratiemodus starten).
ð OPMERKING: Als u de stem niet hoort, houdt u de resetknop op de camera
6seconden ingedrukt tot u 'Restore factory setting' (Fabrieksinstellingen herstellen) hoort.
d) Op de monitor, vanuit het hoofdmenu: Selecteer 'Add Camera' (Camera toevoe-
gen).
e) Selecteer 'Add Camera' (Camera toevoegen). (Dit moet u binnen x minuten na het
opnieuw instellen van de camera doen.)
f) Op de camera: Als de bovenstaande stappen correct zijn uitgevoerd, hoort u het
volgende:
- 'Wireless settings, please wait' (Draadloze instellingen, een ogenblik geduld)
- 'Wireless connection successful' (Draadloze verbinding tot stand gebracht)
g) Op de monitor: Wacht tot de koppeling is voltooid.
4: Wifikanaal
5: Wifikanaal selecteren
5.2 Wifikanaal selecteren (indien vereist)
Als er te veel wifinetwerken in uw omgeving zijn en de ontvangst slecht is, gaat u als
volgt te werk om het wifikanaal te wijzigen:
a) Vanuit het hoofdmenu: Selecteer 'Add Camera' (Camera toevoegen).
b) Selecteer 'Wifi Channel' (Wifikanaal)
c) Selecteer 'Wifi Channel' (Wifikanaal)
d) Selecteer een kanaal in de lijst. (Probeer verschillende kanalen uit als het pro-
bleem zich blijft voordoen.)
26 CMS-30100_IM
Page 27
6.1 Videoweergave
6: Pictogram voor videoweergave
Systeembediening | 6
6 Systeembediening
De video-opname wordt op de monitor gestart op basis van de instellingen in 'Record
Setup' (Opnameconfiguratie). Als u de opnamen wilt bekijken, gaat u als volgt te werk:
a) Vanuit het hoofdmenu: Selecteer 'Video Playback' (Videoweergave).
b) Selecteer de cameramap (1-4) waaruit u opnamen wilt bekijken (er is ondersteu-
ning voor maximaal 4 camera's).
c) Selecteer de map met de gewenste datum.
d) Selecteer de map met de gewenste tijd.
e) Selecteer het gewenste bestand om de opname te bekijken.
7: Hoofdmap
8: Datummap
9: Tijdmap
CMS-30100_IM 27
Page 28
6 | Systeembediening
10: Bestandsmap
6.2 Systeeminstellingen
6.2.1 Taal
Er worden verschillende talen ondersteund op de monitor. In 'System Setup' (Systeem
instellingen) kunt u een keuze maken.
a) Vanuit het hoofdmenu: Selecteer 'System Setup' (Systeem instellingen).
b) Selecteer 'Language' (Taal).
c) Selecteer de gewenste taal in de lijst.
11: Systeeminstellingen - Taal
12: Taalselectie
6.2.2 Tijdconfiguratie
13: Tijdconfiguratie selecteren
De datum en tijd kunnen handmatig of door synchronisatie met internet worden ingesteld.
a) Vanuit het hoofdmenu: Selecteer 'System Setup' (Systeem instellingen).
b) Selecteer 'Time Setup' (Tijdconfiguratie).
c) Kies of u de tijd automatisch wilt synchroniseren. (Voor automatische synchronisa-
tie moet de monitor verbonden zijn met internet.) Raadpleeg de sectie 'Draadloos
internet'.
d) Selecteer een tijdzone. (Dit moet altijd worden gedaan, ook als u kiest voor auto-
matische tijdsynchronisatie.)
e) Selecteer 'Time Setup' (Tijdconfiguratie) als u de tijd en datum handmatig wilt con-
figureren. (Deze optie is alleen beschikbaar als 'Sync Time' (Tijd synchroniseren) is
uitgeschakeld).
14: Tijdconfiguratie
28 CMS-30100_IM
Page 29
15: Datum- en tijdconfiguratie
(handmatig)
6.2.3 Draadloos internet
Systeembediening | 6
Ga als volgt te werk om de draadloze internetverbinding in te schakelen. Dit is optioneel, maar maakt het mogelijk de volgende functies te gebruiken:
– App-connectiviteit
– Tijd- en datumsynchronisatie
a) Zorg ervoor dat u beschikt over een wifirouter die is verbonden met internet, en
dat u uw wachtwoord en routernaam (SSID) weet.
b) Vanuit het hoofdmenu: Selecteer 'System Setup' (Systeem instellingen).
c) Selecteer 'Wireless Internet' (Draadloos internet).
d) Schakel WLAN in.
e) Selecteer 'Hotspot list' (Hotspot lijst).
f) Zoek en selecteer uw draadloze router.
g) Typ uw wachtwoord.
ð OPMERKING: Het apparaat biedt alleen ondersteuning voor 2,4Ghz-wifinet-
werken.
h) Download de app SW360.
i) Open de app, registreer u als een nieuwe gebruiker en volg de instructies uit de
app.
6.2.4 Draadloos kanaal
In sommige gevallen kan het draadloze signaal worden geblokkeerd door andere
draadloze netwerken op hetzelfde kanaal. Als uw bereik lager dan verwacht is, kunt u
dit mogelijk verhelpen door het kanaal te wijzigen.
a) Vanuit het hoofdmenu: Selecteer 'System Setup' (Systeem instellingen).
b) Selecteer 'Wireless Channel' (Draadloos kanaal).
c) Selecteer 'Wifi Channel' (Wifikanaal).
d) Selecteer een nieuw kanaal. (De wifirouter is meestal zo ingesteld dat het kanaal
16: Draadloos kanaal selecteren
17: Wifikanaal
CMS-30100_IM 29
automatisch wordt gedetecteerd. Als dit niet het geval is, moet het kanaal ook
handmatig worden gewijzigd op de router.)
Page 30

6 | Systeembediening
18: Kanalenlijst
6.2.5 Camera-audio inschakelen
19: Camera-audio inschakelen
In dit menu kunt u de cameramicrofoon in- en uitschakelen. Het is belangrijk te beseffen dat 2-wegscommunicatie met de camera niet meer mogelijk is als de camera is uitgeschakeld.
a) Vanuit het hoofdmenu: Selecteer 'System Setup' (Systeem instellingen).
b) Selecteer 'Camera Audio Enable' (Camera-audio inschakelen).
c) Selecteer de relevante camera en zet de schuifregelaar op de aan- of uit-positie.
20: Camera-audio inschakelen/uitschakelen
6.2.6 Volumeconfiguratie
21: Volumeconfiguratie
22: Het volume aanpassen
Via de volumeconfiguratie kunt u het volume van de monitor verhogen of verlagen.
a) Vanuit het hoofdmenu: Selecteer 'System Setup' (Systeem instellingen).
b) Selecteer 'Volume Setup' (Volumeconfiguratie).
c) Stel het volume in door een volumewaarde te selecteren (0-4). Als u de waarde in-
stelt op 0, worden de monitorluidsprekers volledig gedempt.
30 CMS-30100_IM
Page 31

6.2.7 Automatisch sluiten
23: Automatisch sluiten
24: Duur voor automatisch sluiten
(time-out)
Systeembediening | 6
Met de functie voor automatisch sluiten kunt u de time-out voor het scherm in- of uitschakelen. Als de functie voor automatisch sluiten is ingeschakeld, wordt het monitorscherm na een bepaalde tijd uitgeschakeld. Het systeem zelf blijft wel normaal werken.
a) Vanuit het hoofdmenu: Selecteer 'System Setup' (Systeem instellingen).
b) Selecteer 'Auto Close' (Automatisch sluiten).
c) Selecteer een duur voor de time-out (deze duur begint na de laatste interactie met
de monitor).
Opmerking: Als de monitor op batterijen werkt, wordt het aanbevolen een korte duur
voor de time-out in te stellen om stroom te besparen.
6.3 Een camera toevoegen
25: Hoofdmenu - Camera toevoegen
26: Camera toevoegen
U kunt maximaal 4 camera's koppelen met de monitor. Ga als volgt te werk om een camera toe te voegen:
a) Schakel de camera in door deze op de voeding aan te sluiten.
b) Wacht 30seconden.
c) U hoort nu het volgende: 'Start configuration mode' (Configuratiemodus starten).
ð OPMERKING: Als u de stem niet hoort, houdt u de resetknop op de camera
6seconden ingedrukt tot u 'Restore factory setting' (Fabrieksinstellingen herstellen) hoort.
d) Op de monitor, vanuit het hoofdmenu: Selecteer 'Add Camera' (Camera toevoe-
gen).
e) Selecteer 'Add Camera' (Camera toevoegen). (Dit moet u binnen x minuten na het
opnieuw instellen van de camera doen.)
f) Op de camera: Als de bovenstaande stappen correct zijn uitgevoerd, hoort u het
volgende:
- 'Wireless settings, please wait' (Draadloze instellingen, een ogenblik geduld)
- 'Wireless connection successful' (Draadloze verbinding tot stand gebracht)
g) Op de monitor: Wacht tot de koppeling is voltooid.
6.4 Opnameconfiguratie
Op het systeem kunnen video-opnamen in verschillende modi worden geconfigureerd.
Er is ondersteuning voor 4 afzonderlijke schema's. Voor elk schema kan een andere
modus worden ingesteld, met 1 of meer geïnstalleerde camera's. Raadpleeg de sectie
'Opnameschema'.
Ga als volgt te werk om de instellingen voor opnameconfiguratie te wijzigen.
a) Vanuit het hoofdmenu: Selecteer 'Record Setup' (Opnameconfiguratie).
CMS-30100_IM 31
Page 32
6 | Systeembediening
27: Opnameschema
b) Selecteer een opslagapparaat. (Dit is alleen van toepassing als u een MicroSD-kaart
hebt geplaatst.)
c) Selecteer 'Storage Manage' (Opslag beheren) om het huidige opslaggebruik te be-
kijken en de MicroSD-kaart te formatteren.
d) Selecteer 'Overwrite' (Overschrijven) om in of uit te schakelen dat oudere opna-
men op de monitor worden overschreven als er geen opslagruimte meer beschikbaar is.
6.4.1 Opnameschema
Ga als volgt te werk om een opnameschema te maken.
a) Vanuit het hoofdmenu: Selecteer 'Record Setup' (Opnameconfiguratie).
b) Selecteer 'Record Schedule' (Opnameschema).
c) Selecteer schema 1-4.
d) Schakel het geselecteerde schema in door de schuifregelaar te verplaatsen (de re-
gelaar wordt groen als deze is ingeschakeld).
e) Selecteer 'channel' (cameras) (kanalen (camera's)).
f) Selecteer de kanalen (camera's) waarvandaan u wilt opnemen.
g) Selecteer 'Weekday' (Weekdag).
h) Selecteer in de lijst de dagen waarop u wilt opnemen.
i) Selecteer 'Time' (Tijd) om het tijdsbestek in te voegen waarop u wilt opnemen.
Opmerking: Voor 'Type' is slechts één optie beschikbaar ('Enable motion alarm' (Bewegingsalarm inschakelen)); deze optie is standaard ingeschakeld.
28: Schema 1-4
29: Schema-instellingen
30: Alarmconfiguratie - kanalen
6.5 Alarmconfiguratie
De monitor heeft een alarmfunctie die kan worden geactiveerd als beweging wordt gedetecteerd. Ga als volg te werk om het alarm in te stellen.
a) Vanuit het hoofdmenu: Selecteer 'Alarm Setup' (Alarmconfiguratie).
b) Selecteer 'Alarm volume setup' (Alarmvolumeconfiguratie).
c) Stel het gewenste alarmvolume in. (Het alarmvolume overschrijft alle andere ge-
luidsinstellingen als het wordt geactiveerd.)
d) Selecteer de kanalen (camera's) die u wilt gebruiken om het alarm te activeren.
e) Schakel 'Enable Motion Alarm' (Bewegingsalarm inschakelen) in door de schuifre-
gelaar te verplaatsen (de regelaar wordt groen als deze is ingeschakeld).
32 CMS-30100_IM
Page 33
31: Alarmconfiguratie - kanaalinstellingen
32: Gebied bewerken
Systeembediening | 6
f) Als u alarmen wilt ontvangen op uw mobiele apparaat, schakelt u 'APP
Alarm' (App-alarm) in door de schuifregelaar te verplaatsen (de regelaar wordt
groen als deze is ingeschakeld). (Raadpleeg de sectie 'De mobiele app configureren').
g) Schakel 'Monitor Sound Alarm' (Geluidsalarm voor monitor) als u een hoorbaar
alarm wilt ontvangen vanaf de monitor.
h) Selecteer 'Sensitivity' (Gevoeligheid) om de gevoeligheid van de bewegingsdetec-
tor in te stellen.
i) Selecteer 'Area Edit' (Gebied bewerken) als u gebieden wilt maskeren waarvoor
het alarm niet wordt geactiveerd. (Dit is nuttig als er zich permanent bomen of
verkeer in het zichtveld van de camera bevinden.)
Opmerking: Het bewegingsalarm wordt niet geactiveerd voor oranje gemarkeerde gebieden.
33: Systeeminfo
34: Fabrieksinstellingen
6.6 Systeem beheren
6.6.1 Systeeminfo
In de systeeminfo vindt u informatie over de monitor. De informatie wordt voornamelijk gebruikt wanneer ondersteuning noodzakelijk is. Ga als volgt te werk om de systeeminfo te bekijken.
a) Vanuit het hoofdmenu: Selecteer 'System Manage' (Systeem beheren).
b) Selecteer 'System Info' (Systeeminfo).
6.6.2 Fabrieksinstellingen
In dit menu kunt u de fabrieksinstellingen op twee niveaus herstellen.
– Met 'Simple Restore' (Eenvoudig herstel) worden alle instellingen teruggezet, be-
halve de instellingen voor gekoppelde camera's en wifi.
– Met 'Restore All' (Alles herstellen) worden alle instellingen teruggezet, inclusief in-
stellingen voor gekoppelde camera's en wifi.
– Ga als volg te werk om het systeem te herstellen.
a) Vanuit het hoofdmenu: Selecteer 'System Manage' (Systeem beheren).
b) Selecteer 'Factory Setting' (Fabrieksinstellingen).
c) Selecteer 'Simple Restore' (Eenvoudig herstel) of 'Restore All' (Alles herstellen).
6.6.3 Upgrade
In het menu 'Upgrade' kunt u de monitorfirmware bijwerken met een MicroSD-kaart.
Dit wordt niet aanbevolen en wordt voornamelijk gebruikt wanneer dit door het ondersteuningsteam wordt gevraagd.
CMS-30100_IM 33
Page 34

6 | Systeembediening
6.6.4 IPC-upgrade
In het menu 'IPC Upgrade' (IPC-upgrade) kunt u de camerafirmware bijwerken met een
MicroSD-kaart. Dit wordt niet aanbevolen en wordt voornamelijk gebruikt wanneer dit
door het ondersteuningsteam wordt gevraagd.
34 CMS-30100_IM
Page 35

De mobiele app configureren | 7
7 De mobiele app configureren
Het systeem biedt ondersteuning voor de mobiele app SW360. U kunt deze app gebruiken als een extra monitor op uw mobiele apparaat. Ga als volg te werk om de mobiele app te configureren.
a) Sluit de monitor aan op een wifinetwerk. (Raadpleeg de sectie 'Draadloos inter-
net'.)
b) Verbind uw mobiele apparaat met hetzelfde netwerk.
c) Download de app SW360.
d) Open de app, registreer u als een nieuwe gebruiker en volg de instructies uit de
app.
e) Meld u aan in de app.
f) Selecteer het pictogram (+) om een nieuw apparaat toe te voegen.
g) Selecteer de monitor in de apparatenlijst.
h) Selecteer het apparaat dat in de lijst wordt weergegeven (dit is normaal gesproken
een 10-cijferig getal).
Opmerking: Uw apparaat moet nu zijn toegevoegd. Voor meer informatie over SW360
raadpleegt u de handleiding van de app.
CMS-30100_IM 35
Page 36

8 | Conformiteitsverklaring
8 Conformiteitsverklaring
Hierbij verklaart, Smartwares Europe dat het type radioapparatuur CMS-30100 conform is met Richtlijn 2014/53/EU.
De volledige tekst van de EU-conformiteitsverklaring kan worden geraadpleegd op het
volgende internetadres: www.smartwares.eu/doc
36 CMS-30100_IM
Page 37

Inhalt
Inhalt
1 Sicherheit ............................................................................................................................................................. 38
1.1 Sicherheit bei der Montage .................................................................................................................................. 38
1.2 Betriebssicherheit................................................................................................................................................. 38
2 Teilebeschreibung ................................................................................................................................................ 39
3 Montage............................................................................................................................................................... 40
3.1 Montage des Monitors ......................................................................................................................................... 40
3.1.1 Befestigung .............................................................................................................................................. 40
3.1.2 Verdrahtung ............................................................................................................................................. 40
3.1.3 Einsetzen einer MicroSD-Karte (nicht im Lieferumfang).......................................................................... 40
3.2 Montage der Kamera............................................................................................................................................ 40
3.2.1 Befestigung .............................................................................................................................................. 40
3.2.2 Verdrahtung ............................................................................................................................................. 41
4 Bildschirmmenü.................................................................................................................................................... 42
5 Einrichten Ihres Geräts ......................................................................................................................................... 43
5.1 Kamera hinzufügen............................................................................................................................................... 43
5.2 Wählen Sie den WLAN-Kanal (falls erforderlich) .................................................................................................. 43
6 Systembetrieb ...................................................................................................................................................... 44
6.1 Videowiedergabe.................................................................................................................................................. 44
6.2 Systemkonfiguration............................................................................................................................................. 45
6.2.1 Sprache..................................................................................................................................................... 45
6.2.2 Zeiteinstellung.......................................................................................................................................... 45
6.2.3 Kabelloses Internet .................................................................................................................................. 46
6.2.4 Drahtloses Setup ...................................................................................................................................... 46
6.2.5 Kamera-Audio aktivieren ......................................................................................................................... 47
6.2.6 Lautstärkeeinstellung............................................................................................................................... 47
6.2.7 Bildschirm-Standby .................................................................................................................................. 48
6.3 Kamera hinzufügen............................................................................................................................................... 48
6.4 Aufnahmeeinstellung............................................................................................................................................ 48
6.4.1 Aufnahmezeitplan.................................................................................................................................... 49
6.5 Alarmeinstellungen............................................................................................................................................... 49
6.6 Systemverwaltung ................................................................................................................................................ 50
6.6.1 Systeminformationen............................................................................................................................... 50
6.6.2 Werkseinstellung...................................................................................................................................... 50
6.6.3 Aktualisierung .......................................................................................................................................... 50
6.6.4 IPC Upgrade.............................................................................................................................................. 51
7 Einrichten der Mobil-App...................................................................................................................................... 52
8 Konformitätserklärung ......................................................................................................................................... 53
CMS-30100_IM xxxvii
Page 38

1 | Sicherheit
1 Sicherheit
1. Lesen Sie vor der Benutzung des Produkts bitte aufmerksam diese Betriebsanleitung.
2. Schneiden Sie das Netzkabel nicht durch, um es zu verlängern. Das Gerät (Transformator) funktioniert mit einem längeren Kabel nicht. Schließen Sie das Gerät erst
an, wenn die komplette Verdrahtung fertiggestellt ist.
1.1 Sicherheit bei der Montage
1. Halten Sie Kinder und Zuschauer fern, während Sie die Produkte montieren. Ablenkung kann dazu führen, dass Sie die Kontrolle verlieren.
2. Lehnen Sie sich bei der Montage dieses Produkts nicht zu weit hinaus. Achten Sie
jederzeit darauf, einen sicheren Stand zu haben und das Gleichgewicht zu behalten. So können Sie auf unerwartete Situationen besser reagieren.
3. Dieses Produkt ist kein Spielzeug. Montieren Sie es außerhalb der Reichweite von
Kindern.
1.2 Betriebssicherheit
1. Benutzen Sie elektrisch betriebene Produkte nicht in explosionsgefährdeten Bereichen (z.B. mit entflammbaren Flüssigkeiten, Gase oder brennbarem Staub). Elektrisch betriebene Produkte erzeugen Funken, die Staub oder Dämpfe entzünden
können.
2. Die in diesem Handbuch erwähnten Warnungen, Vorsichtsmaßnahmen und Anweisungen können nicht alle möglicherweise auftretenden Bedingungen und Situationen abdecken. Der Benutzer muss verstehen, dass gesunder Menschenverstand und Vorsicht Faktoren sind, die sich nicht in dieses Produkt integrieren lassen, sondern vom Benutzer beizusteuern sind.
3. Setzen Sie das Netzteil dieses Produktes weder Regen noch Feuchtigkeit aus. In
das Netzteil eindringendes Wasser erhöht die Gefahr eines Stromschlags.
4. Achten Sie auf die sachgemäße Benutzung des Netzkabels. Ziehen Sie nie am Netzkabel, um den Stecker aus der Steckdose zu ziehen. Schützen Sie das Netzkabel vor
Hitze, Öl, scharfen Kanten oder sich bewegenden Teilen. Beschädigte oder verhedderte Kabel erhöhen die Gefahr eines Stromschlags.
5. Das Netzteil muss für die Steckdose geeignet sein. Nehmen Sie keinesfalls Veränderungen am Stecker vor. Unveränderte Stecker und geeignete Steckdosen senken
die Gefahr eines Stromschlags.
38 CMS-30100_IM
Page 39

2 Teilebeschreibung
Kamera
1. Antenne
2. LED-Leuchtmittel
3. Objektiv
4. Tag/Nacht-Sensor
5. Mikrofon
6. Lautsprecher
Monitor
1. Antenne
2. Touchscreen
3. Mikrofon
4. LED-Batterieanzeige
5. LED-Aufnahmeanzeige
6. USB-Steckplatz
7. MicroSD-Steckplatz
8. Ein/Aus-Schalter für Batteriebetrieb
9. Netzteileingang
10. Ständer
Teilebeschreibung | 2
CMS-30100_IM 39
Page 40

3 | Montage
3 Montage
Vor der Endmontage sollten Sie Folgendes berücksichtigen:
Schließen Sie alles an, um sich den Komponenten vertraut zu machen.
Überprüfen Sie die Funkabdeckung am vorgesehenen Montageort, indem Sie die Kom-
ponenten provisorisch platzieren.
3.1 Montage des Monitors
3.1.1 Befestigung
Der Monitor kann auf einem Tisch oder einer ebenen Fläche abgestellt werden.
a) Klappen Sie dazu den Ständer auf der Rückseite des Monitors aus.
b) Bringen Sie die beiden Antennen auf der Rückseite des Monitors in eine aufrechte
Position.
c) Stellen Sie den Monitor auf einer ebenen Fläche auf.
3.1.2 Verdrahtung
Der Monitor ist tragbar und kann mittels Akku, Netzstrom oder beidem versorgt werden. Wenn das Netzteil angeschlossen ist, wird der Akku aufgeladen, bis er voll ist, und
das Modul dann direkt über das Netzteil versorgt.
Die Batterie muss separat bezogen werden.
Batterietyp: 18650
3.1.3 Einsetzen einer MicroSD-Karte (nicht im Lieferumfang)
Für Videoaufzeichnungen ist eine MicroSD-Karte erforderlich.
a) Setzen Sie eine MicroSD-Karte in den Steckplatz rechts am Monitor ein.
b) Einsetzen der MicroSD-Karte (passt nur in der korrekten Position).
c) Es sollte eine MicroSD-Karte der Klasse 10 mit maximal 128GB verwendet werden.
3.2 Montage der Kamera
3.2.1 Befestigung
Die Kamera kann in jeder Ausrichtung und auf jedem Untergrund montiert werden, der
ihr Gewicht tragen kann. Die Kamera muss in der Nähe eines Netzanschlusses montiert
werden; andernfalls kann ein Verlängerungskabel erforderlich sein.
Um die Kamera anzubringen, brauchen Sie folgende Werkzeuge:
ü Einen geeigneten Schraubendreher für die beiliegenden Schrauben.
ü Eine Bohrmaschine mit geeignetem Bohrer für die beiliegenden Dübel.
a) Platzieren Sie die Kamera wie gewünscht
40 CMS-30100_IM
Page 41

b) Markieren Sie mit einem Stift die Schraubenpositionen.
c) Bohren Sie die erforderlichen Löcher.
d) Setzen Sie die Dübel ein.
e) Bohren Sie ein ausreichend großes Loch, um die Kabel durchzuführen.
f) Ziehen Sie die erforderlichen Kabel durch die Kabeldurchführung.
g) Bringen Sie die beiliegende Antenne an der Kamera an.
h) Befestigen Sie die Kamera mit Hilfe der Schrauben.
Falls die Kabel auf der Wand verlegt werden sollen, ist eine wetterfeste Anschlussdose
erforderlich.
3.2.2 Verdrahtung
Die Kamera funktioniert kabellos und braucht nur einen Elektroanschluss.
Wichtig beim Verdrahten der Kamera:
– Der Kabelanschluss muss im Innenbereich oder in einer wetterfesten, im Außenbe-
reich angebrachten Anschlussdose vorgenommen werden.
– Das Loch muss versiegelt werden, damit kein Wasser eindringen kann.
– Es wird empfohlen, alle Kabel durch das Loch zu führen. Die Reset-Taste kann au-
ßen verbleiben, obwohl das nicht empfohlen wird.
Montage | 3
CMS-30100_IM 41
Page 42

4 | Bildschirmmenü
Abb.1: Bildschirmmenü
4 Bildschirmmenü
Das Bildschirmmenü erscheint, wenn Sie die Videoaufzeichnung antippen.
Taste Beschreibung
Mikrofon Gedrückt halten, um mit der aktuell angezeigten Kamera zu kom-
munizieren. (Achten Sie darauf, dass das Kameramikrofon einge-
schaltet ist (siehe Abschnitt „Kamera-Audio aktivieren“.)
Stumm Dient zum Deaktivieren/Aktivieren der Monitorlautsprecher
Hauptmenü Dient zum Aufrufen des Hauptmenüs
Zoom Dient zum Einzoomen der Videoaufzeichnung.
Tippen Sie einmal, um den Zoommodus zu wählen.
Zippen Sie erneut, um das Bild einzuzoomen.
Wählen Sie das Symbol (-), um den Zoommodus wieder zu verlas-
sen.
Wiedergabe Dient zum Aufrufen des Wiedergabemenüs.
So können Sie sich Ihre Aufzeichnungen ansehen.
42 CMS-30100_IM
Page 43
5.1 Kamera hinzufügen
Abb.2: Hauptmenü - „Kamera hinzufügen“
Abb.3: Kamera hinzufügen
Einrichten Ihres Geräts | 5
5 Einrichten Ihres Geräts
Der Monitor kann mit bis zu 4 Kameras synchronisiert werden. Um eine Kamera hinzuzufügen, verfahren Sie wie folgt:
a) Schalten Sie die Kamera ein, indem Sie sie an der Spannungsversorgung anschlie-
ßen.
b) Warten Sie 30Sekunden.
c) Sie hören Folgendes: „Start configuration mode“ (Konfigurationsmodus starten).
ð HINWEIS: Falls Sie keine Ansage hören, drücken Sie die Reset-Taste an der Ka-
mera 6Sekunden lang, bis Sie Folgendes hören: „Werkseinstellungen wieder-
herstellen“.
d) Im Hauptmenü des Monitors: Wählen Sie „Kamera hinzufügen“.
e) Wählen Sie „Kamera hinzufügen“. (Dies muss innerhalb von xMinuten nach dem
Zurücksetzen der Kamera geschehen.)
f) An der Kamera: Bei korrekter Ausführung der Schritte oben hören Sie Folgendes:
- „Wireless settings, please wait“ (Funkeinstellungen. Bitte warten)
- „Wireless connection successful“ (Funkverbindung erfolgreich)
g) Am Monitor: Warten Sie, bis die Synchronisierung abgeschlossen ist.
Abb.4: WLAN-Kanal
Abb.5: WLAN-Kanal wählen
5.2 Wählen Sie den WLAN-Kanal (falls erforderlich)
Falls es viele WLAN-Netzwerke in Ihrer Umgebung gibt und der Empfang schlecht ist,
können Sie den WLAN-Kanal wie folgt wechseln:
a) Im Hauptmenü: Wählen Sie „Kamera hinzufügen“.
b) Wählen Sie „WLAN-Kanal“.
c) Wählen Sie „WLAN-Kanal“.
d) Wählen Sie einen Kanal in der Liste. (Probieren Sie verschiedene Kanäle aus, falls
das Empfangsproblem fortbesteht.)
CMS-30100_IM 43
Page 44

6 | Systembetrieb
6.1 Videowiedergabe
Abb.6: Videowiedergabesymbol
6 Systembetrieb
Der Monitor startet die Videoaufzeichnung entsprechend den Einstellungen in „Aufnahmeeinstellungen“. Um sich die Aufzeichnungen anzusehen, verfahren Sie wie folgt:
a) Im Hauptmenü: Wählen Sie „Videowiedergabe“.
b) Wählen Sie den Kameraordner (1-4) mit den gewünschten Aufzeichnungen. (Bis zu
4Kameras werden unterstützt).
c) Wählen Sie den Ordner mit dem gewünschten Datum.
d) Wählen Sie den Ordner mit der gewünschten Zeit.
e) Wählen Sie die gewünschte Datei, um sich die Aufzeichnung anzusehen.
Abb.7: Hauptverzeichnis
Abb.8: Datenverzeichnis
Abb.9: Zeitverzeichnis
44 CMS-30100_IM
Page 45

Abb.10: Dateiverzeichnis
Systembetrieb | 6
6.2 Systemkonfiguration
6.2.1 Sprache
Der Monitor unterstützt mehrere Sprachen, die Sie unter „Systemkonfiguration" auswählen können.
a) Im Hauptmenü: Wählen Sie „Systemkonfiguration".
b) Wählen Sie „Sprache“.
c) Wählen Sie in der Liste die gewünschte Sprache.
Abb.11: Systemsprache
Abb.12: Sprachauswahl
6.2.2 Zeiteinstellung
Abb.13: Zeiteinstellung wählen
Datum und Uhrzeit können manuell oder per Synchronisierung mit dem Internet eingestellt werden.
a) Im Hauptmenü: Wählen Sie „Systemkonfiguration".
b) Wählen Sie „Zeiteinstellung“.
c) Wählen Sie, ob die Uhrzeit automatisch eingestellt werden soll oder nicht. (Für die
automatische Synchronisierung muss der Monitor eine Internetverbindung haben.) Siehe Abschnitt „Kabelloses Internet".
d) Zeitzone wählen (Dies muss vorgenommen werden, auch wenn die Uhrzeit auto-
matisch synchronisiert wird.)
e) Wählen Sie „Zeiteinstellung“, falls Sie Uhrzeit und Datum manuell einstellen wol-
len. (Diese Option ist nur verfügbar, wenn „Synchronisierungszeit“ ausgeschaltet
ist.
Abb.14: Zeiteinstellung
CMS-30100_IM 45
Page 46

6 | Systembetrieb
Abb.15: Datum-/Zeiteinstellung
(manuell)
6.2.3 Kabelloses Internet
Verfahren Sie wie folgt, um die kabellose Internetverbindung zu aktivieren. Diese Funktion ist optional, ermöglicht jedoch die Nutzung folgender Features:
– App-Konnektivität
– Uhrzeit- und Datumssynchronisierung
a) Achten Sie darauf, dass Sie einen mit dem Internet verbundenen WLAN-Router, Ihr
Passwort und den Routernamen (SSID) zur Hand haben.
b) Im Hauptmenü: Wählen Sie „Systemkonfiguration".
c) Wählen Sie „Kabelloses Internet".
d) Aktivieren Sie „WLAN“.
e) Wählen Sie „Hotspot-Liste“.
f) Suchen Sie Ihren WLAN-Router und wählen Sie ihn aus.
g) Geben Sie Ihr Passwort ein.
ð HINWEIS: Es werden nur 2,4-GHz-Netzwerke unterstützt.
h) Laden Sie sich die App „SW360“ herunter.
i) Öffnen Sie die App, melden Sie sich als neuer Benutzer an und befolgen Sie die
Anweisungen in der App.
6.2.4 Drahtloses Setup
Abb.16: Auswahl von „Drahtloses
Setup“
Abb.17: WLAN-Kanal
Unter Umständen kann die Reichweite des Funksignals durch andere Funknetzwerke
beeinträchtigt werden, die denselben Kanal belegen. Sollte die Reichweite daher eingeschränkt sein, kann ein Kanalwechsel Abhilfe schaffen.
a) Im Hauptmenü: Wählen Sie „Systemkonfiguration".
b) Wählen Sie „Drahtloses Setup“.
c) Wählen Sie „WLAN-Kanal“.
d) Wählen Sie einen neuen Kanal. (Der WLAN-Router ist normalerweise so einge-
stellt, dass er den Kanal automatisch erkennt. Andernfalls muss auch der Kanal
manuell am Router geändert werden.)
46 CMS-30100_IM
Page 47

Abb.18: Kanalliste
6.2.5 Kamera-Audio aktivieren
Abb.19: Kamera-Audio aktivieren
Systembetrieb | 6
In diesem Menü können Sie das Kameramikrofon ein- und ausschalten. Wichtig: Wenn
das Kameramikrofon deaktiviert ist, ist eine 2-Wege-Kommunikation mit der Kamera
nicht mehr möglich.
a) Im Hauptmenü: Wählen Sie „Systemkonfiguration".
b) Wählen Sie „Kamera-Audio aktivieren“.
c) Wählen Sie die entsprechende Kamera und schieben Sie den Regler in die Stellung
„Ein“ oder „Aus“.
Abb.20: Kamera-Audio aktivieren/
deaktivieren
6.2.6 Lautstärkeeinstellung
Abb.21: Lautstärkeeinstellung
Abb.22: Lautstärke ändern
Mit dieser Einstellung können Sie die Lautstärke des Monitors erhöhen oder verringern.
a) Im Hauptmenü: Wählen Sie „Systemkonfiguration".
b) Wählen Sie „Lautstärkeeinstellung“.
c) Stellen Sie die Lautstärke durch Auswahl eines der vier Lautstärkewerte (0-4) ein.
In der Einstellung „0“ sind die Monitorlautsprecher stummgeschaltet.
CMS-30100_IM 47
Page 48
6 | Systembetrieb
6.2.7 Bildschirm-Standby
Abb.23: Bildschirm-Standby
Abb.24: Bildschirm-Standby-Dauer
(Zeitüberschreitung)
Mit der Funktion „Bildschirm-Standby“ wird die Bildschirmabschaltung aktiviert oder
deaktiviert. Bei aktivierter Bildschirm-Standby-Funktion schaltet sich der Monitorbildschirm nach einer bestimmten Zeit ab, während sich das System im Normalbetrieb befindet.
a) Im Hauptmenü: Wählen Sie „Systemkonfiguration".
b) Wählen Sie „Bildschirm-Standby“.
c) Wählen Sie die Dauer, nach der sich der Monitor abschalten soll (die Zeitdauer be-
ginnt nach der letzten Interaktion mit dem Monitor).
Hinweis: Falls der Monitor im Batteriebetrieb läuft, sollten eine kurze Zeitdauer gewählt werden, um Energie zu sparen.
6.3 Kamera hinzufügen
Abb.25: Hauptmenü - „Kamera hinzufügen“
Abb.26: Kamera hinzufügen
Der Monitor kann mit bis zu 4 Kameras synchronisiert werden. Um eine Kamera hinzuzufügen, verfahren Sie wie folgt:
a) Schalten Sie die Kamera ein, indem Sie sie an der Spannungsversorgung anschlie-
ßen.
b) Warten Sie 30Sekunden.
c) Sie hören Folgendes: „Start configuration mode“ (Konfigurationsmodus starten).
ð HINWEIS: Falls Sie keine Ansage hören, drücken Sie die Reset-Taste an der Ka-
mera 6Sekunden lang, bis Sie Folgendes hören: „Werkseinstellungen wieder-
herstellen“.
d) Im Hauptmenü des Monitors: Wählen Sie „Kamera hinzufügen“.
e) Wählen Sie „Kamera hinzufügen“. (Dies muss innerhalb von xMinuten nach dem
Zurücksetzen der Kamera geschehen.)
f) An der Kamera: Bei korrekter Ausführung der Schritte oben hören Sie Folgendes:
- „Wireless settings, please wait“ (Funkeinstellungen. Bitte warten)
- „Wireless connection successful“ (Funkverbindung erfolgreich)
g) Am Monitor: Warten Sie, bis die Synchronisierung abgeschlossen ist.
6.4 Aufnahmeeinstellung
Das System kann so eingestellt werden, dass es Videoaufzeichnungen in verschiedenen
Modi macht. Es werden bis zu 4 separate Zeitpläne unterstützt, wobei für jeden Zeitplan unterschiedliche Modi gewählt und eine oder mehrere installierte Kameras benutzt werden können. Siehe Abschnitt „Aufnahmezeitplan”.
Um die Aufnahmeeinstellungen zu konfigurieren, verfahren Sie wie folgt.
a) Im Hauptmenü: Wählen Sie „Aufnahmeeinstellungen“.
48 CMS-30100_IM
Page 49
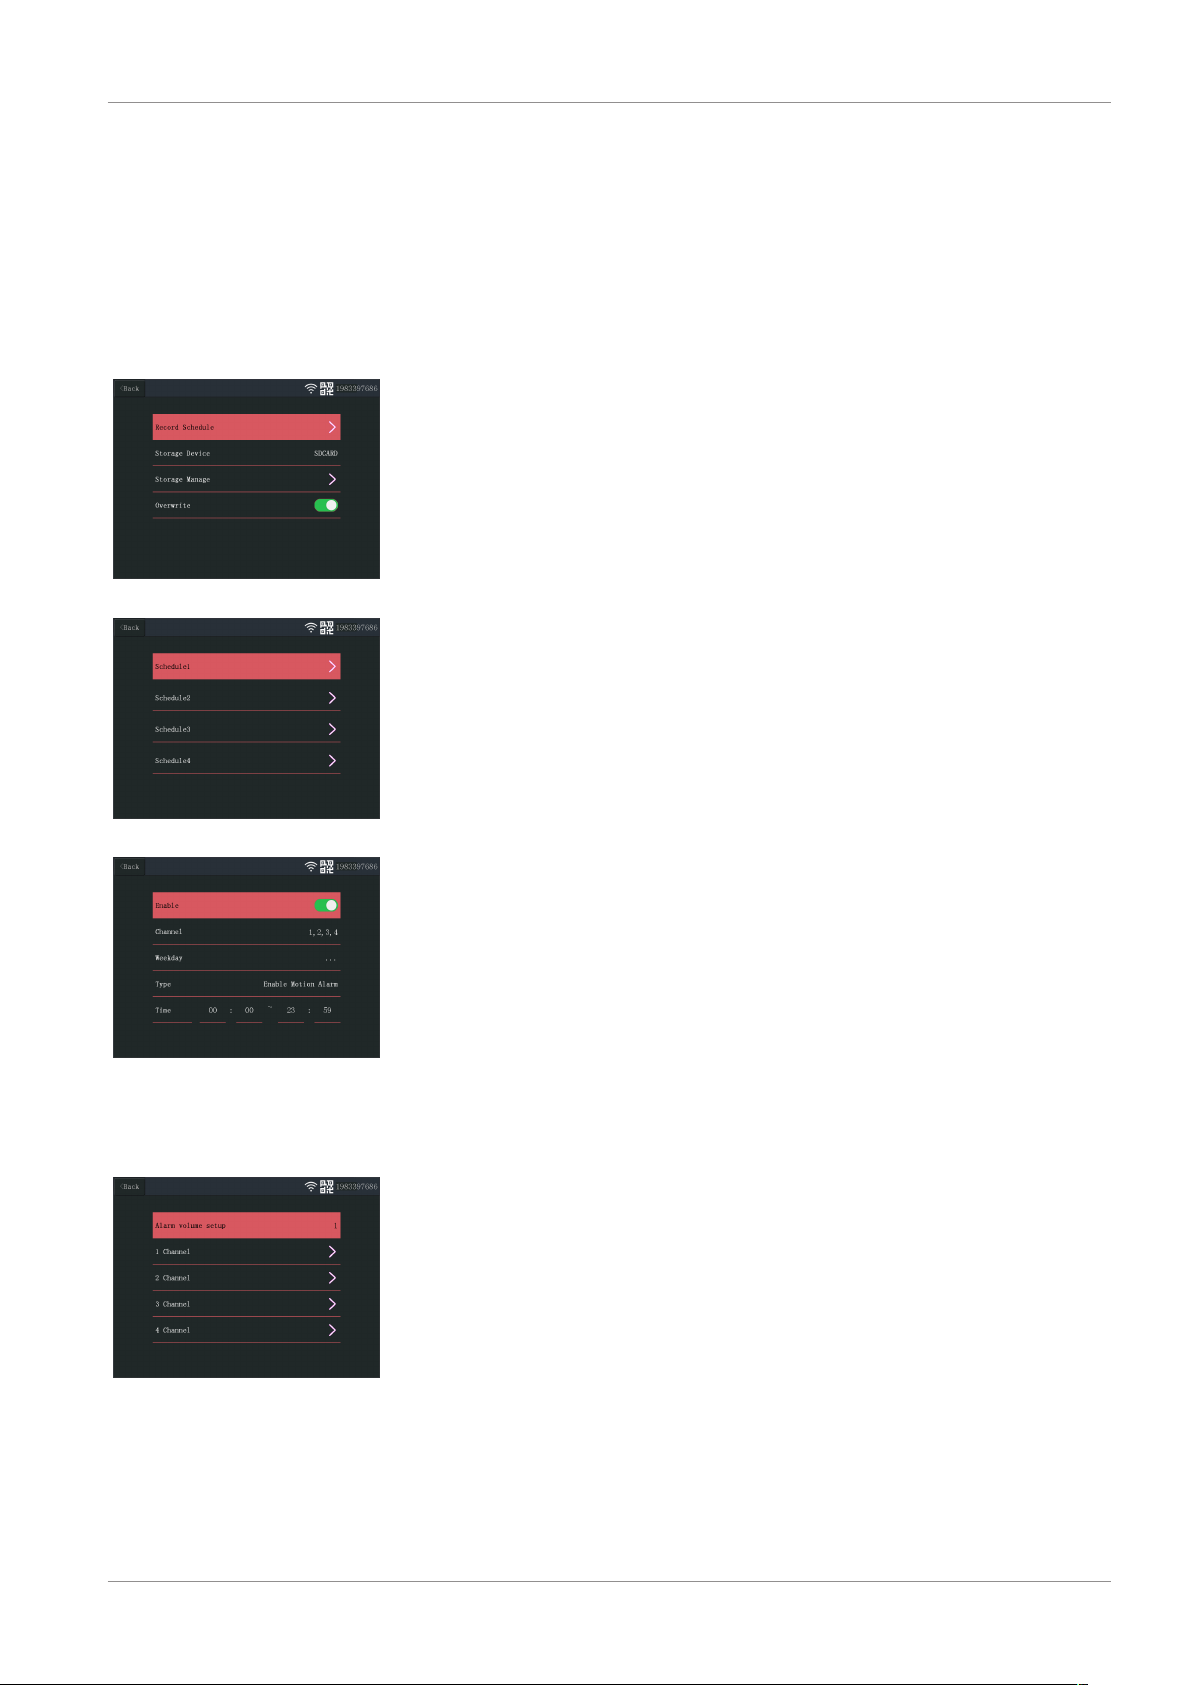
Abb.27: Aufnahmezeitplan
Systembetrieb | 6
b) Wählen Sie das Speichermedium. (Dies ist nur relevant, wenn Sie eine MicroSD-
Karte eingesetzt haben.)
c) Wählen Sie „Speicher verwalten“, um die aktuelle Speicherbelegung anzuzeigen
und die MicroSD-Karte zu formatieren.
d) Wählen Sie „Überschreiben“ und legen Sie fest, ob der Monitor bei mangelndem
Speicherplatz ältere Aufzeichnungen überschreiben soll oder nicht.
6.4.1 Aufnahmezeitplan
Um einen Aufnahmezeitplan einzurichten, verfahren Sie wie folgt.
a) Im Hauptmenü: Wählen Sie „Aufnahmeeinstellungen“.
b) Wählen Sie „Aufnahmezeitplan“.
c) Wählen Sie Zeitplan 1-4.
d) Aktivieren Sie den gewählten Zeitplan mit dem Schieberegler (bei Aktivierung wird
er grün).
e) Wählen Sie „Kanal (Kameras).
f) Wählen Sie den gewünschten Kanal (die Kameras) für die Aufzeichnung.
g) Wählen Sie „Wochentag“.
h) Wählen Sie in der Liste die Tage, an denen eine Aufzeichnung erfolgen soll.
i) Wählen Sie „Uhrzeit“ und geben Sie die Zeitspanne für die Aufzeichnung ein.
Hinweis: Die Option „Typ“ bietet nur eine Möglichkeit („Bewegungsalarm aktivieren“)
und ist standardmäßig aktiviert.
Abb.28: Zeitplan 1-4
Abb.29: Zeitplaneinstellungen
6.5 Alarmeinstellungen
Abb.30: Alarmeinstellungskanäle
Der Monitor hat eine Alarmfunktion, die beim Erkennen von Bewegung ausgelöst werden kann. Um den Alarm zu konfigurieren, verfahren Sie wie folgt.
a) Im Hauptmenü: Wählen Sie „Alarmeinstellungen“.
b) Wählen Sie „Alarmlautstärke einstellen“.
c) Stellen Sie die gewünschte Alarmlautstärke ein. (Bei Auslösung setzt die Alarmlaut-
stärke alle sonstigen Lautstärkeeinstellungen außer Kraft.)
d) Wählen Sie den Kanal (Kamera), die für die Alarmauslösung benutzt werden soll.
e) Aktivieren Sie die Option „Bewegungsalarm aktivieren“ mit dem Schieberegler (bei
Aktivierung wird er grün).
f) Aktivieren Sie die Option „APP Alarm“ mit dem Schieberegler (bei Aktivierung wird
er grün), wenn Sie Alarme auf Ihrem Smartphone empfangen wollen. (Siehe Ab-
schnitt „Einrichten der Mobil-App“)
CMS-30100_IM 49
Page 50

6 | Systembetrieb
Abb.31: Alarmeinstellungskanal
konfigurieren
Abb.32: Bereich bearbeiten
g) Aktivieren Sie „Monitor-Tonalarm“, falls der Monitor einen akustischen Alarm ab-
geben soll.
h) Wählen Sie „Empfindlichkeit“, um das Ansprechverhalten des Bewegungsmelders
einzustellen.
i) Wählen Sie „Bereich bearbeiten“, um Bereiche zu maskieren, in denen kein Alarm
ausgelöst werden soll. (Dies ist nützlich, falls Ihre Kamera ständig Bäume, Straßenverkehr usw. im Blickfeld hat.)
Hinweis: Orange markierte Bereiche lösen keinen Bewegungsalarm aus.
6.6.1 Systeminformationen
Abb.33: Systeminformationen
6.6.2 Werkseinstellung
Abb.34: Werkseinstellung
6.6 Systemverwaltung
Die Systeminformationen enthalten technische Angaben zum Monitor. Diese Angaben
werden hauptsächlich gebraucht, wenn Unterstützung erforderlich ist. Um die Systeminformationen aufzurufen, verfahren Sie wie folgt.
a) Im Hauptmenü: Wählen Sie „System verwalten“.
b) Wählen Sie „Systeminformationen“.
In diesem Menü können Sie die Werkseinstellungen auf zwei Ebenen wiederherstellen.
– „Einfache Wiederherstellung“ setzt alle Einstellungen mit Ausnahme Ihrer synchro-
nisierten Kameras und WLAN-Einstellungen zurück.
– „Alles wiederherstellen“ setzt alle Einstellungen, einschließlich synchronisierten
Kameras und WLAN-Einstellungen, zurück.
– Um Ihr System wiederherzustellen, verfahren Sie wie folgt.
a) Im Hauptmenü: Wählen Sie „System verwalten“.
b) Wählen Sie „Werkseinstellungen“.
c) Wählen Sie „Einfache Wiederherstellung“ oder „Alles wiederherstellen“.
6.6.3 Aktualisierung
Im Menü „Aktualisierung“ können Sie die Monitorfirmware mit Hilfe einer MicroSDKarte aktualisieren. Dies wird nicht empfohlen und wird allgemein nur gebraucht,
wenn Unterstützung erforderlich ist.
50 CMS-30100_IM
Page 51

6.6.4 IPC Upgrade
Im Menü „IPC-Aktualisierung“ können Sie die Kamerafirmware mit Hilfe einer MicroSDKarte aktualisieren. Dies wird nicht empfohlen und wird allgemein nur gebraucht,
wenn Unterstützung erforderlich ist.
Systembetrieb | 6
CMS-30100_IM 51
Page 52

7 | Einrichten der Mobil-App
7 Einrichten der Mobil-App
Das System unterstützt die Mobil-App „SW360“. Diese App kann als zusätzlicher Monitor auf Ihrem Mobilgerät benutzt werden. Um die Mobil-App einzurichten, verfahren
Sie wie folgt.
a) Verbinden Sie den Monitor mit einem WLAN-Netzwerk. Siehe Abschnitt „Kabello-
ses Internet".
b) Verbinden Sie Ihr mobiles Gerät mit demselben WLAN-Netzwerk.
c) Laden Sie sich die App „SW360“ herunter.
d) Öffnen Sie die App, melden Sie sich als neuer Benutzer an und befolgen Sie die An-
weisungen in der App.
e) Melden Sie sich bei der App an.
f) Tippen Sie auf das Pluszeichen (+), um ein neues Gerät hinzuzufügen.
g) Wählen Sie den Monitor in der Geräteliste.
h) Wählen Sie das Gerät, das in der Liste erscheint (normalerweise eine 10-stellige
Nummer).
Hinweis: Ihr Gerät sollte nun hinzugefügt worden sein. Weitergehende Informationen
über die App „SW360“ enthält das zugehörige Benutzerhandbuch.
52 CMS-30100_IM
Page 53

Konformitätserklärung | 8
8 Konformitätserklärung
Hiermit erklärt Smartwares Europe dass der Funkanlagentyp CMS-30100 der Richtlinie
2014/53/EU entspricht.
Der vollständige Text der EU-Konformitätserklärung ist unter der folgenden Internetadresse verfügbar: www.smartwares.eu/doc
CMS-30100_IM 53
Page 54

Sommaire
Sommaire
1 Sécurité ................................................................................................................................................................ 55
1.1 Sécurité lors de l'installation................................................................................................................................. 55
1.2 Sécurité de fonctionnement ................................................................................................................................. 55
2 Description des pièces .......................................................................................................................................... 56
3 Installation ........................................................................................................................................................... 57
3.1 Monter l'écran ...................................................................................................................................................... 57
3.1.1 Montage................................................................................................................................................... 57
3.1.2 Câblage..................................................................................................................................................... 57
3.1.3 Insérer la carte MicroSD (non fournie)..................................................................................................... 57
3.2 Installer l'écran ..................................................................................................................................................... 57
3.2.1 Montage................................................................................................................................................... 57
3.2.2 Câblage..................................................................................................................................................... 58
4 Menu à l'écran...................................................................................................................................................... 59
5 Configuration de votre appareil ............................................................................................................................ 60
5.1 Ajouter une caméra .............................................................................................................................................. 60
5.2 Sélectionner le canal WIFI (si nécessaire)............................................................................................................. 60
6 Fonctionnement du système................................................................................................................................. 61
6.1 Lecture vidéo ........................................................................................................................................................ 61
6.2 Configuration du système..................................................................................................................................... 62
6.2.1 Langue...................................................................................................................................................... 62
6.2.2 Configuration de l'heure .......................................................................................................................... 62
6.2.3 Internet sans fil ........................................................................................................................................ 63
6.2.4 Canal sans fil............................................................................................................................................. 63
6.2.5 Activer le son de la caméra ...................................................................................................................... 64
6.2.6 Configuration du volume ......................................................................................................................... 64
6.2.7 Fermeture automatique........................................................................................................................... 65
6.3 Ajouter une caméra .............................................................................................................................................. 65
6.4 Configuration des enregistrements ...................................................................................................................... 66
6.4.1 Calendrier d'enregistrement.................................................................................................................... 66
6.5 Configuration d'alarme ......................................................................................................................................... 67
6.6 Gestion du système .............................................................................................................................................. 67
6.6.1 Informations du système ......................................................................................................................... 67
6.6.2 Configuration d'usine............................................................................................................................... 68
6.6.3 Mise à niveau ........................................................................................................................................... 68
6.6.4 Mise à niveau IPC ..................................................................................................................................... 68
7 Paramétrage de l'application mobile .................................................................................................................... 69
8 Déclaration de conformité.................................................................................................................................... 70
liv CMS-30100_IM
Page 55

1 Sécurité
1. Veuillez lire attentivement ces instructions avant d'installer et d'utiliser le produit.
2. Ne coupez pas le câble d'alimentation pour le rallonger; l'appareil (transformateur) ne fonctionnera pas avec un câble plus long. Ne pas brancher l'appareil tant
que tout le câblage n'est pas terminé.
1.1 Sécurité lors de l'installation
1. Tenir les enfants et les curieux à l'écart pendant l'installation des produits. La
moindre distraction pourrait vous faire perdre votre contrôle.
2. Ne pas aller trop loin lors de l'installation de ce produit. Gardez toujours une
bonne assise et un bon équilibre. Ceci vous permet de mieux garder le contrôle en
cas d'imprévu.
3. Ce produit n'est pas un jouet. Installez-le hors de portée des enfants.
1.2 Sécurité de fonctionnement
Sécurité | 1
1. N'utilisez pas d'appareils électriques dans des atmosphères explosives, par
exemple en présence de liquides inflammables, de gaz ou de poussières. Les produits électriques créent des étincelles qui peuvent enflammer la poussière ou les
vapeurs.
2. Les avertissements, précautions et instructions figurant dans ce mode d'emploi ne
peuvent pas couvrir toutes les conditions et situations susceptibles de se produire.
L'opérateur doit bien comprendre que le bon sens et la prudence sont des facteurs
qui ne peuvent être intégrés dans ce produit, c'est à lui d'en faire preuve.
3. Attention à ne pas exposer l'adaptateur secteur de cet appareil à la pluie ou à l'humidité. Si de l'eau pénètre dans l'adaptateur secteur, cela augmente le risque de
choc électrique.
4. Ne malmenez pas le cordon d'alimentation. N'utilisez jamais le cordon pour débrancher la fiche de la prise de courant. Éloignez le cordon de la chaleur, de l'huile,
des bords coupants ou de pièces mobiles. Des cordons endommagés ou emmêlés
augmentent le risque de choc électrique.
5. L'adaptateur doit correspondre à la prise de courant. Ne modifiez jamais la fiche.
Les fiches intactes avec les prises correspondantes réduiront le risque de choc
électrique.
CMS-30100_IM 55
Page 56

2 | Description des pièces
2 Description des pièces
Caméra
1. Antenne
2. Lampe LED
3. Lentille
4. Capteur de jour/nuit
5. Microphone
6. Haut-parleur
Écran
1. Antenne
2. Écran tactile
3. Microphone
4. Indicateur LED de batterie
5. Indicateur LED d'enregistrement
6. Port USB
7. Fente micro-SD
8. Interrupteur marche/arrêt pour l'utilisation de la batterie
9. Entrée adaptateur CA
10. Socle
56 CMS-30100_IM
Page 57

3 Installation
Avant de procéder à l'installation fixe, il est recommandé de tenir compte de ce qui
suit:
Tout connecter pour se familiariser avec les unités.
Vérifier la couverture sans fil aux emplacements de montage prévus en y posant tem-
porairement les unités.
3.1 Monter l'écran
3.1.1 Montage
L'écran est conçu pour être posé sur une table ou sur toute surface plane.
a) Tirer le pied de support à l'arrière de l'écran.
b) Tirer sur les deux antennes au dos de l'écran pour les mettre en position verticale.
c) Poser sur toute surface plane.
Installation | 3
3.1.2 Câblage
L'écran est portable et peut être utilisé sur batterie, sur secteur ou sur les deux.
Lorsque l'adaptateur secteur est connecté, la batterie se charge jusqu'à ce qu'elle soit
pleine et fonctionne directement depuis l'adaptateur secteur.
Les batteries s'achètent séparément.
Type de batterie: 18650
3.1.3 Insérer la carte MicroSD (non fournie)
Il faut une carte MicroSD pour enregistrer la vidéo.
a) Repérer la fente pour carte MicroSD sur le côté droit de l'écran.
b) Insérer la MicroSD (elle ne s'insère que si elle est dans la bonne position).
c) Une carte MicroSD de classe 10 avec une capacité de stockage maximale de 128
Go est recommandée.
3.2 Installer l'écran
3.2.1 Montage
La caméra peut être montée dans n'importe quelle direction et sur toute surface capable de supporter son poids. La caméra doit être montée pour pouvoir être branchée
sur le secteur, faute de quoi il faudra une rallonge.
Pour monter la caméra, vous aurez besoin des outils suivants:
ü Un tournevis approprié pour les vis fournies.
ü Un foret et une mèche appropriée pour les vis d'obturation fournis.
a) Poser la caméra à l'emplacement choisi.
CMS-30100_IM 57
Page 58

3 | Installation
b) Marquer les positions des vis à l'aide d'un stylo.
c) Percer les trous nécessaires.
d) Insérer les fiches.
e) Percer un trou suffisamment grand pour passer les câbles.
f) Tirer les câbles nécessaires à travers l'orifice.
g) Monter l'antenne fournie sur la caméra.
h) Fixer la caméra avec les vis.
Si vous souhaitez faire passer le câble à l'extérieur du mur, vous avez besoin d'un boîtier de raccordement résistant aux intempéries.
3.2.2 Câblage
La caméra est sans fil et ne nécessite qu'une connexion électrique.
Éléments à prendre en compte lors du câblage de la caméra:
– Le raccordement du câble doit se faire à l'intérieur ou à l'intérieur d'un boîtier de
raccordement résistant aux intempéries, monté à l'extérieur.
– Le trou doit être obturé à l'aide d'un apprêt pour éviter l'infiltration d'eau.
– Il est recommandé de tirer tous les câbles à travers l'orifice. Le bouton de réinitiali-
sation peut rester à l'extérieur, mais ce n'est pas recommandé.
58 CMS-30100_IM
Page 59

Fig.1: Menu à l'écran
Menu à l'écran | 4
4 Menu à l'écran
Le menu à l'écran apparaît lorsque vous appuyez sur le signal vidéo.
Bouton Description
Microphone Appuyer et maintenir enfoncé pour établir la communication
avec la caméra actuellement visualisée. (S'assurer que le microphone de la caméra est activé, voir section «Activer le son de la
caméra».)
Mute Sélectionner pour activer/désactiver le mode silencieux des haut-
parleurs de l'écran
Menu principal Sélectionner pour accéder au menu principal
Zoom Sélectionner pour zoomer sur le signal vidéo.
Sélectionner une fois pour sélectionner le mode zoom.
Taper à nouveau sur l'image pour zoomer.
Sélectionner l'icône (-) pour quitter le mode zoom.
Lecture Sélectionner pour accéder au menu Lecture.
Ceci vous permettra de visualiser les enregistrements.
CMS-30100_IM 59
Page 60

5 | Configuration de votre appareil
5 Configuration de votre appareil
5.1 Ajouter une caméra
Fig.2: Menu principal - Ajouter une
caméra
L'écran peut être couplé à 4 caméras au plus. Suivre la procédure suivante pour ajouter une caméra:
a) Mettre la caméra sous tension en la branchant sur le secteur.
b) Attendre 30 secondes.
c) Vous allez entendre «Lancer le mode de configuration».
ð REMARQUE: Si vous n'entendez pas la voix, appuyer sur le bouton de réinitia-
lisation sur la caméra durant 6 secondes jusqu'à ce que vous entendiez «Réta-
blir le réglage d'usine».
d) Sur l'écran, à partir du menu principal: Sélectionner: «Ajouter Caméra».
e) Sélectionner: «Ajouter Caméra». (Ceci doit être fait dans les x minutes à partir de
la réinitialisation de la caméra.)
f) Sur la caméra: Une fois les étapes ci-dessus menées à bien, vous allez entendre:
- «Configuration sans fil, veuillez attendre»
- «Connexion sans fil réussie»
g) Sur l'écran: Attendre que le couplage soit terminé.
Fig.3: Ajouter une caméra
5.2 Sélectionner le canal WIFI (si nécessaire)
Fig.4: Canal WIFI
Fig.5: Sélectionner le canal WIFI
S'il y a plusieurs réseaux Wi-Fi dans votre zone et si la réception est mauvaise, changez
le canal Wi-Fi en procédant comme suit:
a) À partir du menu principal: Sélectionner: «Ajouter Caméra».
b) Sélectionner le «Canal WIFI»
c) Sélectionner le «Canal WIFI»
d) Sélectionner un canal sur la liste. (Essayer différents canaux si le problème de ré-
ception persiste.)
60 CMS-30100_IM
Page 61

Fig.6: Icône de lecture vidéo
Fonctionnement du système | 6
6 Fonctionnement du système
6.1 Lecture vidéo
L'écran commence à enregistrer la vidéo en fonction de la configuration du «Calendrier d'enregistrement». Pour visualiser les enregistrements, procéder comme suit:
a) À partir du menu principal: Sélectionner: «Lecture vidéo».
b) Sélectionner le répertoire de caméra (1-4) à partir duquel vous souhaitez visualiser
les enregistrements. (Jusqu'à 4 caméras compatibles).
c) Sélectionner le répertoire avec la date souhaitée.
d) Sélectionner le répertoire avec l'heure souhaitée.
e) Sélectionner le fichier souhaité pour visualiser l'enregistrement.
Fig.7: Répertoire principal
Fig.8: Répertoire des dates
Fig.9: Répertoire horaire
CMS-30100_IM 61
Page 62
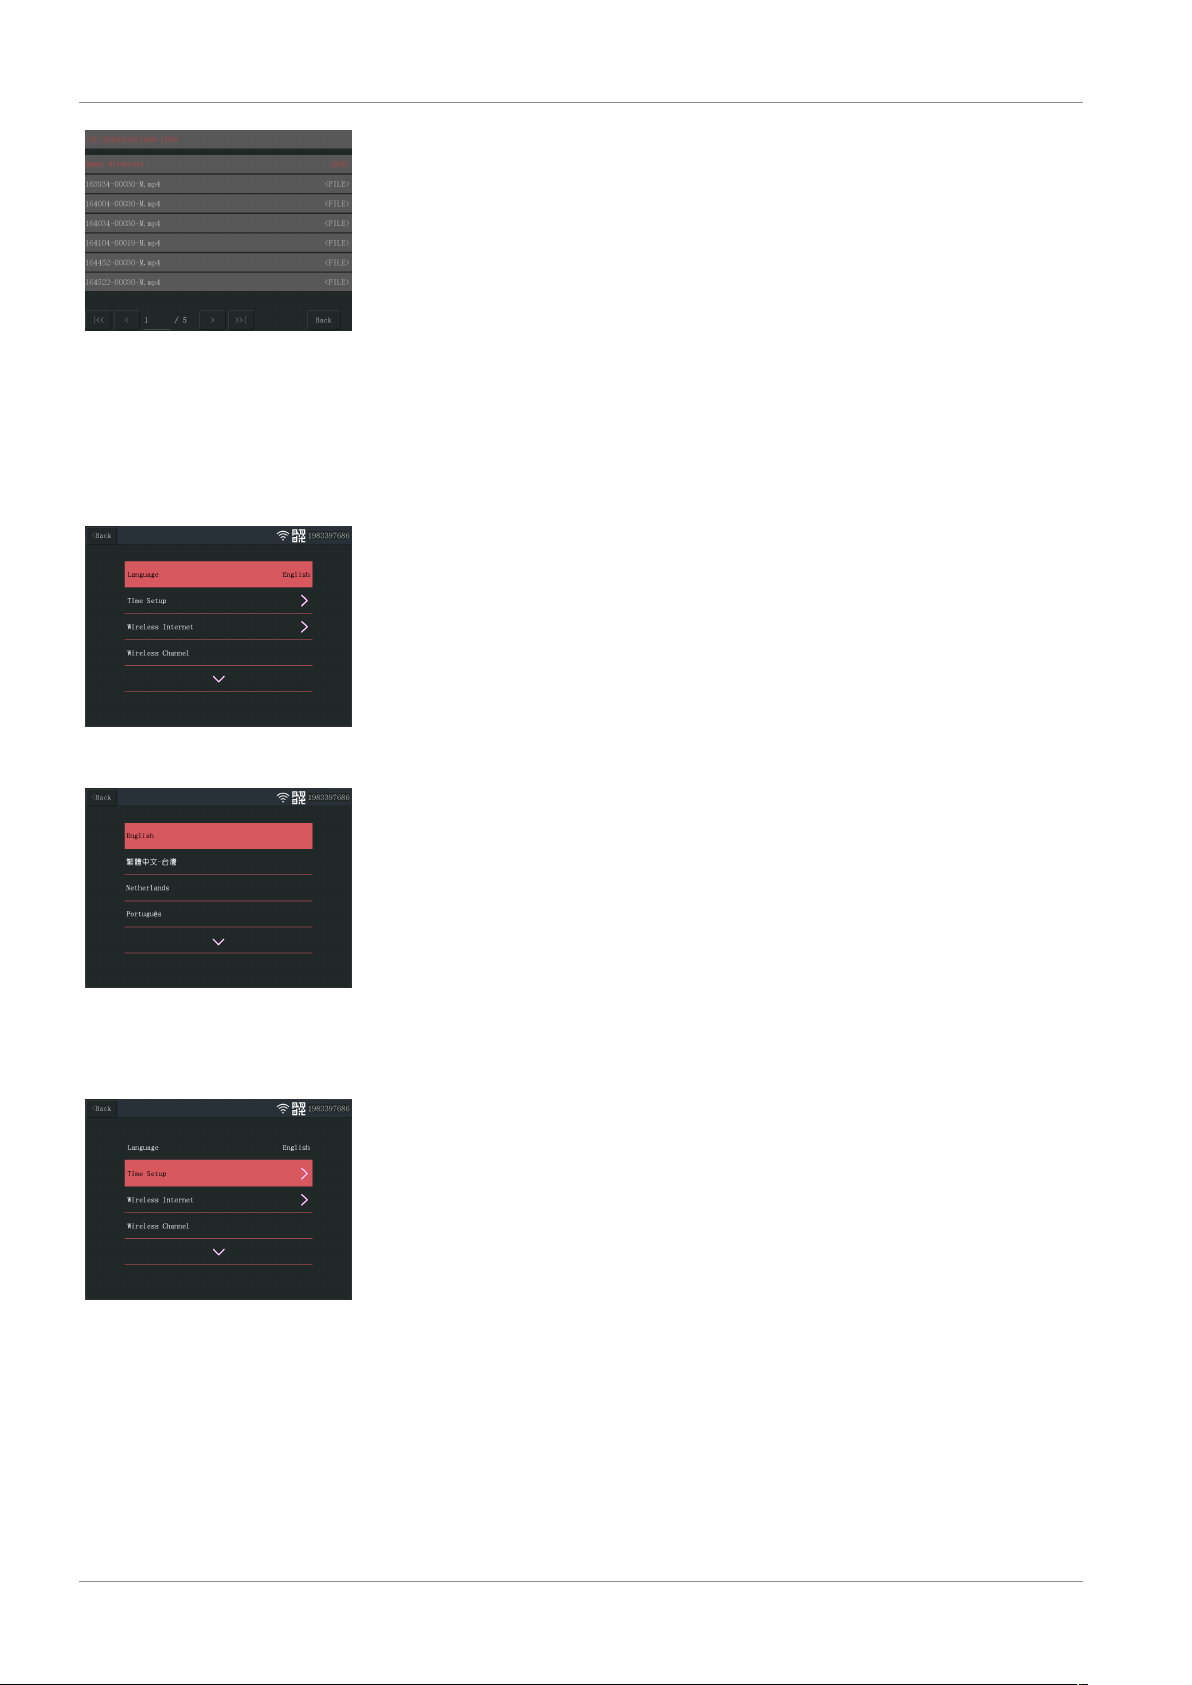
6 | Fonctionnement du système
Fig.10: Répertoire des fichiers
6.2 Configuration du système
6.2.1 Langue
L'écran prend en charge un large éventail de langues que vous pouvez sélectionner
dans le menu «Configuration du système».
a) À partir du menu principal: Sélectionner«Configuration du système».
b) Sélectionner: «Langue».
c) Sélectionner la langue souhaitée dans la liste.
Fig.11: Langue de configuration du
système
Fig.12: Sélection de la langue
6.2.2 Configuration de l'heure
Fig.13: Sélectionner Réglage de
l'heure
La date et l'heure peuvent être réglées manuellement par synchronisation en ligne.
a) À partir du menu principal: Sélectionner «Configuration du système».
b) Sélectionner «Réglage de l'heure».
c) Choisir une synchronisation automatique de l'heure ou non. (Pour une synchroni-
sation automatique, l'écran doit être connecté en ligne. Voir la section «Internet
sans fil».
d) Sélectionner le fuseau horaire. (Nécessaire même si vous choisissez une synchroni-
sation automatique de l'heure.)
e) Sélectionner «Réglage de l'heure» si vous choisissez de régler votre date et heure
manuellement. (Cette option n'est disponible que si «Temps de synchronisation»
est désactivé.
62 CMS-30100_IM
Page 63
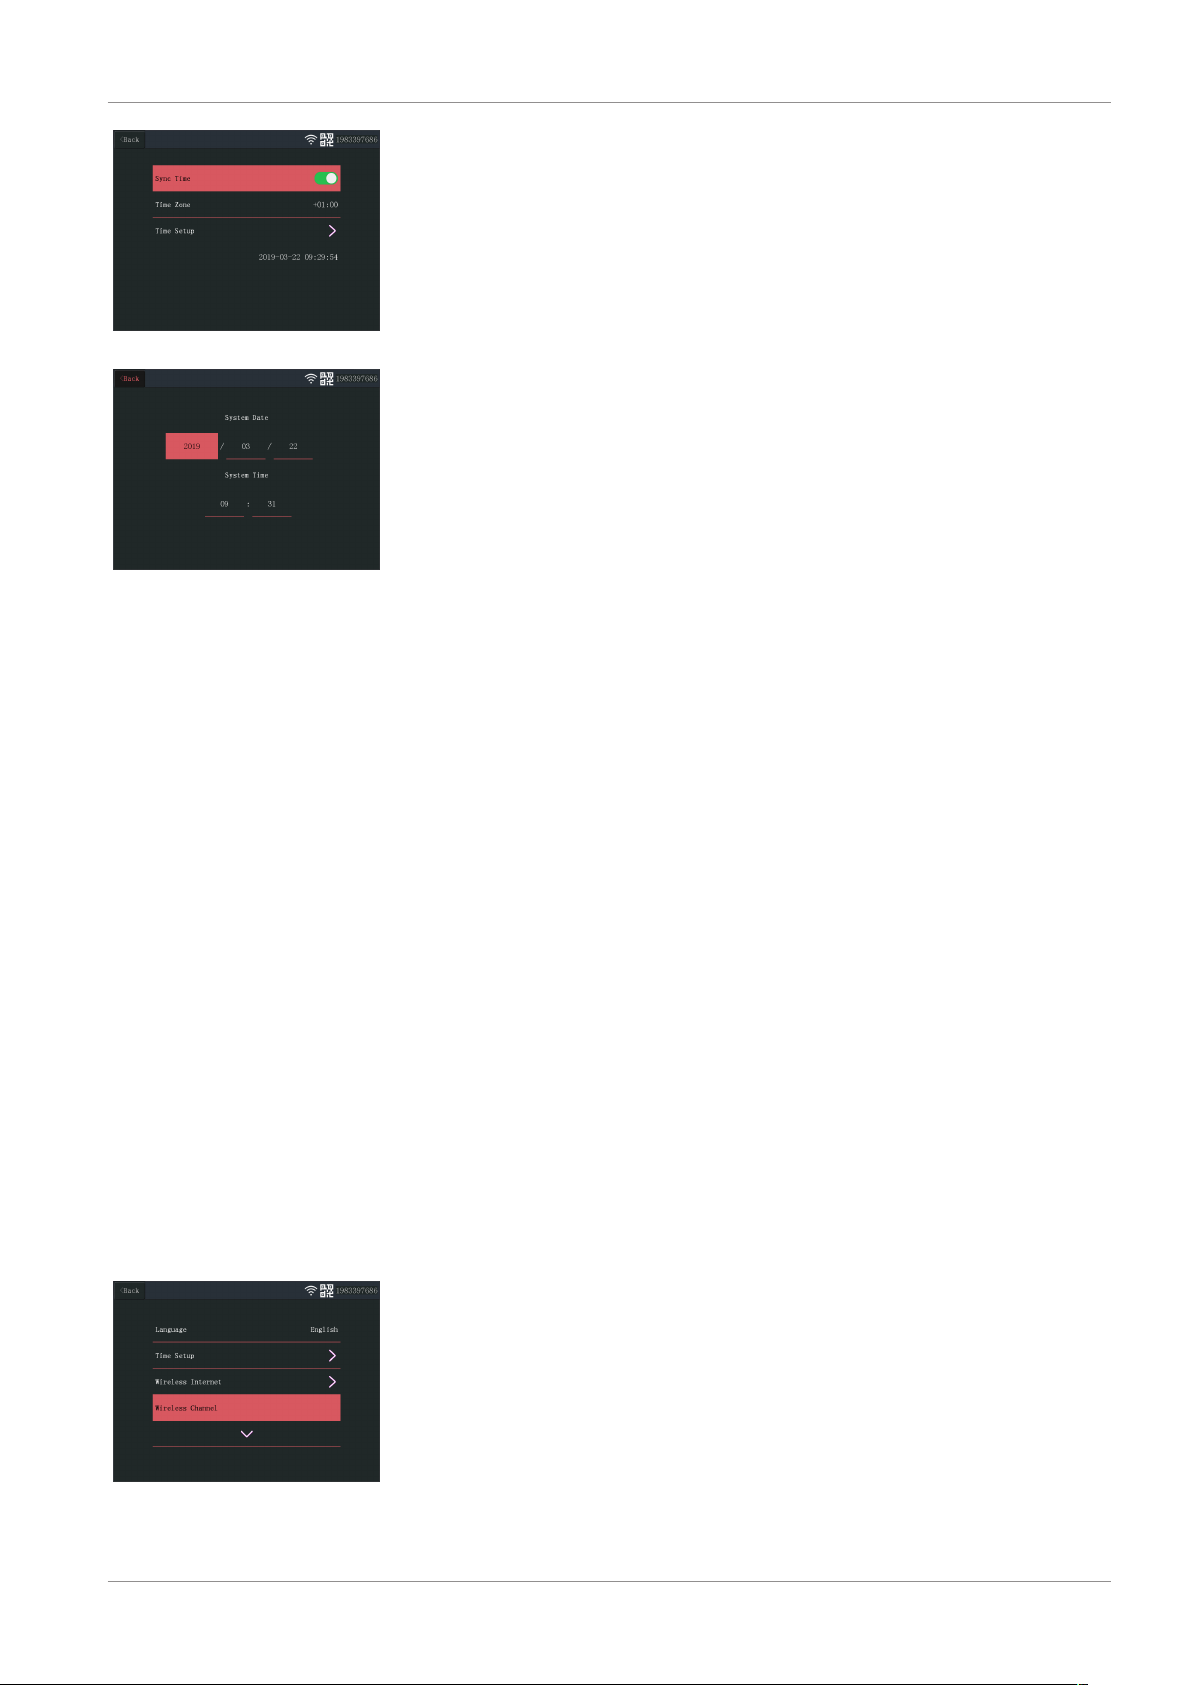
Fig.14: Configuration de l'heure
Fig.15: Réglage de la date et de
l'heure (manuel)
Fonctionnement du système | 6
6.2.3 Internet sans fil
Procéder comme suit pour mettre en place une connexion Internet sans fil. Cette fonction est en option, mais vous offre les possibilités suivantes:
– Connectivité des applications
– Synchronisation de l'heure et de la date.
a) Assurez-vous de disposer d'un routeur WIFI connecté à l'Internet, de votre mot de
passe et nom de routeur (SSID).
b) À partir du menu principal: Sélectionner «Configuration du système».
c) Sélectionner «Internet sans fil».
d) Activer WLAN.
e) Sélectionner «Liste de points chauds».
f) Trouver et sélectionner votre routeur sans fil.
g) Saisir votre mot de passe.
ð REMARQUE: Seuls les réseaux 2,4 GHz sont compatibles
h) Télécharger l'appli «SW360».
i) Ouvrir l'application, s'enregistrer en tant que nouvel utilisateur et suivre les ins-
tructions de l'application.
6.2.4 Canal sans fil
Dans certains cas, la portée du signal sans fil peut être obstruée par d'autres réseaux
sans fil occupant le même canal. Si vous avez une plage plus faible que prévu, vous
pouvez éventuellement y remédier en changeant de canal.
a) À partir du menu principal: Sélectionner «Configuration du système».
b) Sélectionner «Canal sans fil».
c) Sélectionner «Canal Wifi».
d) Sélectionner un nouveau canal. (Le routeur Wifi est généralement configuré pour
Fig.16: Sélectionner le Canal sans fil
CMS-30100_IM 63
détecter automatiquement le canal. Sinon, il faut également changer manuelle-
ment de canal sur le routeur).
Page 64
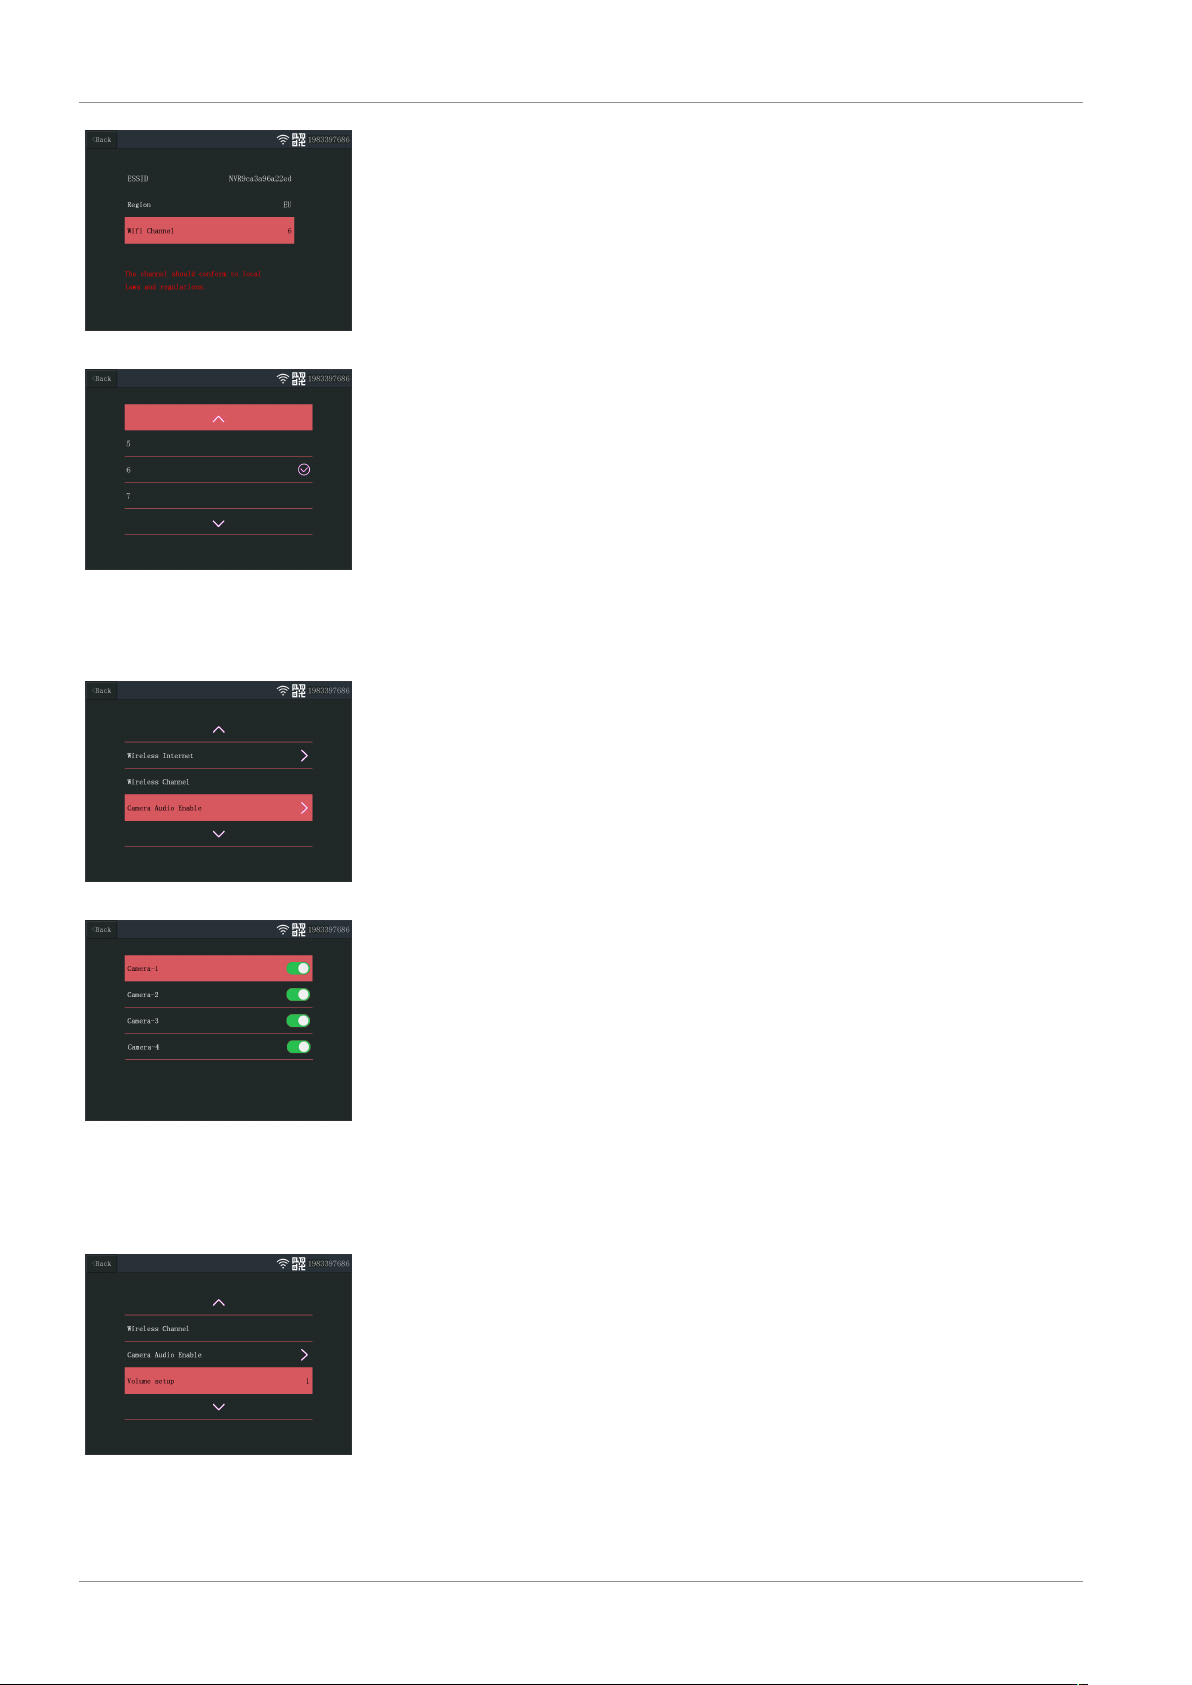
6 | Fonctionnement du système
Fig.17: Canal Wifi
Fig.18: Liste de canaux
6.2.5 Activer le son de la caméra
Fig.19: Activer le son de la caméra
Fig.20: Activer – désactiver le son
de la caméra
6.2.6 Configuration du volume
Le microphone de la caméra peut être activé ou désactivé à partir de ce menu. Attention: si le microphone de la caméra est désactivé, la communication bidirectionnelle
avec la caméra n'est plus possible.
a) À partir du menu principal: Sélectionner «Configuration du système».
b) Sélectionner «Actionner le son de la caméra».
c) Sélectionner la caméra appropriée et tirer le curseur sur la position marche ou ar-
rêt.
La configuration du volume permet d'augmenter ou de diminuer le volume de l'écran.
a) À partir du menu principal: Sélectionner «Configuration du système».
b) Sélectionner «Configuration du volume».
c) Régler le volume en sélectionnant une valeur (0-4). En réglant le volume sur 0, les
haut-parleurs de l'écran de produisent plus aucun son.
Fig.21: Configuration du volume
64 CMS-30100_IM
Page 65
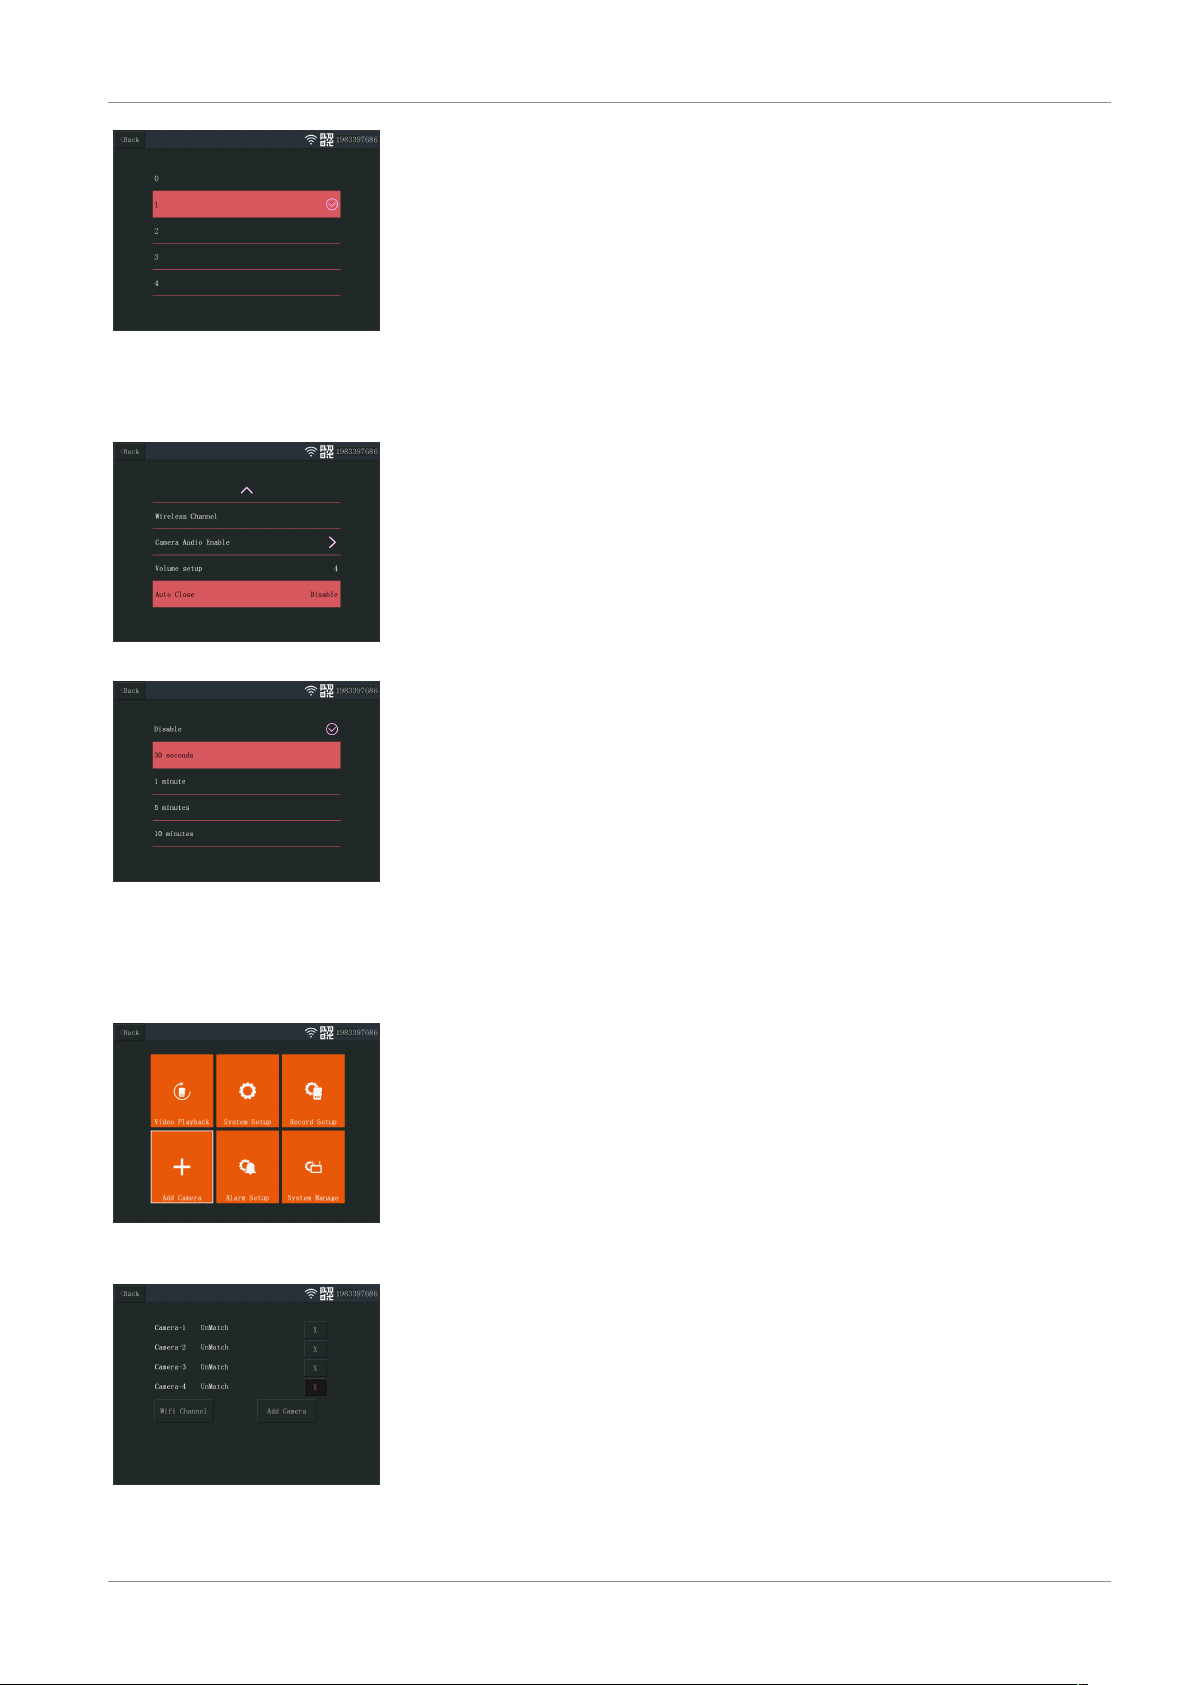
Fig.22: Réglage du volume
6.2.7 Fermeture automatique
Fig.23: Fermeture automatique
Fonctionnement du système | 6
La fonction de fermeture automatique active/désactive la temporisation de l'écran.
Lorsque la fonction de fermeture automatique est activée, l'écran s'éteint après un
certain temps pendant que le système fonctionne normalement.
a) À partir du menu principal: Sélectionner «Configuration du système».
b) Sélectionner «Fermeture automatique»
c) Sélectionner une durée avant le time out (elle commence après la dernière inter-
action avec l'écran).
Remarque: Si l'écran fonctionne sur batterie, il est recommandé de prévoir un time
out court pour économiser l'énergie.
Fig.24: Durée de fermeture automatique (time out)
6.3 Ajouter une caméra
Fig.25: Menu principal - Ajouter
une caméra
L'écran peut être couplé à 4 caméras au plus. Suivre la procédure suivante pour ajouter une caméra:
a) Mettre la caméra sous tension en la branchant sur le secteur.
b) Attendre 30 secondes.
c) Vous allez entendre «Lancer le mode de configuration».
ð REMARQUE: Si vous n'entendez pas la voix, appuyer sur le bouton de réinitia-
lisation sur la caméra durant 6 secondes jusqu'à ce que vous entendiez «Réta-
blir le réglage d'usine».
d) Sur l'écran, à partir du menu principal: Sélectionner: «Ajouter Caméra».
e) Sélectionner: «Ajouter Caméra». (Ceci doit être fait dans les x minutes à partir de
la réinitialisation de la caméra.)
f) Sur la caméra: Une fois les étapes ci-dessus menées à bien, vous allez entendre:
- «Configuration sans fil, veuillez attendre»
- «Connexion sans fil réussie»
g) Sur l'écran: Attendre que le couplage soit terminé.
Fig.26: Ajouter une caméra
CMS-30100_IM 65
Page 66
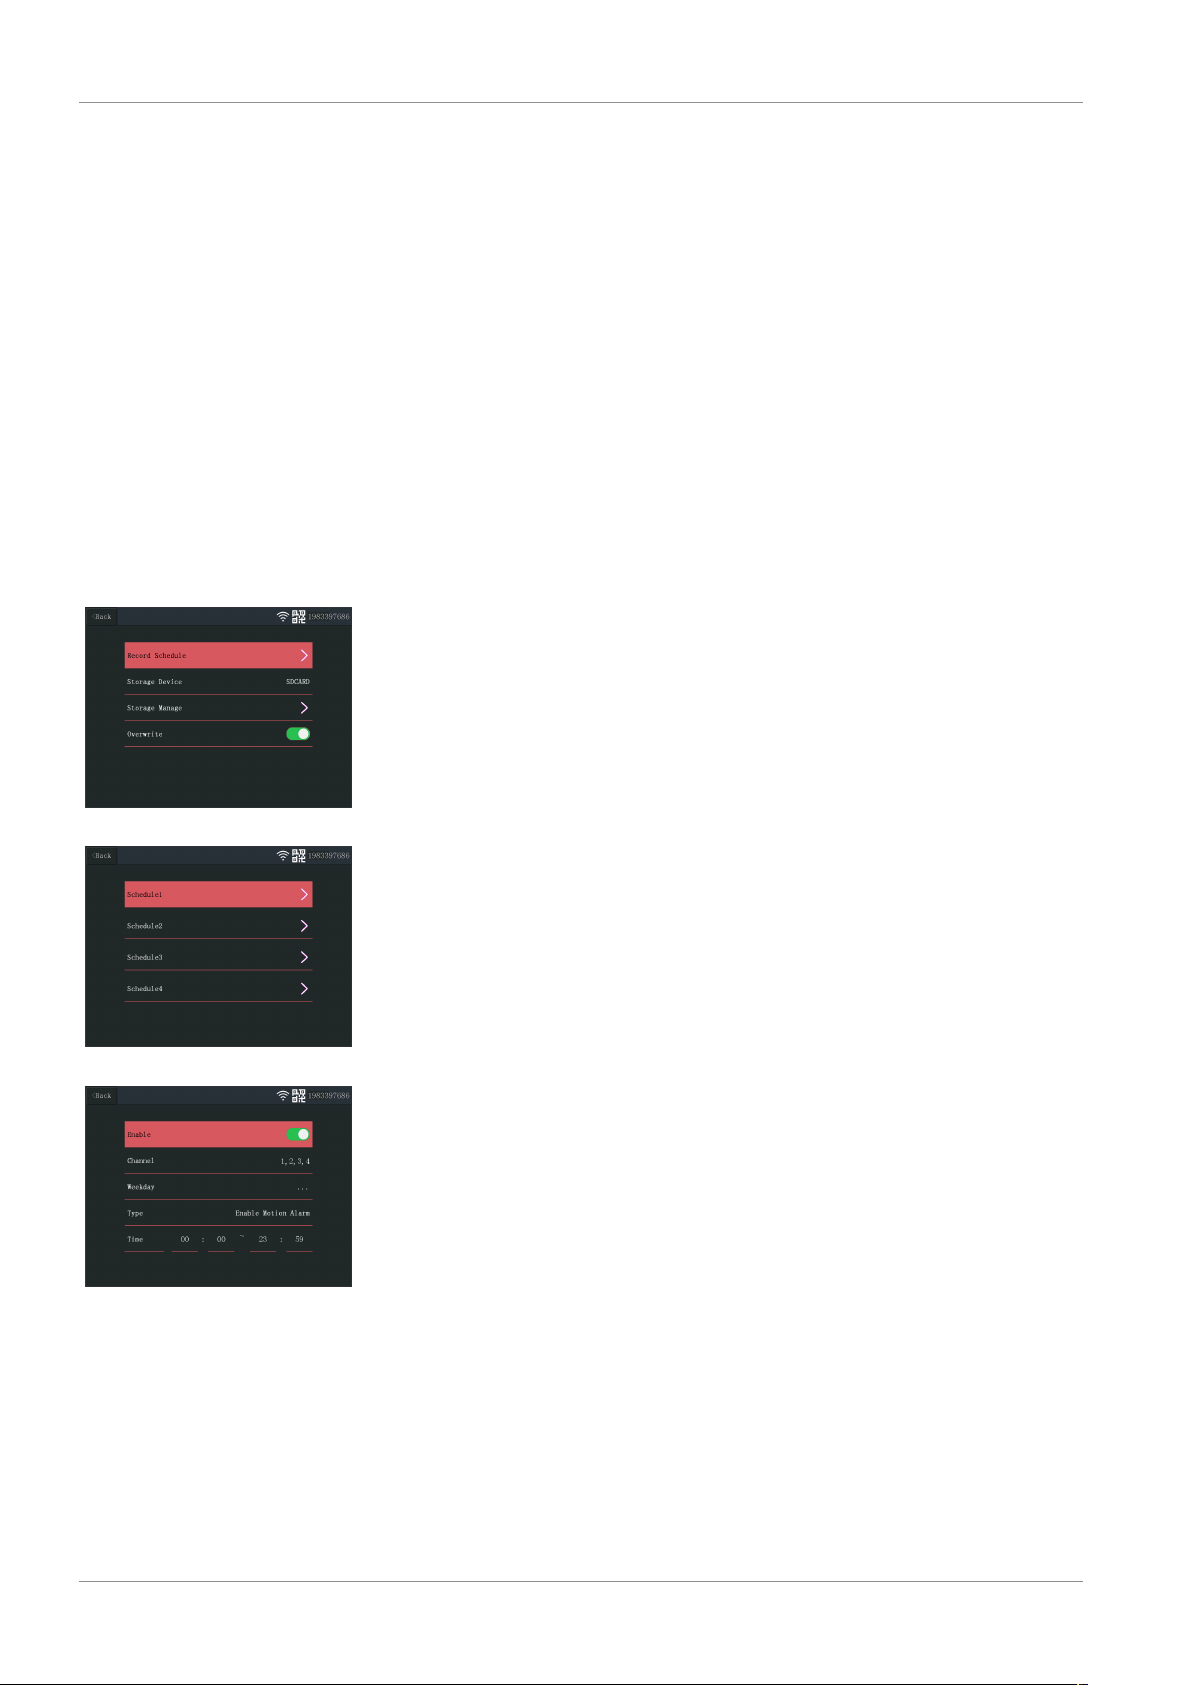
6 | Fonctionnement du système
6.4 Configuration des enregistrements
6.4.1 Calendrier d'enregistrement
Fig.27: Calendrier d'enregistrement
Le système peut être configuré pour des enregistrements vidéo dans différents modes.
Il prend en charge jusqu'à 4 programmes distincts où chaque programme peut être
configuré dans différents modes, en utilisant 1 ou plusieurs caméras installées. Voir la
section «Calendrier d'enregistrement».
Pour configurer les paramètres d'enregistrement, procéder comme suit.
a) À partir du menu principal: Sélectionner «Configuration des enregistrements»
b) Sélectionner le périphérique de stockage. (Ceci n'est pertinent que si vous avez in-
séré une carte MicroSD.)
c) Sélectionner «Gestion du stockage» pour voir l'utilisation actuelle de la mémoire
et formater la carte MicroSD.
d) Sélectionner «Écraser» pour activer/désactiver l'écran afin d'écraser les anciens
enregistrements lorsque la mémoire est épuisée.
Pour configurer un calendrier, procéder comme suit.
a) À partir du menu principal: Sélectionner «Configuration des enregistrements»
b) Sélectionner «Calendrier d'enregistrement»
c) Sélectionner calendrier 1-4.
d) Activer le calendrier sélectionné en faisant glisser le curseur (il passe au vert une
fois activé).
e) Sélectionner «canal» (caméras).
f) Sélectionner le «canal» (caméra(s) à partir duquel vous voulez enregistrer).
g) Sélectionner: «Jour de la semaine».
h) Sélectionner les jours où vous voulez enregistrer à partir de la liste.
i) Sélectionner «Temps» et insérer la plage horaire durant laquelle vous voulez en-
registrer.
Remarque: Le «Type» n'a qu'une seule option (Activer l'alarme de mouvement) et
elle est activée par défaut.
Fig.28: Calendrier 1-4
Fig.29: Configuration du calendrier
66 CMS-30100_IM
Page 67
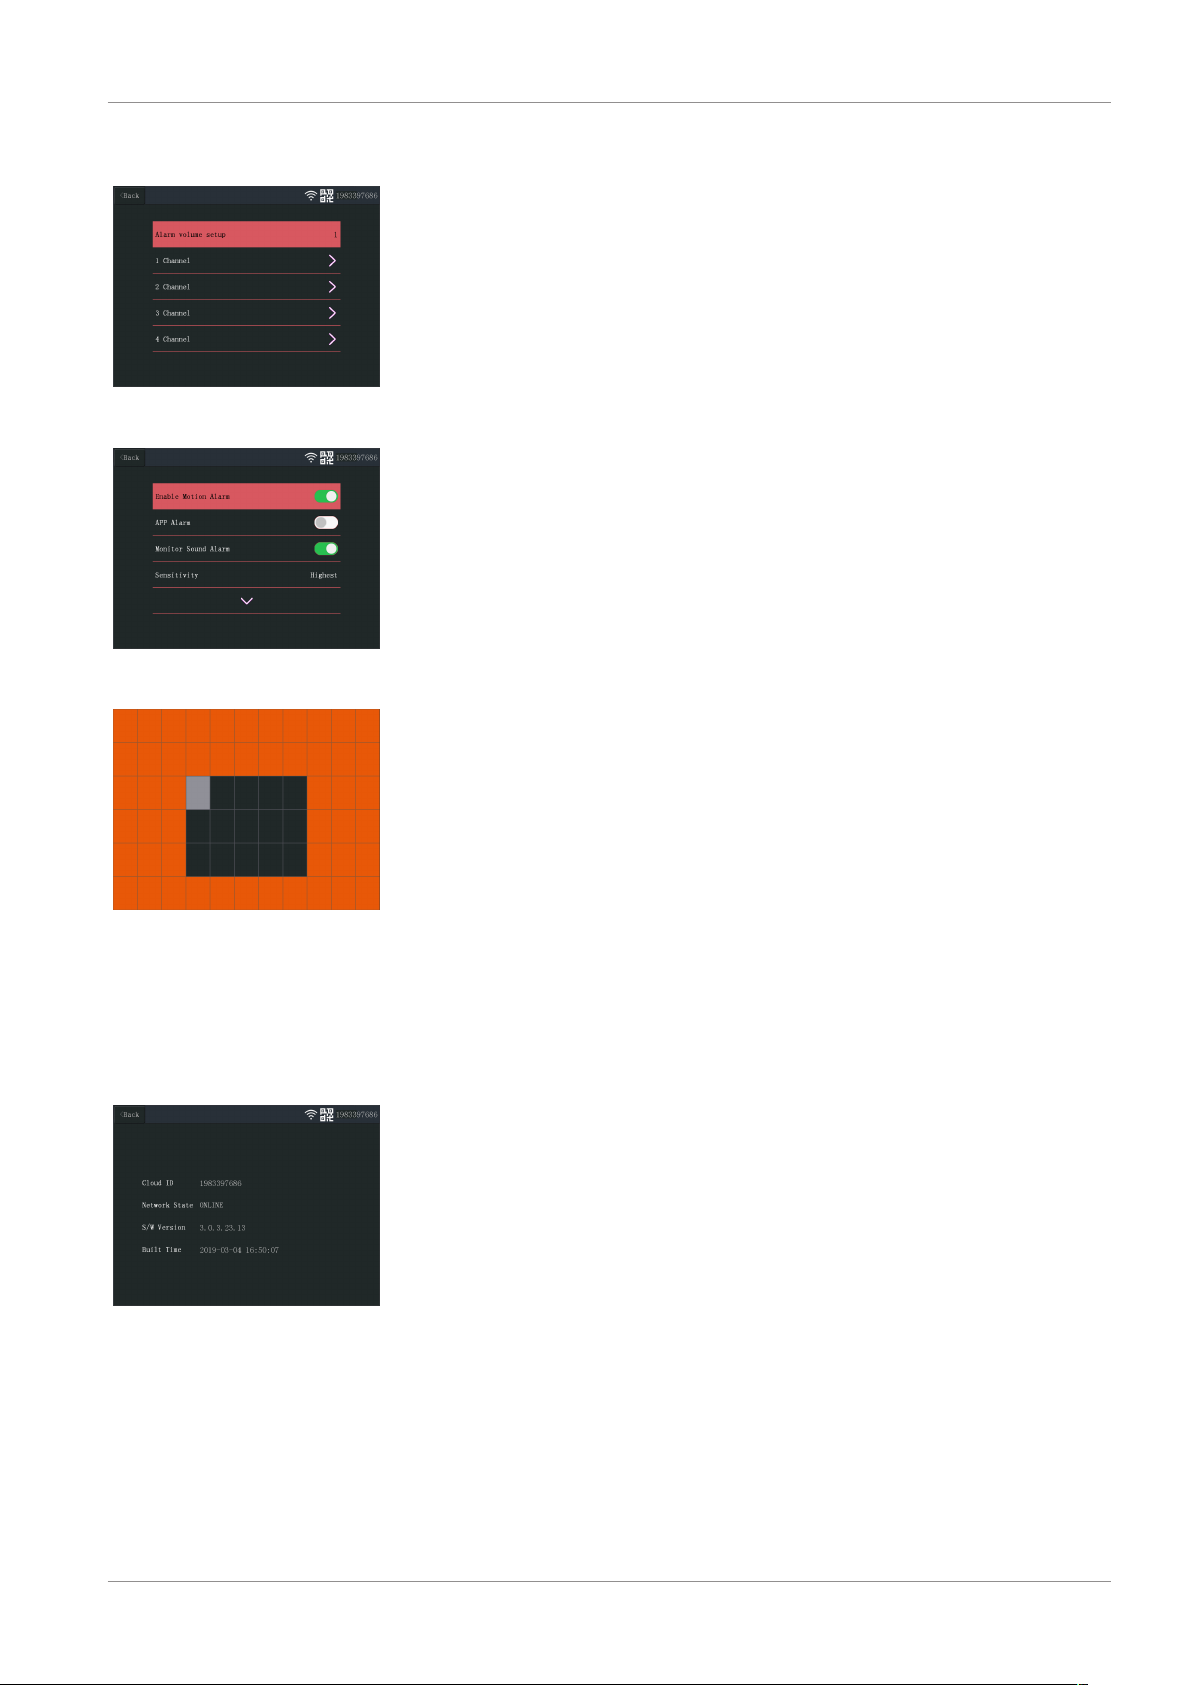
6.5 Configuration d'alarme
Fig.30: Canaux de la configuration
d'alarme
Fig.31: Réglage des canaux de la
configuration d'alarme
Fonctionnement du système | 6
L'écran dispose d'une fonction d'alarme qui peut être réglée pour se déclencher en cas
de détection d'un mouvement. Pour régler d'alarme, procéder comme suit.
a) À partir du menu principal: Sélectionner «Configuration d'alarme»
b) Sélectionner «Configuration du volume de l'alarme».
c) Régler le volume d'alarme souhaité. (Le volume de l'alarme l'emporte sur tout
autre réglage du son en cas de déclenchement.)
d) Sélectionner le «Canal» (caméra) que vous voulez utiliser pour déclencher
l'alarme.
e) Activer «Activer l'alarme de mouvement» en faisant glisser le curseur (il passe au
vert une fois activé).
f) Activer «Alarme APP» en faisant glisser le curseur (il passe au vert une fois activé)
si vous voulez recevoir des alarmes sur votre appareil mobile. (Voir Section«Paramétrer l'application mobile»)
g) Activer «Alarme sonore de l'écran» si vous souhaitez obtenir une alarme audible
à l'écran.
h) Régler la «Sensibilité» de la détection de mouvement.
i) Sélectionner «Éditer zone» pour masquer les zones que vous ne voulez pas voir
déclencher d'alarme. (C'est utile si vous avez des arbres ou de la circulation, etc.
toujours vus par la caméra.)
Remarque: Les zones marquées en orange ne déclencheront pas d'alarme de mouvement.
Fig.32: Édition de zone
6.6 Gestion du système
6.6.1 Informations du système
Fig.33: Informations du système
Les informations du système portent sur l'écran. Ces informations sont surtout utiles
en cas de maintenance. Pour visualiser les informations du système, procéder comme
suit:
a) À partir du menu principal: Sélectionner «Gestion du système».
b) Sélectionner «Informations du système».
CMS-30100_IM 67
Page 68

6 | Fonctionnement du système
6.6.2 Configuration d'usine
Fig.34: Configuration d'usine
6.6.3 Mise à niveau
Ce menu permet à l'utilisateur de restaurer la configuration d'usine à deux niveaux.
– «Restauration simple» permet de réinitialiser tous les paramètres, à l'exception
de vos caméras couplées et des paramètres Wifi.
– «Tout restaurer» permet de réinitialiser tous les paramètres, à l'exception de vos
caméras couplées et des paramètres Wifi.
– Pour restaurer votre système, procéder comme suit.
a) À partir du menu principal: Sélectionner «Gestion du système».
b) Sélectionner «Configuration d'usine».
c) Sélectionner «Restauration simple» ou «Tout restaurer».
Le menu «Mise à niveau» permet à l'utilisateur de mettre à jour le firmware de
l'écran à l'aide d'une carte MicroSD. Ce n'est pas recommandé, et sert avant tout si
c'est nécessaire pour la maintenance.
6.6.4 Mise à niveau IPC
Le menu «Mise à niveau IPC» permet à l'utilisateur de mettre à jour le firmware de
l'écran à l'aide d'une carte MicroSD. Ce n'est pas recommandé, et sert avant tout si
c'est nécessaire pour la maintenance.
68 CMS-30100_IM
Page 69

Paramétrage de l'application mobile | 7
7 Paramétrage de l'application mobile
Le système est compatible avec l'appli mobile «SW360». L'application peut servir
d'écran supplémentaire sur votre périphérique mobile. Pour régler l'appli mobile, procéder comme suit.
a) Raccorder l'écran à un réseau Wifi. (Voir la section «Internet sans fil».)
b) Connecter votre périphérique mobile au même réseau.
c) Télécharger l'appli «SW360».
d) Ouvrir l'application, s'enregistrer en tant que nouvel utilisateur et suivre les ins-
tructions de l'application.
e) Se connecter à l'application.
f) Sélectionner l'icône (+) pour ajouter un nouvel appareil.
g) Sélectionner l'écran dans la liste des appareils.
h) Sélectionner l'appareil qui apparaît dans la liste (normalement un numéro à 10
chiffres).
Remarque: Votre appareil devrait maintenant avoir été ajouté. Pour en savoir plus sur
le SW360, voir le manuel de l'application.
CMS-30100_IM 69
Page 70

8 | Déclaration de conformité
8 Déclaration de conformité
Le soussigné, Smartwares Europe déclare que l'équipement radioélectrique du type
CMS-30100 est conforme à la directive 2014/53/UE.
Le texte complet de la déclaration UE de conformité est disponible à l'adresse internet
suivante: www.smartwares.eu/doc
70 CMS-30100_IM
Page 71

Sommario
Sommario
1 Sicurezza............................................................................................................................................................... 72
1.1 Avvisi di sicurezza per l'installazione .................................................................................................................... 72
1.2 Avvisi di sicurezza per l'uso................................................................................................................................... 72
2 Descrizione delle parti .......................................................................................................................................... 73
3 Installazione ......................................................................................................................................................... 74
3.1 Installare il monitor............................................................................................................................................... 74
3.1.1 Montaggio................................................................................................................................................ 74
3.1.2 Cablaggio.................................................................................................................................................. 74
3.1.3 Inserire la scheda microSD (non fornita).................................................................................................. 74
3.2 Installare la videocamera...................................................................................................................................... 74
3.2.1 Montaggio................................................................................................................................................ 74
3.2.2 Cablaggio.................................................................................................................................................. 75
4 Menu a video ....................................................................................................................................................... 76
5 Configurazione del dispositivo .............................................................................................................................. 77
5.1 Aggiungere una videocamera ............................................................................................................................... 77
5.2 Selezionare il canale Wi-Fi (se richiesto)............................................................................................................... 77
6 Funzionamento del sistema .................................................................................................................................. 78
6.1 Riproduzione video............................................................................................................................................... 78
6.2 Configurazione del sistema................................................................................................................................... 79
6.2.1 Lingua....................................................................................................................................................... 79
6.2.2 Impostazione dell'ora............................................................................................................................... 79
6.2.3 Internet senza fili...................................................................................................................................... 80
6.2.4 Canale wireless......................................................................................................................................... 80
6.2.5 Abilitare l'audio della videocamera.......................................................................................................... 81
6.2.6 Impostazione del volume......................................................................................................................... 81
6.2.7 Spegnimento automatico......................................................................................................................... 82
6.3 Aggiungere una videocamera ............................................................................................................................... 82
6.4 Impostazione registrazioni.................................................................................................................................... 82
6.4.1 Programma di registrazione..................................................................................................................... 83
6.5 Impostazione allarme ........................................................................................................................................... 83
6.6 Gestione del sistema............................................................................................................................................. 84
6.6.1 Informazioni sul sistema .......................................................................................................................... 84
6.6.2 Impostazioni di fabbrica........................................................................................................................... 84
6.6.3 Aggiornamento ........................................................................................................................................ 85
6.6.4 Aggiornamento IPC .................................................................................................................................. 85
7 Impostazione dell'app mobile............................................................................................................................... 86
8 Dichiarazione di conformità.................................................................................................................................. 87
CMS-30100_IM lxxi
Page 72

1 | Sicurezza
1 Sicurezza
1. Leggere attentamente le presenti istruzioni prima di installare e usare il prodotto.
2. Non tagliare il cavo di alimentazione per estenderlo; il dispositivo (trasformatore)
non funzionerà con un cavo più lungo. Non collegare il dispositivo prima di aver
completato tutto il cablaggio.
1.1 Avvisi di sicurezza per l'installazione
1. Durante l'installazione tenere lontani bambini, persone e animali e qualsiasi altra
fonte di distrazione per evitare di perdere la necessaria concentrazione.
2. Non sbilanciarsi durante l'installazione di questo prodotto. Mantenere sempre postura ed equilibrio corretti. Ciò consente un migliore controllo in situazioni impreviste.
3. Questo prodotto non è un giocattolo. Montarlo fuori dalla portata dei bambini.
1.2 Avvisi di sicurezza per l'uso
1. Non utilizzare prodotti alimentati elettricamente in atmosfere esplosive, come ad
esempio in presenza di liquidi infiammabili, gas o polvere. I prodotti alimentati
elettricamente possono produrre scintille con il rischio di incendiare polvere o fumi.
2. Le avvertenze, le precauzioni e le istruzioni descritte in questo manuale di istruzioni non possono coprire tutte le possibili condizioni e situazioni che possono verificarsi. L'operatore deve comprendere che il buon senso e la cautela sono fattori
che non possono essere integrati in questo prodotto, ma devono essere forniti
dall'operatore.
3. Non esporre l'alimentatore di questo prodotto a pioggia o umidità. Se all'interno
dell'alimentatore penetra dell'acqua c'è il rischio di scosse elettriche.
4. Trattare il cavo di alimentazione con le dovute cautele. Non scollegare la spina dalla presa di corrente tirando il cavo di alimentazione. Tenere il cavo lontano da fonti
di calore, olio, spigoli vivi o parti in movimento. I cavi danneggiati o impigliati aumentano il rischio di scosse elettriche.
5. L'adattatore deve corrispondere alla presa. Non modificare mai la spina in alcun
modo. Spine non modificate e prese corrispondenti riducono il rischio di scosse
elettriche.
72 CMS-30100_IM
Page 73

2 Descrizione delle parti
Videocamera
1. Antenna
2. Indicatore LED
3. Ottica
4. Sensore giorno/notte
5. Microfono
6. Altoparlante
Monitor
1. Antenna
2. Touch screen
3. Microfono
4. LED batteria
5. LED registrazione
6. Slot USB
7. Slot microSD
8. Interruttore on/off alimentazione a batteria
9. Ingresso alimentatore AC
10. Supporto
Descrizione delle parti | 2
CMS-30100_IM 73
Page 74

3 | Installazione
3 Installazione
Prima di eseguire l'installazione in posizione fissa, si raccomanda di considerare quanto
segue:
Eseguire tutti i collegamenti per familiarizzare con le unità.
Controllare la copertura wireless nei punti di montaggio previsti posizionando tempo-
raneamente le unità.
3.1 Installare il monitor
3.1.1 Montaggio
Il monitor è progettato per essere posizionato su un tavolo o una superficie piana.
a) Estrarre il sostegno del supporto presente sul retro del monitor.
b) Sollevare in posizione verticale le due antenne sul retro del monitor.
c) Posizionare su una superficie piana.
3.1.2 Cablaggio
Il monitor è portatile e può essere alimentato a batteria, a corrente alternata o con entrambi. L'alimentatore AC collegato carica completamente la batteria, poi alimenta
l'unità.
Le batterie devono essere acquistate separatamente.
Tipo di batteria: 18650
3.1.3 Inserire la scheda microSD (non fornita)
Per registrare il video è richiesta una scheda microSD.
a) Inserire la scheda microSD nello slot sul lato destro del monitor.
b) Inserire la scheda microSD (si inserisce solo con l'orientamento corretto).
c) Si raccomanda l'uso di una scheda microSD classe 10 da 128 GB massimo.
3.2 Installare la videocamera
3.2.1 Montaggio
La videocamera può essere montata in qualsiasi direzione e su qualsiasi superficie che
possa sostenere il suo peso. La videocamera deve essere montata vicino a un accesso
alla rete elettrica o potrebbe essere necessaria una prolunga.
Per montare la videocamera, sono necessari i seguenti strumenti:
ü Un giravite adatto per le viti in dotazione.
ü Un trapano e una punta adatta per i tasselli in dotazione.
a) Posizionare la videocamera nel punto desiderato.
b) Marcare le posizioni delle viti con una penna.
74 CMS-30100_IM
Page 75

c) Praticare i fori necessari.
d) Inserire i tasselli.
e) Praticare un foro sufficientemente grande per il passaggio dei cavi.
f) Far passare i cavi necessari attraverso la foro.
g) Montare l'antenna fornita sulla videocamera.
h) Fissare la videocamera con le viti.
Per realizzare un cablaggio sulla parete esterna, è necessaria una scatola di derivazione
stagna.
3.2.2 Cablaggio
La videocamera è wireless e richiede solo il collegamento elettrico.
Considerazioni sul cablaggio della videocamera:
– Il collegamento dei cavi deve essere realizzato in un ambiente interno o in una sca-
tola di derivazione stagna montata all'esterno.
– Il foro deve essere sigillato con stucco o altro materiale riempitivo per evitare l'in-
gresso di acqua.
– Si raccomanda di far passare tutti i cavi attraverso il foro. Il pulsante di reimposta-
zione (Reset) può essere lasciato all'esterno, sebbene sia sconsigliabile.
Installazione | 3
CMS-30100_IM 75
Page 76

4 | Menu a video
1: Menu a video
4 Menu a video
Toccando l'immagine video sullo schermo compare il menu.
Pulsante Descrizione
Microfono Tenere premuto per abilitare la comunicazione con la videoca-
mera correntemente visualizzata. (Assicurarsi che il microfono
della videocamera sia abilitato. Vedere la sezione "Abilitare l'au-
dio della videocamera").
Muto Disattiva/riattiva l'audio degli altoparlanti del monitor
Menu principale Accede al menu principale
Zoom Effettua lo zoom sull'immagine video.
Toccare una volta per selezionare la modalità zoom.
Toccare nuovamente l'immagine per ingrandire.
Selezionare l'icona (-) per uscire dalla modalità zoom.
Riproduzione Accede al menu di riproduzione.
Consente di guardare le registrazioni.
76 CMS-30100_IM
Page 77

5.1 Aggiungere una videocamera
2: Main menu - Match code (Menu
principale - Aggiungi videocamera)
3: Match code (Aggiungi videocamera)
Configurazione del dispositivo | 5
5 Configurazione del dispositivo
Al monitor è possibile associare fino a 4 videocamere. Per aggiungere una videocamera, procedere come segue:
a) Accendere la videocamera collegandola alla rete elettrica.
b) Attendere 30 secondi.
c) Il dispositivo emetterà il messaggio “Start configuration mode” (Avvio modalità di
configurazione).
ð NOTA: Se non si sente il messaggio, premere il pulsante di reimpostazione (re-
set) sulla videocamera per 6 secondi fino a quando viene emesso il messaggio
"Restore factory setting" (Ripristino delle impostazioni di fabbrica).
d) Nel menu principale del monitor: Selezionare “Match code” (Aggiungi videocame-
ra).
e) Selezionare “Match code” (Aggiungi videocamera). (Da eseguire entro x minuti dal-
la reimpostazione della videocamera.)
f) Sulla videocamera: Se i passaggi precedenti sono stati eseguiti correttamente, si
sentirà:
- “Wireless settings, please wait” (Impostazioni wireless, attendere)
- “Wireless connection successful” (Connessione wireless avvenuta correttamente)
g) Sul monitor: Attendere il completamento dell'associazione.
4: Canale Wi-Fi
5: Selezionare il canale Wi-Fi
5.2 Selezionare il canale Wi-Fi (se richiesto)
In presenza di numerose reti Wi-Fi se la ricezione non è buona, è possibile cambiare il
canale Wi-Fi seguendo la procedura seguente:
a) Nel menu principale: Selezionare “Match code” (Aggiungi videocamera).
b) Selezionare “Wifi Channel” (Canale Wi-Fi).
c) Selezionare “Wifi Channel” (Canale Wi-Fi).
d) Selezionare un canale dall'elenco. (Provare con canali diversi se il problema di rice-
zione persiste.)
CMS-30100_IM 77
Page 78

6 | Funzionamento del sistema
6.1 Riproduzione video
6: Icona Riproduzione video
6 Funzionamento del sistema
Il monitor inizierà a registrare video in base alle impostazioni in "Record Setup" (Impostazione registrazione). Per visualizzare le registrazioni procedere come segue:
a) Nel menu principale: Selezionare “Video Playback” (Riproduzione video).
b) Selezionare la cartella della videocamera (1-4) da cui visualizzare le registrazioni.
(Sono supportate fino a 4 videocamere.)
c) Selezionare la cartella con la data desiderata.
d) Selezionare la cartella con l'ora desiderata.
e) Selezionare il file per visualizzare la registrazione.
7: Cartella principale
8: Cartella date
9: Cartella ore
78 CMS-30100_IM
Page 79

10: Cartella file
Funzionamento del sistema | 6
6.2 Configurazione del sistema
6.2.1 Lingua
Il monitor supporta un'ampia gamma di lingue che è possibile selezionare da "Sistema".
a) Nel menu principale: Selezionare "Sistema".
b) Selezionare “Language” (Lingua).
c) Selezionare la lingua desiderata dall'elenco.
11: Lingua di sistema
12: Selezione della lingua
6.2.2 Impostazione dell'ora
13: Selezionare l'impostazione ora
La data e l'ora possono essere impostate manualmente o sincronizzandosi via Internet.
a) Nel menu principale: Selezionare "Sistema".
b) Selezionare "Time Setup" (Impostazione ora).
c) Scegliere se sincronizzare l'ora automaticamente o no. (La sincronizzazione auto-
matica richiede che il monitor sia connesso a Internet. Vedi sezione "Internet senza fili".
d) Selezionare il fuso orario. (Necessario se si sceglie di sincronizzare automaticamen-
te l'ora)
e) Selezionare "Time Setup" (Impostazione ora) se si sceglie di impostare manual-
mente l'ora e la data. (Questa opzione è disponibile solo se "Sync Time" (Sincronizza ora) è impostata su off.
14: Impostazione dell'ora
CMS-30100_IM 79
Page 80
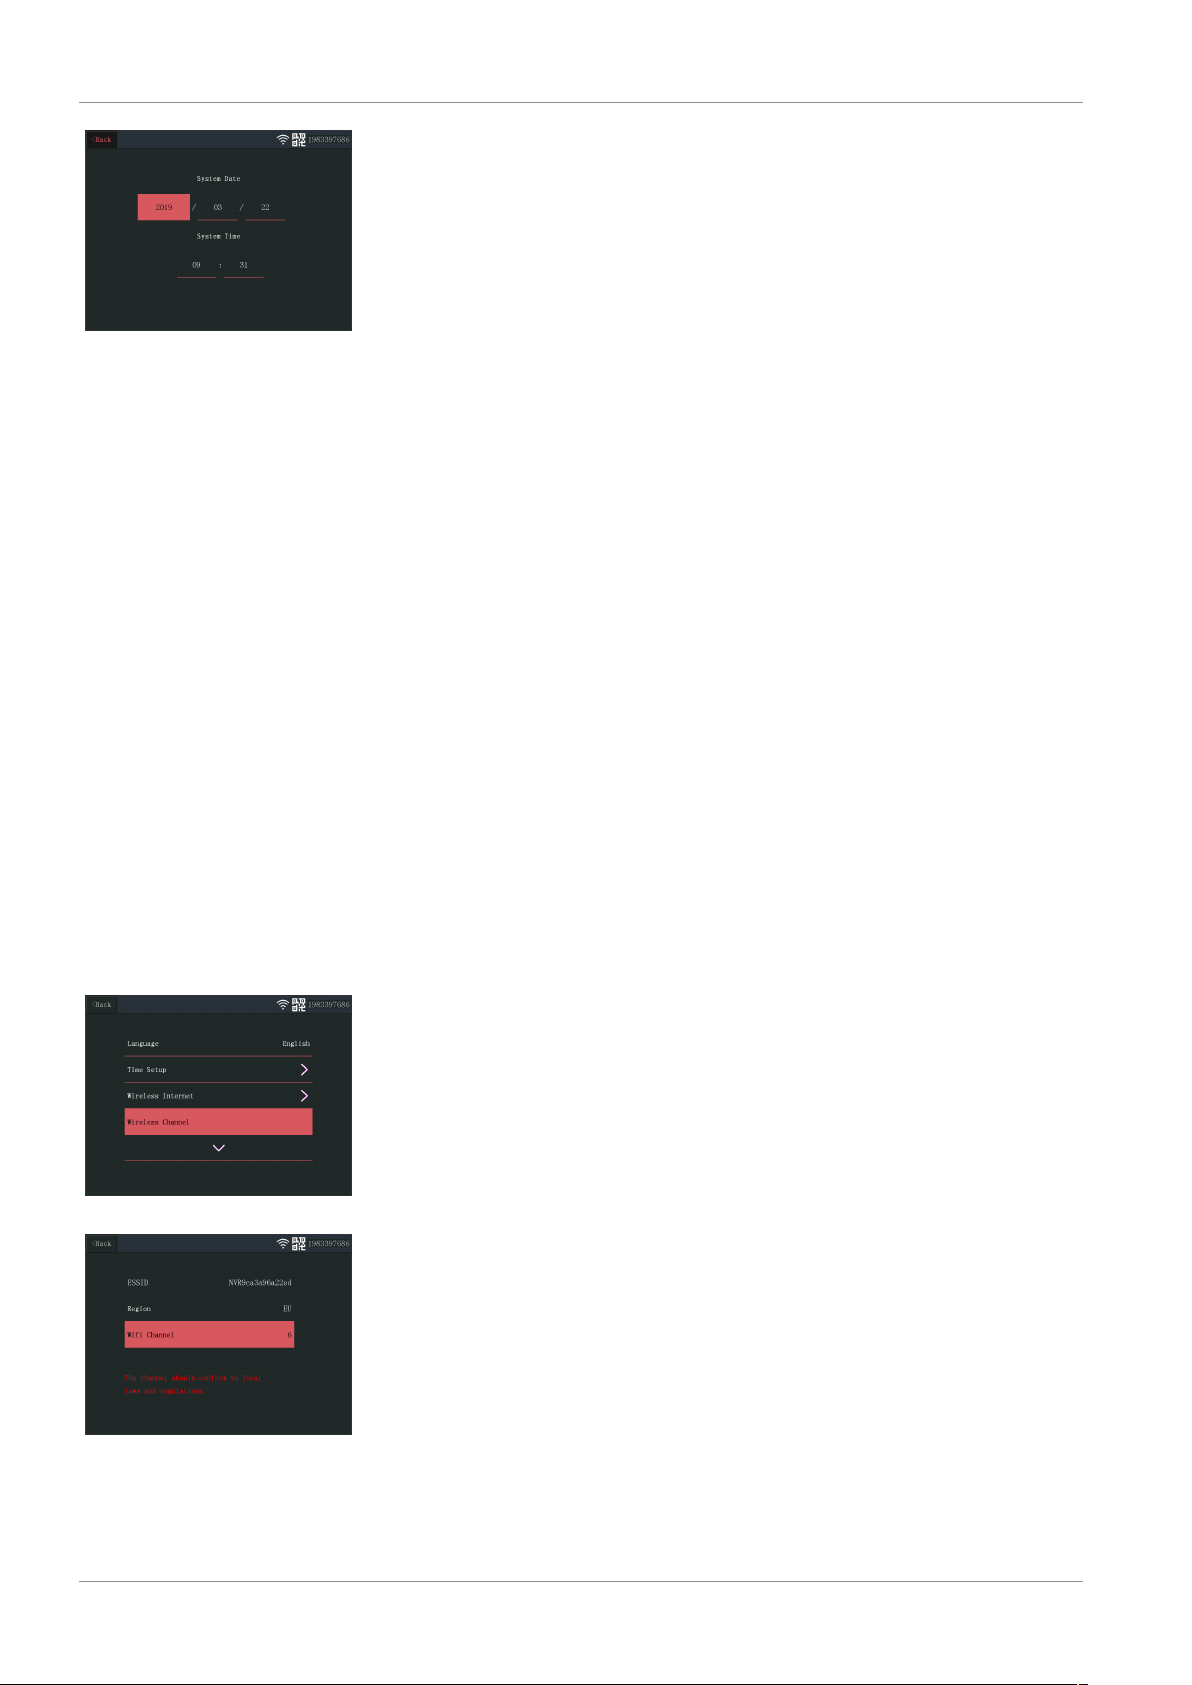
6 | Funzionamento del sistema
15: Impostazione manuale data/ora
6.2.3 Internet senza fili
Eseguire la procedura seguente per abilitare la connessione internet wireless. Questa
funzione è opzionale, ma consente di utilizzare le seguenti funzioni:
– Connettività dell'app
– Sincronizzazione di data e ora.
a) Sono necessari router Wi-Fi connesso a Internet, la password e il nome del router
(SSID).
b) Nel menu principale: Selezionare "Sistema".
c) Selezionare “Internet senza fili”.
d) Abilitare WLAN.
e) Selezionare “Elenco degli hotspot".
f) Individuare e selezionare il router wireless.
g) Digitare la password.
ð NOTA: Sono supportate solo reti a 2,4 GHz
h) Scaricare l'app “SW360”.
i) Aprire l’app, registrarsi come nuovo utente e seguirne le istruzioni.
6.2.4 Canale wireless
16: Selezionare il canale wireless
17: Canale Wi-Fi
In alcuni casi la portata del segnale wireless può essere ridotta da altre reti wireless
che occupano lo stesso canale. In presenza di una copertura inferiore al previsto, cambiare il canale può essere risolutivo.
a) Nel menu principale: Selezionare "Sistema".
b) Selezionare “Wireless Channel” (Canale wireless).
c) Selezionare “Wifi Channel” (Canale Wi-Fi).
d) Selezionare un nuovo canale. (In genere il router Wi-Fi è impostato per rilevare au-
tomaticamente il canale. In caso contrario il canale deve essere cambiato manualmente anche sul router).
80 CMS-30100_IM
Page 81
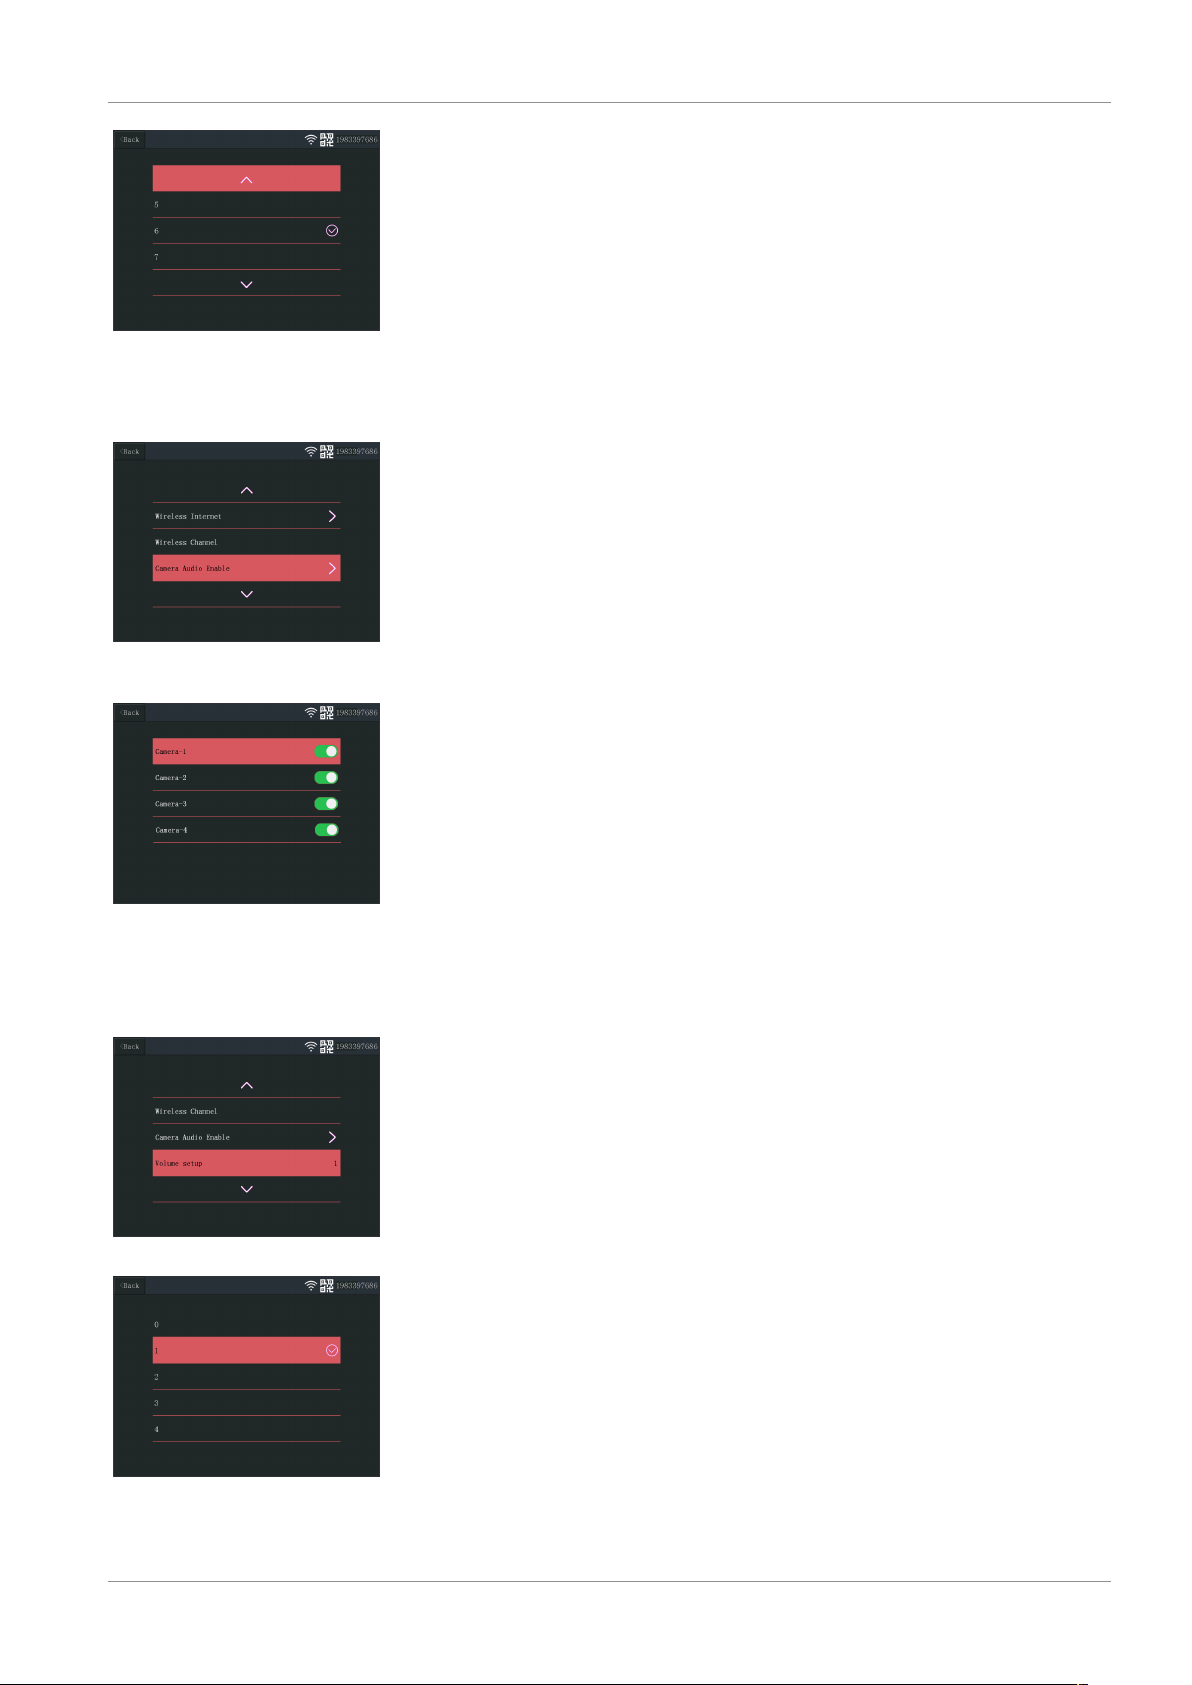
18: Elenco canali
6.2.5 Abilitare l'audio della videocamera
19: Abilitare l'audio della videocamera
Funzionamento del sistema | 6
Il microfono della videocamera può essere abilitato o disabilitato da questo menu. È
importante notare che se il microfono della videocamera è disabilitato, la comunicazione bidirezionale con la videocamera non è più possibile.
a) Nel menu principale: Selezionare "Sistema".
b) Selezionare “Camera Audio Enable” (Abilitare l'audio della videocamera).
c) Selezionare la videocamera desiderata e spostare il cursore in posizione on o off.
20: Abilitare e disabilitare l'audio
della videocamera
6.2.6 Impostazione del volume
21: Impostazione del volume
22: Regolare il volume
L'impostazione del volume consente di alzare o abbassare il volume del monitor.
a) Nel menu principale: Selezionare "Sistema".
b) Selezionare “Volume Setup” (Impostazione volume).
c) Impostare il volume selezionando un valore numerico (0-4). Impostando il valore a
0, gli altoparlanti del monitor verranno disattivati completamente.
CMS-30100_IM 81
Page 82

6 | Funzionamento del sistema
6.2.7 Spegnimento automatico
23: Spegnimento automatico
24: Timeout per lo spegnimento au-
tomatico
La funzione di spegnimento automatico attiva/disattiva il time out dello schermo.
Quando la funzione è abilitata, lo schermo del monitor viene spento trascorso un tempo impostato, e il sistema funziona normalmente.
a) Nel menu principale: Selezionare "Sistema".
b) Selezionare “Auto Close” (Spegnimento automatico)
c) Selezionare la durata (la durata inizia dopo l'ultima interazione con il monitor).
Nota: Se il monitor è alimentato a batterie, si raccomanda di impostare una durata
breve per risparmiare energia.
6.3 Aggiungere una videocamera
25: Main menu - Match code (Menu principale - Aggiungi videocamera)
26: Match code (Aggiungi videocamera)
Al monitor è possibile associare fino a 4 videocamere. Per aggiungere una videocamera, procedere come segue:
a) Accendere la videocamera collegandola alla rete elettrica.
b) Attendere 30 secondi.
c) Il dispositivo emetterà il messaggio “Start configuration mode” (Avvio modalità di
configurazione).
ð NOTA: Se non si sente il messaggio, premere il pulsante di reimpostazione (re-
set) sulla videocamera per 6 secondi fino a quando viene emesso il messaggio
"Restore factory setting" (Ripristino delle impostazioni di fabbrica).
d) Nel menu principale del monitor: Selezionare “Match code” (Aggiungi videocame-
ra).
e) Selezionare “Match code” (Aggiungi videocamera). (Da eseguire entro x minuti dal-
la reimpostazione della videocamera.)
f) Sulla videocamera: Se i passaggi precedenti sono stati eseguiti correttamente, si
sentirà:
- “Wireless settings, please wait” (Impostazioni wireless, attendere)
- “Wireless connection successful” (Connessione wireless avvenuta correttamente)
g) Sul monitor: Attendere il completamento dell'associazione.
6.4 Impostazione registrazioni
Il sistema può essere configurato per registrare video in diverse modalità. Supporta fino a 4 programmi distinti ognuno dei quali può essere impostato in varie modalità, utilizzando 1 o più videocamere installate. Vedi sezione "Programma di registrazione".
Per configurare le impostazioni di registrazione, procedere come segue.
a) Nel menu principale: Selezionare “Record Setup” (Impostazione registrazioni).
82 CMS-30100_IM
Page 83

6.4.1 Programma di registrazione
27: Programma di registrazione
Funzionamento del sistema | 6
b) Selezionare il dispositivo di archiviazione. (Necessario solo se è stata inserita una
scheda microSD.)
c) Selezionare "Storage Manage" (Gestione archiviazione) per verificare l'utilizzo cor-
rente della memoria e formattare la scheda microSD.
d) Selezionare "Overwrite" (Sovrascrivi) per abilitare/disabilitare la sovrascrittura del-
le vecchie registrazioni a memoria piena.
Impostare un programma di registrazione come segue.
a) Nel menu principale: Selezionare “Record Setup” (Impostazione registrazioni).
b) Selezionare “Record Schedule” (Programma di registrazione).
c) Selezionare un programma tra 1 e 4.
d) Abilitare il programma selezionato spostando il cursore (diventa verde quando è
abilitato).
e) Selezionare “channel” (canale - videocamere).
f) Selezionare il canale (videocamere da registrare).
g) Selezionare “Weekday” (Giorno della settimana).
h) Selezionare dall'elenco i giorni in cui si desidera registrare.
i) Selezionare "Time" (Orario) e inserire l'intervallo di tempo di cui si desidera regi-
strare.
Nota: “Type” (Tipo) ha una sola opzione (Enable motion alarm (Abilita allarme su movimento)) che è abilitata come predefinizione.
28: Programma 1-4
29: Impostazione dei programmi
6.5 Impostazione allarme
30: Impostazione allarme - canali
Il monitor dispone di una funzione di allarme che può essere attivata quando viene rilevato un movimento. Per impostare l'allarme procedere come segue.
a) Nel menu principale: Selezionare “Alarm Setup” (Impostazione allarme).
b) Selezionare “Alarm volume setup” (Impostazione volume allarme).
c) Impostare il volume dell’allarme desiderato. (Il volume dell'allarme prevarica qual-
siasi altra impostazione sonora se attivato.)
d) Selezionare il canale (videocamera) che attiverà l'allarme.
e) Abilitare il "Enable Motion Alarm" (Abilita allarme su movimento) spostando il cur-
sore (diventa verde quando è abilitato).
f) Abilitare "APP Alarm" (Allarme APP) spostando il cursore (diventa verde quando è
abilitata) per ricevere gli allarmi sul dispositivo mobile. (Vedi sezione "Impostazio-
ne dell'app mobile").
CMS-30100_IM 83
Page 84

6 | Funzionamento del sistema
31: Impostazione allarme - impostazione canali
32: Modifica area
g) Abilitare “Monitor Sound Alarm” (Allarme sonoro sul monitor) per ricevere un al-
larme acustico dal monitor.
h) Selezionare “Sensitivity” (Sensibilità) per impostare la sensibilità della rilevazione
di movimento.
i) Selezionare "Area edit" (Modifica area) per mascherare le aree in cui la rilevazione
di movimento deve essere disattivata. (Opzione utile in presenza di alberi, traffico,
ecc. costantemente inquadrati dalla videocamera.)
Nota: Le aree contrassegnate in arancione non fanno scattare l'allarme di movimento.
33: Informazioni sul sistema
34: Impostazioni di fabbrica
6.6 Gestione del sistema
6.6.1 Informazioni sul sistema
Le informazioni sul sistema forniscono informazioni sul monitor. Queste informazioni
vengono utilizzate principalmente a supporto degli interventi di assistenza. Per visualizzare le Informazioni sul sistema, procedere come segue.
a) Nel menu principale: Selezionare “System Manage” (Gestione sistema).
b) Selezionare “System Info” (Informazioni sul sistema).
6.6.2 Impostazioni di fabbrica
Questo menu consente di ripristinare le impostazioni di fabbrica a due livelli.
– "Simple Restore" (Ripristino semplice) ripristina tutte le impostazioni, ad eccezione
delle impostazioni Wi-Fi e delle videocamere associate.
– "Restore All" (Ripristina tutto) ripristina tutte le impostazioni, comprese le video-
camere associate e le impostazioni Wi-Fi.
– Per ripristinare il sistema, procedere come segue.
a) Nel menu principale: Selezionare “System Manage” (Gestione sistema).
b) Selezionare “Factory Setting” (Impostazioni di fabbrica).
c) Selezionare “Simple Restore” (Ripristino semplice) o “Restore All” (Ripristina tut-
to).
84 CMS-30100_IM
Page 85

6.6.3 Aggiornamento
Il menu "Upgrade" (Aggiornamento) consente di aggiornare il firmware del monitor
utilizzando una scheda microSD. Questa operazione è sconsigliata e viene principalmente eseguita su esplicita richiesta del supporto tecnico.
6.6.4 Aggiornamento IPC
Il menu "IPC Upgrade" (Aggiornamento IPC) consente di aggiornare il firmware delle videocamere utilizzando una scheda microSD. Questa operazione è sconsigliata e viene
principalmente eseguita su esplicita richiesta del supporto tecnico.
Funzionamento del sistema | 6
CMS-30100_IM 85
Page 86

7 | Impostazione dell'app mobile
7 Impostazione dell'app mobile
Il sistema supporta l'app mobile "SW360". L'app può essere utilizzata come monitor
aggiuntivo sul proprio dispositivo mobile. Per configurare l'app mobile, procedere come segue.
a) Collegare il monitor alla rete Wi-Fi. (Vedi sezione "Internet senza fili").
b) Collegare il dispositivo mobile alla stessa rete.
c) Scaricare l'app “SW360”.
d) Aprire l’app, registrarsi come nuovo utente e seguirne le istruzioni.
e) Accedere all'app.
f) Selezionare l'icona (+) per aggiungere un nuovo dispositivo.
g) Selezionare il monitor dalla lista dei dispositivi.
h) Selezionare il dispositivo che appare nell'elenco (normalmente un numero a 10 ci-
fre).
Nota: Il dispositivo dovrebbe ora essere aggiunto. Per maggiori informazioni su SW360,
consultare il manuale dell'app.
86 CMS-30100_IM
Page 87

Dichiarazione di conformità | 8
8 Dichiarazione di conformità
Il fabbricante, Smartwares Europe dichiara che il tipo di apparecchiatura radio
CMS-30100 è conforme alla direttiva 2014/53/UE.
Il testo completo della dichiarazione di conformità UE è disponibile al seguente indirizzo Internet: www.smartwares.eu/doc
CMS-30100_IM 87
Page 88

Spis treści
Spis treści
1 Bezpieczeństwo .................................................................................................................................................... 89
1.1 Bezpieczeństwo instalacji ..................................................................................................................................... 89
1.2 Bezpieczeństwo obsługi........................................................................................................................................ 89
2 Opis części ............................................................................................................................................................ 90
3 Montaż................................................................................................................................................................. 91
3.1 Zamocuj monitor .................................................................................................................................................. 91
3.1.1 Mocowanie............................................................................................................................................... 91
3.1.2 Okablowanie ............................................................................................................................................ 91
3.1.3 Włóż kartę MicroSD (nie jest dołączona do zestawu) .............................................................................. 91
3.2 Zainstaluj kamerę.................................................................................................................................................. 91
3.2.1 Mocowanie............................................................................................................................................... 91
3.2.2 Okablowanie ............................................................................................................................................ 92
4 Menu ekranowe ................................................................................................................................................... 93
5 Konfiguracja urządzenia........................................................................................................................................ 94
5.1 Dodaj kamerę........................................................................................................................................................ 94
5.2 Wybierz kanał Wi-Fi (jeśli jest wymagany)............................................................................................................ 94
6 Działanie systemu................................................................................................................................................. 95
6.1 Odtwarzanie wideo............................................................................................................................................... 95
6.2 Ustawienia systemu.............................................................................................................................................. 96
6.2.1 Język ......................................................................................................................................................... 96
6.2.2 Ustawienia czasu...................................................................................................................................... 96
6.2.3 Internet bezprzewodowy ......................................................................................................................... 97
6.2.4 Kanał bezprzewodowy ............................................................................................................................. 97
6.2.5 Włącz dźwięk kamery............................................................................................................................... 98
6.2.6 Ustawienie głośności................................................................................................................................ 98
6.2.7 Automatyczne zamknięcie ....................................................................................................................... 99
6.3 Dodaj kamerę........................................................................................................................................................ 99
6.4 Ustawienia nagrywania......................................................................................................................................... 99
6.4.1 Harmonogram nagrywania ...................................................................................................................... 100
6.5 Ustawienie alarmu................................................................................................................................................ 100
6.6 Zarządzanie systemem.......................................................................................................................................... 101
6.6.1 Informacje o systemie.............................................................................................................................. 101
6.6.2 Ustawienia fabryczne............................................................................................................................... 101
6.6.3 Aktualizacja .............................................................................................................................................. 102
6.6.4 Aktualizacja IPC ........................................................................................................................................ 102
7 Ustawienia aplikacji mobilnej ............................................................................................................................... 103
8 Deklaracja zgodności ............................................................................................................................................ 104
lxxxviii CMS-30100_IM
Page 89

1 Bezpieczeństwo
1. Przed zainstalowaniem i rozpoczęciem korzystania zproduktu należy uważnie
przeczytać poniższe instrukcje.
2. Nie przecinaj kabla zasilania, aby go wydłużyć. Urządzenie (transformator) nie działa z dłuższym kablem. Nie podłączaj urządzenia do prądu, dopóki nie skończysz
układać i podłączać całego okablowania.
1.1 Bezpieczeństwo instalacji
1. Zadbaj, aby podczas instalacji produktów w pobliżu nie przebywały dzieci ani inne
osoby postronne. Rozproszenie uwagi może spowodować utratę kontroli.
2. Instalując produkt, nie wychylaj się i nie sięgaj za daleko. Przez cały czas utrzymuj
pewne oparcie stóp i równowagę. Dzięki temu będziesz mieć więcej kontroli w razie nieprzewidzianych sytuacji.
3. Produkt to nie zabawka. Zamontuj go poza zasięgiem dzieci.
Bezpieczeństwo | 1
1.2 Bezpieczeństwo obsługi
1. Nie używaj elektronarzędzi w otoczeniu wybuchowym, np. takim, w którym występują łatwopalne płyny, gazy lub pyły. Elektronarzędzia wytwarzają iskry, które mogą spowodować zapłon pyłu lub oparów.
2. Ostrzeżenia, środki zabezpieczające i instrukcje opisane w niniejszym dokumencie
nie obejmują wszystkich możliwych warunków i sytuacji, które mogą się zdarzyć.
Operator musi zdawać sobie sprawę, że zdrowego rozsądku i ostrożności nie da się
fizycznie wbudować w produkt. Zależą one od samego operatora.
3. Nie wystawiaj zasilacza produktu na deszcz ani wilgoć. Jeśli do zasilacza przeniknie
woda, zwiększy to zagrożenie porażeniem prądem.
4. Nie narażaj kabla zasilającego na nadmierne obciążenia. Nigdy nie ciągnij za kabel,
aby wyjąć wtyczkę zgniazda elektrycznego. Trzymaj kabel z dala od źródeł ciepła,
oleju, ostrych krawędzi i ruchomych części. Uszkodzone i splątane kable zwiększają
zagrożenie porażeniem prądem.
5. Zasilacz musi pasować do gniazdka. Nigdy nie modyfikuj wtyczki. Niezmodyfikowane wtyczki i pasujące do nich gniazdka zasilania zmniejszają zagrożenie porażeniem
prądem.
CMS-30100_IM 89
Page 90

2 | Opis części
2 Opis części
Kamera
1. Antena
2. Oświetlenie LED
3. Obiektyw
4. Czujnik dnia/nocy
5. Mikrofon
6. Głośnik
Monitor
1. Antena
2. Ekran dotykowy
3. Mikrofon
4. Wskaźnik LED baterii
5. Wskaźnik LED nagrywania
6. Gniazdo USB
7. Gniazdo MicroSD
8. Przełącznik wł./wył do pracy na baterii
9. Wejście zasilacza
10. Podstawka
90 CMS-30100_IM
Page 91

3 Montaż
Przed zamontowaniem na stałe warto wykonać następujące czynności:
Podłącz wszystko, aby zapoznać się z urządzeniami.
Sprawdź zasięg połączenia bezprzewodowego w planowanych miejscach montażu,
tymczasowo umieszczając w nich urządzenia.
3.1 Zamocuj monitor
3.1.1 Mocowanie
Monitor jest przeznaczony do ustawiania na stole lub innej płaskiej powierzchni.
a) Wyciągnij nóżkę podstawki z tyłu monitora.
b) Wyciągnij dwie anteny z tyłu monitora do pozycji pionowej.
c) Ustaw na płaskiej powierzchni.
Montaż | 3
3.1.2 Okablowanie
Monitor jest przenośny. Może być zasilany z akumulatora, zasilacza sieciowego lub obu
tych źródeł. Gdy jest podłączony zasilacz sieciowy, akumulator się ładuje do 100%. Następnie urządzenie działa bezpośrednio na zasilaczu.
Akumulatory należy nabyć osobno.
Rodzaj akumulatora: 18650
3.1.3 Włóż kartę MicroSD (nie jest dołączona do zestawu)
Karta MicroSD jest wymagana do nagrywania wideo.
a) Gniazdo karty MicroSD znajduje się z prawej strony monitora.
b) Włóż kartę MicroSD card (można ją włożyć tylko, jeśli jest w prawidłowym położe-
niu).
c) Zaleca się stosowanie karty MicroSD klasy 10 o maksymalnej pojemności 128GB.
3.2 Zainstaluj kamerę
3.2.1 Mocowanie
Kamerę można zamocować skierowaną w dowolnym kierunku, na dowolnej powierzchni, która wytrzyma jej ciężar. Kamerę należy montować blisko źródła zasilania sieciowego, w przeciwnym razie może być konieczne zastosowanie przedłużacza.
Aby przymocować kamerę, potrzebujesz następujących narzędzi:
ü Odpowiedni śrubokręt do dołączonych wkrętów.
ü Wiertarka i odpowiednie wiertło do dołączonych kołków.
a) Umieść kamerę w wybranym miejscu.
b) Oznacz położenie wkrętów za pomocą flamastra, długopisu itp.
CMS-30100_IM 91
Page 92

3 | Montaż
c) Wywierć otwory.
d) Włóż kołki.
e) Wywierć otwór o średnicy wystarczająco dużej, aby przeszły przez niego kable.
f) Przewlecz wymagane kable przez otwór.
g) Przymocuj dołączoną do zestawu antenę do kamery.
h) Przykręć kamerę wkrętami.
Jeśli chcesz poprowadzić kabel po ścianie, konieczna jest wodoszczelna puszka przyłączeniowa.
3.2.2 Okablowanie
Kamera jest bezprzewodowa, wymaga jedynie podłączenia zasilania elektrycznego.
Istotne kwestie związane z okablowaniem kamery:
– Podłączenia kabli muszą być zrealizowane w pomieszczeniu lub w wodoszczelnej
puszce przyłączeniowej zamontowanej na zewnątrz.
– Otwór należy uszczelnić wypełniaczem, aby zapobiec wnikaniu wody do środka.
– Zaleca się, aby przeciągnąć przez otwór wszystkie kable. Przycisk reset można po-
zostawić na zewnątrz, jednak nie jest to zalecane.
92 CMS-30100_IM
Page 93

1: Menu ekranowe
Menu ekranowe | 4
4 Menu ekranowe
Menu ekranowe wyświetla się, gdy dotkniesz materiału wideo.
Przycisk Opis
Mikrofon Naciśnij i przytrzymaj, aby uruchomić komunikację z kamerą, z
której obraz jest aktualnie oglądany. (Upewnij się, że mikrofon
kamery jest włączony, patrz sekcja „Włączanie dźwięku kamery”.)
Wyciszenie Wybierz, aby wyciszyć/pogłośnić głośniki monitora
Menu główne Wybierz, aby wejść do menu głównego
Przybliżenie Wybierz, aby przybliżyć materiał wideo.
Dotknij jeden raz, aby wybrać tryb przybliżania.
Dotknij jeszcze raz na obrazie, aby go przybliżyć.
Wybierz ikonę (-), aby zamknąć tryb przybliżania.
Odtwarzanie Wybierz, aby wejść do menu odtwarzania.
W tym miejscu możesz przeglądać nagrania.
CMS-30100_IM 93
Page 94

5 | Konfiguracja urządzenia
5.1 Dodaj kamerę
2: Menu główne — Dodaj kamerę
3: Dodaj kamerę
5 Konfiguracja urządzenia
Z monitorem można sparować maks. 4 kamery. Aby dodać kamerę, wykonaj następujące kroki:
a) Włącz kamerę, podłączając ją do zasilania sieciowego.
b) Odczekaj 30 sekund.
c) Usłyszysz komunikat: „Start configuration mode” (Początek trybu konfiguracji).
ð UWAGA: Jeśli nie słyszysz komunikatu, naciśnij i przytrzymaj przycisk reset na
kamerze przez 6 sekund, aż usłyszysz „Restore factory setting” (Przywracanie
ustawień fabrycznych).
d) Na monitorze w menu głównym: Wybierz „Add Camera” (Dodaj kamerę).
e) Wybierz „Add Camera” (Dodaj kamerę). (Należy to wykonać w ciągu x minut po
zresetowaniu kamery.)
f) Na kamerze: Jeśli powyższe kroki zostaną przeprowadzone poprawnie, usłyszysz
komunikat:
- „Wireless settings, please wait” (Ustawienia bezprzewodowe, poczekaj chwilę)
- „Wireless connection successful” (Nawiązano połączenie bezprzewodowe)
g) Na monitorze: Poczekaj na zakończenie parowania.
4: Kanał Wi-Fi
5: Wybierz kanał Wi-Fi
5.2 Wybierz kanał Wi-Fi (jeśli jest wymagany)
Jeśli w okolicy jest wiele sieci Wi-Fi i występują problemy z odbiorem, zmień kanał WiFi, wykonując poniższe kroki:
a) W menu głównym: Wybierz „Add Camera” (Dodaj kamerę).
b) Wybierz „Wifi Channel” (Kanał Wi-Fi)
c) Wybierz „Wifi Channel” (Kanał Wi-Fi)
d) Wybierz kanał z listy. (Jeśli problemy z odbiorem nie znikają, wypróbuj inne kana-
ły.)
94 CMS-30100_IM
Page 95

6: Ikona odtwarzania wideo
Działanie systemu | 6
6 Działanie systemu
6.1 Odtwarzanie wideo
Monitor rozpocznie nagrywanie wideo w zależności od ustawień w pozycji „Record Setup” (Ustawienia nagrywania). Aby przeglądać nagrania, wykonaj poniższe kroki:
a) W menu głównym: Wybierz „Video Playback” (Odtwarzanie wideo).
b) Wybierz folder kamery (1-4), z którego nagrania chcesz przeglądać. (Obsługiwane
są maks. 4 kamery).
c) Wybierz folder z żądaną datą.
d) Wybierz folder z żądanym czasem.
e) Wybierz żądany plik, aby przeglądać nagranie.
7: Katalog główny
8: Katalog daty
9: Katalog czasu
CMS-30100_IM 95
Page 96

6 | Działanie systemu
10: Katalog plików
6.2 Ustawienia systemu
6.2.1 Język
Monitor obsługuje szereg języków, które można wybrać w pozycji „System Setup” (Ustawienia systemu).
a) W menu głównym: Wybierz „System Setup” (Ustawienia systemu).
b) Wybierz „Language” (Język).
c) Wybierz żądany język z listy.
11: Język ustawień systemu
12: Wybór języka
13: Wybierz ustawienia czasu
6.2.2 Ustawienia czasu
Datę i czas można ustawić ręcznie lub synchronizując je z Internetem.
a) W menu głównym: Wybierz „System Setup” (Ustawienia systemu).
b) Wybierz „Time Setup” (Ustawienia czasu).
c) Wybierz, czy synchronizować czas automatycznie, czy nie. (Synchronizacja automa-
tyczna wymaga, aby monitor był połączony z Internetem). Patrz sekcja Internet
bezprzewodowy.
d) Wybierz strefę czasową. (Należy to zrobić, nawet jeśli chcesz, aby godzina synchro-
nizowała się automatycznie.)
e) Wybierz „Time Setup” (Ustawienia czasu), jeśli chcesz ustawić datę i godzinę ręcz-
nie. (Ta opcja jest dostępna tylko, gdy funkcja „Sync Time” (Synchronizacja czasu)
jest wyłączona.)
14: Ustawienia czasu
96 CMS-30100_IM
Page 97
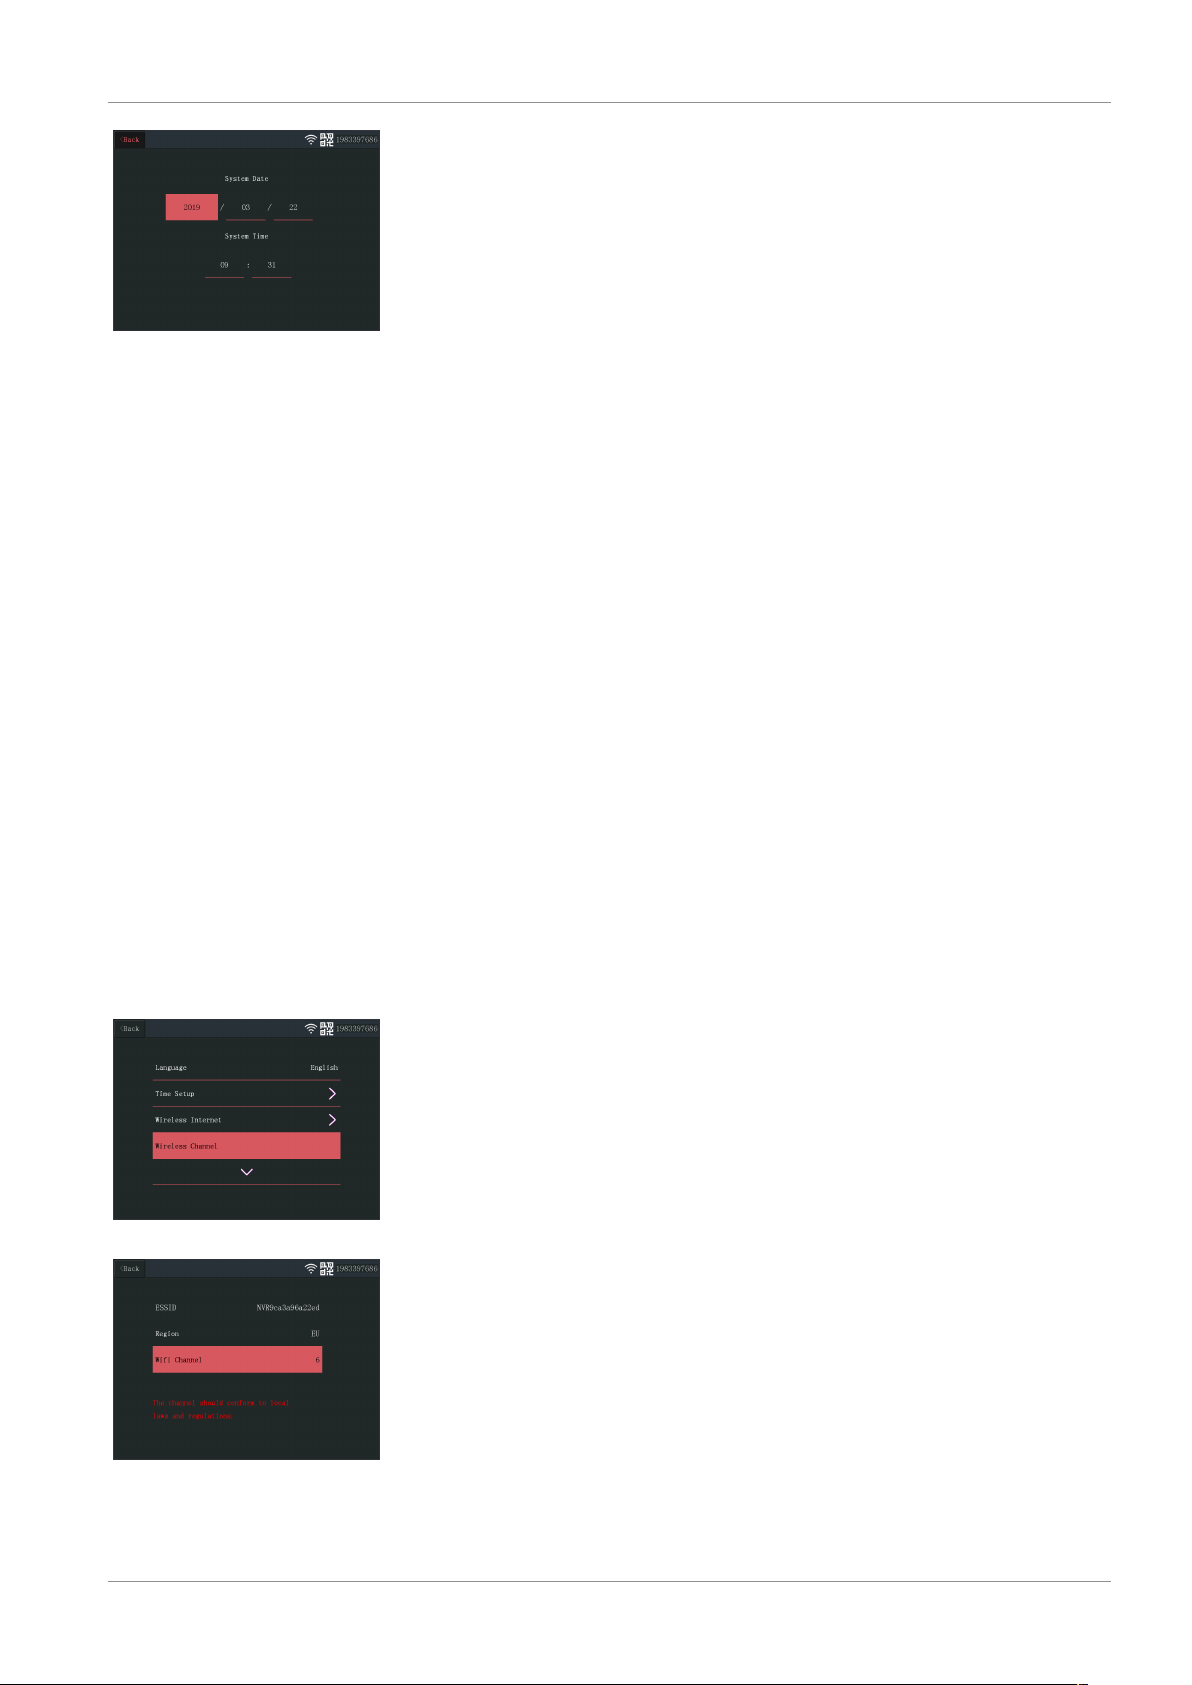
15: Ustawienia daty i czasu (ręczne)
6.2.3 Internet bezprzewodowy
Działanie systemu | 6
Wykonaj poniższe kroki, aby połączyć urządzenie bezprzewodowo z Internetem. Jest to
opcjonalne, ale umożliwia korzystanie z następujących funkcji:
– Łączność z aplikacją
– Synchronizacja daty i godziny.
a) Upewnij się, że dysponujesz routerem Wi-Fi połączonym z Internetem, hasłem i
nazwą routera (SSID).
b) W menu głównym: Wybierz „System Setup” (Ustawienia systemu).
c) Wybierz „Wireless Internet” (Internet bezprzewodowy).
d) Włącz WLAN.
e) Wybierz „Hotspot list” (Lista hotspotów).
f) Znajdź i wybierz swój router bezprzewodowy.
g) Wpisz swoje hasło
ð UWAGA: Obsługiwane są tylko sieci Wi-Fi 2,4 GHz.
h) Pobierz aplikację „SW360”.
i) Otwórz aplikację, zarejestruj się jako nowy użytkownik i postępuj zgodnie z in-
strukcjami w aplikacji.
16: Wybierz kanał
17: Kanał Wi-Fi
6.2.4 Kanał bezprzewodowy
W niektórych przypadkach inne sieci bezprzewodowe zajmujące ten sam kanał mogą
zakłócać sygnał bezprzewodowy. Jeśli zasięg połączenia jest za mały, rozwiązaniem może być zmiana kanału.
a) W menu głównym: Wybierz „System Setup” (Ustawienia systemu).
b) Wybierz „Wireless Channel” (Kanał bezprzewodowy).
c) Wybierz „Wifi Channel” (Kanał Wi-Fi)
d) Wybierz nowy kanał. (Router Wi-Fi jest zwykle skonfigurowany tak, aby wykrywał
kanał automatycznie. W przeciwnym razie kanał należy również ręcznie zmienić w
routerze).
CMS-30100_IM 97
Page 98
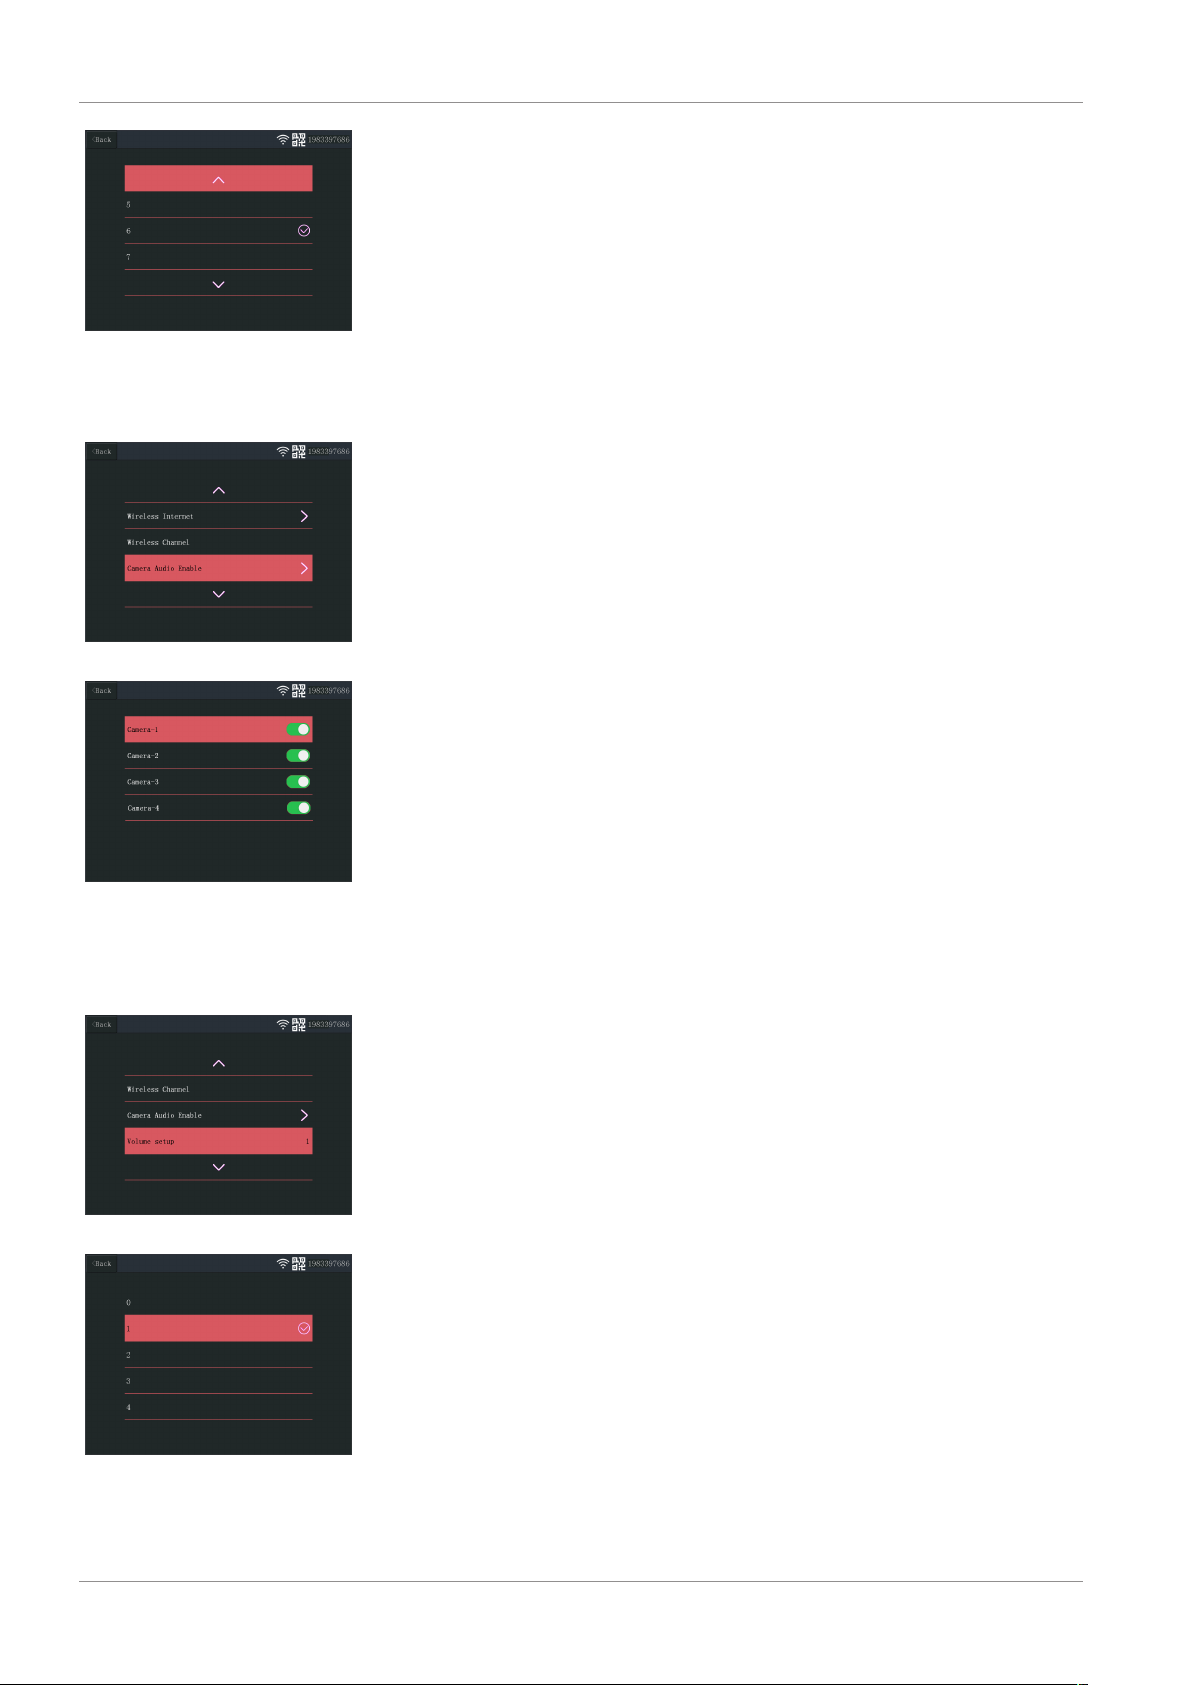
6 | Działanie systemu
18: Lista kanałów
19: Włącz dźwięk kamery
6.2.5 Włącz dźwięk kamery
W tym menu można włączać i wyłączać mikrofon kamery. Należy pamiętać, że gdy mikrofon kamery jest wyłączony, komunikacja dwukierunkowa z kamerą nie jest możliwa.
a) W menu głównym: Wybierz „System Setup” (Ustawienia systemu).
b) Wybierz „Camera Audio Enable” (Włącz dźwięk kamery).
c) Wybierz daną kamerę i przesuń suwak do położenia on (wł.) lub off (wył.).
20: Włącza i wyłącza funkcję dźwięku kamery
6.2.6 Ustawienie głośności
21: Ustawienie głośności
22: Regulacja głośności.
Ustawienie głośności umożliwia zwiększanie i zmniejszanie głośności monitora.
a) W menu głównym: Wybierz „System Setup” (Ustawienia systemu).
b) Wybierz „Volume Setup” (Ustawienia głośności).
c) Ustaw głośność, wybierając wartość numeryczną głośności (0-4). Ustawienie war-
tości na 0 całkowicie wyciszy głośniki monitora.
98 CMS-30100_IM
Page 99
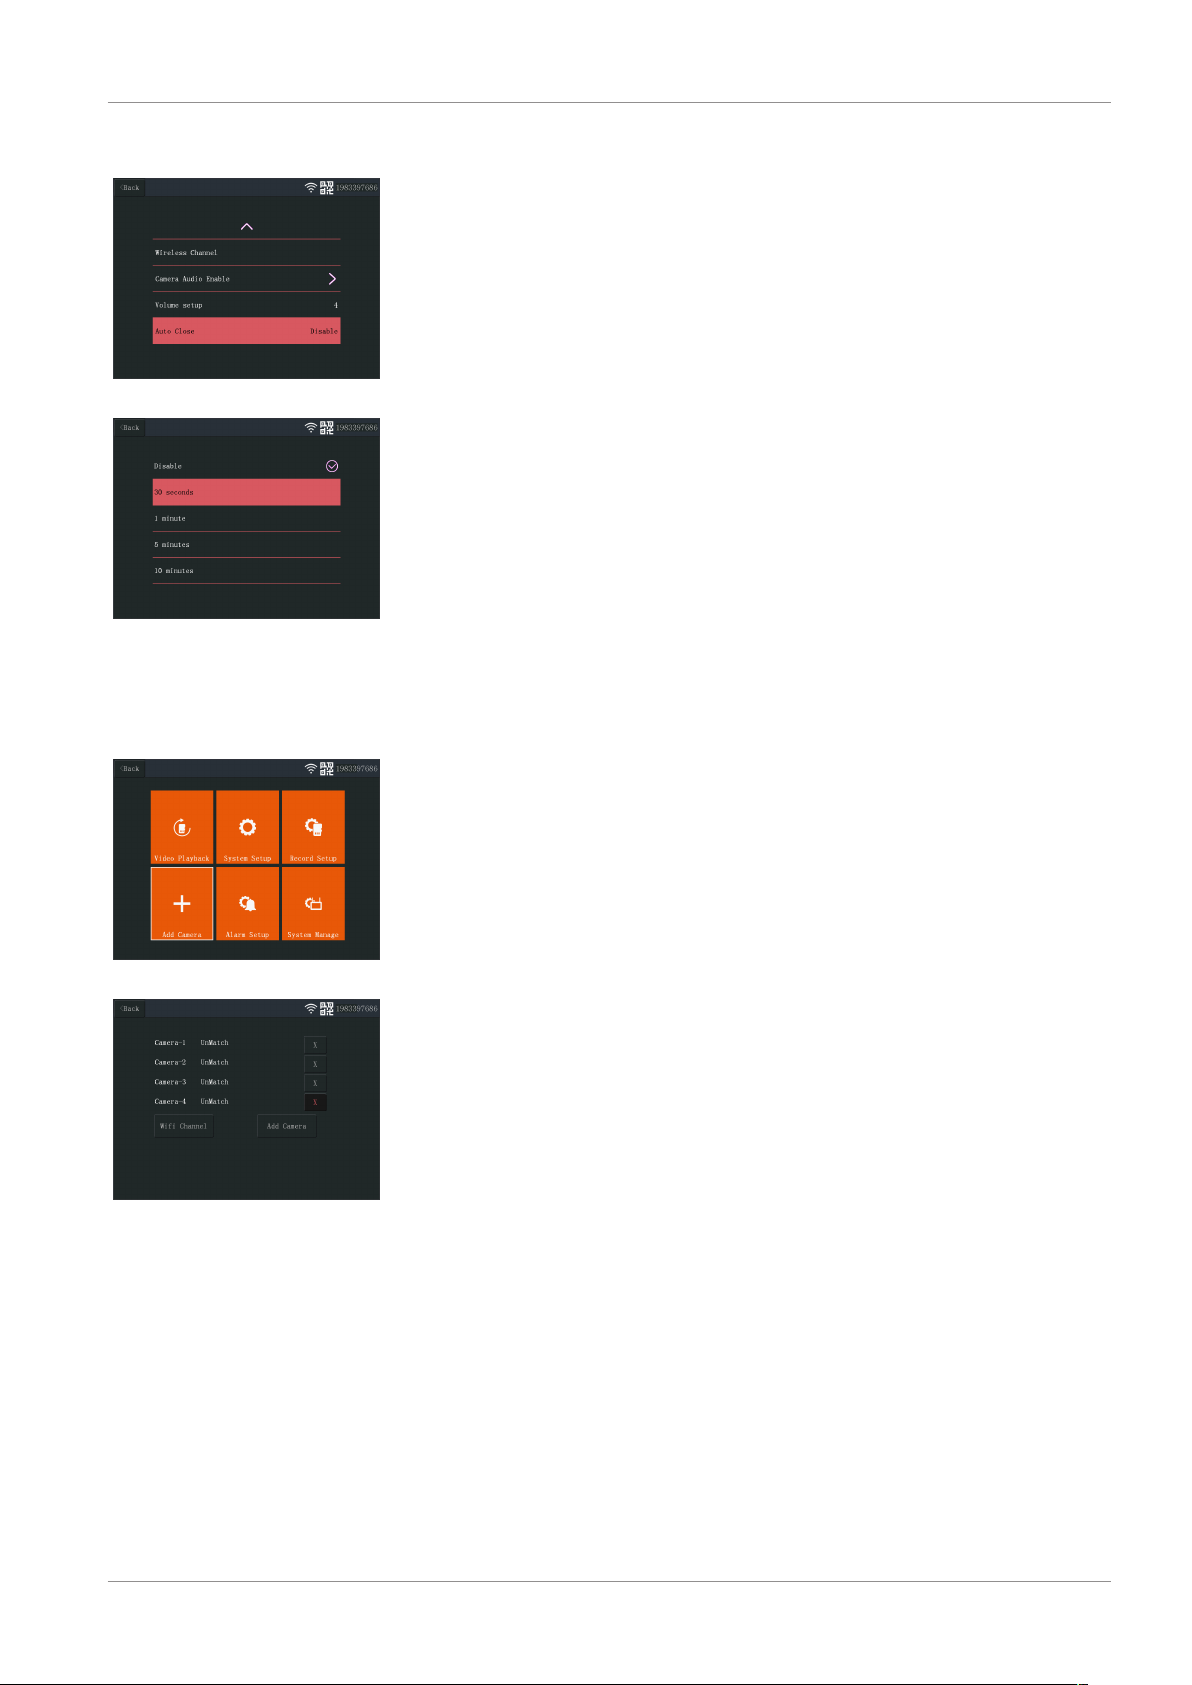
6.2.7 Automatyczne zamknięcie
23: Automatyczne zamknięcie
24: Czas (limit czasu) do automa-
tycznego zamknięcia
Działanie systemu | 6
Funkcja automatycznego zamknięcia włącza/wyłącza limit czasu włączenia ekranu. Gdy
funkcja automatycznego zamknięcia jest włączona, ekran monitora wyłącza się po
upływie ustawionego czasu, gdy system jest normalnie uruchomiony i działa.
a) W menu głównym: Wybierz „System Setup” (Ustawienia systemu).
b) Wybierz „Auto Close” (Automatyczne zamknięcie)
c) Wybierz czas trwania przed upływem limitu (czas trwania rozpoczyna się od chwili
ostatniej interakcji z monitorem).
Uwaga: Gdy monitor działa na zasilaniu akumulatorowym, zaleca się ustawić krótki
czas trwania, aby oszczędzać energię.
6.3 Dodaj kamerę
25: Menu główne — Dodaj kamerę
26: Dodaj kamerę
6.4 Ustawienia nagrywania
Z monitorem można sparować maks. 4 kamery. Aby dodać kamerę, wykonaj następujące kroki:
a) Włącz kamerę, podłączając ją do zasilania sieciowego.
b) Odczekaj 30 sekund.
c) Usłyszysz komunikat: „Start configuration mode” (Początek trybu konfiguracji).
ð UWAGA: Jeśli nie słyszysz komunikatu, naciśnij i przytrzymaj przycisk reset na
kamerze przez 6 sekund, aż usłyszysz „Restore factory setting” (Przywracanie
ustawień fabrycznych).
d) Na monitorze w menu głównym: Wybierz „Add Camera” (Dodaj kamerę).
e) Wybierz „Add Camera” (Dodaj kamerę). (Należy to wykonać w ciągu x minut po
zresetowaniu kamery.)
f) Na kamerze: Jeśli powyższe kroki zostaną przeprowadzone poprawnie, usłyszysz
komunikat:
- „Wireless settings, please wait” (Ustawienia bezprzewodowe, poczekaj chwilę)
- „Wireless connection successful” (Nawiązano połączenie bezprzewodowe)
g) Na monitorze: Poczekaj na zakończenie parowania.
System można ustawić tak, aby nagrywał wideo w różnych trybach. Obsługiwane są
maks. 4 oddzielne harmonogramy, każdy z nich można ustawić w różnych trybach, z
wykorzystywaniem 1 lub większej liczby zainstalowanych kamer. Patrz sekcja „Harmonogram nagrywania”.
Aby skonfigurować ustawienia nagrywania, wykonaj poniższe kroki.
a) W menu głównym: Wybierz „Record Setup” (Ustawienia nagrywania).
b) Wybierz urządzenie pamięci masowej. (Ma to znaczenie tylko, gdy jest włożona
karta MicroSD.)
CMS-30100_IM 99
Page 100
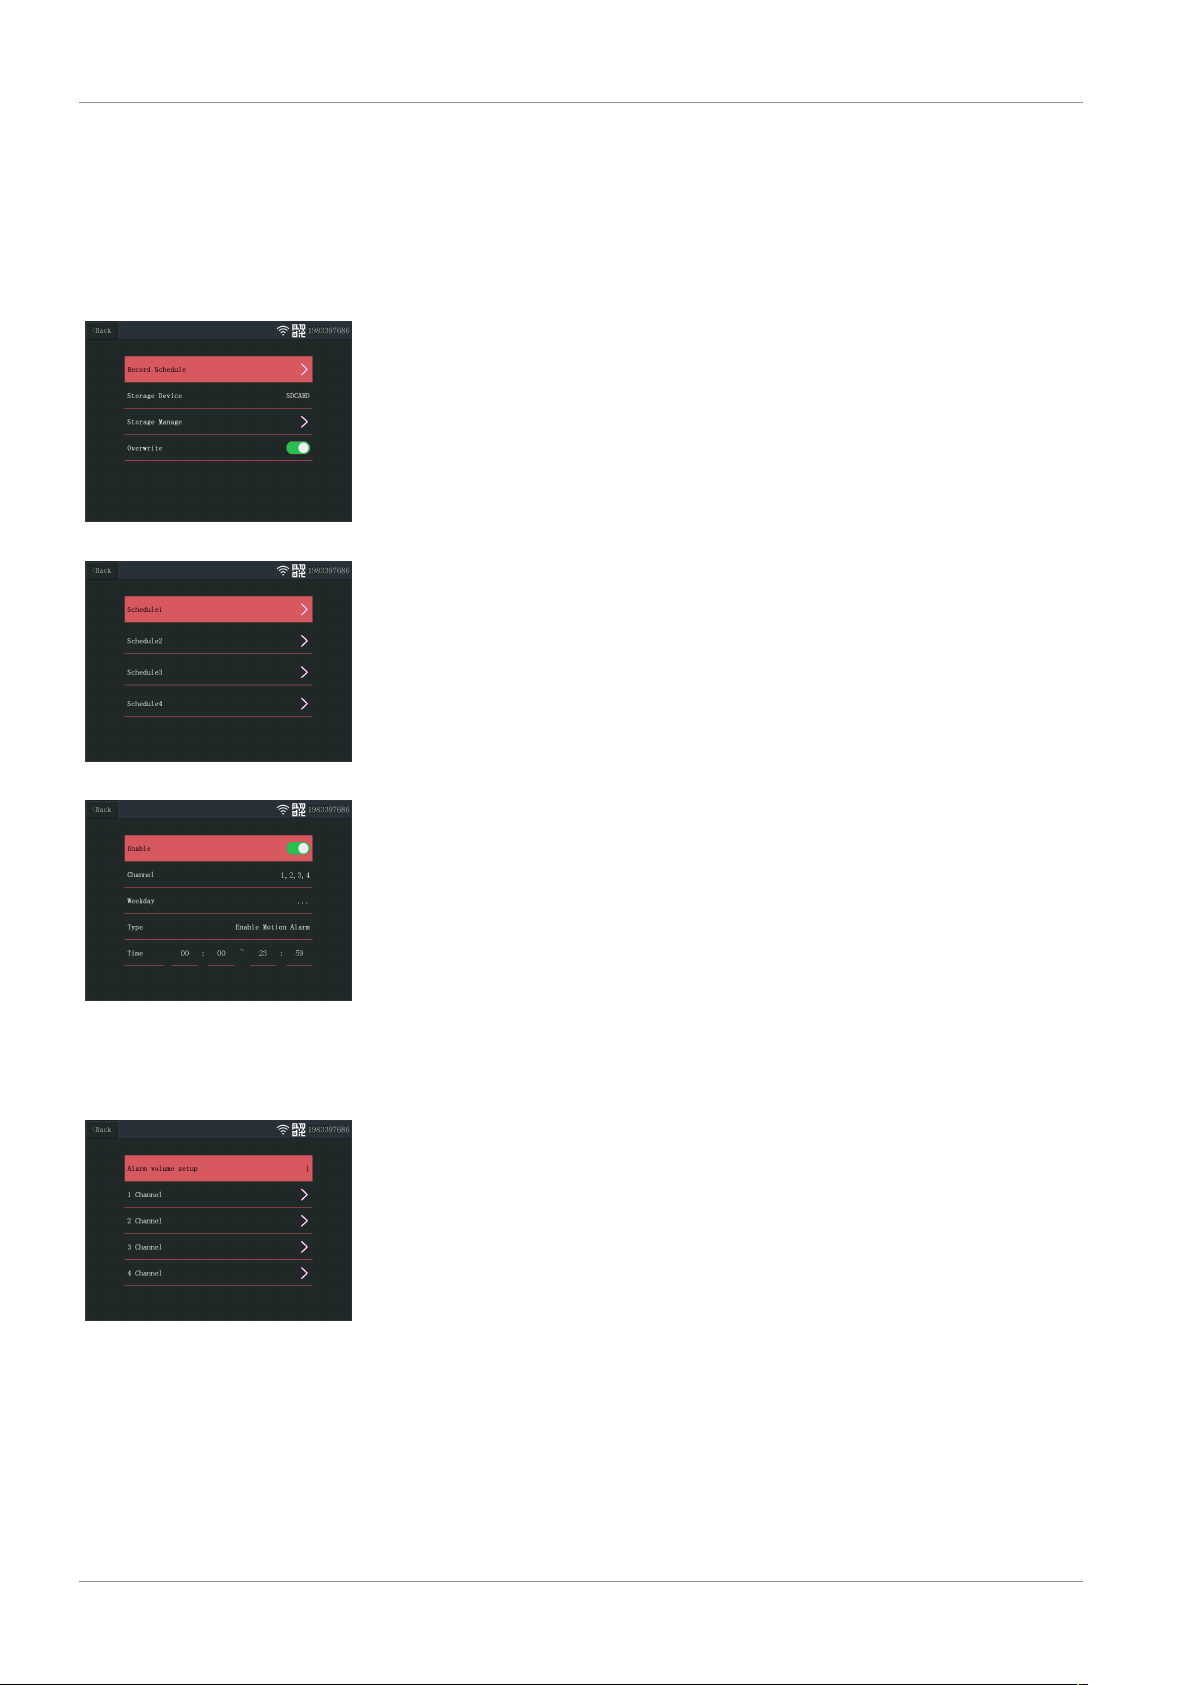
6 | Działanie systemu
6.4.1 Harmonogram nagrywania
27: Harmonogram nagrywania
c) Wybierz „Storage Manage” (Zarządzanie pamięcią masową), aby wyświetlić aktual-
ną zajętość pamięci i sformatować kartę MicroSD.
d) Wybierz „Overwrite” (Nadpisywanie), aby włączyć/wyłączyć funkcję nadpisywania
przez monitor starszych nagrań, gdy pamięć się zapełni.
Aby utworzyć harmonogram nagrywania, wykonaj poniższe kroki.
a) W menu głównym: Wybierz „Record Setup” (Ustawienia nagrywania).
b) Wybierz „Record Schedule” (Harmonogram nagrywania).
c) Wybierz harmonogram 1-4.
d) Włącz wybrany harmonogram, przesuwając suwak (włączony suwak zmienia kolor
na zielony).
e) Wybierz „channel” (kanał — kamery).
f) Wybierz „channel” (kanał — kamerę/-y) z której/których chcesz nagrywać.
g) Wybierz „Weekday” (Dzień tygodnia).
h) Wybierz na liście dni, w które chcesz nagrywać.
i) Wybierz „Time” (Czas) i wstaw ramę czasową, w której chcesz nagrywać.
Uwaga: „Type” (Typ) ma tylko jedną opcję „Enable motion alarm” (Włącz alarm ruchu),
która jest domyślnie włączona.
28: Harmonogram 1-4
29: Ustawienia harmonogramu
30: Kanały ustawienia alarmu
6.5 Ustawienie alarmu
Monitor ma funkcję alarmu, która może uruchamiać alarm po wykryciu ruchu. Aby
ustawić alarm, wykonaj poniższe kroki.
a) W menu głównym: Wybierz „Alarm Setup” (Ustawienia alarmu).
b) Wybierz „Alarm volume setup” (Ustawienia głośności alarmu).
c) Ustaw żądaną głośność alarmu. (Głośność alarmu, jeśli zostanie uruchomiony, za-
stępuje inne ustawienia głośności.)
d) Wybierz „Channel” (kanał — kamerę) której chcesz używać do uruchamiania alar-
mu.
e) Włącz „Enable Motion Alarm” (Włącz alarm ruchu), przesuwając suwak (włączony
suwak zmienia kolor na zielony).
f) Włącz „APP Alarm” (Włącz alarm aplikacji), przesuwając suwak (włączony suwak
zmienia kolor na zielony), jeśli chcesz otrzymywać alarmy na swoje urządzenie
przenośne. (Patrz sekcja „Ustawienia aplikacji mobilnej”)
g) Włącz „Monitor Sound Alarm” (Alarm dźwiękowy monitora), jeśli chcesz, aby mo-
nitor emitował alarm dźwiękowy.
100 CMS-30100_IM
 Loading...