

Page 1
DIC-23216
MANUAL
Page 2
Installation
As the battery may not be fully charged out of the box, it is recommended to plug the doorbell into the
mains using the pre-installed power cable and power supply during set-up. The main button will light up
white during charging.
The power cable comes pre-installed to easy set-up out of the box. You can keep this connected and
keep the doorbell powered from the mains or you can remove it for full wire free use and charge the
doorbell every 4-6 months depending on use. To remove the power cable unscrew the rear cover and
disconnect from the doorbell.
Alternatively, you can also charge the unit using the Micro-USB cable and connect this to the
charger port at the bottom of the doorbell when required.
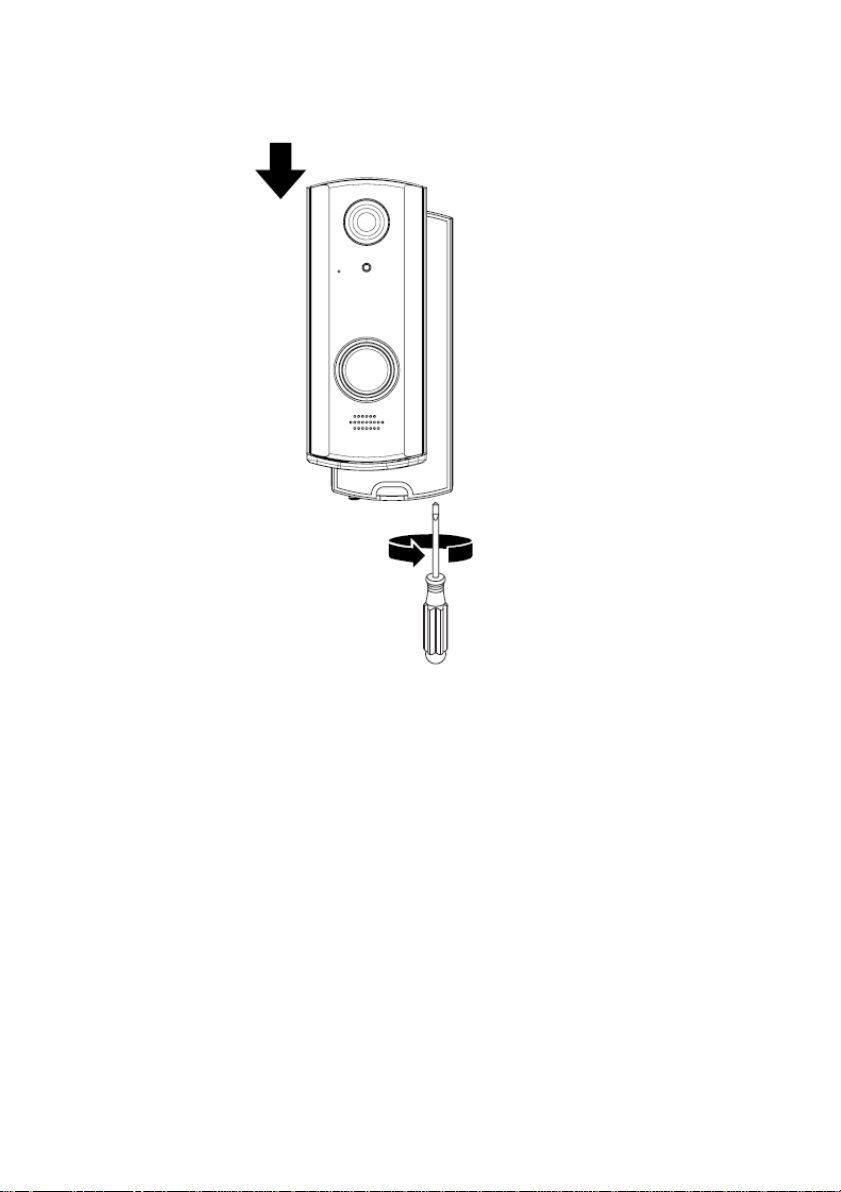
Doorbell setup
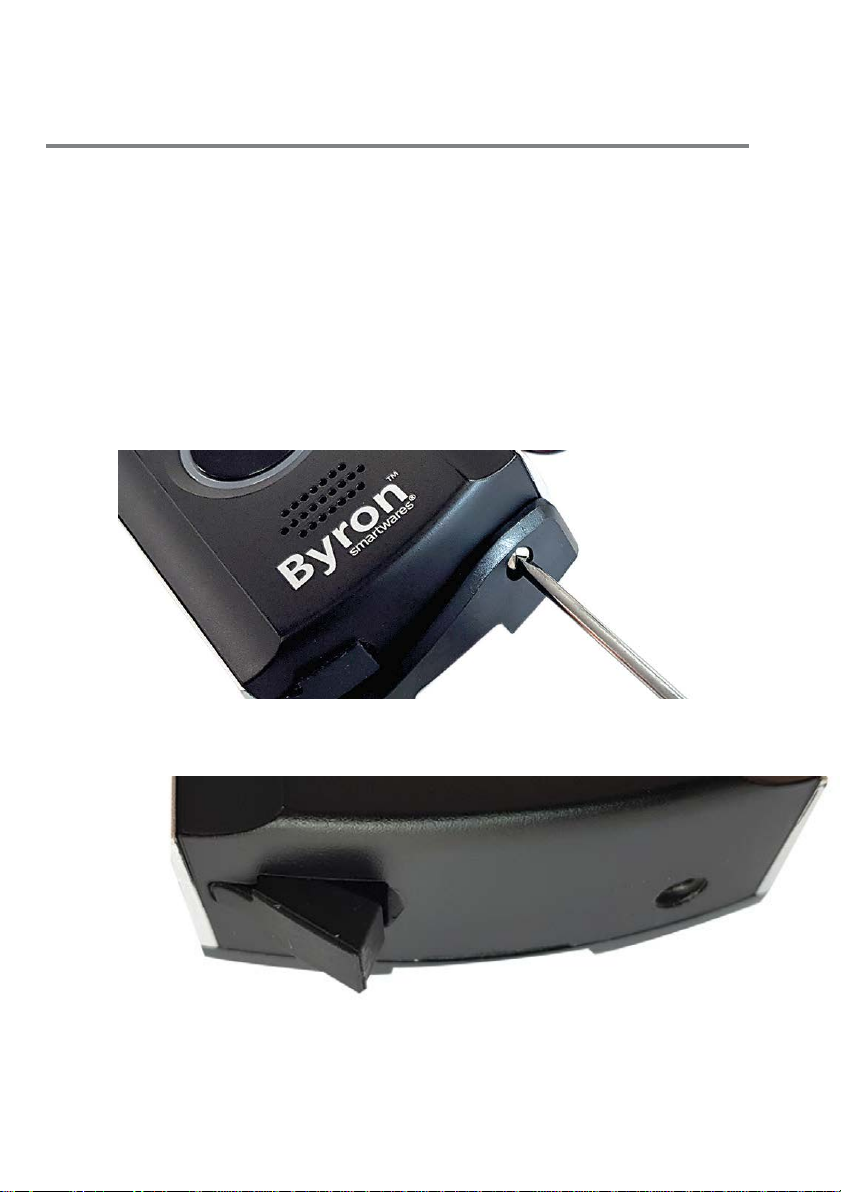
1. Remove the wall fixing base by using the supplied screwdriver to loosen the security screw at
the base of the doorbell then slide the base plate down and off the doorbell.
2. Pull the charger port cover open.
3. Pull the front cover off the doorbell by pulling the bottom first. You can use a blunt tool to help
you with this. This will reveal the power and re-set buttons at the bottom of the doorbell.
Page 3
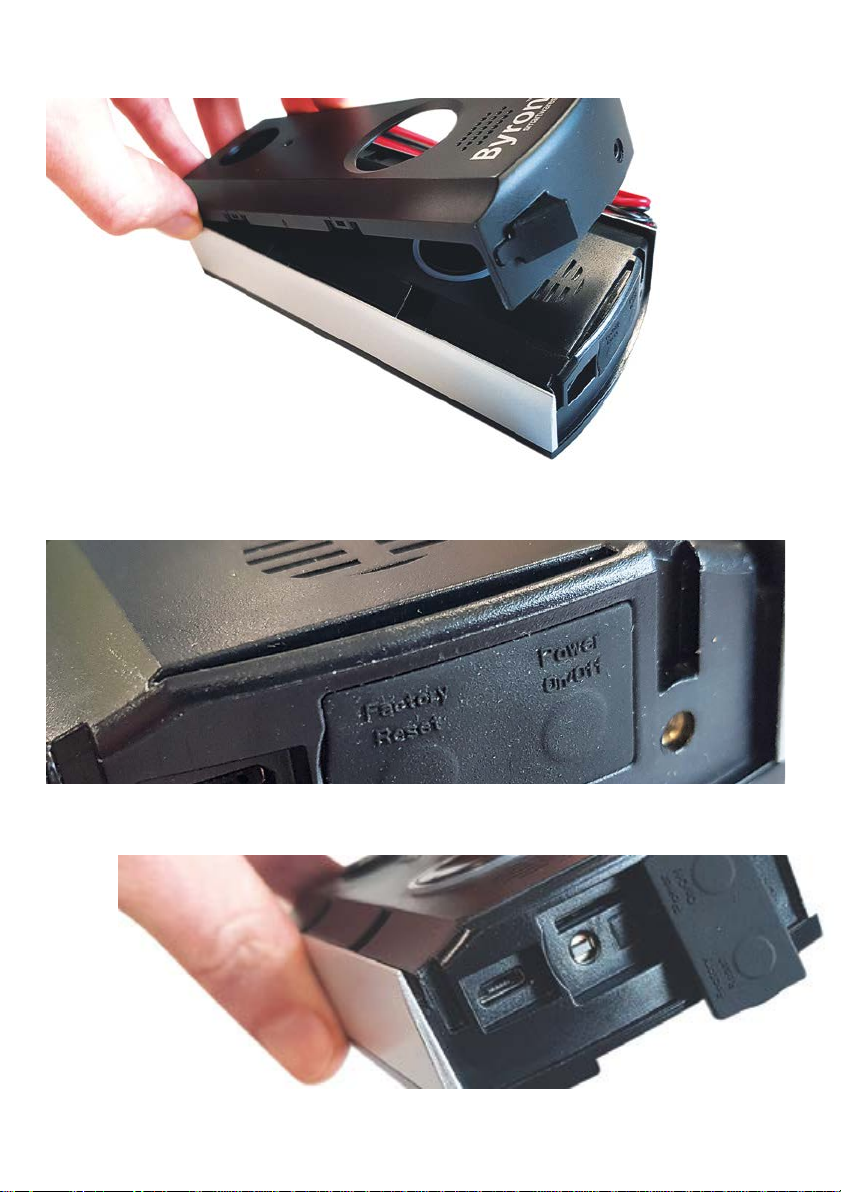
4. At the bottom, press the right hand power button for 2 seconds to turn on the device. The main
button will start to flash blue and white.
5. Open the MicroSD card cover to reveal the MicroSD card slot.
Page 4
Smartwares View App Set-up (iOS)
6. Download the Smartwares View App and install it.
You must allow notifications to receive Alerts on your device!
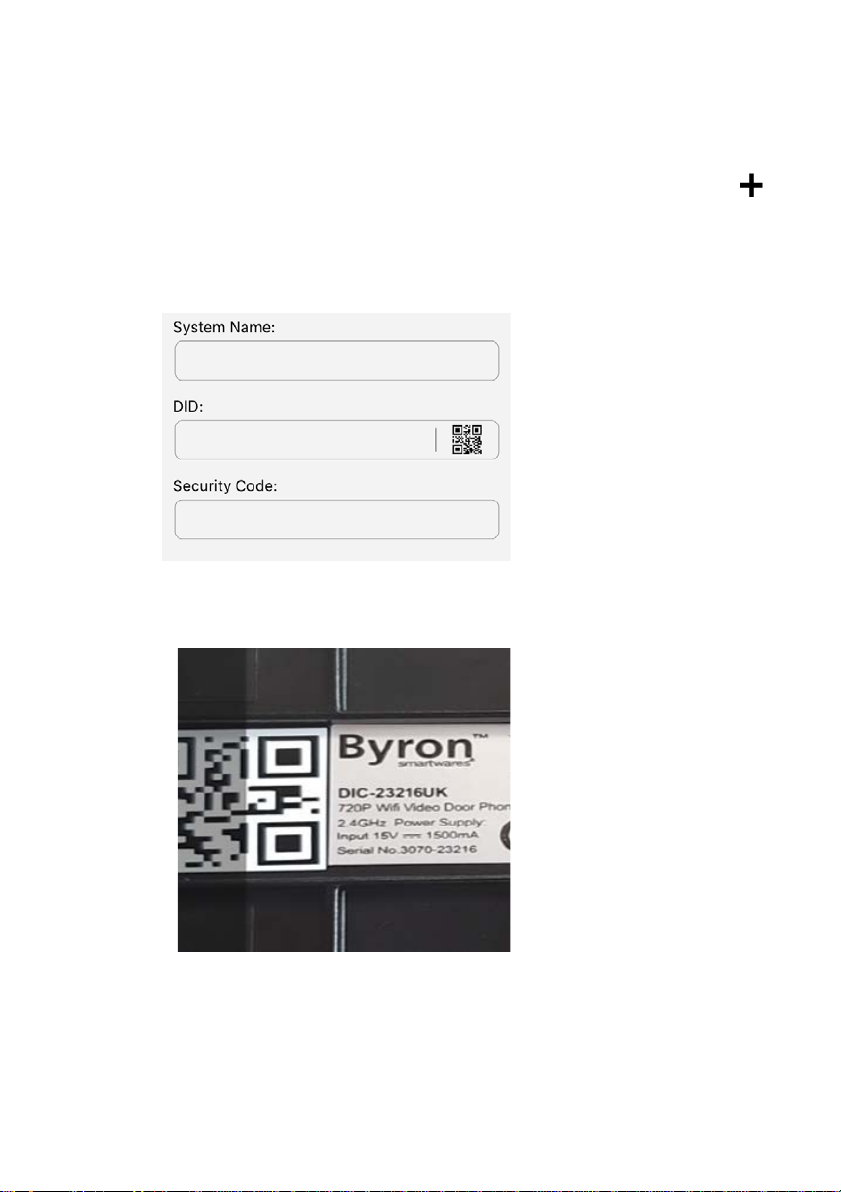
7. Open the Smartwares View App and touch the plus icon on the screen to begin set-up.
8. Type a name for your doorbell under system name.
9. Click the QR code under DID and click “Allow” to open the camera on your phone.
10. Point the camera at the QR code label on the back of the doorbell to scan it. This will
automatically fill the ‘DID’ field.
11. Now enter the default Security code 123456 and click ‘OK’.
Page 5
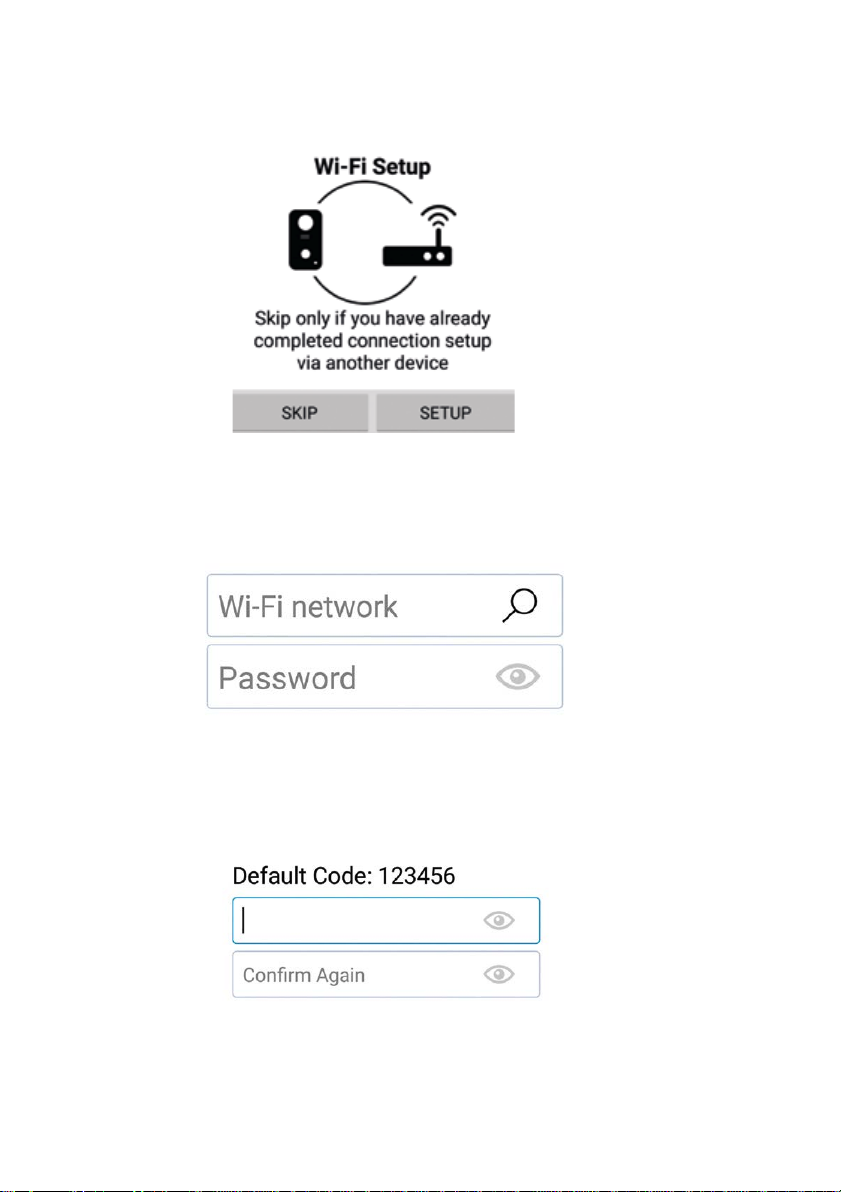
12. On Wi-Fi setup click SET-UP.
13. Ensure your doorbell is still flashing blue and white and then click “Next”. If it is not flashi ng
blue and white, then press the power button twice to turn it back on.
14. Go to your phone Wi-Fi settings and select your required network from the list, then return to
the app to enter the password for the network.
If your phone only has one Wi-Fi network stored then this will already be shown. Enter the
password for the network.
15. Click “Next” in the app until you are prompted to connect to the RVDP Wi-Fi. Go to your
phone Wi-Fi settings and select the RVDP-xxxx network from the list, then enter the password
12345678.
16. Return to the Smartwares View app and click “Next”. Allow a few minutes for the phone to
complete the set-up.
17. Once connected, the doorbell will ring.
Page 6
Smartwares View App Set-up (Android)
6. Download the Smartwares View App and install it.
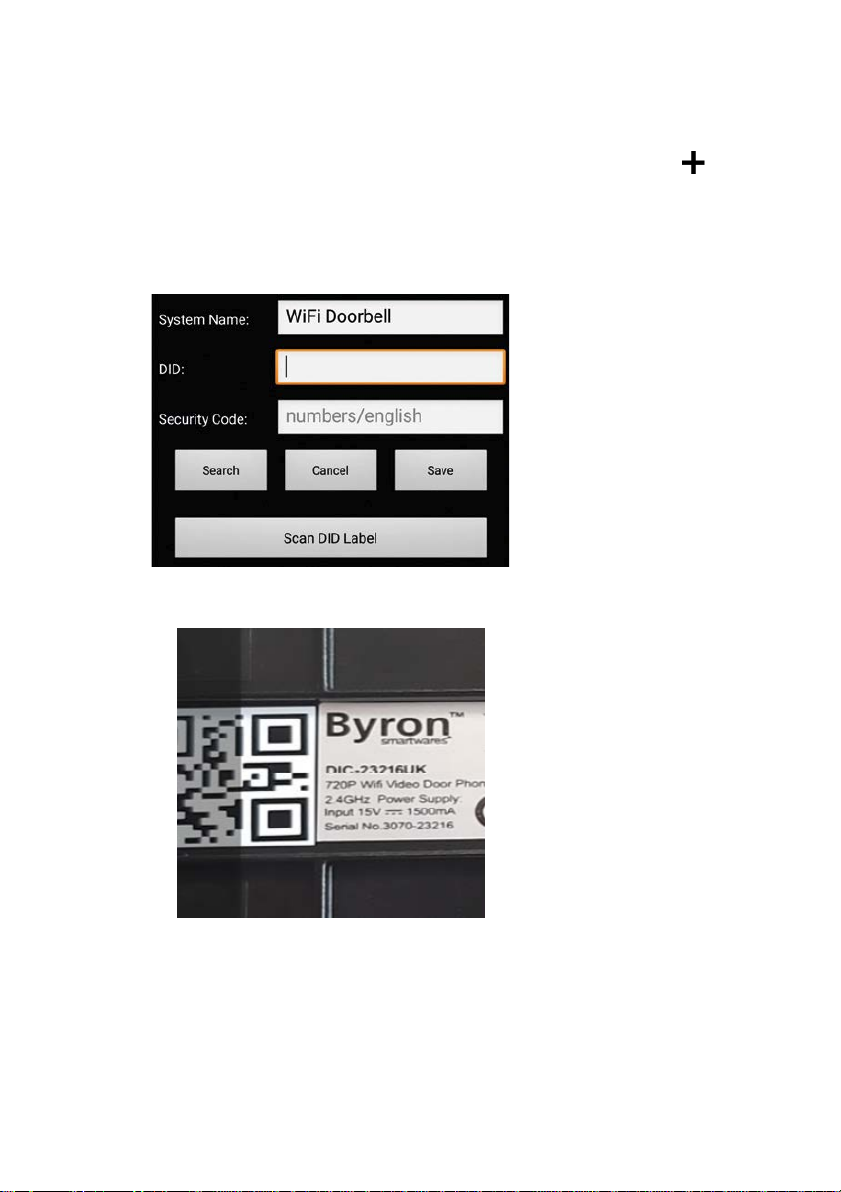
7. Open the Smartwares View App and touch the plus icon on the screen to begin set-up.
8. Type a name for your doorbell under system name.
9. Click the “Scan DID Label” and allow the app access to your camera on your phone.
10. Point the camera at the barcode label on the back of the doorbell to scan it. This will
automatically fill the ‘DID’ field.
11. Now enter the default Security code 123456 and click ‘Save’.
Page 7
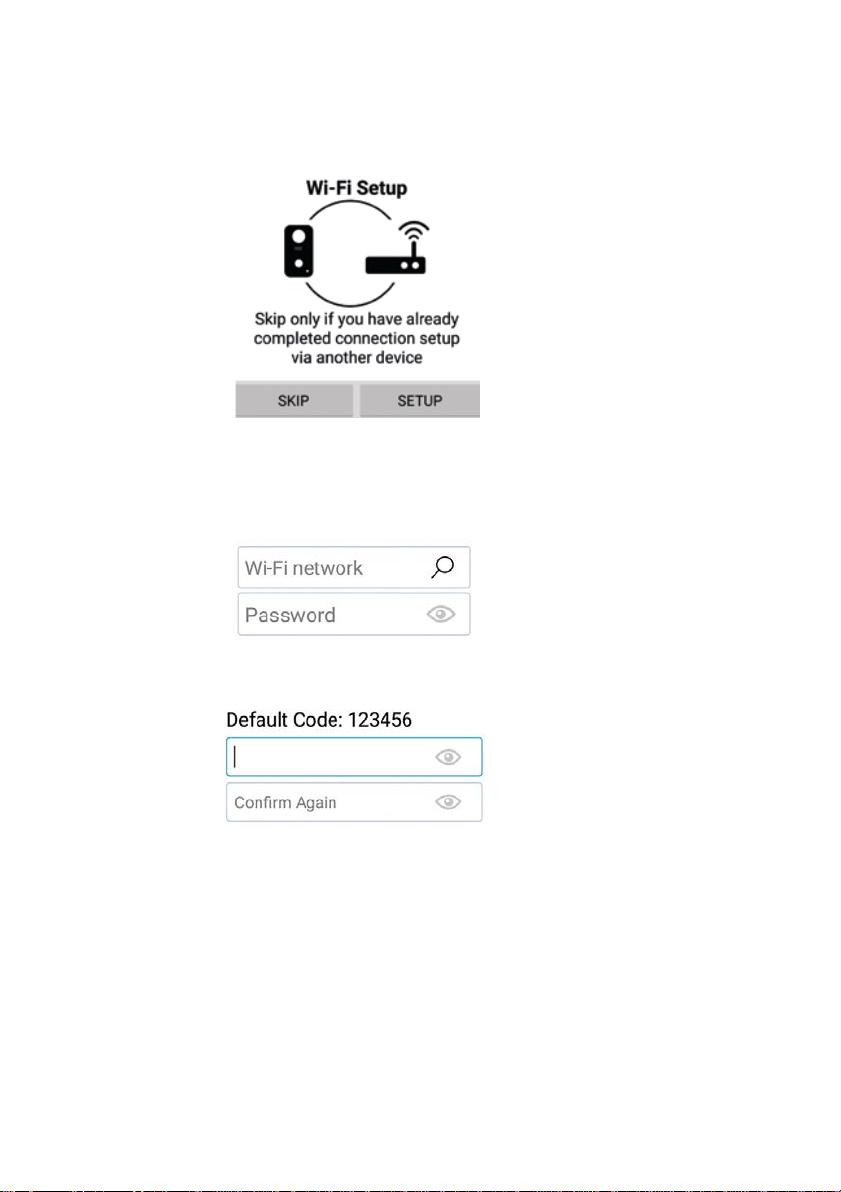
12. On Wi-Fi s et-up click SET-UP.
13. You will be prompted to turn off your mobile data. This is to force the device to connect to the
Wi-Fi of the doorbell. You can turn this back on after set-up. Return to the app and click
“Start”, your device will connect to the doorbell.
14. Click the magnifying glass in the wireless network box to search for nearby Wi-Fi networks.
15. Click the network you want to connect the doorbell to and type the network password.
16. Once connected, the doorbell will ring.
17. Click “Ok” and you will be prompted to change the default password. Choose something
memorable and secure.
Testing
18. Replace the front cover and charger port cover.
19. Exit the App using the back/home button on your phone/tablet.
20. Press the main button on the front of the doorbell to test.
21. You phone will ring and the item is set-up.
22. The main button will flash white when connected and will stop flashing after a short time. To
end the call, press the back/home button on your phone/tablet
Page 8
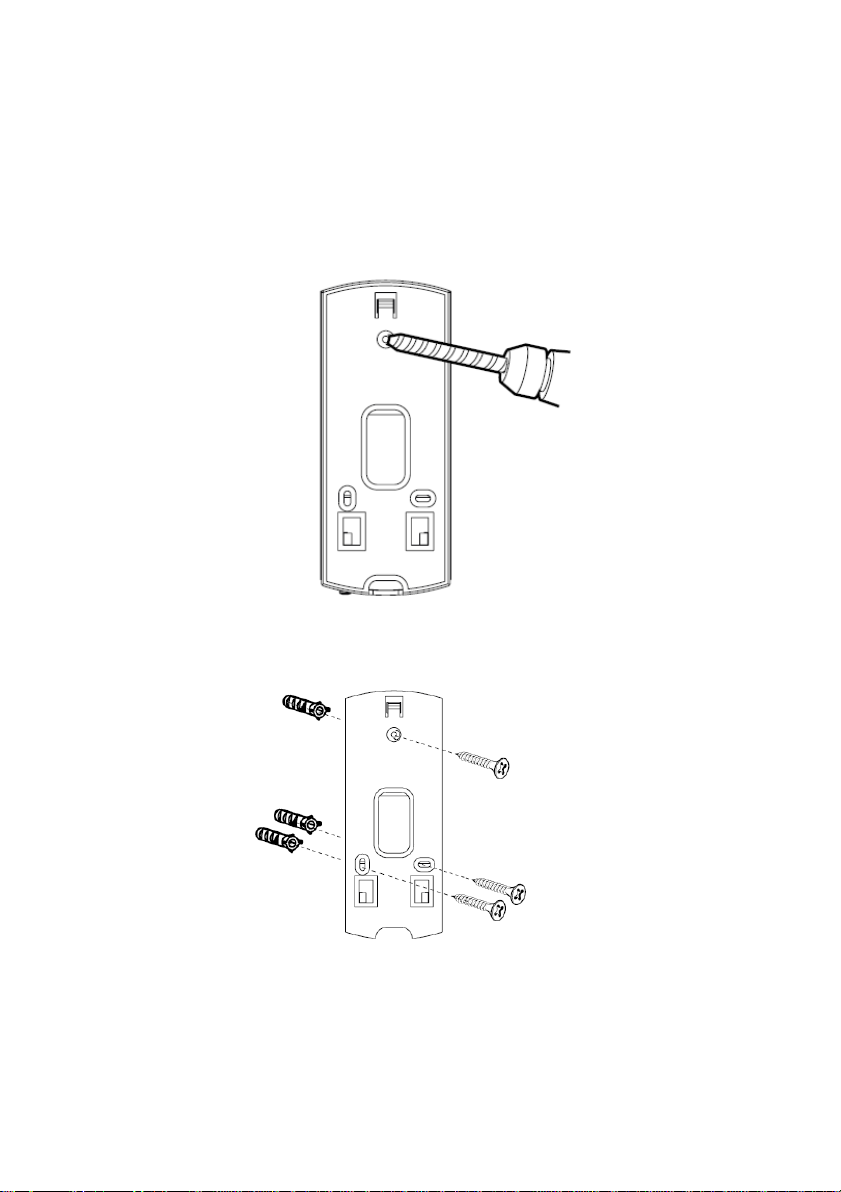
Wall mounting
1. Now the doorbell is working, test it in your ideal location making sure you are happy with the
view from the camera.
2. Using the wall fixing base as a template, mark and drill 3x holes using a 6mm drill bit.
3. Secure the wall fixing base to the wall using the wall plugs and screws provided.
4. If using the power cable, drill a hole to allow the power cable to go through the wall.
5. Feed the cable through the backplate and wall.
6. Put the doorbell onto the backplate and slide down into position, then secure the security
screw.
Page 9
Included in the box is a power cable that can be used to connect bell to a power supply as an alternative
for continuous battery mode. Connect the power cable to the power connection terminals on the rear of
the doorbell and using the cable connectors supplied connect this to your power supply MAX AC: 9V –
36V / DC: 12V- 30V.
Wired Connections
C2-C1 = 0v door/ gate contact controlled via the app using lock 2.
Any door lock / motor used here will require its own power supply. AC/DC:12~30V Max. 2A.
B2-B1 = Connection to wired doorbell system, allows a wired doorbell to be activated when the main
button is pressed. 02-01 = 12V door / gate contact with 12V 1A output.
Controlled via the app using lock 1 suitable for use with a door lock that requires additional voltage to
operate. This mode can only be used when the Wi-Fi doorbell is powered by an adaptor onto the power
connection terminals.
Page 10

the app is updated regularly.
Smartwares View app overview
Note: The screenshots in this manual may look slightly different from the app you are using.
This is because there are different versions of the app for iOS and Android, and because
Start screen
The start screen offers you an overview of your Smartwares Wi-fi video doorbell and other compatible
Smartwares cameras you may have installed. From this screen you have access to different
functions:
Add a Wi-Fi video doorbell (or other compatible Smartwares camera).
Settings: View your video doorbell information, access advanced settings, remove a video
doorbell or camera from the app and view your recordings from the event list.
Refresh : Refresh the connections of all the cameras in the list.
Information : Access camera/app firmware version information, manage your cloud settings,
and set up a PIN lock for the app.
• List of all regis ter ed cam eras . You can
quickly access your camera of choice in
the list, even when multiple cameras are
registered, by scrolling the list up or down.
• Tap the screenshot to enter a live view of
your camera.
• The connection status (connected or
disconnected) is indicated for each camera
in the list.
Page 11

Adding a video doorbell
Note:
Tap to add a video doorbell or other compatible Smartwares camera.
Advanced Settings
Tap . The additional setup selection icons will appear. Now tap to access the
advanced settings. Tap again to exit.
If the device is in power saving mode, you will not be able to access the advanced settings.
Wake the device first by going to live view mode. Now you will be able to access the advanced
settings menu.
Device settings: Change the device name, reset the Wi-Fi settings and access the
advanced settings section.
Delete the device : Remove the device from your app.
Event list: View and play back the list of events for the selected video doorbell or
compatible Smartwares camera.
Page 12

Setup PIN Lock
If you choose to enable the PIN lock function, you are required to enter the PIN code every time
when launching the app.
1. Select "Enable lock when starting" and enter your PIN code.
2. Confirm the PIN code entered.
(iOS) (Android)
Note:
If you forget the PIN code, please delete and reinstall the app.
Notifications
For iOS
If you want to enable/disable notifications, please follow the steps below:
1. Launch Settings fr om your Home screen.
2. Tap “ Notifications”.
3. Scroll down to find the Smartwares View app and tap on it.
4. Adjust the notification settings, such as On/Off, Sounds, banners, etc.
Note:
It takes time for the changes to take effect in iOS.
Page 13

For Android
If you want to enable/disable notifications, please follow the steps below.
Note:
The internet connection and wireless network speed may influence the performance of the
push notification service.
Video hardware acceleration
Turn video hardware acceleration on for faster performance. Please tu rn this off if you experience any graphical glitches.
About app/API version info
Tap “about” to check the app version.
(iOS) (Android)
Page 14

Live view p age
Tap once to speak with
visitor.
required).
Microphone on/off
a visitor, tap again to mute.
Phone mode
Snapshot
Mute
Record
Start/Stop live
video
Door unlock
Trigger
Gate unlock
Trigger
Tap once to switch from hands-free talking mode to phone
mode, tap again to switch back to hands-free mode. In phone
mode, you can hold your phone up to your ear when talking to a
Tap to take a snapshot. Snapshots are saved to your mobile
device.
Tap once to mute the audio coming from the door unit. Tap
again to resume.
Tap to start a recording. The recorded files are stored in the
MicroSD card inside the door unit.
When internet connection speed is low, it can cause delays in
communication with the visitor, Tap this icon once to stop
the video transmission to free up more bandwidth for audio.
Tap this icon once and enter the admin password to remotely
open the door for a visito r (Smartwares DB5005 or DB5005L
Tap the icon once and enter the admin password to remotely
open the gate (Smartwares DB5005 or DB5005L required).
Page 15

Phone mode with two-way talk
Phone mode with
one-way audio
Hands-free mode
with two-way talk
Hands-free Mode
Page 16

Event video playback
The recorded video is automatically saved to the memory card. You can access the files for playback.
Tap on the main page.
Tap
and the date/time filter will appear. You can define the period to display all available recorded
files for playback.
All available events will be stored on the MicroSD card. The number of available events
will depend on the memory card storage capacity. Files stored in the MicroSD card will
be transferred to the cloud if (A) you have activated the cloud storage service (Google
Drive or Dropbox) and (B) sufficient cloud storage space is available. Files will not be
transferred to the cloud if the maximum cloud storage has been reached. To free up more
space for the cloud storage please manually delete the files.
When you have reached maximum storage capacity the camera will begin to overwrite by
removing the oldest event(s). Please backup the files periodically if necessary.
The cloud storage event list displays all available events s tored on t he cloud s ide. The
number of available events will depend on the cloud storage capacity. To expand the
cloud storage capacity please contact Google Drive or Dropbox directly.
Once reaching maximum storage capacity, either Google Drive or Dropbox will remove
any of the files stored within the account.
Page 17

For playback, select the file from either the local or the cloud event section. During the playback you can
tap the pause button to pause /resume the pla yback. The local n etwork conditions may cause improper
video playback, resulting in a black screen. If this happens please leave the playback mode and try again
later when the internet conditions have improved. We strongly suggest using a good Wi-Fi connection for
better performance playback.
Tap once for playback,
press and hold to
download the file to
mobile device.
The app layout may vary depending on the display panel size of your smart-device. Please check the
release notes in the App Store/Google Play f or more deta ils.
Download
If you want to keep a particular event file on you mobile device, tap and hold the event file and a popup will appear, indicating the progress of your download.
Note:
While a user is downloading the event file, the camera's recording and live-view
function will not be available for other users.
Page 18

Delete
Select the file(s) and tap the delete icon. It’s possible to delete multiple fil es at once.
Check the video clip
Then tap the trash can icon
Answering a call
A pop-up like you see on the left will appear on your mobile
device when a visitor presses the doorbell button on you video
doorbell.
•
Tap “Ignore” to ignore the call.
•
Tap “Accept” to answer the call.
Page 19

Advanced settings
Update the time of your device
mode
This chapter explains the advanced settings for t he administ rator. The admi nistrator is the one who
owns the administration password and has full control over the Wi-Fi video doorbell. The
administrator can access all functions and settings, while normal users can only receive the
surveillance images for live view, capture video recordings and cannot manage the camera settings.
Admin Password The security code required to edit the advanced settings
Device Security Code Setup/change the password for remote access
Time Setup
Firmware Update Update the firmware of your device
Notify Enable Activate/deactivate push notificati ons for t he device
Cloud Setting Manage your cloud settings
SD Card Overwrite Activate/deactivate the data storage overwrite function for the device
Record Mode Choose between photo or video
Video Framerate Setup the number of frames per second for the video recording
Video Resolution Select either HD or VGA resolution
Video Brightness Adjust the brightness level
Record Cycle Time Setup the length of the video recording when device detects motion
Environment mode Choose between 50 or 60 Hz
Device remote access Allow remote access of your device
Power Saving Time Adjust the period of time before the device goes into power saving
Ringtone Select the doorbell melody
Volume Select the doorbell melody and volume
Relay Trigger Duration Setup the length of time for the trigger
Audio Acoustic
Cancelling Effect (For
Android only)
Door Chime Melody Change the melody of your chime (sold separately)
Device Information Check the device type and API Kernel version
Acoustic echo canceler
Page 20

Admin password
device from the start.
Note: Before you update the firmware, m ake sure to i nsert a memory card into the device with
enough storage space.
The Admin Password is a specific security code for the administrator to edit the advanced settings.
The default admin password is 123456.
This function allows you to change the default admin password into your personal admin password.
For the protection of your system configuration, you need to enter the admin password when
changing the advanced settings. We strongly suggest that you change the admin password
periodically.
Note: If you forget the admin password, press and hold the reset button on the bottom of
the device for 5 seconds to restore the device to factory default settings, and configure your
Device security code
This section allows you to setup the security code, limiting who can access to the device form a
remote location.
The default security code is 123456. Follow the app ins tructions to revise the security code. For
security reasons a st rong password is required, with 8 or more characters. At least one uppercase
letter, at least one lowercase letter, and at least one number are also required.
Note: If you forget the device security code, press and hold the reset button for 5 seconds
to reset the system to factory default settings. You should configure the device from the start
again.
Time setup
With this function you can sync the time of your video doorbell to the time of your mobile device.
Wi-Fi setting (Android only)
Adjust your Wi-Fi settings.
Firmware update
This function allows you to trigger an over the air firmware update of your device.
Notify enable
By disabling notifications here all users will not be able to receive push notifications on their mobile
device, even if they have push notifications enabled.
Page 21

Cloud settings (DIC-232116 only)
In this section you can manage cloud storage of your footage.
Creating a cloud storage account
If you choose not to create a cloud account at when you first set up the device, you can do it at later
moment. The app automatically detects the fact that cloud storage isn’t available and directs you to
the in-app wizard. Follow the in-app instructions to configure your private c l oud, using your
personal Google Drive or Dropbox account as storage.
The cloud account is different than your Google Drive/Dropbox account, and is for management
of single or multiple devices, and is connected with either Google Drive or Dropbox.
Edit Account
Enter here to modify your cloud account password.
Page 22

Device Management
Enter here to see all devices registered under the cloud account. You can disconnect the selected
device with an existing Google Drive or Dropbox account and then bundle the device to new Google
Drive or Dropbox account.
You can also remove the camera from t he cl oud account to stop using Google Drive or Dropbox as
cloud storage. The video files will then be recorded to the memory card.
SD card overwrite
This function will overwrite the old files when the MicroSD card is full. T urning on this function will
enable the system to start overwriting oldest files when the available mem ory card capacity is not
sufficient. This ensures the most recent video rec ordings can be saved so that you won’t miss any
important footage.
Page 23

Record mode
Choose if the device takes a snapshot or records a video when motion is detected.
Video framerate
This section allows you to set the frame rate of the recorded video. A higher frame rate will result
in a larger video file, but will provide smoother quality for playback .
iOS Android
Video resolution
This section allows you to change the resolution of recorded video. There are two options you can
select, VGA or HD. To get better quality you should select HD video. I t will however consume m ore
storage space, cause longer upl oad tim es, and higher power cons umption.
iOS Android
Page 24

Video Brightness
This setting allows you adjust the brightness level of the recorded video for the best results, with level
1 being the darkest and level 7 being the brightness.
iOS Android
Record cycle time
This section allows you setup the length of time for video recording. The longer length of video record
will consume more battery power and take longer to upload to the cloud, which also consume
additional battery power. Please notice both 30 and 60 seconds are not supported to backup to cloud
service.
iOS Android
Page 25

Environment mode
Choose between 50 or 60 Hz, depending on your region. If you are in Europe, you should select 50Hz.
Device remote access
Allow remote access to the device. Turn this off to save battery. When this is turned off, you won’t be able to turn on live view remotely.
Power saving time
Select the length of time for the device to stay awake after a trigger. This is useful only when the
device is battery powered, because selecting a shorter period of time can preserve more battery
power. By selecting a longer period you will have more time to establish a connection with the app
while you are away.
iOS Android
Page 26

Ringtone
This section allows you to select a melody for your video doorbell. There are five different melodies
you can select.
Volume
You can adjust the volume from completely muted to maximum volume.
Relay trigger duration
In this section you can set the trigger time for your door, gate or doorbell to 1, 3 or 5 seconds
respectively.
Page 27

Door chime melody
Choose a melody for your paired chime (sold separately).
Audio effect (Android only)
If you have issues with echoes when using two-way audio, enable the acoustic echo canceler
function.
Pairing with a Smartwares chime
You can pair you video doorbell with a separate chime. This way you get notified in your home if anyone presses your doorbell, even when you are away from your phone. We recommend the Byron BY501, 504 and 601.
• Put your chime in pairing mode by pressing and holding the correct button (please check
the manual for your chime), unt il the chime beeps.
• Now press the doorbell button on the video doorbell. If the pairing is successful, your chime
will ring.
Factory reset
Press and hold the reset button on the bottom of the device for 5 seconds to reset the system to
factory default settings. You should configure the device from the start again.
Page 28

Trouble shooting
You
not able to connect
the
Wi
,
turn it on again when you’re done.
You need more instructions
on how to install you Wi
video doorbell
You want to change the
language
Smartwares View app
settings. If your language is not available, the app will be in English
The battery life is shorter
than expecte
Disable live view option
Connect the item to a transformer.
The image is flickering
during a call
Improve your Wi-Fi reception by adding a Wi-Fi extender
I do not have any cloud
storage even though I have
connected
doorbell
google drive
A MicroSD card is required to temporarily store recordings before
uploading
it takes longer than
expected to
live
view
When the doorbell is in power saving mode it takes a short while to
wake
weak Wi
· Connect the item to a transformer.
IF SOLUTION
are
video doorbell to your
-Fi network
· Please put the device in close proximity to the Wi-Fi router.
· The device only supports 2.4GHz, it does NOT support a 5GHz
network. Please make sure that the Wi-Fi network is on a 2.4G
frequency.
· If you are using Android 8 (Oreo), turn off mobile data before setup
· Please check our installation videos on YouTube. Search for the
-Fi
item number DIC-23216
in the
d:
my video
to DropBox or
accomplish
· Please change the language of your mobile device. The language
in the app is the same language you have chosen in your device
·
· Limit the times of using live view or the length of watching live view.
·
·
· Set the video resolution to VGA
them to your cloud storage.
· Make sure a MicroSD card is inserted.
-up and switch to live view. This process can take longer with a
-Fi connection.
· Improve your Wi-Fi reception by adding a Wi-Fi extender
Storage media management
MicroSD card capacity
(Class 10)
8GB 720p@30fps 10 hrs. / max.3000 events
16GB 720p@30fps 20 hrs. / max.3000 events
32GB 720p@30fps 40 hrs. / max.3000 events
Max. video
Resolution
Recording time
Page 29

Product specification
Wireless Network Wi-Fi 802.11b/g/n
Transmission Frequency 2.4GHz
Transmission Range Up to 150 Meters
Image Sensor 720P
Remote Live-view 24/7 app remote view, even when battery operated
(can be turned off for power saving)
Two-Way Audio Yes
One-Way Video Yes
Push Notification Yes / iOS and Android
Event List Yes / Snapshot and Video
Remote Event Playback 24/7 remote event playback, even when battery operated
Night Vision Supported
View Angle H:140°/ V75°
Audio Input/output Speaker & Microphone
Video Resolution 720P/VGA
Video FPS Up To 25FPS
Data Storage MicroSD Card up to 32GB with Max 3000 events
IP Rating IP55
Electronic Door Unlock Trigger X1
Electronic Gate Open Trigger X1 Support 3rd Party Motorized Gate
Electronic Doorbell Trigger X1 Yes
Power Source AC:9V~36V/DC:12~30V Direct Power Input*, 5000mAH
Operating Temperature -22°F/-10°C ~ 122°F/50°C
Dimensions (H x W x D) 160 x 66 x 47 mm
Support 3rd Party Wired Door Lock
Rechargeable battery
*For remote door unlock function with 12V/1A current output trigger, the direct input power must be
higher or equal to AC or DC 15V/1.5A.
 Loading...