

Smartwares 271723 Quick-start Manual With Instructions For Assembly And Use, And Safety Notices
Page 1
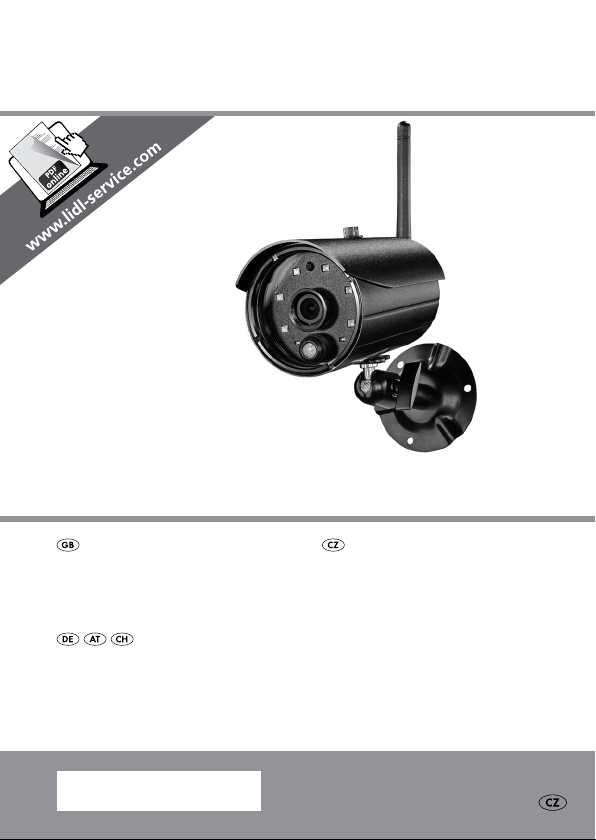
IP SURVEILLANCE CAMERA
IP SURVEILLANCE CAMERA
Quick-start guide with instructions for
assembly and use, and safety notices
IP-ÜBERWACHUNGSKAMERA
Quick-Start-Guide mit Montage-, Bedienungs und Sicherheitshinweisen
IAN 271723
BEZPEČNOSTNÍ IP KAMERA
Quick Start Guide s návodem k montáži,
obsluze a bezpečnostními pokyny
Version 1.4
Page 2
Before reading, unfold both pages containing illustrations and familiarise yourself with all
functions of the device.
Před čtením si odklopte obě dvě strany s obrázky a potom se seznamte se všemi funkcemi
přístroje.
Klappen Sie vor dem Lesen die beiden Seiten mit den Abbildungen aus und machen Sie
sich anschließend mit allen Funktionen des Gerätes vertraut.
GB Assembly, operating and safety instructions Page 5
CZ Pokyny k montáži, obsluze a bezpečnostní pokyny Strana 23
DE / AT / CH Montage-, Bedienungs- und Sicherheitshinweise Seite 41
Page 3
1 2 3 4
5 6 7
A
B
11
129
13
A1 A2 A3
10
8
Page 4
C
D
E
Page 5
FGI
H
Page 6
J
Page 7

List of pictograms used ............................................ Page 6
Introduction
Intended use ............................................................................ Page 7
Parts Description ...................................................................... Page 8
Technical Data ........................................................................ Page 8
Scope of delivery .................................................................... Page 9
Safety instructions ....................................................... Page 10
Installing the camera ................................................. Page 13
Connecting the camera .......................................................... Page 14
Camera setup .......................................................................... Page 15
Changing passwords and configuring the camera
on the WLAN network ............................................................ Page 15
Using the camera .................................................................... Page 17
Troubleshooting ............................................................ Page 18
Cleaning and Care ....................................................... Page 19
Disposal ................................................................................ Page 19
Warranty and Service
Warranty Declaration ............................................................. Page 20
Service address ....................................................................... Page 20
Notes on Conformity ................................................. Page 21
Trademark notices....................................................... Page 22
5 GB
Page 8
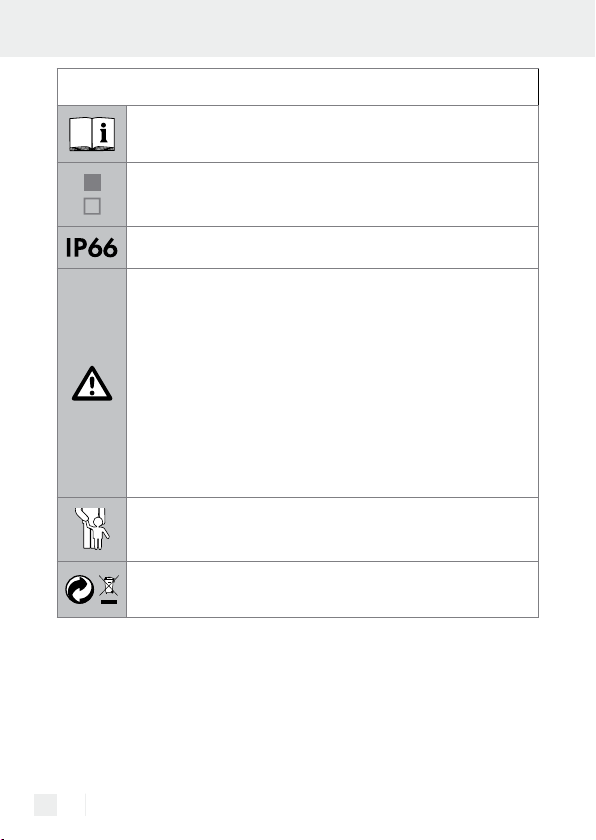
List of pictograms used
Read the instructions!
Safety instructions
Directions for use
Dust- and hose-proof
DANGER: This symbol with wording "DANGER" indicates
a hazard which may result in
not observed
. To avoid the da
WARNING: This symbol with the wording "WARNING"
indicates a hazard which may result in injuries or property
damage if not observed. To avoid the danger, follow the
instruction.
Keep out of reach of children!
Dispose of the packaging and the product in an environmentally compatible manner!
serious injuries or death
nger, follow
the instruction.
if
6 GB
Page 9
IP Surveillance Camera
Introduction
Congratulations on the purchase of your new product. In
doing so you have chosen a top-quality product. Familiarise
yourself with the product before using it for the first time To do
so, carefully read the following quick-start guide including instructions
for assembly and use, and safety notices. The product also includes a
tutorial CD providing more information on the special function of the
camera, including connecting it to a PC. Only use the product as indicated and for the specified areas of application. Both instructions for
use (quick-start guide + tutorial CD) are part of this product. Keep these
for future reference. If you pass the product on to anyone else, please
be sure to also include all documentation.
Intended use
This camera fall into the category information technology. The product
is suitable for use indoors or in protected outdoor areas and is for the
surveillance of garages, car parks, house entrances, etc. The camera
features a night vision function with 6 infrared LEDs and provides clear
image transmission. It also features a built-in microphone for recording
ambient noise. Transmission is sent to a router, from where it can be
accessed and controlled via app. Any use other than previously described
or modifying the product is prohibited and will result in damage. The
manufacturer is not liable for any damages caused by improper use.
This product is not intended for commercial use.
7 GB
Page 10
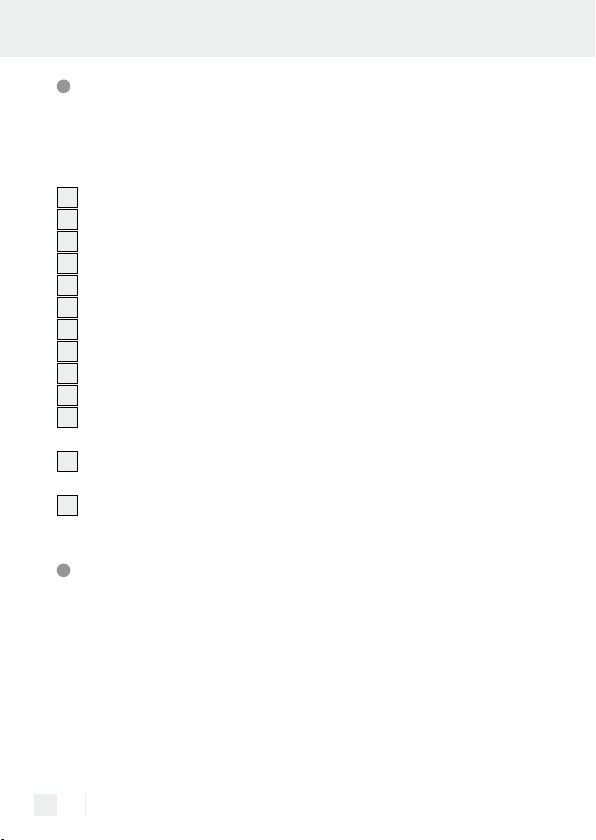
Parts Description
Before reading, unfold the page containing the illustrations and familiarise yourself with all functions of the device.
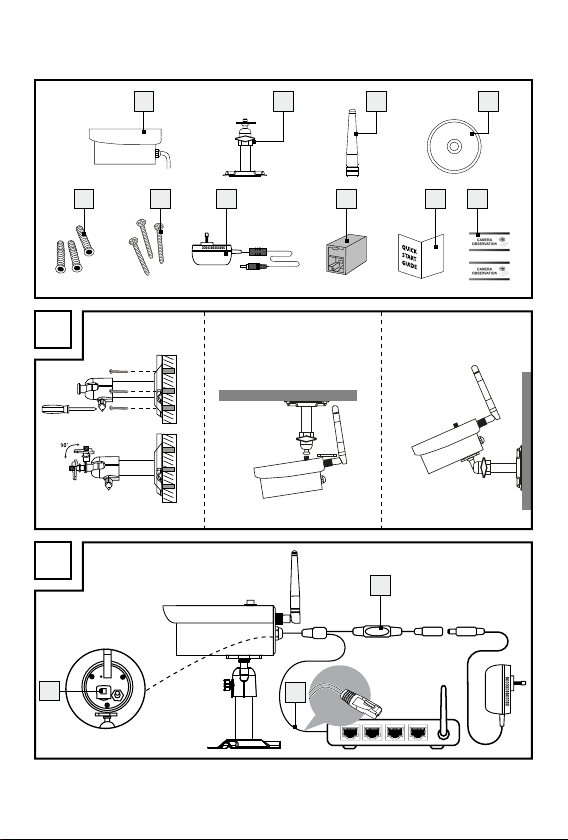
1
Camera
2
Mounting bracket
3
WLAN aerial
4
Tutorial CD
5
Wall plug
6
Screws
7
Power supply
8
Ethernet cable (see Fig. B)
9
RJ-45 connection element
10
RESET button (see Fig. B)
11
SD slot (for micro SD card max. 32 GB Class 10 - not included)
(see Fig. B)
12
Quick start guide with instructions for assembly and use, and
safety notices
13
Decal for marking the area under surveillance
Technical Data
Camera:
Device type: Surveillance Camera WLAN Outdoor
IP66
Dimensions: approx. 6 x 11 cm (ø x d), approx.
6 x 15.5 cm (ø x d) (with WLAN aerial
and sun screen)
Image sensor: 2 megapixel CMOS
Focal length: 3.6mm
8 GB
Page 11

Resolution (horizontal TV lines): 1280 x 720 pixel
Picture angle: h 65 °, v 38 °
Detection range
Motion detector: 90° x 5 m
Infrared range (night vision
mode black / white): 6 IR LEDs up to 8 m range
Light sensitivity: 1–8 LUX
Operating temperature: -10°C – +50 °C
Humidity during use: 40–80 % RH
Storage temperature: -10 °C – ~ +60 °C
Humidity during storage: 20–90 % RH
Connections: Ethernet (10 / 100 Base-T / Base-TX);
WLAN IEEE 802.11 b / g / n
Frequency: 2.4 GHz
Protection class: IP66 (dust- and hose-proof)
Weight: approx. 540 g (camera with base,
aerial and sun screen)
Power supply (for dry indoor use only):
Model / type: CS9C050150FGF
Manufacturer: CSEC
Input voltage / frequency: 100–240 V ~, 50 / 60 Hz
Input current: 500 mA
Output voltage: 5 V DC
Output current: 1.5 A
Protection class: II /
Scope of delivery
Remove all parts from packaging and dispose of all packaging material.
Please contact customer service if parts are missing or damaged.
9 GB
Page 12
1 Camera
1 Mounting bracket
1 WLAN aerial
1 Power supply
1 Mounting kit
1 Tutorial CD
1 RJ-45 connection element
2 Decals for marking the area under surveillance
1 Quick-start guide with instructions for assembly and use, and safety
notices
Safety instructions
Damage due to failure to comply with these instructions for use will
void the warranty! We assume no liability for consequential damage!
We assume no liability for property damage or personal injury due to
improper handling or failure to observe the safety notices!
Children and persons with limitations
DANGER TO LIFE AND RISK
OF ACCIDENT FOR INFANTS AND CHILDREN!
Never leave children unsupervised with the packaging
material. The packaging material poses a suffocation hazard. Packaging materials are not toys. Children frequently underestimate the
dangers.
Always keep children away from the product. This device may be
used by children aged 8 years and up, as well as by persons with
reduced physical, sensory or mental capacities, or lacking experience and / or knowledge, when supervised or instructed in the
safe use of the device and they understand the associated risks.
10 GB
Page 13
Do not allow children to play with the device. Cleaning and user
maintenance must not be performed by children without supervision.
DANGER TO LIFE! During installation keep children away from
the area in which you are working. A large number of screws and
other small parts are included within the scope of delivery. These
may prove life-threatening if swallowed or inhaled.
Damage
Never use the product if it is damaged in any way.
Contact your service centre or a professional if the product is dam-
aged, requires repairs, or for any other problems with the product.
Ensure all electrical connections and cable connections to other
devices comply with the applicable guidelines and with the instructions for use.
Be sure not to overload socket and extension cables. This can lead
to fire or electric shock.
Please note the temperature and humidity during operation and
storage to ensure proper camera operation. These are specified in
the technical data. Moist, very cold or hot environments or storage
can damage the camera.
The camera is suitable for outdoor use, the power supply may only
be used indoors.
Avoid major shock. This can damage the electronic circuit.
Cordless systems are exposed to interference of telephones,
microwaves, as well as other electronic devices operating in the
2.4 GHz range (impacts of interference include poor image quality
or transmission problems).
Maintain a minimum distance of 3 metres during installation and
operation.
Do not open the camera. This is a maintenance-free camera. Open-
ing the product will void the warranty.
Be sure not to damage any wires during installation.
11 GB
Page 14

AC Adaptor
Only plug the power supply into easy to access sockets so it can
easily be unplugged in the event of an emergency.
Do not touch the power supply with wet hands. Otherwise there is
a risk of electric shock.
Only use the power supply in dry indoor spaces.
Never unplug the device by the cable. Always touch the device by
the housing.
Please remember the power supply will continue to draw a small
amount of electricity even without the camera being operated so
long as the power supply is plugged into the socket. To completely
disconnect the power supply it must be unplugged from the mains
socket.
DANGER TO LIFE! Never open the power supply. Otherwise
there is a risk of electric shock.
Never cover the power supply.
Immediately unplug the power supply if you notice unusual noises
or smoke.
Position the cable so as to avoid a trip hazard.
Protect all plug connectors from moisture.
Application
Do not use the camera in explosive environments, e.g. at tank
plants, or in dusty environments.
Observe applicable national laws if you intend to use this camera
to photograph or watch people.
Areas under camera surveillance must be marked. The respective
decals are included, please again observe the labelling requirements of the respective country.
Do not place any liquid-filled containers such as vases or drinks on
or near the device. Shield the power supply from drips or sprays.
12 GB
Page 15
Keep away from open flames. For example, do not place any
burning candles on or near the device. That way you can avoid
the spread of fire.
Installing the camera
Note: Mount the camera at a height and position at which it cannot
be reached without aid. Proceed likewise with the connecting and
Ethernet cable.
Be sure not to pierce electrical lines or other obstructions during
installation.
Before mounting the product to the wall, check which mounting
materials are suitable for your wall.
Hold the mounting bracket 2 against the wall in the desired
mounting position and mark the drill holes on the wall using the
predrilled holes.
CAUTION! RISK OF INJURY! Please refer to your electric
drill‘s instructions for use.
Now drill the mounting holes (Ø 5 mm). Ensure that you do not
damage the supply line.
Now insert the wall plugs 5 into the bore holes.
Secure the mounting bracket 2 to the wall using the screws 6
(Fig. A1).
Loosen the wing bolt on the mounting bracket 2 and adjust the
viewing angle (see Fig. A2).
Then secure the joint by tightening the wing bolt.
Screw the camera 1 onto the mounting bracket 2 (see Fig. A3).
Once the you have turned the camera 1 on the screw in the mounting
bracket
nut in the opposite direction to secure the camera
2
so it is connected as tight as possible, turn the triangle
1
.
13 GB
Page 16

Note: For details and more information, please refer to the included
tutorial CD
4
.
Connecting the camera (see Fig. B)
Connect the Ethernet cable 8 with the router.
Plug the connector of the power supply 7 into the camera 1.
Plug the power supply 7 into the socket.
Wait about 45 seconds after connecting to the electric circuit. Once
the red and green LED on the camera light up, it is connected to
the network.
The red LED indicates the camera is connected with the power
supply. The green LED indicates the camera is connected with the
router.
Note: To use the camera to record, insert an SD card in the SD slot
(see Fig. B).
Open the rubber cover.
Slide the SD card, pins down, into the SD slot 11.
Carefully push the SD card against the resistance of the spring.
The SD card is now locked in place.
To remove the SD card, lightly push against the SD card using
your fingernail.
The spring will now slightly push the SD card out of the SD slot 11.
The SD card can now be removed.
Close the rubber cover to prevent water from entering.
14 GB
Page 17
Camera setup
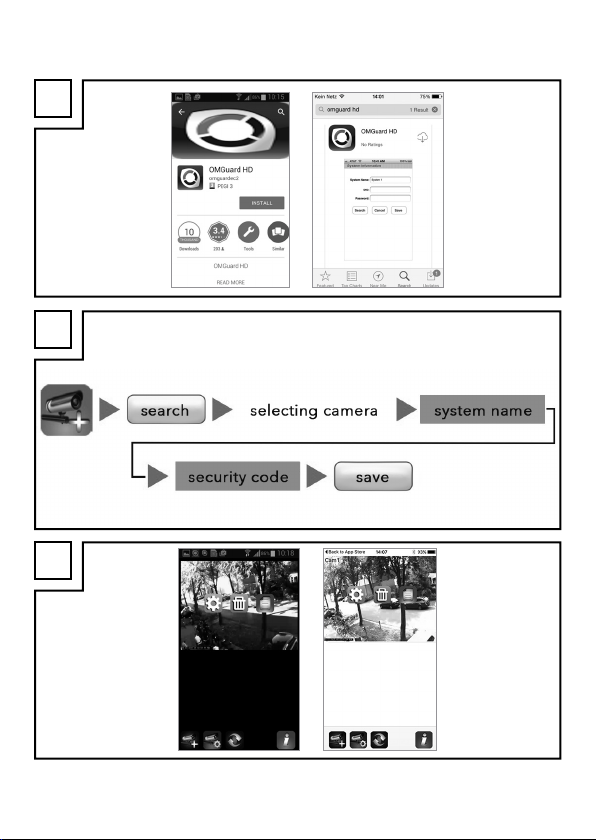
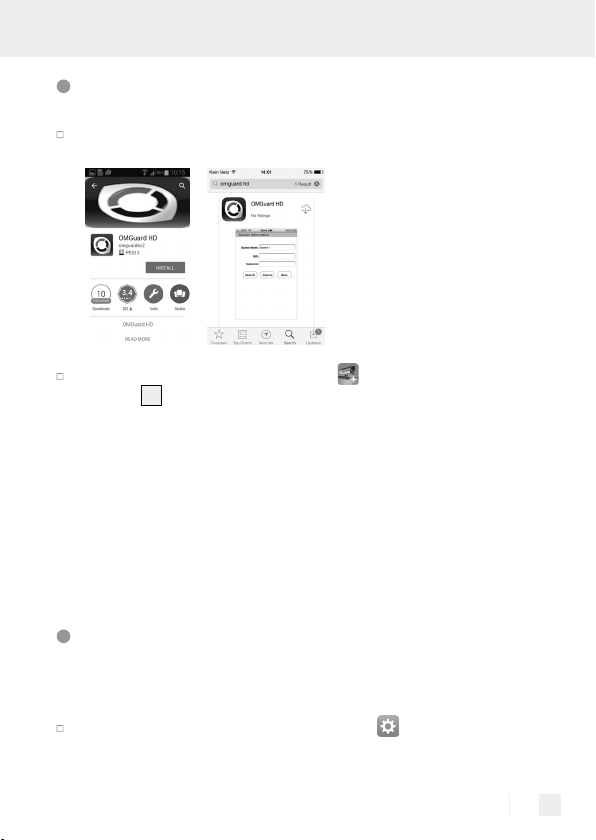
Download the „OMGuard HD“ app from the App Store or Google
Play (see Fig. C).
In the app, select „Add new system“
camera 1 you wish to connect to the router. This will open a new
window with all the cameras available on the network. The camera
will have an alphanumeric code which also corresponds with the
„DID Code“ printed on a label on the underside of the camera.
Compare the codes and select it in the display. Select a name for
the camera and enter it under system name. Then enter the default
security code „123456“ and click „Save“ (see Fig. D). The camera
will capture a still frame and show it in the display along with the
message „Connected“.
and „Scan“ to select the
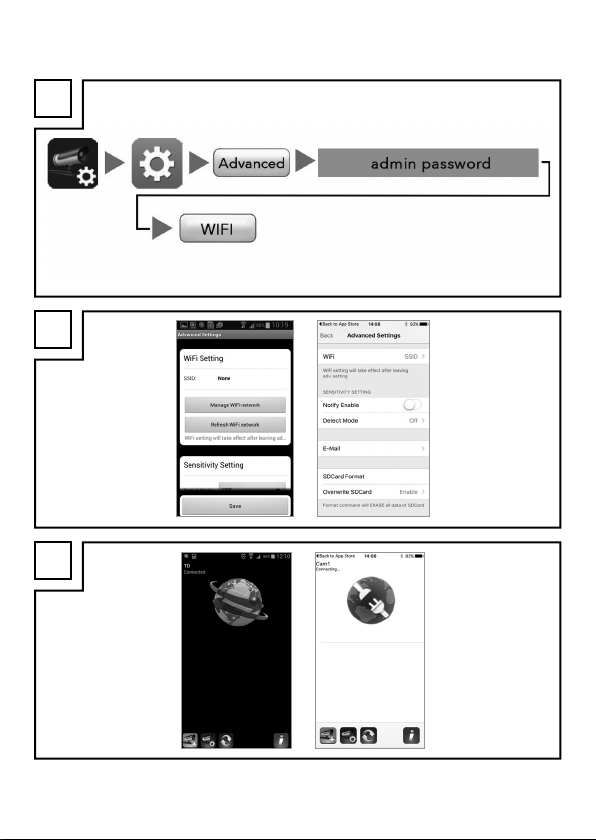
Changing passwords and configuring the
camera on the WLAN network (see Fig. E)
Note: You will find the expanded description in the tutorial CD.
Select the „Camera Settings“ symbol, then
tion“ for additional camera configuration.
„System Informa-
15 GB
Page 18

Select „More“ and enter the default Admin password „123456“.
Click „OK“ to confirm.
Opening „More“ for the first time will open a window prompting
you to enter a new Admin password. You will need to enter a new
password or you will be unable to access the settings. To change
the password again later, scroll all the way up in the „Adv. Settings“ menu until you see the item „Admin Password“. Then enter
your old password, followed by the new one. Enter it again to
confirm the new password.
Scroll down until you see the field „Security Code“. Select „Change“.
Enter the default old password („123456“) and select a new
password and repeat to confirm your entry. Click „OK“ to confirm
your entry.
Scroll down until you see the „WLAN Config.“ field. Select „Adv.
WLAN network“ (see Fig. G).
Once you have successfully entered your WLAN password the
camera will restart. Please disconnect the network plug from the
router when restarting.
The security code allows you to access the camera („Live View“,
not for changing settings) and the „Admin Password“ is used to
change any camera settings.
IMPORTANT: The camera software requires two passwords – the
security code for accessing the camera, and the admin password for
configuring the camera.The factory setting for both passwords is
„123456“. After changing the passwords the new passwords must be
used, not the default password. Please remember the passwords.
Be sure to change both passwords to prevent unauthorised access
to the camera.
16 GB
Page 19
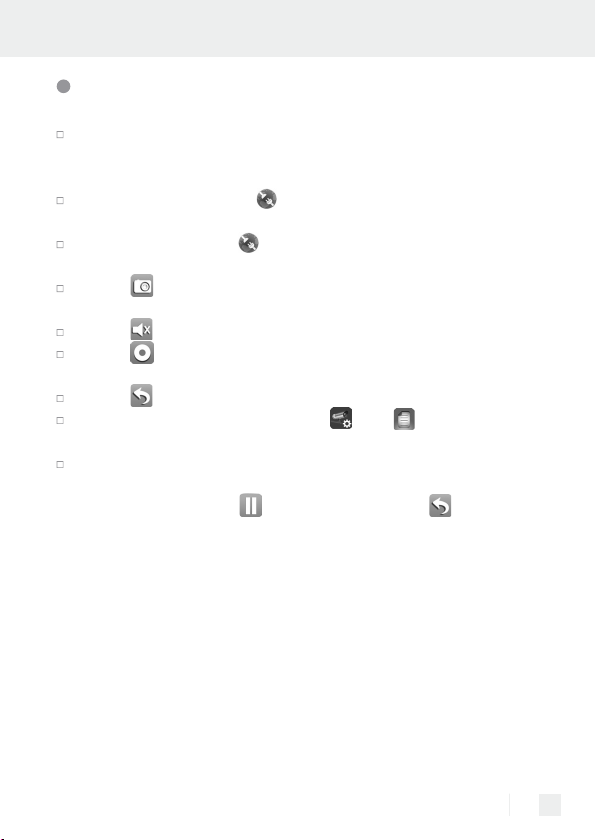
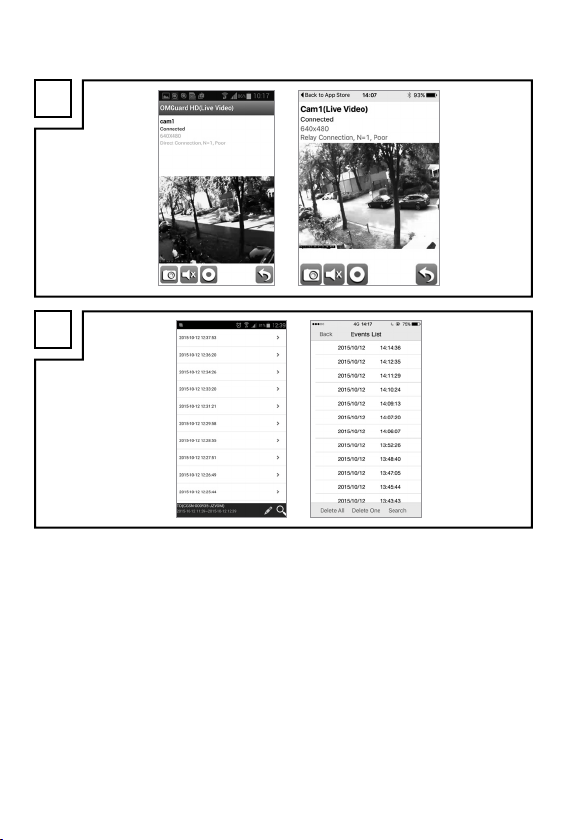
Using the camera
Please check the preview image (still frame) (see Fig. H). Select
the camera image and enter your new security code. You will now
see the „Live Image“ from the camera (see Fig. I).
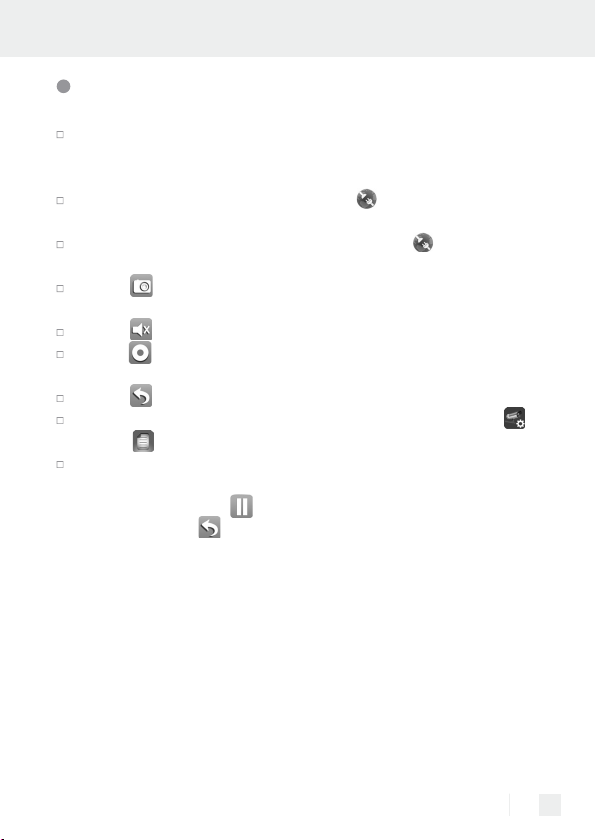
For an IOS device select in the app to view a live camera
recording (see Fig. J right).
Or alternatively select for an ANDROID device to view a live
camera recording (see Fig. J left).
Select to take a screen shot. The picture will be saved to your
mobile and gallery / photos.
Select
Select
automatically.
Select to return to the main screen of the App.
To use the playback function, select , then from the main
screen of the app.
Now select the file you wish to play from the results (see Fig. J,
Android: left, IOS: right). The app will now start the playback.
Use the pause symbol
playback list.
At the very top you will see information related to name, connec-
tion and image quality*.
There are 4 displays:
A – camera name: user specified
B – connection status: connecting / connected / disconnected
C – Resolution information: various by resolution selected.
D – connection type and connection quality: unknown (app does
to switch the audio on / off in LIVE mode.
to record. It will then record for one minute and stop
to pause playback, use
(1280X720 / 640X480)
not recognise the type of connection) / Direct link (camera
and mobile on the same network) / Indirect link (camera and
return to the
17 GB
Page 20

phone on different networks - connected via internet) Connection quality = good / normal / poor.
Note: For details and more information, please refer to the included
tutorial CD
4
.
Notice to Android users: Close the app after viewing the camera
image on your mobile. To do so, from the main screen in the app,
press and hold the respective button at the bottom left corner of the
display. The EXIT command will appear. Select it to close the app.
Note: Depending on the operating system and version you may not
have full access to all functions.
Troubleshooting
No image appears.
Check the display (LED) on the camera.
Verify the camera is connected to power with the included
adapter.
Check the connections of the Ethernet cable.
The camera does not respond, the camera image freezes.
Hold the RESET button 10 for approx. 45 seconds to restart.
Whilst holding the button, first the red, then the green, and finally
the red LED again, will flash. After releasing the RESET button
it will take approx. 45 seconds for the camera to reconnect to the
network. After this, the red and green LED will light up. The green
LED will light up when the camera is connected to the tethered network. The camera is now again ready for use.
All settings will be reset to the factory settings. It will need to be
completely reconfigured.
10
18 GB
Page 21
A poor image will appear.
Do not set up the camera directly behind a glass pane.
Do not aim the camera directly at a light source.
If necessary, clean the camera lens (carefully, using a slight damp
cloth).
Unable to connect to the camera.
Check if the camera and smartphone / tablet are on the same
WLAN network.
Note: For details and more information, please refer to the included
tutorial CD
4
.
Cleaning and Care
When cleaning, first switch off the product at the mains.
Do not use solvents, petrol, etc. Doing so would damage the
product.
Never immerse the product in water.
Only use a dry, lint-free cloth for cleaning.
Disposal
The package and packaging materials consist entirely of
environmentally friendly materials. They can be disposed of
at your local recycling facility.
Do not dispose of electric equipment in the
household waste!
19 GB
Page 22

The symbol with the crossed out wheelie bin means the device is subject
to directive 2012 / 19 / EU and must never be disposed of in normal
household waste. They must be taken to a special waste electrical
equipment collection point. Information on free and environmentallyfriendly disposal of old electronic devices can be found at your local
council or at a disposal site. Keep your environment clean and dispose
of the device correctly. Thank you.
Warranty and Service
Warranty Declaration
The camera is covered by a 3 year warranty from the date of purchase,
granted only the original buyer, and is not transferrable. Please keep
your receipt as your proof of purchase.
The warranty applies to material or manufacturing defects only. It does
not cover worn items or damage caused by improper use. Any modifications will void the warranty. This warranty does not limit your legal
rights. In the event of a warranty claim, please first contact the service
department by phone. This is the only way to return your product free
of charge.
Service address
Smartwares Safety & Lighting Ltd.
Byron House,
Sherwood Road 34
Aston Fields, Bromsgrove
B60 3DR Worcestershire
Tel: +44 1527 557 700
20 GB
Page 23

Business hours:
Monday to Friday 8 am - 6 pm
(€0.14 / min from German landlines. From mobiles max. €0.42 / min)
All other countries:
Fees depend on your individual network.
technical.sl.uk@smartwares.eu
www.smartwares.eu
IAN 271723
Please have your receipt and the item number (IAN 271723) ready
as your proof of purchase when enquiring about your product.
Notes on Conformity
This „IP Surveillance Camera“ IAN 271723 meets the requirements of
the applicable European directives:
R&TTE Directive (1999 / 5 / EC)
Electromagnetic Compatibility (2004 / 108 / EC)
EU Low Voltage Directive (2006 / 95 / EC)
RoHS directive (2011 / 65 / EU)
Ecodesign directive (2009 / 125 / EC)
The complete Declaration of Conformity can be found at the following
link: www.smartwares.eu
21 GB
Page 24

Trademark notices
iOS and Apple are registered trademarks of Apple Inc in the USA and
other countries. App Store is a registered trademark of Apple Inc.
Android and Google Play are registered trademarks of Google Inc.
Other names, trademarks and products listed in these instructions are
the property of the respective owners and may be protected.
22 GB
Page 25

Vysvětlení použitých piktogramů ............... Strana 24
Úvod
Použití ke stanovenému účelu.............................................. Strana 25
Popis dílů .............................................................................. Strana 26
Technická data ..................................................................... Strana 26
Obsah dodávky ................................................................... Strana 28
Bezpečnostní pokyny ............................................ Strana 28
Montáž kamery .......................................................... Strana 31
Připojení kamery................................................................... Strana 32
Zařízení kamery ................................................................... Strana 33
Změna hesel a zařízení kamery ve WLAN síti ................... Strana 33
Použití kamery ...................................................................... Strana 35
Odstranění poruch ................................................... Strana 36
Čistění a ošetřování ................................................. Strana 37
Odstranění do odpadu ......................................... Strana 37
Záruka a servis
Prohlášení k záruce .............................................................. Strana 38
Adresa servisu ...................................................................... Strana 38
Upozornění ke konformitě ............................... Strana 39
Upozornění k použitým značkám zboží ... Strana 40
23 CZ
Page 26

Vysvětlení použitých piktogramů
Přečtěte si pokyny!
Bezpečnostní
Pokyny k použití
Chráněné proti prachu a stříkající vodě
24 CZ
NEBEZPEČÍ:
označuje nebezpečí, která mohou při nerespektování
pokynů vést k těžkým zraněním nebo usmrcení.
příslušným pokynem, aby jste
Tento symbol s upozorněním
zabránili ohrožení.
„NEBEZPEČÍ“
Řiďte se
VÝSTRAHA: Tento symbol s upozorněním „VÝSTRAHA“
označuje nebezpečí, která mohou při nerespektování
pokynů vést ke zraněním nebo věcným škodám. Řiďte se
příslušným pokynem, aby jste zabránili ohrožení.
Chraňte výrobek před dětmi!
Obal a výrobek zlikvidujte vhodným ekologickým
způsobem!
Page 27
Bezpečnostní IP kamera
Úvod
Blahopřejeme Vám k zakoupení Vašeho nového přístroje.
Rozhodli jste se pro vysoce kvalitní výrobek. Před prvním
uvedením do provozu se seznamte s výrobkem. Přečtěte si
k tomu pozorně následující Quick Start Guide s návodem k montáži,
obsluze a bezpečnostními pokyny. S výrobkem jste obdrželi také CD s
návodem, ve kterém jsou ještě další informace o speciálních funkcích
kamery a mimo jiné také vysvětlení k připojení na počítačový systém.
Používejte výrobek jen popsaným způsobem a jen v udaných oblastech použití. Oba návody k obsluze (Quick Start Guide + návod na
CD) jsou součástí výrobku. Uschovejte si je pro případné, pozdější
použití. Všechny podklady vydejte při předání výrobku i třetí osobě.
Použití ke stanovenému účelu
Tato kamera je zařazena do oblasti informační technologie. Výrobek
je vhodný k provozu v místnostech nebo v chráněných venkovních
oblastech a může sloužit k monitorování garáží, parkovišť, domovních
vchodů, atd. Kamera je vybavena funkcí pro noční vidění se 6 infračervenými LED a přenáší křišťálově čisté obrazy. Dále je vybavena integrovaným mikrofonem pro přenos zvuku z monitorovaného prostředí.
Přenos je realizován přes router, přijímaný a řízený prostřednictví App.
Jiné než popsané použití nebo změna na výrobku nejsou přípustné a
mohou vést k jeho poškození. Výrobce neručí za škody vzniklé způsobené jiným použitím než použitím k popsanému účelu. Výrobek není
určen ke komerčnímu použití.
25 CZ
Page 28

Popis dílů
Před čtením si otevřete stranu s obrázky a potom se seznamte se všemi
funkcemi zařízení.
1
Kamera
2
Montážní držák
3
WLAN anténa
4
CD s návodem
5
Hmoždinka
6
Šrouby
7
Síťový adaptér
8
Ethernet kabel (viz obr. B)
9
RJ-45 Spojovací element
10
Tlačítko RESET (viz obr. B)
11
Slot pro SD kartu (pro Micro SD maximálně 32 GB Class 10 -
není v obsahu) (viz obr. B)
12
Quick Start Guide s návodem k montáži, obsluze a bezpečnostními
pokyny
13
Nálepka pro označení monitorovaného prostoru
Technická data
Kamera:
Typ přístroje: Bezpečnostní WLAN kamera pro
venkovní prostory, IP66
Rozměry: cca 6 x 11 cm (ø x T), cca 6 x
15,5 cm (ø x h) (s WLAN anténou a
ochranou před sluncem)
Obrazový senzor: 2 Megapixel CMOS
Ohnisková vzdálenost: 3,6 mm
26 CZ
Page 29

Rozlišení (TV řádky vodorovně): 1280 x 720 Pixel
Obrazový úhel: H 65 °, V 38 °
Prostor dosahu
pohybového senzoru: 90° x 5 m
Infračervená oblast (režim
nočního vidění, černo-bílý): 6 IR LED, dosah až 8 m
Světlocitlivost: 1 až 8 LUX
Provozní teplota: -10 °C až +50 °C
Vlhkost vzduchu za provozu: 40 až 80% RH
Skladovací teplota: -10°C až ~ +60 °C
Vlhkost vzduch při skladování: 20 až 90 % RH
Možnosti připojení: Ethernet (10 / 100 Base-T / Base-TX);
WLAN IEEE 802.11 b / g / n
Frekvence: 2,4 GHz
Druh ochrany: IP66 (chráněné před prachem a
stříkající vodou)
Váha: cca 540 g (kamera se soklem,
anténou a sluneční ochranou)
Síťový adaptér (používat jen v suchých místnostech):
Model / typ: CS9C050150FGF
Výrobce: CSEC
Vstupní napětí / frekvence: 100–240 V ~, 50 / 60 Hz
Vstupní proud: 500 mA
Výstupní napětí: 5 V DC
Výstupní proud: 1,5 A
Ochranná třída: II /
27 CZ
Page 30
Obsah dodávky
Vyjměte všechny díly z balení a odstraňte úplně obalový materiál. V
případě chybějících nebo poškozených dílů se obraťte na zákaznický
servis.
1 kamera
1 montážní držák
1 WLAN anténa
1 síťový adaptér
1 sada na připevnění
1 CD s návodem
1 RJ-45 spojovací element
2 nálepky pro označení monitorovaného prostoru
1 Quick Start Guide s návodem k montáži, obsluze a bezpečnostními
pokyny
Bezpečnostní pokyny
Při škodách způsobených nedodržením tohoto návodu k obsluze zaniká záruka! Za následovné škody se záruka nepřevezme! U věcných
škod a poškození osob, které byly způsobeny neodborným zacházením nebo nedbáním na bezpečnostní pokyny, se záruka nepřevezme!
Děti a osoby s handicapem
NEBEZPEČÍ OHROŽENÍ ŽIVOTA
A ZRANĚNÍ MALÝCH A VELKÝCH DĚTÍ! Nene-
chávejte děti nikdy samotné s obalovým materiálem.
Hrozí jim nebezpečí udušení. Obalový materiál není hračka. Děti
nebezpečí často podceňují.
28 CZ
Page 31

Uchovávejte výrobek mimo dosah dětí. Tento přístroj mohou použí-
vat děti starší 8 let, osoby se sníženými fyzickými, smyslovými nebo
duševními schopnosti nebo s nedostatečnými zkušenostmi a znalostmi, jestliže budou pod dohledem nebo byly poučeny o bezpečném používání přístroje a chápou nebezpečí, která z jeho
používání vyplývají.
Děti si nesmí s přístrojem hrát. Děti nesmějí bez dohledu provádět
čištění ani uživatelskou údržbu.
NEBEZPEČÍ OHROŽENÍ ŽIVOTA! Během montáže držte děti
mimo pracoviště. Součástí dodávky je velký počet šroubů a jiných
drobných dílů. Tyto předměty mohou být v případě spolknutí nebo
vdechnutí životu nebezpečné.
Poškození
Nepoužívejte výrobek pokud jste zjistili že je poškozený.
Při poškozeních, opravách nebo jiných problémech souvisejících s
výrobkem se obraťte na servis nebo odborníka.
Zajistěte, aby všechny elektrické přípojky a kabelová spojení na
ostatních přístrojích odpovídaly příslušným směrnicím a současně i
údajům v návodu k obsluze.
Dávejte pozor, abyste něpřetížili zásuvky a prodlužovací kabel.
Může dojít k požáru nebo zásahu elektrickým proudem.
Pro správný provoz kamery dbejte na teplotu a vlhkost vzduchu za
provozu a při skladování. Tyto hodnoty jsou uvedeny v technických
datech. Vlhké, velmi studené nebo horké prostředí nebo skladování za podobných podmínek může kameru poškodit.
Kamera je vhodná k používání venku, síťový adaptér se smí použí-
vat jen v místnostech.
Zabraňte silným nárazům. Může dojít k poškození elektronických
obvodů.
Bezkabelové systémy jsou vystaveny rušení telefony, mikrovlnnými
troubami i jinými elektronickými přístroji, které pracují s frekvencí
29 CZ
Page 32
2,4 GHz (následky rušení jsou mimo jiné špatná kvalita obrazu
nebo problémy přenosu).
Při instalaci nebo provozu dodržujte odstup nejméně 3 metry.
Kameru neotevírejte. Kamera je bezúdržbová. Jestliže výrobek
otevřete, zanikne záruka.
Zajistěte, aby se při montáži nepoškodily žádné vodiče.
Síťový adaptér
Zastrčte síťový adaptér do snadno přístupné zásuvky, aby jste ho
mohli v nouzovém případě vytáhnout.
Nedotýkejte se síťového adaptéru mokrýma rukama. Jinak hrozí
nebezpečí zásahu elektrickým proudem.
Používejte síťový adaptér jen v suchých místnostech.
Netahejte nikdy přístroj za kabel. Uchopte přístroj vždy jen za
těleso.
Vezměte na vědomí, že pokud je síťový adaptér v zásuvce, odebírá
malé množství proudu i když není kamera v provozu. K úplnému
odpojení síťového adaptéru je třeba ho vytáhnout ze zásuvky.
NEBEZPEČÍ OHROŽENÍ ŽIVOTA! Nikdy síťový adaptér neo-
tevírejte. Jinak hrozí nebezpečí zásahu elektrickým proudem.
Síťový adaptér ničím nepřikrývejte.
Při nezvyklých zvucích nebo vývoji kouře vytáhněte síťový adaptér
ihned ze zásuvky.
Umisťujte kabel zajištěný proti klopýtnutí.
Chraňte zástrčková spojení před vlhkostí.
Použití
Nepoužívejte kameru ve výbušném prostředí, např. v blízkosti čer-
pacích stanic paliva nebo v prašném prostředí.
Řiďte se právními předpisy dotyčné země, které regulují pozoro-
vání osob kamerou.
30 CZ
Page 33

Prostory monitorované kamerou se musí označit. Odpovídající
nálepky jsou přiložené v obsahu, prosíme, respektujte povinnosti
značení v dotyčné zemi.
Nestavte na přístroj nebo do jeho blízkasti nádoby naplněné teku-
tinou, např. vázy nebo nápoje. Chraňte síťový adaptér před kapající nebo stříkající vodou.
Chraňte přístroj před ohněm. Nestavte na přístroj nebo do jeho
blízkosti například hořící svíčky. Zabraňte šíření požáru.
Montáž kamery
Upozornění: Montujte kameru do výšky a polohy nedosažitelné
bez pomůcek. Stejně umisťujte i připojovací kabel a propojovací kabel
s ethernetem.
Dávejte pozor, abyste při montáži neprovrtali elektrická vedení
nebo jiná zařízení.
Před montáží se nejdříve informujte o montážním materiálu, který
je vhodný k připevnění na Vaší stěnu.
Přiložte montážní držák 2 na vyhlédnuté místo na stěně a označte
si na ní pomocí otvorů na držáku místa pro vrtání.
POZOR! NEBEZPEČÍ ZRANĚNÍ! Použijte ktomu návod k
obsluze vaší vrtačky.
Nyní vyvrtejte otvory (Ø 5 mm). Dbejte, abyste nepoškodili vodiče
přívodu elektrického proudu.
Nasaďte hmoždinky 5 do vyvrtaných otvorů.
Přišroubujte montážní držák 2 šrouby 6 na stěnu (obr. A1).
Povolte křídlový šroub 2 na montážním držáku a nastavte poža-
dovaný úhel kamery (viz obr. A2).
Utažením křídlového šroubu nakonec kloub zajistěte.
Přišroubujte kameru 1 na montážní držák 2 (viz obr. A3).
31 CZ
Page 34

Jestliže je kamera 1 šroubem již dostatečně připevněná na
montážní držák
abyste kameru
2
, otáčejte trojúhelníkovou matkou v protisměru,
1
zafixovali.
Poznámka: Podrobnosti a další informace najdete v dodaném
návodu na CD
4
.
Připojení kamery (viz obr. B)
Připojte propojovací kabel pro ethernet 8 na router.
Připojte zástrčku síťového adaptéru 7 na kameru 1.
Zastrčte síťový adaptér 7 do zásuvky.
Po tomto připojení na přívod elektrického proudu počkejte přibližně
45 vteřin. Jestliže na kameře svítí červená a zelená LED, pak je
spojená s počítačovou sítí.
Červená LED signalizuje připojení kamery na přívod elektrického
proudu. Zelená LED signalizuje spojení kamery na routerem.
Poznámka: Jestliže chcete s kamerou scény nahrávat, vložte SD
kartu do příslušného slotu (viz obr. B).
Otevřete gumový kryt.
Zasuňte SD kartu s přípojkami dolů do slotu pro SD 11.
Zatlačte SD kartu opatrně proti odporu pružiny.
Nyní je SD karta aretovaná.
Pro vyjmutí karty na ní mírně zatlačte nehtem.
Pružina vytlačí SD kartu ze slotu 11. Nyní je možné SD kartu vy-
jmout.
Uzavřete gumový kryt, aby se nemohla dostat dovnitř voda.
32 CZ
Page 35

Zařízení kamery
Stáhněte si App „OMGuard HD“ z App-Store nebo od Google
Play (viz obr. C).
V aplikaci zvolte „přidat nový systém“
mohli navolit kameru 1, která má být s routerem spojena. Otevře
se další okno, ve kterém jsou uvedené všechny kamery zapojené
do počítačové sítě. Kamera je zde uvedená pod písmenem a číselným kódem, což odpovídá také DID kódu na štítku na spodní straně
kamery. Porovnejte kódy a zvolte odpovídající kód na displeji.
Zvolte jméno pro kameru a zadejte ho jako jméno systému. Nakonec zadejte přednastavený bezpečnostní kód „123456“ a
uložte vše do paměti tlačítkem „Save“ (viz obr. D). Kamera ukáže
na displeji fotografii spolu s poznámkou „Spojeno“.
a potom „Hledat“, abyste
Změna hesel a zařízení kamery
ve WLAN síti (viz obr. E)
Upozornění: Podrobný popis najdete v návodu na CD.
Pro další nastavení kamery se musí navolit symbol „Nastavení
kamery“ a potom
„Systémová informace“.
33 CZ
Page 36

Zvolte „Další“ a zadejte přednastavené heslo administrátora
„123456“. Potvrďte s „OK“.
Po prvním zvolení „Další“ se otevře okno se žádostí o udání nového
hesla administrátora. Zde musíte nové heslo zadat, jinak se přístup
k nastavení neotevře. Jestliže chcete později Vaše heslo znovu
změnit, přejděte v menu „Rozšířená nastavení“ úplně nahoru, až
se objeví „Heslo administrátora“. Zde zadejte Vaše staré a nakonec
nové heslo. Potvrďte Vaše nové heslo opakovaným zadáním.
Přejděte dolů až se objeví políčko „Bezpečnostní kód“. Zvolte
„Změnit“. Zadejte přednastavené heslo („123456“) a zvolte nové
heslo, které potom potvrdíte opakovaným zadáním. Potvrďte s „OK“.
Přejděte dolů až se objeví políčko „Nastavení WLAN“. Zvolte
„WLAN síť použít“ (viz obr. G).
Potom co jste úspěšně zadali heslo pro WLAN, následuje nový
start kamery. Během nového startu kamery vytáhněte z routeru
zástrčku pro počítačovou síť.
S bezpečnostním kódem a s „Heslem administrátora“ máte přístup
ke všem nastavením kamery („Live-view“ - zde není možné žádná
nastavení měnit).
DŮLEŽITÉ: Pro software kamery jsou zapotřebí dvě hesla - bezpečnostní
kód pro přístup k ovládání kamery a heslo administrátora po jehož
zadání je možné měnit nastavení kamery. Obě hesla jsou z výroby
nastavena na „123456“. Po změně hesel musíte nová hesla používat,
přednastavená jsou neplatná. Prosíme, zapamatujte si dobře obě
hesla.
Bezpodmínečně změňte obě hesla, abyste zabránili neoprávněnému
přístupu k funkcím Vaší kamery.
34 CZ
Page 37
Použití kamery
Prosíme, zkontrolujte první náhled kamery (fotografii) (viz obr. H).
Zvolte obraz kamery a zadejte Vámi změněný bezpečnostní kód.
Nyní vidíte „Živý obraz“ kamery (viz obr. I).
Zvolte v aplikaci na Vašem IOS přístroji , pro zhlédnutí živých
záběrů kamery (viz obr. J vpravo).
Alternativně zvolte v aplikaci ANDROID přístroje , pro zhlédnutí
živých záběrů kamery (viz obr. J vlevo).
Zvolte , pro zhotovení fotografie. Fotografie se uloží do paměti
mobilního telefonu a do Galérie / Fotografie.
Zvolte , pro zapnutí resp. vypnutí zvuku v LIVE režimu.
Zvolte , pro natáčení. Natáčení běží jednu minutu a automaicky
skončí.
Zvolte , pro přechod zpět na hlavní stránku aplikace.
Pro použití Playback funkce zvolte na hlavní stránce aplikace ,
potom
Zvolte v seznamu soubor, který chcete přehrát (viz obr. J, Android:
vlevo, IOS: vpravo). Aplikace začne s přehráváním.
Symbolem přestávky
přerušit, pomocí
Úplně nahoře jsou viditelné informace ke jménu, spojení a kvalitě
obrazu*.
Existují 4 údaje:
A – Jméno kamery: určuje uživatel
B – Stav spojení: spojení probíhá / spojeno / rozpojeno
C – Rozlišení: navolené rozlišení. (1280X720 / 640X480)
D – Způsob spojení a jeho kvalita: neznámý (druh spojení není
.
můžete přehrávání
přejdete zpět na seznam.
aplikaci známý) / Přímé spojení (kamera je připojená na stejnou
síť jako mobilní telefon) / Nepřímé spojení (kamera je spojena
s jinou sítí než mobilní telefon spojený s internetem) Kvalita
spojení = dobrá / normální / špatná.
35 CZ
Page 38

Poznámka: Podrobnosti a další informace najdete v dodaném návodu
4
na CD
.
Poznámka pro uživatele Android: Po zhlédnutí obrazu kamery
aplikaci zavřete. Jestliže se aplikace nachází na hlavní stránce, stiskněte
a přidržte za tímto účelem odpovídající tlačítko v levém dolním rohu
displeje. Objeví se EXIT. Zvolte tento povel k uzavření aplikace.
Upozornění: V závislosti na operačním systému a jeho verzi popřípadě nejsou všechny funkce v plném rozsahu k dispozici.
Odstranění poruch
Obraz se neukáže.
Zkontrolujte signalizaci (LED) kamery.
Zkontrolujte, jestli je k dispozici napájení proudem pomocí doda-
ného adaptéru.
Zkontrolujte kontakty připojení ethernet kabelu.
Kamera nereaguje, obraz kamery se zastavil.
Stiskněte tlačítko RESET 10 po dobu cca 45 vteřin pro nový start.
Při přidrženém tlačítku bliká nejdříve červená, potom zelená a nakonec zase červená LED. Po uvolnění tlačítka RESET
ještě cca 45 vteřin než se kamera zase se sítí spojí. Jakmile dojde
ke spojení, svítí červená a zelená LED. Zelená LED svítí, jestliže je
kamera spojená s kabelovou počítačovou sítí. Nyní je kamera
zase připravená k provozu.
Všechna nastavení jsou vrácena na původní nastavení z výroby.
Musí se znovu provést kompletní instalace.
10
uběhne
Špatný obraz.
Nestavte kameru těsně za sklo.
Nesměrujte kameru přímo proti zdroji světla.
36 CZ
Page 39
Popřípadě vyčistěte čočku kamery (opatrně, míně navlhčeným
hadříkem).
Spojení s kamerou není možné.
Zkontrolujte, zda se kamera a Smartphone nebo tablet nacházejí
ve stejné WLAN síti.
Poznámka: Podrobnosti a další informace najdete v dodaném
návodu na CD
4
.
Čistění a ošetřování
Před čištěním odpojte výrobek od přívodu elektrického proudu.
Nepoužívejte žádná rozpouštědla, benzín apod. Výrobek by se
mohl přitom poškodit.
Výrobek neponořujte do vody.
K čištění používejte jen suchou utěrku nepouštějící vlákna.
Odstranění do odpadu
Obal a obalový materiál se skládají výhradně zekologických materiálů. Lze je zlikvidovat vmístních kontejnerech na
tříděný odpad.
Elektrické spotřebiče neodhazujte do domovního
odpadu!
Symbol přeškrtnuté odpadní nádoby znamená, že pro takto označený
přístroj platí směrnice 2012 / 19 / EU a tím se nesmí odstraňovat do
normálního, domácího odpadu. Musí se odevzdat do zvláštní sběrny
37 CZ
Page 40

starých přístrojů. Informace k bezplatnému a ekologickému odstraněni
do odpadu starých elektrických přístrojů obdržíte u Vaší správy obce
nebo u příslušné sběrny. Udržujte čisté životní prostředí a provádějte
odstranění do odpadu odborně. Děkujeme.
Záruka a servis
Prohlášení k záruce
Na kameru dostáváte 3 roky záruky ode dne zakoupení, platící pro
prvního kupce, záruka není přenosná. Uschovejte si, prosím, pokladní
stvrzenku jako doklad o zakoupení.
Záruka platí jen pro vady materiálu nebo chyby z výroby, nevtahuje
se na díly podléhající opotřebení nebo na škody vzniklé neodborným
používáním. Cizím zásahem do výrobku zaniká záruka. Vaše práva
vyplývající ze zákona touto zárukou nejsou omezena. V případě uplatňování záruky kontaktujte telefonicky Vaší servisní službu. Jen tak je
možné zajistit bezplatné zaslání vašeho zařízení do servisu.
Adresa servisu
NSP servis s.r.o.
Karlovo náměstí 16
413 01 Roudnice nad Labem
Tel: +420 413035055
Pracovní doba:
Pondělí až pátek: od 8 do 18 hodin
(0,14 € / min. z německé pevné sítě. Mobilní síť: maximálně 0,42 € / min.)
38 CZ
Page 41

Pro všechny ostatní země platí:
Poplatky použité telefonní sítě.
jan.lacko@nsp24.cz
www.smartwares.eu
IAN 271723
Pro všechny požadavky si připravte pokladní blok a číslo výrobku
(IAN 271723) jako doklad o nákupu.
Upozornění ke konformitě
Tato „IP bezpečnostní kamera“ IAN 271723 splňuje požadavky platných evropských směrnic:
Požadavky R&TTE (1999 / 5 / EC)
Elektromagnetická kompatibilita (2004 / 108 / EC)
EG směrnice o nízkém napětí (2006 / 95 / EC)
RoHS směrnice (2011 / 65 / EU)
Směrnice ekologického designu (2009 / 125 / EC)
Úplné prohlášení o konformitě najdete na: www.smartwares.eu
39 CZ
Page 42

Upozornění k použitým značkám zboží
iOS a Apple jsou registrované značky zboží Apple Inc v USA a jiných
zemích. App Store je registrovaná značka Apple Inc.
Android a Google Play jsou registrované značky Google Inc.
Ostatní jména, značky zboží a výrobky, jmenované v tomto návodu
jsou majetkem přísluštných osob nebo firem a jsou za určitých okolností
zákonem chráněné.
40 CZ
Page 43

Legende der verwendeten
Piktogramme ................................................................... Seite 42
Einleitung
Bestimmungsgemäße Verwendung ........................................ Seite 43
Teilebeschreibung ................................................................... Seite 44
Technische Daten .................................................................... Seite 44
Lieferumfang ............................................................................ Seite 46
Sicherheitshinweise .................................................... Seite 46
Kamera montieren ...................................................... Seite 49
Kamera anschließen ............................................................... Seite 50
Kamera einrichten ................................................................... Seite 51
Ändern der Passworte und Einrichtung der Kamera
im WLAN-Netz ........................................................................ Seite 52
Kamera verwenden................................................................. Seite 53
Fehlerbehebung ............................................................ Seite 55
Reinigung und Pflege ................................................ Seite 56
Entsorgung ......................................................................... Seite 56
Garantie und Service
Garantieerklärung ................................................................... Seite 57
Serviceadresse ........................................................................ Seite 58
Hinweise zur Konformität .................................... Seite 58
Hinweise zu den verwendeten
Warenzeichen ................................................................. Seite 59
41 DE/AT/CH
Page 44

Legende der verwendeten Piktogramme
Anweisungen lesen!
Sicherheitshinweise
Handlungsanweisungen
Staub- und Strahlwassergeschützt
GEFAHR: Dieses Symbol mit dem Hinweis „GEFAHR“ kennzeichnet eine Gefahr, die bei Nichtbeachtung zu schweren
Verletzungen oder zum Tod führen kann. Um die Gefährdung zu vermeiden, befolgen
Sie unbedingt den Hinweis.
WARNUNG: Dieses Symbol mit dem Hinweis „WARNUNG“ kennzeichnet eine Gefahr, die bei Nichtbeachtung zu Verletzungen oder Sachschäden führen kann. Um
die Gefährdung zu vermeiden, befolgen Sie unbedingt
den Hinweis.
Kinder vom Produkt fernhalten!
Verpackung und Produkt umweltgerecht entsorgen!
42 DE/AT/CH
Page 45

IP-Überwachungskamera
Einleitung
Wir beglückwünschen Sie zum Kauf Ihres neuen Gerätes.
Sie haben sich damit für ein hochwertiges Produkt entschie-
den. Machen Sie sich vor der ersten Inbetriebnahme mit
dem Produkt vertraut. Lesen Sie hierzu aufmerksam den nachfolgenden
Quick-Start-Guide mit Montage-, Bedienungs- und Sicherheitshinweisen.
Mit dem Produkt wird ebenfalls eine Anleitungs-CD mitgeliefert, auf der
weitere Informationen zu speziellen Funktionen der Kamera erklärt
werden u.a. auch die Anbindung an ein PC-System. Benutzen Sie das
Produkt nur wie beschrieben und für die angegebenen Einsatzbereiche.
Beide Bedienungsanleitungen (Quick-Start-Guide + Anleitungs-CD)
sind Bestandteil dieses Produkts. Bewahren Sie diese als späteres
Nachschlagewerk auf. Händigen Sie alle Unterlagen bei Weitergabe
des Produktes an Dritte mit aus.
Bestimmungsgemäße Verwendung
Diese Kamera fällt in den Bereich der Informations-Technologie. Das
Produkt ist für den Betrieb im Innen- oder geschützten Außenbereich
geeignet und dient zur Überwachung von Garagen, Parkplätzen,
Hauseingängen etc. Die Kamera verfügt über eine Nachtsichtfunktion
mit 6 Infrarot-LEDs und liefert eine klare Bildübertragung. Darüber
hinaus ist ein Mikrofon integriert, mit dem Umgebungsgeräusche aufgezeichnet werden können. Die Übertragung erfolgt an einen Router
und kann über eine App abgerufen und gesteuert werden. Eine andere Verwendung als zuvor beschrieben oder eine Veränderung des
Produktes ist nicht zulässig und führt zur Beschädigung. Für aus bestim-
43 DE/AT/CH
Page 46

mungswidriger Verwendung entstandene Schäden übernimmt der
Hersteller keine Haftung. Das Produkt ist nicht für den gewerblichen
Einsatz bestimmt.
Teilebeschreibung
Klappen Sie vor dem Lesen die Seite mit den Abbildungen aus und
machen Sie sich anschließend mit allen Funktionen des Gerätes vertraut.
1
Kamera
2
Montagehalterung
3
WLAN-Antenne
4
Anleitungs-CD
5
Dübel
6
Schrauben
7
Netzteil
8
Ethernet-Kabel (siehe Abb. B)
9
RJ-45 Verbindungselement
10
RESET-Taste (siehe Abb. B)
11
SD-Kartenslot (für Micro-SD-Card max. 32 GB Class 10 -
nicht inklusive) (siehe Abb. B)
12
Quick-Start-Guide mit Bedienungs-, Montage- und Sicherheitshin-
weisen
13
Sticker zur Kennzeichnung des überwachten Bereichs
Technische Daten
Kamera:
Gerätetyp: Überwachungskamera WLAN
Außenbereich IP66
44 DE/AT/CH
Page 47

Maße: ca. 6 x 11 cm (ø x T), ca. 6 x 15,5 cm
(ø x T) (mit WLAN-Antenne und
Sonnenschutz)
Bildsensor: 2 Megapixel CMOS
Brennweite: 3,6 mm
Auflösung (TV-Linien horizontal): 1280 x 720 Pixel
Bildwinkel: H 65 °, V 38 °
Erfassungsbereich
Bewegungsmelder: 90° x 5 m
Infrarotbereich (Nachtsichtmodus schwarz / weiß): 6 IR LED’s bis 8 m Reichweite
Lichtempfindlichkeit: 1–8 LUX
Betriebstemperatur: -10 °C – +50 °C
Luftfeuchtigkeit bei Betrieb: 40–80 % RH
Lagerungstemperatur: -10 °C – ~ +60 °C
Luftfeuchtigkeit bei Lagerung: 20–90 % RH
Anschlussmöglichkeiten: Ethernet (10 / 100 Base-T / Base-TX);
WLAN IEEE 802.11 b / g / n
Frequenz: 2,4 GHz
Schutzart: IP66 (staub- und strahlwassergeschützt)
Gewicht: ca. 540 g (Kamera mit Sockel,
Antenne und Sonnenschutz)
Netzteil (nur in trockenen Innenräumen verwenden):
Modell / Typ: CS9C050150FGF
Hersteller: CSEC
Eingangsspannung / Frequenz: 100–240 V ~, 50 / 60 Hz
Eingangsstrom: 500 mA
Ausgangsspannung: 5 V DC
Ausgangsstrom: 1,5 A
Schutzklasse: II /
45 DE/AT/CH
Page 48

Lieferumfang
Entnehmen Sie alle Teile der Verpackung und entfernen Sie vollständig
das Verpackungsmaterial. Wenden Sie sich bei fehlenden oder beschädigten Teilen an den Kundendienst.
1 Kamera
1 Montagehalterung
1 WLAN-Antenne
1 Netzteil
1 Befestigungsset
1 Anleitungs-CD
1 RJ-45 Verbindungselement
2 Sticker zur Kennzeichnung des überwachten Bereichs
1 Quick-Start-Guide mit Bedienungs-, Montage- und Sicherheitshinweisen
Sicherheitshinweise
Bei Schäden, die durch Nichtbeachtung dieser Bedienungsanleitung
verursacht werden, erlischt der Garantieanspruch! Für Folgeschäden
wird keine Haftung übernommen! Bei Sach- oder Personenschäden, die
durch unsachgemäße Handhabung oder Nichtbeachtung der Sicherheitshinweise verursacht werden, wird keine Haftung übernommen!
Kinder und Personen mit Einschränkungen
LEBENS- UND UNFALLGEFAHR
FÜR KLEINKINDER UND KINDER! Lassen Sie
Kinder niemals unbeaufsichtigt mit dem Verpackungsmaterial. Es besteht Erstickungsgefahr durch Verpackungsmaterial.
Verpackungsmaterialien sind kein Spielzeug. Kinder unterschätzen
häufig die Gefahren.
46 DE/AT/CH
Page 49

Halten Sie Kinder stets vom Produkt fern. Dieses Gerät kann von
Kindern ab 8 Jahren und darüber sowie von Personen mit verringerten physischen, sensorischen oder mentalen Fähigkeiten oder
Mangel an Erfahrung und Wissen benutzt werden, wenn sie beaufsichtigt oder bezüglich des sicheren Gebrauchs des Gerätes
unterwiesen wurden und die daraus resultierenden Gefahren verstehen.
Kinder dürfen nicht mit dem Gerät spielen. Reinigung und Benutzer-
wartung dürfen nicht von Kindern ohne Beaufsichtigung durchgeführt
werden.
LEBENSGEFAHR! Halten Sie Kinder während der Montage vom
Arbeitsbereich fern. Zum Lieferumfang gehört eine Vielzahl von
Schrauben und anderen Kleinteilen. Diese können beim Verschlucken
oder Inhalieren lebensgefährlich sein.
Beschädigungen
Benutzen Sie das Produkt niemals, wenn Sie irgendwelche Beschä-
digungen feststellen.
Wenden Sie sich bei Beschädigungen, Reparaturen oder anderen
Problemen an dem Produkt an die Servicestelle oder eine Fachkraft.
Stellen Sie sicher, dass alle elektrischen Anschlüsse sowie Kabel-
verbindungen an weitere Geräte den betreffenden Richtlinien
entsprechen und sich gleichzeitig in Übereinstimmung mit der
Bedienungsanleitung befinden.
Achten Sie darauf, Steckdosen und Verlängerungskabel nicht zu
überlasten. Das kann zu Feuer oder Stromschlag führen.
Für den ordnungsgemäßen Betrieb der Kamera beachten Sie die
Temperatur und die Luftfeuchtigkeit während des Betriebs und der
Lagerung. Diese werden in den technischen Daten angegeben.
Feuchte, sehr kalte oder heiße Umgebung oder Lagerung kann die
Kamera beschädigen.
47 DE/AT/CH
Page 50

Die Kamera ist für die Nutzung im Außenbereich geeignet, das
Netzteil darf nur in Innenräumen verwendet werden.
Vermeiden Sie harte Stöße. Das kann zu Beschädigung der elektro-
nischen Schaltkreise führen.
Kabellose Systeme sind Störeinflüssen von Telefonen, Mikrowellen
sowie anderen elektronischen Geräten, die im 2,4 GHz-Bereich
arbeiten, ausgesetzt (Auswirkungen von Störeinflüssen sind u. U.
schlechte Bildqualität oder Übertragungsprobleme).
Halten Sie einen Mindestabstand von 3 Metern während Installation
und Betrieb ein.
Öffnen Sie die Kamera nicht. Die Kamera ist wartungsfrei. Ihre
Garantie erlischt, wenn Sie das Produkt öffnen.
Stellen Sie sicher, dass bei der Montage keine Leitungen beschädigt
werden.
Netzteil
Stecken Sie das Netzteil nur in leicht zugängliche Steckdosen,
sodass Sie es im Notfall leicht abziehen können.
Fassen Sie das Netzteil nicht mit nassen Händen an. Andernfalls
besteht Stromschlaggefahr.
Verwenden Sie das Netzteil nur in trockenen Innenräumen.
Ziehen Sie das Gerät niemals am Kabel. Fassen Sie das Gerät
immer am Gehäuse an.
Beachten Sie, dass das Netzteil auch ohne Betrieb der Kamera
noch eine geringe Leistung aufnimmt, solange sich das Netzteil in
der Steckdose befindet. Zur vollständigen Trennung des Netzteils
muss dieses aus der Netzsteckdose entfernt werden.
LEBENSGEFAHR! Öffnen Sie niemals das Netzteil. Andernfalls
besteht Stromschlaggefahr.
Decken Sie das Netzteil nicht ab.
Ziehen Sie das Netzteil bei ungewöhnlichen Geräuschen oder
Rauchentwicklung sofort aus der Steckdose.
48 DE/AT/CH
Page 51

Verlegen Sie das Kabel stolpersicher.
Schützen Sie alle Steckverbinder vor Feuchtigkeit.
Verwendung
Verwenden Sie die Kamera nicht in explosiver Umgebung, z. B.
Tankanlagen, oder in staubhaltiger Umgebung.
Beachten Sie die Gesetzeslage des jeweiligen Landes, wenn
Personen mit dieser Kamera beobachtet werden.
Kameraüberwachte Bereiche sind zu kennzeichnen. Entspre-
chende Aufkleber liegen bei, bitte beachten Sie auch hier die
Kennzeichnungspflicht des jeweiligen Landes.
Stellen Sie keine flüssigkeitsgefüllten Behälter, z. B. Vasen oder
Getränke, auf oder neben das Gerät. Schützen Sie das Netzteil
vor Tropf- und Spritzwasser.
Halten Sie offene Flammen fern. Stellen Sie z. B. keine brennenden
Kerzen auf oder neben das Gerät. So vermeiden Sie die Ausbreitung
von Bränden.
Kamera montieren
Hinweis: Montieren Sie die Kamera in einer Höhe und Position, in der
sie nicht ohne Hilfsmittel erreicht werden kann. Verfahren Sie ebenso
mit dem Anschluss- und Ethernet-Kabel.
Achten Sie darauf, dass Sie keine Elektroleitungen und andere
Hindernisse bei der Montage durchbohren.
Informieren Sie sich vor der Wandmontage über geeignetes
Montagematerial für Ihre Wand.
Halten Sie die Montagehalterung 2 an die Wand des gewünschten
Montageortes und markieren Sie die Bohrlöcher mit Hilfe der vorgebohrten Löcher an der Wand.
49 DE/AT/CH
Page 52

VORSICHT! VERLETZUNGSGEFAHR! Ziehen Sie die Bedie-
nungsanleitung Ihrer Bohrmaschine hinzu.
Bohren Sie nun die Befestigungslöcher (Ø 5 mm). Stellen Sie
sicher, dass Sie die Zuleitung nicht beschädigen.
Führen Sie nun die Dübel 5 in die Bohrlöcher ein.
Befestigen Sie die Montagehalterung 2 mittels der Schrauben
6
an der Wand (Abb. A1).
Lösen Sie die Flügelschraube an der Montagehalterung 2 und
stellen Sie den richtigen Blickwinkel ein (s. Abb. A2).
Sichern Sie anschließend das Gelenk, indem Sie die Flügelschraube
wieder festziehen.
Schrauben Sie die Kamera 1 auf die Montagehalterung 2
(s. Abb. A3).
Wenn die Kamera 1 mittels Drehung so weit wie möglich mit der
Schraube der Montagehalterung
2
verbunden ist, drehen Sie die
Dreiecksmutter in die entgegengesetzte Richtung um die Kamera
1
zu fixieren.
Hinweis: Details und weitere Informationen finden Sie auf der
mitgelieferten Anleitungs-CD
4
.
Kamera anschließen (s. Abb. B)
Schließen Sie das Ethernet-Kabel 8 an den Router an.
Schließen Sie den Anschlussstecker des Netzteils 7 an die Kamera
1
an.
Stecken Sie das Netzteil 7 in die Steckdose.
Warten Sie nach dem Anschluss an den Stromkreis etwa 45 Sekun-
den. Sobald die rote und grüne LED an der Kamera leuchten, ist
sie mit dem Netzwerk verbunden.
Die rote LED zeigt an, dass die Kamera mit der Stromversorgung
50 DE/AT/CH
Page 53

verbunden ist. Die grüne LED zeigt an, dass die Kamera mit dem
Router verbunden ist.
Hinweis: Wenn Sie mit der Kamera aufzeichnen wollen, legen Sie
eine SD-Karte in den SD-Kartenslot ein (s. Abb. B).
Öffnen Sie die Gummi-Abdeckung.
Schieben Sie die SD-Karte mit den Anschlüssen nach unten in den
SD-Kartenslot
11
.
Drücken Sie die SD-Karte vorsichtig gegen den Widerstand der
Feder.
Die SD-Karte ist nun arretiert.
Um die SD-Karte wieder zu entnehmen, drücken Sie leicht mit dem
Fingernagel auf die SD-Karte.
Die Feder drückt nun die SD-Karte leicht aus dem SD-Kartenslot 11.
Die SD-Karte kann nun entnommen werden.
Schließen Sie die Gummi-Abdeckung, damit kein Wasser eindringen
kann.
Kamera einrichten
Laden Sie die App „OMGuard HD“ aus dem App-Store oder von
Google Play herunter (s. Abb. C).
51 DE/AT/CH
Page 54

Wählen Sie in der App „neues System hinzuf.“
1
chen“, um die Kamera
bunden werden soll. Es öffnet sich ein weiteres Fenster, in dem alle
im Netzwerk verfügbaren Kameras gelistet sind. Die Kamera er-
scheint mit einem Buchstaben- und Zahlen-Code, der auch dem
„DID-Code“ entspricht, der auf einem Label auf der Unterseite der
Kamera aufgedruckt ist. Vergleichen Sie die Codes und wählen
Sie diesen auf dem Display aus. Wählen Sie einen Namen für die
Kamera und geben Sie diesen unter Systemname ein. Geben Sie
anschließend den voreingestellten Sicherheitscode „123456“ ein
und speichern Sie mit „Save“ (s. Abb. D). Die Kamera erstellt ein
Standbild und zeigt dieses mit dem Hinweis „Verbunden“ auf dem
Display an.
auszuwählen, die mit dem Router ver-
und dann „Su-
Ändern der Passworte und Einrichtung der
Kamera im WLAN-Netz (s. Abb. E)
Hinweis: Die erweiterte Beschreibung befindet sich in der
Anleitungs-CD auf Seite 19 und folgenden Seiten.
Zur weiteren Einstellung der Kamera muss das Symbol „Kamera-Ein-
stellungen“ ausgewählt werden und dann
Wählen Sie „Weitere“ und geben Sie das voreingestellte Admin-
Passwort „123456“ ein. Bestätigen Sie mit „OK“.
Wenn Sie den Punkt „Weitere“ zum ersten mal aufrufen, öffnet
sich ein Fenster, in dem Sie zur Eingabe eines neuen Admin-Pass-
wortes aufgefordert werden. Sie müssen ein neues Passwort einge-
ben, da sich der Zugang zu den Einstellungen sonst nicht öffnet.
Wenn Sie das Passwort zu einem späteren Zeitpunkt erneut ändern
möchten, scrollen Sie im Menü „Erw. Einstellungen“ ganz nach
oben, bis der Punkt „Admin-Kennwort“ erscheint. Geben Sie dann
„Systeminformation“.
52 DE/AT/CH
Page 55

Ihr altes Passwort ein und anschließend Ihr neues. Bestätigen Sie
das neue Passwort durch eine wiederholte Eingabe.
Scrollen Sie hinunter, bis das Feld „Sicherheitscode“ erscheint.
Wählen Sie „ändern“. Geben Sie das voreingestellte alte Kennwort
(„123456“) ein und wählen Sie ein neues Kennwort, welches Sie
durch wiederholte Eingabe bestätigen. Bestätigen Sie die Eingabe
mit „OK“.
Scrollen Sie hinunter, bis das Feld „WLAN-Einst.“erscheint. Wäh-
len Sie „WLAN-Netzwerk verw.“ (s. Abb. G).
Nachdem Sie Ihr WLAN-Passwort erfolgreich eingegeben haben,
erfolgt ein Neustart der Kamera. Während des Neustarts bitte den
Netzwerkstecker vom Router trennen.
Mit dem Sicherheitscode hat man Zugriff auf die Kamera („Live-
view“ man kann hiermit keine Einstellungen ändern) und mit dem
„Admin-Passwort“ kann man alle Einstellungen der Kamera ändern.
WICHTIG: Die Kamera-Software sieht zwei Passwörter vor – den
Sicherheitscode, um den Zugriff auf die Kamera zu ermöglichen
und das Admin-Passwort, mit dem Sie die Kamera-Einstellungen vornehmen können. Beide Passwörter lauten in der Werkseinstellung
„123456“. Sobald Sie die Passwörter ändern, müssen Sie diese verwenden und nicht mehr das voreingestellte Passwort. Bitte merken Sie
sich die Passwörter gut.
Ändern Sie unbedingt beide Passwörter, um den unberechtigten
Zugriff auf Ihre Kamera zu verhindern.
Kamera verwenden
Bitte überprüfen Sie das Vorschaubild (Standbild) (s. Abb. H).
Wählen Sie das Kamerabild aus und geben Sie den von Ihnen
53 DE/AT/CH
Page 56

geänderten Sicherheitscode ein. Nun sehen Sie das „Live-Bild“
der Kamera (s. Abb. I).
Wählen Sie in der App bei einem IOS-Gerät , um sich eine
Live-Aufnahme der Kamera anzuschauen (s. Abb. J rechts).
Wählen Sie alternativ in der App bei einem ANDROID-Gerät ,
um sich eine Aufnahme der Kamera anzuschauen (s. Abb. J links).
Wählen Sie , um ein Bildschirmfoto zu erstellen. Das Foto wird
auf Ihrem Handy und Gallerie / Fotos gespeichert.
Wählen Sie , um den Ton im LIVE-Modus ein- bzw. auszuschalten.
Wählen Sie , um eine Aufnahme zu erstellen. Die Aufnahme
läuft dann eine Minute lang und wird dann automatisch beendet.
Wählen Sie , um zur Hauptseite der App zurückzukehren.
Um die Playback-Funktion zu nutzen, wählen Sie auf der Haupt-
seite der App
, dann .
Wählen Sie in der Ereignisliste nun die Datei, die Sie abspielen
wollen (s. Abb. J, Android: links, IOS: rechts). Die App beginnt
nun mit der Wiedergabe.
Mit Hilfe des Pause-Symbols
unterbrechen, mit Hilfe von
können Sie die Wiedergabe
gelangen Sie zurück zur Wieder-
gabeliste.
Ganz oben sind Informationen bzgl. Name, Verbindung und
Bildqualität zu sehen*.
Es gibt 4 Anzeigen:
A – Kamera Name: wird durch den Benutzer festgelegt
B – Verbindungs-Status: Verbindung wird aufgebaut / verbunden /
getrennt
C – Anzeige der Auflösung: abhängig davon welche Auflösung
gewählt wird. (1280X720 / 640X480)
D – Verbindungsart und Verbindungs-Qualitäts: unbekannt (Ver-
bindungsart ist der App nicht bekannt) / Direkte Verbindung
(Kamera befindet sich im selben Netzwerk wie das Handy) /
Indirekte Verbindung (Kamera ist mit einem anderem Netz-
54 DE/AT/CH
Page 57

werk verbunden als das Telefon - Verbindung via Internet)
Verbindungsqualität = gut / normal / mies.
Hinweis: Details und weitere Informationen finden Sie auf der mitgelieferten Anleitungs-CD
4
.
Hinweis für Android-Nutzer: Schließen Sie die App, nachdem
Sie sich das Kamerabild auf Ihrem Telefon angesehen haben. Wenn sich
die App im Hauptbildschirm befindet, drücken und halten Sie hierzu die
entsprechende Taste in der unteren linken Ecke des Displays. Der Befehl
EXIT erscheint. Wählen Sie diesen, um die App zu schließen.
Hinweis: Je nach Betriebssystem und Version stehen ggf. nicht alle
Funktionen in vollem Umfang zur Verfügung.
Fehlerbehebung
Es wird kein Bild angezeigt.
Prüfen Sie die Anzeige (LED) an der Kamera.
Prüfen Sie, dass die Stromversorgung mittels des mitgelieferten
Adapters sichergestellt ist.
Prüfen Sie die Steckverbindungen der Ethernet-Kabels auf korrekten
Sitz.
Die Kamera reagiert nicht, das Kamerabild friert ein.
Drücken Sie die RESET-Taste 10 für ca. 45 Sekunden für einen
Neustart. Während Sie die Taste gedrückt halten, blinkt zunächst
die rote, dann die grüne und anschließend wieder die rote LED.
Wenn Sie die RESET-Taste
bis die Kamera sich wieder mit dem Netzwerk verbindet. Sobald
dies geschehen ist, leuchten die rote und die grüne LED. Die grüne
LED leuchtet, wenn die Kamera mit dem kabelgebundenen Netz-
werk verbunden ist. Die Kamera ist nun wieder einsatzbereit.
10
loslassen, dauert es ca. 45 Sekunden,
55 DE/AT/CH
Page 58

Alle Einstellungen werden auf die Werkseinstellungen zurückge-
setzt. Die komplette Installation muss erneut erfolgen.
Es wird ein schlechtes Bild angezeigt.
Stellen Sie die Kamera nicht direkt hinter einer Glasscheibe auf.
Richten Sie die Kamera nicht direkt gegen eine Lichtquelle aus.
Reinigen Sie ggf. die Kamera-Linse (vorsichtig mit einem nebel-
feuchten Tuch).
Es ist keine Verbindung zur Kamera möglich.
Prüfen Sie, ob sich die Kamera und das Smartphone / Tablet im
gleichen WLAN-Netz befinden.
Hinweis: Details und weitere Informationen finden Sie auf der
mitgelieferten Anleitungs-CD
4
.
Reinigung und Pflege
Trennen Sie zur Reinigung das Produkt zuerst vom Stromnetz.
Benutzen Sie keine Lösungsmittel, Benzin o. ä. Das Produkt würde
hierbei Schaden nehmen.
Tauchen Sie das Produkt nicht in Wasser.
Verwenden Sie zur Reinigung nur ein trockenes, fusselfreies Tuch.
Entsorgung
Die Verpackung und das Verpackungsmaterial bestehen
ausschließlich aus umweltfreundlichen Materialien. Sie können in den örtlichen Recyclingbehältern entsorgt werden.
56 DE/AT/CH
Page 59
Werfen Sie Elektrogeräte
nicht in den Hausmüll!
Das Symbol der durchgestrichenen Mülltonne bedeutet, dass so gekennzeichnete Geräte der Richtlinie 2012 / 19 / EU unterliegen und
keinesfalls mit dem normalen Hausmüll entsorgt werden dürfen. Sie
müssen einer gesonderten Sammelstelle für Altgeräte zugeführt werden.
Informationen zur kostenlosen und umweltgerechten Entsorgung alter
Elektrogeräte erhalten Sie bei Ihrer Gemeindeverwaltung oder Ihrem
Entsorgungsbetrieb. Halten Sie unsere Umwelt sauber und entsorgen
Sie fachgerecht. Danke.
Garantie und Service
Garantieerklärung
Sie erhalten auf die Kamera 3 Jahre Garantie ab Kaufdatum, diese
gilt nur für den Ersteinkäufer und ist nicht übertragbar. Bitte bewahren
Sie den Kassenbon als Nachweis auf.
Die Garantieleistung gilt nur für Material- oder Fabrikationsfehler, nicht
aber für Verschleißteile oder für Beschädigungen durch unsachgemäßen
Gebrauch. Die Garantie erlischt bei Fremdeingriff. Ihre gesetzlichen
Rechte werden durch diese Garantie nicht eingeschränkt. Setzen Sie sich
im Garantiefall zuerst telefonisch mit Ihrer Servicestelle in Verbindung.
Nur so kann eine kostenlose Einsendung Ihres Geräts gewährleistet werden.
57 DE/AT/CH
Page 60

Serviceadresse
Smartwares safety & lighting GmbH
Dieselstr. 9
59823 Arnsberg
Deutschland / Germany
Tel: +49 (0)1805 010 762
Zeiten der Erreichbarkeit:
Montags bis Freitags 8–18 Uhr
(0,14 € / Min. aus dem deutschen Festnetz. Mobilfunk max. 0,42 € / Min)
Für allen anderen Länder gilt:
Gebühren fallen aus dem jeweiligen Festnetz an.
info.de@smartwares.eu
www.smartwares.eu
IAN 271723
Bitte halten Sie für alle Anfragen den Kassenbon und die Artikelnummer (IAN 271723) als Nachweis für den Kauf bereit.
Hinweise zur Konformität
Diese „IP-Überwachungskamera“ IAN 271723 erfüllt die Anforderungen
der geltenden europäischen Richtlinien:
R&TTE-Anforderung (1999 / 5 / EC)
Elektromagnetische Verträglichkeit (2004 / 108 / EC)
EG-Niederspannungsrichtlinie (2006 / 95 / EC)
58 DE/AT/CH
Page 61

RoHS Richtlinie (2011 / 65 / EU)
Ökodesign Richtlinie (2009 / 125 / EC)
Die vollständige Konformitätserklärung ist unter folgendem Link
hinterlegt: www.smartwares.eu
Hinweise zu den verwendeten Warenzeichen
iOS und Apple sind eingetragene Warenzeichen der Apple Inc in den
USA und anderen Ländern. App Store ist eine eingetragene Marke
der Apple Inc.
Android und Google Play sind eingetragene Warenzeichen von
Google Inc.
Weitere Namen, Warenzeichen und Produkte, die in dieser Anleitung
genannt werden sind Eigentum der jeweiligen Besitzer und sind u.U.
geschützt.
59 DE/AT/CH
Page 62

60
Page 63

Smartwares BV
Broekakkerweg 15
5126 BD Gilze
The Netherlands
Last Information Update · Stav informací
Stand der Informationen: 10 / 2015
Ident.-No.: C935IP102015-CZ
IAN 271723
 Loading...